JayisGames.com is now available ad-free!
Jay is Games recommends Cheat Happens with 8,000+ games and 35,000+ trainers!

Kingdom of Liars 3


  • Currently 4.2/5
  • 1
  • 2
  • 3
  • 4
  • 5
Rating: 4.2/5 (85 votes)
Comments (8) | Views (21,711)

Kingdom of Liars 3

DoraHyptosis has served up another installment of his point-and-click adventure series, Kingdom of Liars 3. Following the events of the first and second games (so make sure you've played them!), you barely have time to recover before Captain Whelek sends you off to... "gently"... deal with the Steel Fist Templars. What are the chances that will go smoothly, d'you reckon? Well... as it turns out, solving that is easier than you might think, but with the discovery of a mysterious relic in the woods outside the city, it's unlikely your life is going to get any less complicated, or dangerous, any time soon. Just click around to interact and pick up items, and click on two objects in your inventory to try to combine them.

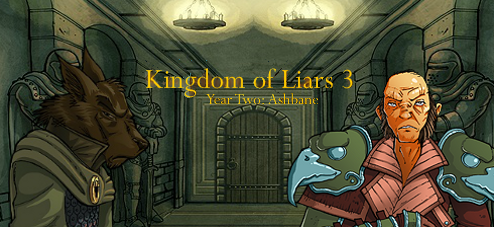
Though Kingdom of Liars 3 features more of the stunning artwork and intriguing setting we've come to expect from Hyptosis, it's short and easy in a way that makes it feel rushed, especially with puzzles that rely more on backtracking and random conversation options to advance than anything else and repetitive dialogue. The series as a whole just has such a great concept and world ripe for exploring that it really feels like it needs a more meaty game to make the characters and their exchanges more memorable and the puzzles more substantial. It deserves to be explored in greater depth instead of the quick snippets we've been given. Of course if you prefer your adventures bite-sized, then you'll still enjoy Kingdom of Liars 3 for what it has to offer... another beautifully illustrated, short yet tantalizing dip into a dark yet fascinating world with just enough small puzzles to keep you occupied rather than make you sweat, and a few clever references to other games Hyptosis has created that tie the worlds together. You'll have to wait for the fourth chapter to find out more!

Play Kingdom of Liars 3

Thanks to Celli for sending this one in!

Walkthrough Guide


(Please allow page to fully load for spoiler tags to be functional.)

Kingdom of Liars Part 3 Walkthrough

Part 1 - Breakthrough

  1. Pick up the file to the left of the turned-over stool. Also, pick up the Leathean coin next to it (1). Pick up the lamp oil on the right side of the screen. Finally, pick up the flint just below the dead body. Head to the lower right.

  2. Pick up the coin (2) and the rag lying on the stump. Go back to the left.

  3. In the inventory, first combine the rag and the lamp oil. Now, combine the flint and the steel file. Finally, combine the flint-and-steel with the oil-soaked rag to make a torch. Use the torch on the dark cavern.

  4. Head through the dark cave. Pick up the coin on the staircase railing (3). Head up the staircase.

Part 2 - Pulling Your Weight

  1. Pick up the coin on the floor (4). Talk to Captain Whelek. He will assign you to help Warren smooth things over with the Steel Fist Templars. Head out of the Captain's office to the lower right.

  2. Once out of the captain's office, click the upper right arrow to go to the equipment room. Pick up the coin (5) and the old machete blade. Return to the foyer.

  3. Click the lower right arrow to head towards the training barracks. Pick up the coin (6), and go back to the foyer.

  4. Click the bottom-center arrow to leave the headquarters. Head to the Steel Fist Temple. Talk to High Commander Eburhart, and point out that "Look, we didn't PICK this job. It was assigned." He will reluctantly give his permission for you to escort the artifact. Pick up the coin (7) and exit.

  5. Make your way to the captain's office. He will assign you the task of helping to escort the artifact. Leave headquarters and go to Dorf Street.

  6. Brahshin will tell you that they are in need of a pack animal to pull the cart. Let's find one. Head to right street. There, Tommy Wilcox will be with his sister's yak. Talk to Tommy about using the yak. Point out that he was searching all morning on the Watch's dime, and that maybe you should tell the captain that he didn't want to help. He'll lend you the yak. Pick up the coin (8), and head into the shop on the left.

  7. There are two coins to pick up in here (9/10), plus, you get to say hi to everyone's favorite merchant, CourBoyn! Anyways, there's nothing else to do, so exit the shop, go back to the map, and head to Dorf Street.

  8. Talk to Brashin, and the artifact will be taken to the museum, which is now unlocked on the map.

Part 3 - This Belongs in a Museum

  1. Go to the museum, and go to the right. Pick up the coin (11) and the lens on the ground next to that familiar fish contraption. Talking to Jahti will give you a little background info. Head back left to the museum entrance then left again to see the artifact.

  2. Pick up the coin on the left bannister of the right staircase. Talk to Shribryn. Ask about Jahti, then mention that the stone is "certainly unusual". This will unlock Theo street on the map. Talk to Shribryn again about Jahti, then mention how the stone seems powerful. This will unlock Borynn the Alchemist's shope on the map.

  3. Head out of the museum, to the map. Go to Borynn's shop. Pick up the coin on the table there (13). Head back to the map.

  4. Go to Theo Street. There you will see the stone Shribryn talked about, as well as a coin on a stone to pick up (14). Looks like we'll need something to slice through the vines on that door, though. Head back to the map.

  5. Go to City Hall. Head around back to the right. Pick up the coin under the plant (15). Head down into the sewer.

  6. Pick up the coin on the right (16). Head deeper into the sewer. Pick up the strip of tough material. In your inventory, combine the tough material with the old machete blade to make a machete. Head to the left, into the sewer workroom. Pick up the coin off the box (17) and the horsehair brush.

  7. Leave the sewer and go back to the map. Return to Theo Street, and use the machete on the vines. Go into the building

  8. Pick up the coin (18). Look at the book and dagger. Hmm. Looks like foul things are afoot (and not just a crossover!). Back away from the book.

  9. Use the horsehair brush on the base of the statue to clean it. Use the lens on the telescope part of the statue. Use the lamp on the candle on the statue. The light shining through looks like it's pointing to the book! Check it out, and remember that glowing symbol. We're heading into the endgame here, but there's one more thing we can do...

Part 3.5 - A Quick Side Journey

  1. Return to the map and head to Grimes Street. Head to the right to the burned tavern. Check out the newspaper lying in the street, and pick up the coin on the curb (19).

  2. Click on the arrow that will let you examine the burnt tavern in more detail. There are two coins to be picked up in the ruins (20/21). Go back to the front of the tavern, then back to the Grimes Street Entrance.

  3. Head to the left, to the back alley. There's a coin to pick up here (22). However, if you've been following this walkthrough you should already have enough to pay for the key the goblin is selling. Head out of the alleyway and back to the ruins of the tavern.

  4. Examine the ruins of the tavern, and go around to the alleyway in the back. Click on the door's keyhole to use the key. And inside is... something unexpected.

Part 4 - Now Where Were We?

  1. Alright, now that we're done with that, head back to Theo Street, and into the house. Examine the base of the statue. Remember when the note by the dagger said "The time will come when the wind blows south at twilight?" That's the clue here.

  2. Using the buttons, spin the wheels so that the symbol shown by the goblin statue aligns with the picture of twilight, and aligned with the outer ring pointing south. Pressing the large button will open a secret compartment.

  3. Get the map, and watch the ending!

8 Comments

Yeah, it's entirely too squished. I'm all for crazy mashups, but this is kind of littered all over the place, disconnected, and then dumped into one box. Sequels need their exposition, it's just that there weren't enough bones to sink my teeth into.

The Easter Egg did make me laugh.

Reply
kitchengarden September 12, 2013 11:59 PM

well, i can't solve the final "small puzzle", so whatever you say.

Reply
kitchengarden September 13, 2013 12:02 AM

...the power of posting. never mind!

Reply

I can't wait for the inevitable Hood crossover. (I hope)

Reply

walkthrough?

Reply

Kingdom of Liars Part 3 Walkthrough

Part 1 - Breakthrough

  1. Pick up the file to the left of the turned-over stool. Also, pick up the Leathean coin next to it (1). Pick up the lamp oil on the right side of the screen. Finally, pick up the flint just below the dead body. Head to the lower right.

  2. Pick up the coin (2) and the rag lying on the stump. Go back to the left.

  3. In the inventory, first combine the rag and the lamp oil. Now, combine the flint and the steel file. Finally, combine the flint-and-steel with the oil-soaked rag to make a torch. Use the torch on the dark cavern.

  4. Head through the dark cave. Pick up the coin on the staircase railing (3). Head up the staircase.

Part 2 - Pulling Your Weight

  1. Pick up the coin on the floor (4). Talk to Captain Whelek. He will assign you to help Warren smooth things over with the Steel Fist Templars. Head out of the Captain's office to the lower right.

  2. Once out of the captain's office, click the upper right arrow to go to the equipment room. Pick up the coin (5) and the old machete blade. Return to the foyer.

  3. Click the lower right arrow to head towards the training barracks. Pick up the coin (6), and go back to the foyer.

  4. Click the bottom-center arrow to leave the headquarters. Head to the Steel Fist Temple. Talk to High Commander Eburhart, and point out that "Look, we didn't PICK this job. It was assigned." He will reluctantly give his permission for you to escort the artifact. Pick up the coin (7) and exit.

  5. Make your way to the captain's office. He will assign you the task of helping to escort the artifact. Leave headquarters and go to Dorf Street.

  6. Brahshin will tell you that they are in need of a pack animal to pull the cart. Let's find one. Head to right street. There, Tommy Wilcox will be with his sister's yak. Talk to Tommy about using the yak. Point out that he was searching all morning on the Watch's dime, and that maybe you should tell the captain that he didn't want to help. He'll lend you the yak. Pick up the coin (8), and head into the shop on the left.

  7. There are two coins to pick up in here (9/10), plus, you get to say hi to everyone's favorite merchant, CourBoyn! Anyways, there's nothing else to do, so exit the shop, go back to the map, and head to Dorf Street.

  8. Talk to Brashin, and the artifact will be taken to the museum, which is now unlocked on the map.

Part 3 - This Belongs in a Museum

  1. Go to the museum, and go to the right. Pick up the coin (11) and the lens on the ground next to that familiar fish contraption. Talking to Jahti will give you a little background info. Head back left to the museum entrance then left again to see the artifact.

  2. Pick up the coin on the left bannister of the right staircase. Talk to Shribryn. Ask about Jahti, then mention that the stone is "certainly unusual". This will unlock Theo street on the map. Talk to Shribryn again about Jahti, then mention how the stone seems powerful. This will unlock Borynn the Alchemist's shope on the map.

  3. Head out of the museum, to the map. Go to Borynn's shop. Pick up the coin on the table there (13). Head back to the map.

  4. Go to Theo Street. There you will see the stone Shribryn talked about, as well as a coin on a stone to pick up (14). Looks like we'll need something to slice through the vines on that door, though. Head back to the map.

  5. Go to City Hall. Head around back to the right. Pick up the coin under the plant (15). Head down into the sewer.

  6. Pick up the coin on the right (16). Head deeper into the sewer. Pick up the strip of tough material. In your inventory, combine the tough material with the old machete blade to make a machete. Head to the left, into the sewer workroom. Pick up the coin off the box (17) and the horsehair brush.

  7. Leave the sewer and go back to the map. Return to Theo Street, and use the machete on the vines. Go into the building

  8. Pick up the coin (18). Look at the book and dagger. Hmm. Looks like foul things are afoot (and not just a crossover!). Back away from the book.

  9. Use the horsehair brush on the base of the statue to clean it. Use the lens on the telescope part of the statue. Use the lamp on the candle on the statue. The light shining through looks like it's pointing to the book! Check it out, and remember that glowing symbol. We're heading into the endgame here, but there's one more thing we can do...

Part 3.5 - A Quick Side Journey

  1. Return to the map and head to Grimes Street. Head to the right to the burned tavern. Check out the newspaper lying in the street, and pick up the coin on the curb (19).

  2. Click on the arrow that will let you examine the burnt tavern in more detail. There are two coins to be picked up in the ruins (20/21). Go back to the front of the tavern, then back to the Grimes Street Entrance.

  3. Head to the left, to the back alley. There's a coin to pick up here (22). However, if you've been following this walkthrough you should already have enough to pay for the key the goblin is selling. Head out of the alleyway and back to the ruins of the tavern.

  4. Examine the ruins of the tavern, and go around to the alleyway in the back. Click on the door's keyhole to use the key. And inside is... something unexpected.

Part 4 - Now Where Were We?

  1. Alright, now that we're done with that, head back to Theo Street, and into the house. Examine the base of the statue. Remember when the note by the dagger said "The time will come when the wind blows south at twilight?" That's the clue here.

  2. Using the buttons, spin the wheels so that the symbol shown by the goblin statue aligns with the picture of twilight, and aligned with the outer ring pointing south. Pressing the large button will open a secret compartment.

  3. Get the map, and watch the ending!

Reply

I solved the puzzle on the statue holding the telescope just after I found that statue. Now I didn't get the story. Replaying! Haha

Reply

I struggled a bit on the final puzzle but I finally finished!

Reply

^ Scroll Up | Homepage >

Leave a comment [top of page]

Please consider creating a Casual Gameplay account if you're a regular visitor here, as it will allow us to create an even better experience for you. Sign-up here!
  • PLEASE UNDERSTAND SITE POLICIES BEFORE POSTING COMMENTS
  • You may use limited HTML tags for style:
    (a href, b, br/, strong, em, ul, ol, li, code, spoiler)
    HTML tags begin with a less-than sign: < and end with a greater-than sign: >. Always. No exceptions.
  • To post spoilers, please use spoiler tags: <spoiler> example </spoiler>
    If you need help understanding spoiler tags, read the spoiler help.
  • Please Preview your comment before posting, especially when using spoilers!
  • No link dropping, no domains as names; do not spam, and do not advertise! (rel="nofollow" in use)
chrpa Jayisgames needs your help to continue providing quality content. Click for details Hi! Weekday Escape and Weekday Puzzle are here! First we have two new cans from tomoLaSiDo and then two small rooms from isotronic. That's all for this...  ...
6,365 Views
0 Comments
chrpa Jayisgames needs your help to continue providing quality content. Click for details Welcome to Mobile Monday! We have another beautiful game from Nicolet and it's a winter game as it should be. Tasuku Yahiro have released another of their...  ...
6,161 Views
2 Comments
chrpa Jayisgames needs your help to continue providing quality content. Click for details We've got a new game from Rinnogogo's magical world and this time it really is magical.. Not only do you get to meet cute animals that express themselves...  ...
chrpa Jayisgames needs your help to continue providing quality content. Click for details After a few weeks of patient waiting, we have been rewarded - the new game from Ichima Coffeedo is here. We got a wonderful new game - it's...  ...

HELP Jayisgames.com

Recent Comments


Display 5 more comments
Limit to the last 5 comments

Game of the week


Dark Romance: Vampire Origins Collector's Edition

Your Favorite Games edit

add
Save links to your favorite games here. Use the Favorites editor.

Monthly Archives