

House of 1,000 Doors: Family Secret
Platform: Windows

![]() While the claim of holding a thousand doors may be a little much, Alawar's casual adventure game House of 1,000 Doors: Family Secret is certainly packed with family secrets, not to mention a twisted plot that reveals information about as slowly as an episode of Lost. The story is the star, but the gameplay pulls its own weight, leaving you feeling confidently thrilled as you crawl through the hallways of the mysteriously vanishing mansion.
While the claim of holding a thousand doors may be a little much, Alawar's casual adventure game House of 1,000 Doors: Family Secret is certainly packed with family secrets, not to mention a twisted plot that reveals information about as slowly as an episode of Lost. The story is the star, but the gameplay pulls its own weight, leaving you feeling confidently thrilled as you crawl through the hallways of the mysteriously vanishing mansion.
 Kate is a supernatural author (her writings are of a supernatural nature), but most of the words she pens these days pale in comparison to her bestselling novel. A mysterious package containing a self-typing typewriter (shipped without paper or ink, by the way) invites her to a séance, so naturally she jumps at the opportunity to see one in real life. Nothing goes quite as planned, and Kate debunks the apparently fake gathering within minutes. But then, the ghost of her grandmother visits and instructs her to go to a location where a mysterious mansion will soon appear. Before long, Kate is wrapped up in the convoluted doings of the family that lives inside this odd little abode, and it only gets more interesting as you play!
Gameplay follows the traditional casual adventure/hidden object hybrid route, allowing you the freedom to roam a few screens at a time, looking for items that might help you solve the puzzles preventing you from going even further. The mansion you'll spend most of your time in definitely has its fair share of enigmas, and it seems like every time you solve one three more take its place. Puzzles aren't too complex, though, it's just a matter of finding the right item for the job, a task that almost always makes good, logical sense.
Apart from the exploration, discussions with family members who live in this dematerializing house, and wicked locks on the doors, you'll come across a good helping of mini-games, many of which are simple in nature but still a treat to complete. Hidden object scenes aren't too frequent, which is a smart decision since the game is so plot-driven, and when you do find one, you won't stay stumped on it for long.
 Analysis: The storyline in House of 1,000 Doors: Family Secret is a surprisingly complex affair for a casual hidden object/adventure game, though it won't take the place of a good thick book. But the ideas it wraps around you while you play are certainly intriguing, especially the Flying Dutchman of mansions the game takes place in.
The gameplay is pretty much what you would expect from a casual adventure game, so no real surprises to find there. Hidden object scenes often contain sub-scenes you can investigate, like opening suitcases or shuffling pillows aside to find more objects. Mildly interactive, but with no major flaws present. Alawar knows how to assemble a hidden object game!
Separating House of 1,000 Doors from the rest of the spook-laden hidden object games out there is the story. Told with just a touch of campiness (helped along by that wacky sound effect of tossing an item back in your inventory), you get the sense the game shouldn't be taken as seriously as the storyline might suggest. Because you're not expected to be scared or anything, the enjoyment factor shoots right up. Instead of mucking about droll "scary" settings, suddenly you're just a writer snooping around a vanishing building looking for gossip behind a mixed-up family history.
A good story that knows not to take its setting too seriously, House of 1,000 Doors: Family Secret is a great experience all the way through to the end. Satisfying and of good length (four hours, including the bonus chapter), you can't go wrong with a disappearing mansion and a writer looking for her next book idea.
A Collector's Edition is also available. It contains a bonus chapter, strategy guide, and more. Remember that Big Fish Game Club Members pay only $13.99 for Collector's Editions (or 2 club credits), and collector's editions count 3 card punches of 6 total needed for a free game.
![]() Windows:
Windows:
Download the demo
Get the full version
Also available: Collector's Edition
![]() Mac OS X:
Mac OS X:
Not available.
Try Boot Camp or Parallels or CrossOver Games.


Walkthrough Guide
(Please allow page to fully load for spoiler tags to be functional.)
House of 1000 Doors: Family Secrets, full walkthrough
General Tips/Info
Tidbits of information you come across, whether related to the story or a puzzle, will be kept in your notebook, which you can access in the lower left.
The hint button, in the lower right, can be used in two ways:
In hidden-object scenes, it will highlight an item left on your list.
It can navigate you to an area where you can do something, although it won't be drained if it points you to a different room.
During a mini-game, the hint button becomes a skip button, which you can use to bypass the mini-game once it fills up.
Hidden-object scenes are used more than once, so it can be good to revisit those areas.
Finding an item does not necessarily mean you have access to where it needs to be used and vice versa.
Take your time finding Beyond Objects. Not only do they change the cursor, but they will slowly morph between two shapes over time.
In your notebook there is a Map tab that will show you the rooms available to you and whether you can do an action there.
If you find yourself needing more help than the game gives, use the walkthrough below, which attempts to order events with the least amount of backtracking.
Locations of Beyond Objects
These are listed, as best as possible, in the order you would encounter them if following the walkthrough below.
Soccer ball/canteen under steps of mansion entrance.
Camera/radio below the gargoyle in the main hall.
Gear/reel on the lefthand light in the upstairs hallway.
Knight/urn on the righthand cabinet in Sammy's room.
Horseshoe/clamp under the table in the living room.
Bird/scroll on the left of the portrait wall.
Button/outlet on the train passage wall.
Camera/pouch on the bench of the engineer's cabin.
Rag/cap on the engine room wall.
Hand mirror/paintbrush on the window in the passenger cabin.
Letter/envelope on molding in dining room.
Bag/notebook above the left cabinet in the kitchen.
Card/handbag on the railing in the elevator.
Jug/mask on the shelf in the cellar.
Pine cone/baseball in the lower right branches of the sculptor's yard.
Bat/fleur de lis above the door of the sculptor's house.
Telescope/rolling pin by the lion in the sculptor's workshop.
Paper crane/crystals on the stump to the right at the cemetary.
Meringue/cup behind the gravestones at the cemetary.
Metronome/jug next to the coffee table in the sculptor's house.
Butterfly/chalkboard next to the bed in Amanda's room.
Candlestick/telephone under the table in the library.
Boat/box under the painting in the scorched room.
Thermometer/ruler behind the scale in the living room.
Shoe/sack on the rafters in the attic.
Thread/jar in the Venice house.
Gun/pipe next to the board in the artist's workshop.
Chest/keg under the table at the painting in the artist's workshop.
Owl/birdhouse in righthand tree at the field.
Baseball bat/plank against woodpile bny wagon in field.
Box/brick under table in the mill.
Pot/pumpkin in the ground at the forest.
Telephone/purse under the cabinet in the hut.
Medallion/scarab next to the mirror in the hut.
Griffin/jug on the cabinet in the secret office.
Main Walkthrough
Chapter 1: Séance
Your Home
Collect the knife under the railing.
Examine the package and use the knife.
Click the wind-up key and turn it.
Back up and open the cabinet doors.
Examine the middle shelf and collect the golden feather.
Back up and examine the top shelf.
Collect the sheet of paper and ink.
Examine the blue box on the mantel and use the golden feather.
Collect the tweezers and back up.
Examine the typewriter and use the sheet of paper.
Turn the key to collect the depleted ribbon.
Back up and examine the tray on the table.
Use the ink, depleted ribbon and tweezers to collect the replenished ribbon.
Back up and examine the typewriter.
Use the replenished ribbon and turn the key.
Click the sheet of paper and back up.
Room 328
Open the briefcase and examine it.
Collect the club and back up.
Click the cane and use it to knock down the item on the light fixture.
Collect the diamond and head to the table.
Collect the spade.
Move the tarot cards around and collect the key.
Back up and examine the box on the dresser.
Use the key and collect the heart.
Back up and examine the dresser door.
Use the club, diamond, spade and heart.
Collect the scissors and back up.
Head back to the table and use the scissors on the wire to the right.
Mansion Entrance
Examine the urn and collect the portrait.
Overturn the urn and dig through the leaves.
Collect the bone and back up.
Examine the mailbox and collect the door knocker on the upper left.
Back up and examine the left statue.
Collect the lighter and back up.
Examine the door and use the door knocker.
Knock on the door and enter the mansion.
Chapter 2: The House of 1000 Doors
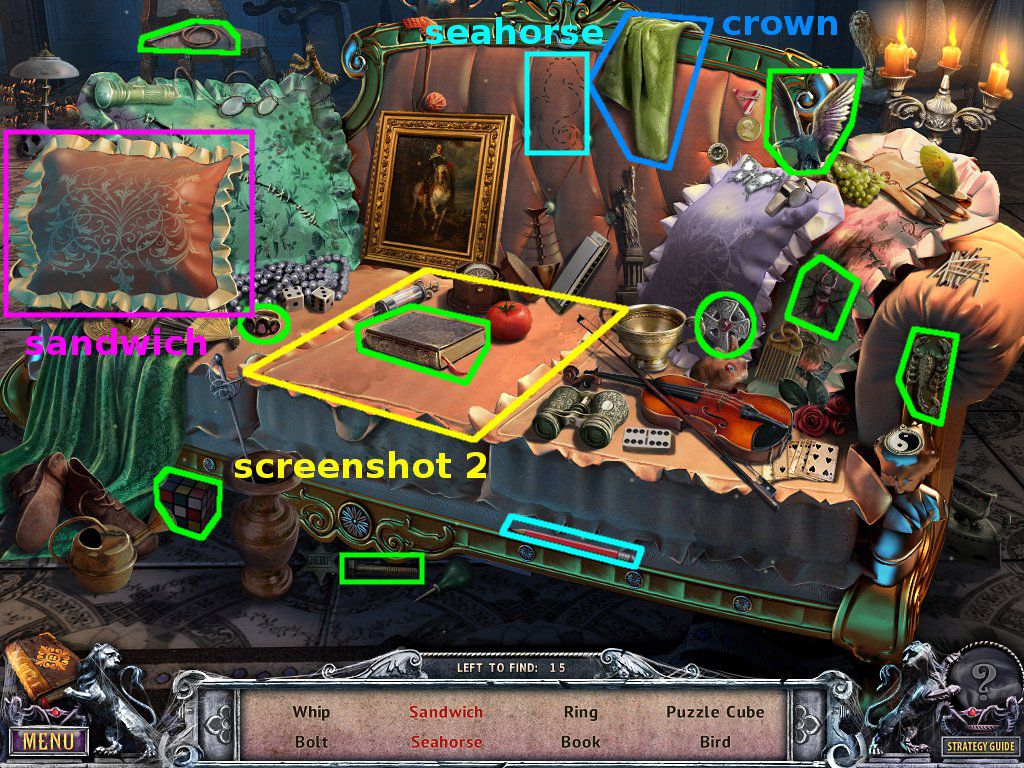
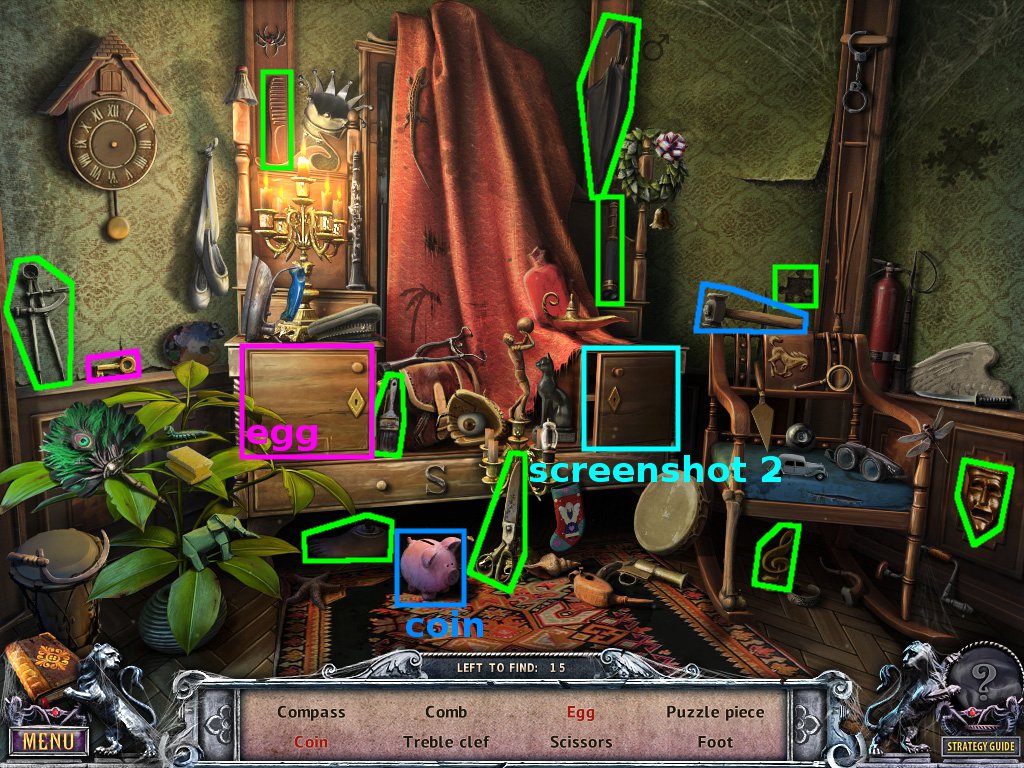
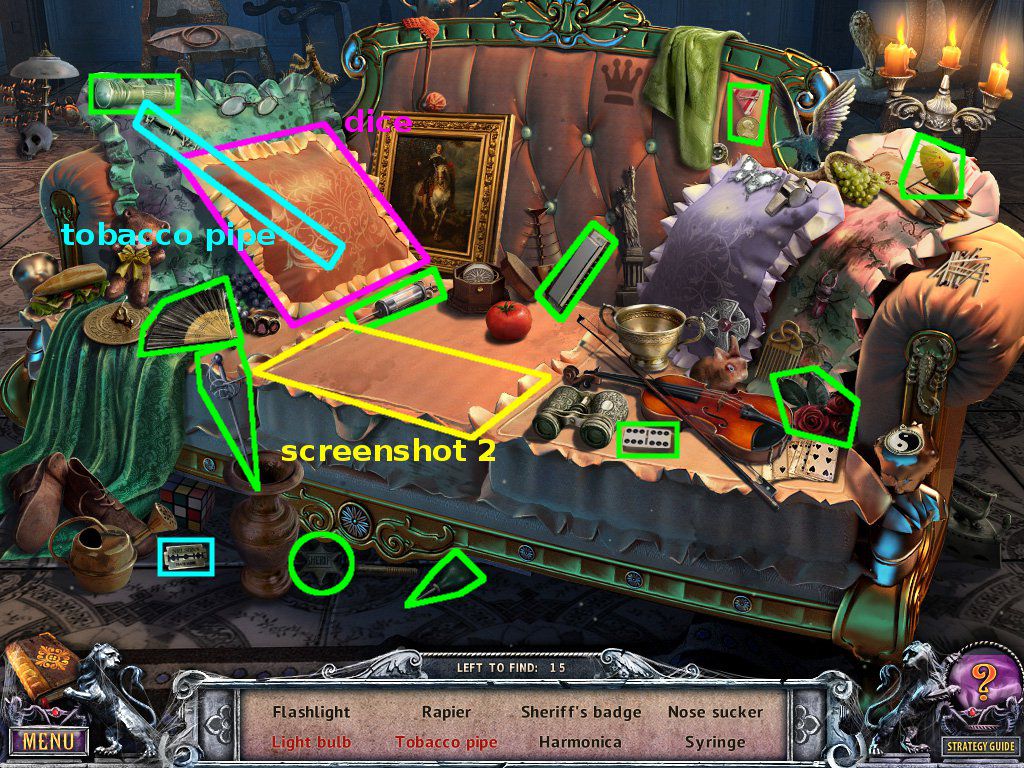
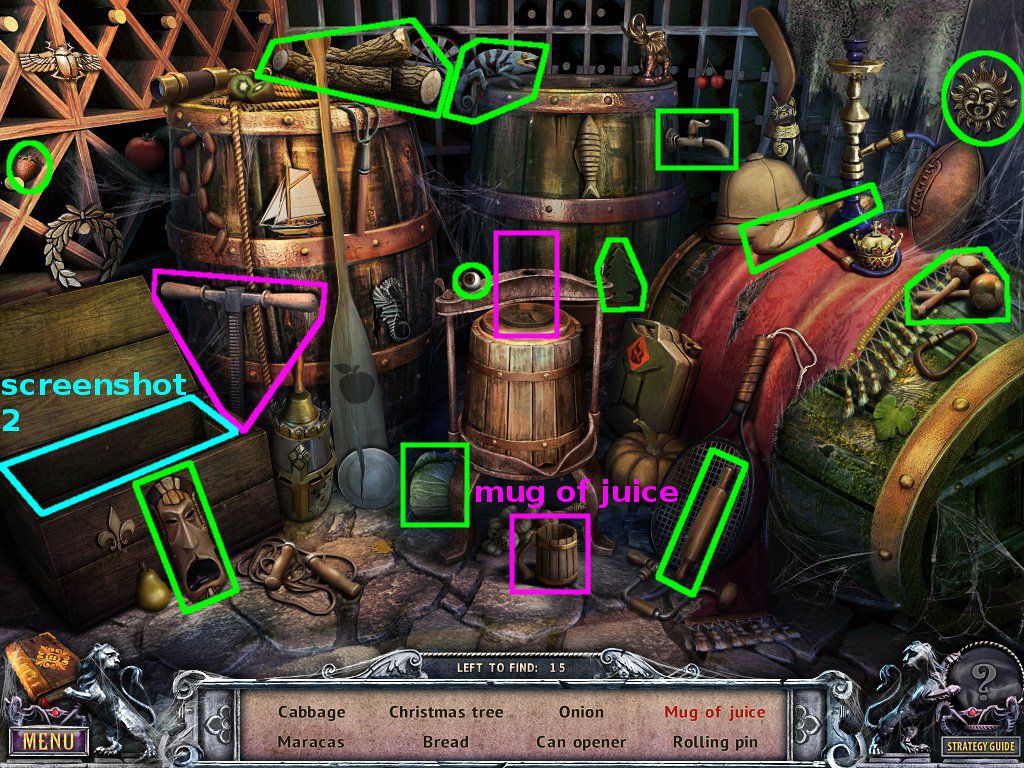
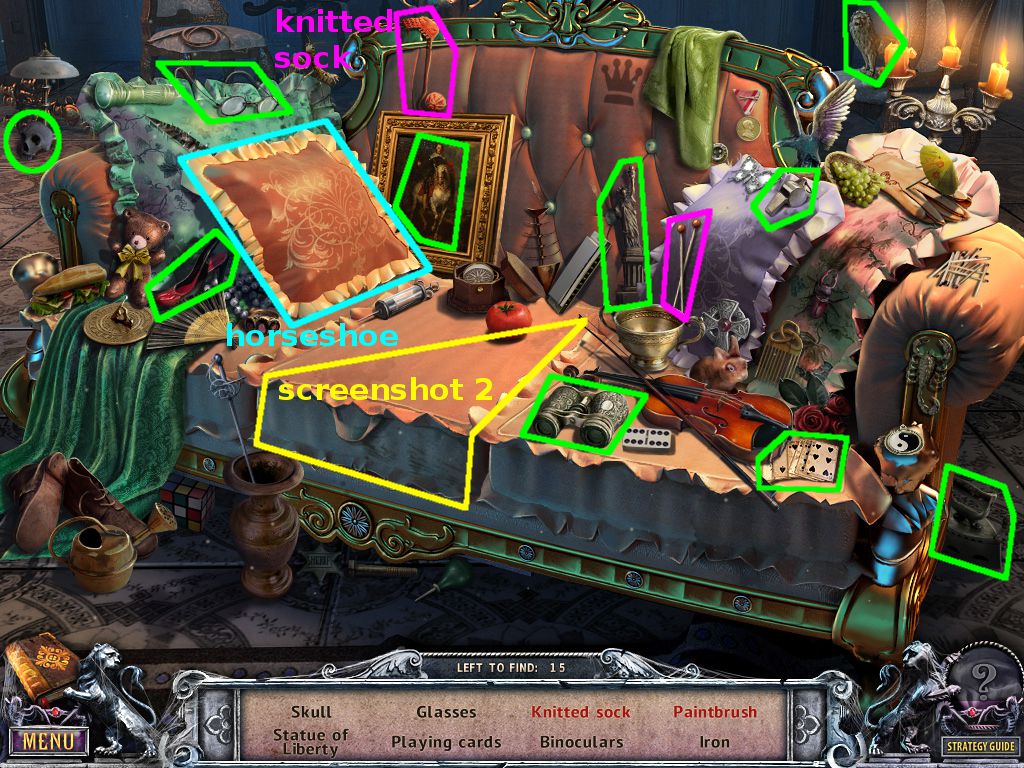
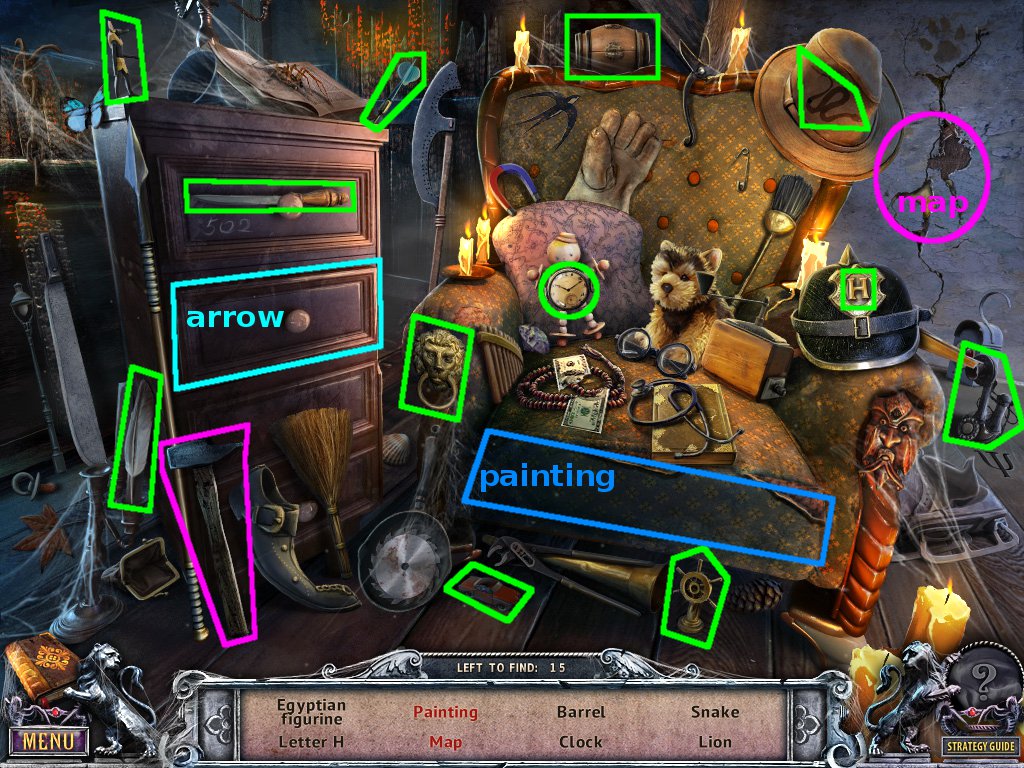
Main Hall
Use the lighter (from the left statue at the mansion entrance) on the rope hanging down.
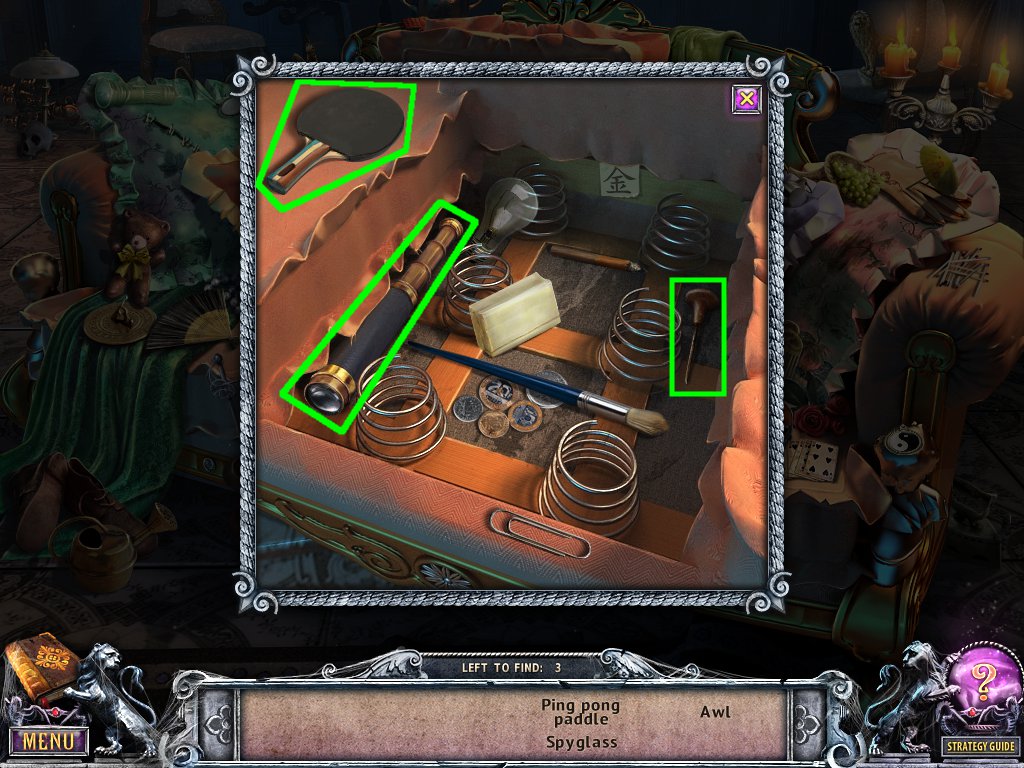
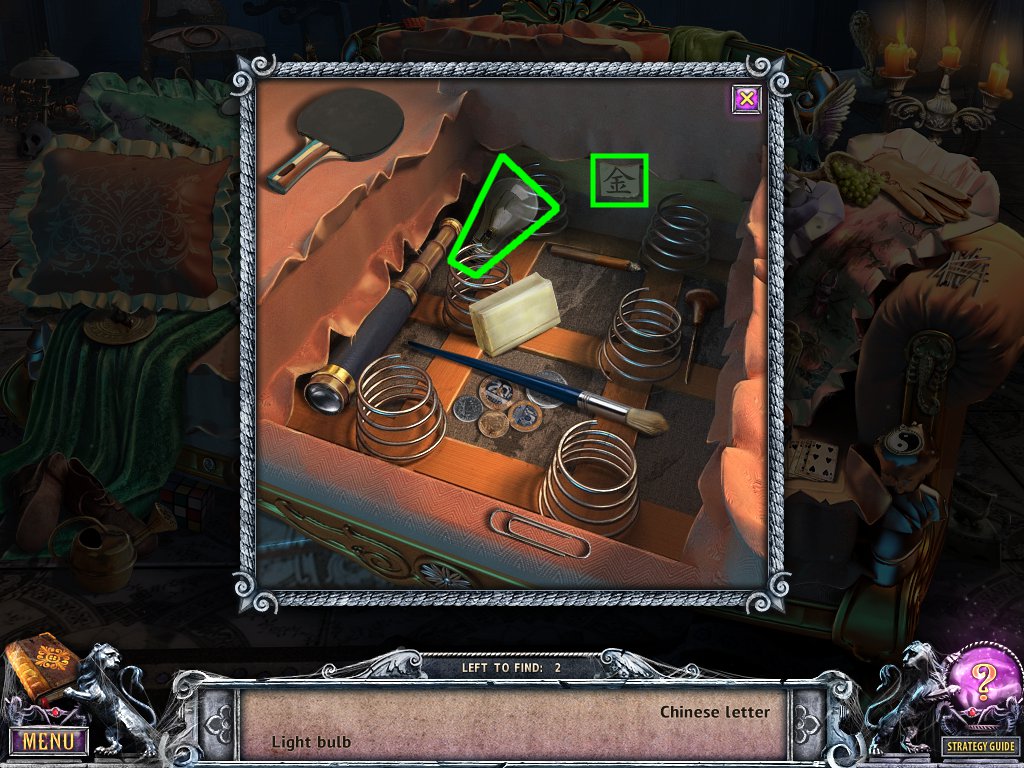
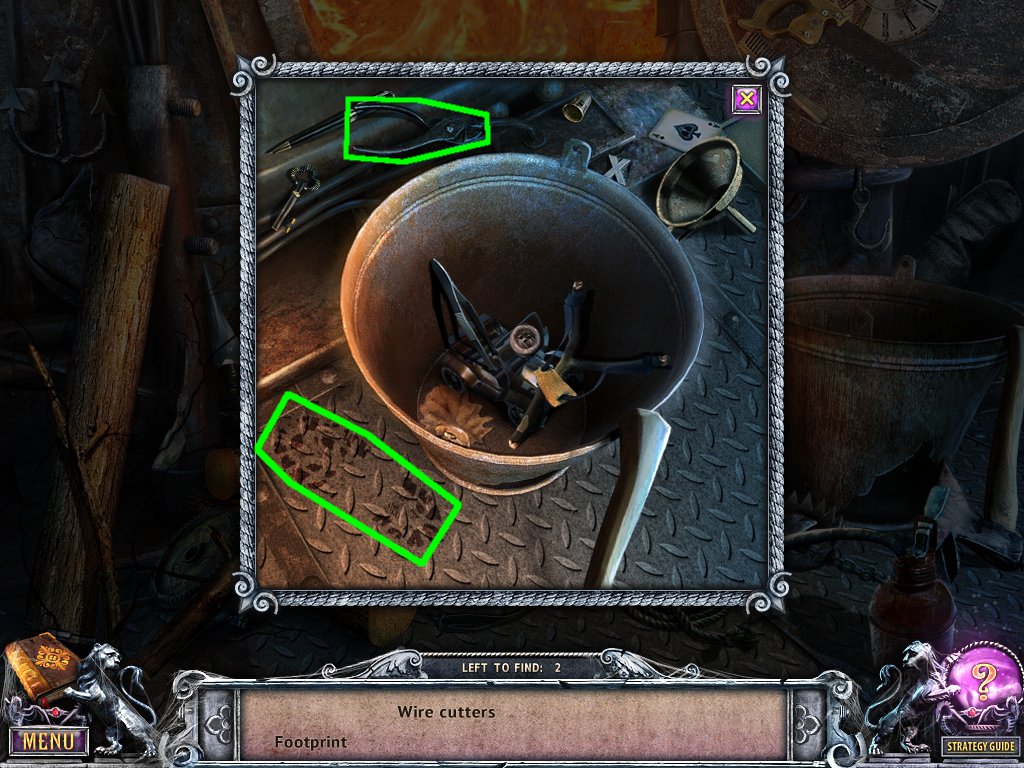
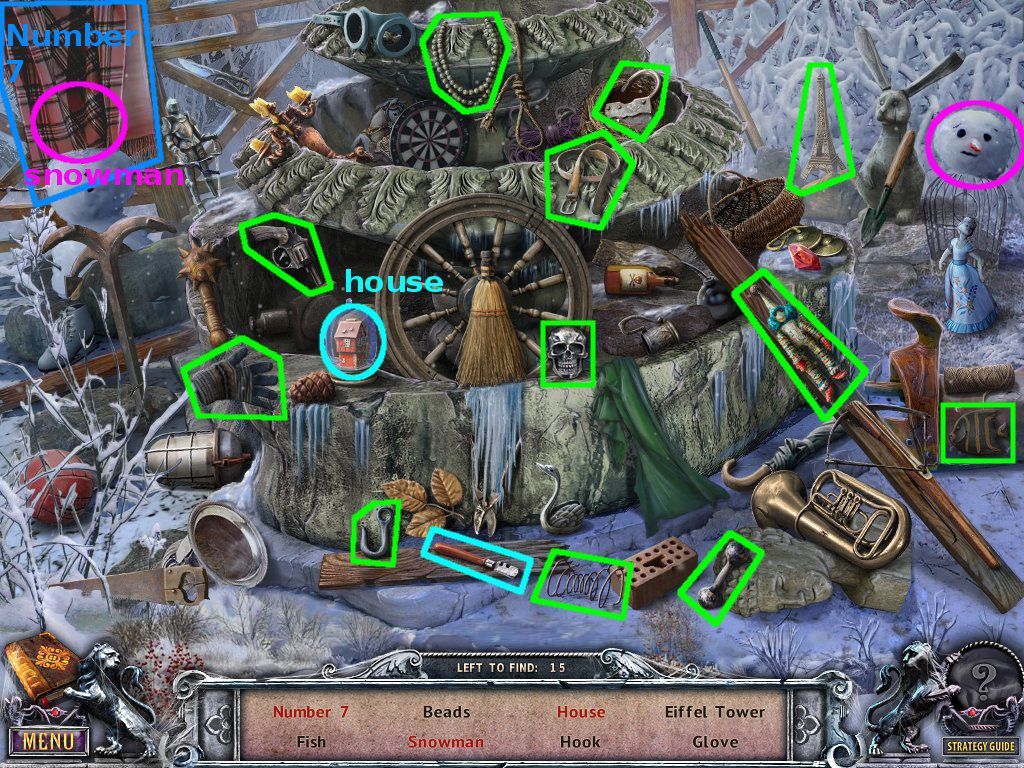
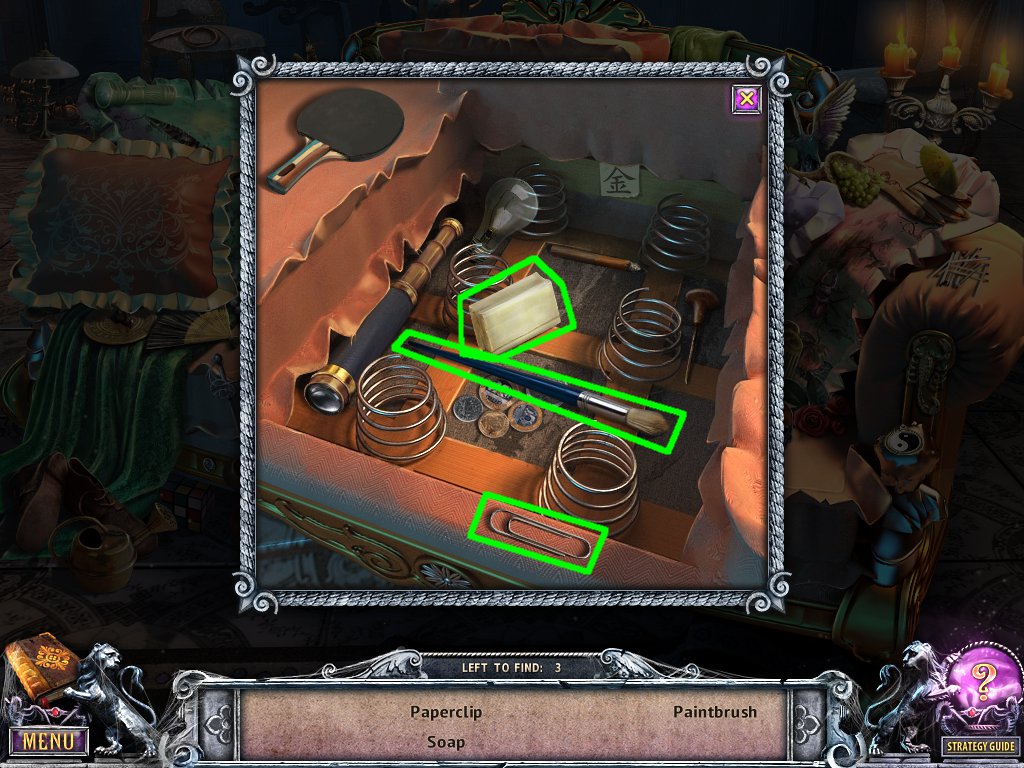
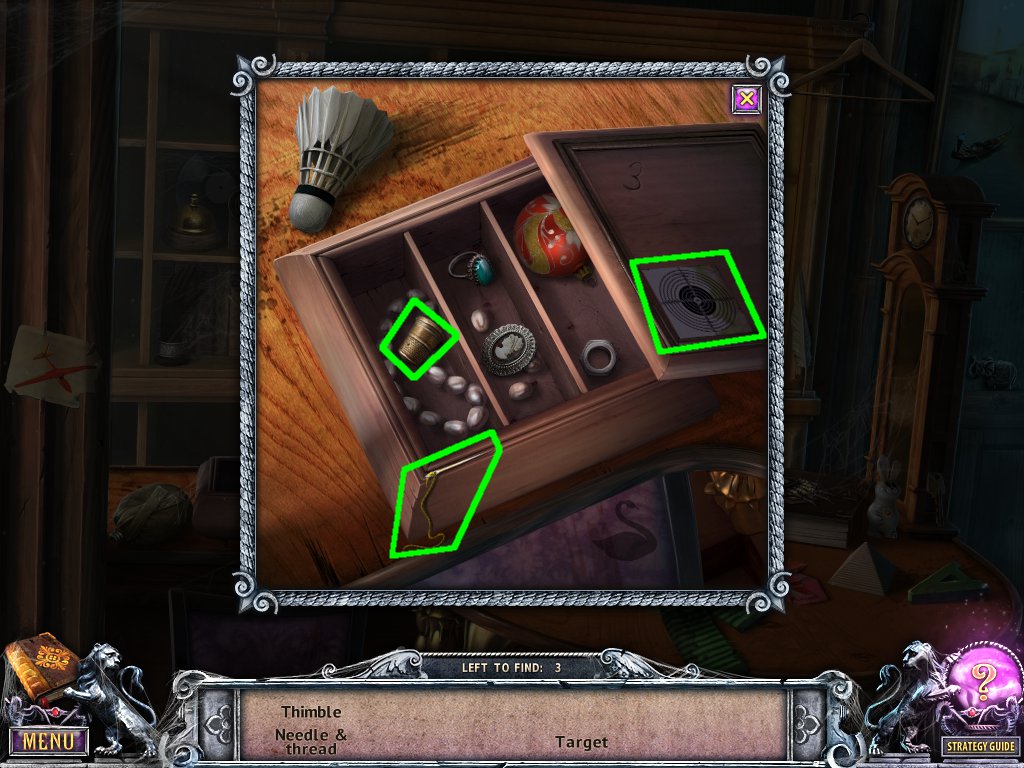
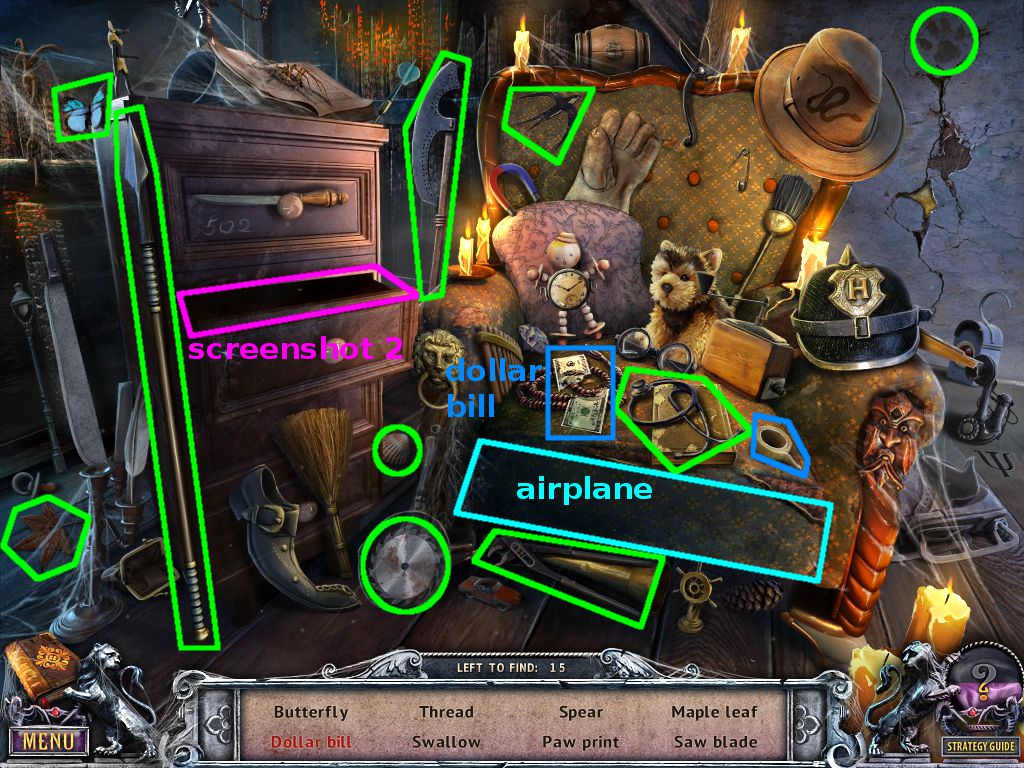
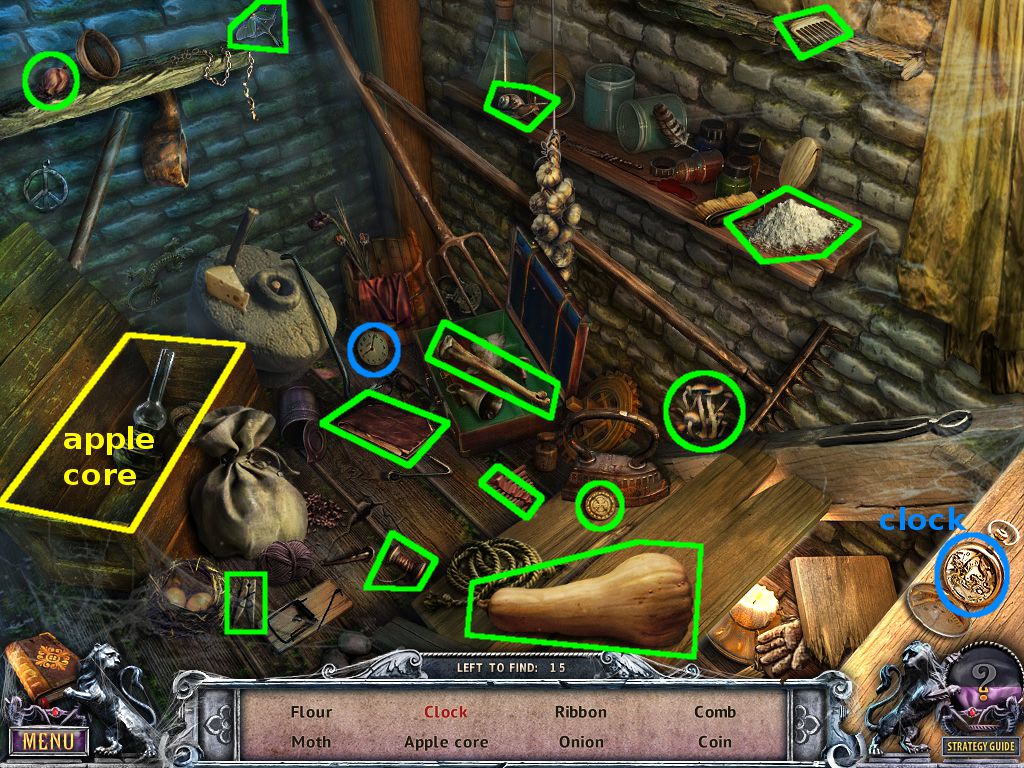
Solve the hidden-object scene using the screenshots below for help.
Items that you must interact with are color-coded and labeled with the item name.
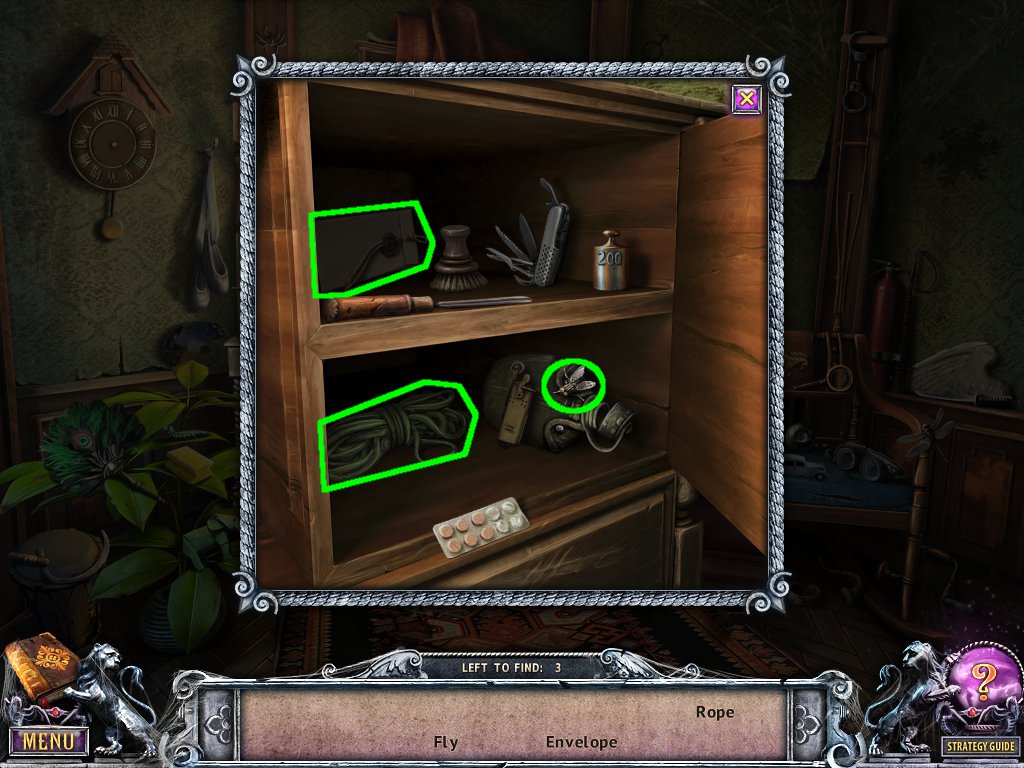
Items that are found in a sub-screen of the scene are indicated in the first screenshot and can be found in the second one.
Screenshot 1
Screenshot 2
You acquire a book.
Head upstairs.
Upstairs Hallway
Examine the windowsill.
Collect the portrait and clock weight.
Back up and head downstairs, going on through the doors to the right.
Living Room
Speak to Saymon.
Examine the table and collect the cup of coffee.
Examine the clock and open the lower door.
Use the clock weight (from the windowsill in the upstairs hallway) and collect the puzzle piece.
Head back outside to the entrance.
Mansion Entrance
Examine the mailbox and click the puzzle.
Use the puzzle piece (from the clock in the living room).
Solve the mini-game by clicking two pieces to swap them.
The goal is to reassemble a picture of a gargoyle.
Pieces will light up when they're in the correct spot.
Collect the gear and back up.
Head to the upstairs hallway.
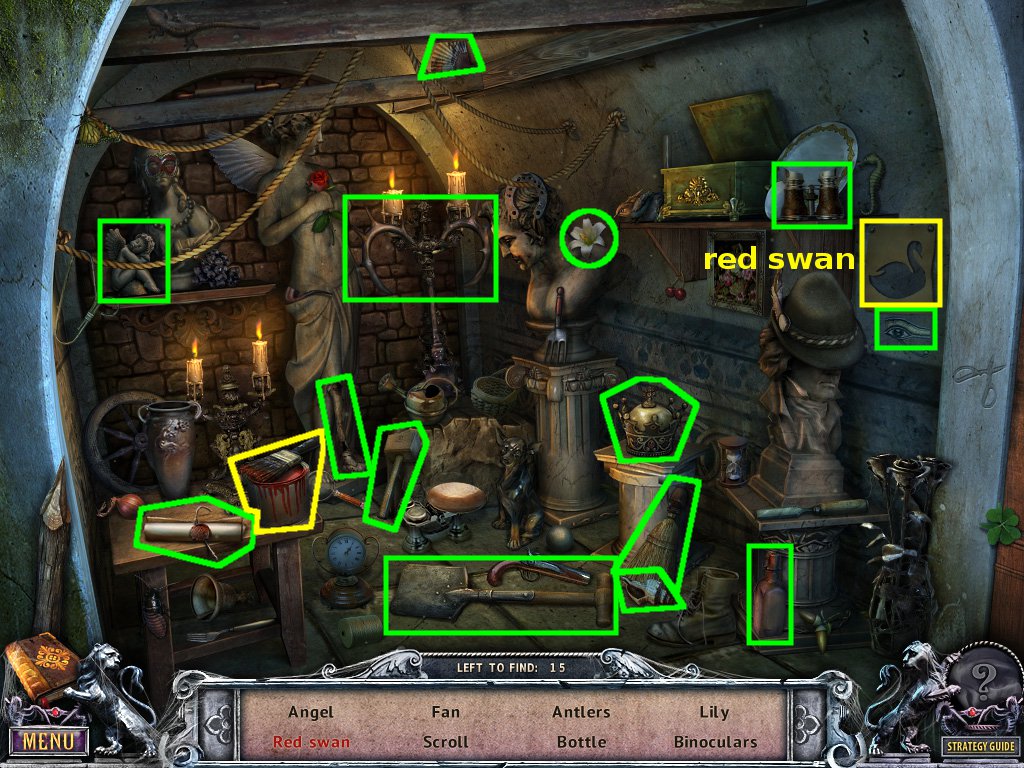
Upstairs Hallway
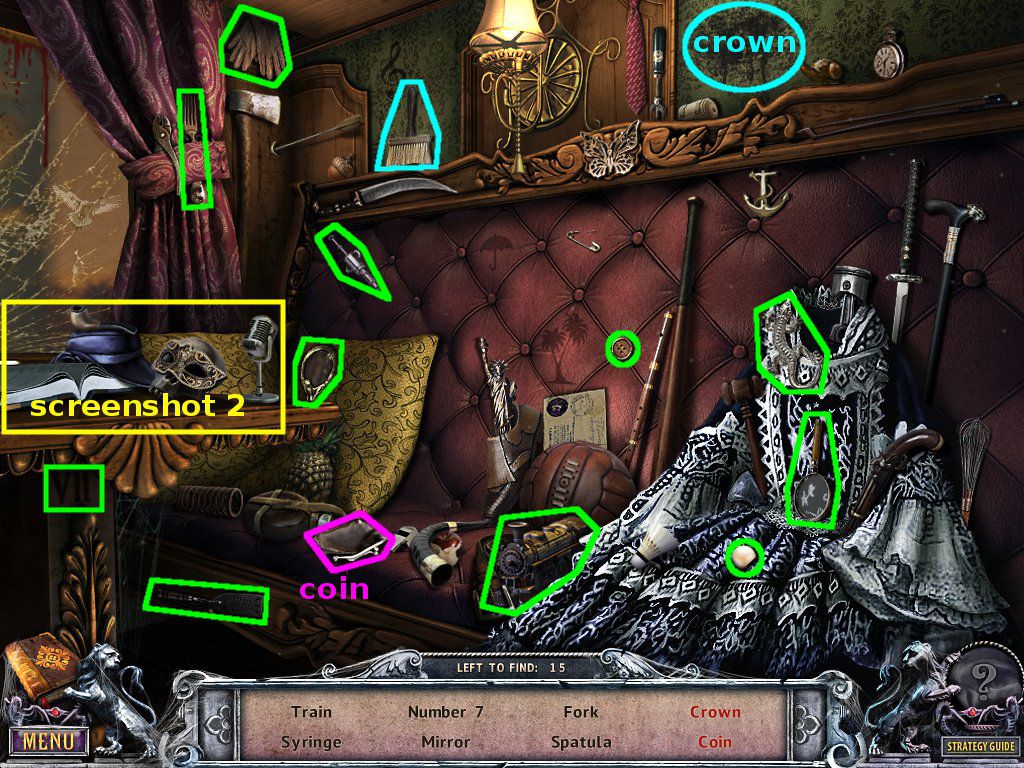
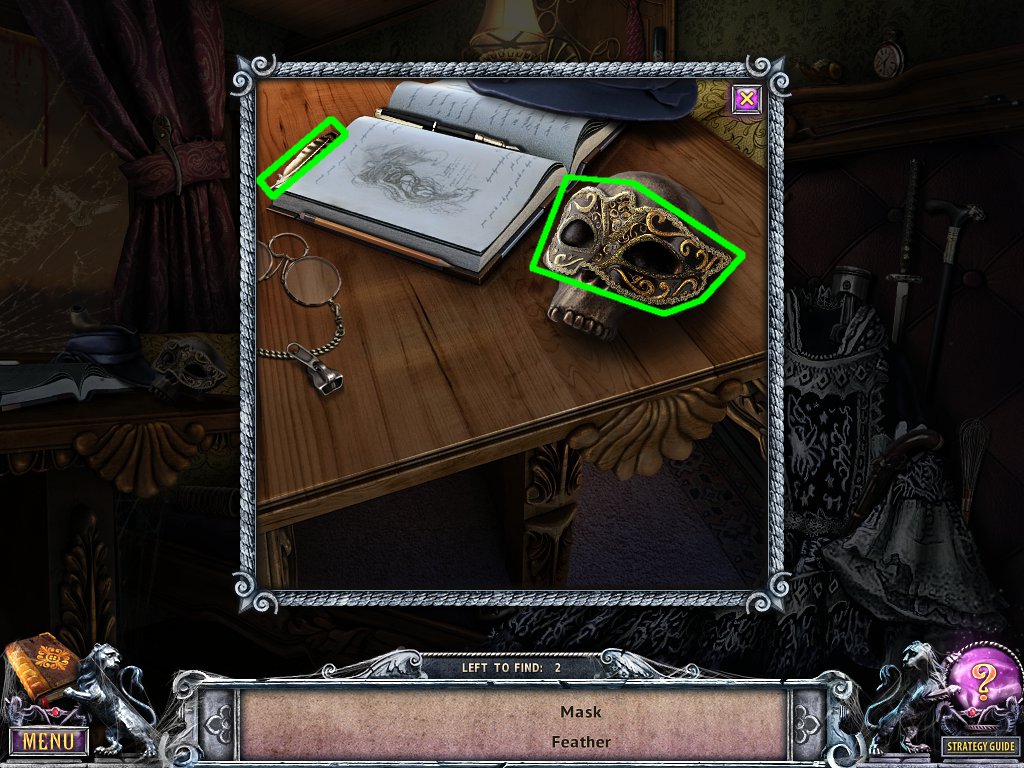
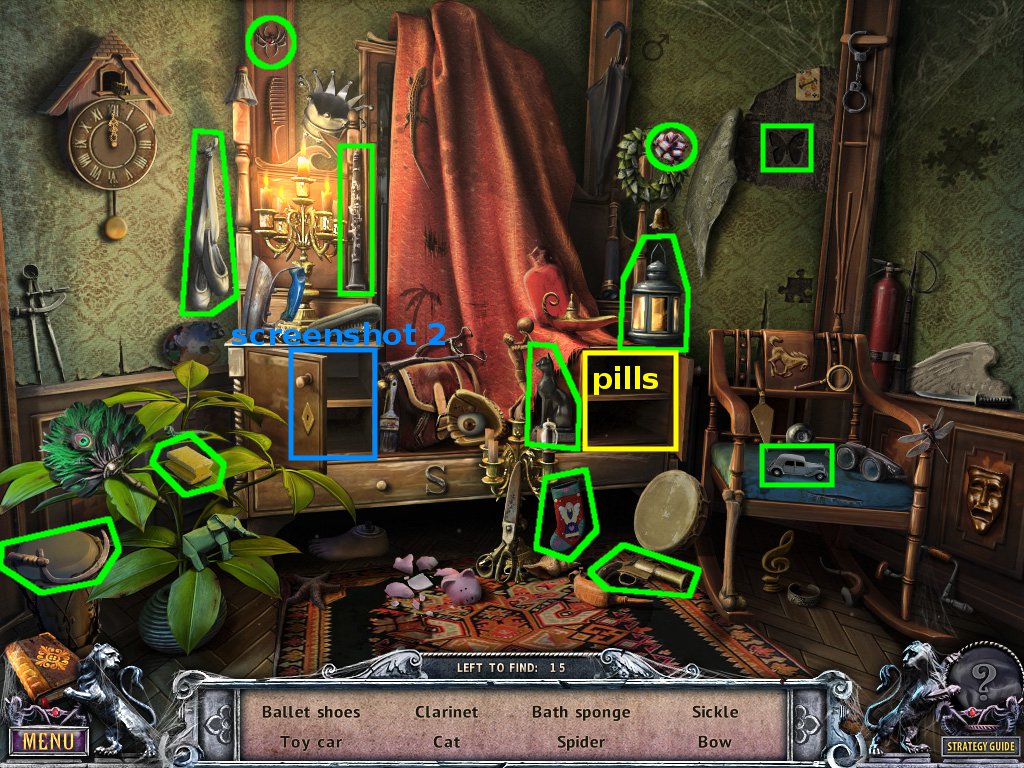
Solve the hidden-object scene using the screenshots below for help.
Items that you must interact with are color-coded and labeled with the item name.
Items that are found in a sub-screen of the scene are indicated in the first screenshot and can be found in the second one.
Screenshot 1
Screenshot 2
You acquire a coin.
Examine the first door and use the gear (from the mailbox at the mansion entrance).
Press the green button, then step through the doorway.
Sammy's Room
Speak to Sammy.
Collect the butterfly net.
Head downstairs to the main hall.
Main Hall
Use the butterfly net (from Sammy's room) to collect the spring off the chandelier.
Enter the living room.
Living Room
Examine the door.
Use the spring (from the chandelier in the main hall).
Head through the doorway.
Library
Collect the musical lamp.
Examine the shelf at the top of the ladder and use the book (from the hidden-object scene in the main hall).
Collect the portrait and back up.
Use the bone (from the urn at the mansion entrance) on the dog.
Head to the portrait wall and use the portraits you have.
The locations of the portraits:
By the urn at the mansion entrance.
On the windowsill in the upstairs hallway.
On the shelf in the library.
One of the portraits will allow you to collect the train-shaped key.
Head back upstairs to Sammy's room.
Sammy's Room
Give Sammy the musical lamp (from the library).
Examine the armoire and use the train-shaped key (from the portrait wall).
Enter the portal to the train.
Chapter 3: Ghost Train
Train Passage
Examine the newspaper on the floor.
Collect the piece of coal.
Enter the first cabin.
Engineer's Cabin
Examine the table.
Collect the portrait and razor.
Back up to the passage.
Train Passage
Use the razor (from the table in the engineer's cabin) on the rope around the curtain.
Examine the window and collect the boiler handle.
Back up and enter the engine room.
Engine Room
Examine the logs.
Solve the mini-game by click a log and placing it to the left.
Be careful of where your arrow is pointing: sometimes it will turn red in a place you can actually put it.
You cannot place a log over a light.
There are three different sized logs, from left-to-right: large, small, medium
Solution:
Top shelf: medium to the left, large to the right
Second shelf: two columns of small to the left, small to the right
Third shelf: a column of large and one of medium
Bottom shelf: medium to the left, large to the right
Use the boiler handle (from the window in the train passage) on the hatch and turn it to open the hatch.
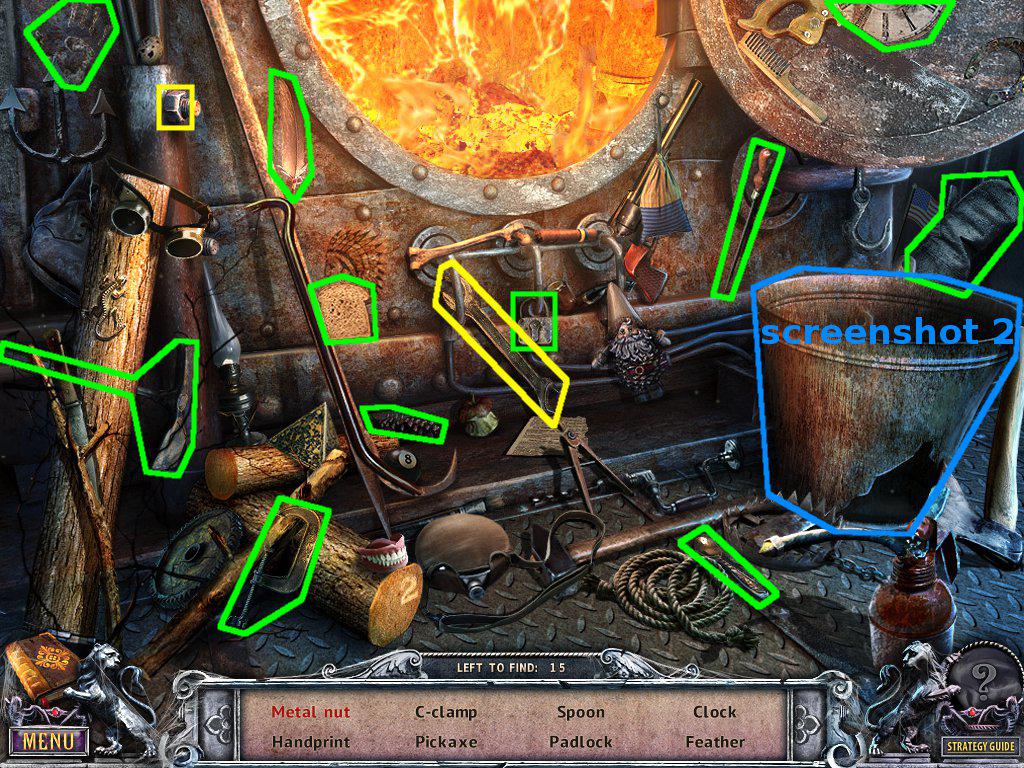
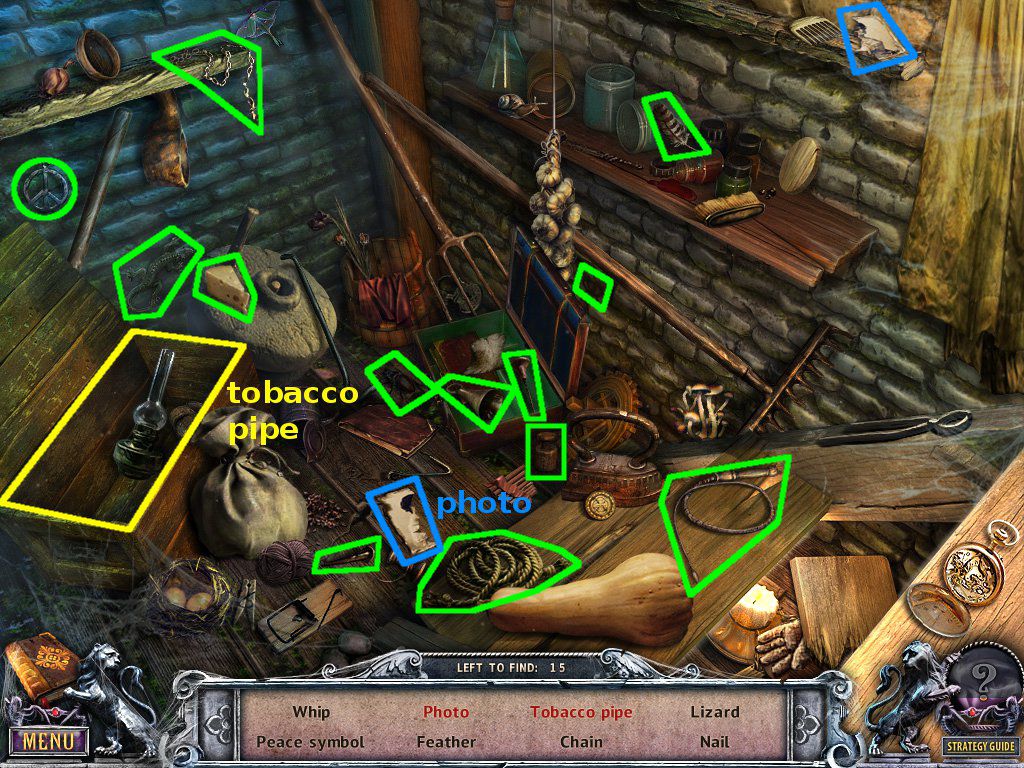
Solve the hidden-object scene using the screenshots below for help.
Items that you must interact with are color-coded and labeled with the item name.
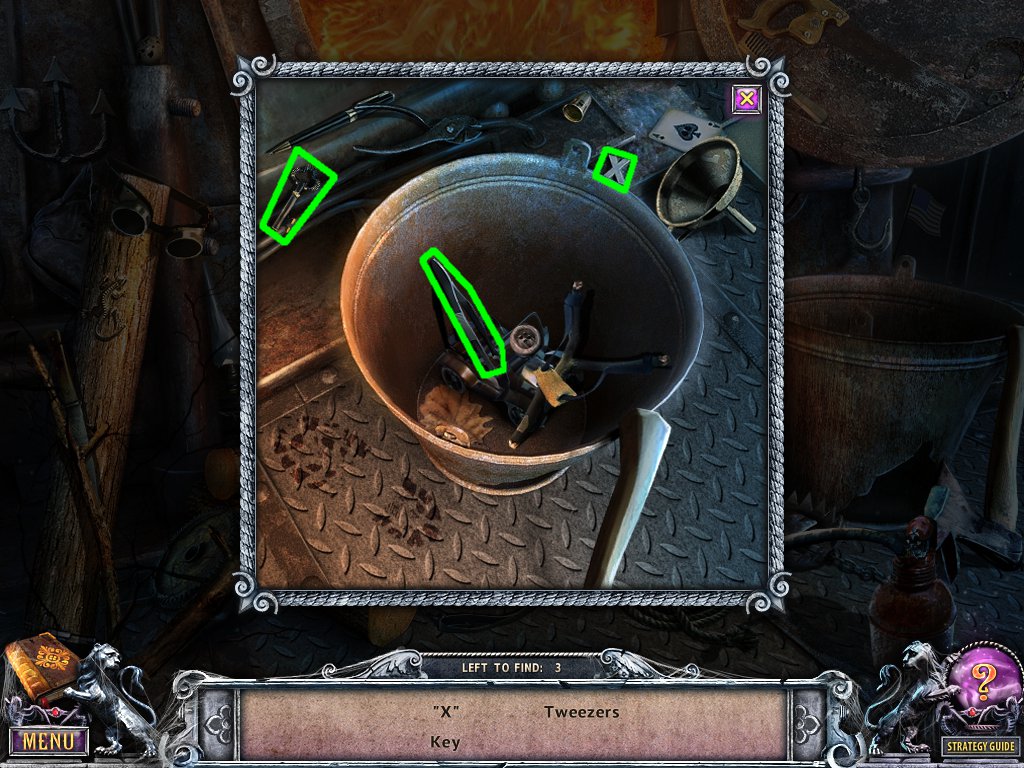
Items that are found in a sub-screen of the scene are indicated in the first screenshot and can be found in the second one.
Screenshot 1
Screenshot 2
You acquire tweezers.
Back up to the hallway.
Train Passage
Examine the vent.
Use the tweezers (from the hidden-object scene in the engine room) to collect the coin.
Enter the engineer's cabin.
Engineer's Cabin
Examine the upper part of the cabinet and use both coins (from the hidden-object scene in the upstairs hallway and from the vent in the train passage).
Solve the mini-game by clicking the arrows to move or swap the coins.
The goal is to get the numbers on the coins to represent a clock face.
You can put the coins in either slot, so there are two different ways of solving this.
Examine the cabinet and collect a key.
Back up to the hallway.
Train Passage
Examine the locked door.
Use the key (from the cabinet in the engineer's cabin).
Enter the passenger cabin.
Passenger Cabin
Speak to Liza.
Examine the table and use the piece of coal (from the floor of the train passage).
Make note of the code and head back to the engineer's cabin.
Engineer's Cabin
Examine the lower cabinet and enter the code.
4-0-8-2
Collect the hex wrench and back up.
Pull the lever on the wall.
Examine the fuse box and use the hex wrench.
Examine the box.
Solve the mini-game by clicking a node and placing it elsewhere until all wires are green.
There is a reset button in the upper right corner if you feel lost (or are ready to use the solution below).
A solution (there are several):
Consider the nodes are numbered 1-16 like so:
[01][02][03][04]
[05][06][07][08]
[09][10][11][12]
[13][14][15][16]
Steps will be given in the form of (beginning node)-(end node).
Spacing is simply for ease of reading.
3-1, 2-12, 5-13, 4-5
7-2, 11-4, 10-11, 15-9
6-10, 16-6, 8-7
Pull the lever.
Head back to the main hall.
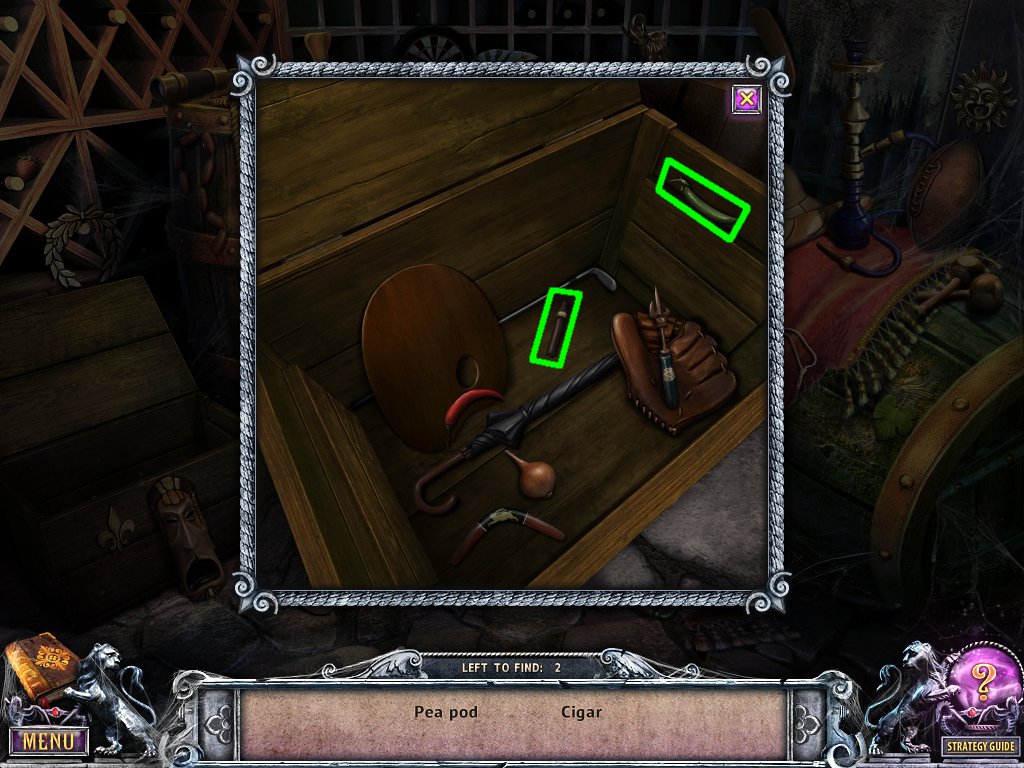
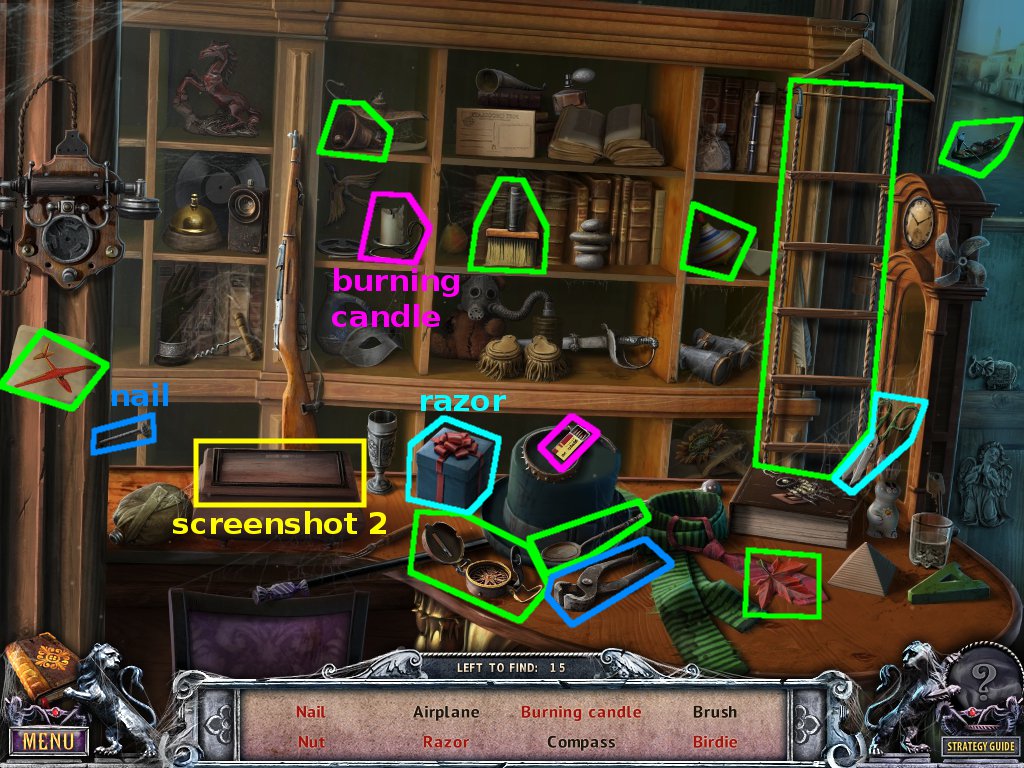
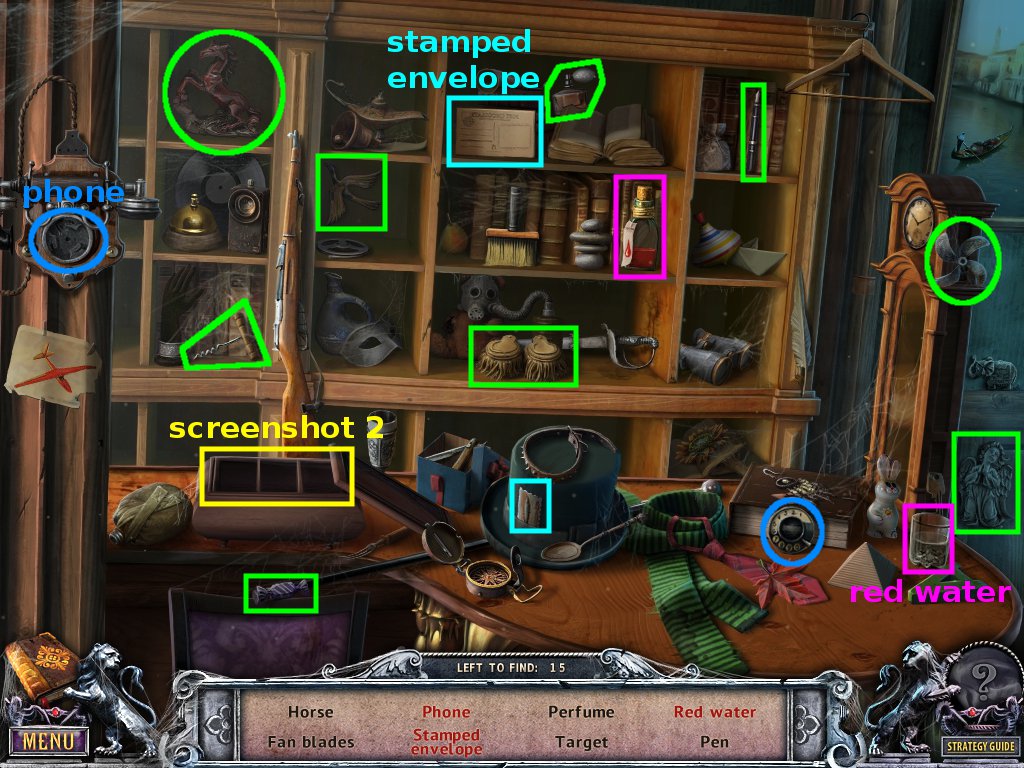
Main Hall
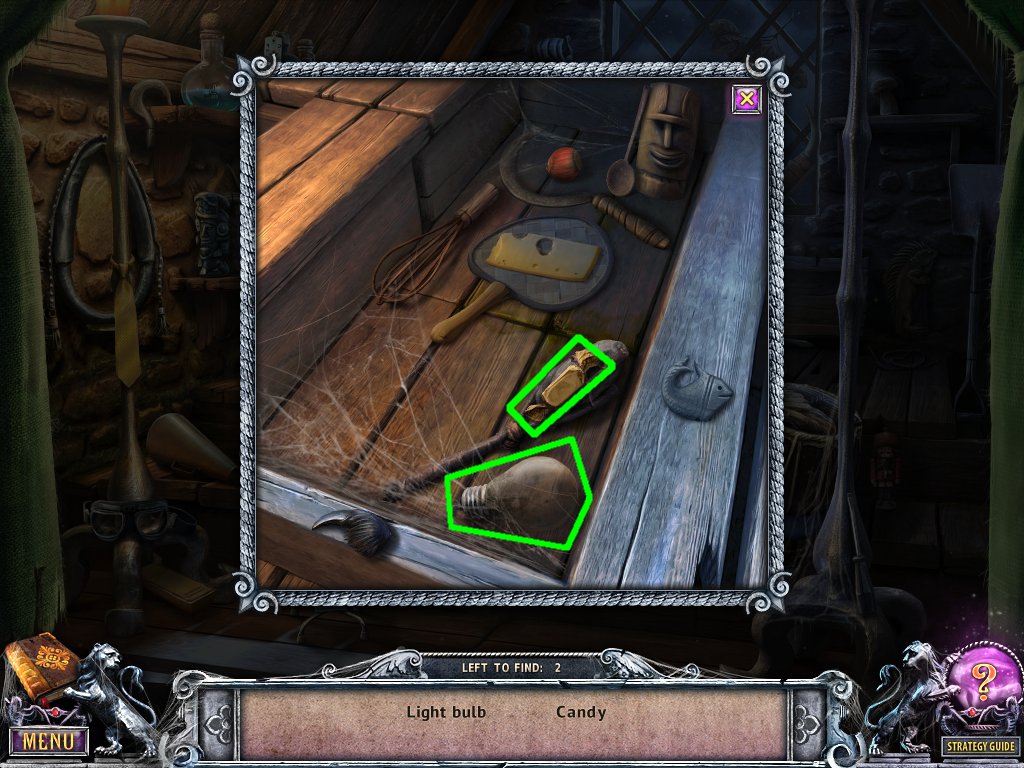
Solve the hidden-object scene using the screenshots below for help.
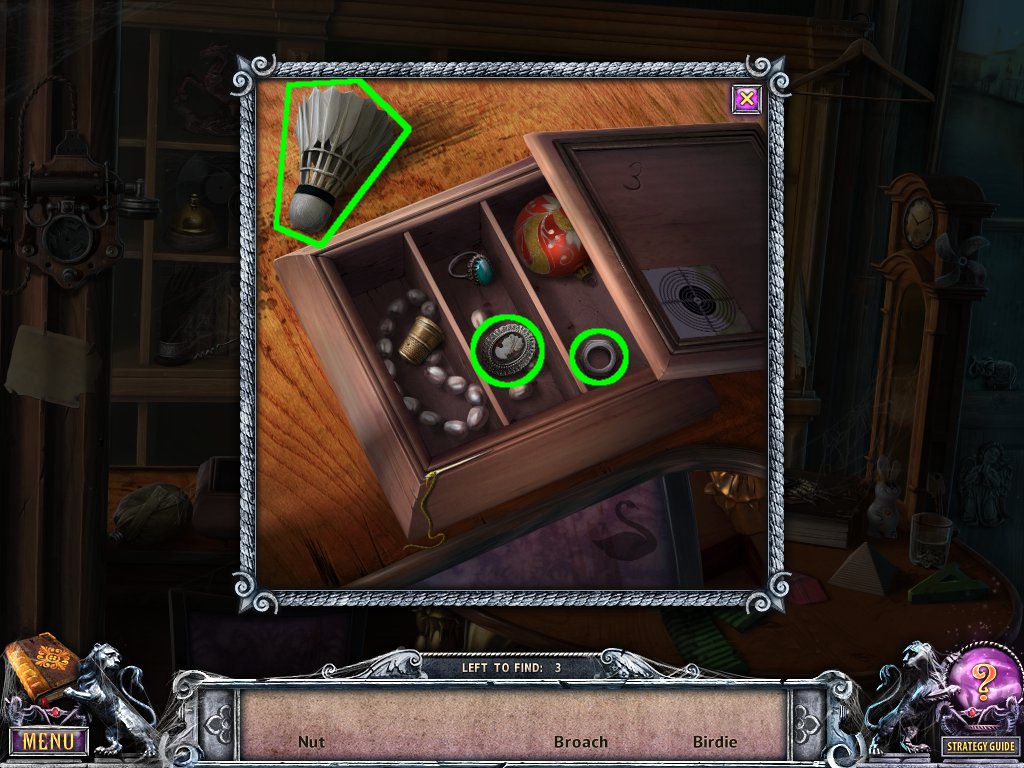
Items that you must interact with are color-coded and labeled with the item name.
Items that are found in a sub-screen of the scene are indicated in the first screenshot and can be found in the second one.
Screenshot 1
Screenshot 2
You acquire a light bulb.
Head back into the train to the passenger cabin.
Passenger Cabin
Examine the light to the right and use the light bulb (from the hidden-object scene in the main hall).
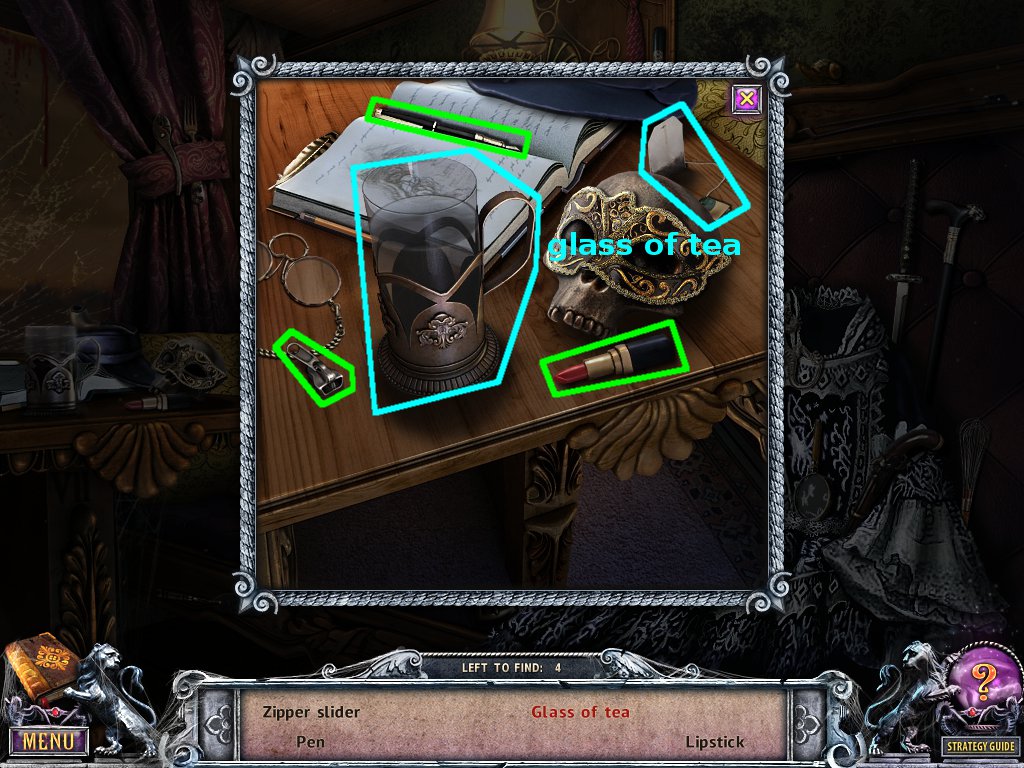
Back up and solve the hidden-object scene using the screenshots below for help.
Items that you must interact with are color-coded and labeled with the item name.
Items that are found in a sub-screen of the scene are indicated in the first screenshot and can be found in the second one.
Screenshot 1
Screenshot 2
You acquire a zipper slider.
Examine the bag and use the zipper slider.
Open the bag and collect the record.
Head down to the living room.
Living Room
Examine the gramophone and use the record (from the bag in the passenger cabin).
Turn the handle.
Collect the portrait and key.
Head back to the main hall.
Main Hall
Examine the door to the left.
Use the key (from the gramophone in the living room).
Enter the dining room.
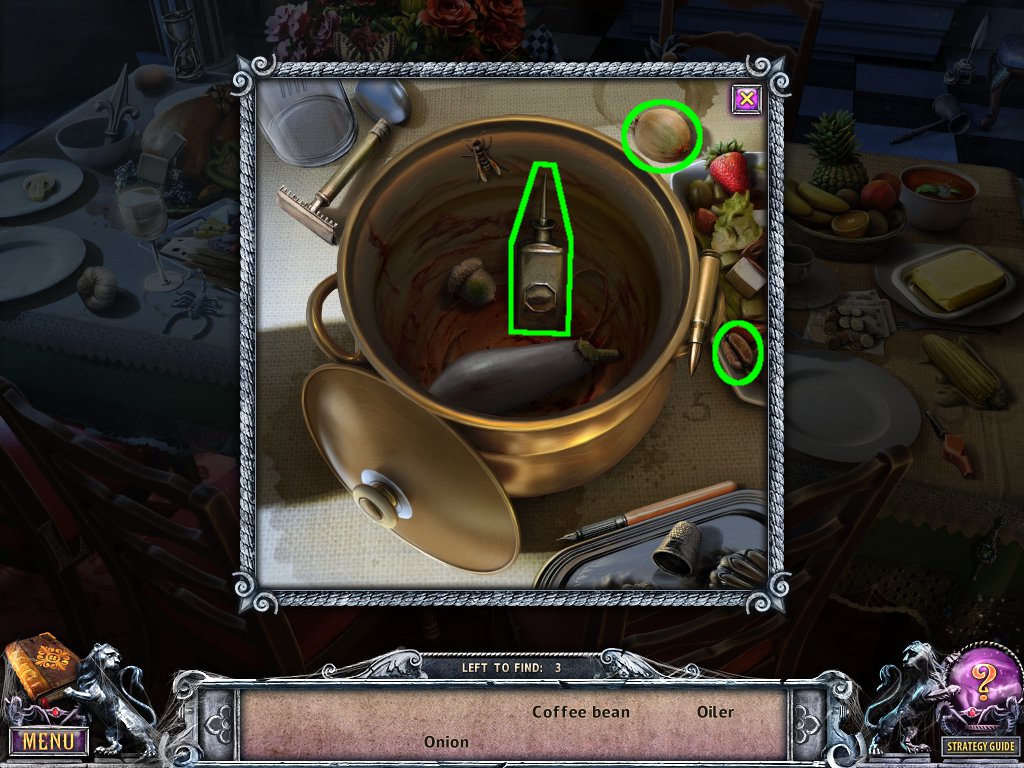
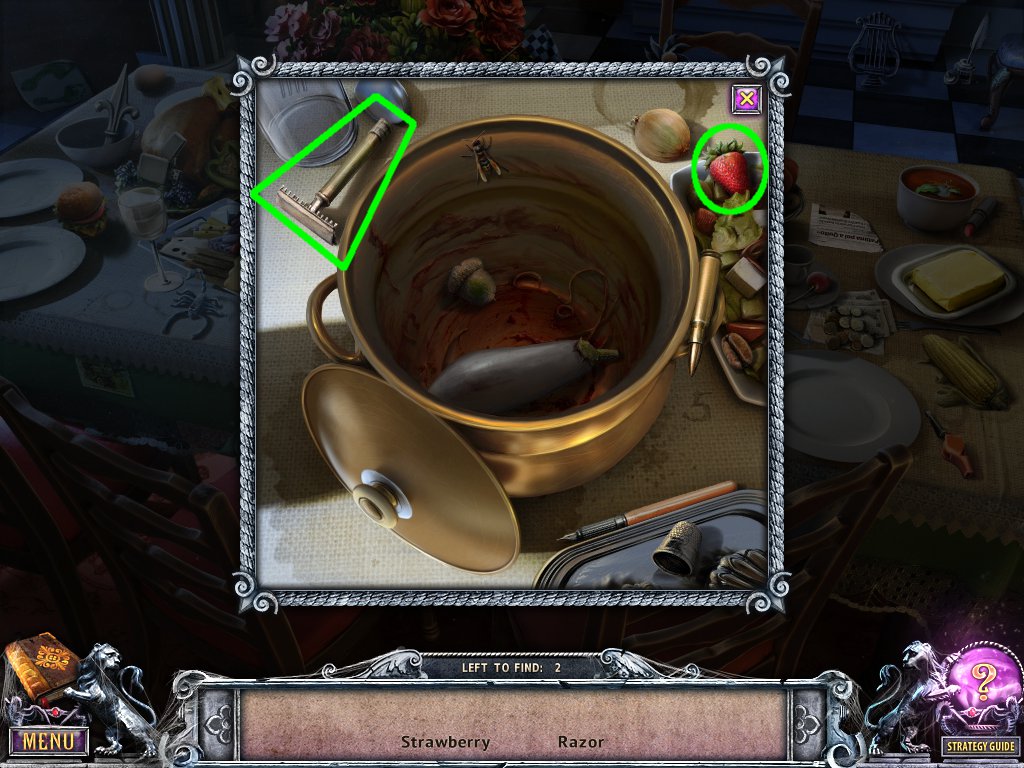
Dining Room
Speak to Chloe.
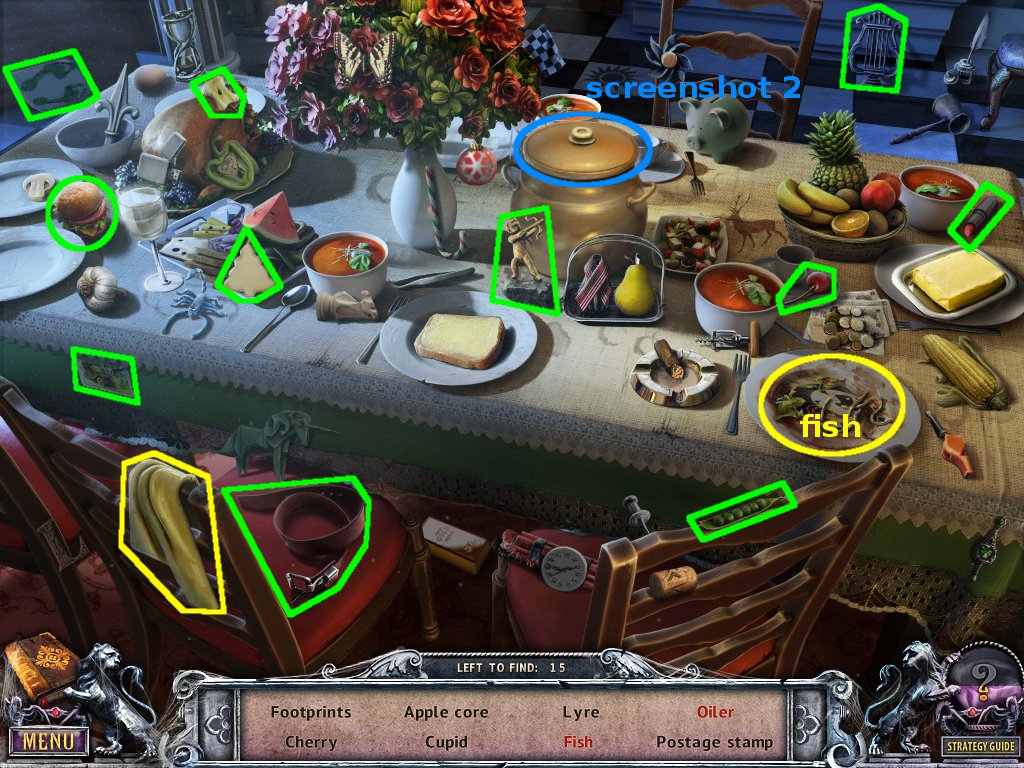
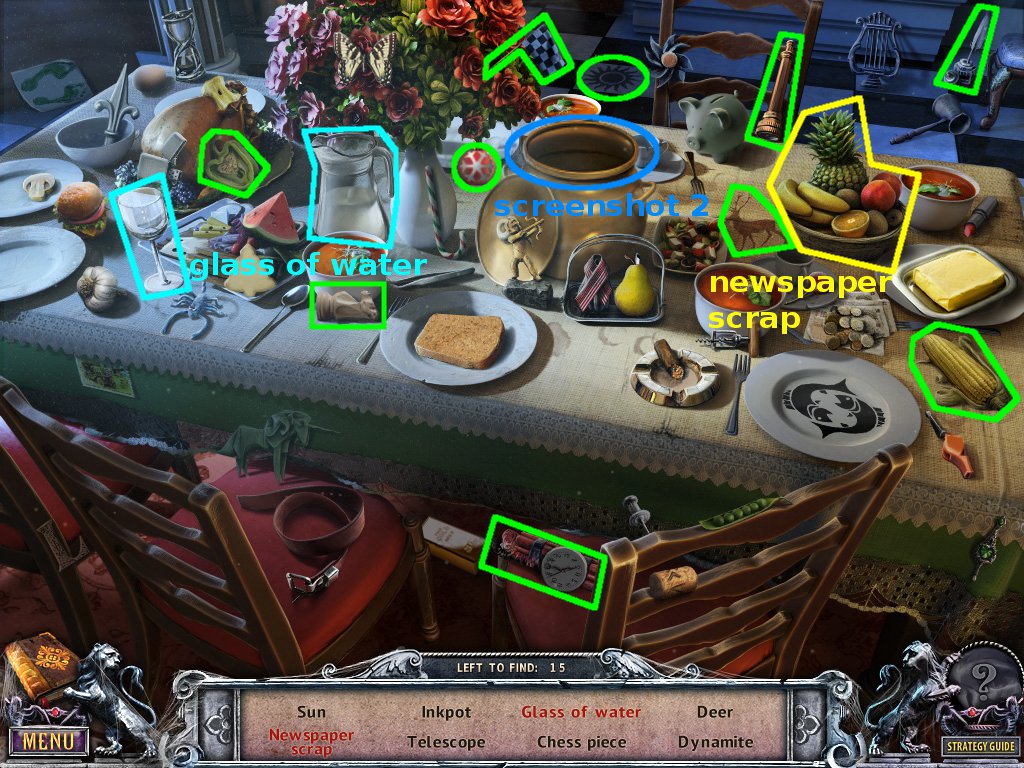
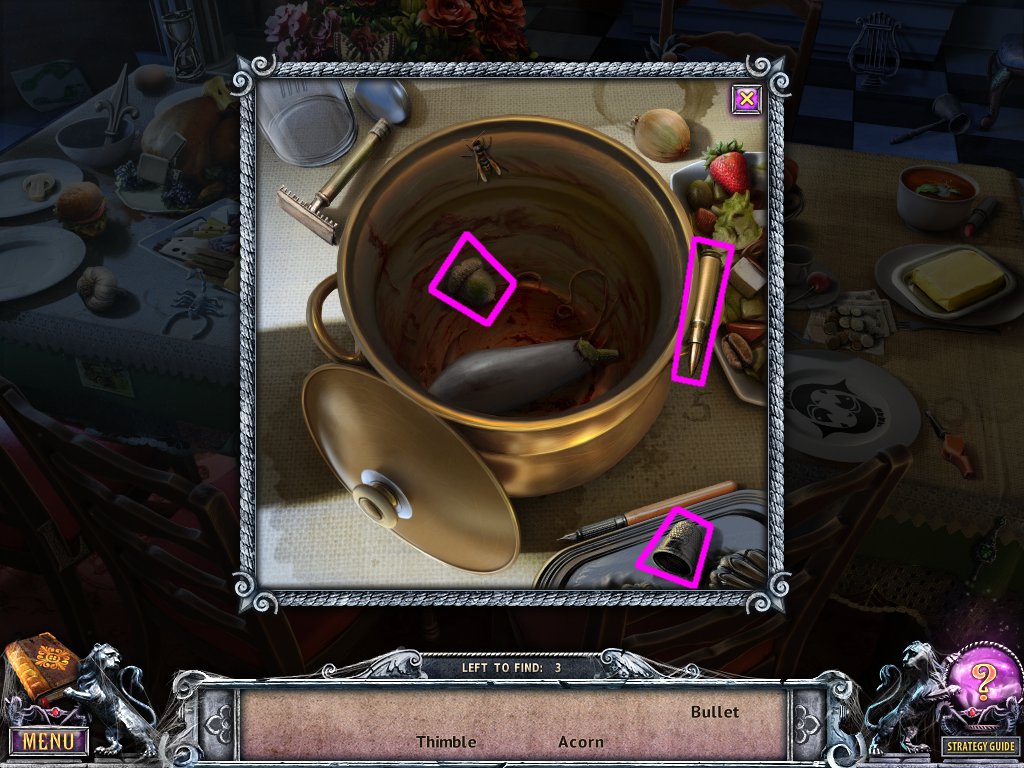
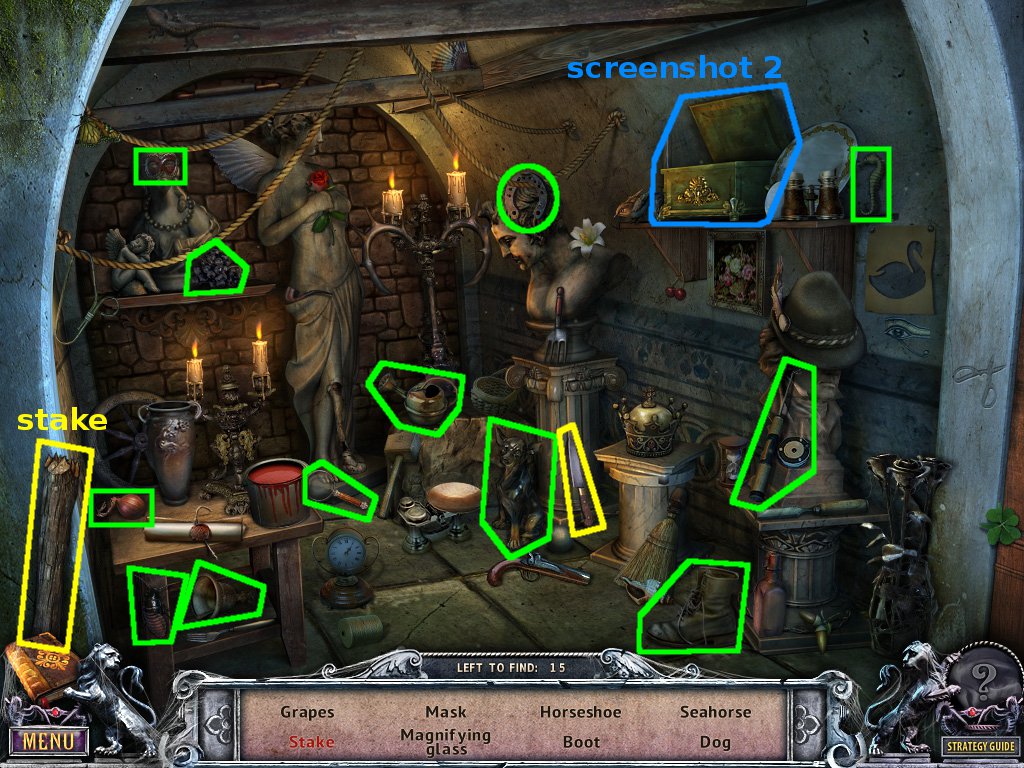
Solve the hidden-object scene using the screenshots below for help.
Items that you must interact with are color-coded and labeled with the item name.
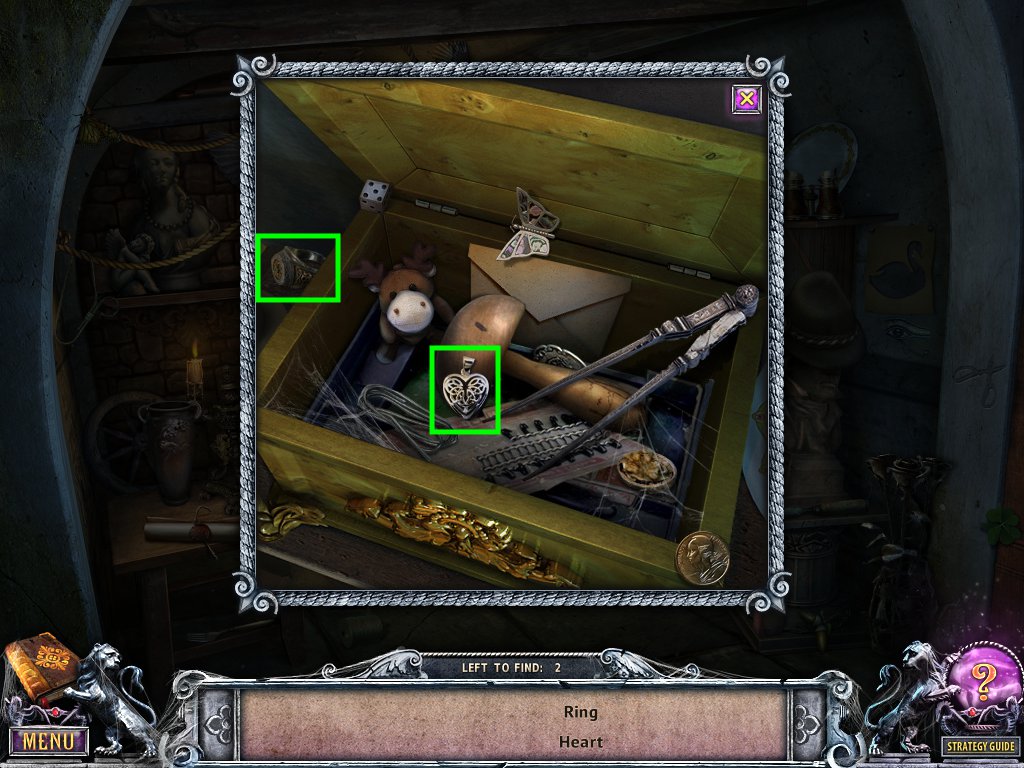
Items that are found in a sub-screen of the scene are indicated in the first screenshot and can be found in the second one.
Screenshot 1
Screenshot 2
You acquire an oiler.
Examine the food tray and lift the cover.
Collect the apple and back up.
Examine the painting above the china cabinet and collect the hatchet.
Head back to the passenger cabin on the train.
Passenger Cabin
Solve the hidden-object scene using the screenshots below for help.
Items that you must interact with are color-coded and labeled with the item name.
Items that are found in a sub-screen of the scene are indicated in the first screenshot and can be found in the second one.
Screenshot 1
Screenshot 2
You acquire a train.
Examine the window and use the oiler (from the hidden-object scene in the dining room).
Turn the handles, push the window open and collect the handkerchief.
Head to the engine room.
Engine Room
Examine the floor lever and use the handkerchief (from the window in the passenger cabin).
Push the lever to stop the train.
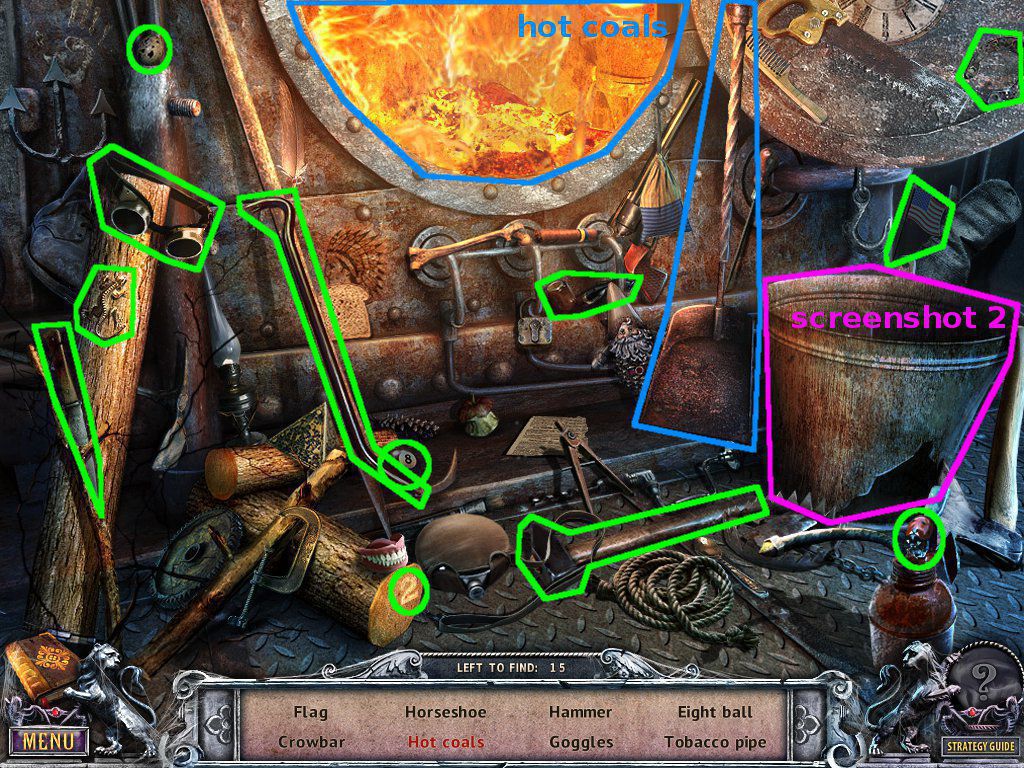
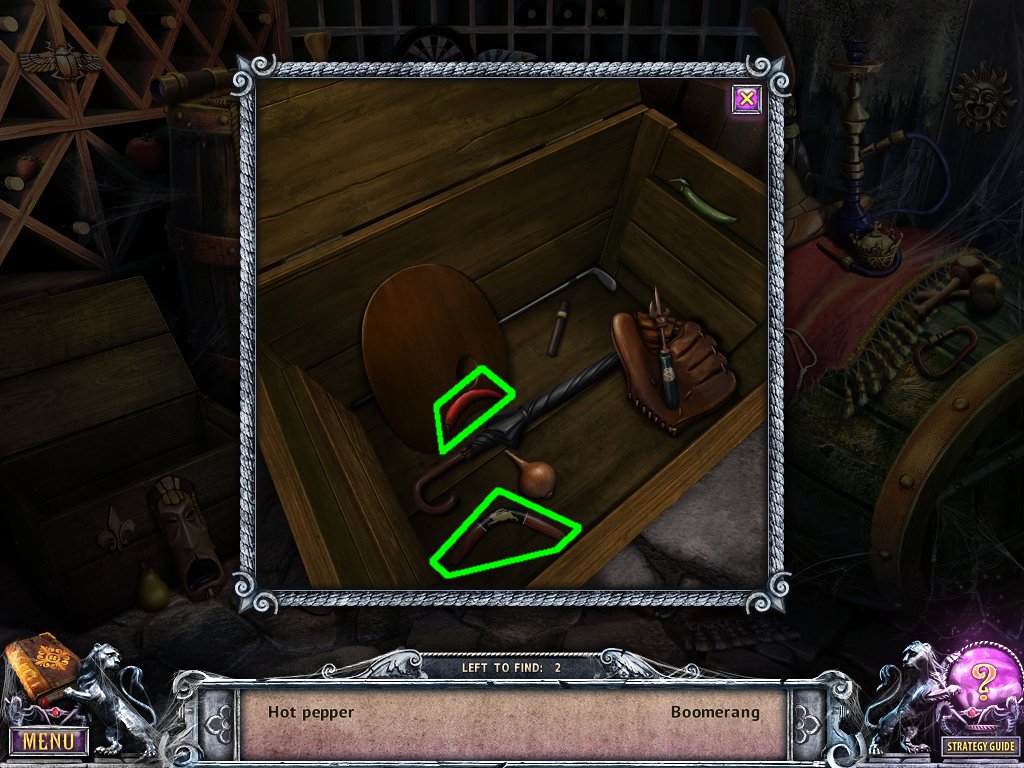
Solve the hidden-object scene using the screenshots below for help.
Items that you must interact with are color-coded and labeled with the item name.
Items that are found in a sub-screen of the scene are indicated in the first screenshot and can be found in the second one.
Screenshot 1
Screenshot 2
You acquire hot coals.
Examine the floor hatch by the logs and use the hot coals.
Now use the hatchet (from a painting in the dining room) and collect the portrait and train tracks.
Head back to Sammy's room.
Sammy's Room
Speak to Sammy to collect the figurine.
Examine the train set and use the train (from the hidden-object scene in the passenger cabin).
Examine the passenger car and use the figurine.
Back up and use the cup of coffee (from the table in the living room) on the engine car.
Examine the engine car and use the lighter on the boiler.
Back up and use the train tracks.
Solve the mini-game by clicking a track and placing it on the field.
There are only set places you can put the tracks, and they cannot go through a building or natural barrier.
All pieces will be used to connect the two cities in the corner.
The solution:
Screenshot
Pull the lever.
Examine the cabinet and collect the corkscrew and ruler.
Examine the bookshelf above the bed and collect the firecracker.
Head to the dining room.
Chapter 4: Stone Heart
Dining Room
Examine the doors.
Use the ruler (from the armoire in Sammy's room).
Head through to the kitchen.
Kitchen
Open the island drawer.
Collect the knife and back up.
Examine the island countertop and use the knife on the cheese.
Collect the cheese and use the corkscrew (from the armoire in Sammy's room) on the bottle.
Pick up the bottle and pour it in the glass.
Collect the hock cup and cork, then back up.
Open the left cabinet and examine it.
Collect the pot and portrait.
Head back to the dining room.
Dining Room
Give the hock cup (from the island in the kitchen) to Chloe.
Solve the hidden-object scene using the screenshots below for help.
Items that you must interact with are color-coded and labeled with the item name.
Items that are found in a sub-screen of the scene are indicated in the first screenshot and can be found in the second one.
Screenshot 1
Screenshot 2
You acquire a telescope.
Head upstairs to Sammy's room.
Sammy's Room
Examine the window and use the telescope, making note of the star positions.
Back up and examine the bird.
Press the lights corresponding to the constellation.
Collect the piece of hose and head down through the kitchen to the elevator.
Elevator
Collect the chamomile off the chair.
Examine the device to the right and use the piece of hose (from the bird in Sammy's room).
Pull the lever and exit to the cellar.
Cellar
Solve the hidden-object scene using the screenshots below for help.
Items that you must interact with are color-coded and labeled with the item name.
Items that are found in a sub-screen of the scene are indicated in the first screenshot and can be found in the second one.
Screenshot 1
Screenshot 2
You acquire a rose.
Collect the sled off the wall and the broom in front.
Use the cheese (from the island in the kitchen) on the mouse hole.
Examine the mouse and collect it.
Head back to the dining room.
Dining Room
Examine the flower painting, make note of the order and back up.
Examine the mantel and use the chamomile (from the chair in the elevator) and rose (from the hidden-object scene in the cellar).
Place the flowers on the metalwork tiles in the order indicated by the painting.
Examine the fireplace and use the broom (from the cellar) on the cobwebs.
Collect the hook and portrait.
Now head to the library.
Library
Examine the portrait wall and use the five portraits.
Location of the portraits:
On the table in the engineer's cabin.
In the gramophone in the living room.
Under the floor hatch in the engine room.
In the left cabinet in the kitchen.
In the fireplace in the dining room.
One of the portraits will allow you to collect a skull-shaped key.
Head back to the dining room.
Dining Room
Examine the winter painting.
Use the skull-shaped key (from the portrait wall).
Head through the portal to the sculptor's yard.
Sculptor's Yard
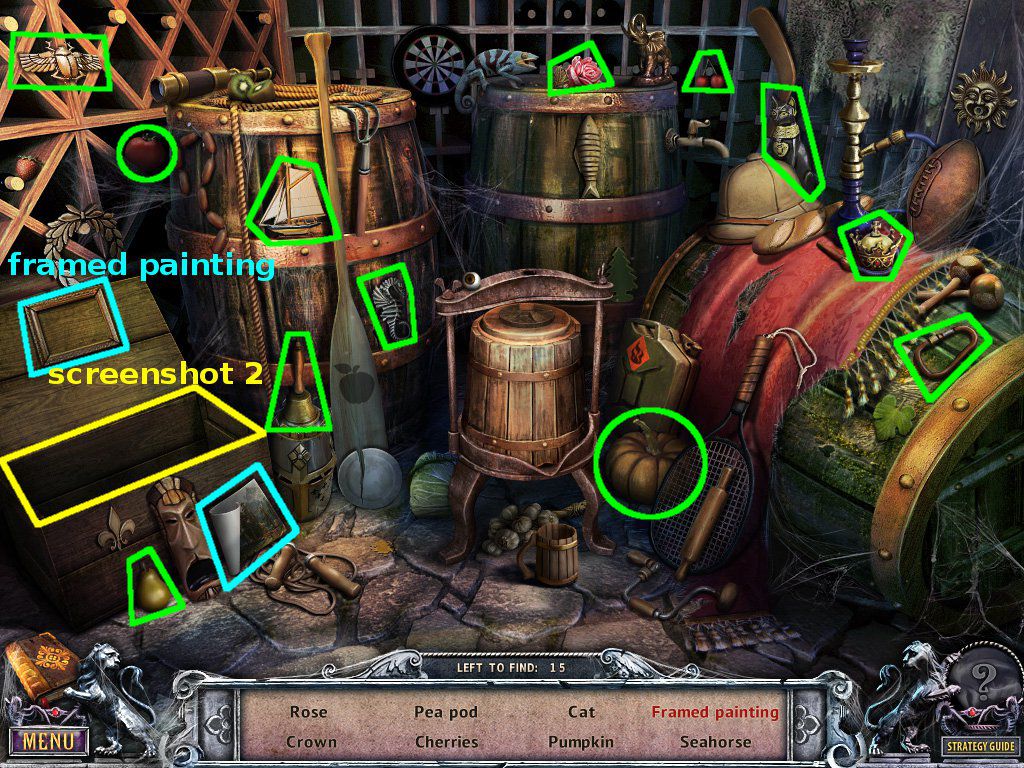
Solve the hidden-object scene using the screenshots below for help.
Items that you must interact with are color-coded and labeled with the item name.
Screenshot
You acquire a silver skull.
Use the sled on the boulder and push it.
Examine the ladder against the sculptor's workshop and collect the egg and ladle.
Back up and examine the house.
Examine the mailbox and open it.
Collect the gear and head inside the sculptor's workshop.
Sculptor's Workshop
Solve the hidden-object scene using the screenshots below for help.
Items that you must interact with are color-coded and labeled with the item name.
Items that are found in a sub-screen of the scene are indicated in the first screenshot and can be found in the second one.
Screenshot 1
Screenshot 2
You acquire the fishing rod.
Examine the water fountain and use the cork (from the island in the kitchen) to stop the water.
Use the ladle (from the ladder in the sculptor's yard) on the water, then collect the gold skull.
Back up, then use the gear (from the mailbox in the sculptor's yard) by the one on the wall.
Use the hook (from the fireplace in the dining room) on the loose rope end.
Turn the handle to raise the rock.
Examine the hole in the floor and collect the portrait and key.
Head back outside and off to the cemetary.
Cemetary
Examine the hole in the ice.
Use the fishing rod (from the hidden-object scene in the sculptor's workshop) to collect the tongs.
Head to the front of the house.
Use the key (from the hole in the floor in the sculptor's workshop) on the lock.
Turn the handle and enter the house.
Sculptor's House
Examine the chest, then use the silver skull (from the hidden-object scene in the sculptor's yard) and the gold skull (from the water fountain in the sculptor's workshop).
Solve the mini-game by clicking a skull to move it to an available space.
Examine the chest and collect the portrait and grindstone.
Examine the elk head and use the tongs (from the ice at the cemetary) to open the mouth.
Collect the diamond-shaped key.
Back up into the mansion and head down to the cellar.
Cellar
Solve the hidden-object scene using the screenshots below for help.
Items that you must interact with are color-coded and labeled with the item name.
Items that are found in a sub-screen of the scene are indicated in the first screenshot and can be found in the second one.
Screenshot 1
Screenshot 2
You acquire logs.
Examine the drawer above the shelves and use the diamond-shaped key (from the elk head in the house).
Collect the portrait and dustpan.
Head back through the portal to the sculptor's workshop.
Sculptor's Workshop
Solve the hidden-object scene using the screenshots below for help.
Items that you must interact with are color-coded and labeled with the item name.
Screenshot
You acquire a shovel.
Examine the rocks below the lion statue and use the dustpan.
Collect the heart and head to the cemetary.
Cemetary
Examine the stone impression and use the heart (from the rocks below the lion statue in the sculptor's workshop).
Speak to Ned.
Examine the grave and use the shovel (from the hidden-object scene in the sculptor's workshop).
Collect the axe and go back to the sculptor's workshop.
Sculptor's Workshop
Use the grindstone (from the chest in the house) on the grinder.
Solve the mini-game by clicking an appropriate piece and setting it on its outline.
Examine the grinder and use the axe (from in the grave at the cemetary) to acquire a sharp axe.
Head outside.
Sculptor's Yard
Solve the hidden-object scene using the screenshots below for help.
Items that you must interact with are color-coded and labeled with the item name.
Screenshot
You acquire a stone figurine.
Use the logs (from the hidden-object scene in the cellar) on the stump.
Use the sharp axe (sharpened in the sculptor's workshop) on the logs.
Solve the mini-game by clicking when the axe is over the split. There is no penalty for missing the split or for taking your time.
You acquire firewood.
Head to the cemetary.
Cemetary
Examine the open grave, examine the casket, then use the stone figurine (from the hidden-object scene at the sculptor's yard).
Solve the mini-game by dragging each figuring up or down until all are lined up in the middle.
A red line will appear to indicate that a figurine is in the correct position.
Most figurines moves other ones simultaneously (numbered 1-5, left-to-right):
#1 also moves #2
#2 only moves itself.
#3 also moves #1, 2 and 5.
#4 also moves #1, 2, 3 and 5.
#5 also moves #1 and 2.
A solution:
Unless indicated, move the indicated figurine as far in the direction given as possible.
Move #4 up.
Move #5 down.
Line #4 in the middle.
Line #3 in the middle.
Line #5 in the middle.
Move #1 down.
Move #2 up.
Line #1 in the middle.
Line #2 in the middle.
Examine the casket and collect the gold key.
Head into the house.
Sculptor's House
Examine the desk and use the gold key (from inside the casket at the cemetary) on the box.
Collect the portrait and valve handle.
Head out the portal to the kitchen.
Kitchen
Examine the water container to the right and use the valve handle (from the box on the desk in the house).
Use the pot (from the left cabinet in the kitchen) and turn the handle.
Collect the pot of water and back up.
Open the oven and use the firewood (split at the sculptor's yard).
Use the lighter on the wood.
Place the pot of water on the stove.
Collect the pot of boiling water.
Head back to the sculptor's yard.
Sculptor's Yard
Examine the bench and use the pot of boiling water (heated in the kitchen).
Collect the pickaxe.
Back up to the dining room.
Dining Room
Examine the statue and use the pickaxe (from the bench at the sculptor's yard).
Collect the skull.
Now head to the cemetary.
Cemetary
Examine the grave.
Examine the casket.
Use the skull (from the statue in the dining room).
Chapter 5: Cursed Painting
Dining Room
Speak to Chloe.
Solve the hidden-object scene using the screenshots below for help.
Items that you must interact with are color-coded and labeled with the item name.
Items that are found in a sub-screen of the scene are indicated in the first screenshot and can be found in the second one.
Screenshot 1
Screenshot 2
You acquire the triangular key.
Head down to the cellar.
Cellar
Examine the cabinet at the base of the wine rack and use the triangular key (from the hidden-object scene in the dining room).
Use the knife on the sack.
Collect the seed, then head to the upstairs hallway.
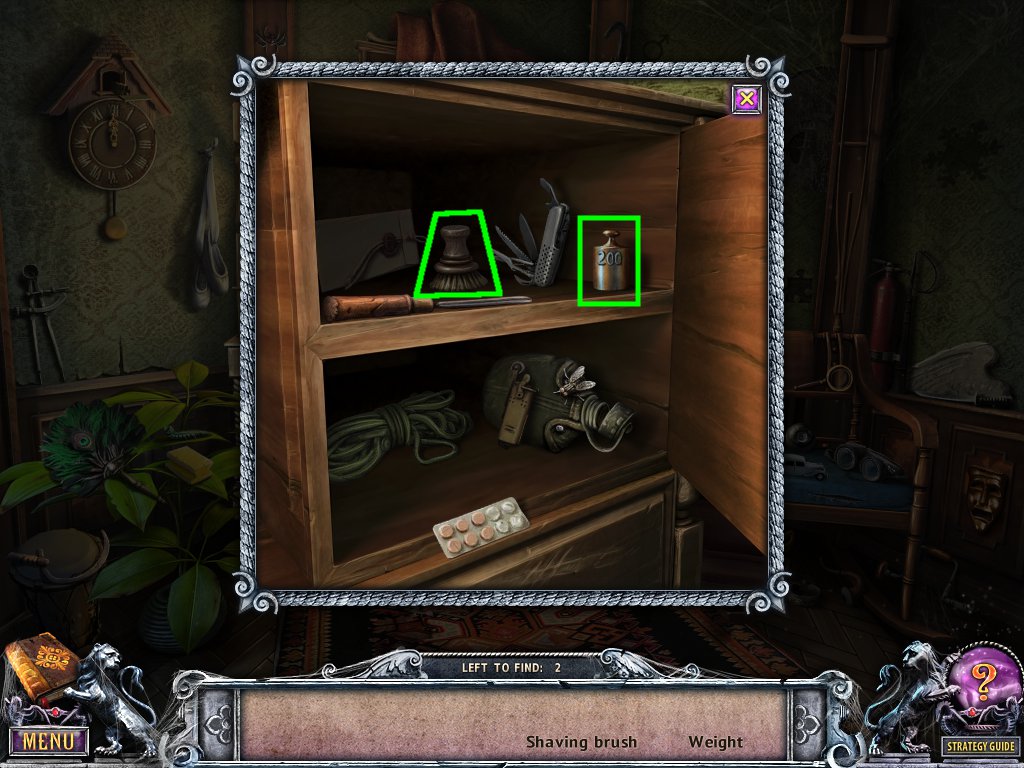
Upstairs Hallway
Solve the hidden-object scene using the screenshots below for help.
Items that you must interact with are color-coded and labeled with the item name.
Items that are found in a sub-screen of the scene are indicated in the first screenshot and can be found in the second one.
Screenshot 1
Screenshot 2
You acquire a weight.
Examine the windowsill and use the seed (from the lower wine rack cabinet).
Collect the heart and back up.
Examine the far door and use the heart.
Enter the room.
Amanda's Room
Speak to Amanda.
Examine the bird cage and collect the cross-shaped key.
Go down to the cellar.
Cellar
Examine the box on the high shelf to the left and use the cross-shaped key (from by the bird cage in Amanda's room).
Collect the portrait and crowbar.
Head to Amanda's room.
Amanda's Room
Examine the door.
Use the crowbar (from the box on the high shelf in the cellar).
Head into the scorched room.
Scorched Room
Examine the couch and lift the cushion.
Collect the chess piece and eye, then back up.
Examine the painting and collect the yellow stones.
Back up to the main hall.
Main Hall
Solve the hidden-object scene using the screenshots below for help.
Items that you must interact with are color-coded and labeled with the item name.
Items that are found in a sub-screen of the scene are indicated in the first screenshot and can be found in the second one.
Screenshot 1
Screenshot 2
You acquire a paintbrush.
Examine the gargoyle and use the eye (from under the couch cushion in the scorched room).
Now examine the dropped step and collect the portrait.
Head to the living room.
Living Room
Examine the scale on the mantel and use the weight (from the hidden-object scene in the upstairs hallway).
Use the yellow stones (from next to the painting in the scorched room).
Solve the mini-game by clicking stones to put them on or remove them from the scales.
Only some of the stones will be used.
The solution (numbering the stones 1-6, left-to-right):
1 and 2 and 4
You acquire 200 grams of yellow stones.
Enter the library.
Library
Examine the portrait wall and use the six portraits you have.
The location of the portraits:
In the hole in the floor at the sculptor's workshop.
In the chest at the sculptor's house.
In the drawer above the shelves in the cellar.
In the box on the desk at the sculptor's house.
In the box on the high shelf in the cellar.
Behind the dropped step in the main hall.
One of them allows you to collect an emerald key.
Head back up to the scorched room.
Scorched Room
Examine the painting and use the 200 grams of yellow stones (weighed on the scales in the living room) in the mortar.
Pick up the pestle and use it on the mortar.
Pick up the mortar and use it on the bowl.
Use the egg (from the top of the ladder at the sculptor's yard) on the bowl.
Pick up the cup and pour it in the bowl.
Now pick up the whisk and use it on the bowl.
Use the paintbrush (from the hidden-object scene in the main hall) on the bowl to acquire a paintbrush with paint.
Back up and examine the back wall.
Use the paintbrush with paint on the wall.
Examine the door and use the emerald key (from the portrait wall).
Step through the portal.
Gallery
Solve the hidden-object scene using the screenshots below for help.
Items that you must interact with are color-coded and labeled with the item name.
Items that are found in a sub-screen of the scene are indicated in the first screenshot and can be found in the second one.
Screenshot 1
Screenshot 2
You acquire a ladder.
Examine the window and use the knife on the purple flower to collect it.
Back up and knock over the pot to the right.
Examine the shards and collect the portrait and key.
Back up and use the ladder below the door above.
Head into the attic.
Attic
Solve the hidden-object scene using the screenshot below for help.
Items that you must interact with are color-coded and labeled with the item name.
Screenshot
You acquire a painting.
Examine the table and collect the piano key.
Back up, examine the chair in back and collect the piano key.
Use the key (from the pot you knocked over in the gallery) on the chest.
Collect the water mill and back up to the gallery.
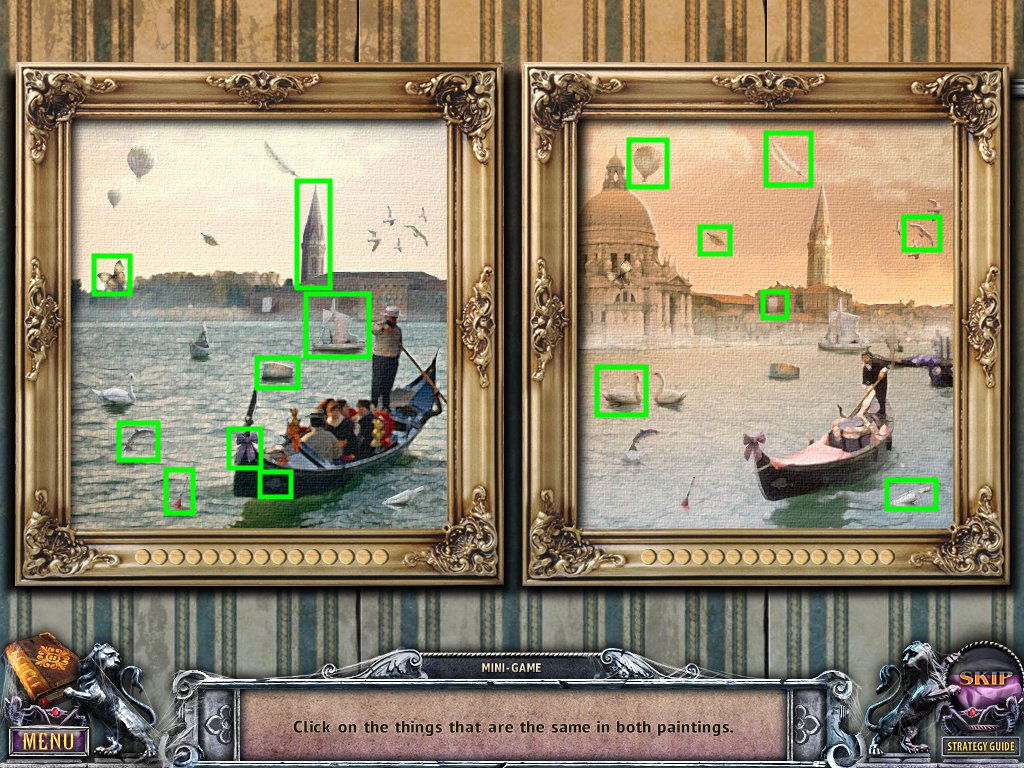
Gallery
Examine the chairs and use the painting (from the hidden-object scene in the attic).
Solve the mini-game by clicking on either painting to indicate objects that are the same in both.
The hotspots are small, so ensure your mouse is directly over the item.
The solution (highlighted objects are spread over both paintings):
Screenshot
Collect the firestone and head throught he door on the first level.
Artist's Workshop
Speak to the girl ghost.
Examine the stone well and use the firestone (from behind the painting in the gallery).
Collect the piano key and back up to Amanda's room.
Amanda's Room
Examine the house and use the water mill (from the chest in the attic).
Flip the switch and collect the portrait and star-shaped key.
Head down to the cellar.
Cellar
Solve the hidden-object scene using the screenshots below for help.
Items that you must interact with are color-coded and labeled with the item name.
Items that are found in a sub-screen of the scene are indicated in the first screenshot and can be found in the second one.
Screenshot 1
Screenshot 2
You acquire a hacksaw.
Examine the door in the middle of the wine rack and use the star-shaped key (from inside the house in Amanda's room).
Collect the pigeon head and go back up to Amanda's room.
Amanda's Room
Examine the bird cage and use the pigeon head (from the middle wine rack door in the cellar).
Collect the sheet music and back up.
Examine the piano and use the three piano keys.
The location of the piano keys:
On the table in the attic.
On the chair in the attic.
Inside the stone well in the artist's studio.
Use the sheet music.
Solve the mini-game by pressing the correct piano keys, in order.
There are clues on the sheet music.
The solution:
Just follow the number of arms on each star, left-to-right.
5-6-3-7-4
Examine the panel that opened and collect the portrait, also making note of the figurine positions.
Head into the gallery.
Gallery
Solve the hidden-object scene using the screenshots below for help.
Items that you must interact with are color-coded and labeled with the item name.
Items that are found in a sub-screen of the scene are indicated in the first screenshot and can be found in the second one.
Screenshot 1
Screenshot 2
You acquire a needle and thread.
Go up into the attic.
Attic
Solve the hidden-object scene using the screenshots below for help.
Items that you must interact with are color-coded and labeled with the item name.
Items that are found in a sub-screen of the scene are indicated in the first screenshot and can be found in the second one.
Screenshot 1
Screenshot 2
You acquire a gondola.
Examine the hourglass and use the hacksaw (from the hidden-object scene in the cellar) to acquire it.
Back up, examine the headboard, then turn the figurines to resemble what was in the piano.
Turn the 2nd one twice and the last one once.
Head down to the artist's workshop.
Artist's Workshop
Examine the painting and use the apple, flower, gondola and hourglass.
Locations of the items:
Apple: from under the tray in the dining room.
Flower: cut from the window in the gallery.
Gondola: from the hidden-object scene in the attic.
Hourglass: cut from the pillar in the attic.
Solve the mini-game by using the paintbrush and selecting a color on the palette, then clicking the appropriate area of the canvas.
Use the knife on the still life and collect it.
Back up and use the still life on the ghost girl.
Examine the drawing on her chair and make note of the gondolier's arm positions.
Go back up into the attic.
Attic
Examine the floor hatch and click the picture.
Solve the mini-game by dragging each of his upper and lower arms to match the drawing from the artist's workshop.
Collect the portrait and solvent.
Back up to the scorched room.
Scorched Room
Examine the painting and use the solvent (from under the floor hatch in the attic).
Use the knife and collect the cursed painting.
Head to the artist's workshop.
Artist's Workshop
Examine the frame and use the cursed painting (from the scorched room).
Use the needle and thread (from the hidden-object scene in the gallery) and recollect the cursed painting.
Back up, examine the well, then use the cursed painting.
Chapter 6: Bloody Mary
Scorched Room
Collect the portrait from the back wall.
Back up to the upstairs hallway.
Upstairs Hallway
Solve the hidden-object scene using the screenshots below for help.
Items that you must interact with are color-coded and labeled with the item name.
Items that are found in a sub-screen of the scene are indicated in the first screenshot and can be found in the second one.
Screenshot 1
Screenshot 2
You acquire a lantern.
Go down into the living room.
Living Room
Speak to Saymon.
Continue into the library.
Library
Examine the portrait wall and use the five portraits you have.
Locations of the portraits:
From the knocked over pot in the gallery.
Inside the house in Amanda's room.
Inside the piano in Amanda's room.
Under the hatch below the bed in the attic.
From the back wall in the scorched room.
One of the portraits allows you to collect the crimson key.
Back up to the living room.
Living Room
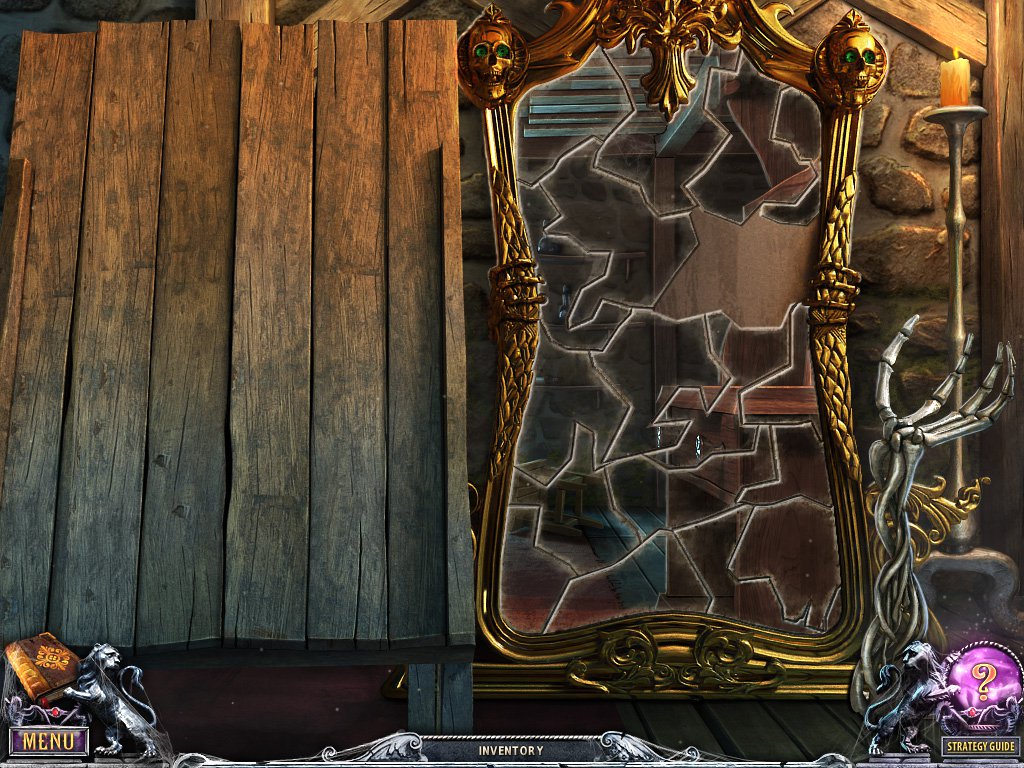
Examine the mirror.
Use the crimson key (from the portrait wall).
Head through the portal to the field.
Field
Examine the scarecrow and use the knife.
Collect the eye and back up.
Examine the stones by the path and collect the portrait.
Use the firecracker (from the shelves above the bed in Sammy's room) on the rocks.
Now use the lighter.
Re-examine the rocks and collect the harness.
Enter the mill.
Mill
Examine the table and collect the portrait and acid.
Back up and use the lantern (from the hidden-object scene in the upstairs hallway) on the hook.
Open the hatch.
Solve the hidden-object scene using the screenshot below for help.
Items that you must interact with are color-coded and labeled with the item name.
Several areas have already been revealed for ease of highlighting.
Screenshot
You acquire a whip.
Back up into the field and head straight to the forest.
Forest
Examine the door.
Use the acid.
Head inside the hut.
Hut
Solve the hidden-object scene using the screenshots below for help.
Items that you must interact with are color-coded and labeled with the item name.
The curtain on the right was opened first for ease of highlighting.
Items that are found in a sub-screen of the scene are indicated in the first screenshot and can be found in the second one.
Screenshot 1
Screenshot 2
You acquire a nut.
Collect the scythe blade leaning on the sack.
Open the hatch and examine it.
Collect the chain and back up.
Examine the near chest and use the eye (from the scarecrow at the field).
Collect the mercury and hair.
Back up and examine the mantel.
Collect the portrait and frog legs.
Use the mouse on the cat, then collect the mirror fragment.
Back up and examine the table.
Collect the bat wings, then go to the kitchen.
Kitchen
Open the doors of the rightmost cabinet and examine it.
Use the nut (from the hidden-object scene at the hut) on the nutcracker.
Collect the nut kernel and head back to the forest.
Forest
Examine the hole in the tree and collect the resin.
Use the nut kernel (freed in the rightmost cabinet of the kitchen) on the squirrel.
Collect the portrait and gems.
Back up to the field.
Field
Examine the wagon and use the chain (from the hatch in the hut) on the back of it.
Examine the ox and use the harness (knocked off the mill at the field).
Connect the poles to the harness and use the whip (from the hidden-object scene in the mill).
Examine the mill cellar and collect the portrait and bucket.
Back up twice, then enter the mill.
Mill
Solve the hidden-object scene using the screenshot below for help.
Items that you must interact with are color-coded and labeled with the item name.
Screenshot
You acquire flour.
Examine the pole in back and use the scythe blade (from the floor of the hut).
Collect the scythe and back up.
Examine the parts on the floor and solve the mini-game (similar to the grinder at the sculptor's workshop).
Use the gems (from the hole in the tree at the forest) on the grinder.
Turn the handle and collect the crushed gems.
Head back to the forest.
Forest
Examine the patch of grass and use the scythe (assembled in the mill).
Collect the portrait and pitchfork.
Enter the hut.
Hut
Solve the hidden-object scene using the screenshots below for help.
Items that you must interact with are color-coded and labeled with the item name.
Items that are found in a sub-screen of the scene are indicated in the first screenshot and can be found in the second one.
Screenshot 1
Screenshot 2
You acquire a handle.
Back up to the forest.
Forest
Examine the well and use the bucket (from the mill cellar next to the field).
Now use the handle (from the hidden-object scene in the hut) and turn it.
Collect the bucket of water.
Go to the field.
Field
Examine the haystack and use the pitchfork (uncovered from the patch of grass at the forest).
Collect the fire poker.
Head into the living room.
Living Room
Examine the fireplace and use the bucket of water (filled at the well in the forest).
Use the fire poker (uncovered from the haystack at the field).
Collect the blood key and go back to the hut.
Hut
Examine the far chest and use the blood key (from the fireplace in the living room).
Collect the portrait and wolf blood.
Back up, examine the fireplace and use the flour, frog legs, wolf blood, resin, bat wings, mercury and crushed gems.
Locations of the items:
Flour: from the hidden-object scene in the mill.
Frog legs: on the mantel in the hut.
Wolf Blood: in the far chest in the hut.
Resin: by the hole in the tree at the forest.
Bat wings: on the table in the hut.
Mercury: in the near chest in the hut.
Crushed gems: ground at the grinder in the mill.
Collect the potion and back up.
Examine the broken mirror.
Solve the mini-game by selecting a shard and placing it on the mirror, using the screenshot below for help.
Screenshot
Use the mirror fragment (from under the cat on the mantel in the hut) on the last spot.
Now use the potion on the mirror.
Place the hair (from the near chest in the hut) on the skeleton hand and use the lighter.
Chapter 7: Gabriel's Message
Living Room
Speak to Saymon.
Examine the end table and collect the portrait and film reel.
Enter the library.
Library
Examine the portrait wall.
Use the eight portraits you have.
Locations of the portraits:
By the stones in the field.
On the table in the mill.
On the mantel in the hut.
In the hole in the tree at the forest.
In the mill cellar by the field.
Under the patch of grass at the forest.
Inside the far chest in the hut.
On the end table in the living room.
Enter the secret office.
Secret Office
Collect the pruning shears by the suit of armor.
Examine the helmet and open it.
Collect the gem and back up.
Examine the table and use the chess piece (from under the couch cushion in the scorched room).
Pick up the bishop and take out the pawn.
Collect the gem and back up.
Examine the shelves and collect the gem.
Back up and open the curtain.
Examine the side room and use the film reel (from the end table in the living room).
Examine the mechanism and collect the hexagonal puzzle piece.
Back up to the main hall.
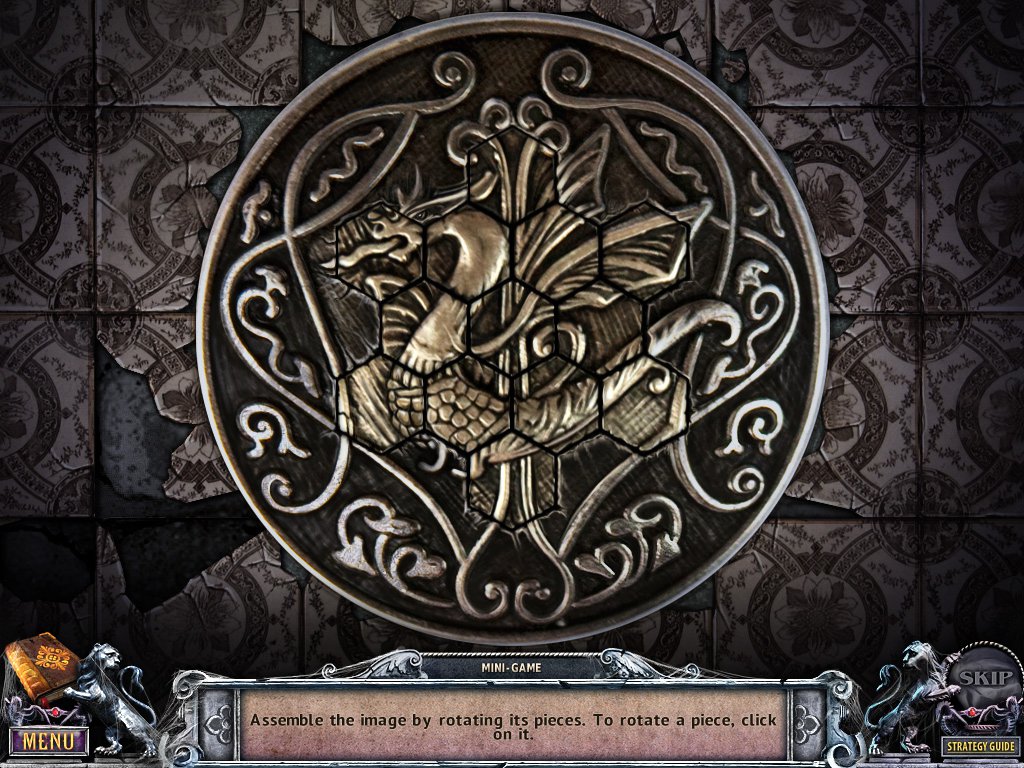
Main Hall
Examine the floor and use the hexagonal puzzle piece (by the mechanism in the secret office).
Solve the mini-game by clicking each piece to rotate it, using the screenshot below for help.
Screenshot
Collect the lantern and head to the entrance.
Entrance
Use the pruning shears (from by the suit of armor in the secret office) on the bush.
Collect the book and back up.
Examine the left statue and use the lantern (from the puzzle on the floor of the main hall).
Make note of the symbols and go to the library.
Library
Examine the shelf at the top of the ladder and use the book (from the bush at the entrance).
Re-arrange the books using the symbols from the entrance.
Swap the 2nd and 4th books.
Collect the globe and enter the secret office.
Secret Office
Examine the mechanism and use the three gems and globe.
Locations of the items:
Gems: in the helmet of the suit of armor in the secret office.
Inside the chess table in the secret office.
On the shelves in the secret office.
Globe: In a compartment by the shelves at the top of the ladder in the library.
Congratulations! You've beat the game!!
Posted by: Kyh |
January 11, 2012 4:43 PM
|
January 11, 2012 4:43 PM