

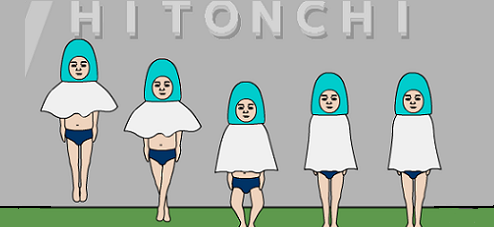
![]() When you look for a good room escape game, what do you look for? Logical puzzles, to be sure. Interesting scenery is also nice. A decent control structure makes everything better as well. But do you also look for a ninja protecting himself with bubble wrap? A strange line of leaping dancers? Some dude with a green face peering at you through a hole in the wall? Small blue men doing...something to a vase? Anyone familiar with the preceding will recognize those particular tropes, Yep, Detarou is back in town with yet another bizarro fantasy-land madhouse in Hitonchi.
When you look for a good room escape game, what do you look for? Logical puzzles, to be sure. Interesting scenery is also nice. A decent control structure makes everything better as well. But do you also look for a ninja protecting himself with bubble wrap? A strange line of leaping dancers? Some dude with a green face peering at you through a hole in the wall? Small blue men doing...something to a vase? Anyone familiar with the preceding will recognize those particular tropes, Yep, Detarou is back in town with yet another bizarro fantasy-land madhouse in Hitonchi.
 Detarou's escapes are always filled with an equal mixture of logic and madness, and Hitonchi is no exception. The amusing and bizarre elements of the game, however, would be nothing without the logical underpinnings of the puzzles. As usual, Detarou hands us a fantastic mix of visual clues that, only when combined in the right ways, will help us point and click our way out of yet another madhouse filled with stunningly strange sights. One of the more interesting characters appears to be some sort of shout-out to the escape men from No. 1 games, but in a...well, let's just say a more adult version, shall we? Hitonchi delivers yet another fantastic Detarou three ending escape along with visuals that will definitely linger longer than the game. Not for young kids or those easily offended, Hitonchi is still a fantastic addition to the genre and a great mid-week break.
Game not loading? Try this alternative link.


Walkthrough Guide
(Please allow page to fully load for spoiler tags to be functional.)
Hitonchi Walkthrough
General Information
Most puzzles have more than one clue.
Some clues apply to more than one puzzle.
This walkthrough will have directions for the colorblind.
There are three endings, bad, normal, and good. This walkthrough will cover all three.
Good luck!
Exploration (Room 1)
You begin in a room with tatami mats. There is a closet on the right with two sliding doors, and a guy in a loincloth rubbing up and down against the wall on the left.
Click on the closet for a close up.
If you open the left door, there is nothing but towels. Open the right door and you will find a blue blob with the face of a man.
Click on the blob to flatten it and you will see a red 4. Back up and turn right.
You are now facing a cabinet with two doors and three drawers. On top of the cabinet is the oddest looking cat you will ever see. There is a litter box on the floor to the left of the cabinet.
Click on the litter box for a close up.
Click on the litter at least four times to move the litter and whatever else is there aside and see the green 5. Back up.
Click on the cabinet for a close up. Click on the doors twice to get closer and open them. Inside you will see a yellow 8. Back up.
Click on the top drawer to open it, it's empty.
Click on the middle drawer to open it. Click on the underwear to move it and reveal the blue 2.
Back up, then click on the bottom drawer to open it.
Inside is a yellow wig, click on it to move it. Tied to the wig is a guy in a blue onsie, take him (Sugiyama #1).
Close down the Sugiyama guy and back up three times.
Click on the cat twice for a close up. He is lying on a paper, but you can't read it and he's not moving. Back up twice.
Turn right.
There's some dude slumped against the wall here, with his hand out. If you click on him for a close up you can see that there is something written on the wall.
Turn right.
You are now facing the door out. Click on it and you will find a code lock that requires a four digit number. To the right of the door hangs a blue jacket.
Click on the jacket for a close up, then click again to move it.
Underneath are some dots, and the face of a man, each with a different color.
From left to right, the colors are yellow, red, green, and blue.
Back up.
Time to get out of this room!
Getting out of Room 1
You've seen all of the clues to get out of the room.
The clues are the colored numbers, and the colored dots.
The colored numbers around the room, 4 (red), 5 (green), 2 (blue), and 8 (yellow) are the first part of the clue.
The second part are the colored dots (and face) on the wall behind the jacket.
The order of the colors is the order of the numbers for the code: yellow (8), red (4), green (5), and blue (2).
Therefore the code is 8452.
Click on the door for a close up and enter the four digit code.
Once the code is in, click on the big button at the bottom of the lock.
Click on the door to leave.
Exploration (Hallways)
You are now facing a hallway. Down the hall there is a door on the left, two doors on the right, and a door at the end of the hall.
Turn right.
To the right is another hall. This one has the guy with the green face, a poster at the end of the hall, and a door on the left and right of the poster.
Turn left twice.
The hallway to your left only has one door, and it is the door out. Looks like we need a gold key to get out.
Turn right and you are back facing the long hallway with the four doors.
Let's explore!
Turn right to face the shorter hall with the green-faced guy.
Click on the poster at the end of the hall to move forward.
This appears to be a poster of a guy trying to...let's say "eat" a microphone.
Click on the poster and it flies up, revealing a five-sided symbol, with the number 25 directly below it.
Turn right.
You are now facing the door that is to the right of the poster. Click on the handle to enter.
You are facing a set of glass doors. Beyond the doors are some people in odd outfits. Click on the glass doors for a close up.
Now you can see the guys(?) on the other side of the glass doors. There are five of them, dressed in white ponchos and weird blue hats. If you click on the guys they will leap into the air.
Back up and turn right.
There's a ninja against this wall, he's holding a large sheet of bubble wrap.
Hover your cursor on the floor in front of the ninja, it's a hot-spot. Click to make part of the floor rise and slam the ninja. Guess that's why the bubble wrap.
The rising floor uncovers a small little alcove, click on it for a close up. Inside is a box with a heart on it, take it and back up.
Turn left to face the glass doors, then left again.
You are now facing a closet with two sliding doors, and an alcove with a picture and a vase.
Click on the vase for a close up.
Notice the guy in blue trying to hide behind the vase, take him (Sugiyama #2).
Click on the left side of the vase for a close up.
Here you will find another guy in blue, hanging onto the vase and doing something that is better not mentioned. Take the guy (Sugiyama #3) and back up twice.
Click on the closet for a close up.
Open the right side of the closet, there's nothing there. Open the left side, and you will see a box on a shelf. Click on the box for a close up.
Click on the box to move it. You will see another of those five-sided symbols, this one with the number 82 below and to the right.
Click on the box again to move it more, and you will find another blue man behind it. Take him (Sugiyama #4) and back up twice.
Turn right and you are facing the glass doors again. Move backwards to get back into the hall.
Turn left to face the poster, then left again to face the other door in this hallway.
Click on the doorknob to open it.
You are now in a room full of cardboard boxes. Click on the pile of boxes on the right.
You should see two little blue guys fighting, take them (Sugiyama #5 and #6) and back up.
Now click on the middle grouping of boxes, the ones on the shelves.
There appears to be a trap door here, looks like you need a silver key.
Back up once from the trap door, then again to enter the hall.
Turn right to face the poster, then back up once. This will get you in the middle of the hall. Turn left to face the long hall.
The long hall has one door on the left, two on the right, and a fourth at the far end. Let's explore!
Go forward once down the long hall.
Turn left.
There is a white door here. On the door is that five-sided symbol, with six triangles below it. If you click on the triangles you will see that they change color, yellow, green, blue, red, and back to white.
Turn right to face the end of the hall, then right again. This time you are facing a red door.
Click on the door handle to open it.
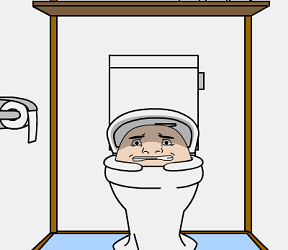
Inside the room is a toilet. Click on the toilet to raise the seat.
Inside is some poor guy. Note the five-sided symbol and the number 48 below and to the left of the symbol.
There is a shelf above the toilet, click on it for a close up.
On the shelf is a box with a club symbol on it, take it and back up twice to leave the room.
Turn left to face the door at the end of the hall. Notice that there are eight switches on the door.
Click on the door with the switches to go forward.
Once the door is in close up, turn right. That last door on the right needs a four letter code.
Turn left to face the door with the switches, then back up twice to the long view of the hall.
Time to solve some puzzles!
The White Door
You should still be facing the long hall.
Go forward once, then turn left to face the white door.
Click on the door again to see the puzzle in close up.
You have actually seen all of the clues to solve this puzzle involving the triangles and the colors.
There are four clues for this puzzle scattered around, the three places you found a number near a five-sided shape, and the numbers/colors that you saw in the first room that you already used to open the door to get out to the hallway.
Look at the five-sided shape on the door. There are two triangles below and to the left, two triangles directly below, and two triangles below and to the right.
These correspond to the numbers scattered throughout the open rooms: the 48 in the toilet that is below and to the left of the symbol, the 25 behind the poster that is directly below the symbol, and the 82 in the closet behind the box that is below and to the right.
Remember the colors/numbers from the first room? Red (4), green (5), blue (2) and yellow (8)?
Combine those colors with the numbers to get the code.
Below and to the left is 48, which is red and yellow.
Directly below is 25, which is blue and green.
Below and to the right is 82, which is yellow and blue.
For the colorblind: click on the far left triangle four times (red), then the triangle just to the right of it once (yellow).
For the two triangles directly below, click the left one three times (blue) and the right one twice (green).
For the two triangles below and to the right, click the left one once (yellow), and the one on the right three times (blue).
Once you enter the proper colors, click the five-sided symbol. You will automatically back up from the door.
Click on the door handle to enter.
Inside you will find a guy at the table, laughing hysterically.
Turn right to face the kitchen.
There are two hot-spots here in the kitchen. Below the sink and to the left is a cabinet that needs a three letter code.
There is something on the refrigerator door, click on it for a close up.
This appears to be a series of black lines on a note, held with a round red magnet.
Back up three times to the hallway, turn right, then back up to the long view of the long hall.
The Switches Door
Go forward down the long hall twice to face the door with the switches.
Click on the switches again for a close up.
We have eight switches, four on the top row and four on the bottom. Each switch has black on the end and white underneath.
Does this look familiar?
Remember the note on the refrigerator, the one with the black lines?
The patterns look suspiciously like switch positions.
However, there is a catch.
Note that on the door, the round red button is below the switches, while on the note the round red button was above the patterns.
Therefore you need to turn the clue from the refrigerator upside down for it to work properly.
The pattern is, top row: down, up, down, down, bottom row: up, down, up, down.
Once you place the switches click on the red button. This will automatically move you back from the close up.
Click on the doorknob to enter the room.
You are now in a bathroom. There is a sink with a mirror above it in front of you, and an empty laundry basket to the left of the sink.
Click on the mirror for a close up, then wait and you will see a rather disturbing sight. Once the guy in the tutu vanishes from the mirror, back up and turn left.
Click on the shower stall doors and wait for the steam to rise. Click on the open doors to see the doll in the tub.
Back up twice, then click on the mirror again. Note the writing in the fogged mirror: BBA.
Back up twice to the hallway, then twice again to the long view.
The Kitchen Cabinet
Go forward once in the long hall, then turn left to face the white door.
Go through the white door, then turn right to face the kitchen.
Click on the cabinet for a close up, then enter the three letter code you just got off of the mirror: BBA.
Click on the large button below the code to open the cabinet.
Inside you will find a box with a spade on it, and a blue guy dressed like a roach. Take them both (Sugiyama #7).
Click on the left side of the open cabinet for a close up.
You should see a pipe on the right and a red button on the left. Click on the pipe for a close up.
Behind the pipe is another blue guy (Sugiyama #8). Take him and back up once.
Click on the red button and enjoy the cut-scene.
Back up four times to the hall, turn right, then back up to the long view.
The Four Letter Code Door
Turn right and explore the hall with the poster, or turn left and explore the hall with the out door, returning to your position facing the long hall.
Go forward to the lever door, go through, then turn left. Click on the shower doors and click again to see the tub. Looks like the doll has left.
Back up three times to the hallway, then back up once more. Turn left to face the white door.
Go through the door, then turn right to face the kitchen.
Looks like the doll stopped for a drink. Notice the milk carton and glass on the counter. Click on them for a close up, then click to take them.
Back up three times to face the white door, then turn right to face the lever door.
Back up once to the long view, then turn left (or right) twice to face the door leading back to the first room.
Enter the first room (you should be facing the cat) and then turn right to the guy slumped against the wall.
He looks thirsty. Give him some milk.
Now the guy jumps up and is very happy. You can click on him to see a close up of the wall behind him and what it says (Cool).
Back up and turn right to face the door out.
Go through the door.
Go forward twice to the lever door, then turn right.
Here's the door that needs the four letter code, which we just got from the wall behind the guy. Enter the code (Cool), then click on the large button below.
Click on the doorknob to open it and enter the room.
Yay, you've found a new room! There is a small table in front of you, with a balance scale on it. Click on the scale for a close up.
Notice that you can click on either side of the scale. Back up.
Turn right and you will see a small pet bowl on the floor against the wall. Maybe this is how you get the cat to move?
Turn left to face the scale, then left again.
On this wall is an odd shelving unit, click on it for a close up.
On the lower right shelf is another blue guy, click on him for a close up and take him (Sugiyama #9).
Back up once and look at the shelves. Notice that each shelf has one of those odd dolls, and they range from smallest (upper left corner) to largest (lower right corner).
Now what?
The Cat and the Dancers
Back up from the shelf, then turn right twice to face the food bowl.
Click on the bowl for a close up, then use the milk on the bowl.
Back up three times to the hallway, then turn left to face the lever door.
Back up twice to the hallway long view, then turn left (or right) twice to face the door back to the first room.
Enter the first room and you will notice that the cat is gone.
Click on the top of the cabinet twice for a close up of the note that the cat was hiding.
Hmmm, there's a familiar blue symbol, and some numbers: 31542, and a 6 below the two.
Back up twice, then turn left (or right) twice to face the door.
Go through the door to the hallway, then turn right to face the hall with the poster.
Go forward towards the poster, then turn right to face the door to the right of the poster.
Go through the door and click on the glass doors for a close up.
Yep, those blue things on the dancer's heads looks just like the blue thing on the note.
But how does it relate?
There are five dancers, and there are six numbers on the note.
However, the numbers are arranged so that there are five numbers, then a number below that.
The numbers represent the order in which you click on the dancers.
This is the order you click on the dancers: second from the left, far right, far left, second from the right, middle, and far right.
If you click on the dancers in the correct order, the one of the far right will scream. Then a cut-scene will play showing a silver key falling from the ceiling next to the cat, who is drinking the milk from the bowl.
Back up twice to the hallway, turn right, and go forward once towards the out door.
Turn right to face the long hall.
The Silver Key
Hey, remember when we saw the doll in the kitchen? He was wearing a bathrobe, what happened to his clothes?
Go forward twice to the lever door, then go in.
Click on the laundry basket. Yep, there's clothes.
Click on the clothes to move them and reveal the socks. Click to take a sock.
Click again to reveal another blue man and take him (Sugiyama #10).
Back up twice to the close up view of the lever door.
Turn right and go through the door with the four letter lock.
Turn right to face the food bowl. Hey, wait, where'd the cat and the key go?
Back up twice to outside the door.
Turn right, then go forward twice to the door to the first room.
Go through the door. Yep, there's the cat.
Click on the cat for a close up. Yep, he has the key in his mouth.
How do we make him drop it?
Use the sock on the cat. The smell will make him drop the key.
Take the key and back up twice.
Turn left (or right) twice to face the door, then go through.
Turn right, then go forward to the poster.
Turn left, then enter the room with the boxes.
Click on the shelves for a close up of the trap door.
Use the silver key on the trap door.
Cool, stairs! Go down the stairs.
The Bad End
If you are going to do this, save the game first. The Bad End will kill you.
Once the game is saved, you should notice your surroundings. To the left is a door, to the right is an alcove with four slots.
Click on the door for a close up.
Notice the picture of a panda on the door. Pandas are bad, bad news in Detarou games.
Did you save the game?
Click on the door to open it. Congratulations, you've been killed by the guy in the panda suit.
The Boxes
Once you go down the stairs, you are at a cul-de-sac. To the left is a door, DON'T open it unless you want the bad end.
to the right is an alcove with four notches in the wall, click on it for a close up.
There's a box with a diamond in one of the notches, take it.
Okay, now you have four boxes (heart, spade, club, and diamond), and there are four notches here (with a big red button in the middle).
But how do we know which box goes into which notch?
Have we seen something like this arrangement, four corners with a red button?
Remember the shelving unit in the four letter code door room?
It had a red button in the middle, and each shelf had a doll of a different size.
But each of this boxes is the same size!
Maybe they weigh different, though?
Back up four times until you are back in the hallway with the poster.
Turn right to face the poster, then back up once.
Turn left to face the long hall, then go forward twice to the lever door.
Turn right to face the door with the four letter code, then go in.
Click on the scales for a close up.
You can weigh the boxes against each other, eventually you will figure out which is the heavier and which is the lighter.
The heart box is the heaviest, followed by the club, the diamond, and the spade box, which is the lightest.
Once you've figured out the boxes, back up twice to the hallway, then turn left to face the lever door.
Back up twice to the long view, then turn right to face the hallway with the poster.
Go forward to the poster, then turn left.
Go through the door to the room with the cardboard boxes, then click on the shelves.
Go down the stairs.
Regular End
Click on the alcove with the four notches for a close up.
Now place the boxes in the notches according to their weight as it matches the shelf clue.
Lower left - heart, upper right - club, lower right - diamond, upper left - spade.
Once the boxes are in place press the red button.
The wall will slide away. Go through the space.
At the end of the new hall is an alcove. Inside the alcove, covered in glass, is a gold key.
There is an opening below the alcove.
So how do we get the key?
Maybe those little Sugiyama men will help?
Click on the opening below the glass, and use the Sugiyama men on it. This will only work if you have all 10 men.
One of the little men will bring you the key, take it.
Back up six times to the hallway.
Turn left to face the out door.
Go forward twice to the door.
Use the gold key on the door to open it.
Go through the open door.
Congratulations! I'm sure you and the cat will become great friends.
Best End
Follow the regular end until you have the key and have backed up to the hall.
Turn left to face the out door.
Go forward twice to the door.
Use the gold key on the door to open it. DO NOT GO THROUGH.
Back up twice, then turn right to face the door to the cardboard box room.
Go back through the door to the cardboard box room, click on the shelves, and go down the stairs.
Go through the opening on the right, then click on the one blue guy in the opening.
Notice that he is raising his arms, right and left, in a distinct pattern.
The pattern is right, right, left, right, left, left.
Back up six times to the hallway, then turn left to face the out door.
Go forward once, then turn right to face the long hall.
Go forward twice to the lever door, then turn right.
Open the four letter code door, then click on the balance scale for a close up.
Hit the scale in the same pattern that you saw the blue man use, right, right, left, right, left, left.
The table will open and you can take a giant red stamp.
Back up, turn right, go forward twice, then turn right to face the out door.
Head out the door and enjoy the best end.
Posted by: grinnyp |
May 22, 2013 4:47 AM
|
May 22, 2013 4:47 AM