

![]() Claire's been having a rough time of it lately. She's been having strange episodes that are making her question her sanity and leaving her unable to focus on her job. A visit to her aunt in Savannah should net her some much needed rest... and TERROR! *70s horror movie keyboard soundtrack* ... okay, so maybe Hidden Mysteries: Vampire Secrets isn't all that scary. At all. But what it is, is an extremely well made point-and-click/hidden-object hybrid that will take you from a quiet little house in the suburbs all the way to a dungeon in a remote castle. Sounds like my kind of night!
Claire's been having a rough time of it lately. She's been having strange episodes that are making her question her sanity and leaving her unable to focus on her job. A visit to her aunt in Savannah should net her some much needed rest... and TERROR! *70s horror movie keyboard soundtrack* ... okay, so maybe Hidden Mysteries: Vampire Secrets isn't all that scary. At all. But what it is, is an extremely well made point-and-click/hidden-object hybrid that will take you from a quiet little house in the suburbs all the way to a dungeon in a remote castle. Sounds like my kind of night!
 Sparkles indicated a hidden-object scene, and the cursor will change to show you places you can interact with, or items you can pick up. If you get stuck, during normal exploration clicking on "tips" in the lower right corner will briefly mark every place on screen you can interact with. In each hidden-object scene, Claire finds items she needs to use to proceed, but occasionally, she finds books as well. Stored in their own page of your inventory, books may appear to be unrelated to your quest, but actually contain clues you'll need to use to solve certain puzzles.
Analysis: Considering the word "vampire" is right there in the title, it feels a little silly for Hidden Mysteries: Vampire Secrets to spent three-quarters of the game being coy about what's really going on in Savannah. Of course, the word "mystery" is in the title as well, so Claire has to travel around gathering clues, and at least in this respect the game is very good at making you feel like you really are unraveling something. (Even if it should be immediately obvious that the answer to everything is "VAMPIRES, duh.") While the character models tend to be a little bland, featuring a disconcerting thousand-yard-stare that seems to come with that sort of design, the environments themselves are beautiful, and made all the more atmospheric by a soundtrack that relies on ambient noise as well as music to bring you in.
 But what's really remarkable about the game, at least for one of its genre, is that none of the hidden-object scenes are ever repeated. The game moves from location to location fairly quickly, and not once does it ever force you to backtrack to a hidden-object scene you've already solved; each one you'll encounter is unique, and only seen once. It's an extremely tightly designed little game in that regard, and it's nice to feel like not only is it not wasting your time, but the developers put a lot of work into it.
The puzzles, unfortunately, are a bit of a mixed bag, where the contents are either "tricky but uninspired" or "meh". If you're paying any attention to your surroundings, chances are you'll spot clues to puzzle solutions every where you look. You'll probably spend between three and four hours of the game, but it could have been longer if the puzzles themselves were more involved, or just more challenging. You'll find yourself sprinting through the game fairly quickly, and while this helps the narrative move along, it also means you won't get that feeling of slow dread the game is trying so hard in places to convey.
In the end, what holds the game back from being really great is just an unfortunate lack of originality. Heck, it even feels the need to squeeze some awkward undead flirtation in the last half hour or so. It also ends rather abruptly, leaving a lot of plot points unanswered, or even mentioned; The result is a very atmospheric and solid little title that could have been a lot better than it is, but is still pretty good despite everything. Although it doesn't pull out any new surprises, Hidden Mysteries: Vampire Secrets is well made, and offers up a nice evening's worth of object hunting and puzzle solving through a wide variety of locations.
![]() Windows:
Windows:
Download the demo
Get the full version
![]() Mac OS X:
Mac OS X:
Download the demo
Get the full version


Walkthrough Guide
(Please allow page to fully load for spoiler tags to be functional.)
Hidden Mysteries: Vampire Secrets Walkthrough
General Tips
From the Main Menu you can play or quit, create and select profiles, and choose your options which include sound and music volume, full screen or window mode, and your choice of custom cursor or not.
Game play is relaxed with no timer and hints are unlimited but need to refill.
There is no clicking penalty so feel free to click as much as you want.
Scene Navigation
The important tools that you need are at the bottom of the scene: you can access the Menu to change options, go to the Main Menu, ask for Help or Resume the Game if you have paused it in full screen mode.
There is no actual Taskbar but instead the lower middle section contains your Inventory and Books.
The cross at the right is your "Tip", "Hint", and "Skip" helper according to the type of scene you are currently involved in.
Moving your cursor around a scene will show you areas that need attention or ways to exit to somewhere else.
When a hand appears over an object pick it up.
Your cursor will turn into a magnifying glass when you should take a closer look at an object for action now or later.
A magnifying glass may also mean that there is a Hidden Object scene or a Mini Game for you to complete in order to continue the game.
Most doors do not have a keyhole but require an action in order to trigger a mechanism to open where you need to advance in the scene.
Instructions for Mini Games are shown at the bottom of the game scene and you can skip the game once the "Skip" button is full.
Hints
Your "Hint Button" for this game only works as a hint for Hidden Object scenes.
It will turn into a "Skip Button" for Mini Games but for transition scenes, it becomes a "Tip Button".
When it is in "Tip" mode press and hold it down and it will show you the exits, items to pick up, and what needs a closer look.
Hidden Object Scenes
Hidden Object scenes have 16 random objects to find but will always have the same key object for your Inventory and may also include a book for your Book collection.
You will not get key objects or books until you have completed the scene at which time they will automatically be added to your Inventory.
Books
There are 10 books hidden throughout the game in the Hidden Object scenes.
The books provide useful information for completing some of the Mini Games.
Your book collection will include the following titles:
History of Savannah
Aunt Rosie's Diary
Voodoo for Beginners
Hymnal
Romania
Introduction to Chemistry
Ancient Greek Architecture
The Fish Book
Rancher's Manual
Notre Dame de Paris
Mastering the Game of Chess
Walkthrough
Chapter 1: Aunt Rosie's House
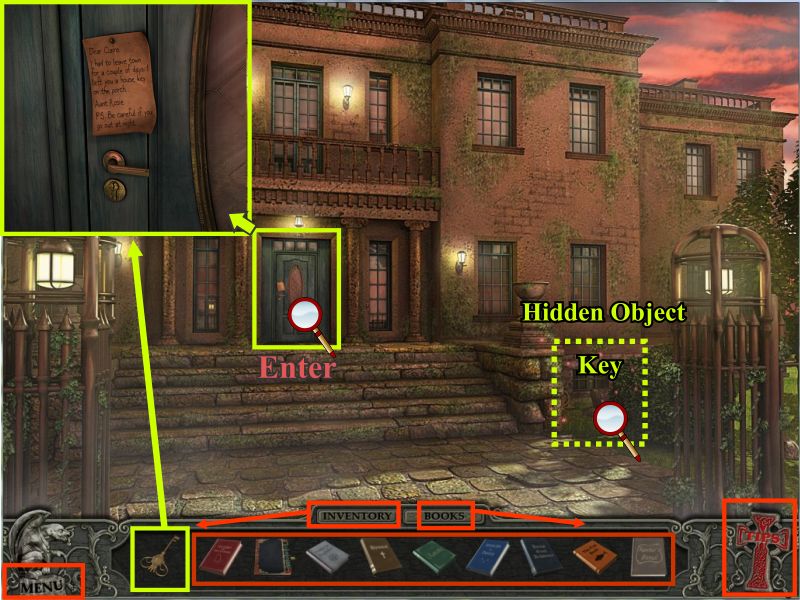
The scene at Aunt Rosie's House will show you all the items for scene navigation and indication where the first Hidden Object scene is located.
Once you have the key from the Hidden Object scene you will be able to enter the house.
You might want to check out the note Rosie left because it gives the first hint that there might be Vampires out at night.
Screenshot
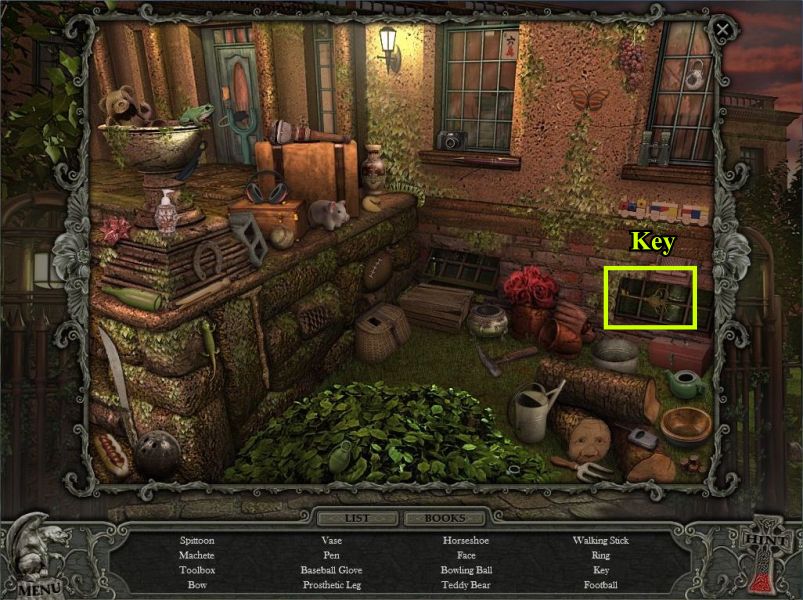
Collect everything on your list and get the key to enter the house.
Screenshot
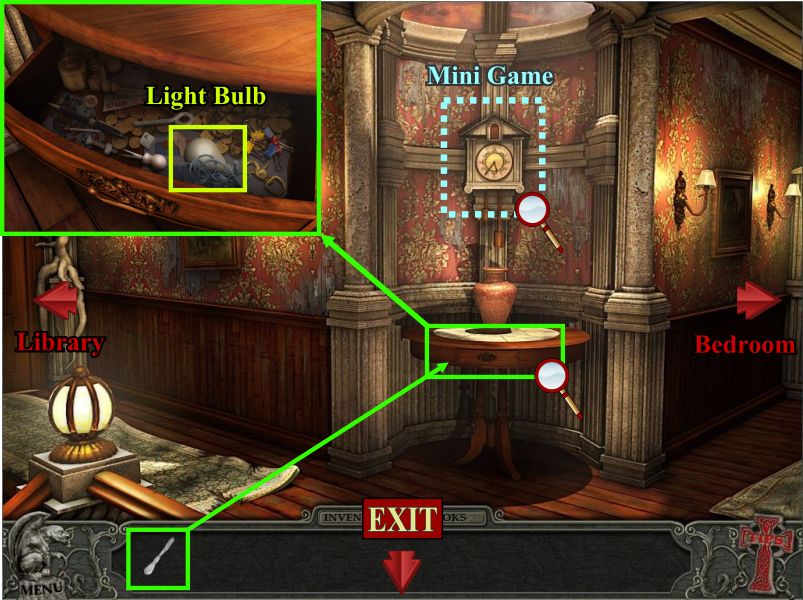
Take the Butter Knife from the table and check out all of the magnifying glasses before going up stairs.
Screenshot
Use the Butter Knife on the drawer below the clock and pick up the light bulb.
Screenshot
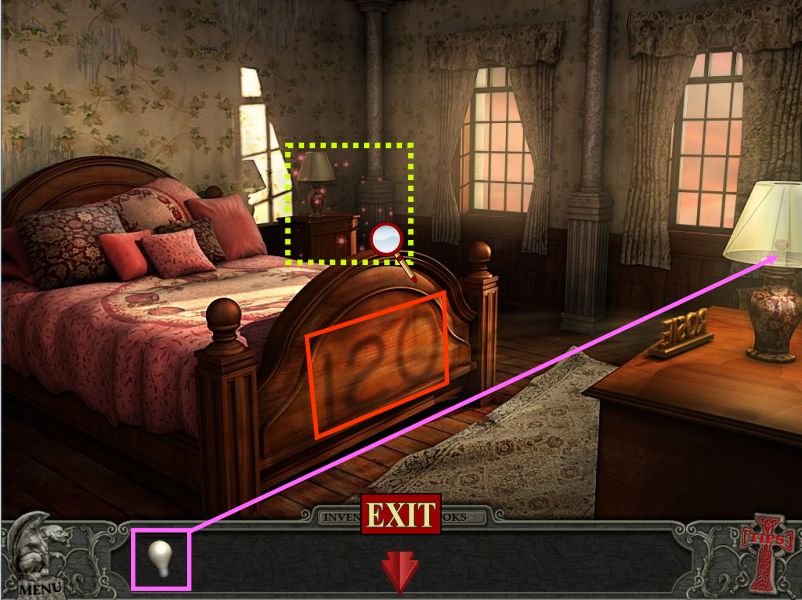
Place the light bulb in the lamp to view the number on the foot of the bed.
Click on the night stand for a Hidden Object scene.
Screenshot
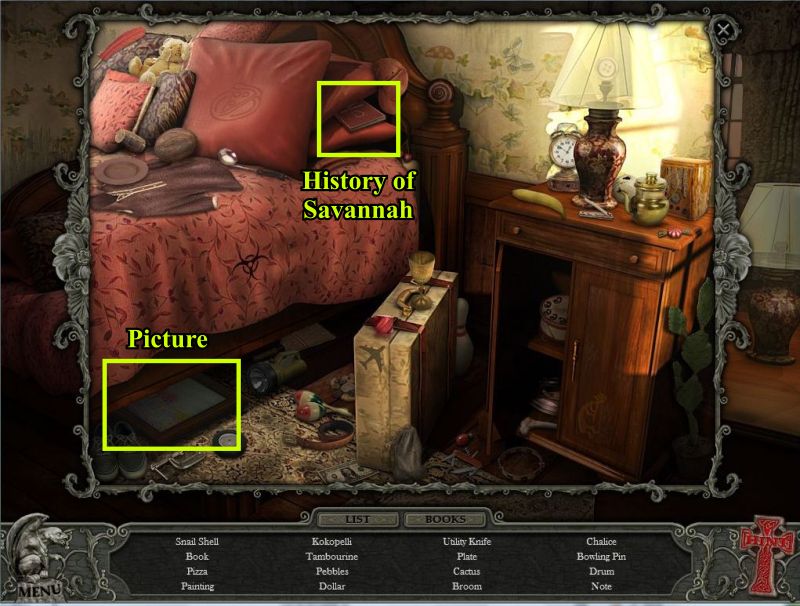
Pick up everything on your list including the picture and the History of Savannah book.
Screenshot
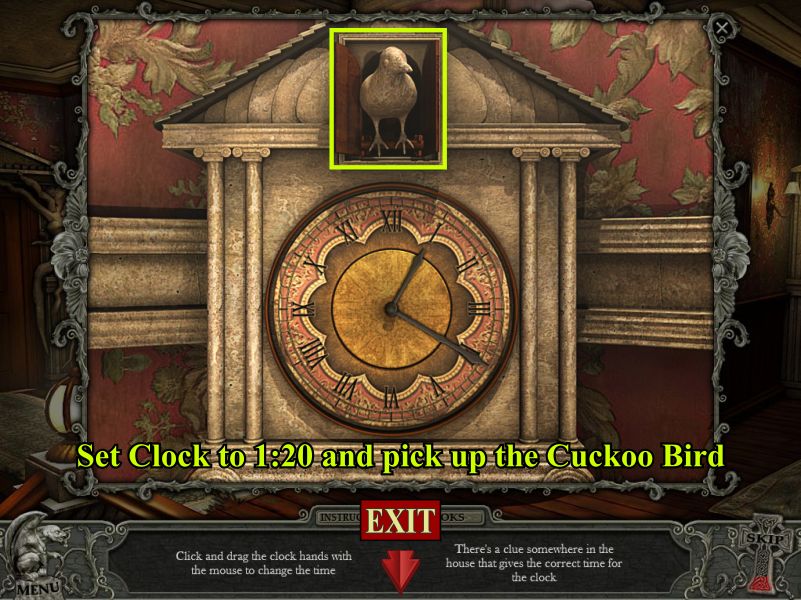
Back in the hall, click on the clock and set the time to the number you saw at the foot of the bed which was 120.
Pick up the Cuckoo Bird and go back to the hall.
Cuckoo Clock Mini Game
Click on the clock and set the hands to 1:20.
A Cuckoo Bird will appear so take him and go downstairs.
Screenshot
Place the picture you collected on the wall to complete the collection and bring up a mini game.
Your goal is to arrange the pictures in order of the seasons: Spring, Summer, Fall, and Winter as shown in the insert.
You have now unlocked the closet door so click on it for a Hidden Object scene.
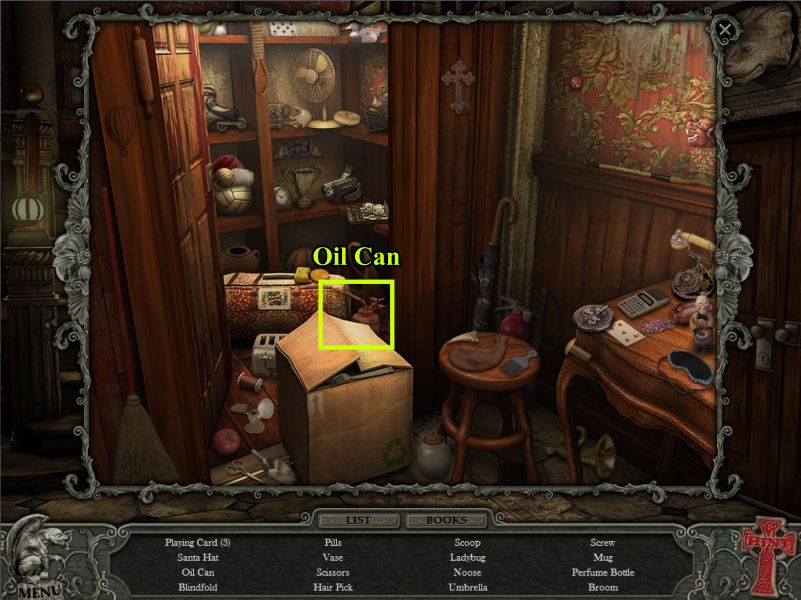
Wall Picture Mini Game
Screenshot
Collect the Oil Can and all of the rest of the items on your list and go back upstairs.
Screenshot
In order to get into the Library, you need to figure out how to open the door
There is a Cuckoo Bird on the branch at the right so place yours on the left branch.
The door will open for you to enter.
Screenshot
You are in the Library but the ladder won't move until you use your Oil Can.
It moves over so that you can reach Aunt Rosie's Diary but you need to open it so play the mini game.
Aunt Rosie's Diary Mini Game
Repeat the sequence shown on the right by clicking on the symbols on the left in the order you are given.
Aunt Rosie's Diary mentions a Miss Pennywell so Claire is off to find her.
Screenshot
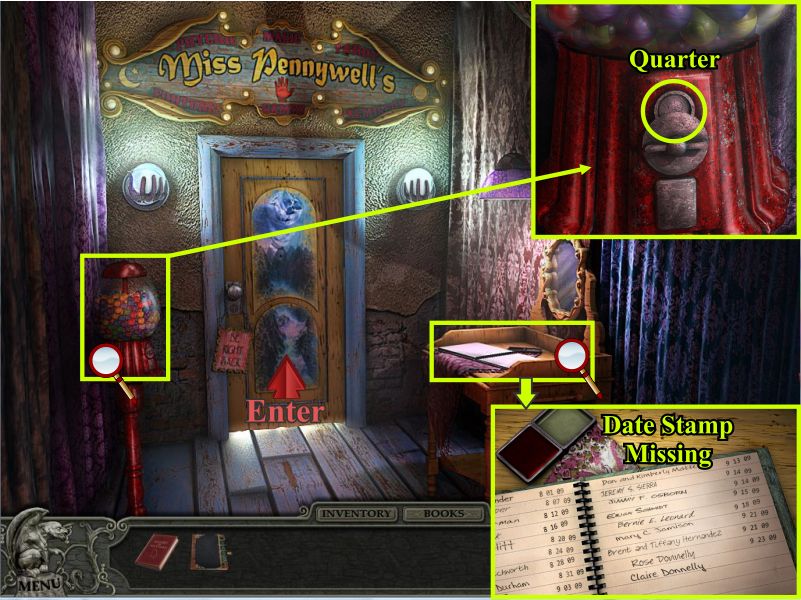
Chapter 2: Miss Pennywell's Shop
Check out the sign in book and see that Rosie was there.
Claire signs in but there is not date stamp so you will have to find it.
Check out the gumball machine on the left, grab the quarter and enter the shop.
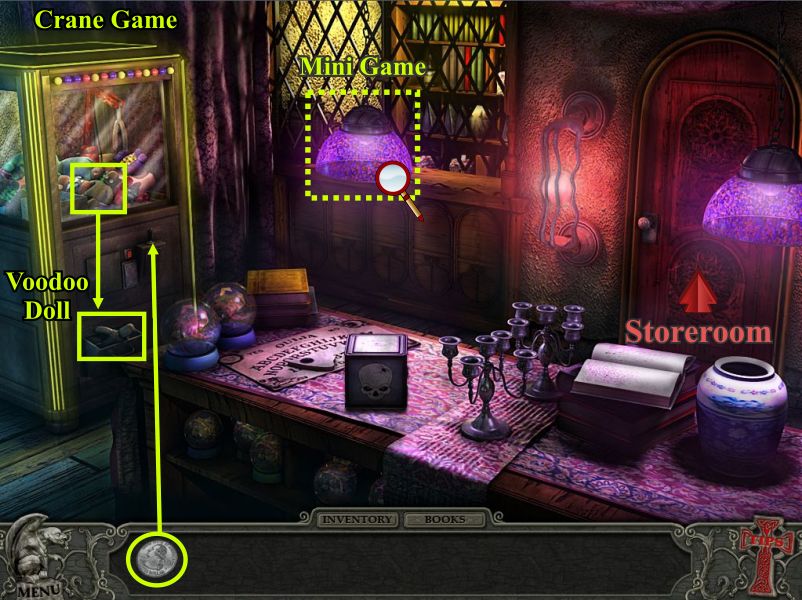
Screenshot
Put the quarter in the vending machine on the left for the Crane Game and pick up the Voodoo Doll.
Look at the lamp to see that you need to find the combination number so enter the Storeroom.
Screenshot
The doors are both locked and one has a Voodoo Code on it.
Click on the shelves for a Hidden Object scene.
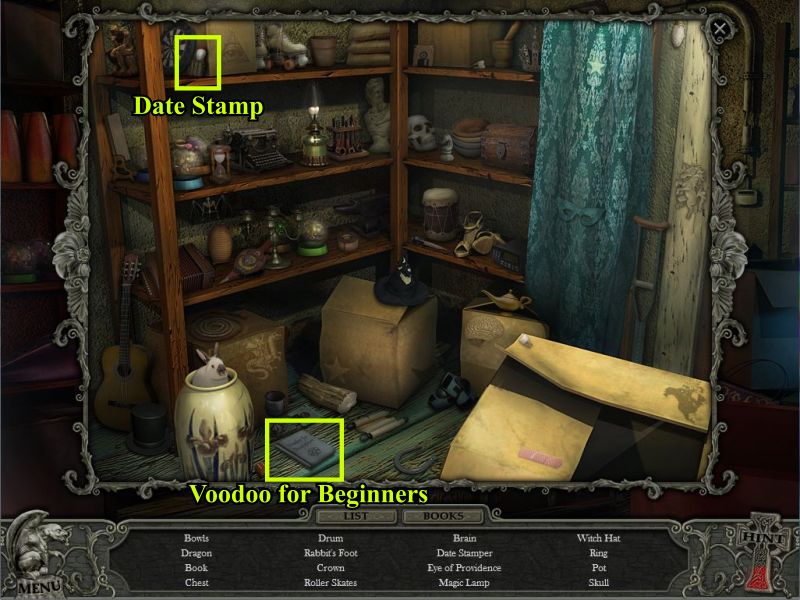
Screenshot
Collect the Date Stamp, Voodoo for Beginners, and the other items on your list.
Exit to the front room.
Screenshot
Hanging Lamp Mini Game
Place the Date Stamp on the stamp pad and then on the Guest Book to find out the date is way off.
Go to the next room and click on the Hanging Lamp and use the numbers from the Date Stamp for the combination.
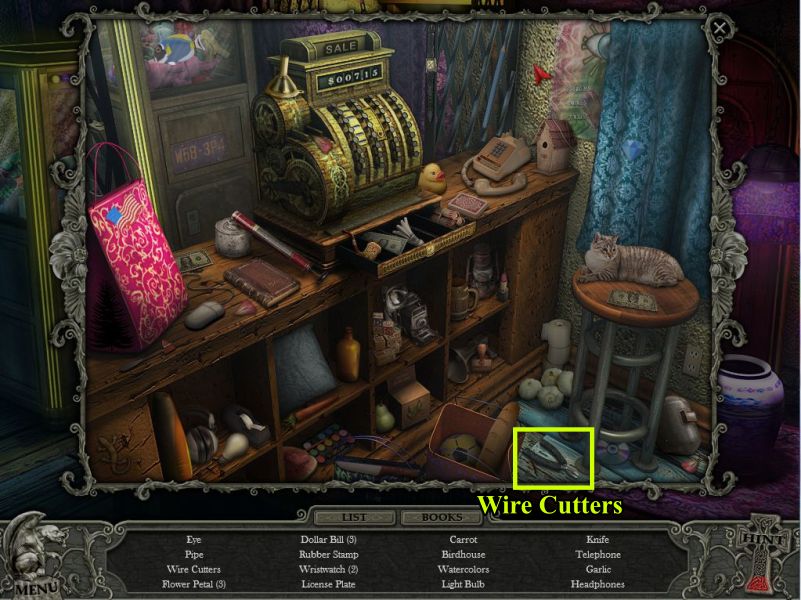
Click on the sparkling area behind the lamp for a Hidden Object scene.
Screenshot
Pick up the Wire Cutters and the rest of the items on your list.
Screenshot
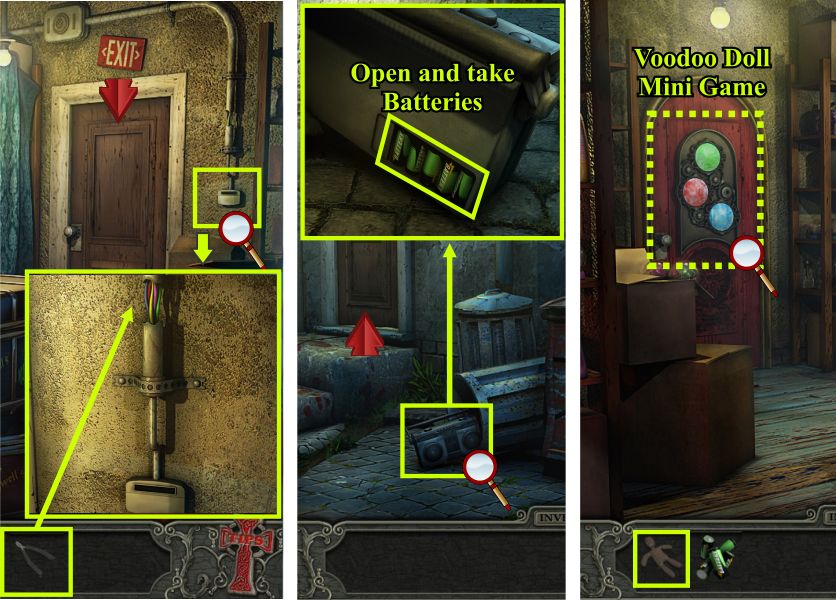
Go back into the storeroom and click on the alarm unit to the right of the Exit and snip the wires.
Go outside and click on the boom box, open the battery compartment and take the batteries.
Place the Voodoo Doll on the door with the Voodoo code to bring up a mini game.
Screenshot
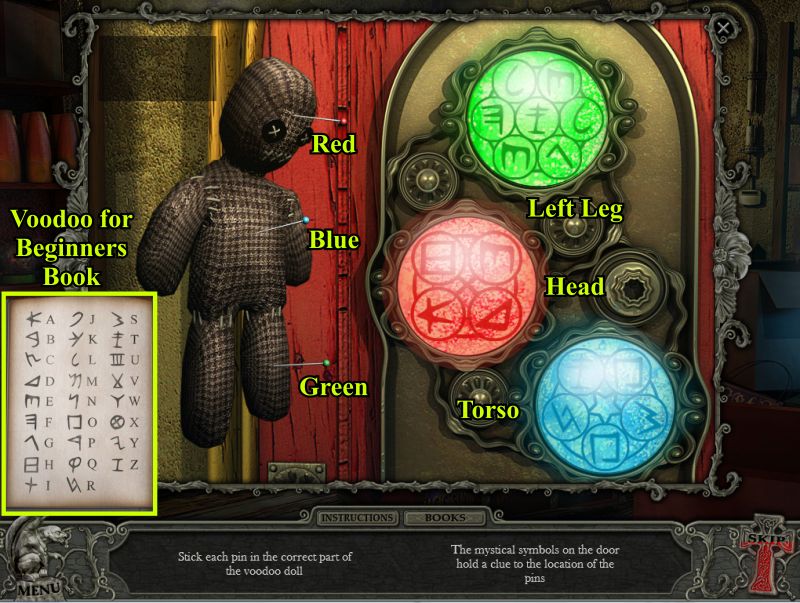
Voodoo Doll Mini Game
Check out the Voodoo for Beginners book to translate the symbols.
Green reads left leg so place the green pin in the doll's left leg.
Red says head so place the red pin in the doll's head.
Blue is torso so place the blue pin in the body of the doll to complete the game and open the door.
Screenshot
Put the batteries in the Flashlight to collect it and go back outside.
Open the lid on the trash bin and place your flashlight there for a Hidden Object scene.
Screenshot
Pick up the Wind up Crank and the rest of the items on your list.
Screenshot
Tarot Card Mini Game
Go to the front office and put the crank in the jack-in-the-box and collect the Tarot Cards.
Go to the Fortune Telling Room and put the Tarot Cards on the table to bring up a mini game.
Your goal is to arrange the cards by color and number on the outer circle.
Transfer the cards to the inner circle where the 4 arrows are shown.
Click the outer arrows to rotate the circle with the cards and place them where they need to go as shown in the solution.
Screenshot
Chapter 3: The Church
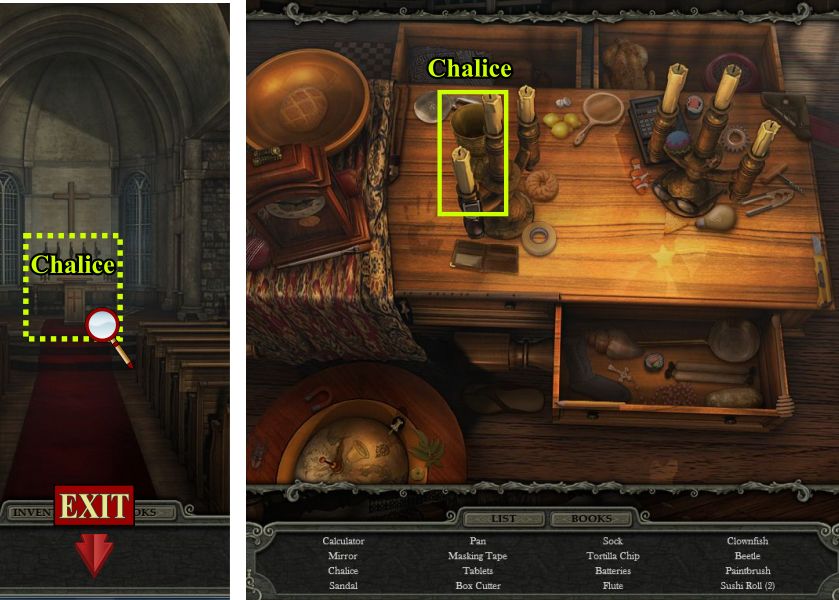
Enter the church, go through the door and up to the altar area for a Hidden Object scene.
Pick up the Chalice and the other objects on your list and go back out to the Vestibule.
Screenshot
Place the Chalice in the water and go back inside and to the right where you see the fire.
Put the fire out with the Chalice and pick up the Sheet Music inside the confessional.
Pick up the number 76 off the red chair to the right.
Screenshot
Go across the church to the left and place the 76 on the Hymns board to get the piece of stained glass.
Go back to the Vestibule and place the stained glass on the door to the left to bring up a mini game.
Screenshot
Stained Glass Mini Game
Swap the stained glass pieces until the image is restored to the solution.
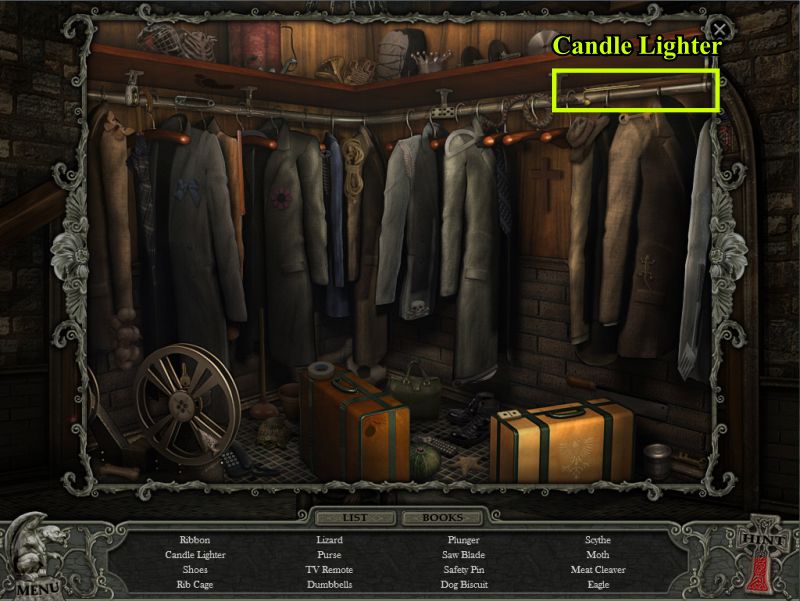
Enter the closet for a Hidden Object scene.
Screenshot
Pick up the Candle Lighter and the rest of the items on your list.
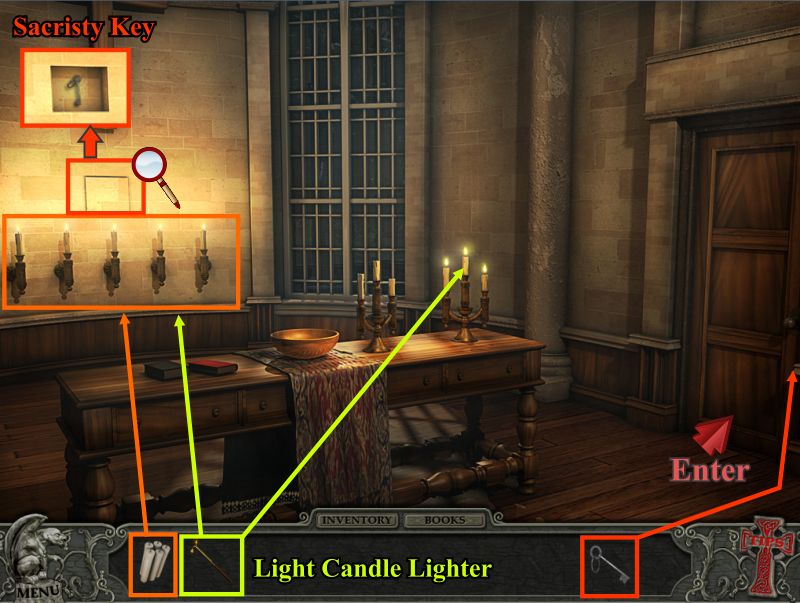
Screenshot
Go to the Altar and light the Candle Lighter in the burning candles.
Place the candles from your inventory in the holders on the wall and light them.
A secret panel opens revealing a key so take it and open the door to the right.
Screenshot
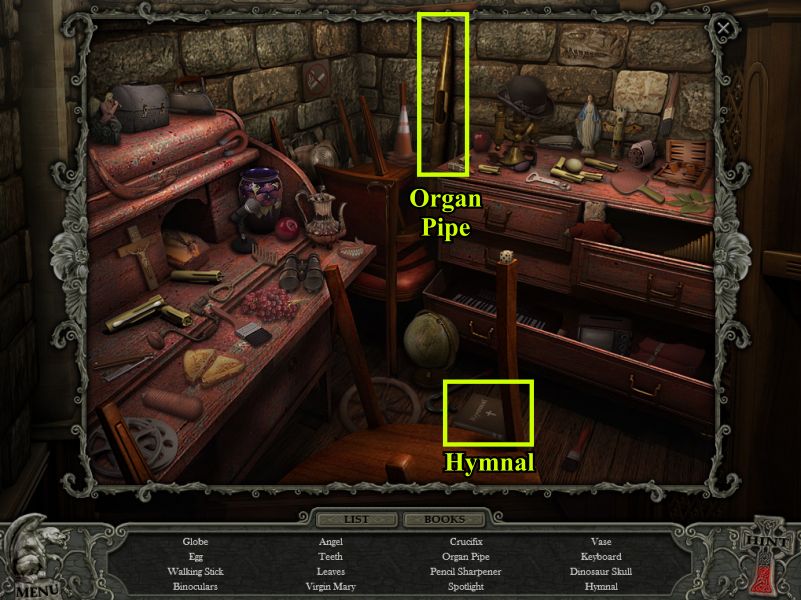
Enter and play the Hidden Object scene.
Pick up the Organ Pipe and Hymnal as well as the other 14 items on your list.
Screenshot
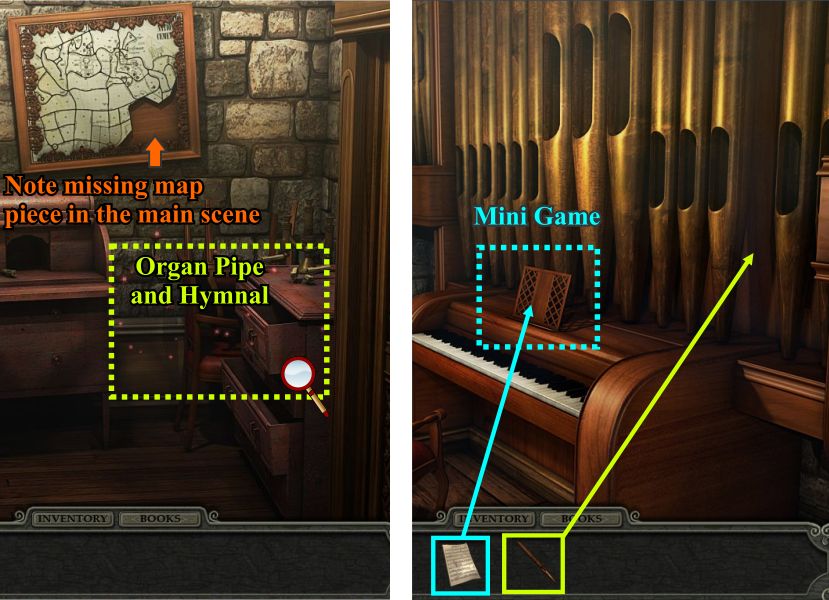
Note the missing map piece which you will get from the Organ Mini Game and bring back to place on the map.
Back away from the Altar and go to the organ on the left.
Place the Organ Pipe where it belongs and put the Sheet Music on the stand to bring up a mini game.
Screenshot
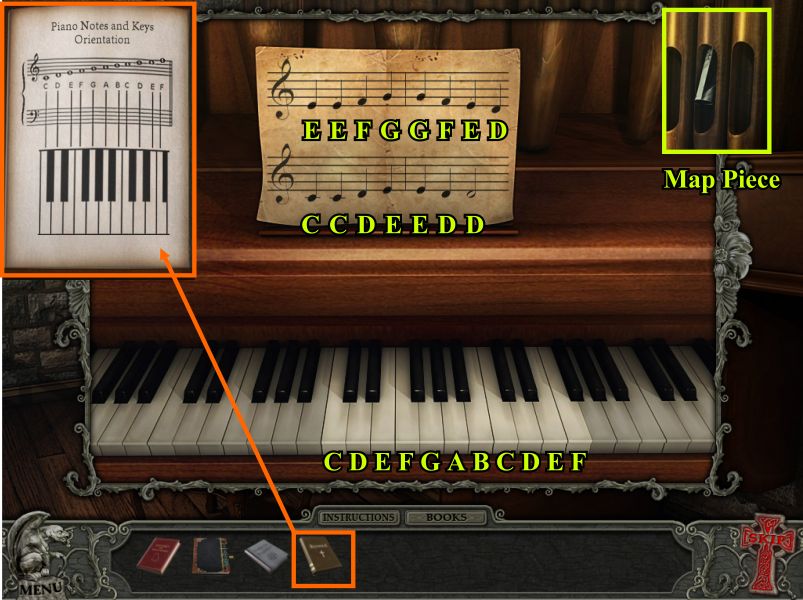
Organ Mini Game
Check your Hymnal about piano notes and keys and play the notes on the sheet music on the piano keys.
The organ pipe with produce the missing map piece for you to take back to the map and place where it belongs.
Screenshot
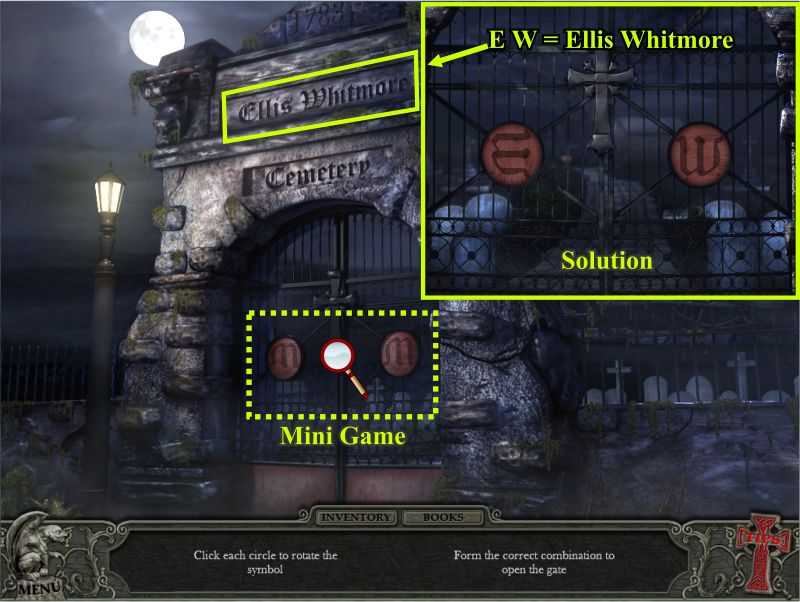
Chapter 4: The Cemetery
The map showed the Cemetery so Claire goes there.
The gate is locked so click on it for a mini game and rotate the symbols to read "EW" which represents Ellis Whitmore Cemetery.
Screenshot
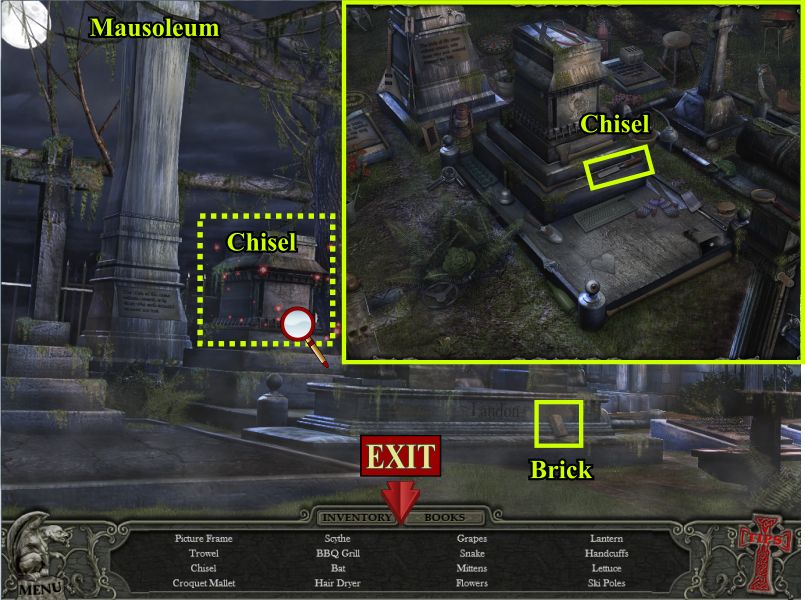
Take the left fork to the Mausoleum and pick up the brick.
Click on the sparkles for a Hidden Object scene to collect the Chisel and the rest of your list.
Screenshot
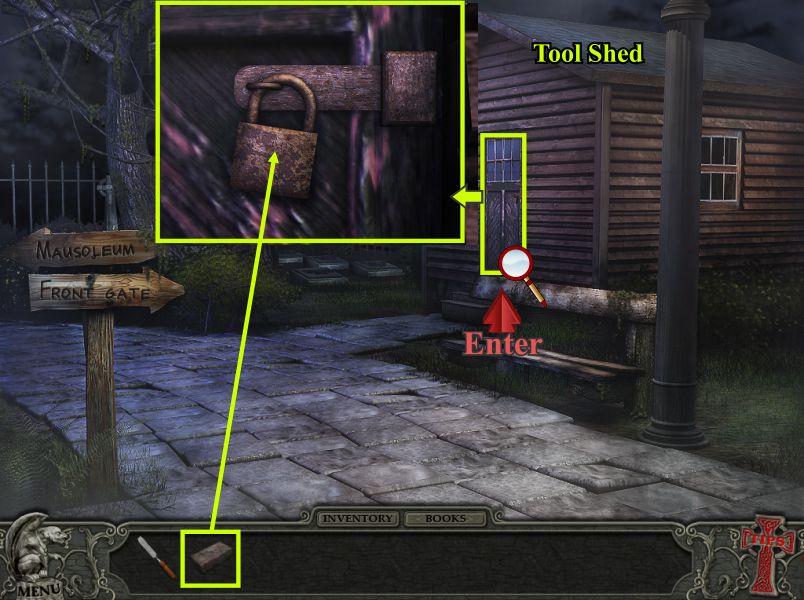
Go back to the Tool Shed and click for a close up of the door.
Use the brick to break the lock and enter the shed.
Screenshot
Click for a Hidden Object scene to get a Crowbar and Romania book along with the rest of your list.
Screenshot
Go to the Front Gate and use the Chisel to move the stone so you can get the Metal Peg.
Go to the Mausoleum and to the right to the Crypt.
Check out the snake on the fence to the right.
Place the Metal Peg on the door to bring up a mini game.
Screenshot
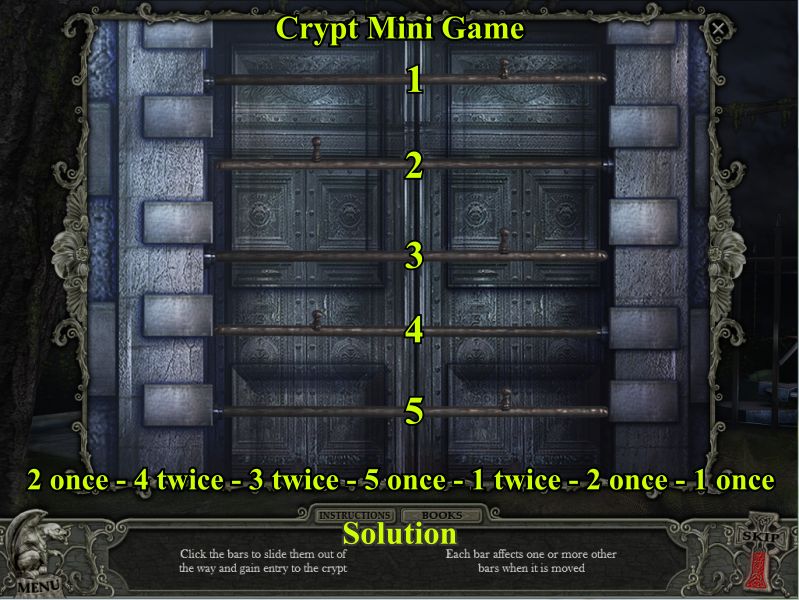
Crypt Door Mini Game
Your goal is to slide the bars out of the way to gain entry to the crypt.
Each bar has an effect on another bar so click the bars in the order indicated.
Click 2 once, 4 twice, 3 twice, 5 once, 1 twice, 2 once, 1 once.
Screenshot
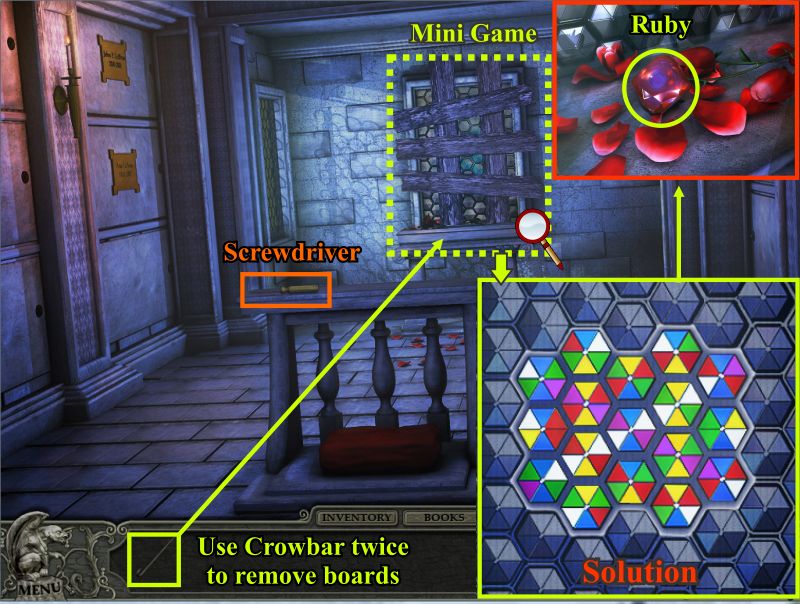
Crypt Window Mini Game
Pick up the Screwdriver and use the Crowbar to remove the horizontal boards on the window and then again to remove the vertical ones so you can play a mini game.
Your goal is to rotate the hexagons so that each side has a matching color to the one next to it as shown in the solution.
You will be rewarded with a Ruby to pick up from the rose petals.
Screenshot
Go back outside and click on the snake on the fence and place the Ruby for his other eye.
Enter the Hidden Object scene and collect the Shovel Head along with the rest of your list.
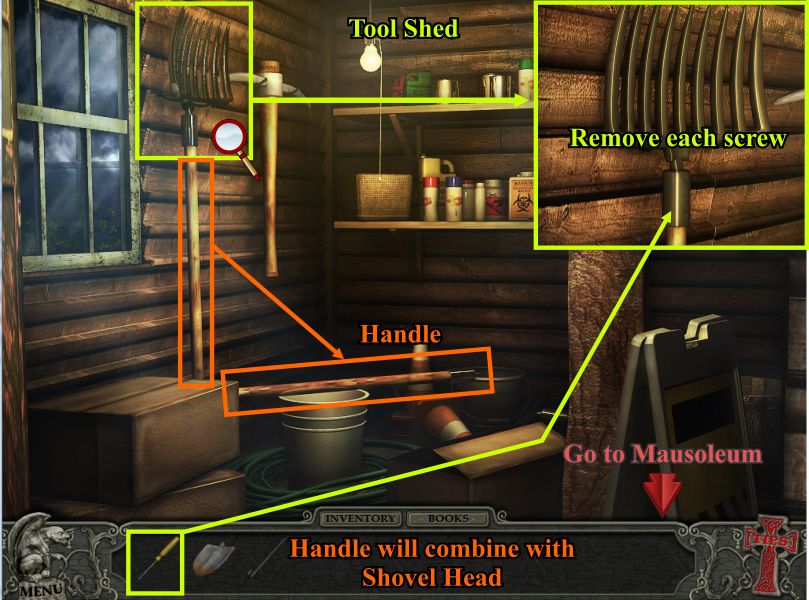
Screenshot
Go back to the Tool Shed and click for a close up of the rack.
Use your Screwdriver to remove both screws to release the Handle.
Collect the handle and it will combine with the Shovel Head.
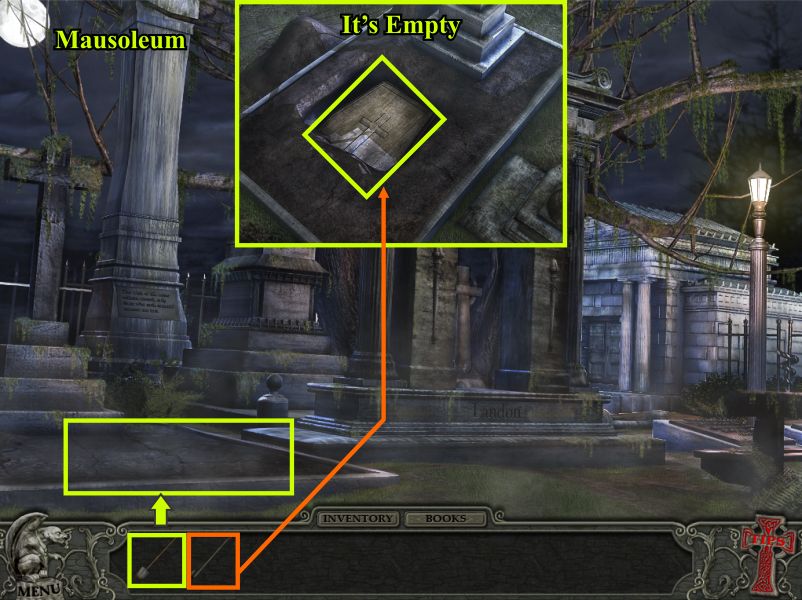
Screenshot
Go back to the Mausoleum and dig in the fresh dirt.
You uncover a casket so use your Crowbar to open it and find out it is empty.
Screenshot
Chapter 5: The Lighthouse
Enter the Lighthouse and click on the sparkling area by the bookcase for a Hidden Object scene.
Pick up the Fishing Pole and the rest of your list.
Screenshot
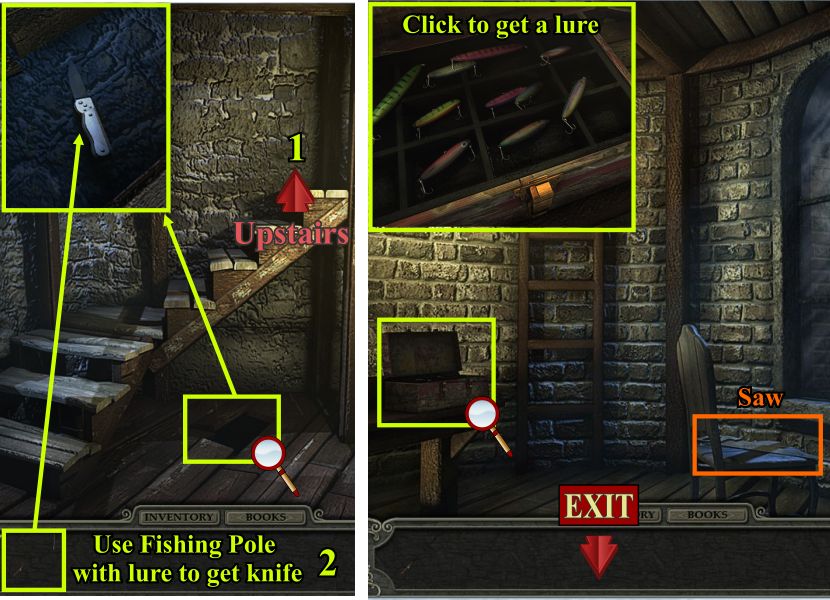
Go through the door on the left and up the stairs.
Pick up the saw and click on the box of lures for a close up.
Click to get a lure and go back down the stairs and use your Fishing pole with lure to get the knife out of the hole in the floorboards.
Screenshot
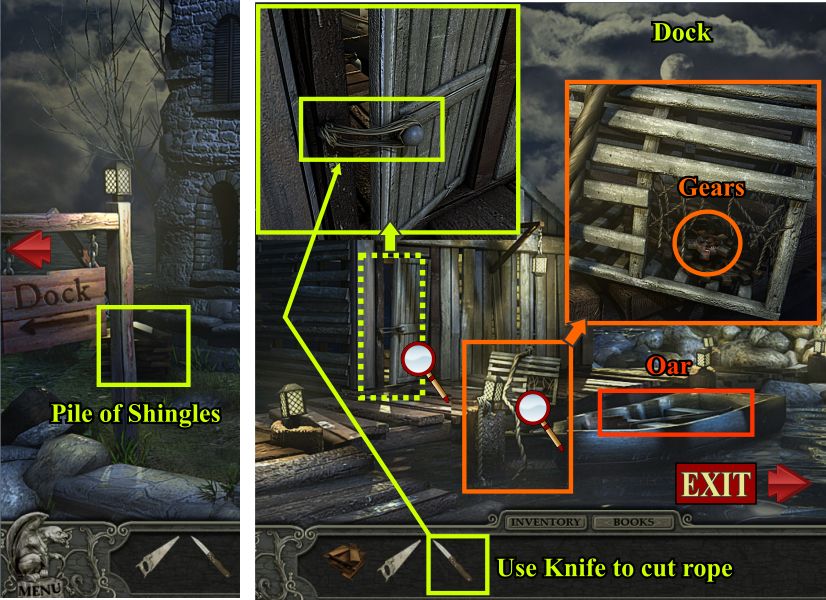
Go back through the door and out the front door.
Stop to pick up the Pile of Shingles and go to the Dock.
Pick up the oar in the boat.
Click on the rope to bring up the trap and take the gears.
Use your knife to cut the rope on the door for a Hidden Object scene.
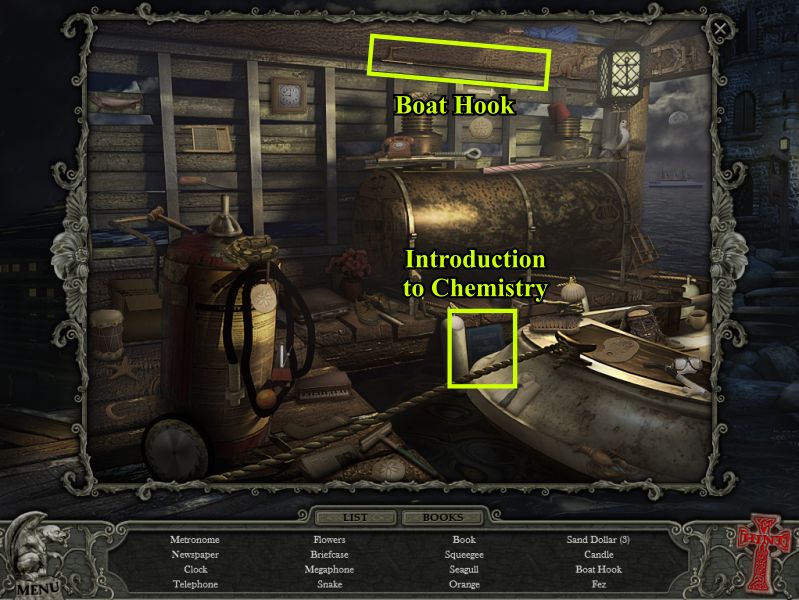
Screenshot
Collect the Boat Hook and the Introduction to Chemistry along with the rest of your list.
Screenshot
Go back to the Lighthouse and place the oar in the vice on the table.
Use the saw to get a couple of pieces to use as rung on the ladder.
Go through the door and place the rung on the ladder and collect it.
Go upstairs and use the Boat Hook to open the hatch to the top of the Lighthouse and go there.
Screenshot
Gears Mini Game
Pick up the Fuses to the right of the gear mechanism area.
Place the gears to bring up a mini game.
You need to place the gears so that the mechanism will run.
When you use a gear it will be replaced by another one to use.
It is not necessary to fill all the pegs so see the solution shown.
Screenshot
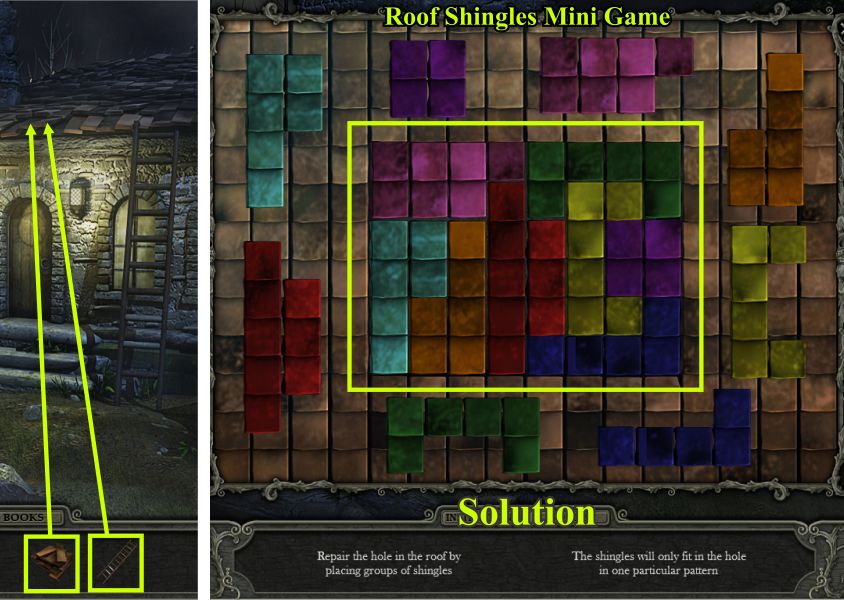
Roof Shingles Mini Game
Go downstairs and outside.
Place the ladder and shingles on the roof to bring up the mini game.
Use the surrounding shingles to repair the hole in the roof as shown.
Screenshot
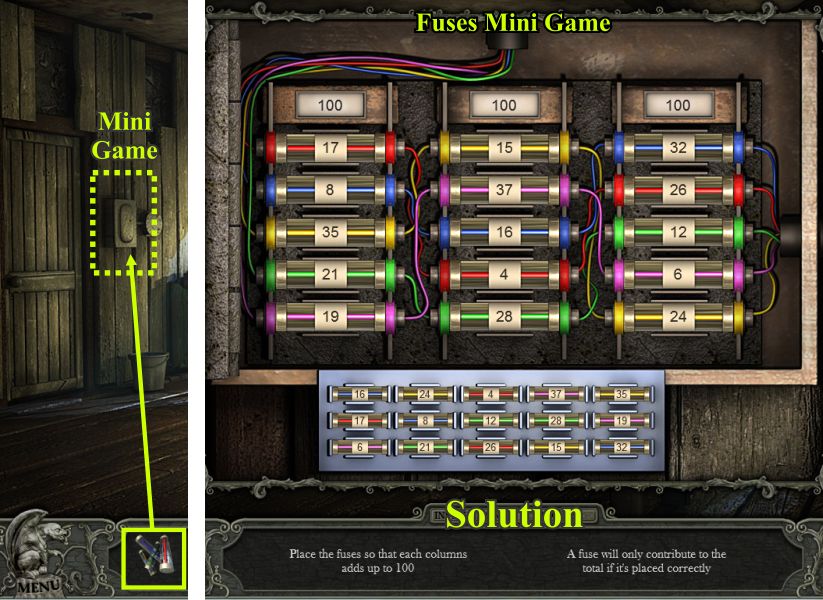
Fuses Mini Game
Now that the roof isn't leaking click on the fuse box for a mini game.
Place the color coded fuses so that each column adds up to 100 as shown in the solution.
Screenshot
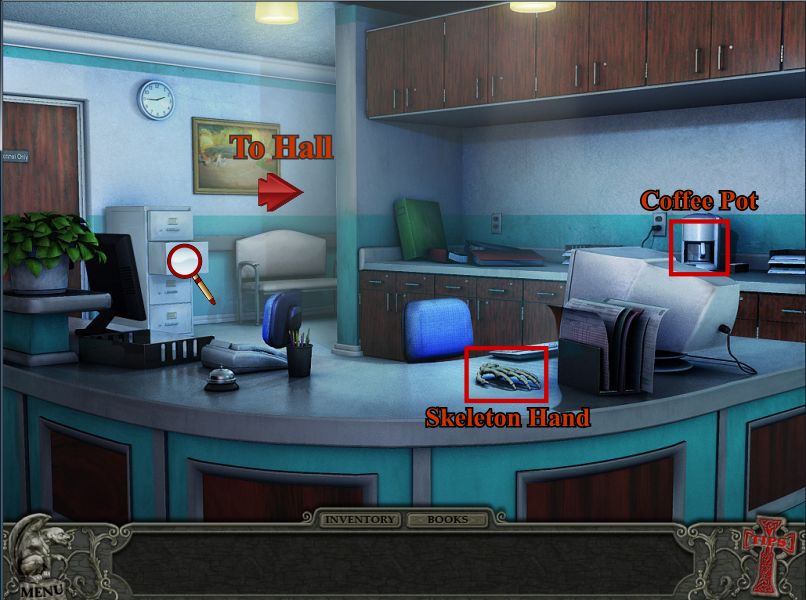
Chapter 6: The Hospital
Pick up the Skeleton Hand and the Coffee Pot.
Note that the file draw isn't complete and head down the hall.
Screenshot
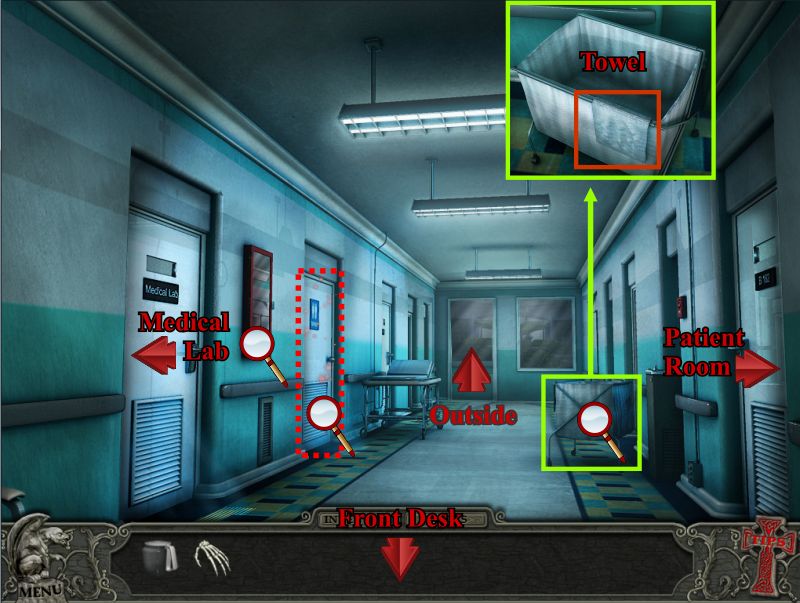
Click on the cart and pick up the towel.
Click on the lavatory for a Hidden Object scene.
The other areas you will visit are marked.
Screenshot
Pick up the Cleaning Solution and the rest of your list.
Go into the Patient Room and pick up the Medical File.
Use the Cleaning Solution and Towel on the light box.
Screenshot
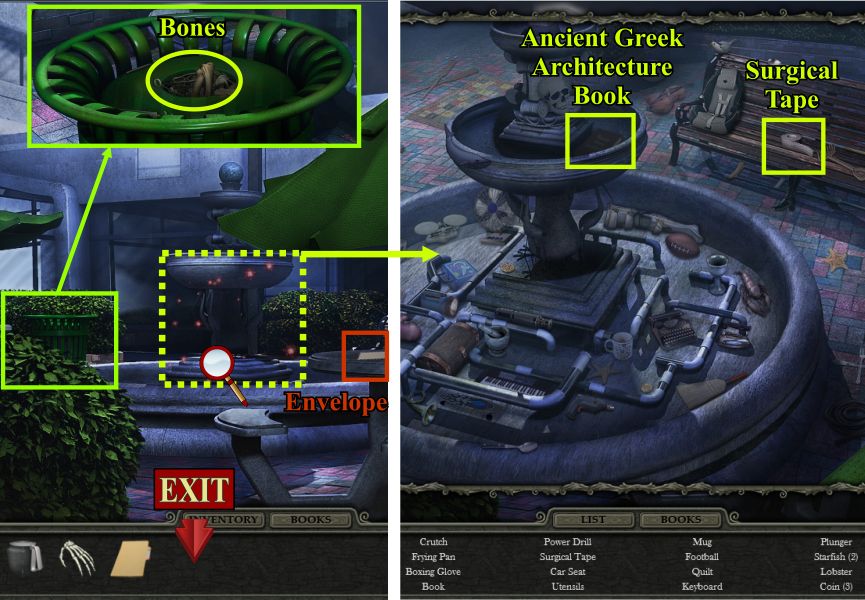
Go down the hall and outside.
Click on the green container at the left and take the Bones.
Pick up the envelope on the table and click on the fountain for a Hidden Object scene.
Collect Ancient Greek Architecture and the Surgical Tape along with the rest of your list.
The Surgical Tape will combine with the bones.
Screenshot
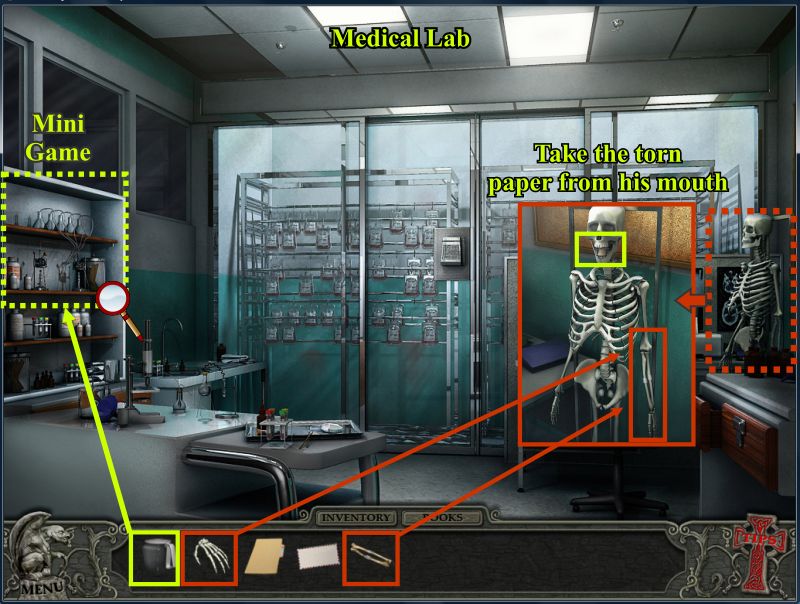
Go to the Medical Lab and click on the Skeleton for a closer look.
Place the taped bones and Skeleton Hand on him and take the scrap of paper from his mouth.
Place the Coffee Pot on the shelves to the left for a mini game.
Screenshot
Hydrochloric Acid Mini Game
Click on the Introduction to Chemistry book and note the steps to make Hydrochloric Acid.
Click on the vials as numbered to add to the coffee pot.
Screenshot
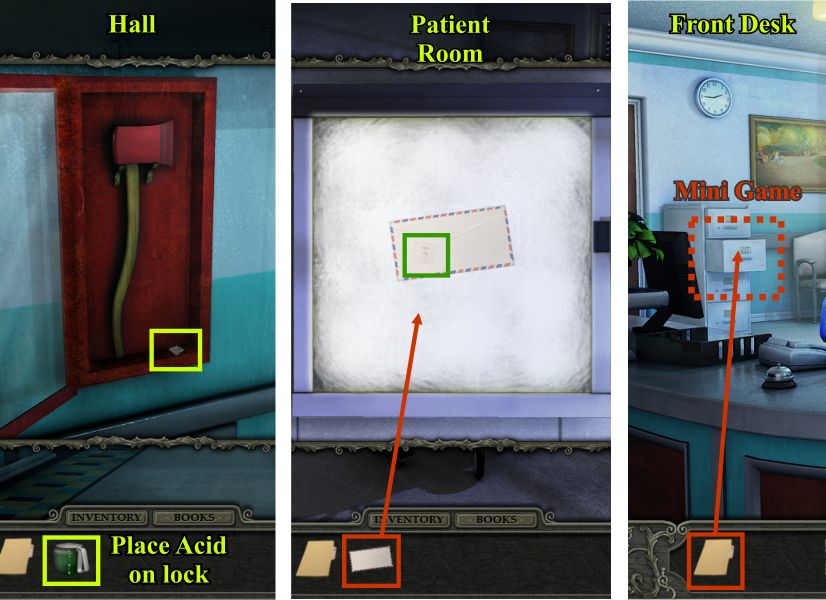
Use the acid on the lock of box with the axe on the left wall of the hall and pick up the paper scrap.
Go into the Patient Room and place the envelope on the light screen to get the number inside.
Go to the front desk area and place the file folder on the file drawer to bring up a mini game.
Screenshot
File Drawer Mini Game
Your goal is to arrange the charts in alphabetical order by color according to the colors shown on the front of each drawer.
Keep in mind that the charts need to be filed from bottom to top because the bottom files are at the front of the drawer.
The left drawer is red at the bottom, green in the middle and yellow at the top.
The right drawer is blue at the bottom, turquoise in the middle and pink at the top.
See the screen shot for the complete solution.
Screenshot
Keypad Lock Mini Game
You now have all 4 scraps of paper with the keypad combination so go to the Medical Lab.
Place the scrapes of paper on the keypad and put the jigsaw puzzle together for the combination of 5 - 7 - 4 - 3 and enter it on the keypad.
There is a motel key tag among the empty blood bags so click on it.
Screenshot
Chapter 7: Creepy Motel
Claire goes off to the creepy motel in search of answers.
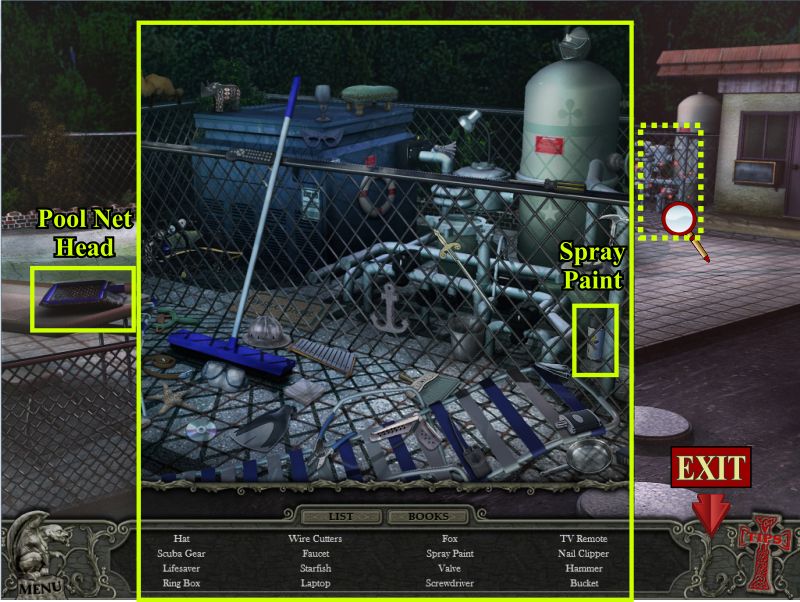
Go forward to the pool area and pick up the Pool Net Head on the table at the left and click on the sparking area at the right for a Hidden Object scene.
Collect your list including the can of Spray Paint.
Screenshot
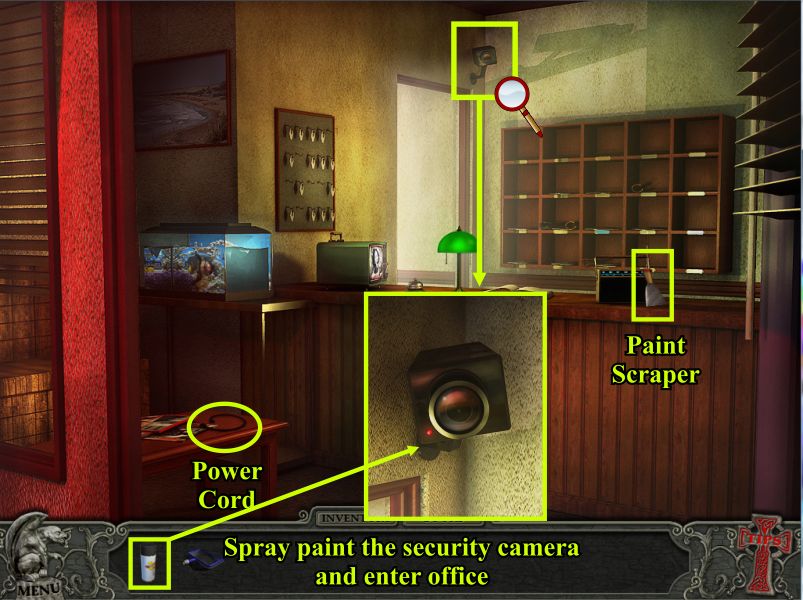
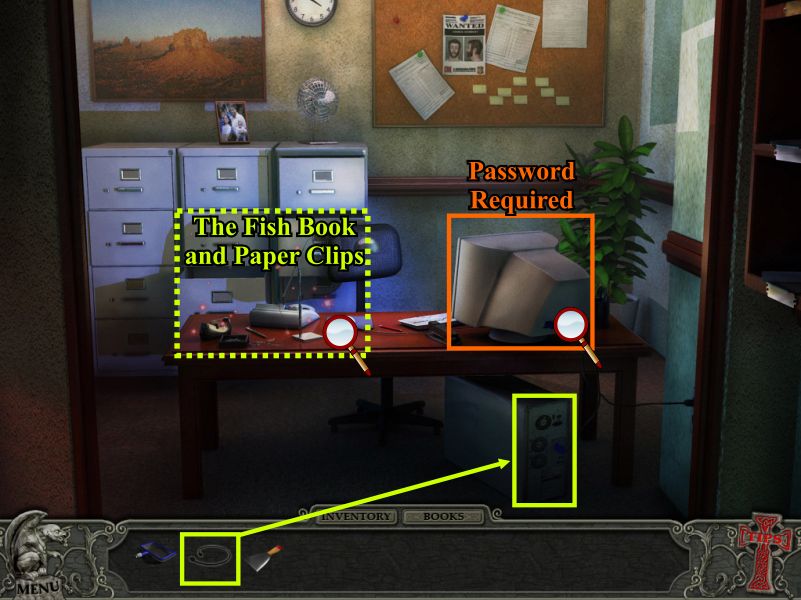
Enter the Motel on the right and collect the Power Cord and Paint Scraper.
Click on the security camera and spray it with the paint so you can go undetected into the office in the back.
Screenshot
Place the power cord on the computer and click on it to find out you need a password.
Click on the file area for a Hidden Object scene.
Screenshot
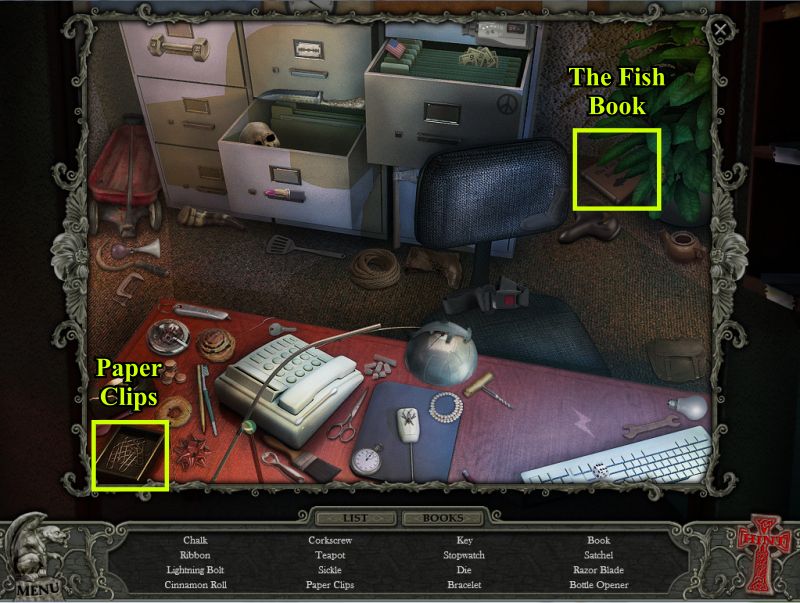
Collect the Paper Clips, Fish Book and the rest of your list.
Screenshot
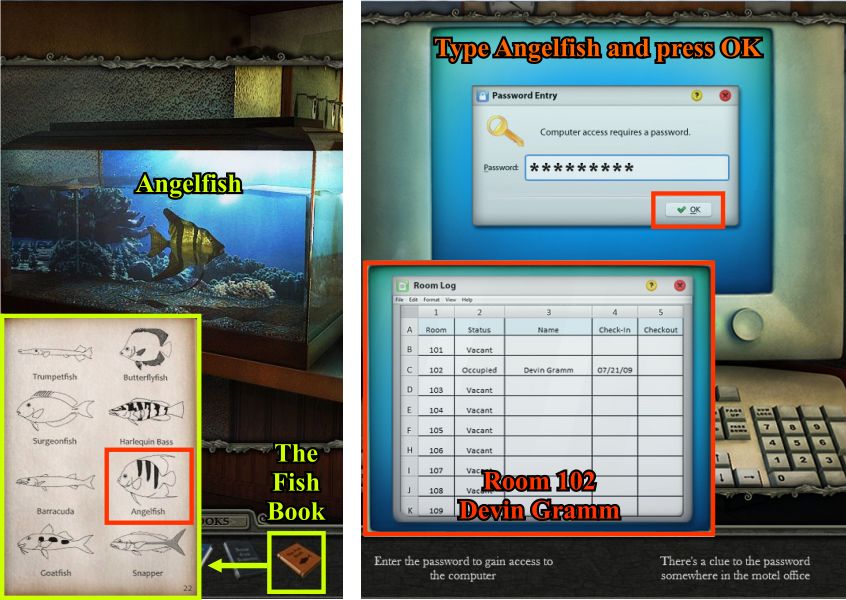
Computer Password Mini Game
Go to the front desk and look at the fish in the tank.
Get out The Fish Book and identify it as an Angelfish.
Go back into the office and type in Angelfish as a password on the computer and press ok or just hit Enter.
Only one room seems to be occupied by a Devin Grimm so go to Room 102.
Screenshot
Room 102 Door Lock Mini Game
Place the paperclips on the door to bring up a mini game.
Use the paperclip to apply pressure to each of the lock mechanisms.
The pressure meter to the left will go up and down so you can click whatever pressure you want but if you apply too much, the mechanism will pop back down and you will have to do that one again.
Since you goal is get them to all stay up as shown in the insert, it seemed to work best to do a little at a time.
Screenshot
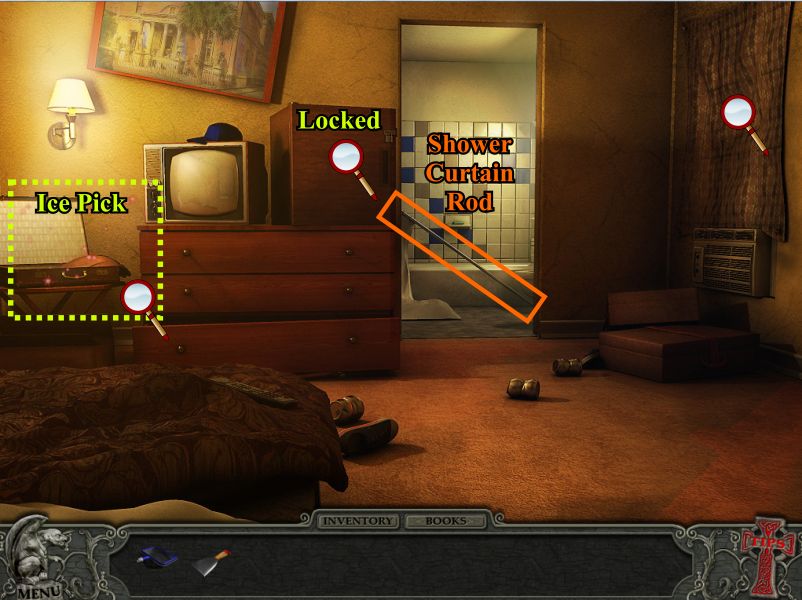
The window is covered over and the refrigerator has a lock.
Go into the bathroom and notice the mirror has wallpaper over it.
Pick up the Shower Curtain Rod which will combine with the Pool Net Head as a handle.
Click on the sparkling area at the left of the room for a Hidden Object scene.
Screenshot
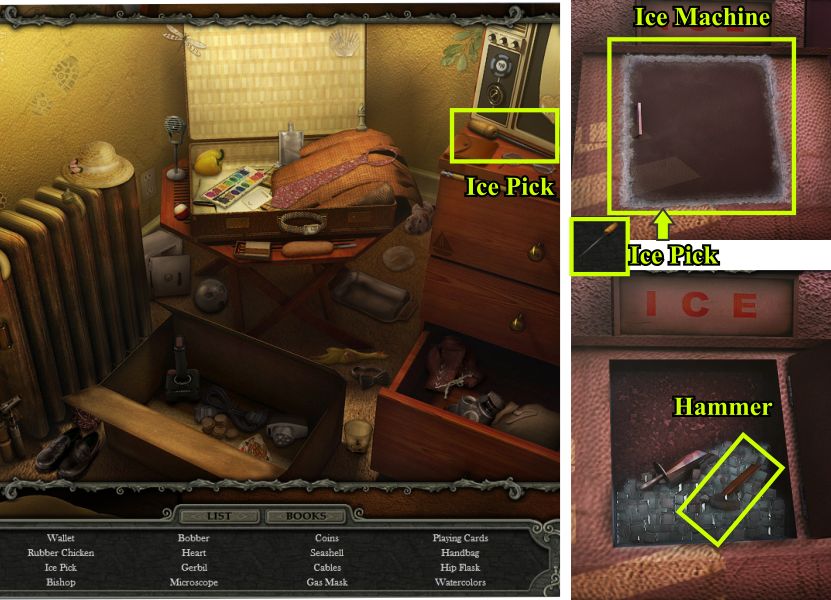
Take the Ice Pick and the rest of your list.
Go outside and click on the Ice Machine.
Use your Ice Pick to open it up and take the Hammer.
Screenshot
Go to the pool and use your Pool Net to fish the key out of the pool.
Back in Room 102 use the key to open the refrigerator and find the missing Hospital blood.
Use the Hammer to remove the window covering and find newspaper underneath.
Go into the bathroom and use the Paint Scraper to get the wallpaper off the mirror only to find out it is broken.
Screenshot
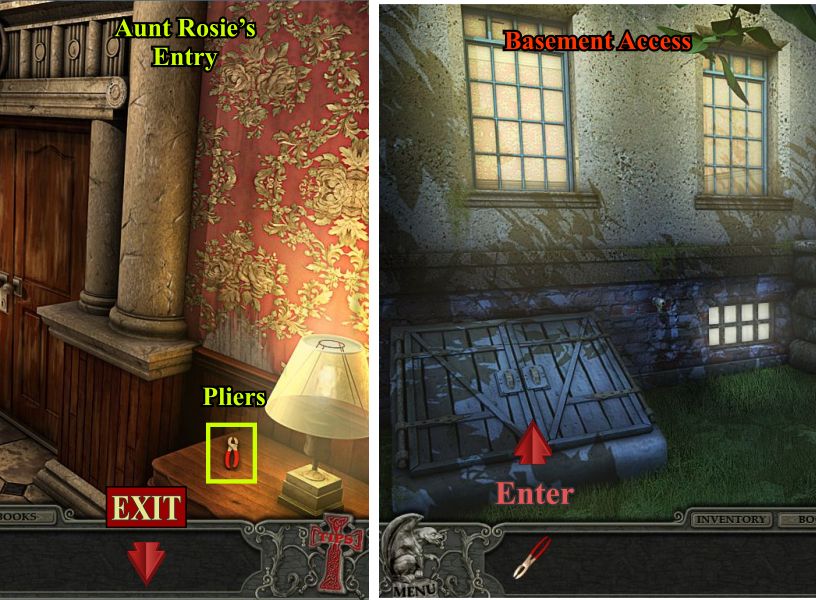
Chapter 8: Aunt Rosie's House
Claire goes back to Aunt Rosie's House to see if she can find out how much Rosie knew about all she has discovered.
Go inside and pick up the Pliers on the table.
Click down and enter the Basement.
Screenshot
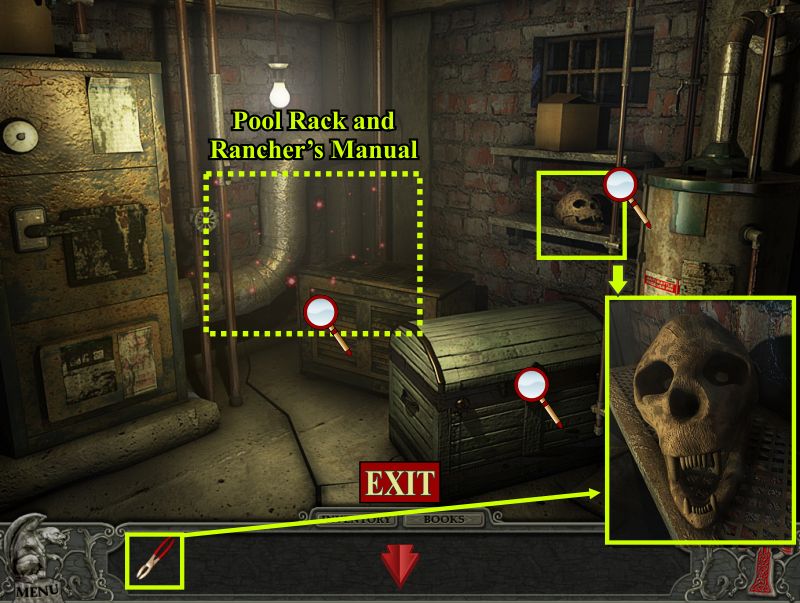
Click on the skeleton head and use your Pliers to remove its teeth.
Click on the sparkles for a Hidden Object scene.
Screenshot
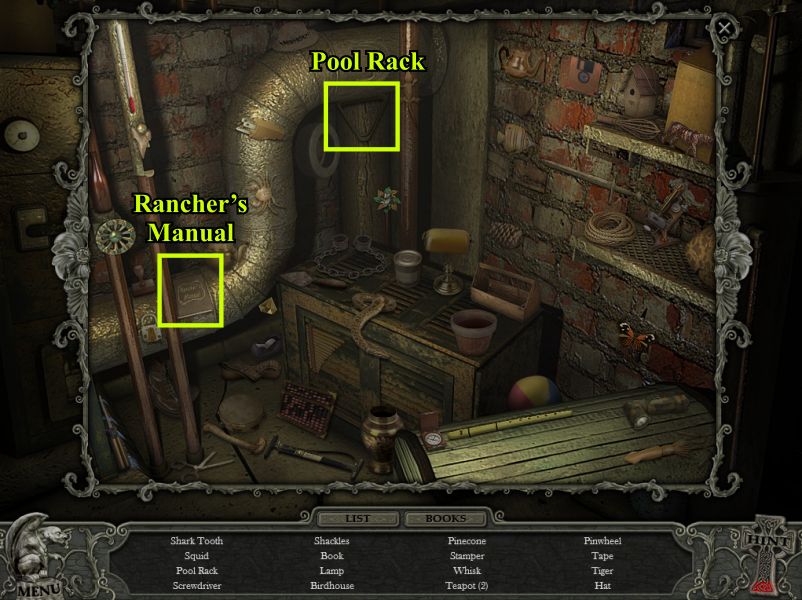
Collect the Rancher's Manual and the Pool Rack as well as the rest of your list.
Screenshot
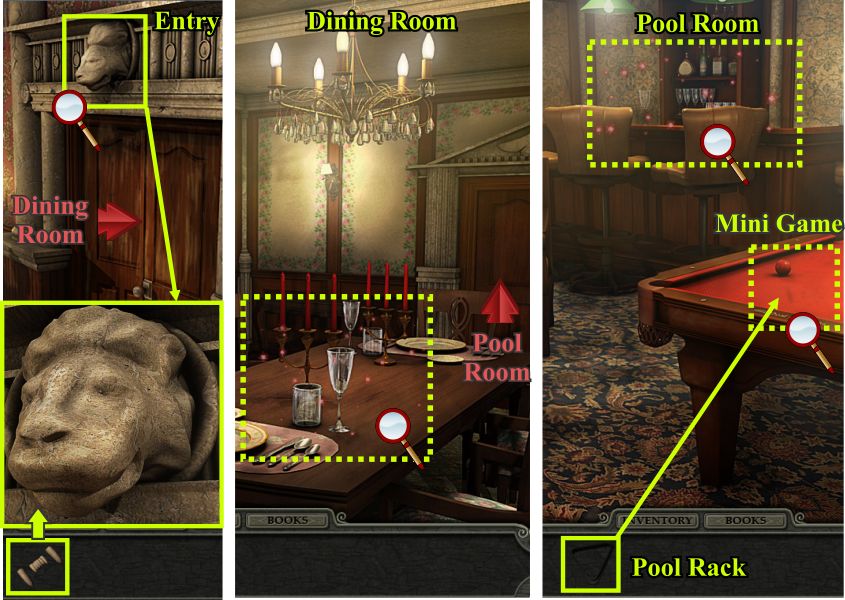
Click down and go back in the door to the house.
Click on the lion and give him the teeth to unlock the Dining Room door.
Go into the Dining Room and click on the table for a Hidden Object scene.
When you have completed the Hidden Objects go through the back door into the Pool Room.
Complete the Hidden Object scene there and then put the Pool Rack on the pool table for a mini game.
Screenshot
Dining Room Hidden Object
Take the empty pitcher and pick up the rest of your list.
Screenshot
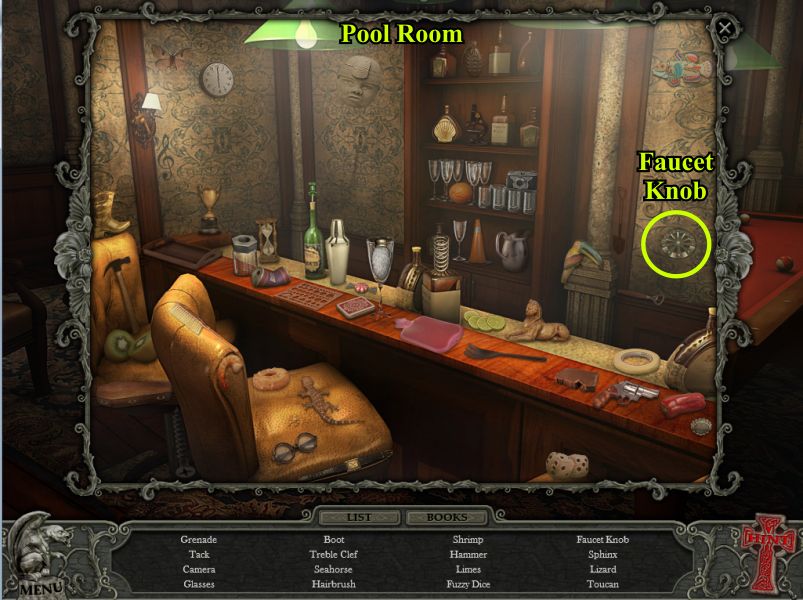
Pool Room Hidden Object
Collect the Faucet Knob and the rest of your list.
Screenshot
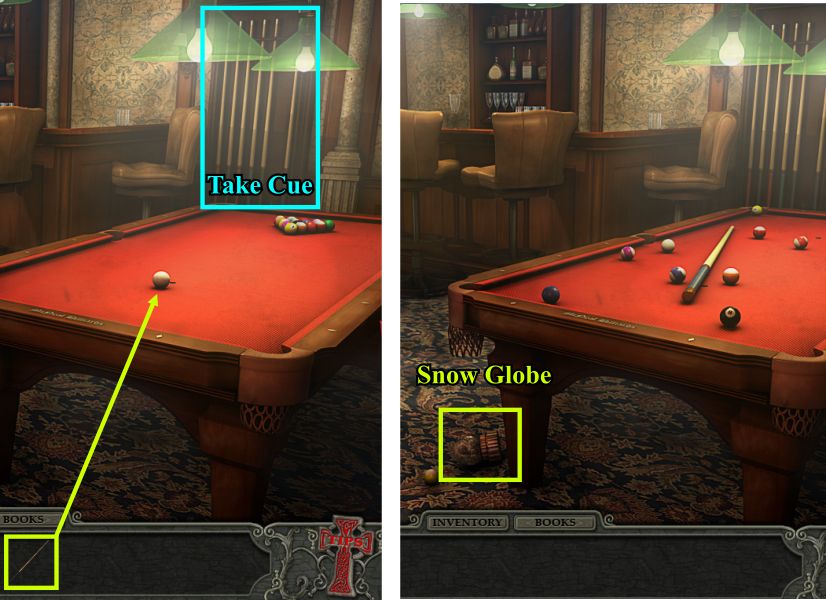
Pool Rack Mini Game
Your goal is to arrange the billiard balls so that each side of the rack equals 50.
The numbers on the balls will be the same for each side but you can arrange them in any configuration you wish as long as they add up correctly.
Screenshot
Grab a cue stick and break the racked balls to find a Snow Globe falls out of the one pocket so collect it.
Screenshot
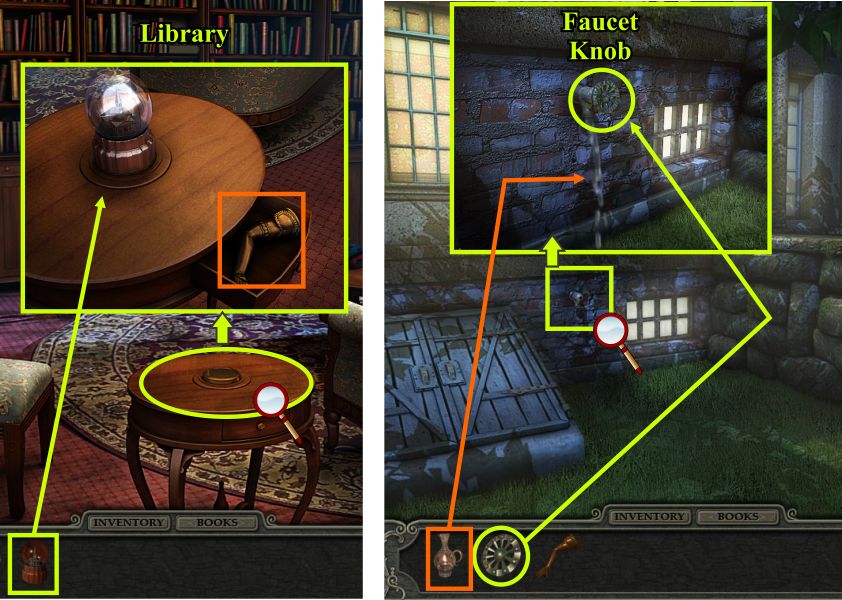
Go upstairs to the Library and place the Snow Globe on the table to open the drawer and collect one of the statue arms.
Go out back and place the Faucet Knob on the faucet so you can fill the water pitcher.
Screenshot
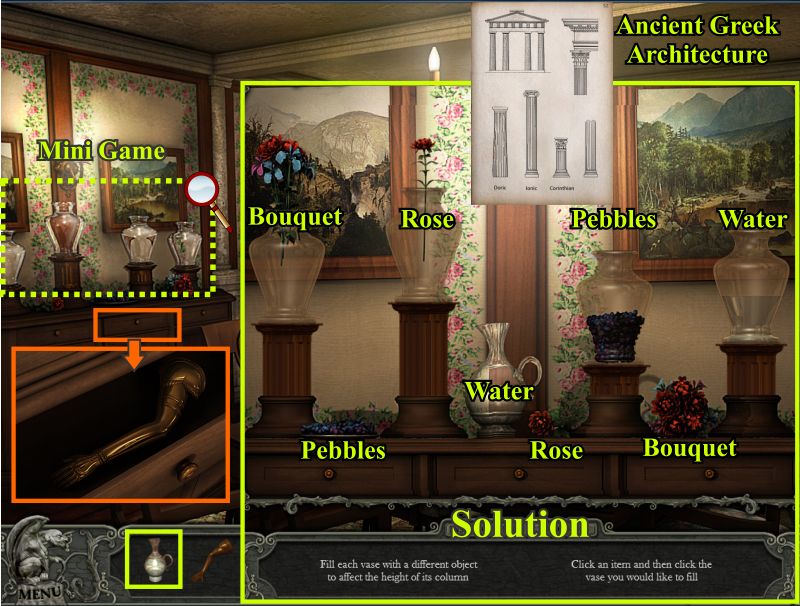
Empty Pitcher Mini Game
Go to the Dining room and place the water pitcher on the sideboard for a mini game.
Check in the Ancient Greek Architecture book for help as to the column heights so you know how to weight the empty pitchers.
Place the bouquet at the far left, then the single rose, the pebbles and the water from the pitcher at the far right.
The drawer below will open for you to collect the other statue arm.
Screenshot
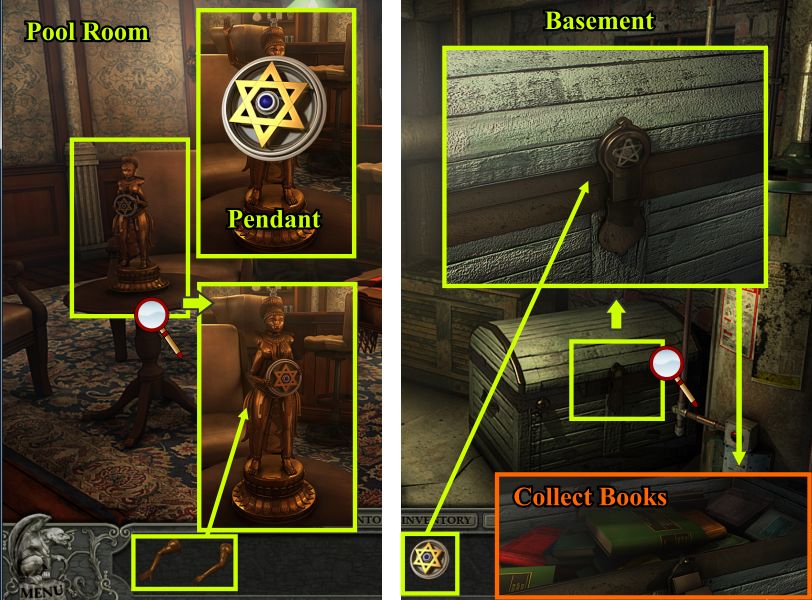
Go to the Pool Room and click on the statue on the table for a close up.
Place the arms on the statue to get the Pendant.
Take the Pendant to the Basement and click on the chest for a close up.
Place the Pendant in the indentation in the lock and when the chest opens, collect the books.
Screenshot
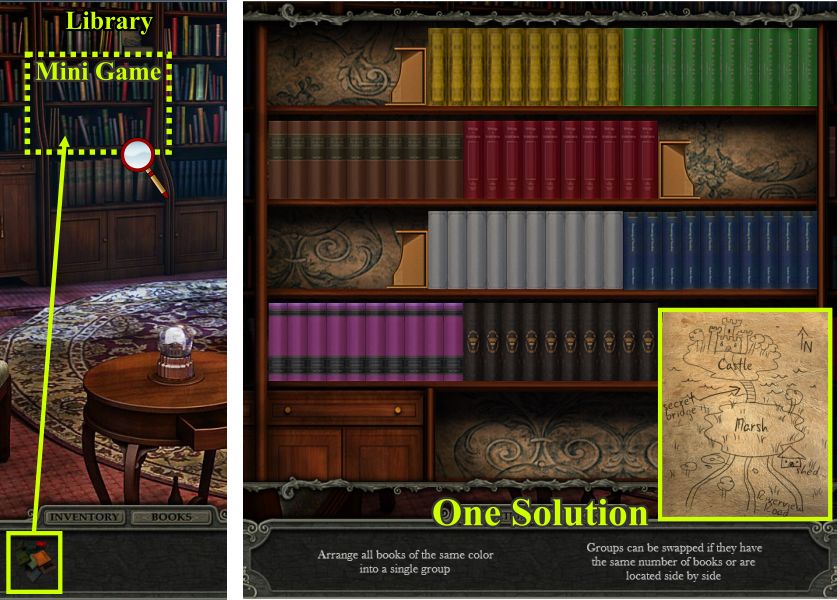
Library Books Mini Game
Click down, go through the back door and upstairs to the Library.
Place the books on the shelves to bring up a mini game.
Your goal is to arrange all the books of the same color together.
It doesn't matter which shelf they are on or how they are arranged.
You can swap books of the same number of books from shelf to shelf or you can exchange books that are side-by-side no matter how many books are in that group.
Pick your colors and arrange your groups.
One solution is shown and when you are done you will get a map showing swamp land, a marsh, a bridge, and a castle so next stop in the adventure has been chosen.
Screenshot
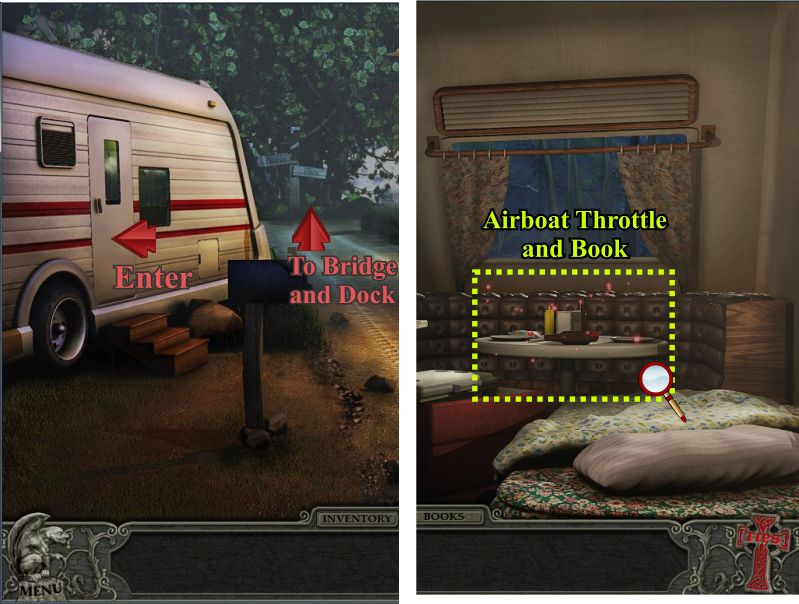
Chapter 9: The Swamp
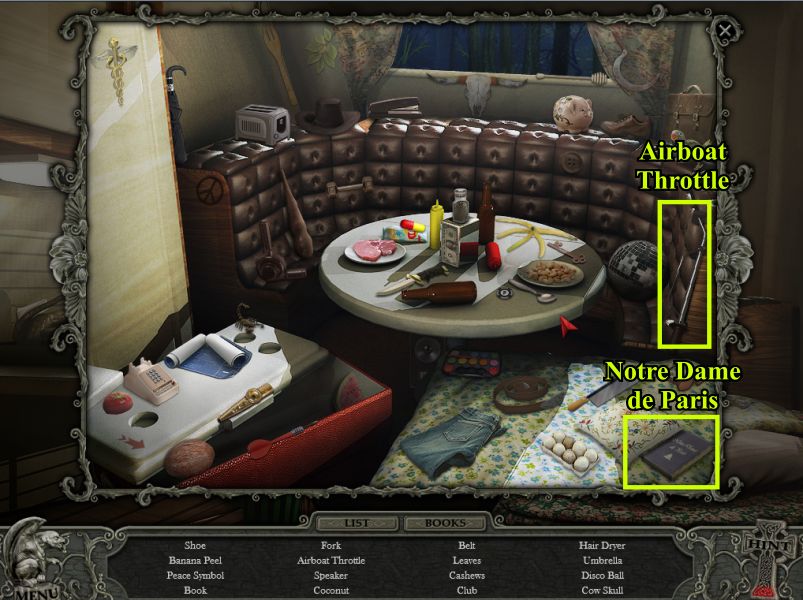
Before going forward to see what is there, go inside the trailer and click on the table for a Hidden Object scene.
Screenshot
Pick up the Airboat Throttle and the Notre Dame de Paris book as well as the rest of your list.
Screenshot
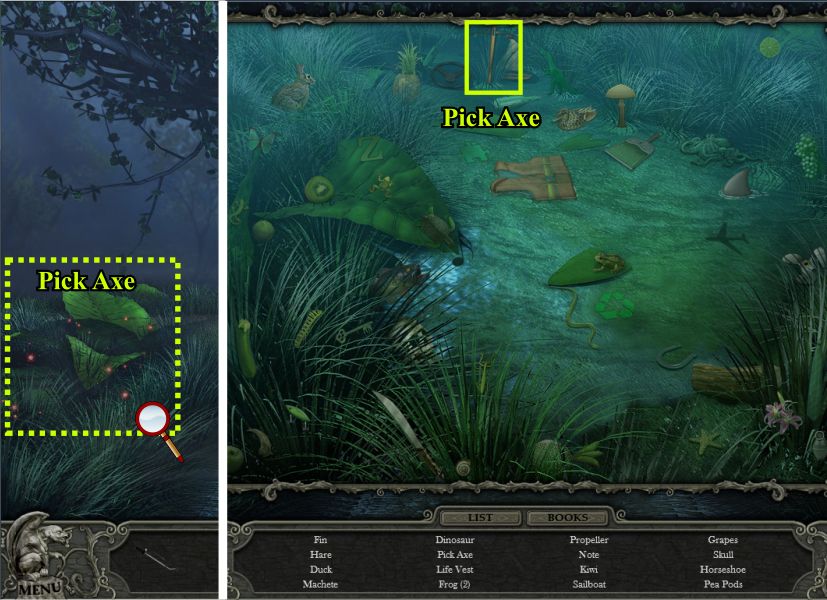
Go to the fork in the road and click on the sparkles to the left for a Hidden Object scene.
Pick up your list including the Pick Axe.
Screenshot
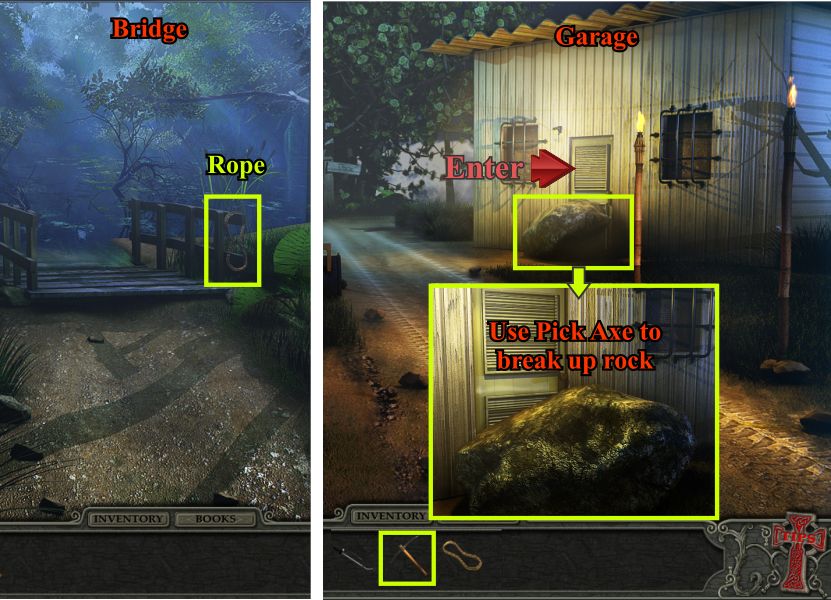
Go left to the partial Bridge and pick up the rope before returning to the trailer area.
Use the Pick Axe on the big rock in front of the door to the garage and break it up twice so you can enter.
Screenshot
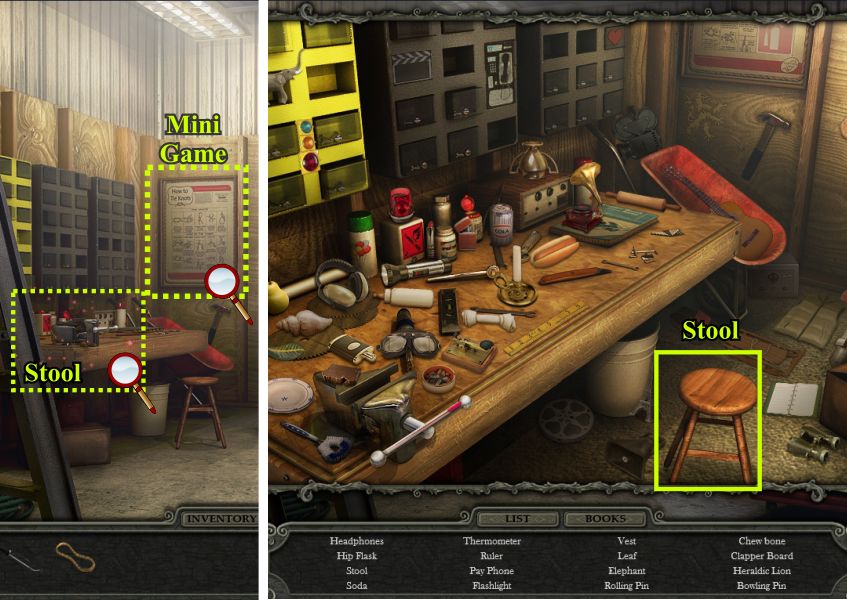
Click on the table at the left for a Hidden Object scene and then on the chart in the back for a mini game.
Pick up the stool and the rest of your list.
Screenshot
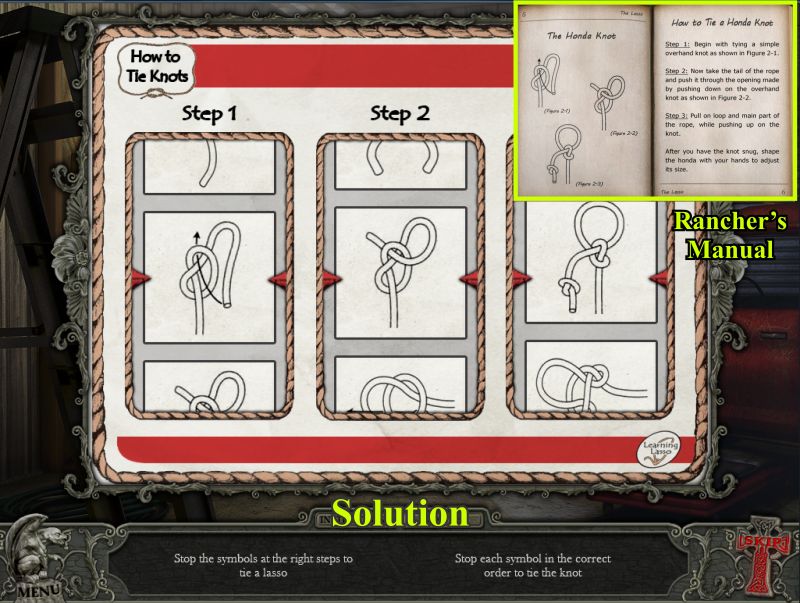
Knot Mini Game
Check out the Rancher's Manual to see how to tie a Honda Knot.
Your goal is to stop the scrolling knots at the right place for each step to tie the knot as shown in the solution.
Your reward will be the actual lasso.
Screenshot
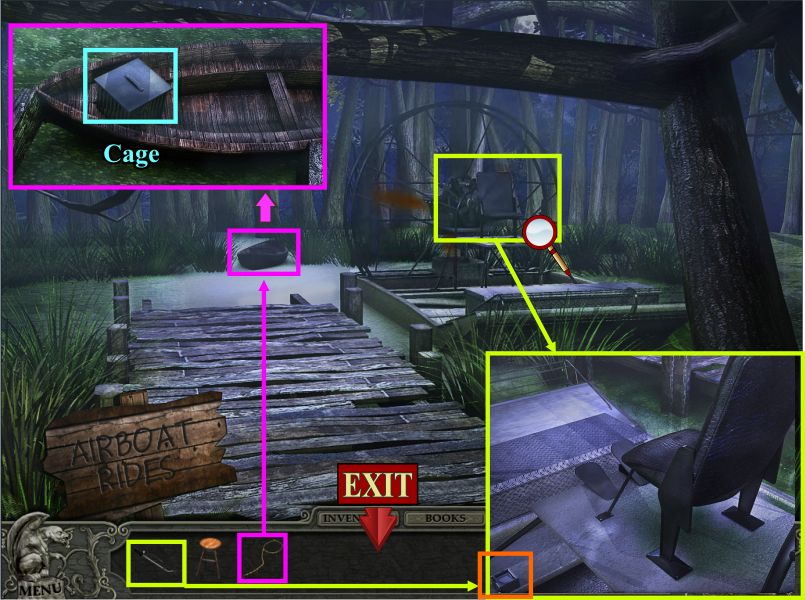
Go to the fork in the road and take the path to the Dock.
Click on the Airboat and place the throttle as shown in the insert.
The wind from the propeller will reveal a small boat in the distance.
Use your lasso to bring it to the Dock so you can collect the Cage that is in it.
Screenshot
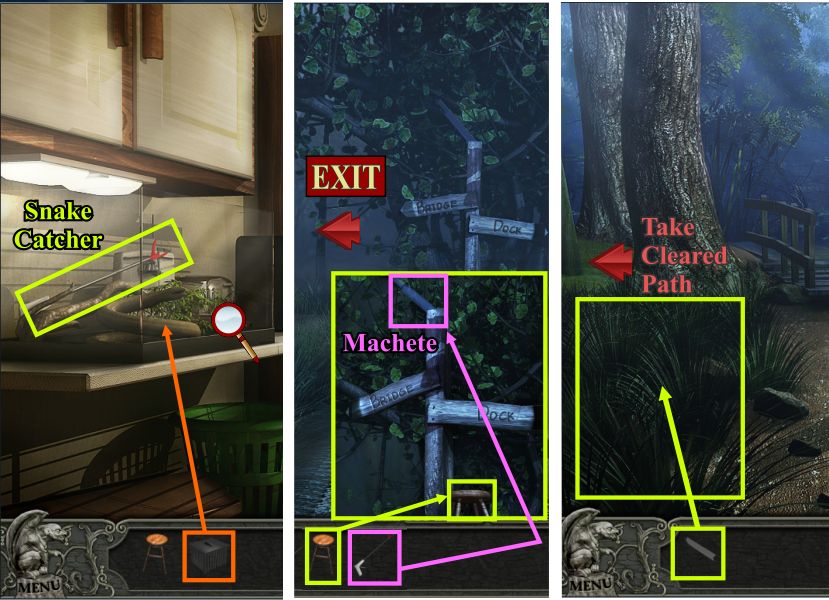
Go to the trailer and place the cage in the close up with the snake and capture him so you can have the Snake Catcher tool.
Go to the crossroads sign and place your stool so you can use the Snake Catcher tool to get the Machete.
Go left to the bridge area and use the Machete to clear the path for you to take to bring up the Maze mini game.
Screenshot
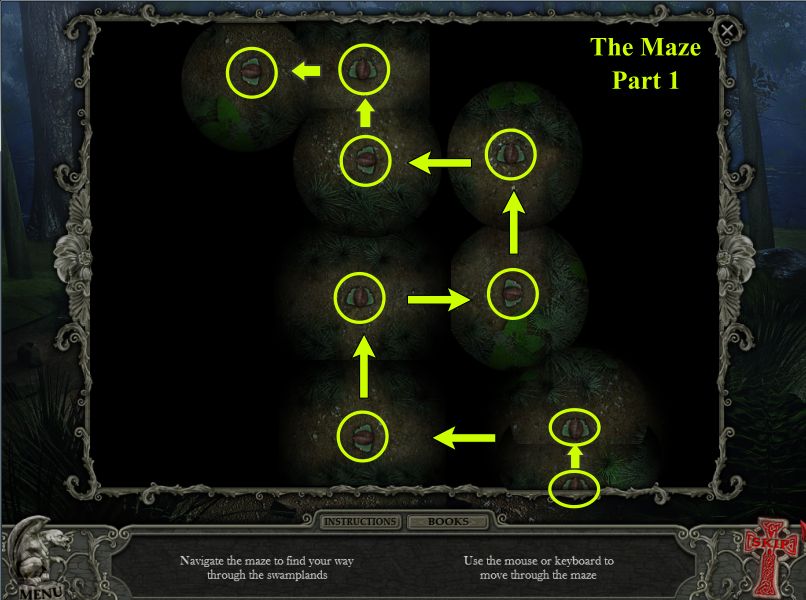
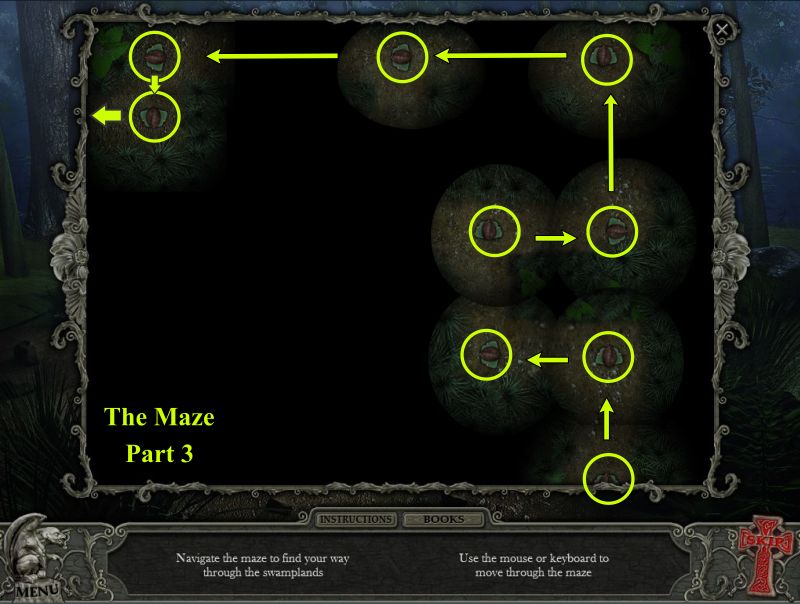
The Maze Mini Game
The Maze is completely dark and your goal is to find a path to navigate through the swamplands.
There are 3 parts so navigate the first part as shown.
Screenshot
The last stopping point will drop down and become the new starting point so follow the marked path.
Screenshot
Once again the ending point drops down to become the starting point.
Navigate as shown to get to the end.
Screenshot
Once you have completed the Maze, throw the lever on the machine you encounter.
The lever will raise the rest of the Bridge so you can cross and continue your journey.
Screenshot
Chapter 10: The Castle
Claire ends up in the Castle Dungeon and is freed by Devin.
This last chapter is a lot crazier than the rest so will be organized in a different way.
We will start at the Basement where Claire found herself in the Dungeon and deal with everything on that floor before progressing to the other 2 floors.
You will be making multiple trips to all of the areas so just choose where you need to go to get help and it should be clear what you need to do.
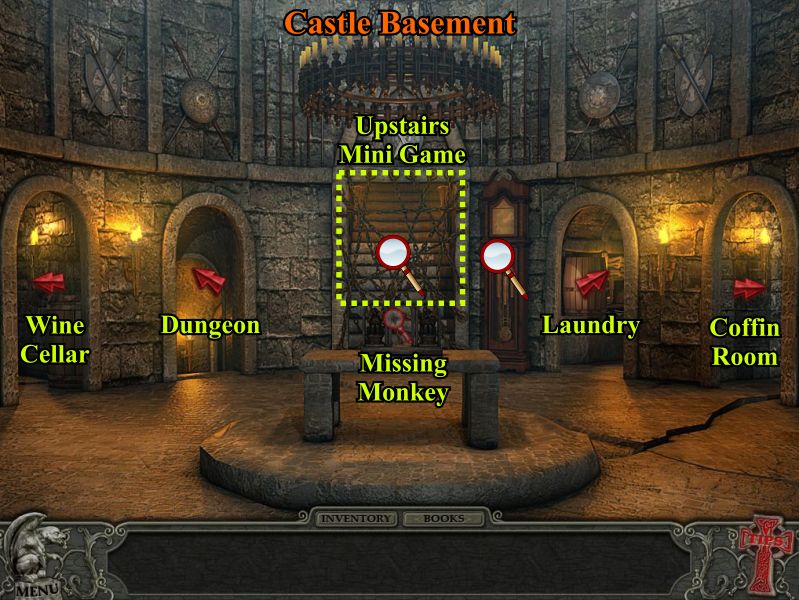
Castle Basement
We know Claire's first encounter in the Castle was the Dungeon but we will start in the Basement where the Dungeon is located.
Everything in the Basement is marked to show you what you will need to eventually deal with.
Screenshot
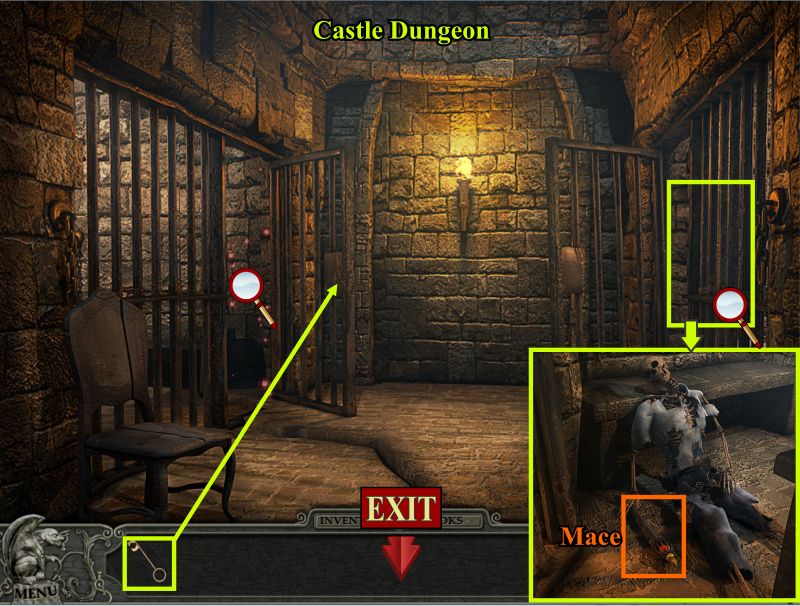
Castle Dungeon
Once Claire has been released by Devin she encounters one of his old cell mates who has a Mace so take it.
Next trip here you will have a key to unlock the left cell and play the Hidden Object scene there.
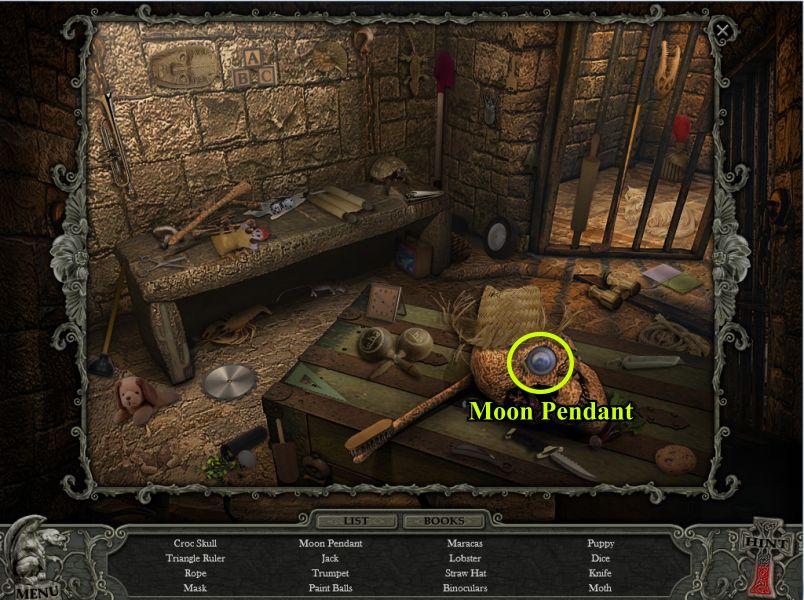
Screenshot
You will have an opportunity to collect the Moon Pendant and when you finish the rest of your list you will be done here.
Screenshot
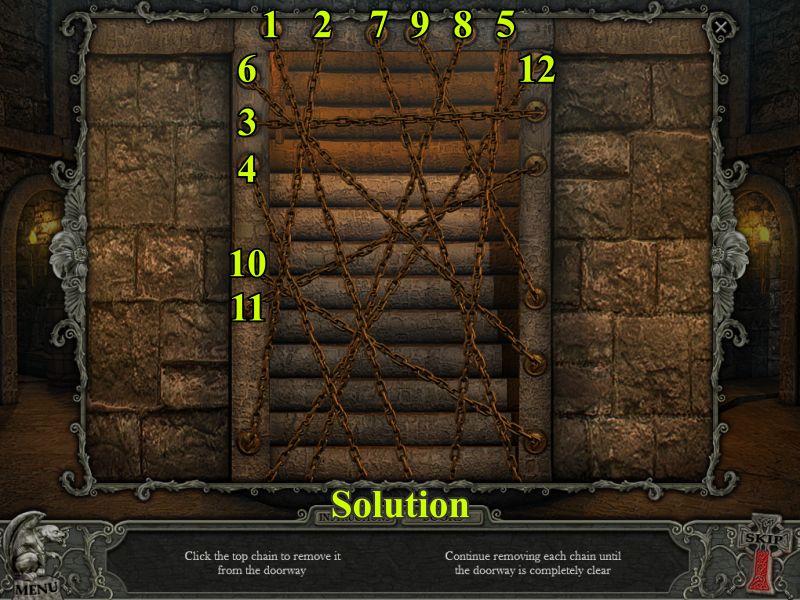
Unchain the Stairs Mini Game
This is a pick up sticks sort of game so pick up the top chain and work your way down.
The solution is numbered to help you complete it.
Screenshot
Wine Cellar
First stop you will need to click to complete the Hidden Object scene.
Once you get the cork screw you will need to come back to uncork the wine bottle and get the lever inside of it.
Screenshot
Wine Cellar Hidden Object
Pick up the Vine and all the rest of your items.
Screenshot
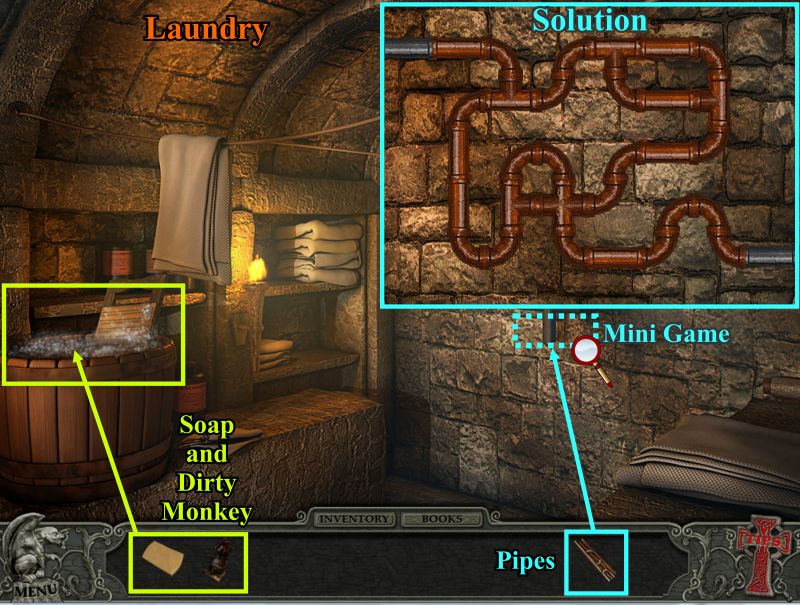
Laundry Room and Pipes Mini Game
Your first stop in the Laundry Room will be when you've collected the Soap and Dirty Monkey you need to clean up.
When you have both, come here and put them in the tub.
Next visit will be when you have the Pipes which you will need to put on the wall to activate the mini game to connect them to put water in the backyard fountain.
The solution for the mini game is shown.
Screenshot
Coffin Room and Bell Mini Game
Your visit to the Coffin room should probably wait until you have the mural piece and the bell.
Place the bell with the other bells, check in the Notre Dame de Paris book after you have the Decoder and ring the bells in this order: E, C, A, B which is equivalent to the numbers shown in the close up.
Place the mural piece for the hidden niche to open for you to collect the right antler.
Click on the coffin for a Hidden Object scene.
Screenshot
Collect everything on your list and get the White Queen.
Screenshot
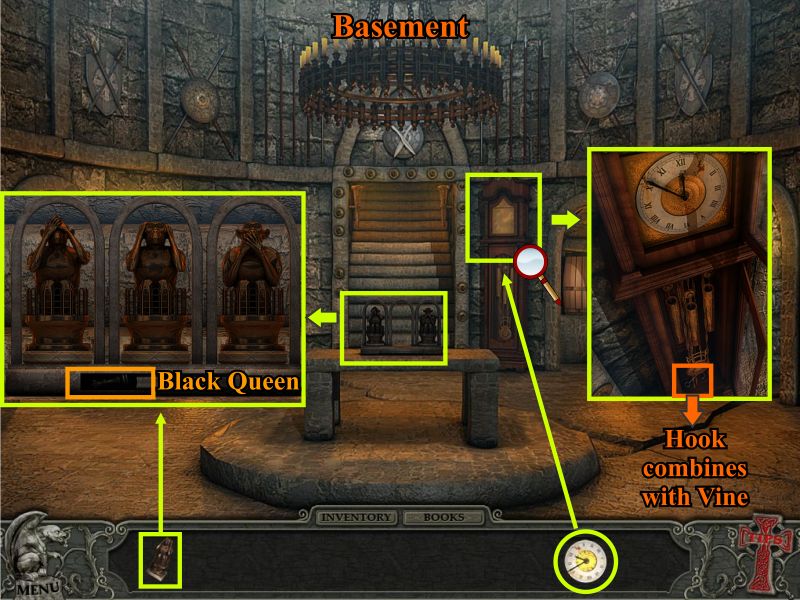
Basement and Clock Mini Game
Once you have a clean Monkey take him to the Basement and place him with the other monkeys as shown in the close up to be able to collect the Black Queen.
Click on the clock and place the face to be able to collect the Hook.
Screenshot
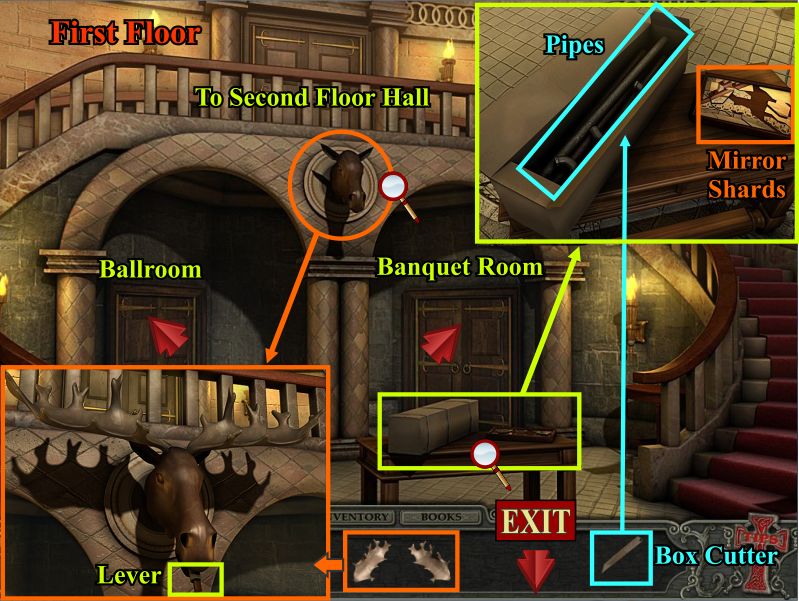
First Floor Foyer
Areas of interest include the Ballroom, Banquet Room, Moose without antlers, table with box and shards and access to the next floor upstairs.
First off, go to the Ballroom and then the next stop should be the Banquet Room after a stop in the Backyard.
Next time here you will have the Box Cutter so can open the box and take the Pipes.
Finally you will need to place the antlers on the moose as shown in the insert so you can get another lever.
Screenshot
Ballroom
Note the piece on the balcony that you cannot reach.
Click on the Hidden Object scene to complete it.
Go outside to the backyard to see what you need to do there.
Later on when you have the grappling hook you will need to return to grab the antler off the chandelier.
Screenshot
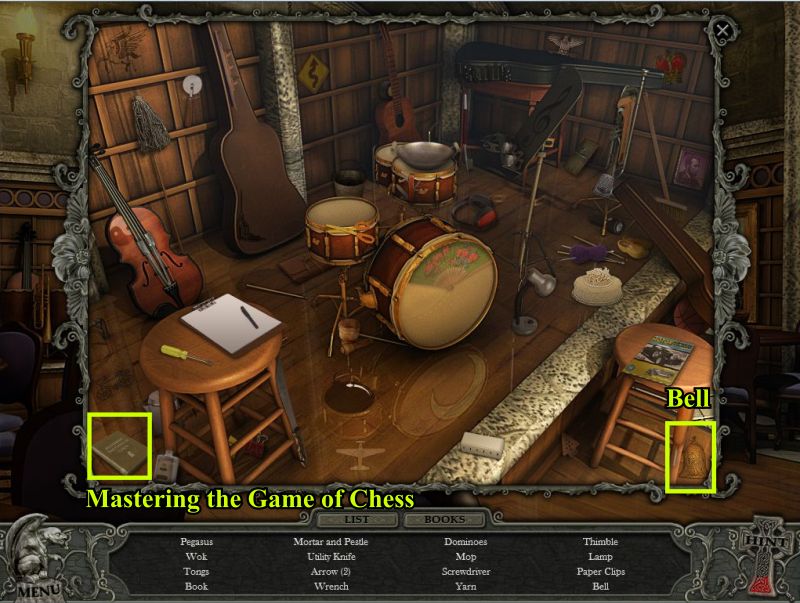
Collect the Bell and Mastering the Game of Chess and the rest of your list.
Screenshot
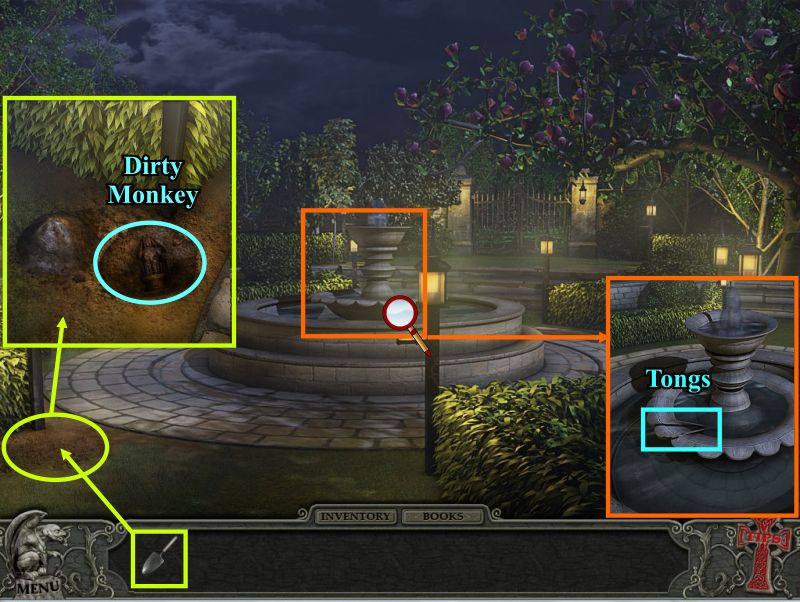
Backyard
First trip is mostly a recon mission to see what is there and what you will need to do so check out all the magnifying glasses.
When you get the shovel you will dig up the Dirty Monkey.
Once the fountain has water after the Pipes are assembled, come and pick up the Tongs.
Screenshot
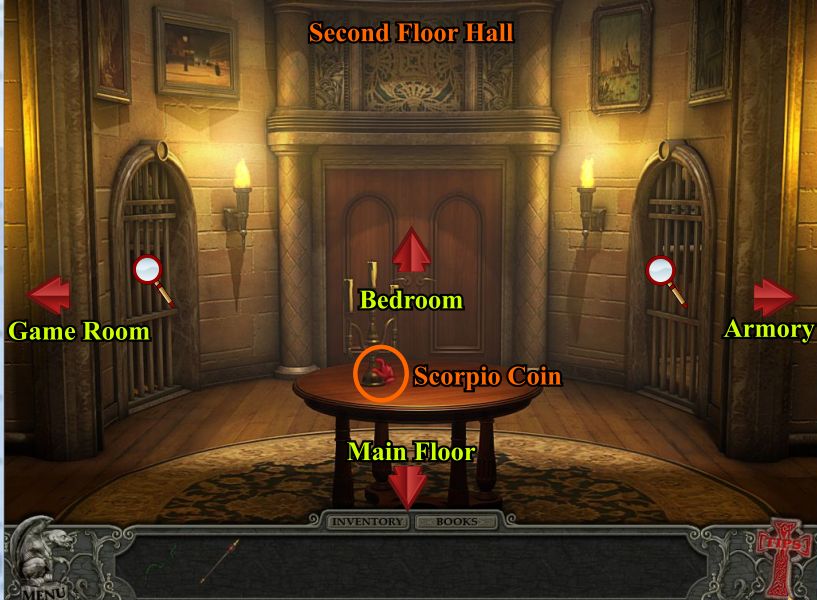
Banquet Room
First will be to look around and go through the back door to the Kitchen.
When you have the armor helmet, come place it.
When you have the Scorpio Coin, come place it for a mini game.
Arrange the coins so that the signs for man and beast are in their proper places as shown in the insert solution.
Screenshot
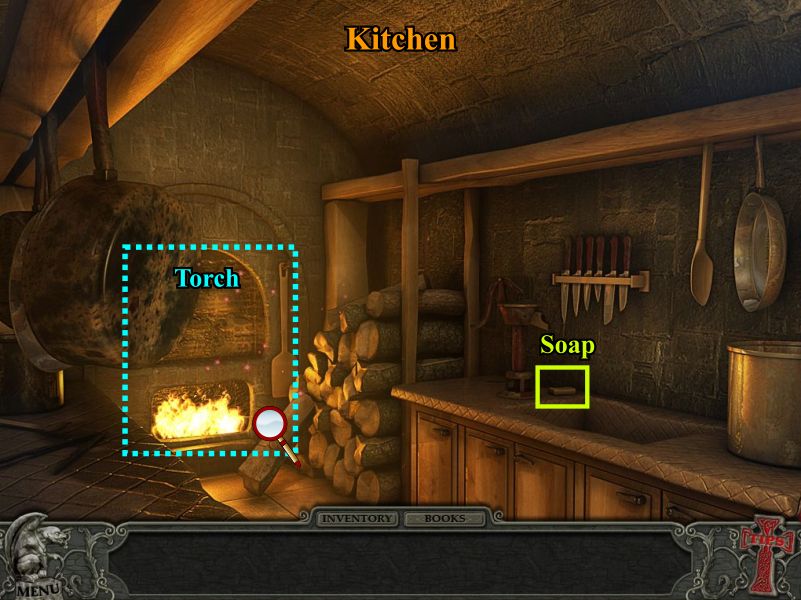
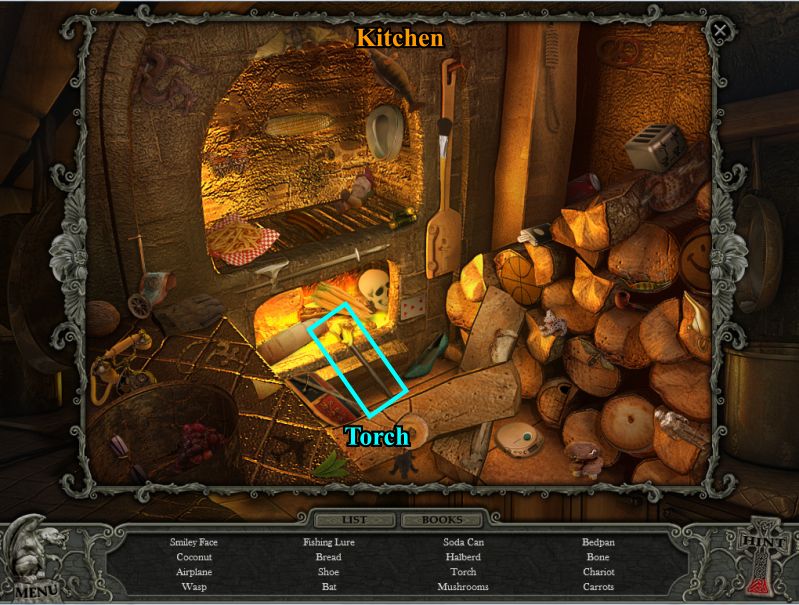
Kitchen
Pick up the soap and click for the Hidden Object scene.
Screenshot
Pick up all your items including the Torch.
Screenshot
Second Floor Hall
Pick up the Scorpion coin and head off to the Game Room.
Everywhere you will need to go is indicated including the two barred rooms for you to zoom in and look at.
Screenshot
Game Room
When you have the Torch and Queens is probably the first stop here.
Place the Torch where it belongs and the door to the Ballroom Balcony will open.
Place the Black and White Queens on the board to activate the mini game.
Screenshot
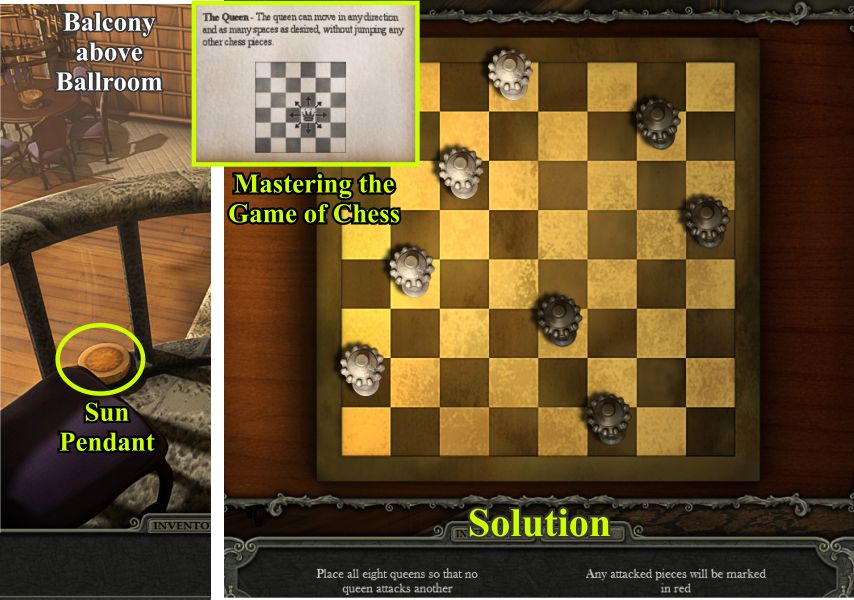
Chess Mini Game
Go out on the Ballroom Balcony and pick up the Sun Pendant.
Open the Mastering the Game of Chess book and note the moves for a Queen piece.
Your goal is to place all 8 Queens so that none of them can attack another.
Check the screen shot for the solution.
Screenshot
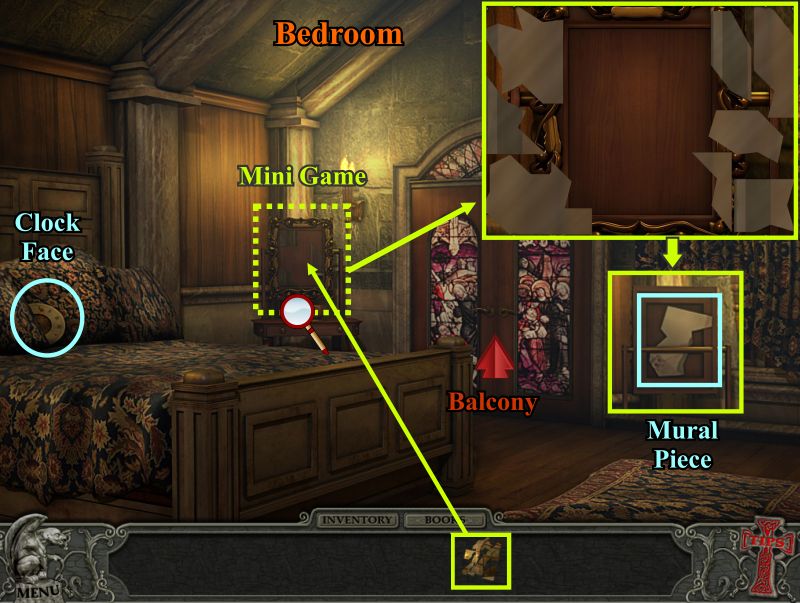
Bedroom and Mirror Mini Game
Pick up the Clock Face, place the mirror shards on the mirror to activate the mini game.
The mini game is a simple jigsaw puzzle which when assembled will get you the mural piece to collect.
Go out on the Balcony and collect the Trowel in the plant to the left.
Screenshot
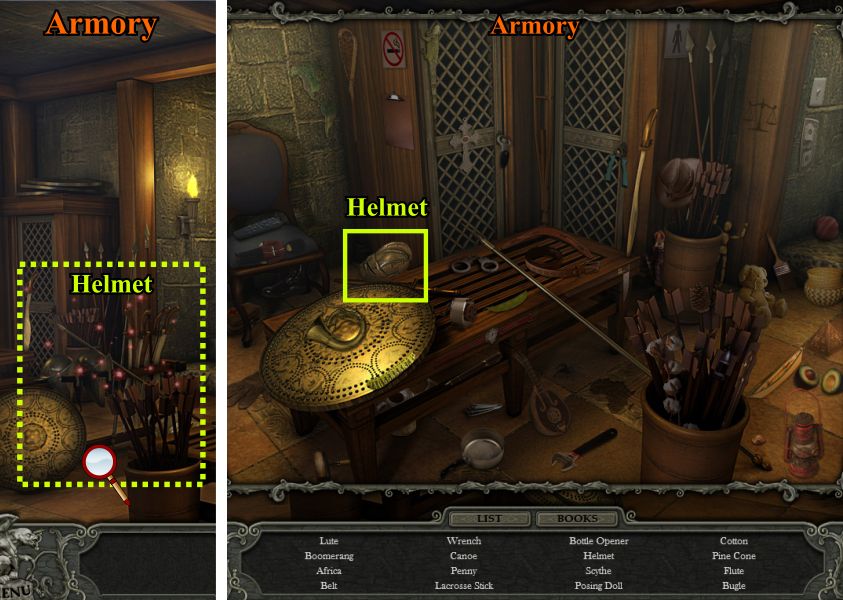
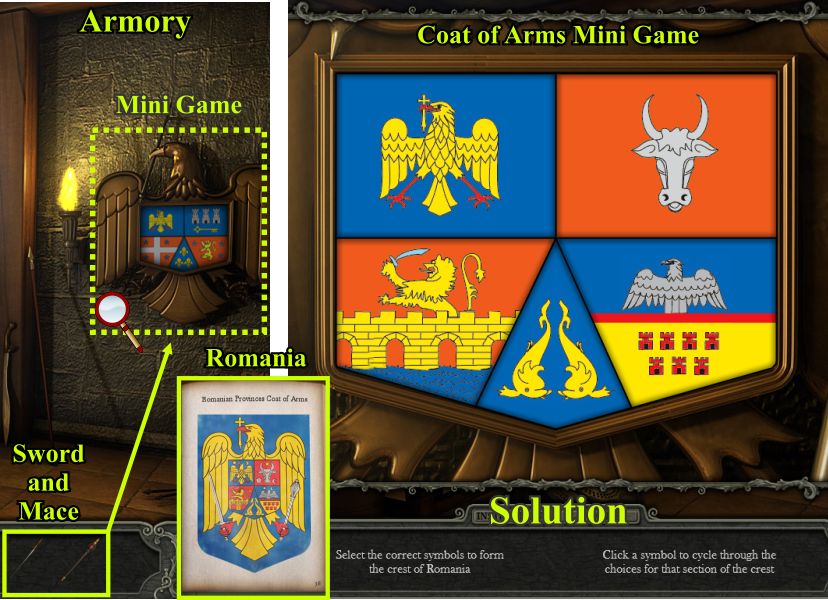
Armory
Click on the sparkles for a Hidden Object scene to get the Helmet.
Screenshot
Coat of Arms Mini Game
Once you have the Sword and Mace place them on the coat of arms for a mini game.
Check your Romania book for the coat of arms picture and match the one on the wall as best as you can.
Click on each of the 5 sections to cycle through them to match what is shown in the solution.
Screenshot
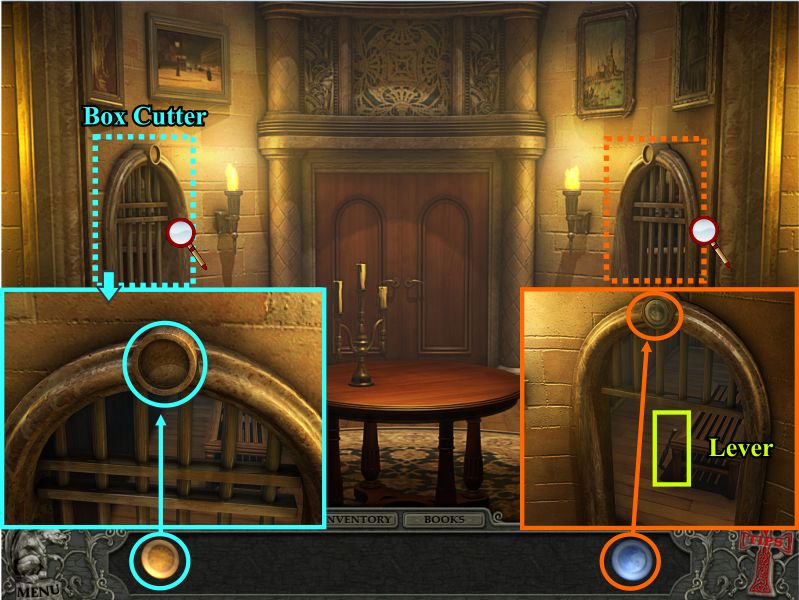
Barred Hall Doors
When you have the Sun and Moon Pendants you will be able to open the barred rooms in the upstairs hall.
Place the Sun on the left door to bring up a Hidden Object scene.
Place the Moon on the right door to be able to collect one of the levers.
Screenshot
Collect everything including the box cutter.
Screenshot
Bedroom Balcony
Your first stop you got the Trowel.
Once you have all 3 levers you can place them for a mini game.
Screenshot
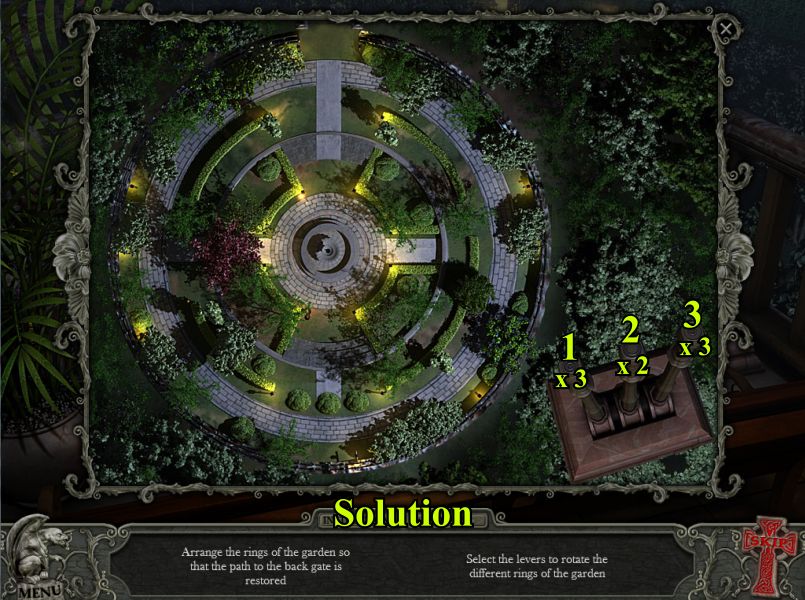
Garden Path Mini Game
In order to open the back gate and escape the Castle you will need to restore the garden path to the gate.
Click on the rings to restore the path as shown and exit the gate.
In order to do that you will need to click on lever 1 three times, lever 2 twice, and lever 3 three times.
Screenshot
Watch the ending scenes.
Congratulations! You have escaped the Castle and completed Hidden Mysteries: Vampire Secrets.
Special thanks to Jazz for this fabulous walkthrough!
Posted by: grinnyp |
August 2, 2010 2:19 PM
|
August 2, 2010 2:19 PM