

Haunting Mysteries:
The Island of Lost Souls
Platform: Mac, Windows
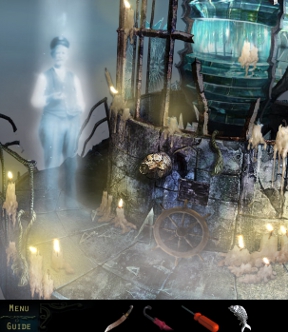
![]() If your cursor is an ominous grinning human skull, can you really be surprised when your plane takes a nosedive into the ocean? In Fuzzy Bug Interactive's hidden-object adventure Haunting Mysteries: The Island of Lost Souls, you manage to avoid a watery grave by floundering ashore onto a nearby island. Of course, the laws of video games dictate that all unmapped islands at sea have at least one (1) malevolent curse and more than two (2) tortured spirits with unfinished business, so chances are you're not going to kick back somewhere with a mug of hot chocolate until help arrives. It seems the island's previous inhabitants had a bit of a tragic history, and one lonely bride has been mourning her beloved and hiding from the vicious spectre of the man who killed him ever since. Can you put a centuries old betrayal and murder to rest without becoming another casualty of the world's worst case of obsession?
If your cursor is an ominous grinning human skull, can you really be surprised when your plane takes a nosedive into the ocean? In Fuzzy Bug Interactive's hidden-object adventure Haunting Mysteries: The Island of Lost Souls, you manage to avoid a watery grave by floundering ashore onto a nearby island. Of course, the laws of video games dictate that all unmapped islands at sea have at least one (1) malevolent curse and more than two (2) tortured spirits with unfinished business, so chances are you're not going to kick back somewhere with a mug of hot chocolate until help arrives. It seems the island's previous inhabitants had a bit of a tragic history, and one lonely bride has been mourning her beloved and hiding from the vicious spectre of the man who killed him ever since. Can you put a centuries old betrayal and murder to rest without becoming another casualty of the world's worst case of obsession?
 The Island of Lost Souls offers two difficulty modes to choose from, but the gameplay should feel immediately familiar to anyone who has played another game of this type before. The cursor will change as you move it around the screen to show places you can interact with or area transitions, and you can click to add items to your inventory. During regular gameplay, the hint option will highlight any places on the current screen you can manipulate to progress, and in hidden-object scenes it randomly displays one of the items you're looking for from your list. Puzzles will attempt to bar your way towards escape and uncovering the truth, but with the option to skip them if you wait a few moments you probably have a leg up over your otherworldly antagonist that he didn't appreciate. You know, if these evil forces really don't want us to succeed in stopping them and exorcising their dastardly influence to the great beyond, maybe they should stop granting us the ability to completely bypass their overly complex locking mechanisms? Just sayin'.
 Analysis: There's no getting around the fact that Haunting Mysteries: The Island of Lost Souls isn't particularly original in its gameplay or story, but what's surprising is how enjoyable it is in spite of it. Despite the morbid subject matter, the game itself isn't oppressively dark and manages to strike an admirable balance between a handful of surprisingly effective creepy scenes and the brisk pace of the adventure gameplay. Item uses are logical, puzzles are simple but creatively presented, and the supernatural elements that continually crop up as you explore serve to keep you from losing interest. Ghost typewriter? Skull-faced madman? Awwww yeah, now you're speaking my language! Though the plot has been done before, The Island of Lost Souls carries it through in the gameplay in a way that makes you feel like you're having an impact on it, and serves it up with some lovely visuals to boot. Though am I the only one who thinks that the waves at the beginning of the game look like they're made out of meat?... yes?... huh. Thanks a lot, subconscious, my psychiatrist will have a field day with that one.
Unfortunately, that visual style makes its frequent hidden-object scenes a pain. Combined with a tendency to hide enough of an item that you might not even know what you're looking at when you're staring at it, you'll probably wish the game didn't make you do quite so much scavenging. The bigger downside, however, is that Haunting Mysteries: The Island of Lost Souls just isn't very long. Most players will sail through it unimpeded in under four hours, smashing easily through puzzles like a particularly nerdy Hulk on the rampage. The Island of Lost Souls is perhaps best recommended for players who want something light and easy to sink into for a single evening's play, or those of you with a fondness for fatal love triangles and secret mechanisms. If you want a lot of challenge or longer gameplay this might not be for you, but for a great casual experience with gameplay nowhere near as dark as tends to be popular these days, Haunting Mysteries: The Island of Lost Souls is worth checking out.
A Collector's Edition is also available. It contains a bonus chapter, art gallery, strategy guide, and more. Remember that Big Fish Game Club Members pay only $13.99 for Collector's Editions (or 2 club credits), and collector's editions count 3 card punches of 6 total needed for a free game.
![]() Windows:
Windows:
Download the demo
Get the full version
Also available: Collector's Edition
![]() Mac OS X:
Mac OS X:
Download the demo
Get the full version
Also available: Collector's Edition


Walkthrough Guide
(Please allow page to fully load for spoiler tags to be functional.)
Haunting Mysteries: The Island of Lost Souls
Chapter 1: Cockpit Escape
Escaping the Crash
Click on the visor in the upper right corner of the cockpit and note the orientation of the switches on the emergency release card.
Up, up, down, down, up.
Click on the switches labeled Emergency Exit Door Release and put them in the orientation indicated on the card.
Press the red exit button on the left of the cockpit.
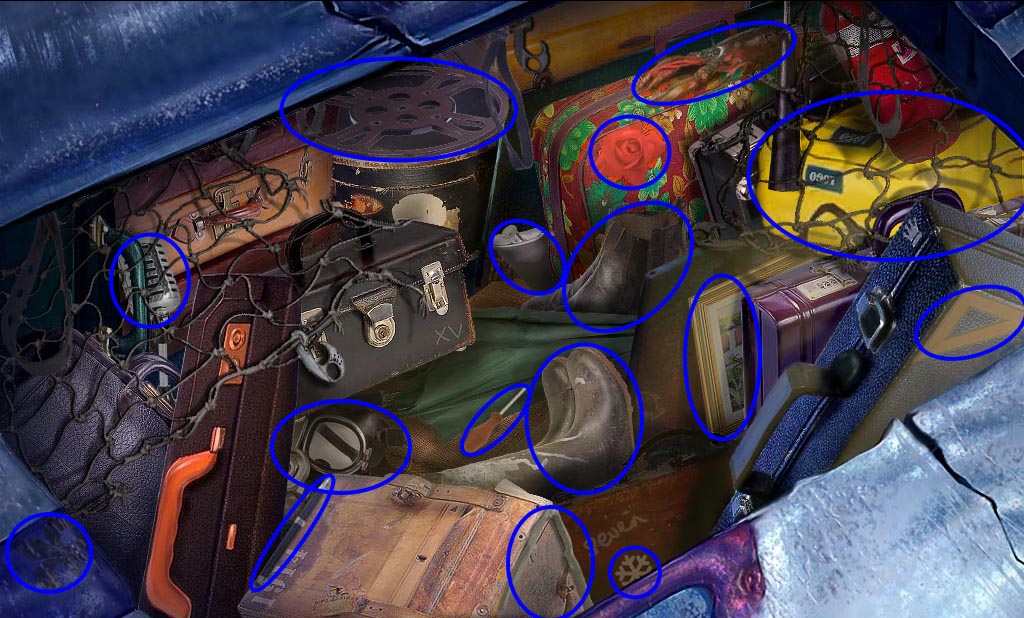
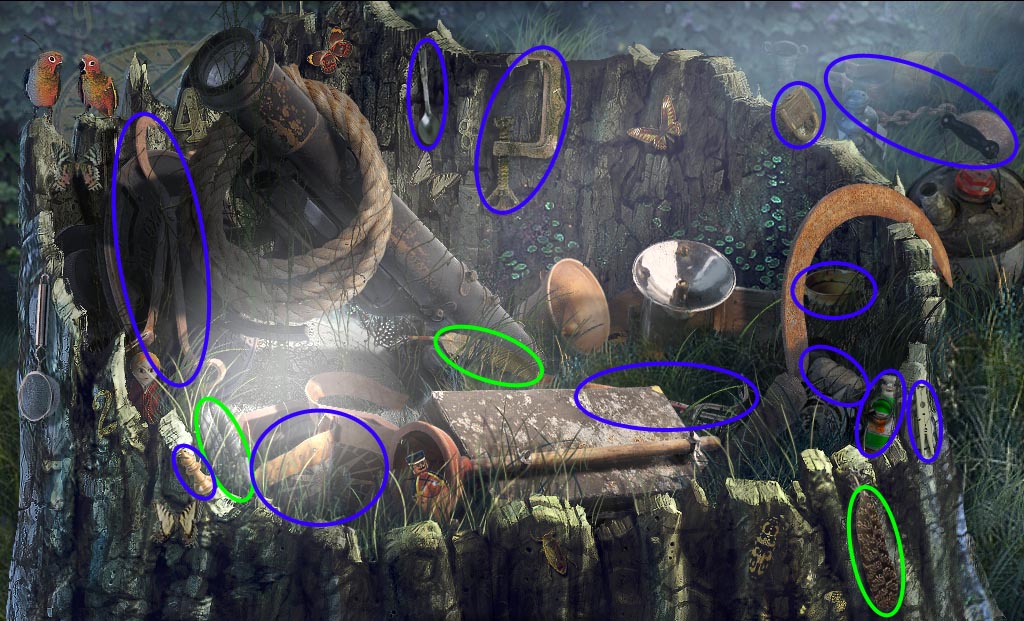
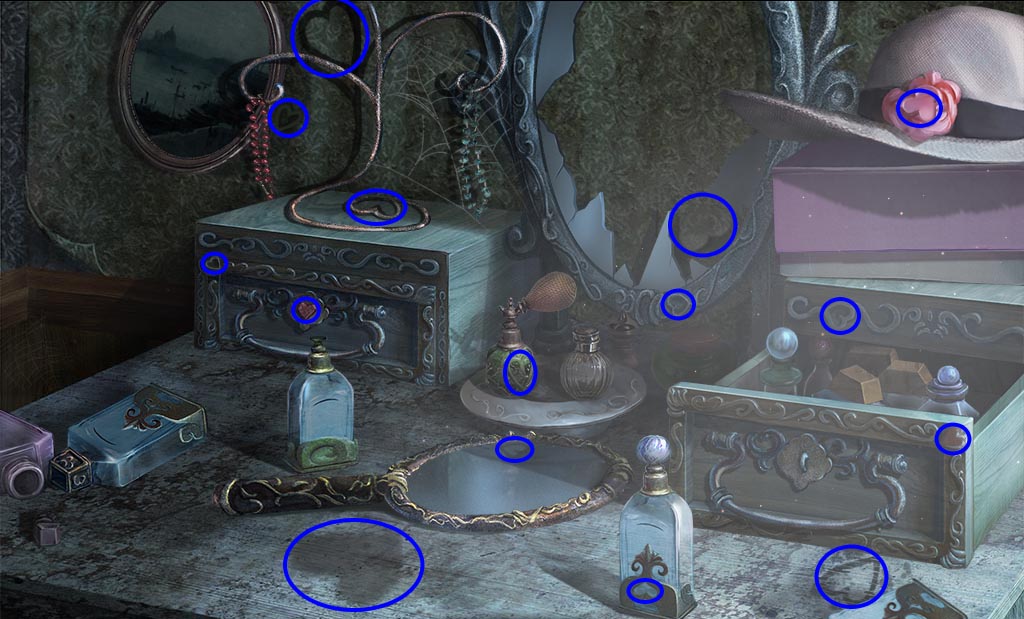
Click on the life preserver to start the hidden object scene.
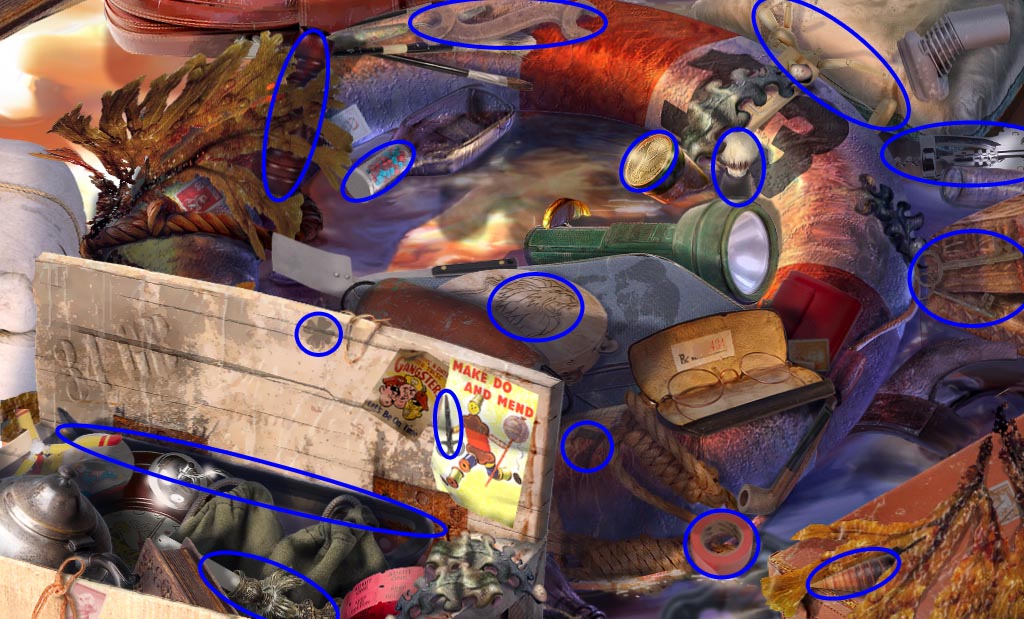
Screenshot.
You will receive a Crowbar.
Inspect the storage door on the plane and use the Crowbar three times to pry it open.
Click on the open storage compartment to begin the hidden object scene.
Screenshot.
You will receive a Liferaft.
Use the Liferaft on the sea to float to the jetty.
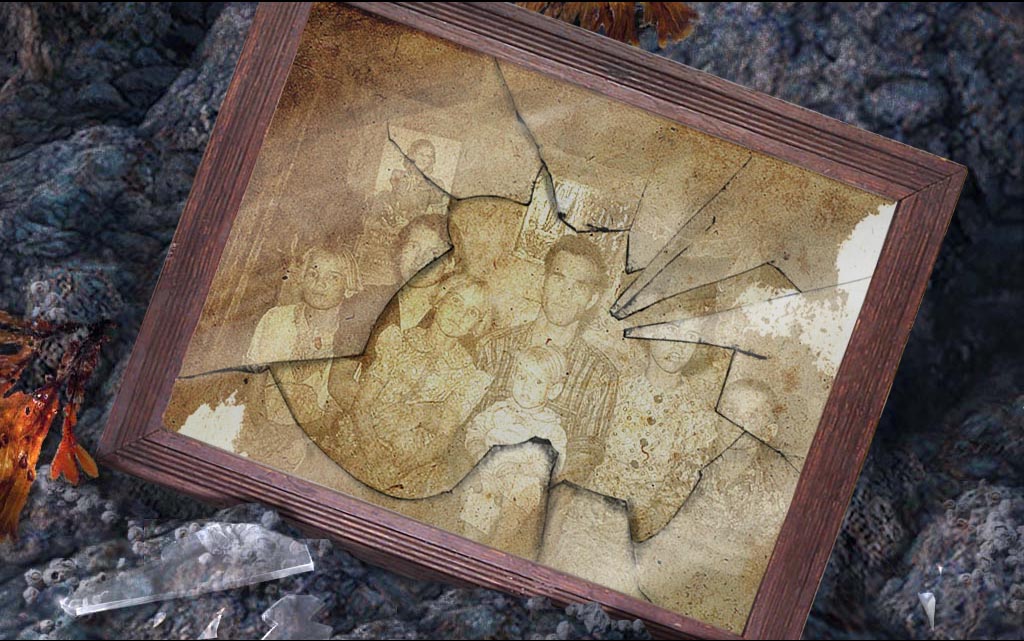
The Family Photo
Pick up the Photo Piece (1/8) from the left side of the dock next to the stairs and the Photo Piece (2/8) from the right side of the dock.
Try to go down the dock and speak to the spirit.
Move to the left toward the lighthouse steps.
Click on the sign on the left and pick up the Photo Piece (3/8).
Inspect the papers in the road and pick up the Photo Piece (4/8).
Go up the stairs to the lighthouse and pick up the Typewriter Ribbon on the steps.
Pick up the Photo Piece (5/8) on the left side of the steps.
Look at the lobster pots and take the Chisel.
Go to the left around to the back of the lighthouse.
Pick up the Photo Piece (6/8) next to the rope tied to the handrail.
Move the box against the wall and pick up the Photo Piece (7/8).
Pick up the Photo Piece (7/8) next to the closed window at the top of the screen.
Inspect the loose brick in the wall and click on it three times to reveal the Hammer Head.
Look at the table and take the Fishing Tackle.
Go back to the front of the lighthouse.
Look at the lobster pots and use the Fishing Tackle on the Fishing Rod and pick it up.
Move back down the steps.
Click on the picture frame and assemble the Photo Pieces to form a picture of a family and receive the Photo.
Click on a piece to rotate it.
A piece will lock in place when put in the correct position.
Screenshot.
Entering the Lighthouse
Inspect the typewriter and place the Typewriter Ribbon in it. Note the number it is typing.
5786
Go back to the docks.
Inspect the briefcase and enter the number that the typewriter was typing on the lock.
Click on the open briefcase to activate the hidden object scene.
Screenshot.
You will receive a Ball of Twine.
Inspect the gap in the dock and use the Fishing Rod to catch a Herring.
Give the Herring to the seagull and it will fly away, allowing you to access the bucket.
Pick up the Screwdriver and the Silver Fish from inside.
Return to the lighthouse and inspect the sign above the door.
Use the Screwdriver on each of the screws to take down the sign and receive a Plank.
Return to the jetty.
Use the Plank on the gap in the dock.
Move to the right to the small graveyard.
Pick up the Wooden Handle from behind the tombstone on the bottom left.
Go to the back of the lighthouse and inspect the stone table.
Place the Ball of Twine, Hammer Head, and Wooden Handle on the table and assemble them into a Hammer.
Inspect the unfinished gravestone.
Use the Chisel and the Hammer to chip the excess stone away and receive the Grave Stone.
Return to the graveyard and place the Grave Stone in the empty spot.
Give the Photo to the ghost that appears to receive a Panel.
Return to the front of the lighthouse and inspect the door.
Use the Panel to start the puzzle.
Rotate the wheels to get the color/shape combination shown on one of the panels.
Click the arrow on the left of the combination on the panel until it is the color that the arrow on the left wheel points to.
Click the arrow on the right of the combination on the panel until it is the shape that the arrow on the right wheel points to.
Repeat until each combination on the panel is locked in.
Screenshot.
Enter the lighthouse.
Chapter 2: Inside the Lighthouse
Turning the Light
Take the Dry Sponge in the bottom right and the Umbrella from under the stairs.
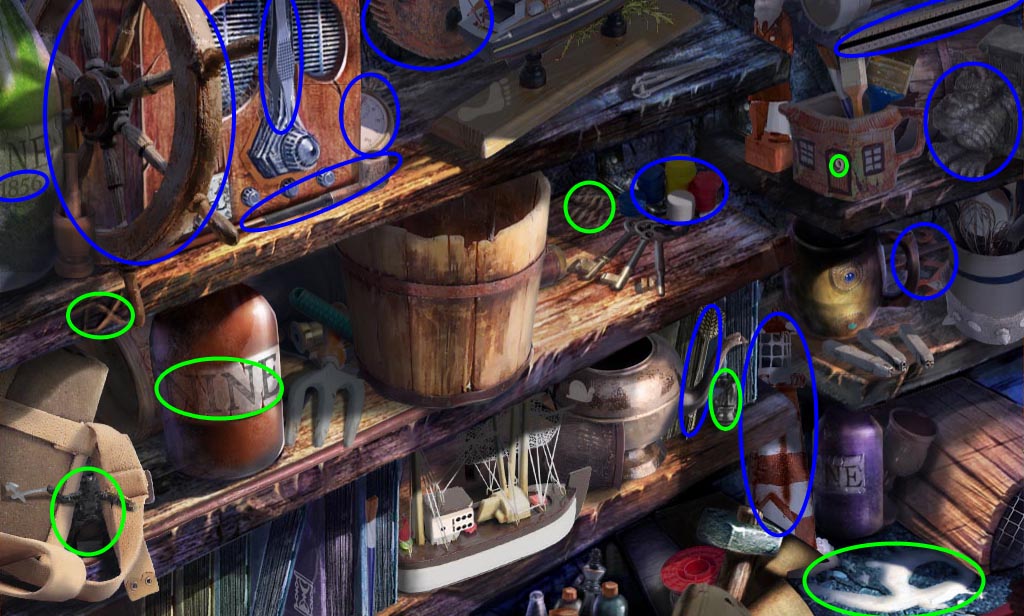
Click on the shelves to begin the hidden object scene.
Screenshot.
You will receive the Ship's Wheel.
Go up the stairs.
Pick up the Oil Can on the ground.
Place the Ship's Wheel on the spindle on the wall.
Go back down the stairs.
Use the Oil Can on the rusty gears and go back upstairs.
Turn the wheel, and a ghost will speak to you.
Opening the Trap Door
Take the Ship's Wheel from where it fell.
Click on the lamp to activate the hidden object scene.
Screenshot.
You will receive a Knife.
Go downstairs and out to the back of the lighthouse.
Use the Knife to cut the rope holding up the barrel.
Inspect the broken barrel.
Move the debris aside until you find the red Jewel.
Go back inside the lighthouse and click on the statue head above the door.
Place the Jewel in the empty eye socket and take the Metal Ring.
Put the Metal Ring in the trap door on the floor and open it.
Go down into the basement and speak to the ghost.
The Spyglass
After the dialogue, inspect the power box on the floor of the right side of the hallway.
Use the Screwdriver to open the box and start the puzzle.
Arrange the wires to connect one side of the box to the other.
This puzzle is randomized each time.
Go left into the tower bunker.
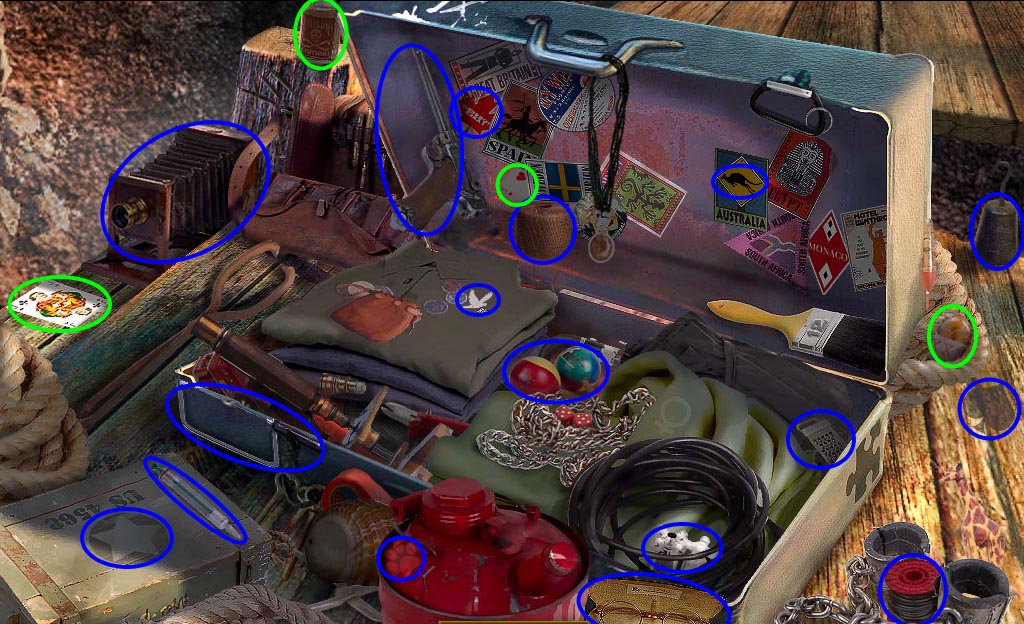
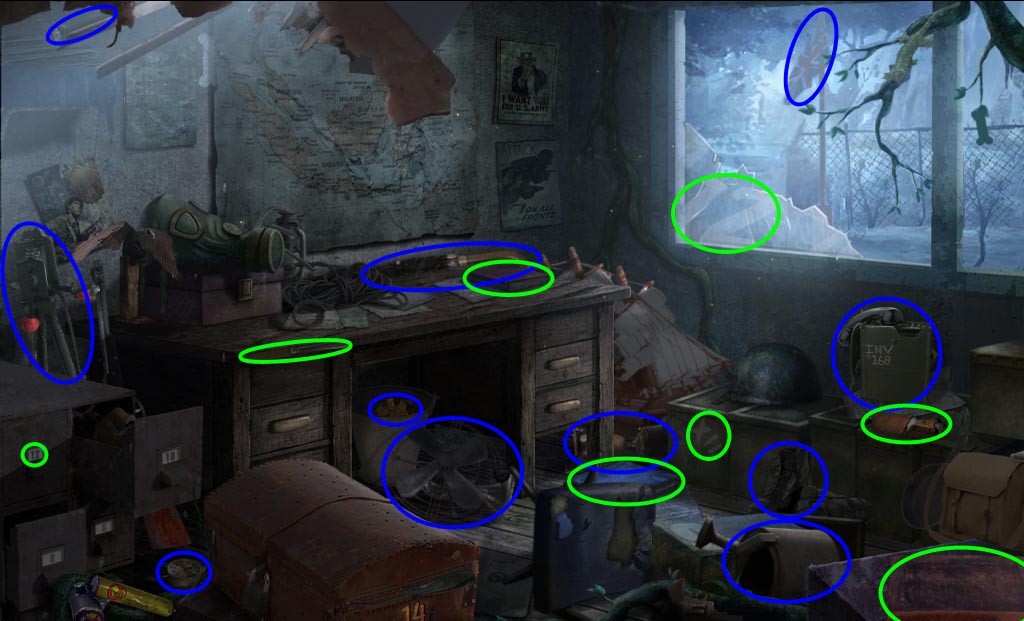
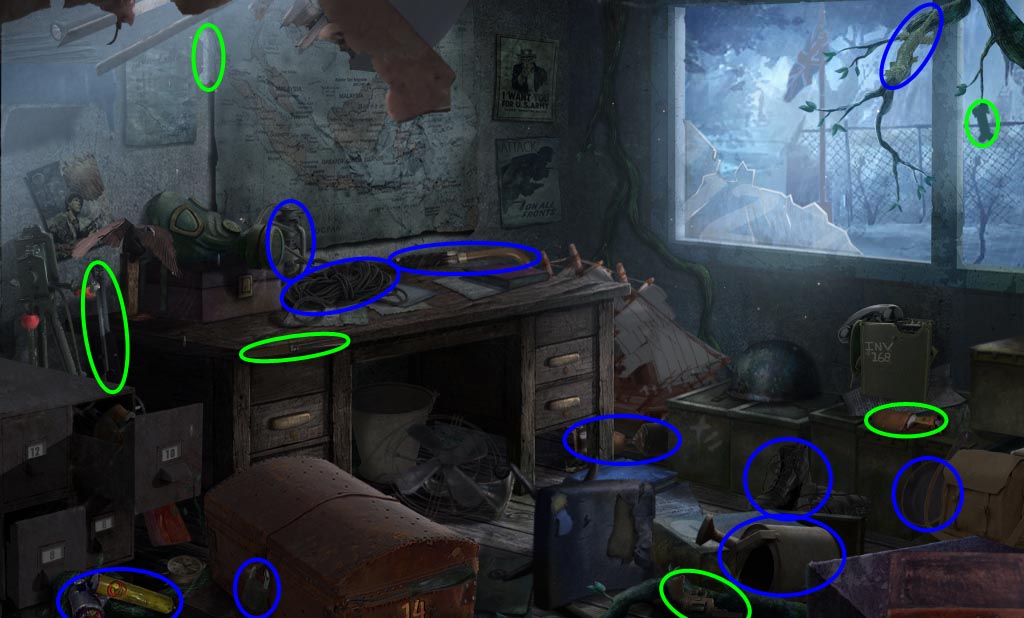
Click on the desk to start the hidden object scene.
Screenshot.
You will receive a Scraper.
Look at the chest on the right and pick up the Shield Half (1/2) behind it.
Use the Dry Sponge on the bucket of water to get a Wet Sponge.
Click on the poster in the upper right.
Use the Wet Sponge to wet down the poster and then use the Scraper to remove it from the wall.
Take the Silver Fish from the alcove in the wall.
Examine the cabinet on the left wall and place the two Silver Fish in the holes.
Grab the Shield Half (2/2) and go back up to the inside of the lighthouse.
Inspect the shelves to start the hidden object scene.
Screenshot.
You will receive a Spyglass.
Go upstairs and give the Spyglass to the ghost and he will give you a Puzzle Piece.
Opening the Blast Door
Click on the barrel on the right and place the Shield Halves in the hole to start the puzzle.
Move each piece of the crest until it locks into its correct spot.
Screenshot.
Take the Wrench from inside the barrel and return to the tower bunker in the basement.
Inspect the cabinet and use the Wrench to remove the Large Bolt.
Exit the lighthouse, go down the stairs to where the typewriter is, and pick up the Heavy-Duty Hook.
Return to the lighthouse basement and examine the blast door down the hall.
Place the Ship's Wheel on the door and the Large Bolt to hold it in place. Use the Wrench to tighten it.
Click on the wheel to open the panel, and place the Puzzle Piece in the open slot to start the puzzle.
Click on each section to rotate it until it forms a contiguous person.
The solution to the puzzle will resemble the ghost from the top of the lighthouse.
Screenshot.
When the door opens, enter the cave.
Chapter 3: Underground
Turning on the Winch
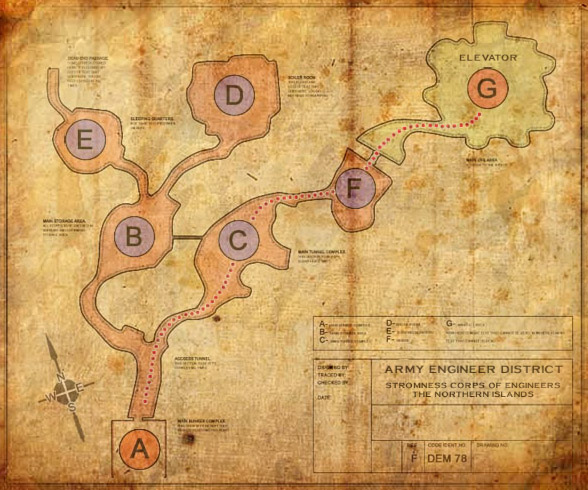
Examine the map on the wall on the right. Take note of the letters assigned to each cave section, they will be used to refer to each section later.
Screenshot.
Go right to cave C.
Grab the Unlit Torch from the torch holder in the upper left.
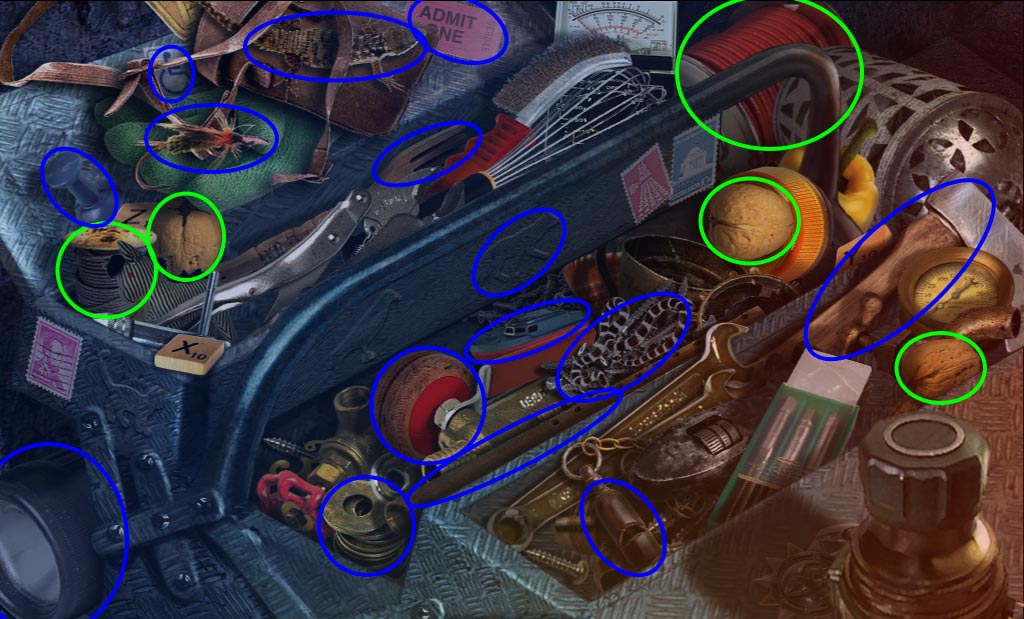
Click on the toolbox in the lower left to start the hidden object scene.
Screenshot.
You will receive a Hatchet.
Go forward into cave F.
Attach the Heavy-Duty Hook to the ring on the statue.
Move back twice and take the left path to cave B.
Use the Hatchet to hack through the wooden gate and proceed to cave D.
Inspect the furnace and take the Machine Belt.
Walk back into cave B.
Place the Machine Belt on the winch and pull the lever.
Accessing the Furnace
Go back to cave F (where you attached the Heavy-Duty Hook) and pick up the Puzzle Piece (1/2) from the statue debris.
Walk forward to cave G and then forward into the elevator.
Open the panel below the elevator controls with the Screwdriver and take the Puzzle Piece (2/2) inside.
Return to cave D with the furnace.
Click above the furnace and place the two Puzzle Pieces in the slots to begin the puzzle.
Click on a piece of the puzzle to select it, then on another piece to swap their places.
Continue until you form a picture of a mansion.
Screenshot.
When the furnace opens, use it to light the Unlit Torch and obtain the Lit Torch.
Fixing the Elevator
Go back and then to the left to enter cave E.
Place the Lit Torch in the torch holder on the right to light the room and speak to the ghost.
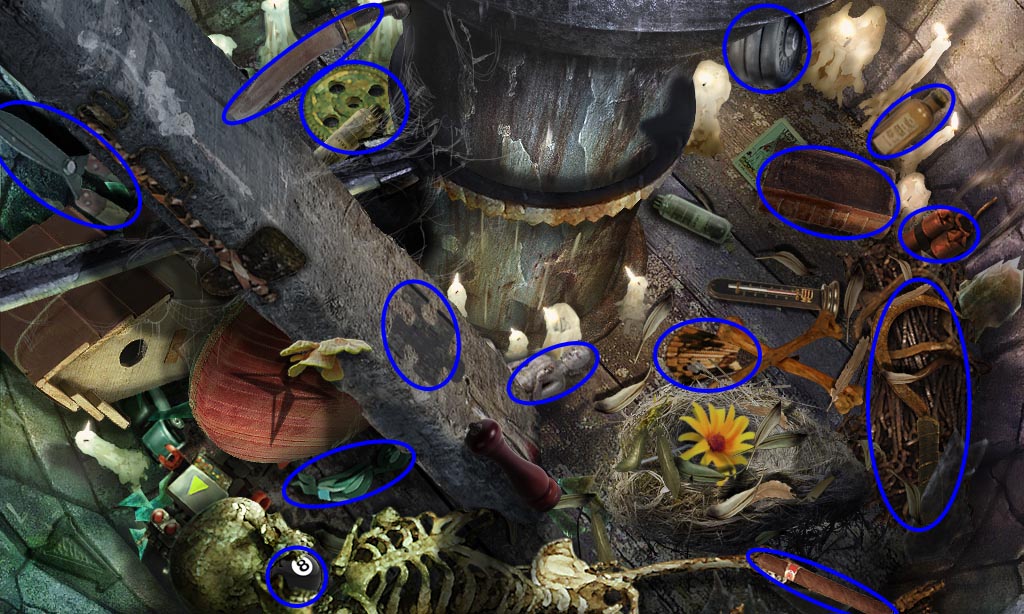
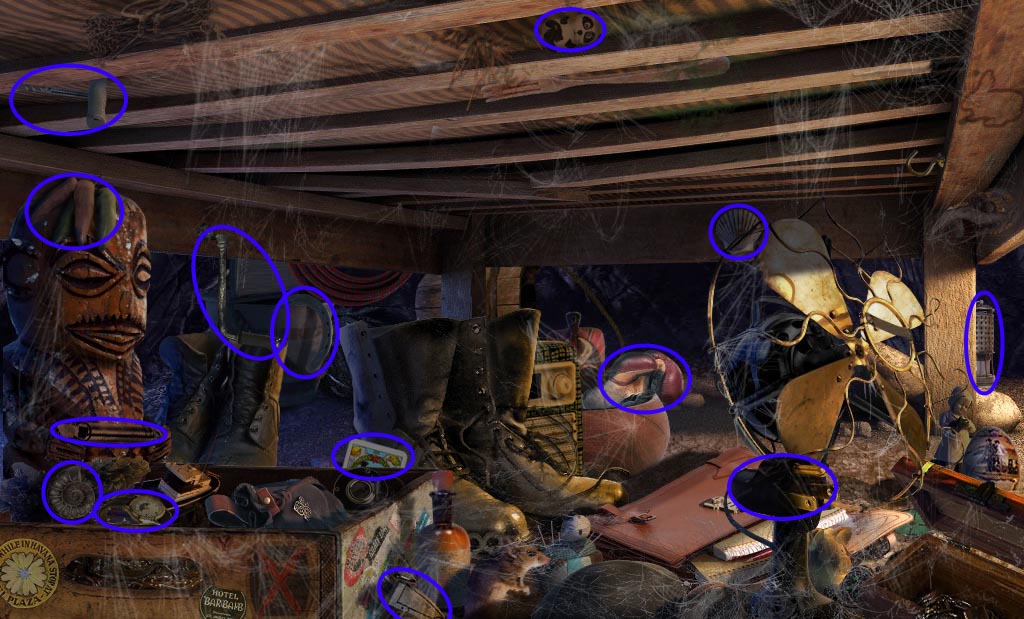
Inspect the bunk beds on the left to begin the hidden object scene.
Screenshot.
You will receive the Chest Key.
Walk back three times and go left into the tower bunker.
Inspect the chest on the right and use the Chest Key to open it and obtain the Battery.
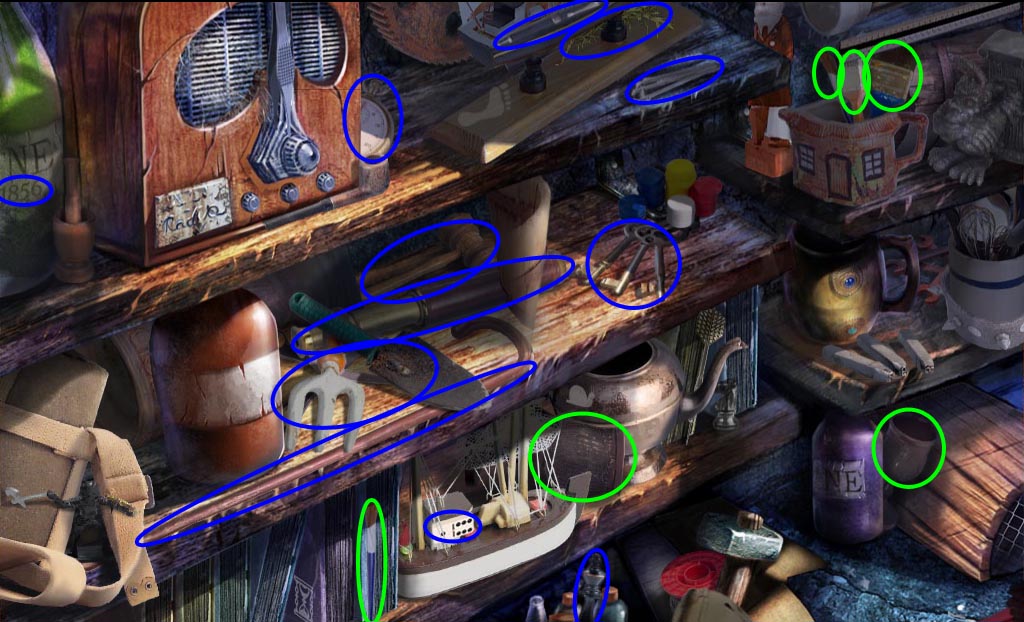
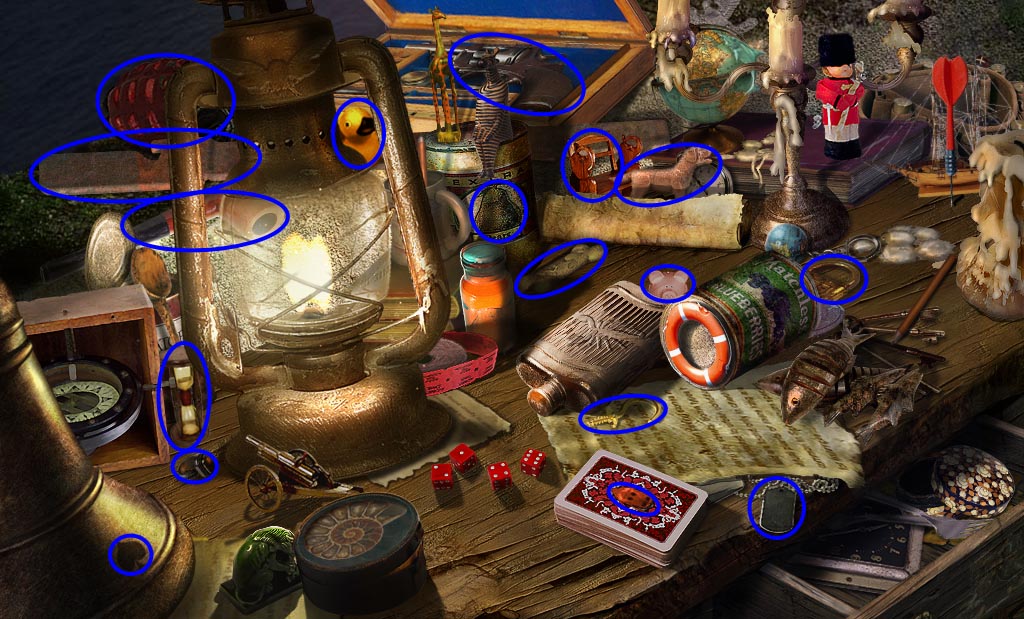
Click on the desk to start the hidden object scene.
Screenshot.
You will receive a Rail Lever.
Return to cave F with the elevator.
Click on the lever: it will send a cart with nothing in it forward, then break.
Use the Rail Lever where the lever was to send through two more carts, one with a Diamond in it.
Take the Diamond to the ghost in cave E, and he will give you a Button.
Return to cave F and enter the elevator.
Hook the Battery up to the wires and place the Button in the control panel.
Press the up button to go up to the surface.
Chapter 4: Abandoned Compound
The Lower Compound
After exiting the elevator, look at the jeep and cut open the tarp with the Knife.
Grab the Cupboard Handle and the Gas Cylinder.
Take the elevator back down and return to cave E.
Inspect the cupboard and use the Cupboard Handle to open it and obtain a Brass Coin.
Click on the bunk beds to activate the hidden object scene.
Screenshot.
You will receive a Crank.
Return to the jeep outside the elevator and place the Brass Coin into the medal box in the back to start the puzzle.
Click on a coin to flip it over, then click on another coin to flip it over.
Unless the coins are identical, they will both flip back.
Continue flipping until all of the pairs of coins are uncovered.
Screenshot.
Take the Shears from inside the box then step forward past the jeep.
Inspect the controls to the left of the waterfall and pick up the first Wooden Pipe.
Opening the Blast Door
Go up the stairs to the left and pick up the Ballerina on the stairs.
Enter the cockpit of the plane on the right and pick up the second Wooden Pipe.
Place the Gas Cylinder in the chair and pull the lever.
Pick up the first Cog Piece from where the chair was and note the Morse code translation sheet behind it—it will be relevant later.
Leave the plane and continue along the path.
After the ghost speaks to you, use the Shears to clear the vines from the gate.
Place the first Cog Piece in the gate and pull the rope to the left to receive the Stone Wedge.
Examine the rotting trunk to the left of the gate to start the hidden object scene.
Screenshot.
You will receive Acid.
Walk back three times to the compound and use the Acid on the chains on the door to the right.
Click on the open door to the guardhouse to start the hidden object scene.
Screenshot.
You will receive the second Cog Piece.
Return to the gate, place the second Cog Piece in the gate and pull the rope to receive the Star Shaped Necklace.
The Second Two Cog Pieces
Take the elevator back down and return to cave C.
Inspect the shrine to the right and use the Star Shaped Necklace to open the chest and receive the third Cog Piece.
Take the Cog Piece to the gate on the surface, place it in the slot and pull the lever to receive the Music Reel.
Inspect the tree to the right, place the Music Reel and Ballerina in the music box, and it will open to reveal a Trowel.
Click on the loose ground below the tree and use the Trowel to uncover the third Wooden Pipe.
Go down twice and then into the mill on the right.
Place the Crank into the mechanism, and a ghost will speak to you.
Put the three Wooden Pipes into place along the wall on the left and pull the crank. The wheel will turn, and you will receive the Crescent Moon.
Exit the mill, click on the controls to the left of the waterfall, and place the Crescent Moon into place.
Follow the path that opens up toward the waterfall and use the Umbrella to block the water.
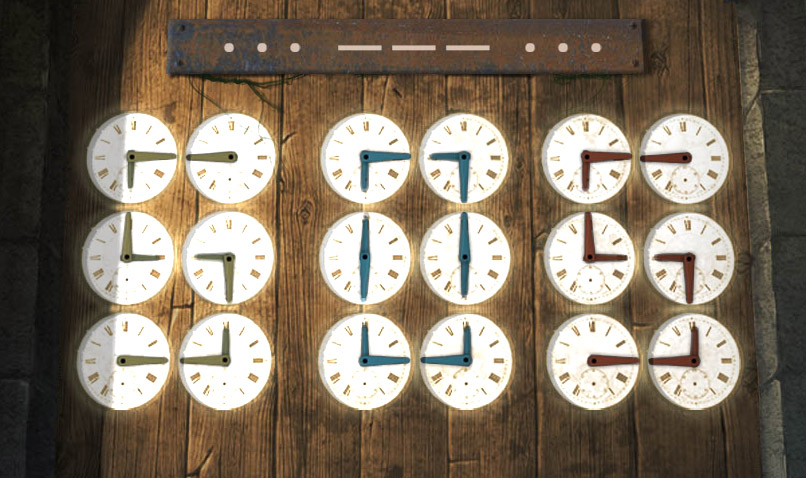
Inside the cave, place the Stone Wedge in the wall to start the puzzle.
A series of four patterns will be displayed on the wall: repeat each one to reveal a four digit code.
I, VI, II, III
Enter the code into the box to the right of the wall to open it and receive an Antique Watch.
Return to the mill and give the Antique Watch to the ghost, and she will give you the fourth Cog Piece.
Take the last Cog Piece to the gate, put it in place and pull the rope to open the way to the town square.
Chapter 5: The Town
Completing the Doll
After entering the town, pick up the Watering Can in the lower left.
Enter the toy shop through the door on the left and speak to the ghost.
Push aside the teddy bears on the shelf to the left and pick up the Flowers.
Inspect the monkey on the right and pick up the Glass Diamond (1/2) from the counter.
Move the doll in the lower right to find the location of the blue diamond for a puzzle later.
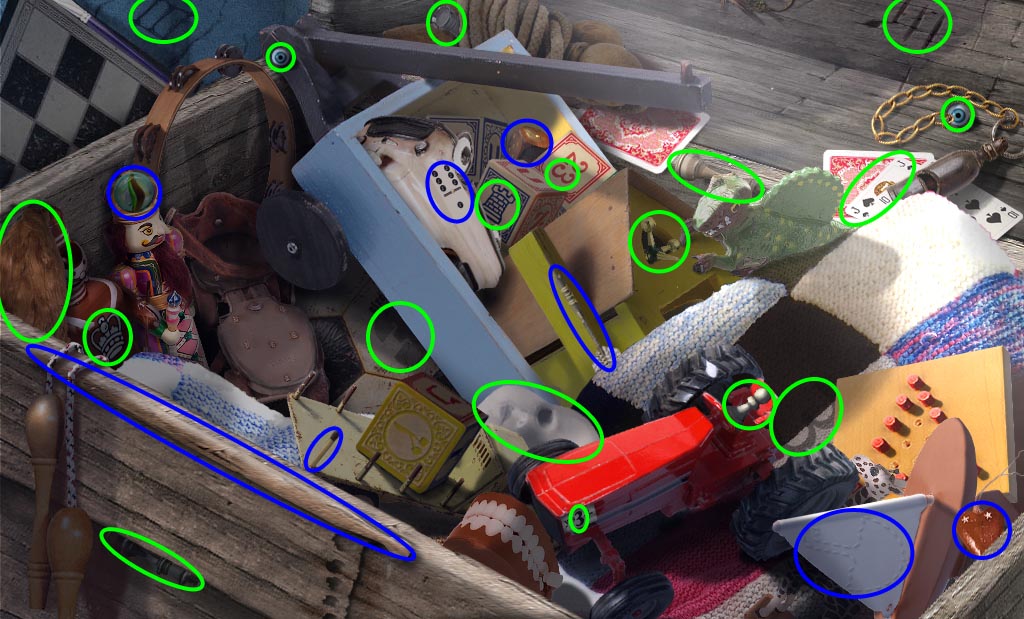
Open the trunk in the corner and click on the contents to activate the hidden object scene.
Screenshot.
You will receive Doll Parts.
Exit the toy shop and enter the florist shop through the door on the right.
Look at the sign on the counter and take the Dry Paintbrush. Note the locations of the yellow and green on the diamond for a puzzle later.
Return to the toy shop.
Inspect the unfinished doll on the counter.
Use the Dry Paintbrush on the paint can to receive the Wet Paintbrush.
Paint the face with the Wet Paintbrush by clicking a few times.
Place the Doll Parts on the counter.
Put the eyes in the sockets, attach the hair, and put on the hat.
Take the finished Doll and give it to the ghost to receive a Clock Face (1/3).
Ringing the Bell
Exit the toy shop and go right down the street.
After the ghost speaks to you, inspect the flowerbed and use the Trowel to dig up the Glass Diamond (2/2).
Look at the crate on the right and note the location of the red on the diamond for the next puzzle.
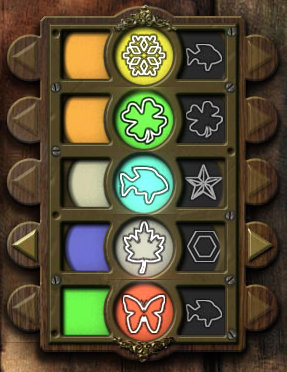
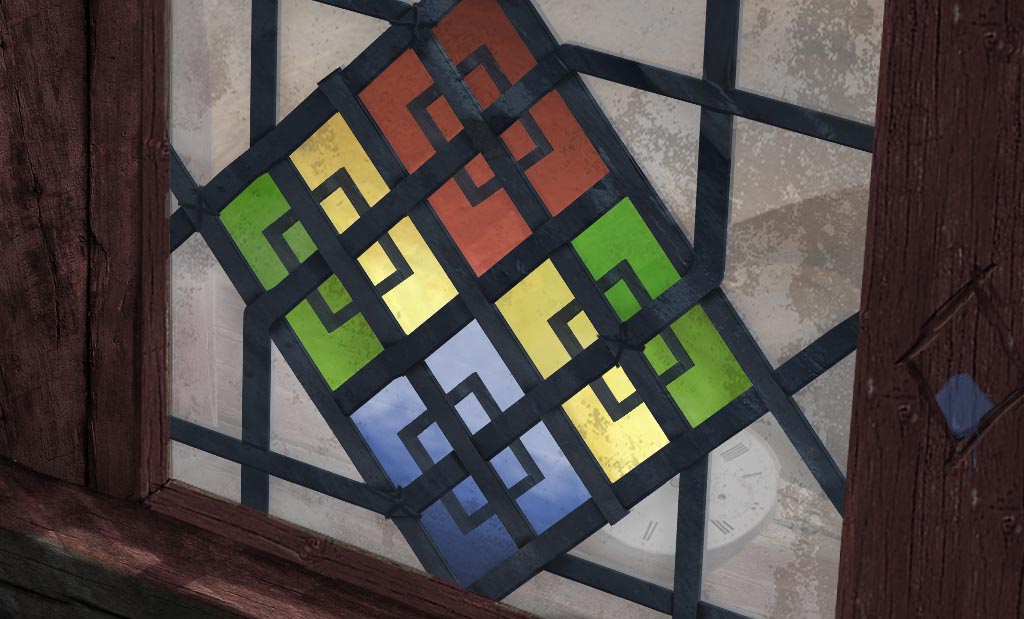
Inspect the window with the colored diamonds and place the Glass Diamonds in the empty spaces to begin the puzzle.
Click on a pane to select it, then click on another pane to switch their location.
Arrange the panes so the colors are in the places indicated earlier.
Screenshot.
With the window open, you can take the Clock Face (2/3).
Walk forward toward the gate. Inspect it and take the Hose Pipe.
Go back six times to the compound.
Examine the jeep. Place the Watering Can next to the gas can on the back of the jeep, then use the Hose Pipe to siphon gas into it and receive Gasoline.
Click on the door to the guard tower to start the hidden object scene.
Screenshot.
You will receive Weedkiller.
Return to the florist shop. Use the Weedkiller on the giant plant and pick up the Clock Face (3/3) that it drops.
Exit the florist shop and inspect the door to the clock tower. Put the Clock Faces in the slots to begin the puzzle.
Use the Morse code sheet in the airplane wreckage to translate the dots and dashes.
Click on a clock face to turn the it and spell out the letters.
The correct letters are S O S.
Screenshot.
Go up the stairs and pick up the Carriage Handle from the floor.
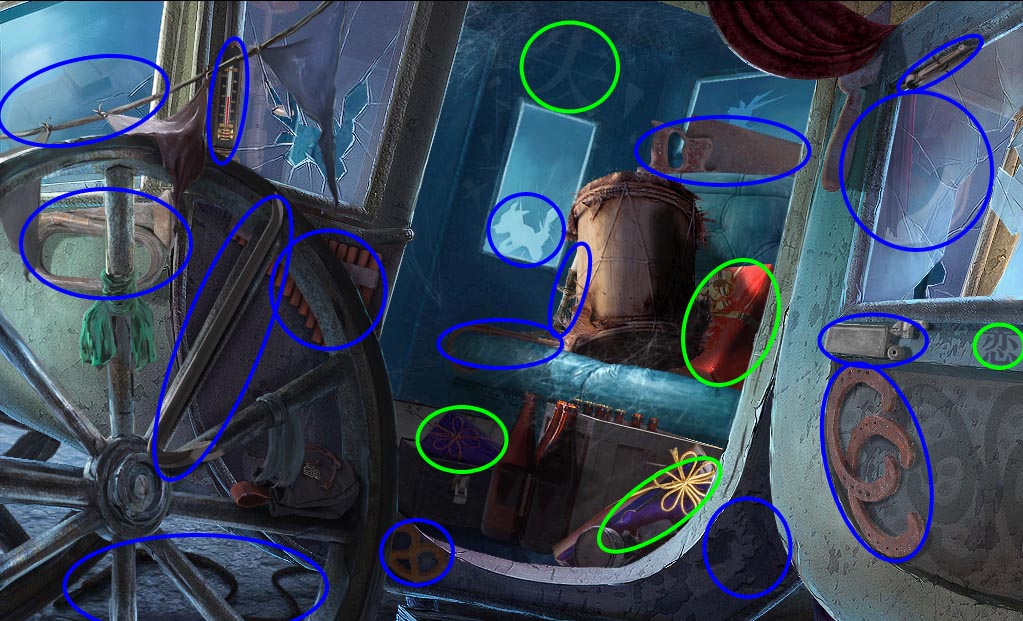
Return to the town square, follow the street to the right and inspect the carriage. Attach the Carriage Handle and open the door to begin the hidden object scene.
Screenshot.
You will receive a Crowbar.
Look at the crate on the right, use the Crowbar three times to open it, and receive the Clapper.
Return to the bell tower, put the Clapper in the bell and ring it.
Lowering the Bridge
After ringing the bell, return to the florist shop and speak to the ghost. She will give you Scissors.
Exit the shop, go right down the alley, and look at the flowerbed on the right. Use the Scissors to collect Flowers (2/8).
Move forward and use the Scissors to collect Flowers (3/8) from the right of the gate.
Walk back three times and use the Scissors to collect Flowers (4/8) below the tree.
Go back once and use the Scissors to collect the Flowers (5/8) below the stone pillar.
Walk back again and use the Scissors to collect the Flowers (6/8) next to the bushes on the lower left.
Move forward towards the waterfall and use the Scissors to collect the Flowers (7/8) on the far left.
Go back twice to the compound and use the Scissors to collect Flowers (8/8) next to the guardhouse door.
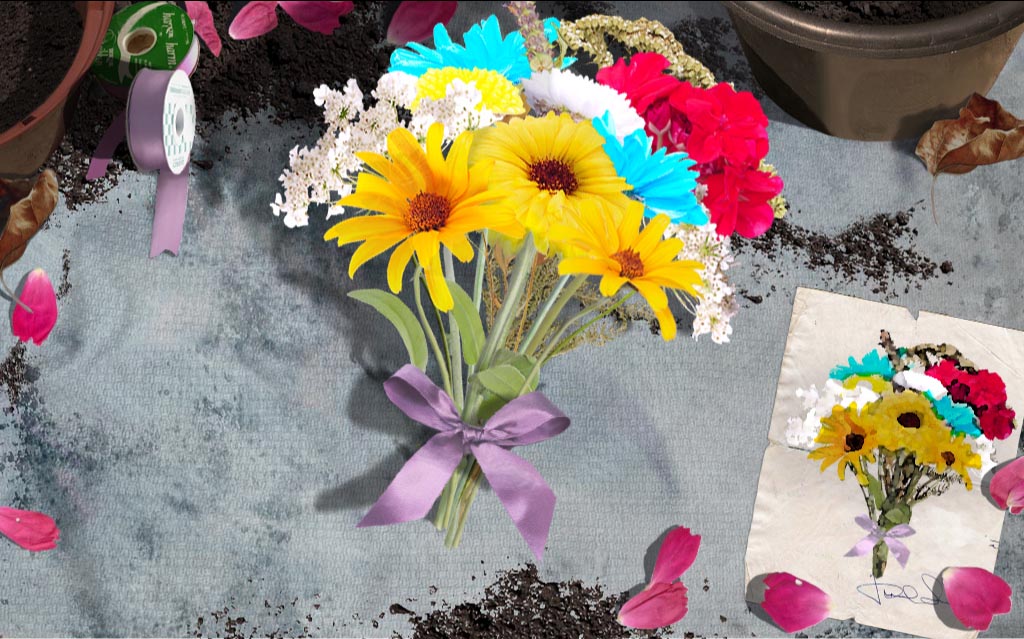
Return to the florist shop in town, inspect the table on the right, and place the Flowers on the table to begin the puzzle.
Place the flowers in the correct places.
Use the Scissors to cut a length of Floristry Ribbon.
Tie the flowers with the Floristry Ribbon.
Cut off the stems with the Scissors and pick up the Bouquet.
Screenshot.
Give the Bouquet to the ghost, and she will give you a Funnel.
Go back to the top of the bell tower and use the Scissors to cut some Silk Cloth from the parachute hanging from the gargoyles mouth.
Exit the bell tower and go straight toward the river.
Inspect the bridge mechanism. Place the Funnel in the gas tank and fill it with the Gasoline. Press the button and pull the lever to lower the bridge.
Entering the Mansion
Pick up the Ladder from the bridge and return to the street with the carriage.
Place the Ladder against the balcony and climb into the room.
Inspect the music box on the far right to start the puzzle.
Click on each measure of notes to change it to the correct notes.
When the bar passes through the measures, it will highlight the correct location of each note.
Screenshot.
Open the music box and take the Dove.
Click on the dresser on the left to start the hidden object scene.
Screenshot.
The box will open to reveal Tiny Cymbals.
Return to the toy shop. Inspect the toy monkey on the right and place the Tiny Cymbals in his hands to open the compartment and reveal the Monkey Head.
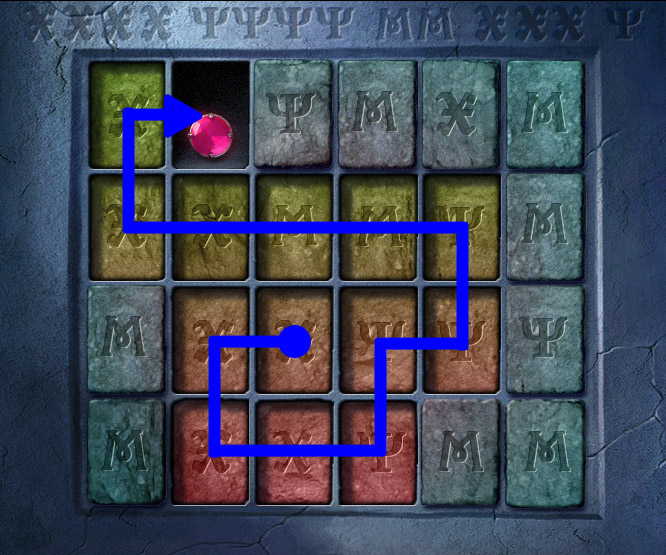
Exit the toy shop and go down the hole made by the fallen bell. Put the Monkey Head on the headless statue to flip the wall and start the puzzle.
Click on the runes in the order shown at the top of the wall.
You can only click on a rune adjacent to the previous rune selected.
When you find the correct path to select the runes, the last rune will open up.
Screenshot.
You will receive a Pink Gem.
Move back three times, inspect the stone pillar and place the Pink Gem in the empty slot to begin the puzzle.
Move the gems so that the color of each one matches the color around the slot.
This puzzle is randomized each time.
You will receive a Lion Head.
Return to the gate to the mansion. Inspect the crest and put the Lion Head into place to open the gate.
Chapter 6: Neville's Mansion
The Missing Book
Look at the fountain on the right and pick up the Sword, Stained Glass (1/16), and Stained Glass (2/16).
Inspect the suit of armor on the right, place the Sword in its hands and grab the Door Knocker. Pick up Stained Glass (3/16) from the bushes on the left and Stained Glass (4/16) on the stairs.
Click on the front door and put the Door Knocker on it. Knock to open the door.
Enter the mansion and pick up the first Torn Painting Scrap from the candle stand on the left.
Go through the door on the left to the drawing room and take the second Torn Painting Scrap from the mouth of the bear rug.
Grab the Poker by the fireplace and move the chair on the far left to get the Stained Glass (5/16).
Go back to the hall and inspect the broken door on the right.
Take the Stained Glass (6/16), then use the Poker to bring the Book close enough to pick up.
The Torn Painting
Enter the library through the door in the upper left.
Pick up the Pliers and Stained Glass (7/16) from the table.
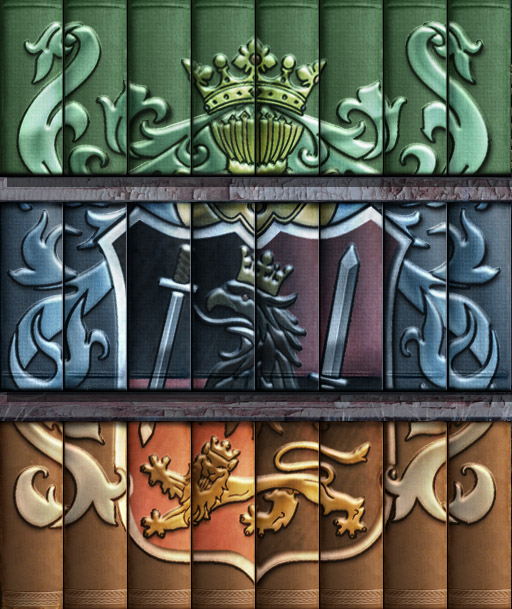
Inspect the bookcase on the far right and put the Book into place to start the puzzle.
Click on a book to select it, then click on another to switch their positions.
Arrange the books so that they form the crest.
Green books will be on the top shelf, blue books on the middle, and red books on the bottom.
Screenshot.
When the bookcase moves aside, look at the block of ice and click on the Dagger three times to pull it out.
Use the Dagger to cut the rope around the suit of armor on the left so you can pick up the Shield.
Exit the mansion and inspect the suit of armor on the left and place the shield in its hand to reveal the third Torn Painting Scrap.
Go back inside to the drawing room on the left and click on the painting frame.
Place the Torn Painting Scraps into the frame to complete the painting, and it will move aside to reveal the Glowing Disc.
Putting the Souls to Rest
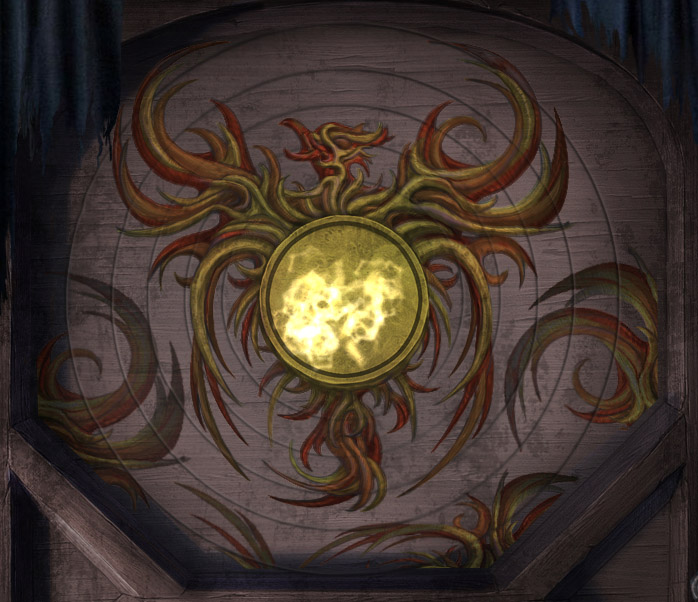
Exit to the hall and inspect the door in the upper right. Put the Glowing Disc into place to begin the puzzle.
Spin each disc to form a contiguous picture.
Start with the outer disc, line it up with the outside, and work your way in.
Screenshot.
Enter the bedroom and pick up the Call Button on the floor and Stained Glass (8/16).
Return to the drawing room and inspect the dumb waiter hatch above the fireplace.
Pick up Stained Glass (9/16) and Stained Glass (10/16), then put the Call Button into the empty slot and push the button. Pick up Stained Glass (11/16) when it falls out.
Move back five times and go down the street to the left to the bridge. Cross the bridge to enter the church.
Examine the coffin on the right and use the Silk Cloth to clean it off. Place the Dove into the empty slot: a ghost will speak to you and give you the first Broken Heart.
Inspect the stained glass window in the back and pick up the remaining pieces of Stained Glass and use them to start the puzzle.
Assemble all of the pieces of stained glass into their correct places.
Click on a piece to rotate it.
The correct place for each piece will have corresponding colors surrounding each side.
Screenshot.
You will receive a Door Key.
Return to the hall in mansion and inspect the door on the right.
Use the Door Key in the lock, and use the Pliers to turn the key when it breaks. Click on the open door to start the hidden object scene.
Screenshot.
You will receive Matches.
Go back to the drawing room and use the Matches to light a fire in the fireplace.
Go upstairs to the library and push the call button on the dumb waiter. Pick up the second Broken Heart when it arrives.
Return to the bedroom, inspect the box being held by the skeleton at the foot of the bed, and place the Broken Hearts in the holes to begin the puzzle.
Rotate the circles by clicking on them to complete the picture.
Begin with the circle that rotates the others, and work your way to the independant circle.
Screenshot.
Assemble the picture in the same way you assembled the photo in Chapter 1.
The photo will be the same as the puzzle directly before it, but the woman will be smiling.
You will receive Wedding Rings.
Go to the church and give the bride and groom their Wedding Rings.
Posted by: cheeko |
June 15, 2012 10:15 PM
|
June 15, 2012 10:15 PM