

Haunted Legends:
The Bronze Horseman
Platform: Mac, Windows

![]() The superstition about a malicious, supernatural horseman riding the streets after torrential rainfall and floods in the small town you've been summoned to seems like a silly one... right up until you see the statue come to life in the middle of town. In Haunted Legends: The Bronze Horseman, a hidden-object adventure from ERS Game Studio, the local legends might be the least of your worries. The mayor's son has gone missing, a familiar tiny demonic (though impeccably dressed) figure is causing mayhem in the streets, and as more and more townsfolk vanish you start noticing a series of bizarre crystals all competing for "World's Derpiest Expression" showing up. Look, as your friend, I have to tell you; if this is "all in a day's work" for you, you might think about asking for a raise.
The superstition about a malicious, supernatural horseman riding the streets after torrential rainfall and floods in the small town you've been summoned to seems like a silly one... right up until you see the statue come to life in the middle of town. In Haunted Legends: The Bronze Horseman, a hidden-object adventure from ERS Game Studio, the local legends might be the least of your worries. The mayor's son has gone missing, a familiar tiny demonic (though impeccably dressed) figure is causing mayhem in the streets, and as more and more townsfolk vanish you start noticing a series of bizarre crystals all competing for "World's Derpiest Expression" showing up. Look, as your friend, I have to tell you; if this is "all in a day's work" for you, you might think about asking for a raise.
 Being an old-timey fantasy detective is, it turns out, very similar to playing a point-and-click computer game. In fact, it IS a point-and-click computer game! How convenient! You'll explore the town and the surrounding area, solving hidden-object scenes and looking for clues to achieve your objective; namely, to solve the mystery of the disappearing townsfolk and the statuesque horseman that appears to be tormenting them. The game has two levels of difficulty, with the only real differences being how fast your hint and skip buttons recharge and whether the interactive areas coyly vie for your attention with "come hither" sparklies. (Flirts.)
Analysis: By now, ERS are old hats (which is a compliment, believe it or not) at game design, and if you've played any of their previous titles (including the predecessor to Bronze Horseman, The Queen of Spades) you've likely already come to expect a certain degree of quality from them. Which, happily, The Bronze Horseman delivers in nearly every regard. The overall design might be the best in an ERS Game Studio title to date, mixing bizarre architecture with the aesthetics of a warped fairytale to create an environment that's worth admiring as you explore. The story features a surprising amount of animation and a fair amount of voice acting, which can be very hit-and-miss, but still isn't quite as annoying as the protagonists' fussy derision over doing even the simplest, slightly messy tasks with their bare hands. Seriously, I am going to take all your Man Cards away from you if this keeps up. Yes, even if you're a lady.
 Click detection is, unfortunately, a little finicky, with picking out thin or tiny items in hidden-object scenes being the worst. It's not uncommon for games in this genre to repeat hidden-object scenes, but the Bronze Horseman is happy to make you do the same scene over within the span of five or ten minutes. However, the game also might be the most intriguing one the developers have done in regards to the story and mystery, which only gets stranger the more you play. It's a welcome change from games that tell you everything within the first fifteen minutes, and exhibits a lot of creativity that makes you want to see what it's going to come up with next.
While Haunted Legends: The Bronze Horseman has a robust variety of puzzles (including one that pays homage to gods of the doodle variety), it still isn't particularly difficult regardless of whether you choose casual or advanced at the beginning. Objects have a tendency to show up right when you need them, usually within a screen or two of where they need to be, so unless this is your very first hidden-object adventure game ever, chances are you're going to be proceeding at a respectable clip throughout the whole title. This isn't a bad thing; unless you demand a lot of challenge, The Bronze Horseman is still easily recommended for its excellent quality. Speedsters can finish the game in around three hours, but for most people it'll likely run closer to five without the bonus chapter. While it might not be an instant classic, Haunted Legends: The Bronze Horseman is still a beautifully made and imaginative title. If you like hidden-object adventures and snail/horse hybrid statuettes, then trying the demo should be an instant no-brainer. Just a pro-tip for future city planners, however; if you don't want to have your citizens beset by unholy creatures and demonic horsemen, you might want to avoid designing your entire city around the concept of misshapen horse monstrosities and horse-related mechanisms. Just a thought.
A Collector's Edition is also available. It contains a bonus chapter to play, wallpapers, strategy guide, and more. Remember that Big Fish Game Club Members pay only $13.99 for Collector's Editions (or 2 club credits), and collector's editions count 3 card punches of 6 total needed for a free game.
![]() Windows:
Windows:
Download the demo
Get the full version
Also available: Collector's Edition
![]() Mac OS X:
Mac OS X:
Download the demo
Get the full version
Also available: Collector's Edition


Walkthrough Guide
(Please allow page to fully load for spoiler tags to be functional.)
Haunted Legends: The Bronze Horseman Walkthrough
General Information and Chapters 1 through 6
General Information
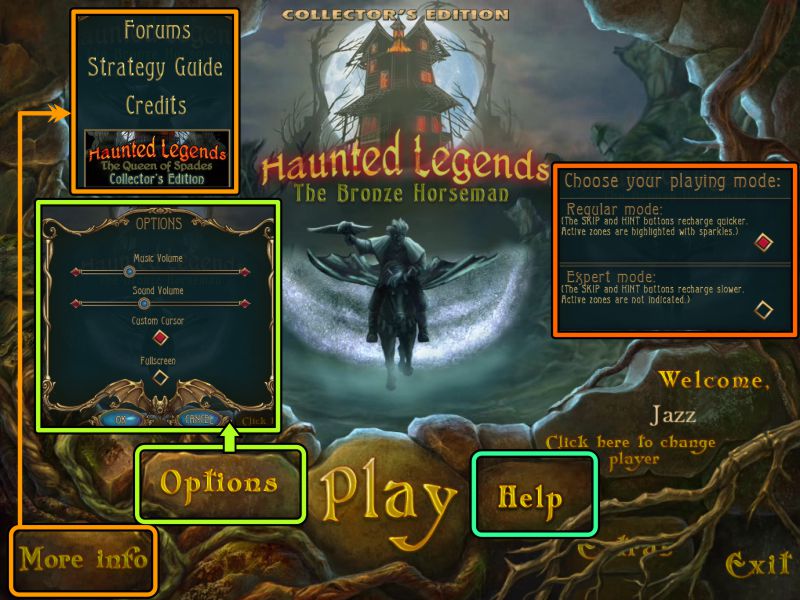
Main Menu and Options
On the Main Menu, you can choose your Profile, Play or Exit the game. You may also select your Options, which include music and sound volume, full screen or windowed, and a custom cursor or not.
If you purchased the Collector's Edition, extras will become available once you have completed the basic adventure.
When you first start game play, you will have a choice of playing Regular or Expert Mode.
In Regular Mode, the Hint and Skip buttons recharge faster and active zones are highlighted with sparkles.
For Expert Mode, the Hint and Skip buttons recharge slower and the active zones are not indicated.
When you Exit the game, your progress is automatically saved.
More Info has links to the BFG forums and the previous Haunted Legends game, plus access to the game Credits, as well as the Strategy Guide in the Collector's Edition.
"Help" has additional information about game play.
Screenshot
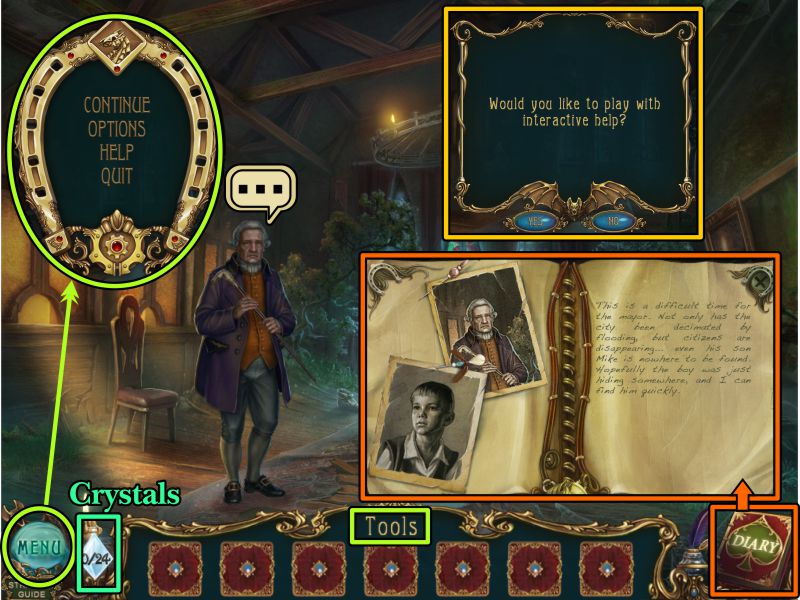
Scene Navigation
As you start the game, you will be asked if you want Interactive Help, which you can later skip should you select it in the beginning.
The game has an auto-pause feature that brings up the Menu, where you can choose to continue the game, change your options, access the Help screens, or quit to the Main Menu.
If you have the Collector's Edition, you can access the Strategy Guide from a link below the Menu in the scenes.
Next to the Menu is an accounting of your Crystals that will be discussed in the heading below.
In the middle of the bottom of the scene are Inventory items called Tools that are collected for future use, or your item list for Hidden Object Scenes.
You will collect Notes that will not go into your inventory, but will be recorded in the Diary.
Be sure to look at anything that has sparkles or a magnifying glass, and to check your Diary when the cover becomes animated.
The Diary is located at the far right bottom of the scene and can provide you with important information about your adventure.
There is no Hint button for main scenes, but the Diary will turn into a Hint button for Hidden Object Scenes and a Skip button for Mini Games and Puzzles.
Hidden Object Scenes are random, so the only objects that will be marked are those that require an addition task to locate them, the key object that goes into your Inventory, and multiple instances of the same item.
If you are not automatically returned to the main scene after a close up, you need to exit out of it by clicking the "X" in the upper right corner of the close up, clicking somewhere on the main scene, or exiting at the bottom of the scene where the arrow appears.
Mini Games are mostly puzzles to open door locks, and can be skipped once the Skip button is fully charged.
Be sure to check out all of the screenshots for additional visual information.
There will be people to talk to during the game, so I've placed a talk bubble, like the one in this screenshot, to remind you that you need to talk to them before you can continue the scene.
Screenshot
Crystals of Soul
Throughout the game, you will collect Crystals containing the souls of some of the townsfolk.
The Crystals are all marked, and you can view the number you have collected next to the Menu on the lower portion of each scene.
There are 24 Crystals, 6 of each color: blue, red, green, and purple.
If you click on the icon next to the Menu button, you can view the Crystals you have collected.
A list of all Crystals and their locations is provided at the end of this walkthrough.
Chapter 1: Mayor's Office
Hall
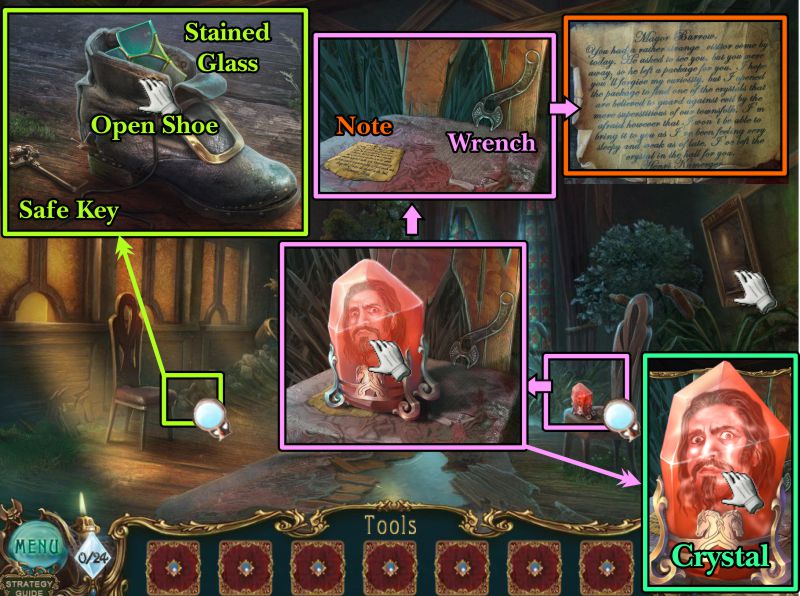
Zoom in on the shoe, open it, take the Stained Glass, and grab the Safe Key on the floor.
Move the painting on the right wall.
Zoom in on the chair, then click on the Crystal again to collect it.
Take the Wrench on the chair and read the Note.
Screenshot
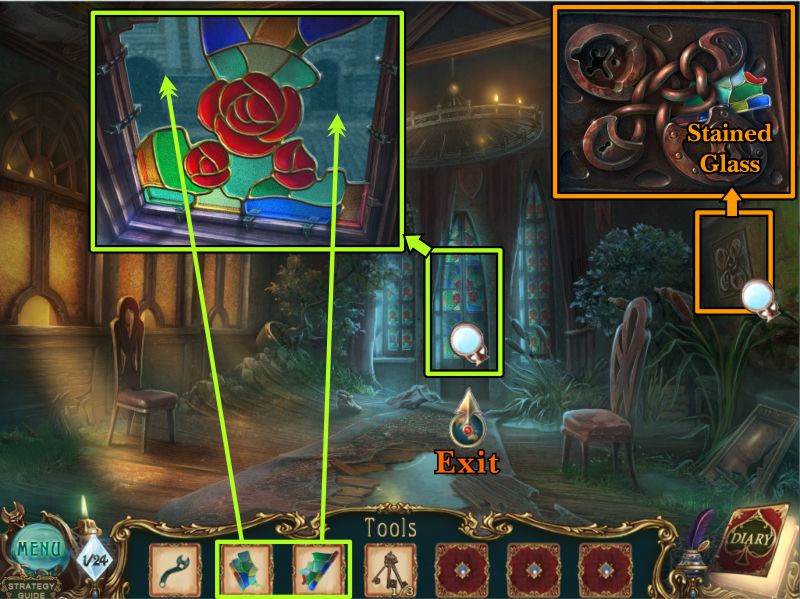
Zoom in on the safe, take the Stained Glass, and note you need 3 keys and a handle to open it.
Click on the Stained Glass door for a closer look so you can place your 2 Stained Glass pieces.
The door opens, so exit.
Screenshot
Square
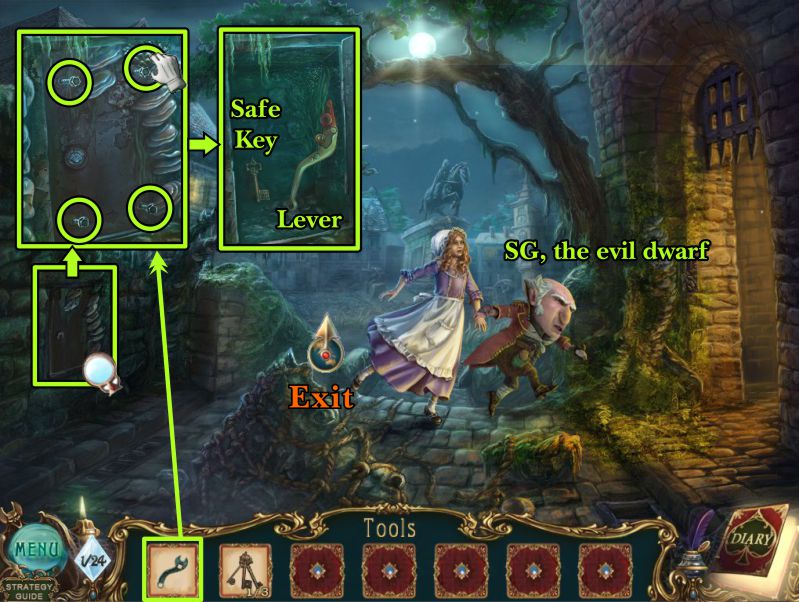
Attempt to talk to the girl, and SG, the evil dwarf we met in Haunted Legends: The Queen of Spades, will come and drag her to the alley.
The gate shuts behind her, so you need to find a way to rescue her.
Zoom in on the wall at the left, and use your Wrench to remove the 4 bolts.
Grab the door to open the cabinet.
Take the second Safe Key and the Lever.
Exit to the Horseman statue on the pedestal.
Screenshot
Horseman Pedestal
SG is examining a jacket: try to catch him and he will run off.
Grab hold of the rope-shaped part of the pedestal and it breaks off.
Look at the plaque, and go examine the jacket.
Take the Spring, read the note, and take it for your Diary.
Screenshot
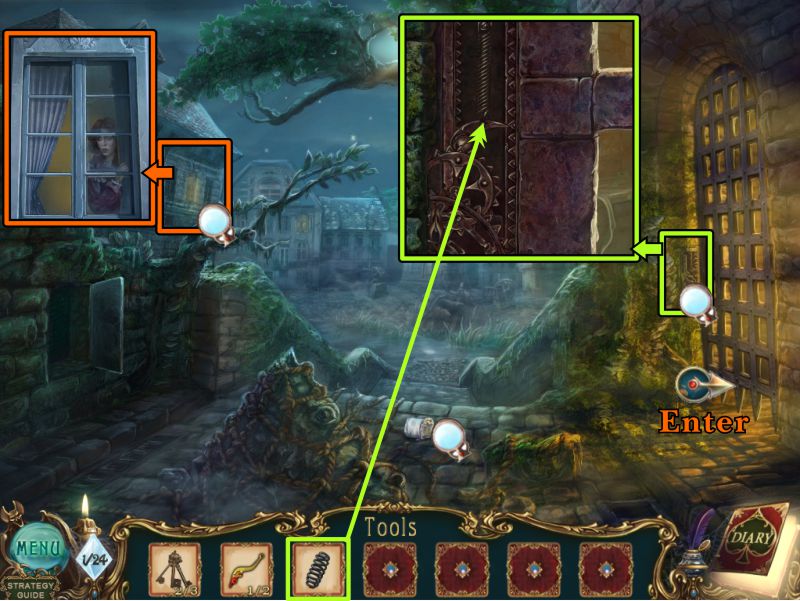
Square
Zoom in on the window shown in the screenshot to see the woman watching.
Note the bonnet that flew off when SG grabbed the girl.
Zoom in on the gate, place your Spring, and enter when the gate opens.
Screenshot
Chapter 2: Lisa
Blind Alley
Talk to Lisa, and she will give you the last Safe Key.
Click on the Crystal on the shelf and take it.
Play the Hidden Object Scene, and then exit to the Mayor's Office.
Screenshot
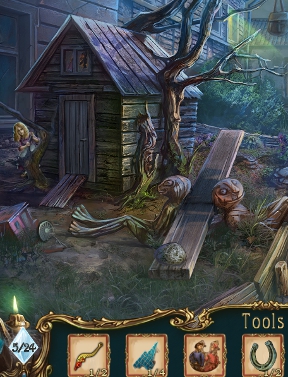
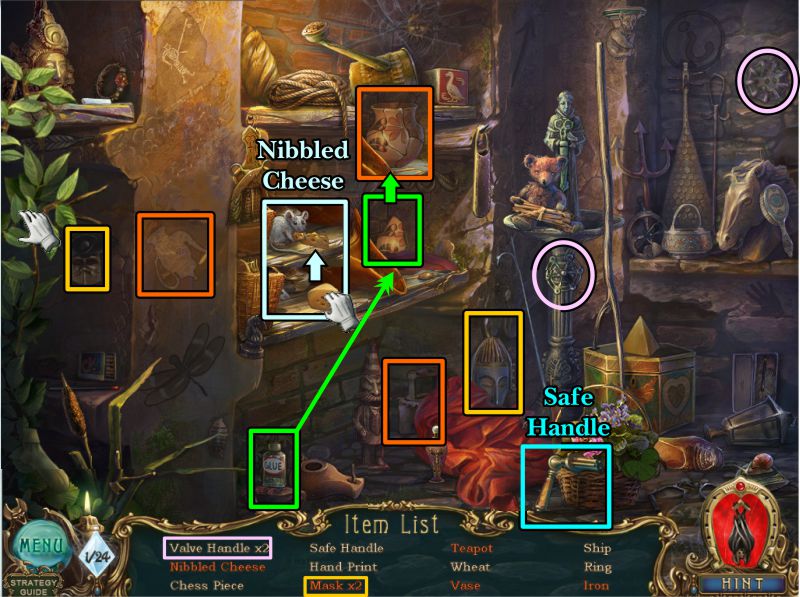
Niche Hidden Object Scene
Move the foliage on the left after you collect the wheat if it is on your list.
If you have masks, they are marked in the screenshot.
Place the glue on the vase fragments to collect the Vase.
Touch the cheese, and a mouse will come to nibble on it so you can have Nibbled Cheese.
Pick up the Valves if they are on your list.
Once you have collected everything on your list, your Inventory item will be the Safe Handle.
Screenshot
Mayor's Office
Zoom in on the safe and place the Keys and Handle.
Turn all the Keys, and then the Handle to open the safe.
Take the Chisel and read the Note.
Play the Hidden Object Scene before returning to the Blind Alley.
Screenshot
Office Hidden Object Scene
Zoom in on the books to take the Mosaic Fragment that will later go into your Inventory.
Spin the globe around to find Africa.
Open the scroll to get the Crab.
Break the egg to find the Duckling.
Collect the rest of the items on your list.
Screenshot
Blind Alley
Zoom in on the back wall and loosen the brick with your Chisel.
Pull out the brick and take the Strange Key.
Play the Hidden Object Scene, then head off to the Statue Pedestal.
Screenshot
Niche Hidden Object Scene
Use the chalk to finish the Horseman Drawing.
Light the lamp with the matches and take the Lamp Flame.
Collect everything else on your list to get the Gaff Hook for your Inventory.
Screenshot
Horseman Pedestal
When you get to the statue, it comes to life and takes off over the rubble, leaving just a few logs to remove.
Zoom in on the logs and remove them one at a time with your Gaff Hook.
Once they are gone, follow where the Bronze Horseman went.
Screenshot
Chapter 3: Town
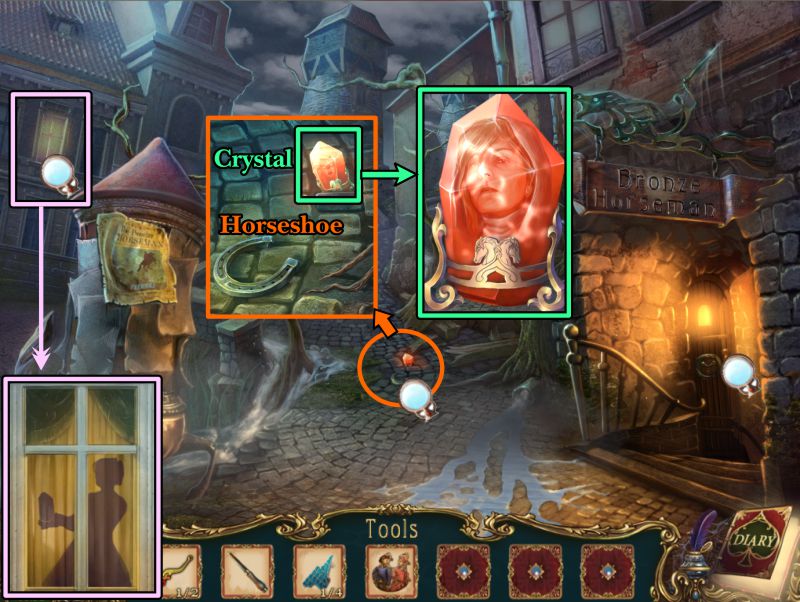
Pub Entrance
Zoom in on the window at the left and watch.
Check the Pub door to see you need a special key.
Zoom in on the Crystal on the ground; collect it and the Horseshoe.
Screenshot
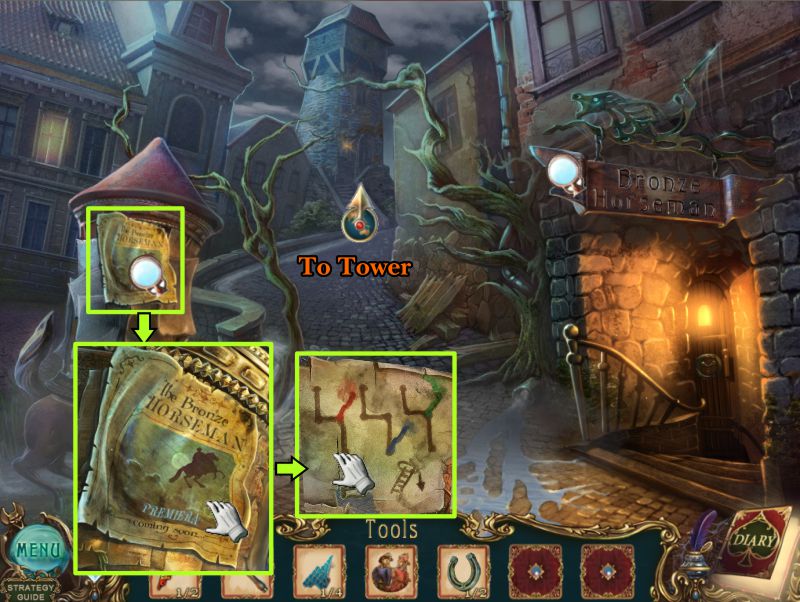
Check out the Pub sign, then zoom in on the kiosk.
Remove the poster and take the schematic for your Diary.
Head off toward the Tower.
Screenshot
Tower Grounds
Try to grab SG, and he will run inside the Tower.
Zoom in on the niche in the lower right and take the Crystal.
Play the Hidden Object Scene, then exit down twice.
Screenshot
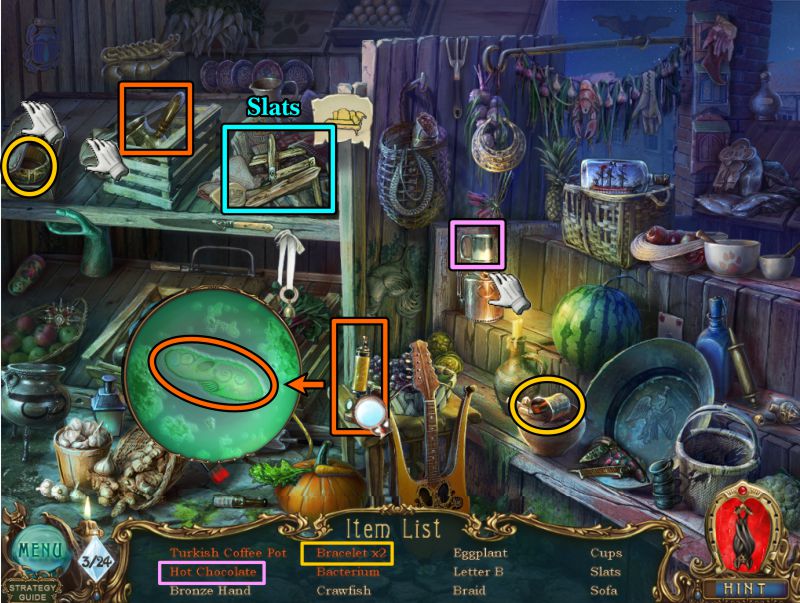
Tent Hidden Object Scene
Collect everything on your list to get the Slats.
Turn on the burner to heat the chocolate.
Zoom in on the vial to find the Bacterium.
Move the cloth on the box to find the Turkish Coffee Pot.
Open the box to find one of the bracelets.
Screenshot
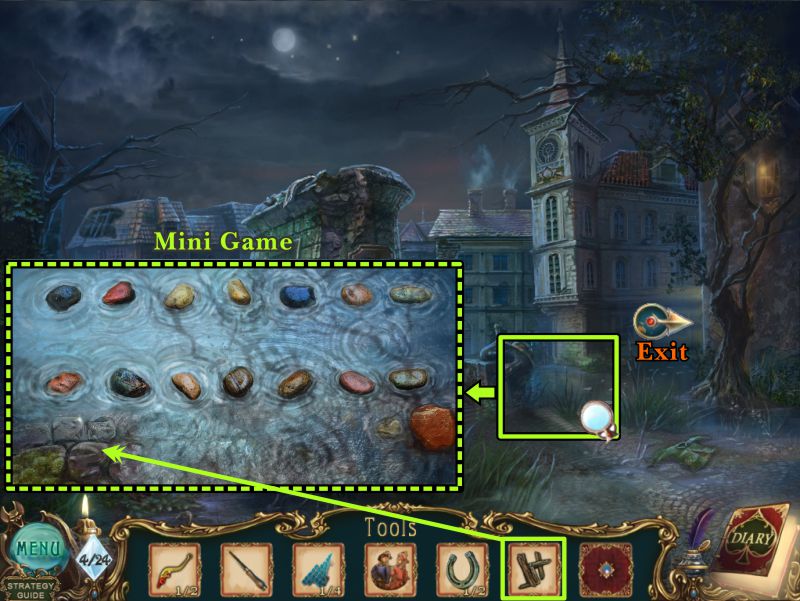
Horseman Pedestal
Zoom in on the puddle at the right and place the Slats to trigger a Mini Game.
Once you have completed the game, you will be able to go down the side street.
Screenshot
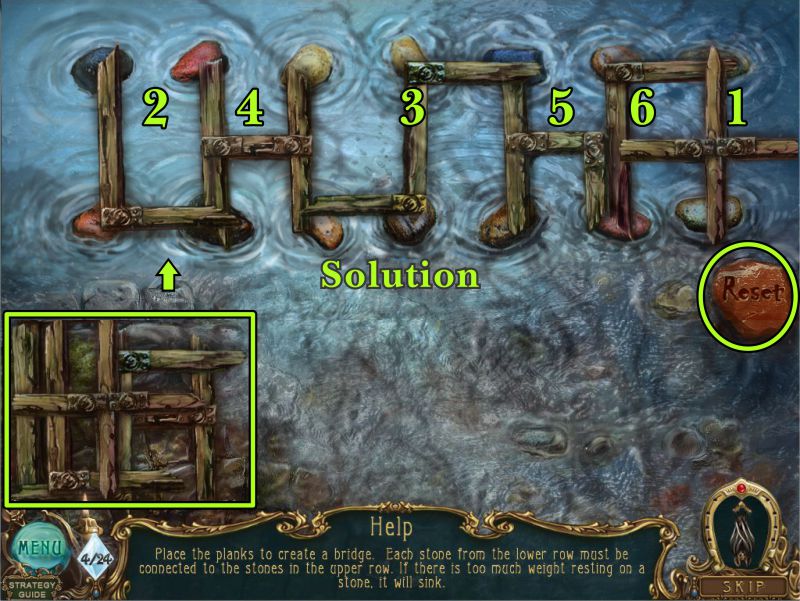
Puddle Mini Game
Your goal is to place the slats to connect all the stones so you can walk across the puddle.
There is a Reset button if you need it.
The screenshot show the placement of the slats in the order you pick them up off the pile.
Screenshot
Chapter 4: Children's Playground
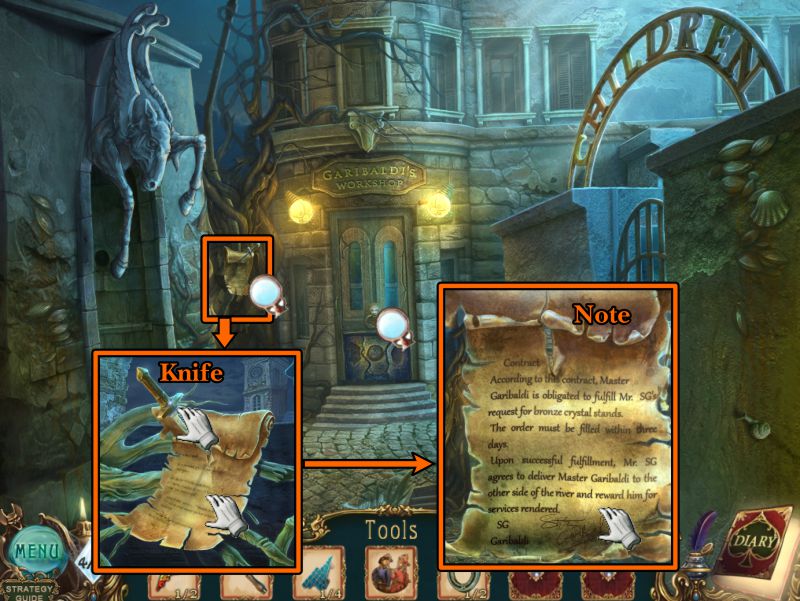
Side Street
You are on the street outside Garibaldi's Workshop and the Children's Playground.
Zoom in on the vines at the left, take the Knife, read the Note and take it for your Diary.
Screenshot
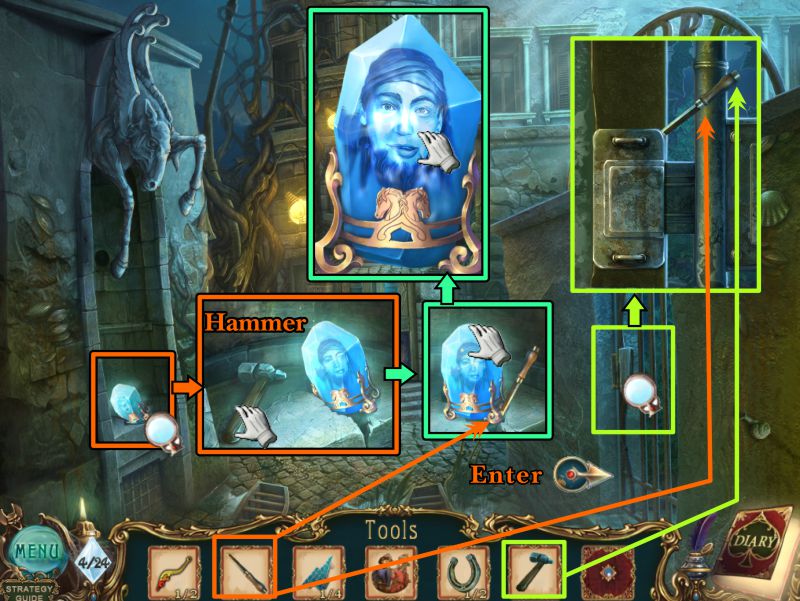
Zoom in on the niche to take the Hammer and Crystal.
Zoom in on the gate to the Children's Playground and use your Hammer and Chisel to remove the lock, so you can enter.
Screenshot
Playground
Talk to Lisa, who wants to hide in the Playhouse; zoom in on the lock and push the button to remove the bars.
Place your Strange Key to open the door for Lisa.
Play the Hidden Object Scene.
Screenshot
Playhouse
Go inside the Playhouse and talk to Lisa.
Take the Ice Canister and exit.
Screenshot
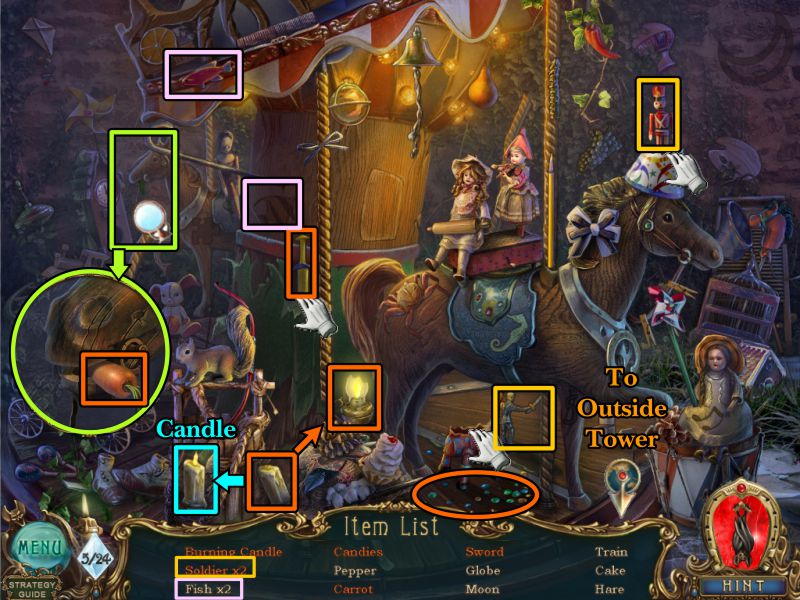
Carousel Hidden Object Scene
Light the candle on the lantern, and collect the Burning Candle that will go into your Inventory once you have collected everything.
Pop open the hat on the horse's head to get one of the Soldiers.
Break the Pi-ata to get the Candies.
Zoom in on the horse to the left and take the Carrot.
The two fish are marked in the screenshot.
Pull down the green cloth to pick up the Sword.
Go to the outside of the Tower.
Screenshot
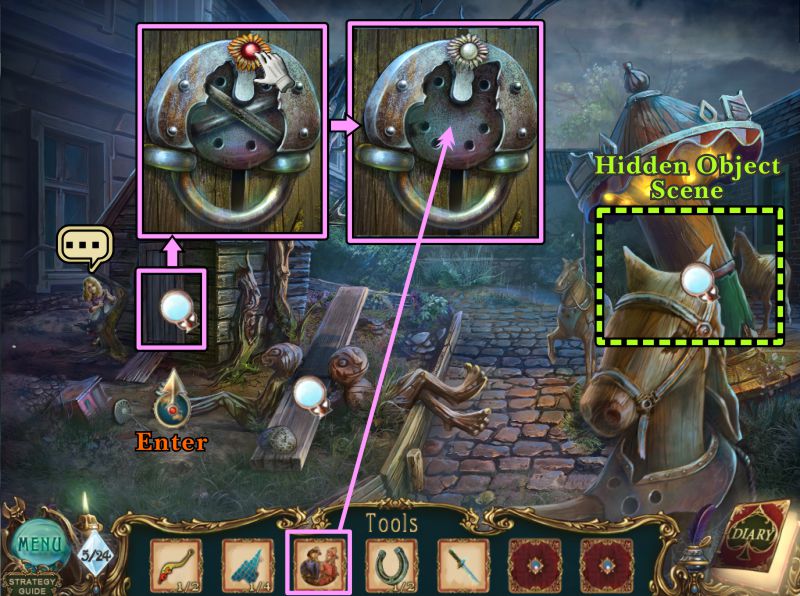
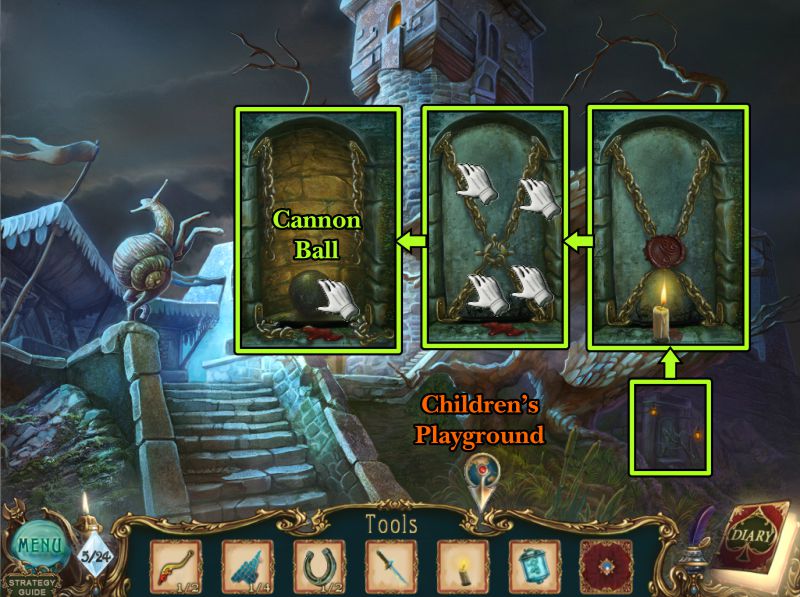
Tower Grounds
Zoom in on the niche and place the Candle to melt the wax seal.
Remove each of the 4 chains, then take the Cannon Ball when the niche opens.
Return to the Children's Playground.
Screenshot
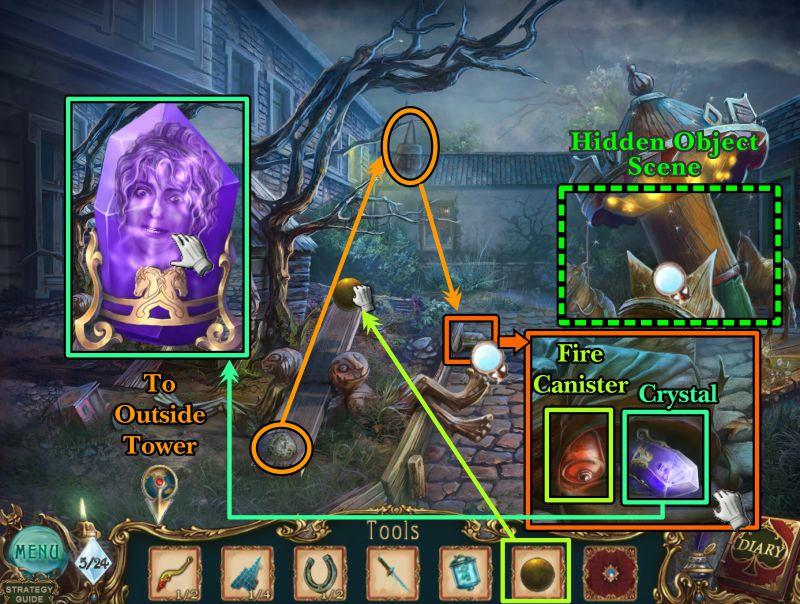
Playground
Place the Cannon Ball on the far side of the seesaw, and the rock will knock down the bag hung up in the tree.
Zoom in, open the bag, and take the Fire Canister and Crystal.
Play the Hidden Object Scene and head off to the Tower.
Screenshot
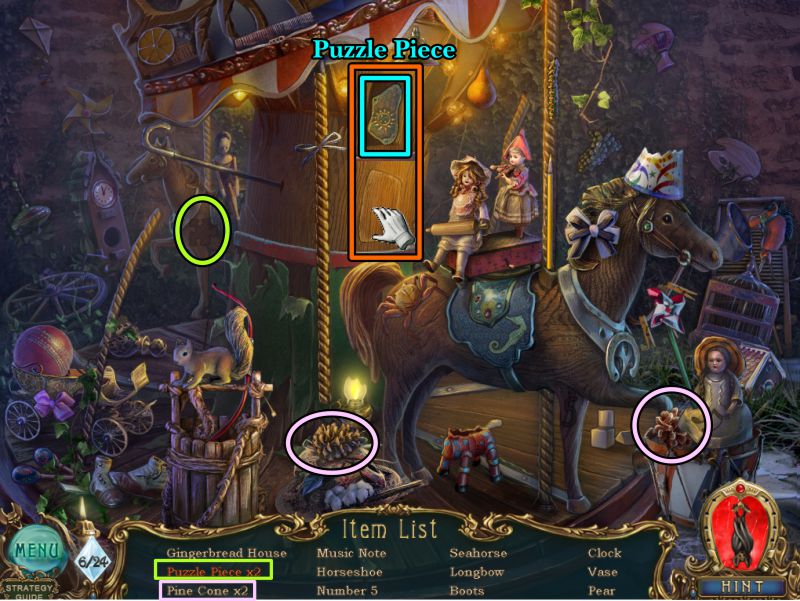
Carousel Hidden Object Scene
See the screenshot for the multiple items.
Open the hidden compartment to get one of the Puzzle Pieces that will go into your Inventory once you have everything.
Screenshot
Tower Grounds
Play the Hidden Object Scene, then the Mini Game to open the Tower door.
Place your 2 Canisters to trigger the game.
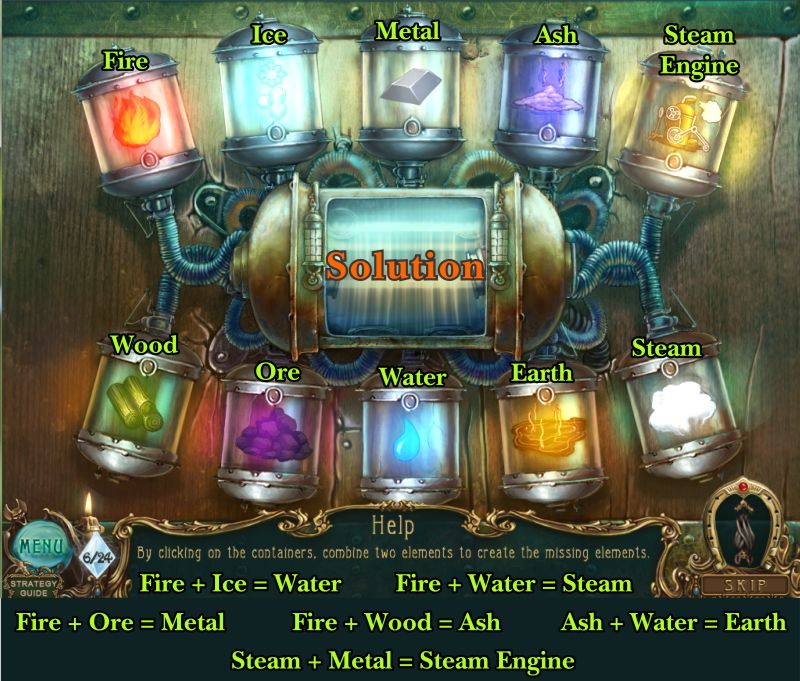
Your goal will be to complete the 6 empty canisters by combining the elements.
Screenshot
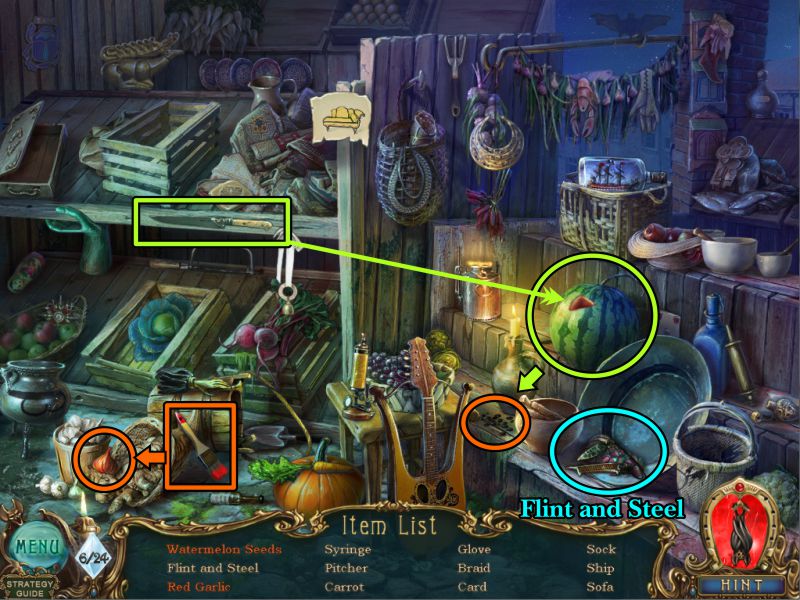
Tent Hidden Object Scene
Use the knife to cut a hole in the watermelon and get the seeds.
Use the paintbrush to paint the clove of garlic red.
Take the Flint and Steel for your Inventory and finish collecting your list.
Screenshot
Alchemy Mini Game
See the screenshot for the names of the canisters and which ones you need to combine to finish the game.
Screenshot
Chapter 5: Tower
Entrance Hall
Enter the Tower to find SG waiting for you on the stairs.
Try to grab him, and he will run upstairs, taking the lower portion of the stairs with him.
Zoom in on the bench and take the Lever and Crystal.
Zoom in on the machine at the left and place your Levers.
Check the Schematic in your Diary to see about the placement of the Levers.
Screenshot
Stairs Mechanism
See the screenshot for the solution to the lever placement.
For the levers that need to stop in a certain position, place your cursor to make them turn corners and stop where you want them to be.
The stairs will lower for you to climb to the upper level.
Screenshot
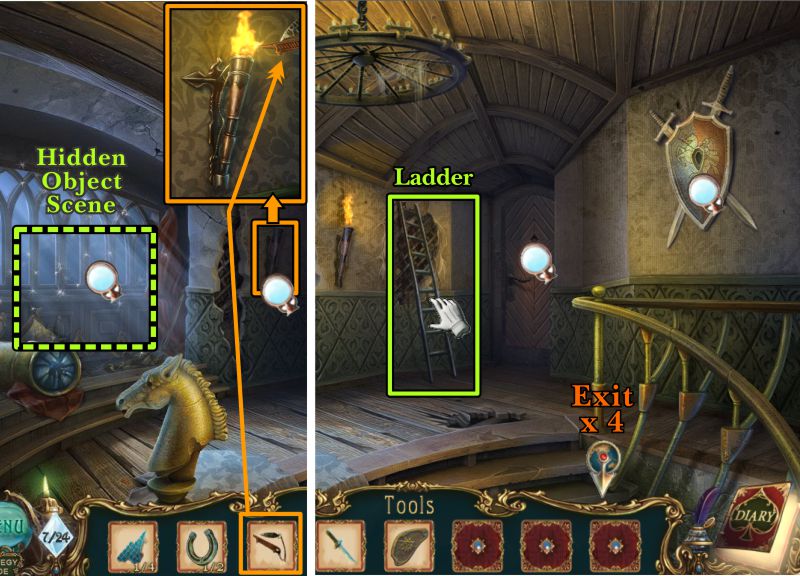
Corridor
Zoom in and use your Flint and Steel to light the torch.
Check out the Shield and door, grab the Ladder, and play the Hidden Object Scene.
Exit down 4 times.
Screenshot
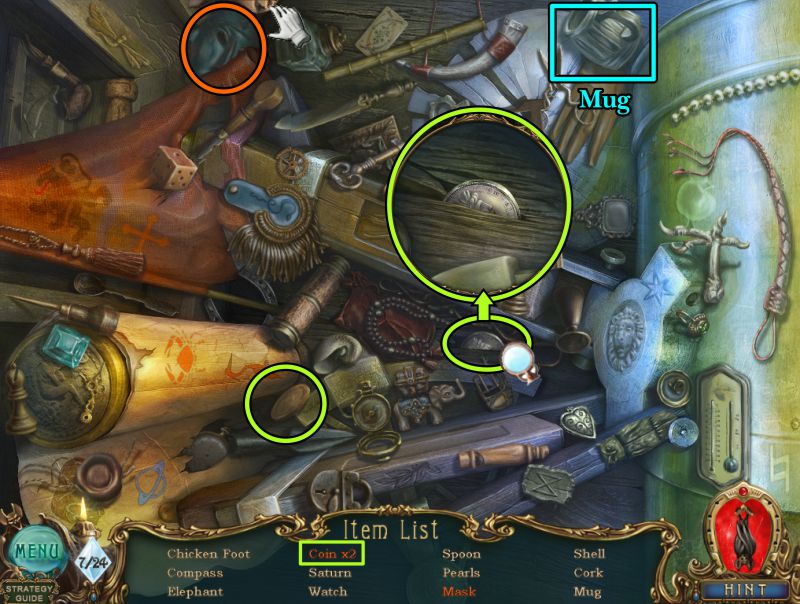
Balcony Hidden Object Scene
Take the Mug that will become your Inventory Item.
Move the cloth to take the Mask.
Zoom in as shown in the screenshot to collect one of the coins.
Screenshot
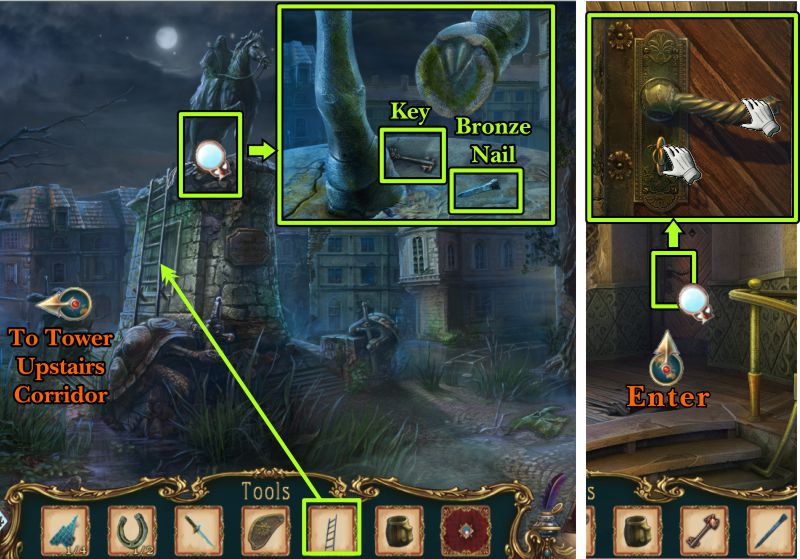
Horseman Pedestal and Tower Corridor
Use the Ladder to take a closer look at the Pedestal.
Take the Key and Bronze Nail.
Return to the Tower Corridor and zoom in on the door.
Put the Key in the keyhole and turn it.
Pull down on the handle and enter the room.
Screenshot
Tower Room
SG is holding onto Mike; try to grab him, and they will swing out the window on the rope.
Zoom in on the window sill, and take the Pub Key and Note.
Open the cabinet and take the two Crystals.
There is a notation in the cabinet that says a purple crystal equals fear, and a green crystal equals greed.
Exit down 4 times.
Screenshot
Chapter 6: The Pub
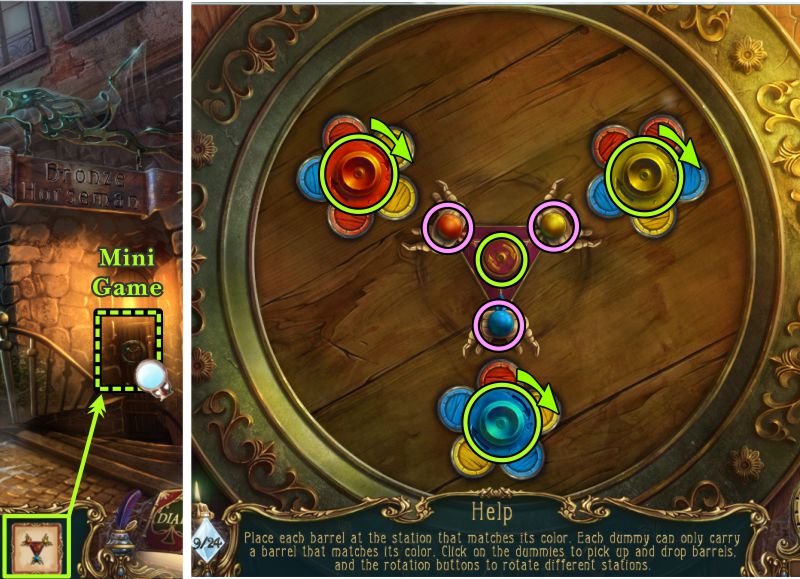
Pub Entrance Mini Game
Zoom in on the Pub Entrance and place your Key to activate a Mini Game.
Your goal is to match all the small buttons on the barrels of the same color.
The barrels rotate clockwise, as does the center button of the key.
Use the three arms on the key to grab the small buttons of matching color to move them.
Press the round balls to grab or release the buttons.
Screenshot
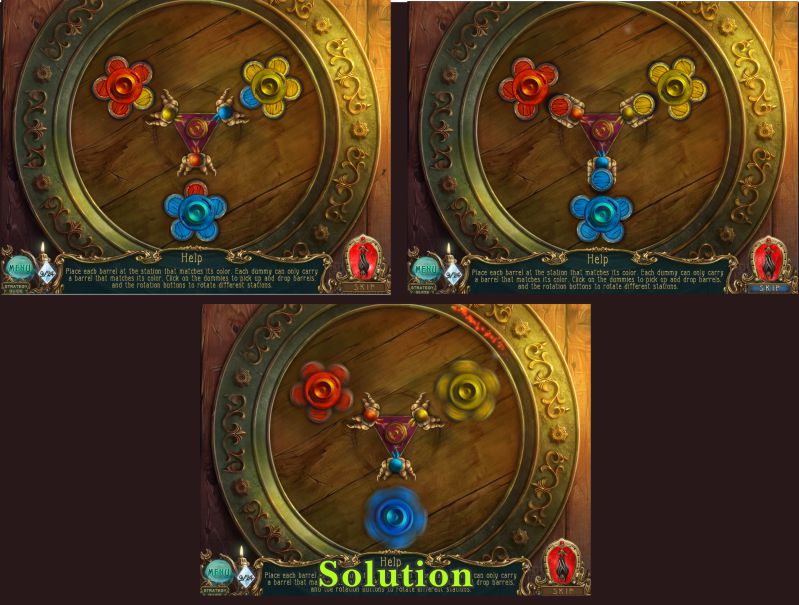
Entrance Mini Game
See the screenshot for the grab action of the key arms. Rotate the key and release the buttons.
When you complete the game, the door will open: enter the Pub.
Screenshot
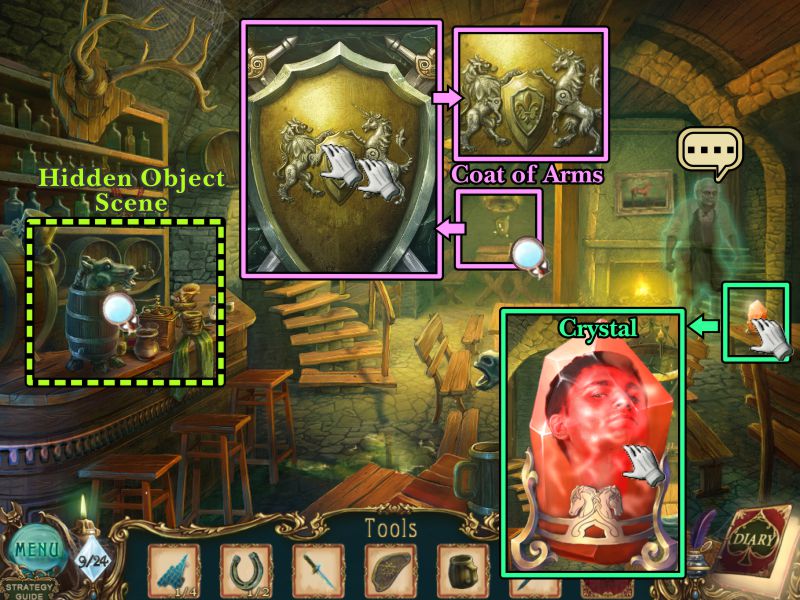
Inside Pub
Talk to the Pub owner's ghost, then take the red Crystal on the table to the right.
Zoom in on the Coat of Arms on the back wall.
Move both animals front legs that are holding the Coat of Arms so you can collect it.
Play the Hidden Object Scene at the bar.
Screenshot
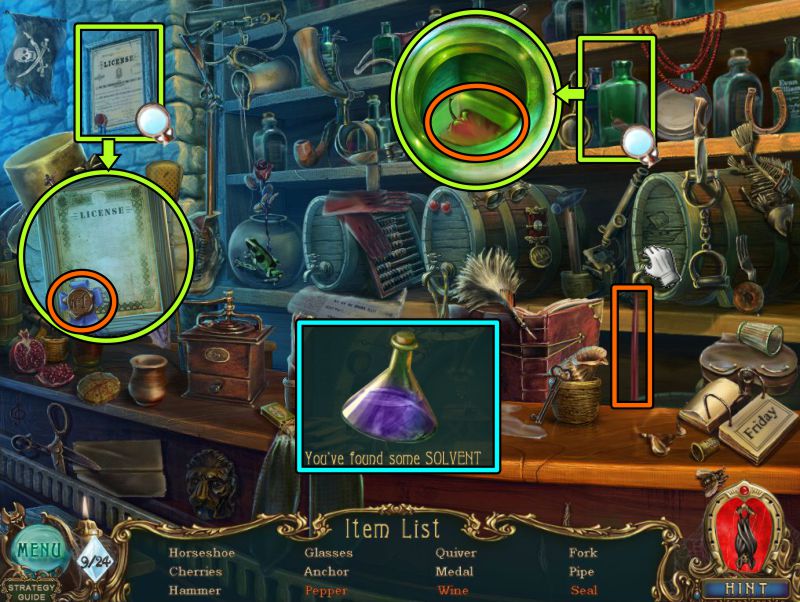
Bar Hidden Object Scene
Collect everything on your list to get a flask of Solvent.
Zoom in on the License to take the Seal.
Turn on the tap of the wine keg and grab the stream of wine.
Zoom in on the green bottle to get the Pepper.
Screenshot
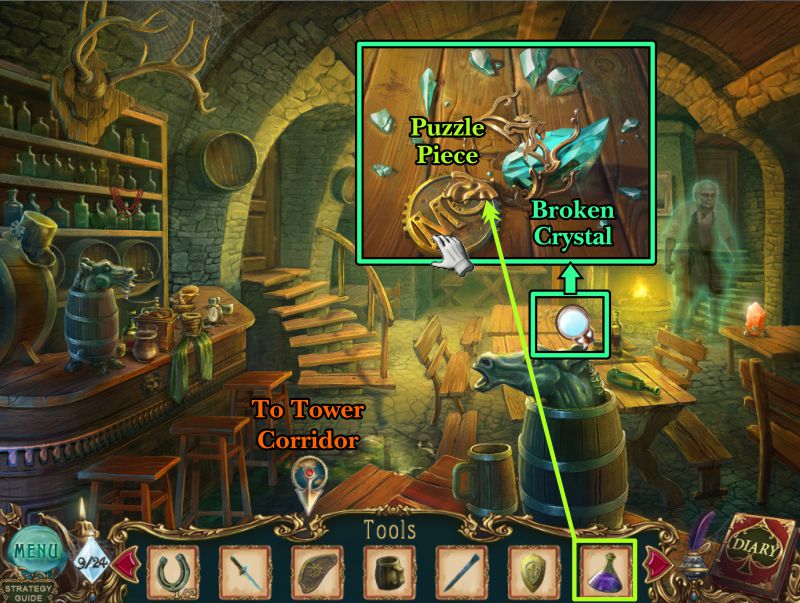
Broken Crystal
Zoom in on the Broken Crystal on the table.
Use the Solvent to detach the Puzzle Piece from the holder.
Return to the Tower Corridor.
Screenshot
Tower Corridor
Place the Coat of Arms on the Shield on the wall, and it will slide down the wall.
Take the Puzzle Piece; read and take the Note for your Diary.
Play the Hidden Object Scene on the Balcony, then return to the Pub.
Screenshot
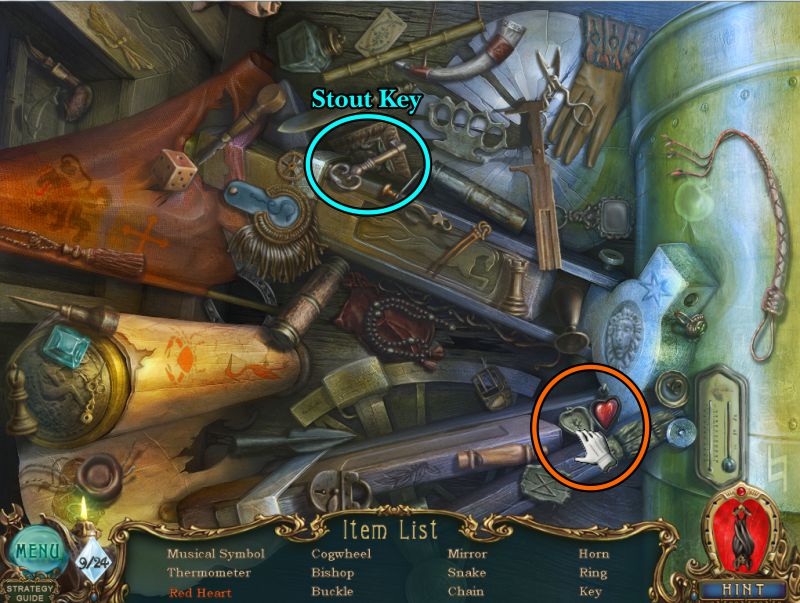
Balcony Hidden Object Scene
Collect everything to get the Stout Key for your Inventory.
To find the Red Heart, open the locket shown in the screenshot.
Screenshot
Inside Pub
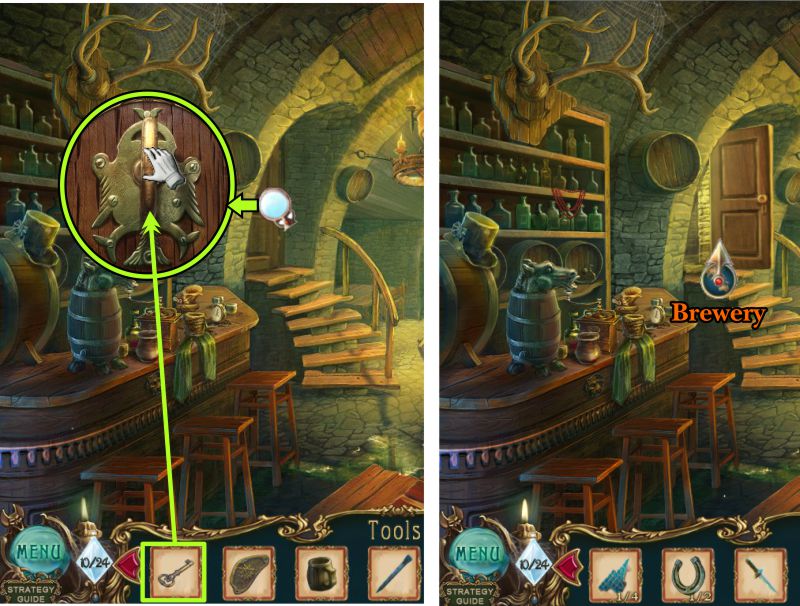
Zoom in on the Brewery door, place your Stout Key, turn it and enter the Brewery.
Screenshot
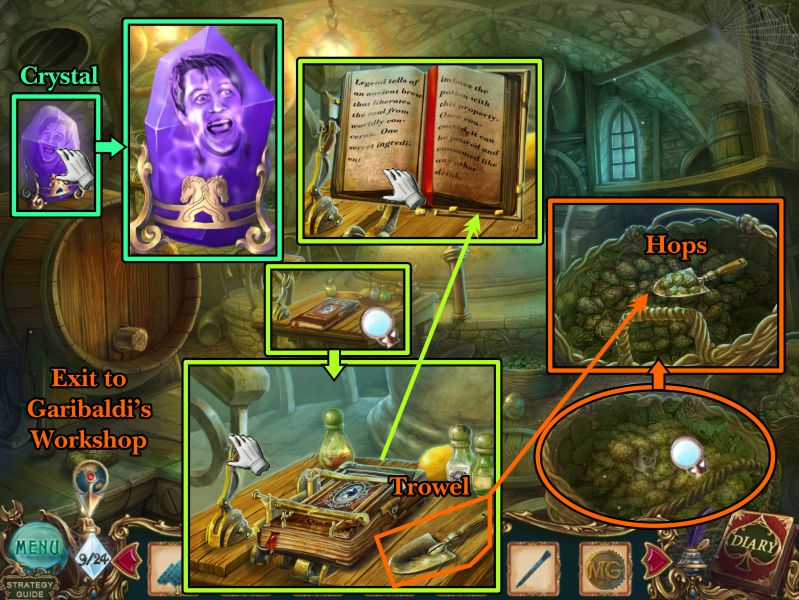
Brewery
Take the Crystal on the keg.
Zoom in on the table, take the Trowel, and throw the lever to release the book.
Read the book and take it for your Diary.
Zoom in on the bag of Hops and take a Trowel full for your Inventory.
Exit to Garibaldi's Workshop.
Screenshot
Posted by: Jazz |
September 13, 2011 8:17 PM
|
September 13, 2011 8:17 PM
Haunted Legends: The Bronze Horseman Walkthrough
Chapters 7 through 12
Chapter 7: Garibaldi's Workshop
Entrance
Zoom in on the door and place the Puzzle Pieces as shown in the screenshot to trigger a Mini Game.
The Mini Game has a Reset button in case you need it.
The arrow on the left moves the piece on the left, and the arrow on the right moves the piece on the right.
The circular arrow flips the puzzle over.
For your first move, use the arrow on the right to move that piece.
Screenshot
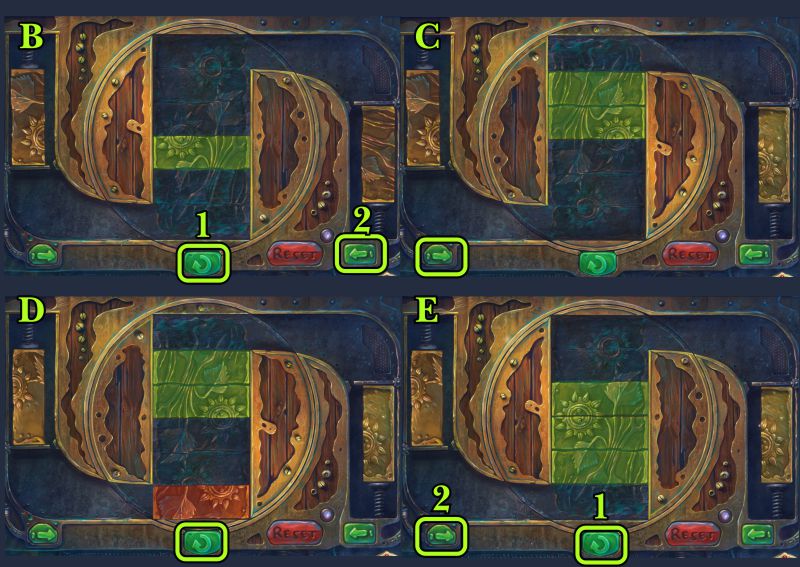
Garibaldi's Door Mini Game
Follow the screenshot for sequences B through E.
Screenshot
See the screenshot for sequences F through H and the solution.
Screenshot
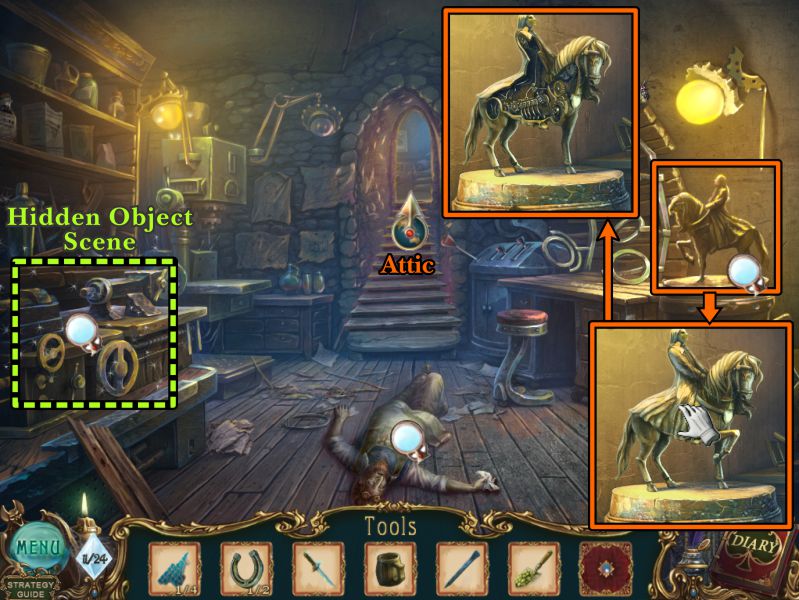
Inside Garibaldi's Workshop
Zoom in on the horseman statue, move the coat, and examine the inside of the horse.
Take a closer look at Garibaldi, play the Hidden Object Scene at the left, and go to the Attic.
Screenshot
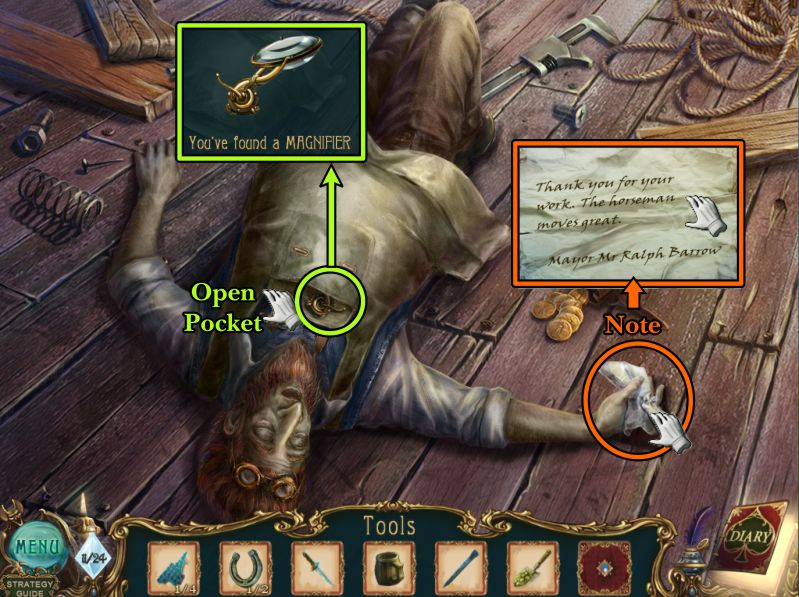
Garibaldi
Garibaldi is dead, so take the Note from his hand for your Diary.
Open his pocket and collect the Magnifier.
Screenshot
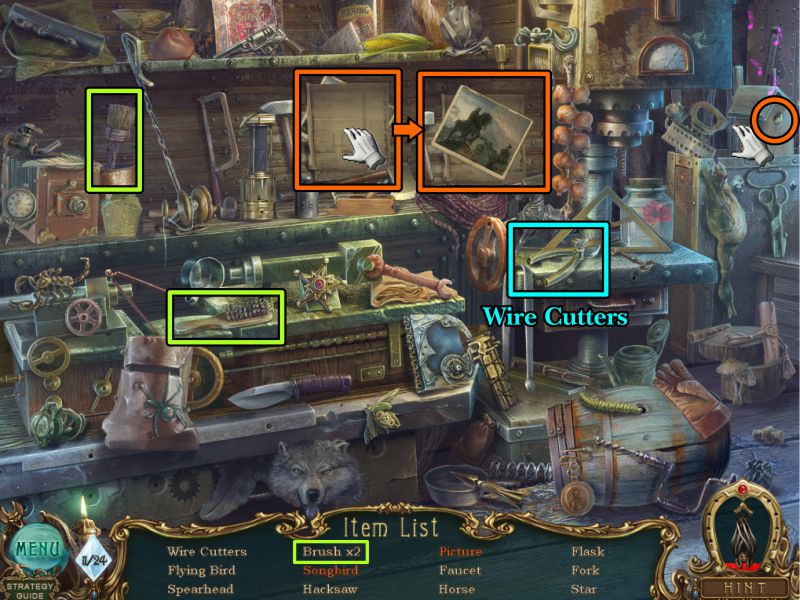
Workbench Hidden Object Scene
Click on the birdhouse at the right to make the bird sing so you can collect a Songbird.
Move the blueprint, as shown in the screenshot, to collect the Picture.
Collect everything else on your list to get the Wire Cutters for your Inventory.
Screenshot
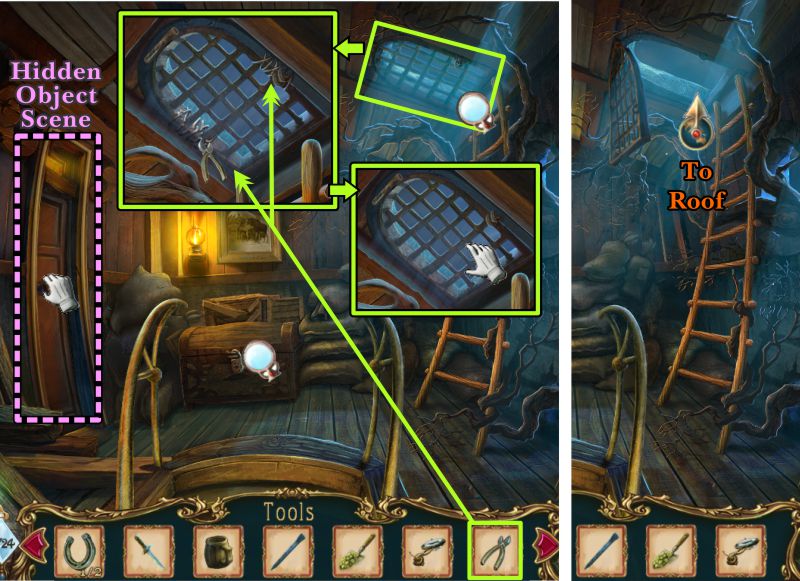
Attic
Zoom in on the grate, use your Wire Cutters as shown in the screenshot, and open the grate.
Open the door at the left and play the Hidden Object Scene before going to the Roof.
Screenshot
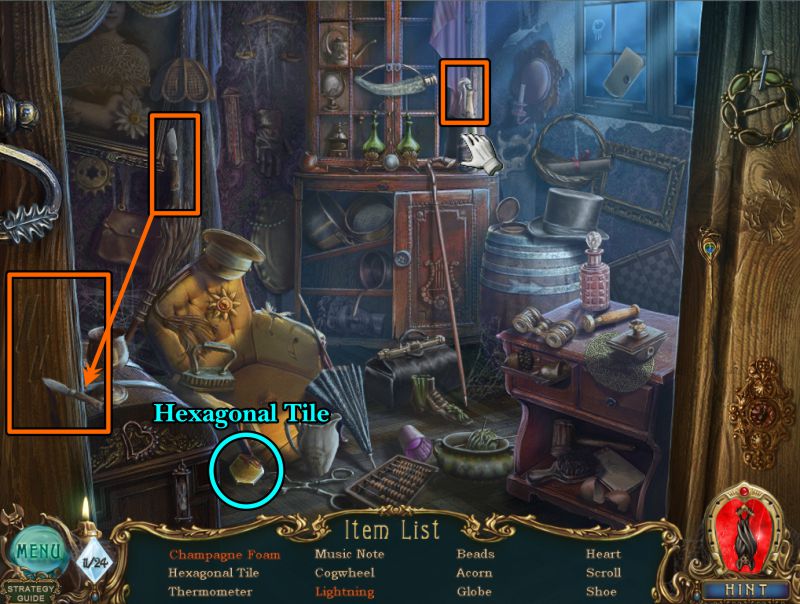
Attic Hidden Object Scene
Use the knife to carve the lightening, as shown in the screenshot.
Click on the Champagne bottle to open it and collect the foam.
After you collect everything, you will get a Hexagonal Tile for your Inventory.
Screenshot
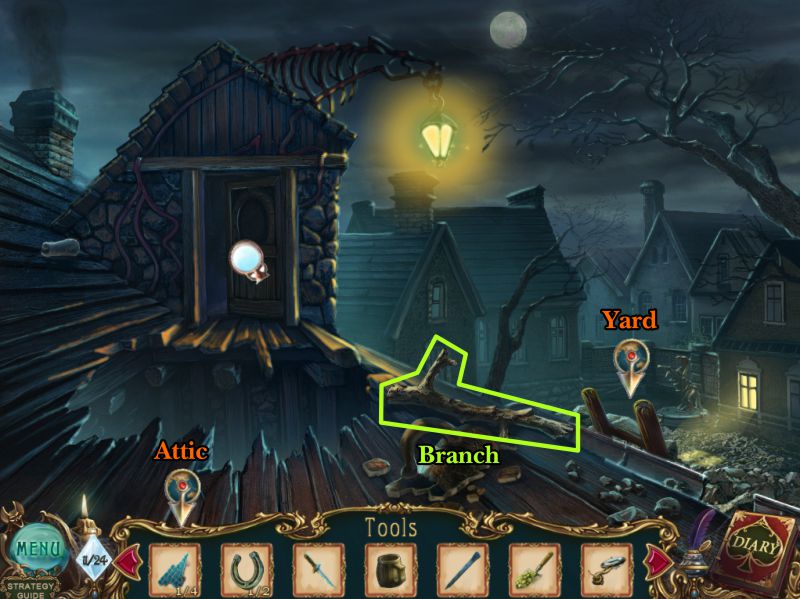
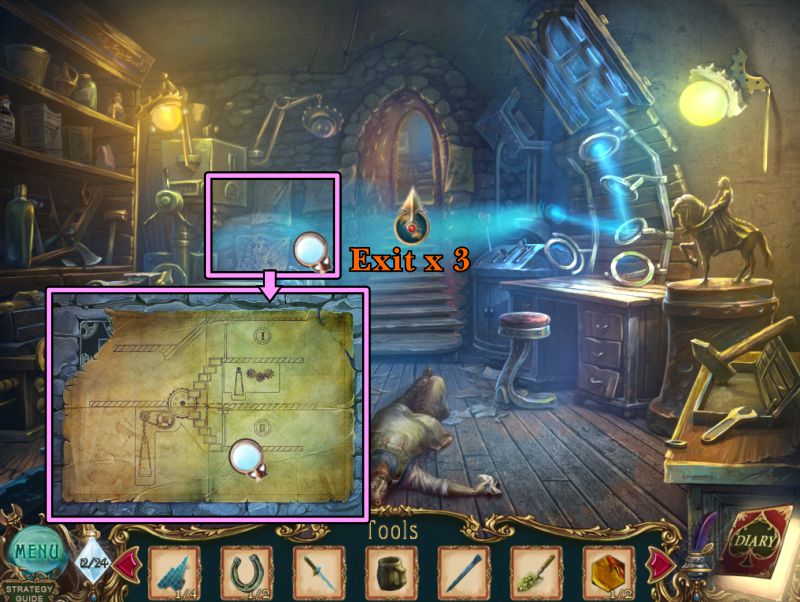
Roof
Collect the Branch and go down the ladder to the Yard.
Screenshot
Yard
Check out the magnifying glasses and play the Hidden Object Scene.
Exit down to return to the Roof.
Screenshot
Yard Hidden Object Scene
Click on the Soldier to get him to trumpet.
Collect everything else to get the Boards for your Inventory.
Screenshot
Roof
Place the Boards across the hole in the roof.
Grab the Note shown in the screenshot and take it for your Diary.
Cross the Boards and enter the door.
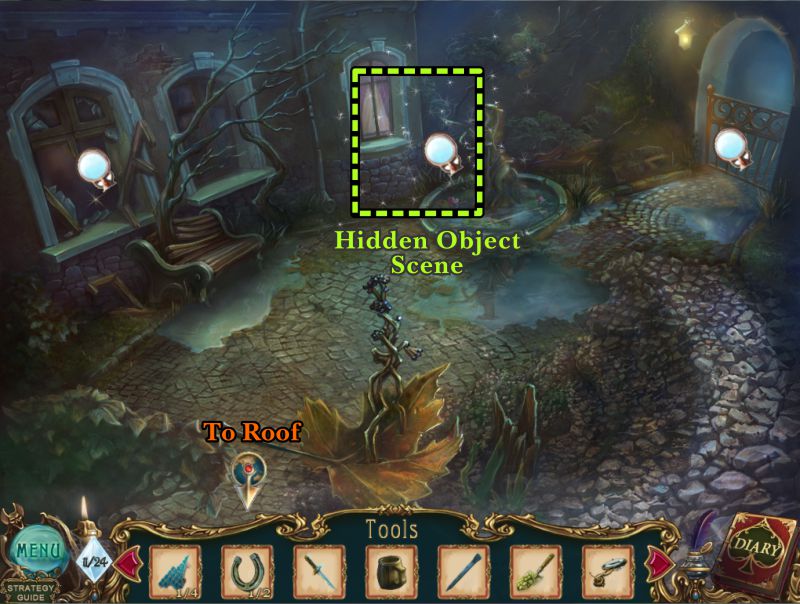
Screenshot
Bedroom
Collect the Green Crystal at the left, check out the cabinet, and look out the window.
Use your Branch to retrieve the Jack.
Play the Hidden Object Scene, then exit down 3 times to return to the Workshop.
Screenshot
Bed Hidden Object Scene
Open the bag to get the Flag.
Collect your list of items to get the Mirror for your Inventory.
Screenshot
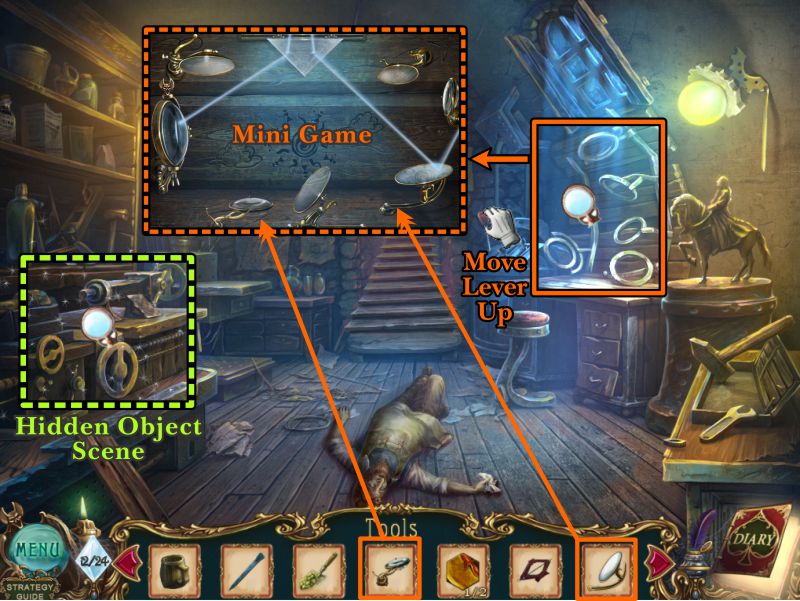
Workshop
Play the Hidden Object Scene.
Move the lever shown in the screenshot to let in some moonlight.
Zoom in on the mirrors, and place your Magnifier and Mirror to trigger a Mini Game.
Screenshot
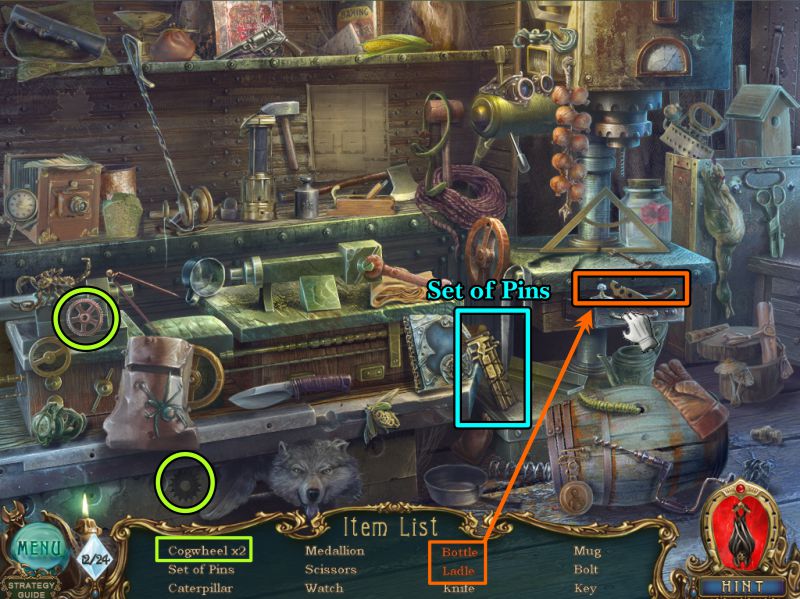
Workbench Hidden Object Scene
Open the drawer to collect the Bottle and Ladle.
Collect everything else to get a Set of Pins for your Inventory.
The 2 Cogwheels are shown in the screenshot.
Screenshot
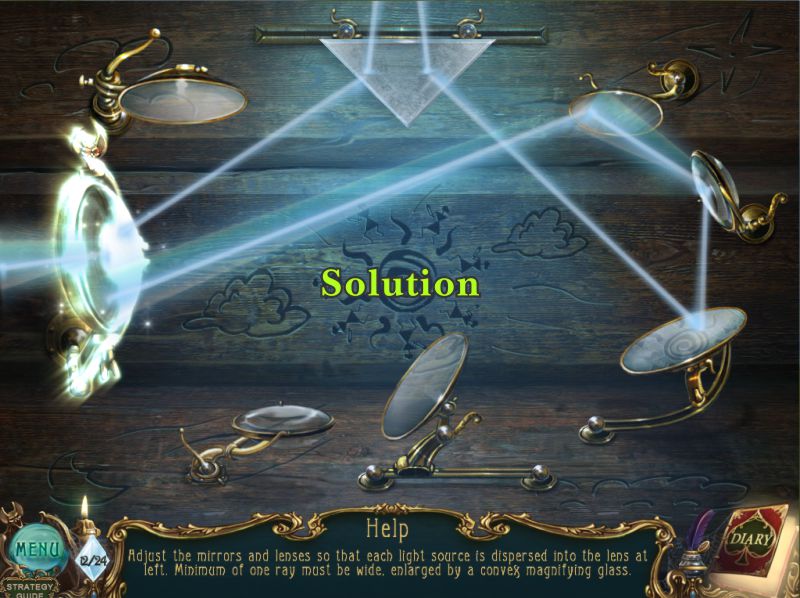
Reflection Mini Game
Your goal is to disperse the moonlight into the lens at the left.
Adjust the three mirrors at the right so they reflect, as shown in the screenshot solution.
Screenshot
Workshop
Seen the screenshot to see where the reflection points.
Zoom in on the schematic: you cannot remove it without a tool, so exit to the Bedroom.
Screenshot
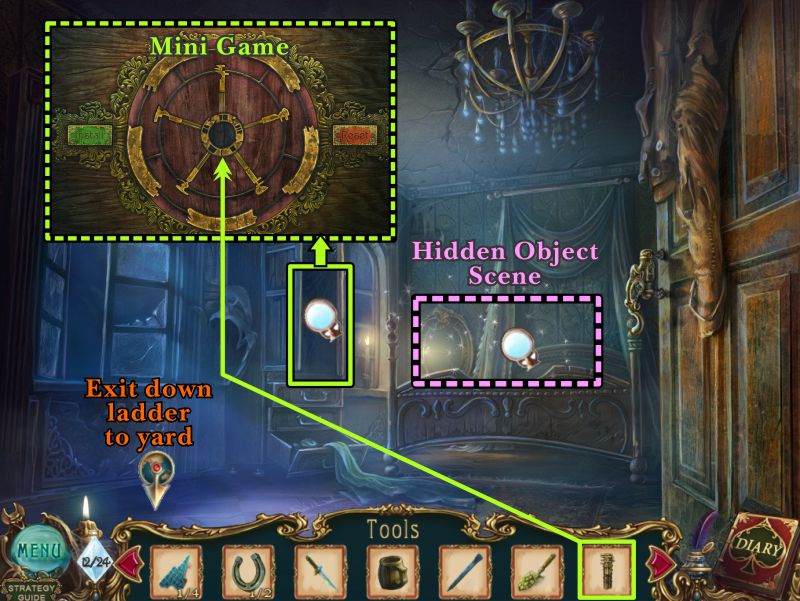
Garibaldi
Play the Hidden Object Scene, then zoom in on the cabinet.
Place your Set of Pins to trigger a Mini Game.
When you are finished in the Bedroom, exit to the Yard.
Screenshot
Bed Hidden Object Scene
Click on the bell to jingle it and collect the Jingle Bell.
Your Inventory item will be a Palette Knife.
Screenshot
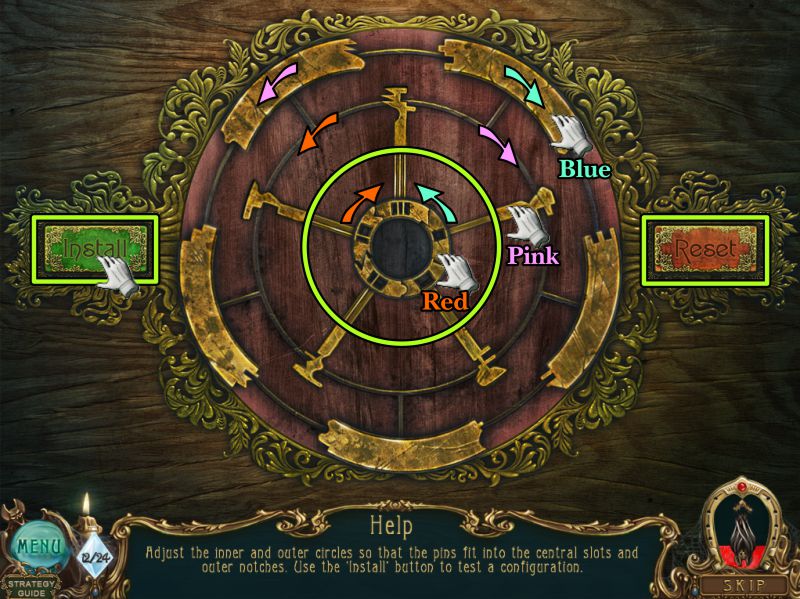
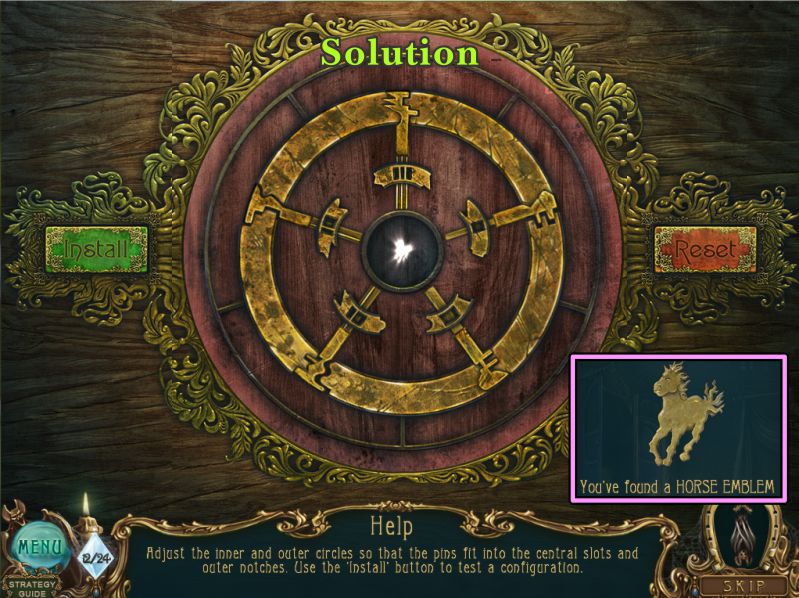
Cabinet Lock Mini Game
You need to adjust the inner and outer circles so the pins fit in the correct outer notches. See the screenshot to see what direction the circles move.
The inner circle must line up according to the configuration of the pins. For instance, the top pin in the screenshot has 3 stripes, so the inner circle must match with the 3 stripes.
When your circles match the screenshot, click the Install button.
There is a Reset button to use if needed.
Screenshot
See the screenshot for the solution.
You will get a Horse Emblem for your Inventory.
Screenshot
Yard Gate
Zoom in on the gate and place the Jack as shown in the screenshot.
The gate will compress and fall open, so exit through it.
Screenshot
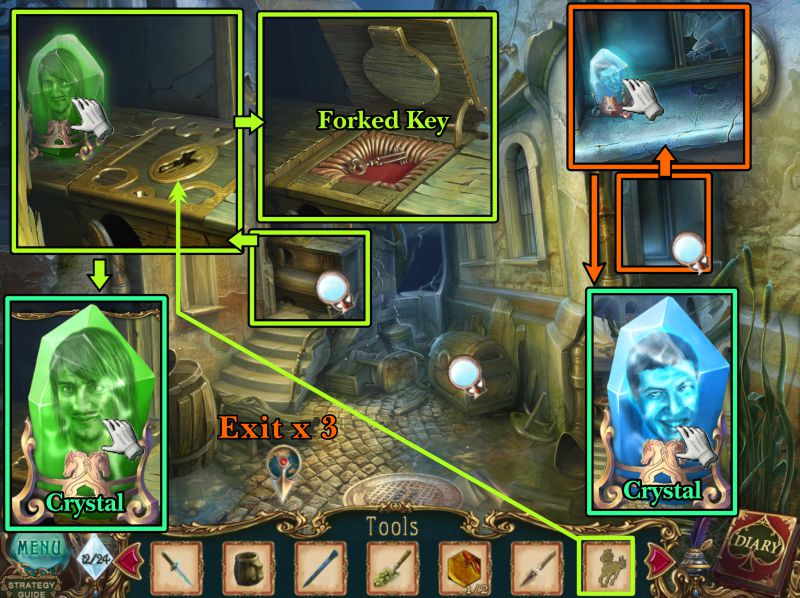
Street
Zoom in on the piano and take the Green Crystal.
Place your Horse Emblem on the lock and take the Forked Key.
Zoom in on the window marked in the screenshot and take the Blue Crystal.
Exit down 3 times to the Attic.
Screenshot
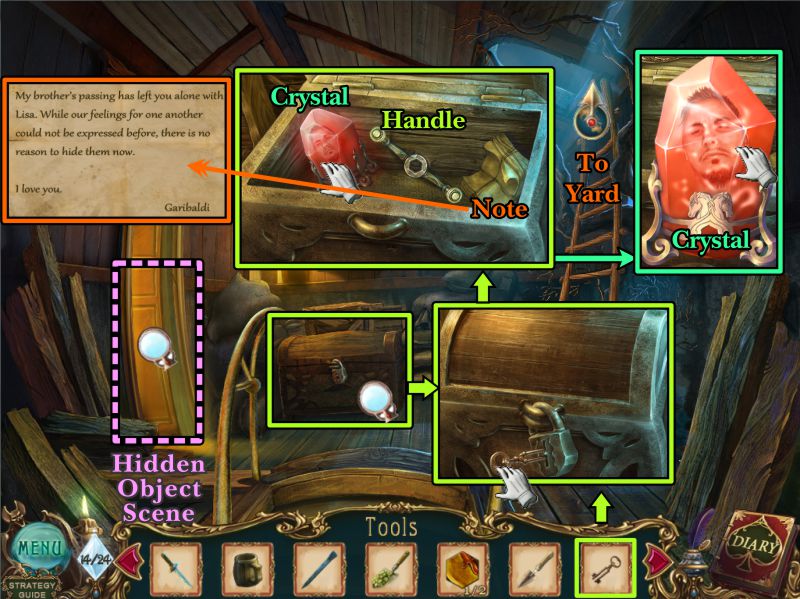
Attic
Zoom in on the chest, place your Forked Key in the lock, and turn to open.
Take the Crystal, Handle, and Note.
Play the Hidden Object Scene and go to the Yard.
Screenshot
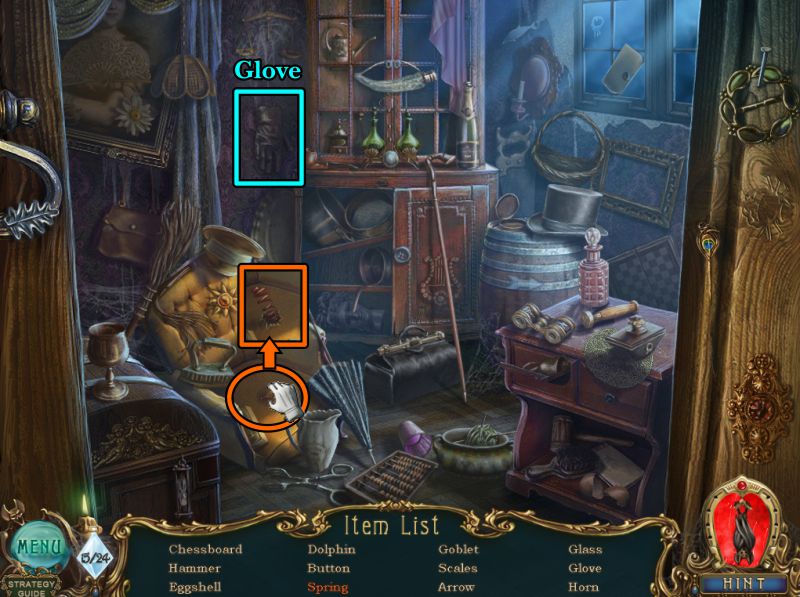
Attic Hidden Object Scene
Pop the spring out of the chair. Collect everything else to get a Glove for your Inventory.
Screenshot
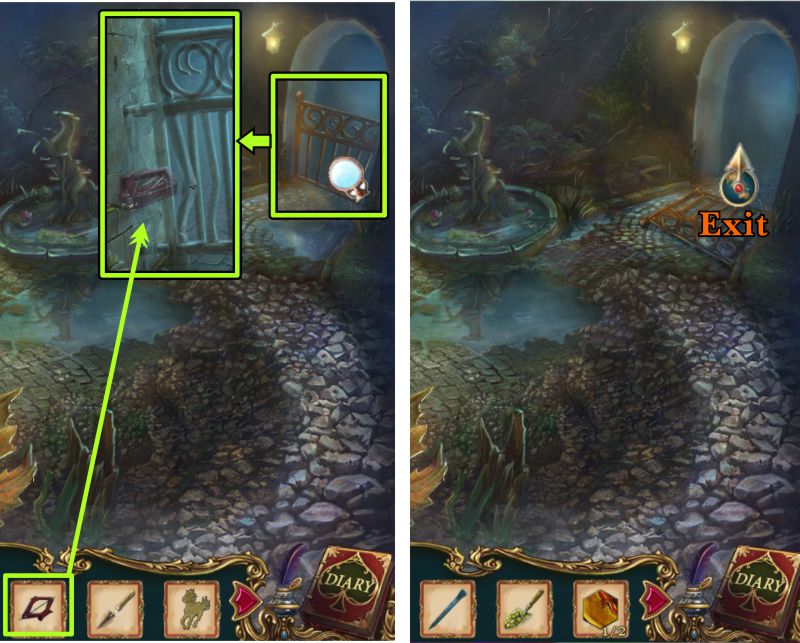
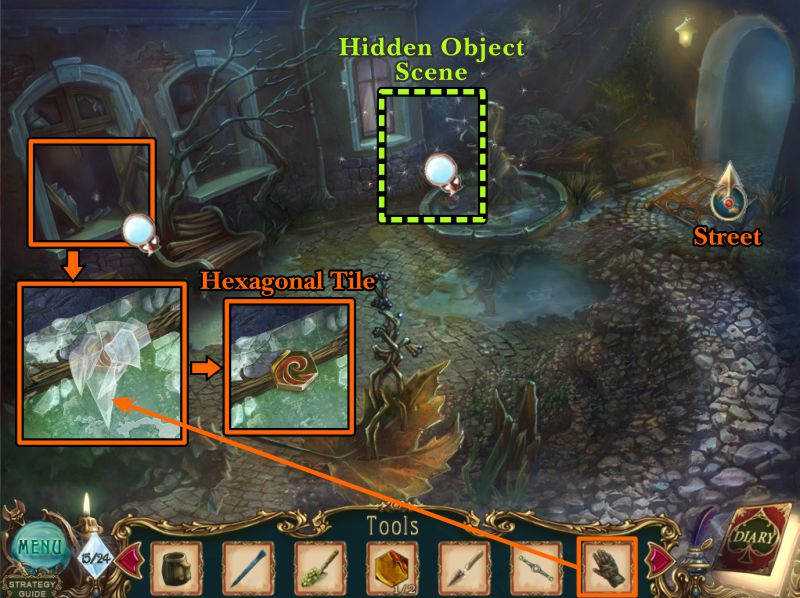
Yard
Zoom in on the window at the left and use your glove to move the glass so you can get the Hexagonal Tile.
Play the Hidden Object Scene, then go to the Street.
Screenshot
Yard Hidden Object Scene
Open the lily in the fountain to get a Blooming Flower.
Move the leaf on the edge of the fountain to find the Caterpillar.
A Scoop will be added to your Inventory when you have collected your list.
Screenshot
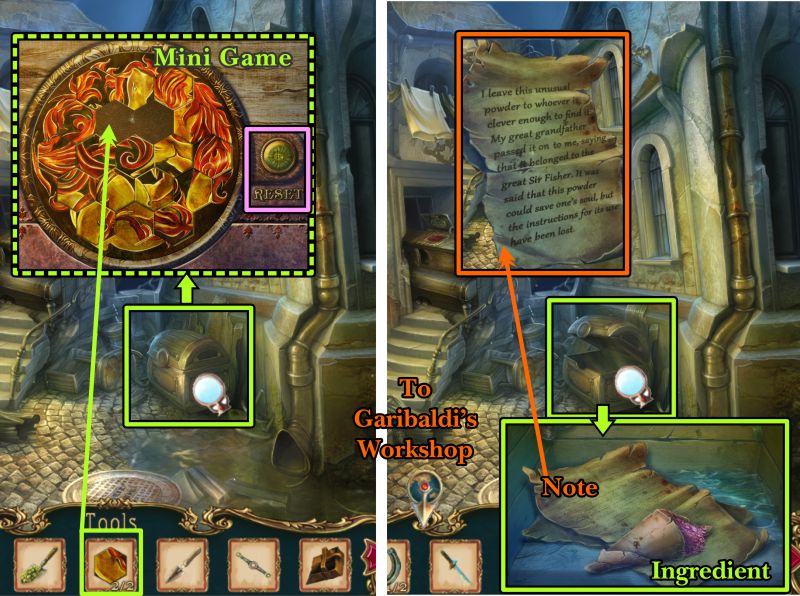
Street
Zoom in on the chest and place your two Hexagonal Tiles on the lock to trigger a Mini Game.
In case you need it, there is a Reset button.
When the chest opens, grab the Note and Ingredient.
Go to Garibaldi's Workshop.
Screenshot
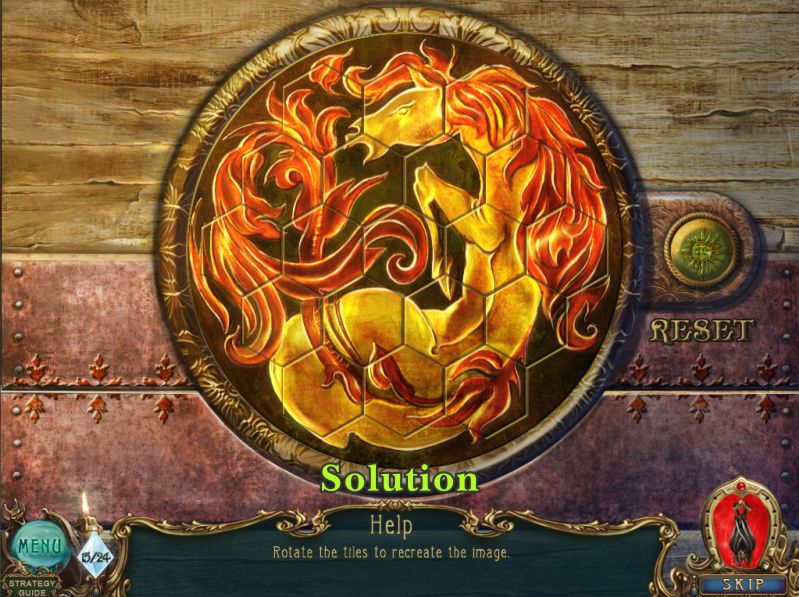
Street Chest Mini Game
Your goal is to rotate the tiles to create the image shown in the screenshot.
Screenshot
Workshop
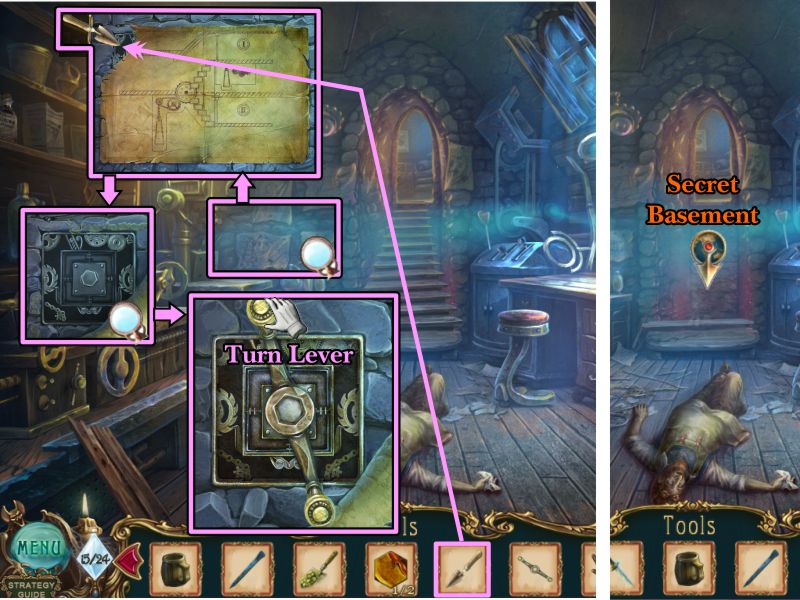
Zoom in on the diagram on the wall and use your Palette Knife to loosen the corner from the wall.
Zoom in on the mechanism, place your Lever, and turn it.
The stairs will reverse and go down into the Secret Basement. If you need to return to the Attic, Yard, or Street for any reason, you will need to reverse the stairs.
Go down to the basement.
Screenshot
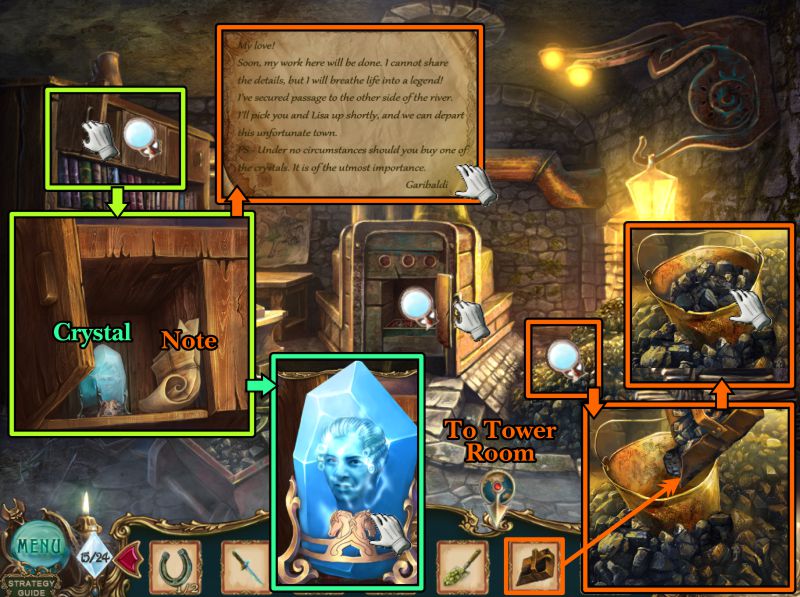
Secret Basement
Open the door above the bookcase, zoom in and take the Crystal and Note.
Zoom in on the pile of coal and use your Scoop to fill the bucket with coal.
Take the bucket, open the furnace and zoom in on it.
Screenshot
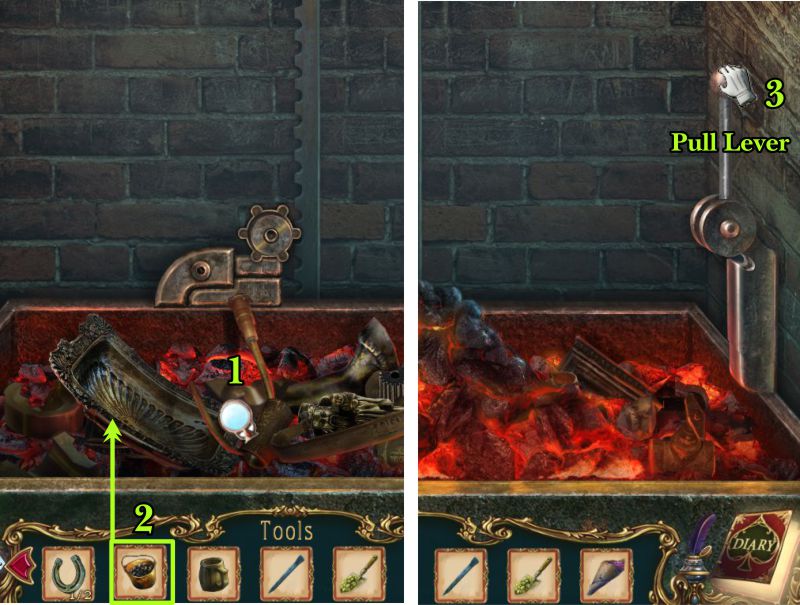
Basement Furnace
Take a closer look at the metal in the trough, pour in your bucket of coal, and pull the lever at the right to trigger a Mini Game.
Screenshot
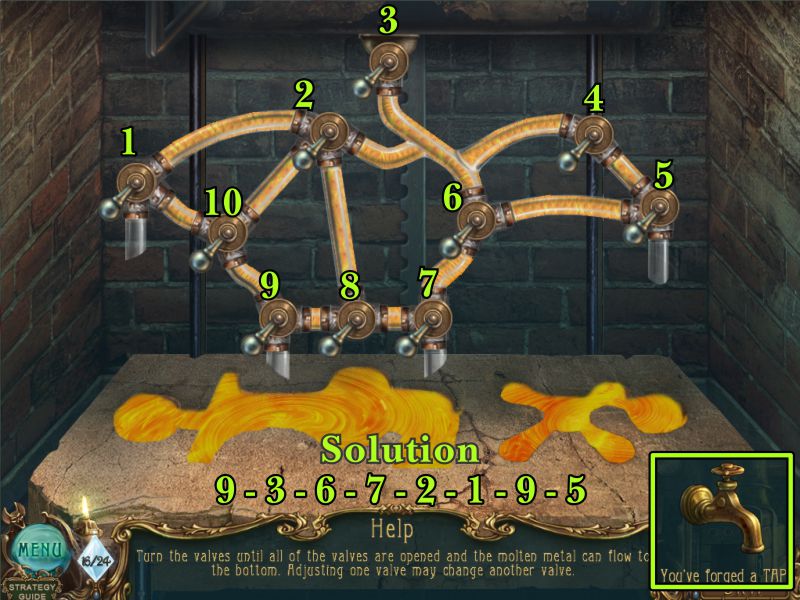
Forge Mini Game
See the screenshot and follow the number sequence shown there.
You will forge a Tap to take for your Inventory.
Screenshot
Chapter 8: The Potion
Tower Room
You forged a Tap and found the Secret Ingredient, so you are now able to create the Potion.
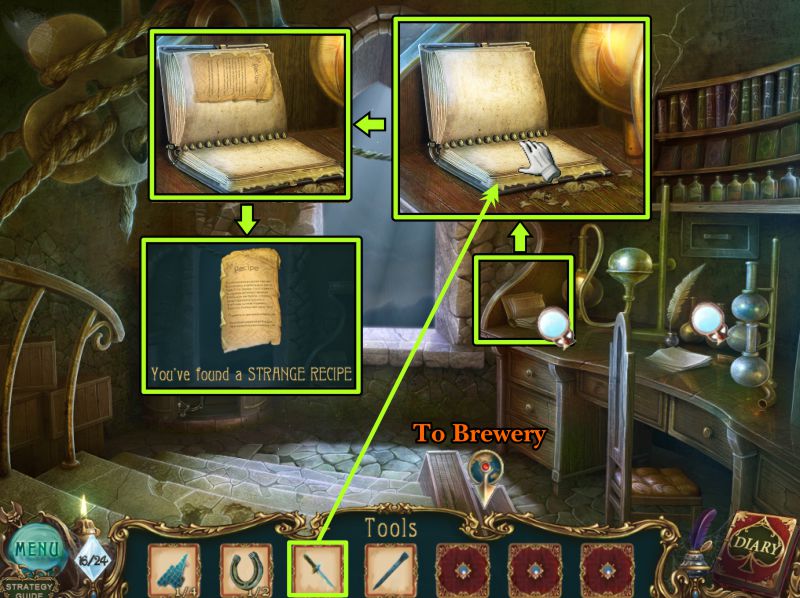
First, you need to find SG's recipe for the potion, so go to the room at the top of the Tower.
Zoom in on his alchemy apparatus on the desk at the right.
Use your Knife to remove the glue from the book you find there.
Flip the page to discover the recipe.
Take the Strange Recipe and go to the Brewery.
Screenshot
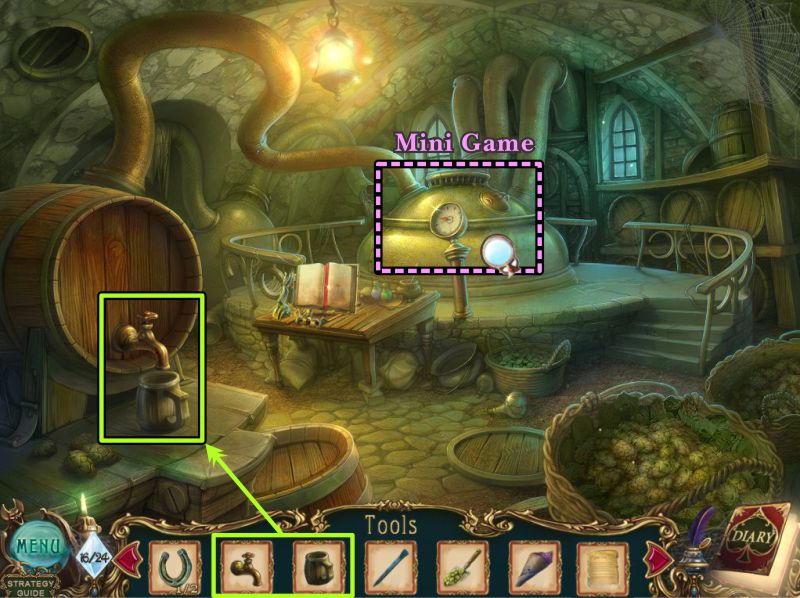
Brewery
Swap out the cork on the keg for your Tap and place the Mug under it.
Zoom in on the brewing machine for a Mini Game.
Screenshot
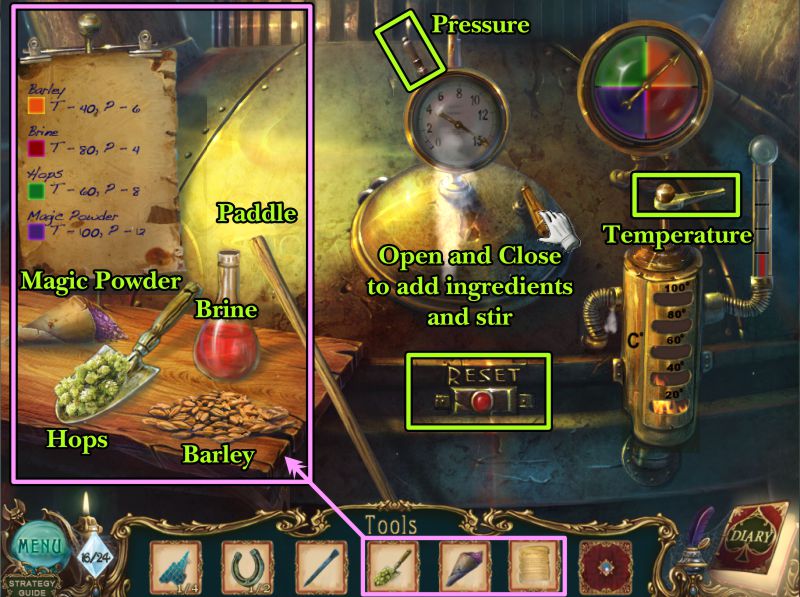
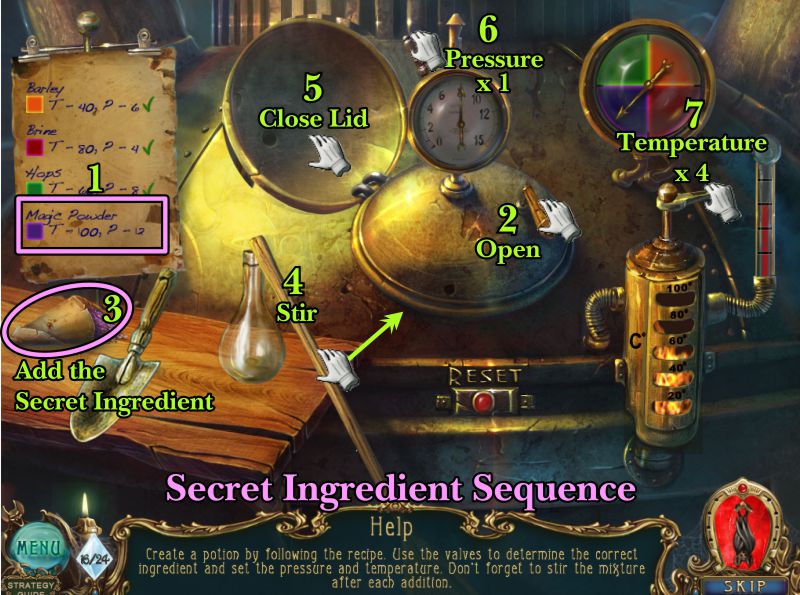
Create the Potion Mini Game
Place the ingredients from your Inventory on the shelf (the Hops and Magic Powder), and place the recipe on the stand.
Your goal is to follow the directions for each ingredient by first opening and closing the vat access.
You will place your ingredient, stir it, adjust the pressure and temperature according to the recipe, and then continue to the next ingredient.
There is a Reset button for the game if necessary.
Screenshot
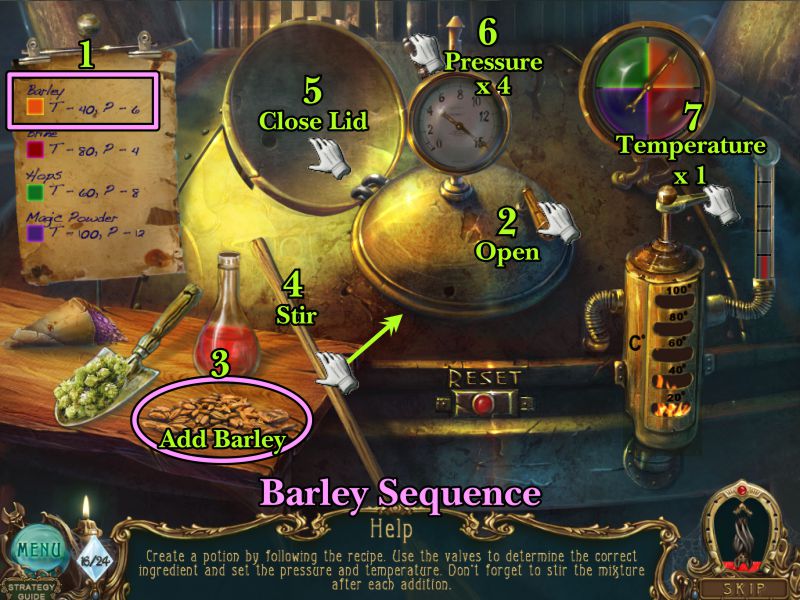
Barley Sequence
See the screenshot for the numerical sequence of how to deal with the Barley.
Also note the number of adjustments needed for the pressure and temperature.
When you have completed the sequence, go on to the next ingredient.
Screenshot
Brine Sequence
The Brine was already available for you to use, so follow the screenshot instructions for completing its addition.
Screenshot
Hops Sequence
See the screenshot and follow the instructions.
Screenshot
Secret Ingredient Sequence
Time to add the Magic Powder, so follow the screenshot instructions.
Screenshot
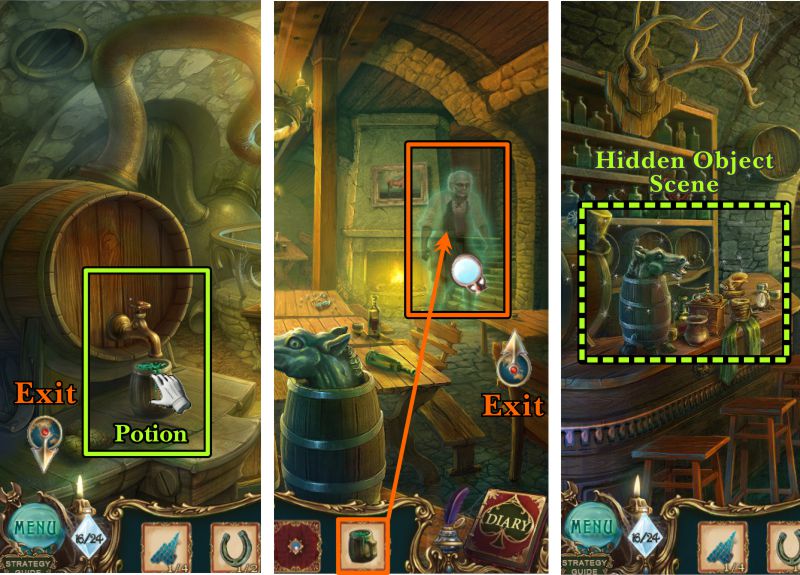
Brewery and Pub
You have completed the Potion, so go collect the mug full of Potion.
Take it to the Pub owner's ghost, zoom in and give it to him.
He will disappear and give you access to the back door. Go through it after you complete the Hidden Object Scene.
Screenshot
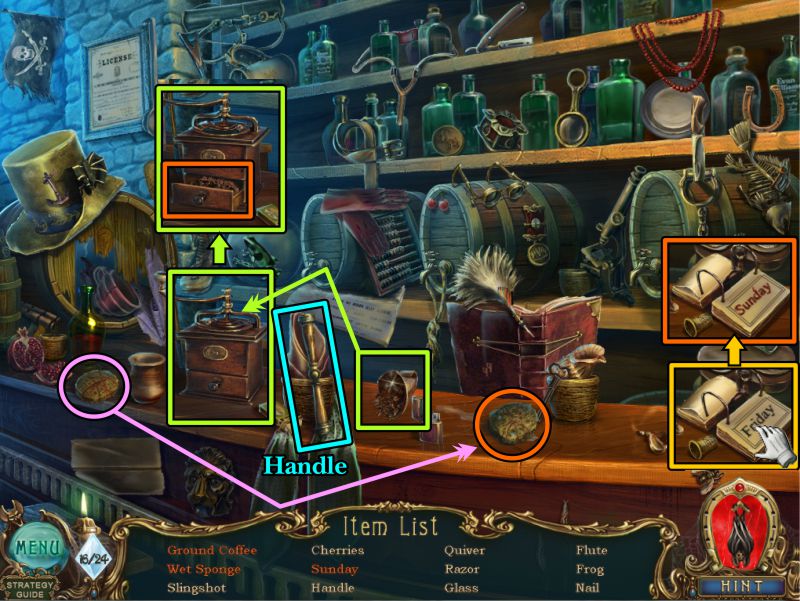
Bar Hidden Object Scene
Place the coffee beans in the grinder so it will give you Ground Coffee to collect.
Change the calendar at the right from Friday to Sunday.
Use the sponge to sop up the liquid on the bar so your can have a Wet Sponge.
Your Inventory item will be a Handle.
Screenshot
Chapter 9: The River
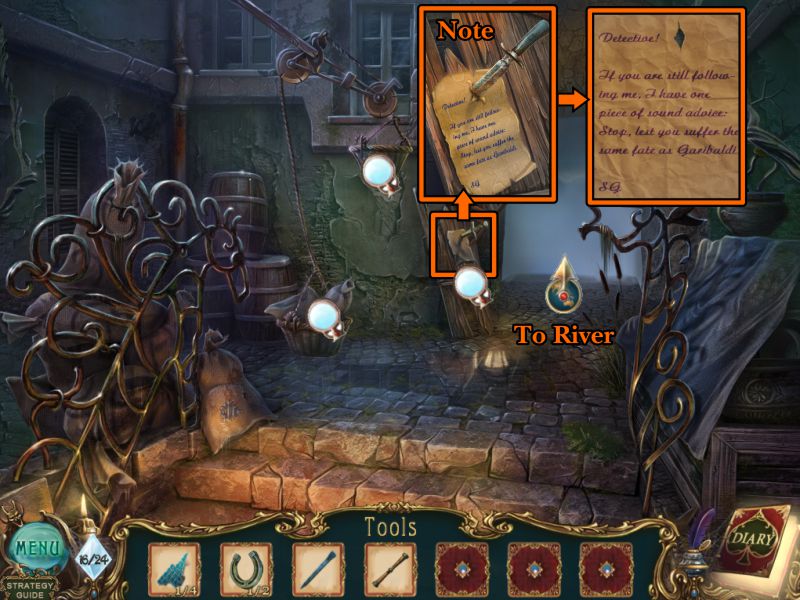
Back Passageway
Check out everything once you've exited through the back door of the Pub.
Zoom in on the Note that is tacked up with a knife and read it.
You can't access the basket, so exit to the River in search of something to help get it down.
Screenshot
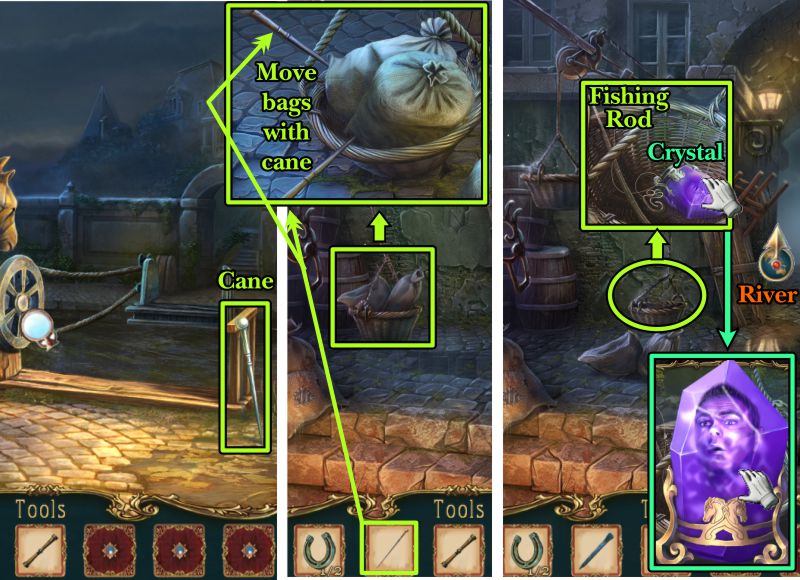
River and Back Passage
Pick up the Cane near the bridge mechanism and return to the Back Passage.
Zoom in on the lower basket and use the Cane to move the two bags.
Once the bags have been removed, the upper basket lowers.
Take the Fishing Rod and the Crystal, then return to the River.
Screenshot
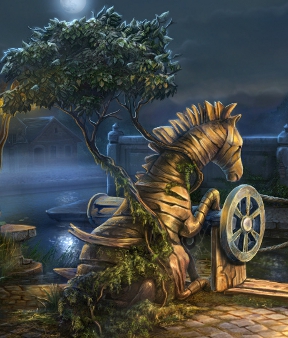
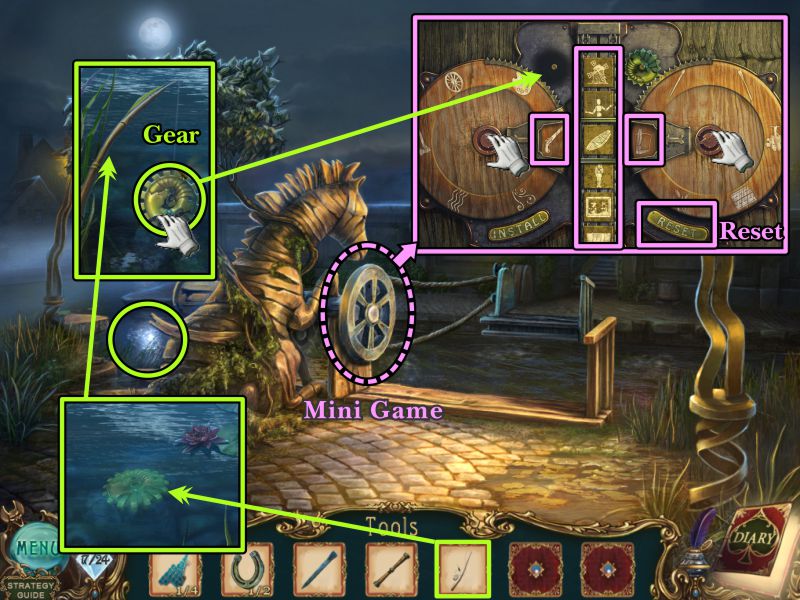
River
Zoom in on the area of the River shown in the screenshot and use your Fishing Rod to get the Gear.
Zoom in to have a look at the bridge mechanism next to the horse, then place the Gear you just retrieved.
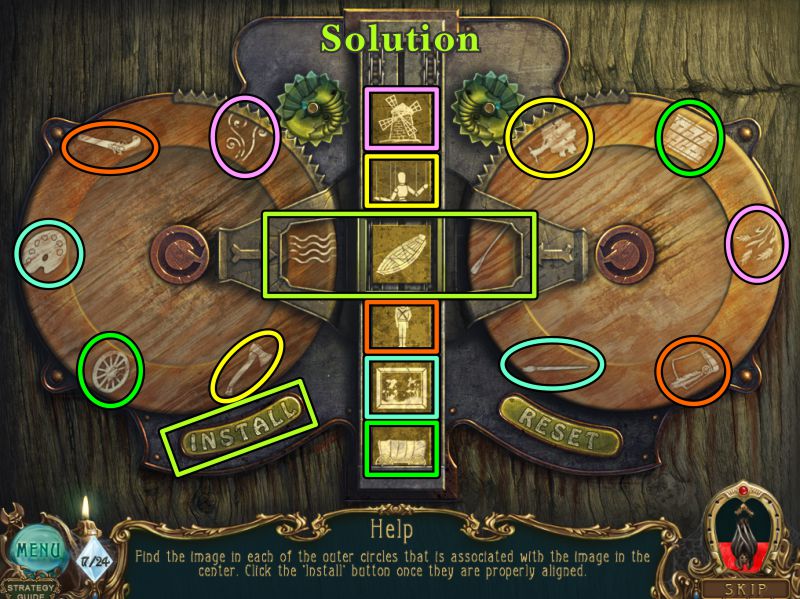
You have triggered a Mini Game to retrieve the bridge from across the River. Your goal is to move the center knobs of the ring to match up the ring images with the one presented to you in the center column. A Reset button is available.
Screenshot
Bridge Mechanism Mini Game
All of the images are color-coded in the screenshot solution.
Once you have the three images lined up horizontally, press the Install button to check your selection.
Screenshot
Bridge
Upon completion of the game, you will need to place your Handle as shown in the screenshot and pull the Handle.
When the bridge comes to you, cross the River.
Screenshot
Chapter 10: The Horseman
Mayor's Yard
The Horseman seems to have invaded the yard of the Mayor's house.
Zoom in on the area at the left shown in the screenshot.
Take the Mosaic Fragment and the Purple Crystal.
Go to the Porch.
Screenshot
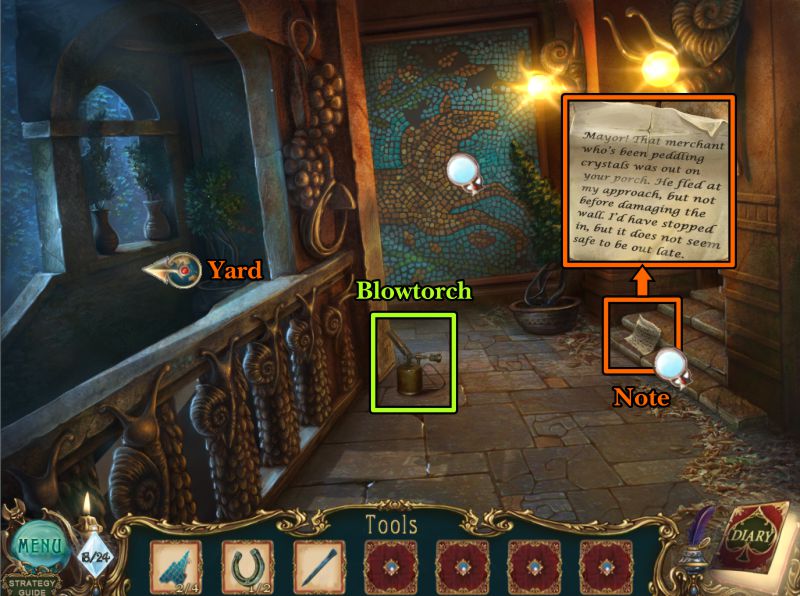
Porch
Read the Note and pick up the Blowtorch.
Check out the Mosaic wall that you will deal with later, then return to the Yard.
Screenshot
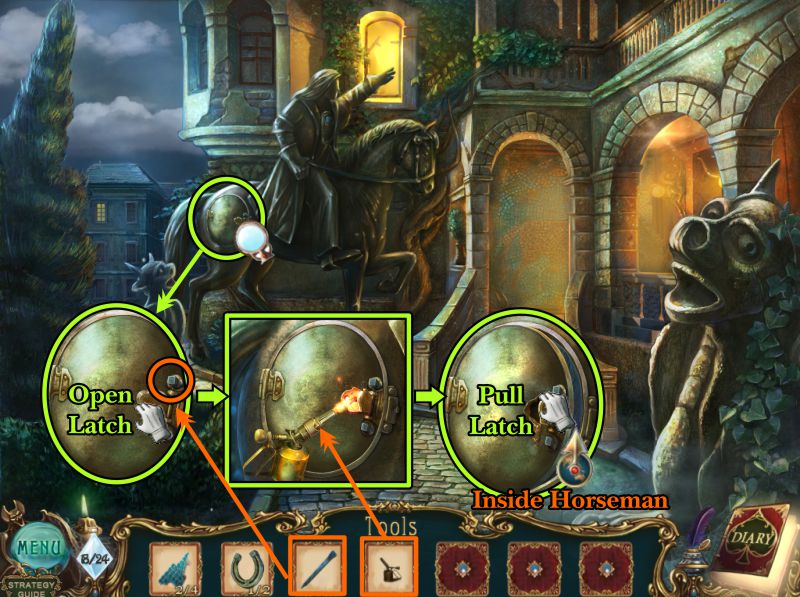
Attic
Zoom in on the rump of the horse and open the latch.
Use the Blowtorch you just found on the lock and pull the latch open.
Go inside the horse.
Screenshot
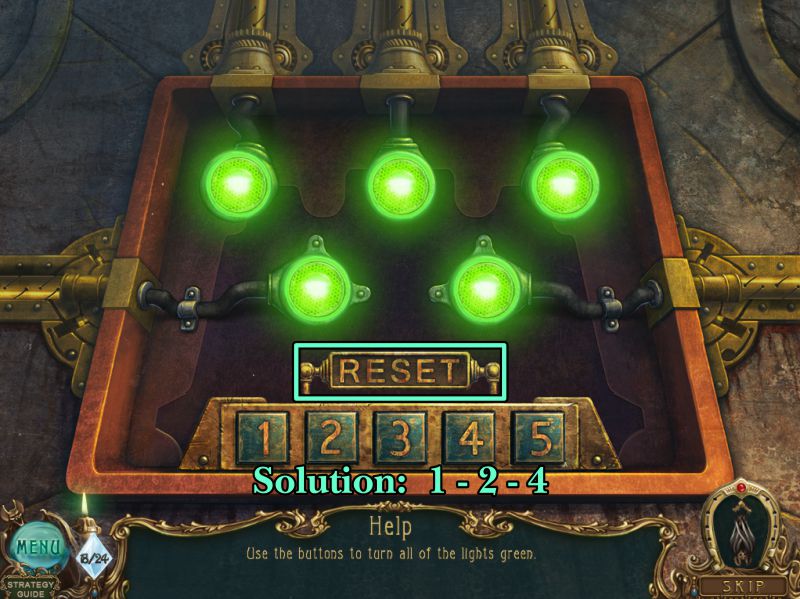
Inside the Horseman
Pull the two levers shown in the screenshot and zoom in on the area shown for a Mini Game.
Screenshot
Horse Mini Game
Your goal is to turn all the red lights green. Each of the numbered buttons you press also light up adjoining lights.
See the screenshot for the solution. There is a Reset button available.
Screenshot
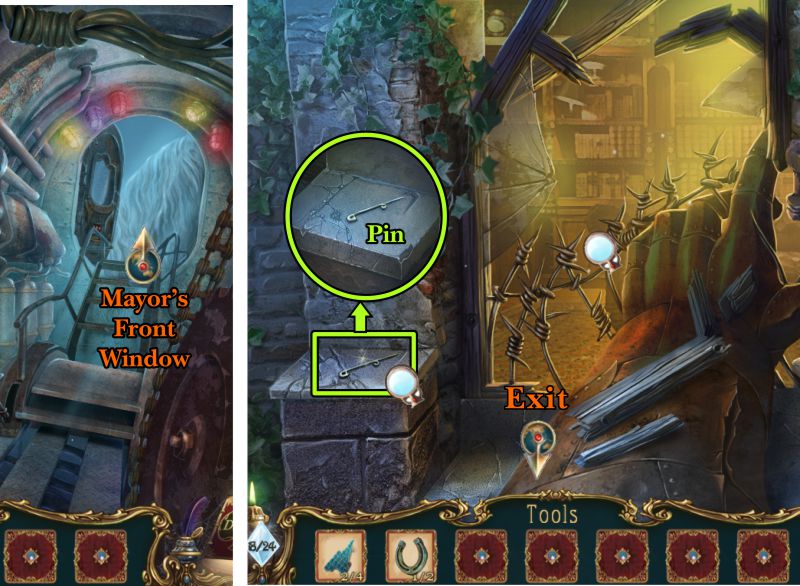
Inside Horse and Mayor's Front Window
The horse opens to give you access to the Mayor's Front Window. Only problem is there is barbed wire you cannot cross.
Zoom in and pick up the Pin on the ledge and go back inside the horse.
Screenshot
Inside Horse and Front Window
Zoom in on the box at the left that was exposed when you threw the green lever.
Use the Pin you found in each of the four holes shown in the screenshot, then pull open the lid of the box.
Take the Rough Cloth and return to the Window.
Place the cloth over the barbed wire and go into the Mayor's Room.
Screenshot
Chapter 11: Mayor's House
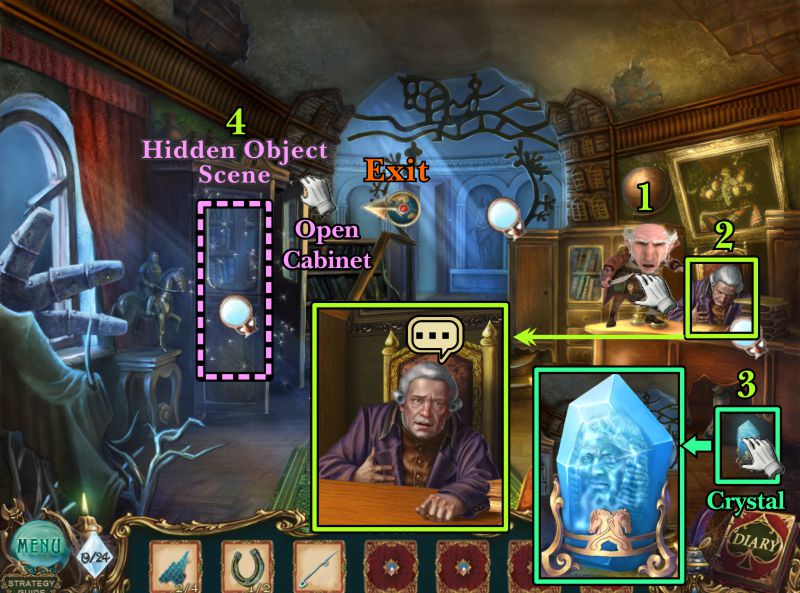
Entrance
Try to grab SG: he will harm the Mayor more and then run off.
Zoom in on the Mayor and talk to him.
Grab the Blue Crystal in front of his desk.
Open the Cabinet at the left and play the Hidden Object Scene.
Exit at the back of the scene.
Screenshot
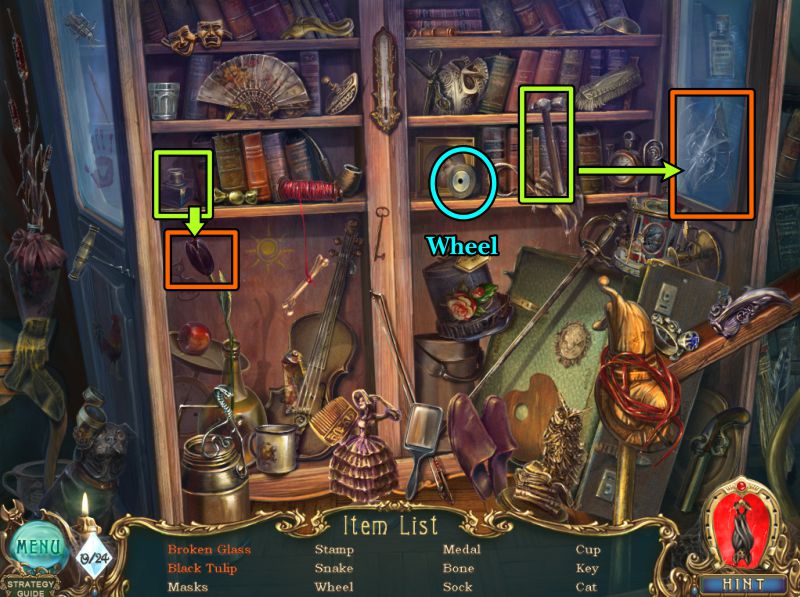
Cabinet Hidden Object Scene
Pour the ink on the tulip to get a Black Tulip.
Use the hammer to break the window to get Broken Glass.
You will ultimately get a Wheel for your Inventory.
Screenshot
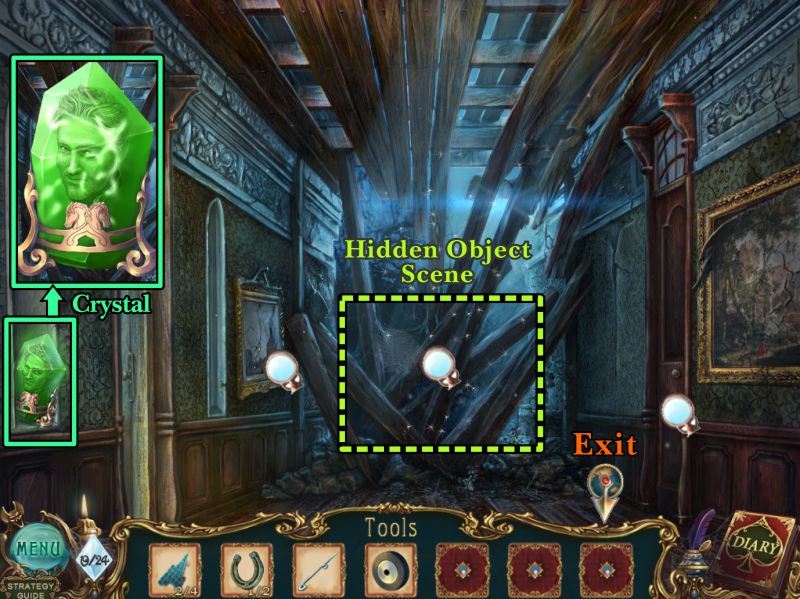
Destroyed Corridor
You have found the Destroyed Corridor with ultimate access to Mike's Room and the Stairs to the Hallway.
Zoom in at the left and take the Green Crystal.
Play the Hidden Object Scene and then exit back to the Mayor's Room.
Screenshot
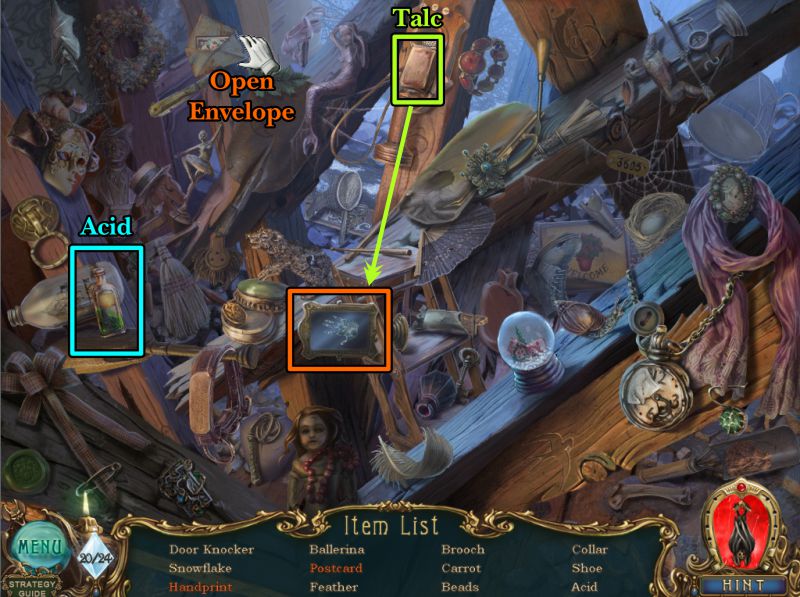
Destroyed Corridor Hidden Object Scene
Put the Talc on the mirror to produce the Handprint.
Open the envelope to get the Post Card.
You will end up with Acid for your Inventory.
Screenshot
Mayor's Room and Destroyed Corridor
Zoom in on the niche in the back wall and use the Acid to melt the arm of the statue so you can take the Spearhead.
Return to the Destroyed Corridor and zoom in on the picture at the left.
Use the Spearhead to rip the painting to get the Key Panel.
Enter Mike's Room.
Screenshot
Mike's Room
Move the rocker to the right of the scene so you can get to the box above the cabinet.
Take a closer look and use the Spearhead to rip it open so you can take the Pin.
Zoom in on the desk and place the Key Panel on the book.
Open it and take the Clue Scroll.
Return to the Destroyed Corridor.
Screenshot
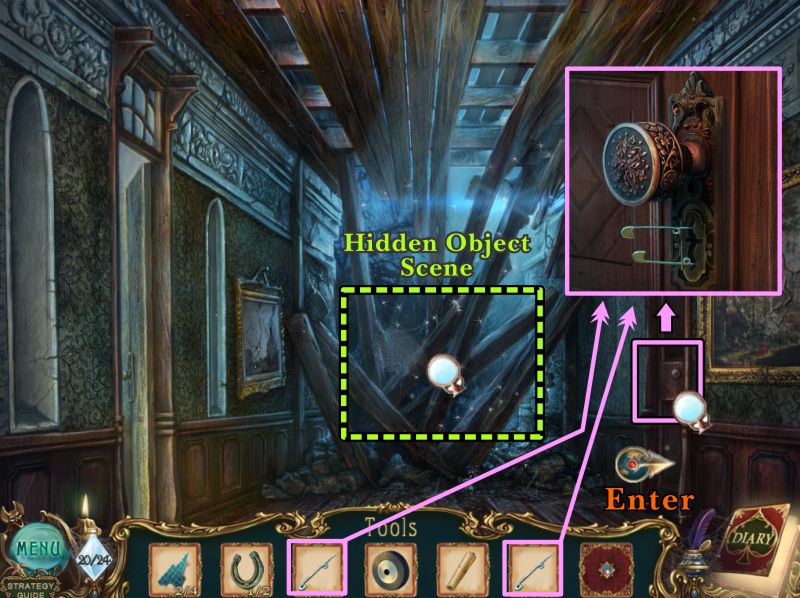
Destroyed Corridor
Play the Hidden Object Scene, then zoom in on the door to the right.
Use your two Pins to open the lock so you can go inside.
Screenshot
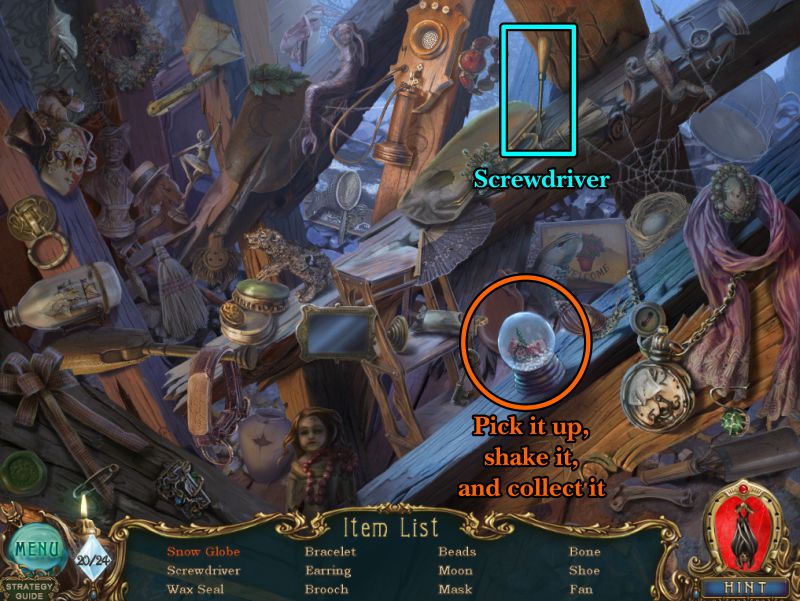
Destroyed Corridor Hidden Object Scene
Pick up the snow globe and shake it to get snow so you can collect it.
Your Inventory item will be a Screwdriver.
Screenshot
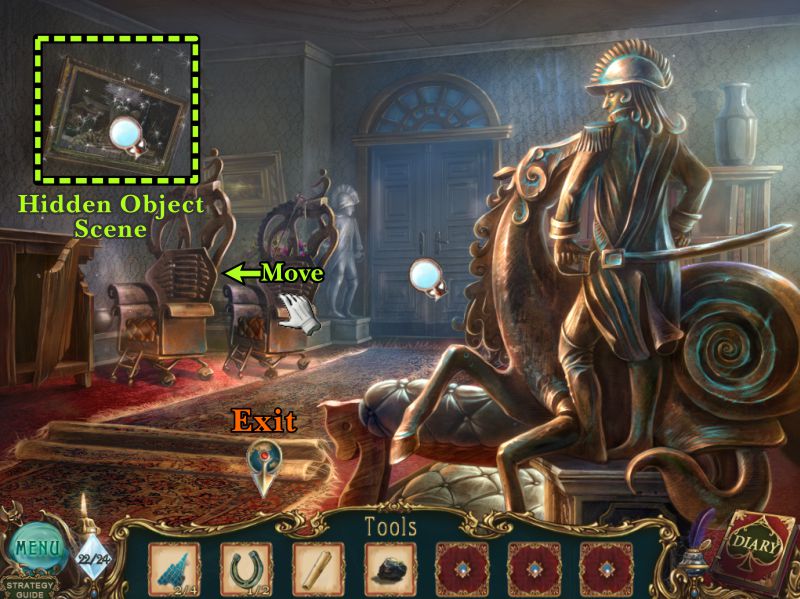
Hallway
Got down the stairs and try to grab SG, who will run out the back door and lock it.
Collect the Blue Crystal from the statue.
Zoom in on the chair, install your Wheel, pick up the screw and place it.
Use your screwdriver to tighten the screw.
Screenshot
Move the chair over so you can reach the painting for a Hidden Object Scene.
Screenshot
Painting Hidden Object Scene
Use the knife marked in the screenshot to cut a slice off the lemon so you can have a Slice of Lemon.
The Apples will go into your Inventory.
Screenshot
Stairs
Go up the stairs, zoom in on the column, and take the Red Crystal and Coal.
Zoom in on the apple tree at the left, place your Apples, and take the Glass Triangle from the hidden compartment.
Go across the corridor to Mike's Room.
Screenshot
Mike's Room
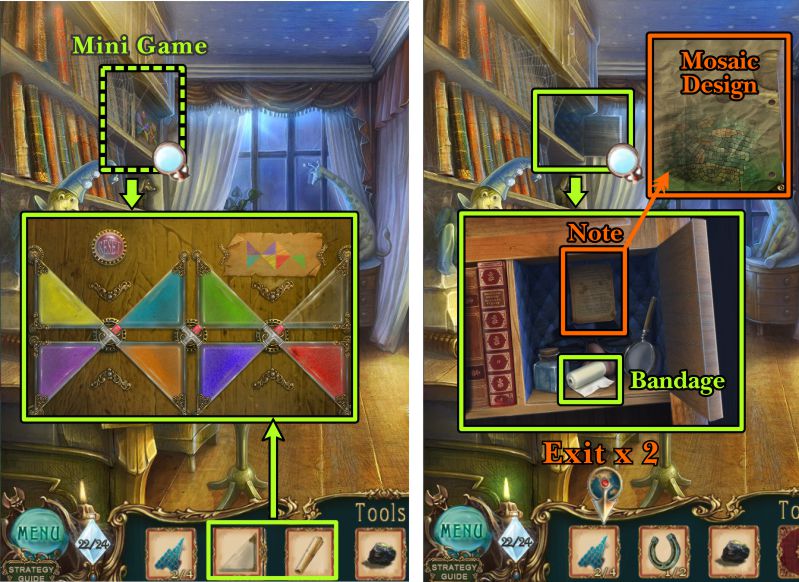
Zoom in on the bookcase for a Mini Game.
Place your Glass Triangle and Clue Scroll to start the game.
When the compartment opens, take the Bandage and Note with the Mosaic Design before exiting to the Mayor's Room.
Screenshot
Glass Triangle Mini Game
Rotate the 3 tubes to change the color of the sand in the triangles to match the design on the scroll.
There is a Reset button if needed, and the solution is shown in the screenshot.
Screenshot
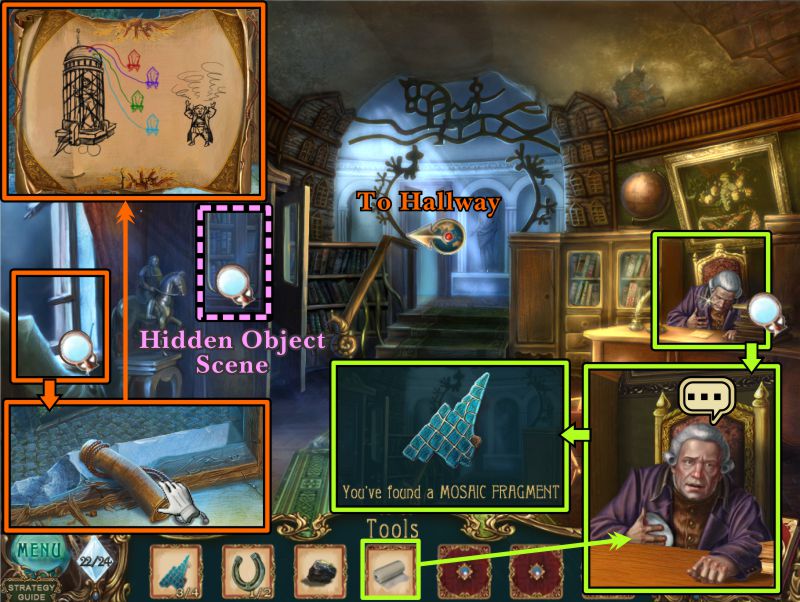
Mayor's Room
Zoom in on the Mayor and give him the Bandage. He will give you a Mosaic Fragment.
Note that the Horseman is gone from the window. Zoom in and read the scroll left on the sill.
Play the Hidden Object Scene and return to the back Hallway through the door in the Destroyed Corridor.
Screenshot
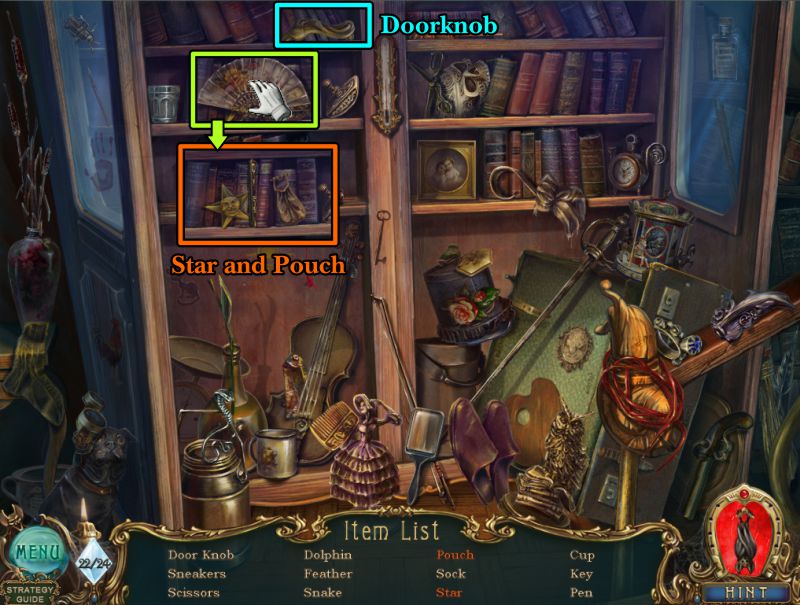
Cabinet Hidden Object Scene
Fold up the fan to get the Star and Pouch.
Collect everything to get the Doorknob for your Inventory.
Screenshot
Hallway
Play the Hidden Object Scene, and zoom in on the back door.
Place your Doorknob and open both sides of the door to go to the Porch.
Screenshot
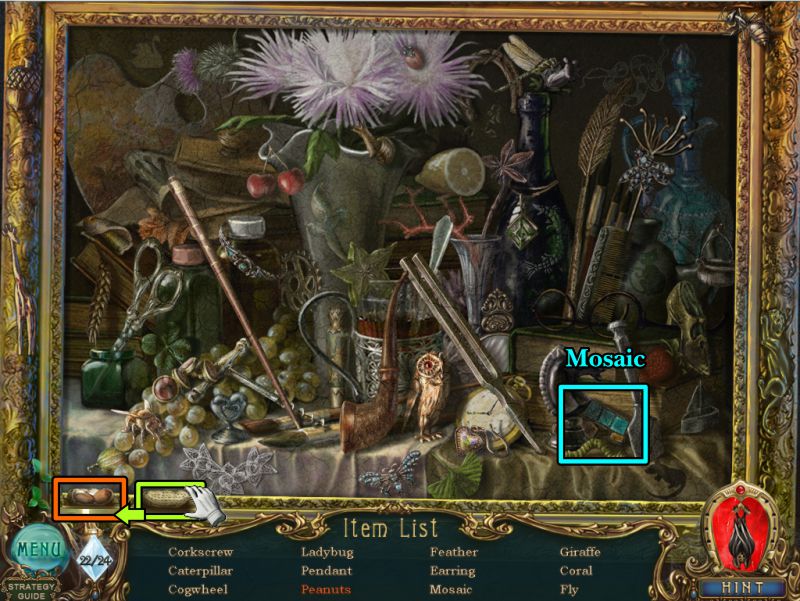
Painting Hidden Object Scene
Open the peanut shell to get the peanuts.
You will get the last piece of Mosaic for your Inventory.
Screenshot
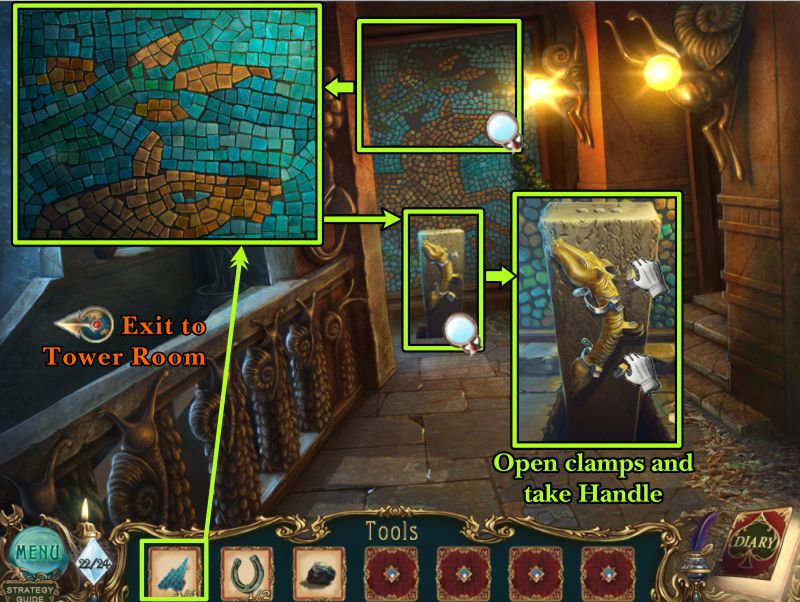
Porch
Zoom in on the mosaic and place your 4 Mosaic Fragments.
A pillar will rise up in front of the mosaic, so zoom in on it.
Open the two clamps holding the Handle and take it.
Exit to the left and go back across the River, through the Pub and up to the top room in the Tower.
Screenshot
Chapter 12: Mike and SG
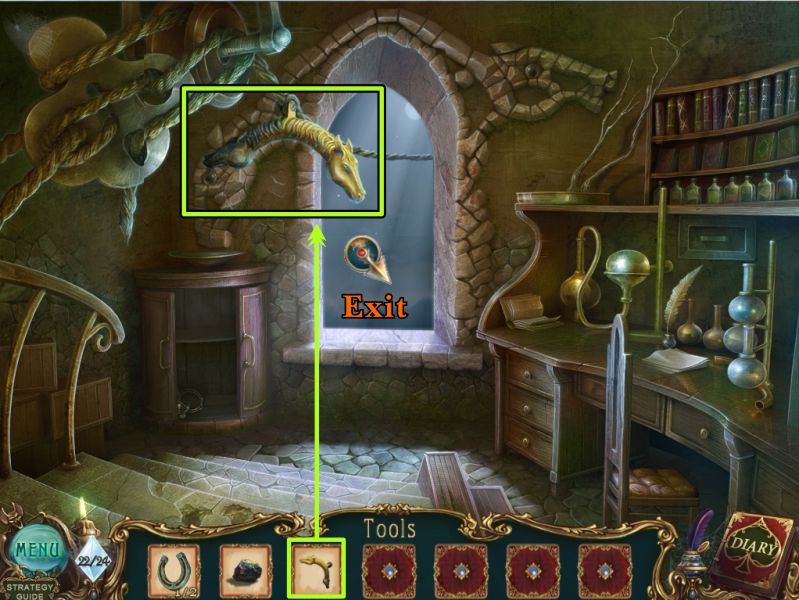
Tower Room
Place your Handle as shown in the screenshot and exit through the window.
Screenshot
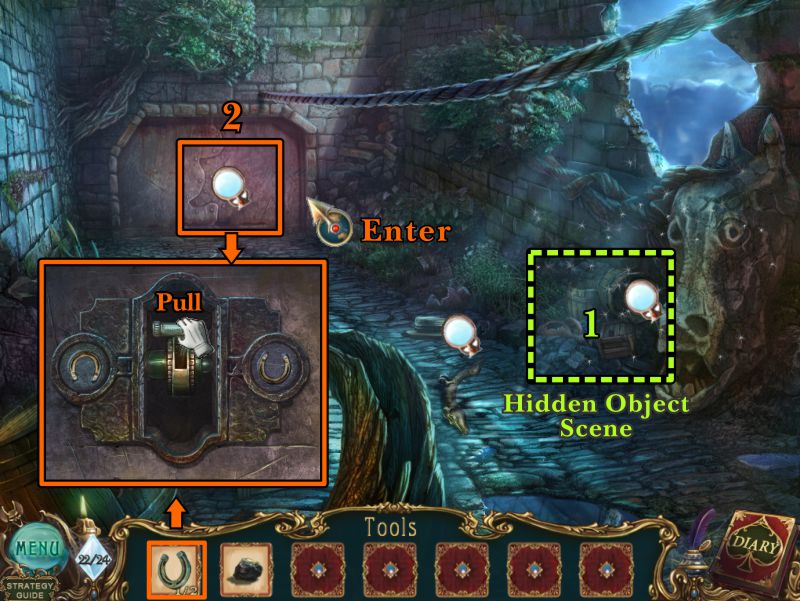
Den Entrance
Play the Hidden Object Scene to get the second Horseshoe.
Zoom in on the entrance, place both Horseshoes, and pull the lever that appears.
Screenshot
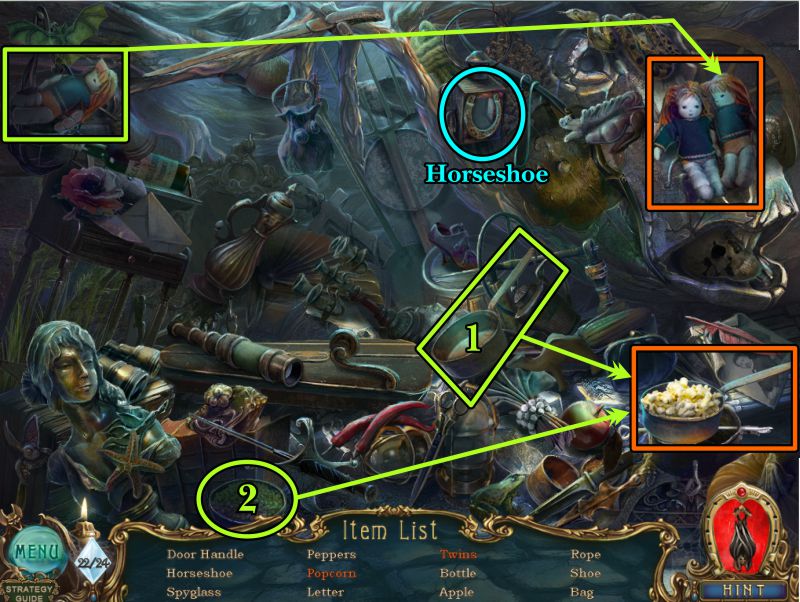
Den Entrance Hidden Object Scene
Place the doll on the left with the doll on the right to collect Twins.
Put the pan shown in the screenshot on the burner and the corn in the pan to create Popcorn.
Collect everything to get the Horseshoe.
Screenshot
Labyrinth
Zoom in on the Instructions on the chair. Use your Coal to make it readable.
Zoom in on the cabinet on the desk, open it and take the Purple Crystal and Control Panel.
Check out the machine at the left, pick up the Fuse, and throw the switch. A Lamp Basket will appear.
Exit back to the Den Entrance to get the lamp.
Screenshot
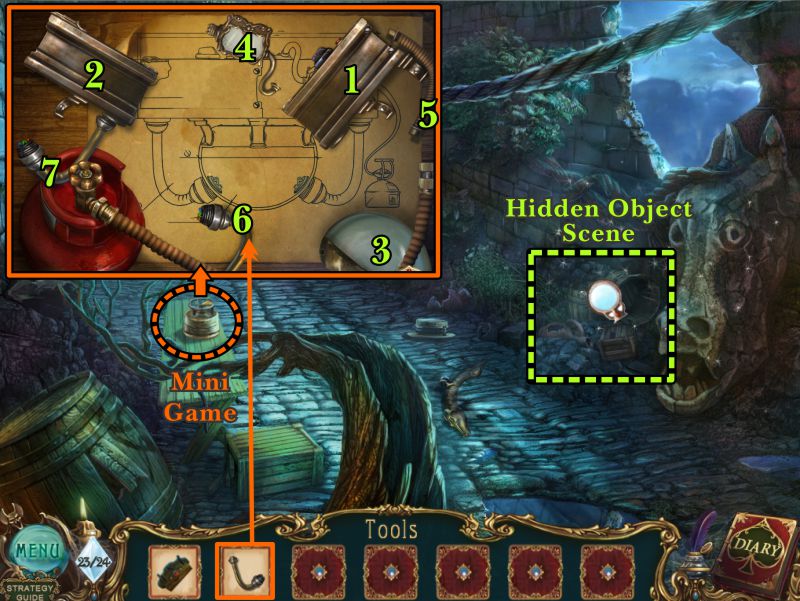
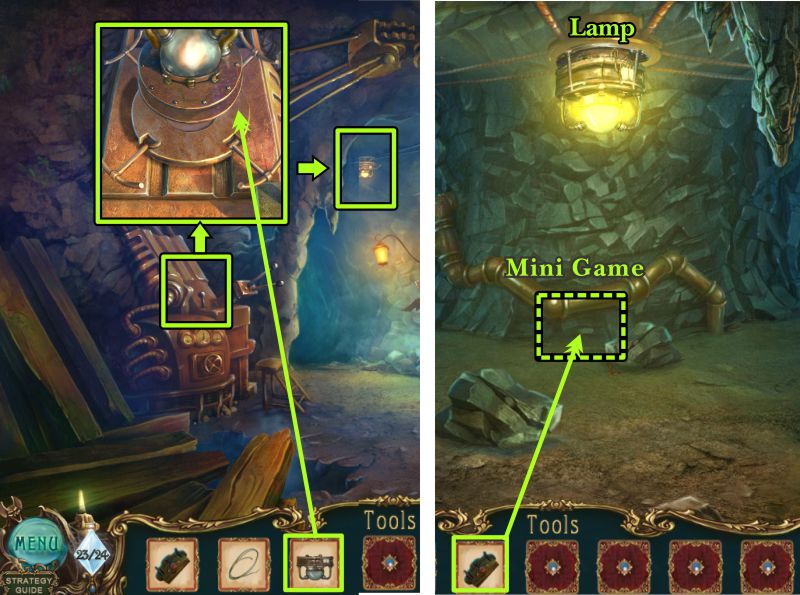
Den Entrance
Play the Hidden Object Scene and zoom in on the lamp at the left.
Place your Fuse, then assemble the lamp according to the diagram.
The screenshot is numbered to help along your assembly. It is important that you place part 1 first.
Screenshot
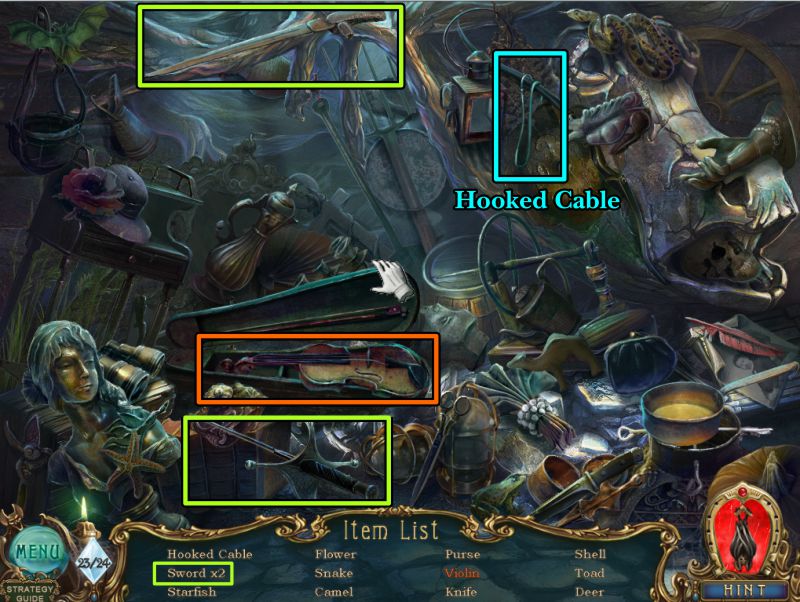
Den Entrance Hidden Object Scene
Two swords are marked in the screenshot.
Open the violin case to get the Violin.
A Hooked Cable will go into your Inventory.
Screenshot
Lamp Mini Game
See the screenshot for the solution.
Turn the valve on the tank to fill the lamp and then take it for your Inventory.
Return to the Labyrinth.
Screenshot
Labyrinth
Zoom in on the machine at the left and place your Lamp in the basket.
Got toward the labyrinth where the Lamp is waiting for you.
You need to be able to control its direction, so place the Control Panel as shown in the screenshot to trigger a Mini Game.
Screenshot
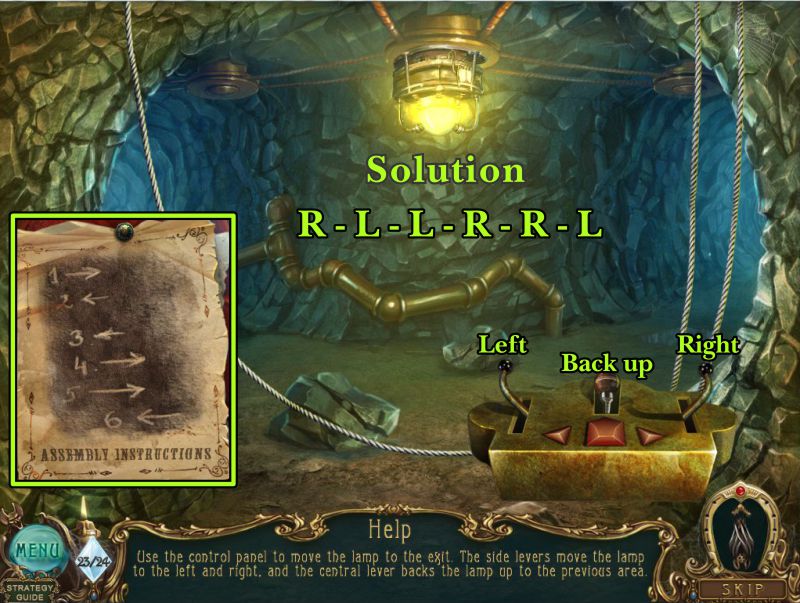
Labyrinth Mini Game
Use the control panel to move the lamp in the direction you want to go.
The side levers move it left and right and the center lever will back it up to your last location.
You have the Instructions as shown in the screenshot; follow them for the solution.
Screenshot
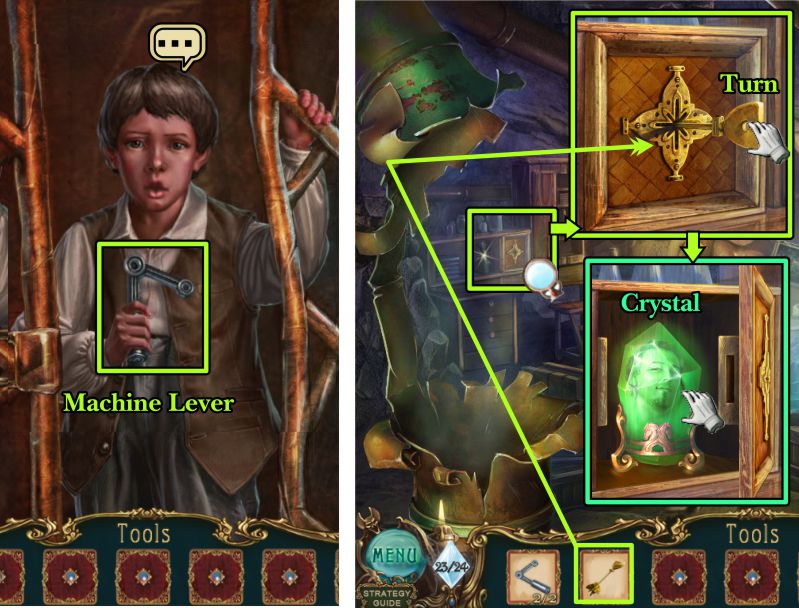
SG's Den
There he is again, so try to grab him and he will have a few choice words before disappearing down the grate.
Zoom in on the grate and use your Hooked Cable to retrieve the Machine Lever.
Play the Hidden Object Scene and return to the Labyrinth by clicking down.
Screenshot
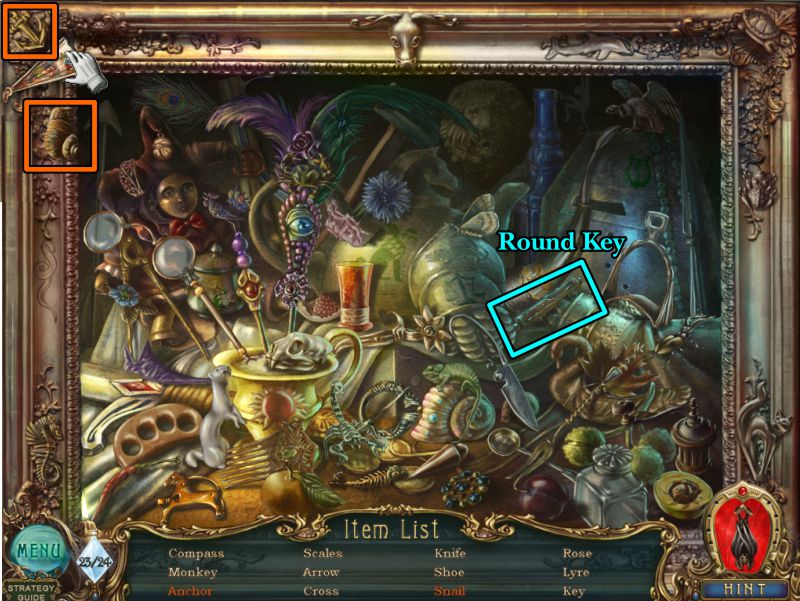
Den Hidden Object Scene
Fold up the fan on the frame to find the Anchor and Snail.
You will get a Round Key for your Inventory.
Screenshot
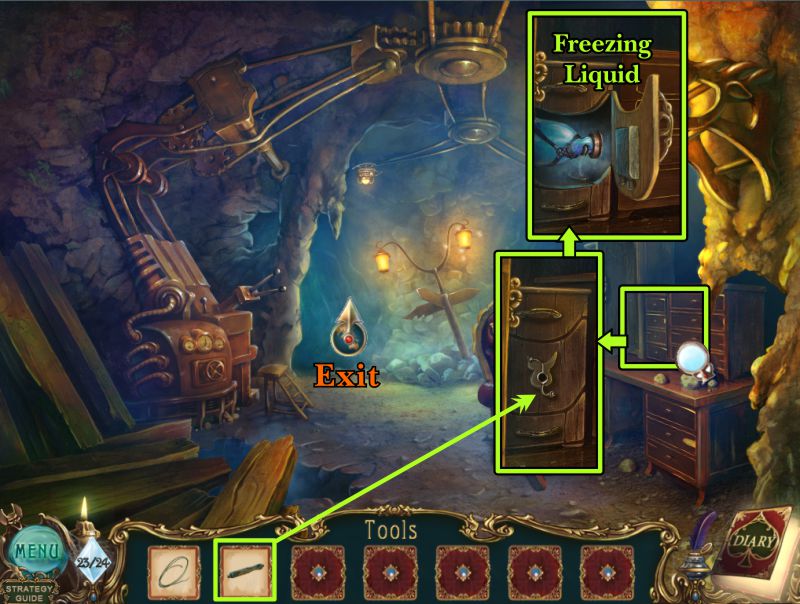
Labyrinth
Zoom in on the desk at the right and use the Round Key to open the compartment and take the Freezing Liquid.
Return to the Den.
Screenshot
Den
Play the Hidden Object Scene, and then exit through the hole at the rear.
Screenshot
Den Hidden Object Scene
Close the eye marked in the screenshot to get the closed eye.
Your Inventory item will be a Sledgehammer.
Screenshot
SG's Machine
You found Mike all caged up, so zoom in and talk to him.
Place the Freezing Liquid on the lock and hit the lock with the Sledgehammer.
Zoom in on the opening and grab the Cross Key.
Screenshot
Cage and Den
Mike is free, so zoom in and talk to him again; he will give you a Machine Lever.
Mike will run off, so go to the Den and zoom in on the workbench at the left and place your Cross Key in the compartment.
Turn the key and take the Green Crystal.
Return to the Machine Room.
Screenshot
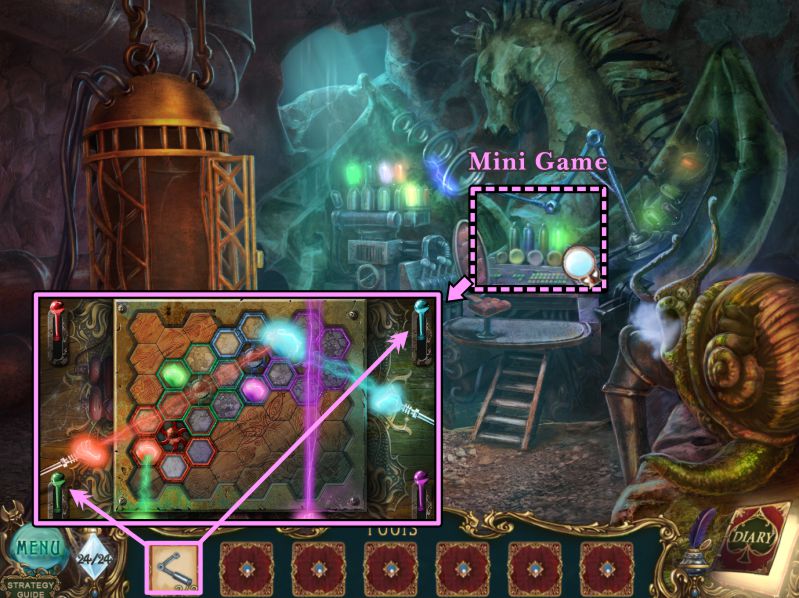
Crystal Machine Mini Game
Zoom in on the machine and place your two levers to trigger the Mini Game.
Screenshot
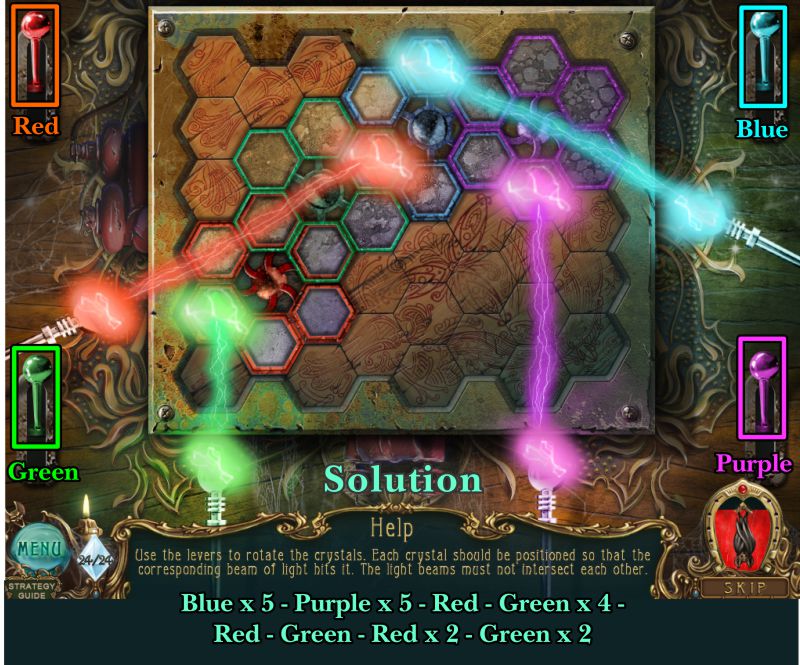
Attic
Your goal is to use the levers to rotate the crystals of the same color.
Each crystal must be placed so that the beam of the same color directly hits it without crossing paths with any other beam.
See the screenshot for the solution.
Screenshot
Congratulations, you have released all the souls and saved the town.
If you purchased the Collector's Edition, the vine has now been removed from the Extras on the Main Menu.
You may now access the Music, Wallpaper, Concept Art, Screensaver, and play the Bonus Chapter.
Posted by: Jazz |
September 21, 2011 9:17 PM
|
September 21, 2011 9:17 PM
Haunted Legends: The Bronze Horseman
Location of Crystals of Soul
Location by Scene
Hall of Mayor's Office: Red
Blind Alley: Blue
Front of Pub: Red
Front of Tower: Green
Side Street by Garibaldi and Playground: Blue
Children's Playground: Purple
Tower Hall: Red
Tower Room: Green
Tower Room: Purple
Pub: Red
Brewery: Purple
Garibaldi's Bedroom: Green
Street behind Garibaldi: Blue
Street behind Garibaldi: Green
Garibaldi's Attic Chest: Red
Garibaldi's Secret Basement: Blue
Back Passageway to River: Purple
Mayor's Yard: Purple
Mayor's Room: Blue
Destroyed Corridor: Green
Back Hallway at Mayor's House: Blue
Stairs in Mayor's House: Red
Labyrinth: Purple
Dwarf's Den: Green
Location by Color
Blue:
Blind Alley where Lisa is held
Side Street on way to Garibaldi and Playground
Secret Basement at Workshop
Street behind Garibaldi
Mayor's Room
Back Hallway at Mayor's House
Green:
Front of Tower
Tower Room
Garibaldi's Bedroom
Street behind Garibaldi
Destroyed Corridor in Mayor's House
Dwarf's Den
Purple
Children's Playground
Tower Room
Brewery
Back Passageway to River
Mayor's Yard
Labyrinth
Red
Hall of Mayor's Office
Front of Pub
Tower Hall
Pub
Attic Chest
Stairs in Mayor's House
Posted by: Jazz |
September 21, 2011 9:20 PM
|
September 21, 2011 9:20 PM