

Haunted Hotel:
Charles Dexter Ward
Platform: Windows

![]() From movies to books to video games, the "creepy" seems all-pervasive. Put an individual or group in some deserted, out of the way place with lots of shadows and eerie sounds and you've got the recipe going strong! Luckily for you, assuming you're the type that likes creepy things, Specialbit Studio has quite the joyride for you! In the hidden object puzzle adventure game Haunted Hotel: Charles Dexter Ward, you get rewarded with the creepiest of creepy: a deserted hotel in a bayou out in good ol' Louisiana. I wouldn't stick around for any jambalaya if I were you.
From movies to books to video games, the "creepy" seems all-pervasive. Put an individual or group in some deserted, out of the way place with lots of shadows and eerie sounds and you've got the recipe going strong! Luckily for you, assuming you're the type that likes creepy things, Specialbit Studio has quite the joyride for you! In the hidden object puzzle adventure game Haunted Hotel: Charles Dexter Ward, you get rewarded with the creepiest of creepy: a deserted hotel in a bayou out in good ol' Louisiana. I wouldn't stick around for any jambalaya if I were you.
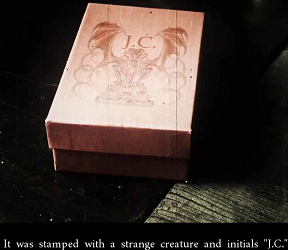 Your brother has been missing for seven days, and the cops don't seem very concerned, insisting that he simply "ran away". You return home one day to find a mysterious box with a rather imposing demonic figure on the lid accompanied by the initials J.C. What lovely thing rests inside? Just your brother's necklace that he never takes off. Obviously things have gone horribly wrong, and it's up to you to rescue your brother from a swamp infested wasteland. Good luck, and watch out for alligators!
Haunted Hotel is peppered with hidden object scenes as well as puzzles and mini-games. Your cursor is plenty helpful as it changes when you hover over specific areas, and depending on which of the two difficulty levels you chose, your hint button is either readily available or slowly recharging. As you mosey around the hotel property you'll discover notes and letters that will unravel the story of what has happened to your brother. The game plays through three days where you have no map to guide you, so be sure to pay close attention to your surroundings.
 Analysis: The most phenomenally well done part of Haunted Hotel: Charles Dexter Ward is the cut scenes. When you come across a game with live actors, more often than not you get someone who doesn't know how to speak like a normal human or grossly exaggerates their character and it ruins the whole experience. Haunted Hotel avoids that folly and enchants with a seamless delivery, something you'll be quite thankful for once the game gets its hooks in you!
A point of frustration arises with the absence of a map. It's not that it's hard to remember which way to go, but in a hidden object game, there's always a good deal of backtracking. A visual reminder (or a blatant signal) that an area needs to be visited is always appreciated, so when it's not there, suddenly it's sorely missed. Haunted Hotel also does something unusual by using mini-games to open doors, a departure from the "find a bunch of keys for all the locks" philosophy of most casual adventure games.
Game plots are much like fashion and music: nothing is truly original anymore. From kidnapped family members to enchanted fairytale creatures, it's all been done at least a hundred times before in one form or another. Don't fret though because despite the repetition, Haunted Hotels delivers a well-developed game with intricate puzzles and dazzling graphics to make you forget, quite easily I might add, that you've probably done heard this story before.
A Collector's Edition is also available. It contains bonus gameplay, an art gallery, strategy guide, and more. Remember that Big Fish Game Club Members pay only $13.99 for Collector's Editions (or 2 club credits), and collector's editions count 3 card punches of 6 total needed for a free game.
![]() Windows:
Windows:
Download the demo
Get the full version
Also available: Collector's Edition
![]() Mac OS X:
Mac OS X:
Not available.
Try Boot Camp or Parallels or CrossOver Games.


Walkthrough Guide
(Please allow page to fully load for spoiler tags to be functional.)
Haunted Hotel: Charles Dexter Ward
Day 1
Exterior of the Hotel
Click on the fountain to start the hidden object scene.
Screenshot.
You will receive a Metal Cross.
Go forward, touch the door, and step back to speak to Charles.
Head left and examine the woodpile.
Pick up the Boards on the left and the Firewood on the right.
Move right to the Courtyard and right again to the Patio.
Examine the bushes at the bottom of the screen and pick up the Stones.
Click on the first floor window. Knock down the birdhouse from the tree and inspect it to obtain the Hook.
Return to the Patio and head forward through the gate to the Swing.
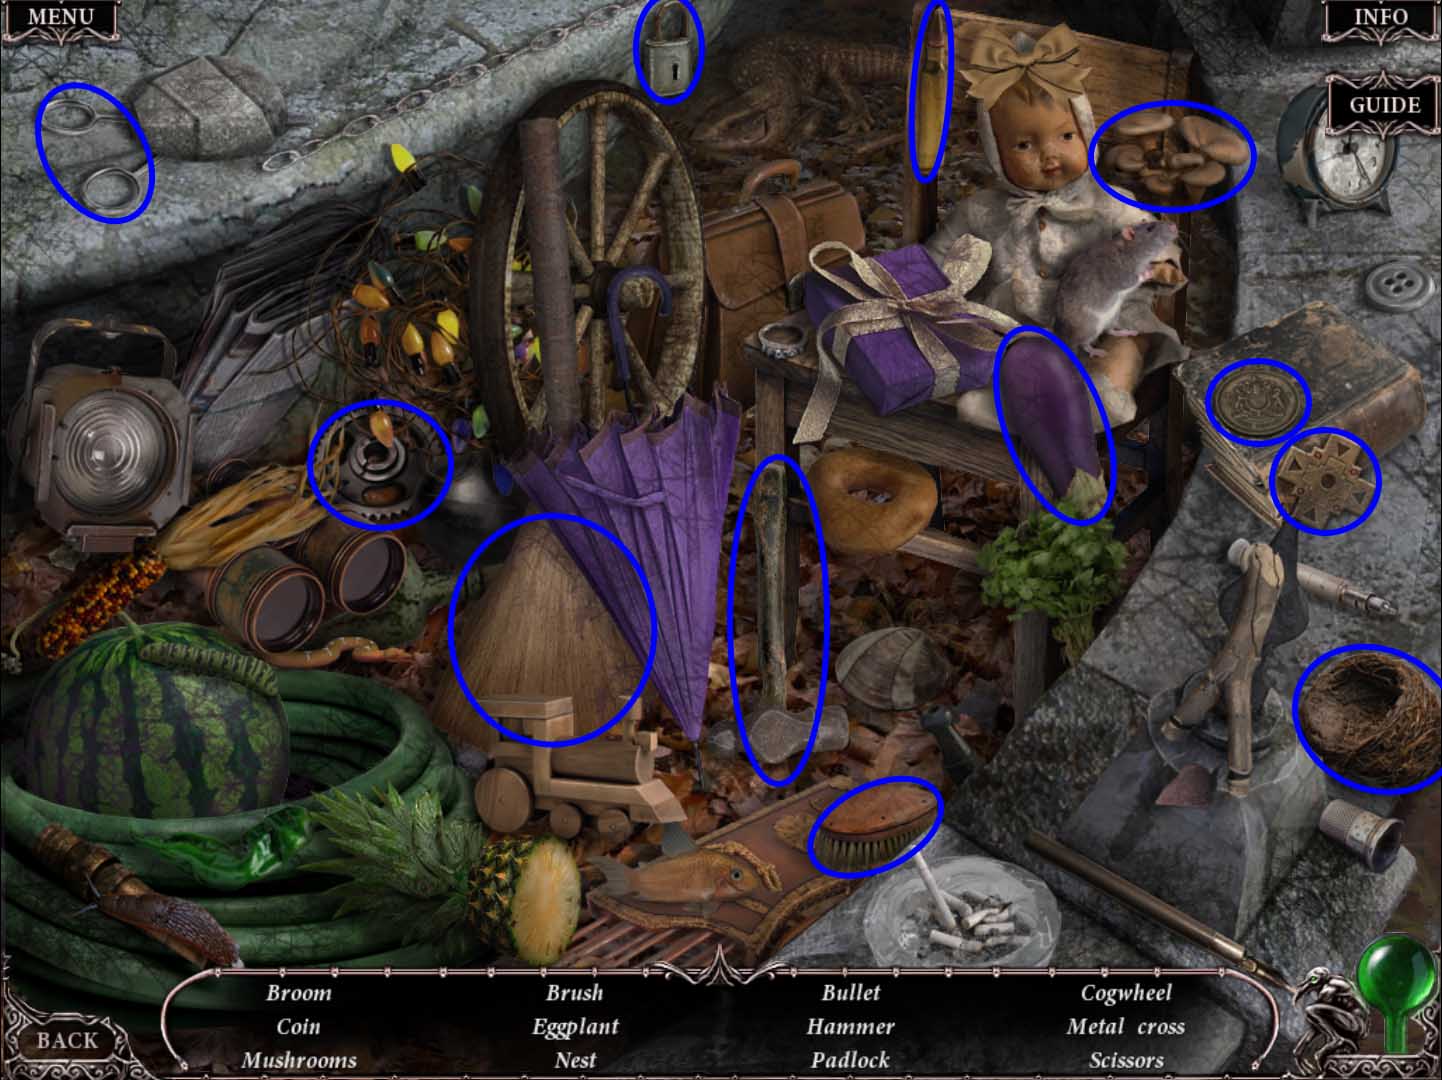
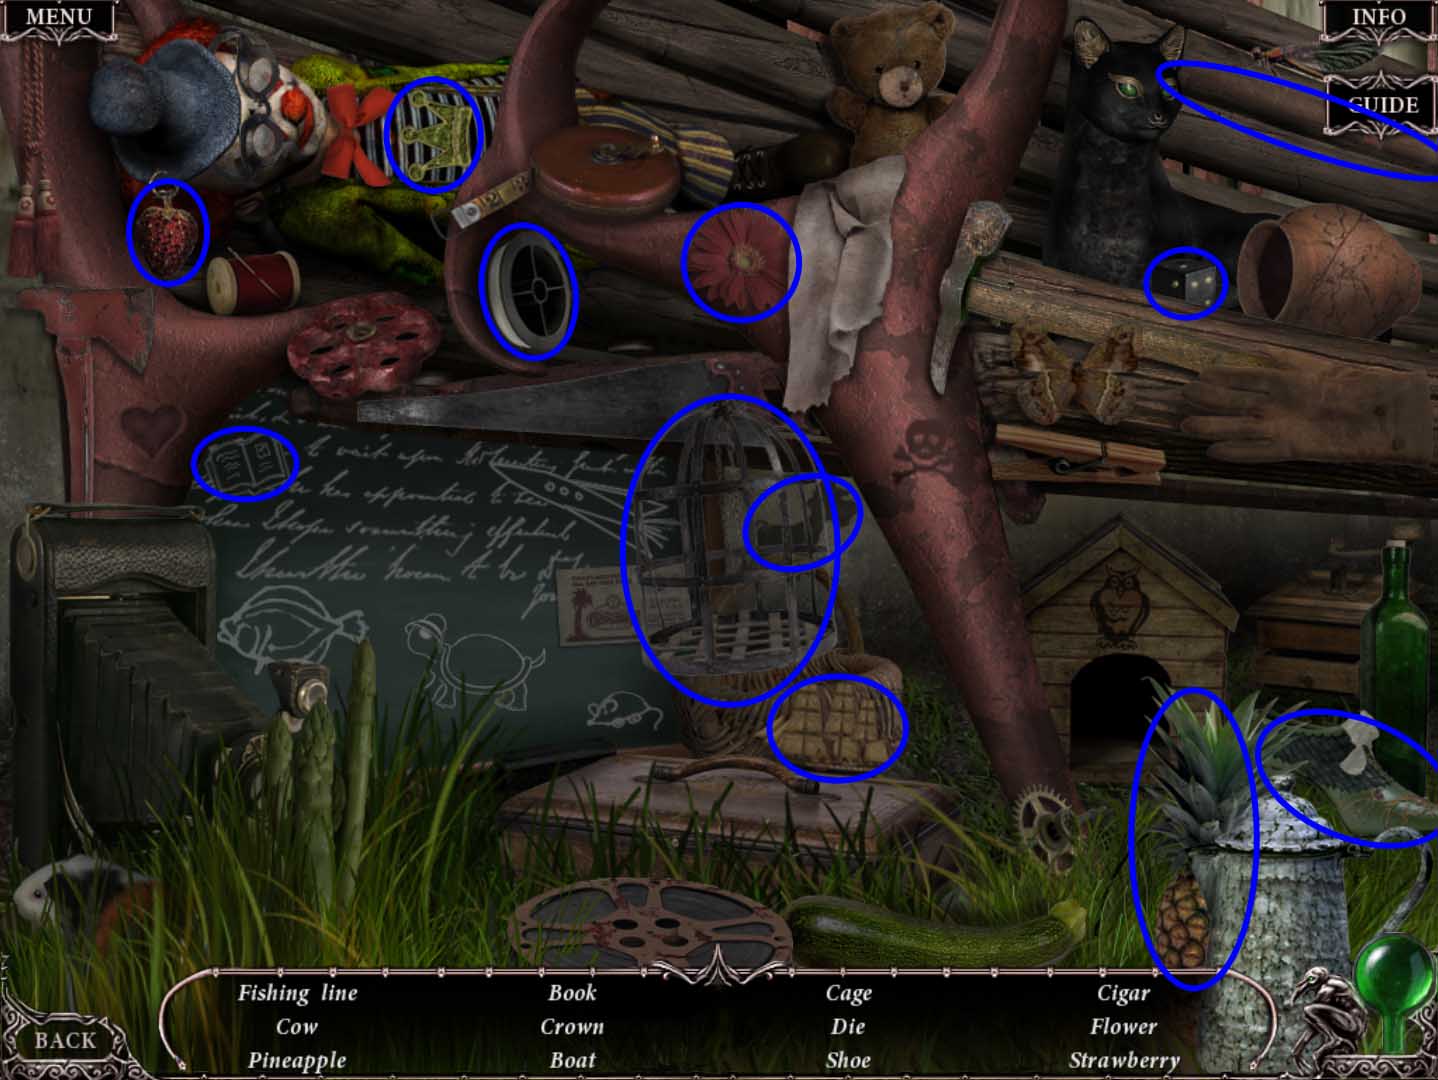
Click on the park bench to start the hidden object scene.
Screenshot.
You will receive a Fishing Line.
Inspect the bottom of the lamp on the right an pick up the Pole Spikes.
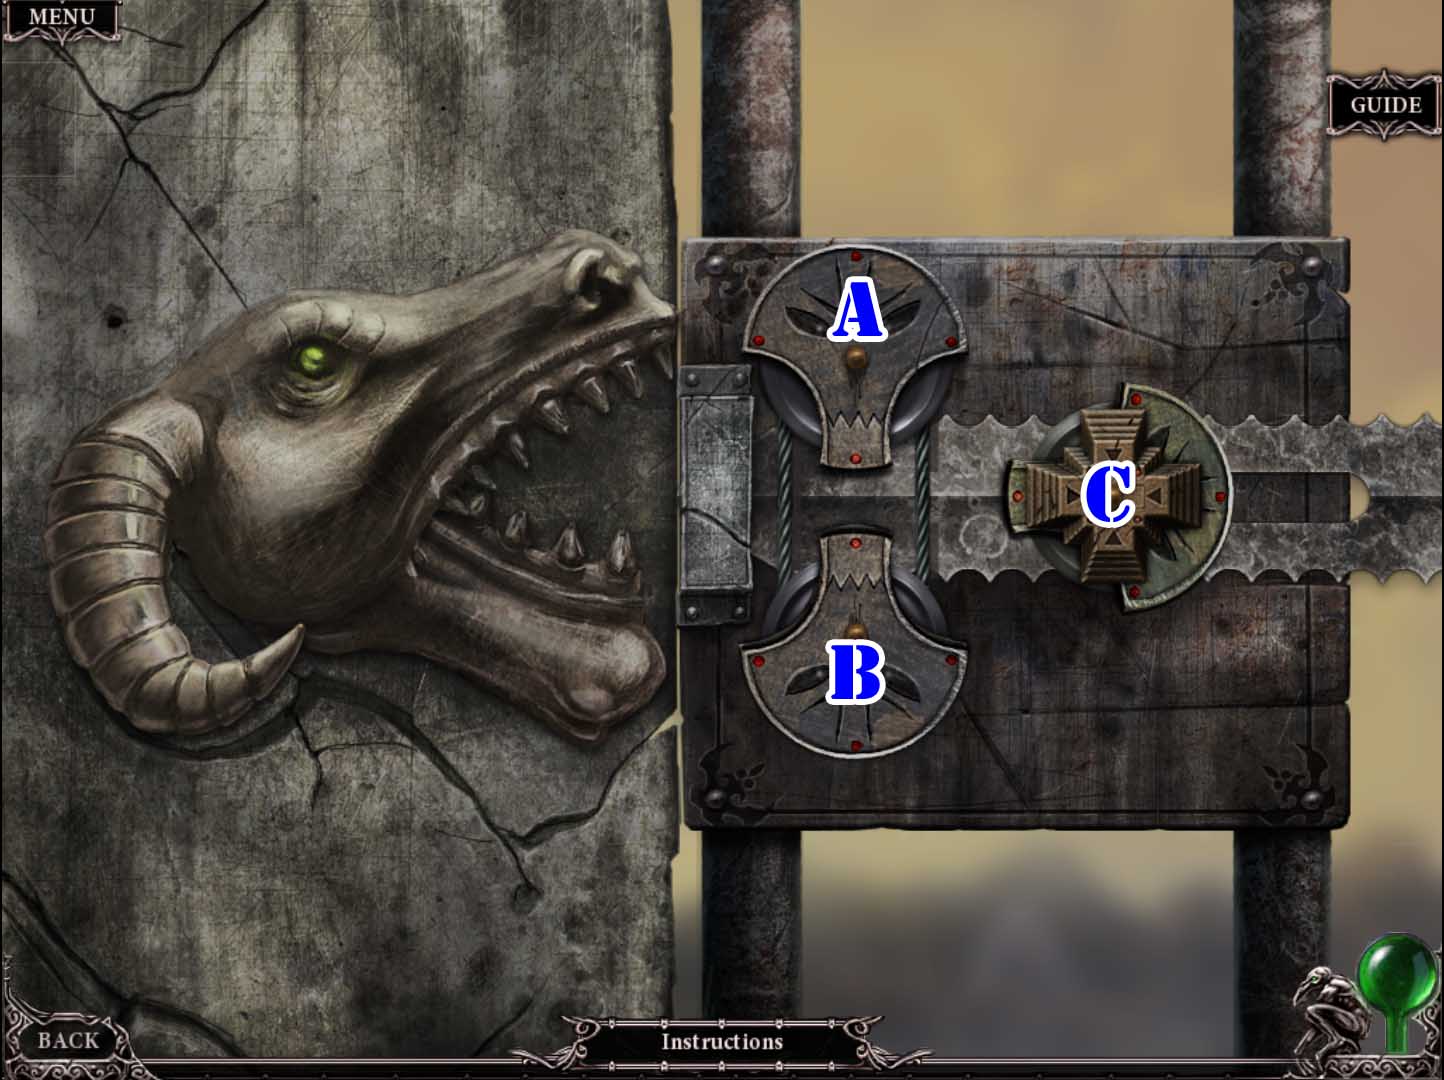
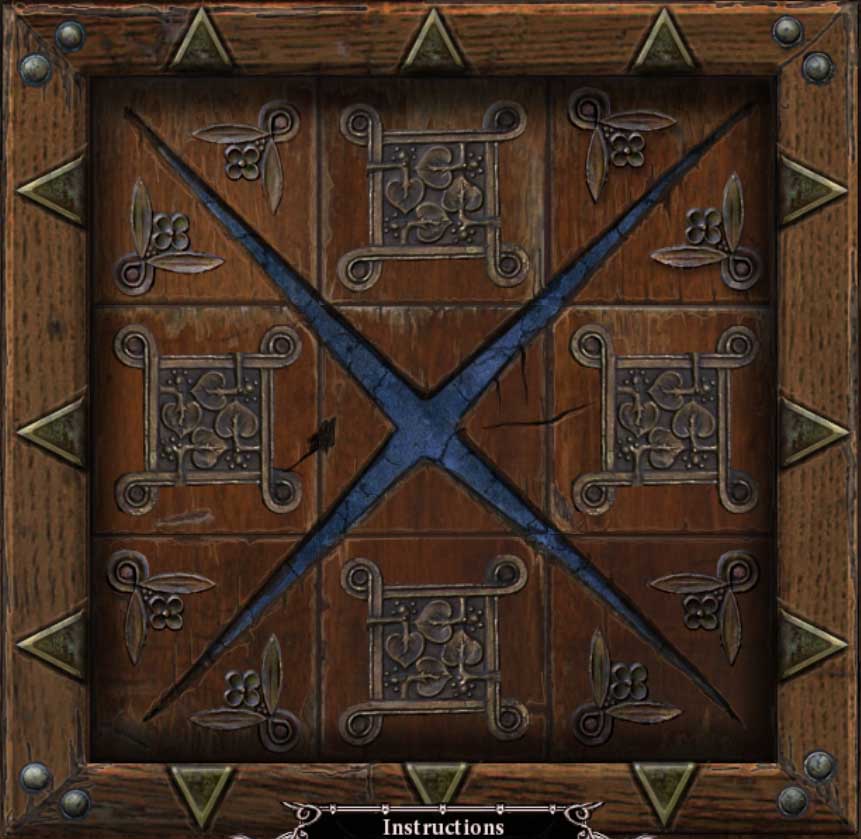
Examine the gate and place the Metal Cross in it to start the puzzle.
To solve the puzzle, take the cross from one peg and put it on another until all of the crosses are on the right peg.
Follow the steps below, moving a cross from the peg (A, B, or C) to another.
Screenshot.
A-C, A-B, C-B, A-C, B-A, B-C, A-C, A-B, C-B, C-A, B-A, C-B, A-C, A-B, C-B, A-C, B-A, B-C, A-C, B-A, C-B, C-A, B-A, B-C, A-C, A-B, C-B, A-C, B-A, B-C, A-C
Go through the gate to the Ferry.
Fixing the Electric Pole
Click on the crow, and it will fly away with the key.
Move back to the Swing.
Throw the Stones at the crow to make it drop the Key. Pick it up.
Return to the Ferry and use the Key to open the red box.
Look in the red box and take the Insulation Tape and Pliers.
Go right to the Generator.
Place the Boards on the stones in the water and take the Seltzer Bottle with Water.
Inspect the barrel on the right to begin the hidden object scene.
Screenshot.
You will receive a Sledgehammer.
Return to the Courtyard and go left to the Electric Pole.
Combine the Insulating Tape with the Pliers to create Insulated Pliers.
Put the Pole Spikes on the electric pole to climb it.
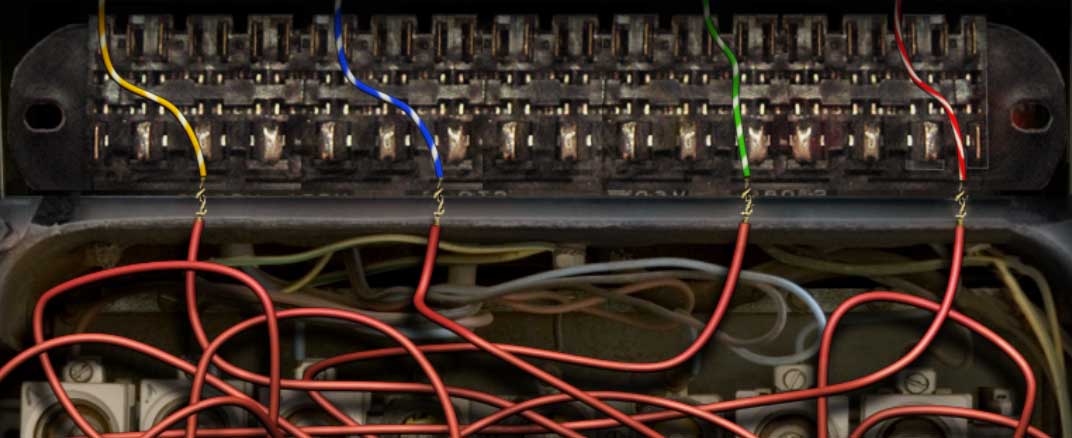
Inspect the top of the pole and use the Insulated Pliers to start the puzzle.
Connect the wires as shown.
Screenshot.
Go back to the Courtyard and step toward the entrance.
Use the Sledgehammer to break down the boards on the door and enter the Lobby.
The Ferry
Examine the left wall and flip the lightswitch to turn on the lights.
Go up the stairs and left into the Hallway, and then back to the Lobby.
Click on the safe on the right to start the puzzle.
Press the right and left arrow in the correct order until the lock reaches the top and the door opens.
If you press the wrong button, it will reset and you will have to start the sequence again.
This puzzle is randomized.
Pick up the Numbered Tiles and the Newspaper.
Return to the second floor and go through the door on the left to the Hallway.
Inspect the door on the right and put the Numbered Tiles in the slots to start the puzzle.
Arrange the tiles so that the numbers on each row and column add up to 34.
There are several possible solutions, one of which is shown below.
Screenshot.
Grab the Axe from the far wall and the Poker from the floor by the fireplace.
Return to the Generator to the right of the Ferry.
Combine the Fishing Line with the Hook to create a Fishing Rod Part. Combine the Fishing Rod Part with the Poker to create a Fishing Rod.
Use the Fishing Rod to fish the Ferry Wheel out of the water.
Go back to the Ferry. Put the Ferry Wheel in place and use the Axe to cut the rope holding the ferry to start a puzzle.
Click on the wheel when the rotating square is in the green zone.
Take the Wooden Sign by the dock.
Inspect the shore to start the hidden object scene.
Screenshot.
You will receive a Pocketknife.
Go right to the Crypt Entrance.
Take the Crowbar by the crypt steps.
Enter the Crypt.
The Crypt
Examine the brown coffin and take the Hatch Ring.
Pick up the Flint from the bench on the left and use it to light the torch by the door and obtain the Torch.
Inspect the floor to find a trap door: use the Hatch Ring to open it and use the Torch to proceed to the Crypt Basement.
Pick up the Bowl on the pedestal and the Rope Fence to the left.
Remove the cloth from the body on the table to reveal Charles.
Return to the Crypt.
Examine the window and use the Rope Fence to climb down.
Go back to the Ferry Dock.
Inspect the dock and use the Crowbar to remove a Board.
Return to the Crypt Entrance.
Use the Board on the bushes and walk across it to the Boat.
Examine the bottom of the tree on the right and use the Pocketknife to remove some Moss.
Look at the boat: bail it out with the Bowl, patch it up with the Moss, and use the Wooden Sign for an oar.
Take the boat to the other side.
Lighting Candles
Move back twice to the Patio and examine the window.
Click on the bushes and use the Seltzer Bottle with Water to scare away the snake.
Open the window shutters and use the Pocketknife to open the window.
Enter the Kitchen through the window.
Examine the shelf in the far corner and take the Boric Acid and the first Candle Stump.
Look at the counter below and take the second Candle Stump and Matches. Open the drawer and take the third Candle Stump and the Candlewick.
Click on the top cabinet. Take the fourth Candle Stump, open the cabinet and take the Spirit.
Open the bottom cabinet and take the fifth Candle Stump.
Take the sixth Candle Stump from the mantle above the fireplace.
Click on the table, pick up the Pan, and look at the directions on the right.
Put the Boric Acid and Candlewick in the bowl.
Use the Pocketknife to cut the wick and obtain three Candlewicks.
Pour Spirit in the burner.
Place the Pan on the burner.
Put all six Candle Stumps in the pan and use the Matches to light the burner.
Pick up the Pan with Wax.
Put a Candlewick into the candle mold, then fill it with wax. Pick up the completed Candle.
Repeat step 6 two more times.
Place the three Candles in the candleholder and light them with the Matches to obtain the Candelabra.
Go through the door on the right to the Lobby.
Return to Curwen's Room upstairs.
Put the Firewood and Newspaper in the fireplace and light it with the Candelabra.
Day 2
Starting the Generator
Exit the mansion to the Courtyard.
Examine the fountain and take the Saw Blade.
Move left and click on the pole: it will crash through the gate.
Go through the gate to the Shed and click on the shelves on the right to start the hidden object scene.
Screenshot.
You will receive Coins.
Inspect the shelves on the left and pick up the Saw Handle, the Rusty Shears, and the Gloves.
Examine the toolbox on the ground and grab the Hammer and the Metal Pin.
Look under the table to find the Inspect Spray and the Sprayer.
Go back to the Patio.
Inspect the bicycle and take the Chain with the Gloves.
Go to the Generator to the right of where the ferry was.
Examine the generator and put the Chain on the gears.
Combine the Saw Blade and the Saw Handle to create the Saw.
Cut the log blocking the water wheel with the Saw.
Look at the generator again and push the button on the right.
Door Puzzles
Go back inside the hotel and to the Hallway on the second floor.
Inspect the wall lamp on the right and pick up the Puzzle Piece.
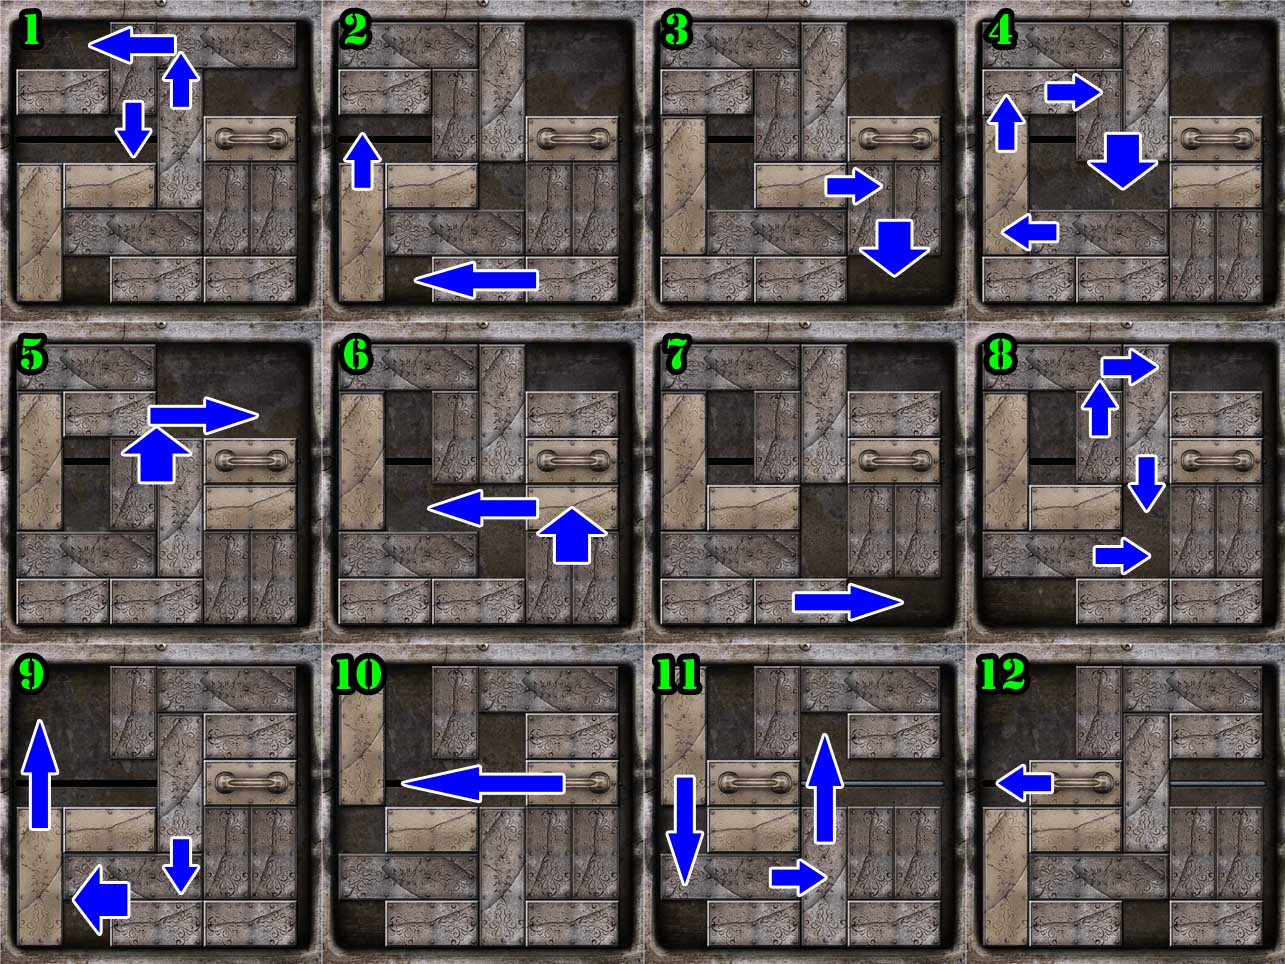
Walk down and click on the door on the right. Use the Puzzle Piece to begin the puzzle.
The goal of the puzzle is to move the piece with the handle from the right side to the left.
Slide the pieces around in the manner shown below.
Screenshot.
Pick up the Pump Handle leaning against the chair.
Examine the small table by the back door and pick up the Puzzle Piece.
Move back to the Lobby and then left into the Hallway.
Inspect the door on the left and put the Puzzle Piece into the slot to start the puzzle.
Click on the arrows to slide a row or column.
The goal is shown below.
Screenshot.
This puzzle is randomized.
After stepping through the door, you will fall through the floor.
Look at the crate on the right and take the Shovel.
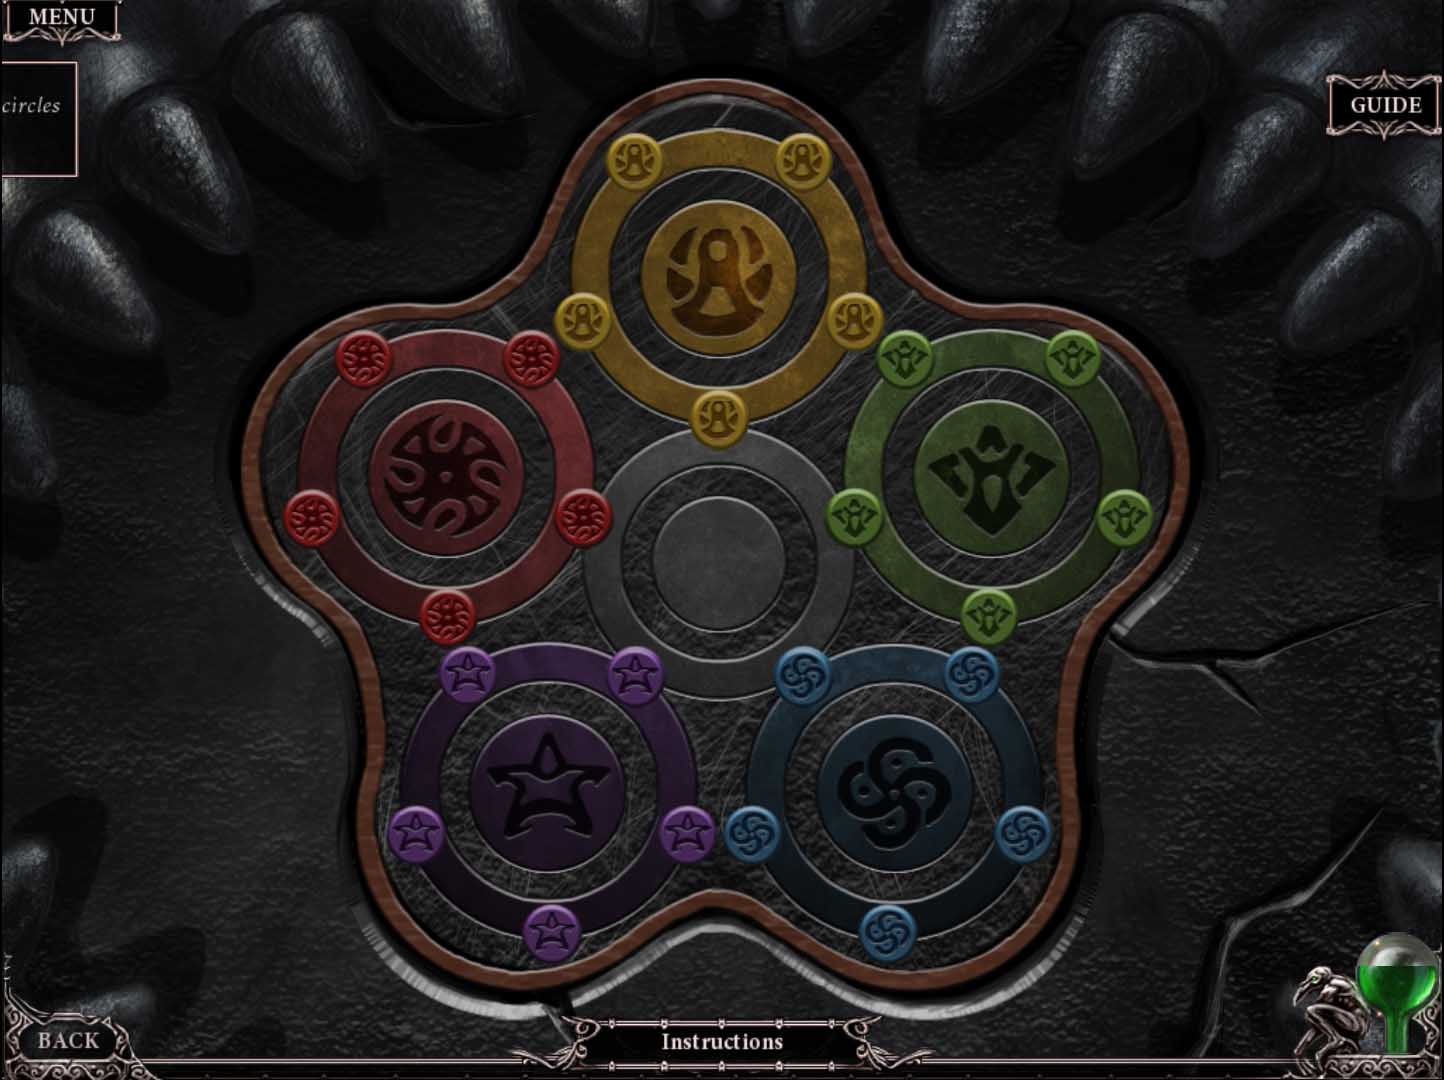
Inspect the door to the Alchemy Room to start the puzzle.
Left-click on a circle to rotate it clockwise, right-click to rotate counter-clockwise.
The goal is to put all the colors around their corresponding circles.
Screenshot.
This puzzle is randomized.
Enter the Alchemy Room.
The Alchemy Room and the Elevator
Examine the stone shelves and take the Red Paint and the Oil.
Inspect the hole in the side of the table and pick up the Fixer and the Bowl.
Exit the Alchemy Room and go left to the Back Room.
Look at the ladder by the bookcase and pick up the Ladder and Trays.
Examine the mantle and take the Developer.
Take the Rope from the desk.
Go back twice to the Lobby, then up the stairs and to the left into the Hallway.
Use the Ladder to access the hatch on the ceiling and go up to the Attic.
Inspect the camera on the desk. Open it and take the Film.
Examine the radio against the back wall and pick up the Needle and the Button.
Go back down to the Pump Room.
Click on the pump. Use the Pump Handle and the Metal Pin to fix it.
Move down to the Elevator.
Click on the hose on the ground to move it into the pit of water.
Return to the Pump Room and use the pump to empty the pit.
Go back down to the Elevator.
Click on the board in the pit to move it so you can cross.
Inspect the button by the elevator and put the Button into place.
Push the button and take the elevator up to the Tower Room.
Developing the Film
Examine the transmitter in the corner and pick up the Magnet.
Look at the package on the table. Open it with the Pocketknife and take the UV Bulb.
Zoom in on the door in the lower right and slide the latch to open it.
Walk down and go into the Hallway on the left.
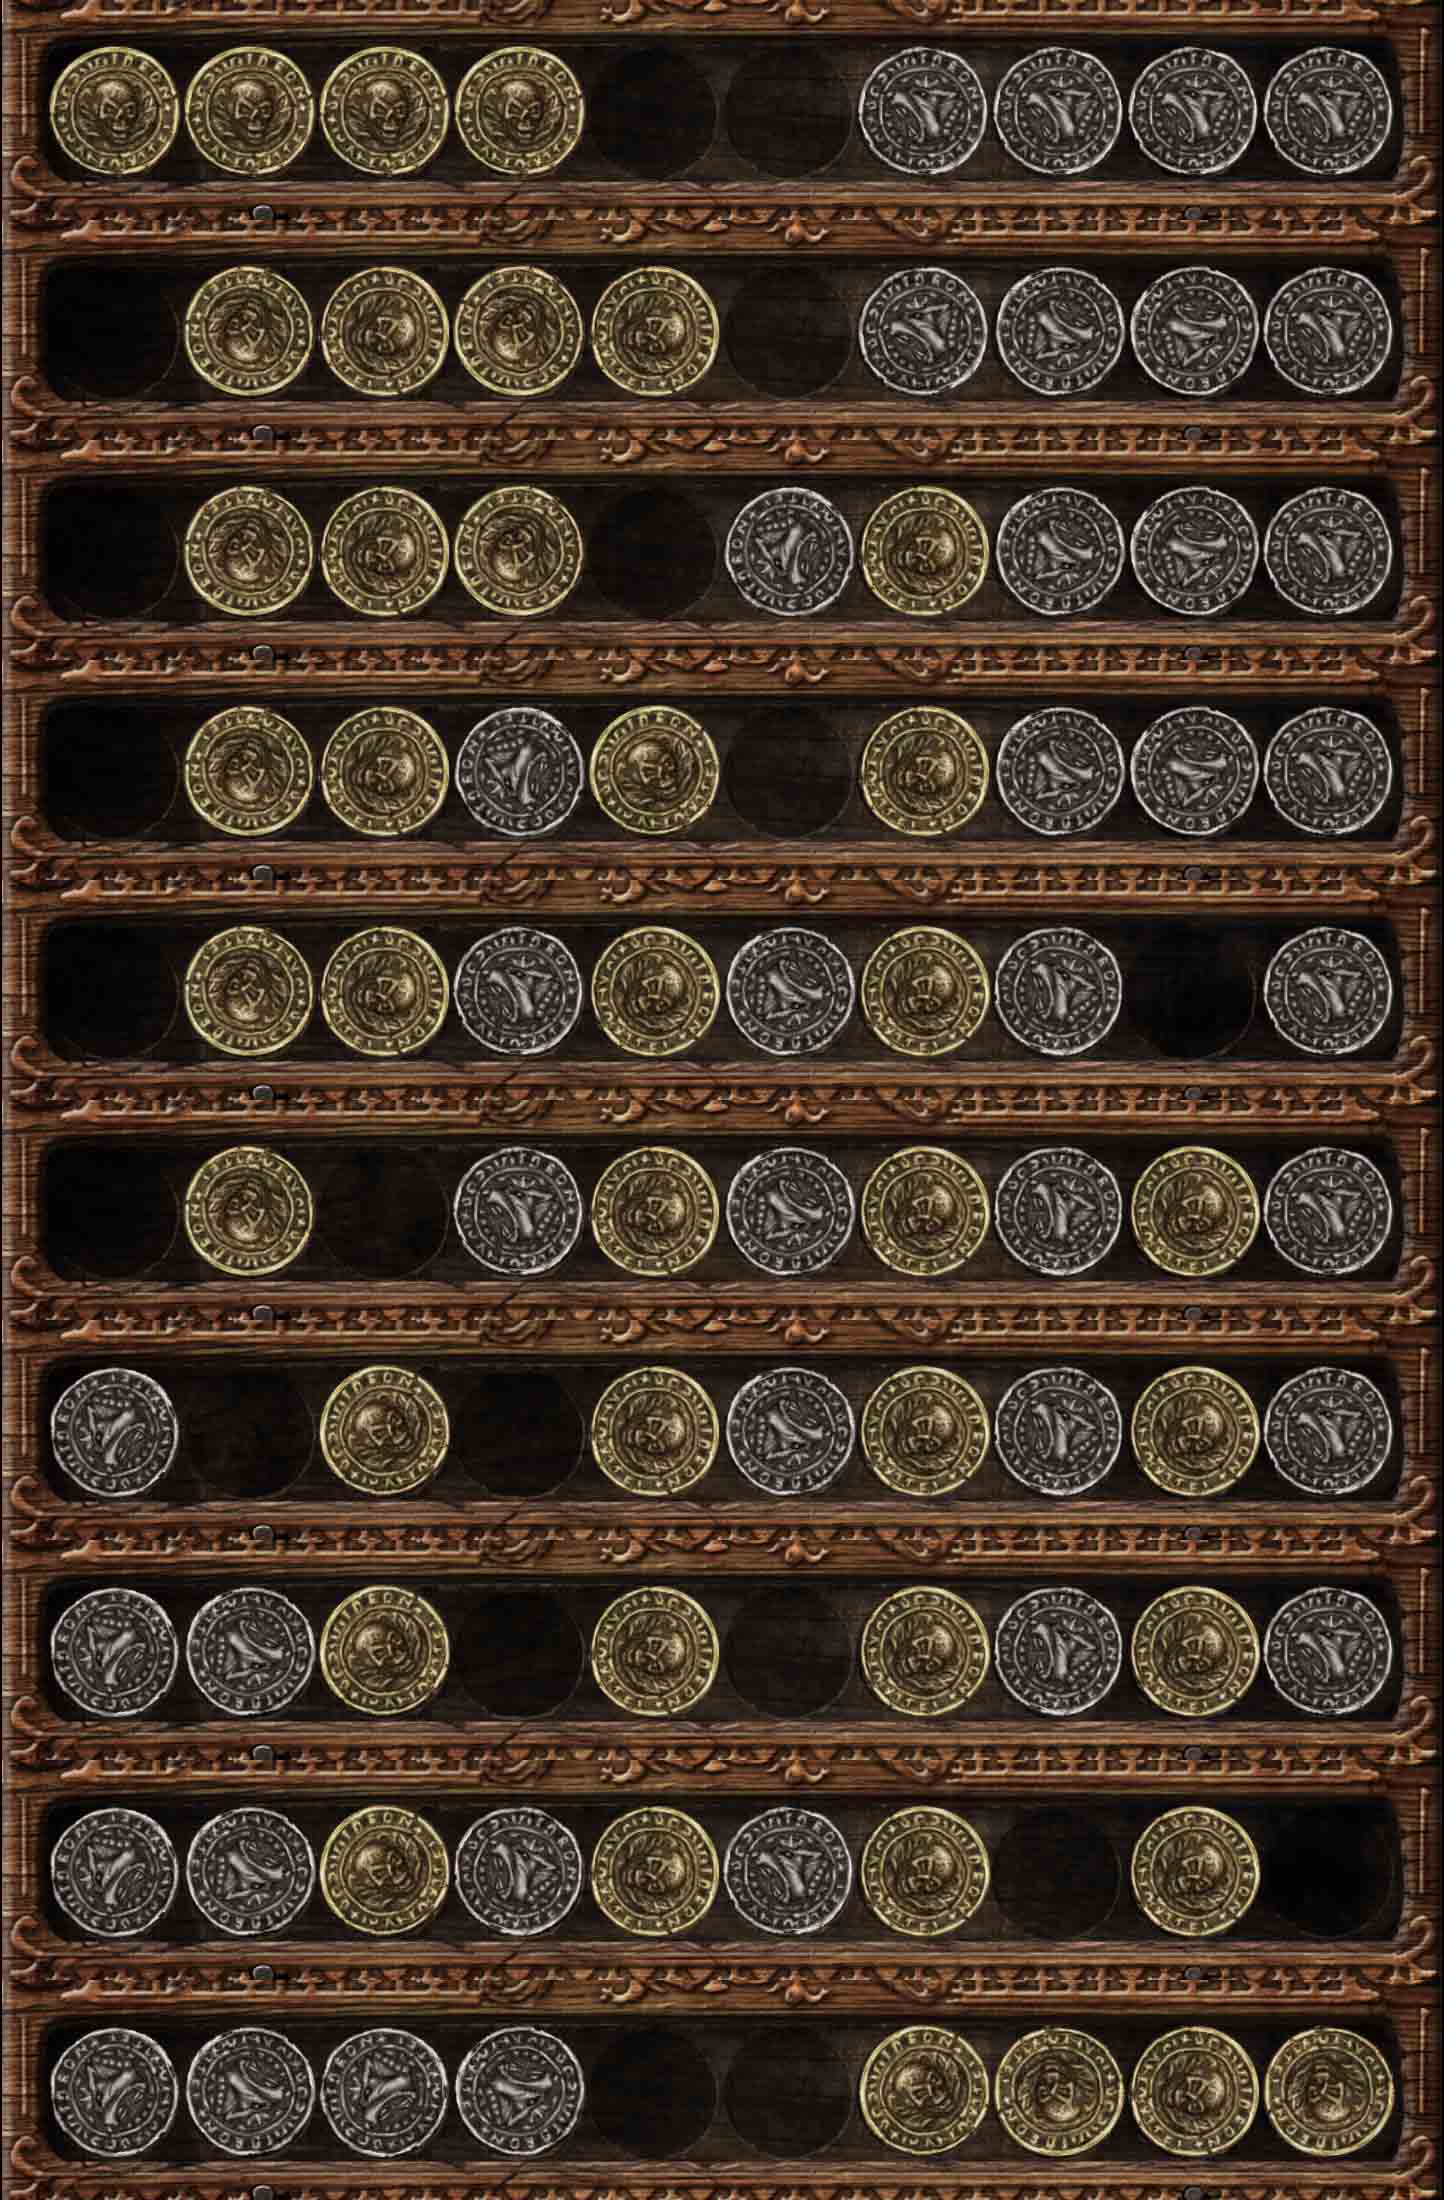
Inspect the door at the end of the hall and put the Coins in place to start the puzzle.
The goal is to get all of the copper coins on the right side and all of the silver coins on the left.
Click on a copper coin to move it right or a silver coin to move it left.
A coin can jump over one coin, but not two.
The solution is shown below.
Screenshot.
Examine the lamp on the desk, take the Lightbulb and replace it with the UV Bulb.
Look at the symbols on the floor, pry up the floorboard with the Hammer and take the Key.
Go back down to the Alchemy Room and look at the table.
Put the Red Paint in the bowl and dip the Light Bulb in it to receive the Red Bulb.
Return to the Study on the second floor.
Replace the UV Bulb with the Red Bulb.
Place the Trays on the table.
Pour the Developer into one tray and Fixer into the other.
Put the Film into the tray on the left to obtain the Half-developed Film.
Put the Half-developed Film into the tray on the right to receive the Developed Film.
Use the lens on the table to look at the Developed Film and see that there is something buried under the swing outside.
The Compass and the Labyrinth
Move back three times to the Lobby and then right into the Kitchen.
Click on the sink on the left to begin the hidden object scene.
Screenshot.
You will receive a Corkscrew.
Go outside and to the left to the Electrical Pole.
Use the Bowl on the puddle to receive a Bowl of Water.
Return to Curwin's Room on the second floor.
Inspect the desk and use the Key to open the drawer and obtain the Corked Bottle.
Combine the Corkscrew and the Corked Bottle to receive a Cork.
Combine the Needle and the Magnet to receive a Magnetized Needle.
Combine the Cork and the Magnetized Needle to receive a Cork with Magnetized Needle.
Place the Bowl of Water on top of the desk and put the Cork with Magnetized Needle in the water and take the Compass.
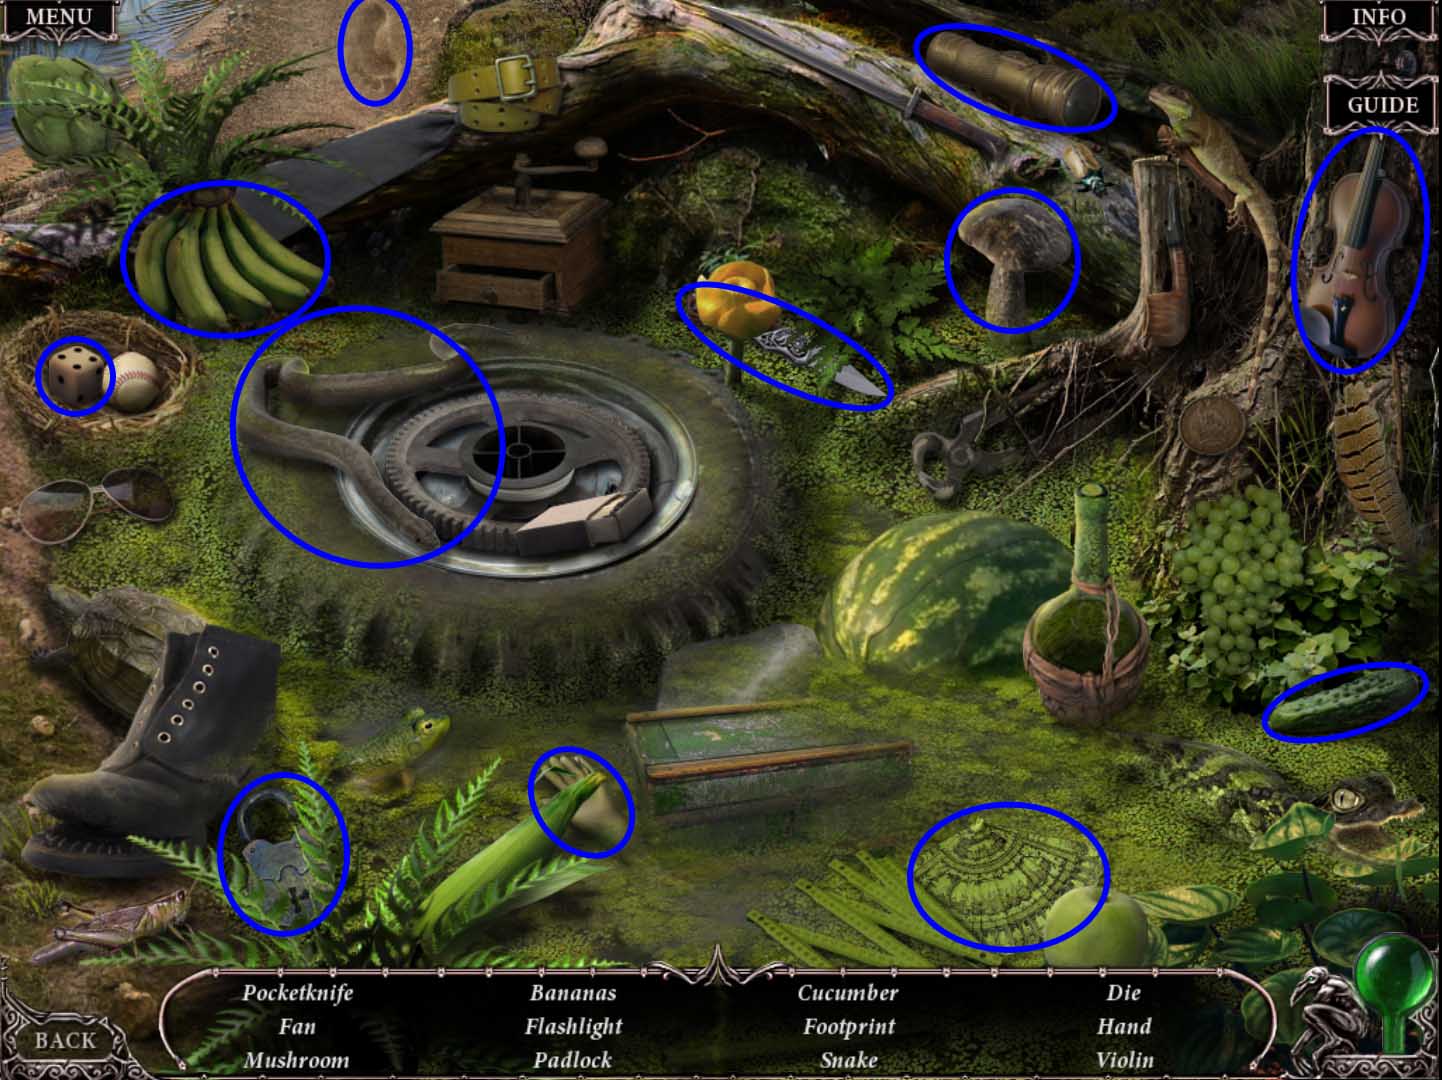
Exit the hotel and go to the Swing.
Examine the ground below the swing and use the Shovel to dig up the Statuette.
Go left to the Garden.
Combine the Rusted Shears with the Oil to obtain the Oiled Shears.
Use the Oiled Shears to cut away the overgrowth and reveal the gate.
Inspect the gate. Pick up the Charles's Handkerchief and place the Statuette in the recess.
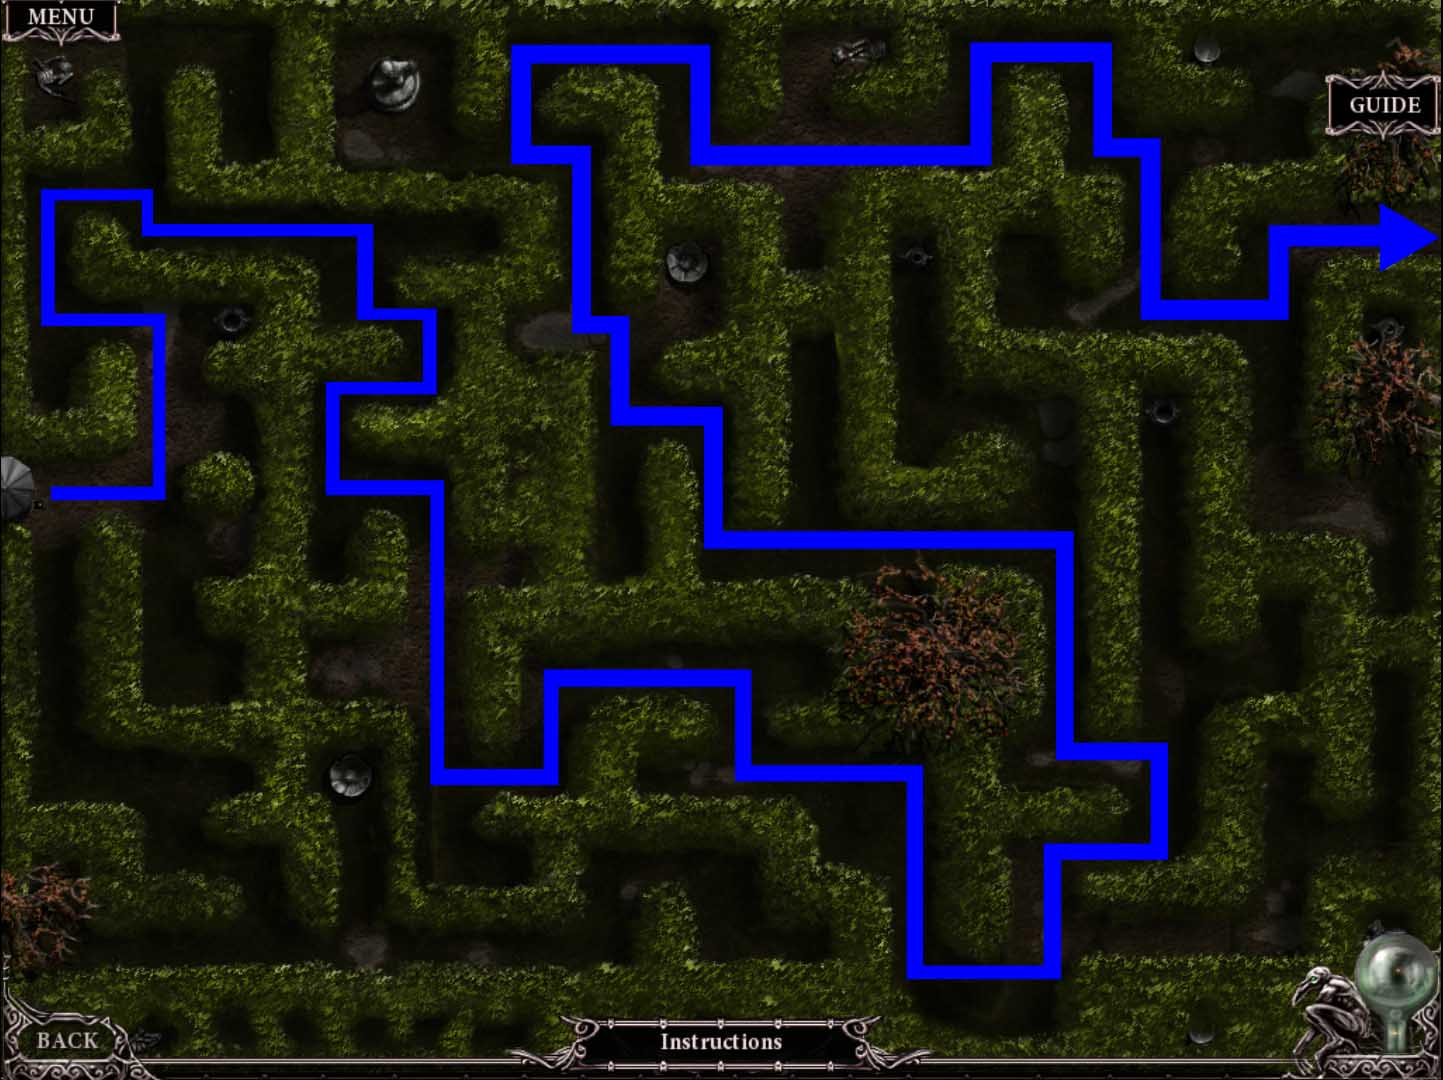
Open the gate and go into the Labyrinth to start the puzzle.
Screenshot.
Crossing the Bridge
Pick up the Long Branch leaning against the tree.
Use the Long Branch on the rock to move it closer to the tree.
Inspect the birdhouse and pick up the Lighter.
Examine the tree to the left of the birdhouse. Pick up the Green Flower and scrape some Moss off the tree with the Pocketknife.
Go right toward the Bridge.
Look at the bottom of the tree on the right and grab the Pine Needles.
Zoom in on the reeds on the left and use the Pocketknife to cut off some Reeds.
Walk back down to the Forest and inspect the firepit on the right.
Place the Pine Needles, Reeds, and Moss in the pit and light it with the Lighter.
Go back to the Bridge and cross it to the Swamp House Entrance.
The Swamp House
Pick up the Talisman Frame sticking out of the ground.
Take the Grass Mill Handle sitting on the stone.
Inspect the roots growing on the wall and cut off a Root with the Pocketknife.
Step inside the Swamp House.
Open the Necronomicon sitting on the desk.
Pick up the Ash Form hanging above the fireplace.
Exit the Swamp House and walk forward into the Swamp House Glade.
Examine the skeleton and take the Key from around its neck.
Click on the statue on the right and pick up the Red and Purple Flowers.
Go back inside the Swamp House.
Use the Key to open the briefcase in the corner on the right and pick up the Phone Handle inside.
Examine the table and place the Grass Mill Handle on the mill.
Put the Green Flower and the Red and Purple Flowers into the mill, turn the handle and pick up the resulting Flower Juice.
Place the Flower Juice in the bowl above the fireplace to start a puzzle.
A rune will appear on the stone: click and hold while tracing it with your cursor after it disappears.
Repeat for each rune that appears.
Look at the bowl above the fireplace again. Put the Talisman Frame and Charles's Handkerchief in the bowl.
Use the Pocketknife to cut a piece of the handkerchief and obtain a Small Handkerchief.
Walk down three times to the Forest.
The Talisman and the Compass
Combine the Ash Form with the Root to create a Skull with Root.
Combine the Skull with Root with the Small Handkerchief to receive Skull with Root and Handkerchief.
Examine the firepit, place the Skull with Root and Handkerchief in the fire and pick up the Ash.
Return to the Swamp House.
Look at the bowl above the fireplace again and use the Ash on the bowl to receive the Talisman.
Go back to the Swamp House Glade and use the Talisman on the black cloud.
Step forward into the Forest.
Use the compass to navigate the forest.
Go right.
Go left.
Go forward.
Go right
Inspect the tree and take the Branch.
Examine the right side of the fence and use the Branch to move the toolbox closer to pick up the Crowbar.
Look at the left side of the fence, use the Crowbar to pry it open and move forward into the Courtyard.
Once in the Lobby, click on the phone on the right and use the Phone Handle.
Day 3
The Fountain Skull
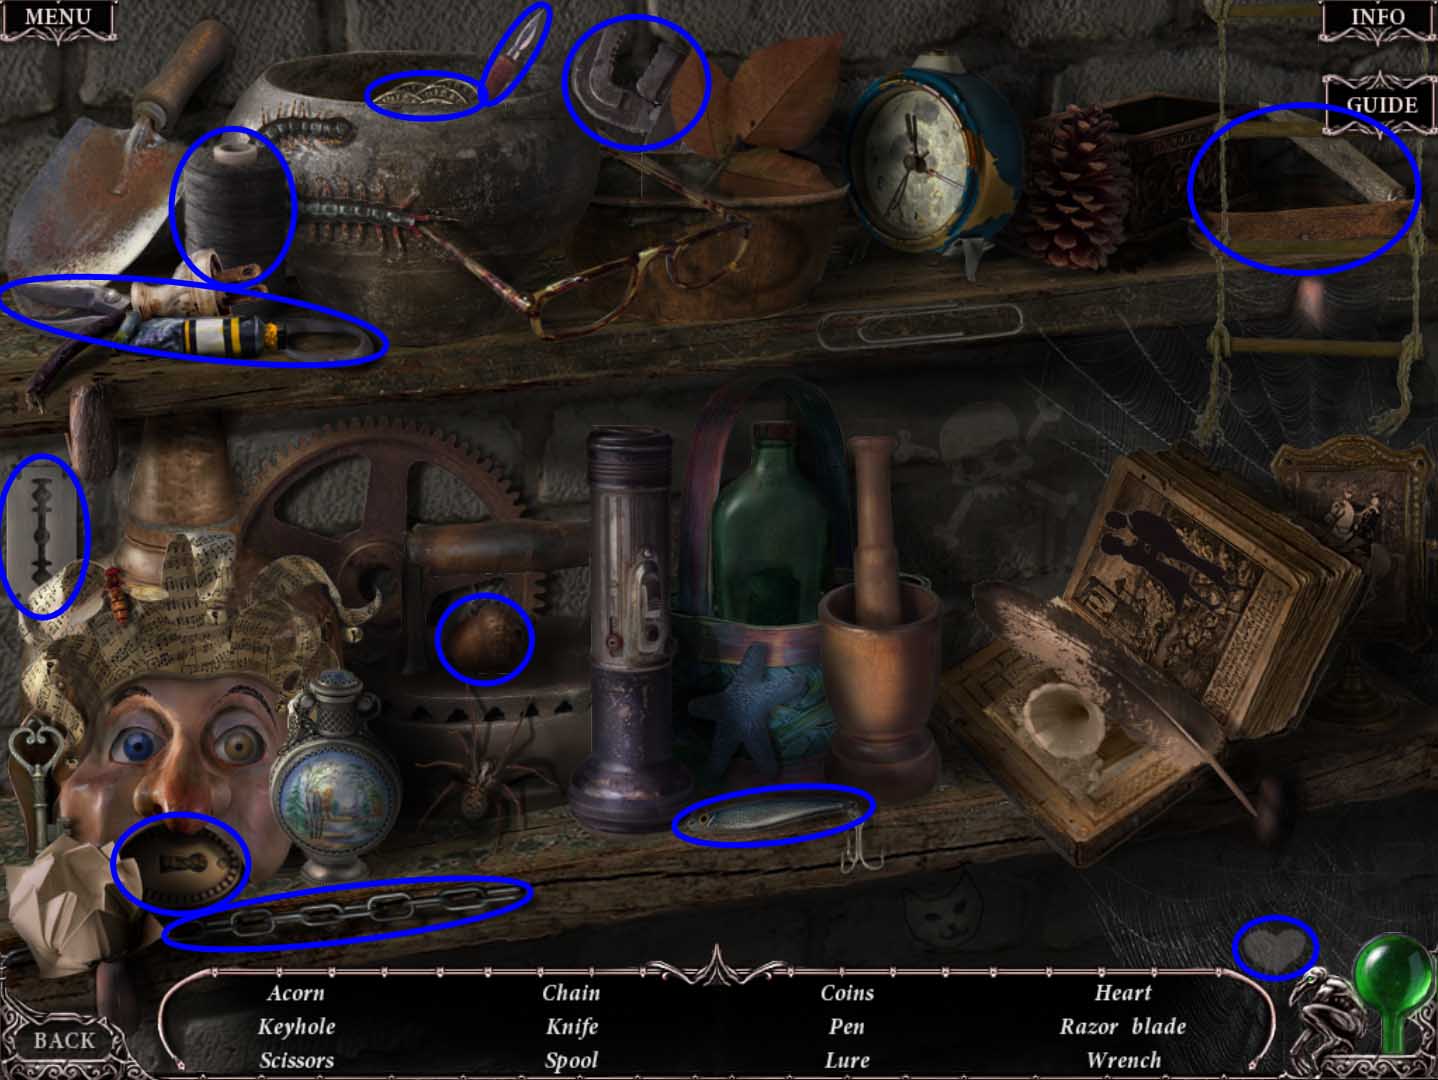
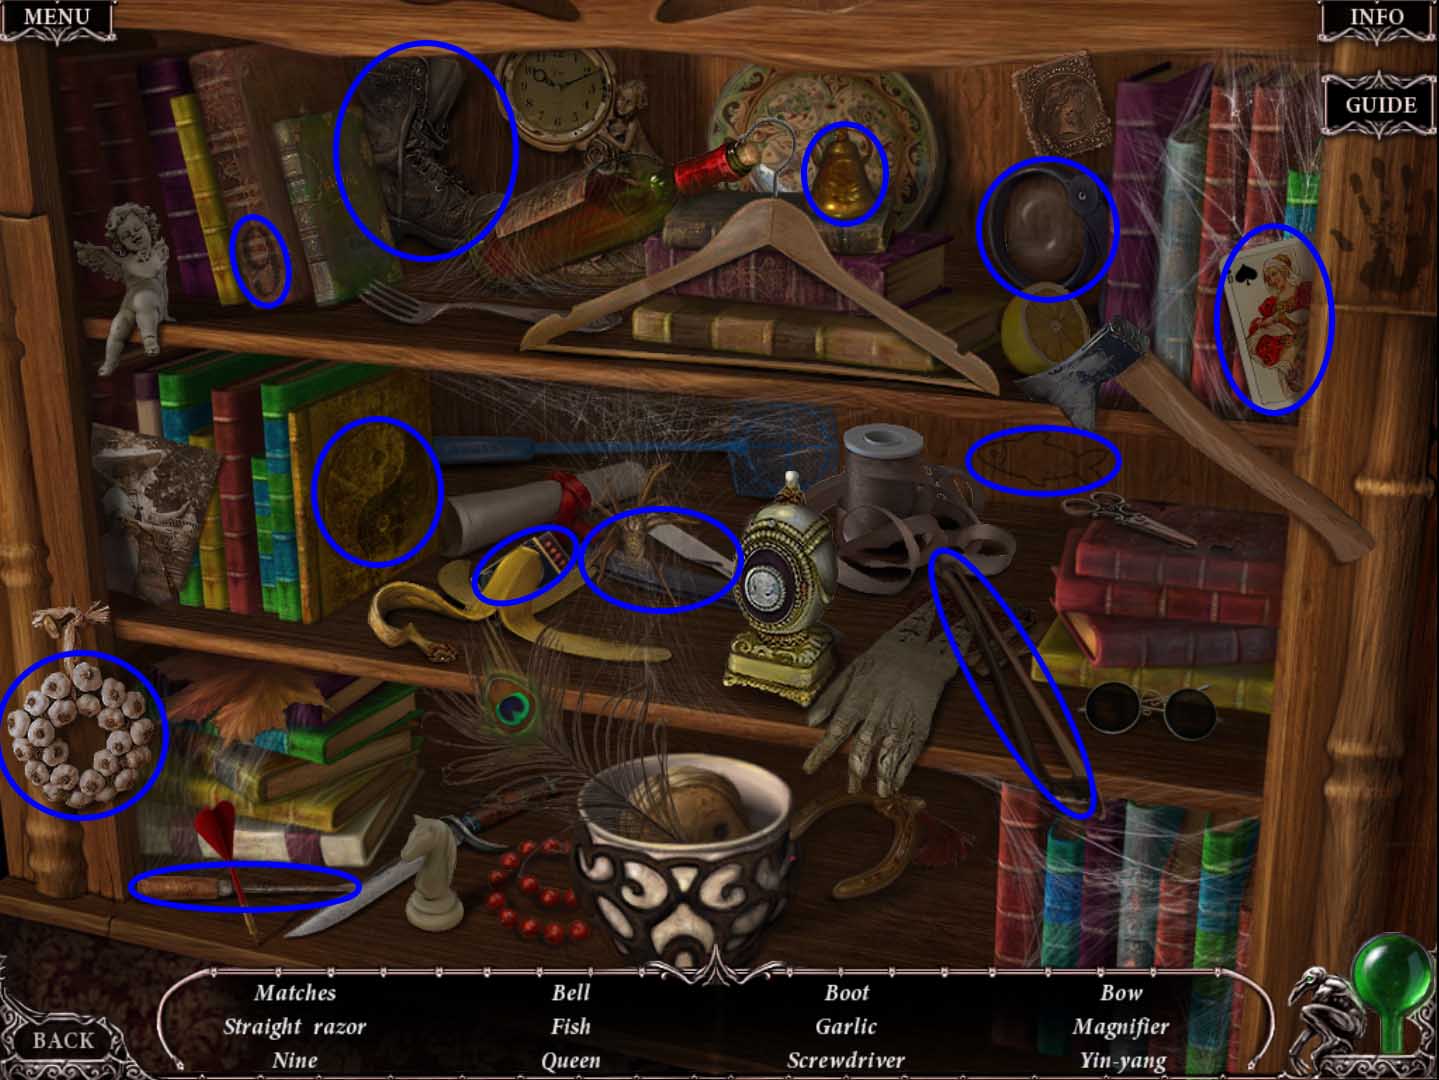
Inspect the shelves to start the hidden object scene.
Screenshot.
You will receive Matches.
Go to the Shed by the Electric Pole.
Click on the shelves on the right for a hidden object scene.
Screenshot.
You will receive a Wooden Disk.
Go back to the Hallway on the left side of the first floor.
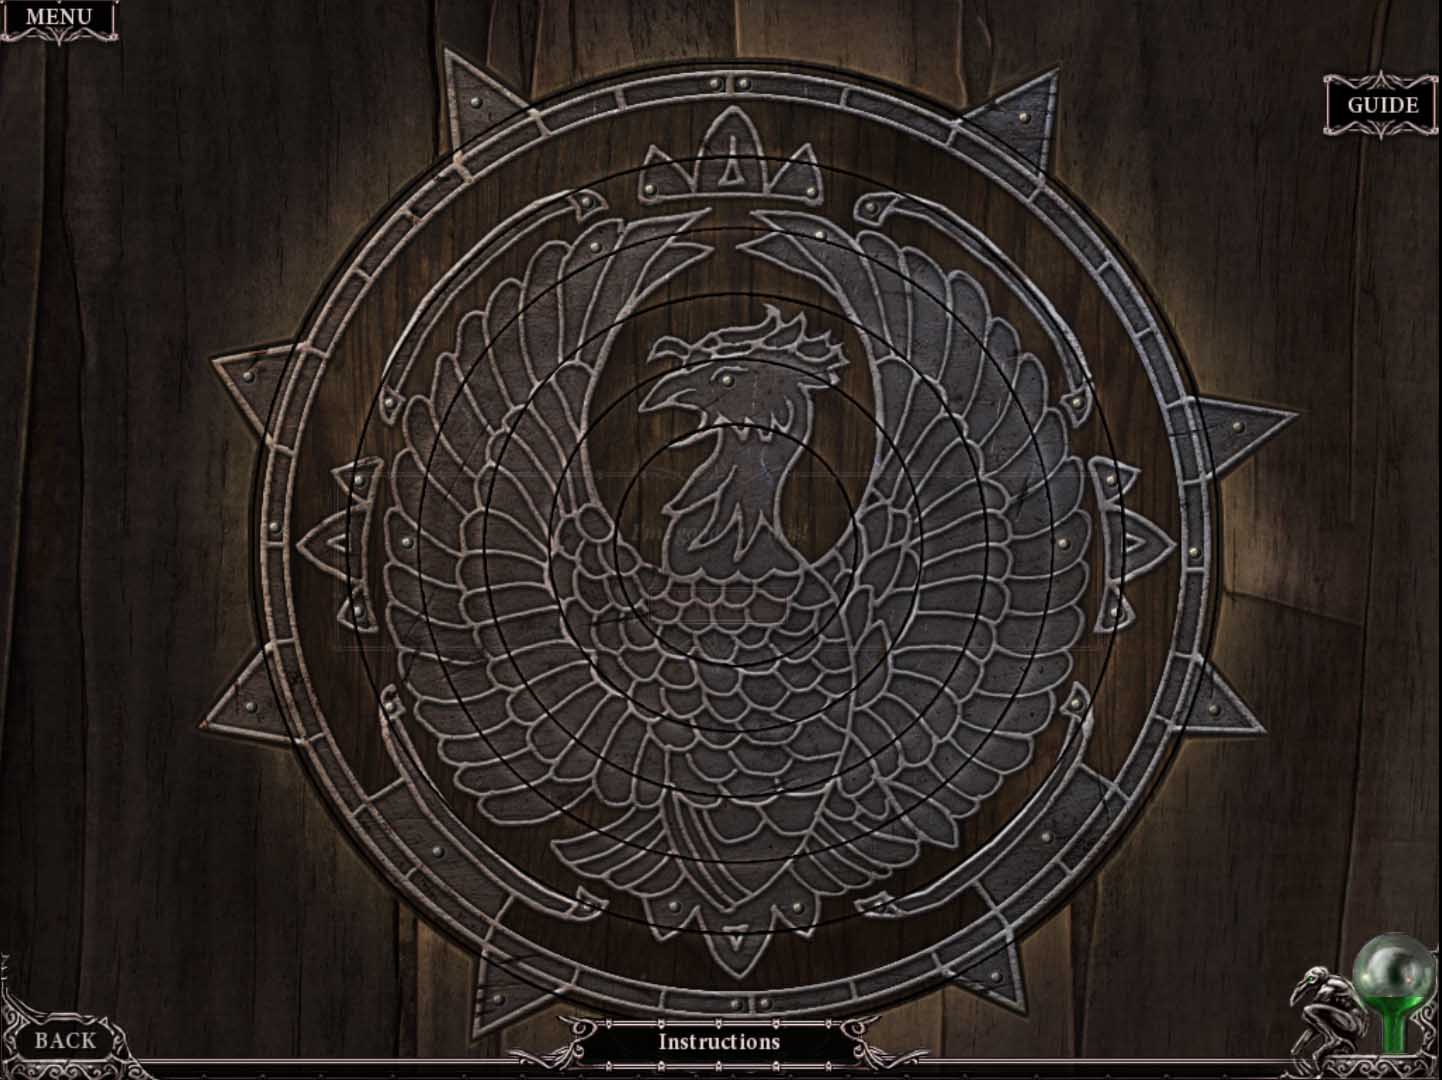
Place the Wooden Disk in the door on the right to start the puzzle.
Left-click on a circle to rotate it clockwise, right-click to rotate counter-clockwise.
Start with the outermost circle and work in until they all line up into a contiguous picture.
Screenshot.
Examine the cabinet on the back wall and take the Surgical Mask and the Syringe.
Inspect the bookshelf on the left and pick up the Screwdriver and the Broom.
Click on the chandelier and use the Broom to get the Fountain Skull.
The Undgerground
Exit the hotel to the Courtyard.
Zoom in on the gargoyle in the fountain, put the Fountain Skull in its hand and take the Cross Key from its mouth.
Return to the Library and examine the clock.
Put the Cross Key in the hole on the top of the clock and go through the passage to the Underground Bestiary that opens.
Look at the stand on the left and pick up the Sealed Container.
Inspect the torch on the wall. Light it with the Matches to obtain the Torch and pick up the Power Plug.
Examine the bookcase on the right and clear the cobwebs away with the Broom. Take the Wrench and the Hacksaw.
Use the Torch in the dark corridor ahead and go forward to the Underground Mortuary.
Click on the grate on the floor and pick up the Skeleton Arm.
Open the chest on the left and take the Aroma Lamp and the Dead Water Vial.
Zoom in on the coffin. Take the Coffin Lid and the Metal Hanger.
Look at the tray next to the body and take the Small Scissors.
Walk back and go right to the Underground River.
Examine the vase on the right and take the Batteries next to the flashlight.
Pick up the Small Bones on the ground.
Inspect the bucket in the water. Use the Skeleton Arm to pick it up and obtain the Bucket.
Click on the door on the right to start the puzzle.
Click on a tile to flip it over. Flip over two tiles: if they are the same, they will stay flipped. If not, they will turn back.
After finding a few pairs, the tiles will shuffle.
Continue until all of the tiles are paired off.
This puzzle is randomized.
Zoom in on Charles's head and use the Small Scissors to cut off some of his Hair.
Go back to the Underground River and left up the stairs to the Cemetery.
The Cemetery and the Old Church
Combine the Insect Spray with the Sprayer to create the Full Sprayer.
Use the Full Sprayer to clear the bugs from around the bush.
Take the Berries from the bush.
Examine the grave on the right and pick up the Horn.
Look at the grave on the left and use the Pocketknife to cut some Leaves from the bush.
Go right to the Dead Water.
Combine the Bucket with the Rope to create the Bucket with Rope.
Inspect the swamp and use the Bucket with Rope to fill it with water.
Use the bucket to fill the Dead Water Vial and obtain Dead Water.
Go back to the Cemetery and left to the Old Church.
Use the Surgical Mask anywhere to put it on.
Place the Coffin Lid on the log in the swamp to access the stone on the right.
Zoom in on the mushroom on the stone and put it in the Sealed Container to obtain the Mushroom.
Creating the Elixir
Return to the Shed outside the hotel.
Examine the table on the right. Put the Small Bones in the grinder to receive the Ground Bone.
Go back to the Alchemy Room.
Look at the shelf on the right. Pick up the Pestle, place the Berries and Leaves in the mortar, and use the Pestle to grind them into Oil.
Click on the table. Place the Mushroom, Ground Bone, and Hair into the evaporator on the left and light it with the Matches.
Use the Syringe on the beaker filled with green fluid to get a Syringe with Elixir.
Return to the Attic.
Fixing the Transmitter and Completing the Ritual
Zoom in on the radio against the back wall and pick up the Radio without Batteries.
Inspect the top of the armoire and take the Microphone.
Look at the window on the left and use the Wrench to open it. You will receive a Screw.
Go through the window to the Roof.
Examine the antenna on the left. Use the Hacksaw to create a groove on the broken bolt and use the Screwdriver to remove it.
Place the Screw in the empty spot and tighten it with the Wrench.
Return to the Tower Room.
Click on the transmitter in the corner and place the Microphone next to it.
Look at the phonograph. Plug it in with the Power Plug and attach the Horn. Click on it, and you will be prompted to find a record with the invocation spell.
Inspect the bookcase to the left, grab the Vinyl Record and play it on the phonograph.
Go back to the Crypt Basement.
Combine the Oil and the Aroma Lamp to create the Full Aroma Lamp.
Combine the Radio without Batteries with the Batteries to obtain the Radio.
Place the Full Aroma Lamp next to Charles and light it with the Matches.
Put the Radio on the stand and use the Metal Hanger on it as an antenna.
Zoom in on Charles and sprinkle the Dead Water on his face and inject him with the Syringe with Elixir.
Posted by: cheeko |
June 23, 2012 8:52 PM
|
June 23, 2012 8:52 PM