


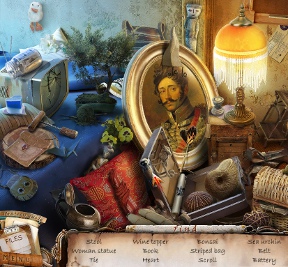
![]() From the horror-themed hidden object masters at Vogat Interactive comes F.A.C.E.S., another casual adventure tale filled with mystery, occult occurrences, and plenty of strange human abilities. You play a young woman who can travel into photographs and carry things back to the real world. She's trapped in an asylum at the game's outset, however, and knows she's about to endure the scientists' final experiment. Not good! To escape, she'll need to find the right photographs and scurry her way out into the world beyond!
From the horror-themed hidden object masters at Vogat Interactive comes F.A.C.E.S., another casual adventure tale filled with mystery, occult occurrences, and plenty of strange human abilities. You play a young woman who can travel into photographs and carry things back to the real world. She's trapped in an asylum at the game's outset, however, and knows she's about to endure the scientists' final experiment. Not good! To escape, she'll need to find the right photographs and scurry her way out into the world beyond!
 The scenes in F.A.C.E.S. are fully packed with things to investigate, and if you choose Advanced Mode from the beginning as opposed to Casual, you won't be notified of areas of interest. Use your mouse to click things you'd like more information about. A number of spots have close-up views available, while others present you with a bit of information, a hidden object scene, or an item for your cozy little inventory.
Puzzles are everywhere and you'll find more questions than you will answers during your first pass through each section. Hidden object scenes are frequent in F.A.C.E.S., but they're generally short and not too difficult to solve. When you complete one you're rewarded with a new item that stashes itself in your inventory. Use it to solve one of the many pressing puzzles standing between you and the next area!
Most areas in F.A.C.E.S. are solved without too much exploration or head-scratching on your part. Many puzzles require you to find a certain number of an item scattered around a few screens or stashed inside hidden object areas. Logic is your friend, and the game never twists things around for the sake of pumping up the difficulty or lengthening the experience.
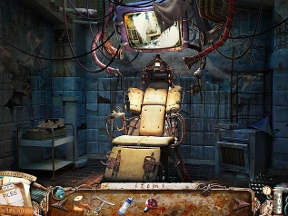 Analysis: Vogat knows hidden object adventures, and F.A.C.E.S. shows the studio has gotten the formula down to an art. The visuals are, as expected, grand, and the all-important atmosphere is spot-on spooky. Some really disturbed people must work at Vogat to conjure up some of these events, but they make for a great casual hidden object game!
One interesting fact about F.A.C.E.S. is that it features no voice acting, just haunting music and silent text to read. The sound effects are rather sparse, too, creating a cut-off, eerily quiet world for you to explore. You really feel like you're stuffed inside this crazy(?) girl's head, lending a somewhat twisted slant to the game as a whole.
The bonus content in the collector's edition of F.A.C.E.S. includes a chapter that adds another hour or so of gameplay. You can preview this mode before purchasing, which is a great option for those of us who like to try everything out before we buy. All in all, F.A.C.E.S. provides around five hours of play time (not including the bonus chapter), which is a bit longer than most hidden object games on the market.
While F.A.C.E.S. is yet another asylum-based mystery hidden object game, Vogat has a special talent that turns these experiences into genuine fun. If you're ready for a great story that's filled with haunting images and smart puzzles, F.A.C.E.S. was made for you!
(P.S. Yes, F.A.C.E.S. does stand for something!)
A Collector's Edition is also available. It contains exclusive bonus gameplay, wallpapers, and an in-game strategy guide. Remember that Big Fish Game Club Members pay only $13.99 for Collector's Editions (or 2 club credits), and collector's editions count 3 card punches of 6 total needed for a free game.
![]() Windows:
Windows:
Download the demo
Get the full version
Also available: Collector's Edition
![]() Mac OS X:
Mac OS X:
Download the demo
Get the full version
Also available: Collector's Edition


Walkthrough Guide
(Please allow page to fully load for spoiler tags to be functional.)
F.A.C.E.S. Walkthrough
General Knowledge
F.A.C.E.S. is a hidden object puzzle game where the cursor is used to interact with the environment.
When the cursor is over an area that you can zoom in to, read, or start a hidden object scene, it will turn to an eyeball.
When the cursor is over an item that you can pick up, interact with, or add to your inventory it will change to a hand.
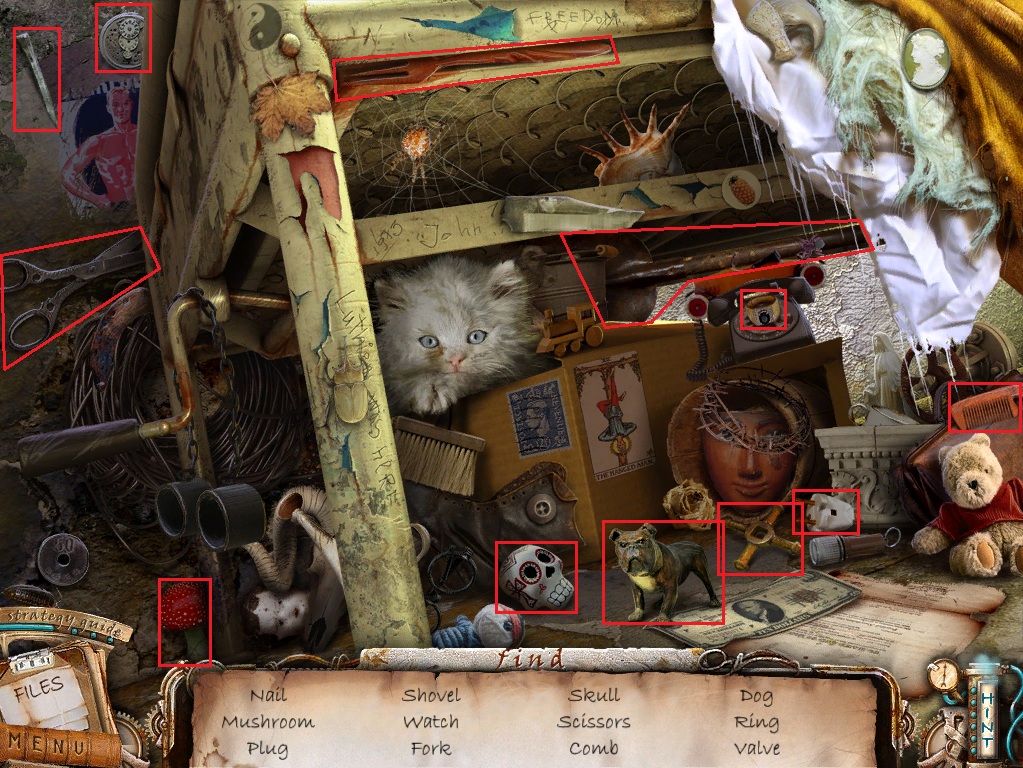
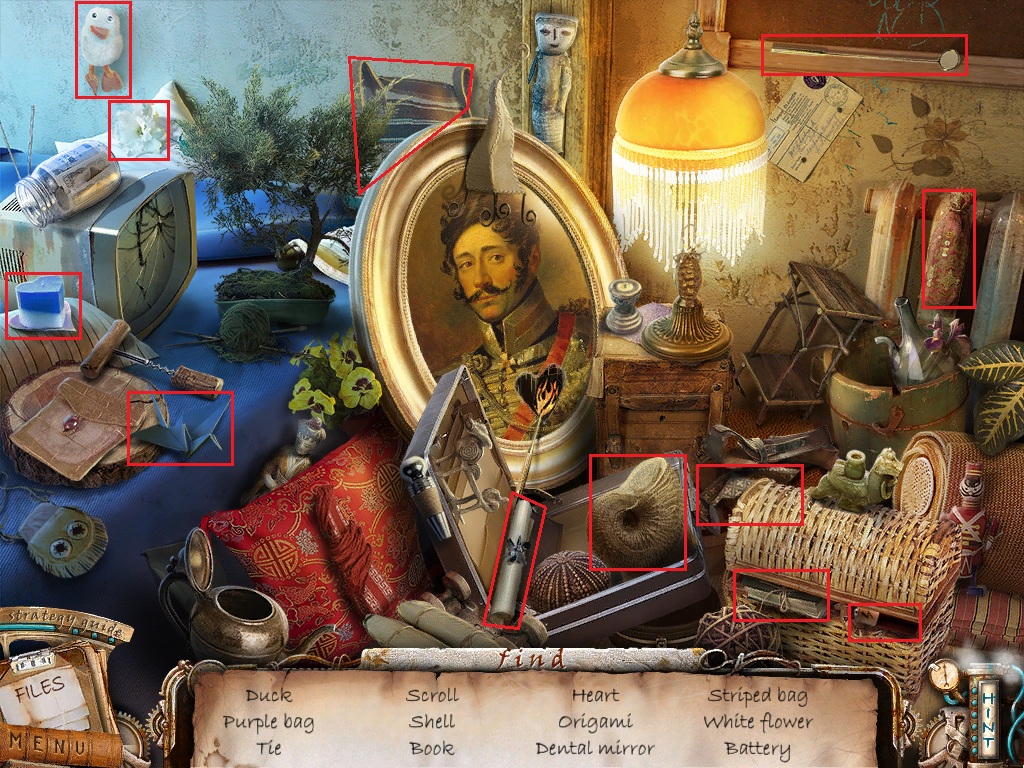
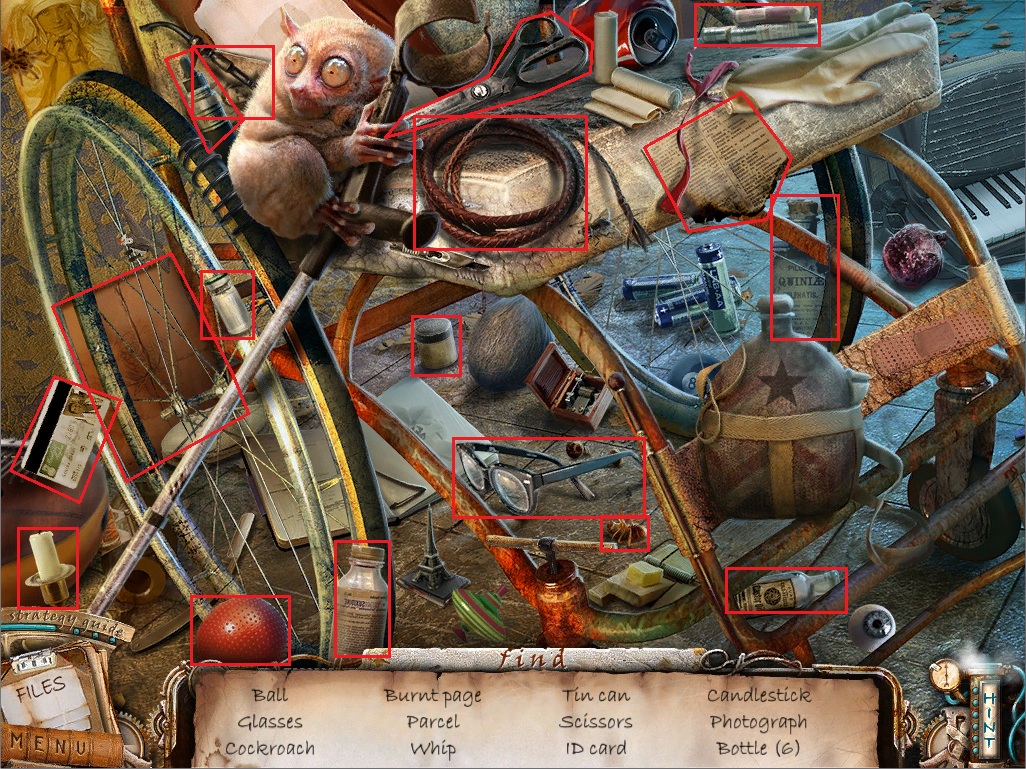
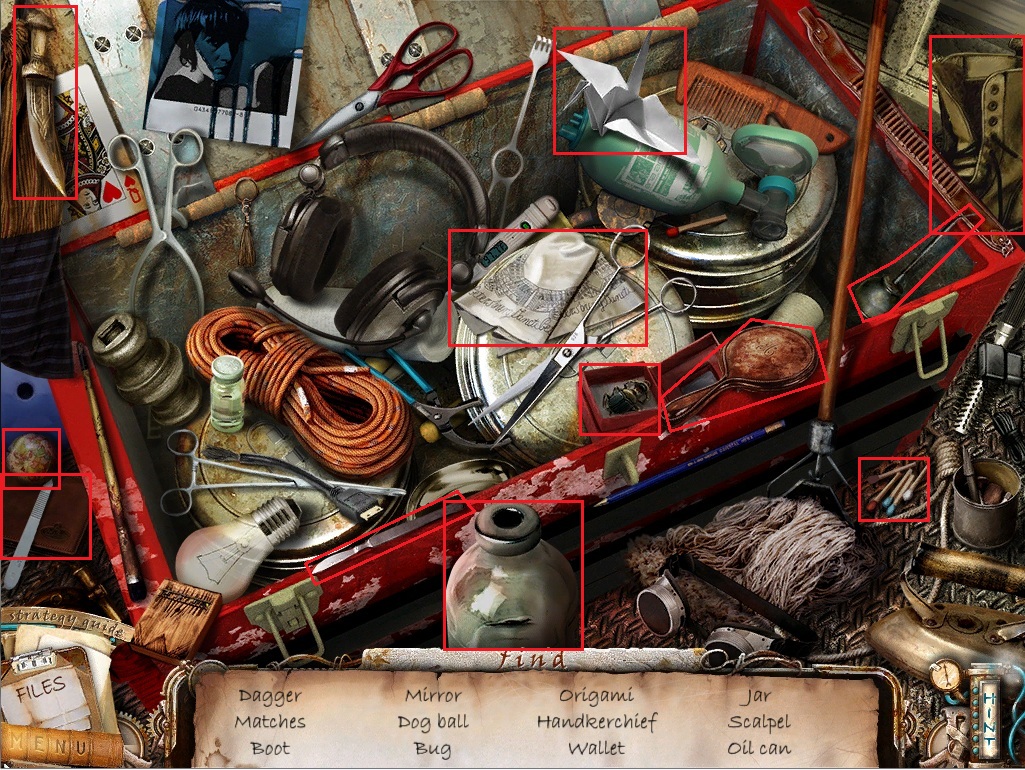
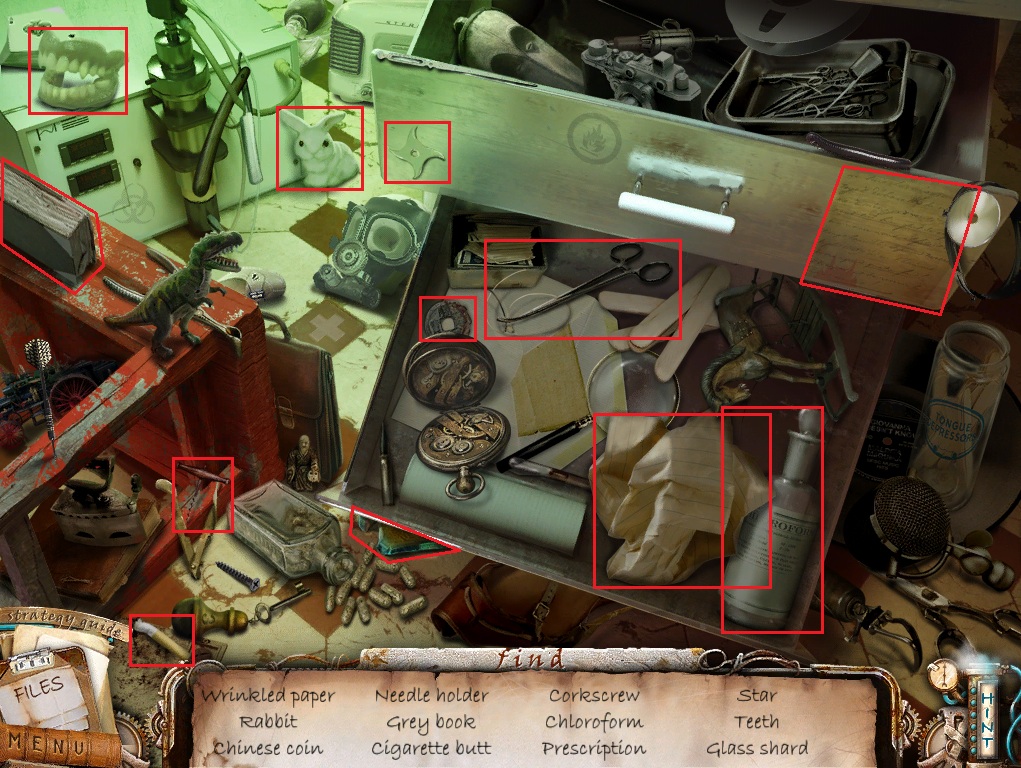
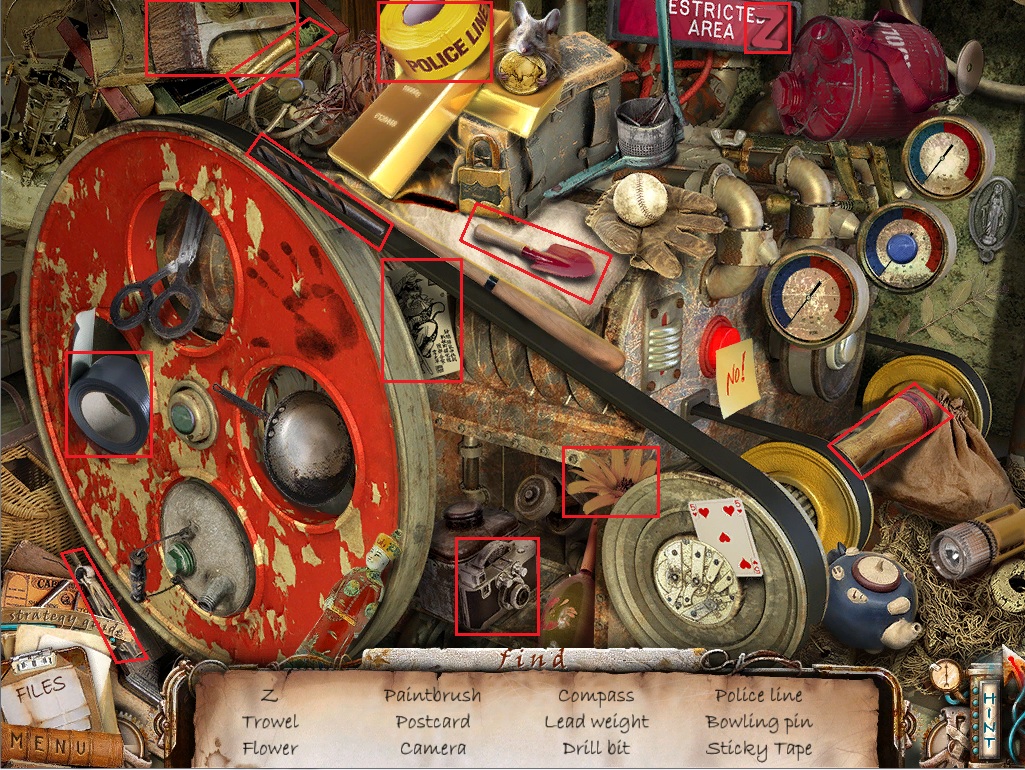
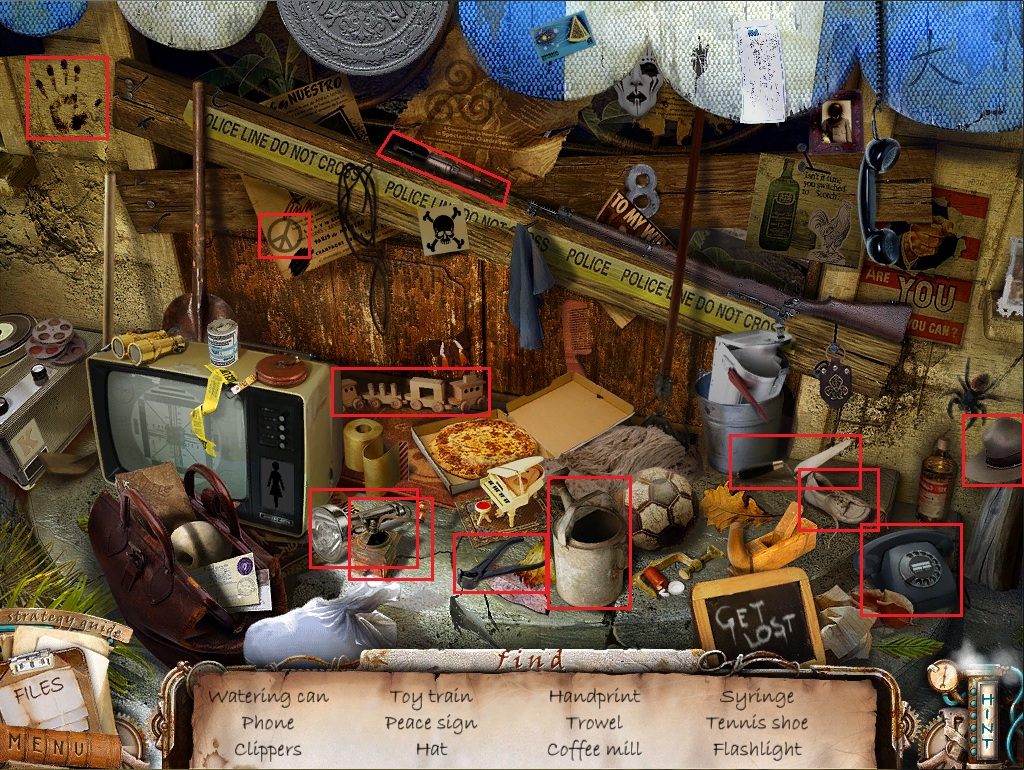
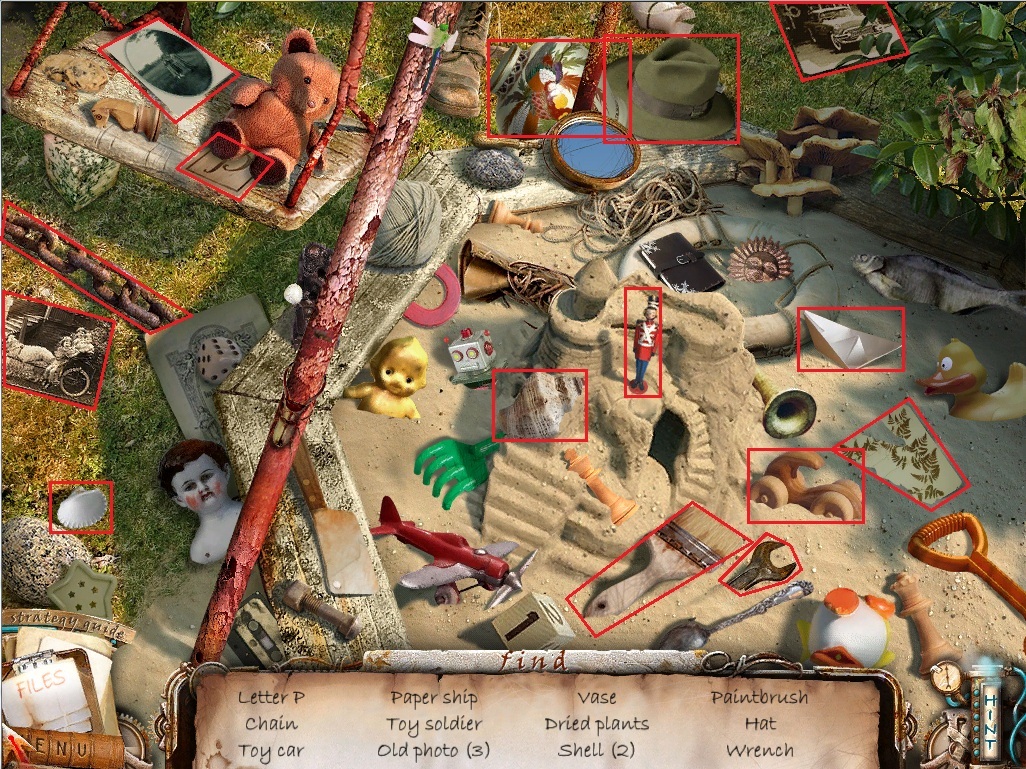
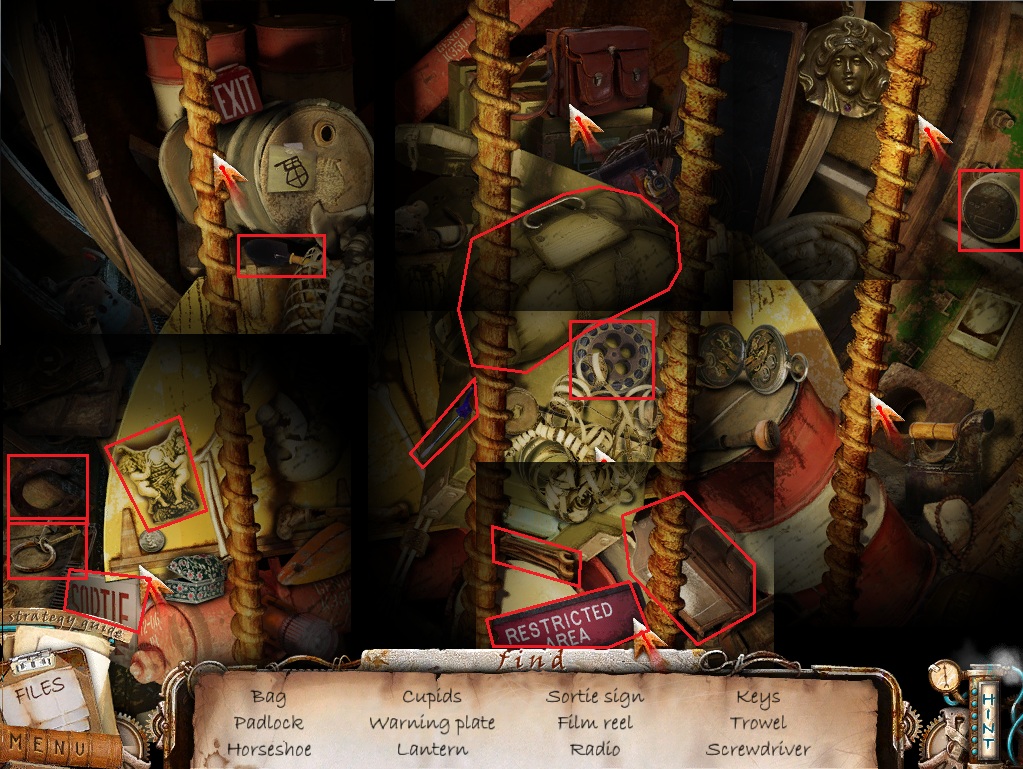
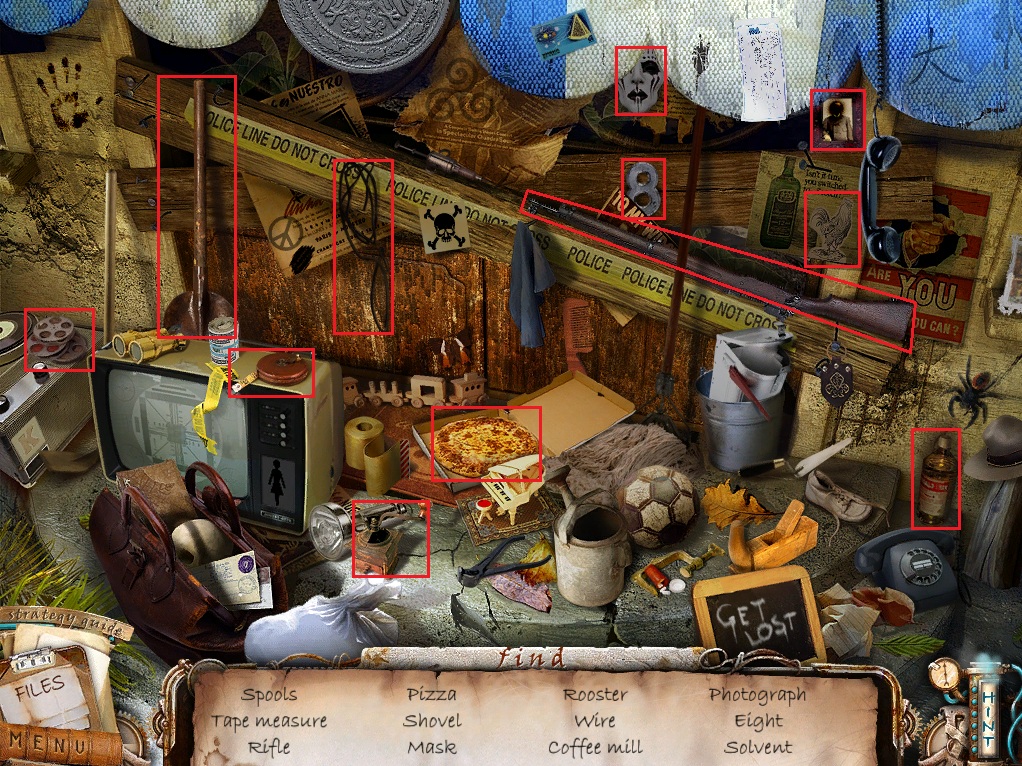
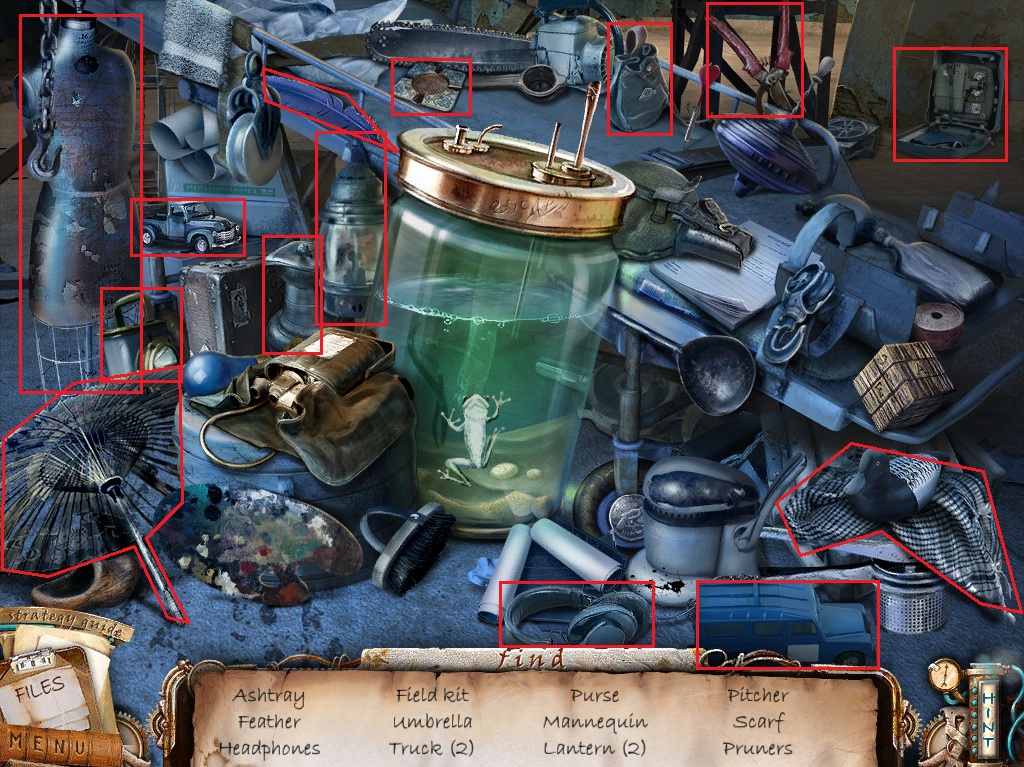
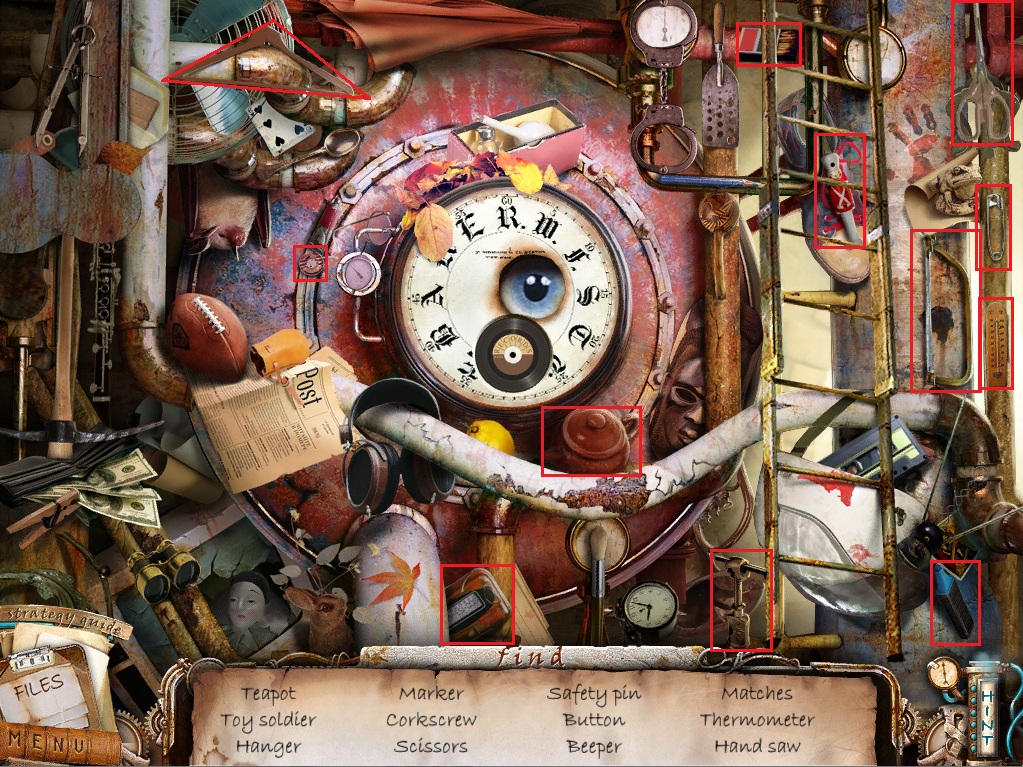
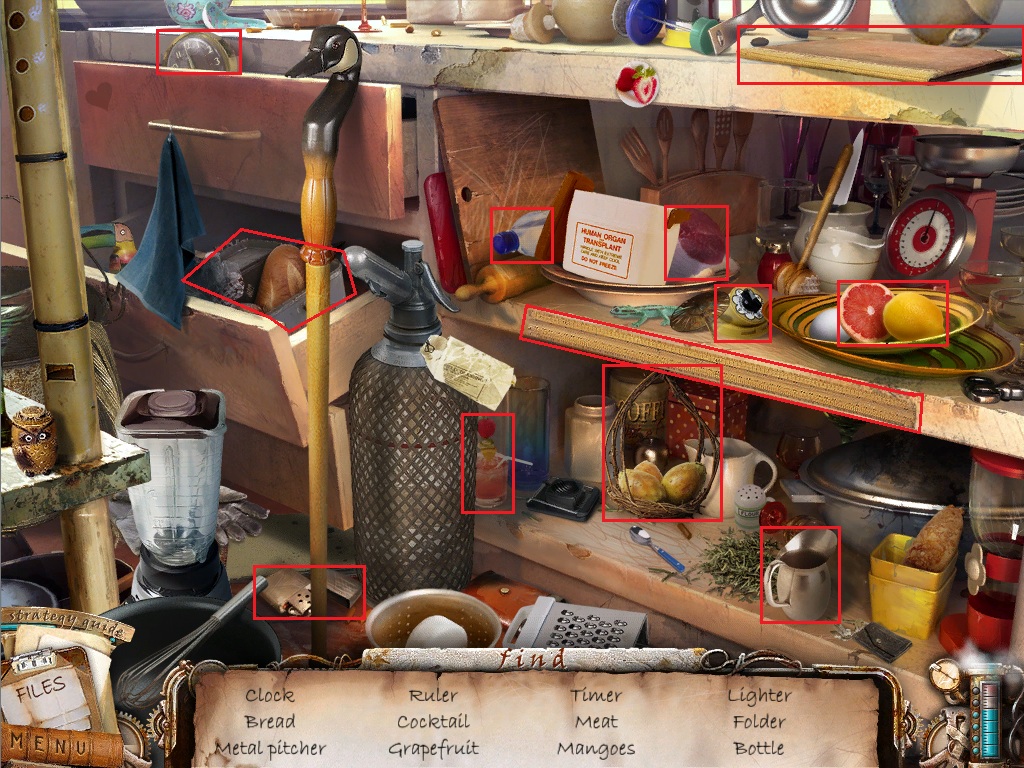
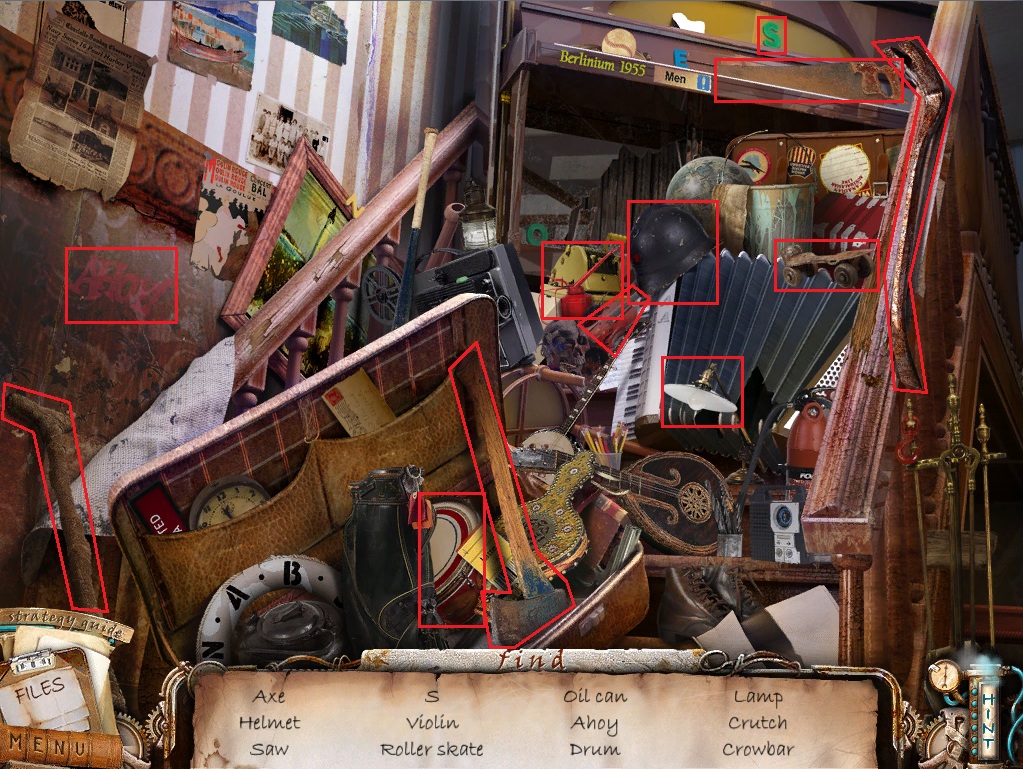
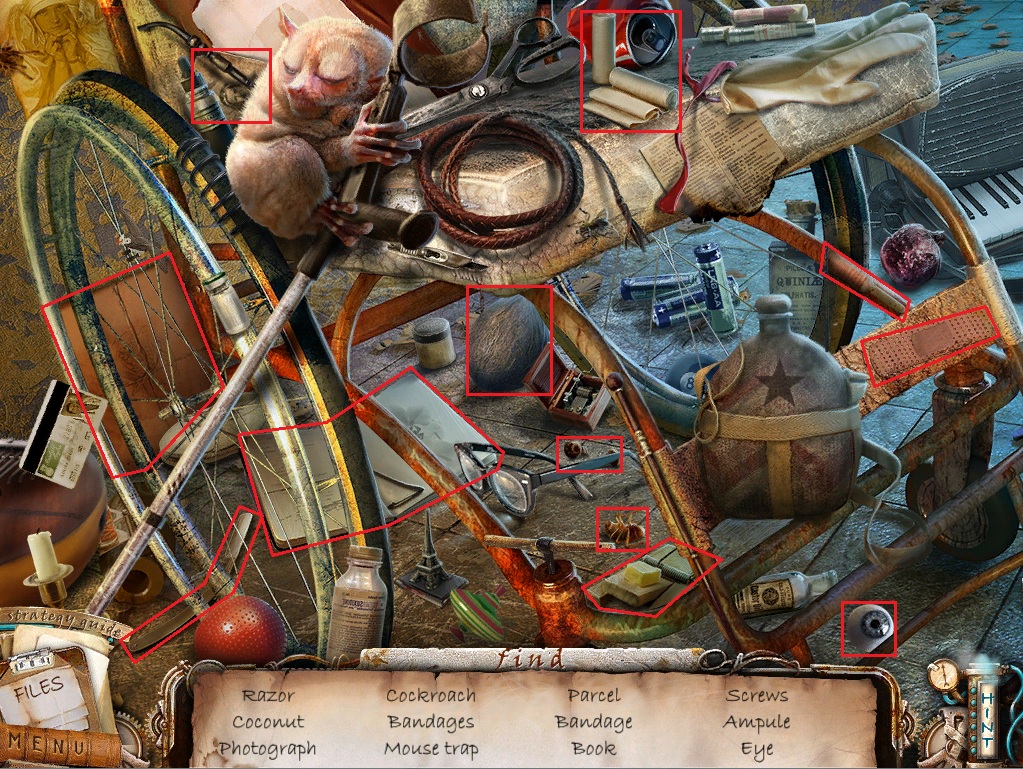
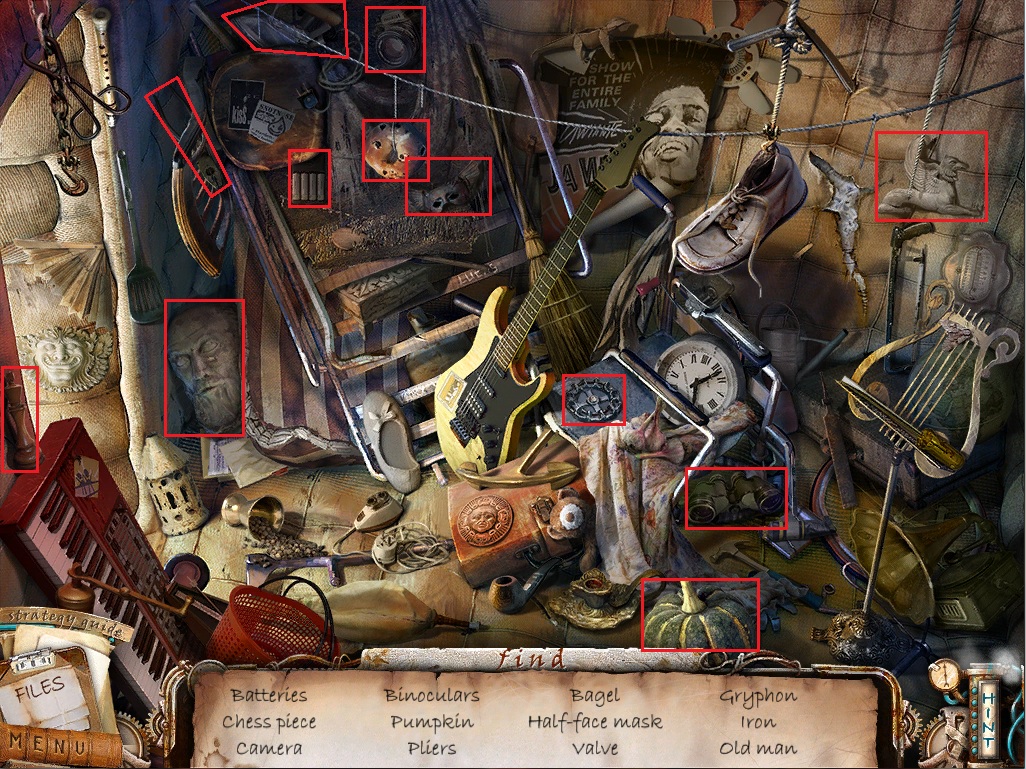
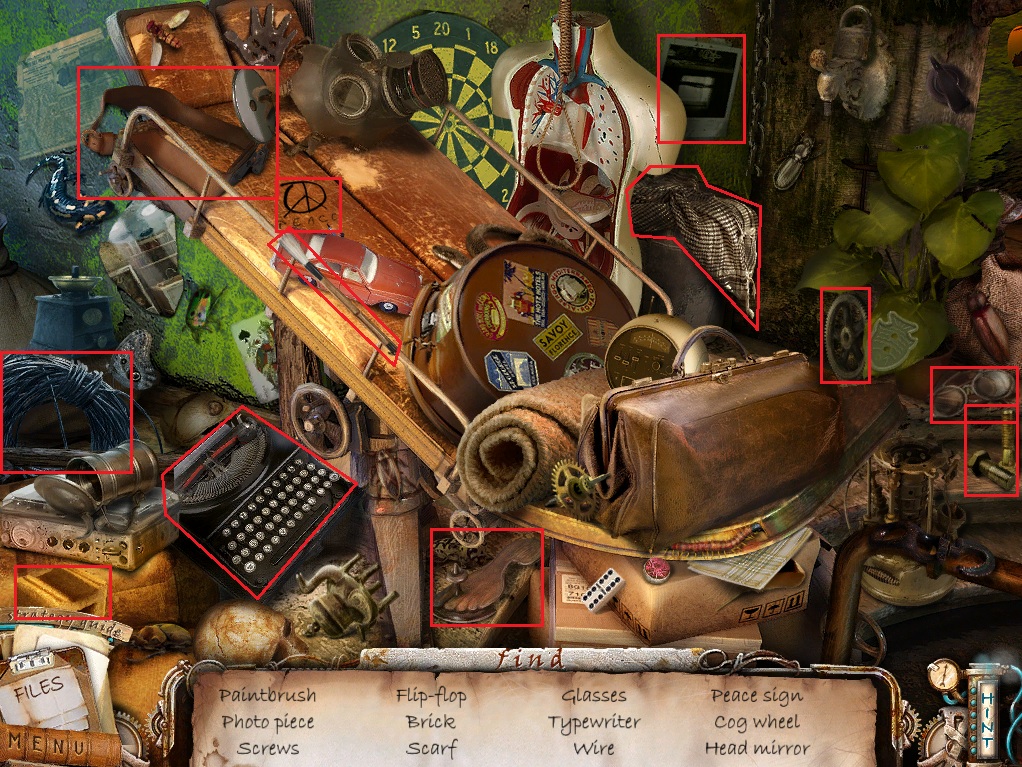
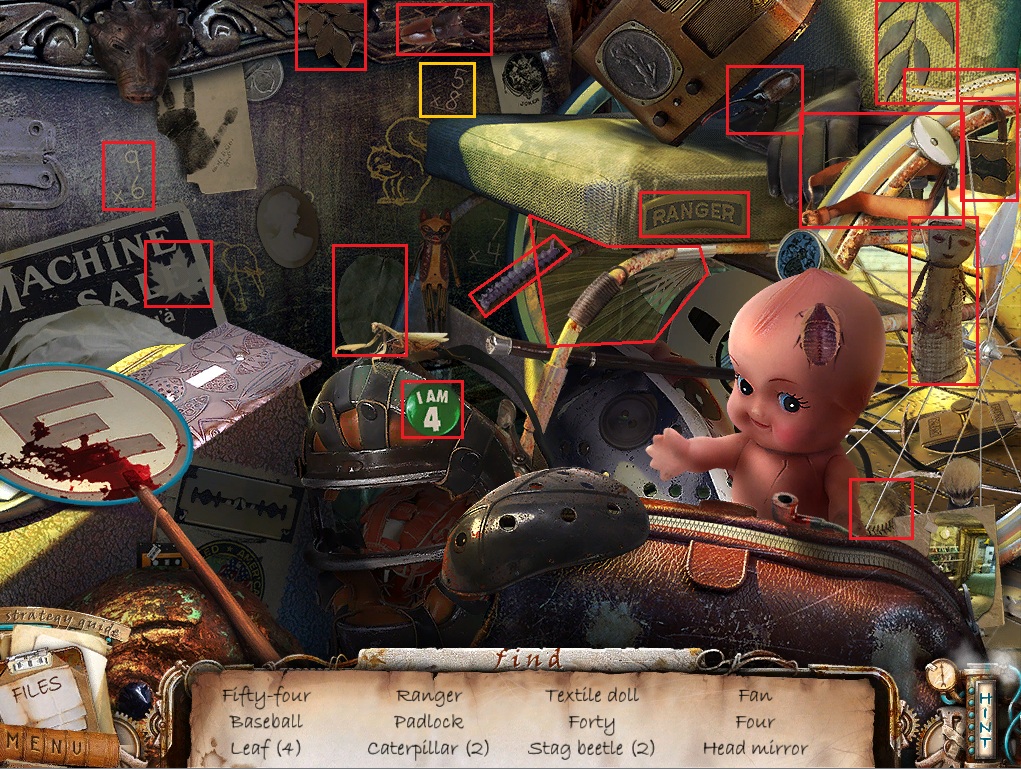
Hidden object scenes are areas in which items that are listed in the box at the bottom of the screen must be found hidden in the scenery.
In screenshots, these listed items are surrounded by a red square.
The list of items in each hidden object scene is randomized each time, so different games will have to find different items. Thus, screenshots of hidden object scenes are a reference rather than an exact solution.
Once a hidden object scene is completed, an item will be added to your inventory.
The inventory is a list of items collected throughout your adventure and is managed with the bar at the bottom of the screen.
Mouse over the inventory bar to view the items, or click the handle in the upper left corner of the bar to lock it into place.
In the lower left corner beside the inventory is a clipboard with your Files.
The Files contain helpful information about areas and can also contain important notes used for solving puzzles.
Below the Files is the Menu button.
Click the Menu button to access the in-game options or exit your current game to return the main menu.
In the lower right corner of the screen is the Hint bar.
Click the Hint bar to reveal an item in a hidden object scene, automatically solve a puzzle, or for advice on the next step of your journey.
Chapter 1
The Museum
Click the laser device in front of the platform.
Click the large switch to turn the laser grid off and remove the glass case.
Click the ruby to zoom in then click it again to pick it up.
The Cell
Click the window to zoom in.
Take the newspaper clipping that floats into the window to read it.
Go right to face the bed.
Click the balloon to pop it, then read the note that drops to the floor.
Click the blanket beneath the pillow to push it aside.
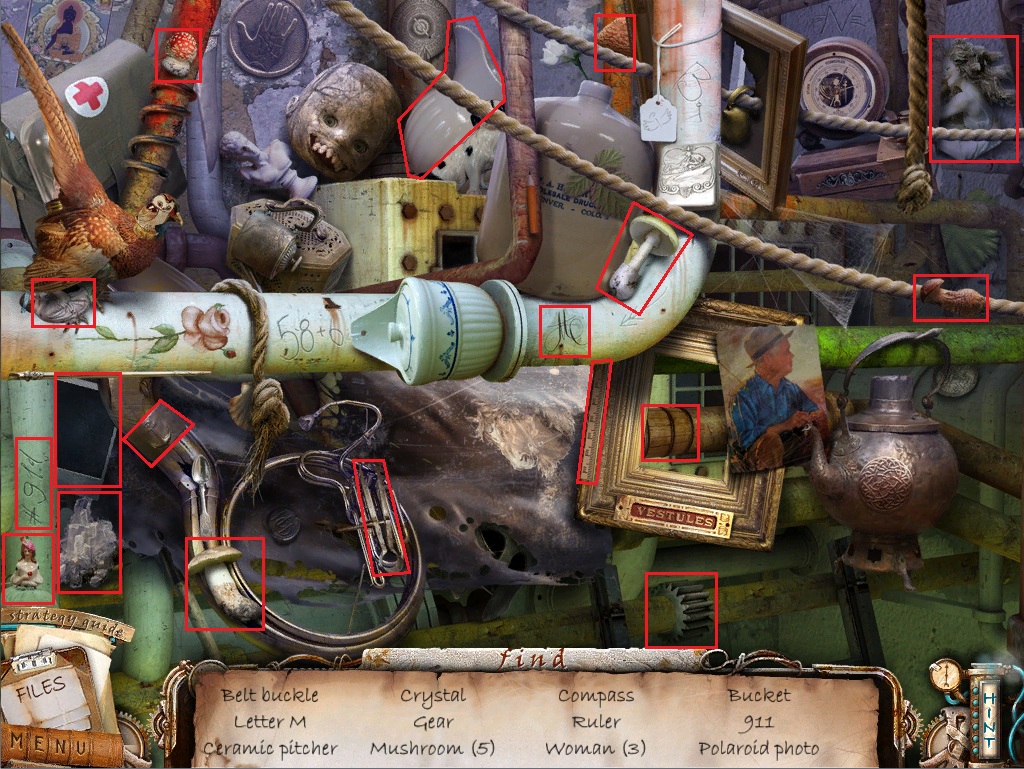
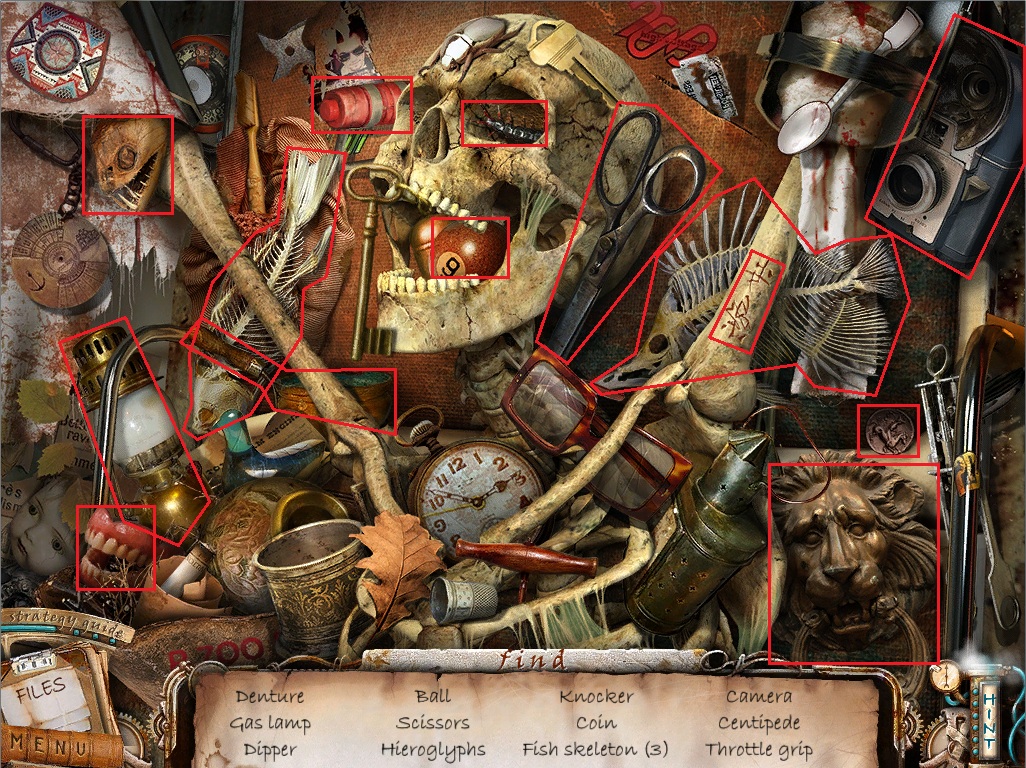
Click under the bed to start the hidden object scene.
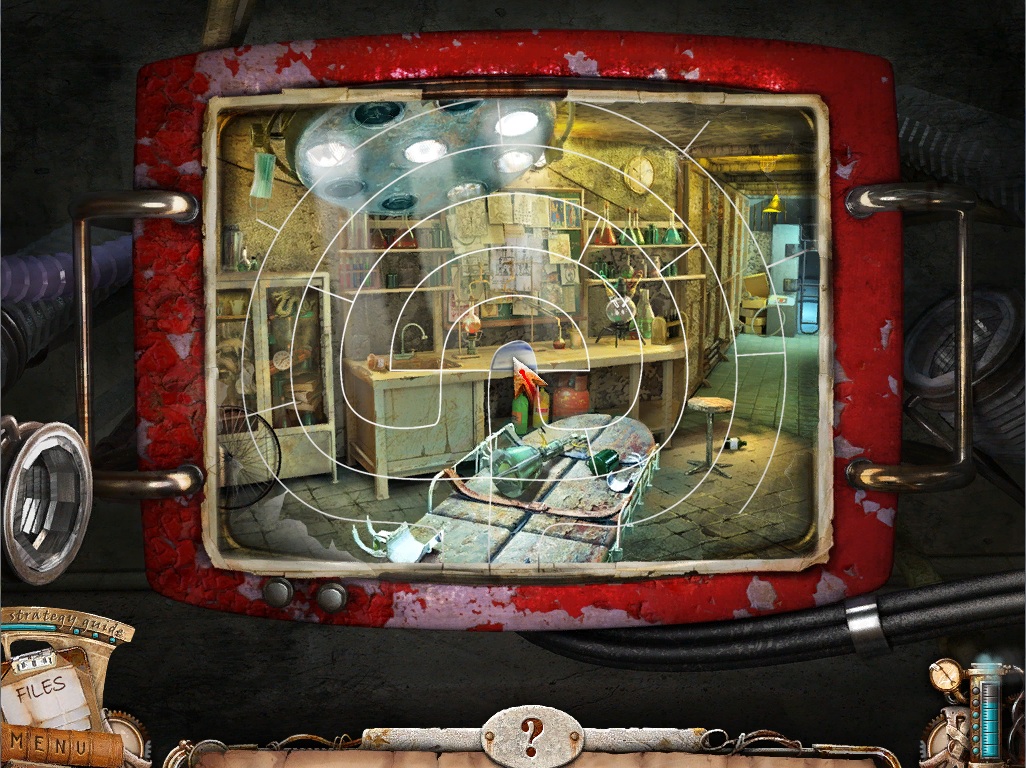
Screenshot.
Once the hidden object scene is complete you will receive a valve.
Click the sink in the corner of the room to zoom in.
Add the Valve from your inventory to the water tap in the sink.
Take the Chopsticks that float to the top of the water.
Go left back towards the window.
Click the large crack in the floor to zoom in.
Use the Chopsticks to pull the stuck photo out of the crack.
The House
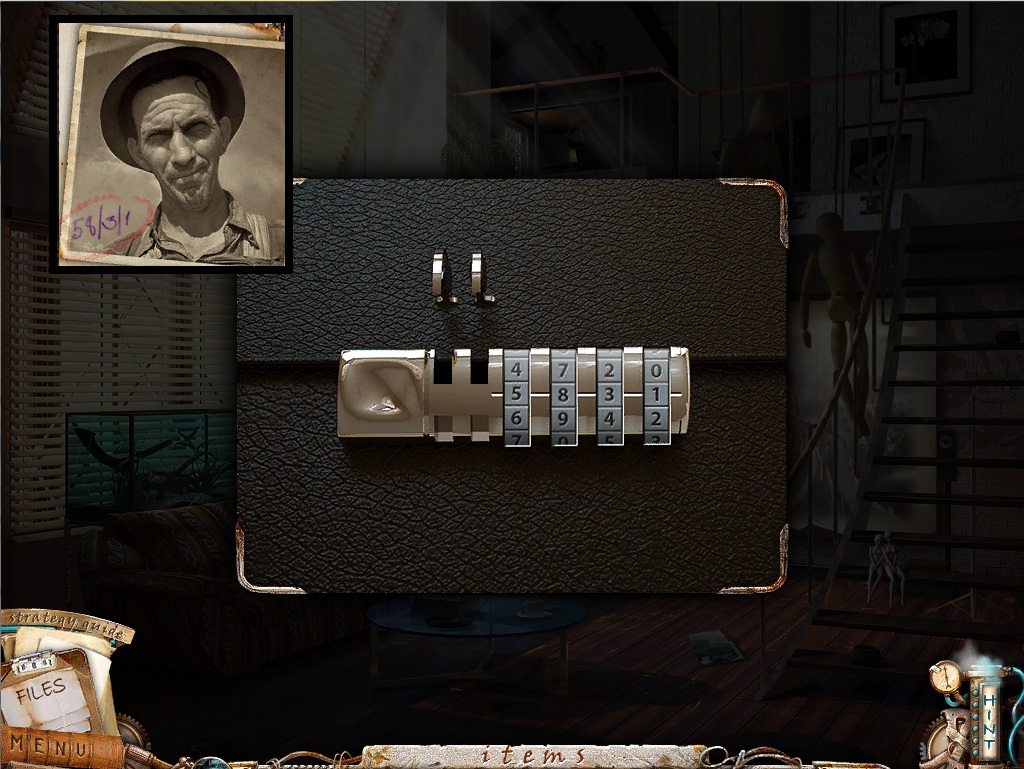
Click the glass coffee table to zoom in.
Take the African Mask.
Click the old photograph and note the reversed date in the corner 58/3/1.
Click the briefcase on the couch to zoom in.
Enter in the date from the photograph to the combination on the lock 5-8-3-1.
Solution.
Click the brochure to read it.
Take the Glass Eye(1/4) behind the papers.
Click the stairway to go upstairs.
Click the bed to start the hidden object scene.
Screenshot.
Once the hidden object scene is complete, you will receive a Battery(1/2).
Click the lava lamp on the middle step to zoom in.
Click the plug to put it in the socket and turn on the lamp.
Click the silver top of the lamp to unscrew it and take the Glass Eye(2/4) inside.
Click the hand holding the light bulb underneath the light, then take the Dummy's Hand.
Go through the door into the bathroom.
Click the tub to zoom in.
Pull the plug out of the drain to empty the water, then take the Glass Eye(3/4) by the rubber duck.
Click the mirror over the sink for a closer look.
Turn on the faucet to steam up the mirror, revealing the shape of a hand making the peace sign.
Click the basket of dirty clothes to zoom in.
Move the clothes aside to reveal the Battery(2/2) at the bottom.
Click the cabinet under the bathroom mirror to open it.
Click the cabinet again to start the hidden object scene.
Screenshot.
Once the hidden object scene is complete, you will receive a Jar.
Exit the bathroom.
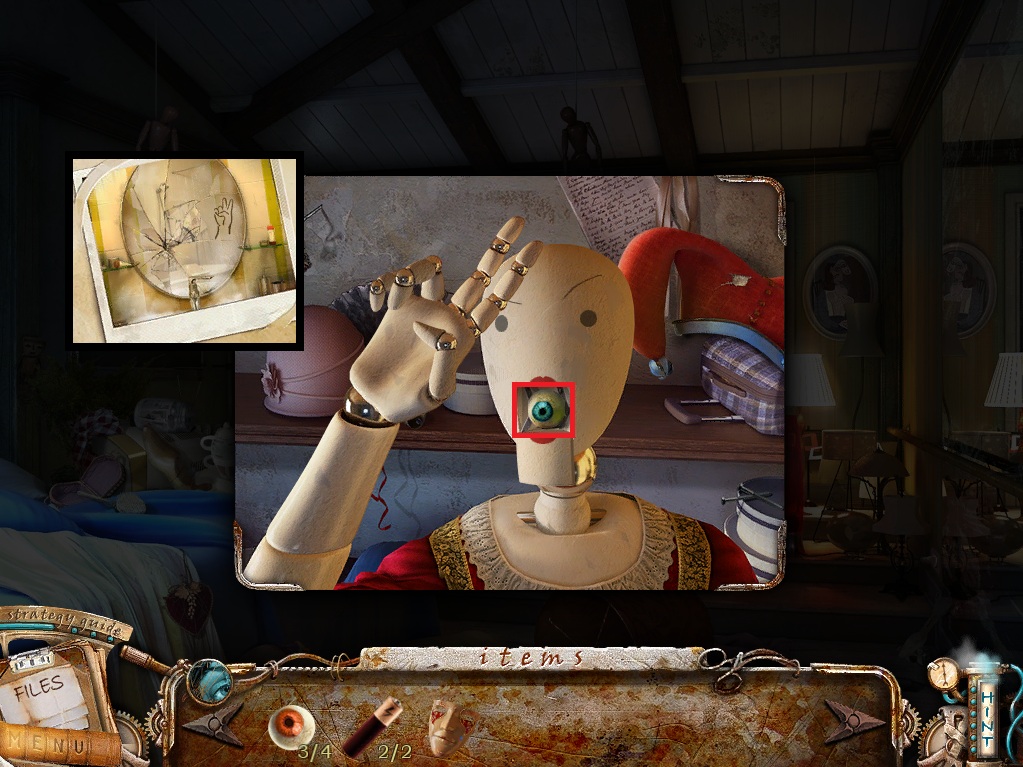
Click the mannequin behind the curtain to zoom in.
Remove the jester's hat and take the Venetian Mask from the mannequin's head.
Add the Dummy's Hand from your inventory to the figure's empty wrist.
Position the hand to match the image in the mirror.
Solution.
Take the Glass Eye(4/4) from the mannequin's open mouth.
Go back downstairs.
Click the terrarium under the window.
Use the Jar from your inventory on the scorpion and take the Mask with Beak inside the case.
Click the coffee table to zoom in.
Place the two Batteries from your inventory into the back of the remote, then click the remote to turn off the projector.
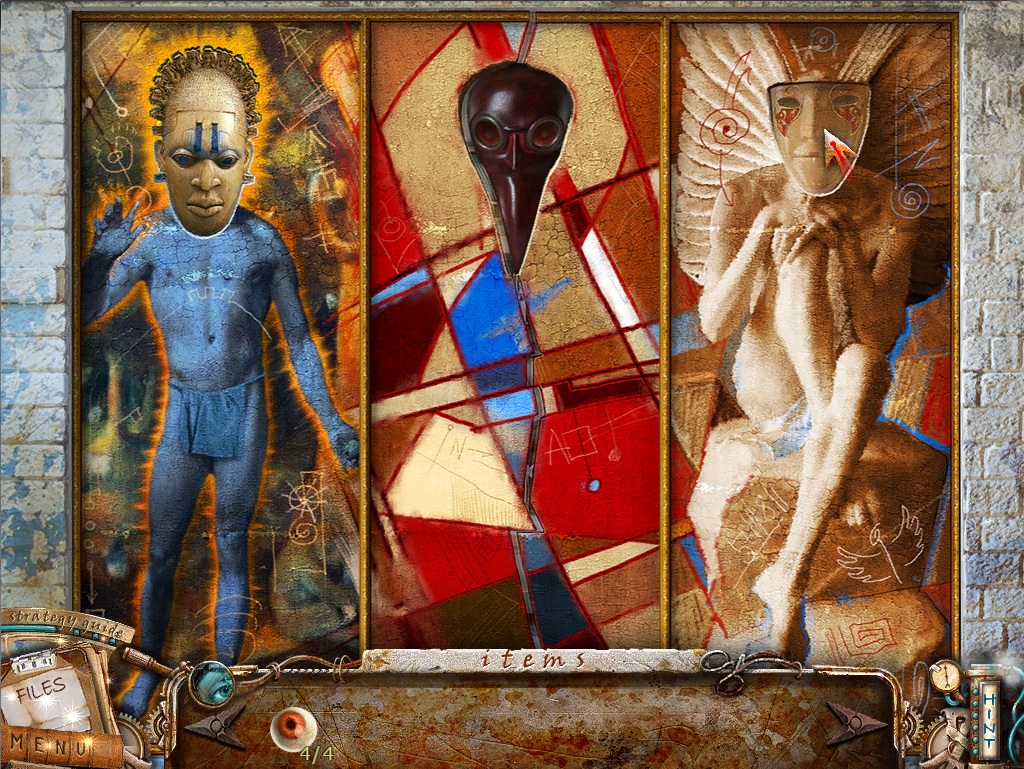
Click the wall behind the lifted screen for a closer look.
Place the African Mask in the left space, the Mask with Beak in the middle space, and the Venetian Mask in the right space.
Solution.
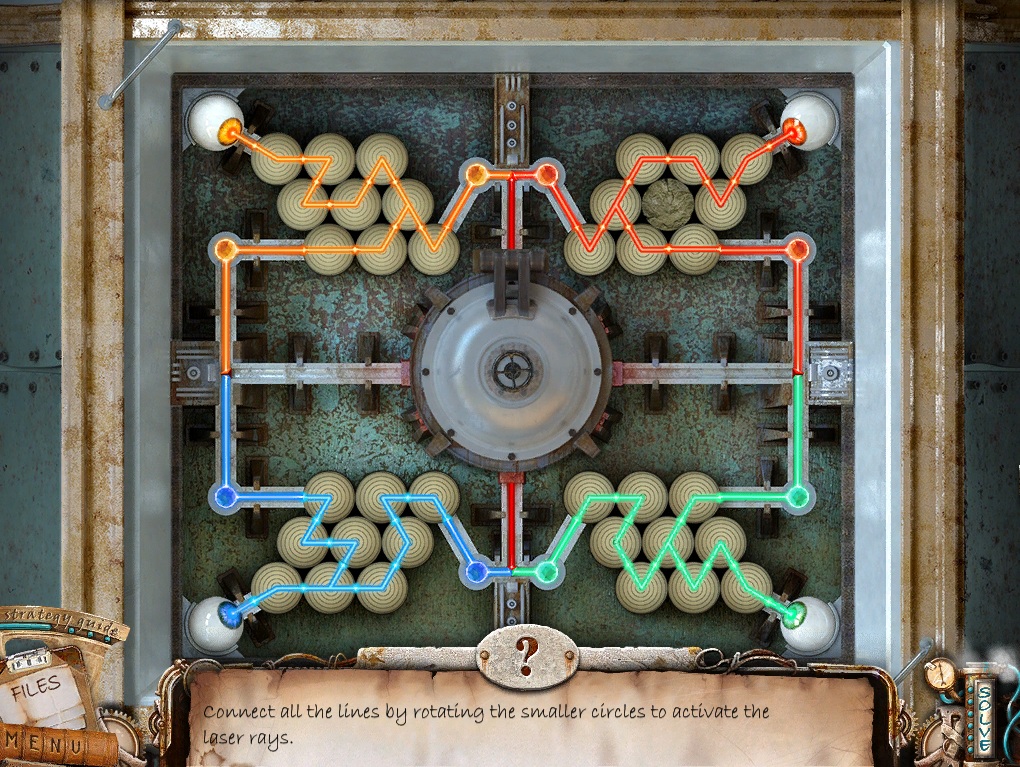
Click the device in the middle of the wall to zoom in.
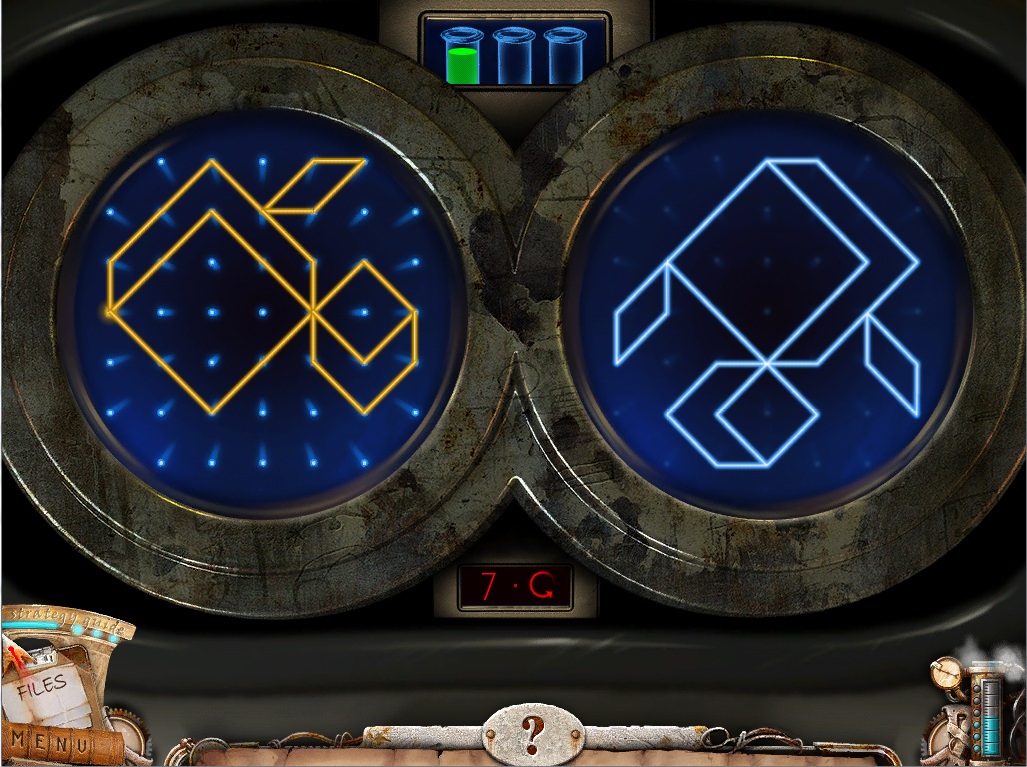
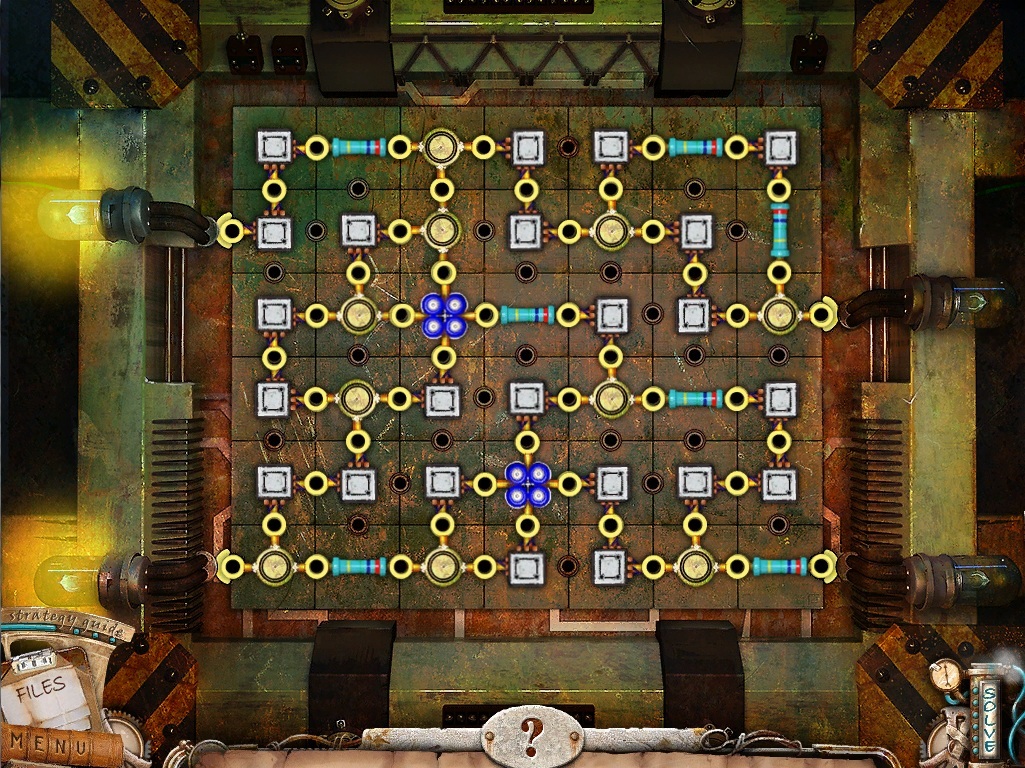
Add the four Glass Eyes from your inventory to the device to start the puzzle.
To solve this puzzle, rotate each of the tiles to create a path from each colored eye to its two matching colored stones.
Click a tile to rotate it counter-clockwise.
If the lines are connected to the laser coming from the eyeball, the path will glow with that same color.
Connect the path from the laser out of the eye to the gemstones in the middle and corners of the device.
Solution.
Once the puzzle is solved, take the Skeleton Key from the center of the device.
Click the front door to zoom in.
Use the Skeleton key on the lock to open the door.
The Cell
Click the cell door to zoom in.
Use the Skeleton Key from your inventory on the lock under the handle
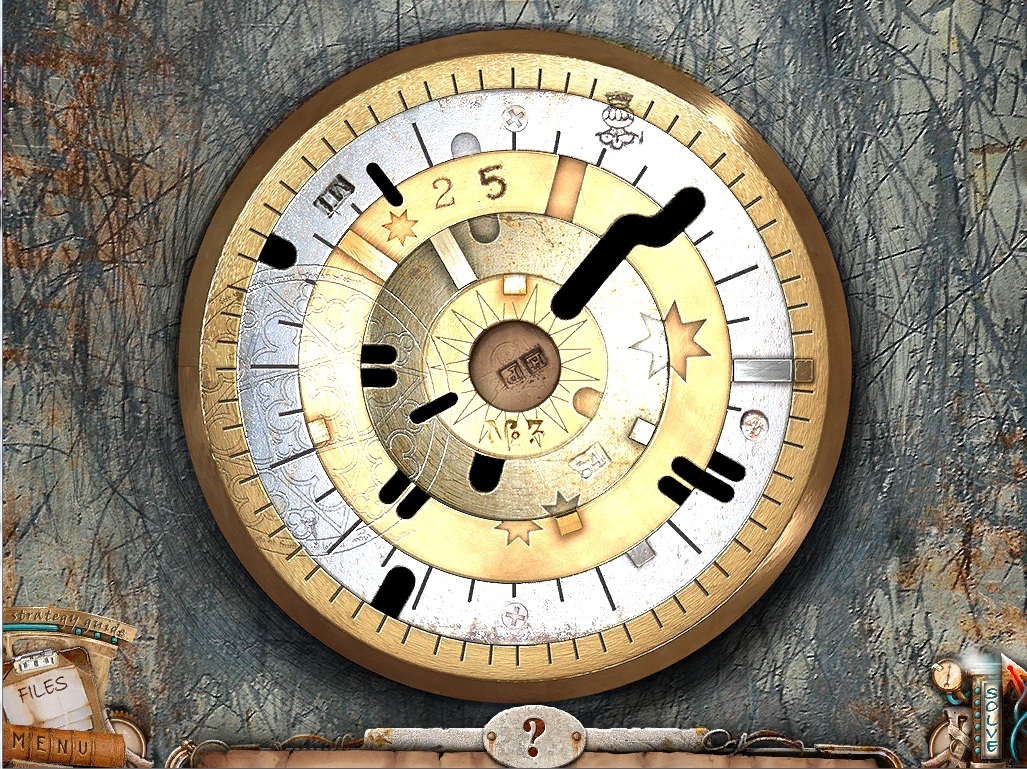
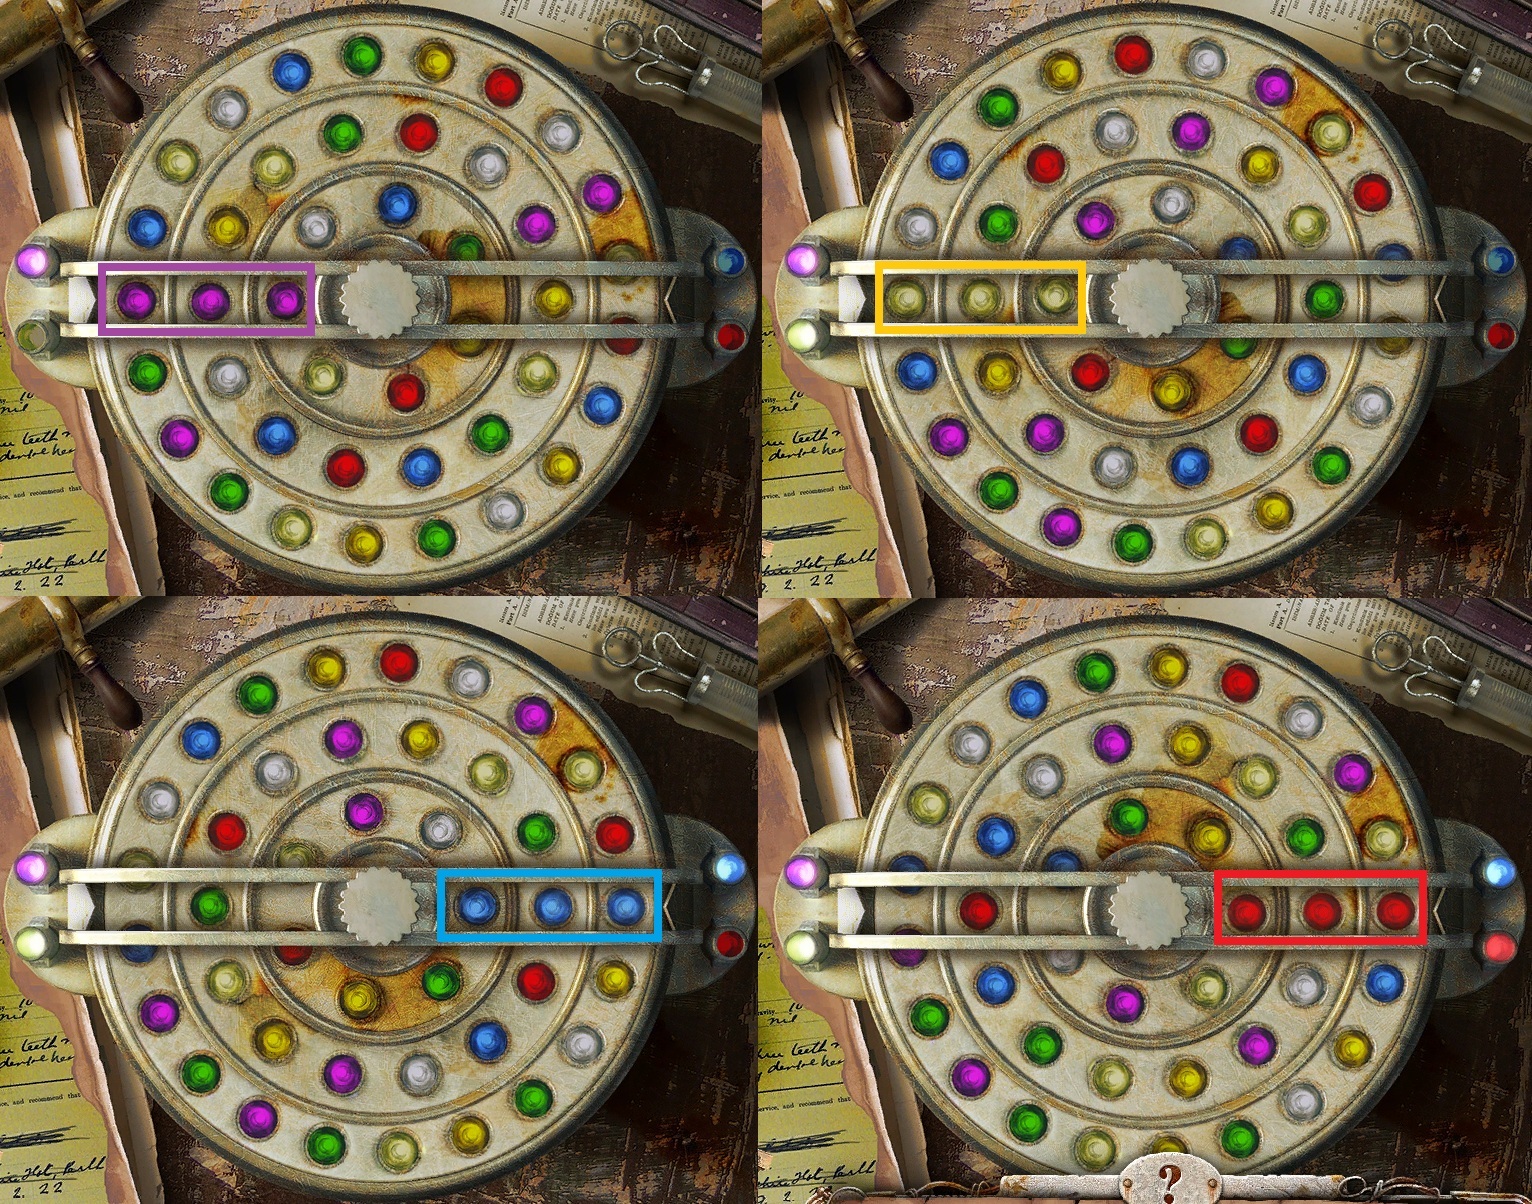
Click the dial to start the puzzle.
To solve this puzzle, turn the dials to align the images.
Because turning the dials on the inside affects some of the outer dials start with the center ring and then move outward.
The outmost dial is immovable, so ignore all of the patterns except for the ones found on the outside ring: the crown, the grey rectangle, and the large circular imprinted design.
Click and hold a ring to select it, then drag to turn it clockwise or counter-clockwise.
Solution.
Go through the open door into the hallway of the ground floor.
The 4th Floor
Click the switch on the right wall.
Pull down the lever to turn on the power.
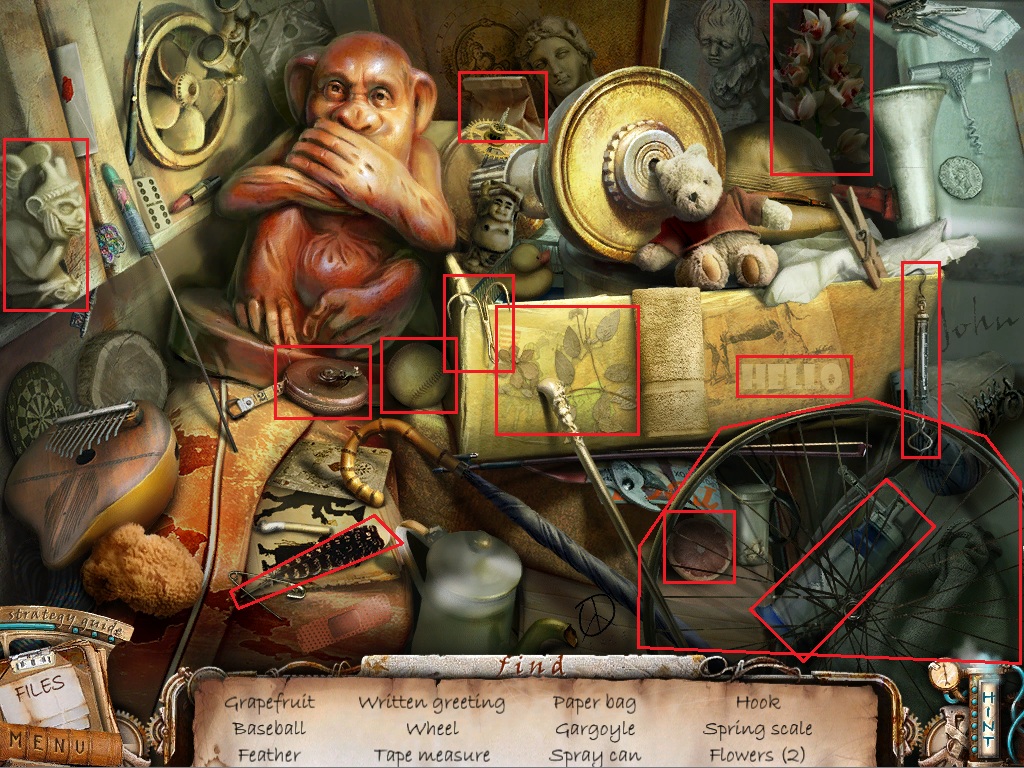
Click the wheelchair to start the hidden object scene.
Screenshot.
Once the hidden object scene is complete you will receive an ID Card.
Click the call button next to the elevator door, then step inside the elevator.
Click the panel under the green light to zoom in.
Use the ID Card from your inventory on the slot above the small blank screen.
Click the red toolbox to start the hidden object scene.
Screenshot.
Once the hidden object scene is complete you will receive an Oil Can.
Click the lock blocking the cage of the elevator to zoom in.
Take the Pliers behind the chain.
Use the Oil Can on the padlock.
Click the elevator control panel to zoom in.
Use the Pliers on the sparking Ground floor button to remove the Pin.
Click the padlock in the gate again.
Use the Pin from your inventory to pick the lock, then click the lock to remove it.
Click the patient file on the stretcher to zoom in.
Note that patient is kept on the 3rd floor.
Click the elevator panel again and push the 3rd floor button.
Exit the elevator to the third floor.
Chapter 2
The 3rd Floor
Click the window directly ahead to zoom in.
Take the Glass Shard(1/4) sticking out of the bottom left corner of the frame.
Go through the left door into the X-ray room.
X-ray Room
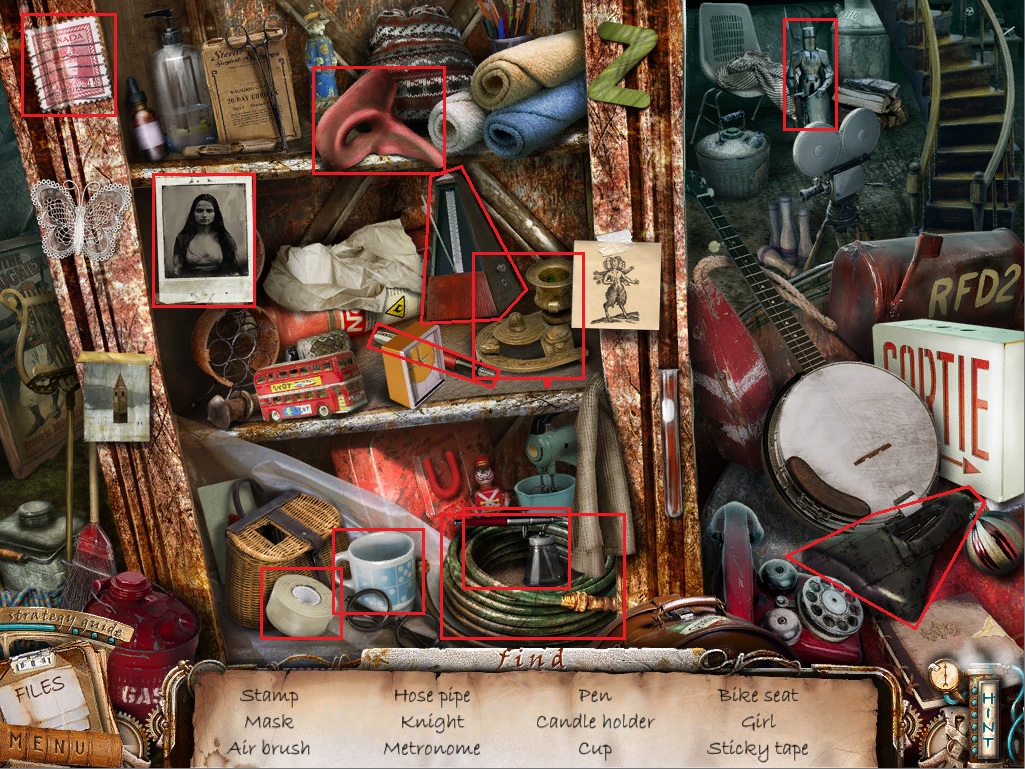
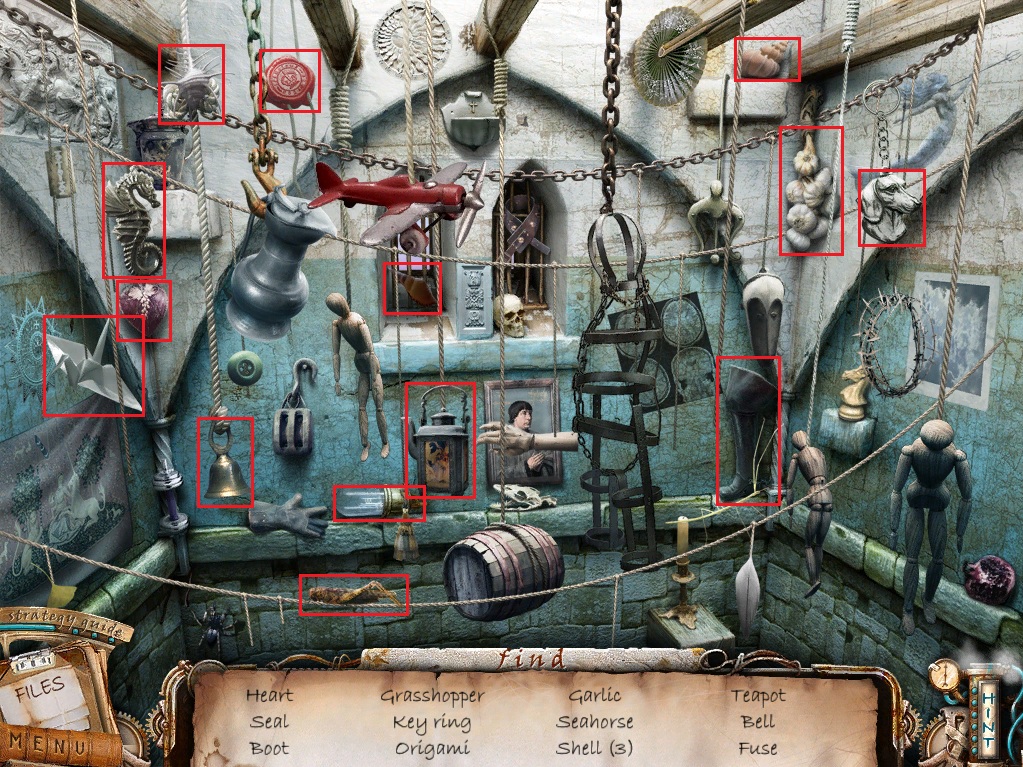
Click the cabinet shelves to start the hidden object scene.
Screenshot.
Once the hidden object scene is complete, you will receive a Glass Shard(2/4)
Click the computer on the left counter to zoom in.
Flip the switch at the bottom to the OFF position to start the puzzle.
To solve this puzzle, click the X-ray image that is different from the other pictures.
The following screenshot is only an example for reference, as many of the X-rays are randomized.
Solution.
Once the puzzle is solved, take the Data Disk that slides out of the bottom of the computer.
Click the X-ray machine to zoom in.
Open the door and take the 3rd Floor Fuse inside the machine.
Click the X-ray pictures stuck to the upright stretcher for a closer look.
Take the Glass Shard(3/4) next to the image of the hand.
Exit the room and return to the 3rd floor hallway.
The 3rd Floor
Go right to the locked cell door.
Click the telephone machine on the wall to zoom in.
Take the Glass Shard (4/4) on top of the telephone.
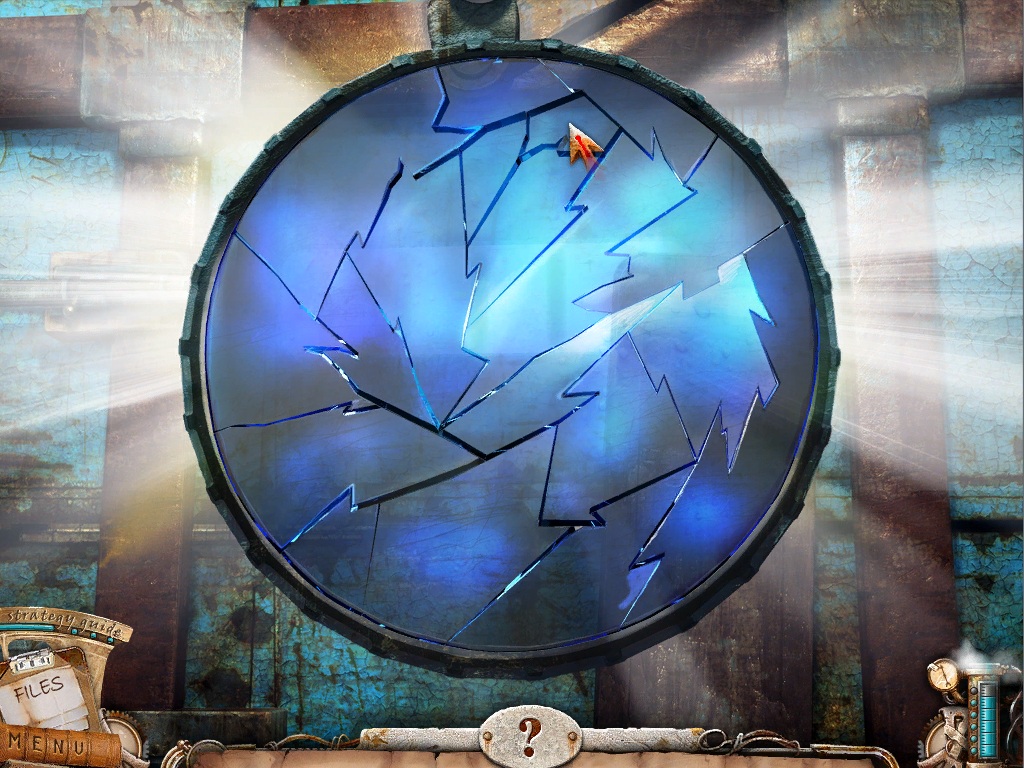
Click the window of the cell door for a closer look.
Add the four Glass Shards from your inventory to start the puzzle.
To solve this puzzle, arrange the fragments of broken glass to complete the mirror.
Left click a glass shard to select it, then right click to rotate that shard clockwise.
Left click a position inside the circular frame of the mirror to place it.
If the shard is correctly positioned, it will lock in place with a chime of music.
Solution.
Click the cell window to speak with the prisoner inside and receive the Keyboard Buttons.
Return to the elevator and push the Basement button.
The Basement
Go directly forward to the security room.
Security Room
Click the keyboard on the desk to zoom in.
Place the Data Disk from your inventory into the slot in the box above the keyboard.
Add the Keyboard Buttons from your inventory to the empty spaces on the keyboard.
Click the computer screen for a closer look.
Take the Basement Fuse beside the system down screen.
Place the 3rd Floor Fuse in the space labeled three.
Place the Basement Fuse in the space labeled basement.
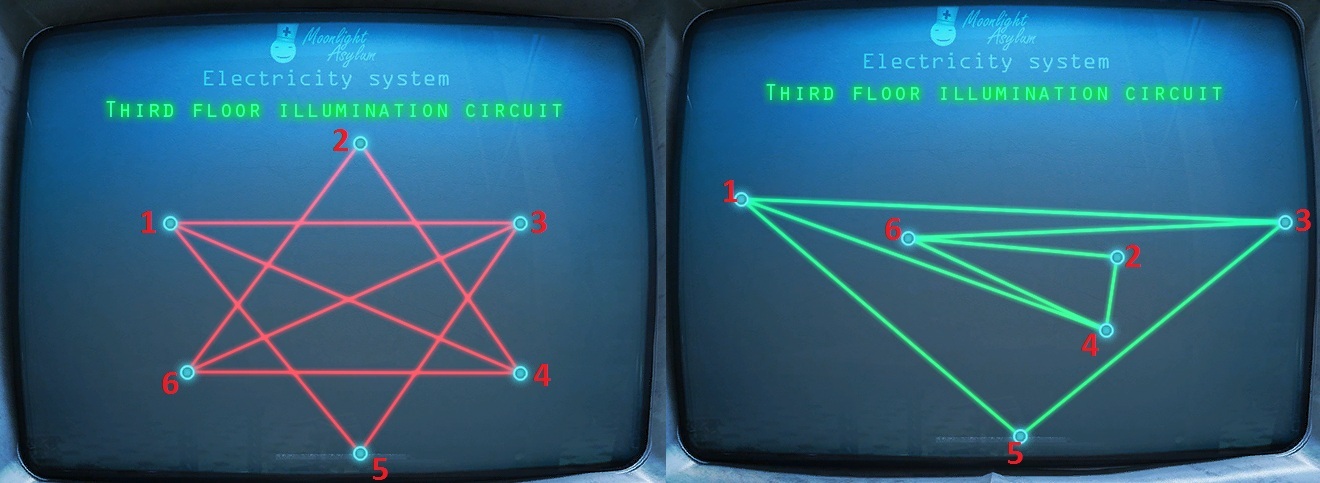
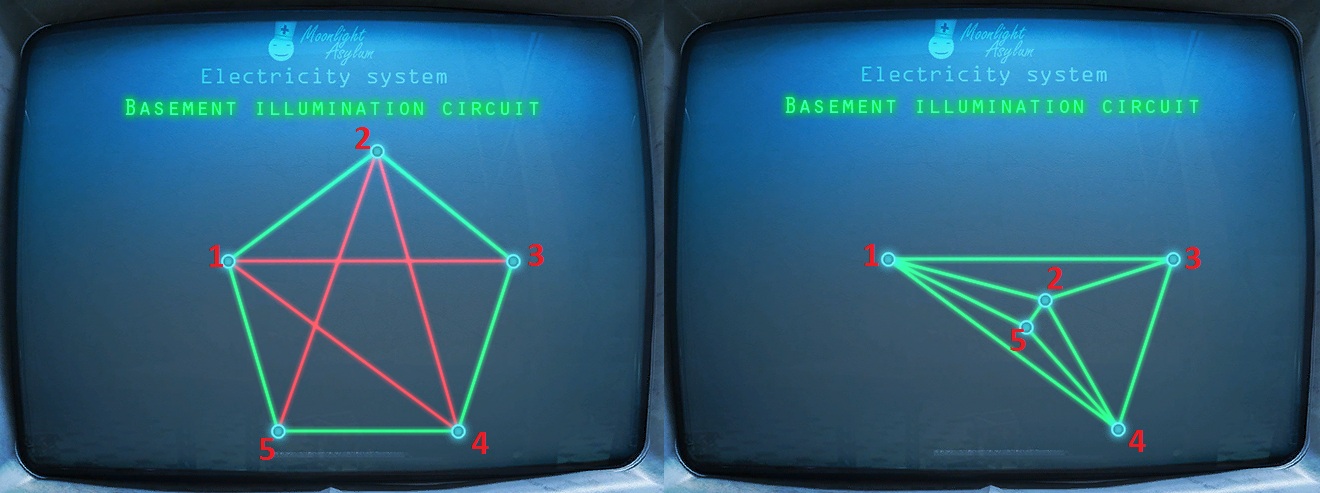
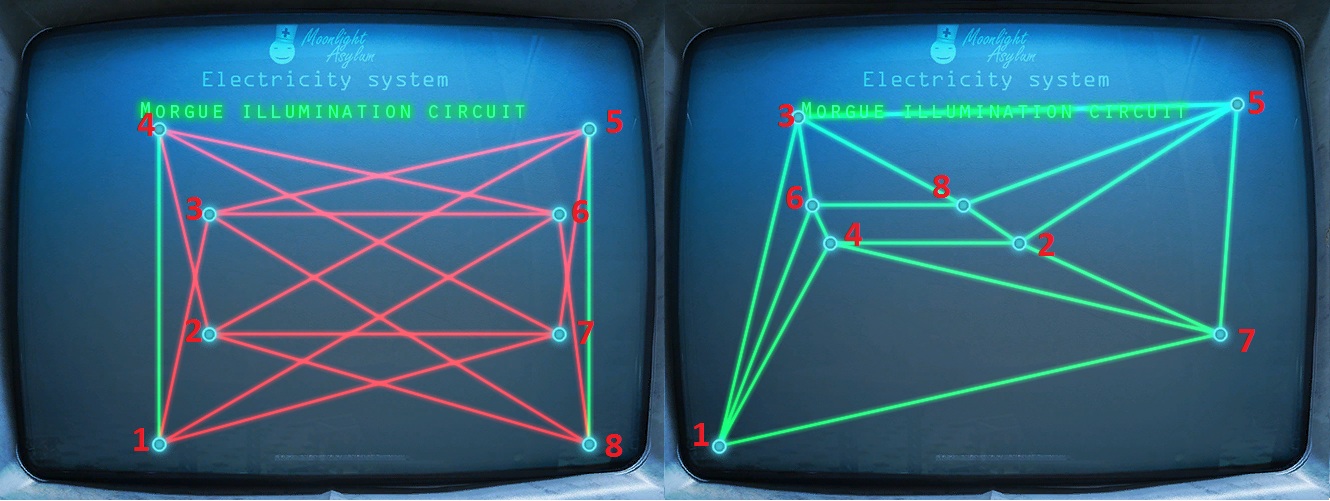
Click the screen to start the puzzle.
To solve this puzzle, move the blue circles so that the lines attached to them do not intersect.
Click and hold a blue dot to select it, then drag it around the screen to move it and release the mouse to place it.
When a line is free of all intersections it will turn green. If the line is still tangled, it will stay red.
3rd Floor Solution.
Basement Solution.
Click the left drawer under the apple core to zoom in.
Take the Elevator Button(1/3) to the right of the locked box.
Click the drawer to open it, revealing a Key with a #4 label tag.
Exit the security room.
The Basement
Click the area under the stairs to start the hidden object scene.
Screenshot.
Once the hidden object scene is complete, you will receive Duct Tape.
Go back inside the elevator and push the button for the 3rd floor.
The 3rd Floor
Go right to the cell and click the door to speak with the patient inside to receive the Knob.
Go back one screen and click the window to zoom in.
Place the knob on the lock of the window, then move the latch to reveal the photograph.
Consultation Center
Click the entrance to start the hidden object scene.
Screenshot.
Once the hidden object scene is complete, you will receive a Flashlight.
Click the green trash bin set on the street to zoom in.
Move the planks of wood aside to reveal the Rubber Glove.
Go to the right side of the building to the backdoor.
Click the sandbox to start the hidden object scene.
Screenshot.
Once the hidden object scene is complete you will receive a Wrench.
Go back to the front entrance of the center.
Click the gutter at the bottom of the steps.
Use the Wrench from your inventory on the four bolts at the corners of the grate.
Take the Coin on the small cement platform.
Click the newspaper stand to zoom in.
Place the Coin in the coin slot at the corner of the machine.
Take the Gear(1/3) that rolls to the bottom.
Click the gutter again for a closer look.
Use the Flashlight from your inventory on the ladder to descend into the sewers.
The Sewer
Click the large cluster of spiderwebs in the top right corner of the room to zoom in.
Use the Rubber Gloves from your inventory three times on the webs to reveal the Gear(2/3)
Go forward across the ladder to the end of the tunnel.
Click the Cane sticking through the bars on the right wall to zoom in, then click it again to add it to your inventory.
Click the blue screwdriver in the space behind the iron bars for a closer look.
Use the Cane from your inventory on the screwdriver to knock the back of the garbage truck down.
Click the pile of trash to start the hidden object scene.
Screenshot.
Once the hidden object scene is complete, you will receive a Screwdriver.
Go back to the side entrance of the consultation center.
Consultation Center
Click the lock on the back door to zoom in.
Use the Screwdriver from your inventory on the three screws in the corner of the lock.
Click the front panel of the lock to remove it, then click the can of paint can for a closer look.
Use the Rubber Glove to remove the paint covered gear from the can.
Click the lock again to zoom in.
Add the three Gears from your inventory to the lock mechanism.
Return to the front entrance of the center.
Click the stairs to start the hidden object scene.
Screenshot.
Once the hidden object scene is complete, you will receive a bottle of Solvent.
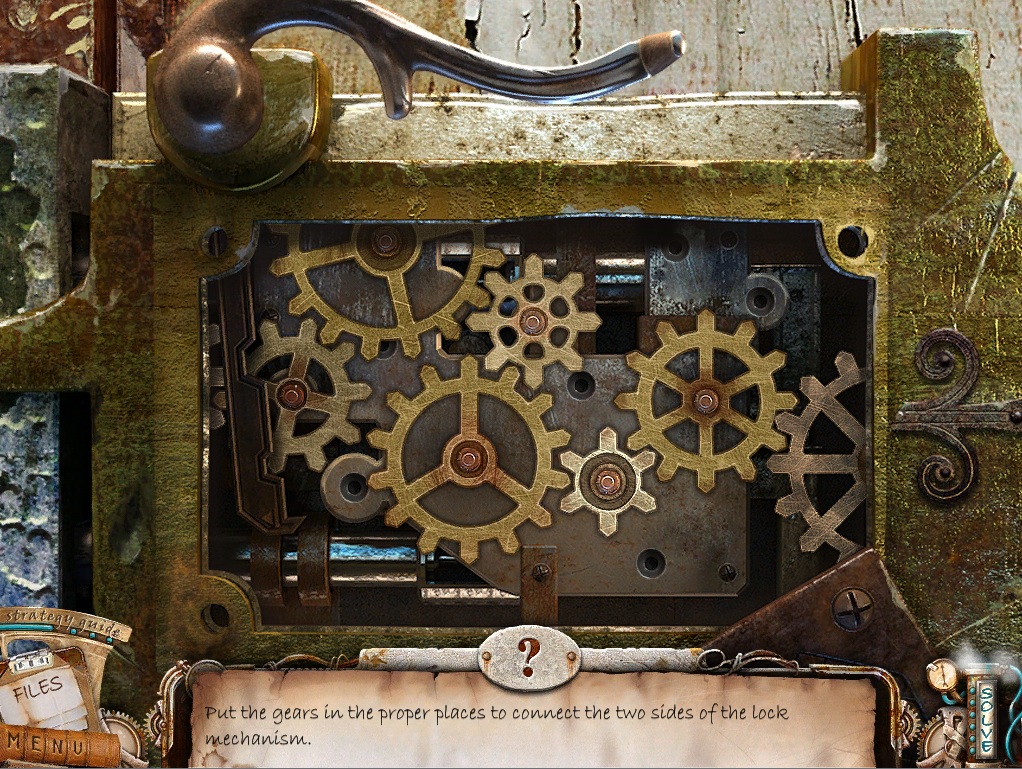
Go to the back entrance and click the lock mechanism.
Use the Solvent from your inventory on the dirty gears, then click the gears to start the puzzle.
To solve this puzzle, arrange all the gears to connect a path to both sides of the lock.
Click a gear to select it and hover it over the sockets.
If the gear glows while over a socket, it can be placed there.
Gears cannot overlap, and will revert to their original position if you try to misplace them.
Solution.
Once the puzzle is solved, click the handle to open the door.
Go through the door to return to the 3rd floor.
3rd Floor
Click the stretcher to start the hidden object scene.
Screenshot.
Once the hidden object scene is complete you will receive a Pruner.
Go right to the cell door.
Click the telephone on the wall left of the door to zoom in.
Use the Screwdriver from your inventory on the two Phone Bells, then click the bells again to pick them up.
Go back inside the elevator.
Click the sparking electric panel to zoom in.
Use the Screwdriver from your inventory on the screws to remove the metal door.
Use the Duct Tape to reattach the severed wires.
Click the button panel to zoom in.
Press the B button to return to the basement.
The Basement
Click the left door to go into the boiler room.
The Boiler Room
Click the hatch in the upper left corner of the room to start the hidden object scene.
Screenshot.
Once the hidden object scene is complete you will receive a Hand Saw.
Exit the boiler room and return to the basement.
The Basement
Click the door at the top of the stairs to zoom in.
Use the Hand Saw from your inventory on the padlock, then click the padlock to remove it.
Go through the open door to the lobby area.
The Lobby
Click the boxes to the left of the desk to start the hidden object scene.
Screenshot.
Once the hidden object scene is complete, you will receive a Phone Disk.
Click the window at the desk to zoom in.
Click the newspaper next to the telephone to move it aside, revealing the Elevator Button(2/3)
Go back downstairs to the basement then through the right door into the morgue.
The Morgue
Click the lit lab table to zoom in.
Take the Elevator Button(3/3) next to the far left jar.
Return to the elevator.
Click the button panel to zoom in.
Place the three Elevator Buttons from your inventory into the empty spaces on the button panel.
Push the 4 button to return to the 4th floor.
4th Floor
Go back inside your old prison cell.
The Cell
Click the cabinet under the window.
Use the Key from your inventory on the padlock.
Click the cabinet to start the hidden object scene.
Screenshot.
Once the hidden object scene is complete, you will receive the 2nd Floor Fuse.
Go all the way back to the security room on the basement floor.
Security Room
Click the control panel under the middle television screen to zoom in.
Put the 2nd Floor Fuse from your inventory into the #2 space.
Click the screen to start the puzzle.
Just as before, move the blue circles so that the lines attached to them do not intersect.
Click and hold a blue dot to select it, then drag it around the screen to move it and release the mouse to place it.
When a line is free of all intersections it will turn green. If the line is still tangled, it will stay red.
Solution.
Exit the security room and return to the boiler room.
The Boiler Room
Click the red hatch to repeat the hidden object scene.
Screenshot.
Once the hidden object scene is complete, you will receive a ladder.
Return to the elevator and press the 2 button to travel to the 2nd floor.
Chapter 3
2nd Floor
Click the top of the plank over the electrified pool of water to zoom in.
Use the Pruner from your inventory to cut the lower rope.
Click the lever on the right wall for a closer look, then click the lever again to pull it down.
Click the water to start the hidden object scene.
Screenshot.
Once the hidden object scene is complete, you will receive a Scalpel.
Return to the elevator and go to the third floor.
3rd Floor
Click the middle of the stretcher to zoom in.
Use the Scalpel from your inventory twice to cut the fabric of the stretcher, revealing the Sterilizer Key.
Go back to the 2nd floor.
2nd Floor
Click the tank in the pile of garbage in the bottom left corner.
Use the Sterilizer Key from your inventory on the missing handle of the sterilizer tank.
Click the handle to start the puzzle.
To solve this puzzle, align three circles of matching color between the metal bars in the center of the disk.
On the left and right sides of each pair of bars are small colored lights that will glow when the correct three colored circles are aligned between the parallel bars next to them.
Click and hold one of the three dials and drag the dial to rotate it clockwise or counterclockwise.
Moving the inner dial also moves the middle dial in the opposite direction.
Moving the middle dial also moves the outer dial in the opposite direction.
Moving the outer dial also moves the inner dial in the opposite direction.
Solution.
Once the puzzle is solved the top will open, revealing the Developer Fluid.
Return to the cell on the 4th floor.
The Cell
Turn right to face the bed.
Place the Ladder from your inventory at the vent in the upper right corner of the room.
Click the vent to start a hidden object scene.
Screenshot.
Once the hidden object scene is complete you will receive an Undeveloped Photograph.
Return to the morgue on the basement floor.
The Morgue
Click the photo lab table lit in the back of the room to zoom in.
Place the Undeveloped Photograph from your inventory into the tray on the table.
Add the Developer Fluid to the tray to start the puzzle.
To solve this puzzle, mix the three colors in the bottom jars by mixing the solutions that pour from the top jars.
Note the color wheel on the left side for a guide on how to mix colors.
Click the left or right arrows beside the bottom jars to move the row in that direction.
Click the red button to pour the top solutions into the jars below.
The equation at the bottom of the color wheel reads Y+M=O+M=R meaning:
Yellow mixed with Maroon makes Orange. Orange mixed with Maroon makes Red.
Click the red button.
Click the right arrow.
Click the red button twice.
Click the left arrow three times.
Click the red button.
Solution.
Once the puzzle is solved you will be automatically transported inside the consultation center.
Inside the Consultation Center - The Kitchen
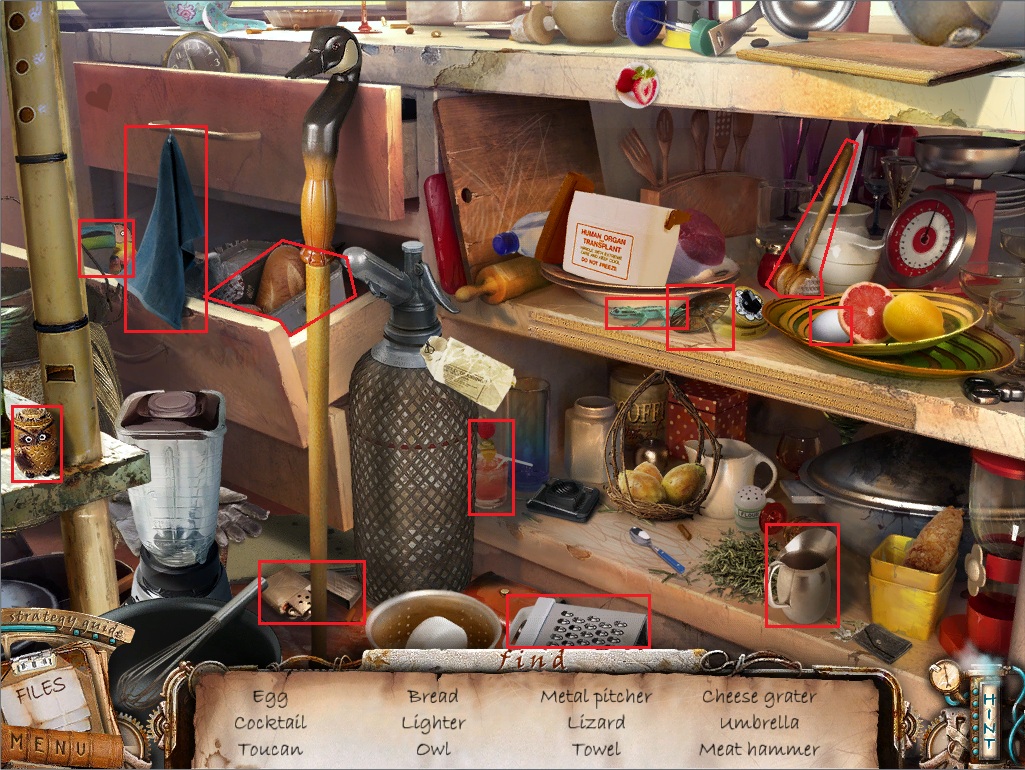
Click the shelves under the table to start the hidden object scene.
Screenshot.
Once the hidden object scene is complete, you will receive a Mallet.
Go left to the cafe.
The Cafe
Click the glass dessert case on the counter to zoom in.
Use the Mallet from your inventory three times to break the glass.
Click the shelves to start the hidden object scene.
Screenshot.
Once the hidden object scene is complete, you will receive Coffee Beans.
Go left one screen to the dance hall.
Dance Hall
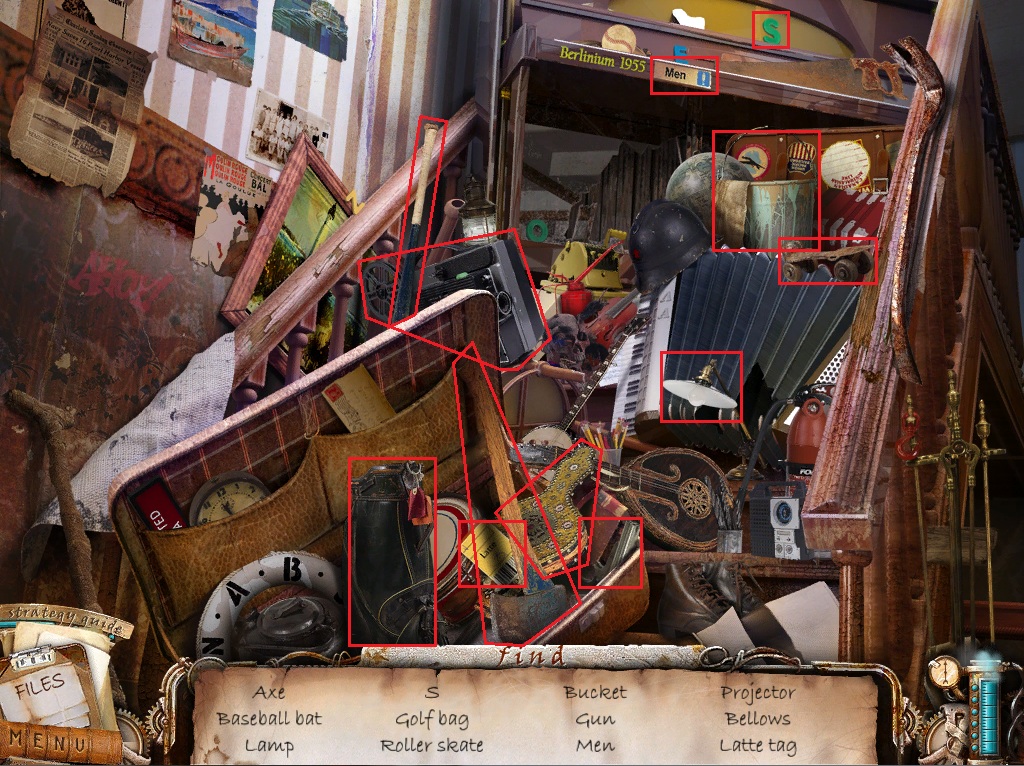
Click the stairs to start the hidden object scene.
Screenshot.
Once the hidden object scene is complete, you will receive a Lemon Pie Price tag.
Go right two screens to return to the kitchen.
The Kitchen
Click the shelves to repeat the hidden object scene.
Screenshot.
Once the hidden object scene is complete, you will receive a Water Bottle.
Go left to the cafe.
The Cafe
Click the coffee maker on the counter to zoom in.
Use the Coffee Beans and Water Bottle from your inventory on the white cup, then take the Latte price tag dispensed at the top of the machine.
Click the cash register to zoom in.
Use the Lemon Pie and Latte Price tags on the scanner of the machine and take the revealed Key from the cash drawer.
Go left to the dance hall.
Dance Hall
Click the stairs to repeat the hidden object scene.
Screenshot.
Once the hidden object scene is complete, you will receive a Crowbar.
Return to the kitchen.
The Kitchen
Click the refidgerator to zoom in.
Use the Key from your inventory on the padlock, then break the center block of ice with the Crowbar.
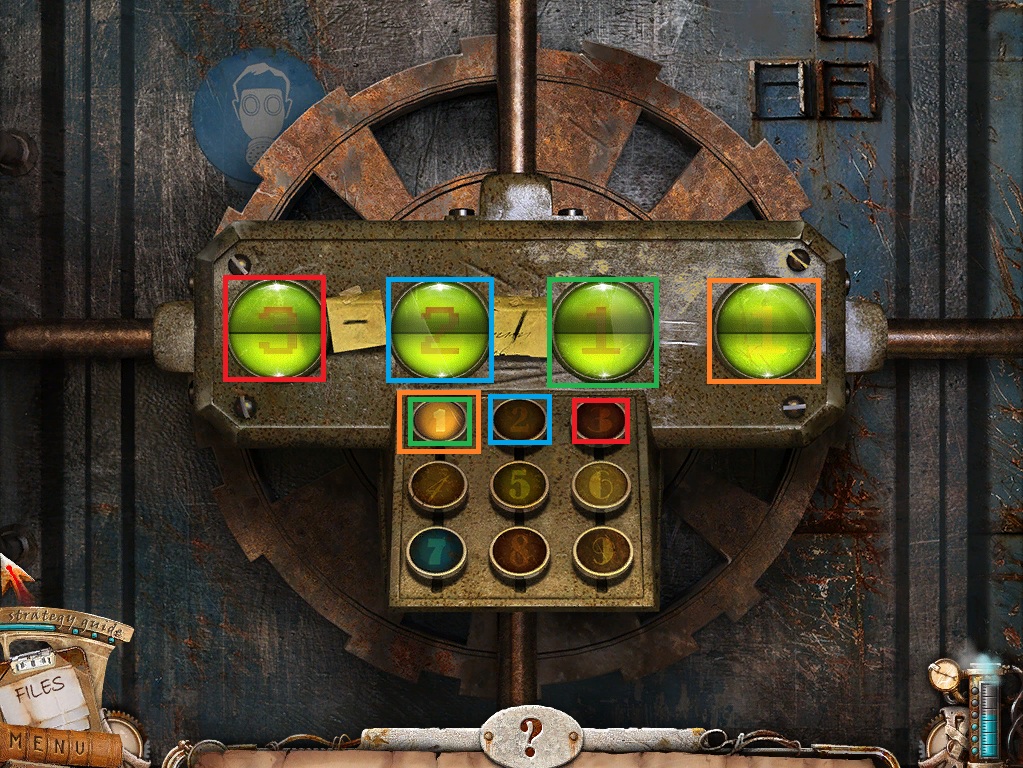
Click the keypad to start the puzzle.
To solve this puzzle, enter in the correct combination of numbers to solve the equation.
The equation provided is X - Y / Z = 1
Click the numbers on the keypad to enter them into the spaces at the top.
There are many potential solutions to this equation, the following screenshot is only an example.
Solution.
Go through the secret passage to return to the morgue.
The Morgue
Exit the morgue and go up the stairs to the lobby.
The Lobby
Click the window at the reception desk to zoom in.
Use the Scalpel from your inventory to cut the cord of the receiver and take the Handset.
Go into the elevator and push the button for the 2nd floor.
2nd Floor
Go across the board to the cell door.
Click the cage around the telephone to zoom in.
Use the Crowbar from your inventory on the padlock at the left side of the cage.
Click the cage again to open it.
Add the Disk to the center of the phone, the Bells to the bottom, and the Handset to the top of the phone.
Click the completed telephone to speak with the prisoner inside the cell.
Click the open compartment of the cell to zoom in.
Take the 1st floor fuse.
Return to the security room in the basement.
Security Room
Click the control panel under the large screen to zoom in.
Add the 1st Floor Fuse from your inventory to the space numbered 1.
Click the screen at the bottom to start the puzzle.
Just as before, move the blue circles so that the lines attached to them do not intersect.
Click and hold a blue dot to select it, then drag it around the screen to move it and release the mouse to place it.
When a line is free of all intersections it will turn green. If the line is still tangled, it will stay red.
Solution.
Go into the elevator and press the 1 button to travel to the first floor.
Chapter 4
1st Floor
Click the terminal between the bars to zoom in.
Take the Cloth hanging below the screen.
Go to the elevator and return to the 4th floor.
4th Floor
Click the wheelchair to repeat the hidden object scene.
Screenshot.
Once the hidden object scene is complete, you will receive an Eye.
Return to the 1st floor.
1st Floor
Click the terminal again for a closer look.
Use the Eye from your inventory on the security scanner.
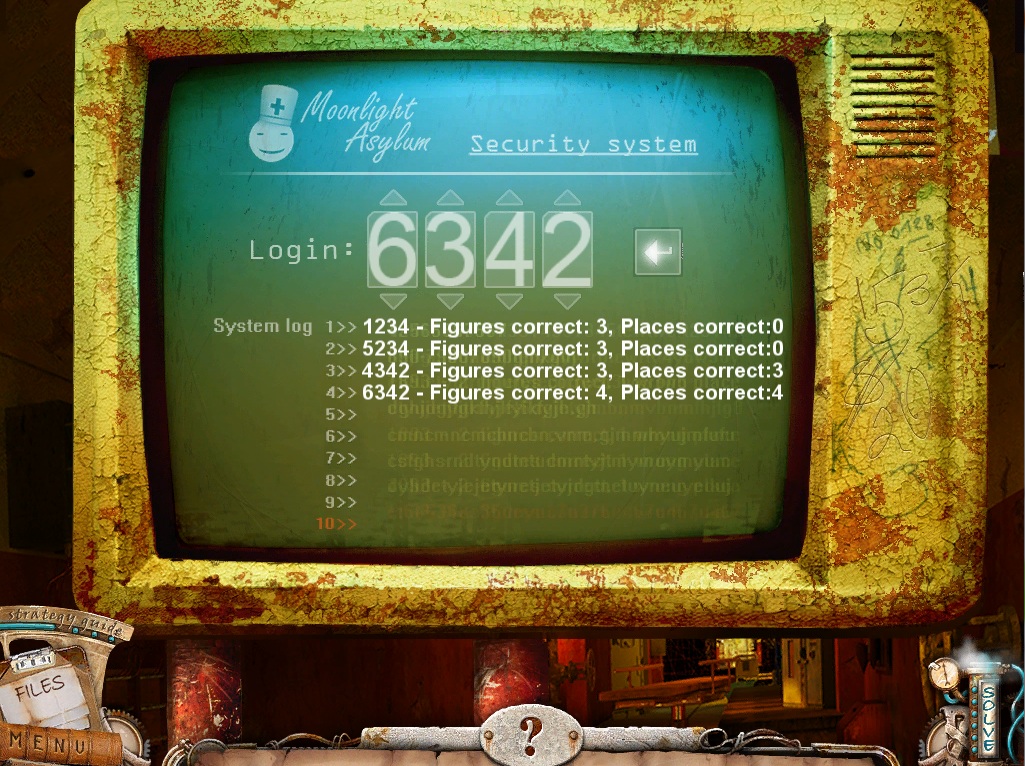
Click the buttons below the scanner to start the puzzle.
To solve this puzzle, determine the correct combination using the system log clues.
Press the up and down arrows in the space above each digit to scroll through the numbers 0-9.
After you've prepared your guess for each of the four digits, press the arrow to the right to submit your solution.
The system log at the bottom indicates how many digits you have correct and how many of those digits are also in the correct position.
Adjust your solution accordingly until you have deduced the correct combination.
If after 10 attempts you still have not correctly decided, the system will reset and a new password will be randomized.
Solution.
Go through the open gate down the hallway.
Click the antechamber to the left to start the hidden object scene.
Screenshot.
Once the hidden object scene is complete, you will receive a Statue Head.
Continue down the hallway to the laser grid.
Click the file attached to the headboard of the bedframe to zoom in.
Take the three Pins(3/6) and the Photo Part(1/2) attached to the board.
Read the note hanging beside the left door.
Go back to the X-ray room on the 3rd floor.
X-ray Room
Click the opened cabinet drawers to start the hidden object scene.
Screenshot.
Once the hdiden object scene is complete, you will receive a Head Lamp Mirror(1/3)
Return to the elevator and travel to the 2nd floor.
2nd Floor
Click the stretcher above the pool of water to start the hidden object scene.
Screenshot.
Once the hidden object scene is complete, you will receive a Head Lamp Mirror(2/3)
Go to the basement floor, then up the stairs to the lobby.
The Lobby
Click the luggage to start the hidden object scene.
Screenshot.
Once the hidden object scene is complete, you will receive a Head Lamp Mirror(3/3)
Return to the laser grid on the 1st floor.
1st Floor
Click the metal box to the left of the laser grid to zoom in.
Add the three Head Lamp Mirrors from your inventory to the box to start the puzzle.
To solve this puzzle, move the balls to the tile with the matching symbols.
Click a ball to select it, then click the up, down, left, or right arrow to move it in that direction.
A ball will continue to move until blocked by an obstruction such as a wall or another ball.
When a ball passes over a tile with a matching symbol, it will disappear.
Screenshot.
Move Ball #2 to H,7.
Move Ball #2 to A,7
Move Ball #2 to A,10
Move Ball #2 to J,10
Move Ball #1 to H,7
Move Ball #1 to A,7
Move Ball #1 to A,10
Move ball #1 to H,10
Move Ball #3 to A,3
Move Ball #3 to A,10
Move Ball #3 to B,10
Screenshot.
Move Ball #1 to J,7
Move Ball #1 to E,7
Move Ball #2 to H,7
Move Ball #1 to G,7
Move Ball #2 to H,10
Move Ball #2 to G,10
Move Ball #2 to G,8
Move Ball #3 to E,10
Move Ball #3 to E,5
Move Ball #3 to G,5
Move Ball #1 to G,6
Move Ball #2 to G,7
Move Ball #2 to E,7
Move Ball #2 to E,5
Move Ball #2 to F,5
Move Ball #2 to F,1
Move Ball #2 to J,1
Move Ball #3 to E,5
Move Ball #1 to G,5
Move Ball #3 to F,5
Move Ball #3 to F,1
Move Ball #3 to I,1
Move Ball #3 to I,5
Move Ball #3 to J,5
Move Ball #3 to J,3
Move Ball #2 to D,1
Move Ball #2 to D,4
MOve Ball #2 to A,4
Move Ball #2 to A,8
Move Ball #1 to G,10
Screenshot.
Move Ball #2 to G,7
Move Ball #2 to D,7
Move Ball #1 to A,10
Move Ball #1 to D,10
Move Ball #1 to D,8
Move Ball #1 to E,8
Move Ball #3 to J,7
Move Ball #3 to E,7
Move Ball #3 to E,6
Move Ball #2 to D,5
Move Ball #2 to A,5
Move Ball #2 to A,9
Move Ball #1 to D,5
Move Ball #1 to F,5
Move Ball #1 to F,3
Move Ball #1 to G,3
Move Ball #1 to G,1
Move Ball #1 to A,1
Once the puzzle is solved, the laser grid will be dropped.
Go down the hall to the cell door.
Click the patient file to the right of the door to zoom in.
Take the 3 Pins(6/6) stuck to the patient's photograph, then take the photograph.
Go back to the cell door at the 2nd floor.
2nd Floor
Click the compartment at the bottom of the cell to zoom in.
Place the Cloth, the six Pins, and the Patient X Photo into the compartment.
Click the compartment again for a closer look, then take the Voodoo Doll.
Click the broken bust on the shelf to the right of the gated door.
Add the Statue Head from your inventory to the bust.
Go through the open door up the stairs to view the room with the chair.
Go back downstairs and click the stretcher to repeat the hidden object scene.
Screenshot.
Once the hidden object scene is complete, you will receive a Photo Part(2/2)
Return upstairs to the room with the chair.
Click the screen above the chair to zoom in.
Add the two Photo Parts from your inventory to the screen to start the puzzle.
To solve this puzzle, assemble all of the pieces in the correct position to complete the image.
Click a picture piece to select it, then click a place on the board to set it down.
If correctly positioned, the piece will lock in place and lose its blue hue.
Solution.
Once the puzzle is solved, you will be automatically transported to the hospital.
The Hospital
Click the left closet to start the hidden object scene.
Screenshot.
Once the hidden object scene is complete, you will receive a Chemical Flask.
Click the bottom shelf under the counter for a closer look.
Push the green, red, and yellow bottles aside to reveal a green Chemical Flask.
Click the test tube device on the counter to zoom in.
Put the green Chemical Flask in the left tube, and the purple Chemical flask in the right test tube.
Click the eye piece to start the puzzle.
To solve this puzzle, repeat the pattern seen in the right circle by following the tracing the lines in the left circle.
The left circle consists of one yellow dot, where you start, and several white points.
Points where you have an available move in that direction will glow brightly; click one of those points to draw a line between the two dots.
You can only draw a line on the left side of it also exists on the right.
Each path can only be taken once.
After every 8 moves (tracked by the counter at the bottom) the left side will rotate. Continue to trace the identical pattern.
Solution.
Once the puzzle is solved, you will receive a vial of Acid.
Click the sink on the left side of the counter to zoom in, then take the Thick Gloves inside.
Go right down the hallway to the locked door.
Click the box on the left to start the hidden object scene.
Screenshot.
Once the hidden object scene is complete, you will receive Liquid Nitrogen.
Click the padlock in the center of the gate to zoom in.
Use the Acid from your inventory on the rusted padlock.
Click the small cabinet covered in posters to the right of the gate for a closer look.
Use the Liquid Nitrogen on the cabinet door then use the Thick Gloves three times to break through the ice to reveal the Mechanical Key.
Click the mechanism on the right side of the gate to zoom in.
Use the Mechanical Key on the traingular space, then click the key to turn it.
Go through the open gates into the underground station.
Underground Station
Click under the right stairway to start the hidden object scene.
Screenshot.
Once the hidden object scene is complete you will receive Sticky Tape.
Go through the door up the stairs into the duty operator's office.
Duty Operator's Office
Click the first-aid box on the wall to zoom in.
Take the Hammer next to the box and use it to smash the emergency glass at the bottom.
Take the Emergency Flare to add it to your inventory.
Click the screen on the operator's control panel for a closer look.
Use the Sticky Tape from your inventory on the handprint smudged on the screen, then click the tape to receive a Fingerprint.
Go back one screen to the underground station.
Underground Station
Click the trash bin left of the ladder to zoom in.
Place the Emergency Flare from your inventory on the top of the bin.
Click the lid of the trashcan to open it, then click the mechanism inside to start the puzzle.
To solve this puzzle, connect all of the fuses on the grid.
Click a fuse to rotate it 90 degrees.
At the end of each fuse is a certain number of prongs ending in a circle.
All of the circled prongs must be touching the ends of an adjacent fuse's prongs.
Solution.
Once the puzzle is solved, the train car will roll into the station.
Click the side of the train door to go inside.
Train Car
Use the Fingerprint from your inventory on the touchpad next to the door handle.
Go through the open door into the train car.
Click the skeleton shackled to the wall to start the hidden object scene.
Screenshot.
Once the hidden object scene is complete, you will receive a Cabinet Key.
Exit the train car and return to the duty operator's office.
Duty Operator's Office
Click the first-aid kit on the wall to zoom in.
Use the Cabinet Key from your inventory to unlock the padlock on the right side of the kit.
Click the cabinet door to open it, revealing a Control Panel Part.
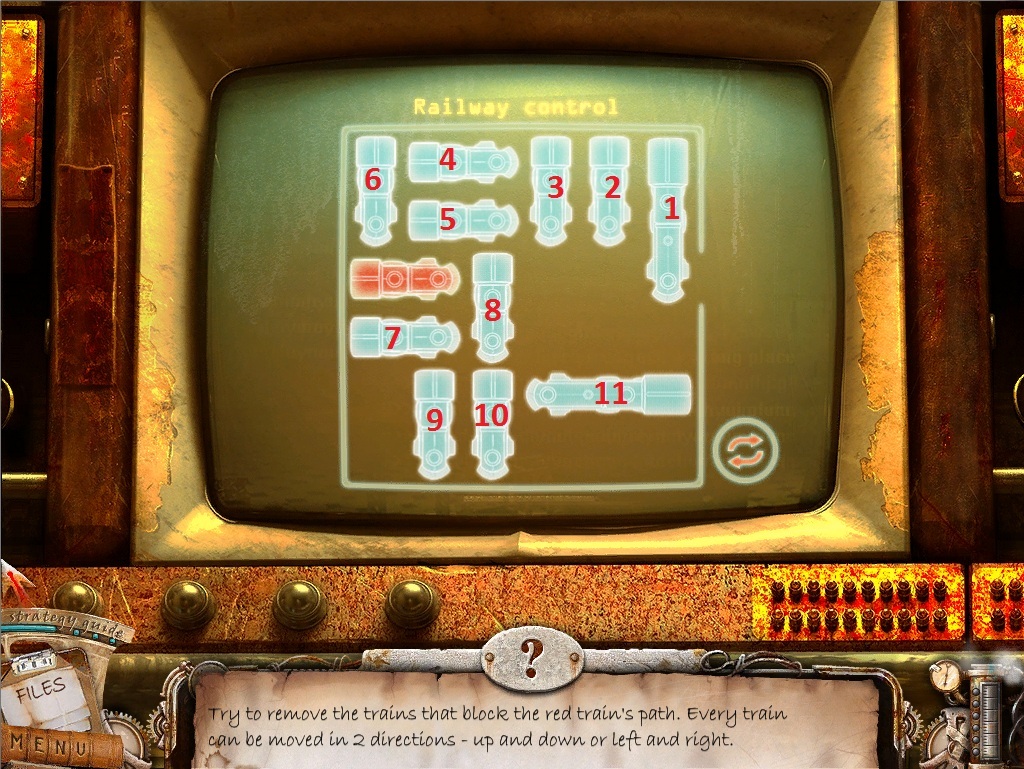
Click the control panel to zoom in.
Use the Control Panel Part on the missing space inside the panel to start the puzzle.
To solve this puzzle, get the red train car out of the hole in the square by moving the blue train cars out of the way.
Mousing over a train car will show a track that outlines the direction of its available path.
Click and drag a train car to move it in that direction.
Train cars cannot move through obstacles such as walls or other train cars.
Screenshot.
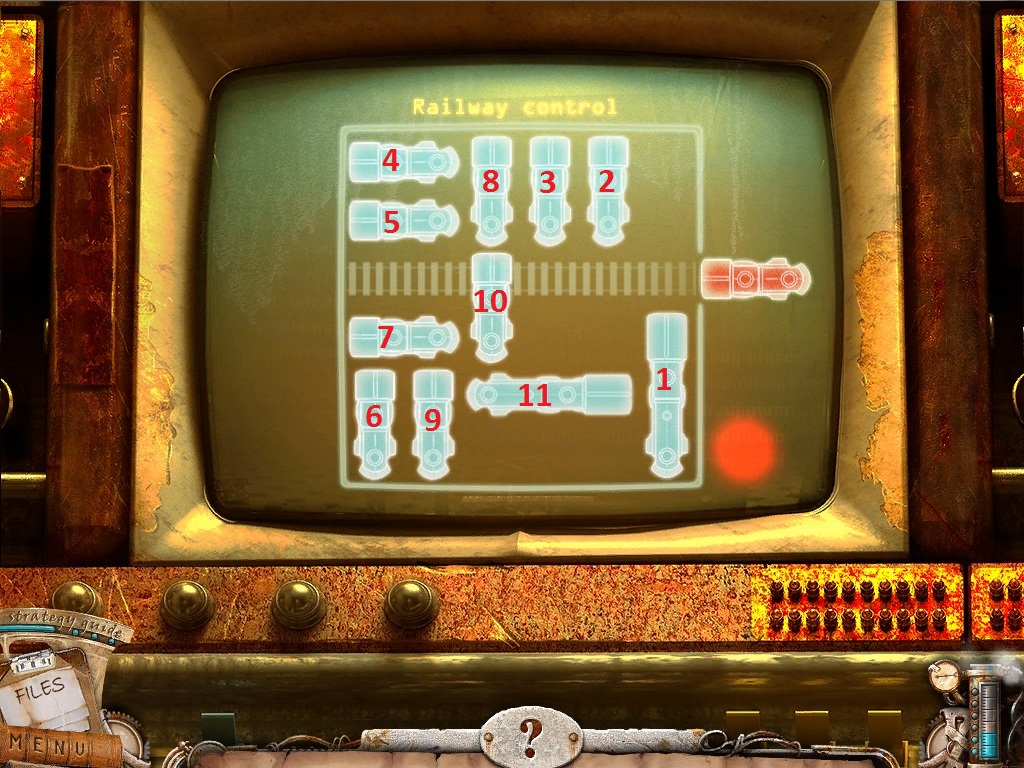
Move Train 1 down.
Move Train 2 down.
Move Train 3 down.
Move Train 4 right.
Move Trani 5 right.
Move Train 8 up.
Move the red car right.
Move Train 7 right.
Move Train 6 down.
Move the red car left.
Move Train 7 left.
Move Train 8 down.
Move Train 4 left.
Move Train 5 left.
Move Train 1 up.
Move Train 2 up.
Move Train 3 up.
Move Train 8 up.
Move the red car right.
Move Train 10 up.
Move Train 11 left.
Move Train 1 down.
Move the red car right.
Solution.
Exit the office and go back into the train car.
Train Car
Click the skeleton to repeat the hidden object scene.
Screenshot.
Once the hidden object scene is complete, you will receive a Throttle Grip.
Click the right side of the control panel to zoom in.
Place the Throttle Grip from your inventory in the space next to the lever handle.
Click the throttle to return to the 2nd floor.
2nd Floor
Go to the elevator and return to the basement floor, then go through the left door into the boiler room.
Boiler Room
Click the green valve on the front pipe to zoom in.
Use the Thick Gloves from your inventory to turn the valve.
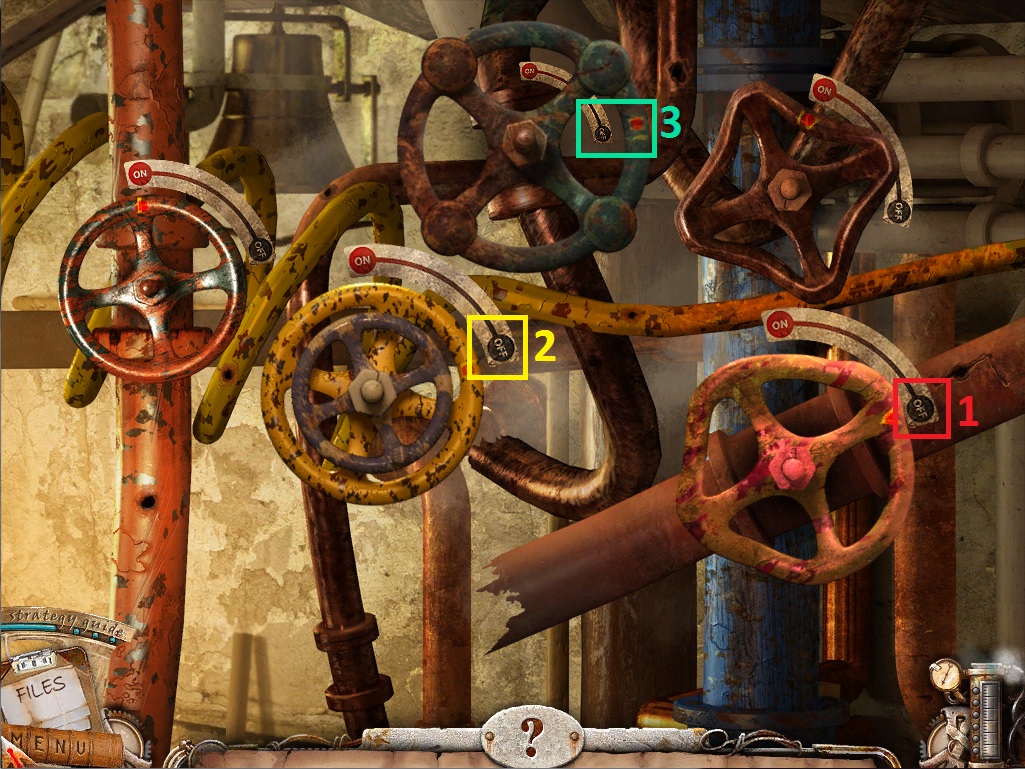
Click the steaming pipes to start the puzzle.
To solve this puzzle, shut off the steam by turning the valves to the correct positions.
Click a valve to rotate it between the "on" or "off" position.
Solution.
Click the boiler under the pipes to zoom in.
Put the Voodoo Doll from your inventory into the fire of the boiler.
Go to the elevator and return to the 1st floor.
1st Floor
Go to the cell door at the end of the hallway.
Click the valve on the left side of the cell door to zoom in.
Click the valve again to open the door.
Go through the open door into Patient X's cell.
Patient X's Cell
Click the device on the tray to the right of the patient to zoom in.
Take the Tweezers off the top of the device.
Return to the boiler room in the basement.
Boiler Room
Click the boiler to zoom in.
Use the Tweezers from your inventory to pull the Drugstore Key from the fire.
Go to the elevator and return to the 4th floor.
4th Floor
Click the drug storehouse door to zoom in.
Use the Drugstore Key from your inventory on the keyhole, then click the key to turn it in the lock.
Go through the open door into the drug storehouse.
Drug Storehouse
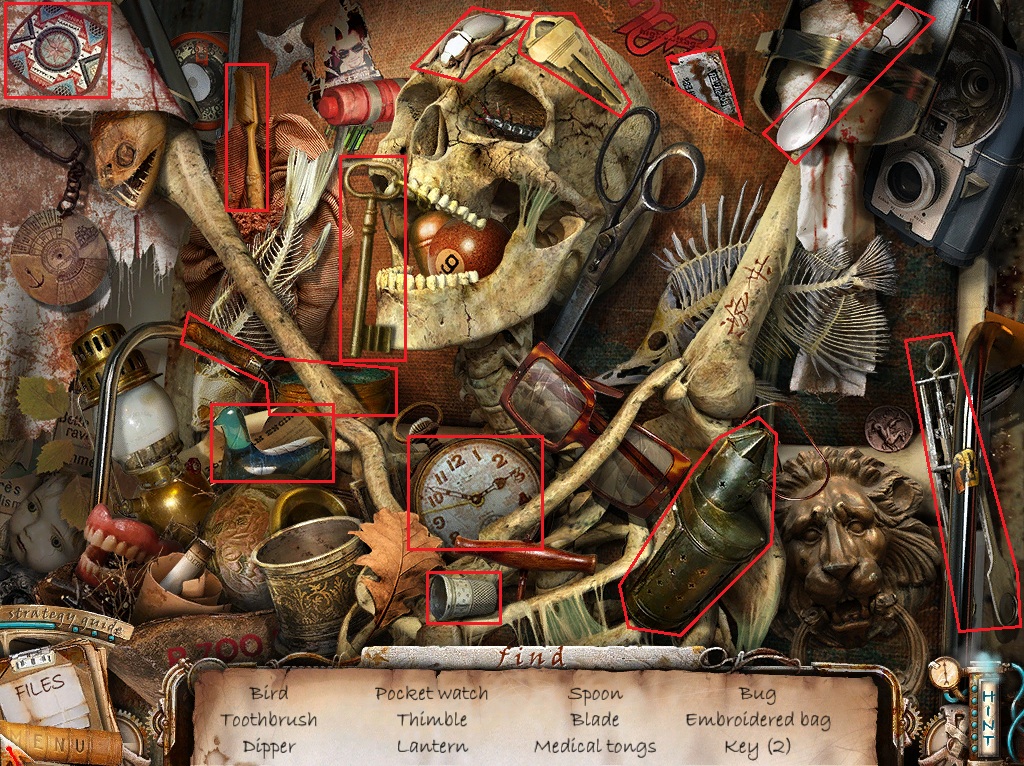
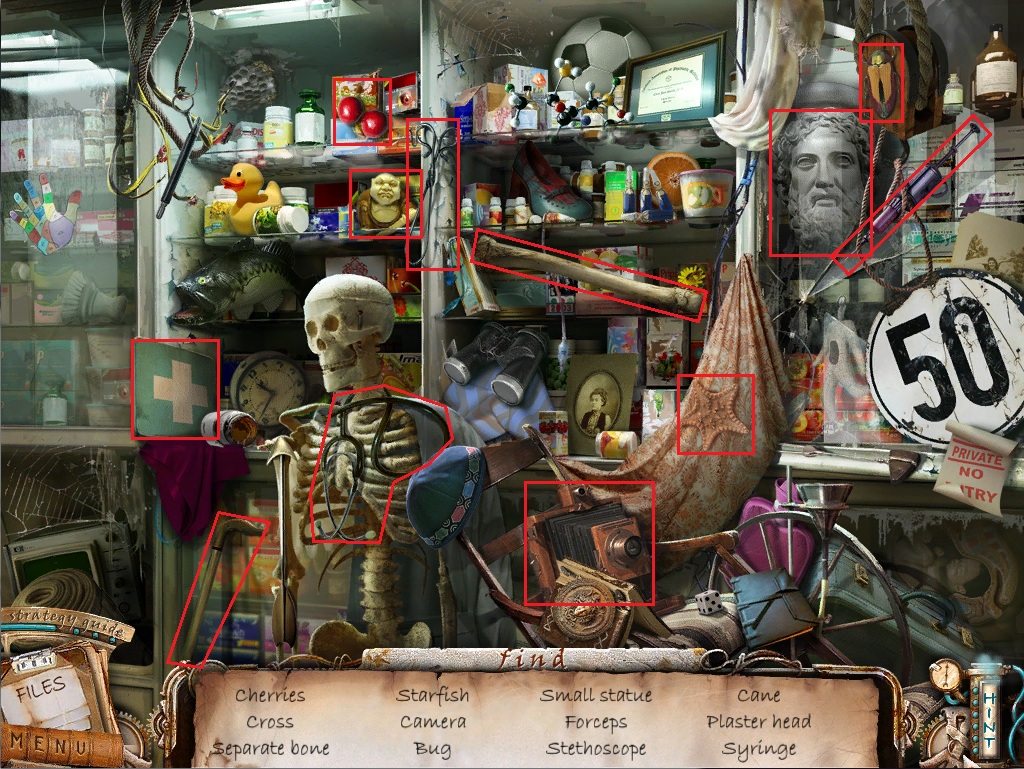
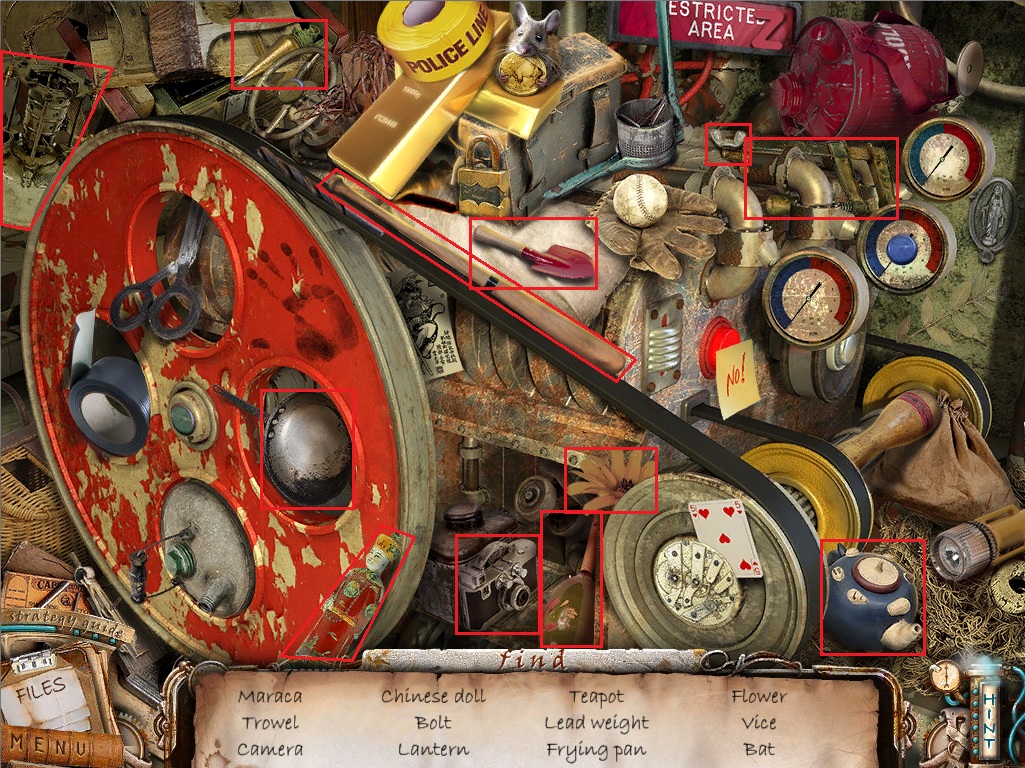
Click the shelves of supplies to start the hidden object scene.
Screenshot.
Once the hidden object scene is complete, you will receive the Cure for Icarus.
Click the cabinet drawers to zoom in.
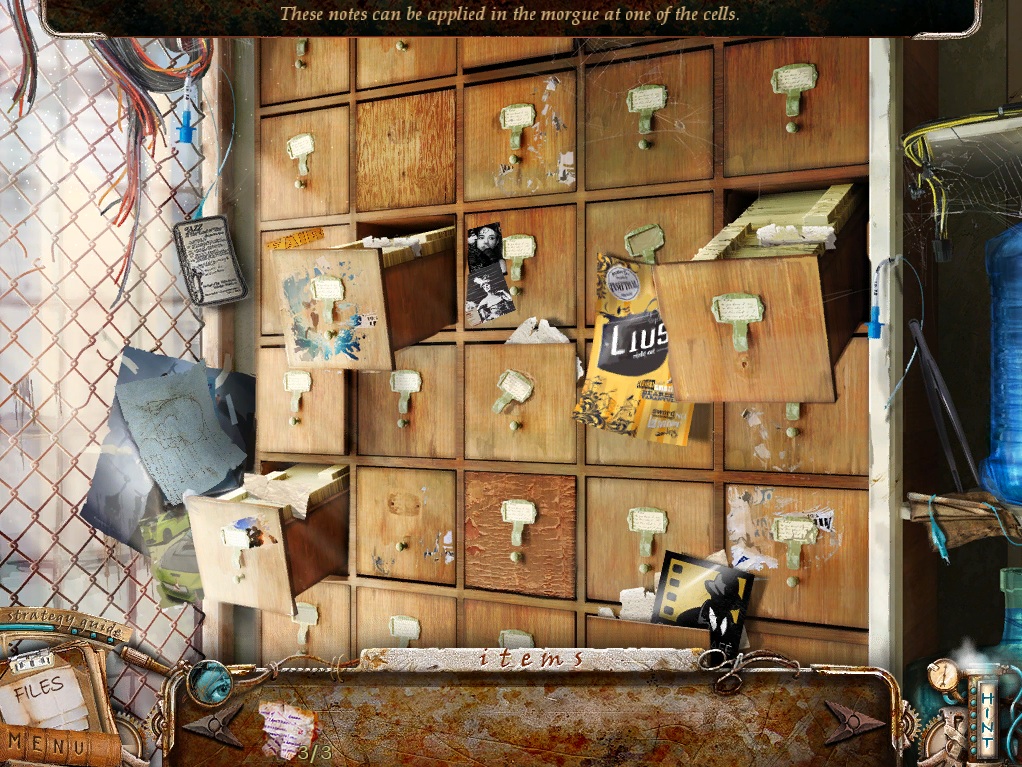
Open the three drawers for a closer look and take the Bloody Notes(3/3)
Screenshot.
Go the elevator and return to the 3rd floor.
3rd Floor
Go right to the cell door.
Use the Cure for Icarus on the cell window.
Step inside Icarus' cell to start the hidden object scene.
Screenshot.
Once the hidden object scene is complete, you will receive the Morgue Fuse.
Go back to the security room in the basement.
Security Room
Click the terminal on the desk to zoom in.
Use the Morgue Fuse from your inventory on the empty morgue space on the panel.
Click the screen to start the puzzle.
Just as before, move the blue circles so that the lines attached to them do not intersect.
Click and hold a blue dot to select it, then drag it around the screen to move it and release the mouse to place it.
When a line is free of all intersections it will turn green. If the line is still tangled, it will stay red.
Solution.
Exit the security room and go into the morgue.
The Morgue
Click the locked refidgerated body chamber to zoom in.
Use the Bloody Notes from your inventory on the dial lock.
Enter the code from the notes to the combination on the lock and take the revealed Frozen Hand.
Leave the morgue and go up the stairs into the lobby.
The Lobby
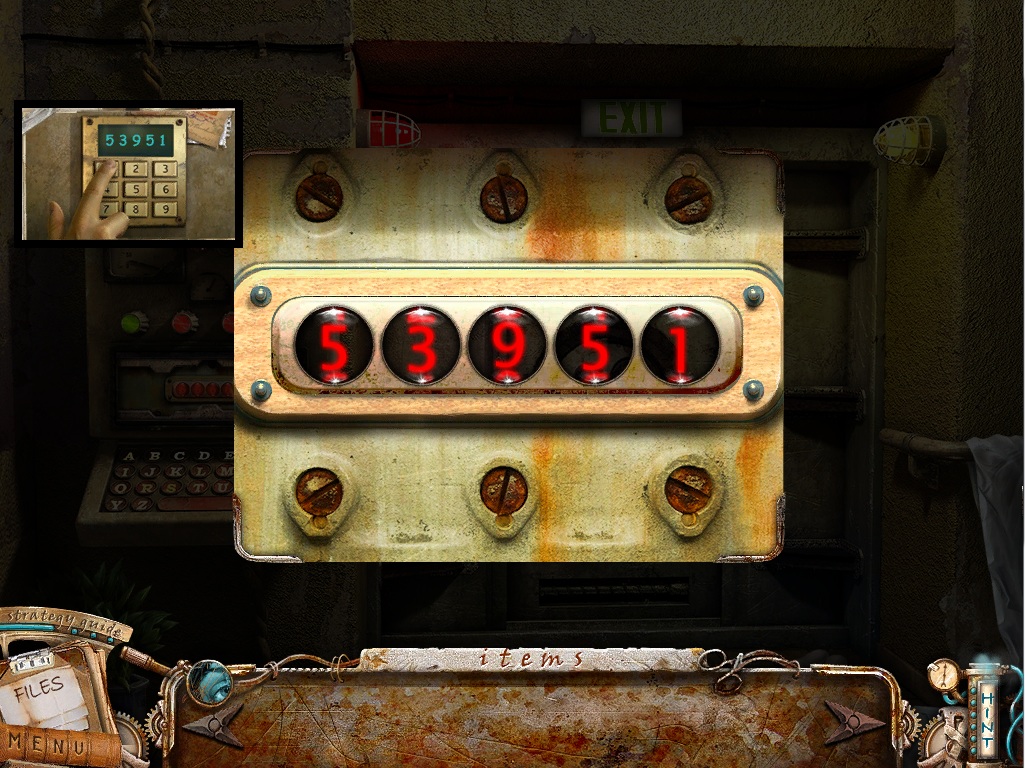
Click the exit door to zoom in.
Click the code case device for a closer look.
Use the Frozen Hand from your inventory on the red touch pad.
Click the red lights to view the code case.
Enter in the combination found at the underground station: 5-3-9-5-1
Screenshot.
Click the door to attempt to open it.
Leave the lobby and return to the basement.
The Basement
Click the area under the stairs to repeat the hidden object scene.
Screenshot.
once the hidden object scene is complete, you will receive a Bat.
Go into the security room.
Security Room
Click the control panel to zoom in.
Use the Bat from your inventory to smash all of the fuses.
Leave the security room and return to the lobby.
The Lobby
Go through the open exit door.
Posted by: Trinn |
July 24, 2011 1:52 AM
|
July 24, 2011 1:52 AM
F.A.C.E.S. Walkthrough Bonus Chapter
Bonus Chapter - The Family House
Front Lawn
Click the bottom of the tree in front of the window to zoom in.
Click the roots to move them aside, revealing the Glass Eye.
Click the stairs in front of the house for a closer look.
Click the cracked step three times to receive a Heavy Stone.
Click the gargoyle perched above the stairs.
Read the note on the gargoyle's wing.
Use the Heavy Stone from your inventory to break off the gargoyle's Stone Tooth
Click the statue head on the front door for a closer look.
Use the Glass Eye from your inventory on the empty space in the statue's head.
Place the Stone Tooth in the empty space in the statue's mouth.
Go through the open door into the foyer.
The Foyer
Click the broken floor boards beside the tablecloth to zoom in.
Take the Pillow underneath the plank of wood.
Go left to the hallway.
The Hallway
Click the twisted plant in front of the windows to zoom in.
Place the Pillow from your inventory under the fruit,click the fruit to drop it, then click it again to pick it up.
Click the telephone on the wall to start the hidden object scene.
Screenshot.
Once the hidden object scene is complete, you will receive a Piano Key(1/3)
Click the tricycle to zoom in.
Take the Thick Gloves on the ground under the seat.
Click the bricked up doorway for a closer look.
Click the brick with heiroglyphs to move it aside.
Place the Explosive fruit from your inventory into the space between the bricks.
Go through the opened doorway into the guest room.
Guest Room
Click the portrait on the wall to zoom in.
Take the Dip Net leaning on the wall next to the portrait.
use the Thick Gloves from your inventory to remove the Sharp Glass in the lower left corner of the frame.
Go right towards the shuttered closet.
Click the round panel at the bottom of the shutters to zoom in.
Take the Oil Can in the corner of the board.
Exit the guest room and return to the foyer.
The Foyer
Click the flower blocking the right pathway to zoom in.
Use the Oil Can from your inventory on the flower bud and take the revealed Crowbar.
Go back to the front lawn.
Front Lawn
Click the mailbox to the right of the steps to zoom in.
Use the Crowbar from your inventory to pry the mailbox door open.
Click the rolled up newspaper to open it and take the Fish Food inside.
Click the water under the bridge to zoom in.
Use the Fish Food on the fish swimming in the water.
Use the Dip Net to pull the Room Key out of the moat.
Return to the foyer.
The Foyer
Click the gated door on the right to zoom in.
Use the Room Key from your inventory on the lock with the fish key ring.
Go through the open door into Emy's room.
Emy's Room
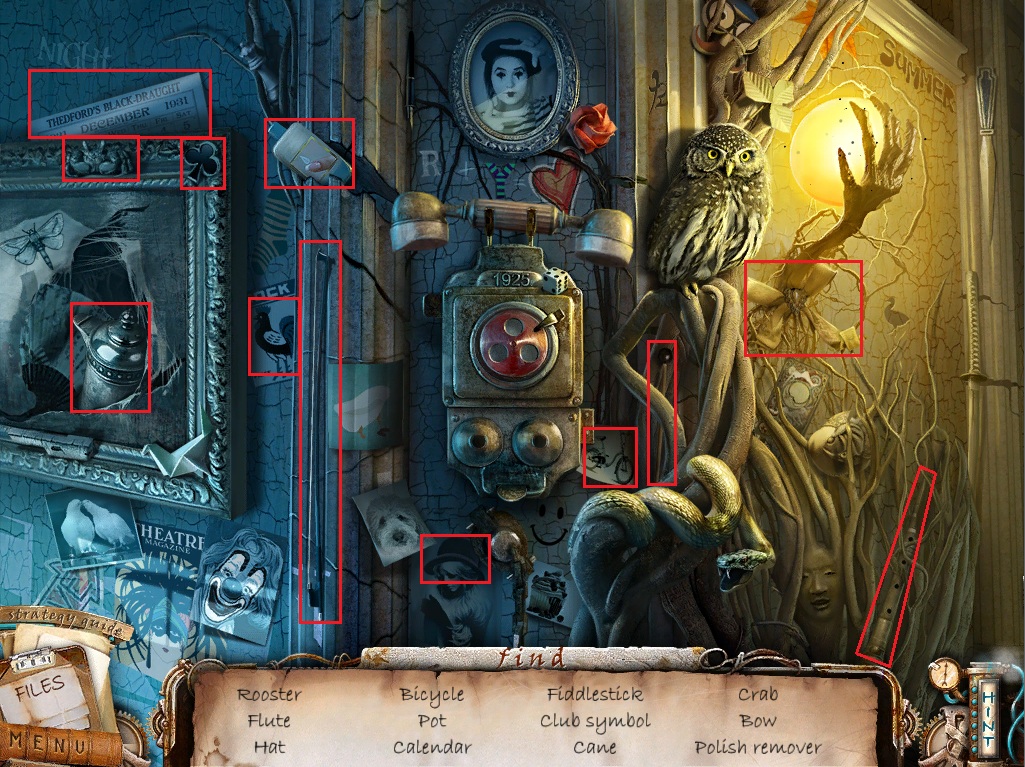
Click the chemistry set in front of the window to start the hidden object scene.
Screenshot.
Once the hidden object scene is complete, you will receive a Fireplace poker
Click the large photo album to zoom in.
Click the drawing to move it aside and take the revealed Piece of Puzzle.
Return to the guest room.
Guest Room
Go right to face the closet.
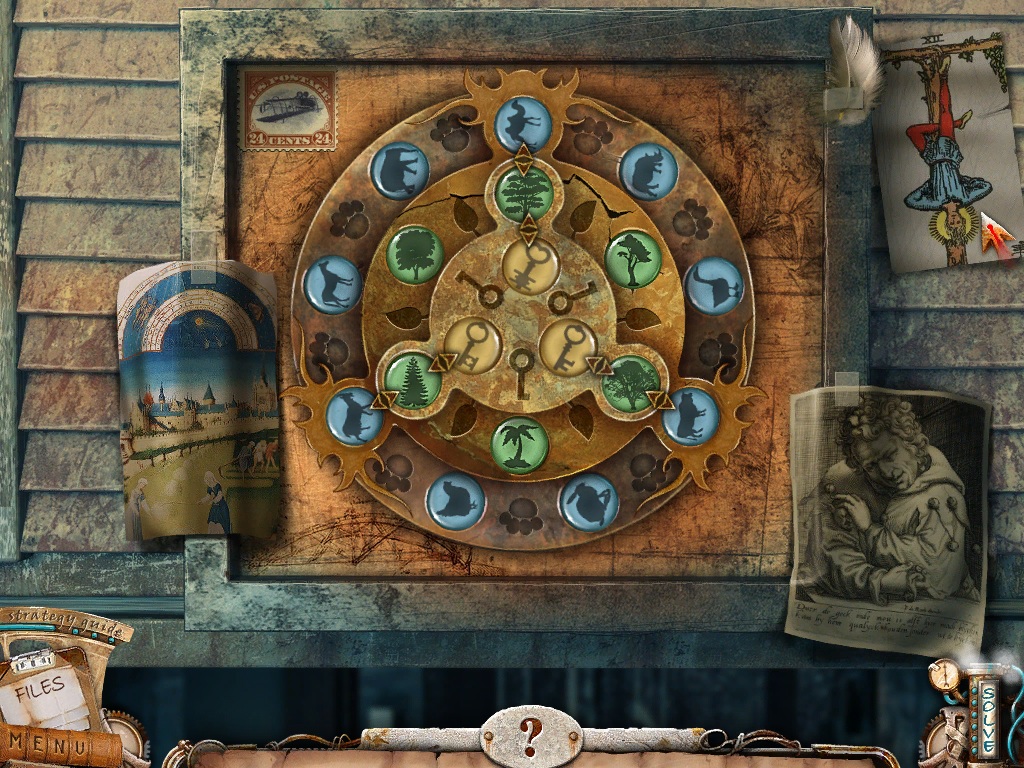
Click the round panel at the buttom of the large shutter to zoom in.
Add the Piece of Puzzle from your inventory to the space in the center to start the puzzle.
To solve this puzzle, arrange the buttons so that they are all in a ring of matching categories.
The key buttons go in the center ring, plants go into the middle ring, and animals go into the outside ring.
Click and hold a dial to select it then drag it to move it clockwise or counterclockwise.
Click the arrows between the dials to swap buttons from ring to ring.
Solution.
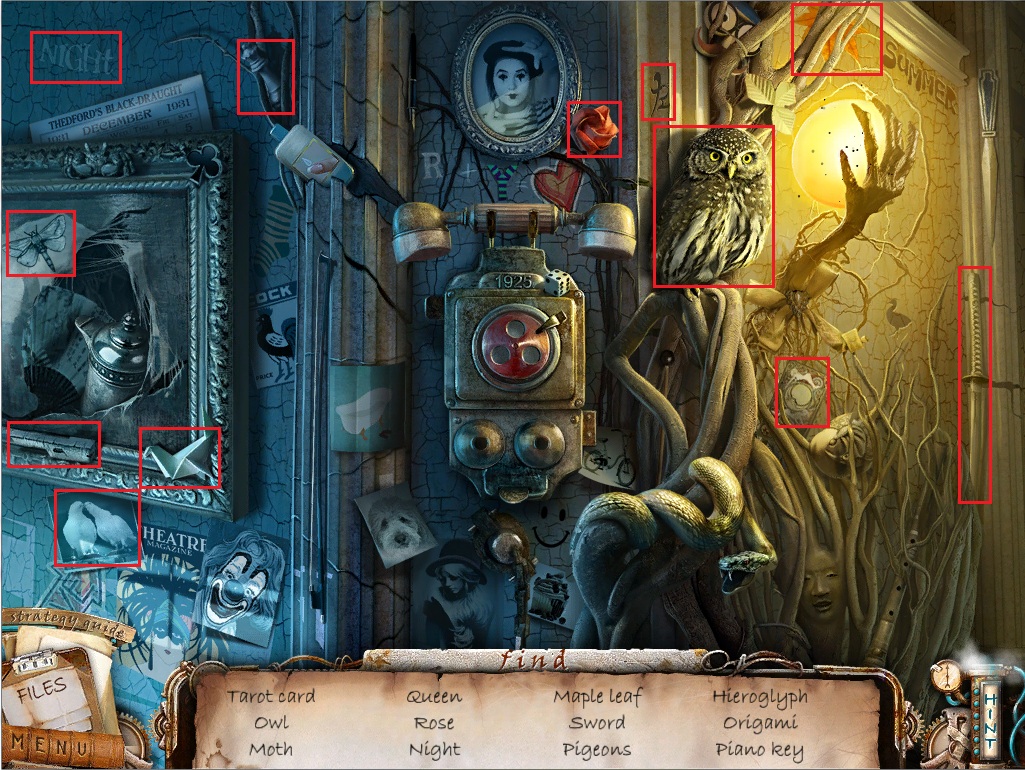
Click the french horn to start the hidden object scene.
Screenshot.
Once the hidden object scene is complete, you will receive a Room Photo.
Click the closet to zoom in.
Click the crystal device on the shelf for a closer look.
Take the Duct Tape beside the device.
Go back to face the rest of the guest room.
Click the watering can on the ground behind the sofa to zoom in.
Use the Duct Tape to patch the holes in the watering can, then click the Empty Watering Can to add it to your inventory.
Go back to the front lawn.
Front Lawn
Click the water under the bridge to zoom in.
Fill the Watering Can from your inventory with the water from the moat.
Return to the guest room.
Guest Room
Click the fireplace to zoom in.
Use the Watering Can from your inventory to douse the fire.
Use the Fireplace Poker on the charred logs to reveal the gold Bug.
Go back to Emy's Room.
Emy's Room
Click the caged toad above the wooden door to zoom in.
Feed the toad the Bug from your inventory.
Go through the open door into the bedroom.
The Bedroom
Click the skeleton for a closer look.
Take the Book in front of the skeleton's ribcage.
Click the creature on the bed to zoom in.
Use the Sharp Glass from your inventory to kill the creature.
Take the blue feather Duster and the Key.
Click the piano to zoom in.
Take the Metronome on top of the piano.
Use the Key to unlock the keyboard.
Go back to the front lawn.
Front lawn
Click the mailbox to the right of the stairs to zoom in.
Use the Duster from your inventory to remove the cobwebs from the mailbox.
Take the revealed Piano Key(2/3)
Return to Emy's room.
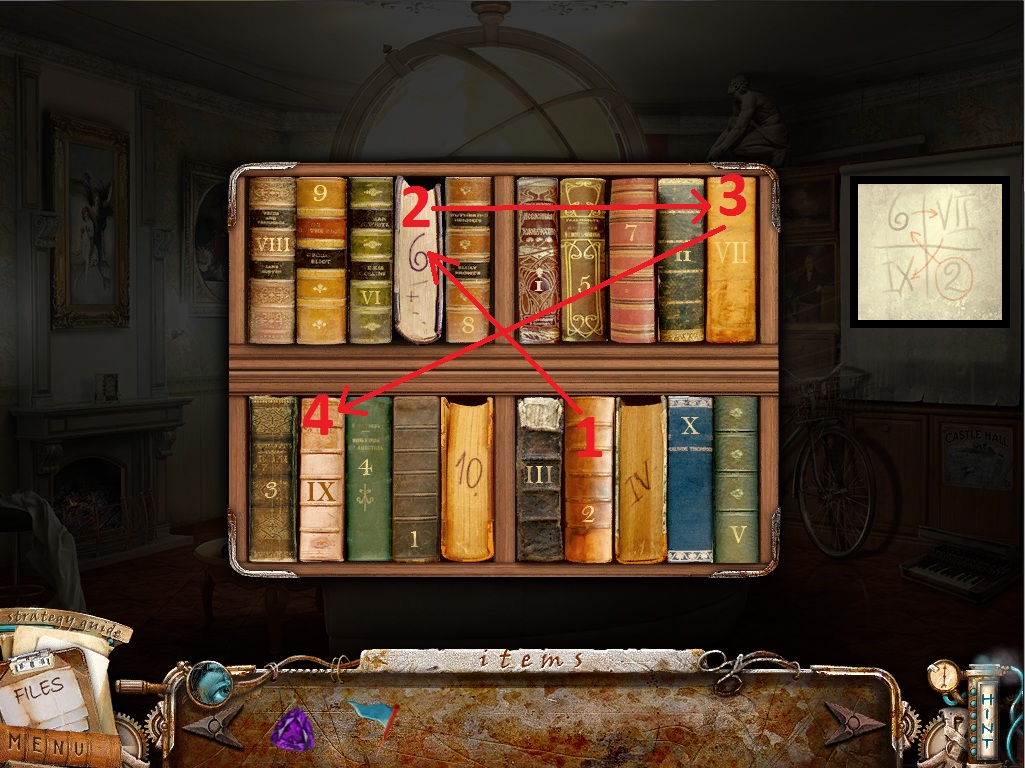
Emy's Room
Add the Book from your inventory to the bookshelf on the left wall.
Click the shelf to start the puzzle.
To solve this puzzle, align all of the books so the images on their spines complete the larger picture.
Click a book to select it, then click a different book to swap positions.
Solution.
Once the puzzle is solved the shelf will open, reveailng the Musical Notes.
Return to the guest room.
Guest Room
Go right towards the closet.
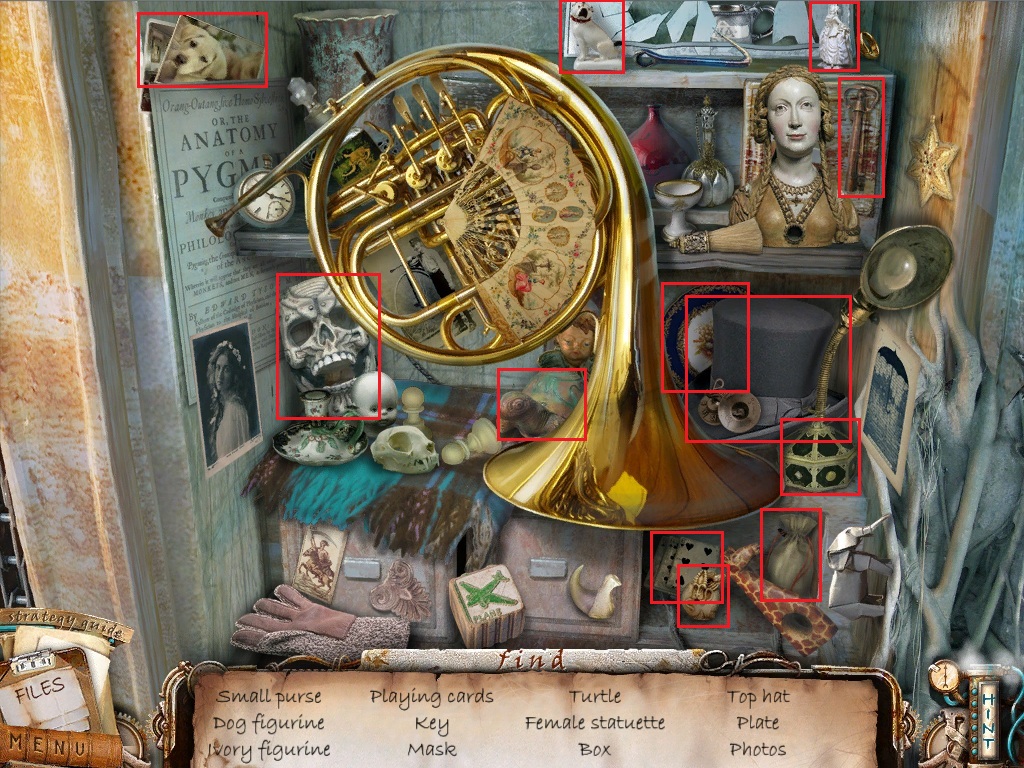
Click the french horn to repeat the hidden object scene.
Screenshot.
Once the hidden object scene is complete you will receive a Ring.
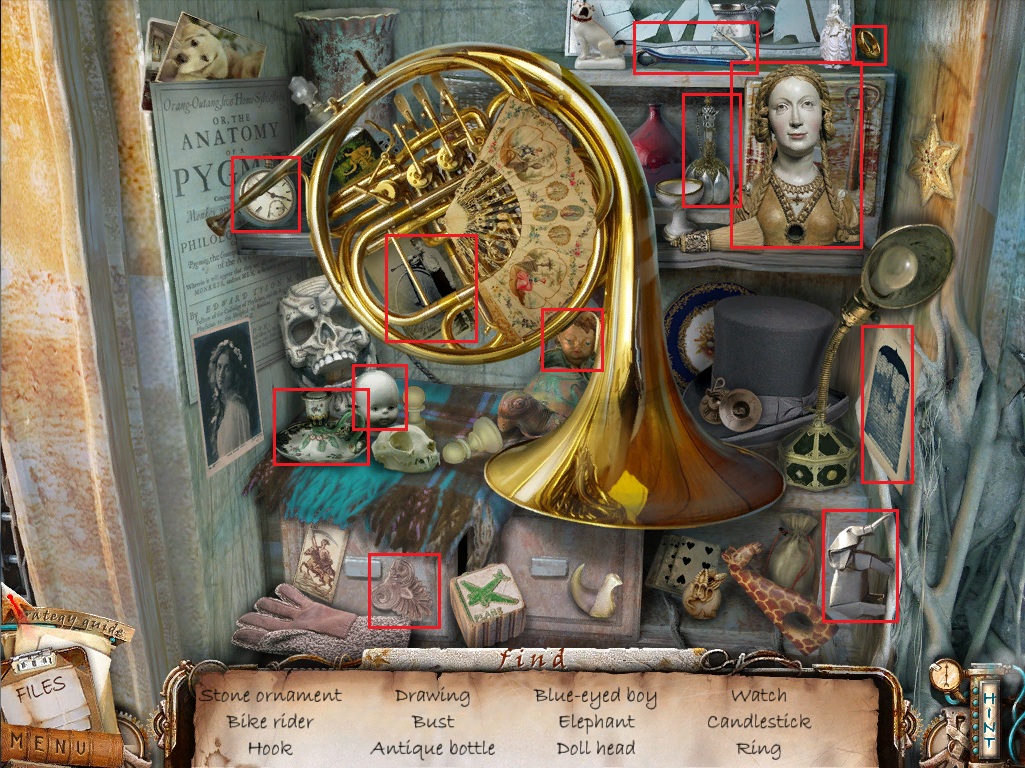
Click the left shutter to zoom in.
Use the Metronome from your inventory on the triangular space below the shutter, then take the revealed Piano Strings.
Go back to the bedroom.
The Bedroom
Click the skeleton's hand to zoom in.
Put the Ring from your inventory on the skeleton's outstretched finger.
Take the Piano Key(3/3) from the open hand.
Click the piano to zoom in.
Add the three Piano Keys to the keyboard, then place the Musical Notes on the stand.
Repair the broken wire with the Piano Strings from your inventory.
Click the piano to start the puzzle.
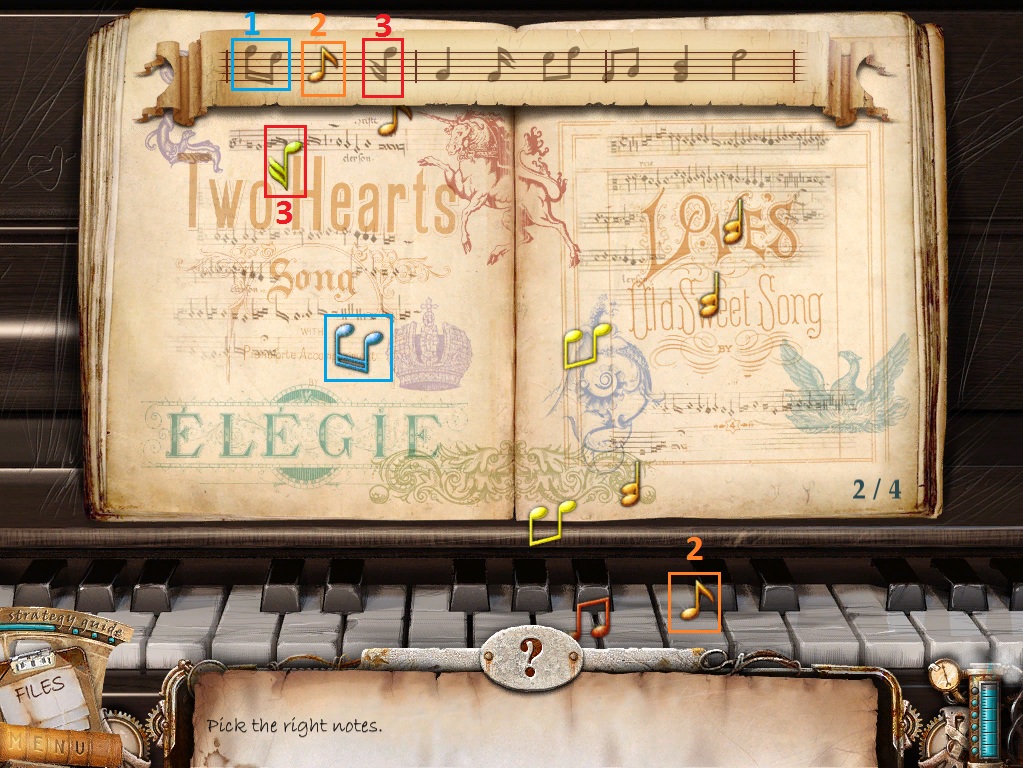
To solve this puzzle, click the falling notes that match the notes in the music.
At the top of the music sheet is a five-lined staff with musical notation.
Each of the eighth, quarter, and half notes will have a different shape and color.
Several notes will fall from the top of the screen, then disappear at the bottom.
Click the notes in order that match the notes shape and color written in the staff.
The puzzle will repeat four times, and each measure is randomized.
Screenshot.
Once the puzzle is solved two of the keys will ilft, revealing the Drawing Marker.
Go back one screen to Emy's Room.
Emy's Room
Click the photo album to zoom in.
Use the Drawing Marker from your inventory on the picture of the sun in the child's drawing.
After the dark presence has been cleaned from the room, click the briefcase under the table to zoom in.
Click the flap to open the case and take the Flashlight inside.
Go back to the foyer.
The Foyer
Click the broken floorboards to the left of the table to zoom in.
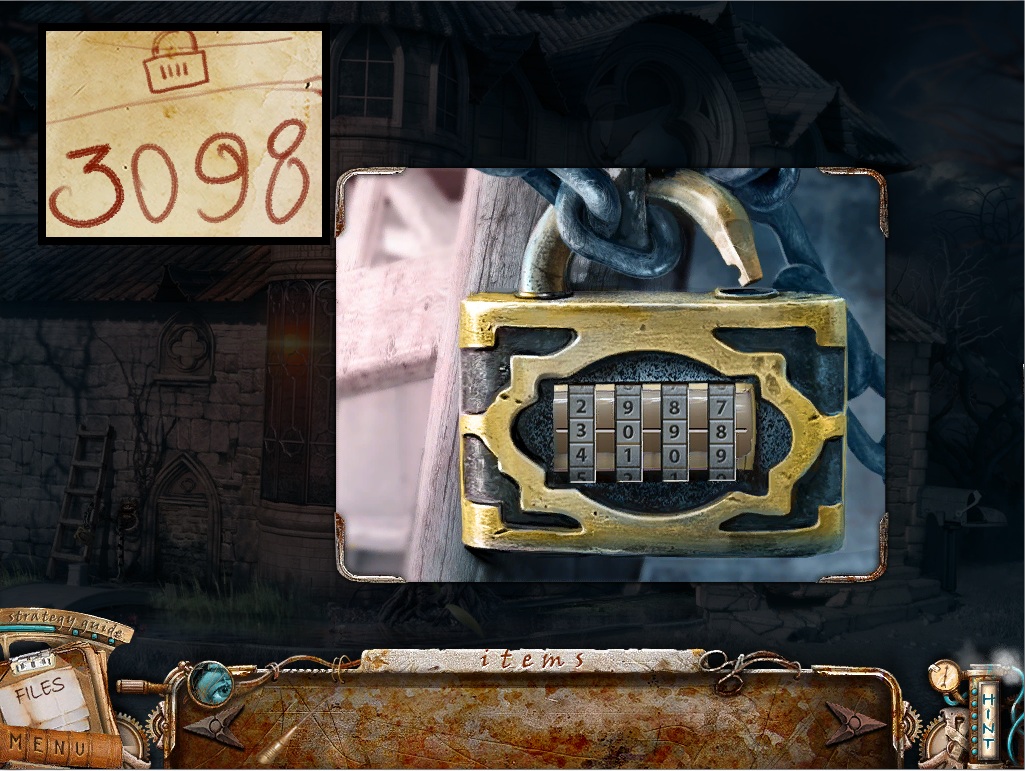
Use the Flashlight from your inventory on the space under the loose boards to reveal the Screwdriver and a four digit code.
Go back to the front lawn.
Front Lawn
Click the ladder leaning against the west side of the building to zoom in.
Enter the 4 digit combination found under the floorboards to the padlock.
Screenshot.
Click the Step Ladder again to add it to your inventory.
Return to the hallway.
The Hallway
Click the telephone to repeat the hidden object scene.
Screenshot.
Once the hidden object scene is complete, you will receive Polish Remover.
Go back to Emy's room.
Emy's Room
Click the suitcase on the rug to zoom in.
Use the Polish Remover from your inventory on the dried gum covering the suticase lock.
Click the suitcase to open it, then take the Knife inside.
Click the package on the ground for a closer look.
Use the Knife to tear through the tape around the box, revealing the Airplane Model.
Return to the hallway.
The Hallway
Use the Step Ladder from your inventory on the toy plane hanging from the ceiling.
Click the plane to zoom in.
Replace the old toy with the Airplane Model from your inventory.
After the dark presence has been cleansed from the hallway, click the frame on the wall to zoom in.
Use the Knife to tear off the wallpaper.
Use the Screwdriver to remove the screws from the metal panel.
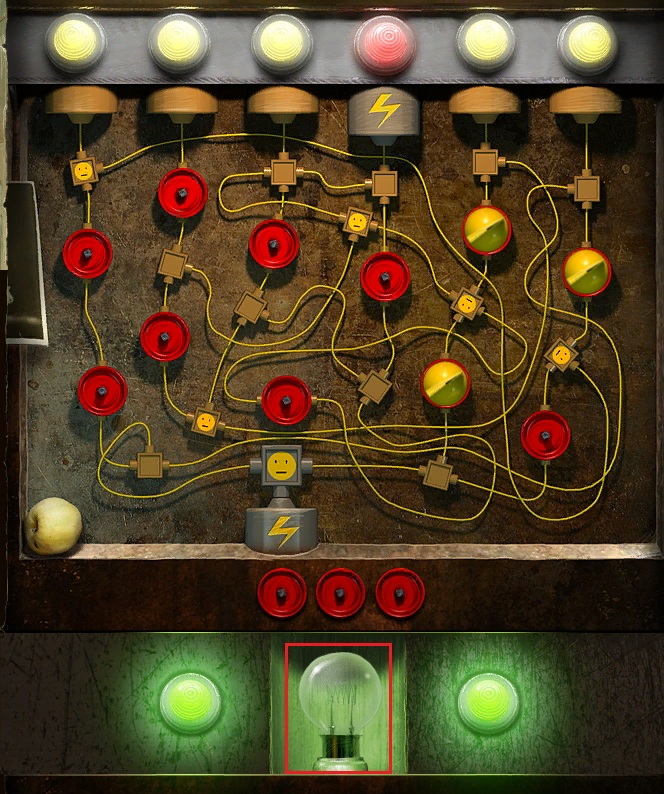
Click the revealed circuit board to start the puzzle.
To solve this puzle, arrange the yellow switches to cut off power to the red bulb.
Click one of the three switches at the bottom to select it.
While a switch is selected, click an empty red circle to place it in that space.
Place the switches to block any potential path between the red light and the electric source.
Solution.
Once the puzzle is solved, take the revealed Bulb from the compartment.
Go forward into the guest room.
Guest Room
Go right to the closet.
Click the crystal device for a closer look.
Add the Room Photo from your inventory to the photo plate.
Place the Bulb in the empty socket to start the puzzle.
To solve this puzzle, move the levers to adjust the image halves and complete the picture.
Adjust the top right lever to move the left image horizontally.
Adjust the bottom right lever to zoom in the left image in and out.
Adjust the top left lever to move the right image vertically.
Adjust the bottom left lever to zoom the right image in and out.
Solution #1.
Solution #2.
Solution #3.
Solution #4.
Once the puzzle is solved the sphere will open, revealing the Globe.
Go left to the main view of the guest room.
Put the Globe from your inventory into the middle of the disks hanging from the ceiling.
After the room in cleansed, go through the open door into the study.
The Study
Click the desk to start the hidden object scene.
Screenshot.
Once the hidden object scene is complete, you will receive a Violet Gem.
Click the wastepaper basket next to the desk to zoom in.
Click the employment contract to read it.
Click the other items to move them aside, revealing the Slide.
Click the map on the sofa to zoom in.
Take the blue Flag sticking out of the image of Australia.
Click the shelf in the bookcase to zoom in.
Take the Rag on top of the gembox.
Go back to the guest room.
Guest Room
Click the projector on the coffee table to zoom in.
Place the Slide from your inventory into the slot on the side, then push the button to start the projector.
Use the Rag to clean the projector lens.
Note the image projected onto the wall, then click the bookcase to solve the puzzle.
To solve this puzzle, click the books in the correct order shown by the image on the projector.
Click a book to select it, starting with book 2 circled on the projector image.
Click books 2-6-7-9
Solution.
Once the puzzle is solved the shelves will open, revealing the Yellow Gem.
Click the globe hanging from the ceiling to zoom in.
Click the globe again to turn it until the continent of Australia is visible.
Stick the Flag from your inventory into the the image of the island, then take the revealed Blue Gem.
Return to the study.
The Study
Click the gem box in the bookcase to zoom in.
Place the Violet Gem in the triangular space in the top left corner.
Place the Blue Gem in the round space in the bottom left corner.
Place the Yellow Gem in the square space in the bottom right corner, then take the revealed Piece of Ornament.
Return to the foyer.
The Foyer
Click the mosaic in the center of the room to zoom in.
Place the Piece of Ornament from your inventory into the empty ornament space on the right side of the mosaic frame.
Click the Diary inside the revealed compartment to read it.
The End
Posted by: Trinn |
July 24, 2011 1:53 AM
|
July 24, 2011 1:53 AM