

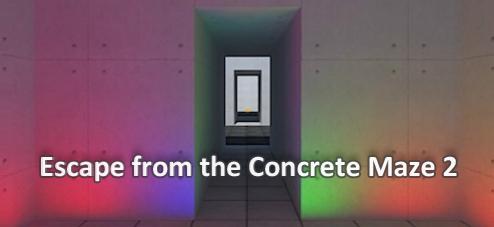
![]() The walls are a drab cement grey, but at least the sky is blue and no sign of rain in the near future. That may be little recompense when you're discombobulated and all turned about, trying to Escape from the Concrete Maze 2, which must be why Hottategoya thoughtfully provided three nifty little puzzles for you to play with. It's not enough to find your way once through this maze—if you ever want to leave, you have some clues to sort out, safes to open and a door to unlock first.
The walls are a drab cement grey, but at least the sky is blue and no sign of rain in the near future. That may be little recompense when you're discombobulated and all turned about, trying to Escape from the Concrete Maze 2, which must be why Hottategoya thoughtfully provided three nifty little puzzles for you to play with. It's not enough to find your way once through this maze—if you ever want to leave, you have some clues to sort out, safes to open and a door to unlock first.
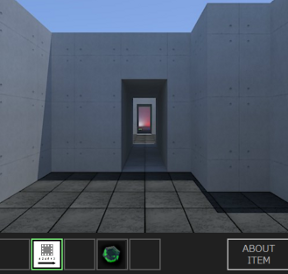 Such a floor design puts an extra layer of challenge on what would otherwise be a simple escape game. To navigate, move to another room by clicking a doorway or turn 90° in either direction by clicking the sides of the screen. You can do a full 360 in four clicks although one wall often looks much like the next and making spatial sense of what you see is all part of the overarching puzzle, thus you might want to break out your amateur cartographer kit to see how it all fits. The cursor doesn't change but the few things to click on or pick up are easily found against the stark surroundings.
Beyond navigational complexities that put extra work into clue gathering, the codes you need to solve are actually quite straight-forward. Instead, going back-and-forth and getting turned around is what truly disguises the puzzle solutions, in a way somewhat similar to Tesshi-e's Escape from the Same Room 2. If that game gave you trouble, you'll be no greater fan of this one: it's more convoluted yet much less charming. If you long for that concrete feeling of accomplishment when you find your way out, though, then Escape from the Concrete Maze 2 is indeed amazing fun (it had to be said!)


Walkthrough Guide
(Please allow page to fully load for spoiler tags to be functional.)
Escape from the Concrete Maze 2 walkthrough
Exploring the Maze and Gathering Clues
When you begin, you're facing three safes. Zoom in and out to take a look at each...
The left safe has 4 buttons: red, green, blue and white.
The middle safe also has 4 buttons of various polygonal shapes.
The safe on the right has 8 buttons that wind their way partly around the center square.
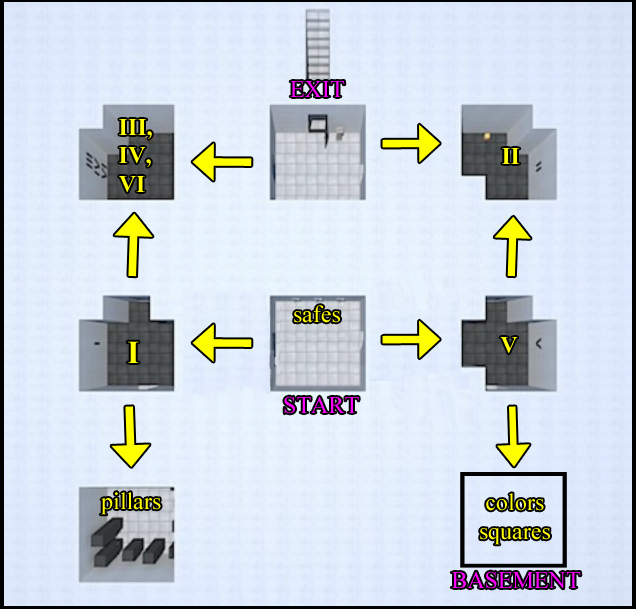
Since you're in a maze, maybe you want to map this room?
Turning left from the three safes, you see a hallway leading to "I".
Turning right from the three safes, there is hallway leading to "V".
Behind you is a blank wall.
Go right, down the hallway to room "V".
Turn all the way around in this room, making note of its shape (be careful to not over count the corners) and the other rooms you can reach from here.
To the left of the "V" wall is a hallway that leads to a room with a wooden box.
To the right of the "V" is a hallway that leads to a colorfully lit-up room.
Directly opposite of the "V" is the way back to the starting room.
Go right, to the colorful lit-up room.
This room is smaller and has a ceiling.
As you turn around in it, make a note of all the colors you see, remembering to not double-count a corners.
Turn right three times in order to see all the different colored squares, then turn left again to face the doorway.
Go back through the doorway to the "V" room and continue forward into the room with the wooden box.
Examine the wooden box and open it.
Take the PAPER (1/2) from inside and read it: squares with numbers (that design should look familiar).
Back up and turn right from the box to see a "II" on the wall.
Continue turning right, making a note of this room's shape until you're facing the wooden box again.
Then turn back to the left.
Through the wall to the left of the box is a long hallway leading to a room labeled "III, IV, VI." Go forward.
Midway between the "II" room and the "III..." room is another room.
This room is perfectly square. To the right of the hallway leading to the "III, IV, VI" room is a door. The exit door.
There's a pillar next to the door: looks like three gems will fit there.
Turn and continue through the hallway to the "III, IV, VI" room.
Once again, you'll want to turn 360 degrees around in this room to note its shape.
To the right of the roman numerals is another wooden box. Go over to it and open it:
Take out another PAPER (2/2) and read it: eight bars which go from very short to very high.
Back up twice from the box and turn left twice.
To the left of the "III, IV, VI" is another hallway. Go through it once. There's still another room ahead, but stop here first to look around.
Turning all the way around in this room, you'll notice one of the walls is marked with a "I". Make a note of this room's shape.
Then, turning left from the "I" wall, you'll face the hallway to the last room of the maze.
Go down the hallway to a room lined with black pillars of various heights:
In front of you, you can see four pillars. Note their sizes.
Then, turn to the left of the doorway and note three other pillars (don't double-count the one on the right).
Then, turn right twice to view the last pillar and note its height.
Turn right again to face the doorway.
You're now ready to head back to the starting room and open the safes.
If you need help getting back to the safes' room....
Look at the Screenshot: Map of the Maze
Or follow these directions: from the pillar room, go forward once, turn right, go forward, then turn left to face the safes.
Four Colored Buttons
Zoom in on the safe on the left. You need to push the colored buttons in the correct sequence to unlock it.
From left to right, the colors are: red, green, blue and white.
Use the clue from the piece of paper and the colorful room to solve this puzzle.
HINT/COLORBLIND HELP:
Screenshot: Color Buttons Help
SOLUTION:
This puzzle might look more complicated than it is. It's simply about how many times a particular color shows up on the map; that�s how you number the colors: 1=WHITE; 2=GREEN; 4=BLUE; 5=RED
The piece of paper gives you the number/color sequence. So press the buttons in this order...
BLUE-GREEN-BLUE-RED-WHITE-RED
When it's unlocked, open the safe and get:
A SQUARE RUBY.
Back out.
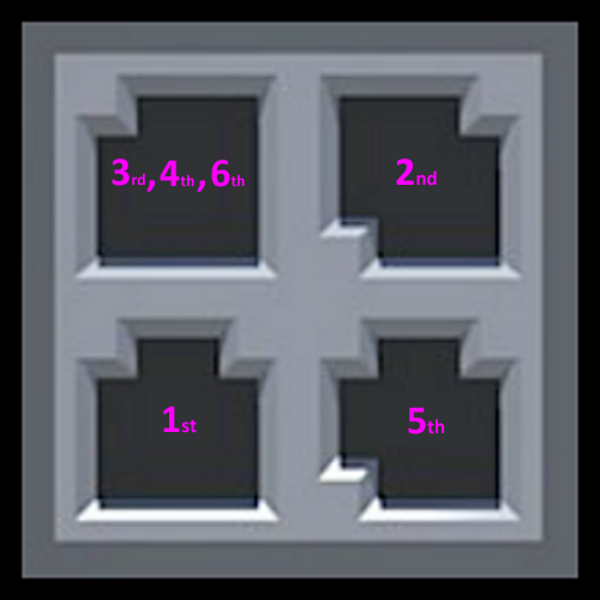
Four Polygonal Shapes
Examine the middle safe. You need to push each of the four buttons in the correct sequence to unlock it.
The rooms you explored with roman numerals on the wall provide the answer.
SOLUTION:
Screenshot: Middle Safe Solution
Bottom LEFT � Top RIGHT � Top LEFT � Top LEFT � Bottom RIGHT � Top LEFT
When it's unlocked, open the safe to get:
A HEXAGONAL EMERALD.
Back out.
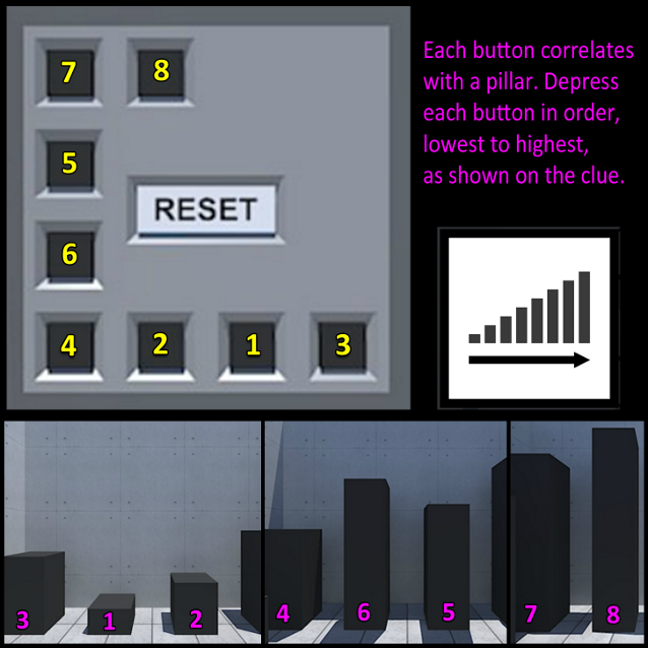
Eight Black Buttons
Examine the safe on the right. This has eight buttons arranged in a semi-L shape. You need to push in each button in the correct order.
The room with all the pillars and a piece of paper provide the answer.
SOLUTION:
Screenshot: Right Safe Solution
When it's unlocked, open up this safe to get:
AN OCTOGONAL SAPPHIRE.
Back up.
Exiting
Go back to the exit room:
From the safes, turn right and go forward into the "V" room. Then turn left and walk into the "II" room. Take another left and go through the doorway to the exit room. The exit door will be on the right.
Examine the top of the pillar and insert each of the gems, in the same order as in your inventory: square ruby, hexagonal emerald, and octogonal sapphire.
The gems unlock the door.
Back up, open the door, and head on out.
Congratulations!
Map of the Premises
Avoid looking at the map unless you're completely lost as it also gives away a puzzle solution.
Screenshot: Map of the Maze
Thanks, elle, for the walkthrough
Posted by: Mike |
March 28, 2013 9:08 AM
|
March 28, 2013 9:08 AM