

![]() Enlightenus is Latin for — wait, no it isn't! Actually, Enlightenus, from Forgotten Riddles creator Blue Tea Games, is a story-driven hidden object adventure game made backwards. Instead of looking for and collecting a list of items in cluttered rooms, your job is to find where items belong and put them back. Compare your inventory with the objects on the screen and decipher which items go in which location. It's a simple gameplay switcheroo that shoves Enlightenus away from the pack and into the spotlight.
Enlightenus is Latin for — wait, no it isn't! Actually, Enlightenus, from Forgotten Riddles creator Blue Tea Games, is a story-driven hidden object adventure game made backwards. Instead of looking for and collecting a list of items in cluttered rooms, your job is to find where items belong and put them back. Compare your inventory with the objects on the screen and decipher which items go in which location. It's a simple gameplay switcheroo that shoves Enlightenus away from the pack and into the spotlight.
 You are Inspector Doubleleaf, a famous detective called by novelist Edgar Lee to unravel an intriguing mystery. The author has a machine that can transport him to different worlds, a trick he uses to find inspiration for his novels (cheater). An energy surge threw everything out of whack, however, scrambling his stories and hiding the pages of his novels in an alternate version of his mansion. And now it's your job to put everything back together.
The introduction eases you into this uniquely constructed game, and subsequent chapters expand on the concept in measured increments. As you explore each room of the mansion you'll come across pages of Edgar's novel. Each page is a hidden object scene (well, the opposite of that, but you get my drift) that, when completed, gives you buttons that are used to complete puzzles elsewhere in the mansion. It all weaves together into a fantastic plot that feels like a cross between Myst and Harry Potter.
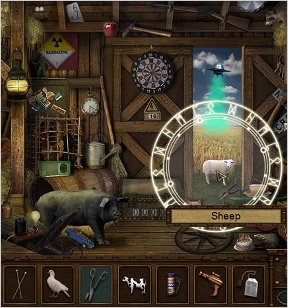
Putting objects in their place is much more of a brain trick than you might think. Your only clues are the names of inventory items and short labels found around the scene. For example, an item might be labeled "hostage cow" and a UFO floating in the background might be casting a "bovine beam" to the ground. See how that works itself out? Some objects have to be used before you can uncover uses for other items. Can't very well see the bovine beam if the barn door is shut, can you? A hint system serves as a gentle nudge, but don't rely on it too much. Completing found object scenes will require some actual thought and light riddle solving, something many hidden object gamers aren't used to.
 Analysis: Enlightenus isn't a comedic game, but I couldn't help but grin at its premise. I mean, here I am putting found objects back where they belong, almost like I'm cleaning up after some hidden object gamer played the very same stage! Besides the twist on the genre, Enlightenus also has a distinct Azada or Dream Chronicles feel, and you really can't go wrong if you follow in those footsteps.
If I were to choose one area Enlightenus needs improvement, I would have to say accessibility. Despite its reverse mechanics and adventure game leanings, this game falls into the hidden object genre. Hidden object games tend to be straightforward. From exploring environments to finding items in a scene, everything takes place on a nice and neat track. Enlightenus encourages you to move around and explore, solve puzzles in your own order, and unravel a number of riddles. This non-linearity will frighten a small set of casual gamers away, though, in truth, it shouldn't. Perhaps its a fault of our genre labeling habit, as I don't feel Enlightenus got anything "wrong" in its design.
Enlightenus is a beautiful and inspired game, from its story to presentation to the scattering of apropos mini-games. You'll love the atmosphere, you'll adore the adventure sensibilities, and after you get accustomed to it, you'll love putting objects back where they belong.
![]() Windows:
Windows:
Download the demo
Get the full version
![]() Mac OS X:
Mac OS X:
Not available.
Try Boot Camp or Parallels or CrossOver Games.


Walkthrough Guide
(Please allow page to fully load for spoiler tags to be functional.)
Enlightenus Walkthrough
General Information
There are five sections to the game: Prologue, Chapter 1, Chapter 2, Chapter 3, and the Endgame.
There is a built in hint feature that recharges slowly. You can recharge it faster using the e-cards.
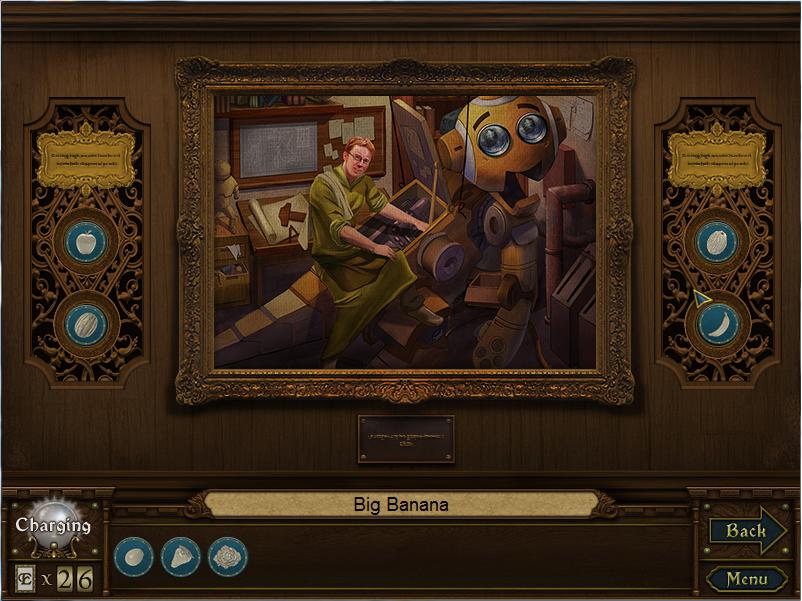
At the end of each novel scene you will receive an engraved button. These are used for solving the "special" painting puzzles.
While in a novel scene pick up any of your objects and "hover" them over the objects in the scene. Captions will appear showing what those objects are. Read the captions carefully, they give clues as to what object goes where. If you have a "golden bone", and the object you are hovering over is a "golden dog", it is logical that they go together.
In each section look at all the pictures you can find and identify the "special" paintings. These pictures will have sections on the left and right for the buttons to be placed and clues as to which buttons to place there.
Some buttons can be confusing. One picture clue might be "tools for a carpenter", another might be "tools for a toymaker". You will have buttons that will seem to fit both categories. You can use your hint feature to make sure the buttons are in the right place.
Look for "Enlightenus cards" (hereafter known as e-cards) in every one of the novel scenes. You will have one card when you start the game and pick up three more in the Library in the beginning. After that you can find two e-cards in each novel scene. Use a card to rapidly charge your hint feature.
Novel scenes are "reverse" hidden object scenes. Rather than finding items to subtract from the scene you will be placing items into the scene. In the game there are 13 scenes, and you will visit each three times.
Novel scenes are easy to spot if they are out in the open. They look like pieces of paper with sparks coming off of them.
List of Scenes
The Mysterious Clock tower Labyrinth
Enchanted Forest and the Seven Seals
Journey to the Ancient Parthenon
Darkwood Mansion Haunted Stories
The Great Museum Caper
Strange Tales on Meadow Creek Farm
And Now, for My Next Trick
Playful Teddy's Lullaby Adventures
Whiddon's Expedition: Atlantis
A Tomb Amidst the Shifting Sands
Forgotten Idol: The Mayan Exploration
Majestic Theater of Nobel Hill
Wild West Jack and the Raccoon Gang
Double Leaf Cases: Floral Mansion Enigma
Yes, the list shows 14 scenes, not 13, this will be explained at the end of the game.
In various locations you will see plaques on items. Always click on plaques for a close up. Some are hints, some are mini-games.
Each chapter has several locations which will be visited more than once. However, you cannot move on to another chapter until you have completed the one you are in. Once you move on to the next chapter you cannot go back to a previous one.
Look at the book in the lower right of the screen to check your progress on the novel scenes. It will list all the scenes and the number of times you have visited them. When all three visits are complete a green check mark will appear to the left of the scene name.
There is a secret room in the game. More about the secret room will be explained in the End Game section. You can complete the game without finding the secret room.
The names for the rooms are arbitrarily my own. I do not know if they are the "official" room names.
Once you use an item in your inventory it disappears. There is one exception, the E-key. The E-key is used two (or three if you find the secret room) times.
Prologue
Go in the front door.
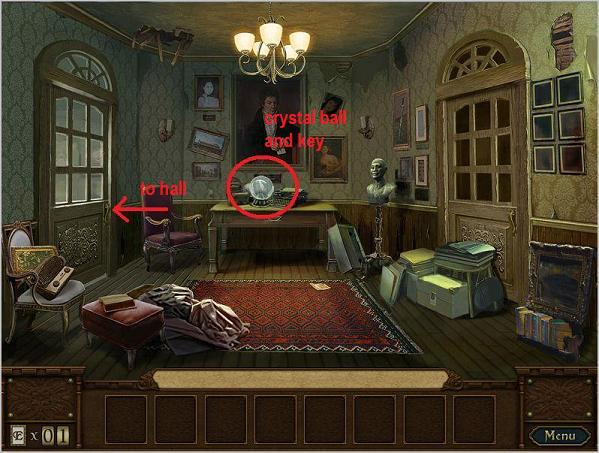
Parlor
Click on the crystal ball on the table to take it. This is your hint function. screenshot
Click on the typewriter (where the orb was) to get the key.
Use the key to open the door on the left.
Go left.
Hallway
Go through the door at the end of the hallway.
Library
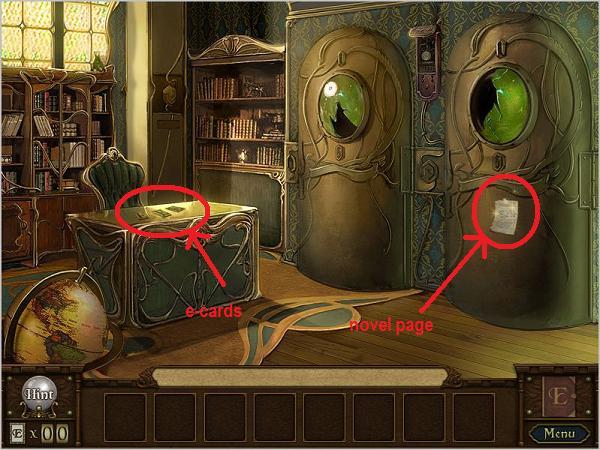
Click on the book on the desk. This book helps you track your progress and triggers the intro animation. screenshot
Click on the left machine.
Library 2
Click on the desk for the 3 E cards. screenshot
Click on the novel page on the right machine to enter the first scene.
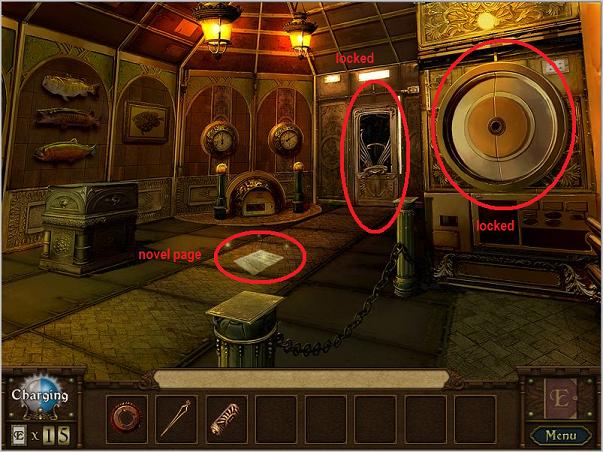
The Mysterious Clocktower Labyrinth
The light bulb goes in the electric lamp on the right.
The minute hand goes in the large clock in the center.
The bow goes with the cello on the far right.
The balloon goes on the helium gas burner (between the moon and the oil lamp).
The red paint brush goes on the blue ornament.
The sun emblem goes into the empty slot right behind the electric lamp.
Use the bolt cutter on the locked chest.
Use the chisel on the stone slab in the chest.
Receive an engraved button.
Library 2
Move the cursor to the bottom of the screen and a down arrow appears (this is how you go backwards). Click.
Hallway 2
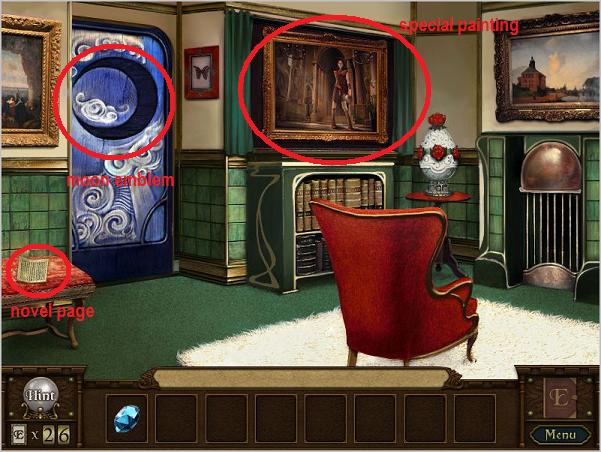
Examine the picture on the left. This is one of the special pictures.
Go Backwards.
Parlor
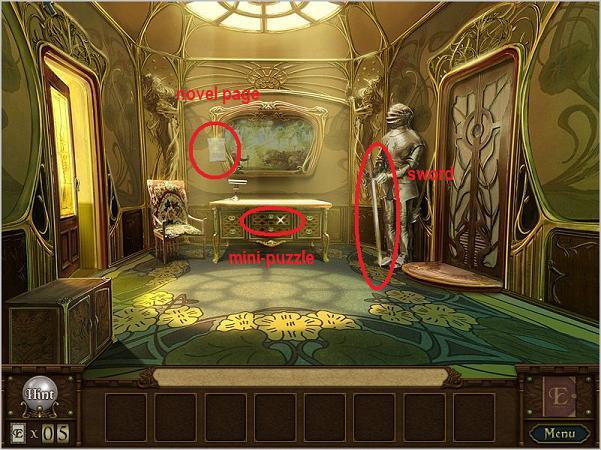
Click on the Knight to take his sword. screenshot
Click on the dresser drawer for a mini-puzzle.
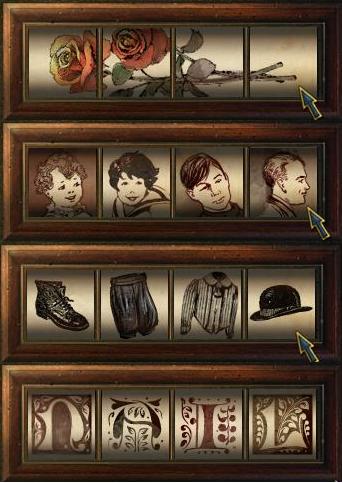
Dresser Mini-Puzzle
Rose: Click each roller to rotate until it forms the picture of a long-stemmed rose.
Children: click each roller until the pictures are sorted from youngest to oldest, left to right. (toddler, boy in sailor suit, young man, mature man).
Click each roller until the pictures depict an outfit from left to right: Shoes, pants, shirt, hat.
Click each roller until it spells the word "nail". solutions
This unlocks the Dresser drawer. Take the hammer.
Click on the novel page stuck on the picture frame above the dresser.
Darkwood Manor Haunted Stories
Use pumpkin scooper on the pumpkin on the floor.
Use the carving knife on the same pumpkin.
Put the jack-o-lantern candle in the pumpkin.
Put the cheese into the mouse trap on the floor (located just to the left of the fireplace).
Put the toy train on the railroad tracks on the floor (lower right, just to the left of the gator skull).
Put the diaper on the baby doll in the bookcase (far right of the screen).
Use the spray bottle on the frowning portrait above the piano (left side of the screen).
Put the antlers on the deer head (top left of the screen).
Receive an engraved button.
Parlor
Go through the left door to the hallway.
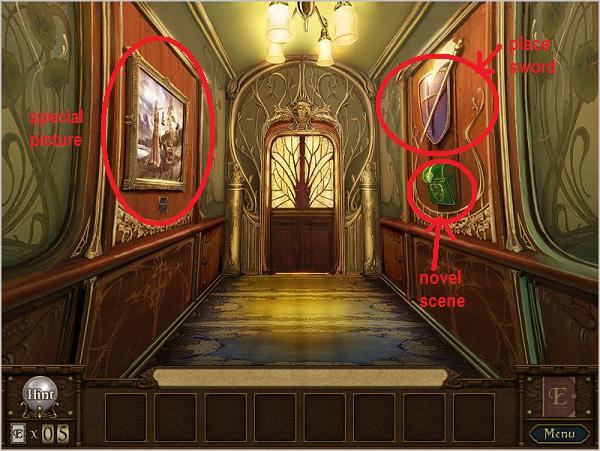
Hallway 2
On the right wall is a shield and an axe. Place the sword from your inventory on the shield. This opens the mailbox below. screenshot
Click on the mailbox for a close-up.
Click on the novel page in the mailbox.
Strange Tales on Meadow Creek Farm
Use the rusty key on the rusty lock on the double doors (opens doors).
Use the shears on the sheep outside the doors.
Use the knitting needles on the pile of wool from the shearing.
Put the cow in the UFO beam outside the doors.
Put the UFO escape beam on the UFO outside the doors.
Put the tea bag in the tea cup (just to the right of the sheep).
Put the film in the camera (to the right of the teacup).
Put the mother bird on the nest of eggs (top of the scene, right above the radioactive sign).
Receive an engraved button.
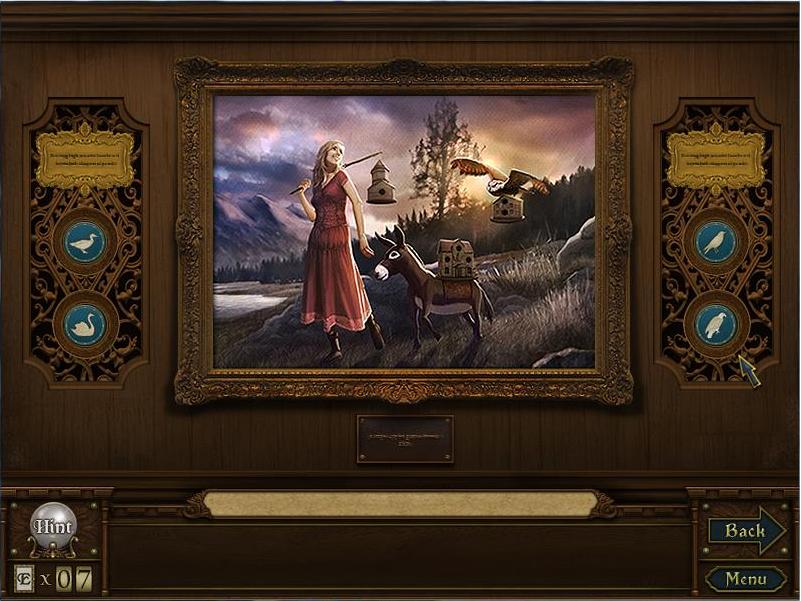
Picture
Now click on the picture on the left wall. This is one of the "special" pictures where you will place your engraved buttons.
The clue on the left indicates things that live in a pond. A duck button is already installed there.
The clue on the right indicates birds that fly high.
Put the swan button in the open slot on the left and place the eagle and raven buttons in the empty slots on the right. screenshot
The picture will open up to reveal a yin gem.
Go back to the parlor.
Parlor
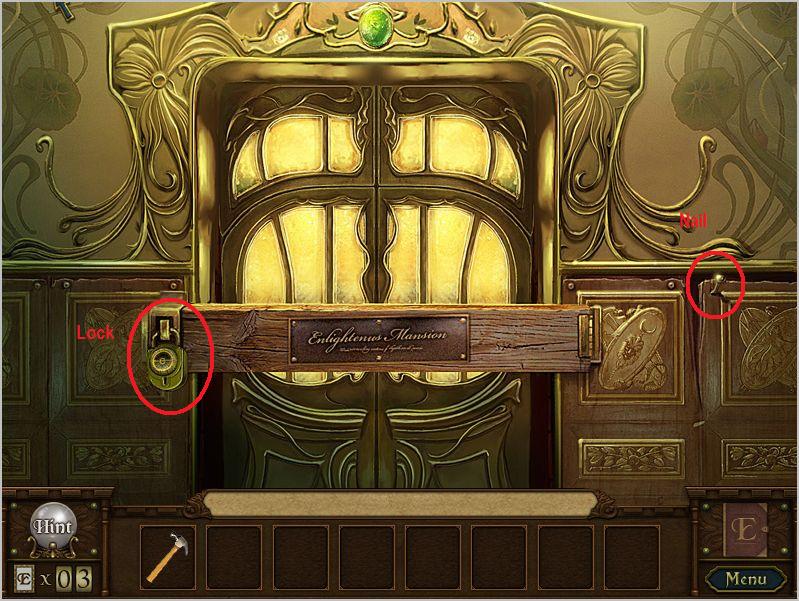
Go back. You are now standing in front of a door that is barred and padlocked. Examine the paneling to the right of the door, there is a loose nail. screenshot
Use the hammer to remove the loose nail. This will get you a yang gem.
Go back to the parlor.
Examine the door on the right. There is an empty yin-yang symbol.
Place the Yin and Yang gems in the symbol
Go through the door.
Once you go through the door it locks behind you.
End of Prologue
Chapter 1
You are now standing in a hallway with an antique shop on your left and a potions shop on your right. The hallway also extends further forward. Go left into the antique shop.
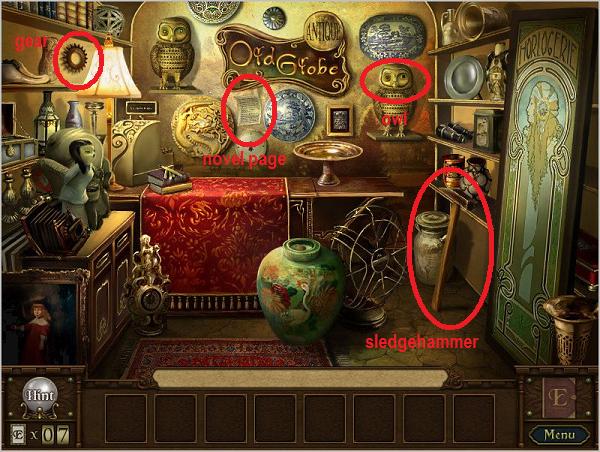
Old Globe Antiques
There is a sledgehammer leaning agains the wall on the right. Take it. screenshot
One of the owls is missing a red gem eye.
On the left wall on a shelf to the left of the lamp is a gear. Take it.
On the back wall is a novel page. Click on it.
And Now, For My Next Trick
The rabbit goes in the green cage on the left.
The black dot goes on the dice below the rabbit cage (middle die).
The heart goes in the Ace of Hearts card in the middle of the scene.
The red cloth goes over the rabbit cage.
The rope goes on the pulleys hanging from the curtain in the top left of the scene.
The sandbag goes on the hook hanging down from the rope you just placed.
The battery goes in the toy robot in the upper right of the scene.
The top hat goes on the "magician" teddy bear on the stage (below the skull).
Engraved Button.
Go back to the hallway.
Go right into the potions shop.
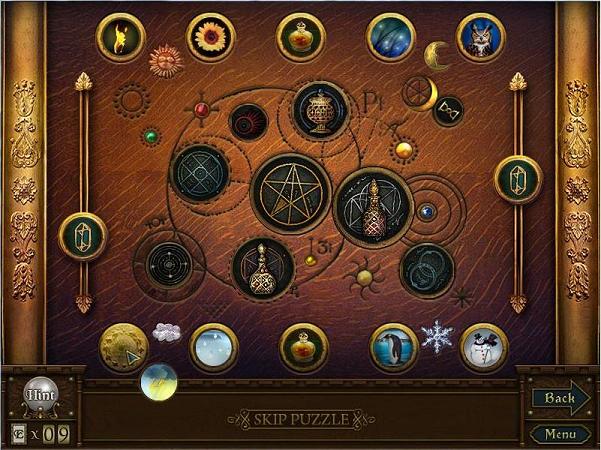
Potions Perfecta Door
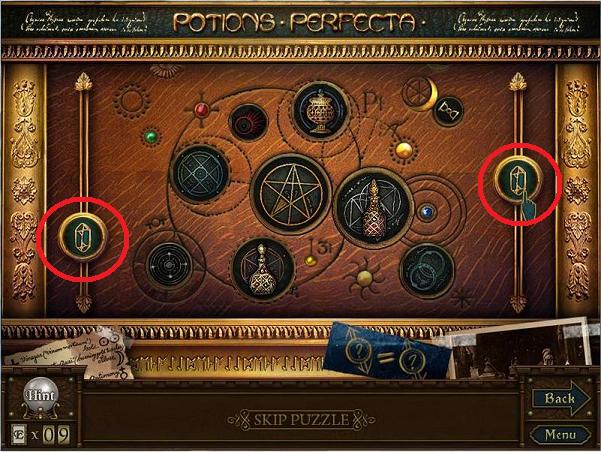
To get through this door you have to solve a puzzle.
On either side of the puzzle are buttons that slide up and down, changing shapes everytime you move them. You need to slide each button until they are showing the same shape. screenshot More buttons will appear in the middle of the puzzle.screenshot
Notice that in the corners of the puzzle there are four symbols, a sun, a moon, a cloud, and a snowflake. There are six buttons on the top of the puzzle and six on the bottom that can be moved around. The buttons need to be placed near the symbol they represent.
Upper left corner near the sun: flame and flower.
Upper right corner near the moon: fireflies and owl.
Lower left corner near the cloud: rain and lighning.
Lower right corner near the snowflake: penguin and snowman.
This leaves a space in the middle of the top row and the bottom row. Fill those spaces with the bottles. screenshot
The door is now open.
Potions Perfecta
On the counter to the right of the book is a minute hand. Take it. screenshot
On the display shelves behind the counter is an empty slot for a teacup.
On the counter to the left of the book is a novel page. Click on it.
Enchanted Forest and the Seven Seals
The red bird goes in the empty red birdhouse (upper left, hanging from a tree branch).
The small gnome goes in the gnome house (lower right).
The acorn goes to the hungry squirrel (upper right branch of the tree).
The watering can goes on the fast growth seed (lower left of the scene, below the rocks.
Put the bee on the sunflower you just grew.
Use the carving knife to finish the heart carving on the upper right branch of the tree.
Put the heavy stone in the basket hanging from the upper right branch (beside the hungry squirrel).
Put the hungry bunny on the carrot that appears.
Engraved Button.
Go upstairs.
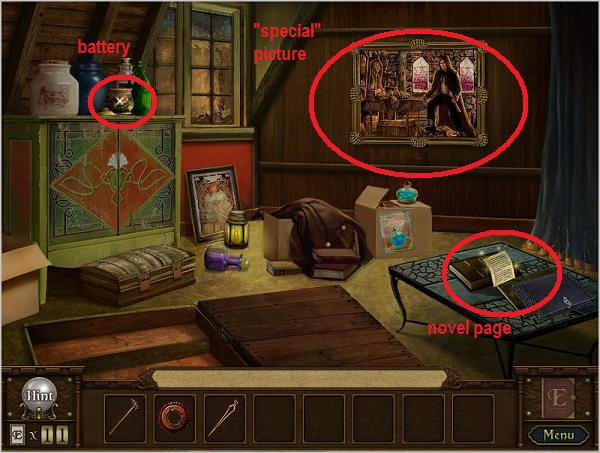
Potions Perfecta Attic
On the cabinet on the left is a small vase. Click on it for a close up and take the battery. screenshot
On the wall is a "special" picture. The clues: tools for a hunter and tools for a sculptor.
On the low table on the right are some books. Click on them to reveal the next novel page.
The Mysterious Clocktower Labyrinth 2
Put the winged wooden shoe on the wood foot just to the left of the large clock.
Put the microscope lens in the microscope (just below the large clock).
Put the microscope slide in the microscope.
Put the untyped paper in the typewriter (bottom of screen).
Put the mailbox flag on the mailbox which appears.
Put the wine with the pair of wineglasses in the upper right corner.
Use the match on the oil lamp (just left of the large clock).
Use the silver stone hammer on the silver stone gnome (just to the right of the cello).
Engraved Button.
Go back to the potions shop and back again to the hall.
Once in the hall go forward down the hall.
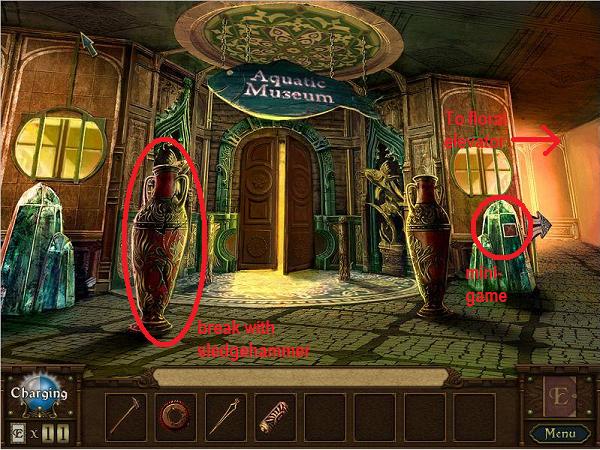
Aquatic Museum (outside)
There are two large crystal formations that flank the museum. Click on the right one (it has a plaque) to enter a match mini-game. screenshot
In the match mini-game rather than matching two things that are alike you are matching the front and back halves of animals.
Complete the game to open the next novel scene.
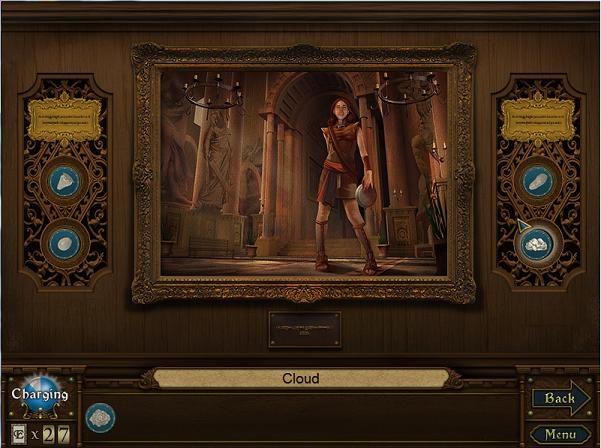
Journey to the Ancient Parthenon
The elephant emblem goes on the top of the far left column.
The small cannonball goes into the cannon at the bottom of the scene.
The statue head goes onto the headless statue in the middle of the scene.
Put the artist's brush on the sketch in the left side of the scene.
Put the origami instruction book on top of the green paper (sitting on top of the barrel just left of the sketch). An elephant appears.
Put the ivory tusk on the elephant.
Put the royal blue gem in the crown in the bottom left side of the scene.
Give the cheese to the hungry mouse in the far right column.
Engraved Button.
There are a pair of large vases outside the door to the museum. Hit the left vase with the sledgehammer to reveal another novel scene.
Strange Tales on Meadow Creek Farm 2
Put the dart in the dartboard (left door of the double doors). A paper clue will fall out.
Put the paper with code onto the paper clue that just fell down. The chest will open.
Put the green lantern lens into the lantern in the newly opened chest. A green X will appear on the floor.
Use the shovel on the green X on the floor.
Put the radio dial on the radio (just above the pig).
Put the passport on the traveler's luggage (just below the radioactive sign).
Put the green glove on the mannequin hand (left of the scene, just next to the pitchfork).
Put the fuse in the empty bulb box (just below and to the left of the pig).
Engraved Button.
Go into the museum.
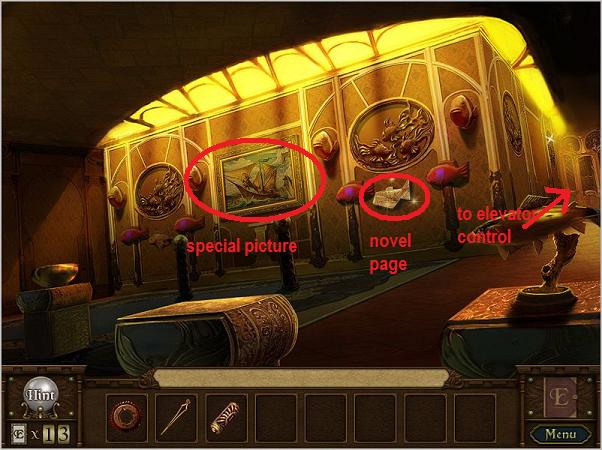
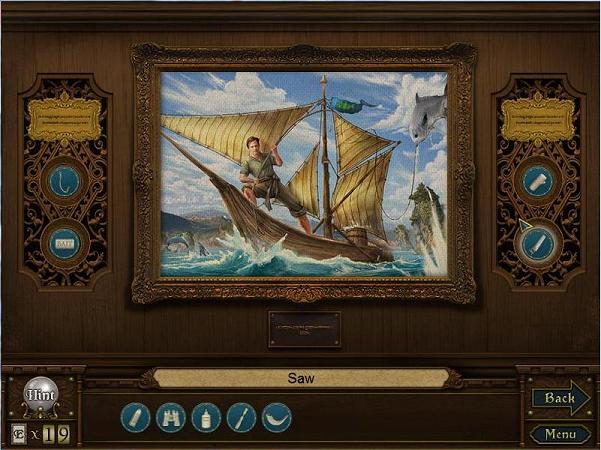
Aquatic Museum (interior)
On the wall in front of you is a "special" picture. Clues are tools for a fisherman and tools for a carpenter. screenshot
On the wall to the right of the "special" painting is a novel page. Click on it.
The Great Museum Caper
Put the blue feather in the wolf's headband.
Put the alarm panel in the panel slot on the right of the left display case.
Put the war paint on the Indian Warrior's face.
Use the hammer on the "thick, breakable glass" on the lower left display case.
Use the alarm disable code on the alarm panel you installed.
Put the clay camel lid on the clay camel pot in the display case you shattered with the hammer.
Put the oil in the lamp that the Pirate is holding.
Use the sponge to wipe the handprints off the left display case.
Engraved Button.
On the far right is a corridor leading off. Click on that corridor.
Elevator Control Room
On the right are two locks that you can't get into yet. screenshot
On the floor is a novel page. Click on it.
Enchanted Forest and the Seven Seals 2
Put the fly in the spider's web in the left branch of the tree. A spider will appear.
Use the bug jar to collect the spider.
Put the wooden nose on the noseless doll (sitting in the window to the left of the tree).
Put the arrow in the target (bottom of the tree).
Put the owl in the nocturnal rest, a hole in the tree trunk between the branches.
Use the lighter on the pile of logs in the lower right of the scene.
Put the letter on the carrier pigeon (left branch of the tree beside the spider web)
Put the fangs on the green snake sitting just below the lower left root of the tree.
Engraved Button.
Back up until you are in front of the Aquatic Museum. There is a corridor leading to the right of the museum. Go right.
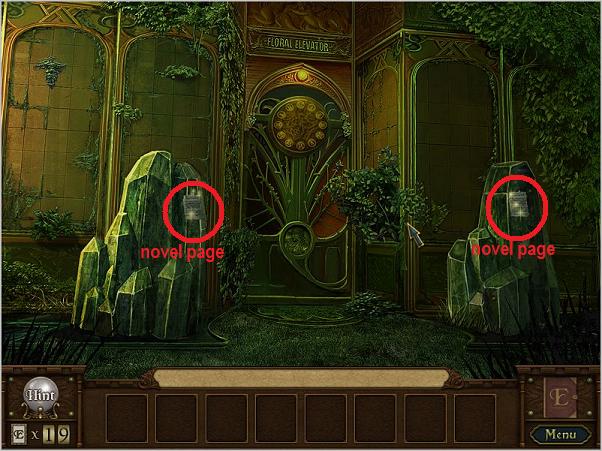
Floral Elevator
On the crystal formation to the left of the elevator is a novel page. Click on it. screenshot
Darkwood Manor Haunted Stories 2
The sheet music goes on the piano music stand.
Use the mirror cleanser (spray bottle) on the mirror sitting on the piano stool.
Use the flashlight on the mirror, it chases away the spirit that appeared.
Use the magic bookmark on the magic book sitting below the piano.
Hang the prisoner doll from the noose hanging from the bookcase on the right.
Use the straws on the broomhandle (below the hanging prisoner doll).
Use the axe on the logs sitting in front of the fireplace.
Use the match to light the fireplace.
Engraved Button.
Now click on the crystal formation to the right of the elevator.
Insert the battery from your inventory into the space above the slot. this exposes a novel page. Click on it.
Strange Tales on Meadow Creek Farm 3
Put the egg in the egg carton (to the left of the pig).
Put the spider in the spider web (top left, just below the typewriter).
Put the shotgun shell in the shotgun (hanging above the double doors). This blows open a hole in the wall.
Put the magnifying glass on the newly opened hole in the wall (beam of light).
Use the chalk on the blackboard (top right, just below the fire extinguisher).
Use the stethescope on the safe to the far left of the pig.
Put the baseball in the baseball glove (just above the egg carton).
Put the tiny party hat on the birthday rat (far right bottom of the screen, sitting in front of a birthday cake).
Engraved Button.
Put the clock hand on the floral elevator clock.
Go back to the Aquatic Museum.
Aquatic Museum
Go into the Aquatic Museum and click on the "special" picture.
Place the buttons to solve the puzzle: Fisherman's tools (left) hook, bait; Carpenter's tools (right) wood, saw. screenshot
The picture will slide up to expose a teacup emblem. Take it.
Go back to the potions shop.
Potions Perfecta
Place the teacup emblem in the open space on the display cabinet (lower right of the display cabinet).
A red gem and a novel page will appear.
Take the red gem.
Click on the novel page.
Playful Teddy's Lullaby Adventures
Put the bean train on the train tracks (lower center of the scene).
Put the magic beans in the train.
Use the small comb on the doll with messy white hair (upper right of the castle).
Put the rodeo doll on the toy horse (lower right shelf).
Use the insta-hair on the bald doll on the second shelf down on the right.
Use the clown nose on the same doll.
Use the oversize tie on the big king bear in the center of the scene.
Use the chopsticks on the geisha doll above and slightly to the right of the king bear.
Engraved Button.
Go upstairs.
Potions Perfecta Attic
You should now have all the buttons to solve the "special picture".
Click on the "special" picture.
On the left, tools for a hunter: bullet, binoculars, deer horn.
On the right, tools for a sculptor: glue, chisel, hammer. screenshot
The picture opens to show an hour hand for a clock. Take it.
Go back to the hall, then go into the antiques store.
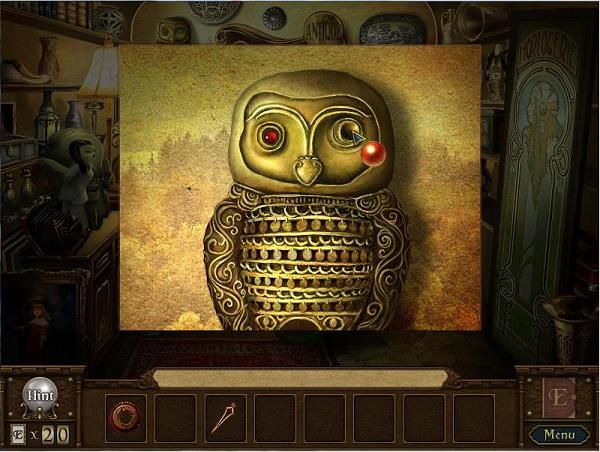
Old Globe Antiques
Click on the owl to the right for a close up.
Place the red gem in the owl's eye socket. screenshot
His beak will open up to show a fish emblem. Take it.
Go back to the hall and proceed forward to the Aquatic Museum.
Aquatic Museum
Go inside and take the right hall back to the Elevator Control Room.
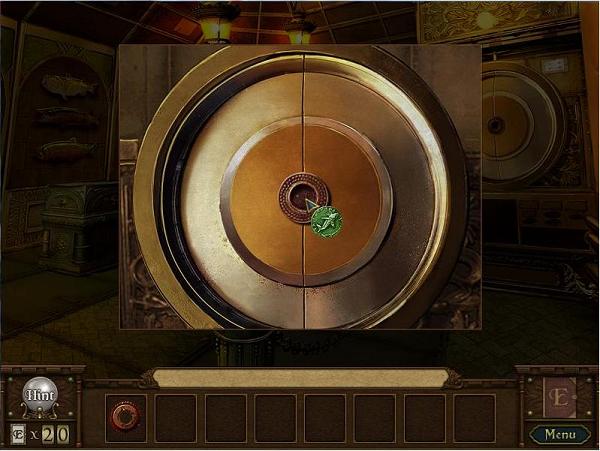
Click on the large circle on the right wall for a close up.
Put the fish emblem in the empty slot in the middle.screenshot
The circle will open up to reveal machinery.
Place the gear in the machinery to repair it.
Go back to the front of the museum.
Now go around the right to the Foral Elevator.
Floral Elevator
Place the last clock hand on the clock.
Click on the clock. You are now in the elevator.
End of Chapter 1
Chapter 2
The Underground Garden
Before you go anywhere turn around and look at the floral elevator. It is no longer functional. screenshot
On the crystal to the left of the elevator is a novel page. Click on it.
Journey to the Ancient Parthenon 2
Put the crusader axe on the crusader shield to the left of the headless statue.
Put the crusader sword on the crusader shield to the right of the headless statue.
Use the scissors on the golden hair of the head in the trunk in the lower center of the scene.
Put the glasses on the squinting statue below the crusader shield on the left.
Put the bow-tie on the bowless bear (just to the left of the harp).
Put the number 5 in the etched slab directly above the headless statue in the center.
Use the sponge on the dirty statue to the left of the bowless bear.
Use the time-reverse bandages on the overcooked turkey to the left of the headless statue.
Engraved Button.
On the crystal to the right of the elevator is a novel page. Click on it.
The Great Museum Caper 2
Use the sledgehammer on the smashable crate in the lower right section of the scene. You can now see the display case behind it.
Use the glass cutter on the thin glass of the display case revealed by smashing the crate.
Use the thief glove to take the gem from the now opened display case.
Put the sandbag in the case where you just removed the gem.
Put the flowers in the vase just to the left of the opened display case.
Use the wire cutters on the wires to the right of the flashing alarm light at the top of the scene.
Put the pirate hat on the pirate.
Give the prehistoric meat to the dino head in the far upper left of the scene.
Engraved Button.
Turn around and face the garden.
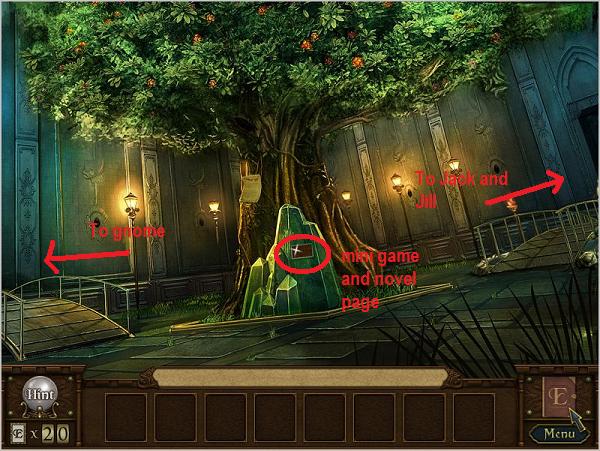
The Underground Garden
Directly in front of you is a crystal formation with a plaque. Click on the plaque to open another matching game. In this game you are matching the animal to it's home. At this point you will have gained the ability to "see" through the cards before you've even clicked on them. Just hover the mouse pointer over a card and the image will start to come through. screenshot
Complete the game to reveal a novel page. Click on the Novel Page.
A Tomb Amidst the Shifting Sands
Use the golden bone on the golden dog statue in the lower left (looks like a greyhound).
Use the hammer on the cracked pot to the lower left of the sarcophagus.
Use the tomb key on the lock that is exposed by breaking the pot. The sarcophagus is now open.
Use the black buttons on the snowman in the sarcophagus.
Use the scarf on the snowman.
Use the gold dog collar on the dog ark statue in the lower right of the scene (black dog laying on a gold platform).
Use the flowers in the vase just to the left of the dog ark statue.
Use the stone wing on the wing-less sphinx (left of the broken pot).
Engraved Button.
Go to the right.
Jack and Jill Statues
There are two statues standing on either side of a globe. Tacked to the base of the globe is a novel page. Click on it. screenshot
Whiddon's Expedition: Atlantis
Put the Poseidon crown on the Poseidon statue's head (right window).
Put the starfish in the star engraving (rocks in the middle window, below the squid).
Put the valve on the inoperable tank (blue oxygen tank between the right and middle windows).
Put the deflated blowfish on the tank hose (just to the right of the tank in the right window).
Use the feather on the ticklish squid (middle window). He will blow out ink.
Use the pipette (eye dropper) on the ink. There is now a zebra fish in the middle window.
Use the twin fish on the zebra fish.
Put the teeth on the alligator skull just below the left window.
Engraved Button.
Around the neck of each statue is a necklace with an inscription.
Jack's inscription: "Jack eats only fruits and they must be colored green. His choice of fruits must be larger than Jill's fruits."
Jill's inscription: "Jill eats only fruits. Her choice of fruits must be smaller than Jack's fruits."
These inscriptions are the clues for one of the "special" paintings.
At the base of each statue is a match game.
Jack's match game: Match a pencil drawing to the same picture in color. Play through the puzzle and receive a machete.
Jill's match game: A simple match game with a twist, they are all pictures of a panda in various poses. Match the identical poses and get a master key.
Go back to the garden.
Underground garden
Go over the left bridge.
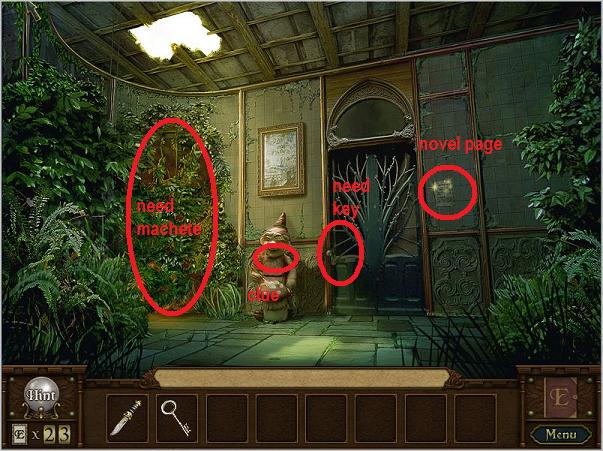
Gnome Room
In the room is a gnome statue with another clue around his neck. It reads: "In the aquatic Elven home, West is what governs earth and East is what governs heaven." This is another "special" painting clue. screenshot
On the wall next to the locked door is a novel page. Click on it.
Forgotten Idol: The Mayan Expedition
Put the Shaman Mask on the Shaman crow (sitting halfway up the far right column).
Put the ruby pupil in the stone eye disc (top of the scene, middle).
Put the beak on the beakless duck (top of the scene, just to the right of the stone disc).
Use the pottery glue on the broken pot (lower left, next to the far left column). A lily pad appears.
Put the frog on the lily pad.
Put the eye patch on the pirate parrot (top left of the scene).
Put the tail on the unbalanced squirrel (to the right of the repaired pot).
Put the twin moth on the brown moth (upper part of the scene, just where the roof opens to the sky).
Engraved button.
Gnome Room
To the left of the gnome statue is an entryway blocked by vines.
Use the machete on the vines.
Go left.
Mine
On the wall on the right is a "special" picture. screenshot
On the left is a large crystal formation with a plaque. Click on the plaque to open another matching mini-game. In this game you are matching the animal to its food.
Solve the matching mini-game to find a novel scene. Click on it.
Whiddon's Expedition: Atlantis 2
Put the pearl in the large clam in the middle window.
Put the tiara on the mermaid statue's head (left window).
Put the royal sceptre in the mermaid's hand.
Put the sharp prong on Poseidon's spear (right window).
Put the martial arts bandana on the Kung-Fu Lobster (below the ships wheel).
Put the gold coin in the gold chest (to the right of the mermaid).
Use the scissors on the stuffed shark's side to remove the stitches (upper middle of the scene). A hand will fall out.
Put the diamond ring on the hand.
Engraved button.
On the chair to the left is another novel scene. Click on it.
And Now, For My Next Trick 2
Use the carpet cleaner for the stain on the stairs (lower center of the scene).
Add the extension cord to the short cord hanging down from the top center circle.
Use the glowing carrot on the neon rabbit.
Use the saw to saw the lady in half (center of the scene).
Hang the balloon on the balloon hook (left of scene, green board with outline of a man. balloon hook is at the top of the board).
Now use the throwing dagger on the balloon.
Use the buttons on the eyeless clown doll.
Use the ghost projection on the crystal ball.
Engraved button.
You now have enough buttons to solve the "special" picture.
On the left: food that Jack likes to eat, apple, watermelon.
On the right: food that grows on trees: coconut, banana. screenshot
The picture will open and reveal a novel page and a blue gem.
Take the blue gem.
Click on the novel page.
Playful Teddy's Lullaby Adventure 2
Put the piano key on the red keyboard (lower right).
Put the white spray paint can on the zebra (striped horse? on the lowest shelf on the left).
Put the horn on the now white horse.
Put the gold knob on the left castle door.
Put the "b" block between the "a" and "c" blocks to the right of the large teddy bear.
Put the yellow halo on the angel doll (top shelf on the right).
Put the green worm on the bitten apple (left, just above the left castle door).
Put the knight doll on the knight hungry dragon (upper left above the castle).
Engraved button.
Go back to gnome room.
Gnome Room
Use the master key to open the door on the right.
Go into the now unlocked door.
Sitting Room
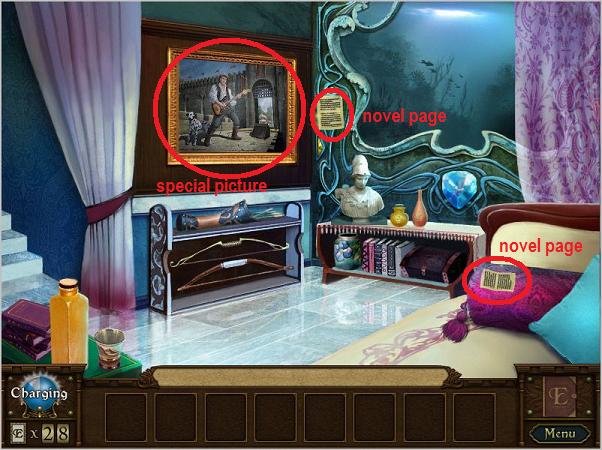
Above the bookcase is another "special" painting. screenshot
On the settee on the left there is a novel page. Click on it.
The Mysterious Clocktower Labyrinth 3
Put the three candles in the shiny candelabra (lower right).
Put the envelope for stocking in the stocking hanging below the red ornaments.
Put the doll spirit on the wooden doll sitting to the left of the cello.
Put the red dragon stitching on the blank red flag (upper left of the scene).
Put the unfried egg in the frying pan (lower right of the scene).
Put the thinking cap on the thinking gargoyle (below the red dragon flag on the left).
Put the plastic eye in the plastic skull (just to the left of the gargoyle).
Put the taste for poison (teeth) on the poison apple (upper left of the scene, just below the first red ornament).
Engraved Button.
You should now have the buttons to solve the "special" picture.
Left: Food that Jill likes to eat, grape, strawberry.
Right: Food that grows on soil: potato, lettuce. screenshot
The picture will open to reveal a ring and a novel page.
Take the ring.
Click on the novel page.
Journey to the Ancient Parthenon 3
Put the gilded plate on the wall with the gilded silverware (upper left of the scene between the two columns).
Use the correction pen on the "fibonacci 4" (the numbers on the wooden shelf right below the headless statue).
Put the record on the phonograph (just to the right of the sketch).
Put the blue feather on the featherless hat (lower right, just below the harp).
Use the pickaxe on the cracked ceiling (upper middle of scene). This reveals a beam of light.
Put the key in ice in the beam of light.
Put the locked box on the key.
Use the tweezers on the incomplete ship in a bottle (middle right of the scene, to the left of the teddy bear).
Engraved Button.
Back up all the way to the garden.
Go right.
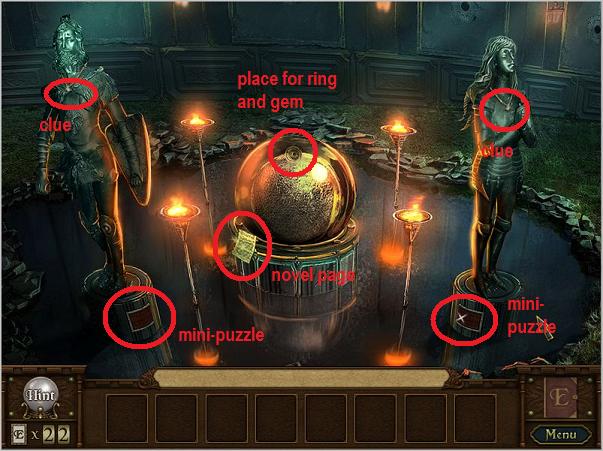
Jack and Jill
Click on the large globe for a close up.
Put the ring in the depression at the top of the globe.
Put the blue sapphire in the ring.
The globe will open up revealing a passage.
Click on the revealed passage.
Aquatic Elf home
The picture on the wall above the bows and arrows is a "special" picture. screenshot
On the bed is a novel page. Click on it.
A Tomb Amongst the Shifting Sands 2
Put the red sun emblem on the chest of the sarcophagus. It opens to reveal a skeleton.
Put the skeleton arm on the skeleton.
Put the yang gem on the yin pot (below and to the right of the sarcophagus).
Put the black paint on the gold cat statue to the right of the yin/yang pot.
Put the Anubis spear in the hands of the Anubis statue (lower left of the scene).
Put the black orb in the eye engraving below and to the right of the yin/yang pot.
Put the can of oil on the dry torch (left of the scene, just above the Anubis statue).
Use the match on the torch.
Engraved Button.
On the wall next to the "special" painting is another novel page. Click on it.
And Now, For My Next Trick 3
Put the sun emblem on the celestial slot (the left side of the "saw the lady in half" box).
Put the trigger on the incomplete rifle (lower left of the scene). A red flag will pop out.
Put the "pow" sign on the red flag.
Put the three swords in the cabinet on the right.
But the bell handle on the bell (just to the left of the sword cabinet).
Put the water bottle on the "sun and water" hat (the top hat sitting on the stage just below where the sun emblem was placed.
Put the magic wand on the wand hat (the top hat just below the ace of hearts card).
Use the lighter on the plate of gunpowder (just below the ace of clubs).
Engraved Button.
Now click on the "special" picture. There are six slots for the picture, but two of the slots have already been filled.
The clues are from the gnome statue.
On the left: what governs the west, dirt, wave.
On the right: what governs the east, cloud, moon. screenshot
The painting will open to reveal a crescent moon emblem. Take it.
Back out of the room to the Jack and Jill room, then back once more to the garden. Once in the garden go left to the gnome room. In the gnome room go through the door on the right.
Sitting Room
To the left there is a blue door with a crescent moon shape on it. Place the crescent moon emblem on the door. Go through the door.
End of Chapter 2
Chapter 3
Chapter 3 begins standing in front of an enormous tower. Go forward into the tower.
Tower Entry
There are novel pages on both the right and left walls, and an object in the lamp above the right novel page which cannot be retrieved yet. screenshot
Click on the right novel page.
Darkwood Manor Haunted Stories 3
Use the scissors on the painting above the fireplace. Treasure is revealed.
Put the top hat on the head of the skeleton just to the left of the fireplace painting.
Use the drum mallets on the rain drum (lower right of the scene). Causes lightning in the windows.
Use the crowbar on the window boards.
Use the key on the coffin lid to the right of the fireplace. A vampire is revealed in the coffin.
Use the garlic on the vampire.
Use the hand of forcasting on the crystal ball.
Put the angel figurine on the death figurine sitting on the fireplace mantel.
Engraved button.
Now click on the left novel page.
Majestic Theater of Nobel Hill
Put the dress on the bare mannequin (to the right of the stage curtains).
Put the handle on the curtain crank (left column halfway up). Curtain opens to reveal a boat.
Put the lion emblem on the blank shield on the boat.
Put the bow and arrow in the hands of the viking in the boat.
Put the flute in the hands of the flutist doll (lower right of the stage, just to the left of the mannequin).
Put the shell on the shelless slug (upper right of the scene, just above the giraffe neck).
Put the cookie with the glass of milk (upper right of the stage, just below the bird's nest).
Put the trumpet with the horn-blowing snake (lower left of the stage next to the stone bust).
Engraved button.
Go forward.
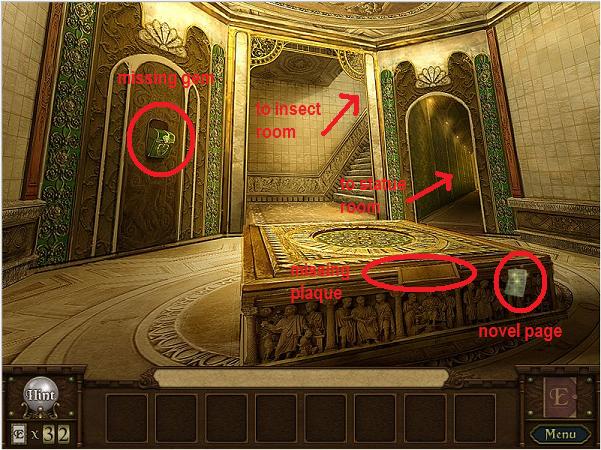
Rotunda
On the left wall is a box missing a gem. screenshot
In front of you is a low carved table missing a plaque.
There is a novel page on the table, click on it.
The Great Museum Caper 3
Put the panel code on the right case panel. Glass panel should open.
Put the egyptian sceptre in the hands of the Anubis statue (in the opened case on the right).
Put the rolled up painting in the empty frame (top of the opened case).
Use the glue on the shattered pieces (open case, second shelf from the top).
Use the chisel on the smooth tombstone (between the pirate and the scholar).
Use the polishing brush on the tarnished pole (right in front of the tombstone).
Put the bleach in the bucket (floor in front of the Mayan princess).
Use the mop on the green stain (to the right of the bucket).
Engraved button.
Go through the door to the right.
Statue Room
The painting on the wall is one of the "special" paintings. screenshot
Below the painting is a patch of ground that smells like flowers.
In the water below and to the right of the right-hand statue is a blue bug. Take it.
On the left-hand statue is a novel page. Click on it.
Playful Teddy's Lullaby Adventures 3
Put the letter "A" on the blank block (left shelf unit, just above the zebra).
Put the crank on the jack-in-the-box (left of the blocks).
Put the antenna on the robot (below and to the right of the large teddy bear).
Put the paper pterodactyl on the chewed gum (left shelf unit, top shelf above the dinosaurs).
Use the pencil on the tic-tac-toe (ceiling, above the geisha doll).
Use the needle and thread on the torn bear (right shelf unit, second shelf down).
Put the piece of white plastic on the rabbit missing an hear (left shelf unit, second shelf down).
Put the 5 red marbles on the tree to the right of the right castle door.
Engraved button.
Go back to the Rotunda.
Go up the stairs.
Insect Room
On a low table to the right is a novel page. Click on it. screenshot
Wild West Jack and the Racoon Gang
Use the shears on the overgrown hedge (far lower right of the scene). This reveals a large walnut.
Use the nutcracker on the walnut.
Use the super age soil on the baby cactus (on the porch to the left of the gunslinger rabbit).
Put the plant needles on the now grown cactus.
Put the crow on the friendly scarecrow (far right of the scene).
Give the bag of cash to the robber raccoon (upper left balcony).
Put the insect stinger on the harmless bee (lower left of the scene, sitting on a cactus).
Put the sheriff badge on the sheriff lizard (upper right of the scene, hanging off the balcony).
Engraved button.
On the wall in the center of the scene are three framed insect collections. Click on the top one for a close up.
Place the blue beetle in the middle top space. The frame will raise to reveal a novel page. Click on it.
Forgotton Idol: The Mayan Expedition 2
Put the stone star in the star slot just to the left of the rotating head carving.
Use the shovel on the ground where "x marks the spot" (lower middle of the scene).
Put the seeds in the hole you just made with the shovel.
Put the hungry rabbit on the plant that appears after you put in the seeds.
Put the pith helmet on the skull sitting to the lower left of the rotating head carving.
Put the battery in the empty flashlight (lower right of the scene).
Use the tiny hammer on the egg that is in the lower left of the scene, just above the broken pot.
Use the white paint on what looks like a chipmunk (skunk?) halfway up the column on the far right.
Engraved button.
Go up the stairs on the left.
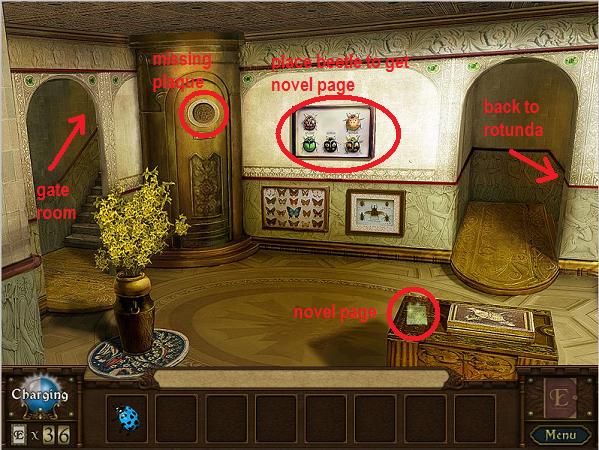
Gate Room
Sitting on the stairs to the right is a screwdriver. Take it. screenshot
Above the table with the globe is a green box on the wall. Click on it to reveal a novel page. Click on the novel page.
Enchanted Forest and the Seven Seals 3
Put the mother bird on the nest with eggs (upper right tree branch).
Put the red gem in the missing eye statue (to the right of the tree, chinese-style dog statue).
Use the key on the locked door in the tree trunk. Reveals a nutcracker.
Put the hard walnut on the nutcracker.
Hit the toy gopher with the toy mallet (lower right roots of the tree).
Use the clippers on the untrimmed bush (between the tree trunk and the dog statue).
Use the paintbrush on the sketch to the left of the tree trunk.
Use the brown dye on the green chameleon (to the left of the carrier pigeon on the upper left branch of the tree).
Engraved button.
To the right of the green box is a door. Go through.
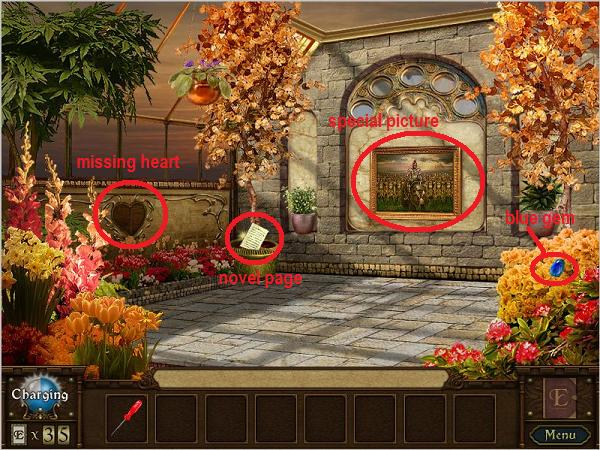
Terrace Garden
On the orange flowering bush to the right of the scene is a blue gem. Take it. screenshot
On the back wall is a "special" painting.
On the left wall is an empty slot in the shape of a heart.
At the base of the potted tree is a novel page. Click on it.
Wild West Jack and the Raccoon Gang 2
Put the gunslinger's hat on the gunslinger rabbit.
Put the bullet belts on bulletless barker (the german shepherd with a gun).
Put the mystery mask on the mysterious moose (between the rabbit and the dog in the doorway).
Put the boxing gloves on the punch hungry pug (dog just below the pig on the left of the porch).
Put the half-loaf of bread on the half loaf of bread sitting on the crates in the upper right balcony.
Use the paintbrush on the unpainted wood of the house (upper right by the window).
Give the antique rifle to the sharpshooter kitten (sitting on the porch roof to the right of the saloon sign). This shoots a hole in the barrel in the lower right.
Put the thirsty rat on the leaking barrel.
Engraved button.
Go all the way back down to the Rotunda.
Rotunda
Click on the box on the left wall for a close up.
Put the blue gem on the box, this reveals a novel page. Click on the novel page.
A Tomb Amidst the Shifting Sands 3
Put the ruby gem in the slot on the column second from the left.
Give the ball of yarn to the playful cat (second shelf from the top, left of the sarcophagus).
Put the stone beard on the stone pharoh bust (top shelf, right of the sarcophagus).
Use the toothbrush on the skull with dirty teeth (top shelf, left of the sarcophagus).
Put the compass in the engraving just above the sarcophagus.
Use the crowbar on the sarcophagus. The sarcophagus will open, revealing a mummy.
Use the bandage on the mummy's uncovered arm.
Put the sunglasses on the mummy.
Engraved button.
Go right to the statue room.
Statue Room
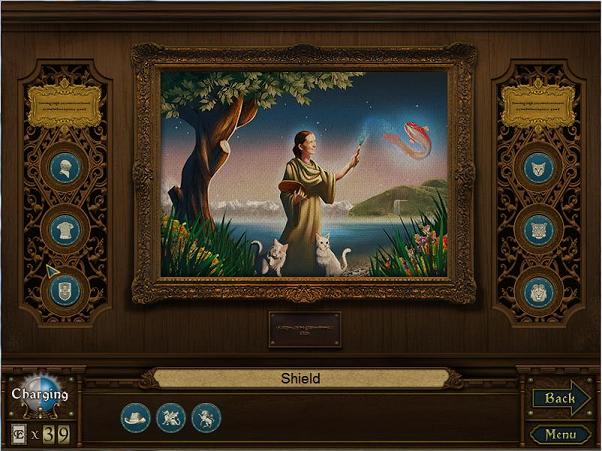
You should now have enough buttons to solve the "special" painting in this room.
Click on the "special" painting for a close up.
Left side: Adorn me and you need not evade the enemy's blade.
Right side: We're all family at our core, yet our voices range from a purr to a roar.
Place the buttons: left side, helmet, chain mail, shield; right side, cat, lion, tiger. screenshot
The painting will rise to reveal a golden plaque.
Go back twice to the tower entry.
Tower entry
Click on the wall sconce to the right for a close up.
Use the screwdriver to open the sconce.
Take the heart gem.
Go forward.
Rotunda
Place the golden plaque on the low table.
A triangle gem will appear in the middle of the table. Take it.
Go upstairs to the insect room and upstairs again to the gate room.
Gate Room
Put the triangle gem on the portrait just to the left of the green box.
The gate is now open.
Go through the gate.
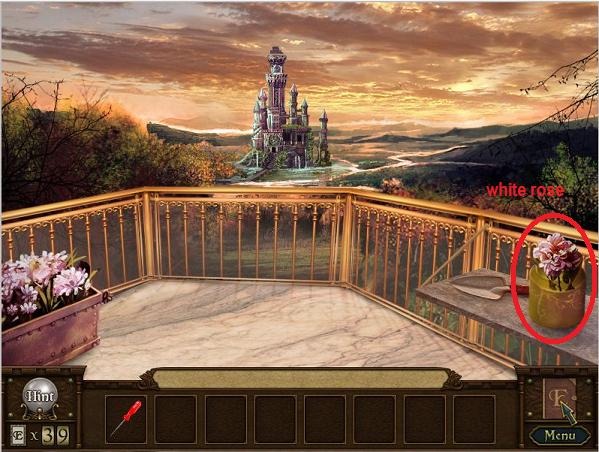
Balcony
In the potted plant to the right is a white rose. Take it. screenshot
Go back and then right to the terrace garden.
Terrace Garden
Click on the left wall for a close up.
Put the heart shaped gem in the heart shaped space.
A novel page will appear. Click on it.
Majestic Theater of Nobel Hill 2
Put the moon piece on the symbol of the moon on the curtains (right side).
Put the strings on the incomplete violin (below the right moon symbol).
Put the pirate patch on the giraffe (upper right of the scene).
Put the skull and crossbones on the black flag (just to the left of the giraffe).
Use the key on the tragedy mask above the curtains (middle). A scene is revealed of a knight and a princess.
Put the gauntlet on the knight.
Put the tiara on the princess.
Use the toothbrush on the dirty-teeth gator head (lower left of the scene, just below the balconies).
Engraved button.
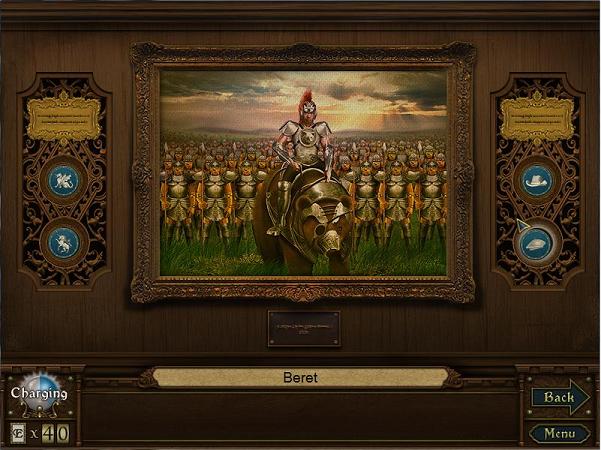
You should now have the buttons to solve the "special" painting.
Click on the "special" painting for a close up.
Left clue: Seen only in movie features, we are mythical creatures.
Right clue: Many fashion trends have we led by resting comfortably on the human head.
Left panel: unicorn, dragon.
Right panel: Cowboy hat, beret. screenshot
The painting will rise to reveal a red rose. Take it.
Go back and all the way down to the rotunda. Once there go right to the statue room.
Statue Room
Click on the dirt area below the painting for a close up.
Place the red rose in the left vase and the white rose in the right vase.
A stone rose will appear. Take it. screenshot
Go back to the rotunda and upstairs to the insect room.
Insect room
To the left of the insect collections is a gilded door with a floral engraving.
Place the stone rose in the circle on the door. The door will open.
Go through the door.
End chapter 3
End Game
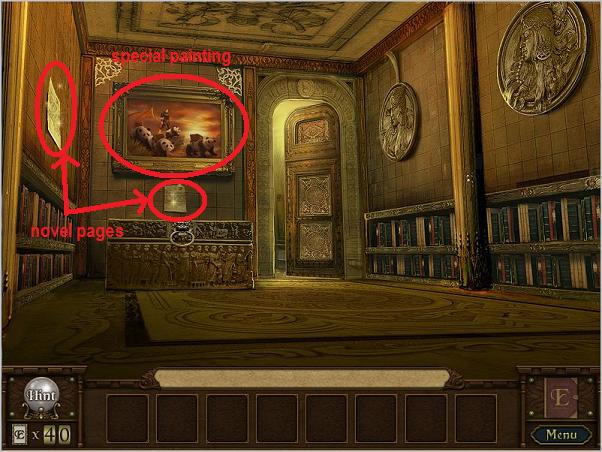
Chest Room
On the far wall next to a door is a "special" painting. screenshot
Underneath the painting is a novel page. Click on it.
Whiddon's Expedition: Atlantis 3
Use the small shovel on the buried teddy bear (middle window, bottom)
Put the heart on the newly exposed teddy bear.
Use the watering can on the bowl-like diving helmet (beneath the middle window).
Put the goldfish in the helmet.
Use the glue on the finless shark (hanging above the middle window).
Put the fin on the finless shark.
Use the lightning bolt on the eel (middle window above the giant clam).
Use the sardine on the hiding turtle (lower right of the scene).
Engraved button.
On the left wall is another novel page. Click on it.
Forgotten Idol: The Mayan Expedition 3
Use the dollar sign on the dollar bill (lower left of the scene).
Use the burglar mask on the bandit fox (to the left of the rotating face).
Put the pearl on the clam engraving (left column, halfway up).
Put the tiny peg-leg on the three legged lizard (above the clam engraving).
Put the signing pen on the autograph book (lower left, just to the right of the broken pot).
Put the warm sleeping bag on the cold snake (blue snake at the base of the stairs below the rotating face).
Put the animal crown on the lion (just to the right of the clam engraving).
Put the hook on the hanging fish (right column, top).
Engraved button.
Go through the door next to the "special" painting.
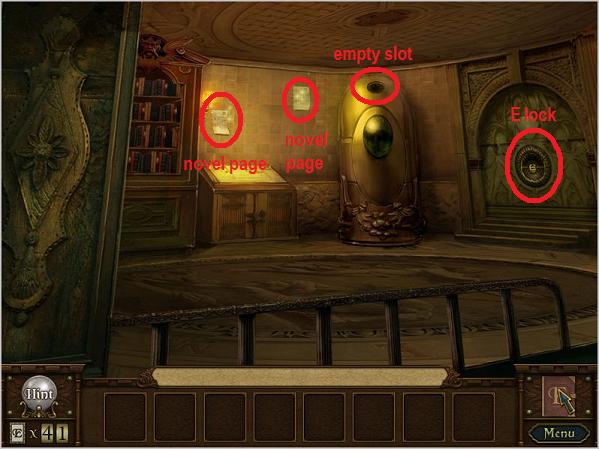
Machine Room
There are two novel pages on the opposite wall. Click on the left page. screenshot
Majestic Theater of Nobel Hill 3
Put the book worm on the apple book (lower left of the stage).
Put the sheriff's star on the policeman doll (crate just to the right of the apple book).
Put the "P" on the crate just to the right of the apple book. This opens the curtains to a bakery scene.
Put the pineapple in the pineapple basket (baker scene).
Put the culinary award on the chef (baker scene).
Put the kitty bell on the siamese cat (baker scene).
Put the head in chair VII (seven).
Put the cleaver with the beaver (lower right of the stage).
Engraved button.
Click on the next novel page.
Wild West Jack and the Racoon Gang 3
Put the boards on the broken window in the upper left of the saloon.
Use the hammer and nails on the saloon sign.
Hang the vacancy sign on the chains below the saloon sign.
Put the top hat on the well-dressed monkey (sitting on the barrel, lower right).
Give the whiskey to the parched porcupine (upper right balcony).
Put the party hat on the pig (porch, lower left).
Give the fish to the hungry eagle (balcony above and left of the saloon sign).
Put the handcuffs on the prisoner parrot (balcony just above the saloon sign).
Engraved button.
Go back to the Chest Room.
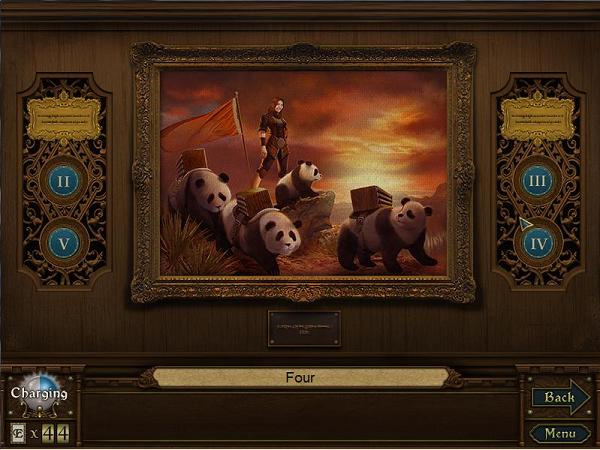
Click on the "special" painting.
Left clue: we sum up to seven.
Right clue: Our difference is one.
Left side: II and V.
Right side: III and IV. screenshot
The painting will open to reveal a golden leaf. Take it.
Go forward to the machine room.
Machine Room
Directly in front of you is something that looks like the time machines from the beginning. At the top of the machine is a round slot.
Put the golden leaf in the slot.
The author will appear and tell you that he's written a story about your adventures. These are the three chapters never seen in the main book.
The door to the machine will open. On the door is a key. Take it.
To the right of the machine is a door with a glowing E. Click on the door for a close-up and use the key.
Go through the door.
You are back in the Library where your adventure began.
Go back to the hall.
Go back to the parlor.
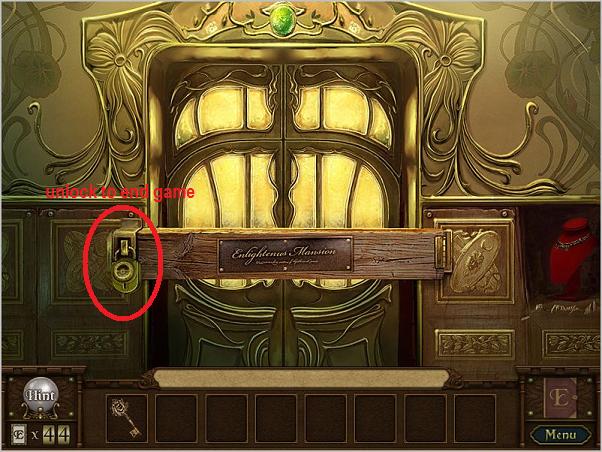
Secret Room ending
At this point in the parlor you can simply go back one more step and use your Enlightenus key to exit and end the game. However, there is a hidden room with one more puzzle. Do not open spoiler if you want to find the room on your own. screenshot
Hidden Room
Go to the right through the door by the armor.
You are now back in the shopping mall.
Go forward to the aquatic museum.
Go into the aquatic museum.
Go down the right corridor to the elevator control room.
There is a door on the far wall with a glowing "E". Click on it for a close up and use the key. Go through the door.
Secret Room
There are some interesting pictures on the wall, examine them for a close up.
The crystal formation has a mini-match game. Click on it to play.
In the mini-match game you are matching toys to their blueprints.
When the mini-match game is over the crystal will shatter, revealing a plaque.
Go down the hallway to the left to return to the Elevator control room.
Go backwards 4 times until you are back in the parlor.
Go backwards one more time to see the locked door.
Click on the lock for a close up and use the key.
Go through the door.
The end.
Posted by: grinnyp |
July 3, 2009 7:49 PM
|
July 3, 2009 7:49 PM