

![]() Endless Escape is a puzzle-oriented mobile game from Mobest Media. It follows the simple but supremely addictive layout made popular by games like 100 Lights and DOOORS, utilizing the room escape formula at its core but confining things to a single space of puzzles presented one after another. Instead of roaming around looking under rugs for four digit keypad combinations, your mission is as simple as finding a key, unlocking a door, then proceeding to the next stage. The methods you'll employ to find that key, however, are delightfully unusual!
Endless Escape is a puzzle-oriented mobile game from Mobest Media. It follows the simple but supremely addictive layout made popular by games like 100 Lights and DOOORS, utilizing the room escape formula at its core but confining things to a single space of puzzles presented one after another. Instead of roaming around looking under rugs for four digit keypad combinations, your mission is as simple as finding a key, unlocking a door, then proceeding to the next stage. The methods you'll employ to find that key, however, are delightfully unusual!
 To locate each level's key you'll need to think outside of your mobile device. Tapping on things usually does the trick, but more often than not, you'll see a few clues that hint at abnormal actions you'll need to take. Things like setting your phone down, shaking it, or even messing about with the game's menu screens are often necessary to obtain the key. You can even combine some inventory items by tapping them in succession, so don't limit your thinking when staring at that locked door.
We've grown to love this trend of distilling escape games down to a series of one room puzzles, and Endless Escape does a great job utilizing the mobile devices' extra abilities. At the time of writing there are 24 levels available to play, with another 24 marked as "coming soon". A bit short for an initial outing, and the levels aren't too challenging, but with any luck, future updates will remedy those issues. The more puzzles the better, and we can't wait to get another set of rooms to escape from!
NOTE: This game was played and reviewed on a Motorola DEFY XT. Game was available in the North American market at the time of publication, but may not be available in other territories. Please see individual app market pages for purchasing info.


Walkthrough Guide
(Please allow page to fully load for spoiler tags to be functional.)
Endless Escape Walkthrough
General Info/Tips
Tap an item in your inventory to activate it, then tap on the screen where you'd like to use it (including on another item in your inventory).
If you're stuck, remember that your device recognizes more actions (or inactions) than just a tap.
This walkthrough will be updated as new levels become available!
Stage 1
Tap the door and head through.
Stage 2
Tap the vase to move it.
Collect the key and use it on the door.
Head through.
Stage 3
Collect the rock to the left.
Use the rock on the glass display.
Now collect the key from the bottom shelf.
Unlock the door with the key and head through.
Stage 4
Using the clue to the left, tap the letters in the correct order.
AFRICA (the A's are not order specific)
Collect the key, use it on the door and head through.
Stage 5
Using the clue to the right, tap the three squares to make them the correct colors.
(left-to-right)
yellow, blue, red
Collect the key from the vase.
Use the key on the door and head through.
Stage 6
Tap each of the squares to create a wire path, using the screenshot below for help.
Screenshot
Collect the key from the safe.
Use the key on the door and head through.
Stage 7
Tilt your device both to the left and right to activate the lights.
Open the door and head through.
Stage 8
Collect the paintbrush on the right and the paint can on the left.
Use the paintbrush on the paint can.
Now use the paint on the wall where the door usually is by swiping your finger.
Open the door and head through.
Stage 9
Tap each of the digits above the door to solve the sequence.
16 (the numbers double left-to-right)
Collect the key off the statue.
Use the key on the door and head through.
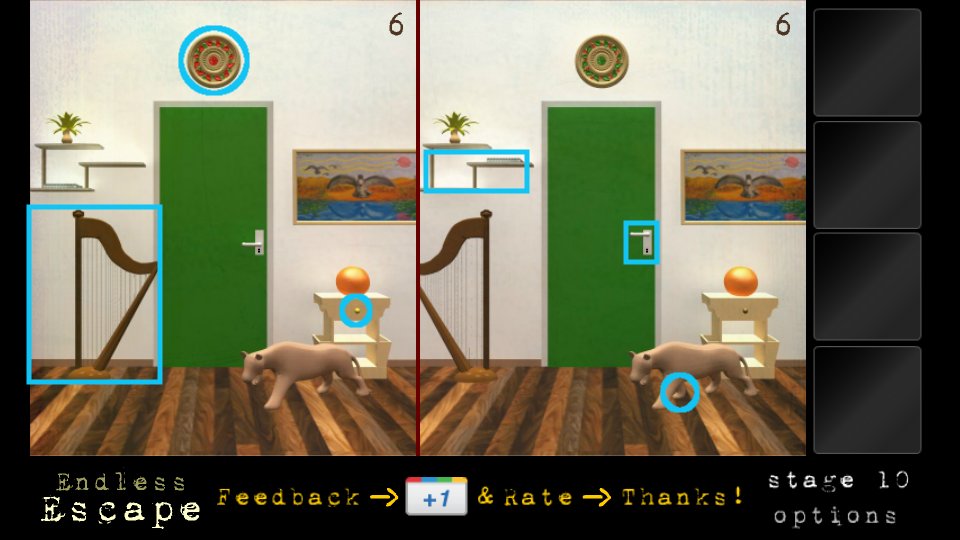
Stage 10
Tap either side of the screen to identify the 6 differences, using the screenshot below for help.
Screenshot
Open the door and head through.
Stage 11
Tap the picture and collect the scissors that drop.
Now tap the vase and collect the cat food you reveal.
Use the scissors on the cat food.
Now use the open cat food on the cat dish.
Collect the key, use it on the door and head through.
Stage 12
Ignoring the clue, simply wait.
Once the light on the timer goes green, tap the door and head through.
Stage 13
Using the clue on the left, enter the code to the right.
Rotate your device clockwise to read the numbers revealed on the left (the blank circles).
1245
Collect the key from the duck.
Use the key on the door and head through.
Stage 14
Collect the scissors hiding behind the desk.
Use the scissors on the hanging to the right.
Now using the clue revealed, tap the door and head through.
tap 4 times
Stage 15
From the clue above the door, open the options menu in the lower right.
Collect the key on the menu, then close it.
Use the key on the door and head through.
Stage 16
From the clue to the left, set your device down (or hold it horizontal if you can keep that still).
Once the Relax-o-meter fills, open the door and head through.
Stage 17
Tap the chair and collect the rag that drops.
Use the rag on the lamp by swiping back and forth on it.
Collect the key, use it on the door and head through.
Stage 18
Use the clue above the door, tap the correct area.
Tap the name "Endless Escape" in the lower left.
Collect the key from the figure that appears from the left.
Use the key on the door and head through.
Stage 19
Shake your device until all four apples have dropped, then collect them.
Use all the apples on the left of the scale.
Collect the key, use it on the door and head through.
Stage 20
Swipe from right to left until you reach a door with a different drawing above the door.
Open the door and head through.
Stage 21
(the arrow keys are used to scroll through your inventory)
Collect the seed on the floor to the right (directly below the key).
Use the seed on the pot to the left.
Now collect the watering can and use it on the pot.
Collect the saw and use it on the tree that grows.
Now collect the boards, nails and hammer.
Use the nails on the boards, then use the hammer on that.
Now use the table on the floor below the key.
Collect the key, use it on the door and head through.
Stage 22
Collect the wire cutters hiding behind the vase and the screwdriver under the table.
Use the screwdriver on the panel, then the wire cutters on the blue and red wires.
Now using the clues above, enter the code on the floor.
The large shape tells you the mathematical function.
The smaller shapes within tell you what numbers to calculate.
The number of sides of the shapes give you the number.
0*4, 3+5, 3/3, 5-3
0812
Collect the key on the table, use it on the door and head through.
Stage 23
Using the balls on the floor as clues, tap the three circles above to the right colors.
The two colors of each circle 'add up' (pigment-wise) to the ball below, left-to-right.
red/yellow, yellow/blue, blue/red
Collect the key out of the crate.
Use the key on the door and head through.
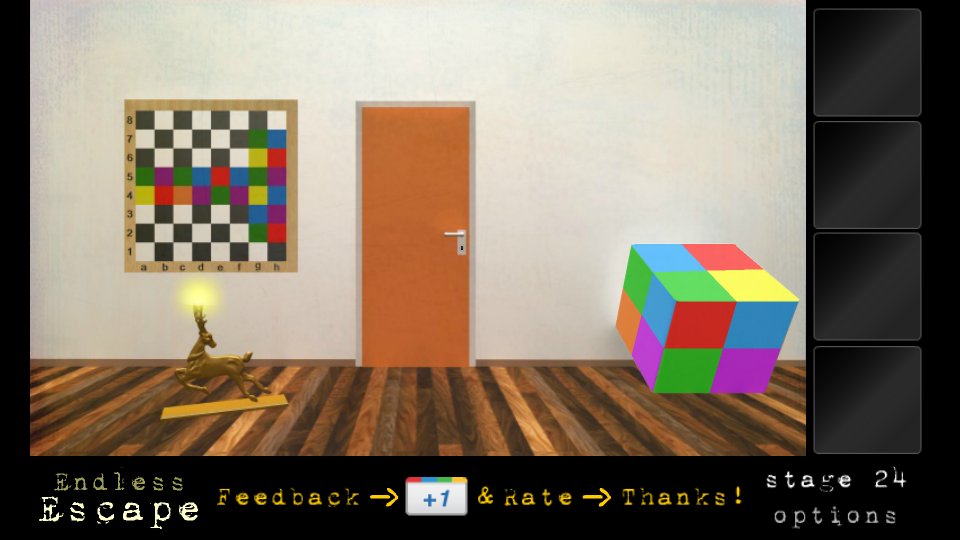
Stage 24
Using the picture on the left, tap the three sides on the cube to the right to match, using the screenshot below for help.
Screenshot
Collect the key off the statue.
Use the key on the door and head through.
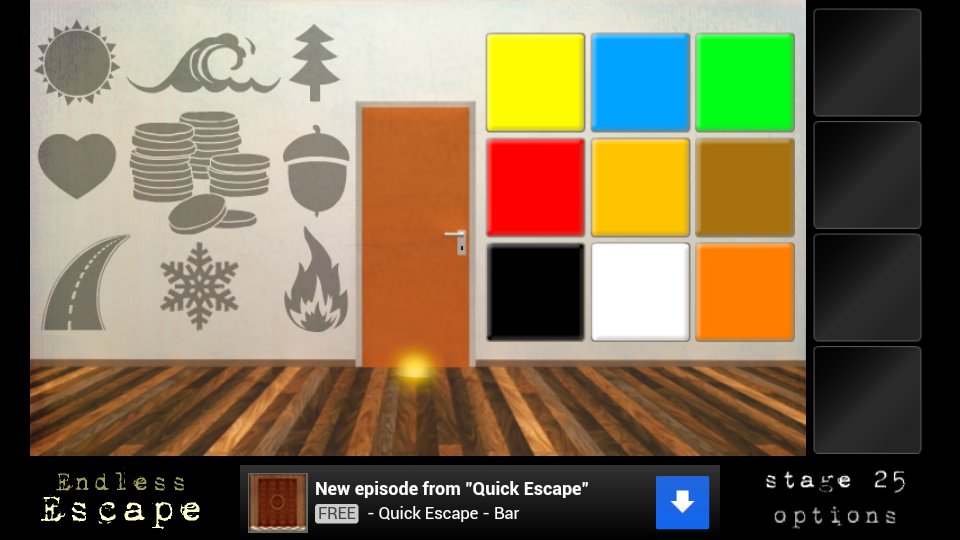
Stage 25
Using the images to the left, tap the squares on the right to the correct colors, using the screenshot below for help.
Screenshot
Collect the key at the base of the door.
Use the key on the door and head through.
Stage 26
Using the clue on the left, tap the correct portions of the wall on the right to duplicate it.
It's a star.
Collect the key below the telescope.
Use the key on the door and head through.
Stage 27
Using the clues on the left, tap the correct arrows on the right.
The arrows will light up green as you tap them in the correct order.
Notice anything about the beginning of the words?
They represent cardinal directions.
east, northeast, south, north, west
Collect the key on the globe.
Use the key on the door and head through.
Stage 28
Using the clues on the left, tap the squares on the right to solve the picross-style puzzle.
Collect the key on the table.
Use the key on the door and head through.
Stage 29
You need a symbol to complete the tic-tac-toe grid on the right, do you see one anywhere?
Tap the new 'x' on the game's title.
Use the 'x' on the empty space on the grid.
Collect the key below the gong.
Use the key on the door and head through.
Stage 30
As the stage starts, while the screen is (mostly) black, make note of the four symbols that appear in the corners.
Tap the squares on the right to match the positions and shapes of each symbol.
(clockwise, starting in the upper left)
diamond, spade, club, heart
Collect the key at the base of the elephant statue.
Use the key on the door and head through.
Stage 31
Using the clue on the right, shake your device.
Once the glass breaks on the cabinet, collect the stethoscope.
Use the stethoscope on the safe and collect the key.
Now use the key on the door and head through.
Stage 32
Tap the gambling machine on the left and collect the coin.
Using the coin, swipe the empty squares below to reveal the key.
Use the key on the door and head through.
Stage 33
Using the symbol in the upper left as a clue, tap the six squares to the correct color.
It's the Google Play symbol (plus there's the word 'play' at the end of the squares).
blue, red, yellow, blue, green, red (from the main google site, the colors of the letters)
Collect the key off the Google Play symbol.
Use the key on the door and head through.
Stage 34
Using the symbols above the door as a clue, move just three of the tiles to create the image on the right.
Move the very top fin to create a diamond with the bottom two fins.
Move the upper left tile to become the lower right fin.
Move the upper right tile to become the lower left fin.
Collect the key off the placard.
Use the key on the door and head through.
Stage 35
There is glass in your way. As before, shake your device.
Once the glass completely shatters, collect the key by the door.
Use the key on the door and head through.
Stage 36
Using the balanced scales given to the right of the door, solve the scale on the left.
The following abbreviations are given to the symbols: E=elephant, B=bear, H=hyena, R=rabbit, M=mouse.
From the scales to the right, you can calculate the following equivalencies: E=3B=6H=18R=72M.
Solution:
mouse, hyena, rabbit, bear
Collect the key from the left scale.
Use the key on the door and head through.
Stage 37
Using the left drawing as a clue, tap each quadrant on the square to the right to fill in the blank.
There is a pattern in the shapes for each column and each row.
Each row/column contains each sized circle.
Each row/column contains a circle with a vertical line and one with a horizontal line.
Solution:
medium-sized circle, no lines
Collect the key from the basket.
Use the key on the door and head through.
Stage 38
Using the clues on the left and above the door, enter the correct numbers on the right.
The numbers on the left appear to be a time and the clue above the door indicates +30 minutes.
But how many clocks have you seen with a frame around it? It must be in a mirror.
Flip the image and add 30 minutes to it to get the correct time.
Solution:
12:45
Collect the key off the statues.
Use the key on the door and head through.
Stage 39
Flip your device screen side down to open the man hole.
After flipping your device back over, collect the key that appears.
Use the key on the door and head through.
Stage 40
Tap the numbers to the right to complete the top two addition problems.
37 and 90
For the last problem, tap the stage number in the lower right to acquire the 40.
Use the 40 as the solution for the bottom problem, then collect the key off the easel.
Now use the key on the door and head through.
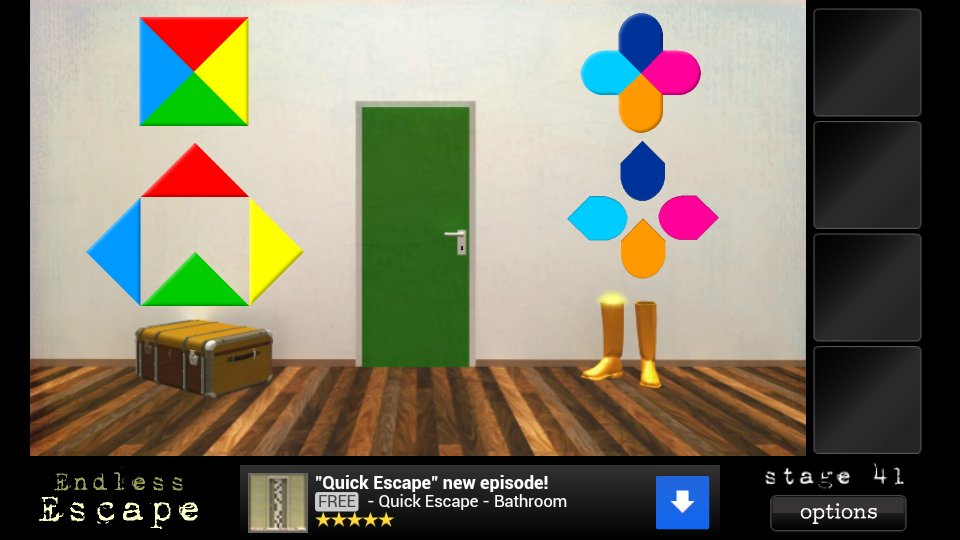
Stage 41
Using the pictures on the left, tap the bottom symbol on the right to make the correct transformations.
Use the screenshot below for help (you must match both the color of each part and the direction).
Screenshot
Collect the key off the boot.
Use the key on the door and head through.
Stage 42
There's nothing you can really do here, but the scene looks funny . . . is that a picture frame? Maybe you're looking too closely.
Use the two finger pinch to zoom out.
Collect the key off the floor.
Use the key on the door and head through.
Stage 43
Using the two triangles on the left as example, enter the correct number in the right triangle.
There is a set of calculations using the outer numbers to find the inner one.
It's just addition and subtraction involved.
Add the top and lower left numbers, subtract the lower right number.
Solution:
55
Collect the key off the plant.
Use the key on the door and head through.
Stage 44
Collect the sharpening stone from the far left.
Now collect the axe head from behind the tree trunk and the shaft in the leaves above.
Combine the sharpening stone and axe head to create a sharp axe head.
Now combine the sharp axe head and shaft to create an axe.
With the axe highlighted, shake your device to cut down the tree.
Once the tree is down, collect the key on the stump.
Use the key on the door and head through.
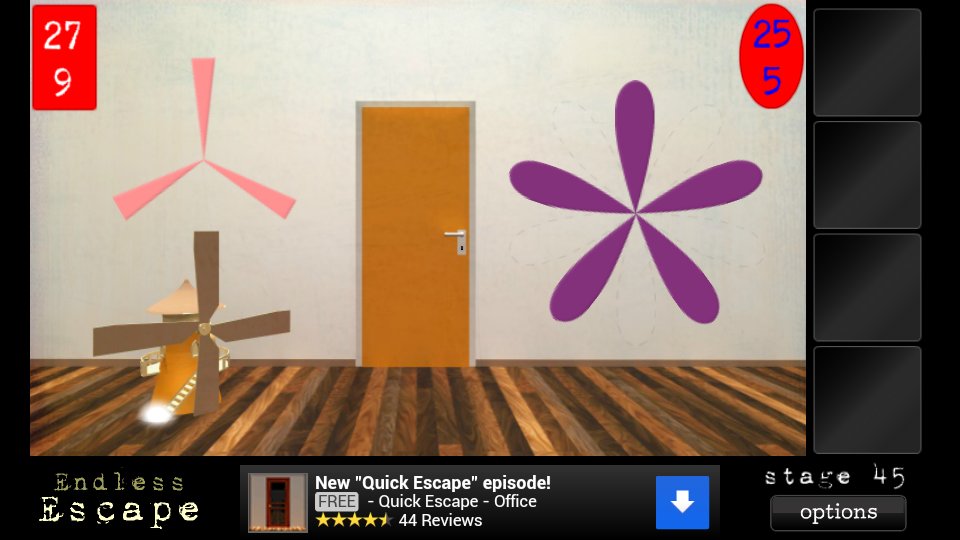
Stage 45
Using the number and color clues on the left, tap the outlined shape on the right to the correct color with the correct number of arms.
Notice how the numbers in the upper left box correspond to the number of arms.
Now notice how the colors of the upper left box correspond to the color of the arms.
Divide the numbers to get the number of arms, combine the two colors to get the arm color.
Use the screenshot below for help.
Screenshot
Collect the key at the base of the windmill.
Use the key on the door and head through.
Stage 46
The clue at the top of the screen tells you where to go to find the key.
Tap 'options', then 'level select'.
Go to Stage 1 and collect the key (it will not appear in your inventory).
Use the same process to get back to Stage 46.
After the key appears in your inventory, use it on the door.
Head through the door to the next stage.
Stage 47
Using the numbers on the candles, tap the correct numbers on the squares to the right.
Notice that there is a pattern to the change of the three candles on the left.
Apply that same pattern to the ones on the right to get the numbers.
The numbers on the left increase by 109, then 111 (and even 113 across the door).
The increase then becomes 205 between the right two candles, so the increase to the next one should be 207.
Solution: 891
Collect the key off the first candle.
Use the key on the door and head through.
Stage 48
This stage consists of four mini-puzzles to solve. There are two 'what doesn't belong' types (upper left ties and lower right outlines) and two 'match the pattern' types.
Upper left tie puzzle:
You'll notice that each tie is in a different color with different patterns. Nothing to get from there.
Is there something else that's common among (most of) them?
The knot of the tie appears to show the pattern at 90 degrees to the rest of the tie.
Tap the tie that doesn't have this feature to X it out.
The fourth (blue) tie.
Lower left arrow puzzle:
Looking at each row of the triangle, you'll notice that each of the arrows in that row has the same shading (filled-in, outlined, etc.).
Now looking along the right line of the triangle, all the adjacent arrows are pointing in the same direction. Following the arrows to the right will show that this holds true.
Following the left line of the triangle now, you'll see that the sets of arrows along that line are of the same color.
With this information, tap the blank area to put in the correct arrow.
Up-pointing, red, empty, outlined arrow.
Upper right colored shapes puzzle:
Do you notice a relationship between the left and right group of shapes? The left set is a 2D representation of a shape that the right set is a 3D representation of.
Considering that, simply tap the right shape until it matches a possible look at that shape.
yellow triangle on the left, red triangle on the right, both rectangular bottoms blue
Lower right outlines puzzle:
First you have to notice that each of the five outlines is actually two shapes intersecting.
There is a relationship between the two shapes in how they intersect.
Once you figure out that relationship, you can tap the remaining outlines.
In each of the sets of outlines, the triangle and parallelogram have a set of intersections that match up with their outer limits (the first set: height-wise, second: width-wise, etc.).
Solution: the fourth set from the left.
Collect the key off the arrow puzzle.
Use the key on the door and head through.
Stage 49
Following the wires from the panel on the left, tap the corners of the panel on the right to match in color.
Upper-left: blue
Upper-right: pink
Lower-right: red
Lower-left: yellow
Collect the key on the floor to the right.
Use the key on the door and head through.
Stage 50
Using the scale on the left as a clue, you must put the correct numbers in the blank squares to the right to balance the sides.
There is 18 on the right and a 4 on the left, so you need 14 more on the left.
The exact numbers you use and which square you put them in don't matter as long as they add up to 14.
Possible solutions: 5/9, 9/5, 6/8, etc.
Collect the key off the scale.
Use the key on the door and head through.
Stage 51
On this stage, there are four digits you need to enter on the right wall and a light button on either side of the door.
By pressing the light buttons, you see two different patterns that appear in their respective corners.
Using these patterns as clues, enter the correct number on the wall.
By overlaying these patterns, you'll be able to make out four numbers.
8579
Collect the key off the cabinet.
Use the key on the door and head through.
Stage 52
The basketball hoop and stationary bicycle give you a clue as to the point of this stage.
Now press the START button and subsequently the STOP button.
You'll notice a number appear between the '4' and '5', but playing around more you'll see that the number changes depending on how long between when you press START and STOP. It's acting like a stopwatch.
The numbers on either side of the underscores tell you what your target range is, so get to counting seconds.
There's no real cheat to this, you have to just get the timing right.
If you have a watch/clock nearby, don't be afraid to use it to help you.
If you're counting the seconds manually, it may throw you off if you're listening to music.
Collect the key from the top of the basketball hoop.
Use the key on the door and head through.
Stage 53
Collect the metal detector from behind the plant and the drill off the bookshelf.
With the metal detector highlighted, tap around the scene until you find the right spot (a red 'x' will appear).
On the left wall just below the leftmost leaves of the plant.
Use the drill on the red 'x'.
Collect the key from the hole.
Use the key on the door and head through.
Stage 54
The moves necessary to win this level appear to be mostly randomized. The only pattern I've seen the times I've won are that I win with a different move with each person (so if I win with rock with the first guy, it'll be paper or scissors for the lady).
As evidence by the buttons on the left and the symbols above the people, you're here to play Rock, Paper, Scissors with these three people.
Unfortunately, as mentioned above, what your opponent will play seems to be randomized, so there is no strategy.
If you win a round, you'll move onto the next person. If you tie, you'll play that person again. If you lose, you have to play all your opponents over again.
When you finally win, collect the key off the couch.
Use the key on the door and head through.
Stage 55
From the clues on the wall, you must match the correct girls and guys by placing the correct number under the guy for the girl on the left.
I do not fully understand the logic of the match-ups, so in the spoiler below I have the answer and what I've been able to deduce about this puzzle.
Solution: (left-to-right, top-to-bottom) 3412
It seems that the clues next to each person applies directly to them.
Girl 1 likes Andrew and skateboard, so Guy 1 is the lower left one.
Girl 3 has a white bag (but also has it crossed out?), so either the upper left or lower right guy is Guy 3.
Girl 4 is not Alison, so from the names on the right should either be Anne, Andrea or Angela.
After enter the correct numbers under the guys, collect the key on the left.
Use the key on the door and head through.
Stage 56
Make note of the upside down guy above the door.
Flipping your device upside down to help, enter the numbers on the wall to match what the numbers above them are when flipped.
1961 on the left.
1502 on the right.
Collect the key out of the plant.
Use the key on the door and head through.
Stage 57
Using the cypher on the right, enter the correct 3 letter code on the left.
Notice that the triangle symbols begin with an 'F' and the crosses with an 'M'.
The single symbols have an 'A' in the middle, dual symbols have an 'O' and triple an 'I'.
Blue symbols end with 'N', yellow symbols with 'T' and red symbols 'R'.
Three red triangle symbols=FIR
Collect the key below the bench.
Use the key on the door and head through.
Stage 58
Tap the string in the upper left to get a needle to drop.
Now tap the haystack to find the needle.
On the right above what appears to be the first level of hay (lower right area).
Use the needle on the chest.
Collect the key, use it on the door and head through.
Stage 59
Using the telephone booth as a general clue, you must guess the next pattern from the progression on the left.
The colors of the buttons don't actually matter as the upper left square will always be blue, the next one red, etc.
Think of the squares like a telephone keypad. Then you get a progression of:
2/3-2/4-1/6-3/5-2/7
Which adds up to: 5-6-7-8-9
So, considering what the next number should be, enter any pair of 'numbers' on the grid to get it.
You need to add up to 10.
Remembering the color-number correlation (odds are blue, evens are red), enter any pair that adds up to 10.
Possible solutions: upper left blue/lower right blue, upper middle red/bottom middle red, etc.
Be sure all the other squares are left blank and not with question marks.
Collect the key to the far right.
Use the key on the door and head through.
Stage 60
Tap the door to open it and reveal a brick wall.
Just as the wall commands, shake your device to 'jump'.
Once a rather large hole has appeared on the floor, tap it to go through.
Congratulations! You've beat the game!!!
Posted by: Kyh |
October 19, 2012 9:11 AM
|
October 19, 2012 9:11 AM