


![]() You're not sure who you are. You don't know where you are. And a mysterious dark shadow is following you around, clouding your memory. It's shaping up to be quite a bad day as Echoes of Sorrow, a new casual adventure game from BlitPop, begins. This title drops a few hidden object scenes to flavor an otherwise straight-up free roaming adventure game that emphasizes exploration and inventory puzzles. Not only do you have to gather items from various parts of the game, but you're usually not sure what to do until the very last moment. It's a smartly paced game that hits all the sweet spots for casual adventure fans.
You're not sure who you are. You don't know where you are. And a mysterious dark shadow is following you around, clouding your memory. It's shaping up to be quite a bad day as Echoes of Sorrow, a new casual adventure game from BlitPop, begins. This title drops a few hidden object scenes to flavor an otherwise straight-up free roaming adventure game that emphasizes exploration and inventory puzzles. Not only do you have to gather items from various parts of the game, but you're usually not sure what to do until the very last moment. It's a smartly paced game that hits all the sweet spots for casual adventure fans.
 With very little information to go on, you feel much like the main character in Echoes of Sorrow as you start playing. A short, textless cutscene introduces things, and then you find yourself thrown into the game, staring at a few strange and haunting scenes right off the bat. The interface is standard, assigning all actions to the mouse and a cursor that changes when hovering over something you can interact with, so there's at least one familiar thing you can hold on to at the beginning.
Echoes of Sorrow is divided into small areas that represent a portion of the main character's past. You must unlock these one by one, completing the puzzles within each to learn more about the characters' pasts and freeing pieces of your soul in the process. For example, the first area puts you in your childhood home, filled with mildly disturbing images from your past. You'll eventually move on through your life, setting emotions at ease and filling in the massive gaps in your memory.
Puzzles are largely inventory based and feature a lot of backtracking, collecting, and experimentation. You'll often need to find certain items in order to gain access to parts of the level introduced early on, forcing you to abandon scenes in favor of pressing onward. Eventually you'll gather the things you need and be able to gut the entire level of its secrets, but accomplishing that requires some thorough exploration and a very keen eye.
 Hidden object scenes are kept at a minimum, with just three or four very short interludes per area. They're also surprisingly easy, with just a dozen or so items to find, none of which are obscured or masked in any strange way. The hit box for clicking on items is also rather large, making it easy to accidentally nab something you weren't even sure you were trying to take. The game's hint system is very generous as well, so if you're not one for hidden object games, you don't have to overlook Echoes of Sorrow!
Analysis: Echoes of Sorrow is a smartly-made game that holds fast to its casual adventure roots. Level design is surprisingly open-ended, affording you the freedom to roam around, click on things that interest you, and gather things as you please. The puzzles are also well-done, though they require more of an eagle eye than a genius brain. If you ever get stuck, it's probably because you missed some detail in a room, not because you can't figure out how to solve a puzzle in front of your face.
The whole amnesia shtick has been done many times before, but in the case of Echoes of Sorrow, it actually works quite well. The story unfolds while you play, introducing bits of information as you solve puzzles and explaining a few things with quick cutscenes before and after each area. Even though it's trite, the story and setting in Echoes of Sorrow is one of the game's several strong points, so don't pass it by simply because it stars an amnesiac!
Although the mini-games are kept to an absolute minimum, Echoes of Sorrow has some of the most creative diversions I've seen in a game of this genre. For example, in the first area, you'll find a child's picture created with bits of fabric. Your job is to drag the cutouts to where they belong, much like an abstract dress-up game. Unusual? Yes. Fun? Very much so.
A strong adventure game that doesn't deviate from its core, Echoes of Sorrow will keep you busy for several intriguing hours, unfolding an interesting story while leading you through an unusual world filled with memories and mildly unsettling images.
![]() Windows:
Windows:
Download the demo
Get the full version
![]() Mac OS X:
Mac OS X:
Not available.
Try Boot Camp or Parallels or CrossOver Games.


Walkthrough Guide
(Please allow page to fully load for spoiler tags to be functional.)
Echoes of Sorrow - Walkthrough
General
There is no time limit.
Pink shining areas can mean two things, moving your cursor over it will show you what you are dealing with:
If you move your cursor over the pink area and you see object shadows, it means that this is a ghost puzzle. Solving it will make a ghost appear and give you an important object part to solve this particular location.
If you move your cursor over the pink area and no objects are shown, it means that this puzzle has to be solved either to obtain an inventory object or to move on to another area.
The hint recharges quickly and will show you a random object from your list to use in search scenes.
The hint will also work outside the search scenes and show you objects laying around you might have missed.
It will also show active parts in the actual area, no matter if you already have the needed objects for this particular puzzle or not.
Search scenes are marked by a light sparkle.
Listed objects in the search scenes are not very meaningful. After finding all objects of the list, a word will appear written in blue. Find this object and it will go into your inventory.
Search scenes and puzzles are not random.
There is no journal: You may want to write down numbers or codes when you find them, or you will have to go back and forth to look it up.
The inventory panel at the bottom center will auto-hide; move your cursor over it to open.
1. Train/Main Square
As soon as the shadow disappears, grab the part of a ticket (1/5) from the suitcase on the ground, right side.
Zoom in on the bench and play the search scene to obtain clock hands (middle of the bench).
Zoom in on the schedule on the right side of the gate and note the time of 10:35.
Zoom in on the clock above the gate, place the clock hands and set the time to 10:35.
Go through the now open gate.
House
2. Garden/Hall
Note the pink area on the left: Moving your cursor over it, you will see that a tire and a rope are needed.
Pick up the tire in front of the dog house.
Zoom in on the fallen mail box and grab the red crayon.
Note the numbers on the envelop: 5937
Click the door of the house and enter.
Take the painting (1/6) from the wall above the stairs.
Grab the red brick sticking out a little from the wall on the left of the stairs.
Grab the painting (2/6) from the table on the left, next to the stairs.
Take the painting (3/6) from the floor on the right, next to the stairs.
Grab the drawing from the table in the low right corner.
Zoom in on the beam with the red symbols on the wall on the right, next to the stairs.
Use the red crayon to write the number 60 (simply click on it).
A ghost of a girl will appear; grab the part of a picture (1/6) that is now on the ground right next to her.
Push the armoire from the wall and click the wall to learn that you need some sharp tool here.
Go right into the living room.
3. Living Room/Children's Room
Grab the 3 paintings (4-6/6) standing in the living room.
Zoom in on the drawer in the low right corner and grab the 4 gears.
Zoom in on the wall on the far right and place the paintings (here and Spoiler 2); just click 6x and they will go into the right spot automatically.
A ghost of a girl will appear; grab the part of a picture (2/6) right next to her.
Go back 1x and upstairs into the children's room.
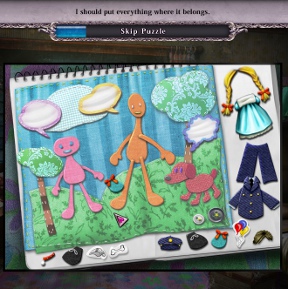
Zoom in on the chest on the low right and take the yellow cloth.
Put the drawing (Spoiler 2) on the scrap book on the floor in the middle of the room to activate a mini game. Your goal is to dress the paper dolls.
Take the items from the outer edges and place them on the dolls by left clicking.
A ghost of a girl appears; grab the part of a picture (3/6) right next to her.
Zoom in on the bed below the window and play the search scene to obtain a ballerina (low left corner).
Go back into the garden.
4. Garden/Hall/Basement
Click the basement window under the right side of the porch.
Use the yellow cloth (Spoiler 2) to clean the window; you may either click on the dirty spots or click and drag with the left mouse button over the window).
Use the brick (Spoiler 1) to break the window and grab the box cutter.
Return to the hall.
Use the box cutter on the wall where the armoire was standing before.
Zoom in on the view of the door that appears. Use the arrows to change the shown numbers into the middle according to the number you saw on the envelope inside the mail box (Spoiler 2).
5937
The door opens; enter the basement.
Play the search scene to obtain a handle (top shelf).
Use the box cutter with the rope coil on the low left in front of the locker to obtain a piece of rope.
Go back to the garden.
5. Garden/Living Room
Place first the rope (Spoiler 4) and then the tire (Spoiler 2) on the tree to the right.
The ghost of a girl appears; grab the part of a picture (4/6) below the tire.
Return to the living room.
Zoom in on the chest on the table in the middle of the room.
Place the 4 gears (Spoiler 3) and arrange them so that all gears are moving.
Now place the handle (Spoiler 4) and place the ballerina (Spoiler 3).
The little drawer opens; take a part of a picture (5/6).
Go upstairs.
6. Children's Room/Basement/Main Square
Play the search scene in the children's room to obtain a doll part (1/2) (left side, pink dress).
Return to the basement.
Play the search scene to obtain a doll part (2/2) (middle shelf, button).
Use the doll parts to zoom in on the table on the right.
Restore the doll by placing all the pieces in the correct position.
The ghost of a girl will appear; take the piece of a picture (6/6) from the table.
Return to the children's room.
Use the pieces of a picture (Spoilers 2, 3, 5, 6) to zoom in on the photo frame on the armoire on the left.
Reassemble the picture; parts in the right place will lock and can't be moved anymore.
Watch the cut scene to see the regained memories about your twin sister.
You will receive a white crystal and be brought to the Main Square.
Place the white crystal onto the white flame in front of the house. This will remove one chain from the statue and open the red door to the College (second door seen from left).
Enter your College memories.
College
7. Lockers/Classroom
Zoom in on the cabinet above the stairs and take the hammer.
Zoom in on the fire alarm on the left side and use the hammer 5x to break the glass.
Click the lever to activate the sprinklers.
Take a look at the loose tile on the floor where the water was.
Grab the car key.
Go upstairs to the Classroom.
Take the rose from the table in the low right corner and play the search scene at the desk to obtain a hack saw.
Go downstairs and use the hacksaw on the padlock of the door straight ahead.
Go outside.
8. Outside/Corridor
Use the car key (Spoiler 6) to open the trunk of the car and take the car jack.
Use the car jack to raise the car; zoom under the car and take the strings (1/4).
Zoom in on the pedestal on the far left and take the strings (2/4).
Use the stair ahead to enter the Corridor.
Click the announcement board on the far left and have a look at the diagram.
Click the fuse box on the lower right wall. Your goal is to move the levels to match those in the diagram.
You will need to adjust the levels; start with blue and set it on 3/4, red 1/2, green on 0, yellow on 5/8, blue on 3/4, red on 1/2 and last green on 0.
Now you have light. Zoom in on the box on the low right side and grab the screwdriver.
Zoom in on the grate on the left side, right next to the door and use the screwdriver to remove the screws.
Grab the string (3/4) and the chalk.
Zoom in on the door mat on the left and place the rose (Spoiler 7) onto it.
The ghost of the man appears; take the slide (1/5) from the ground on the right side of the door.
The door is open now, enter the room.
9. Room/Lockers
Play the search scene on the balcony to obtain a key.
Zoom in on the ripped pillow on the couch, right side; take the string (4/4).
Zoom in on the trash bin on the left, next to the desk, and take the lever.
Go back 3x times and use the key on the locker with the No 7.
The locker door opens and the ghost of a man appears. Zoom in on the locker and take the slide (2/5).
Use the stairs up to the Classroom.
10. Classroom/Room
Play the search scene to obtain a keyboard.
Use the chalk on the chalk board.
The ghost of a man appears; take the slide (3/5) on the left next to him, leaning on the chalk board.
Return to the Room (1x back, 2x forward, left into the room).
Place the keyboard on the desk.
The ghost of a man appears; take the slide (4/5) to the left on the desk.
Play the search scene on the balcony to obtain a knife.
11. Outside/Classroom/Main Square
Go outside and zoom in on the guitar on the tree, right side.
Use the strings (Spoiler 8, 9).
Zoom in on the half of a heart on the tree. Use the knife (Spoiler 10) four times to finish the heart.
The ghost of a man appears; take the slide (5/5) from the blanket.
Return to the Classroom.
Zoom in on the window blind control on the top far left and use the lever (Spoiler 9) to darken the room.
Place all 5 slides (Spoilers 8, 9, 10) in the slide projector.
Watch the cut scene to see the regained memories about your college boyfriend. You will receive an orange crystal and be brought to the Main Square.
Place the orange crystal into the orange flame.
This will remove one more chain from the statue and open the door to the prison (first door from the right).
Enter the Prison.
Prison
12. Prison Yard/Watchtower
Zoom in on the toolbox in the low right corner and take the pliers.
Zoom in on the lamp above the door on the left side and take the red cable.
Use the pliers to cut a hole into the fence on the far right and go to the Watchtower.
Zoom in on the framed newspaper clipping to the right of the entrance and note the number 1962.
Play the search scene to obtain a crowbar.
Click the spotlight on the left and use the red cable.
Go back to the Prison Yard and play the search scene at the bleachers on the far left to obtain scissors.
Enter the Security through the door on the left side.
13. Security/Warden's Office
Use the crowbar (Spoiler 12) to remove the planks from the door straight ahead.
Zoom in on the keypad on the left, next to the door, and type the number you saw on the framed clipping (Spoiler 12).
1962
Enter the Warden's Office.
Use the scissors (Spoiler 12) on the curtain on the lower left side. The curtain will go into your inventory.
Take the light bulb from the windowsill you are able to see now without the curtain.
Zoom in on the painting on the wall behind the desk and use the scissors to cut the painting.
Take the security card.
Zoom in on the chair on the right, next to the desk, and take the two bullets.
Use the light bulb with the desk lamp on the left side of the desk.
Take the cigar box key you can now see in the lampshade.
Use the key to open the cigar box on the right side of the desk; take the closet key.
Use this key to open the closet on the right side of the room and take out the file (1/7).
Return to the Watchtower.
14. Watchtower/Prison Yard
Play the search scene at the Watchtower to obtain a basketball.
Use the scissors with the shotgun on the left side of the tower entrance.
Inside the inventory it will automatically combine with the bullets (Spoiler 13).
Return to the Prison Yard and play the search scene to obtain a lever.
Place the basketball in the hoop.
The ghost of a prisoner will appear; grab the file (2/7) next to the Security entrance.
Enter the Security.
15. Security/Cafeteria
Use the shot gun (Spoiler 14) with the glass wall on the right.
Take the iron ball in the low right corner and use it with the shackles on the floor.
The ghost of a prisoner will appear; grab the file (3/7) on the left next to the chair.
Click the security control panel on the far middle to activate a mini-game. Your goal is to press the correct combination of numbers in the right order
Use the equations as clues to the sequence and substitute the blue and white numbers to complete the 3 equations.
Numbers can be used more than once.
Press 4-3 (=7) for the left, 8-3-1 (=10) for the middle and 4-5-7 (=13) for the right equation.
This opens the door to the Cafeteria; enter.
Take the knife and the empty jug from the table on the right side.
Use the knife with the loaf of bread on the tea trolley to get a slice of bread.
Take the mop out off the bucket on the low right side.
Zoom in on the cabinet on the far right side and grab the soup ladle.
Click the chalk board on the column left next to the closet and learn about the inmate meal.
Take the funnel from the tablet on the low left side.
Enter the Green Mile through the door on the far middle.
16. Green Mile/Execution Room
Use the mop (Spoiler 15) on the pink footprints on the left side.
The ghost of a prisoner will appear; grab the file (4/7) in front of the cell No 10 on the left side.
Zoom in on the monitoring screen on the far right to activate a mini-game. Your goal is to open all the cells by pulling the levers.
Each lever effect more than one cell.
Picture the levers as A, B, C (from left to right).
Pull C, then B.
Play the search scene in cell No 10 on the left side to obtain a valve handle.
Zoom in on the card reader on the far right and use the security card (Spoiler 13).
Enter the rear door to the Execution Room.
Take the lighter in front of the chair.
Zoom in on the power box on the left wall.
Your goal is to rotate the rings so that power can flow from start to finish.
Click each ring 6x.
Use the lever (Spoiler 14) on the chair switch on the right side and click it.
The lights will chase the dark shadow away; take the part of a ticket (2/5) from the floor.
The ghost of a prisoner will appear; grab the file (5/7) at the chair.
Return to the Cafeteria.
17.Cafeteria/Green Mile
Zoom in on the pipe on the far left and place the valve. The sprinklers will start and extinguish the fire.
Use your empty jug (Spoiler 15) with the water to fill it.
Fill the glass on the tray at the table on the right side with the water jug.
Use the soup ladle (Spoiler 15) with the pot on the oven and fill the soup bowl on the tray.
Place the slice of bread (Spoiler 15) on the tray.
The ghost of a prisoner will appear; grab the file (6/7) from the left bench.
Return to the Green Mile an play the search scene in cell No 10 to obtain a magnifying glass.
Go back to the Warden's Office.
18. Warden's Office/Main Square
Use the magnifying glass on the blood stain on the floor.
The ghost of a prisoner will appear; grab the file (7/7) from the floor.
Use all 7 files (13, 14, 15, 16, 17, 18) with the dossier on the desk to activate a mini-game. Your goal is it to put the evidence in chronological order.
Look at the colored tag on each photo and find the matching color tag on the right.
Take the time on the tag and add or subtract the amount of time on the photo.
Place the photo into the appropriate time slot.
A photo in the right slot will lock and cannot be moved anymore.
You will need to place the photos from left to right: yellow, purple, pink, blue. green, orange.
This will regain your memories about the janitor you accused of murdering your college boyfriend. You will receive a blue crystal and automatically be brought back to the Main Square.
Place the crystal in the blue flame; this will remove another chain from the statue and open the door to the church (first door from the left).
Enter the church.
Church
19. Church/Graveyard
Take the devil statuette in the low left corner and the broom in the low right corner.
Zoom in on the statue on the right side and take the cross key.
Go through the door on the far right side to enter the Graveyard.
Grab the hose from the second grave stone on the left side.
Take the wing (1/2) from the statue behind the first grave on the left side.
Zoom in on the spot left next to the shed entrance and take the shovel.
Play the search scene on the shed entrance to obtain garden shears.
Use the shears with the dead flowers on the grave on the left side and use the shovel on the grave after.
Go forward to the Bell Tower
20. Bell Tower Entrance/Bell Tower
Take the wing (2/2) from the statue on the right side.
Take the stairs on the left side.
Use the broom (Spoiler 19) to remove the spider webs on the ladder and take the ladder afterwards.
Take the dagger from the frame on the left side.
Zoom in on the painting on the far left and take half of a photo.
Go downstairs
21. Altar/Bell Tower Entrance
Zoom in on the rear door and use the cross key (Spoiler 19) to open it.
Enter the Altar.
Zoom in on the shelf on the far left side and take a part of a tablet (1/4).
Take the golden jug right next to the Altar.
Use the dagger (Spoiler 20) to cut the cloth of the altar and take the angel statuette.
Exit the room and use the golden jug with the water basin on the left side. The filled jug will go back into your inventory.
Return to the Church.
22. Church/Dungeon
Place the wings (Spoiler 19, 20) on the statue in the far back. This will open the hatch to the Dungeon.
Go down.
Use the dagger (Spoiler 20) on the seed pack in the low right corner to obtain seeds.
Zoom in on the skeleton on the right side and take the axe.
Play the search scene at the coffin to obtain a crucifix.
Place the angel statuette on the pedestal to the far left and the devil statuette on the pedestal on the far right.
Use the lighter (Spoiler 16) to light the torches above the statuettes.
A ghost of Dad appears after lighting the torch on the left side; take the photo (1/6) on the left next to him.
The dark shadow disappears when you light the torch on the right side; take the part of a ticket (3/5) from the wall on the right side of the torch.
Zoom in on the book in the far middle and note the positions of the angel and the devil.
Zoom in on the devil; your goal is to match the position of the devil with the picture in the book.
Use the arrows to do so. Click the arrows on the right side:
Top, middle, bottom, top
The pedestal opened, take out a part of a tablet (1/2).
Zoom in on the angel and use the left arrows top and middle and the middle arrow on the right side.
The pedestal opened, take out a part of a tablet (2/2).
Return to the Church.
Use the axe to remove the planks on the right side.
The ghost of Dad appears, grab the photo (2/6) on the right side of the altar.
Use the rear door to enter the Graveyard.
23. Graveyard/Bell Tower Entrance
Play the search scene to obtain a bell clapper.
Use the seeds (Spoiler 22), then the jug with water, on the grave on the left.
The ghost of Dad appears; grab the photo (3/6) leaning on the lower side of the grave.
Use the axe (Spoiler 22) with the log on the low right side to obtain fire wood.
Enter the Bell Tower Entrance.
Zoom in on the confessional on the right side and place the crucifix (Spoiler 22) on the chair.
The ghost of Dad appears; grab the photo (4/6) from the floor left next to the ghost.
Return to the Dungeon.
24. Dungeon/Altar
Play the search scene at the coffin to obtain a coin.
Go back to the Altar.
Place the coin on the closed box on the chair on the lower right side.
Zoom in on the now open box and take the part of a tablet (2/2).
You know have two times 2 parts of a tablet. Place the tablets on the other two halves on the wall left and right.
Zoom in on the stained window.
Use the glass shards from the left and right to repair the window. A shard in the correct place can't be moved anymore.
The ghost of Dad appears; grab the photo (5/6) from the Altar.
Exit and go up to the Bell Tower.
25. Bell Tower/Main Square
Place the bell clapper (Spoiler 23) on the bell.
The ghost of Dad appears; grab the photo (6/6) from the floor.
Use all six photos (Spoiler 22, 23, 24, 25) on the photo album on the left side to activate a mini game.
Arrange the photos in a chronological order. A photo in the right spot will lock and cannot be moved anymore.
This will regain your memories about what your father told you and you will receive a yellow crystal. You will be automatically be brought to the Main Square.
Place the yellow crystal in the yellow flame.
The last chain will be removed and the heart of the statue will raise.
Click the statue to remember.
Banishing the remaining dark Shadows/Finding Ticket parts
26. House
Enter the house and go down in the basement.
Use the funnel (Spoiler 15) on the gas can in front of the motorcycle.
Use the hose (Spoiler 19) with the motorcycle's tank.
Take the filled gas can and go upstairs in the living room.
Place the fire wood (Spoiler 23) in the fire place and use first the filled gas can, then the lighter (Spoiler 16) with the wood. The dark shadow will disappear.
Grab the part of a ticket (4/5) from the lower part of the mirror above the fire place.
Exit to the Main Square and enter the College.
27. College
Zoom in on the locker and take the candle.
Go forward through the door outside.
Place the ladder (Spoiler 20) on the balcony and click to zoom in.
Use candle with the lamp and light it with the lighter (Spoiler 16). The shadow will disappear.
Grab the part of a ticket (5/5) at the bottom of the ladder.
Return to the Main Square.
28. Finding all parts of the stamp machine/Escape
Select each door and play the search scene. You will obtain one part of the stamp machine for each search scene.
Once you have them all, return to the train and zoom in on the stamper on the far back.
Use the parts of the stamper and place the completed ticket (Spoilers 1, 26, 22, 26, 27) in its mouth.
Pull the lever and go through the wide open door.
Finale
29. Hospital Room
Play the search-scene to obtain a key.
Take the cup and the coin (1/3) from the table in the low right corner.
Grab the clothes on the hanger on the far left; you are dressed now.
Zoom in on the upper part of the cupboard on the left side and take the bottle with medicine.
Zoom in on the middle drawer of the cupboard and take the two batteries (2/4 parts).
Zoom in on the table below the window and place the cup.
Take the water jug and use it to fill the cup. The water jug goes back into your inventory.
Pour the medicine into the water cup and take it; you now took your medicine.
Zoom in on the fuse box left next to the window and use the water jug to create a short circuit.
The window is open now, go through.
30. Outside
Pick up the stick from the ground.
Zoom in on the trash bin in the low right corner and grab the phone dial, the tape (2/4) parts and the handcuffs.
Zoom in on the shed on the far right and use key (Spoiler 29) to open the padlock.
Zoom in on the open door of the shed and grab the shovel.
Zoom in on the flower pot on the left side and use the shovel to obtain a valve handle.
Zoom in on the fountain and use the valve handle with the valve on the right.
Grab the coin (2/3) when the water is gone and take the oil can.
Return to the Hospital Room.
31. Hospital Room
Zoom in on the cupboard on the left and use the stick (Spoiler 30) to smash the glass door.
Take the pepper spray.
This will activate another search scene at the bed.
Play the search scene to obtain a tape recorder (4/4 parts).
Go outside.
32. Outside
Zoom in on the telephone booth and use the oil can (Spoiler 30) with the rusty hinges.
Zoom in on the telephone booth again and take the coin (3/3).
Place the phone dial (Spoiler 30) and click the coins (Spoilers 29, 30, 32) at the coin slot; one slot will remain.
Click the tape recorder (Spoilers 29, 30, 31) at the telephone.
Watch the cut scene.
Now use first the pepper spray (Spoiler 31) with your husband, then the handcuffs (Spoiler 30).
Zoom in on the phone booth and use the remaining coin to call the police.
Enjoy THE END
Posted by: Kayleigh |
March 20, 2011 3:48 PM
|
March 20, 2011 3:48 PM