

Dark Alleys: Penumbra Motel
Platform: Mac, Windows
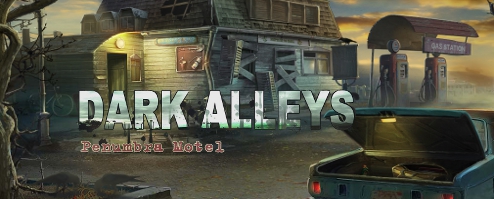
![]() Congratulations! You're officially the worst babysitter ever. When Monica, the little girl you're supposed to be driving to her grandmother's house for a friend, gets kidnapped by evil forces in a gas station, you find yourself embroiled in one very strange family with a tragic past that just won't stay dead. Dark Alleys: Penumbra Motel is ERS Game Studio's first pure adventure game that attacks its horror with such high camp and magic ghost dogs that it never really becomes scary, but is still a gorgeous and engrossing creepy experience to sink into. Just remember kids... if you absolutely must go into dark gas stations by yourself, for the love of whatever don't wear pigtails, carry a teddy-bear, and skip as your primary means of transportation. It's like wearing a big sign that tells the universe "Please kidnap me!"
Congratulations! You're officially the worst babysitter ever. When Monica, the little girl you're supposed to be driving to her grandmother's house for a friend, gets kidnapped by evil forces in a gas station, you find yourself embroiled in one very strange family with a tragic past that just won't stay dead. Dark Alleys: Penumbra Motel is ERS Game Studio's first pure adventure game that attacks its horror with such high camp and magic ghost dogs that it never really becomes scary, but is still a gorgeous and engrossing creepy experience to sink into. Just remember kids... if you absolutely must go into dark gas stations by yourself, for the love of whatever don't wear pigtails, carry a teddy-bear, and skip as your primary means of transportation. It's like wearing a big sign that tells the universe "Please kidnap me!"
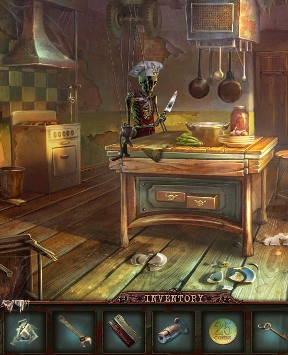 Penumbra Motel has three difficulty modes to choose from, though the gameplay is relatively constant throughout. You'll explore the area, gathering items you need to solve various puzzles or get past obstacles. Your diary will keep track of current events and goals, as well as any important clues you'll come across for future reference, and the handy-dandy magic television on the opposite side of the screen will let you get a hint when you're stuck or skip puzzles. Turns out the area has a rich history of military heroes, cultural significance, and murder, and some spirits don't lie quietly. If you want to rescue little Monica, you'll need to put on your thinking cap to solve a wide variety of problems and bizarre puzzles. Or maybe you could just pick up another kid from somewhere and her parents won't notice. Kids are like goldfish, right? You can't really tell them apart. It would save you a lot of trouble, and drastically reduce your odds of "bloody murder by vicious old man ghost".
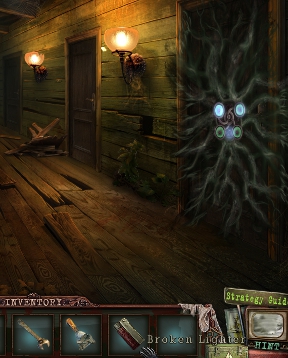 Analysis: Unless you're the sort of person who is scared by Halloween masks and wondering who was phone, Dark Alleys: Penumbra Motel is too over-the-top goofy and gleeful to be scary. From the big, overly dramatic "evil dark lord" laughter to the seething masses of darkness and eyeballs blocking doorways, this game is a trip. Largely a pretty good one at that. The story is morbid, but so packed full of evil, wacky mysticism you really only have to worry about the occasional jump scare. The area designs are seriously creative, and a real joy to explore. Flickering lights, rich use of colour, otherworldly occurrences all combine to create an atmosphere reminiscent of a particularly surreal Tales from the Dark Side episode, and it's a lot of fun to experience even if it never feels particularly deep. It's the perfect choice for people looking for a really casual gaming experience with the sort of polish ERS delivers, but without all that hidden-object hunting you might not care for.
Since Penumbra Motel is essentially a straight-up adventure game with nothing so tedious as a hidden-object scene to bog you down, the gameplay moves at a brisk pace. Unfortunately, that also means you'll encounter a lot more frustrating adventure game concepts, like gathering up multiple items for a single task that shouldn't even be an obstacle to begin with, obscure object uses, and a lot of backtracking. Luckily, the game features a lot of puzzles and some fairly imaginative versions of them, leaving you challenged but rarely outright stymied. As an experimental foray into the world of straight adventuring, Dark Alleys: Penumbra Motel succeeds more than it fails and delivers a cheesy, highly detailed, cinematic experience fans of schlock horror will enjoy. As always, try the demo and see if it whets your appetite before you buy, but if you're a fan of ERS and are looking for something to fill four hours or so, you can do a lot worse than this campy adventure.
A Collector's Edition is also available. It contains a bonus chapter, art gallery, strategy guide, and more. Remember that Big Fish Game Club Members pay only $13.99 for Collector's Editions (or 2 club credits), and collector's editions count 3 card punches of 6 total needed for a free game.
![]() Windows:
Windows:
Download the demo
Get the full version
Also available: Collector's Edition
![]() Mac OS X:
Mac OS X:
Download the demo
Get the full version
Also available: Collector's Edition


Walkthrough Guide
(Please allow page to fully load for spoiler tags to be functional.)
Dark Alleys: Penumbra Motel
Game Basics
Beginning Screen
On the right of the screen is the Options tab.
In the Options menu you can:
Change the volume of the music and sound.
Turn on or off the use of the custom cursor.
Change screen size.
Change the play mode.
There are three different levels of difficulty:
Casual: Active areas are indicated by sparkles. The hint and skip options recharge quickly.
Hard: Active areas are not indicated. The hint and skip options recharge slowly.
Advanced: Active areas are not indicated. The hint and skip options recharge very slowly. Tips are not available.
There is a Help tab that informs you of what to expect from gameplay.
There is a Credits tab where you can view the makers of the game.
The Extras tab has multiple goodies only available in the Collector's Edition.
Gameplay
On your screen:
On the bottom left is the Goals tab, which tells you the different goals you must achieve in the game.
Under the Goals tab is the Diary tab, which keeps important information you have discovered along your journey.
On the bottom left is the Menu tab, which gives you the Options tab and allows you to change your preferences, or quit the game.
In the middle at the bottom of the screen is your Inventory, which collapses when the cursor is not hovering over it.
On the bottom right is the hint button.
Under the hint button is a little box which holds film reels you will collect. You can watch the films by clicking on the box.
When hovering over an item or area that can be investigated, the cursor will change to a magnifying glass.
If you can pick an item up, the cursor will change to a grasping hand.
If an object needs to have an inventory item used on it, the cursor will change to two gears connected.
If you can move into a new area, the cursor will change into a directional arrow.
There is no map in the game.
Chapter One: The Gas Station
Opening the Cash Register
Speak with the man standing ahead of you.
Click on the trunk of the car to inspect it.
Pick up the glue and the picture of the little girl.
Zoom in on the bulletin board near the gas pumps.
Pick up the hook and read the information about the Penum family.
Click on the right window that has no shutters. Click on the trunk on the ground to move it. Pick up the tape.
Zoom in on the red square on the side of the building with the tools.
Place glue on the stick with the broken end. Place the hook on the broken end. Wrap the tape around the hook. You receive a pole.
Investigate the dog house and use the pole to retrieve the key.
Zoom in on the doorknob of the door and use the key on the lock. Click to unlock.
Go through the door.
Click on the door with the shadowy figure. Once the door shuts, zoom in on the payphone.
Pick up the phone, then hang it up.
Examine the bottom of the dresser and pick up the brick.
Inspect the fake person behind the cash register. Use the pole on the ceiling fan to cut the man loose.
Zoom in on the faux person and pick up the two buttons.
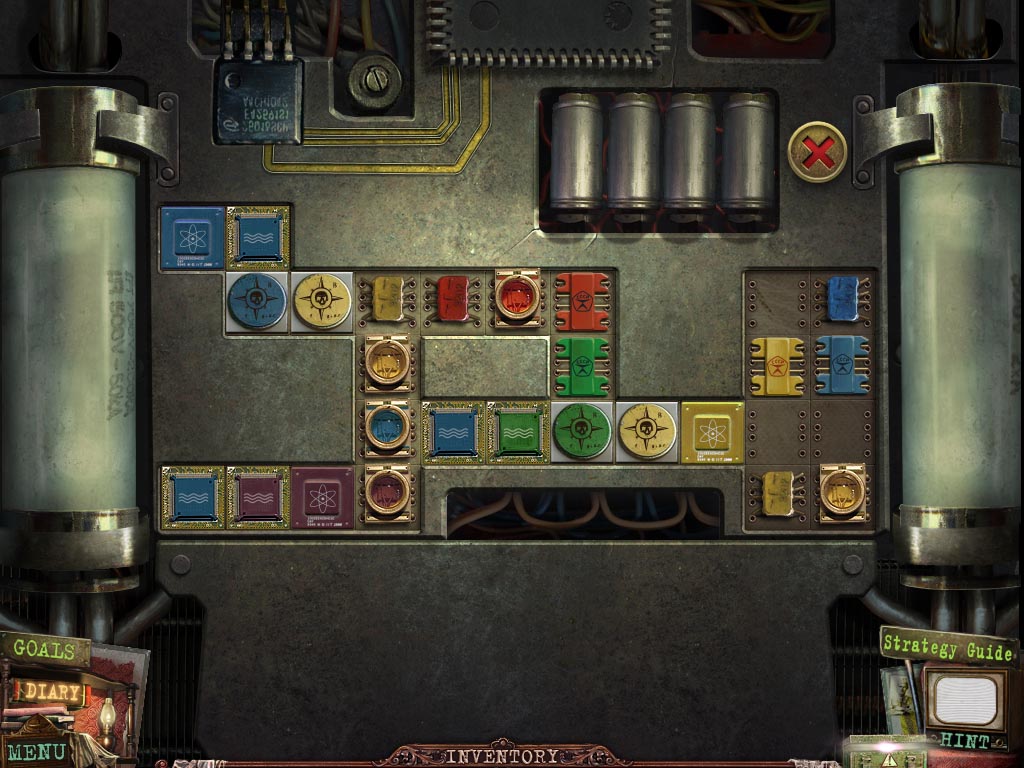
Click on the cash register twice and place both buttons in the missing spots to start a puzzle. You must click all the buttons until they display numbers, and you must click them in the proper numerical order.
Press button 1 first.
Press button 9 second.
Press button 5 next.
Press button 3.
Press button 7 to finish.
Screenshot
Examine the cash register once more and pick up the jack handle and the paper part.
Getting the Doorbell Button
Zoom in on the top of the dresser and place tape on the torn paper, followed by the paper part.
Click on the fixed piece of paper to read about Jack Penum. Pick up the revealed razor blade.
Inspect the trunk on the left and use the razor blade to sever the ropes.
Click on the drawer to open it, then pick up the jack.
Investigate the bottom of the dresser and place the jack underneath it. Add the jack handle to the jack, then click to lift up the dresser.
Pick up the photo.
Go through the opened doorway.
Click on the dog to get rid of it.
Pick up the newspaper article on the wall above the bike.
Inspect the hood of the car that's near the barricade and pick up the stool.
Investigate the window of the red car on the left side.
Use the brick to break open the window.
Press on the door lock to unlock it, then click on the door handle to open the car.
Pick up the engine diagram, then press the button on the left of the dash to pop open the hood.
Investigate the engine and pick up the radiator valve.
Move forward to the left where the brick wall is.
Inspect the board leaning against the trailer and read the news article.
Click on the swinging door of the trailer to make it stay. Go forward into the trailer.
Zoom in on the bucket and click on it to retrieve the bucket.
Pick up the stool.
Examine the radio, click the buttons, and pick up the doorbell button.
Getting the Paper Clip
Go back once, then zoom in on the water. Place the bucket in the water to retrieve a bucket of water.
Go back once, then inspect the hood of the car. Pour the bucket with water into the radiator, then replace the radiator valve.
Investigate the door where the barricade is. Place the doorbell button on the broken doorbell.
Click on the doorbell to have the door open, then walk through.
Press on the guy to speak with him.
Click on the dresser to zoom in and read the diary entry.
Pick up the revealed postcard pieces and the nippers.
Examine the desk drawers and click on the bottom on to pull it out.
Place the postcard pieces on the desk to start a puzzle. You must click on the postcard pieces to move them to the correct place to create an image.
Screenshot
Once don,e click on the finished postcard after reading.
Go back once, go left, then go into the trailer.
Zoom in on the fish and use the nippers to cut the wiring around it. Pick up the fish.
Investigate the hatch on the floor from where you picked up the stool and use the nippers on the wiring keeping the hatch shut.
Pick up the family photo and the tire iron.
Go back once and examine the cat on the car. Place the fish in the food bowl.
Move back once and zoom in on the car nearest the hotel. Use the tire iron to pop open the hood. Pick up the belt.
Investigate the engine of the red car and place the belt on the engine.
Go into the building with the man and give him the family photo.
Take the photo back from him to receive a paper clip.
Opening the Path to the Hotel
Before leaving, talk to the man once more to hear his request for something to drink.
Go back to the car that the cat had originally been sitting on and use the paper clip on the trunk to open it up.
Pick up the bottle with drink, the rope, and the film reel.
Return to the building with the man and zoom in on the desk. Pour the bottle with drink into the glass. You receive a glass.
Give the man the glass with the drink in it.
Grab the dropped scissors.
Use the scissors to cut the rope that's holding the iron next to the window.
Examine the desk and pick up the iron.
Click on the box on the desk to open it and grab the car keys and the war medal.
Go back once and zoom in on the rope on the street. Place the rope on the hook to connect them.
Get in the car and place the car keys in the ignition. Click to turn the car on.
Inspect the opened hatch to start a puzzle.
You want to connect like colored fuses to start the car up. On the right side are switches for colors that you'll flip to move a specific color. There are arrows above the switches that you will use to move the switches in the proper direction.
Click the green switch and move it left twice, down twice, then up once. Press on the switch to turn it off so you don't move that color.
Click on the blue switch and move it up once, then left once.
Click the red switch and move it left twice, down four times, right twice, up twice, down once, left twice, up three times, up once, and down once.
Click the yellow switch and move it down once.
Click the red switch and move it right once.
Click the blue switch and move it right once, down three times, left once, right once, and up once.
Click the yellow switch and move it right twice, up twice, down once, and left once.
Place the iron on the gas pedal to make the car take off and move the car that was blocking the path to the hotel.
Getting to the Cinema
Go up the stairs.
Examine the bushes to the left. Click on the ribbon, then click on the toolbox. Click on the toolbox twice, once to clear away leaves.
Pick up the nail puller and the heating element.
Attempt going up the stairs a second time.
Go back once and into the building with the man.
Zoom in on the table with the teapot and place the heating element on the electric stove.
Click on the kettle to move it on the stove, then press on the switch to turn it on.
Pick up the kettle to receive boiling water.
Place both stools on the ground below the ruined ceiling.
Examine the ceiling and pick up the hammer.
Go back once, then move left. Examine the board leaning against the trailer and pour the boiling water on the pitch.
Use the nail puller on any one of the nails, then click to pick all the nails up. Click on the wood to receive boards.
Go back to the staircase and move up. Zoom in on the broken part of the stairs and place the boards down first.
Put the nails on the boards, then use the hammer to complete the new stairs.
Go up.
Investigate the gate and pick up the newspaper article on the stone column to the right.
Go left towards the gazebo.
Zoom in on the bannister and click multiple times to release the door handle. Pick it up once it falls.
Examine the bench and pick up the handkerchief. Take note of the initials carved into the bench.
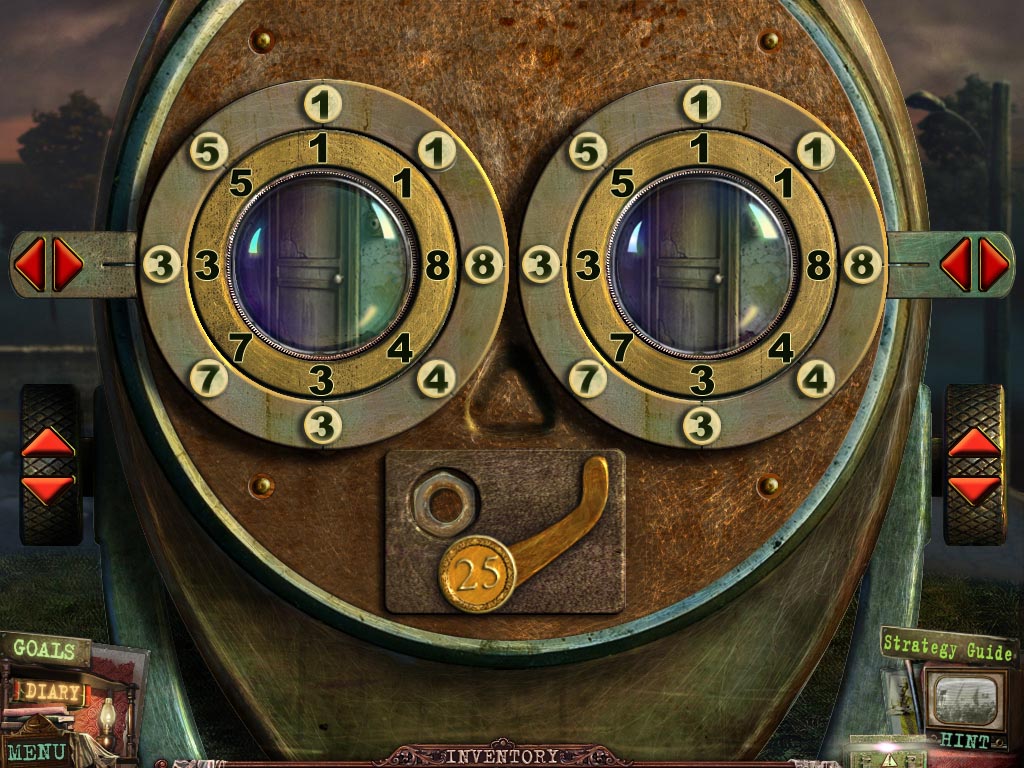
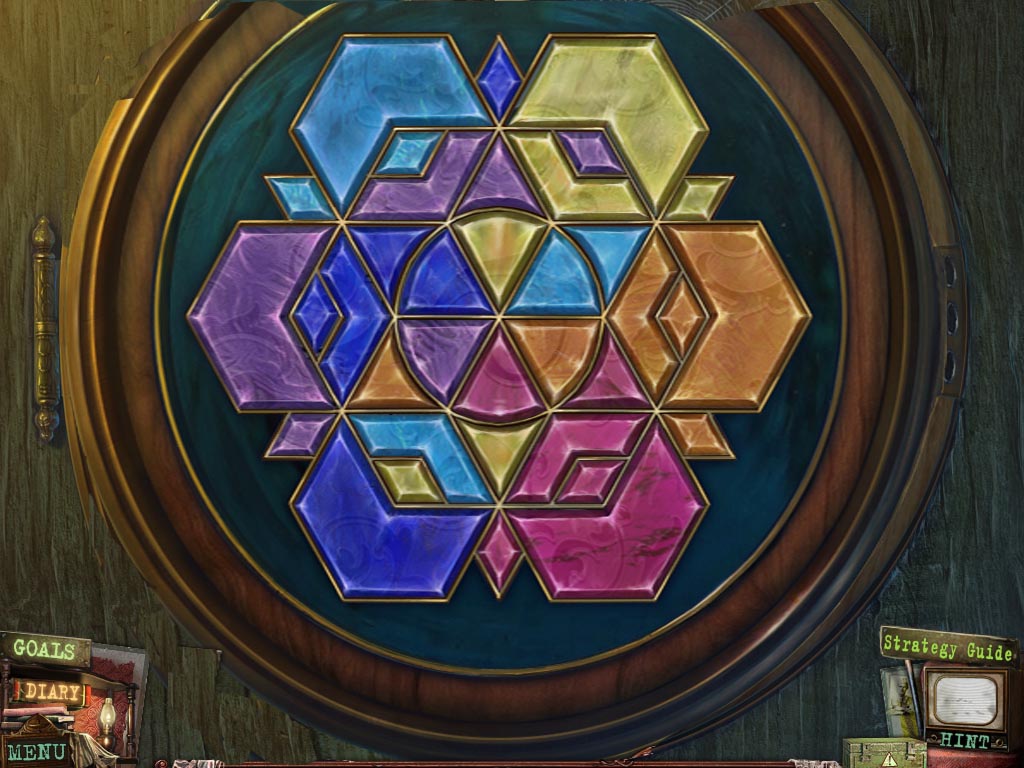
Look into the binocculars to start a puzzle. Rotate the circles so that the outside circle matches the corresponding numbers in the inner circle.
Screenshot
Once completed, pick up the nut.
Go back once, then go right.
Chapter Two: The Cinema
Getting Rid of the Dog
Inspect the notice board on the left.
Pick up the square key and read the notice about the play.
Examine the well and click on the bucket. Pick up the well handle.
Inspect the back barn where the skeleton is. Use the scissors on the rope to cut the skeleton down.
Click on the door, then go forward into the barn.
Investigate the jacket at the back wall and click on it to reveal the cross key, which you can pick up.
Zoom in on the table and pick up the wrench and the dirty putty knife.
Go back once, then go right.
Inspect the table and pick up the diagram.
Examine the skeleton and take the lighter. Take note of the ring on his finger.
Walk back twice and zoom in on the vase.
Dip the handkerchief in the vase. Place the dirty putty knife in the water as well.
You now have a clean putty knife and wet handkerchief.
Investigate the gate and place the gate handle on the spot where it's missing.
Place the nut on the screw, then use the wrench to tighten it.
Click on the gate to open it, then walk through.
Click on the ghost to speak with him.
Examine the bay window on the bottom right of the house.
Pick up the coin.
Click on the foliage to move it away and reveal a film reel that can be picked up.
Use the wet handkerchief on the window to clean it.
Go left behind the house. Click on the dog to make it vanish.
Obtaining a War Medal
Inspect the wooden door closest to you on the right.
Place the well handle in the plunger suction cup to create a plunger.
Zoom in on the window to the left of the chained door and pick up the storage key.
Use the clean putty knife to remove the edges around the glass pane. Use the plunger on the glass itself to pull it out.
Go through the window.
Investigate the sink in the back right and pick up the hook.
Inspect the drawers straight ahead and pick up the kerosene can.
Examine the skeleton and pick up the mincer handle.
Zoom in on the door by the back sink and use the storage key in the lock. Click to turn it and open the door. Walk through the door.
Click on the fridge door to open it and pick up the toilet paper.
Press on the door of the first aid cabinet and grab the ammonia jar.
Examine the cellar doors and pick up the latch and the matches.
Inspect the shelves with the bottles and place the mincer handle on the screw driver to retrieve the screwdriver.
Check the door on the left and use the screwdriver on the lock to open it. Go forward through the door.
Click on the man to try and speak with him.
Pick up the metal rod.
Examine the jukebox in the left corner and place the coin in the coin slot.
Pick up the handle.
Investigate the hatch on the bottom of the jukebox. Use the screwdriver on each screw, then pick up the screws.
Click on the cover to remove it and pick up the fuse.
Inspect the book on the table. Pick up the rag and read the diary entry.
Go back once into the kitchen and zoom in on the stove.
Place the rag on the poker to the left of the stove and click on it to receive a poker with rag.
Use the matches on the stove to light it.
Place the poker with rag on top of the fire to receive a hot poker.
Examine the skeleton chef and use the hot poker to cut loose the bindings.
Zoom in on the fallen skeleton and pick up the war medal.
Picking up a Brass Horn
Go forward into the back room and zoom in on the broken door handle of the pantry.
Place the screws on the broken handle, then use the screwdriver to twist them in. Click on the handle to open the pantry door.
Place the toilet paper on the wooden stick. Pour the kerosene can on the toilet paper.
You receive a torch.
Go back twice and investigate the attic door. Pick up the rope.
Investigate the wooden door nearest you. Place the latch on the door.
Click on the latch to unlock it, then click on the door to open it. Go through the door into the basement.
Use the ammonia jar on the collapsed man. Once he's done speaking, pick up the war medal from his hand.
Inspect the furnace and pick up the valve.
Use the rope on the back door, then use the rope again on the pipe, and use it once more on the object with the valve.
Zoom in on the final spot and use the metal rod to turn it.
Click on the wooden box to open it and pick up the fuse.
Press on the door that the rope was attached to in order to open it. Go through the door.
Examine the rungs on the wall to the right and place the torch in them. Use the matches on the torch to light up the room.
Click on the generator and place both fuses on it to start a puzzle.
You must move the chips so that whatever chips are next to each other either match in color or shape.
Screenshot
Once the generator is on, examine the lever box on the left wall and place the handle in the left slot. Press on the levers to activate the generator.
Go back three times to the front of the house and zoom in on the front door.
Place all three war medals in the empty slots to activate a puzzle.
Each line that connects needs to have matching colors. You must rotate to match them up.
Screenshot
Zoom in on the door and press it to open it. Go through the door.
Inspect the skeleton and take the brass horn.
Grabbing a Goblet
Investigate the diary on the table. Click on the cover to activate a puzzle.
You must put the pieces back together to complete the torn letter.
Screenshot
Click on the letter to pick it up once you're done.
Click on the book on the counter top once more and pick up the lens.
Pick up the trophy.
Examine the telephone on the wall. Pick it up, then hang it up. Grab the key in the coin tray.
Look at the dresser on the left. Press the button to start the film reel rolling. Once it's gone haywire, pick up the cap under the right reel spot.
Go left up the stairs.
Zoom in on the table and pick up the goblet. Click on the cover of the diary to open it, then grab the diary entry.
Click on the mannequin and pick up the glass part.
Inspect the dresser on the right and place the glass part on the surface to start a puzzle.
You must move the pieces so that no matching colors are touching each other.
Screenshot
Pick up the film.
Examine the camera on the tripod. Touch it to make it slump over. Zoom in on the legs and place the cap in the empty hole.
Click on the cover of the camera and place the film inside. Press the cover once more to close it.
Pick up the key.
Inspect the camera once more and take the picture.
Zoom in on the door at the back and use the key in the lock. Go through the door.
Examine the board in the back with all the fishing supplies. Place the hook on the fishing line.
You receive a fishing pole.
Pick up the goblet.
A Bunch of Keys Obtained
Inspect the desk and pick up the propeller from the plane.
Grab the solvent jar.
Click on the picture behind the desk to find out the placement of the fishing trophies.
Zoom in on the trophy case and place the trophies in their proper spot.
Examine the revealed drawer. Pick up the table part and read the piece of paper.
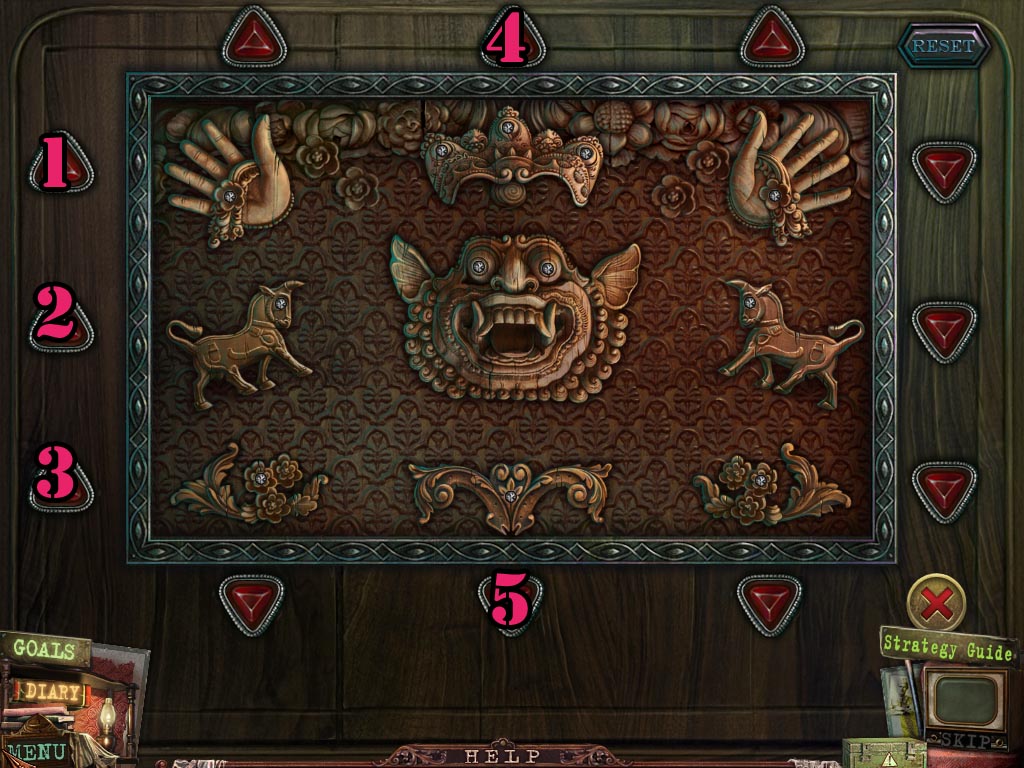
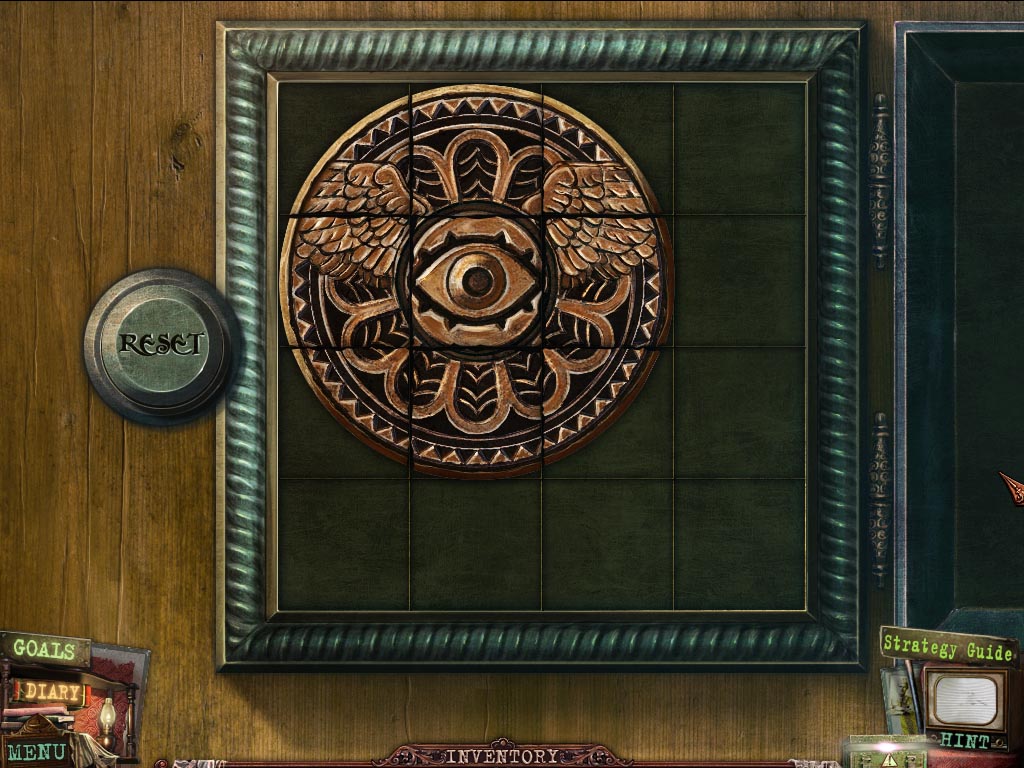
Look at the side of the desk and place the table part on it to start a puzzle.
You must click the arrows in the correct order to enlarge the proper pieces.
Press arrow 1.
Press arrow 3.
Press arrow 2.
Press arrow 4.
Press arrow 2.
Press arrow 1 twice.
Press arrow 5.
Screenshot
Examine the newly revealed compartment and pick up the film reel and the safe handle.
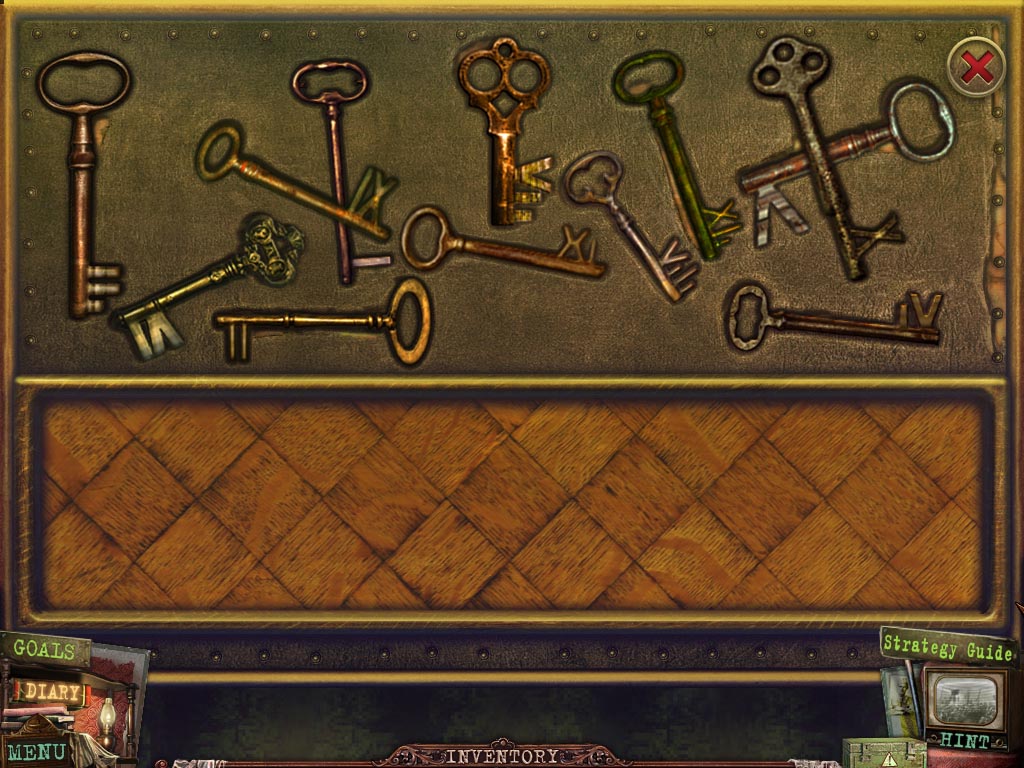
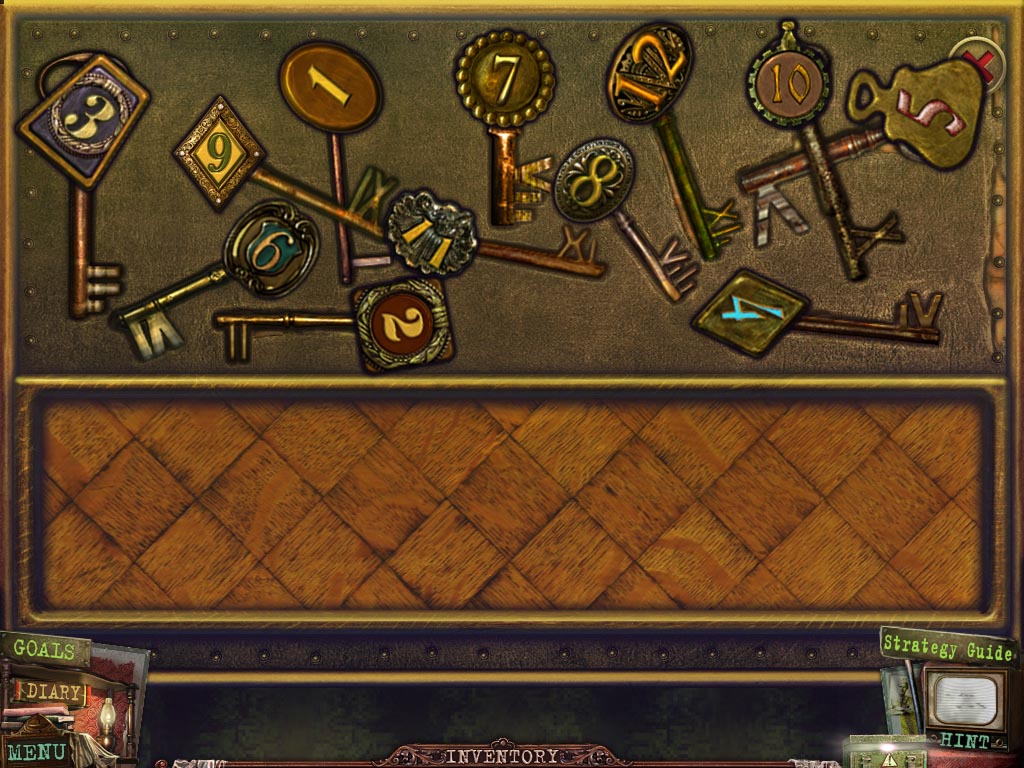
Go back to the hotel lobby and zoom in on the keys on the wall. Place the key on the surface to activate a puzzle.
You must place the keys in the correctly shaped groove.
Screenshot
Once done, inspect the safe and place the safe handle on the safe.
Change the combination.
2-4-8-6
Click on the safe handle to open the safe. Pick up the tags.
Press on the safe to close it up again. You will return to the key puzzle. Place the tags on the surface and attach them to the appropriate number key.
I-One.
II-Two.
III-Three.
IV-Four.
V-Five.
VI-Six.
VII-Seven.
VIII-Eight.
IX-Nine.
X-Ten.
XI-Eleven.
XII-Twelve.
Screenshot
You receive a bunch of keys.
Getting a Box Key
Go back twice, then move right.
Investigate the stone to the right and place the valve on the top. Click on the valve to turn off the steam.
Click on the rope to reveal the triangle key, then pick it up.
Go into the building and click on the box in front of the ladder.
Use the triangle key, cross key, and square key in the empty key holes.
Click the middle panel to open it and pick up the extension cord.
Go back once, then move right.
Inspect the grate and use the fishing pole on it to withdraw the cigar case.
Zoom in on the door and use the bunch of keys on the lock. Go through the doorway.
Look closer at the bedside table and pick up the pipe.
Go back once, then go upstairs.
Zoom in on the middle door and use the bunch of keys on the lock and open the door.
Go into the room.
Examine the mirror. Grab the part of key after it breaks.
Zoom in on the diary and use the pipe on it. Click on the ashes to spread them around and reveal what was written.
Pick up the diary page.
Go through the doorway into the bathroom.
Inspect the medicine cabinet and click on the cover to open it. Pick up the soap and the brush.
Investigate the sink. Place the soap under the tap, then click it. Pick up the revealed part of key.
Move back three times, then go through the open doorway.
Click on the desk to look closer. Press on the book and place the two parts of key in the groove top open it. Pick up the watch.
Go back once and inspect the table. Place the cigar case down first.
Place the watch on the cigar case, followed by the broken lighter.
Pick up the box key.
Completing a Medal Puzzle
Go back into the bottom floor room that's open.
Look closer at the pillow and click on it to move it. Examine the box further and use the box key in the lock to open it.
Pick up the screwdriver and the fourth war medal.
Inspect the desk to the left and click on the clock. Press on the clock face to move it.
Use the screwdriver on the screws, then take the gears.
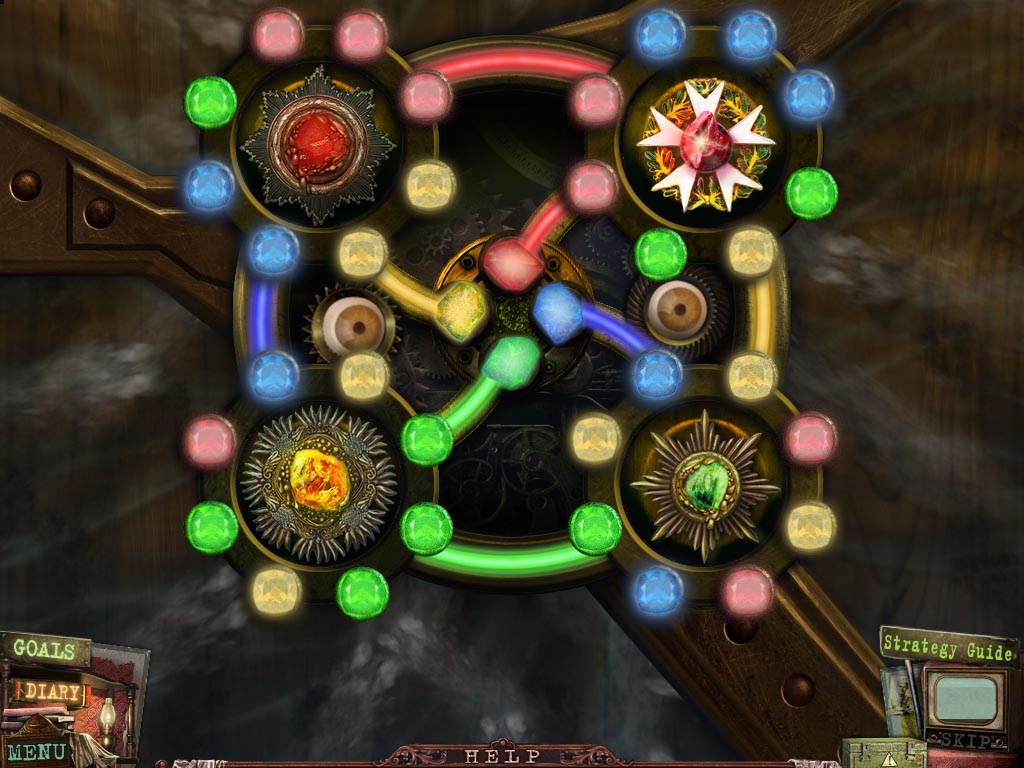
Go back once, then walk up the staircase. Examine the door closest to you and place all four war medals on it to activate a puzzle.
This puzzle is exactly like the previous puzzle with the war medals. You must move the colors around so that for each connecting line two like colors are connected.
Screenshot
Go right into the room.
Chapter Three: The Penumbra Motel
Taking a Bullet
Examine the bed post and pick up the knife.
Inspect the desk and pick up the paper after the typewriter is finished.
Use the solvent jar on the glue bottle. Place the brush inside the glue bottle to receive a brush with glue.
Zoom in on the toy plane and use the brush with glue on it, then place the propeller in the appropriate spot.
Pick up the fallen corkscrew.
Examine the wine bottles on the table to the left. Use the corkscrew on the cork of the wine bottle to pull it out.
Click on the bottle to tip it over, then pick up the chain.
Investigate the box under the portrait on the wall and pick up the diagram. Place the chain on the gears.
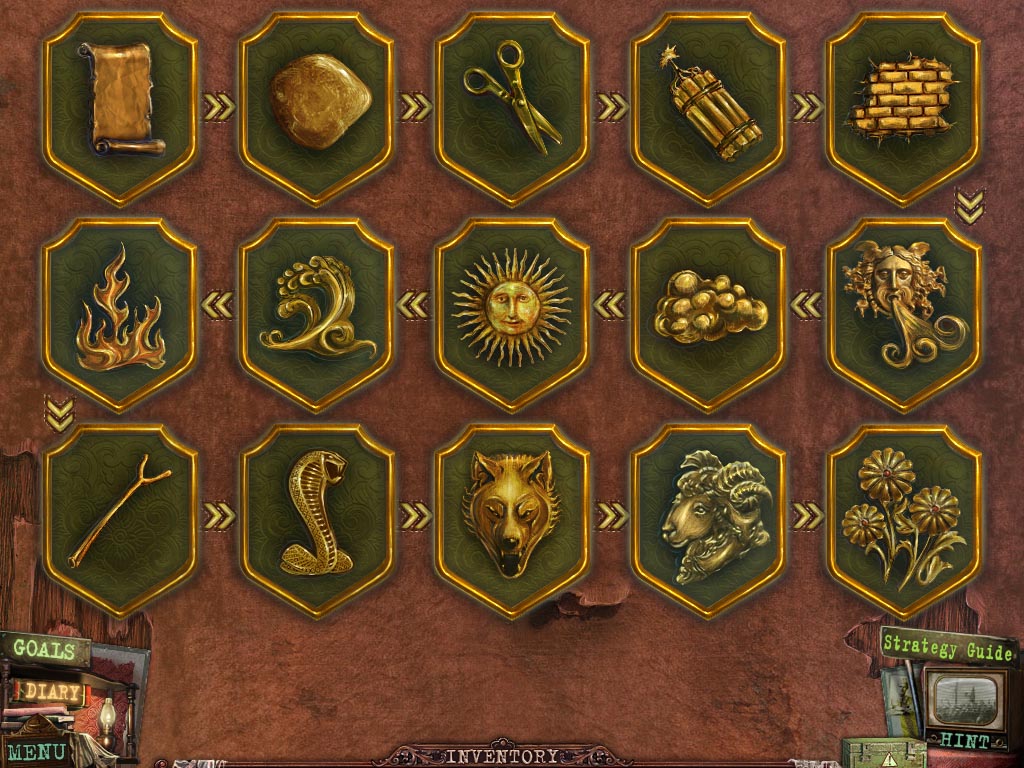
Inspect the picture to the left to start a puzzle.
Follow the arrows to place the item that beats the next item. I.E. Paper beats rock, rock beats scissor, scissor beats dynamite, etc.
Screenshot
Look at the gear box once more and flip the switch.
Go up the newly revealed staircase.
Examine the atlas and pick up the diagram. Pick up the nail and place it with the horseshoe. Click on it to receive a magnet.
Look in the box with all the rolled up papers and pick up the handle.
Go back once and investigate the desk. Place the handle on the drawer to the right, then click on it to open it.
Once the drawer is open, pick up the bullet.
Inspect the tank on the box and open the back hatch. Place the gears in the back hatch.
Click on the top of the tank and place the bullet inside.
Obtaining Glued Film
Inspect the area that got shot at and take notice of the numbers.
Go up the ladder once more and investigate the dresser.
Put in the code on the lock.
2-7-5-4
Press on the door to open it.
Pick up the film reel, key, and weight. Read the news article.
Go back twice, then go through the middle door.
Inspect the dresser to the right and press on the door to open it. A yarn ball will fall out and under the dresser.
Use the magnet twice. One time will get you a needle, and the second will get you a hook.
Go back twice and speak with the Professor, then go into the room on the bottom floor.
Inspect the dresser. Click on the door to open it, then use the hook on the scarf to receive thread.
Go back until you're at the cinema once more.
Go inside the cinema and examine the back wall.
Place the knife at the top left of the wall, then click on the sheet to hang it up.
After the dog has ruined the sheet, zoom in on the tatterd bits.
Use the needle and thread to start a puzzle.
You must repair the torn sheet and place the pieces in the proper spots.
Screenshot
Inspect the projector on the table and place the extension cord and the lens on the camera.
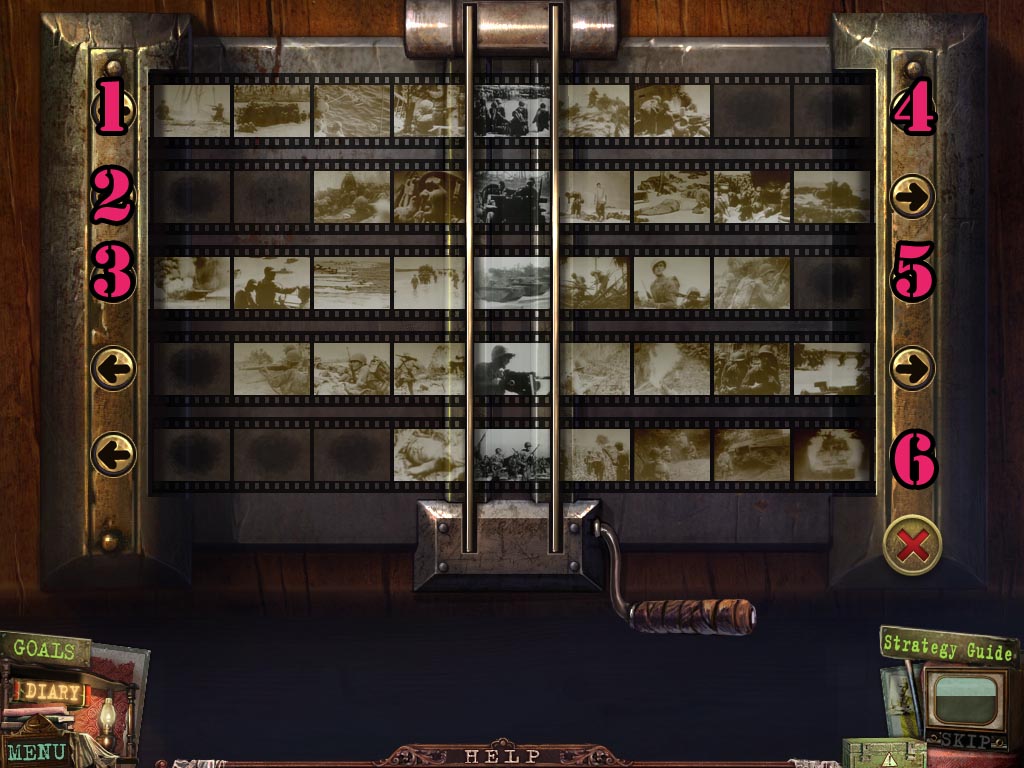
Zoom in on the film cutter to the left and place all five film reels on the cutter to start a puzzle.
You must move the strips so that only the black and white pictures are in the middle, then cut them.
Press arrow 6 three times.
Press arrow 5 once.
Press arrow 3 four times.
Press arrow 2 twice.
Press arrow 1 five times.
Press arrow 4 once.
Screenshot
You receive glued film.
Escaping the Well
Examine the cords on the floor and click to plug them in.
Inspect the film projector once more and place the glued film on the projector. Flip the switch to turn it on.
Click on the revealed compartment, then use the key in the lock. Click it to open the compartment.
Pick up the detail.
Go to the basement and examine the door on the right. Place the detail on the lock mechanism. Click on the handle, then go through the door.
Investigate the cabinet to the left. Click on the sheets to combine them, then click to receive the tied sheets.
Zoom in on the left washer and place the weight inside. Push the button to start the machine.
Pick up the lock part from the mannequin.
Move back four times, then go right to the cinema. Zoom in on the well.
Place the tied sheets on the well, then go down.
Examine the skeleton and pick up the amulet.
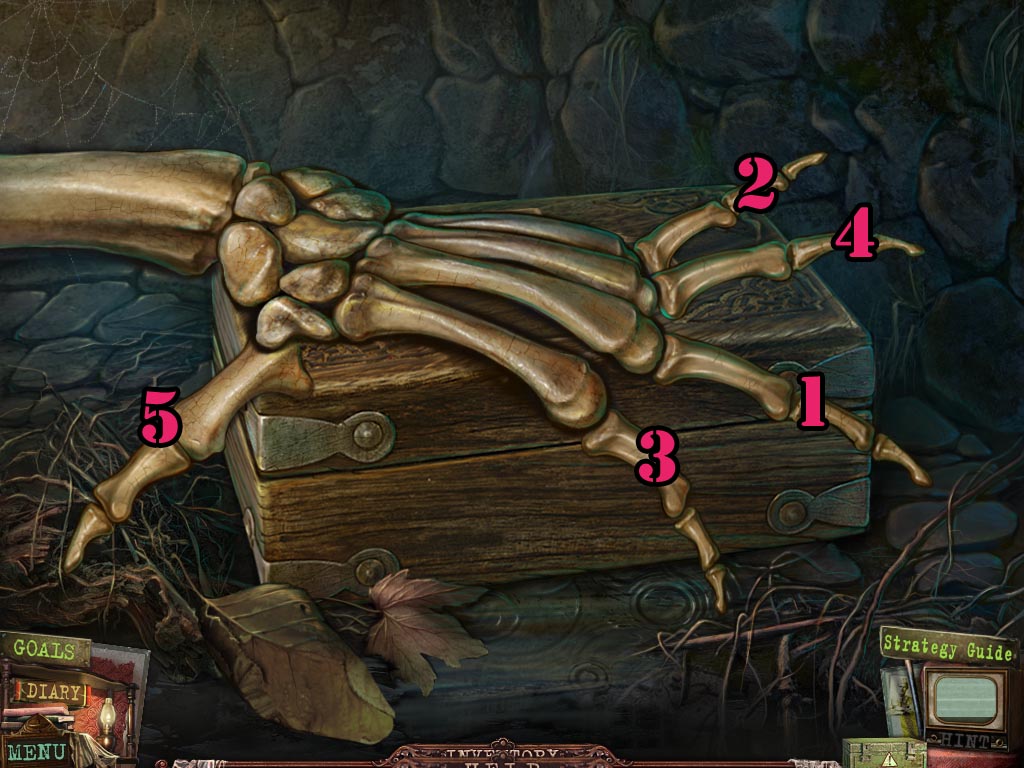
Inspect the skeleton hand to start a puzzle.
You must press on the fingers in the correct order to remove the hand.
Screenshot
Once the hand is removed, place the amulet in the empty spot on the box.
Pick up the gears and the skeleton hand.
Grab the bracket and whip.
Examine the wall and replace the bracket.
Go back up.
Chapter Four: The Road to the Mansion
Getting a Screwdriver
Go back once, then go forward until you're in the backyard behind the motel.
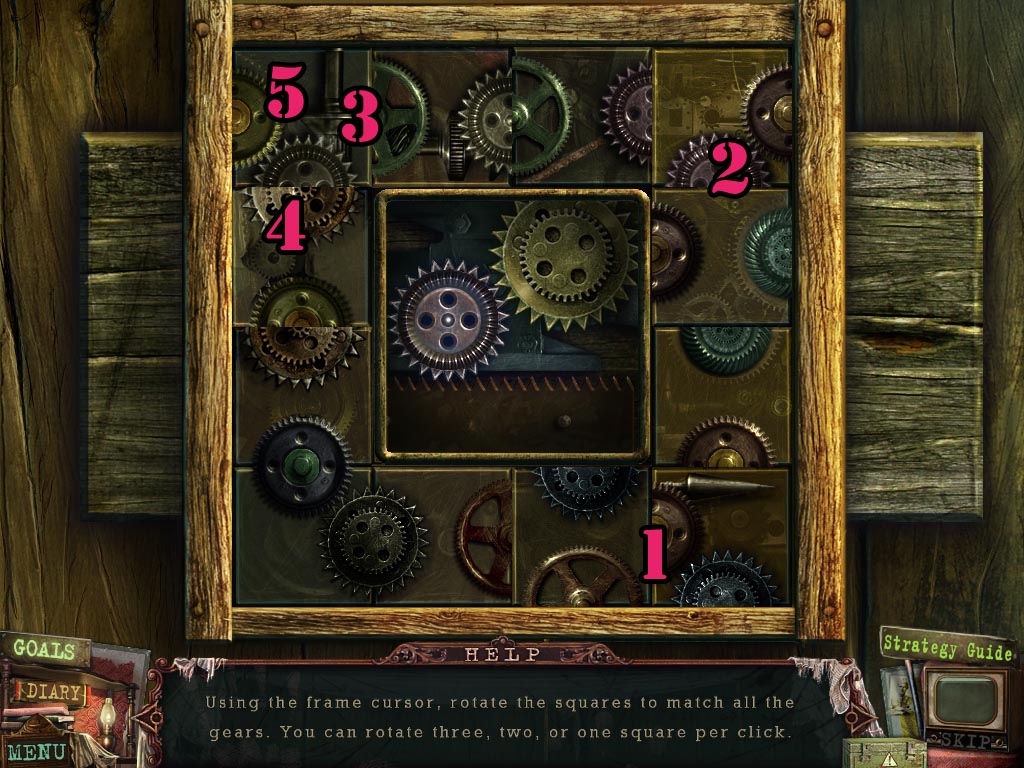
Examine the door on the left and place the gears and lock part on the surface to start a puzzle.
You will move the cursor around and press on the gears to rotate them. When not moving a gear, hover your cursor on the outside of the puzzle.
Move block 1 twice.
Move block 2 once.
Move block 3 twice.
Move block 4 twice.
Move block 5 three times.
Screenshot
Go through the door once it opens.
Inspect the grass to the right and click on it twice to move it. Pick up the bottle.
Go forward.
Click on the mailbox to open it and pick up the slide 10, then read the diary entry.
Inspect the fence and use the whip.
Grab the finial, then move forward.
Examine the tricycle and pick up the rag.
Go right. Investigate the bushes and click on the leaves to push them aside. Pick up the rocket head.
Grab the fire extinguisher.
Look closely at the bulding under the windows and pick up the hose.
Go forward.
Zoom in on the tractor and click on the gas tank cover to open it.
Place the hose in the hole, then put the bottle underneath the hose.
You receive a bottle with gas.
Use the finial on the handle of the tractor to open the door.
Pick up the screwdriver.
Snagging a Water Pipe
Click on the barn door to open it, then walk through.
Inspect the lawn mower.
Use the wrench to open the cover. Pick up the chain.
Examine the barrel and pick up the can of oil.
Read the note.
Place the bottle of oil on top of the barrel. Place the rag inside the bottle of oil. Use the matches to light the rag on fire.
Pick up the explosive.
Go back once and examine the water pump. Use the can of oil on the nut to receive a lever.
Walk back twice and use the explosive on the dog.
Use the fire extinguisher to put out the fire.
Inspect the grassy area underneath the porch. Pick up the hook.
Go forward towards the path on the left.
Inspect the tree and use the screwdriver on it. Pick up the wind up key.
Investigate the sandbox and pick up the shovel.
Use the shovel on the car, then pick up the toy car.
Click on the door of the treehouse, then go through.
Investigate the child mannequin and pick up the mirror.
Examine the table, pick up the slide 8, and read the diagram.
Go back until you're at the barn again. Inspect the winch in the back and place the lever on it.
Place the hook on the rope, then press the lever.
Grab the fallen gear.
Go back twice.
Inspect the control box on the left and place the chain and gear inside. Click on it twice to open the garage.
Investigate the table and read the diary note.
Zoom in on the stack of pipes and click on them to move them out of the way. Pick up the water pipe.
Getting into the Mansion
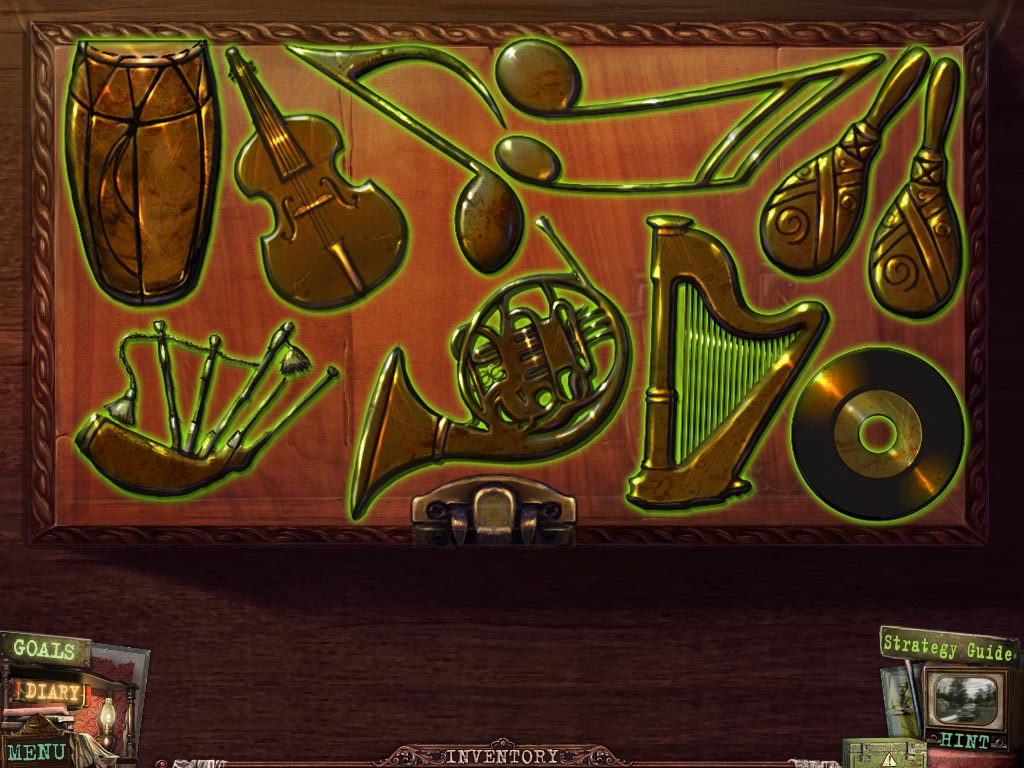
Examine the box and place the brass horn on it to start a puzzle.
You must move the instruments so that they all fit on the cover of the box without touching.
Screenshot
Pick up the bracelet.
Inspect the skeleton and place the bracelet on the arm with no hand.
Then place the skeleton hand inside the bracelet.
Place the toy car in the skeleton hand.
Put the wind up key on the mechanism around the skeleton neck.
Pick up the war medal.
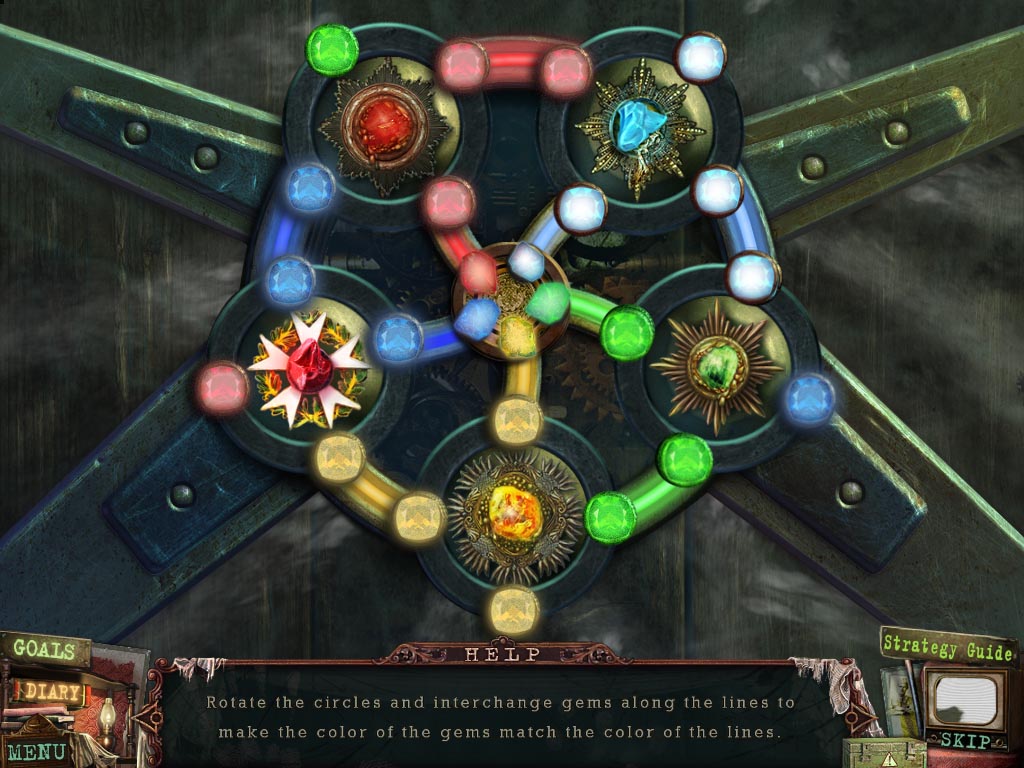
Go back twice and zoom into the door. Place all five medals on the door to start a puzzle.
You must make sure that all connecting lines have the appropriate matching colors.
Screenshot
Go through the door.
Chapter Five: The Mansion
Discovering Slide 11
Click on the woman to speak with her.
Pick up the cane.
Go left through the door.
Go forward through the open door into the bathroom.
Examine the tub.
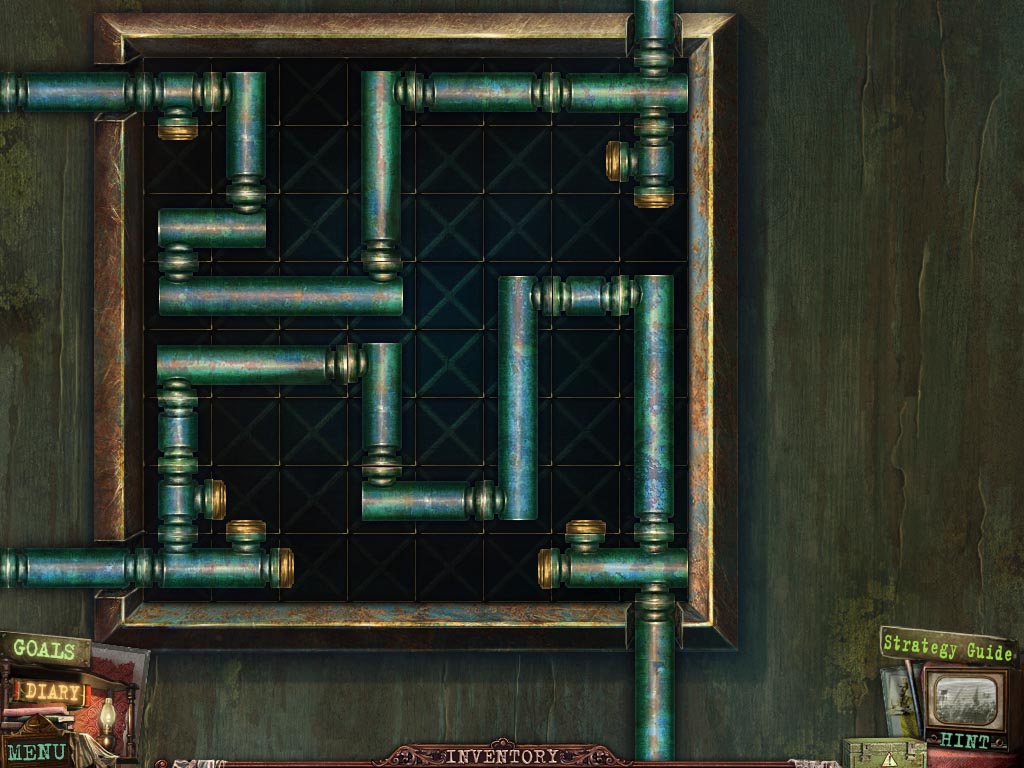
Inspect the cupboard to the left and add the water pipe to start a puzzle.
You must connect all the pipes and tubes. You can turn a pipe by right clicking on it.
Screenshot
Inspect the bath once more and click on the drain twice to empty the tub.
Pick up the door handle.
Go back three times, then go towards the tree house.
Inspect the ladder to the right of the tree house and use the cane to pull it down.
Pick up the fallen ladder.
Go back once, then go through the front door.
Place the ladder on the floor, then zoom in on the chandelier. Pick up the binoculars.
Go through the left door.
Inspect the middle door of the hallway and place the door handle on the empty spot. Click on the handle to open the door, then go through.
Examine the vanity and press on the lamp.
Place the binoculars on the stack of books, then place the mirror under the lamp so it melts the wax.
Inspect the box and click on the top to open it. Pick up the rocket explosive and the cabinet part.
Zoom in on the cabinet and place the cabinet part on it to reveal a secret room. Go through the cabinet.
Investigate the desk and grab slide 11.
Getting Another War Medal
Go back four times, then forward until you're at the tree house.
Look closer at the table and place the rocket head on the table, followed by the rocket explosive.
Click on the rocket explosive to attach it to the base of the rocket.
Press on the rocket head to put the rocket together. Pick up the finished rocket.
Go back twice, then go forward into the mansion. Go left into the hallway, then left into the middle door. Go forward through the cabinet into the secret room.
Inspect the desk and place the rocket on the desk top. Use the matches to light the rocket.
Pick up the planet.
Go back three times and inspect the door on the right. Place the planet on the surface to start a puzzle.
You must click on the planets to make them go out on the line until they reach the sun.
Press planet 4 once.
Press planet 5 once.
Press planet 4 once.
Press planet 5 twice.
Press planet 4 once.
Press planet 5 twice.
Press planet 1 four times.
Press planet 2 six times.
Press planet 4 once.
Press planet 1 once.
Press planet 6 four times.
Press planet 2 three times.
Press planet 3 twice.
Press planet 5 twice.
Press planet 3 twice.
Press planet 2 once.
Screenshot
Go through the door and investigate the toaster on the table. Click the button to make the moon pop up. Pick up the moon.
Go back, then go through the door on the left. Go through the middle door, then into the secret room through the cabinet.
Examine the chest and place the moon on the spot for it. Click the top to open the chest.
Pick up the handle, then return to the kitchen.
Inspect the food processor and place the handle on it. Click on the handle to turn it.
Look at the stove and pick up the hot pan, then zoom into the sink and put the hot pan in the sink.
Pick up the war medal.
Taking a Tie off a Bear
Go back once and speak with the girl again. Go up the stairs after she vanishes.
Examine the lamp and click on it to turn on the light.
Click on the right door and go through it. Inspect the desk.
Pick up slide 12 and the pencil.
Inspect the shelf and place the pencil inside the hole, then grab the train.
Go back once.
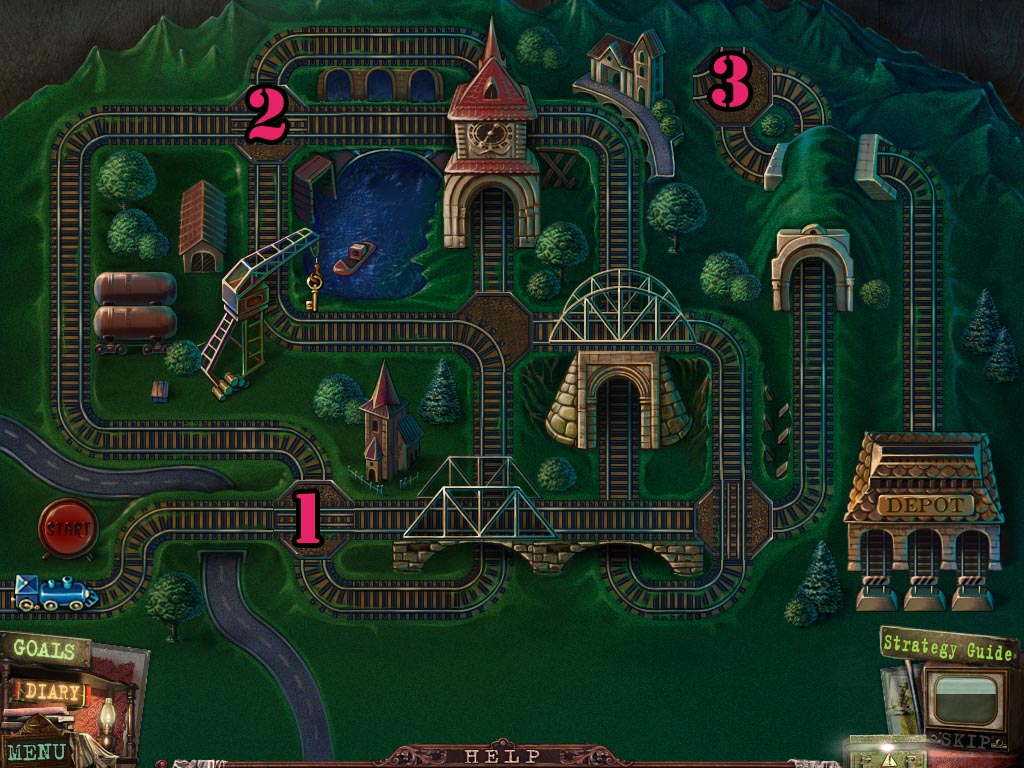
Investigate the model by the window and put the train on it to start a puzzle.
You must move the tracks so that they will allow the train to get to the depot.
Click on spot 2 once.
Click on spot 1 twice.
Click on spot 3 once.
Screenshot
You get a key.
Inspect the door to the direct right of the model and place the key into the lock. Click on the key to open the door.
Go through the door, then zoom in on the desk. Click on the papers to move them around, then grab the knife.
Walk back once, then go through the door on the right that's farthest from the train model.
Investigate the bookcase and use the knife on the badges. Pick up the badge.
Zoom in on the closet and click on it to open the door. Look closely at the briefcase.
Place the badge on the lock, then click on the briefcase to open it. Grab the knob.
Inspect the night stand table and place the knob on the drawer. Click on the drawer to open it and pick up the key.
Go back once and zoom in on the left door. Place the key in the lock, then click the key to open the door. Go through into the room.
Look at the bear and grab the tie.
Obtaining a Magic Button
Examine the window and pick up the horn.
Inspect the bison head mounted on the wall and place the horn on its head. Pick up the key on its tongue.
Go back once, then go downstairs. Go through the door on the left, then go through the middle door. Go through the cabinet into the secret room.
Look at the projector at the back of the room and place all four slides into the projector. Press the button and notice the number shown.
Go back three times, then go up the stairs. Go through the door on the left.
Investigate the cabinet and click on the door to open it. Look closely at the safe, then enter the combination.
3-8-5-2
Pick up the bullet and part of mold.
Look at the cabinet on the right side of the wall and use the key to unlock and open it.
Place the bullet in the shotgun, then pick up the gun.
Walk back twice and zoom in on the dart board. Use the gun on the dart board.
Click on the door to open it, then walk through.
Pick up the shovel, then use the shovel on the coals. You receive a shovel of coal.
Inspect the table and add the part of mold to the surface to start a puzzle.
You must move the pieces so that they form an image.
Screenshot
You receive a cast.
Zoom in on the furnace at the back left. Open the cover and place the shovel with coal inside.
Click on the valve to turn it, then put the cast inside next.
You receive a hot cast.
Examine the faucet to the right of the furnace and place the tie around the hole in the pipe.
Turn the valve to turn on the water, then place the hot cast into the cold water.
Pick up the chilled cast.
Zoom in on the table and place the chilled cast on the surface.
Click on the hammer, and it will start hammering the chilled cast.
Press on the cast to receive a magic button.
The Great Escape
Walk back twice from your area.
Zoom in on the attic door and place all six war medals in the circles to activate the puzzle.
Screenshot
Go into the attic and press on the cage. Pick up the rope.
Inspect the tray table and grab the saw. Click on the book to open it, then read the diary entry.
Examine the box and use the saw to sever the cable.
Place the rope on the end of the table.
Zoom in on the bottom of the object and click on the rope.
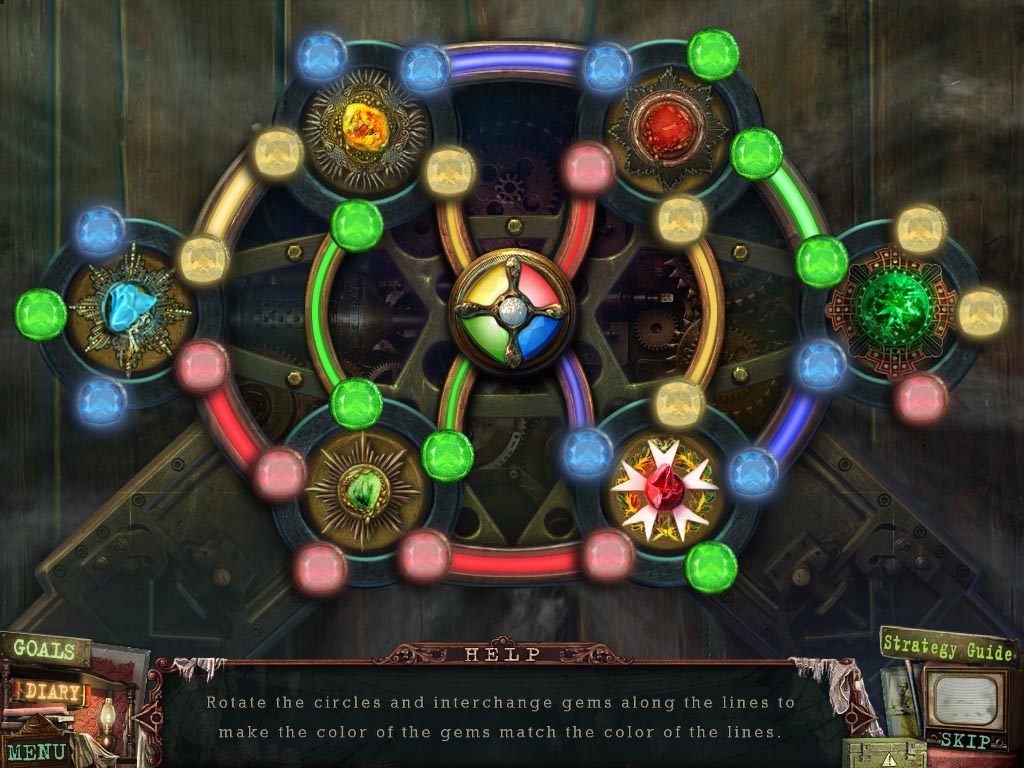
Investigate the controls and use the magic button on them to start a puzzle.
You must move the button over colored squares. To unlock a blue lock, you must place the button on a blue square.
Place two of the buttons on the burnt orange color.
Move the third button to the far left and place it on the burnt orange color.
Move one of the buttons to the far right and place it on a blue or green button.
Move the button that's on the far left onto either a blue or green spot depending on which color you chose for the button on the far right.
Move the button that is still in the middle to the far right area. Place it on either the green or blue color depending on which is available.
Move the button on the far left over to the far right, then move all three into the empty circle spots to complete the puzzle.
Run!
Posted by: Meaghan |
June 22, 2012 9:27 PM
|
June 22, 2012 9:27 PM