

Cursed Memories:
The Secret of Agony Creek
Platform: Mac, Windows

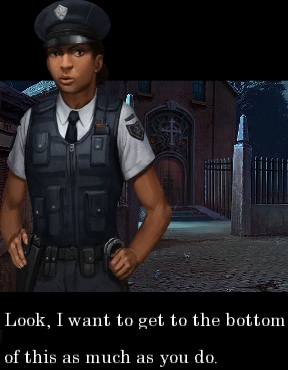
![]() You don't remember much... an explosion in a mine, someone dragging you away, a face in a doorway... but when you come to shackled to the floor in a dirty room, it's clear you're in a lot of trouble. A phone call from a stranger warns you not to trust the police officer who bursts in the door to rescue you a moment later. Who can you trust? What happened to the town? Cursed Memories: The Secret of Agony Creek is a hidden-object adventure from Vast Studios that plays like a mystery thriller, making for a surprisingly engrossing experience despite a relatively short length and easy ride along the way.
You don't remember much... an explosion in a mine, someone dragging you away, a face in a doorway... but when you come to shackled to the floor in a dirty room, it's clear you're in a lot of trouble. A phone call from a stranger warns you not to trust the police officer who bursts in the door to rescue you a moment later. Who can you trust? What happened to the town? Cursed Memories: The Secret of Agony Creek is a hidden-object adventure from Vast Studios that plays like a mystery thriller, making for a surprisingly engrossing experience despite a relatively short length and easy ride along the way.
 Ultimately, your goal is to figure out what happened to you... easier said than done since everyone you meet seems to be vying for "Most Suspicious of the Year" and the town itself appears to be largely abandoned. Click around for clues; the game has two difficulty settings, for those of you who prefer to play without helpful sparkles and quick hint timers, but if you pay attention to your surroundings and explore you should be able to find your way regardless. The hint candles will not only point-out items in hidden-object scenes, but also indicate a place you're able to accomplish something in the current area. Just... for the future, in order to avoid being kidnapped entirely, maybe you ought to avoid places with portentous names like Agony Creek and stick to friendlier sounding places... for instance, I hear Cholera Canyon is lovely this time of year.
 Analysis: There aren't a lot of games that manage to snag you as firmly as Agony Creek does in the first five minutes. It's rare to find a mystery game that actually feels like a mystery, and the plot works extremely hard to make it difficult to figure out who to trust and what's happening to you. The plot is fairly convoluted, with a big reveal that almost feels a bit trite compared to all the whodunnit build up, but there's still more than enough going on to keep you intrigued until the end with a lot of twists and turns along the way. The artwork is nice, despite some graininess and strange "animation, and the voice acting is actually surprisingly good, even if Vincenzo seems to be channeling Luis Sera by way of Ben Urich. (Minus the fascination with "ballistas".)
The game is, unfortunately, not the most challenging; some of the hidden-object scenes feel token and tacked on, while the actual gameplay and puzzles are enjoyable but so straight-forward most players will proceed at a quick clip throughout most of the game regardless of their chosen difficulty setting. An average playtime is likely around three hours, not counting the bonus chapter, and the story loses momentum a bit; it almost feels like the game should have been twice as long to really give the characters and story more screen time. Still, while it lasts Cursed Memories: The Secret of Agony Creek manages to craft an atmosphere of mystery and menace that few other titles in the genre can match, and will keep you guessing until the end. Strange, creepy, and even a little thrilling, it's a short but surprisingly well crafted little mystery that's worth checking out if you have an evening to spare.
A Collector's Edition is also available. It contains a bonus chapter, art gallery, strategy guide, and more. Remember that Big Fish Game Club Members pay only $13.99 for Collector's Editions (or 2 club credits), and collector's editions count 3 card punches of 6 total needed for a free game.
![]() Windows:
Windows:
Download the demo
Get the full version
Also available: Collector's Edition
![]() Mac OS X:
Mac OS X:
Download the demo
Get the full version
Also available: Collector's Edition


Walkthrough Guide
(Please allow page to fully load for spoiler tags to be functional.)
Cursed Memories: The Secret of Agony Creek Walkthrough
General Info/Tips
The hidden-object scenes have tight clickable areas, so be sure you're within the boundary of the item you want to click.
The hidden-object puzzles also use a random list of objects, so not everything on your list will be indicated in the screenshots below.
Not every object in the hidden-object puzzles are physically there: Some of them are simply the shapes, so look for shadows, etchings, drawings etc.
The game gives few descriptions for place names, so they've been named as best as possible.
Some of the hidden-object puzzles are re-used, so if you're stuck, try revisiting a recent scene.
Locations of all 30 Gold Pouches
The trunk of the crashed car outside the shop in the woods.
On the shelf to the left in the gas station.
To the lower left in the well.
Inside the shed between the initial cabin and gas station.
Inside the mailbox outside the well.
By the fence near the campfire.
Near the garden by the cabin.
On the stairs to the theatre.
On the stage of the theatre.
Behind the seat in the theatre missing the plaque.
Under the blanket in the cabin.
On the counter in the barbershop.
On Walter's statue in the town square.
In the safe in the backroom of the library.
Under the bell in the church.
In the wooden box in the crematorium.
In the right cove of the mausoleum.
In the wall crack of the mausoleum backroom.
In the balloon stand of the carnival.
In the escaped cage of the carnival building.
By the mouse's box in the alley.
On the cart in the bank vault.
By the pamphlets in the police station.
On the flagpole outside the police station.
In the train car at the train stop.
In the desk drawer of the police station backroom.
In the control station at the train stop.
On the wooden crates in the mines.
In the cart in the mines.
Behind the panel in the tunnel.
Main Walkthrough
Note: While there are chapters in the game, it plays as one continuous scene with all old areas accessible at all times. Thus, this walkthrough is organized by goals instead.
GOAL: Escape the initial cabin.
Initial Cabin Room
Examine the news clippings on the wall.
Collect the razor blade and back up.
Examine the chair in the lower right.
Pick up the cell phone.
Re-examine the chair.
Use the razor blade (from the news clippings) on the chair and collect the bobby pin.
Use the bobby pin (from the chair) on the lock on the floor.
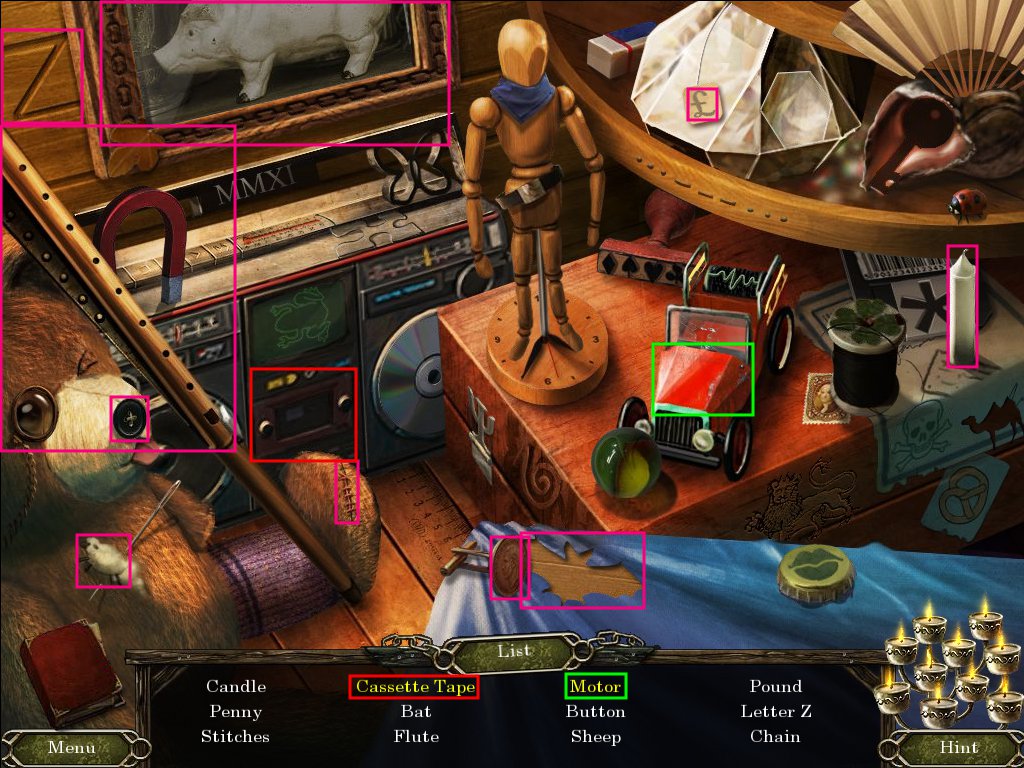
Examine the pile of junk in the corner.
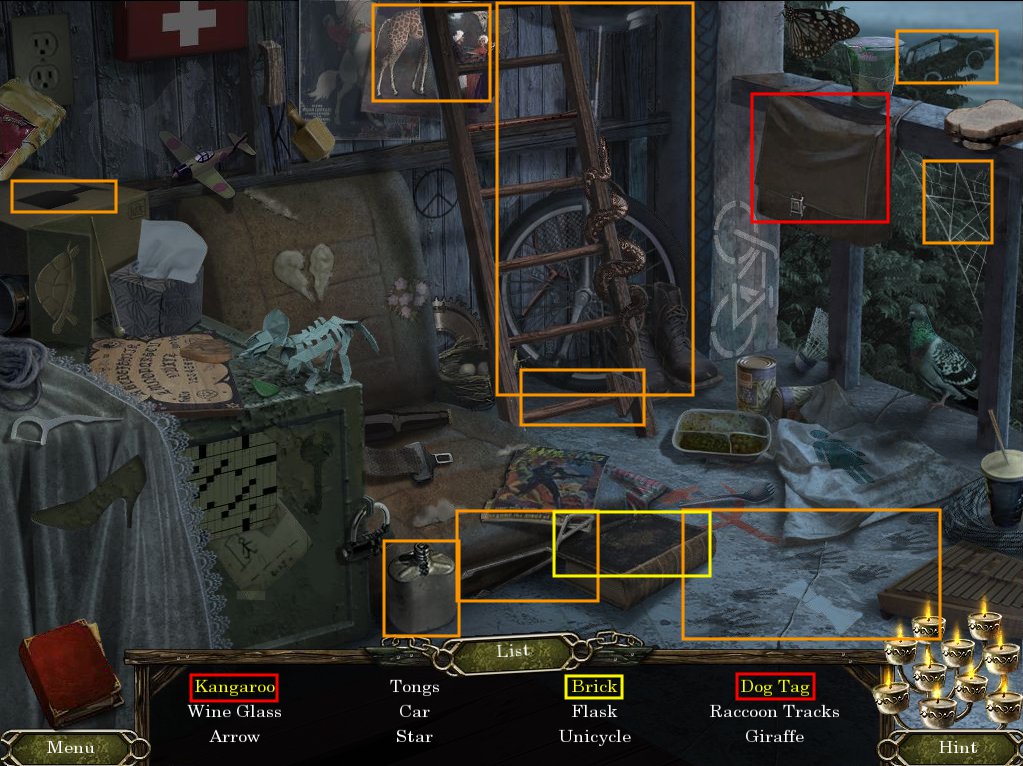
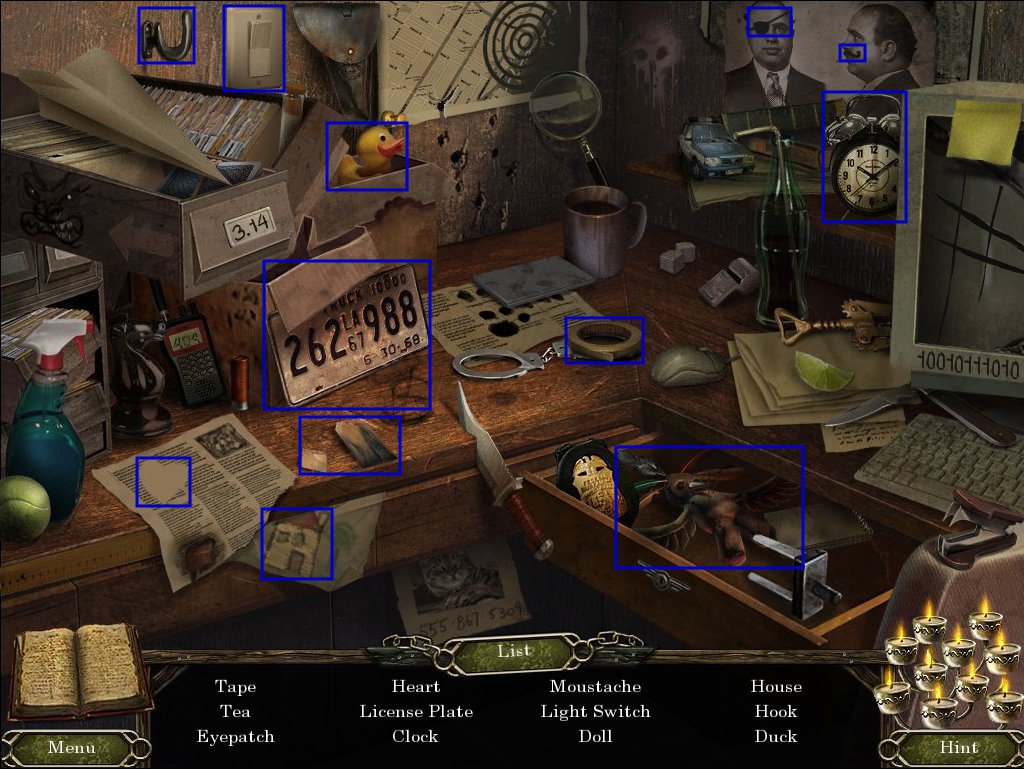
Solve the hidden-object puzzle. Items in yellow are not readily visible.
Use the screenshot below for help. Yellow items have been color coded to their hidden areas.
Screenshot
You acquire a pry bar.
Examine the loose floor board.
Use the pry bar (from the pile of junk) on the board.
Collect the fuse and glue.
Examine the broken mask on the left.
Use the glue (from the loose floor board) on the mask.
Reattach the three broken pieces to acquire the sorrowful mask.
Use the pry bar on the barricaded door on the right until it's free.
Enter the bathroom.
Initial Cabin Bathroom
Collect the fabric scissors from the medicine cabinet.
Use the pry bar (from the pile of junk) on the window until it's free.
Exit the initial cabin.
Head straight toward the well.
Click the fence to the left to hide from the cop.
Head forward toward the garage, then left toward the shop.
GOAL: Get the car running.
Outside the Shop
Examine the front seat of the crashed car.
Click the trunk release button in the center console.
Open the glove box and collect the lighter and gold pouch.
Examine the trunk.
Collect the spare tire.
Open the bag and collect the sledge hammer.
Examine the backpack under the streetlight.
Use the fabric scissors (from the initial cabin bathroom's medicine cabinet) on the backpack.
Collect the screwdriver.
Head toward the shop.
Examine the board on the right.
Click the code at the bottom of the notice to put it in your journal.
Examine the fuse box.
Replace the missing fuse (from the loose floor board in the initial cabin) and solve the number puzzle using the code to the right.
Click the number you want, then click the corresponding letter to connect them.
The letter/number code:
A=1, B=5, C=2, D=8, E=9, F=7, G=3, H=10
Enter the shop.
Shop
Examine the plaque below the miner statue.
Use the screwdriver on all four screws.
Collect the piece of wire, then the miner statuette.
Examine the toys on the floor.
Solve the hidden-object puzzle. Items hidden in areas of the screen are color cooridinated: Use the screenshot below for help.
Screenshot
You acquire a candle.
Examine the scales to the left.
The left side says 25, so you need to add the right weights to the right to balance them.
The correct weights:
15 + 7 + 3 = 25
Collect the miner's ring.
Exit and back up to outside the gas station.
Outside the Gas Station
Examine the garage door.
Use the piece of wire (from below the miner statue in the shop) to repair the controls and push the green button.
Examine the garage.
Collect the car jack and blow torch.
Examine the front door.
Use the pry bar until it's free and enter.
Gas Station
Collect the gold pouch on the shelf to the left.
Examine the safe behind the counter.
Solve the code by pressing the correct buttons in order, looking at your journal for reference (from the notice outside the shop).
The correct code:
Hollow upward triangle, filled diamond, filled star, filled downward triangle
Open the safe and collect the cash.
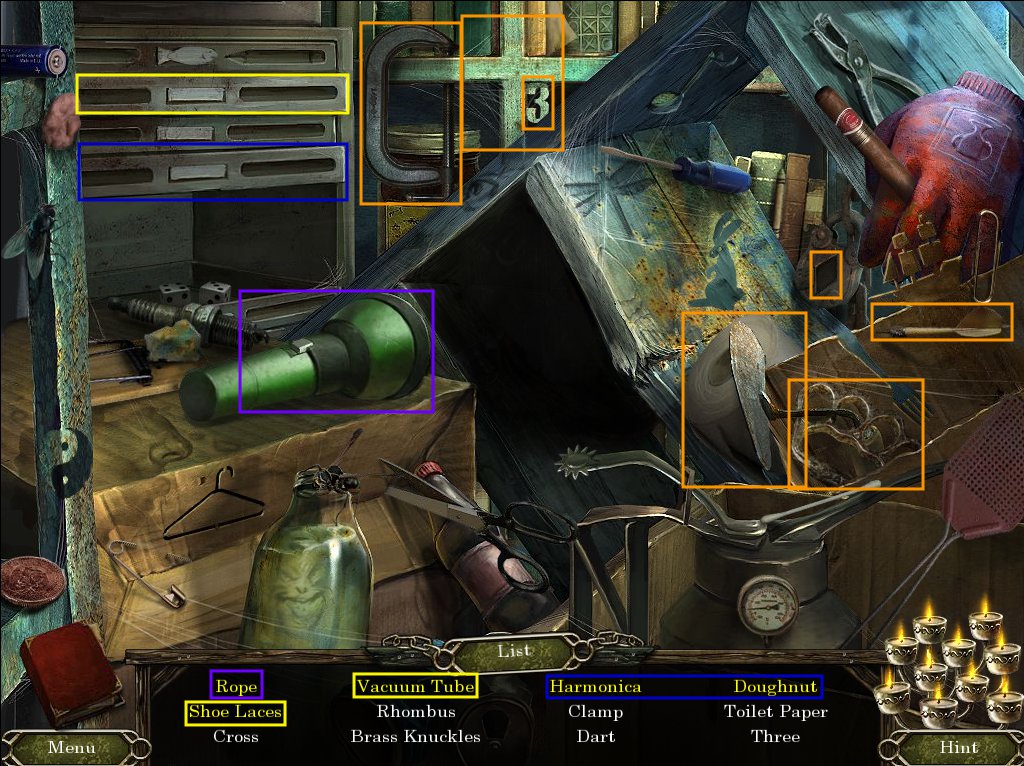
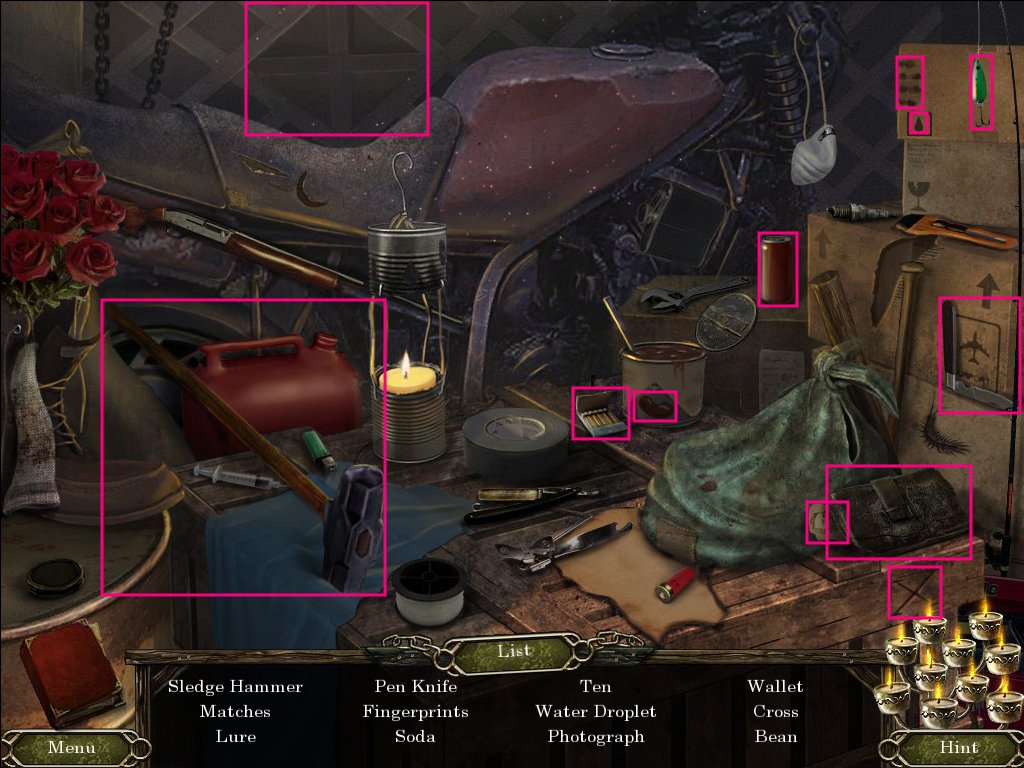
Examine the dusty boxes on the ground.
Solve the hidden-object puzzle, items hidden in areas of the screen are color coordinated.
Use the screenshot below for help.
Screenshot
You acquire a rope.
Exit and head back to the shed.
Shed
Examine the door.
Use the blow torch (from the garage of the gas station) on the piece of metal.
Collect the gold pouch and crank handle.
Head straight to the well.
Outside the Well
Examine the well, use the rope (from the boxes in the gas station) and head into the well.
Collect the gold pouch in the lower left.
Examine the new section of bricks on the wall.
Use the sledge hammer (from the trunk of the crashed car) and collect the red gemstone.
Examine the strap holding the sheet of rock and use the crank handle (from the shed) until a hand appears.
Collect the oil and head back up.
Examine the mailbox and use the oil (from the well).
Collect the gold pouch and skull ring.
Re-enter the gas station.
Gas Station
Examine the box on the top shelf to the left.
Use the skull ring (from the mailbox) on the depression.
Collect the car key.
Head outside and go back to the front door of the shop.
Examine the donation box to the left, use the cash (from the safe in the gas station) on the slot and collect the miner's key.
Go right to outside the gas station.
Outside the Gas Station
Examine the car.
Use the car jack (from the garage of the gas station) and click it once to lift the car.
Use the spare tire (from the trunk of the crashed car) on the wheel.
Use the car key (from the box in the gas station) on the ignition.
Head right through the hole in the fence.
Click the figure and follow him toward the left.
GOAL: Rendezvous at the cabin
At the Lantern
Examine the lantern.
Use the candle (from the shop) and then the lighter (from the glove box of the crashed car).
Head straight twice to the campfire.
Campfire
Examine the box on the ground.
Use the miner's key (from the donation box outside the shop) on the lock.
Collect the joyful mask.
Examine the fence toward the right.
Collect the gold pouch and shovel.
Back up to the cabin.
Outside the Cabin
Examine the garden on the left and collect the gold pouch.
Now use the shovel (from the fence by the campfire) on the dirt twice.
Collect the purse tile.
Examine the log on the right and collect the axe.
Back up to the lantern.
At the Lantern
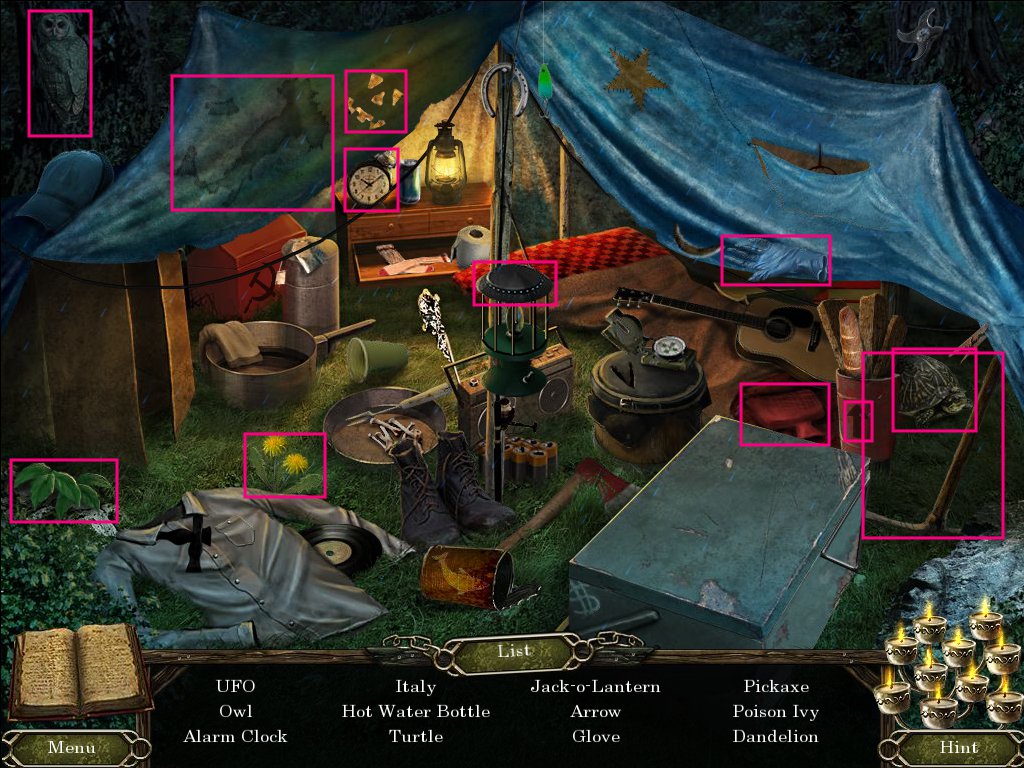
Examine the tent site across the stream.
Solve the hidden-object puzzle. Items in yellow are not readily visible.
Use the screenshot below for help. Yellow items have been color coded to their hidden areas.
Screenshot
You acquire a light bulb.
Back up and head to the theatre.
Outside the Theatre
Collect the gold pouch above the steps and examine the theatre doors.
Use the sorrowful mask (from the initial cabin) and the joyful mask (from the box at the campfire) on the indentations.
Enter the theatre.
Theatre
Collect the scenery flat.
Examine the stage light and use the light bulb (from the tent site across the stream of the lantern).
Close the door and make note of the numbers that appear.
Use the axe (from the log outside the cabin) on the rope to the left.
Head straight onto the stage.
Backstage
Collect the gold pouch to the right.
Examine the doll on the floor.
Collect the purse tile and bug net.
Head outside and back to the lantern.
At the Lantern
Use the bug net on the lantern to collect the moths.
Back up once and examine where the car crashed in the water.
Use the moths (from the lantern) on the frog and collect the numbered plaque.
Re-enter the theatre.
Theatre
Examine the seats to the upper left.
Collect the gold pouch in the row behind.
Use the numbered plaque (from the frog where the car crashed in the water) on the seat.
Collect the purse tile and head back on stage.
Backstage
Examine the purse on the mannequin.
Use the purse tiles on the purse.
Locations of the purse tiles:
In the garden by the cabin.
On the doll backstage.
In the seat in the theatre missing a plaque.
Solve the tile sliding puzzle by dragging each piece so that the symbol on the tile is over the symbol on the board.
The solution:
Log tile right.
Mining car tile down.
Lantern tile left.
Shovel tile down.
Pick tile left.
Skull tile right.
Examine the purse again.
Collect the cabin key, then head back outside and to the cabin.
Outside the Cabin
Examine the cabin door.
Input the code from the theatre, which is written in your journal.
1888
Use the cabin key (from the purse in the backstage of the theatre) on the lock and enter.
Cabin
After speaking to Evelyn, examine the chest and collect the opera record.
Collect the blanket off the sofa and the gold pouch underneath.
Examine the kitchen sink, place the blanket in the sink and collect the wet blanket.
Back up and go ahead to the campfire.
GOAL: Get into Agony Creek (Town)
Campfire
Examine the fire and use the wet blanket (from the cabin) on it.
Move the grating and collect the cans of paint.
Back up to the lantern.
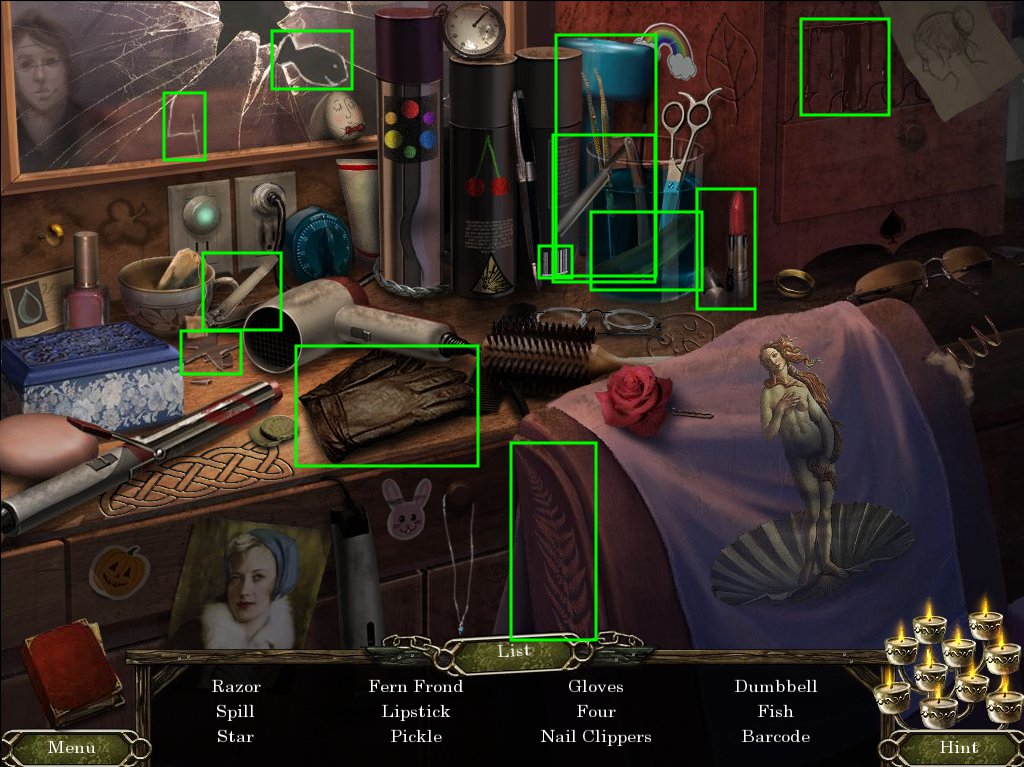
Lantern
Re-examine the tent site across the stream.
Solve the hidden-object puzzle. Use the screenshot below for help.
Screenshot
You acquire a glove.
Back up and go to outside the theatre.
Outside the Theatre
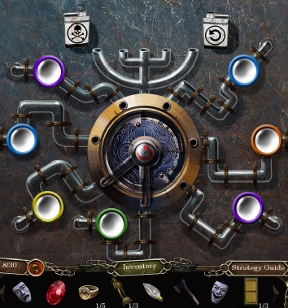
Examine the gate and use the cans of paint (from the campfire) on the mechanism.
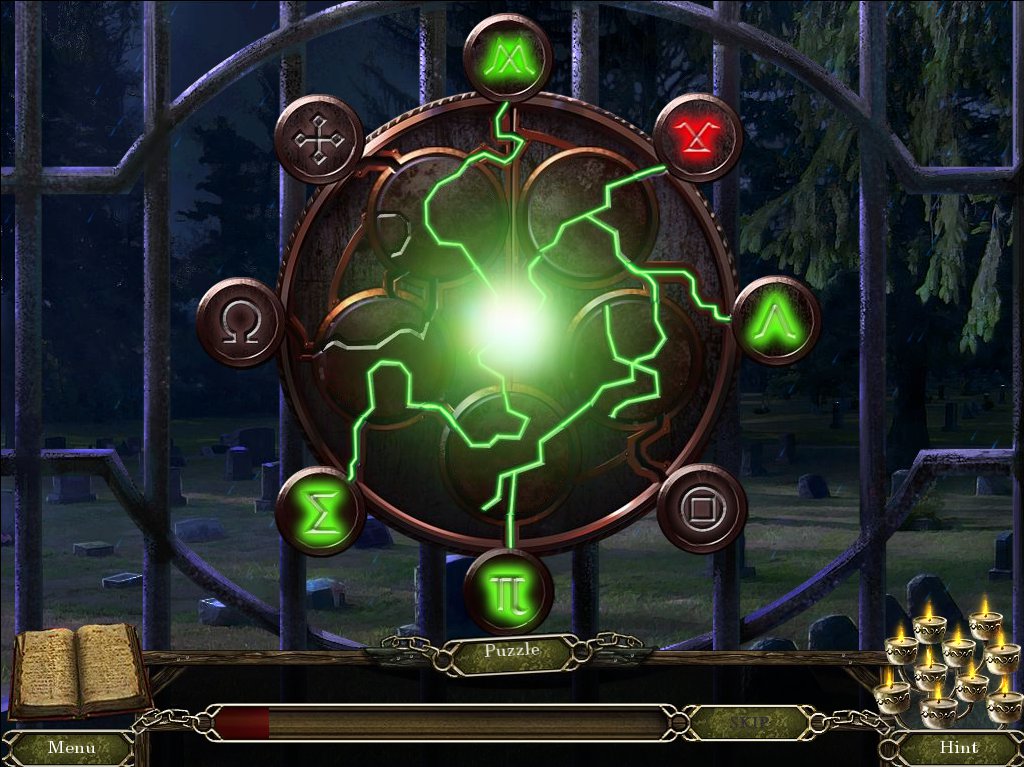
Solve the color match puzzle by filling each circle with the appropriate color.
The center of the wheel turns the tubes counterclockwise.
The skull and crossbones empties the connected circles.
The counterclockwise arrow undoes the last move (as long as the circles are still connected to the tubes).
Click the three colors to add them to the circles connected by the two tubes. A solution:
Turn the tubes so they're connected to the orange and purple circles.
Add red.
Rotate the tubes.
Add yellow.
Rotate the tubes.
Press the undo button.
Add blue.
Rotate the tubes.
Add red.
Rotate the tubes.
Press the undo button.
Add blue.
Rotate the tubes.
Press the undo button.
Add yellow.
Rotate the tubes.
Add blue.
Enter the town.
After speaking to Vincenzo, enter the store on the left.
GOAL: Rendezvous at the library
Store
Examine the gramophone and use the opera record (from the chest in the cabin).
Collect the library emblem.
Examine the display case and solve the hidden-object puzzle, using the screenshot below for help.
Screenshot
You acquire a wrench.
Go outside and examine the crevasse.
Use the scenery flat (from the theatre) and head across.
Go right into the barbershop.
Barbershop
Collect the gold pouch on the counter.
Examine the sink in back and use the glove (from the tent site across the stream at the lantern) on the water.
Collect the engraved disc.
Examine the bottom of the first chair and use the wrench (from the display case in the store) to loosen all four bolts.
You acquire a crank.
Examine the counter behind the first chair and solve the hidden-object puzzle. Use the screenshot below if you need help.
Screenshot
You acquire the straight razor.
Back up and go back into the store.
Store
Examine the cabinet doors and use the straight razor (from the counter in the barbershop) to cut the twine.
Open the door to collect the bird seed and rune.
Go back outside.
Town Square
Examine the statue. Collect the gold pouch at his belt and feed the raven the bird seed (from cabinet in the store).
You acquire an engraved disc.
Examine the library door to the right.
Use the library emblem (from from the case by the gramophone in the store) and the engraved discs.
Locations of the engraved discs:
Inside the sink in the barbershop.
From the raven on the statue in the town square.
Solve the disc match puzzle by pressing the buttons to rotate the three encircling discs until the pictures match.
Solution:
Press the three buttons in this order, two times each: lower right, lower left, top.
Enter the library.
Library
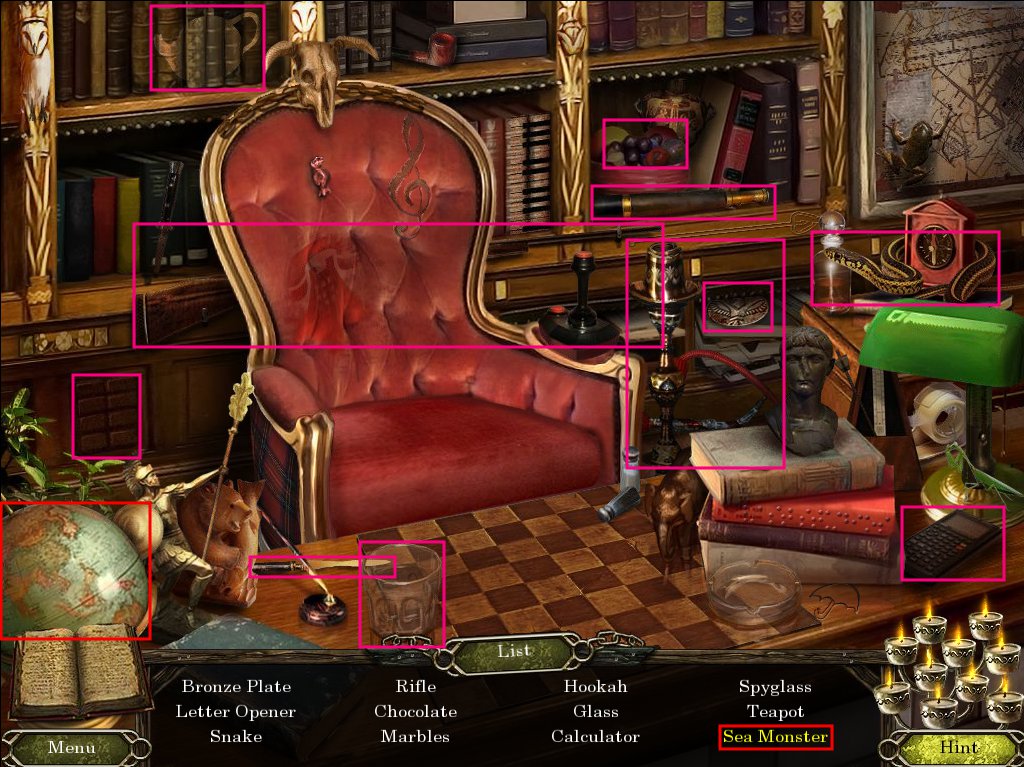
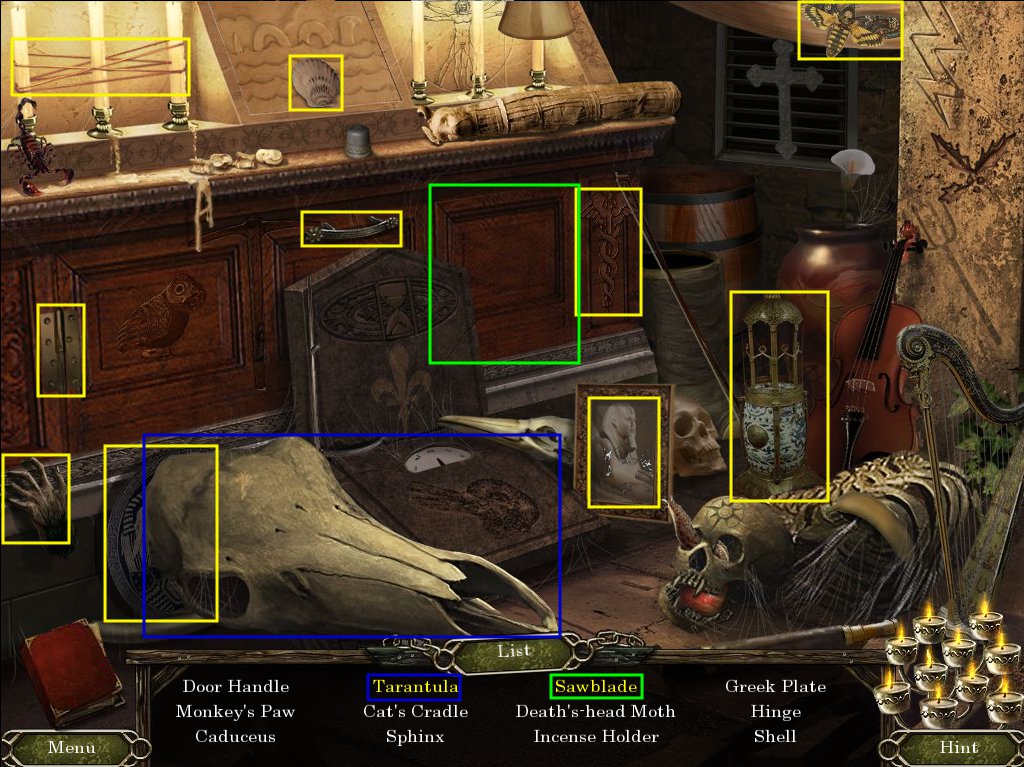
Examine the desk on the right and solve the hidden-object puzzle.
Use the screenshot below for help.
Screenshot
You acquire a bronze plate.
Enter the backroom.
Library Backroom
Pick up the picture on the desk and click it to put it in your journal.
Examine the eagle statue.
Use the bronze plate (from the library desk) on the slot and collect the book.
Back up into the library proper.
Library
Examine the first bookcase and use the book (from the eagle statue in the backroom).
Solve the match puzzle by swapping the books on the bottom shelf so the spines match the top shelf.
Click the book that drops down and collect the cabinet key.
Examine the cabinet and use the cabinet key.
Look at the second file for a safe code.
Re-enter the backroom.
Library Backroom
Examine the painting and click it to reveal a safe.
Input the code from the cabinet, which is written in your journal.
218
Collect the gold pouch and blue gemstone.
Head outside and across the gap to chat with Diane.
GOAL: Explore the church graveyard.
Outside the Church
Examine the church door.
Use the red and blue gemstones (from behind the bricks in the well and from the safe in the library backroom, respectively).
Enter the church.
Church
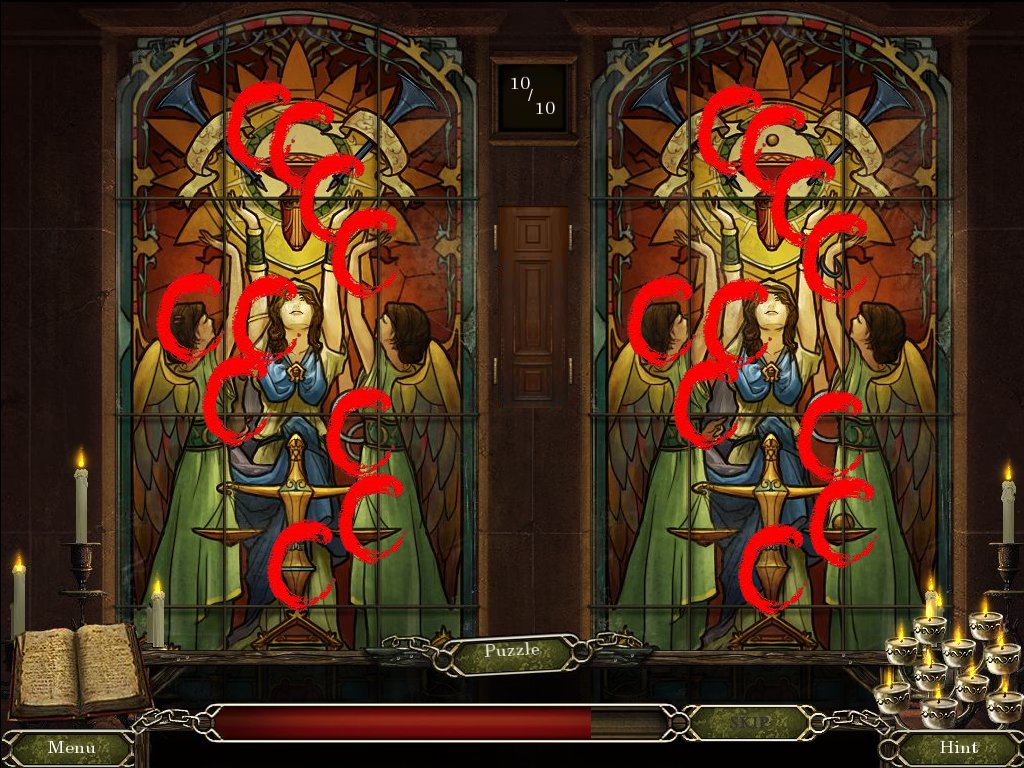
Examine the stained glass windows.
Solve the difference puzzle.
Use the screenshot below if you need help. Each difference is circled on both halves.
Screenshot
Collect the miner statuette.
Head up the staircase.
Church Belfry
Open the grating to the left and examine the hole.
Move the debris to collect the rune and darts.
Use the crank on the gear and turn it to raise the bell.
Collect the gold pouch and ring the bell.
Collect the gate disc.
Examine the chair and solve the hidden-object puzzle.
Use the screenshot below if you need help.
Screenshot
You acquire the tongs.
Head outside.
Outside the Church
Examine the cemetary gate.
Use the gate disc on the gate and solve the connection puzzle by clicking each disc to rotate it.
The solution is in the screenshot below.
Screenshot
Enter the cemetary.
Cemetary
Examine the open grave.
Click the sheet of paper to put it in your journal.
Collect the wire cutters.
Examine the far door and use the runes.
Locations of the runes:
In the cabinet of the store.
Behind the grating of the church belfry.
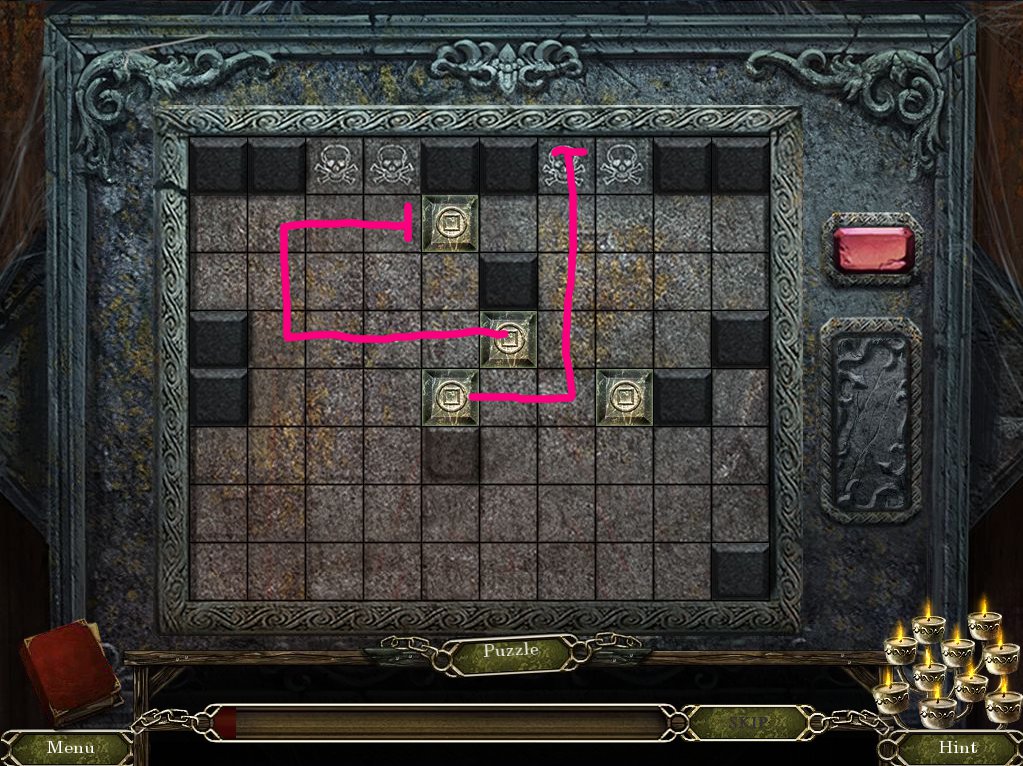
Solve the rune sliding puzzle by clicking the rune, then the direction you'd like it to move.
The rune will travel in that direction until it runs into something.
Hit the red button to reset the board.
The goal is to get all the runes onto the skull tiles.
The succession of screenshots below show a solution.
Step 1
Step 2
Step 3
Enter the crematorium.
Crematorium
Examine the shelf of urns and collect the metal urn (bottom middle).
Open the wooden box and examine it.
Collect the gold pouch.
Use the wire cutters (from the open grave in the cemetary) on the skull until it's free.
Collect the death key.
Examine the cremation chamber and open the door.
Use the tongs (from the chair in the church belfry) to collect the miner statuette.
Back up and go back into the church.
Church
Examine the three empty niches and use the three miner statuettes in each.
Locations of the miner statuettes:
In the shop in the woods.
From the stained glass windows in the church.
In the cremation chamber in the crematorium.
Collect Walter's emblem.
Go back into the cemetary.
Cemetary
Examine the mausoleum door.
Use Walter's emblem (from the miner statuettes' niches in the church) on the empty socket.
Enter the mausoleum.
Mausoleum
Examine the cove to the right.
Use the death key on the lock.
Collect the gold pouch and onyx eye.
Examine the cove straight ahead.
Place the metal urn (from the shelves in the crematorium) on the pedestal.
Collect the ashes.
Examine the statue on the right.
Use the ashes on the fire.
Collect the gold nugget and crystal eye.
Head left.
Mausoleum Backroom
Collect the gold pouch in the wall crack.
Examine the cabinet and solve the hidden-object puzzle, using the screenshot below for help.
Screenshot
You acquire the ashbin handle.
Back up and head into the crematorium.
Crematorium
Examine the bins and use the ashbin handle (from the cabinet in the mausoleum backroom).
Click the newspaper clipping for your journal.
Collect the pliers and special access card.
Head back to the mausoleum backroom.
Mausoleum Backroom
Examine the arm hanging out the wall.
Use the pliers (from the ashbin in the crematorium).
Collect the silver tongue and back up.
Mausoleum
Examine the coffin.
Use the onyx eye (from the right cove in the mausoleum), crystal eye (from the statue in the mausoleum) and the silver tongue (from the arm hanging out the wall in the mausoleum backroom).
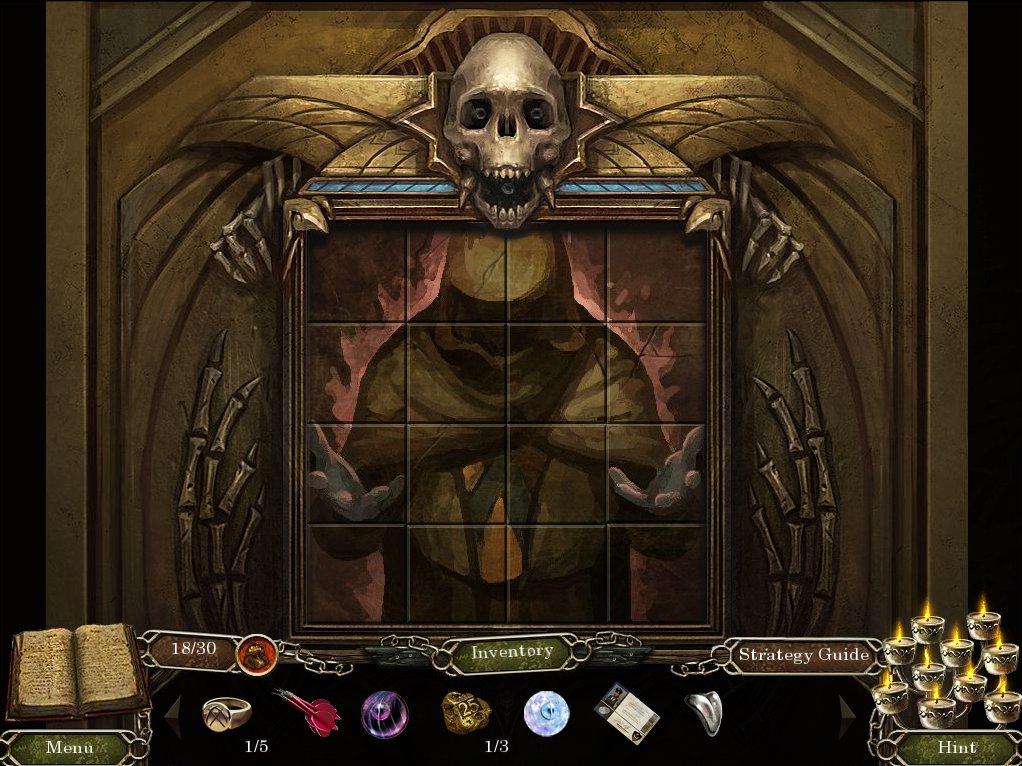
Solve the sliding tile puzzle by clicking a tile adjacent to an empty space to move it.
Use the screenshot below of the completed picture for help.
Screenshot
Collect the miner's ring and back up twice to the street.
Now head right, down the street.
Outside the Bank
Examine the bank entrance and use the special access card (from the ashbin in the crematorium) on the slot.
Solve the Simon-says puzzle by pressing the buttons in the order indicated.
Enter the bank.
Bank
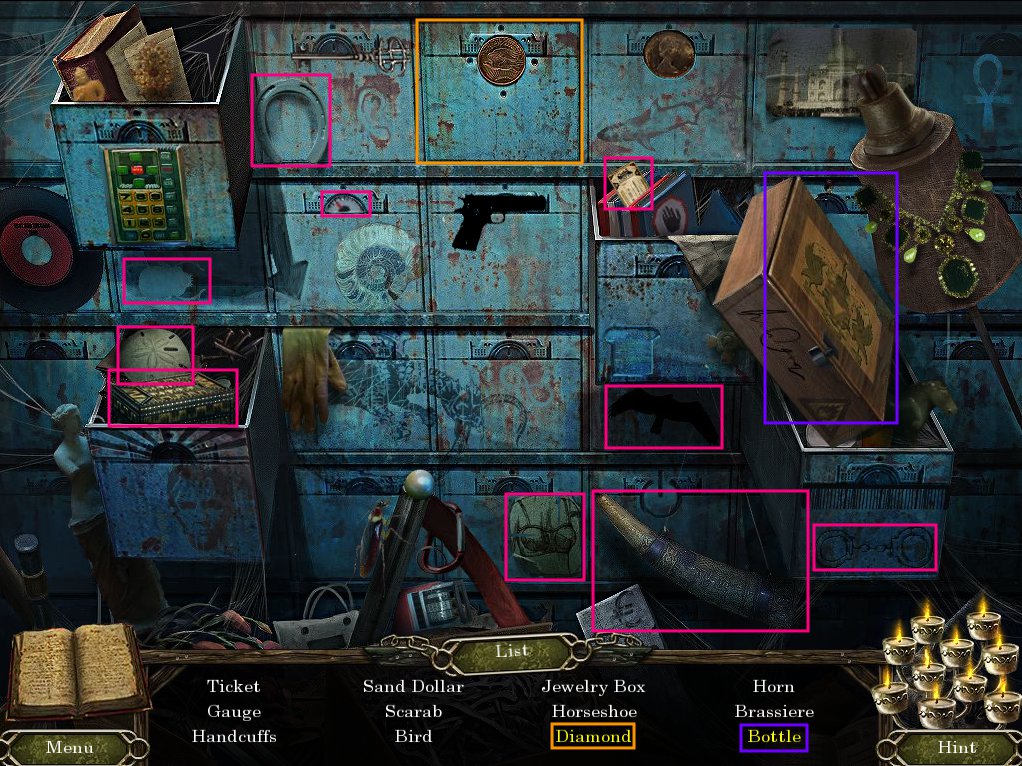
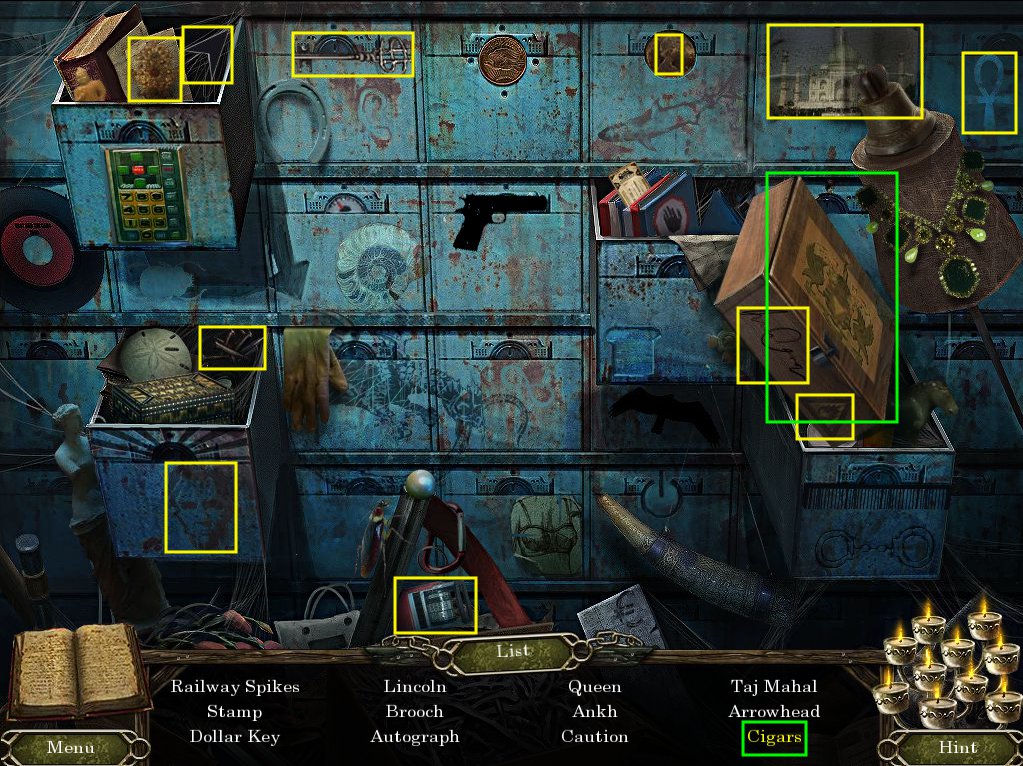
Examine the lockboxes and solve the hidden-object puzzle.
Use the screenshot below if you need help.
Screenshot
You acquire a train ticket.
Back up and head straight into the alley.
Alley
Examine the overturned garbage can.
Collect the bag of peanuts and matches.
Back up.
Outside the Bank
Examine the machine.
Use the train ticket on the slot.
Enter the carnival grounds.
GOAL: Deactivate the security cameras.
Carnival Grounds
Examine the stand to the left.
Use the bag of peanuts (from the overturned garbage can in the alley) on the elephant.
Collect the gold pouch and use the darts (from behind the grating in the church belfry) to pop all the balloons.
Collect the cheese.
Examine the stand on the right.
Collect the archeology brush.
Head straight to enter the building.
Carnival Building
Examine the cage on the left.
Collect the gold pouch and use the archeology brush (from the ticket stand on the carnival grounds) on the footprint.
Collect the gold nugget.
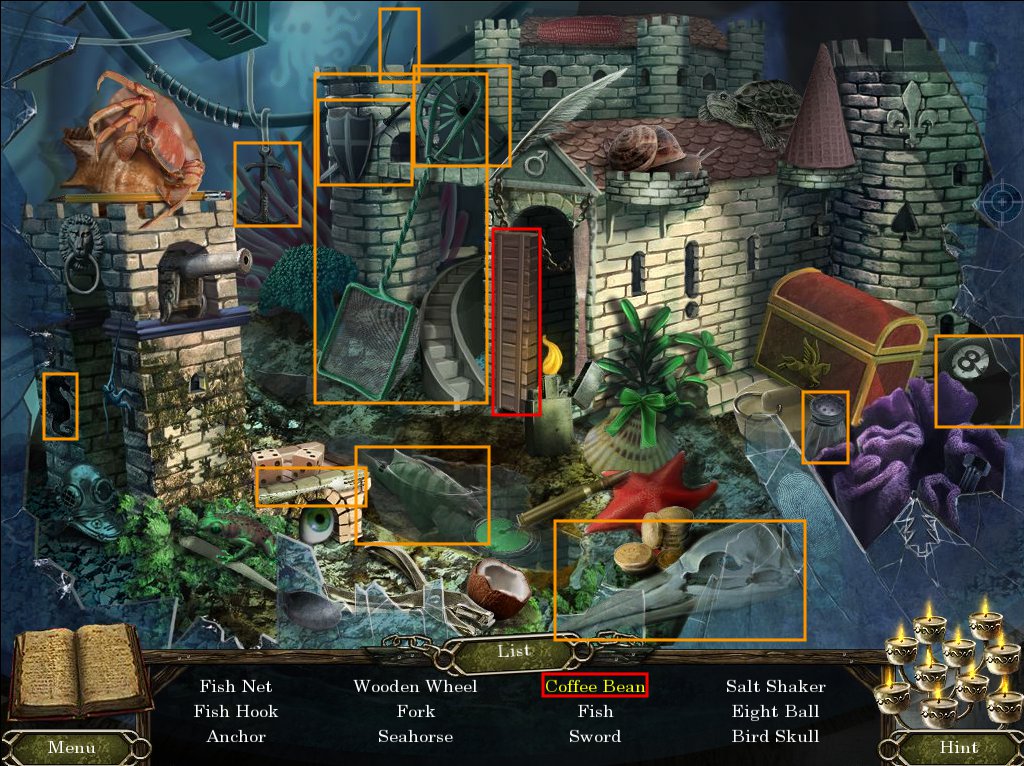
Examine the broken fish tank and solve the hidden-object puzzle, using the screenshot below for help.
Screenshot
You acquire a fish net.
Back up.
Carnival Grounds
Examine the fountain and use the fish net (from the fish tank in the carnival building) on the water.
You acquire a hex key.
Go back into the alley.
Alley
Examine the box to the right.
Collect the gold pouch and feed the mouse the cheese (from the left stand at the carnival grounds).
Collect the mouse.
Examine the panel high on the wall.
Use the hex key (from the fountain at the carnival grounds) on all four screws.
Take off the cover and flip all six switches.
Go back into the carnival building.
Carnival Building
Examine the mouse cage to the right.
Open the door and use the mouse (from the box in the alley) on the cage.
Collect the metal ball.
Head back into the bank.
Bank
Re-examine the lockboxes and solve the hidden-object puzzle, using the screenshot below for help.
Screenshot
You acquire railway spikes.
Examine the vault.
Use the metal ball on the grid.
Solve the labyrinth puzzle by rotating the grid to get each ball into it's same colored hole.
To help you visualize which way to turn, the button's arrow points in the direction the ball will roll.
Once a ball has reached its target, it will no longer move.
The solution (steps are shown by which arrow to push, they also assume you've followed the previous steps):
Yellow ball: L, L, R, L, L
Pink ball: R, R, L, R
Purple ball: R, L, R, L, R, R
Green ball: R, R, R, L, R, L, L, R, R
Blue ball: R, L, L, L
Enter the vault.
Bank Vault
Collect the gold pouch on the cart.
Collect the photo taped to the side to put it in your journal.
Examine the lockboxes and open one.
Collect a gold nugget and dynamite.
Go back outside and head back to the town square.
GOAL: Get into the mines.
Town Square
Examine the statue.
Use the gold nuggets on the pan.
Locations of the gold nuggets:
On the statue in the mausoleum.
Under the footprint in the escaped cage of the carnival building.
In the lockbox in the bank vault.
Head right and into the police station.
Police Station
Collect the gold pouch by the pamphlets.
Examine the computer and click it to activate.
Collect the cable.
Enter the backroom.
Police Station Backroom
Examine the desk and solve the hidden-object puzzle, using the screenshot below if you need help.
Screenshot
You acquire tape.
Head outside.
Outside the Police Station
Examine the flagpole.
Click the flag to lower it.
Collect the gold pouch and token.
Examine the brick wall.
Click the picture to put it in your journal.
Re-examine the brick wall.
Use the tape (from the police station backroom desk), dynamite (from the lockboxes in the bank vault) and matches (from the overturned garbage can in the alley).
Enter the railway.
Railway
Examine the chest to the left.
Remove the lid and collect the planks and bolt cutters.
Head straight to the train stop.
Train Stop
Examine the ticket machine and use the token (from the flagpole outside the police station) on the coin slot.
You acquire a knob.
Open the train door and enter.
Train Car
Collect the gasoline and gold pouch.
Examine the motorcycle and solve the hidden-object puzzle, using the screenshot below for help.
Screenshot
You acquire a sledge hammer.
Go back inside the police station backroom.
Police Station Backroom
Examine the desk for another hidden-object puzzle, using the screenshot below for help.
Screenshot
You acquire an electric switch.
Examine the desk drawer.
Use the knob (from the ticket machine at the train stop).
Open the drawer and collect the gold pouch and train pin.
Go back to the train car.
Train Car
Examine the hatch on the wall.
Use the train pin (from the police station backroom desk drawer).
Collect the elephant key and miner's ring.
Back up.
Train Stop
Examine the control station to the right.
Collect the gold pouch.
Use the electric switch (from the police station backroom desk).
Flip the switch and press the red button.
Go back into the police station.
Police Station
Examine the chest by the door.
Use the elephant key (from the hatch in the train car).
Collect the miner's ring.
Go back to the railway.
Railway
Examine the tracks.
Use the planks (from from the chest in the railway) and railway spikes (from the lockboxes in the bank).
Use the sledge hammer (from the train car) on each spike.
Examine the drill.
Use the gasoline on the red gas tank.
Pull the lever.
Enter the tunnel.
Tunnel
Examine the fuse box to the right.
Use the cable (from the computer in the police station) and flip all four switches.
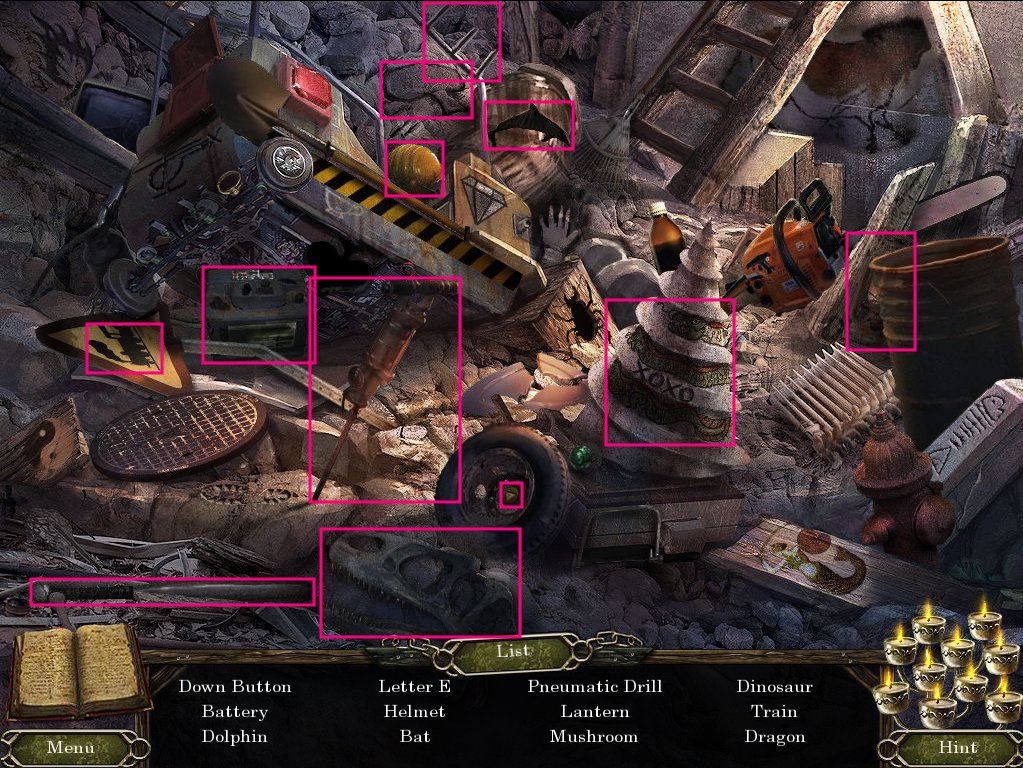
Examine the drill to the left and solve the hidden-object puzzle, using the screenshot below for help.
Screenshot
You acquire an elevator button.
Examine the wooden box on the rock.
Open it and collect the gear.
Examine the elevator door.
Use the bolt cutters (from the chest at the railway) until it's free.
Open the door and enter the elevator.
Examine the mechanics to the left and use the gear (from the wooden box in the tunnel).
Examine the controls and use the elevator button (from the drill in the tunnel).
Press the down arrow and enter the mines.
Mines
Collect the gold pouch on the wooden crates.
Examine the jacket and collect the femur.
Open the pocket to collect the matches.
Examine the cart and use the femur to pry it open.
Collect the gold pouch and hammer.
Head back up the elevator (back up to exit it).
Tunnel
Examine the panel on the left wall.
Use the hammer (from the cart in the mines) on the door until it's free.
Collect the gold pouch and tool key.
Go back downstairs.
Mines
Examine the wooden door.
Use the tool key (from the panel in the tunnel) on the lock.
Open the door and collect the pickaxe.
Use the pickaxe on the boulder until it's destroyed.
Examine the door and solve the tile rotation puzzle.
Click the buttons in the corners to rotate the adjacent pieces.
Use the guide to the right for the correct placement of the symbols.
It's best to work top-down or bottom-up.
Enter the final chamber.
Mine Chamber
Examine the picture and collect the miner's ring.
Examine each group of skeletons and use the miner's rings on their hands.
Locations of the miner's rings:
From the scales in the shop.
From the coffin in the mausoleum.
From the hatch in the train car.
From the chest in the police station.
By the picture in the mine chamber.
Use the matches on the fuse.
Congratulations! You've completed the game!!
Posted by: Kyh |
September 29, 2011 1:08 PM
|
September 29, 2011 1:08 PM