

Amanda Rose:
The Game of Time
Platform: Windows

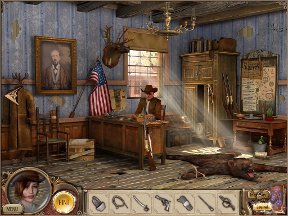
![]() The concept of travelling through time has ignited the imaginations of many, and the resulting tales present with a myriad of possibilities. But more often than not, there's a time machine involved. Amanda Rose: The Game of Time, developed by Renergy, takes the idea of hurtling through a time-space continuum one step further by way of a small stone in an unfolding cube found by our heroine, Amanda, at the site of a plane crash. It's not an easy ride though and after several days of unconsciousness, she awakes to an adventure that will take her through the wild west of America to the amazing lost city of Atlantis. Of course there are multiple hidden objects to be found to help her on her way.
The concept of travelling through time has ignited the imaginations of many, and the resulting tales present with a myriad of possibilities. But more often than not, there's a time machine involved. Amanda Rose: The Game of Time, developed by Renergy, takes the idea of hurtling through a time-space continuum one step further by way of a small stone in an unfolding cube found by our heroine, Amanda, at the site of a plane crash. It's not an easy ride though and after several days of unconsciousness, she awakes to an adventure that will take her through the wild west of America to the amazing lost city of Atlantis. Of course there are multiple hidden objects to be found to help her on her way.
 Amanda Rose: The Game of Time takes the hidden object adventure hybrid standard up a notch with gorgeously-detailed scenes, high quality artwork and a high level of puzzle solving to locate items. There are also puzzles to solve aside from the searching, and while intricately detailed to look at, they're not overly challenging. The main goal of the game is to help Amanda Rose locate her missing father, and to do this she undertakes a variety of tasks to help the characters she meets during her journey.
Each scene requires a double level of hidden object seeking. The first level of objects are fairly straightforward to locate, hidden somewhere in each detailed scene. The second level requires a bit more puzzle-solving on your part as these items are hidden within locked chests and safes, or can only be acquired after completing certain tasks. Some items need to be combined in order to progress, which is easily achieved in the inventory and signified by a "plus" symbol next to objects.
Facets of the game that are there to help include a journal that records notes and codes as well as serving to remind you which tasks need to be completed, and a hint meter which is slow to recharge, but helpful in pointing the way. What's nice about the hint meter is that it often doesn't point directly to difficult to locate objects, but really does serve as a hint system.
 Analysis: Some games really make you feel valued as a consumer, and this would have to be one of them. The work and care invested in Amanda Rose is immediately evident with gorgeously detailed scenes to explore as an almost seamless adventure unfolds. The gameplay is interspersed with comic-style graphics and dialogue, which fills out the overall game quite a bit, and can be skipped entirely, but the artwork is so beautifully executed that it's a pleasure to watch the story unfold. There's additional dialogue from Amanda Rose's character, which at times feels unnecessary as it points out the obvious.
With the quality artwork and amazingly detailed scenes with expressive characters that look almost three dimensional, the game starts with all cylinders firing. Unfortunately, the momentum slows in the last three or four chapters, which are shorter in duration and gameplay, as the artwork looks less detailed and the games, both hidden object and puzzles, start to feel less challenging to the point of being underwhelming. But the design, sound effects and intricacy of detail makes this point forgivable.
Gameplay is very linear; objects need to be found and puzzles solved before you can progress to ensuing scenes. Much of the challenging gameplay lies in the hidden object games, as the puzzles are more or less based on sliding tile puzzles, and as such are not a strong element of the game despite being beautiful to behold. When all the items are found in a room, the game lets you know which saves a whole lot of fruitless pointing and clicking. The game itself plays for approximately three or more hours, but that is entirely dependent on how much dialogue you wish to skip.
Amanda Rose: The Game of Time is a magnificent example of developers investing so much work and care into their games, and Renergy has created a beautifully detailed game. From beginning to end, this is a game that will captivate you with its imagery, sound and imaginative tale, and one you'll remember for quite a while after you've finished playing.
![]() Windows:
Windows:
Download the demo
Get the full version
![]() Mac OS X:
Mac OS X:
Not available.
Try Boot Camp or Parallels or CrossOver Games.


Walkthrough Guide
(Please allow page to fully load for spoiler tags to be functional.)
Amanda Rose: The Game of Time Walkthrough
General Information
From the Main Menu, you can Start and Exit the game, choose your Player name, view the Credits, and select the Options you wish.
Options consist of Music, Sound and Ambient Effects volume; use of a custom cursor; and choice of Full Scene with or without a Widescreen correction versus Windowed play.
The game will automatically be saved for you when you Exit.
Screenshot
Scene Navigation
You will be given your choice whether you wish to play the Tutorial.
If you choose to play the Tutorial, you can skip it at any time by clicking on the bar at the top of the scene.
Hints are unlimited, but the button needs time to refill.
If you choose a Hint, you will have to select which item you wish it to help you find.
You can access the Menu in the far left corner under Amanda's picture.
You will be given the Menu choices when the game auto pauses in Window Mode.
You can change your Options, go Back to playing the game, or Exit to the Main Menu.
The items to find for a Hidden Object Scene are pictured at the bottom of the scene.
If an item has a lock on it, that means it is currently hidden from view and you will need to perform a task to reveal it.
Items for your Inventory will appear in the middle of the screen for you to click before they go into your Inventory.
Your Inventory can be accessed by clicking on the Inventory button in the lower right corner.
Sometimes items in your Inventory will have a plus next their picture, which means they need to be combined with another item in the Inventory before they can be used.
To get back to your items list, click again on the Inventory button.
Next to the Inventory button is your Journal that can be accessed via the Journal button.
The Journal has tabs for the Story, Goals, and Notes, and it will glow when there is something important for you to read.
Items to find will usually be replaced by another item, so the second set of items will also be shown in the screenshot.
Be sure to watch the cutscenes for more information about the story.
If you miss something, you can check the Journal.
Screenshot
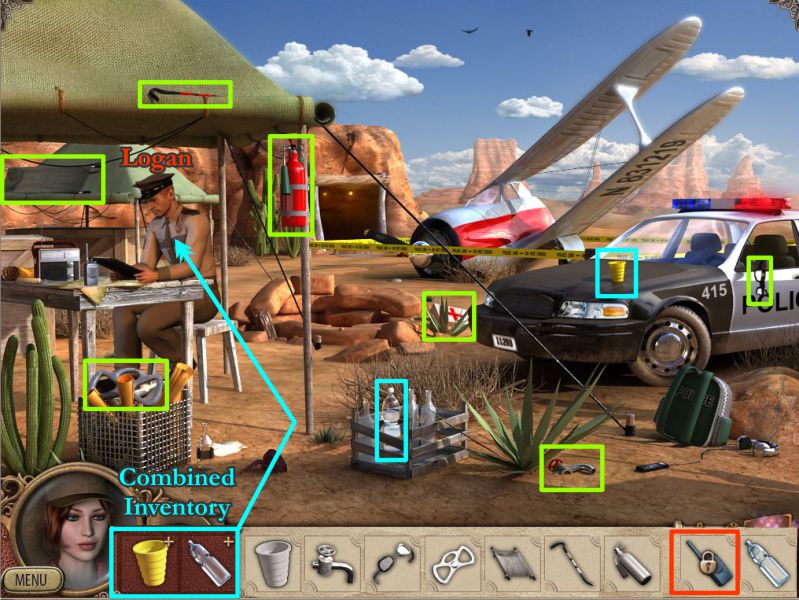
Chapter 1: The Plane Crash
Your goal is to sneak over to the crash site of Dad's plane so you can find the stone for the device you have.
Logan isn't about to let you, so you need to find a way to distract him.
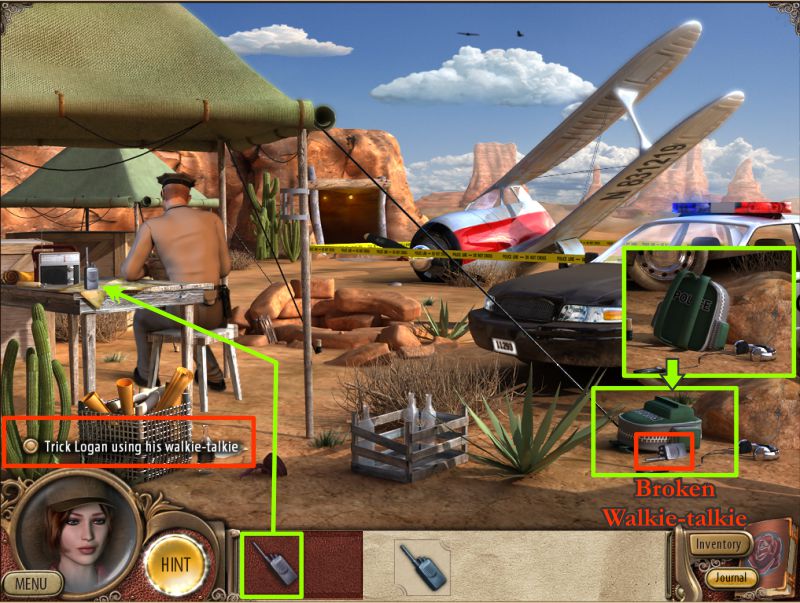
Collect everything and you will get a cup and bottle of water for your Inventory.
Combine both items and offer a cup of water to Logan.
Screenshot
Logan turns his back to you, so tip over the backpack to get the broken walkie-talkie for your Inventory.
Swap his walkie-talkie and the broken one and inquire if he has heard anything.
He discovers his walkie-talkie is broken and goes off to fix it.
Screenshot
Chapter 2: An Unfamiliar Place
Amanda wakes up in a strange room and needs to get out of there.
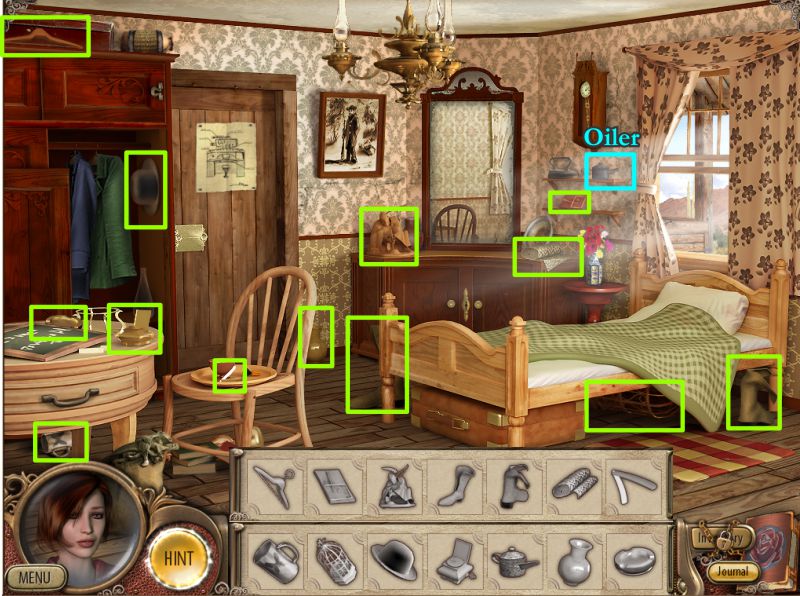
Find all the items and you will get an Oiler for your Inventory.
Screenshot
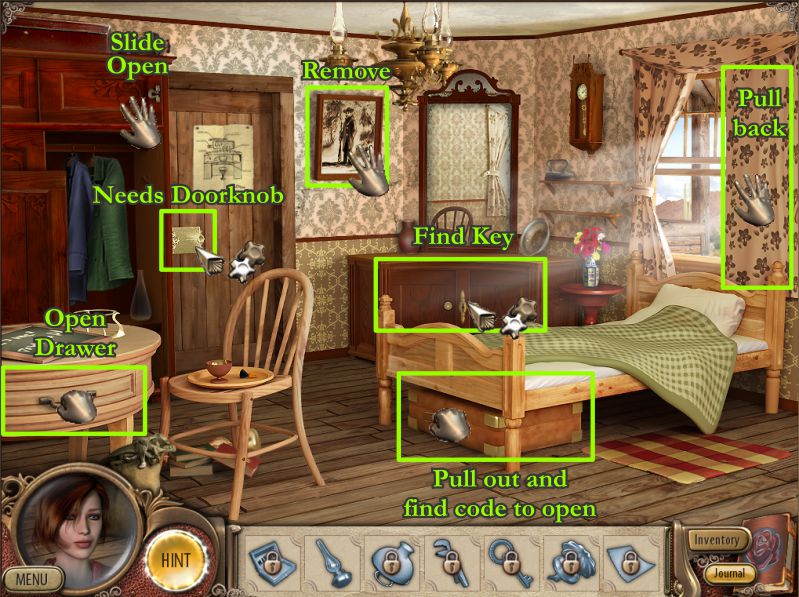
The next group of items are almost all hidden from sight. See the screenshot for your next set of tasks.
Screenshot
The items you need to find are marked in red in the screenshot.
The Inventory items are color-coded as to where to use them.
Combine the lampshade and lamp, place them on the stand on the table, and light the lamp with the matches.
Use the oiler on the rusty screws of the cache behind the picture.
Use the wrench to remove the bolts so you can collect the blank paper.
Place the paper on the lighted lamp and a code will appear on the paper.
Place the code on the suitcase and take the key that is inside.
Use the key to open the cabinet and get the doorknob.
Place the doorknob on the door to trigger a Mini Game.
Screenshot
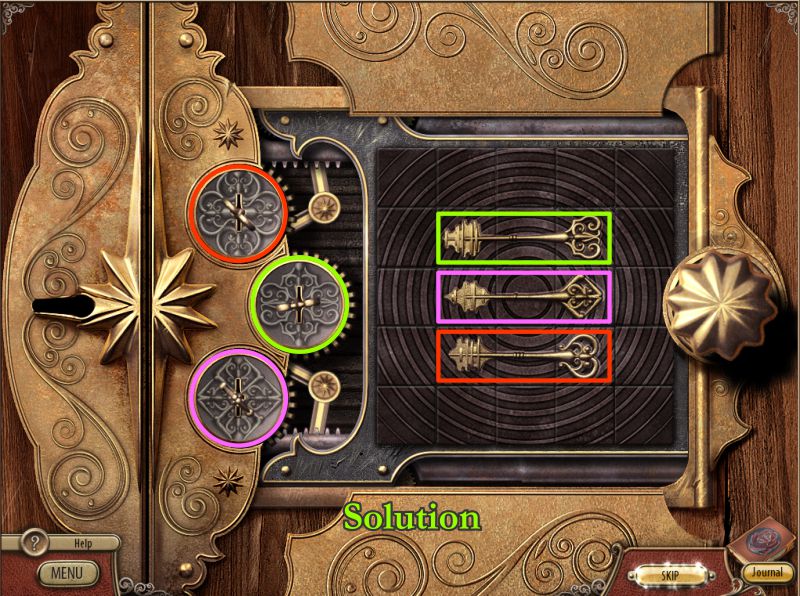
Door Lock Mini Game
Swap the pieces of the puzzle to match the screenshot and get the 3 keys.
Place the keys in the keyholes as color coded and the door will open.
Screenshot
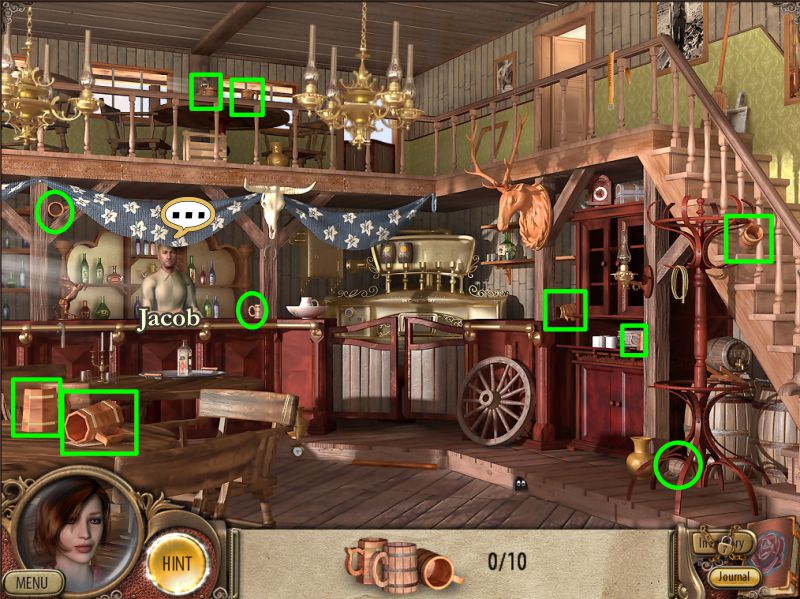
Chapter 3: The Search Begins
Amanda meets Jacob, the saloon owner, who rescued her.
Your goal is to repair the cocktail machine so Jacob can make Tropical Night cocktails like the one Doc made for him.
Find 10 beer mugs for Jacob.
Screenshot
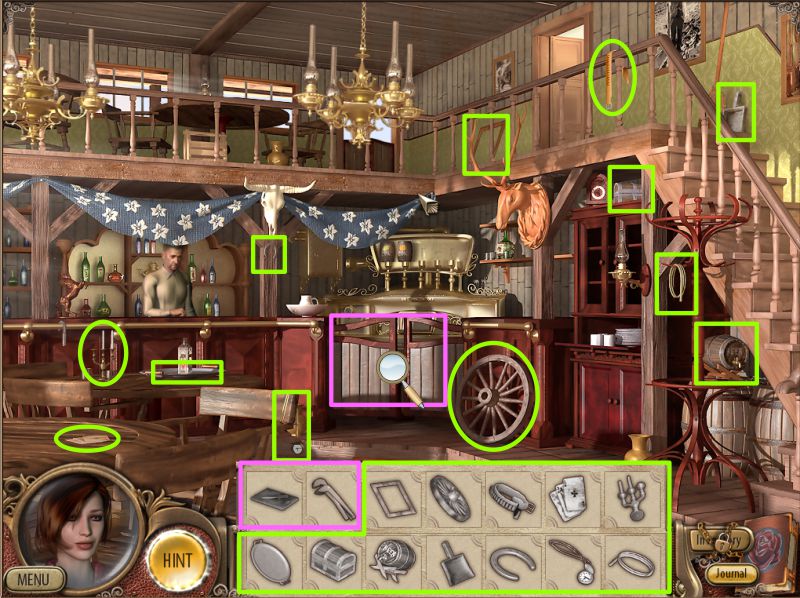
Find all the items pictured, and then go to the cocktail machine for the last two items.
Screenshot
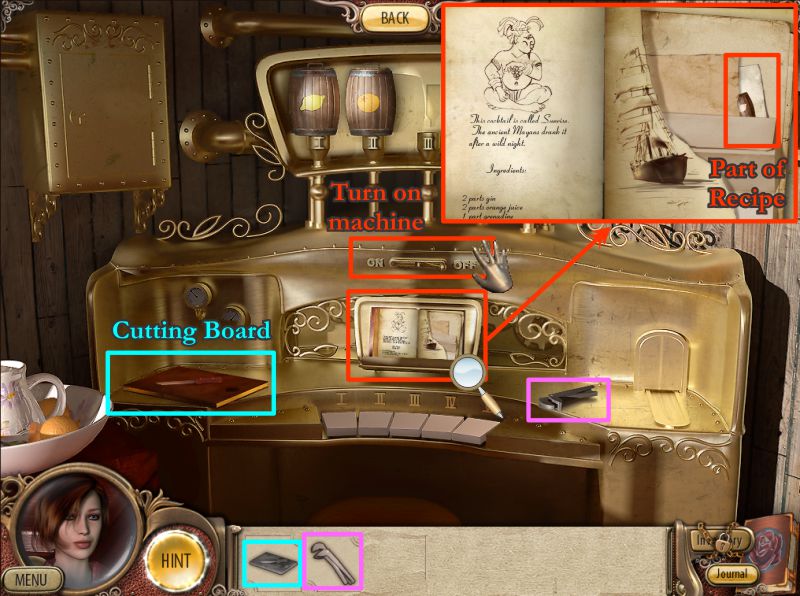
Pick up the Cutting Board for your Inventory and collect the wrench.
Turn on the machine and click on the recipe book with the missing page.
Click the part of the recipe, and it will go into your Journal.
Select the Back button at the top of the scene to go back out to the saloon.
Screenshot
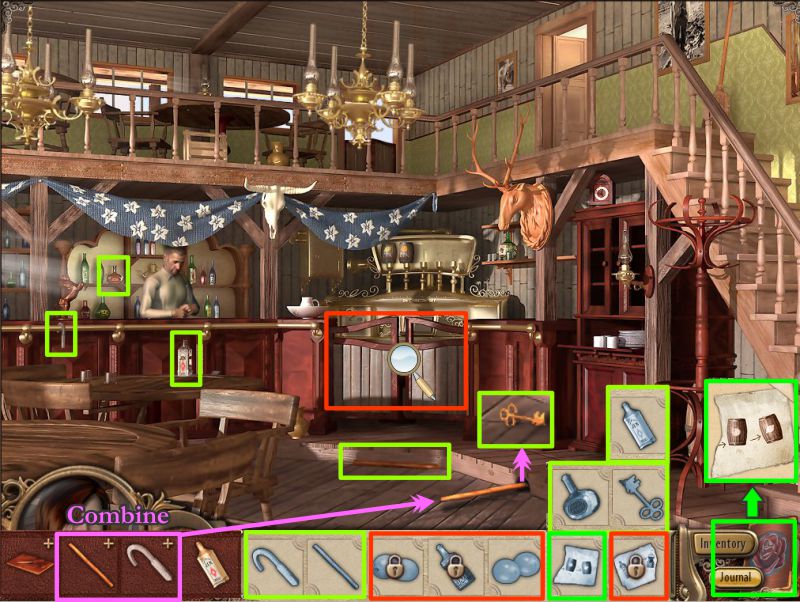
Click on the Journal Notes tab to get the recipe part.
The hook and pole will go into your Inventory, so combine them and use them on the mouse hole to retrieve a key for the refrigerator.
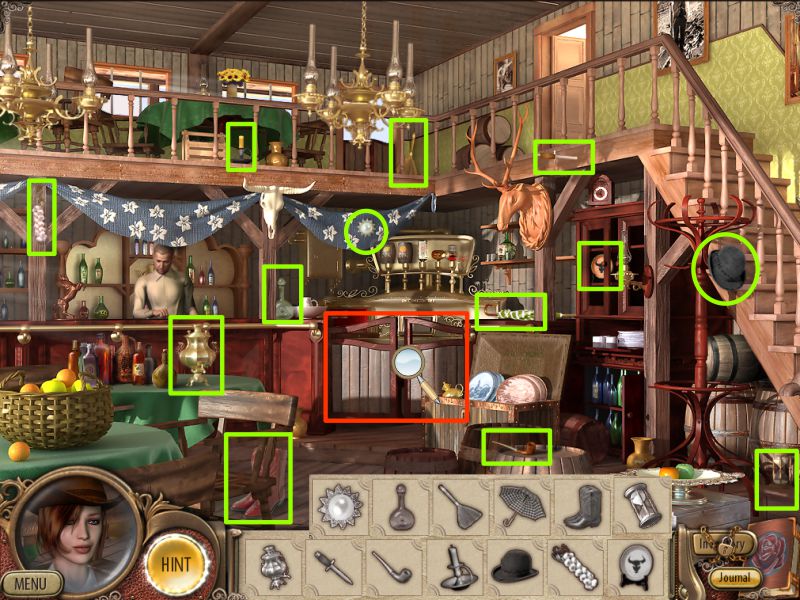
Collect all the available items in the saloon before returning to the cocktail machine.
Screenshot
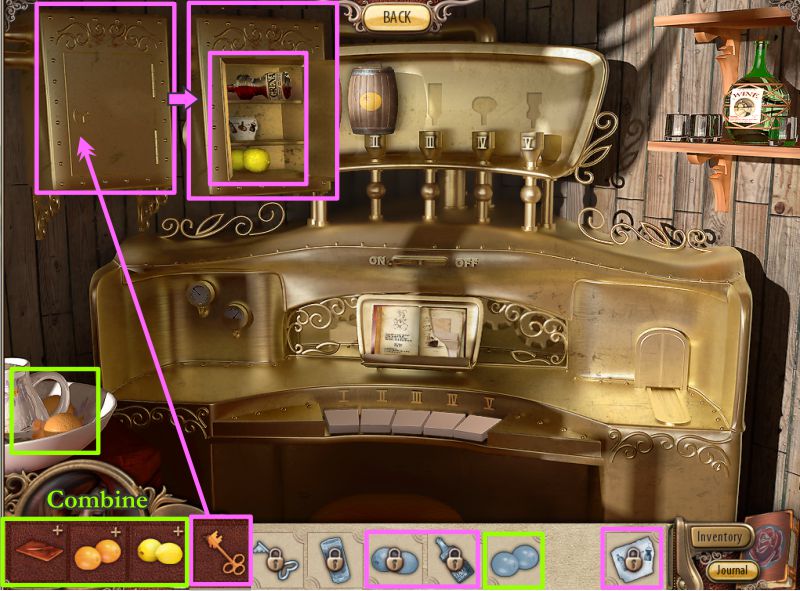
Collect the oranges and open the refrigerator with the key.
Take the lemons, recipe piece and Grenadine.
Combine the cutting board with the oranges and lemons to cut them up.
Screenshot
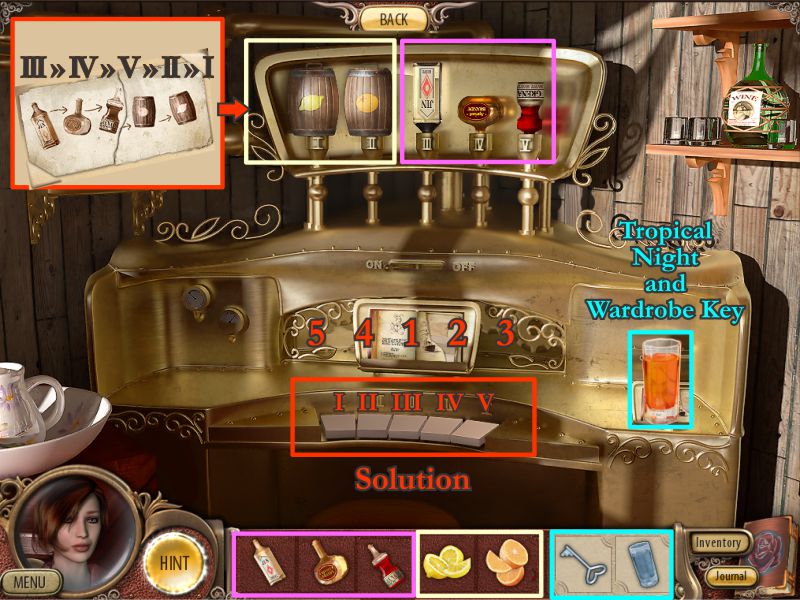
Tropical Night Mini Game
Place the lemons and oranges in the small barrels.
Place the Gin, Brandy and Grenadine in their correct silhouettes.
Check the combined recipe in the Journal to see the order in which you need to strike the keyboard to make the cocktail.
See the screenshot for the solution.
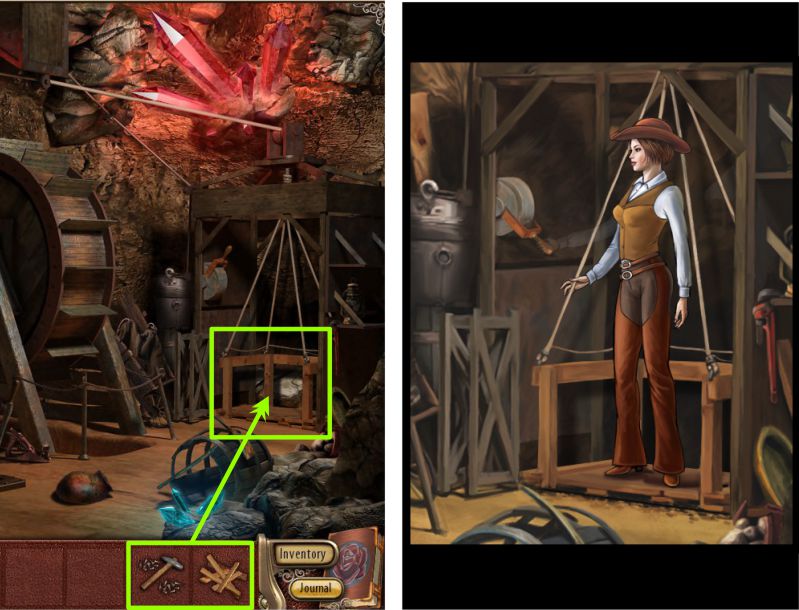
A glass of Tropical Night appears, so collect it and get a key to open the wardrobe.
Jacob approves of the drink and suggests Amanda change clothes to better fit in with the rest of the town.
Screenshot
Chapter 4: The Bank
The Bomb Mini Game
The Bank is being robbed as you get there, and there is a bomb set to go off.
In order to defuse the bomb, you need to cut the wires in the order indicated on the dial: Green, Blue, Red, and Gold.
The dial will flip back and forth, so only click on the wire when the dial is on the color you need to cut.
Screenshot
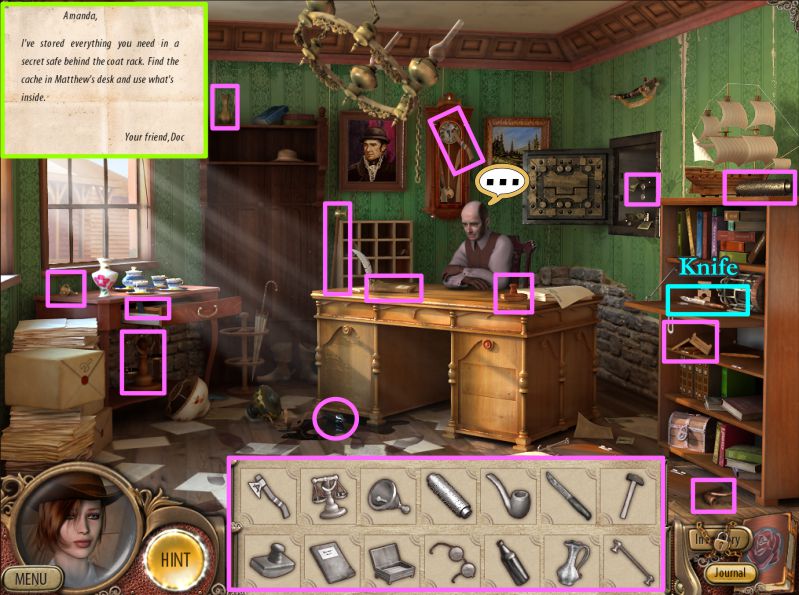
The banker gives you a note from Doc.
Find all the items pictured and receive a dull knife for your Inventory.
Screenshot
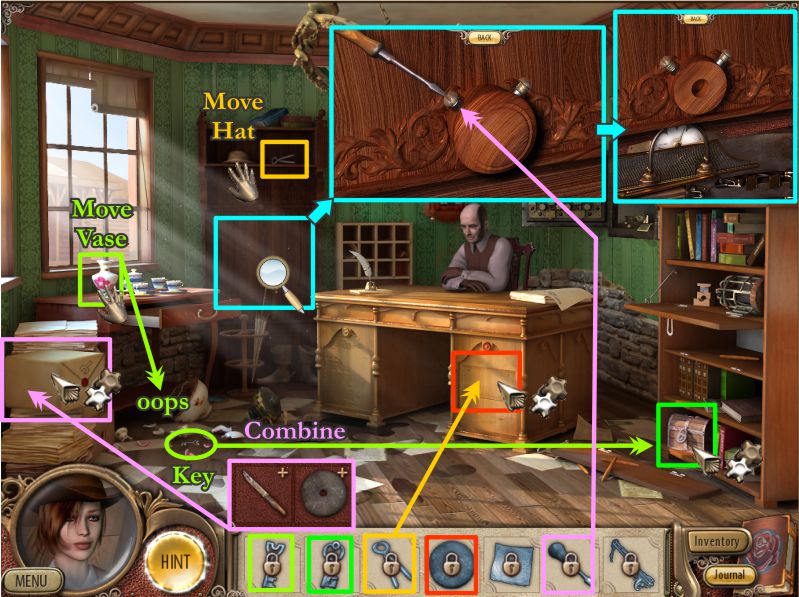
Move the hat to get the pincers.
Use the pincers to remove the nails in the desk cache.
Move the vase, and it will fall on the floor and break.
Pick up the key and use it to open the small chest and get the key inside.
Combine the dull knife and grinding wheel in your Inventory.
Use the sharp knife to cut open the package.
Take the screwdriver and zoom in on the coat rack.
Place the screwdriver on the knob to remove the screws to reveal the secret safe.
Screenshot
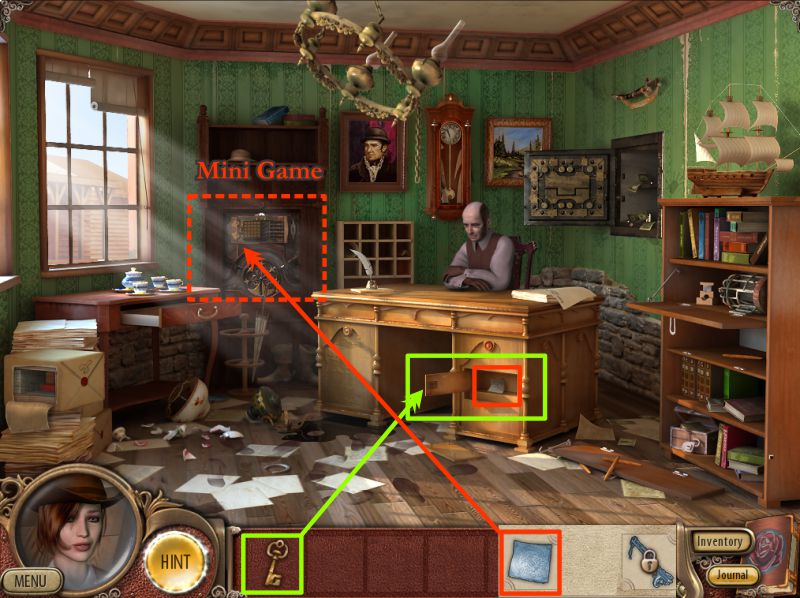
Use the key from the small chest to open the compartment in the desk.
Take the paper and place it on the secret safe to trigger a Mini Game.
Screenshot
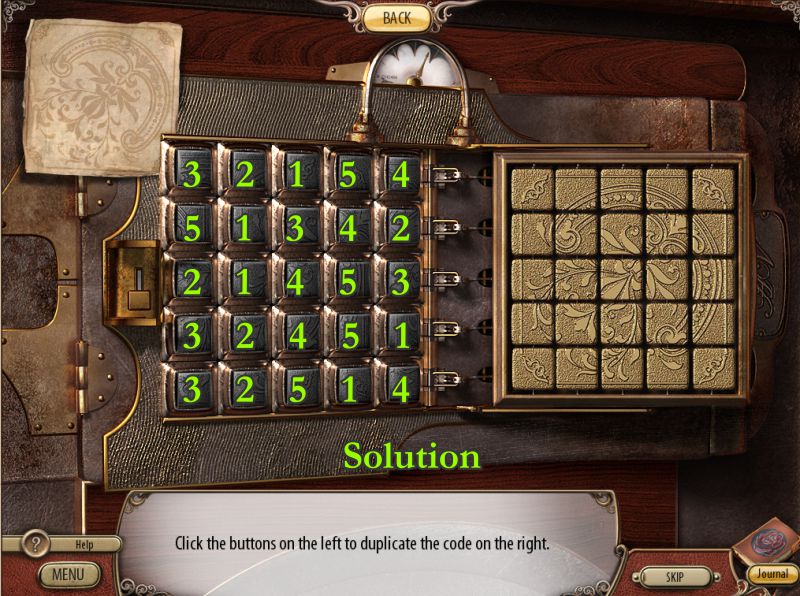
Secret Safe Mini Game
Your goal is to duplicate the design from the paper on the portion of the lock.
Transfer the design using the buttons on the left in the correct order for each row.
If you make a mistake, you will have to start the row over again.
A numbered solution is shown in the screenshot.
Screenshot
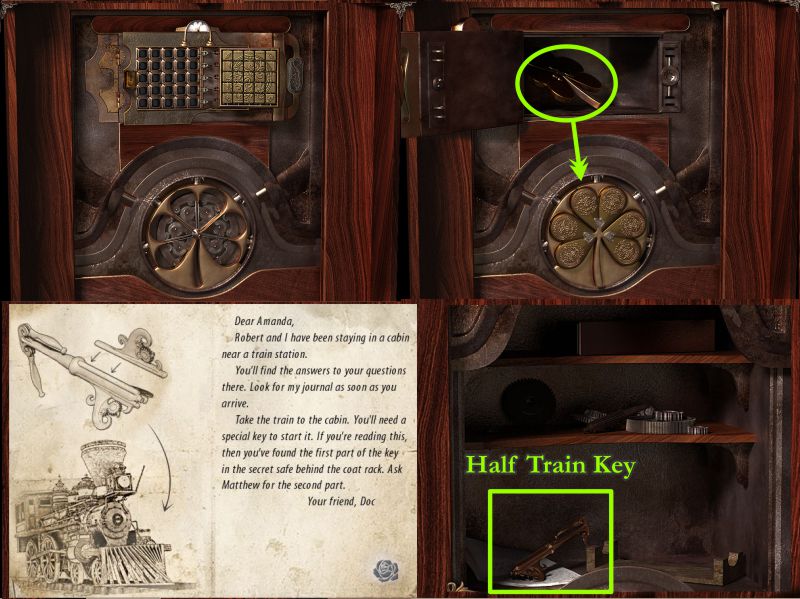
When you have completed the Mini Game, the first portion of the safe will open and a clover piece will transfer to the indentation on the safe lock.
There is a note from Doc and half of the Train Key inside the safe.
Matthew, the bank owner, is suppose to give you the other half, but the robbers took it.
Screenshot
Amanda finds a horseshoe with a design on it, so is off to find the blacksmith.
Chapter 5: The Mystery of the Horseshoe
There is a left and right side to the blacksmith shop that will be referred to as the Forge and Workshop.
Check your sparkling Journal for information.
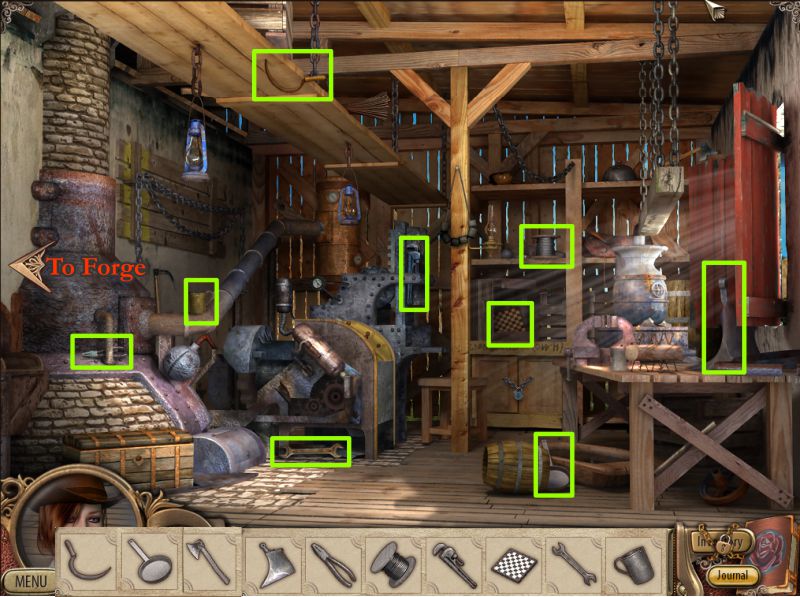
Find all the items and you will get some Tongs for your Inventory.
Follow the arrow at the right to go to the Workshop.
Screenshot
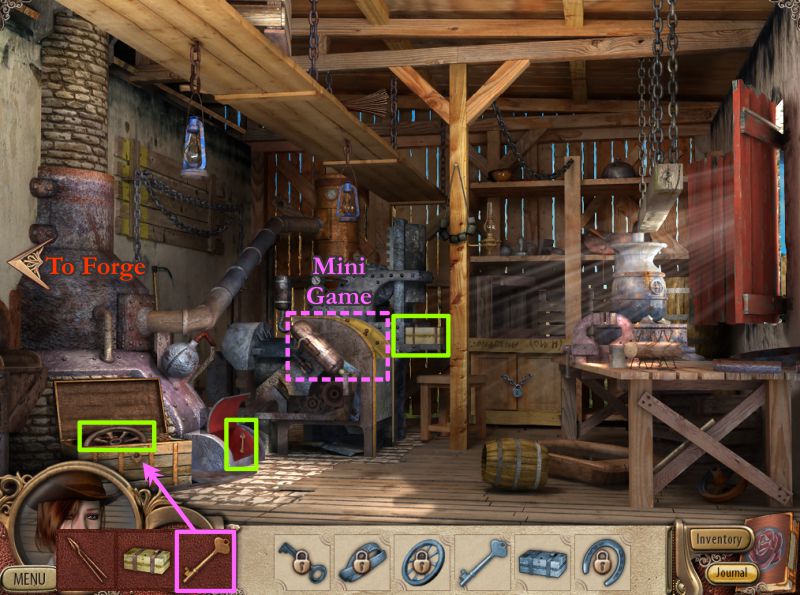
Collect everything marked in the screenshot.
Screenshot
Zoom in on the Mechanism for a Mini Game.
When you have completed the game, the machine will produce a mold for you to collect.
A compartment will open for you to take the key inside.
Use the key to open the chest so you can take the wheel.
Return to the Forge.
Screenshot
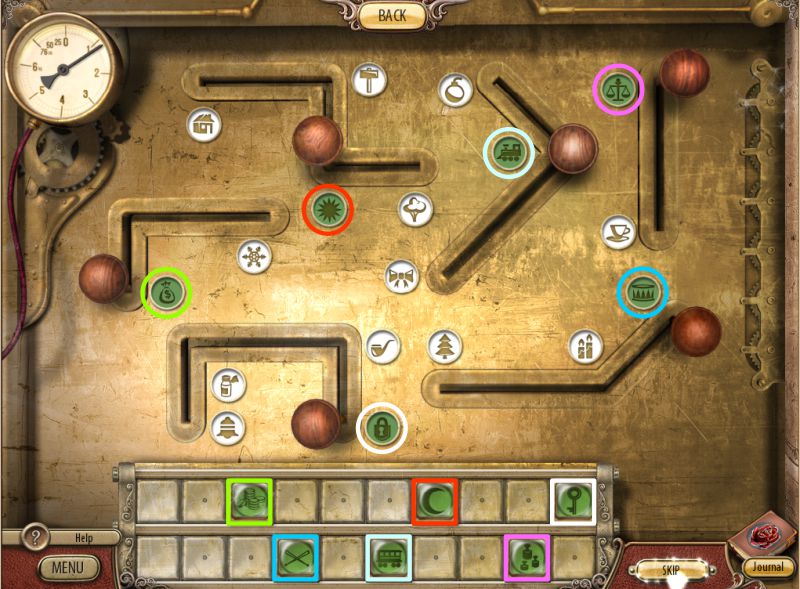
Workshop Mechanism Mini Game
Your goal is to match the icons at the top to similar icons at the bottom.
When you have a match, the knob will move to the icon you have chosen and both icons will turn green.
Screenshot
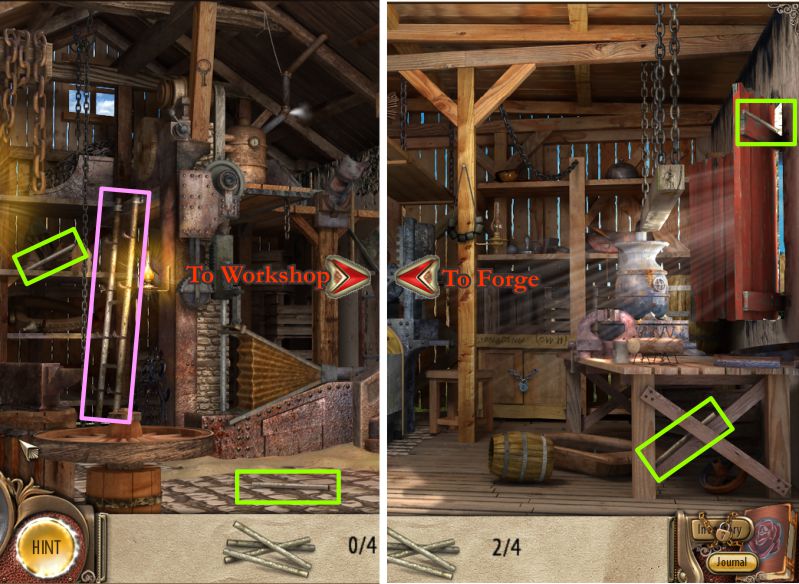
Click on the ladder to trigger a task of collecting the rungs.
Pick up two in the Forge and 2 in the Workshop.
Screenshot
Return to the Forge and place the rungs in the ladder so you can reach the key on the post.
Go to the Workshop and open the cabinet with the key so you can get the Belt.
Screenshot
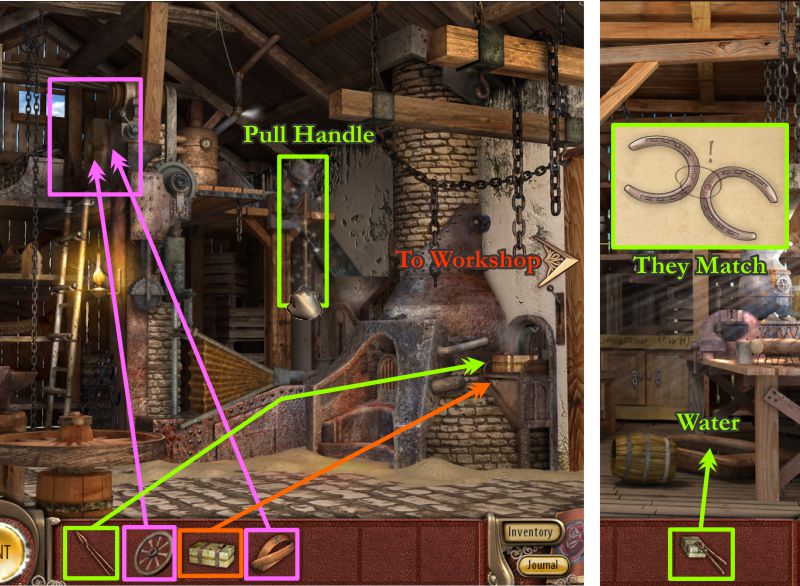
Go back to the Forge and place the wheel and belt on the axis.
Place the mold as shown in the screenshot.
Pull the handle, and the metal will heat up and pour into the mold.
Use the tongs to pick up the mold and carry it to the Workshop.
Cool the mold in the water and examine the horseshoe to find out it's a match to the one Amanda found at the Bank.
Screenshot
Chapter 6: Justice
The Sheriff is busy trying to fix his wife's clock that he broke, so have a look around.
The scene is split between the Office and the Jail, so use the arrows to travel back and forth as necessary.
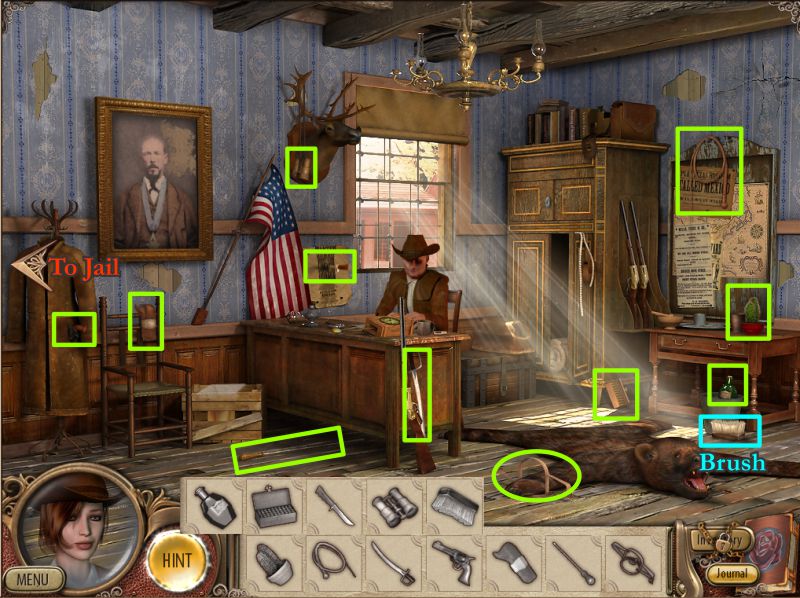
Collect the items in the Office to get a Brush for your Inventory, and then go to the Jail.
Screenshot
Collect the items marked in the screenshot.
Screenshot
Pick up the matches and crowbar on the next list.
Dip the brush from your Inventory in the bucket of water before going back to the office.
Screenshot
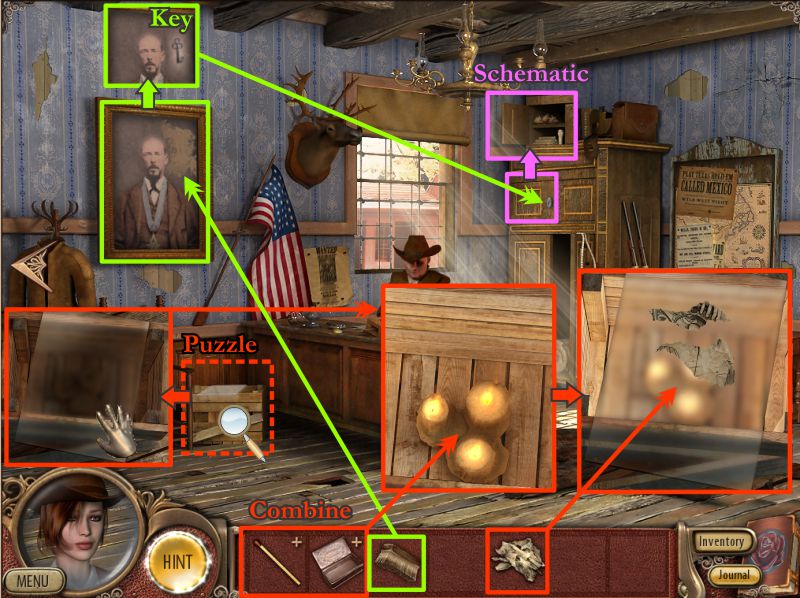
Use the brush to clean the dirty part of the painting and take the key that appears.
Use the key to open the cabinet in back of the Sheriff.
Take the torn-up Schematic and zoom in on the crate.
Remove the glass. Combine the match with the match box to light the match.
Use the lit match to light the candles in the crate, and the glass will automatically be replaced.
Place the torn schematic on the glass to trigger a puzzle.
Screenshot
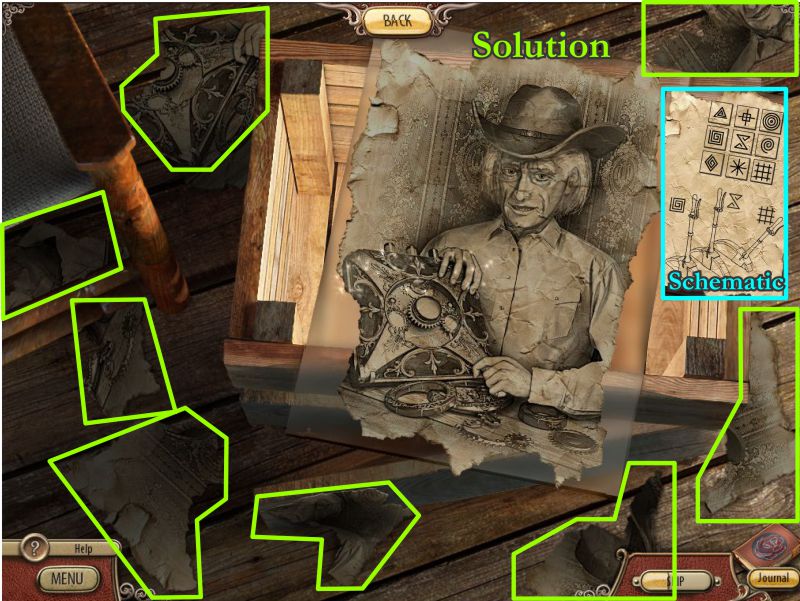
Schematic Puzzle
Two pieces of the puzzle are on the glass, but the rest are scattered around next to the crate.
Put the puzzle together as shown in the screenshot solution, and it will turn over to reveal the schematic for the jail cell levers.
Screenshot
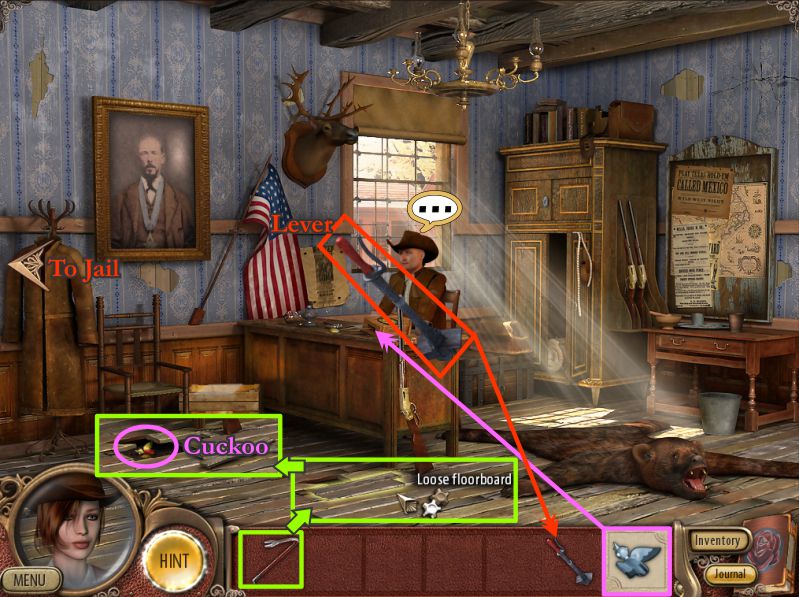
Use the crowbar from your Inventory to take up the loose floorboard.
Take the Cuckoo and place it on the clock the Sheriff was trying to fix.
The Sheriff will give you the missing lever for the cell door, so go to the Jail.
Screenshot
Cell Levers Mini Game
Zoom in on the levers and place the missing lever to trigger a Mini Game.
Using the schematic, which is now in your Journal, put the tiles in their proper places.
Screenshot
The solution to the Mini Game is shown in the screenshot.
After you have properly placed the tiles, pull the first two levers once each, and the right lever twice so the markers are as shown in the screenshot.
Return to the Office.
Screenshot
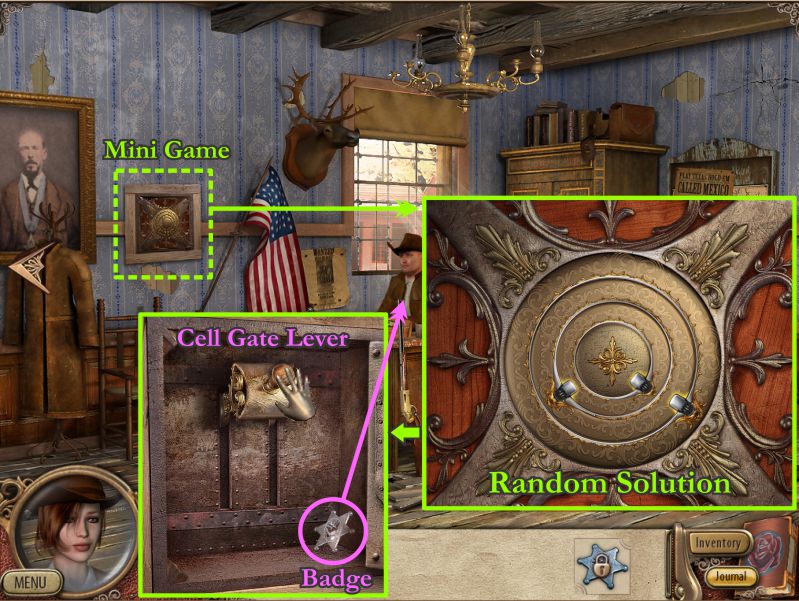
Cache Lock Mini Game
The painting has moved, revealing a cache behind it with a lock that needs opening.
Your goal is to move the rings until the open and grab the next ring.
The solution is random, so try working from the inside out until the locks extend as shown in the screenshot.
When the cache opens, pull down on the lever and the cell gates will open.
Pick up the badge, give it to the Sheriff, and you all go off to catch the robbers.
Screenshot
You recover the banker's money and Amanda gets the second part of the train key.
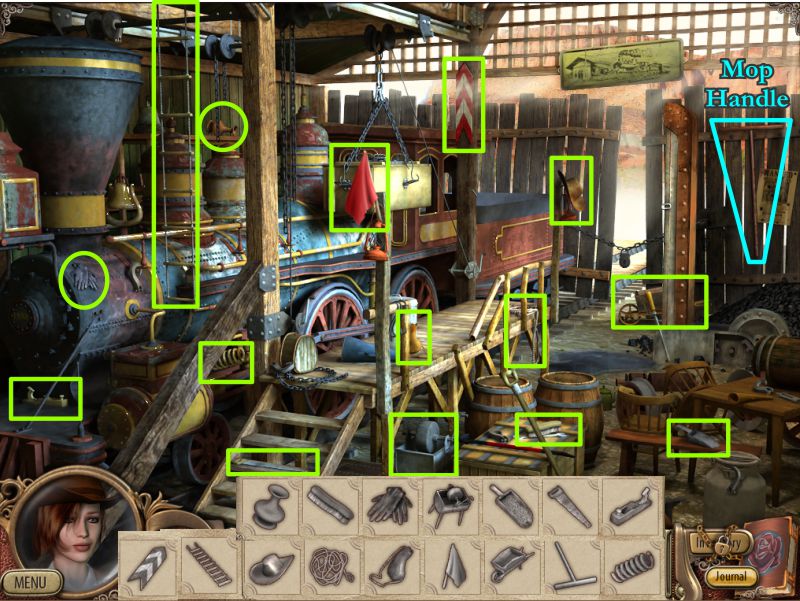
Chapter 7: Doc's Hangar
Your ultimate goal is to fuel the train and get it started so you can go find Doc.
Collect everything marked in the screenshot to get a Mop Handle.
Screenshot
Lower the crate and examine the lock to trigger the task of finding the hooks.
Place the hooks on the crate lock to open it.
Move the megaphone to get the key inside.
Screenshot
Take the gear inside the crate.
Use the key to open the box under the steps.
Take the cloth and combine it with the mop handle.
Use the mop on the oil and pick up the key.
Open the lock on the gate with the key.
Place the gear on the coal loader, and it will automatically fill the coal car with coal.
Screenshot
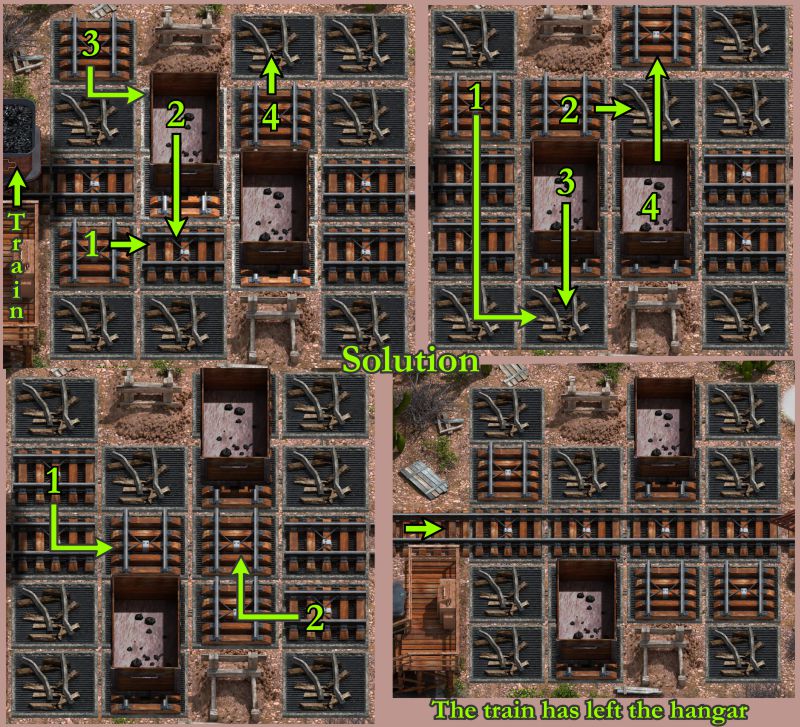
Align the Tracks Mini Game
In order for the train to be on its way, you need to slide the tracks around so that there are 4 sets of horizontal tracks in the path of the train.
The screenshot shows one step-by-step solution.
Screenshot
Chapter 8: The Hideout
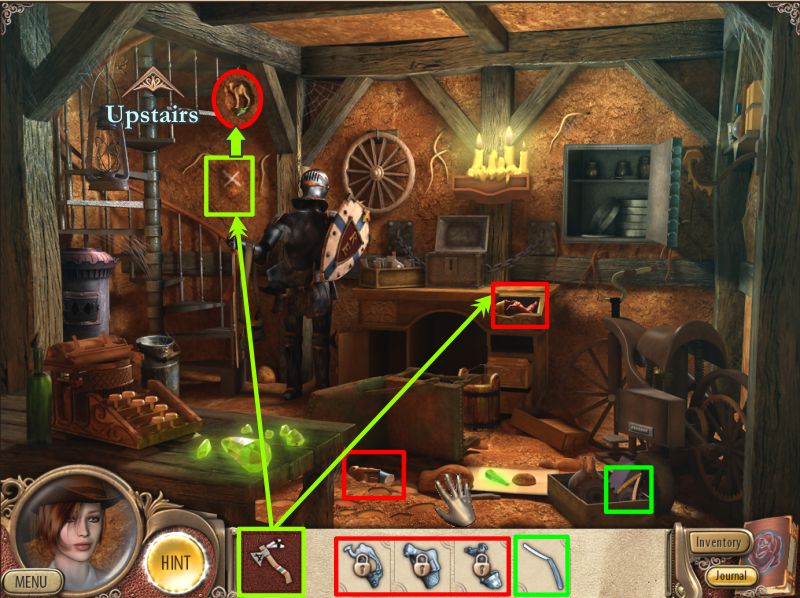
Collect everything to get a Fire Poker.
Screenshot
Use the poker on the fireplace to drag out a Gauntlet.
Pick up the blank piece of paper and remove the lid of the basket. There is a snake in the basket protecting a key.
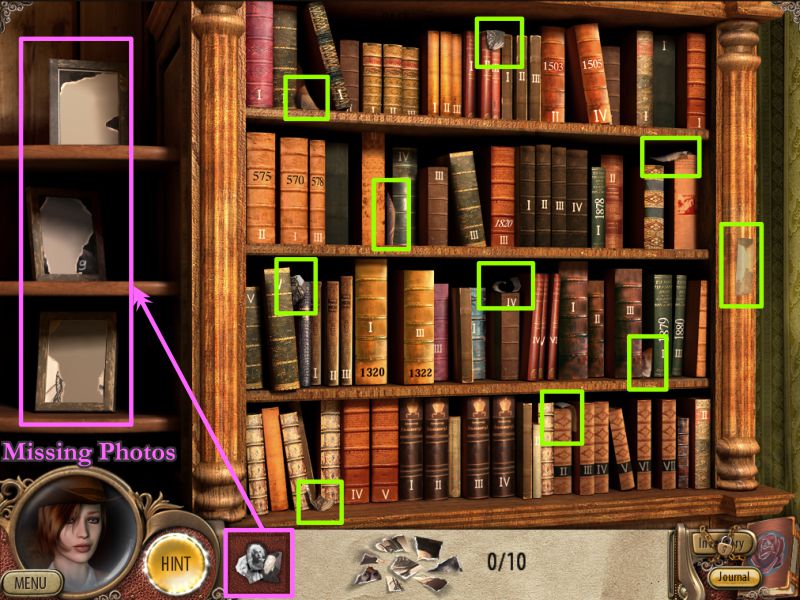
Zoom in on the bookcase.
Screenshot
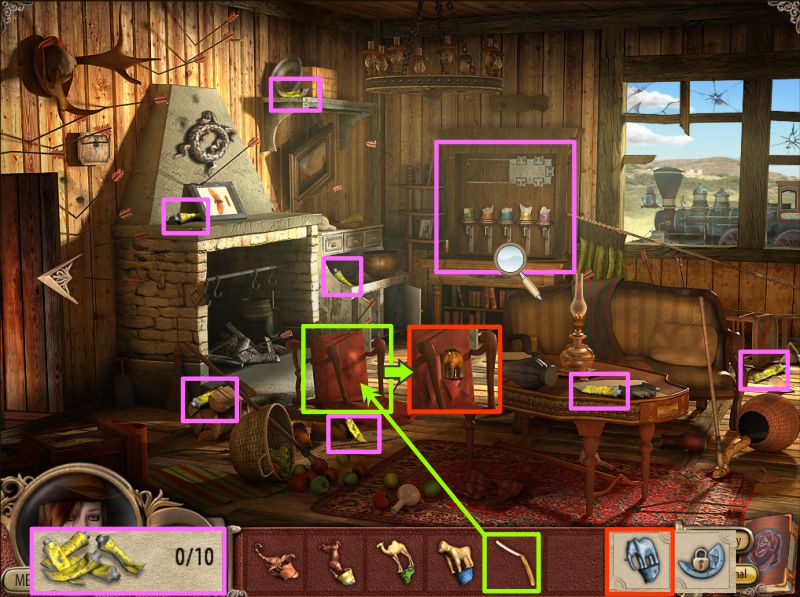
There are 3 picture frames with missing photos, so collect the 10 photo scraps among the books.
Screenshot
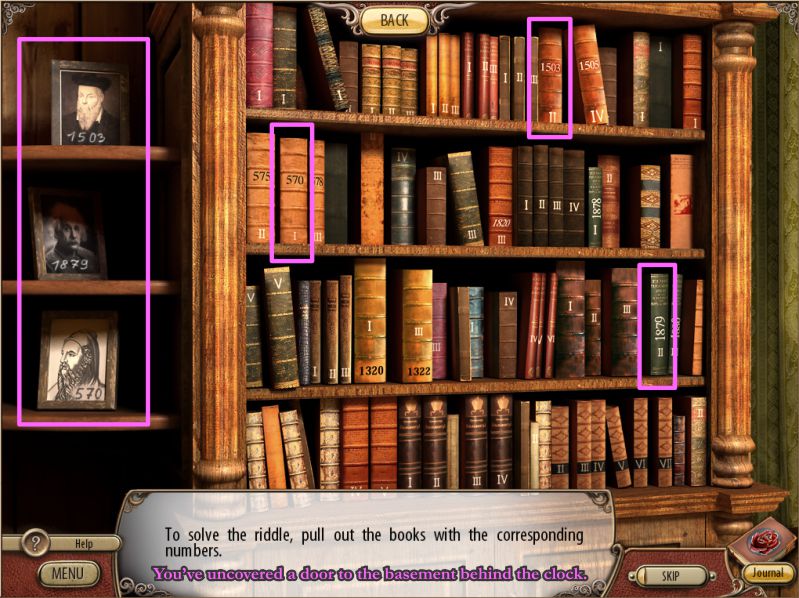
Place the scraps on one of the photos.
Pull out the 3 books in the bookcase that have the same numbers as the pictures: 1503, 1879, and 570.
The clock next to the fireplace will move, revealing a secret entrance to a basement.
Screenshot
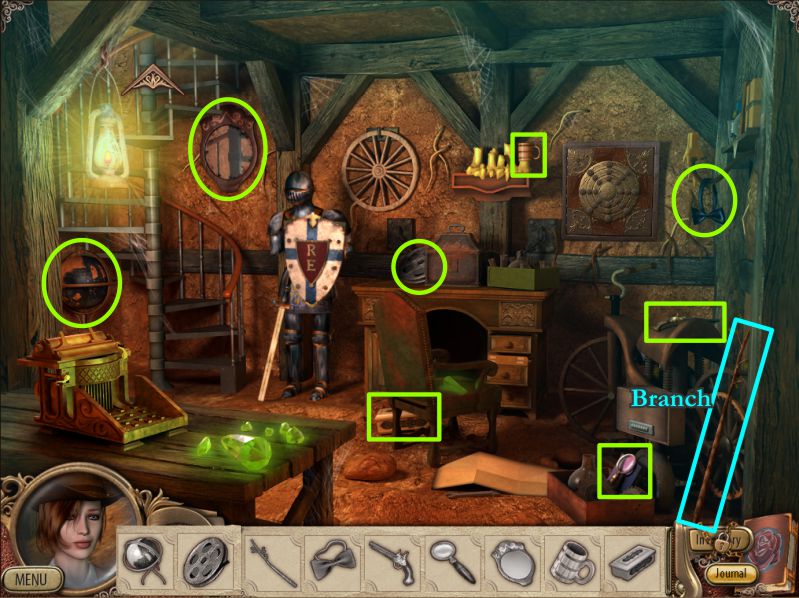
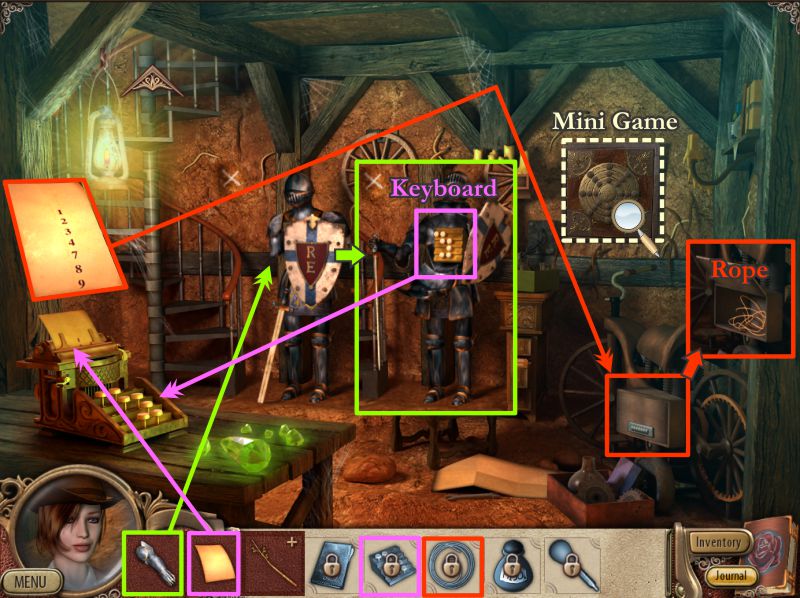
Collect everything shown on the list for the basement and you will get a Branch.
Screenshot
Place the gauntlet on the suit of armor, and it will give you a Keyboard.
Install the keyboard on the printer and the blank piece of paper in it.
It will type a code that you can place on the storage box to open it and get the rope inside.
Zoom in on the safe for a Mini Game.
Screenshot
Safe Mini Game
Your goal is to line up the 3 rings with icons that have something in common with the picture in the center.
The red arrow will point to the position where you are to place the icon, starting from the center outward.
When you have the correct icon, the arrow will turn green and the ring will rotate, leaving the rest of the icons dark.
The pictures are random, but might be a teapot, canon, heart, sailboat, bird, or a horse like the sample in the screenshot.
Once you have opened the safe, take the Sulfuric Acid and Eyedropper.
Screenshot
Go back upstairs and combine the rope with the branch to make a fishing pole.
The rope has a hook at the end of it, so go fish for the key in the snake basket.
Return to the Basement and combine the eyedropper with the Sulfuric Acid.
Use the acid on the chest to remove the rust so you can open it with the key.
Doc's Journal is inside, so read through it and then collect it.
Screenshot
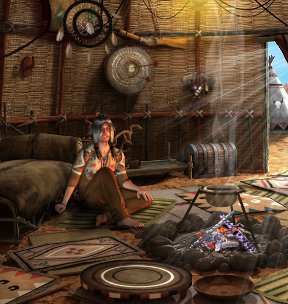
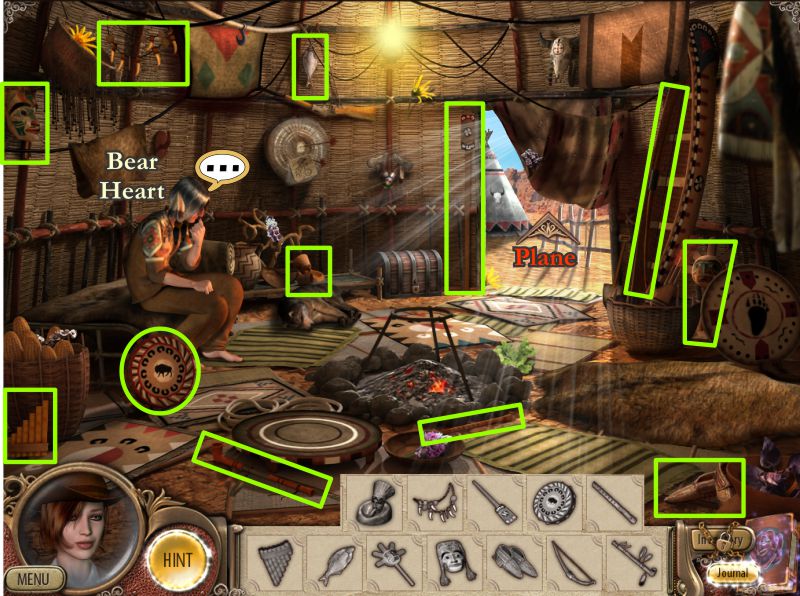
Chapter 9: Indian Settlement
You are transported to the Indian Settlement where you meet the chief, Bear Heart.
An evil spirit is present, so Bear Heart wants you to make a dreamcatcher.
Unless the evil leaves, he cannot remember the potion to cure his sick dog, Yokki.
Collect everything inside the teepee and then go outside to discover the plane.
Screenshot
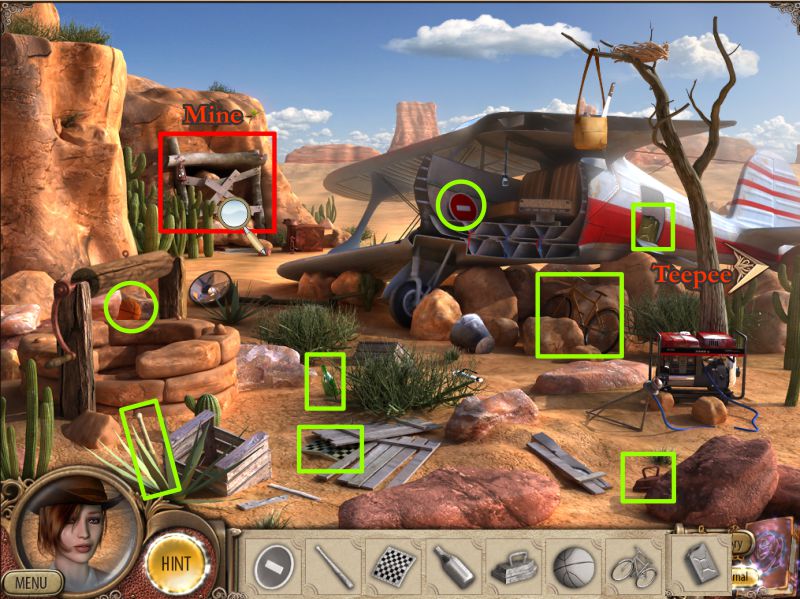
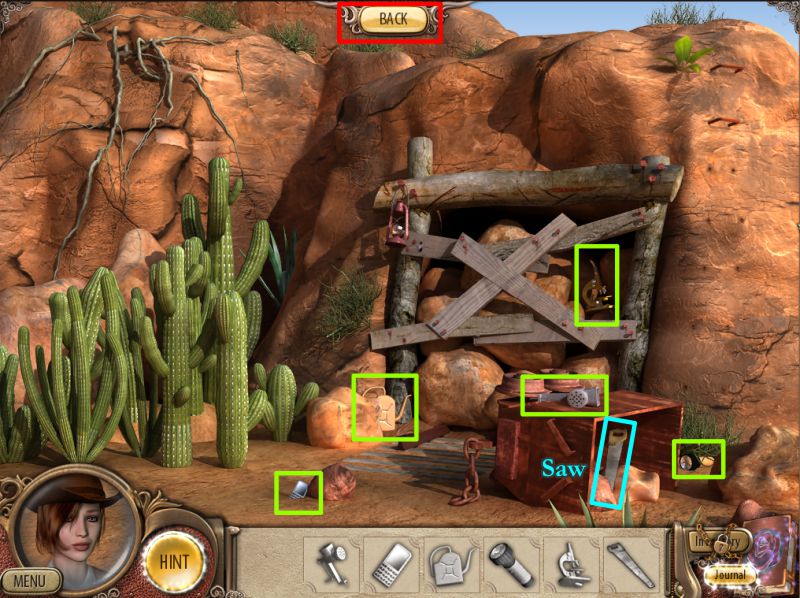
Collect all of the items and then zoom in on the Mine.
Screenshot
Collect the items there to get a Saw.
Click on the "Back" button to go back to the plane, and then go inside the teepee.
Screenshot
Pick up the schematic, rope and shovel.
Move the animal skin and use the shovel to dig in the loose dirt.
Pick up the key and use it to open the chest.
Collect the Caldron and place it on the stand in the fire ring.
Move the cloth on the line at the left and take the rings.
Screenshot
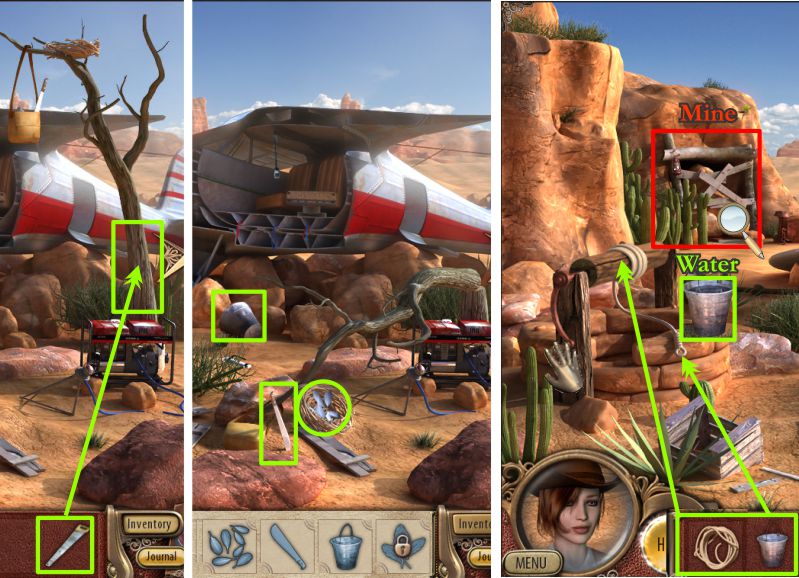
Go outside and use the saw from your Inventory to cut down the dead tree.
Pick up the machete, bucket and feathers.
Place the rope on the well and the bucket on the rope.
The bucket goes down into the well, so turn the handle to bring it back up and get the water.
Zoom in on the Mine.
Screenshot
Use the machete to remove some of the cactus.
Pick up the firewood and metal rungs with a hammer.
Place the metal rungs to be hammered in as shown in the screenshot.
Pick the Sorrel at the top of the ladder and return to the teepee.
Screenshot
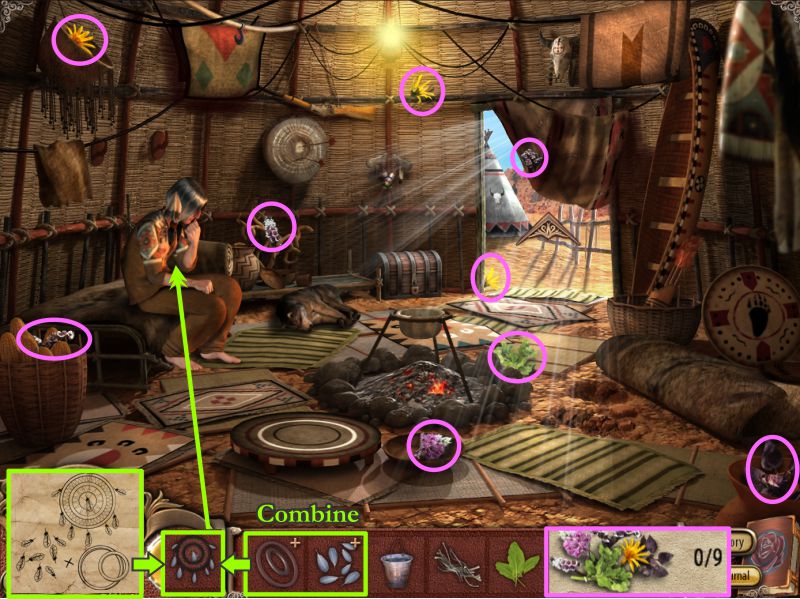
Combine the rings with the feathers like the design shown in the schematic.
Give the dreamcatcher to Bear Heart and the evil spirit will leave.
Bear Heart can now remember how to cure Yokki, so asks you to collect the herbs.
Screenshot
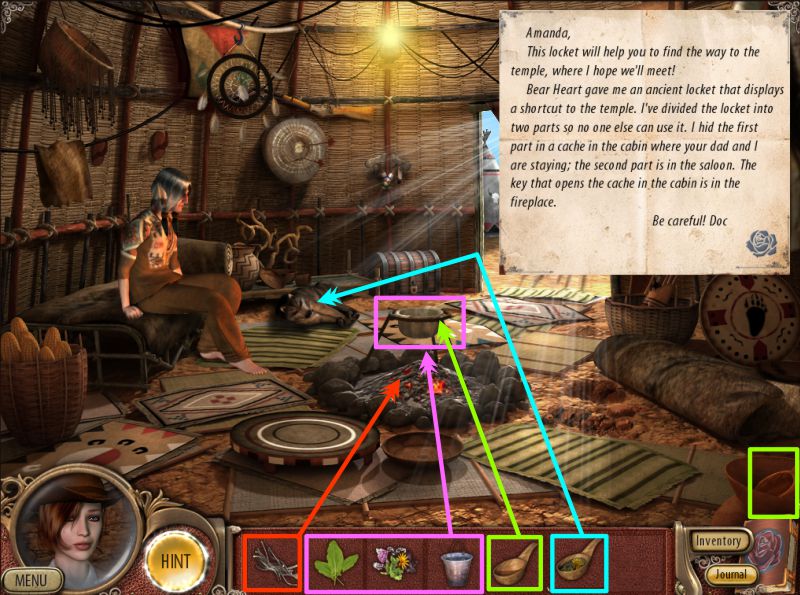
Place the firewood on the coals and pour the water in the caldron.
Place the herbs and sorrel in the caldron of water.
Pick up the bowl at the right and use it to ladle out some of the potion.
Give the potion to Yokki, who seems to be much better.
Bear Heart give you a letter from Doc, so you are off to find both halves of the locket.
Screenshot
Chapter 10: Indian Locket Part I
Somebody else paid a visit to the cabin while you were gone and left the place in a mess.
When you have collected everything, you will get a couple Batteries.
Screenshot
Move the throw on the sofa, and take the Tomahawk.
Turn the block on the fireplace and the bookcase will lower.
Zoom in and collect the flashlight and scorpion figurine.
Use the Back button to back out of the close up.
Combine the batteries with the flashlight to get a working flashlight.
Go down to the dark basement.
Screenshot
You cannot see in the basement without the flashlight, so I have lightened the screenshot to make it easier for you to find the items
Once you have located everything, you will get a Lighter that will automatically light the candles above the desk to give you some light.
Screenshot
Pick up the razor at the right, and move the stone to find another figurine.
Use your tomahawk to smash the bulge on the wall and open the drawer in the desk.
Collect the two figurines and return upstairs.
Screenshot
Use the razor to cut the bulge in the chair and collect the last figurine.
Zoom in on the display and try to place a figurine to trigger a new task.
You can't repair the figurines unless you find some glue to stick them to the stands.
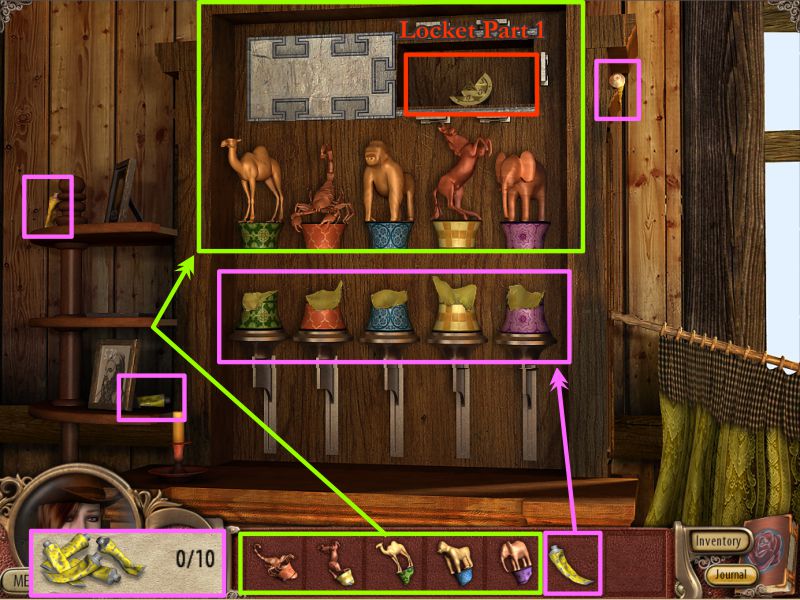
Collect the 6 tubes of glue in the room and zoom in on the display again.
Screenshot
Pick up the remaining 3 glue tubes and use the glue on all of the stands.
Place the figurines on their stands according to the matching colors.
The cache will open with the first part of the Locket.
Screenshot
Chapter 11: Indian Locket Part II
Next stop to find the second part of the Locket is Jacob's Saloon.
Collect all of the items and then head to the bar area and the cocktail machine.
Screenshot
Collect the remaining items and you will find the second part of the Locket behind the creamer.
Screenshot
You go back to see Bear Heart, who has you put the two halves of the locket together.
He says you must use the dynamite and detonator he gives you to blow up the entrance to the mine and that the locket will help you find the temple.
Chapter 12: The Abandoned Mine
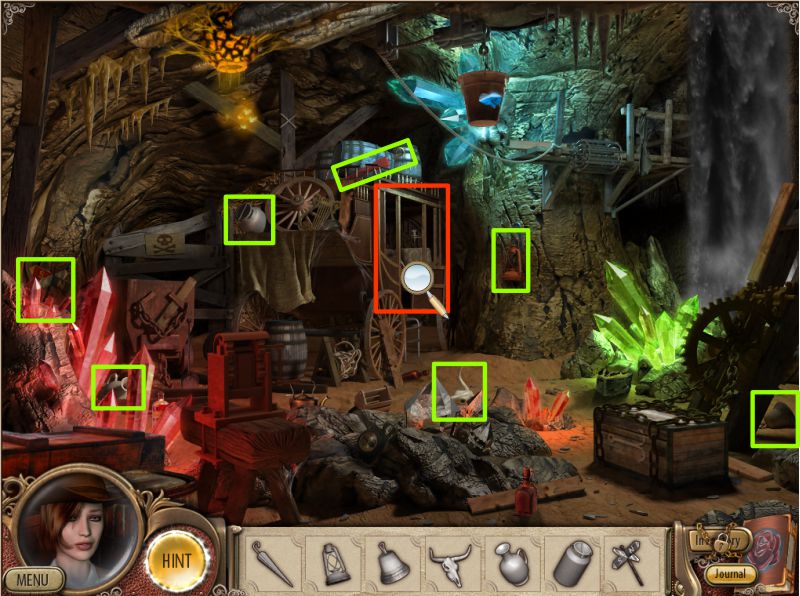
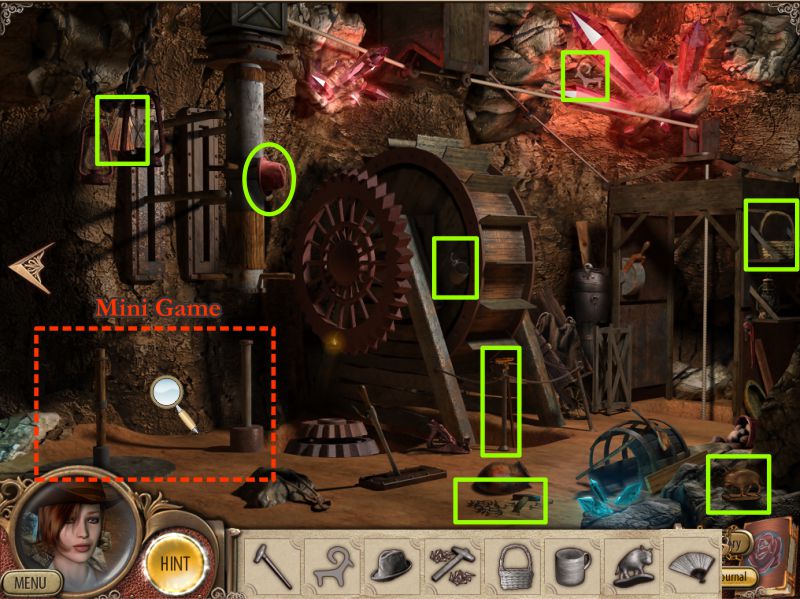
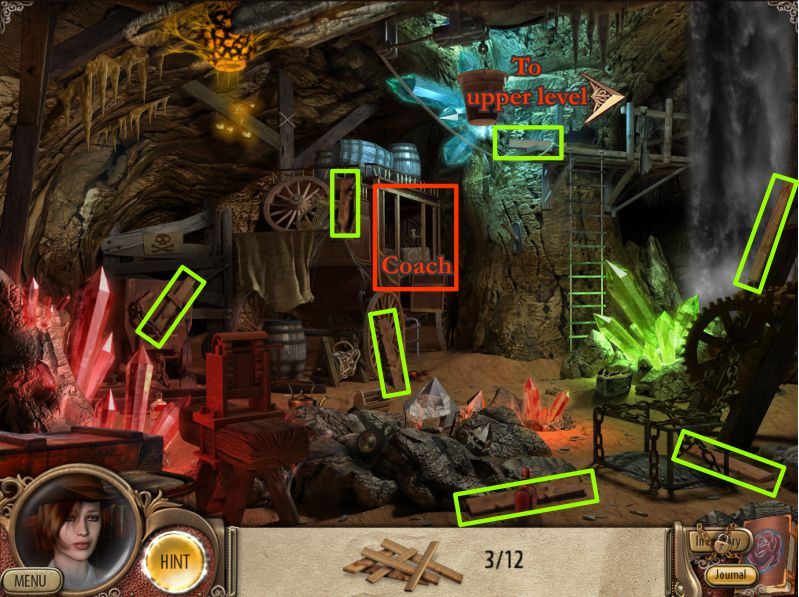
Collect all available objects in the mine and then zoom in on the Coach.
Screenshot
Move the papers as shown in the screenshot, and collect the rest of the items so you will get the Pickaxe.
Screenshot
Collect the available items, then back out of the Coach.
Screenshot
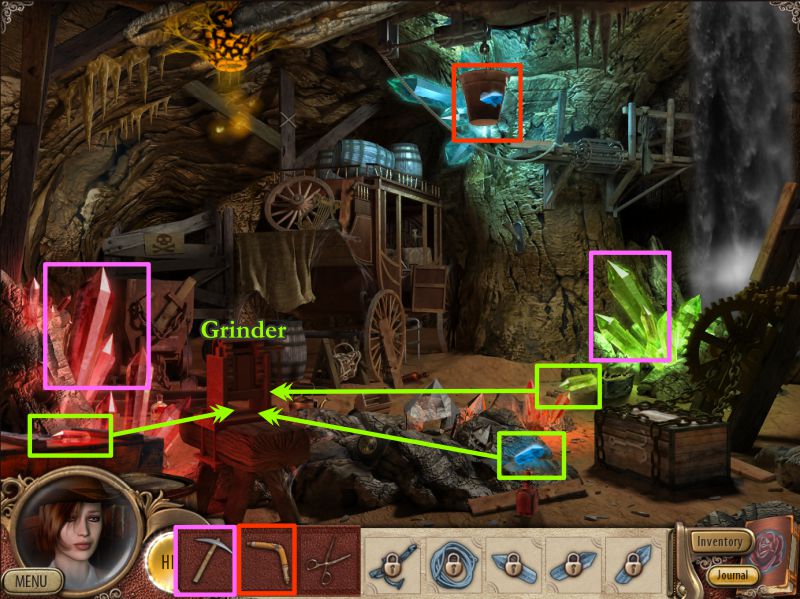
You now have tools available in your Inventory to collect the crystals.
Use the boomerang on the bucket so the blue crystal will drop.
Use the pickaxe to hack off part of the red and green crystals.
Pick up all three crystals and place them one at a time in the Grinder.
Screenshot
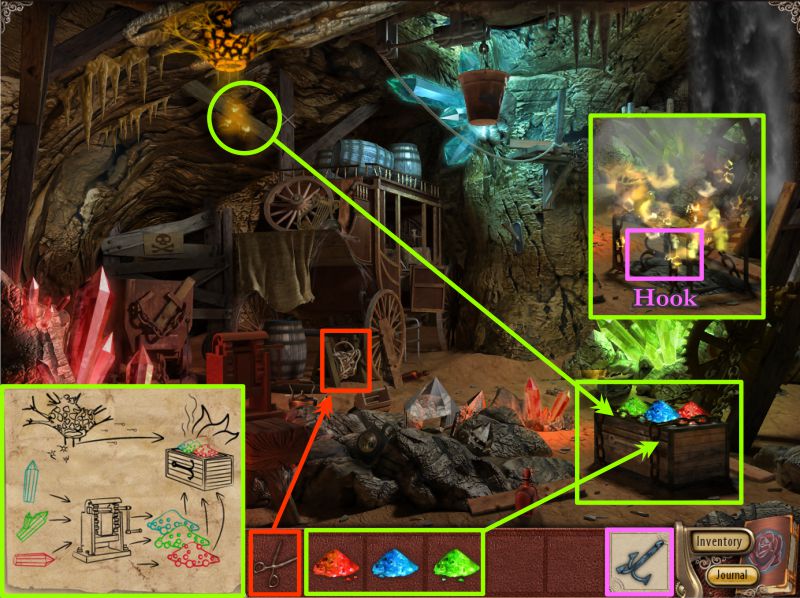
Collect all of the ground crystals and check out your next task in the Journal to see what to do with them.
Your goal is to attract the lightening bugs to the chest. Place the ground crystals in any order on the chest.
The lightening bugs will zoom in on the chest and burn it so you can pick up the hook inside.
Use your scissors to snip off part of the rope marked in the screenshot.
Screenshot
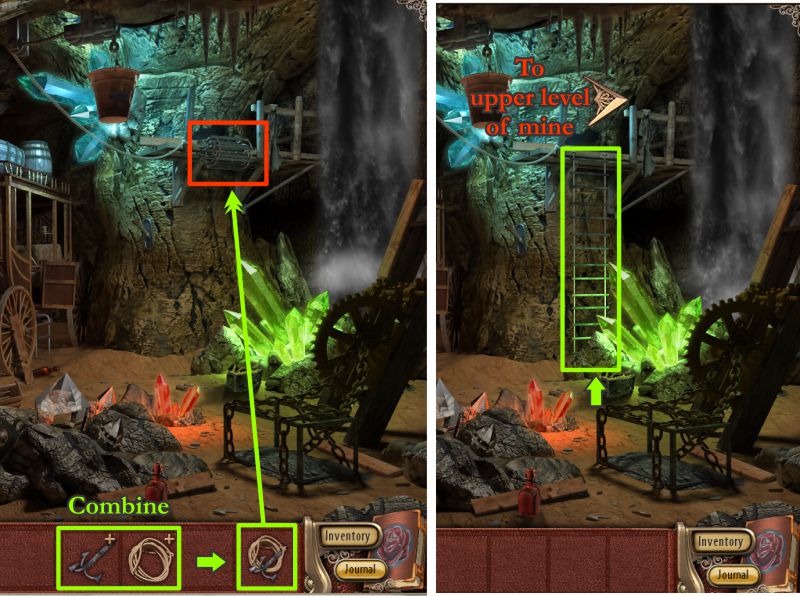
Combine the hook and rope to get a grappling hook to use on the rope ladder marked in the screenshot.
When the ladder drops and the arrow appears, follow it to the upper level of the mine.
Screenshot
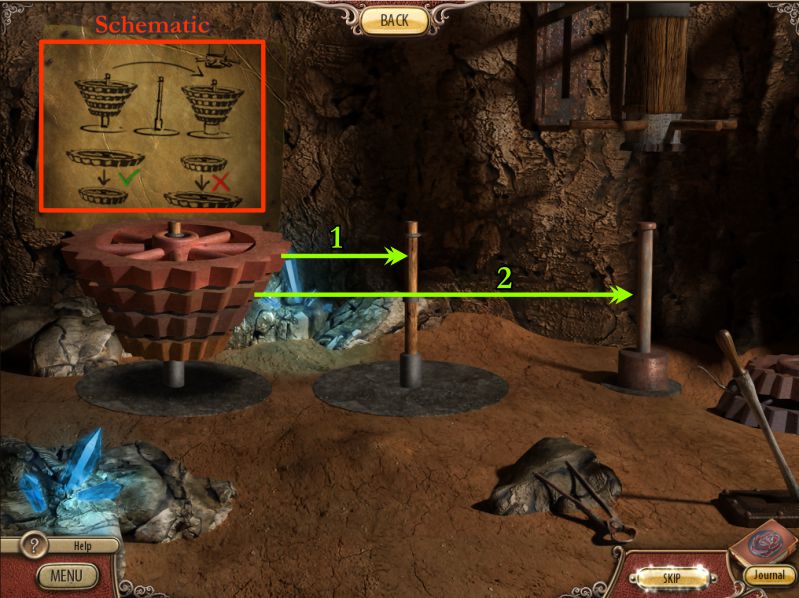
Collect all the items and zoom in on the mechanism for a Mini Game.
Screenshot
Mechanism Gears Mini Game
Your goal is to move the 4 gears from the left pole to the right one as shown in the schematic.
You cannot place a small gear on top of a larger one, so you need to make sure you always have a larger gear on top.
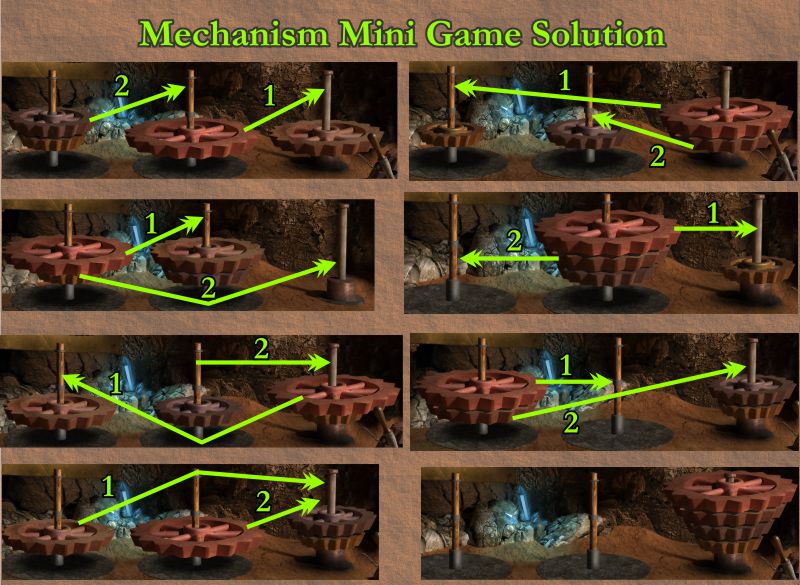
Screenshot
The screenshot is one step-by-step solution to reaching your goal, so check it out.
Screenshot
Once you have correctly moved the gears, you will be transported out of the mechanism.
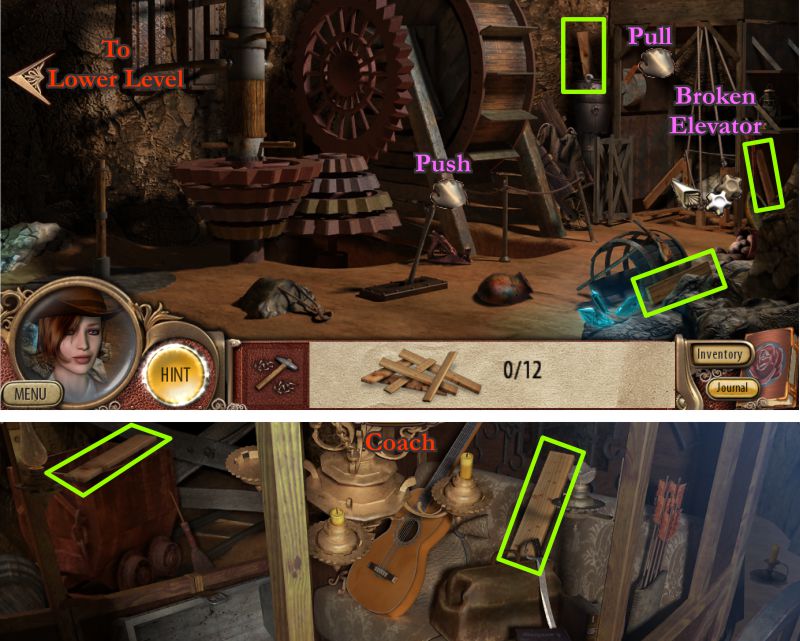
Push the mechanism lever and then pull the broken elevator level to pull the elevator up to your level.
Click on the elevator, and you will be asked to collect 12 boards to repair it.
Collect the 3 available in the scene where you already are and then click the arrow back to the lower level.
Go into the Coach and pick up the two boards there.
Screenshot
Collect the rest of the boards once you're back in the lower level, then return to the upper level.
Screenshot
Place the boards on the broken elevator and then use your hammer and nails to secure them.
Amanda will now descend on the elevator and discover that the Temple is directly under the Mine.
Screenshot
Chapter 13: The Temple
I haven't given the Temple an exact name because there seems to be some confuse in the game as to whether we should call it Atlantis or Atlas.
The Temple has various rooms you will visit which have the colors of blue, green, and red.
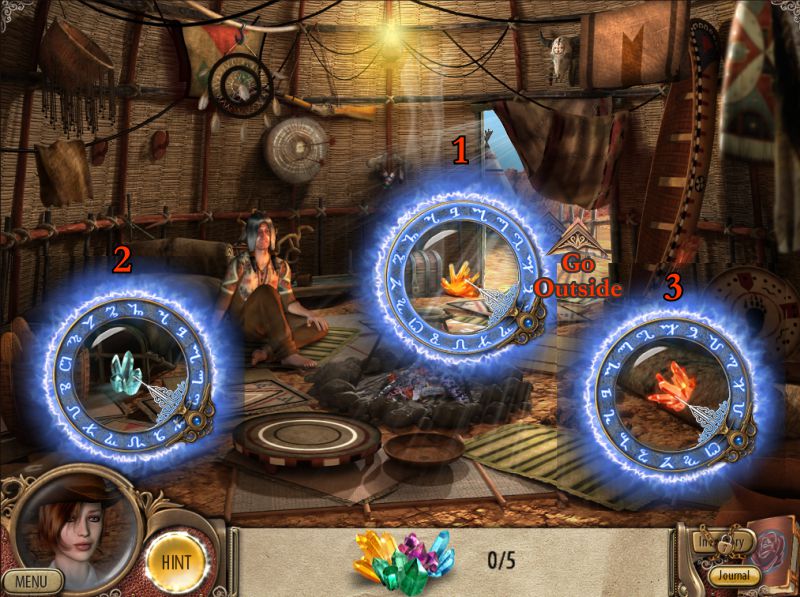
The Blue Room
The goddess statue is in the Blue Room, which seems to be the main hall of the Temple.
Pick up the object on the ground: It is a special energy ring that allows you to view hidden objects.
Check it out by trying to find the 3 energy balls available in the room.
I found you needed to locate them in a certain order; check the screenshot to see the numbering.
Screenshot
Once you have found all the energy balls, they will combine and go into your Inventory.
You must then place the ball in the goddess' sphere to see what she has to say.
She will give you a test in the form of a Match Game.
You will need to match up the tiles until all are gone.
One match is shown in the screenshot to give you an idea.
Once you have completed her test, you will be given steps to ascend to the Green Room.
Screenshot
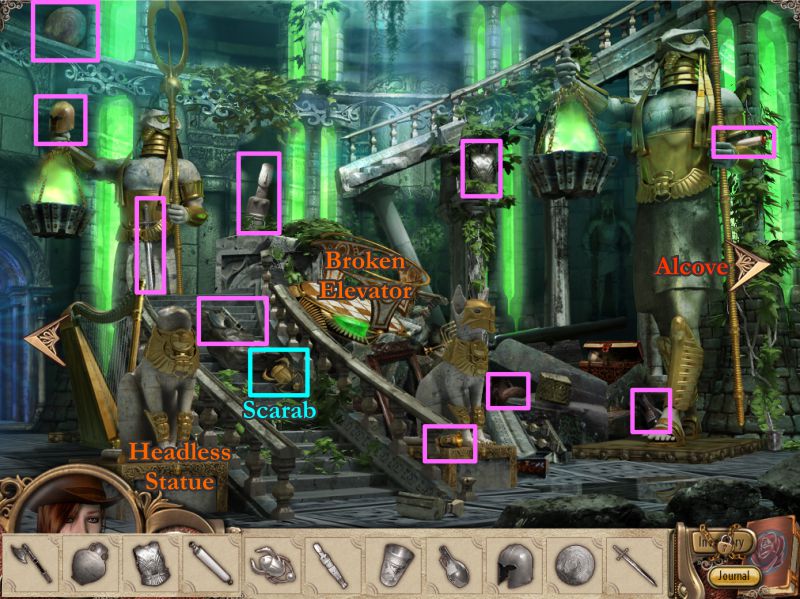
The Green Room
Check out the broken elevator and headless statue.
Collect everything available to you and then go to the Alcove.
Screenshot
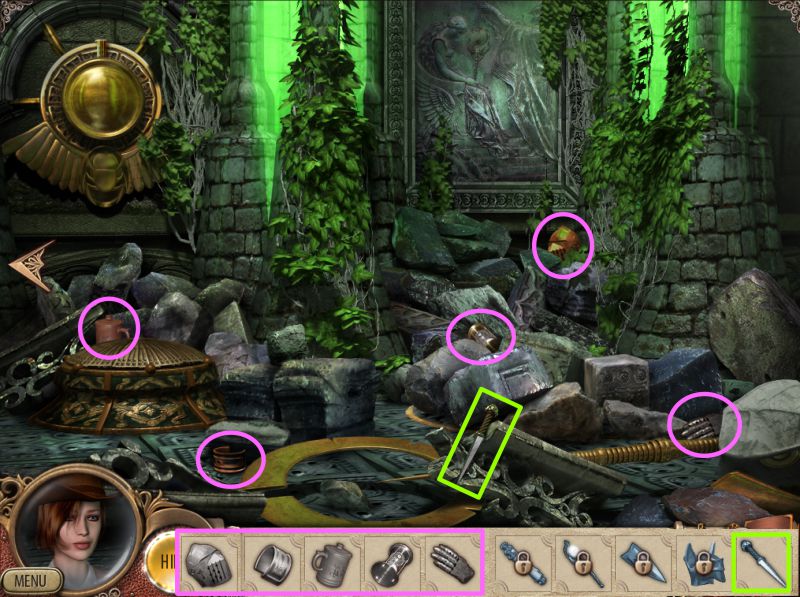
When you have finished collecting all the items, the necessity for the dagger will appear, so grab it.
Screenshot
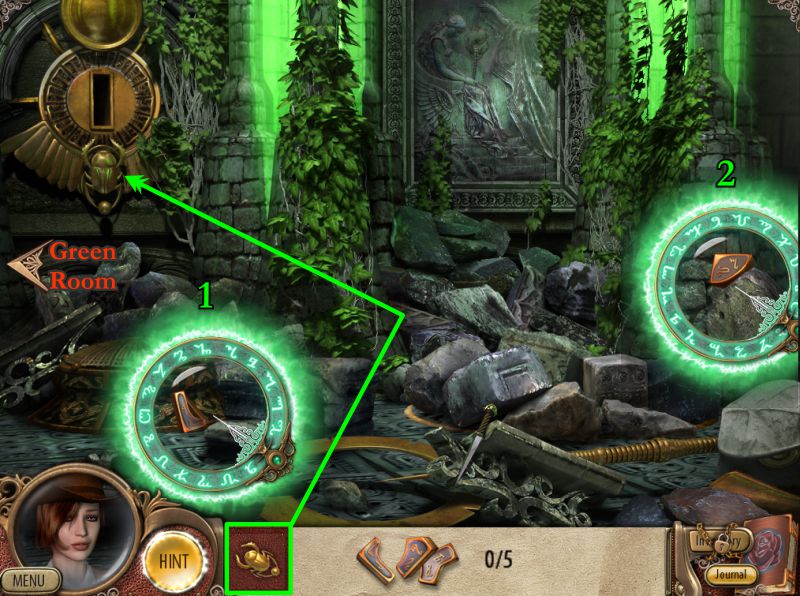
You will be asked to collect a bunch of parts for the old plate, but you will need the energy ring to help you.
Place the scarab on the lock to trigger a task to locate the old plates parts.
The Ring will once again become available to help you locate the hidden items.
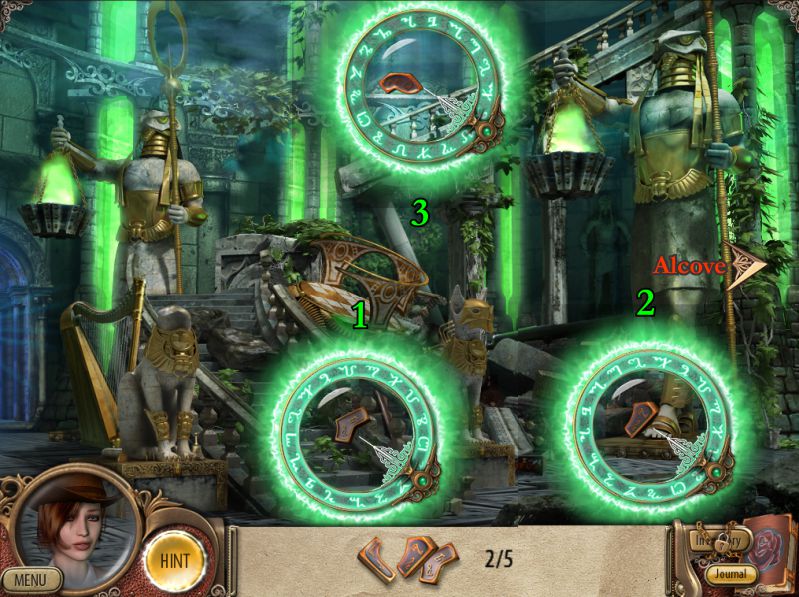
Find the items in the order shown in the screenshot and then return to the Green Room.
Screenshot
Find 3 more pieces in the order shown in the screenshot.
Screenshot
Place the old plate in the lock as shown in the screenshot, and you will trigger a Mini Game.
Your goal in the Mini Game is to swap the tiles so the pattern looks like the one in the screenshot.
Screenshot
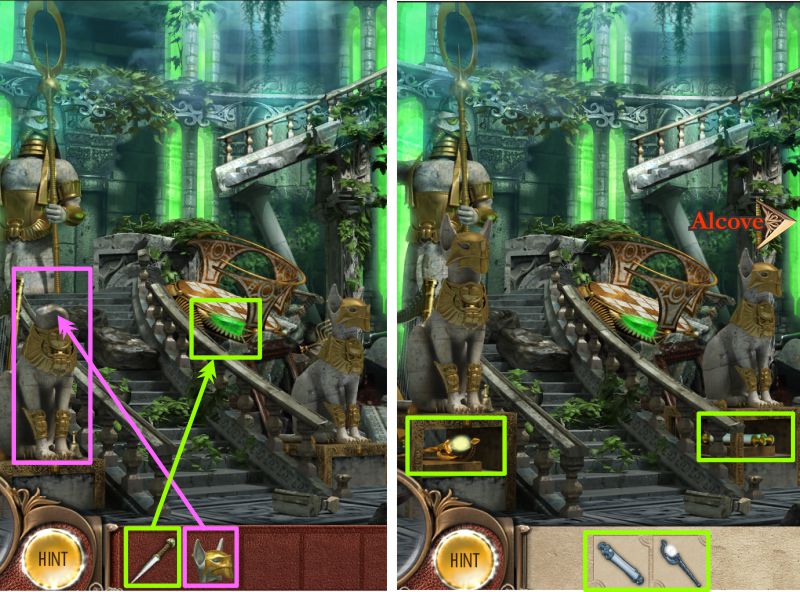
Once you have completed the pattern in the Mini Game, the scene will transform and you will eventually get an elevator to consider.
Beside the elevator is a head you need to collect before you return to the Green Room.
Screenshot
Place the statue head on the left statue with the missing head and both statues will elevate.
Beneath the statues are two items for you to collect.
You also need to go to your Inventory to find the sharp knife to use to remove the green crystal from the broken elevator.
Go to the Alcove.
Screenshot
Place the green crystal on the elevator in the indentation that looks like it.
The elevator will now rise and produce steps for you to take to go up to the Red Room.
Screenshot
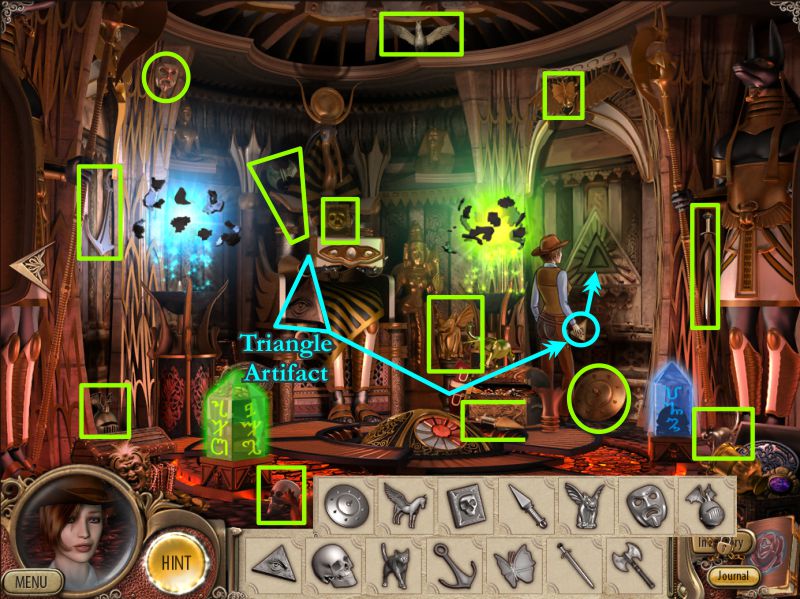
The Red Room
Amanda thinks this room is different, but I'd say that you just need to collect the necessary objects to get the Triangle Artifact.
Once you get it, Amanda goes to the door shown in the screenshot and places it there.
Screenshot
Amanda finds her Dad and Doc but now needs to find the Key to Atlantis in order to free them.
You find the key, but it is missing its gems, so Bear Heart will help Amanda find them.
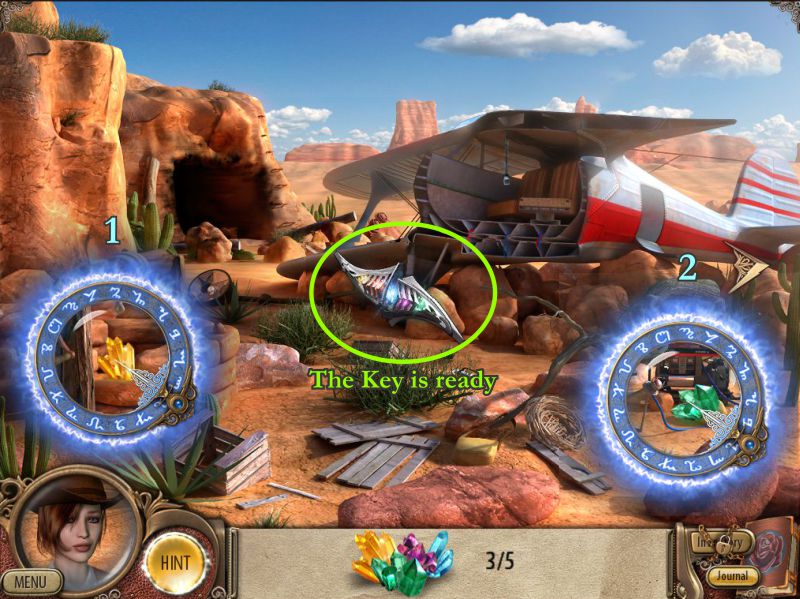
Chapter 14: The Mystery of the Ancient Key
The energy ring is back for you to use to locate the gems in Bear Heart's teepee.
Screenshot
Go outside and located the last 2 gems.
The Key is now has all its gems and is ready to be used.
Screenshot
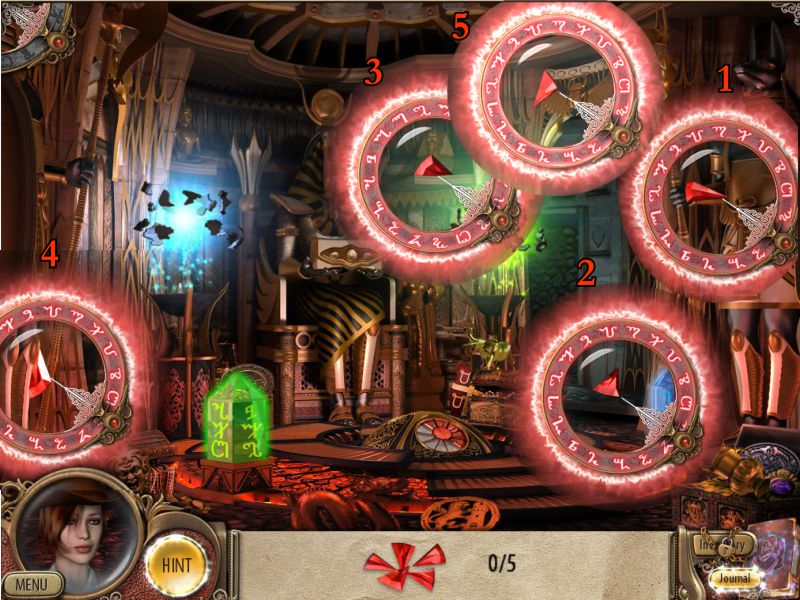
Chapter 15: The Time Portal
You are transported back to the red room at the Temple.
Use the energy ring to find the 5 red glass shards.
Screenshot
Place the shards on the ring with the other shards to trigger a puzzle.
Rotate the tiles so the image matches the screenshot and you get a second image.
Screenshot
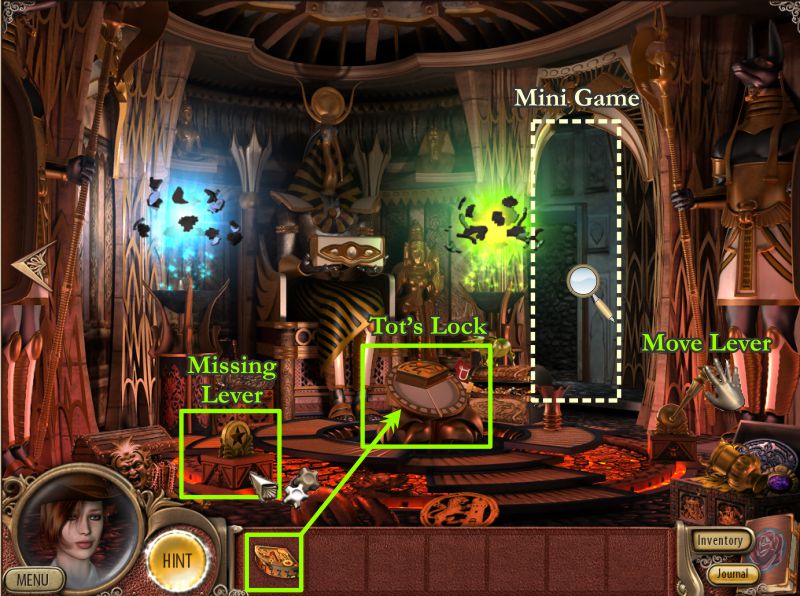
The mechanism rises up and becomes Tot's Lock with a piece of the lock already in place.
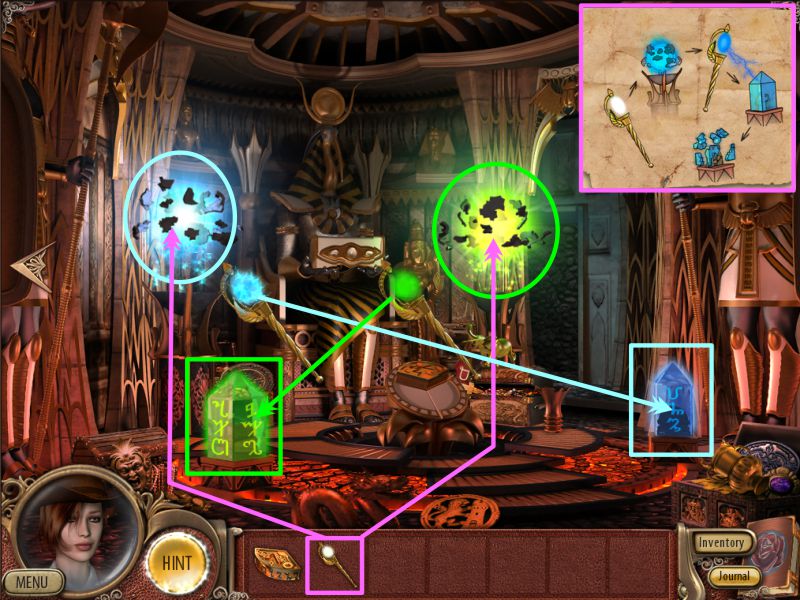
Check the page in your Journal telling you how to use the Guardian's Staff.
Hold the staff in the blue energy field and blue energy will be transferred to the staff.
When the blue staff ends up in your Inventory, use it on the blue obelisk and it will shatter.
The staff will once again become white and end up in your Inventory.
Place the white staff in the green energy field, and it will become a green staff.
When it goes into your Inventory, use the green staff on the green obelisk.
Screenshot
The green obelisk produces a mechanism with a missing lever.
The blue mechanism already has a lever, so move it to the left.
Place your piece of Tot's Lock on the lock and zoom in on the passage for a Mini Game.
Screenshot
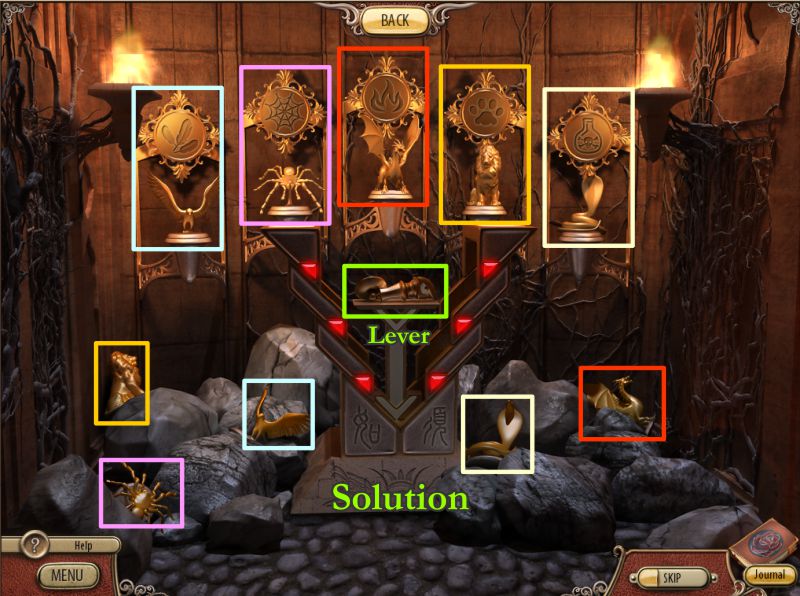
Passage Mini Game
See the screenshot as to how to match up the statues in the rocks with their proper displays. They are color matched in the screenshot.
Once they are matched, the display will open and you can take the lever.
Screenshot
You are now back in the Red Room, so pick up the piece of Tot's Lock and place it on the lock.
Put the lever where it belongs as shown in the screenshot, and move the lever to the left.
You will be shown the Blue Room to watch the portal gate rise out of the floor.
Screenshot
You will be immediately be transported back to the Red Room.
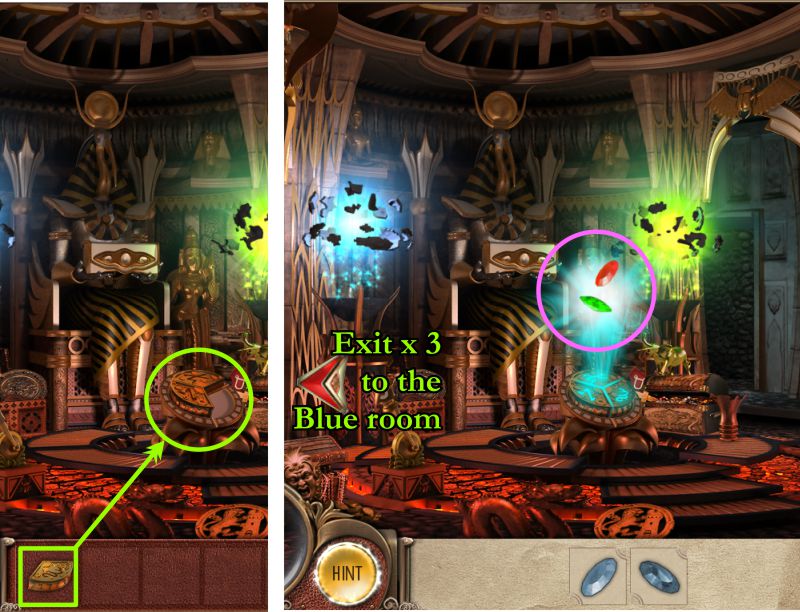
Place your last piece of Tot's Lock where it belongs, and watch what happens.
Collect the red and green gems, and then exit 3 times to the Blue Room.
Screenshot
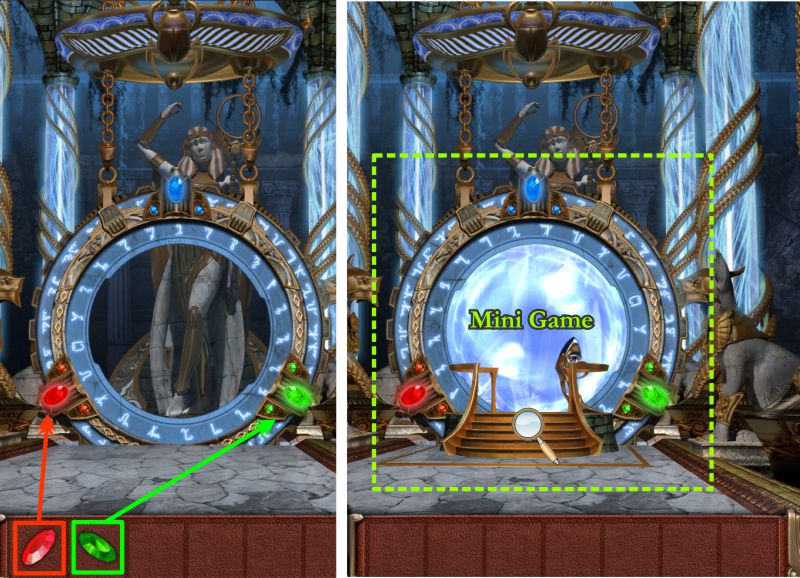
Place the two gems as shown in the screenshot in order to trigger a Mini Game.
Screenshot
Portal Mini Game
Your goal in this game is to win the three rounds to complete the coordinates necessary to open the portal.
The placement of the icons is random, so the solutions are also random, because they are dependent upon the moves you make with the icons.
The screenshots will show you each round you need to complete and a possible first move depending upon where your icons are placed.
In order to move an icon, you need to click on it and then tell it where you want it to go by clicking on the destination.
When you have surrounded the figures with icons, the colors will disappear.
It is okay to move unneeded icons to other destinations that might make them remove a shape that is no longer there, because it will get them out of the way of what you are trying to accomplish.
If you get in trouble, there is a restart button.
Once you have completed all your tasks, the coordinates will be set and the game will take you to the next scenario.
Screenshot
If you are here, you have opened the portal and Dad and Doc will appear.
Amanda has one more task to complete, and Doc will give her the symbols to enter to activate the portal.
Screenshot
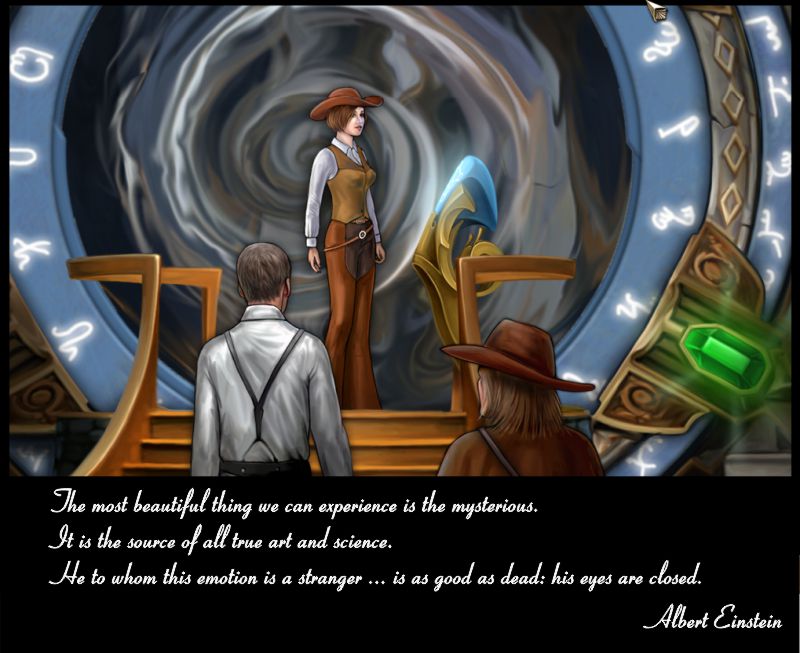
Watch the ending scenes, and note Einstein's comment about what you have accomplished by helping Amanda complete her adventure.
Posted by: Jazz |
May 13, 2011 5:51 PM
|
May 13, 2011 5:51 PM