

Age of Enigma:
The Secret of the Sixth Ghost
Platform: Mac, Windows
![]() A g-g-g-ghost! More than one, even! Actually, the mansion Ashley finds herself called to is practically heaving with spectres, all of them with unfinished business, and a mysterious being informs her that she is the only one who can set them free. Age of Enigma: The Secret of the Sixth Ghost is a point-and-click adventure from Casual Box. It looks stunning, almost like a playable Saturday morning cartoon (readers aged 30 and over, that reference is for you!), and even though the puzzle elements are a bit thin, the game manages to paint an atmosphere of intrigue that draws you right in.
A g-g-g-ghost! More than one, even! Actually, the mansion Ashley finds herself called to is practically heaving with spectres, all of them with unfinished business, and a mysterious being informs her that she is the only one who can set them free. Age of Enigma: The Secret of the Sixth Ghost is a point-and-click adventure from Casual Box. It looks stunning, almost like a playable Saturday morning cartoon (readers aged 30 and over, that reference is for you!), and even though the puzzle elements are a bit thin, the game manages to paint an atmosphere of intrigue that draws you right in.
 For starters, Age of Enigma is about as close to an adventure game as any casual game can get. There are no hidden object scenes of the traditional sort (i.e. find a list of items to proceed), over two dozen mini-games, and plenty of inventory items to find, combine, and utilize. All you need is your trusty mouse and a button to click and you're ready to go. The cursor changes to indicate actions you can perform, such as walking to new rooms, interacting with items, or just getting some more information out of a curious sight.
Your job is to walk around and help out half a dozen souls who have become trapped in this realm. That's a real bummer for them, but since it's pretty easy for you to lend a hand, you might as well. You'll encounter a handful of moderately-frightening things in the game, a few of which are really bone-jarring in nature (giant eyeball in the keyhole, anyone?). Most puzzles can be completed by visiting a few adjacent rooms, so backtracking is practically non-existent, even though there's a map and a diary to help you keep track of things. A few broken things to find, a couple of items to assemble, and you get to call it a successful ghost-helping session!
 Analysis: Visually, Age of Enigma: The Secret of the Sixth Ghost is beyond captivating. Seriously, try looking at one scene in motion and then walking away without looking at a few more. It's a gorgeous game, with artwork that would be right at home in a finely-crafted graphic novel.
The gameplay, unfortunately, is way too easy, and all but the most inexperienced casual gamers will breeze through the game in three hours or so. Puzzles are pretty much spelled out right in front of your eyes, and if you're stuck, there's an in-game guide to unstick you. Ghosts are quite helpful and your diary fills in any blank you could possibly imagine. Plus, every mini-game is skippable right from the start. And that's on the free-roaming "hard" mode!
The Age of Enigma soundtrack is available for download on iTunes!
Age of Enigma has the visual punch necessary to stand out from the crowd, but pieces of it feel awkwardly incomplete, almost as if it were rushed out the door to meet a deadline and someone forgot to add challenge. More time in the gameplay incubator would have done this one well! Still, this is the perfect sort of game to receive a sequel, as the developers have some room to improve on an already promising concept.
![]() Windows:
Windows:
Download the demo
Get the full version
![]() Mac OS X:
Mac OS X:
Download the demo
Get the full version


Walkthrough Guide
(Please allow page to fully load for spoiler tags to be functional.)
Age of Enigma: The Secret of the Sixth Ghost Walkthrough
General Information
This is a fairly straightforward Hidden Object/Adventure game. You can't die, and there's only one section with objects you can pick up that aren't directly related to completing the game.
Click on things to pick them up. Click on items in your inventory and then on something in the world to use them on things. If an inventory item displays a puzzle piece icon when you hover the mouse over it, it will eventually need to be combined with another item.
If an object or location in the world says "Something seems to be missing here," you'll inevitably have to use an inventory item on it, so remember where these spots are.
If a puzzle proves to be too difficult, you can skip it or turn down the difficulty with no penalty.
There are seven optional diary entries hidden in the game - these are only good for background reading and aren't necessary to finish the game. The walkthrough details how to find all seven.
Chapter 1: Yumanco
The House
Short bonus video if you click on the city skyline, not required.
Click on the car to look inside.
Get the car key from the ignition.
Use the car key to unlock the glove box.
Get the map and key from inside the glove box.
Click the door of the house to walk up to it.
Use the key to unlock the door.
Get the first diary entry from this screen - it's behind the name plaque.
Get the light switch pieces from the ground.
Once you have all three, use the repaired switch on the plug to fix it.
Turn the light on with the switch.
Conversation with Nathan; he gives you the pendant.
Isaac freaks, door locks behind you, Nathan tells you to head left.
Get the score from the cupboard in the hall before you leave.
The Kapangya
You meet the first ghost, a tribal spirit that wants you to restore the Kapangya book.
The Kapangya book is missing some pages.
Get the diary entry from the mantle above the fireplace.
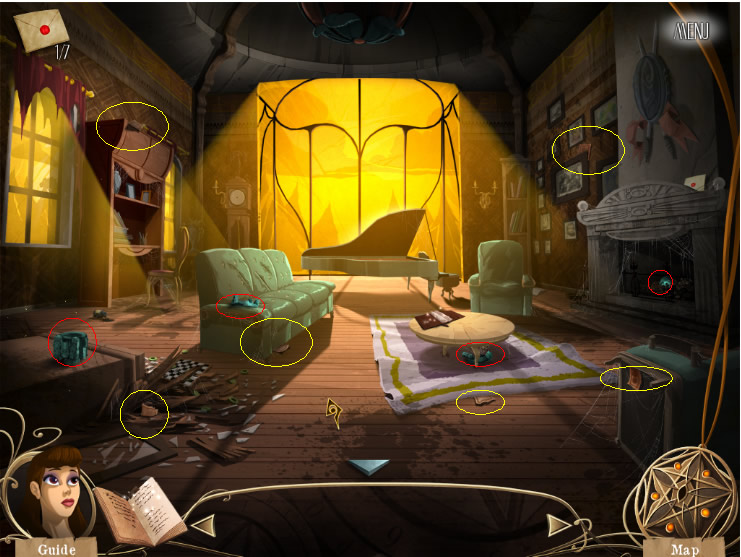
Get the torn pages: from on top of the desk on the left, behind one of the paintings on the wall near the fireplace, under the couch, under the rug near the table where the book sits, in the luggage in the lower right corner and under the destroyed cabinet in the lower left corner, near the chessboard.
Use the pages with the book - the book tells you how to assemble the Kapangya statuette.
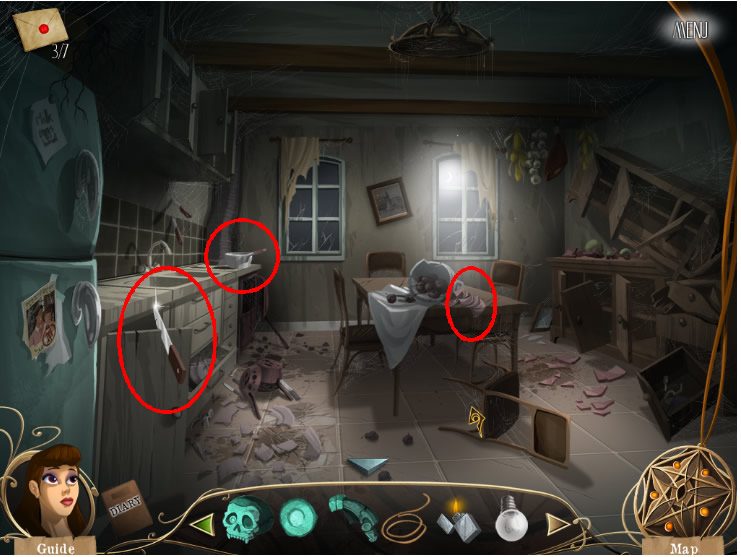
Get the pieces of statuette. Several are in the living room. There's one on the couch, one on the left hand side of the screen, one in the fireplace, one under the table. One of the Kapangya's eyes is in the box near the chessboard. Another piece is in the piano.
Check the screenshot for the pieces of statuette and the torn pages.
Screenshot.
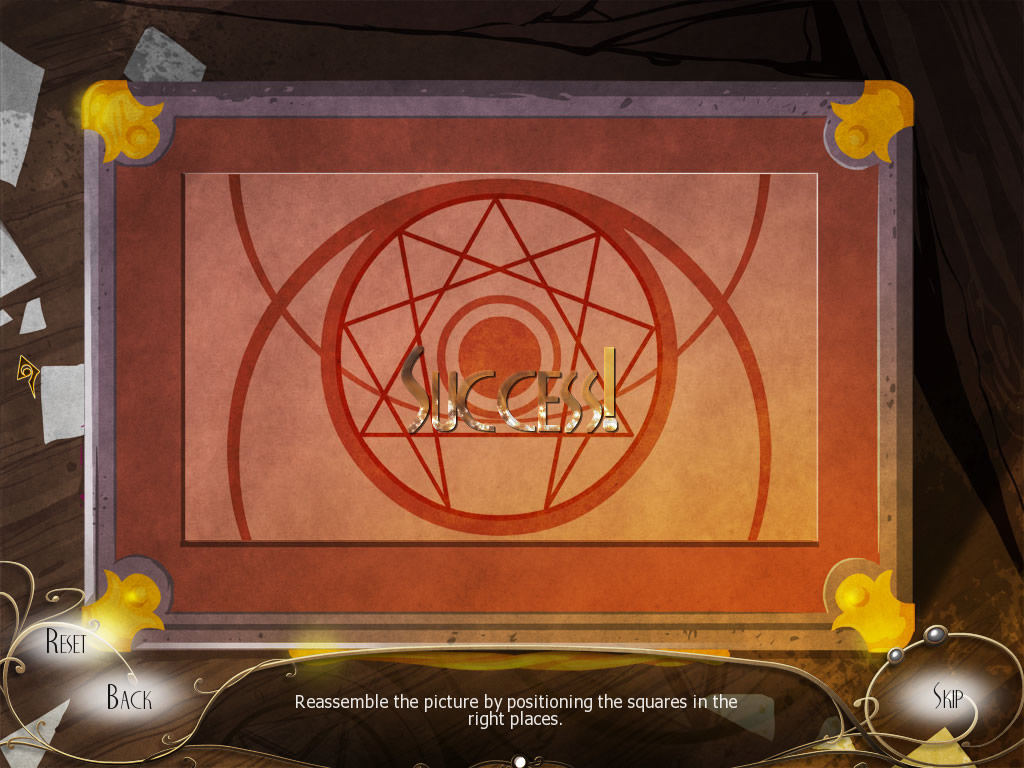
There's a puzzle box near the chessboard.
Fairly simple puzzle - move the tiles around, and you'll hear a confirmation tone and see a check mark when you put a tile in the right place. The image is symmetrical, so keep that in mind to speed up the process; once you set a tile in one side, set its twin in the same place on the other side.
A screenshot of the completed puzzle is included.
Screenshot.
Click the piano: a ghost will play it for a bit, then you'll zoom in.
Use the score on the piano to set it up.
Play the piece by tapping the four highlighted keys - while the notes used don't make sense, you should still play them from high to low. The order of keys you should press, assuming they're numbered from left to right: 1, 4, 3, 2, 4, 2.
Get the piece of statuette from inside the piano once you're done.
Step back out of the living room and head to the corridor.
Grab the piece of statuette from under the rug.
Also grab the diary entry from behind the nightstand.
Click on the painting above the nightstand to move it down. Grab the rope that was behind it.
Click on the bottom drawer of the nightstand to open it and get the empty lighter.
Head to the closet next.
Inside, grab the light bulb on the lantern and the lighter fluid from the top shelf.
Use the lighter fluid to fill the empty lighter and get the reloaded lighter.
Head to the kitchen next.
Grab the knife from the left side of the screen, the empty saucepan from the burner on the stove, and the rag from the table. Turn on the faucet and fill the empty suacepan with water.
Check the screenshot for the locations of the items in the kitchen.
Screenshot.
Head back to the entrance hall and use the knife on the broken pot to get the twigs.
Read the book in the living room for information on the powers of the Kapangya statuette.
Go back out of the book and put the statuette together according to the diagram in the book - but first you need to light a fire in the base.
Fortunately you've got a lighter, some twigs for kindling, and the pieces of the statuette already.
Put the statuette base on the table first - it's the larger rectangular piece. Bind the twigs together with the rope to get the tinder wood, then put the tinder wood in the base. Use the lighter to start a fire, then add the smaller rectangular part to finish the base.
Next, add the jaw, then the two halves of the head, then the skull. Finally, add the other eye.
You can now use the completed Kapangya statuette.
The ghost wants you to activate Elevation, so change both symbols to red dragons by clicking them, then push the eye in.
Next, activate Illumination - a purple eye on top and a red dragon beneath, then push the eye in.
Quake is next - two purple eyes.
Finally, Eclipse - a dragon on top and an eye beneath.
Yumanco, the ghost, lets you into his world.
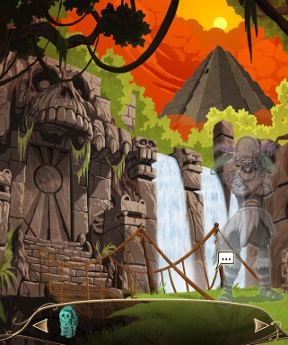
The Great Sorrows
You're now playing as Yumanco. He has the completed Kapangya on hand.
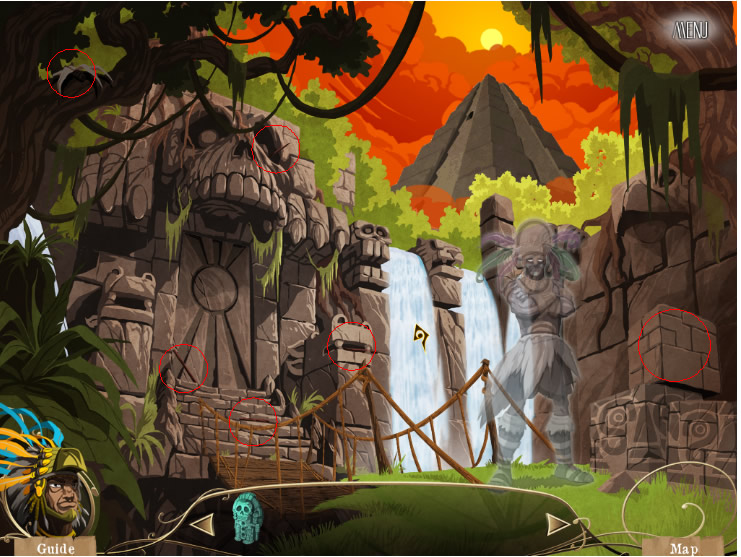
The Guide's spear is broken. Grab the pieces - one is in the right dinosaur statue's mouth in front of the temple gate, another is in the tree in the upper left corner of the screen, a third is in the right eye of the statue above the temple gate, another is on the lower left corner of the temple door, one is on the steps leading up to the temple door and the last one is obtained by finishing the cube puzzle on the right hand size of the screen.
Check the screenshot for the locations of the spear pieces.
Screenshot.
This puzzle asks you how many cubes were used to build the assembly. Spatial recognition wins the day. There are 39 cubes.
Finishing this gets you a spear piece.
Give the Guide his repaired spear.
He says you need to get into the temple, but the gate is closed.
Use the Kapangya statuette on the door. Elevation (dragon + dragon) will open it.
Head inside.
The inside of the room is dark. Illumination (eye + dragon) will solve that.
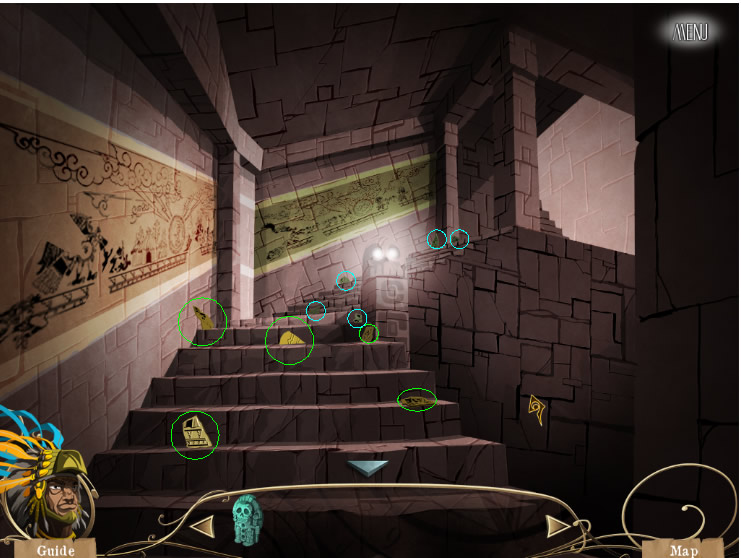
Now you're looking for fresco pieces. There are five of them, all on the stairs leading up deeper into the temple.
Check the screenshot for the locations of the fresco pieces.
Screenshot.
Grab them all, then use the completed fresco on the yellow fresco on the left hand wall.
Two parts of the fresco are missing. They're the first and second pieces, but this may be randomized in each game. Click them and submit to solve this puzzle. You'll get the first Great Sorrow.
Grab five more fresco pieces: these are from the green fresco. They're on the stairs as well, slightly higher up than the yellow fresco pieces. Use the completed green fresco on the green fresco on the far wall.
Second verse, same as the first. Click the missing pieces and submit. You'll get the second Great Sorrow.
Head up the stairs in the Temple Interior to reach Death Row.
Grab the Cartridge from the ground near the middle of the screen.
Put the cartridge in under the red fresco.
Slightly different than the previous fresco puzzles. This time you're given a completed fresco and need to place each of the fragments where they would go on it. Straightforward but randomized. Finish it for the third Great Sorrow.
The blue cartridge is on the right, but there's a big hole in the way.
Look above the hole - the blocks up there are unstable.
Use the Kapangya on them, then activate Quake (eye + eye) to knock them down and make a bridge.
Grab the blue cartridge and put it in under the blue fresco.
Same deal as the red fresco. These are fairly forgiving puzzles - focus on identifying unique parts of each shard and using them to match the shards to the fresco. When you're done, you'll get the fourth and final Great Sorrow.
The priest is about to sacrifice your wife and will only stop for a sign from the gods.
So make one - use the Kapangya on the sun. Activate Eclipse (dragon + eye).
Saving her isn't enough, though - you now need to sacrifice the Kapangya itself. Click on the altar.
Match your items to the imprints. The Kapangya goes in the middle. The first Great Sorrow goes in the lower left, the second in the lower right, the third in the upper right, the fourth in the upper left.
The priest destroys the Kapangya and you're done with Yumanco.
Chapter 2: Natsumi
The Basement
Yumanco is gone and you've activated the first gem on the Pendant.
Grab the basement key from the floor near the couch - this wasn't here until you finished with Yumanco.
Nathan meets you in the entrance hall. He tells you head to the corridor - do so.
Check the basement door on the right.
Go to the basement door, click on it. An eye pops out.
You'll talk with the eye for a bit. She wants you to open the door.
Not a problem since you've got the key.
Head down into the basement proper. You'll meet Natsumi.
It's dark in here; the light bulb is shattered. Use the rag (which you got from the kitchen upstairs) on the shattered bulb to take it out. Then use the light bulb (it's in the closet upstairs if you didn't grab it earlier) to fix the light. Hit the switch on the right wall to turn the lights on.
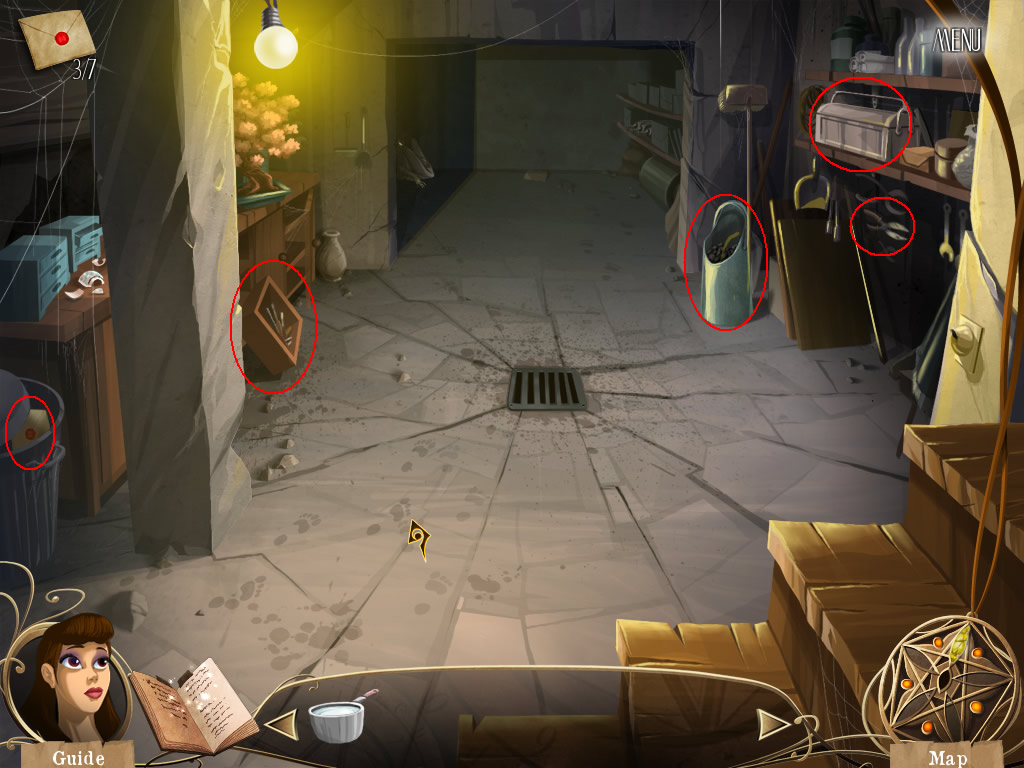
Grab the diary entry from the trash can on the left.
Get the screwdriver from the tipped-over cabinet on the left wall.
Open the tookbox on the right shelf and get the hammer.
Also get the broken pruning shears from the right wall.
Knock over the coal on the right wall as well.
Check the screenshot for the locations of the items in the basement.
Screenshot.
Click on the grate in the middle of the room, then use the screwdriver on it.
In a clear violation of the laws of physics, the screws are linked together. The lower-right screw isn't linked to anything, the lower-left screw is linked to the lower-right screw, the upper-right screw is linked to the lower-left screw, the upper-left screw is linked to the upper-right screw. Easy enough - just unscrew them all the way in order from upper-left to upper-right to lower-left to lower-right. You might need to loosen the next screw in the order if it goes down too far while you're working on another screw.
Finishing this will get you the charcoal (from the pit beneath the grate) and a bolt (upper-left of the screen).
Use the bolt on the broken pruning shears to fix them.
Use the hammer on the vase near the bonsai. Inside is a paper.
Give the charcoal and paper to Natsumi - she's in the corner on the far end of the room, so click on her first, then give her the items.
She'll make you a drawing. Now that you have the drawing, use the fixed pruning shears on the bonsai.
Trim the bonsai to match the paper by clicking on the unnecessary boughs. The unnecessary boughs are around the top of the tree and on the base.
When you're done, you'll enter Natsumi's world.
The Bridal Suite
Grab the petals from under the cherry tree.
Head straight from the Pathway to head to the Zen Garden.
Click on the Zen Garden for a puzzle.
Click on the image representing an accurate aerial view of the garden. This may be random, but in my case it was the third on the top row. Finishing this puzzle will open the bridal suite.
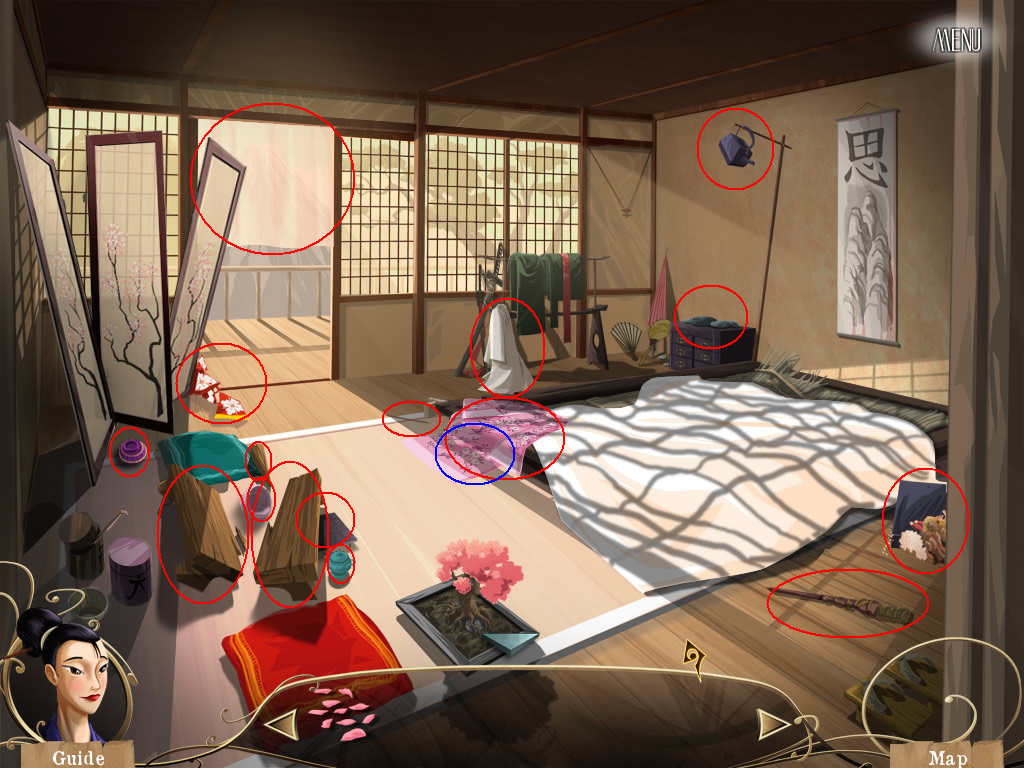
This place is a mess: Clean it up - grab all the items in here. There are bowls, four fragments of table (three in a pile on the left side of the room, one under the bed), a teapot stand, three parts of a kimono, a teapot hanging over the bed, an empty bento, a meal, an incomplete incense holder and incense and an extinguished torch.
Check the screenshot for the locations of all the items in the bridal suite.
Screenshot.
Next, click on the stone display next to the bed.
Click on the stone arrangement that would cast the shadow in question. In my case this was #3.
Make sure you've gotten all the items.
Click the bed to see how the room is supposed to look.
Set up the table on the left side of the room. Put the bowls on it, along with the teapot stand, teapot and full bento.
Put the petals on the bed.
Put the meal in the empty bento.
Put the white kimono piece on the door on the left, then the pink kimono piece on top of that, then the red kimono piece on top of that.
Click on the curtain over the door outside to make it blow in the wind.
Combine the incomplete incense holder and incense to get the incense holder, then put it in front of the table.
Step back out to the Zen Garden and use the extinguished torch on the lamp to light it.
Head back out again to the Pathway.
Use the torch to light the torches here. Light the one on the right first, then the left, then the one on the far edge of the path. Click on the stone bench for a puzzle.
This is basically a form of the game Mastermind. Place the colored cobblestones on the question marks, then check the water lilies on the right. Water lilies with flowers mean you put the right stone in the right place. Water lilies without flowers mean you have the right stone in the wrong place. This is randomized. Use the process of elimination here - if you get a flower, check the stones you used to determine which one is correct. if you get a green lily pad, alter fewer stones on your next guess.
Finishing this gets you an oil lamp.
Place the oil lamp on the hanger near the bed, then light it with the torch.
Light the incense holder with the torch.
Place the torch on the hanger next to the lamp.
Once this is all done, you'll get a scene with Natsumi's husband. If you don't, check the bed again to be sure you did everything.
You're done with Natsumi.
Chapter 3: Murray
The Dining Room
Having freed Natsumi, you'll get the second gem in the Pendant. Take the rope from the floor of the basement and head back to the Entrance Hall.
The door to the Dining Room is now open. Go inside to meet the next ghost, Samuel Murray.
He won't talk to you unless you're a worthy pirate. By "pirate" he means "janitor." He wants you to clean up the Dining Room.
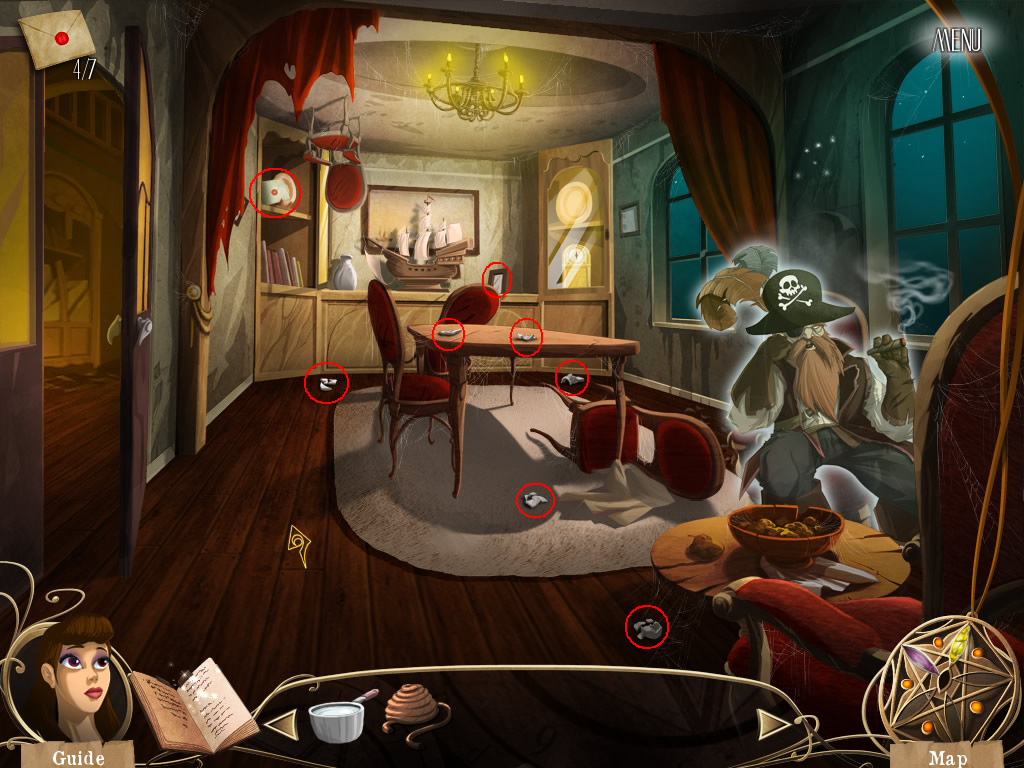
Grab the vase pieces: there's six total. They're strewn about the floor and on the table in plain sight. When they're finished, you'll get a vase.
Check the screenshot for the locations of all the items in the dining room.
Screenshot.
Grab the diary entry from the shelf in the upper left corner of the screen.
Also grab the picture frame from the mantle on the far wall. Put it on the right side of the room above Murray's head. You'll automatically zoom in on it; clean off the smudge on the right side to reveal that the clock is set to 6:55.
Put the vase where the picture frame was on the mantle.
You'll be done tidying up if you've done all of the above, and Murray will start a fire on the rug. Use the pot filled with water (which you got from the kitchen) to take care of that.
When the fire is out, there will be a hole in the rug. Grab the display cabinet key it reveals.
You can then unlock the display cabinet to get to the clock.
Twist the knobs on the corners of the clock face to set the time to 6:55. The clock's top drawer will open so you can get the torn page.
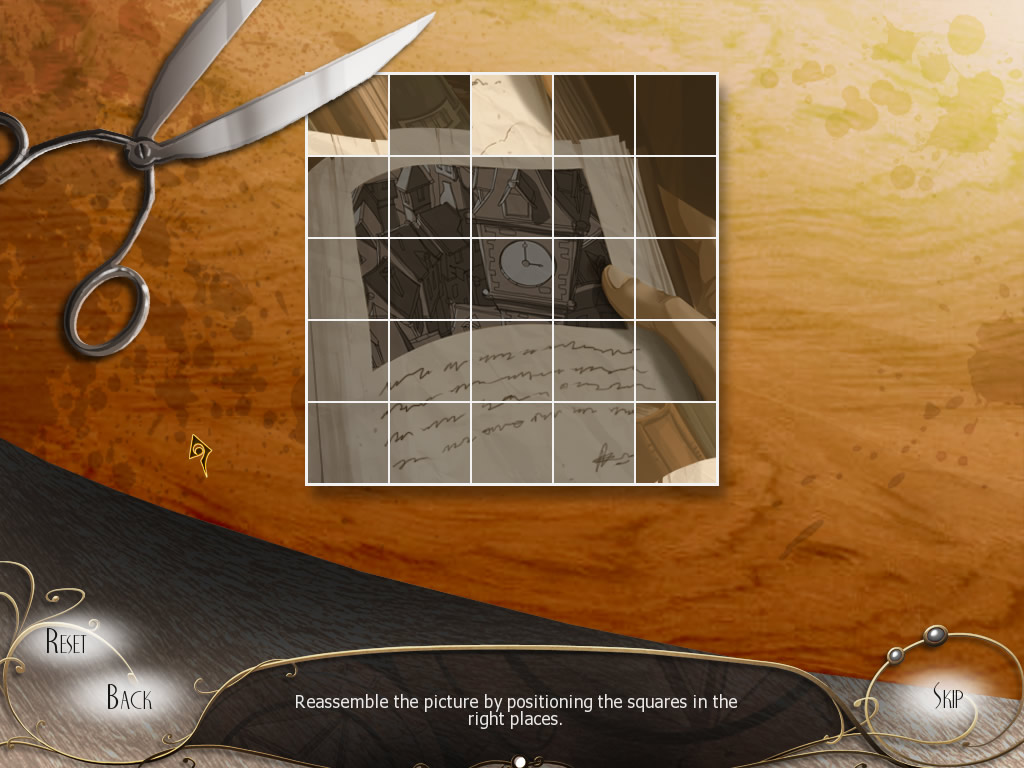
Click on the bookshelf on the left side of the room. When you zoom in, use the torn page on the far right book. Then click on the illustration in the book for a puzzle.
This is just like the game's first puzzle way back in the living room. Switch the tiles around to complete the picture. When you put a tile in the right place it will confirm and lock.
Check the screenshot for a nearly complete puzzle if you need help.
Screenshot.
When this is finished, the illustration will show a clock tower with the time at 3:00.
Set the clock to 3:00 to open the bottom drawer. You'll get the boat mast.
Click on the model ship at the far end of the room. Use the boat mast on it to fix it. Doing this will open the cannon ports on the right side of the ship. Click on them.
This is a word problem. No tricks here. 8 4 6 2.
When this is done, the right side of the ship will open and reveal treasure. Take it.
Give the treasure to Murray. He'll accept you as a true pirate and let you enter his world.
Treasure Island
Murray needs to find his treasure chest and get the booty from inside.
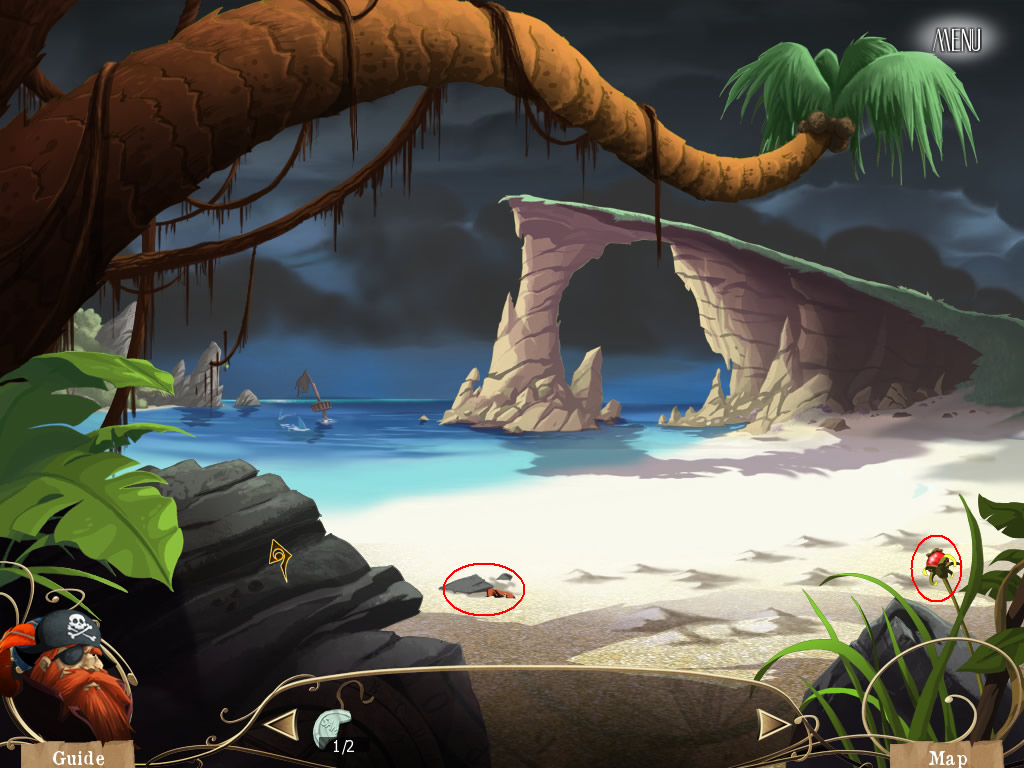
Grab the crab from the piece of driftwood near the bottom of the screen - you need to wait until the crab is actually standing on the driftwood to grab it.
Also grab the berry from the lower right of the screen.
Check the screenshot for the locations of the items on the beach.
Screenshot.
Head to the Creek next.
Talk to the Parrot to scare it off.
Grab the strap from the sekelton's head.
The skeleton's head falls off - grab the reed that was behind it.
Put the crab in the crab shelter next to the skeleton. It will push out a treasure map.
Head to the Pile of Branches on the left side of the screen next.
Use the pile for a puzzle.
Pick up the sticks in order, starting from the top and working your way to the bottom, just like the instructions say. Easy.
When you're done you get the shovel handle.
Head back to the Beach.
Use the Treasure Map on the beach.
Click to start, watch where the pirate goes, and put a flag on each cross where he heads. It's similar to Simon. You'll eventually trace out his whole path over 9 steps.
When you finish this, the X will appear on the beach so you know where to dig when you've got a shovel.
Head to the Seafloor next.
You've got 30 seconds to spend whenever you go to this screen, but if you run low on time you can just leave and come back.
Grab the shovel head on the left side of the screen, around the ship.
The parrot's in the tree. If you want the pearl it's holding you'll need to shoot it down. Combine the berry with the reed to get a blowpipe. Shoot the parrot to make it drop the pearl. Then click the pearl in the sand for a puzzle.
You have six tries to find the pearl. Whenever you click on a square, you're given the distance from the pearl. Start in the middle and pick a direction - if the number gets smaller you're going the right way; if it gets larger try the opposite way. Continue in this fashion until you find it.
Back to the seafloor.
Grab the stick near the clam.
When the clam opens, prop it up with the stick. That's not enough to keep it open though. Add the pearl to get the key.
Combine the shovel head with the shovel handle to get the shovel.
The shovel isn't enough to dig up the chest. Combine it with the strap to get the strengthened shovel.
Dig up the chest with the strengthened shovel by using it on the X.
Use the key on the chest.
Get the other half of the locket from inside. You've already had the first half.
You're done with Murray.
Chapter 4: Neferes
The Bathroom
You've got the third gem in the Pendant.
Nathan appears here and chats with you for a while. When he's done, grab the hook from the floor.
Combine the hook with the rope you got after clearing Natsumi's world to get the grapple.
Now you can get upstairs.
Use the grapple on the upstairs balcony to get to the second floor.
You'll finally meet up with Isaac again.
Grab the diary entry from under the lower right corner of the blue carpet.
Head to the Bathroom.
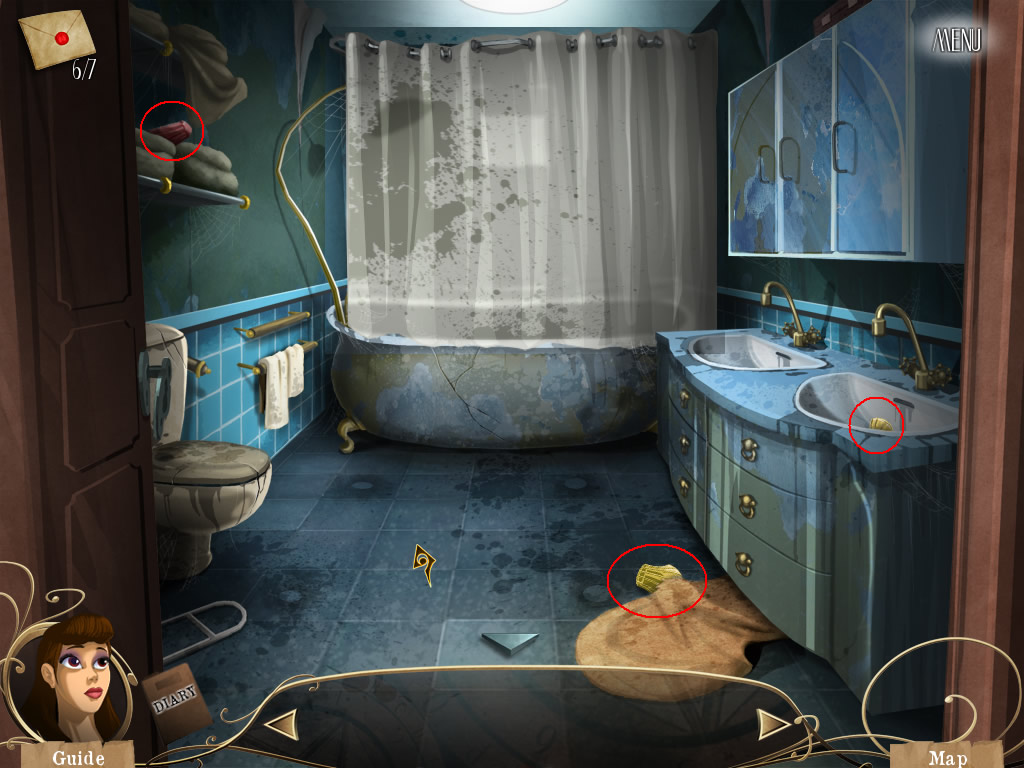
Grab the pieces of the yellow bottle. One is under the bath mat near the door, another is in the sink on the right.
Also grab the piece of the red bottle in the upper left of the screen on some towels.
Check the screenshot for the locations of the items in the bathroom.
Screenshot.
Check the medicine cabinets. Open the one on the left. Inside is the first piece of the blue bottle and the first piece of the green bottle.
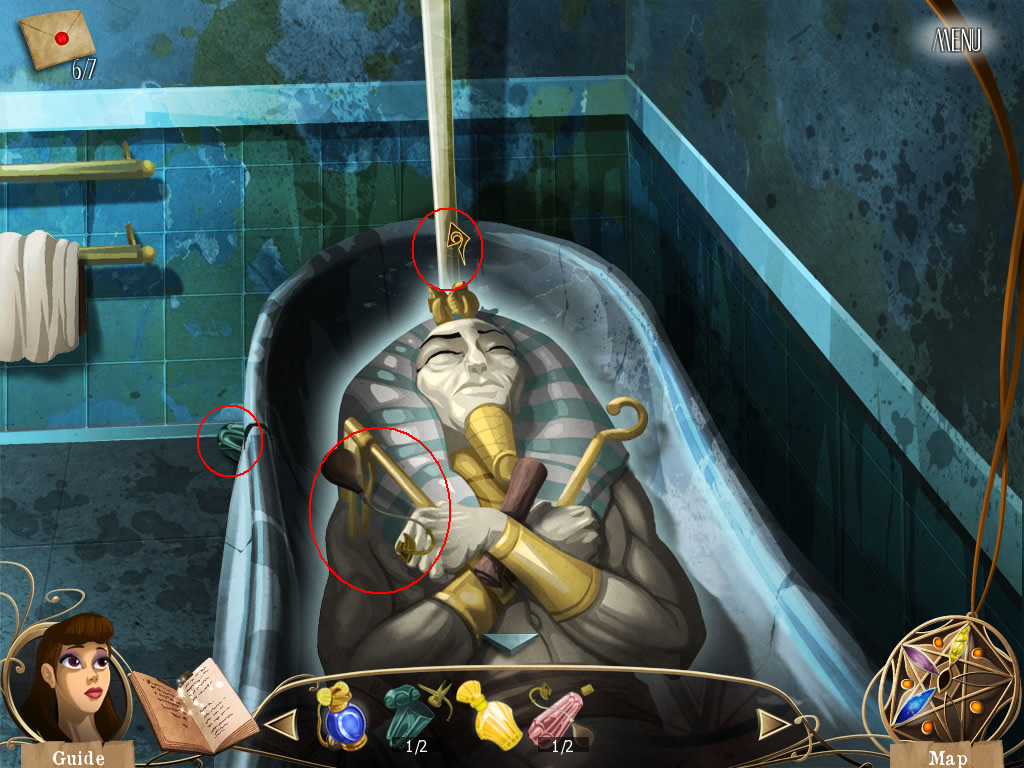
Use the shower curtain to reveal the Pharaoh. You can't wake him yet, but if you click him you can get another piece of the green bottle under the tub near his head, another piece of the blue bottle around the showerhead pole and another piece of the red bottle in his hand. Also check the map in his hands - it's a clue for the upcoming bottle puzzle.
Check the screenshot for the locations of the items in and around the tub.
Screenshot.
Place the blue bottle on the upper left post on the floor, the red bottle on the upper right post, the yellow bottle in the lower right post and the green bottle in the lower left post.
Click on the completed bottle design for a puzzle.
Click and drag the bottles to slide them. Place them on their respectively colored Xes. Straightforward, you can't really mess this one up.
When you're done, Neferes wakes up and you can enter his world.
The Tomb
Click on the dealer to the right. When you zoom in, click on the mat.
Match the cards with their best companions. The man goes with the female symbol, the desert with the water, the sun with the moon, the cow with the grain, the boat/water with the fire.
Finishing this will get you the Maze Key.
Head to the entrance of the tomb.
You'll be accosted by a mummmy.
Grab the Hathor stone on the right side of the screen.
Head to the Key Room on the left.
Use the panel on the floor. It's missing a tile - use the maze key on the empty slot for a puzzle.
You have to rebuild the dice from the pattern. Place the sun above the man, the sitting pharaoh above that, the blue heron to the left of the sun, the eye to the right of the man and the reed below the eye.
Doing this will unlock the tomb opening mechanism. Use it.
The tomb is now open. Before you head inside, note the stone markings on the right side of the door. This is a map to making it through the labyrinth.
Proceed through the doors in order: 1, 2, 2, 1, 1, 3, 3, 1, 2.
Grab the figurines as you go. You'll have nine when you reach the end.
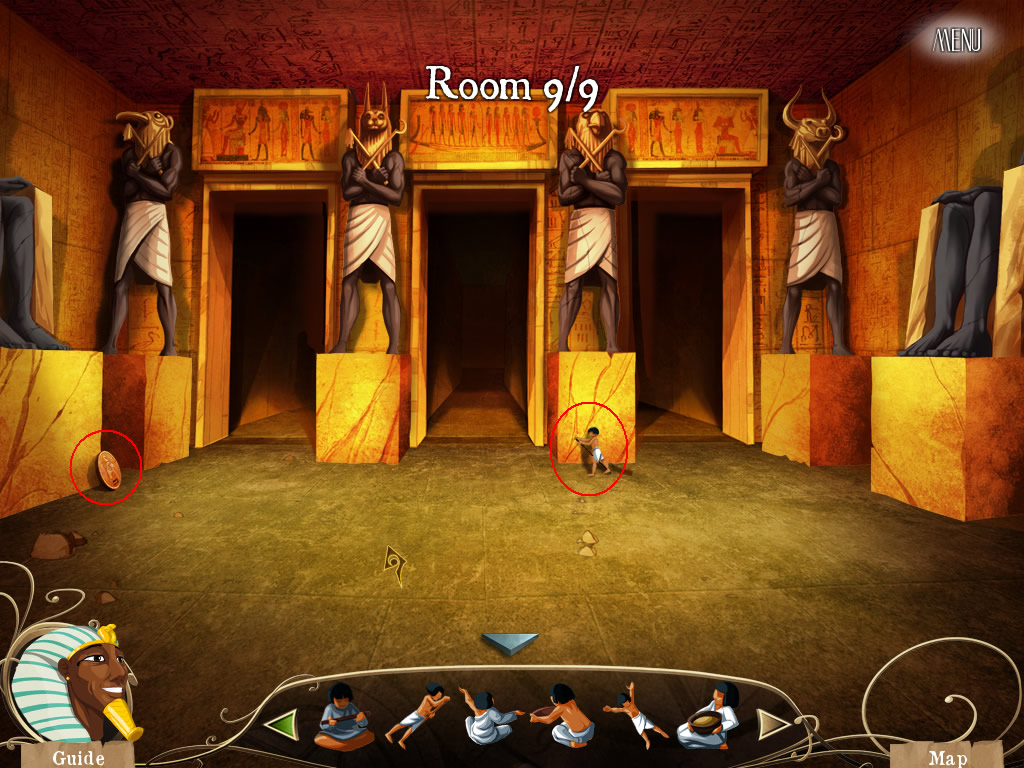
In the ninth room, grab the Amon coin from the left side of the screen.
Check the screenshot for the locations of the Amon coin and figurine in the ninth room.
Screenshot.
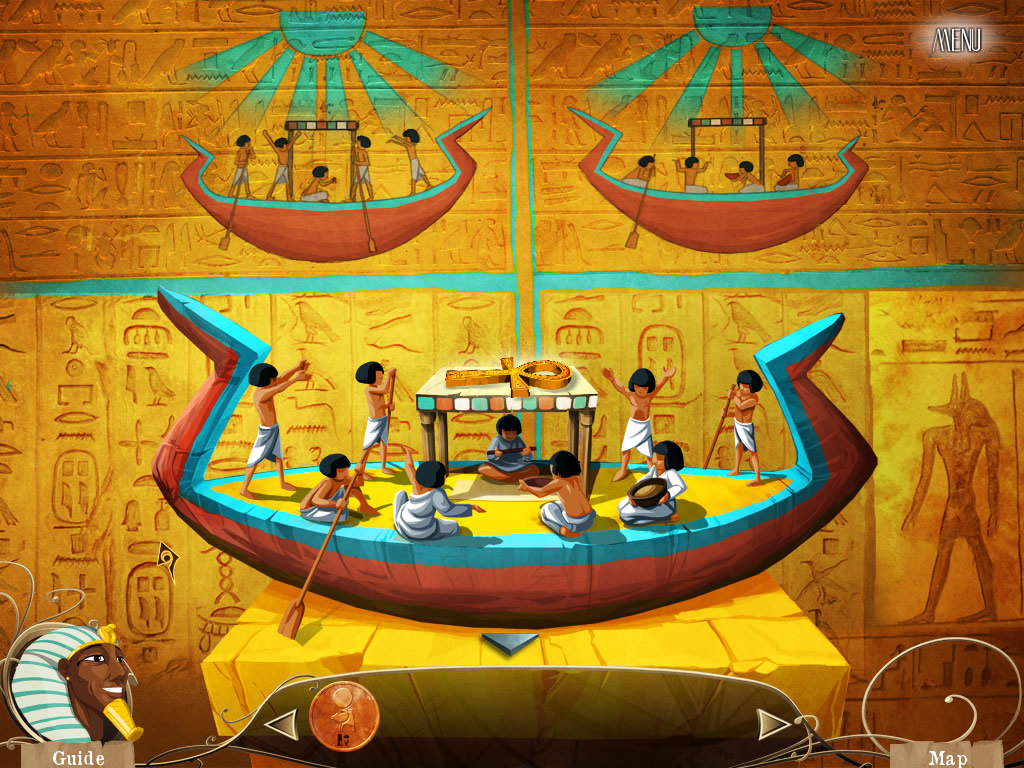
Click on the boat. Note the murals on the wall - they will tell you where to place your figurines. Check the screenshot if you need help.
Screenshot.
When this is done, you'll get the key.
Place the key in the ankh-shaped depression near the door.
The door will open. You can now enter the Tomb.
The Pharaoh's mother appears. There's a chat. Once it's done, grab the Isis coin from the right side of the screen.
Grab the rest of the god coins from the mechanism. You should now have seven - if not, make sure you got the Hathor coin from the entrance, the Amon coin from the ninth room of the labyrinth and the Isis coin from the Tomb.
Place the coins in order - Isis, Thot, Horus, Hathor, Osiris, Anubis, Amon.
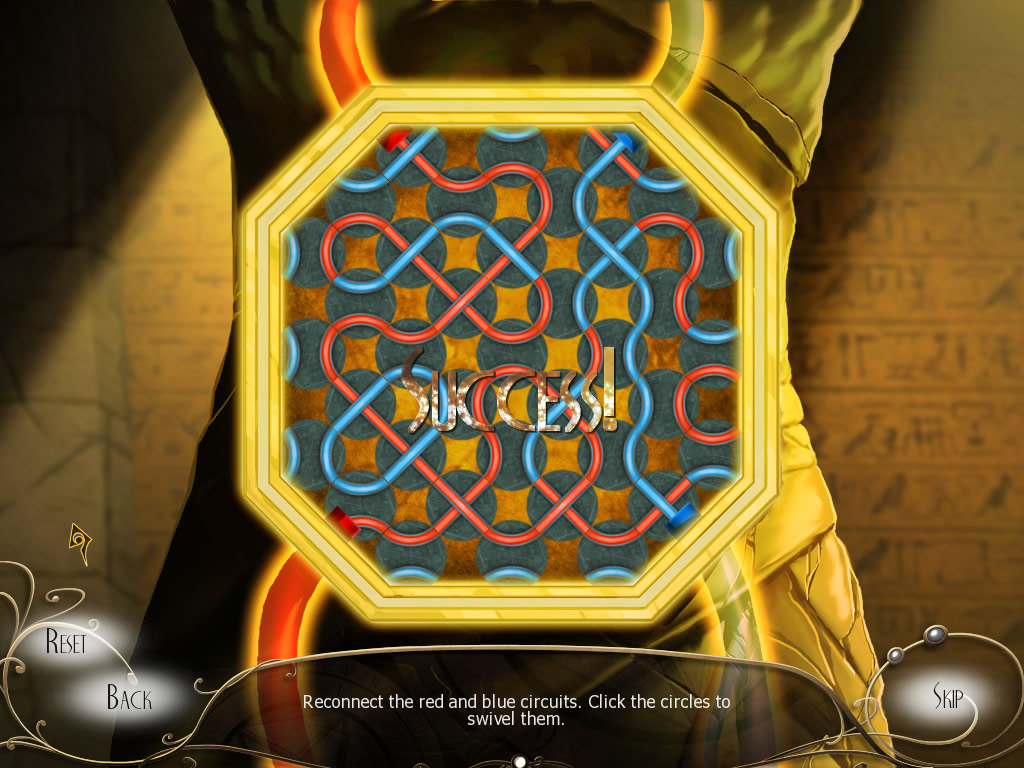
When they're in order, you can use the purifying mechanism by clicking up on the top of the machine.
Twist the circles to reconnect the blue and red circuits. The blue one can go essentially straight up the right side, while the red one twists around a bit.
Check the screenshot for one example of how to finish the purifying mechanism puzzle.
Screenshot.
When you're done, you're finished with Neferes.
Chapter 5: Guillem
The Bedroom
You've got the fourth gem for the Pendant.
Grab the ochre chalk from the bathroom floor, then head back to the second floor hallway.
Nathan again. Once he's done, head to the bedroom.
Check the nightstand on the right. When you zoom in, click it again. You'll find a rosary, then the Monk will appear to talk to you. He's lost his bible.
Click on Isaac and he'll find the bible for you. Then give it to the monk.
He still can't pray because there's a demon hidden in the room. He'll give you a mirror fragment.
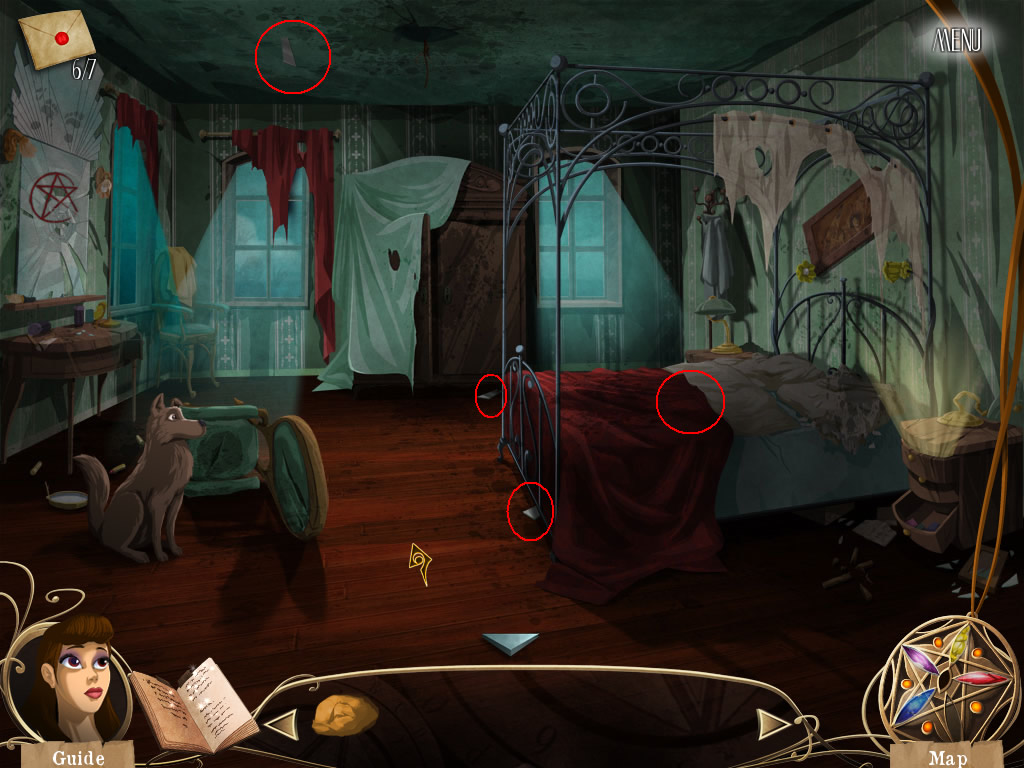
Grab the mirror fragment from under the dresser. Click on the bed to move the sheets and get another mirror fragment from under them. There's also one embedded in the ceiling above the mirror. Finally, grab the one at the foot of the bed near the monk. Then look at the mirror on the right. Grab the mirror fragments embedded in the wall and the shelves in front of the mirror. If you've gotten all the fragments, you should be able to finish the mirror. Click on the mirror for the mirror puzzle.
Check this screenshot for the locations of the items in the bedroom.
Screenshot.
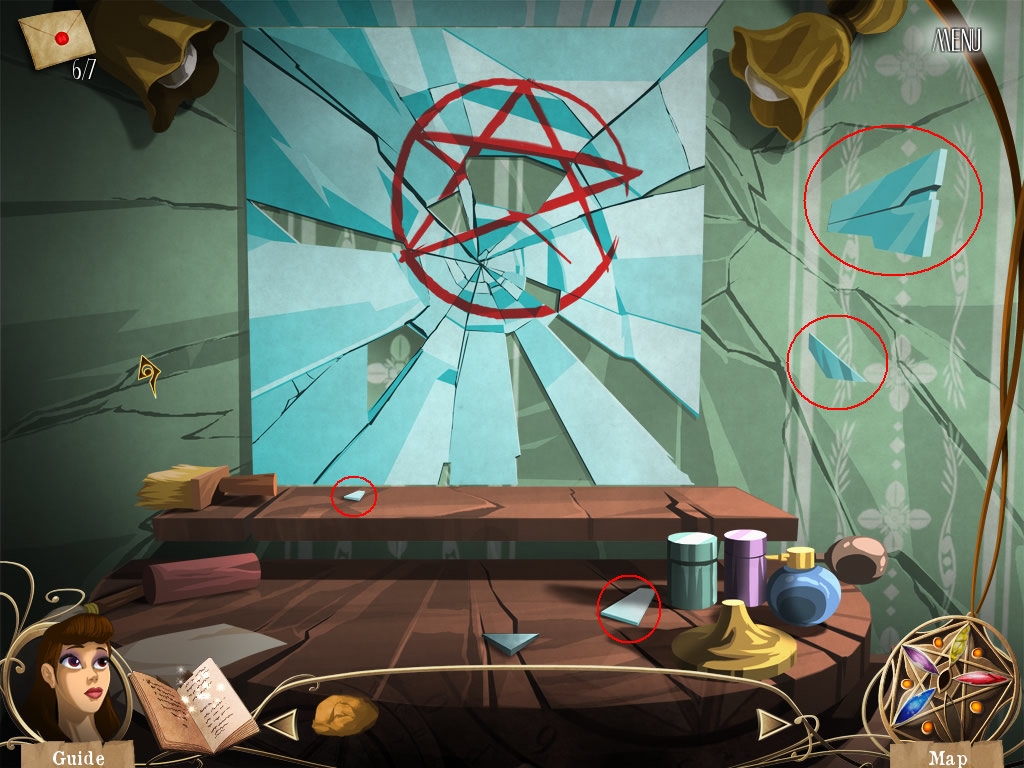
Check this screenshot for the locations of the items in the mirror.
Screenshot.
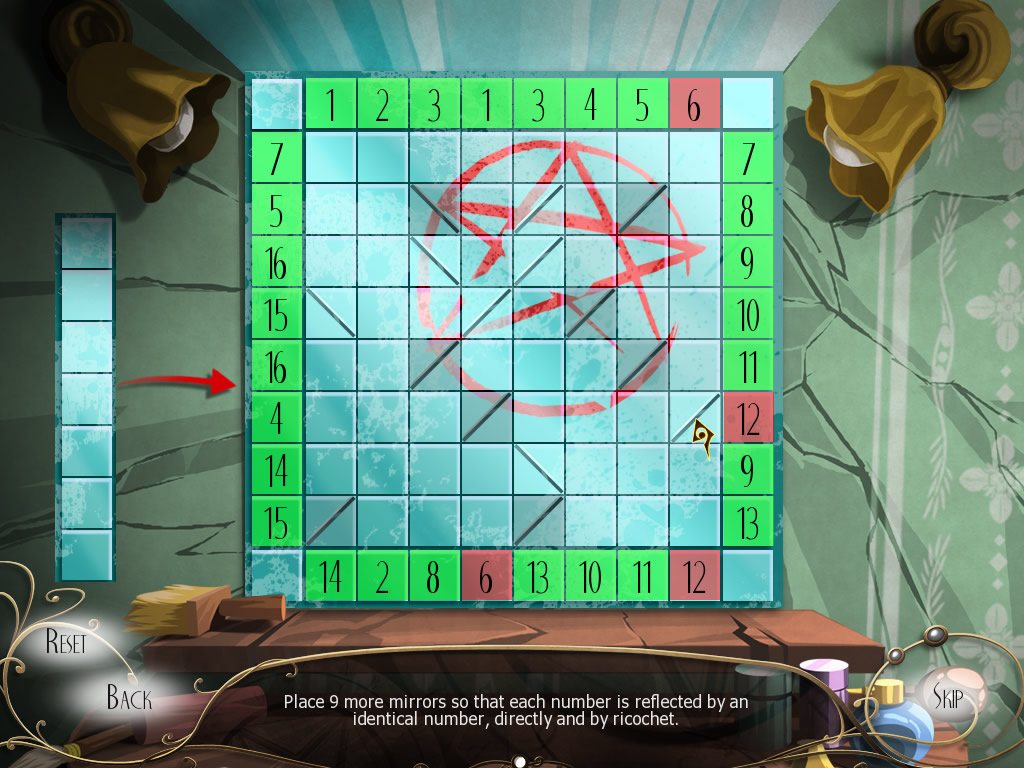
Place the mirrors so that each number reflects itself. This one's difficult to explain in text, check the screenshot for the solution.
Screenshot.
When you're done, the poltergeist comes out to harass the monk. Click it, then click it a ton of times until it's toast.
The Monk lets you enter his world once you've gotten rid of the poltergeist.
Curing the Abbot
Grab the piece of wood from the middle of the path. That's all you can get for now, so head to the Cloister.
The Abbot's been poisoned - you need to help him.
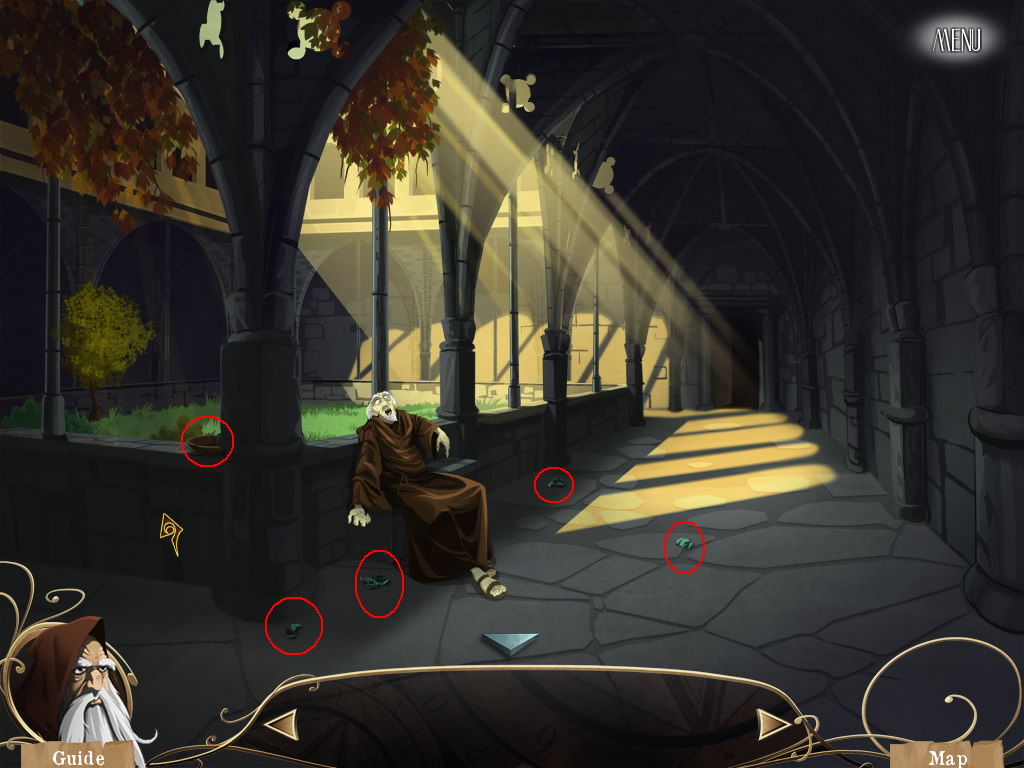
First, grab the bottle pieces from the ground around the abbot - there are four. Also grab the plate from behind the column near the abbot.
Check the screenshot for the locations of all the items in the cloister.
Screenshot.
Head to the Stairs to Jail next.
Grab the Sickle from the stairs on the left. Then walk to the Jail.
Talk to the Prisoner. She wants you to help her prepare a cure for the Abbot. She wants the plate - put it on the stone ring in front of her. Then she wants a plant with a bud like a snake's head. Head back to the Countryside.
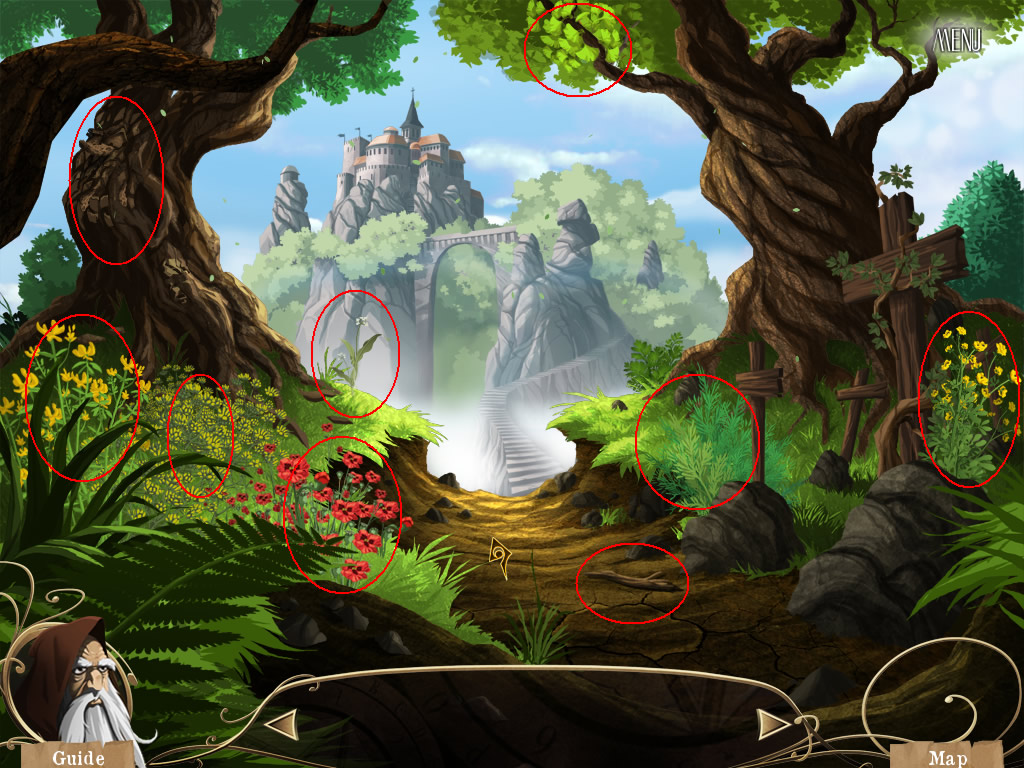
Use the slickle on the cork on the upper left to get a sample. Also use it on the grass to the right of the path to get some of that. The yellow flowers on the left are harvestable as well, as are the green plants on the right. The other plants on this screen require that you do a puzzle before you can harvest them.
It's a memory game - study the grid, then answer a question about the grid afterwards. You'll need to do this several times to get all the plant samples.
In the end, you'll have cork, two yellow flowers, two green plants, a pleasant smelling green plant, a branch, a red flower and a strong smelling plant. You don't need ALL of these, but it's a good adventure game habit to grab everything.
Check the screenshot for the locations of all the items in the Countryside.
Screenshot.
When you've got everything head back to the jail.
Place the red flower in the bowl. Use the sickle on the piece of wood to make a pestle, then use the pestle on the bowl. Time for a puzzle.
You need to find the correct number of each kind of plant so the totals for each row and column add up. This is similar to sudoku and is randomized, so it's not possible to offer a direct solution.
When you're done, the prisoner will ask for a plant with a leaf like a fan. This is the branch. Put it on the plate. Time for another puzzle.
This one actually is Sudoku using symbols. The layout is random, so it's not possible to offer a direct solution.
Once you're done, the prisoner wants the strong-smelling plant. Put it on the plate and use the pestle again.
The same thing as the first one. Also random, so I can't give a solution.
Now she wants one of the yellow flowers. Put it on the plate and use the pestle again.
It's the Sudoku puzzle again.
When you're done, the remedy will be complete. Take it from the plate and give it to the prisoner, then give her the bottle. Use the sickle on the cork to make a cap, then give her the cap. She'll give you the cure for the abbot.
Give the Abbot the cure and he'll recover.
You're done with Guillem.
Chapter 6: The Sixth Ghost
The Attic
You've got the fifth gem on the Pendant, but you're not done yet.
Take the flask of holy water from the bedroom floor. Then head back to the second floor hallway and proceed to the attic door.
Grab the seventh and final diary entry from the wall on the right.
Use the ochre chalk you got from Neferem on the door. Time for a puzzle.
Count the triangles on the door. Don't forget - some triangles are parts of other, larger triangles. There's 30 triangles total - this puzzle tries to trick you with an incomplete line on the pentagram!
Once you're done, the pentagram lights up. Use the holy water on it to open the door.
When you enter, you get the Soul Pendant.
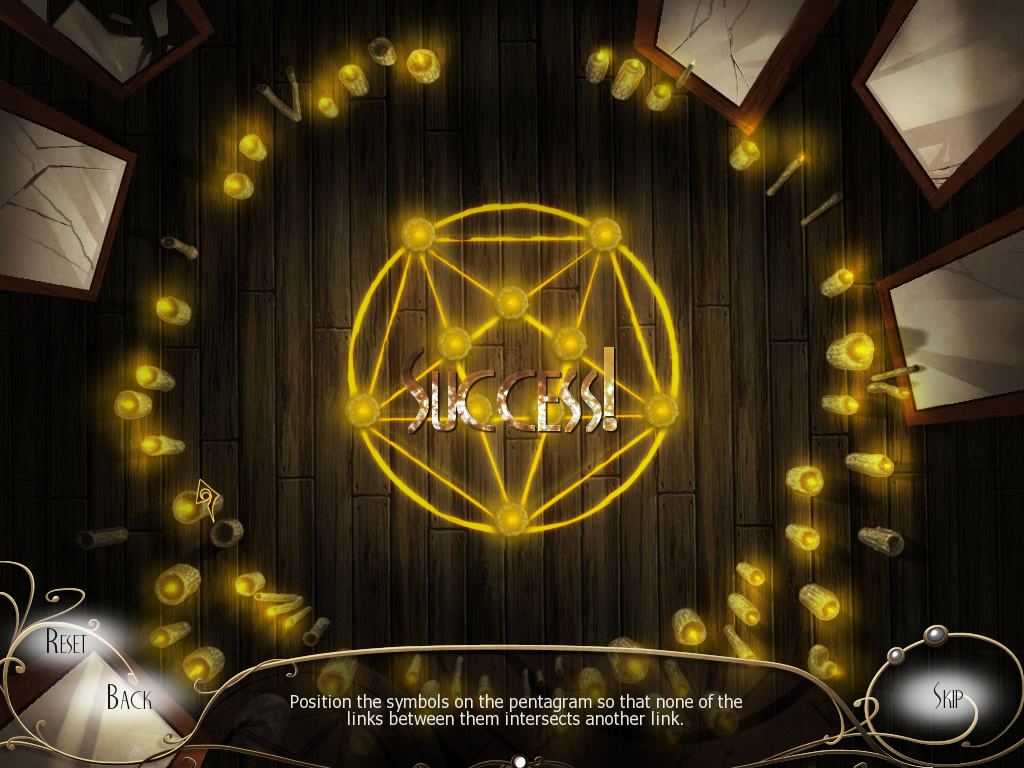
Click on the pentagram in the middle of the room to zoom in on it, then use the Soul Pendant on the slot in the middle for a puzzle.
You need to plate the points on the pentagram so that none of the lines intersect. Difficult to explain in text - check the screenshot.
Screenshot.
When the ritual is done, Nathan appears. Turns out he's the sixth ghost. He sends you to Hell.
Hell
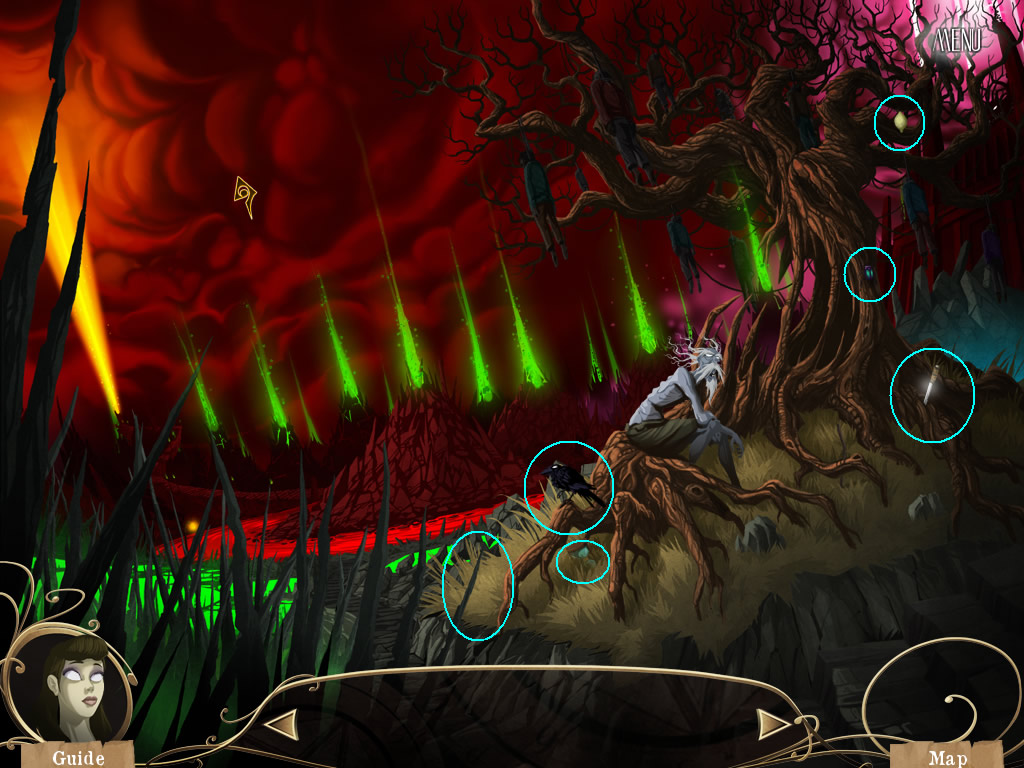
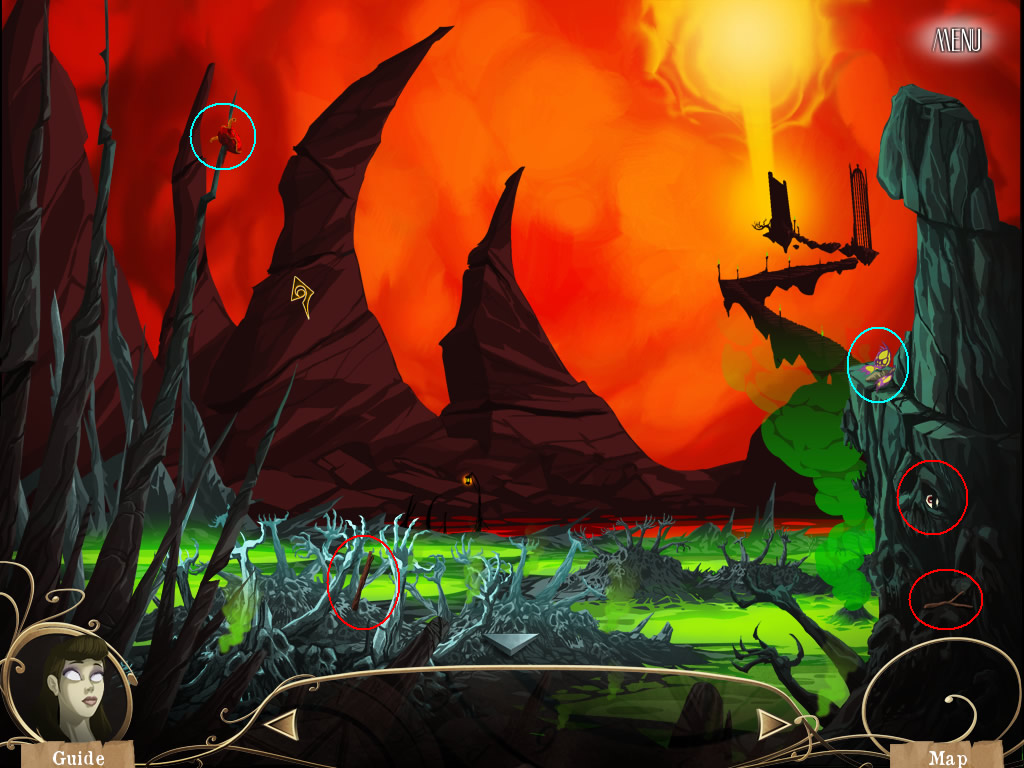
After the cutscene, grab the injured crow and empty hourglass from the base of the tree, the knife from the right of the tree and the beetle from the tree's trunk. Also grab the walking stick piece at the base of the tree. Then head to Soul Valley.
Check the screenshot for the locations of all the items at the Tree of the Hanged.
Screenshot.
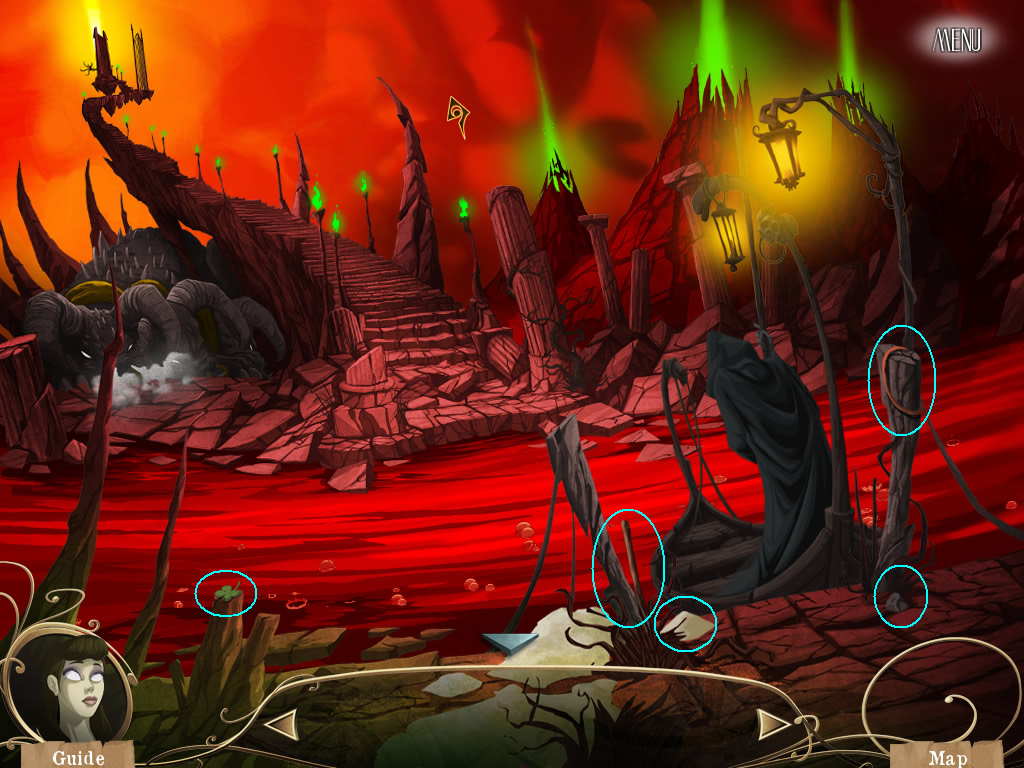
Grab the butterfly wing from the right side of the screen, the stick on the same pillar as the butterfly wing, the heart impaled on the spike to the left and the walking stick piece in the grasping soul hands. Use the knife on the eye embedded in the wall on the right to get it. Then click on the soul hand a little to the left of the walking stick piece. This soul wants assistance, but he needs more items. Head to the River Styx.
Check the screenshot for the locations of all the items at the Valley of Souls.
Screenshot.
Grab the clover on the lower left part of the screen, the stone to the right of Charon, the string above the stone and the last walking stick piece to the left of Charon. Combine the stick and string to make a slingshot, then add the stone to make an armed slingshot. Also grab the sand near Charon and put it in the empty hourglass to fill it.
Check the screenshot for the locations of all the items at the River Styx.
Screenshot.
Charon won't take you across the River Styx. You need to pay him first.
Head back to the Tree of the Hanged and use the armed slingshot on the lemon in the upper right to get it.
Give the soul the clover, the heart and the beetle. It will vanish.
Click on the soul hands again and another soul will come out. Give this soul the injured raven, the eye and the hourglass and he'll leave.
Click again and another soul will come out. Give this one the walking stick and butterfly wing, then use the lemon on the gas to the right of the soul to rot it and give him that too.
Use the soul hands one last time and Richard will come out.
Tell Seth you found Richard, and he'll give you a gold coin. Head back to the River Styx.
Pay Charon. He'll sail you across the river. Click on the gate to hell for a puzzle.
This is similar to Tetris Attack and plenty of other games. It's based on skill and is fairly easy to win.
When you're done you'll escape from Hell.
Nathan is defeated and you've finished the game!
Posted by: corygalliher |
August 27, 2011 5:55 PM
|
August 27, 2011 5:55 PM