

Ubooly and Friends
It's hide-and-puzzle time with Ubooly and Friends! All twelve of Ubooly's friends are hiding somewhere on the nine-screen map, and the only way to reveal them is to point and click around and solve puzzles relating the the clues they give. If this premise sounds familiar, it should— its author, BenRadish of BeardShaker Games, was also the one behind Tanooky Tracks, which is very similar both in art style and in gameplay, and there's no reason to complain about that. The puzzles are logical and well-designed, the tropical environment is well implemented, and the graphics and audio have a charm all their own.
Read More16 Comments
Ubooly and Friends Walkthrough
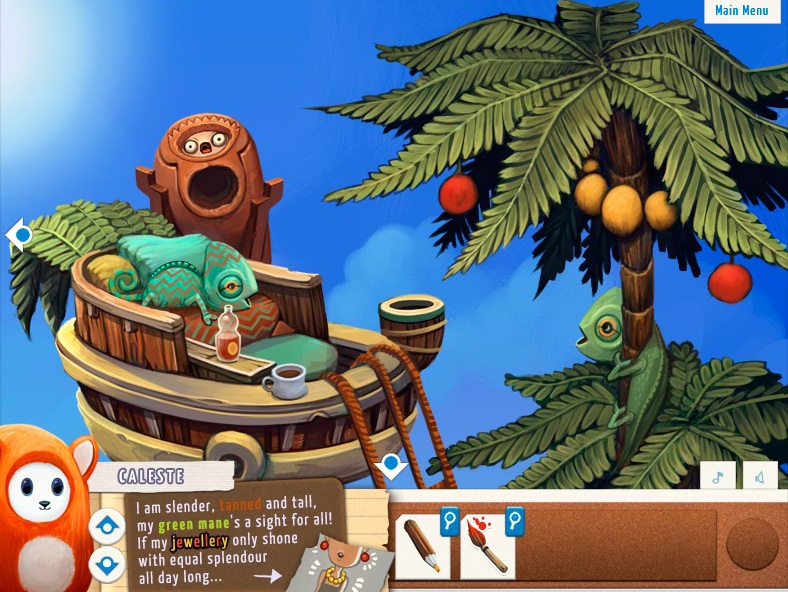
Caleste
-
Caleste's Riddle:
I am slender, tanned and tall,
my green mane's a sight for all!
If my jewelry only shone
with equal splendour
all day long...
-
First let's solve for the object in the riddle:
-
What is tall, thin and brown, with a "green mane" at the top?
-
A palm tree!
-
Next, identify the jewelry.
-
Take a look at the picture at the side of the riddle.
-
The jewelry in that image consists of a shiny necklace and a pair of earrings.
-
Combine the the information about the object and the jewelry hint to discover Caleste's hiding place.
-
Search for a palm tree that looks like it's wearing jewelry.
-
You'll find the right palm tree at the Crow's Nest in the upper right corner zone, with coconuts around it that look just like a necklace and earrings.
-
But those coconuts are a little dull, and the riddle says they are supposed to "shine" with "splendour".
-
Go to the Puzzle Board at the center zone.
-
Take the RED PAINTBRUSH on the stone platform.
-
Move left once to go to the Upper Sitting Area at the middle left zone.
-
Pick up the ORANGE CRAYON on the middle step.
-
Go back to the Crow's Nest at the upper right corner zone.
-
Now you have the tools, but what should you use them on?
-
Refer to the picture of the jewelry next to the riddle, then color the coconuts on the tree to match the image.
-
Use the RED PAINTBRUSH to paint the two earrings red.
-
Use the the ORANGE CRAYON to color the necklace orange.
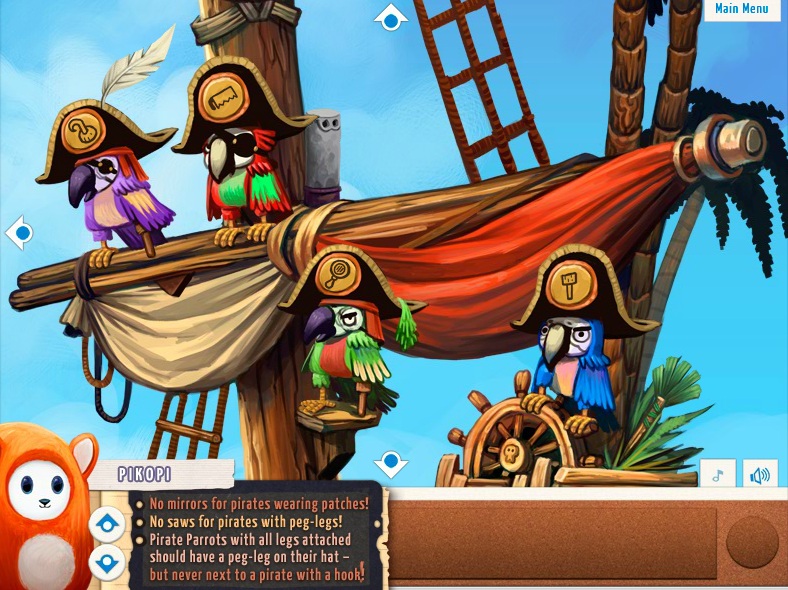
Pikopi
-
Pikopi's Riddle:
No mirrors for pirates wearing patches!
No saws for pirates with peg legs!
Pirate Parrots with all legs attached should have a peg-leg on their hat -
but never next to a pirate with a hook!
-
You can find the pirate parrots at the Pirate Ship Mast in the middle right zone.
-
Each of the parrots has one or more identifying features and a hat with a changeable icon.
-
Use the clues from the riddle and process of elimination to determine the correct symbol for the parrot's hats.
-
The first line says that none of the parrots with eye patches have a hat with the mirror symbol.
-
The second line says that none of the parrots with a peg leg have a hat with the saw symbol.
-
The third line says parrots with two legs should have a hat with a peg leg symbol, but not if they are next to a parrot with a hook symbol on their hat.
-
Now, apply these rules to the four parrots.
-
The first purple parrot on the left has an eyepatch and a peg-leg. Therefore, his hat cannot have the mirror symbol, the saw symbol, or the peg-leg symbol.
-
Change the first parrot's hat to the only remaining possible symbol: the hook.
-
The second red parrot has an eyepatch and both legs, so his hat cannot have a mirror and the hook symbol has already been eliminated. It also cannot have a peg-leg, because he is next to a parrot with a hook.
-
Change the second parrot's hat to the only remaining possible symbol: the saw.
-
The third green parrot has a peg-leg, so his hat cannot have the peg-leg, and the hook and saw are already eliminated.
-
Change the third parrot's hat to the only remaining possible symbol: the mirror.
-
The last blue parrot on the right is the easiest. Change his hat to the only unused symbol: the peg-leg.
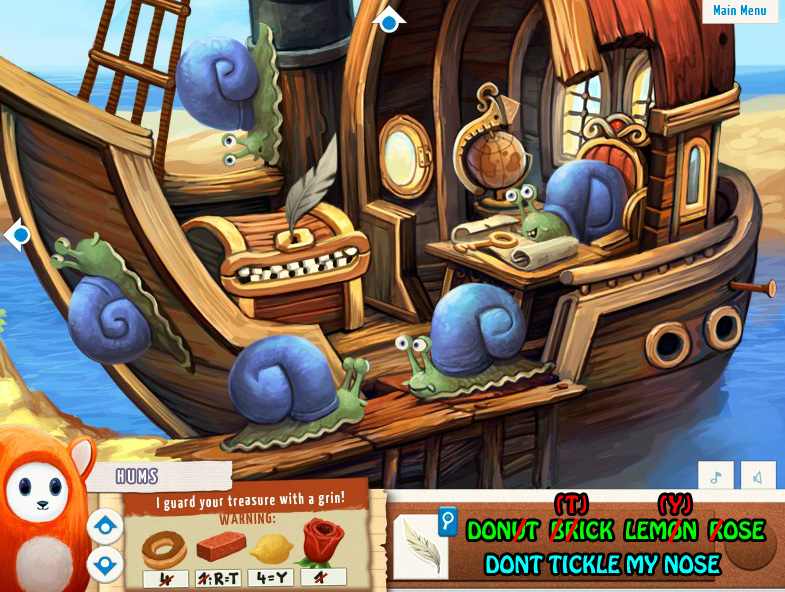
Hums
-
Hums's Riddle:
I guard your treasure with a grin!
WARNING:
Donut, Brick, Lemon, Rose
-
First, use the clues in the boxes under each object in the riddle to solve the word puzzle.
-
You'll see one similarity between all four boxes right away: what could those numbers mean?
-
The number in the box refers to a particular letter in the name of the object.
-
For example, the first box under the picture of the donut contains the number 4 crossed out.
-
The 4th letter in the word DONUT is U.
-
Since the number 4 was crossed out, remove the 4th letter from the word.
-
DONUT - U becomes DONT.
-
Now that you know how the riddle works, use the information to solve the next three pictures.
-
The box under the brick has 1 crossed out and R = T.
-
The first letter of BRICK is B.
-
BRICK - B becomes RICK.
-
Next, substitute the letter T for the letter R and RICK becomes TICK.
-
The box under the lemon says that 4 = Y.
-
The fourth letter of the word LEMON is O.
-
Substitute the letter Y for O and LEMON becomes LEMYN.
-
The last box under the rose has the number 1 crossed out.
-
The first letter of ROSE is R.
-
ROSE - R becomes OSE.
-
Put all of the pieces together and you have: DONT TICK LEMYN OSE.
-
Hmm, the words still look like jibberish! Maybe if you reorganize the letters a little...
-
You'll find the message DON'T TICKLE MY NOSE.
-
Next, you need to find a tool that's good for tickling.
-
Go to the Pirate Ship Mast in the middle right zone.
-
Take the WHITE FEATHER from the purple parrot on the left.
-
Lastly, you must find the object that can "guard your treasure with a grin!"
-
Go down once to the Pirate Ship Deck at the bottom right corner zone where you'll find a smiling treasure chest.
-
Use the WHITE FEATHER to tickle the keyhole at the center of the chest.
Camou
-
Camou's Riddle:
When we're here we look like that
When we're here we look like that
When we lick this we like to share
One for you, one for me - that's fair!
-
First locate the object mentioned in the second-to-last line, something you can lick and also share.
-
Go to the Lower Sitting Area at the bottom left corner zone.
-
Take two scoops of ICE CREAM BALLS from the ice cream maker on the small table.
-
Next, find the things with the patterns that match the icons in the riddle.
-
What kind of creature has an appearance that changes depending on where it's located?
-
A chameleon!
-
Go to the Crow's Nest at the top right corner zone.
-
There you'll find one chameleon sitting in the tree with leaves that match the small image in the first line of the riddle.
-
You'll also see a second chameleon sitting on the chair with a fabric pattern that matches the small image in the second line of the riddle.
-
But how are they going to be able to share the ice cream?
-
Place the 2 ICE CREAM BALLS into the bowl attached to the right side of the crow's nest and right in the middle of the two chameleons.
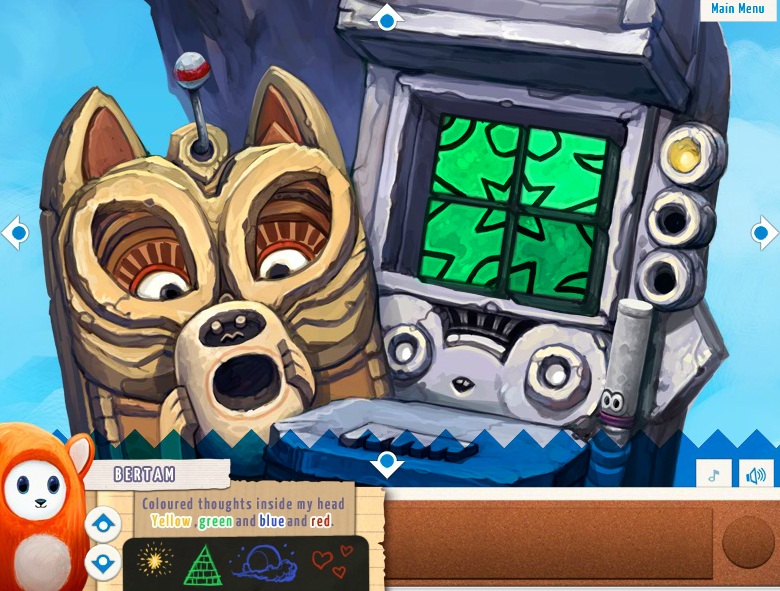
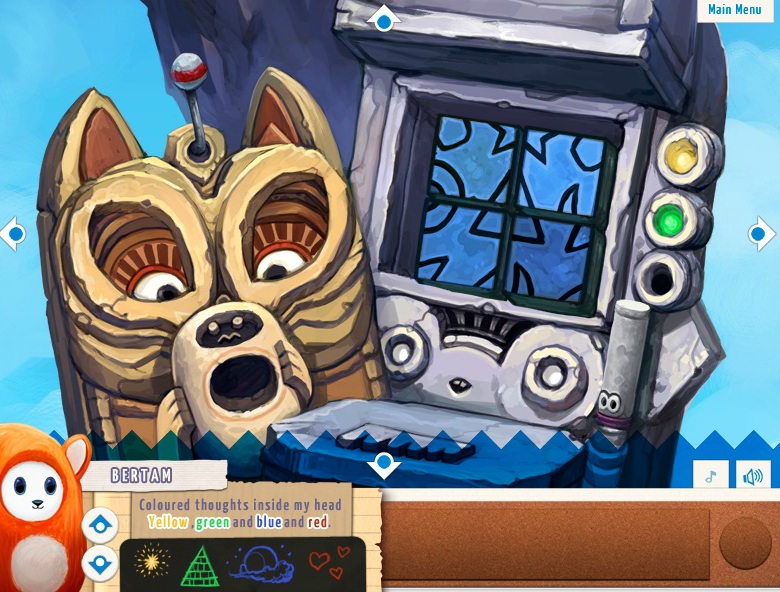
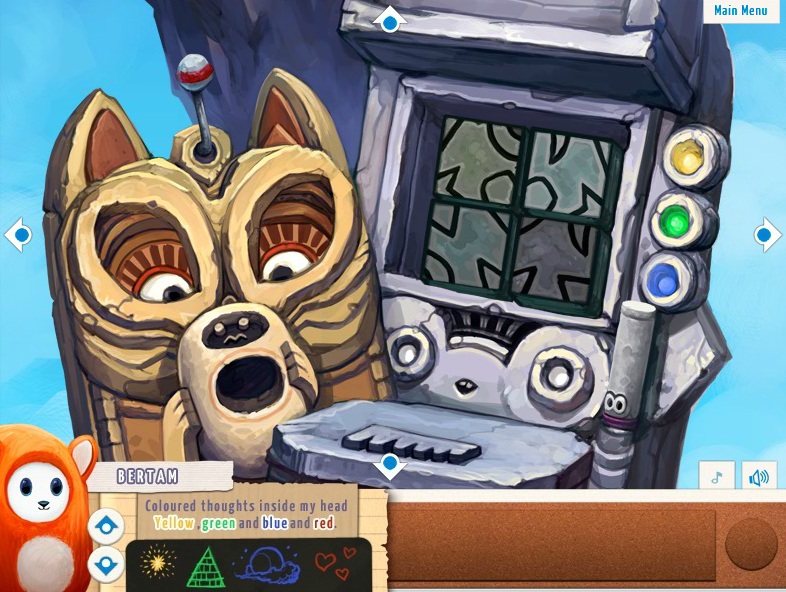
Bertram
-
Bertam's Riddle:
Coloured thoughts inside my head
Yellow,green and blue and red.
-
Go to the Puzzle Board at the center zone.
-
If you play around with the tiles, you'll find you can click to rotate them clockwise and that each tile contains a piece of one of four symbols.
-
Use the clue and the images from the riddle to create the symbols in the correct order.
-
The first picture at the bottom of the riddle shows a shining yellow star.
-
Rotate the tiles to create a 5-pointed star in the center, which will turn on the first light at the right side of the puzzle.
-
The next picture shows a green pyramid.
-
Rotate the tiles to create an equilateral triangle in the center to turn on the second green light.
-
The third picture shows a cloudy night sky.
-
Rotate the tiles to create a crescent moon in the center to turn on the third blue light.
-
The last picture shows three red hearts.
-
Rotate the tiles to create a single heart in the center to complete the puzzle.
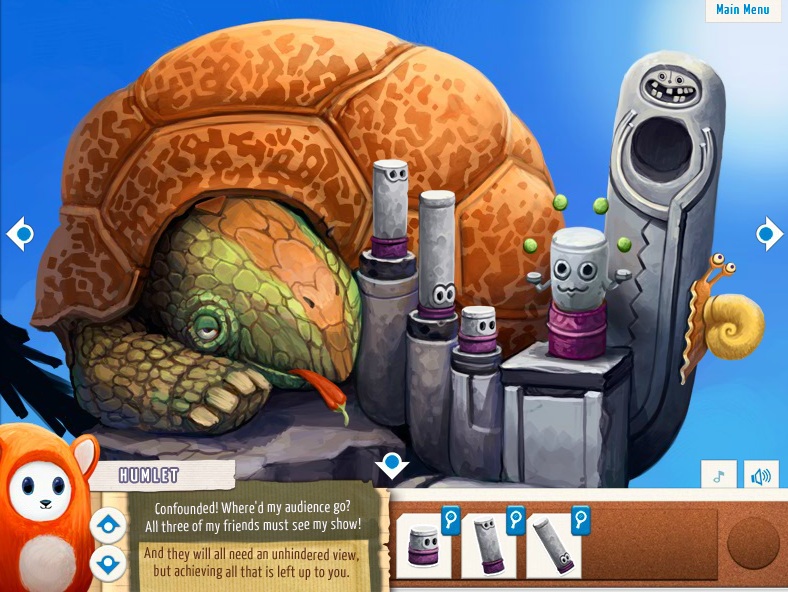
Humlet
-
Humlet's Riddle:
Counfounded! Where'd my audience go?
All three of my friends must see my show!
And they will all need an unhindered view,
but achieving all that is left up to you.
-
The first step is to locate this lonesome performer.
-
Go up to the Giant Turtle at the middle section of the top zone to find a juggling tiki.
-
Sure enough, there are three empty seats next to the juggler, so you'll have to find three more tikis to fill them.
-
Move down once to go to the Puzzle Board at the center zone.
-
Take the first TIKI FIGURINE on the stand at the right side of the platform.
-
Move left once to go to the Upper Sitting Area at the middle left zone.
-
Pick up the second TIKI FIGURINE on the step beside the orange creature.
-
Go right twice to the Pirate Ship Mast at the middle right zone.
-
Take the third TIKI FIGURINE above the middle of the sail, just to the right of the red parrot whose hat you gave the saw symbol to.
-
With all the tikis in hand, you're ready to return to the Giant Turtle at the middle section of the top zone.
-
Place all three TIKI FIGURINES onto the pedestals beside the juggling tiki.
-
But there's more! Remember from the riddle that each member of the audience needs "an unhindered view."
-
Organize the TIKI FIGURINES on the seats so that the body of one tiki does not obstruct another tiki's view.
-
Don't only pay attention to the tiki's height, because not every tiki has eyes at the top of its body.
-
Put the shortest tiki on the lowest platform.
-
Put the longest tiki on the middle platform.
-
Put the medium-sized tiki on the top platform.
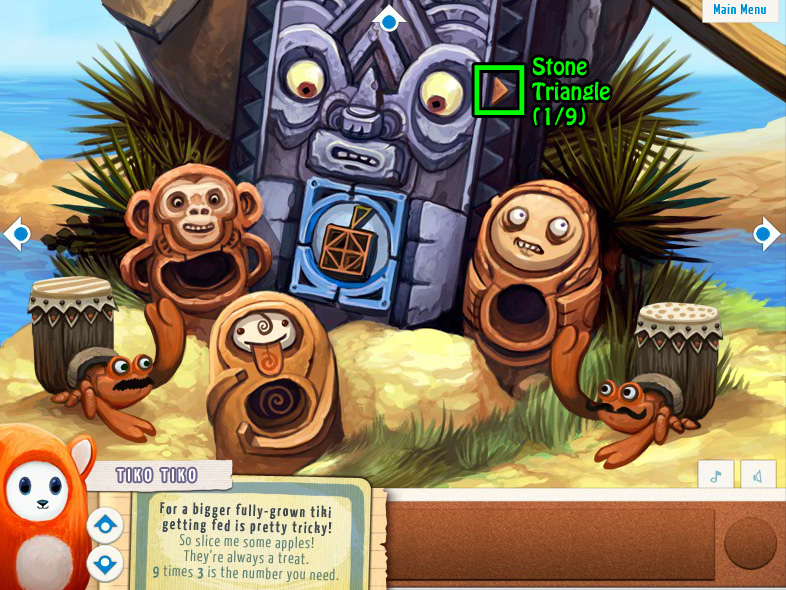
Tiko Tiko
-
Tiko Tiko's Riddle:
For a bigger fully-grown tiki
getting fed is pretty tricky!
So slice me some apples!
They're always a treat.
9 times 3 is the number you need.
-
Go to the Giant Tiki at the middle section of the bottom zone.
-
Between the tiki's hands, you'll see an image of an apple apple made of geometrical shapes.
-
The apple consists of 9 small triangles.
-
One triangle piece is hidden in every single scene in the game.
-
Locate all 9 of the small triangles to complete the apple.
-
Find the first STONE TRIANGLE (1/9) beside the giant tiki's right eyeball.
-
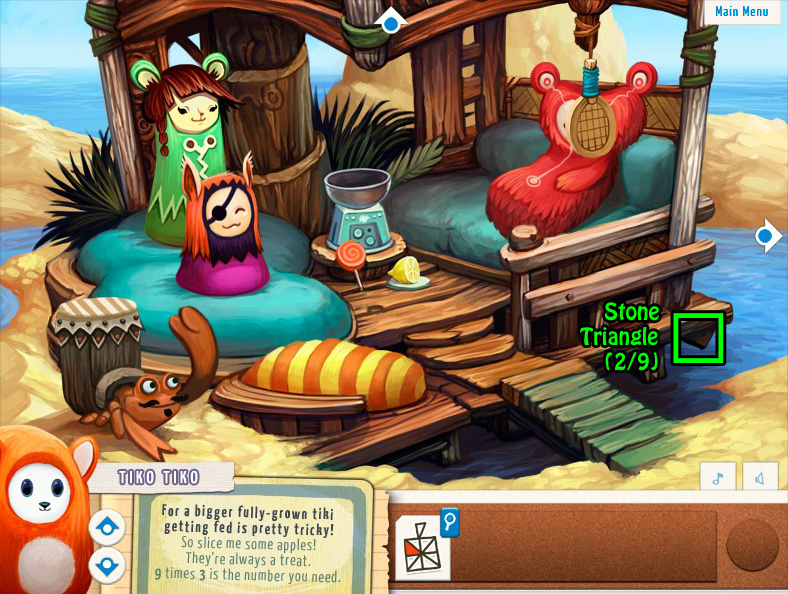
Move left to the Lower Sitting Area at the bottom left corner zone.
-
Find STONE TRIANGLE (2/9) underneath the right corner of the building, directly above the surface of the water.
-
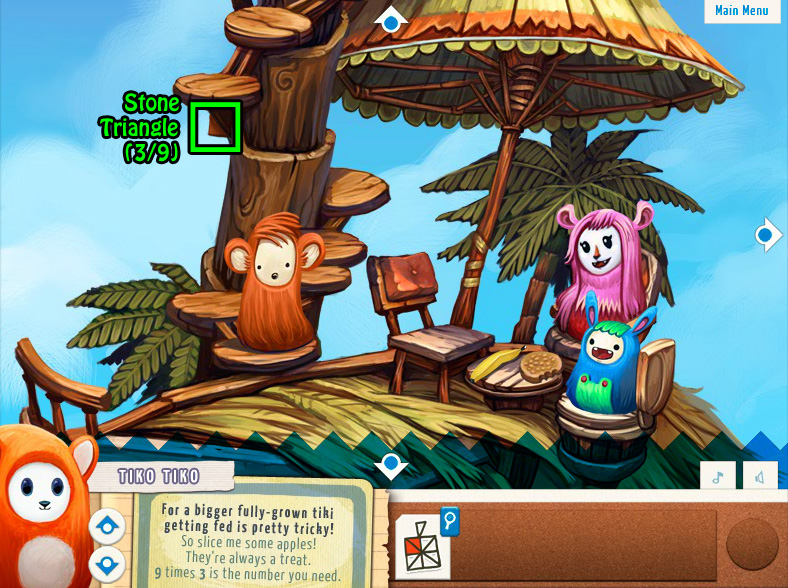
Go up once to the Upper Sitting Area at the middle left zone.
-
Find STONE TRIANGLE (3/9) underneath the second highest step.
-
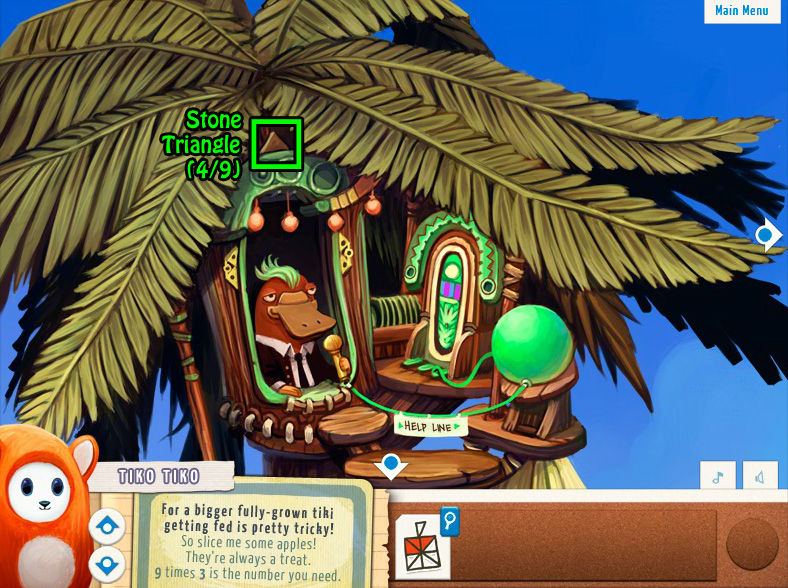
Move up to the Wise Platypus at the top right corner zone.
-
Find STONE TRIANGLE (4/9) at the top of the green archway above Wise Platypus.
-
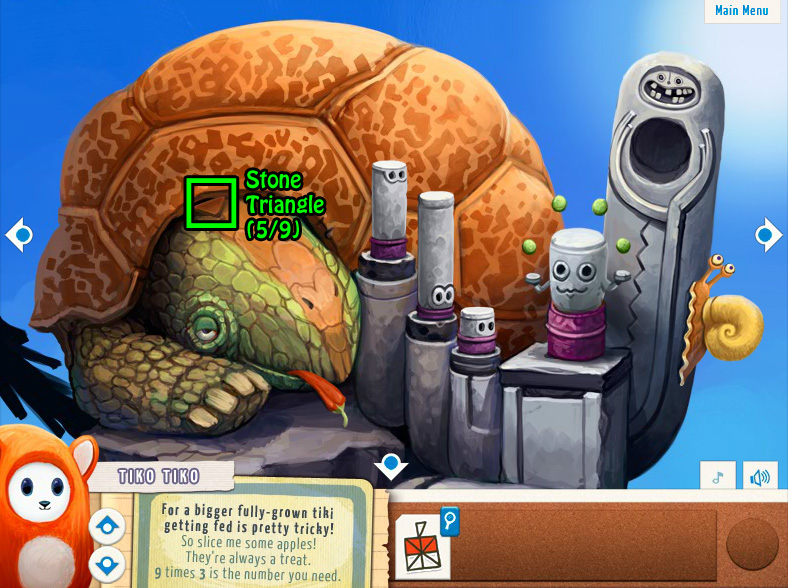
Go right to the Giant Turtle at the upper middle zone.
-
Find STONE TRIANGLE (5/9) on the top of the turtle's head.
-
Move right once to the Crow's Nest at the top right corner zone.
-
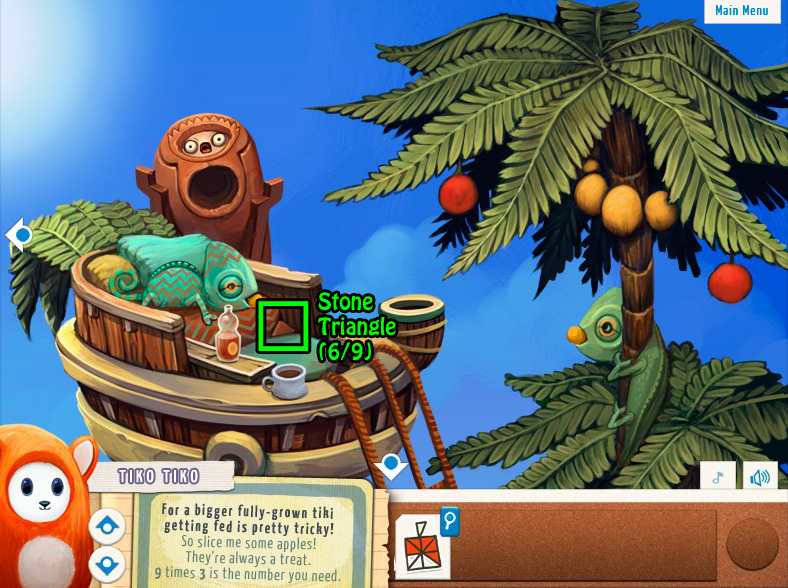
Find STONE TRIANGLE (6/9) beside the cushion under the left chameleon.
-
Go down once to the Pirate Ship Mast at the middle right zone.
-
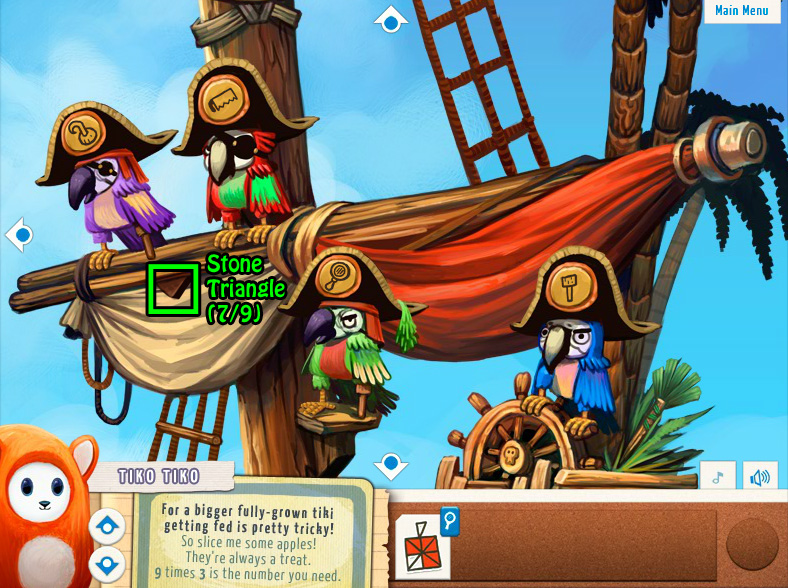
Find STONE TRIANGLE (7/9) at the top of the white sail.
-
Move down to the Pirate Ship Deck at the bottom right corner.
-
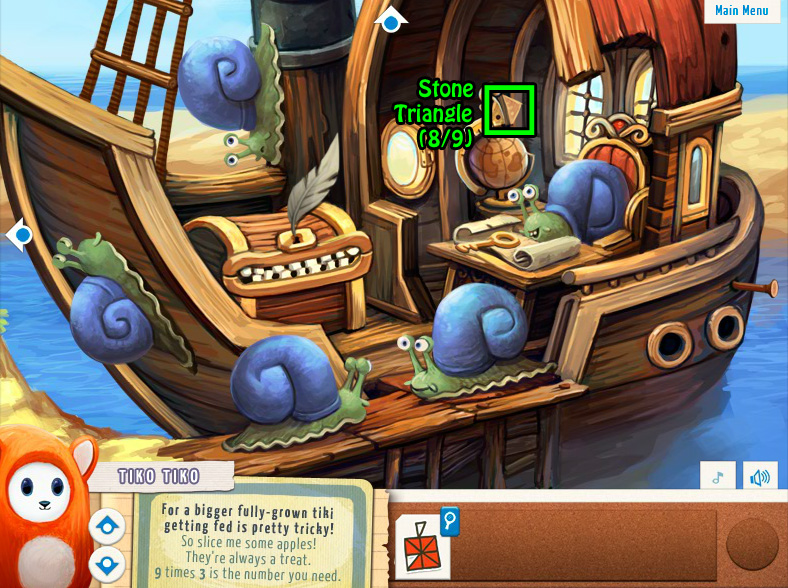
Find STONE TRIANGLE (8/9) at the top of the frame around the globe.
-
Go up once and then left once to reach the Puzzle Board at the center zone.
-
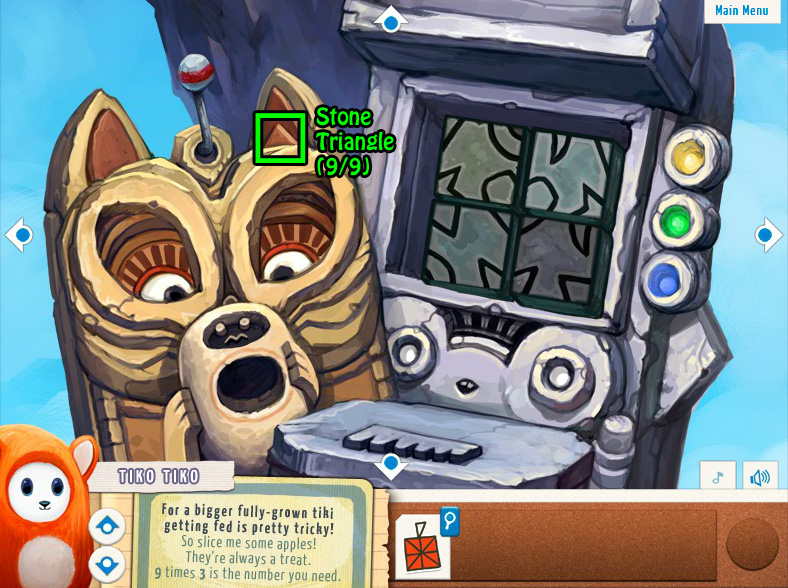
Find Stone TRIANGLE (9/9) inside the cat statue's right ear.
-
Move down to return to the Giant Tiki at the lower middle zone.
-
Place the 9 STONE TRIANGLES into the carving of the apple between the giant tiki's hands.
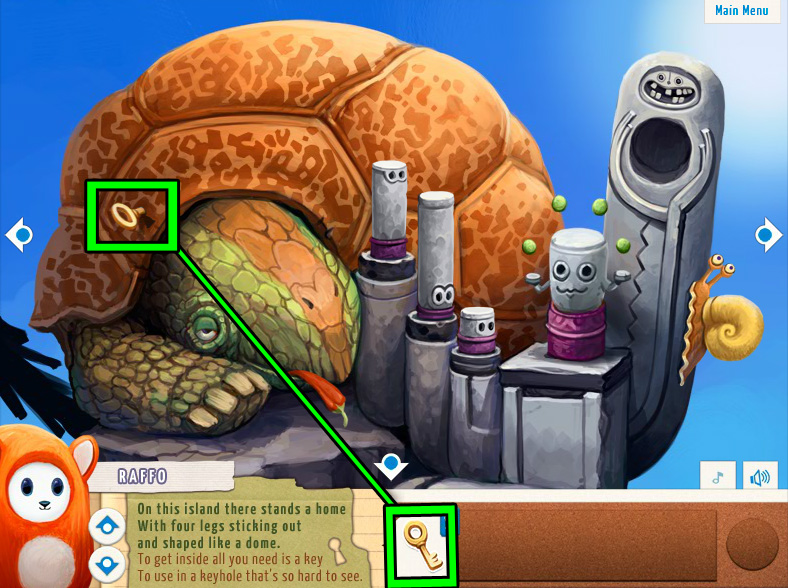
Raffo
-
Raffo's Riddle:
On this island there stands a home
With four legs sticking out
and shaped like a dome.
To get inside all you need is a key
To use in a keyhole that's so hard to see.
-
First locate the key mentioned in the second to last line of the riddle.
-
It's not hard to find, simply go to the Pirate Ship Deck at the bottom right corner zone.
-
Take the GOLDEN KEY from the treasure map on the table.
-
Now find the "home" that has "four legs" and is shaped like a "dome".
-
What has four legs and lives in something dome-shaped?
-
A turtle! Go to the Giant Turtle at the upper middle zone.
-
You have the key and you've found the dome, but where is the "keyhole that's so hard to see"?
-
Search through the patterns on the turtle's shell to find the shape that looks like a keyhole.
-
Place the GOLDEN KEY into the hidden lock on the shell.
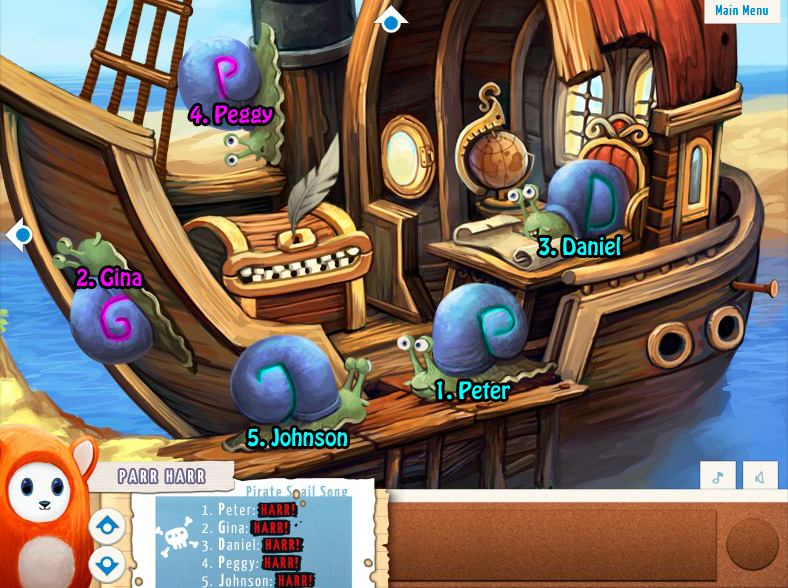
Parr Harr
-
Parr Harr's Riddle:
Pirate S_ail Song
1. Peter: HARR!
2. Gina: HARR!
3. Daniel: HARR!
4. Peggy: HARR!
5. Johnson: HARR!
-
Take a look at the title at the top of the riddle.
-
The second letter of the second word is concealed with a stain, but you can see the other letters S_AIL.
-
With only one letter missing, it's easy to find the pirates that sing "HARR!"
-
Locate the snails at the Pirate Ship Deck at the bottom right corner.
-
You can click the creatures to make them sing, but according to the numbered list in the riddle, they need to be clicked in a specific order.
-
First identify which snails are male or female using the sound of their voice and the color of their speech text.
-
Female snails have higher voices and pink text, whereas male snails have lower voices and blue text.
-
Note that the first letter of each name on the list is bolded.
-
Where else can you find those bolded letters?
-
Each snail shell has a curl shaped like a letter of the alphabet.
-
The letter on the pirate snail's shell is the first letter of their name.
-
Using that clue as your guide, click the correct snails to make them sing.
-
First, click the male snail with the letter P on its shell to make Peter sing.
-
Next, click the female snail with the letter G on its shell to make Gina sing.
-
Third, click the male snail with the letter D on its shell to make Daniel sing.
-
Then, click the female snail with the letter P on its shell to make Peggy sing.
-
Lastly, click the male snail with the letter J on its shell to make Johnson sing.
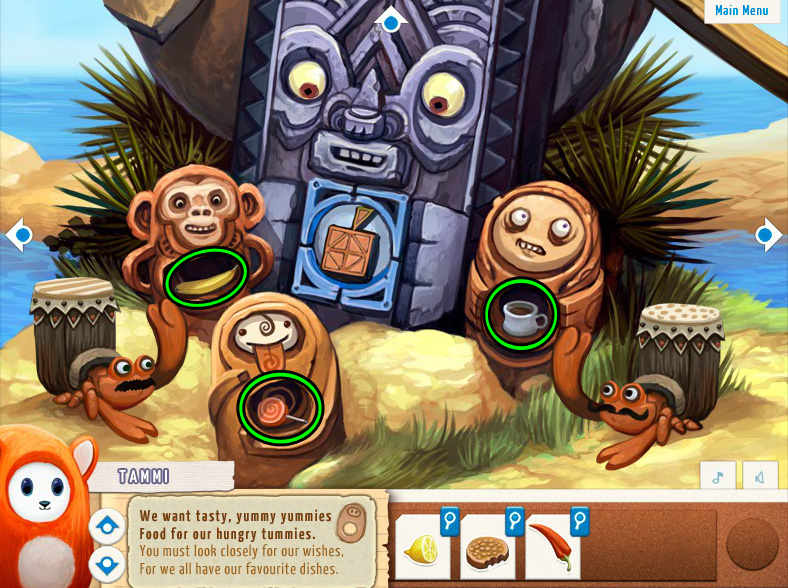
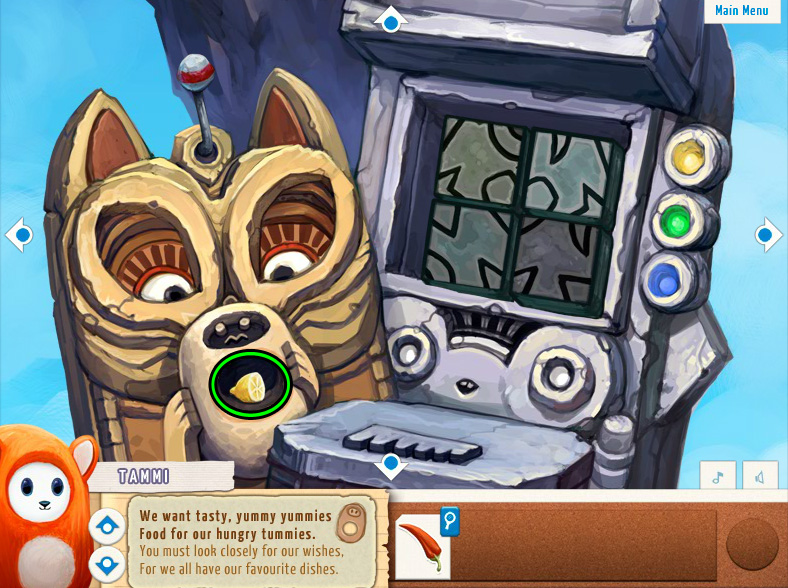
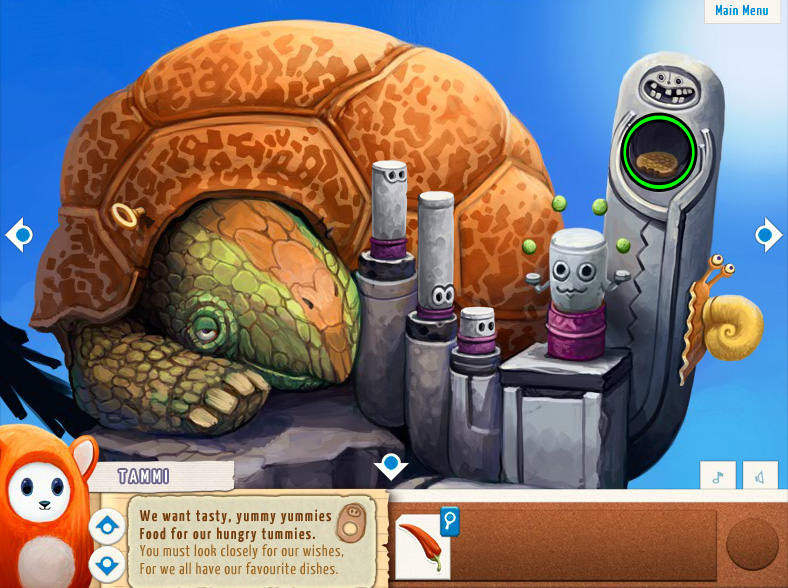
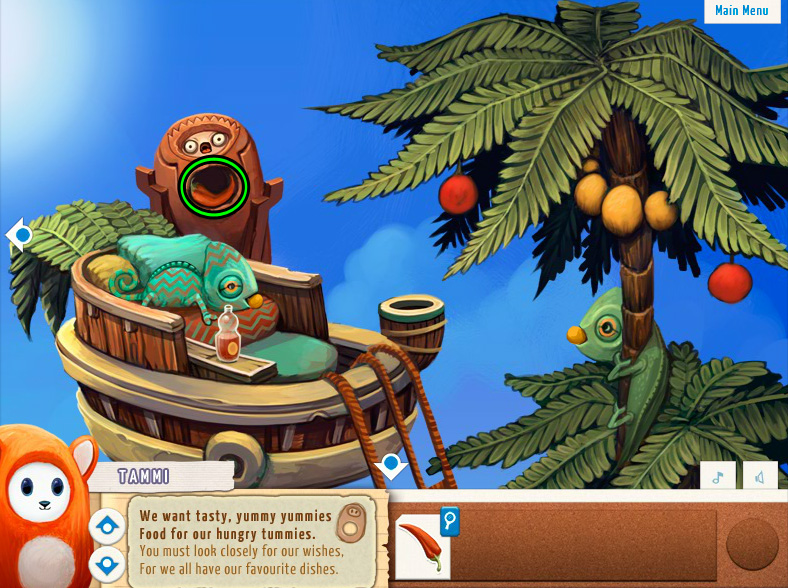
Tammi
-
Tammi's Riddle:
We want tasty, yummy tummies
Food for our hungry tummies.
You must look closely for our wishes,
For we all have our favourite dishes.
-
Find and collect the six items of food or drink that make up the "favourite dishes" mentioned in the riddle.
-
Go to the Crow's Nest at the top right corner zone.
-
Take the COFFEE MUG at the edge of the crow's nest, to the left of the rope hanging over the side.
-
Move left once to reach the Giant Turtle at the upper middle zone.
-
Pick up the CHILI PEPPER in front of the turtle's mouth.
-
Go down once and then left once to the Upper Sitting Area.
-
Take both the BANANA and the ROCK HARD COOKIE on the table.
-
Move down to the Lower Sitting Area.
-
Pick up the LEMON from the dish and the LOLLIPOP on the floor.
-
Now you have all the food, but who should you give it to?
-
Look for six figures with empty tummies that look like the picture at the side of the riddle.
-
Locate the six statues with holes in their midsection and use the clues from their appearance to give them the correct food and drink items.
-
Go to the Giant Tiki at the lower middle zone.
-
Give the BANANA to the monkey statue.
-
Give the LOLLIPOP to the statue with the swirl on its face and tummy.
-
Give the COFFEE MUG to the statue with tired, baggy eyes.
-
Move up to the Puzzle Board at the center zone.
-
Give the LEMON to the frowning statue being held by the cat.
-
Go up once to the Giant Turtle at the upper middle zone.
-
Give the ROCK HARD COOKIE to the statue with the broken-toothed smile.
-
Move right once to reach the Crow's Nest at the top right corner zone.
-
Give the CHILI PEPPER to the screaming statue.
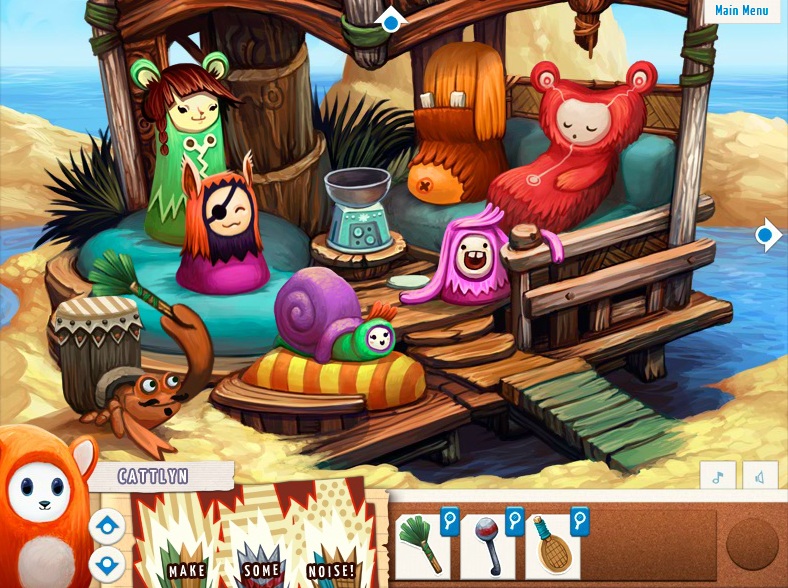
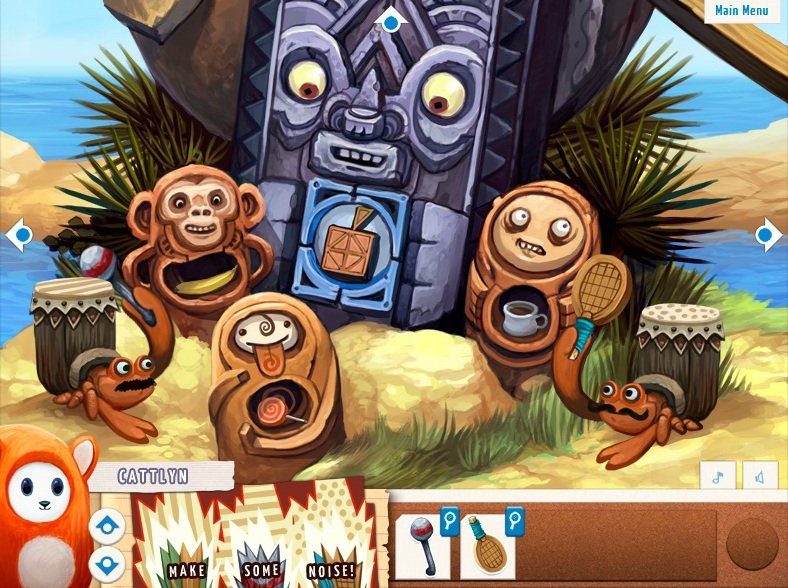
Cattlyn
-
Cattlyn's Riddle:
MAKE SOME NOISE!
-
This riddle is pretty short and to the point: find the objects that can make some loud noises.
-
Find the crabs with drums around their backs at the Lower Sitting Area (at the bottom right corner zone) and the Giant Tiki (at the lower middle zone).
-
Find the three tools to play on the instruments.
-
Go to the Lower Sitting Area at the bottom left corner zone.
-
Take the WOODEN RACQUET hanging from the right side of the ceiling.
-
Move up once and right once to reach the Puzzle Board at the center zone.
-
Take the STONE ANTENNA at the top of the cat statue's head.
-
Go right once to the Pirate Ship Mast at the middle right zone.
-
Take the PALM FAN from the leaves beside the blue pirate on the helm.
-
Now that you have all three items to play the instruments, use the clue from the riddle to find which item belongs to which drum.
-
The left image labeled "MAKE" is green and brown, just like the PALM FAN.
-
The background of the image has vertical stripes that match the skin of the drum at the Lower Sitting Area.
-
Go to the Lower Sitting Area at the bottom left corner zone.
-
Use the PALM FAN to play the drum.
-
The middle image labeled "SOME" is grey and red like the colors of the STONE ANTENNA.
-
The background of the image has horizontal stripes that match the skin of the drum on the left side.
-
Go right to the Giant Tiki at the lower middle zone.
-
Use the STONE ANTENNA to play the left drum.
-
The right image labeled "NOISE!" is blue and brown like the colors of the WOODEN RACQUET.
-
The background of the image has polka dots that match the skin of the drum on the right side.
-
Use the WOODEN RACQUET to play the right drum.
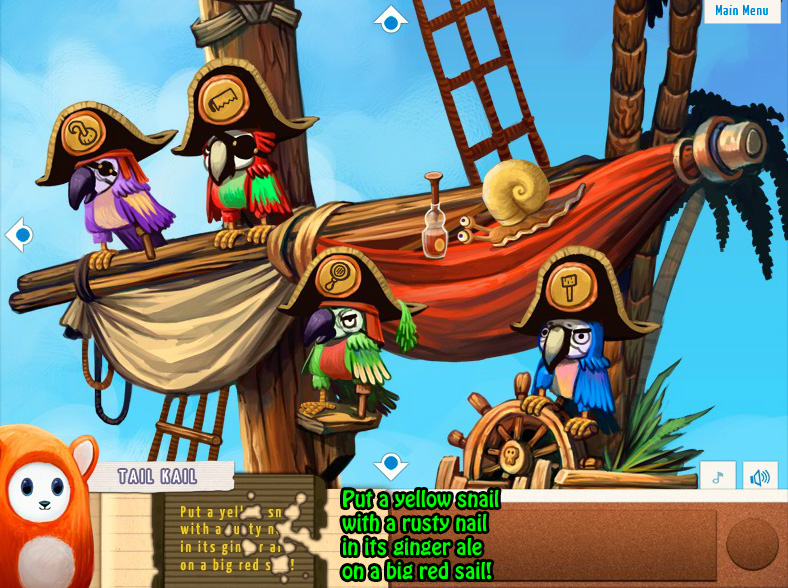
Tail Kail
-
Tail Kail's Riddle:
Put a yell-- sn---
With a -usty n---
in its gin--r al-
on a big red s---!
-
Click the riddle to hear Ubooly read it out loud. Hearing the incomplete words will help you to identify them.
-
The second line, "-usty n---" is the easiest to guess, so start that line.
-
It's a rusty nail!
-
Now that you know the secret word for one line, you can find the rhyming words at the end of the other lines.
-
The final decoded riddle is:
-
Put a yellow snail
-
with a rusty nail
-
in its ginger ale
-
on a big red sail!
-
Now to find all of the items mentioned in the riddle!
-
Go to the Giant Turtle at the upper middle zone.
-
Take the YELLOW SNAIL on the side of the statue base.
-
Move right to the Crow's Nest at the top right corner zone.
-
Pick up the bottle of GINGER ALE beside the left chameleon on the seat.
-
Go down twice to the Pirate Ship Deck at the bottom right corner.
-
Remove the RUSTY NAIL above the portholes in the ship's hull.
-
Next, find the location of the big red sail.
-
Go to the Pirate Ship Mast at the middle right zone.
-
Now follow the instructions from the riddle.
-
Place the bottle of GINGER ALE on top of the red sail.
-
Drop the RUSTY NAIL into the bottle of ginger ale.
-
Put the YELLOW SNAIL next to the bottle and nail.

...rocking the Cas-Ga?
My first walkthrough! Hoopla!
Find your twelve friends by solving each puzzle. Drag items onto screen to use them.
Walkthrough
Exploration!
Items are relatively easy to find, they will pulse when you hover your mouse over them.
From the first screen pick up the lemon, lollipop, wooden racquet and two scoops of ice-cream from the bowl in the centre. Also get a stone triangle from the bottom right corner of the hut.
Go right one screen and you'll find another stone triangle to the right of the statue's eye. Go right to the next screen and you'll see a gold key on the desk and a rusty nail sticking out of the bow of the ship. Grab them as well as the stone triangle on the top of the globe. Now go up one screen.
Polly wanna puzzle? Nab the Tiki figurine, feather (from the parrot's hat) and the palm fan (bottom right corner). Don't forget the stone triangle on the sail and then go left.
By this stage I was as cross eyed as the statue but I digress. Notice the stone triangle in the ear of our stony friend? Nab it as well as the red paintbrush, stone antenna (top of statue) and second Tiki figurine and continue left.
Oh good, I was getting peckish actually. Snatch the banana and cookie and give them to me. Fine... keep them for yourselves... whatever. Just don't miss the stone triangle under the step (second from the top) and pick up the orange crayon and third Tiki figurine too. Now head onwards and upwards.
Ubooly has spoken! The wise (yet sauve and over-confident looking) Platypus will help us if we get stuck. Good to know. Swipe the stone triangle from above his window and scoot right.
Righteous! RIGHTEOUS! Grab the stone triangle from my head dude and the chili pepper from my mouth! Tubular! What? It's a Finding Nemo reference! WHAT? Oh quit looking at me like that, kidnap the snail and go right one screen. Sheesh.
Final screen! I am parched. YOINK! Yes!! The ginger beer and coffee mug are mine! Now grab the last stone triangle from the crowsnest chair and let's start finding those friends...
Caleste
I am slender tanned and tall, my green mane's a sight for all! If my jewellery only shone with equal splendour all day long...
hmmm, notice the picture?
If you aren't there already, head to the top right area with the coconut tree. Well, that tree is tall and slender. The leaves make a green mane. But what's missing?
Look at the picture in the clue. Red earrings and an orange necklace...
Paint the two outer coconuts red with the red paintbrush and the necklace orange with the crayon! Voila!
Pikopi
The clue mentions Pirate Parrots, I think we should go down to the right middle screen. Notice the symbols on their hats?
Either trial and error or logical deduction will help here. Just follow the clues to change each Parrot's hat.
From left to right the symbols on the Parrot's hats should be hook, saw, mirror and peg leg.
Hums
I guard your treasure with a grin! Head down one screen so you're at the bottom right. That treasure chest is awful smily.
Well, it has a keyhole. Odd, the key does nothing. Time to decypher our clue. A Donut with 4 crossed out, a Brick with 1 crossed out and R=T, a Lemon with 4 = Y and a Rose with 1 crossed out.
Numbers indicate a letter in the word, therefore Donut with the 4 crossed out means Don't. Remove the letter U. What happens if we apply this to the rest of the clue?
It translates to {Don't Tickle My Nose}. Yeah right, like I ever do what I'm told. Ooh look, I have a feather and I guess your keyhole is a nose. Mwahaha!
Camou
Check out that clue. When we're here we look like that and when we're here we look like that. But those circles look the same... What changes to look like it's surroundings?
Head up to the top right screen with our blinging coconut amigo. Look at those chameleons, despite their best efforts we can still see them. But there are only two of them. The third line of the clue mentioned licking something yellow. Wait... what??
Oh right... ICECREAM! Obviously. Two scoops for two hungry reptiles. Put some frozen yumminess in the bowl between our scaly friends. Sweet!
Bertam
Coloured thoughts inside my head. Yellow, Green and Blue and Red. Tastes like a mighty fine picture puzzle to me! Shimmy over to the middle screen with the Foxxy statue
OK, maybe it's a Kitty statue. Stop splitting hairs and take a gander at that 4x4 square grid. It's yellow, like the first part of our clue and the picture in the clue looks like a star. Hmmm...
Click to rotate the squares until they line up to make a picture of a star. Now the grid is green. Arrange the 4x4 grid to match the pictures in the clue, a pyramid, a crescent moon and a love heart. The colour will change each time you get the right combination. Huzzah!
Humlet
Confounded! Where'd my audience go? All three of my friends must see my show!
Well... who have we seen that looks like a bit of an attention who- I mean, entertainer
Go up to the top middle screen. Looks like that Tiki figurine wants some friends to watch it juggle. Luckily we have such friends. The second part of the clue says they need an unhindered view. Well, I don't think they're that enthused by juggling but who am I to argue?
Place the three Tiki figurines we collected onto the three plinthes in front the turtle. Make sure all of the can see though!
Put the medium sized figurine with it's eyes on top at the back, the tall one with the eyes on the bottom in the middle and the titchy little one right in front. Confused? Good!
Tiko Tiko
For a bigger fully-grown Tiki, getting fed is pretty tricky! So slice me some apples! They're always a treat. 9 times 3 is the number you need.
Fully-grown Tiki? I think I saw on of them in the bottom middle screen. But I never saw any apples...
Oh, I get it. The triangles in the middle are like a square apple. Hey wait a minute, 9 times 3? Triangles have three sides.
Ok, you figured it out already. The nine stone triangles we collected earler make the same apple shape as on the Tiki's tummy. Too smart for your own good, you know that?.
Raffo
On this island there stands a home- wait four legs and a dome??? Who has four legs and a dome and perhaps takes their home everywhere with them?
Shoot up to the top middle screen and visit our Turtley Awesome chum. He has four legs and a dome but where is this keyhole that's so hard to see?
Duh... it's hard to see. Do a squinty face and peer intently at the markings on the Tortoise Shell (Yes, I knew it wasn't a turtle the whole time.) Notice a keyhole shape just up and left from the eye?
Drag the golden key we found over to the keyhole and... Cowabunga! Ok, ok... last lame turtle joke, I swear.
Parr Harr
Pirate S_ail Song? Maybe the missing letter is N. Pirate Snails? Head down to the slowest ship on the sevens seas!!! Bottom right screen.
Five snails and five names... but how do we know which snail is named what?
Take a squiz at the shells. I can make out two Ps, a J, a D and a G. Two P's though? Ah, one's a girl snail and one's a boy snail...
Click the snails in order of their names. Peter is second from the right, Gina is leftmost, Daniel is on the far right (not politically), Peggy is at the top and Johnson is second from the left. YARRR!!!
Tammi
We want tasty, yummy yummies. Food for our hungry tummies.
Don't we all my friend? Notice the little sketch in the clue? I've seen those critters around the place before. Head to the bottom middle screen.
Well, we have empty tummied characters but what food to give them? Use their appearance as a clue and check through your inventory to see what might fit.
Put the banana in the monkey's tummy, the lollipop in the swirly tongued one's tummy and the coffee mug in the over caffeinated looking dude's tummy. Now head up one screen.
Why the sour puss? Looks like this guy's been sucking on lemons. Head up one more screen to the top middle. Seems our friend here is missing some teeth, I guess that rock hard cookie was a bad idea. Shift to the right now and check out our last hungry customer. Now that's a face I recognise. Feed it the chili pepper. IT BURNS! IT BURNS!
Cattlyn
MAKE SOME NOISE!!!
You don't have to ask me twice. I loves me some percussion man! Looks like all the crabby drummers around here need something to beat their bongos with.
Luckily, we have just what they need. Hand out the stone antenna, wooden racquet and palm fan to the three crabs in the bottom middle and bottom left screens. Badoom Tsh!
Tail Kail
Put a yell__ sn___ with a _u_ty n___
in it's gin__r al_ on a big red s___!
Maybe we should check our inventory to see what this might mean...
Put a yellow snail with a rusty nail in it's ginger ale on a big red sail!
Um... ok, if you say so.
Go to the right middle screen and put the yellow snail with a- just do what it said. HOORAY! Looks like we have found all of Ubooly's friends. I hope you feel special. I know I do.
PS. I tried to proof read it but it's 1:30am here and my eyes have gone wibbly.
Forgive any mistakes. (Or neatly edit them and make me look cool. I'm looking at you Jay! I think. Maybe it's just my wibbly eyes.)
Curse you Trinn!!! *shakes fist at screen*
I spent ages on that!
*collapses in a quivering heap*
[Muahaha! >:) -Trinn]
Thank you, Dandy! We appreciate your efforts! :D
Fun little game once you get your mind into the right space. I found some of the puzzles straight forward, one or two were head scratchers.
Overall, great game.
Good job on the walkthrough Dandy. There's no harm in having more than one. Sometimes it adds just the perspective you need.
For serious, Dandy! Do you know if I tried to do a walkthrough it would just be like if you forced Ron Swanson to do it? "Play the game. WIN THE GAME. Leave me alone." I don't have the patience to write out walkthroughs, and we always love it when our community bands together to help each other out. *hug hug hug*
I dribbled my coffee when I read Trinn's 'Muahaha!'...
Thanks for the support Jay, Zeke and Dora. I feel like the fat kid that gets a ribbon just for showing up to sports day. BECAUSE I WAS THAT KID! Seriously though, I'm so not writing a walkthrough ever again. I dreamed about spoiler tags.
Now let's never speak of this again. :P
I kid, I kid! But seriously, please don't be discouraged from writing another walkthrough! Your contributions to the site are very appreciated and we love to see people getting involved. From one spoiler junkie to another :P (At this rate, I've got so much HTML on the brain there's a good chance even my kids will end up with the names Ul and Li)
Very cute game! Had some trouble with some of the puzzles, but it was great nonetheless.
This was a puzzler for sure, and at the beginning, I thought it was for little kids! Not so...
Whew. I'm usually really good at hidden object games, but am having a hard time with the last two triangles. Besides that, pretty smooth sailing. Creative, cute and fun game!
Oh, and I wanted to comment that the little girl's voice acting was unusually good. Cute without being obnoxious, with clear diction and enjoyable expressiveness.
Ah. Now I see why that was so. It was an advertisement game for a toy with that voice. These things take me a little while. Be kind.
Had to read the spoilers, but feel a little cheated. I'm from England, and the word we use is "doughnut", not "donut". In fact, even typing this, my spell checker has picked it up as wrong... I know it's American spelling, or a least, I do now. I suppose at least I learnt something today.
Leave a comment [top of page]

Game of the week

Walkthrough Guide
(Please allow page to fully load for spoiler tags to be functional.)
Ubooly and Friends Walkthrough
Caleste
Caleste's Riddle:
I am slender, tanned and tall,
my green mane's a sight for all!
If my jewelry only shone
with equal splendour
all day long...
First let's solve for the object in the riddle:
What is tall, thin and brown, with a "green mane" at the top?
A palm tree!
Next, identify the jewelry.
Take a look at the picture at the side of the riddle.
The jewelry in that image consists of a shiny necklace and a pair of earrings.
Combine the the information about the object and the jewelry hint to discover Caleste's hiding place.
Search for a palm tree that looks like it's wearing jewelry.
You'll find the right palm tree at the Crow's Nest in the upper right corner zone, with coconuts around it that look just like a necklace and earrings.
But those coconuts are a little dull, and the riddle says they are supposed to "shine" with "splendour".
Go to the Puzzle Board at the center zone.
Take the RED PAINTBRUSH on the stone platform.
Move left once to go to the Upper Sitting Area at the middle left zone.
Pick up the ORANGE CRAYON on the middle step.
Go back to the Crow's Nest at the upper right corner zone.
Now you have the tools, but what should you use them on?
Refer to the picture of the jewelry next to the riddle, then color the coconuts on the tree to match the image.
Use the RED PAINTBRUSH to paint the two earrings red.
Use the the ORANGE CRAYON to color the necklace orange.
Screenshot
Pikopi
Pikopi's Riddle:
No mirrors for pirates wearing patches!
No saws for pirates with peg legs!
Pirate Parrots with all legs attached should have a peg-leg on their hat -
but never next to a pirate with a hook!
You can find the pirate parrots at the Pirate Ship Mast in the middle right zone.
Each of the parrots has one or more identifying features and a hat with a changeable icon.
Use the clues from the riddle and process of elimination to determine the correct symbol for the parrot's hats.
The first line says that none of the parrots with eye patches have a hat with the mirror symbol.
The second line says that none of the parrots with a peg leg have a hat with the saw symbol.
The third line says parrots with two legs should have a hat with a peg leg symbol, but not if they are next to a parrot with a hook symbol on their hat.
Now, apply these rules to the four parrots.
The first purple parrot on the left has an eyepatch and a peg-leg. Therefore, his hat cannot have the mirror symbol, the saw symbol, or the peg-leg symbol.
Change the first parrot's hat to the only remaining possible symbol: the hook.
The second red parrot has an eyepatch and both legs, so his hat cannot have a mirror and the hook symbol has already been eliminated. It also cannot have a peg-leg, because he is next to a parrot with a hook.
Change the second parrot's hat to the only remaining possible symbol: the saw.
The third green parrot has a peg-leg, so his hat cannot have the peg-leg, and the hook and saw are already eliminated.
Change the third parrot's hat to the only remaining possible symbol: the mirror.
The last blue parrot on the right is the easiest. Change his hat to the only unused symbol: the peg-leg.
Screenshot
Hums
Hums's Riddle:
I guard your treasure with a grin!
WARNING:
Donut, Brick, Lemon, Rose
First, use the clues in the boxes under each object in the riddle to solve the word puzzle.
You'll see one similarity between all four boxes right away: what could those numbers mean?
The number in the box refers to a particular letter in the name of the object.
For example, the first box under the picture of the donut contains the number 4 crossed out.
The 4th letter in the word DONUT is U.
Since the number 4 was crossed out, remove the 4th letter from the word.
DONUT - U becomes DONT.
Now that you know how the riddle works, use the information to solve the next three pictures.
The box under the brick has 1 crossed out and R = T.
The first letter of BRICK is B.
BRICK - B becomes RICK.
Next, substitute the letter T for the letter R and RICK becomes TICK.
The box under the lemon says that 4 = Y.
The fourth letter of the word LEMON is O.
Substitute the letter Y for O and LEMON becomes LEMYN.
The last box under the rose has the number 1 crossed out.
The first letter of ROSE is R.
ROSE - R becomes OSE.
Put all of the pieces together and you have: DONT TICK LEMYN OSE.
Hmm, the words still look like jibberish! Maybe if you reorganize the letters a little...
You'll find the message DON'T TICKLE MY NOSE.
Next, you need to find a tool that's good for tickling.
Go to the Pirate Ship Mast in the middle right zone.
Take the WHITE FEATHER from the purple parrot on the left.
Lastly, you must find the object that can "guard your treasure with a grin!"
Go down once to the Pirate Ship Deck at the bottom right corner zone where you'll find a smiling treasure chest.
Use the WHITE FEATHER to tickle the keyhole at the center of the chest.
Screenshot
Camou
Camou's Riddle:
When we're here we look like that
When we're here we look like that
When we lick this we like to share
One for you, one for me - that's fair!
First locate the object mentioned in the second-to-last line, something you can lick and also share.
Go to the Lower Sitting Area at the bottom left corner zone.
Take two scoops of ICE CREAM BALLS from the ice cream maker on the small table.
Next, find the things with the patterns that match the icons in the riddle.
What kind of creature has an appearance that changes depending on where it's located?
A chameleon!
Go to the Crow's Nest at the top right corner zone.
There you'll find one chameleon sitting in the tree with leaves that match the small image in the first line of the riddle.
You'll also see a second chameleon sitting on the chair with a fabric pattern that matches the small image in the second line of the riddle.
But how are they going to be able to share the ice cream?
Place the 2 ICE CREAM BALLS into the bowl attached to the right side of the crow's nest and right in the middle of the two chameleons.
Bertram
Bertam's Riddle:
Coloured thoughts inside my head
Yellow,green and blue and red.
Go to the Puzzle Board at the center zone.
If you play around with the tiles, you'll find you can click to rotate them clockwise and that each tile contains a piece of one of four symbols.
Use the clue and the images from the riddle to create the symbols in the correct order.
The first picture at the bottom of the riddle shows a shining yellow star.
Rotate the tiles to create a 5-pointed star in the center, which will turn on the first light at the right side of the puzzle.
Screenshot
The next picture shows a green pyramid.
Rotate the tiles to create an equilateral triangle in the center to turn on the second green light.
Screenshot
The third picture shows a cloudy night sky.
Rotate the tiles to create a crescent moon in the center to turn on the third blue light.
Screenshot
The last picture shows three red hearts.
Rotate the tiles to create a single heart in the center to complete the puzzle.
Screenshot
Humlet
Humlet's Riddle:
Counfounded! Where'd my audience go?
All three of my friends must see my show!
And they will all need an unhindered view,
but achieving all that is left up to you.
The first step is to locate this lonesome performer.
Go up to the Giant Turtle at the middle section of the top zone to find a juggling tiki.
Sure enough, there are three empty seats next to the juggler, so you'll have to find three more tikis to fill them.
Move down once to go to the Puzzle Board at the center zone.
Take the first TIKI FIGURINE on the stand at the right side of the platform.
Move left once to go to the Upper Sitting Area at the middle left zone.
Pick up the second TIKI FIGURINE on the step beside the orange creature.
Go right twice to the Pirate Ship Mast at the middle right zone.
Take the third TIKI FIGURINE above the middle of the sail, just to the right of the red parrot whose hat you gave the saw symbol to.
With all the tikis in hand, you're ready to return to the Giant Turtle at the middle section of the top zone.
Place all three TIKI FIGURINES onto the pedestals beside the juggling tiki.
But there's more! Remember from the riddle that each member of the audience needs "an unhindered view."
Organize the TIKI FIGURINES on the seats so that the body of one tiki does not obstruct another tiki's view.
Don't only pay attention to the tiki's height, because not every tiki has eyes at the top of its body.
Put the shortest tiki on the lowest platform.
Put the longest tiki on the middle platform.
Put the medium-sized tiki on the top platform.
Screenshot
Tiko Tiko
Tiko Tiko's Riddle:
For a bigger fully-grown tiki
getting fed is pretty tricky!
So slice me some apples!
They're always a treat.
9 times 3 is the number you need.
Go to the Giant Tiki at the middle section of the bottom zone.
Between the tiki's hands, you'll see an image of an apple apple made of geometrical shapes.
The apple consists of 9 small triangles.
One triangle piece is hidden in every single scene in the game.
Locate all 9 of the small triangles to complete the apple.
Find the first STONE TRIANGLE (1/9) beside the giant tiki's right eyeball.
Screenshot
Move left to the Lower Sitting Area at the bottom left corner zone.
Find STONE TRIANGLE (2/9) underneath the right corner of the building, directly above the surface of the water.
Screenshot
Go up once to the Upper Sitting Area at the middle left zone.
Find STONE TRIANGLE (3/9) underneath the second highest step.
Screenshot
Move up to the Wise Platypus at the top right corner zone.
Find STONE TRIANGLE (4/9) at the top of the green archway above Wise Platypus.
Screenshot
Go right to the Giant Turtle at the upper middle zone.
Find STONE TRIANGLE (5/9) on the top of the turtle's head.
Screenshot
Move right once to the Crow's Nest at the top right corner zone.
Find STONE TRIANGLE (6/9) beside the cushion under the left chameleon.
Screenshot
Go down once to the Pirate Ship Mast at the middle right zone.
Find STONE TRIANGLE (7/9) at the top of the white sail.
Screenshot
Move down to the Pirate Ship Deck at the bottom right corner.
Find STONE TRIANGLE (8/9) at the top of the frame around the globe.
Screenshot
Go up once and then left once to reach the Puzzle Board at the center zone.
Find Stone TRIANGLE (9/9) inside the cat statue's right ear.
Screenshot
Move down to return to the Giant Tiki at the lower middle zone.
Place the 9 STONE TRIANGLES into the carving of the apple between the giant tiki's hands.
Raffo
Raffo's Riddle:
On this island there stands a home
With four legs sticking out
and shaped like a dome.
To get inside all you need is a key
To use in a keyhole that's so hard to see.
First locate the key mentioned in the second to last line of the riddle.
It's not hard to find, simply go to the Pirate Ship Deck at the bottom right corner zone.
Take the GOLDEN KEY from the treasure map on the table.
Now find the "home" that has "four legs" and is shaped like a "dome".
What has four legs and lives in something dome-shaped?
A turtle! Go to the Giant Turtle at the upper middle zone.
You have the key and you've found the dome, but where is the "keyhole that's so hard to see"?
Search through the patterns on the turtle's shell to find the shape that looks like a keyhole.
Place the GOLDEN KEY into the hidden lock on the shell.
Screenshot
Parr Harr
Parr Harr's Riddle:
Pirate S_ail Song
1. Peter: HARR!
2. Gina: HARR!
3. Daniel: HARR!
4. Peggy: HARR!
5. Johnson: HARR!
Take a look at the title at the top of the riddle.
The second letter of the second word is concealed with a stain, but you can see the other letters S_AIL.
With only one letter missing, it's easy to find the pirates that sing "HARR!"
Locate the snails at the Pirate Ship Deck at the bottom right corner.
You can click the creatures to make them sing, but according to the numbered list in the riddle, they need to be clicked in a specific order.
First identify which snails are male or female using the sound of their voice and the color of their speech text.
Female snails have higher voices and pink text, whereas male snails have lower voices and blue text.
Note that the first letter of each name on the list is bolded.
Where else can you find those bolded letters?
Each snail shell has a curl shaped like a letter of the alphabet.
The letter on the pirate snail's shell is the first letter of their name.
Using that clue as your guide, click the correct snails to make them sing.
First, click the male snail with the letter P on its shell to make Peter sing.
Next, click the female snail with the letter G on its shell to make Gina sing.
Third, click the male snail with the letter D on its shell to make Daniel sing.
Then, click the female snail with the letter P on its shell to make Peggy sing.
Lastly, click the male snail with the letter J on its shell to make Johnson sing.
Screenshot
Tammi
Tammi's Riddle:
We want tasty, yummy tummies
Food for our hungry tummies.
You must look closely for our wishes,
For we all have our favourite dishes.
Find and collect the six items of food or drink that make up the "favourite dishes" mentioned in the riddle.
Go to the Crow's Nest at the top right corner zone.
Take the COFFEE MUG at the edge of the crow's nest, to the left of the rope hanging over the side.
Move left once to reach the Giant Turtle at the upper middle zone.
Pick up the CHILI PEPPER in front of the turtle's mouth.
Go down once and then left once to the Upper Sitting Area.
Take both the BANANA and the ROCK HARD COOKIE on the table.
Move down to the Lower Sitting Area.
Pick up the LEMON from the dish and the LOLLIPOP on the floor.
Now you have all the food, but who should you give it to?
Look for six figures with empty tummies that look like the picture at the side of the riddle.
Locate the six statues with holes in their midsection and use the clues from their appearance to give them the correct food and drink items.
Go to the Giant Tiki at the lower middle zone.
Give the BANANA to the monkey statue.
Give the LOLLIPOP to the statue with the swirl on its face and tummy.
Give the COFFEE MUG to the statue with tired, baggy eyes.
Screenshot
Move up to the Puzzle Board at the center zone.
Give the LEMON to the frowning statue being held by the cat.
Screenshot
Go up once to the Giant Turtle at the upper middle zone.
Give the ROCK HARD COOKIE to the statue with the broken-toothed smile.
Screenshot
Move right once to reach the Crow's Nest at the top right corner zone.
Give the CHILI PEPPER to the screaming statue.
Screenshot
Cattlyn
Cattlyn's Riddle:
MAKE SOME NOISE!
This riddle is pretty short and to the point: find the objects that can make some loud noises.
Find the crabs with drums around their backs at the Lower Sitting Area (at the bottom right corner zone) and the Giant Tiki (at the lower middle zone).
Find the three tools to play on the instruments.
Go to the Lower Sitting Area at the bottom left corner zone.
Take the WOODEN RACQUET hanging from the right side of the ceiling.
Move up once and right once to reach the Puzzle Board at the center zone.
Take the STONE ANTENNA at the top of the cat statue's head.
Go right once to the Pirate Ship Mast at the middle right zone.
Take the PALM FAN from the leaves beside the blue pirate on the helm.
Now that you have all three items to play the instruments, use the clue from the riddle to find which item belongs to which drum.
The left image labeled "MAKE" is green and brown, just like the PALM FAN.
The background of the image has vertical stripes that match the skin of the drum at the Lower Sitting Area.
Go to the Lower Sitting Area at the bottom left corner zone.
Use the PALM FAN to play the drum.
Screenshot
The middle image labeled "SOME" is grey and red like the colors of the STONE ANTENNA.
The background of the image has horizontal stripes that match the skin of the drum on the left side.
Go right to the Giant Tiki at the lower middle zone.
Use the STONE ANTENNA to play the left drum.
The right image labeled "NOISE!" is blue and brown like the colors of the WOODEN RACQUET.
The background of the image has polka dots that match the skin of the drum on the right side.
Use the WOODEN RACQUET to play the right drum.
Screenshot
Tail Kail
Tail Kail's Riddle:
Put a yell-- sn---
With a -usty n---
in its gin--r al-
on a big red s---!
Click the riddle to hear Ubooly read it out loud. Hearing the incomplete words will help you to identify them.
The second line, "-usty n---" is the easiest to guess, so start that line.
It's a rusty nail!
Now that you know the secret word for one line, you can find the rhyming words at the end of the other lines.
The final decoded riddle is:
Put a yellow snail
with a rusty nail
in its ginger ale
on a big red sail!
Now to find all of the items mentioned in the riddle!
Go to the Giant Turtle at the upper middle zone.
Take the YELLOW SNAIL on the side of the statue base.
Move right to the Crow's Nest at the top right corner zone.
Pick up the bottle of GINGER ALE beside the left chameleon on the seat.
Go down twice to the Pirate Ship Deck at the bottom right corner.
Remove the RUSTY NAIL above the portholes in the ship's hull.
Next, find the location of the big red sail.
Go to the Pirate Ship Mast at the middle right zone.
Now follow the instructions from the riddle.
Place the bottle of GINGER ALE on top of the red sail.
Drop the RUSTY NAIL into the bottle of ginger ale.
Put the YELLOW SNAIL next to the bottle and nail.
Screenshot
Posted by: Trinn |
December 17, 2012 10:24 AM
|
December 17, 2012 10:24 AM
My first walkthrough! Hoopla!
Find your twelve friends by solving each puzzle. Drag items onto screen to use them.
Walkthrough
Exploration!
Items are relatively easy to find, they will pulse when you hover your mouse over them.
From the first screen pick up the lemon, lollipop, wooden racquet and two scoops of ice-cream from the bowl in the centre. Also get a stone triangle from the bottom right corner of the hut.
Go right one screen and you'll find another stone triangle to the right of the statue's eye. Go right to the next screen and you'll see a gold key on the desk and a rusty nail sticking out of the bow of the ship. Grab them as well as the stone triangle on the top of the globe. Now go up one screen.
Polly wanna puzzle? Nab the Tiki figurine, feather (from the parrot's hat) and the palm fan (bottom right corner). Don't forget the stone triangle on the sail and then go left.
By this stage I was as cross eyed as the statue but I digress. Notice the stone triangle in the ear of our stony friend? Nab it as well as the red paintbrush, stone antenna (top of statue) and second Tiki figurine and continue left.
Oh good, I was getting peckish actually. Snatch the banana and cookie and give them to me. Fine... keep them for yourselves... whatever. Just don't miss the stone triangle under the step (second from the top) and pick up the orange crayon and third Tiki figurine too. Now head onwards and upwards.
Ubooly has spoken! The wise (yet sauve and over-confident looking) Platypus will help us if we get stuck. Good to know. Swipe the stone triangle from above his window and scoot right.
Righteous! RIGHTEOUS! Grab the stone triangle from my head dude and the chili pepper from my mouth! Tubular! What? It's a Finding Nemo reference! WHAT? Oh quit looking at me like that, kidnap the snail and go right one screen. Sheesh.
Final screen! I am parched. YOINK! Yes!! The ginger beer and coffee mug are mine! Now grab the last stone triangle from the crowsnest chair and let's start finding those friends...
Caleste
I am slender tanned and tall, my green mane's a sight for all! If my jewellery only shone with equal splendour all day long...
hmmm, notice the picture?
If you aren't there already, head to the top right area with the coconut tree. Well, that tree is tall and slender. The leaves make a green mane. But what's missing?
Look at the picture in the clue. Red earrings and an orange necklace...
Paint the two outer coconuts red with the red paintbrush and the necklace orange with the crayon! Voila!
Pikopi
The clue mentions Pirate Parrots, I think we should go down to the right middle screen. Notice the symbols on their hats?
Either trial and error or logical deduction will help here. Just follow the clues to change each Parrot's hat.
From left to right the symbols on the Parrot's hats should be hook, saw, mirror and peg leg.
Hums
I guard your treasure with a grin! Head down one screen so you're at the bottom right. That treasure chest is awful smily.
Well, it has a keyhole. Odd, the key does nothing. Time to decypher our clue. A Donut with 4 crossed out, a Brick with 1 crossed out and R=T, a Lemon with 4 = Y and a Rose with 1 crossed out.
Numbers indicate a letter in the word, therefore Donut with the 4 crossed out means Don't. Remove the letter U. What happens if we apply this to the rest of the clue?
It translates to {Don't Tickle My Nose}. Yeah right, like I ever do what I'm told. Ooh look, I have a feather and I guess your keyhole is a nose. Mwahaha!
Camou
Check out that clue. When we're here we look like that and when we're here we look like that. But those circles look the same... What changes to look like it's surroundings?
Head up to the top right screen with our blinging coconut amigo. Look at those chameleons, despite their best efforts we can still see them. But there are only two of them. The third line of the clue mentioned licking something yellow. Wait... what??
Oh right... ICECREAM! Obviously. Two scoops for two hungry reptiles. Put some frozen yumminess in the bowl between our scaly friends. Sweet!
Bertam
Coloured thoughts inside my head. Yellow, Green and Blue and Red. Tastes like a mighty fine picture puzzle to me! Shimmy over to the middle screen with the Foxxy statue
OK, maybe it's a Kitty statue. Stop splitting hairs and take a gander at that 4x4 square grid. It's yellow, like the first part of our clue and the picture in the clue looks like a star. Hmmm...
Click to rotate the squares until they line up to make a picture of a star. Now the grid is green. Arrange the 4x4 grid to match the pictures in the clue, a pyramid, a crescent moon and a love heart. The colour will change each time you get the right combination. Huzzah!
Humlet
Confounded! Where'd my audience go? All three of my friends must see my show!
Well... who have we seen that looks like a bit of an attention who- I mean, entertainer
Go up to the top middle screen. Looks like that Tiki figurine wants some friends to watch it juggle. Luckily we have such friends. The second part of the clue says they need an unhindered view. Well, I don't think they're that enthused by juggling but who am I to argue?
Place the three Tiki figurines we collected onto the three plinthes in front the turtle. Make sure all of the can see though!
Put the medium sized figurine with it's eyes on top at the back, the tall one with the eyes on the bottom in the middle and the titchy little one right in front. Confused? Good!
Tiko Tiko
For a bigger fully-grown Tiki, getting fed is pretty tricky! So slice me some apples! They're always a treat. 9 times 3 is the number you need.
Fully-grown Tiki? I think I saw on of them in the bottom middle screen. But I never saw any apples...
Oh, I get it. The triangles in the middle are like a square apple. Hey wait a minute, 9 times 3? Triangles have three sides.
Ok, you figured it out already. The nine stone triangles we collected earler make the same apple shape as on the Tiki's tummy. Too smart for your own good, you know that?.
Raffo
On this island there stands a home- wait four legs and a dome??? Who has four legs and a dome and perhaps takes their home everywhere with them?
Shoot up to the top middle screen and visit our Turtley Awesome chum. He has four legs and a dome but where is this keyhole that's so hard to see?
Duh... it's hard to see. Do a squinty face and peer intently at the markings on the Tortoise Shell (Yes, I knew it wasn't a turtle the whole time.) Notice a keyhole shape just up and left from the eye?
Drag the golden key we found over to the keyhole and... Cowabunga! Ok, ok... last lame turtle joke, I swear.
Parr Harr
Pirate S_ail Song? Maybe the missing letter is N. Pirate Snails? Head down to the slowest ship on the sevens seas!!! Bottom right screen.
Five snails and five names... but how do we know which snail is named what?
Take a squiz at the shells. I can make out two Ps, a J, a D and a G. Two P's though? Ah, one's a girl snail and one's a boy snail...
Click the snails in order of their names. Peter is second from the right, Gina is leftmost, Daniel is on the far right (not politically), Peggy is at the top and Johnson is second from the left. YARRR!!!
Tammi
We want tasty, yummy yummies. Food for our hungry tummies.
Don't we all my friend? Notice the little sketch in the clue? I've seen those critters around the place before. Head to the bottom middle screen.
Well, we have empty tummied characters but what food to give them? Use their appearance as a clue and check through your inventory to see what might fit.
Put the banana in the monkey's tummy, the lollipop in the swirly tongued one's tummy and the coffee mug in the over caffeinated looking dude's tummy. Now head up one screen.
Why the sour puss? Looks like this guy's been sucking on lemons. Head up one more screen to the top middle. Seems our friend here is missing some teeth, I guess that rock hard cookie was a bad idea. Shift to the right now and check out our last hungry customer. Now that's a face I recognise. Feed it the chili pepper. IT BURNS! IT BURNS!
Cattlyn
MAKE SOME NOISE!!!
You don't have to ask me twice. I loves me some percussion man! Looks like all the crabby drummers around here need something to beat their bongos with.
Luckily, we have just what they need. Hand out the stone antenna, wooden racquet and palm fan to the three crabs in the bottom middle and bottom left screens. Badoom Tsh!
Tail Kail
Put a yell__ sn___ with a _u_ty n___
in it's gin__r al_ on a big red s___!
Maybe we should check our inventory to see what this might mean...
Put a yellow snail with a rusty nail in it's ginger ale on a big red sail!
Um... ok, if you say so.
Go to the right middle screen and put the yellow snail with a- just do what it said. HOORAY! Looks like we have found all of Ubooly's friends. I hope you feel special. I know I do.
PS. I tried to proof read it but it's 1:30am here and my eyes have gone wibbly.
Forgive any mistakes. (Or neatly edit them and make me look cool. I'm looking at you Jay! I think. Maybe it's just my wibbly eyes.)
Posted by: Dandy |
December 17, 2012 12:32 PM
|
December 17, 2012 12:32 PM