

Totally Odd
Totally Odd packs together a great bundle of clever thinking and creative presentation. Don't let those three little words "trial-and-error" dissuade you from the thoroughly enjoyable gameplay. With a bit of persistence and patience, that "Ah-ha!" moment when you finally solve a tricky puzzle becomes all the more gratifying. If you're hungry for mental stimulation in a cute little wrapper with an unusual dash of spice, Totally Odd is the perfect brainfood.
Read More23 Comments
Yay for plasticine!
I'm having a flashback from my time in the Neverhood... (THAT was a sadly forgotten legendary game!)

Even following the walkthrough ... I couldn't get past the plants.
Cute game. Anyone remember Neverhood? If you do I bet you're now humming the music!
MtDewed:
Figure out what each plant isn't willing to eat, then work with that data.
i need the code when you break the glass with the laser.
Oh my gosh I remember Neverhood! I loved that game, such a classic and it was kinda difficult. As soon as I started playing this I immediately thought back to that.
Totally Odd Walkthrough
Level 1
-
Do NOT push the button!
-
Click the door on the left side of the room to exit.
Level 2
-
Click the device with the two buttons on the left side of the first floor.
-
Move the cursor over the note to zoom in.
-
The note has feeding information for the three venus fly traps on the second floor.
-
Plant #1 is named Borya, and he does not like fish.
-
Plant #2 is named Vova, and he is a vegetarian.
-
Plant #3 is named Dima, and he does not like his favorite food anymore.
-
Click the Money button in the list of words to select money for delivery.
-
Click the left dial to select Plant #3(identified by the Roman numeral III)
-
Click the right button to dispense the food.
-
Take the coin dropped in front of the elevator.
-
To the right of the food dispenser device is the smell machine.
-
Use the smell machine to spray yourself with the scent of the three foods the plants will not eat.
-
Click the coin in the top right corner to select it then drop it into the coin dispenser of the smell machine
-
Select Cake, Hen, and Fish in the scent lists and push the button at the top.
-
Click the elevator to ride to the second floor and exit the room.
Level 3
-
Click the lever beside the door.
-
A mini-bot will be placed in the pipe and dropped onto the second floor.
-
Take the mini-bot then put it into the machine next to the lever.
-
Click the machine to zoom in.
-
Click the top file "1Security system Horrificorp" to download it into the mini-bot then take the bot out of the bottom of the machine.
-
Place the minibot onto the numbered platform.
-
The robot will roll from step 6 to step 3, revealing a color at the front of each step before it falls into the spike pit below.
-
For example: step 6 glows blue, step 5 glows red, step 4 glows green, and step 3 glows blue.
-
Click the device with the pink lining next to the steps to zoom in.
-
Take the colored tiles and place them in the numbered squares.
-
Following the previous example, the blue tile would go in square 6, the red tile would go in square 5, and the green tile in square 4.
-
Remember that at step 3, the robot fell through the floor into the rotating spikes. This means, the color at step three is incorrect.
-
Place a different colored tile onto square 3, then place the last two remaining tiles on squares 1 and 2.
-
Pull the lever by the right door to get another mini-bot.
-
Do not download the Horrificorp program again, simply place the robot on the platform to test the solution.
-
If the robot makes it to the end of the paltform without falling through the floor, you can cross safely.
-
If the robot falls, note the step and the color at which it fell then go back to the device and change the color at that tile.
-
Repeat the process until it is safe to cross and exit through the left door.
Level 4
-
Click the signboard by the door to zoom in.
-
Note that the board contains three items: a date, a name, and a four digit code.
-
Read the note pinned to the board.
-
Click the elevator to go downstairs.
-
Click the Calendar above the radio.
-
Note the circled date on the calendar is Thursday the 26th.
-
According to the signboard upstairs, Luie is on duty on Thursdays and his code is 1075.
-
Click the keybad below the calendar.
-
Enter in the four digit pin 1-0-7-5 then press the telephone shaped button.
-
Click the radio to zoom in.
-
Turn the top dial on the radio to FM 4
-
Turn the bottom dial to raise the volume to 3.
-
Note the tentacles are sticking out of all the cabinet drawers except for one.
-
Click the radio again and turn off the music by setting the volume back down to 0.
-
Click the drawer that did not have the tentacle inside it, the 2nd door from the left on the bottom row.
-
Take the key inside the drawer.
-
Use the key to unlock the birdcage then take the bird.
-
Click the elevator to go back upstairs.
-
Click the door to enter the voice authentication room.
-
You only have a few seconds to present the talking bird (it should be saying "blah-blah-blah") to the voice authentication.
-
Go through the unlocked door to the left elevator.
Level 5
-
Click the elevator to receive the alchemy book at the top shelf.
-
Click the book to see the recipes.
-
Turn the page to the recipe with the closed eye.
-
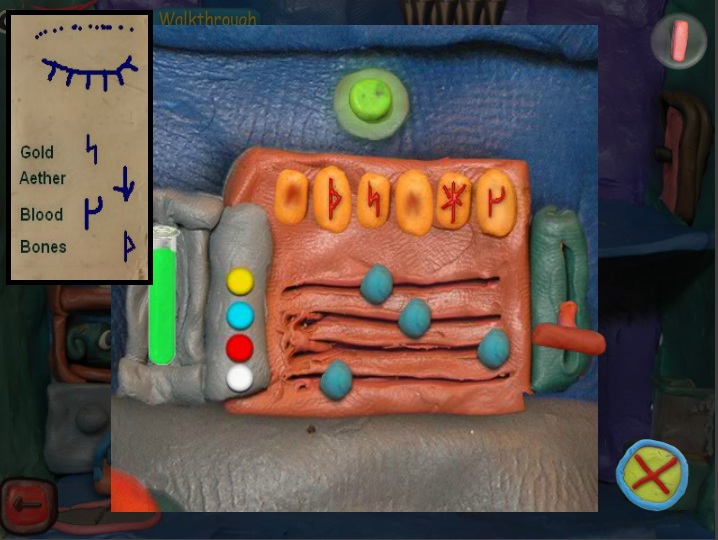
Note the symbols representing the four ingredients: Gold, Aether, Blood, and Bones.
-
Click the panel underneath the tank of eyeball creatures to zoom in.
-
Set the dials to the correct symbols matching the recipe from your book.
-
Pull the handle to fill the vial with a bright green liquid.
-
Click the vial to pick it up.
-
Use the bright green solution on your character to turn invisible.
-
Click the elevator to ride to the top floor then exit out the door.
Level 6
-
Click the elevator to go downstairs.
-
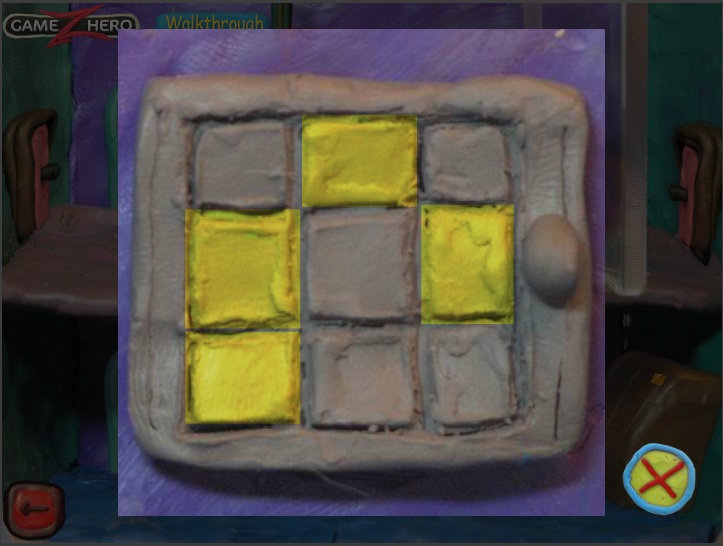
Note the yellow squares on the far right side of the room.
-
In the first column the bottom two squares are lit, in the second column the top square is lit, and in the third column the middle square is lit.
-
Click the panel under the white light to zoom in.
-
Drag the button above the lightbulb sign down one space to turn on the lights.
-
Drag the button above the fan sign all the way to the red light at the top to turn off electricity to the fan.
-
Drag the button above the cage sign up only one light.
-
Drag the button above the purple lightning bolt sign down to the third white light.
-
Click the square device to the right of the electric panel.
-
Press the buttons that were yellow while the lights were off.
-
Take the pink dial inside the opened safe.
-
Click the elevator to go upstairs.
-
Click the device with the large purple lightning bolt button.
-
Put the pink dial in the empty space on the device.
-
Keep the top dial at 90 degrees and set the pink dial to II.
-
Click the green "Go" button.
-
Take the orange disk(the core generator) out of the drilled rock.
-
Click the elevator to go back downstairs.
-
Click the electric panel to zoom in.
-
Drag the button above the purple lightning bolt all the way to the red light at the top.
-
Click the large brown machine on the right wall.
-
Click the faded out generator to pick it up.
-
Replace the old generator with the one you found upstairs.
-
The reserved energy should jump from 3 squares to 5.
-
Click the electric panel again.
-
Drag the button above the purple lightning bolt all the way down to the fifth white light.
-
Click the elevator to go back upstairs.
-
Click the fan to the right of the creature laser cage.
-
Read the note behind the fan blade.
-
The note says the password follows the shape of an "L".
-
Moving in an L shape down a 9 digit keypad: first down 3 spaces 1,4,7 then right two spaces 8,9.
-
Click the device with the purple lightning bolt icon.
-
Set the top dial to 0 and the pink dial to III.
-
Press the "Go" button to drill through the glass wall.
-
When the wall comes down the three critters will be released.
-
Quickly click the keypad next to the right door and enter in the combination from the letter 1-4-7-8-9 then push the telephone button.
Level 7
-
Push the button in front of the hole on the top floor to call the elevator.
-
Take the severed arm on the elevator platform.
-
Click the large machine on the right wall.
-
Used the severed arm on the touch pad.
-
Access the diary then go to the last page dated August 26, 2297.
-
Note the professor claims the timer countdown deactivation code is his birth year.
-
Click the tv screens to the left of the large machine to zoom in.
-
Note the top right screen that shows two rotating satellites.
-
Click the large board to the left of the screens to access the satellite control center.
-
Click the middle green satellite, _s1_k5 to select it.
-
Push the "deactivate" button.
-
Click the green satellite one space to the right _si_k6 at coordinates 33,20 then deactivate that satellite as well.
-
If you check the tv screens again, you'll notice both satellites have stopped spinning.
-
Click the large machine on the right wall again.
-
Select the top option "Call for Air Support"
-
Using the keypad, enter in the coordinates 3-3-2-0 then press "Fire"
-
Wait about 10 seconds and a large laser will destroy the BrainSpider.
-
Click the machine on the far left side to zoom in.
-
Click the glass case to open it then take out the brain worm.
-
Put the severed arm inside and close the case.
-
The analysis results show that the age of the arm is 74 years.
-
Subtract 74 years from the current date 2297; 2223.
-
Click the elevatorto go downstairs.
-
Click the panel under the countdown screen to zoom in.
-
Enter in the professor's birth year to stop the countdown, 2-2-2-3
-
Click the door to exit.
Level 8
-
Push thelarge red button in the center of the room.
The End
Yay! Great game- quirky but logic-based puzzles and I loved the graphics. Hope there's more to come.
Problem lv 4
Can't get the bird to authenticate the voice!
JiGuest:
The code to break the glass wall with the laser can be found in the note behind the fanblade. It's the shape of an L, so make an L down and across the keypad.
1-4-7-8-9
Dave:
The bird will only start talking (and save you from being laser-fried) if you enter in the correct 4 digit combination on the keypad next to its cage.
Check the calendar to see the date, then check the board upstairs to see who's supposed to be on duty on the day circled at the calendar. To the right of the person's name is their 4 digit pass.
Go back downstairs and enter in that number. If you're correct, the words "blah blah blah" will float around the bird.
Go inside the voice authentication room, click the bird in the top corner of the screen, and use him on the voice authenticator.
problem with level 2.
the smells i'm supposed to choose according to the walkthrough is "Cake, Hen, and Fish". 2 of these work, but when i go to the far left one, he eats me. I do not think one of these is correct.
For level 2:
The last plant's "favorite food" isn't always cake...
Paul:
Dima's favorite food can change between games. Set the dial on the feeding machine to 1 then test out which food he won't eat. Fish and Hen do not ever change, but Cake could also be Banana or Apple.
also level 3 seems to be goofy
after you get to the point where you put the thing on the conveyer belt, the first 3 it goes by fine, but it falls on the 4th one. The walkthrough says "if it falls,it;s not the right color. #4 should be changed to a different color" #4 was red so i put a blue there,and put the colors exactly how it said,but it screwed it up by #1.
I think this walkthrough needs some revamping.
Paul:
There's nothing wrong with the instructions on the walkthrough... If you fell at step 1 then the color at tile 1 was also incorrect and you need to go back and change that color.
If you read the note on the Horrificorp machines it says that the mini-bots programming is buggy. The "error" can also be seen when you try to program them at the computer. This is an additional challenge, as it means means they only correctly read the first three steps 6, 5, and 4. The last three 3, 2, and 1 have to be found using trial and error.
The walkthrough is there to explain mechanics and concepts, which it does in detail, but I can't possibly account for the changes that occur between games, because it's totally random what order those colors are. That's why the colors noted in the walkthrough are only called an "example"
Trinn
ok i did manage to beat the game. sorry about that Trinn,but usually if one of the games in here is done the same way everytime,then the walkthrough is written the way it is,but if one code is 4962 but next time if the code is 2775, then what you could have done was say "my code was 4962 (however the code varies from game to game)" this way i know,that i will get different results each time i play. But otherwise,your walkthrough is cool.
the ending was............totally.....odd.
I was able to finish level 6 while skipping half the work.
Turn on the lights, lower the cage by 1, turn off the fan and turn the laser up to 3. Get the note from the fan if you want, then turn the laser to 0, III and use it. Enter the code and that's it! You can skip the whole core part entirely. I didn't even know I needed to do it until I read the walkthrough.
It's always been my dream to visit a paralel university.
LOL at DAM. Their English was... totally... odd.
for lvl 2 its actually fish, hen and banana
It's randomized every game, Audzz.
Leave a comment [top of page]

Game of the week

Walkthrough Guide
(Please allow page to fully load for spoiler tags to be functional.)
Totally Odd Walkthrough
Level 1
Do NOT push the button!
Click the door on the left side of the room to exit.
Level 2
Click the device with the two buttons on the left side of the first floor.
Move the cursor over the note to zoom in.
The note has feeding information for the three venus fly traps on the second floor.
Plant #1 is named Borya, and he does not like fish.
Plant #2 is named Vova, and he is a vegetarian.
Plant #3 is named Dima, and he does not like his favorite food anymore.
Click the Money button in the list of words to select money for delivery.
Click the left dial to select Plant #3(identified by the Roman numeral III)
Click the right button to dispense the food.
Take the coin dropped in front of the elevator.
To the right of the food dispenser device is the smell machine.
Use the smell machine to spray yourself with the scent of the three foods the plants will not eat.
Click the coin in the top right corner to select it then drop it into the coin dispenser of the smell machine
Select Cake, Hen, and Fish in the scent lists and push the button at the top.
Click the elevator to ride to the second floor and exit the room.
Level 3
Click the lever beside the door.
A mini-bot will be placed in the pipe and dropped onto the second floor.
Take the mini-bot then put it into the machine next to the lever.
Click the machine to zoom in.
Click the top file "1Security system Horrificorp" to download it into the mini-bot then take the bot out of the bottom of the machine.
Place the minibot onto the numbered platform.
The robot will roll from step 6 to step 3, revealing a color at the front of each step before it falls into the spike pit below.
For example: step 6 glows blue, step 5 glows red, step 4 glows green, and step 3 glows blue.
Click the device with the pink lining next to the steps to zoom in.
Take the colored tiles and place them in the numbered squares.
Following the previous example, the blue tile would go in square 6, the red tile would go in square 5, and the green tile in square 4.
Remember that at step 3, the robot fell through the floor into the rotating spikes. This means, the color at step three is incorrect.
Place a different colored tile onto square 3, then place the last two remaining tiles on squares 1 and 2.
Pull the lever by the right door to get another mini-bot.
Do not download the Horrificorp program again, simply place the robot on the platform to test the solution.
If the robot makes it to the end of the paltform without falling through the floor, you can cross safely.
If the robot falls, note the step and the color at which it fell then go back to the device and change the color at that tile.
Repeat the process until it is safe to cross and exit through the left door.
Level 4
Click the signboard by the door to zoom in.
Note that the board contains three items: a date, a name, and a four digit code.
Read the note pinned to the board.
Click the elevator to go downstairs.
Click the Calendar above the radio.
Note the circled date on the calendar is Thursday the 26th.
According to the signboard upstairs, Luie is on duty on Thursdays and his code is 1075.
Click the keybad below the calendar.
Enter in the four digit pin 1-0-7-5 then press the telephone shaped button.
Click the radio to zoom in.
Turn the top dial on the radio to FM 4
Turn the bottom dial to raise the volume to 3.
Note the tentacles are sticking out of all the cabinet drawers except for one.
Click the radio again and turn off the music by setting the volume back down to 0.
Click the drawer that did not have the tentacle inside it, the 2nd door from the left on the bottom row.
Take the key inside the drawer.
Use the key to unlock the birdcage then take the bird.
Click the elevator to go back upstairs.
Click the door to enter the voice authentication room.
You only have a few seconds to present the talking bird (it should be saying "blah-blah-blah") to the voice authentication.
Go through the unlocked door to the left elevator.
Level 5
Click the elevator to receive the alchemy book at the top shelf.
Click the book to see the recipes.
Turn the page to the recipe with the closed eye.
Note the symbols representing the four ingredients: Gold, Aether, Blood, and Bones.
Click the panel underneath the tank of eyeball creatures to zoom in.
Set the dials to the correct symbols matching the recipe from your book.
Pull the handle to fill the vial with a bright green liquid.
Screenshot.
Click the vial to pick it up.
Use the bright green solution on your character to turn invisible.
Click the elevator to ride to the top floor then exit out the door.
Level 6
Click the elevator to go downstairs.
Note the yellow squares on the far right side of the room.
In the first column the bottom two squares are lit, in the second column the top square is lit, and in the third column the middle square is lit.
Click the panel under the white light to zoom in.
Drag the button above the lightbulb sign down one space to turn on the lights.
Drag the button above the fan sign all the way to the red light at the top to turn off electricity to the fan.
Drag the button above the cage sign up only one light.
Drag the button above the purple lightning bolt sign down to the third white light.
Click the square device to the right of the electric panel.
Press the buttons that were yellow while the lights were off.
Screenshot.
Take the pink dial inside the opened safe.
Click the elevator to go upstairs.
Click the device with the large purple lightning bolt button.
Put the pink dial in the empty space on the device.
Keep the top dial at 90 degrees and set the pink dial to II.
Click the green "Go" button.
Take the orange disk(the core generator) out of the drilled rock.
Click the elevator to go back downstairs.
Click the electric panel to zoom in.
Drag the button above the purple lightning bolt all the way to the red light at the top.
Click the large brown machine on the right wall.
Click the faded out generator to pick it up.
Replace the old generator with the one you found upstairs.
The reserved energy should jump from 3 squares to 5.
Click the electric panel again.
Drag the button above the purple lightning bolt all the way down to the fifth white light.
Click the elevator to go back upstairs.
Click the fan to the right of the creature laser cage.
Read the note behind the fan blade.
The note says the password follows the shape of an "L".
Moving in an L shape down a 9 digit keypad: first down 3 spaces 1,4,7 then right two spaces 8,9.
Click the device with the purple lightning bolt icon.
Set the top dial to 0 and the pink dial to III.
Press the "Go" button to drill through the glass wall.
When the wall comes down the three critters will be released.
Quickly click the keypad next to the right door and enter in the combination from the letter 1-4-7-8-9 then push the telephone button.
Level 7
Push the button in front of the hole on the top floor to call the elevator.
Take the severed arm on the elevator platform.
Click the large machine on the right wall.
Used the severed arm on the touch pad.
Access the diary then go to the last page dated August 26, 2297.
Note the professor claims the timer countdown deactivation code is his birth year.
Click the tv screens to the left of the large machine to zoom in.
Note the top right screen that shows two rotating satellites.
Click the large board to the left of the screens to access the satellite control center.
Click the middle green satellite, _s1_k5 to select it.
Push the "deactivate" button.
Click the green satellite one space to the right _si_k6 at coordinates 33,20 then deactivate that satellite as well.
If you check the tv screens again, you'll notice both satellites have stopped spinning.
Click the large machine on the right wall again.
Select the top option "Call for Air Support"
Using the keypad, enter in the coordinates 3-3-2-0 then press "Fire"
Wait about 10 seconds and a large laser will destroy the BrainSpider.
Click the machine on the far left side to zoom in.
Click the glass case to open it then take out the brain worm.
Put the severed arm inside and close the case.
The analysis results show that the age of the arm is 74 years.
Subtract 74 years from the current date 2297; 2223.
Click the elevatorto go downstairs.
Click the panel under the countdown screen to zoom in.
Enter in the professor's birth year to stop the countdown, 2-2-2-3
Click the door to exit.
Level 8
Push thelarge red button in the center of the room.
The End
Posted by: Trinn |
July 14, 2011 12:33 PM
|
July 14, 2011 12:33 PM