

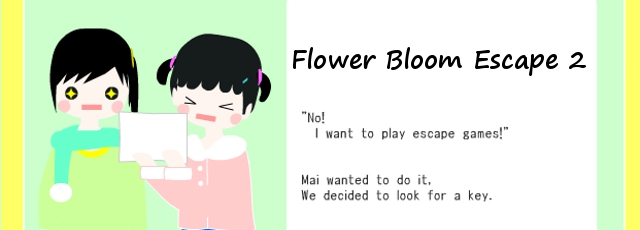
![]() Set phasers to hnnnnnnngh, because Fuwayura's escape game Flower Bloom Escape 2 is so sweet it might just make you keel over. In this adorable sorta-sequel to Flower Bloom Escape, Hana and Mai are doing homework at Hana's house, but when they're done and ready to go outside, they discover Hana's mom, who is a bit of an escape game fanatic, has hidden the key. Hana just wants to wait for her mom to come home and let them out, but Mai is, um, a little more gung-ho about it, so before these two girls can go out to the park, you'll have to help them. Click "English" in the lower-left corner at any time to make the text display in, well, English, and just click around to interact when the cursor changes. The arrows at the sides of the screen will let you move around the tiny apartment. Click an item in your inventory to highlight it for use, or click "about item" to view it up close, which will usually give you a little hint. Some items will need to be viewed close up in order to combine them with others, so try everything!
Set phasers to hnnnnnnngh, because Fuwayura's escape game Flower Bloom Escape 2 is so sweet it might just make you keel over. In this adorable sorta-sequel to Flower Bloom Escape, Hana and Mai are doing homework at Hana's house, but when they're done and ready to go outside, they discover Hana's mom, who is a bit of an escape game fanatic, has hidden the key. Hana just wants to wait for her mom to come home and let them out, but Mai is, um, a little more gung-ho about it, so before these two girls can go out to the park, you'll have to help them. Click "English" in the lower-left corner at any time to make the text display in, well, English, and just click around to interact when the cursor changes. The arrows at the sides of the screen will let you move around the tiny apartment. Click an item in your inventory to highlight it for use, or click "about item" to view it up close, which will usually give you a little hint. Some items will need to be viewed close up in order to combine them with others, so try everything!
 Although bigger than the single-scene original, Flower Bloom Escape 2 is still on the easy side. The puzzles you'll find all have clues to their solutions hidden about, but because the area is so cleanly designed, most of them will be fairly obvious when you've fully explored and thus seen what there is to be seen, and the changing cursor nicely cuts out mindless clicking. Still, for the five or so minutes it'll take you, Flower Bloom Escape 2 is one of the all-out cutest and most pleasant little escape games you could ever hope to play. It's not so easy as to be mindless, the characters are adorable, the design is bright and colourful, and the soundtrack is bouncy and happy... although if you're feeling particularly miserly today, you can simply use the in-game volume slider to turn it down. Though not particularly challenging, Flower Bloom Escape 2's fun puzzles and cheerful style make it pure pleasure from start to finish with its syrupy sweet ending cutscene, and a definite improvement over its predecessor, which means we can only hope we keep seeing even more from Fuwayura (and Hana and Mai!) in the future!


Walkthrough Guide
(Please allow page to fully load for spoiler tags to be functional.)
Flower Bloom 2 Escape
There's a map- it's very useful to make sure you've found every view.
Shelf Side
Collect Blue Mug from white cupboard.
Collect Driver from left drawer of blue desk
Note animal lock on right drawer of blue desk
Note the Heart Lock in the red cupboard
Note the locked door on the white cupboard
Area in the Middle
Red Desk has a lock that has two mugs and 2 shapes
Desk Side
Collect Green Heart Panel
Note grid of colors and outlined spot to place something
Left Area
Collect Key from behind the picture frame
Collect Yellow Heart Panel from behind the 'Animal Love' Picture.
Note the highlighted letters in 'Animal Love'
Note the order of animal heads in the right picture
Note the shape on the bottom right of the animal picture
Use Driver to open animal picture to reveal a safe.
Safe Code:
From the highlighted letters in 'Animal Love' (they're backwards) to get 301
Receive Pink Cup
Right Area
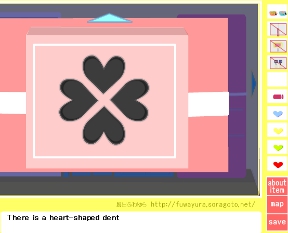
Collect Red Heart Panel
Note the Blue & Pink mug buttons
Shelf Side
Use the Key on the white cupboard to collect Blue Heart Panel.
Use the hint of the animal heads to open the blue desk drawer
Solution:
Elephant, Duck, Cat, Rabbit
Reveal a teal box with lines that can be moved with pink buttons on corner. This can also be solved with a hint from the animal picture
Click each button once to rotate into a diamond
Receive Tea Bags and place them into the Pink & Blue Mugs
Use mugs on electric kettle on the top right of the blue desk to make tea
Area in Middle
Note the colors of the tea you've made, and the symbols on the tea bags, and use them on the red drawer
Solution: (with colorblind help)
Left should be green tea (click twice) and a crescent moon
Right should be pink tea (click four times) and a star
Receive flashlight
Right Area
Use the numbers on the mugs to get the left-right code
Solutions:
Right, Right, Left, Left, Left, Right
Receive Battery
Desk View
Place Battery in the Flashlight and place it on the marks on the stool.
It will highlight colors with hearts
Shelf Side
Use highlighted colors to place the Heart Panels in the heart lock.
Solution: (with colorblind instructions)
Green heart (second from bottom of inventory) on top
Red heart (bottom of inventory) on left
Blue heart (fourth from bottom of inventory) on right
Yellow heart (third from bottom of inventory) on bottom
Open door to receive Door Key
Posted by: VoxPopuli42 |
June 30, 2014 2:02 PM
|
June 30, 2014 2:02 PM
Guide for finding items and solving puzzles. Not a step by step walkthrough.
Item Locations (Items marked with * need you to solve a puzzle in order to get them.)
Kitchen:
SCREWDRIVER in the drawer under the microwave
BLUE CUP inside the tall cabinet
BLUE HEART* inside the bottom door of the tall cabinet. *Use the KEY to open it.
TEABAGS* inside the *Animal Drawer
EXIT KEY* inside the fridge after you solve *Heart Panel Puzzle
Teacup panel wall:
RED HEART on the floor
BATTERY behind the *Teacup Panel
Table wall:
KEY behind the photo
YELLOW HEART behind the "Animal Love" frame
PINK CUP* Inside the safe with the *3-digit code
Bar:
GREEN HEART on the left table
Oven/Stove wall:
FLASHLIGHT* inside the *Teacup Drawer
Puzzle Solutions
Animal Drawer
This drawer below the water kettle in the kitchen opens in two steps, the clues for both are found in the animal faces picture above the table. Note the order of the animal faces, and note the shape in the lower right corner of the frame.
To open the drawer: Elephant Bird Cat Rabbit
To open the box inside the drawer: make the diamond shape with the four lines >
Three-Digit Code
Behind the Animal Faces picture frame there is a 3-digit code. The clue for this code is in the "Animal Love" picture on the same wall. Note the highlighted letters and note that the arrow indicates a clockwise reading of the letters starting from the lower right.
the code is 301. (the backwards "E" and the "O" and the "I")
Making Tea
Pull open the teacups in your inventory, and put the teabags in them. Then go to the kitchen, select the cups in your inventory, and click on the kettle to pour the water. This will give you all the clues for two puzzles.
Right Cup Left Cup, Blue Cup Red Cup
On the Teacup Panel, click the pink and blue cups on the wall in the order indicated by the clues on your teacups in your inventory. You will need to make tea first in order to see the clue.
the pink cup says 345 (third, fourth, fifth) and the blue cup 126 (first, second, sixth). So you will push the cups on the wall in the order Blue Blue Pink Pink Pink Blue. Then apply the code by pushing the yellow button.
Teacup Drawer
Under the sink on the Stove/Oven wall is a drawer with code involving two teacups, various colors, and various shapes. The clues appear on the BLUE and PINK CUPS after you have made the tea in them.
Change the left teacup to green and the right one to pink to match the colors of the teas you made. Change the shapes to be moon (left) and star (right) to match the teabag stubs in your inventory. Apply the code by clicking the red button in the lower right corner.
Lighten the Heart
Insert battery into flashlight. In the bar view, use the flashlight on the right table. It will shine on the code for the Heart Panel. In the kitchen, insert the colored hearts you have collected into the panel on the fridge according to the flashlight code.
top: green,
right: blue
bottom: yellow
left: red
Now go make a yogurt cake and enjoy. :)
Posted by: JudyJetson |
June 30, 2014 10:19 PM
|
June 30, 2014 10:19 PM