


![]() Is it officially a new year, really, if we haven't celebrated with Tesshi-e's yearly Mild Escape game? I say to thee nay, but now that Mild Escape 7 is finally here, we can break out the streamers and confetti! Each year, as the narrator tells us at the start, we find ourselves back at a particular door in this series of escape games, and this time is no different. Click your way around the room to explore and interact while some evocative piano music makes you feel weirdly nostalgic and melancholy. If you highlight an item in your inventory, you can click "about item" to view it up close and try to manipulate it, or just click in the area you're exploring to try to use it there. Some objects in your surroundings can't be carried or picked up, but if you click and hold on them, a closer or alternate view might be displayed.
Is it officially a new year, really, if we haven't celebrated with Tesshi-e's yearly Mild Escape game? I say to thee nay, but now that Mild Escape 7 is finally here, we can break out the streamers and confetti! Each year, as the narrator tells us at the start, we find ourselves back at a particular door in this series of escape games, and this time is no different. Click your way around the room to explore and interact while some evocative piano music makes you feel weirdly nostalgic and melancholy. If you highlight an item in your inventory, you can click "about item" to view it up close and try to manipulate it, or just click in the area you're exploring to try to use it there. Some objects in your surroundings can't be carried or picked up, but if you click and hold on them, a closer or alternate view might be displayed.
 Like any good Tesshi-e game worth its salt, Mild Escape 7 is all about finding clues to solve the puzzle locks in your way. Though not as obscure or misleading as some other escape developers, Tesshi-e has managed to craft puzzles that feel logical and challenging in a way that encourages you to think about the information you have rather than simply resorting to the old point-and-click standby of desperately clicking everything on everything else. In most cases, following your gut instinct to use or solve something winds up being accurate, which shows a developer who thinks about the player's potential thought patterns, rather than expecting you to interpret their own. The atmosphere is particularly lovely, with nice touches such as the persistent and accurate reflections of objects and points of light adding to the subtle detail. The game says "happy coin will bring happiness to you", but if you're a fan of escape games, then Tesshi-e is probably always a bearer of good tidings as well, with Mild Escape 7 another jewel in the crown... a crown so jewel encrusted at this point it's probably causing some series neck strain, but heavy is the head and all that.
Thanks to Cyberjar 88 for sending this one in!


Walkthrough Guide
(Please allow page to fully load for spoiler tags to be functional.)
Walkthrough/Complete Hints for Mild Escape 7:
This game has two endings: normal and "good". The two endings are a bit different from each other, so I think it's worth seeing both, and it doesn't matter which one you see first.
Free items, collectible before needing to solve any puzzles:
Umbrella
In the umbrella stand, on the exit door view.
Ball (Scorpio)
Inside the right-most cupboard, on the exit door view.
Ball (Sagittarius)
On the ledge of the second window from the left, on the window view.
Ball (Leo)
Tucked into the stand of the blue table, on the window view.
Unusual looking ornament
On the left-hand edge of the desk, in the desk view.
Note
Inside the middle clear plastic drawer on top of the desk, on the desk view.
Ball (Virgo)
Inside the bottom clear plastic drawer on top of the desk, on the desk view.
Ball (Cancer)
Inside the paper "Mild Escape" bag on the shelves, on the guitar view.
Puzzles, in order from the left edge of the starting view, and proceeding clockwise around the room:
The umbrella stand
Once you have taken the umbrella, you can look inside and see an item out of reach at the bottom of the stand. To get it you will need the umbrella and the sucking disc.
View the umbrella by using the "About Item" button, then select the sucking disc and use it on the tip of the umbrella. Now use this new tool on the item at the bottom of the umbrella stand to receive the ball (Libra).
The exit door
The door can be opened with the item found by solving the green box with three indentations puzzle.
The hippo statue
The clue for the hippo statue code can be seen once you have found the compact disc.
Click on the computer under the desk to open the optical drive tray, and insert the compact disc. The screen on top of the desk will have changed to show a clue to this puzzle.
The clue looks like a simple subtraction problem, but the answer would be longer than the four digits which we need. It might help to think about it as two lists of individual digits, rather than two numbers.
The code can be found by removing every occurrence of the digits 2, 0, 5, and 6 from the first group of digits.
The code to open the hippo statue is 7143. Enter the code to collect a clover-shaped key.
The left-most cupboard
This cupboard can be opened with the item found by solving the hippo statue puzzle. Collect the screwdriver.
The green box with three circular indentations
This puzzle can be solved once you have the bronze, silver, and gold medals.
You need to put the three medals into the three indentations, but what is the correct order? There is a clue in the bottom-left desk drawer. Solve the puzzle and collect a heart-shaped key.
*OPTIONAL: For "good" ending*
After taking the key, you will be able to see the letters "BGS" on the panel that hid the key. Perhaps if you re-order the medals...
Now we have a new tray with an indentation that reads "Gold". But removing the gold medal from its position above causes the tray to close. What other object could we use here?
The compact disc is round and golden; we can remove it from the computer by opening the tray again and taking it.
But the box seems to reject the compact disc without doing anything, if we put it into the "Gold" tray. Is there another way around this?
Yes. Remove the gold medal from its place above, and put the compact disc in its place. This will still cause the tray to open. Now we can put the real gold medal into the "Gold" tray. The box will take it in, and then re-open the tray which now holds the happy coin. Collect the happy coin for the "Good Ending".
The middle cupboard
This cupboard can be opened with the item found by solving the left-most cupboard puzzle. Collect the silver medal.
The pink bird statue
The clue for this puzzle can be found once you have the note and the pencil, and also have solved the left-middle desk drawer puzzle.
View the note by using the "About Item" button, select the pencil, and then use it on the note.
It's a series of astrological symbols; the same symbols that are featured on the six balls found around the room.
The order of symbols on the note (left to right) gives the order in which to press the buttons on the bird statue. The symbols are linked to the buttons by the configuration in which you placed the balls in the middle-left drawer puzzle.
If you followed my advice about placing the balls in the drawer puzzle, you should now be able to solve this puzzle by pressing the buttons in order from left-to-right, top-to-bottom:
1 2 3
4 5 6
Collect the diamond-shaped key.
The hanging pot-plant
This puzzle can be solved once you have the umbrella and the unusual looking ornament.
View the unusual looking ornament by using the "About Item" button, and click on it to separate the metal upper part from the blue base. Now view the umbrella, select the upper part of the unusual ornament, and then use it on the tip of the umbrella. Use this new tool on the hanging pot-plant and you will be able to collect the sucking disc.
The happy coin picture
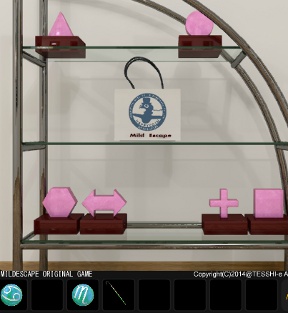
The clues for this puzzle can be found by examining the books on top of the desk, and noting the position of the pink figures on the shelves in the guitar view.
While the same shapes appear both in the book and on the shelves, they are lined up in a single row in the book, while on the shelves they are grouped into four corners.
You must tap the corners of the picture in the order given left to right in the book, in order to solve this puzzle and be able to collect the spade-shaped key.
The correct order is upper-left, lower-right, lower-right, lower-left, upper-right, lower-left.
Upper-left desk drawer
This drawer can be opened with the item found by solving the happy coin picture puzzle. Open the drawer to collect the pencil.
Middle-left desk drawer
This puzzle can be solved once you have found all six balls with astrological signs on them. Five balls can be found without solving any puzzles; the sixth ball is received after solving the umbrella stand puzzle.
Simply put the balls into the holes in any configuration, and a tray will pop open, revealing a compact disc. Note, however, that the order in which you place the balls will have an impact on another puzzle. To make things easier later, place the balls in this configuration:
If we number the balls as they appear in your inventory like this:
1 2 3
4 5 6
then my recommended configuration is:
3 4 6
2 5 1
Top-right desk drawer
This drawer can be opened with the item found by solving the pink bird statue puzzle. Open the drawer to collect the bronze medal.
Middle-right desk drawer
This clues for this puzzle can be found by examining the back of the guitar, and noting the star and red letter "N" on top of the blue table.
The back of the guitar reads "NEW SEE". It is noteworthy that there are only four different letters in that phrase.
N, E, W, and S; they're compass directions. But assuming that North equals up and trying to enter the code into the box doesn't work. They must be modified somehow.
At first glance, the clue on the table top appears to be telling us that North should be equal to down, but this isn't correct, either. Note the orientation of the star beneath the plant in the center of the table.
By carefully noting the relative positions of the red N and the star on the table top, we can realize that North should in fact be equal to right on the puzzle.
The correct code is right, down, up, left, down, down. Enter the code to collect the gold medal.
Posted by: Nezuji |
May 4, 2014 8:28 AM
|
May 4, 2014 8:28 AM