


![]() The Room is back! After Fireproof Game's wildly successful 2012 mobile point-and-click puzzle game, the team got to work on a sequel. The Room Two is now ready to impress, taking just about everything that made the original so perfect and making it even better. Dozens of layered puzzles to solve, multiple boxes in each room, a spyglass to give you a new perspective on locations, and the same dark, haunting atmosphere that make the games so irresistible.
The Room is back! After Fireproof Game's wildly successful 2012 mobile point-and-click puzzle game, the team got to work on a sequel. The Room Two is now ready to impress, taking just about everything that made the original so perfect and making it even better. Dozens of layered puzzles to solve, multiple boxes in each room, a spyglass to give you a new perspective on locations, and the same dark, haunting atmosphere that make the games so irresistible.
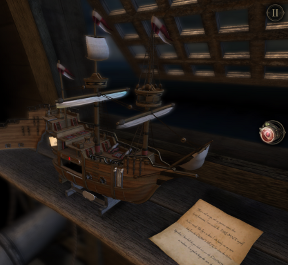 Each chapter in The Room Two features sets of boxes you must figure out how to unlock. It's more than just "find key, insert into keyhole, celebrate", as each of these containers is riddled with tiered puzzles to solve, often requiring pieces to be brought in from elsewhere. Even the word "box" is a bit of a misnomer, as you'll be pulling apart everything from model ships to treasure chests to entire table tops. Oh, and plenty of actual boxes, too.
Navigation is an elegant affair with The Room Two. To shift from one box to another, simply pinch to zoom out, just like you're browsing a web page on that fancy mobile device of yours. Tap and drag to look around each area. Double tap to zoom in on an item of interest, then slide your finger to take a look at the object from different angles. You can also interact with many objects, such as pulling out drawers, flipping levers, taking off lids, rotating inventory items, etc.
SEE ALSO ON JAYISGAMES: The Room
A handy spyglass quite literally adds a new layer to every puzzle. Certain clues can only be seen by swapping the lens, sort of like those old decoder puzzles you'd get in your cereal (if you ate the fun cereal as a kid). This not only forces you to look beyond the puzzle you're trying to solve, it also contributes to the tightly-knit spaces that give The Room Two such a brilliantly claustrophobic feeling. The walls aren't closing in on you, you just feel like it's those boxes and you, nothing else exists.
 Analysis: The Room Two is such a brilliantly crafted work of art, it's difficult to even draw comparisons to other games in the genre. The production values are extraordinarily high, featuring detailed models with lighting effects that make objects look eerily realistic. The atmosphere is unparalleled. Spotlights illuminate only the boxes you're working on, leaving everything else sitting just beyond the shadow line, teasing your mind with what secrets are behind the veil. Finish the chapter and you just might find out.
The touch interface works really well for The Room Two, although it does feel slightly sluggish from time to time. There's an integrated hint system that appears after several moments of inactivity, pointing you in the right direction without spoiling things right away. It's the perfect brand of nudging games like this need, allowing you to do things on your own but whispering secrets in your ear so you don't get frustrated.
If you've played through The Room, you'll immediately notice that The Room Two is a bit more straightforward than its predecessor, despite featuring multi-boxed chapters. Puzzles seem to fall into place with less effort and thought, and since your attention is divided between multiple areas, some of that razor focus is lost. Still, it's not a disappointing sequel by any means.
Quiet, mysterious, layered with intrigue, and delightfully cerebral. The Room Two knocks everything up a notch for the room escape genre.Unlocking boxes has never been this complex or provocative. And we never want it to end!
NOTE: This game was played and reviewed on the iPad 3. Game was available in the North American market at the time of publication, but may not be available in other territories. Please see individual app market pages for purchasing info.


Walkthrough Guide
(Please allow page to fully load for spoiler tags to be functional.)
The Room 2 Walkthrough
This walkthrough is still a work in progress. Please check back soon for more updates!
Chapter 1 - The Crypt
Part 1 (Tutorial)
First, tap the screen to begin the game. Tap the folded paper on the table twice to examine it.
Swipe from right to left over the paper to unfold it. The EYEPIECE will be added to your inventory automatically.
Tap the EYEPIECE at the top of your inventory bar (on the left side of the screen) to find the lens is broken.
Press the arrow button on the right side of the screen to exit the inventory screen.
Use a pinching motion on the screen to zoom out from the note. Zoom out again to view the entire room.
Double tap the table at the left side of the area to take a closer look. Double tap the round box on the table for a close-up view.
Drag the gold cover clockwise in a circular motion to lift it up.
Press the revealed button to unlock the round box lid.
Drag the lid of the box up to open it and view the puzzle inside.
Insert the three gold plate pieces into the matching spaces at the center of the broken disc.
To begin with, the correct section of the disc is already aligned with the lower left piece, so you can simply drag the piece up into the space to insert it.
Rotate the disc to the right so that the t-shaped space is adjacent to the t-shaped piece, then drag the piece into the space.
Turn the disc right one more time to align the final space with the final piece and complete the puzzle.
After the puzzle is solved the camera angle will shift to the side drawer at the bottom of the box. Tap and drag the handle towards the right to slide the drawer open.
Take the LENS inside the opened drawer, which will automatically repair the EYEPIECE.
The camera will shift again to the inside of the raised box lid. Tap the completed EYEPIECE at the right side of the screen to equip it.
A bright red fingerprint on the button in the lid will become visible. Tap it to open a hidden compartment and take the SHAPED METAL PIECE 1/2 inside.
Tap the EYEPIECE again to remove it.
Part 2
Pinch the screen to zoom out once.
Turn the camera to the opposite end of the table where you'll find an envelope. Double tap it to zoom in
Tap the letter inside the envelope to read it.
At the edge of the table directly underneath the envelope is the other SHAPED METAL PIECE 2/2. Tap it to add it to your inventory
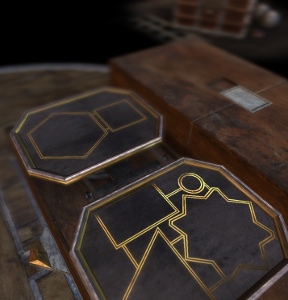
Zoom out twice to return to the full view of the room, then double tap the table on the right to view it more closely. From there, turn the camera right to face the front of the table and double tap the two hexagonal spaces on the surface to zoom in.
Put both SHAPED METAL PIECES into the two spaces by dragging from your inventory and releasing them over each space.
Two gold discs with a small round hole in the center will appear beside the hexagonal pieces. You can see an object through the hole, but it's too small to pull out. You'll have to make the hole bigger!
Turn the discs so that the larger cut-out sections meet in the middle, allowing the golden orb underneath the discs to pass through the hole.
Tap the BRASS SPHERE to add it to add it to your inventory.
Zoom out, then examine the letter you opened earlier beside the large compass at the center of the table.
Equip your EYEPIECE to view a hidden message at the bottom of the note.
Five red letters appear on the page: S E S W N.
Back away from the letter, then double tap the compass to examine it next.
Place the BRASS SPHERE into the space in the middle of the compass to begin a puzzle.
Turn the dial of the compass to point the diamond at the cardinal directions, North (N), South(S), East (E), or West (W) in the correct order.
Each time the diamond passes one of the directions, its letter will appear in the buttons underneath the eye. If you release the dial too early, the puzzle will reset.
Input the letters in the order you saw from the hidden message on the note: S E S W N, or, South East South West and North.
First turn the dial clockwise to South.
Next, turn the dial counter-clockwise to East.
Thirdly, turn the dial lockwise again to return to South.
Continue moving clockwise to West.
Lastly, turn the dial clockwise further to North.
Release the dial to submit your solution.
Once the puzzle is complete, take the MEDALLION from the opened eye in the middle of the compass.
Tap the MEDALLION in your inventory to take a closer look at it.
Using two fingers, simultaneously swipe the upper left and upper right sides of the medallion outward (in the directions indicated by the two arrows) to rearrange the shape of the medallion into a square.
Zoom out twice to view the room again, then go back to the table on the left. Double tap the square box at the center of the table to inspect it.
Place the now square MEDALLION into the matching square space at the top of the box to reveal the spot light.
Double tap the spot light to move behind it, then tap your EYEPIECE to equip it. Now you can drag the spot light to move it around
Sweep the light around the area until you locate a red rune. Aim the light at the rune to highlight it.
After each rune is found, the spot light will shift to the next location where you must find another rune.
When you've highlighted all three red runes the camera will shift automatically to the angel statue.
Turn the top half of the box in the statue's hand so that the two halves of the red pattern on the front of the box are aligned.
Next, the scene will transition to a group of floating red segments and your EYEPIECE will activate.
The goal is to recreate the pattern shown at the lower right corner that also flashes intermittently on the screen.
Turn the camera to face the stationary red lines on the wall. Now adjust the angle of your view so that the floating red segments are aligned with the red lines, creating the completed pattern and completing the chapter.
Chapter 2: The Ship
Part 1: Model Ship
Double tap the small model ship on the windowsill by the open window to move towards it.
Tap the note to the right of the ship twice to read the clue.
Note the capitalized words in the message that all describe three parts of the ship: The fore-mast, the crow's nest, and the cannons.
Zoom out from the letter, then double tap the first area named in the letter, the fore-mast (the mast nearest the front of the ship), for a closer look.
At the bow of the ship directly underneath the slanted fore-mast, you'll see a peg that appears to be missing something. Note that information for later, then zoom back out.
Next, take a look at the second area named in the letter: the crow's nest. Double tap the structure underneath the long nets at the middle of the second tallest mast to find the crow's nest.
At the side of the structure you'll see a misaligned diamond pattern. Rotate the two halves of the pattern until you find a split image of a knotted rope.
Adjust the top and bottom halves so that the rope image is connected to unlock a secret compartment in the crow's nest, then take the SMALL GOLD KEY inside.
Back up from the crow's nest, then investigate the last area mentioned in the letter, the cannons, on the deck of the ship.
Here you'll see four cannons, two of which are set on a track in the deck.
Move the left cannon to the end of the track by dragging it first to the left, then rotating it 90 degrees clockwise, then dragging it down.
Now move the right cannon by dragging it down, pulling it left, and then dragging it down again.
This will open three of the portholes at the side of the ship. The first two portholes contain a cannon, but the third porthole has a keyhole.
Use the SMALL GOLD KEY on the lock in the third porthole. Turn the key to open the lock, which pops out the back half on the starboard side of the ship.
Drag the side of the ship outwards to look inside.
Take the STRANGE SHAPED KEY from the middle deck.
Between the middle and lower deck is a mechanism with a red gem half on the left side and an empty slot for another half on the right side. Drag the gem on the left all the way to the middle of the mechanism.
This will unlock the treasure chest and cause the camera to shift to that area automatically.
Posted by: Trinn |
December 15, 2013 7:25 PM
|
December 15, 2013 7:25 PM