

![]() Hiversaires is a game about not knowing. Not knowing where you are, or why you're there. Not knowing what those markings on the wall mean. Not knowing where you're supposed to go, or how to get there. But eventually, piece by piece, you start to figure things out.
Hiversaires is a game about not knowing. Not knowing where you are, or why you're there. Not knowing what those markings on the wall mean. Not knowing where you're supposed to go, or how to get there. But eventually, piece by piece, you start to figure things out.
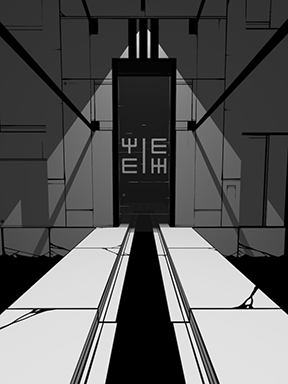 Created by Aliceffekt, Hiversaires is a first-person point-and-click adventure that drops you cold into a dark, mysterious, monochrome world full of cryptic symbols and machines. You begin on a white stone path pockmarked by abstract trees in a pool of blackness. The first thing in front of you is a white block displaying two unknown symbols on top of each other. To your left is a terminal with a different unknown symbol. Behind the block is a screen showing a circle with four symbols like a compass. Tapping the screen causes the image to change, but what is the significance of it? What purpose does any of this have? That's for Hiversaires to know and for you to find out.
The design of Hiversaires is minimalist in form and function. There are no menus, no inventories, no text, no heads-up display and no clues — save for some subtle cues given at the bottom of the screen. The controls are aptly simple. Tap the center of the screen to move forward, and tap the sides to turn left or right. Anything you need to interact with will always be in the center of your field of vision, so there's no worries about tapping on random areas of the screen to move into an awkward position in order to access something that seems out of reach.
 Analysis: When you know nothing, everything you discover is an achievement. Like Myst or Kairo, Hiversaires is a game about exploration and discovery that makes no attempt to lead you, instead letting you come to terms with the world around you in your own time and on your own terms. Everything that can typically bog down adventure titles — pixel-hunting, frustrating item combining, cartoon logic — is stripped away, allowing the game to focus on the puzzles and the atmosphere, both of which are exceptional.
For those who like more information with their games, the stark simplicity of Hiversaires can be disconcerting. Akin to the old adventure games of yore, making your way through the labyrinthine settings requires taking notes — maybe even drawing yourself a map — and taking in full account of your surroundings. But for those who live for the thrill of discovery, who eschew hand-holding for the opportunity to walk into the darkness alone, Hiversaires is a breath of fresh air.
Conceptually and aesthetically beautiful, Hiversaires is one of the finest adventure games to come out in quite a while — certainly one of the best on iOS, if not the best. All of the game's mysteries draw you in, and unraveling them bit by bit in a world that becomes curiouser and curiouser with each turn is enthralling. All of the puzzles are well-constructed out of pure logic, and to say anything more about them would be a disservice. If wandering through a cryptic environment is your cup of cocoa, this is one title you can't pass up.
NOTE: This game was played and reviewed on the iPad 2. Game was available in the North American market at the time of publication, but may not be available in other territories. Please see individual app market pages for purchasing info.


Walkthrough Guide
(Please allow page to fully load for spoiler tags to be functional.)
Hiversaires Walkthrough
Symbol legend (READ FIRST!):
In Hiversaires, the puzzles largely revolve around a series of alien symbols. Since most of the symbols have no English counterpart, here's a list of what each relevant symbol vaguely looks like, and what it will be referred to in the walkthrough.
Looks like: A capital letter E
Referred to as: E symbol
Looks like: A fork with three prongs on the top
Referred to as: Fork symbol
Looks like: A six on its side (kind of)
Referred to as: 6 symbol
Looks like: An upward pointing arrow
Referred to as: Arrow symbol
Looks like: A capital letter H with an extra vertical line in the middle
Referred to as: H symbol
Looks like: An upside-down 4
Referred to as: 4 symbol
Looks like: A window
Referred to as: Window symbol
Looks like: A capital T with an extra horizontal line through the center
Referred to as: T symbol
General hints and tips:
Fuses:
Fuses are the only thing to collect in Hiversaires. They are glowing sticks and they can be placed in fuse boxes to open doors. The grey bars in the lower left show how many fuses you are carrying. If the area flashes red, it means you are standing in front of something that is fuse-powered.
Activating Symbols:
You can activate up to two symbols using the terminals with the round screens found throughout the game. The lower right side of the screen shows which symbols are active at any given time. Certain machines and doors will not open or activate unless you have the correct two symbols active.
The Circle:
The Circle is a circular hub that connects several areas of the game. There are four doors around the Circle corresponding to four symbols: Arrow (up), 4 (left), H (right), 6 (bottom). The upper door (the Arrow symbol) is always open and leads to an impassable gap. The remaining three can be locked or unlocked via Circle terminals which display the four symbols around (what else) a circle. There are several Circle terminals in Hiversaires; they allow you to unlock two doors at a time corresponding to whichever two symbols are lit.
Walkthrough:
Part 1: The first fuse
Move forward to the circular walkway. Note the symbols on the white block in the center.
A new path will open if you return with the E and Arrow symbols active.
Move left around the block, then turn left so you're facing the round terminal displaying the Fork symbol. Tap the terminal to activate the symbol — you should see it appear in the lower right side of the screen.
Continue around the walkway until you are at the back of the block. Turn right to view the rectangular screen. This is a Circle terminal. (See general hints and tips for more info.) Tap the screen until the left and bottom (4 and 6) symbols are lit.
Turn around and walk towards the door. Turn left and move forward around the door until you are facing a tall box. This is a fuse locker. Tap the box to open it and reveal a fuse. Tap the fuse to obtain it.
Turn right so you are facing a round port with three horizontal lines on it. This is a fuse box. Tap the fuse box to open it, then tap again to put the fuse in.
Go back to the door. Tap it to open it and walk through.
Part 2: The eye and the bridge
SYMBOLS ACTIVE: Fork, none
CIRCLE DOORS OPEN: 4 (left), 6 (bottom)
After stepping through the first door, turn left, open the fuse box and take the fuse. (Note: This is the same fuse that you put in on the other side of the wall.)
Turn back right and move forward one pace. Turn right again to face the door. This door leads to the Circle. Go forward, open the door and enter the Circle.
Turn right and move forward until you reach the first door on your right, the one with the symbol that looks like a 6 on its side. Turn right to face the door and tap it to open it.
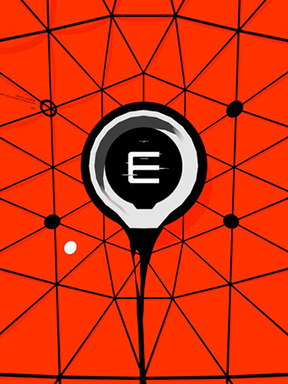
Move forward until you hit the wall, then turn left and move forward until you reach the circle on the wall with the E symbol above it.
Turn left, open the fuse box and put your fuse inside. Turn back right. Tap the circle and it will open, revealing an eye. Tap the eye to enter it and go into the red room.
Once inside the red room, turn right. Activate the terminal with the E symbol. You should now have the E symbol and the Fork symbol active.
Turn right twice to find another Circle terminal. Set it so the left and right (4 and H) symbols are lit. Turn left and tap the circle to exit the eye.
Once outside the eye, turn right and remove the fuse from the fuse box. Then turn around and walk up the stairs.
At the top of the stairs, turn right. Move forward once, then turn left to face the bridge. (Or, if you want, move forward and turn right to view the map on the wall, which gives a rough idea of how all the various areas are connected.) Move forward across the bridge and up to the door. Note the symbols on the door.
The door shows two pairs of symbols: The Fork and the E on the left, and the E and H on the right. This indicates that in order to open the door, you need one of these pairs of symbols to be active.
Tap the door to open it and move forward into the next area.
Part 3: Symbolism
SYMBOLS ACTIVE: Fork, E
CIRCLE DOORS OPEN: 4 (left), H (right)
Having just entered the door at the end of the bridge, move forward down the stairs until you reach the edge and turn left. Move forward twice and turn left to face the fuse box. Open it and insert your fuse. Turn right and open the door.
Move forward into the next area, then turn right and go forward three paces — almost to the wall at the far end. Turn left and move forward once. Turn left again and you should be in front of another fuse locker. Open it and remove the fuse.
Turn around and move forward, then turn right and move forward to reach the H symbol door that leads back to the Circle. Open the door and enter the Circle.
Turn either left or right and move forward four times to reach the door with the 4 symbol on the opposite side of the Circle. Open the door.
Move forward and left to reach the fuse box next to the door and put your fuse in. Turn left and open the door, re-entering the starting area. Move right around the circular path to reach the terminal with the Fork symbol and tap it to deactivate the symbol — you should now only have the E symbol active.
Turn back and retrace your steps through the door, forward past the fuse box (leaving the fuse in this time) then right through the door with the Arrow symbol leading to the Circle.
Enter the Circle and move around to reach the door with the H symbol on the opposite side. Open the door.
Move forward one step into the room then turn left and move forward all the way to the end of the hallway. Turn left again and open the door.
Move forward three times, then turn right. Move forward another three times then turn left. You should be facing a circle containing the Arrow symbol — tap it to activate the symbol.
Part 4: White block revisited
SYMBOLS ACTIVE: Arrow, E
CIRCLE DOORS OPEN: 4 (left), H (right)
From the terminal with the Arrow symbol, turn left and move all the way forward. Then turn left and go forward through the door. Turn right and go down the hall all the way forward, then turn right again and enter the door into the Circle.
Head around to the opposite side of the Circle and go through the door with the 4 symbol.
Go forward to the wall then turn left and go forward through the door, returning to the starting area once again.
After stepping through the door, head right around the door and remove the fuse from the fuse box next to the fuse locker.
Move back to the Circle terminal on the other side of the white block and tap the screen to change it so the left and bottom (4 and 6) symbols are lit.
Now move all the way around to the other side of the circular path, then turn to face the white block which shows the E and Arrow symbols. Tap the white block to move closer and then tap again to make the symbols glow. Tap the glowing symbols and you'll be transported to a new area.
Once in the new area, move forward and then right to find another fuse box. Open it and put in your fuse.
Turn left and go through the door. Go forward down the hall, turn right, move forward to the wall, turn right and go forward to the end of the other hall. Turn left and open the door, then move forward twice and right thrice and turn left to face the Arrow terminal. Tap it to deactivate it.
With the Arrow deactivated, retrace your steps to go back to the new area. (Left to the floor edge, left through the door, right down the hallway, left across to the wall, then left down the other hallway and through the door.) Once through the door turn right, move forward, then turn right again to face the H symbol terminal. Tap to activate it — you should now have the H and E symbols active.
Part 5: Turning the handle
SYMBOLS ACTIVE: H, E
CIRCLE DOORS OPEN: 4 (left), 6 (bottom)
From the H symbol terminal, you're going to go back to the area containing the Arrow symbol terminal. (Right to the fuse box and then left through the door, forward down the hallway, right to the wall then right down the other hallway, finally left throughout the door.)
Once through the door, turn right and remove the fuse from the fuse box. Turn back left and move two paces forward, then turn right and go forward up the stairs.
Go forward through the door and across the bridge. Head right then left down the stairs to reach the fuse box next to the eye. Open it and put your fuse in.
Turn right and enter the eye. Once inside the red room, turn right and deactivate the E symbol terminal. You should now only have the H symbol active. Turn right and exit the red room.
Once out of the eye, move forward once and turn right. Move forward to reach the 6 symbol terminal and activate it — you should now have the 6 and H symbols active.
Move left to the Circle door and go through it, then move left to reach the door with the 4 symbol and go through it. Move forward to the wall, then turn right and move forward one pace, then turn left and move forward one pace. Turn left again and you should be facing a device displaying two glowing symbols (6 and H) and a handle with a Window symbol. Tap the handle to turn it.
Turn back around and head back to the Circle. Once through the door, head right to the 6 symbol door. Go through the door then turn left, move forward and turn left again to face the 6 symbol terminal. Tap it to deactivate it.
Turn around completely then move forward and left to face the eye. Enter the eye and turn right inside the red room to face the E symbol terminal. Activate it.
Turn around completely to face the Circle terminal. Tap it until the left and right (4 and H) symbols are lit. Turn left and exit the red room.
Once out of the eye, turn right and remove the fuse from the fuse box.
Part 6: Backtracking and finale
SYMBOLS ACTIVE: H, E
CIRCLE DOORS OPEN: 4 (left), H (right)
After removing the fuse from the fuse box beside the eye, turn around completely and head up the stairs. Go across the bridge, through the door then down the stairs on the other side.
Turn left and walk up to the door, then turn left and insert the fuse into the fuse box. Turn back right and go through the door, then right down the hallway, left to the wall, then left down the other hallway and through the door. Move right to the H symbol terminal and deactivate it.
Now head back through the door and go back the way you came (down the hallway, right to the wall, right down the other hallway and left through the door) and go forward and right to reach the Arrow symbol terminal. Activate it — you should now have the Arrow and E symbols active.
Retrace your steps again to get back to the room with the H terminal. (Door, hallway, hallway, door. I'm sure you understand the drill.) Once inside the room, turn left and remove the fuse from the fuse box.
Fuse in hand, turn right and head to the wall with the large Arrow and E symbols. Tap the wall to make the symbols glow and transport yourself to the starting area.
Walk around the circular walkway and head to the fuse box to the left of the door. Put your fuse in and head back through the door, just like you did at the beginning of the game.
Once through the door, turn left and remove the fuse, then turn right and head forward and right to the Circle.
Head to the opposite side of the Circle and walk through the H door. Go all the way forward and turn right to face the fuse box you haven't used yet. Insert your fuse.
Turn right and walk forward up to the door, then turn right, head down the hallway and go left through the door. Once through the door turn right and remove the fuse from the fuse box.
Turn back left and head all the way forward to the wall. Turn right and go forward two paces, then turn left to face the door with the Window symbol. Go through the door.
Turn right and move forward, then turn right to face the door with the T symbol. Go through the door.
Move forward to face the final fuse box. Place your fuse inside. Turn right and move forward into the blackness.
Congratulations, you've beaten Hiversaires!
Thanks to Kinetikai for the walkthrough!
Posted by: Mike |
May 28, 2013 10:54 PM
|
May 28, 2013 10:54 PM