

The Promised Land
Platform: Windows
![]() In this age of over population, it's hard not to daydream about having a nice little town all to yourself. But unless you're a billionaire, chances are the only way to experience the feel of colonization is through the gracious world of casual gaming. The Promised Land from Boolat Games is a pleasant simulation building and strategy game similar to Virtual Villagers that hands you a piece of uncharted land ready to be plundered. As an adventurer, you're off to find the elusive spring of eternal happiness and build yourself a town that could rival even the most advanced of civilizations!
In this age of over population, it's hard not to daydream about having a nice little town all to yourself. But unless you're a billionaire, chances are the only way to experience the feel of colonization is through the gracious world of casual gaming. The Promised Land from Boolat Games is a pleasant simulation building and strategy game similar to Virtual Villagers that hands you a piece of uncharted land ready to be plundered. As an adventurer, you're off to find the elusive spring of eternal happiness and build yourself a town that could rival even the most advanced of civilizations!
 Just after you land in this new, uncharted world, you get to work utilizing your four little helpers to do all of your bidding. Simply click, drag and drop villagers to assign tasks, bumping against the edge of the screen with your cursor to scroll across the map. There are a number of different professions to specialize in, including farmer, worker, builder, artisan, and scientist. A farmer will always be more productive when farming, for example, whereas a scientist will fumble a bit when set to a task like mining. Specializing in one area means your people will get more work done at a faster pace, so naturally it's a good idea to keep workers as focused as you can.
While watching over your minions, keep track of their hunger, happiness, and health, three stats that slowly decrease over time. Villagers are pretty smart and will take care of most major problems as they arise, but you can always click and drag them around to speed things up a little. As your colony expands, you must build houses to make sure each and every person has a place to call home. Homeless villagers will stand around listlessly, which not only gets in the way, but it doesn't help you obtain your goals, either!
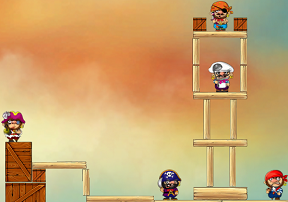
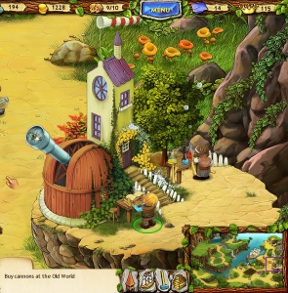 Buildings are also a part of The Promised Land, and over the course of the game, you'll work with a number of different types of structures. Most require you study a topic at the laboratory before you can build them, and even when you have the technology, it always costs a certain amount of resources to get something built. Fortunately, earning resources is far from a boring affair. You can either complete the tasks listed at the bottom of the screen, or send out your ships to barter for goods with other colonies. But beware: pirates are all over the place, and they'd love nothing better than to get a hand or two on your stuff! Using your ship's cannons, you can fight them off using an Angry Birds style mini-game, pulling back the fuse to knock pirates from their perches.
Analysis: Much like the Virtual Villagers series or the more overlooked Floating Kingdoms, The Promised Land is a game that will have you looking at the clock and thinking, "Where in the world did my day go?" There's so much going on that there's never really a time when you can sit back and feel like you're adequately stockpiled on supplies. There's always this item or that item that needs to be made or collected, this building or that building that needs to be built or upgraded. But, you know, since you're low on resources, you'll have to do a few trading trips first, and we all know what that means: pirate cannoning time!
 As with most casual sims, The Promised Land is all about managing the small details as you work towards a greater whole. The trading aspect is a notable departure from the usual formula, and it really sets this game out from the other offerings in the crowded genre. Combine that with a colorful visual presentation, characters that are filled with personality, and a poppy sort of active soundtrack and you've got one of the most fulfilling and varied sims on the market.
Clearly, any fan of resource management games will be squealing with glee at this new (and highly addictive) addition to the genre. Even if you're new to sims, you can easily pick up the basic ideas and quickly tackle that pesky quarry or garden. Here's to celebrating your summer right and having a little piece of a world to call your own!
![]() Windows:
Windows:
Download the demo
Get the full version
![]() Mac OS X:
Mac OS X:
Not available.
Try Boot Camp or Parallels or CrossOver Games.


Walkthrough Guide
(Please allow page to fully load for spoiler tags to be functional.)
The Promised Land Strategy Guide
General Tips
Workers have likes and dislikes for tasks, seen in the worker screen at the top. If you assign them to tasks they dislike, their morale will drop. Improve morale by allowing them to stop for conversations with each other, if needed.
A good way to increase reputation early on is through selling goods during high demand for them. You'll get a popup notification when a good is in demand, and stocking your ship with whatever item is needed will earn extra coins and reputation when you sell the items. Some quests also increase rep.
You get payment for the goods you sell as soon as you send the ship, not once it returns. This means that if you need money or reputation in a hurry, you don't need to wait for the ship to return before you can spend it.
Buy new workers early on in the game, as soon as you have space for them. You don't need to buy the expensive guy; just make sure you have plenty of people collecting wood, mining, etc. Extra workers won't do anything while they don't have housing, but they'll wait around until you have room for them.
Workers in a job they enjoy will give you a big thumbs up or a bow when you assign them. Their morale will stay high, and they're quicker at the job, so try to match workers with jobs they like. The worker screen will also tell you the job they like most, and which they dislike the most.
Need goods in a hurry? Workers walking back to your town hall with items can be dragged to speed things up!
Put as many workers as you can spare in the laboratory when you first research it. Research points are needed for research (of course), which is essential for being able to build new buildings. You can't progress without these, so research away! Early on, its good to have two or three researchers in the lab, and increase it to 5, including a Master of All, when you can.
Once research on every tech is complete, remember to reassign your researchers to other tasks.
If you save your research points and put them into construction first, rather than nature as the game suggests, you'll be able to build more housing—and therefore employ more workers sooner.
After researching construction, you can also build more rooms in your houses, allowing you to have more workers. Do this early on for maximum productivity!
Once you upgrade the forge, you can make tools—which are needed for clearing fields, amongst other things. You can only make one type of item at the forge at a time, though, so build what you need.
Once you've cleared the reeds, workers may get injured as they do tasks. They'll need a hospital to recover, which should be kept stocked with healing herbs. You can grow healing herbs in the lower field, but to start with there's a small rock on the right to harvest them from.
The kitchen is essential for feeding your workers. Putting a Master of All in it might be a good idea to ensure a quick turnover on food. A fully upgraded kitchen can make a lot of food, but make sure it doesn't run out of stock.
Remember that when you hire more workers, you'll be using more food. Increase food production accordingly.
The final two ship upgrades are the least important. Leave them until the end—they unlock more pirate missions, but the money and resources are better spent on other things early on.
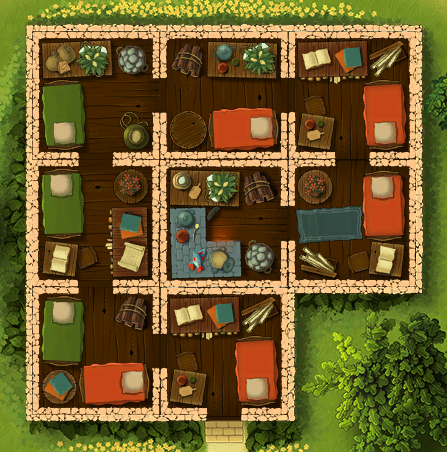
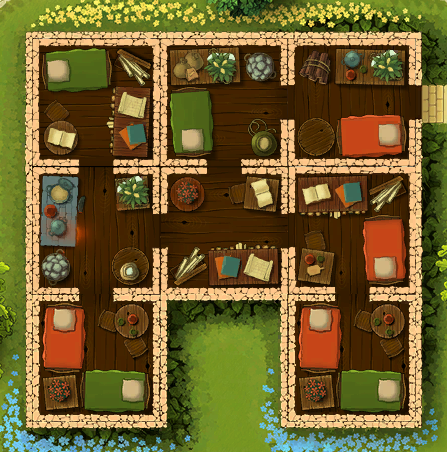
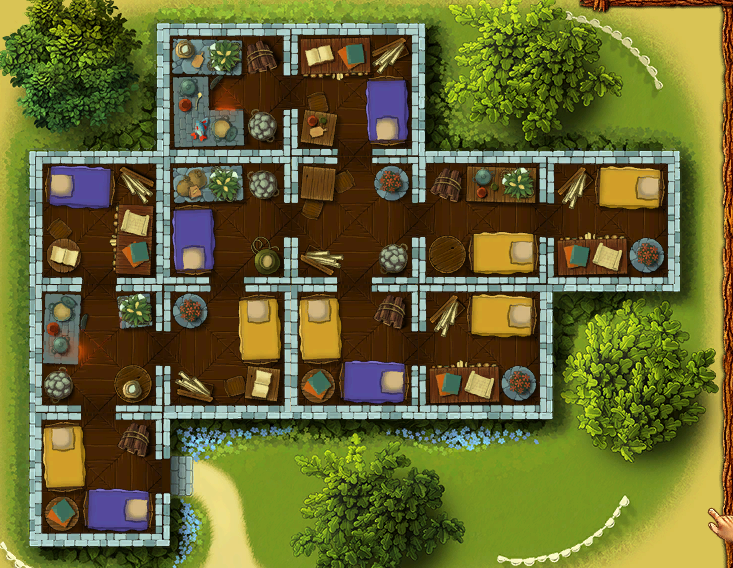
House Puzzles
The screenshots show the correct way to arrange the rooms in each house to allow the maximum number of occupants to move in.
Small House: Screenshot
Medium House: Screenshot
Forest House: Screenshot
Lake House: Screenshot
Manor House: Screenshot
Tasks
The order that Tasks are assigned to you can alter depending on what you've already built. If you have 5 tasks waiting, no more will trigger until one of them is completed.
Gather 5 units of food: Just let your workers gather food. Reward: 10 coins.
Chop 5 units of wood: Assign workers to chop wood in the same way as food. Reward: 15 coins.
Build a house: Follow instructions onscreen to build a house. Reward: 25 coins and a pickaxe.
Make the first upgrade to the Town Hall: Click the Buildings menu, choose Buildings, then click the Warehouse upgrade arrow. Reward: 5 food, 5 wood, 40 coins.
Remove the stone obstruction: Mine the stone to the north within 5 minutes. Put as many workers as you can spare on the task to speed things up. Reward: 1 farmer, 10 food, 30 coins, plus 10 stone for completing within the time limit.
Build a well. Build from the buildings menu again. Reward: 1 water, 30 coins.
Repair the iron mine: The mine is at the top, and you have a 5 minute time limit. Reward: 5 iron ore, 50 coins, plus 5 iron ore time bonus.
Clear the field: Use the farmer to clear the upper field. Reward: 10 stone, 40 coins.
Find 5 treasures: Use a settler to collect the treasures left around the area. Reward: 5 coins, 1 treasure, 1 compass.
Build a forge: Build a forge from the buildings menu. Reward: 3 nails.
Repair the ship: Repair your ship in the same way you'd harvest crops. You'll need nails from the forge in order to make repairs. Reward: 100 coins.
Sell some goods to the Old World: Click your newly repaired ship for a tutorial on how to do this. Make sure you've collected all the treasure you can first, or you may need to make several trips or sell other items as well. Reward: 50 reputation, 100 coins.
Buy cannons from the Old World: Buy some cannons for the ship. This mission activates after the first pirate attack on your ship,and you'll need 150 reputation before you can actually buy the cannons. Reward: 50 reputation.
Build a laboratory: Build a lab. Do so from the buildings menu as usual. You need scientific equipment to do this, which can be bought from the Old World. Reward: 70 reputation, 10 research.
Build a kitchen: Build a kitchen. Reward: 20 reputation, 30 food, and the agriculture screen. The kitchen unlocks early on, and you can (and should) build it without waiting to be instructed to do so. Once the kitchen is built, you can start to plant other crops, which can be cooked into more food.
Build a Hospital: Build a hospital from the buildings menu. You can't do this without researching Nature 1 (research is unlocked by building the lab). Reward: 5 healing herbs, 100 reputation.
Build a fort: Build a fort to protect the colony against pirates. This unlocks at some point after you buy cannons for an earlier quest. Reward: one artisan, 200 reputation.
Upgrade the forge: Upgrade the forge from the buildings menu. Requires level 1 industry. Reward: 7 tools, 100 reputation, plus upgraded forges can make tools.
Build a fishing hut: Build a fishing hut from the Buildings menu. Reward: 15 fish.
Upgrade the ship: Once you've researched Sailing 1, you can upgrade the ship from the buildings menu. Reward: 120 reputation and 200 coins, and one extra cargo slot on the ship from upgrading.
Defeat 3 pirate captains: Play and win the first three missions from the fort. You can't do this if the ship is out. Reward: 300 reputation, 500 coins.
Build a school: Build a school from the buildings menu. Requires level 2 construction and an upgraded lab. Reward: 150 research points, 200 reputation.
Clear the thicket of reeds: Clear the thicket within 8 minutes 20 seconds. You need a hospital to activate the missions. Reward: 100 coins, plus access to the next zone. Time bonus: 10 sugar cane.
Make 10 units of nails for natives: This is a timed task which activates as soon as you finish clearing the reeds. Assign a few more people to the iron mine and the forge to get the nails produced quickly. Reward: 100 reputation, 6 silver products. Time bonus: 3 silver products.
Upgrade the ship again: Keep upgrading your boat. Reward: 200 reputation, 300 coins.
Clear the second field: Once you have tools, you can assign someone to clear the second field. Once its clear you'll be able to plant crops in it. Reward: 5 healing herbs, 25 stone.
Upgrade the forge to its highest level. This requires level 2 industry, plus precision machines bought from the Capital. Reward: 10 gears, 300 reputation.
Sell 30 units of sugar cane. This is a timed mission. Assign some workers to harvest sugar cane, found where the reeds that you cleared earlier were, if you need to. Note that the mission is to sell the sugar cane, not to harvest it—if you already have 30 units, just load it onto the boat to complete the task. Reward: 250 coins, plus 80 coins time bonus.
Build a sugar plant: A sugar refining plant, that is. Reward: 120 reputation, 10 sugar.
Collect 10 units of healing herbs: This is a timed mission. Collect the herbs within 6 minutes 40 seconds. Reward: 100 research points, plus a 50 research point time bonus.
Build a hanging bridge: Build a bridge to reach the next zone. Reward: an artisan, 50 reputation, 100 coins, plus access to a new zone.
Teach a farmer and a worker at the school: You'll need the school for this, of course, plus two apprentices. Drop them into the school and set one to study farming, and one to study workering. Reward: 200 reputation, 300 research points.
Clear the plateau: Set a farmer to work clearing the plateau on the top left. You'll need level 3 agriculture for this. Reward: 250 reputation, 12 coffee.
Build a rope bridge: Build a rope bridge from the buildings menu. Reward: 500 reputation. The rope bridge allows food to be transferred to the plateau and goods to be sent in the opposite direction, saving workers a long walk back.
Explore 3 ruins: Use the archaeology research to explore ruins, as you would with treasure. Reward: 1 stone slab, 1000 research points.
Upgrade the small house: Build all the rooms in the small house and connect them together. Reward: 150 reputation, 200 coins.
Defeat 3 pirates to save the chief's daughter: Find three new missions in the fort and complete them. Reward: 1 hatchet, which allows you to pass through jungle unharmed, and 500 coins.
Build a weavery: Build a weavery for your settlement. Reward: 200 reputation, 15 cloth.
Build a woodcutter shed: Build a shed near the exotic forest in order to harvest wood from the trees there. Reward: 150 research points, 10 magic wood.
Make 15 units of machinery: This is a timed quest. You'll need people working in the forge (making the gears) and in the iron mine (to stock the forge). Reward: 800 research points, plus a 200 research point bonus if you manage it in time.
Sell 25 units of silk thread: Just what it says—load them onto the boat and sell them. Reward: 150 reputation, 300 coins. Time bonus of 150 coins.
Make the second upgrade to the town hall: Upgrade the town hall again. You need level 3 construction for this. Reward: 1 Master of All, 1000 reputation
Build a lighthouse: Requirements are the stone bridge, the powerful light, and rank 3 sailing. Reward: 400 reputation.
Upgrade the sugar plant: You'll be able to make candy once it's upgraded. Reward: 15 candy, 300 reputation.
Build a bridge: Build the bridge to open up the plateau. Reward: 100 reputation, 200 coins.
Upgrade the weavery: This will allow you to produce silk. Reward: 12 silk, 300 reputation.
Make the third town hall upgrade: Upgrade the town hall to max. Reward: 1 sundial piece, 2000 reputation.
Build a watermill: Reward: 250 reputation, 10 flour.
Repair the ancient stairway: Repair the stairs up from the plateau, to reach the final zone. Reward: 500 research points, 5 gold items.
Clean the silver mine: Repair the silver mine at the top of the map. Reward: One Master of All, 350 crowns, 30 silver ore.
Build a metal-smiths shop: Build a shop to forge silver and gold in. Reward: 500 reputation, 8 silver products.
Upgrade the watermill: Reward: 7 pepper, 350 reputation.
Sell 20 exotic wood: This is a timed quest. Just make sure you have enough workers in the exotic forest to harvest the wood in time. Note that the quest is to sell it (with the ship), not just harvest it. Reward: 250 reputation, 500 coins, and a time bonus of 200 coins.
Make 12 units of sugar for the natives: This is a timed mission. Make new sugar products within the time limit. Reward: 200 reputation, 15 silver products. Time bonus of 4 silver products.
Collect 36 units of corn for the natives: This is a timed mission. You have 20 minutes to grow and harvest 36 new units of corn. Convert your field to grow all corn for a short time, and add workers to it. Reward: 400 reputation, 12 silver products. Time bonus 6 silver products.
Make 10 units of linen cloth for the natives: This is a timed mission and can trigger at the same time as the corn one, making it tricky to assign enough workers to both. Remember this is for linen cloth, not linen itself—so you'll need workers harvesting linen on the field, and in the weavery making it into cloth. Reward: 250 reputation, 25 exotic wood. Time bonus 10 exotic wood.
Sell 35 units of coffee: This is a timed mission—but easy if you have a stockpile of coffee already. Remember you need to sell it using the boat, rather than simply harvesting it it. Reward: 150 reputation, 600 coins, plus a 200 coins time bonus.
Collect 30 units of tea: Timed mission. Grow and harvest the tea. Reward: 300 reputation, 50 gold ore. Time bonus 20 gold ore.
Make 20 units of candy: Timed mission. Harvest sugarcane and use the sugar mill to make it into candies. Reward: 1 gold leaf, 15 silver products. Time bonus 5 silver products.
Gather 50 healing herbs: This mission is timed. Put a lot of workers on the lower field and convert it all to healing herb production. Reward: 1 Amulet of Spirits, 1000 coins. Time bonus 300 coins.
Make 20 units of spices for the natives: This mission is timed and can trigger before you're actually able to make spices. Upgrade nature research if you needed to, then plant spices on the plateau and harvest them quickly. Reward: 1 sundial piece, 15 gold products. Time bonus 5 gold products.
Build a Fluffer farm: You need the Fluffer Food (gold leaf) for this. You can shear Fluffers here. Reward: 400 reputation, 20 Fluffer wool.
Clear the goldmine: Once you have the amulet of spirits, you can repair the goldmine to mine gold in. Reward: 1 sundial piece, 500 reputation, 20 gold ore.
Upgrade the weavery to its limit: Max out the weavery upgrades. Reward: 18 wool, 400 reputation.
Sell 25 units of silk cloth to the capital: If you already have the silk cloth, this is easy to do. It's a timed mission, so get the weavery stocked up quickly if you need to. Reward: 120 reputation, 350 coins. Time bonus 175 coins.
Sell 24 units of pepper: This is a timed mission, but if you're well stocked with peppers, its simple. Remember to sell the peppers using the ship. Reward: 180 reputation, 400 coins, 200 coin time bonus.
Produce 30 units of flour: This is a timed mission. Reward: 200 reputation, 8 gold products, 8 silver products. Time bonus 200 reputation.
Upgrade the ship to max: Reward: 600 reputation.
Defeat 3 pirates to gain their treasure: Play the missions from the fort and refer to the pirate mission guide below if you need to. Reward: 300 reputation, 20 gold products.
Defeat three pirates to eliminate the pirate king: Play the last 3 pirate missions from the fort and refer to the pirate mission guide below if you need to. Reward: 1 sundial piece, 1000 reputation, 40 gold products.
Make 30 units of wool cloth for the natives: Wool from the Fluffer (llama creatures) is used in the upgrade weavery to make wool cloth. The mission triggers as soon as you upgrade the weavery to max, so stock up on wool first for an easier time with it. Reward: 1 sundial piece, 15 gold products. Time bonus 5 gold products.
Explore the Ancient Temple: Repair the temple and see what's inside. Reward: 1000 reputation and 1000 gold—not that you'll need either this late in the game!
Sell 10 products: Load 10 gold products onto the boat to sell. This is a timed mission, but pretty easy if you don't sell everything as soon as its made. Reward: 200 reputation 700 coins time bonus 300 coins
Sell 5,000 gold products(!): This is a timed mission. Don't worry though, the mission name and description is wrong and you're actually looking for 5,000 REVENUE form gold products, which means you'll need to sell about 77. Reward: 1000 reputation 2000 coins 1000 coin time bonus.
Solve the final puzzle: You will only be assigned this task if you don't immediately complete the temple puzzle. To claim the reward, you'll need to continue your game after the credits roll. Reward: 10,000 coins.
Final Temple Puzzle
Rotate the pieces around until the jewels are all in the quarter matching their color.
There's no quick solution to this—just push gems to the outside edge of the board, and move them round until you can push them into the middle.
You can skip the puzzle anyway.
Missions
Missions are unlocked after buying the fort. Click it to bring up the mission select screen. Upgrading your boat unlocks more missions, for a total of 12. All the missions use the same physics style minigame.
You can replay missions for a small coin bonus, but the main reward is only given once.
New Cannon: Play the Angry-Birds-style mini game against some pirates. One well placed shot should take out the center and everything around it, then use one more ball to clear up any remaining pirates if needed. Reward: 150 coins, 50 reputation.
In hot pursuit: The boat is bigger this time, with more pirates on board. Use the same strategy as before.
Answering an attack: 3 boats this time. Take them out one at a time; they're too far apart form big chain reactions. Reward: 200 coins, 90 reputation, 10 gold.
The Quest Continues: One boat in front of some cliffs. You can bounce a shot off the smaller boat and under the cliffs to knock out the supports of the structure the other pirates are on. Reward: 300 reputation, 100 coins, 10 gold ore.
The Lair of the Beast: The pirates are spread out along 5 small rocks. You can clear the first two with one hit to the first structure, causing a small chain reaction, and the second two the same way. One more shot to the pirates at the end will still award a 5 star rating. Reward: 350 coins, 130 reputation, 10 gold ore.
Rescuing the princess: This is made up of two structures, but across 4 different rocky islands. Aim high and knock the wooden barrel off to the right to destroy everything on the far right island in one go, then take out the closer structure with a more traditional shot to the center. Reward: 400 coins, 150 reputation, 8 silverware.
Lost Tides: Clear the small structure in front of the ship first, then aim high so that the ship collapses and knocks the pirates at the back off as well. Reward: 450 coins, 30 silver ore, 8 silver products.
The Leviathan: There's a horizontal plank in the center of the structure that will take a big part of it out if you hit it with a ball. Aim for that first, then clear up what's left. You have fewer cannonballs this time than in earlier missions, so line up your shots carefully. Reward: 500 coins, 30 gold ore, 8 gold products.
Port Attack: The difficulty here is from how spread out the mission is. The center structure is covered with barrels, which roll and take out most of the level, so aim for that first. Reward: 600 coins, 12 silver products, 10 gold products.
The Swashbuckler: This is a big structure and solidly built. Aim near the back at first, because the barrels in the middle will roll right and do some of the work for you. Reward: 700 coins 300 reputation, 20 silver products.
Back to back: Starting with the middle ship may make this one a bit easier. The ships are all packed with heavy objects, so chain reactions are important. Reward: 800 coins, 400 reputation, 40 gold ore.
Payback time: The central tower is quite difficult to topple directly from cannonball hits. Aim to knock the other pillars into it, or use it to push other pillars out the way if you prefer. Reward: 900 coins, 500 reputation, 15 gold products.
Achievements
Researcher Bronze: Explore 2 zones.
Researcher Silver: Explore 4 zones.
Researcher Gold: Explore 6 zones.
Colonist Bronze: Reach a population of 12 people.
Colonist Silver: Population of 25 people.
Colonist Gold: 50 people in your settlement.
Fisher Bronze: Catch 50 fish.
Fisher Silver: Catch 100 fish.
Fisher Gold: Catch 250 fish.
Farmer Bronze: Harvest plants.
Farmer Silver: Harvest 750 plants .
Farmer Gold: Harvest 1500 plants.
Worker Bronze: Collect 100 wood and 100 stone.
Worker Silver: 250 wood and 250 stone.
Worker Gold: 500 wood and 500 stone.
Merchant Bronze: Sell items.
Merchant Silver: 800 items sold.
Merchant Gold: 2000 sales.
Expert Bronze: Complete 5 timed tasks within the time limit.
Expert Silver: Complete 10 tasks on time.
Expert Gold: 15 tasks finished on time.
Scientist Bronze: Research every tech to level 1.
Scientist Silver: Research every tech to level 2.
Scientist Gold: Level up every tech to level 4.
Reputation Bronze: Collect 1500 total reputation.
Reputation Silver: 3000 reputation total.
Reputation Gold 6000 reputation total.
Town Hall Bronze: Level 2 Town Hall.
Town Hall Silver: Level 3 Town Hall.
Town Hall Gold: Level 4 Town Hall
Confectioner Bronze: Collect 75 candies.
Confectioner Silver: 130 candies.
Confectioner Gold: 200 candies.
Silk Bronze: Collect 40 silk.
Silk Silver: Get 80 silk.
Silk Gold: Get 150 gold.
Spice Bronze: Collect 40 spices.
Spice Silver: 80 spices.
Spice Gold: 150 spices.
Metalsmith Bronze: Make or find 40 gold products.
Metalsmith Silver: 80 gold products.
Metalsmith Gold: 150 products.
Archaeology: Explore all the ruins.
Builder: Build and upgrade every building.
Pirate: Beat every pirate mission.
Temple: Open the ancient temple to win the game.
FAQ
What's the best order to do stuff in?
The game suggests a path for you to follow with the quests it gives you. However, you may find you can progress faster by choosing a different build order. Increasing worker numbers early on can help you progress, whereas upgrading the ship can wait until late in the game.
Can my workers die?
No—but they won't work if they're too hungry, if they don't have a room, if morale is too low, or if they're injured. They will automatically look for anything they need, as long as they have a room.
I ran out of food. Is that game over?
Nope. Drag your workers to a direct source of food, such as the orange tree. they'll eat some of the food themselves, and then start carrying the rest back to your town hall.
I need more workers but I can't buy a new house yet.
You can upgrade the number of rooms in existing houses before the quest to do so appears. Remember to line up the doors to ensure access to each room. Solutions for each of the houses are presented earlier in this guide.
How much produce should I sell?
Check the timed missions for an idea of what to keep on hand. Timed missions are much easier to complete if you already have a surplus of stock. Other than that, you can sell anything you aren't using, although it's a good idea to keep hold of your food and try to sell other stock during price increases.
Can you fail timed missions?
No—if you don't complete them in time, you just won't receive the time bonus. There's no other penalty and you can continue the mission after the time limit expires. You can get the gold achievement without completing every tied mission in time.
How do I complete timed missions? Some of these are impossible!
Assign every worker you can to the relevant jobs. Speed them up by dragging them between locations yourself, such as from the mine to the Town Hall. If you have Master of All workers, use those for faster production. Keeping stockpiles of resource can help you as well.
Is there a prize for getting 5 stars in the pirate missions?
Nope. The pirate missions give the same reward when you beat them regardless of your rating. There isn't an achievement for 5-starring them all, either.
Do achievements give me anything?
Just the pride of achieving them.
Can I keep playing after I complete the game?
Yes, but there's nothing else to do. If you want to max out all the achievements or finish missions of upgrades you missed before, you can, but its pointless.
What is a Master of All?
These are special workers that are good at any task. Its a good idea to put one of them in research, and one in the kitchen, and reassign the researcher if you happen to urgently need extra help in other places, such as for a timed mission.
Are resources limited? What is the number that appears when I mouse over them?
Resources deplete as they're harvested, but regenerate over time. The number shows the current total available for collection by workers, who harvest one unit per trip. For this reason, you shouldn't use more than two workers for fishing, or more than one for healing herb collection, as the resource will run out and your workers will have to wait around before they can keep collecting it.
How do I disable auto pause when I click outside the game window?
Sorry, you can't.
The mission list is in the wrong order!
Most of the missions are triggered by upgrades, buildings, or events as you play. If you improve your ship to the maximum level early on for example, you'll see the ship missions earlier in the game.
What happens if I complete a mission before it's set?
You'll get a popup congratulating you on your work, and the mission rewards will be paid out to you as usual.
Posted by: Ben |
July 11, 2012 4:33 PM
|
July 11, 2012 4:33 PM