


![]() Oh, Little Red Riding Hood. You with your crimson cloak, guileless observations, and boundless naiveté, how do you do it? Somehow you find yourself Little Red in Danger again, trapped inside Grandmother's house while untold peril lurks outside. You're asked to "wait here like a good girl" because it is so very dangerous outside. But, should you listen? That's the pressing question in IDAC's mobile escaping adventure: to discover just how and when to safely exit this quaint abode.
Oh, Little Red Riding Hood. You with your crimson cloak, guileless observations, and boundless naiveté, how do you do it? Somehow you find yourself Little Red in Danger again, trapped inside Grandmother's house while untold peril lurks outside. You're asked to "wait here like a good girl" because it is so very dangerous outside. But, should you listen? That's the pressing question in IDAC's mobile escaping adventure: to discover just how and when to safely exit this quaint abode.
 Play by tapping the screen, finding items and hints hidden across the room, and trying to escape from the house you were locked inside. Clues and puzzles scattered everywhere add up to plenty of in-depth exploration. Be precise where you tap; a surgeon's touch will prevent your missing essential clues. Utilizing your inventory is intuitive: tap once to highlight an object then tap the screen where you want to use it; double-tapping brings inventory items into closer detail and is also useful in certain interactive areas. Keep in mind there are two ways to exit and both bring happy endings—well, one is happy only for the wolf whose appetite is whetted by blood red head coverings.
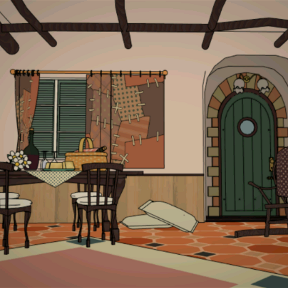
Players familiar with Gotmail's browser-based escape games will recognize many a characteristic Gotmail trait—both good and not-so-good—in this release from the developer's mobile franchise, IDAC. Little Red in Danger especially succeeds at creating an intriguing environment that you really want to play around in; the neato graphical style is even worthy of being wallpaper on your mobile device. The design is well-drawn and eye-pleasing so that the smaller screen is never itself an impediment to immersion in the setting. Conversely, the means to navigate these deceivingly serene surroundings are not so user friendly: pixel hunting is an uninvited guest here at Grandma's house.
As a welcome plus, Little Red in Danger does a great job of challenging your sleuthing skills, often putting your inner Matlock to the test, requiring you to rethink possible solutions and recheck doubtful areas more than once. At times it proves frustrating as any mis-tap means missed information, so if you prefer more affable escape-the-room games, this one might not be for you. On the other hand, for those who enjoy creative means for problem solving and an Engrish-faceted scenario to quirkily wrap it up, Little Red in Danger has the perfect basket-full-of-goodies just for you. "So, do you think you can get out of this alive?"
NOTE: This game was played and reviewed on the HTC Incredible 4. Game was available in the North American market at the time of publication, but may not be available in other territories. Please see individual app market pages for purchasing info.


Walkthrough Guide
(Please allow page to fully load for spoiler tags to be functional.)
Little Red in Danger Walkthrough
Getting Started: "How to Play"
Please refer to the "How to Play" section of the game before you begin.
Use the arrows on the title screen to scroll between these options:
"New Game" - start a new game from the beginning.
"Continue" - continue a game in progress from where it was saved*.
"How to Play" - description of gameplay and controls.
Once you have started the game, the "Option" and "Save" buttons will show in the lower left and right corners of your screen (just above the advertisement bar).
From "Option" you can adjust the game volume, turn on "Auto Save" to automatically save your game progress, revisit the "How to Play" section, or return to the main Title Screen.
Use the "Save" button to save your game before you leave; if you haven't turned on auto-save, this is the only way to prevent having to start all over when you come back. On the other hand, if you only want to save from a specific point in the game, you'll need to turn off auto-save and use the "Save" button exclusively.
Navigation works two ways:
by tapping the arrows at the edges of the game screen to turn around or back up.
and by touching an object or area you want to examine more closely.
Objects and inventory:
Items that can be picked up will be automatically added to your inventory, but some items require additional manipulation (more than one tap) before they can be taken.
To use one of your inventory items, tap it once to highlight it in your inventory, then tap on where you want to use it.
You can examine an item in your inventory by tapping twice to pull up its detail screen. From there, you can combine it with another item by tapping the second once to highlight it then tapping on the first item's detail screen.
Tap to interact with other objects in the game environment—some interactive areas are small and require you to tap in a precise location. So if you think you should be able to do something, but the game is not responding, try adjusting where you tap.
In game messages will explain most items and actions as you encounter them but please be aware that the language has been translated from Japanese to English: some meanings may be incomplete or lost in translation.
There are two endings to this game; try to find both.
Good luck and happy gaming!
Walkthrough Part 1: Cake, Chair and Crates
Tap the door to examine on its locks:
First tap the main handle to confirm it is locked (from the outside, but the translation is wrong).
Next, tap the left edge of the bottom bolt. Tapping in the right spot will cause the bolt to slide close, locking the door from the inside, too, so nobody—and nothing else—can enter.
Tap the bottom arrow to back up.
Turn right and zoom in on the rocking chair:
Tap the broken chair leg on the left to fix it (you may have to tap several times to secure the repairs).
Once it is fixed, tap the chair again and something will fall out of grandma's apron onto the floor:
a FORK. Pick it up.
Back up, turn left, and examine all the items on the table:
Touch the wine. "WINE" is Grandmother's favorite thing.
Back up and then tap the napkin in the basket to pull it out.
Make note of the number "II" (2) on the napkin.
Use the FORK to dig into the cake.
Get a queen's head COIN from the plate.
Back up and turn left to see several crates stacked under a framed map:
Zoom in on the crates.
Tap the crate in the middle to look inside it.
Tap a couple times on the potatoes to move them out of the way:
Get the FLINT.
Back up.
Part 2: The Bedroom, Gathering Clues
Examine the pink door next to the crates:
Use the queen's head COIN you found in the cake on the slot under the knob to unlock the door.
Back up then tap the pink door to open it.
Go inside the bedroom. When you first enter, you'll be facing the bed. Tap the bed to zoom in on it:
Tap twice to pull back the blanket and reveal a note.
Pick up the note and read it for a clue:
"The drawer will open with grandmother's favorite thing."
What is grandmother's favorite thing again? Which drawer does the clue mean?
NOTE: the password is case sensitive; use all caps when you type it in.
Touch the "down arrow" to put the note away.
Tap the pillow to learn there is something inside it:
Use the FORK to tear off the pillow case.
The number "IV" (4) is revealed. Make a note.
Turn to examine the nightstand:
Tap the left edge of the nightstand to look at its side:
More roman numerals are scratched into the side of the nightstand:
I VIII IX (189)
Back up and tap on the bonnet to pick it up:
Tap the bottom edge of the bonnet to turn it over.
Underneath the bonnet is a clump of fur. Tap it again to remove it.
Some GLASSES are revealed. Take them.
Examine the nightstand drawer to see something round is needed to unlock it.
Back up twice to face the door from inside the bedroom:
Take the WREATH off the door...
Examine the wreath and tap the edges several times to remove all the leaves and flowers. You'll get a:
DECORATIVE PLATE (1/3).
Tap the door to open it and then tap the opening to exit the bedroom.
Part 3: The Cupboard and Fireplace
When you leave the bedroom, you'll be facing the fireplace:
Zoom in on the woodbox on the right side of the fireplace.
Tap the green brick to the left of the woodbox to remove it.
Then get the STICK out of the hole in the fireplace wall.
Back up and turn right to face the cupboards. There is a window to the left of the cupboard:
Zoom in on the window and click the curtain to close it.
Zoom in closer to note of another clue:
Roman numeral "I" (1)
Back up twice.
Examine the large green cupboards:
Click on the bottom drawer twice to bring up its lock. Type in the password then tap "enter":
WINE
Grandma's favorite thing.
The password is case sensitive. Use all capital letters.
Once you unlock the drawer, back up. Then tap it to open it:
Get the LAMP from inside the drawer.
Examine the lamp to see you need lamp oil and a means to light it.
Back up and try to open the middle cupboard drawers:
The middle drawer needs to be tapped several times before it finally opens all the way. There's nothing inside, but keep in mind that it can be opened half way if ever needed.
Now try to open the top cupboard drawer:
It will only open a small amount.
Use the STICK to get an object out of the top drawer:
a METAL OBJECT.
Examine the FLINT from your inventory:
Use the METAL OBJECT on the FLINT to attach the two. Now you can make fire.
Open the left door of the cupboard:
Get the STEPLADDER.
Try to use the stepladder: place it in front of the cupboard drawers then tap it.
It will break into pieces of WOOD.
Back up and turn left. Examine the fireplace:
Put the pieces of WOOD under the pot in the fireplace.
Use the FLINT w/metal attached to light the fire.
The stew will begin to cook:
Seems the pot will take some time to cook, so leave the fireplace then check back on the pot. More time is needed, leave again and check back again. Still more time is needed, so back up one more time then zoom in again.
After it has cooked a while, a ROUND WOODEN SOMETHING will float to the top of the stew. Get it.
Attach the STICK to the ROUND WOOD to make a LADLE.
Use the LADLE on the stew to get a king's head COIN.
Turn around and face the framed map on the wall.
Part 4: Poetry Books, Map and Nightstand
NOTE: a poem book will not open until you have found its numbers clues.
Take a closer look at the map hanging next to the bedroom door:
Use the GLASSES on the map to read the tiny letters. A clue is revealed:
"III III I" (331)
Turn around to face the cupboard again. Examine the books of poetry sitting on its countertop:
By now you have gathered three 3-digit number codes. (From the three pieces of checkered cloth, from the nightstand and from the map).
Take a look at the PINK POETRY BOOK in the middle:
The cover of the pink poetry book has symbols as if indicating a map:
Use the numbers from the map -- 331 -- to open the book.
Inside the book you'll find this clue:
"Traveling around the world clockwise from the southeast. That was the beginning of my adventure."
Go back to the map on the wall:
Examine the corners of the map's frame.
Using the clue from the poetry book, unloose each screw in the correct order to cause it to fall off the wall:
Start in the bottom right corner of the map frame and tap that screw to loosen it (southeast); then do the bottom left corner's screw; next, the top left corner; finally, the top right corner (i.e. traveling around the world clockwise)*.
Each time you unloose a bottom screw, you'll need to back out only once to zoom back into the next part of the frame. The top two screws do not need to be zoomed in on, though.
*This must be done in the correct order. If you need to start over, back away two times from the map then zoom back in on it. If you accidentally back away too far from the map, you'll also need to start over.
After removing the map from the wall, something is found behind it:
Another DECORATIVE PLATE (2/3). Get it.
Back away from the map wall.
Now you might hear a knock at the door.
If you want to experience the "bad ending" now, go answer it. Otherwise, don't answer it! Just ignore the knock and continue on.
Go back to the cupboard and take a look at the GREEN POETRY BOOK:
The clue on the green book's cover is more subtle. The round coins refer to the coin-shaped hole on the nightstand drawer.
Use the numbers found on the side of the nightstand -- 189 -- to open the book to that page.
The new clue tells you "The King and Queen are always together, they are two sides of the same coin."
Go back into the bedroom and examine the nightstand again:
Put the two coins together:
Open the QUEEN COIN in your inventory.
Then, select the KING COIN and use it on the queen coin.
Insert the double-sided coin into the hole on the nightstand drawer.
Open the nightstand drawer and get another DECORATIVE PLATE (3/3).
One more trip to the poetry books on the cupboard. Finally, look at the YELLOW BOOK on the right:
Make sure you have examined the napkin from the wine basket on the table, the pillow case in the bedroom (use fork) and the patch on the curtain by the cupboard.
By putting all the numbers found on the napkin pieces you get a new number:
2 4 1
Enter that number into the YELLOW BOOK for another clue:
"Something fragrant and something soothing, my whimsical little friend, and my beloved...When these are lined up, an untold fortune will shine upon you."
This refers to what you need to do with the plates to get the lamp oil.
Part 5: The Plates, the Good Ending and a Bad Ending, too
By now, you have all three decorative plates. But how do you reach the shelf where they belong?
Remember how the drawers on the cupboard could be opened all the way or part way?
Examine the cupboard drawers again:
Form a ladder by opening the bottom drawer all the way, the middle drawer half way, and the top drawer just a little.
Then, tap on the top "ladder-drawers" to climb to the upper shelf of the cupboard.
Set each of the decorative plates on their stands atop the cupboard:
Using the clue from the yellow poetry book, but the plates on their stands from left to right:
Flower (fragrant) -- Moon (soothing) -- Cat (whimsical friend) -- Lady (beloved)
Back up twice. Now the right door of the cupboard can be opened:
Get the LAMP OIL.
Continue to wiggle the right door of the cupboard by tapping on it:
The cupboard door will fall off.
Get the DOOR OF THE CUPBOARD.
Go back into the bedroom. Look under the bed.
It is dark so use the lamp:
Examine the lamp in your inventory and pour the lamp oil into its base.
Use the flint to light the lamp.
Set the lamp under the bed.
Now you can see a hatch. But it's hard to open:
First put LAMP OIL on the rusty hinges.
Next, use the CUPBOARD DOOR to act as leverage to lift up the heavy hatch lid.
Tap the cupboard door inside the hatch several more times until you're told "If I let go, it will close."
Finally use the STICK to prop the hatch lid open.
Now you have two choices:
Good Ending?
-or-
Bad Ending?
Save your game before making your choice.*
If you want the Good Ending:
Go through the hatch under the bed.
If you want the Bad Ending:
Unlock and exit out the front door.
*By saving your game before escaping, you can select "continue" from the title screen and try both endings.
Enjoy!
Posted by: elle |
July 30, 2012 3:55 PM
|
July 30, 2012 3:55 PM