


Grim Tales: The Wishes
Platform: Mac, Windows
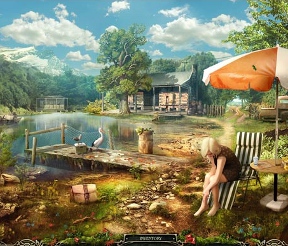
![]() Grim Tales: The Wishes is the third in the series of Grim Tales hidden object adventure releases from Elephant Games. Featuring an absolutely chilling storyline, Grim Tales 3 plays like an epic tale filled with puzzles that are sprawled out across the detailed landscape. Items and points of interest are practically in every corner, and while you search for the pieces you need to continue through the game, a surprisingly terrifying plot is unfolding right before your eyes.
Grim Tales: The Wishes is the third in the series of Grim Tales hidden object adventure releases from Elephant Games. Featuring an absolutely chilling storyline, Grim Tales 3 plays like an epic tale filled with puzzles that are sprawled out across the detailed landscape. Items and points of interest are practically in every corner, and while you search for the pieces you need to continue through the game, a surprisingly terrifying plot is unfolding right before your eyes.
 Brandon is having a rough time, what with the demons and witches and all. His mother notices he's been acting strangely lately, mumbling something about paying for his sins, setting wrongs right, and, oh, there's the whole looking like a pale-faced centuries old corpse thing, too. That's when you witness the chilling scene where a shadow creature erupts from the closet and takes Brandon away. You rush to inform Brandon's mother, your sister Luisa, but she's vanished, too. Now that your blood is flowing, get ready for an intense storytelling ride.
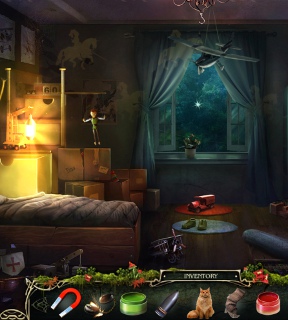
Grim Tales: The Wishes shares some basic design points, story elements, and characters with both Grim Tales: The Legacy and Grim Tales: The Bride, and the similarities are all very welcomed. The game is structured like a casual adventure with a dozen or more rooms to explore at a time, each littered with puzzles, mini-games, and a hidden object scene or two. To gain access to certain areas or solve certain riddles, you'll need to pick up items and carry them around in your inventory, often hunting for most of a chapter before you get to solve a puzzle you saw early on. It's a bit overwhelming at first to see all of these unsolved mysteries and have no clue how to complete them, but the plot of Grim Tales grabs you from the start, so while you're feeling a bit lost, you'll also feel a bit intrigued as well.
 Analysis: Grim Tales: The Wishes is the perfect way to do a sequel. Elephant Games kept only the most desirable elements from the previous games while bumping up the immersion and puzzle challenge, two things you rarely see done so well in the casual hidden object genre. If you have a high definition monitor, you'll also get treated to some fantastic visual effects along with a few surreal animations. When you first lay eyes on the living puppet, you'll know exactly what we mean!
One thing Grim Tales: The Wishes mercifully offers: three levels of difficulty. As with many hidden object games, you're often presented a choice between casual and expert modes, adjusting the hint timer, cursor changes, and those telltale "sparklies". With Grim Tales, you get three modes, the easiest of which offers loads of hints and suggestions, while the hardest takes away the hint feature altogether, doesn't allow you to skip mini-games, and gives you absolutely no clues during play. You may not think much of this at first, but when you see that Grim Tales is a difficult game even on casual mode, you'll realize this game actually has the ability to challenge you!
Its name may not carry the weight of bigger franchises like Drawn or Mystery Case Files, but Grim Tales: Three Wishes deserves a spot on the top shelf. You know, if your computer had shelves and if the location of those virtual shelves had any meaning. It's an outstanding casual adventure experience with balanced gameplay, excellent visuals, and a story that just keeps twisting and turning as you play.
A Collector's Edition is also available. It contains a bonus chapter, art gallery, strategy guide, and more. Remember that Big Fish Game Club Members pay only $13.99 for Collector's Editions (or 2 club credits), and collector's editions count 3 card punches of 6 total needed for a free game.
![]() Windows:
Windows:
Download the demo
Get the full version
Also available: Collector's Edition
![]() Mac OS X:
Mac OS X:
Download the demo
Get the full version
Collector's Edition


Walkthrough Guide
(Please allow page to fully load for spoiler tags to be functional.)
Grim Tales: The Wishes Walkthrough
General Info, Chapters 1-5
General Information
Main Menu
From the Main Menu, you can Play or Quit the game, choose your Options and Profile, plus connect to the previous two games.
Options include Music, Effects, Environment, and Voice volume; Graphics Gamma adjustment, Full or Windowed screen, Wide Screen or not, use of Special Effects or a Custom Cursor, plus Game Mode, and an opportunity to view the Credits.
If you purchased the Collector's Edition, there is a Strategy Guide and Bonus Content that will become available when you have completed the basic adventure.
Game Modes are Casual, Advanced, or Hardcore Mode:
Casual Mode provides you with a more relaxed game-play with lots of sparkles and a Hint button that recharges quickly.
If you choose Advanced, you won't get that extra help because the Hint button takes longer to refill and there are no sparkles.
Hardcore Mode is for those of you who really don't want any sort of help because you get no hints, skips or sparkles.
As you begin play, you will get a choice of having Interactive Help .
Important Note: If you stop playing the game and go back at a later time, once you choose Play, you will be asked if you wish to Continue or Restart the game, so choose carefully.
Scene Navigation
Hints are unlimited once the Hint button in the lower left corner refills.
In the lower right corner is the Menu where you can change your Options and Game Mode, resume the game, or quit to the Main Menu.
In the lower center of your screen is your Inventory, and where Hidden Object Scene lists are shown.
If you need to identify an item in your Inventory, mouse over it for its name.
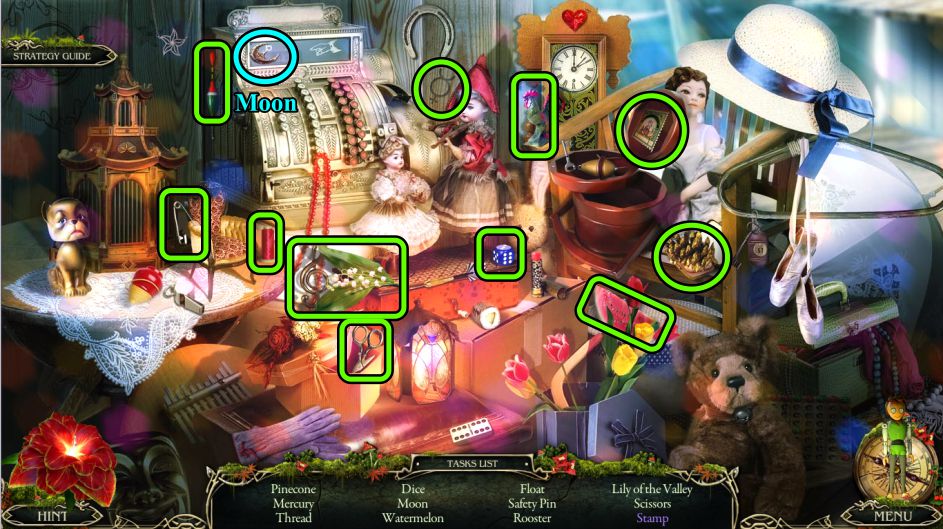
There are 12 items to locate in the Hidden Object Scenes including one item for your Inventory.
The items to locate are the same for everyone so are marked in the screenshots, and the Inventory item is marked in bright blue.
Mini Games have a Skip option when the button becomes full.
All Mini Games also have an Info Button to tell you what is expected for you to complete the game.
There is also a Restart Button if you need to begin again.
Some games have an "Undo Button" so that you can back up a few moves without having to completely restart.
Objects and locations with a Magnifying Glass will have a name tag, and should be checked out for more information or to perform a task .
A Hand wants you to pick something up, move, or open an object.
A Hand with gears means there is a task you cannot as yet complete, but you will be provided with more information about what you need to complete it.
Arrows to move on to another location will tell you where you are going or need to go.
Also, you may not always need to pick up an item because it will automatically go to your Inventory.
Usually you will need to back out of a close-up scene, unless you have completed all your tasks there.
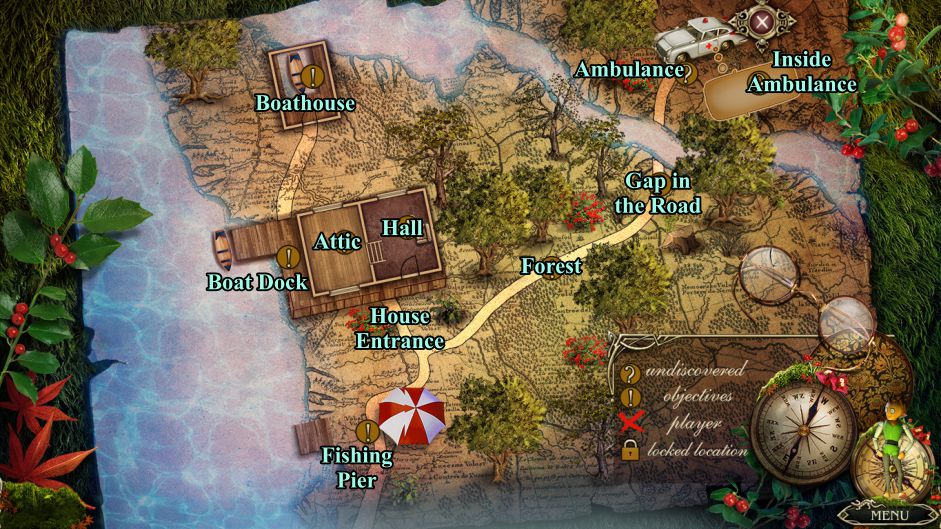
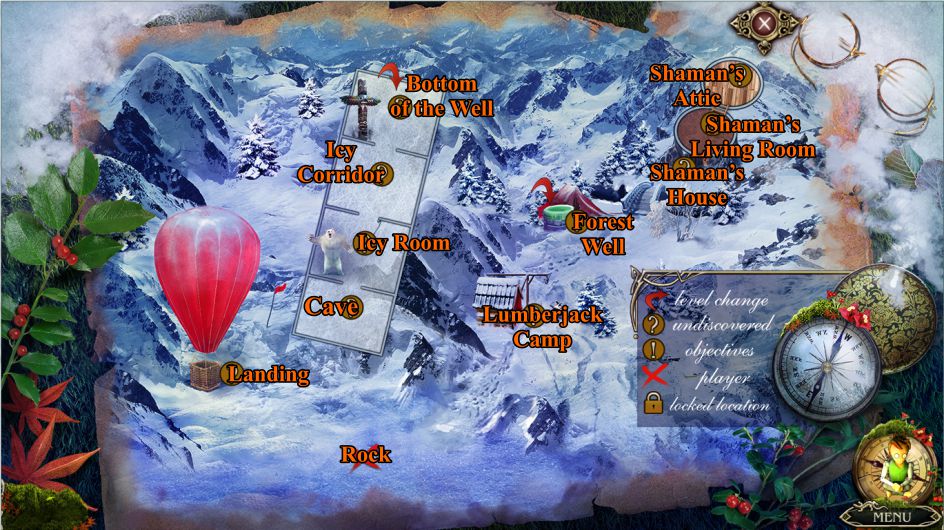
Maps
Once you free Brandon's Puppet, he will bring a Compass to the lower right corner of the scene.
The Compass is a map you can use to directly go to another location.
The legend shows you where you are, what you have yet to discover, any level changes, and those areas that have tasks for you to complete.
The Maps will change when the entire location becomes different.
See the screenshot for the first map of the Gray's house and surroundings.
Screenshot
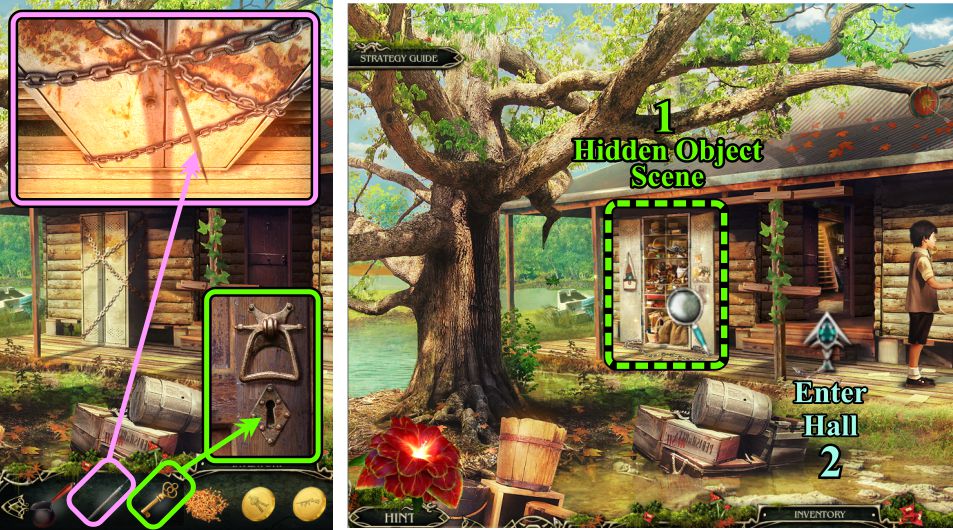
Chapter 1: Arrival at the House
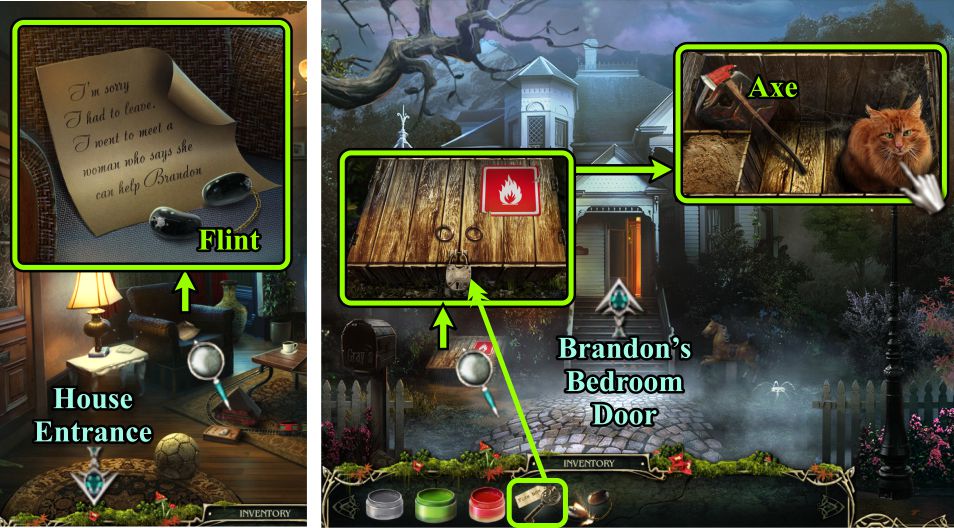
House Entrance
Zoom in on the window and collect the Crest and Magnet.
Luisa left you a note at the front door, so zoom in to read it and use the Crest to open the door.
Enter to the front Hall.
Screenshot
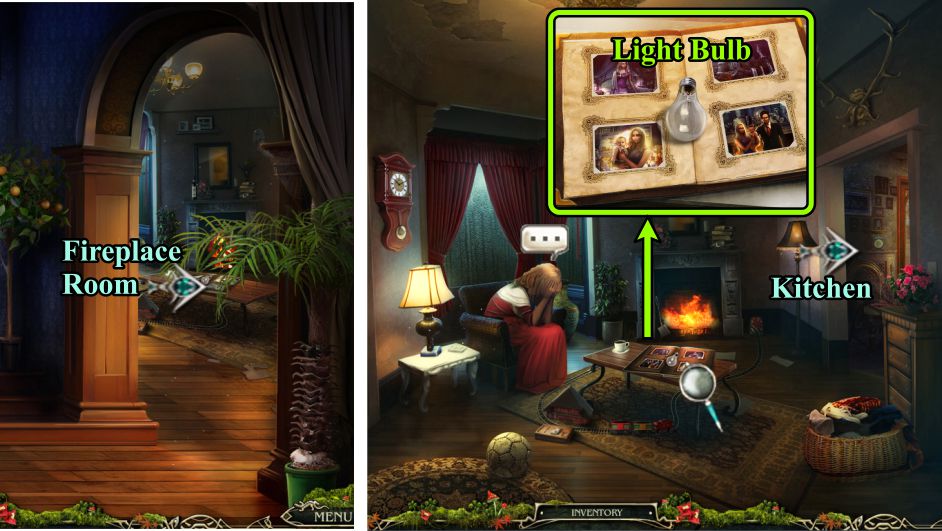
Hall and Fireplace Room
Go through the arch at the right to the Fireplace Room.
Talk to Luisa.
Zoom in on the table and take the Light Bulb.
Go through the opening to the Kitchen.
Screenshot
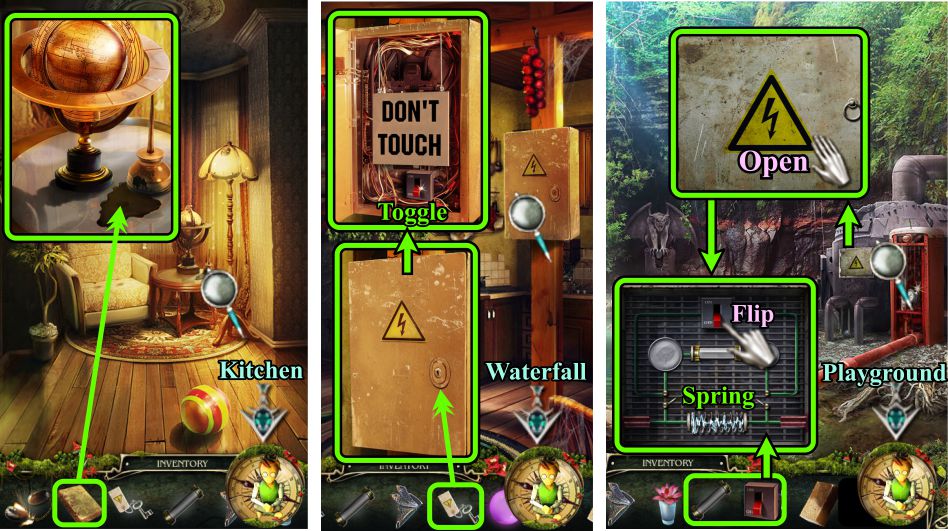
Kitchen
Zoom in on the table to collect some Green Paint.
Open the curtain and collect the Gray Paint from the step.
Use the Magnet to retrieve the Key from the broken floorboard.
Screenshot
Hall
Zoom in on the light fixture, place your Light Bulb, and pull the cord.
You can examine a few photos on the wall on your way to the Second Floor.
Screenshot
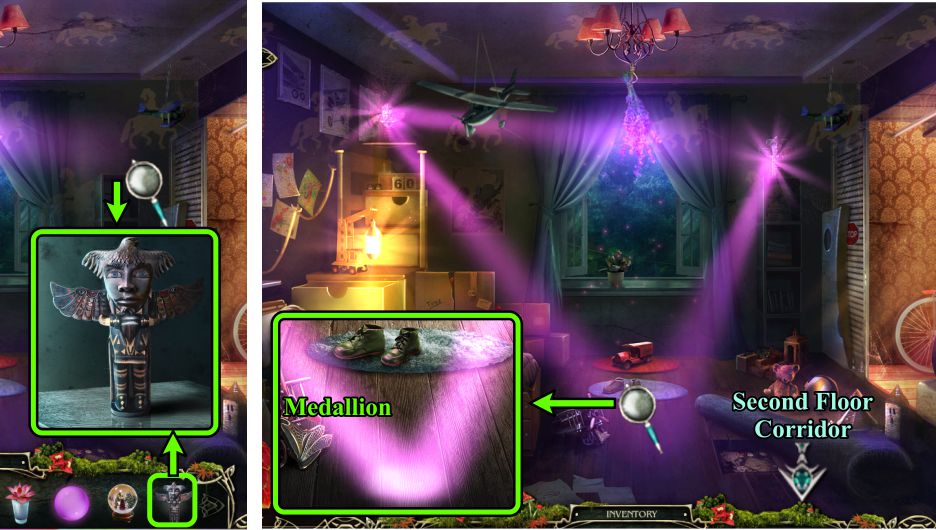
Second Floor Corridor
Check out the magnifying glasses.
The door on the right is open; enter to find out it's Luisa's Room.
Screenshot
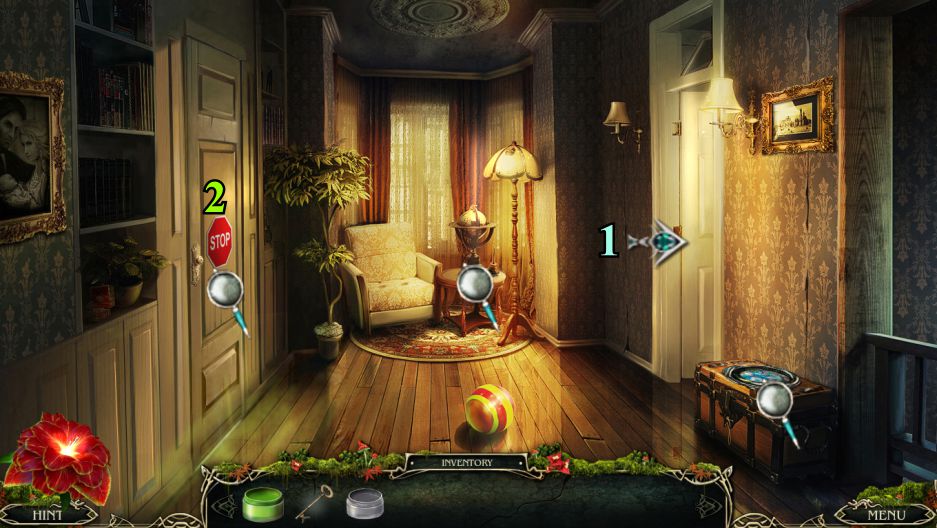
Luisa's Room
Straighten up the family pictures on the wall: one falls to the floor.
Something is hidden there, but you can't remove the backing without a tool.
Play the Hidden Object Scene, and return to the corridor.
Screenshot
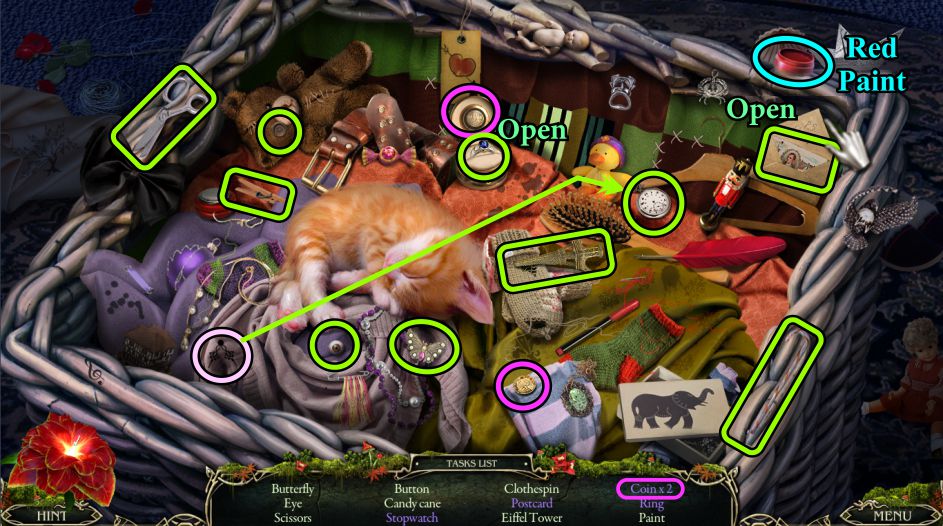
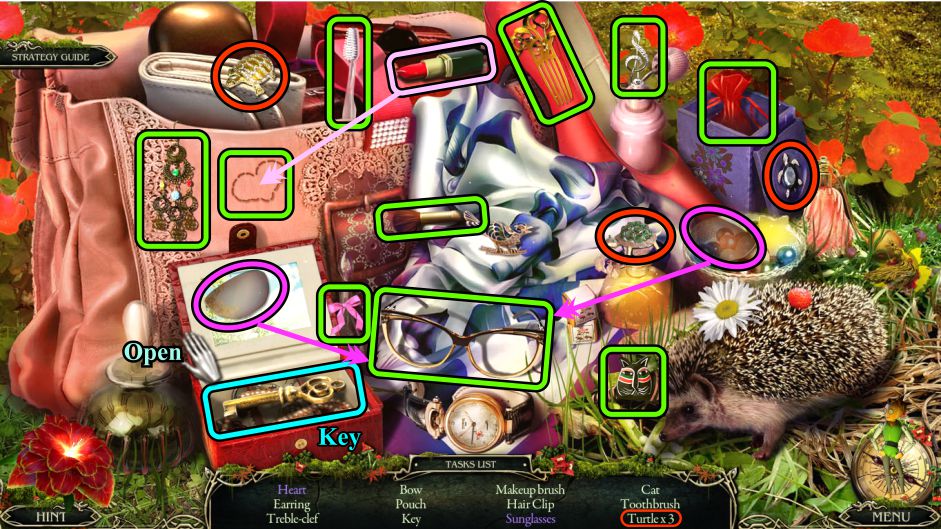
Basket Hidden Object Scene
Open the envelope to find the postcard.
Place the hands on the watch to get a stopwatch.
Open the box to find the ring and a coin.
The Red Paint will go into your Inventory.
Screenshot
Second Floor Corridor
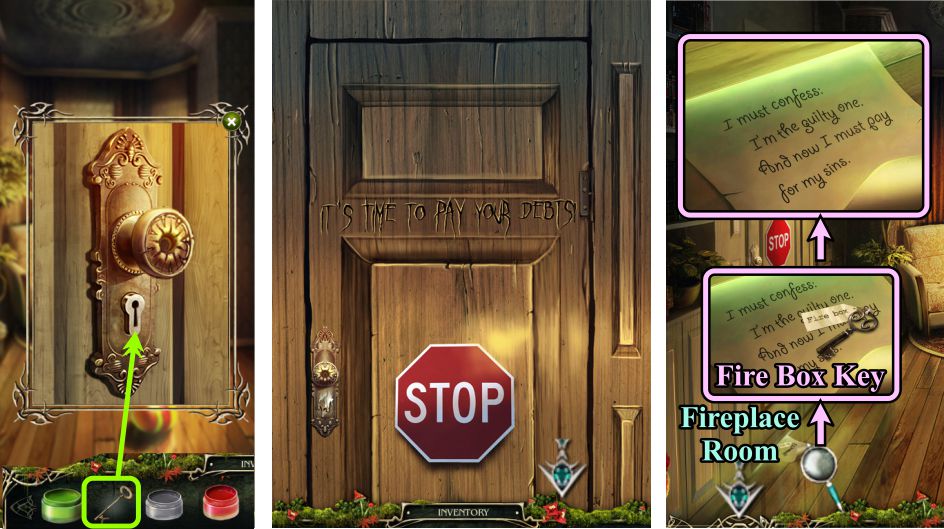
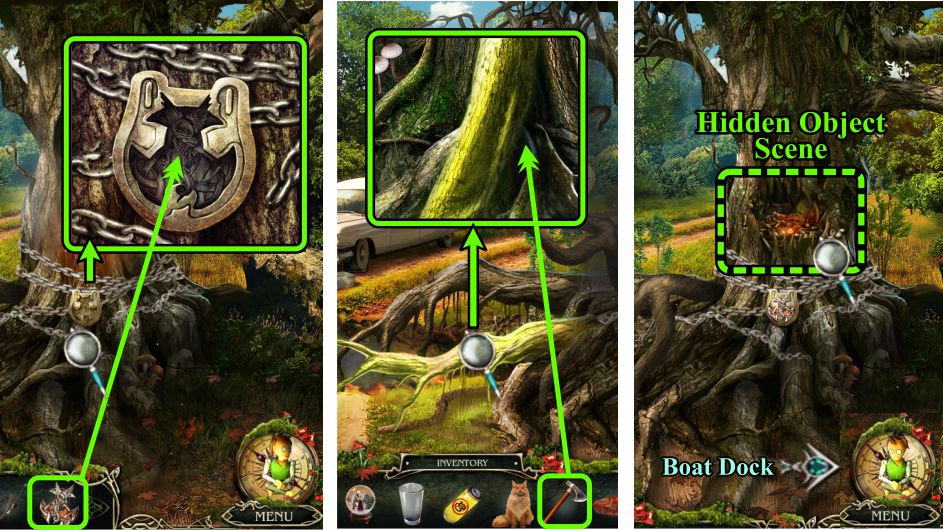
Zoom in on the door at the left and use your Key to open the lock.
After the cut scene, Brandon slips a note with a Key to the Firebox under the door.
Return to the Fireplace Room to talk to Luisa.
Screenshot
Fireplace Room and House Entrance
Luisa's gone, but she left you a note and Flint on the chair.
Go outside, zoom in on the firebox, and use the Key to open the lock.
Fluffy, Luisa's favorite cat, isn't particularly welcoming, so just take the Axe and go to Brandon's Bedroom Door.
Screenshot
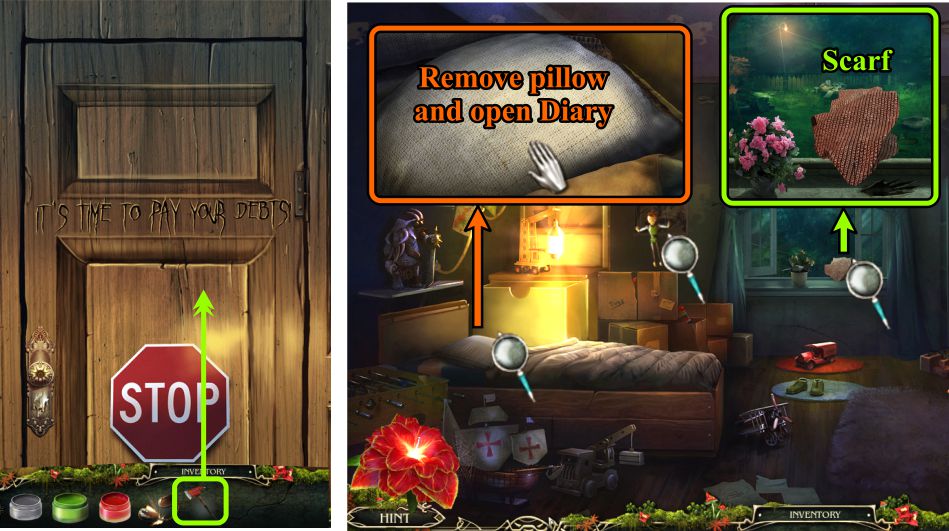
Second Floor Corridor and Brandon's Room
Use the Axe to break down the door.
Brandon is being taken away out the window, so examine it and take the Scarf.
Examine the puppet hanging in the corner.
Remove the pillow on Brandon's bed and open his Diary.
Screenshot
Chapter 2: The Puppet
Brandon's Room and Kitchen
Read the Diary, and go to the Kitchen.
Use the Flint to light the Candle.
Pick it up and go to the Fireplace Room.
Screenshot
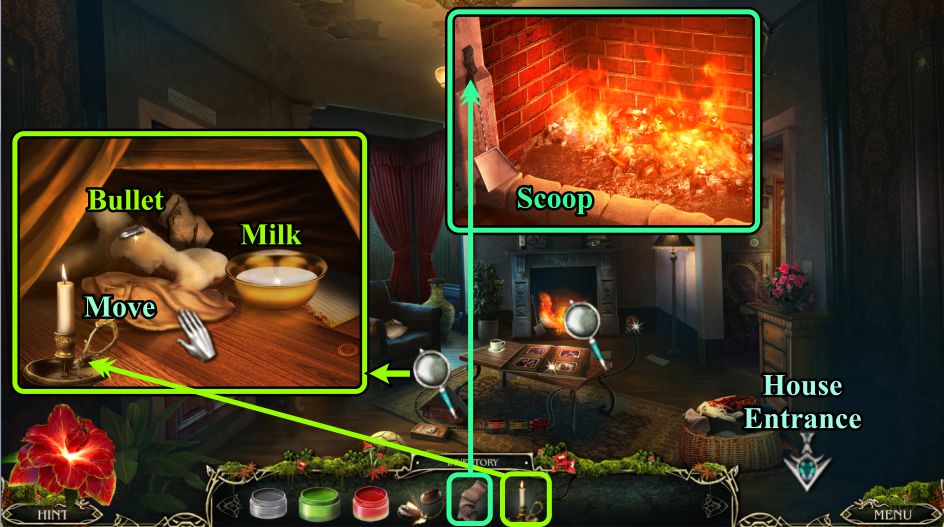
Fireplace Room
Use the Candle to light the area under the chair.
Move the cloth to find some Milk, and take the Bullet.
Use the scarf on the Scoop at the fireplace so it isn't too hot to remove.
Go outside.
Screenshot
House Entrance and Fireplace Room
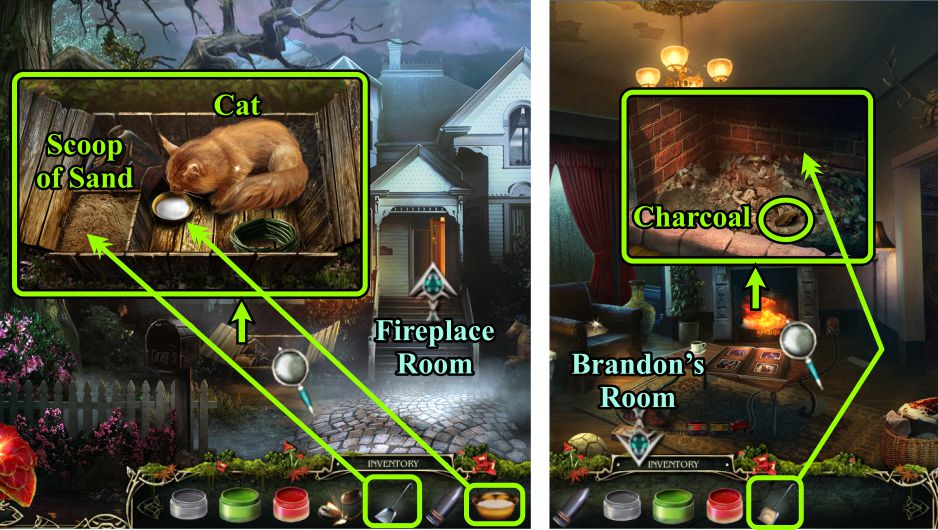
Zoom in on the firebox, give the Milk to Fluffy, and take a Scoop of Sand.
Pick up the cat and return to the Fireplace Room.
Use the sand to put out the fire, take a piece of Charcoal, and go to Brandon's Room.
Screenshot
Brandon's Room
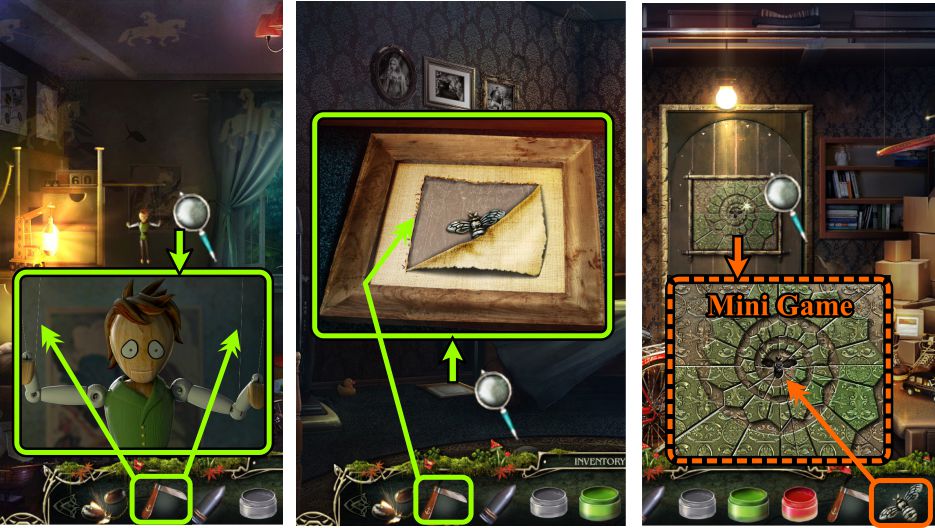
Use the Charcoal to draw a mouth on the puppet so he can talk to you. He gives you a piece of Stained Glass.
Go to the Corridor and zoom in on the chest.
Place the Stained Glass to trigger a Mini Game.
Screenshot
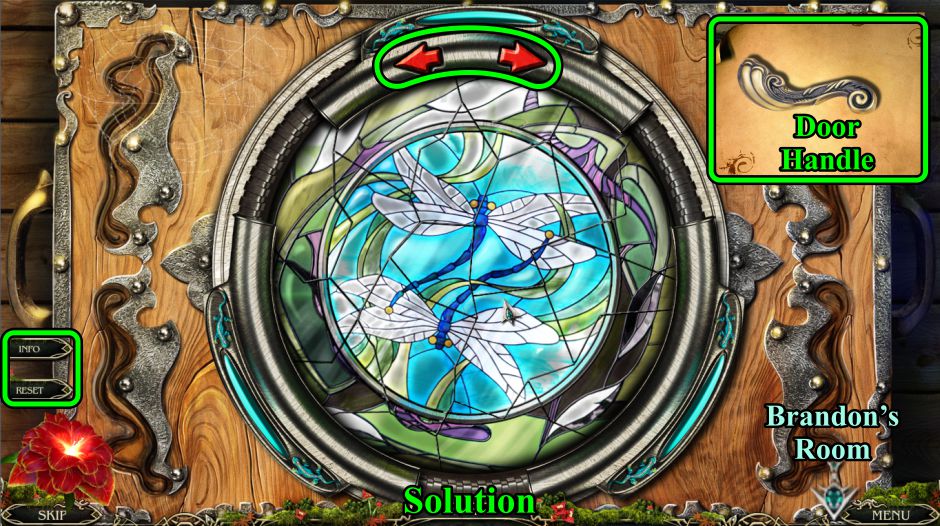
Stained Glass Mini Game
Your goal is to complete the picture as shown in the screenshot.
Instead of turning the puzzle pieces to make them fit, you need to use the two red arrows at the top to rotate the frame until it is at the correct place to insert the piece you want.
The outer pieces will tuck under the frame when they are correct.
At the end, you will receive a Door Handle to take back to the closet in Brandon's Room.
Screenshot
Brandon's Closet
Place the Door Handle on the closet and open it.
Move all the clothes out of the way to get to a Hidden Object Scene.
Back out to the room.
Screenshot
Closet Hidden Object Scene
Open the Purse to get the Paperclip.
Use the chalk to write the number 8 on the board.
Place the glue and chip on the Cup so you can collect it.
See the screenshot for additional help.
A Knife will go into your Inventory.
Screenshot
Brandon's Room
Use the Knife to cut the Puppet strings.
The Puppet will talk to you after you set him free, and will then want you to return to the closet.
He will follow you and rip off the wallpaper to reveal a door to a Secret Passage.
Then he will join you on your journey as the keeper of the compass.
Examine the door to find out you need something bee-shaped to open it.
Since you've seen something that should work, cross the Corridor to Luisa's Room.
Luisa's Room
Zoom in on the fallen photo, use your Knife to cut it open, and take the Bee.
Brandon's Room
Return to Brandon's closet and zoom in on the door.
Place the Bee to trigger a Mini Game.
Screenshot
Beehive Mini Game
Your goal is to fill up the beehive by using the arrows on the bee.
You can Undo an action or Restart if needed.
See the screenshot for the path to the solution.
Once the door is open, send Fluffy to get rid of the rats.
Screenshot
Secret Passage
There is no light to go down the stairs, so use the Flint on the oil to light your way.
At the moment, all you can do is grab the Pipe Wrench.
Use the Map to go to the House Entrance.
Screenshot
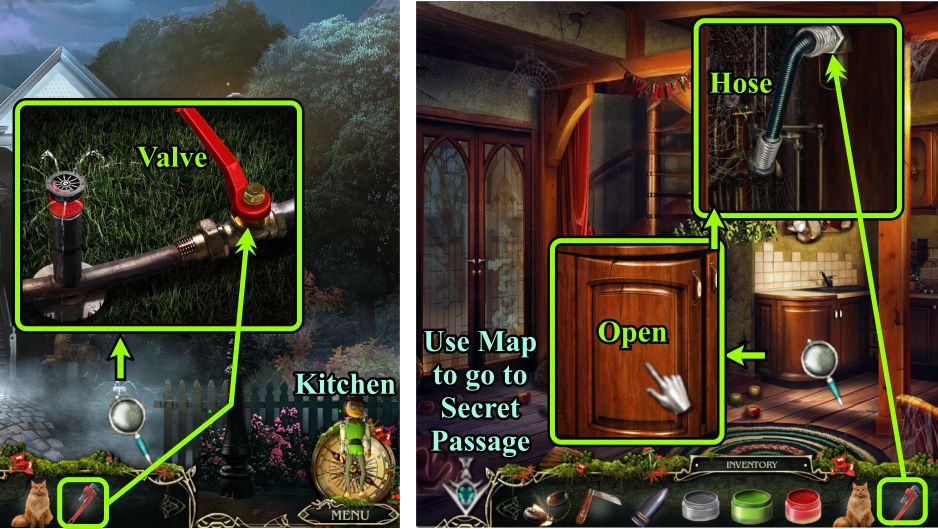
House Entrance and Kitchen
Zoom in on the sprinkler and use the Pipe Wrench to detach the Valve.
Go to the Kitchen, open the cabinet door, and use the Wrench to remove the Hose.
Use the map to return to the Secret Passage.
Screenshot
Secret Passage
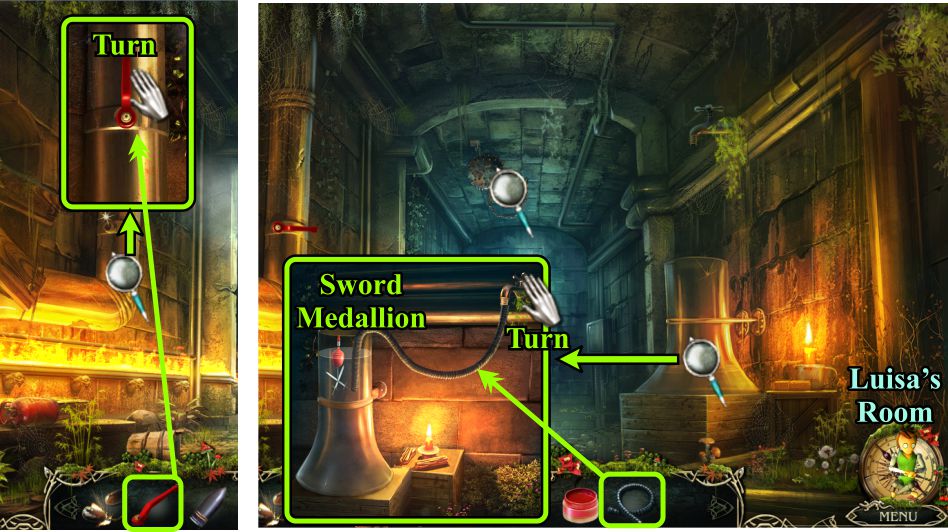
Zoom in on the pipe, place the Valve, and turn it.
Examine the large tube at the right, place the hose, and turn on the water.
Take the Sword Medallion, and go to Luisa's Room.
Screenshot
Luisa's Room and Secret Passage
Zoom in on the box on the shelf, place the Sword Medallion, and take the Ball.
Examine the box under the bed and place the Ball.
Use the arrows to enter the numbers 5 - 9 - 3, and take the Gun.
Go to the Secret Passage.
Zoom in on the mace on the ceiling and shoot the chain with the gun.
Screenshot
Chapter 3: Finding Brandon
Forest Edge
Exit through the hole in the wall to the Forest Edge.
You can't get to the tree house because of the hive, so zoom in on the tire to find a note from Brandon and a Battery.
Follow Luisa to the Forest Thicket.
Screenshot
Forest Thicket
Examine the chain saw.
Note in the screenshot your choices of areas to visit and the order we'll go to each.
First, enter the shelter.
Screenshot
Shelter
Zoom in on the chair, read the note, and take the Hexagonal Wrench.
Play the Hidden Object Scene.
Screenshot
Shelter Hidden Object Scene
Open the box to find the blade for the Windmill.
Use the hammer to break the bottle so you can collect the Ship.
The Locomotive will go into your Inventory.
Screenshot
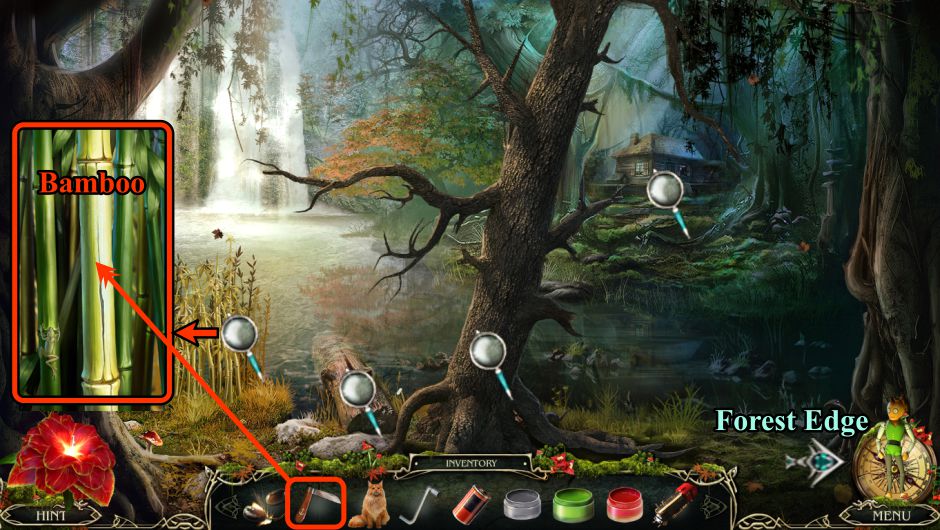
Swamp
Check all the magnifying glasses and zoom in on the Bamboo.
Use your Knife to cut a piece of Bamboo, and head to the Forest Edge.
Screenshot
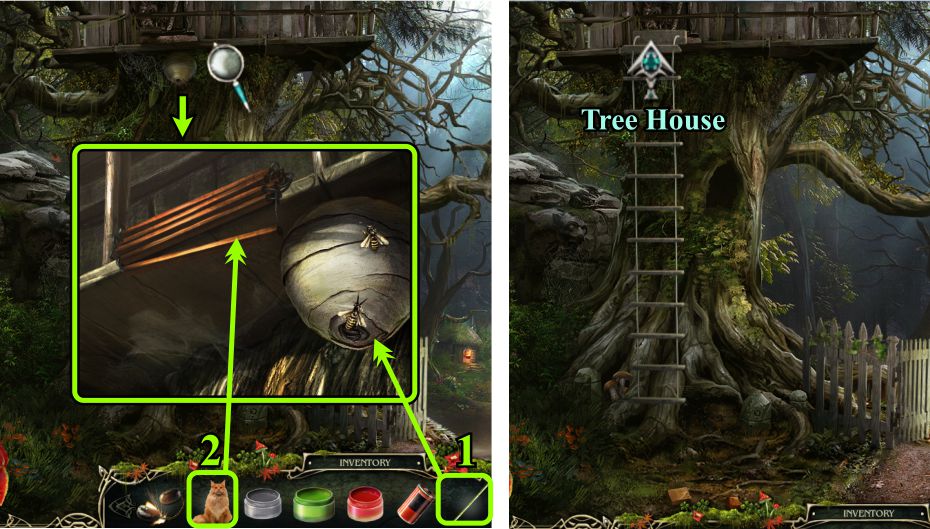
Forest Edge
Use the Bamboo to get rid of the hive.
Send Fluffy up the tree to let down the ladder.
Climb up the tree to the Tree House.
Screenshot
Tree House
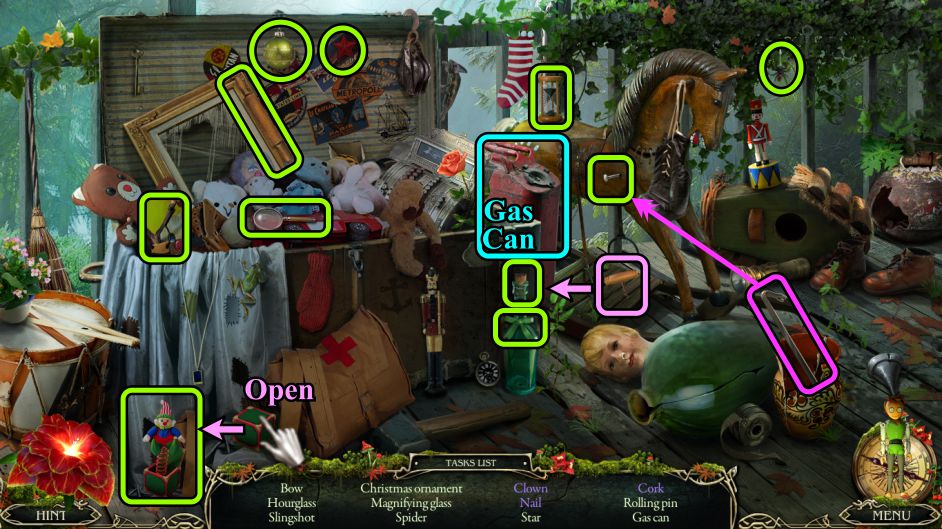
Take the Tongs and zoom in on the note.
Take the Funnel and Paintbrush, and read the note.
Play the Hidden Object Scene, and go to the Swamp.
Screenshot
Tree House Hidden Object Scene
You will get a Gas Can for your Inventory.
To get the Clown, open the box.
Use the corkscrew to remove the Cork from the bottle.
The Nail will fall to the floor for you to collect after you use the crowbar to remove it from the horse.
Screenshot
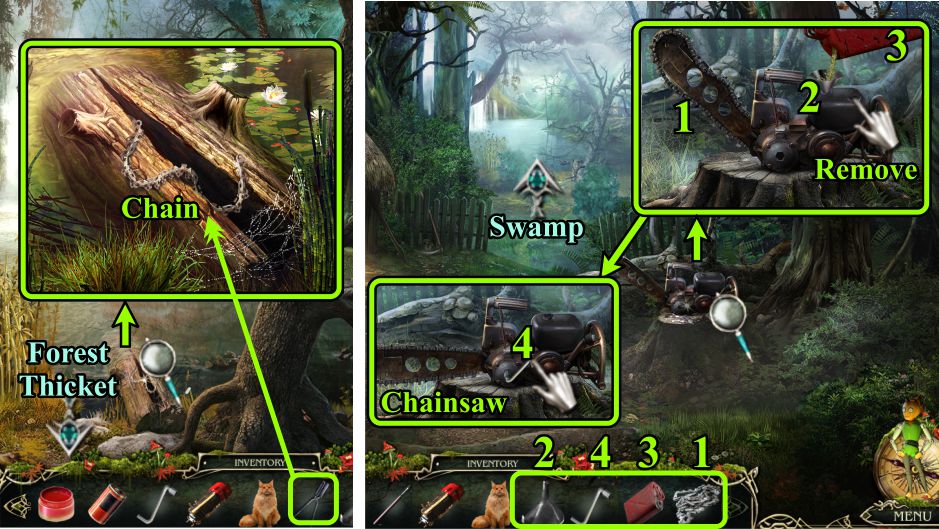
Swamp and Forest Thicket
Zoom in on the log and use the Tongs to widen the crack so you can get the Chain.
Go to the Forest Thicket and zoom in on the chainsaw.
Place the Chain.
Remove the cap and insert the Funnel.
Pour in the fuel from the Gas Can.
Use the Hexagonal Wrench to tighten the Chain.
Take the Chainsaw, and return to the Swamp.
Screenshot
Swamp
Zoom in and use the Chainsaw to cut through the tree so you can cross to the Swamp House.
Screenshot
Swamp House
Peek in the window to see Luisa and the Swamp Demon.
When the demon comes outside, use the Flint to set fire to the leaves by her.
Enter the Swamp Demon's Living Room.
Screenshot
Swamp Demon's Living Room
Examine the magnifying glasses to find out Luisa's captured in a crystal ball and Brandon in a photo.
Read the book on the floor and play the Hidden Object Scene.
Use the map to go to the house Fireplace Room.
Screenshot
Sideboard Hidden Object Scene
Use the knife to cut a slice of lemon for the tea.
Click the handle to pour the tea in the cup for a Cup of Tea.
You will get the Crown for your Inventory.
Screenshot
Fireplace Room
Zoom in on the train tracks and place the Locomotive.
Zoom in on the controls.
Place the Battery.
Move the lever to maximum.
Flip the switch to start the train.
Zoom in on the cave and take the Sun Medallion.
Go to the Swamp House.
Screenshot
Brandon's Photo Mini Game
Zoom in on Brandon's photo and place the Sun Medallion to trigger a Mini Game.
Your goal is to move the rings on the frame to complete the picture.
See the screenshot for a solution.
After the cut scene, you will receive Puzzle Blocks from Brandon, so go to Brandon's Room.
Screenshot
Chapter 4: Unlocking Brandon's Memory
Brandon's Room Puzzle Block Mini Game
Move the carpet and zoom in on the floor.
Place the Puzzle Blocks to trigger a Mini Game.
At the completion of the game, go to the Shelter.
Your goal is to match up the blocks of the same color so they disappear.
For more detailed information, read the "Info" tab.
There are 3 Rounds, so if you Reset the blocks, they will start from the first round.
See the screenshot for the first 2 moves.
Screenshot
See the screenshot for the rest of the first round and the beginning of Round 2.
After you complete the first row of blocks in Round 2, it's easiest to just drop all the upper blocks to the first row and repeat the same moves.
Screenshot
See the screenshot for the completion of Round 2 and the first part of Round 3.
Screenshot
The screenshot shows the completion of Round 3 and the Quill you receive at the end.
Screenshot
Shelter
Zoom in on the Children's Book on table.
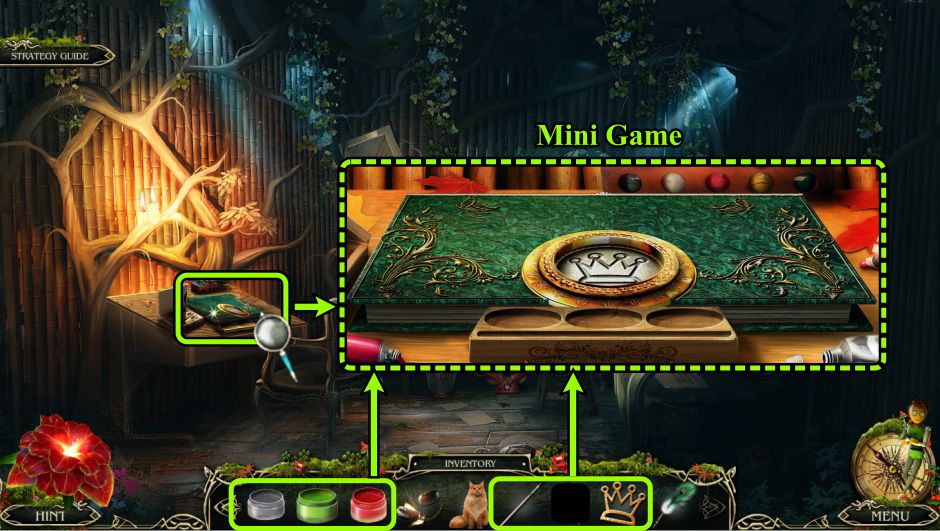
Place the Paints, Paintbrush, and Crown to trigger a Mini Game.
Screenshot
Children's Book Mini Game
Paint the white areas as numbered in the screenshot.
The white areas with no numbers are filled in automatically.
Screenshot
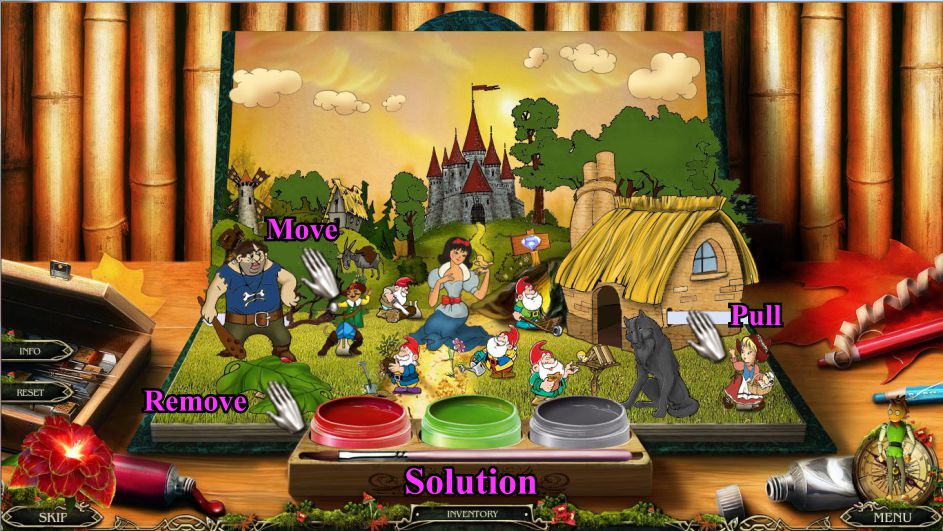
Place the figures as shown in the screenshot.
Move the bush to the right, pull the tab to open the door and find a dwarf, and find another dwarf under the leaves.
Screenshot
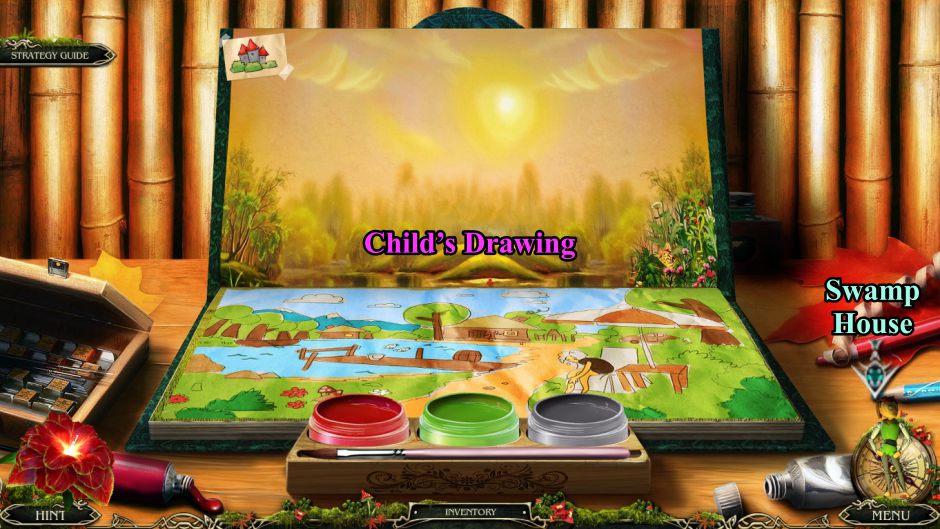
Collect the Child's Drawing and go to the Swamp House.
Screenshot
Swamp House
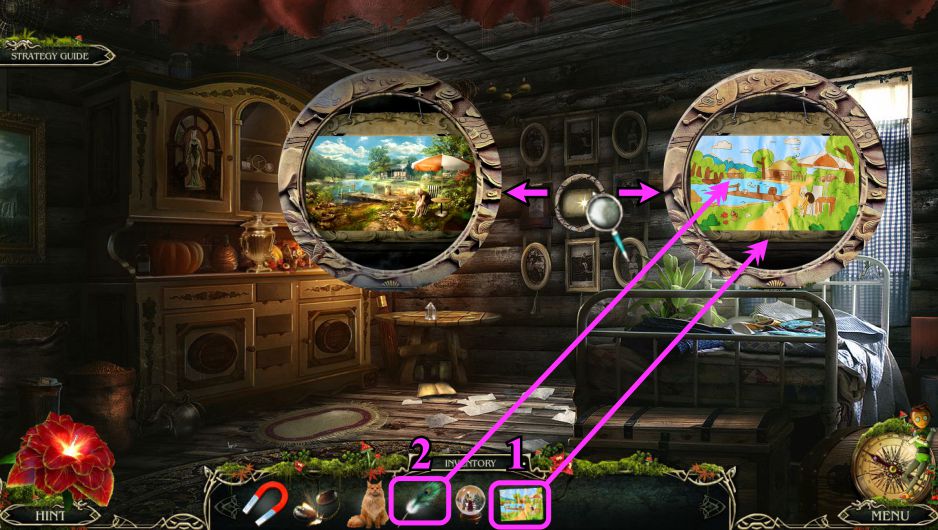
Zoom in on the photo frame, then place the Child's Drawing and the Quill to begin exploring Brandon's memory.
Screenshot
Chapter 5: Saving Luisa
Map
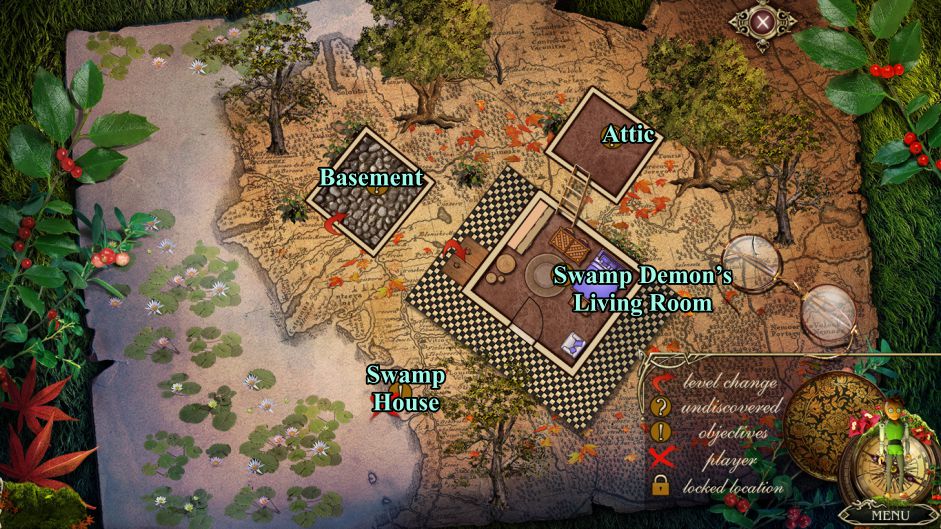
Your location has changed and so has the Map. See the screenshot for the new locations you will visit in this chapter.
Screenshot
Fishing Pier
Since this is one of Brandon's memories, none of the other people in the scenes will see you or interact with you.
Examine the table next to Luisa and take the Coin.
Check the magnifying glasses and head to the House Entrance.
Screenshot
House Entrance
Zoom in on the glass cat on the roof and send Fluffy to knock it down.
Take the Coin and Glass Shard.
Examine the shelf next to the phone and take the Thread.
Zoom in on the drain pipe and take the Rag.
Go around the corner to the Boat Dock.
Screenshot
Boat Dock
Check the sign on how to get rid of the bear.
Zoom in on the light and clean the lens with your Rag.
Turn the light toward the bear and he will run off.
Zoom in on the boat by the dock and take the Coin and Steering Wheel.
Examine the door in the distance, place the Steering Wheel on the lock, and enter the Boat House.
Screenshot
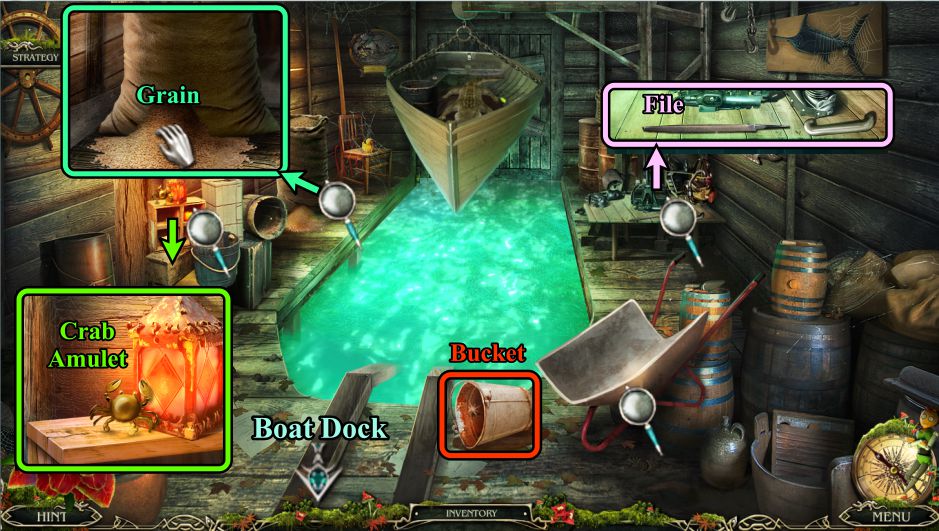
Boathouse
Zoom in on the bookcase at the left and take the Crab Amulet.
Pick up the Bucket, examine the table with the engine parts, and take the File.
Zoom in on the bag of Grain and take a handful.
Return to the Boat Dock.
Screenshot
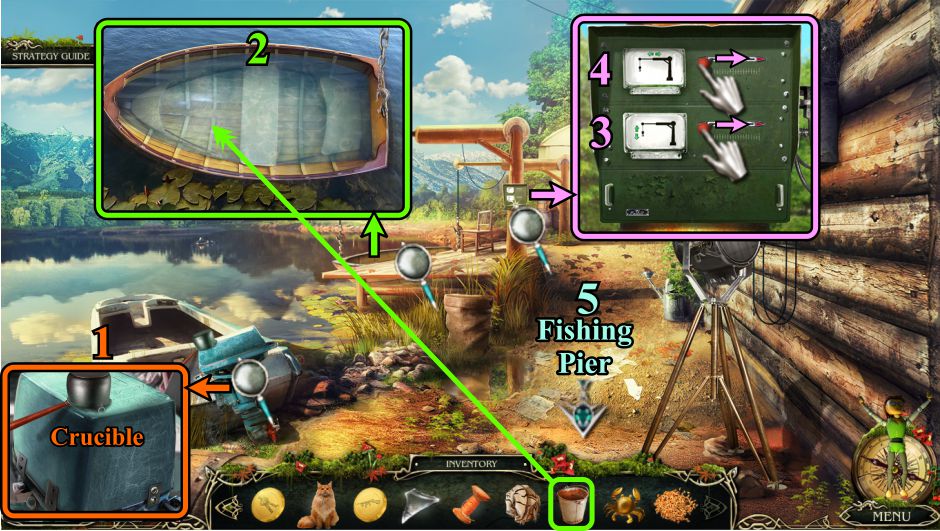
Boat Dock
Zoom in on the motor boat and take the Crucible.
Use your Bucket to remove the water from the boat at the dock, and the Bucket of Water will go into your Inventory.
Zoom in on the lift mechanism and move the bottom lever to the right.
Once the boat it out of the water, zoom in on the same mechanism and move the top lever to the right.
Go to the Fishing Pier.
Screenshot
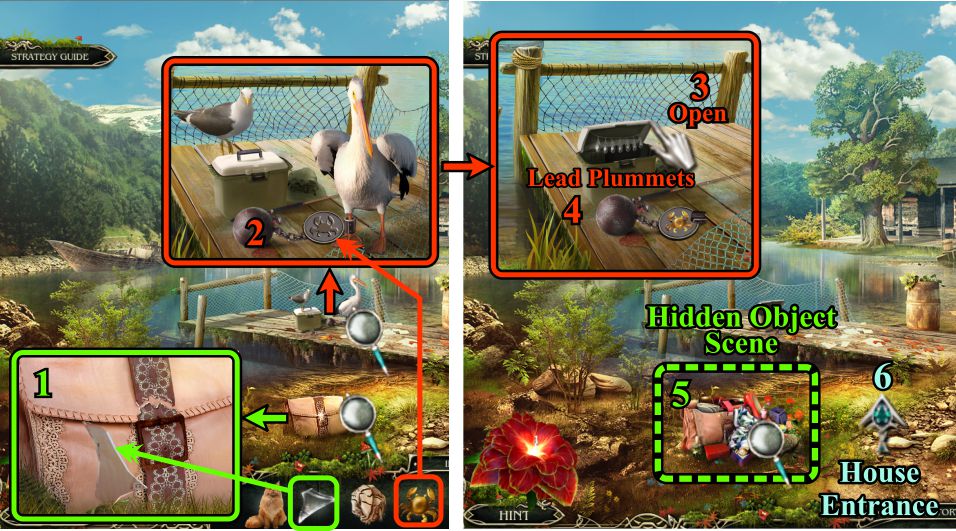
Map
Zoom in on Luisa's purse and use the Glass Shard to cut the strap.
Examine the lock restraining the pelican and use the Crab Amulet to open it.
The birds fly away, so open the box.
Take the Lead Plummets.
Play the Hidden Object Scene in Luisa's purse.
Go forward to the House Entrance.
Screenshot
Purse Hidden Object Scene
Open the box to find the Key on one lens for the glasses.
Place the other lens in the frame and collect the Sunglasses.
Use the lipstick to color the Heart.
Collect everything else to get the Key for your Inventory.
Screenshot
House Entrance
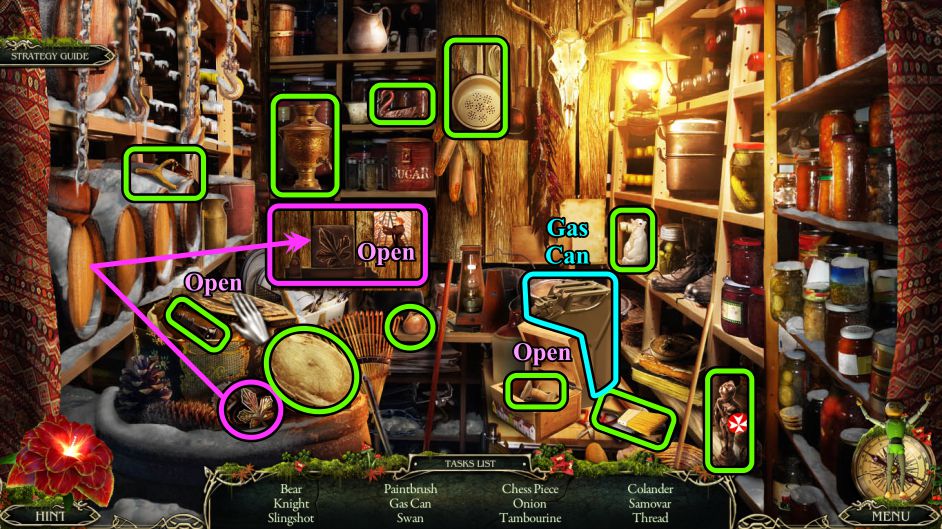
Zoom in on the cabinet and use the File to remove the chains so you can play the Hidden Object Scene.
Use the Key to unlock the front door of the house and enter to the Hall.
Screenshot
Cabinet Hidden Object Scene
Use the key to open the safe and find the Butterfly.
Open the purse to find the Paperclip.
Once you have collected everything, you will get the Arrow for your Inventory.
Screenshot
House Hall
Use the Rag to clean up the grime on the refrigerator.
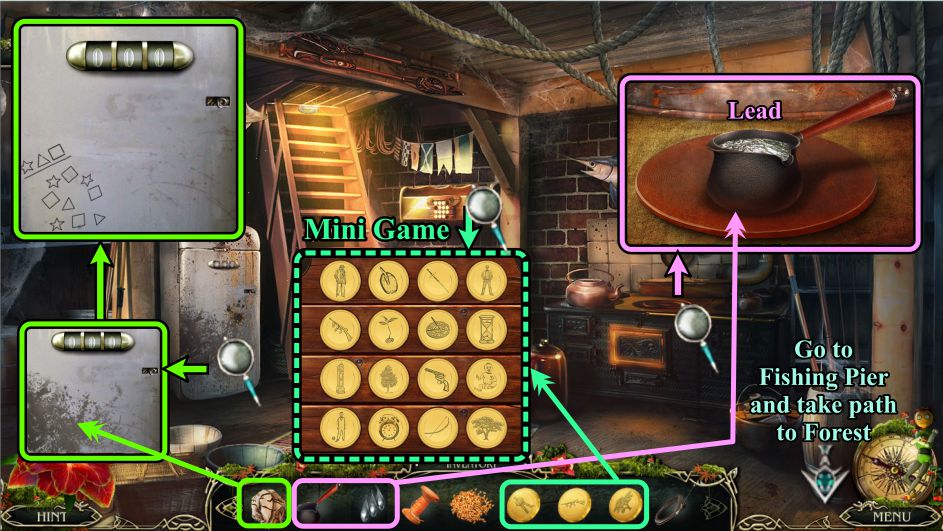
Zoom in on the stove and place the Crucible on the burner.
Place the Lead Plummets in the Crucible and take the melted Lead.
Zoom in on the shelf next to the stairs and place your 3 coins to trigger a Mini Game.
When you have completed your tasks, go to the Fishing Pier and take the path to the Forest (Since you have never been to the Forest, you cannot use the Map to go there this time).
Screenshot
Axe Mini Game
Your goal is to arrange the coins according to their stages of life from youngest to oldest.
Swap the coins, and they will light up with a green circle when the entire row is correct.
They must be arranged in specific rows; see the screenshot for the solution.
Collect the Axe.
Screenshot
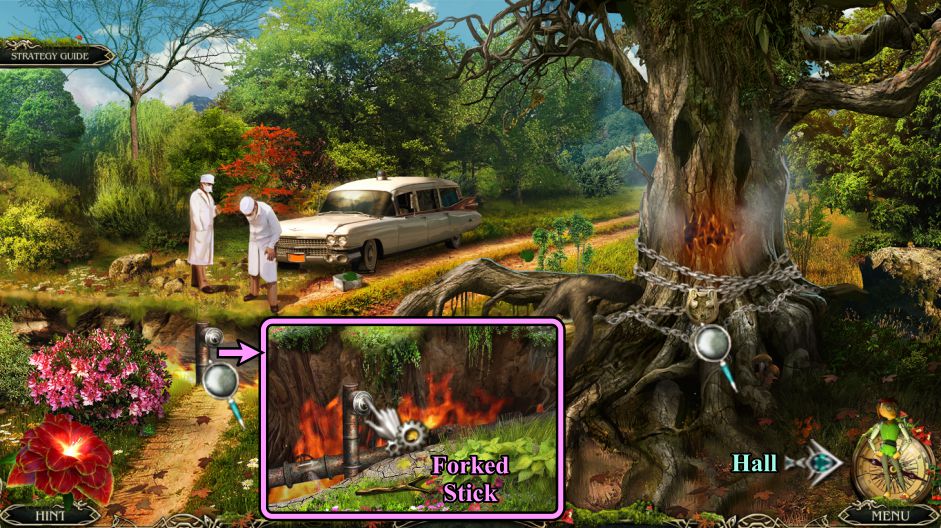
Forest
Use your Bucket of Water to put out the fire.
Zoom in on the pile of sand at the right and pour your lead in the form there.
Take the Shark and continue on up the road.
Screenshot
Gap in the Road
Zoom in on the path by the ditch and take the Forked Stick.
Examine the tree, then use the Map to return to the Hall.
Screenshot
Hall
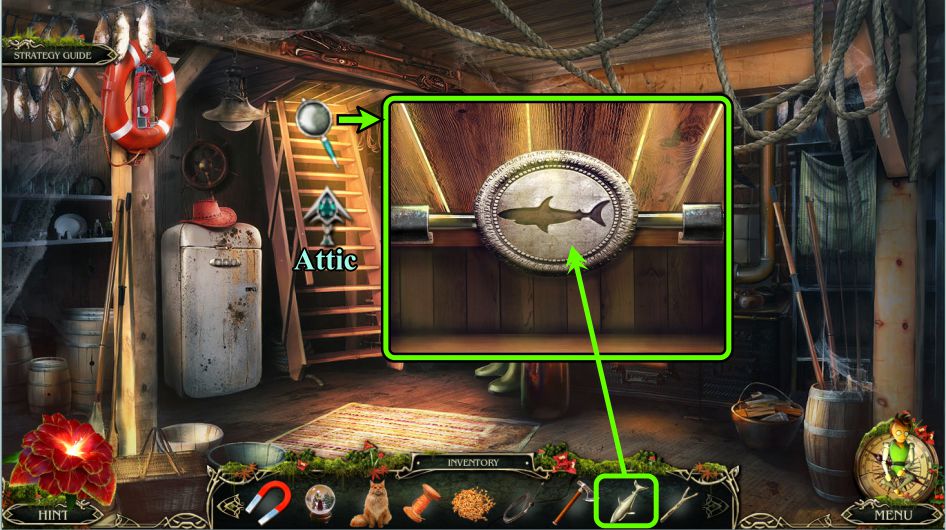
Zoom in on the Attic hatch and place the Shark to open it so you can enter.
Screenshot
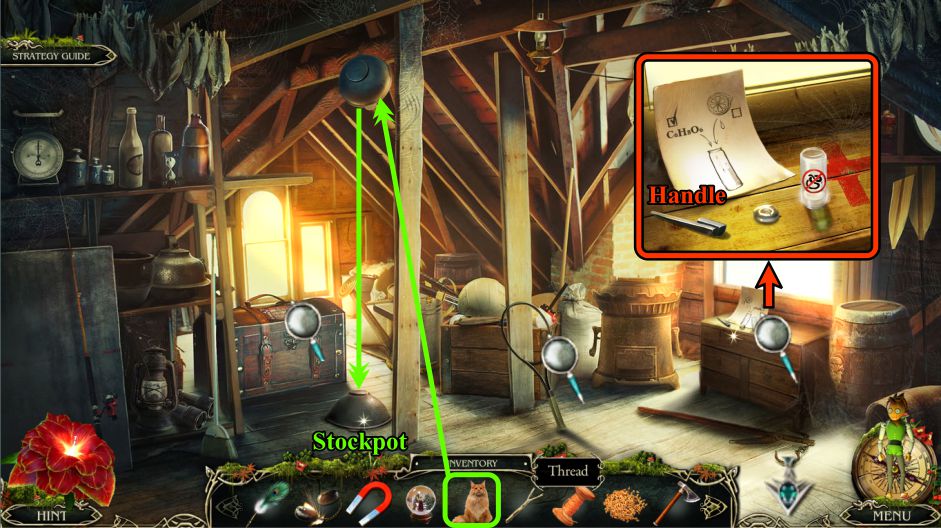
Attic
Zoom in on the crate at the right, take the Handle, and note the rest of the items.
Send Fluffy up to knock down the Stockpot so you can pick it up.
Go back downstairs.
Screenshot
Hall
Zoom in on the refrigerator and count the number of each character.
Use the 3 - 2 - 4 combination to open the door.
Take the Frozen Meat and Juicer.
Zoom in on the stove and place the Frozen Meat on the burner to get Cooked Meat.
Go to the Fishing Pier.
Screenshot
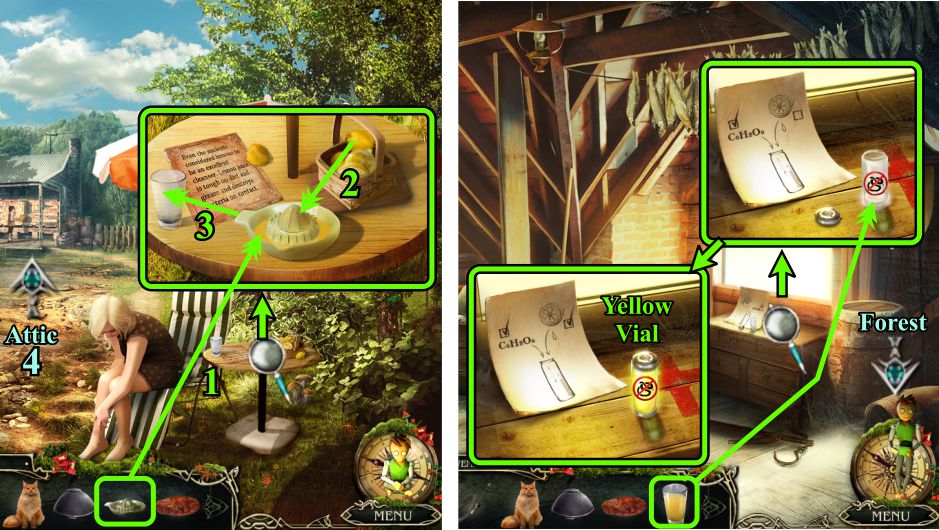
Fishing Pier and Attic
Place the Juicer on the table.
Juice one of the lemon pieces.
Pour the juice in the glass
Go to the Attic.
Zoom in on the crate and pour the Lemon Juice in the vial.
Take the Yellow Vial.
Go to the Forest.
Screenshot
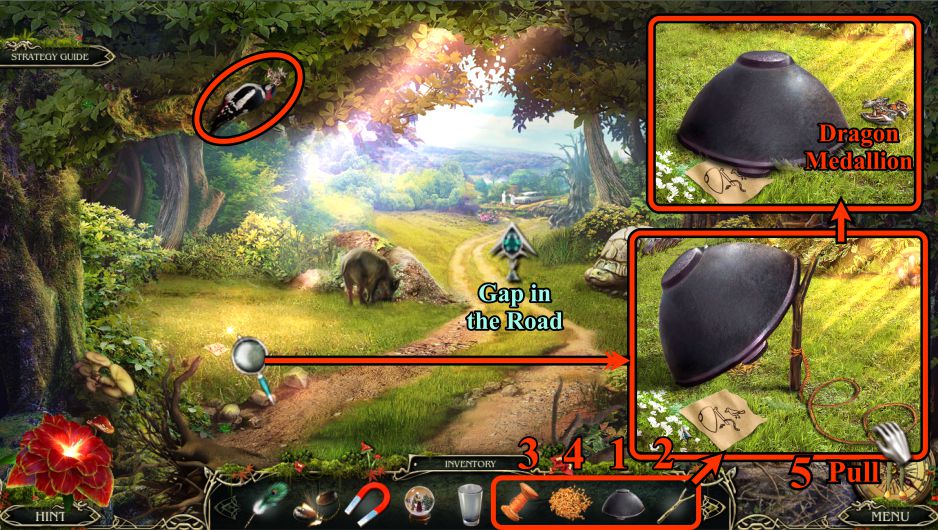
Forest
Zoom in where the note is on the ground and see how to catch the woodpecker.
Place the Stockpot, Forked Stick, Thread, and Grain next to the note.
When the bird comes for the Grain, pull the thread to trap him so you can get the Dragon Medallion.
Continue on up the road to the Gap.
Screenshot
Gap in the Road
Zoom in on the tree and place the Dragon Medallion on the lock.
Use the Axe on the green root to remove the evil from the tree.
Play the Hidden Object Scene, then go to the Boat Dock.
Screenshot
Tree Hollow Hidden Object Scene
Use the knife to cut a Slice of Pumpkin.
Smash the egg with the rock so you can collect the Egg Yolk.
Your Inventory item will be a Screwdriver.
Screenshot
Boat Dock and Boathouse
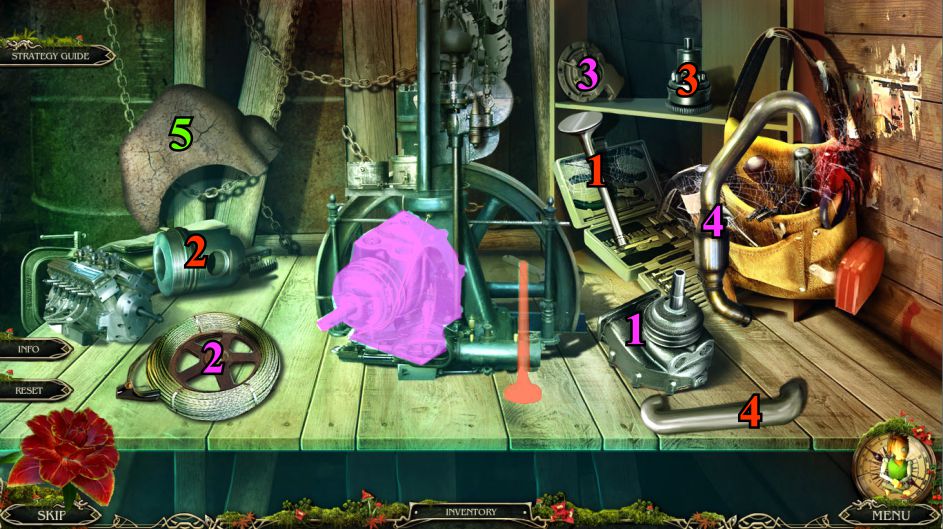
Zoom in on the boat motor and use the Screwdriver to take off the cover.
Collect the Rope and go to the Boathouse.
Zoom in on the table with the engine parts and place the Rope to start a Mini Game.
Screenshot
Engine Mini Game
There are 2 sections to the engine, so the parts in the screenshot are color coded with numbers to match where they go and in what order.
As you assemble the pieces, a silhouette of the next part you need will appear.
Your final part will be the cover that combines both sections of the engine.
Screenshot
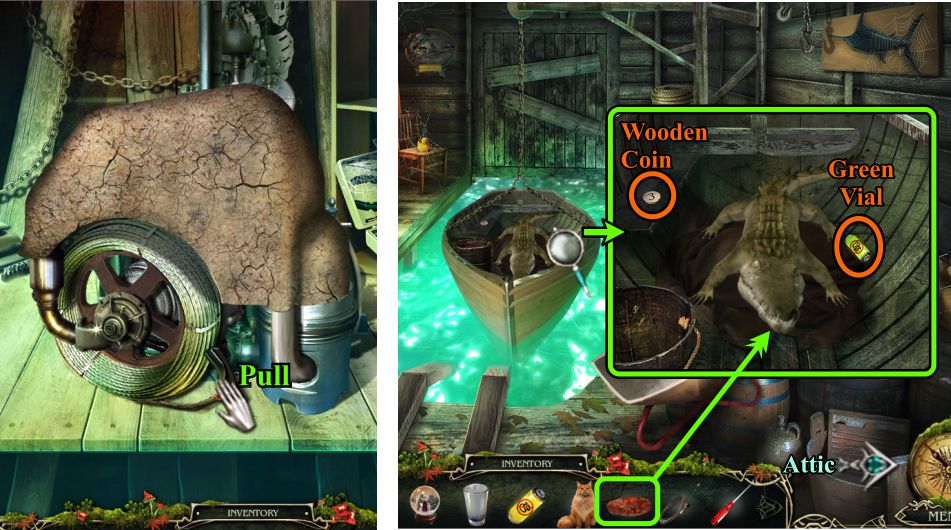
Once you have completed the engine, pull the cord to lower the boat into the water.
Surprise, you are not alone: give the Cooked Meat to the Crocodile, and he will jump overboard and leave the boat to you.
Collect the Wooden Coin and Green Vial, then go to the Attic.
Screenshot
Chest Mini Game
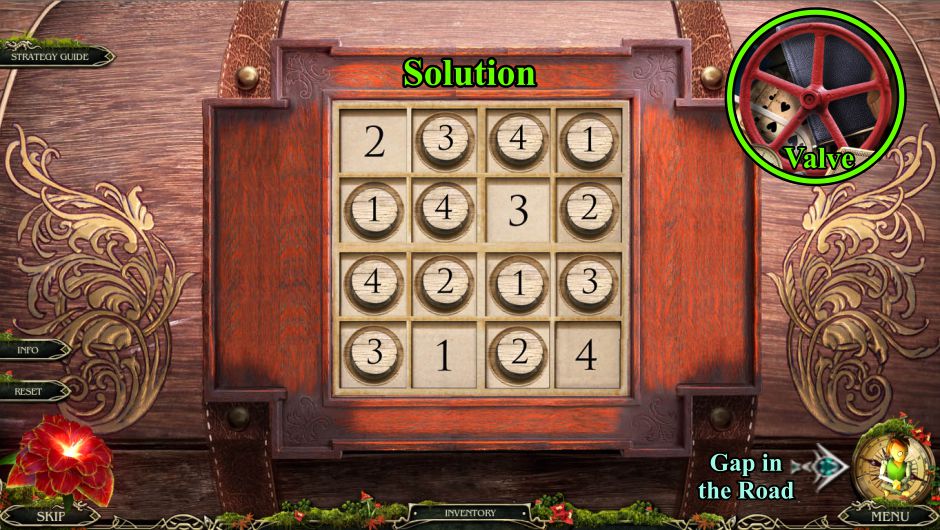
Zoom in on the chest and place your Wooden Coin for a Mini Game.
This is a Sudoku puzzle: your objective is to place all the coins so that the same numbers do not appear in the same columns or rows. See the screenshot.
Take the Valve at the end of the game, then go to the Gap in the Road.
Screenshot
Gap in the Road
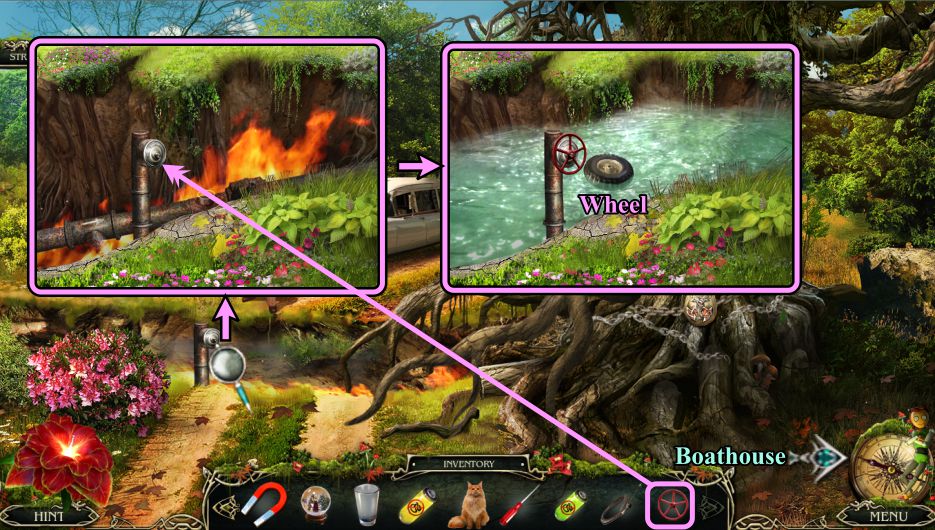
Zoom in and place the Valve to rid the ditch of fire and fill it with water.
Take the Wheel that floats to the surface, and go to the Boathouse.
Screenshot
Boathouse and Gap in the Road
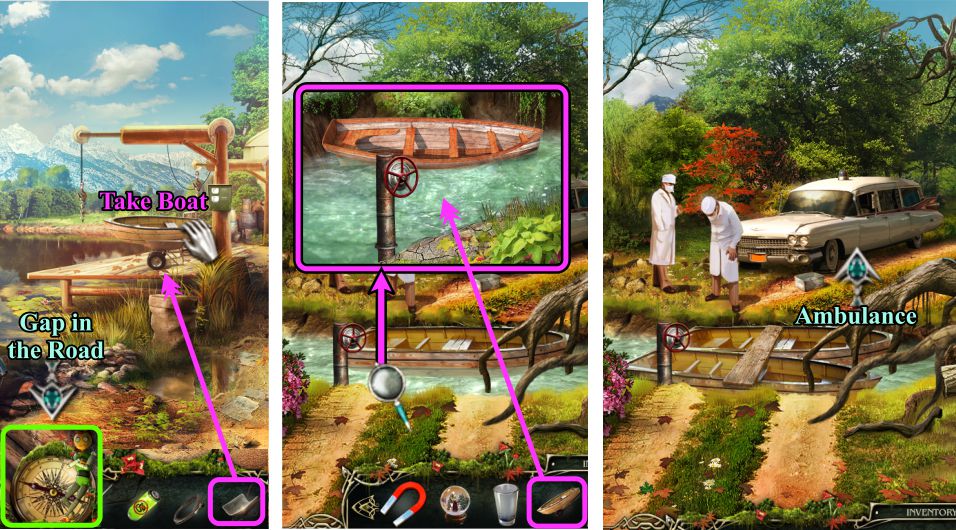
Zoom in on the wheelbarrow and install the Wheel.
Place the wheelbarrow on the boat, and it will go to dry-dock.
Collect the boat and go to the Gap in the Road.
Zoom in on the water and place the boat.
The wheelbarrow will return to your Inventory, so go to the Boat Dock.
Screenshot
Boat Dock, Gap in the Road, and Ambulance
Place the wheelbarrow under the boat on the dock and collect them.
Go to the Gap in the Road, zoom in and place the second boat.
A plank will automatically appear so you can cross to the Ambulance.
Screenshot
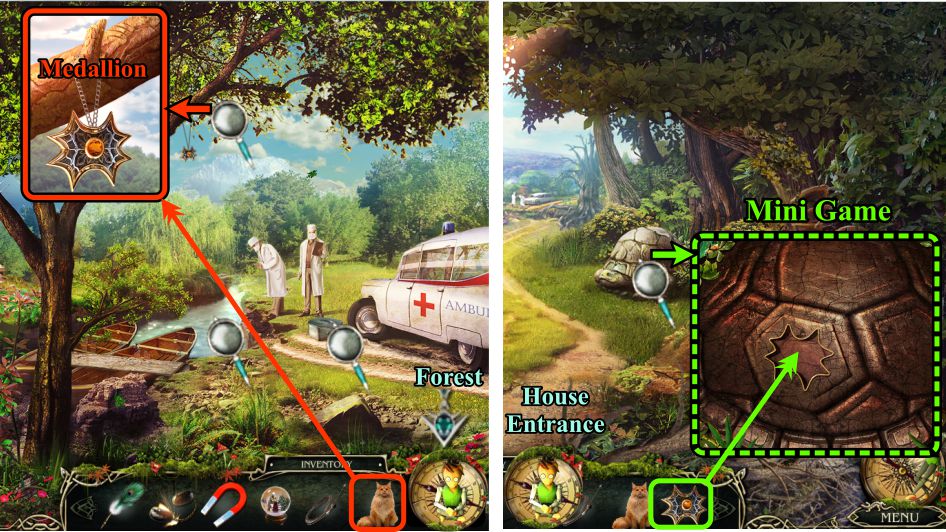
Ambulance and Forest
Check the magnifying glasses and send Fluffy up the tree to drop the Medallion for you to pick up.
Go to the Forest and zoom in on the tortoise shell.
Place the Medallion for a Mini Game.
Go to the House Entrance when you have completed the game.
Screenshot
Tortoise Mini Game
Your goal is to move all of the planets into their matching slots as numbered in the screenshot.
In order to do so, you will need to use the ramps and catapults.
Each planet needs to be moved one at a time starting with the smallest and progressing to the largest.
The ramps are used to transport the planets to the proper circle.
The catapults are used to propel the planets where you want them to go.
The large catapult has the ability to break the glass barriers so should be used when that is necessary.
Screenshot
Here are the ramp and catapults necessary to arrive at the solution shown.
5 ramps and a small catapult placed at the right of the ramps.
2 ramps and a large catapult placed at the left of the ramp in the circle.
3 ramps and a large catapult placed to the right of the ramps.
No ramps are necessary, but you need to place a large catapult at the left in the circle.
4 ramps and place a large at the left of the ramps.
7 ramps and no catapult needed.
The final solution is shown and numbered in the screenshot, with the ramp for the last planet shown.
Your reward will be a Bow that will automatically combine itself with the Arrow from your Inventory to make a Bow and Arrow.
Screenshot
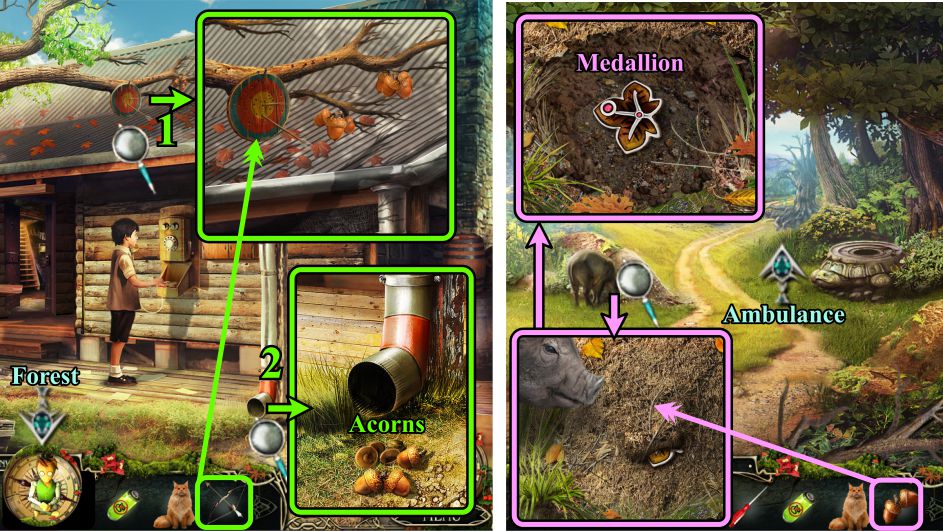
House Entrance and Forest
Zoom in on the target on the tree and use the Bow and Arrow to shoot at it.
Check out the drain pipe to find some Acorns.
Go to the Forest.
Zoom in where the boar is sniffing around.
Place the Acorns, and he will root out the Medallion for you to collect.
Go to the Ambulance.
Screenshot
Ambulance and Inside Ambulance
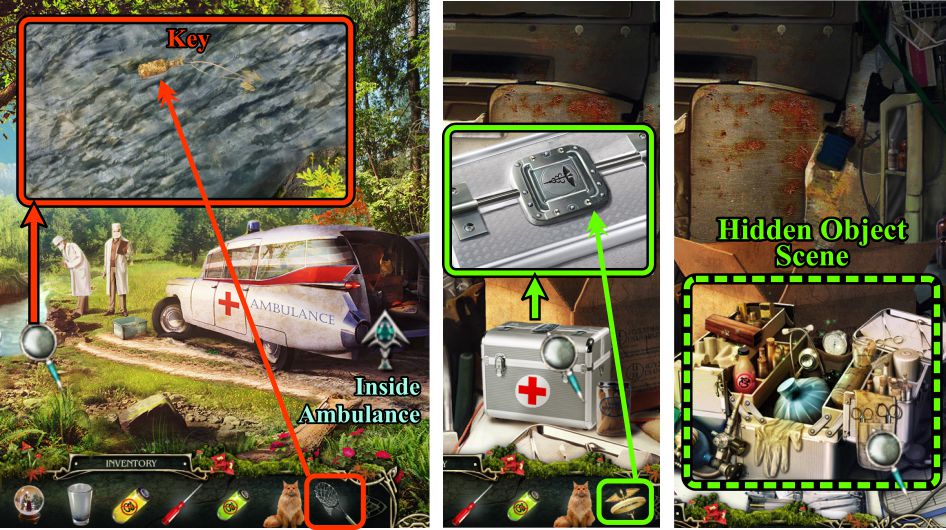
Zoom in on the medical box, place the Medallion, and take the Syringe Needle from the opened box.
Go inside the Ambulance and use the Syringe Needle to pick the lock on the glove compartment.
Take the Scissors and go to the Fishing Pier.
Screenshot
Fishing Pier and Attic
Zoom in on the pier and use the Scissors to cut a piece of Fishing Net.
Go to the Attic.
Zoom in on the tennis rack and place the Fishing Net to create a Scoop Net.
Use the Map to go to the Ambulance.
Screenshot
Ambulance and Inside Ambulance
Zoom in on the water in the ditch and use the Scoop Net to retrieve the Key to the medical kit inside the Ambulance.
Go inside the Ambulance and place the symbol on the medical box to trigger a Hidden Object Scene.
Screenshot
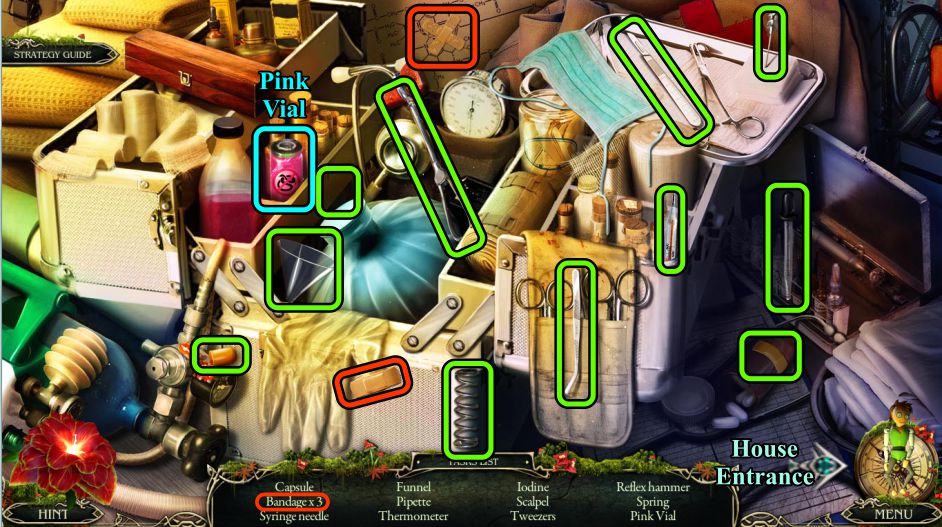
Medical Box Hidden Object Scene
Collect everything to get the Pink Vial.
Go to the House Entrance.
Screenshot
House Entrance and Fishing Pier
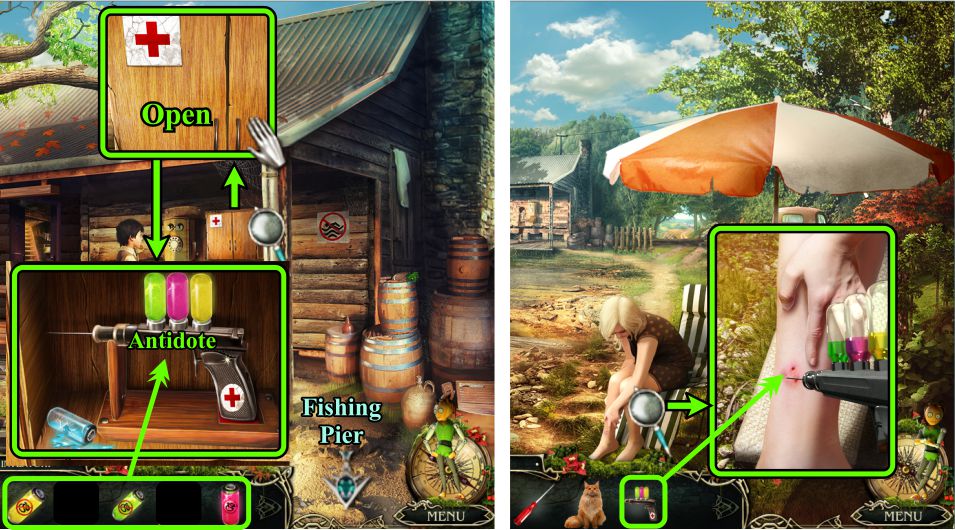
Zoom in and open the first aid cabinet.
Place all the vials into the injector gun and collect the Antidote.
Go to the Fishing Pier, zoom in on Luisa, and give her the Antidote.
Screenshot
Posted by: Jazz |
July 15, 2012 9:25 PM
|
July 15, 2012 9:25 PM
Grim Tales: The Wishes Walkthrough
Chapters 6-13
Chapter 6: Protecting Brandon
Map
You have returned to the Gray's house, so see the screenshot as a reference for the new areas that will open up.
Screenshot
Swamp Demon's Living Room
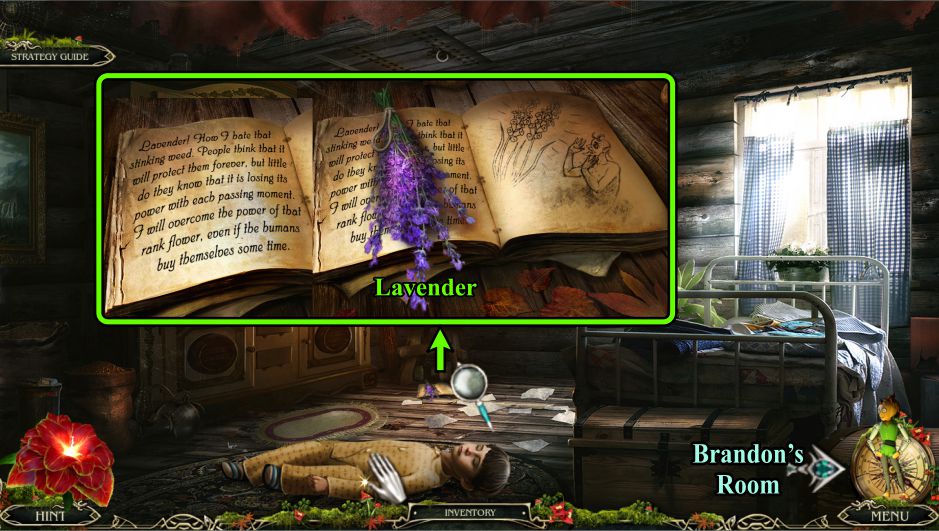
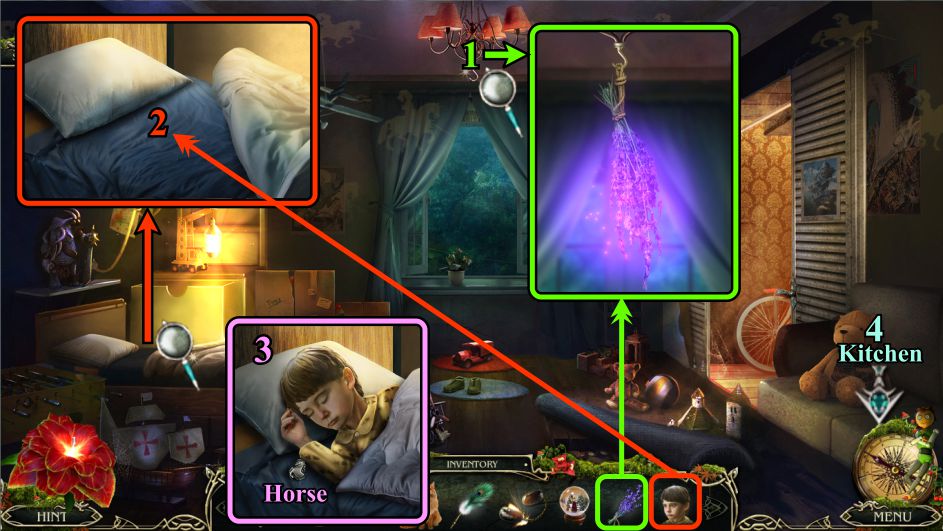
Zoom in on the book on the floor, take the Lavender and read the page.
Pick up Brandon and head to his room.
Screenshot
Brandon's Room
Hang the Lavender on the hook on the light fixture.
Zoom in on the bed and put Brandon in it.
Examine the bed and take the Horse.
Go to the Kitchen.
Screenshot
Kitchen and Backyard
Zoom in on the door and place the Horse to unlock it.
Go outside to the Backyard.
Examine the water valve and take the Zipper Pull.
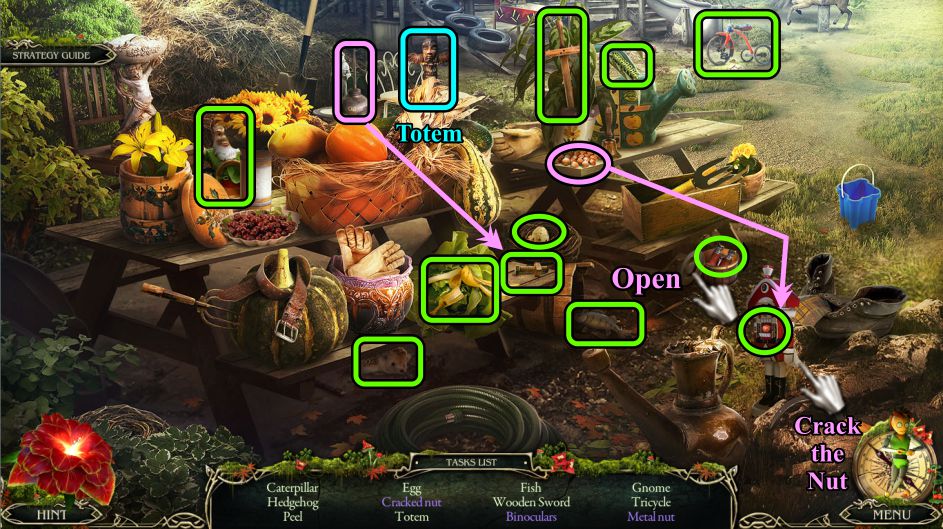
Play the Hidden Object Scene, then head off to the Playground.
Screenshot
Bench Hidden Object Scene
Your Inventory item will be a Totem.
Use the oil on the rusty bolt so you can get the Metal Nut.
Open the round box to find the Binoculars.
Place on of the nuts from the table in the nutcracker's mouth and pull the handle to get a Cracked Nut.
Screenshot
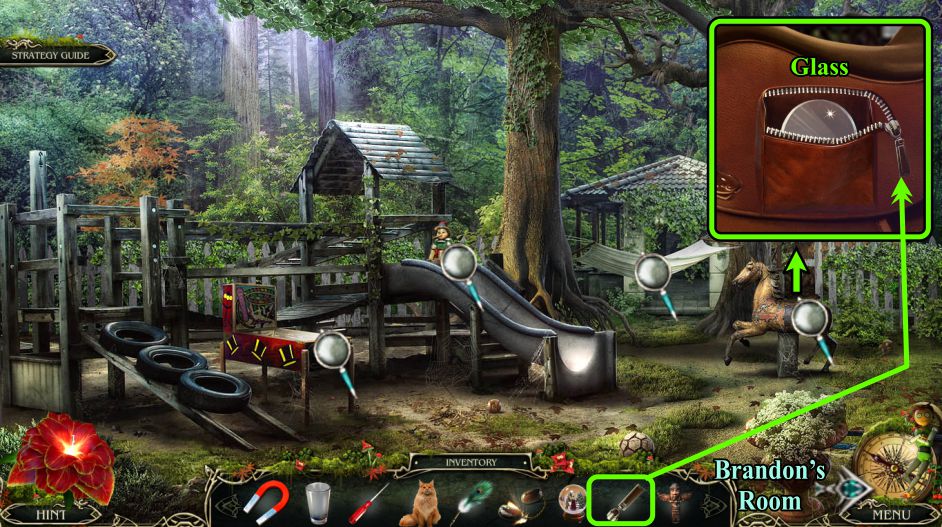
Playground
Examine the magnifying glasses, then zoom in on the horse.
Place the Zipper Pull to open the pocket, and take the Glass.
Go to Brandon's Room.
Screenshot
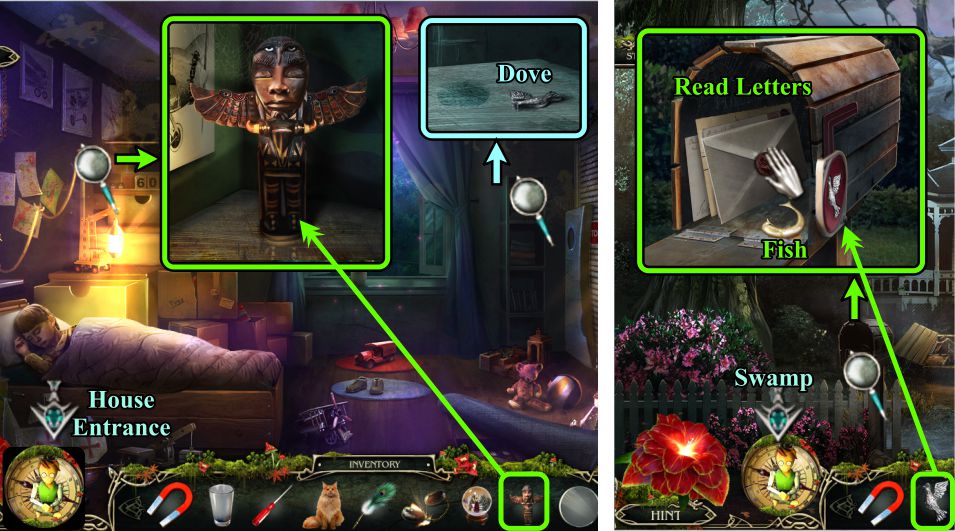
Brandon's Room and House Entrance
Zoom in on the top shelf to the left and place the Totem.
Examine the right bookcase and take the Dove.
Go to the House Entrance.
Zoom in and place the Dove to open the mailbox.
Take the Fish and read the letters.
Go to the Swamp.
Screenshot
Swamp and Waterfall
Go forward on the path that is created during the cut scene.
Examine the magnifying glasses, then zoom in on the sensor and remove the broken glass.
Replace the Glass with the one from your Inventory, unscrew the Sensor, and take it.
Zoom in on the lily pond, take the Glass Ball, and use the Glass to collect the Flower.
Go to the Backyard.
Screenshot
Backyard
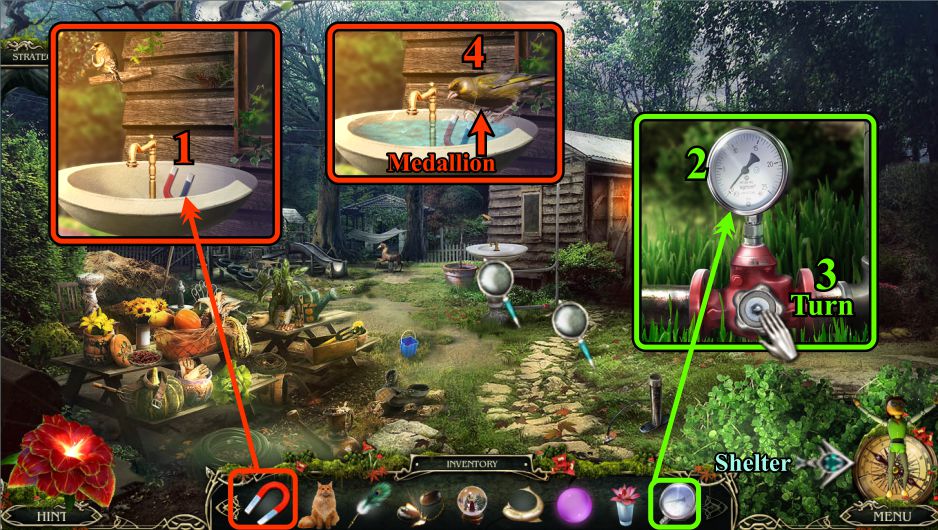
Zoom in on the basin and place the Magnet.
Zoom in and place the Sensor.
Turn the valve to fill the basin with water.
Wen the bird comes for a drink, the Magnet holds on to the Medallion as he flies away, so collect it.
Go to the Shelter.
Screenshot
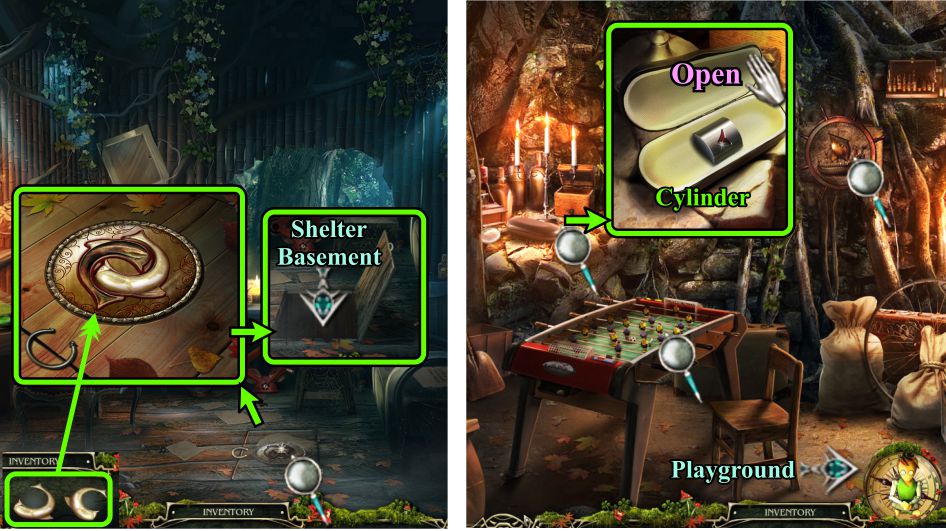
Shelter and Shelter Basement
You have both halves of the Medallion to open the basement hatch, so zoom in and place them.
Go to the Shelter basement and look around.
Zoom in on the niche at the left and open the case.
Take the Cylinder and go to the Playground.
Screenshot
Playground
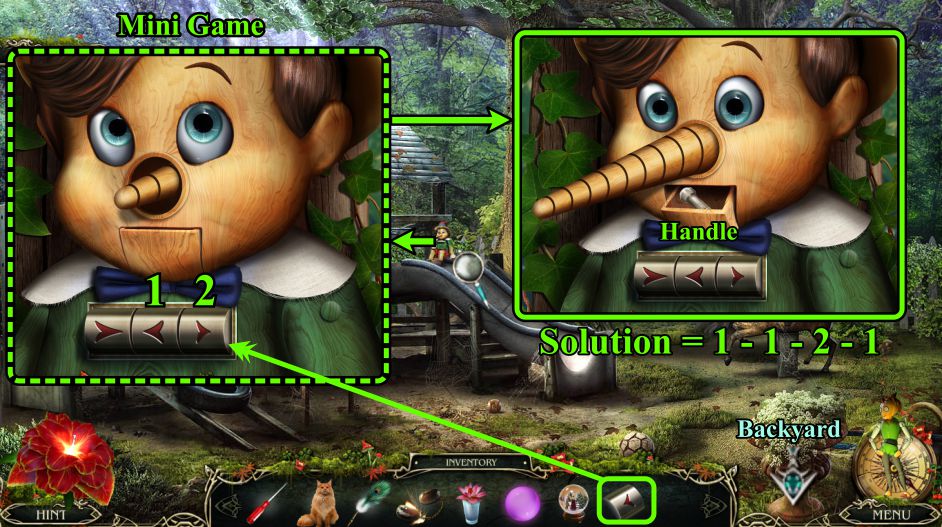
Zoom in on Pinocchio and place the Cylinder for a Mini Game.
Your goal is to make his nose grow by pressing the cylinders.
See the screenshot for the solution.
When his mouth opens, take the Handle and go to the Backyard.
Screenshot
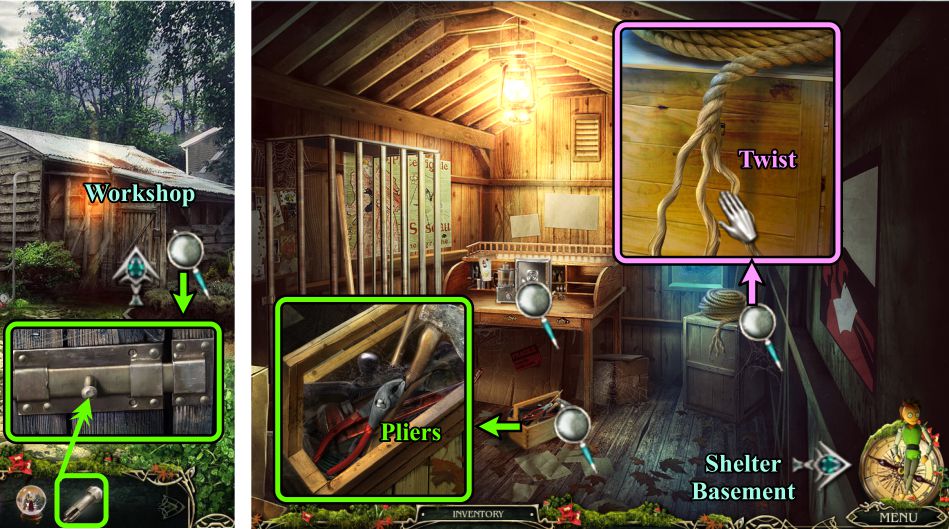
Backyard and Workshop
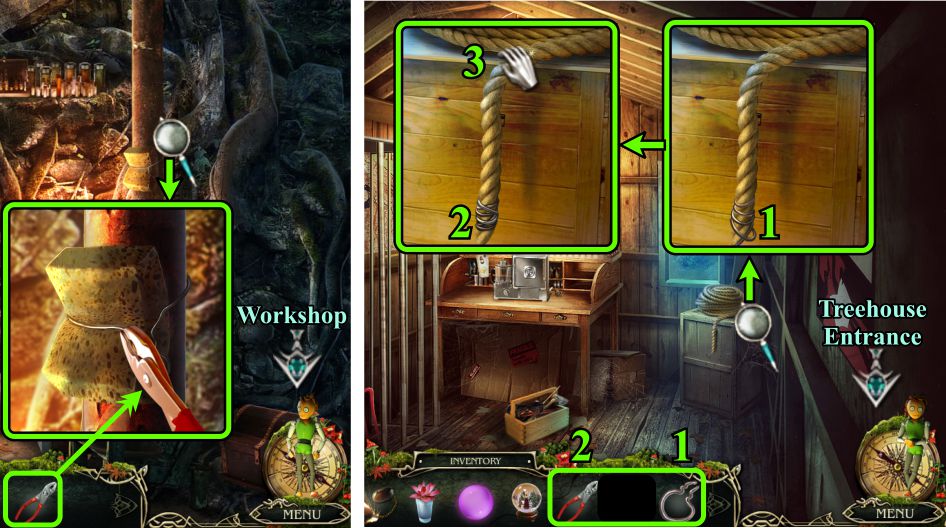
Zoom in on the Workshop door, place the handle to open the door, and enter.
Examine the toolbox and take the pliers.
Look at the rope in the corner and twist it back together, but you can't take it until you find something to keep it from untwisting again.
Go to the Shelter Basement.
Screenshot
Shelter Basement and Workshop
Zoom in on the pipe and use the Pliers to remove the wire holding the sponge, and all three items will go into your Inventory.
Go to the Workshop and zoom in on the rope.
Put the Wire on the end of the rope, use the Pliers to tighten it, and take the Rope.
Go to the Treehouse Entrance.
Screenshot
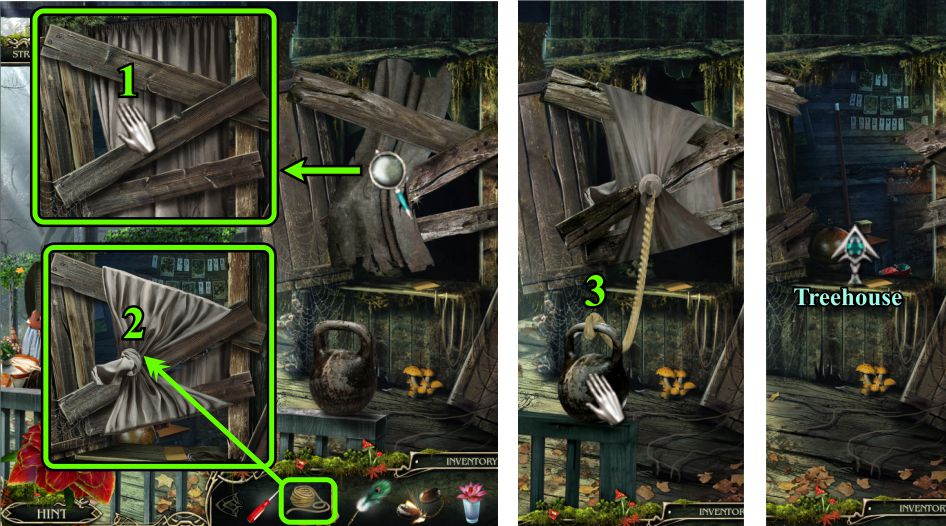
Treehouse Entrance
Zoom in on the curtain and boards and combine then into a knot.
Tie the rope to the knot, and it will attach itself to the weight.
Throw the weight off the platform.
Enter the opening to the Treehouse.
Screenshot
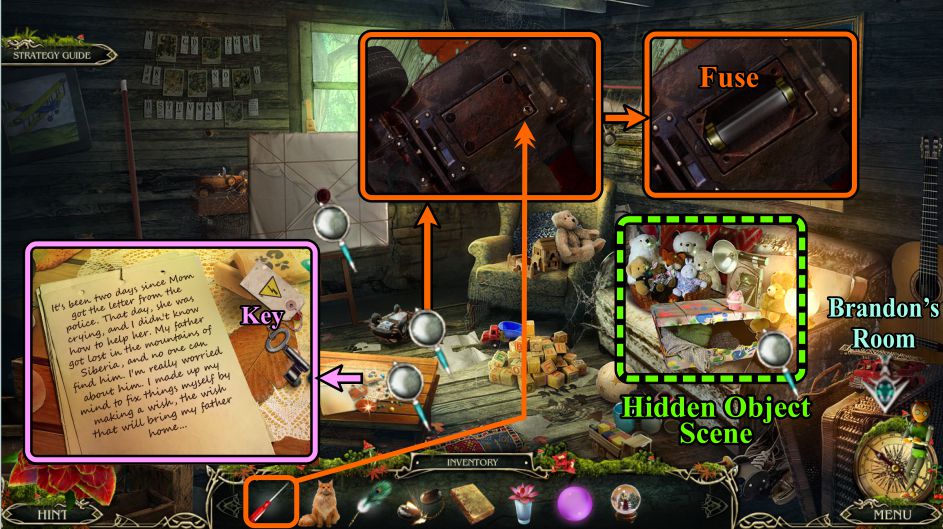
Treehouse
Read the note on the table and take the Key.
Zoom in on the upside down car on the floor and use the Screwdriver to open the compartment to take the Fuse.
Play the Hidden Object Scene, then go to Brandon's Room.
Screenshot
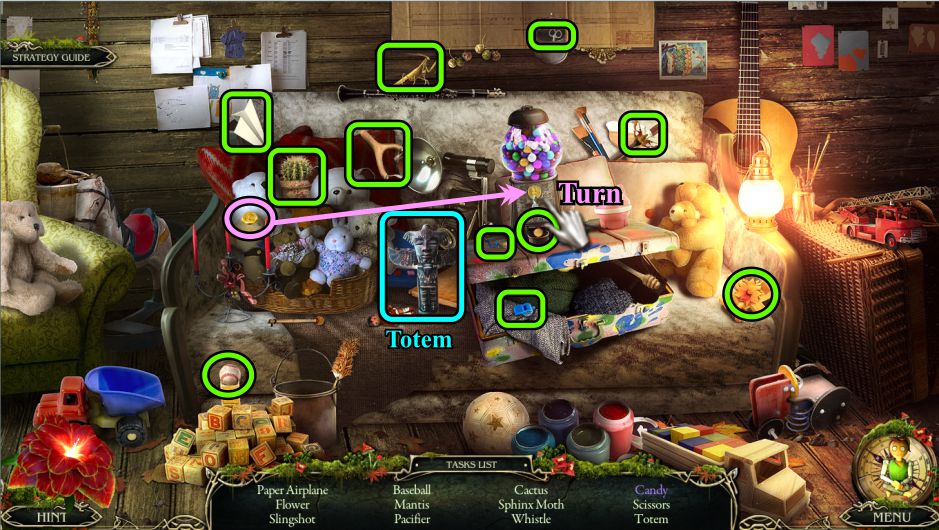
Sofa Hidden Object Scene
Place the coin in the candy machine and turn the knob.
Take the Candy and the rest of the items on the list to get the Totem.
Screenshot
Brandon's Room
Zoom in on the top of the right bookcase and place the Totem.
Examine where the lights meet on the floor and take the Medallion.
Back out the door to the Corridor.
Screenshot
Corridor, Kitchen, and Waterfall
Zoom in on the table and use the Sponge to soak up the spilled oil.
Go to the Kitchen and zoom in on the electrical cabinet.
Use your Key to open it, and take the Toggle.
Go to the Waterfall, zoom in on the electrical box there, and open it.
Place the Fuse and Toggle, flip the switch, and the Spring will go into your Inventory.
Go to the Playground.
Screenshot
Playground and Shelter Basement
Zoom in on the pinball machine and remove the broken spring.
Replace the Spring with the one from your Inventory and click the knob.
Collect the Ball and go to the Shelter Basement.
Zoom in on the soccer game and place the Ball for a Mini Game.
Screenshot
Soccer Mini Game
You are the blue team, so you need to set your players up to pass the ball between them to score a goal.
You need to score 3 goals to win the game, and the field changes for each round.
You can move your players to another position on the rod by choosing a player and then clicking on one of the red markers.
Click on each player to choose the angle for the ball to be kicked.
Once you have all players properly placed, press the Start button.
See the screenshot for how to set up your players for Round 1.
Screenshot
See the screenshot for the positioning for Round 2.
Screenshot
See the screenshot for the solution to Round 3. When you complete Round 3, you will be rewarded with a Medallion.
Go to the Hall in the Gray's house.
Screenshot
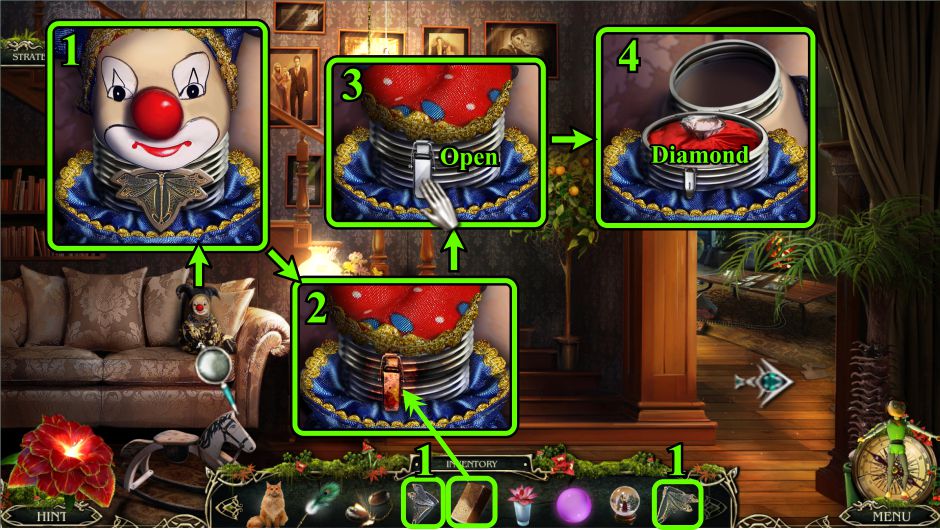
Hall
Zoom in on the clown on the sofa and place both halves of the Medallion.
Oil the rusty latch.
Open the latch.
Take the Diamond.
Go to the Fireplace Room.
Screenshot
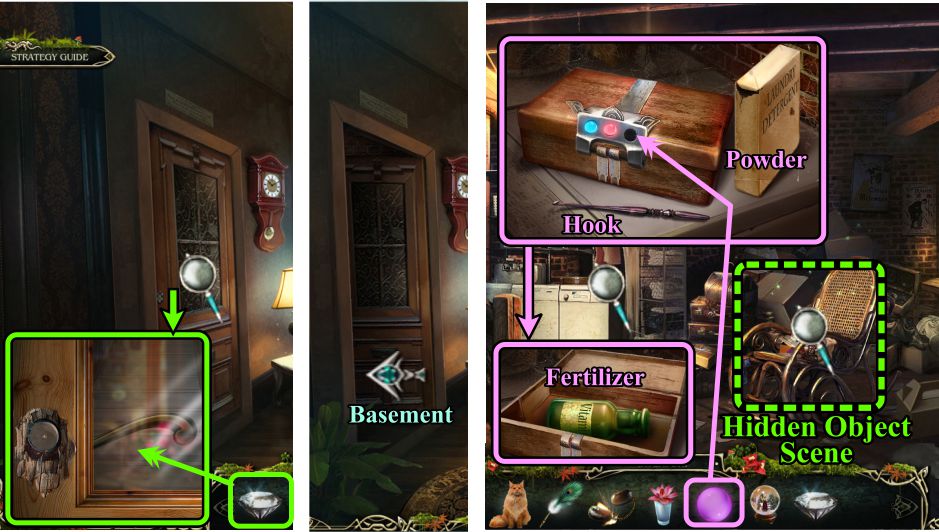
Fireplace Room and Basement
Zoom in on the door at the left and use the Diamond to cut a hole in the glass so the door opens.
Go down to the Basement.
Zoom in on the box on the washing machine and place your Glass Ball to open it.
Collect the Hook, Powder, and Fertilizer.
Play the Hidden Object Scene.
Screenshot
Rocking Chair Hidden Object Scene
Use the scissors to cut the string on the small box to open it.
See the screenshot for other items to open.
Place half on the heart on the other half to collect it.
A Totem will go into your Inventory.
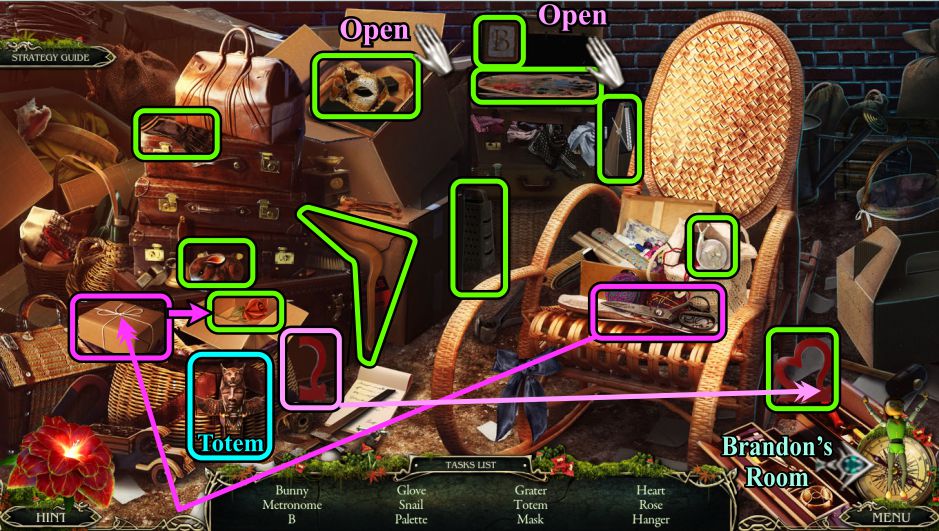
Go to Brandon's Room.
Screenshot
Brandon's Room
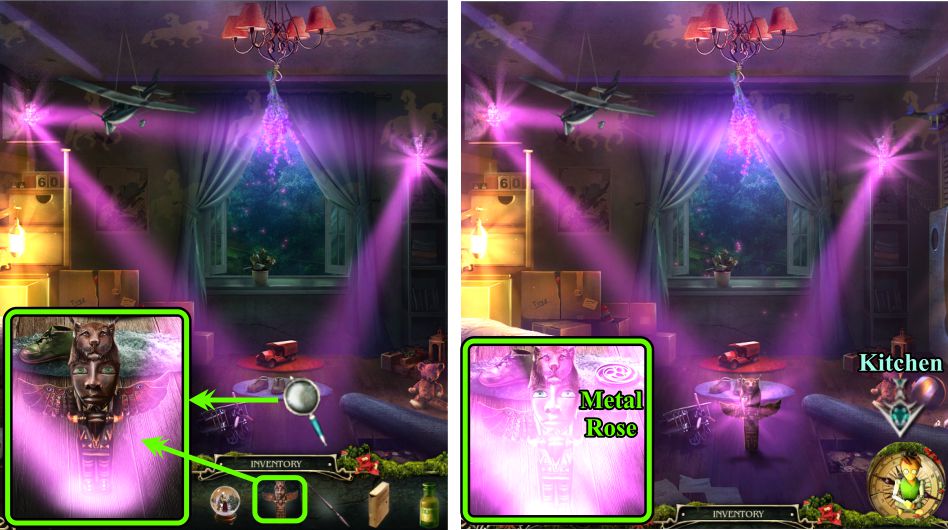
Zoom in on the triangle place on the floor and leave the Totem there.
After the cut scene, zoom in on the last Totem and take the Metal Rose.
Go to the Kitchen.
Screenshot
Chapter 7: Uncovering Another Memory
Kitchen and Swamp House
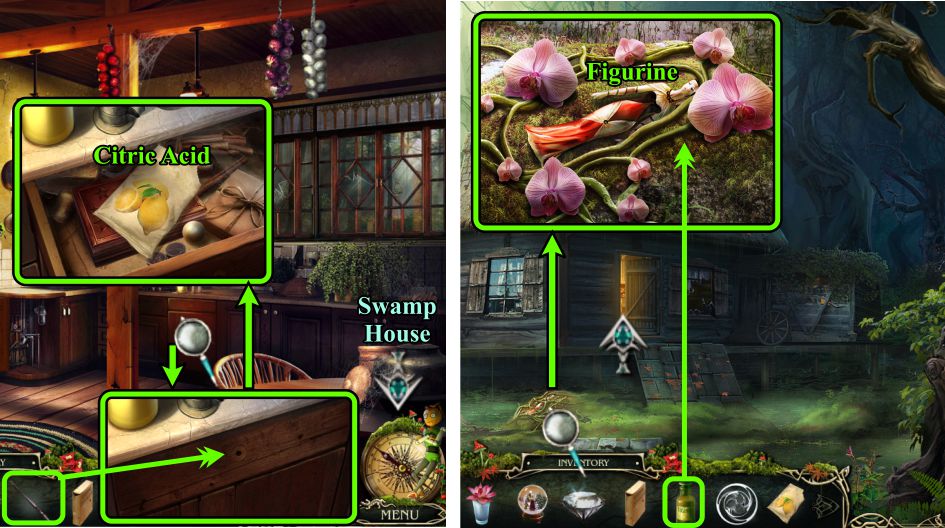
Zoom in on the drawer and use the Crochet Hook to open it.
Take the Citric Acid, and go to the Swamp House.
Zoom in on the liana plant and Fertilize it.
Once it blossoms, take the Figurine.
Go inside the house.
Screenshot
Swamp Demon's Living Room and Workshop
Zoom in on the buffet and place the Figurine on the cabinet door.
Take the Alcohol, and go to the Workshop.
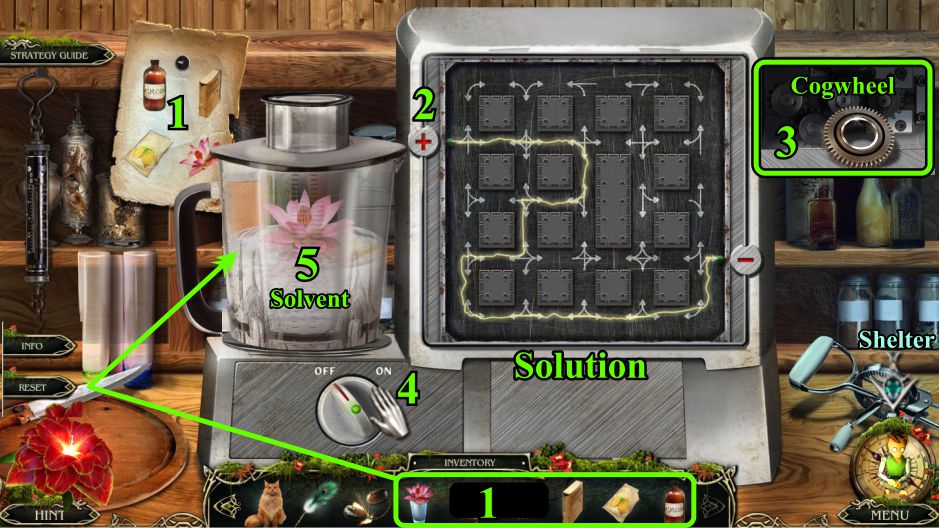
Zoom in on the mixer and place the Metal Rose for a Mini Game.
Screenshot
Mixer Mini Game
Place the Alcohol, Powder, Citric Acid, and Flower in the mixer.
Move the atom on the circuit board from the plus to the minus button using the red directional arrows...see the screenshot for the solution.
Take the Cogwheel when the mixer opens.
Turn the mixer on to process the contents.
Take the finished Solvent, and go to the Shelter.
Screenshot
Shelter
Zoom in on the jack and place the Cogwheel.
Pull the handle to compress the Jack and collect it.
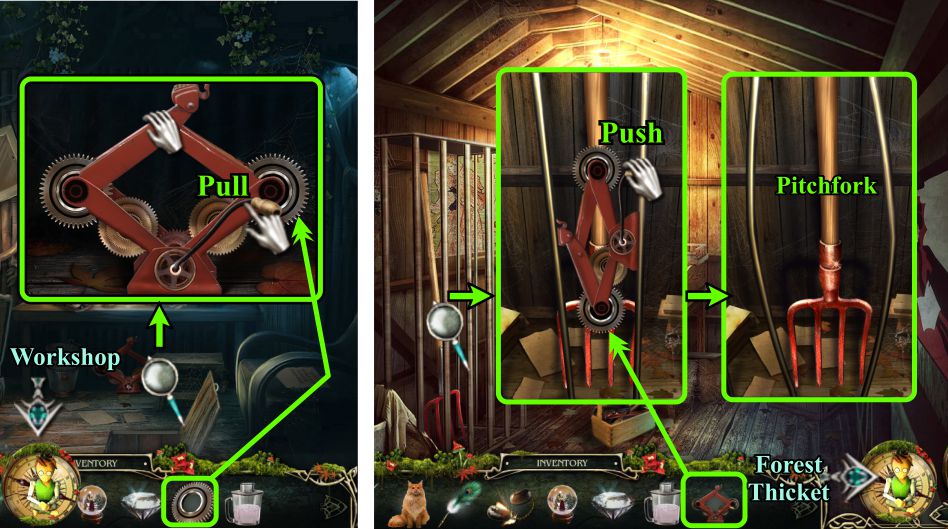
Go to the Workshop and zoom in on the bars.
Place Jack and push the handle to widen the bars so you can get the Pitchfork.
Go to the Forest Thicket.
Screenshot
Forest Thicket
Zoom in on the hollow log and use the Pitchfork to remove the leaves, only to discover a nasty raccoon isn't happy with your presence.
Send Fluffy in after the raccoon, which will chase after Fluffy, leaving you to play the Hidden Object Scene.
Not to worry, Fluffy will return to your Inventory.
Screenshot
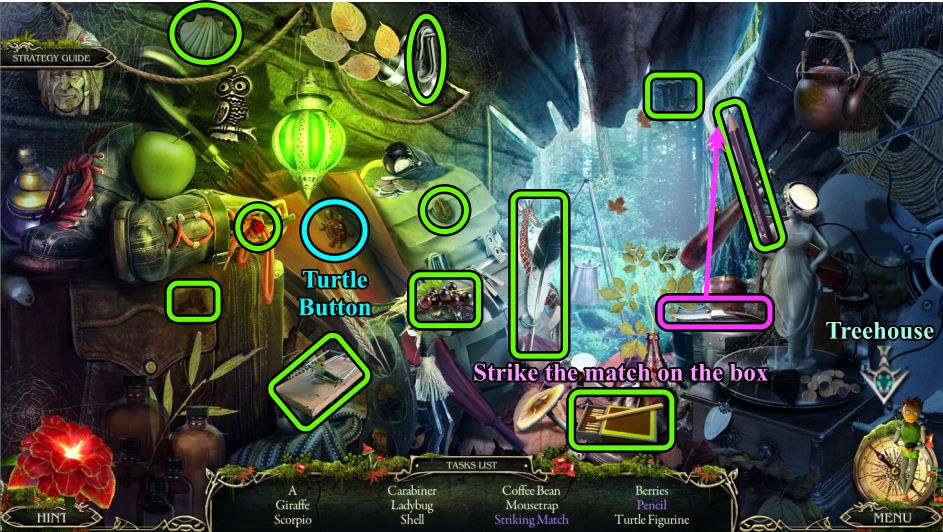
Hollow Log Hidden Object Scene
Strike the match on the box to get a Striking Match.
Use the knife to sharpen the Pencil.
A Turtle Button will go into your Inventory.
Go to the Treehouse.
Screenshot
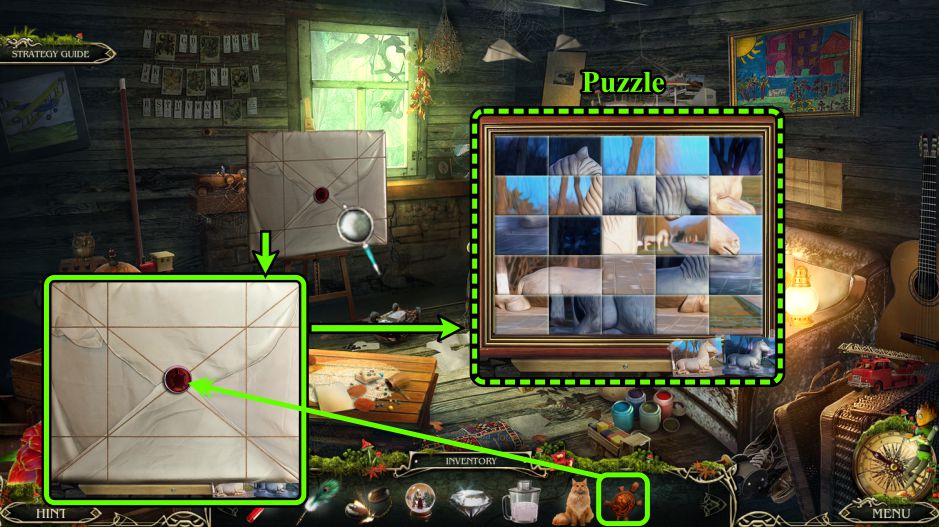
Treehouse
Zoom in on the easel and place the Turtle Button on the seal to remove the paper for a Puzzle.
There are two versions of the finished puzzle as shown by the two photos below the board.
Click two adjacent puzzle pieces to swap them.
When you exchange the pieces, the day version becomes night and night becomes day.
Screenshot
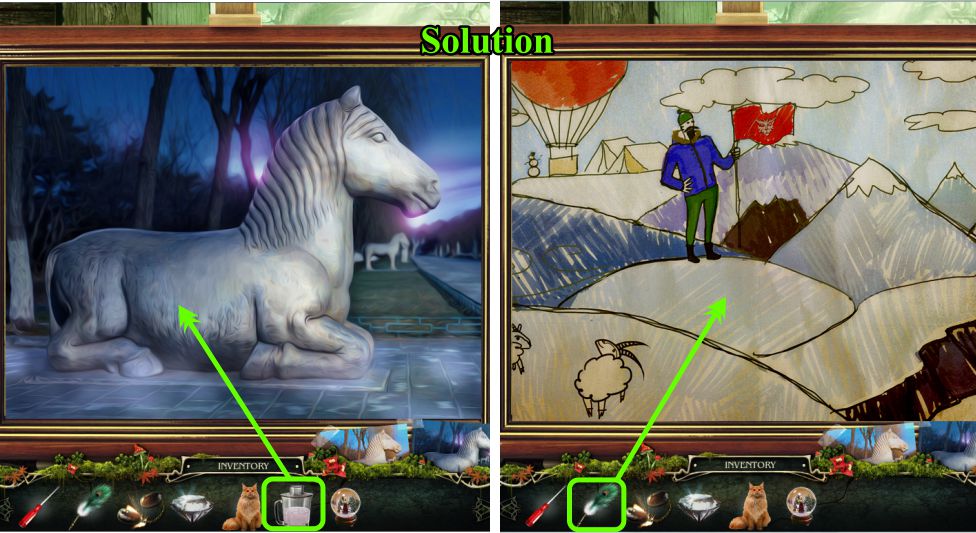
Day and Night Puzzle
Your goal is to complete the puzzle so that the final picture is either the night or the day version.
The solution in the screenshot is night.
Pour the Solvent over the completed picture to uncover the clue to Brandon's next memory.
Use the Quill on the picture to enter his memory.
Screenshot
Chapter 8: Siberia
Map
Brandon's memory has sent us to Siberia to find his father, so the Map reflects all the locations there.
Screenshot
Rock and Landing
You first find yourself on the Rock, but you cannot do anything there at the moment, so head toward the balloon on the hill.
Pick up the Crosspiece and examine the balloon.
Pick up the Snowshoes and head back to the Rock.
Check out the camera and examine the cavern to find Gray.
Place the Snowshoes on the trail to the Lumberjack Camp so you can navigate your way.
Screenshot
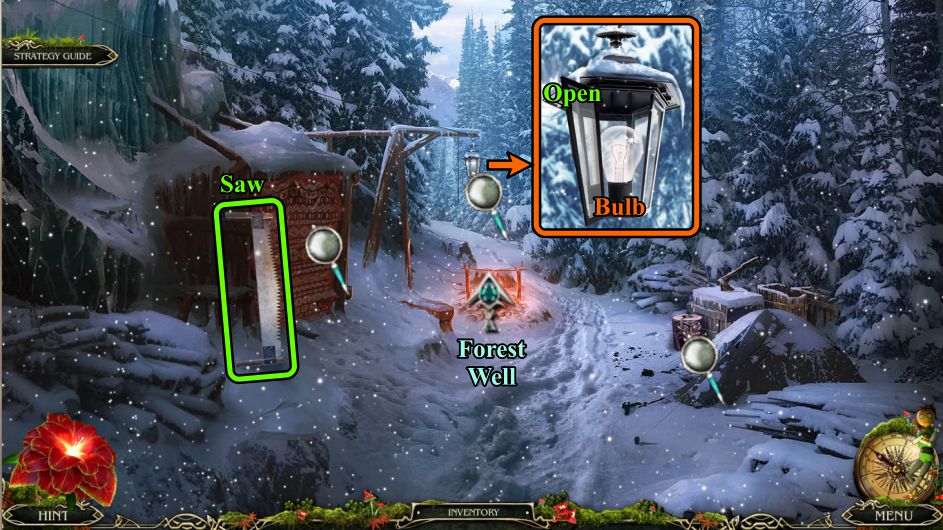
Lumberjack Camp
Collect the Saw, then zoom in on the lamp.
Open the glass and take the Bulb.
Go forward to the Forest Well.
Screenshot
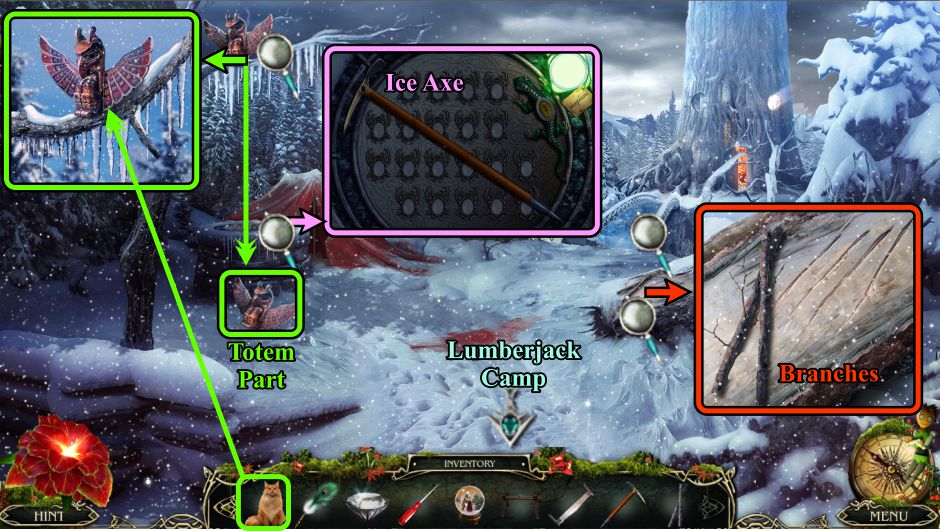
Forest Well
Examine the fallen tree at the right and take the Branches.
Zoom in on the Well and pick up the Ice Axe.
Send Fluffy up the tree to knock down the Totem Part.
Return to the Lumberjack Camp.
Screenshot
Lumberjack Camp
Zoom in on the tent and use the Ice Axe to rip the material for a Hidden Object Scene.
Return to the Forest Well.
Tent Hidden Object Scene
Place the leaf on the cabinet to open it.
Open the boxes shown in the screenshot to get Thread and Chess Piece.
The Gas Can will go into your Inventory.
Screenshot
Forest Well
Zoom in on the bridge, pour the Gas Can on it, and ignite it with the Flint.
Cross the bridge to the Shaman's House.
Shaman's House
Zoom in on the tree roots and use your Saw to get the Totem Part.
Examine the iced up torch and use your Ice Axe to free it.
Use the flint to light the Torch, then collect it and go into the Shaman's Living Room.
Screenshot
Shaman's Living Room
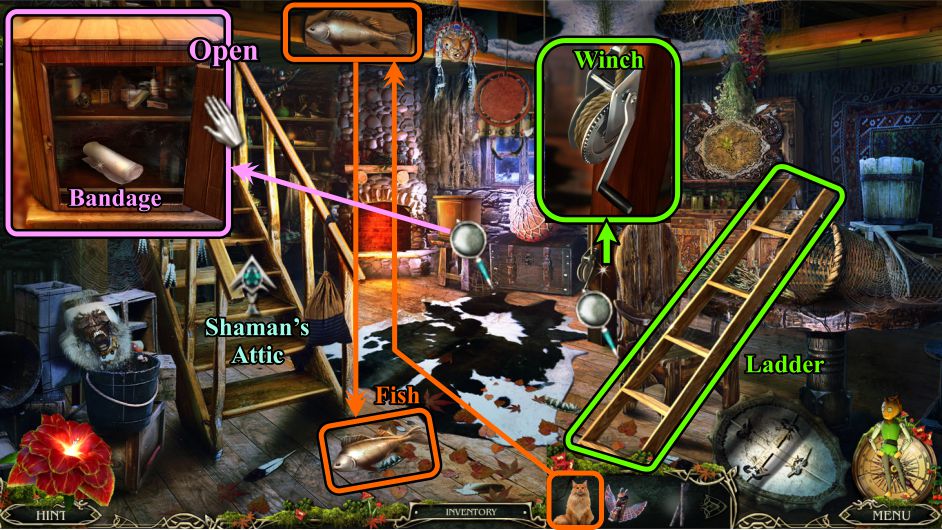
Pick up the Ladder, then zoom in on the post to collect the Winch.
Send Fluffy up to knock down the Fish so you can pick it up.
Open the box to collect the Bandage, then head up to the Attic.
Screenshot
Shaman's Attic
Zoom in on the desk, turn on the battery charger, and collect the charged Battery.
Use the Map to go to the Rock.
Screenshot
Rock and Well Mini Game
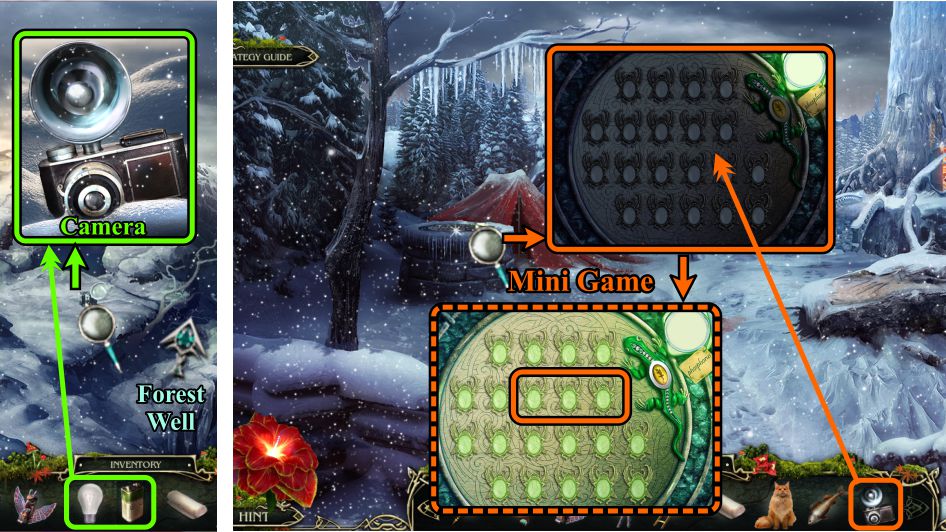
Zoom in on the Camera, put the Bulb in the flash, open the compartment and install the Battery.
Collect the Camera, then go to the Forest Well.
Zoom in on the Well and take a picture with the Camera so the flash will give light for a Mini Game.
Your goal is to beat the lizard by removing the last beetle.
For each move, you can remove 1 to 3 beetles in a row by clicking on them.
The lizard will make his move after you.
Since play is random, you are on your own to beat the lizard, but the screenshot shows my last moves in hope it helps.
Screenshot
Forest Well
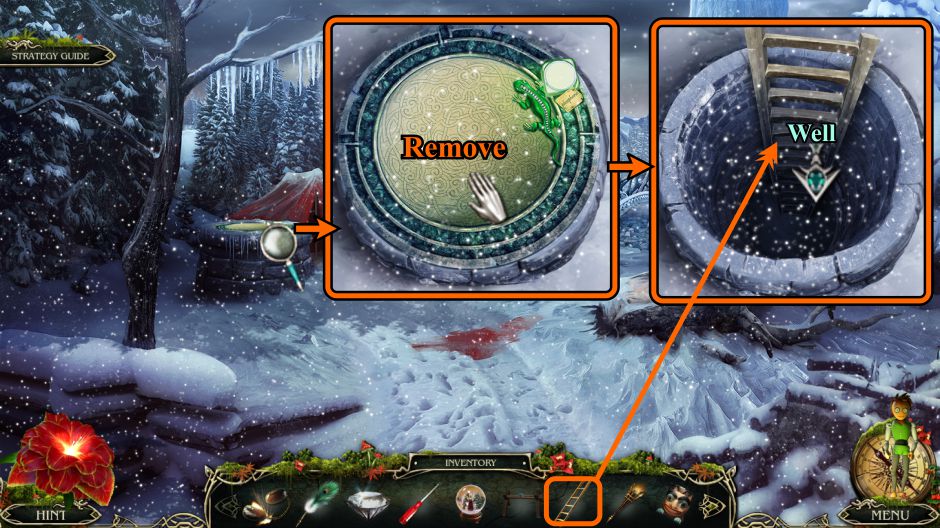
After the Mini Game, zoom in and remove the well cover.
Place your Ladder in the Well and climb down.
Screenshot
Bottom of Well and Lumberjack Camp
Zoom in on the niche and place your Torch.
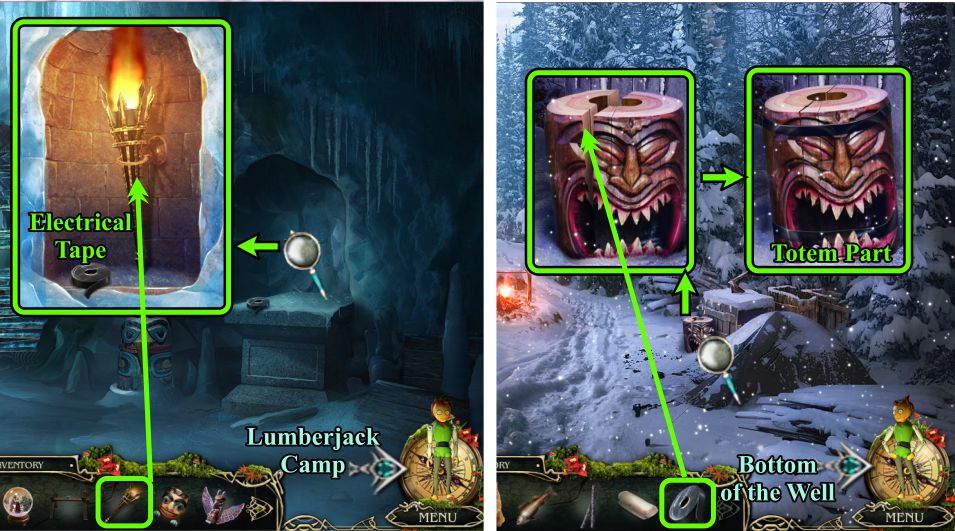
Take the Electrical Tape and go to the Lumberjack Camp.
Zoom in on the Totem Part and tape it back together so you can collect it.
Return to the Bottom of the Well.
Screenshot
Bottom of Well
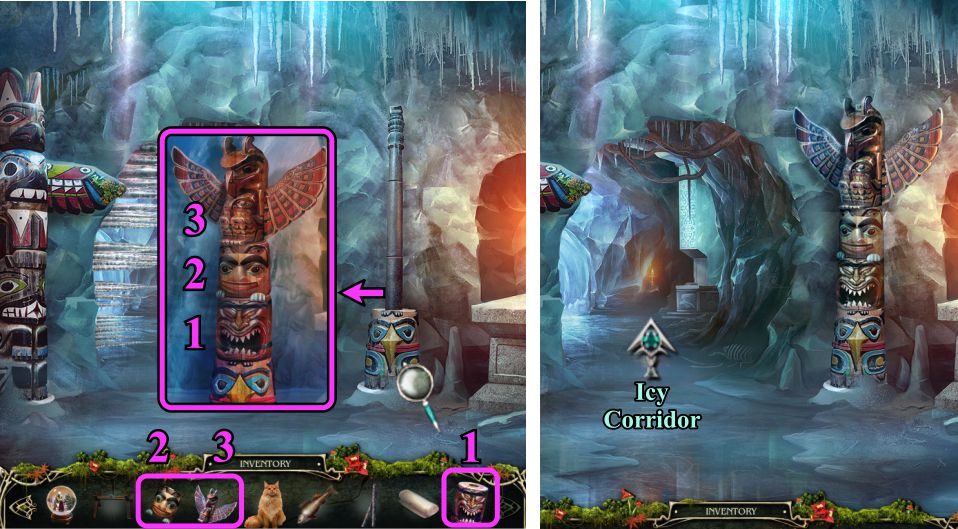
Zoom in on the pole with the totem piece in place.
Assemble the totem with your Totem Parts.
See the screenshot for a numbered solution to complete the totem.
Go forward to the Icy Corridor.
Screenshot
Icy Corridor and Icy Room
Zoom in on the niche at the left and place your Fish.
Take the Fish Oil and go forward to the Icy Room.
Zoom in on the rock at the left, note the bear removal instructions, and take the Leaf.
Play the Hidden Object Scene.
Screenshot
Icy Room Hidden Object Scene
Use the corkscrew to remove the cork from the bottle to get the Note inside.
The Bear will go into your Inventory.
Return to the Icy Corridor.
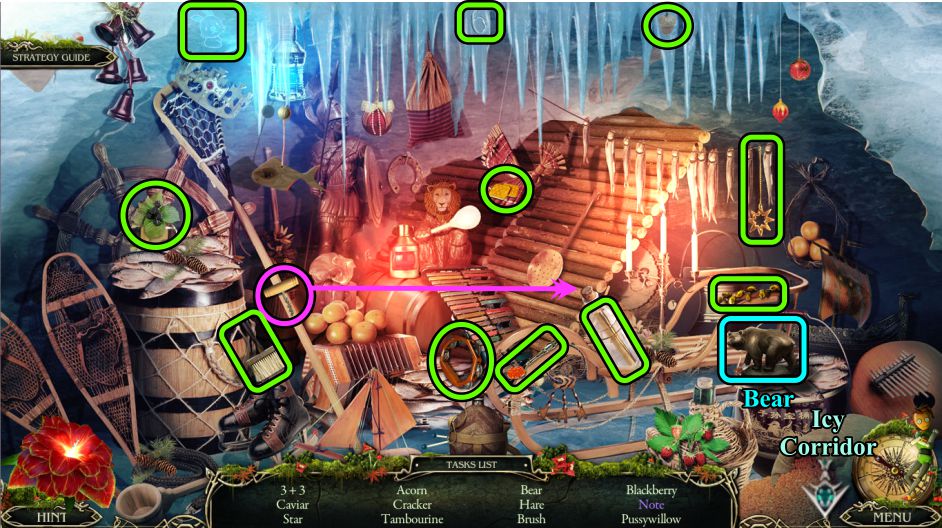
Screenshot
Icy Corridor, Shaman's House and Living Room
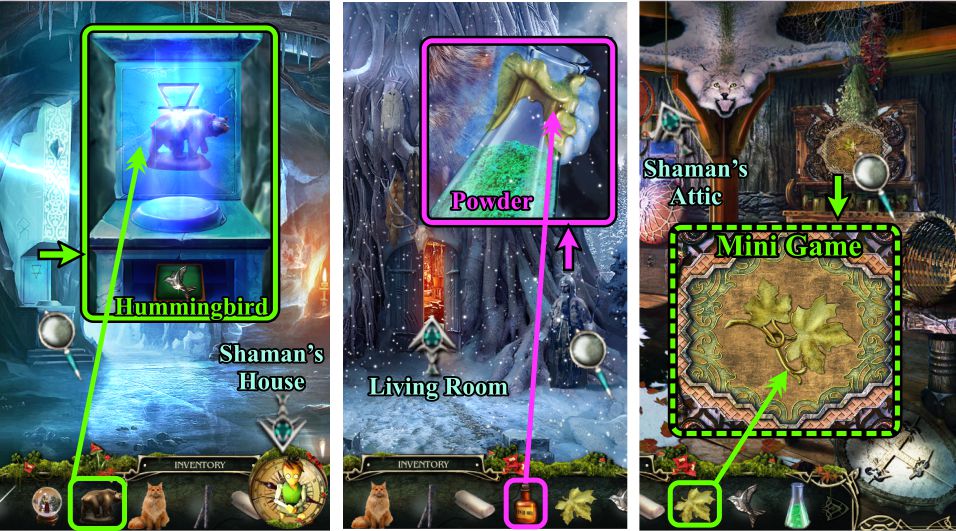
Place the Bear on the niche to the left of the opening, and take the Hummingbird.
Go to the Shaman's House, zoom in on him, and use the Fish Oil to get the Powder from his hand.
Go inside, zoom in on the herb cabinet, and place the leaf to trigger a Mini Game.
After the game, go upstairs to the Attic.
Screenshot
Herb Cabinet Mini Game
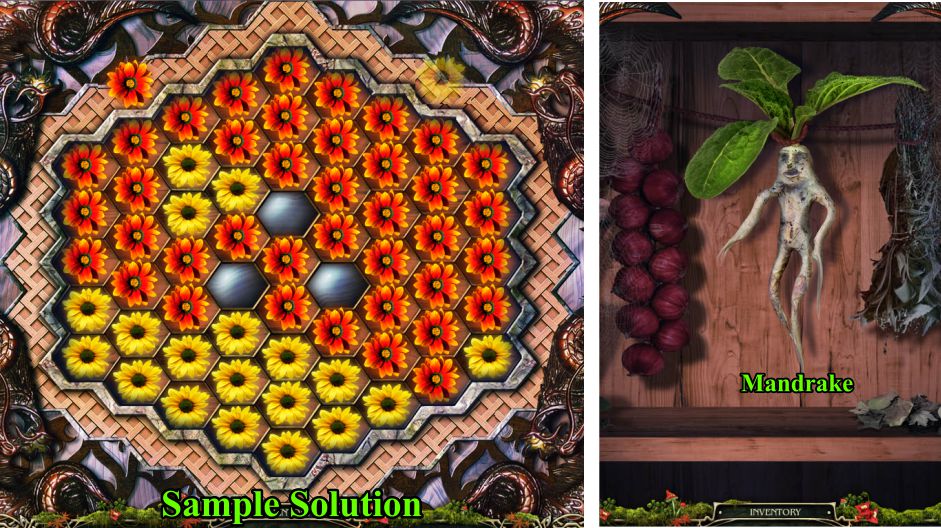
Your goal is to fill up the cells with as many red flowers as possible before the yellow flowers take over.
When you click on a flower, you will be shown where you can make your move.
Flowers that move to adjacent cells duplicate, but not if you jump a distant cell.
You want to continuously duplicate your flowers and turn your opponent's flowers to your color. See the screenshot for a sample solution.
Take the Mandrake when the cabinet opens.
Screenshot
Shaman's Attic, Icy Corridor, and Icy Room
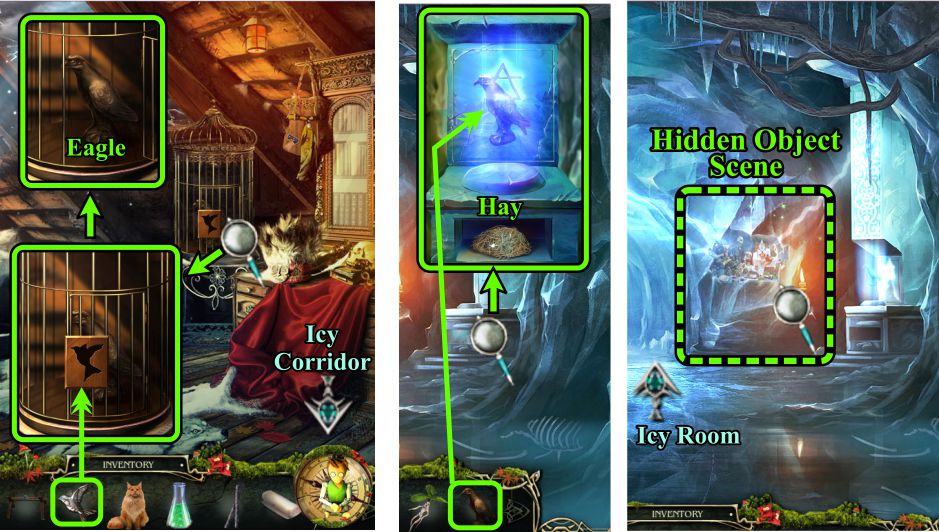
Zoom in on the cage and place the Hummingbird.
Take the Eagle and go to the Icy Corridor.
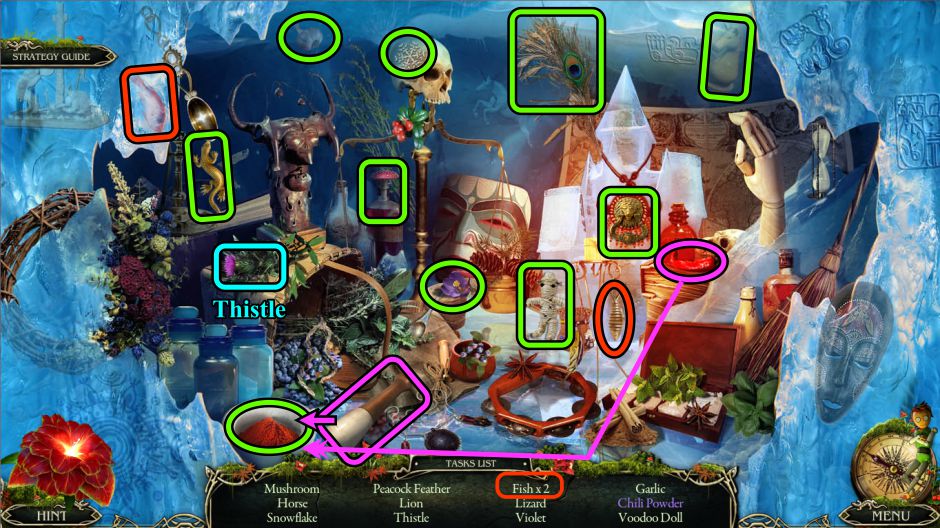
Place the Eagle in the niche at the right and take the Hay.
Play the Hidden Object Scene, then go to the Icy Room.
Screenshot
Icy Corridor Hidden Object Scene
Place the Chili Pepper in the mortar and use the pestle to grind it.
A Thistle is your Inventory item.
Screenshot
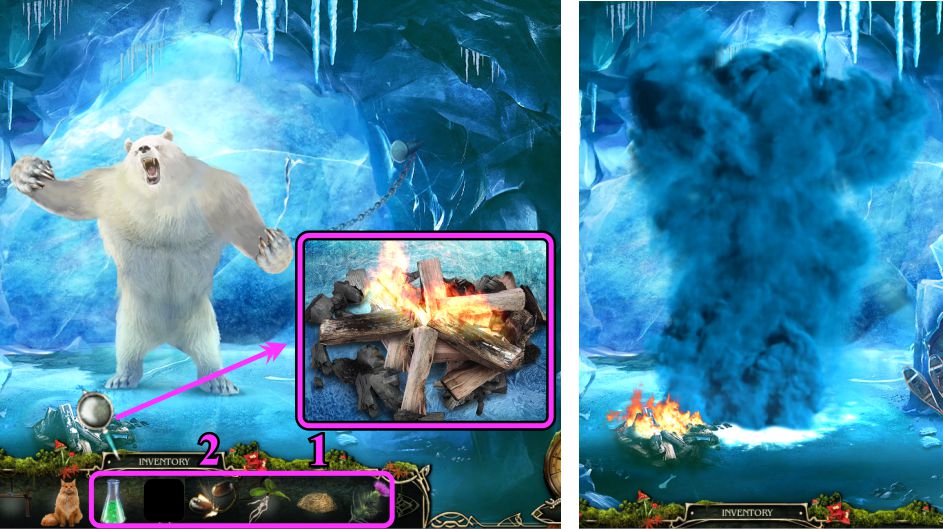
Icy Room
Time to follow the get-rid-of-the-bear instructions. Place the Hay on the fire logs and ignite it with the Flint.
Throw the Powder, Mandrake, and Thistle on the fire to create the removal smoke.
Screenshot
Icy Room and Shaman's Attic
Now the bear is a manageable size, so feel free to grab the Bas-relief.
Go to the Shaman's Attic and zoom in on the altar.
Place the Bas-relief for a Mini Game.
Afterwards, return to the Icy Room.
Screenshot
Altar Mini Game and Icy Room
Your goal is to convert all the cloudy tokens to sun tokens in order to drive away the storm.
Click on a sun token and then another token to pass on the sun's energy to the other token.
Since the sun's energy needs to be higher than the number on the cloudy token, it can be helpful to use sun tokens on other sun tokens to keep up the sun's energy.
There are 3 rounds to complete before you get the tuning fork.
See the screenshot for sample solutions.
Go to the Icy Room, zoom in on the crack in the ice, and place the Tuning Fork.
Screenshot
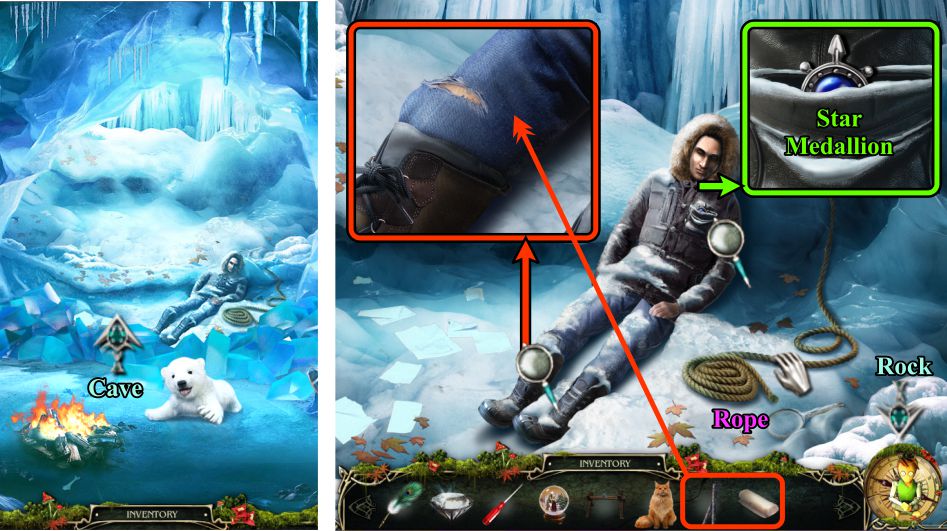
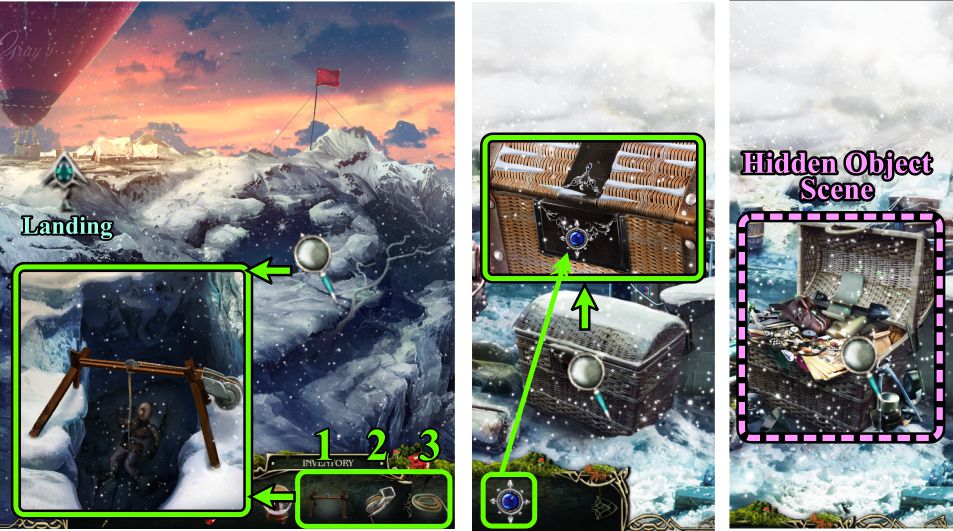
Cave
The ice wall has fallen down, so you can go see about John Gray.
Take the Rope, zoom in on his pocket, and take the Star Medallion.
Examine his right leg and brush the snow away.
Place the Branches and Bandage on his broken leg, and go to the Rock.
Screenshot
Rock
Zoom in on the gap and place the Crosspiece, Winch, and Rope in that order.
Go to the Landing and zoom in on the chest.
Place the Star Medallion to trigger a Hidden Object Scene.
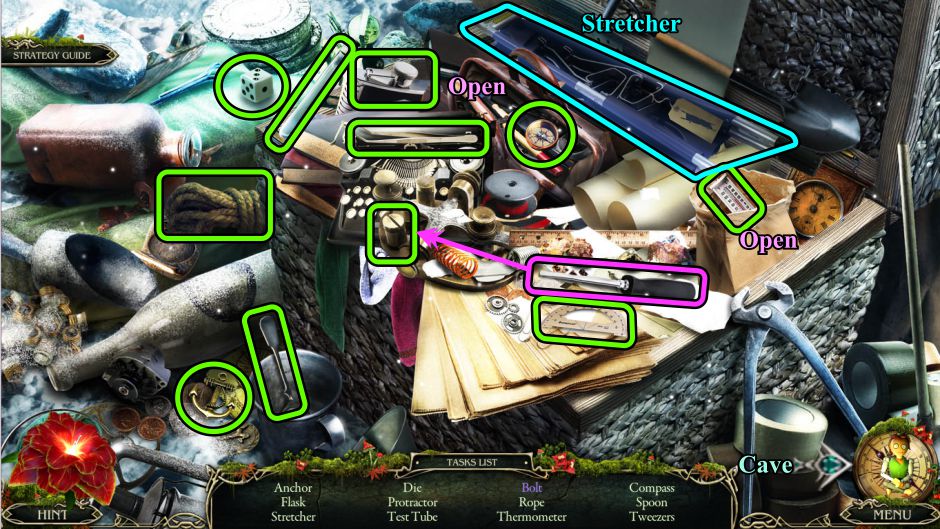
Screenshot
Chest Hidden Object Scene
Open the paper and medical bags to find objects.
Use the screwdriver to loosen the Bolt.
You will come away with the Stretcher, so take it to the Cave.
Screenshot
Cave
Place the Stretcher under Gray.
Pull on the Rope to tie it to the Stretcher.
Pick up the Glass Tube.
Go to the Rock.
Screenshot
Rock and Landing
Zoom in and start the Winch.
Collect Gray.
Go to the Landing.
Place Gray in the balloon basket.
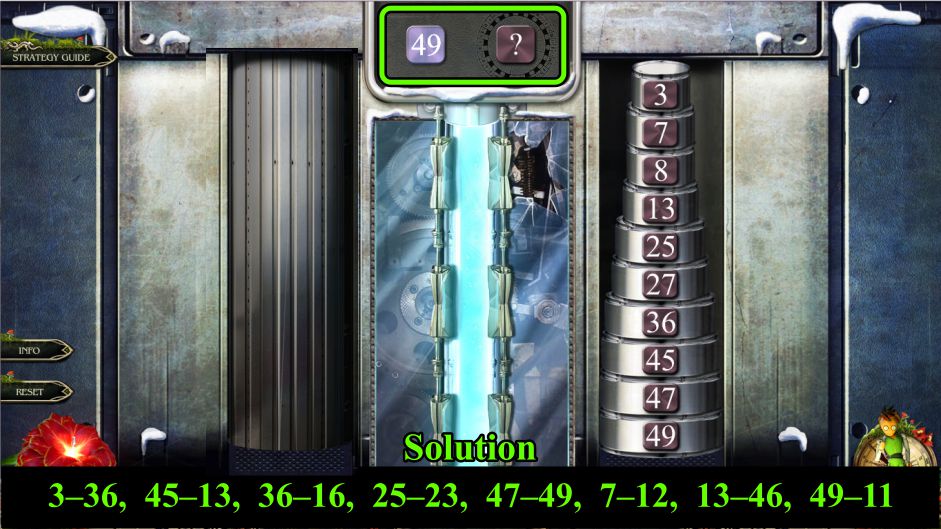
Zoom in on the engine and place the Glass Tube to trigger a Mini Game.
Screenshot
Balloon Engine Mini Game
You will only be dealing with the right set of tiles.
Your goal is to rearrange them so the lowest number is on the top and the highest on the bottom.
You can only swap the top number above the tube, or you have a choice of clicking on the question mark to get a random number between 1 and 50.
Using the numbers that appear works perfectly fine. See the screenshot for the solution of the numbers to swap.
When you have completed the game, the other set of tiles will open and the balloon will be on its way.
Screenshot
Chapter 9: Freeing Luisa
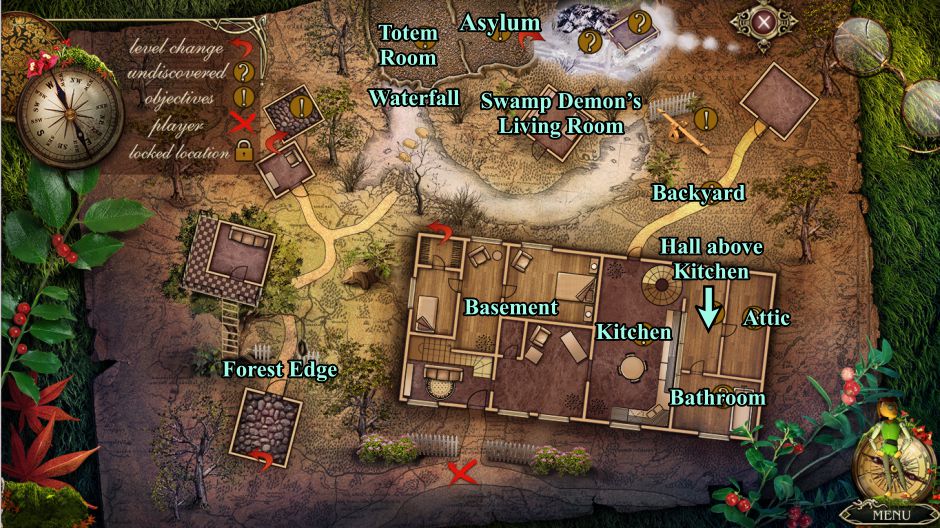
Map
You are back at the Gray house, so the Map reflects the areas you will visit there.
Screenshot
Forest Edge and Waterfall
Meet up with Gray at the Forest Edge, speak with him, and he will give you an Eagle Medallion.
Follow him to the Waterfall, and zoom in on the creature to his left.
Place the Eagle Medallion to turn off the waterfall.
Go through the opening to the Totem Room.
Screenshot
Totem Room
Gray follows you but continues through the next opening.
Zoom in on the pedestal, take the Chalk, and place Luisa's Crystal Ball.
Play the Hidden Object Scene, and then follow Gray to the Asylum.
Screenshot
Totem Room Hidden Object Scene
Collect everything to get the Moon.
Screenshot
Asylum
Talk to Gray, and give him the Chalk when he asks for it.
Take the Steps, then zoom in on the desk to read the book and take the Crystal.
When Gray finishes his translation, zoom in on the book, read it and place the Moon to open the compartment with the Moonstone.
Return to the Totem Room.
Screenshot
Totem Room
Zoom in on the left Atlas and place the Moonstone for a Mini Game.
This is a match 3 game with the goal of collecting 15 sets of Moonstones.
Matching 4 of a kind will subtract 2 from the number shown.
See the screenshot for a couple samples to swap.
Take the Crystal, and a beam of light will shine on Luisa.
Go to the Kitchen.
Screenshot
Kitchen and Hall above Kitchen
Zoom in on the steps and replace the broken ones with the Steps from your Inventory.
Go up the stairs to the Hall above the Kitchen.
Zoom in on the cabinet and use your Screwdriver to open the top drawer.
Take the Crystal and go check out the Bathroom.
Screenshot
Bathroom
Zoom in on the cabinet over the toilet and use your Diamond to cut a hole to get the Sun.
Play the Hidden Object Scene and return to the Hall.
Screenshot
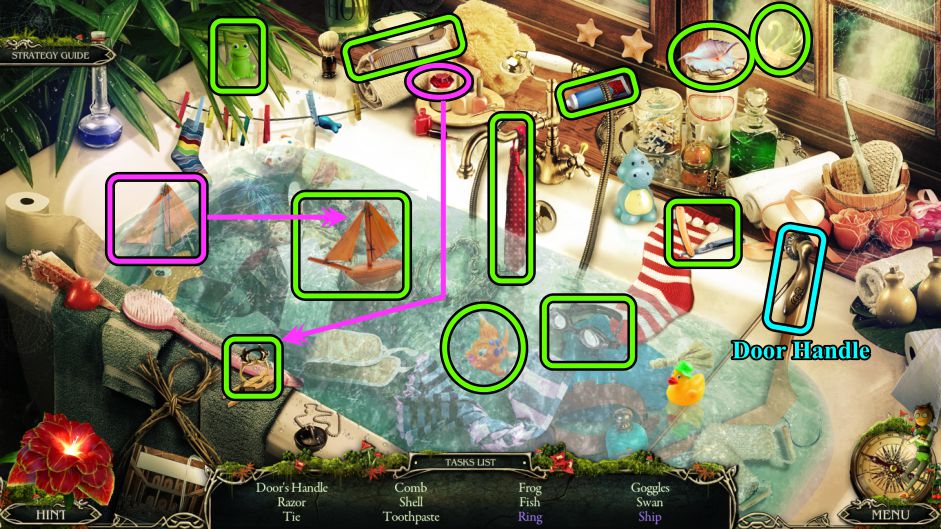
Bathtub Hidden Object Scene
Place the sail on the boat and the ruby in the setting of the ring.
The Door Handle will go into your Inventory.
Screenshot
Hall and Attic
Zoom in on the door at the left, place the Door Handle, and enter the Attic.
Take the Plug and look around.
Zoom in on the rug on the floor and collect the Ruby.
Examine the box on the desk and read the note.
Return to the Hall.
Screenshot
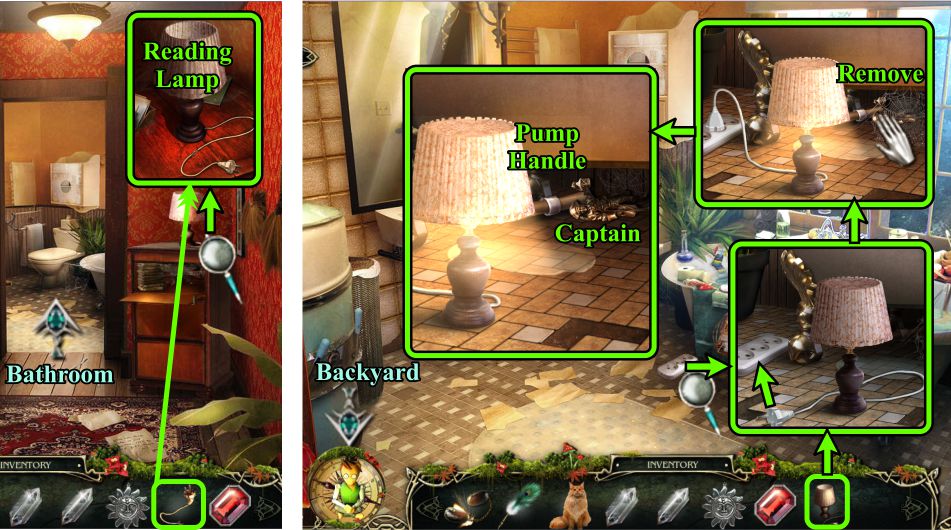
Hall and Bathroom
Zoom in on the lamp and place the Plug.
Take the Reading Lamp to the Bathroom and place it on the floor.
Plug it into the power strip and remove the cobweb.
Collect the Pump Handle and Captain, then go to the Backyard.
Screenshot
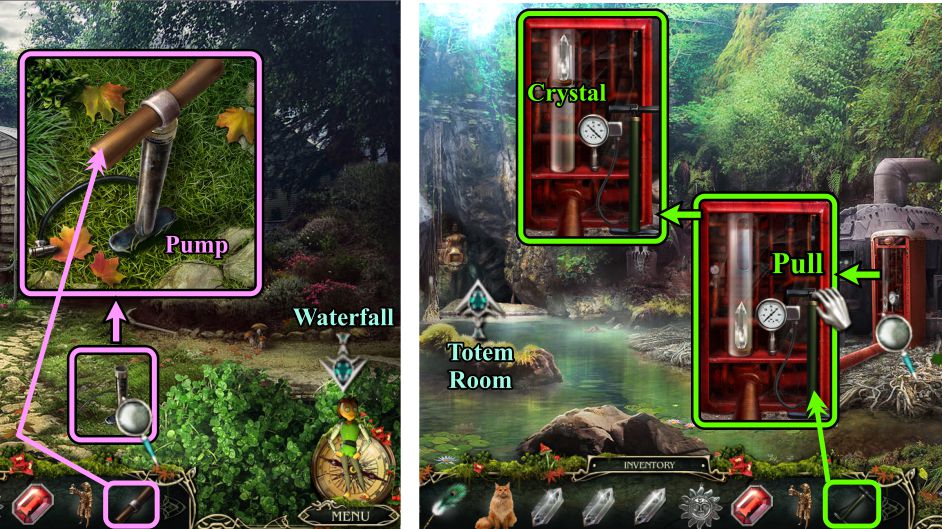
Backyard
Zoom in and place the Handle on the Pump.
Go to the Waterfall, zoom in on the mechanism at the right and place the Pump.
Pump the Crystal to the top of the tube so you can collect it.
Enter the Totem Room.
Screenshot
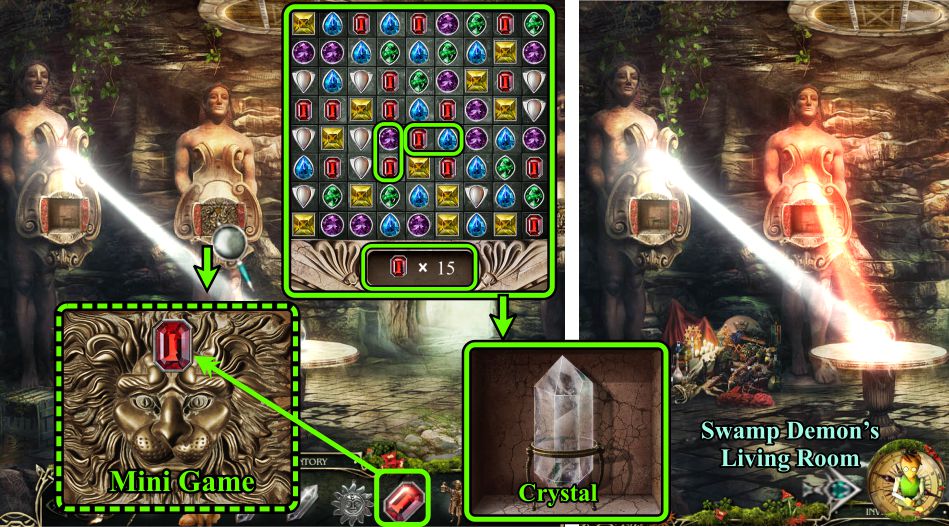
Totem Room
Zoom in on the center Atlas and place the Ruby and another match 3 Mini Game.
Your goal this time is to match 15 sets of Rubies.
Collect the Crystal, and a second beam of light will shine on Luisa.
Go to the Swap Demon's Living Room.
Screenshot
Swamp Demon's Living Room and Totem Room
Zoom in on the round table and place your 5 Crystals.
Take the Emerald from the open compartment and go to the Totem Room.
Zoom in and place the Emerald on the right Atlas for your Emerald match 3 game.
Match 15 sets of Emeralds to get a Piece of Chart.
Screenshot
Chapter 10: Crystal Ball
Totem Room and Crystal Ball
All three beams are shining on Luisa and create a portal to the Crystal Ball, so enter.
Luisa is standing on a thorny vine pad in the snow.
Zoom in, take the Piece of Chart and go into the House.
Screenshot
House in the Crystal Ball
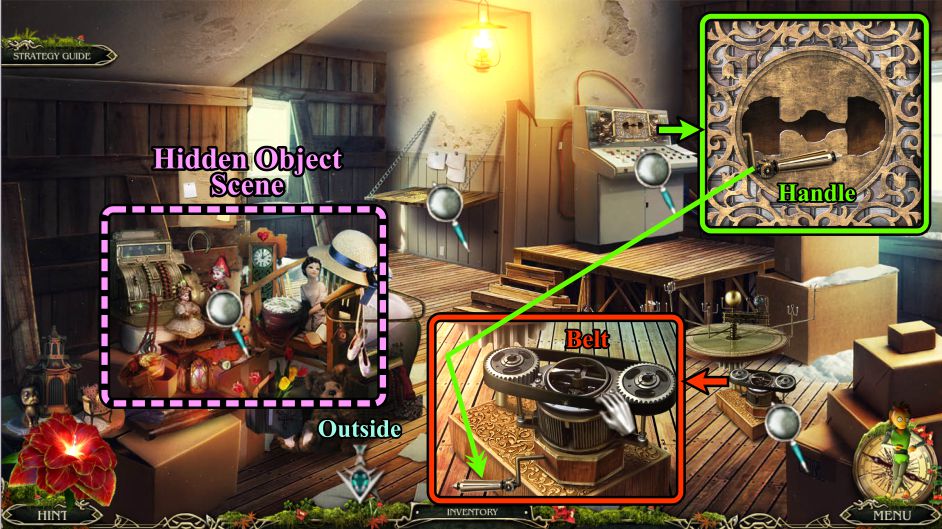
Zoom in on the control mechanism on the platform and take the Handle.
Examine the planetarium and place the Handle to loosen the Belt so you can take it.
Play the Hidden Object Scene before returning Outside.
Screenshot
Box Hidden Object Scene
Once you've collected everything, you will receive the Moon for your Inventory.
Screenshot
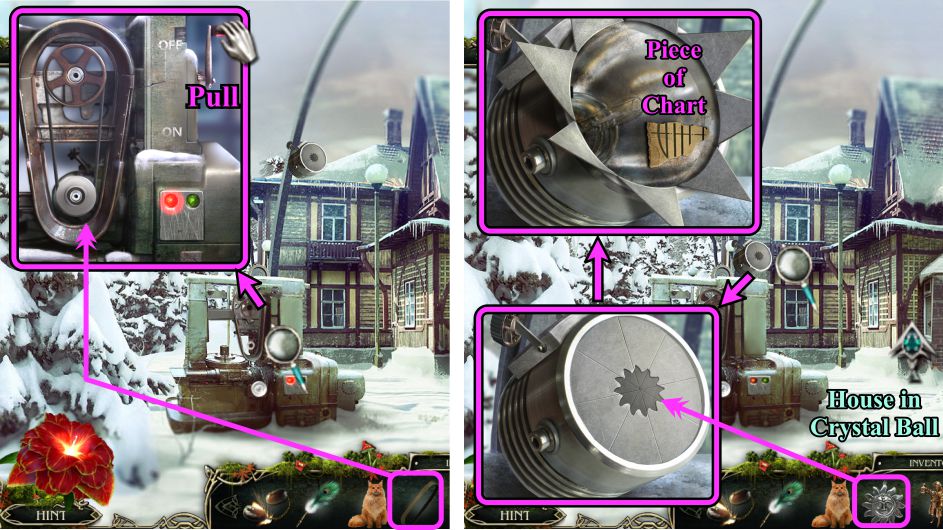
Crystal Ball
Examine the projector and place the Belt.
Pull the handle, and the search light will lower. Zoom in on it and place the Sun.
Take the Piece of Chart and go back into the house.
Screenshot
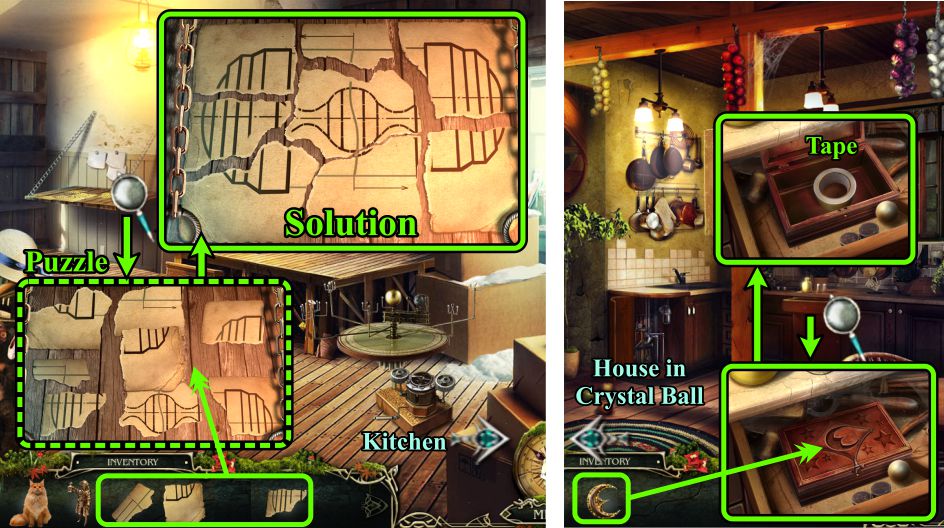
House in Crystal Ball and Gray's Kitchen
Zoom in on the work area and place your Chart Pieces with the rest for a Puzzle to assemble it.
Swap pieces so the solution looks like the one in the screenshot.
Go to the Kitchen and place the Moon on the box in the drawer.
Take the Tape and return to the House in the Crystal Ball.
Screenshot
House in the Crystal Ball and Gray's Attic
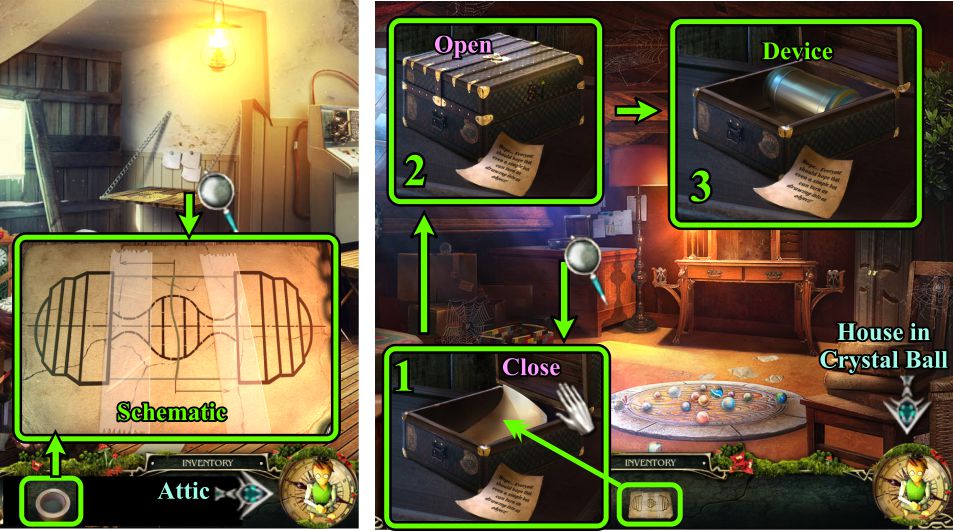
Tape the assembled Schematic together and go to the Attic.
Place your Schematic in the special box and close the lid.
After it processes, open the lid of the box.
Take the Device.
Return to the House in the Crystal Ball.
Screenshot
House in Crystal Ball and Sun Mini Game
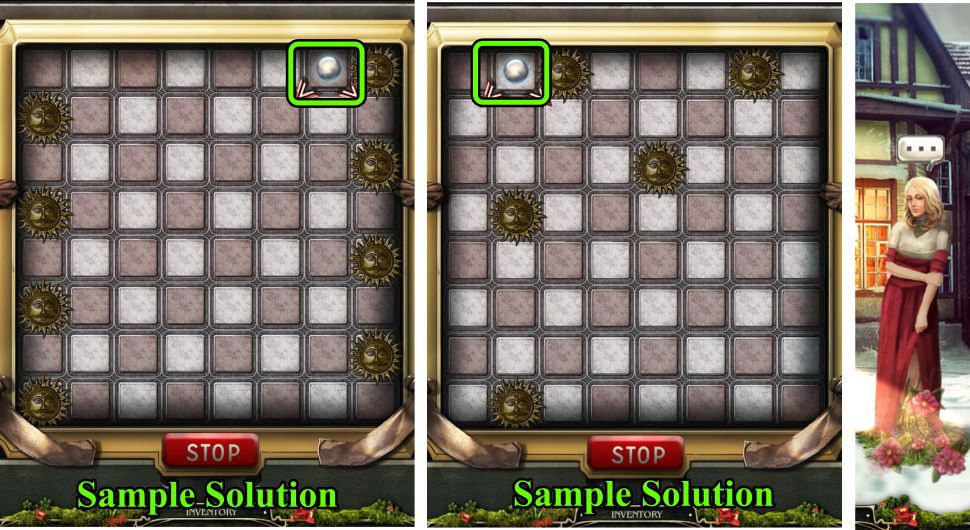
Zoom in on the mechanism and place your Device for a Mini Game.
Your goal is to light all the suns by not hitting them more than 3 times with the ball.
If your choice doesn't seem to be working out, there is a Stop button so you can start the round over.
The screenshots show sample placement of the ball for the 3 rounds.
Round 1 is shown in this screenshot and you can choose either directional arrow.
Screenshot
Sun Mini Game
See the screenshot for sample placement of the ball for Rounds 2 and 3.
Again, you can choose either directional arrow.
Once you have activated the control center, Luisa will be freed of the vines, so talk to her.
Screenshot
Chapter 11: Reunion
Brandon's Bedroom
Luisa rushes to Brandon's side and trips over the totem, causing the protection to be broken, so now you must free Brandon from himself.
Play the Hidden Object Scene.
Screenshot
Brandon's Boxes Hidden Object Scene
Use the key to open the box and find the Crown.
Place the picture in the frame to collect the Framed Picture.
Your Inventory item will be the Anchor.
Go to the Playground.
Screenshot
Playground and Shelter Basement
Zoom in on the hammock and place the Anchor on the box.
Take the Pirate and Ensign, and go to the Shelter Basement.
Zoom in on the ship on the wall.
Place the Captain, Pirate, and Ensign to uncover another of Brandon's Memories.
Use the Quill on the drawing.
Screenshot
Chapter 12: Saving Brandon
Map
Brandon's memory was about his visits to the Swamp House, so this Map concentrates on that area.
Screenshot
Swamp House and Basement
Zoom in on the barrel and take the Soap that suds itself before going into your Inventory.
Examine the piles of leaves, move them out of the way twice, and take the Rusty Nippers.
Go down the hatch to the Basement.
Zoom in on the grinder and sharpen your Rusty Nippers.
Go back outside.
Screenshot
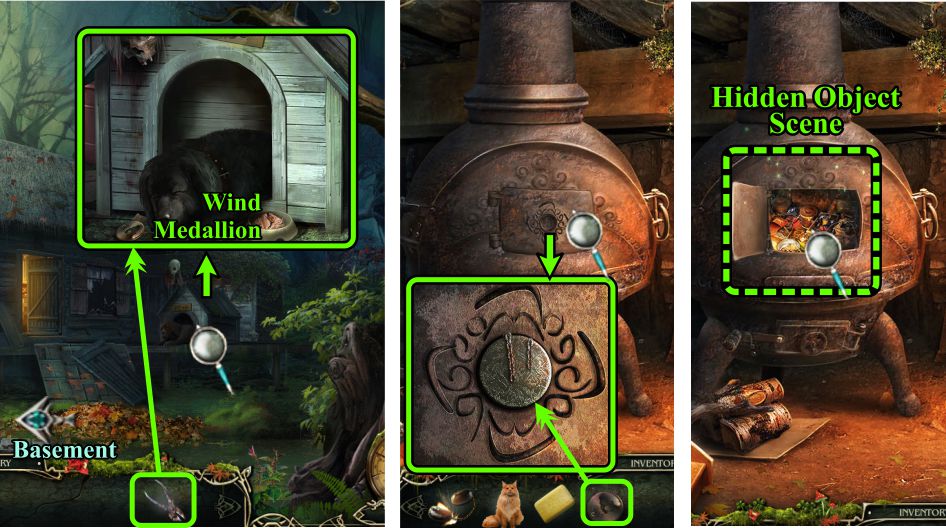
Swamp House and Basement
Check out the dog house to find a sleeping dog. Use your Sharpened Nippers to clip the chain and take the Wind Medallion.
Go to the Basement and zoom in on the on the furnace.
Place the Wind Medallion and play the Hidden Object Scene.
Screenshot
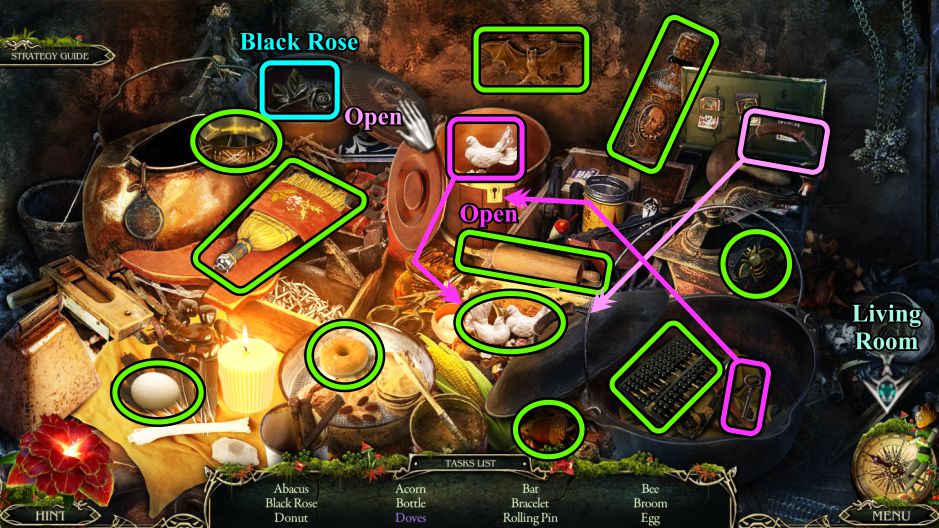
Furnace Hidden Object Scene
Place the handle on the cauldron to open it.
Use the key to open the container with the second Dove so you can place it to collect Doves.
The Black Rose will go into your Inventory.
Screenshot
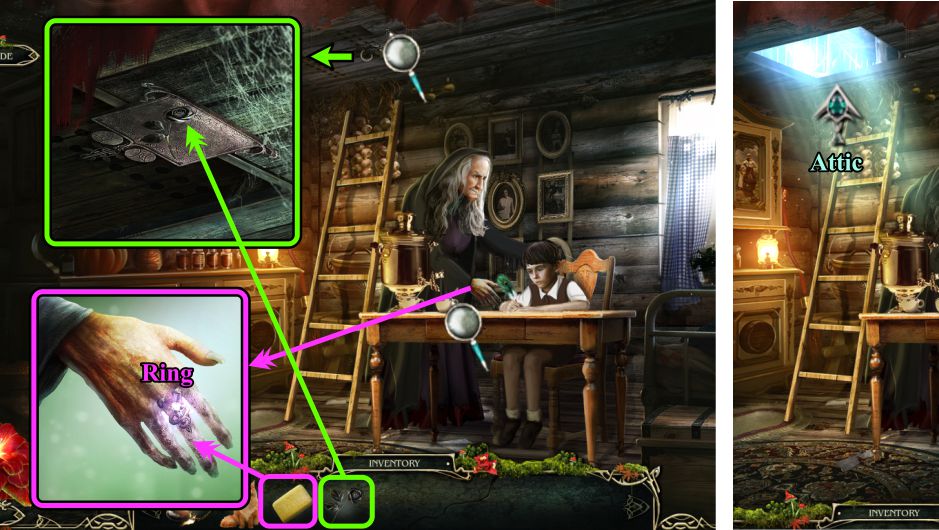
Swamp Demon's Living Room and Attic
Zoom in on the Demon's hand and use the Soap to get the Ring.
Examine the Attic hatch, place the Forged Rose (Black Rose from the HOS) and enter the Attic.
Screenshot
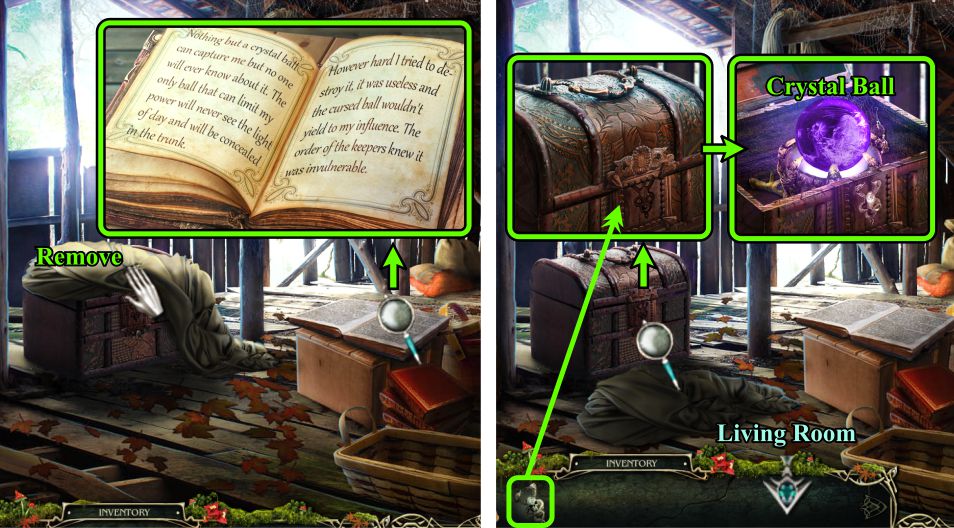
Swamp House Attic
Zoom in and read the book to find out how to destroy the Demon.
Remove the cloth from the trunk, then zoom in and place the Ring to open it.
Take the Crystal Ball and return downstairs.
Screenshot
Chapter 13: Destroying the Demon
Map
Once you have trapped the Demon in the Crystal Ball, your Map will change to its final locations.
Screenshot
Swamp Demon's Living Room and Totem Room
Place the Crystal Ball on the Demon to capture her.
Go to the Totem Room and zoom in on the pedestal.
Place the Crystal Ball with the Demon.
You still need to open the upper hatch, so head to the Asylum.
Screenshot
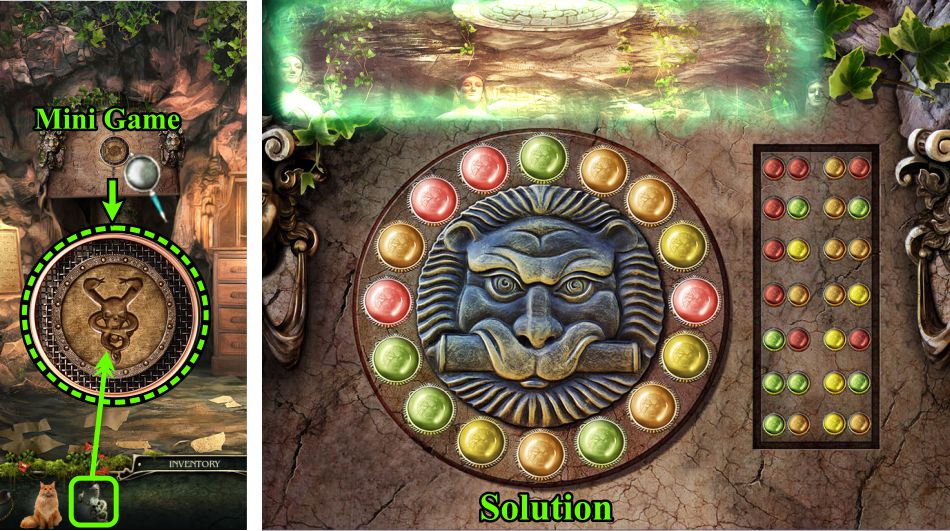
Asylum Control Center Mini Game
Zoom in on the controls and place the Ring for a Mini Game.
Your goal is to light up all the colors on the circle to match those in the panel to the right.
See the screenshot for the solution.
Screenshot
Congratulations! You have reunited the Gray family and destroy the demon by completing Grim Tales: The Wishes.
Posted by: Jazz |
August 3, 2012 7:09 PM
|
August 3, 2012 7:09 PM