

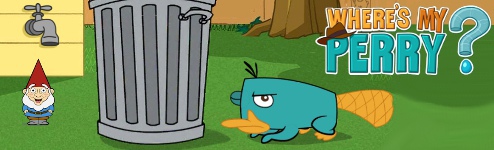
![]() Where's My Perry? is a brand new physics puzzle game from Disney Mobile. Utilizing the same set-up as Where's My Water?, this updated and expanded version sets things in the Phineas and Ferb universe where Perry the platypus has to work his way through underground tubes to investigate a series of mysteries (some of which may or may not involve moustaches). The catch is that the power doesn't work for these tubes, trapping Perry in booths until you can guide water to the intake valve. It's a very similar experience to Swampy wanting his bath water, but with new gameplay elements and puzzles, you'll be happy to join in on the much-improved fun!
Where's My Perry? is a brand new physics puzzle game from Disney Mobile. Utilizing the same set-up as Where's My Water?, this updated and expanded version sets things in the Phineas and Ferb universe where Perry the platypus has to work his way through underground tubes to investigate a series of mysteries (some of which may or may not involve moustaches). The catch is that the power doesn't work for these tubes, trapping Perry in booths until you can guide water to the intake valve. It's a very similar experience to Swampy wanting his bath water, but with new gameplay elements and puzzles, you'll be happy to join in on the much-improved fun!
 Getting the gooey liquid stuff to the power spout is a simple matter of removing soil and letting gravity do the rest. By dragging your finger across the screen, you can get rid of any amount of dirt you see fit, freeing up space for the water to flow. When the liquid gets going, it can do things like power movable blocks, set off celebratory confetti gadgets, fill and collect water gnomes you'll need to get the best score for each stage, and finally, power that transportation tube so you can move on to the next puzzle!
New in Where's My Perry? are certain Crazy-inator beams that can turn water into steam or ice. Naturally, ice sets still, often forming necessary platforms, and steam rises to the top of the screen, forcing you to invert your dirt removing strategies and come up with convoluted plans to clear a path upwards. Many of the later stages require you to convert water back and forth between states, setting up multi-stage puzzles that can take some time to wrap your head around.
 Analysis: Where's My Perry? is far from a simple re-brand of Where's My Water?. In addition to the slightly new look, a number of new gameplay elements have also been added (namely, the steam and ice beams), not to mention new levels, new cutscenes, and plenty of character cameos from the Phineas and Ferb cartoon. The re-skin doesn't really add or subtract anything from the experience, but if you're a fan of the cartoon, you'll definitely get a kick out of seeing the characters do their thing on your mobile device.
The puzzles in Where's My Perry? are simultaneously more devious than in Where's My Water? and easier to solve by accident. Staring at a level and plotting out your moves, you might think it'll be next to impossible to solve the puzzle in front of your face. That is, until you stumble across the solution without even trying. This is likely an intentional design feature due to the younger crowd that will be drawn to the cartoon rebranding. Don't think there's no challenge to Where's My Perry?, though. There are still plenty of levels and plenty of obstacles to overcome, especially if you want to shoot for collecting all of the secret folders and gnomes!
Where's My Perry? is a smartly-done redesign of an already amazing game. It keeps everything intact that made the original so perfect while adding new elements, more complex puzzles, and more stages to complete. Really, the only bad thing about the game is the slightly awkward name!
NOTE: This game was played and reviewed on an iPad. Game was available in the North American market at the time of publication, but may not be available in other territories. Please see individual app market pages for purchasing info.


Walkthrough Guide
(Please allow page to fully load for spoiler tags to be functional.)
Where's My Perry walkthrough
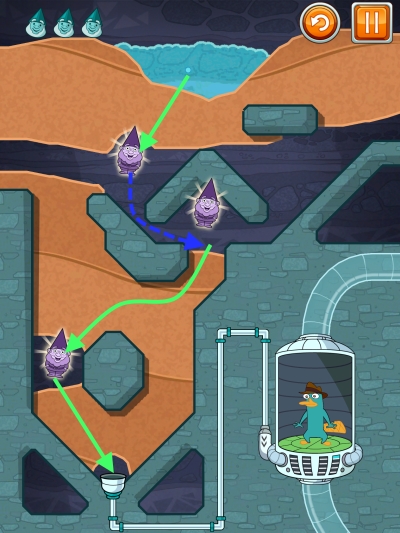
NB: The text in the following sections refers to the screenshot for each level of this walkthrough. Refer to the screenshot, then follow the steps for completing each level.
Mission 1
1-1
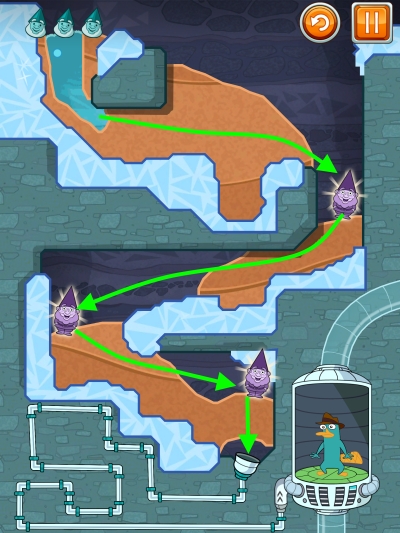
Draw a vertical line through the gnomes. That's it.
1-2
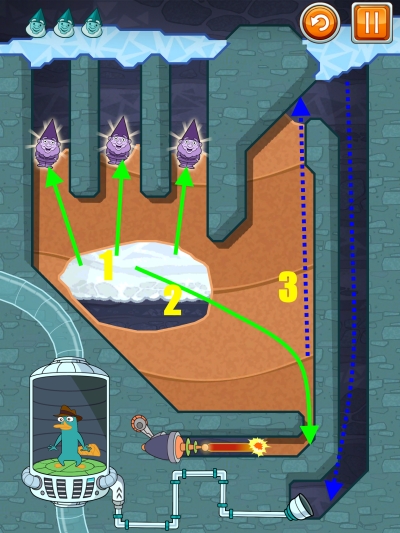
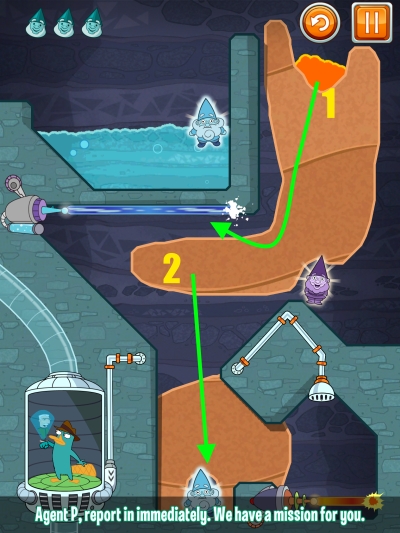
Screenshot
Dig where the green arrows are.
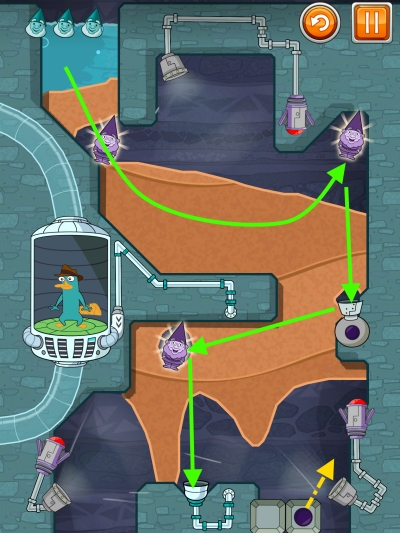
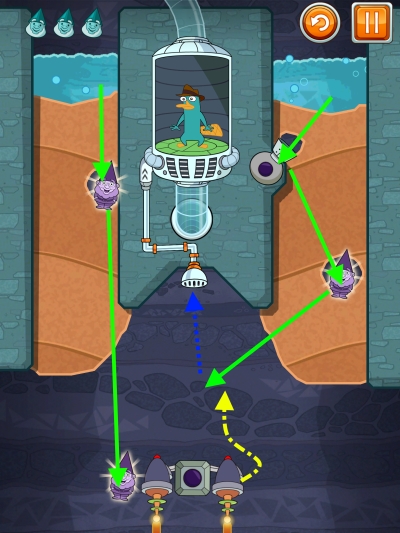
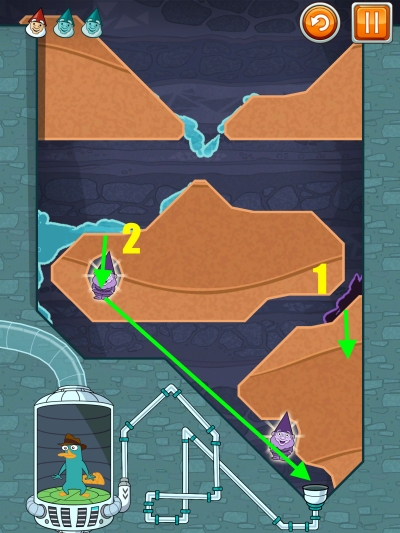
1-3
Screenshot
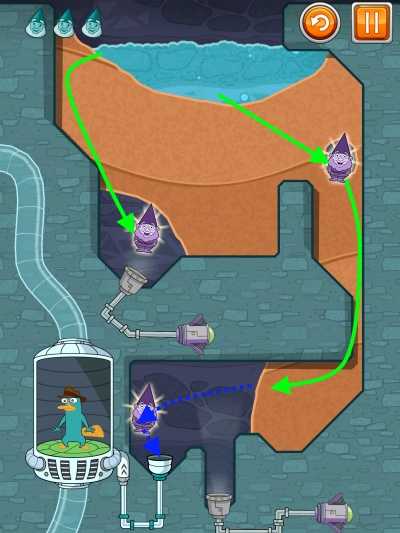
Dig where the green arrows are. To get the middle gnome, allow the water to build up below him before continuing.
1-4
Screenshot
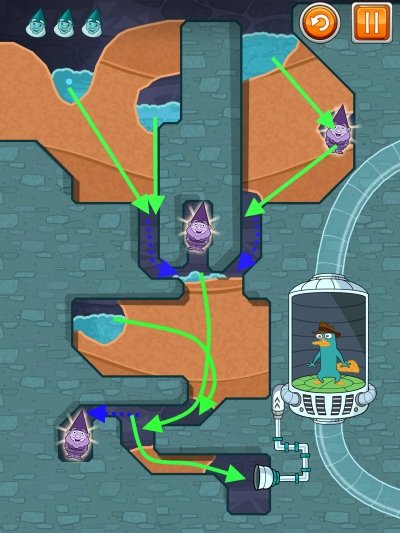
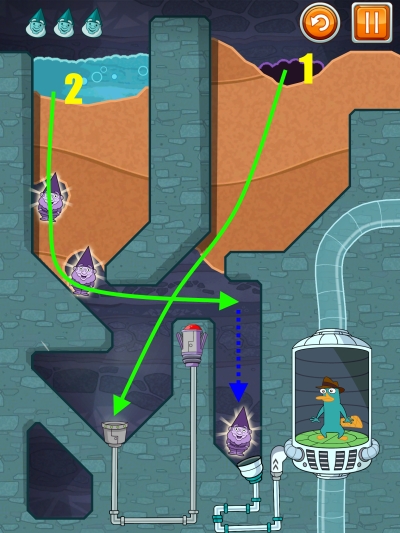
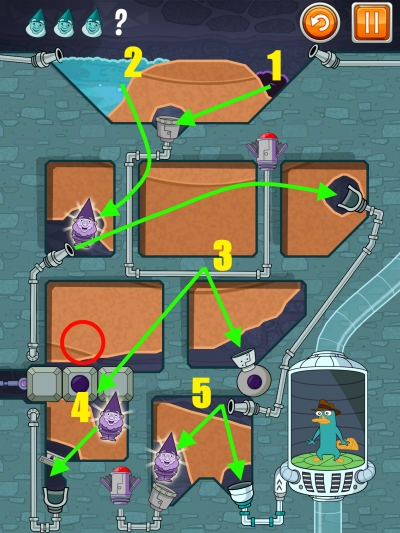
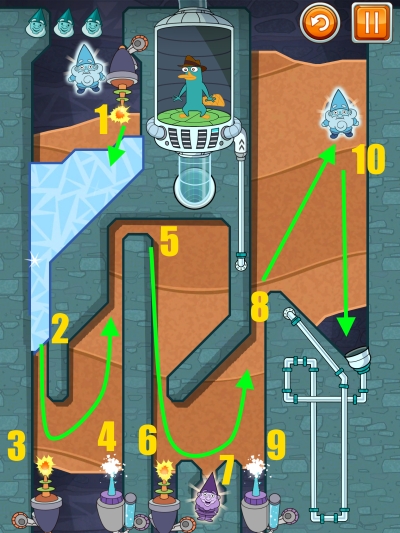
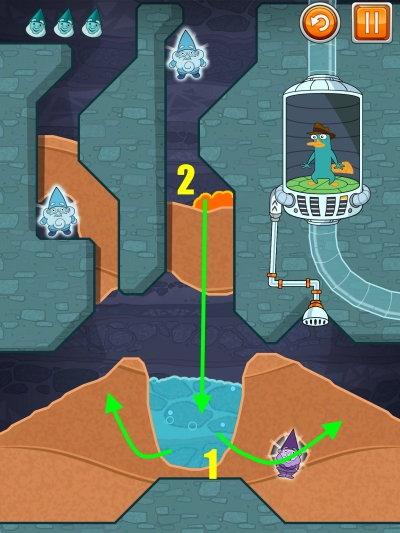
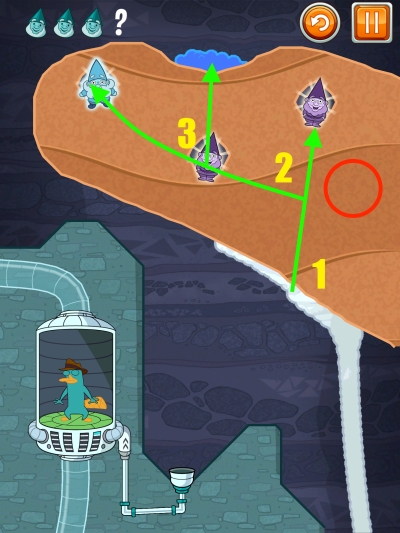
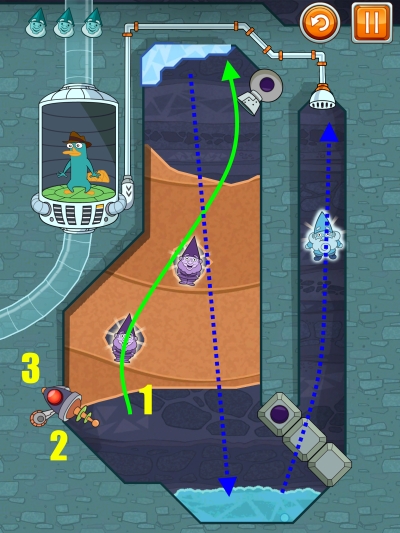
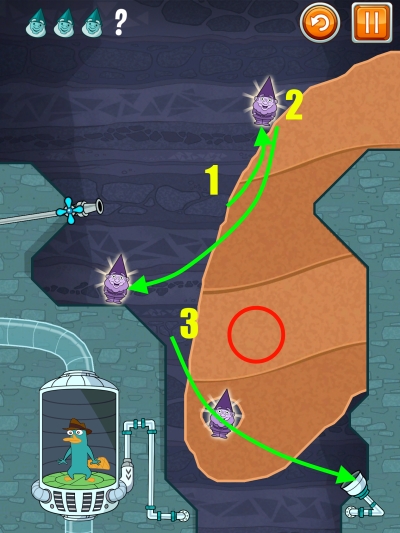
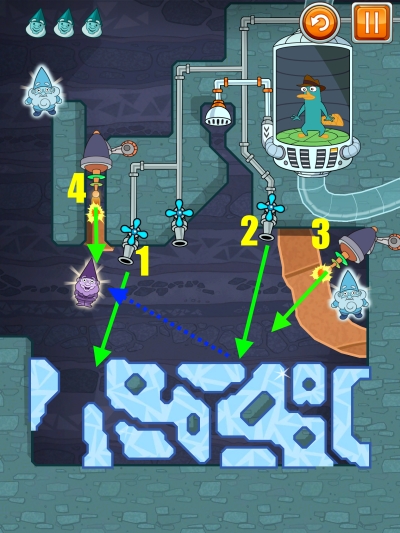
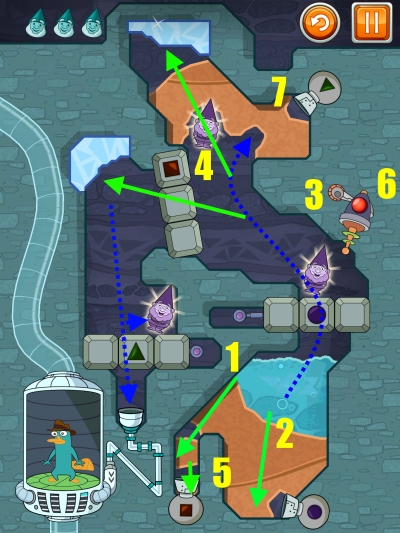
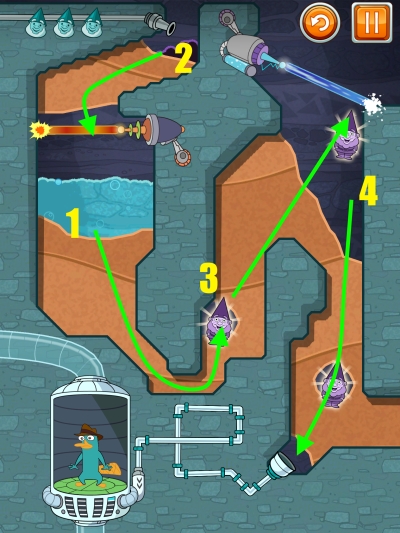
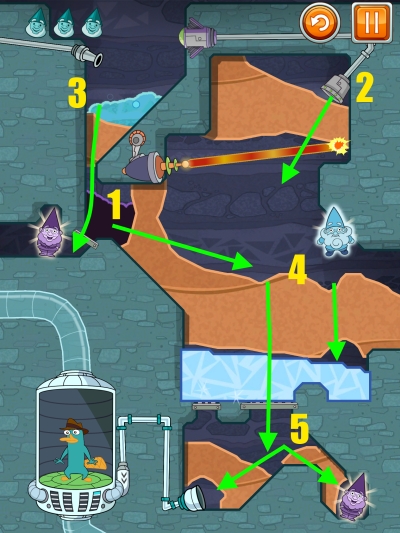
Divide the stream so that the gnome on the lower right is reached as well. The collectible is circled in red.
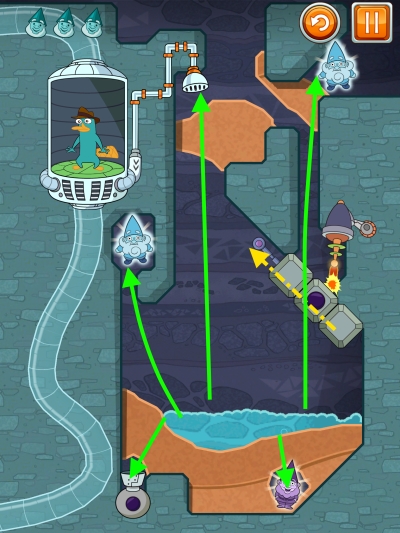
1-5
Screenshot
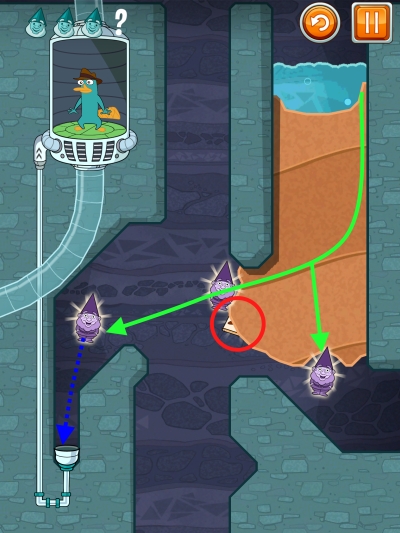
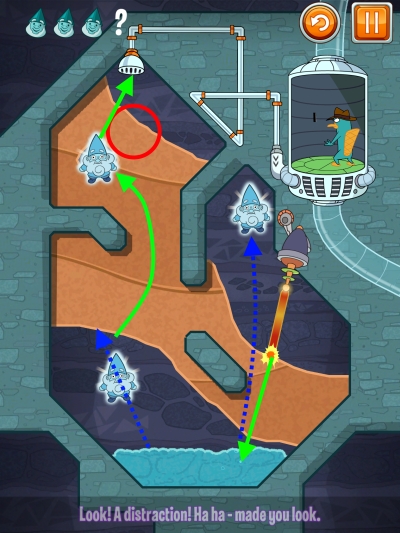
The gnome at the start can be claimed by letting the game idle for a few minutes. The solid blue arrow shows the pipe to reach him the 'proper' way.
1-6
Screenshot
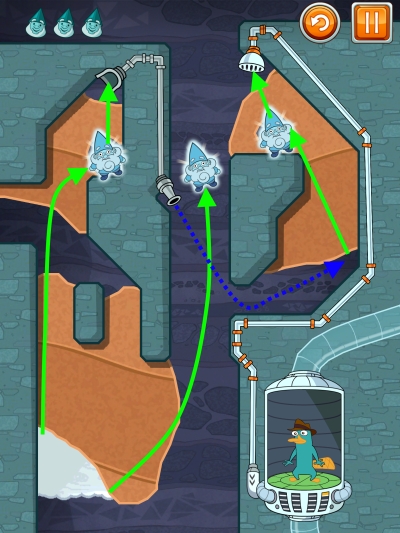
Be sure to keep your tunnels inside the dirt - an open tunnel will allow the fun-inators to hoover up the water.
Pick up a collectible here too.
1-7
Screenshot
On the left, use as little water as possible for the gnome.
Send the rest along the path of the green arrows on the right, making sure it has enough momentum to jump over the fun-inator.
1-8
Screenshot
Turn the water into steam, then clear a path to the top for it.
Pick up a collectible here too.
1-9
Screenshot
Splitting the steam stream in order to collect the gnome in the middle is the only difficult part here.
1-10
Screenshot
Follow the green arrows through the dirt. Avoid hitting the lasers, as they will turn your stream into steam.
The box in front of the lowest laser moves automatically, so time the stream for when it's blocking the laser.
1-11
Screenshot
Just follow the green arrows through the level.
1-12
Screenshot
Dig to the gnome.
Use the laser to turn the water into steam.
Dig up to the exit.
Collect an item along the way.
1-13
Screenshot
Once the water reaches the switch, the laser will turn the rest into steam, so collect the water gnome first.
Direct the steam as the arrows in the screenshot show.
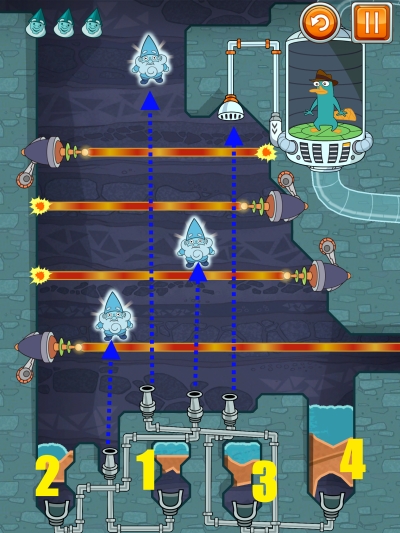
1-14
Screenshot
Clear the dirt in the order marked on the screenshot. The blue dotted arrows show the path the water will take.
1-15
Screenshot
Create a path down for all the pools of water to take, collecting at a single point above the laser. Then give it a straight path to the top.
Pick up a collectible here too.
1-16
Screenshot
Clear the laser with the smaller pool.
Use the slightly larger pool to clear the next laser.
Use the third pool to collect the gnomes.
1-17
Screenshot
Starting from the top right, follow the green arrows to the box and fill it.
Continue as directed by the arrows marked on the screenshot.
Pick up a collectible here too.
1-18
Screenshot
The lasers rotate up once you hit the switch on the right.
After that, water will be converted to steam and rise up again.
1-19
Screenshot
Turn the water in the small pool into steam, then use it to collect the uppermost gnome and trigger the switch.
Split the larger pool between the gnome on the bottom left and the path to the end of the level.
1-20
Screenshot
Create paths through the dirt in the order indicated on the screenshot. You need steam for the middle gnome, but enough water left over to rescue Perry.
There are several alternate paths through the level.
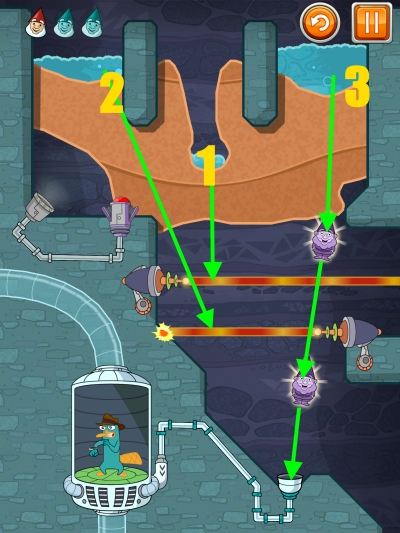
Mission 2
2-1
Screenshot
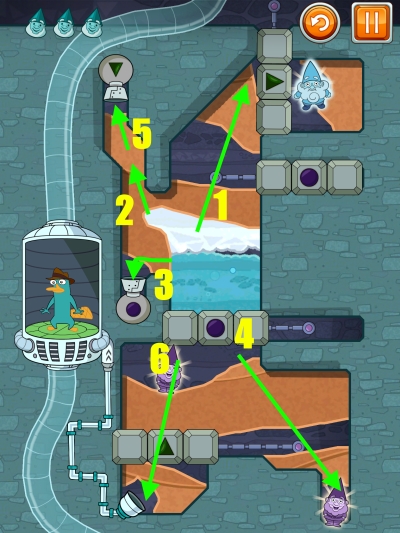
Dig where the green arrow is marked on the screenshot.
The steam will turn into water and return along the path of the blue dotted arrow.
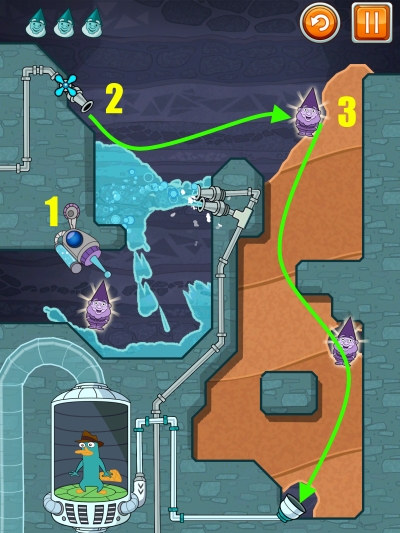
2-2
Screenshot
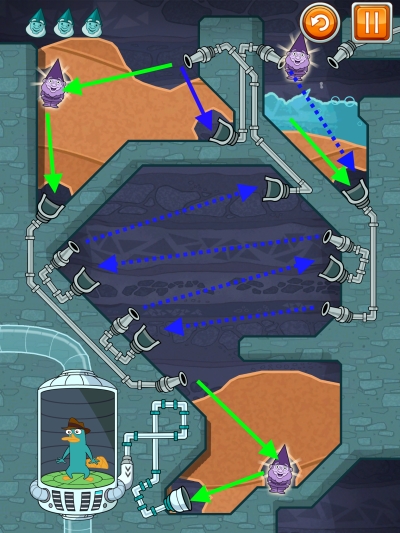
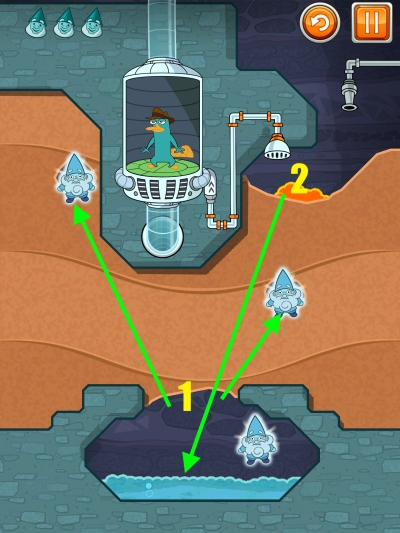
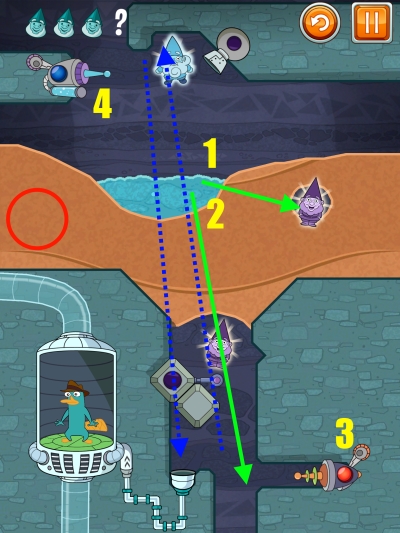
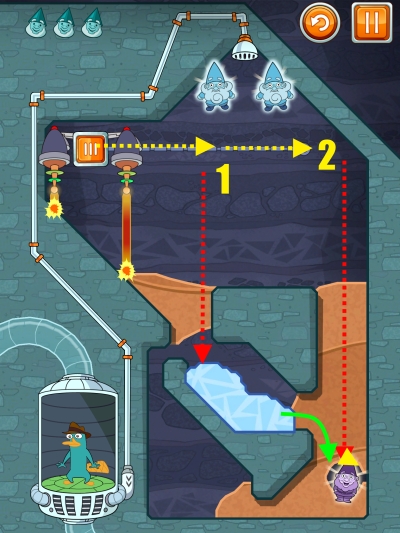
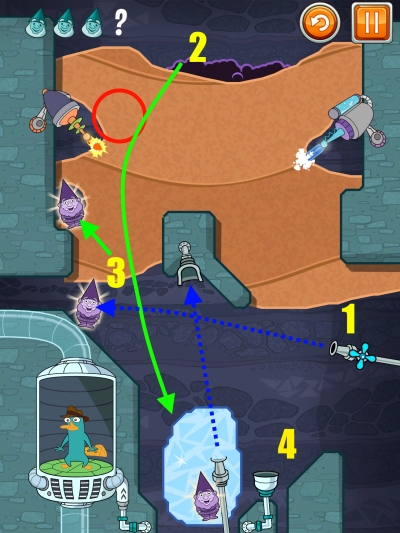
Use a small amount of water to collect the two gnomes near the top, and then to reach the lower one.
Open a path for the cooling ray to freeze the lower pool.
Send the rest of the water into the pipe, from which it should hit the ice and bounce over the gap, into the generator.
Pick up a collectible here too.
2-3
Screenshot
Create a path for the steam to rise.
Taker the water to the laser, so it turns into steam.
Follow the green arrows around to claim a gnome, turn the steam back into water, and drop into the generator pipe, picking up the final gnome along the way.
2-4
Screenshot
Clear the whole area marked in the center.
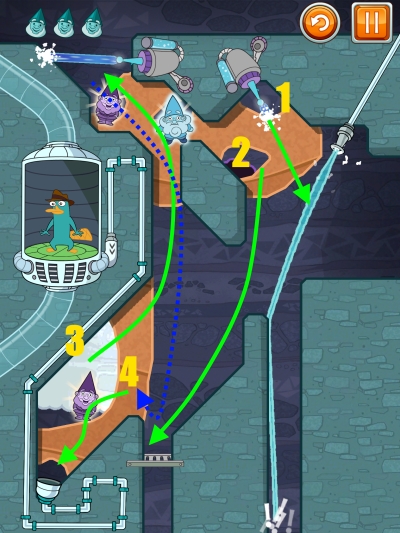
Freeze the jet.
Thaw the ice.
Pick up a collectible here too.
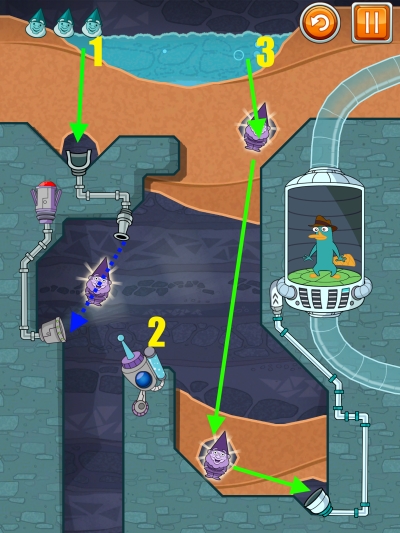
2-5
Screenshot
Dig where the green arrows are marked. Avoid letting the water touch the ice.
2-6
Screenshot
Let the steam rise through each tunnel to the ice, which will turn it into water. It will collect the gnomes and fall back into the dirt.
Tunnel to the laser to turn the water back into steam.
Allow the steam to hit the ice on the top right, turning it back into water. The path it should take is marked with a blue dotted arrow.
2-7
Screenshot
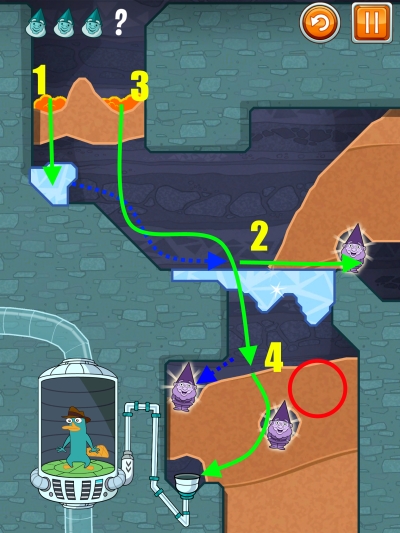
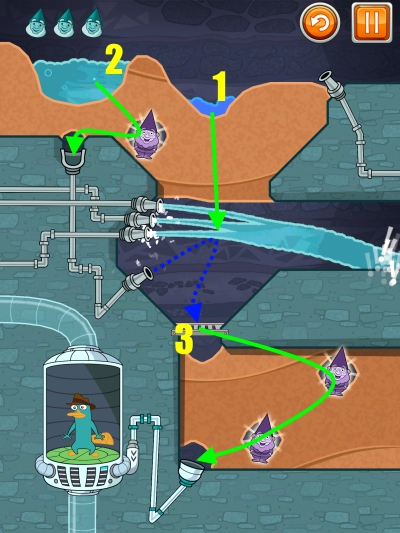
Dig a ditch to safely contain the goop.
Collect the gnome, then tunnel through to allow the water to reach the exit.
2-8
Screenshot
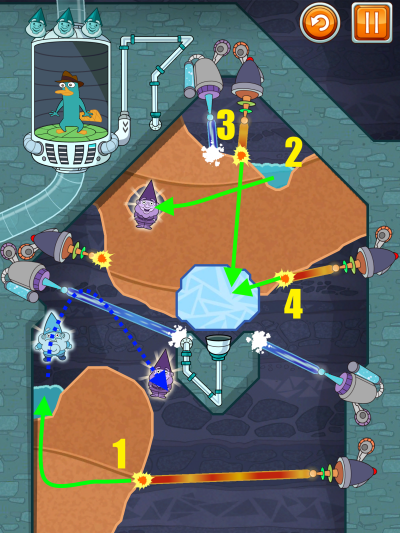
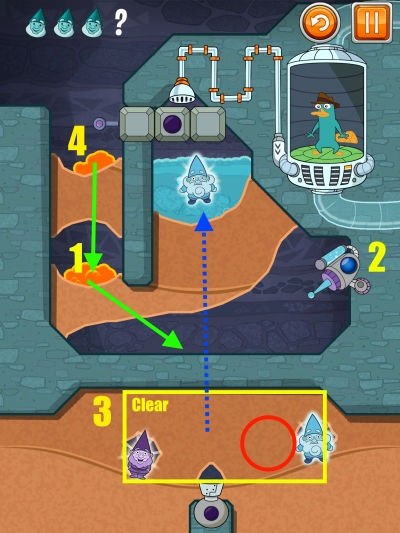
A collectible item is circled in red.
Use the goop to block the grate, then let the water through.
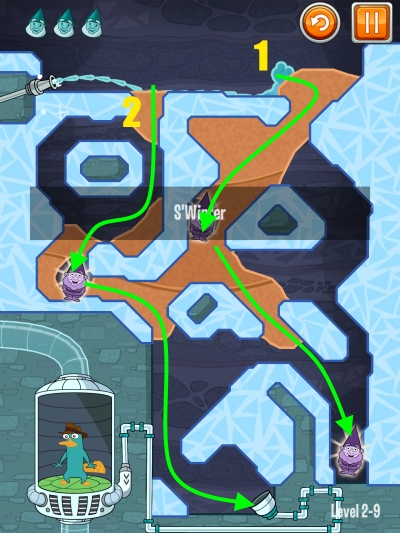
2-9
Screenshot
Collect the right hand gnomes first, avoiding the ice where possible.
Collect the gnome on the left, and then dig to the exit.
2-10
Screenshot
Use the goop to destroy the fun-inator.
Use the water to collect the gnomes and jump the gap to the exit.
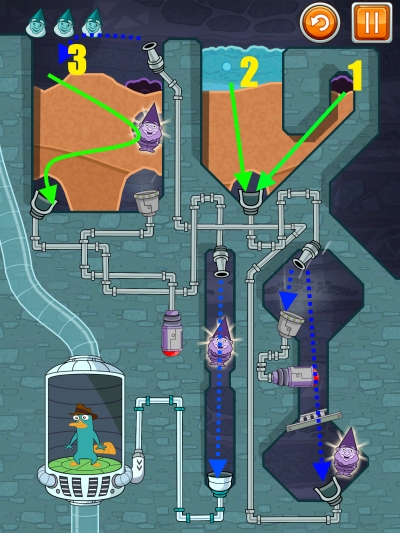
2-11
Screenshot
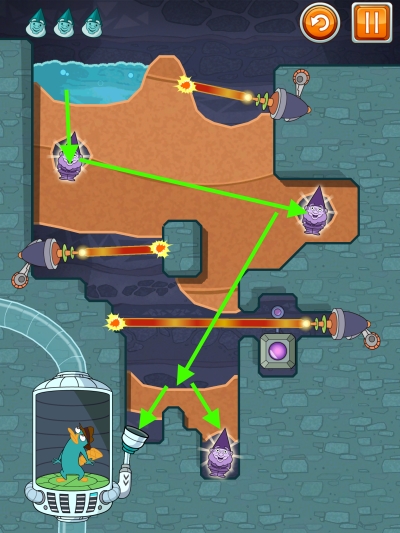
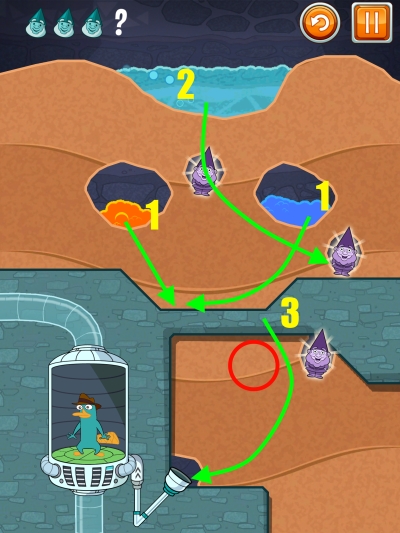
Send the goop through the pipe first to destroy the fun-inator.
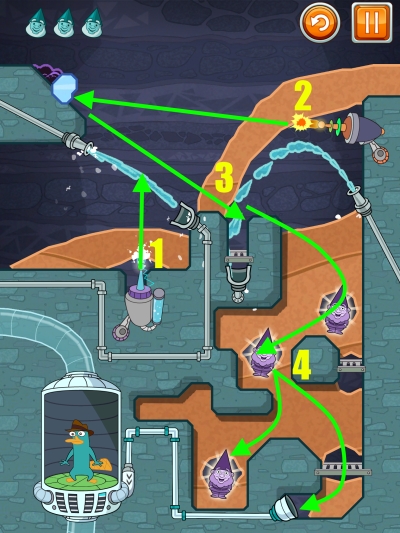
Send the water through the pipe to collect the gnome. It will return to point 3.
Avoid the goop and drop the water into the left hand pipe, picking up the gnome on the way.
2-12
Screenshot
Use a small amount of water to collect the gnome.
Collect the lower middle gnome, using as little water as possible.
Use the goop to destroy the machine.
Trigger the switch with a drop of water.
Empty the top right pool into the generator.
Pick up a collectible here too.
2-13
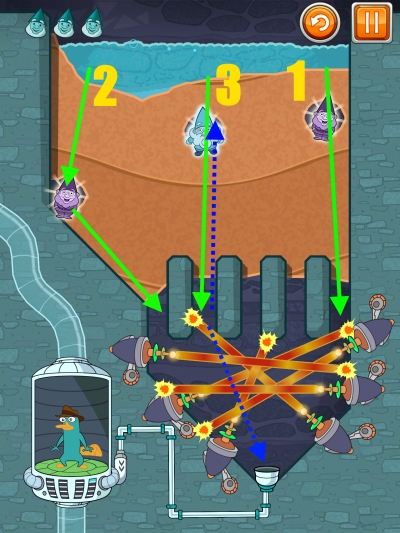
Screenshot
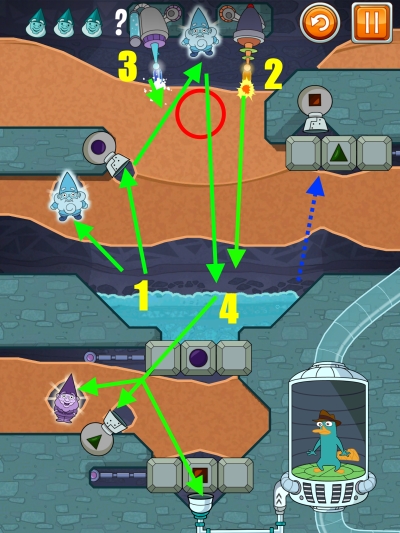
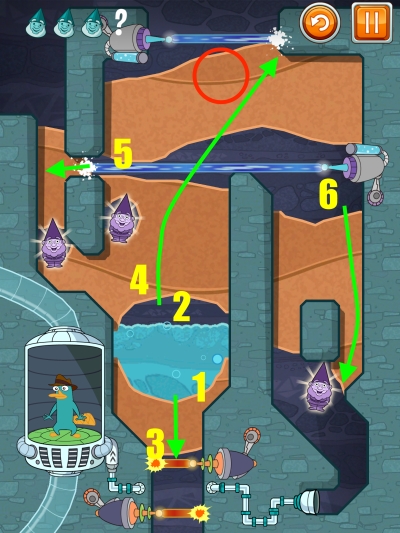
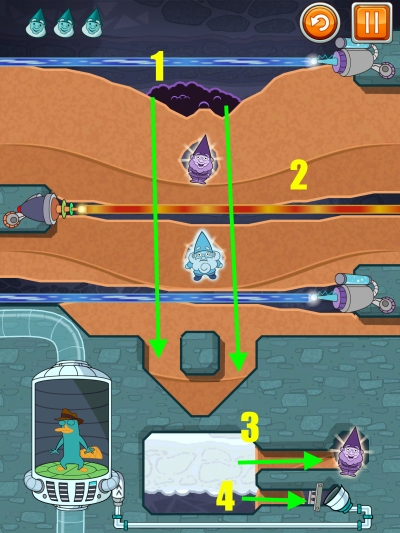
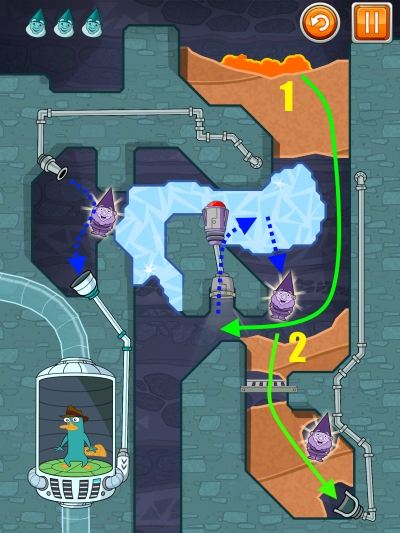
Dig a path as indicated by the numbered green arrows on the screenshot.
At point #3, allow the area to fill with ice before letting the laser strike it.
2-14
Screenshot
Dig in the order indicated on the screenshot.
There are several points where you need to split the stream or send small amounts of water in one direction to trigger a switch.
Don't free the goop on this level.
2-15
Screenshot
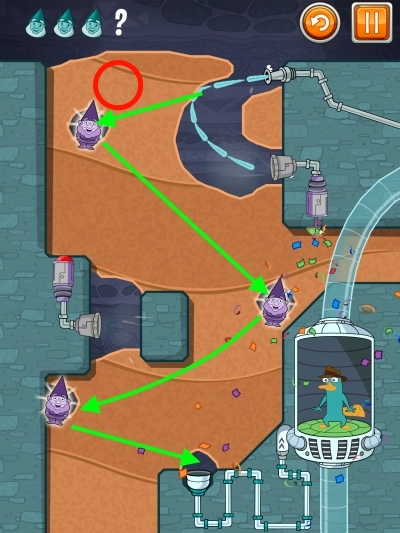
Use the goop to break through the wall by destroying the machine.
Collect the gnome here if you like, or at the end of the level; it doesn't matter.
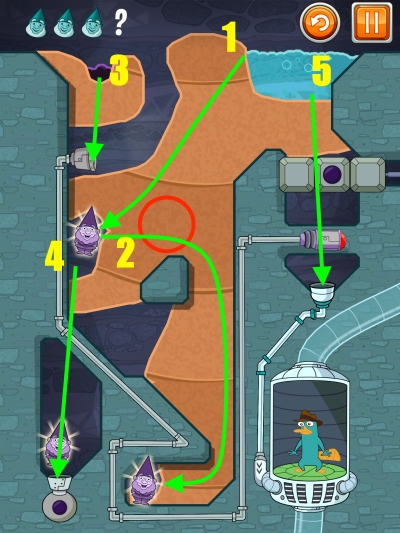
Send one drop of water to trigger the switch, and the rest to the left.
Collect the gnome and use the pipe to take you to point 5.
Allow the area to fill before claiming the gnome and ending the stage.
Pick up a collectible here too.
2-16
Screenshot
Move the steam ready to claim the gnome.
Keep some steam to trigger the switch.
Trigger the purple switch to let the water through.
Collect the lower right gnome.
Trigger the steam switch to get the upper right gnome.
Follow the arrow to finish the level.
2-17
Screenshot
Freeze the jet.
Bounce the goop off the jet to block the grate.
Use the steam to collect the gnome at the top, then turn it back into water with the cooler ray. It will follow the path of the blue dotted arrow.
Dig to the exit.
2-18
Screenshot
Dig tunnels ready for steam.
Turn the water into steam and let it move through the tunnels you dug.
Turn the steam back into water.
Trigger the green switch, and let the steam left over on the right toggle the red one in order to open the path to the exit.
Find a collectible where the red circle is shown on the screenshot.
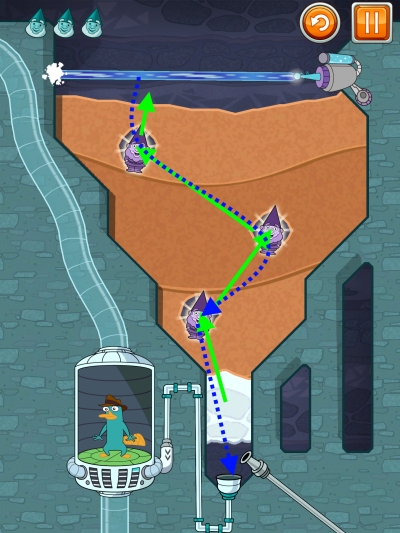
2-19
Screenshot
Thaw the ice into water.
Dig through the dirt to allow the water to loop the water around into a cavern. Don't break through the floor just yet.
Now dig above the laser to turn the water into steam.
Clear the cavern area, allowing the steam in, before cooling it back to water with the cooling laser.
Build a new path through for the water, so it ends up in a cave above the gnome
Turn the water back into steam, grabbing the lower gnome just before you use the laser.
Build a path up for the steam
Collect the final gnome with the steam.
Change the steam back into water.
Direct the water to the exit.
2-20
Screenshot
Collect the steam & water gnomes in one go by dropping the pool into the path of the laser. When the steam rises, the cooling beam will turn it back to water, which will run towards the water gnome.
Dig a path to the other water gnome.
Melt the ice with the top laser.
Melt it again with another fire laser.
Mission 3
3-1
Screenshot
Create paths to the gnomes.
Use the lava to turn the water into steam.
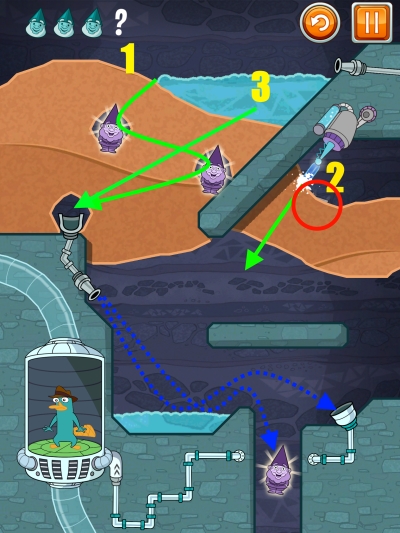
3-2
Screenshot
A collectible is marked in red in the screenshot.
Melt the ice with the lava.
Let the water through the dirt to the gnome.
Use the other lava pool to melt the big sheet of ice.
Dig to the gnomes and then through to the exit.
3-3
Screenshot
Set up clear pathways for the steam to rise. The steam on the right needs to be delayed a little so that the level doesn't end before the gnomes are collected.
Use the lava to turn the water into steam.
3-4
Screenshot
Freeze the jet.
Melt the ice.
Let the goop through to block the grate, then as the water fills up, guide it to the gnomes.
Dig to the exit.
3-5
Screenshot
Freeze the jets.
Collect the gnome and free the water.
Collect the other gnomes and dig to the exit.
3-6
Screenshot
Fill the top area, in the order shown by the screenshot. Then turn the lot to water and voila.
Don't forget the collectible, marked in red.
3-7
Screenshot
Make a path to the top of the screen.
Zap the water to convert it to steam.
Wait until the ice has turned it all back into water and the switch at the top has triggered, then turn the water to steam again.
3-8
Screenshot
Dropping the water will make it fall off screen, unless its steam, in which case it rises again.
This laser can be used more than once. Press the button to switch it on and convert all the water to steam.
Build a path to the top, collecting the gnomes on the way.
3-9
Screenshot
Dig a curve up to the first gnome.
Hollow the dirt out a little in order to let the water build momentum to reach the second gnome.
Build a path through the third gnome to the exit.
Remember to claim the collectible.
3-10
Screenshot
Direct the water to the two gnomes in the dirt.
Fill in the gap in the ice with water and let it freeze.
Melt all the water.
3-11
Screenshot
Freeze the water once the gnome is ready.
Bounce the jet off the ice to the right hand gnome.
Dig to the other gnome and the exit.
3-12
Screenshot
Let some water into the pipe.
Freeze the jet after the gnome is collected.
Use the rest of the water to collect the gnomes and clear the level.
3-13
Screenshot
Fill the gaps in the ice.
Bounce the jet into the gnome on the left.
Melt the ice.
Turn the water to steam.
3-14
Screenshot
Mix the lava and coolant to explode the rock.
Use the water to get the gnomes.
Dig to the exit.
Remember to collect the item.
3-15
Screenshot
Use the lava and coolant to explode the rock.
Use the steam to collect the gnome, then the second pool of coolant to turn into water.
The water will fall through the gap; use it to get the two other gnomes.
Dig below the exit.
Use the other lava pool to turn the water into steam again.
3-16
Screenshot
Collect the gnome on the right.
Dig through the dirt.
Use the laser to create steam.
When the switch is triggered and all the steam is at the top, cool it back into water and allow it to drop into the exit.
Pick up a collectible here too.
3-17
Screenshot
Build a little reservoir and fill it with water.
Dig straight to the bottom and collect the gnomes.
Freeze the jet.
Use the reservoir you built earlier to finish the level.
3-18
Screenshot
Dig to the lava.
Go up to the coolant.
Back to the lava.
To the higher coolant!
If there was some steam on this side, it will turn into water for the gnome.
Send the rest of the water to the exit.
Remember to pick up the collectible.
3-19
Screenshot
Keep a few drops of water aside for the red switch, but dont trigger it yet.
Activate the purple switch.
Turn the water into steam. it will follow the blue dotted line up.
Allow most of the steam to reach the ice, where it will turn back into water and return to the purple switch.
Activate the red switch.
Turn the water into steam again.
Once the last gnome is collected, activate the green switch at the top.
3-20
Screenshot
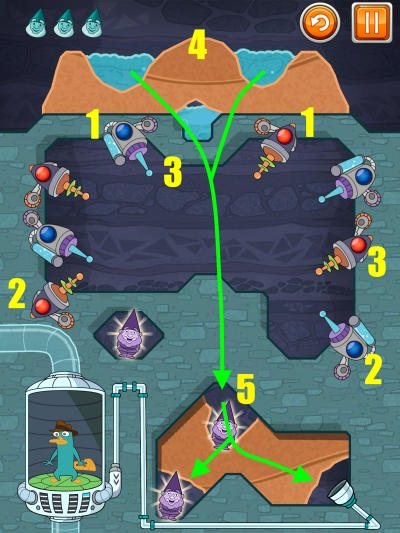
Trigger the pair of guns marked "1" in the screenshot.
Trigger the pair of guns marked "2" in the screenshot.
Trigger the pair of guns marked "3" in the screenshot.
Drain the water.
Split it between the remaining gnome and the exit.
Mission 4
4-1
Screenshot
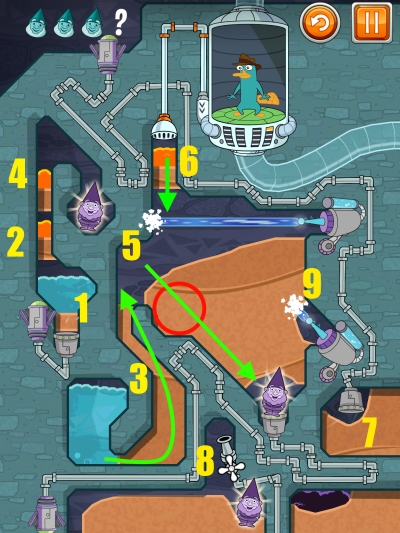
Drop the goop into the laser to make lava and turn the water into steam.
Dig paths for the steam to rise to the top, collecting the gnomes along the way.
When the steam hits the cooling laser, it turns back into water, which you can direct to the exit.
4-2
Screenshot
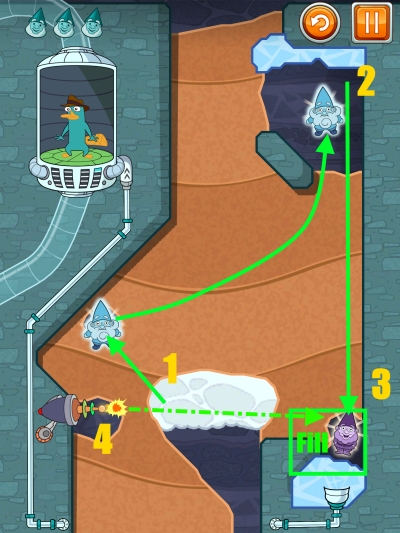
Dig from the pool to the gap and let the water freeze in place.
Use the lava to melt the ice, which will collect the other gnomes and finish the level.
Pick up the collectible marked in red on the screenshot.
4-3
Screenshot
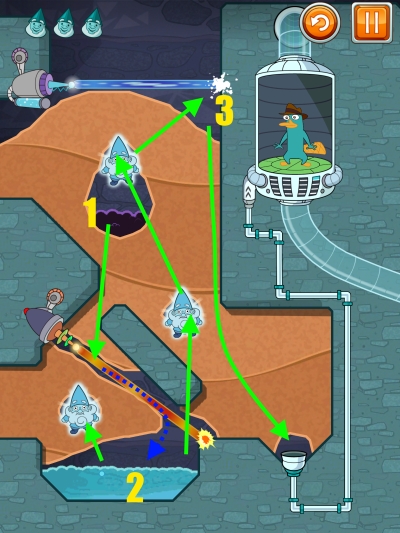
Dig through to the gnome.
Turn the goop into lava and use it to change the water into steam.
Let the steam rise to the cooling ray.
Dig a path to the exit.
4-4
Screenshot
Freeze the water and let the goop block the grate.
Dig a hole to the gnome.
Melt the water.
4-5
Screenshot
Use the left laser to melt the ice and dig to the gnome.
Use the right hand laser to turn the water into steam. You'll need enough water on the slope to move left as steam for the third gnome.
4-6
Screenshot
Release the water a few drops at a time from the top by moving the block to the right.
Trigger the purple switch to shut off the vertical laser.
Collect the gnomes and use a few drops of water to toggle the laser, before digging a path for the rest of the water.
Move the block up to direct the water to the gnome.
Move the block back in front of the laser and dig to the exit.
4-7
Screenshot
Dig to the two gnomes.
Split the goop and use the left side of it, as lava from the laser, to turn the water into steam.
Turn the rest of the goop into coolant and use it to freeze the jets.
Bounce the remaining water off the ice to end the level.
Pick up a collectible here too.
4-8
Screenshot
Set the level up as shown. Then let the water through in the order shown in the screenshot.
4-9
Screenshot
Put the lava on the rock.
Fire the cooling laser to explode the rock.
Clear the dirt below out and let the water through to trigger the switch.
Use the other pool of lava to turn the water into steam.
Pick up a collectible here too.
4-10
Screenshot
Split the goop into two, turning one side into lava and one into coolant, and use it to explode the rock.
Clear all the dirt away to let the steam rise.
Dig to the gnome.
Clear the way to the exit.
4-11
Screenshot
Use one drop of goop and the freeze ray to freeze the jets.
Fire some more goop, which will now bounce off the ice.
Use the laser to turn the goop into lava, and melt the ice with it.
Once the gnome is collected, use the laser to turn the water into steam.
When the steam gnome is activated, use the cooling laser to turn the steam back into water and complete the level.
4-12
Screenshot
Explode the lava with the cooling laser
Let the steam out to collect the gnome
Cool the steam back into water to collect the lower gnome
Drop lava onto the first rock and use the cooling laser on it.
Drop lava onto the second rock and use the cooling laser again.
Drop lava onto the third rock and use the cooling laser to make a path to the ice.
Melt the ice and let the steam rise to the exit
4-13
Screenshot
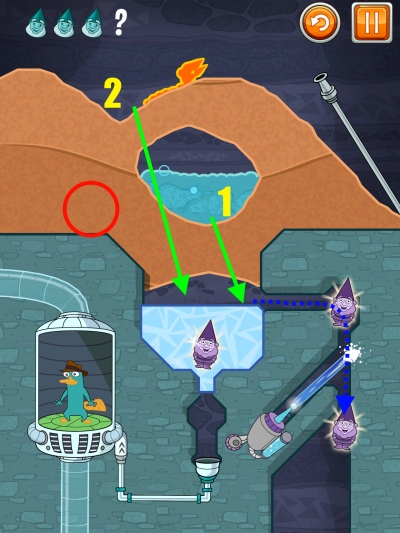
Fill the cave with water for the first gnome.
Turn the water into steam.
Let the steam out of one pipe at a time to collect the other two gnomes. The blue arrows on the screenshot show the path the steam will take.
Using both pipes at the same time will cause the steam to go directly upwards, completing the level.
4-14
Screenshot
Use the steam to collect the left hand gnome.
Freeze the steam.
Bounce the water off the ice into the switch.
Dig to the lower gnome.
Let the steam out on the right.
Freeze it and bounce the water jet off it again to the exit.
Pick up the collectible while you're on the level.
4-15
Screenshot
Let the goop into the main cave.
Clearing the dirt here will allow the fun-inator to suck up the goop. The laser turns it into lava on the way, destroying the machine. You should be left with some lava still.
Use the water to claim the gnome on the left.
Your leftover lava can be used to melt the ice. Most of it needs to drop through the grates, but turn some of it into steam for the steam gnome.
Clear the way to the gnome and the exit.
4-16
Screenshot
Use the faucet to collect the gnome.
Turn the goop into lava and melt the ice to activate the jet.
Use the faucet against the jet to blast water towards the other gnome.
Running the faucet long enough now the jet is on will fill up the exit pipes. However, the 'correct' way to do this part is to use the goop and cooling laser to freeze the jet and bounce the water from the faucet off.
Remember to pick up the collectible.
4-17
Screenshot
Send about half the lava round the edge of the screen to the fun-inator. It will destroy the machine, and one or two drops will hit the ice on the right, melting it.
Dig a path for the water and wait for the level to end.
4-18
Screenshot
Turn the goop into lava, which will explode when it reacts with the coolant.
Use the small pool of water to collect the gnome and freeze the upper pipe, stopping the coolant from falling.
Make a path for the water from the large pool to reach the exit.
At any point in the level, send some water to the left to react with the lava and create steam if you're going for the gnomes.
4-19
Screenshot
Let the pool run into the fun-inator.
Drop the lava into the fun-inator to explode it.
Clear a path for the water.
Drop the lava onto the water to turn it into steam.
When the steam hits the cooling ray, it will turn back into water. Dig to the gnome.
Use the lava to destroy the fun-inator.
Dig to the fun-inator so the goop destroys it.
Create steam from this faucet, now the path is clear.
Use the cooling beam to turn the steam near the top left gnome back into water before the level ends.
Pick up the collectible while you're on the level.
4-20
Screenshot
Create a ramp for the lava so it reacts with the cooling beam.
Direct the water to the laser to turn it into steam and claim the gnomes before finishing the level. The gnome at the top of the screen can still be claimed as the level ends, if the steam is taking its time to reach him.
Agent File Levels
Dig a path up and around the rocks. There are a few spikes, but nothing difficult.
Just avoid the lasers and the sides of the screen. Not much to this one.
This one is tough - there are thorns to avoid as well. Stay on the left and use the water to toggle the lasers, then the higher faucet to push the balloon to the right to finish the level.
Freeze water in front of the spikes so your balloon doesn't fly into it. Turn the big ice block into steam at the end of the level.
Doofinator File Levels
Make paths for the steam to reach the switches to allow you to progress.
Clear the way by sending the goop into the fun-inators.
Use the faucets to push the balloon if you get too near the spikes. Stay on the right of the screen for most of the level.
Clear the way by blowing up fun-inators again.
Achievements
An Agent I Can Trust: Complete the first set of levels.
A Thousand Times Over: Complete the second set of levels.
The Puppetmaster: Complete the third set of levels.
The Fall of Major Monogram: Complete the fourth set of levels.
Tri-Gnome Mission 1: Collect all the gnomes in the first set of levels.
Tri-Gnome Mission 2: Collect all the gnomes in the second set of levels.
Tri-Gnome Mission 3: Collect all the gnomes in the third set of levels.
Tri-Gnome Mission 4: Collect all the gnomes in the fourth set of levels.
Secret Agent: Find any secret file.
Top Secret Agent: Find 10 secret files.
Super Secret Agent: Find every secret file.
Friend of Balloony: Unlock a bonus level by collecting a set of secret files.
Best Balloony Buddy: Complete every bonus level.
Efficient Cut: Use multi-touch to dig in two places at once.
Confidence: Complete level 1-10 in one cut.
Persistence: Restart a level 7 times before completing it.
Quick Finish: Complete level 4-19 with a time bonus of 50 seconds or more (skip the gnomes and go straight to the finish).
Secret File Locations
Locations are marked with a red circle.
1-4: Screenshot
1-6: Screenshot
1-8: Screenshot
1-12: Screenshot
1-15: Screenshot
1-17: Screenshot
2-2: Screenshot
2-4: Screenshot
2-8: Screenshot
2-12: Screenshot
2-15: Screenshot
2-18: Screenshot
3-2: Screenshot
3-6: Screenshot
3-9: Screenshot
3-14: Screenshot
3-16: Screenshot
3-18: Screenshot
4-2: Screenshot
4-7: Screenshot
4-9: Screenshot
4-14: Screenshot
4-16: Screenshot
4-19: Screenshot
Posted by: Ben |
July 3, 2012 3:42 PM
|
July 3, 2012 3:42 PM