


Fierce Tales: The Dog's Heart
Platform: Mac, Windows

![]() One of the main tropes present in hidden object hybrids these days is that someone gets kidnapped by mysterious forces and you must rescue them, be it a prince, a princess, children, a whole town, or some random guy off the street. However, Fierce Tales: The Dog's Heart by Blam! Games (creator of The Keepers: Lost Progeny) goes in a completely different direction. You see, your cute little puppy is kidnapped by mysterious forces, and you must rescue him before it's too late. It may not reinvent the hidden object wheel, but it's still a pretty darned good adventure waiting to be played!
One of the main tropes present in hidden object hybrids these days is that someone gets kidnapped by mysterious forces and you must rescue them, be it a prince, a princess, children, a whole town, or some random guy off the street. However, Fierce Tales: The Dog's Heart by Blam! Games (creator of The Keepers: Lost Progeny) goes in a completely different direction. You see, your cute little puppy is kidnapped by mysterious forces, and you must rescue him before it's too late. It may not reinvent the hidden object wheel, but it's still a pretty darned good adventure waiting to be played!
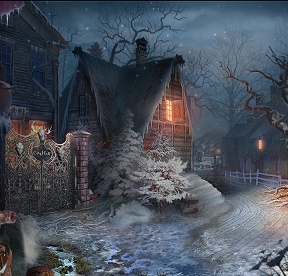 The Town of Houndspoint is one that really, really loves their dogs. Unfortunately and rather suddenly, not all of the dogs are returning that love. A strange pack of savage dogs has appeared and is ravaging the town, killing at least one resident and dognapping other faithful companions on their way through. It all seems like a rather abstract problem to you, the hero, until the calamitous canines make a run at your house and kidnap your cute little puppy Pippa. All you need to do is track the dogs and discover the secret behind the pernicious pack before the entire town is wiped out.
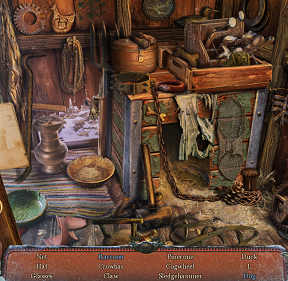
Gameplay is of the point-and-click variety with changing cursors to indicate areas of interest and navigation, hidden object scenes which disgorge one useful item, a nice scattering of mini-games and puzzles, a bottom loading inventory, and a refilling hint timer. Glints, gleams, and glimmers of light highlight areas of interest if played in casual mode, and the usual articles, letters, scraps of paper, etc. are everywhere telling the story as you wander a town suffering from the doggie equivalent of shell shock. Helpful residents of town (not all of them human) are around to answer questions or give more clues to solve the central puzzle of what is happening to man's best friend.
 Analysis: With Fierce Tales: The Dog's Heart, Blam! Games has created a beautiful, engaging tale that is sprinkled with more than a bit of humor. Yes, the story is one that has been done before, but rarely this stylishly and with as hefty an amount of gameplay. Bonus points for no ghosts, demons, or other supernatural beings wandering about. More bonus points for being a canine-rescuing hero!
Background visuals are stunning and bathed in tones of blue and brown befitting the night-time setting of the adventure, enhanced by a rousing soundtrack and some pretty nifty animations. Voice acting is competent and not a large intrusion, merely serving to move the story along rather than acting as filler to make the game seem longer. What really stands out is the rather snarky humor that pops up in unexpected places, keeping the story from becoming too overwrought and angsty.
Gameplay length is fantastic and will clock in at five hours or more just for the main adventure (in the Collector's Edition, the bonus adventure is also pretty hefty). Hidden object scenes are the usual list o' stuff but do involve some interactivity to keep them interesting, and the mini-games and puzzles are fun and engaging although on the familiar and somewhat easy side. Three modes of play ensure that a wide range of players can enjoy the mayhem, although it might be a bit too intense for those under the age of eight. Rounding out the experience is a handy interactive map, a feature that is welcome to keep track of all the places that have been explored.
With its meaty gameplay and rather amusing twist on the standard "damsel in distress" theme Fierce Tales: The Dog's Heart is a definite must for those who love adventure hybrids, a genre that has too often, it must be said, gone to the dogs.
A Collector's Edition is also available. It includes wallpapers, music, concept art, extra gameplay, and a built-in strategy guide. Remember that Big Fish Game Club Members pay only $13.99 for Collector's Editions, and collector's editions count 3 card punches of 6 total needed for a free game.
![]() Windows:
Windows:
Download the demo
Get the full version
Also available: Collector's Edition
![]() Mac OS X:
Mac OS X:
Download the demo
Get the full version
Also available: Collector's Edition


Walkthrough Guide
(Please allow page to fully load for spoiler tags to be functional.)
Fierce Tales: The Dog's Heart Walkthrough
Part 1: General Info & Chapters 1-3
General Information
At the start of a new game you have a choice of three difficulties: Casual Mode, Advanced Mode, and Hardcore Mode. These difficulties can be changed at any time by accessing the menu options.
In Casual Mode the Hint and Skip buttons will recharge quickly and sparkles will often indicate active areas. This is a good setting for beginners or for players would like a relaxed gameplay session.
In the Advanced mode the Hint and Skip buttons take a longer time to recharge and sparkles to indicate active areas less frequently. This is the higher difficult setting suggested only for experienced players.
In the Hardcore mode the Hint and Skip functions are complete disabled and there are no sparkles whatsoever. This mode is only suggested for players who wish to experience the game without any help at all.
Enable the tutorial at the beginning of the game to view the basic instructions to gameplay.
Use the cursor to interact with the environment.
The cursor will change to a magnifying glass when you can investigate an area more closely; a magnifying glass over a sparkling area indicates a hidden object scene.
The cursor changes to a directional arrow when you can navigate to a different location.
The cursor changes to a hand when you can pick up an item to add it to your Inventory or interact directly with the environment.
The Inventory is the toolbar located at the bottom of the screen.
Your Inventory bar contains all of the items you will need to progress through the game.
Click an item in your Inventory to select it, then click on an area in the game to attempt to use the item.
Often times when an item is used, it will disappear permanently from your Inventory.
To the right of the Inventory bar is the Hint button shaped like an owl.
The Hint button can be used to reveal an item during a hidden object scene or to show you the next step of your adventure if you're stuck.
The Hint button will change to the Skip button during puzzles.
Click the Skip button once it is fully charged to immediately complete the puzzle.
Hidden object scenes are areas indicated by sparkles where you must collect various randomized objects listed at the bottom to receive a new inventory item upon completion.
Interactive, incomplete, or concealed items in a hidden object scene are shown in blue lettering on the list of objects.
Sometimes you must combine two or more items or alter an active area in the scene to complete an interactive item.
To receive an additional hint during a hidden object scene, you can move your cursor over the name of the item to view a silhouette of its shape.
On the left side of the Inventory bar is the Journal.
The Journal contains helpful information to track your progress through the story.
Click the left or right arrows at the bottom of the Diary to flip through the pages.
Click the Map tab while viewing the Journal to see a complete map of the surrounding area you've explored so far.
Select any location on the map to travel to it instantly.
Directly below the Diary button is the Menu button.
Click the Menu to view an in-game menu where you can edit the audio or video options, change the difficulty, view basic Help information, or return to the Main Menu screen.
Chapter 1
House
Take the BROOM leaning against the wall to the left of the door.
Click the window above the dog to zoom in.
Move the latch to open the window and look outside.
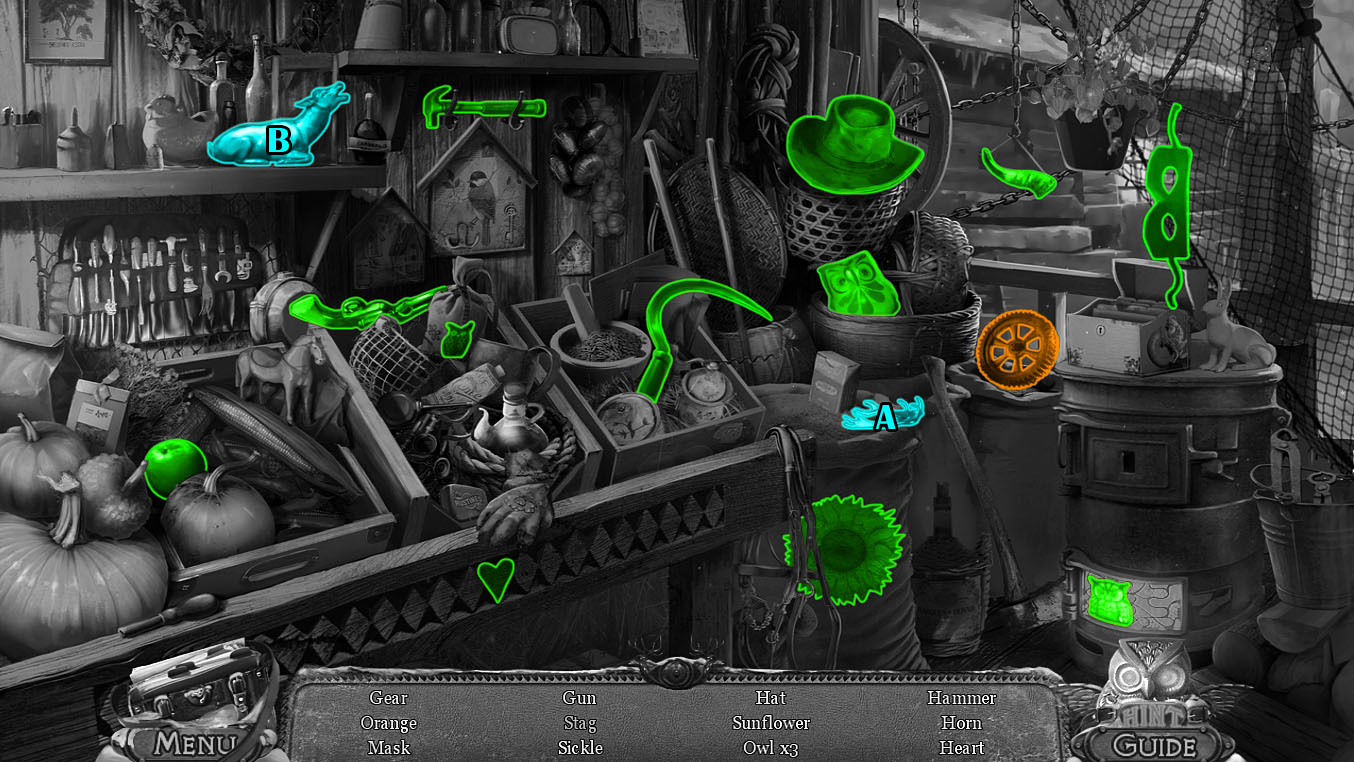
Click the knapsack left of the fireplace to start the hidden object scene.
Lift the flap at the back of the knapsack (A) to uncover the knife.
Use the knife to cut the stitched section of the cloth (B) and reveal the Coin.
Pick up the rag (C) and use it to wipe off the dirty wall and reveal the Train (D).
Screenshot.
Once the hidden object scene is complete, you will receive the CAN OPENER.
Click the mantle over the fireplace for a closer look.
Use the CAN OPENER to open the can of DOG FOOD, then click the can to add it to your inventory.
Click the small dog to zoom in.
Place the DOG FOOD onto the plate on the floor.
/ul>
Follow the dog outside to the Backyard.
Backyard
After the cinematic, click the locket on the ground to zoom in.
Click the locket again to add the note to your journal.
Take the SNOWSHOE 1/2 from the side of the snowman.
Use the BROOM (from the wall at the House) to sweep away the pile of snow blocking the doors to the left building.
Open the doors and continue left into the Garage.
Garage
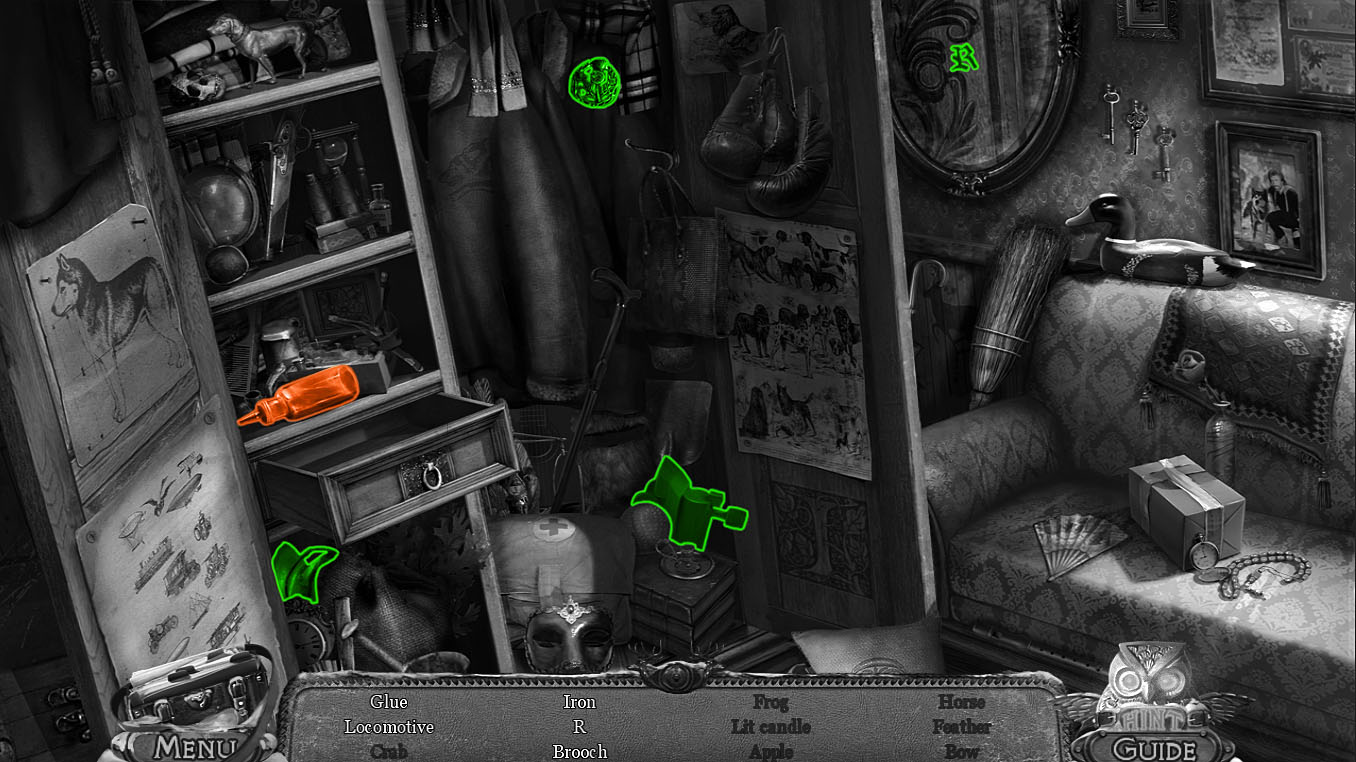
Click the pile of junk in the rear left corner of the room to start the hidden object scene.
Lift the latches at the sides of the suitcase and open the lid to uncover the Feather and the Book.
Screenshot.
Once the hidden object scene is complete, you will receive the TORCH.
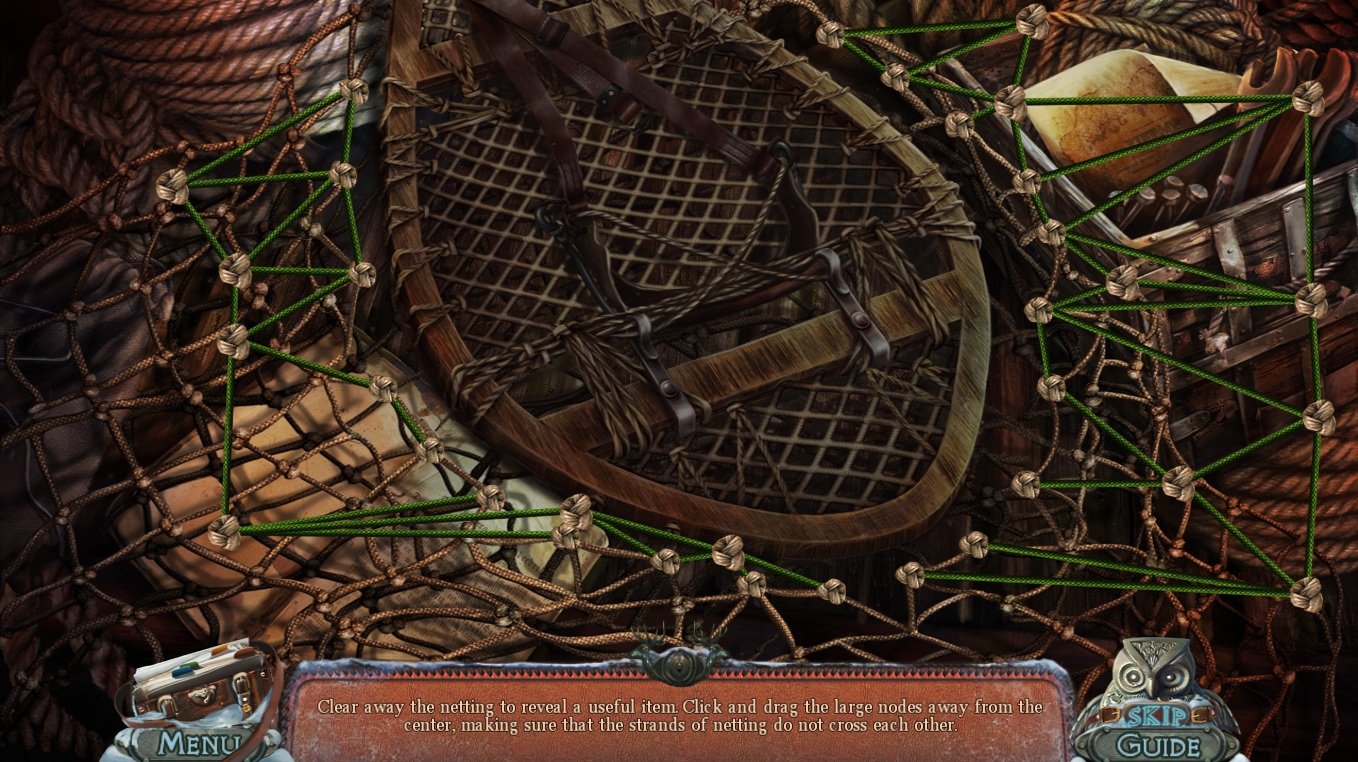
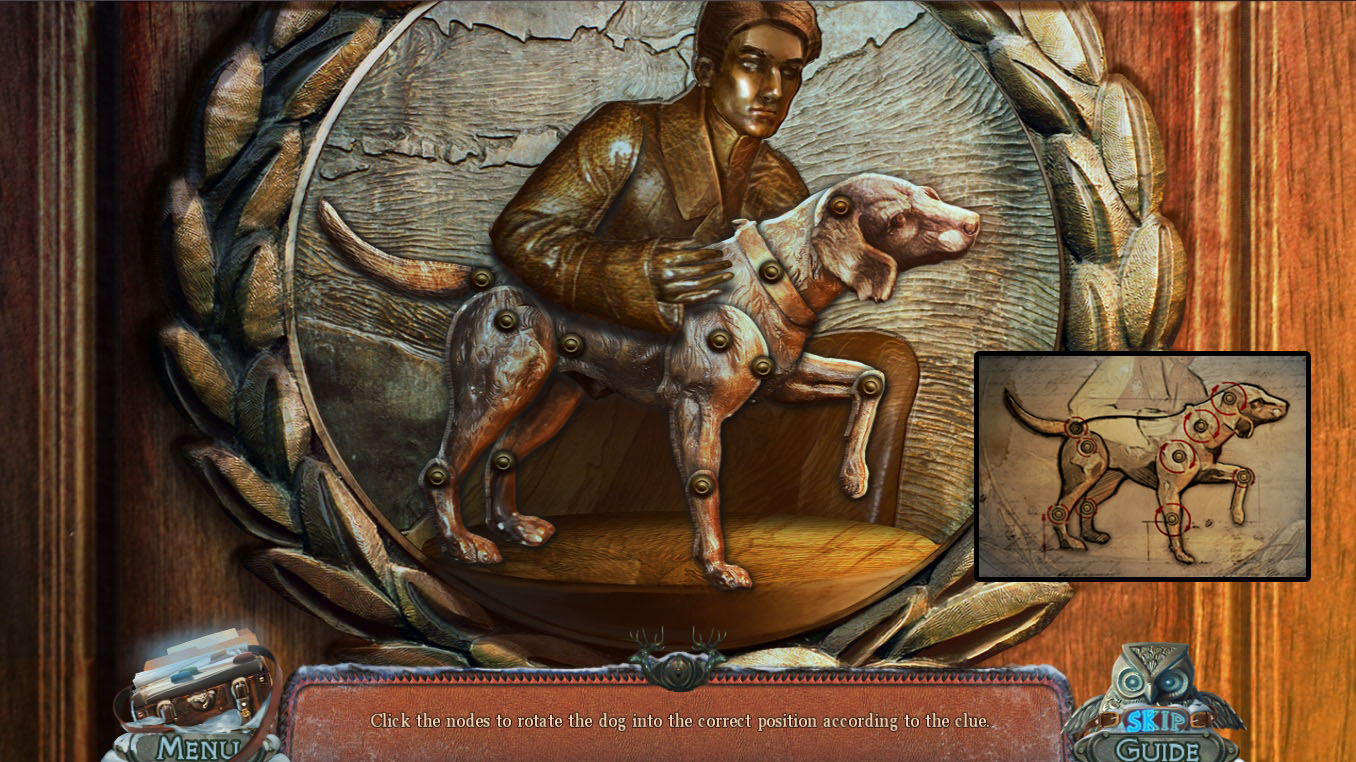
Click the net on top of the crate to start the puzzle.
Position the nodes so none of the ropes cross and are away from the snowshoe.
Click and drag a node to move it around the area, then release it to set it down.
If two or more ropes are crossing, it will turn red.
If the lines are correctly placed and not crossed over any other ropes, they will turn green.
Solution.
After the puzzle is solved, click the SNOWSHOE 2/2 to add it to your inventory.
Click the corner of the table on the right to zoom in and take the MATCHES.
Go back out to the Backyard.
Backyard
Use the two SNOWSHOES on the pile of snow blocking the gate to travel to the Crossroads.
Crossroad
Click the sign board for a closer look.
Take the ICE PICK pinned at the upper right side of the sign.
Click the two papers in the middle of the board to read the article on Terry Sherman's death and add the picture of the town statue's to your journal.
Continue forward to the Bridge.
Bridge
Click the frozen puddle under the tree to zoom in.
Use the ICE PICK (from the sign board at the Crossroad) to break the ice and uncover the SAW HANDLE.
Click the male statue for a closer look.
Take the HAT between the statue's hands.
Go back to the Garage.
Garage
Inspect the broken saw blade stuck at the top of the log in the corner of the room.
Add the SAW HANDLE (from the frozen puddle at the Bridge) to the blade to receive the completed SAW.
Return to the Bridge.
Bridge
Click the bridge to try to cross.
After the cinematic, use the SAW (from the log at the Garage) to cut through the trunk of the tree beside the bridge.
Move forward to the Left Square, then continue right to the Right Square.
Right Square
Click the sheriff standing next to the woman to speak with him.
Inspect the plaque under the statues in the center of the square.
Take the SHELL on the ground under the plaque.
Click the middle statue for a closer look.
Put the HAT (from the statues at the Bridge) on the statue's head.
Take the DOG HEAD from the compartment in the statue's chest.
Move forward to the City Kennels.
City Kennels
Click the dog house for a closer look.
Read the note beside the food dish, note the pattern of different colored dog heads at the bottom of the paper.
Place the DOG HEAD (from the statue compartment at the Right Square) on top of the bust to the left of the kennel doors to start the puzzle.
Click the buttons in the correct order to remove the bars from the lock.
Click a button to test it; if it's hit in the correct order, one of the metal bars blocking the door will retract.
If a button is pressed out of order, the puzzle will reset.
The correct order is randomized each game, refer to screenshot below as only an example.
Solution.
After the puzzle is solved, go through the open door to the Kennel Interior.
Kennel Interior
Pick up the STRANGE COLLAR on the floor.
Click the book on the shelf above the cages for a closer look.
Open the book and turn the right page twice to find the INSTRUCTIONS PIECE.
Take the EMPTY CUP on top of the table.
Click the bulletin board for a closer look.
Take the BOTTLE at the bottom of the board.
Click the wounded dog to zoom in.
Take the jug of KEROSENE between the two stacks of hay.
Go back three times to the Left Square.
Left Square
Click the leaking pipe by the left wall for a closer look.
Use the EMPTY CUP (from the table at the Kennel Interior) on the water leaking out of the pipe to receive the CUP OF WARM WATER.
Inspect the pile of snow on the ground under the trees to the right of the gate.
Use the CUP OF WARM WATER to melt the snow to find the DRILL.
Return to the City Kennels.
City Kennels
Click the beam under the right side of the roof to zoom in.
Use the DRILL (from the snow pile at the Left Square) on the drill bit stuck in the board to complete the DRILL WITH BIT.
Go back once to the Right Square.
Right Square
Inspect the right statue of the landscaper in the center of the square.
Click the key in the statue's hands to drop it to the ground.
Click the manhole where the key falls for a closer look.
Click the key again to drop it through the manhole into the sewer.
Use the DRILL WITH BIT (from the roof beam at the City Kennels) on the hatch to remove the lid.
Go down the hole into the Sewers.
Sewers
Inspect the dog-shaped torch base in the middle of the support beam in the light.
Place the TORCH (from the Garage hidden object scene) in the torch base.
Douse the rag around the torch with the KEROSENE (from the hay stack at the Kennel Interior).
Ignite the torch with the MATCHES (from the table at the Garage) to light the room.
Take the NIPPERS on the pipe at the left side of the room.
Go back to return to the surface at the Right Square, then continue forward to the City Kennels.
City Kennels
Click the tied up gate to the left of the kennel doors to zoom in.
Use the NIPPERS (from the pipe at the Sewers) to cut through the wire tied between the doors.
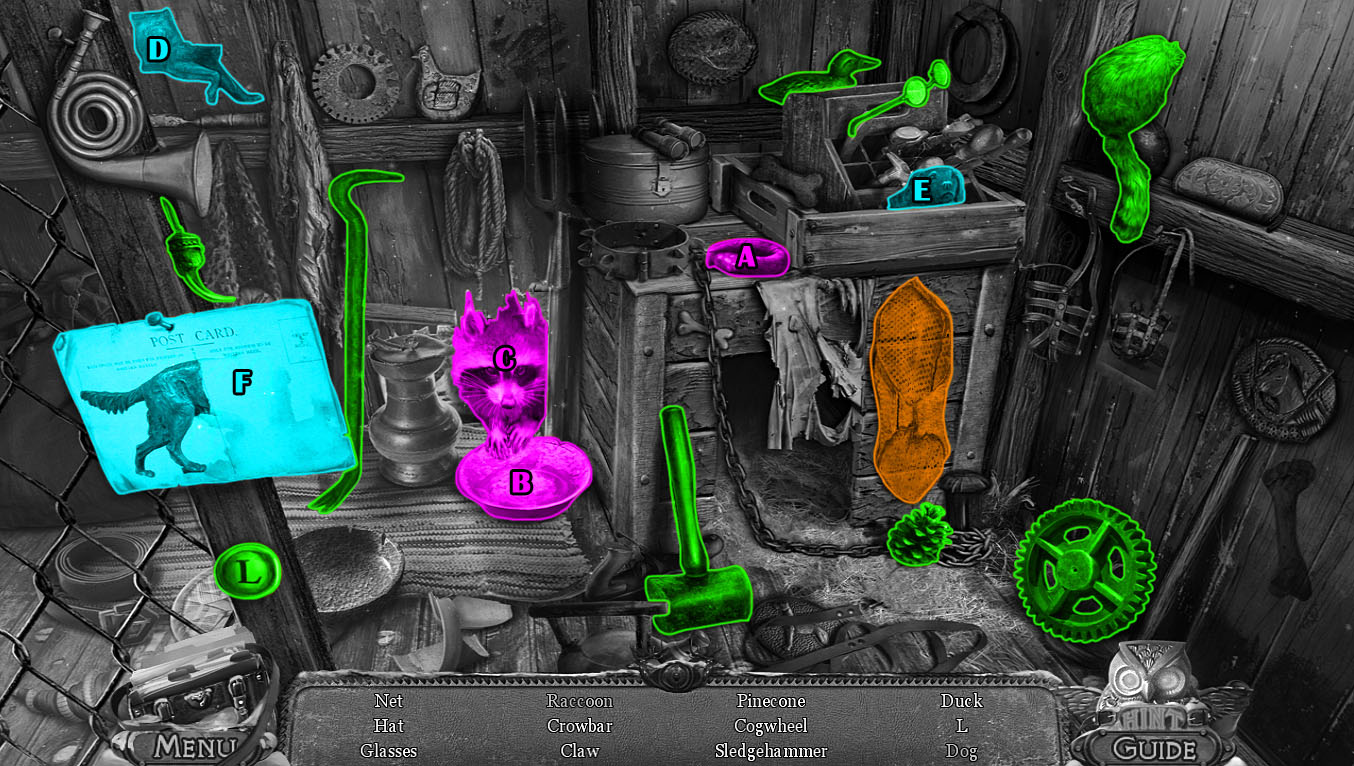
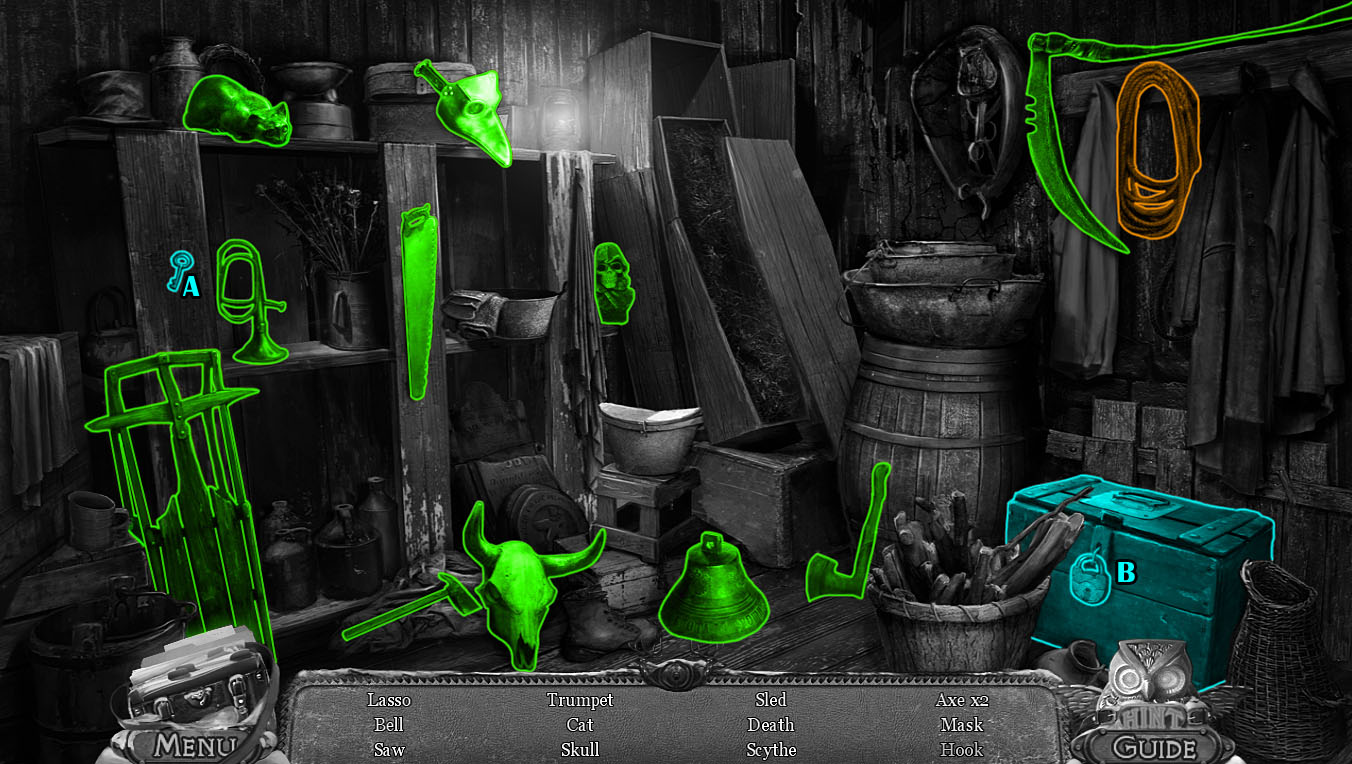
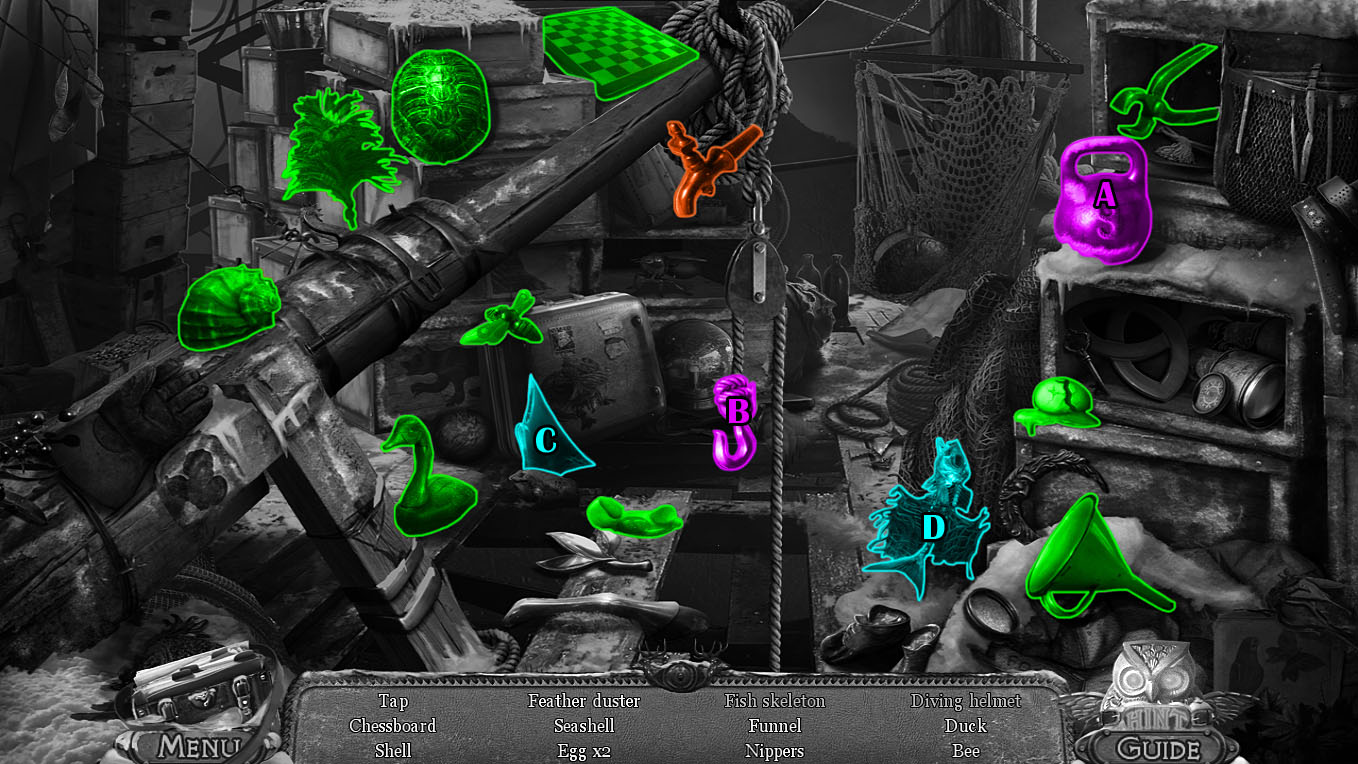
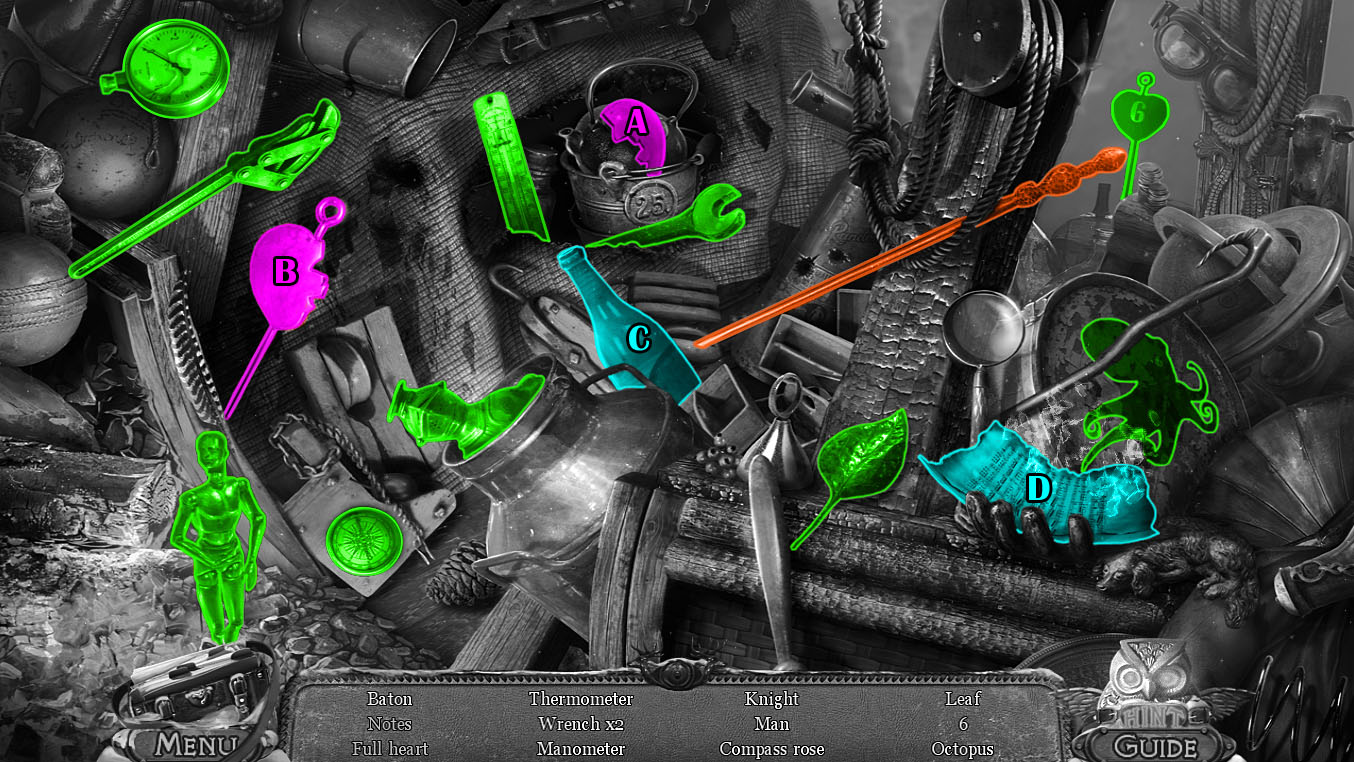
Click the shelves behind the opened doors to start the hidden object scene.
Put the sausage (A) in the dish on the floor (B) to lure the Raccoon (C).
Place the pieces of the picture (D & E) on the postcard (F) to complete the image of a dog.
Screenshot.
Once the hidden object scene is complete, you will receive the NET.
Go back to the Right Square.
Right Square
Inspect the right statue of the landscaper in the center of the square.
Add the NET (from the City Kennels hidden object scene) to the handle the statue is holding.
Take back the complete NET from the statue's hand.
Go down the manhole into the Sewers.
Sewers
Use the NET (from the landscaper statue in the Right Square) to pick up the VETERINARIAN'S KEY on the ground between the snakes.
Go back out to the Right Square.
Right Square
Click the door to the veterinarian building on the right side of the square to zoom in.
Use the VETERINARIAN'S KEY (from the snake pit at the Sewers) on the lock and turn it twice to open the door.
Go through the open door into the Pharmacy.
Pharmacy
Take the SYRINGE on top of the operating table.
Click the book on top of the middle table for a closer look.
Turn the page to find the DOG MEDALLION.
Add the INSTRUCTIONS PIECE (from the book at the Kennel Interior) to the torn right page in the book.
The note on treating a dog's gunshot wound will be added to your journal.
Inspect the locked drawer in the middle of the cabinet on the right wall.
Refer to the code on the note from the dog house at the Kennel Interior to open the lock.
Click the buttons to cycle through the images until each dog head image is set to the correct color.
From top to bottom it's: Light Blue - Orange - Green - Dark Blue.
Solution.
After the lock is opened, read the note taped to the back to find the "miracle liquid" advertisement and add it to your journal.
Take the BANDAGE and SYMBOL 1 inside the cabinet.
Click the desk at the left side of the room to zoom in.
Place the DOG MEDALLION in the carved slot to open the cover on the desk.
Click the desk again to start a hidden object scene.
Drop the paper (A) hanging over the cubby to uncover the Limestone.
Open the small right door (B) to reveal the Amber in the cubby.
Use the key (C) to open the locked cabinet (D) to find the Squirrel.
Screenshot.
Once the hidden object scene is complete, you will receive the GUNPOWDER.
Click the cabinet to the right of the window for a close-up view.
Place the BOTTLE (from the bulletin board at the Kennel Interior) on the table to start the puzzle.
Put the bottles on the rack in the correct order by measuring their weight.
The bottles must be arranged from left to right in order of lightest weight to heaviest weight.
Two of the bottles weigh exactly the same; place those bottles on the spaces under the rack with the water = water labels.
Click and drag a bottle to move it, then release it on the rack or a balance of the scale to place it.
When weighing two bottles on a scale, whichever side the arrow at the center of the scale points to is the heavier object.
Solution.
After the puzzle is solved, you will receive a bottle of MORPHINE.
Go back to the Kennel Interior.
Kennel Interior
Click the wounded dog for a closer look.
Place the BANDAGE (from the unlocked cabinet at the Pharmacy), the SYRINGE (from the operating table at the Pharmacy), and the MORPHINE (from the scale puzzle at the Pharmacy) on the ground beside the dog.
Use the SYRINGE on the MORPHINE bottle to fill it, then use it to inject the dog.
Wrap the wound with the BANDAGE to finish treating the dog.
After the dog leaves the room, click the hay pile it was lying on to zoom in and take the STAR KEY.
Inspect the locked cage under the "Jessie" name plate.
Use the STAR KEY to open the lock.
Click the opened cage to start the hidden object scene.
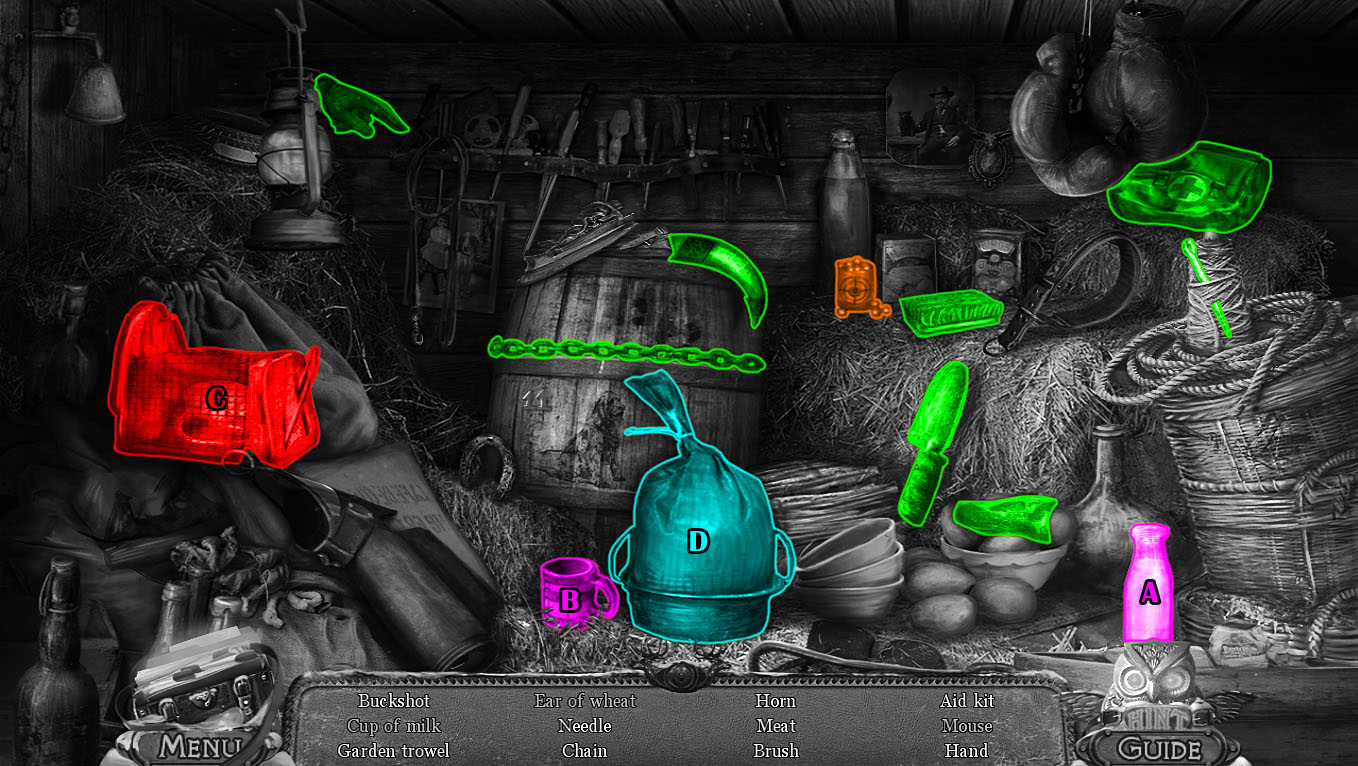
Pour the bottle of milk (A) into the mug (B) to complete the Cup of Milk.
Open the cage door (C) to find the Mouse.
Open the sack (D) to reveal the Ear of Wheat.
Screenshot.
Once the hidden object scene is complete, you will receive the BUCKSHOT.
Click the rifle on top of the cupboard to zoom in.
Place the SHELL (from the plaque at the Right Square), the GUNPOWDER (from the Pharmacy hidden object scene), and the BUCKSHOT on the surface under the gun.
Place the SHELL in the holder, pack it with the GUNPOWDER, fill it with the BUCKSHOT, then click the lever to complete the BULLET.
Load the BULLET into the chamber to add the RIFLE to your inventory.
Go back out to the City Kennels.
City Kennels
Click the chained door to the right gate for a close-up view.
Use the RIFLE (assembled at the Kennel Interior) to shoot off the chain.
Continue right to the Street.
Street
Click the bottom of the door to the house to zoom in.
Pick up the SYMBOL 2 the dog drops on the ground.
Inspect the lock at the top of the door for a closer-up view.
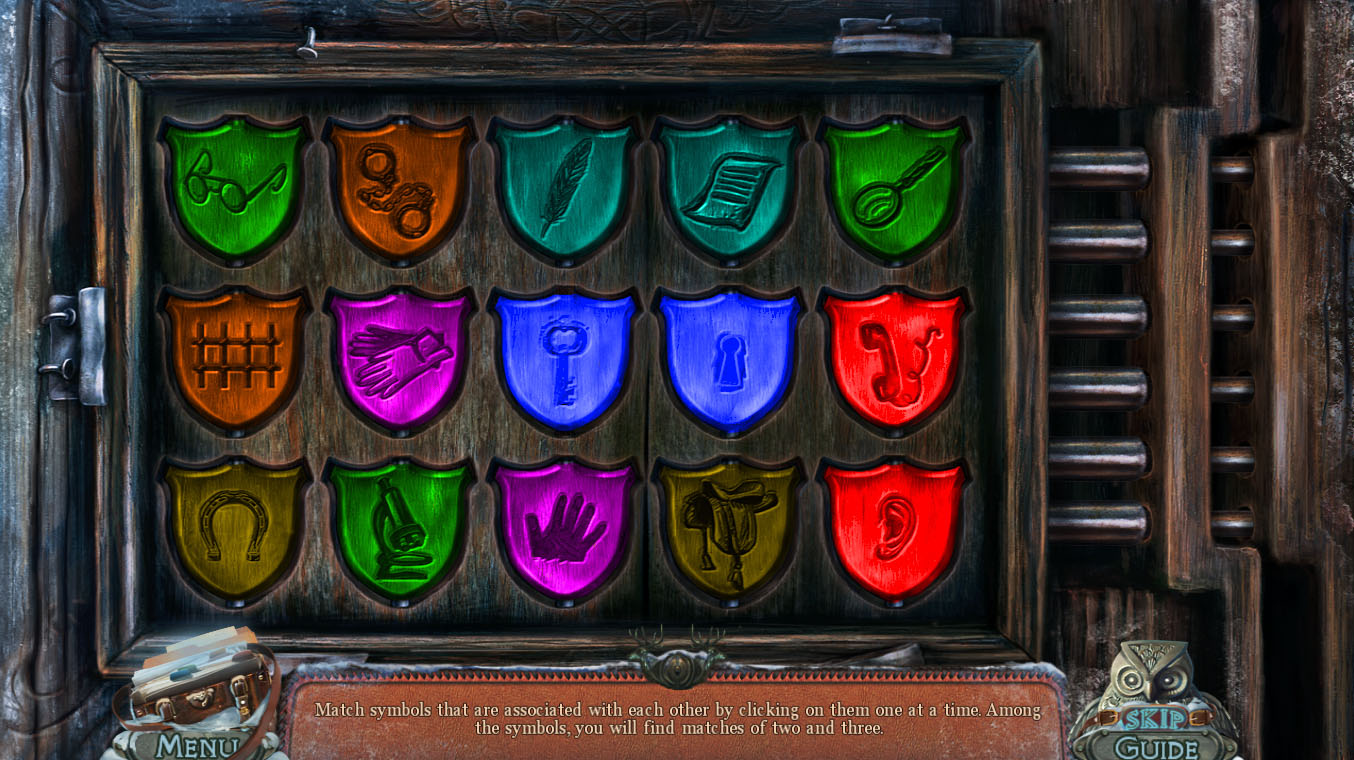
Add the SYMBOL 1 (from the unlocked cabinet at the Pharmacy) and SYMBOL 2 to the lock to start the puzzle.
Match the pairs or trios of symbols that are associated items with associated uses.
Click a button to select it, then click a matching button (or buttons) to pair them.
If the buttons are matched correctly, they will flip over.
Click the Glasses, the Magnifier, and the Microscope.
Click the Handcuffs and the Prison Bars.
Click the Quill and the Paper.
Click the Gloves and the Hand.
Click the Key and the Keyhole.
Click the Telephone and the Ear.
Click the Horseshoe and the Saddle.
Solution.
After the puzzle is solved, go through the open door to enter the Detective's Hall.
Chapter 2
Detective's Hall
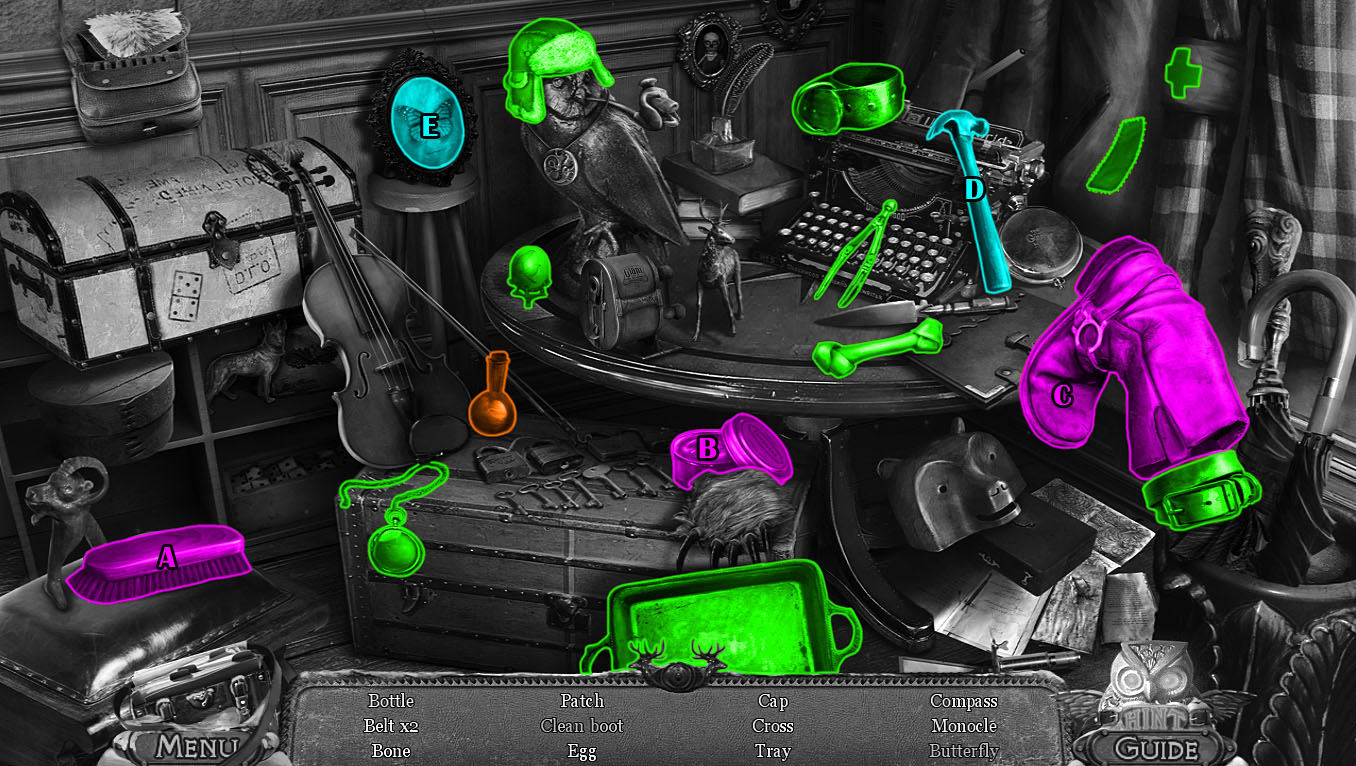
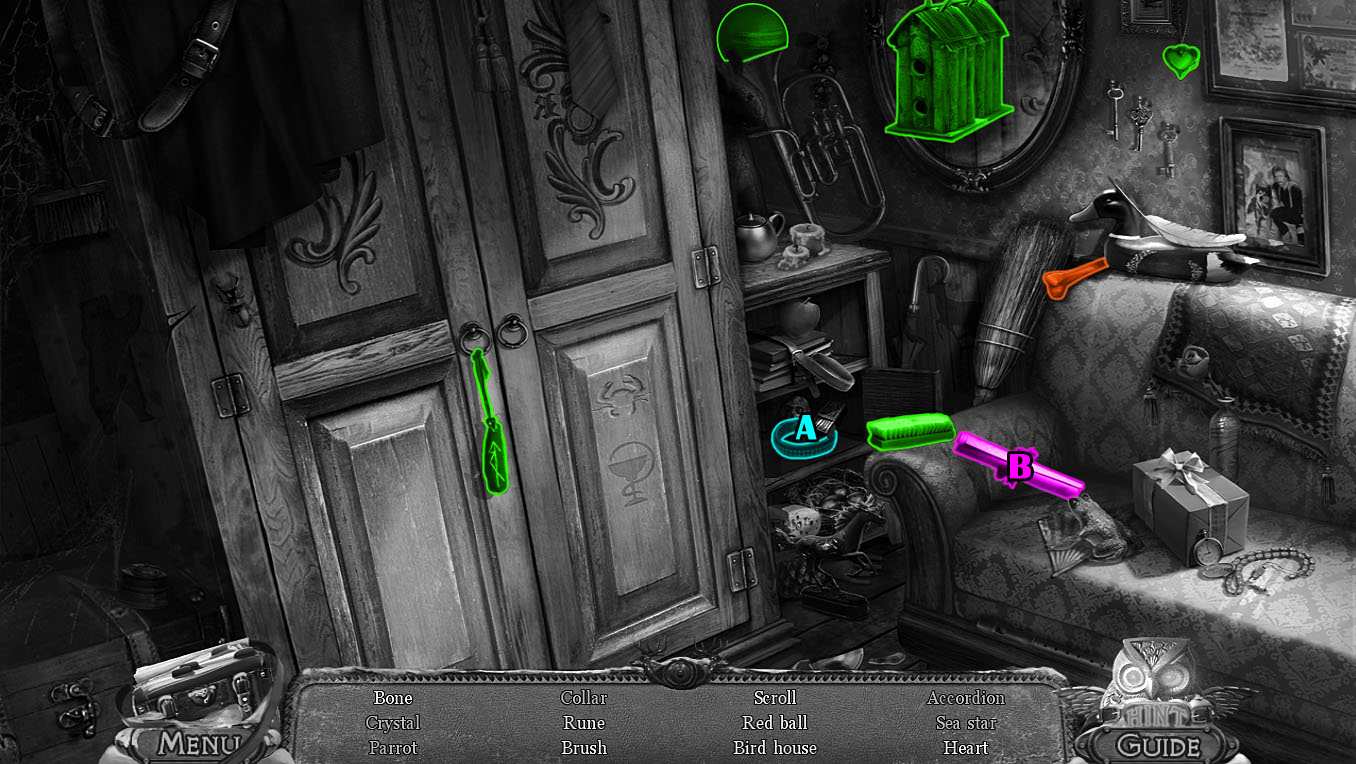
Click the owl on the table to start the hidden object scene.
Put the brush (A) in the tin of shoe polish (B), then use it on the toe of the boot (C) to complete the Clean Boot.
Use the hammer (D) to smash the glass in the frame (E) to uncover the Butterfly.
Screenshot.
Once the hidden object scene is complete, you will receive the PURPLE SOLUTION.
Click the wardrobe that the dog is scratching at, and open the door to find the detective's body.
Inspect the inside of the closet to find the JAR.
Click the detective's hand to zoom in and take the NEWSPAPER PIECE and the KEY.
Click the pile of newspapers at the foot of the stairs to zoom in.
Move away the papers to find the torn sheet underneath.
Add the NEWSPAPER PIECE from your inventory to the ripped page to read the detectives note about the locked safe and Drawer #3.
Click the drawers to the right of the window for a close-up view.
Open Drawer #3 to find the SLINGSHOT BAND.
Read the articles in the file at the back of the drawer to add the notes to your journal.
Move up the stairs to the Detective's Cabinet.
Detective's Cabinet
Click the open box on the floor left of the desk to look inside.
Move away the papers to uncover the TWEEZERS.
Inspect the candles on the corner of the desk.
Take the unlit CANDLE from the middle stand.
Go back downstairs to the Detective's Hall.
Detective's Hall
Click the small table by the bottom of the stairs for a closer look.
Use the TWEEZERS (from the cardboard box at the Detective's Cabinet) to pull the FINGERPRINT 1/2 out of the flower vase.
Go back to the Sewers.
Sewers
Click the snake wrapped around the metal pipe to zoom in.
Use the JAR (from the closet at the Detective's Hall) on the snake to collect the JAR WITH POISON.
Return to the Pharmacy.
Pharmacy
Inspect the chemistry set at the corner of the table in the center of the room.
Place the CANDLE (from the desk at the Detective's Cabinet) on the plate at the bottom of the stand.
Pour the JAR WITH POISON (from the snake at the Sewers) into the right beaker.
Put the PURPLE SOLUTION (from the Detective's Hall hidden object scene) in the empty holder on the stand.
Light the candle with the MATCHES (from the table at the Garage).
Take the lower left beaker to add the ACID to your inventory.
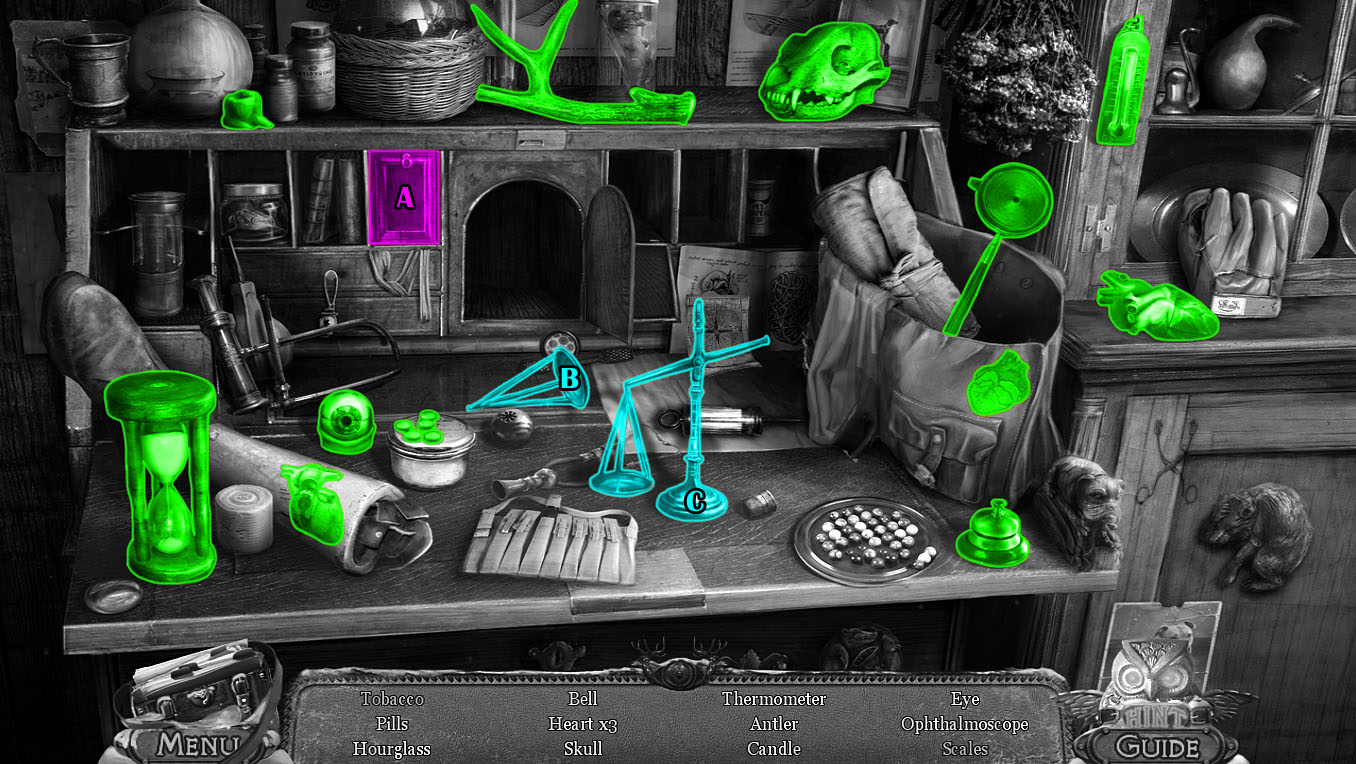
Click the left desk to repeat the hidden object scene.
Open the left cubby door (A) to find the Tobacco.
Add the right balance (B) to complete the Scales (C).
Screenshot.
Once the hidden object scene is complete, you will receive the BOX OF TOBACCO.
Go to the City Kennel.
City Kennel
Click the dog house for a closer look.
Add the SLINGSHOT BAND (from Drawer #3 at the Detective's Hall) to the handle at the front of the dog house.
Click the completed SLINGSHOT on the ground to add it to your inventory.
Continue forward to travel to the Street.
Street
Use the SLINGSHOT (from the dog house at the City Kennel) to shoot at the nest in the tree.
Pick up the SYMBOL OF MATURITY that falls from the nest to the ground.
Move forward twice to reach the Detective's Cabinet.
Detective's Cabinet
Click the locked chest on the shelf for a close-up view.
Put the KEY (from the corpse's hand at the Detective's Hall)in the lock in the chest.
Turn the key to break it in the lock, then use the ACID (from the chemistry set at the Pharmacy) to burn through the lock and uncover the fingerprint kit.
Take the empty glass SLIDE at the side of the slide rack.
Go back downstairs to the Detective's Hall.
Detective's Hall
Click the detective's hand for a closer look.
Use the SLIDE (from the rack of the fingerprint kit at the Detective's Cabinet) on the detective's finger to make the INVISIBLE FINGERPRINT on the slide.
Return upstairs to the Detective's Cabinet.
Detective's Cabinet
Click the fingerprint kit on the shelf to zoom in.
Place the INVISIBLE FINGERPRINT (from the detective's hand at the Detective's Hall) in the space on the stand.
Put the dust from the powder container on top of the slide, use the brush to sweep off the dust, then pour the bottle of the solution onto the slide to complete the FINGERPRINT 2/2.
Click the mask hanging on the wall to the left of the bookcase to drop it, revealing a wall safe.
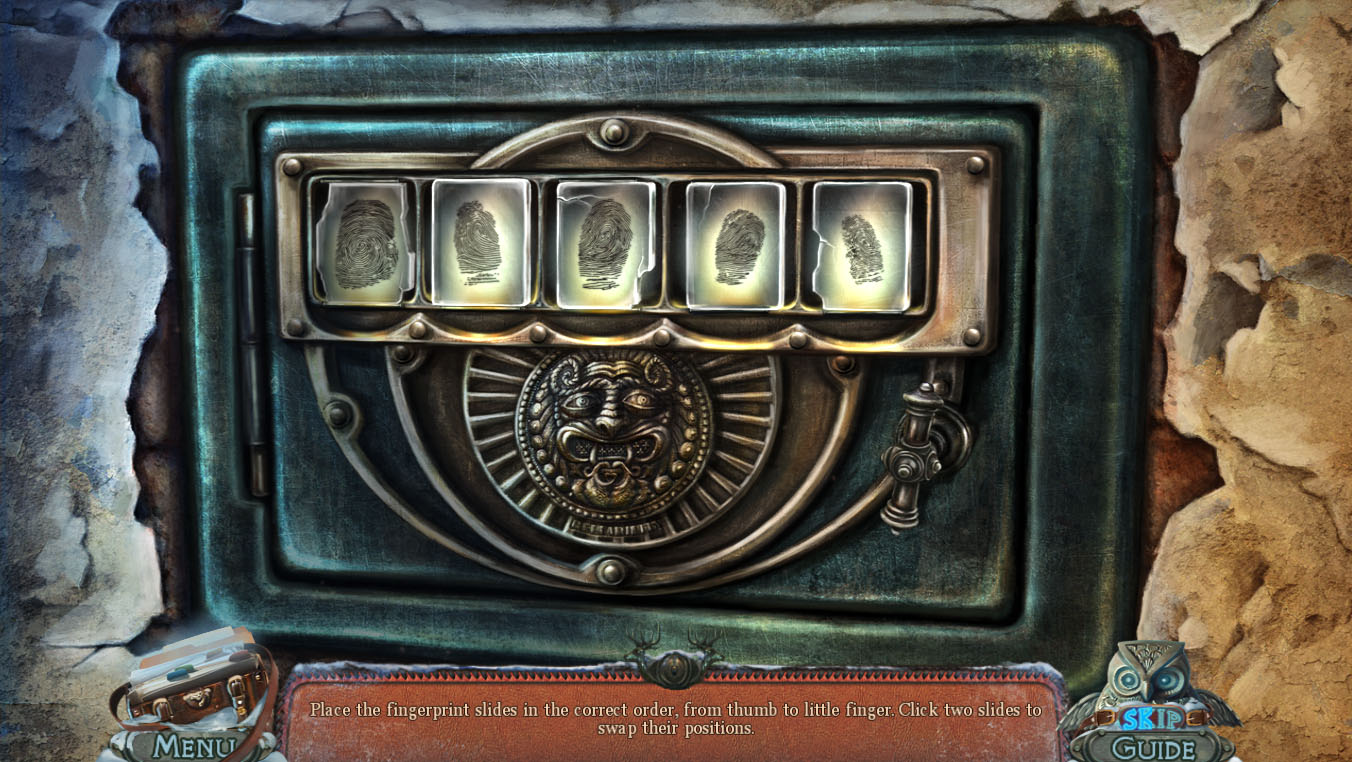
Put the two FINGERPRINTS into the two empty spaces in the middle of the safe to start the puzzle.
Arrange the fingerprints in the correct order of the fingers on a right hand.
From left to right, the slides should be in order of thumb, pointer finger, middle finger, ring finger, and little finger.
Click a slide to select it, then click another slide to swap their positions.
Note the size of the fingerprint and the direction the print is leaning to determine which finger it belongs to.
Solution.
After the puzzle is solved, look inside the folder in the open safe to find the SYMBOL OF BIRTH, the SCRAP OF CLOTHING and the STRANGE PAPER.
Read the note at the bottom of the page "candlelight reveals secrets" to add it to your journal.
Click the candle at the corner of the desk for a closer look.
Use the STRANGE PAPER on the lit candle to reveal a hidden message with a pattern that is added to your journal.
Go back downstairs to the Detective's Hall.
Detective's Hall
Click the owl on the table to repeat the hidden object scene.
Put the unsharpened pencil (A) in the sharpener (B) to complete the Pencil.
Open the chest to find the Scratches (C).
Screenshot.
Once the hidden object scene is complete, you will receive the PIPE.
Give the SCRAP OF CLOTHING (from the fingerprint safe puzzle at the Detective's Cabinet) to the dog.
Return to the Right Square.
Right Square
Inspect the left statue of the composer in the center of the square.
Put the PIPE (from the Detective's Hall hidden object scene) in the statue's empty hand.
Pack the pipe with the BOX OF TOBACCO (from the Pharmacy hidden object scene), then light it with the MATCHES (from the table at the Garage).
Take the MUSIC SHEET from the statue's opposite hand.
Use the map to travel to the Street.
Street
Click the cemetery gate to zoom in, then inspect the lock for a close-up view.
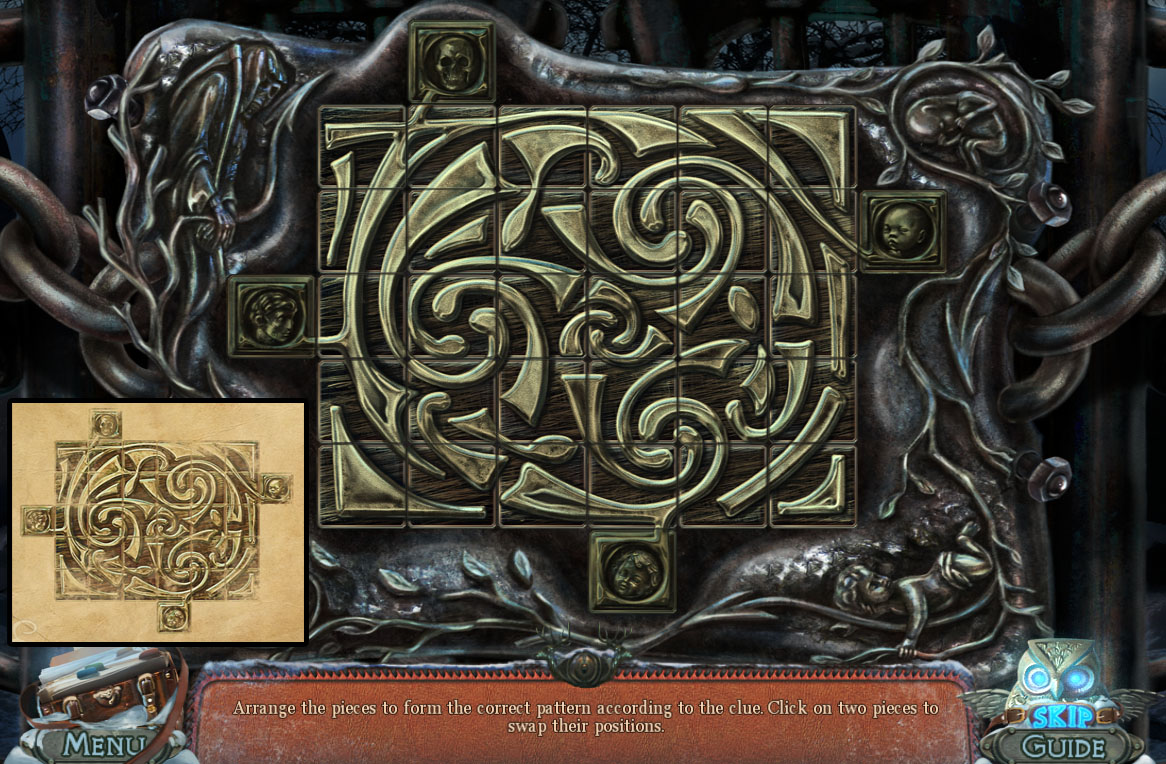
Add the SYMBOL OF MATURITY (from the nest in the tree at the Street) and the SYMBOL OF BIRTH (from the fingerprint safe puzzle at the Detective's Cabinet) to start the puzzle.
Arrange the tiles in the correct pattern to complete the image; refer to the picture in your journal from the hidden message revealed by the candle at the Detective's Cabinet for an example.
Click a tile to select it, then click another tile to swap their positions.
If a tile is correctly positioned, it will turn gold and lock in place.
Solution.
After the puzzle is solved, continue through the open gate to the Graveyard.
Graveyard
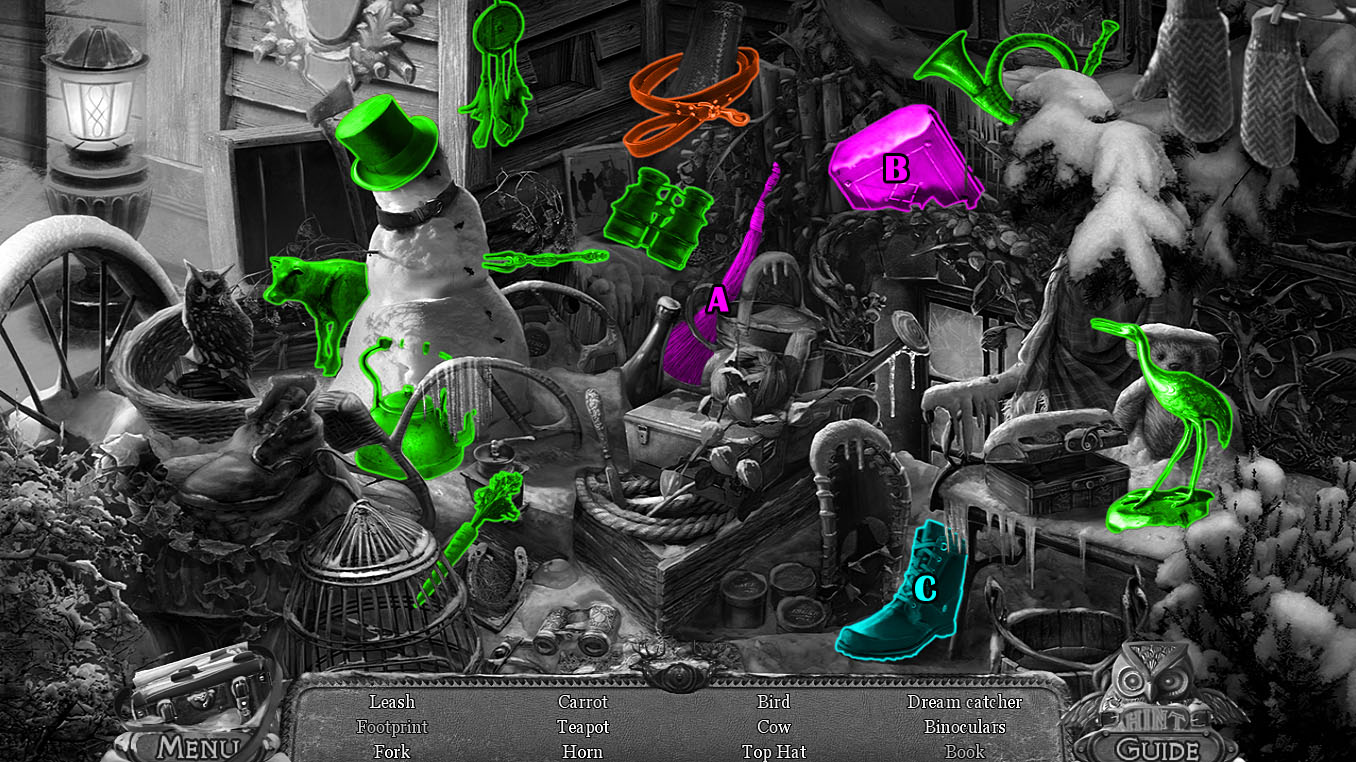
Click the open door to the shed to start the hidden object scene.
Move the coffin lid to find the Rag Doll (A).
Screenshot.
Once the hidden object scene is complete, you will receive the SHOVEL HANDLE.
Pick up the BAG OF SAND on the ground in front of the tombstone.
Go back to the Street.
Street
Click the shovel blade leaning against the fence for a closer look.
Add the SHOVEL HANDLE (from the Graveyard hidden object scene) to the blade, then click the SHOVEL to add it to your inventory.
Go left to return to the Graveyard.
Graveyard
Click the grave the dog is digging at to zoom in.
Use the SHOVEL (assembled at the fence at the Street) to dig up the grave.
Take the PIANO KEY from the opened coffin.
After the cinematic, inspect the stone lying in the snow.
Read the note, then click the STONE to add it to your inventory.
Click the door to the shed to repeat the hidden object scene.
Use the key (A) to open the padlocked chest (B) and find the Hook inside.
Screenshot.
Once the hidden object scene is complete, you will receive the LASSO.
Use the map to travel to the Left Square.
Left Square
Click the icy part of the left road for a closer look.
Pour the BAG OF SAND (from the ground at the Graveyard) on the ice.
Continue down the left road to reach the Fountains.
Chapter 3
Fountains
Click the piano player statue at the left to zoom in.
Place the MUSIC SHEET (from the composer statue at the Right Square) on the stand above the piano.
Add the PIANO KEY (from the coffin at the Graveyard) to the space on the keyboard.
Pick up the FARM KEY that falls to the ground in front of the conductor statue.
Go back three times to the Crossroad.
Crossroad
Inspect the left gate leading to Terry Sherman's farm.
Use the FARM KEY (from the pianist statue at the Fountains) to open the lock on the gate.
Continue left to the Farm.
Farm
Click Terry Sherman's grave for a closer look.
Pick up the LOCK PART 1 on the ground in front of the tombstone.
Inspect the barrel at the corner of the front porch.
Take the SHORT HOSE hanging over the top of the barrel.
Click the shelves at the right side of the building to start the hidden object scene.
Open the music box to find the Doll (A).
Add the band (B) to the handle (C) to complete the Slingshot.
Screenshot.
Once the hidden object scene is complete, you will receive the CANDY JAR.
Go up the left path to reach the Cliff.
Cliff
Click the area under the sign to the lighthouse to start the hidden object scene.
Give the piece of bread (A) to the bird (B), then click the Nut it leaves behind.
Add the blade (C) to complete the Windmill (D).
Screenshot.
Once the hidden object scene is complete, you will receive the NUT.
Click the tree hanging over the side of the cliff to zoom in.
Use the LASSO (from the Graveyard hidden object scene) to pull the FISHING REEL between the branches.
Click the cable car to look inside.
Remove the broken pipe and replace it with the SHORT HOSE (from the barrel at the Farm).
Use the STONE (from the ground at the Graveyard) to bend the curved metal bar into shape.
Click the cable car to go inside.
Cable Car
Click the paper pinned to the left beam for a close-up view.
Take the MAP PIECE 1/5, then note the pattern of symbols carved onto the beam to add it to your journal.
Take the LOCK PART 2 on the seat of the rear right chair.
Go back to the Farm.
Farm
Click the door to the building for a closer look.
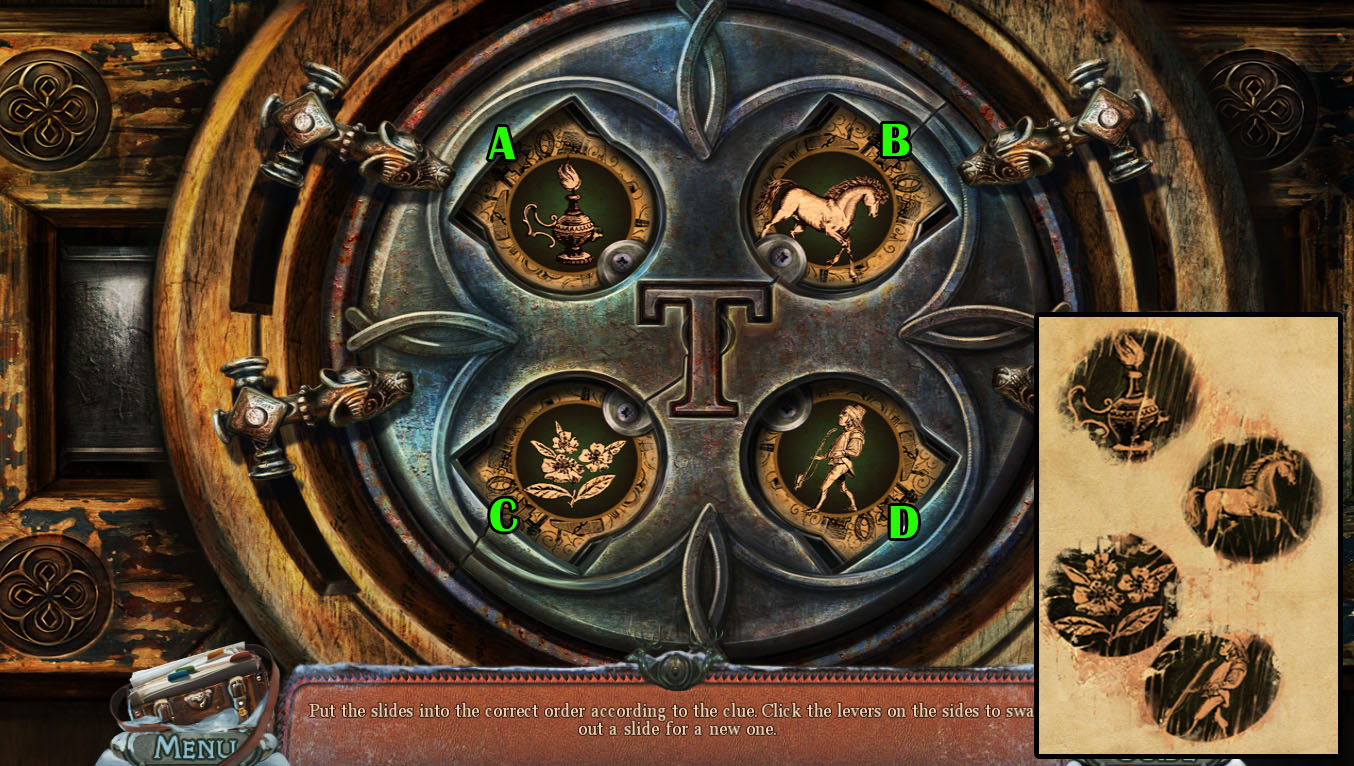
Add the LOCK PART 1 (from the tombstone at the Farm) and LOCK PART 2 (from the chair at the Cable Car) to the lock to start the puzzle.
Arrange the slides in the correct order according to the clue in your journal from the carved beam at the Cable Car.
Click the button beside each slide to change it.
Set Slide A first; clicking Slide A changes both A and D.
Set Slide C second; clicking Slide C changes both C and B.
Set Slide B third; clicking Slide B changes only B.
Set Slide B last; clicking Slide D changes only D.
Solution.
After the puzzle is solved, go through the open door into Terry's Room.
Terry's Room
Inspect the box on the seat of the green chair.
Remove the first few letters to find the MOSAIC PIECE 1/2.
Take out the next few letters to uncover the SMALL VALVE.
Click the framed fishing equipment on the wall for a close-up view.
Use the STONE (from the ground at the Graveyard) to break the glass and take the FISHING LURE.
Go up the stairs to Lily's Room.
Lily's Room
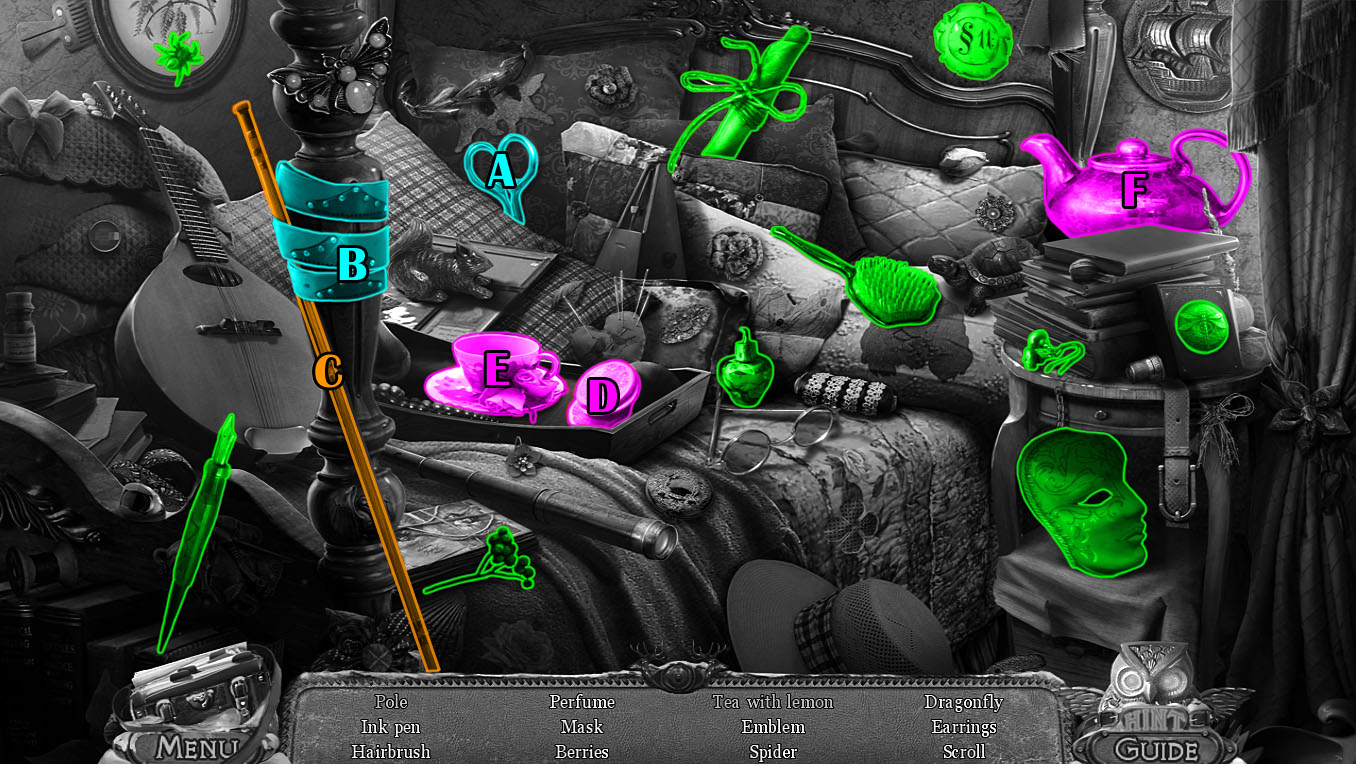
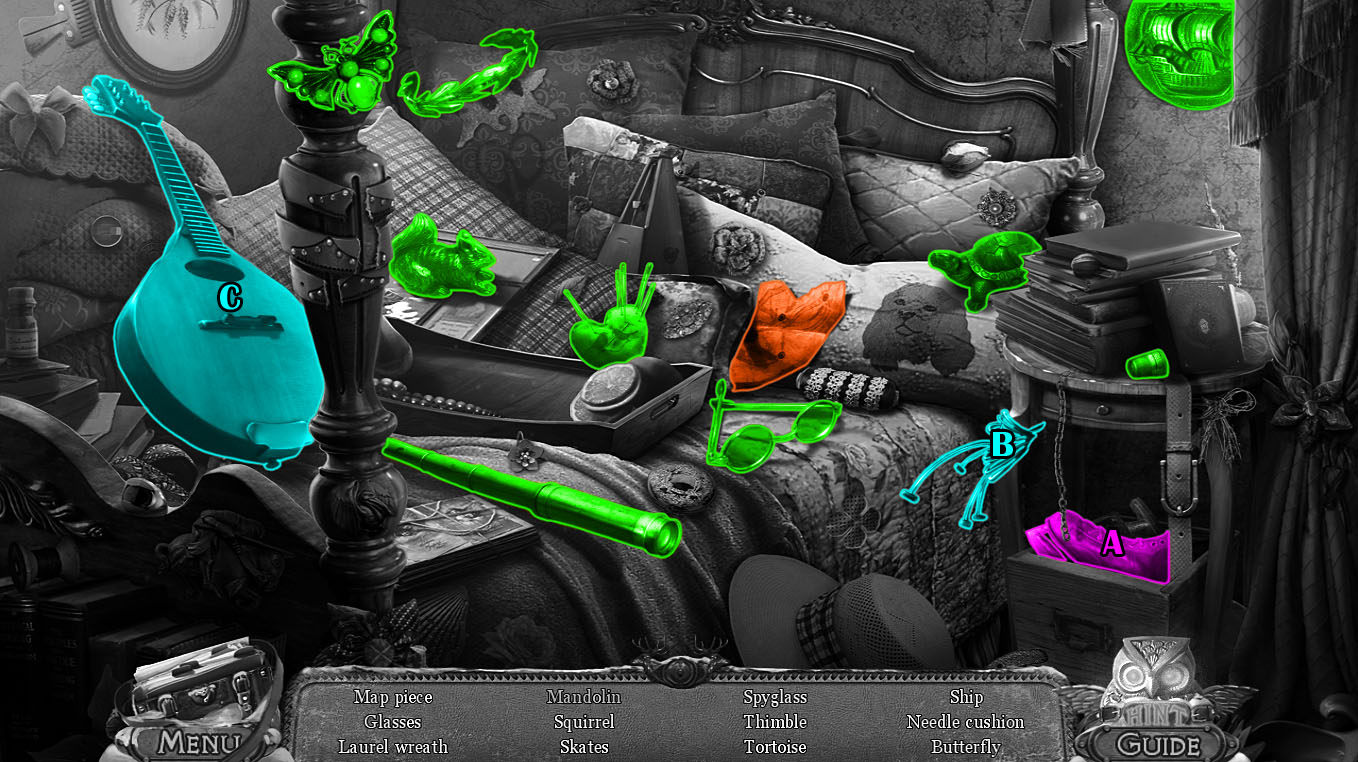
Click the tray on the bed to start the hidden object scene.
Use the scissors (A) to cut the leather strap (B) and uncover the Pole (C).
Put the lemon slice (D) in the tea cup (E), then pour the steaming kettle (F) into the cup to complete the Tea With Lemon.
Screenshot.
Once the hidden object scene is complete, you will receive the POLE.
Inspect the sewing materials on the seat of the chair beside the table.
Take the NEEDLE AND THREAD and the MAP PIECE 2/5 from the seat.
Use the map to travel to the Cliff.
Cliff
Click the edger of the pool for a closer look.
Place the POLE (from the hidden object scene at Lily's Room) on the y-shaped stand.
Add the FISHING REEL (from the tree at the Cliff) and the FISHING LURE (from the framed picture at Terry's Room) to the rod.
Click the lure to lower it to the water to receive the FRESH FISH.
Enter the Cable Car.
Cable Car
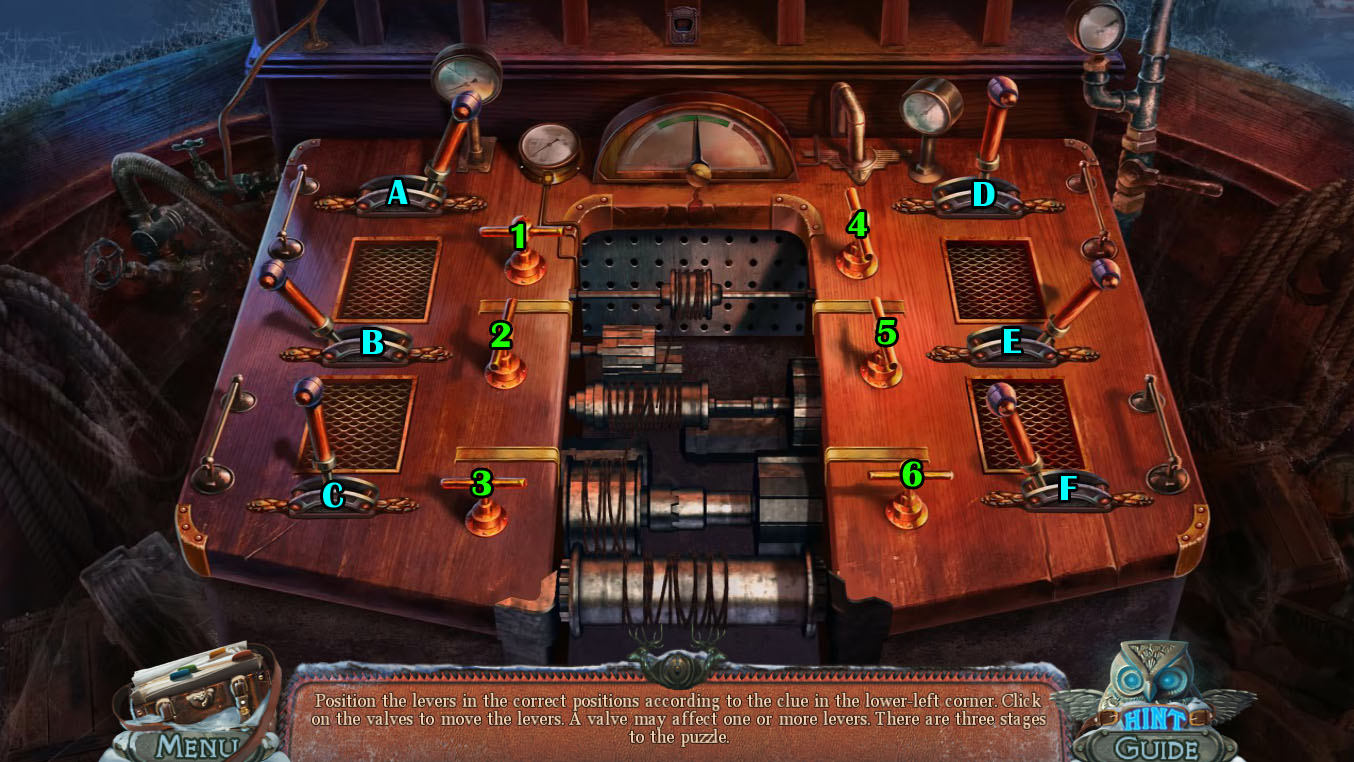
Move the curtain at the helm, then click the control panel to zoom in.
Add the SMALL VALVE (from the box of letters at Terry's Room) to the panel to start the puzzle.
Turn all the levers on the panel in the correct direction according to the note at the lower left corner.
Click the switches to change the position of the levers, each switch has control of a different lever or levers.
Switch 1 turns Lever E; Switch 2 turns Lever C, Lever D, and Lever F; Switch 3 turns Lever A; Switch 4 turns Lever A and Lever C; Switch 5 turns Lever F; Switch 6 turns Lever B and Lever E.
First turn every lever to the left to complete the first step, then turn them all to the middle to complete the second step, and finally turn them all to the right to complete the third step.
To complete the puzzle hit the switches in the following order:
Step 1 - Switch 3, Switch 6
Step 2 - Switch 1, Switch 3, Switch 6, Switch 5
Step 3 - Switch 3, Switch 6, Switch 4, Switch 6.
Screenshot.
After the puzzle is solved, the cable car will transport you to the Lighthouse.
Posted by: Trinn |
July 8, 2012 2:35 PM
|
July 8, 2012 2:35 PM
Fierce Tales: The Dog's Heart Walkthrough
Part 2: Chapters 4-6
Chapter 4
Lighthouse
Click the squirrel sitting on the fence post for a closer look.
Give the NUT (from the Cliff hidden object scene) to the squirrel, then take the MEDAL it drops from its hands.
Use the CANDY JAR (from the Farm hidden object scene) to collect the bugs crawling on the post to receive the JAR WITH TERMITES.
Use the map to travel to the Bridge.
Bridge
Click the statue of the founders to zoom in.
Place the MEDAL (from the squirrel at the Lighthouse) on the carved space in the statue's jacket.
Take the CANE from the statue's hand.
Go back to the Farm.
Farm
Inspect the bottom of the covered cart behind the fence.
Use the CANE (from the statue at the Bridge) to move the wheel.
Take the TARPAULIN and the GLOVE from the cart.
Return to the Lighthouse.
Lighthouse
Click the thorny bush for a close-up view.
Use the GLOVE (from the covered cart at the Farm) to pull the DOOR HANDLE out of the bush.
Click the door to the lighthouse to zoom in.
Add the DOOR HANDLE to the empty socket in the door, then click the handle to open the door.
Go into the Lighthouse Floor 1.
Lighthouse Floor 1
Click the stair mechanism at the right to zoom in.
Take the MAP PIECE 3/5 on the mechanism above the space for the lever.
Inspect the gas canister by the left window.
Take the NAIL PULLER hanging from the nail rack on the wall.
Click the wood fresco for a closer look.
Take the SMALL KEY at the bottom of the fresco.
Use the JAR OF TERMITES (from the post at the Lighthouse) on the fresco to reveal the TONGS and the MOSAIC PIECE 2/2.
Use the map to travel to the Farm.
Farm
Click the junk pile at the right side of the building to repeat the hidden object scene.
Add the horns (A) to the deer (B) to complete the Stag.
Screenshot.
Once the hidden object scene is complete, you will receive the GEAR.
Click the board in the middle of the left side of the fence to zoom in.
Use the NAIL PULLER (from the rack at the Lighthouse Floor 1), then click the BOARD to add it to your inventory.
Continue forward into Terry's Room.
Terry's Room
Move the bear rug on the floor, then inspect the mosaic underneath it.
Add the MOSAIC PIECE 1 (from the box of letters at Terry's Room) and MOSAIC PIECE 2 (from the fresco at Lighthouse Floor 1) to the frame to start the puzzle.
Arrange the pieces in the frame to complete the mosaic.
Click a piece to select it, then move it inside the frame and left click to rotate it.
When a piece is positioned in the right location and rotated correctly, it will lock in place.
Solution.
After the puzzle is solved, take the BIG LEVER and the PART OF KEY from the revealed floor compartment.
Click the fireplace for a close-up view.
Use the TONGS to pull out the BURNING COAL from the fire.
Return to the Lighthouse Floor 1.
Lighthouse Floor 1
Click the stair mechanism to the right for a closer look.
Put the BIG LEVER (from the mosaic puzzle at Terry's Room) in the mechanism, then click the lever to lower the stairs.
Go up the stairs to Lighthouse Floor 2.
Lighthouse Floor 2
Click the lighthouse lantern to zoom in.
Turn the handle to open the door.
Put the BURNING COAL (from the fireplace at Terry's Room) on the burner.
Place the BOARD (from the fence at the Farm) over the gap at the open doorway.
Continue right across the board to the Landing Zone.
Landing Zone
Give the FRESH FISH (from the pond at the Cliff) to the wild cat.
Click the toolbox on the crate to zoom in.
Take the GIRL FIGURINE in the middle compartment of the box.
Inspect the sand bags at the bottom of the zeppelin.
Take the EMPTY SACK beside the small steps.
Click the deflated balloon lying on the deck for a close-up view.
Place the TARPAULIN (from the cart at the Farm) over the large hole.
Use the NEEDLE AND THREAD (from the chair at Lily's Room) to sew a patch over the hole.
Move forward into the Airship.
Airship
Take the EMPTY GAS TANK from the holder underneath the burner.
Take the EMPTY OILER on the left edge of the airship.
Go back to the Lighthouse Floor 1.
Lighthouse Floor 1
Click the gas canister in front of the left window to zoom in.
Place the EMPTY GAS TANK (from the holder at the Airship) in the space in front of the canister.
Click the hose to attach it to the tank, then turn the valve to fill it with gas.
Click the FULL GAS TANK to place it back in your inventory.
Return to the Cliff.
Cliff
Click the objects at the end of the deck beside the cable car to repeat the hidden object scene.
Put the weight (A) on the hook (B) to lift up the Diving Helmet.
Use the glass shard (C) to cut the net (D) and reveal the Fish Skeleton.
Screenshot.
Once the hidden object scene is complete, you will receive the TAP.
Go back to the Farm.
Farm
Click the barrel at the corner of the porch for a closer look.
Use the TAP (from the Cliff hidden object scene) on the cork at the side of the cask.
Put the EMPTY OILER (from the Airship) on the crate under the tap.
Turn the handle on the tap to fill the oiler, then click the FULL OILER to add it to your inventory.
Enter the house and go up the stairs to Lily's Room.
Lily's Room
Click the tray on the bed to repeat the hidden object scene.
Remove the cloth under the end table to reveal the Skates (A) in the drawer.
Add the strings (B) to complete the Mandolin (C).
Screenshot.
Once the hidden object scene is complete, you will receive the MAP PIECE 4/5.
Click the locked music box on the windowsill to zoom in.
Place the GIRL FIGURINE (from the toolbox at the Landing Zone) on the space at the top of the box next to the dog figurine.
Open the lock with the SMALL KEY (from the fresco at Lighthouse Floor 1).
Turn the key to open the box and take the LENS inside.
Inspect the book on the table in front of the vanity mirror.
Open the book and combine the PART OF KEY (from the Mosaic Puzzle at Terry's Room) with the key half on the page, then take the complete ZEPPELIN KEY.
Return to the Lighthouse Floor 1.
Lighthouse Floor 1
Click the red machine to the left of the stairs to zoom in.
Place the GEAR (from the hidden object scene at the Farm) into the mechanism above the dispenser.
Use the FULL OILER (from the barrel at the Farm) to oil the rusted gears.
Place the EMPTY SACK (from the deck at the Landing Zone) on the floor under the dispenser.
Pull the lever to fill the SACK WITH SAND, then click the bag to add it to your inventory.
Go up the stairs to Lighthouse Floor 2
Lighthouse Floor 2
Click the telescope to the left of the lighthouse lantern for a closer look.
Take out the old, broken lens and replace it with the LENS (from the music box at Lily's Room).
Click the lens to look through it; after the cut scene, take the MAP PIECE 5/5 on top of the telescope.
Go right to the Landing Zone.
Landing Zone
Click the bottom of the zeppelin to zoom in.
Place the SACK WITH SAND (from the red machine at Lighthouse Floor 1) at the space beside the steps.
Move forward to enter the Airship.
Airship
Place the FULL GAS TANK (from the gas canister at Lighthouse Floor 1) in the holder at the left side, then turn the valve to start the flow of gas.
Use the FULL OILER (from the barrel at the Farm) to oil the rusty valve at the side of the burner, then click the repaired valve to light the burner.
Click the heart-shaped lock in the middle of the right beam for a closer look.
Unlock the heart with the ZEPPELIN KEY (from the book at Lily's Room).
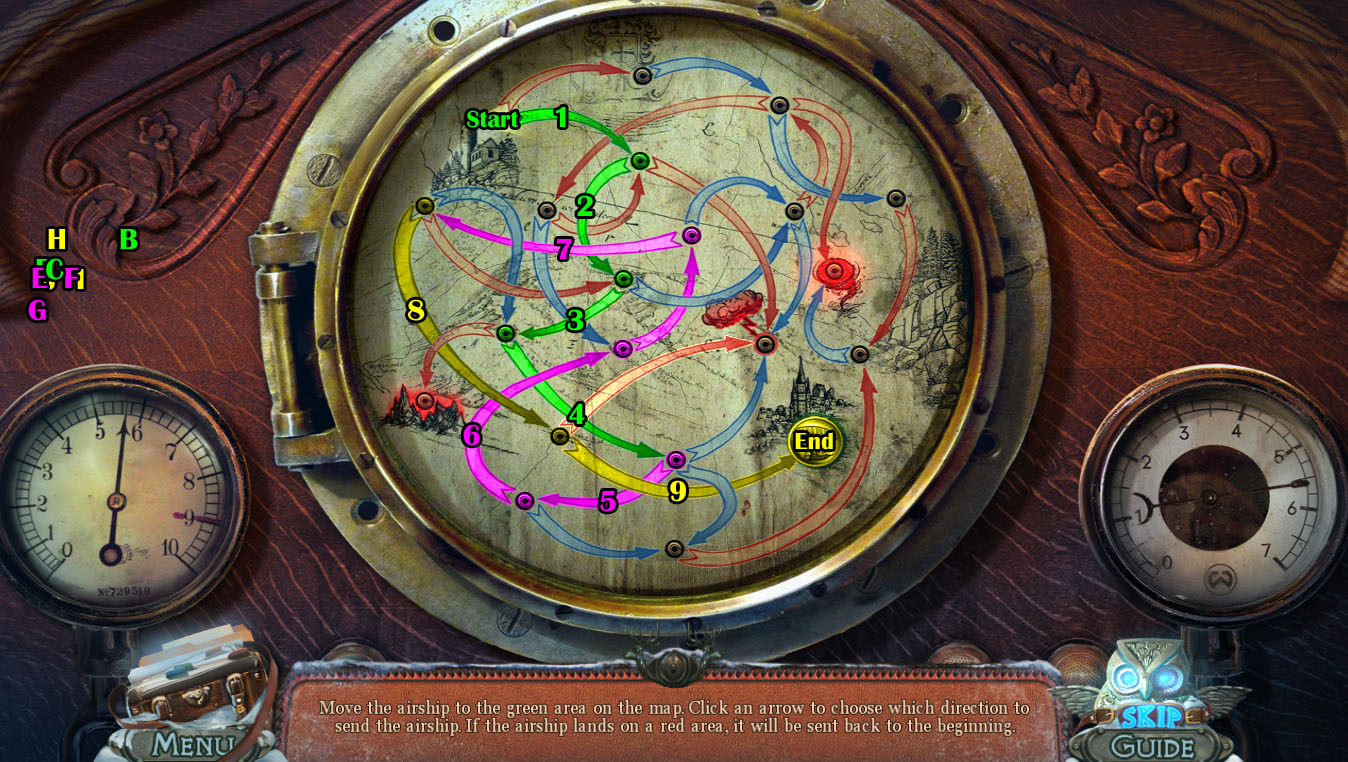
Inspect the incomplete map in the round frame at the middle of the control panel.
Add the five MAP PIECES from your inventory to the frame to start the puzzle.
Guide the ship to the green location by selecting the correct arrows to guide you to the destination.
Avoid any dangerous red areas, or the puzzle will reset.
Click an arrow at each crossroads to follow their direction the the next stop.
Refer to the screenshot and follow the arrows from 1-9 to reach the finish.
Solution.
After the puzzle is solved, take the GAS VALVE from the cache under the lifted dome.
Go back to Lighthouse Floor 2.
Lighthouse Floor 2
Click the lighthouse lantern for a closer look.
Add the GAS VALVE (from the puzzle cache at the Airship) to pipe beside the burner.
Turn the valve and close the lantern door to light it.
Return to the Airship to travel to the Right Square.
Chapter 5
Right Square
Pick up the HOSE on the pile of the debris at the lower left side of the area.
Go back once to the Left Square.
Left Square
Click the leaking water pipe to zoom in.
Attach the HOSE (from the ground at the Right Square) to the end of the pipe.
Return to the Right Square.
Right Square
Click the burning airship to put out the fire.
After the fire is out, click the interior of the airship to start the hidden object scene.
Add the fragment (A) to complete the Full Heart (B).
Pour the bottle (C) onto the burning music sheet (D) to douse the Notes.
Screenshot.
Once the hidden object scene is complete, you will receive the BATON.
Move right to Deans' House.
Deans' House
Pick up the SAXOPHONE KEY on the pile of snow at the left side of the gate.
Go back to the Left Square, then continue forward to the Fountains.
Fountains
Click the statue of the saxophonist to zoom in.
Add the SAXOPHONE KEY (from the snow pile at Deans' House) to the saxophone.
Click the statue of the conductor to zoom in.
Put the BATON (from the Right Square hidden object scene) in the statue's right hand.
Click the device in the center of the stone drums to start the puzzle.
Arrange the sliders in the correct positions so that the musicians all play together.
Click and drag a token to slide it across the track, then release the token to set it in place.
The token will change color depending on how far away it is from the correct position.
Red means the token is far from the location, yellow means it is near, and green means it is at the right spot.
Solution.
After the puzzle is solved, continue forward to the Canyon.
Canyon
Click the cave at the other side of the bridge to start the cut scene.
Inspect the note on the ground.
Read the message and take the SWALLOW underneath the paper.
Use the map to travel to the Deans' House.
Deans' House
Click the mailbox on the right column for a closer look.
Put the SWALLOW (from the ground at the Canyon) in the space for the symbol.
Take DEAN'S KEY inside the opened post box.
Click the lock in the middle of the gate for a close-up view.
Put DEAN"S KEY in the lock, then turn the key to open the gate.
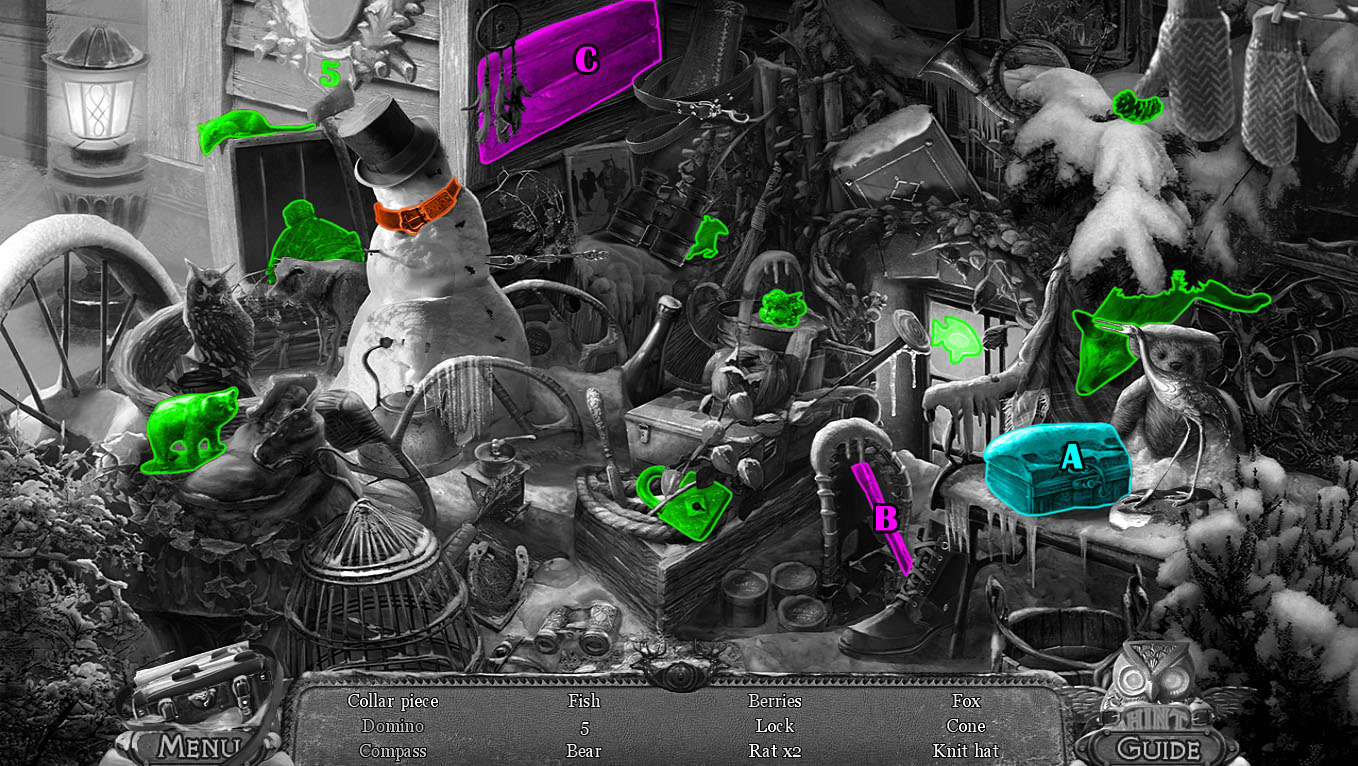
Click the snowman at the right side of the house to start the hidden object scene.
Open the small lockbox (A) to reveal the Domino.
Use the hammer (B) to remove the boards (C) and uncover the Compass.
Screenshot.
Once the hidden object scene is complete, you will receive the COLLAR PIECE.
Go through the front door to enter Deans' Hall, then continue right to Roger's Cabinet.
Roger's Cabinet
Click the folder on the desk against the right wall to zoom in.
Move the papers to find the DEER FIGURINE.
Click the doors to the cellar for a closer look.
Add the COLLAR PIECE (from the hidden object scene at Deans' House) to the dog carving to open the door.
Go down the stairs to reach the Operating Room.
Operating Room
Remove the shroud, then inspect the dog skeleton on the operating table.
Take the PRUNER from the tray beside the skeleton.
Click the back door to zoom in.
Take the STONE HEART from the round design in the middle of the door.
Go back to the gates at the Deans' House.
Deans' House
Click the dog statue for a closer look.
Use the PRUNER (from the tray at the Operating Room) to remove the plants covering the statue.
Take the WOODEN HEART from the dog's chest and replace it with the STONE HEART (from the door at the Operating Room).
Pick up the DOG PUPPET from the revealed cache behind the plaque under the statue.
Return to the Operating Room in the cellar.
Operating Room
Click the back door to zoom in.
Place the WOODEN HEART (from the dog statue at Deans' House) in the carved space, then turn the handle to open the door.
Continue forward to enter the Laboratory.
Laboratory
Take the RETRACTOR from the box on top of the chair.
Go back into the Operating Room.
Operating Room
Inspect the dog skeleton on top of the operating table.
Use the RETRACTOR (from the chair at the Laboratory) to pry open the skeleton's ribs.
Take the WEB CUTTER and the RULER inside the chest cavity.
Go forward to enter the Laboratory again.
Laboratory
Click the doors to the large cupboard for a closer look.
Use the RULER (from the dog skeleton at the Operating Room) to lift the latch and open the door.
Take the SMALL HOOP NET from the shelf.
Inspect the spider web-covered flask on the corner of the table.
Use the WEB CUTTER (from the dog skeleton at the Operating Room) to clean off the bottle.
Read the note inside the bottle to add the number combination clue to your journal.
Go back to Roger's Cabinet.
Roger's Cabinet
Click the aquarium to zoom in.
Use the SMALL HOOP NET (from the cupboard at the Laboratory) to scoop up the CARD FILE KEY.
Inspect the medical card index, then use the CARD FILE KEY to open the drawer.
Open the file inside the drawer and take the CLIP at the top of the papers.
Move the framed picture at the upper right side of the wall to reveal the safe.
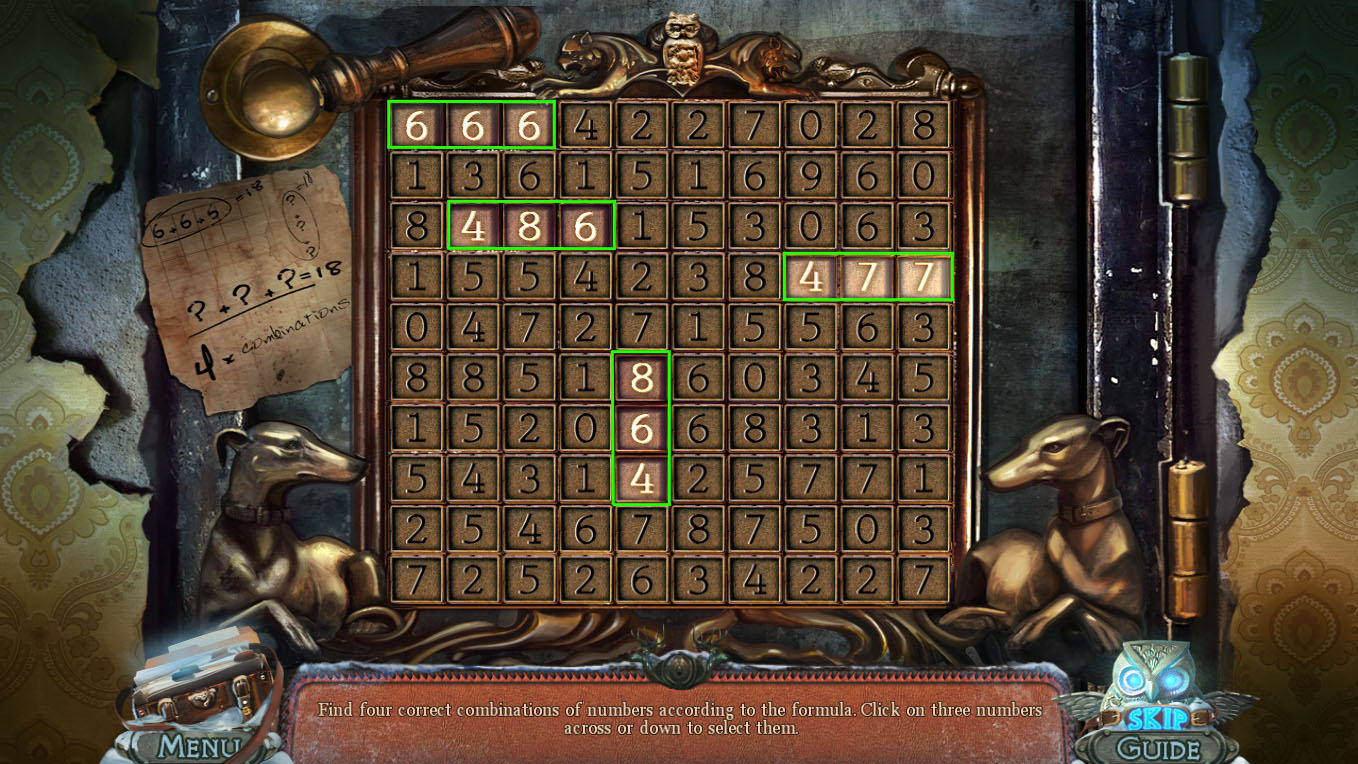
Click the safe to start the puzzle.
Find four combinations of three adjacent numbers that add up to a sum of 18.
The number tiles must be uninterrupted and aligned either horizontally or vertically.
Look for the following chain of numbers that add to 18 on the board:
6-6-6
4-8-6
4-7-7
8-6-4
Solution.
After the puzzle is solved, take the PATTERN and the CORKSCREW from the open safe, then read the diary to add a note to your journal.
Return to the Laboratory.
Laboratory
Inspect the locked first aid kit on top of the stool.
Use the CLIP (from the file in the medical index drawer at Roger's Cabinet) to pick the lock.
Read the letter and take the FILE inside the box.
Go back to the Deans' Hall.
Deans' Hall
Click the cupboard under the stairs for a close-up view.
Place the PATTERN (from the safe puzzle at Roger's Cabinet) into the lock to open the cupboard.
Click the area under the stairs to start the hidden object scene.
Open the drawer in the right shelves to reveal the Collar (A).
Move the pillow to uncover the Scroll (B).
Open the cupboard to find the Accordion, Sea Star, and Parrot.
Open the drawer in the cupboard to reveal the Crystal (C).
Screenshot Part 1.
Screenshot Part 2.
Once the hidden object scene is complete, you will receive the BONE.
Go back outside to the Deans' House.
Deans' House
Click the bottle lying in the snow near the gate to zoom in.
Use the CORKSCREW (from the wall safe puzzle at Rogers' Cabinet) to remove the note.
Read the note in the bottle to view a diagram of a dog puppet and add the image to your journal.
Move forward to enter the Deans' Hall.
Deans' Hall
Click the door at the top of the stairs for a closer look.
Add the DOG PUPPET (from the dog statue plaque at the Deans' House) to the space in the carving to start the puzzle.
Arrange the parts of the dog puppet into the correct positions.
Refer to the image in your journal from the bottle at the Deans' House to view the final image.
Click the bolt in the middle of the limb to move the joint into the right position.
Solution.
After the puzzle is solved, go through the open door to Ashton's Room.
Ashton's Room
Click the woman standing in the room to speak with her, then take the DOG SCENT from her hand.
Tear the wall paper on the right wall beside the bed and click it to zoom in.
Take the PIECES OF LETTER on the wall.
Read Ashton's diary on the floor to add a note to your journal.
Go back downstairs to the Deans' Hall.
Deans' Hall
Click the open closet under the stairs to repeat the hidden object scene.
Use the matches (A) on the candle (B) to complete the Lit Candle.
Screenshot Part 1.
Screenshot Part 2.
Once the hidden object scene is complete, you will receive the GLUE.
Go back outside to the Deans' House.
Deans' House
Click the snowman in front of the right side of the building to repeat the hidden object scene.
Use the broom (A) to brush the snow off the Book (B).
Move the boot (C) to uncover the Footprint on the ground.
Screenshot.
Once the hidden object scene is complete, you will receive the LEASH.
Return to Ashton's Room.
Ashton's Room
Inspect the pile of letters on the floor beside the overturned chair.
Add the PIECES OF LETTER (from the wallpaper at Ashton's Room) to the torn papers on the ground.
Use the GLUE (from the Deans' Hall hidden object scene) to combine the letter pieces.
Read the completed letter to add a note of the round diagram to your journal.
Use the map to travel to the Canyon.
Canyon
Use the bottle of DOG SCENT (from the woman in Ashton's Room) on the dogs blocking the bridge to clear the path.
Continue forward to the Cave Entrance.
Chapter 6
Cave Entrance
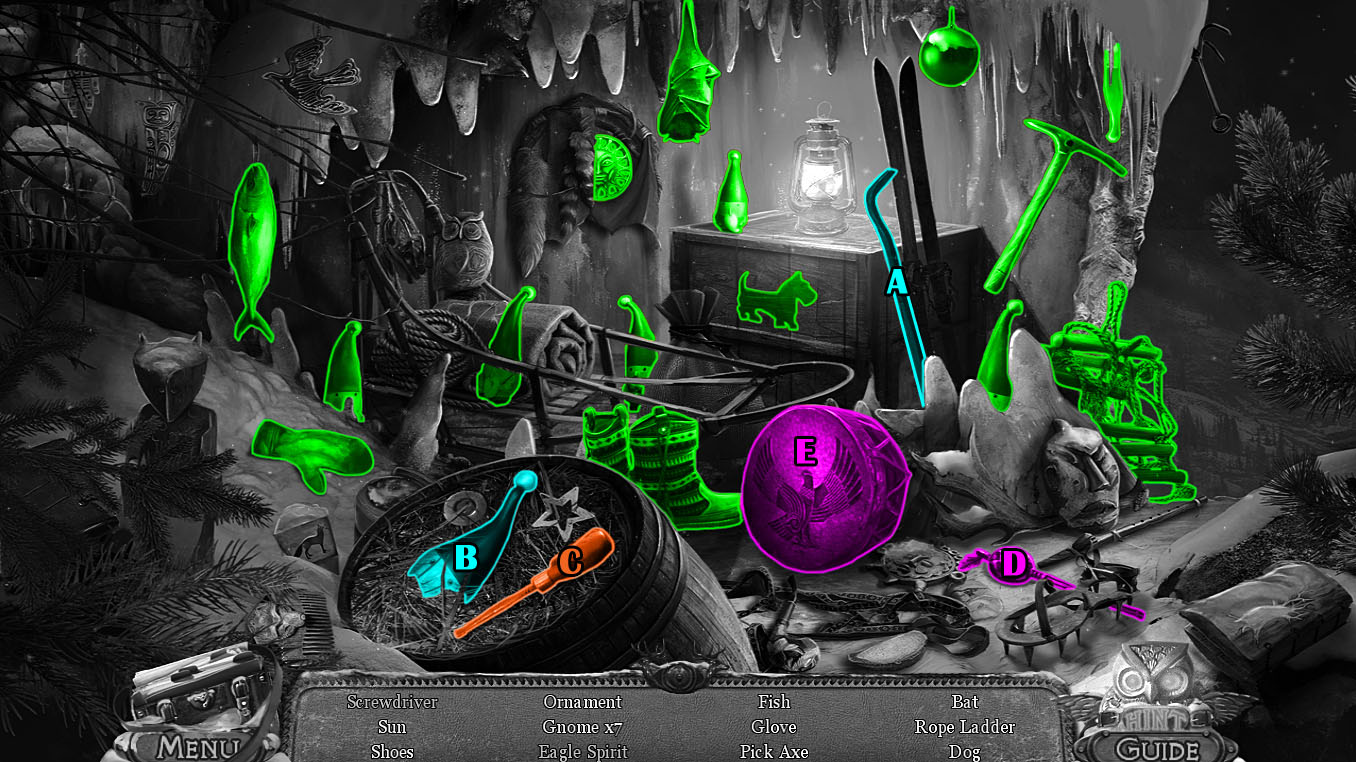
Click the cave across the bridge to start the hidden object scene.
Open the barrel with the crowbar (A) to reveal the Gnome (B) and the Screwdriver (C).
Use the stick (D) on the drum (E) to summon the Eagle Spirit.
Screenshot.
Once the hidden object scene is complete, you will receive the SCREWDRIVER.
Move forward twice to enter the Dining Room.
Dining Room
Click the small dog statue chained to the block for a closer look.
Use the SCREWDRIVER (from the Cave Entrance hidden object scene) to remove the bolts at the ends of the chain.
Pick up the PUPPY STATUE to add it to your inventory.
Continue up the steps to Dog's Town.
Dog's Town
Pick up the BIRD SKULL at the bottom of the right column.
Click the statue at the top of the steps for a closer look.
Take the MAMMOTH TUSK from the statue's hand.
Go back to the Cave Entrance.
Cave Entrance
Inspect the statue of the three dogs between the two braziers.
Place the PUPPY STATUE (from the chained block at the Dining Room) on the space at the base of the statue.
Take ASHTON'S METAL that appears above the plaque.
Move forward to reach the Road Fork.
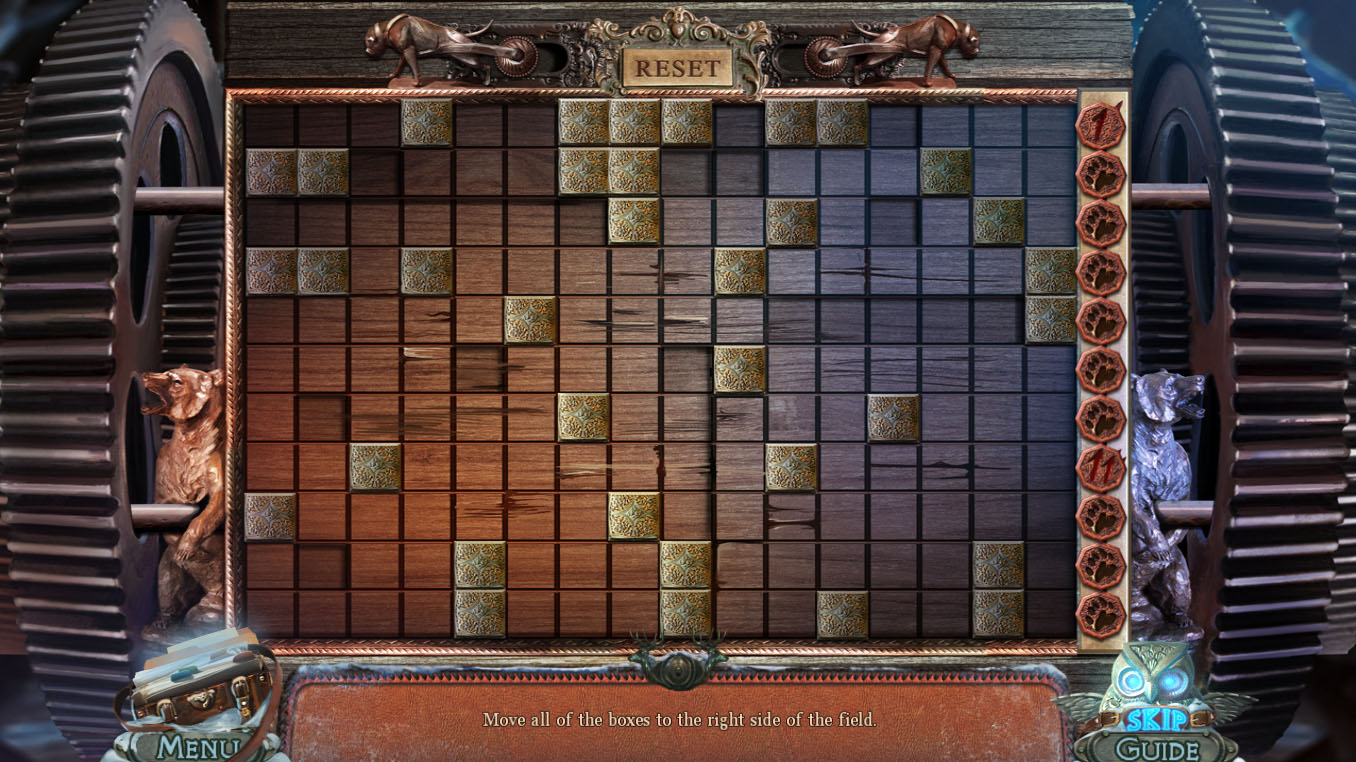
Road Fork
Click the left door for a close-up view.
Add ASHTON'S METAL (from the the dogs statue at the Cave Entrance) to the circular space in the lock to start the puzzle.
Arrange each numbered token beside its matching number in the metal ring.
Click a button to select it, which will highlight all available spaces it can move to.
Next, click one of the highlighted buttons to swap their positions.
When a button is correctly placed, it will turn a light green shade.
To solve this puzzle, swap the numbered buttons in the following order:
Switch button 9 with button 3.
Switch button 5 with button 9.
Switch button 7 with button 3.
Switch button 5 with button 7.
Switch button 2 with button 8.
Switch button 8 with button 1.
Switch button 0 with button 4.
Solution.
After the puzzle is solved, go through the open door to Roger's Laboratory.
Roger's Laboratory
Pick up the bottle of SMELLING SALTS on top of the red cloth.
Click the papers on the desk to zoom in.
Read the paper on top of the book to add a note of the horn diagram to your journal.
Take the TRIANGLE beside the candlestick.
Open the book to read Ashton's diary.
Use the map to travel to the Laboratory.
Laboratory
Click the bowl on the corner of the right table to zoom in.
Use the SMELLING SALTS (from Roger's Laboratory) on the bowl of cotton.
Click the SMELLING SALTS COTTON to add it to your inventory.
Return to Dog's Town.
Dog's Town
Inspect the far left cage at the top of the steps.
Click the latch to open the cage door.
Give the BONE (from the Deans' Hall hidden object scene) to Pippa, then click her collar for a close-up view.
Add the TRIANGLE (from the desk at Roger's Laboratory) to the collar to start the puzzle.
Navigate the triangle to the space at the center of the maze.
Click and drag the triangular piece at the start to move it through the paths to the end.
Solution.
After the puzzle is solved, click PIPPA to add her to your inventory.
Go back to the Dining Room.
Dining Room
Click the stack of barrels for a closer look.
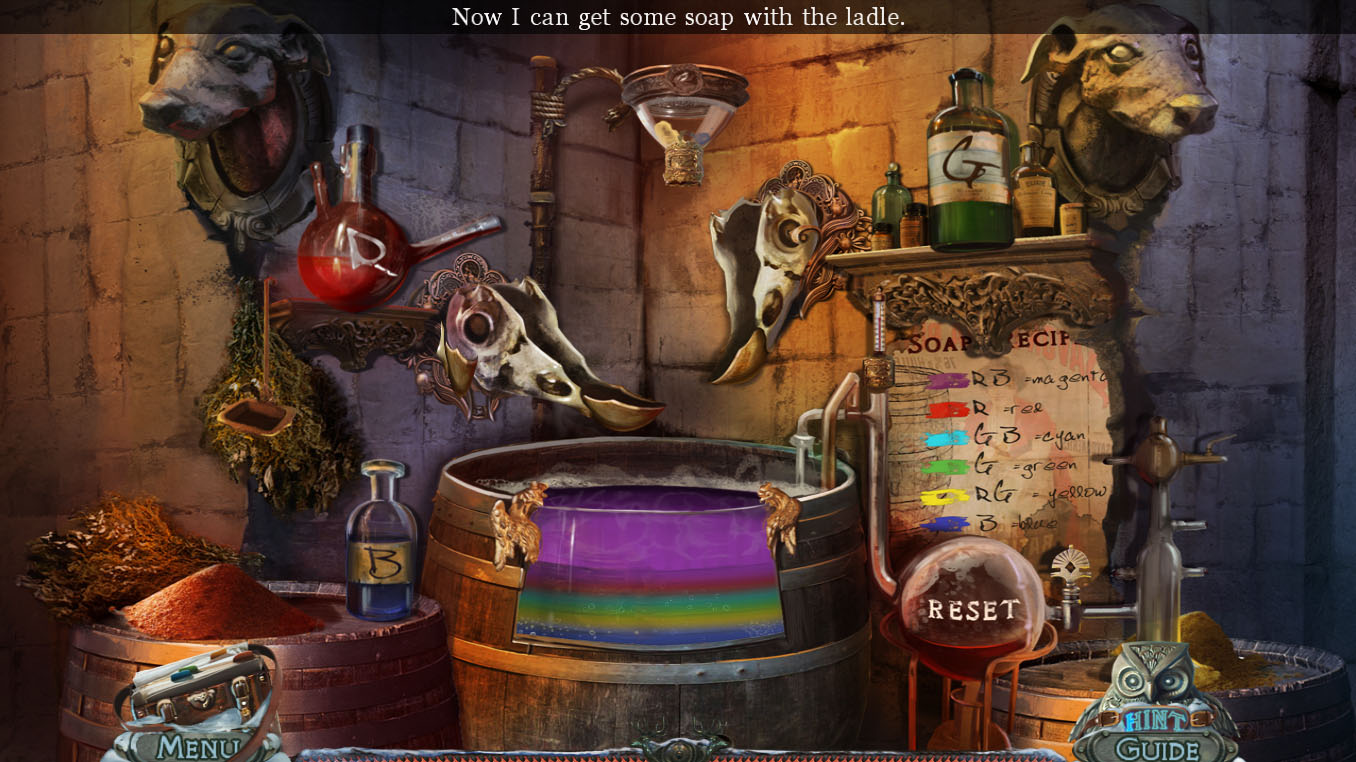
Add the BIRD SKULL (from the column at Dog's Town) to the right stand to start the puzzle.
Mix the bottles of colored solution into the barrel in the correct order, according to the recipe at the right side of the puzzle.
Click one of the bottles to pour it into one of the bird skulls.
Follow the colors in the recipe from bottom to top to make layers of Blue, Yellow, Green, Cyan, Red, and Magenta fluids.
Click the bottles in the following order to complete the puzzle:
Click the blue bottle (B) once.
Click the green bottle (G) once and the red bottle (R) once.
Click the green bottle (G) twice.
Click the blue bottle (B) once.
Click the red bottle (R) twice.
Click the red bottle (R) once and the blue bottle (B) once.
Solution.
After the puzzle is solved, the bar of SOAP will be added to your inventory.
Go back to the Road Fork.
Road Fork
Click the ramp below the large dog statue to zoom in.
Use the bar of SOAP (from the liquid mixing puzzle t the Dining Room) on the ramp, then click the base of the statue to slide it down the ramp.
Inspect the head of the broken statue after it lands against the right wall to find the PEARLS.
Click the small window at the top of the right wall for a closer look.
Take the LEVER wedged in the rock in front of the hole.
Return to the Dining Room.
Dining Room
Click the wagon in the middle of tracks for a close-up view.
Attach the LEASH (from the Deans' House hidden object scene) to the hook at the front of the cart.
Insert the LEVER (from the window at the Road Fork) into the empty socket beside the hook.
Click the lever to move the cart down the track.
Go through the open door on the right to reach the Cages.
Cages
Click the woman in the cage for a closer look.
Use the SMELLING SALTS COTTON (from the bowl at the Laboratory) to revive her.
Speak with Lily, then take the LIFE FLOWER from her hand.
Take the PICKAXE stuck in the rock beside Lily's cage.
Go back to the Road Fork.
Road Fork
Click the diamond chunks in the middle of the left wall to zoom in.
Use the PICKAXE (from the rock at the Cages) to mine a DIAMOND from the wall.
Inspect the small window at the top of the right wall.
Insert the DIAMOND into the space to shine a light into the room.
Send PIPPA (from the cage at Dog's Town) into the crevice in the left wall.
Pick up the OWL SYMBOL that Pippa leaves on the ground.
Go back to the Canyon.
Canyon
Inspect the carving tools on top of the pedestal at the left side of the canyon.
Add the FILE (from the first aid box at the Laboratory), the MAMMOTH TUSK (from the statue at Dog's Town), the PEARLS (from the broken dog statue at the Road Fork), and the LIFE FLOWER (from Lily at the Cages) to start the puzzle.
Carve the sections of the mammoth tusks with the correct tools to complete the horn copy according to the diagram hanging above the dusk.
Click a file to select it, then click a section of the tusk to attempt to carve it.
If the correct tool is selected, it will carve a design into the tusk; if the incorrect file is used, it will crack the tusk and the puzzle will reset.
Refer to the screenshot below and use the following tools to complete the puzzle:
Use file A on section 1 of the tusk.
Use file B on section 2.
Use file C on section 3 and section 6.
Use file D on section 4 and section 7.
Use file E on section 5.
Place the life flower (F) in section 2.
Place the pearls (G & H) in section 5.
Solution.
After the puzzle is solved, click the HORN COPY to add it to your inventory.
Return to Roger's Laboratory.
Roger's Laboratory
Inspect the bottom dog statue in the middle of the back wall.
Switch the HORN COPY (from the carving puzzle at the Canyon) with the HORN in the statue's mouth.
Go back to the Cages.
Cages
Click the mechanism in the middle of the left wall for a closer look.
Add the DEER FIGURINE (from the desk at Roger's Cabinet) to the right slider and the OWL SYMBOL (from the crevice at the Road Fork) to the space in the center of the plate to start the puzzle.
Move the tiles to the sockets at the right side of the board.
Click a tile to select it, then click an arrow around the tile to move it in that direction.
A tile will continue to move until it reaches an obstacle such as a wall, a block, or another tile.
Two of the tiles are numbered, 1 and 11, and must be placed at the matching numbered sockets.
Start by placing the 1 tile in the socket at the top.
Next, place 6 paw tiles directly underneath it, followed by the 11 tile.
Finally place the remaining the 3 remaining paw tiles to complete the puzzle.
Solution.
After the puzzle is solved, Lily will be freed from her cage.
Give Lily the STRANGE COLLAR (from the floor at the Kennel Interior).
Return to Dog's Town.
Dog's Town
After the cinematic, use the HORN (from the dog statue at Roger's Laboratory) on the man.
Posted by: Trinn |
July 8, 2012 2:41 PM
|
July 8, 2012 2:41 PM