


![]()
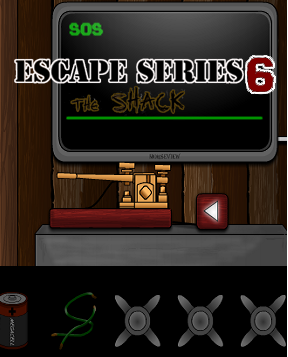 Have you ever wanted to wake up mysteriously in some odd cabin in the woods as your next vacation? Of course not! That is just plain freaky and Shawn Tanner continues his escape series by testing your wits to escape a god forsaken lake-side cabin in Escape Series #6: The Shack. Scrounge together whatever you can find to solve puzzles so you won't have to spend another second in this shady shack.
Just point and click with the mouse to pick up items and navigate any conspicuous places in your confined quarters. You may be timed in your escape, but relax and go slowly or you may miss obvious objects or hints in your frantic rush. A nice usage of nautically themed puzzles gets you tapping out Morse code and helping a mini-boat find the lighthouse's signal. The few puzzles there are will fire off quite a few synapses to get you to solve those puzzles as quickly as you can handle. Tanner really knows how to deliver a compelling escape game by keeping each installment fresh and engrossing.
Who knows what lies in the dreary darkness, but you shouldn't stay around to find out! The lighthouse is your only beacon of hope and you need to find a way there. Get crackin'!
Play Escape Series #6: The Shack
Play the entire Escape Series...


Walkthrough Guide
(Please allow page to fully load for spoiler tags to be functional.)
Escape Series #6: The Shack Walkthrough
The Beginning
The game starts out with you looking at an iron door with barred windows to each side. The door needs a key to unlock, so in the meantime, click to the left side of the screen.
The numbers "5 52" are painted on the wall, but notice the large gap between the two fives. A number belongs there so for now, pick up the gray rectangle directly below the first number five. It is a Morse code chart for use later. There is also a gray panel that is currently locked. Forget it and head back to the door.
Windowed Wall of the Shack
Head to the door's right side, and you will see a lighthouse through a window, a large white poster, a Morse Code machine, and a blank screen. Pull down the curtain on the window and notice there is a section cut out of it.
Head back to where the painted numbers are and notice the missing number is a seven. Write that sequence so you can use it later. You should make your way back to the window and white poster wall. Zoom in on the white poster for a clearer picture.
White Poster with the Secret Message
You can read the poster, but hopefully you noticed the tiny red text written on the black bars of the SOS Morse Code sequence. Zoom in on it for a better look. The inscription reads that you will get a secret message if you count every ten letters from the first one in the poster's text.
Zoom out from the text, read the poster's text and write down each tenth letter you come across. The secret message should say:
HELP IS ON THE WAY
The spaces in the phrase are provided for easier reading. That phrase will be necessary for solving the Morse code puzzle. Zoom out from the poster and zoom in on the Morse code device and screen.
Morse Code Puzzle
Notice the little metal 'x' object near the play button. Grab it for use later in another puzzle.
Now it is time to tap out the secret phrase you found into the machine. You can refer to the Morse code sheet or look into the next spoiler so you won't have to keep checking the sheet for the right 'dot and bar' sequences. A dot or 'dit' is done by a quick click on the lever while a bar or 'dah' is produced by clicking and holding the click for a second.
H = **** or four taps
E = * or a single tap
L = *-** or tap, hold, two taps
P = *--* or tap, two holds, tap
I = ** or two taps
S = *** or three taps
O = --- or three holds
N = -* or hold, tap
T = - or hold
H = **** or four taps
E = * or a tap
W = *-- or a tap and two holds
A = *- or a tap and a hold
Y = -*-- or a hold, a tap, and two holds
Once the phrase is tapped in properly, a small key will pop out from the bottom right corner ot the screen. Take it, zoom out from the machine, and to your right.
Back Wall of the Shack
You are facing a map with a lighthouse, rocks, and a boat on it. There is also a fuse box to the left of that and a battery sitting on the ground near the fuse box. Grab the battery and zoom in on the fuse box. Notice the green wire to the right side of the box and grab it.
Fuse Box Puzzle
There are four dials on the box that must be adjusted for the box to open up. The arrows indicate the way in which each dial should be rotated, but they only rotate in a clockwise fashion. Keep that in mind when solving the other dials.
First, click on the leftmost dial once to get it in the correct postion. The sun image should be at the top of the triangle.
Using the position of the first dial, do not click on the second dial because the moon image should be the point of the triangle.
On the third dial, click twice so the star image is at the top of the triangle.
On the final dial, click it twice so the moon image is at the top of the triangle.
The red light should turn green and click on the color to open the door.
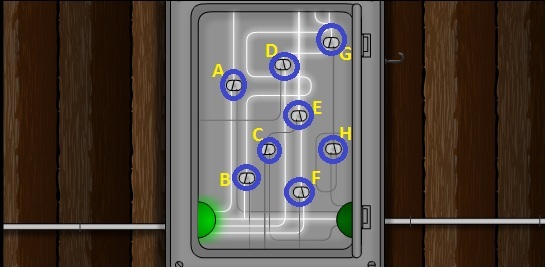
The Circuitry Puzzle
All the power is going to the Morse code screen so the left green circle is lit. Redirect the circuits' energy so the right side green circle is glowing. You can do that by clicking on the gray switches so the energy goes on a different path. I will label each circuit switch with a letter starting at A. The picture will show which circuit switch is which.
Screenshot
Click on A.
Leave B alone.
Click on C.
Leave D alone.
Click on E.
Leave F alone.
Click on G.
Click on H.
The power should be redirected now to be used on the next puzzle. Zoom out from the fuse box and zoom in on the sea chart.
The Locked Safe Box
Use the small key on the keyhole in the lighthouse to the left side of the chart. A yellow key is inside of it, so grab it once the door is open. Head back to the front of the shack where the door is and use the yellow key on the door's knob.
You will now be outside on the dock and a lock box will on your left side. Zoom in on the lock box and type in the number code you wrote down from painted numbers and hit enter. Take everything you find in the safe (which includes another repeater and two various sized light bulbs. head back to the sea chart on the shack's back wall.
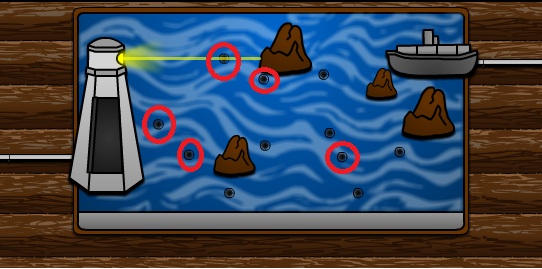
Sea Chart Puzzle
Grab the three other repeaters sitting on the bottom left of the sea chart. Click on the smaller light bulb and place inside the top of the mini lighthouse. Do that by clicking the yellow area of the lighthouse's top. Place the repeaters on the circular spots on the board so the light beam will shine on the boat. A picture is provided to show where they should be put.
Screenshot
Notice a beam of light shooting out the top of the ship. The locked gray panel from earlier will be unlocked, so zoom out and head to your left. Click on the gray panel and you will be taken underneath the shack.
Seeing in the Dark
You see a boat in the darkness, but it is too dark for you to get in it. You will need to combine the items you have to create some type of light source.
Combine the wire and the battery to form a Wired Battery.
Combine the wired battery and the big light blub to create a Makeshift Flashlight.
Click on your Makeshift Flashlight and click on the boat with it. The boat will be illuminated so click on it and get the heck out of this shack.
You have escaped the shack!
Posted by: Bryan Gawinski |
April 25, 2012 10:16 PM
|
April 25, 2012 10:16 PM