

Dark Strokes:
Sins of the Fathers
Platform: Mac, Windows
![]() "The sins of the fathers shall be visited upon the children." Of all of the misquotes from the bible (and it is a misquote), this is one of the most hotly debated. Do sons deserve to suffer for what their fathers have done? And if not, would someone please explain that to Emily Thorne on "Revenge"? Leaving aside the most addictive show on television today, Alawar Games (creators of such classics as Sacra Terra: Angelic Night) has come up with a fabulous adventure hybrid based upon this theme, visiting the (supposed) sins of a father upon a hapless son in Dark Strokes: Sins of the Fathers.
"The sins of the fathers shall be visited upon the children." Of all of the misquotes from the bible (and it is a misquote), this is one of the most hotly debated. Do sons deserve to suffer for what their fathers have done? And if not, would someone please explain that to Emily Thorne on "Revenge"? Leaving aside the most addictive show on television today, Alawar Games (creators of such classics as Sacra Terra: Angelic Night) has come up with a fabulous adventure hybrid based upon this theme, visiting the (supposed) sins of a father upon a hapless son in Dark Strokes: Sins of the Fathers.
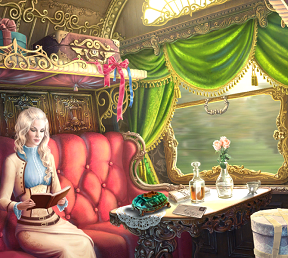 The game begins with Ethan Blake, about to happily marry his fiancé Clair. Unfortunately, his wedding needs to be postponed as he and his beloved rush to meet with his father in response to an urgent message. Even more unfortunately it becomes immediately apparent that someone or something is after poor Ethan, smashing in his train cabin window, causing a massive (and beautifully animated) wreck, and kidnapping both Clair and his father the Judge, all while terrorizing the town where Ethan's father has lived. Ethan must discover who the faceless ones are pretty quickly or else everyone he loves is doomed (as well as the town, but you know where Ethan's true priorities lie).
Dark Strokes: Sins of the Fathers is basic point-and-click adventuring with hidden object elements scattered throughout the game. Ethan must find his way around using navigation arrows and solve a wide variety of puzzles in order to discover exactly what is going on with this very strange town. Classic hidden object scenes (themselves quite nicely done with necessary interactions to find the listed objects), mini-games (of a nice variety and difficulty), and the usual adventure puzzle solving are balanced with a lot of story-telling, revealed through handy articles, conversations, and tons of gorgeously animated cut-scenes. A refilling hint timer is useful both within the games and puzzles and also within the adventuring portion of the game. Glints and sparks of light point the way to useful areas (a feature disabled in the expert mode) and a mysterious glowing blue eye highlights hidden object scenes.
 Analysis: The story of Dark Strokes: Sins of the Fathers is a variation that has been seen many, many times in adventure hybrids these days. And although the game is gorgeous, and the animations that move the story along are wonderful, what is it that makes this particular hybrid stand out amongst the pack? The answer is gameplay, and lots of it. Dark Strokes is so packed with story, gaming, and adventure that it approaches a length (even in the "regular" adventure portion) very rarely seen in games these days.
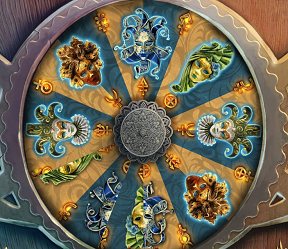
It's not that the story is not interesting, because it is indeed quite gripping, especially the scenes relating to the finding of the figurines and the amazing little steampunk boat display they fit in, each one revealing a tiny bit more of the past. Answers are not completely obvious and there are enough plot twists to keep the gamer interested rather than creating a story so obvious that you can guess the entire plot line within half an hour of play. There are also enough unique elements in the hidden object scenes and the puzzles to keep the game fresh and interesting as the story develops and the player edges ever closer to the "forbidden city", where answers await the most intrepid.
 For seasoned adventure connoisseurs the game can be a bit easy in casual mode, with too many glints, hints, and clues, but most of that is taken care of in Expert mode, and is enough to satisfy a wide-range of adventurers. There are a few minor problems with the English, most noticeably with Clair's name (in my day it was spelled with an "e" at the end), but overall the text, dialogue, and voice-overs are competently done. The music, while not necessarily anything to write home about, still does the job in setting the mood.
The standout storytelling, animation, and gameplay makes Dark Strokes: Sins of the Fathers a fun and somewhat spooky experience through a long and satisfying adventure hybrid. More mysterious than flat out scary, it is nonetheless quite a ride and definitely worth the time.
A Collector's Edition is also available. It includes concept art, a built-in strategy guide, and extra gameplay. Remember that Big Fish Game Club Members pay only $13.99 for Collector's Editions (or 2 club credits), and collector's editions count 3 card punches of 6 total needed for a free game.
![]() Windows:
Windows:
Download the demo
Get the full version
Also available: Collector's Edition
![]() Mac OS X:
Mac OS X:
Download the demo
Get the full version
Also available: Collector's Edition


Walkthrough Guide
(Please allow page to fully load for spoiler tags to be functional.)
Dark Strokes: Sins of the Fathers
Walkthrough Part 1
General Info, Prologue, and Chapters 1-6
General Information
Main Menu
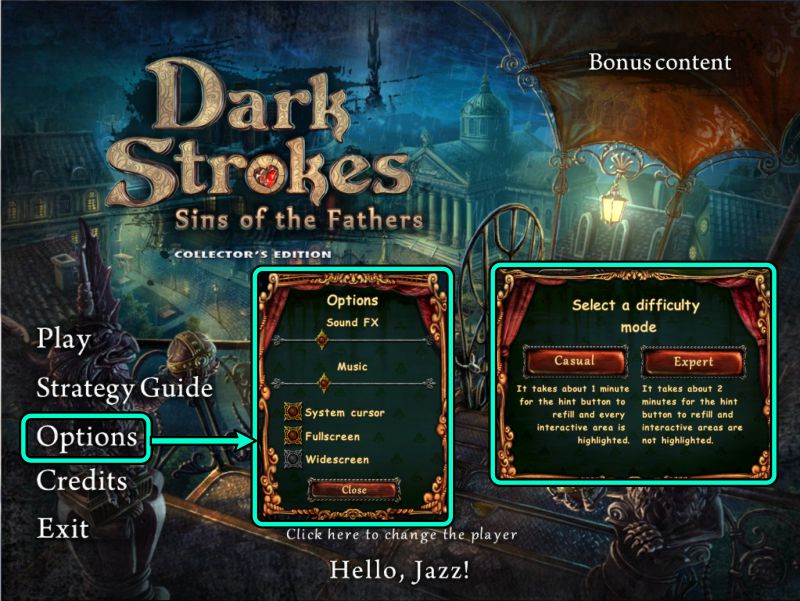
From the Main Menu, you can Play or Quit the game, choose your Options and Profile, and view the Extras.
Options include Music, and Sound FX volume; Full or Windowed screen, use of a custom or system cursor, and an adjustment for a wide screen in full-screen mode.
There is a Strategy Guide and Bonus Content included with the game.
In order to access the Bonus Content, you must complete the basic adventure.
Bonus Content includes Concept Art for scenes and characters, Wallpaper, and Media that will not be unlocked until you finish the Bonus Chapter.
When you begin, select between Casual and Expert difficulty modes.
In Casual Mode the Hint button takes about 1 minute to refill, and interactive areas are highlighted.
As an Expert, you must wait approximately 2 minutes for the Hint button to refill, and there is no interactive help.
As you begin play, you will get tutorial help that you can choose to skip at any time you wish.
Screenshot
Scene Navigation
Hints, located in the lower right corner are unlimited once they refill.
Hints work for main scenes as well as Hidden Object Scenes.
When there is nothing more for you to do in a particular scene, Hints will show you to move on to another area.
Your Journal is located in the lower left corner with notations about your adventure, and a Map once it becomes available.
The Map is not interactive and only shows the layout of the areas you have visited and where you currently are.
Screenshot
Access to the Menu is under the Journal and gives you your choice of continuing the game, accessing Options or Strategy Guide, or exiting to the Main Menu.
Once you locate the jeweled box in the Loft, it will be situated between your Journal and the Menu.
The box will automatically open when you find another Figurine to place in it, but you can open and refer to it whenever you wish.
In the center is your Inventory and Hidden Object Lists.
You can identify an item in your Inventory by placing your cursor over it.
Hidden Object items are the same for everyone and are marked in the screenshots. All items that go into your Inventory are marked in bright blue.
All Mini Games give you instructions in the lower center of the screen and have a Skip option.
Objects and locations with a Magnifying Glass should be checked out for more information.
Arrows show you other locations you can travel to.
You will need to back out of close-up scenes via the "X" in the upper right corner, or by clicking somewhere in the main scene.
There is a lot of running around in this game, so make sure you have your track shoes handy.
Prologue
Train Cabin
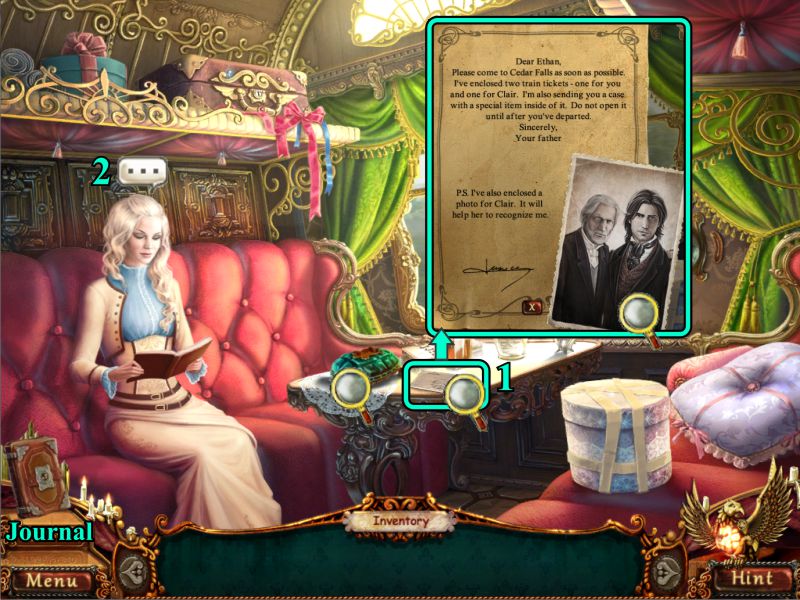
Ethan and Clair are on the train to Cedar Falls. Check on the letter from Ethan's father, and then talk to Clair.
Note the picture of Ethan with his father, since Clair hasn't met him before.
Screenshot
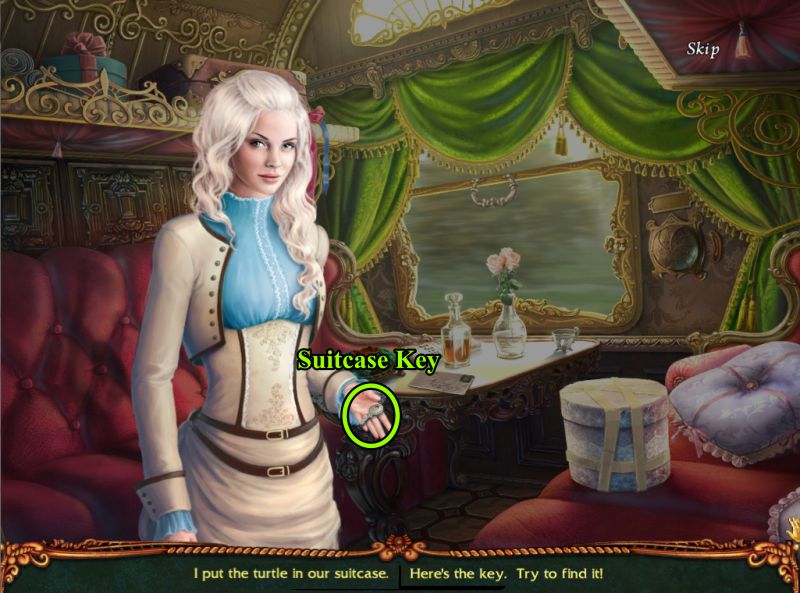
They are both curious about the little box, so Clair offers the key to the suitcase because it has the Turtle you need to open the box.
Screenshot
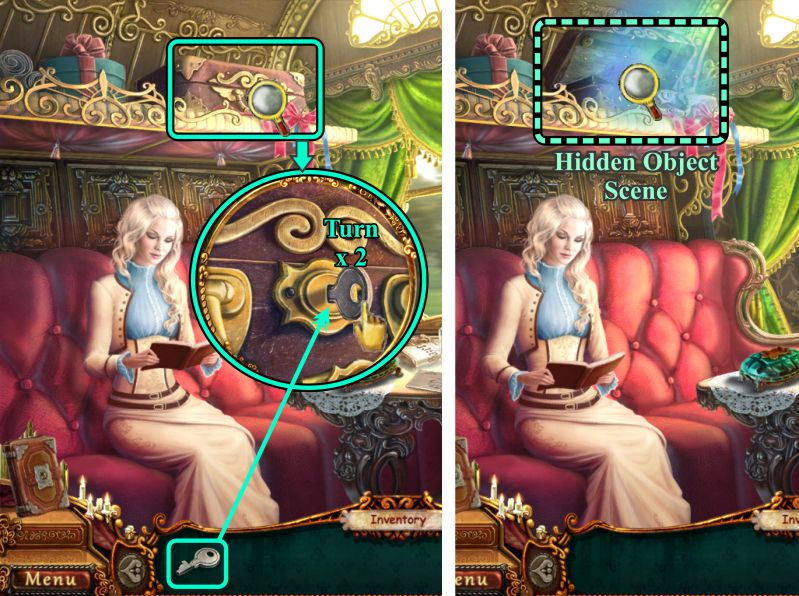
Zoom in on the suitcase, place the key and turn it twice to trigger a Hidden Object Scene.
Screenshot
Suitcase Hidden Object Scene
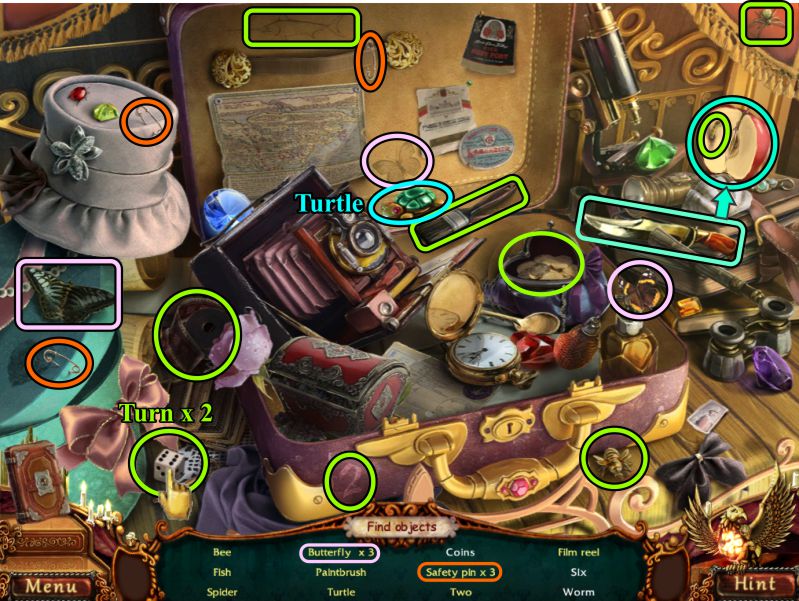
Once you have collected everything, you will get the Turtle.
To complete the hidden object scene, you will need to use the knife to cut the apple in half to find the worm.
Turn the dice twice until it becomes 6 to collect it.
Screenshot
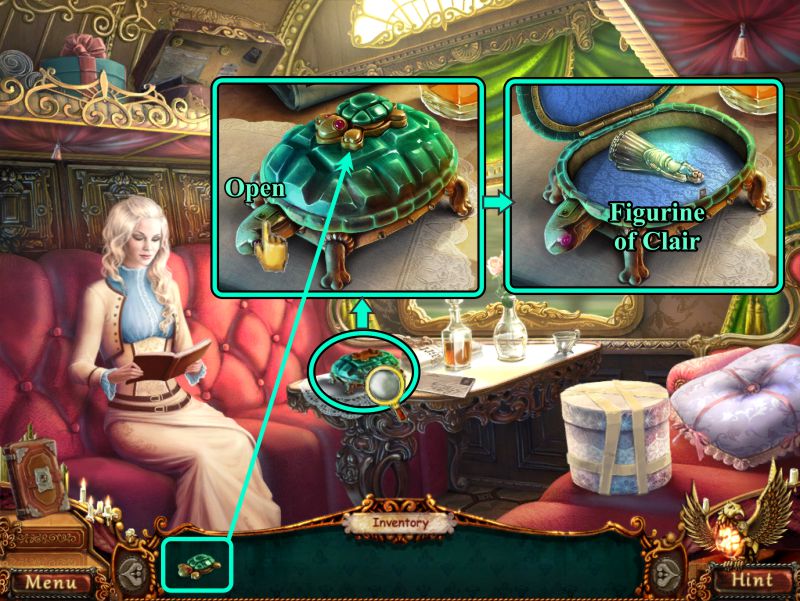
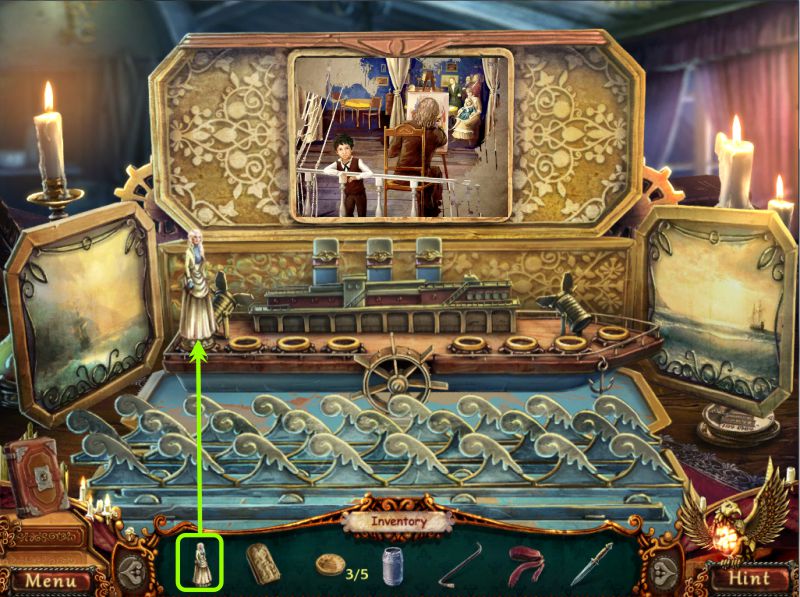
Train Cabin
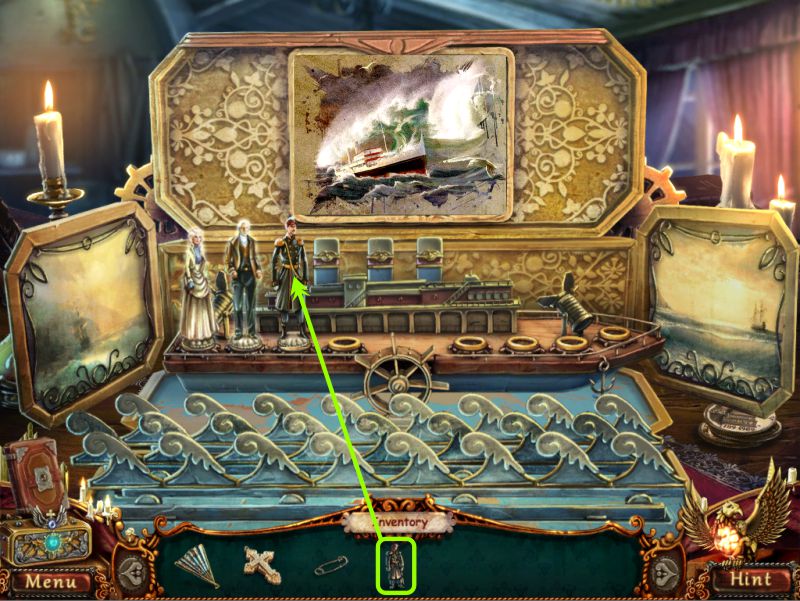
Zoom in and place the Turtle on the top of the box.
Open the box and take the Figurine of Clair.
Screenshot
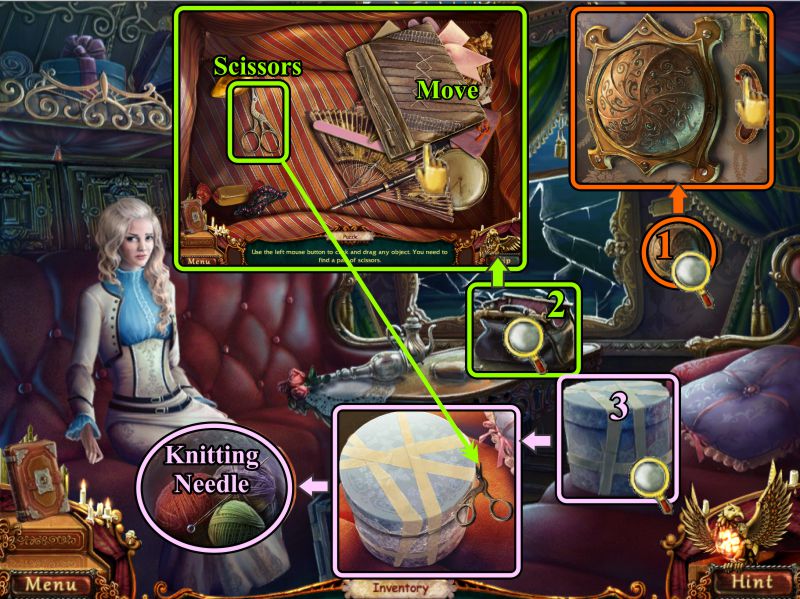
Watch the cut scene.
Zoom in to try to contact the engineer: once you touch the lever, it will break off.
Zoom in on the bag on the table and move everything to find the Scissors.
Use the Scissors to cut open the hat box.
Take the Knitting Needle.
Screenshot
Zoom back in on the communication device and place the Knitting Needle to open it.
Once the device opens, push the red button, then watch the cut scene.
Screenshot
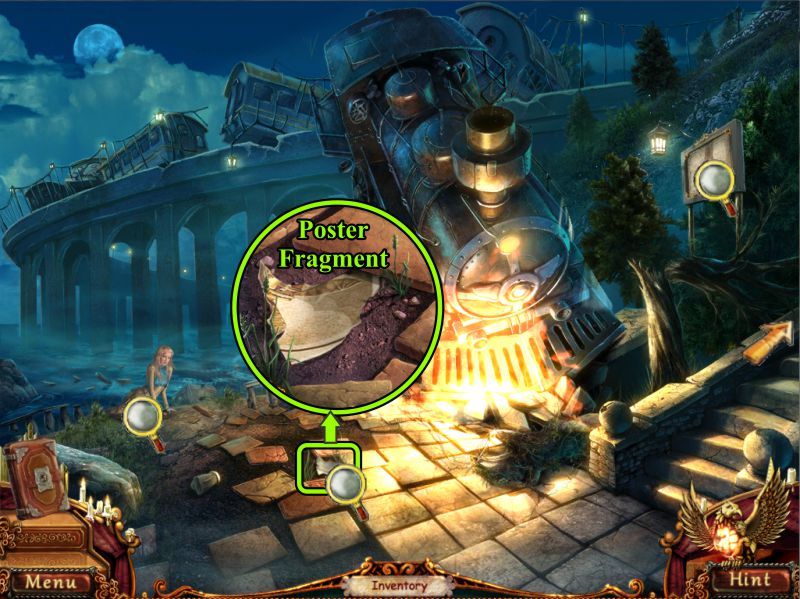
Train Wreck
Clair is caught up in a fishing net so Ethan has to find a way to free her.
Pick up the Poster Fragment, look at the poster, and go up the stairs.
Screenshot
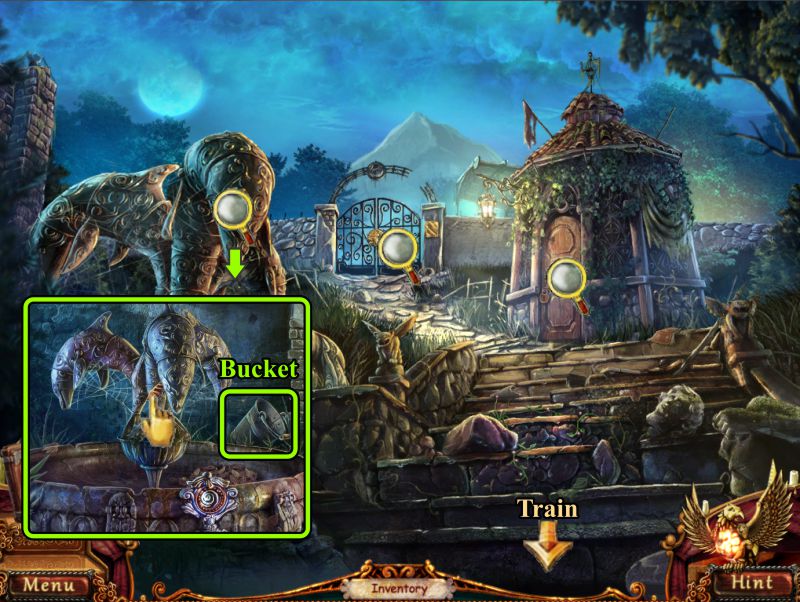
Path to Mountain Lift
Zoom in on the fountain and take the Bucket.
Check out the other magnifying glasses and return to the wrecked Train.
Screenshot
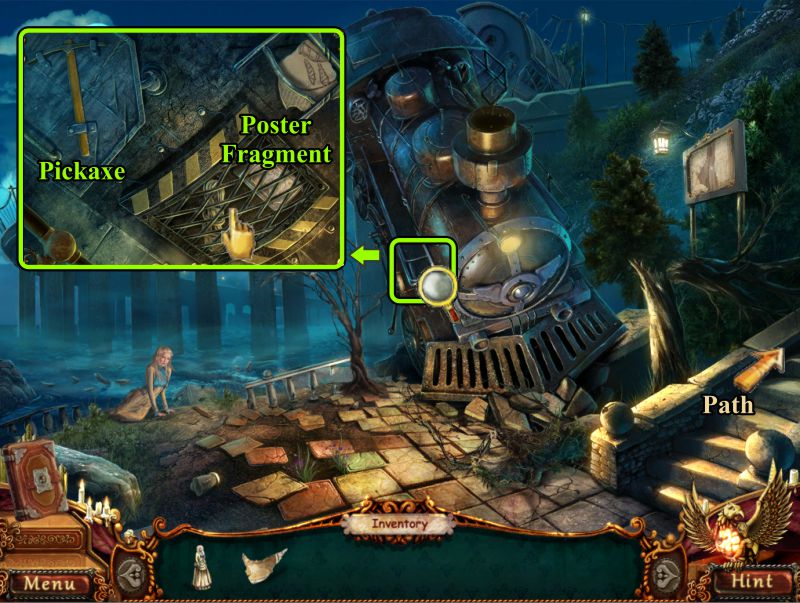
Train Wreck
Zoom in on the water and fill the Bucket.
Pour the Bucket of Water on the Fire.
Screenshot
Zoom in on the train and take the Pickaxe and Poster Fragment.
Go back up the stairs.
Screenshot
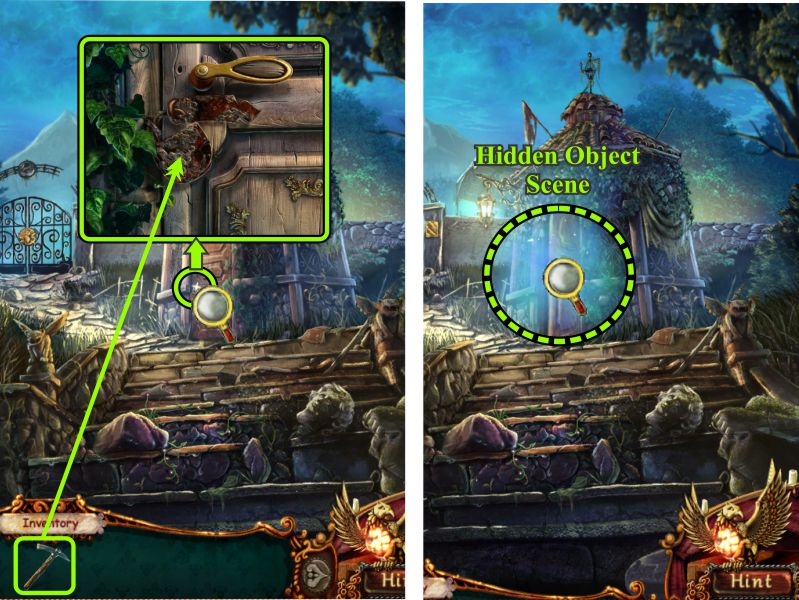
Path to Mountain Lift
Zoom in on the shed and use the Pickaxe to break the lock for a Hidden Object Scene.
Screenshot
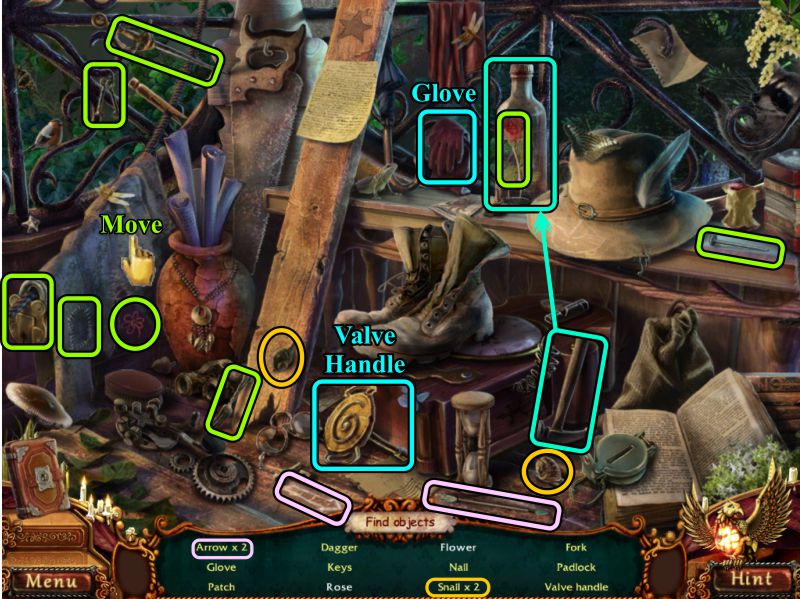
Shed Hidden Object Scene
Collect everything to get a Valve Handle and Glove.
Use the hammer to break the bottle to get the Rose.
Move the cloth to find the Flower.
Screenshot
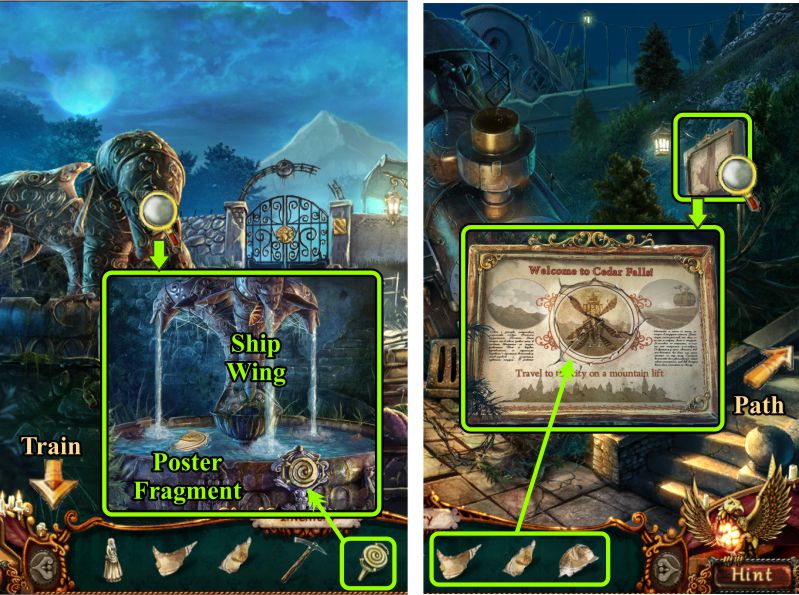
Path and Train
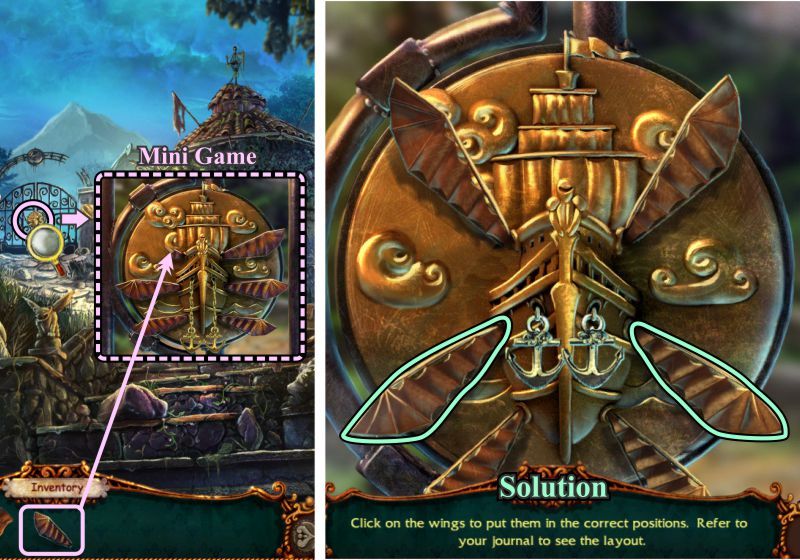
Zoom in on the fountain, place the Valve Handle, and take the Poster Fragment and Ship Wing.
Go back to the Train and zoom in on the poster.
Place the 3 Poster Fragments and note the position of the Ship Wings.
Go up the Path to the Gate.
Screenshot
Mountain Lift Gate
Zoom in on the Gate and place the Ship Wing to trigger a Mini Game.
Move the two wings marked in the screenshot to the down position.
Go through the Gate to the Mountain Lift.
Screenshot
Mountain Lift
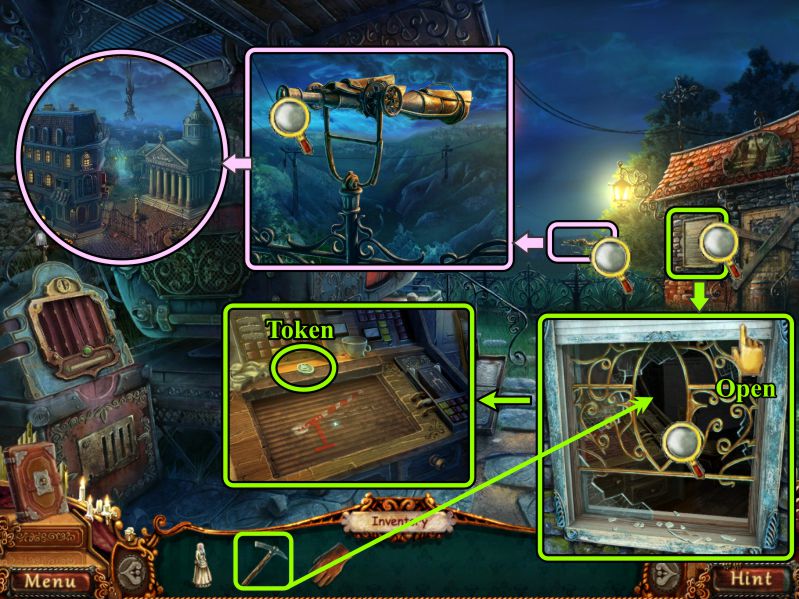
Zoom in on the telescope and look through the lens at Cedar Falls.
Zoom in on the station window, open the shade, and use your Pickaxe to break the window.
Pick up the Token.
Screenshot
Zoom in on the ticket machine next to the Lift.
Place your Token and scroll the stations until you find the Cedar Falls Station.
Buy a ticket.
Screenshot
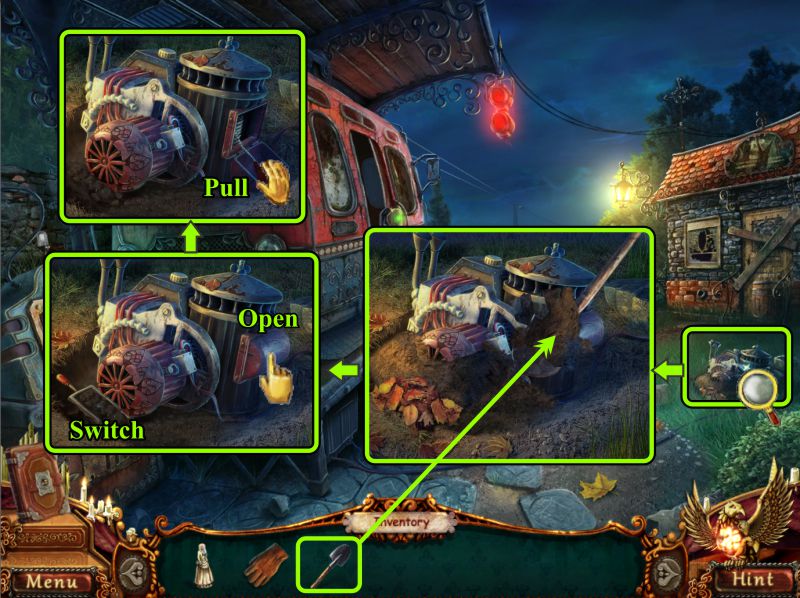
Go to the Lift door, zoom in and place your ticket to open the door.
Pick up the Shovel and leave the Lift.
Screenshot
Zoom in on the Generator and use the Shovel to dig it out.
Pick up the Switch and open the compartment on the side.
Try to start the Generator, and the rope will break.
Screenshot
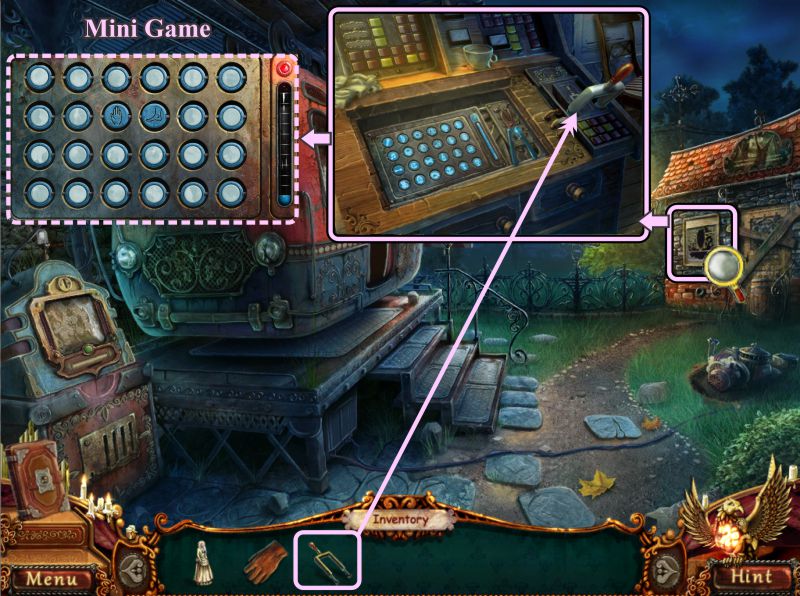
Go to the station window and place the Switch to trigger a Mini Game.
Screenshot
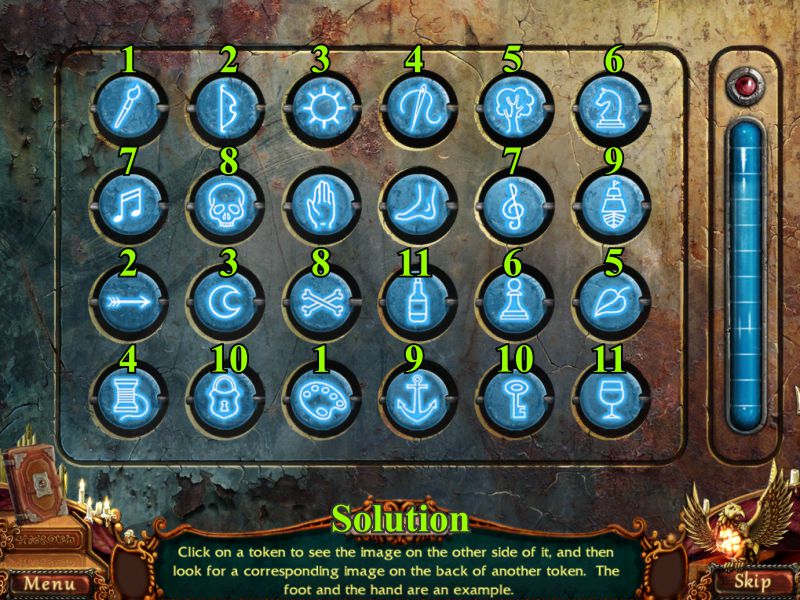
Barricade Mini Game
Your goal is to match the tokens to another token with the corresponding image.
The foot and hand are already matched as a sample.
See the screenshot for a numbered solution.
Return to the Train Wreck.
Screenshot
Train
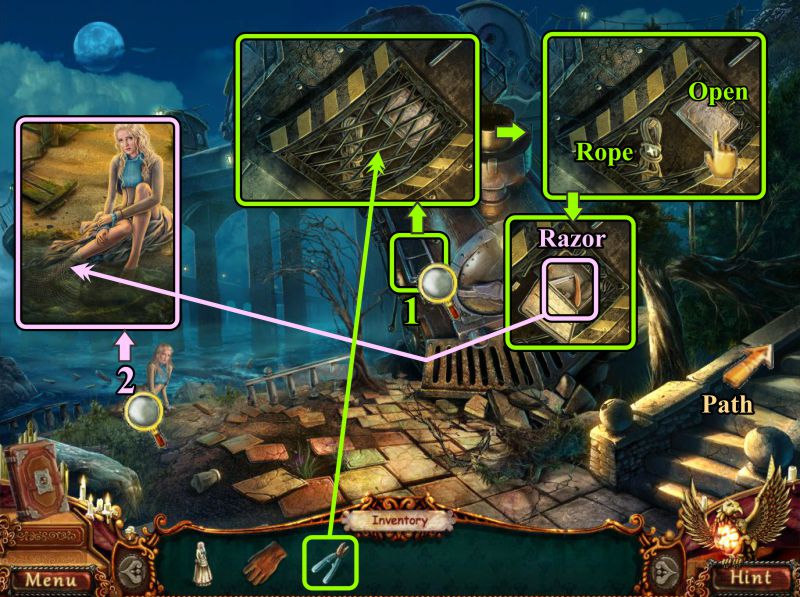
Zoom in on the train and use your Wire Cutters to cut the grate.
Pick up the Rope and open the compartment.
Take the Razor and zoom in on Clair.
Use the Razor to cut her free.
Screenshot
Mountain Lift
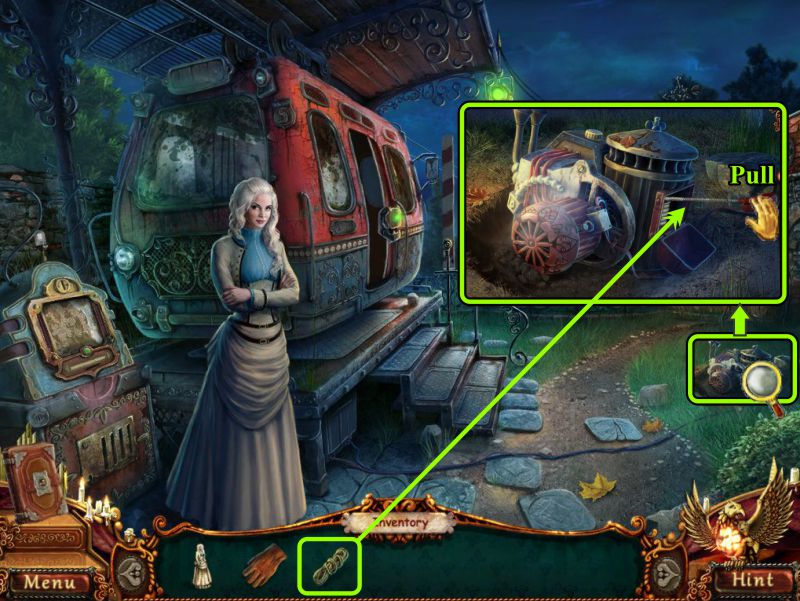
Zoom in and place the Rope on the generator.
Start the generator.
Screenshot
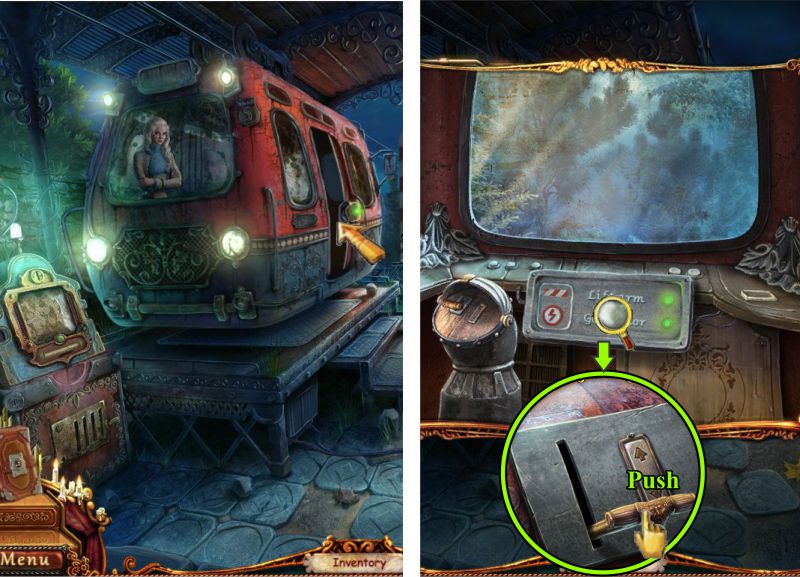
Enter the Lift, zoom in on the controls and start the Lift.
Watch the cut scene as Clair exits the Lift.
Screenshot
Chapter 1
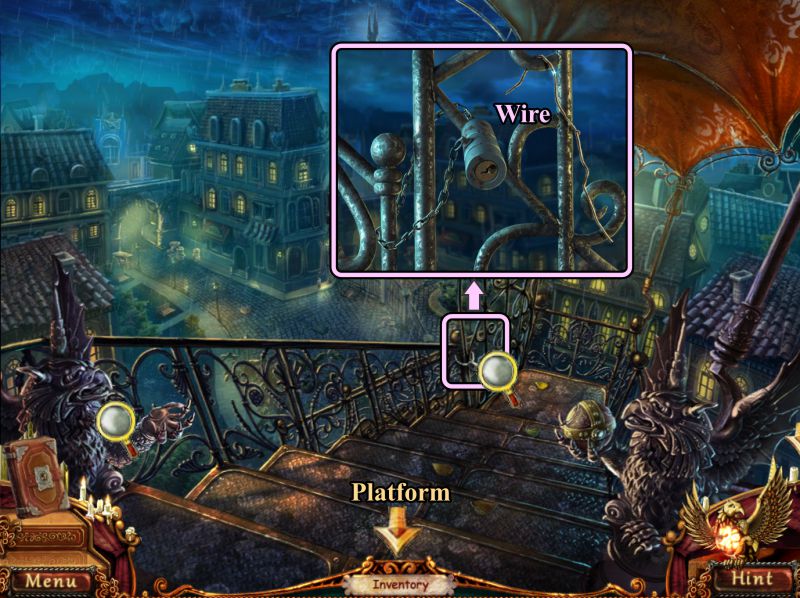
Mountain Lift Platform
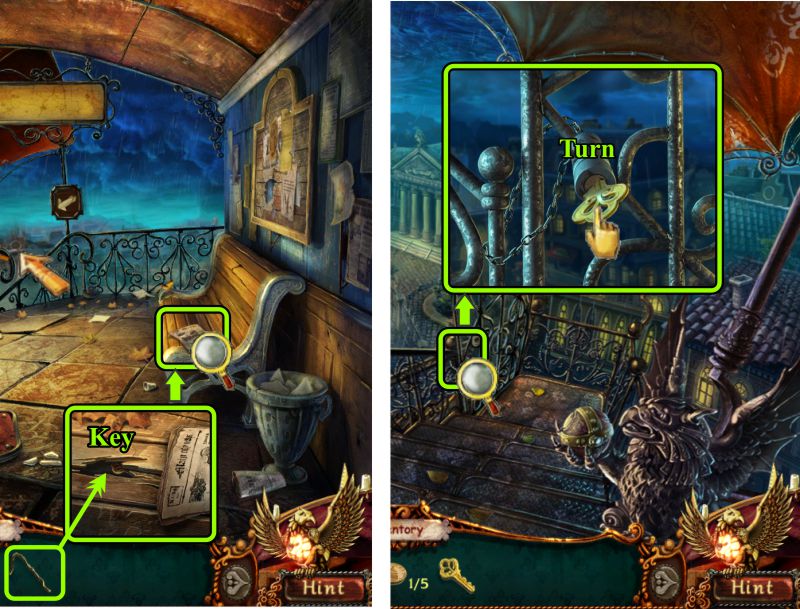
Zoom in on the bench, then move and read the newspaper.
There's something in the hole in the bench, so you need to find a tool to remove it.
Zoom in on the bulletin board, read it, and poke a hole in the area shown in the screenshot.
Take the Tile, then zoom to check out the first aid kit.
Zoom in on the tipped over trash and take the Coin.
Go down the stairs.
Screenshot
Stairs
Check out the left gargoyle, then zoom in on the gate.
Take the Wire and go back to the Platform.
Screenshot
Platform and Stairs
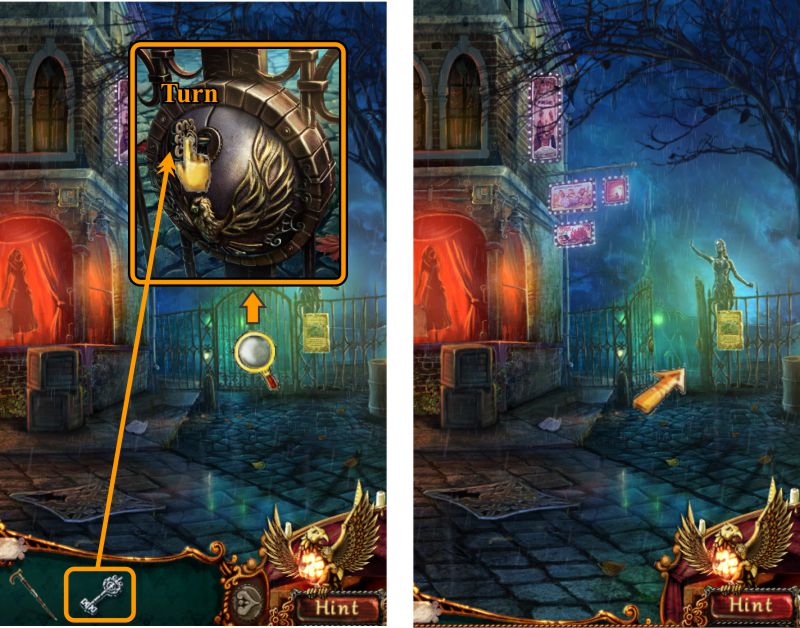
Zoom in on the bench and use the Wire to get the Key out of the hole.
Go down the stairs to the gate.
Place the key and turn it to open the gate.
Screenshot
Crossroads
Talk to Leonard.
Move the two boxes to get to the alarm.
Use your Glove to reconnect the broken wire.
Screenshot
When the lights go on, examine the window.
Take the Glue, read the notice, and note the Globe in the display.
Check out the gate and notice, then go left to the Mortuary.
Screenshot
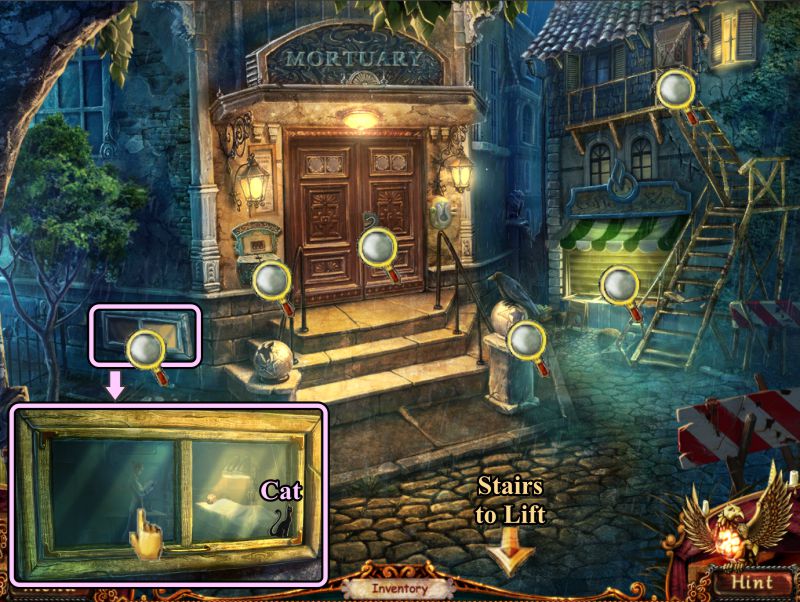
Outside Mortuary
Check out all the magnifying glasses, then zoom in on the window of the Mortuary.
Notice what's going on inside, then take the Cat.
Go to the Mountain Lift Stairs.
Screenshot
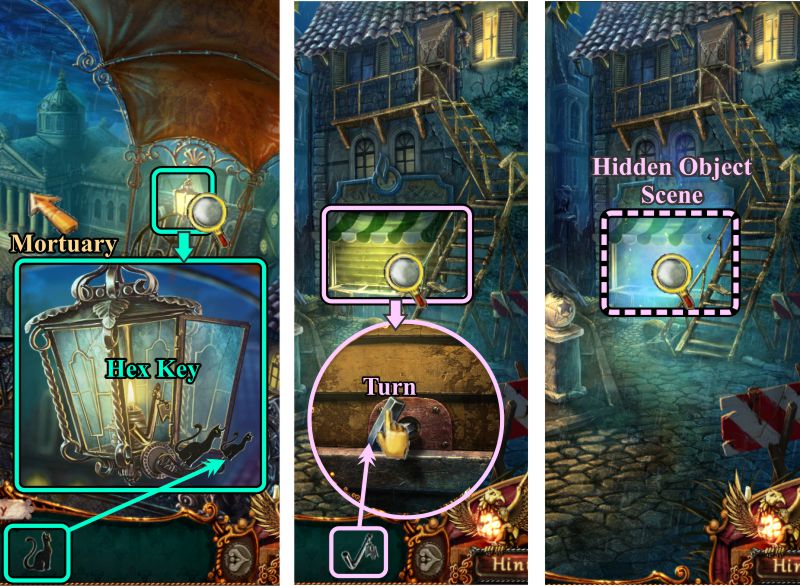
Stairs and Outside Mortuary
Zoom in on the lamp, place the Cat, and take the Hex Key.
Return to the Mortuary.
Zoom in on the building at the right and use the Hex Key to unlock the stand security cover.
Play the Hidden Object Scene.
Screenshot
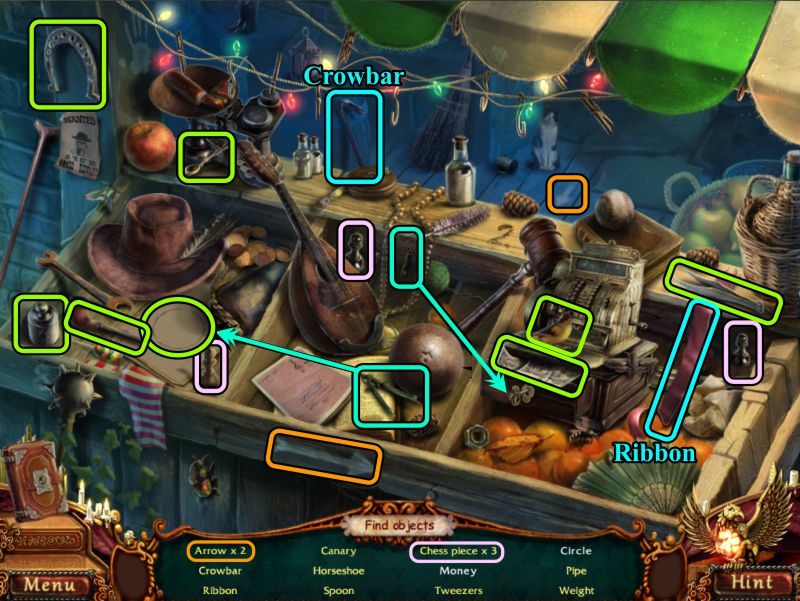
Stand Hidden Object Scene
Collect everything to get the Crowbar and Ribbon.
Use the compass to draw a circle on the paper.
Open the cash register with the key to get the Money.
Go to the Crossroads.
Screenshot
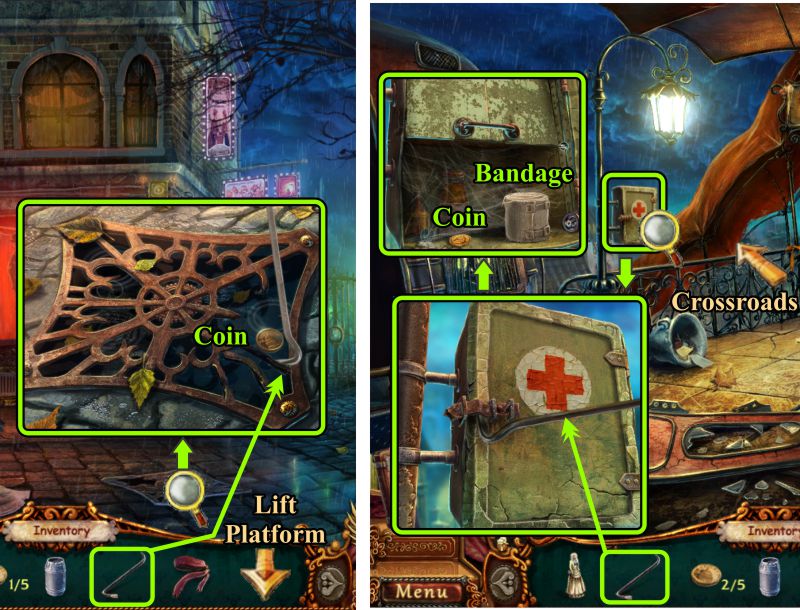
Crossroads and Lift Platform
Go to the Crossroads, zoom in on the grate, and use the Crowbar to get the Coin.
Go to the Mountain Lift Platform and zoom in on the first aid kit.
Use the Crowbar to open it.
Collect the Coin and Bandage, then return to the Crossroads.
Screenshot
Crossroads
Give the Bandage to Leonard, and he will give you some Lock Parts.
Go toward the Mortuary.
Screenshot
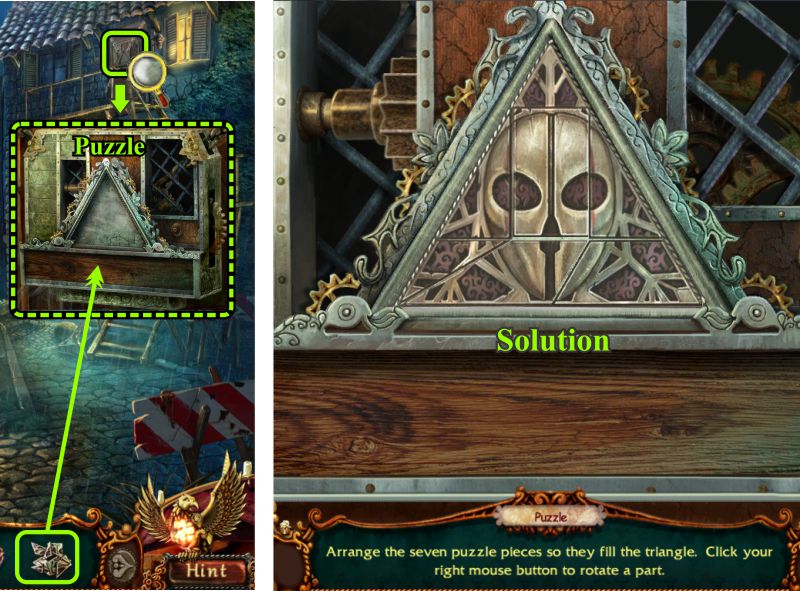
Attic Door Puzzle
Zoom in on the Attic Door at the top of the stairs to the right.
Place the Lock Parts Leonard gave you to trigger a Puzzle.
See the screenshot for the solution. Enter the room.
Screenshot
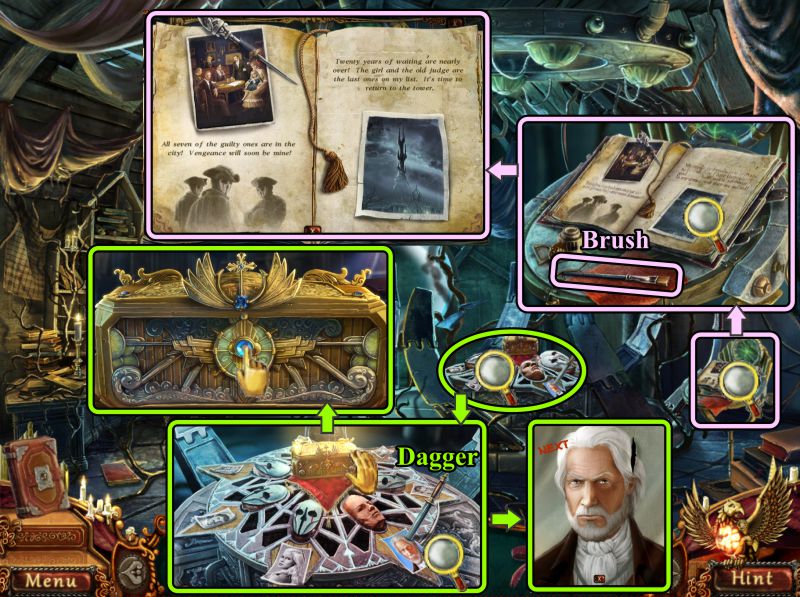
Attic
Watch the cut scene.
Zoom in on the small table at the right, grab the Brush, and zoom in again to read the book.
Zoom in on the round table with all the pictures.
Take the Dagger holding the Judge's photo and zoom in to see that it says "Next".
Open the box in the center of the table.
Screenshot
The Box
Place Clair's Figurine, then watch the cut scene.
Once you close the box, it will install itself under your Journal in the lower left of the scene for future use.
Screenshot
Attic
Check out the pictures on the walls, then zoom in on the desk at the left.
Place the Brush and Glue and note what items you need.
Play the Hidden Object Scene, then go to the Crossroads.
Screenshot
Attic Hidden Object Scene
Collect everything to get a Cane and a Screwdriver.
To get the Eye, dip the brush in the paint and paint the eye on the canvas.
Open the can with the can opener to collect the Corn.
Place the coffee beans in the grinder to get Ground Coffee.
Screenshot
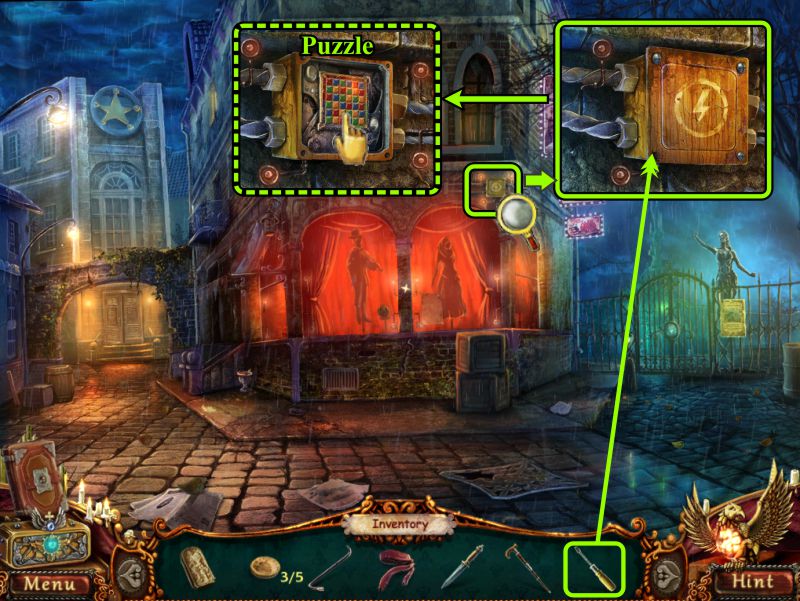
Crossroads
Zoom in on the alarm and use your Screwdriver to remove the cover.
Click on the inside to trigger a Puzzle.
Screenshot
Alarm Puzzle
Your goal is the make the tokens line up in squares of 9 to match the outside corners.
See the screenshot for a step-by-step solution.
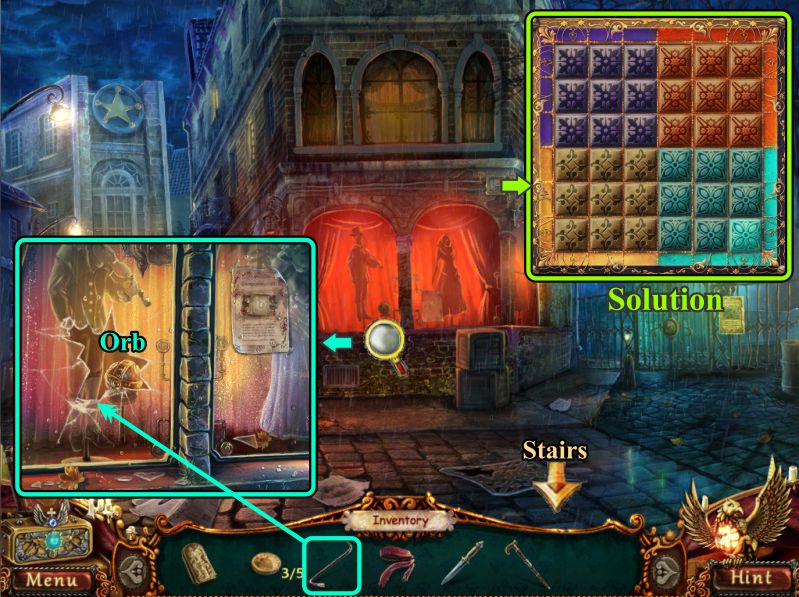
Screenshot
Crossroads
See the screenshot for the final solution to deactivate the alarm.
Zoom in on the window and use your crowbar to break the glass.
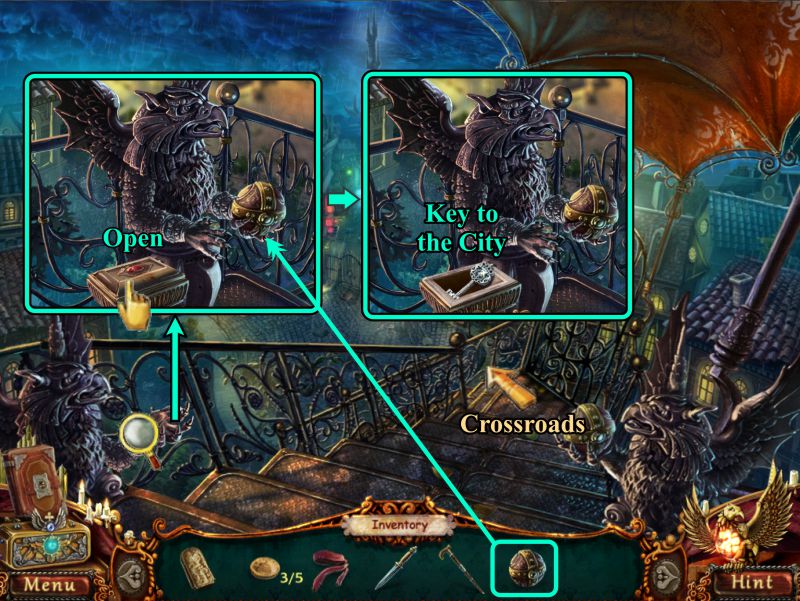
Take the Orb and head to the Stairs.
Screenshot
Stairs
Zoom in on the gargoyle and place the Orb.
When the box is released, open it and take the Key to the City.
Return to the Crossroads.
Screenshot
Gate
Zoom in on the Gate to the City, place the Key and turn it.
Enter the City.
Screenshot
Chapter 2
Town Square
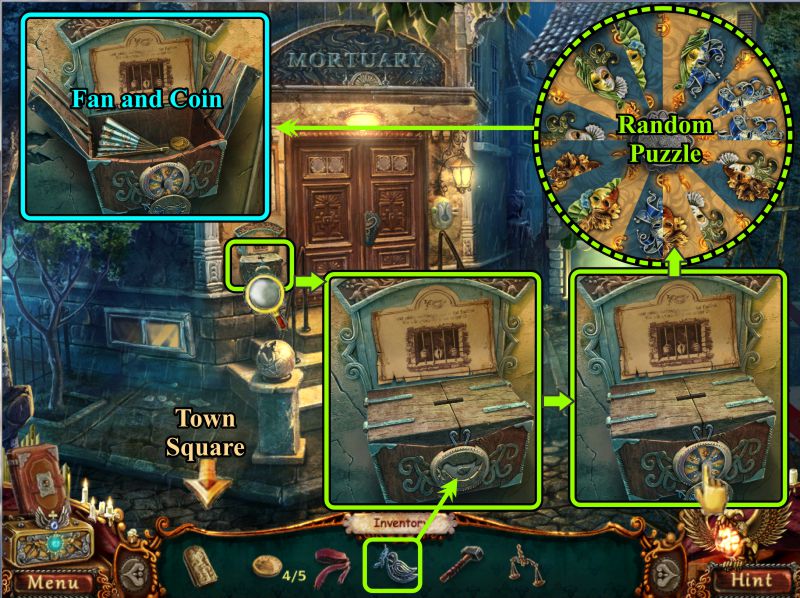
Examine the magnifying glasses, talk to the photographer, and grab the Sledgehammer.
Zoom in on the statue and take the Bird.
Go to the Forbidden City Gate to find out you cannot get past the guard unless you are police.
Go to the Courthouse Door.
Screenshot
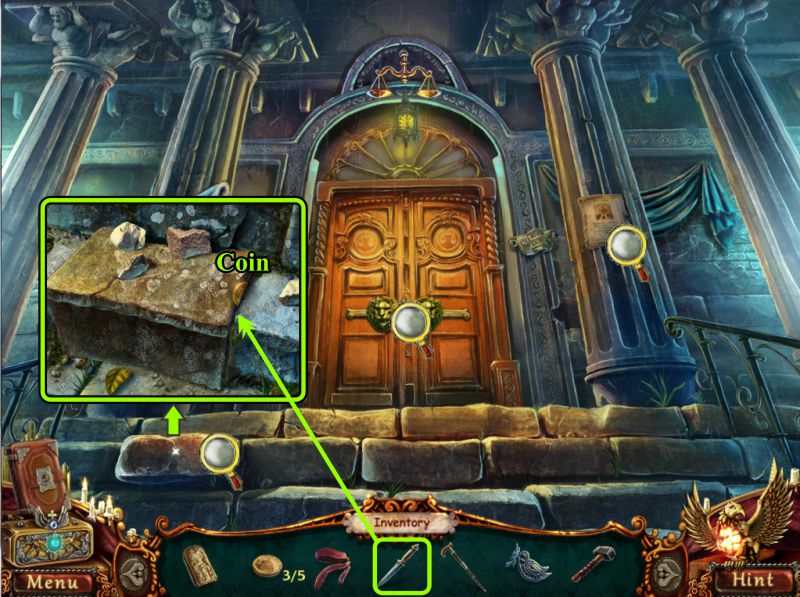
Courthouse Door
Read the notice, zoom in on the step, and use your Dagger to remove the coin.
Examine the lock on the door; it will be barricaded.
Screenshot
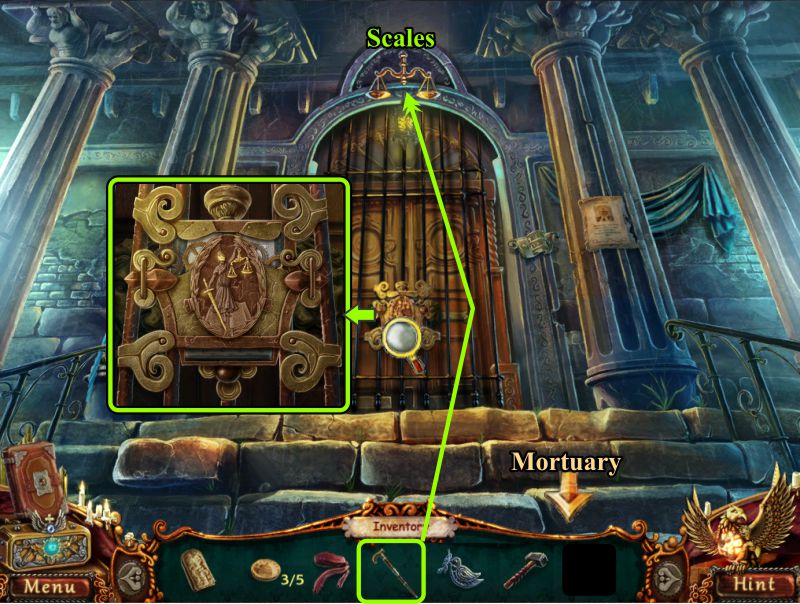
Zoom in on the gate and note the picture.
Use your Cane to remove the Scales from above the door.
Head to the Mortuary.
Screenshot
Outside Mortuary
Zoom in on the box next to the door, place the Bird, and click on the lock to trigger a Puzzle.
The Puzzle is random. When completed, the box will open for you to collect a Fan and Coin.
Go to the Town Square through the Gate.
Screenshot
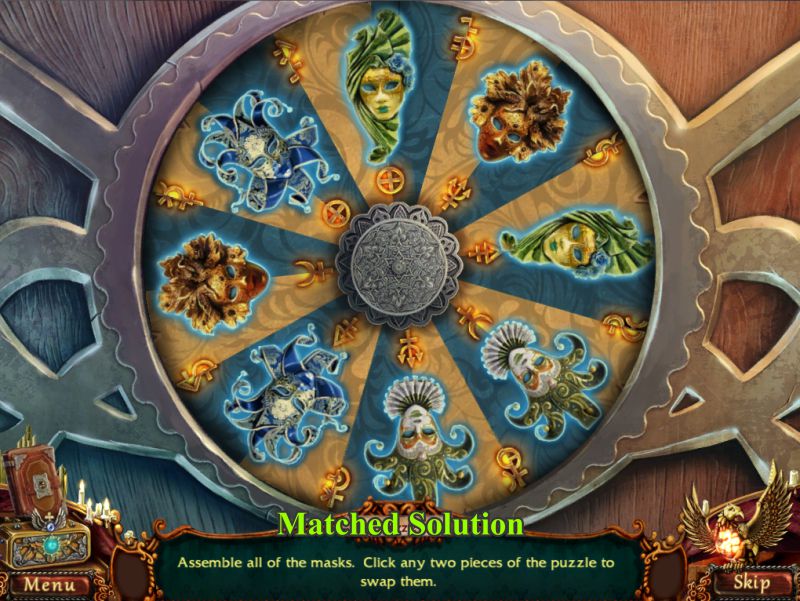
Collection Box Puzzle
Although the Puzzle's initial presentation is random, the masks need to be assembled in the same way.
Swap the mask pieces, making sure you also match the characters underneath.
See the screenshot for the matched solution.
Screenshot
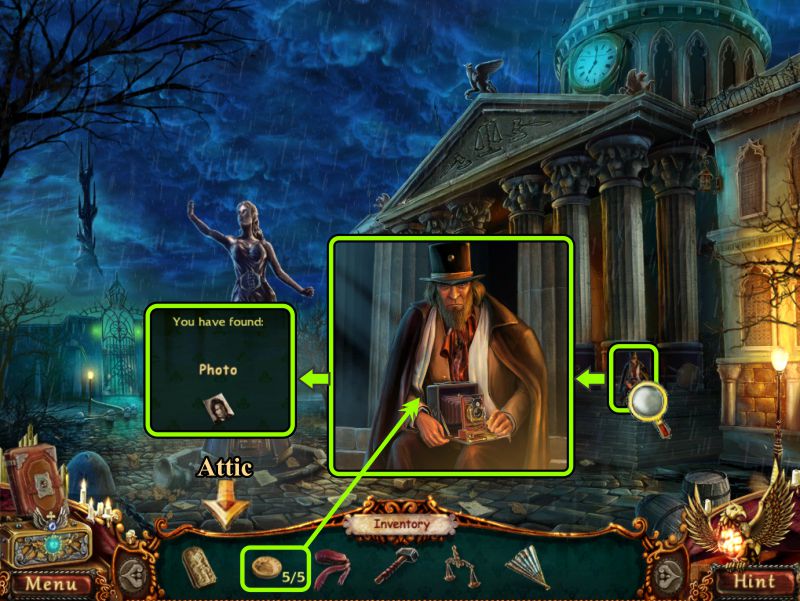
Town Square
Zoom in and give your coins to the photographer in exchange for a Photo.
Go to the Attic.
Screenshot
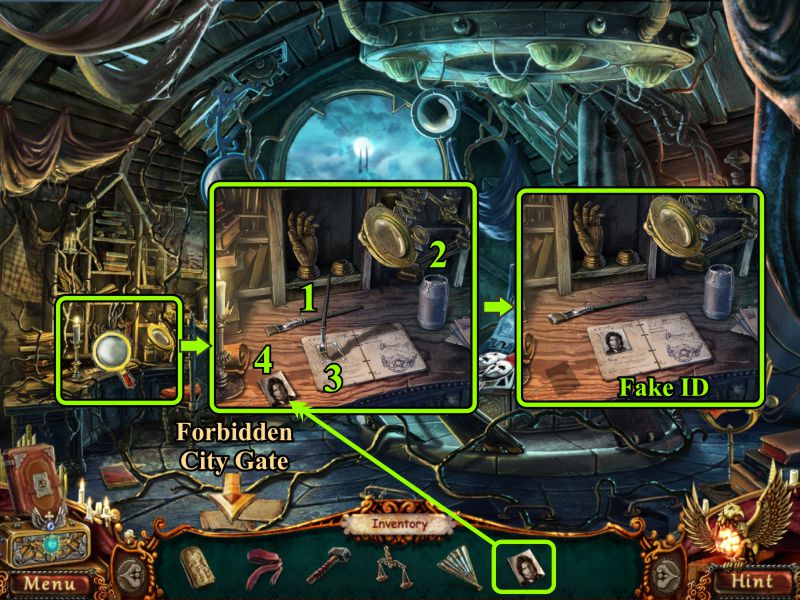
Attic
Zoom in on the desk.
Dip the Brush in the Glue, and it will place glue on the ID.
Place your Photo on the desk and then on the glued ID.
Take the Fake ID and go to the Forbidden City Gate.
Screenshot
Forbidden City Gate
Give your ID to the guard, and he will give you the Key to the police shed.
Screenshot
Place the Key on the shed, turn it, and take the Sword from the open shed.
Examine the gate and notice, then go to the Town Square.
Screenshot
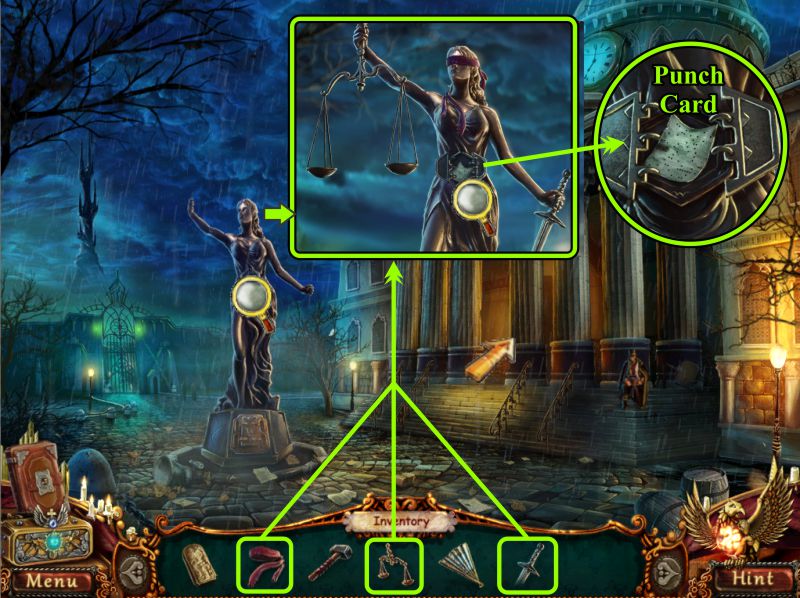
Town Square
Zoom in on the statue and place the Ribbon, Scale, and Sword as shown.
Take the Punch Card and go to the Courthouse Door.
Screenshot
Chapter 3
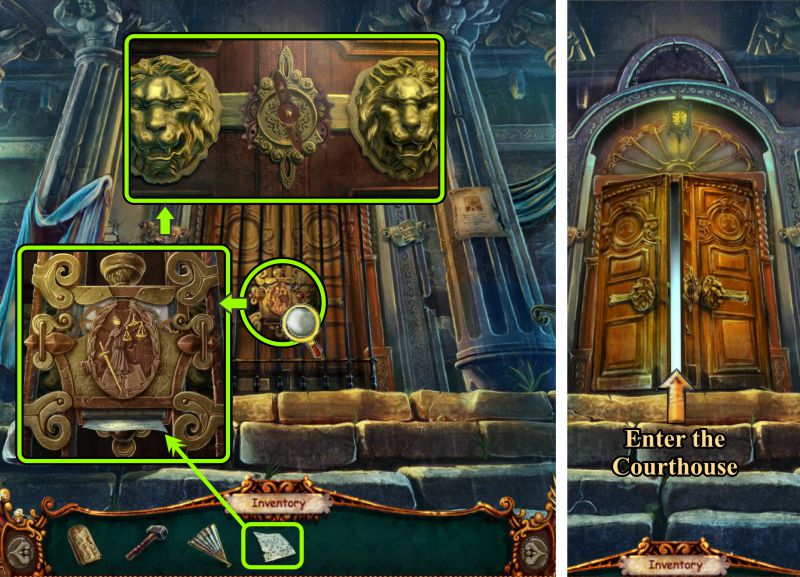
The Courthouse
Zoom in on the gate and place the Punch Card.
The gate and door will open, so enter the Courthouse.
Screenshot
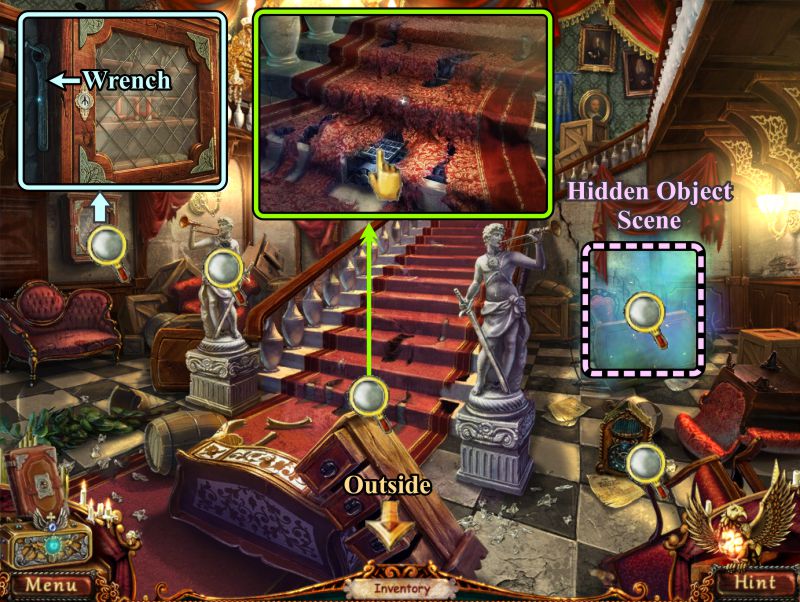
Foyer
Zoom in on the ammunition case at the left and take the Wrench.
Examine the statue and clock, then zoom in on the stairs.
Touch them and stand back.
Play the Hidden Object Scene, then go outside.
Screenshot
Foyer Hidden Object Scene
Collect everything to get a Wedge and Pruning Shears.
Use the matches to light the candle to get a Burning Candle.
Click on the ribbon to turn it into a Bow.
Use the knife on the seat of the chair to expose the Spring.
Screenshot
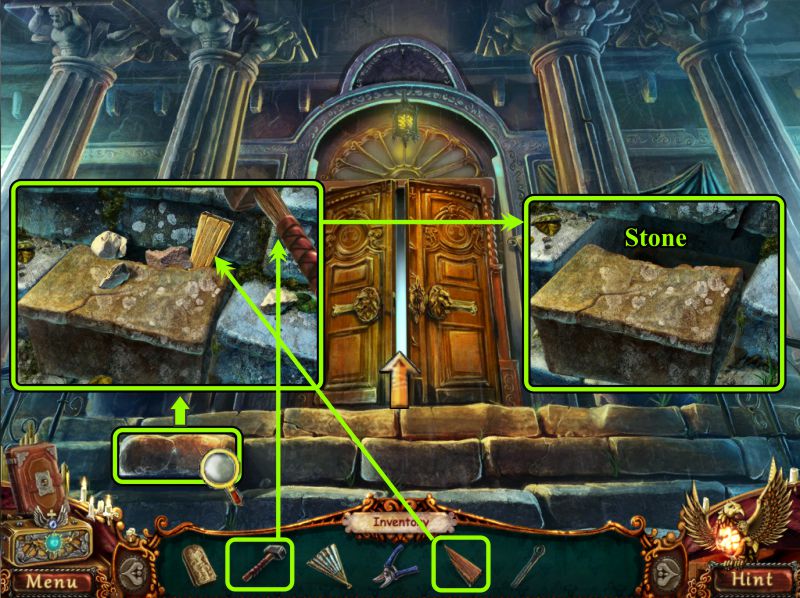
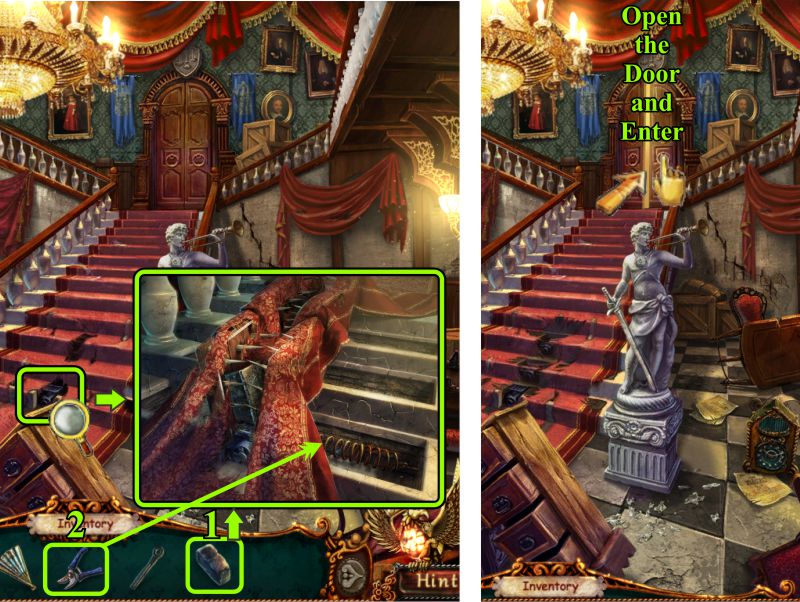
Courthouse Door
Zoom in on the loose step, place the Wedge, and use the Sledgehammer to dislodge the Stone.
Take the Stone and return inside.
Screenshot
Foyer
Zoom in on the stairs, place the Stone on the trigger, and use your Pruning Shears to clip the spring.
Go upstairs, open the door, and enter the Judge's Office.
Screenshot
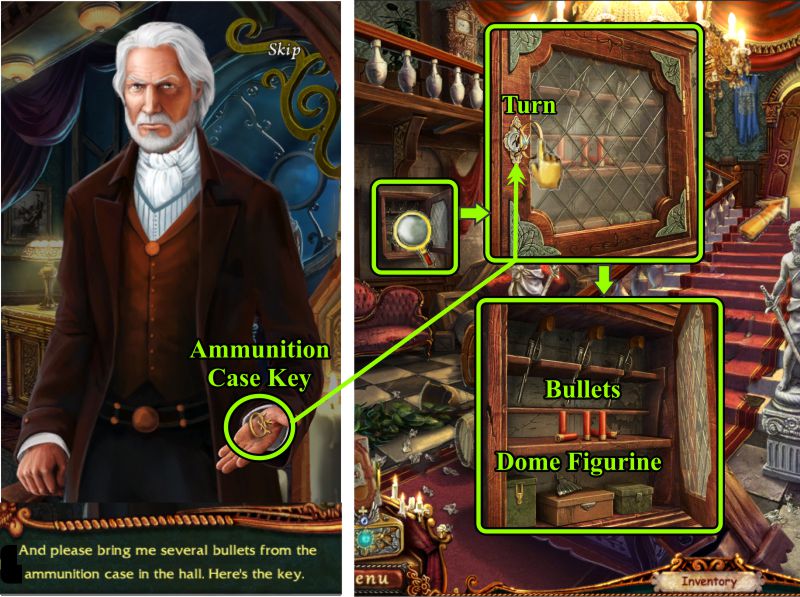
Judge's Office
The Judge gives you the Key to the Ammunition Case, so go downstairs and zoom in on the case.
Place the Key, turn it, and take the Bullets and Dome Figurine.
Watch the cut scene and go back upstairs.
Screenshot
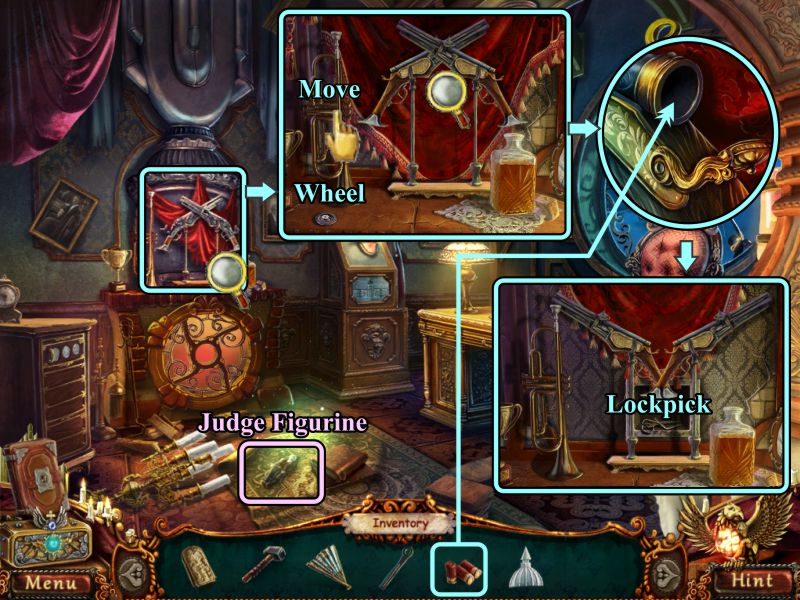
Judge's Office
The Judge is gone, so pick up the Judge Figurine and zoom in on the gun display.
Move the trumpet and pick up the Wheel.
Zoom in on the guns and place the Bullets.
The guns will turn around, revealing a Lockpick for you to collect.
Screenshot
The Box
When you pick up the Judge Figurine, the Box will open.
Place the figurine, watch the cut scene, and close the Box.
Screenshot
Judge's Office
Look at the window and take the Rope.
Examine the Judge's desk.
Zoom in on the book and read it.
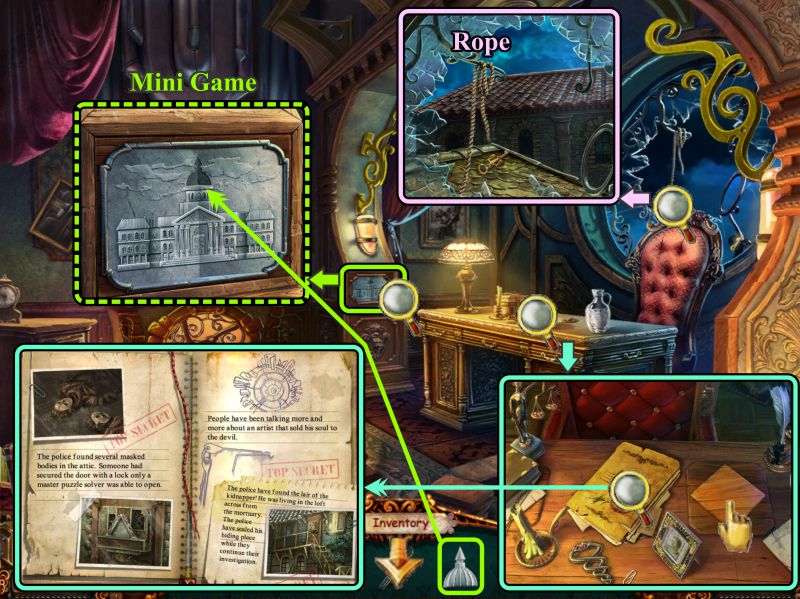
Open the safe cover, then zoom in on the cabinet next to the desk.
Place the Dome Figurine to trigger a Mini Game.
Screenshot
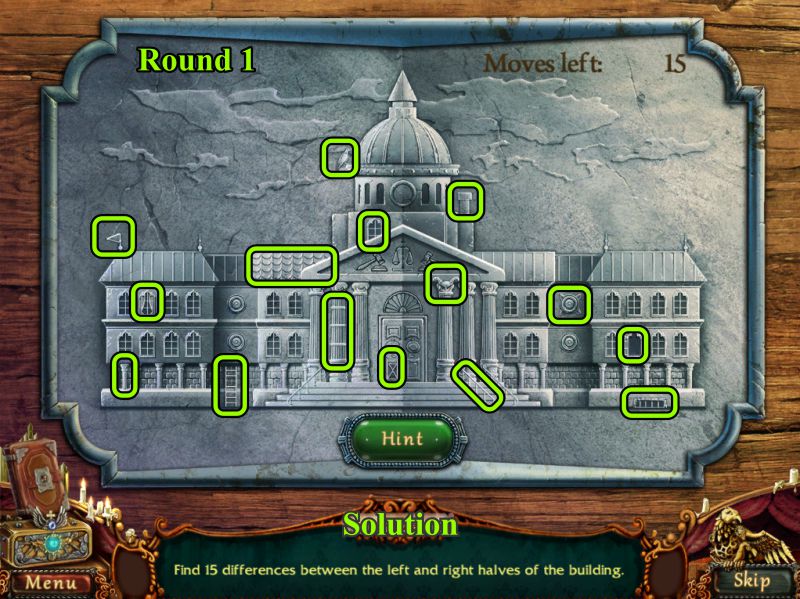
Courthouse Mini Game
There are 3 rounds to the game, and your goal is to find 15 differences between the two halves of the building.
See the screenshot for the solution to Round 1.
Screenshot
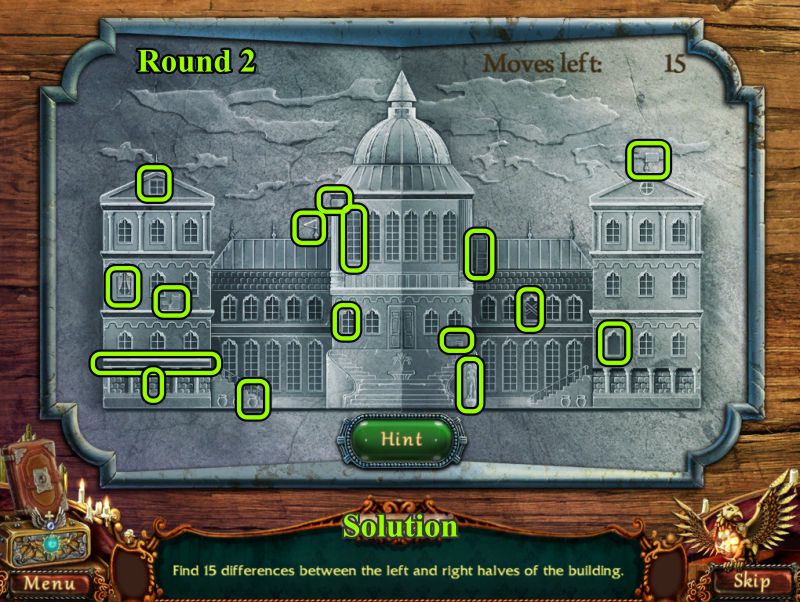
The Round 2 solution is marked in the screenshot.
Screenshot
See the screenshot for the Round 3 differences.
When the cabinet opens, take the Courthouse Replica, and note the glass behind it.
Screenshot
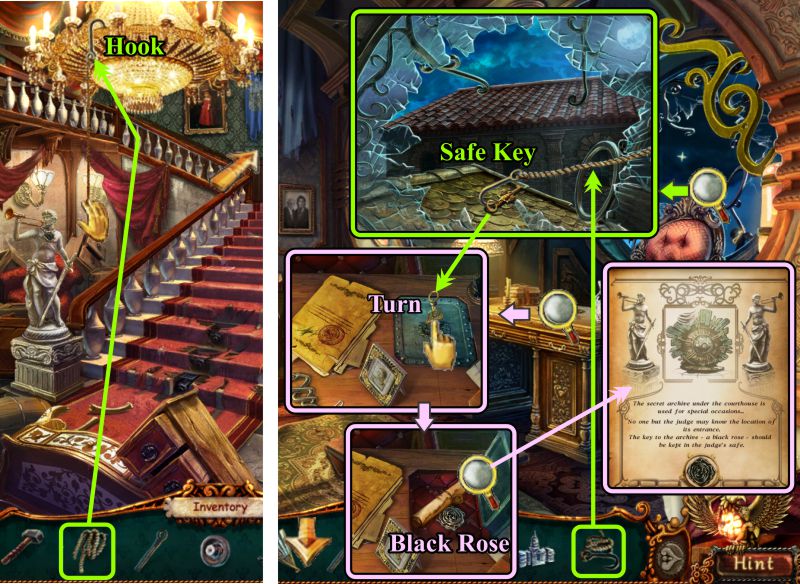
Foyer
Go downstairs and toss your Rope on the Hook on the chandelier.
Return upstairs, zoom in on the window, and use your Rope to hook the Safe Key.
Place the Key in the safe and turn to open it.
Take the Black Rose and read the note.
Return downstairs.
Screenshot
Foyer
Zoom in on the left statue and place the Black Rose.
Zoom in on the lower part of the statue for a Mini Game to open the Secret Archive.
Screenshot
Statue Mini Game
Your goal is to place the weights at the bottom on the two plates at the top so the sides balance.
See the screenshot for one solution.
Screenshot
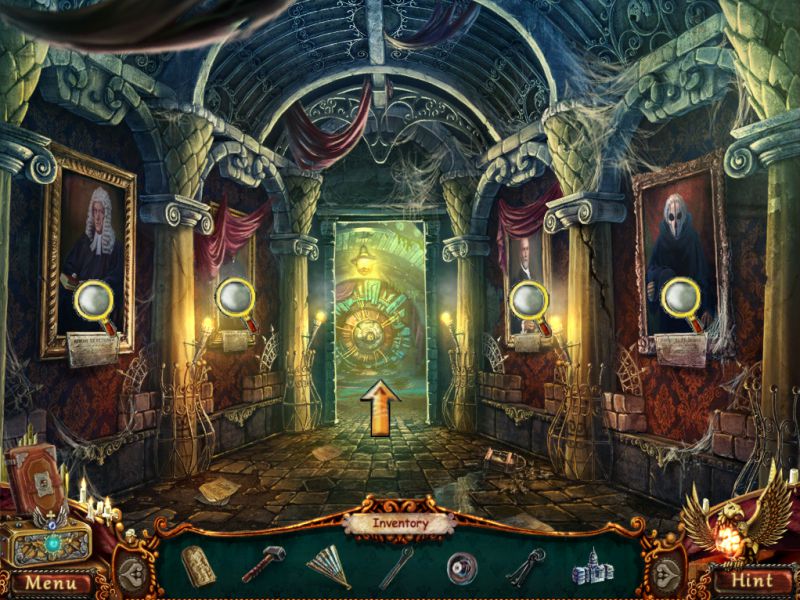
Archive Hallway
Examine all the paintings before entering the Archive.
Screenshot
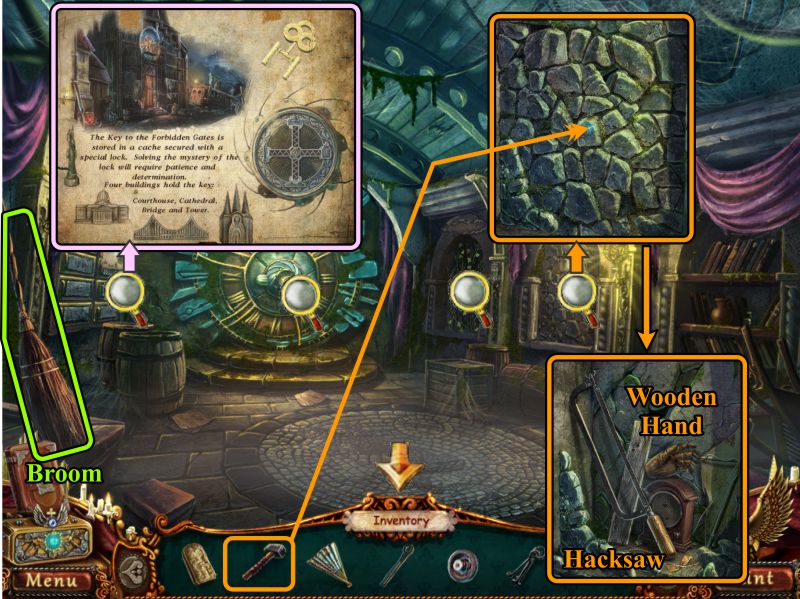
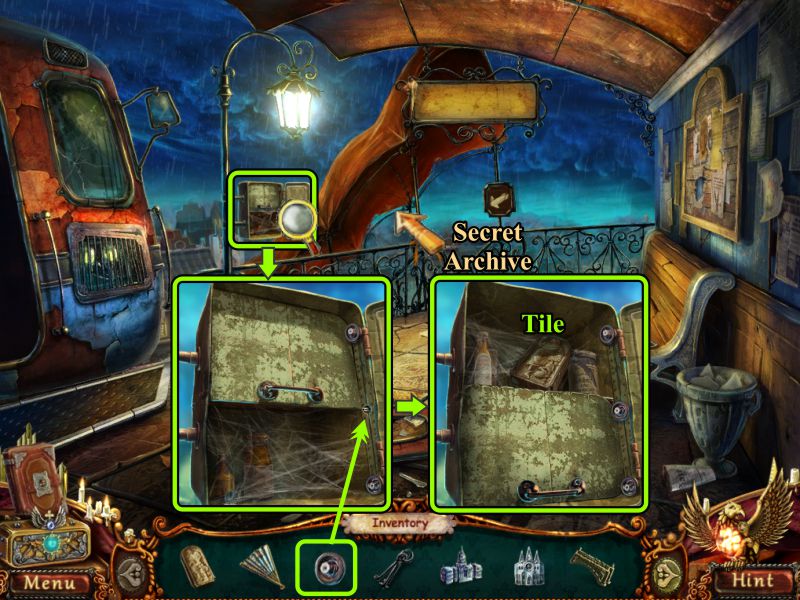
Secret Archive
Pick up the Broom, examine the magnifying glasses, and zoom in to read the notice about the key.
Zoom in on the stone wall to the right and use your Sledgehammer to break up the stones.
Take the Hacksaw and Wooden Hand.
Return to the Hallway.
Screenshot
Archive Hallway
Zoom in on the ceiling and use your Broom to remove the cobwebs.
Note the pattern of Pisces, Virgo, and Sagittarius.
Go to the Judge's Office.
Screenshot
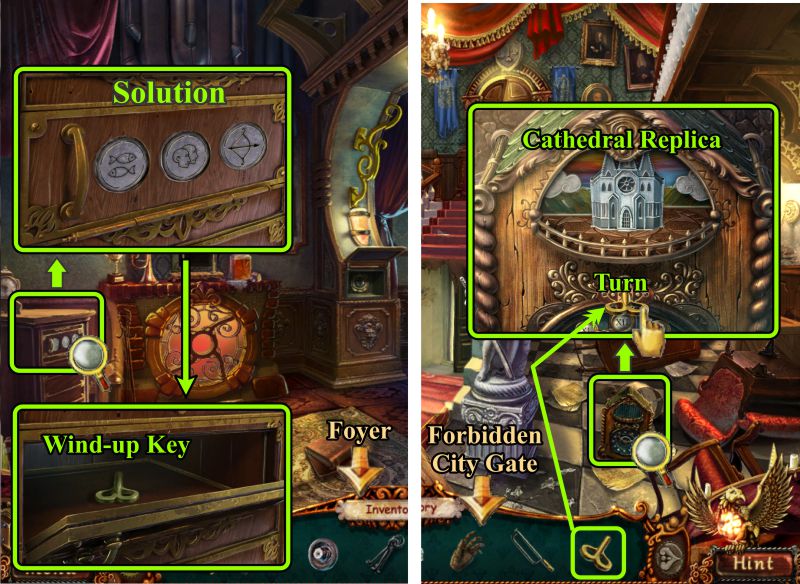
Judge's Office and Foyer
Zoom in on the cabinet at the left and change the zodiac symbols to Pisces, Gemini, and Sagittarius.
When it opens, take the Wind-up Key.
Go downstairs and zoom in on the clock.
Place the Wind-up Key and turn it.
Take the Cathedral Replica.
Go to the Forbidden City Gate.
Screenshot
Forbidden City Gate
Zoom in on the sign at the left and use your Wrench to remove it.
Take the Tile, then zoom in on the shed at the right.
Use your Hacksaw to remove the Tower Replica.
Go to the Attic.
Screenshot
Attic
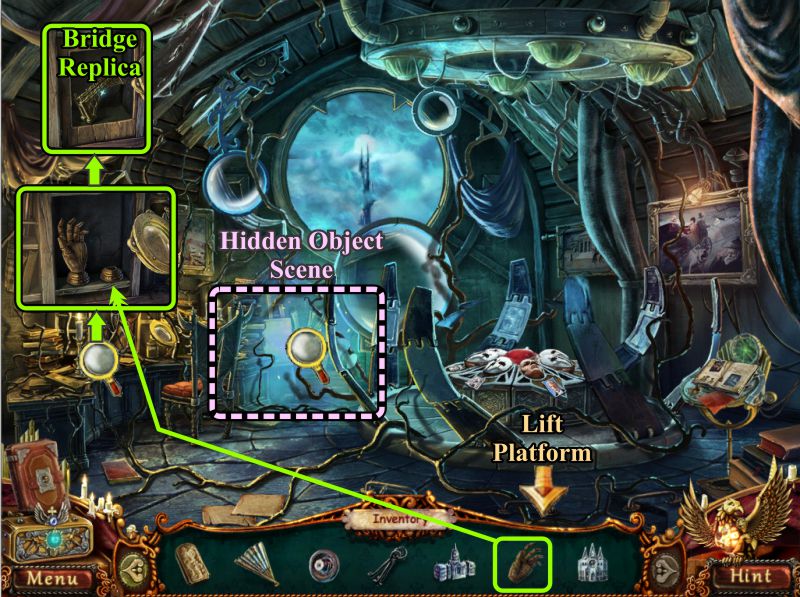
Zoom in on the desk and place the Wooden Hand.
Take the Bridge Replica.
Play the Hidden Object Scene, then go to the Lift Platform.
Screenshot
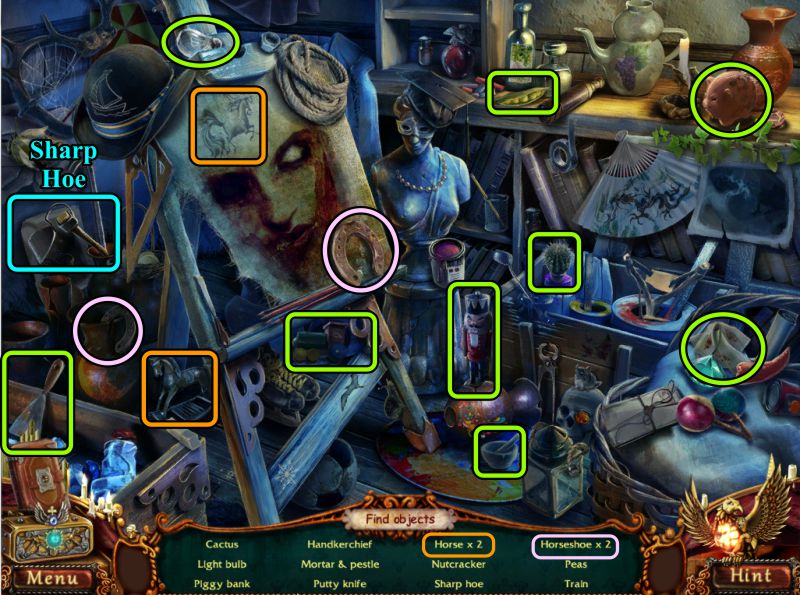
Attic Hidden Object Scene
Collect everything to get a Sharp Hoe for your Inventory.
Screenshot
Mountain Lift Platform
Zoom in on the first aid cabinet and place the missing Wheel.
Take the Tile, then go to the Secret Archive in the Courthouse.
Screenshot
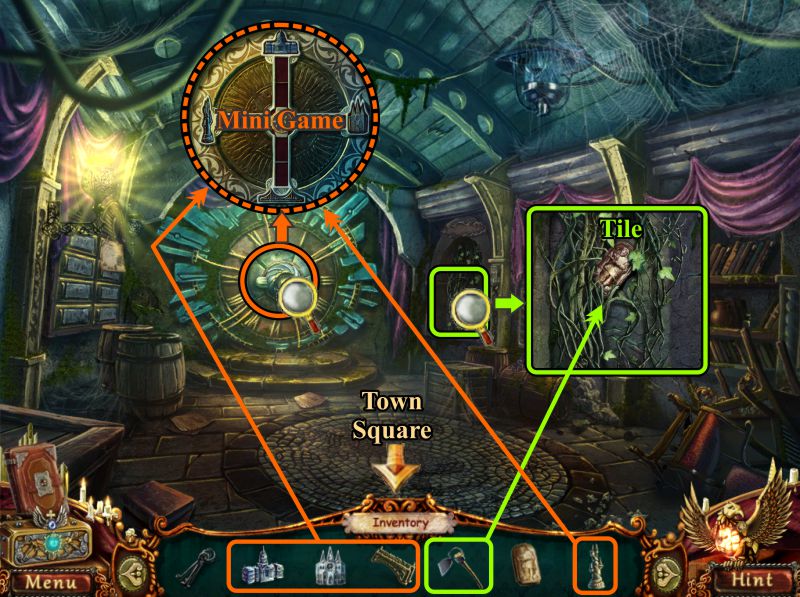
Secret Archive
Zoom in on the panel to the right and use your Sharp Hoe to remove the vines.
Take the Tile, then zoom in on the lock.
Place all 4 of your Replicas to trigger a Mini Game.
Screenshot
Secret Archive Cache Mini Game
Your goal is to arrange the tiles so that the inner tiles match the sun and the outer tiles match the appropriate architecture.
Each of the two sets of tiles must also match each other where they touch.
Right click to rotate the tiles.
See the screenshot for the solution.
Take the Forbidden Gate Key and go to the Town Square.
Screenshot
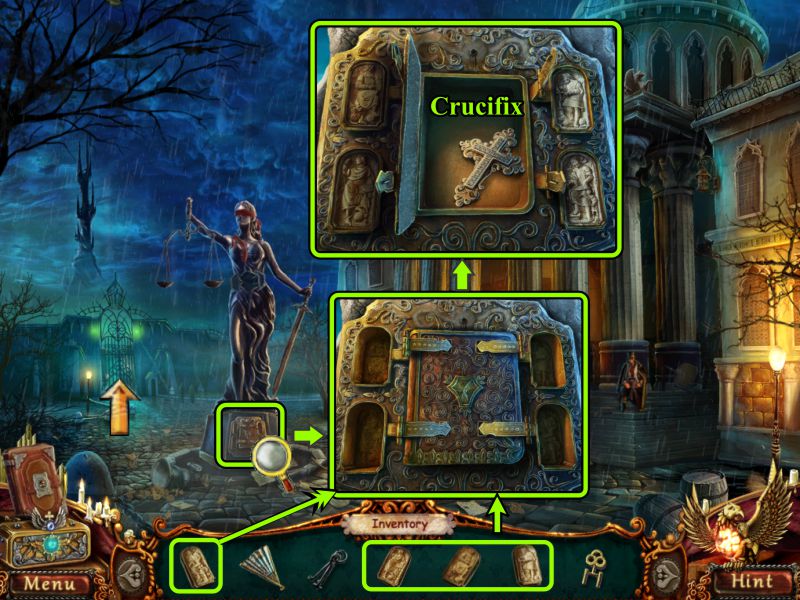
Town Square
Zoom in on the lower part of the statue and place your 4 Tiles.
Take the Crucifix and go to the Forbidden City Gate.
Screenshot
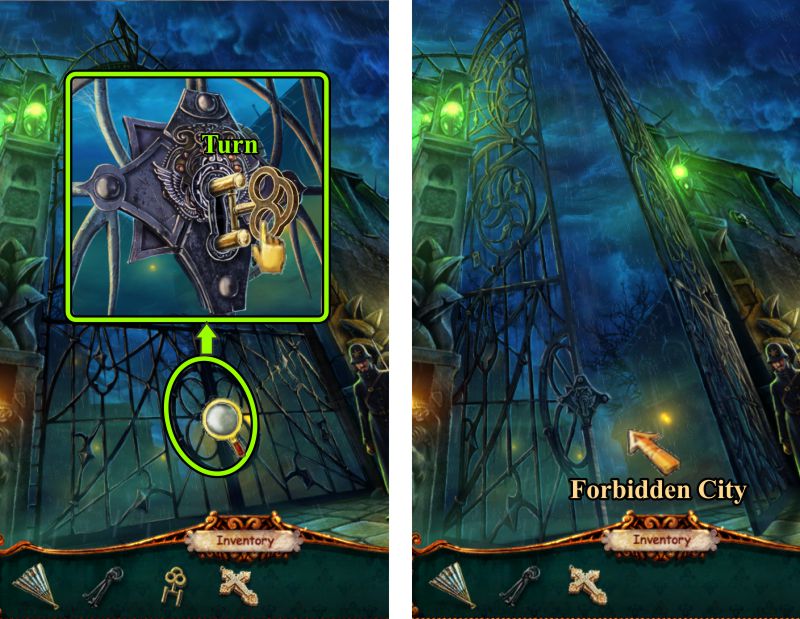
Chapter 4
The Forbidden City
Zoom in, place your Key, turn it, and enter the Forbidden City.
Screenshot
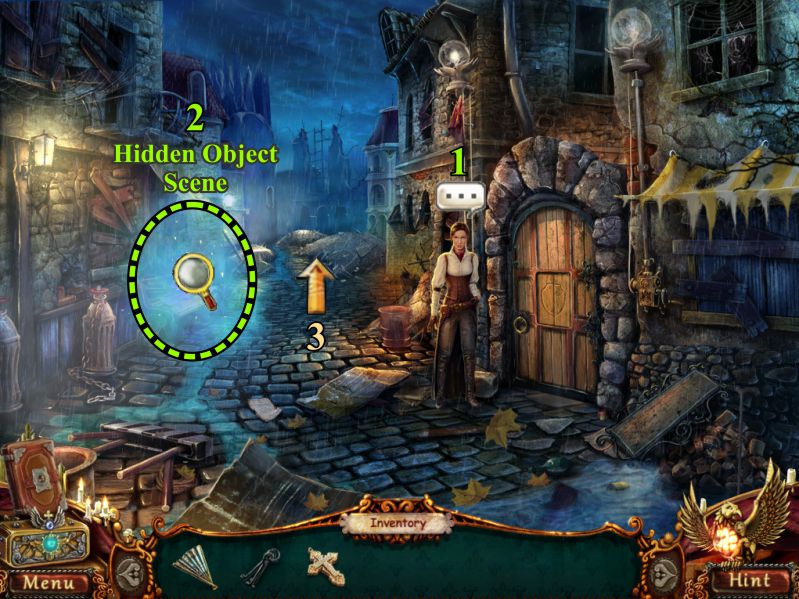
Forbidden City Street
Talk to Officer Mary Duran, play the Hidden Object Scene, and go forward to the Cathedral.
Screenshot
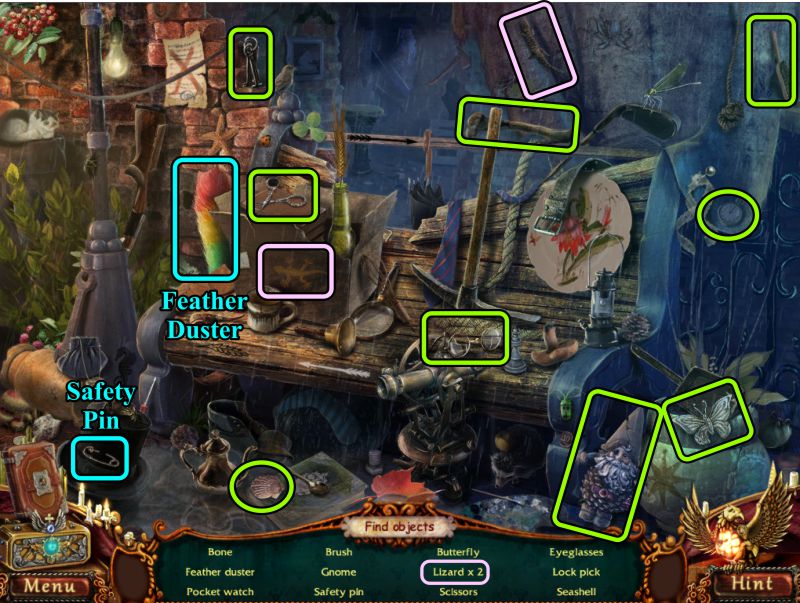
Forbidden City Hidden Object Scene
Collect everything to get a Feather Duster and Safety Pin.
Screenshot
Outside Cathedral
Examine the magnifying glasses, then zoom in on the crane at the right.
Turn the handle to bring up a container of coal.
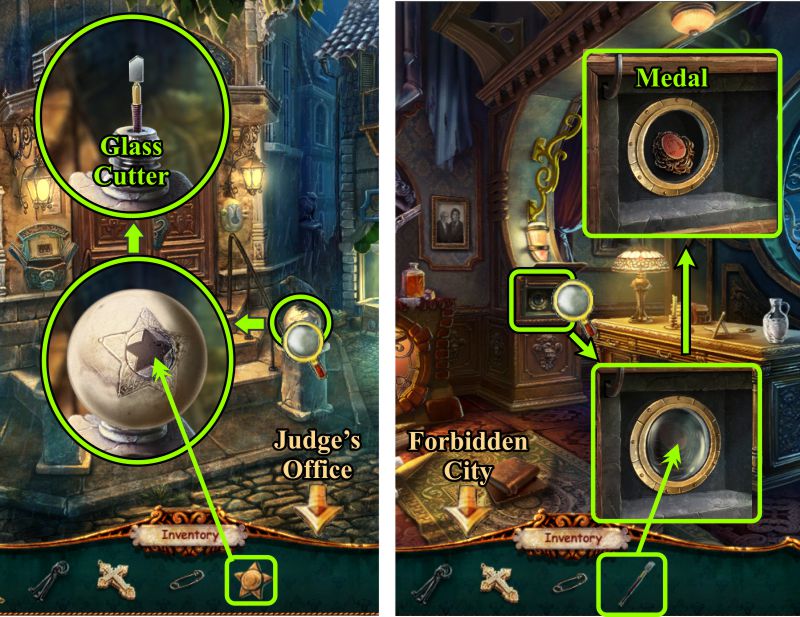
Use your Feather Duster to remove some of the dust so you can collect a Star.
Go to the Mortuary.
Screenshot
Outside Mortuary and Judge's Office
Zoom in on the right ball and place the Star.
Take and Glass Cutter, then go to the Judge's Office.
Zoom in on the cabinet next to the desk and use the Glass Cutter to remove the glass.
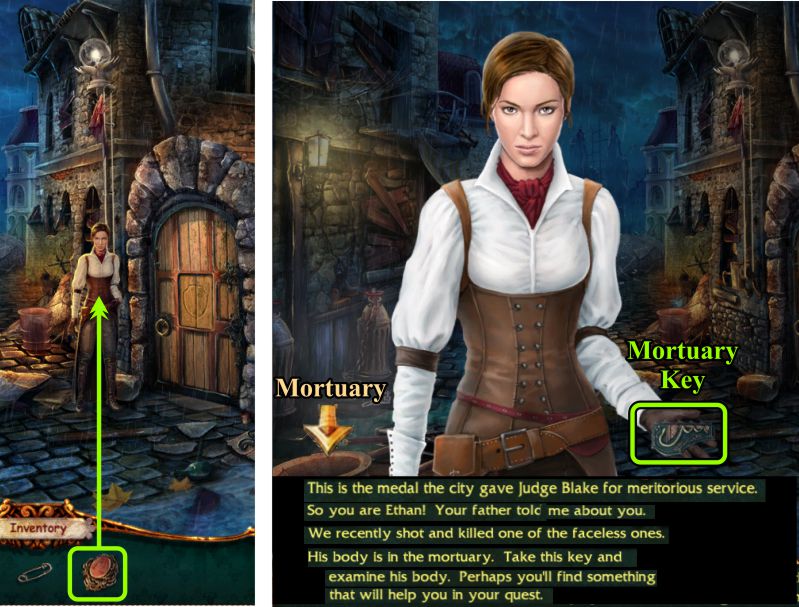
Take the Medal, then go to the Forbidden City.
Screenshot
Forbidden City
Give the Medal to Officer Duran, and she will give you the Mortuary Key.
Go to the Mortuary.
Screenshot
Chapter 5
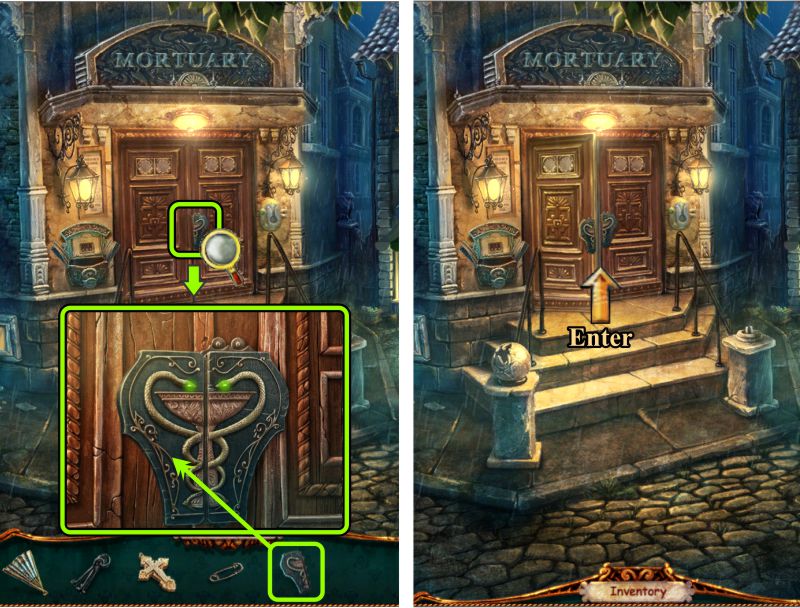
Mortuary Door
Zoom in and place the Mortuary Key.
Enter the Mortuary.
Screenshot
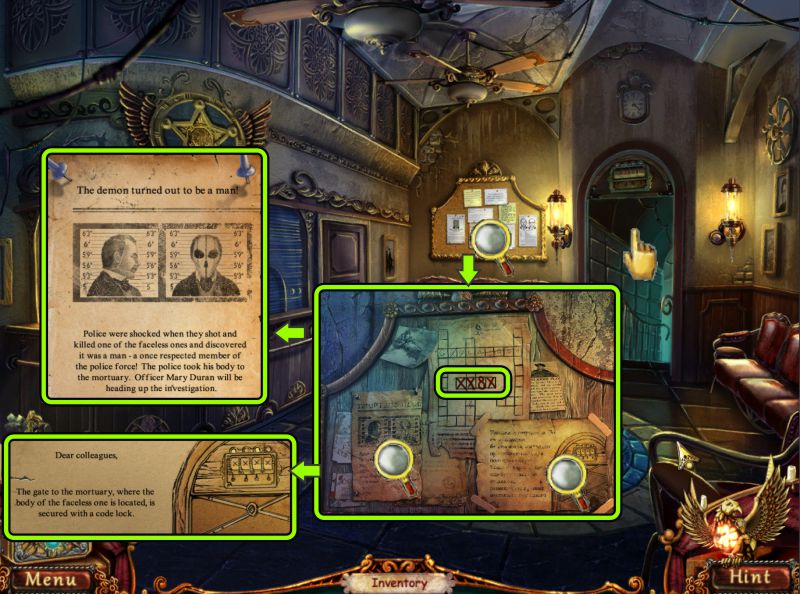
Mortuary Reception
Zoom in on the bulletin board and read the postings. Note the number xx8x.
Click on the doorway to downstairs; it will be barricaded by a gate.
Screenshot
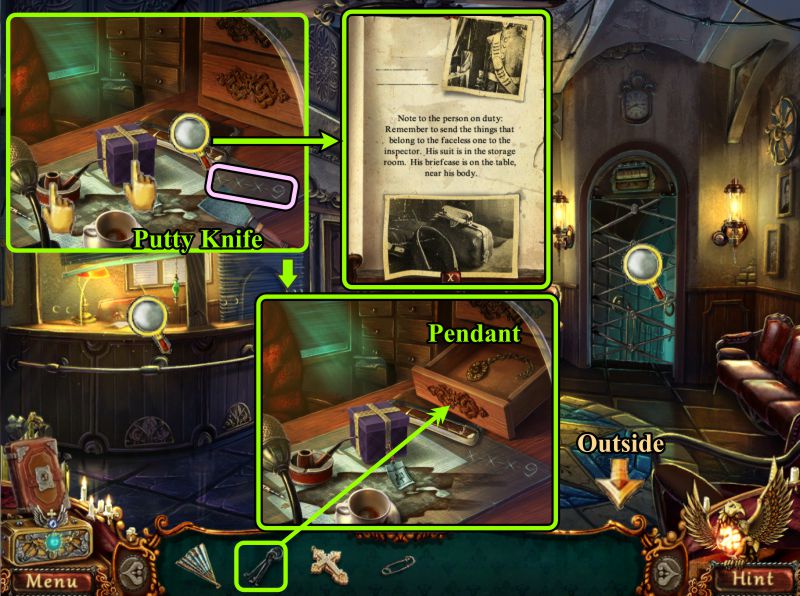
Zoom in on the reception desk, note the number xxx9, and take the Putty Knife.
Zoom in on the book and read it.
Use your Lockpick to open the drawer, then take the Pendant.
Go outside.
Screenshot
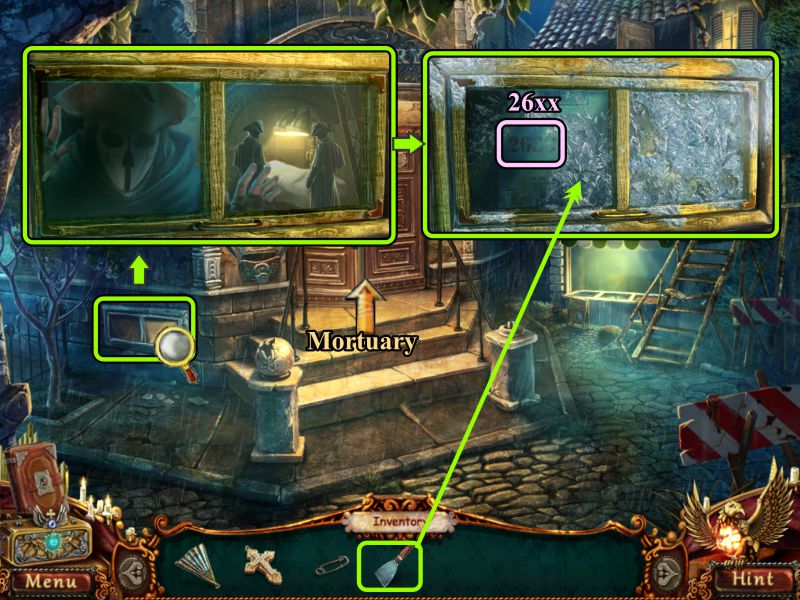
Outside Mortuary
Zoom in on the window to see what's going on at the Mortuary: a faceless one will freeze over the window.
Use your Putty Knife to scrape away some of the ice so you can read the number 26xx.
Go back into the Mortuary.
Screenshot
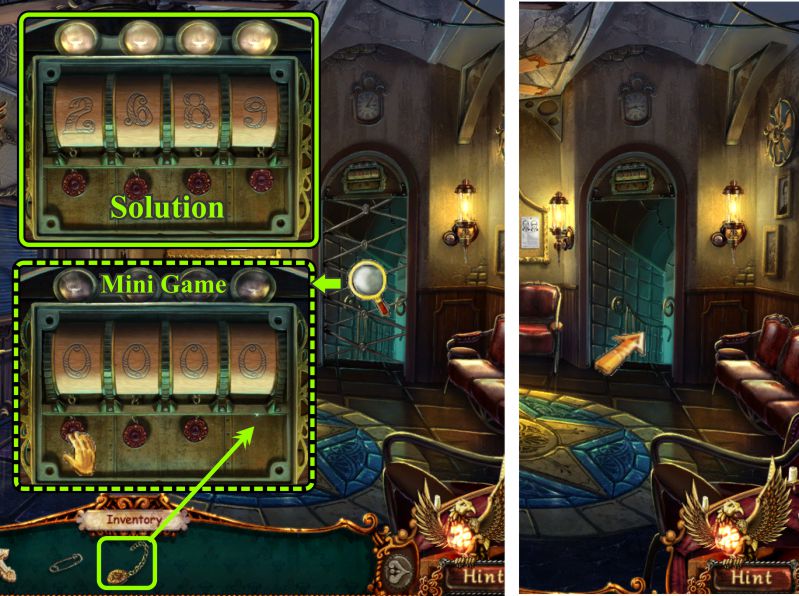
Mortuary Reception
Zoom in on the gate and place the Pendant to trigger a Mini Game.
Pull each pendant to enter the number 2689.
When the gate opens, go downstairs.
Screenshot
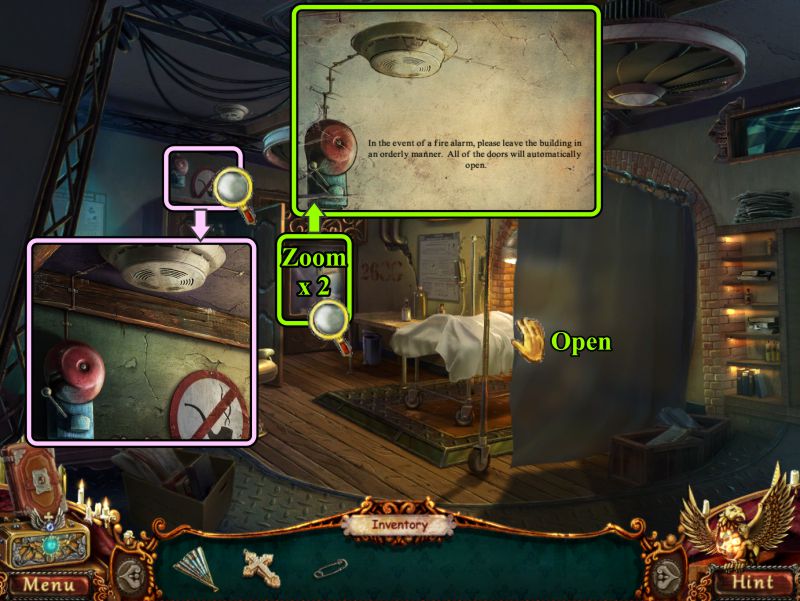
Mortuary Examining Room
Zoom in twice on the notice, then zoom in on the fire alarm to see that no lit pipes are allowed.
Open the curtain.
Screenshot
Zoom in and remove the cover.
Pick up the Scalpel and the Officer Figurine.
Screenshot
The Box
Place the Officer Figurine and watch the cut scene.
Close the box and go upstairs to Reception.
Screenshot
Mortuary Reception
Zoom in on the reception desk.
Use the Scalpel to cut the ribbon on the box.
Take the Lighter and light the pipe.
Take the lit Pipe and return downstairs.
Screenshot
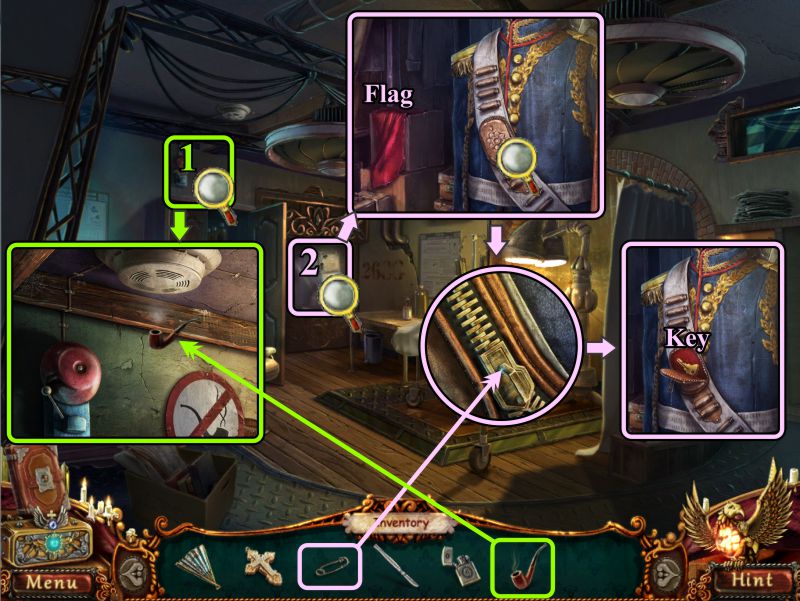
Mortuary Examining Room
Zoom in on the smoke detector and fire alarm.
Place the Pipe under the smoke detector: the alarm will go off, opening all the doors.
Zoom in on the cabinet, take the Flag, and zoom in and the uniform.
Use the Safety Pin as a zipper pull, then take the Key.
Screenshot
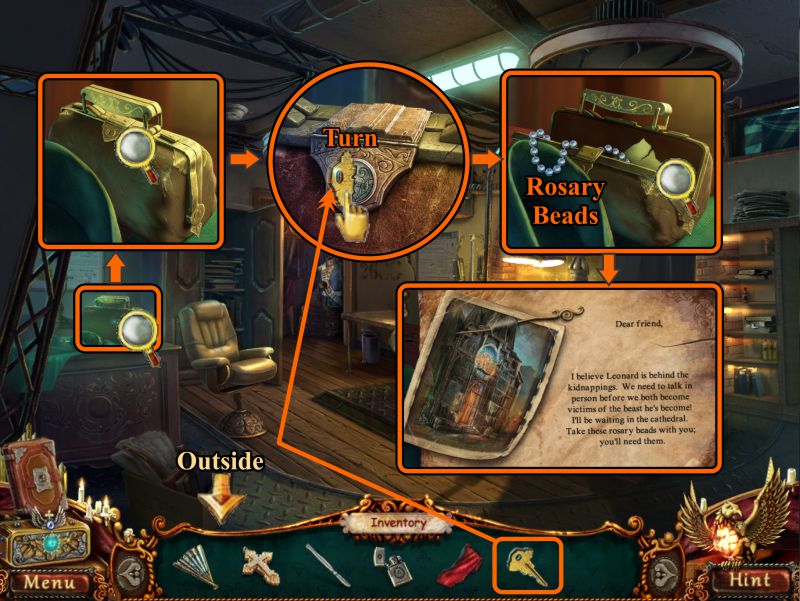
Zoom in on the bag and lock, place the key, and turn it.
Take the Rosary Beads and read the note.
Leave the Mortuary.
Screenshot
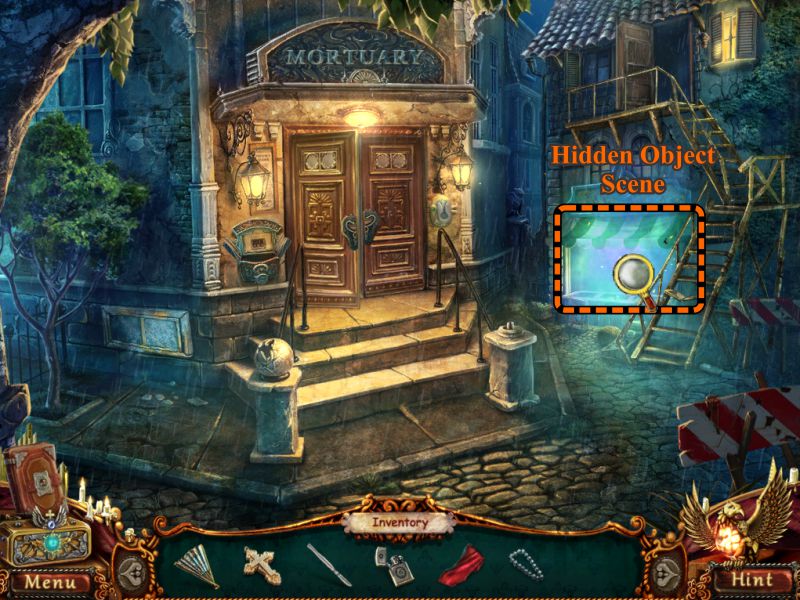
Outside Mortuary
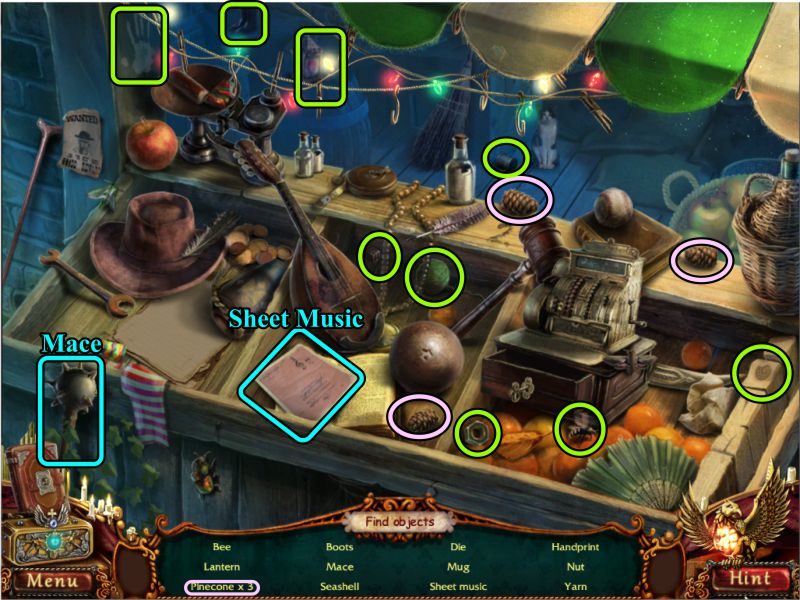
Play the Hidden Object Scene at the stand.
Screenshot
Stand Hidden Object Scene
Collect everything to get the Mace and Sheet Music.
Go to the Cathedral.
Screenshot
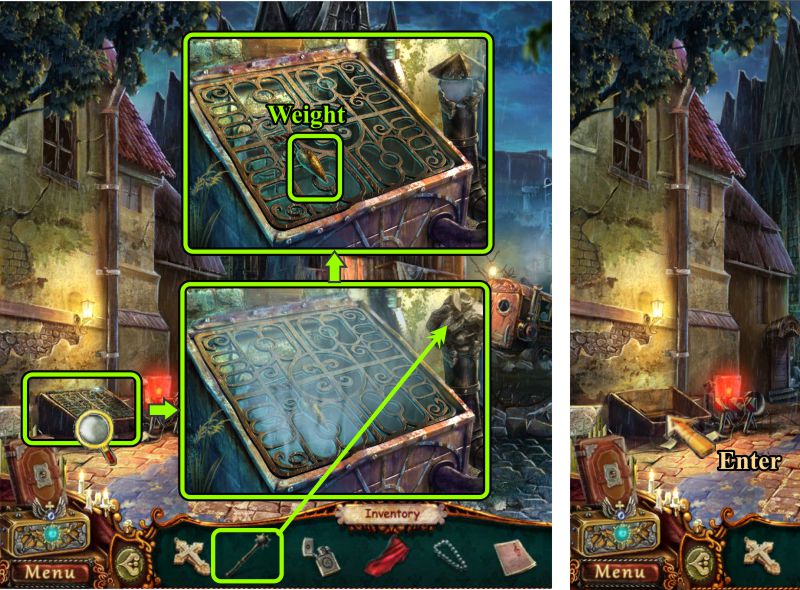
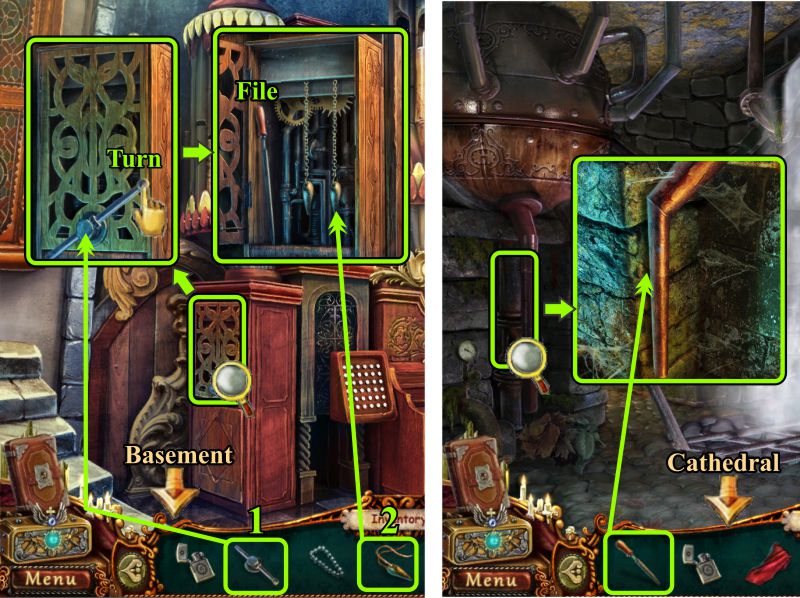
Outside Cathedral
Zoom in on the smoking grate and use to Mace to remove the concrete from the vent.
Pick up the Weight, then enter the basement .
Screenshot
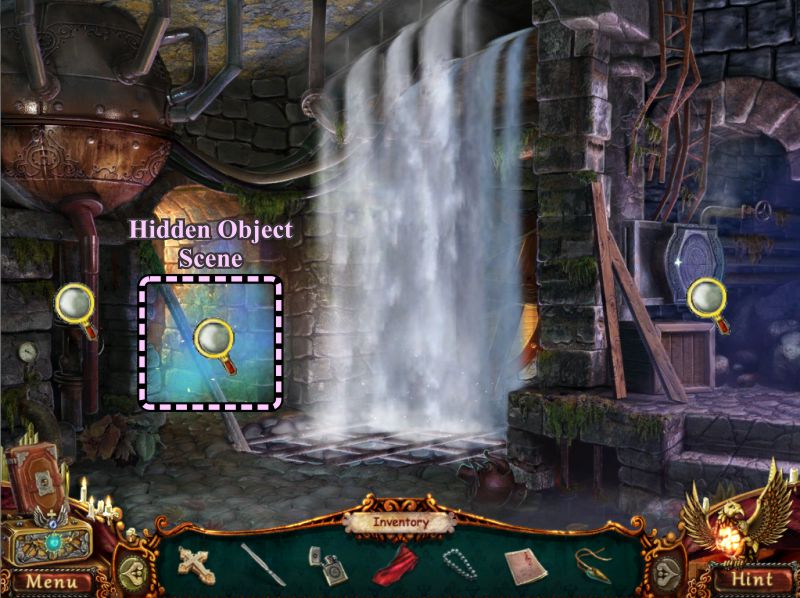
Cathedral Basement
Examine the magnifying glasses, then play the Hidden Object Scene.
Screenshot
Basement Hidden Object Scene
Collect everything to get the Pruning Shears.
Go back outside.
Screenshot
Chapter 6
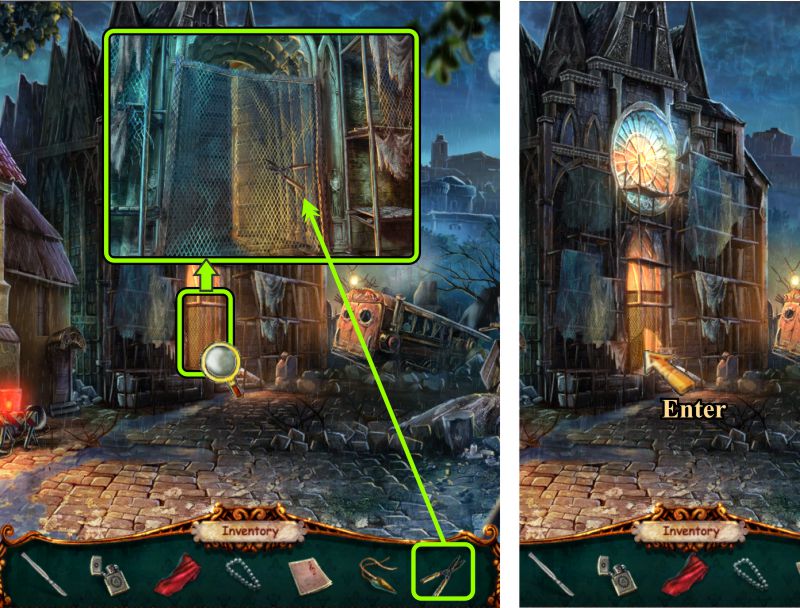
Cathedral Door
Zoom in on the door and use the Pruning Shears to cut the net.
Enter the Cathedral.
Screenshot
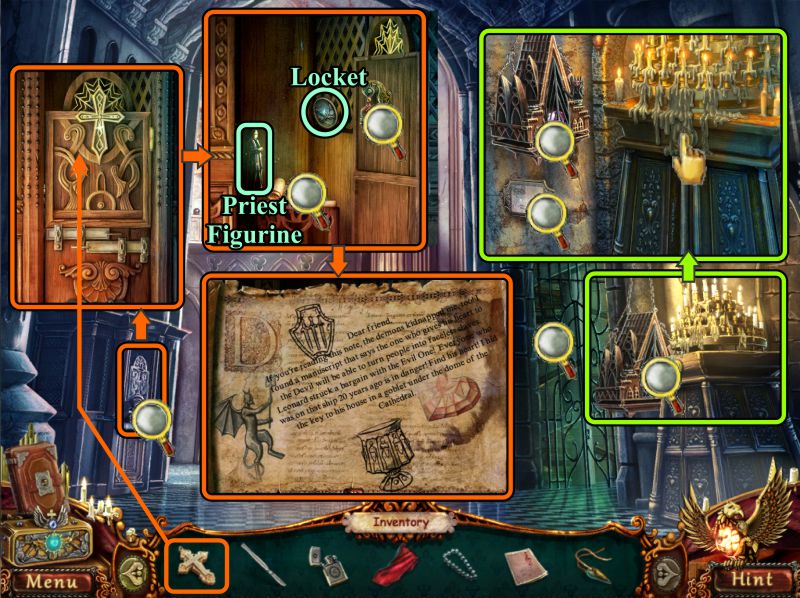
Vestibule
Zoom in on the confessional and place the Crucifix.
Take the Locket and Priest Figurine.
Examine the bell and read the note.
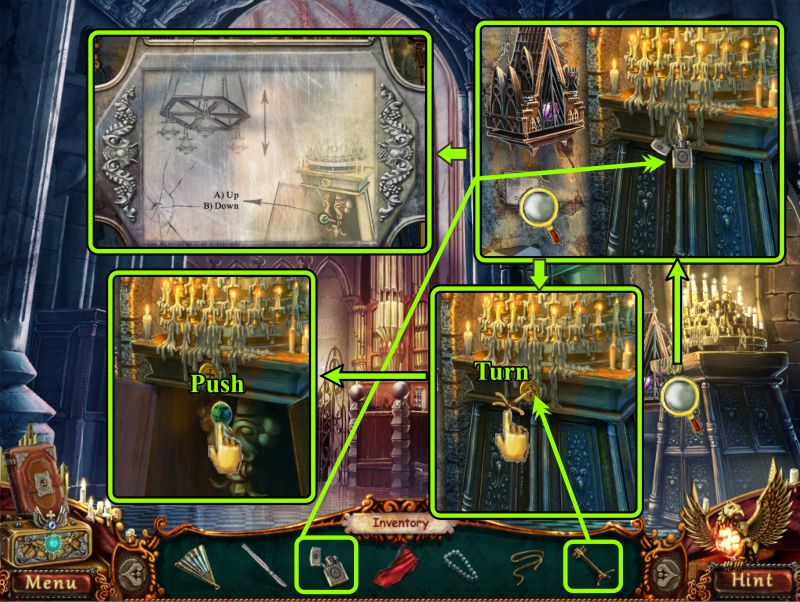
Zoom in on the candles at the right and examine the magnifying glasses.
Screenshot
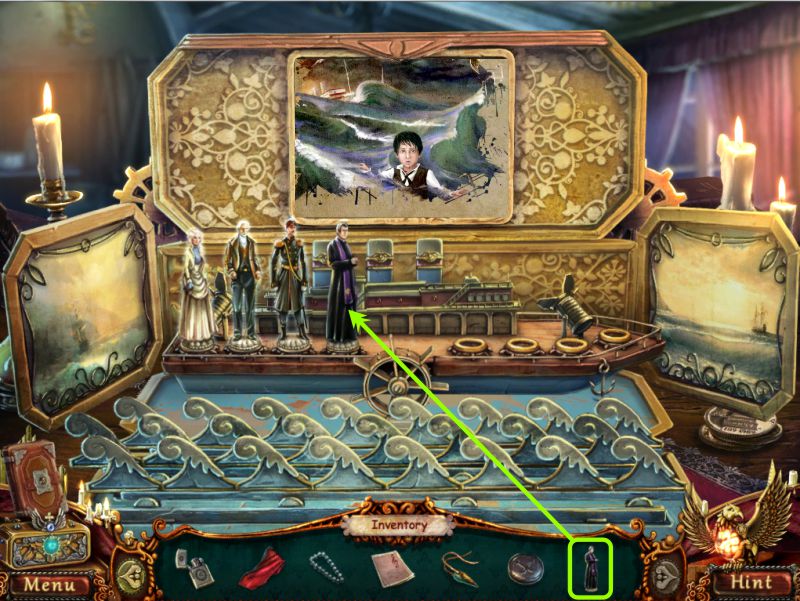
The Box
Place the Priest Figurine and watch the cut scene.
Close the box and go forward to the organ.
Screenshot
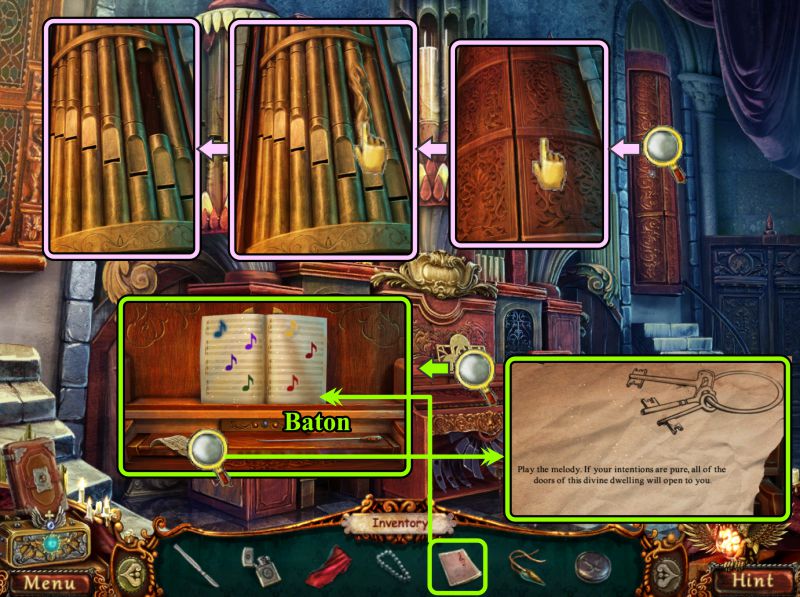
Organ
Zoom in, take the Baton, read the note, and place your Sheet Music.
Zoom in on the pipe enclosure, open it and remove the damaged pipe.
Go outside.
Screenshot
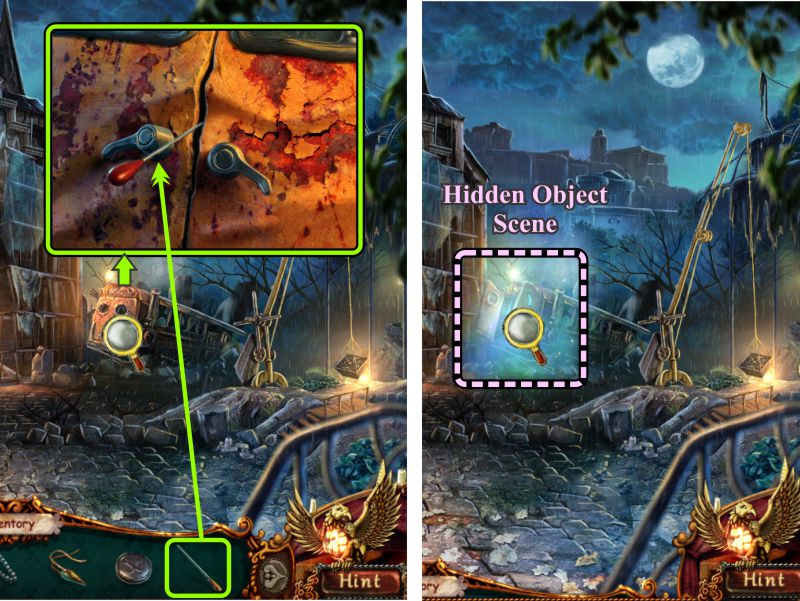
Outside Cathedral
Zoom in on the bus and use the Baton to open it.
Play the Hidden Object Scene and return to the organ area inside the Cathedral.
Screenshot
Bus Hidden Object Scene
When you have collected everything, you will receive a Shoelace and Steel Handle.
Screenshot
Cathedral Organ and Basement
Zoom in on the grate on the side of the organ and place the Steel Handle.
Turn it, place the Weight and take the File.
Go to the Basement.
Zoom in on the pipe and use the File to cut a section of pipe.
Return to the organ.
Screenshot
Cathedral Organ
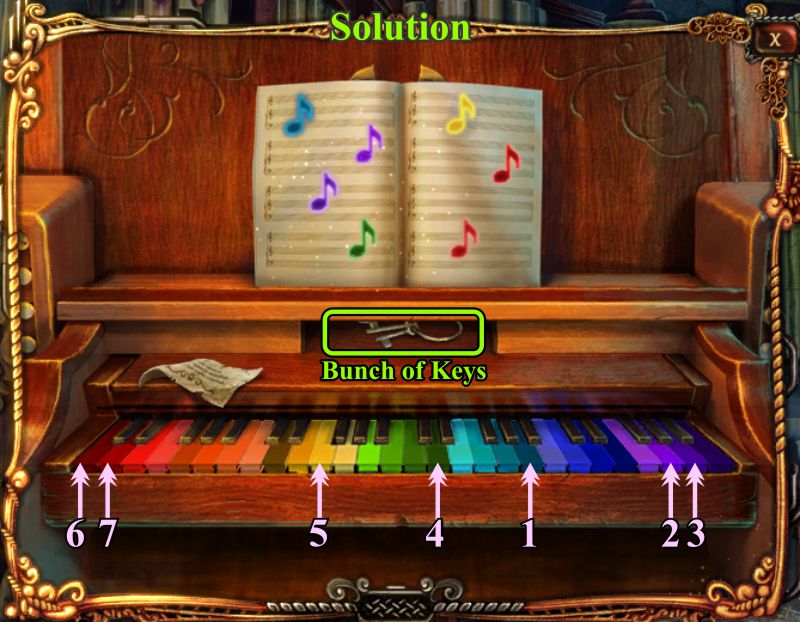
Zoom in and place the Pipe, then zoom in on the organ for a Mini Game.
Screenshot
Organ Mini Game
Your goal is to play the notes on the Sheet Music on the color-coded keyboard. See the screenshot for the solution.
Take the Bunch of Keys, then go to the Vestibule.
Screenshot
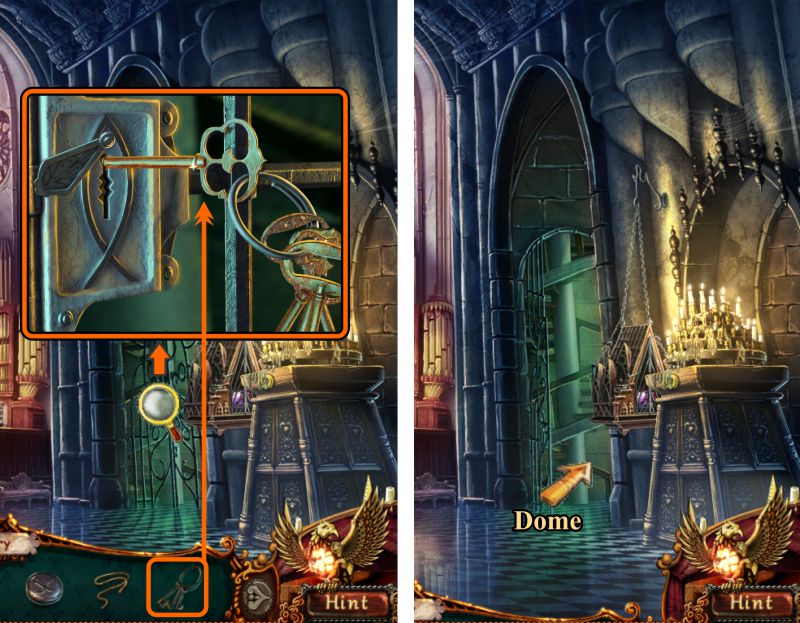
Vestibule
Zoom in on the gate and use your Bunch of Keys to open it.
Go to the Dome.
Screenshot
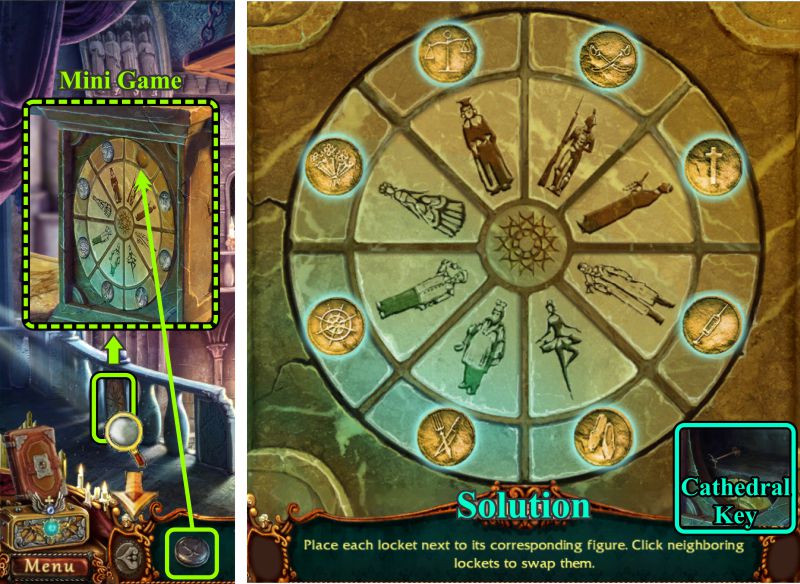
Cathedral Dome Mini Game
Zoom in on the railing at the left and place the Locket to trigger a Mini Game.
You goal is to place each locket next to its corresponding figure.
You can only swap the lockets one space at a time.
See the screenshot for the solution. Take the Cathedral Key and return downstairs.
Screenshot
Vestibule
Zoom in on the candles and use your Lighter to melt the wax covering the keyhole.
Place your Key and turn it.
Read the note on the wall, then push the lever.
Return to the Dome.
Screenshot
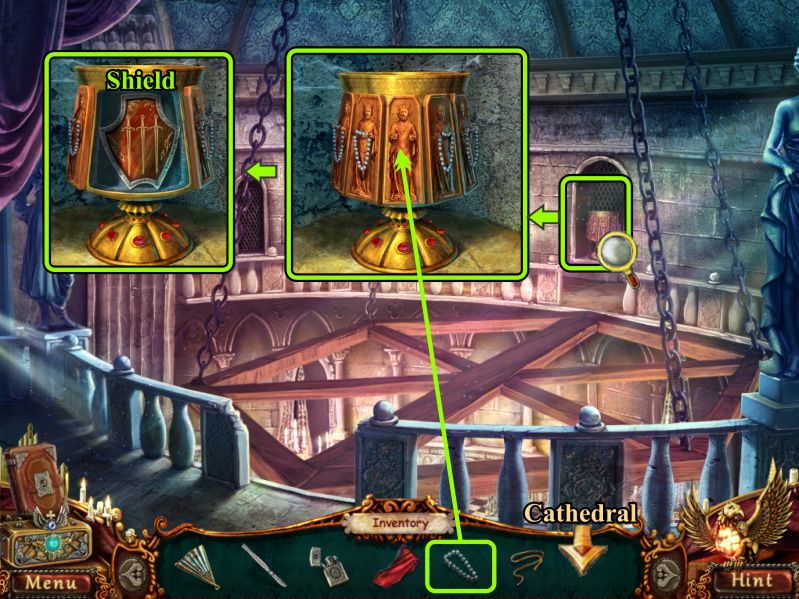
Dome
Cross the lowered chandelier by zooming in on the right niche.
Place the Rosary Beads, then take the Shield.
Return downstairs.
Screenshot
Officer Duran and Forbidden City
Talk to Officer Duran, take the Handkerchief, and exit twice to the Forbidden City.
Play the Hidden Object Scene.
Screenshot
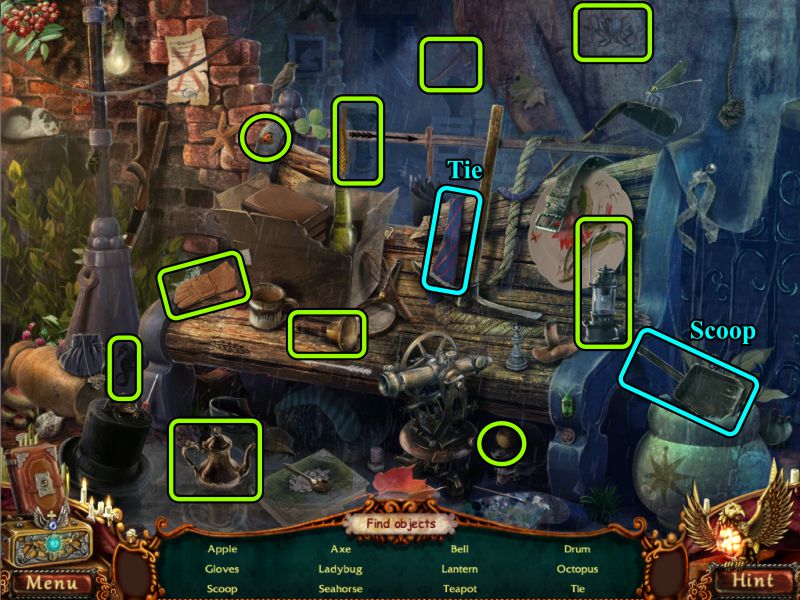
Forbidden City Street Hidden Object Scene
Collect everything to get a Tie and Scoop.
Screenshot
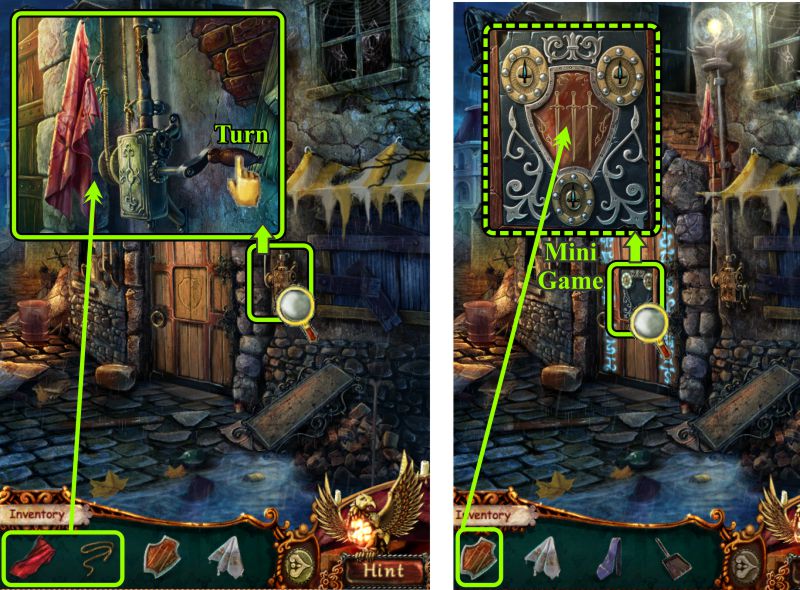
Forbidden City Street
Zoom in on the flag pole at the right and place your Flag and Rope.
Turn the handle to raise the flag and open a section on the door.
Zoom in on the door and place your Shield to trigger a Mini Game.
Screenshot
Leonard's Door
Your goal is to turn all the blades down in order to open the door.
See the screenshot for one solution. Enter the door.
Screenshot
Posted by: Jazz |
March 22, 2012 6:19 PM
|
March 22, 2012 6:19 PM
Dark Strokes: Sins of the Fathers Walkthrough Part 2
Chapters 7-12
Chapter 7
Leonard's Studio
Look at the easel to see that something is underneath the top layer of paint.
Go to the window, open the paint remover, and dip your Handkerchief in it.
Use the paint remover on the canvas to uncover a Locket.
Screenshot
The scene changes as if Ethan was transported to 20 years earlier by viewing the locket.
Pick up the Ladder and place it, as shown in the screenshot.
Zoom in on the eyehook and use the Scalpel to cut the rope.
Screenshot
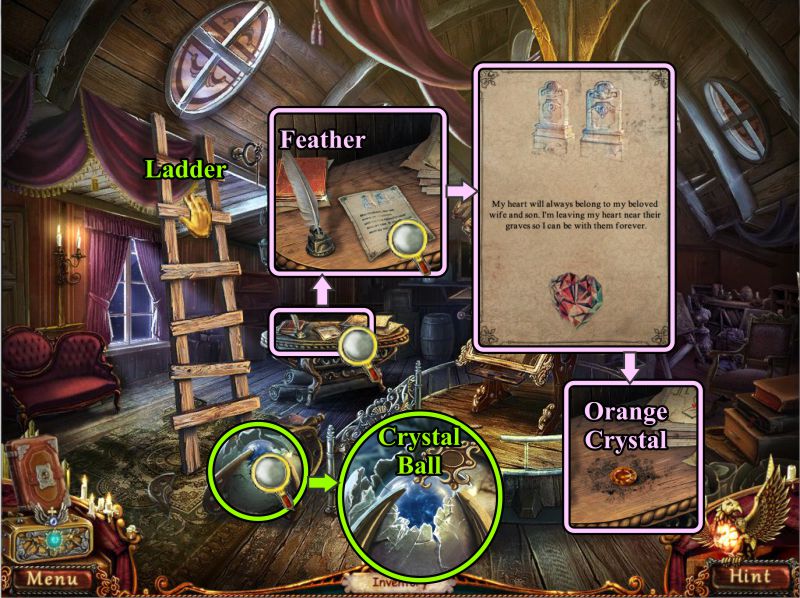
The large ball hanging from the ceiling falls to the ground, revealing a Crystal Ball inside.
Take the Crystal Ball and grab the Ladder.
Zoom in on the table, take the Feather, and zoom in again on the note.
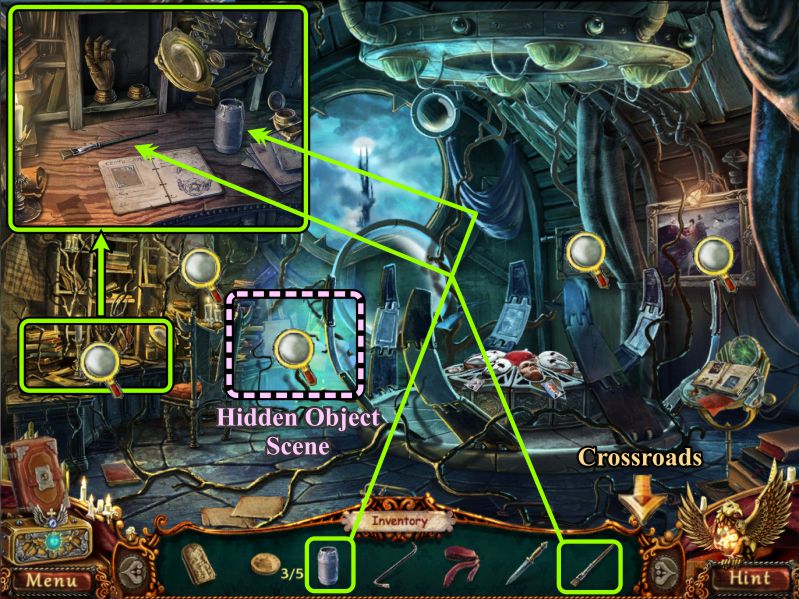
Read it, then take the Orange Crystal after the note burns up.
Screenshot
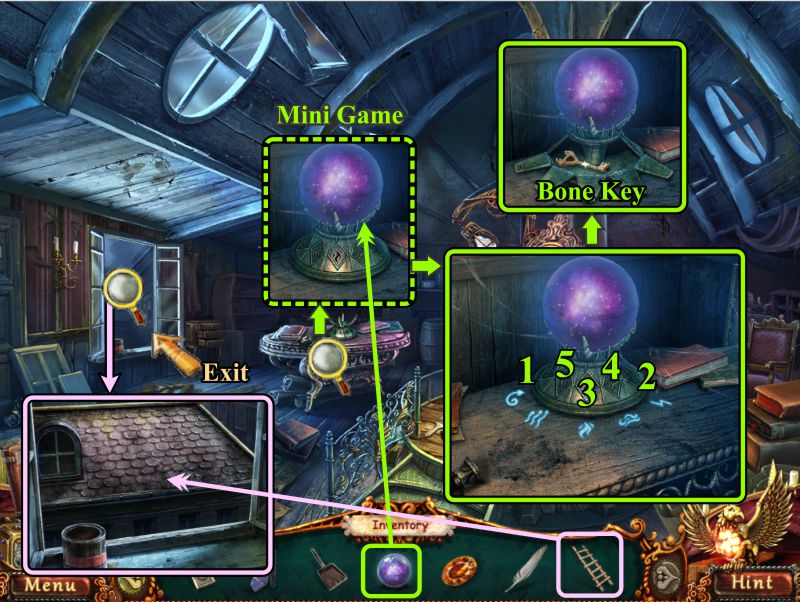
The room changes back to the present, so zoom in on that same table and place the Crystal Ball to trigger a Mini Game.
As the symbols appear on the table, press the same symbol on the crystal ball stand.
The order of the symbols is shown in the screenshot.
Take the Bone Key, and go to the window.
Place the ladder on the windowsill, and it will reach to the roof across the way.
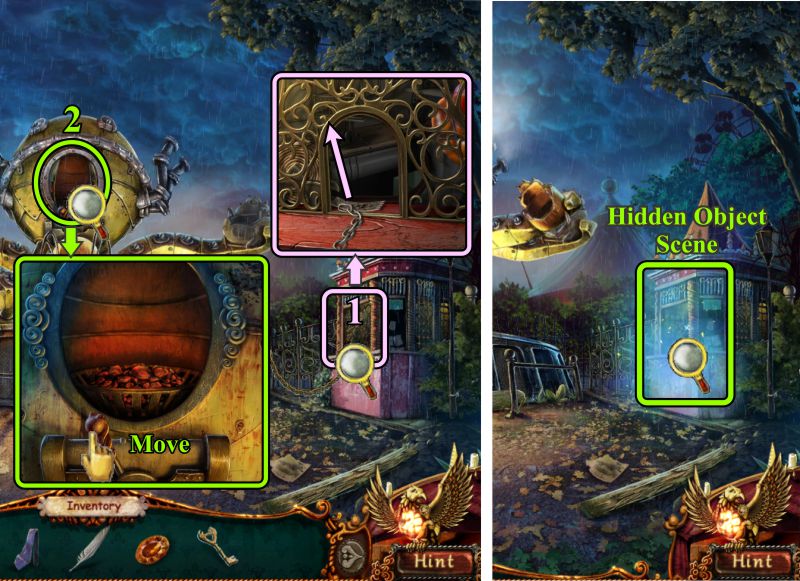
Exit through the window to the Amusement Park.
Screenshot
Amusement Park
Check out all the magnifying glasses, then zoom in on the lower right seat of the Octopus ride.
Collect the Bag you find there, then go to the Cathedral.
Screenshot
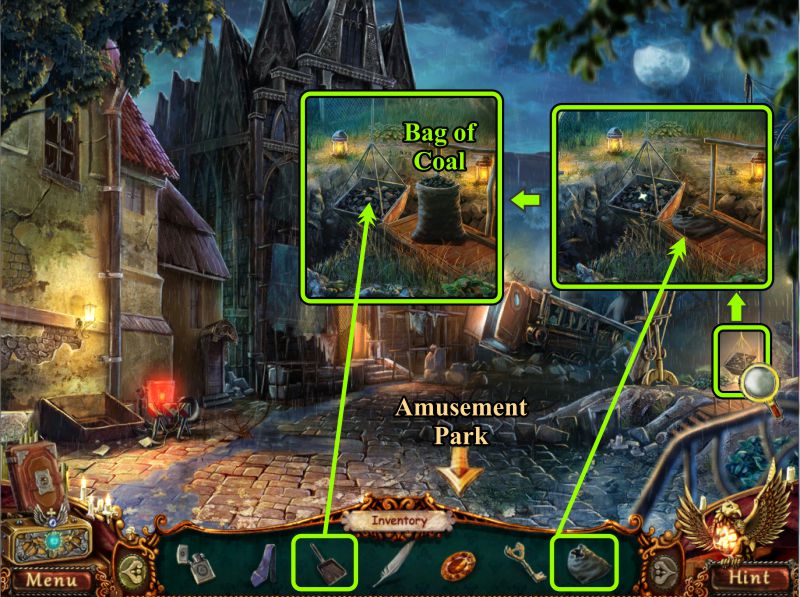
Outside Cathedral
Zoom in on the coal bin at the right and place the Bag you found.
Use your Scoop to get a Bag of Coal, then return to the Amusement Park.
Screenshot
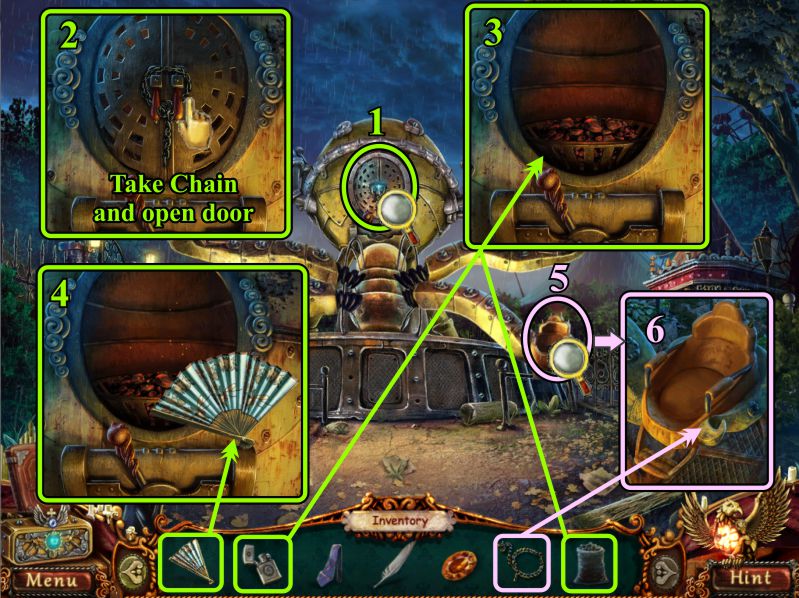
Amusement Park
Zoom in on the furnace door, take the Chain, and open the door.
Place the Bag of Coal inside the furnace and light the coal with your Lighter.
The fire isn't quite hot enough, so use your Fan to make the fire hotter.
Zoom in and place the Chain on the hook on the right Octopus seat.
Screenshot
Zoom in on the souvenir booth and secure the Chain to the grill.
Zoom in again on the furnace, move the lever to close the door, and start the ride.
Once the grill is removed from the souvenir booth, play the Hidden Object Scene.
Screenshot
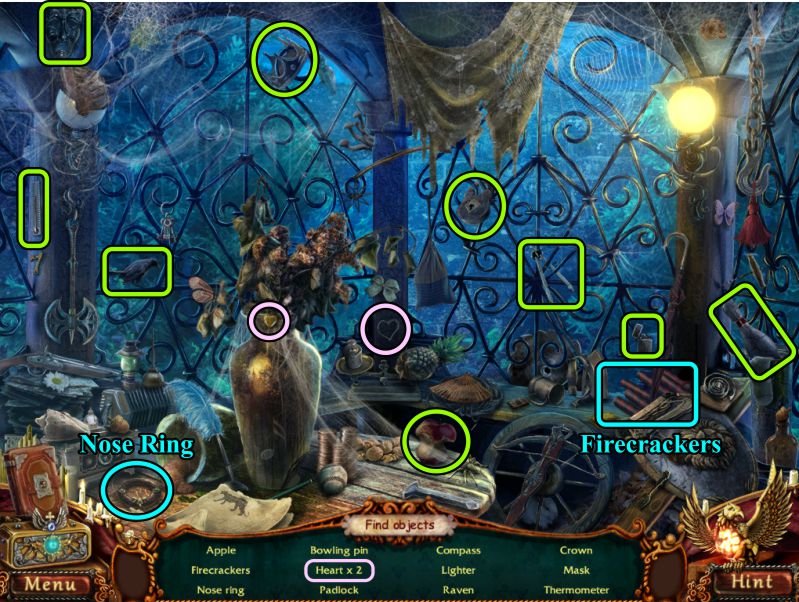
Souvenir Booth Hidden Object Scene
Collect everything to get a Nose Ring and some Firecrackers.
Screenshot
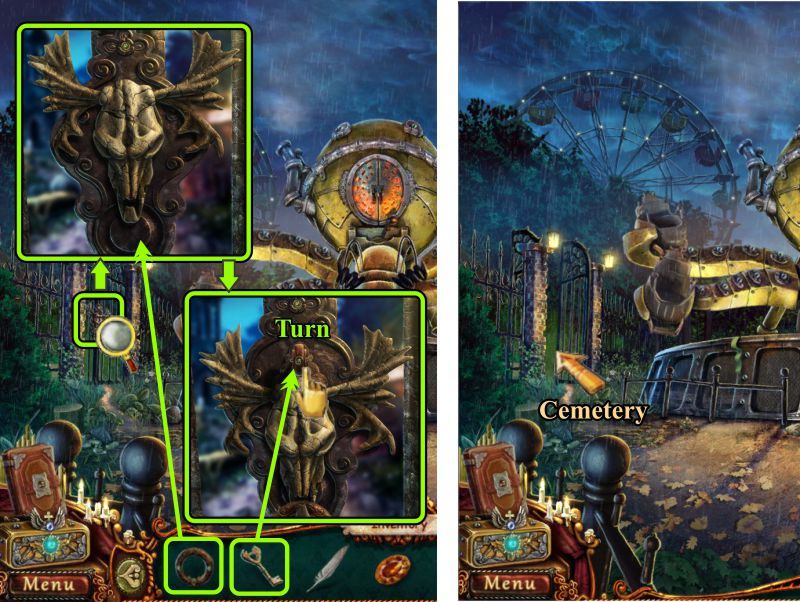
Amusement Park Gate
Zoom in on the gate, place the Nose Ring, and then the Bone Key.
Turn the key to open the gate, then go to the Cemetery.
Screenshot
Chapter 8
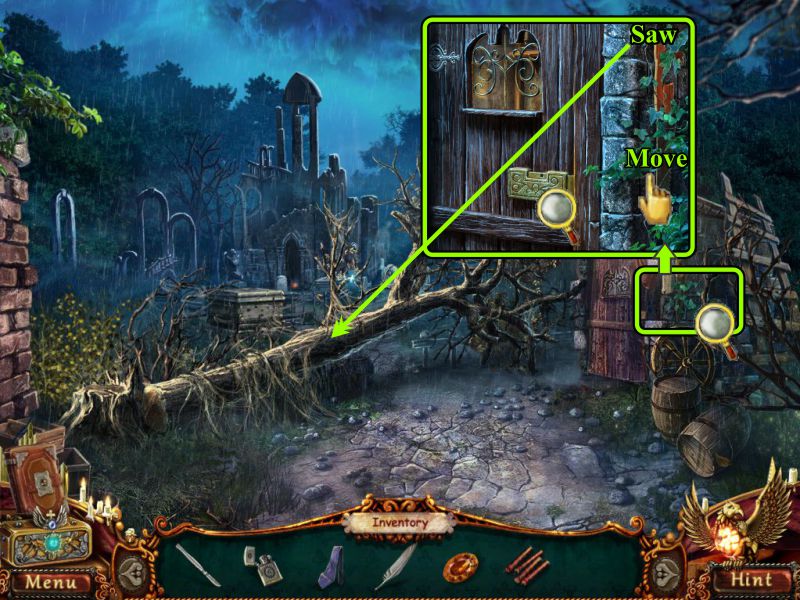
Cemetery
Watch the cut scene, then zoom in on the watchman's shed.
Move the ivy and take the Saw.
Use the Saw to cut the fallen tree.
Screenshot
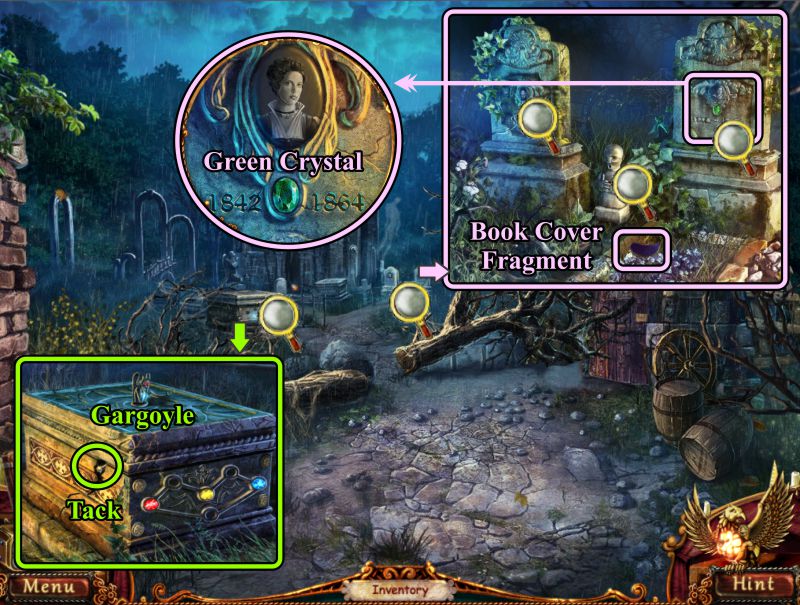
Zoom in on the coffin and take the Tack and Gargoyle.
Zoom in on the graves of Leonard's family and take the Book Cover Fragment.
Zoom in on the headstones and take the Green Crystal from his wife's headstone.
Screenshot
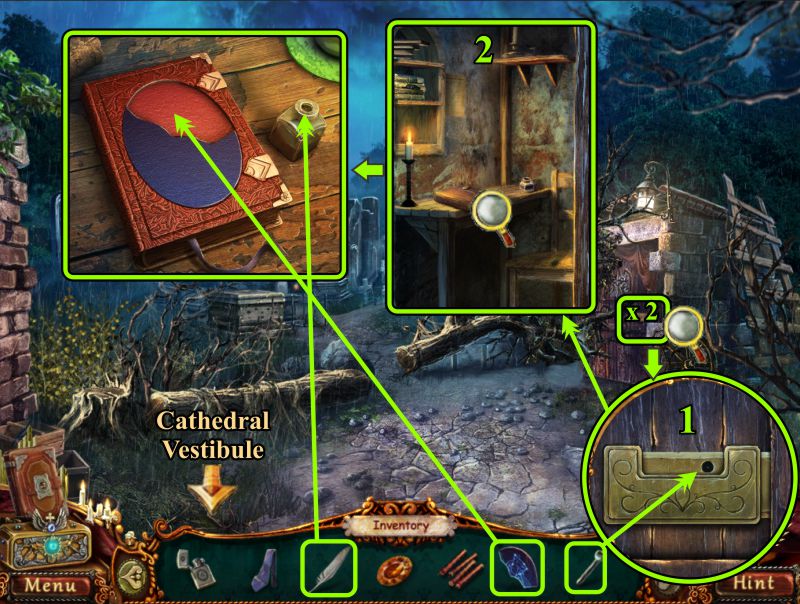
Zoom in on the shed and then again on the lock.
Use the Tack to open the lock, then zoom in on the desk.
Place the Book Cover Fragment on the book and the Feather in the ink well.
Screenshot
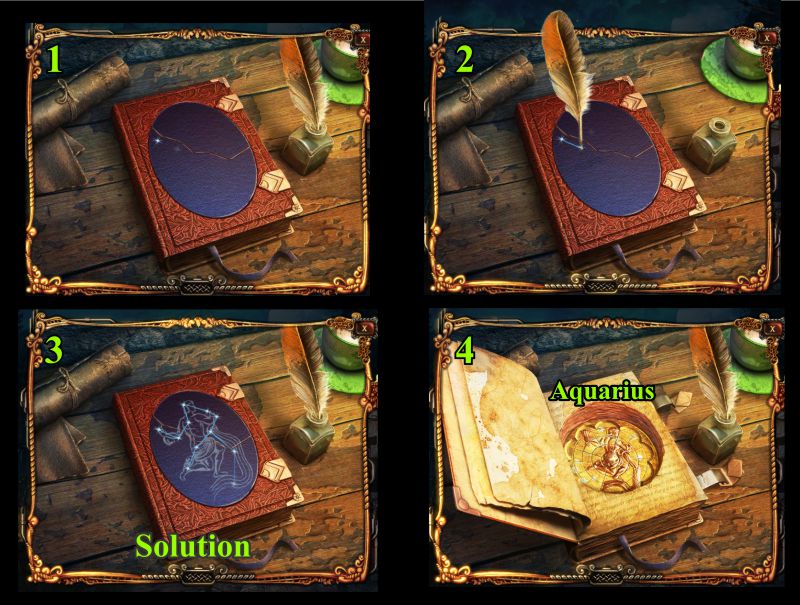
Book Cover Mini Game
Use the Feather to connect the dots as they appear on the book cover.
See the screenshot for the final solution.
Take the Aquarius from inside the book, then go to the Cathedral Vestibule.
Screenshot
Cathedral Vestibule
Zoom in on the candle display, and then again on the censer.
Place the Gargoyle and take the Violet Crystal.
Go to the Cathedral Basement.
Screenshot
Cathedral Basement
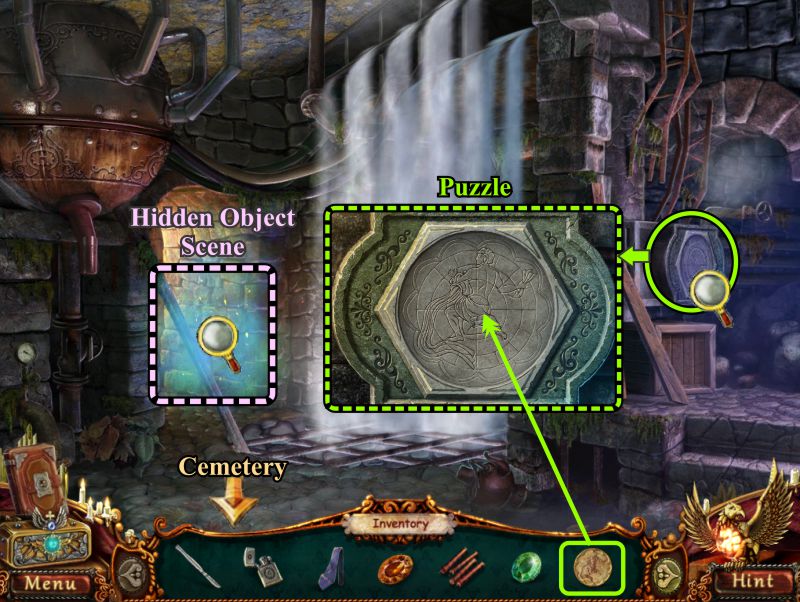
Play the Hidden Object Scene.
Zoom in on the area to the right by the valve.
Place the missing Aquarius to trigger a Puzzle.
Complete the Puzzle, then go to the Cemetery.
Screenshot
Basement Hidden Object Scene
Collect everything to get a Bell and some Honey.
Screenshot
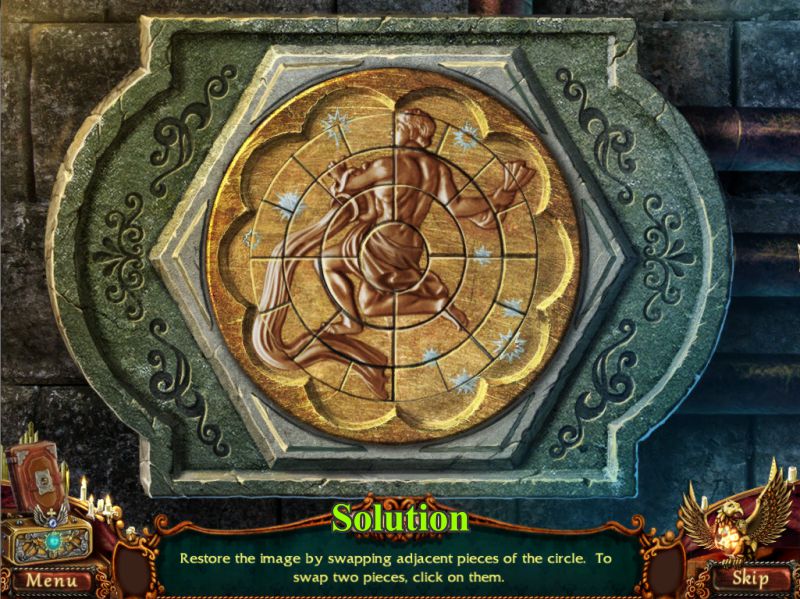
Aquarius Puzzle
Your goal to complete the Puzzle is to swap pieces of each circle with those next to them in the circle until you complete the image as shown in the screenshot.
You have now turned off the water.
Screenshot
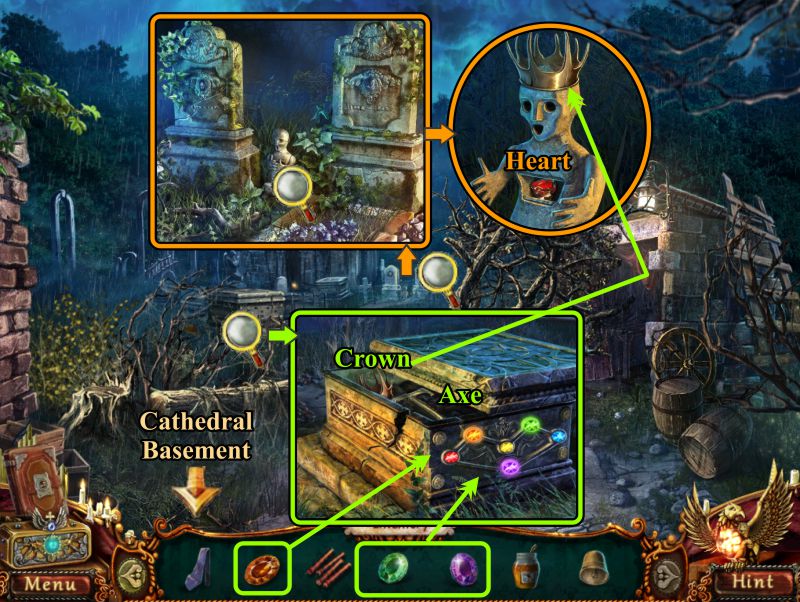
Cemetery
Zoom in on the coffin and place the crystals as shown in the screenshot.
Take the Crown and Axe when the coffin opens.
Zoom in on Leonard's graves and again on the little statue.
Place the Crown on the statue's head and take the Heart.
Return to the Cathedral Basement.
Screenshot
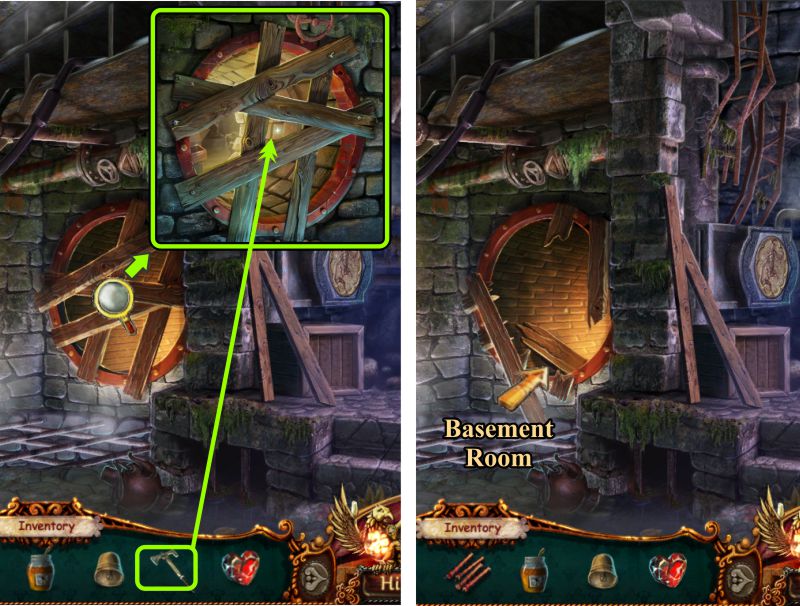
Cathedral Basement
Zoom in and use to Axe to remove the boarded up hole that was behind the water.
Go through the sewer tube to the Basement Room.
Screenshot
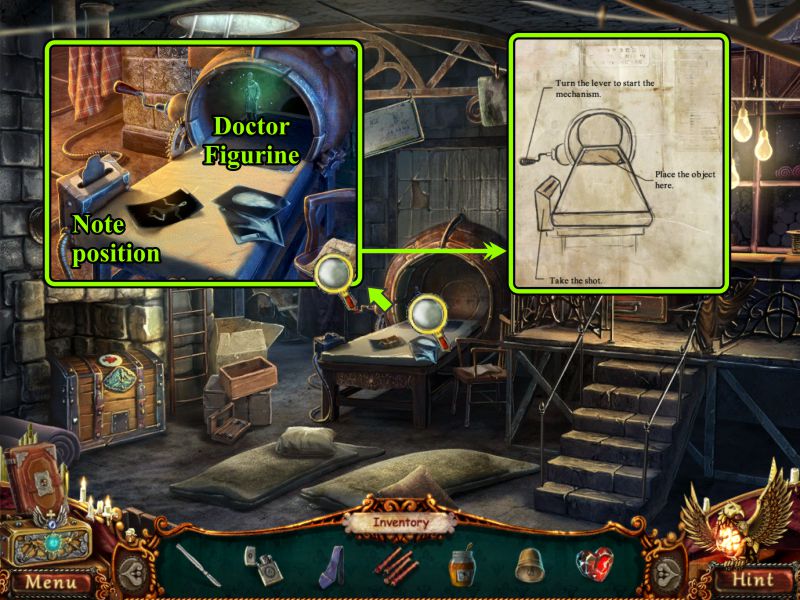
Basement Room
Zoom in on the table and again on the note.
Note the position of the skeleton x-ray, then take the Doctor Figurine.
Screenshot
The Box
When the box opens, place the Doctor Figurine and watch the cut scene.
Close the box.
Screenshot
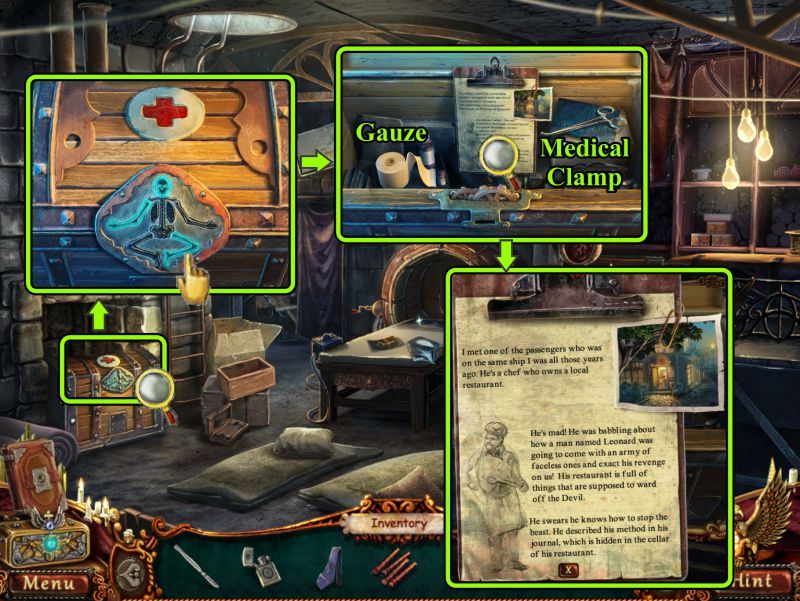
Zoom in on the chest and touch the skeleton parts that you saw highlighted in the x-ray on the table.
Take the Gauze and Medical Clamp, then read the note on the clipboard.
Screenshot
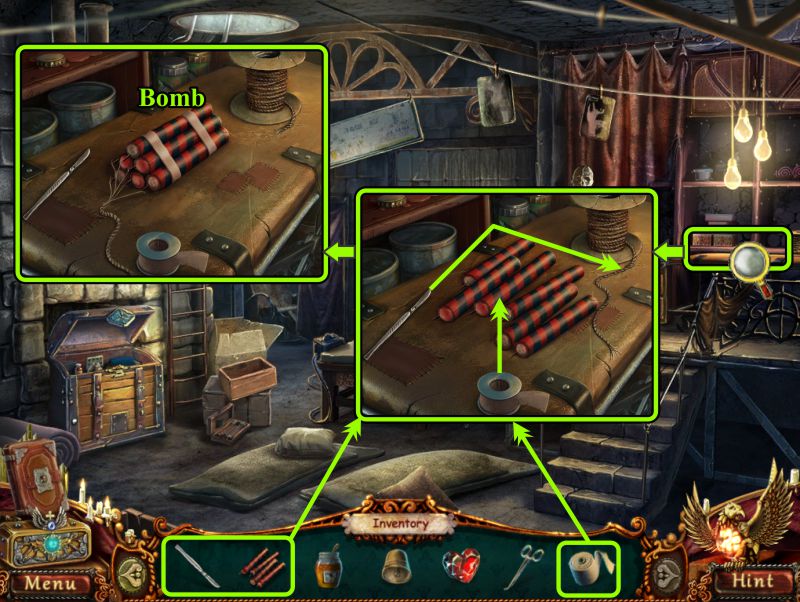
Zoom in on the workbench.
Place the Gauze, Scalpel, and Fireworks.
Use the Gauze to wrap up the Fireworks.
Cut a fuse with the Scalpel, attach it to the Fireworks, and collect your Bomb.
Screenshot
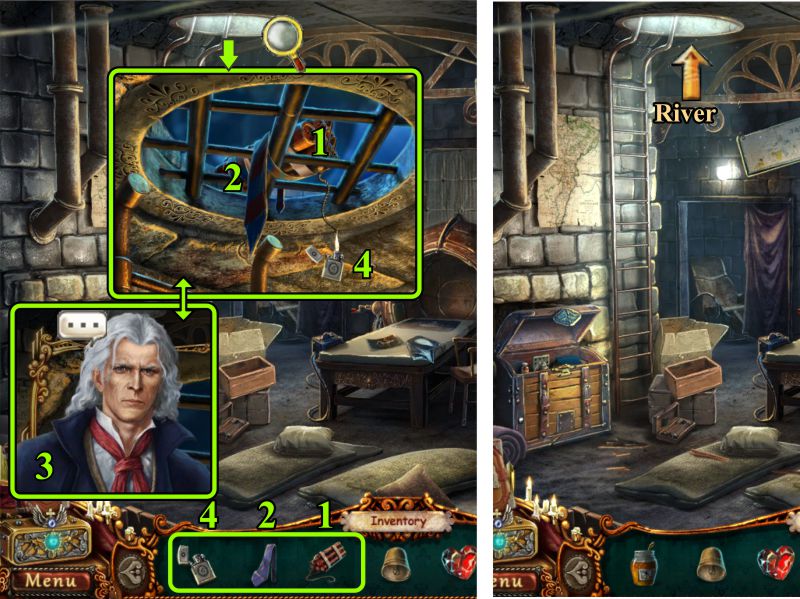
Zoom in on the grate, place the Bomb, and tie it up with the Tie.
Leonard appears: after he disappears, light the Bomb with your Lighter.
Once the grate is gone, go up to the River.
Screenshot
Chapter 9
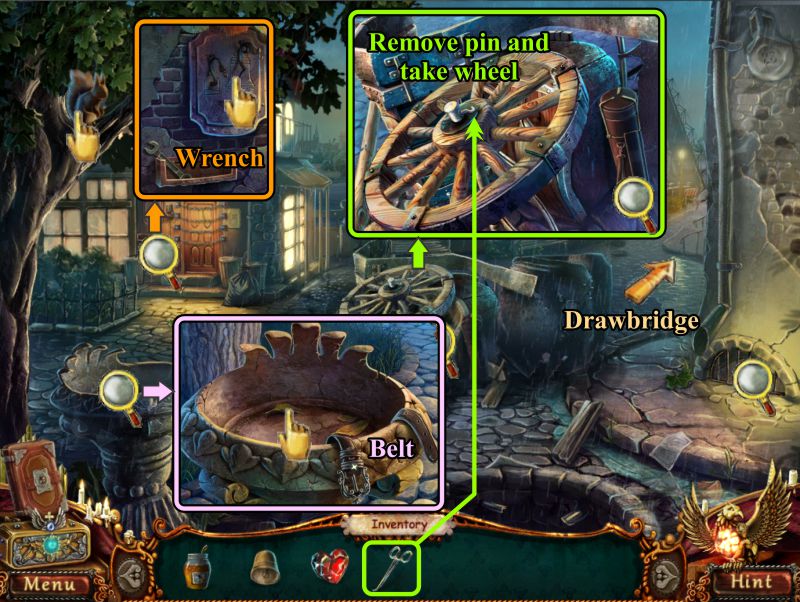
Riverfront
Zoom in on the Restaurant door and take the Wrench.
Examine the birdbath and take the Belt.
Zoom in and the wheel and use the Medical Clamp to remove the bin so you can take the Wheel.
Head to the Drawbridge.
Screenshot
Drawbridge
Check out the bridge mechanism and door to the right.
Zoom in on the river, notice the net, and take the Tile with the bells on it.
Go to the Cathedral Vestibule.
Screenshot
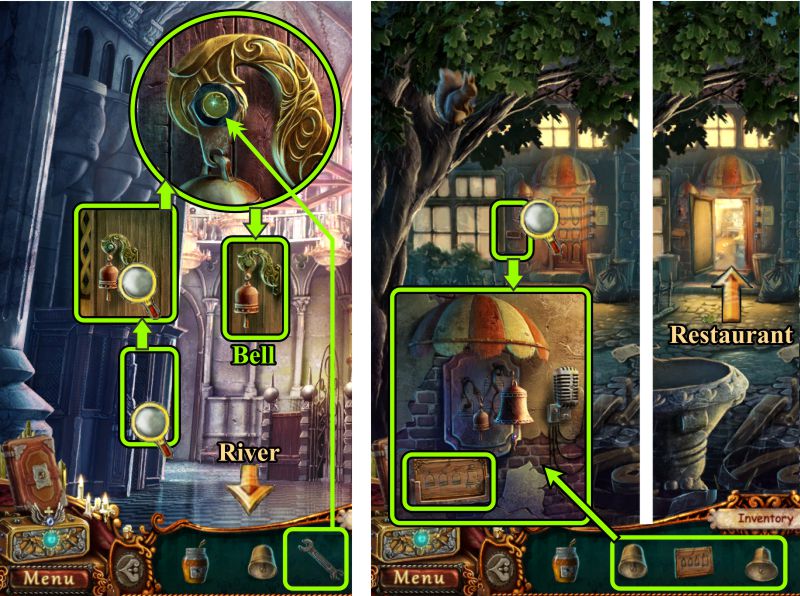
Cathedral Vestibule and Riverfront
Zoom in on the confessional and again on the bell.
Use the Wrench to remove the bolt so you can take the Bell.
Return to the River and zoom in on the Restaurant door.
Place your Bells and Tile as shown.
Ring the bells just like on the Tile to open the door.
Go inside the Restaurant.
Screenshot
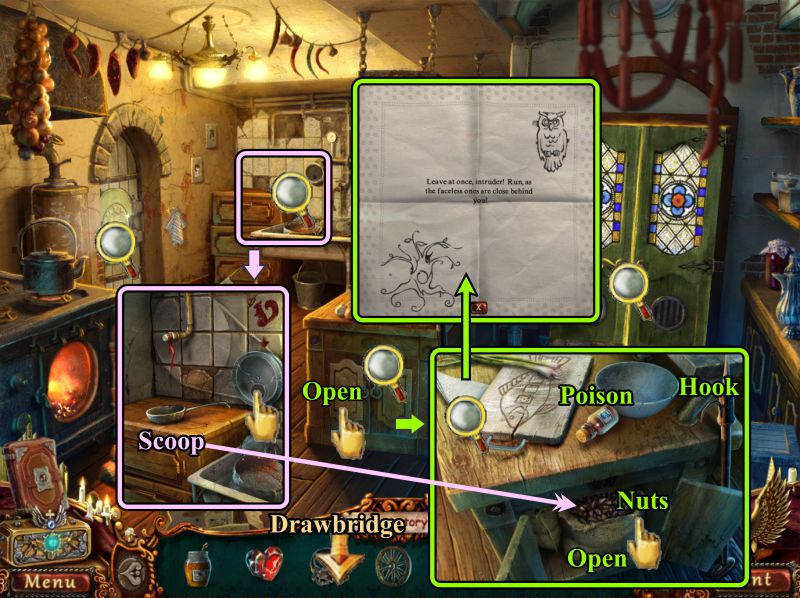
Zoom in on the sink and take the Scoop.
Read the note on the cabinet, then take the Poison and Hook.
Open the cabinet doors and use your Scoop to take some Nuts.
Go to the Drawbridge.
Screenshot
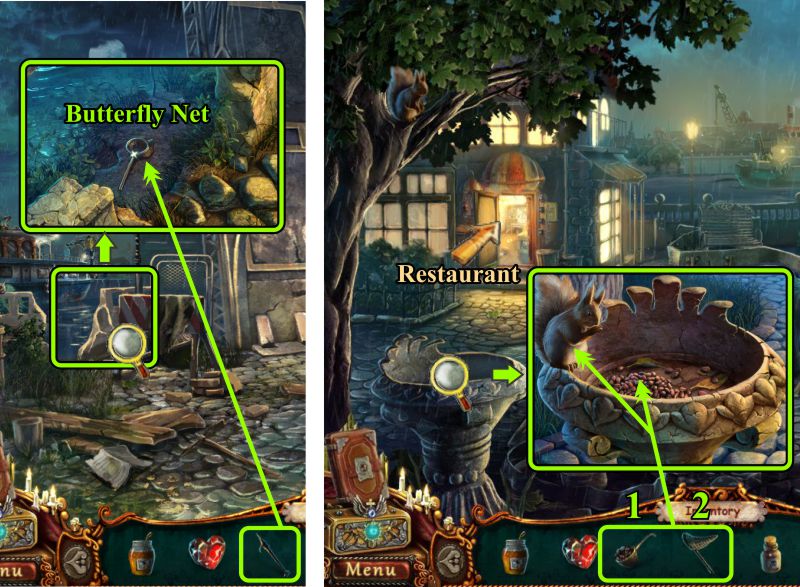
Drawbridge and Riverfront
Zoom in and use the Hook to get the Butterfly Net.
Go to the birdbath, place your Scoop of Nuts, and use the Butterfly Net to grab the squirrel when he comes to eat the nuts.
Return to the Restaurant.
Screenshot
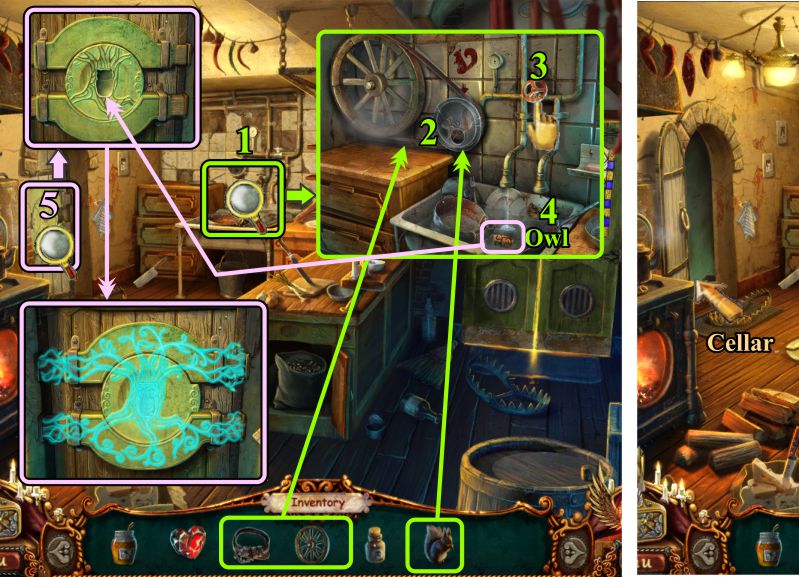
Restaurant Kitchen
Zoom in on the sink, place the squirrel and the wheel, and use the Belt to connect both wheels.
Turn the valve, then take the Owl.
Zoom in on the Cellar door and place the Owl.
When the door opens, go down to the cellar.
Screenshot
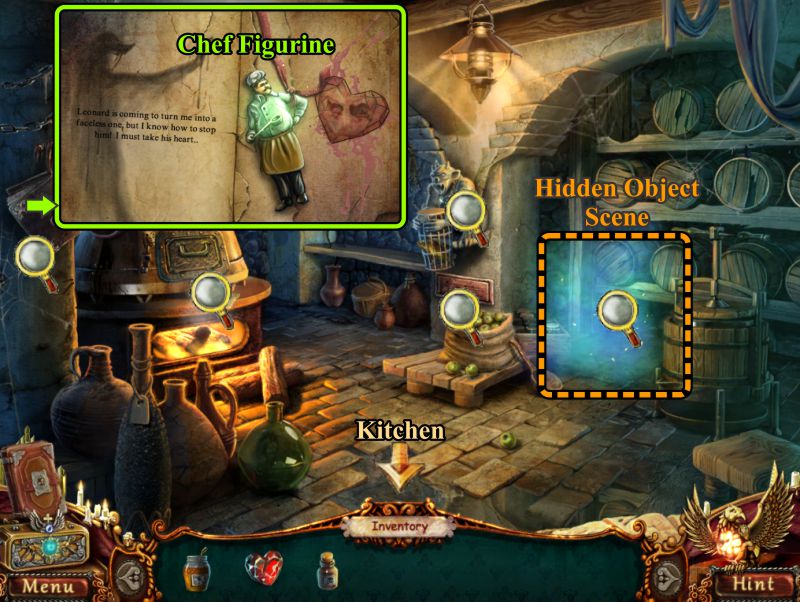
Cellar
Check all the magnifying glasses, play the Hidden Object Scene, and zoom in on the note at the left to find a Chef Figurine.
Screenshot
The Box
Place the Chef Figurine in the box, watch the cut scene, close the box and return to the Kitchen.
Screenshot
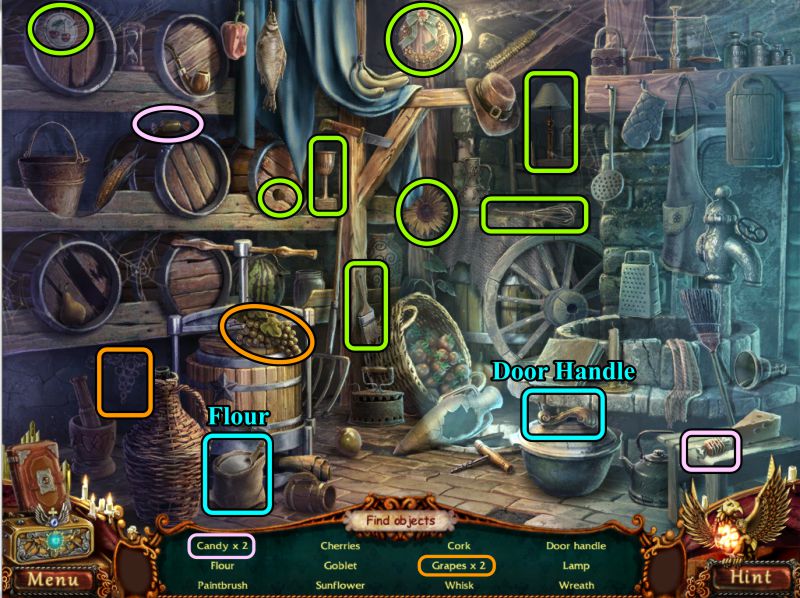
Cellar Hidden Object Scene
Collect everything to get a Door Handle and some Flour.
Screenshot
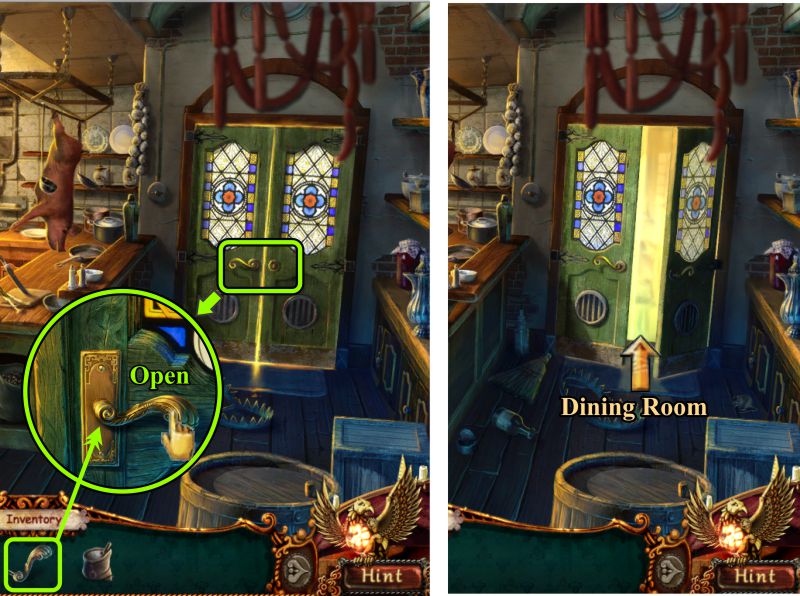
Kitchen
Zoom in on the Dining Room door, place the Door Handle, open it, and enter the Dining Room.
Screenshot
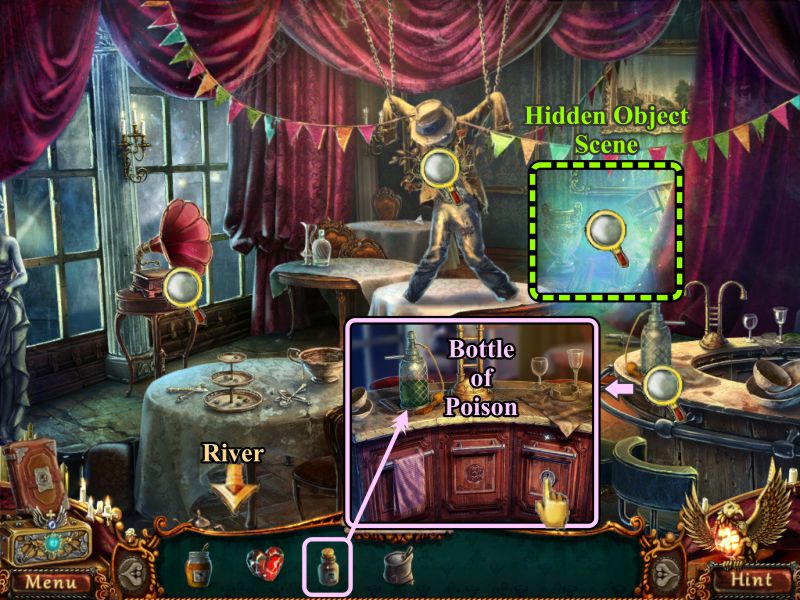
Dining Room
Zoom in on the bar and place your Poison in the spray bottle to get a Bottle of Poison.
Check out the magnifying glasses, play the Hidden Object Scene and go to the Riverfront.
Screenshot
Dining Room Hidden Object Scene
Collect everything to get a Gravy Boat and Gramophone Needle.
Screenshot
River and Dining Room
Zoom in on the rats and spray them with the poison.
Move the grate and take the Record.
Return to the Dining Room and zoom in on the gramophone.
Place the Record and Needle, then turn the handle.
Take the Brush from the drawer and read the note.
Go to the Drawbridge.
Screenshot
Drawbridge
Zoom in on the door of the Control Room.
Dust the buttons with Flour.
Use the Brush to remove some of the Flour to see which buttons were most frequently pushed.
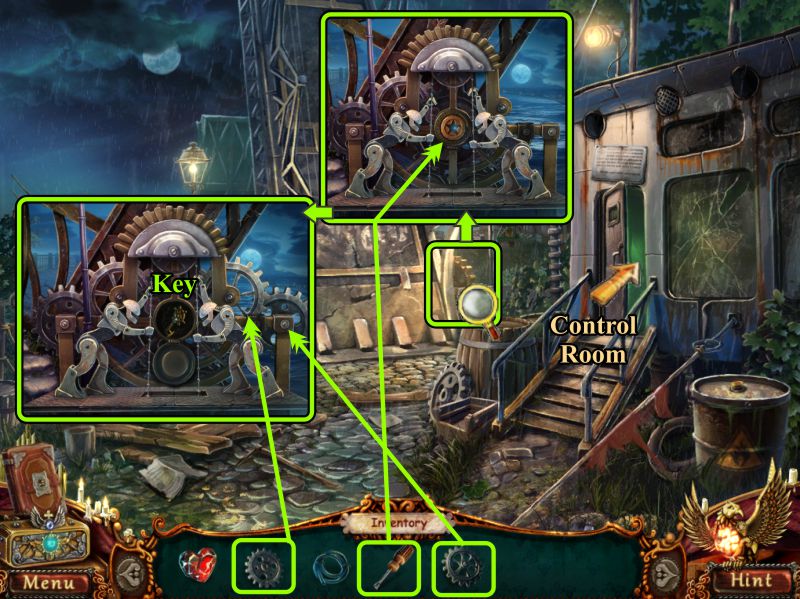
Push in the buttons shown in the screenshot to open the door.
Zoom in on the drum next to the door and pick up the Gear.
Enter the Control Room.
Screenshot
Control Room
Zoom in and read the note, then check out the cabinet and mechanism.
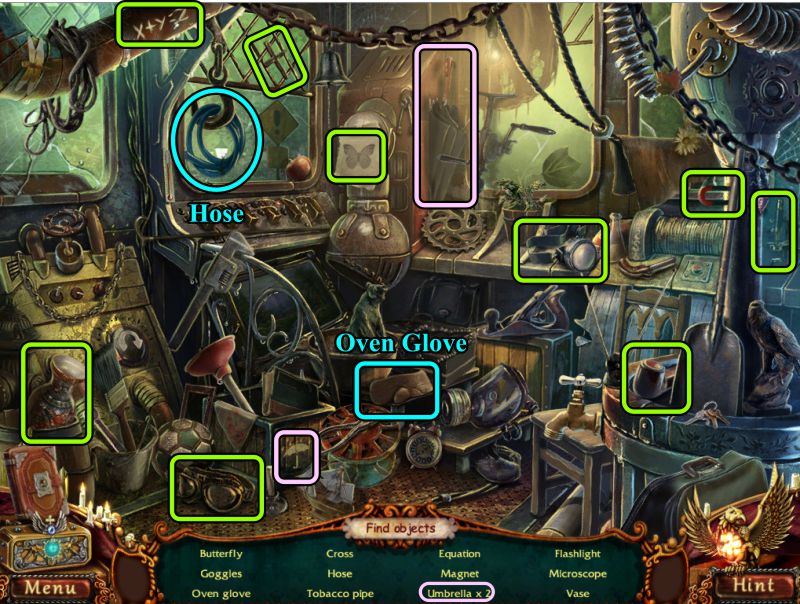
Play the Hidden Object Scene, then go to the Restaurant Dining Room.
Screenshot
Control Room Hidden Object Scene
A Hose and Oven Glove will go into your Inventory.
Screenshot
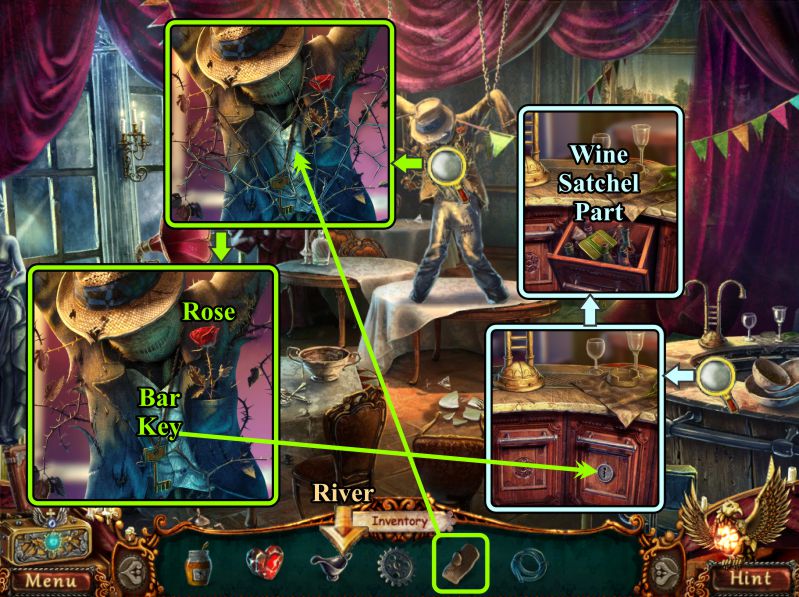
Dining Room
Zoom in on the dummy and use the Oven Glove to remove the vine so you can get the Rose and Bar Key.
Zoom in on the bar and use the key to open the drawer.
Take the Wine Satchel Part and go to the River.
Screenshot
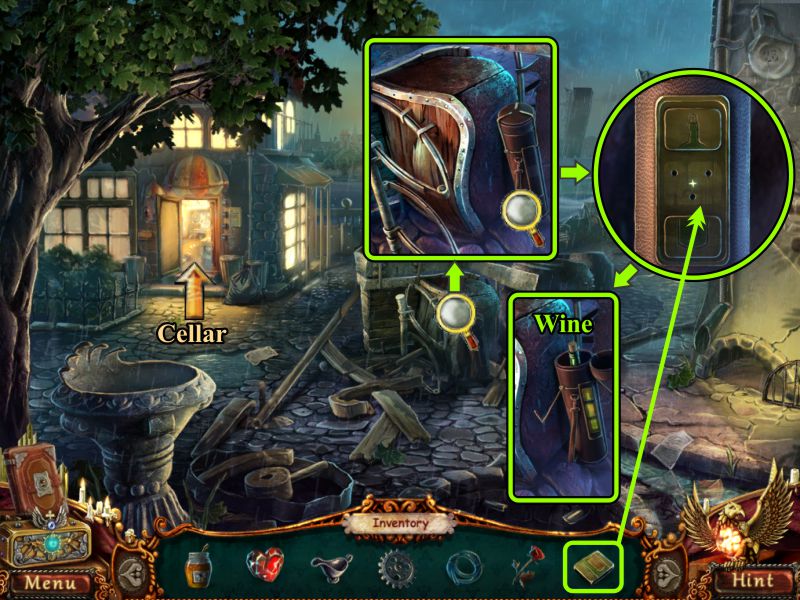
Riverfront
Zoom in where the wheel was, and again on the wine satchel.
Place the missing Wine Satchel Part, then collect the Wine.
Go to the Restaurant Cellar.
Screenshot
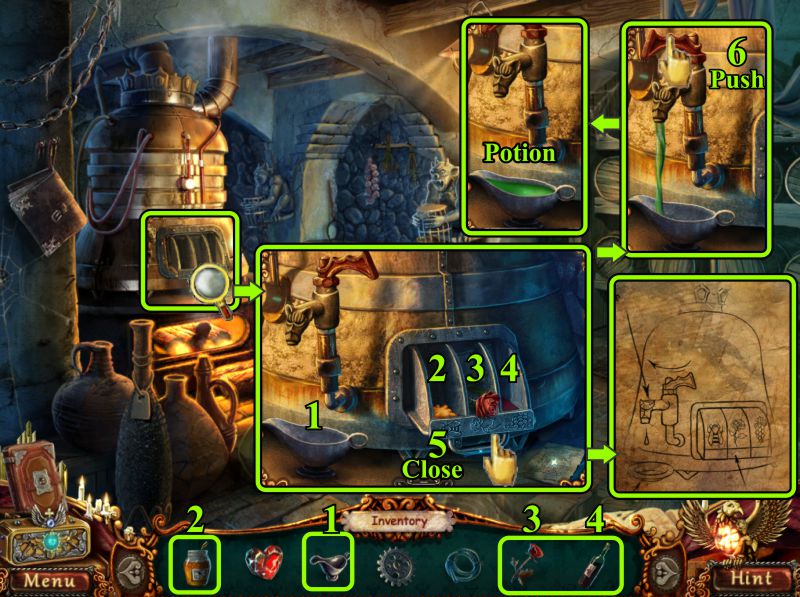
Cellar
Zoom in on the machine and place your Gravy Boat.
Note the instruction sheet, then place the ingredients as shown in the screenshot.
Close the tray, and once it's ready, push the handle to pour the Potion into the Gravy Boat.
Screenshot
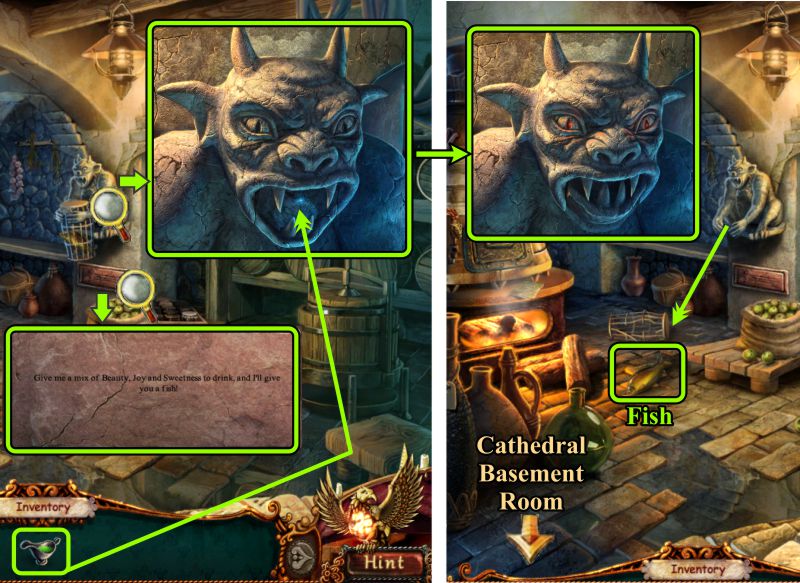
Examine the plaque under the gargoyle, zoom in on him, and pour the Potion in his mouth.
He will let go of his container so you can collect a Fish.
Go to the Cathedral Basement Room.
Screenshot
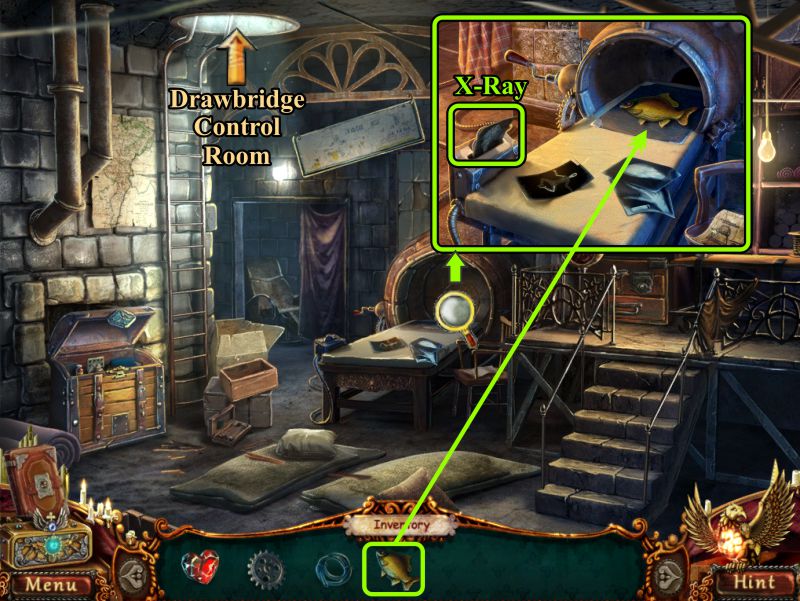
Basement Room
Place the Fish in the x-ray machine and take the x-ray.
Go to the Drawbridge Control Room.
Screenshot
Control Room
Zoom in on the cabinet and place your x-ray.
Turn the dice on the cabinet door to match the dice in the x-ray.
Take the Gear and Star-shaped Screwdriver from inside the cabinet, then go to the Drawbridge.
Screenshot
Drawbridge
Zoom in on the bridge mechanism and place your two Gears.
Use the Star-shaped Screwdriver to open the space between the two figures.
Take the Key and return to the Control Room.
Screenshot
Control Room
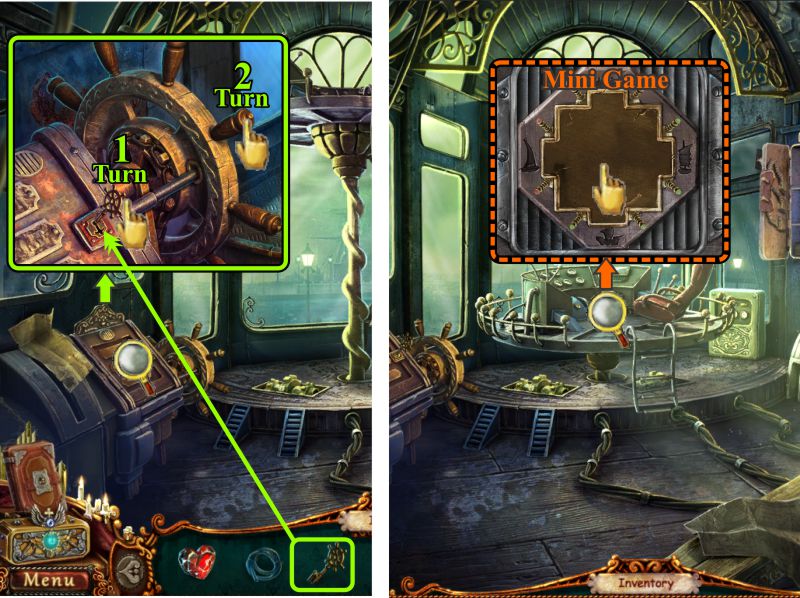
Zoom in on the control mechanism, place the key, and turn it.
Turn the wheel to lower the control panel.
Zoom in and touch the panel to trigger a Mini Game.
Screenshot
Dock the Boats Mini Game
This is a slider game with 4 simulated exits.
Your goal is to move the 4 boats to their appropriate docks, as shown by their silhouettes.
The next 3 screenshots show a step-by-step solution to the game.
Screenshot
One boat is docked, so continue your quest.
Screenshot
Once all the boats are docked, the panel will open for you to collect the Central Gear.
Take it to the Drawbridge.
Screenshot
Drawbridge
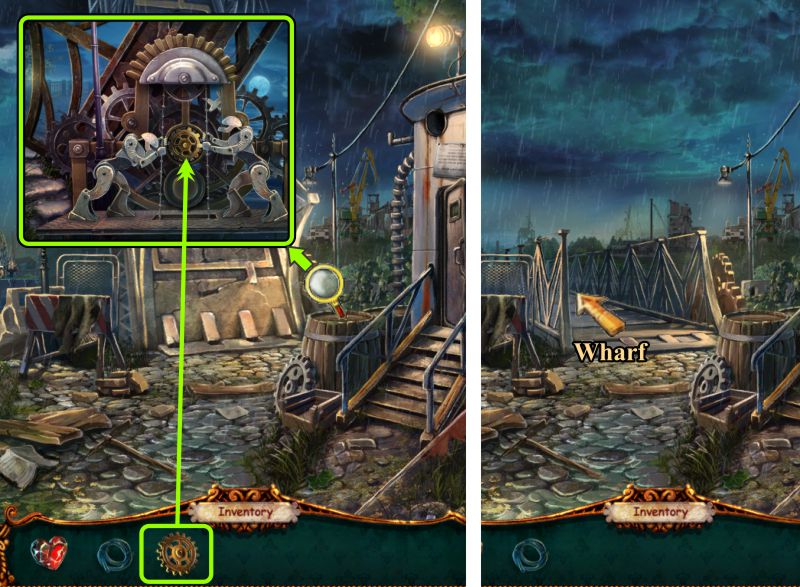
Zoom in on the mechanism and place the Central Gear.
Watch the figures work really hard to lower the bridge, then cross it to go to the Wharf.
Screenshot
Chapter 10
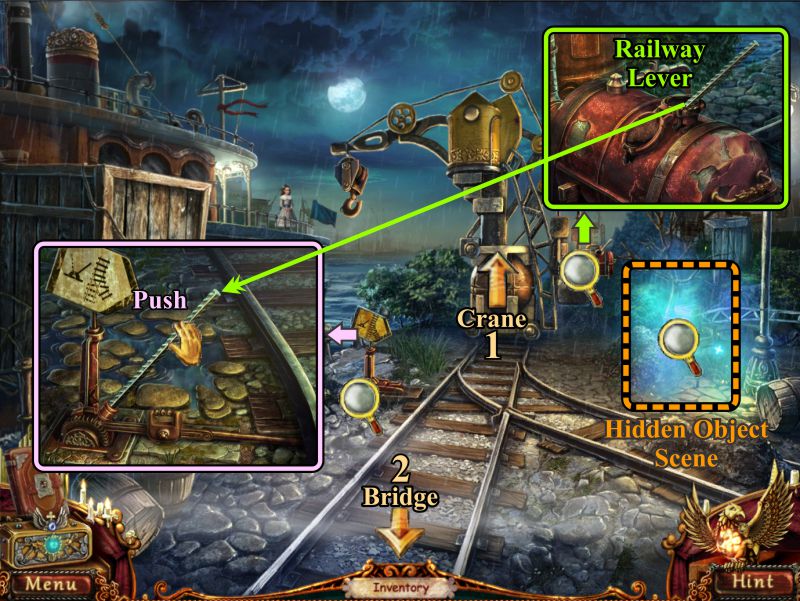
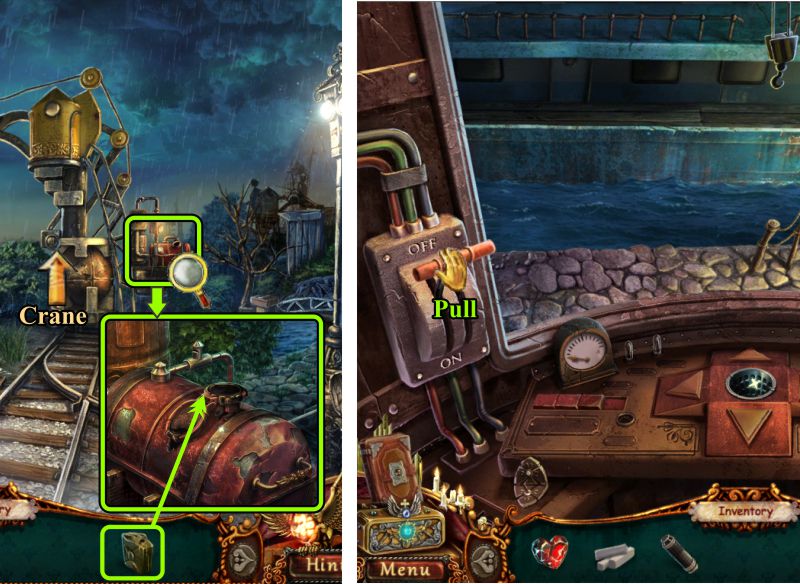
Wharf
Zoom in to find out the Crane needs gas.
Take the Railway Lever, zoom in on the switcher, place the lever, and push it to switch the tracks.
Play the Hidden Object Scene, go to the Crane, and then return to the Drawbridge.
Screenshot
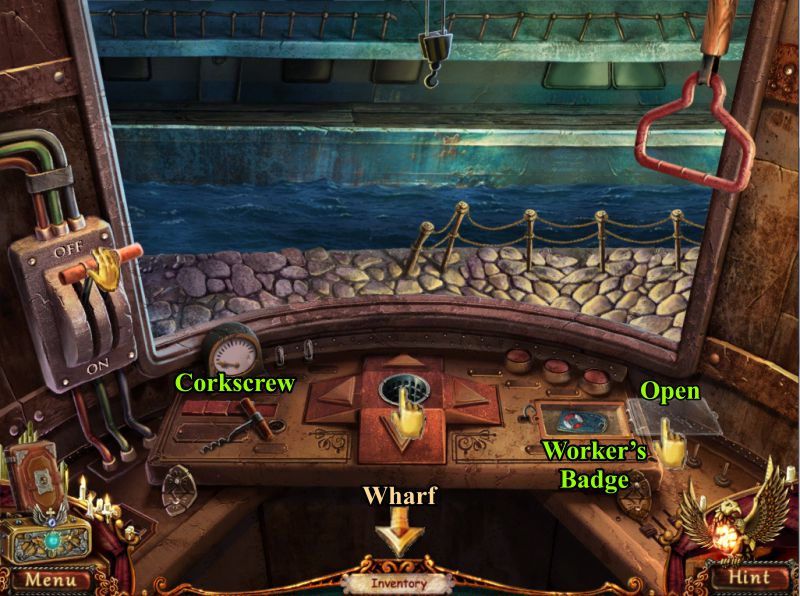
Crane
Take the Corkscrew, open the compartment, and take the Worker's Badge.
Screenshot
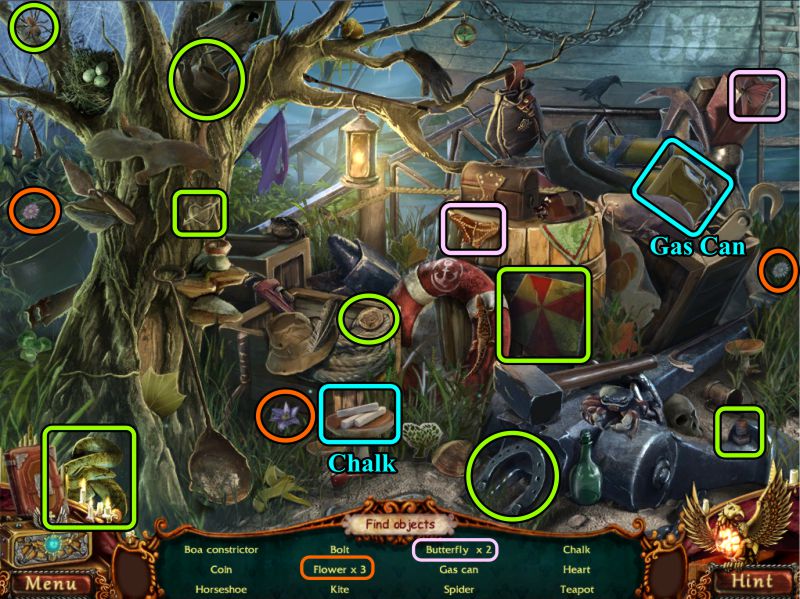
Wharf Hidden Object Scene
You will get a Gas Can and some Chalk for your Inventory.
Screenshot
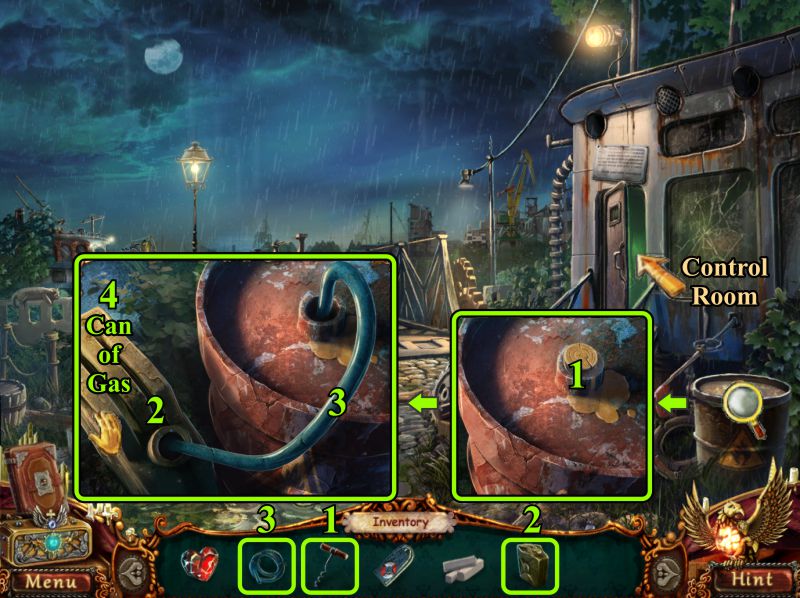
Drawbridge
Zoom in on the drum and use the Corkscrew to get rid of the cork.
Place your Gas Can, insert the Hose, and take your Can of Gas.
Enter the Control Room.
Screenshot
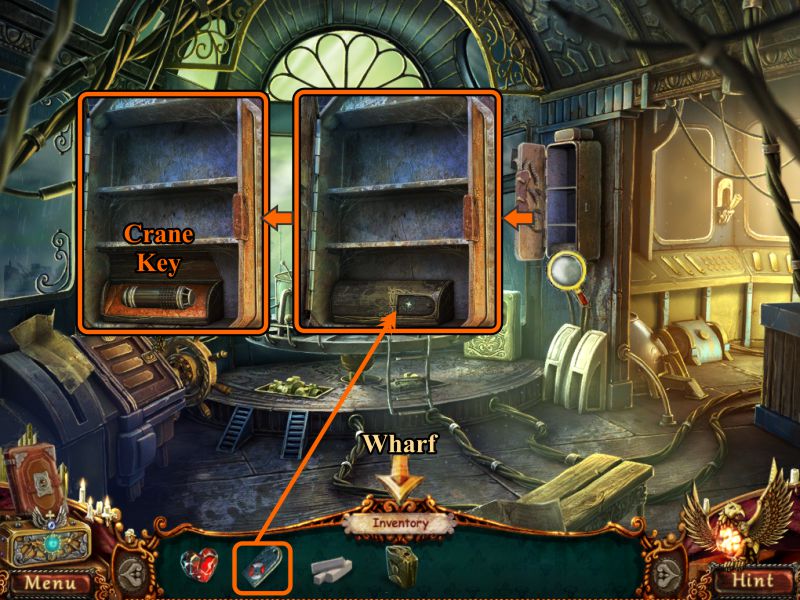
Control Room
Zoom in on the cabinet, place your Worker's Badge, and take the Crane Key.
Return to the Wharf across the Drawbridge.
Screenshot
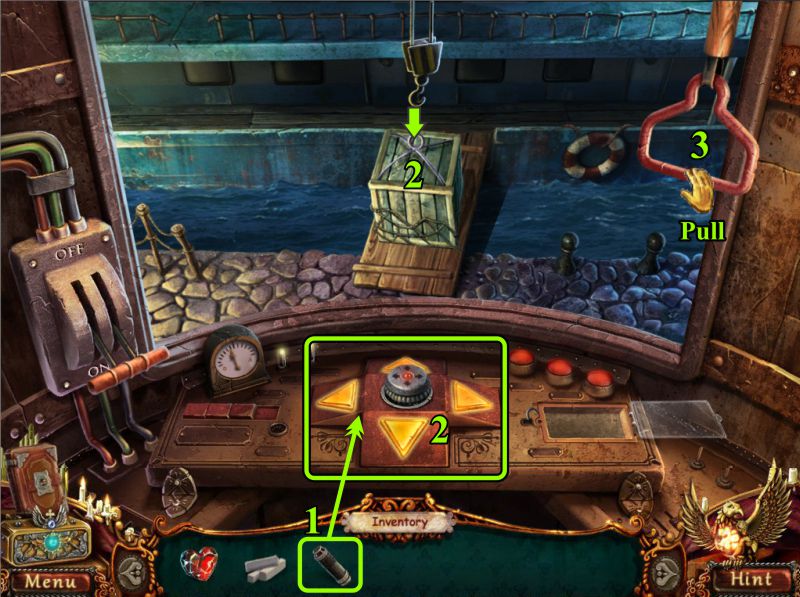
Wharf and Crane
Zoom in and fill the tank with gas.
Enter the Crane and pull the handle at the left to start the Crane.
Screenshot
Crane
Place the Crane Key to light up the 4 directional arrows.
Using the directional arrows, move the hook to the position over the box shown in the screenshot.
Pull the handle at the right and, if your position is correct, you will pick up the box and move it out of the way.
Leave the Crane.
After your conversation with Mary Duran, board the ship.
Screenshot
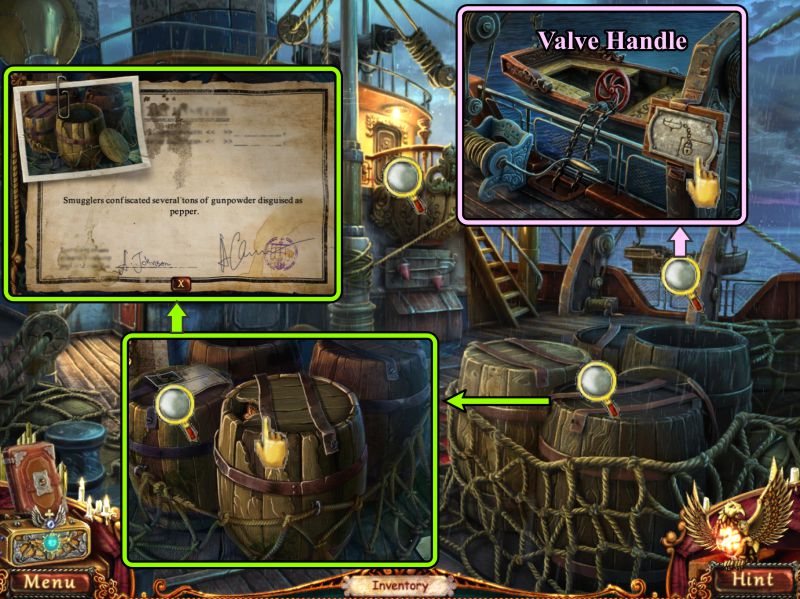
Ship's Deck
Zoom in on the barrels, and read the note.
Zoom in on the lifeboat, note the schematic, and take the Valve Handle.
Screenshot
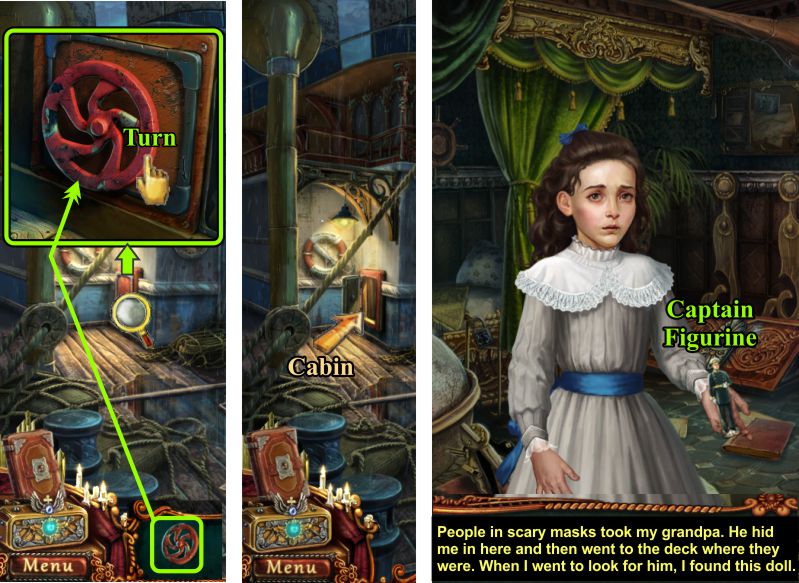
Deck and Cabin
Zoom in on the hatch and place the Valve Handle. Turn it and enter the Cabin.
Talk to Mary's daughter, and take the Captain Figurine.
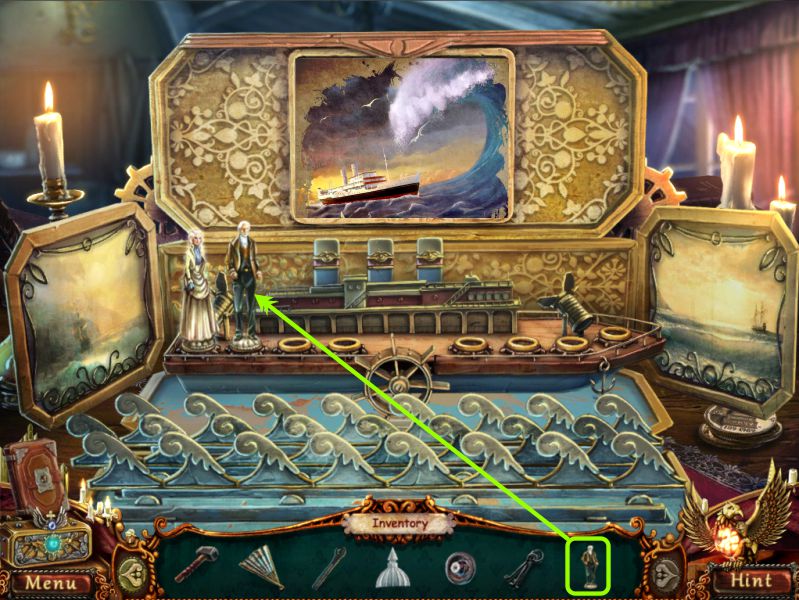
Screenshot
The Box
Place the Captain Figurine, watch the cut scene, and close the box.
Screenshot
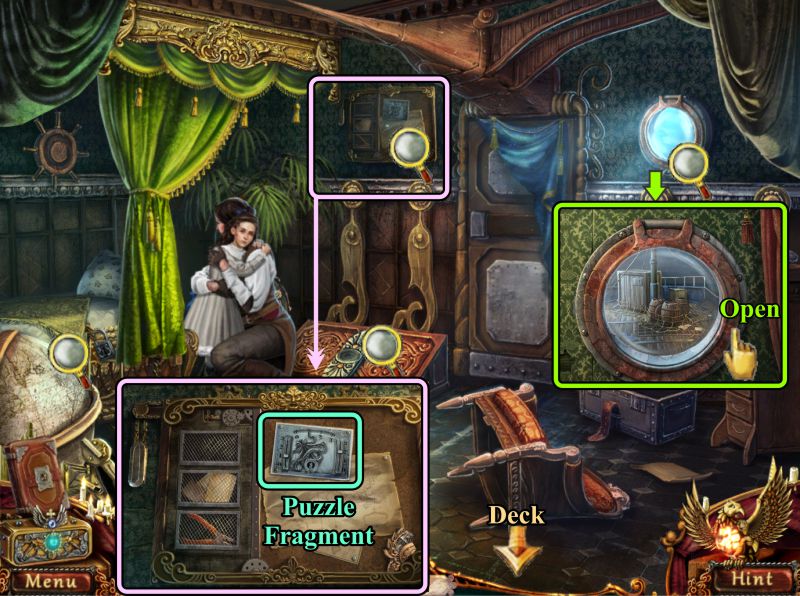
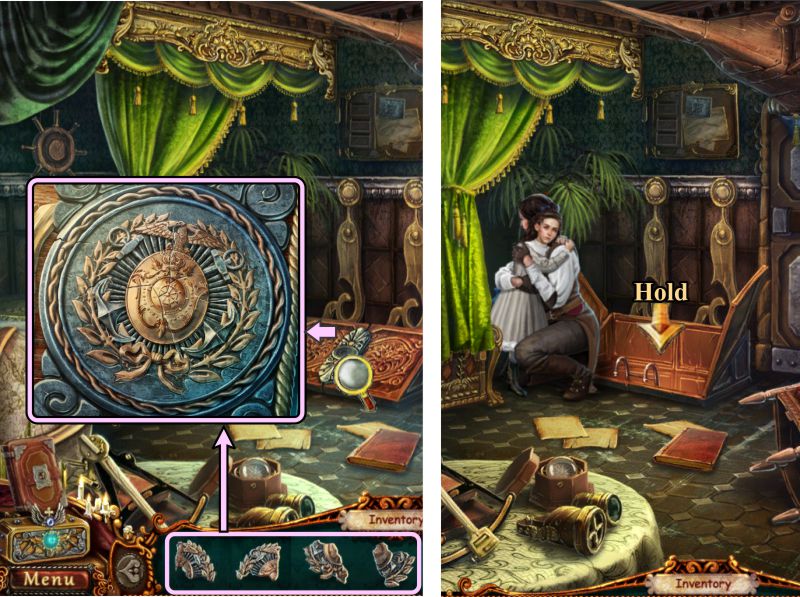
Cabin
Zoom in on the wall to the right of the bed, take the Puzzle Fragment, and note you need to open the compartments.
Examine the porthole, open it, and note your view of the barrels with the gunpowder.
Return to the Deck.
Screenshot
Ship's Deck
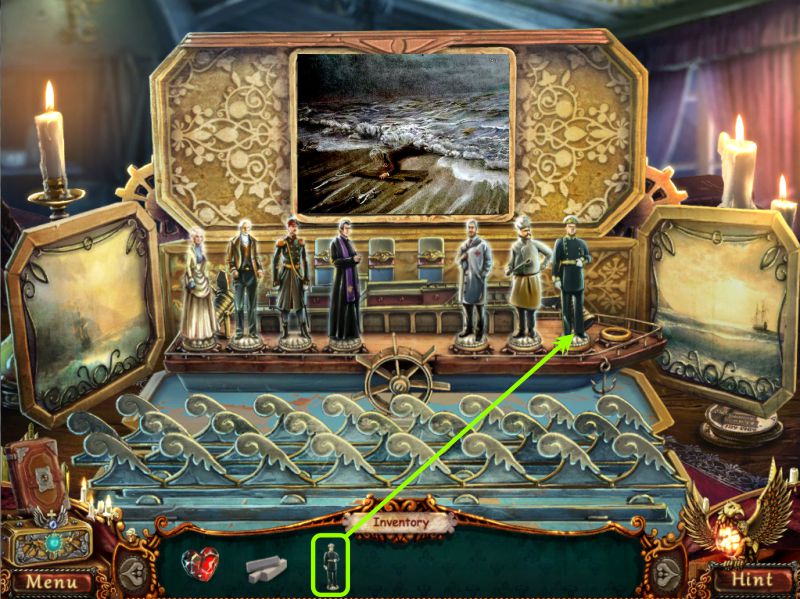
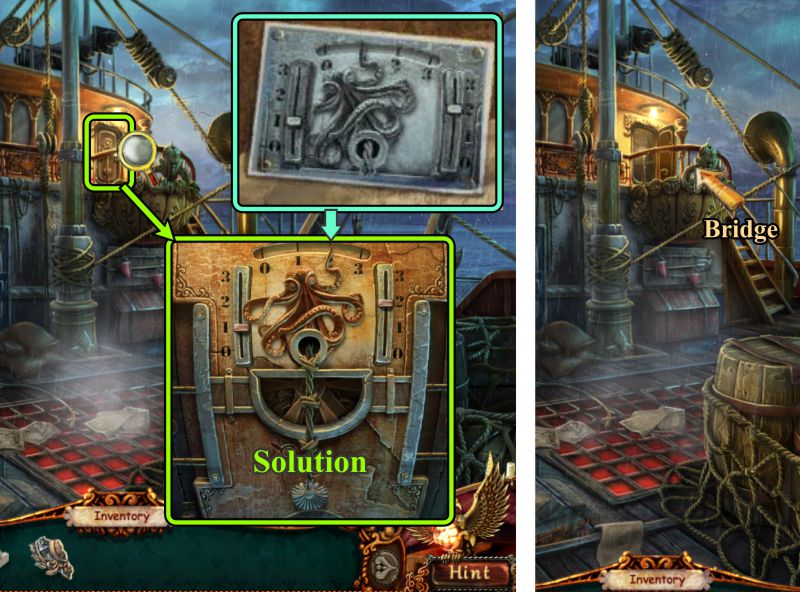
Zoom in on the Bridge and use the diagram you found to arrange the levers for the octopus to open the door. See the screenshot for the solution.
Enter the Bridge when the door opens.
Screenshot
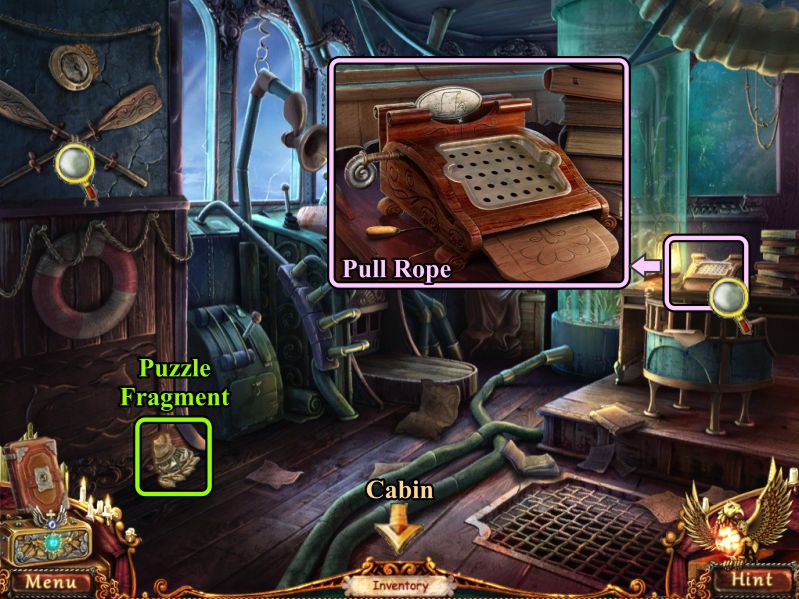
Ship's Bridge
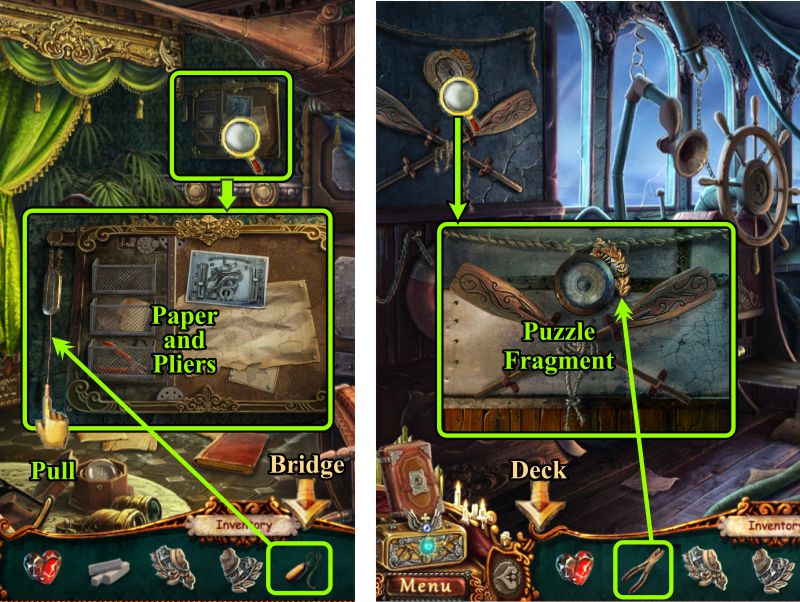
Pick up the Puzzle Fragment, note the oars, and zoom in on the coder.
Take the Pull Rope and go to the Cabin.
Screenshot
Cabin and Bridge
Zoom in on the wall to the right of the bed, place the Pull Rope, and take the Paper and Pliers when the compartments open.
Return to the Bridge and zoom in on the oars.
Use the Pliers to remove the Puzzle Fragment.
Go to the Deck.
Screenshot
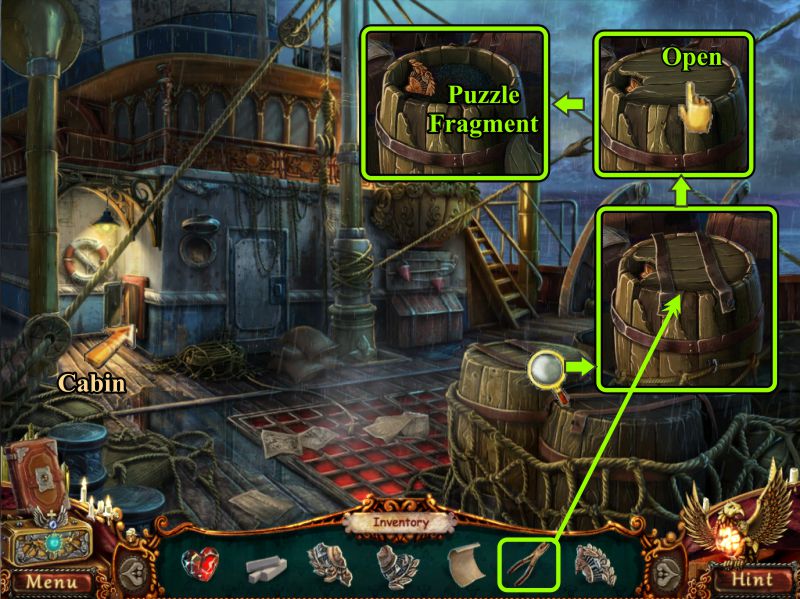
Ship's Deck
Zoom in on the barrels and use the Pliers to cut the straps.
Open the lid and take the Puzzle Fragment.
Return to the Cabin.
Screenshot
Cabin
Zoom in on the Hold entrance and place all your Puzzle Fragments to open it.
Enter the Hold.
Screenshot
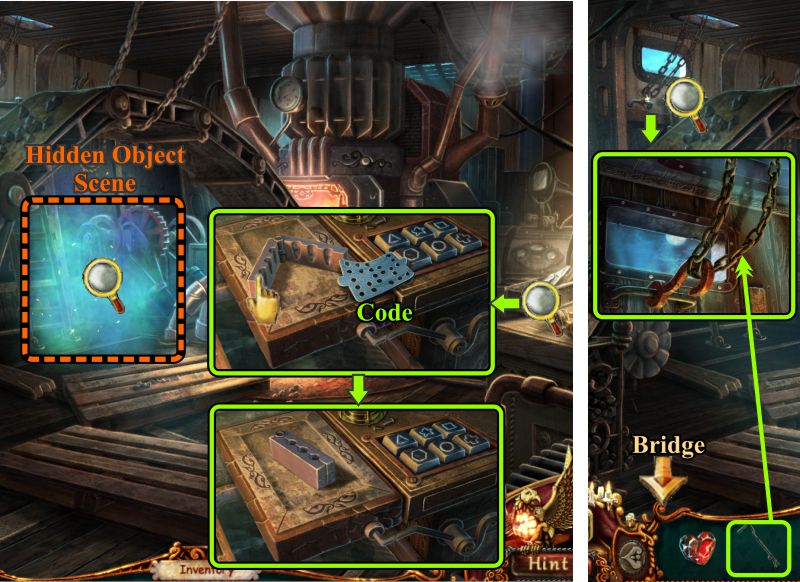
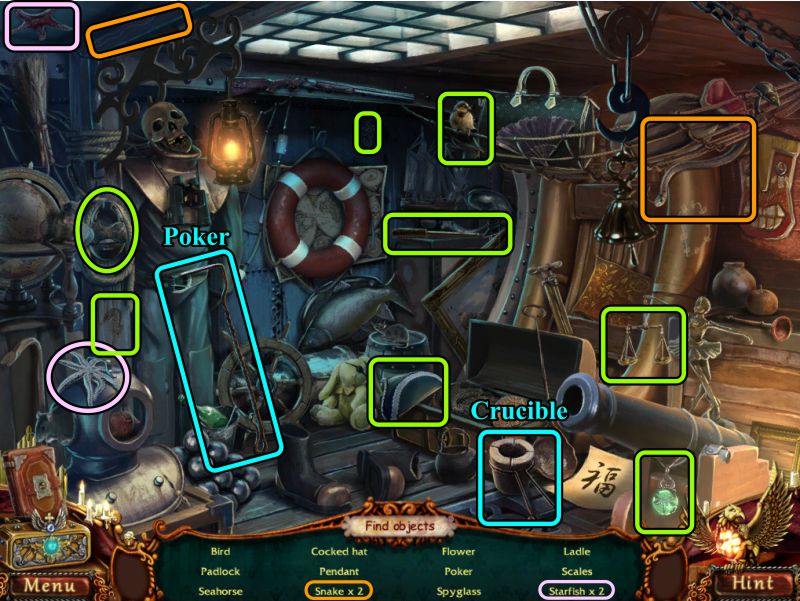
Ship's Hold
Play the Hidden Object Scene, then zoom in on the table.
Take the Code, touch the bullet form to close it, and zoom in on the window chains that hold the lifeboat.
Use the Poker to remove the chains from the hook.
Go to the Bridge.
Screenshot
Hold Hidden Object Game
Your Inventory items will be a Poker and a Crucible (that was called a Ladle when you picked it up).
Screenshot
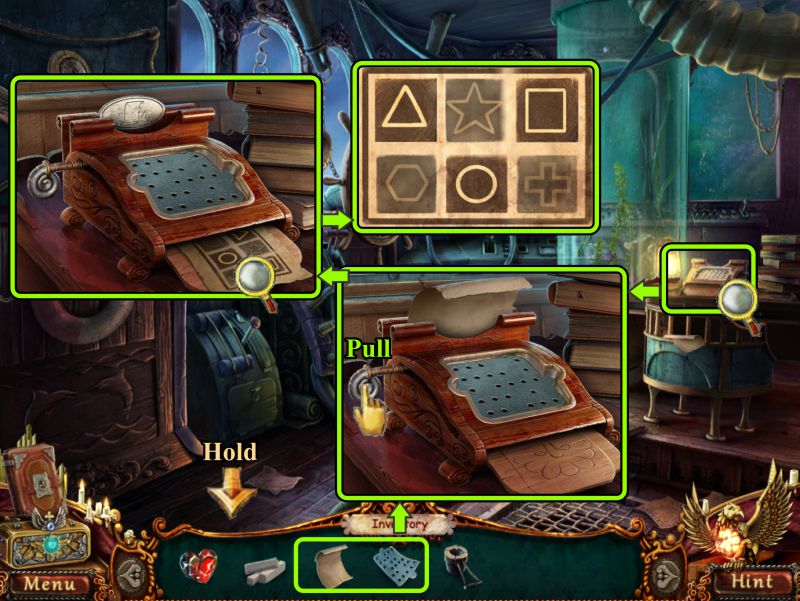
Control Room
Zoom in on the code machine.
Place your Code and your Paper.
Pull the handle and read the code that appears.
Go to the Hold.
Screenshot
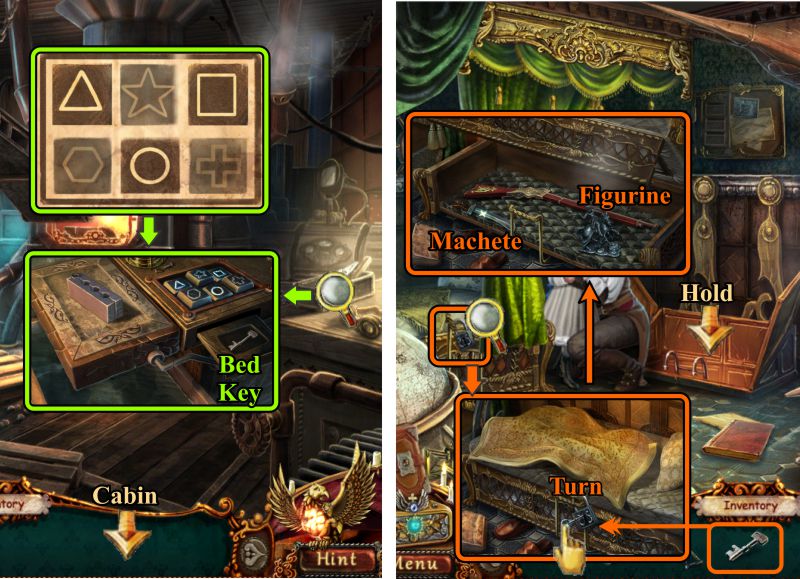
Hold and Cabin
Zoom in on the table and press the code shown in the screenshot.
Take the Bed Key and go to the Cabin.
Use the Bed Key on the bed and turn it.
When the bed opens, take the Machete and Figurine. Note the Rifle without bullets.
Go back to the Hold.
Screenshot
Ship's Hold
Zoom in on the furnace and place the Crucible.
Place the figurine in the crucible to be melted.
Take the crucible with the melted metal and pour the metal into the bullet form.
Pull the handle to lower and raise the bullet form to cool it.
Take the bullets and go to the Cabin.
Screenshot
Cabin
Zoom in on the bed and place the Bullets in the Rifle.
Take the Rifle and zoom in on the porthole.
Shoot the barrels of gunpowder to get rid of the faceless intruder.
Go to the Bridge.
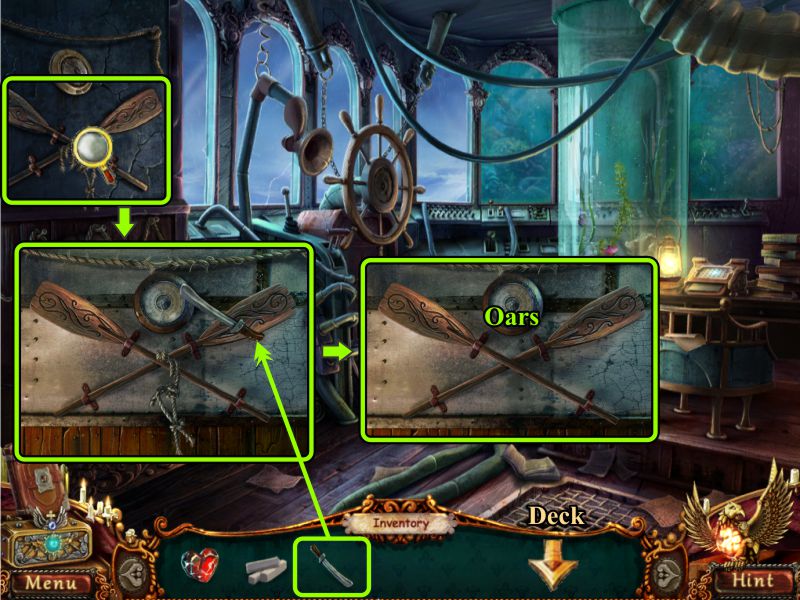
Screenshot
Bridge
Zoom in on the Oars and use the Machete to cut them free.
Grab the Oars and go to the Deck.
Screenshot
Deck
Zoom in on the lifeboat, place the Oars, and lower the boat.
Head to the Tower Island.
Screenshot
Chapter 11
Landing
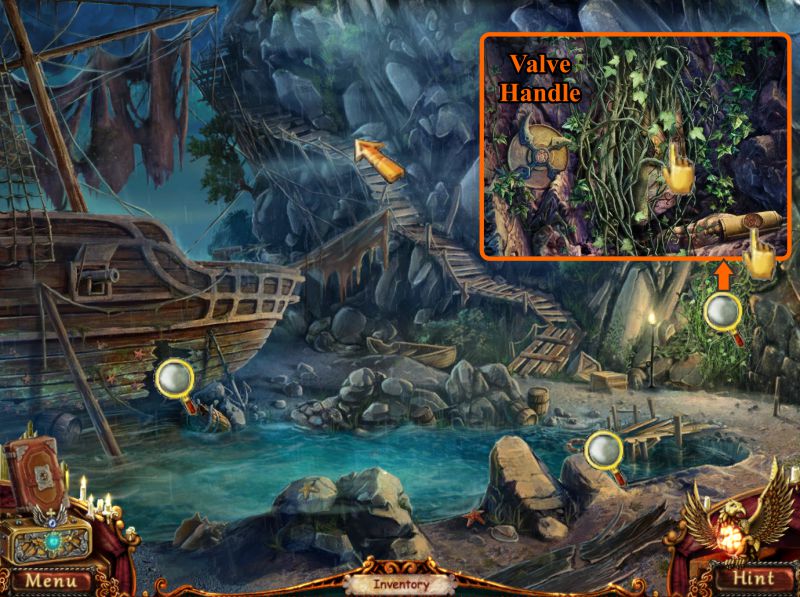
Examine the magnifying glasses, then zoom in on the ivy on the rocks.
Take the Valve Handle and head up the Path.
Screenshot
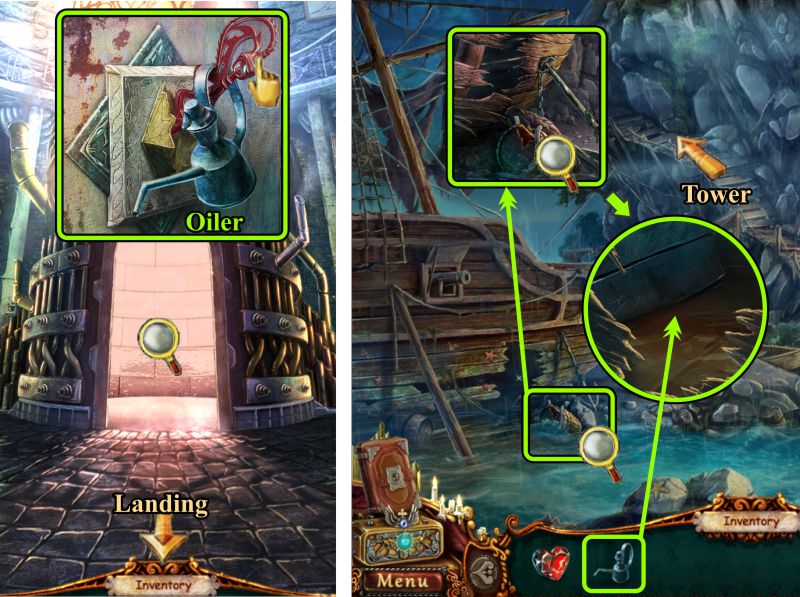
Path and Landing
Grab the Hook and return to the Landing.
Zoom in on the shipwreck and use the Hook to get the Plank.
Note the barrel full of oil, then go back up the Path.
Screenshot
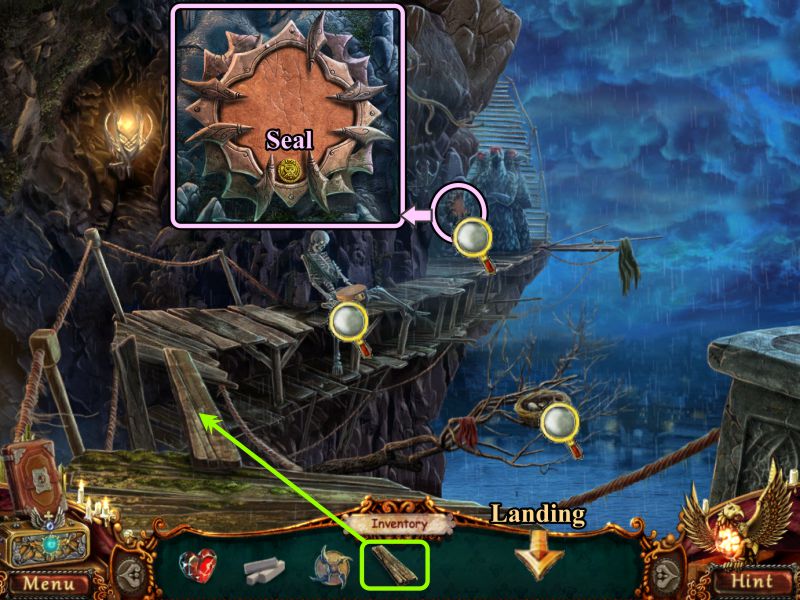
Path
Place the Plank so you can cross the gap.
Check the magnifying glasses and zoom in on the eagles blocking the path.
Take the Seal and return to the Landing.
Screenshot
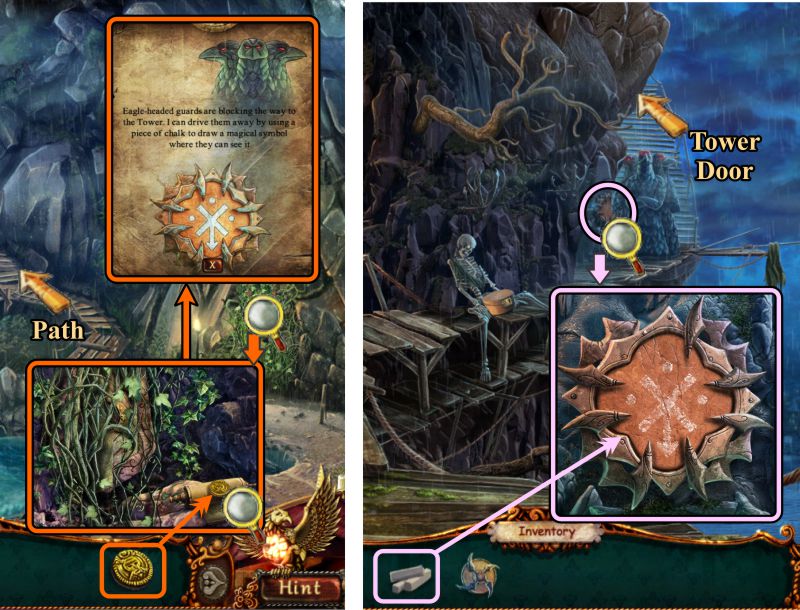
Landing and Path
Zoom in on the ivy and place the Seal on the scroll.
Read the scroll, then go back up the Path.
Zoom in on the eagles and use your chalk to automatically draw the symbol.
The eagles move aside, so head up the Path to the Tower Door.
Screenshot
Tower Door and Path
Examine the candles and door lock, take the Tongs and go back down the Path.
Zoom in twice on the skeleton and use the Tongs to remove the Pearl.
Return to the Tower Door.
Screenshot
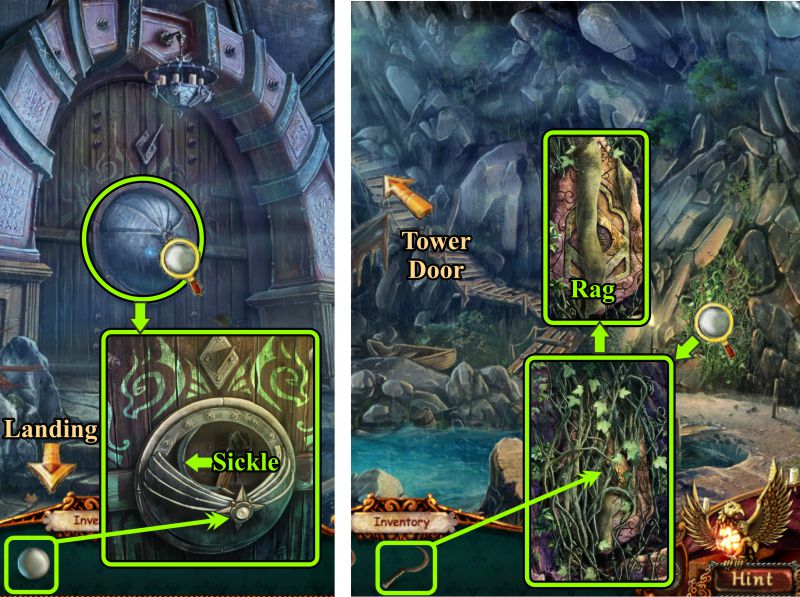
Tower Door and Landing
Zoom in on the door and place the Pearl.
Take the Sickle, then go to the Landing.
Use the Sickle to remove the ivy vines so you can collect the Rag.
Return to the Tower Door.
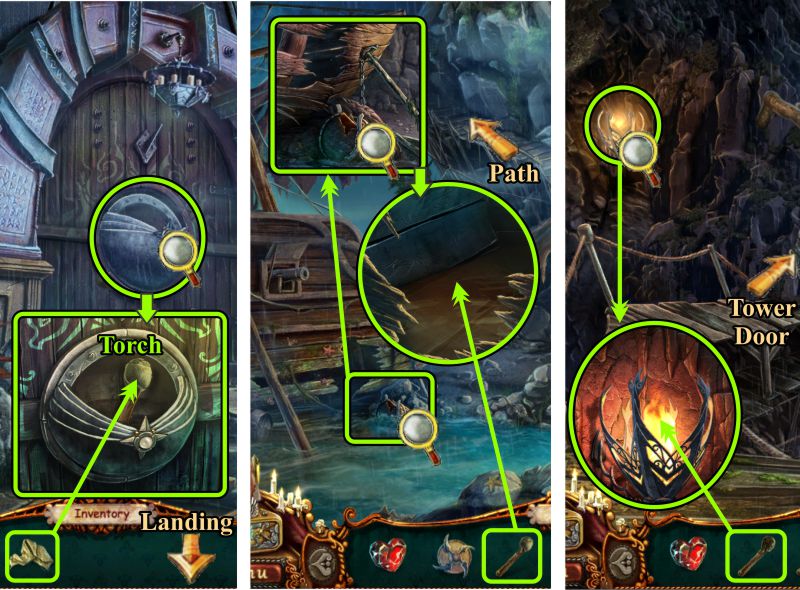
Screenshot
Tower Door, Landing, and Path
Zoom in on the door and wrap your Rag around the Torch.
Go to the Landing, zoom in on the shipwreck barrel.
Dip the Torch in the oil, then head back up the Path.
Zoom in on the torch attached to the rocks and use it to light your Torch.
Continue up the Path to the Tower Door.
Screenshot
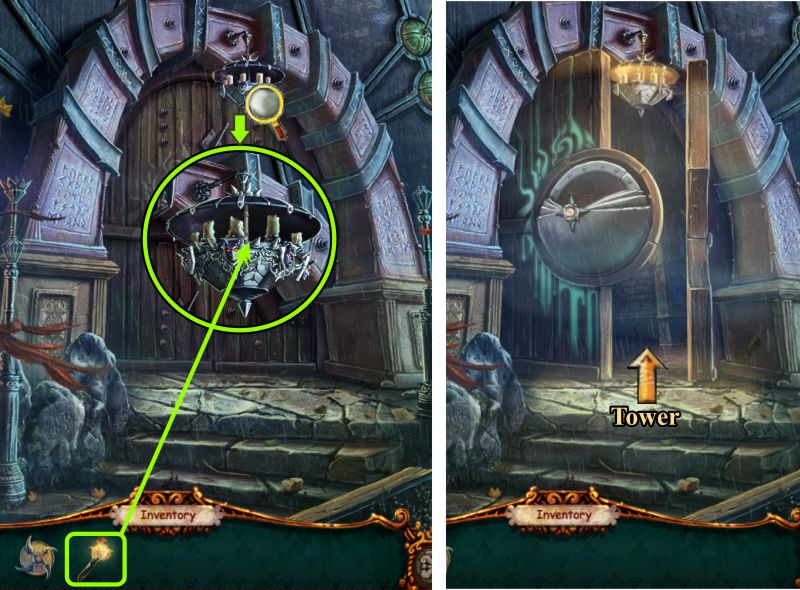
Tower Door
Zoom in and use your Burning Torch to light the candles.
Enter the Tower when the door opens.
Screenshot
Chapter 12
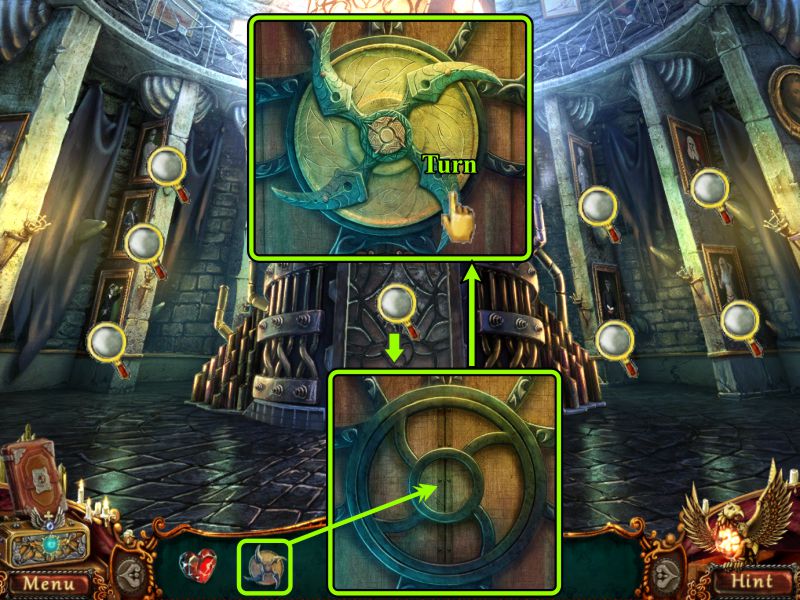
Tower Foyer
Examine all the magnifying glasses, then zoom in on the elevator gate.
Place your Valve handle and turn it.
Screenshot
Tower Foyer and Landing
Zoom in on the elevator, take the Oiler, and note the rusty handle.
Go to the landing and zoom in on the barrel of oil.
Fill your Oiler and return to the Tower.
Screenshot
Elevator and Top of the Tower
Zoom in and use your Oiler to remove the rust from the elevator handle.
Push the handle to go to the top of the Tower.
After your conversation with your father, take the Judge's Gavel.
Screenshot
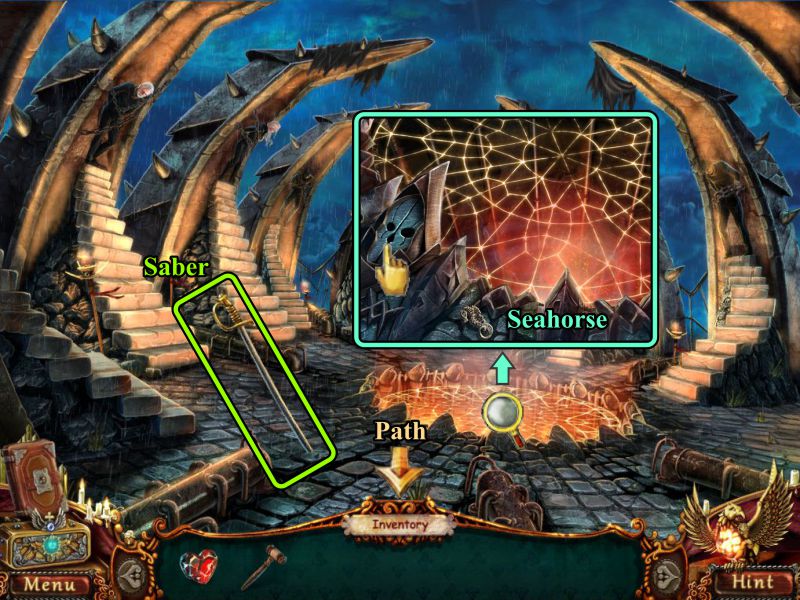
Top of the Tower
Take the Saber and zoom in on the firepit.
Take the Seahorse and note the mask.
Go to the Path.
Screenshot
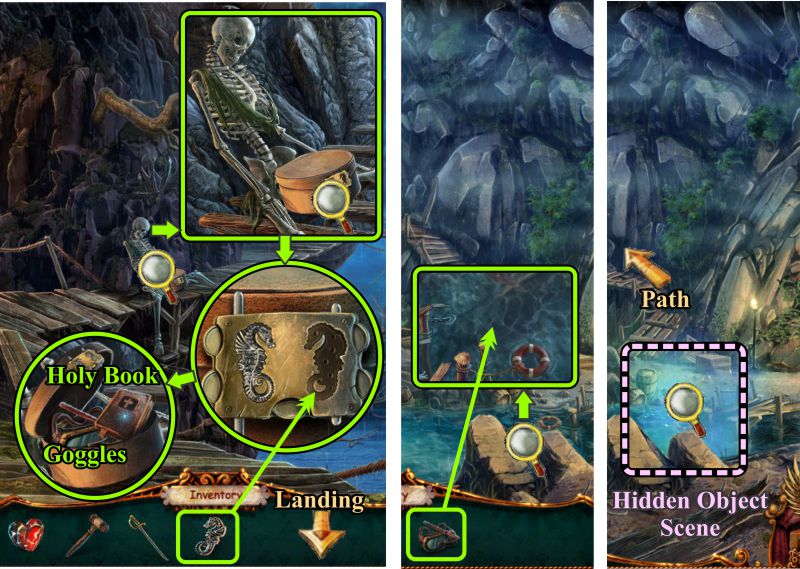
Path and Landing
Zoom in on the box the skeleton is holding.
Place the Seahorse, then take the Holy Book and Goggles from the open box.
Go to the Landing and zoom in on the water.
Place your Goggles to trigger a Hidden Object Scene.
After you play the Hidden Object Scene, head back up the Path.
Screenshot
Underwater Hidden Object Scene
Your Inventory items will be a Stethoscope and a Lasso.
Screenshot
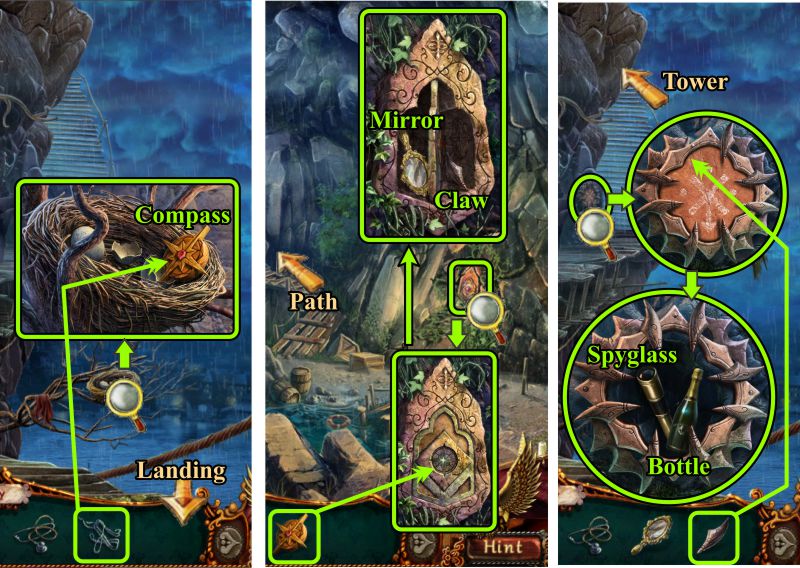
Path, Landing, and Path
Zoom in on the bird nest and use your Lasso to retrieve the Compass.
Return to the Landing, zoom in on the vines, and place the Compass.
Take the Mirror and Claw, then go back up the Path.
Zoom in on the eagle plaque and place the missing Claw.
Take the Spyglass and Bottle, then continue up the Path to the Tower.
Screenshot
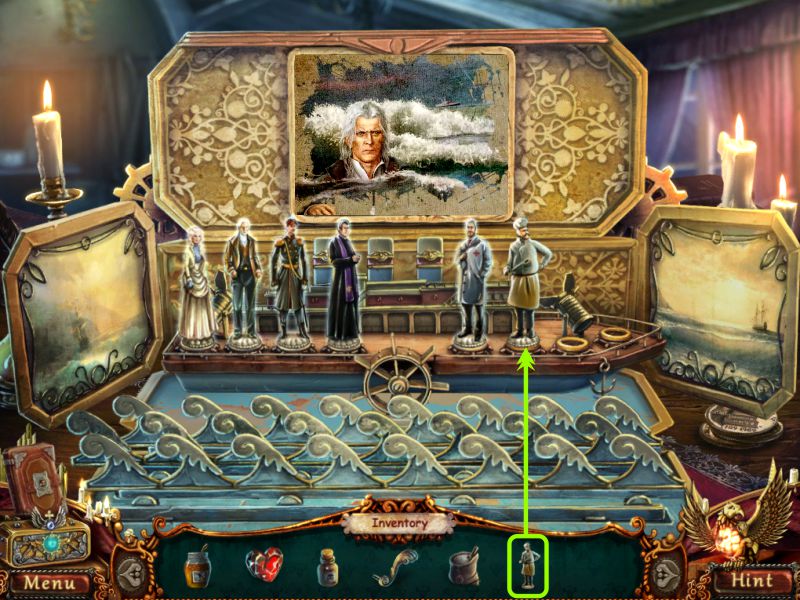
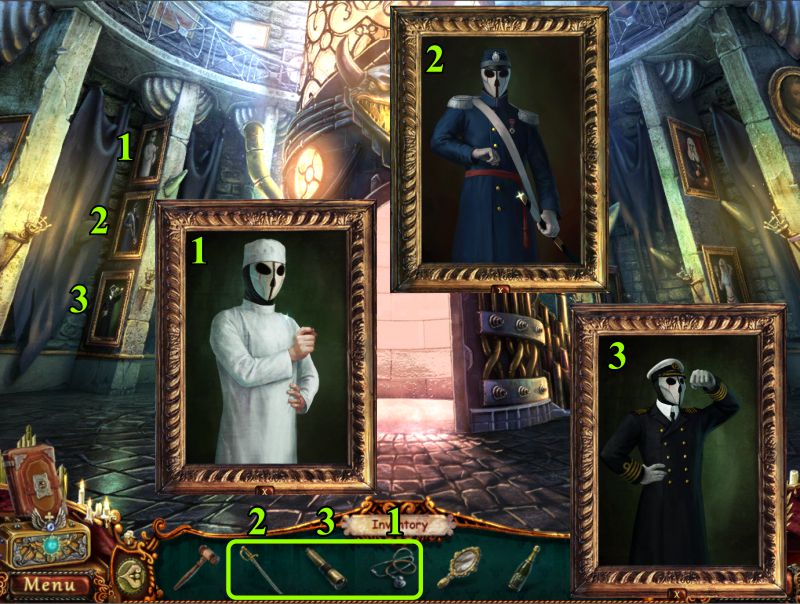
Tower Foyer
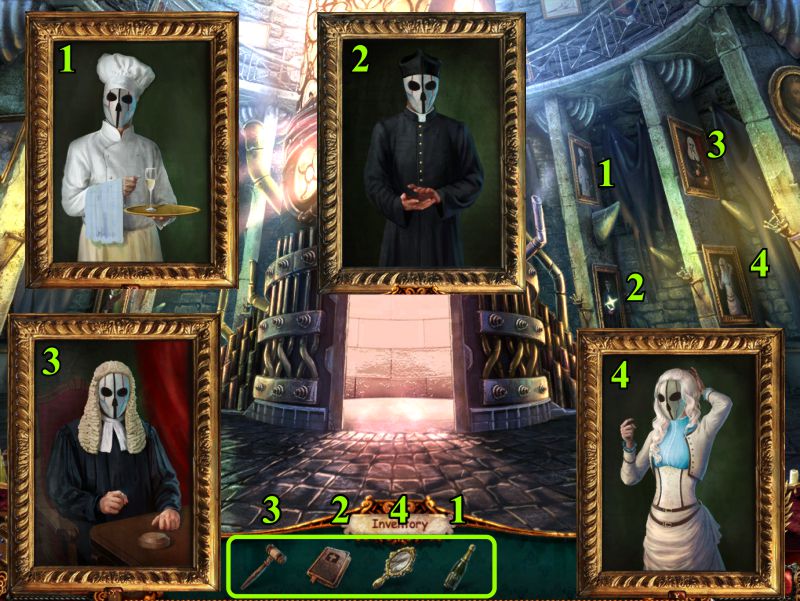
Zoom in on each of the 3 portraits to the left and place with each their associated objects.
Give the doctor the Stethoscope, the military man his Sword, and the ship's captain his Spyglass.
Screenshot
On the other side of the room, zoom in on each of the 4 portraits hanging there.
Give the chef the Bottle, the priest the Holy Book, the Judge his Gavel, and Clair the Mirror.
Screenshot
Foyer and Top of the Tower
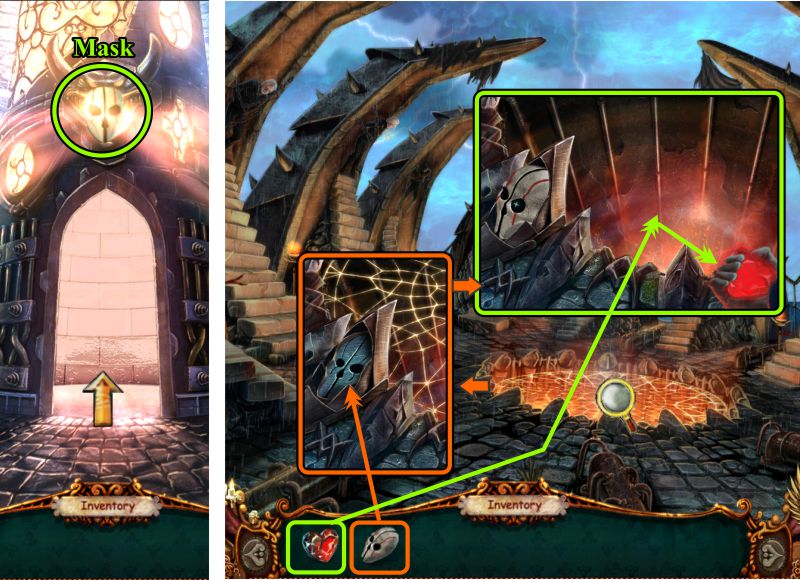
Take the Mask above the elevator, then go to the Top of the Tower.
Zoom in on the fire and place the Mask.
Throw the Heart into the now-open fire, but Leonard grabs it.
Screenshot
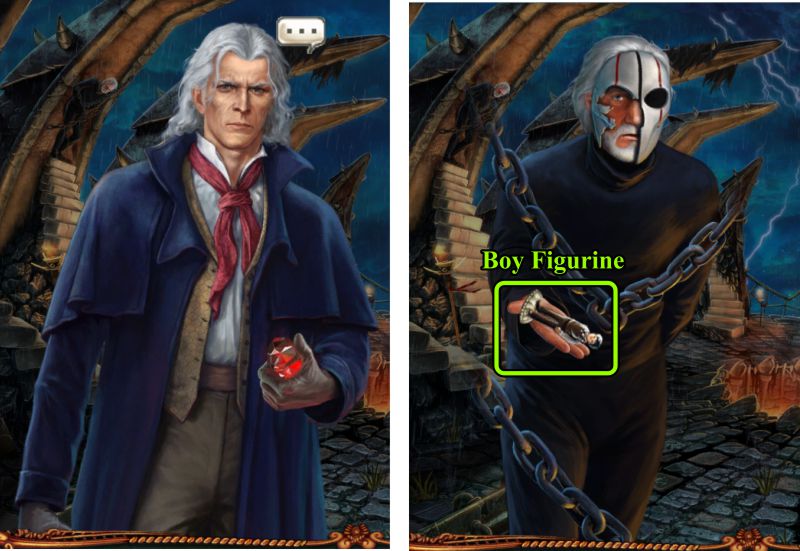
Leonard and the Judge
After conversing with Leonard, your father offers the Boy Figurine.
Screenshot
The Box
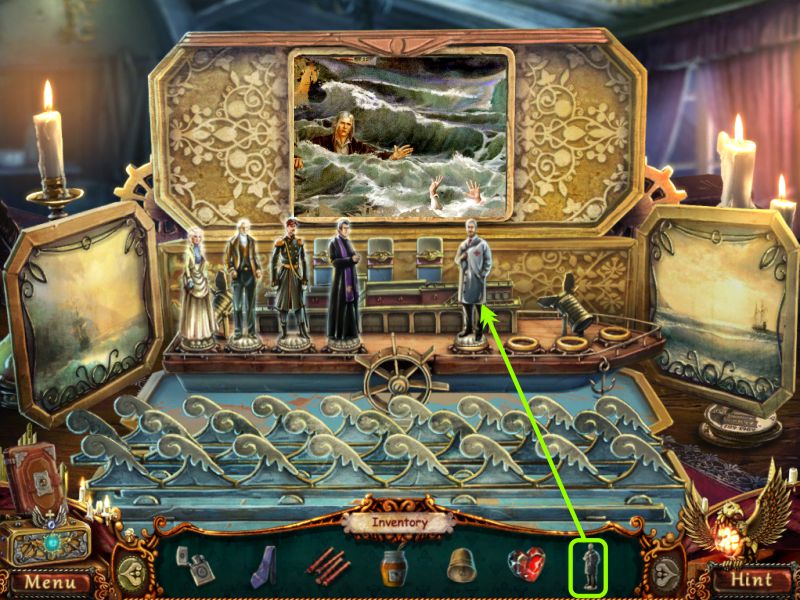
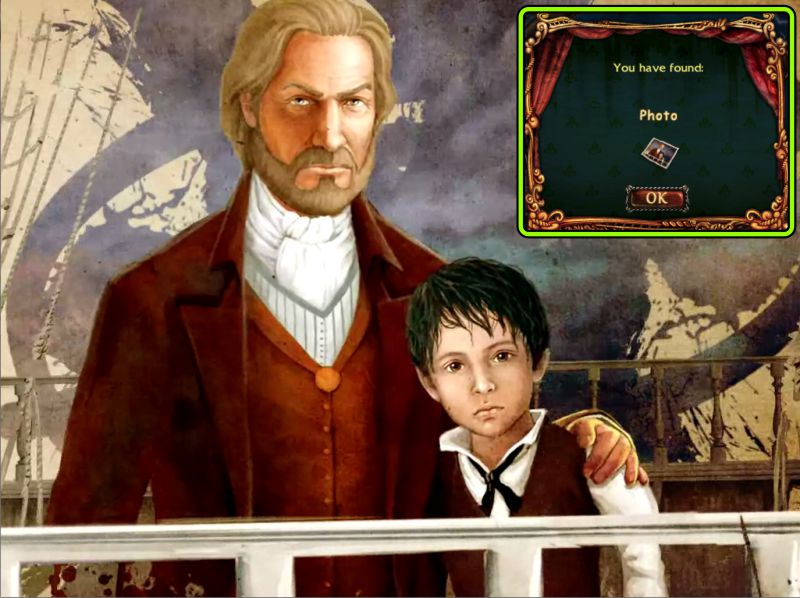
Place the Boy Figurine in the box and watch the cut scene.
Screenshot
Close the box, and you will get a Photo.
Screenshot
Top of the Tower
Give the Photo to Leonard.
Screenshot
Watch the cut scene to the completion of Dark Strokes: Sins of the Fathers.
Posted by: Jazz |
March 31, 2012 3:44 PM
|
March 31, 2012 3:44 PM