


Nightfall Mysteries: Black Heart
Platform: Mac, Windows
![]() After her beloved Viggo is captured in spectacular fashion by a caped figure (rad) on horseback (radder) with a lasso (raddest), Christine turns to you for her assistance in tracking him down and rescuing him. Because both these two lovebirds were previously in the opera, it stands to reason everything they do must be done in the most dramatic way possible, so naturally Viggo has found a way to send Christine letters from his prison by trained pigeons. You find yourself led to the mysterious Blackhill Manor only to be swiftly separated from your companion and forced to go it alone. Will you succeed in rescuing Viggo and Christine? Or will you find yourself the next victim of the strange Black Widow of Blackhill Manor? Find out in Vast Games' hidden-object adventure Nightfall Mysteries: Black Heart, the sequel to Curse of the Opera and Asylum Conspiracy. Both of which, incidentally, you should have played before this so you know what's going on... but since they're two of my favourite casual download games of all time you've already done so, right? Right. Onward!
After her beloved Viggo is captured in spectacular fashion by a caped figure (rad) on horseback (radder) with a lasso (raddest), Christine turns to you for her assistance in tracking him down and rescuing him. Because both these two lovebirds were previously in the opera, it stands to reason everything they do must be done in the most dramatic way possible, so naturally Viggo has found a way to send Christine letters from his prison by trained pigeons. You find yourself led to the mysterious Blackhill Manor only to be swiftly separated from your companion and forced to go it alone. Will you succeed in rescuing Viggo and Christine? Or will you find yourself the next victim of the strange Black Widow of Blackhill Manor? Find out in Vast Games' hidden-object adventure Nightfall Mysteries: Black Heart, the sequel to Curse of the Opera and Asylum Conspiracy. Both of which, incidentally, you should have played before this so you know what's going on... but since they're two of my favourite casual download games of all time you've already done so, right? Right. Onward!
 To save Viggo, you'll need to uncover the secret of Blackhill Manor (all manors are contractually obligated to have dark secrets) and his twisted family tree. Unlike most games, Black Heart offers three flavours of difficulty, including an unusual "extreme" choice that refuses to offer any help at all while you play. Hint and skip buttons make their usual appearances, but in most cases they're the only help you have as you go deeper into the twisted Blackhill Manor. Like any good villains, the bad guys here have gone to great extent to leave clues and even tape recordings around to aid you in your search for Viggo, but that doesn't mean it's going to be easy. You'll solve puzzles and hidden-object scenes, avoid attempts on your life more than once, and uncover the truth about one of the weirdest family trees you're likely to encounter.
Analysis: With its flair for high drama, soap-opera complex storylines, and ghoulish charms, Nightfall Mysteries has been a personal favourite series of mine for some time now. Black Heart, happily, continues the tradition and provides a solidly entertaining adventure that constantly throws new clues and scenes at you to keep you engaged. The whole design is beautiful and full of small touches both fantastical and macabre, like a wedding dress designed by Vera Wang, Tim Burton... and Dexter Morgan. Exploring and discovering the audio tapes is a lot of fun, especially since the voice acting this time around is actually quite good. Of course, at this point in the series, the narrative is more than a little convoluted. Despite how drastically it has deviated from its origins, this actually works in its favour by providing a campy but exciting and intriguing little thriller mystery. Plane crashes? Bloody bathtubs? Cowled and murderous gymnastic savants? Beats a stick in yer eye any day. (Who came up with that as an endorsement? What a silly thing to say. Moving on... )
 If Black Heart has any real flaws, they're mostly the same technical quibbles the whole series has possessed, such as somewhat finicky click detection or item usage, and the somewhat disappointing "fuzzy" artwork that's nowhere near as sharp as you'd expect. The actual gameplay itself, for the most part, is solid, if standard. None of the item uses are particularly obtuse, but be prepared to use an item once, have it vanish, and then encounter an identical issue that needs a different item more than once. You know, typical adventure game stuff. The puzzles are all mostly stylized versions of concepts you're most likely going to have seen before, and hidden-object scenes are mostly balanced both in terms of difficulty and how often they crop up. Which, y'know, is probably a good thing if you're getting annoyed with "random garbage pile" item assortments in these scenes like I am.
Nightfall Mysteries: Black Heart doesn't really provide any innovation, but it marries story and gameplay better than most games in the genre out there. At around five hours for a leisurely playthrough, it's also a good length. While the perplexingly grainy visuals might be a turn off for some, those that stick with it will find an engagingly cheesy and dramatic adventure that's well worth your time. Give the demo and try, and then go and brush up on your pigeon taming/training skills. After all, these are skills we should all apparently know in an emergency. Bless you, Viggo.
A Collector's Edition is also available. It contains a bonus chapter, art gallery, strategy guide, and more. Remember that Big Fish Game Club Members pay only $13.99 for Collector's Editions (or 2 club credits), and collector's editions count 3 card punches of 6 total needed for a free game.
![]() Windows:
Windows:
Download the demo
Get the full version
Also available: Collector's Edition
![]() Mac OS X:
Mac OS X:
Download the demo
Get the full version
Also available: Collector's Edition


Walkthrough Guide
(Please allow page to fully load for spoiler tags to be functional.)
Nightfall Mysteries: Black Heart Walkthrough
General Info, Chapters 1-3
General Information
At the start of a new game, you have a choice between three difficulties: Casual, Advanced, and Extreme mode.
In Casual mode, the Hint has a modest recharge timer, sparkles will indicate active areas, and you will be offered a beginner's tutorial at the start of the game.
In Advanced mode, the Hint button has a slower recharge timer and sparkles will have a longer period of time between indicating active zones.
In the Extreme mode, the Hint button and sparkles are removed entirely from the game, and you will not receive the option for the beginner's tutorial.
Use the cursor to interact with the environment.
The cursor will change to a magnifying glass when you can inspect an area more closely or start a puzzle or hidden object scene.
The cursor changes to a directional arrow when you can move to a different location.
The cursor changes to a speech bubble when you can talk to one of the characters.
The cursor changes to a hand when you can pick up an item to add it to your Inventory or to interact directly with the environment.
The Inventory is the toolbar located at the bottom of the screen.
Your Inventory bar contains all of the items you will need to progress through the game.
Click an item in your Inventory to select it, then click on an area in the game to attempt to use the item.
Often, once an item is used, it will disappear permanently from your Inventory.
Click the arrows at the left and right sides of the Inventory to toggle through the multiple sections of the list.
To the right of the Inventory bar is the Hint button.
The Hint button can be used to reveal an item during a hidden object scene, offer additional information about a puzzle, or to show you the next step of your adventure if you're stuck.
While solving a puzzle, the Skip button will appear at the bottom of the window.
Press the Skip button when it fully charges to immediately complete the puzzle.
Hidden object scenes are areas indicated by sparkles where you must collect various randomized objects listed at the bottom to receive a new inventory item upon completion.
In the screenshots of this guide, the random items are highlighted in purple, and the inventory item you receive at the end is labeled and highlighted in blue.
If two items must be combined in a hidden object scene, the name of that object will be colored green in the list and highlighted green in the screenshot.
If an item must be manipulated to reveal a hidden object, the name of that item object will be colored yellow in the list highlighted yellow in the screenshot.
On the left side of the Inventory bar is the Journal.
The Journal contains multiple tabs that offer helpful information and track your progress through the game.
The Clues tab includes important images and texts that document the information you find.
The Audio Tapes tab is a collection of each of the 15 hidden tape cassettes that you have discovered.
Click and drag an audio tape cassette into the tape player to hear and read the information on that tape.
The Map tab includes the entire floor plan to the estate.
An area you have not yet visited will be labeled with a "?"; once you have reached that destination, it will be labeled properly with the name of the room.
The "X" on the map indicates your current location.
A "!" on the map denotes an area where you still have available actions to complete.
The Collectables tab tracks the number of hidden Opera Masks you have discovered and the rewards you have earned. Find all of the Opera Masks located throughout the game to unlock bonus music and concept art as well as 12 additional hidden object scenes and puzzles.
Under the Journal is the Menu button. Click the Menu button to view an in-game menu where you can pause the game, edit the Options, view additional in-game Help, or Exit to the main menu.
Opera Masks Locations
Opera Mask 1: Workshop Porch
Screenshot.
Opera Mask 2: Hedge Maze
Screenshot.
Opera Mask 3: Great Hallway
Screenshot.
Opera Mask 4: Nursery
Screenshot.
Opera Mask 5: Walk-In Closet
Screenshot.
Opera Mask 6: Conservatory
Screenshot.
Opera Mask 7: Breaker Room
Screenshot.
Opera Mask 8: Dining Room
Screenshot.
Opera Mask 9: Back Patio
Screenshot.
Opera Mask 10: Catacomb Halls
Screenshot.
Opera Mask 11: Cliffside Path
Screenshot.
Opera Mask 12: Catacomb Crypt
Screenshot.
Opera Mask 13: Old Sewer
Screenshot.
Opera Mask 14: Blood Chamber
Screenshot.
Opera Mask 15: Inner Sanctum.
Screenshot.
Chapter 1
Blackhill Bridge
Inspect the side of the watchman's post for a closer look.
Click the portraits of Viggo and Christine at the bottom of the poster to reveal the RED HEART HALF and the BLACK HEART HALF.
Click the crying statue next to Christine to zoom in.
Take the PORTRAIT OF VIGGO from the statue's hands.
Place the RED HEART HALF and BLACK HEART HALF inside the heart-shaped hole in the statue's chest.
Click the combined CRYSTAL HEART to activate the Hint Button feature.
Click the bridge that leads to the mansion.
Pick up the METAL BAR that falls to the ground beside the statue.
Inspect the destroyed Blackhill sign.
Take the AXE wedged in the K of the Blackhill sign.
Read the letter wrapped around the L of the Blackhill sign.
Use the AXE to remove the boards covering the front of the watchman's post.
Click the uncovered window to the watchman's post to start the hidden object scene.
Put the ball into the cup to make the Hole in One (A).
Place the fish into the glass bowl to create the Fish in Bowl (B).
Add the dart to the target to make the Bullseye (C).
Open the takeout box to find the Shrimp (D).
Screenshot.
Once the hidden object scene is complete, you will receive the BUG SPRAY.
Click the right gate to zoom in.
Take the COUNTESS INSIGNIA stuck in the center of the gate.
Use the METAL BAR to pry open the bent bars of the gate.
Go right to the Abandoned Playground.
Abandoned Playground
Click the yellow bird spring toy to chase away the hawk.
Click the hawk's nest to start the hidden object scene.
Open the chipmunk's mouth to find the Acorn (A).
Move away the leaves to reveal the Doubloons (B).
Open the flower bud to find the Bee (C).
Open the cracked egg to reveal the Hawk Talon (D).
Screenshot.
Once the hidden object scene is complete, you will receive the HAWK TALON.
Inspect the horse on the merry-go-round for a closer look.
Take the CHISEL from the horse's tail.
Click the wood fragment in the horse's mouth to lure out the black widow.
Kill the spider with the BUG SPRAY, then take the WOOD CARVING (1/3).
Go up the stairs to the Workshop Porch.
Workshop Porch
Grab the Opera Mask (1/15) Collectable on the wall to the right of the door.
Take the Tape Player leaning against the red chest to add it to the journal.
Open the yellow locker, then take the HANDLE inside.
Click the red chest to zoom in.
Use the HAWK TALON to cut through the rope tied around the handle, then click the ROPE to add it to your inventory.
Open the red chest and take the SCOOP inside.
Return to the Blackhill Bridge.
Blackhill Bridge
Click the broken Blackhill sign to zoom in.
Use the SCOOP to dig up the dirt under the sign.
Take the revealed PIECE OF CHAIN on the ground.
Click the broken bridge to look over the cliff.
Attach the ROPE to the left post.
Take the WOOD CARVING (2/3) from the ledge just under the post.
Continue right to the Abandoned Playground.
Abandoned Playground
Inspect the swing set for a closer look.
Repair the broken swing with the PIECE OF CHAIN.
Click the swing to chase away the carrier pigeon.
Click the sandbox under the swing to zoom in.
Open the parcel and take the Audio Tape (1/15) and WOODEN CARVING (3/3).
Go up to the Workshop Porch.
Workshop Porch
Click the door to the workshop for a closer look.
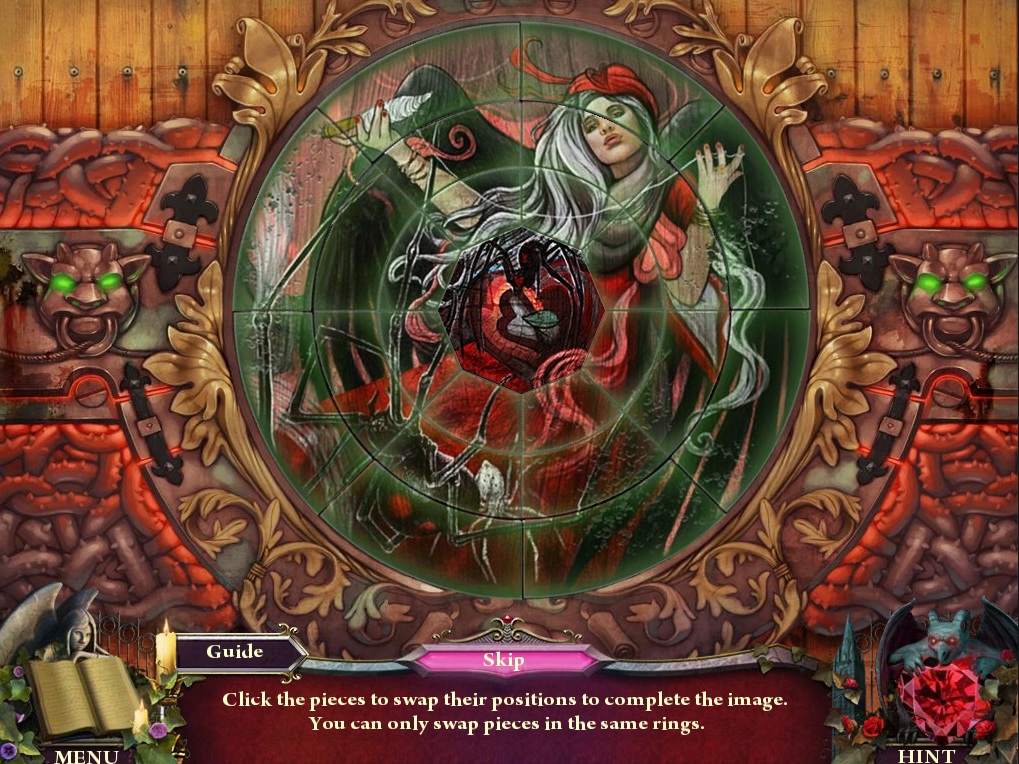
Add the three WOODEN CARVING(s) from your inventory to the board to start the puzzle.
Swap the panels in the discs of the round board to complete the picture.
Tiles can only be switched with other tiles in the same disc.
When a piece is correctly positioned, it will lock in place.
Solution.
Go through the open door to the Workshop.
Workshop
Pick up the WOOD PLANK leaning against the stool.
Open the red curtain, then click the wood carved statue to zoom in.
Use the CHISEL to remove the BONE HORN glued to the side of the statue's head.
Inspect the workbench for a closer look.
Take the SCREWDRIVER sticking out of the table.
Add the HANDLE to the vice, then click the handle to release the SANDBOX KEY.
Click the window to zoom in.
Take the GEAR (1/3) from the can of red paint.
Go back to the Abandoned Playground.
Abandoned Playground
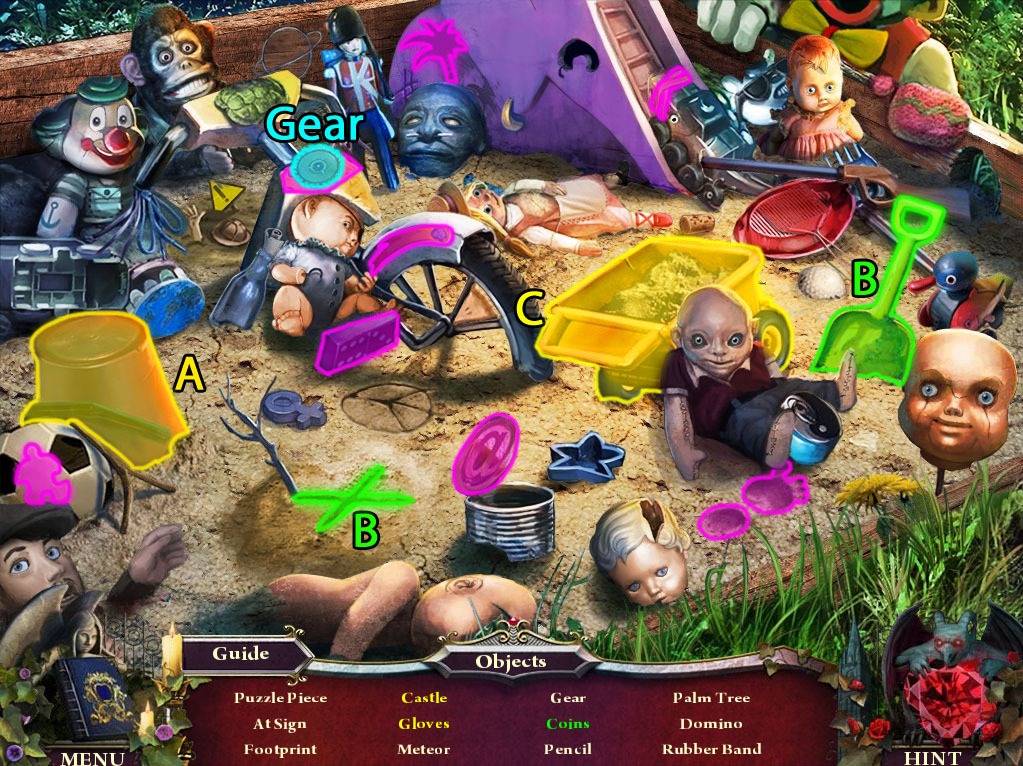
Click the covered sandbox to zoom in.
Use the SANDBOX KEY to open the padlock.
Click the opened sandbox to start the hidden object scene.
Lift the bucket to find the Castle (A).
Use the Shovel to dig at the X to reveal the Coins (B).
Empty the toy dump truck to find the Gloves (C).
Screenshot.
Once the hidden object scene is complete, you will receive the GEAR (2/3).
Click the horse on the merry-go-round for a closer look.
Add the BONE HORN to the horse's head.
Lift the saddle to find the CONTROL CHIP.
Return to the Workshop Porch.
Workshop Porch
Look inside the open red chest.
Use the SCREWDRIVER to remove the screws from the plate on the toy robot's chest.
Take the revealed GEAR (3/3) from the robot
Go inside the Workshop.
Workshop
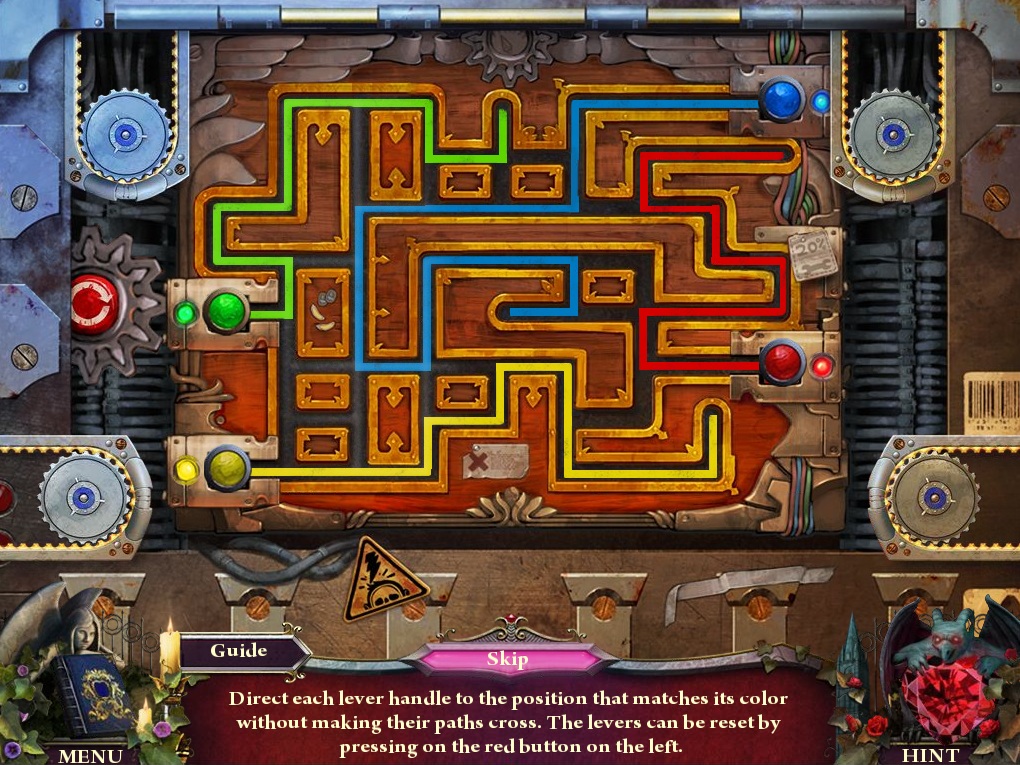
Inspect the control panel mechanism beside the large wheel for a closer look.
Add the three GEAR(s) to the mechanism to start the puzzle.
Move each colored circle to the matching colored square tile at the sides of the board.
Click the circle to select it, then direction arrows to move it along the track in the corresponding directions.
Moving a round handle will leave a trail behind it; every circle must make it to the end without crossing over the path of any other circle.
Solution.
Go outside to the Workshop Porch.
Workshop Porch
Click the door to the cable car to zoom in.
Place the WOOD PLANK over the gap between the broken deck and the car.
Take the WORK GLOVES stuck between the doors.
Click the poster board on the workshop wall to the left of the door for a closer look.
Take the newspaper article on top of the poster.
Use the WORK GLOVES to take the DOOR RELEASE HANDLE stuck in the barbed wire.
Inspect the door to the cable car again.
Add the DOOR RELEASE HANDLE to the mechanism on the right side of the car door.
Click the handle to open the doors.
Enter the opened Cable Car.
Cable Car
Read the newspaper headline on top of the chair.
Pick up the PAINT THINNER on the sofa seat.
Return to the Workshop.
Workshop
Click the windowsill to zoom in.
Use the PAINT THINNER on the spilled blue paint to reveal the CORKSCREW.
Inspect the side of the unfinished wood carving.
Use the CORKSCREW to remove the cork panel from the statue's side.
Take the revealed KEY inside the statue.
Go back to the Cable Car.
Cable Car
Click the control panel under the middle window for a closer look.
Take the NIGHTLIGHT on top of the switch board.
Insert the CONTROL CHIP into the control panel to lift the key cover.
Use the KEY on the ignition, then turn the key to power the cable car.
Click the handle to travel to the Courtyard.
Chapter 2
Courtyard
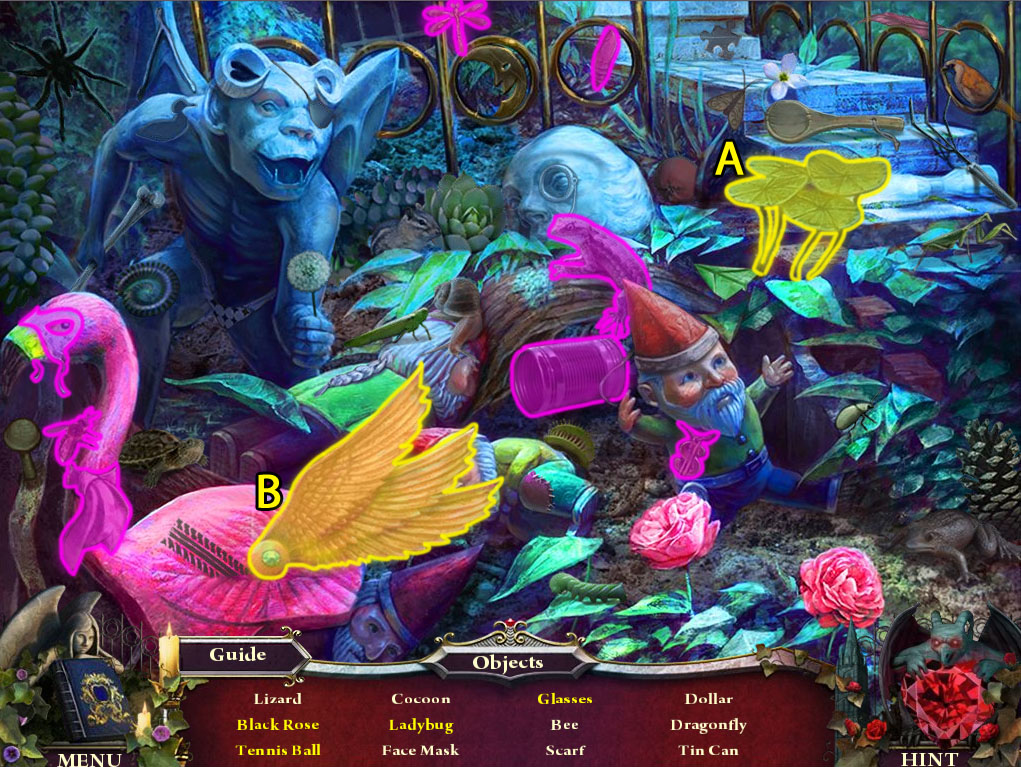
Click the planter with the pink flamingo to start the hidden object scene.
Move away the leaves to find the Black Rose (A).
Lift the flamingo's wing to reveal the Ladybug, the Glasses, and the Tennis Ball (B).
Screenshot.
Once the hidden object scene is complete, you will receive the BLACK ROSE.
Click the park bench to zoom in.
Pick up the newspaper and take the LOCK PICK underneath.
Go left to the Fountains, then continue forward to the Front Door.
Front Door
Take the WATERING CAN from the side of the steps.
Click the altar to the right of the stairs to zoom in.
Take the PORTRAIT OF VLADD in the altar statue's hands.
Take the Audio Tape (2/15) on the altar in front of the candles.
Go back to the Fountains.
Fountains
Click the sewer grate under the left archway for a closer look.
Use the LOCK PICK to unlock the grate.
Take the revealed CLEAN WATER TABLET inside the cache.
Inspect the angel statue for a closer look.
Place the BLACK ROSE in the angel's empty hand.
Use the WATERING CAN to collect the black tar pouring from the statue's mouth to receive the POISONOUS SUBSTANCE.
Take the QUILL feather on the angel's leg.
Click the basin of the water fountain to zoom in.
Take the MASONRY TROWEL from the edge of the fountain.
Go back to the Courtyard.
Courtyard
Click the hanging planter in the statue's hand to zoom in.
Use the POISONOUS SUBSTANCE to kill the thorny vines.
Take the uncovered FIRE GARGOYLE HEAD.
Return to the Front Door.
Front Door
Inspect the plaque on the wall to the left of the door.
Use the MASONRY TROWEL to remove the loose brick under the plaque.
Click the BRICK to add it to your inventory.
Take the revealed VALVE WHEEL from the wall cache.
Go back to the Fountains.
Fountains
Click the water fountain to zoom in.
Add the VALVE WHEEL to the socket beside the spout.
Click the valve to shut off the water.
Pour the CLEAN WATER TABLET into the dirty water inside the fountain basin.
Take the revealed ICE GARGOYLE HEAD floating in the clean water.
Go back to the Courtyard.
Courtyard
Click the park bench for a closer look.
Use the BRICK to smash the clay pot on the pedestal.
Take the revealed COPPER COIN from the broken pot.
Return to the Front Door.
Front Door
Click the front door for a closer look.
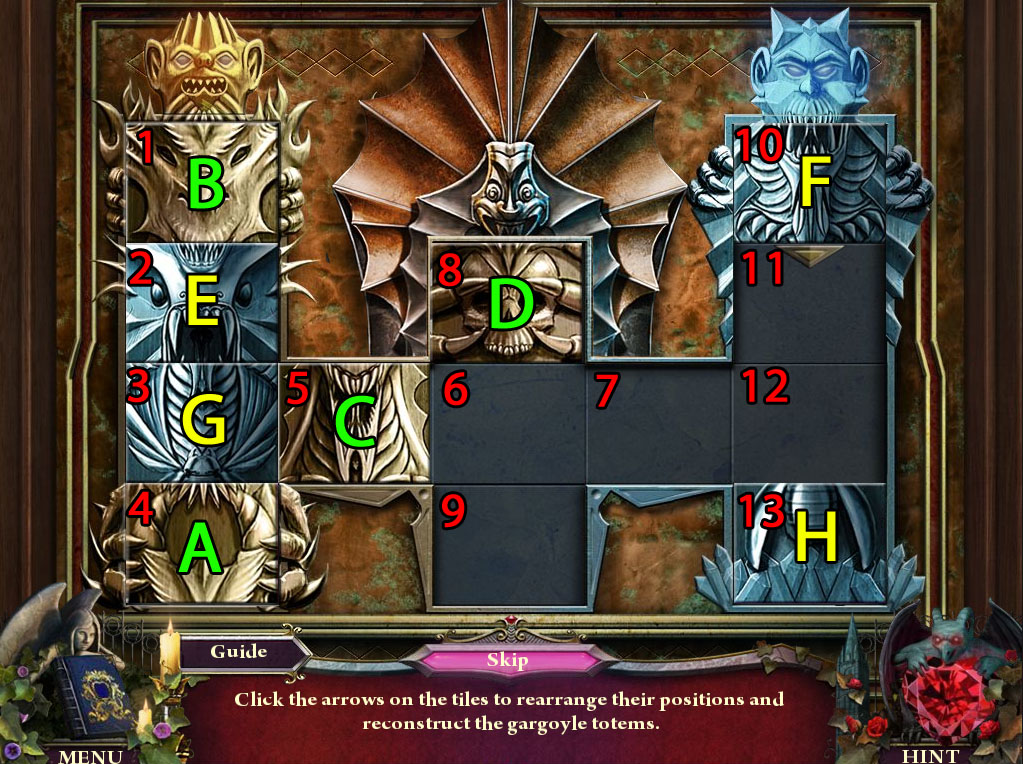
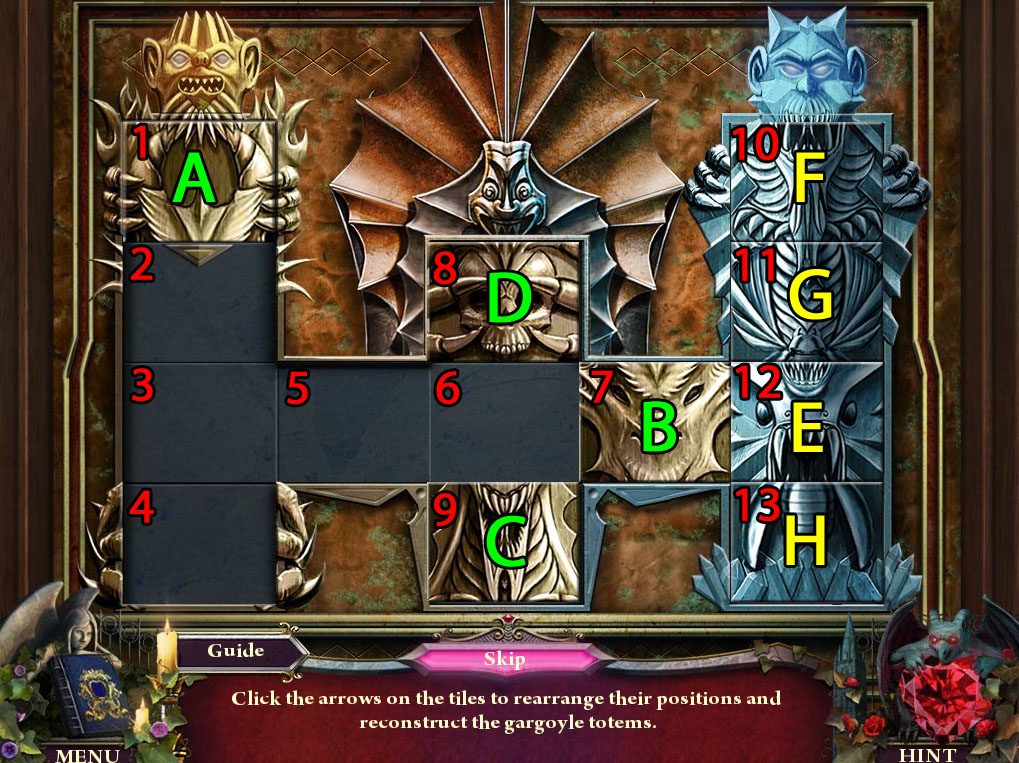
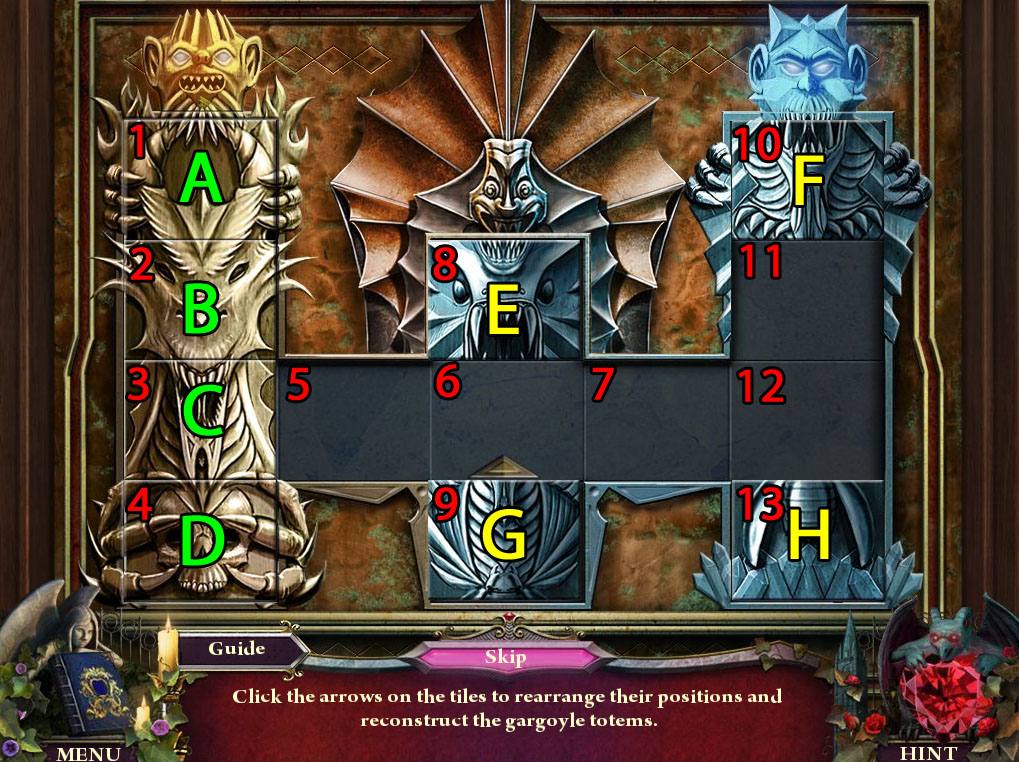
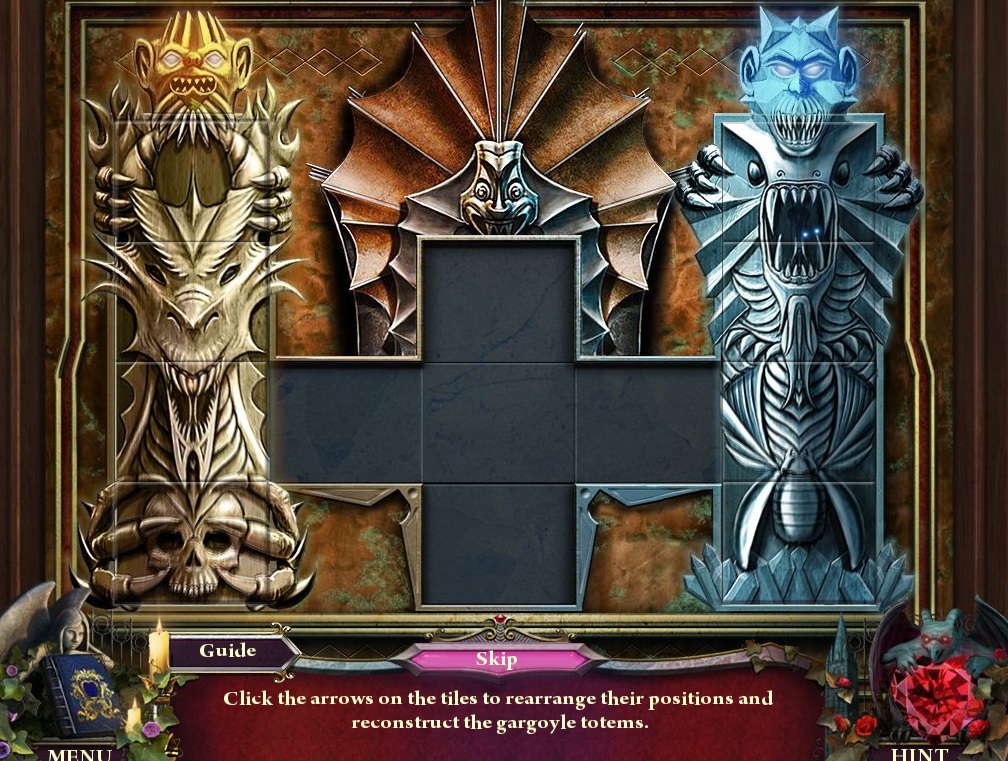
Add the FIRE GARGOYLE HEAD and the ICE GARGOYLE HEAD to the board to start the puzzle.
Arrange the tiles in the correct positions to complete the totems.
Click a tile to select it, then click the directional arrows at its sides to move it in the corresponding directions.
Move the tiles in the following order (Tiles are labeled alphabetically and spaces are labeled numerically):
Screenshot.
Move Tile D to space 8, move Tile F to Space 9, move Tile H to Space 13, move Tile C to Space 5, move Tile F to Space 10.
Solution Part 1.
Move Tile C to Space 9, move Tile G to Space 11, move Tile E to Space 12, move Tile B to Space 7, move Tile A to Space 1.
Solution Part 2.
Move Tile D to Space 4, move Tile B to Space 2, move Tile C to Space 3, move Tile E to Space 8, move Tile G to Space 5.
Solution Part 3.
Move Tile F to Space 9, move Tile E to Space 10, move Tile F to Space 11, move Tile G to Space 12.
Solution Part 4.
Go through the open door to the Grand Stairs.
Chapter 3
Grand Stairs
Click the small table to zoom in.
Take the GRIFFIN FIGURINE and the newspaper clipping.
Use the QUILL on the ink well to make it an INKED QUILL.
Inspect the door at the top of the stairs.
Read the note from the Countess, then take the HEDGE CLIPPERS from the door handle.
Click the cupid statue on the pedestal at the end of the left banister for a closer look.
Take the GOLD LEAF from the statue's waist.
Go back to the Courtyard.
Courtyard
Click the grate at the bottom of the building to speak with Viggo.
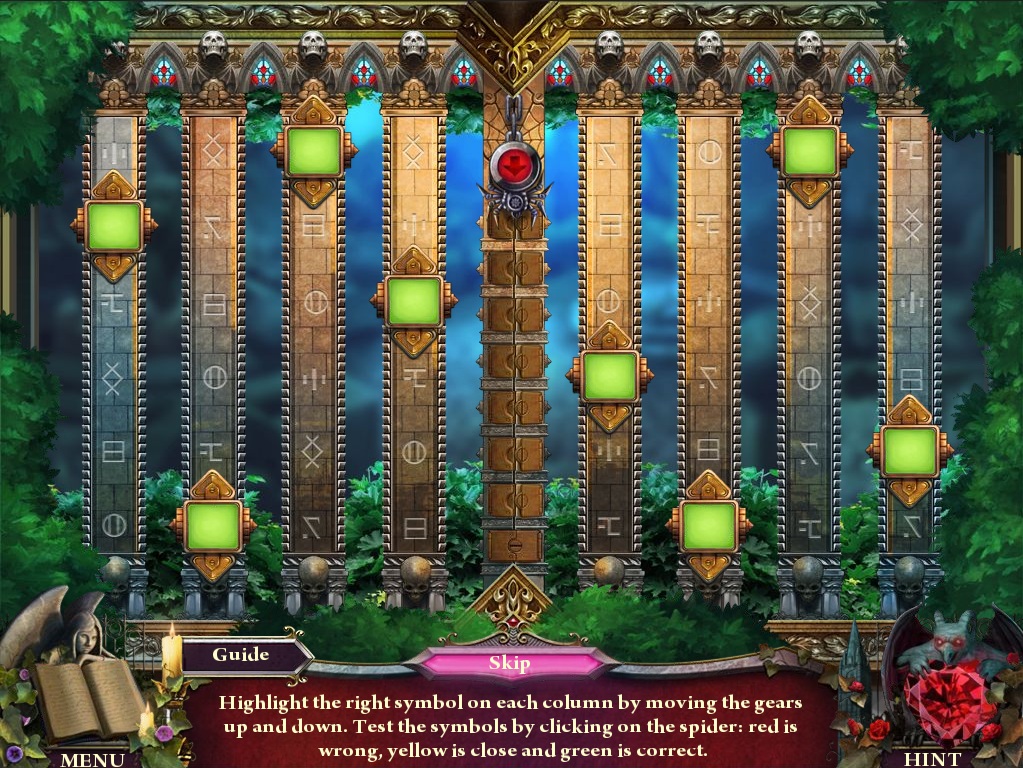
Inspect the right gate under the hedge archway for a closer look.
Use the HEDGE CLIPPERS three times to remove the hedge plants and start the puzzle.
Position each slider correctly on the bar using the color clues.
Click the up and down directional arrows at the ends of the slider to move it around the bar.
Click the spider to test your solution: a correctly positioned slider will turn green, an incorrectly positioned slider will turn red, and a slider within one space of the correct position will turn yellow.
Solution.
Continue right through the open gate to the Hedge Maze.
Hedge Maze
Click the destroyed helicopter to start the hidden object scene.
Open the box to find the Police Light (A).
Screenshot.
Once the hidden object scene is complete, you will receive the MATCHBOOK.
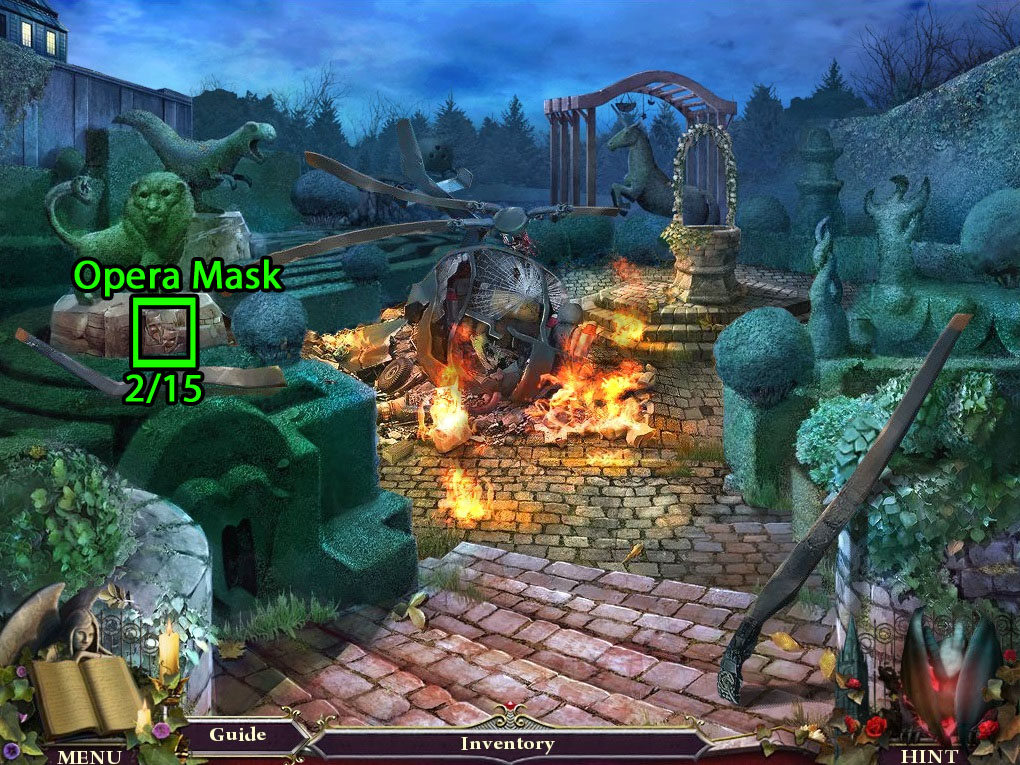
Take the Opera Mask (2/15) Collectable from the pedestal under the hedge plant shaped like a lion.
Inspect the hedge animal for a closer look.
Remove the plants from the lion's stomach to reveal the SANGUINE KEY inside the wire frame.
Click the wishing well in the center to zoom in.
Put the COPPER COIN into the well.
Take the COUNT INSIGNIA that floats to the top of the water.
Return to the Grand Stairs.
Grand Stairs
Click the door at the top of the stairs to zoom in.
Put the COUNT INSIGNIA into the left empty oval above the door handle.
Put the COUNTESS INSIGNIA into the right empty oval.
Go through the open door to the Great Hallway.
Great Hallway
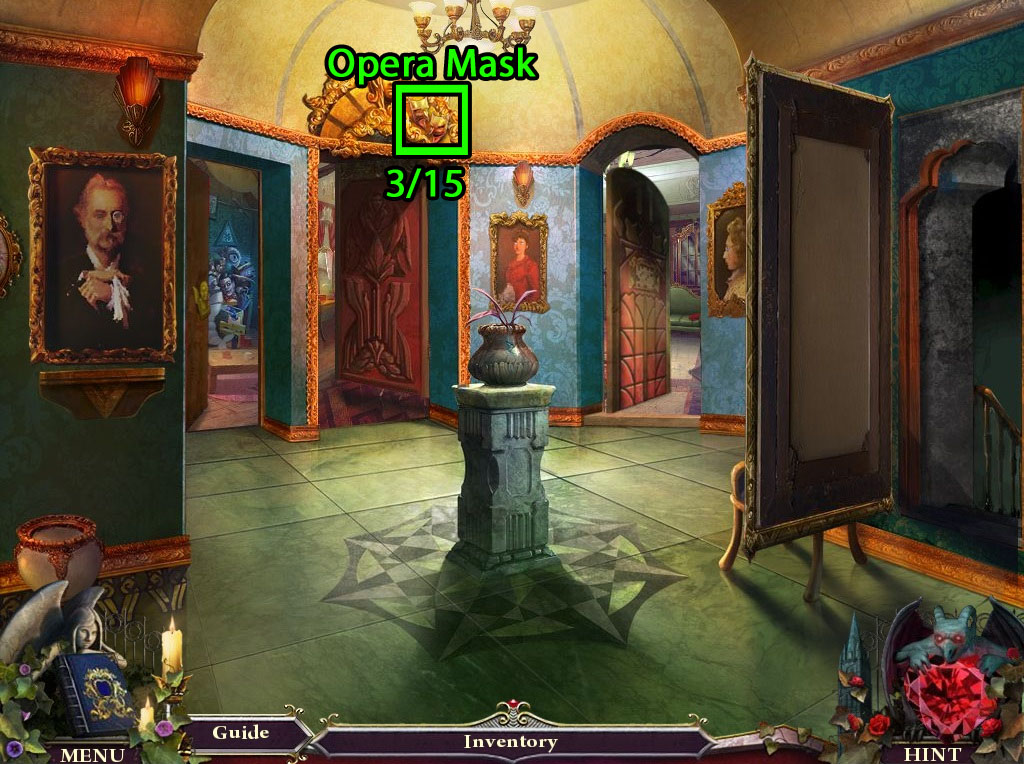
Find the Opera Mask (3/15) Collectable in the gold carving above the middle doorway to the Countess' Bedroom.
Click the large portrait on the right wall to zoom in.
Take the SNAKE EYE from the figure's eye in the painting.
Go through the open middle door to the Countess' Bedroom.
Countess' Bedroom
Click the end table at the foot of the bed for a closer look.
Take the PORTRAIT OF VIOLETTA beside the spider jar.
Inspect the vanity mirror in the corner of the room.
Click the red journal to open it.
Use the INKED QUILL on the blank journal pages, then pick up the spider diagram from the right page.
Take the CLEANING SPRAY on the table.
Open the green box to find the Audio Tape (3/15).
Click the left door to zoom in.
Use the SANGUINE KEY on the keyhole to open the door.
Go through the open door to the Countess' Bathroom.
Countess' Bathroom
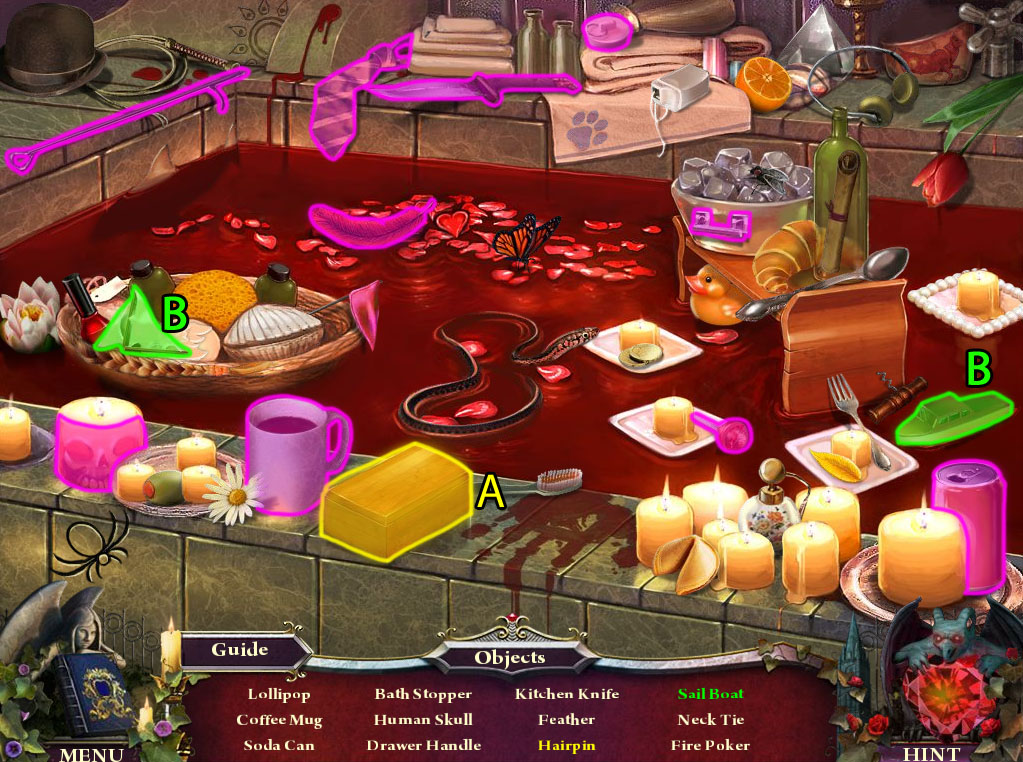
Use the MATCHBOOK to light the candles at the side of the bath.
Click the bathtub to start the hidden object scene.
Open the wood box to find the Hairpin (A).
Add the sail to the toy boat to complete the Sail Boat (B).
Screenshot.
Once the hidden object scene is complete, you will receive the HAIRPIN.
Inspect the freezer to the left of the statue.
Take the MANNEQUIN ARM on top of the freezer.
Click the sink to zoom in.
Take the HARPY FIGURINE next to the right water tap.
Go back to the Countess' Bedroom.
Countess' Bedroom
Click the vanity mirror to zoom in.
Use the HAIRPIN to unlock the red jewelry box.
Take the NURSERY KEY and the SPIDER PIN (1/4) from the opened box.
Go back to the Great Hallway.
Great Hallway
Click the left door for a closer look.
Add the NURSERY KEY to the cherub figurine.
Turn the key in the cherub's mouth to open the door.
Go through the open left door to the Nursery.
Nursery
Find the Opera Mask (4/15) Collectable on the floor by the wheel of the train.
Click the cupboard next to the lamp to zoom in.
Take the PORTRAIT OF VICTOR next to the deck of cards.
Take the LION EYE from the toy lion's head.
Click the baby's crib to look inside.
Take the HOURGLASS GEM inside the toy black widow spider.
Inspect the power outlet on the wall for a closer look.
Take the BROKEN POWER CORD from the bottom socket.
Put the NIGHTLIGHT in the top socket.
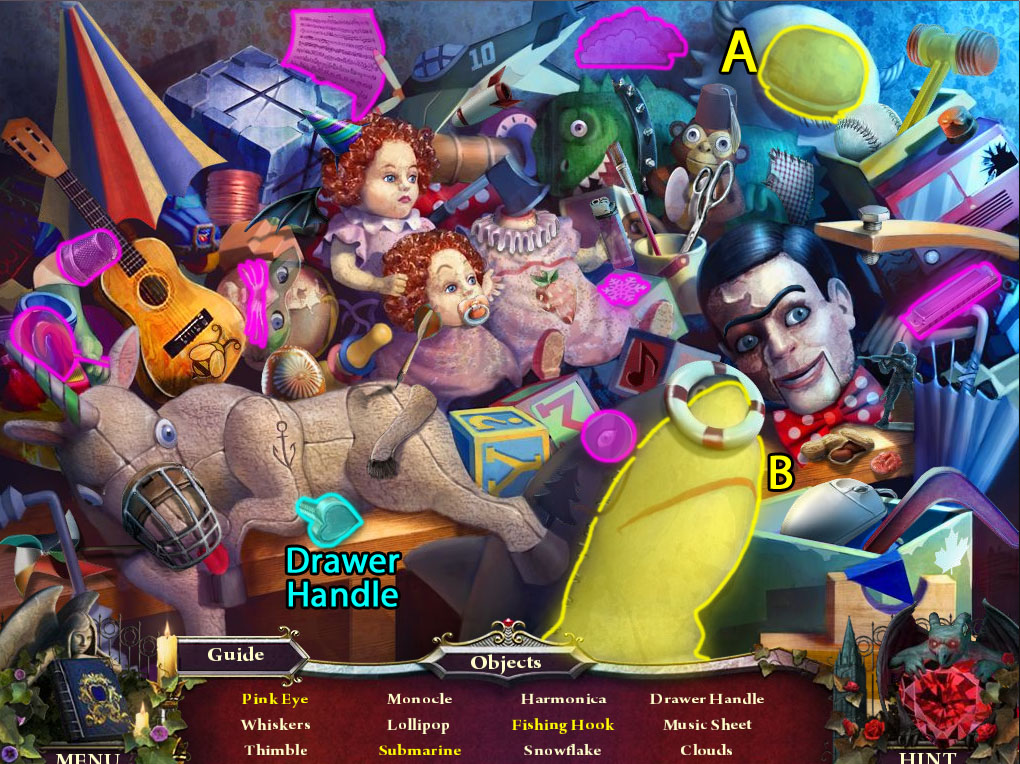
Click the pile of toys to start the hidden object scene.
Open the toy cyclops' eye to reveal the Pink Eye (A).
Open the shark's mouth to find the Submarine and the Fishing Hook (B).
Screenshot.
Once the hidden object scene is complete, you will receive the DRAWER HANDLE.
Return to the Countess' Bedroom.
Countess' Bedroom
Click the closet door to zoom in.
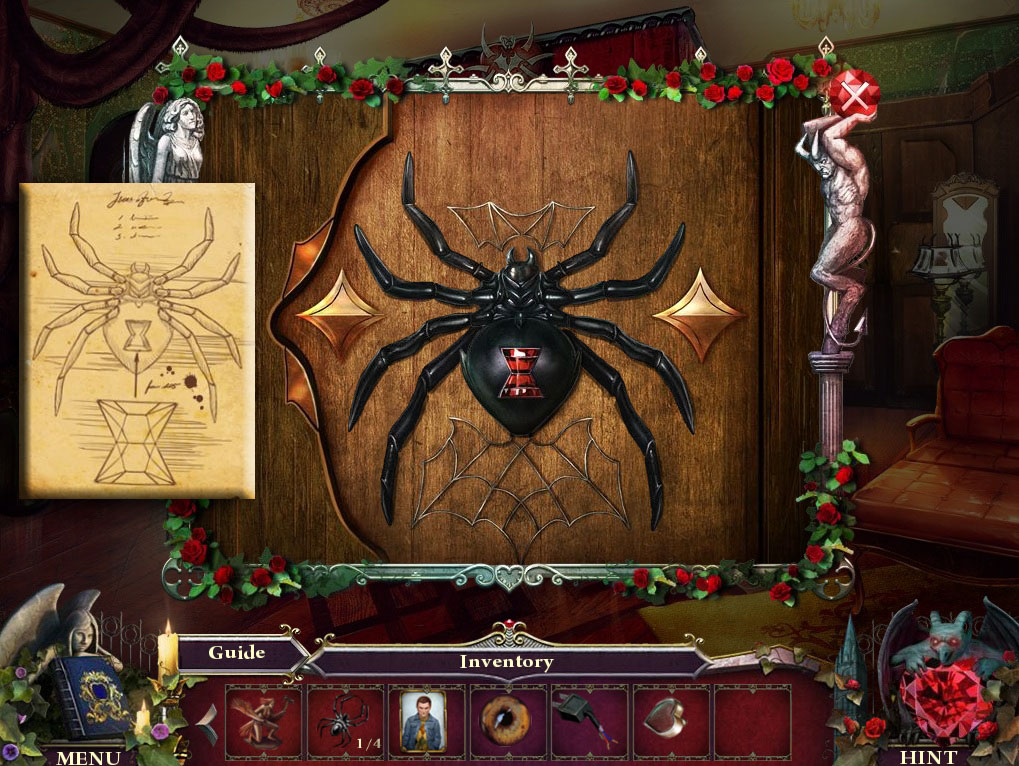
Place the HOURGLASS GEM into the spider's back.
Click the each of the spider's legs once to stretch them outward like the image from the Countess' journal.
Screenshot.
Go through the open door into the Walk-In Closet.
Walk-In Closet
Inspect the mannequin in front of the dressing mirror.
Attach the MANNEQUIN ARM to the missing socket.
Take the MEDICAL GLOVE off the opposite arm after it lifts from her side.
Open the tied straps in the middle of the mannequin's bodice to find the SEAM RIPPER.
Click the cupboard to zoom in.
Add the DRAWER HANDLE to the heart-shaped space in the center.
Click the handle to open the drawer.
Take the SPIDER PIN (2/4) and the HEART TIP between the red dividers.
Open the gryphon statue's mouth to find the Audio Tape (4/15).
Return to the Countess' Bathroom.
Countess' Bathroom
Click the sink to zoom in.
Use the MEDICAL GLOVE on the blood-filled sink to pull the drain.
Take the MAGNET from the empty sink.
Go back to the Countess' Bedroom.
Countess' Bedroom
Click the table at the foot of the bed for a closer look.
Use the MAGNET on the side of the spider jar to receive the SPIDER PIN (3/4).
Go to the Nursery.
Nursery
Click the baby's crib to look inside.
Use the SEAM RIPPER three times to tear through the middle of the stitched together stuffed animal.
Remove the fluff inside the toy to find the GOLDEN APPLE PIN.
Return to the Walk-In Closet.
Walk-In Closet
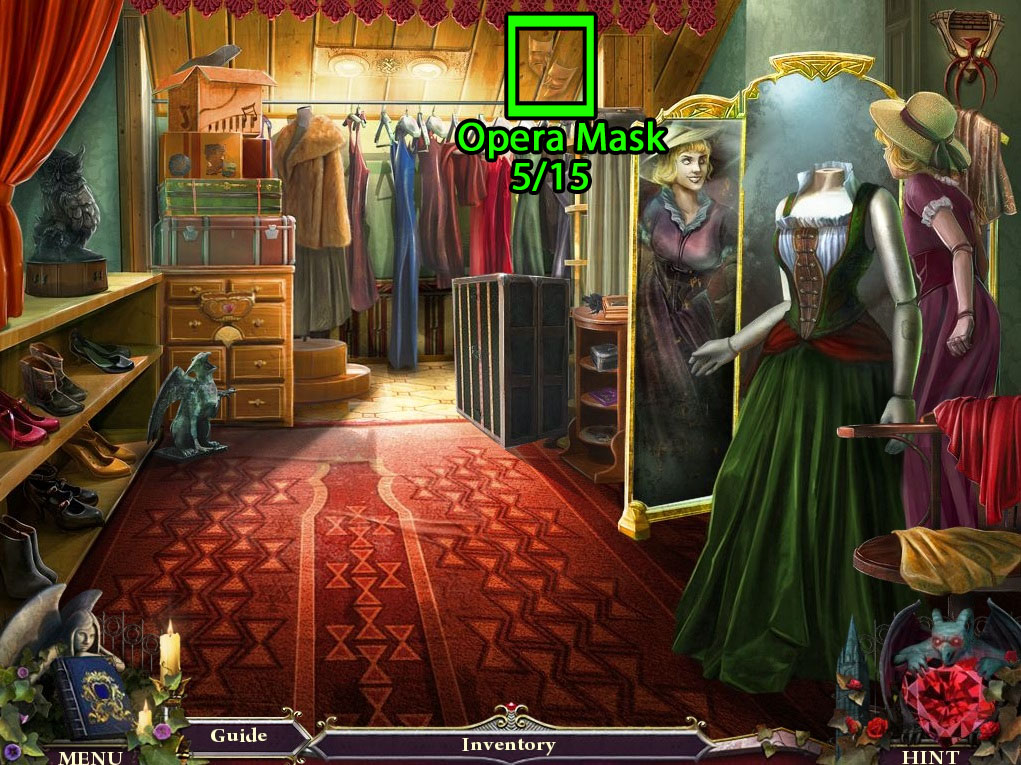
Pick up the Opera Mask (5/15) Collectable to the right of the ceiling light.
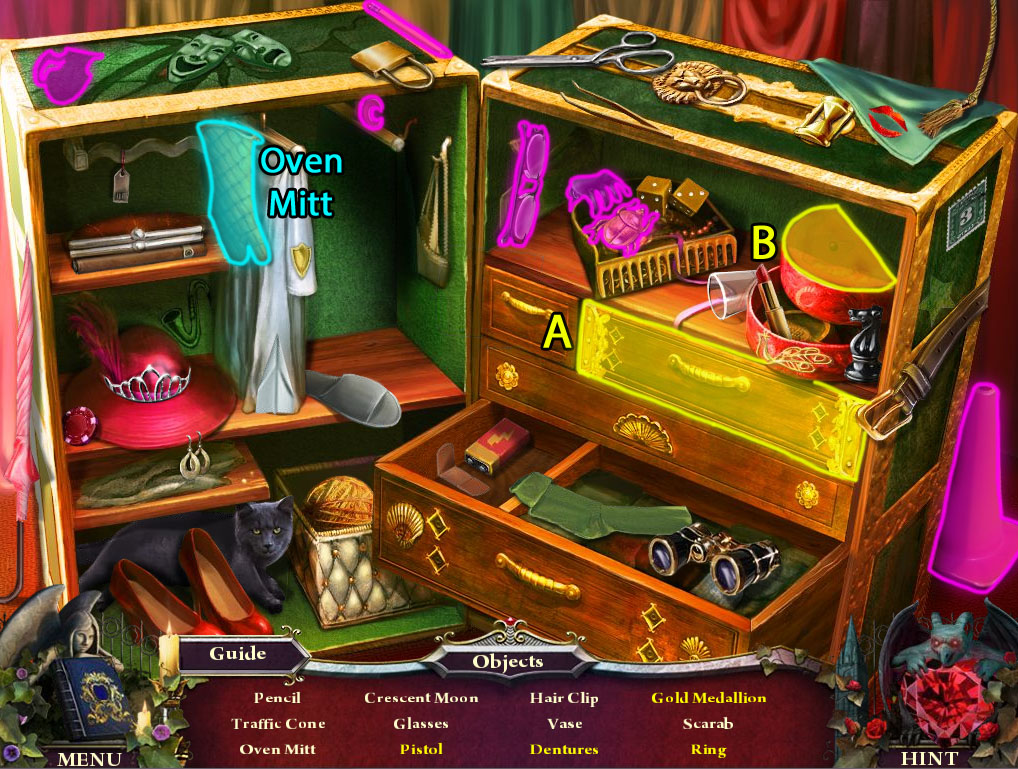
Inspect the large trunk for a closer look.
Place the GOLDEN APPLE PIN into the space at the bottom of the lock.
Pull the snake's tongue to open the trunk.
Click the open trunk to start the hidden object scene.
Open the drawer to find the Pistol, Dentures, and Gold Medallion (A).
Open the red box to reveal the Ring (B).
Screenshot.
Once the hidden object scene is complete, you will receive the OVEN MITT.
Go back to the Grand Stairs.
Grand Stairs
Click the cherub statue on the left banister to zoom in.
Add the HEART TIP to the end of the arrow.
Inspect the round table for a closer look.
Take the FUSE from the broken hourglass sand on the table.
Go to the Hedge Maze.
Hedge Maze
Inspect the hedge plant shaped like a lion.
Put the LION EYE and the SNAKE EYE into the eye sockets of the lion's head.
Take the SPIDER PIN (4/4) from the lion's mouth.
Return to the Great Hallway.
Great Hallway
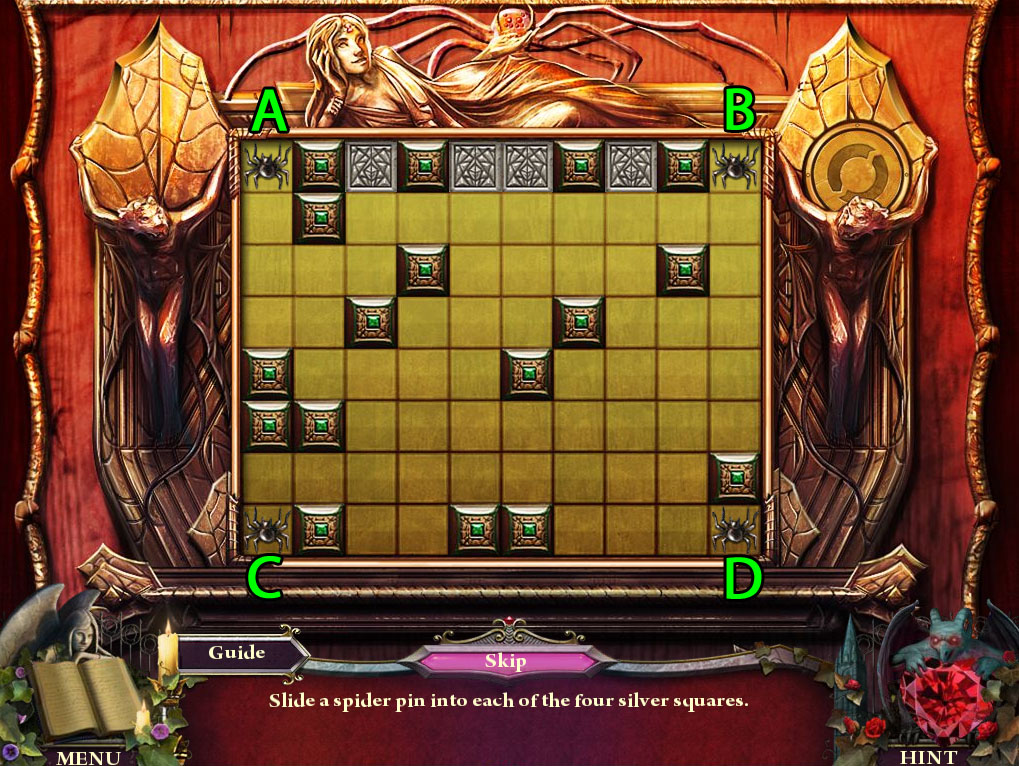
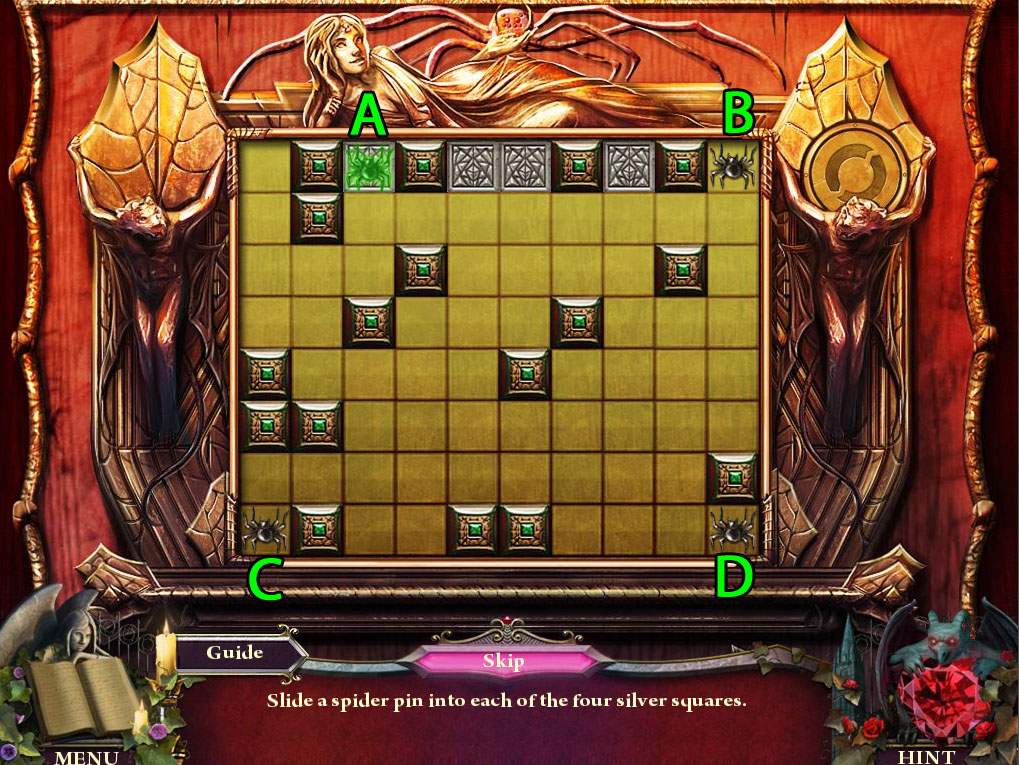
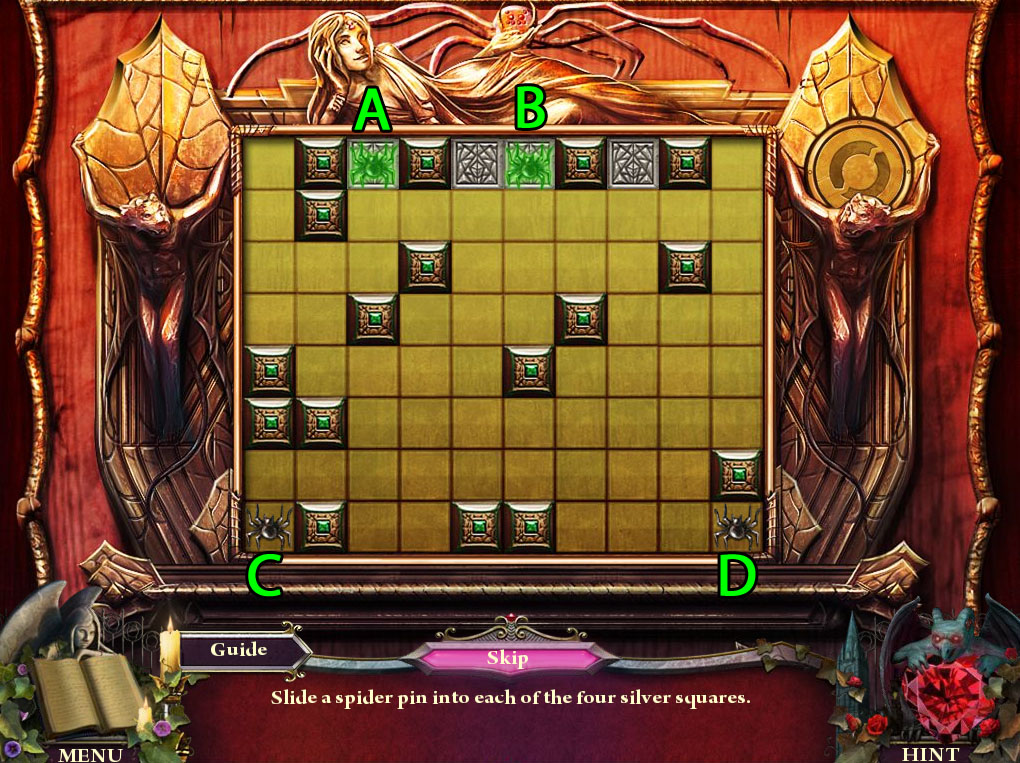
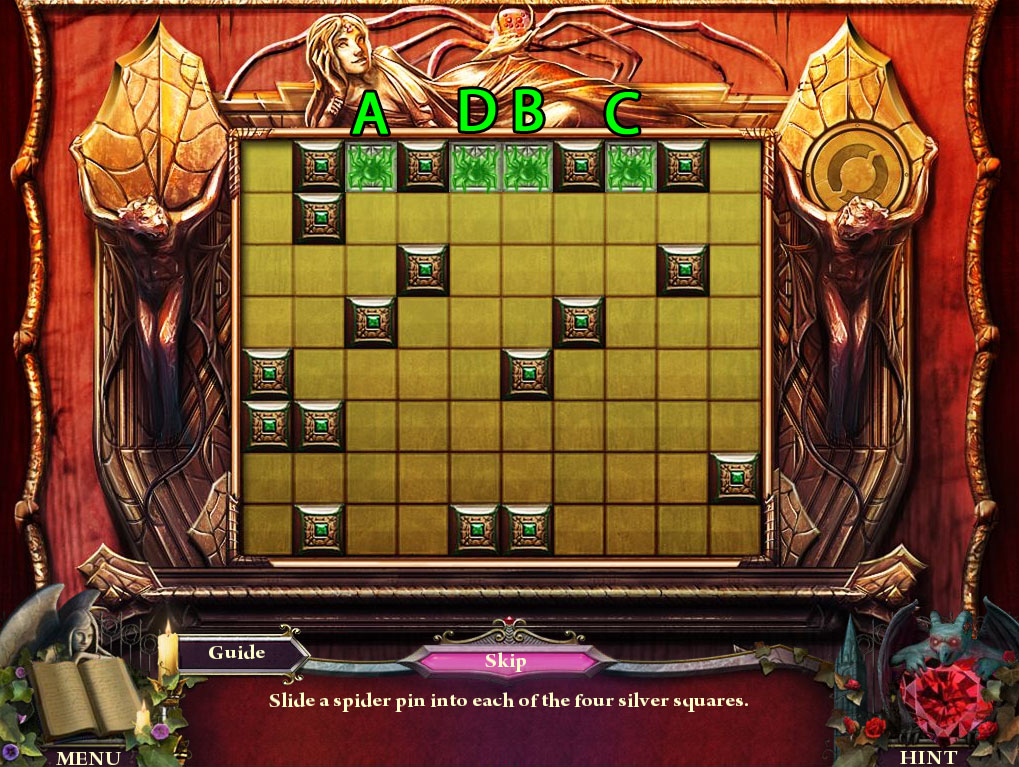
Click the right door for a closer look.
Add the four SPIDER PIN(s) to the board to start the puzzle.
Move the spiders from the corners of the board to the silver tiles.
Click a spider to select it, then click a directional arrow to move the spider up, down, left, or right.
A spider will continue to move until it hits an obstacle such as a block, wall, or another spider.
Screenshot.
Move Spider A in the upper left corner Down, Right, Up, Right, Up.
Solution Part 1.
Move Spider B in the upper right corner Down, Left, Down, Right, Up, Right, Up.
Solution Part 2.
Move Spider C in the lower left corner Up, Right, Up, Left, Up.
Solution Part 3.
Move Spider D in the lower right corner Left, Up, Right, Down, Left, Up, Right, Up.
Solution Part 4.
Once the puzzle is solved, go through the open right door to the Family Parlor.
Posted by: Trinn |
February 3, 2012 5:56 PM
|
February 3, 2012 5:56 PM
Nightfall Mysteries: Black Heart Walkthrough
Chapters 4-7
Chapter 4
Family Parlor
Click the seat of the green sofa for a closer look.
Take the bottle of SOLVENT in front of the pillow.
Open the book to find the Audio Tape (5/15) and the picture of the Vansig family tree.
Click the fireplace to zoom in.
Take the SHEPARD'S CROOK leaning against the left side of the fireplace.
Inspect the record player on the green chair.
Take the MICROPHONE on top of the record player.
Go through the right doorway to the Conservatory.
Conservatory
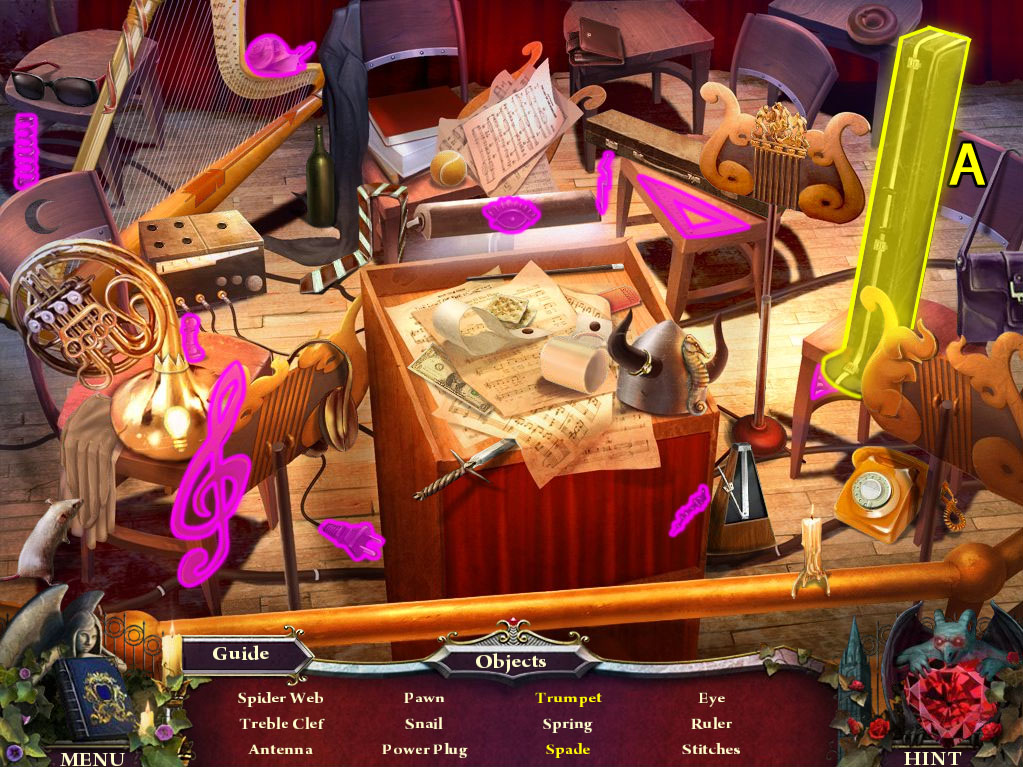
Click the orchestra pit to start the hidden object scene.
Open the instrument case to find the Trumpet and the Spade (A).
Screenshot.
Once the hidden object scene is complete, you will receive the TRUMPET.
Click the organ to zoom in.
Take the TUNING FORK on the stand to the left of the organ.
Find the Opera Mask (6/15) Collectable between the steps and the stage light in the bin.
Inspect the curtain control mechanism on the left edge of the stage.
Take the DRILL next to the insert for the lever.
Go to the Great Hallway.
Great Hallway
Inspect the large portrait on the right wall.
Use the DRILL to remove the three bolts at the upper left and upper right sides of the painting frame
Go through the secret passage to Victor's Secret Room.
Victor's Secret Room
Take the animal collage taped to the whiteboard.
Click the chemistry set to zoom in.
Pick up the ACID on the table.
Click the security monitor for a closer look.
Use the CLEANING SPRAY to clean the grime from the screen.
Push the glowing blue button indicated on the screen to eject the disk.
Take the ejected DATA DISK from the disk drive.
Inspect the dark table under the bulletin board.
Take the CONTROL LEVER in front of the books.
Return to the Conservatory.
Conservatory
Inspect the curtain control mechanism on the left side of the stage.
Place the CONTROL LEVER at the top of the mechanism.
Click the lever to raise the stage curtain.
Click the figures on the stage to zoom in.
Give the MICROPHONE to the female mannequin.
Give the TRUMPET to the clown.
Take the SANDBAG tied over the male mannequin's side.
Go back to the Family Parlor.
Family Parlor
Click the fireplace to zoom in.
Use the SANDBAG to douse the fire.
Open the cache inside the fireplace to find the PORTRAIT OF VILHELM.
Inspect the family tree in the middle of the root-covered column.
Add the PORTRAIT OF VILHELM, PORTRAIT OF VICTOR, PORTRAIT OF VIOLETTA, PORTRAIT OF VLADD, and PORTRAIT OF VIGGO to the family tree to start the puzzle.
Organize the portraits according to the image of the family tree found inside the book.
Click a portrait to select it, then click a different portrait to swap their positions.
Solution.
Take the BLACK HEART KEY from the burned hole in the board.
Go to the Grand Staircase.
Grand Staircase
Click the right door to zoom in.
Insert the BLACK HEART KEY into the heart-shaped lock.
Go through the open door to the Basement Hallway.
Basement Hallway
Click the record player on the table to zoom in.
Connect the BROKEN POWER CORD to the split cord on the record player.
Take the ANTENNA from the upper left corner of the device.
Go right to the Breaker Room.
Breaker Room
Pick up the BIRD SEEDS next to the cleaning equipment in the lower right corner.
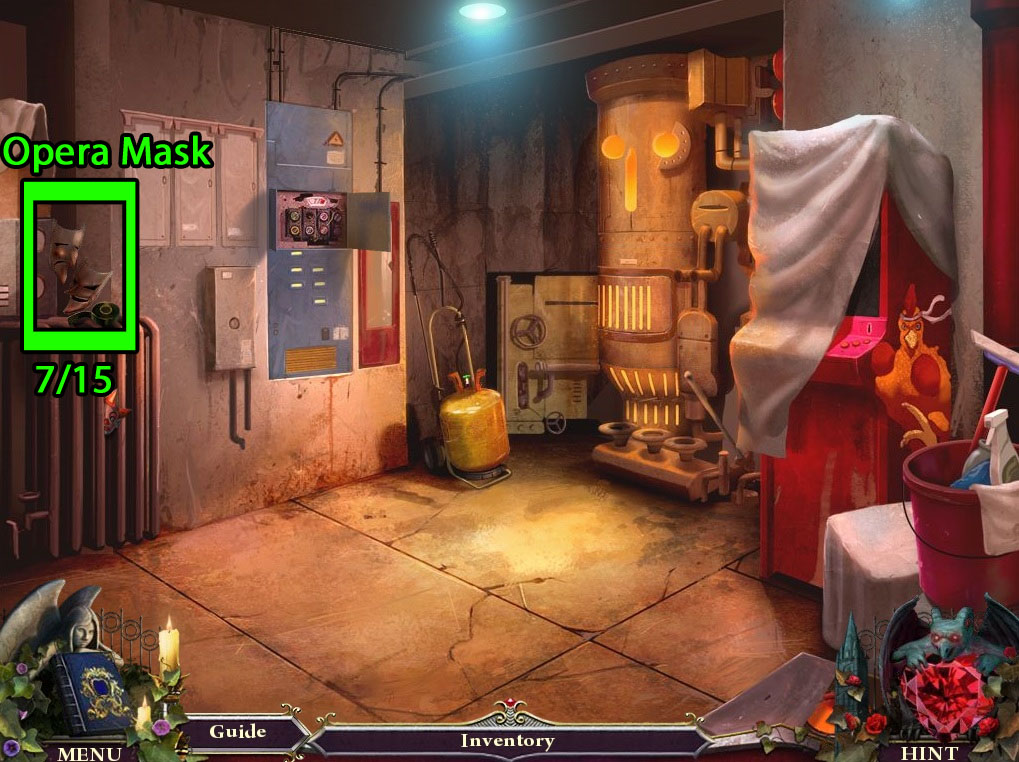
Find the Opera Mask (7/15) Collectable above the radiator.
Click the radiator to zoom in.
Take the ELECTRICAL TAPE on top of the radiator.
Use the OVEN MITT to pick up the CLOWN HEAD.
Click the fuse panel for a closer look.
Add the FUSE to the socket in the upper left corner to start the puzzle.
Arrange the fuses in the appropriate sockets to overload the power meter.
The needle at the top indicates how much power is currently being directed.
The color meter at the top indicates which color fuse conducts the most power in order from right to left.
The multiple beside each socket indicates how much the power of a fuse in that socket is amplified.
Solution.
Go back to the Basement Hallway.
Basement Hallway
Click the record player to zoom in.
Use the ELECTRICAL TAPE to repair the broken power cord.
Take the Audio Tape (7/15) and the RECORD from the open the open record player.
Continue forward to the Wine Cellar.
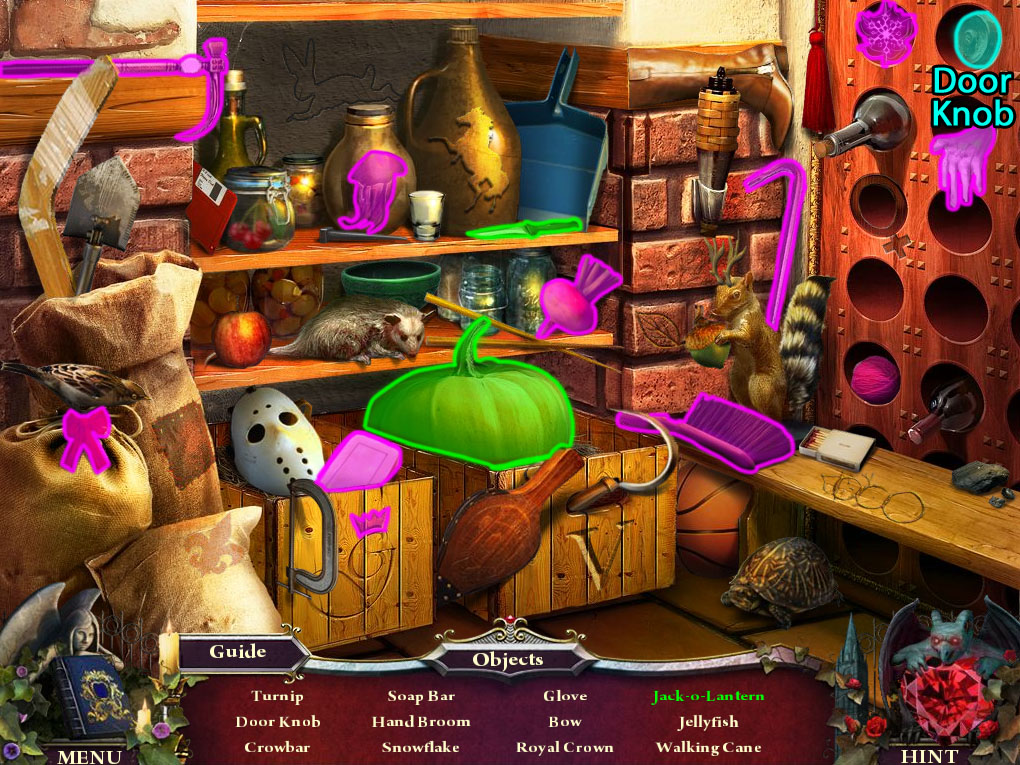
Wine Cellar
Click the shelves in the rear right corner of the room to start the hidden object scene.
Use the knife on the pumpkin to carve the Jack-o-Lantern.
Screenshot.
Once the hidden object scene is complete, you will receive the DOOR KNOB.
Go back to the Nursery.
Nursery
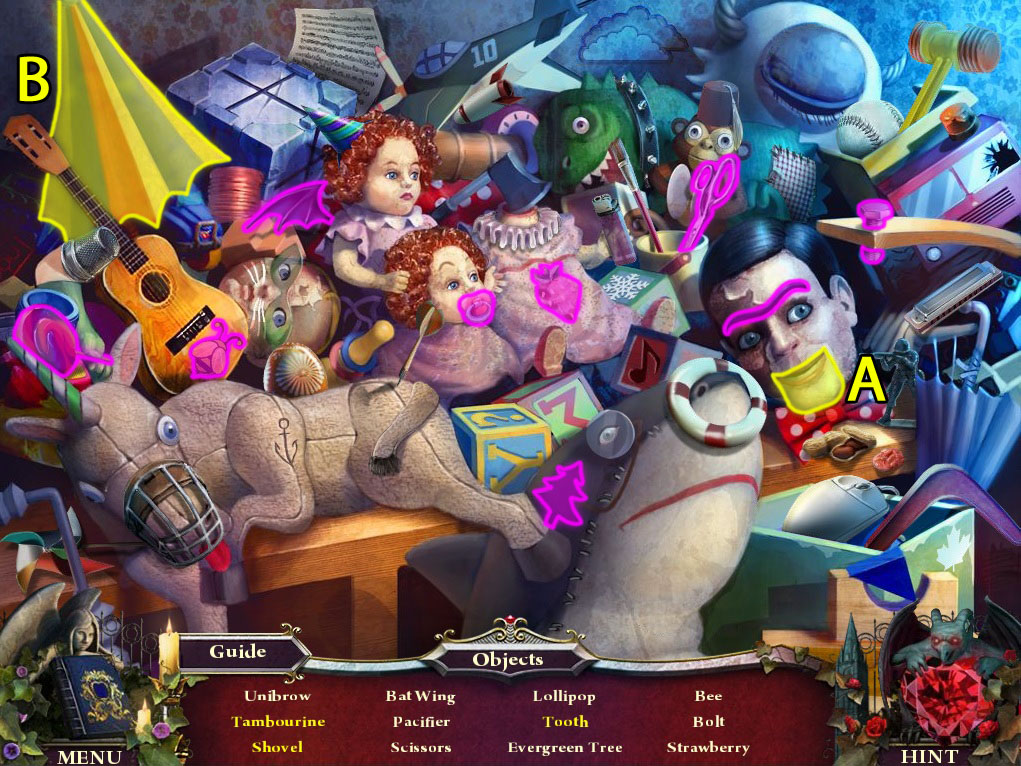
Click the pile of toys to repeat the hidden object scene.
Open the ventriloquist dummy's mouth to find the Tooth (A).
Open the umbrella to reveal the Tambourine and the Shovel (B).
Screenshot.
Once the hidden object scene is complete, you will receive the TOOTH (1/3).
Click the top of the cupboard to zoom in.
Add the CLOWN HEAD to the clown doll.
Take the DRUMSTICKS from the clown.
Return to the Family Parlor.
Family Parlor
Click the record player on the chair to zoom in.
Place the RECORD on the turn table.
Click the needle to play the record.
Take the ORGAN KEY (1/3) from the revealed compartment.
Go to the Grand Stairs.
Grand Stairs
Click the left door for a closer look.
Add the DOOR KNOB to the space on the handle.
Go through the open left door to the Dining Room.
Dining Room
Click the dining table to start the hidden object scene.
Use the clamps to break the Lobster Claw (A).
Screenshot.
Once the hidden object scene is complete, you will receive the SALT SHAKER.
Click the small round table to zoom in.
Pick up the MINOTAUR FIGURINE.
Use the TUNING FORK to break the crystal glass.
Take the shard of PURE CRYSTAL.
Use the SOLVENT on the rusted bolt of the lockbox.
Take the WINE BOTTLE from the open box.
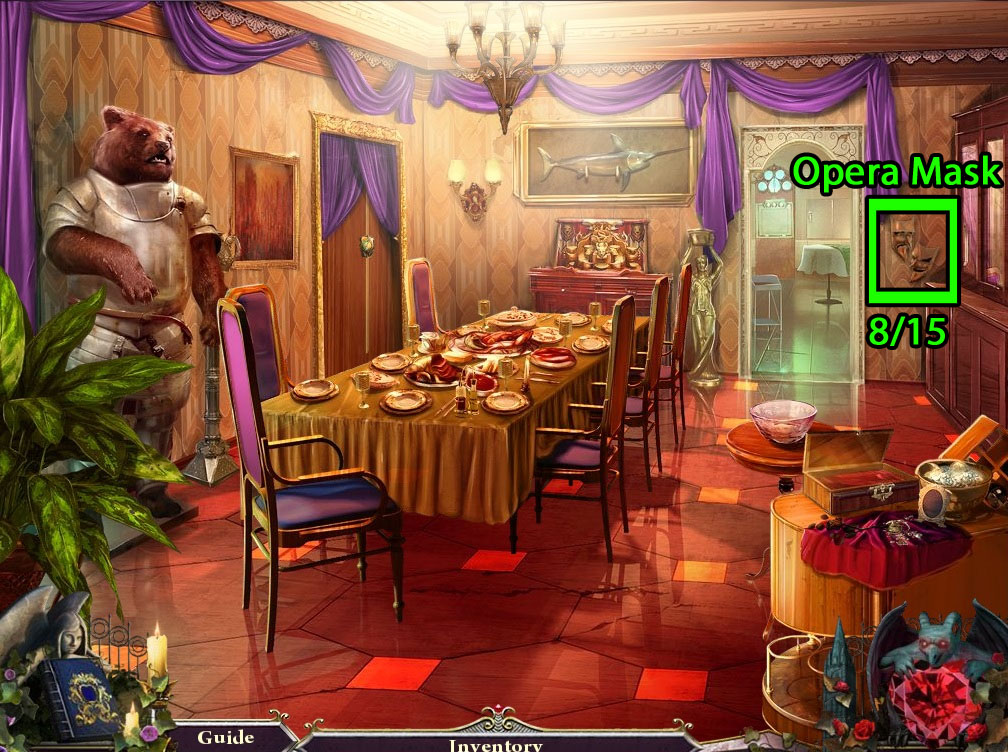
Find the Opera Mask (8/15) Collectable to the right of the open doorway.
Go through the open doorway into the Kitchen.
Kitchen
Click the sink to start the hidden object scene.
Drain the sink water to find the Sink Plug (A) Handprint (B) Rolling Pin (C) and Star (D).
Screenshot.
Once the hidden object scene is complete, you will receive the FORCEPS.
Click the dumbwaiter to zoom in.
Click the dumbwaiter door to open it.
Take the RUBBER HOSE hanging from the top.
Inspect the steaming pot on top of the stove.
Pick up the DISH SOAP on the tray.
Click the bread box on the counter to zoom in.
Lift the lid to the cookie jar to find the Audio Tape (6/15).
Click the back door for a closer look.
Use the ACID to burn through the chain on the door handle.
Go through the open door to the Back Patio.
Back Patio
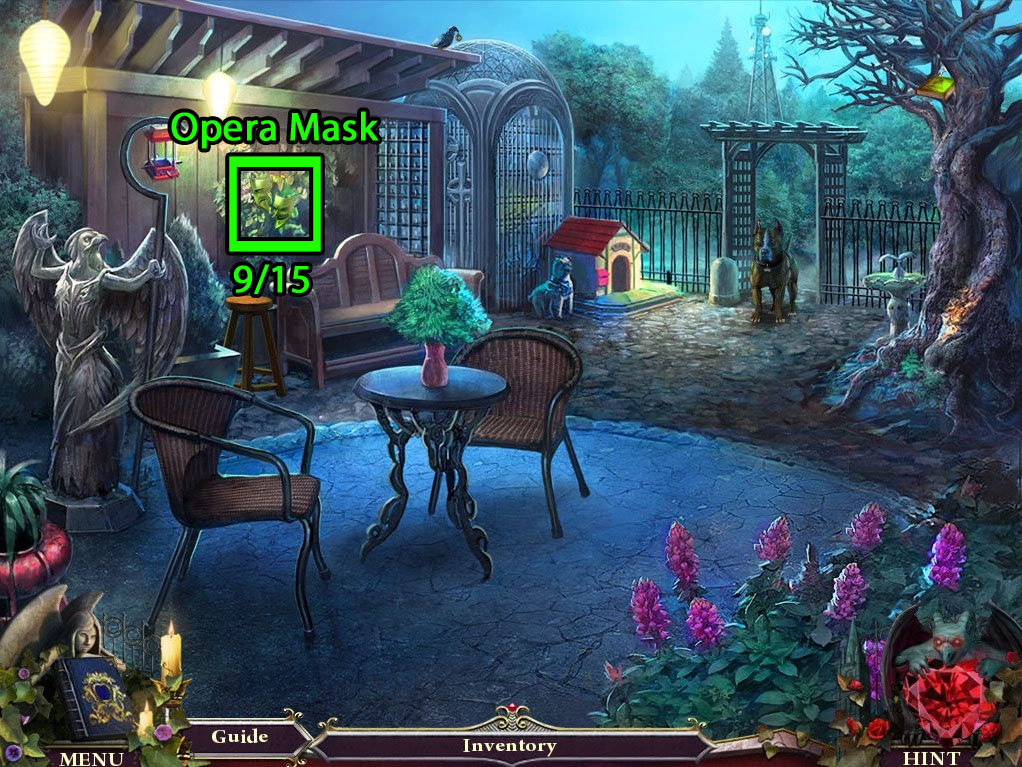
Find the Opera Mask (9/15) Collectable in the vines on the wall.
Click the bird feeder at the top of the statue's staff to zoom in.
Put the BIRD SEED inside the feeder.
Take the CLOCK SPRING (1/2) the pigeon drops onto the feeder.
Pick up the STOOL next to the park bench.
Use the SHEPARD'S CROOK to remove the book stuck in the branches of the tree.
Pick up the GREEN BOOK (1/4) that falls to the ground.
Click the trunk of the tree for a closer look.
Use the DISH SOAP to remove the sap covering the roots.
Take the revealed BARBEQUE LIGHTER.
Go to Victor's Secret Room.
Victor's Secret Room
Click the chemistry set for a closer look.
Place the GOLD LEAF on top of the carved V mold.
Connect the burner to the gas supply with the RUBBER HOSE.
Turn the red valve to start the flow of gas.
Light the gas from the burner with the BARBEQUE LIGHTER.
After the gold leaf melts, pick up the GOLDEN V.
Travel to the Front Door.
Front Door
Click the candle lit altar to zoom in.
Insert the GOLDEN V into the space on the statue's chest.
Take the VANSIG SEAL (1/4) from the revealed cache inside the statue.
Return to the Countess' Bathroom.
Countess' Bathroom
Click the bathtub to repeat the hidden object scene.
Open the clam to find the Blood Crystal (A).
Screenshot.
Once the hidden object scene is complete, you will receive the BLOOD CRYSTAL.
Click the freezer to the left of the tub to zoom in.
Use the SALT SHAKER to melt the ice covering the side of the freezer.
Click the door to open the freezer.
Take the revealed BLOOD VIAL hanging inside.
Go back to the Walk-In Closet.
Walk-In Closet
Place the STOOL next to the stack of boxes.
Click the open cardboard box at the top of the stack to look inside.
Pick up the ORGAN KEY (2/3) on top of the miniature piano.
Take the YELLOW BOOK (2/4) inside the box.
Go to the Wine Cellar.
Wine Cellar
Click the wine rack at the bottom of the gold statue to zoom in.
Place the WINE BOTTLE into the empty space on the rack.
Go through the revealed secret passage to the Catacomb Halls.
Chapter 5
Catacomb Halls
Find the Opera Mask (10/15) Collectable above the right burning torch.
Inspect the alcove filled with skulls in the left wall.
Use the BARBEQUE LIGHTER to light the torch.
Use the FORCEPS to pull out the TOOTH (2/3) from the skull.
Pick up the BONE.
Lift the cloth to reveal the Audio Tape (8/15).
Click the metal door to the right to zoom in.
Move the latch to speak with Viggo and receive the VIOLIN.
Go to the Conservatory.
Conservatory
Click the stage to zoom in.
Give the VIOLIN to the male mannequin.
Give the DRUM STICKS to the drummer with the lizard head.
Click the pile of junk that falls on the stage for a closer look.
Take the MANNEQUIN HEAD and the ORGAN KEY (3/3) on top of the pile.
Open the wood box to find the Audio Tape (9/15).
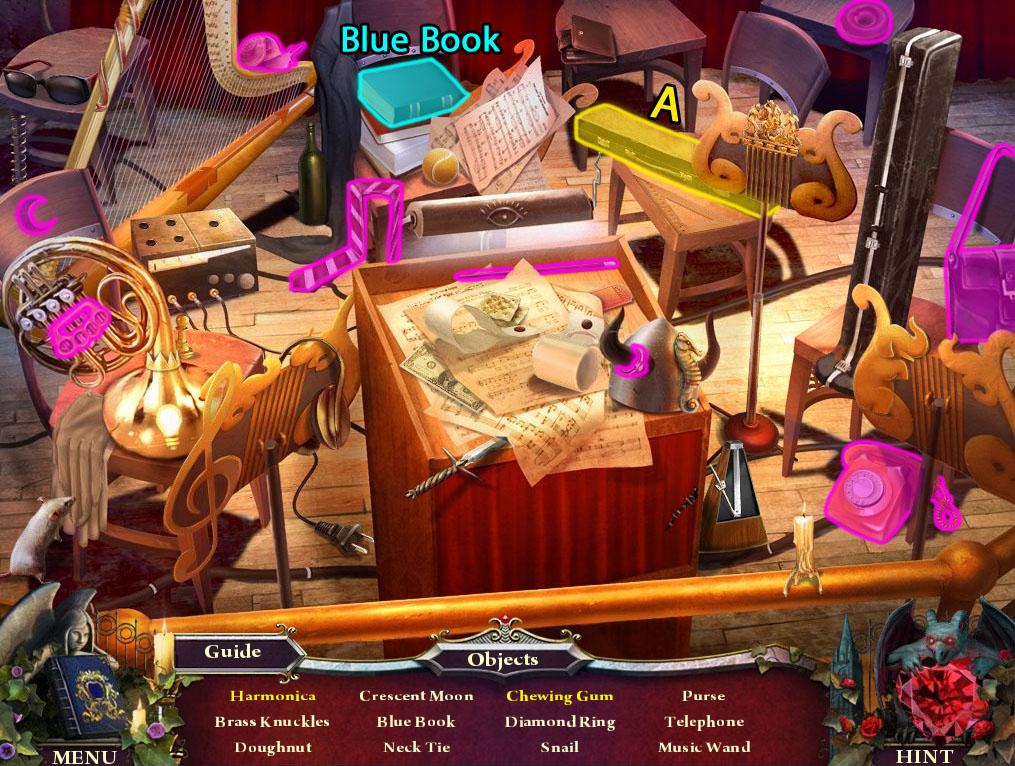
Click the orchestra pit to repeat the hidden object scene.
Open the brown instrument case on the chair to reveal the Harmonica and Chewing Gum (A).
Screenshot.
Once the hidden object scene is complete, you will receive the BLUE BOOK (3/4).
Click the organ for a closer look.
Add the three ORGAN KEY(s) to the keyboard of the organ.
Click the keyboard to play it.
Click the chandelier on the floor to zoom in.
Take the NIGHT CRYSTAL between the broken shards on the floor.
Go back to the Family Parlor.
Family Parlor
Click the left door for a closer look.
Place the PURE CRYSTAL into the hands of the white lizard.
Place the BLOOD CRYSTAL into the hands of the red lizard.
Place the NIGHT CRYSTAL into the hands of the purple lizard.
Go through the open door to the Great Library
Great Library
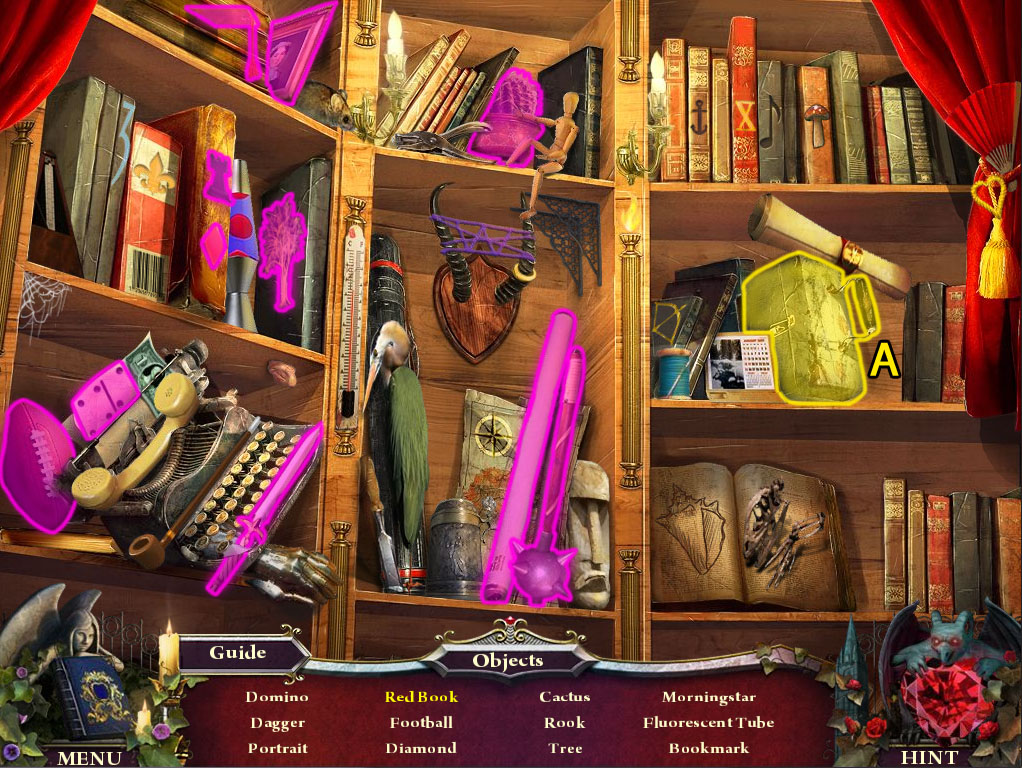
Click the bookshelf with the red curtain to start the hidden object scene.
Open the tin box to find the Red Book (A).
Screenshot.
Once the hidden object scene is complete, you will receive the RED BOOK (4/4).
Click the writing desk to zoom in.
Take the Audio Tape (10/15) and the SUN HALF off the desk.
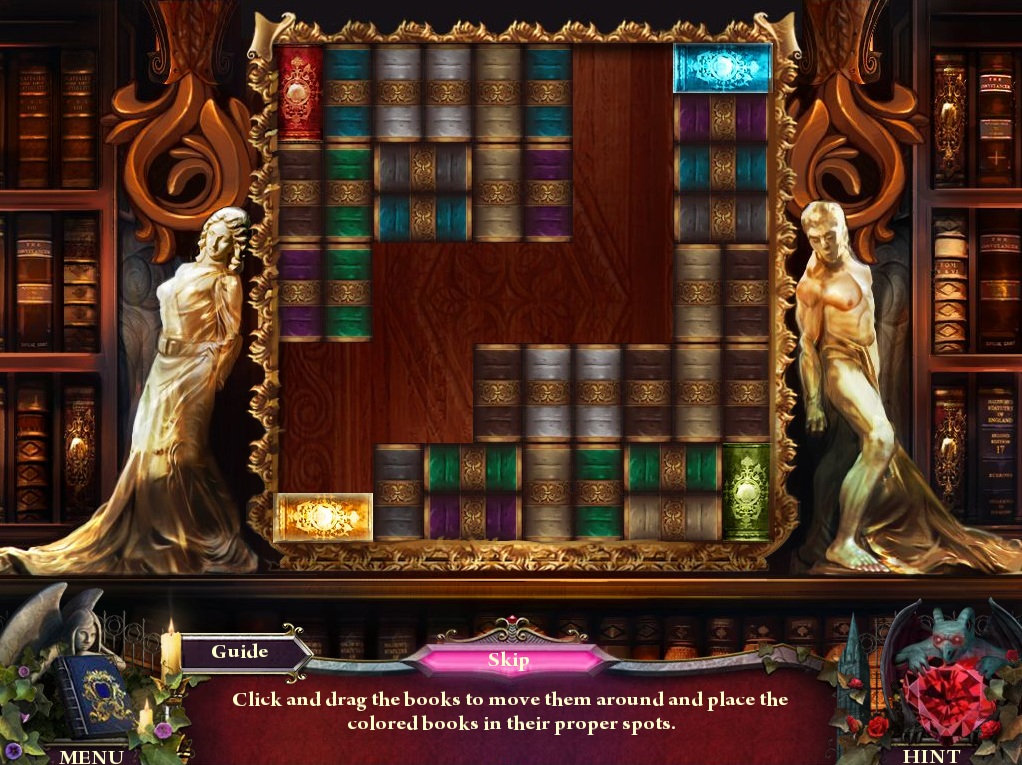
Inspect the ornate bookcase in the back of the room.
Add the four colored BOOK(s) from your inventory to the board to start the puzzle.
Move the colored books into the matching color spaces at the corners of the board.
Click and drag the books to move them up, down, left, or right.
Arrange the plain books to clear a path for the colored books to move to the corners.
Solution #1.
Solution #2.
Once the puzzle is solved, take the revealed CLOCK SPRING (2/2) from the revealed compartment.
Go back to the Walk-In Closet.
Walk-In Closet
Click the open valise to repeat the hidden object scene.
Open the drawer to find the Shuttlecock and the Joker Card (A).
Use the Scissors to cut the long skirt into a Mini Skirt (B).
Screenshot.
Once the hidden object is complete, you will receive the ANTIQUE BRACELET.
Click the mannequin to zoom in.
Place the MANNEQUIN HEAD on top of its neck.
Take the LENS (1/5) from the mannequin's eye.
Return to the Back Patio.
Back Patio
Give the BONE to the angry dog.
Click the dog house to start the hidden object scene.
Lift the curtain over the dog house door to find the Dog Treat (A).
Open the mouth of the dog statue to find the Tennis Ball (B).
Screenshot.
Continue forward to the Cliffside Path.
Cliffside Path
Click the telescope to zoom in.
Click the telescope again to rotate it.
Take the MOON HALF in the goblin statuette's hands.
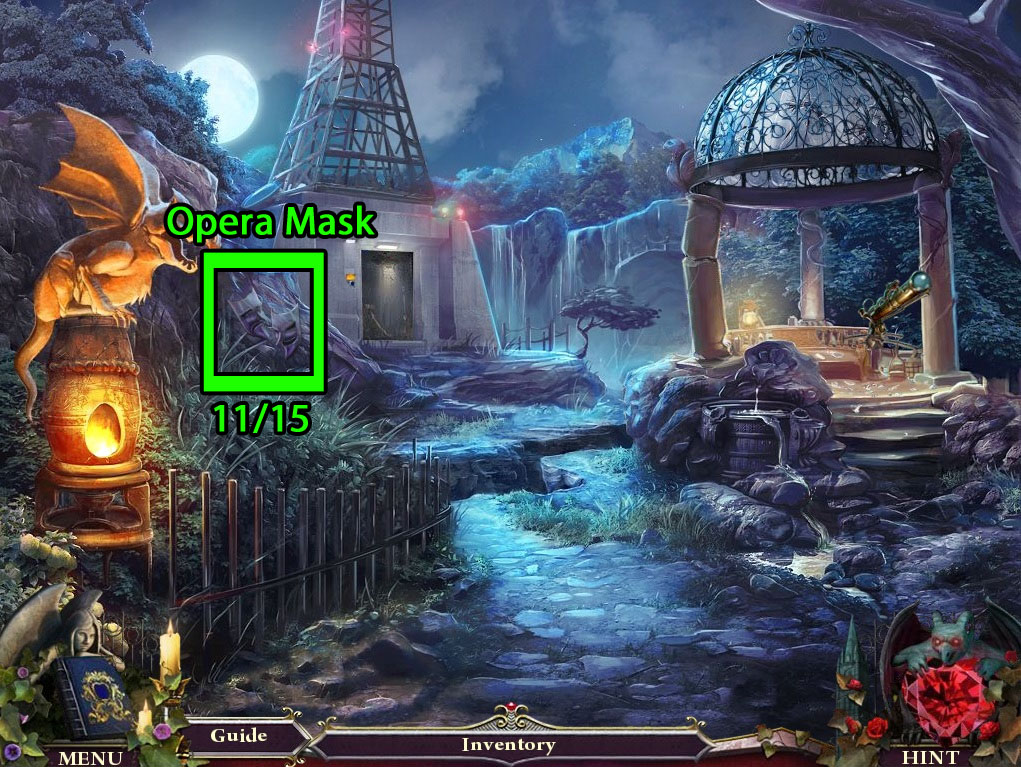
Find the Opera Mask (11/15) Collectable on the face of the left rock.
Go to the Kitchen.
Kitchen
Click the pot on the stove for a closer look.
Use the SIEVE to sift through the stew in the pot and receive the TOOTH (3/3).
Go back to the Dining Room.
Dining Room
Click the left door to zoom in.
Place the SUN HALF at the right side of the lock.
Add the MOON HALF to the left side of the lock.
Go through the open door to the Study.
Study
Inspect the computer on top of the counter.
Take the BASILISK FIGURINE on the speaker.
Press the power button to turn on the computer.
Insert the DATA DISK into the disk drive of the computer.
Note the positions of the roman numerals on the screen.
Remove the cover on the left speaker.
Take the revealed Audio Tape (11/15).
Return to the Grand Stairs.
Grand Stairs
Click the grandfather clock at the center of the stairs for a closer look.
Add the two CLOCK SPRING(s) to the face of the clock to start the puzzle.
Rotate the Roman numerals around the face of the clock to match the order shown on the monitor in the Study.
Click the right and left arrows at the top to rotate the clock clockwise or counter-clockwise, respectively.
Click the left or right yellow buttons to swap the two discs surrounded by the gold filigree.
Click the reset button in the upper left corner to start the puzzle over from the beginning.
Press the buttons in the following order:
Right, Right Button, Left x 4, Left Button, Right x 2, Left Button, Right x 2, Right Button, Right x 3, Right Button.
Solution Part 1.
Right x 2, Left Button, Left x 3, Right Button, Right, Left Button, Right x 2, Left Button, Right x 2, Left Button, Left x 2, Left Button.
Solution Part 2.
Left x 5, Right Button, Right x 3, Left Button, Right x 2, Left Button, Right x 5, Right Button, Left, Right Button, Right x 5, Left Button, Right
Solution Part 3.
Once the puzzle is solved, you will receive the SHADOW DIAL.
Go to the Catacomb Halls.
Catacomb Halls
Inspect the large metal door at the end of the hall.
Add the three TEETH to the skull to start the puzzle.
Click the buttons inside the holes of the skull to lower all of the gold teeth.
Each eye raises or lowers specific teeth inside the mouth when clicked.
Solution.
Click the ring inside the skull's mouth to open the door.
Go through the open door to the Demon Reliquary.
Chapter 6
Demon Reliquary
Click the large tapestry to zoom in.
Take the DAGGER stuck in the upper right corner.
Inspect the pillar with the stone snake wrapped around the base.
Take the DRAGON FIGURINE in the recess.
Insert the SHADOW DIAL into the round socket.
Take the CELL KEY from the revealed cache.
Click the small doors above the cache to open them.
Pick up the Audio Tape (12/15).
Click the statue in the left alcove to zoom in.
Read the diagram stuck on the wall beside the statue.
Go back to the Catacomb Halls.
Catacomb Halls
Speak with Christine, then click the door to Viggo's cell to zoom in.
Use the CELL KEY on the keyhole under the door handle and turn the key to open the door.
Go through the open door to Viggo's Cell.
Viggo's Cell
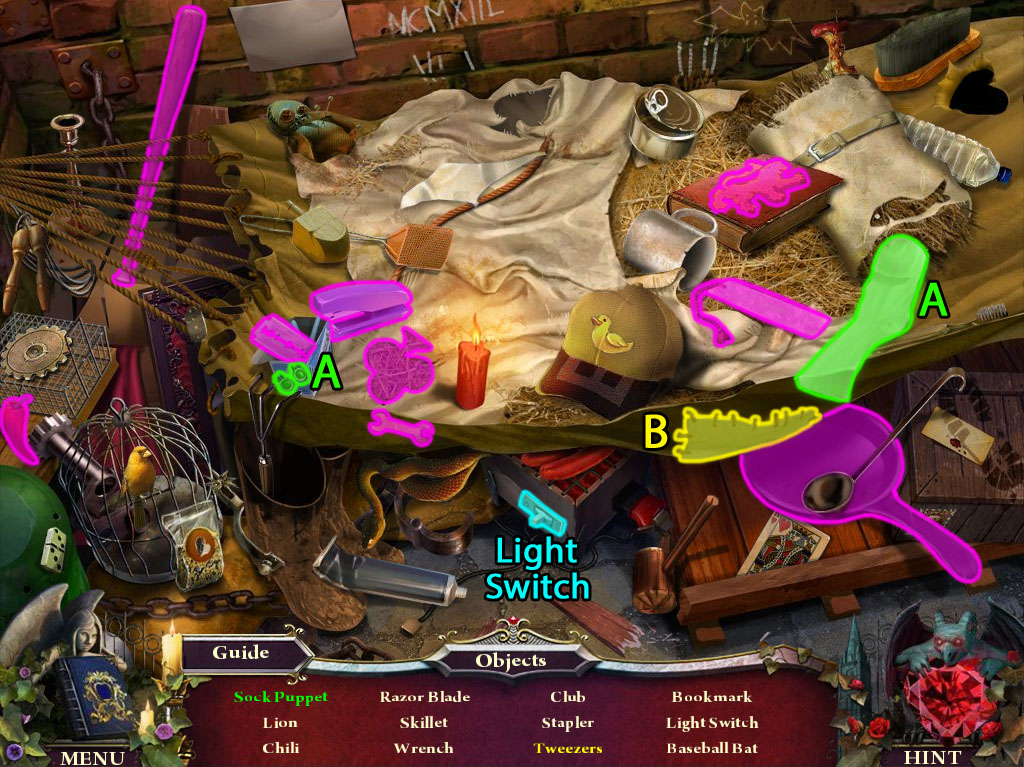
Click the hammock to start the hidden object scene.
Add the eyes to the sock to make the Sock Puppet (A).
Remove the patch to find the Tweezers (B).
Screenshot.
Once the hidden object scene is complete, you will receive the LIGHT SWITCH.
Click the open grate in the floor to zoom in.
Take the WOODEN KNOB by the drain.
Click the toiler for a closer look.
Remove the lid to the water tank above the toilet seat.
Take the WRENCH inside the water tank.
Go back to the Wine Cellar.
Wine Cellar
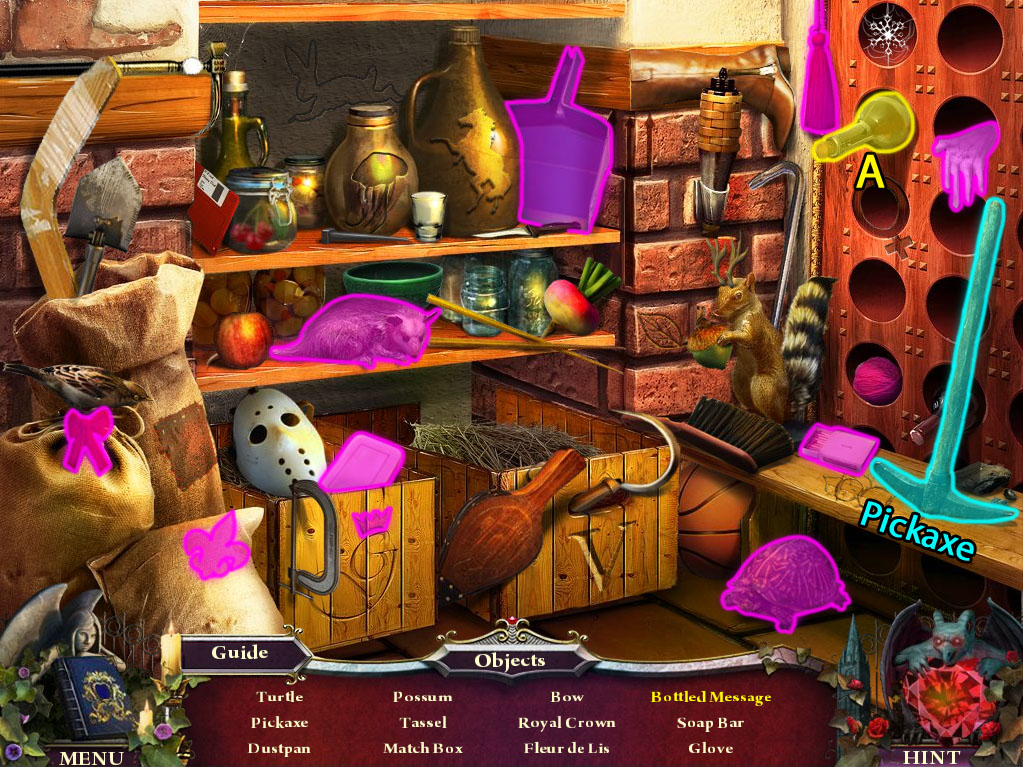
Click the shelves at the bottom of the right archway to repeat the hidden object scene.
Open the corked glass bottle to find the Bottled Message (A).
Screenshot.
Once the hidden object scene is complete, you will receive the PICKAXE.
Return to the Dining Room.
Dining Room
Click the figurine display on top of the cupboard to zoom in.
Place the GRIFFIN FIGURINE, HARPY FIGURINE, MINOTAUR FIGURINE, BASILISK FIGURINE, and the DRAGON FIGURINE to the pedestals of the display.
Take the revealed VANSIG SEAL (2/4) from the disc in the center.
Continue forward to the Kitchen.
Kitchen
Click the breadbox on the counter to for a closer look.
Add the WOODEN KNOB to the breadbox.
Click the knob to open the box.
Take the GLASS CUTTER inside the open box.
Go back to the Study.
Study
Inspect the glass covered shelf in the middle of the liquor cabinet.
Use the GLASS CUTTER to cut a hole in the glass and receive the LENS (2/5).
Take the KEYCARD between the bottles.
Return to the Back Patio.
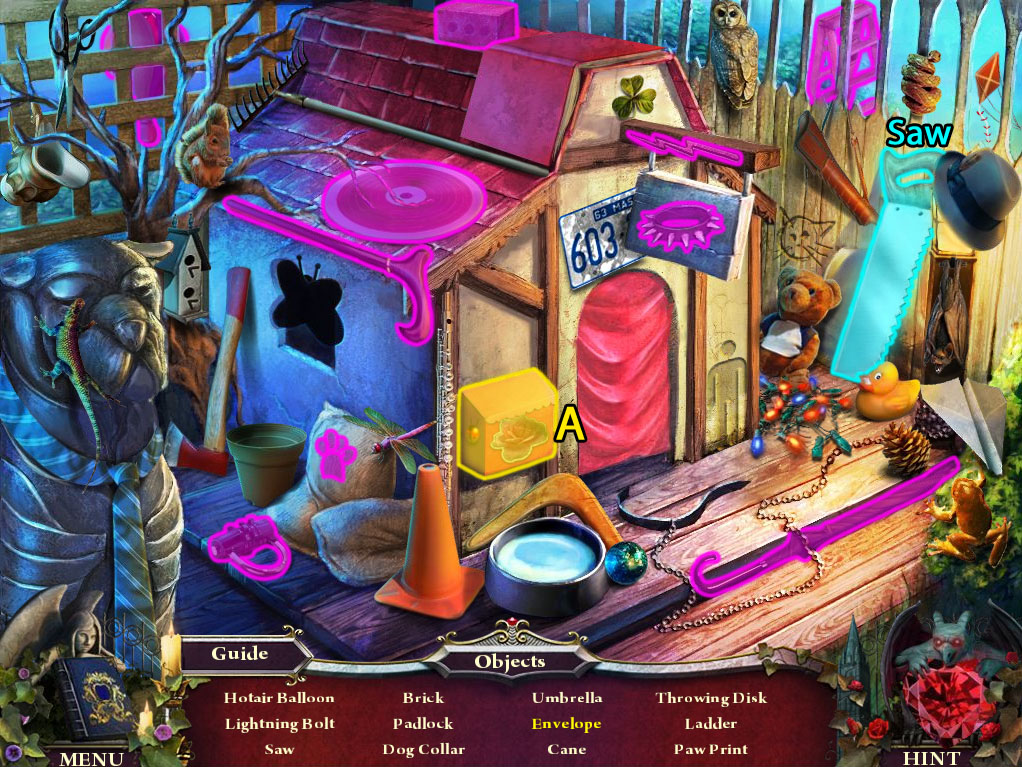
Back Patio
Click the dog house to repeat the hidden object scene.
Open the mailbox to find the Envelope (A).
Screenshot.
Once the hidden object scene is complete, you will receive the SAW.
Continue forward to the Cliffside Path.
Cliffside Path
Click the broken pillar of the gazebo to zoom in.
Use the PICKAXE three times to destroy the base of the column.
Click the doorway to the radio tower for a closer look.
Insert the KEYCARD into the security lock.
Go through the open door to the Radio Tower.
Radio Tower
Click the radio on top of the control panel for a closer look.
Open the bottom tape player and take the Audio Tape (14/15).
Add the ANTENNA to the radio.
Open the panel on the left side of the radio, then push the button to turn it on.
Take the UP BUTTON from the radio.
Inspect the metal bust on the red cloth covered table.
Click the three bronze lightning bolts to lower them into the sphere.
Pick up the CANDLE SNUFFER that pops out onto the table.
Grab the OIL CAN inside the cavity of the statue's chest.
Go back to the Cliffside Path.
Cliffside Path
Click the telescope to zoom in.
Use the OIL CAN to grease the telescope.
Remove the LENS (3/5) from the end of the telescope.
Return to the Kitchen.
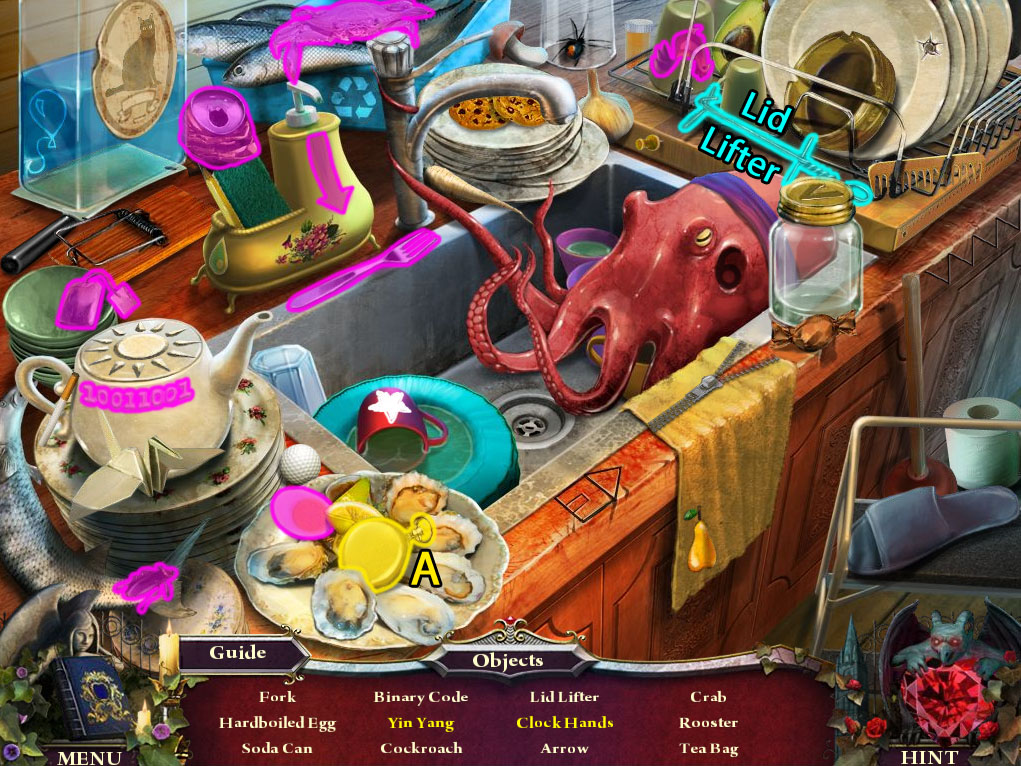
Kitchen
Click the sink to repeat the hidden object scene.
Open the pocket watch to find the Yin Yang and the Clock Hands (A).
Screenshot.
Once the hidden object scene is complete, you will receive the LID LIFTER.
Click the dumbwaiter to zoom in.
Place the UP BUTTON in the right space of the button panel at the top of the dumbwaiter.
Click the up button to raise the dumbwaiter.
Take the revealed FAN BLADE>
Go to the Great Library.
Great Library
Click the bookshelf with the red curtain to repeat the hidden object scene.
Use the chisel to carve the Bust (A).
Screenshot.
Once the hidden object scene is complete, you will receive the GOLD WINGS.
Click the writing desk for a closer look.
Add the LIGHT SWITCH to the slot above the lamp.
Click the light switch to turn off the light.
Remove the LIGHT BULB from the lamp.
Go back to Victor's Secret Room.
Victor's Secret Room
Click the dark table to zoom in.
Put the LIGHT BULB inside the lamp.
Unfold the cloth to find the BOOT DISK and Audio Tape (13/15).
Return to the Basement Hallway.
Basement Hallway
Click the vent in the left wall to zoom in.
Use the WRENCH to remove the bolts at the corners of the vent.
Add the FAN BLADE to the ventilator.
Grab the radio tower blueprints that blow to the front of the fan.
Continue forward into the Wine Cellar.
Wince Cellar
Click the cracked barrel for a closer look.
Use the SAW to cut open the lid.
Take the EMPTY JUG inside the barrel.
Go to Viggo's Cell.
Viggo's Cell
Click the grate in the floor to zoom in.
Use the LID LIFTER to remove the drain.
Take the revealed BLACK LIGHT inside the hole.
Return to the Demon Reliquary
Demon Reliquary
Inspect the statue in the left candlelit altar.
Extinguish the flames of all five candles with the CANDLE SNUFFER.
Use the EMPTY JUG to collect the liquid pouring out of the statue's mouth and receive the JUG OF LIQUID NITROGEN.
Click the tapestry to zoom in.
Use the BLACK LIGHT to illuminate the hidden image.
Click the statue in the center alcove for a closer look.
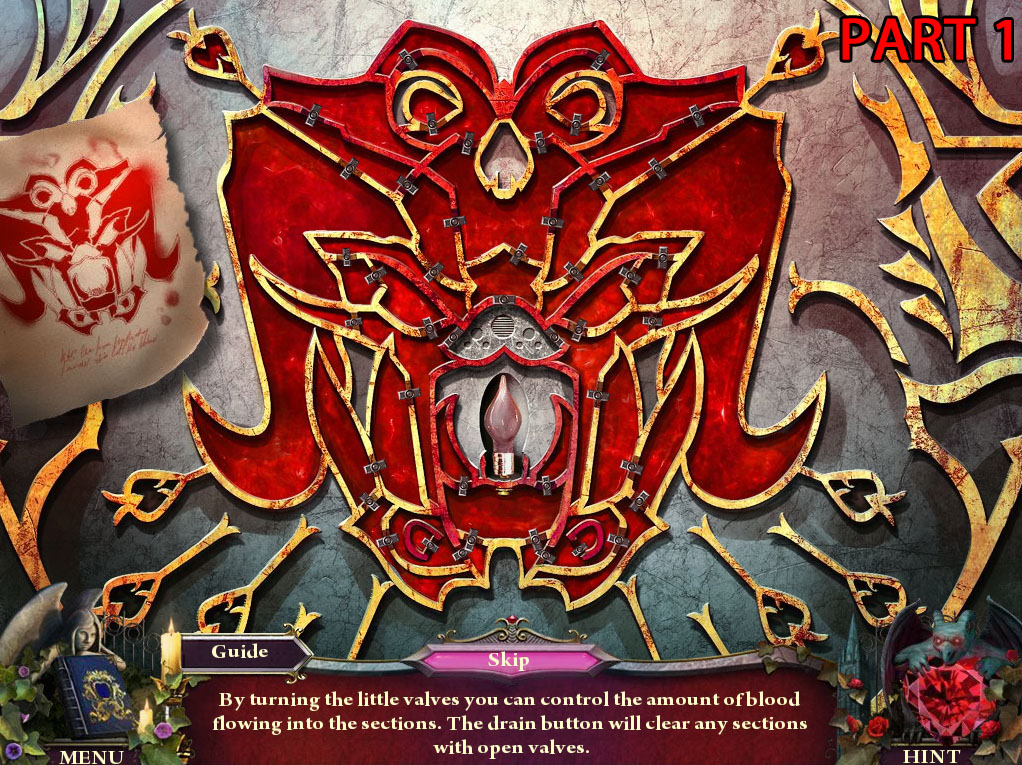
Add the BLOOD VIAL to the space in the center to start the puzzle.
First open all of the valves except for the three draining valves in the center to fill the entire area with blood.
Solution Part 1.
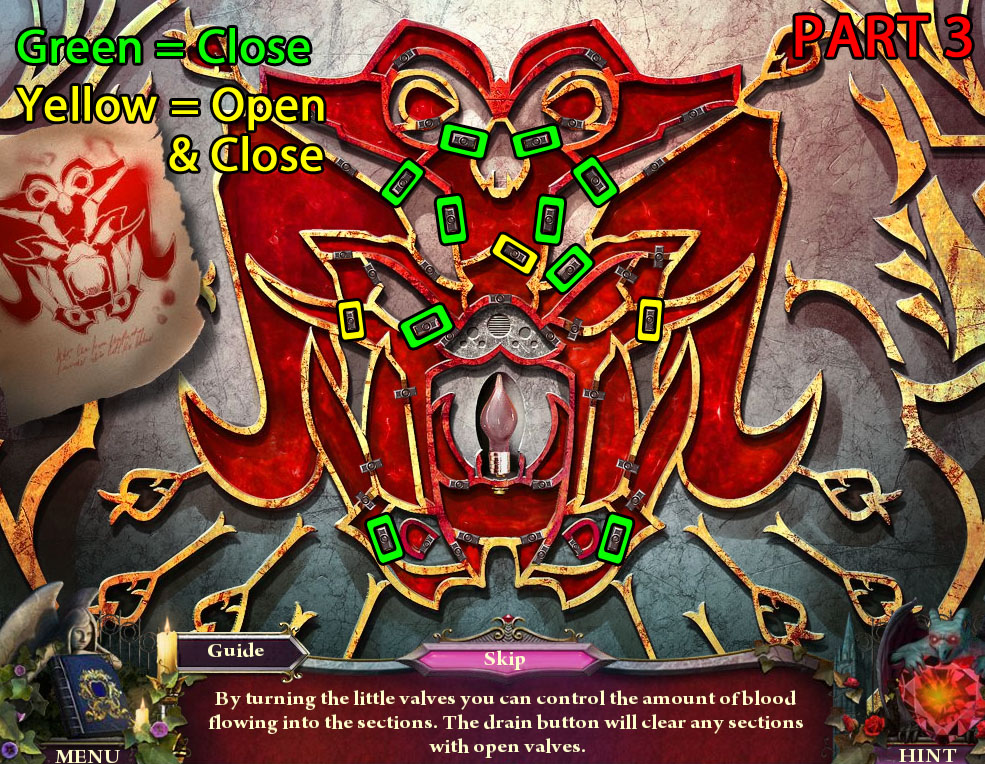
Close all of the valves highlighted green in the following screenshot, then open the two side drain valves highlighted blue:
Solution Part 2.
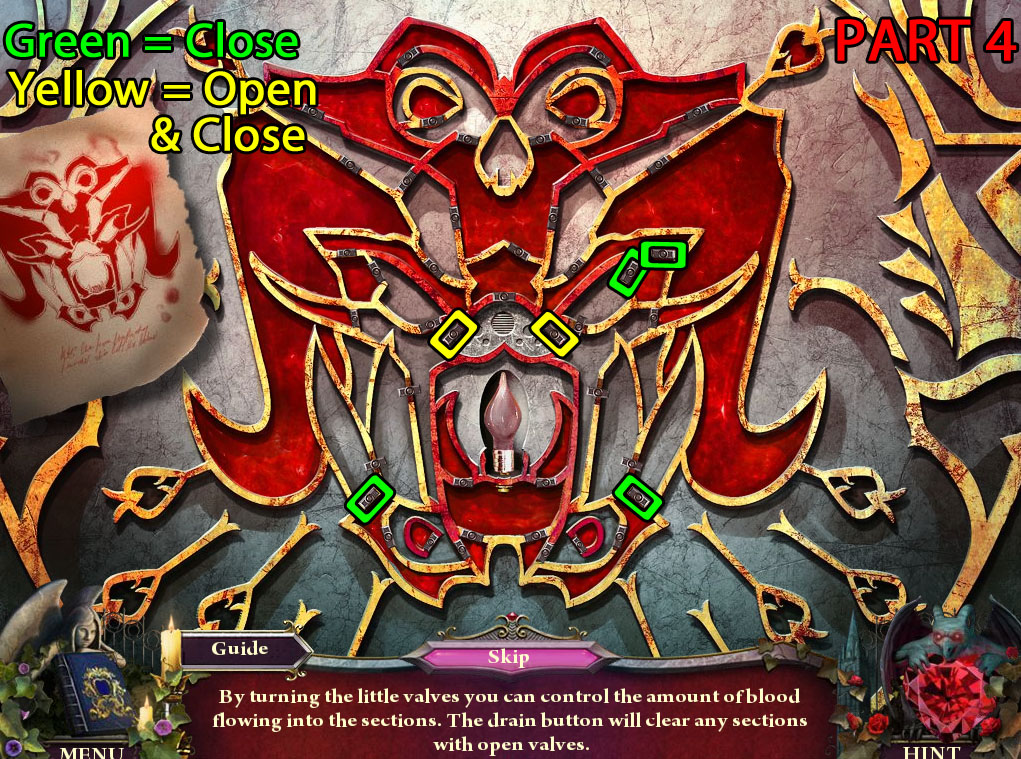
Close the two drain valves first, close the other valves highlighted green, then open and close the valves highlighted yellow:
Solution Part 3.
Close the valves highlighted green, then open and close the side drain valves highlighted yellow:
Solution Part 4.
Close the valves highlighted green, then open the valves highlighted blue:
Solution Part 5.
Once the puzzle is solved, go through the open door to the Catacomb Crypt.
Catacomb Crypt
Find the Opera Mask (12/15) Collectable on the wall beside the left burning torch.
Click the left altar to start the hidden object scene.
Separate the stone book to find the Urn (A).
Open the lock box to reveal the Scorpion (B).
Put the rose in the pot of black ink to make the Black Rose (C).
Screenshot.
Once the hidden object scene is complete, you will receive the GAS VALVE.
Inspect the coffin inside the alcove.
Pick up the VANSIG SHIELD on top of the corpse.
Put the ANTIQUE BRACELET on the body's wrist.
Take the GOLD STAFF from the open hand.
Go back to the Dining Room.
Dining Room
Click the dining table to repeat the hidden object scene.
Open the butter dish to find the Butter (A).
Screenshot.
Once the hidden object scene is complete, you will receive the WATER BOTTLE.
Return to the Breaker Room
Breaker Room
Click the furnace to zoom in.
Add the GAS VALVE to the socket on the valve.
Click the valve to turn off the fire.
Take the GAUNTLET inside the furnace.
Travel to the Study.
Study
Inspect the suit of armor on top of the pedestal.
Put the DAGGER inside the sheath.
Add the GAUNTLET to the missing space at the end of the arm.
Place the VANSIG SHIELD over the opposite arm.
Take the revealed GOLD WIRE under the lifted collar.
Go back to the Radio Tower.
Radio Tower
Read the note from Thomas on top of the electrical system.
Click the electrical system panel for a closer look.
Add the GOLD WIRE to the broken tube to the left of panel.
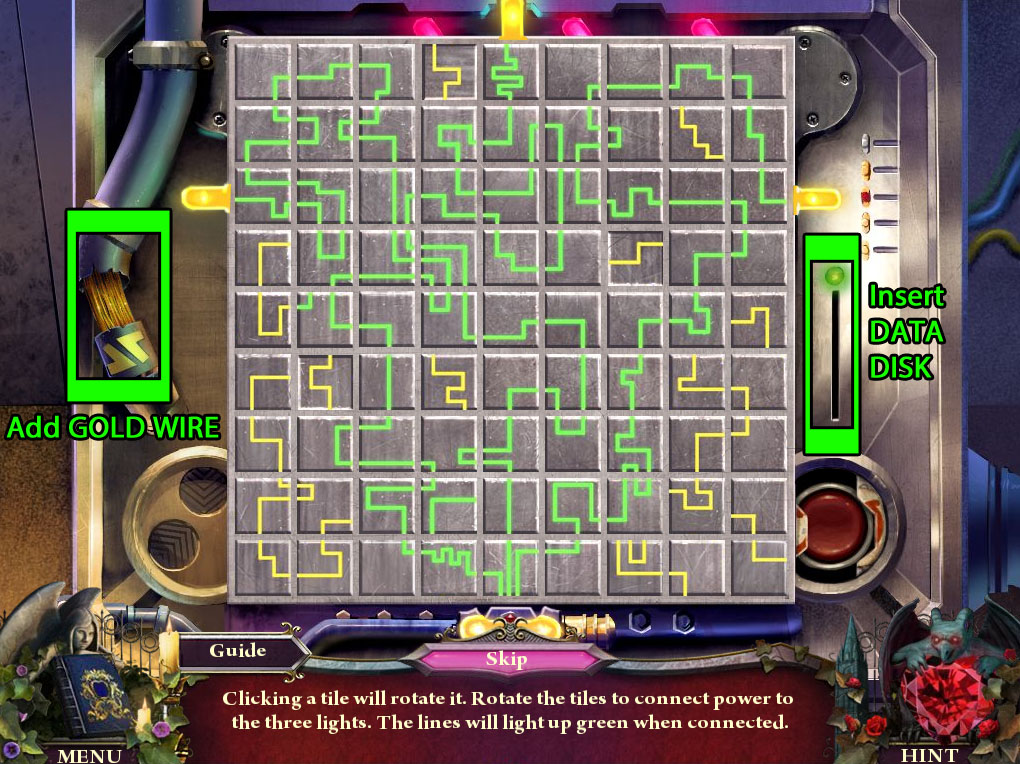
Insert the BOOT DISK at the right side of the panel to start the puzzle.
Arrange the lines to connect the power at the bottom to the three lights at the top, left, and right sides according to the blueprints found in the ventilation of the Basement Hallway.
Click a tile to rotate it 90 degrees clockwise.
Connect the lines inside each of the tiles to create an uninterrupted path between the lights.
Solution.
After the puzzle is solved, you will be transported to the Dungeon.
Chapter 7
Dungeon
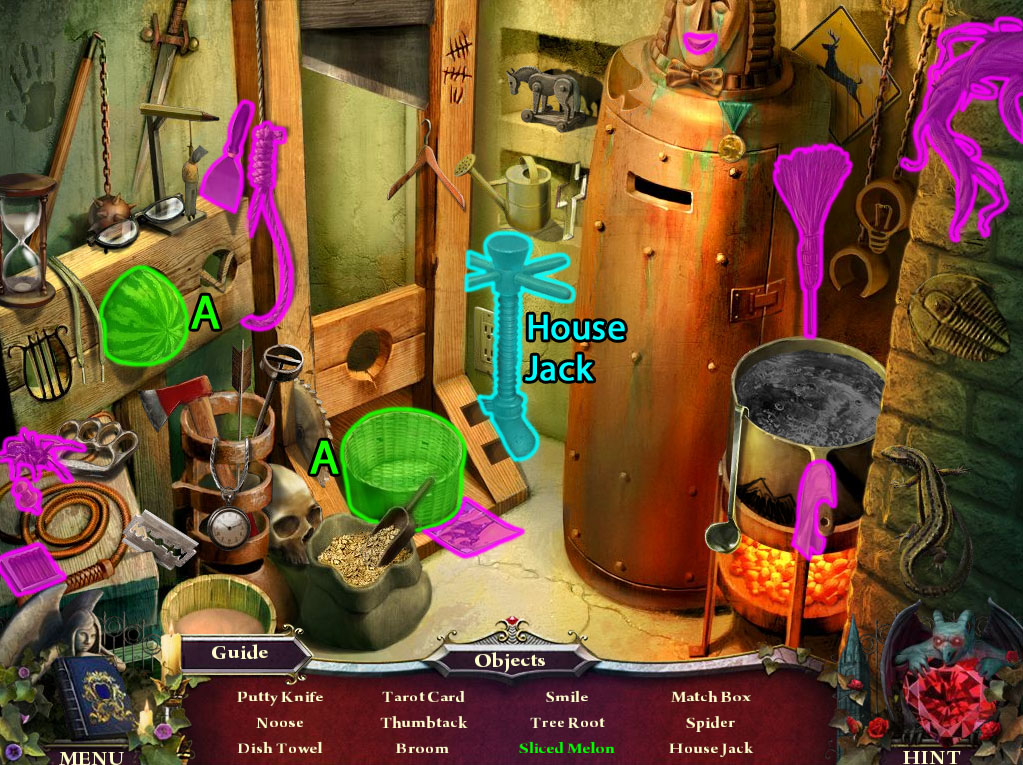
Click the torture insturments in the back of the room to start the hidden object scene.
Put the watermelon inside the guillotine basket to make it a Sliced Melon (A).
Screenshot.
Once the hidden object scene is complete, you will receive the HOUSE JACK.
Pick up the paper with the heart diagram taped to the post.
Click the torture rack to zoom in.
Take the PLUNGER stuck under the shackles.
Inspect the rock on top of the circle drawn in the sand.
Take the RED MARBLE lying on the ground.
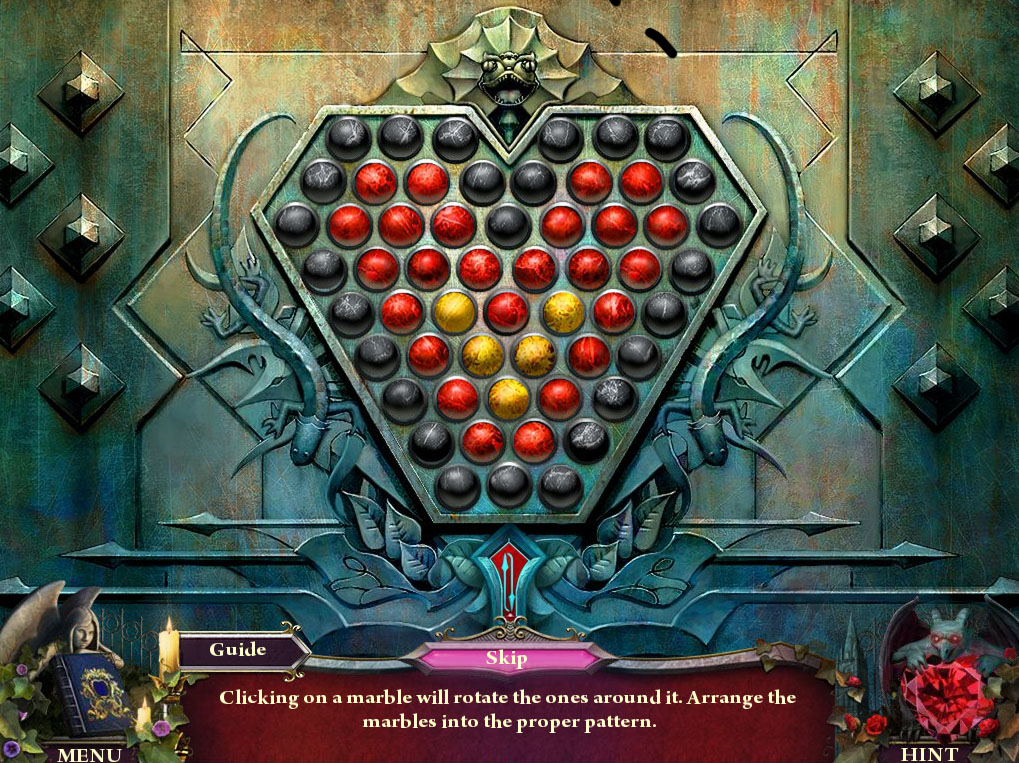
Click the door for a closer look.
Add the RED MARBLE to the heart-shaped board to start the puzzle.
Rotate the marbles on the board to copy the shape found on the diagram.
Click a marble to rotate all adjacent marbles in a circle around it.
Start with the bottom of the heart, then finish the left and right sides.
Solution Part 1.
Solution Part 2.
Solution Part 3.
Once the puzzle is solved, go through the open door to the Old Sewer.
Old Sewer
Find the Opera Mask (13/15) Collectable at the lower left section of the broken left wall.
Click the stick holding up the broken wall to zoom in.
Replace the stick with the HOUSE JACK.
Click the STICK to add it to your inventory.
Click the broken pipe in the right wall for a closer look.
Use the PLUNGER to remove the dirty pipe water.
Take the revealed WOOD CRANK.
Go back to the Dungeon.
Dungeon
Click the torture rack for a closer look.
Add the WOOD CRANK to the side of the torture device.
Take the TWINE on the rack from the broken rope.
Click the rock on the ground to zoom in.
Add the STICK to the large rock.
Tie the two items together with the TWINE.
Pick up the completed SLEDGEHAMMER.
Return to the Old Sewer.
Old Sewer
Inspect the sewer exit up the ladder at the end of the tunnel.
Take the FLUSH CHAIN on top of the platform.
Smash away the rock blocking the exit with the SLEDGEHAMMER.
Go out to the Fountains, then travel to the Courtyard.
Courtyard
Click the pink flamingo in the planet to repeat the hidden object scene.
Lift the lawn gnome's hat to find the Mohawk (A).
Screenshot.
Once the hidden object scene is complete, you will receive the FISHING LINE.
Go right to the Hedge Maze.
Hedge Maze
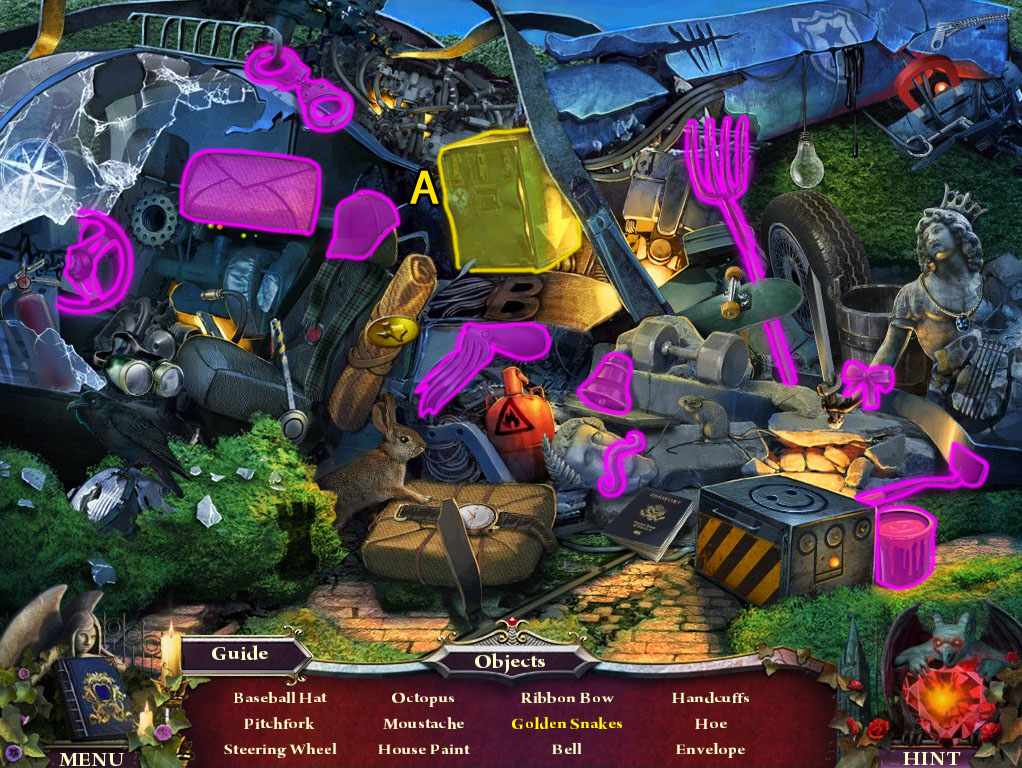
Click the crashed helicopter to repeat the hidden object scene.
Open the green safe to find the Golden Snakes (A).
Screenshot.
Once the hidden object scene is complete, you will receive the GOLDEN SNAKES.
Click the drained fountain to zoom in and speak with Christine.
Use the FISHING LINE on the hole in the basin.
Pick up the CATACOMBS KEY pulled out of the hole on the line.
Return to Viggo's Cell.
Viggo's Cell
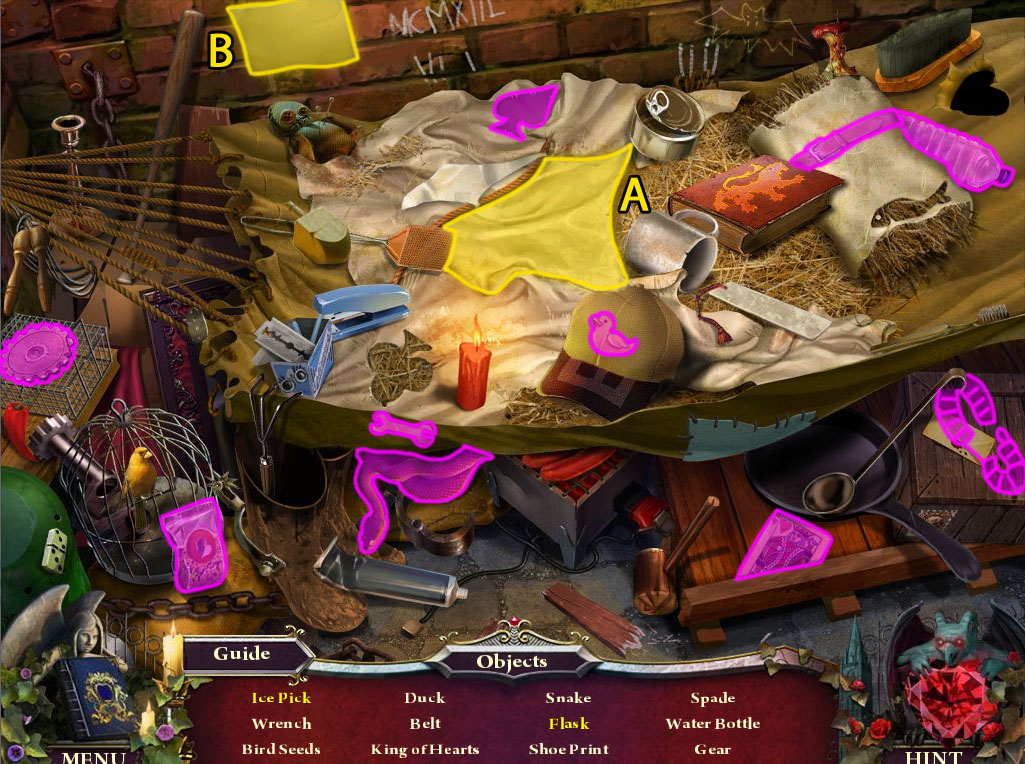
Click the hammock to repeat the hidden object scene.
Move the cloth to find the Ice Pick (A).
Lift the paper to find the Flask (B).
Screenshot.
Once the hidden object scene is complete, you will receive the ICE PICK.
Click the toilet to zoom in.
Add the FLUSH CHAIN to the bar water tank.
Flush the toilet, then take the THROW SWITCH (1/2) in the empty toilet bowl.
Go to the Catacomb Crypt.
Catacomb Crypt
Click the altar to repeat the hidden object scene.
Use the chisel on the S carved in the left slope to make it an Engraved S (A).
Open the lid over the urn to find the Ghost (B).
Screenshot.
Once the hidden object scene is complete, you will receive the SNIPS.
Click the right door to zoom in.
Place the GOLD SNAKES, GOLD STAFF, and GOLD WINGS into the carving on the door.
Go through the open door to the Medical Room.
Medical Room
Click the stasis chamber to raise it, then click the chamber again for a closer look.
Click the glass section of the lid to raise it.
Use the SNIPS to cut the chain of the locket.
Pick up the RED CRYSTAL HEART.
Click the table to zoom in.
Take the MEDICAL TUBING at the corner of the table.
Go back to the Catacomb Crypt.
Catacomb Crypt
Inspect the left door covered in chains.
Insert the the CATACOMBS KEY into the padlock.
Turn the key to open the lock.
Go through the open left door to Vladd's Tomb.
Vladd's Tomb
Inspect the skeleton seated on the throne.
Take the BLACK CRYSTAL HEART inside the skeleton's chest cavity.
Click the left door to zoom in.
Place the RED CRYSTAL HEART in the top heart-shaped carving.
Insert the BLACK CRYSTAL HEART in the bottom heart-shaped carving.
Go through the open door to the Blood Chamber.
Blood Chamber
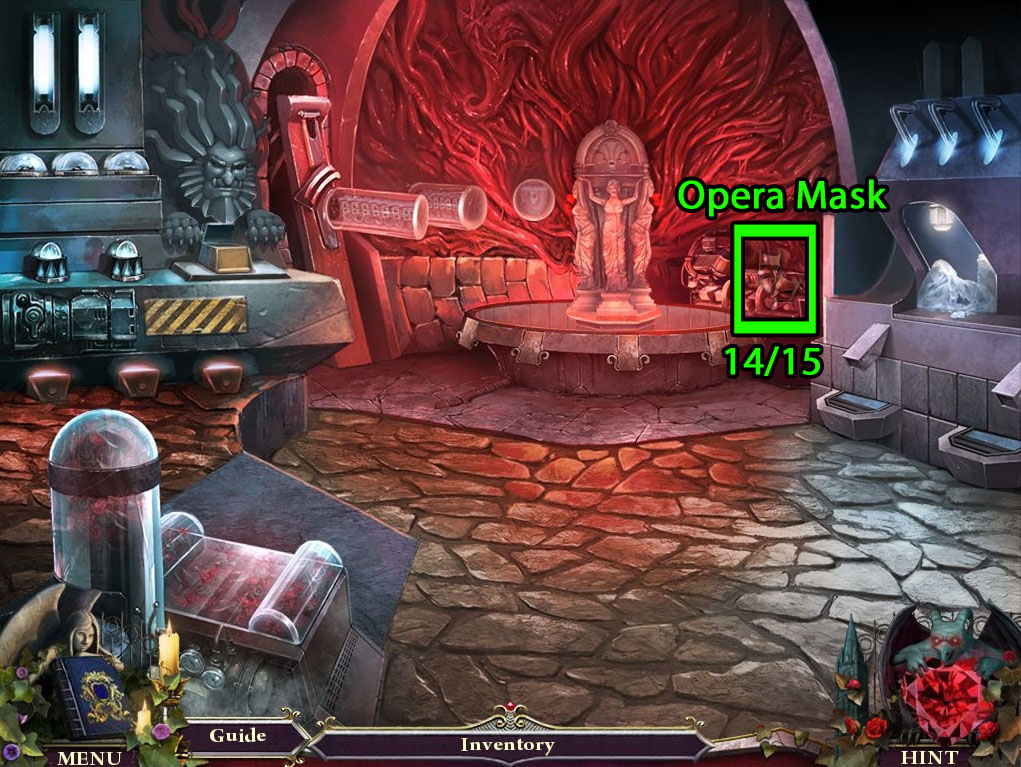
Find the Opera Mask (14/15) Collectable on top of the mechanism behind the blood fountain.
Click the chunk of ice in the freezer chamber for a closer look.
Use the ICE PICK too chip away the ice.
Pick up the revealed HOURGLASS.
Click the blood fountain to zoom in.
Add the MEDICAL TUBING to the pump mechanism.
Take the SEAL STAMPER inside the empty fountain basin.
Take the THROW SWITCH (2/2) at the base of the fountain statues.
Click the mold making device on the counter to zoom in.
First close the lid to the mold.
Take the Audio Tape (15/15) in the cup behind the mold.
Pour the WATER BOTTLE into the hole at the top of the lid.
Next, use the JUG OF LIQUID NITROGEN on the hole in the lid.
Open the lid and take the LENS (4/5) inside the mold.
Go back to the Medical Room.
Medical Room
Inspect the heart inside the preservation tube.
Add the two THROW SWITCHES to the sides of the tube.
Click both switches to drain the tube.
Take the exposed DEMONIC HEART.
Click the table to zoom in.
Use the SEAL STAMPER on the clump of black wax.
Pick up the formed VANSIG SEAL (3/4).
Return to Vladd's Tomb.
Vladd's Tomb
Click the skeleton on the throne for a closer look.
Place the HOURGLASS in the skeleton's open hand.
Put the DEMONIC HEART in the skeleton's chest.
Take the VANSIG SEAL (4/4) from the skeleton's open mouth.
Click the coffin in the center of the room to zoom in.
Insert the four VANSIG SEAL(s) into the four round slots on the coffin lid.
Take the LENS (5/5) from the monocle over the corpse's eye.
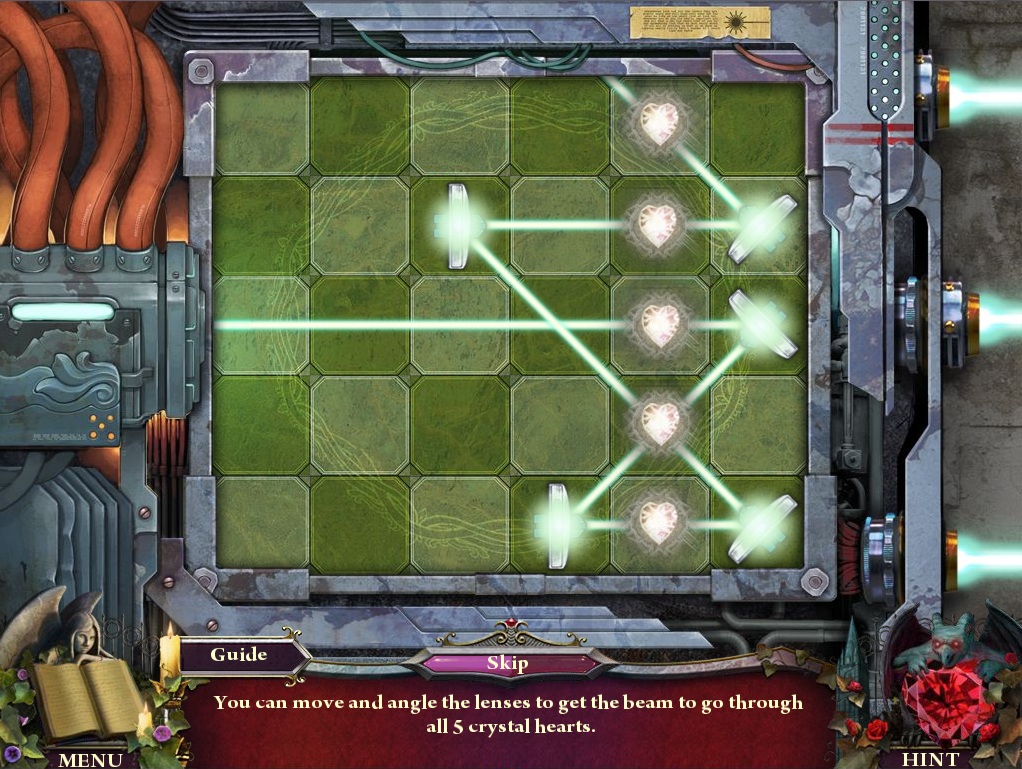
Inspect the laser grid blocking the right door.
Add the five LENS to the grid to start the puzzle.
Place and rotate the lenses around the board to direct the beam of light through all of the crystal hearts.
Click and drag a lens to place it on a tile, then click it to rotate it clockwise.
The beam of light will reflect off the surface of a lense at the angle it's rotated to face.
When the light passes through a crystal heart, it will change in color from purple to white.
Solution.
Go through the open door to the Inner Sanctum (Once you enter this area, you will not be able to return to the rest of the house).
Inner Sanctum
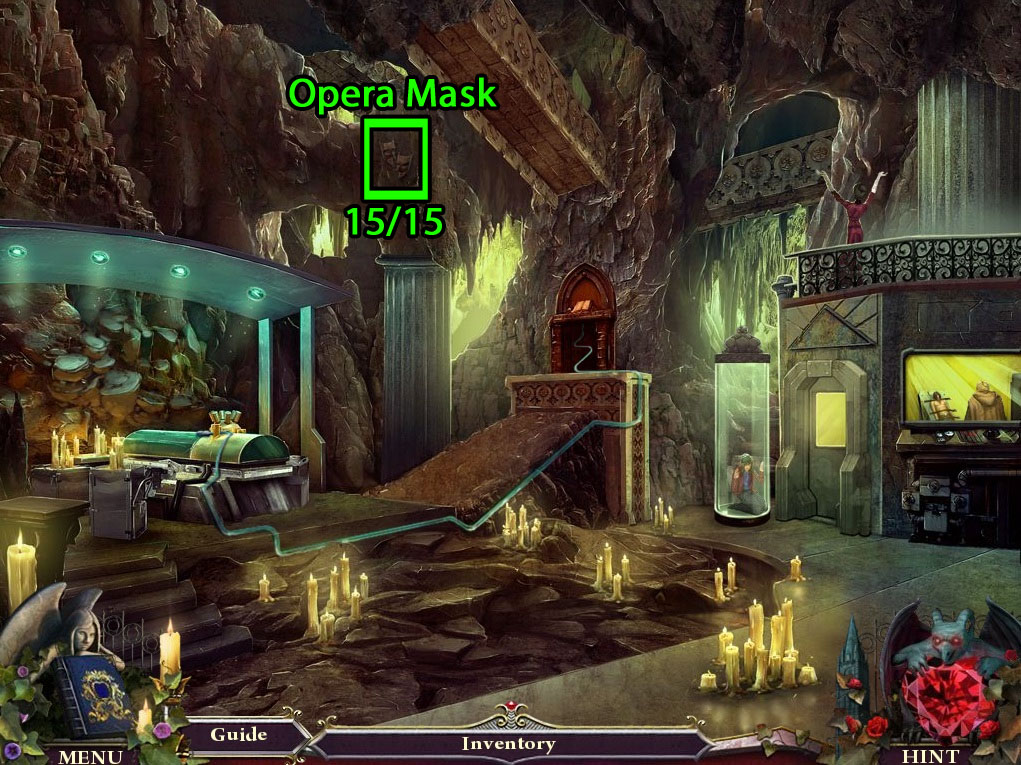
Find the Opera Mask (15/15) Collectable on the rock wall above the large column.
Click the podium up the ramp to zoom in.
Take the ENERGY GEM below the book.
Click Vlaad's life support system for a closer look.
Place the ENERGY GEM into the diamond shaped insert.
Speak with Viggo, Christine, and the detective.
The End
Posted by: Trinn |
February 3, 2012 6:00 PM
|
February 3, 2012 6:00 PM