JayisGames.com is now available ad-free!
Jay is Games recommends Cheat Happens with 8,000+ games and 35,000+ trainers!

Dismantlement: Box Lunch 2


  • Currently 4.6/5
  • 1
  • 2
  • 3
  • 4
  • 5
Rating: 4.6/5 (127 votes)
Comments (23) | Views (15,154)

ElleDismantlement Box Lunch 2
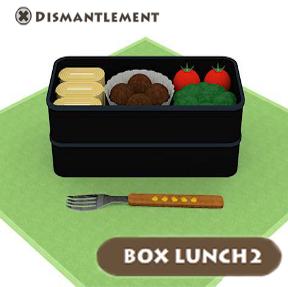
It's a truth universally acknowledged that a single lunch in possession of a good screwdriver must be in want of a sequel. So it is with the point-and-click puzzle game Dismantlement: Box Lunch 2, the perfectly explosive follow up to Gam.eBB's earlier game in the Dismantlement series titled... what else? Dismantlement: Box Lunch.

You're not going to find any new revelations in gameplay or design here. It is more of the same and—as a fan of this popular series—that's exactly what you ordered. Starting out with a screwdriver, and only a screwdriver, make your way through a series of food shaped puzzles until you reveal the secret at the bottom of the box lunch: a bomb! From there you have a generous 5 minutes to work out the last solution before it blows up in your face.

As with the first, this Dismantlement is on the easy side yet still likely to cause more than a few "face palm" moments amongst its players out there. Nevertheless, it is an irresistibly satisfying bite-sized bit of point-and-click fun. Dig in and enjoy!

Play Dismantlement: Box Lunch 2

Walkthrough Guide


(Please allow page to fully load for spoiler tags to be functional.)

Bomb Proof Walkthrough
Dismantlement: Box Lunch 2

1. Taking the Lid Off of Things

Aw, a fork!
Look at the cute chicks.
Some make pink hearts when they look at each other.
Others make blue hearts as they stare off into the distant sunset.
Time to get the lid off this box.

Turn the first heart blue (two clicks);
turn the third heart pink (one click).

Back up and click the lid to remove it.

2. Meatballs

Spin the colors as if you're making a mix, to match the color in the dot betwixt.

Top Dial: yellow and white at top; red and green at the bottom.
Left Dial: white and blue at top; yellow and red at the bottom.
Right Dial: yellow and blue at top; red and green at the bottom.
Bottom Dial: yellow and white at top; red and green at the bottom.

Now unscrew the revealed screws; back up and remove the meatballs.

3. Two Tomatos and a Broccoli


Each tomato has five segments. In those segments are seeds. If you were to put the two tomatos together to form one tomato, how many seeds are in each segment?

--9--
7---5
-7-8-

Remove the screw, close, take out the veggies, then undo the screw revealed underneath them.

Back up and then zero in on the rolls.

4. Rolls?

Open up the yellow twinkie-like rolls and you'll see two things circumnavigating the outer track. They occasionally pause.

Note also that one blip is square while the other is round.

Top square = O
Bottom square = U
Left circle = F
Right circle = U

Unscrew the two screws. Close. Remove the rolls. Then, unscrew the screw underneath. Back up. Take off the middle portion of the box lunch.

5. Veggie Pie

The four shapes keep changing and usually they're different...

...occasionally they equal eachother, though.

Top Left = X
Top Right = Triangle
Bottom Left = Circle
Bottom Right = Star

Four more screws to remove. Close lid, remove pie, then remove white tray. Finally, take out the screw left behind. Back up.

6.Sushi

Open up the red sushi sort of delicacy there on the left side of the box.

Up pops for little balls with slices taken out of them.

Those slices resemble arrows. Turn them so their arrow shapes mirror the arrows on the panel below.

Left = 1 click, so that slice is on right side.
Second from Left = 2 clicks, so the slice is on top.
Second from Right = 2 clicks, so slice is on top.
Right = 3 clicks, so slice is on left.

Remove screws. Close. Remove sushi sort of thing. Remove screw. Remove green panel. Remove screw.

7. Rice Bomb

Here's the trickiest part. Unfortunately, you have a limited amount of time to stop the bomb (fortunately, you have an unlimited number of lives here to do it).

Take a look at how many letters there are. Yes, there is a pattern, but doesn't it also look like something familiar?

Those letters line up with digits on a clock face.

Change the 9 o'clock A to an N for "nine" and...

...T for ten, E for eleven, and T for twelve.

Then hit the "stop bomb" button. Click the green light at top. Remove the screw left behind...

Mmm. Looks yummy, don't it? Dig in and Enjoy!

Fun as always.

I see there's no walkthrough... Or comment yet, anyway, so...
Also, I am sorry. I don't know the names of these meals, if they have any.

Walkthrough

1 - the box lid - bird love

There's a fork and a box. Observe the fork, you'll find the key to unlock the box lid on it.

There are 6 birds on the box, and only 5 on the fork - maybe you shouldn't just copy it...

Observe the patterns on the fork - you can see when there is a pruple heart between two birds and when there is a blue one.

You have to put a blue heart (one-side love) between two birds facing left and a purple heart (actual love :D) between two birds facing each other.

The hearts on the lid should be set up as follows:

Blue, White, Purple, White, White

The box lid comes off. Underneath, you'll find three sections. Only the middle one can be opened right now, though.

2a - the middle - colour mixing

There are colours on the rings you can rotate, and some colours between them.

You will have to set the rings up so that each two neighboring colours produce the one in between them when mixed.

Purple = Red + Blue
Orange = Red + Yellow
Greenish yellow (:) = Green + Yellow
Magenta = Red + White

The top-left colour on each rings should be the following (start with the upper ring, proceed in counter-clockwise direction)

Yellow, White, Yellow, Yellow

This puzzle is a bit weird - the colours are (sorta) okay, but the text that appears when you mouse-over them... Eh

Unscrew the four screws, close the... orbs, remove them, remove the cupcake. Now you can access both the left part and the right part.

2b - the left - letter timing

There are two objects moving around the puzzle, stopping periodically, next to some boxes with letters.

Notice there are two types of letter boxes - rounds ones and square ones.

There are also two types of objects - their base is either round or square.

You will have to see what letter is formed when the objects pause, and enter that in the letter box.

The letters are (start at top, proceed in clockwise direction)

O, U, U, F

Unscrew the two screws, close the puzzle, remove it, unscrew the big screw.

2c - the right - simple maths

There are two... tomatoes, each has five sub-sections, with some dots in it. Between the tomatoes is a plus symbol. Below the symbol, there are five number boxes.

You have to add the number of dots in each section, then put the result in the corresponding number box.

The numbers are (start at the top, proceed in CW direction)

9, 5, 8, 7, 7

Unscrew the screw, close the puzzle, unscrew the big screw. The upper part of the box will now come off.

There are three parts / meals, none of which can be removed / opened except the noodle one.

3a - the noodle one - symbol pairing

There are four symbols in the outer circle, and four symbol boxes in the inner circle. The outer symbols change periodically.

Notice that there is an equals (=) sign in between each two changing symbol boxes. Underneath the sign, there is an arrow pointing at one of the input symbol boxes.

Every now and then, two symbols next to each other in the outer circle are the same.

When that happens, you have to change the symbol in the inner circle that is between the two to the same symbol.

The symbols are (start with the top-left one, proceed in CW direction)

Cross, Triangle, Star, Circle

Unscrew the four screws, close the puzzle, remove it, remove the cup. Unscrew the big screw.

Now, the meal in the top-left can be opened (is it sushi?).

3b - sushi-doppelgänger - arrow pointing

In the top, there are four rotatable parts. Underneath each of them is an arrow, pointing somewhere.

You'll have to rotate the four parts so that they match the arrows.

Notice that the parts that are missing from each of the four parts look a bit like the arrows.

The arrows in the four parts have to be pointing in these directions (start at the left one)

Left, Up, Up, Right

In other words, rotate each part this number of times

1, 2, 2, 3

Unscrew the two screws, close the puzzle, remove it, unscrew the big screw. Click on the green part, it can now be removed. Unscrew the last screw. Now the rice can be removed.

4 - the bomb - clock lettering (yes, I can't come up with anything better)

Oh no, it's the bomb. In the middle, there is the timer. Around it, there are 12 letter boxes, four of which can be changed.

Notice that the boxes are all around one timer - clock.

Clocks have 12 hours...

The letters in the boxes correspond to to the first letters of the 12 hours.

O - One
T - Two
T - Three
F - Four
F - Five
S - Six
S - Seven
E - Eight
...

Fill the last four boxes with the following letters (start with the bottom one, proceed in CW direction)

N, T, E, T

Unscrew the disarming screw... Whew, it didn't blow up. Just remove anything that's left and you've finished the game. Congratulations...

23 Comments

You cleared dismantlement of the box lunch 2!! No.4114
Time: 16:05 Explosion: 0

Reply
stickytape December 29, 2011 5:56 AM

Are these dismantlement puzzles getting easier? Or have I played too many of them...

Reply

Fun as always.

I see there's no walkthrough... Or comment yet, anyway, so...
Also, I am sorry. I don't know the names of these meals, if they have any.

Walkthrough

1 - the box lid - bird love

There's a fork and a box. Observe the fork, you'll find the key to unlock the box lid on it.

There are 6 birds on the box, and only 5 on the fork - maybe you shouldn't just copy it...

Observe the patterns on the fork - you can see when there is a pruple heart between two birds and when there is a blue one.

You have to put a blue heart (one-side love) between two birds facing left and a purple heart (actual love :D) between two birds facing each other.

The hearts on the lid should be set up as follows:

Blue, White, Purple, White, White

The box lid comes off. Underneath, you'll find three sections. Only the middle one can be opened right now, though.

2a - the middle - colour mixing

There are colours on the rings you can rotate, and some colours between them.

You will have to set the rings up so that each two neighboring colours produce the one in between them when mixed.

Purple = Red + Blue
Orange = Red + Yellow
Greenish yellow (:) = Green + Yellow
Magenta = Red + White

The top-left colour on each rings should be the following (start with the upper ring, proceed in counter-clockwise direction)

Yellow, White, Yellow, Yellow

This puzzle is a bit weird - the colours are (sorta) okay, but the text that appears when you mouse-over them... Eh

Unscrew the four screws, close the... orbs, remove them, remove the cupcake. Now you can access both the left part and the right part.

2b - the left - letter timing

There are two objects moving around the puzzle, stopping periodically, next to some boxes with letters.

Notice there are two types of letter boxes - rounds ones and square ones.

There are also two types of objects - their base is either round or square.

You will have to see what letter is formed when the objects pause, and enter that in the letter box.

The letters are (start at top, proceed in clockwise direction)

O, U, U, F

Unscrew the two screws, close the puzzle, remove it, unscrew the big screw.

2c - the right - simple maths

There are two... tomatoes, each has five sub-sections, with some dots in it. Between the tomatoes is a plus symbol. Below the symbol, there are five number boxes.

You have to add the number of dots in each section, then put the result in the corresponding number box.

The numbers are (start at the top, proceed in CW direction)

9, 5, 8, 7, 7

Unscrew the screw, close the puzzle, unscrew the big screw. The upper part of the box will now come off.

There are three parts / meals, none of which can be removed / opened except the noodle one.

3a - the noodle one - symbol pairing

There are four symbols in the outer circle, and four symbol boxes in the inner circle. The outer symbols change periodically.

Notice that there is an equals (=) sign in between each two changing symbol boxes. Underneath the sign, there is an arrow pointing at one of the input symbol boxes.

Every now and then, two symbols next to each other in the outer circle are the same.

When that happens, you have to change the symbol in the inner circle that is between the two to the same symbol.

The symbols are (start with the top-left one, proceed in CW direction)

Cross, Triangle, Star, Circle

Unscrew the four screws, close the puzzle, remove it, remove the cup. Unscrew the big screw.

Now, the meal in the top-left can be opened (is it sushi?).

3b - sushi-doppelgänger - arrow pointing

In the top, there are four rotatable parts. Underneath each of them is an arrow, pointing somewhere.

You'll have to rotate the four parts so that they match the arrows.

Notice that the parts that are missing from each of the four parts look a bit like the arrows.

The arrows in the four parts have to be pointing in these directions (start at the left one)

Left, Up, Up, Right

In other words, rotate each part this number of times

1, 2, 2, 3

Unscrew the two screws, close the puzzle, remove it, unscrew the big screw. Click on the green part, it can now be removed. Unscrew the last screw. Now the rice can be removed.

4 - the bomb - clock lettering (yes, I can't come up with anything better)

Oh no, it's the bomb. In the middle, there is the timer. Around it, there are 12 letter boxes, four of which can be changed.

Notice that the boxes are all around one timer - clock.

Clocks have 12 hours...

The letters in the boxes correspond to to the first letters of the 12 hours.

O - One
T - Two
T - Three
F - Four
F - Five
S - Six
S - Seven
E - Eight
...

Fill the last four boxes with the following letters (start with the bottom one, proceed in CW direction)

N, T, E, T

Unscrew the disarming screw... Whew, it didn't blow up. Just remove anything that's left and you've finished the game. Congratulations...

Reply

Oops, elle was faster... :'(

Reply

Too easy.
You cleared dismantlement of the lunch box 2!! No. 4350 Time 10:01 Explosions 0.
That's at work. Multitasking, baby!

Reply

Still hugely enjoyable.

That's why it's especially a pity that the later installments are getting easier and easier, taking less and less time to complete. I mean 5 minutes and 02 seconds?

Come on guys, it's too much fun to have such small bites!

Happy new year to everyone.

bio

Reply

Another short and easy one. But still fun. Would love to see another one with a bit harder puzzles.

Reply

yay! the game wouldn't load for me a while back (server/capacity issues, according to the error message), and I was kinda disappointed (too many other fellow-fans of this game I guess? :D)... now it's up! *goes to play*

Reply

No. 7141, 4:26. (not bad huh)

Reply
zielona-zmija December 29, 2011 10:31 AM

Very easy and very nice :)

Reply

I think this one was easy because I'm not very good generally at Dismantlements but I succeded quite quickly this time.

Fun all the same ! Thank you for this.

Rafo

Reply
Carny Asada December 29, 2011 5:41 PM

Easier, or am I just starting to think like Gam.eBB? Terrifying thought.

Reply
wildflower12 December 30, 2011 12:54 AM

no 17799 in 7:22. I definitely think they are getting simpler. I only had one little hang up, but figured it out pretty quickly. I still love these games and look forward to each new one!

Reply

Good, but easy.

Reply

I thought I was getting better at these, but it seems everyone's found this one a bit easier than previous dismantlements. Oh well, it was still fun!

Reply

That's not sushi!
That's a slice of apple, with the peel made to look like bunny ears.

Reply

Finished in less than 8 minutes. I am pretty sure that the reduction in time to finish these is not merely because I am more used to these now.

Reply

Where's my (office supply store device thing)?
THAT WAS EASY!

Reply

I liked that this one wasn't too hard. It was nice not to be frustrated (and especially nice not to have to look at a walkthrough and find "argh, so there is something on the side, I just didn't click precisely enough to get there when I was trying before? bluh" or anything along those lines, which has been a common experience for me in this series.)

Also, it was super cute. Not sure if I'd want a lunch like that, though; it doesn't seem particularly... edible.

Reply

3:59.
Beat that humanity!

Reply
Papachabre December 31, 2011 9:55 AM

I've never been disappointed by a dismantlement game. Thanks elle!

Reply
Mr. Meteor December 31, 2011 5:51 PM

Man, whoever the player is is really unlucky to constantly be buying products with bombs.

Reply

^ Scroll Up | Homepage >

Leave a comment [top of page]

Please consider creating a Casual Gameplay account if you're a regular visitor here, as it will allow us to create an even better experience for you. Sign-up here!
  • PLEASE UNDERSTAND SITE POLICIES BEFORE POSTING COMMENTS
  • You may use limited HTML tags for style:
    (a href, b, br/, strong, em, ul, ol, li, code, spoiler)
    HTML tags begin with a less-than sign: < and end with a greater-than sign: >. Always. No exceptions.
  • To post spoilers, please use spoiler tags: <spoiler> example </spoiler>
    If you need help understanding spoiler tags, read the spoiler help.
  • Please Preview your comment before posting, especially when using spoilers!
  • No link dropping, no domains as names; do not spam, and do not advertise! (rel="nofollow" in use)
chrpa Jayisgames needs your help to continue providing quality content. Click for details Welcome to the Roundup 66 - Retro with four games! After you find the ten monkeys in the chapter, look in the inventory. You will find a...  ...
chrpa Jayisgames needs your help to continue providing quality content. Click for details Welcome to the Roundup 65 with three games! As mentioned in the previous roundups, only odd-numbered episodes are featured since even-numbered are for Robin Vencel's patrons (the...  ...
chrpa Jayisgames needs your help to continue providing quality content. Click for details Hi! Weekday Escape and Weekday Puzzle are here! First we have two new cans from tomoLaSiDo and then two small rooms from isotronic. That's all for this...  ...
6,365 Views
0 Comments
chrpa Jayisgames needs your help to continue providing quality content. Click for details Welcome to Mobile Monday! We have another beautiful game from Nicolet and it's a winter game as it should be. Tasuku Yahiro have released another of their...  ...

HELP Jayisgames.com

Recent Comments


Display 5 more comments
Limit to the last 5 comments

Game of the week


Dark Romance: Vampire Origins Collector's Edition

Your Favorite Games edit

add
Save links to your favorite games here. Use the Favorites editor.

Monthly Archives