


Haunted Manor:
Queen of Death
Platform: Mac, Windows
![]() Although they're twins, Stella and Christie have never gotten along, and Christie can't shake the feeling that her sister was glad to be rid of her when Christie left the family home to go to school in London. Everything changes in the blink of an eye, however, when Christie receives a letter from Stella telling her their parents are dead and begging her to return home. Has the tragedy finally provided the catalyst for the two sisters to put aside their differences? Or is Christie's dewy-eyed hope for sisterly reconciliation blinding her to the obvious signs of danger... you know, like the spirits of the damned that rise out of the grounds surrounding the family homestead to greet her. Given that the title of this hidden-object adventure from Top Evidence Studio is Haunted Manor: Queen of Death and not "Learning to Love Again: The Christie and Stella Story" on the Lifetime movie network, you can probably guess where this is going.
Although they're twins, Stella and Christie have never gotten along, and Christie can't shake the feeling that her sister was glad to be rid of her when Christie left the family home to go to school in London. Everything changes in the blink of an eye, however, when Christie receives a letter from Stella telling her their parents are dead and begging her to return home. Has the tragedy finally provided the catalyst for the two sisters to put aside their differences? Or is Christie's dewy-eyed hope for sisterly reconciliation blinding her to the obvious signs of danger... you know, like the spirits of the damned that rise out of the grounds surrounding the family homestead to greet her. Given that the title of this hidden-object adventure from Top Evidence Studio is Haunted Manor: Queen of Death and not "Learning to Love Again: The Christie and Stella Story" on the Lifetime movie network, you can probably guess where this is going.
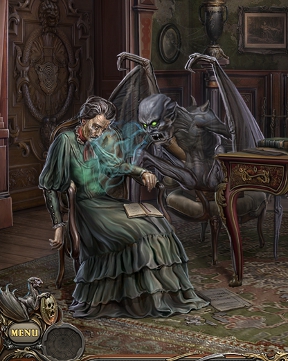 Because this would be an extremely boring game otherwise, Christie naturally returns home to find her home barricaded, malevolent beings prowling the area, and a sinister breeze that keeps whispering I am evil... or maybe I hate weevils... or even soylent green is people. It's hard to tell. Regardless, Christie's got a lot to worry about, and it doesn't help matters that her family home was apparently designed by the Umbrella Corporation and is packed full of puzzles, secrets, and complicated keys. The game only has one mode of difficulty, so you'll find sparkles drawing your attention to interactive areas and hidden-object scenes you need to solve. In short order, Christie discovers an ancient cursed medallion with a local legend clinging to it may be the source of all the heartache and horror plaguing her family... but with people dropping like flies left and right and her progress impeded by puzzles and apparitions at every turn, she might be running out of time to do anything about it before the medallion turns its gaze on her. Kind of makes all your problems seem trivial, doesn't it? So what if your computer got a virus and you forgot to pick up coffee... at least some grotesque naked gray spider demon isn't trying to kiss your soul out while you try to solve a complex mathematical puzzle to open a lock, you wussy.
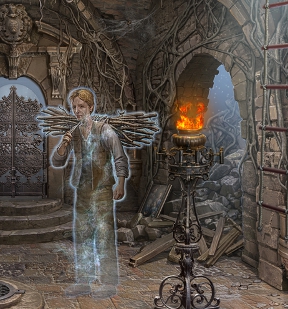 Analysis: Don't let the spider demons and murder-by-soul-suck scare you; despite all the spooky sounds and monsters, Haunted Manor: Queen of Death isn't actually frightening. It doesn't even try to startle you, so you can also cross jump scares off the list of things to worry about. You'll see spectres and monsters pop up as you play, and naturally you can expect to run across some creepy scenery and otherworldly murder, but even the worst of that pales compared to, say, the closet scene from The Ring. The artwork is gorgeous and crisp, with clear detail that adds interest to every environment, and while the repetitive soundtrack may lose its creepy charm after the seventh or eight time you hear it loop around, on the whole the production is top notch. The story is entertaining, but also a bit of a mixed bag because the big twist is not only fairly obvious, but is also actually revealed on a lot of the promo material from Big Fish Games.
The gameplay as a whole is solid, despite a lot of backtracking, with challenging hidden-object scenes and familiar but clever puzzles. It does suffer somewhat from an inability to let you sit back and figure things out yourself. It's like the game interprets any hesitation your part as complete and utter bafflement and starts fluttering sparkles everywhere to point out places you can click. Despite this, however, Queen of Death manages to remain solidly enjoyable because of how hard it works to keep you engaged and interested. You're constantly catching glimpses of Stella, beckoning you at the end of a hallway, finding damning letters left behind, being menaced by flying furniture, and combined with the solid gameplay makes for an easily recommended title. You can expect to spend close to five hours on it if you take your time and don't speed through puzzles, and if you've been looking for a good looking and stylish hidden-object adventure with just a touch of supernatural flair, the demo for this is well worth a look.
A Collector's Edition is also available. It contains a bonus chapter, art gallery, strategy guide, and more. Remember that Big Fish Game Club Members pay only $13.99 for Collector's Editions (or 2 club credits), and collector's editions count 3 card punches of 6 total needed for a free game.
![]() Windows:
Windows:
Download the demo
Get the full version
Also available: Collector's Edition
![]() Mac OS X:
Mac OS X:
Download the demo
Get the full version
Also available: Collector's Edition


Walkthrough Guide
(Please allow page to fully load for spoiler tags to be functional.)
Haunted Manor: Queen of Death Walkthrough
General Information
Areas in the game that can be interacted with are indicated by an occasional sparkle.
Glittering areas indicate hidden object scenes.
Many puzzles and hidden object scenes in the game are random; therefore, screenshots should be used as a reference and not a definitive solution.
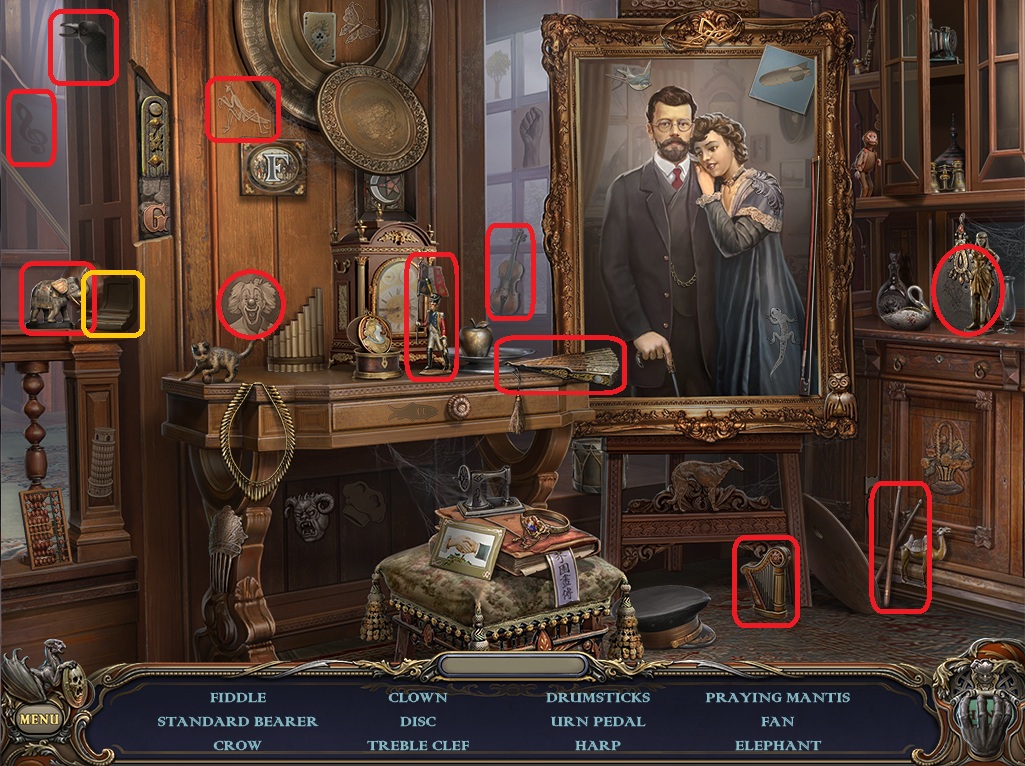
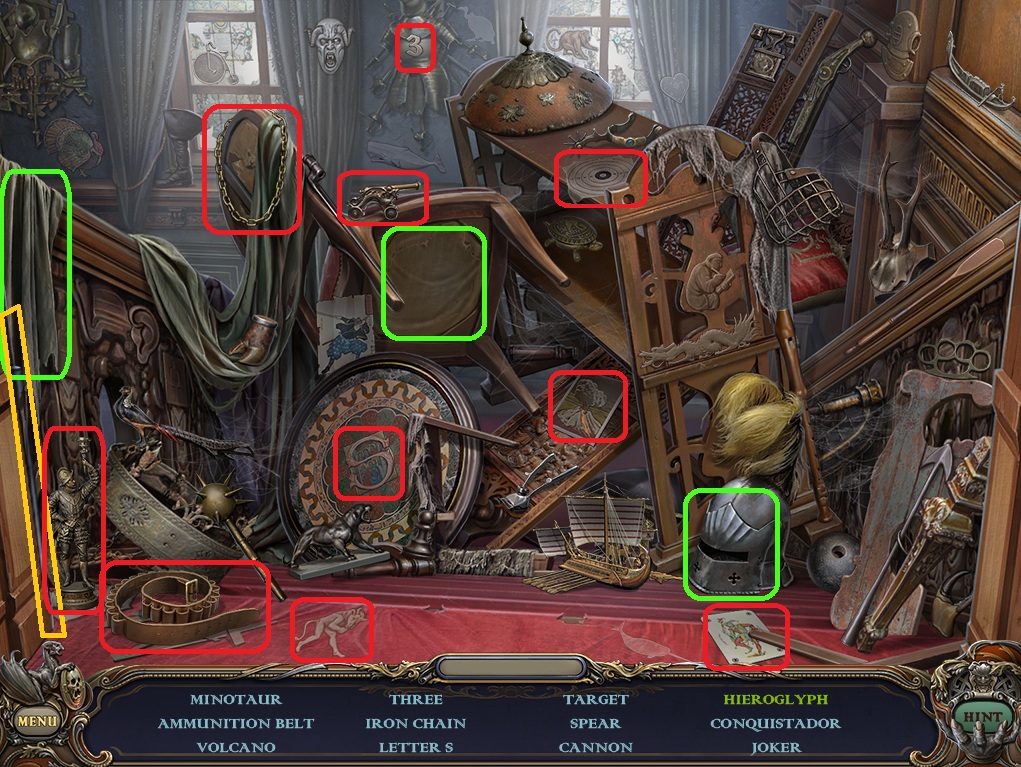
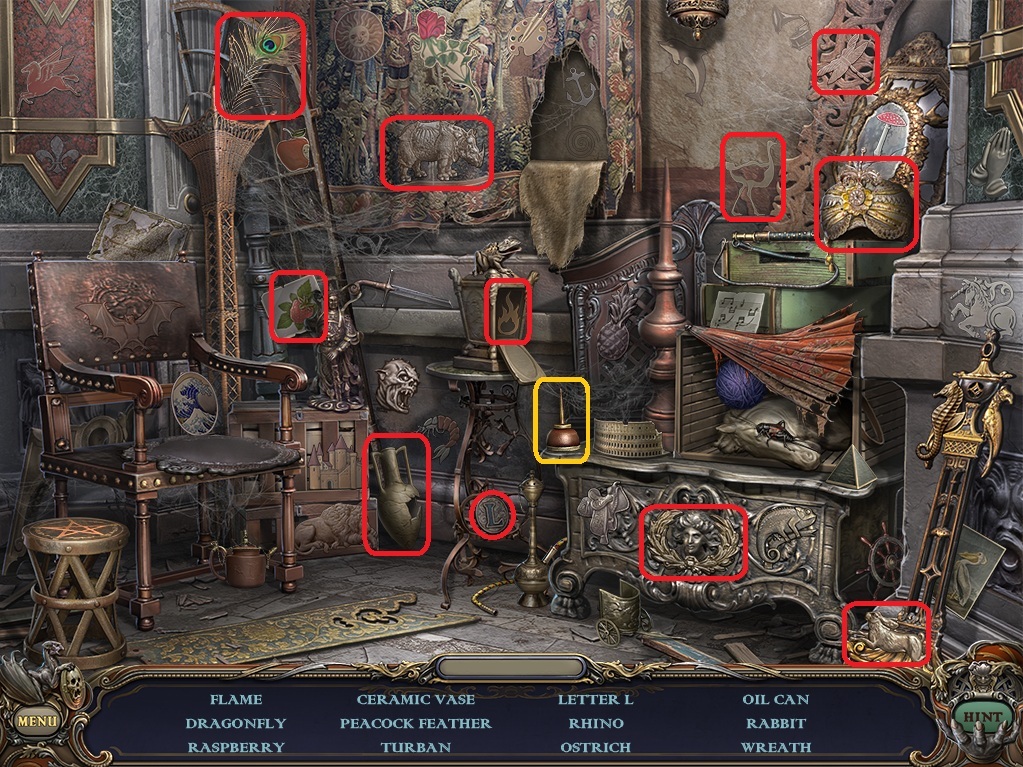
In screenshots depicting scenes within the game, items that can be picked up are highlighted in green, interactive areas are highlighted in blue, and puzzle or hidden object areas are highlighted in orange.
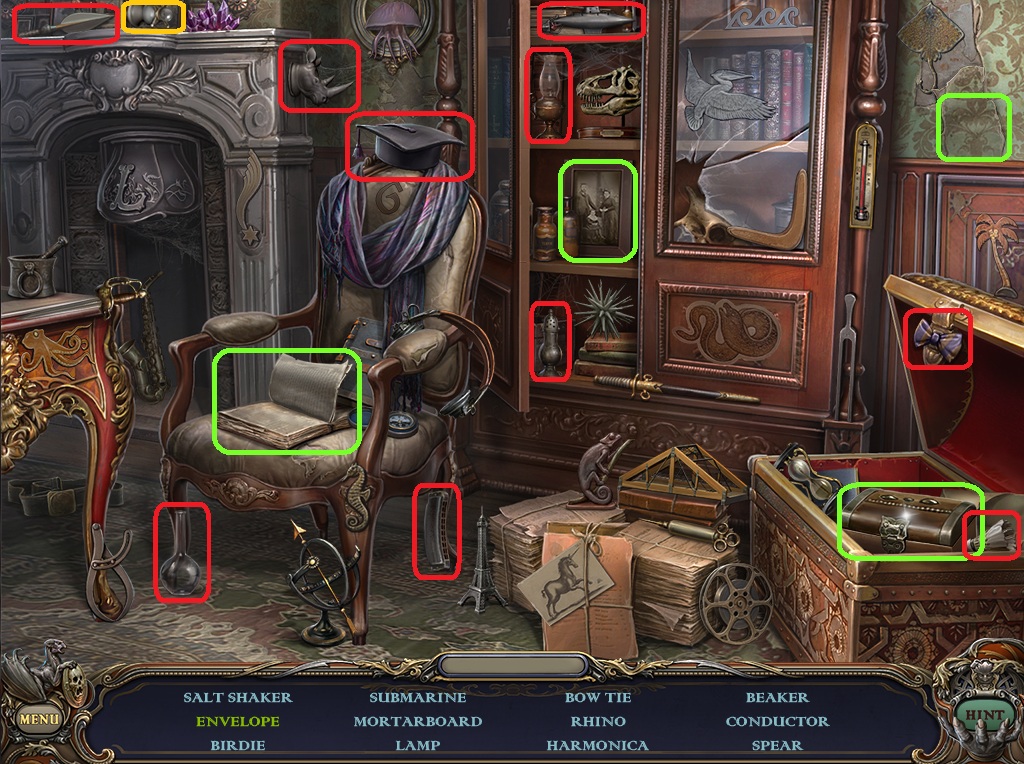
Hidden object scenes are randomized each game; in a hidden object scene items that are visible are written in the list in blue text, whereas concealed items that must be interacted with to be revealed are written in green text.
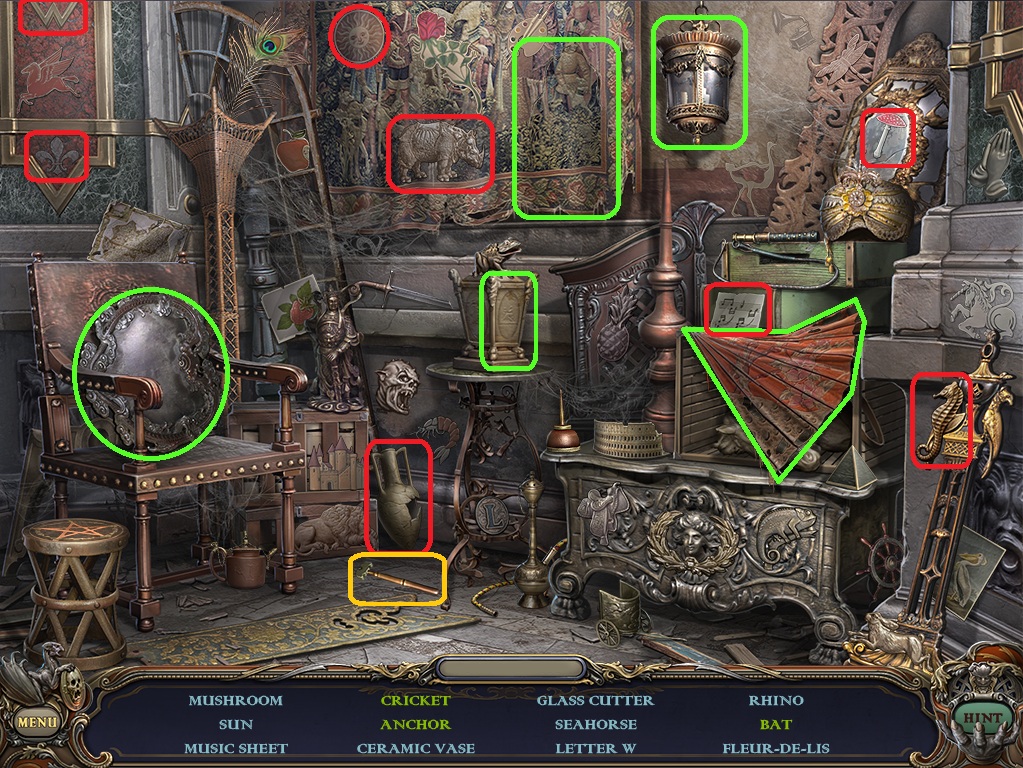
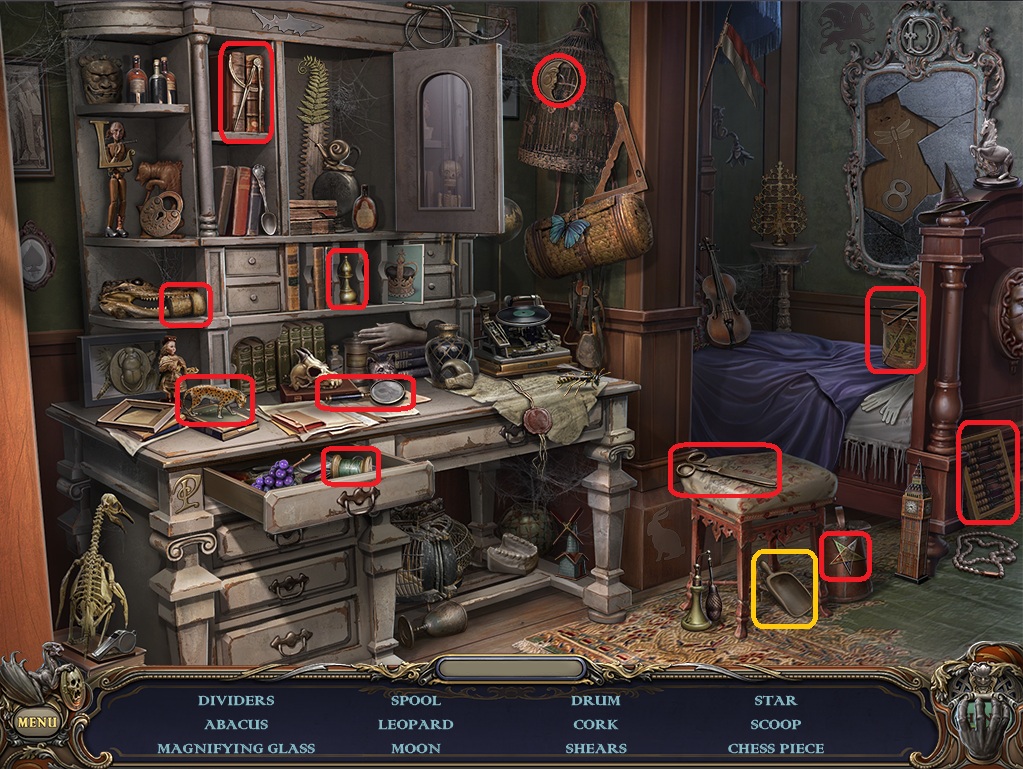
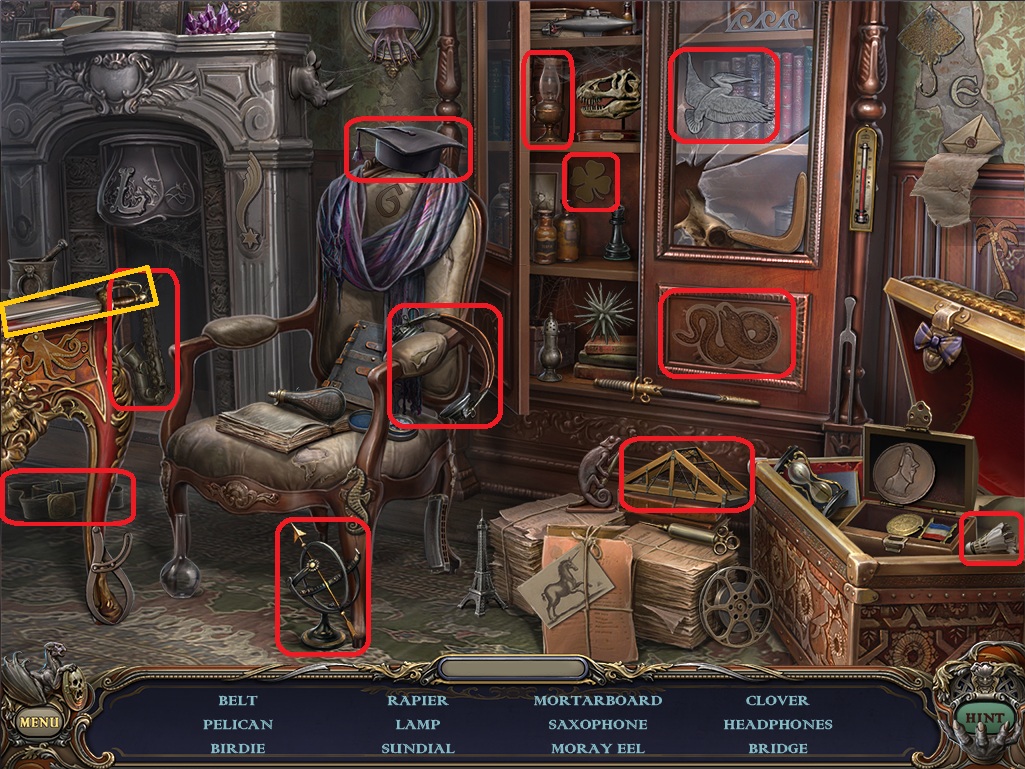
Hidden-object scene screenshots show all interactive areas outlined in green and all collectable hidden objects outlined in red.
At the end of any hidden-object scene, you will receive an item - in screenshots this item is outlined in orange.
When the cursor is over an item that can be picked up, it will change to a hand.
When the cursor is over an area that can be more closely inspected, it will change to a magnifying glass.
When the cursor is over an area that you can travel to, it will change to an arrow.
Items collected will go into your Inventory Bar at the bottom of the screen.
To cycle through your inventory, click and hold the left or right arrows at the side of the Inventory Bar.
To the right of the Inventory Bar is the Hint Button. Click the Hint button to reveal an item during a hidden-object scene or to receive directions on where to go next in the main game.
During puzzles, a Question Mark Button will appear above the Hint Button. Clicking this button provides instructions for puzzles.
A Skip button will also appear on the lower left side of the screen during puzzles. When the Skip bar is filled, clicking the button will allow you to skip the puzzle.
During your adventure, you will collect an item called a Fresco. The Fresco will remain on the left side of your Inventory Bar and remain there until you have collected all of the pieces of the Fresco Background and all of the elixier Ingredients.
Click the Menu button to the left of the Fresco and Inventory Bar to view the in-game options menu, or to return to the Main Menu.
Chapter 1
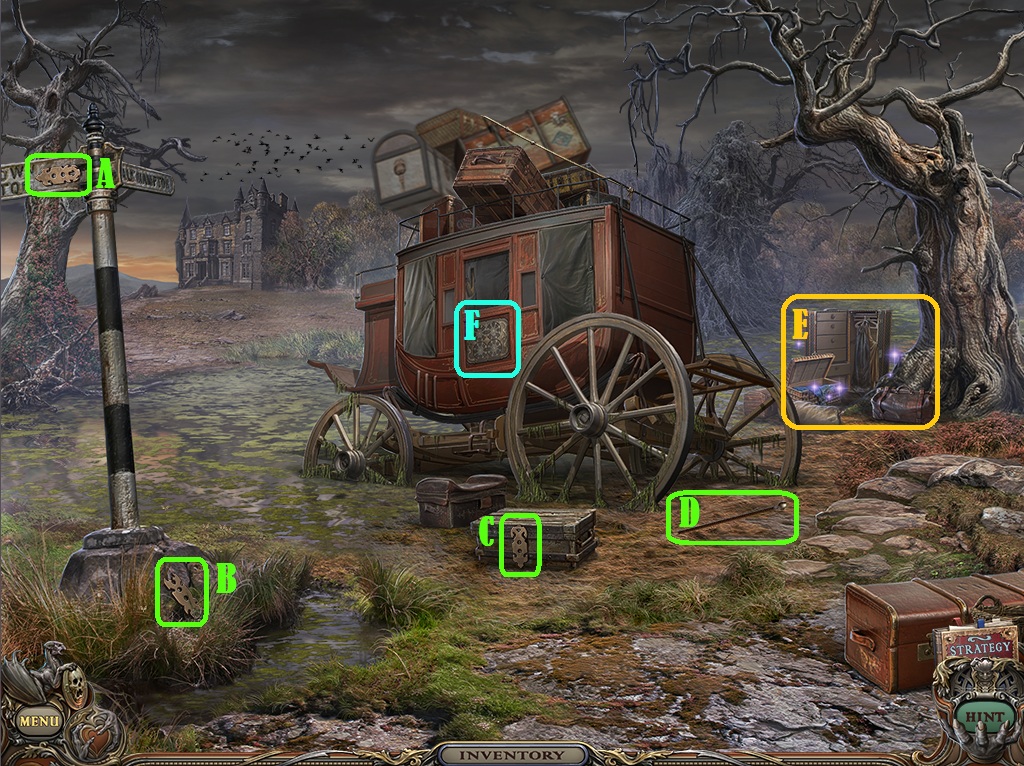
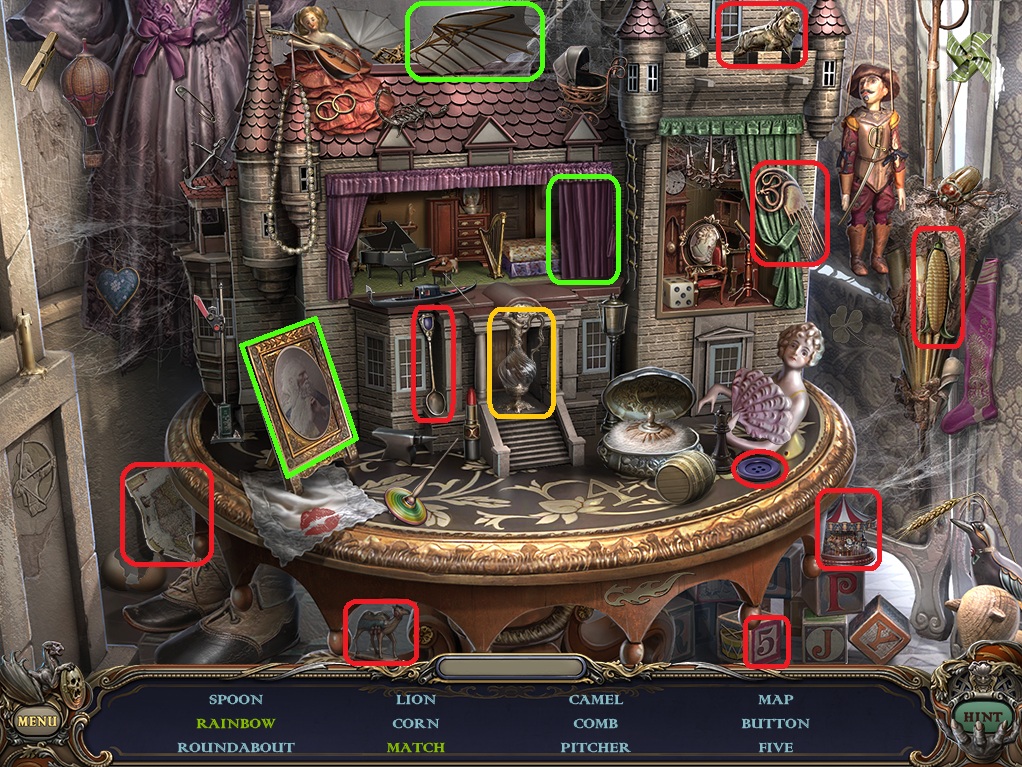
Swamp
Screenshot.
Take the Punched Key Card 1/4 (A) on top of the signpost.
Take the Punched Key Card 2/4 (B) at the base of the signpost.
Take the Punched Key Card 3/4 (C) on the lock of the wooden chest on the ground.
Take the Cane (D) on the ground beside the chest.
Click the luggage beside the dead tree on the right (E) to start the hidden object scene.
Open the doctor's bag (1) to reveal the Punched Key Card.
Screenshot.
Once the hidden object scene is complete, you will receive the Punched Key Card 4/4.
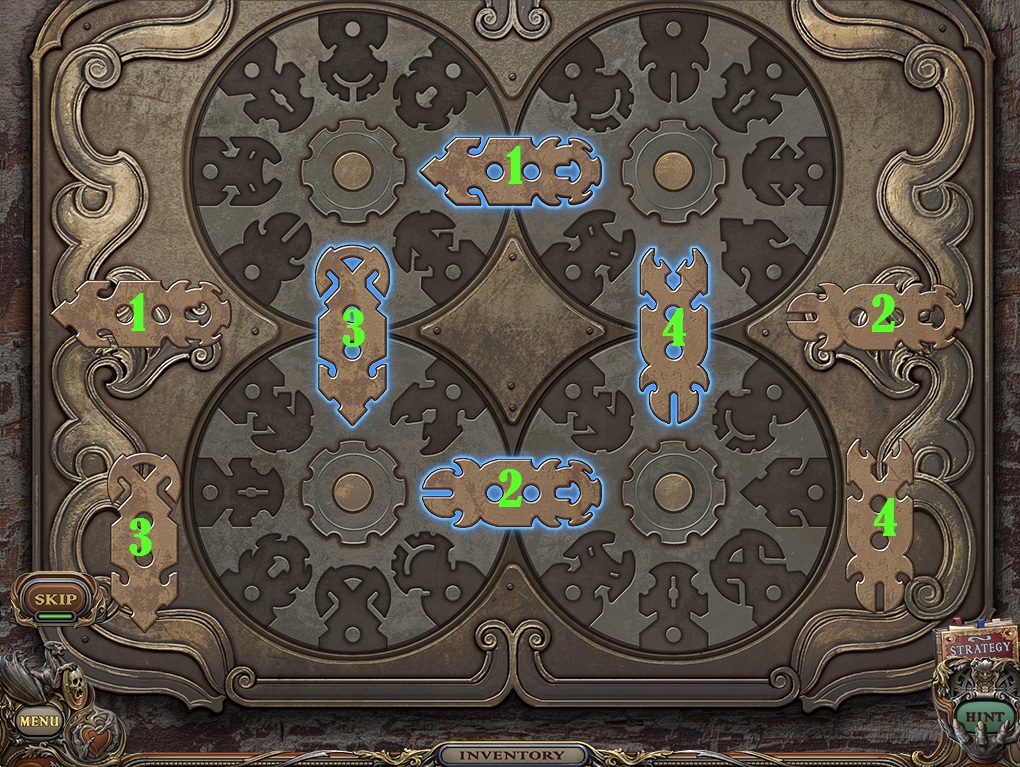
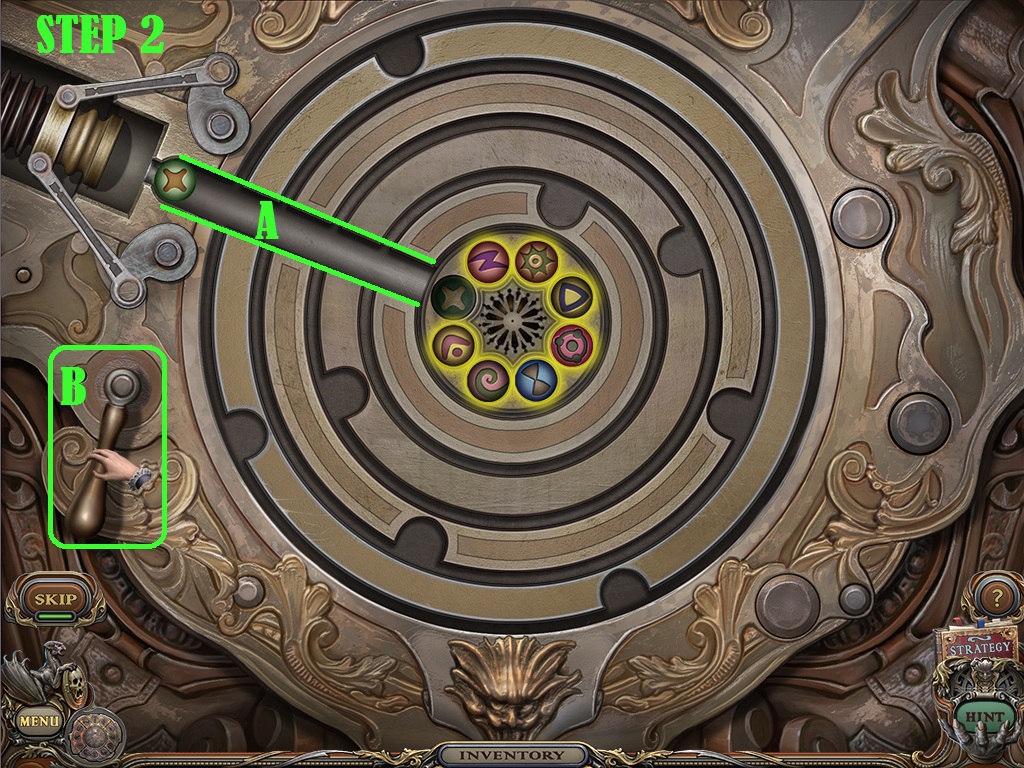
Click the door of the carriage (F), then add the four Punched Key Cards to the carriage lock to start the puzzle.
To solve this puzzle, click each of the four circles to rotate them and align their indentations to match the shapes of the four Punched Key Cards.
Click and drag a punched key card to set it into the indentation; if correctly positioned it will lock in place.
Solution.
Once the puzzle is solved, click the open door of the Carriage to go inside.
Carriage
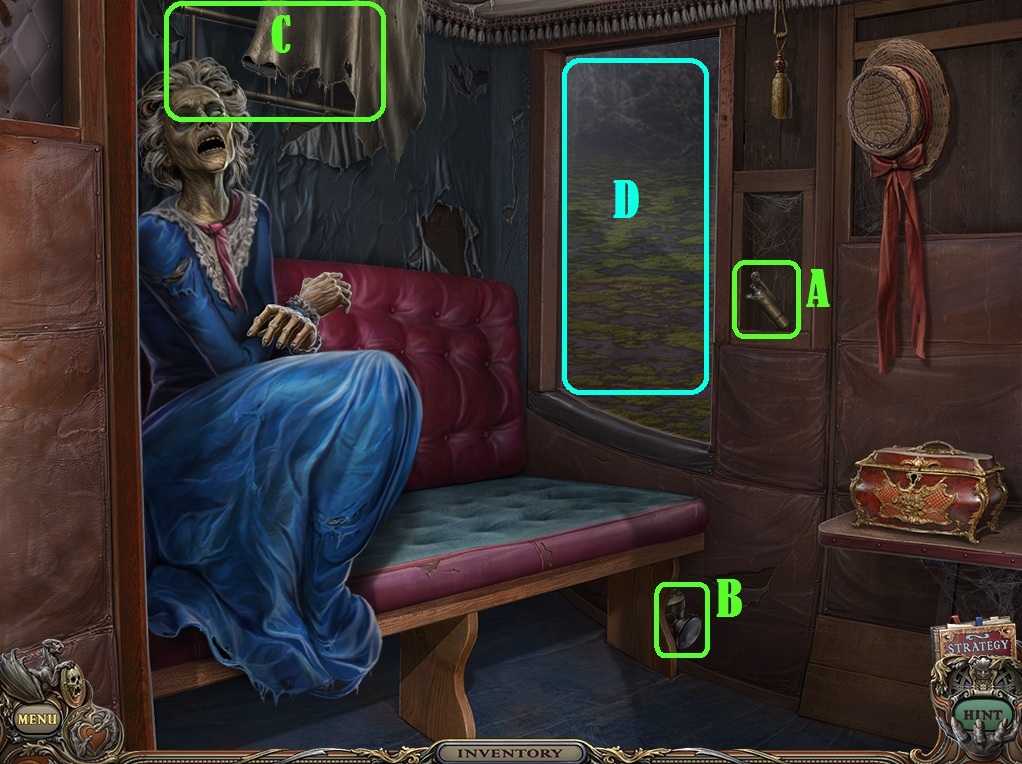
Take the Lighter (A) in the space to the right of the window.
Take the Flashlight (B) underneath the seat.
Take the Ladder (C) on the wall above the corpse.
Use the Cane to smash through the window (D).
Screenshot.
Take the Splinter of shattered glass that falls on the seat.
Go back outside to the Swamp.
Swamp
Place the Ladder on the right side of the carriage.
Use the Flashlight to chase away the owl.
Climb up the ladder to view the roof of the carriage.
Use the Splinter of glass three times to cut through the rope attached to the luggage.
Walk across the luggage that falls into the swamp on the left to reach the Yard, then go down the stairs on the left to travel to the Mine Entrance.
Mine Entrance
Take the Axe on the ground in front of the chasm.
Take the Handle in the rock wall to the left of the lantern.
Go back up the stairs to the Yard, then move forward to the House Entrance.
House Entrance
Click the ghost boy, then follow him back to the yard and down the right path to the woods.
Woods
Click the ghost boy again.
Take the Rope Ladder hanging over the right tree branch.
Follow the ghost up the right path to the Tree House.
Tree House
Click the ghost boy a third time.
Use the Axe on the branches covering the door of the tree house.
Click the stone head sticking out of the ground to the left of the tree to zoom in.
Take the Cameo (1/2) from the stone hand beside the head.
Go back to the Woods.
Woods
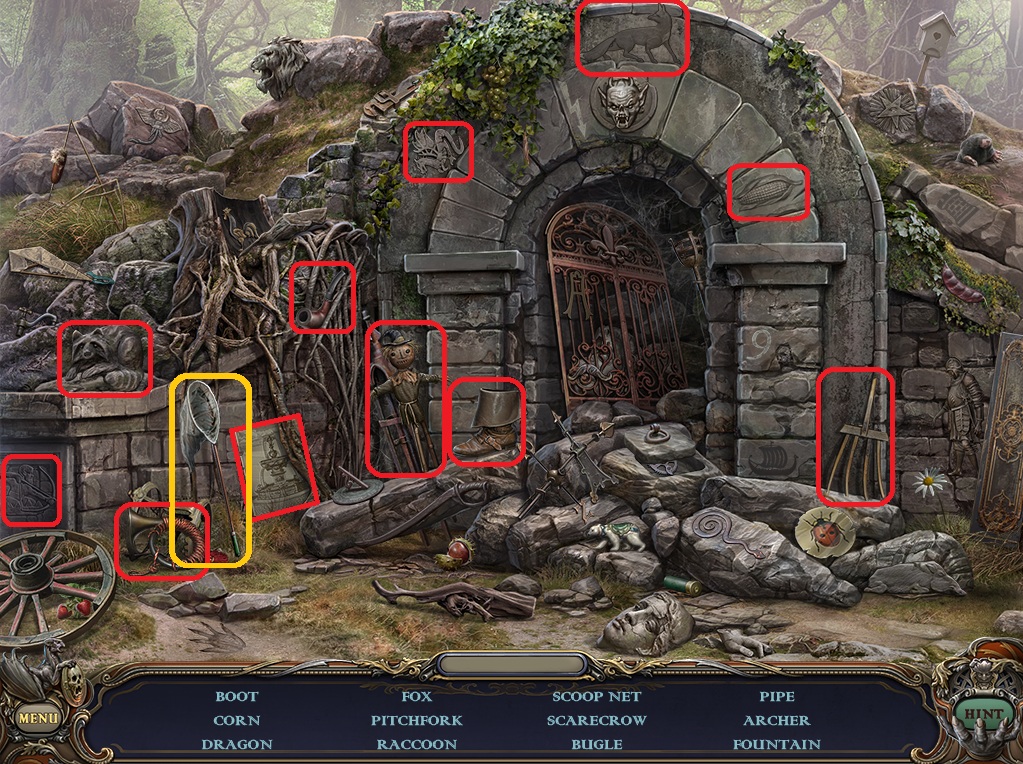
Click the pile of rubble around the broken gate to the left to start the hidden object scene.
Screenshot.
Once the hidden object scene is complete, you will receive a Ball.
Return to the Tree House.
Tree House
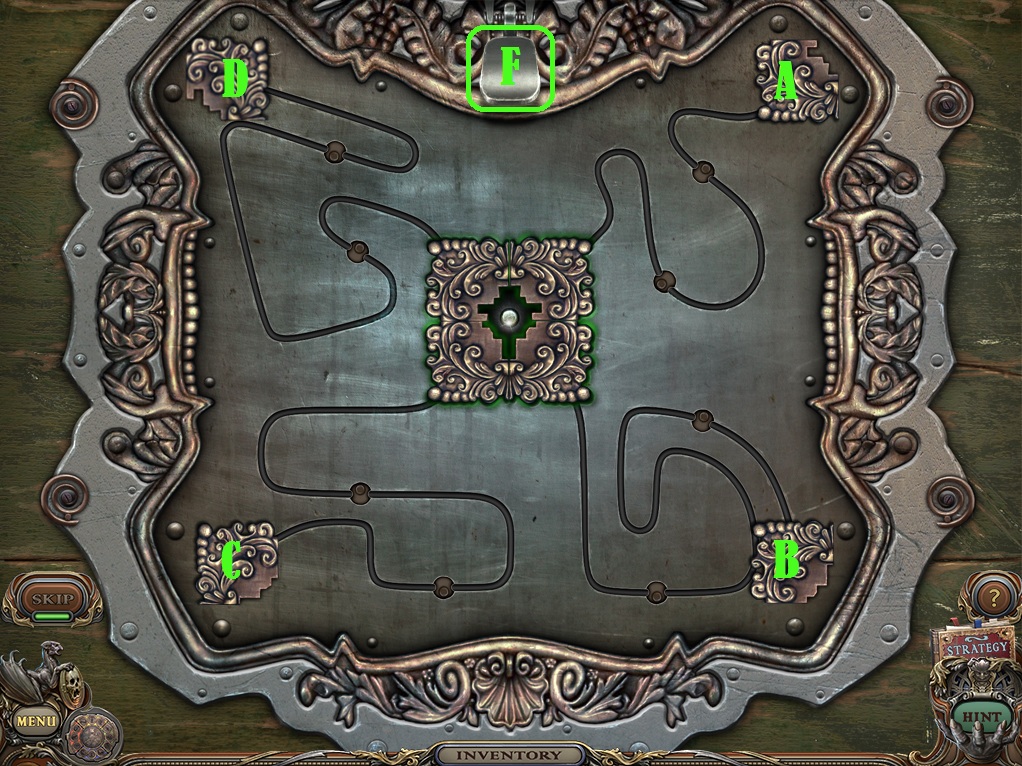
Click the lock on the door of the tree house to zoom in.
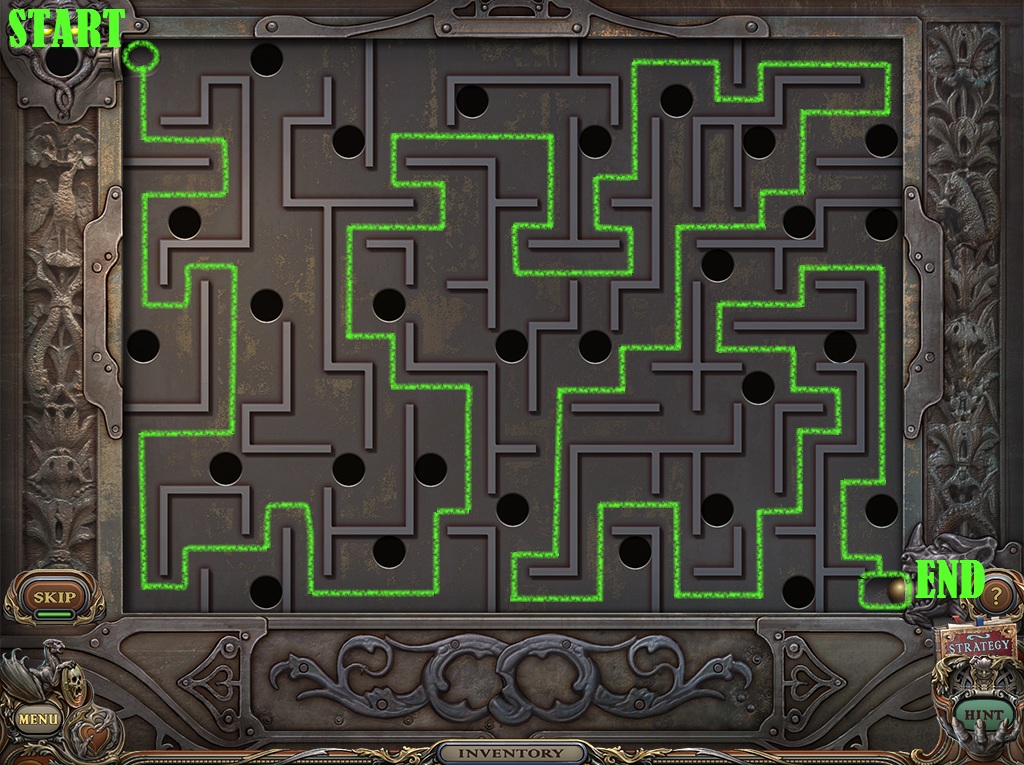
Use the Ball on the hole at the top left corner of the board to start the puzzle.
To solve this puzzle, move the ball to the end of the maze in the bottom right corner of the board without letting it fall into any of the holes.
Click an area up, down, left, or right of the ball to move it in that direction.
If the ball falls into any of the holes, the puzzle will reset.
Solution.
Go through the open door to the Tree House Entrance.
Tree House Entrance
Use the Handle on the hole on the right side of the round, metal lid.
Click the handle to lift the lid.
Place the Rope Ladder on the rungs at the top of the hole.
Climb down the ladder to the Crypt.
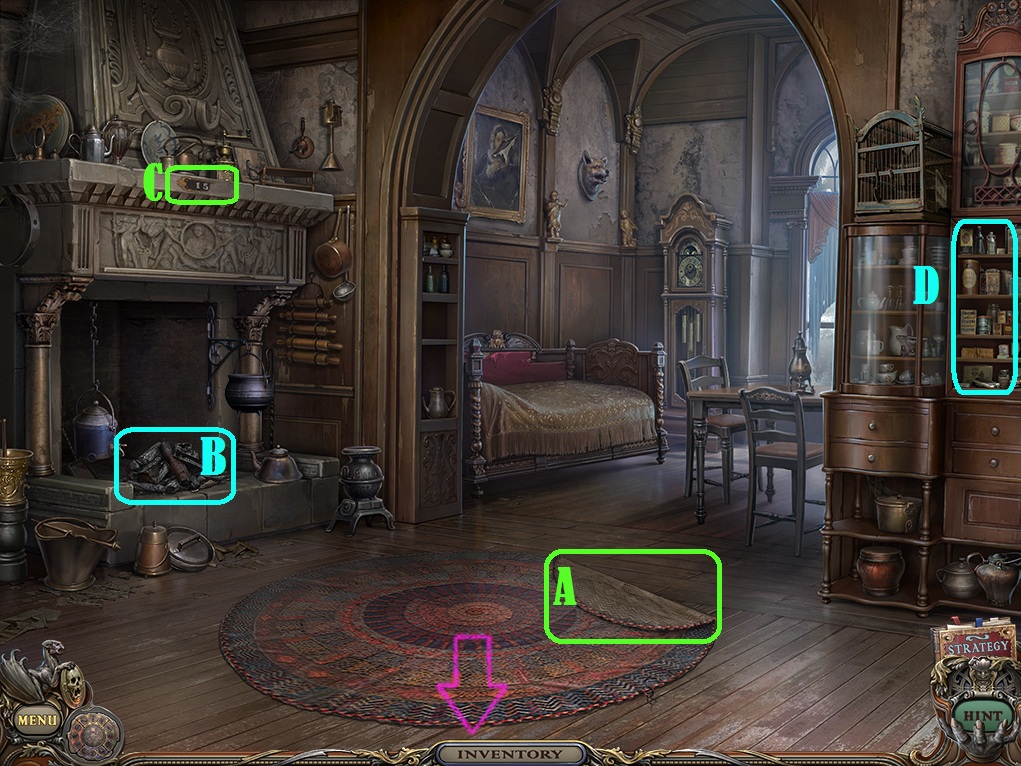
Crypt
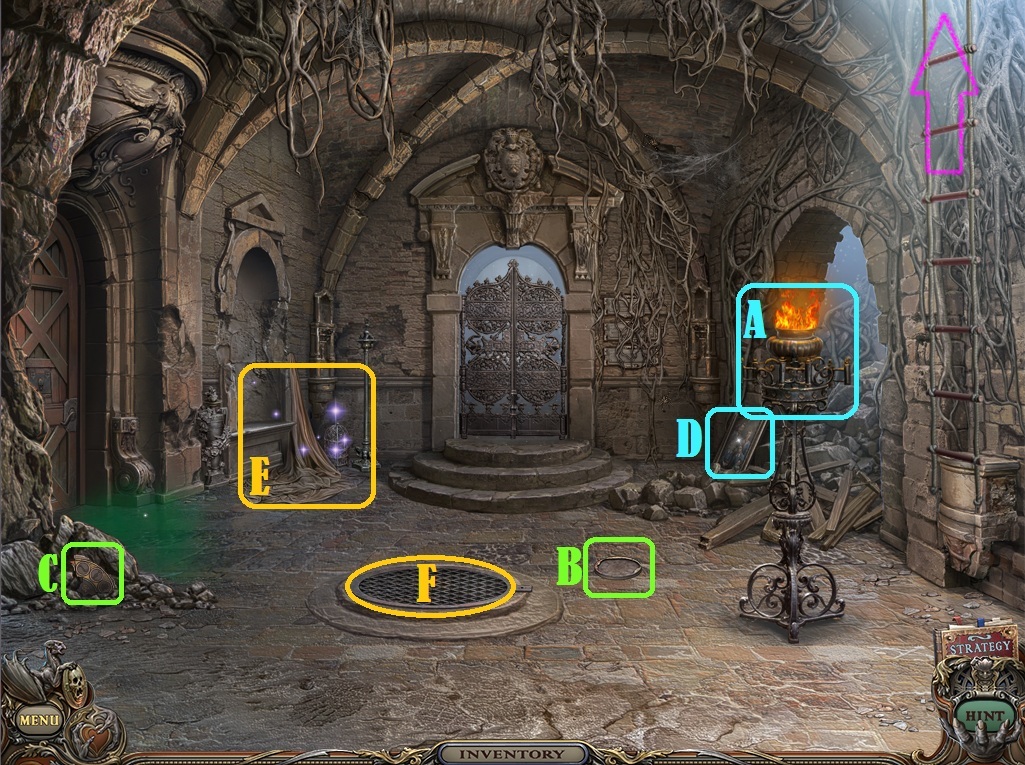
Screenshot.
Use the Lighter on the lamp on the stand (A) to light the room.
Click the ghost boy a final time to speak with him.
When the ghost disappears, take the Fresco Background (B) the falls to the ground where he was standing. The Fresco Background will be placed on your toolbar to the left of your inventory.
Take the Fresco Piece 1/4 (C) on the rocks beside the green smoke under the left door.
Click the framed painting on the ground (D) in the rear right corner of the room to zoom in.
Take the Candles at the bottom of the painting's frame.
Click the pile of junk (E) in the rear left corner of the room to start the hidden object scene.
Click the cage (1) to reveal the Key on the wall.
Screenshot.
Once the hidden object scene is complete, you will receive a Key.
Click the round grate (F) in the center of the room for a closer look.
Use the Key on the lock at the right side of the grate, then click the key to start the puzzle.
To solve this puzzle, match identical pairs of bugs until all of them are removed.
Click one bug to select it, then click the second identical bug to pair them, as shown in the example screenshot with bugs (1) and (2).
Screenshot.
Once the puzzle has been solved, take the Cameo 2/2 from the revealed cache (A) in the center of the circle.
Go back to the Woods.
Woods
Click the carved obelisk in the center of the area to zoom in.
Take the Fresco Piece 2/4 at the bottom of the obelisk.
Go back to the Yard.
Yard
Click the pile of rocks to the right of the path to zoom in.
Click the small rock on the left to reveal the Fresco Piece 3/4.
Return to the House Entrance.
House Entrance
Place the first Cameo into the round space on the chest of the left gargoyle at the foot of the stairs.
Place the second Cameo into the space on the right gargoyle.
Go through the open door into the Hallway of the house.
Hallway
Screenshot.
Take the Candelabra (A) that is hurled to the floor.
Click the top of the small table (B) on the right to zoom in.
Place the Candelabra on top of the table.
Add the Candles to the holders of the candelabra, then light the candles with the Lighter.
Click the pillow (C) on the seat to the right of the knight to move it aside, revealing the Ball.
Click the painting (D) on the wall above the lit candles to zoom in.
Study the location of all of the monster faces and commit them to memory as best you can, then place the Ball in the hole at the top of the painting's frame start the puzzle.
To solve this puzzle, match the monster face shown at the top of the frame with the hidden monster faces in the circles inside the painting.
One face at a time will be shown in the circle at the top of the frame; click one of the grey circles in the painting to attempt to find the identical face.
If chosen correctly, the face will stay revealed as shown in the example screenshot.
Solution.
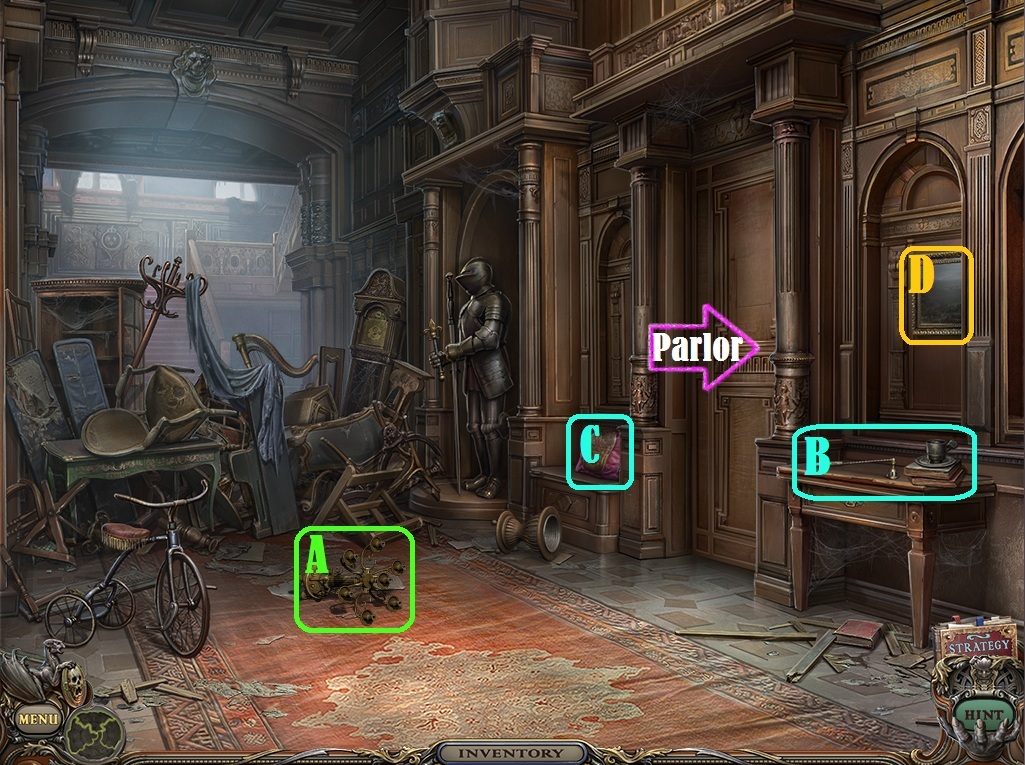
Go through the open door into the Parlor, then follow the nanny into the Music Room.
Music Room
Take the large Board lying on the floor.
Take the Pull Chord laying over the end table against the right wall.
Go back to the Parlor.
Parlor
Use the Pull Chord on the standing lamp in front of the middle archway.
Pull the chord to turn on the lamp and light up the room.
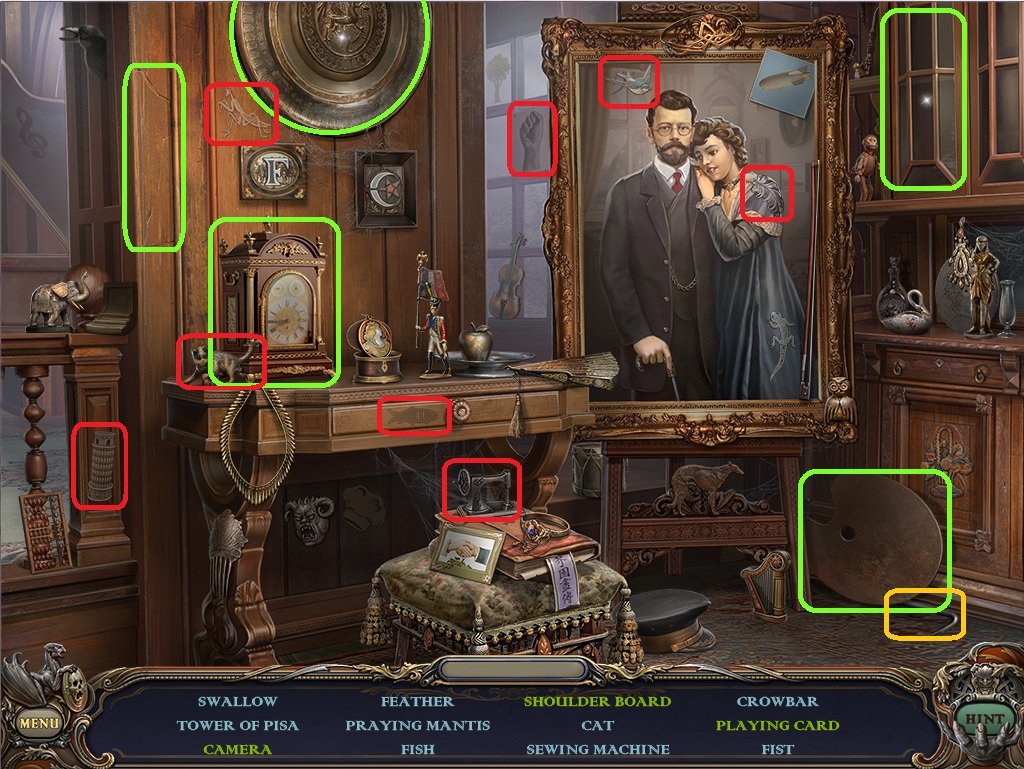
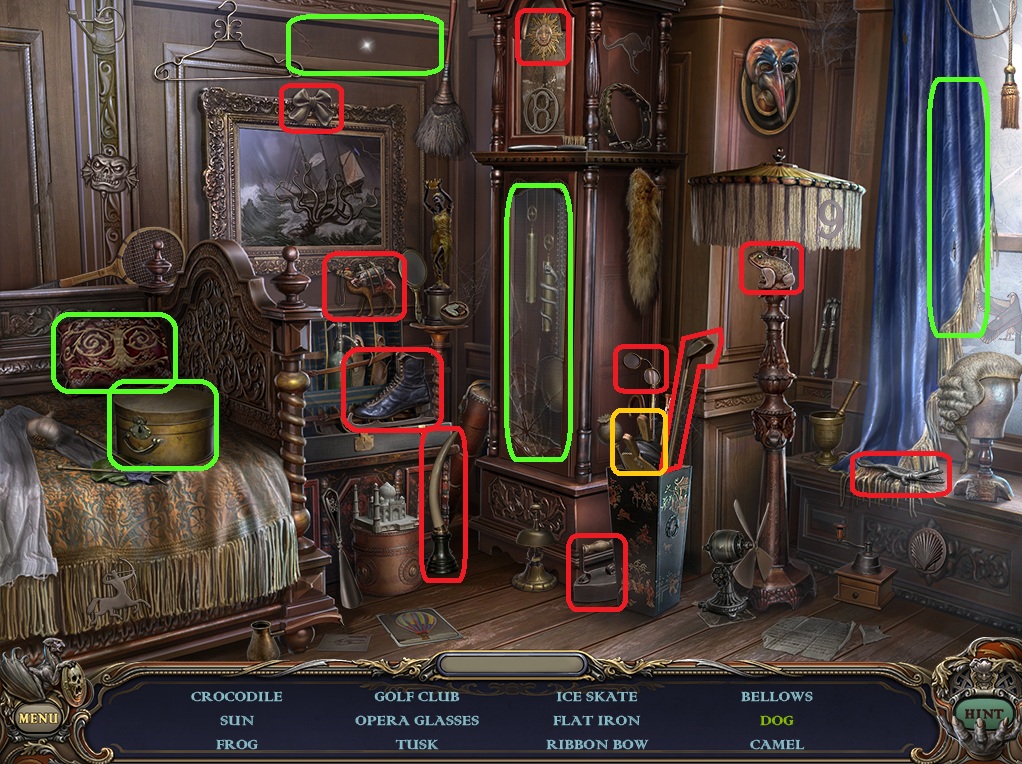
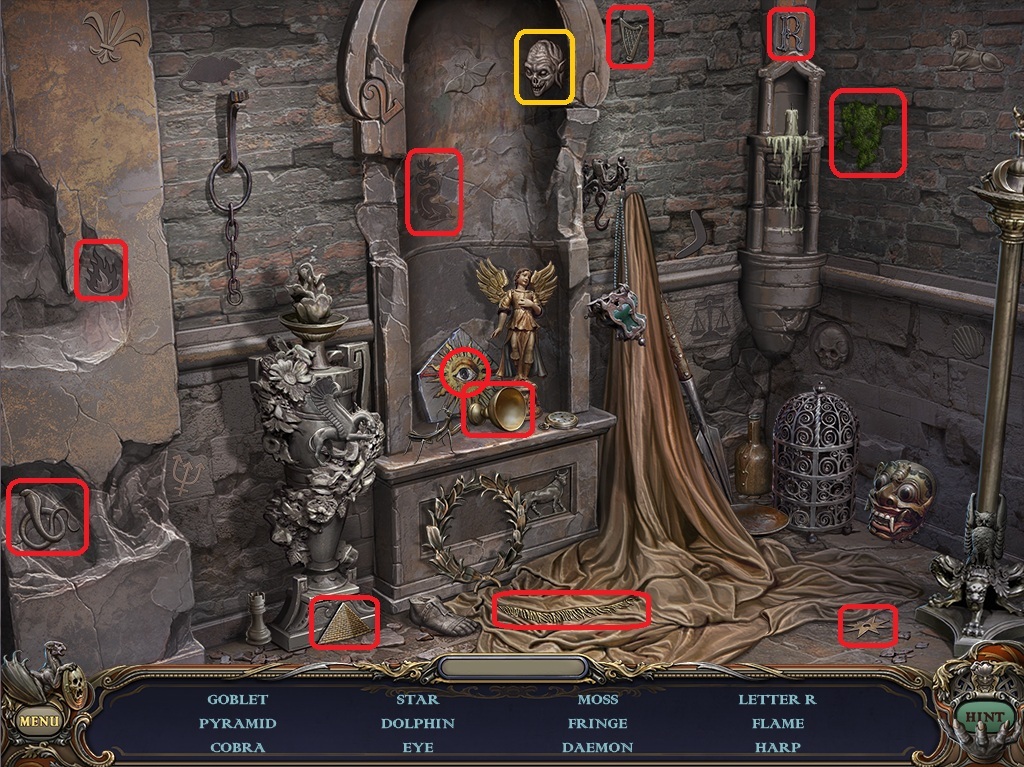
Click the portrait to start the hidden object scene.
Screenshot.
Once the hidden object scene is complete, you will receive a Crowbar.
Go back to the Mine Entrance.
Mine Entrance
Place the Board across the gap of the chasm.
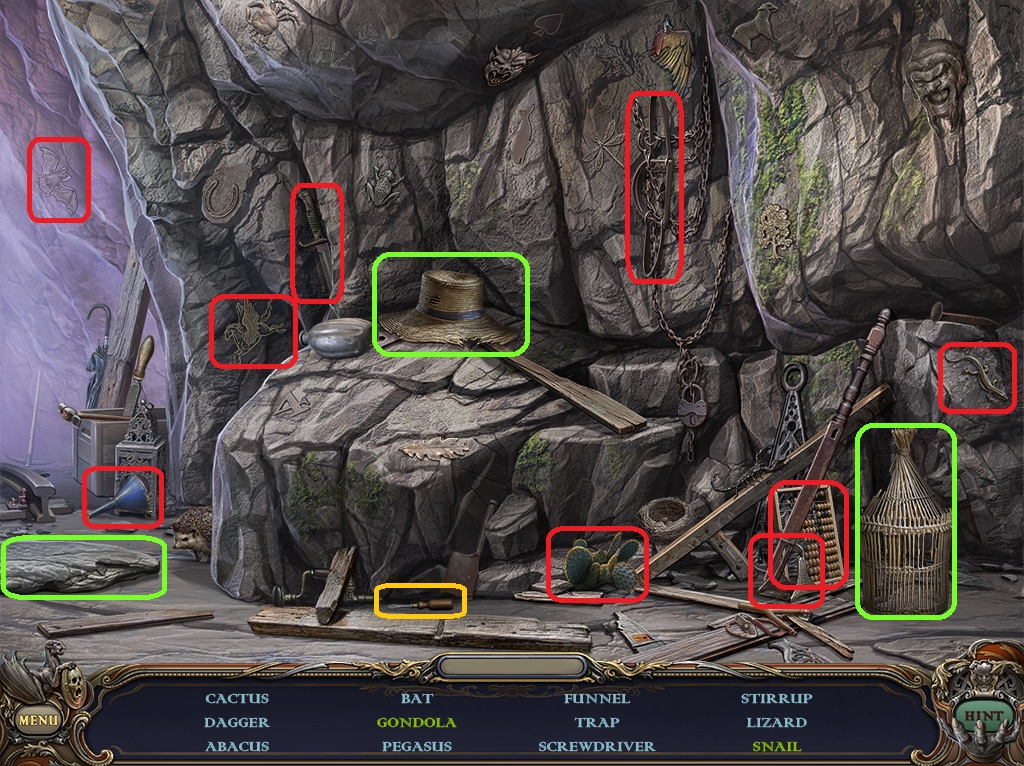
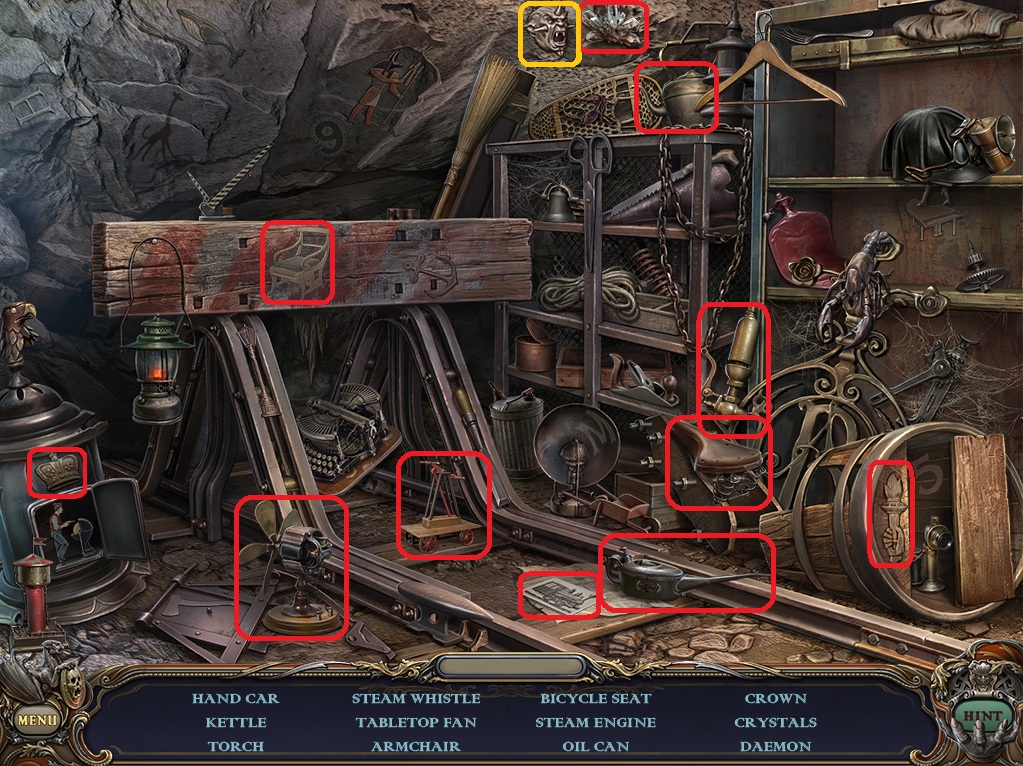
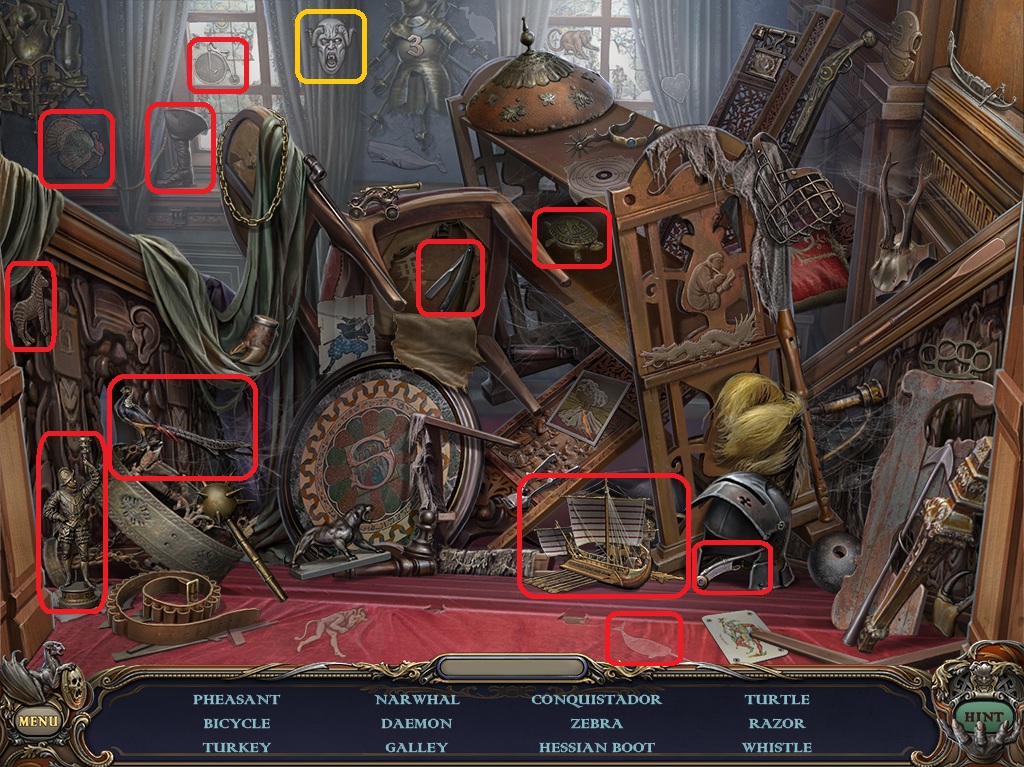
Click the large boulder on the right side of the mouth of the cave to start the hidden object scene.
Screenshot.
Once the hidden object scene is complete, you will receive a Screwdriver.
Click the postman to speak with him.
Read the newspaper on the ground beside the corpse.
Return to the Hallway.
Hallway
Click the bicycle to zoom in.
Use the Screwdriver on the pedal attached to the wheel, then click it to add the Handle to your inventory.
Return to the Music Room.
Music Room
Click the chair with the blue seat on the left side of the room to push it aside.
Click the corner of the rug the chair was covering to lift it up.
Use the Crowbar on the loose tile, then click the revealed space to zoom in.
Use the Handle on the floor mechanism, then click the handle to activate it.
Go through the open door to the Cabinet.
Cabinet
Read the diary on top of the nanny's lap.
Click the brown tube on the seat to the right of the corpse to open it, then take the Telescope inside.
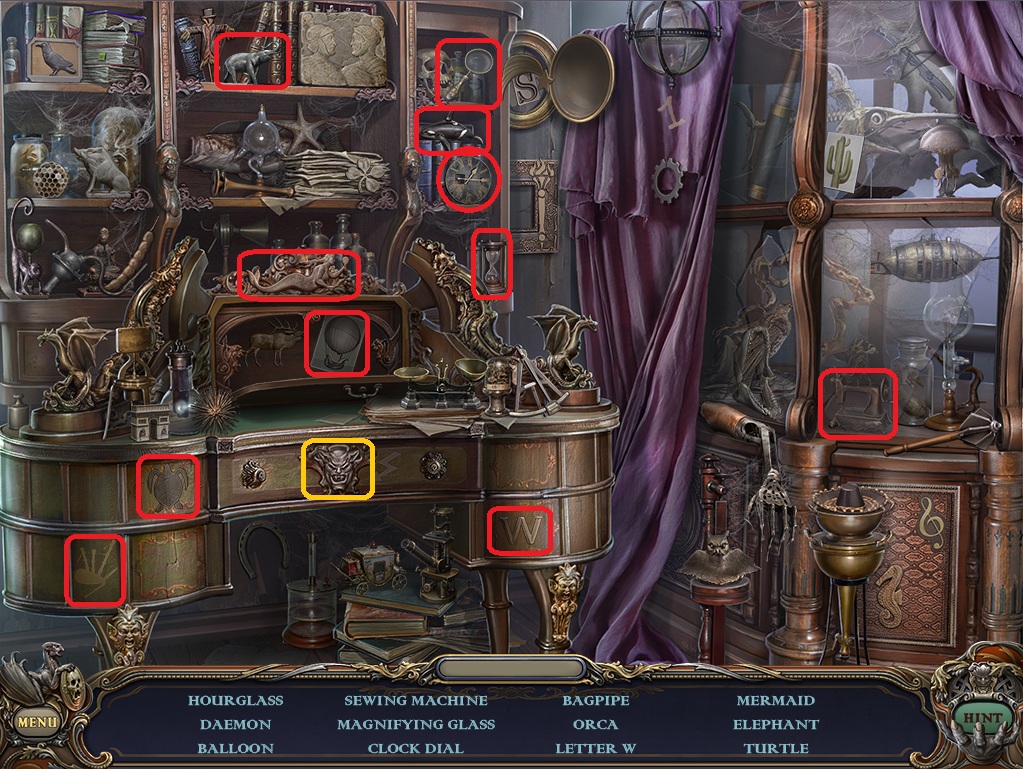
Click the chair and bookcase to the right of the table to start the hidden object scene.
Screenshot.
Once the hidden object scene is complete, you will receive a Conductor.
Go back to the Mine Entrance, then move forward into the Passageway.
Passageway
Click the fuse panel on top of the generator to open it, then click it again to zoom in.
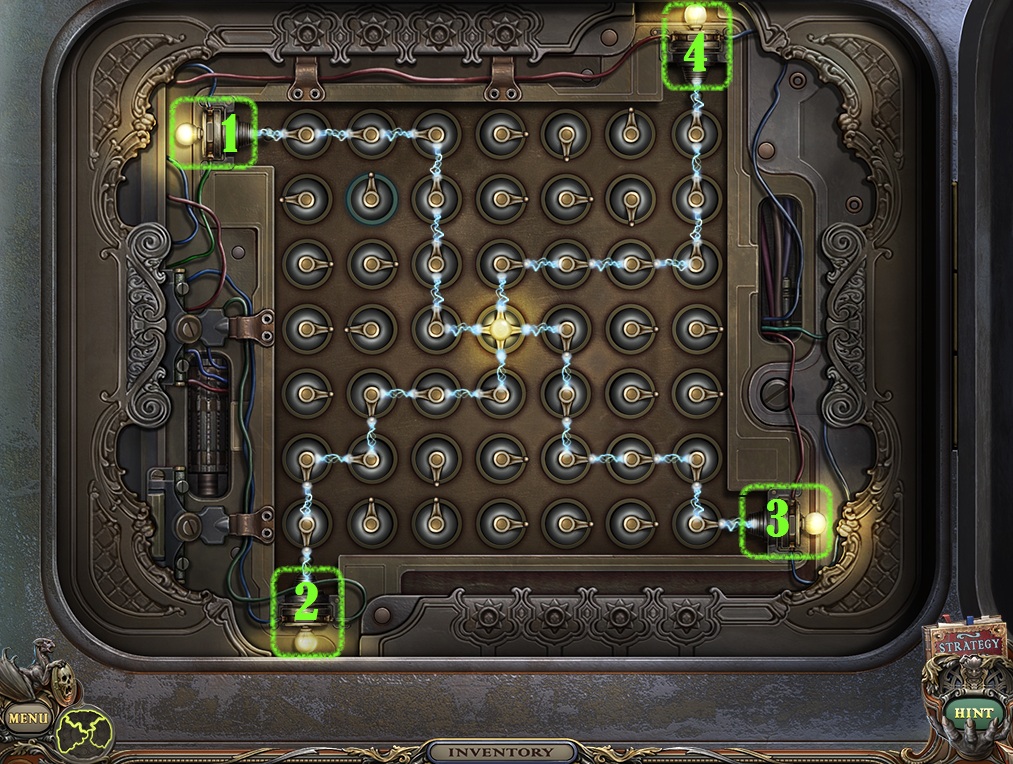
Add the Conductor to the space in the center of the panel to start the puzzle.
To solve this puzzle, turn the conductors to form a path of electricity to each of the four lights at the corners of the panel.
Click a conductor to select it; clicking a different conductor will rotate both conductors into the other's position.
For example, if you click a conductor that is pointing up and then click a different conductor that is pointing to the right, the first conductor will rotate to point to the right and the second conductor will now point up.
If you don't want the conductor to rotate, simply select a different conductor that is already pointing in the same direction.
Conductors must be pointing at the round center of an adjacent conductor to continue the path of electricity, meaning two conductors pointing at each other will not work.
Solution.
Take the Fresco Piece 4/4 beside the ripped papers attached to the wooden wall.
Click the Fresco Background in the toolbar beside your inventory for a closer look.
Add all four Fresco Pieces to the Fresco Background.
Go left to the Mine Junction.
Chapter 2
Mine Junction
Use the Blunt Axe on the grindstone in the lower left side of the cave.
Return to the Crypt underneath the Tree House Entrance.
Crypt
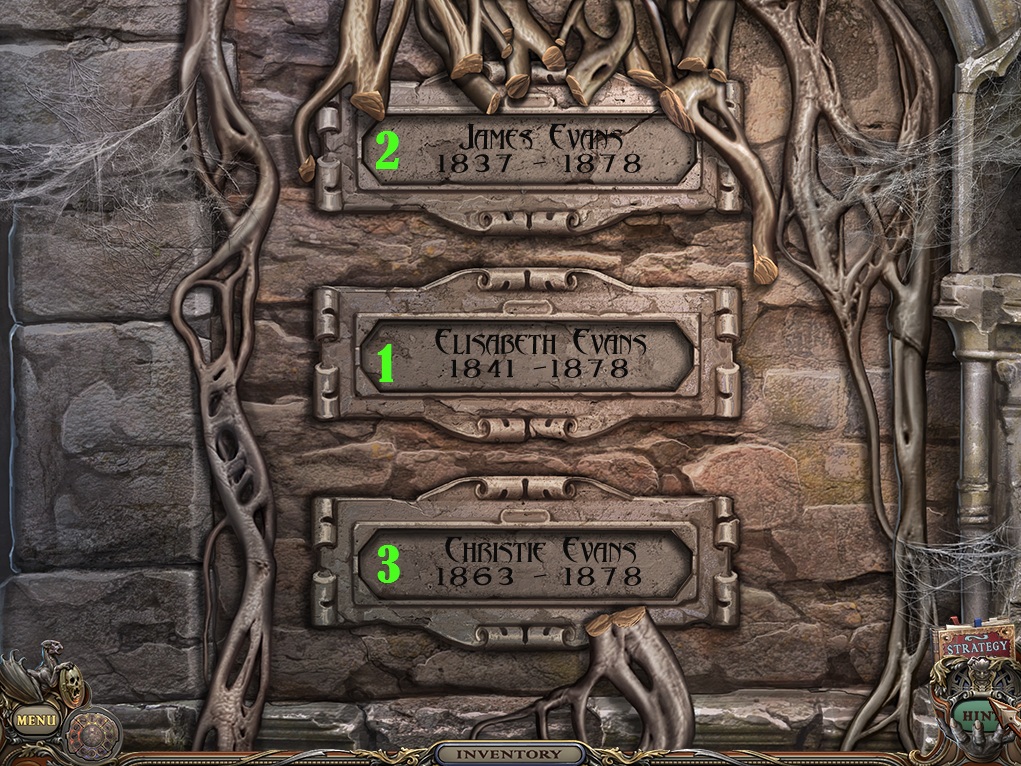
Click the plaques on the back wall covered in roots to the right of the gate to zoom in.
Use the Sharp Axe to cut through the roots.
Click the name plates in order of Mother->Father->Daughter.
Screenshot.
Go through the open gates into the Mausoleum.
Mausoleum
Click the left coffin to zoom in, then click it again to open the lid.
Click the scroll to read about the fresco ingredients.
Take the Sphere Disc above the scroll.
Take the Bird Foot (Ingredient 1/12) to the left of the scroll, then add it to the ingredient space in the Fresco.
Take the Sword Hilt off of the sword inside the coffin.
Go back to the full view of the Mausoleum, then click the right coffin for a closer look.
Open the coffin, then take the Ruby 1/2 in the middle socket of the bracelet.
Go back to the Hallway.
Hallway
Click the suit of armor to zoom in.
Add the Sword Hilt to the top of the incomplete sword in the knight's hand.
Take the Sceptre 1/4 from its open hand.
Return to the Cabinet.
Cabinet
Click the left door for a closer look.
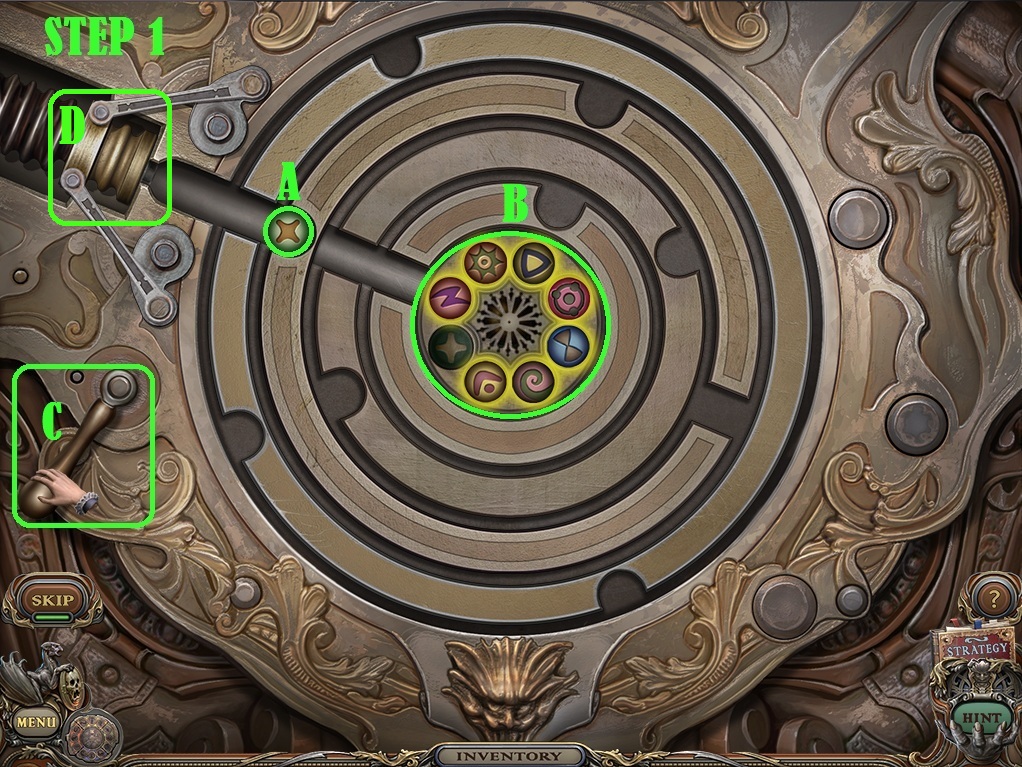
Place the Sphere Disc into the space at the center of the door to start the puzzle.
To solve this puzzle, place all of the spheres into the spaces with the matching symbol inside the disc at the center.
Click any of the four outer discs to rotate them clockwise.
Align one of the spheres (A) with the suction mechanism (D).
Click the lever (C) to pull the sphere to the suction mechanism.
When the lever is pulled, the center disc (B) will rotate once clockwise.
Screenshot.
Now that the center disc is rotated, click the outer discs to create a clear path for the sphere (A).
Click the lever (B) again to shoot the sphere into the matching space inside the center disc.
Screenshot.
Repeat the process until every sphere is in the correct space in the center disc.
Go through the open door to the Lower Stairs.
Lower Stairs
Take the Tumbler Lock on the floor underneath the green sofa.
Go back to the Parlor.
Parlor
Click the bear head mounted on the wall to zoom in.
Add the Tumbler Lock to the holes in the bear's nose.
Go back to the main view of the Parlor room, then click the portrait to repeat the hidden object scene.
Screenshot.
Once the hidden object scene is complete, you will receive an Urn Pedal.
Go forward to the Music Room.
Music Room
Use the Urn Pedal on the urn on the floor between the piano and the end table.
Click the pedal to open the urn and take the Scissors inside.
Go back to the Parlor.
Parlor
Use the Scissors on the pillow on top of the chair.
Click the ripped pillow to read the note with the code 3-9.
Click the bear head to zoom in.
Enter in the first two numbers from the code 3 and 9, then cycle through the last number on the right to find the complete combination.
Screenshot.
Take the Dragon Heart from the revealed wall cache.
Return to the Lower Stairs, then go up to the Upper Stairs.
Upper Stairs
Click the sceptre on top of the stairs.
Use the Scissors to cut the cord connected from the banister to the drape.
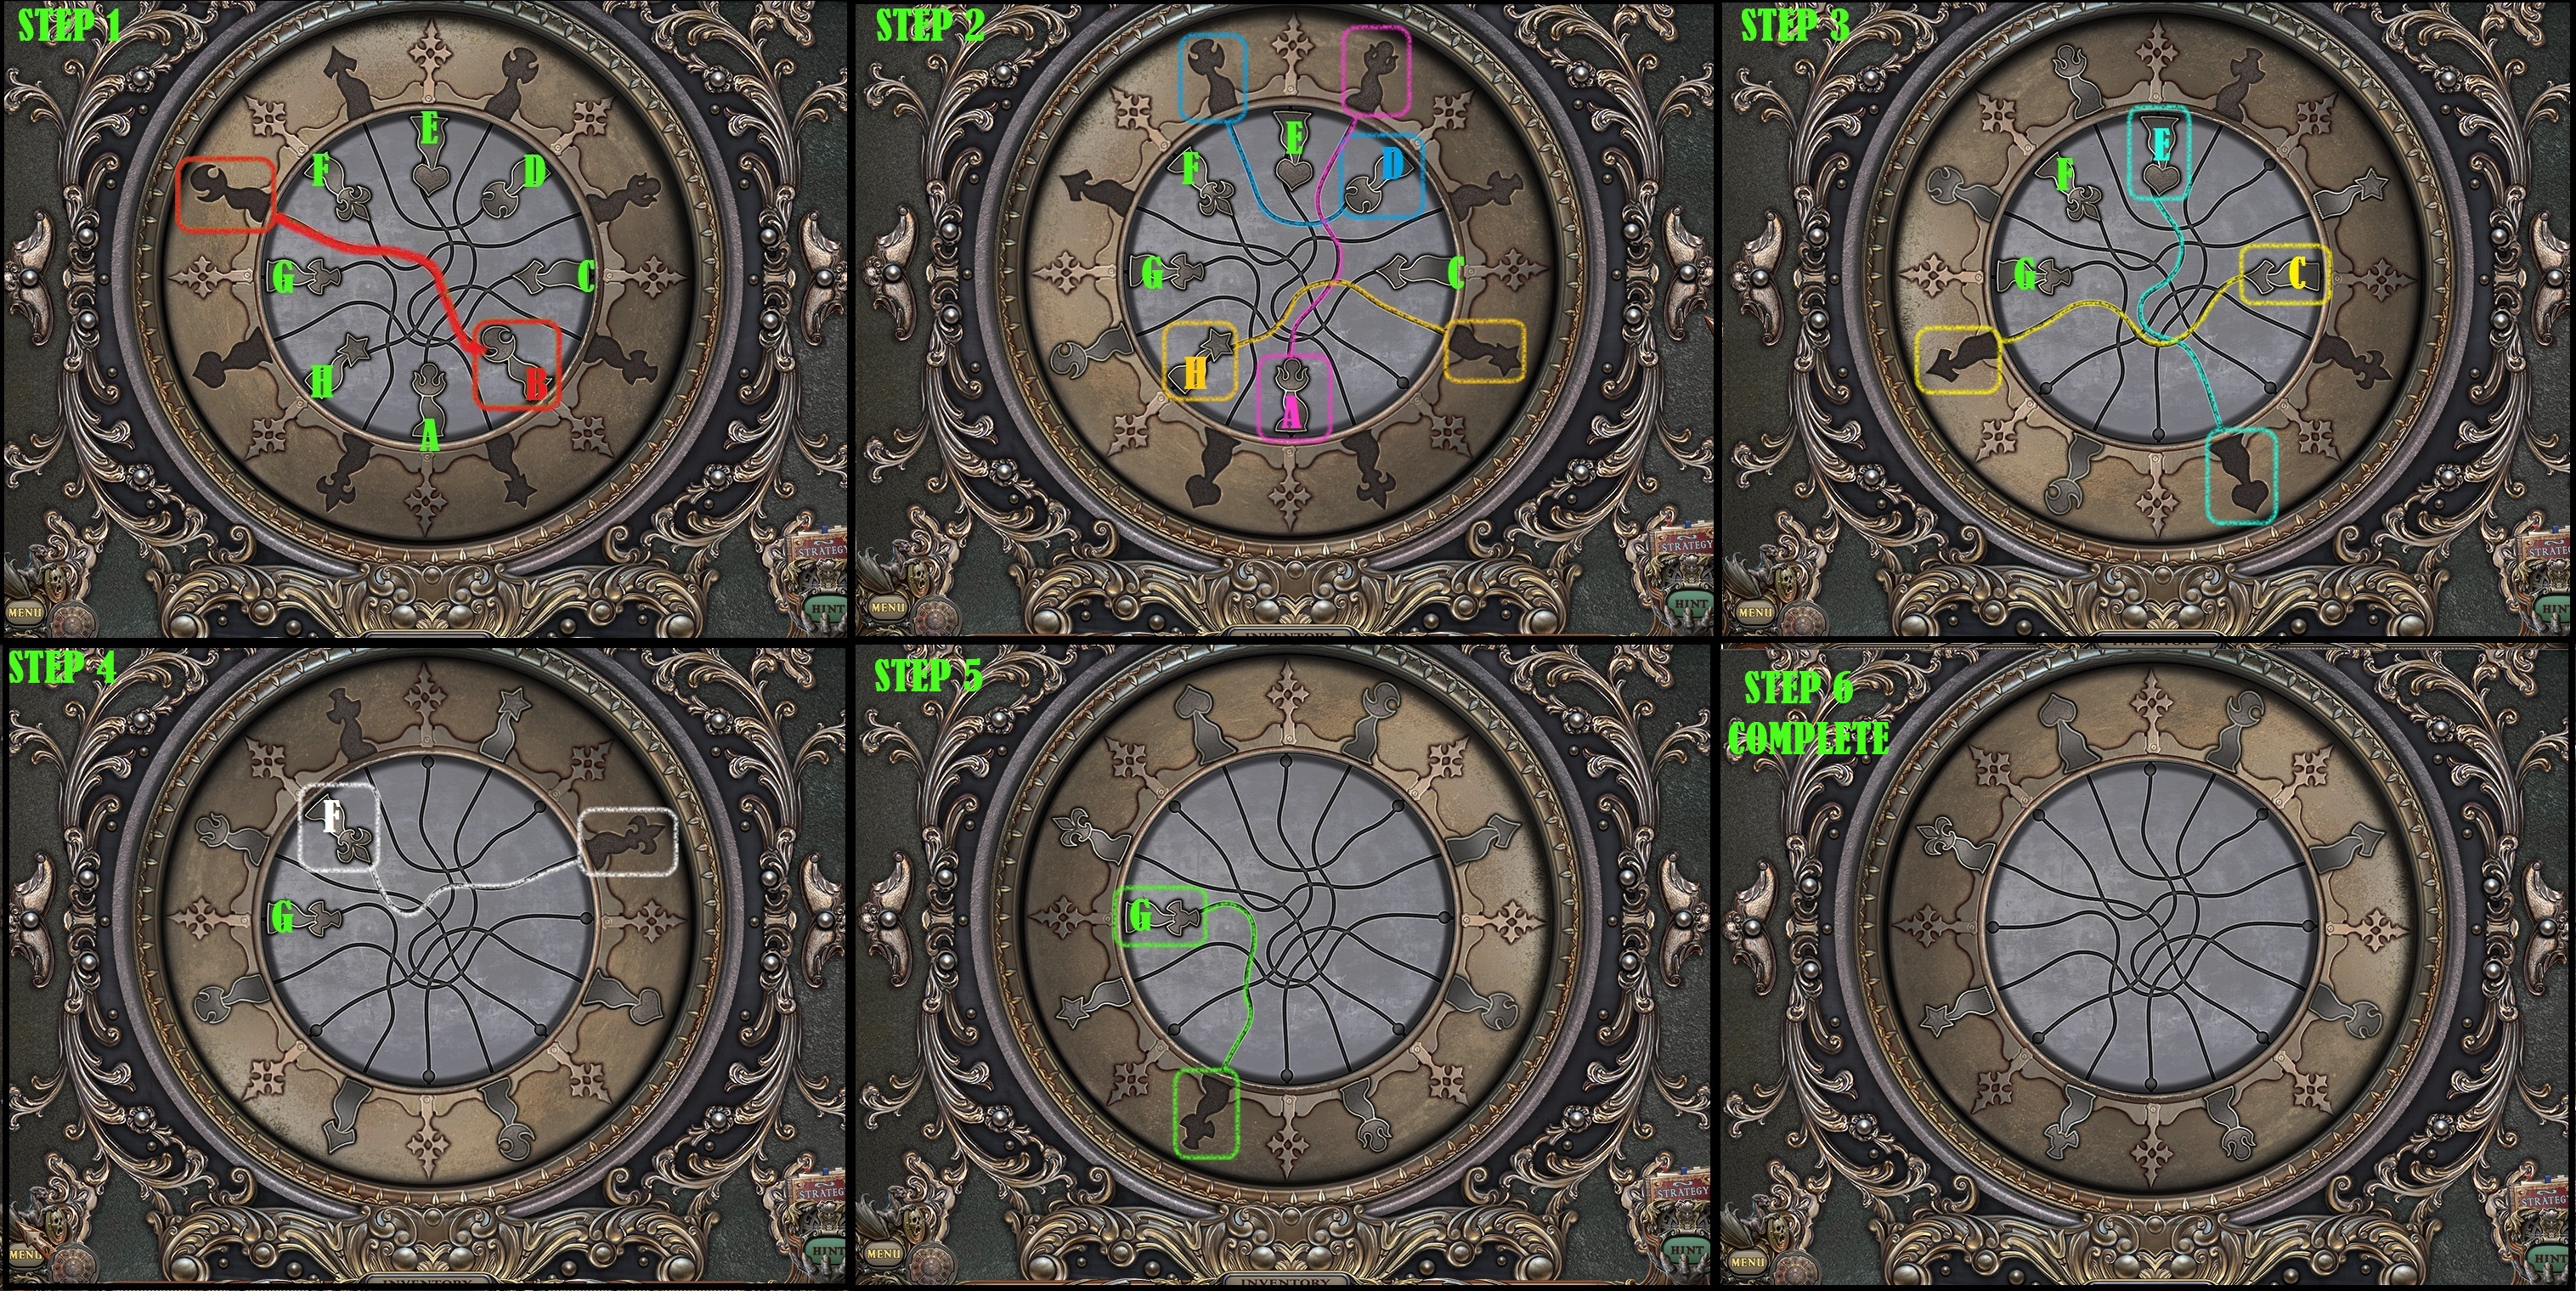
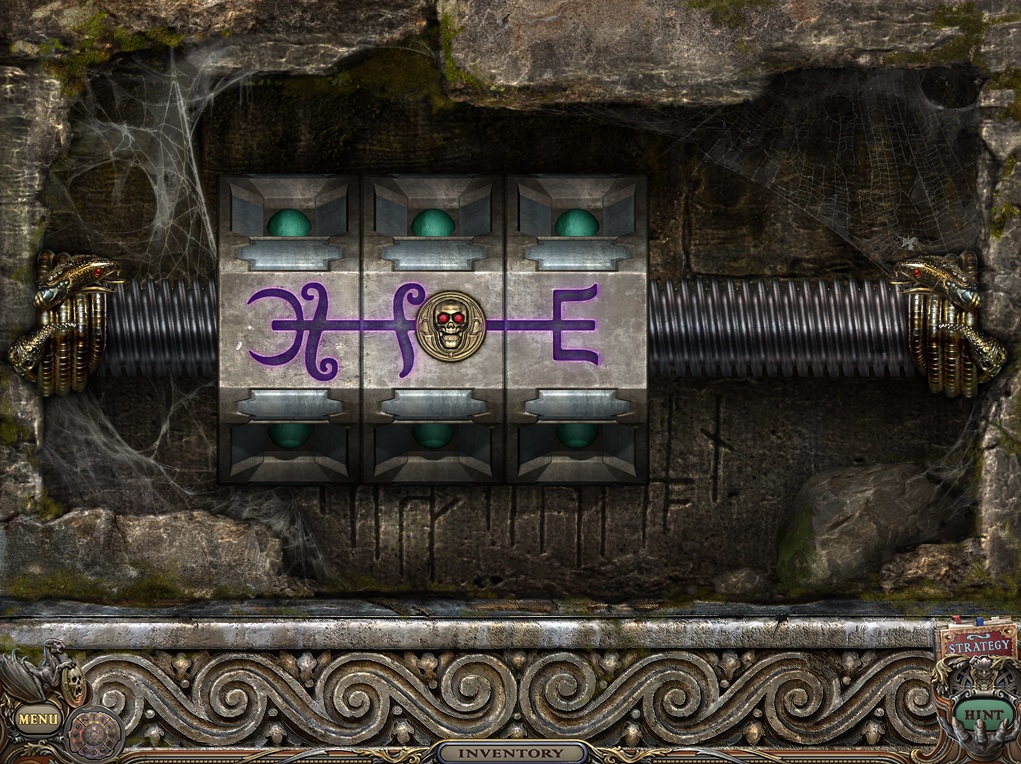
Click the gargoyle holding up the chandelier to start the puzzle.
To solve this puzzle, place each of the symbols into their matching space around the ring.
Clicking a symbol will cause it to move to the end of its track.
If the space at the end of the track matches, it will fit in place; if the space is incorrect, the symbol will return to the start of the track.
Clicking the ring will rotate it counter-clockwise.
Click symbol B to set it in place.
Click the ring once to rotate it.
Click symbol A to set it in place.
Click symbol D to set it in place.
Click symbol H to set it in place.
Click the ring once to rotate it.
Click symbol C to set it in place.
Click symbol E to set it in place.
Click the ring once to rotate it.
Click Symbol F to set it in place.
Click the ring three times to rotate it.
Click Symbol G to set it in place.
Solution.
Take the Sceptre 2/4 inside the chandelier.
Go through the open door to the 2nd Floor Hallway.
2nd Floor Hallway
Click the large clock in the left corner at the end of the hall for a closer look.
Click the plate to the left of the rotating gear to start the puzzle.
To solve this puzzle, arrange the gears so that no two touching gears in each section are rotating in the same direction.
Click a gear to change its rotation between clockwise and counter-clockwise.
After each section has been correctly set, the plate revealing the next section will drop.
Solution.
Once the puzzle is solved, go through the open door into the Nursery.
Nursery
Click Stella on the wheelchair.
Click the wheelchair to move it aside, then click the round rug to reveal the Brush.
Click the paper on the bed to view the drawing.
Go back out to the 2nd Floor Hallway.
2nd Floor Hallway
Click the painting hanging above the step ladder to zoom in.
Use the Brush to remove the cobwebs, then take the revealed Puzzle Chest Key.
Go back to the Upper Stairs.
Upper Stairs
Click the pile of junk on the left stairway to start the hidden object scene.
Screenshot.
Once the hidden object scene is complete, you will receive a Spear.
Return to the 2nd Floor Hallway.
2nd Floor Hallway
Use the Spear on the knight figurine on the upper left pedestal.
Go through the open door on the right to the Parents' Bedroom.
Parents' Bedroom
Click the book on the table in the lower left corner to zoom in.
Take the Ruby 2/2 below the glasses on top of the table.
Click the large green chest to start the puzzle.
To solve this puzzle, click the tiles to rotate them, then click the tab at the top to send them to the middle.
If correctly positioned, the tile will lock in place; if incorrectly rotated, the tile will revert to the corner of the board.
Click Tile A once.
Click Tile B once.
Click Tile C twice.
Click Tile D three times.
Click the tab (F) to send the tiles to the center.
Solution.
Use the Puzzle Chest Key on the lock in the center of the chest's puzzle mechanism, then click the key to open the lock.
Click the chest lid to open it and take the Arrow and Snake Catcher Stick inside.
Go back to the Woods.
Woods
Click the obelisk in the middle of the area to zoom in.
Use the Snake Catcher Stick on the Snake (Ingredient 2/12) to add it to your inventory.
Add the Snake to the ingredient space in the Fresco.
Continue forward to the Tree House Entrance.
Tree House Entrance
Use the Brush on the cobwebs to the right of the manhole.
Take the revealed Rapier 1/4 on the ground.
Go down into the Crypt and then forward to the Mausoleum.
Mausoleum
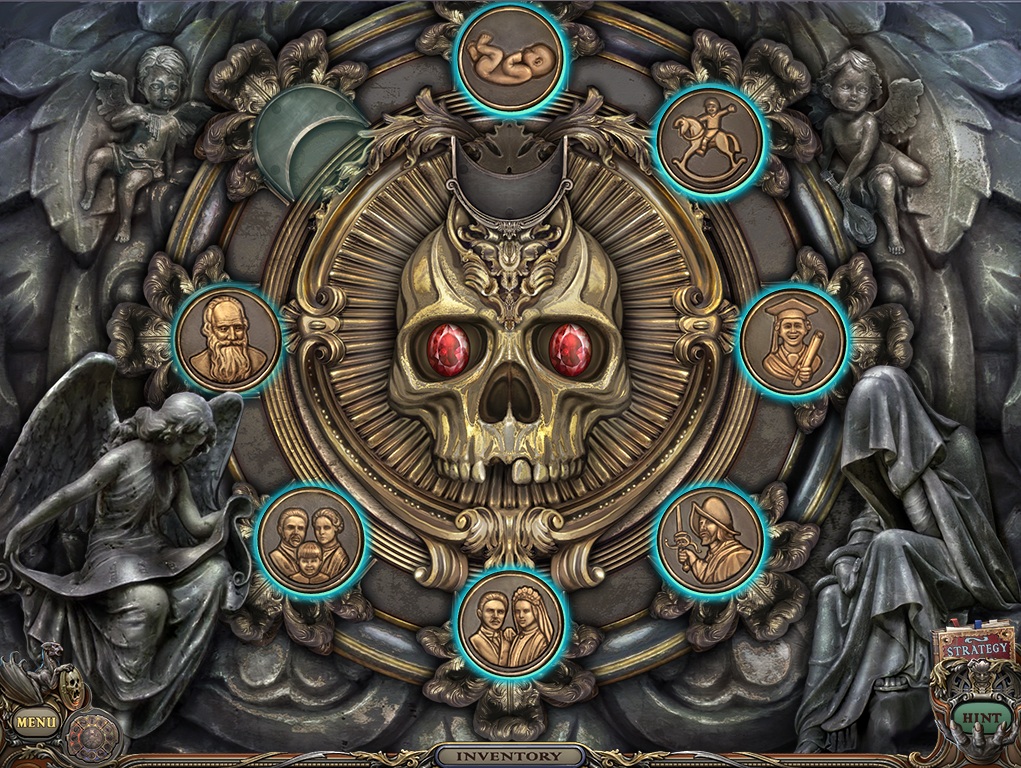
Click the center coffin, then click the lower skull for a closer look.
Add the two Rubies to the skull's eyes to start the puzzle.
To solve this puzzle, arrange the tokens clockwise to show the progress of the man's life from infancy to old age.
Click the area just outside the token towards the center to rotate the skull in that direction.
Then, click the selected token to place it inside the slot at the top of the skull.
Click an empty space to rotate the skull again, then click the token inside the skull to place it inside the empty space.
Continue this process until all tokens are placed in chronological order clockwise, starting with birth at 12 o' clock.
Solution.
Once the puzzle is solved, take the revealed Clown Head, Mask Eye, and Crypt Signet ring inside the coffin.
Click the right coffin to look inside.
Use the Scissors on the branch to cut off a piece of Mistletoe (Ingredient 3/12).
Add the Mistletoe to the ingredient space on the Fresco.
Return to the Cabinet.
Cabinet
Click the mask mounted on the wall between the bookcase and the fireplace to zoom in.
Use the Mask Eye to the space at the mask's forehead.
Take the Dragon Hook from the revealed cache behind the mask.
Go back to the Music Room.
Music Room
Click the dragon statue between the miniature columns for a closer look.
Place the Dragon Heart into the space in the middle of the dragon's chest.
Add the Dragon Hook to the bottom of the chain hanging from the dragon's mouth.
Click the dragon's head to lift the panel, revealing a compartment with the Rapier 2/4 inside.
Return to the Nursery.
Nursery
Click the pile of dolls on the floor at the left side of the room to zoom in.
Add the Clown Head to the headless doll in the center to start the puzzle.
To solve this puzzle, click the dolls' eyes so that all of them are open and showing the pupil.
Clicking one doll's eye will also affect another doll's eye.
Click doll B's left eye.
Click doll C's left eye.
Click doll A's right eye.
Click doll C's left eye.
Solution.
Take the Lantern Key from the clown's mouth.
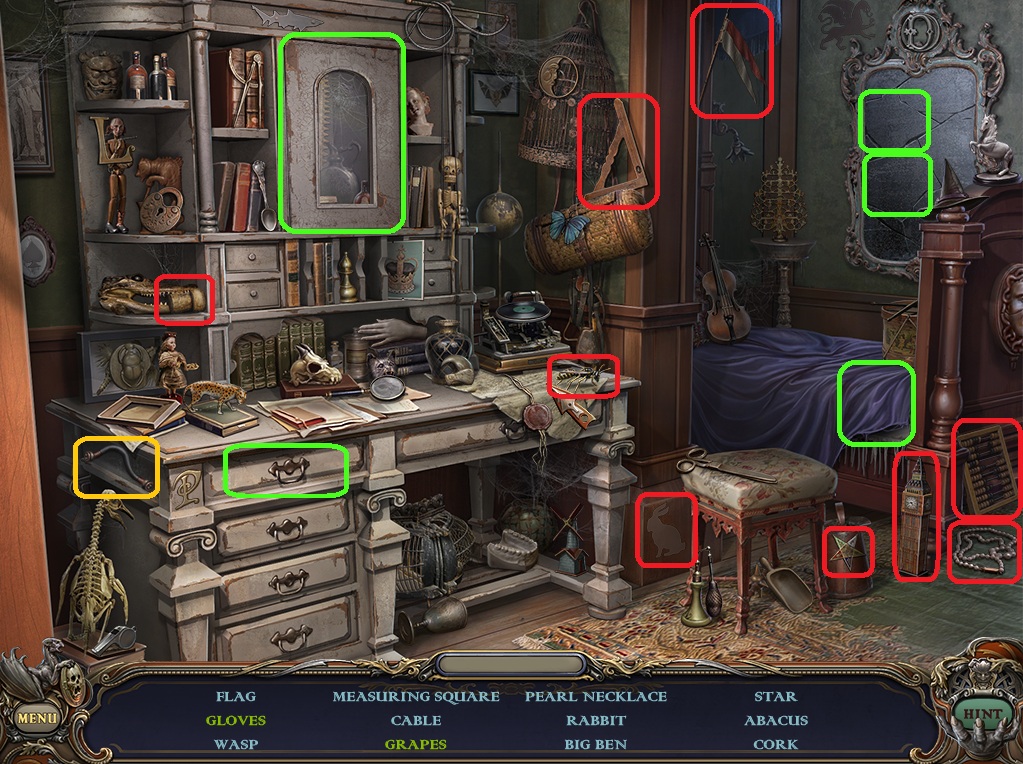
Click the desk to start the hidden object scene.
Screenshot.
Once the hidden object scene is complete, you will receive a Cable.
Exit to the 2nd Floor Hallway and then go right into the Parents' Bedroom.
Parents' Bedroom
Click the book on the small table to zoom in.
Use the Crypt Signet on the lock on the book cover.
Click the signet to open the book, then click the pages to find the Key Part 1/3.
Go back to the Mine Entrance.
Mine Entrance
Click the lantern hanging on the rock wall above the steps for a closer look.
Use the Lantern Key on the side of the lantern, then click the key to turn it.
Take the Reflector inside the open lantern.
Go back to the Yard.
Yard
Place the Reflector into the slot on the right side of the rock.
Take the Antitoxin sticking out of the back of the rock.
Take the Cobble in the ring of the leaves.
Click the leaves to reveal the centipede, then click the centipede and watch which leaf it hides under next.
Use the Cobble on that leaf, then take the smashed Centipede Ingredient 4/12.
Place the Centipede in the ingredient space on the Fresco.
Return to the Mine Junction.
Mine Junction
Screenshot.
Place the Cable into the gap (A) in the cord between the switch and the cable hanging on the rock wall under the mine cart.
Click the switch (B) to turn on the spotlight.
Click the circular area of the track (C) on the floor in the center of the room to start the puzzle.
To solve this puzzle, rotate the rings to connect the four tracks, creating a path from right to left
Clicking ring 1 also rotates ring 3.
Clicking ring 2 also rotates ring 5.
Clicking ring 3 also rotates ring 6.
Clicking ring 4 also rotates ring 2.
Clicking ring 5 also rotates ring 1.
Clicking ring 6 also rotates ring 4.
Solution.
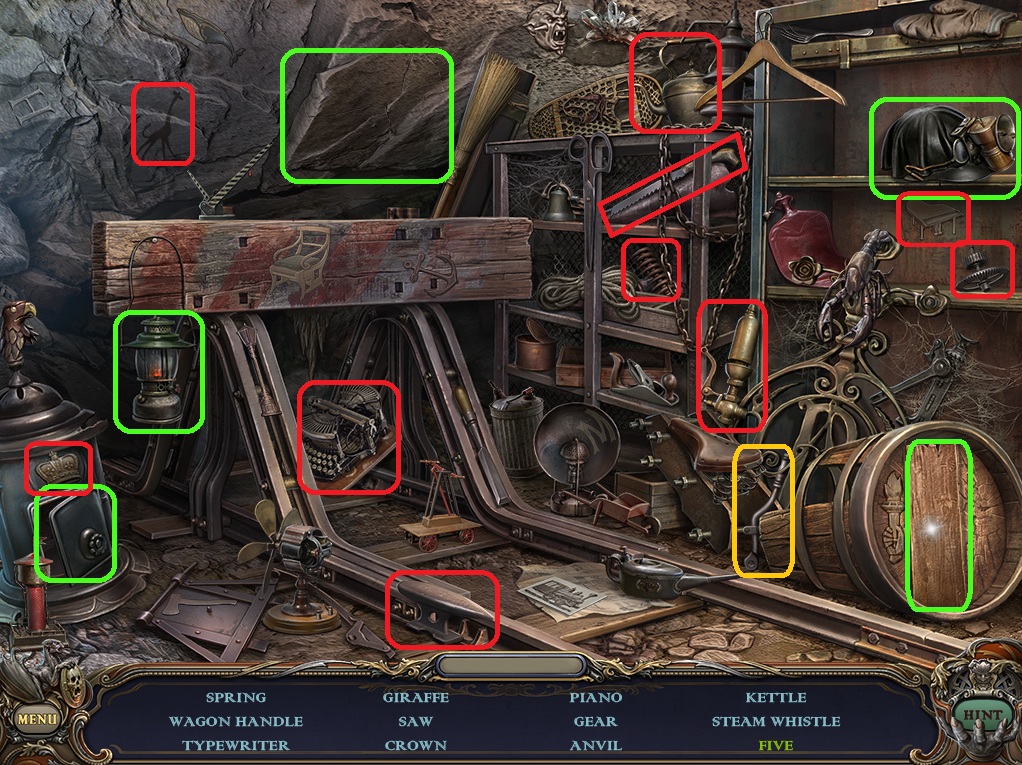
Click the end of the right track (D) to start the hidden object scene.
Screenshot.
Once the hidden object scene is complete, you will receive the Wagon Handle.
Add the Wagon Handle to the Mine Cart (E), then click the handle to send the cart down the track.
Take the Pickaxe (F) after the wall breaks and it falls to the ceiling to the floor.
Go through the broken wall to Stella's Hall.
Chapter 3
Stella's Hall
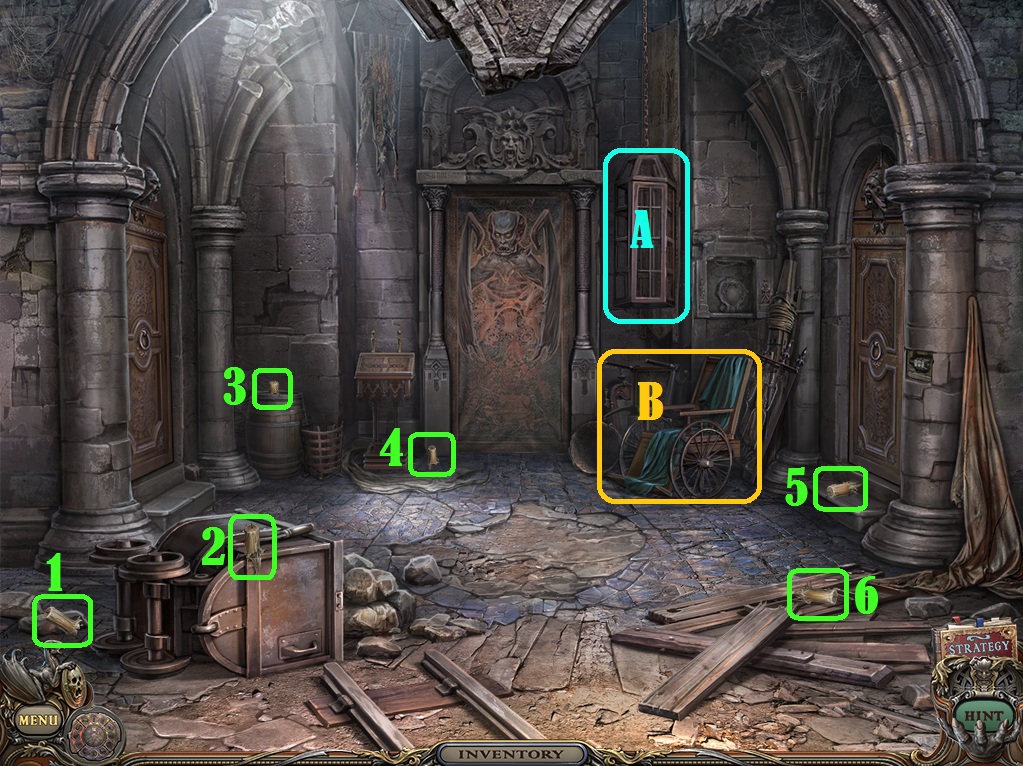
Screenshot.
Take the six Candles around the room.
Click the cage (A) hanging from the ceiling.
Place all 6 Candles at the bottom of the cage.
Light the candles with the Lighter.
Click the wheelchair (B) to start the hidden object scene.
Screenshot.
Once the hidden object scene is complete, you will receive an Eyepiece.
Go back to the Tree House.
Tree House
Stick the statue head on the ground to zoom in.
Use the Pickaxe on the object stuck inside the statue's hair.
Take the revealed Goblet.
Return to the 2nd Floor Hallway and then go right to the Balcony.
Balcony
Use the Lighter on the lamp hanging over the railing.
Place the Telescope on top of the tripod.
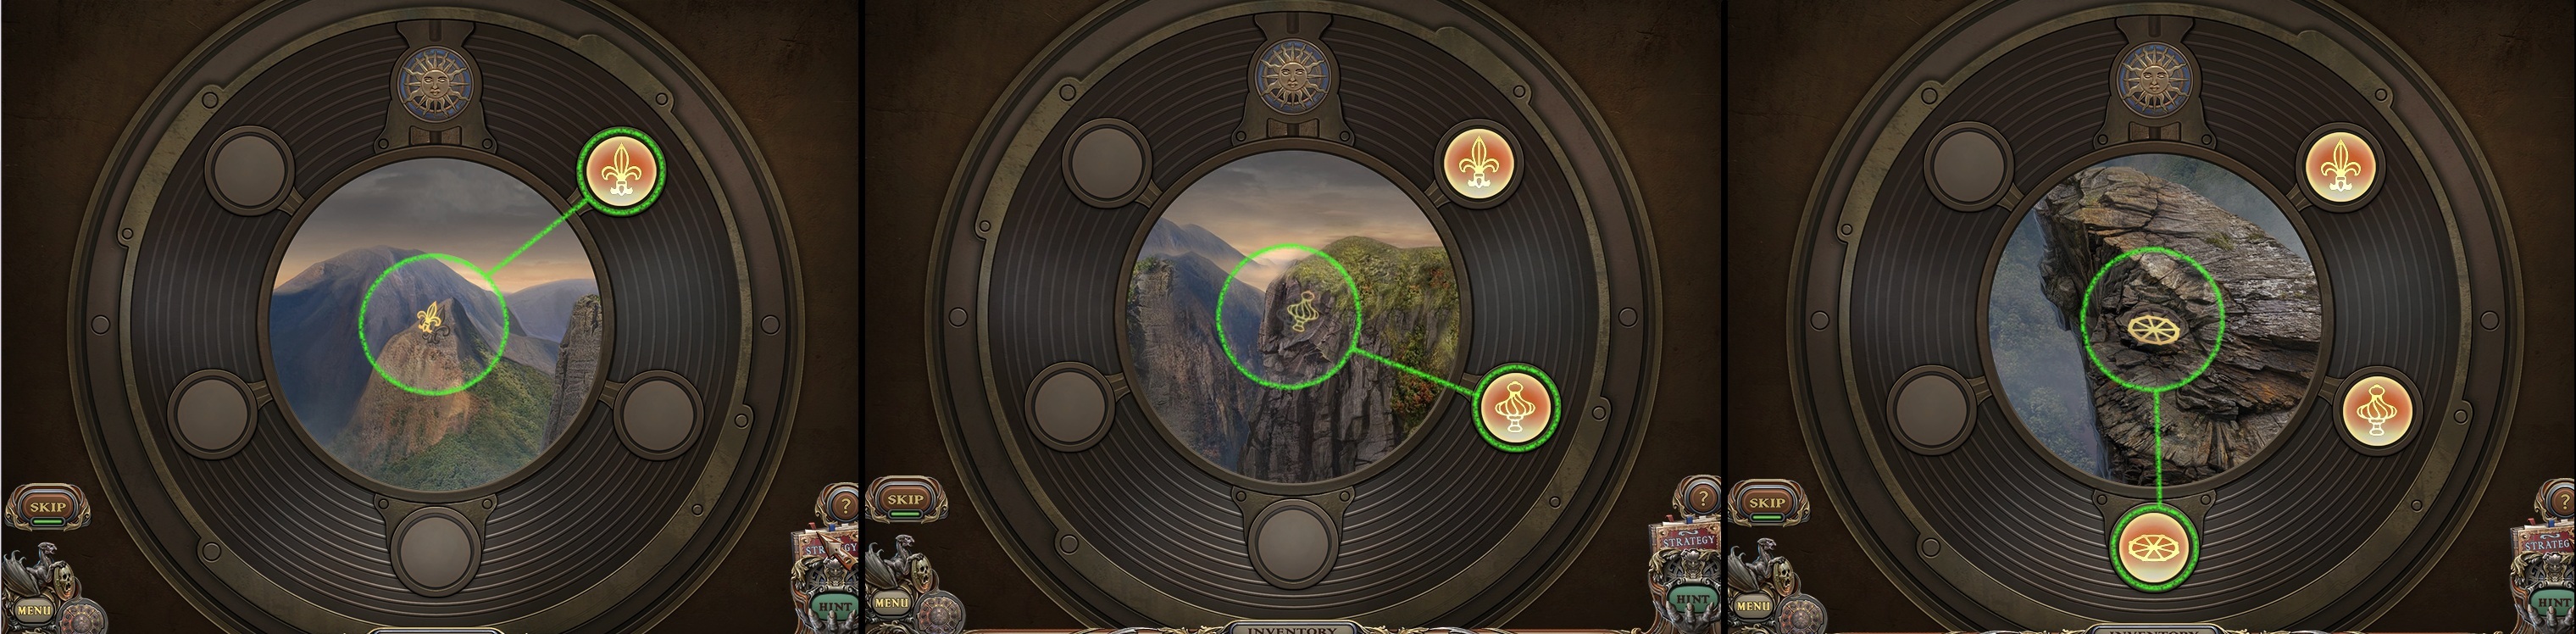
Add the Eyepiece to the telescope, then click the completed telescope to start the puzzle.
To solve this puzzle, find all of the symbols hidden around the landscape.
Click an area to move the scope in that direction.
When the focus of the scope passes near a symbol, the ring around the lens will start to glow orange.
The brighter the ring glows, the closer you are to finding its corresponding symbol.
When you find a symbol, click it to add it to the ring.
Solution Part 1.
Solution Part 2.
Once the puzzle is solved, take the Sun Key at the top of lens.
Go back to the Lower Stairs.
Lower Stairs
Use the Pickaxe on the cracked tile to the right of the red carpet on the floor.
Take the Medusa Fragment from the hole in the ground.
Click the door under the stairs for a closer look.
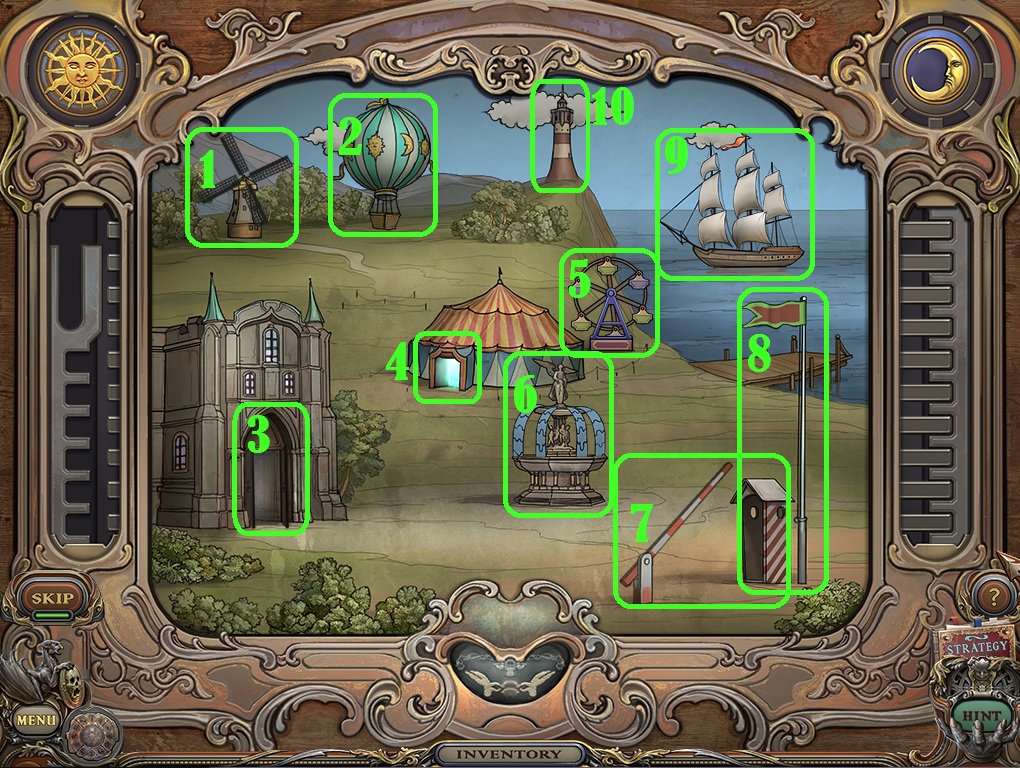
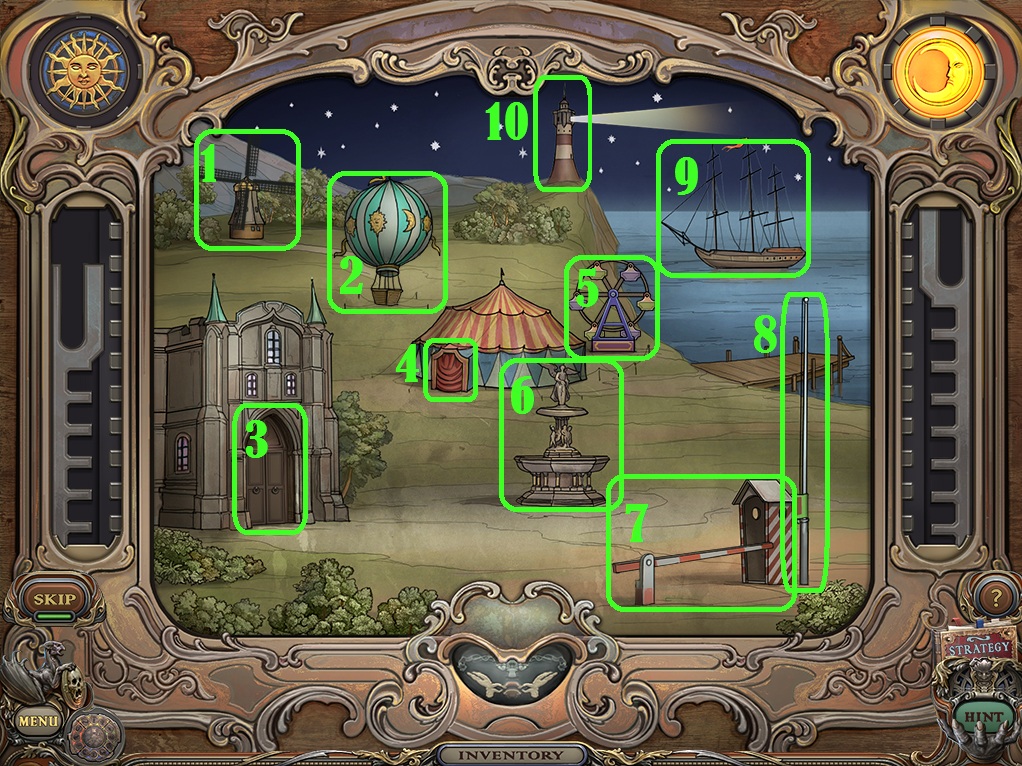
Place the Sun Key in the space at the upper left corner of the board to start the puzle.
To solve this puzzle, arrange all of the items in the picture so that they are appropriate for day and then for night.
During the day:
The windmill (1) should be turning.
The balloon (2) should be floating in the air.
The cathedral door (3) should be open.
The circus entrance (4) should be open.
The ferris wheel (5) should be rotating.
The fountain (6) should have flowing water.
The gate (7) should be open.
The flag (8) should be raised.
The ship (9) should have full sails.
The light in the lighthouse (10) should be off.
Day Solution.
During the night:
The windmill (1) should not be turning.
The balloon (2) should be on the ground.
The cathedral door (3) should be closed.
The circus entrance (4) should be closed.
The ferris wheel (5) should not be rotating.
The fountain (6) should have no water.
The gate (7) should be closed.
The flag (8) should be lowered.
The ship (9) should have no sails sails.
The light in the lighthouse (10) should be on.
Night Solution.
Once the puzzle is solved, go through the open door under the stairs to the Basement Stairs.
Basement Stairs
Use the Lighter on the candle above the stairs.
Use the Brush on the cobweb on the wall.
Take the Rapier 3/4 on the wall.
Take the Sceptre 3/4 in the middle of the banister railing.
Continue down to the Basement.
Basement
Click the chair in the back of the room to start the hidden object scene.
Screenshot.
Once the hidden object scene is complete, you will receive a Glass Cutter.
Go back to the Nursery.
Nursery
Click the desk to repeat the hidden object scene.
Screenshot.
Once the hidden object scene is complete, you will receive a Scoop.
Use the Medusa Fragment on the relief at the foot of the bed.
Take the Valve from the revealed cache.
Exit the nursery and go right to the Balcony.
Balcony
Click the glass cage to zoom in.
Use the Glass Cutter to cut a hole in the lid, then click the lid to remove it.
Take the Toad (Ingredient 5/12), then place it in the matching space on the Fresco.
Use the Scoop on the dirt inside the urn.
Take the revealed Root (Ingredient 6/12), then place it in the matching space on the Fresco.
Go back to the Cabinet.
Cabinet
Click the chair behind the table to repeat the hidden object scene.
Screenshot.
Once the hidden object scene is complete, you will receive a Rapier 4/4.
Click the shield mounted on the wall above the fireplace for a closer look.
Place the four Rapiers into the corners of the shield.
Take the revealed Key Part 2/3 inside the open globe on the desk.
Return to the Basement.
Basement
Click the chair in the back of the room to repeat the hidden object scene.
Screenshot.
Once the hidden object scene is complete, you will receive a Oil Can.
Leave the mansion and go back to the Crypt.
Crypt
Click the left door to zoom in.
Use the Oil Can on the rusted hinges at the top of the skull-engraved plate.
Place the Antitoxin in the skull plate to neutralize the poison gas.
Click the handle to open the door, then go through the open door to the Laboratory.
Laboratory
Click the monster to speak with the father.
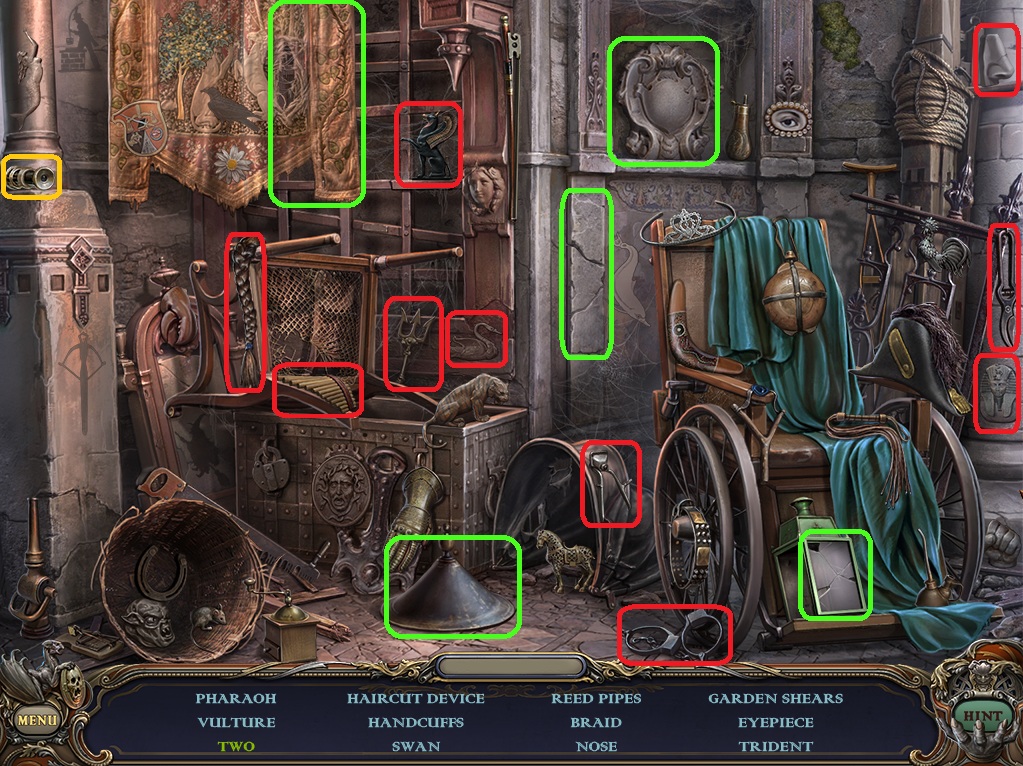
Go back to the full view of the room, then click the purple drapes beside the window to start the hidden object scene.
Screenshot.
Once the hidden object scene is complete, you will receive a Key Part 3/3.
Click the chemistry set on the table to zoom in.
Use the Lighter on the burner on the table.
Click the tap at the bottom of the green beaker, then take the filled vial of Acid.
Return to the Upper Stairs.
Upper Stairs
Click the left door for a closer look.
Add all three Key Parts to the relief in the center of the door to start the puzzle.
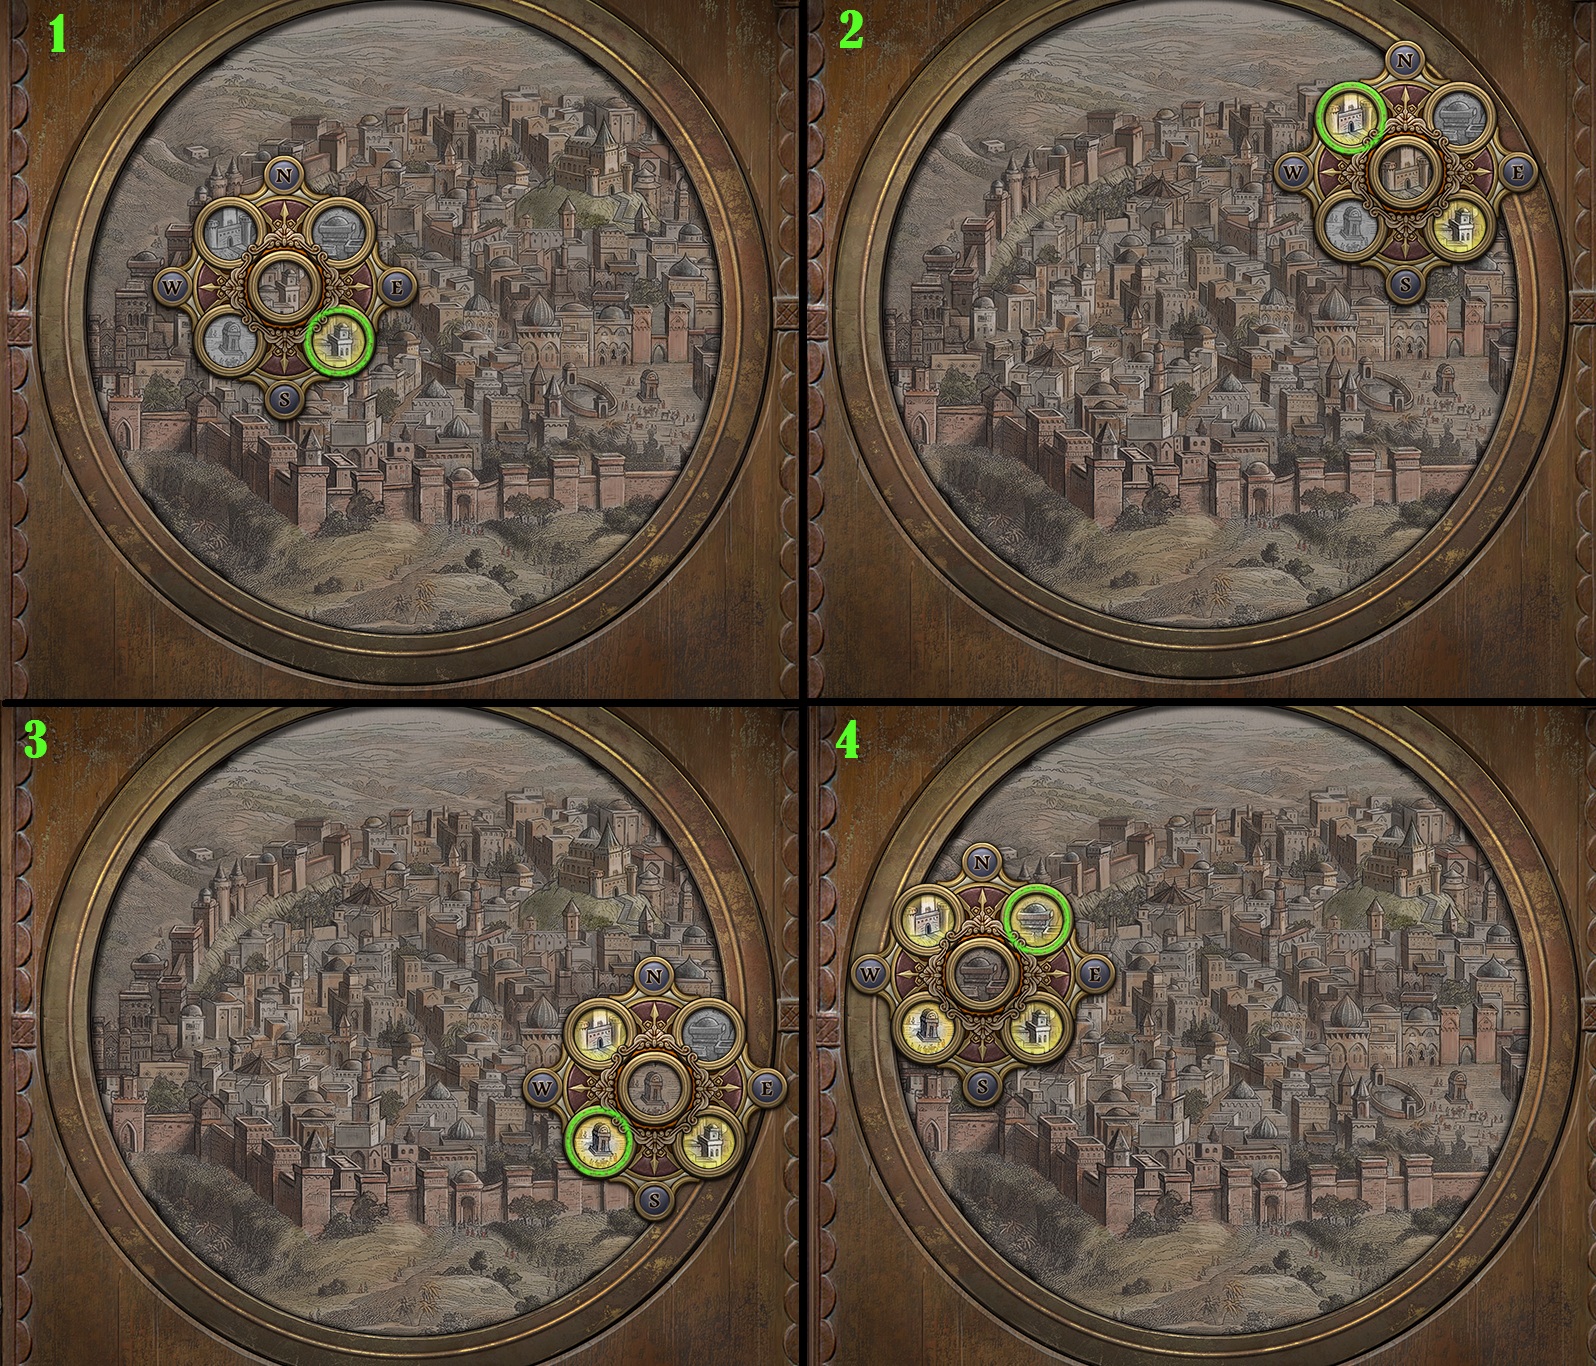
To solve this puzzle, find the four images on the compass in the larger picture on the door.
Click and drag the compass to move it around the picture.
Align the circular gap at the center of the compass on each image to highlight it on the compass.
Solution.
Go through the open door into the Library.
Library
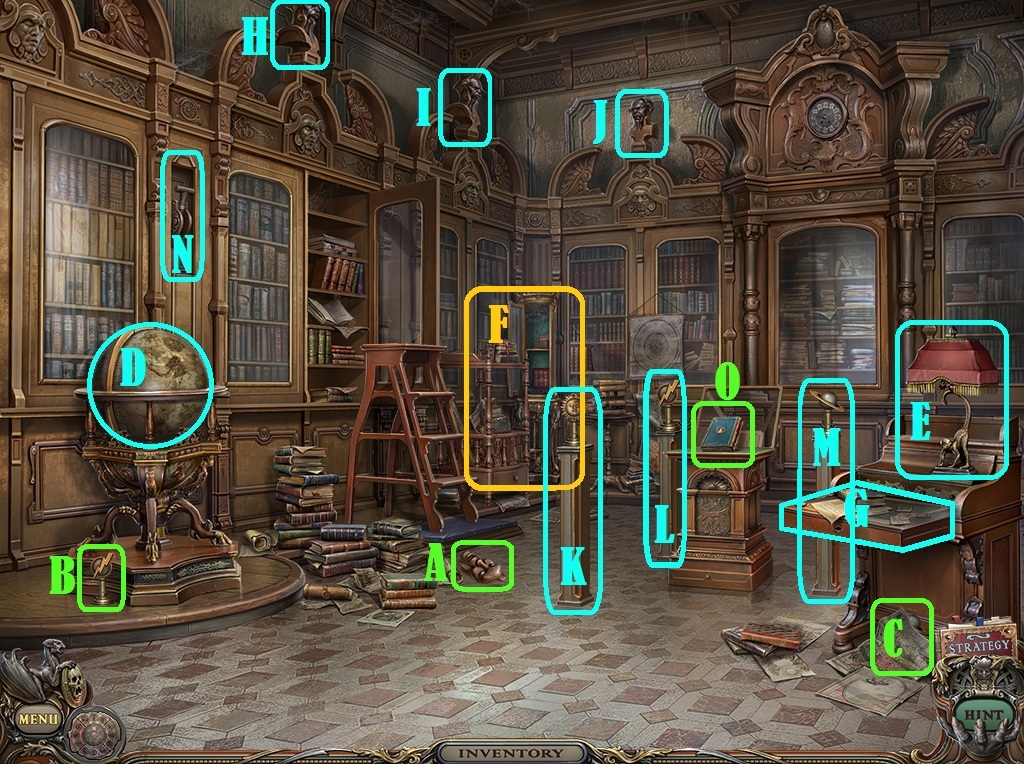
Screenshot.
Take the Bas-Relief Sculpture (A) on the floor beside the pile of books.
Take the Statuette 1/3 (B) by the base of the globe.
Click the newspaper under the desk to reveal the Statuette 2/3 (C).
Click the globe (D) to spin it, then click the circle at the top to open the globe and take the Statuette 3/3 inside.
Click the lamp (E) on the desk to light the room.
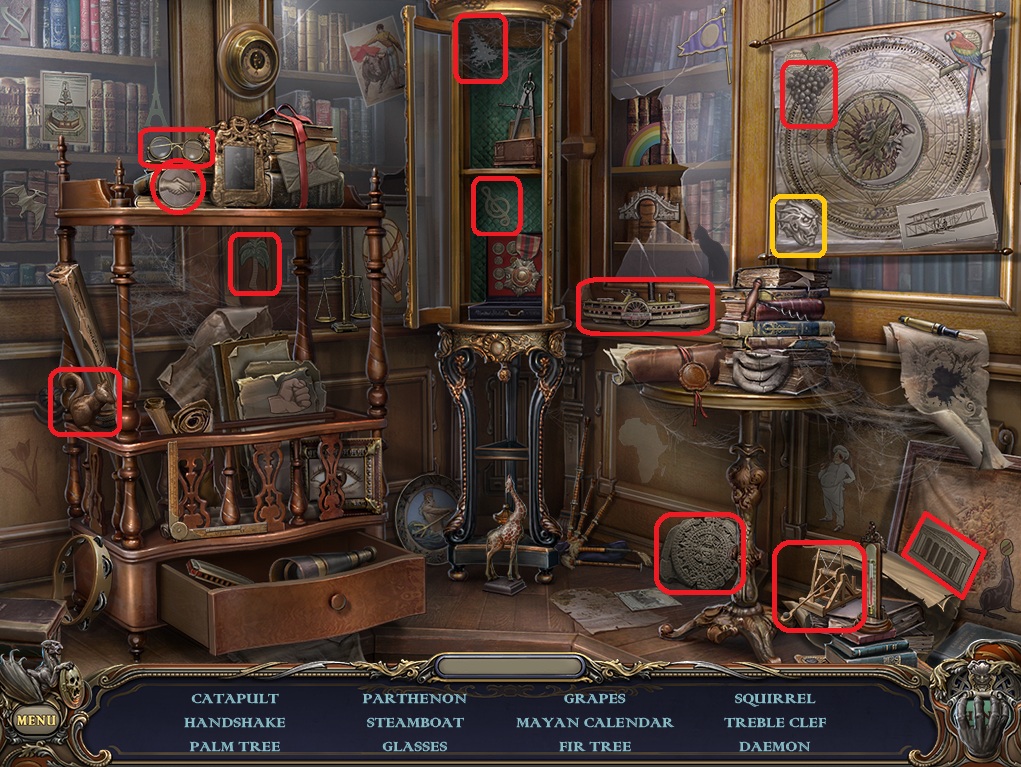
Click the display case (F) in the corner of the room to start the hidden object scene.
Screenshot.
Once the hidden object scene is complete, you will receive a Sceptre 4/4.
Click the desk (G) under the lamp for a closer look.
Take the XV Card (1/3), the III Card (2/3), and the IX Card (3/3).
Click the left bust (H) above the bookshelf to zoom in.
Place the III Card with the picture of the sun at the base of the bust.
Place the sun Statuette on top of the left pedestal (K) that rises from the ground.
Click the middle bust (I) above the bookshelf to zoom in.
Place the IX Card with the picture of the lightning bolt at the base of the bust.
Place the lightning bolt Statuette on top of the middle pedestal (L) that rises from the ground.
Click the right bust (J) above the bookshelf to zoom in.
Place the XV Card with the picture of the planet Saturn at the base of the bust.
Place the Saturn Statuette on top of the right pedestal (M) that rises from the ground.
Pull the lever (N) that is revealed on the left panel between the bookcases.
Take the Book (O) inside the opened glass case.
Go back to the Lower Stairs.
Lower Stairs
Click the bottom of the left railing of the stairs for a closer look.
Place the Bas-Relief Sculpture into the space at the center of the banister.
Take the Gem from the revealed cache at the top.
Return to the Basement.
Basement
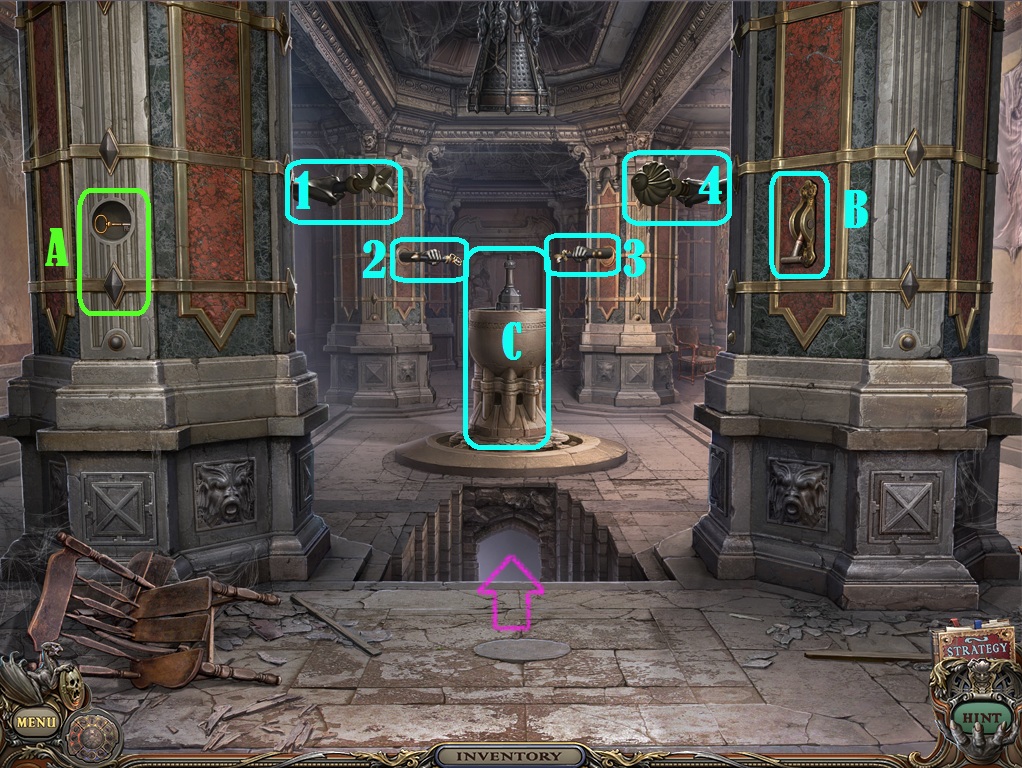
Screenshot.
Place the Gem in the space (A) at the bottom of the left column, then take the revealed Golden Key from the revealed cache.
Put the four Sceptres into the fists at the sides of the columns (1-4).
Pull the lever (B) to raise the cage in the center of the room and reveal the secret passageway in the floor.
Click the stand in the middle of the room (C) under the lifted cage to zoom in.
Place the Valve at the top of the metal spout, then click the valve to turn on the water.
Use the Goblet on the fountain to fill it with water.
Go down the stairs to return to the Mine Junction, then go left to Stella's Hall.
Stella's Hall
Click the bookstand to the left of the center door for a closer look.
Place the Book on top of the bookstand.
Take the Rune 1/6 on the ground to the left of the overturned mine cart.
Go back to the Mine Junction.
Mine Junction
Take the Rune 2/6 on the ground above the cable beside the switch to the rails.
Go back to the Mine Entrance.
Mine Entrance
Take the Rune 3/6 on the ground to the left of the wood plank over the chasm.
Return to the Basement.
Basement
Take the Rune 4/6 above the base of the left column.
Go back to the Woods.
Woods
Take the Rune 5/6 on the rock to the lower left of the obelisk.
Continue forward to the Tree House.
Tree House
Click the statue head in the ground to zoom in.
Use the Filled Goblet on the statue head.
Take the Blueberries (Ingredient 7/12) from the statue's hand, then place it in the matching space of the Fresco.
Go back to the Swamp.
Swamp
Click the carriage to look inside.
Use the Golden Key on the jeweled lockbox.
Turn the key to open the box, then take the Skull Key inside.
Return to Stella's Hall.
Stella's Hall
Click the lock in the column next to the right door.
Place the Skull Coin in the space at the center nut to start the puzzle.
To solve this puzzle, rotate the nuts to align the three etched symbols.
Clicking the top of the nut will rotate it up and move it to the left, while clicking the bottom of the nut will rotate it down and move it to the right.
Keep the center skull nut untouched, then move the left and right nuts to the ends of the bolt.
Turn the left nut at the end until the symbol is visible, then click the top 7 times to rotate it upwards.
Next, click the bottom of the nut to move it right towards the center, aligning the left symbol with the middle symbol.
Turn the right nut at the end until the symbol is visible, then click it 7 times to rotate it downwards.
Click the top of the nut to move it left towards the center, aligning the right symbol with the middle symbol.
Solution.
Go through the open door into Stella's Bedroom.
Chapter 4
Stella's Bedroom
Screenshot.
Take the Rune 6/6 (A) on the floor beside the bird cage.
Click the left side of the screen (B) to reveal a hidden object scene.
Screenshot.
Once the hidden object scene is complete, you will receive an Empty Pitcher.
Click the sink (C) under the mirror for a closer look.
Take the Tweezers on top of the counter.
Click the bed (D) to zoom in.
Take the Key beside the pillow.
Use the Tweezers to pick up the Hair (Ingredient 8/12), then put it in the matching space of the Fresco.
Return to the 2nd Floor Hallway.
2nd Floor Hallway
Click the second door on the right for a closer look.
Use the Key on the lock under the handle, then turn the key four times to open the lock.
Click the handle to open the door, then continue through the open door to the Maid's Room.
Maid's Room
Screenshot.
Click the rug (A) on the floor to reveal the Tension Mechanism.
Use the Lighter on the fireplace (B) to light a fire.
Take the Piece of Piano Plate (C) at the top of the fireplace mantle.
Click the cupboard shelves (D) for a closer look.
Take the Corkscrew at the top of the red vial.
Click the lid of the tin on the middle shelf to remove it.
Use the Acid on the chunk of amber to reveal the Scorpion Tail (Ingredient 9/12)., then put it in the matching space of the Fresco.
Go back to the Upper Stairs.
Upper Stairs
Click the right weapons rack on the wall above the left stairway to zoom in.
Add the Tension Mechanism to the crossbow, then click the crank to draw the bow.
Place the Arrow at the top of the Crossbow, then click it to add it to your inventory.
Go back to the House Entrance.
House Entrance
Click the bottom of the barrel for a closer look.
Use the Corkscrew to remove the cork from the barrel.
Click the top of the barrel to zoom in.
Use the Crowbar on the top of the barrel, then click the crowbar to remove the barrel lid.
Take the Coral (Ingredient 10/12) at the bottom of the empty barrel, then add it to the matching space in the Fresco.
Return to the Music Room.
Music Room
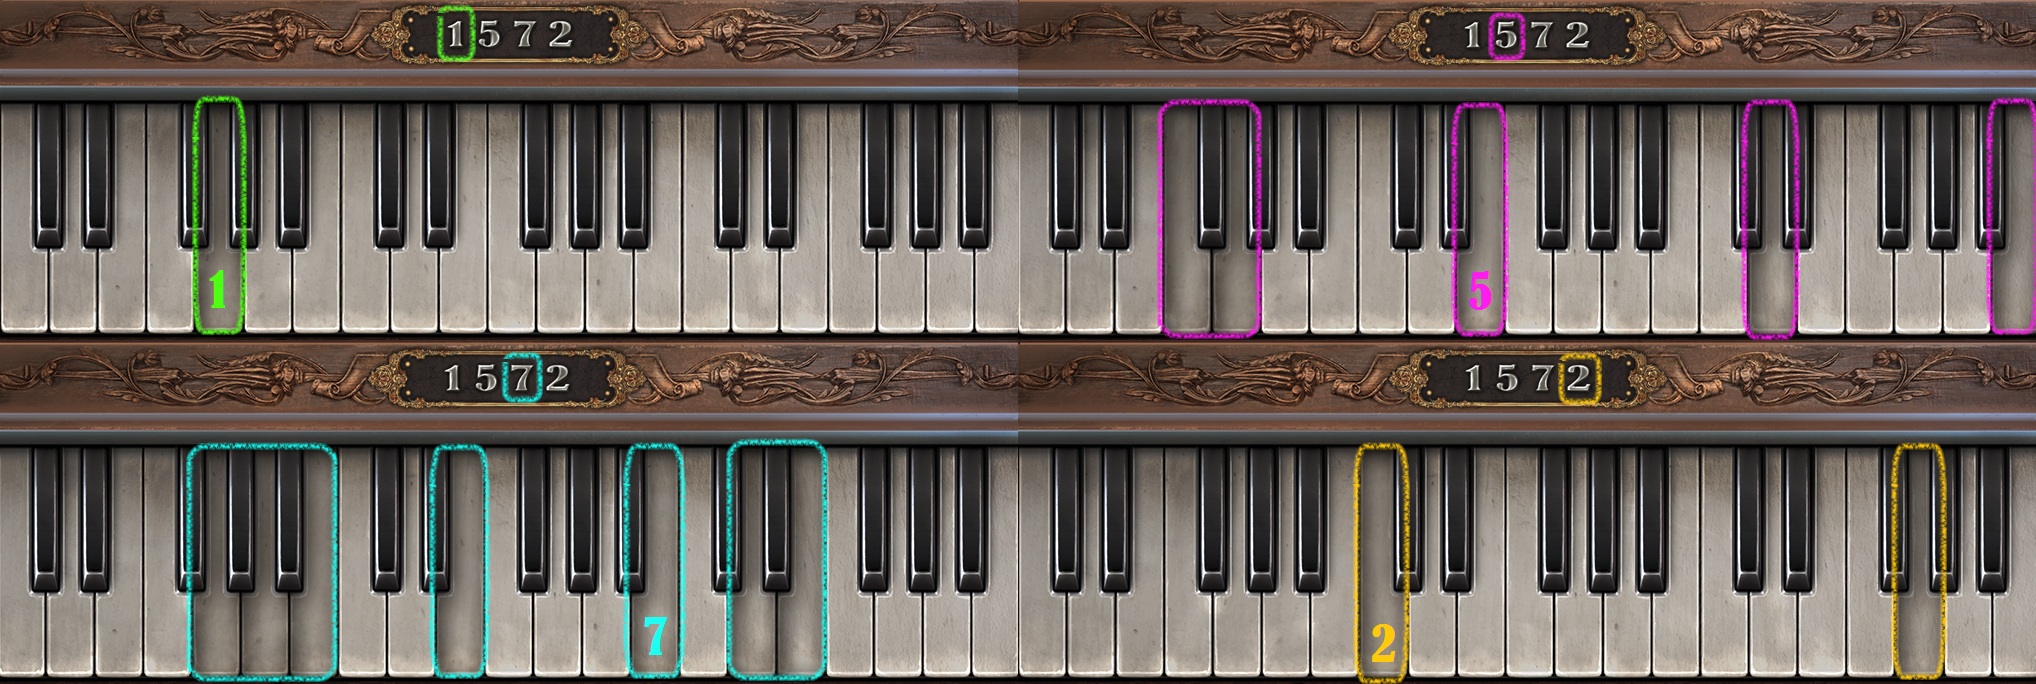
Click the keyboard of the piano for a closer look.
Add the Piece of Piano Plate to the fractured piano plate to start the puzzle.
To solve this puzzle, press the keys on the piano to play a chord that includes the number of keys in the order shown on the piano plate.
Press the G key in the lower octave to play the 1 note chord.
Press the E key in the middle octave to play the 5 note chord.
Press the B key in the middle octave to play the 7 note chord.
Press the middle C key to play the 2 note chord.
Solution.
Once the puzzle is solved, take the unlocked Silver Nugget above the piano plate.
Return to the Maid's Room.
Maid's Room
Use the Silver Nugget on the cauldron above the fire.
Click the grandfather clock at the foot of the bed to start the hidden object scene.
Screenshot.
Once the hidden object scene is complete, you will receive Bellows.
Use the Bellows on the cauldron over the fire.
Use the Empty Pitcher on the cauldron to receive the Pure Silver (Ingredient 11/12), then place it in the matching space of the Fresco.
Go back to the Balcony.
Balcony
Use the Crossbow on the tube in the wolf statue's mouth.
Go back to the Mine Entrance.
Mine Entrance
Take the Tube leaning over the chain in the fence.
Return to the Woods.
Woods
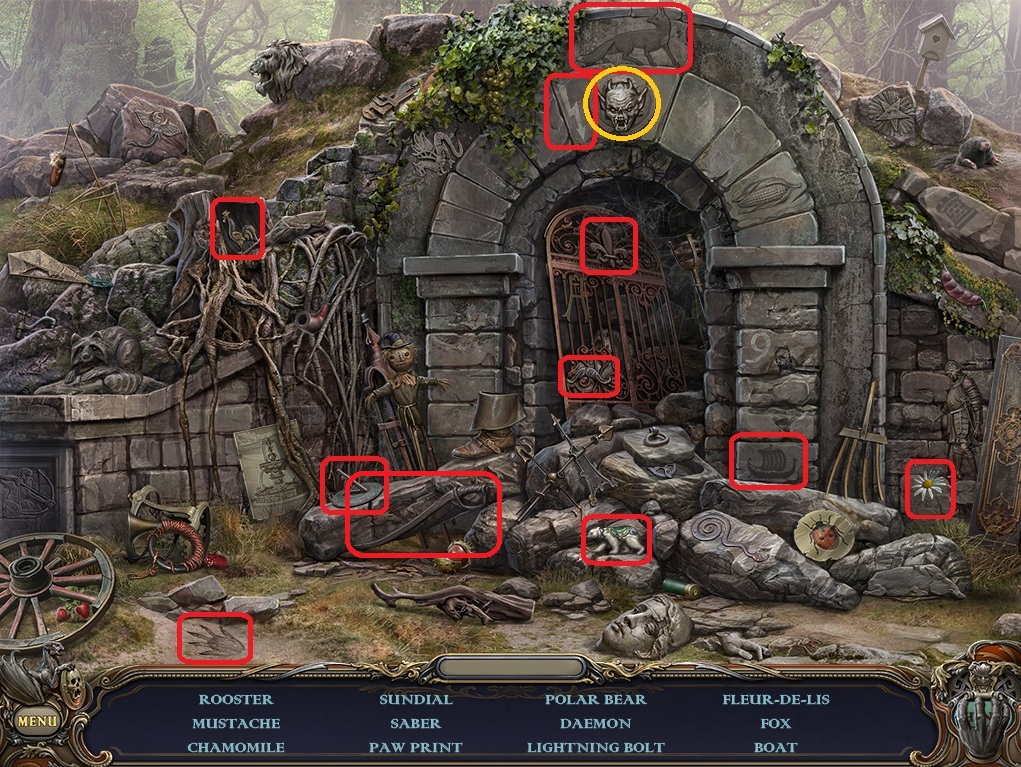
Click the rubble around the gate to repeat the hidden object scene.
Screenshot.
Once the hidden object scene is complete, you will receive an Insect Net.
Go back to the Balcony.
Balcony
Use the Insect Net on the Moth flying around the lantern to add it to your inventory.
Return to the Parents' Bedroom.
Parents' Bedroom
Click the lamp on the nightstand to turn it on, then click again to zoom in.
Place the Moth on the spider's web.
Take the Spider (Ingredient 12/12), then add it to the matching space in the Fresco.
Go back to the Laboratory in the Crypt.
Laboratory
Click the chemistry set on the table for a closer look.
Click the Fresco to add it to the wheel beside the chemistry set.
Place the Tube in the gap between the valve and the last chamber of the chemistry set to start the puzzle.
To solve this puzzle, match all of the symbols on the ingredients of the fresco with the symbols on the vials of the chemistry set.
Click an ingredient on the wheel of the fresco, then note its adjacent symbol; find and click the matching symbol on one of the empty vials.
If correctly matched, the symbol on the vial and the ingredient on the fresco will glow, and the vial will fill with liquid.
Solution.
Once the puzzle is solved, take the glowing bottle of Elixer on the table.
Click the purple curtain by the window to repeat the hidden object scene.
Screenshot.
Once the hidden object scene is complete, you will receive a Hammer.
Return to Stella's Bedroom.
Stella's Bedroom
Click the mirror above the sink to zoom in.
Use the Hammer on the mirror to reveal the Dagger..
Go back to Stella's Hall.
Stella's Hall
Click the bookstand for a closer look.
Place the Dagger at the top of the stand.
Add the six Runes to the spaces on the book with matching runic symbols.
Take the Magical Dagger from the bookstand.
Use the Magical Dagger to cut through the tapestry blocking the middle doorway.
Continue forward to the Secret Room.
Chapter 5
Secret Room
Click the fresco above the throne for a closer look.
Go back to Stella's Hall.
Stella's Hall
Click the wheelchair to repeat the hidden object scene.
Screenshot.
Once the hidden object scene is complete, you will receive a Daemon 1/12.
Go back to the Mine Junction.
Mine Junction
Click the end of the track to the right of the Basement doorway to repeat the hidden object scene.
Screenshot.
Once the hidden object scene is complete, you will receive a Daemon 2/12.
Continue forward to the Basement.
Basement
Click the chair in the corner of the room behind the column to repeat the hidden object scene.
Screenshot.
Once the hidden object scene is complete, you will receive a Daemon 3/12.
Go back to the Mine Entrance.
Mine Entrance
Click the rock on the right side of the cave mouth to repeat the hidden object scene.
Screenshot.
Once the hidden object scene is complete, you will receive a Daemon 4/12.
Return to Woods.
Woods
Click the rubble around the gate to repeat the hidden object scene.
Screenshot.
Once the hidden object scene is complete, you will receive a Daemon 5/12.
Go to the Crypt.
Crypt
Click the pile of junk in the rear left corner of the room to repeat the hidden object scene.
Screenshot.
Once the hidden object scene is complete, you will receive a Daemon 6/12.
Go left into the Laboratory.
Laboratory
Click the purple curtain by the window to repeat the hidden object scene.
Screenshot.
Once the hidden object scene is complete, you will receive a Daemon 7/12.
Return to the Parlor.
Parlor
Click the portrait to repeat the hidden object scene.
Screenshot.
Once the hidden object scene is complete, you will receive a Daemon 8/12.
Go to the Upper Stairs.
Upper Stairs
Click the junk blocking the left stairway to repeat the hidden object scene.
Screenshot.
Once the hidden object scene is complete, you will receive a Daemon 9/12.
Continue right to the Library.
Library
Click the display case in the corner of the room to repeat the hidden object scene.
Screenshot.
Once the hidden object scene is complete, you will receive a Daemon 10/12.
Return to the Maid's Room.
Maid's Room
Click the grandfather clock behind the bed to repeat the hidden object scene.
Screenshot.
Once the hidden object scene is complete, you will receive a Daemon 11/12.
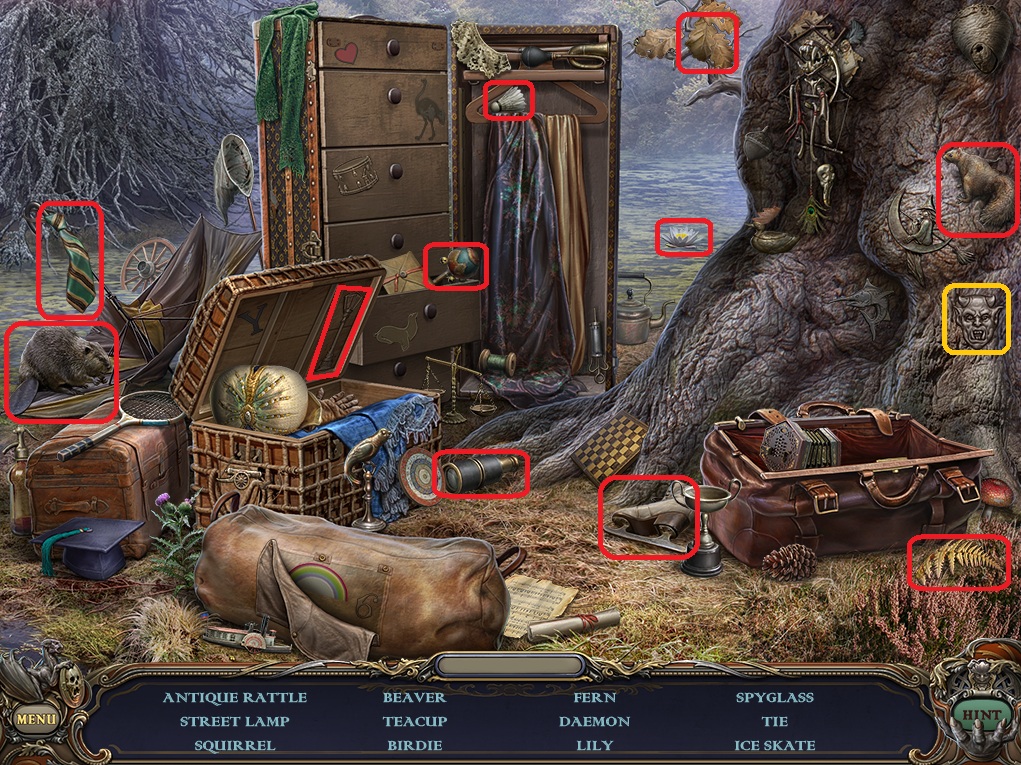
Go to the Swamp.
Swamp
Click the pile of luggage beside the dead tree to repeat the hidden object scene.
Screenshot.
Once the hidden object scene is complete, you will receive a Daemon 12/12.
Return to the Secret Room.
Secret Room
Click the fresco behind the throne to zoom in.
Place all 12 Daemons into their matching spaces around the fresco.
Click the figure seated on the throne.
Use the Elixer on Stella.
The End
Posted by: Trinn |
December 5, 2011 3:47 PM
|
December 5, 2011 3:47 PM