

Hallowed Legends: Templar
Platform: Mac, Windows
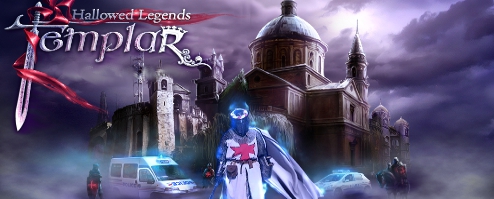
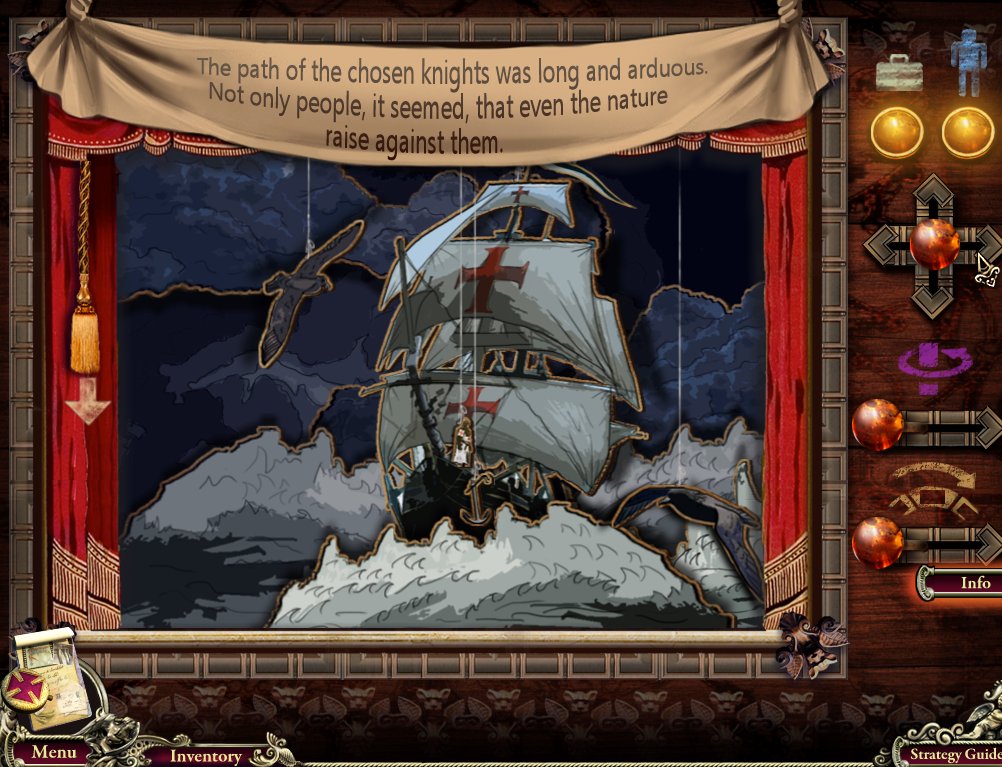
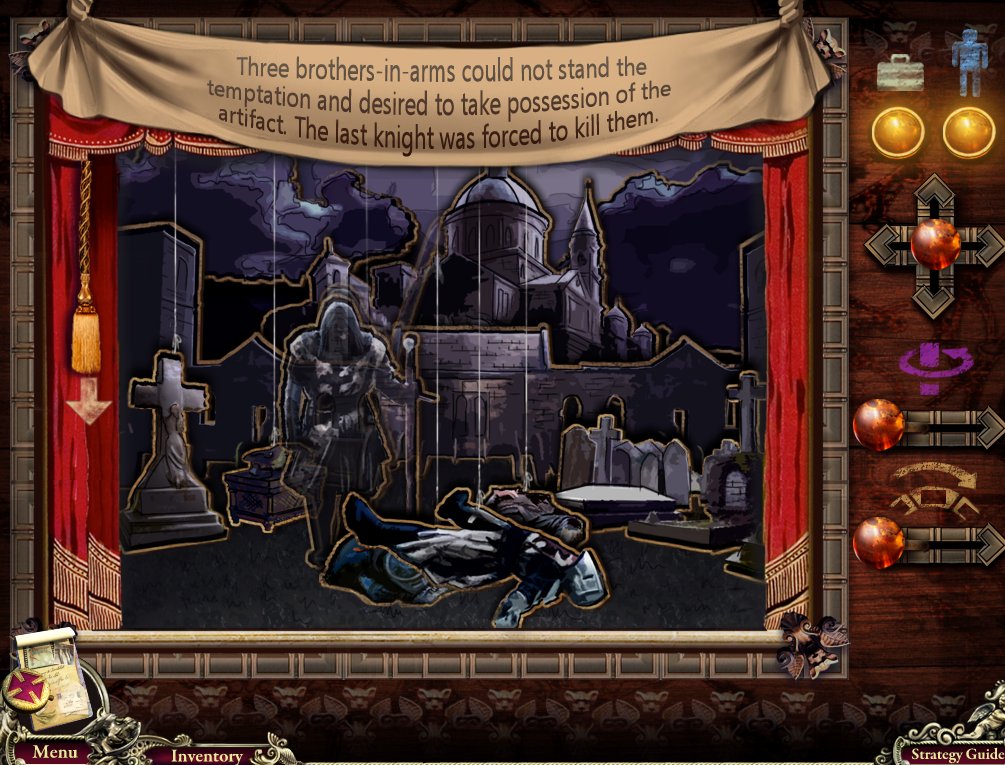
![]() Ah, France... Hubert Keller, little animated rats, Les Misérables... oh, and the big angry Templar that just stormed in and sucker-punched you in your hotel room, of course. In Elephant Games' new hidden-object adventure Hallowed Legends: Templar, you fly in to France upon hearing your brother has gone missing, only to be ambushed before your investigation can really begin. You soon discover, however, it's not just one lunatic in a suit of stolen armor, and there might be something a lot bigger, and older, than you ever expected going on in town.
Ah, France... Hubert Keller, little animated rats, Les Misérables... oh, and the big angry Templar that just stormed in and sucker-punched you in your hotel room, of course. In Elephant Games' new hidden-object adventure Hallowed Legends: Templar, you fly in to France upon hearing your brother has gone missing, only to be ambushed before your investigation can really begin. You soon discover, however, it's not just one lunatic in a suit of stolen armor, and there might be something a lot bigger, and older, than you ever expected going on in town.
 Hallowed Legends: Templar has three difficulty settings for those of you who prefer to tackle things easily or in a Bear Grylls-y fashion, and you can swap between them any time you wish by opening the options menu. You'll explore the town and the area around it searching for clues, gathering items and solving puzzles while trying not to cross paths with the knights you'll see prowling the area. The area has more than a few secrets, and there are quite a few people doing what they can to keep you from unraveling them.
Naturally, in addition to dodging attempts on your life, this also involves solving hidden-object scenes. Occasionally you may run into one of these where you have to use an item from your inventory to be able to get the item onscreen, so if you can't seem to collect something from the list and you're not carrying anything appropriate, you may have missed something you needed to pick up elsewhere in the town. Fortunately, once it's charged you can rely on the hint button to tell you explicitly what you need to do to proceed.
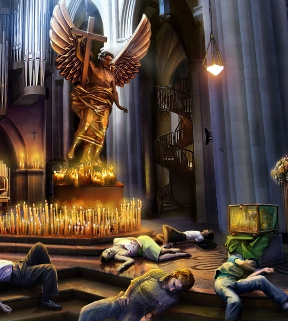
 Analysis: For hidden-object adventures with real creativity and intrigue, Elephant Games is rapidly becoming the developer to beat. Hallowed Legends: Templar is a big, strange, engrossing game packed with strange characters, excitement, and even a bit of supernatural mysticism that sets it apart from other titles. Mixing recorded cutscenes featuring real people with beautifully drawn visuals and environments, it helps give the impression that you're in a movie. A slightly crazy movie best enjoyed with a big bucket of popcorn on the couch at three in the morning, but a movie nonetheless. The game is great at doling out tidbits of information that fill you in on what's happening, while events keep popping up to move the action along at a quick pace and keep you interested with new developments. The story itself is admittedly a little convoluted, but if you don't demand big, serious narratives and just want to enjoy yourself with something imaginative and different, this might be right up your alley.
Click detection is, unfortunately, rather temperamental; too quick and the game might not register it, and the place to click to pick up or use an item can sometimes be annoyingly small and precise. This can also factor into problems with hidden-object scenes, where the art style occasionally makes it difficult to tell what you're looking at. Are you clicking on the wrong item, or just in the wrong spot? Is that a candle, or a teacup? Then you also have a few instances of what might be called "muddy descriptions", such as "white chess piece" actually referring to something the stunted artist in me would call "orange-y beige-ish". None of this is game breaking, and it is something you become more adept at noticing the more you play, but it does feel like it interrupts the flow somewhat. It's also worth mentioning that some players (though not yours truly) have reported performance issues on different machines, so as always, make sure you try the demo before you buy.
Despite that, however, and a somewhat stiff written translation, Hallowed Legends: Templar is still easily recommended. It's over four hours on average, with another hour or more to play the bonus content, and throughout the game rarely feels like it's dragging its feet by trying to artificially extend the gameplay. It's silly, it's exciting, it's weird and imaginative, and it's just the thing to relax with when you're looking for something fun. Try the demo to dip your toe into it, and keep an eye out for runaway cars, crossbow bolts... and pungent cheese, which is just as dangerous. This is France, after all.
A Collector's Edition is also available. It contains a bonus chapter, art gallery, strategy guide, and more. Remember that Big Fish Game Club Members pay only $13.99 for Collector's Editions (or 2 club credits), and collector's editions count 3 card punches of 6 total needed for a free game.
![]() Windows:
Windows:
Download the demo
Get the full version
Also available: Collector's Edition
![]() Mac OS X:
Mac OS X:
Download the demo
Get the full version
Also available: Collector's Edition


Walkthrough Guide
(Please allow page to fully load for spoiler tags to be functional.)
Hallowed Legends: Templar walkthrough (complete)
General Information
Main Menu
From the main menu, you can view credits and options, quit the game, and view achievements.
Options include setting graphics, sound, and difficulty.
The center button lets you start a new game ("Play"), or continue an existing game ("Continue game"), depending on your profile.
Set a new profile if you want to start a new game, by clicking the name above the center button.
When you create a new profile, you can also choose between one of three difficulty modes. You can also switch the game mode at any time through the Options menu.
Casual mode features "sparkles" to indicate important clickable areas, plus faster recharge times for the Hint meter.
Advanced mode doesn't use sparkles and recharges the Hint meter more slowly.
Hardcore mode has no sparkles, hints, or puzzle skipping.
Gameplay
Your journal is in the bottom left corner. Click it to view a map with your current location, and to see the notes you collect throughout the game.
Your hint meter, if you have one, in in the lower right corner. In the normal game screen, click it to read a tip about what to do next. In a hidden-object scene, click it to see the location of one object. In a puzzle minigame, use it to skip the puzzle, once it charges.
Clicking the menu button in the lower-left corner will bring up the Options menu, which is identical to the Options menu in the Main menu. You can also return to the Main menu, where you can quit the game
You can view your inventory bar by hovering over the Inventory button, next to the Menu button. The items list for hidden-object scenes is in the same place, and you can switch between your items list and your inventory by clicking the tabs at the top of the bar.
Your cursor changes according to the context. An arrow means you can go to a new screen. A magnifying glass means you can take a closer look, or start a conversation with a character. A "grabbing" gauntlet means you can take an item. A gauntlet with gears means you can use an item from your inventory.
You will often need to complete hidden-object scenes to find a particular item for your inventory.
There is no click penalty. Click an item, and it will disappear if it is on your list.
If you click on the space between an item, it will not be selected, so make sure you are clicking on the item itself.
Items listed in orange require some special action to be found. Often this means combining some item on the screen with some other item. Look for the "grabbing" and "gear" cursors, and click on those spots for clues about what to do.
Other items listed in orange may require an item from your inventory to be found. Click over to your inventory to select the item and use it where it is needed. If you can't find such a hidden-object, it might mean you haven't found the inventory item it requires.
Chapter 1: Hotel Maltese Cross
Room Escape
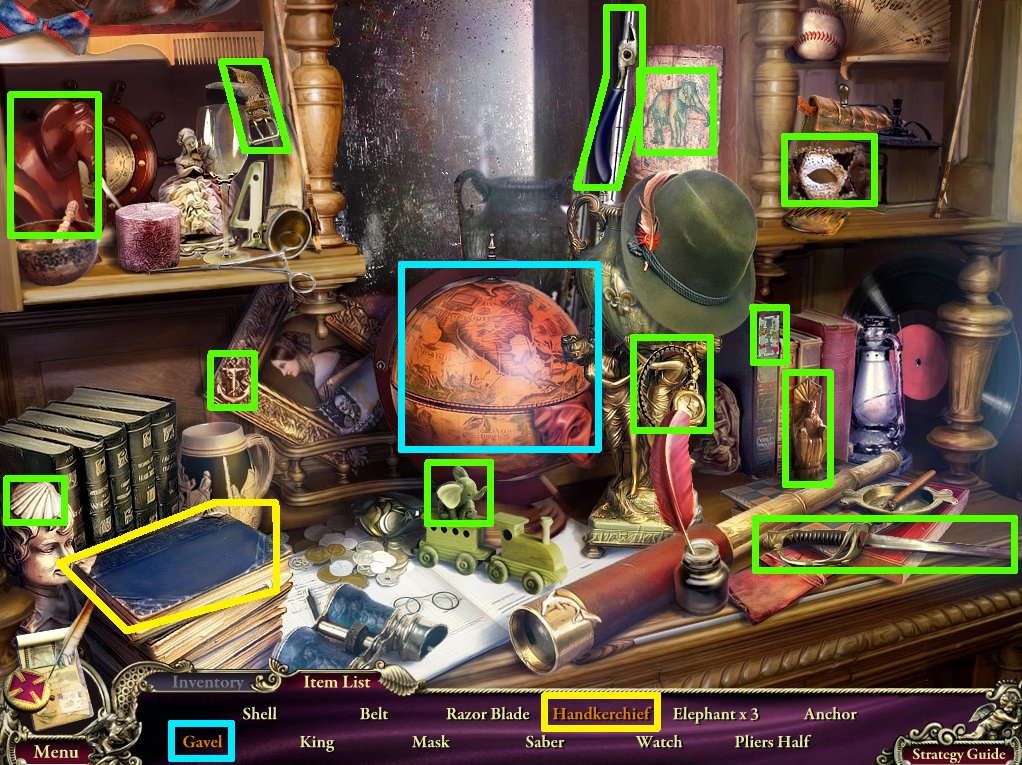
Zoom in on the jewelry box on the right. Take the envelope and the Cupboard Key.
Use the Key on the cupboard on the left. Zoom in and complete the hidden-object scene to get a Pliers Half.
Click the globe to find the Gavel.
Click the book to find the Handkerchief.
Screenshot
Use the Pliers Half with the other pliers half on the desk, then take the Pliers.
Click the drapes, then zoom in on the window.
Use the Pliers on the wires. Watch the cutscene, then take the Hose.
Zoom in on the axe and steaming pipes, next to the window. Use the Hose with the pipes. Enter the door on the right.
Hotel Escape
Zoom in on the elevator doors in the back and take the Wrench.
Go upstairs to the attic.
Take the Ladder in the back of the room.
Zoom in on the shelf to the left and take the Satyr Statue.
Go back downstairs. Zoom in on the hole to the right of the sofa and use the Ladder. Go down the hole.
First Mask
Take the Tray from the counter in the middle of the room.
Zoom in on the panel on the refrigerator. Complete the minigame to unlock it.
Line the tiles up into columns by their symbol. Click and drag to move tiles. You can only move one tile at a time, though you can move a single tile several places at once.
Focus on the dead-end spaces (the top and bottom tiles of each column), before completing the rest of the puzzle.
Solution
Click the open fridge and take the green bottle of Acid.
Take the exit through the back of the room.
Zoom in on the faded poster below the lantern and take the Magnet.
Zoom in on the front of the abandoned car. Use the Wrench from the 2nd floor on each of the bolts.
Zoom in and complete the hidden-object scene to get an Eagle plaque.
Use the key with the lock to find the Opened Lock.
Click the leaves to uncover the Dart.
Screenshot
Go through the gate. After the cutscene, go to the right.
Go up the steps and watch the cutscene. Zoom in on the broken lamp and take the Crossbow Bolt.
Zoom in on the coat hanging on the steps. Click the coat again and take the Glasses.
Zoom in on the garden path. Use the Acid from the kitchen on the Helmet Mask, then take it.
Go back 3x to return to the kitchen.
Second Mask
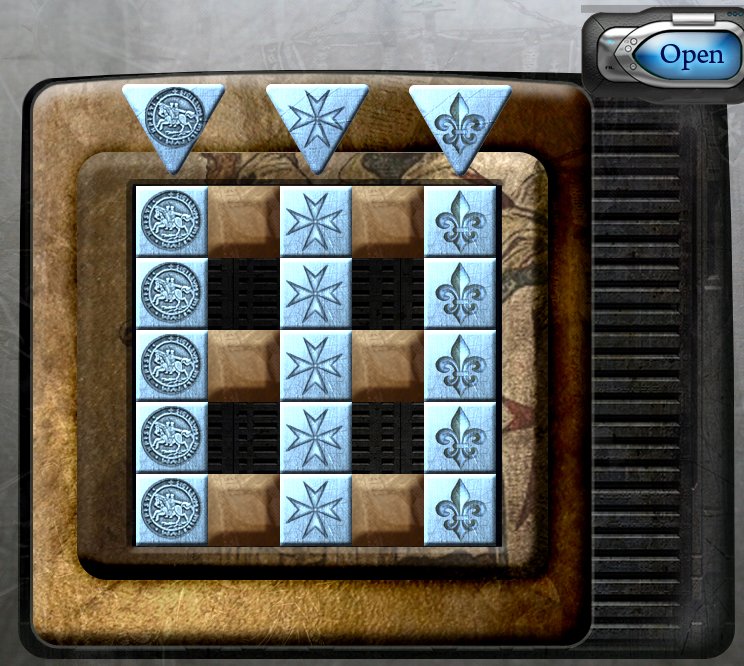
Zoom in on the door to the left. Use the Tray from the kitchen counter on the door, then use the Crossbow Bolt from the church steps on the keyhole.
Take the key and use it on the lock to open it. Enter the door.
Restaurant
Zoom in on the man crouched over the dining table. Click him, then take the Chessman from his hand.
Zoom in on the elevator shaft in the back of the room. Take the Weight from the right side of the cables.
Zoom in on the aquarium. Use the Magnet from the Back Entrance to get the Iron Amulet from the bottom.
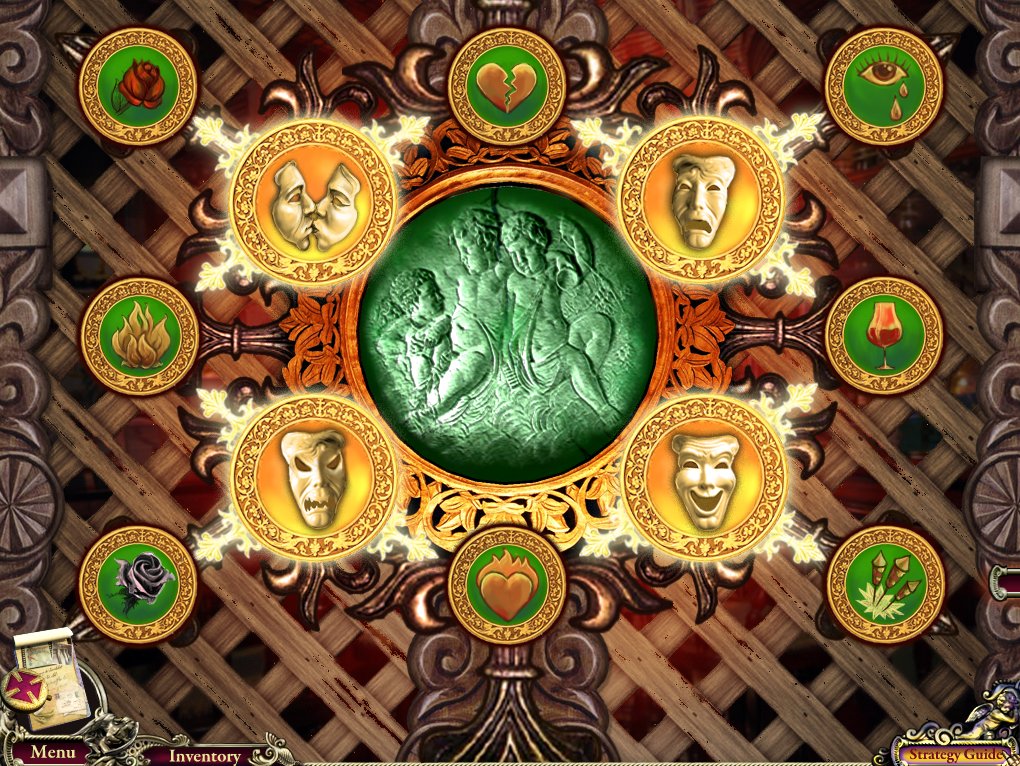
Zoom in on the bar, to the left of the aquarium. Use the Satyr Statue in the recess.
Complete the minigame to unlock the bar.
Match the green symbols with the emotions on the masks. The arrows will light up when you have a correct match.
Solution
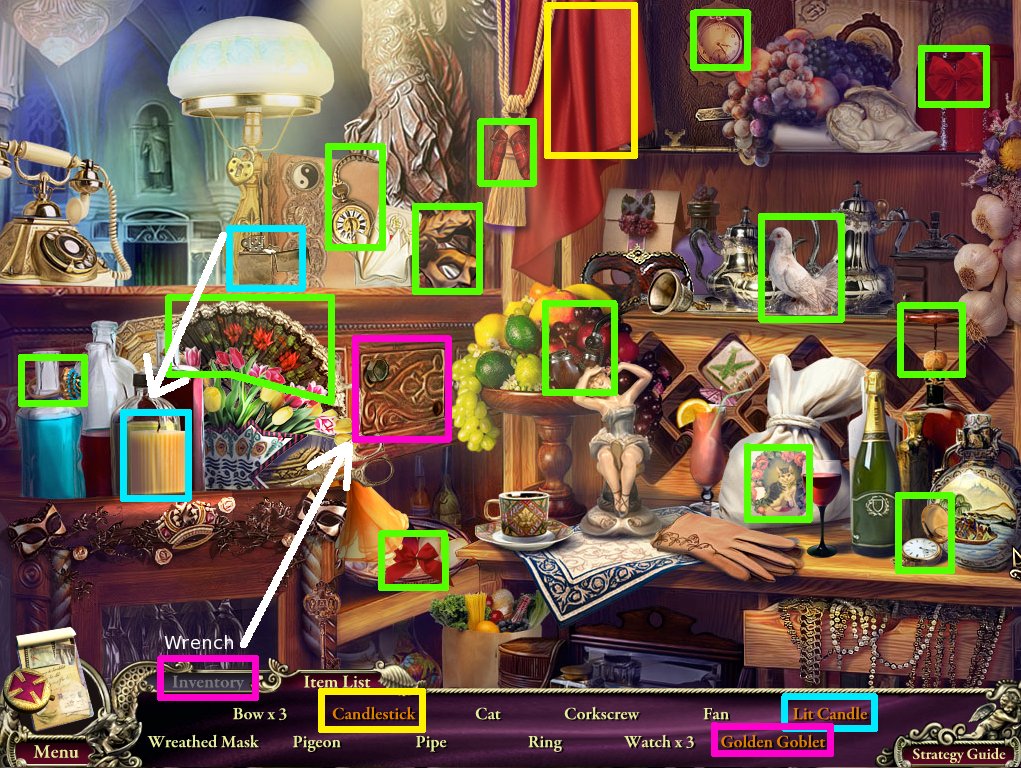
Zoom in on the bar and complete the hidden-object scene for a Wreathed Mask.
Use your Wrench from your inventory on the bolt to find the Golden Goblet.
Click the red drapes to find the Candlestick.
Use the lighter with the candle to get a Lit Candle.
Screenshot
Go back twice to return to the 2nd floor.
Third Mask
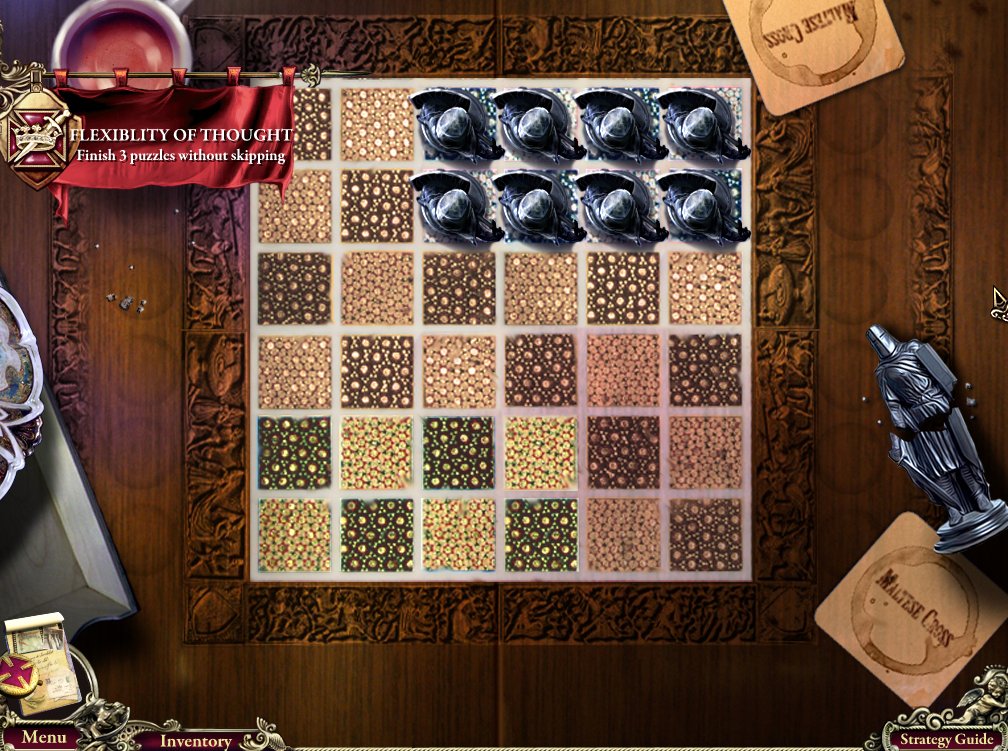
Zoom in on the chessboard on the table. Use the Chessman from the man in the Restaurant to start a minigame.
The goal is to get all the pieces on the gray squares in the opposite corner.
Move a piece by jumping it over another piece, like Chinese checkers.
Move the four rightmost pieces as far right as they can go. Do the same for the other four pieces. Then simply move all the pieces up the board.
Screenshot
Zoom in on the table and complete the hidden-object scene for a Lion plaque.
Use the Polaroid camera on the model car for the Car Photo.
Open the travel bag to find the Flashlight.
Use the teabag with the teacup for the Cup of Tea.
Use the pencil with the pencil sharpener for a Sharp Pencil.
Screenshot
Go back to your room. Zoom in on the desk and use the Eagle from the car in the back entrance, and the Lion from the chess table on the 2nd floor. Take the Mitre Mask.
Exit your room and go to the attic.
Fourth Mask
Zoom in on the knight and use the Weight from the elevator in the Restaurant. Take the Gauntlet.
Zoom in on the rug to flip it open and reveal a puzzle. Rotate the rings to get the picture.
From the outer ring to the inner ring, imagine the rings labeled 1-5 (the innermost ring would be 6, but it can't be rotated).
Start by putting ring 5 in position, then 1, then 3, then 4.
Put ring 2 in position by alternating between clicking ring 2 and ring 5. You may need to click ring 5 twice in a row on one occasion to get the two rings to align.
Solution
Use the Iron Amulet from the aquarium in the Restaurant to open the panel, then take the Crown Mask (Note that the place to put the Iron Amulet will only open if you got the Amulet before you solved this puzzle. If you did it out of order, you can "resolve" the puzzle by rotating the innermost ring 360 degrees).
Using the Masks
Go to the church square outside the Hotel (via the Back Entrance).
Zoom in on the statue you saw the Templar enter earlier.
Use the masks on each of the figures so they match: From left to right, use the Helmet Mask with the warrior, Crown Mask with the king, Mitre Mask with the patriarch, and Wreathed Mask with the orator.
Screenshot
Enter the doorway that opens.
Chapter 2: The Dungeon
Finding the Abandoned Storehouse
Watch the cutscene. Look at the news clip to take it and the Lockpicks.
Zoom in on the victim at the base of the steps. Take the Badge (which looks like a blue credit card) from his coat.
Continue down the stairs. Zoom in on the barbed wire to the left (underneath the lantern). Use the Gauntlet from the hotel attic to remove the wire, then click to clear the doorway. Enter.
Zoom in on the valve under the stream of water. Use the Lockpicks from the dungeon entrance on the lock, then click the spigot to stop the water.
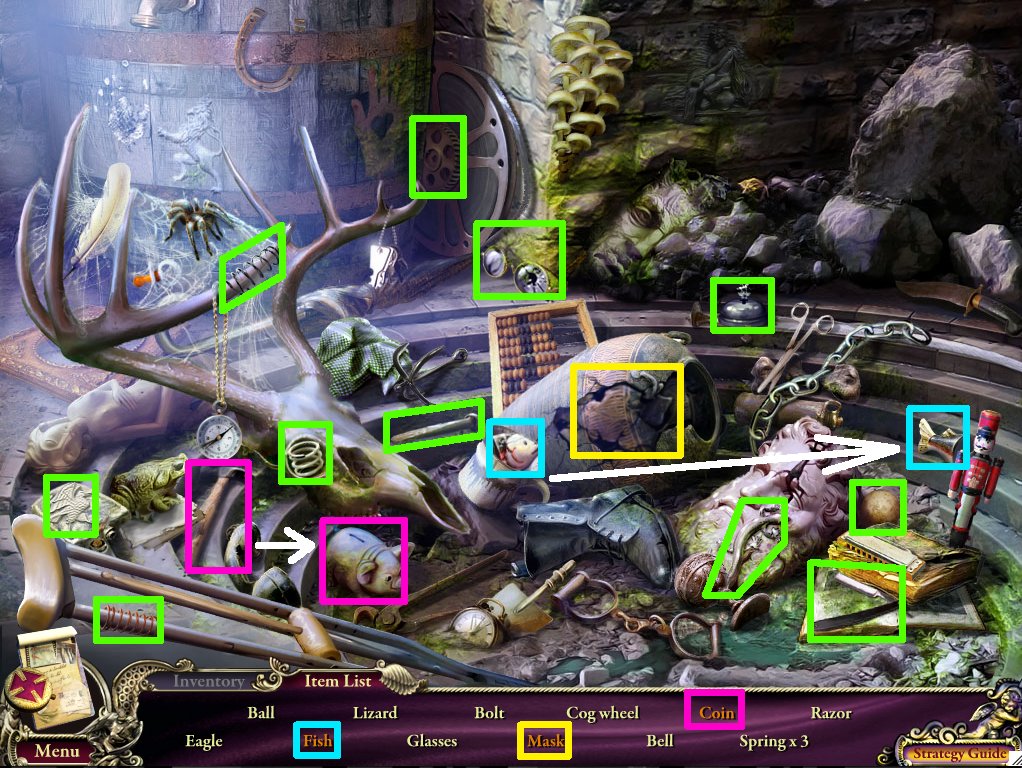
Zoom in on the basin and complete the hidden-object scene for a Bell.
Use the fish head with the fish tail to make the Fish.
Click the urn twice to uncover the Mask.
Use the hammer with the piggy bank to find the Coin.
Screenshot
Return to the restaurant in the hotel.
Hotel Reception
Zoom in on the desk on the left and use the bell. Enter the open door.
Examine the safe in the back right of the room (it looks a bit like a television). Use the Badge from the victim in the dungeon entrance on the card swiper.
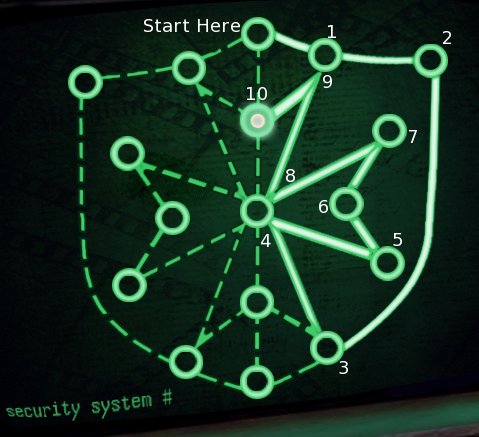
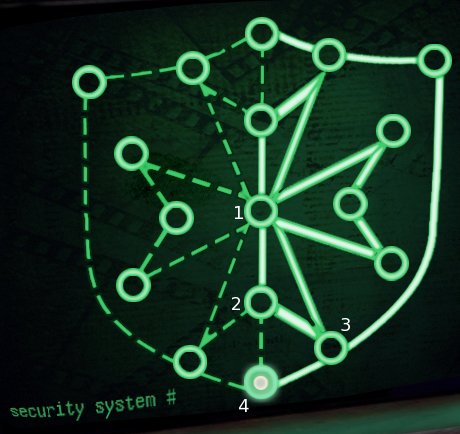
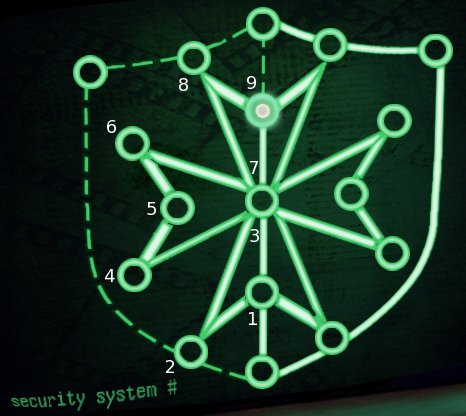
Solve the puzzle by lighting up all the lines. Do this by clicking one dot, then the next. The line in between will light up. Dots have to be connected in sequence.
There are a few ways to solve this puzzle. A good strategy is to start on top and trace halfway down the shield outline. Then trace the cross so you end up at the top of the emblem again, then complete the shield outline.
Solution part 1
Solution part 2
Solution part 3
Solution part 4
Take the Film reel from the open safe.
Turn on all the lamps above the desk. One will open the panel behind the painting. Examine it.
Take the key in the middle, which is the key to Room 12. Go back to the kitchen and up the ladder to the 2nd floor.
Room 12
Examine the door to the left and use the room key. Enter the door.
Examine the body laying on the hole through the roof. Click the tape machine to listen to his message, then take the Whistle from his hand.
Zoom in on the chest and take the Fireplace Poker sticking through it.
Click the raven that flies out of the chest, perched on the wardrobe. Use the Whistle to scare it away and get the Hacksaw.
Zoom in on the round puzzle on the back wall. Solve it by sliding the columns and rows until you complete the picture.
The best tip I can offer is to focus on one column at a time, and proceed carefully from left to right. Once you complete a column, you'll have to undo your work to complete other columns, but for the first several columns, it should be easy to restore your work by reversing some steps. Even so, I only solved the last few sections by persistent trial and error.
Screenshot
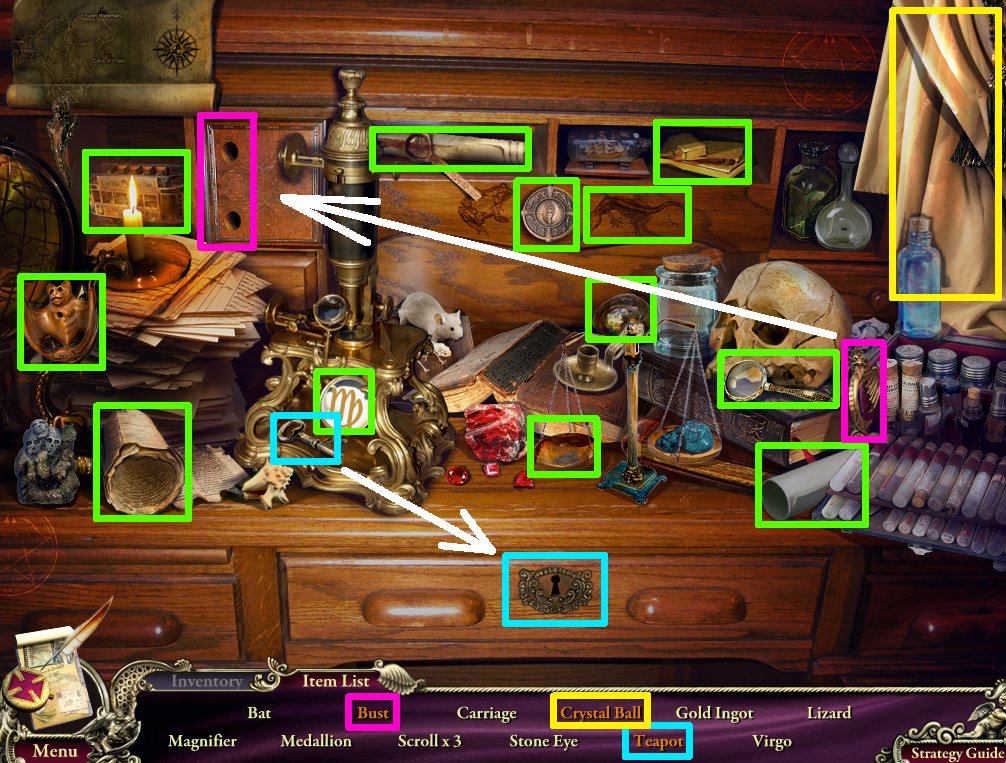
Take the Sword from the open panel.
Zoom in on the dresser below the window and complete the hidden-object scene for a Stone Eye.
Use the key with the desk drawer to get the Teapot.
Click the curtain to find the Crystal Ball.
Use the handle with the square door to find the Bust.
Screenshot
The Arbor
Go to the Rear Entrance.
Zoom in on the trellised door. Click the handle and watch the cutscene. Zoom in again and use the Hacksaw from Room 12 to open the door. Enter.
Take the White Veil to reveal a video projector.
Zoom in on the curtain rod on the right trellis. Take the red Flask, then use the Veil to get a projection screen.
Zoom in on the projector. Use the Film from the reception safe and the glasses from the church steps to fix it, then flick the switch. Watch the scene and get the Coin.
The Bomb in the Sewers
Exit the Arbor. Zoom in on the newspaper machine and use the Coin to get the Rubber Gloves.
Go to the reception area of the hotel. Zoom in on the fuse box (near the chair) and use the Rubber Gloves to get the Screwdriver.
Go back to the church square and go through the dungeon entrance to the sewer.
Zoom in on the grate in the back wall of the sewer. Use the Fireplace Poker with the chest, open it, and take the Timer.
Click on the body that emerges to take the note, then take the Revolver.
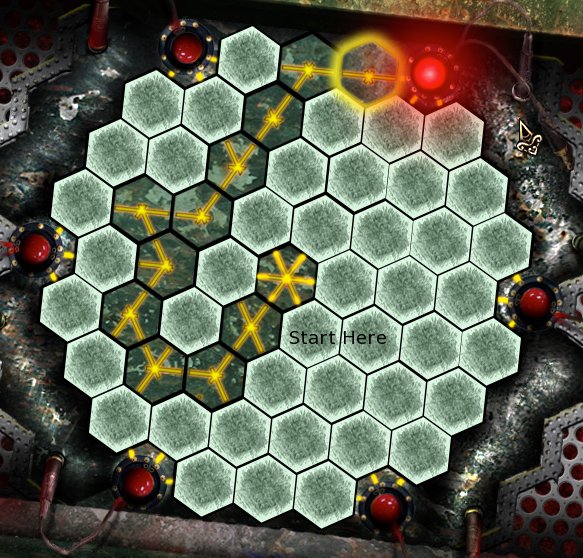
Zoom in on the big bomb in the hole in the sewer wall. Use the Screwdriver from the reception area on the screws.
Click on the hexagons to form a path from the center of the panel to one of the red connectors. Once the bomb is deactivated, go through the hole in the sewer wall.
Solution
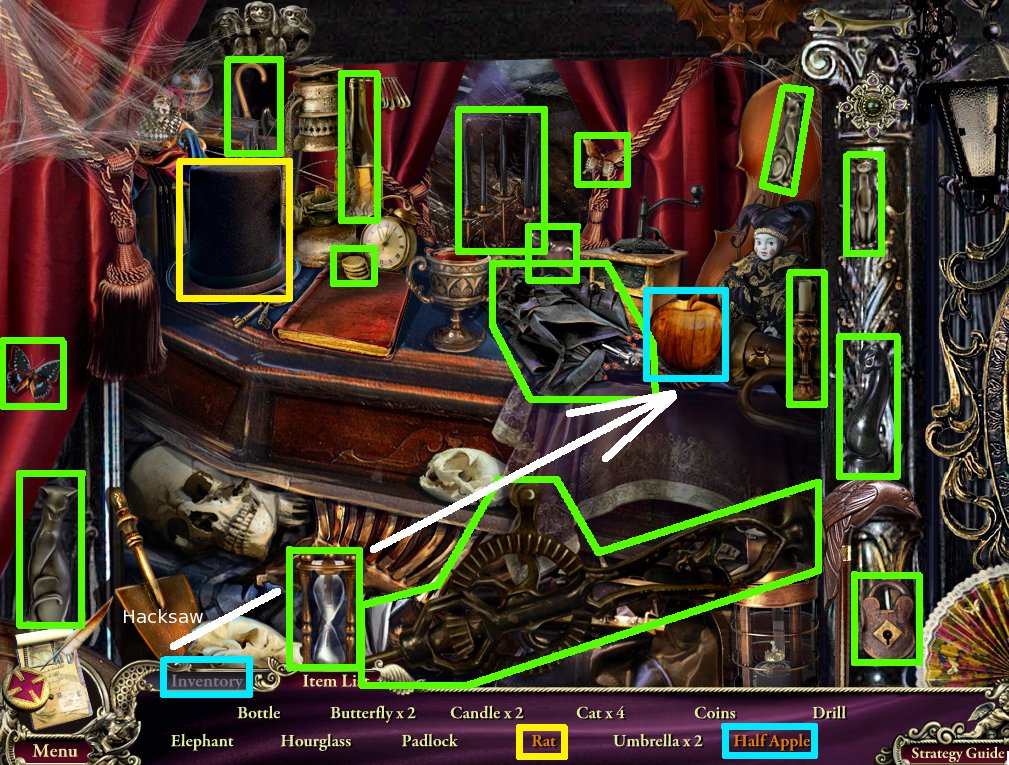
The Madman
Watch the cutscene. Zoom in on the carriage driver and click the newspaper, then take the Left Lever from his coat.
Zoom in on the coffin and take the Rope from the sack.
Click the curtain of the carriage, then zoom in. Complete the hidden-object scene to find a Drill.
Click the tophat to find the Rat.
Use the Hacksaw from your inventory on the wooden apple for the Half Apple.
Screenshot
Enter the door in the back wall. Click the window in the back of the hospital room and use the Revolver (from the body in the sewers) to scare the rats. Take the Forceps from the window ledge.
Click on the trembling madman to speak with him. Click again to find out he wants a drink.
Go back to the abandoned storehouse (back twice, then to the left). Zoom in on the keg with the spigot, to the left of the basin. Use the Flask to fill it with wine. Return to the hospital room and give the Flask to the madman.
Click the board game to play the game the madman offers you. The goal is to surround the madman's pink gamepiece with your green ones. It's similar to Chat Noir. Hint:
Start laying your pieces far away from the pink piece, focusing on the direction it moves. That way you have a chance to build a suitable barricade before it arrives.
The Pirate's Chest—Escaping the Dungeon
The madman gives you a Flashlight. Back out, then zoom in on the well to the left. Use the Flashlight with the well.
Descend the well. Take the Shield.
Zoom in on the culvert to the left. Use the Forceps from the hospital room to bend the bars, then take the Right Lever.
Return to the hospital. Zoom in on the hanging safe and use the two Levers (from the carriage in the ruins and from the well) on either side. Play the minigame.
Use the arrows to move the chits from one section of the panel to the other. The goal is to get eight chits in the big left section and eight in the smaller lower-right section.
You only need to click the red arrows. Start by clicking the top red arrow, then the right red arrow.
Then click the top, right, bottom, and right red arrows, in that order. Repeat these four steps until the puzzle is solved (you will go through the cycle 3.5 times).
Zoom in on the open safe and take the Surgical Saw.
Go down the well again. Zoom in on the pirate skeleton and use the Saw on its arm to get the Pirate Seal.
Return to the abandoned storehouse. Zoom in on the chest and use the Pirate Seal to unlock it, then use the Drill from the carriage in the ruins to open it.
Use the Rope from the coffin in the ruins to tie the dynamite sticks together, then use the Timer from the chest in the sewer. Collect the now-functional Dynamite.
Go to the dungeon entrance. Look right and use the Dynamite with the sealed entrance.
Chapter 3: The Church
The Wild Garden
Go right to the church steps. Now that you have the Shield, you can proceed safely up the church steps to the churchyard.
Zoom in on the bench. Take the blade from the Scythe.
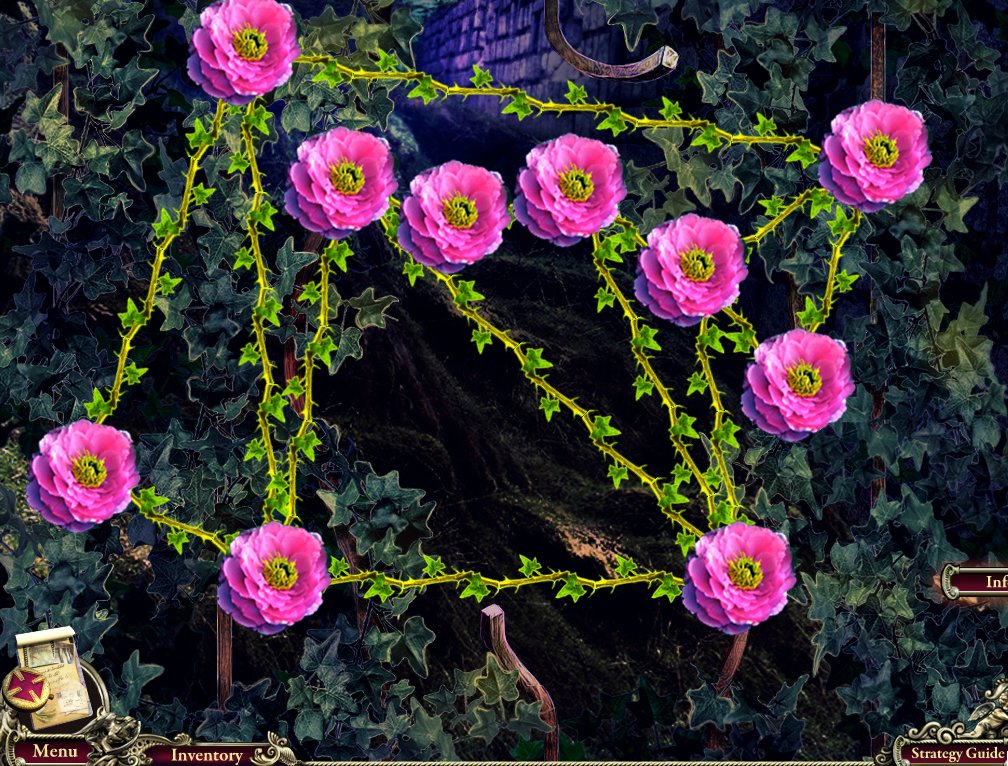
Zoom in on the roses behind the bench, to the left of the gate.
Untangle the vines to clear a path. Do this by clicking and dragging the flowers so the vines don't cross. Vines that do not cross other vines will become highlighted in yellow-green.
Solution
Go down the cleared path.
Zoom in on the pile of leaves to the right of the path. Click three times, then take the Inscription that you uncover.
Inside the Church—Getting the Grappling Hook
Go back to the churchyard and zoom in on the doors. Use the Inscription from the wild garden in its place below the doorway, then enter.
Go up the spiral stairs to the belfry. Zoom in on the basket of groceries below the work table and take the sack of Grain.
Zoom in on the big bell above the table and use the Scythe blade (from the churchyard) to get the Cable.
Go back to the wild garden. Zoom in on the lit-up pile of debris on the left. Complete the hidden-object scene to find a Grappling Hook.
Use the Cable from your inventory with the anchor for the Grappling Hook.
Use the kettle with the candle to steam open the crumpled Envelope.
Use the flute to charm the snake and get the Apple.
Screenshot
Go back to the square.
The Cafe
Zoom in on the broken railing above the cafe and use the Grappling Hook. Enter the cafe through the second floor.
Go through the doorway on the left and pull back the curtain. Zoom in on the table and take the Sponge.
Go back, then downstairs, through the door on the right. Zoom in on the table in the back. Click the plates, then collect the Mechanical Heart and the card.
Zoom in on the bar to the left. Use the Sponge with the water, then take the Wet Sponge.
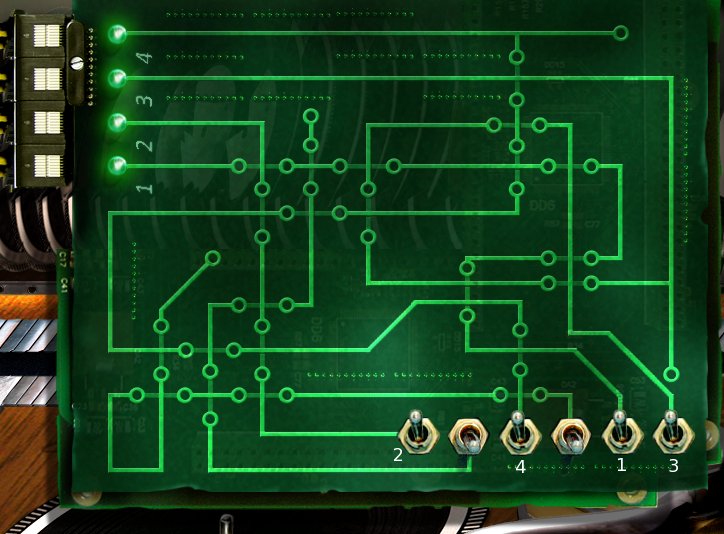
Go upstairs again. Zoom in on the jukebox for a series of minigames.
Trace the circuits from the numbers in top left corner to the switches. Flick the switches in numerical order.
From left to right, number the switches 1-6. Flick switches 5, 1, 6, and 3, in that order. Screenshot.
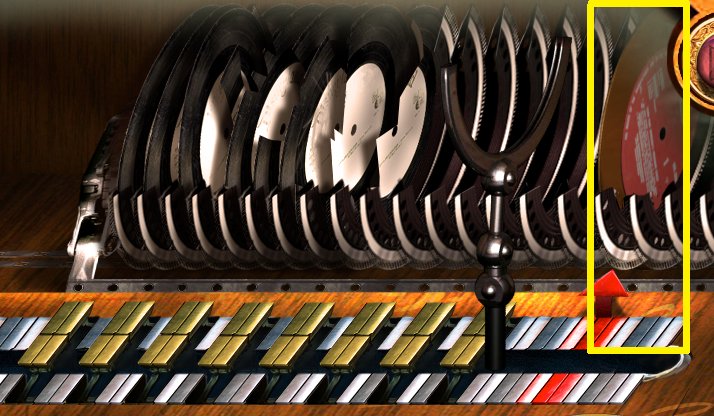
Use the red buttons in the corners of the screen to move the gold record to the red arrow. The right arrow moves 5 slots to the right, while the left arrow moves 7 slots to the left.
Screenshot
Clear the path of the record to the record player by pushing the buttons to depress the golden platforms. Trial and error will eventually clear the path.
Take the Punch Card.
Exit the cafe, then go back to the wild garden, via the churchyard.
The Garden Corner
Zoom in on the statue near the bridge. Use the Mechanical Heart in its place to activate the bridge, then cross it.
Click anywhere to activate a cutscene.
Zoom in on the embers and take the Handle.
Zoom in on the dovecote (the birdhouse up the ladder).
Use the grain from the belfry to start a minigame.
It's a game of memory: click a portal, then another, and try to match the birds by species.
Each portal has two sets of birds: When you match the first bird in a portal, another will appear in its place. When you match the second bird, the portal closes.
The first six matches (numbering the portals 1-6 from left to right in the top row, and 7-12 in the bottom row):
1-5
2-9
3-6
4-11
7-12
8-10
The second six:
1-6
2-11
3-8
4-7
5-9
10-12
You get a swan-shaped Ladle when you are done.
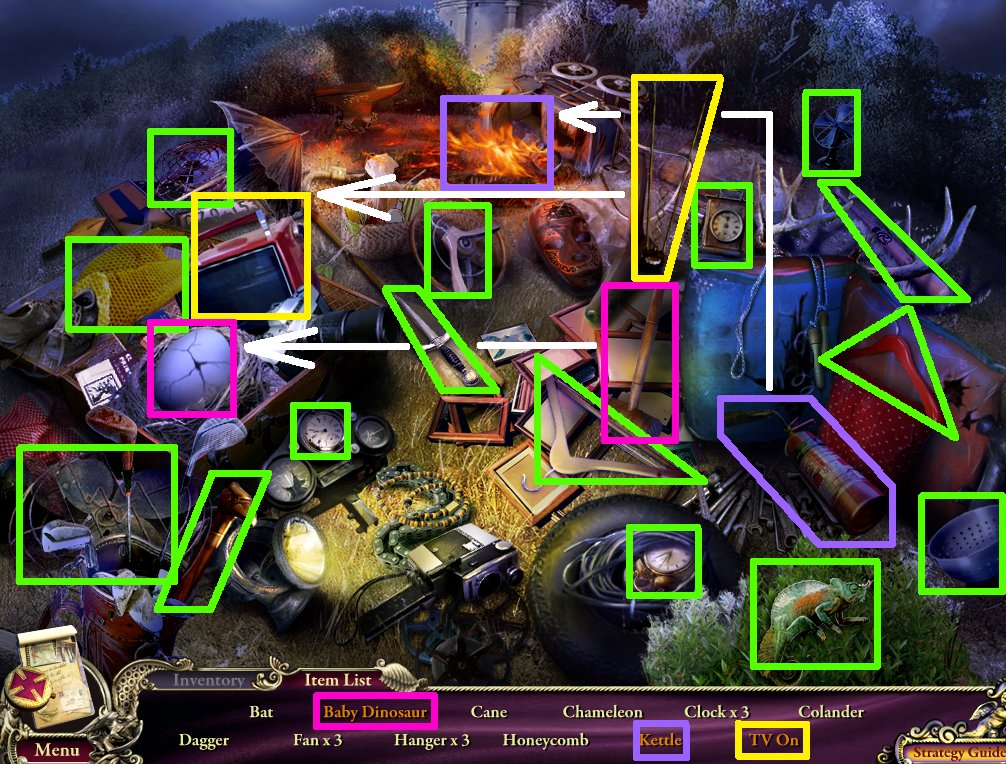
Zoom in on the pile of debris to the left and complete the hidden-object scene for a Cane.
Use the extinguisher on the flames to find the Kettle.
Use the gavel on the egg to find the Baby Dinosaur.
Use the aerial with the TV to find the TV On.
Screenshot
Zoom in on the crashed car on the right and use the Punch Card from the jukebox in the cafe with the typewriter-like card reader. Take the Burner from the open compartment.
The Organ
Go back to the central nave in the church. Zoom in on the organ pipes in back (not the keyboards) and use the Burner to fix them.
Zoom in on the keyboards for a minigame.
Look at the "music": each scale represents the development of some object. Press keys with pictures that represent that development, from least to most refined. A correct key will light up its corresponding note in the scale.
Boats:
Raft, rowboat, longboat, galleon.
Evolution:
Amoeba, snail, fish, lizard, horse.
Architecture:
Hut, cabin, house, tower, palace.
Astronomy:
Comet, moon, globe, galaxy.
Light:
Fire, torch, candelabra, lantern, bulb.
Solution
Zoom in on the broken case to the right. Take the Key and the Mallet.
The Cafe—Finding Helen
Go back to the cafe and go downstairs.
Zoom in on the closet door to the right and use the Handle from the embers in the garden corner to open it.
Zoom in on the door again and complete the hidden-object scene for a Saw.
Use the orange, then the glass, with the juicer to make the Glass of Juice.
Use the nut with the goblet to make a crude Bell.
Use the handle with the sawblade to make the Saw.
Go upstairs to the Second Floor. Zoom in on the painting.
Use the Wet Sponge (from the table "upstairs" and the water at the bar on the first floor) to clean the painting. Use the Mallet from the nave of the church to smash the glass.
Enter the passage. Zoom in on the misplaced brick in the wall on the left. Click the brick and take the Wedge and the Golden Sign (1/5) from the cache.
Zoom in on the steps. Use the Saw from the closet on the first floor to set a trap.
Zoom in on the door to talk to Helen. Use the Crane from the hidden-object scene in the garden corner with the mechanism to the right to open the door.
Watch the cutscene. Zoom in on the fallen Templar. Click the wreath and take the Crucifix.
Go upstairs. Zoom in on the broken window. Use the Ladle from the dovecote in the garden corner with the rainspout on the left to fill it.
Zoom in on the fireplace and take the Crossbow.
The Cemetary
Leave the cafe and go back to the central nave of the church.
Zoom in on the confession booth and use the Crucifix with the cross-shaped slot. Open the compartment and take the Gasoline.
Go outside and zoom in on the scooter. Click the gas cap on the right. Use the Gasoline with the hole and use the Key from the case in the nave with the padlock. Enter the gate.
Zoom in on the madman to talk to him and get the Anesthetic Gel.
Try to head down the right path. Use the Ladle (from the dovecote in the corner garden, filled with water from Helen's room at the cafe) on the fire, then continue down the path.
Use the Crossbow from Helen's room with the cannonball-head of the statue, then take the Cannonball.
Zoom in on the path leading up on the left side. The gargoyle will try to zap you if you try to pass. Use the Stone Eye from the hidden-object scene in Room 12 of the hotel with the gargoyle, then click the door.
The Tomb
Enter the now-open door. Go down the stairs to the right.
Take the Whip hanging from the torch.
Zoom in on the left wall and use the Wedge from the cache in the secret passage at the cafe to start a minigame. Drag the wedges the holes in the wall to complete the math problems.
There are no equal signs, the symbols might not be in the right order, and while some rows might have more than one possible solution, only one will be accepted.
When you have a proper solution, the crack in that row grows wider.
Solution
When you solve all the problems, you gain a Chisel.
Zoom in on the stool to the right of the statue. Use the Chisel and get the Stool, now properly carved.
Go upstairs and zoom in on the ballista, to the left of the open sarcophagus.
Use the Cannonball (from the statue in the cemetery), then the Whip and carved Stool (both from the monastic cells downstairs), then the Scythe blade (from the churchyard).
Zoom in on the smashed wall and complete the hidden-object scene for a Bellows.
Use the brush with the pile of dust to find the Owl.
Use the chisel with the rock, then the moon with the sun for the Sun and Moon.
Screenshot
Key to the Town Hall Gates
Go to the belfry of the church. Zoom in on the red balloon, below the right window. Use the Bellows from the tomb hidden-object scene with the balloon, then take the Tongs once they fall.
Go back to the tomb. Zoom in on the open sarcophagus and use the Tongs with the chest to open it. Take the black Sword.
Go downstairs and zoom in on the lion statue. Use the black Sword to break it, then take the Cross Key.
Go all the way back to the square and zoom in on the gate. Use the Cross Key to open the gate, then enter.
Chapter 4: The Town Hall
Entering the Museum
Zoom in on the police car. Click the small video display screen in the center console, then take the Stunner from the open compartment.
Go up the big set of stairs. Zoom in on the box office booth to the left. Click the tray of coins to the right of the table, then take the Ticket.
Go back, then zoom in on the door in the turret atop the smaller stair. Use the Ticket with the machine and pull the handle. Enter the open door.
The Museum
Zoom in on the desk on the far right and take the Yo-Yo.
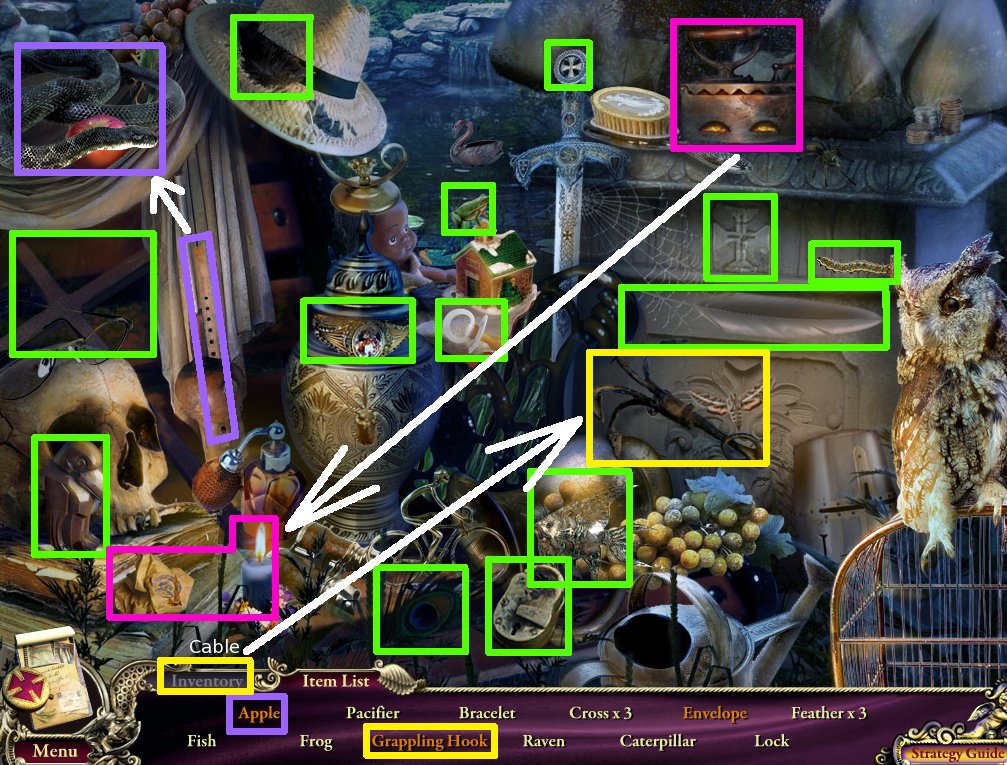
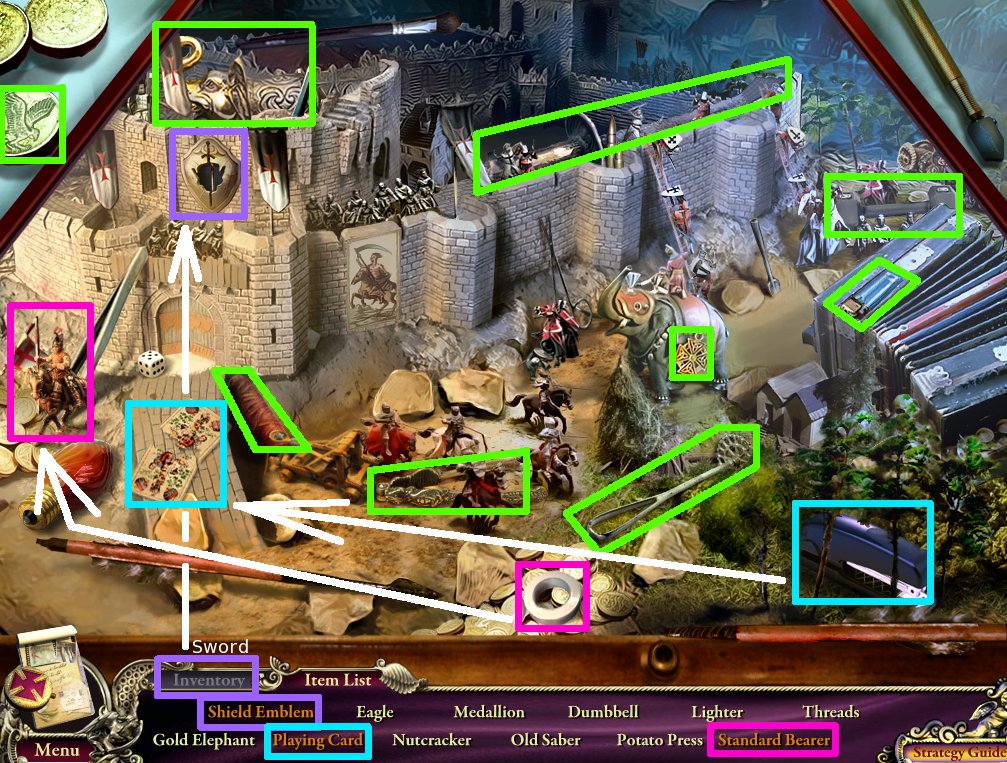
Go forward through the door. Zoom in on the open, octagonal display case in the middle of the room and complete the hidden-object scene for an Elephant.
Use the tape with the broken flag to make the Standard Bearer.
Use the stapler with the torn card to make the Playing Card.
Use the Sword from your inventory (the one from the sliding-tile puzzle in Room 12 of the hotel) with the slot to make the Shield Emblem.
Screenshot
Zoom in on the knight exhibit to the left. Use the Stunner from the police car in the crossroads outside with the panel to disable the electric field, then take the Spear from the knight.
The Flooded Streets
Go back outside and down the street to the left, under the bridge.
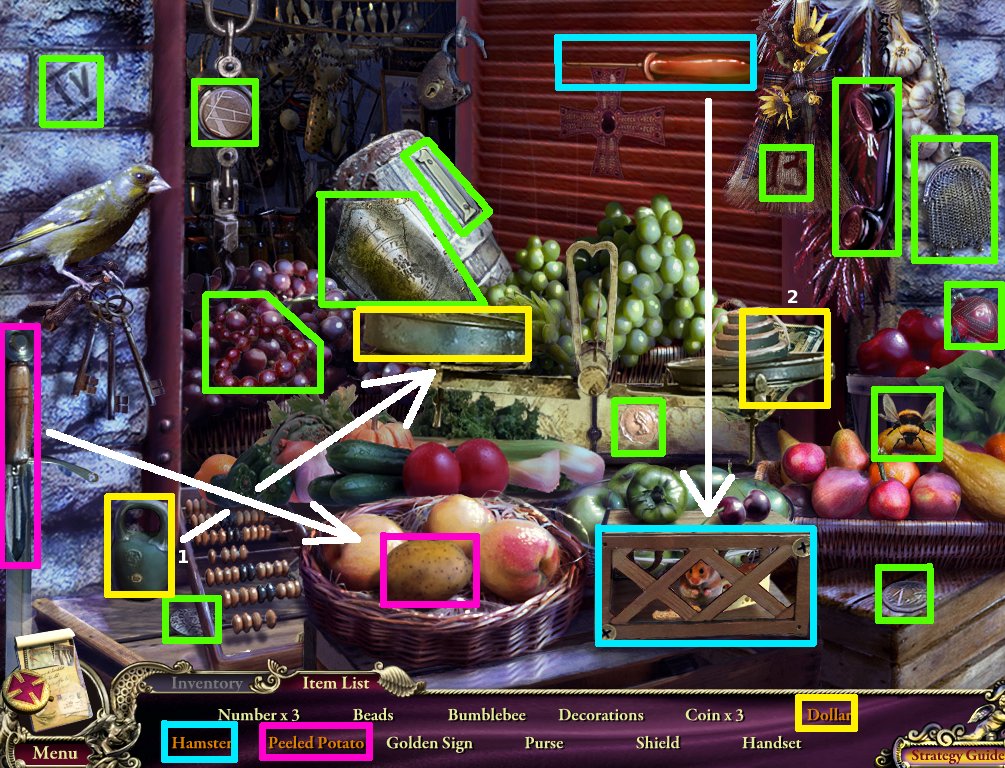
Zoom in on the market stand to the left. Complete the hidden-object scene for a Golden Sign (2/5).
Use the peeler on the potato to make a Peeled Potato.
Use the weight on the left side of the balance to reveal the Dollar.
Use the screwdriver with the cage to get to the Hamster.
Screenshot
Zoom in on the lantern hanging above the explosive drums. Use the Yo-Yo from the museum on the lantern, then enter the doorway.
Restoration House
Take the Rubber Hose from near the cauldron on the right side.
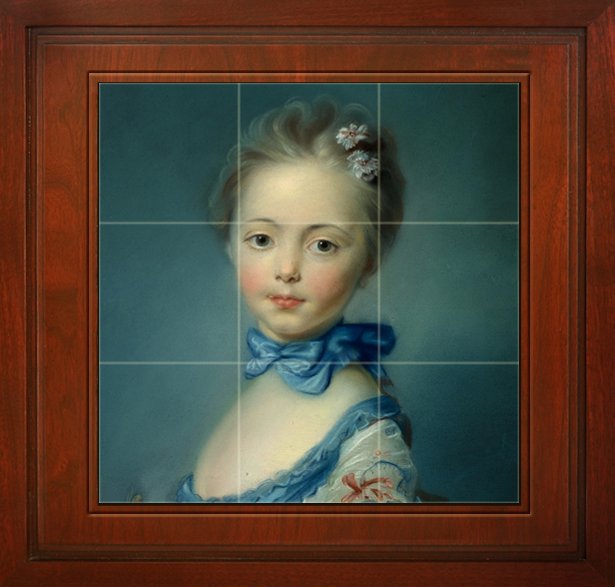
Zoom in on the shelf behind the ladder on the right. Complete the minigame by clicking the squares so they complete the portrait. Take the Circular Saw.
Solution
Go back outside and to the front hall of the museum. Zoom in on the iron maiden in the back. Use the Circular Saw on the bands and take the flask of liquid Nitrogen.
Go back down the street and into the restoration house. Zoom in on the diving helmet to the left. Use the Nitrogen on the fasteners, then take the Diving Helmet.
Now that you have a means of breathing underwater, go downstairs to the flooded ground floor. The stairs are behind the chair and statue to the right.
Take the Clapper from the right side of the screen.
Zoom in on the desk in the back and take the Glass Cutter.
The Town Hall
Go back to the crossroads and up the large stairs. Zoom in on the window near the statue to the right. Use the Spear with the red button to open the doors to the town hall.
Enter the open doors. Zoom in on the red case on the chair in the lower right corner. Click the case, then take the Medical Tape.
Zoom in on the little stage at the back of the hall for a series of minigames.
The goal is set all the pieces in each scene in the proper way. Pulling the cord on the left shows you how the scene should look. Pull it again to work with the scene.
The top two buttons lower into each scene the props and characters, respectively.
Click on a prop or character to select it. The top lever moves the selected prop or character, while the middle lever rotates it.
The bottom lever changes the background. I recommend matching the background before hitting the top two buttons.
Make sure you not only have each prop and character in the right place, but also in the right location. Also, for the third scene, I found that I needed to switch the background, even though it looked like it was set properly.
1st Solution
2nd Solution
3rd Solution
Take the Emblem 1. Enter the door upstairs. Watch the cutscene. Talk to the mayor.
Zoom in on the fallen knight. Use the Anesthetic Gel on the wreath on his head, then take the Wreath (1/3).
Zoom in on the cabinet near the mayor and take the Corkscrew.
Zoom in on the fireplace on the left and finish the hidden-object scene for a Golden Sign (3/5).
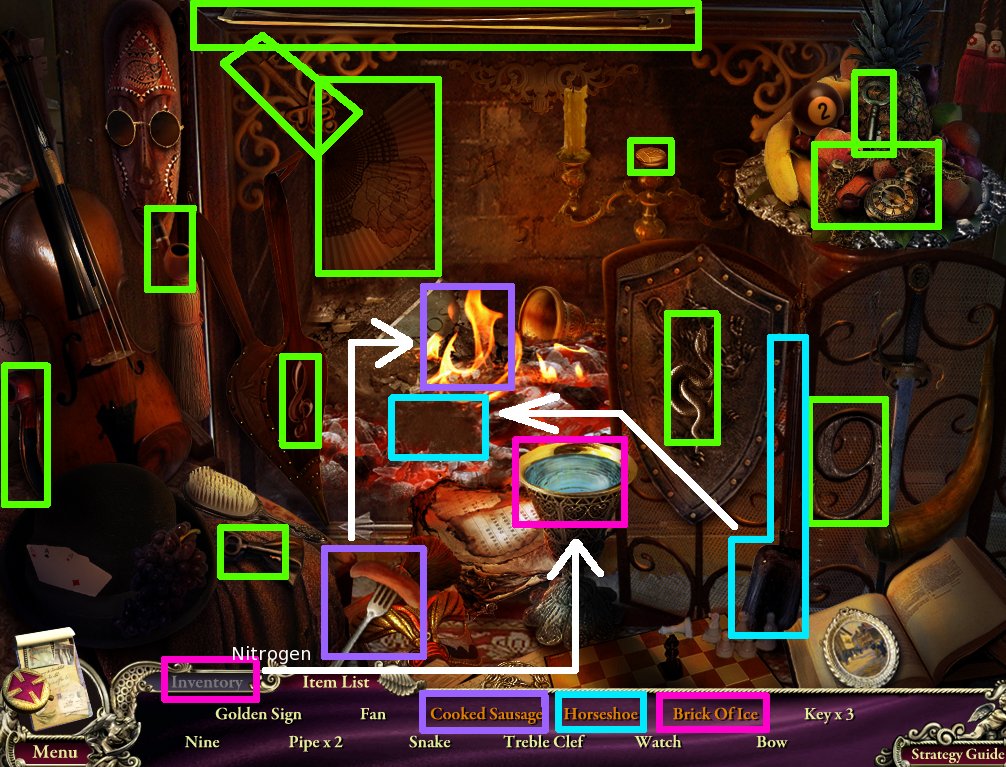
Put the sausage over the fire to make the Cooked Sausage.
Use the shovel in the fire to reveal the Horseshoe.
Use the Nitrogen from your inventory (from the iron maiden in the museum) with the water goblet to get a Block of Ice.
Screenshot
Making the Raft
Leave the town hall and head to the main hall of the museum (i.e., the back room).
Zoom in on the case along the back wall. Use the Glass Cutter from the flooded room in the restoration house, then take the Broken Oar.
Go back down the streets and to the flooded ground floor of the restoration house.
Zoom in on the plant and use the Broken Oar with the pole and take the Paddle.
Go outside to the flooded streets. Take the blue Barrel from in front of the scooter.
Zoom in on the green barrel floating in the street. Use the Barrel and Paddle, then use the Rubber Hose from the restoration house.
The Dam
Now that you have a crude raft, go further down the street.
Zoom in on the shield near the raft and take the Golden Sign (4/5).
Zoom in the green machine. Use the Medical Tape from the town hall, then complete the minigame.
Complete a path from the bottom left corner to the center of the screen. The steps must alternate red-blue-yellow-green.
Click an arrow to change the direction of the path. Press the red button to test the path.
Solution
When successful, the mechanism above the green machine will be activated. Zoom in on the mechanism and flick the switch. Continue up the path.
Watch the cutscene. Take the Pipe Wrench, hiding behind the right railing.
Zoom in on the gear mechanism, near where the Pipe Wrench lay, and take the Trowel.
Zoom in on the green water flowing from the broken pipe. Use the Nitrogen to freeze it.
Zoom in on the pile of junk behind the pipe and take the Book.
Go back down the path. Zoom in on the shield again and take the Wreath (2/3).
Getting the Key and the Ruby
Go back down the flooded streets, then head for the mayor's office. Zoom in on the cabinet he is standing next to and use the Book with the space between the other two books. Take the Letter Opener from the cache that opens.
Go back to the main stairs of the town hall. Zoom in on the portraits in the upper left corner. Use the Letter Opener on the middle portrait, then take the Key.
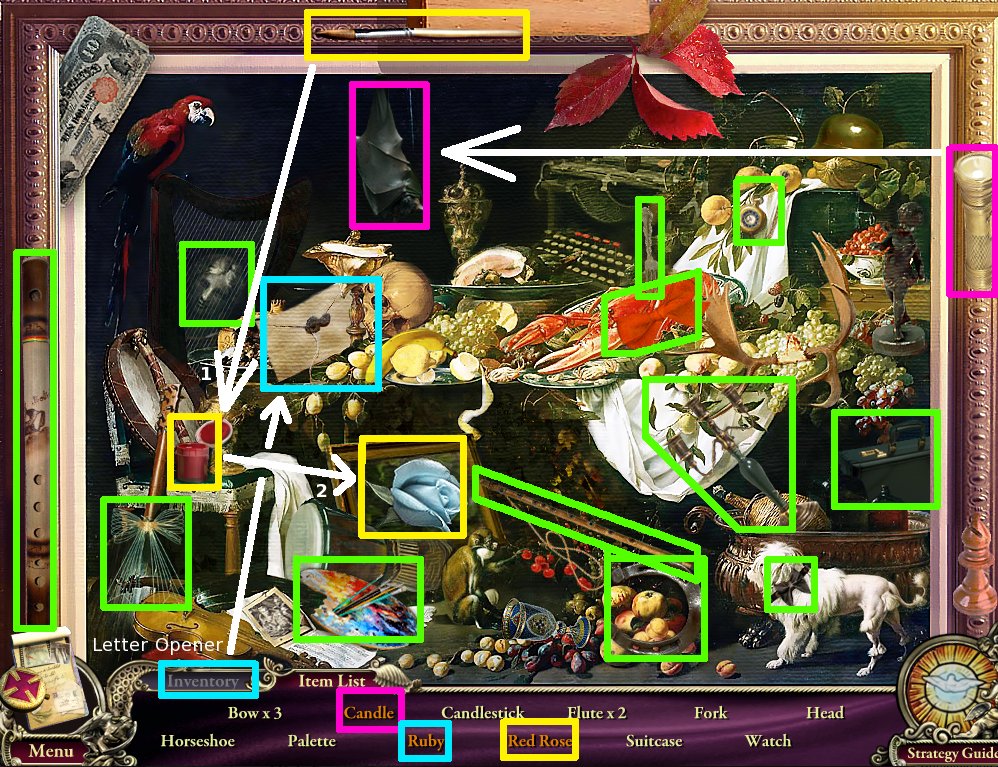
Go back to the restoration house, near the flooded streets. Zoom in on the painting on the easel on the left.
Complete the hidden-object scene for a Ruby.
Use the brush with the red paint, then the picture of the white rose to make the Red Rose.
Use the flashlight on the bat to reveal the Candle.
Use the Letter Opener from your inventory (from the mayor's office) with the envelope to find the Ruby.
Screenshot
Go down to the ground floor and zoom in on the floating case. Click the latch to open it, then use the Trowel from the dam on the emblem. Take the Emblem 2.
Secret Museum Room
Go back outside and return to the front hall of the museum. Zoom in on the iron door to the left and use the Key from the portrait in the town hall.
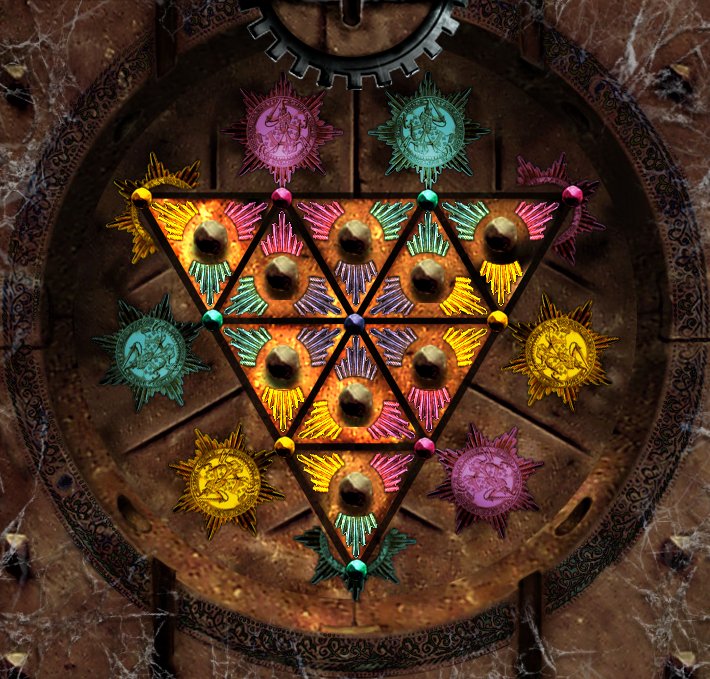
Complete the minigame by clicking each triangular panel to rotate the colored stones around them.
The goal is to match the stones with the colored backgrounds. Focus on the corners first, then the middle sections, for the easiest solution.
Solution
Enter the open door. Zoom in on the skulls embedded in the back wall on the left side. Use the Ruby from the hidden-object scene in the "third eye" of the skull. Take the electronic Lockpick.
Leave the museum and go up the stairs to the town hall yard. Zoom in on the crashed helicopter to the left of the town hall building.
Use the Lockpick with the slot on the right. Complete the minigame by lighting all the squares.
This puzzle may be different from similar puzzles you have seen before, in that clicking a square will switch it and all the squares neighboring it, including the diagonal ones.
Two strategies for solving this: Either try to make a "single L" (e.g. light up the left column and bottom row, or the right column and top row), then clicking the middle of the unlit squares. Or, try to make a "double L" (e.g. light up the 2 bottom rows and 2 right columns), then click the one corner square that is unlit.
Click to open the hatch, then take the Golf Club.
Go back to the secret room in the museum. Zoom in on the fan in the ceiling and use the Golf Club to stop it.
Zoom in on the tiles in the rock to the right of the stairs that are now lit up. Use Emblem 1 (from the mechanical theater in the town hall) and Emblem 2 (from the case in the flooded ground floor in the restoration house) in the slots. Take the Golden Sign (5/5).
Town Hall Secret Room
Go back to the mayor's office. Zoom in on the map behind the desk.
Use all the Golden Signs (from the secret passage in the cafe, the hidden-object scene in the flooded streets, the hidden-object scene in the mayor's office, the riverbank at the dam, and the secret room in the museum) on the map to start a minigame.
Move the discs so they line up with the map. They will glow and lock into place when you have positioned them correctly.
Solution
Go through the secret door that opens. Take the Pickax from the corner of the platform you are standing on.
The Dam and the Altar
Go back to the flooded street, then to the top of the ruined dam.
Zoom in on the broken pipe and freeze the water with the Nitrogen from the iron maiden in the museum, if you haven't already. Then use the Pickax from the secret room in the mayor's office.
Zoom in on the pipe again and complete the hidden-object scene for a Wooden Statue.
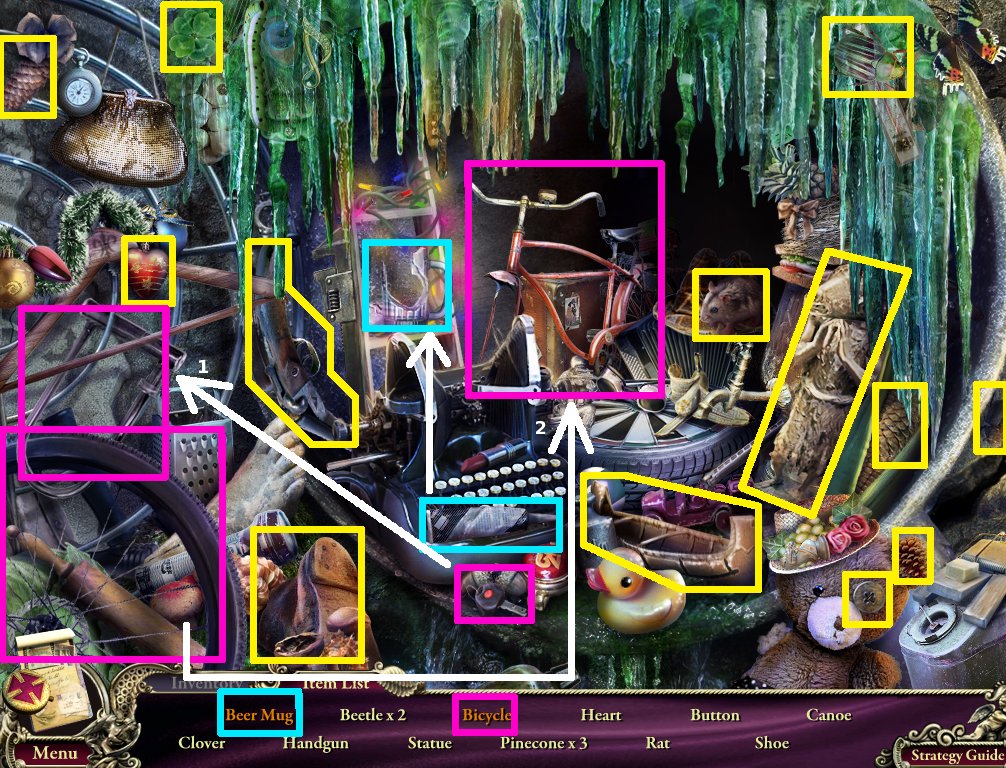
Use the key with the bikelock, then drag the wheel to the Bicycle to fix it.
Use the glue with the Beermug to fix it.
Screenshot
Go back to the museum. Zoom in on the guillotine on the left. Use the Wooden Statue and take the Ring.
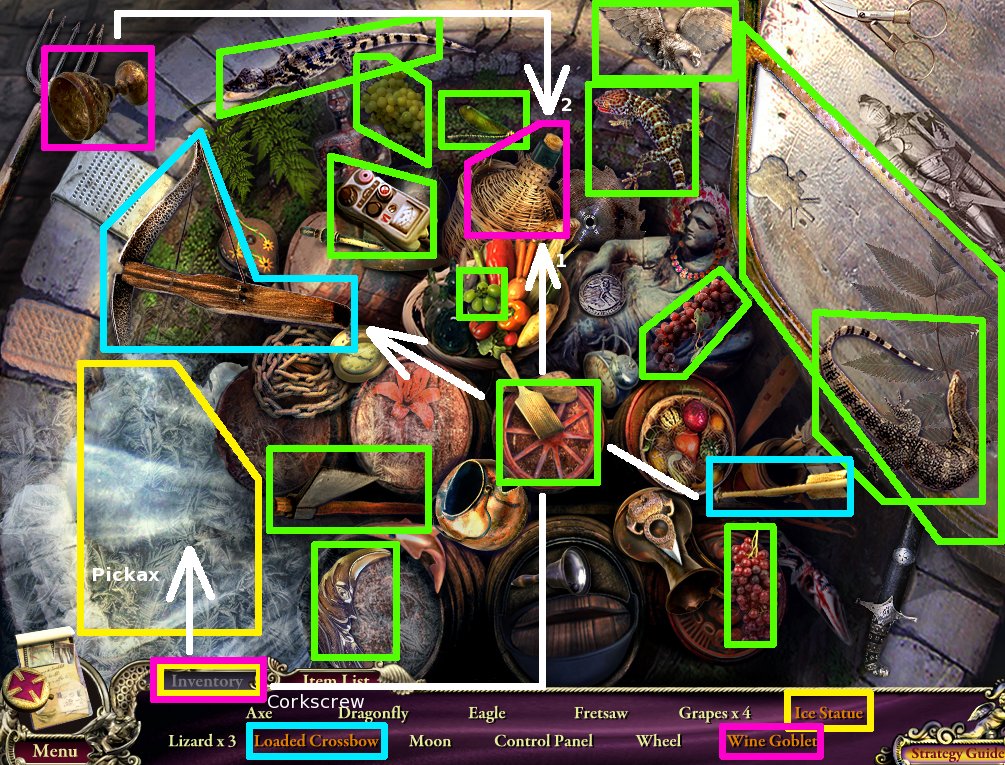
Enter the secret door. Zoom in on the altar and use the Ring on the trapdoor. Complete the hidden-object scene for a Control Panel.
Use the bolt with the crossbow to make a Loaded Crossbow.
Use the Pickax from your inventory with the ice patch to reveal the Ice Statue.
Use the Corkscrew from your inventory (from the cabinet in the mayor's office) with the jug of wine, then use the goblet with the wine for a Wine Goblet.
Screenshot
Showdown
Go back to the clocktower, via the secret passage in the mayor's office. Use the Control Panel (from the hidden-object scene in the secret room of the museum) with the broken clockface, then push the button.
He's got a gun! Use the Elephant (from the hidden-object scene in the museum) on the hook on the right.
Zoom in on the geared mechanical device on the far left side of the screen. Use the Wrench from the dam to activate the device.
Zoom in on the ark (the golden box). You need three wreaths. The first two you got from Carl in the mayor's office, and from the dam, after the madman attacked the other Templar.
If you haven't yet, go back to the cafe to get the third wreath. It's on the head of the fallen knight in the secret passageway. Zoom in, use the Anesthetic Gel, and take the Wreath (3/3).
Once you have all the Wreaths, return to the clocktower, zoom in on the ark, and use all three Wreaths. Watch the cutscene.
Zoom in on the broken window. Take the Bell.
Zoom in on the mechanical device with all the bells. Use the Bell with the empty space. Use the Clapper from the flooded floor of the restoration house with the big bell to fix it.
Complete the minigame by playing the "bell alarm" tune on the bells, using the score. Notes that are lower on the staff correspond to larger bells. When you play the right note, it will be crossed off on the score.
Solution
Watch the cutscene and finish the conversation with the officer. Take the Ark and go back to the crossroads (in front of the museum).
Finish the conversation with Balthazar, then give him the Ark (He seems trustworthy!).
THE END!
Golden Dove Locations
On the bedpost, in the hotel room.
On the piano, second floor lobby.
In the rafters, hotel attic.
On the counter, hotel kitchen.
Under the potted plant on the right side of the screen, back entrance to the hotel.
Atop the garden decoration where the Helmet Mask can be found, church steps.
Zoomed in on the cafe doors, church square.
Zoomed in on the man, hotel restaurant.
Top left corner, dungeon entrance.
Zoomed in on the man, dungeon entrance.
On the ledge on the top-right side of the screen, sewers.
Top right of the screen, abandoned storehouse.
To the right of the chair, hotel reception.
Zoomed in on the key cubbyholes, hotel reception.
On the desk, Room 12.
Zoomed in on the carriage driver, ruins.
Zoomed in on the casket (engraved on the lid), ruins.
Atop the stove, hospital room.
Zoomed in on the keg, abandoned storehouse.
Under the culvert, empty well.
Zoomed in on the sealed steps outside, dungeon exit.
Right side of the screen, wild garden.
Atop the confessional booth, church nave.
In the big tube on the workbench, belfry.
On the red ceiling lamp in the upper left corner, cafe 2nd floor.
On the large broken beam, cafe 1st floor.
Zoomed in on the bar, cafe 1st floor.
Zoomed in on the statue, wild garden.
Lower right corner of the screen, garden corner.
In the middle of the screen, secret passageway of the cafe.
Zoomed inside the confession booth, church nave.
Upper right corner, tomb.
Left side of the screen, monastic cells.
Zoomed in on the lion statue, monastic cells.
Zoomed in on the police car, engraved on the door, crossroads.
At the base of the lamppost, town hall yard.
Zoomed in on the box office, in the wrought iron on top, town hall yard.
Atop the central pillar, Templar museum front room.
Zoomed in on the right table, museum front room.
Atop the central pillar, museum main hall.
Zoomed in on the knight display, hanging from the bridle, museum main hall.
Bottom left corner of the screen, flooded streets.
The pillow on the chair, restoration house.
Perched at the top of the screen on the pipes, restoration house ground floor.
Zoomed in on the security office, on the chair, town hall square.
The emblem at the top of the balustrade, town hall main stairs.
On the desk, mayor's office.
Zoomed in on the cabinet, painted on the door, mayor's office.
Zoomed in on the knight, mayor's office.
In the middle of the step path, river bank.
Zoomed in on the shield, river bank.
The card, zoomed in on the pile of junk near the waterspout, the dam.
Zoomed in on the portraits, town hall main stairs.
The skeleton on the right side of the bridge, secret hall of the museum.
Posted by: Mike |
November 23, 2011 10:14 PM
|
November 23, 2011 10:14 PM