


Redemption Cemetery:
Children's Plight
Platform: Mac, Windows
![]() Do you think you're safe from the denizens of the night just because you turned the light on? Does the warmth of the sun scare away evil just because it's bright and cheery? Think again. As Redemption Cemetery: Children's Plight aims to prove, you're never safe from the demons of this world (or any other world). A follow-up to the first point-and-click hidden object/adventure hybrid from ERS Game Studios, Redemption Cemetery: Curse of the Raven, this installment forces you to ask the difficult question: how the heck am I going to fall asleep tonight after witnessing that?
Do you think you're safe from the denizens of the night just because you turned the light on? Does the warmth of the sun scare away evil just because it's bright and cheery? Think again. As Redemption Cemetery: Children's Plight aims to prove, you're never safe from the demons of this world (or any other world). A follow-up to the first point-and-click hidden object/adventure hybrid from ERS Game Studios, Redemption Cemetery: Curse of the Raven, this installment forces you to ask the difficult question: how the heck am I going to fall asleep tonight after witnessing that?
 Your day starts off with a major bummer: a powerful warlock has recently escaped from his ancient tomb, and he decides the first thing he's going to do is mess with you. You survive the encounter thanks to a helpful crow (a.k.a. a friendly wizard guy), but you were cursed and are now trapped in a cemetery. The only way to get out is to find the warlock and defeat him.
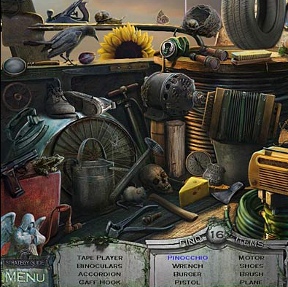
Pointing and clicking are all you'll need to do in this game, so ignore your keyboard and snuggle close to that mouse of yours. The cursor (a skeleton's hand, yikes) changes when you can interact with objects or take a closer look at certain areas, so a few quick swipes across the screen and you'll get a good idea of what you should do next. Puzzles, even though they might be staring you in the face, usually can't be solved until you find certain items, usually by grabbing them in a hidden object scene or finding them laying around the adventure portions of the game.
As for the hidden object scenes, expect a mix of riddle-style items as well as straight-up laundry list searching. Some things you'll have to create or assemble before ticking them off of your list. For example, to find a jack-o-lantern, you'll need to locate a knife, then use it on the pumpkin to carve a nice face into the front. Only then can you collect the item and call it a day!
 Analysis: Did you pick up Redemption Cemetery: Curse of the Raven? Then you know exactly what to expect from this spook-fest of a sequel! A solid four to five hours of gameplay round out the experience, complete with a number of challenging chapters, mini-games, puzzles, and the like. The visuals are superb, the music is quite fitting, and the atmosphere of doom and gloom is excellent, exactly the kind of thing you expect from ERS Game Studio.
Detracting from Redemption Cemetery: Children's Plight's almost pristine exterior is the sad fact that it's structured almost exactly like every other ERS hidden object adventure release. While that list includes some fantastic titles (Grim Facade: Mystery of Venice, PuppetShow: Lost Town, and Haunted Halls: Green Hills Sanitarium, just to name a few), sometimes it's nice to have something different to satisfy that casual hidden object yearning we often have. The spooky/eerie dark and dreary casual adventure game has been done, and while Redemption Cemetery does it extraordinarily well, it doesn't exactly reinvent the casual wheel, so to speak.
Lack of innovation aside, Redemption Cemetery: Children's Plight never fails to entertain. Solid challenge, good length, appropriately creepy story, and excellent visuals packed with fluid animations. It's hard to go wrong with an ERS Game Studio release!
A Collector's Edition is also available. It contains exclusive bonus gameplay, wallpapers, screensavers, concept art, and an in-game strategy guide. Remember that Big Fish Game Club Members pay only $13.99 for Collector's Editions (or 2 club credits), and collector's editions count 3 card punches of 6 total needed for a free game.
![]() Windows:
Windows:
Download the demo
Get the full version
Also available: Collector's Edition
![]() Mac OS X:
Mac OS X:
Download the demo
Get the full version
Also available: Collector's Edition


Walkthrough Guide
(Please allow page to fully load for spoiler tags to be functional.)
Redemption Cemetery: Children's Plight (Collector's Edition) Walkthrough
General Information
At the start of every new game, you have a choice between two difficulty modes: Regular or Expert.
Regular mode includes an optional tutorial at the start of the game, a quicker hint and skip button recharge timer, and interactive zones are highlighted with sparkles.
Expert mode has no tutorial, the hint and skip button takes longer to recharge, and interactive zones are not highlighted.
The mouse is the only tool used to interact with the environment throughout the entire game.
When the cursor changes to a skeletal hand over an item, you can click that item to add it to your inventory.
When the cursor changes to a magnifying glass over an area, you can click the area to zoom in or to start a hidden object scene.
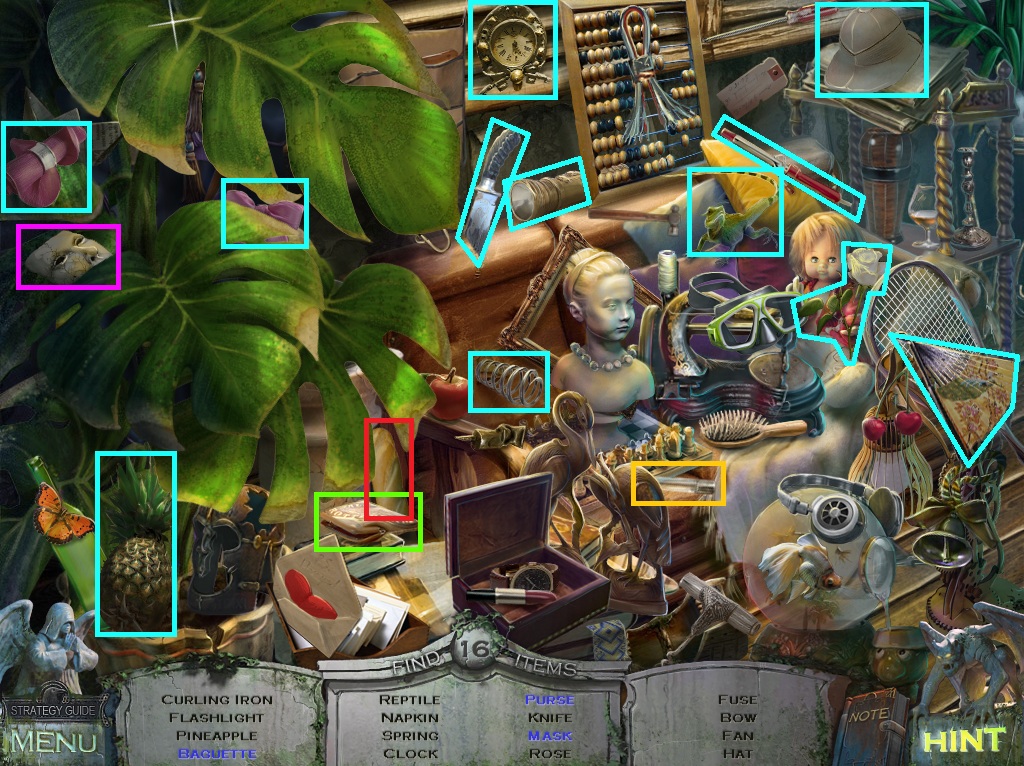
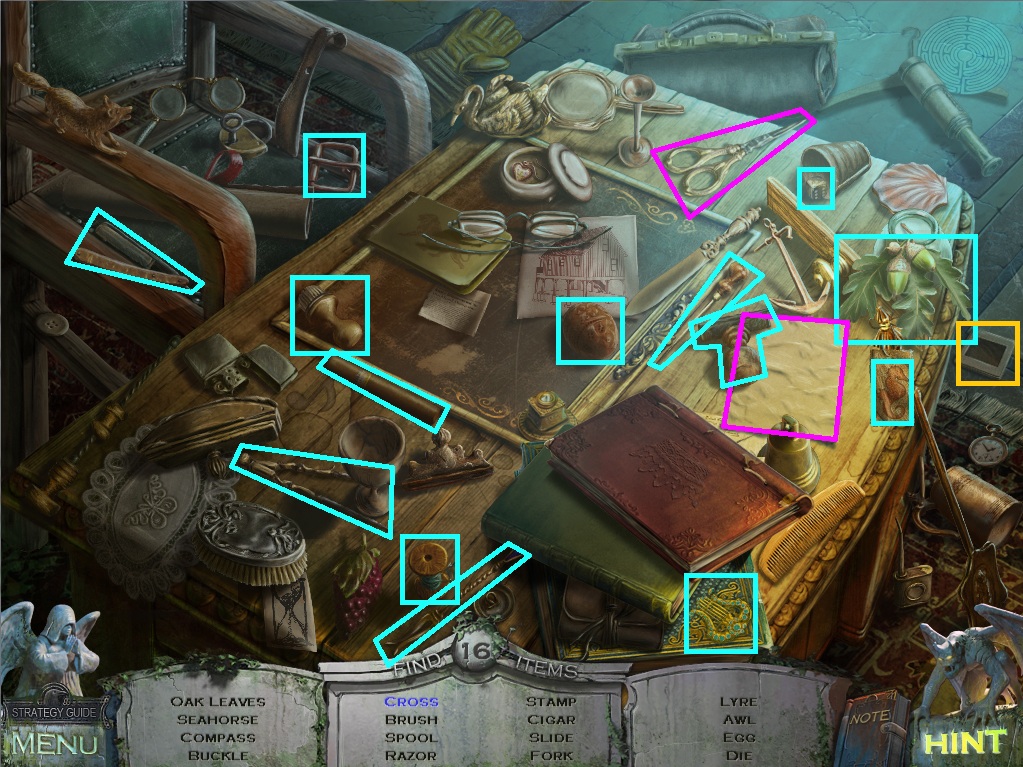
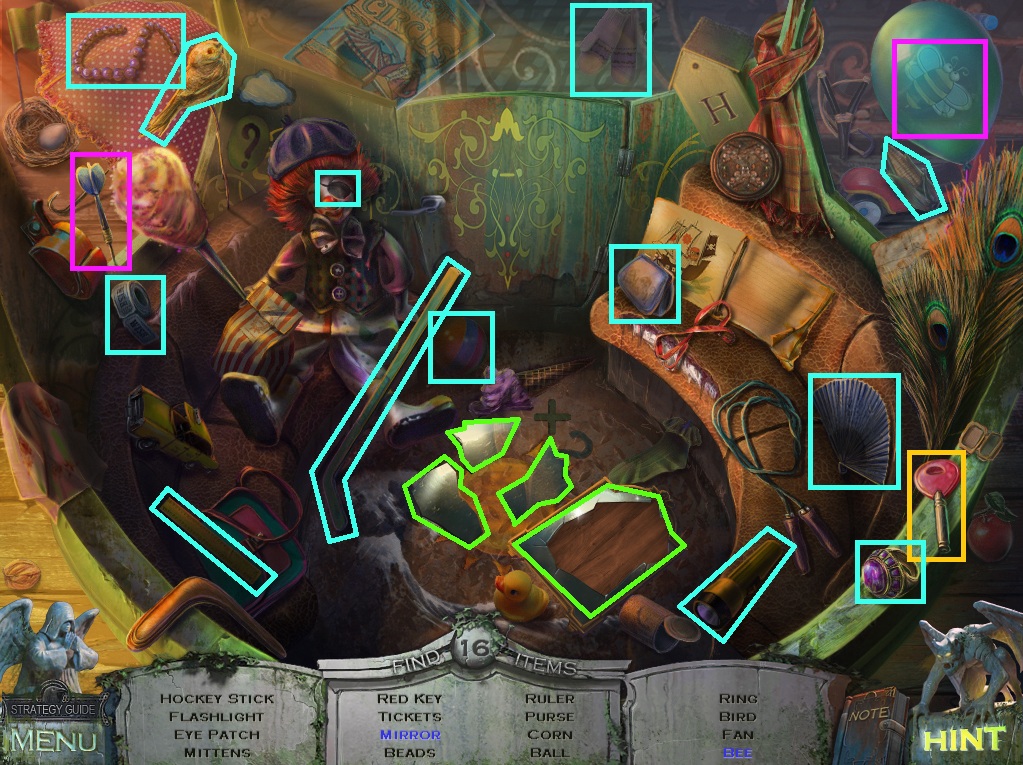
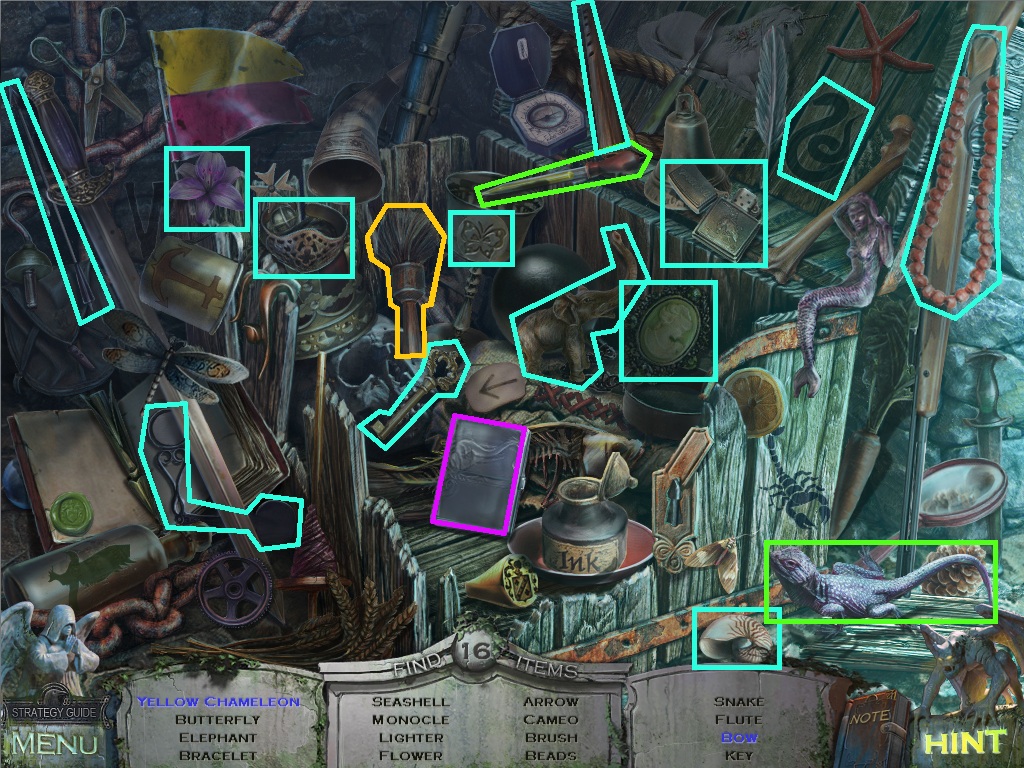
In a hidden object scene, several items that are listed at the bottom of the screen must be collected by discovering and clicking each object from the list in the scene above; these items are indicated with a bright blue border.
In each scene are one or more items which will need to be interacted with before they can be collected. They are indicated in screenshots with either a bright green or purple border.
At the end of every hidden object scene, one of the items will be added to your inventory.
Use the items currently in your inventory by clicking on them in the inventory bar at the bottom of the screen, and, then clicking an interactable area in the environment.
You can toggle through your inventory list by clicking the left and right arrows at the sides of the inventory bar.
To the right of the inventory bar is the Hint button - press this button to get a hint that can reveal the next step in your adventure based on which scene you're at, highlight an item in a hidden object scene, or skip a puzzle entirely.
To the left of the inventory bar is the Menu button; click the menu button to pause the gameplay, access the in-game options, or return to the main menu.
For the Collector's Edition version of Redemption Cemetery: Children's Plight, go to the main menu to view the Extras page, where you can access the bonus chapter of gameplay.
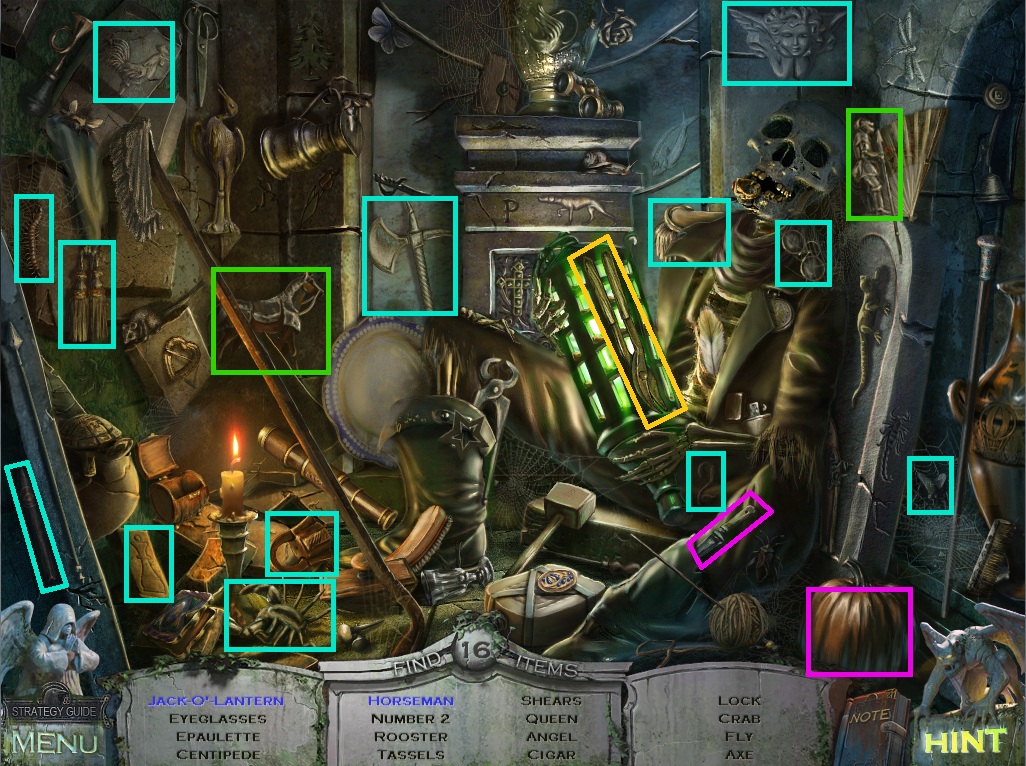
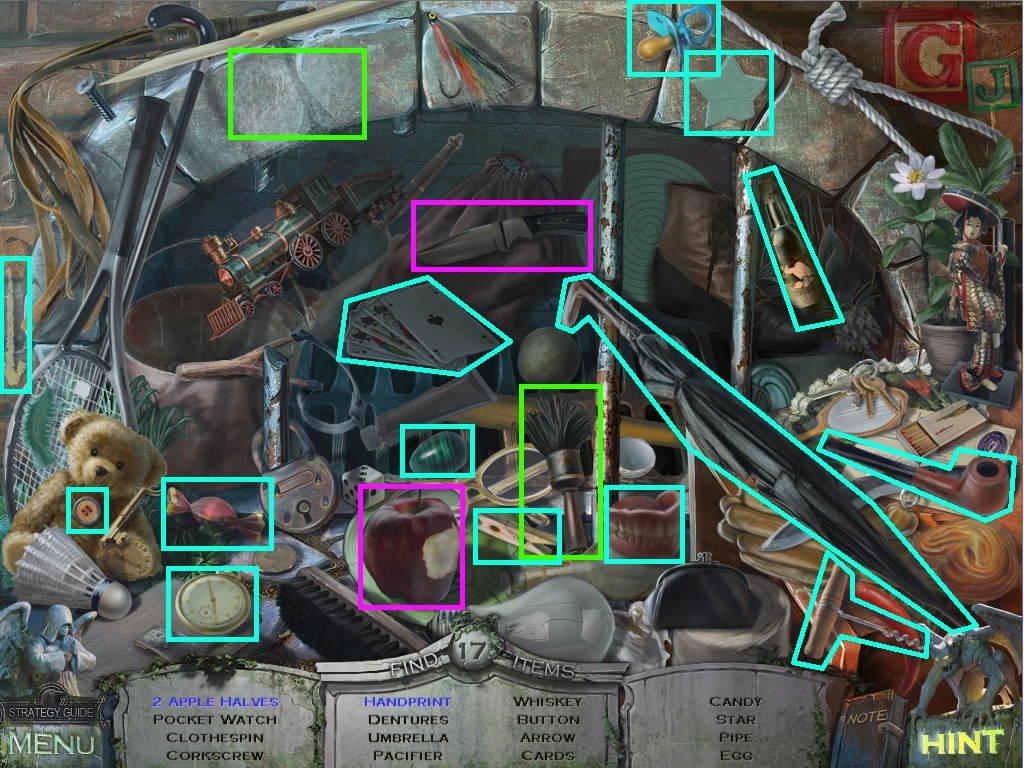
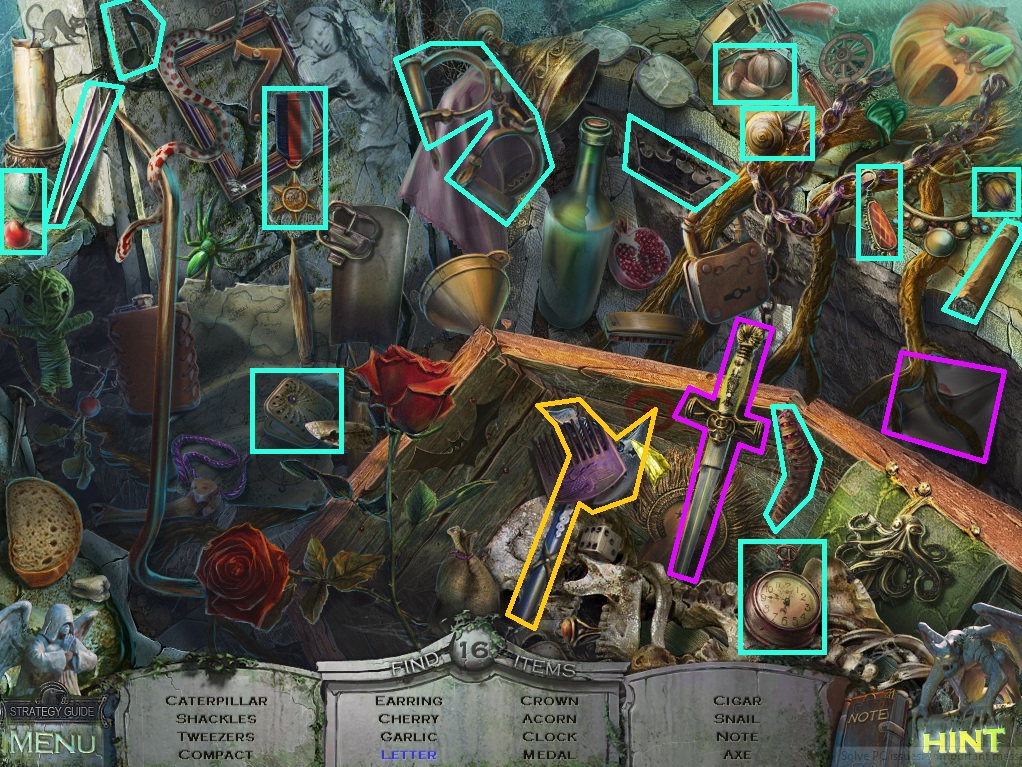
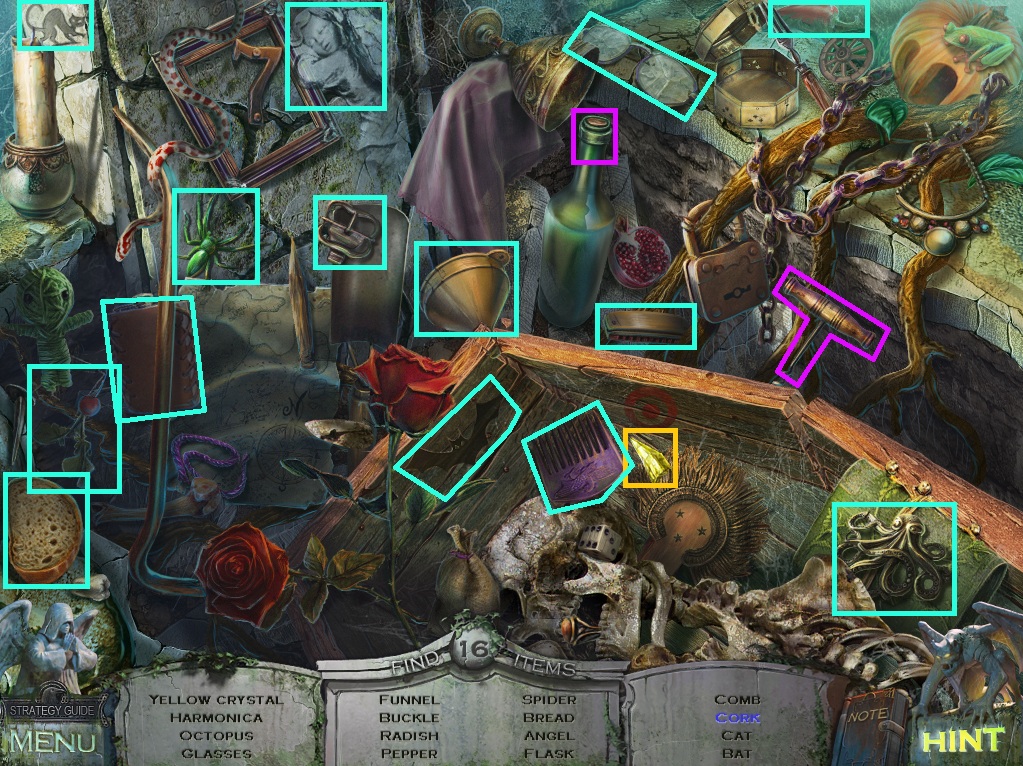
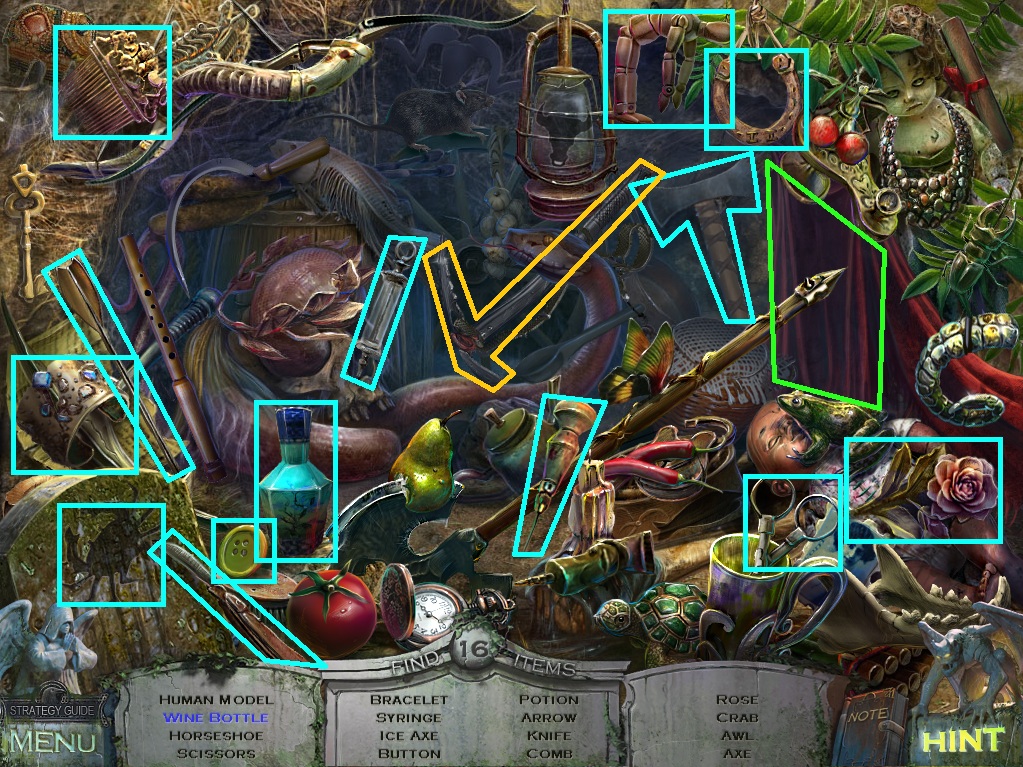
Chapter 1 - Cemetery
Tomb
Take the Rake on the ground to the left of the path.
Click the pile of leaves by the right tombstone under the hill to zoom in.
Use the Rake from your inventory on the pile of leaves to reveal the Sphere.
Click the base of the grim reaper statue for a closer look.
Drop the Sphere into the mouth of the snake carving.
Take the Puzzle Piece from the opened cache.
Click the tomb on the left to zoom in.
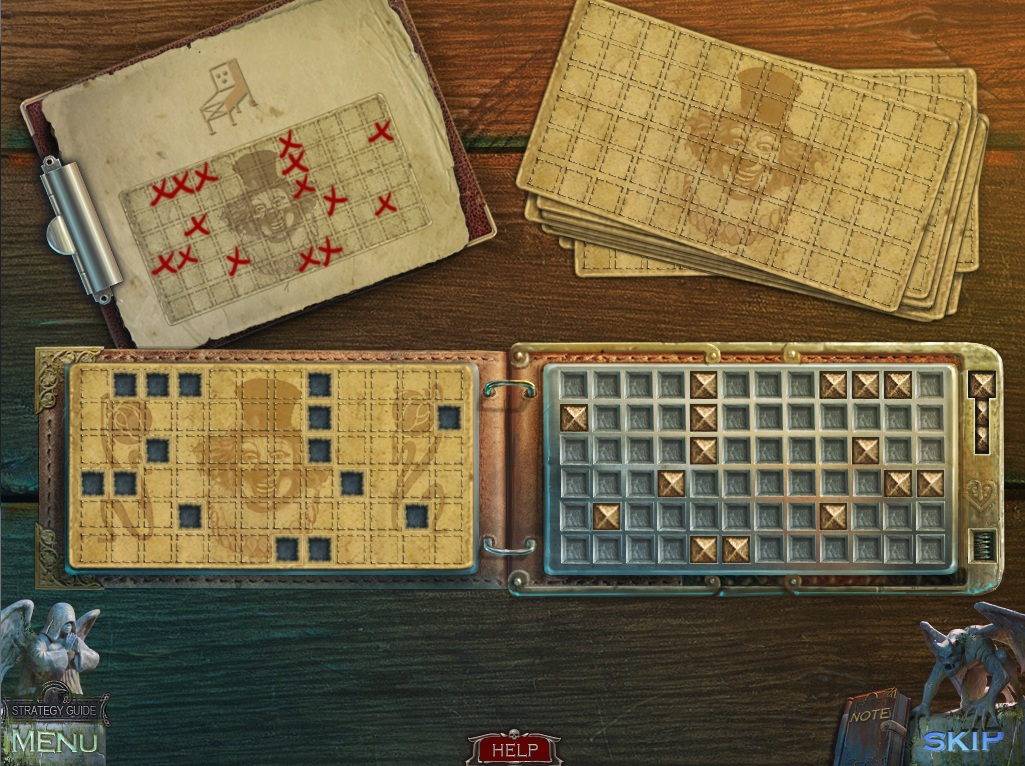
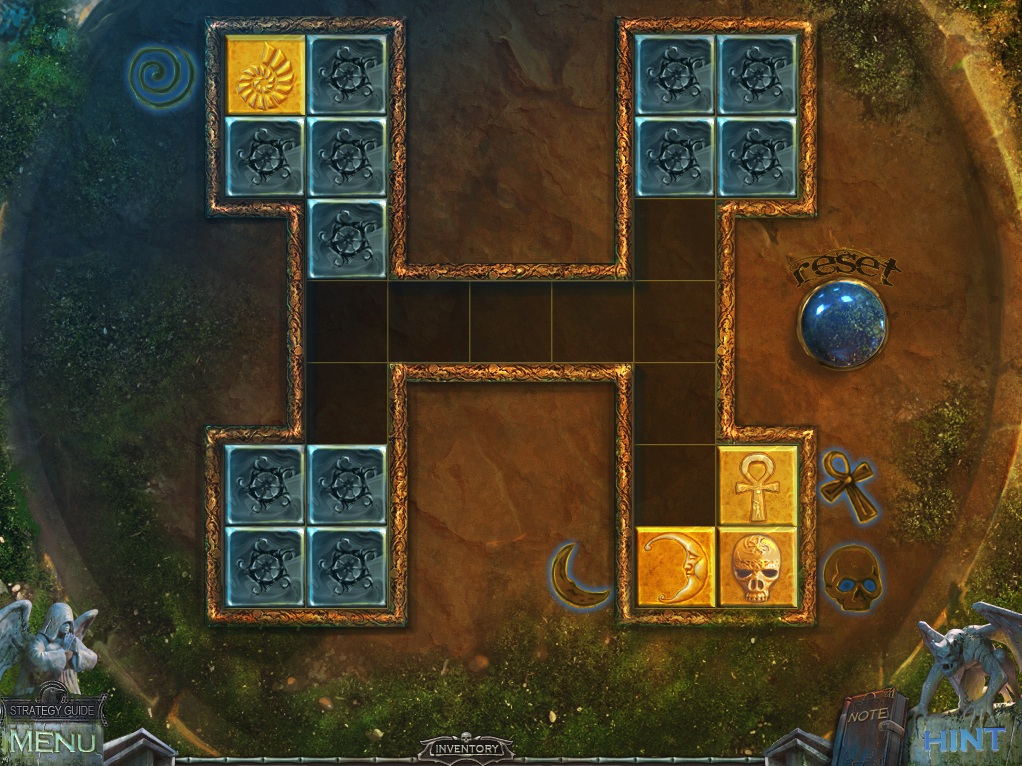
Place the Puzzle Piece into the empty space on the lock to start the puzzle.
To solve this puzzle, rotate the discs into the correct position to complete the image.
Click a skull disc to select it, then click a different disc to swap their positions
Click the up or down arrows beside the skull discs to rotate it clockwise or counterclockwise respectively.
When a disc is in the correct position, it will illuminate and lock in place.
Solution.
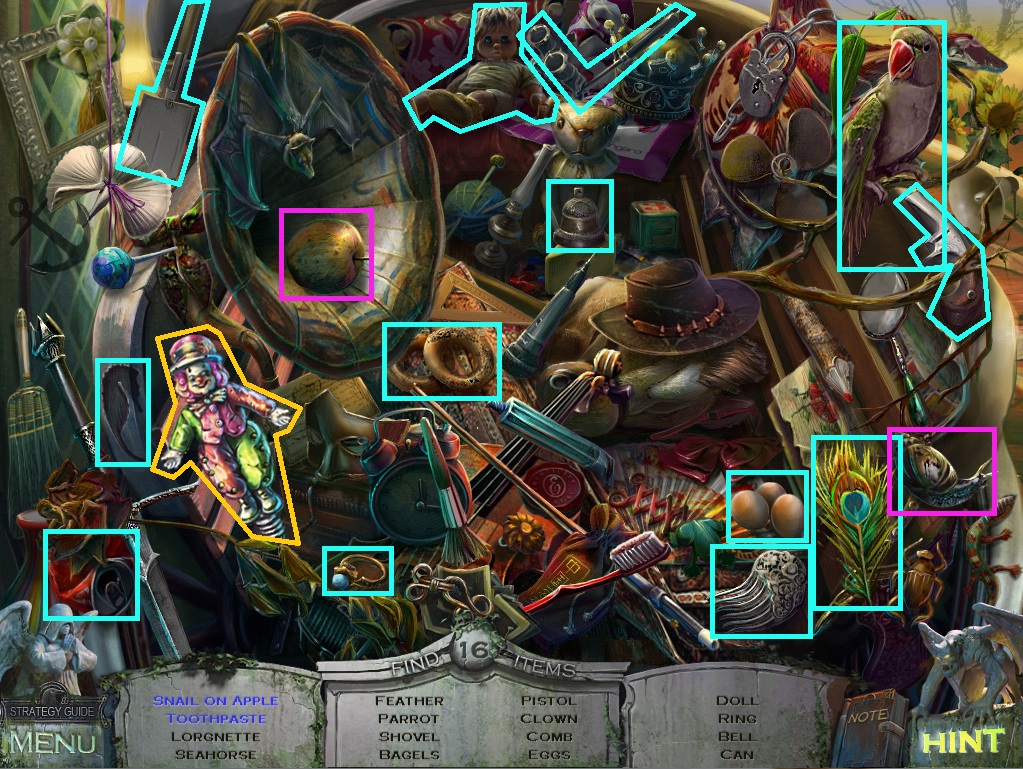
Click the open tomb to start the hidden object scene.
Use the knife on the pumpkin to carve the Jack-O'-Lantern.
Put the knight figurine on the small horse to make the Horseman.
Screenshot.
Once the hidden object scene is complete, you will receive Shears.
Go forward to the cathedral entrance.
Cathedral Entrance
Click the stone slab on the ground for a closer look.
Note the items each head of the cerberus requires.
Click the head of the statue on the left side of the door and take the Empty Bottle.
Click the right gate to zoom in.
Use the Shears from your inventory on the branches blocking the path.
Go right to the statues.
Statues
Take the Noose hanging from the tree branch on the right.
Use the Shears from your inventory to clear the vines away from the two statues.
Take the Trident from the devil statue.
Go back to the cathedral entrance.
Cathedral Entrance
Click the stairs to zoom in.
Use the Trident from your inventory on the three indentations in the step.
Take the Bowl from the opened compartment.
Return to the statues.
Statues
Click the angel statue to zoom in.
Put the Bowl from your inventory into the hands of the angel statue.
Use the Empty Bottle on the angel's tears to receive the Tears of Cerberus
Go back to the cathedral entrance.
Cathedral Entrance
Click the right cerberus head on top of the cathedral door to zoom in.
Put the Tears of Cerberus from your inventory in the space on the nose.
Take the Puzzle Piece from its open mouth.
Click the left gate to zoom in.
Add the Puzzle Piece to the board to start the puzzle.
To solve this puzzle, arrange the pieces so that the blank lock pieces with indentations matching the shape of the four tumblers are aligned.
Click and drag a lock piece to move it along the path. This will also move all the other pieces on the same chain.
When a lock piece is in the correct position, it will connect to the tumbler but can still be moved.
Solution.
Go through the left gate to the graveyard.
Graveyard
Click the crow and take the Hydra Head (1/2) it drops on the path.
Click the pit on the right side of the road to zoom in.
Use the Noose from your inventory to pull the lever.
Note the position of the hydra heads on the plate that covers the pit.
Move left to the Hattman graves.
Hattman Graves
Click Silvia Hattman's tombstone to zoom in.
Take the Hydra Head (2/2) on top of the tombstone.
Click Mary Hattman's tombstone to zoom in and take the Lighter.
Click the twisted roots to the right of Silvia's grave for a closer look.
Click the dirt piles over the skeleton to push it away, revealing the Warhammer.
Go back to the main area of the graveyard.
Graveyard
Click the hydra statue on the stone block to the left of the path to zoom in.
Use the 2 Hydra Heads from your inventory on the empty spaces of the statue.
Turn the heads to match the image of the plate that covers the pit.
Solution.
Take the Scythe Blade from the opened cache.
Return to the cathedral, then go all the way back to the tomb.
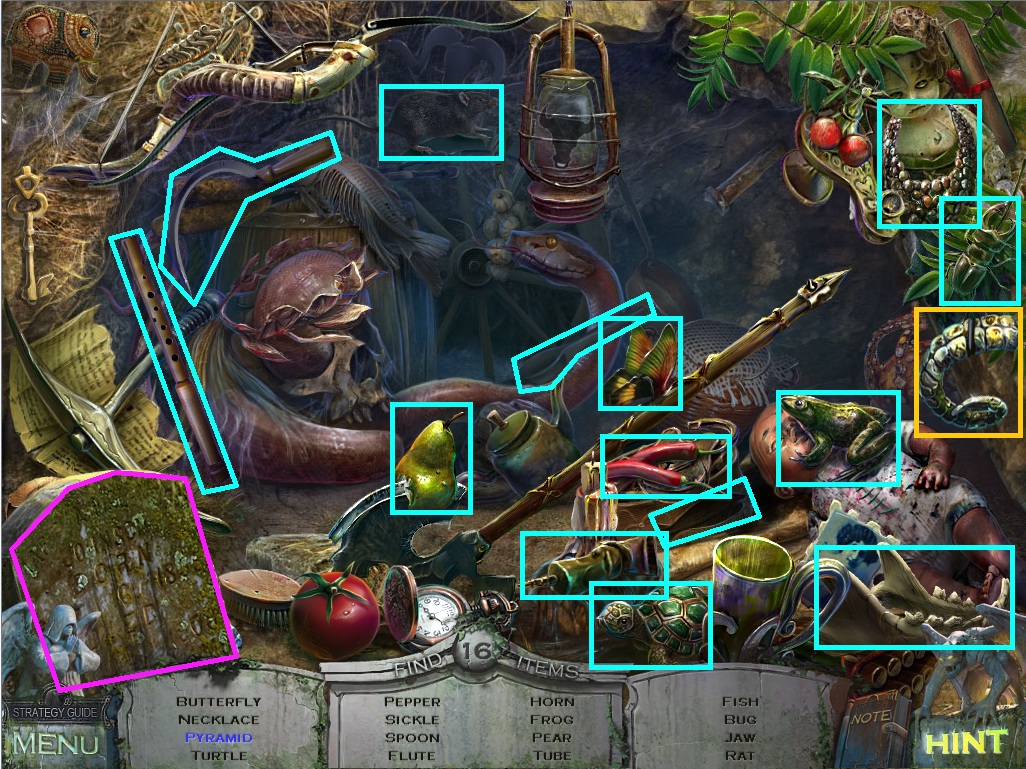
Tomb
Click the tomb to repeat the hidden object scene.
Click the skeleton's head to zoom in to find the Coin.
Use the brush on the plate to reveal the Grapes.
Screenshot.
Once the hidden object scene is complete, you will receive a Needle.
Use the Scythe Blade from your inventory on the staff held by the statue of Death.
Click the head of the statue to zoom in.
Use the Needle from your inventory to pry the Eyes of Cerberus from the face of the statue.
Return to the Cathedral Entrance.
Cathedral Entrance
Click the center cerberus head above the cathedral door to zoom in.
Use the Eyes of Cerberus from your inventory on the eyes of the statue head and take the Amulet Fragment (1/2) from its mouth.
Go right to the statues.
Statues
Click the devil statue to zoom in.
Use the Warhammer from your inventory to smash the devil's chest, revealing the Heart of Cerberus
Go back to the cathedral entrance.
Cathedral Entrance
Click the left cerberus head above the door to zoom in.
Put the Heart of Cerberus from your inventory into the mouth of the statue's head, then take the Gem off the tongue.
Click the cathedral door to start the puzzle.
To solve this puzzle, remove all but 1 skulls on the board by jumping one skull over another.
Click the skull to select it, then drag it over another skull to an empty space on the board.
A skull that has been jumped over will be removed from the board.
Solution steps 1-4.
Solution steps 5-9.
Go through the open door into the cathedral.
Cathedral
Click the king's grave in the back left corner of the room to zoom in.
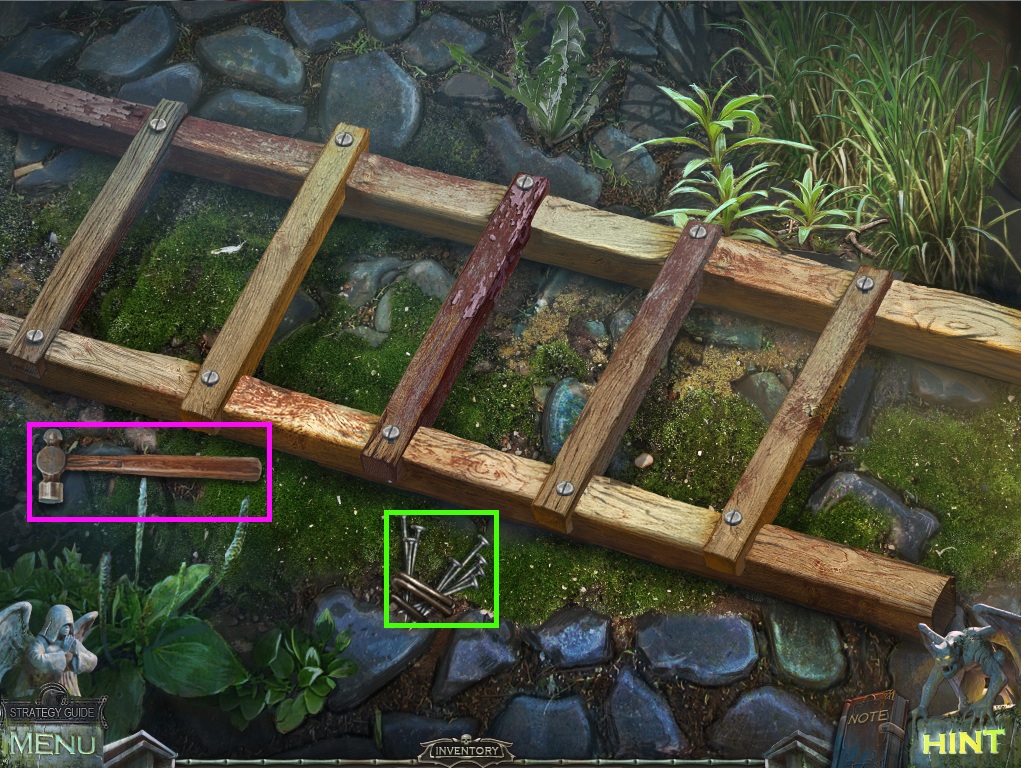
Use the Gem from your inventory on the round space of the engraved coffin lid, then take the revealed Rope Ladder.
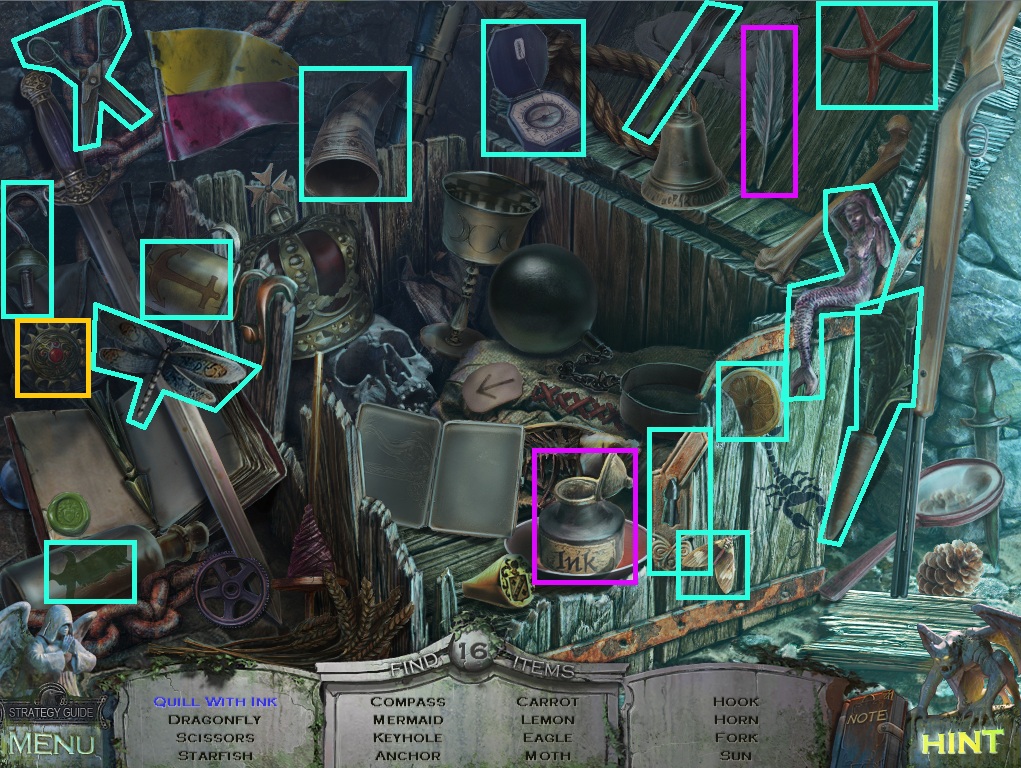
Click the rope by the left gate to draw back the red curtain, revealing a hidden object scene.
Use the wine bottle on the glass to make a Glass of Wine.
Click the knight's helmet to open it, then click it again to zoom in and take the comb.
Screenshot.
Once the hidden object scene is complete, you will receive a Fork.
Click the stone gargoyle to push it across the floor, opening the outer gate.
Use the Fork from your inventory on the gate to hold it open.
Click the gargoyle again to open the inner gate.
Click the right gate to zoom in.
Take the Key and click the chain crank to lift the chandelier.
Click the well for a closer look, then click the little girl.
Take the Amulet Fragment (2/2) on the ground at the lower left side of the well.
Use the rope ladder from your inventory to climb down the well.
Chapter 2 - Through the Well
Well
Use the Lighter from your inventory on the two torches at the left and right sides of the wall.
Click the stone archway in the center to zoom in.
Use the 2 Amulet Fragments from your inventory on the round space in the wall.
Click the gate on the right to zoom in.
Use the Key from your inventory on the square indentation in the lock.
Go through the open gate to the mouth of the cave.
Cave Mouth
Click the crow to send it to the truck.
Click the truck to travel to the cliff.
Cliff
Click the middle striped cement post to view the lock schematics.
Click the cliff to look over the edge.
Take the Saw behind the rope at the top of the cliff.
Click Mary inside the car to speak with her.
Go back to the cave mouth, and, then forward to the crossroads.
Crossroads
Click the power box of the fallen pole to zoom in.
Take the Pump beside the power box.
Go back to the truck at the cliffside.
Cliff
Click the rear right tire of the truck to zoom in.
Use the Pump from your inventory four times to inflate the tire.
Click the satchel under the tire to zoom in and take the Screwdriver and the Wrench.
Click the back of the truck for a closer look.
Use the Saw from your inventory on the rusty latch.
Click the bed of the truck to start the hidden object scene.
Add the blade to the handle to make the axe, then use the axe on the block of wood to carve the figure of Pinocchio.
Screenshot.
Once the hidden object scene is complete, you will receive the Gaff Hook.
Go back to the cave mouth.
Cave Mouth
Click the corpse hanging from the electric pole to zoom in.
Use the Gaff Hook from your inventory to pull down the bag wrapped over his shoulder.
Click the bag to look inside and take the Pincers and Keys.
Click the pole on the far left to zoom in.
Use the Pincers from your inventory to cut through the wire and take the Magnet.
Return to the crossroads.
Crossroads
Click the power box on the fallen pole to zoom in.
Use the screwdriver from your inventory on the screws in the four corners of the box.
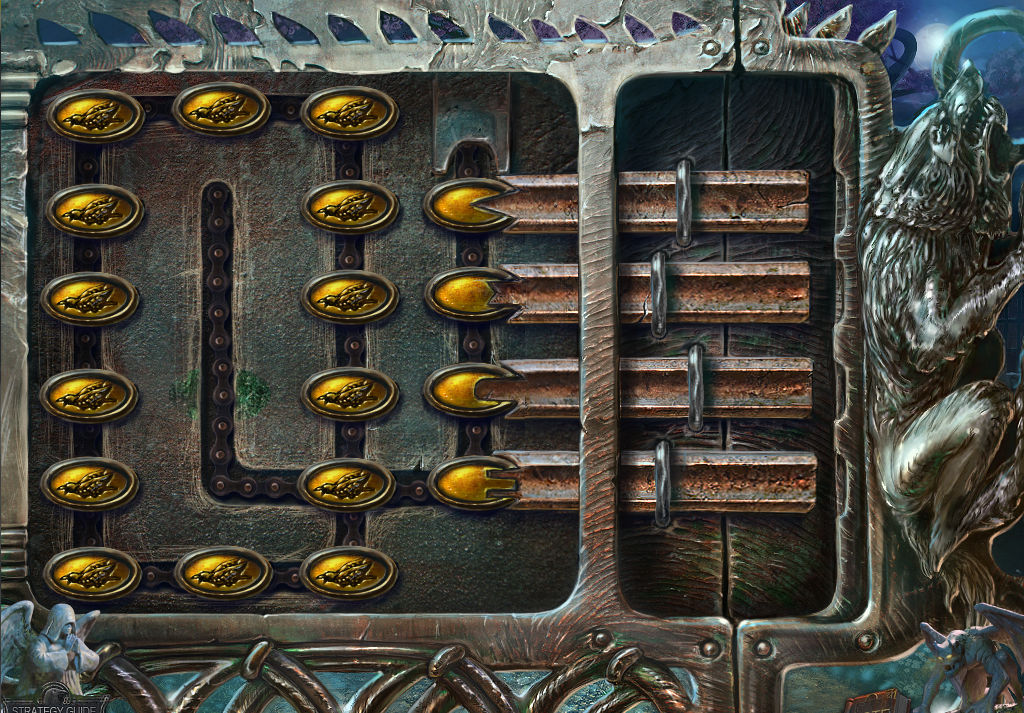
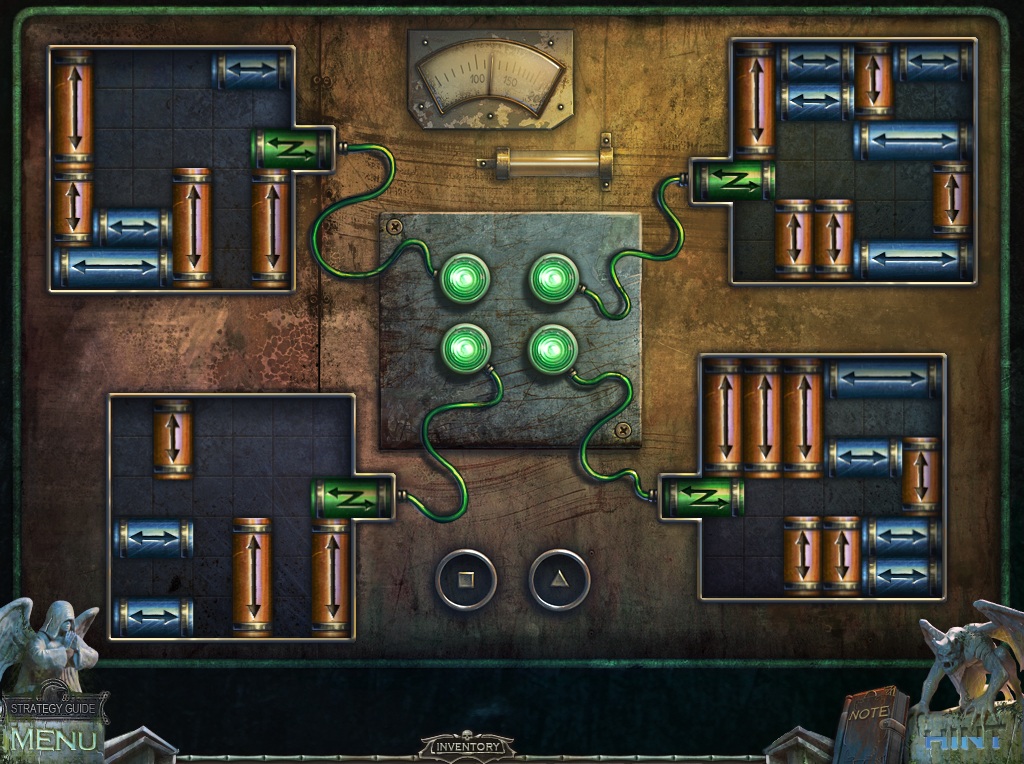
Open the box and click the panel to start the puzzle.
To solve this puzzle, arrange the fuses so that none of the paths of electricity cross.
Click a fuse to select it, then hold and drag it to a socket to set it in place.
Solution.
Click the mailbox on the right sidewalk to zoom in.
Click the mailbox again to open it and take the Key.
Take the Ladder under the power line, to the right of the caution tape.
Click the building in the center of the crossroads to start the hidden object scene.
Put the cherry on the cupcake to make a Cherry Cupcake.
Use the swatter on the fly to make it a Dead Fly.
Screenshot.
Once the hidden object scene is complete, you will receive a Bear.
Click the shaft in the center of the caution tape to zoom in and take the Horse.
Go back to the cliff.
Cliff
Click the bed of the truck to repeat the hidden object scene.
Put the red maple leaf on the flag to make the Canadian Flag.
Click the tire to look inside and take the Feather.
Screenshot.
Once the hidden object scene is complete, you will receive an Angel.
Click the door to the truck to zoom in.
Push the button on the lock, then use the Keys from your inventory to unlock the door.
Turn the key to open the door, then click the seat to look inside the truck.
Take the Electrical Tape on the dashboard.
Return to the crossroads.
Crossroads
Click the door to the building on the right to zoom in.
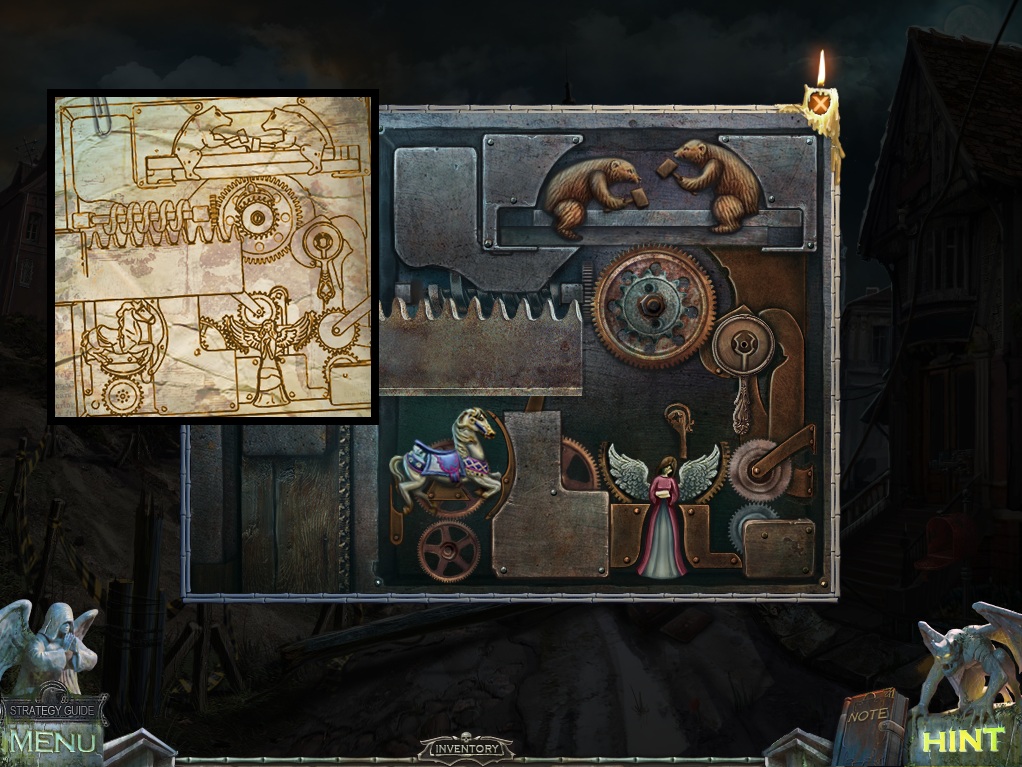
Place the Angel, Horse, and Bear figurines from your inventory onto the lock mechanism, matching the picture found on the note at the cliff.
Screenshot.
Go through the open door into the general store.
General Store
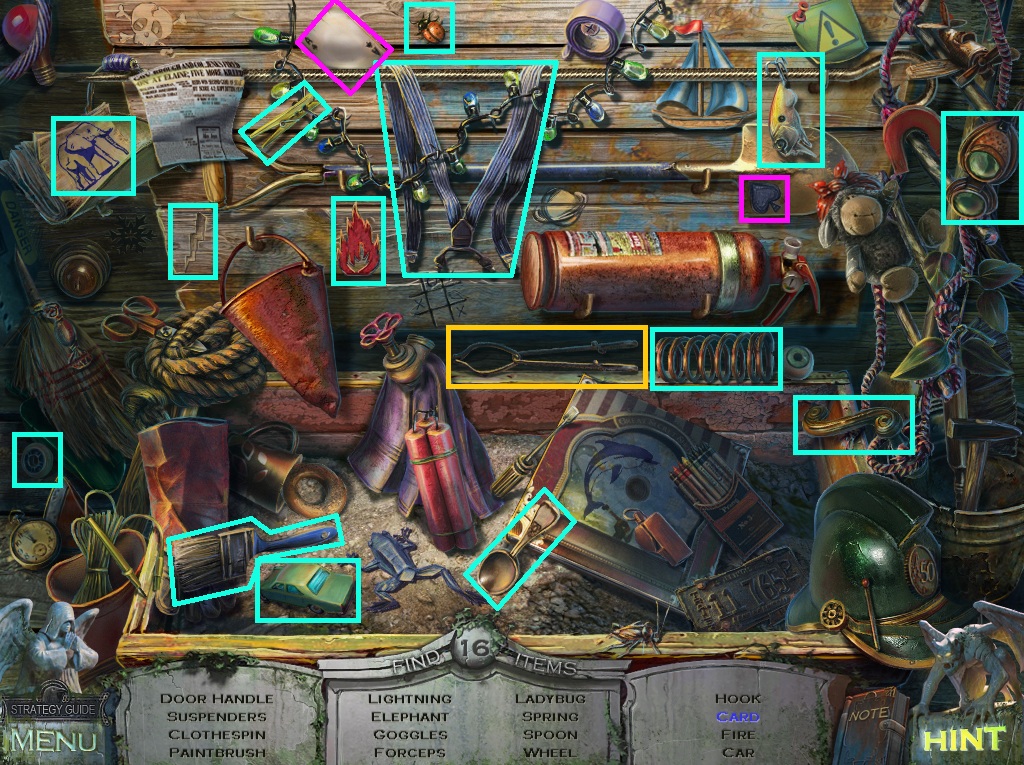
Take the Pickax leaning against the counter.
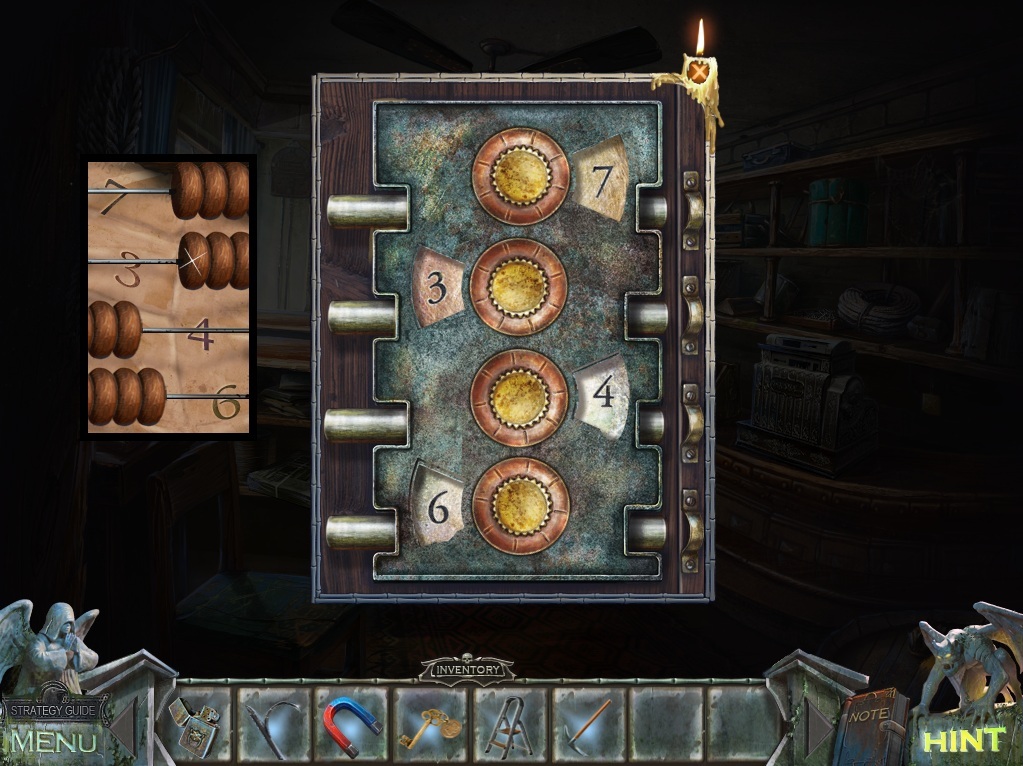
Click the abacus on the left table for a closer look.
Drag the beads away to reveal a 4 digit number at the bottom.
Click the power box on the wall between the bookshelf and the window to zoom in.
Use the Wrench from your inventory on the four bolts in the corners of the front panel.
Use the Electrical Tape on the broken wires.
Click the button behind the counter and under the shelves to zoom in.
Push the button, then take the Fan Blade from the wall.
Use the Ladder on the shelves, then click the cupboard to zoom in.
Open the second drawer and take the Wing Nut.
Click the briefcase above the top shelf for a closer look.
Use the Key from your inventory on both locks, then take the Empty Gas Torch.
Click the door in the back of the room to view the lock.
Click the dials of the lock mechanism to enter in the combination found behind the abacus.
Screenshot.
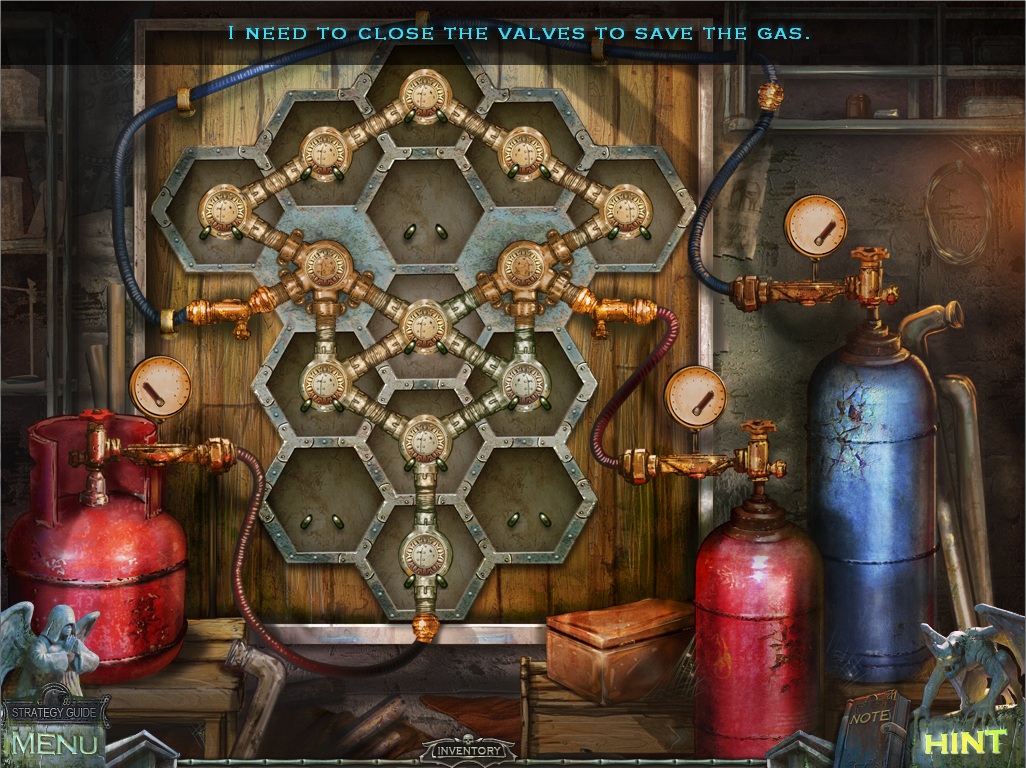
Click the open closet door to start the puzzle.
To solve this puzzle, use the pipes to create an uninterrupted path to the three valves.
Click a pipe to select it, then click a space on the board to set it in place.
Solution.
Once the puzzle is solved, click the valves at the top of each tank to shut off the flow of gas.
Use the Empty Gas Torch from your inventory on the large red take to the left to receive the Fueled Gas Torch.
Go back to the crossroads.
Crossroads
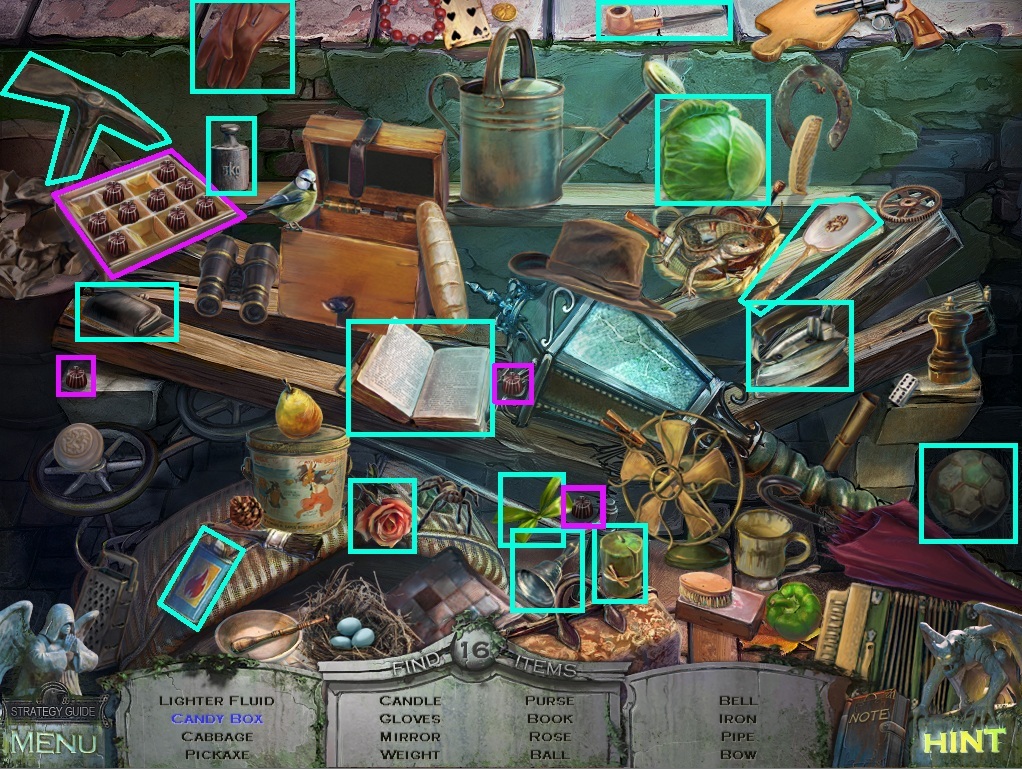
Click the center building to repeat the hidden object scene.
Put the three chocolates inside the box to complete the Candy Box.
Screenshot.
Once the hidden object scene is complete, you will receive Lighter Fluid.
Click the shaft in the hill to zoom in.
Use the Fueled Gas Torch from your inventory to burn through each of the weak parts in the white center of the bars.
Go through the opened gate into the cellar.
Cellar
Use the Pickax from your inventory on the chunk of coal on the ground.
Click the broken up pile to receive the Coal.
Click the mechanism above the broken burner pipe to zoom in.
Add the Fan, then the Wing Nut to the mechanism.
Click the burner to zoom in.
Open the door to the burner and put the Coal inside.
Pour the Lighter Fluid on the coal, then use the Lighter on the doused pile.
Click the lever to turn the handle towards the right so that steam escapes from the broken pipe.
Go through the open door to the pit.
Pit
Click the coil of rope at the side of the pit to zoom in.
Add the Magnet from your inventory to the rope and take the Valve.
Click the barrel mechanism on the left wall for a closer look.
Place the Valve on the faucet, then click it to fill the barrel with water.
Use the gaff hook to pull the raft in.
Click the raft to zoom in and take the Nail Puller.
Go back to the cellar.
Cellar
Click the crate on the ground to zoom in.
Use the Nail Puller from your inventory to remove all the nails from the top of the crate.
Open the crate and take the Raft.
Return to the pit.
Pit
Use the Raft from your inventory on the pit to create a bridge.
Click the light at the other side to zoom in.
Click the wires to remove them, then take the Battery.
Go back to the cliff.
Cliff
Click the front of the truck to zoom in.
Put the Battery from your inventory to the space under the hood.
Click the red and blue plugs to attach them to the battery.
Click the seat of the truck to look inside.
Click the ignition for a closer look, then use the Keys on the ignition to start the car.
Click the button labelled Winch to turn on the winch and pull up the car.
Click Mary to speak with her, then go through the portal to the Hattman graves.
Hattman Graves
Speak with Silvia, then take the Amulet from her hand.
Go back one screen to the graveyard.
Graveyard
Go right to travel to the newly emerged tomb.
Rayn Graves
Speak with Gordon Rayn, then return to the well under the cathedral.
Well
Click the left pedestal to zoom in.
Add the Amulet from your inventory to the engraving on top of the pedestal.
Click the statue of the demon to zoom in.
Take the glowing blue Torch from the demon's hand.
Return to the crossroads, then go up the left path to the square.
Chapter 3 - Town Square
Square
Use the Torch from your inventory on the giant spiderweb.
Click the crow on top of the manhole.
Go down the crevice into the underground garage, then go through the right door to the security room.
Security Room
Click the skeleton's hand on the table to zoom in.
Take the Clip under the thumb on the table.
Go back to the underground garage.
Underground Garage
Click the toy monkey to push it over, then click it again to zoom in.
Click the zipper on the monkey's back to remove it.
Use the Clip from your inventory on the top of the zipper, then click the clip to open the back, revealing the Batteries.
Go right to the security room.
Security Room
Click the skeleton's hand by the floor to zoom in.
Click the back of the flashlight to open it.
Use the Batteries from your inventory on the flashlight.
Put the cap back on the flashlight, then push the button to turn on the light.
Click the third locker to open it, then click it again to zoom in and take the Saw.
Click the TV screen to view an image of a spotlight projected from the mayor's house.
Go back to the square, then move left to the side door entrance to the toy store.
Toy Store Entrance
Click the black box in front of the door to zoom in.
Take the Fridge Handle.
Go back to the square, then go forward to the main entrance.
Town Hall Entrance
Click the gutter at the bottom of the stairs to start the hidden object scene.
Use the knife to carve the apple, making 2 Apple Halves.
Use the duster on the stone to reveal the Handprint.
Screenshot.
Once the hidden object scene is complete, you will receive Whiskey.
Click the fallen tree next to the crashed van to zoom in.
Use the Saw from your inventory to remove the branches.
Click the door to open it, then go through into the saloon.
Saloon
Use the Whiskey from your inventory on the glass in the cowboy robot's hand.
Click the robot's hat to zoom in and take the Cloud.
Click the plate on the table next to the skeleton to zoom in and take the Blue Sword.
Click the gramophone on the bar shelf to zoom in and take the Corkscrew.
Use the refridgerator door for a closer look.
Use the Fridge Handle from your inventory on the door.
Click the handle to open the door, revealing a hidden object scene.
Click the freezer door to open it, revealing the Sausage.
Screenshot.
Once the hidden object scene is complete, you will receive a Red Sword.
Return to the toy store entrance.
Toy Store Entrance
Click the green door to zoom in.
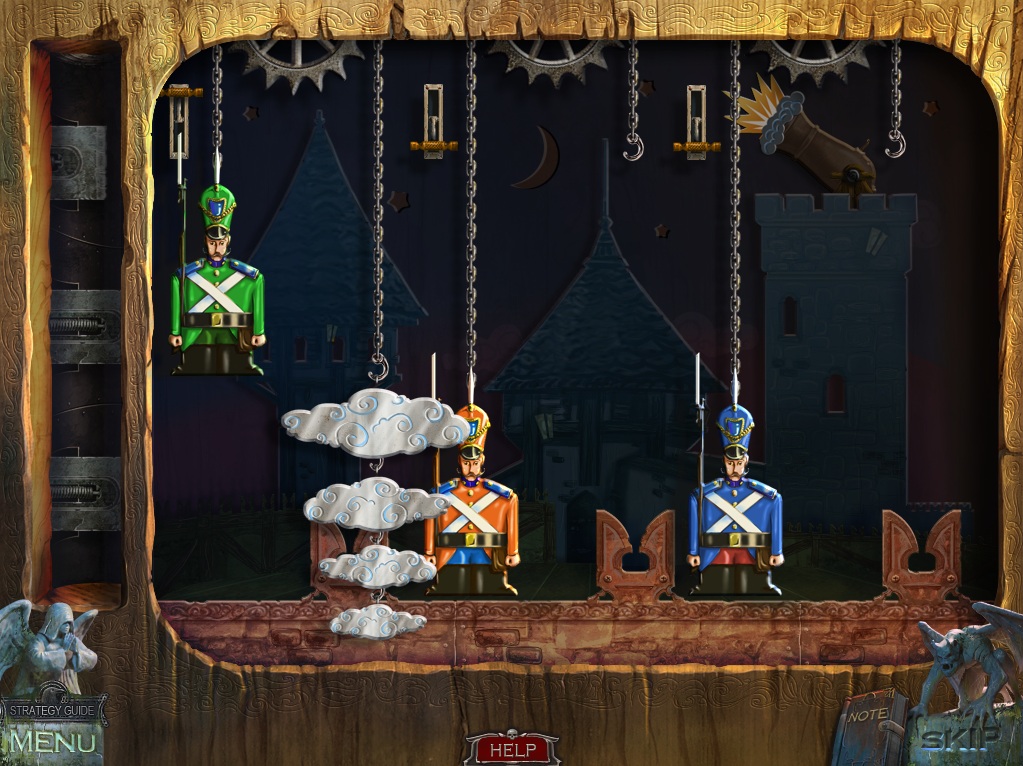
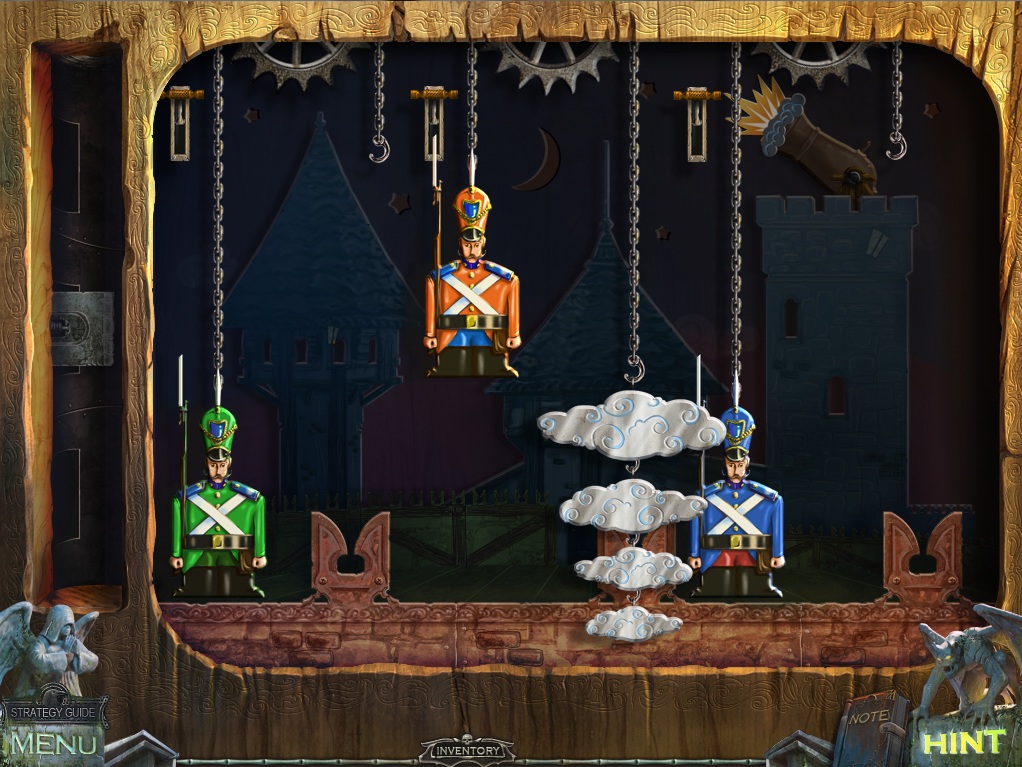
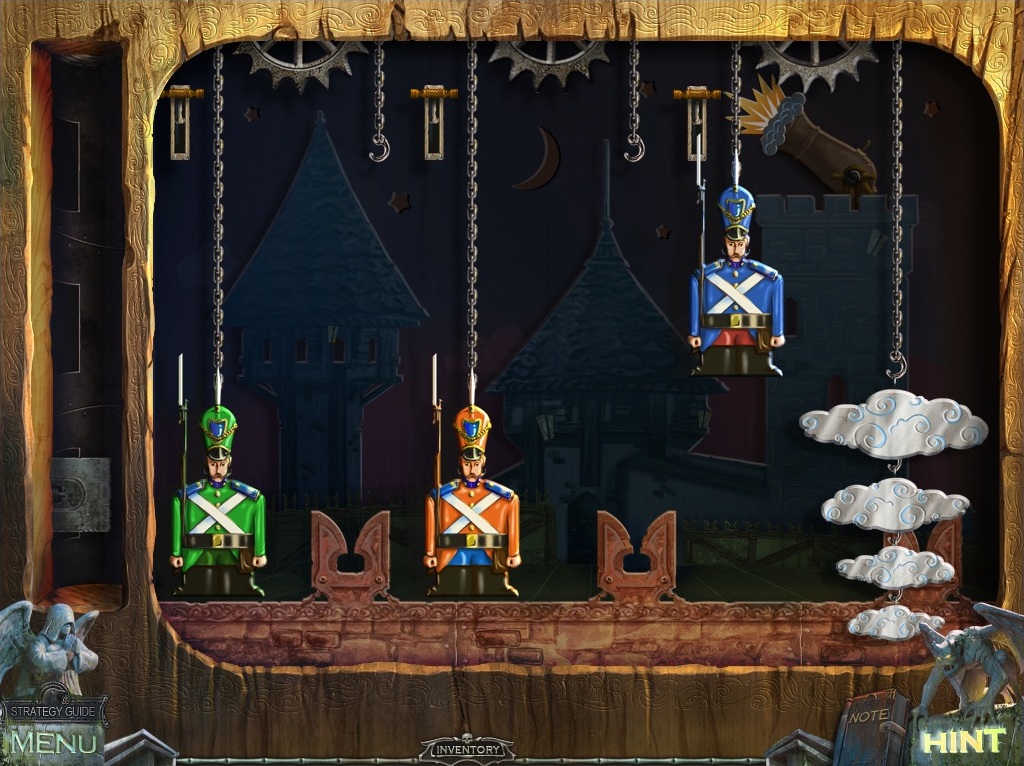
Add the cloud from your inventory to the empty hook to start the puzzle.
To solve this puzzle, lower all three levers by hanging the clouds on the hooks in order from biggest to smallest.
Click a cloud to select it, then click a hook to set it in place.
Clouds will only attach to an empty hook or on the hook of a bigger cloud.
When all of the clouds are hanging on each of the three chains with the biggest cloud on top to the smallest on the bottom, the corresponding lever will pull down and the cannon will fire.
Solution #1.
Solution #2.
Solution #3.
Once the puzzle is solved, go through the open door into the toy store.
Toy Store
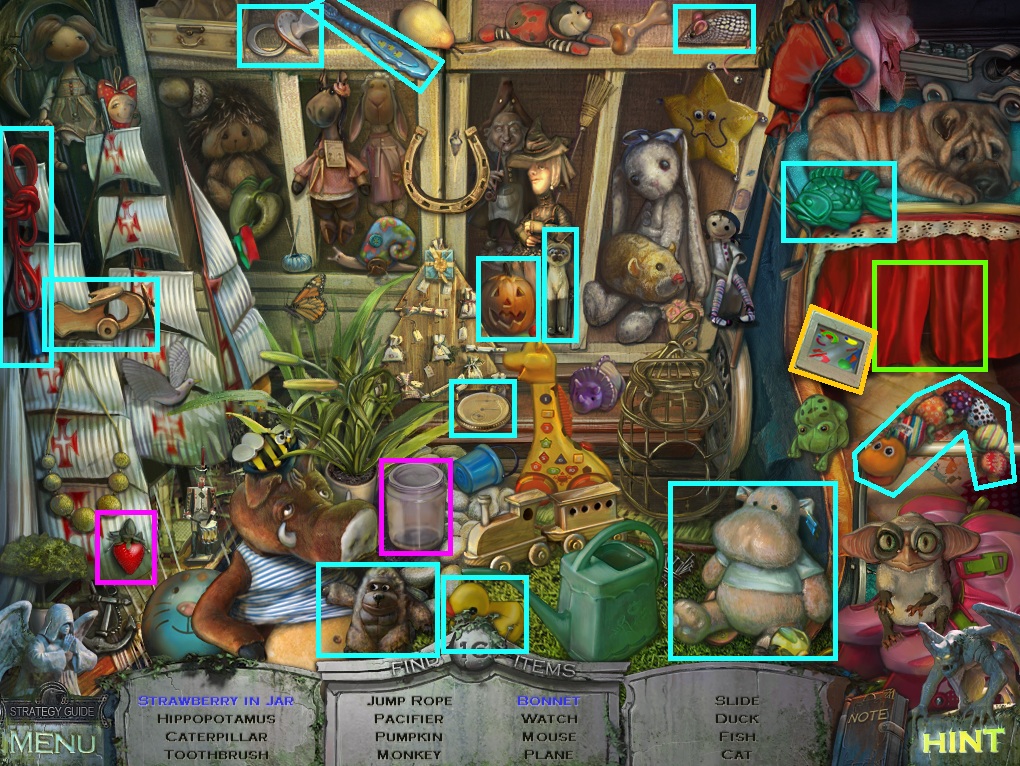
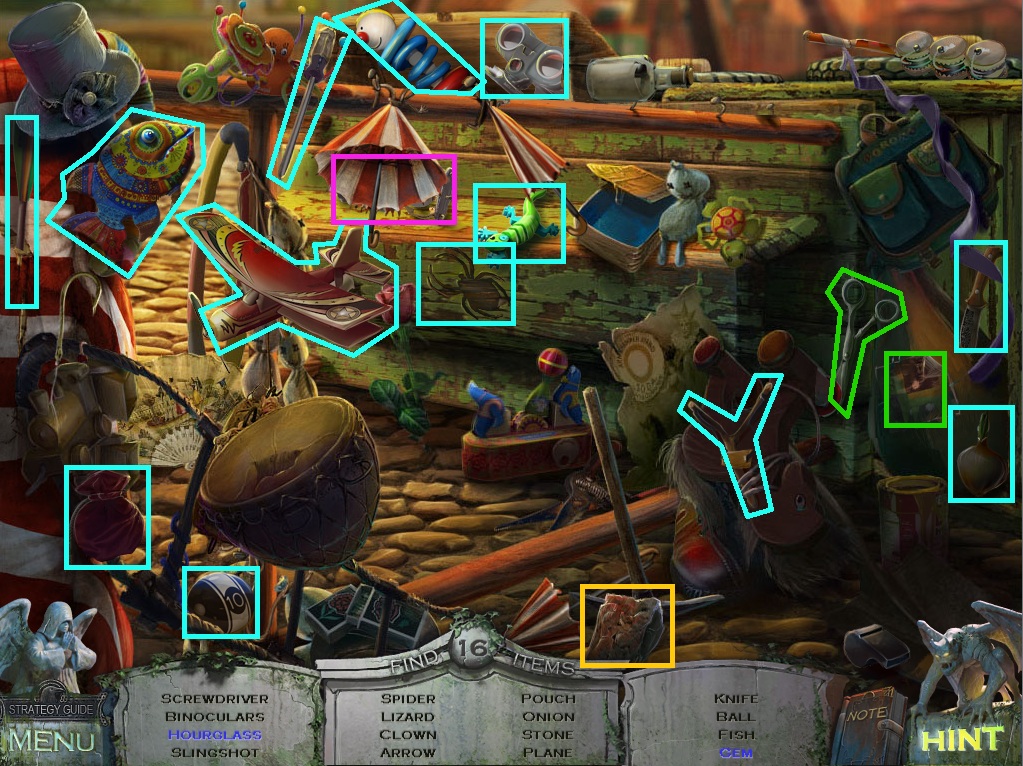
Click the shelves of toys on the right wall to start the hidden object scene.
Drop the strawberry into the glass jar to make a Strawberry in Jar.
Click the miniature red curtains to reveal the Bonnet.
Screenshot.
Once the hidden object scene is complete, you will receive the Slide (1/4).
Click the balloons next to the cash register to pop them.
Click the shelf where the balloons were to zoom in and take the Scissors.
Click the bottle on the ground to the left of the bicycle to zoom in.
Take the Blue Dart, then use the Corkscrew from your inventory on the cork in the bottle to reveal the darts note.
Click the treasure chest under the pirate's foot for a closer look.
Use the Red Sword on the hand of the left pirate and the Blue Sword on the hand of the right pirate.
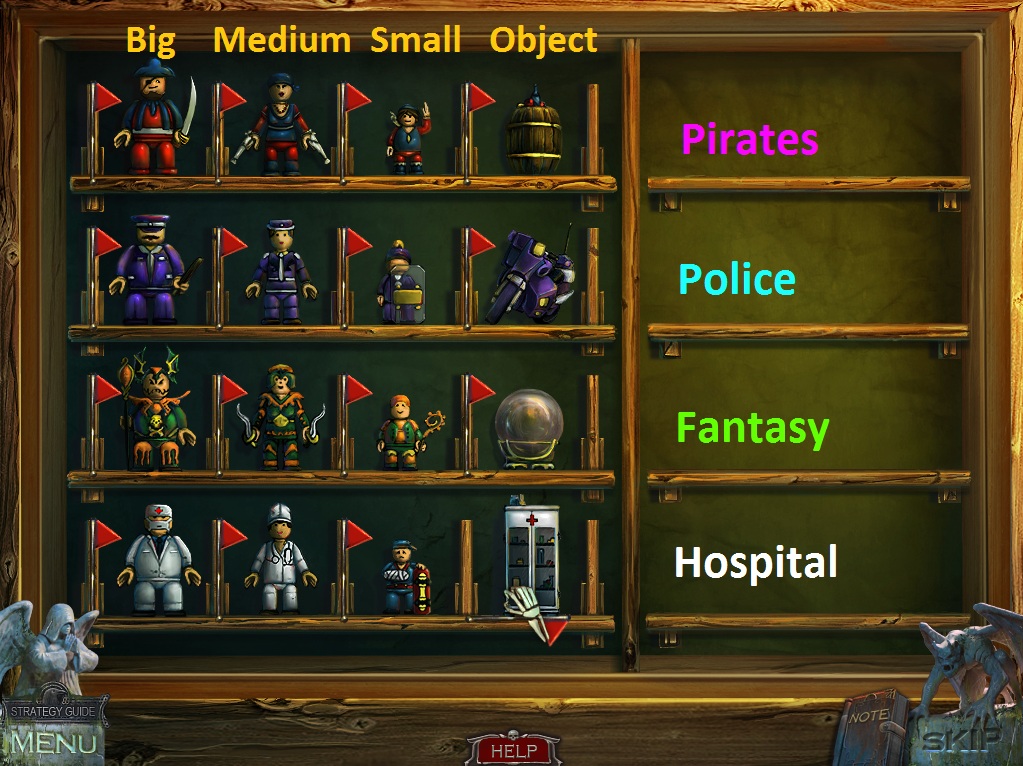
Click the board to start the puzzle.
To solve this puzzle, organize the figurines in the correct boxes according to type.
Click a figurine to select it, then click a box to set it in place.
If correctly placed, the flag of that box will raise.
Solution.
Once the puzzle is solved, the box will open, revealing the Record.
Go back to the town hall entrance.
Town Hall Entrance
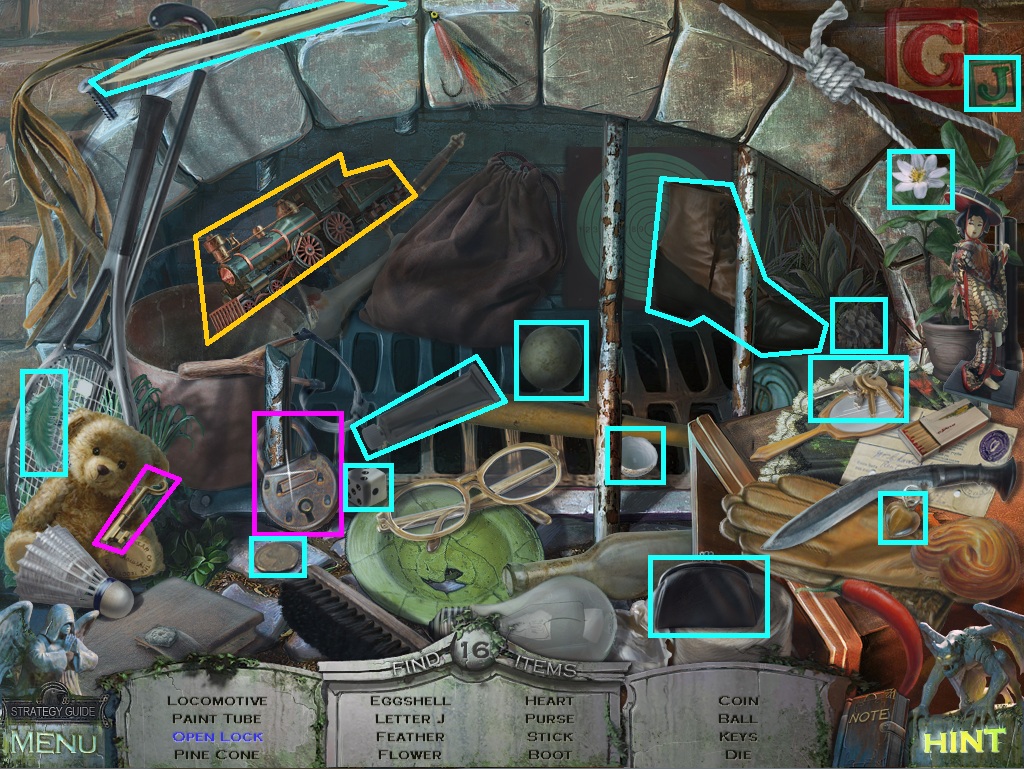
Click the gutter under the stairs to repeat the hidden object scene.
Use the key on the padlock to make the Open Lock.
Screenshot.
Once the hidden object scene is complete, you will receive a Locomotive.
Return to the saloon.
Saloon
Click the refridgerator to repeat the hidden object scene.
Click the freezer door to open it, revealing the Canned Food.
Screenshot.
Once the hidden object scene is complete, you will receive a Train Key.
Click the gramophone on the shelf behind the bar to zoom in.
Place the Record from your inventory on the gramophone, then set the needle and turn the handle to play the record.
Take the Red Dart from the opened compartment.
Return to the toy store.
Toy Store
Put the Locomotive from your inventory on train tracks.
Click the side of the train set to zoom in.
Use the Train Key from your inventory on the socket, then turn the key to start the locomotive.
After the train circles the track, click it to zoom in and take the Green Dart.
Go back to the Saloon.
Saloon
Click the dartboard on the wall to zoom in.
Place the Red Dart, Green Dart, and Blue Dart from your inventory onto the correct position on the dartboard according to the message in the bottle from the toy store.
Screenshot.
When the darts are correctly positioned, the board will open, revealing the Coin and Magnetic Card.
Return to the town hall entrance.
Town Hall Entrance
Click the front door to the building to zoom in.
Use the Magnetic Card from your inventory on the security lock.
Go through the open door into the town hall lobby.
Chapter 4 - Inside Town Hall
Lobby
Click the vending machine in the back of the room to zoom in.
Use the Coin from your inventory on the coin slot to push out the Half Token.
Click the sofa on the far left for a closer look.
Use the Scissors from your inventory on the stitches in the seat to reveal the Clock Face.
Click the counter of the reception desk on the right to zoom in.
Click the books and papers to push them off of the glass panel.
Use the Half Token on the slot to the right of the grid, then push the button to remove the panel.
Click the lever to open the gate blocking the stairway.
Go up the stairs to the landing.
Landing
Take the Box with Puzzles on the ground at the top of the stairs.
Click the left couch by the window to start the hidden object scene.
Click the left leaf to reveal the Mask.
Click the right leaf to reveal the Baguette and the Purse.
Screenshot.
Once the hidden object scene is complete, you will receive a Fuse (1/3).
Click the pipe at the end of the delivery tube next to the left door to zoom in.
Click the pipe again to open the small door, revealing the Bobbin.
Go through the right door to the office.
Office
Click the desk to start the hidden object scene.
Use the scissors on the blank sheet of paper to cut an image of the Cross.
Screenshot.
Once the hidden object scene is complete, you will receive the Slide (2/4)
Click the windowsill to zoom in and note the time 5:40 written on the paper.
Click the seat of the sofa chair to zoom in.
Click the left cushion to lift it, revealing the Slide (3/4)
Click the mail tube above the desk to zoom in and take the Canister.
Go back to the landing.
Landing
Click the couch to repeat the hidden object scene.
Click the top leaf to reveal the Tassles and the Scale.
Click the right leaf to reveal the Apple.
Screenshot.
Once the hidden object scene is complete, you will receive a Hammer.
Click the mail tube next to the door to zoom in.
Use the Canister from your inventory on the tube to send it through to the office.
Go forward through the window to the scaffold.
Scaffold
Click the bucket on the scaffold to zoom in.
Click the bottle in the bucket to add the Solvent to your inventory.
Go back to the landing, then through the left door to the projector room.
Projector Room
Click the right drawer of the cabinet to open it, then click it again to zoom in.
Use the Solvent from your inventory on the glue, then take the Clock Hand (1/2) and the Glass Cutter.
Click the machine in the corner of the room to zoom in and take the Slide (4/4)
Return to the office.
Office
Click the mail tube above the desk to zoom in.
Click the tube to open it and take the Clock Hand (2/2).
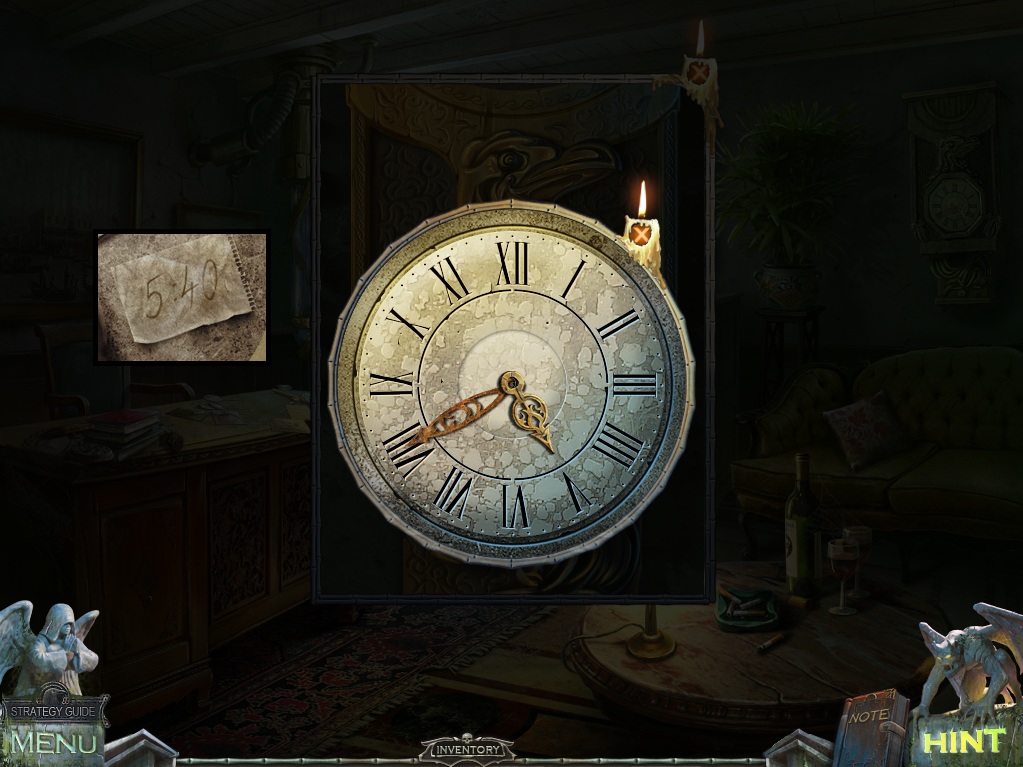
Click the clock on the wall above the couch to zoom in.
Add the Clock face and both Clock Hands from your inventory to the clock.
Set the correct time according to the note on the windowsill, 5:40.
Screenshot.
Take the Weight at the bottom of the clock.
Go back to the lobby.
Lobby
Click the top of the Atlas statue in the center of the room to zoom in.
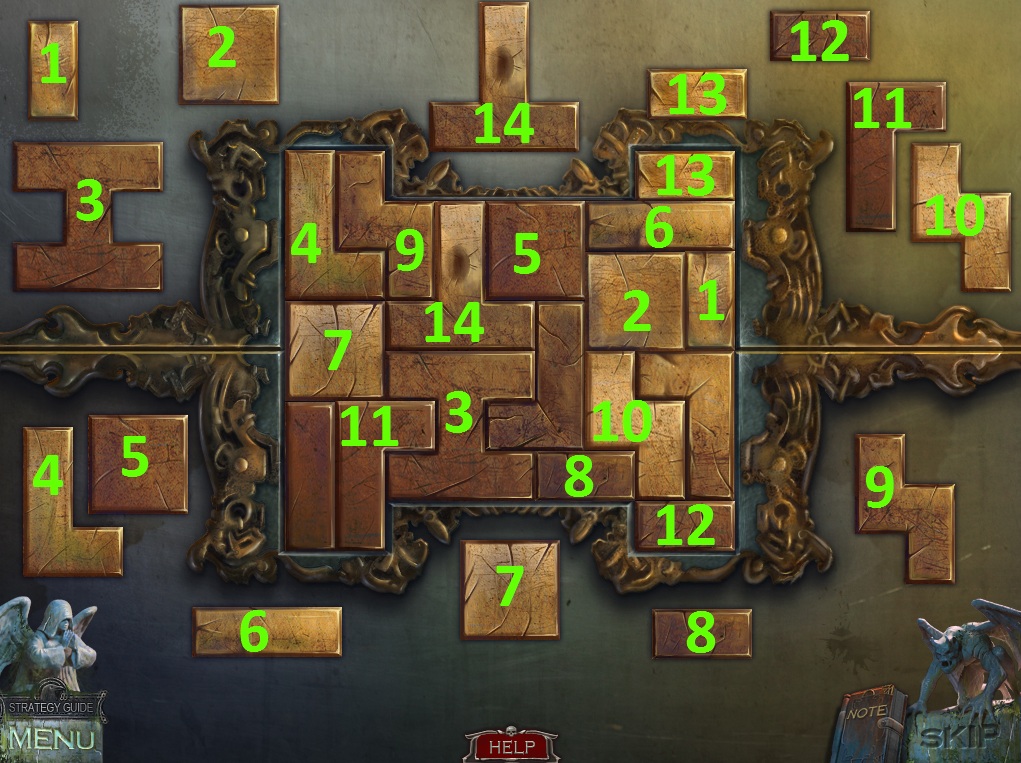
Add the Box with Puzzles from your inventory to the board to start the puzzle.
To solve this puzzle, place all the tiles so that they fit into the grid.
Click a tile to select it, then drag it to a position on the board to set it in place.
Tiles cannot intersect walls or other tiles.
Solution.
Once the puzzle is solved, click the open globe to zoom in.
Use the Glass Cutter from your inventory on the glass case, then take the Projector inside.
Return to the projector room.
Projector Room
Use the Weight from your inventory on the bottom of the rolled up screen to keep it pulled down.
Place the Projector from your inventory on top of the table to the left.
Click the back of the projector to zoom in.
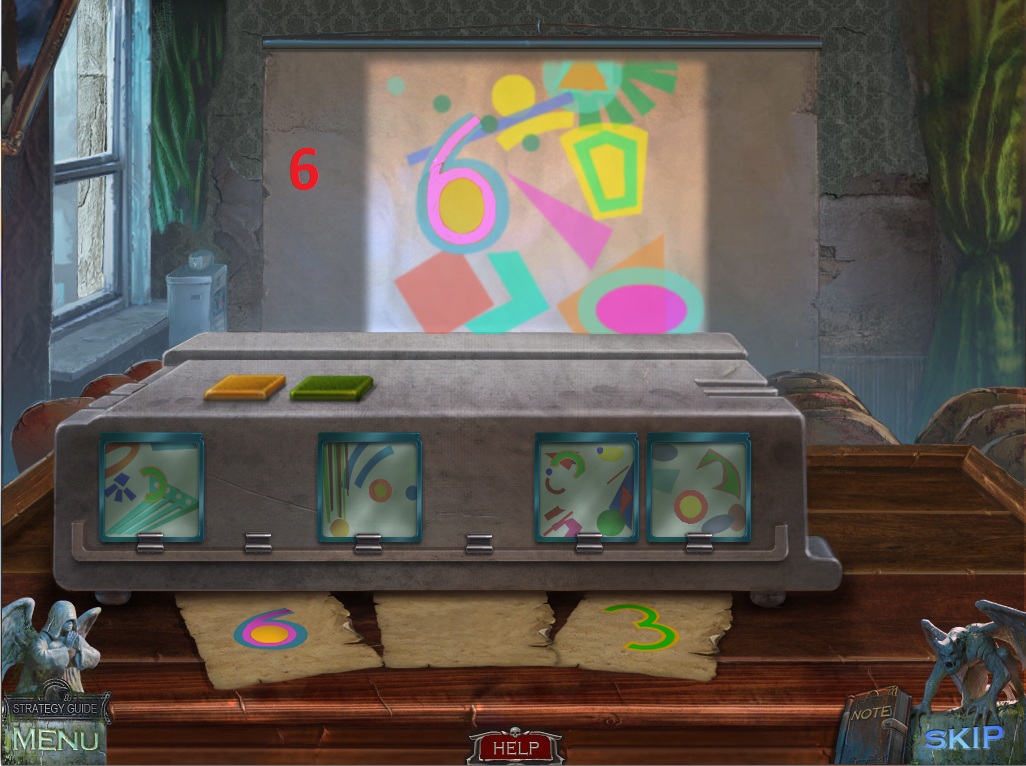
Place the four Slides from your inventory on to the back of the projector to start the puzzle.
To solve this puzzle, insert the slides two at a time into the projector to reveal the combination.
Press the green and yellow buttons on the top of the projector to open and close the slide slots.
Click a slide to select it, then click the slide slot to place it inside.
The images on the slide will be projected to the screen. If correctly combined, the symbols will reveal a number.
Solution #1.
Solution #2.
Solution #3.
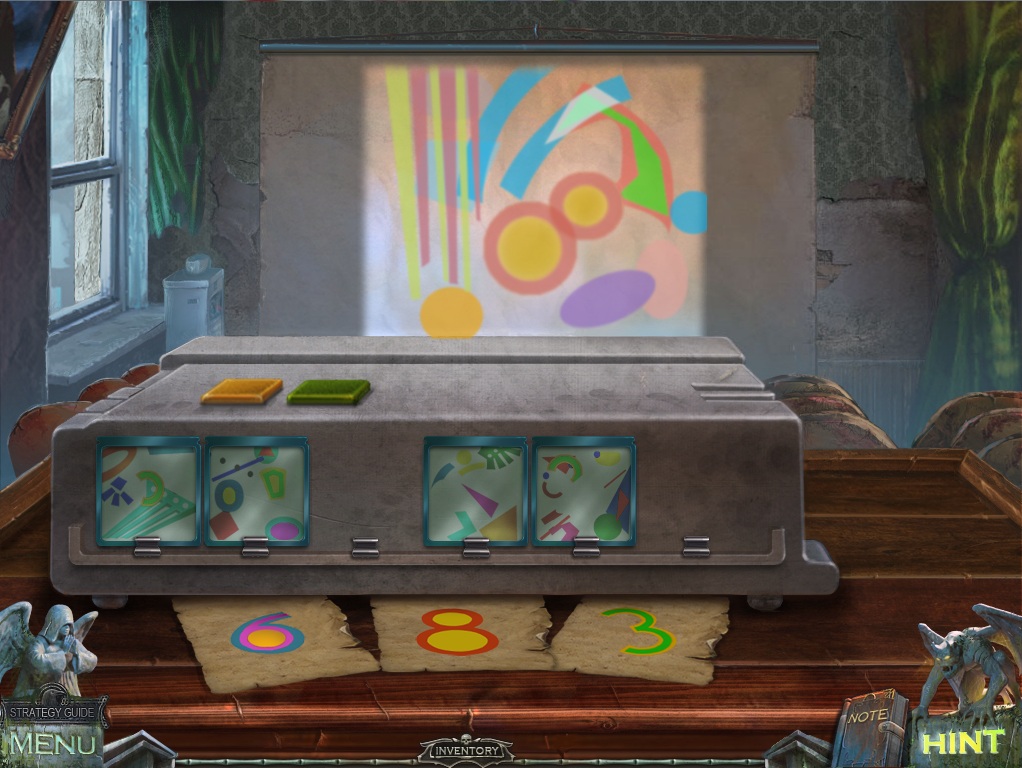
Go back to the office.
Office
Click the safe to zoom in.
Enter in the 3 digit combination found from the projector room into the safe by turning the three dials in order from top to bottom: 6-8-3
Click the handle to open the safe and take the Fuse (2/3) inside.
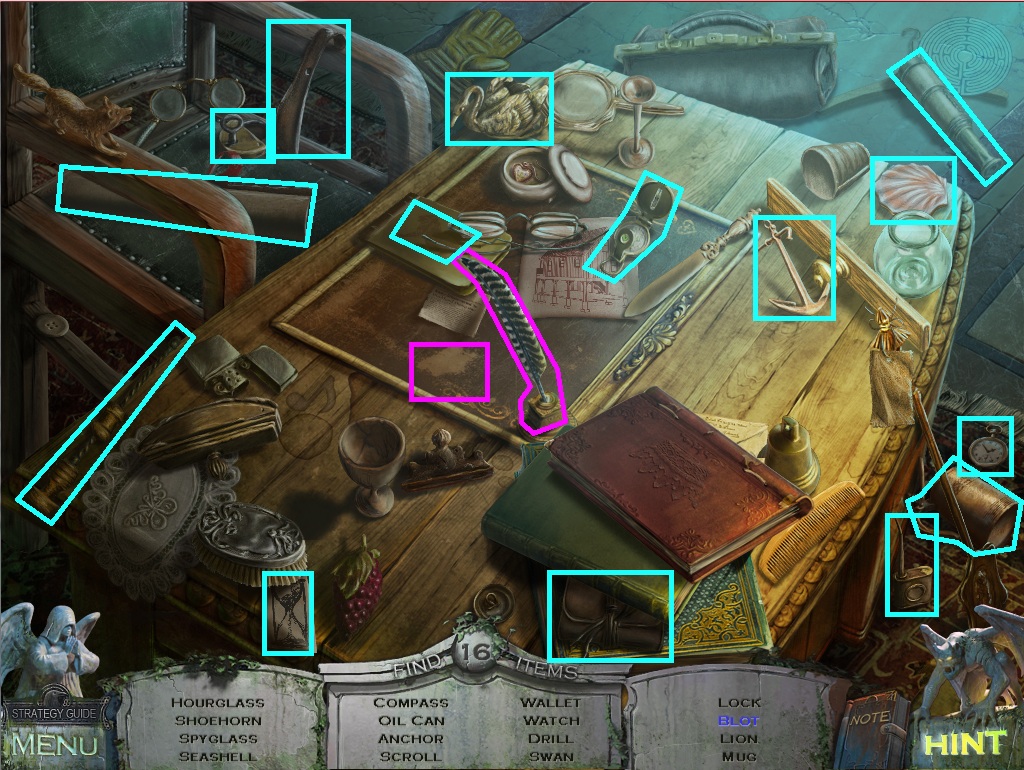
Click the desk to repeat the hidden object scene.
Use the quill pen on the desk to make an ink Blot.
Screenshot.
Once the hidden object scene is complete, you will receive a Fuse (3/3)
Go back to the toy store.
Toy Store
Click the toy shelves to repeat the hidden object scene.
Put the dove in the birdcage, then close the door to make a Bird in Cage.
Use the watering can on the potted plant to reveal the Flower.
Screenshot.
Once the hidden object scene is complete, you will receive Nails.
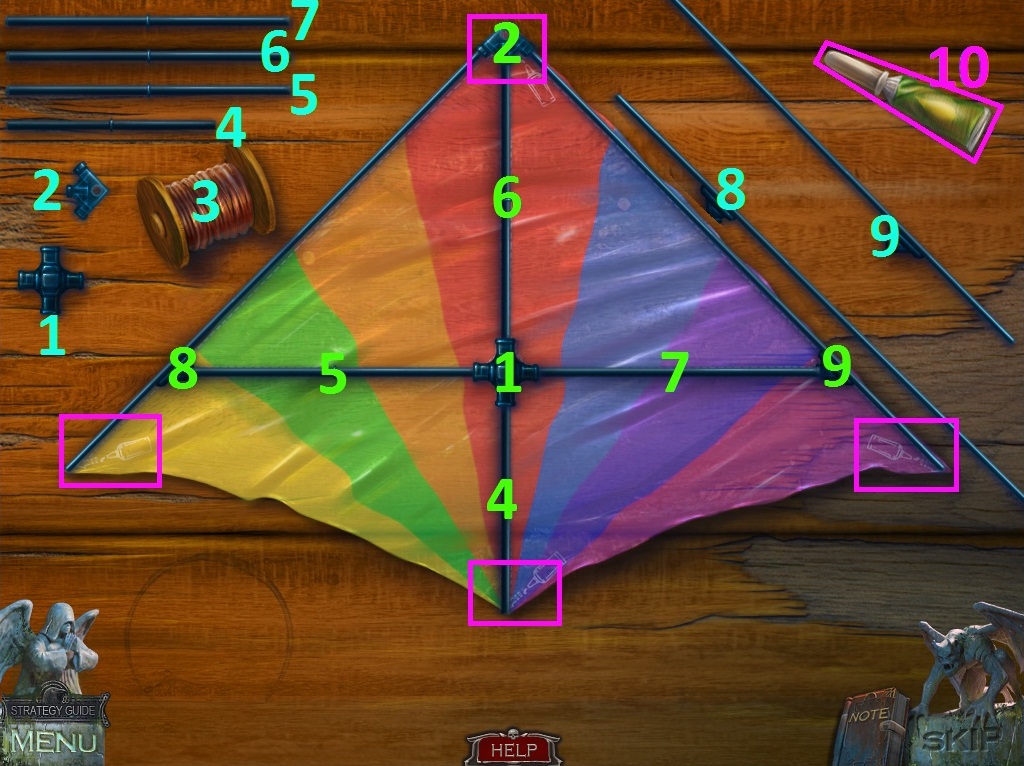
Click the kite on the right counter to zoom in.
Add the Bobbin from your inventory to start the puzzle.
To solve this puzzle, assemble the pieces from the table to build the kite.
Click a piece to select it, then right click while a piece is selected to rotate it.
Click a position on the kite to set the piece in place.
Solution.
Once all the pieces are assembled, add the string to the frame to complete the Kite.
Return to the scaffold.
Scaffold
Click the generator to the right of the rope pulley to zoom in.
Place the three Fuses from your inventory into the fusebox.
Click the button device on the right side of the scaffold for a closer look.
Press the up button to raise the elevator, then go through the window on the left into the clock tower.
Clock Tower
Click the book on the ground to read instructions for charging the clock mechanism.
Go up the hatch in the roof to the terrace.
Terrace
Click any area of the screen to prompt the cutscene.
Take the Glove on top of the hatch door.
Go back to the town hall entrance.
Town Hall Entrance
Click the broken ladder to zoom in.
Add the Nails and Hammer from your inventory to the ladder to start the puzzle.
To solve this puzzle, assemble the steps using the hammer and nails to reconstruct the ladder.
Click a step to select it, then click a space on the ladder to place it.
Add the nails to the top and bottom of each step.
Use the Hammer three times on each nail to hammer them down.
Solution.
Once the puzzle is solved, click the Ladder to add it to your inventory.
Return to the terrace.
Terrace
Use the Ladder from your inventory on the center column.
Click the cord running parallel to the ladder to zoom in.
Attach the Kite to the hook on the cord.
When the kite is struck by lightning, go down the hatch to the clock tower.
Clock Tower
Click the generator mechanism on the left to zoom in.
Click the lever to turn on the power to the clock mechanism.
Take the Sewer Hook that falls to the ground under the clock mechanism.
Click the spotlight under the face of the clock to zoom in.
Click the frame of the spotlight to remove it.
Use the Glove from your inventory to remove the Spotlight Bulb.
Go back to the square.
Square
Click the spotlight on the lamppost to zoom in.
Click the frame to open the light, then click the bulb to remove it.
Replace the broken bulb with the Spotlight Bulb from your inventory.
Click the fixed spotlight so that it points at the large hole in the road.
Click the gutter under the left building to zoom in and take the Mirror.
Use the Sewer Hook from your inventory to lift the manhole from the pavement.
Click the light to point it down at the manhole.
Go down into the underground garage.
Underground Garage
Use the Mirror from your inventory on the road sign frame sticking out of the rubble.
Go through the portal to return to the Rayn graves.
Rayn Graves
Speak with Gordon Rayn to receive the Amulet.
Go back to the main view of the graveyard, then move forward to the newly emerged tomb.
Kallagen Graves
Speak with Rachel Kallagen, then return to the well under the cathedral.
Well
Click the pedestal on the right to zoom in.
Use the Amulet from your inventory on the engraving at the top of the pedestal.
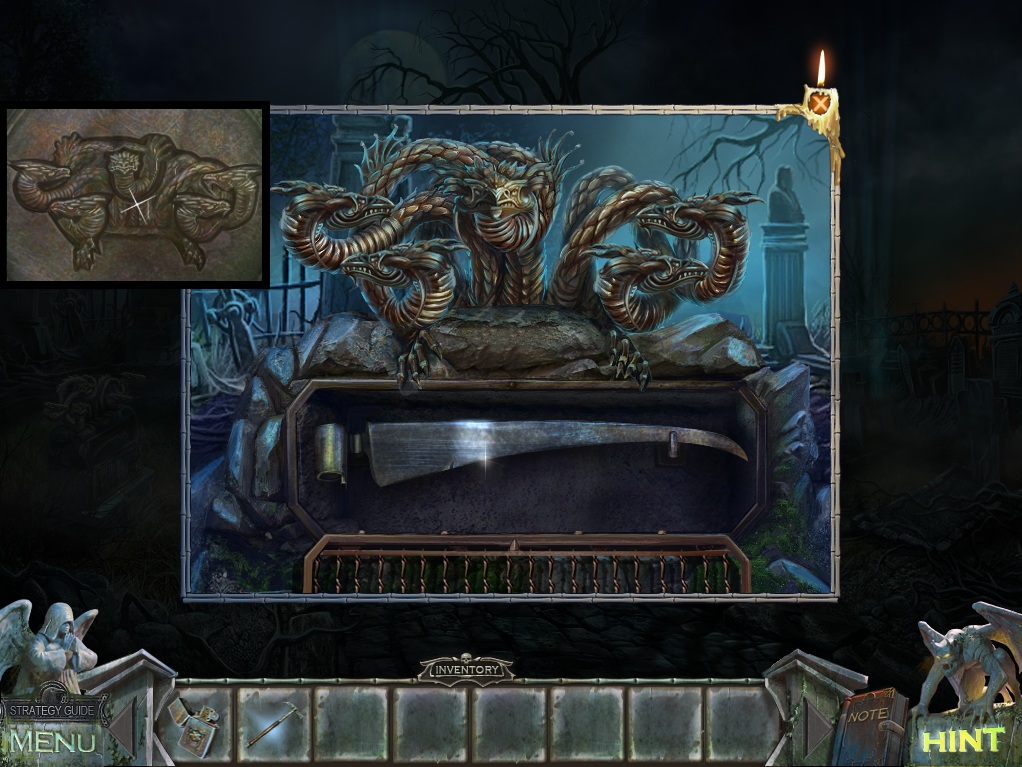
Click the demonic statue to zoom in and take the Sickle.
Go all the way to the crossroads, then take the right path to travel to the entrance gate.
Chapter 5 - Amusement Park
Entrance Gate
Use the Sickle from your inventory on the plant monsters around the gate.
Click any part of the area to prompt the cut scene.
Click the crow on the telescope.
Click the telescope to look at the girl on top of the ferris wheel.
Click the park bench to zoom in and take the Knife and the Hand Key.
Go forward to the overturned kiosk.
Kiosk
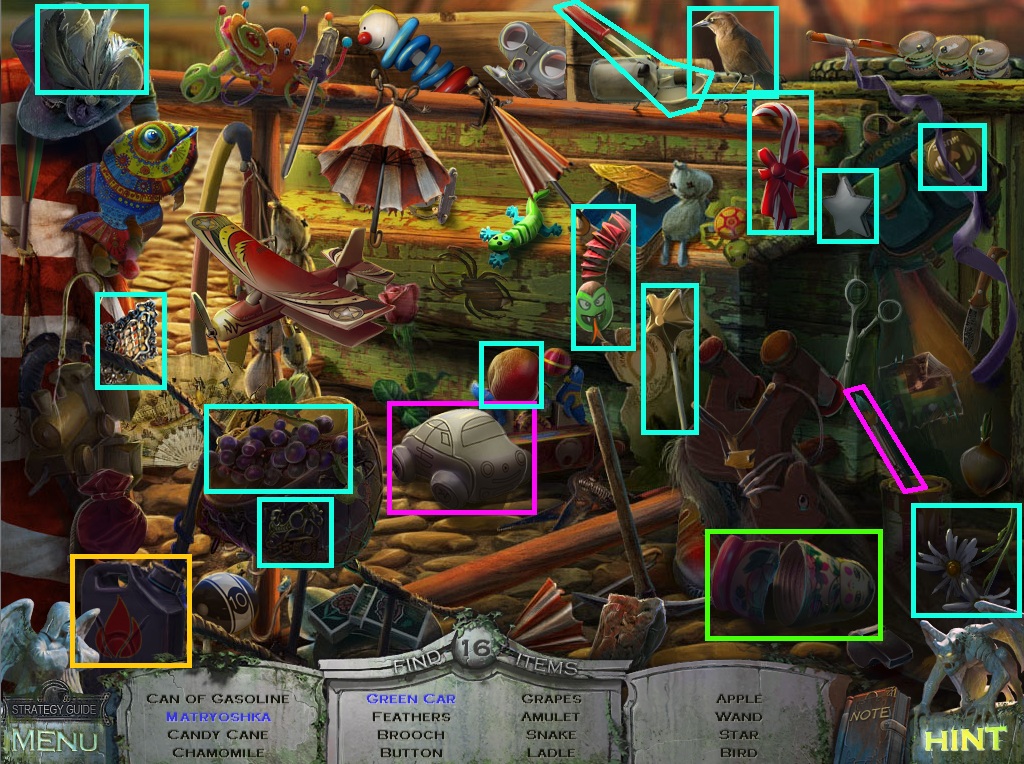
Click the cart to start the hidden object scene.
Use the paint brush on the toy car to make the Green Car.
Click the split Matryoshka to stand it up and connect the two halves.
Screenshot.
Once the hidden object scene is complete, you will receive a Canister of Gasoline.
Go back to the entrance gate, then go through the door on the right into the generator room.
Generator Room
Click the top of the generator to zoom in.
Click the cap to remove it, then use the Canister of Gasoline from your inventory on the fuel tank.
Click the bottom of the generator for a closer look.
Press the green button to start the power.
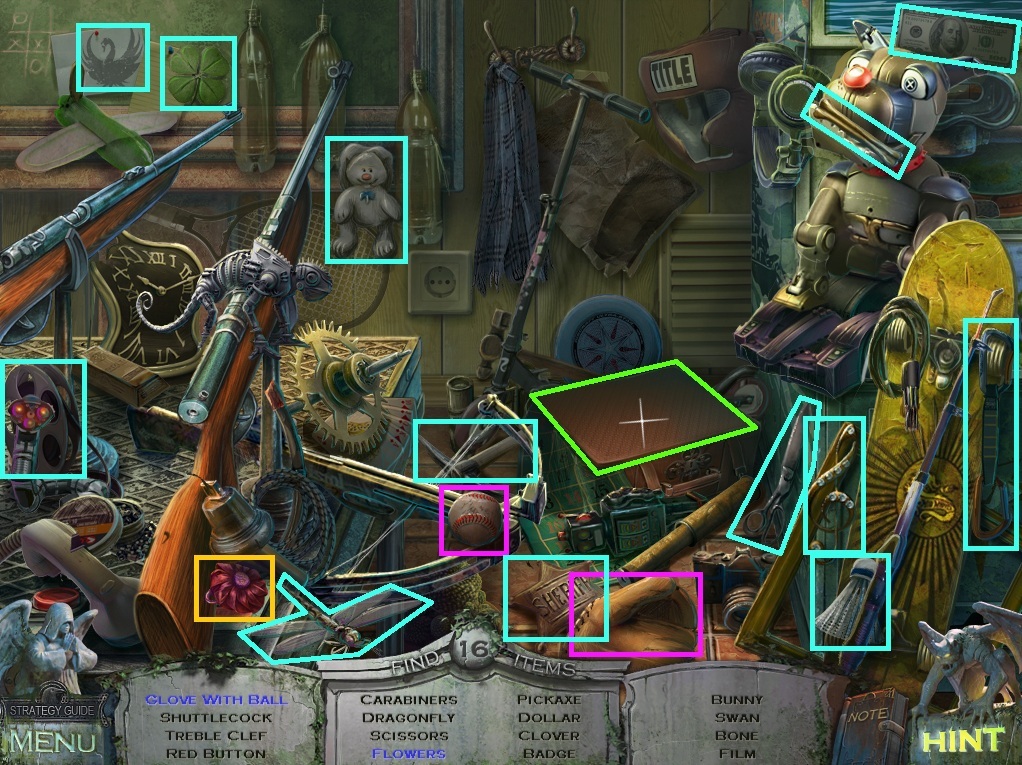
Click the pile of junk against the right wall to start the hidden object scene.
Put the spade on the ace to complete the Card.
Screenshot.
Once the hidden object scene is complete, you will receive Forceps.
Take the Mop leaning against the lockers.
Click the cardboard box on the ground against the right wall to zoom in.
Use the Knife from your inventory to cut the tape.
Click the box to open it and take the Needle and Thread and Tickets.
Go back to the entrance gate.
Entrance Gate
Click the ticket window on the left to zoom in.
Use the Tickets from your inventory on the table to start the puzzle.
To solve this puzzle, punch the tickets to match the picture on the clipboard.
Click a button from the slot on the right side of the ticket puncher to pick it up, then click a space on the grid to set the button in place.
Click the left side of the puncher to close the device and punch the ticket.
If the order is incorrect, the puzzle will reset.
Solution.
Once the puzzle is solved, you will receive a Ferris Wheel Card.
Go forward to the kiosk.
Kiosk
Click the overturned cart to repeat the hidden object scene.
Close the umbrella to reveal the Hourglass.
Cut the patch with the scissors to reveal the Gem.
Screenshot.
Once the hidden object scene is complete, you will receive a Stone.
Click the manhole in the pavement to the right of the fallen kiosk to zoom in.
Use the Hand Key from your inventory on the socket inside the manhole.
Use the Forceps to pull out the Ferris Wheel Fuse.
Go back to the generator room.
Generator Room
Click the fusebox on the right wall to zoom in.
Place the Ferris Wheel Fuse from your inventory into the socket at the top of the left panel.
Pull the switch to start the power to the ferris wheel.
Return to the kiosk.
Kiosk
Click the middle gate to the ferris wheel to zoom in.
Put the Ferris Wheel Card from your inventory into the slot inside the mechanical clown head.
Go through the open gate to the ferris wheel.
Ferris Wheel
Click the green cart at the bottom to start the hidden object scene.
Open the gate to reveal the Banana peel and the Clapperboard.
Screenshot.
Once the hidden object scene is complete, you will receive a Hook.
Click the purple cart on the right to look inside.
Click the handle strap on the seat.
Repair the strap using the Needle and Thread from your inventory.
Click the handle again to lift the seat, revealing the Arcade Fuse.
Go up the ladder on the left to the ferris wheel center.
Ferris Wheel Center
Click the glass case on the railing to zoom in.
Use the Stone from your inventory three times to break the glass, then take the Arcade Pattern inside.
Note the repair instructions on the paper behind the broken glass.
Click the side of the engine mechanism for a closer look.
Click the broken chain to remove it.
Use the Hook from your inventory to remove the Linchpin from the center of the gear.
Click the broken wheel to remove it.
Go back to the generator room.
Generator Room
Click the fusebox on the right wall to zoom in.
Place the Arcade Fuse from your inventory into the socket on the center panel.
Pull the middle switch to start the power to the arcade.
Click the pile of junk under the fusebox to repeat the hidden object scene.
Click the newspaper to make a Paper Airplane.
Screenshot.
Once the hidden object scene is complete, you will receive a Coin.
Go outside to the entrance gate.
Entrance Gate
Click the ticket window on the left to zoom in.
Place the Arcade Pattern from your inventory onto the clipboard to start the puzzle.
As before, punch the tickets to match the picture on the clipboard.
Click a button from the slot on the right side of the ticket puncher to pick it up, then click a space on the grid to set the button in place.
Click the left side of the puncher to close the device and punch the ticket.
If the order is incorrect, the puzzle will reset.
Solution.
Once the puzzle is solved, you will receive an Arcade Ticket.
Go to the kiosk.
Kiosk
Click the left gate in front of the arcade to zoom in.
Place the Arcade Ticket from your inventory into the slot in the mechanical clown head.
Go through the open gate into the arcade.
Arcade
Click the board on the back to start the hidden object scene.
Open the suitcase to reveal the Hummingbird.
Use the ice pick on the balloon animal to make a Popped Balloon.
Screenshot.
Once the hidden object scene is complete, you will receive a Horse Head.
Click the foosball table to zoom in.
Take the Clown (1/2) in the middle of the table.
Use the Coin from your inventory on the coin slot, then take the Ball from the dispenser.
Click the dispenser of the jackpot machine to zoom in and take the Carousel Fuse.
Use the Mop on the light fixture above the jackpot machine, then take the Carousel Pattern that falls to the ground.
Go back to the generator room.
Generator Room
Click the fusebox on the right wall to zoom in.
Place the Carousel Fuse from your inventory into the socket on the right fuse panel.
Click the lever to start the power to the carousel.
Return to the entrance gate.
Entrance Gate
Click the ticket window to zoom in.
Use the Carousel Pattern from your inventory on the clipboard to start the puzzle.
As before, punch the tickets to match the picture on the clipboard.
Click a button from the slot on the right side of the ticket puncher to pick it up, then click a space on the grid to set the button in place.
Click the left side of the puncher to close the device and punch the ticket.
If the order is incorrect, the puzzle will reset.
Solution.
Once the puzzle is solved, you will receive a Carousel Ticket.
Go forward to the kiosk.
Click the gate on the right in front of the carousel to zoom in.
Use the Carousel Ticket from your inventory on the slot in the mechanical clown head.
Go through the open gate to the carousel.
Carousel
Click the carriage to start the hidden object scene.
Put the snail on the apple to make it a Snail on Apple.
Use the tube on the toothbrush to squeeze out the Toothpaste.
Screenshot.
Once the hidden object scene is complete, you will receive a Clown (2/2).
Click the control panel on the left to zoom in.
Add the Horse Head from your inventory to the horse on the carousel to start the puzzle.
To solve this puzzle, arrange the position of the horse to match the front and back halves of the other horses on the left and right side.
Click the levers and dials to alter their settings, then click the lever on the far right to change the position of the horse.
The left dial moves the tail and the right dial moves the head.
The first lever on the left moves the horses rear right leg, the second lever moves the horses rear left leg, the third lever moves the front left leg, and the fourth lever moves the front right leg.
Solution.
Once the puzzle is solved, the large clown will drop the present to the ground.
Click the gift box to zoom in and take the Golden Token.
Return to the arcade.
Arcade
Click the pinball machine to zoom in.
Use the two Clowns and the Ball on the pinball machine.
Click the button to pull the spring back and release the ball, knocking it and the Violet Button into the dispenser at the bottom.
Click the board at the back of the room to repeat the hidden object scene.
Put the baseball into the mitt to make the Glove with Ball.
Open the suitcase to reveal the Flowers.
Screenshot.
Once the hidden object scene is complete, you will receive a Red Button.
Click the claw grabber game to zoom in.
Use the Golden Token from your inventory on the coin slot to start the puzzle.
To solve this puzzle, drop the clown head into the toy dispenser.
Push the left and right arrows to move the claw from side to side, then push the red button to drop the claw and pick up a toy.
Pick up the sailboat first, then the train, next the giraffe, and finally the clown head.
Solution.
Once the puzzle is solved, take the Clown Head from the toy dispenser.
Go back to the kiosk.
Kiosk
Click the door to the blue building on the left to zoom in.
Add the Clown head from your inventory to the puppet to start the puzzle.
To solve this puzzle, position the clown doll to match the drawing nailed to the door.
Click a piece of the clown's body to pivot its position.
Solution.
Click the open door to view the supply closet.
Supply Closet
Click the cloth to reveal the Gear on the ground.
Click the toolbox to zoom in and take the Chain.
Go back to the center of the ferris wheel.
Ferris Wheel Center
Click the side of the large mechanism on the left to zoom in.
Add the Gear to the center wheel of the device.
Lock the gear in place with the Linchpin, then add the Chain to the gear.
Go down to the bottom of the ferris wheel.
Ferris Wheel
Click the bottom carriage to repeat the hidden object scene.
Place the shards of glass in the frame to repair the Mirror.
Pop the balloon with the dart, revealing the Bee.
Screenshot.
Once the hidden object scene is complete, you will receive a Red Key.
Go back to the carousel.
Carousel
Click the carriage to repeat the hidden object scene.
Click the hat to reveal the Pipe.
Screenshot.
Once the hidden object scene is complete, you will receive an Orange Button.
Click the large clown to zoom in.
Place the three Buttons from your inventory onto the spaces of the clown's shirt, then take the Blue Key from its mouth.
Return to the ferris wheel.
Ferris Wheel
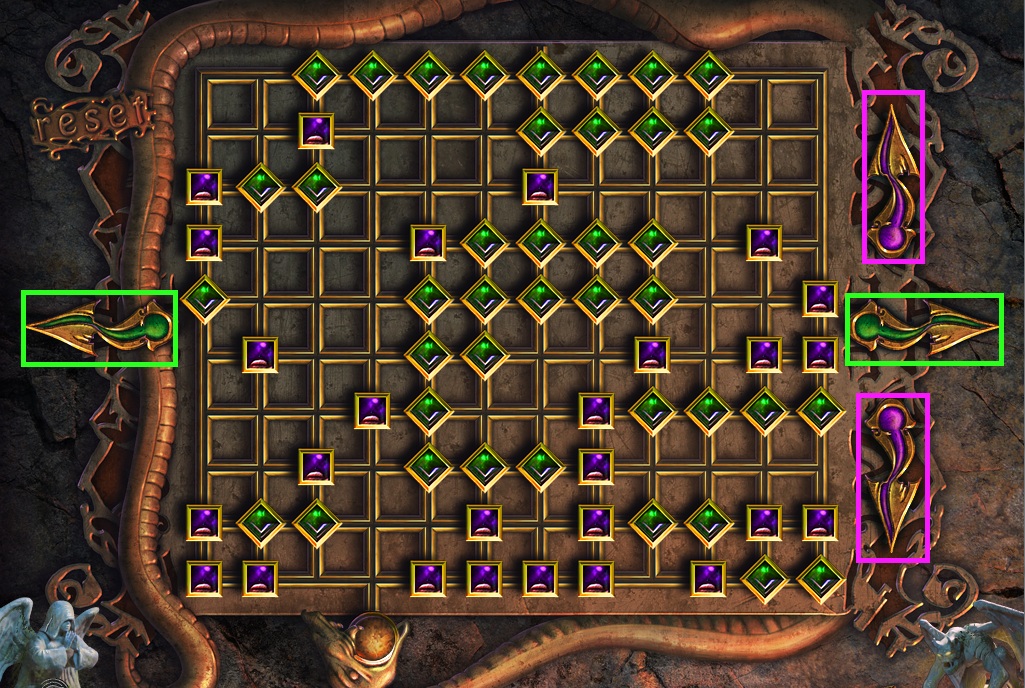
Click the control panel to zoom in.
Add the Blue Key and the Red Key from your inventory into the two keyholes at the bottom of the panel.
Turn each key to start the puzzle.
To solve this puzzle, connect the green batteries with the green wires in each square.
Click each battery, then drag it to move it in the direction indicated by the arrows carved into the battery.
Batteries cannot move through obstacles such as walls or other batteries.
When a battery is connected to a wire, it will lock in place and the green light of the corresponding square will illuminate.
Solution.
Click the lever to rotate it and start the ferris wheel.
Click the little girl to speak with her, then go through the portal to the Kallagen graves.
Kallagen Graves
Speak with Rachel Kallagen to receive the last Amulet.
Go back to the well under the cathedral.
Cathedral
Click the center pedestal to zoom in.
Use the Amulet from your inventory on the engraved top of the pedestal.
The End
Posted by: Trinn |
August 23, 2011 5:32 PM
|
August 23, 2011 5:32 PM
Redemption Cemetery: Children's Plight (Collector's Edition)
Bonus Chapter Walkthrough
Tomb
Go through the broken tomb on the left to the crystal cave.
Crystal Cave
Click the broken crate under the left archway to start the hidden object scene.
Open the metal case to reveal the Bow.
Use the pipette on the chameleon to color it into a Yellow Chameleon.
Screenshot.
Once the hidden object scene is complete, you will receive a Brush.
Go to the graveyard.
Graveyard
Click the first grave on the right to start the hidden object scene.
Click the coffin lid to remove it.
Use the dagger to open the envelope, revealing the Letter.
Screenshot.
Once the hidden object scene is complete, you will receive an Axe.
Go left to the Hattman graves on the left side of the graveyard.
Hattman Graves
Click Silvia Hattman's grave to zoom in and take the Shovel Handle.
Go to the Kallagen graves in the center of the graveyard.
Kallagen Graves
Click the hollow of the tree on the right to zoom in.
Use the Axe from your inventory on the tree to reveal the Skull.
Click Rachel Kallagen's grave to zoom in and take the Blue Crystal.
Go to the Rayn graves on the right side of the graveyard.
Rayn Graves
Click the top of Gordon Rayn's tomb to zoom in.
Use the Skull from your inventory on the space above the skeletal hands.
Take the Green Crystal from the revealed cache.
Click the spade in the grass by the left flowers for a closer look.
Add the Shovel Handle to the spade to complete the Shovel.
Click the graves behind the fence on the left to zoom in.
Use the Shovel to dig up the plot of dirt, revealing the Red Crystal.
Go back to the graveyard.
Graveyard
Click the first grave on the right to repeat the hidden object scene.
Use the corkscrew on the bottle to remove the Cork.
Screenshot.
Once the hidden object scene is complete, you will receive a Yellow Crystal.
Go back to the crystal cave.
Crystal Cave
Click the Green Crystal from your inventory to the top of the large crystal on the far left.
Add the Blue Crystal to the tip of the crystal next to the large green crystal.
Place the Red Crystal to the apex of the crystal on the far right.
Put the Yellow Crystal on top of the crystal next to the large red crystal.
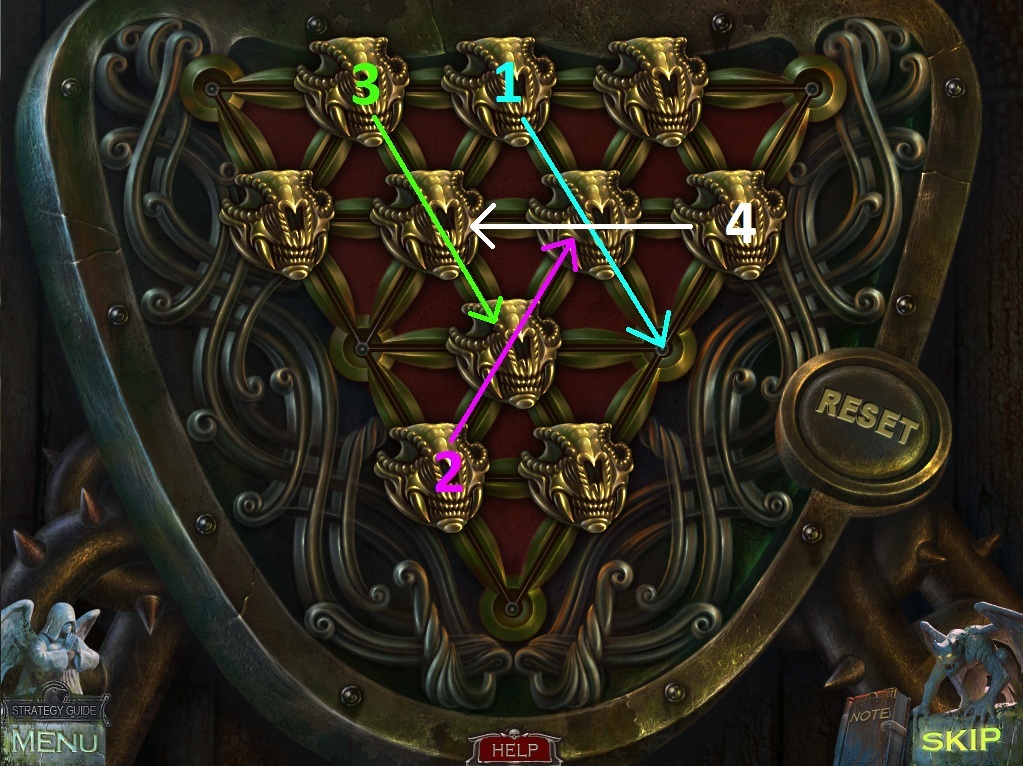
Click the stone door to start the puzzle.
To solve this puzzle, arrange the golden tiles next to their matching symbols outside the board.
Click a tile to select it, then click a position on the board to set it in place.
Tiles cannot move through obstacles such as walls or other tiles.
When a golden tile is correctly placed, its matching symbol will glow.
Solution.
Go through the open door to the burial vault.
Burial Vault
Click the animal skull statue on the pedestal between the two broken columns to zoom in.
Use the Brush from your inventory on the spiderweb to reveal the Moon.
Go back to the crystal cave.
Crystal Cave
Click the crate to repeat the hidden object scene.
Use the feather on the ink well to make a Quill with Ink.
Screenshot.
Once the hidden object scene is complete, you will receive a Sun.
Return to the graveyard.
Graveyard
Click the door in the pit under the broken pavement to zoom in.
Add the Sun and Moon from your inventory to the engraved spaces on the stone door to start the puzzle.
To solve this puzzle, arrange the tiles so that they are touching a number of adjacent tiles equal to the number of dots indicated on top of each tile.
A tile with 1 dot can only touch 1 adjacent tile, a tile with 2 dots can touch 2 other tiles, etc.
Click a tile select it, then click a position on the board to place it.
When a tile has an incorrect number of nearby tiles next to it, it will glow red.
If a tile has the correct number of tiles touching it, it will glow green.
If a tile has nothing touching it, it will glow yellow.
Solution.
Go through the open door to the warlock's prison.
Warlock's Prison
Click the gutter under the right wall to start the hidden object scene.
Click the red curtain to reveal the Wine Bottle.
Screenshot.
Once the hidden object scene is complete, you will receive an Ice Axe.
Go through the bottom archway to the ice cave.
Ice Cave
Use the Ice Axe from your inventory to chop a makeshift ladder to the top of the large chunk of ice to the right of the bridge.
Take the Lever stuck at the peak of the ice chunk.
Go back to the warlock's prison.
Warlock's Prison
Click the floor under the stairs to zoom in.
Use the Lever from your inventory on the socket in the ground.
Click the lever to lower the staircase.
Go up through the second archway on the right to the lava cave.
Lava Cave
Click the pile of sand in the center of the ring to zoom in.
Use the Shovel from your inventory on the pile to make it a Shovel of Sand.
Go back to the warlock's prison.
Warlock's Prison
Click the gutter to repeat the hidden object scene.
Click the headstone to reveal the Pyramid.
Screenshot.
Once the hidden object scene is complete, you will receive a Horn.
Go into the ice cave.
Ice Cave
Use the Shovel Sand from your inventory on the frozen path.
Click the mechanism under the large basin to zoom in and take the Arrow.
Return to the lava cave.
Lava Cave
Use the Arrow from your inventory on the engraved space at the right side of the circle.
When the lava pours down the hole, go back to the ice cave.
Ice Cave
Click the mechanism at the bottom of the basin to zoom in.
Click the valve to start the flow of steam.
Click the partially melted block of ice encasing the knight to zoom in and take the Sword.
Go back to the burial vault.
Burial Vault
Click the ram skull on the pedestal to zoom in.
Add the Horn from your inventory to the left side of the skull.
Click both of the horns to raise the bridge.
Use the Sword from your inventory on the knight statue to the right.
Take the Weight that drops onto the ground.
Return to the lava cave.
Lava Cave
Use the Weight from your inventory on the scale hanging from the ceiling.
Click the cache behind the lifted grate to zoom in and take the Right Valve.
Go back to the ice cave.
Ice Cave
Click the basin mechanism to zoom in.
Place the Right Valve from your inventory on to the socket at the right, then click the valve to start the flow of steam.
Click the knight in the block of ice to zoom in and take the Shield.
Go back to the burial vault.
Burial Vault
Use the Shield from your inventory on the knight statue to the left.
Take the Chain that falls to the ground.
Return to the ice cave.
Ice Cave
Click the ravine under the left side of the bridge to zoom in.
Use the Chain from your inventory to pull up the bucket and take the Red Valve.
Click the basin mechanism to zoom in.
Add the Red Valve to the center socket, then click the valve to start the steam.
Click the frozen knight to zoom in and take the Crown.
Go back to the burial vault.
Burial Vault
Use the Crown from your inventory on the center statue.
Take the Arrow from the revealed secret compartment at the base of the seated statue.
Return to the lava cave.
Lava Cave
Place the Arrow from your inventory into the engraved space at the left side of the circle.
Take the Spider that drops from the ceiling.
Go back to the warlock's prison.
Warlock's Prison
Click the stained glass panel in the large rock on the left side to zoom in.
Add the spider from your inventory to the space in the center to start the puzzle.
To solve this puzzle, drop the ball at the top into the snakes mouth at the bottom.
Click the arrows to move the tiles along the grid.
The green left and right arrows move the green diamond tiles horizontally.
The purple up and down arrows move the purple square tiles vertically.
Click the corresponding arrows in this order: Left, Down, Left, Right, Up, Left, Down, Right x3, Up, Right, Left x2, Down, Right x2, Down, Left x2.
Solution.
Once the puzzle is solved, the statue will be lowered.
Posted by: Trinn |
August 23, 2011 5:33 PM
|
August 23, 2011 5:33 PM