


Vampire Saga:
Welcome to Hell Lock
Platform: Windows
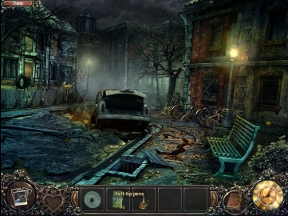
![]() You wake up. Disoriented. Outside of an abandoned town. All you know is your motorcycle is ruined, but a series of vague images continually float through your mind. The town you're stranded outside of was evacuated decades ago because of a fire in the mines. Coal is still burning below the surface, and something ghostly walks the streets above ground. Vampire Saga: Welcome to Hell Lock, a sequel to Vampire Saga: Pandora's Box, is an extraordinarily well-done hidden object adventure that incorporates classic horror film methods to create a creepy, captivating world that draws your interest out with each and every step you take.
You wake up. Disoriented. Outside of an abandoned town. All you know is your motorcycle is ruined, but a series of vague images continually float through your mind. The town you're stranded outside of was evacuated decades ago because of a fire in the mines. Coal is still burning below the surface, and something ghostly walks the streets above ground. Vampire Saga: Welcome to Hell Lock, a sequel to Vampire Saga: Pandora's Box, is an extraordinarily well-done hidden object adventure that incorporates classic horror film methods to create a creepy, captivating world that draws your interest out with each and every step you take.
 A casual adventure at its core, Vampire Saga unleashes hidden object scenes at a long pace, leaving you plenty of time to enjoy the game's wealth of inventory-related puzzles. Search for areas you can take a closer look at by clicking on the shining spots, then figure out what you might need to solve the puzzle. Move from scene to scene by clicking the navigation arrows, and when you find an item you think might come in handy, try using it! More often than not, the object that solves a puzzle will be easily found and immediately obvious what you'll need to do with it, it's just a matter of getting there and getting things done.
Vampire Saga features a few shortcut mechanics that every single hidden object game released in the future should incorporate. The first is a sort of hot/cold radar for locating items during the hidden object scenes. Move the cursor around the area and watch the list of items below. See some of them slowly turning green? The greener the word, the closer your cursor is to the object. No more scouring every pixel to find a pair of binoculars! Vampire Saga makes it so you have automatic help if you need it, turning hidden object scenes into pure fun.
The second feature in Vampire Saga that should be emulated is the quick-travel photo album. After visiting a scene, you can access their images by clicking on the photographs below. Look at a shot, see if there's something you need to do there, then click the "travel" button to instantly transport yourself there. No more tedious clicking to backtrack, just instant travel for instant puzzle solving. It's simple, but it goes a long way to making the game more accessible and more entertaining.
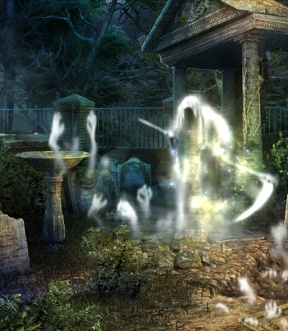 Analysis: Do mystery games intrigue you? Does the horror genre make you all goosebumpey and happy on the inside? Vampire Saga: Welcome to Hell Lock is totally the game for you. Casual adventure games rarely get this sort of genre right, often resorting to cheesy gimmicks or tired tropes in an attempt to coax a scare out of the player. Here, though, you'll be genuinely interested, especially after you see the, well, "smoke human" and find your own face on an empty can. I'll say no more!
Vampire Saga has the unfortunate habit of holding your hand a bit too frequently, providing loud sparkles for objects you need to interact with, and a hint system that walks you right to the next task. Depending on where you stand on the subject, this may or may not be a drawback. And besides, most of the helpful nudges the game gives you can simply be ignored, so if you want more of a challenge, just don't ask for help!
Also worth noting: Vampire Saga is longer than your average hidden object title, clocking it at five to six hours of playtime for most users. It's a rare game that's genuinely scary without resorting to cheap thrills, Vampire Saga: Welcome to Hell Lock is a satisfying hidden object adventure with a number of great gameplay features that make it a complete joy to experience!
![]() Windows:
Windows:
Download the demo
Get the full version
![]() Mac OS X:
Mac OS X:
Not available.
Try Boot Camp or Parallels or CrossOver Games.


Walkthrough Guide
(Please allow page to fully load for spoiler tags to be functional.)
Vampire Saga: Welcome to Hell Lock
General Knowledge
Vampire Saga: Welcome to Hell Lock is a hidden object adventure game, where the cursor is used to interact with the environment.
When the cursor is over an area where you can zoom in for a closer look or start a hidden object scene, it will change to a manifying glass.
While in a hidden object scene, the words in the list of items will glow bright green if the cursor is near one of those objects.
Moving the cursor towards the edge of a screen will cause large arrows to appear. Click the arrows to travel to the next scene in that direction.
When the cursor is over an area you can interact with or an object you can pick up, it will change to a gear.
Items you pick up will be added to the inventory bar at the bottom.
Use inventory items to solve puzzles and interact with objects throughout the game.
In the right corner is the Hint button. Click the hint button to reveal an item in a hidden object scene or for a suggestion of what to do next in your adventure.
Beside the Hint button is the Journal. The Journal contains notes including helpful information for puzzles and important plot points.
On the left corner of the screen is the Camera. Use the Camera to photograph areas, revealing Rubies that are collected in the Pendant next to the Camera.
When you're in an area you've already visited or photographed, the Camera will be replaced by a stack of pictures. Click the pictures then select a specific photo to automatically travel to that location.
Click the Menu in the top left corner of the screen for an in-game menu where you can change the Options or return to the Main Menu.
Chapter 1
The Highway
Click the welcome sign to add a Journal entry.
Use the Camera to photograph the bloody prints on the twisted tree.
Click the tree and take the red Ruby(1/15) to add it to the pendant.
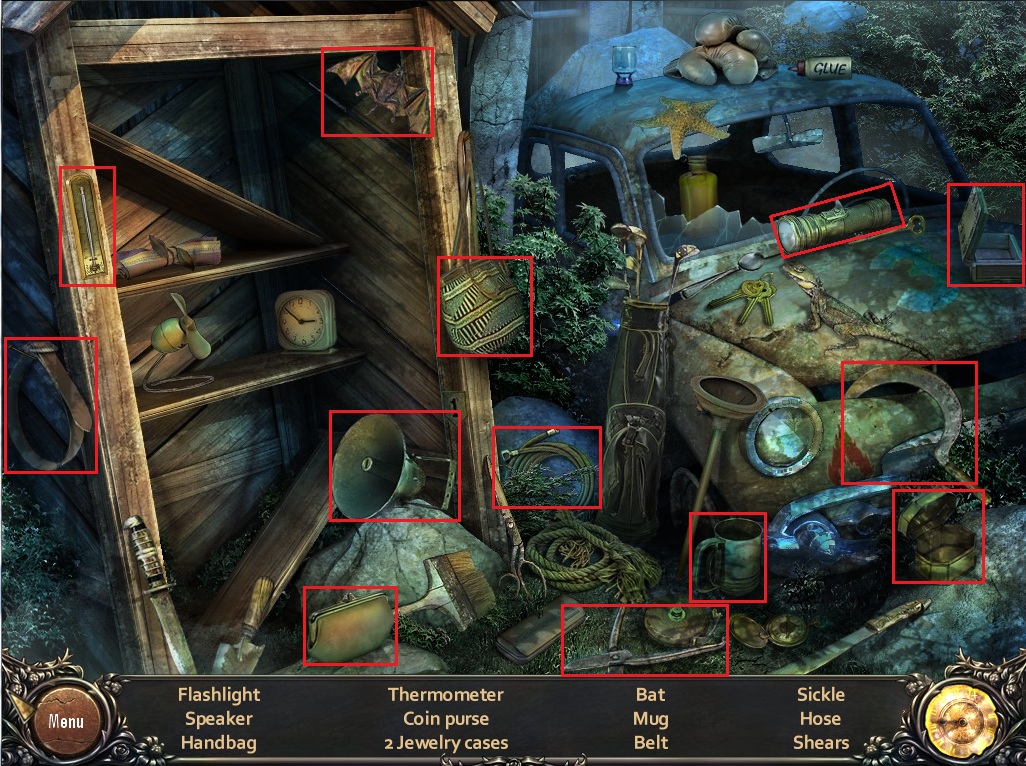
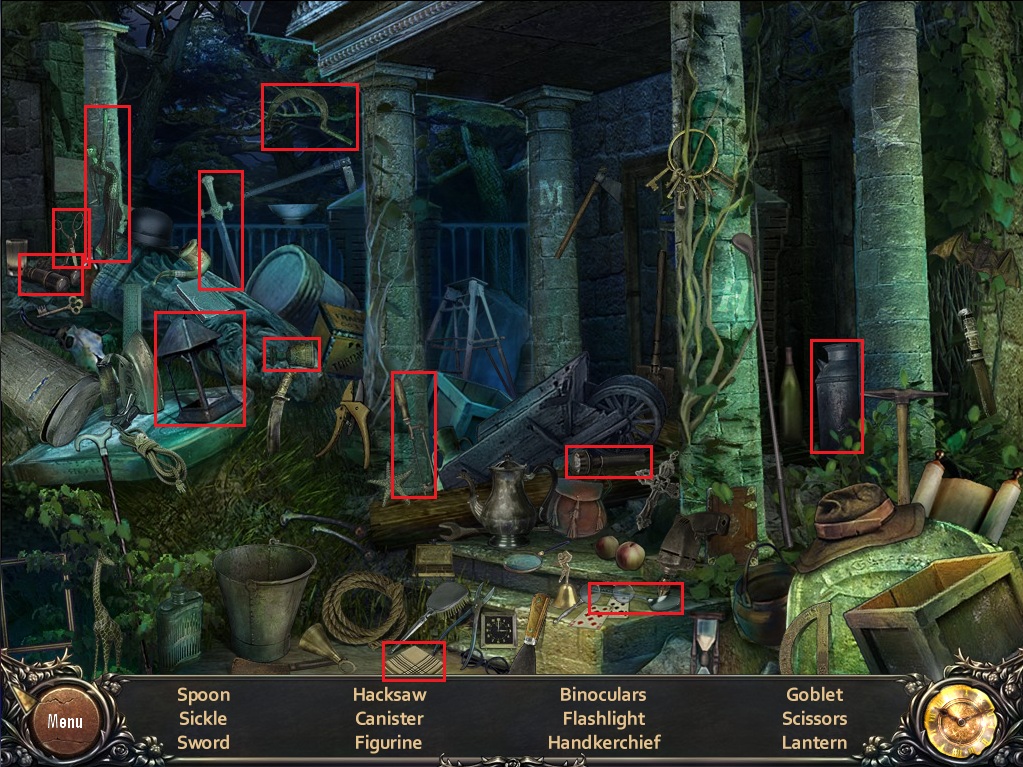
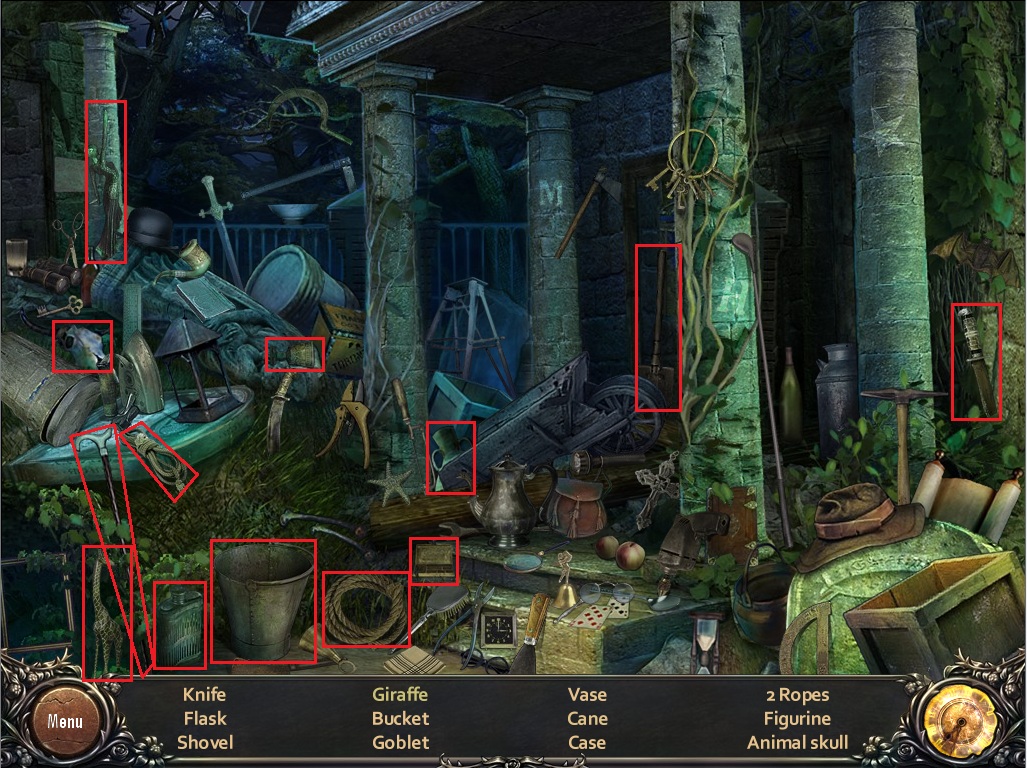
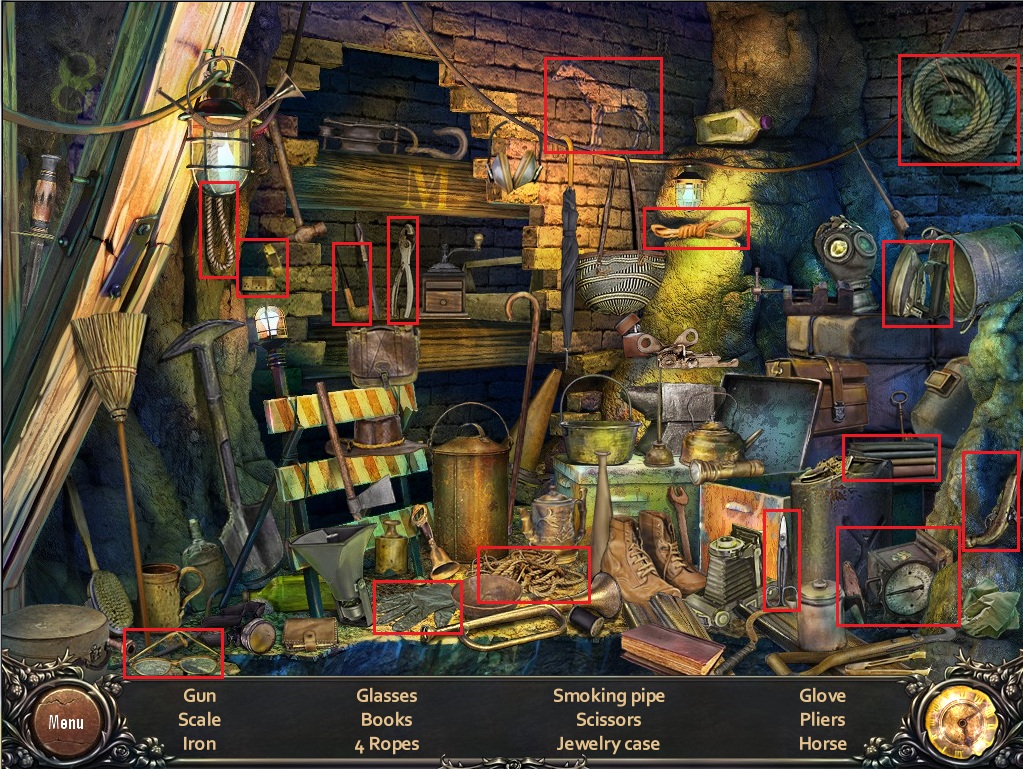
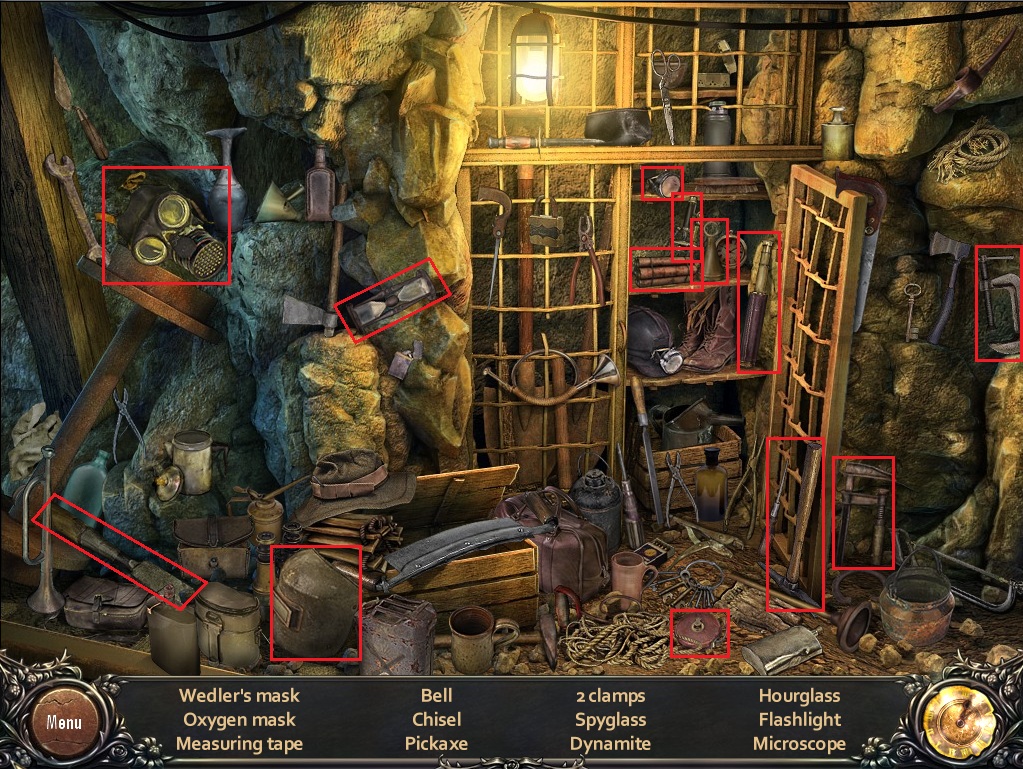
Click the small shed by the gate to start the hidden object scene.
Screenshot.
Once the hidden object scene is complete, you will receive Shears.
Move left to face the gate.
Click the sign on the gate to zoom in.
Use the Shears from your inventory on the chain blocking the gate.
Click the red tank to zoom in.
Take Green Bottle on top of the tank.
Go back one screen and click the crashed motorcycle.
Use the Green Bottle at the top of the fuel leaking from the motorcycle to fill it with gas.
Return to the red tank beside the gate.
Pop the lid off the tank then pour in the Bottle with Gas.
Click the levers to the right of the tank for a closer look.
Remove the left vent to reveal the third Switch.
Add the switch to the panel, then flip the three handles to open the gate.
Go through the opened gate to the abandoned streets.
Abandoned Streets
Use the Camera to photograph the overturned mailbox on the ground.
Click the mailbox and take the red Ruby(2/15) to add it to the pendant.
Take the Axe jutting out of the stump on the road.
Click the power box on the wooden beam of the right building.
Pull the switch to turn off the power, switching the light from green to red.
Click the toppled telephone poles blocking the the street to zoom in.
Use the Axe to chop both of the poles, clearing the path.
Go forward and you will reach a part of the road with a car falling through a hole in the pavement.
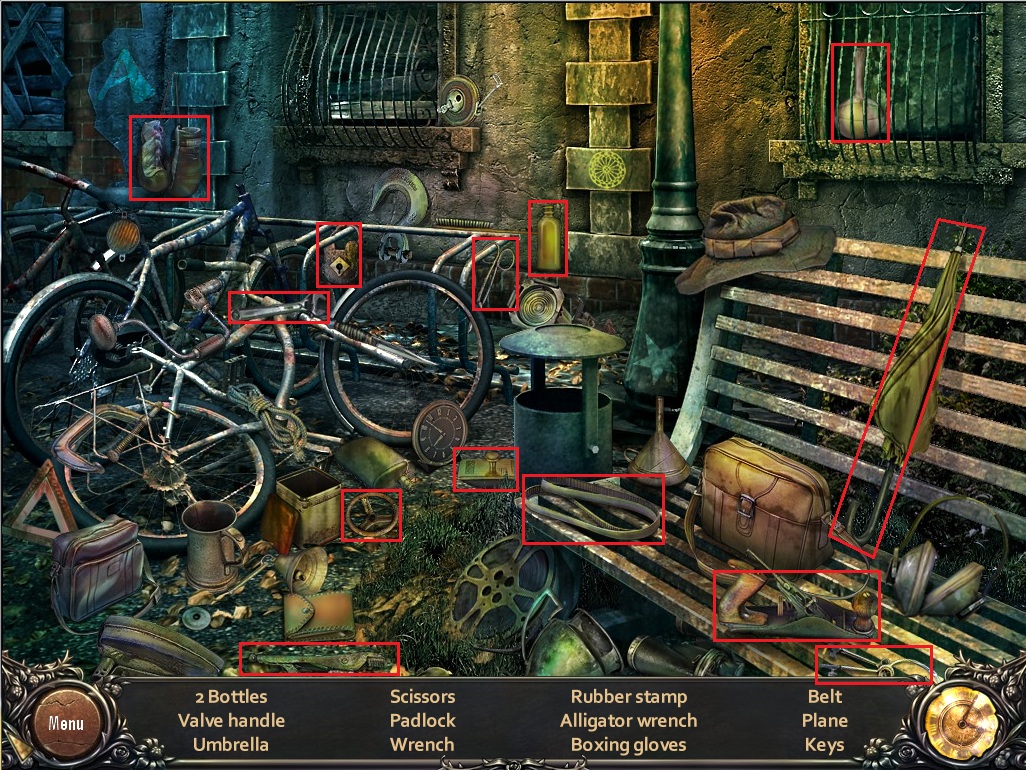
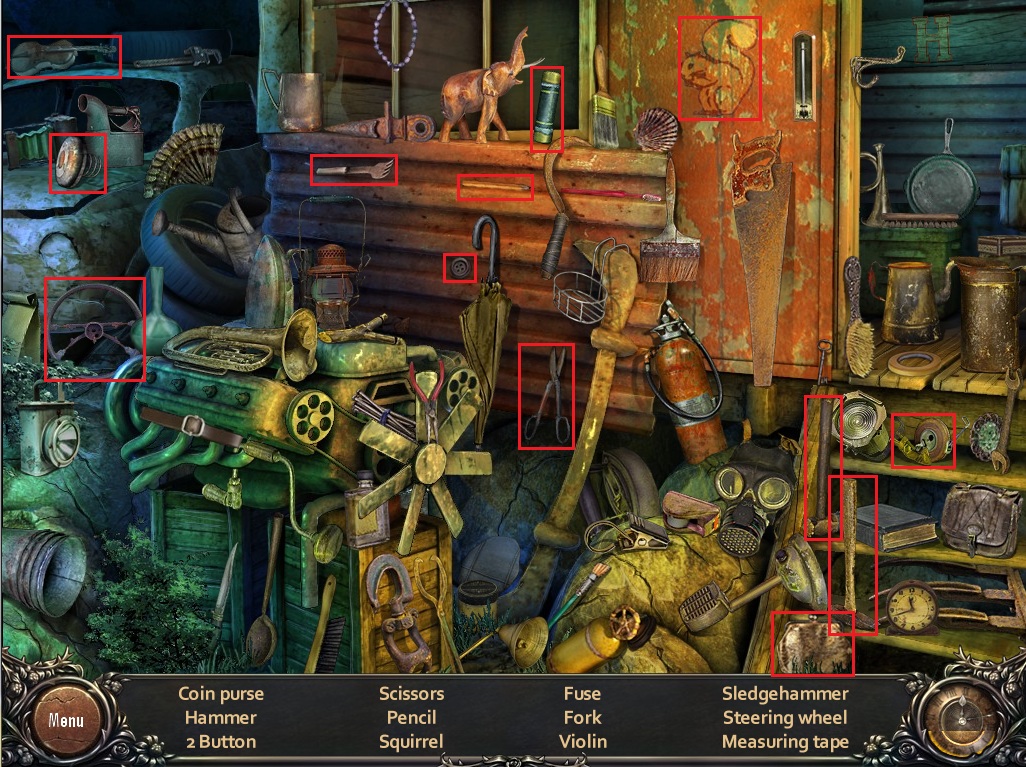
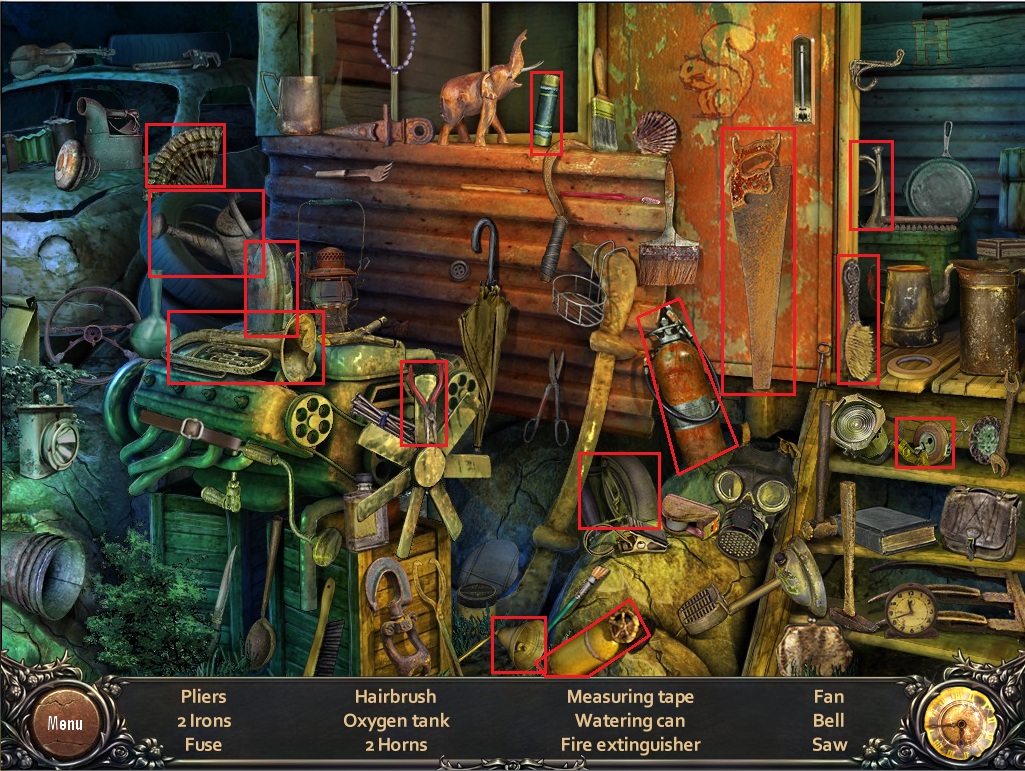
Click the stationed bicycles to the right of the car to start a hidden object scene.
Screenshot.
Once the hidden object scene is complete, you will receive a Small Wheel.
Go through the small picket fence on the left towards the front yard of the house.
The House
Click the mailbox to zoom in.
Open the mailbox to find a note stating that the gnome has the key.
Click the moving tire swing and take the Chisel carried inside.
Click the lawn gnome standing in the grass to zoom in.
Use the Chisel on the gnome's hat to reveal the House Key.
Click the front door of the house, then open the door using the House Key.
Click the head stuck to the door to receive the Doll's Head and the Scissors.
Go through the open door into the foyer of the house.
Click the torn painting next to the fridge to zoom in.
Take the brown Felt-tip Pen(1/6) behind the rip in the center of the painting.
Click the framed painting on the left wall above the stairs.
Use the Scissors to cut through the canvas, revealing the green Felt-tip Pen(2/6)
Click the closet on the right to open the door, then take the Fire Poker inside.
Go up the stairs to the hallway.
Click the baby carriage to zoom in.
Place the Doll's Head from your inventory next to the severed doll body.
Click the framed painting on the right wall.
Use the Scissors to cut through the canvas, revealing the blue Felt-tip Pen(3/6)
Click the painting on the left wall between the window and the open door.
Use the Scissors to cut through the canvas, revealing the red Felt-tip Pen(4/6)
Go through the left door into the child's bedroom.
Click the painting on the left wall above the fish tank.
Use the Scissors to cut through the canvas, revealing the grey Felt-tip Pen(5/6)
Click the painting on the right wall under the bunk bed to zoom in.
Use the Scissors to cut through the canvas, revealing the yellow Felt-tip Pen(6/6)
Click the desk to zoom in and take the Magnet.
Click the fish tank for closer look.
Use the Magnet to pull up the Car Trunk Keys next to the tarantula.
Click the window behind the drapes to zoom in.
Take the Bug Spray on the windowpane.
Click the top of the bunk bed for a closer look.
Use the Bug Spray on the pile of spiders.
Go back downstairs to the foyer.
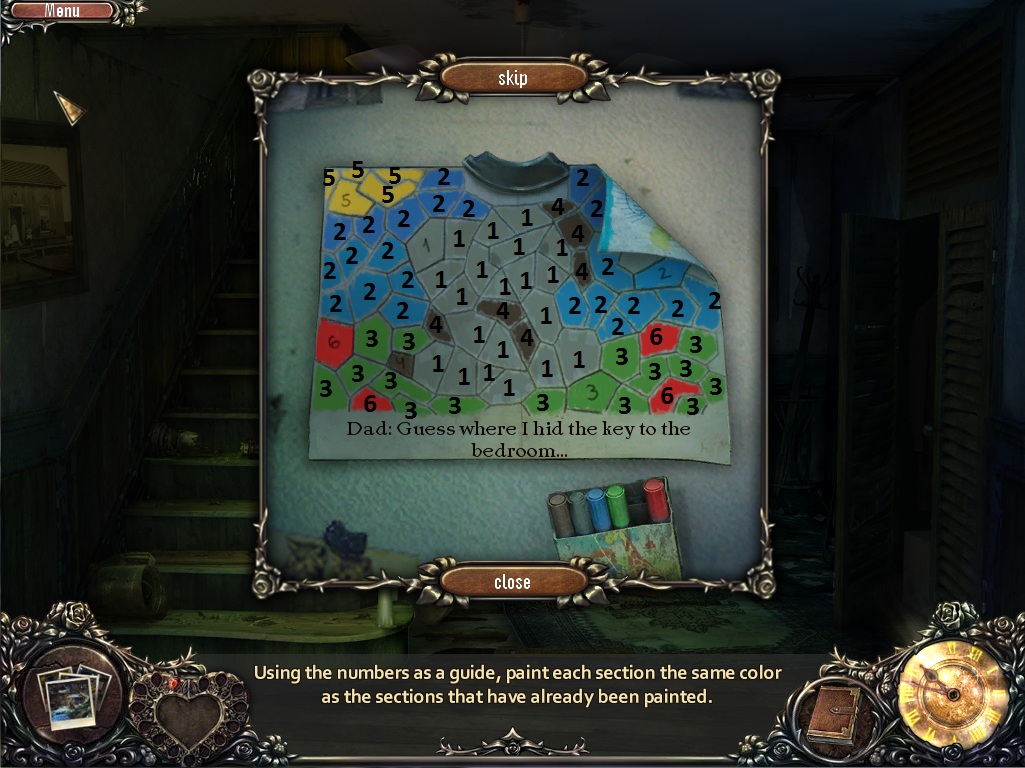
Click the refidgerator and then click the coloring book page to zoom in.
Add the Felt-tip Pens from your inventory to the fridge to start the puzzle.
To solve this puzzle, use the markers to fill in the numbered sections with the appropriate color.
Color all of the #1 spaces with the Grey pen.
Color all of the #2 spaces with the Blue pen.
Color all of the #3 spaces with the Green pen.
Color all of the #4 spaces with the Brown pen.
Color all of the #5 spaces with the Yellow pen.
Color all of the #6 spaces with the Red pen.
Solution.
Click the fridge to open the door, revealing the Cleaner.
Go back two screens to the crashed car in the abandoned streets.
Abandoned Streets
Click the trunk of the car to zoom in.
Use the Car Trunk Keys from your inventory on the lock at the bottom to open the trunk door, then take the Funnel inside.
Click the grate by the gutter in the street for a closer look.
Use the Fire Poker to remove the grate and click the uncovered toy elephant.
Use the Scissors on the stitching in the elephant's side to reveal the Bedroom Key.
Return to the upstairs hallway inside the house.
The House
Click the closed right door to zoom in.
Use the Bedroom Key from your inventory on the keyhole to open the door.
Go through the open door into the master bedroom.
Click the wardrobe to the left of the window to zoom in.
Add the Small Wheel from your inventory to the space at the bottom, then use the Oiler on the wheel to repair the wardrobe.
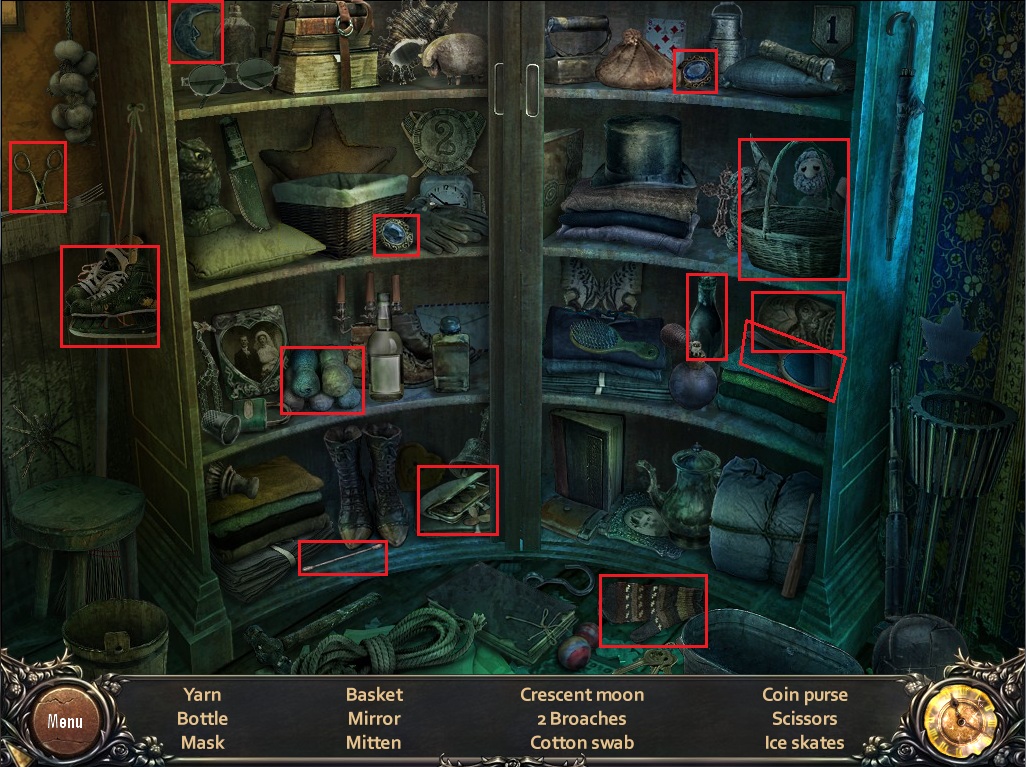
Click the wardrobe door to start the hidden object scene.
Screenshot.
Once the hidden object scene is complete, you will receive a Screwdriver.
Click the bed to remove the covers and lift the mattress.
Use the Screwdriver on the screws at the sides of the second board in the bedframe to receive the Plank, then take the revealed Handle.
Click the drawer under the television to zoom in.
Add the Handle to the space at the top drawer, then click the drawer to open it.
Pop the top the jar. Although there's nothing you can do with the jar now, note the alcohol smell of the liquid.
Click the window to step onto the ledge.
Place the Plank from your inventory on the space in the roof.
Go across the roof and down the ladder to street entrance of the cinema, then move forward once more to the churchyard.
Chapter 2
The Churchyard
Use the Camera to photograph the middle light of the lamppost.
Click the lamppost for a closer look, then take the red Ruby(3/15) to add it to the pendant.
Click the broken bell on the pavement to zoom in.
Take Silver Cross next to the clapper inside the bell.
Go left to the graveyard.
The Graveyard
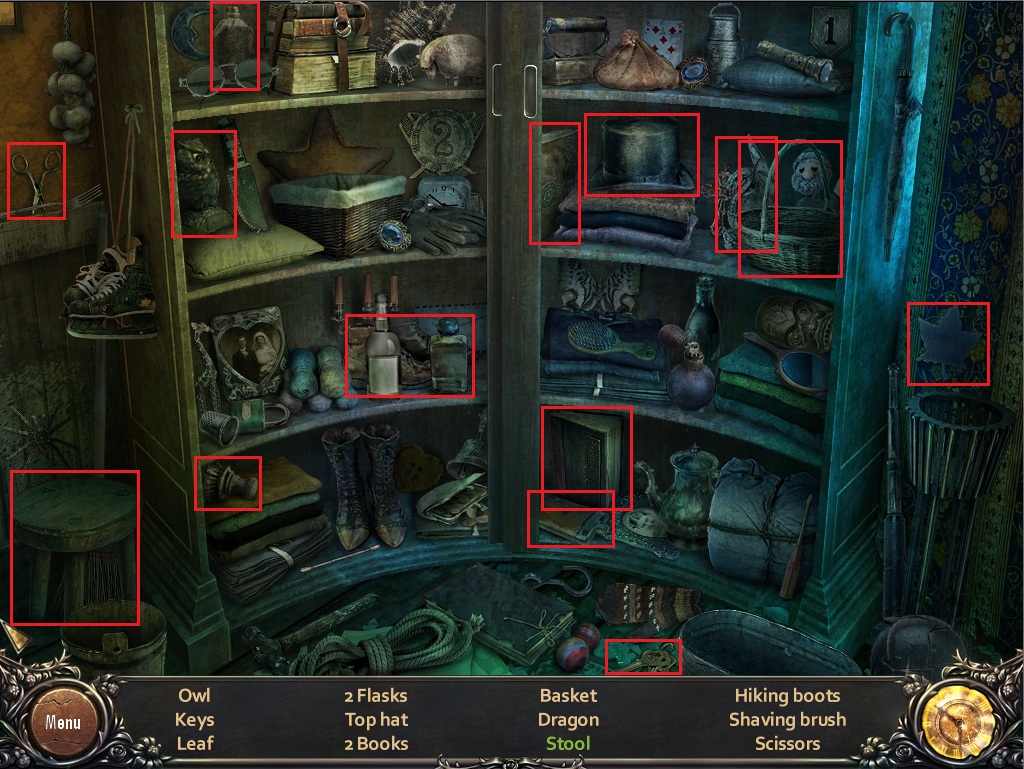
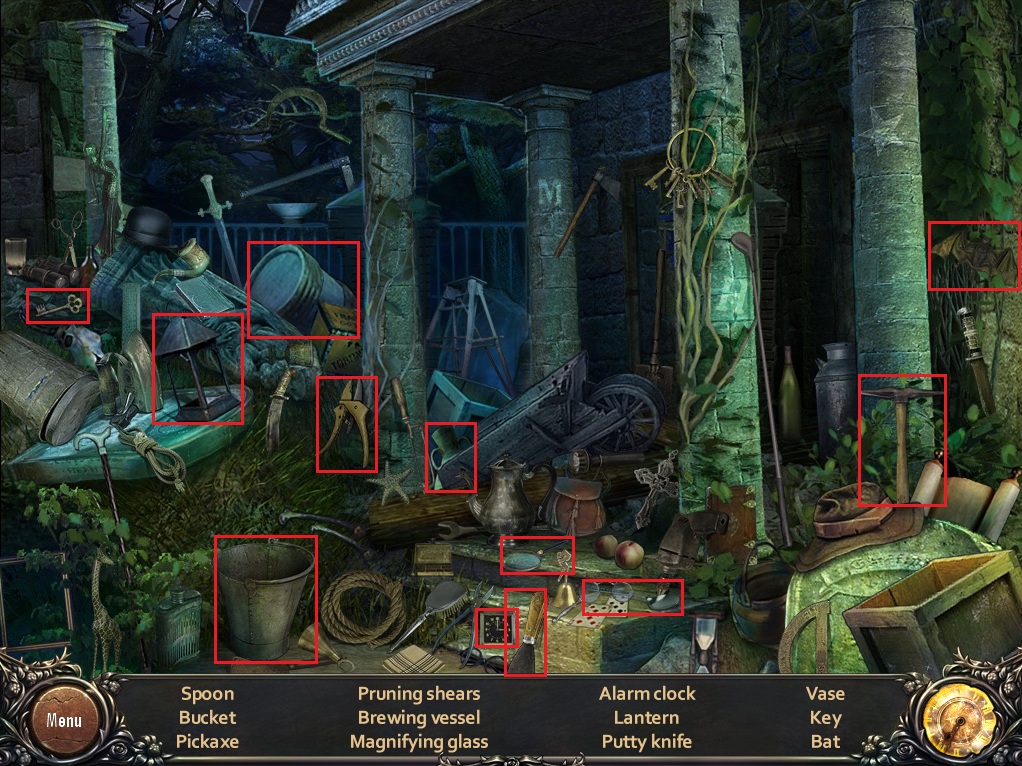
Click the tomb at the back of the graveyard to start the hidden object scene.
Screenshot.
Once the hidden object scene is complete, you will receive a Glass.
Go back two screens and then right two screens to the water tank alley.
Water Tank Alley
Click the water tank to zoom in.
Rotate each of the three valves to lift the hatch.
Click the liquid below to see something large obscured by the water.
Close the top view then click the bottom of the water tank to zoom in.
Take the Flare wedged in the valve, then turn the valve handle to empty the water.
Click the open hatch at the top of the water tank again.
Toss the Flare down inside the tank.
Move forward through the archway to the firetruck.
The Firetruck
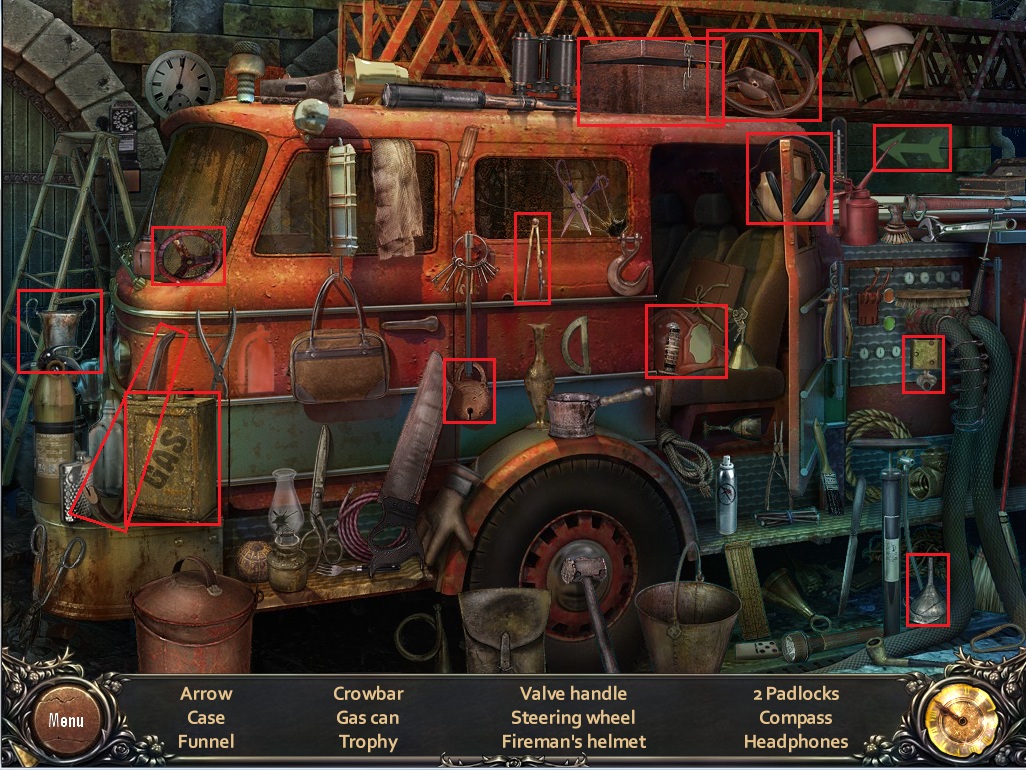
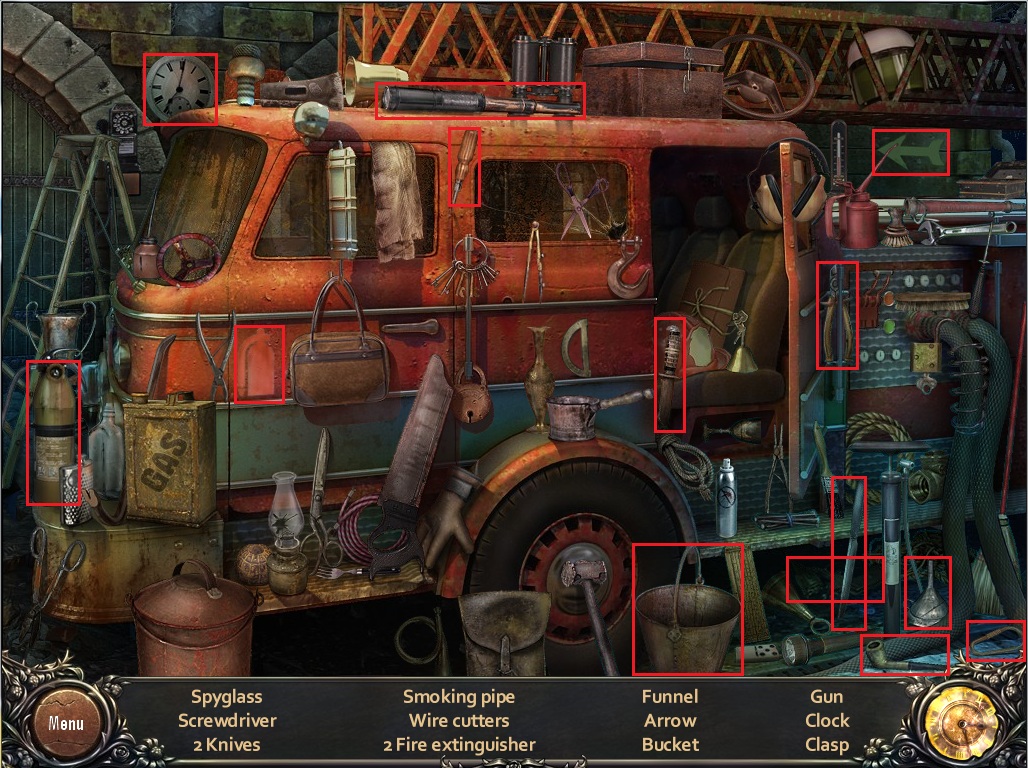
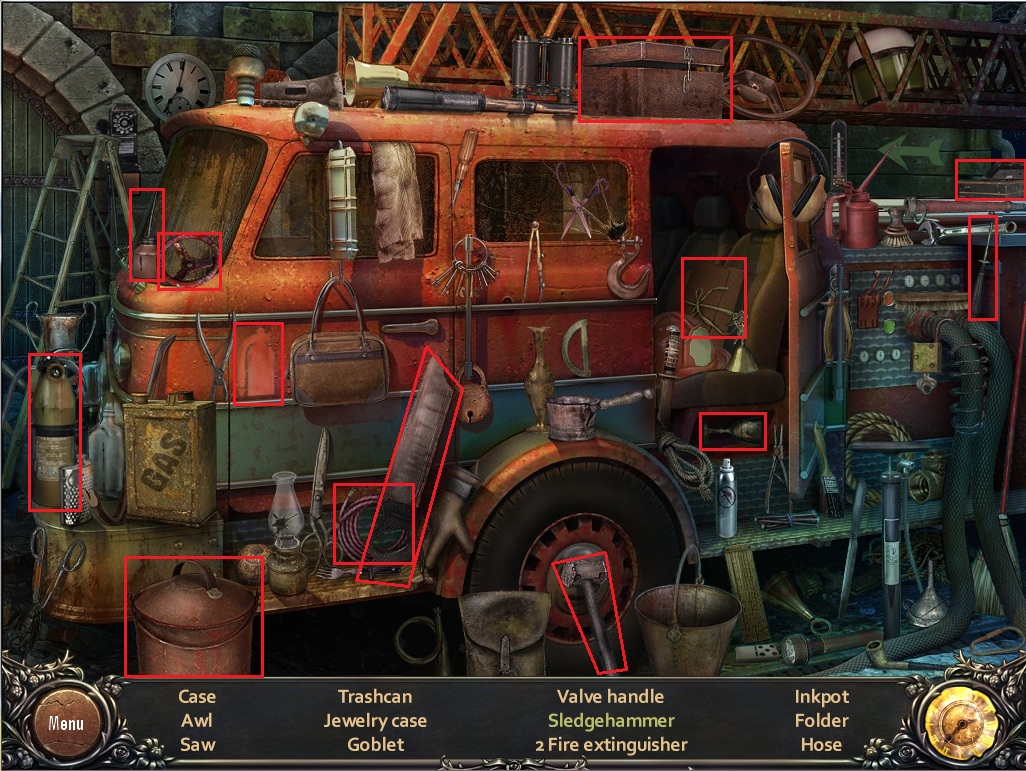
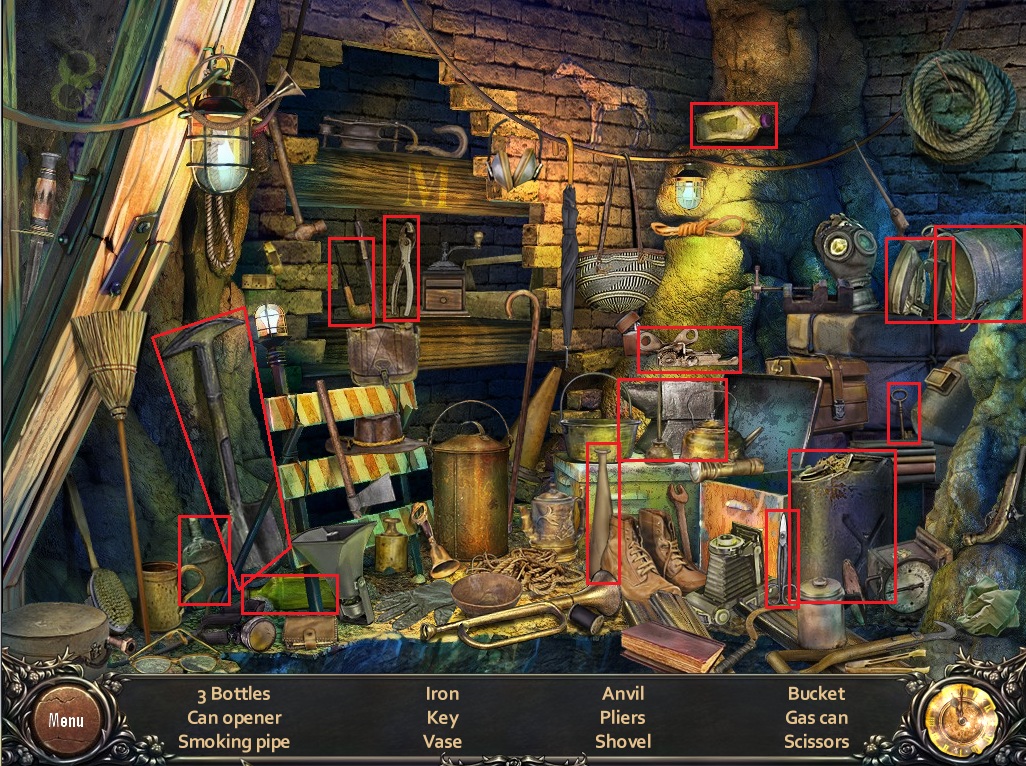
Click the side of the firetruck to start the hidden object scene.
Screenshot.
Once the hidden object scene is complete, you will receive a Valve Handle.
Return to the graveyard.
The Graveyard
Click the broken fountain to zoom in.
Add the Valve Handle from your inventory to the pipe under the cracked section of the fountain.
Click the handle to release the water.
Place the Silver Cross inside the small pool of water in the fountain.
Use the Glass on the sparkling pool to fill it with Holy Water.
Return to the water tank alley.
Water Tank Alley
Click the top of the water tank to open it and look inside.
Pour the Glass with Holy Water from your inventory onto the undead creature inside the tank.
Take the Sheriff's Key in the pile of the destroyed vampire's ashes.
Go back one screen to the cinema entrance.
The Cinema
Use the Camera to photograph the top of the theater sign.
Click the sign to zoom in, then take the red Ruby(4/15) to add it to the pendant.
Go through the open door into the cinema.
Click the ticket window on the right wall to zoom in.
Take the note slipped under the window for a clue to the cash register code; the price of a burger and a drink at Molly's Cafe.
Click the cash register to zoom in.
Take the taxi cab business card with the telephone number 973 stuck to the top of the register.
Go upstairs to the camera room.
Click the film rewinder machine.
Use the Cleaner from your inventory on the large bloodstain.
Click the stagelight next to the film projector to zoom in.
Click the back of the light to twist it off.
Click the photo developing machine in the back of the room.
Take the Photo Paper on the table to the right of the four bottles.
Exit the cinema to return outside.
Click the phonebooth in front of the entrance.
Dial the number to the taxi service 9-7-3.
Take the Coin that falls down the coin dispenser.
Go back inside the cinema.
Click the game machine in the corner of the entrance room, to the left of the ticket window.
Place the Coin inside the coin slot of the machine to start the puzzle.
To Solve this puzzle, simply use the claw to pick up the teddy bear.
Click and hold the lever to operate the claw.
Drag the lever to the left to move it directly over the bear.
Push the red button to dispense the claw and pick the bear up.
Take the Needle & Thread from the teddy bear's stomach.
Return to the upstairs hallway of the house.
The House
Click the baby carriage to zoom in.
Use the Needle & Thread from your inventory to stitch the doll's head and body back together.
Click the completed doll to make it disappear.
Take the revealed Film Negative(1/12) and the Scrub Brush from the bed of the carriage.
Return to the highway where you crashed the motorcycle.
The Highway
Click the glowing blue light in the grass under the tree.
Click the ringing cellphone to add it to your inventory.
Return to the graveyard.
The Graveyard
Click the tomb to repeat the hidden object scene.
Screenshot.
Once the hidden object scene is complete, you will receive a Hacksaw.
Return to the firetruck area.
The Firetruck
Click the large double doors to zoom in.
Use the Hacksaw from your inventory to cut through the bar blocking the doors.
Go through the open archway to the sheriff's office.
Sheriff's Office
Use the Camera to photograph the left stone gatepost.
Click the large ball at the top of the post and take the Ruby(5/15) to add it to the pendant.
Click the door to the office to zoom in.
Use the Sheriff's Key from your inventory to open the door, then step inside.
Click the desk in the middle of the room for a closer look.
Read the note left on the table top to learn that the safe code for the box buried in the cemetary is the same number as the Hill Lock population.
Take the box of Bullets to the left of the note.
Click the large weapons locker next to the jail cell.
Click the dial of the lock to start the puzzle.
To solve this puzzle, rotate the dial alternately clockwise and counterclockwise until each of the five tumblers is lifted.
Click the top arrow to move the dial clockwise, click the bottom arrow to move the dial counterclockwise.
Click the Top arrow 5 times.
Click the Bottom arrow 7 times.
Click the Top arrow 4 times.
Click the Bottom arrow 3 times.
Click the Top arrow 6 times.
Once the puzzle is solved, take the Rifle from the locker.
Load the gun with the Bullets from your inventory.
Click the coffee machine to zoom in.
Take the empty Kettle from inside the machine.
Exit the building and step back outside.
Click the gate to zoom in.
Use the Rifle from your inventory on the large padlock.
Go through the opened gate to the electric substation.
Chapter 3
The Substation
Use the Camera to photograph the pile of rubble on the ground.
Click the rocks and take the Ruby(6/15) to add it to the pendant.
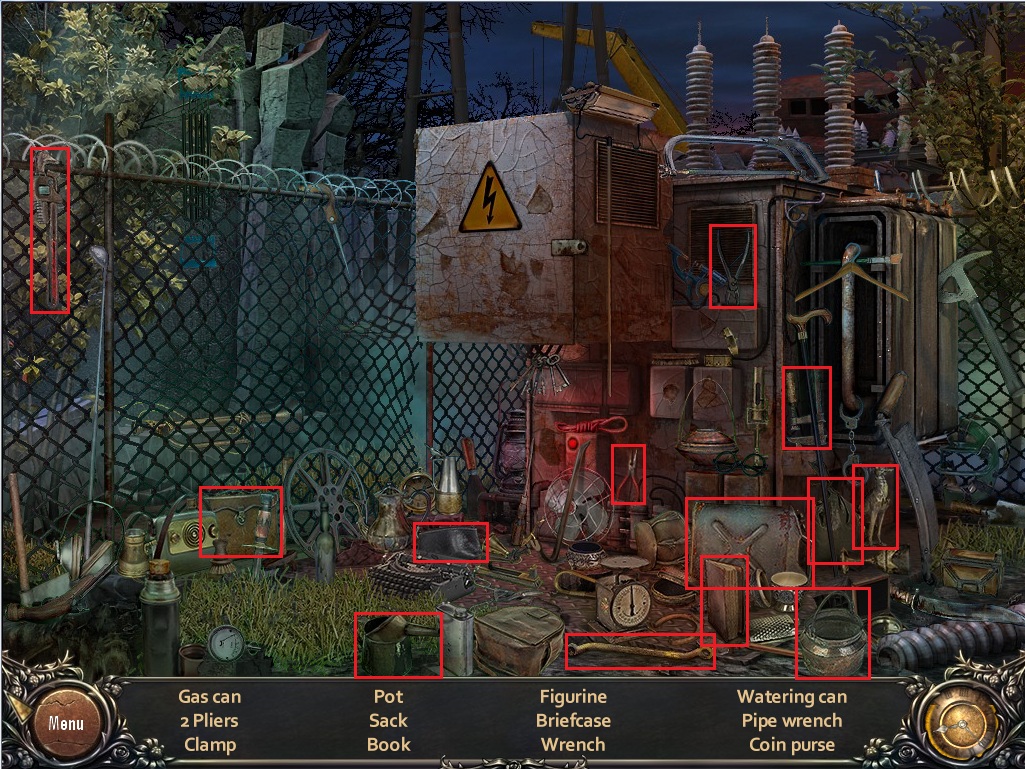
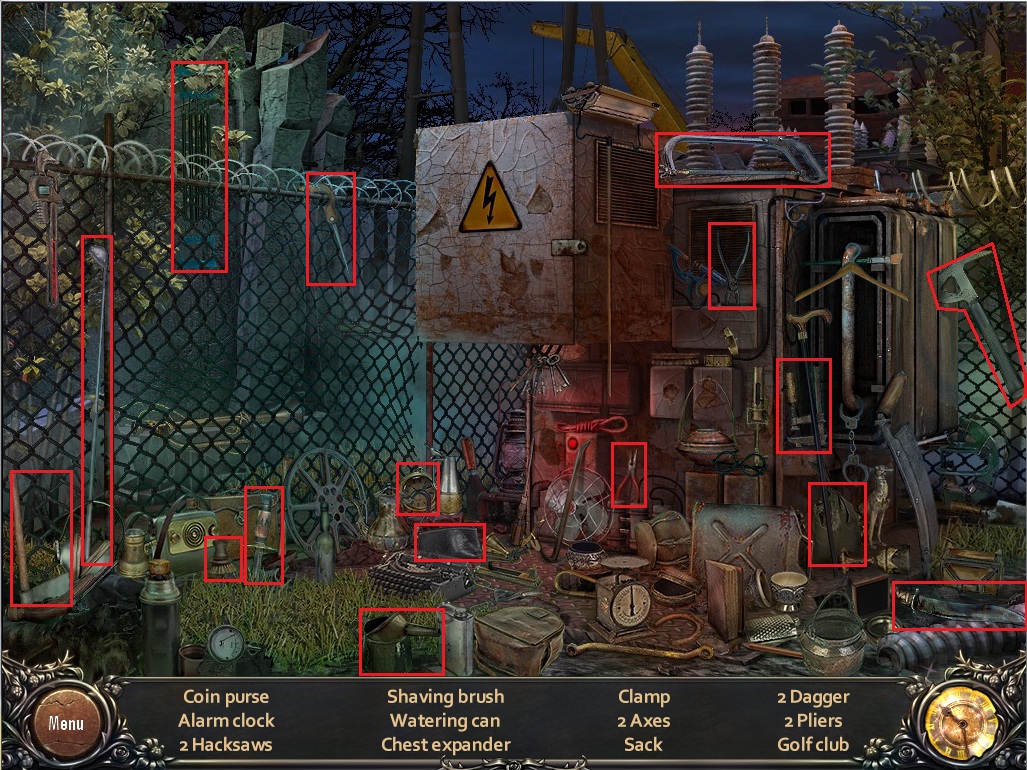
Click the back fence to start the hidden object scene.
Screenshot.
Once the hidden object scene is complete, you will receive a Pipe Wrench.
Go forward to the junkyard.
The Junkyard
Click the bottom of the crane to zoom in.
Use the Pipe Wrench from your inventory to remove the cap of the fuel tank.
Click the tank to look inside.
Take out the rolled up booklet and click the page to read it.
The booklet is the menu mentioned in the clue for the cash register code; note the price of the burger and soda: $11.99
Go back to the first room inside the cinema.
The Cinema
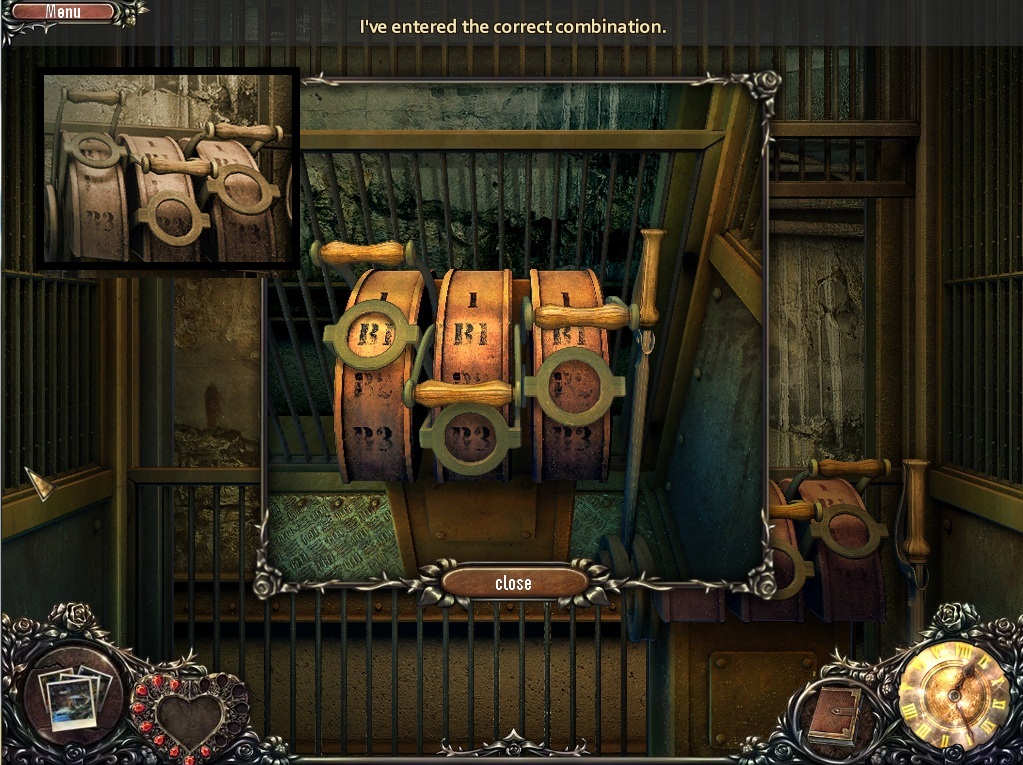
Click the register on the counter to start the puzzle.
To solve this puzzle, enter in the correct combination by pushing the buttons on the cash register.
Remember: the combination is the price of a burger & soda at Molly's Cafe $11.99
Solution.
Once the puzzle is solved the register drawer will open, revealing the Key.
Click the wooden double doors to zoom in.
Use the Key on the keyhole of the lock then step through the open door into the theater.
Click the stage to zoom in.
Take the Piece of Poster and the Wire on the stage platform.
Use the Camera to take a picture of the exit sign above the door.
Click the sign and take the Ruby(7/15) to add it to the pendant.
Exit the theater and go upstairs.
Click the stagelight to zoom in.
Add the wire to the back of the light, then click the wire to connect it with the bolts.
Return to the graveyard.
The Graveyard
Click the fountain to zoom in.
Use the Kettle from your inventory on the fountain to fill it with water.
Return to the firetruck.
The Firetruck
Click the side of the truck to repeat the hidden objct scene.
Screenshot.
Once the hidden object scene is complete, you will receive a Gas Can.
Go forward one screen to the sheriff's office.
Sheriff's Office
Click the poster taped to the window to zoom in.
Add the Piece of Poster from your inventory to the torn poster on the window.
Take the Film Negative(3/12) behind the broken glass.
Click the coffee machine to zoom in.
Go inside the office building.
Place the Coffee Pot from your inventory back into the coffee machine.
Exit the building and go ahead 2 screens to the junkyard.
The Junkyard
Click the gas tank at the bottom of the magnetic crane to zoom in.
Use the Gas Can from your inventory to fill the tank.
Click the drivers seat inside the crane to start the puzzle.
To solve this puzzle, operate the crane to lift the mine car and move it to the far left side.
Click and drag the lever left or right to move the magnet in the corresponding direction.
Press the red button to power the magnet on and off.
Click and drag the handle up or down to move the magnet vertically.
Move the magnet left until it's over the middle of the mine car.
Lower the magnet so it's just above the black and yellow striped band, about level with the wheels of the car; the handle should be halfway down.
Press the red button to activate the magnet and pick the car up.
Move the handle to the top to lift the car up as high as possible.
Push the lever to move the car left as far as it will go until it's partially obscured by a stacked yellow and red car.
Press the red button to power off the magnet and drop the mine car.
Click the back of the crane to zoom in.
Remove the Battery to add it to your inventory.
Go left to the hut in the back of the junkyard.
Use the Camera to photograph the top of the large pile of vehicles.
Click the green car and take the Ruby(8/15)
Click the broken car smashed underneath the mine car to zoom in.
Click the hood of the car to lift it, then click the hood again to take a closer look.
Place the Battery from your inventory inside the empty space.
Go back to the substation.
The Substation
Click the fence to repeat the hidden object scene.
Screenshot.
Once the hidden object scene is complete, you will receive a Crowbar.
Go back one screen to the sheriff's office.
Sherrif's Office
Click the broken glass on the window to zoom in.
Use the Crowbar from your inventory to remove the five broken chunks of glass.
Take the Blue Fuse from the bottom of the window pane.
Go right to the substation and put the Blue Fuse inside the fusebox, then return to the sheriff's office.
Go inside the office building.
Click the coffee machine to zoom in.
Press the red button to heat the water.
Take the Kettle when the water starts to boil.
Click the thermostat in the corner of the room.
Use the Kettle to pour the hot water over the frozen thermostat.
Take the Film Negative(4/12)
Click the broken button to reattach it, then click it again to start the air conditioner.
Take the Wires and the Yellow Fuse that fall to the ground.
Return to the substation.
The Substation
Click the fusebox to zoom in.
Place the Yellow Fuse from your inventory inside the empty yellow space.
Go forward two screens to the hut in the back of the junkyard.
Chapter 4
The Junkyard
Click the hood of the broken car to zoom in.
Attach the Wires from your inventory to the battery under the hood.
Click the pile of cars to start the hidden object scene.
Screenshot.
Once the hidden object scene is complete, you will receive Insulating Tape.
Go back to the cinema.
The Cinema
Outside the cinema entrance, click the manhole to zoom in.
Use the Crowbar from your inventory to lift the plate covering the manhole.
Go inside the cinema and then upstairs to the film room.
Click the stagelight to zoom in.
Use the Insulating Tape from your inventory on the exposed wires at the back of the light.
Click the light to turn it on.
Go downstairs and into the theater.
Click the illuminated row of chairs to zoom in.
Take the Green Fuse on the ground.
Click the back of the right chair to lift the seat.
Take the revealed Nail.
Return to the firetruck.
The Firetruck
Click the side of the truck to repeat the hidden object scene.
Screenshot.
Once the hidden object scene is complete, you will receive a can of Bug Spray.
Go ahead two screens to the substation.
The Substation
Click the substation to zoom in.
Put the Green Fuse in the empty green space of the fusebox.
Return to the house.
The House
Go inside the children's bedroom.
Click the top of the bunk bed to zoom in.
Use the Bug Spray from your inventory on the pile of spiders.
Take the revealed Torn Film Reel and the Film Negative(5/12) on top of the mattress.
Go into the master bedroom.
Click the wardrobe to repeat the hidden object scene.
Screenshot.
Once the hidden object scene is complete, you will receive Scissors.
Click the television to zoom in.
Push the button at the bottom of the T.V. set.
Click the television to turn it around.
Use the Screwdriver on one of the four screws in corners of the back panel.
Click the circuit board for a closer look.
Note that there is a rusty bulb socket that needs cleaning.
Return to the graveyard
The Graveyard
Click the tomb to repeat the hidden object scene.
Screenshot.
Once the hidden object scene is complete, you will receive a Shovel.
Click the fresh grave to zoom in.
Use the Shovel to dig up the dirt, uncovering the safe.
According to the note in the sheriff's office, the combination to the safe is the population of Hell Lock.
Go all the way back to the highway.
The Highway
Go right up the road.
Click the speed limit sign to zoom in.
Use the Nail from your inventory on the broken sign.
Use the Scissors to cut the rope tied around the pole to receive a Feather.
Click the stump to zoom in.
Use the shovel to dig up the dirt inside the stump.
Add the Feather to the bird skeleton.
Take the revealed TV Knob and the Film Negative(6/12).
Return to the junkyard.
The Junkyard
Click the television on the ground in front of the right pile of cars to zoom in.
Add the TV Knob from your inventory to the side of the television.
Take the revealed TV Bulb and the Film Negative(7/12)
Go back to the cinema.
The Cinema
Go upstairs into the film room.
Click the film rewinding machine to zoom in.
Add the Torn Film Reel from your inventory to the device.
Use the Scissors to clip the loose strip hanging off each reel.
Go all the way back to the highway.
The Highway
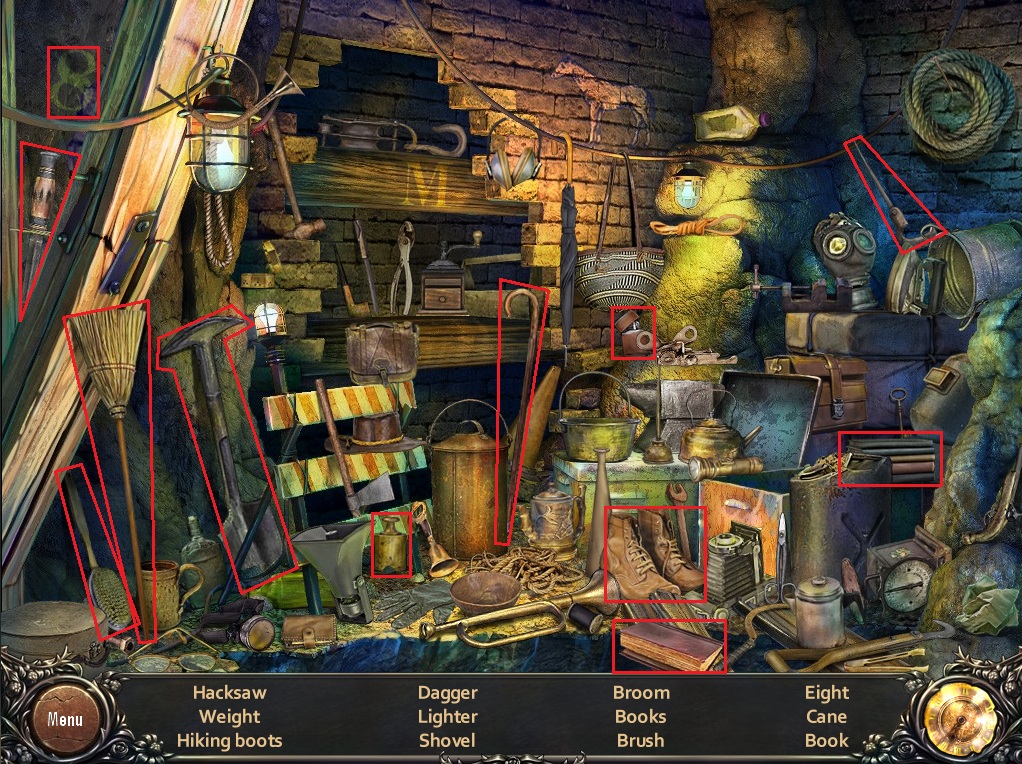
Click the small shed to the left of the welcome sign to repeat the hidden object scene.
Screenshot.
Once the hidden object scene is complete, you will receive the Glue.
Return to the cinema.
The Cinema
Go upstairs to the film room.
Click the film rewinding machine to zoom in.
Use the Glue from your inventory on the small empty compartment in the middle of the film reel.
Push the small handle then press the redbutton to rewind the film.
Take the Repaired Film.
Put the Repaired Film in the empty space at the top of the film projector.
Go downstairs and into the theater.
Click the screen to note the picture is blurry, and that there is a large hole in the corner.
Return to the house.
The House
Click the wardrobe to repeat the hidden object scene.
Screenshot.
Once the hidden object scene is complete, you will receive a Cotton Swab.
Click the cabinet drawer under the television.
Use the Cotton Swab on the jar of alcohol.
Click the television in the master bedroom to zoom in.
Use the Cotton Swab with Alcohol on the dirty bulb socket.
Place the TV Bulb from your inventory on the cleaned bulb socket.
Click the repaired tv to zoom in.
Push the power button and the turn the knob to switch the channel.
Note the image of the tuning table with four numbers in the corner and an indian head in the center.
Return to the cinema.
The Cinema
Go upstairs to the film room.
Click the side of the film projector to start the puzzle.
To solve this puzzle, turn the four dials to the correct number to focus the image in the center.
Remember the combination from the image on the television 2-3-9-5.
Click the dial to turn it once clockwise, cycling through the numbers 1-9.
Set the top left dial to 2.
Set the top right dial to 3.
Set the bottom left dial to 9.
Set the bottom right dial to 5.
Solution.
Go back to the crashed car in the abandoned streets.
Abandoned Streets
Click the bicycle rack to repeat the hidden object scene.
Screenshot.
Once the hidden object scene is complete, you will receive a Wrench.
Go back to the highway.
The Highway
Click the front of the car to zoom in.
Take the Car Charger on the front seat.
Plug the Car Charger into the socket left of the steering wheel.
Attach the Cell Phone to the car charger.
Return to the firetruck.
The Firetruck
Click the side of the firetruck to repeat the hidden object scene.
Screenshot.
Once the hidden object scene is complete, you will receive a Funnel.
Return to the hut in the junkyard.
Chapter 5
The Junkyard
Click the inside of the car to zoom in.
Use the Car Charger from your inventory in the socket of the dashboard.
Add the Cell Phone to the car charger.
Click the pile of cars to repeat the hidden object scene.
Screenshot.
Once the hidden object scene is complete, you will receive a button.
Click the shed to zoom in.
Click the case in the back of the shed for a closer look.
Use the Wrench from your inventory to the lid on the case.
Click the lid to remove it.
Take the Rubber Patch.
Use crowbar on the lid to the paint can.
Click the crushing mechanism behind the shed to zoom in.
Click the coiled hose to attach it to the mechanism.
Place the button on the empty space next to the handle.
Use the Glue on the hole in the hose.
Add the Rubber Patch to the hole in the hose.
Press the red and white button, then pull the handle down to crush the car blocking the path.
Go forward to the gates of the mine.
Use the Camera to photograph the overturned car by the left railing.
Click the car and take the Ruby(9/15) to add it to the pendant.
Click the track under the mine cart to zoom in.
Use the Wrench on the bolts of the track, then click the rail to remove it.
Take the Mine Car Wheel on the ground next to the mining pick.
Click the rear wheel of the mine car to zoom in.
Add the Mine Car Wheel to the car.
Place the four Bolts to the empty spaces around the wheel, then tighten the bolts with the Wrench.
Click the mine car to push it through the gates.
Take the Hose on the ground to the left of the track.
Click the generator on the left to zoom in.
Place the Funnel in the fuel tank.
Use the Gas Can on the funnel to fill the tank with fuel.
Go back one screen to the hut in the junkyard
Click the pile of cars to repeat the hidden object scene.
Screenshot.
Once the hidden object scene is complete, you will receive a Fuse.
Go forward back to the track in front of the mine entrance.
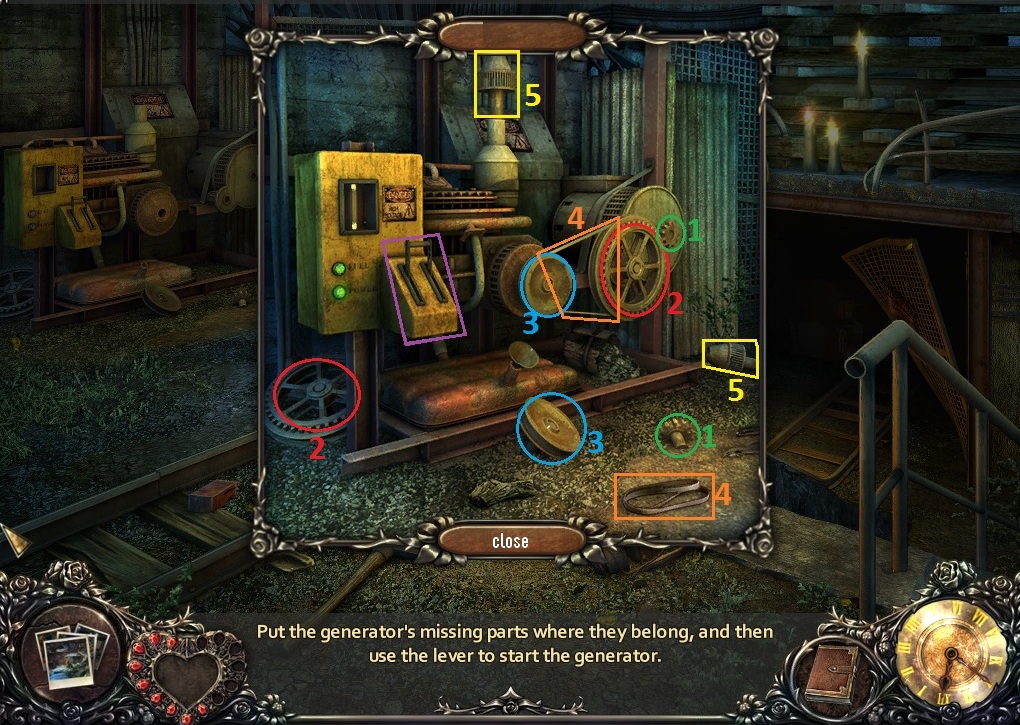
Click the generator to zoom in.
Add the Fuse from your inventory to the space on the left side of the device to start the puzzle.
To solve this puzzle, correctly place all of the parts to the machinery of the generator.
Click a part on the ground around the generator to select it, then click the position on the machine to place it.
Pull the lever to test your solution.
Solution.
Go through the open gate into the elevator.
Note the elevator controls need a specific setting.
Return to the substation.
The Substation
Click the fence to repeat the hidden object scene.
Screenshot.
Once the hidden object scene is complete, you will receive a Dagger.
Go back to the churchyard.
The Churchyard
Click the church door to zoom in.
Use the Dagger from your inventory on the pumpkin.
Take the Stapler inside the pumpkin's mouth.
Take the Film Negative(8/12) in the pumpkin's eye.
Return to the front entrance outside the cinema.
The Cinema
Click the poster right of the entrance door to zoom in.
Use the Dagger from your inventory to remove the poster.
Go inside the cinema and into the cinema.
Click the hole in the screen to zoom in.
Place the poster over the hole.
Use the Stapler to attach the poster.
Note the position of the elevator controls.
Return to the elevator inside the junkyad.
The Junkyard
Click the elevator controls to zoom in.
Position the handles to match the image from the film in the theater.
Screenshot.
Click the handle to descend into the mine.
The Mine
Use the Camera to photograph the rock wall between the mining helmet and the lantern.
Click the rock and take the Ruby(10/15) to add it to the pendant.
Take the Car Jack on the ground to the left of the mine car track.
Go back to the crashed car in the abandoned streets.
Abandoned Streets
Click the back of the car to zoom in.
Use the Car Jack from your inventory on the rear of the car.
Click the jack to elevate the car, revealing the Red Fuse.
Click the car to push it into the gap.
Return to the substation.
The Substation
Click the substation to zoom in.
Place the Red Fuse from your inventory into the red space in the fuse box.
Return to the mine shaft.
Chapter 6
The Mine
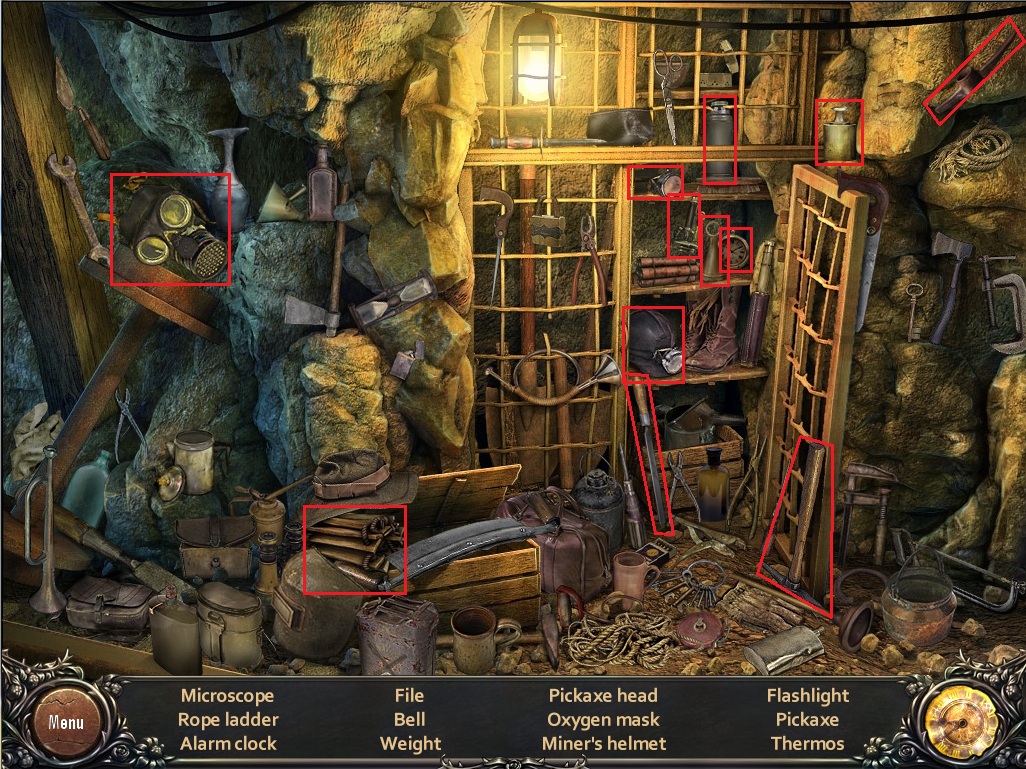
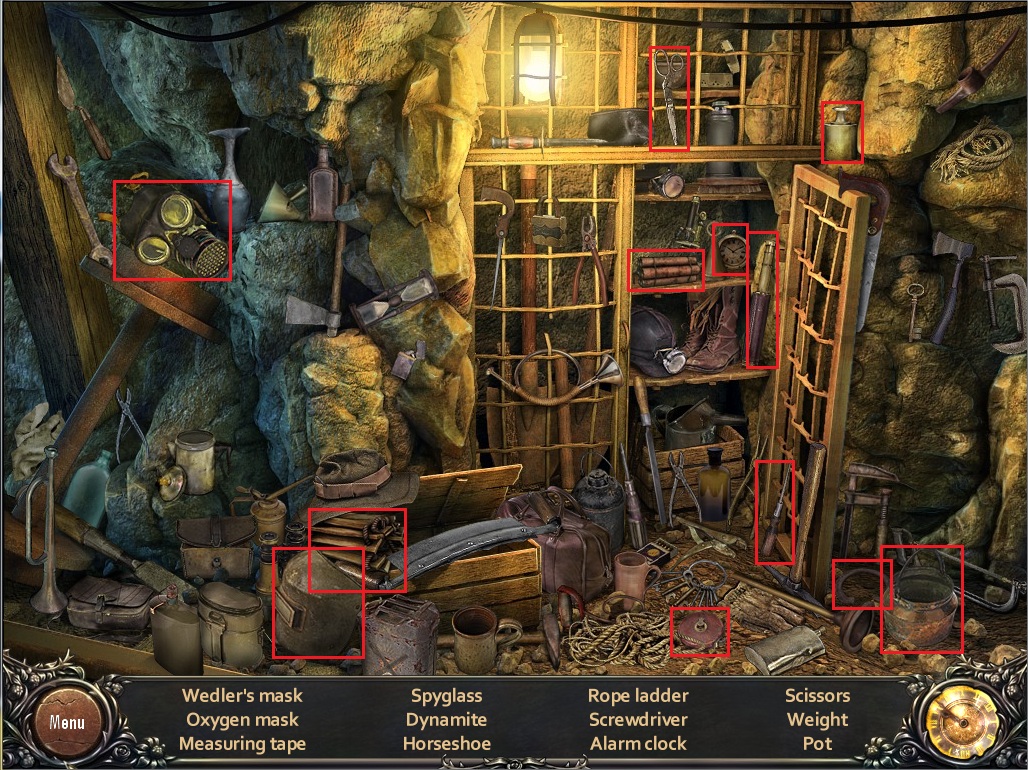
Click the suppy closet to start the hidden object scene.
Screenshot.
Once the hidden object scene is complete, you will receive an empty oxygen mask.
Go back to the firetruck.
The Firetruck
Click the side of the firetruck to repeat the hidden object scene.
Screenshot.
Once the hidden object scene is complete, you will receive a Sledgehammer.
Go back one screen to the water tank alley.
Water Tank Alley
Click the oxygen tanks to the right of the archway to zoom in.
Place the Empty Oxygen Mask from your inventory onto the platform of the oxygen tank device.
Click the valve of the oxygen tank, then take the Filled Oxygen Mask.
Return to the mines.
The Mine
Use the Filled Oxygen mask from your inventory on the cloud of smoke in the mineshaft.
Go forward to the fork in the mine car track.
Use the Camera to photograph the miner's helmet on the ground to the left of the track.
Click the helmet and take the Ruby(11/15) to add it to the pendant.
Go left to the compressor on the track blocking the path.
Use the Sledgehammer from your inventory on the stopper blocking the compressor's wheel.
Click the compressor to roll it down the track, then take the revealed Lever.
Use the Camera to photograph the broken lantern on the right support beam.
Click the lantern and take the Ruby(12/15) to add it to the pendant.
Go back one screen to the fork in the track.
Click the red sign at the fork to zoom in.
Use the Lever from your inventory on the hole in the device to the right of the sign.
Click the lever to switch the direction of the track.
Click the compressor to push it down the right track.
Follow the compressor down the right path.
Click the machinery on the side of the compressor to zoom in.
Use the Hose from you rinventory on the pipe next to the valves.
Pull the handle under the wheel to start the compressor.
Take the Jackhammer leaning on the right rockwall.
Click the pile of stones blocking the path to zoom in.
Use the Jackhammer on the stones.
Go forward down the tunnel to the area blocked by burning coals.
Use the Camera to photograph the left support beam.
Click the beam and take the Ruby(13/15 to add it to the pendant.
Take the Firehose Nozzle on the rock under the red "X"
Return to the entrance of the mine shaft.
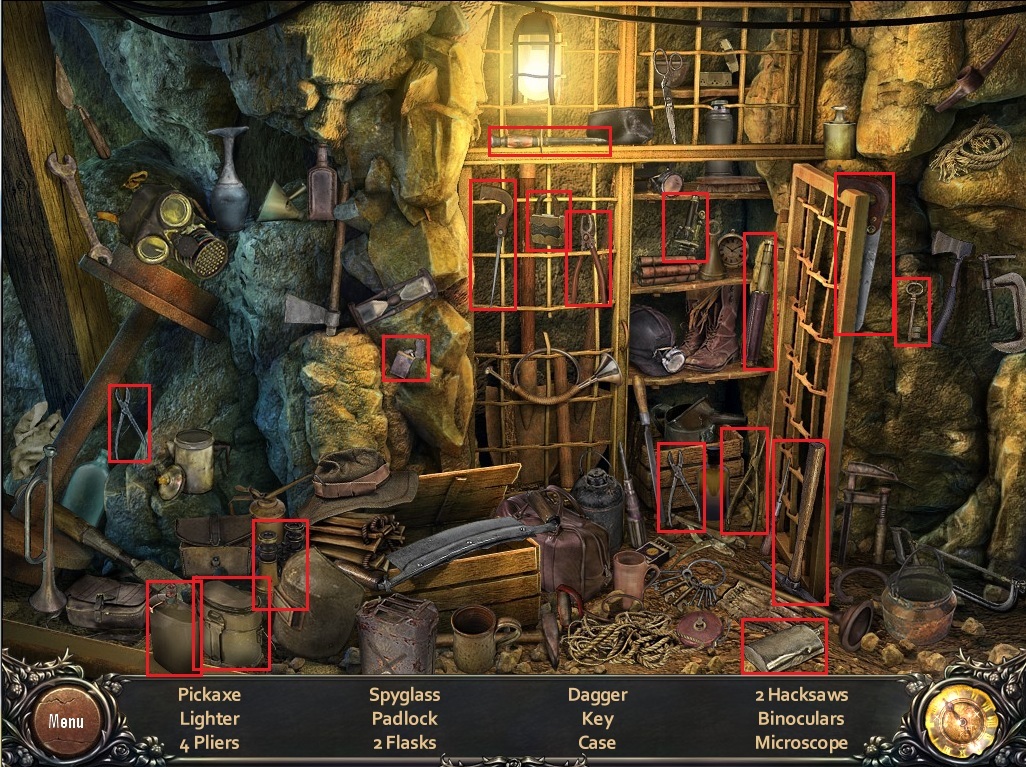
Click the supply closet to repeat the hidden object scene.
Screenshot.
Once the hidden object scene is complete, you will receive a Pickaxe.
Go back down the tunnels into the area with the burning coals.
Use the Pickaxe from your inventory on the red "X" in the rock wall.
Click the old photograph and take the revealed Valve handle and the Film Negative(9/12)
Return to the firetruck.
The Firetruck
Attach the Firehose Nozel from your inventory to the hose on the ground near the fire hydrant.
Click the hose to drop it down the hole in the pavement.
Return to the street entrance in front of the cinema.
The Cinema
Click the manhole in the street to zoom in.
Place the Valve Handle from your inventory on the top of the water pipe in the hole.
Click the handle to start the flow of water to the fire hydrant.
Return to the firetruck.
The Firetruck
Click the hose to attach it to the fire hydrant.
Click the side of the firetruck to zoom in.
Pull down the lever so the light switches from red to green.
Return to the mine shaft.
Chapter 7
The Mine
Go down the tunnels to the area of the mine filled with burning coals.
Click the hose to douse the fire, then click the hose again to stop the flow of water.
Go right down the tunnel to the pit.
Use the Camera to photograph the light above the left sign.
Click the light and take the Ruby(14/15) to add it to the pendant.
Click the cracked wall above the right sign to start the hidden object scene.
Screenshot.
Once the hidden object scene is complete, you will receive a Wrench.
Go all the way back to the highway.
The Highway
Click the welcome sign to zoom in.
Use the Wrench from your inventory on the skull to remove it.
Take the uncovered Film Negative(10/12).
Note the revealed population number 1,204
Return to the graveyard.
The Graveyard
Click the tomb to repeat the hidden object scene.
Screenshot.
Once the hidden object scene is complete, you will receive Pruning Shears.
Click the vine-covered grave to the left of the fountain to zoom in.
Use the Pruning Shears three times on the vines to reveal the Light Bulb and the Film Negative(11/12)
Click the empty grave to zoom in.
Click the lock in the safe to start the puzzle.
To solve this puzzle, click the dials to enter the combination.
Remember the note from the sheriff's office states the combination for the lock is the same as the city's population: 1-2-0-4.
Click the dials to cycle thruogh the numbers 0-9.
Solution.
Once the puzzle is solved, take the locket which is automatically added to the pendant.
Return to the shack in the back of the junkyard.
The Junkyard
Click the front of the shack, then click the small metal box to zoom in.
Use the Lightbulb from your inventory on the red paint can.
Go down into the mine.
The Mine
Click the supply closet to repeat the hidden object scene.
Screenshot.
Once the hidden object scene is complete, you will receive a Rope Ladder.
Go all the way down the tunnels to the pit.
Use the Rope Ladder on the track over the pit.
Go down the ladder into the crypt.
Use the Camera to photograph the alcoves left of the coffin.
Click the empty alcove and take the Ruby(15/15) to complete the Pendant.
Go back up the rope ladder to the top of the pit.
Click the cracked wall to repeat the hidden object scene.
Screenshot.
Once the hidden object scene is complete, you will receive a Can Opener.
Go back to the large chasm in the abandoned streets.
Abandoned Streets
Click the park bench beside the sidewalk to zoom in.
Use the Can Opener from your inventory on the tin can.
Take the Hairpin and the Film Negative(12/12) underneath the can lid.
Return to the cinema.
The Cinema
Go upstairs into the film room.
Click the empty light socket next to the film developing machine.
Put the Red Lightbulb from your inventory in the socket.
Click the film developer to zoom in.
Press the button under the red light to turn it on.
Place the Film Negatives from you rinventory into the photo enlarger.
Place the Photo Paper into the tray under the photo enlarger to start the puzzle.
To solve this puzzle, click the photograph pieces to develop them.
For a couple seconds, a fraction of the image will flash in the tray.
Click the piece to lock it in place until each of the twelve photos are completed.
Once the puzzle is solved, a blue pattern with two rings of symbols will appear over the prints on the wall.
Return to the mine.
The Mine
Go forward down the tunnel then take the left fork in the road.
Click the skeleton shackled to the sign to zoom in.
Use the Hairpin from your inventory on the handcuff around the skeleton's wrist to receive the Ancient Handcuffs.
Go back down the tunnels, through the pit, and into the crypt.
Click the center of the coffin to start the puzzle.
To solve this puzzle, rotate the rings to arrange the symbols in the correct order.
Click the left ring to rotate it once clockwise, and click the right ring to rotate it counterclockwise.
If the runes are in the correct position, the symbols will glow bright blue.
Copy the order of the runes from the image in the film room at the cinema.
Click the left ring once.
Click the right ring twice.
Click the left ring three times.
Solution.
Put the Pendant from your inventory on the empty heart space in the statue.
Click the decapitated skeleton on the ground to zoom in.
Take the Fuse inside the skeleton's jacket.
Go back to the entrance of the mine tunnel.
Click the supply closet to repeat the hidden object scene.
Screenshot.
Once the hidden object scene is complete, you will receive Dynamite.
Return to the pit.
Click the wall to repeat the hidden object scene.
Screenshot.
Once the hidden object scene is complete, you will receive a lighter.
Click the cracked support beam to zoom in.
Place the Dynamite from your inventory to the beam.
Attach the Fuse to the sticks of dynamite.
Ignite the fuse with the Lighter.
Attach the Ancient Handcuffs to Laura's wrist.
The End
Posted by: Trinn |
July 18, 2011 2:31 PM
|
July 18, 2011 2:31 PM