


Hide and Secret:
The Lost World
Platform: Windows

![]() You want action? We got that. You want cheesy storylines with French villains obsessed about obtaining immortality, kidnapped scientists, plane crashes and giant spiders? Got that, too. Hide and Secret: The Lost World from Anarchy Enterprises is the fourth game in the hidden object adventure series, featuring a classic-styled plot ripped out of your favorite dime novel from a century ago.
You want action? We got that. You want cheesy storylines with French villains obsessed about obtaining immortality, kidnapped scientists, plane crashes and giant spiders? Got that, too. Hide and Secret: The Lost World from Anarchy Enterprises is the fourth game in the hidden object adventure series, featuring a classic-styled plot ripped out of your favorite dime novel from a century ago.
 Your arch nemesis, Jacques, has stolen an ancient relic and kidnapped Professor Columbia, absconding with them both to the Lost World. There, his plan is to sacrifice the professor to reveal the relic's secret: eternal life. Your team of fit adventurers sets out to stop him, but before you make it, your plane crashes in the jungle. Rescue your crew who are barely holding on to their lives (quicksand, collapsed pillars, etc.), then set out to stop that Jacques!
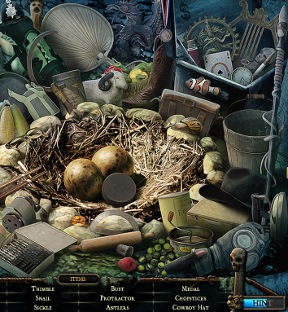
Hide and Secret: The Lost World blends frequent hidden object scenes with a multitude of mini-game segments scattered around an exploration-based adventure core. Move from place to place, investigating pieces of each scene and hunting for items that will help you progress. Sometimes you can find the objects you need laying around the place, but most of the time you'll need to find your next inventory prize at the end of a hidden object scene.
You can choose between Relaxed and Expert modes from the beginning of your game. The former offers faster hint recharges and makes the mini-game skip button fill much faster. Also, there's no click penalty in Relaxed, which many hidden object fans will appreciate! Expert mode shortens the timers and slaps you on the wrist for clicking too frequently in hidden object scenes.
 Analysis: Hide and Secret: The Lost World is definitely a wild, if predictable, ride. The storyline is one of the game's biggest selling points. It's based on every trope from the last hundred years of creative writing, but somehow it comes across as a caricature of the genre, not a poor example of it. Sometimes that sort of cheese is exactly the food we need in our games!
You'll spend quite a lot of time in Hide and Secret 4 sifting through the hidden object scenes that seem to appear every few minutes. For the most part, they aren't overly challenging, though you'll often wonder why you have to continue with the exercise once you've found the key inventory item you want to walk away with.
Some of the puzzles, unfortunately, feel rather pointless and end up serving as busywork rather than honest challenge. The hint system also doesn't function properly all of the time, leaving you a bit stranded when the game wants you to trigger a specific event before continuing. If you're a thorough player, this probably won't be an issue, however.
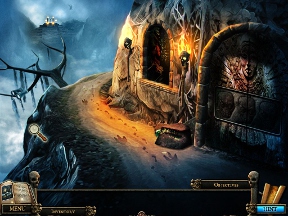
Visually, Hide and Secret: The Lost World is lush and polished. The scenes are filled with animation and lots of dramatic mood, something the storyline demands to be shown. The characters look remarkably stiff, though, and seem to have been rendered with software from 1994. Cardboard actors aren't much of a problem when you're laughing at them, of course!
Hide and Secret: The Lost World has a lot of hits and misses to its name, with muddled puzzles but good challenge and length. It's definitely worth checking out, especially if you're itching to see if Jacques gets that immortality he so desperately wants!
![]() Windows:
Windows:
Download the demo
Get the full version
![]() Mac OS X:
Mac OS X:
Not available.
Try Boot Camp or Parallels or CrossOver Games.


Walkthrough Guide
(Please allow page to fully load for spoiler tags to be functional.)
Hide and Secret 4: The Lost World Walkthrough
General Information
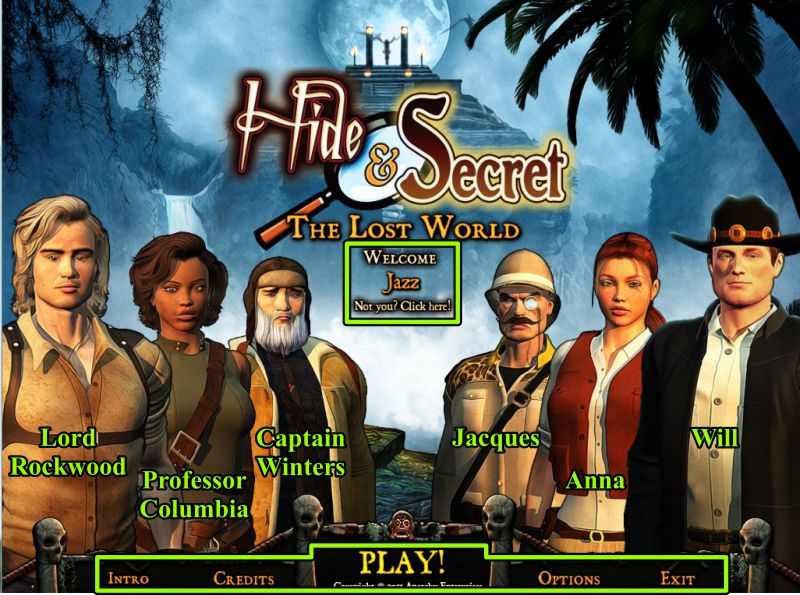
From the Main Menu, you Play or Exit the game, and choose your Options and Profile.
You can also view the Credits or replay the Intro.
Anna and Will are the regulars in the Hide and Secret series, Jacques is the villain, and the 3 characters on the left are along for the expedition to see The Lost World.
Screenshot
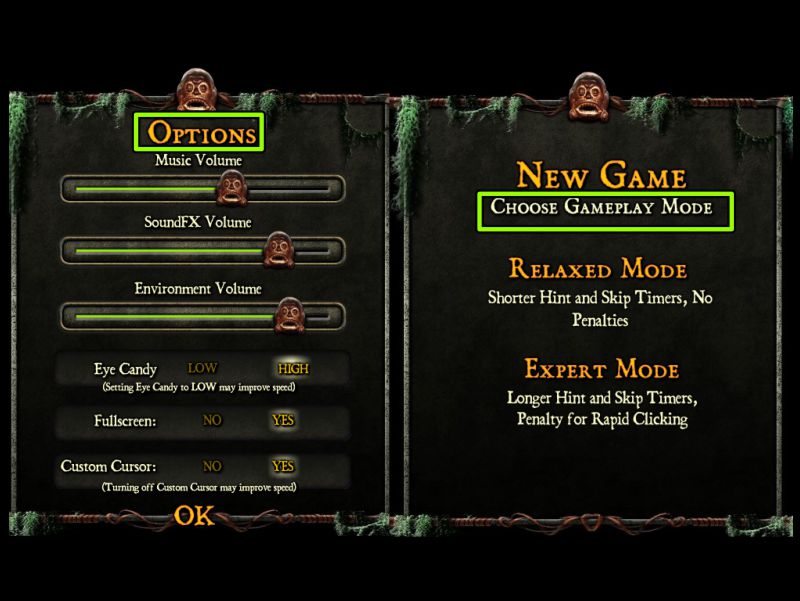
When you choose your profile, you will be asked to choose a mode of play.
Relaxed Mode has shorter times for the Hint and Skip buttons to refill, and there is no click penalty.
In Expert Mode, the Hint and Skip buttons take longer to refill, and there is a click penalty for rapid clicking.
Options include Full versus Windowed screen; Custom Cursor; Music, Sound Effects and Environment volume; plus you have a choice of whether you prefer high or low Eye Candy.
The Option's screen indicates that low Eye Candy and no Custom Curser may improve the speed of the game, but I didn't find the other choices slowed down the game.
When the game is paused, you can change one or more Options or return to the Main Menu or game.
Screenshot
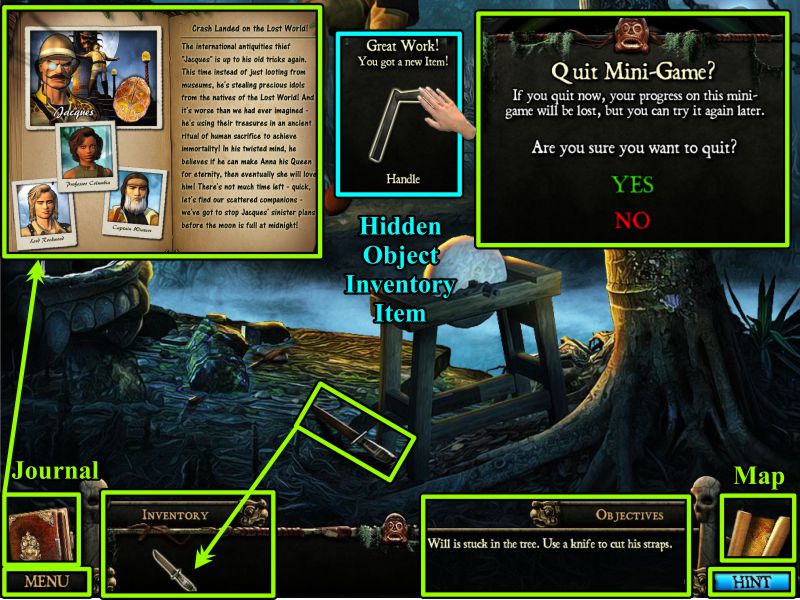
Scene Navigation
Hints are unlimited once the Hint button in the lower right corner refills.
Hints can be useful when you are not in a Hidden Object Scene, but they will bring up a Help screen to give you hints of what to do next.
Lower left is your Journal with notations about your adventure.
Below the Journal is the Menu where you can change your options, resume the game or quit to the Main Menu.
In the center of your screen is your Inventory, Objectives, and where Hidden Object Scene lists are shown.
If you need to identify an item in your Inventory, mouse over it for its name.
There are 12 items to locate in the Hidden Object Scenes including one item for your Inventory.
The items to locate are the same for everyone, and the Inventory item will be marked in bright blue.
Mini Games have a Skip option when the button becomes full.
If you back out of a Mini Game, you will be warned that you will need to start over if you leave the game.
You will come across a Map of The Lost World that will be discussed a little later.
When you start the game you get a mandatory Tutorial that finally disappears once it is decided we are good to go on our own.
Screenshot
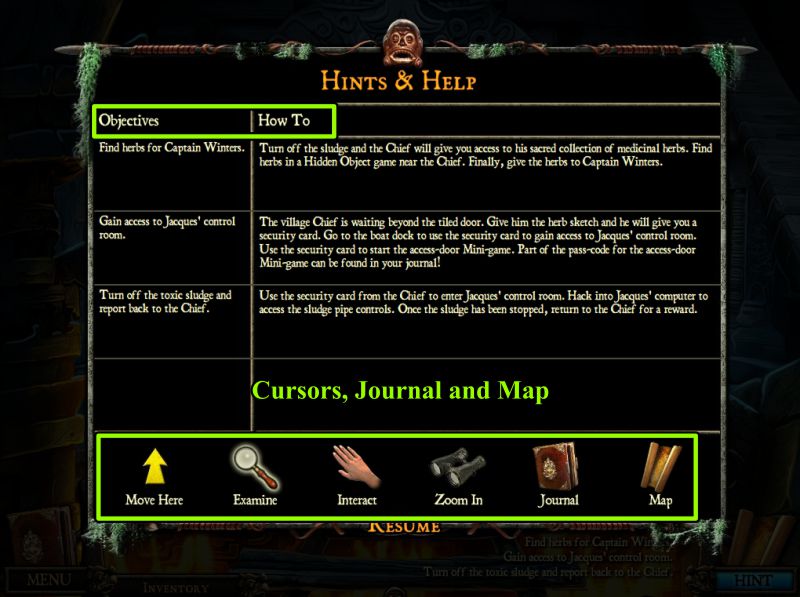
Hints and Help
Your cursor will get various attachments to help you during your adventure.
A Hand pick up an object or move an item for you.
A Magnifying Glass is for close-ups.
Yellow Arrows show you where you can leave the scene.
Once you collect them, binoculars will allow you to see items in the distance.
Your Journal records helpful notations for future reference.
The Map will be discussed below.
Your current Objectives are shown along with a "How To" solve it section.
A sample of the Hints & Help is shown in the screenshot.
Screenshot
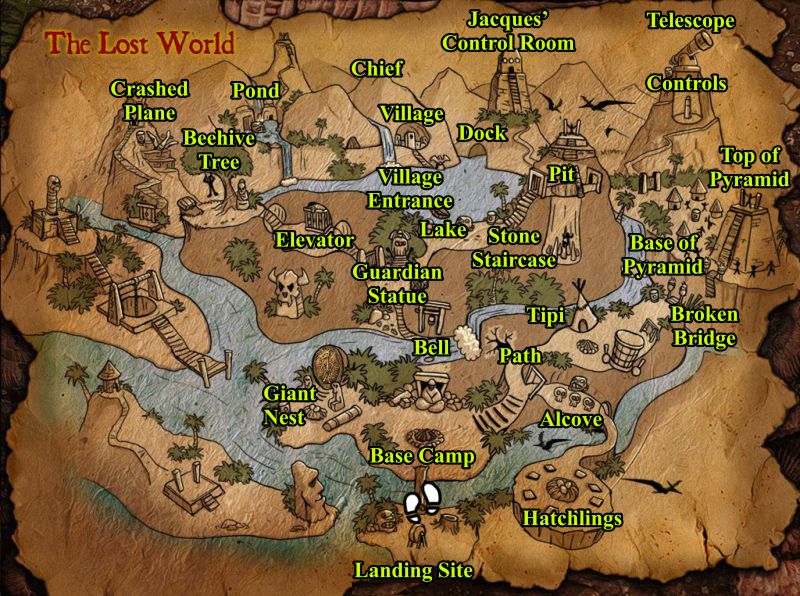
Map
In the beginning of the game, you will not be expanding your adventure beyond the need to go a short distance from your Base Camp, which is where you find the Map.
As the game progresses, you will greatly expand your area of search, so trying to figure out how to get somewhere becomes more difficult.
Once you have visited a location, that location becomes available on the Map, so all you need to do is click on the map and immediately go to that location.
When the walkthrough says to go to a location, unless there are instructions to go to a neighboring location, use the Map.
All locations you will visit in The Lost World are labeled on this screenshot.
Screenshot
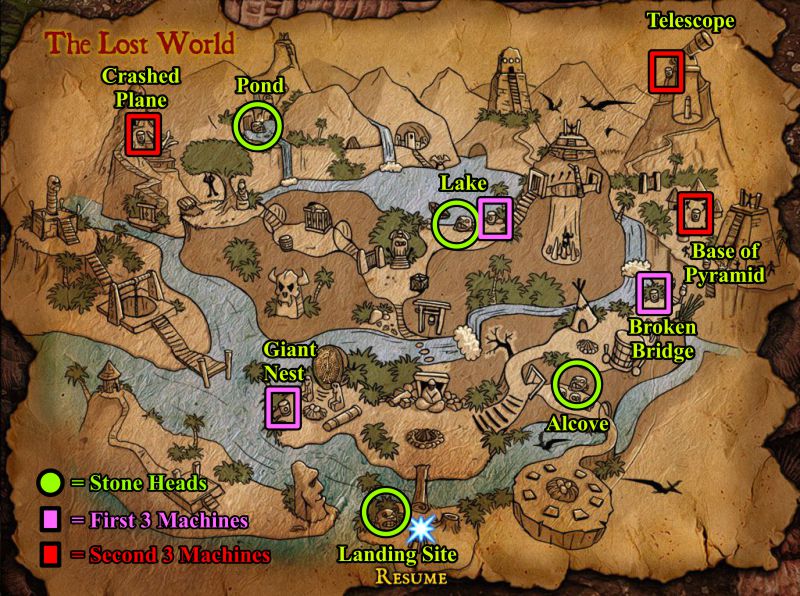
Stone Head and Machine Locations
You will need to locate Stone Heads and Machines for some Mini Games.
The screenshot shows the locations of these objects to help you readily locate them.
Screenshot
Chapter 1: Arrival on the Island
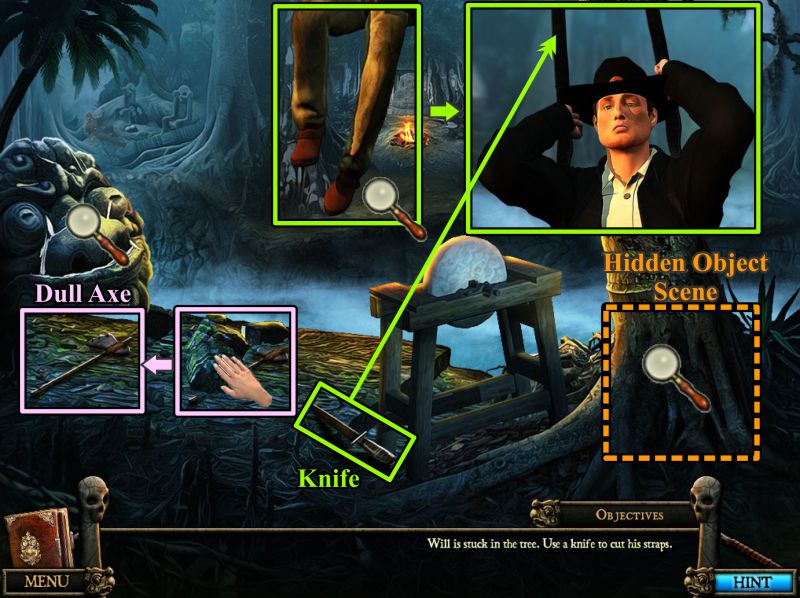
Landing Site
The planes headed for The Lost World are shot down by Jacques, so everybody takes to parachutes while the planes crash land.
Will gets hung up in a tree, so you first objective is to get him down.
Pick up the Knife on the ground, zoom in on Will, and cut the parachute straps.
Move the rock near the Stone Head, and pick up the Dull Axe.
Play the Hidden Object Scene.
Screenshot
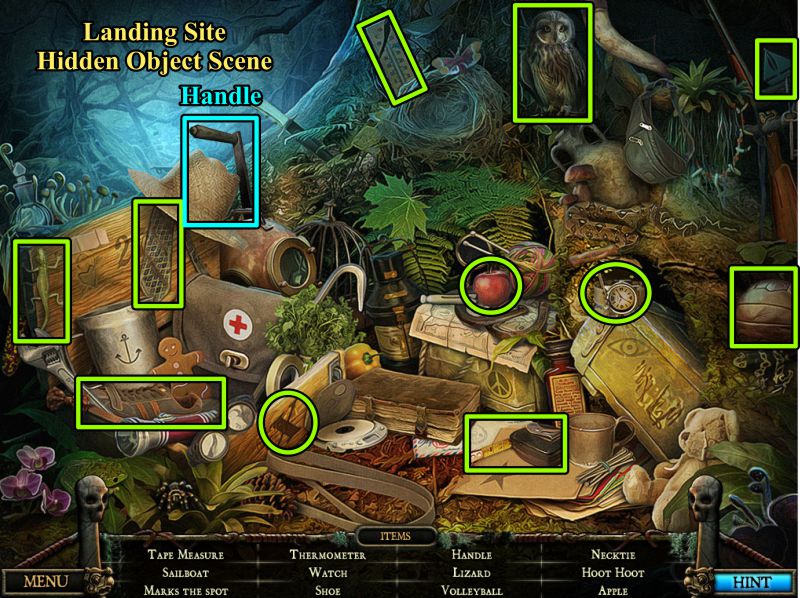
Landing Site Hidden Object Game
Collect all 12 items to get the Handle.
Hoot Hoot is the owl, and "X" marks the spot.
Screenshot
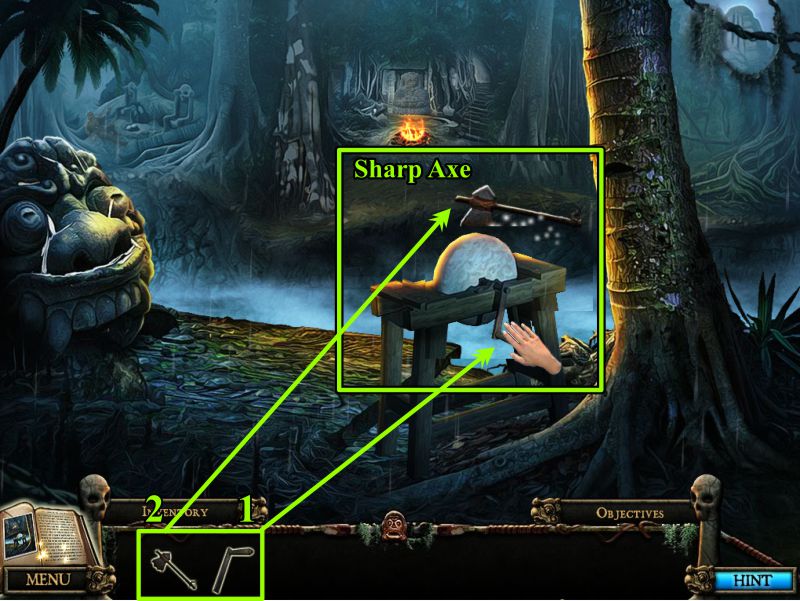
Crossing the River
Place the handle on the grinder and the Dull Axe.
Collect a Sharp Axe to use on the rotten tree.
Screenshot
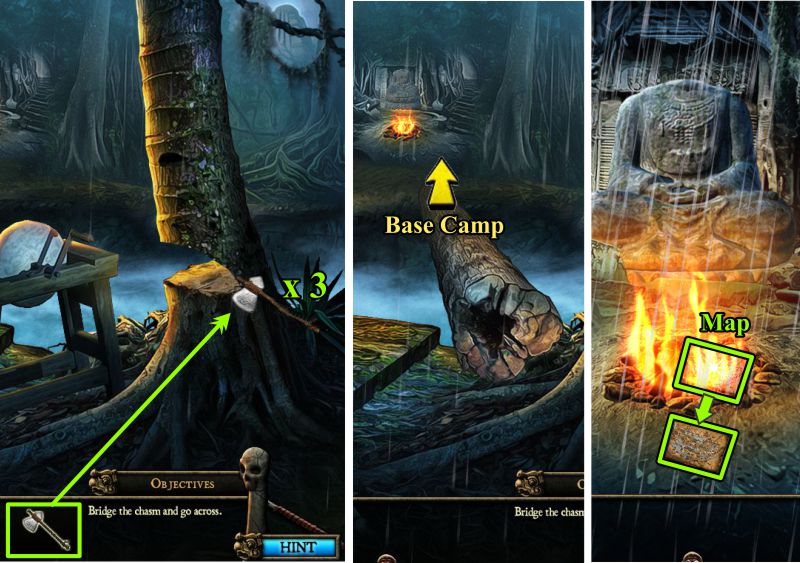
Use the Sharp Axe 3 times on the rotten tree, and it will knock the grinder out of the way to give you a bridge to what will become your Base Camp.
The fire is roaring until the rain begins to put it out so you can grab the Map Jacques tried to burn.
You now have your Map to help you travel more efficiently in your adventure.
Screenshot
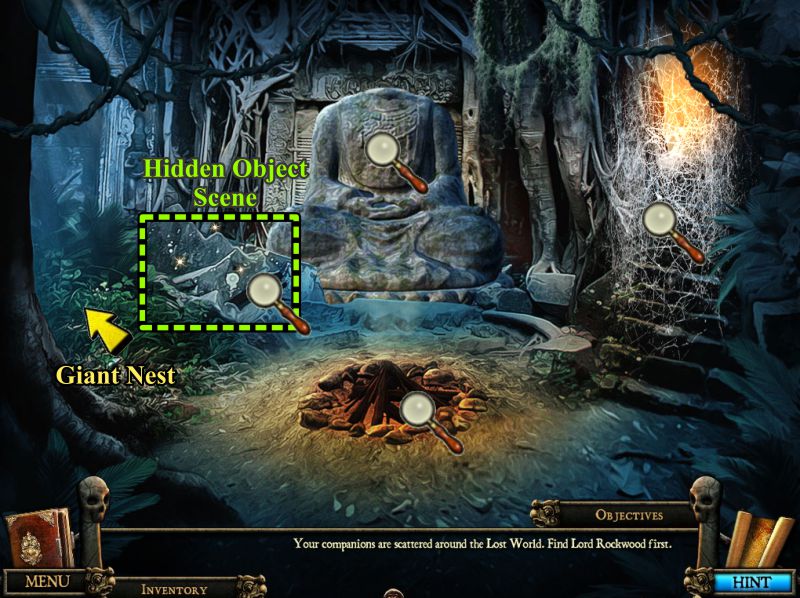
Base Camp
Check out all the magnifying glasses shown in the screenshot to obtain more information.
Play the Hidden Object Scene, and then head off to the Giant Nest.
Screenshot
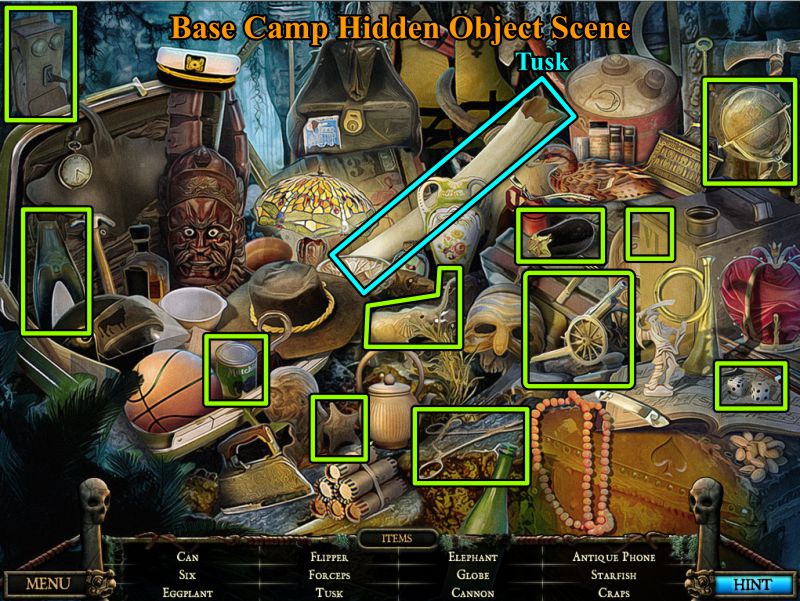
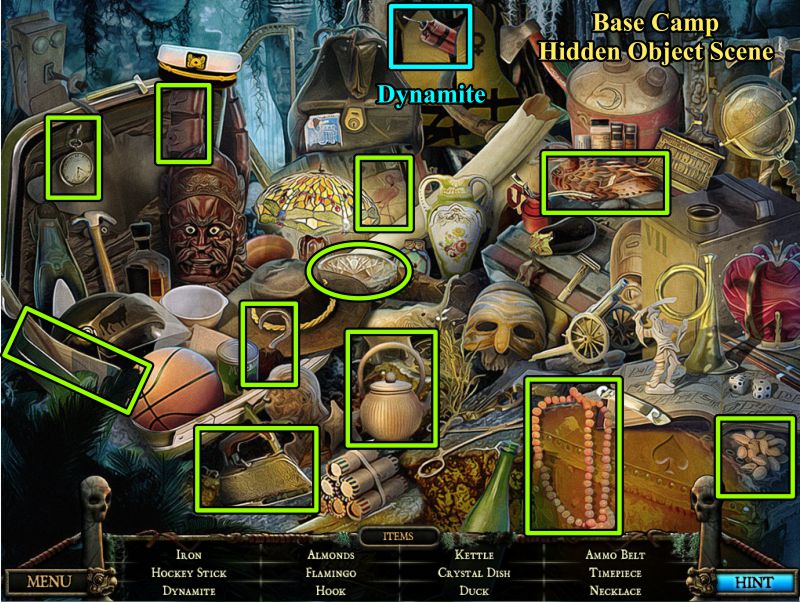
Base Camp Hidden Object Scene
When you collect everything, you will get a pretty good sized Tusk.
Screenshot
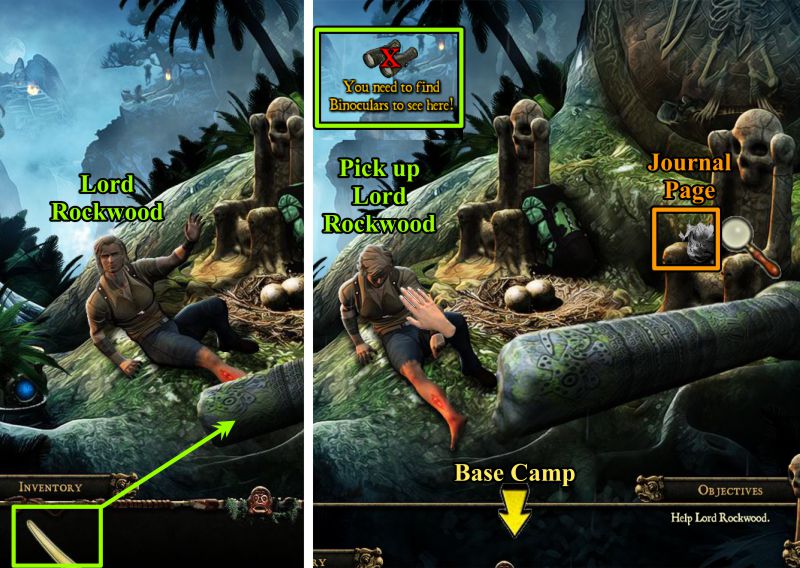
Chapter 2: Lord Rockwood
Rescue Lord Rockwood from the Giant Nest
Jacques tipped over a column on Lord Rockwood and broke his leg.
Use the Tusk from your Inventory to move the column.
Grab the Journal page and try to see what is in the distance, only to find out you need binoculars that you don't have.
Pick up Lord Rockwood and take him back to Base Camp.
Screenshot
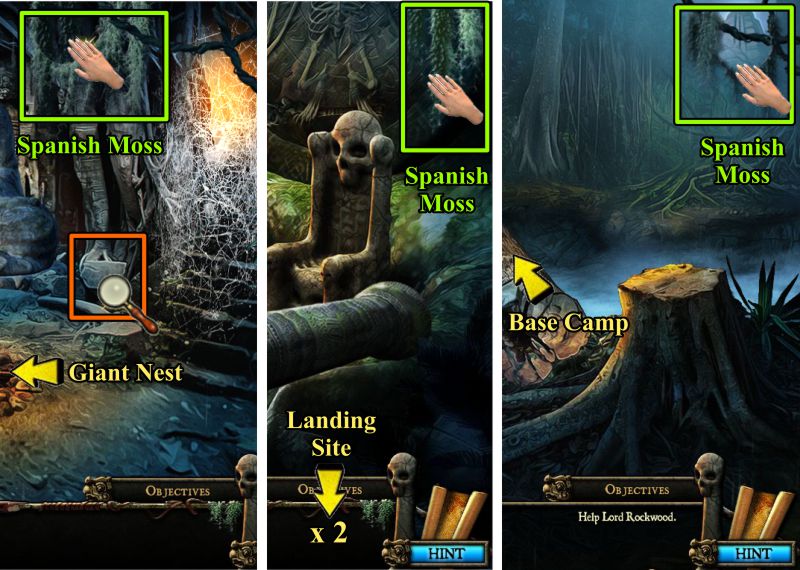
Finding Spanish Moss
There looks to be a good spot to put Lord Rockwood, but you need to find something to make it more comfortable.
Grab the Spanish Moss above the area, go back to the Giant Nest and grab the Moss there.
Return to Base Camp and go across the chasm to the Landing Site to find more Moss there.
Go back to Base Camp.
Screenshot
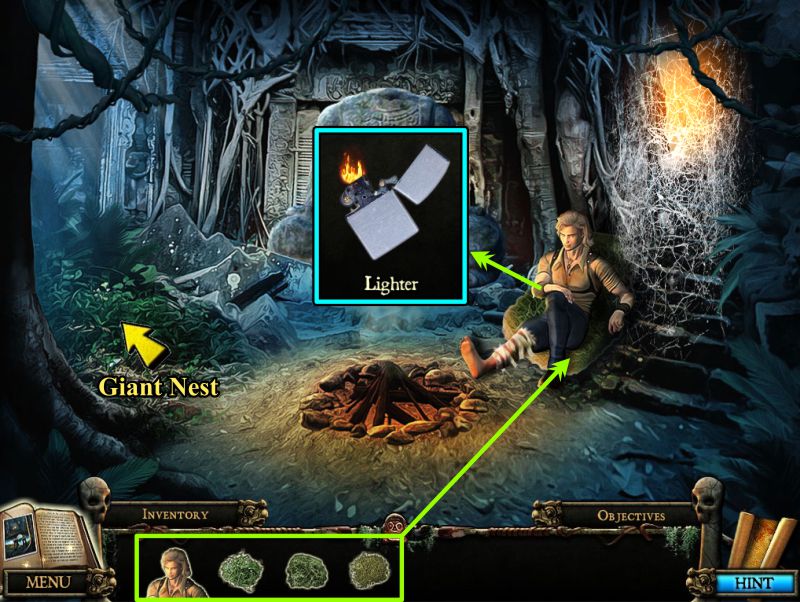
Base Camp
Place the Spanish Moss as shown in the screenshot, and put Lord Rockwood on it.
He will give you a lighter to start up the fire, but the wood is wet so you need something to ignite it.
Go to the Giant Nest and click on the sparkles for a Hidden Object Scene.
Screenshot
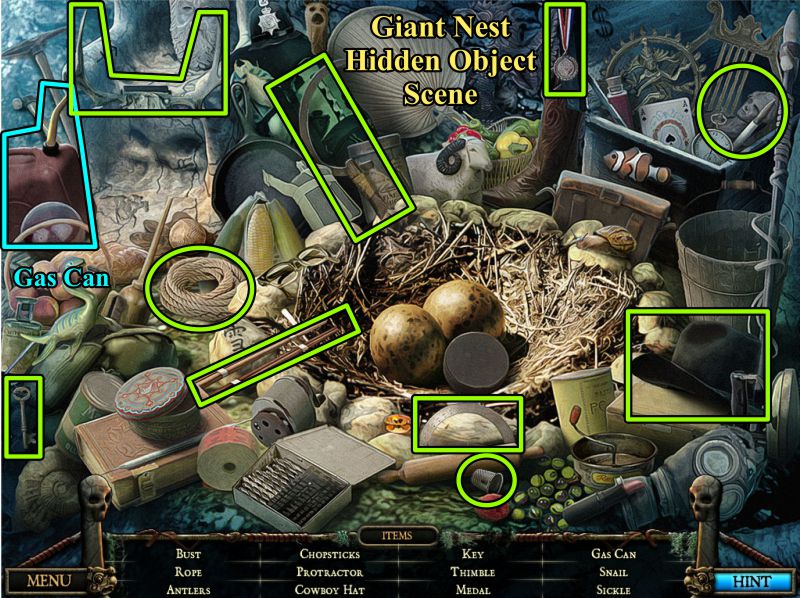
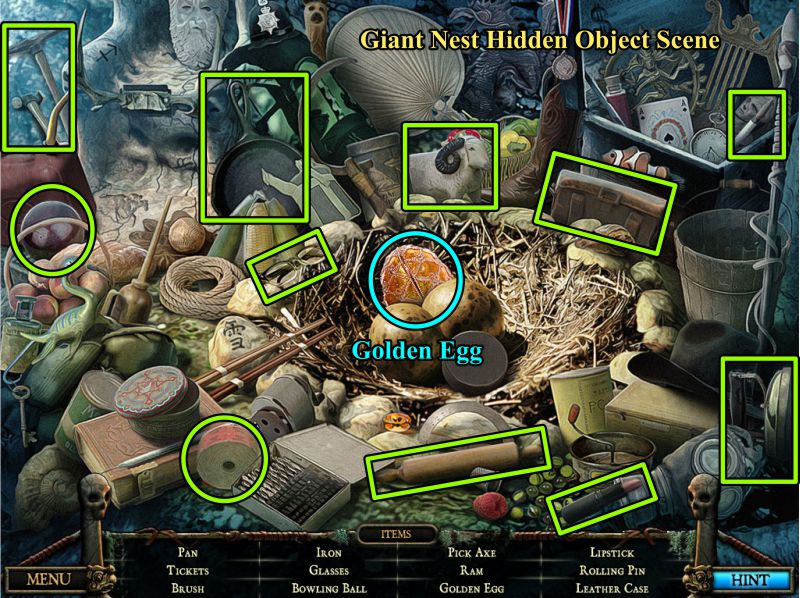
Giant Nest Hidden Object Scene
When you collect everything, you will have a Gas Can so take it back to Base Camp.
Screenshot
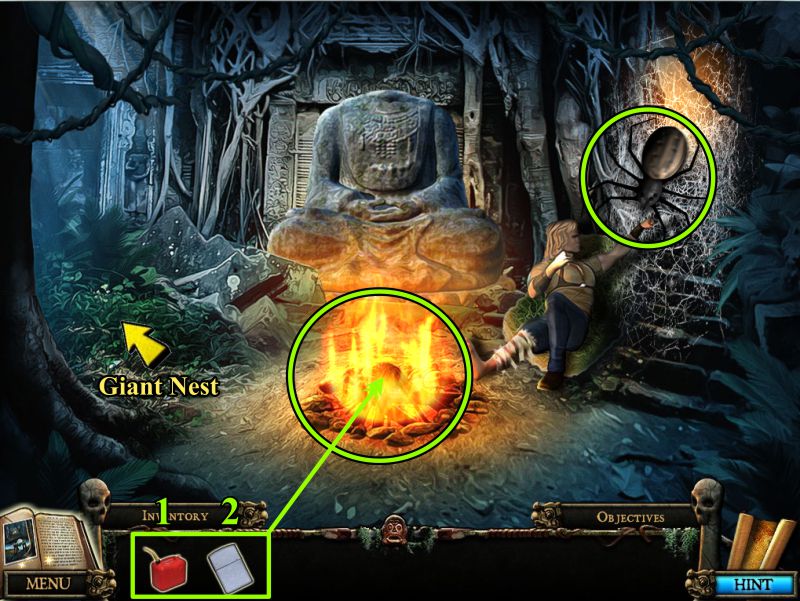
Light the Fire
Pour the Gasoline on the fire and light it with the lighter.
A Giant Spider appears, so go back to the Giant Nest to see what you can find to get rid of it.
Screenshot
Giant Nest Mini Game
Zoom in on the plaque with the sparkles for a Mini Game.
Rotate the circles to create the Pteranodon image shown in the screenshot solution.
The Torch it is standing on becomes available for you to collect, so take it and return to Base Camp.
Screenshot
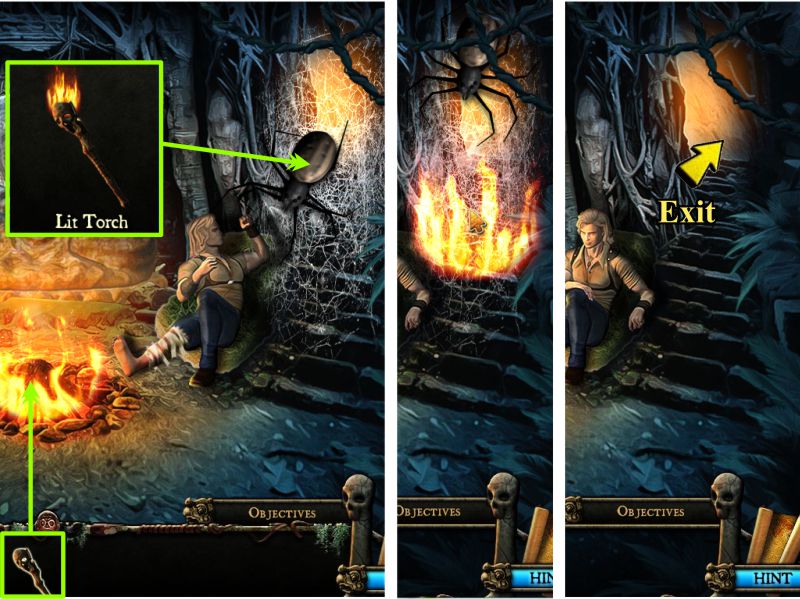
Torch the Spider
Light the Torch in the fire and place it on the spider and/or web.
The spider will disappear leaving an opening for you to go through.
Screenshot
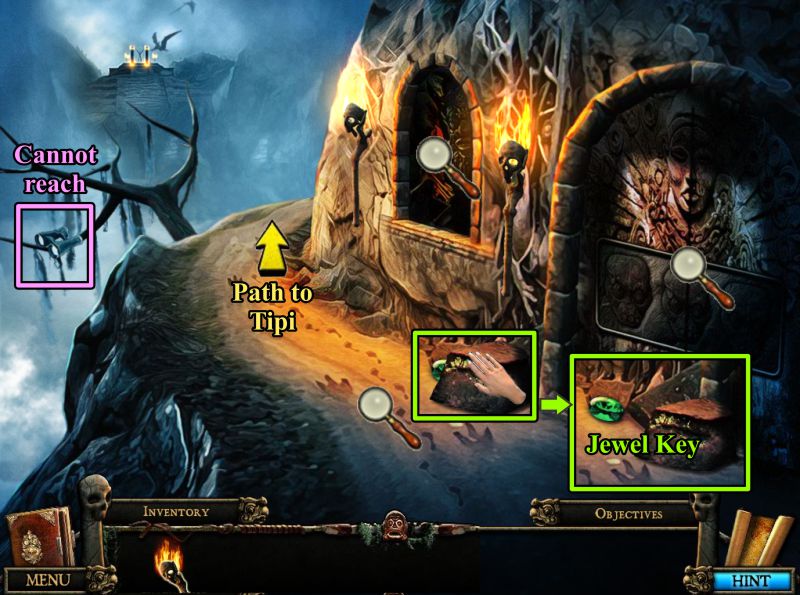
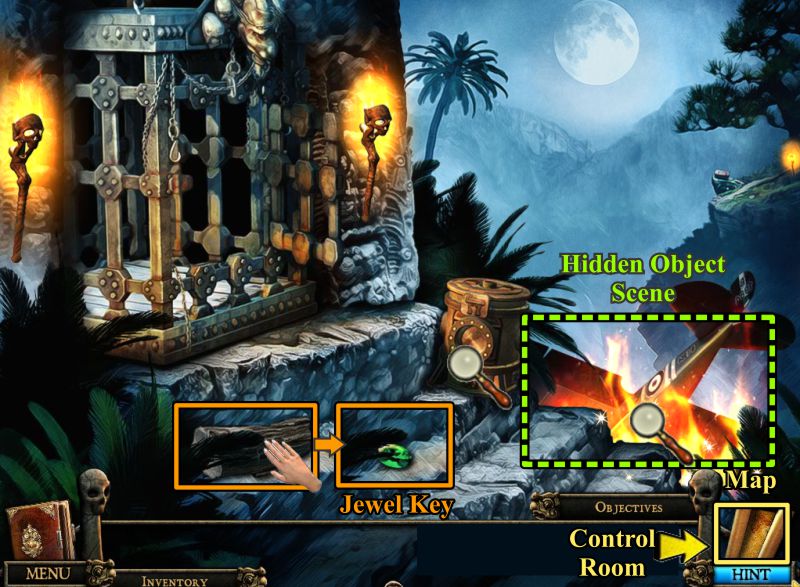
Hillside Path
The binoculars are in a tree you cannot reach until you find something to help you.
Check the magnifying glasses in the screenshot for future reference.
Move the object on the ground to reveal a Jewel Key to collect.
Screenshot
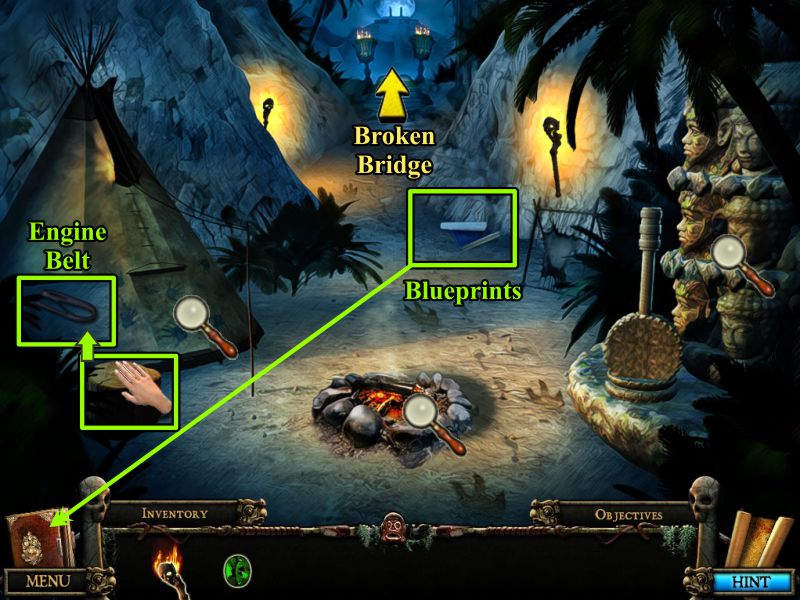
Tipi
There are actually two ways to refer to the conical-shaped dwelling of Native Americans from the Great Plains.
One spelling is Tipi and the other is Teepee.
The game developer chose to use the Tipi spelling, so that is what will be used for this walkthrough.
Move the object by the Tipi to find an Engine Belt for your Inventory.
Collect Jacques' Blueprints, and notice that someone has recently been at the Tipi.
Go forward to check out the Broken Bridge.
Screenshot
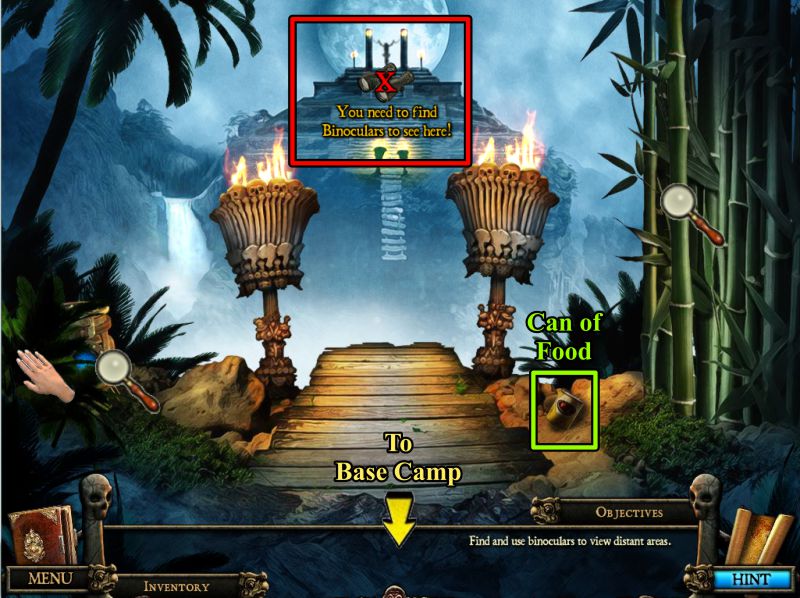
Broken Bridge
There is a distant view you would like to see but you need binoculars.
Pick up the Can of Food, and move the bush to se what the Machine is all about.
You could use one of the bamboo stalks but need to find something to cut it.
Return to Base Camp.
Screenshot
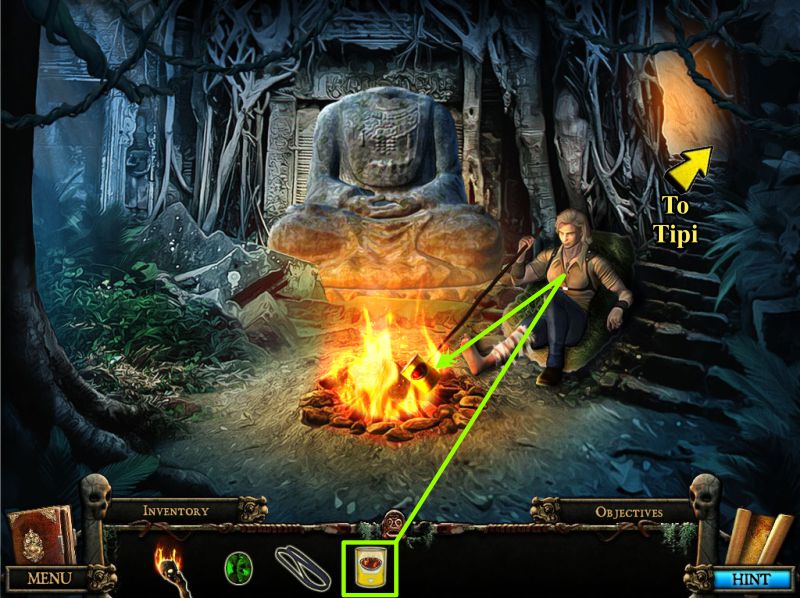
Base Camp
Give the Can of Food to Lord Rockwood who warms it on the fire.
Return to the Tipi.
Screenshot
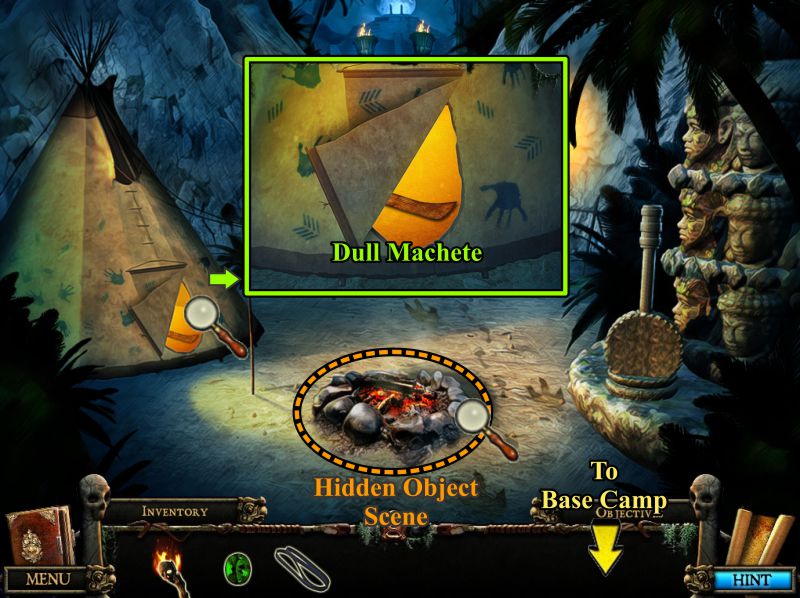
Tipi
Zoom in on the open Tipi, and grab the Dull Machete.
The fire is now smoldering, so click on it and play the Hidden Object Scene.
Screenshot
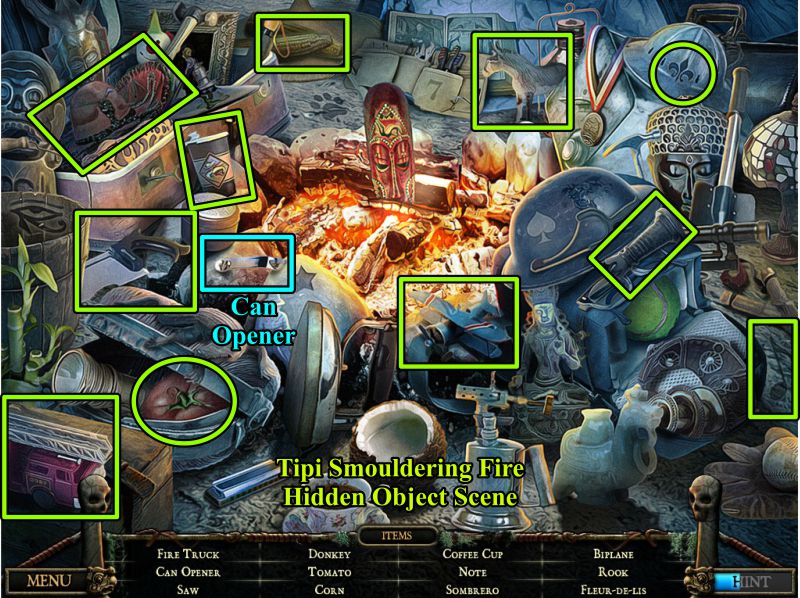
Smoldering Fire Hidden Object Scene
When you collect everything, you will have a Can Opener, so take it back to Base Camp.
Screenshot
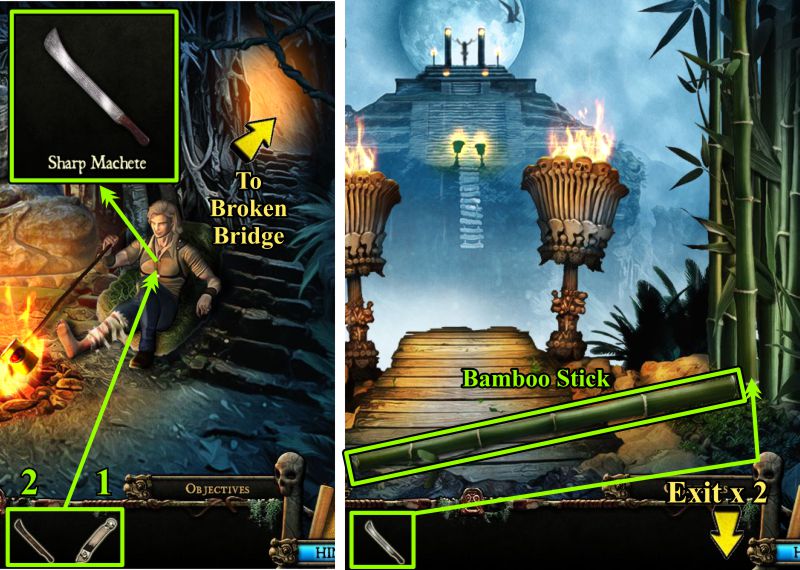
Base Camp and Broken Bridge
Give the Can Opener to Lord Rockwood who says he has a whetstone to sharpen your Machete.
Give him the Dull Machete to sharpen.
Head to the Broken Bridge.
Use the Sharp Machete to cut a Bamboo Stick.
Pick it up and exit to the Hillside Path.
Screenshot
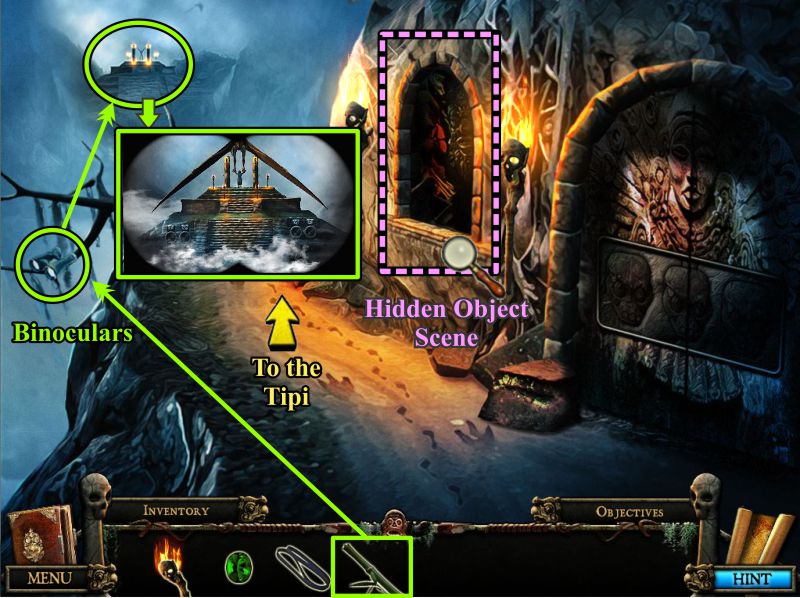
Hillside Path
Use the Bamboo Stick to snag the binoculars off the tree.
Use the binoculars on the distant horizon to see a little girl being carried away by a Pteranodon.
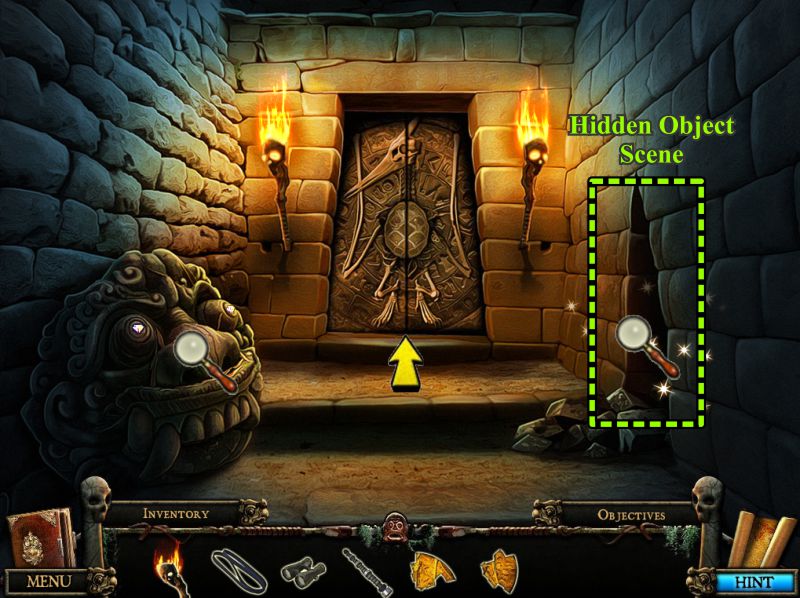
Zoom in on the shrine at the side for a Hidden Object Scene.
Screenshot
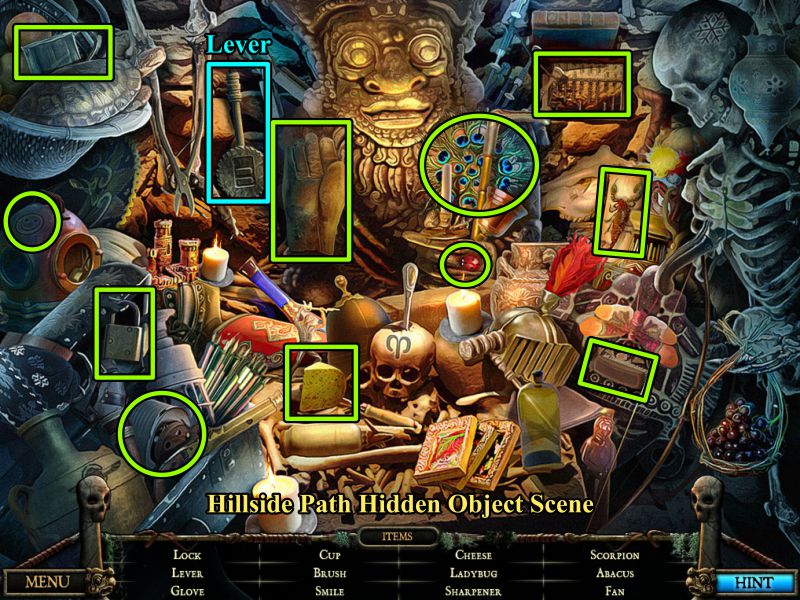
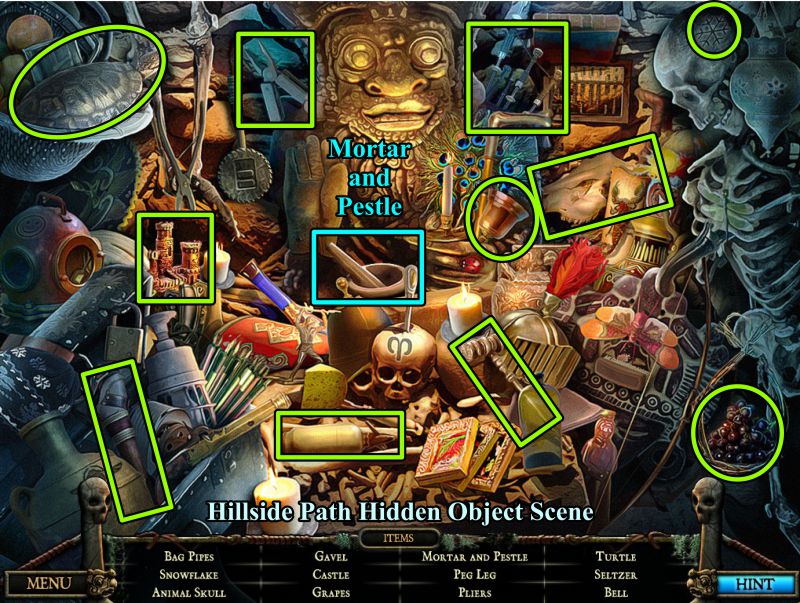
Hillside Path Hidden Object Scene
You will get a Lever when you find all the objects.
Go to the Tipi for Jacques' Stone Head game.
Screenshot
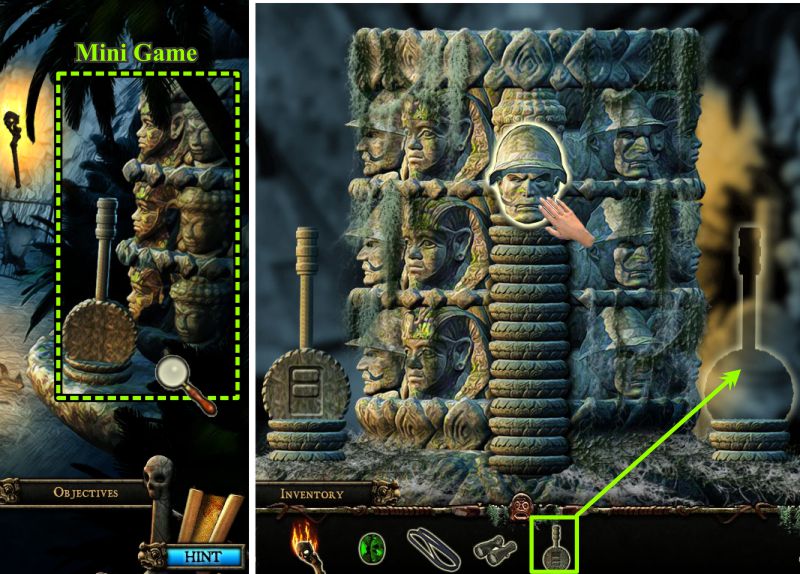
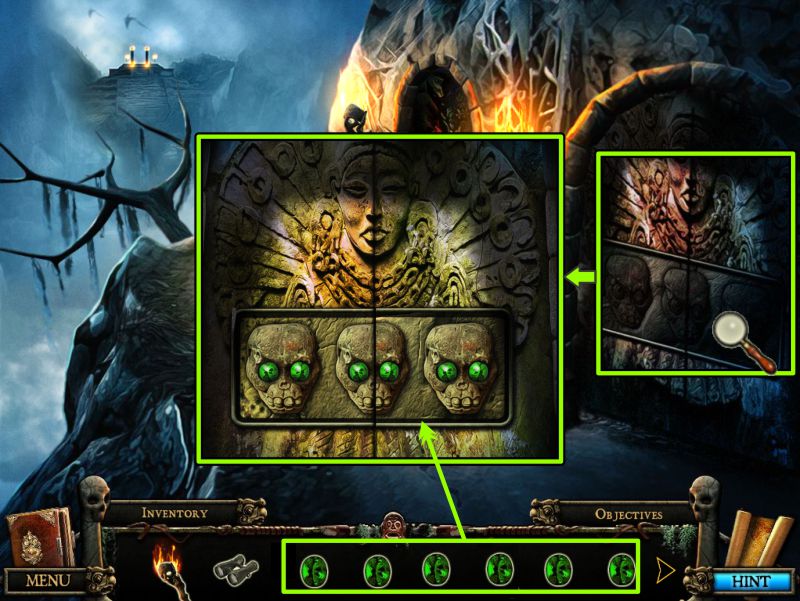
Jacques' Stone Head Mini Game
Zoom in on the area to the right.
Place your lever and push on Jacques' image to trigger the Mini Game.
Screenshot
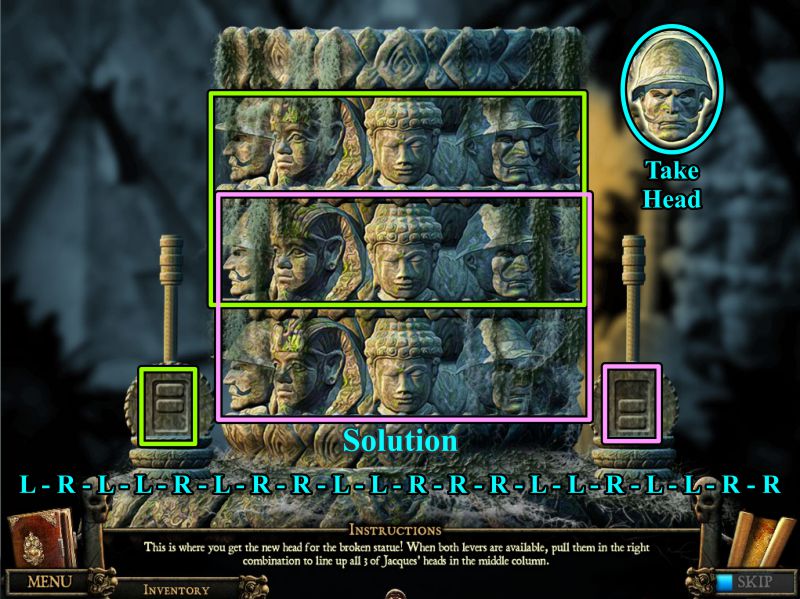
Your goal is to make all the images of Jacques' Head line up in the center of the puzzle.
The left lever moves the two top rows.
The right lever moves the two bottom rows.
The solution as to how to move the levers is shown in the screenshot.
When you have completed the Mini Game, take Jacques' head, and return to Base Camp.
Screenshot
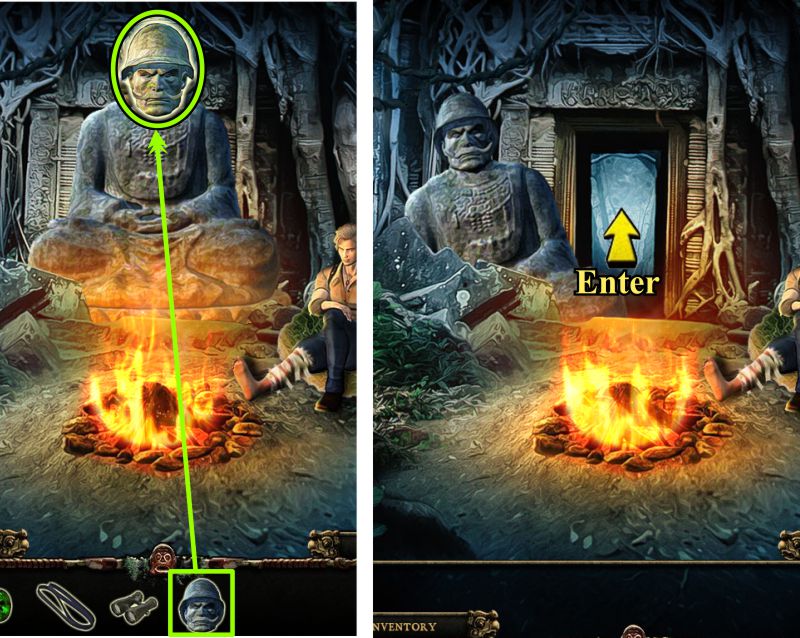
Base Camp
Place the stone head on top of the statue.
The statue will move revealing a door to enter.
Screenshot
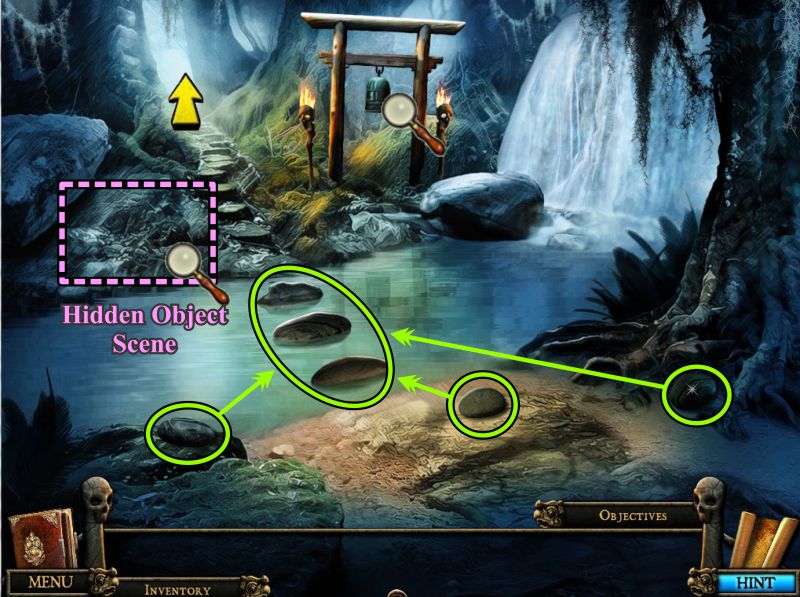
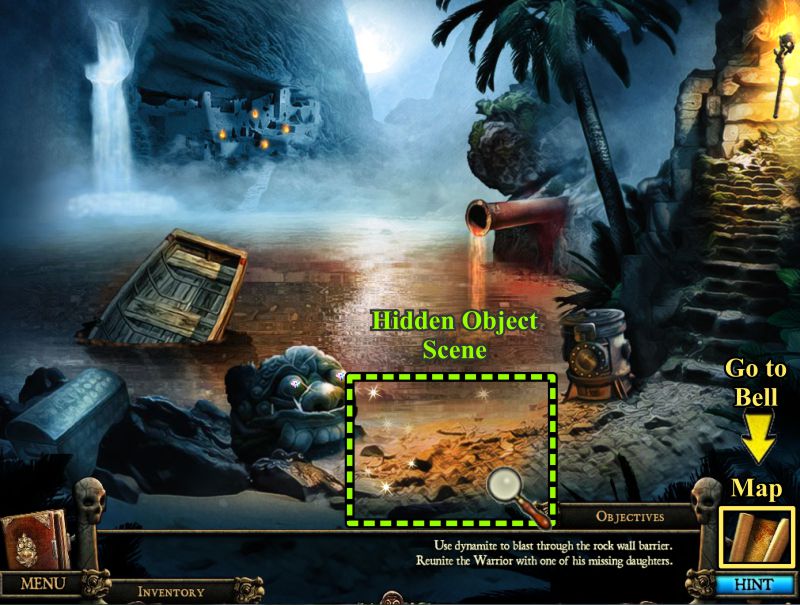
River by the Bell
You have arrived at a crystal clear river.
Pick up the stones shown in the screenshot, and place them in the River so you can cross.
Check out the Bell for more information.
Play the Hidden Object Game on the beach area across the river, and then travel on to see what is next.
Screenshot
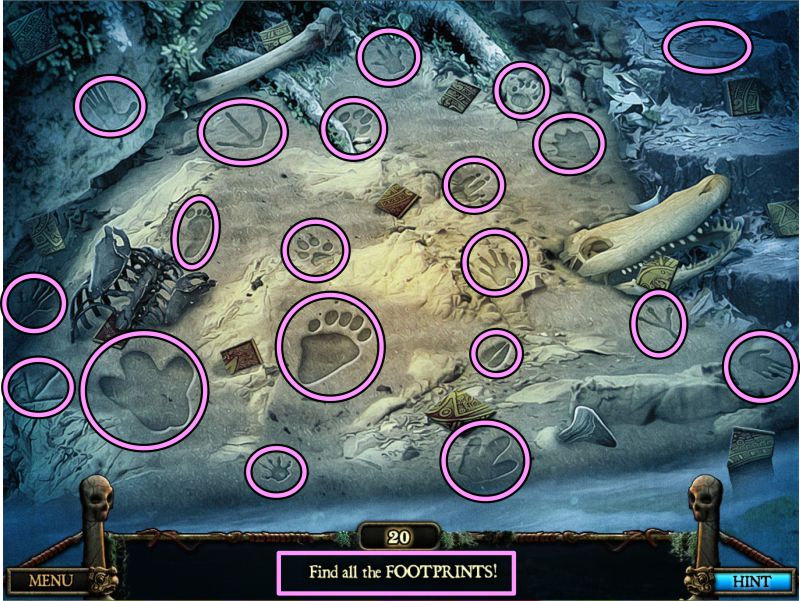
Footprint Hidden Object Scene
Collect all the footprints marked in the screenshot.
Screenshot
Chapter 3: Captain Winters
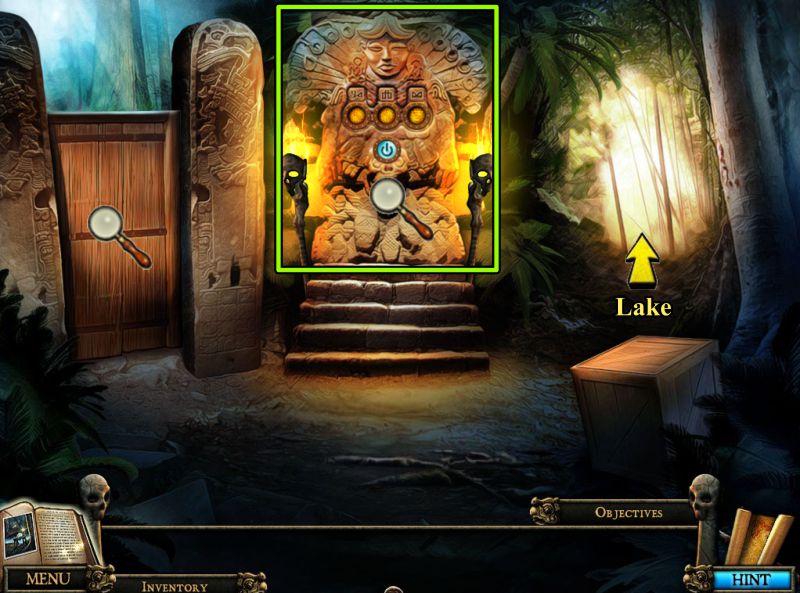
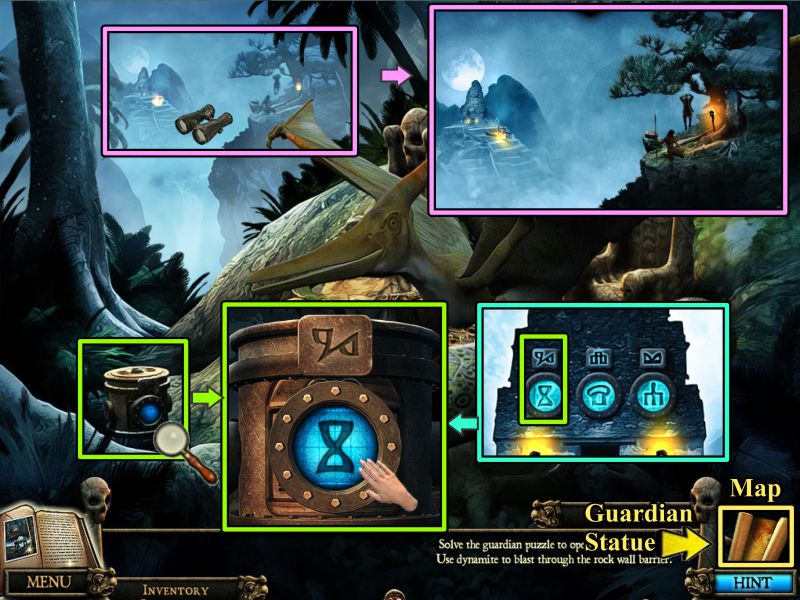
Guardian Statue
You cannot play the Mini Game to open the door at the left because you need more information, therefore head off to the Lake.
Screenshot
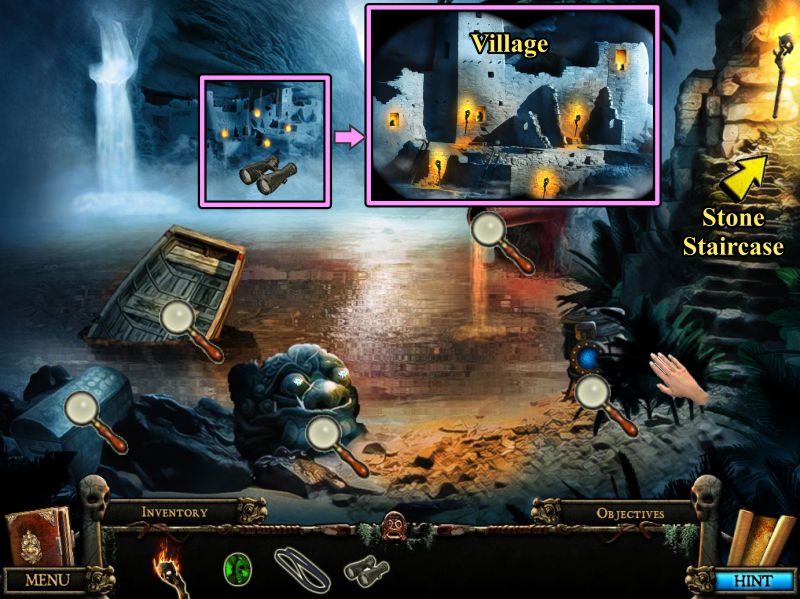
Lake
Use your binoculars to check out the Village across the Lake.
No need to pick up the binoculars from your Inventory, just click on the distant view.
Check out all the magnifying glasses shown in the screenshot.
Move the foliage away from the Machine, and go up the staircase.
Screenshot
Stone Staircase
Check the distant view and note the symbols.
Move the log on the staircase to collect the screwdriver.
There is another stone head of Jacques blocking your path.
Return to the Lake.
Screenshot
Lake Machine
Click on the Machine, move the symbols to show a mushroom shape.
Use the Map to go to the Broken Bridge.
Screenshot
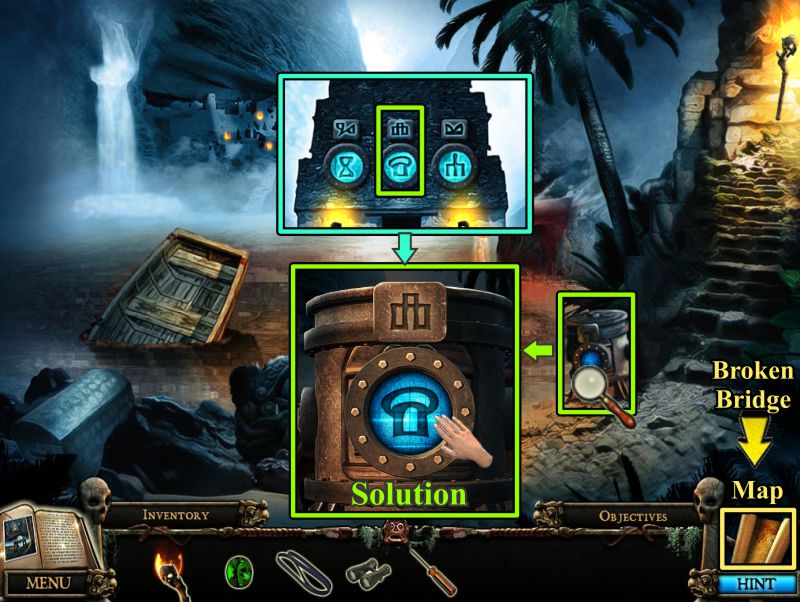
Broken Bridge Machine
If you use your binoculars to view the distant Pyramid, you will see that Professor Columbia is a captive there.
Zoom in on the Machine, and set it to the symbol shown in the screenshot.
Use the Map to travel to the Giant Nest.
Screenshot
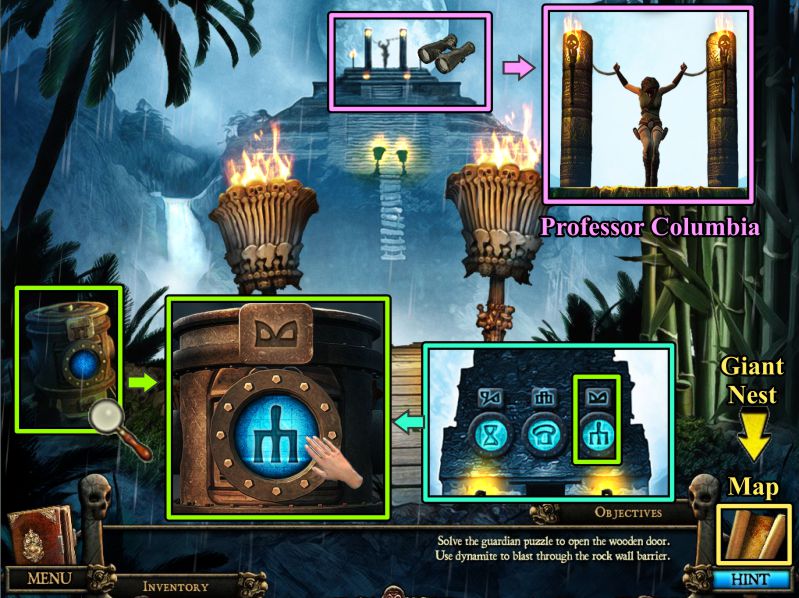
Giant Nest Machine
Zoom in on the Machine and set it as shown.
Check out the horizon to see that somebody is hanging in a tree.
Click on the Map and go to the Guardian Statue.
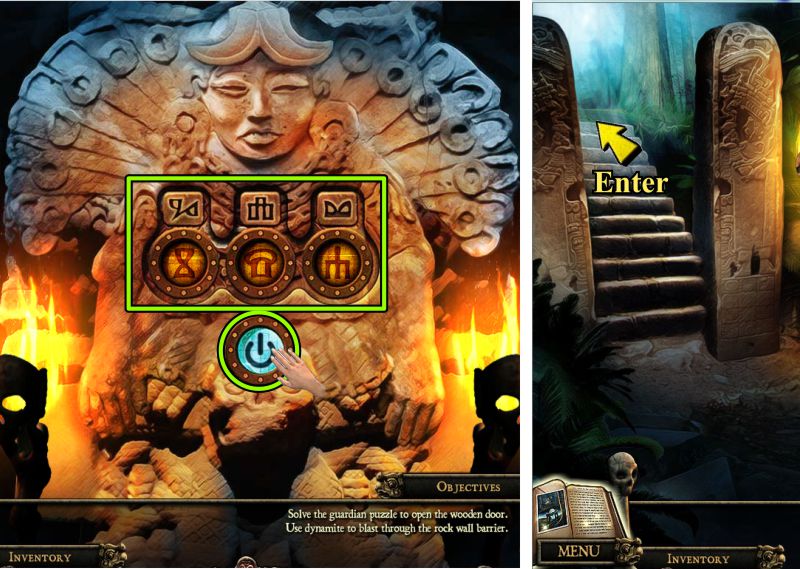
Screenshot
Guardian Statue
Zoom in and press the blue button.
If the symbols are set correctly, the gate will open.
Screenshot
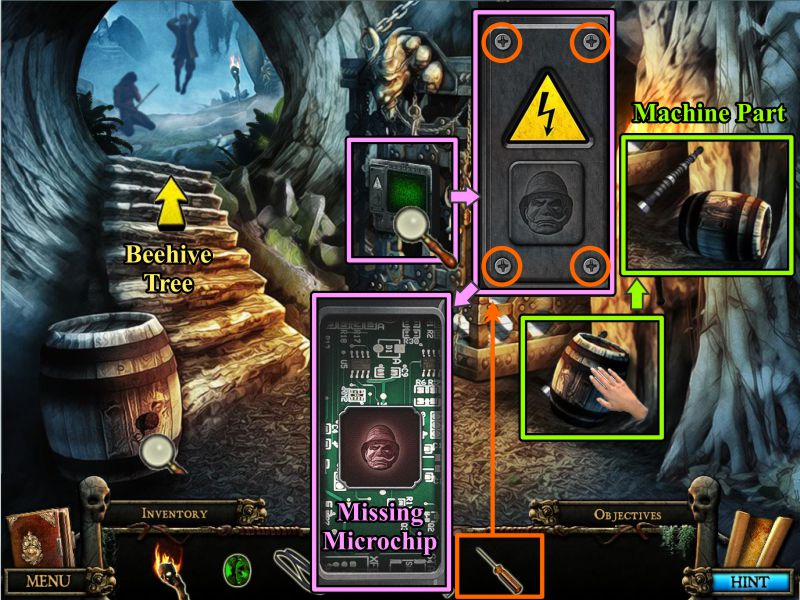
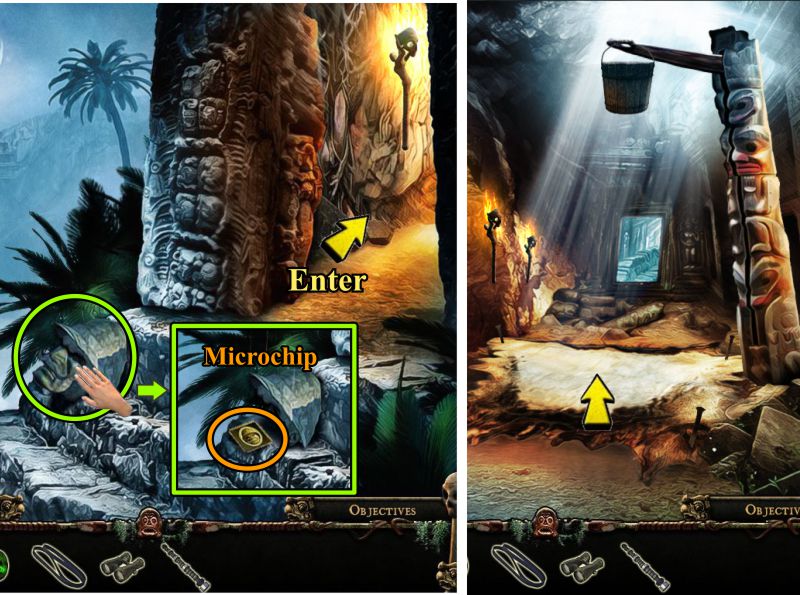
Tunnel Elevator
Check out the elevator, use your screwdriver to open the plate to see there is a missing microchip.
Tip over the barrel at the right to find the Machine Part.
You need to find a corkscrew for the barrel at the left.
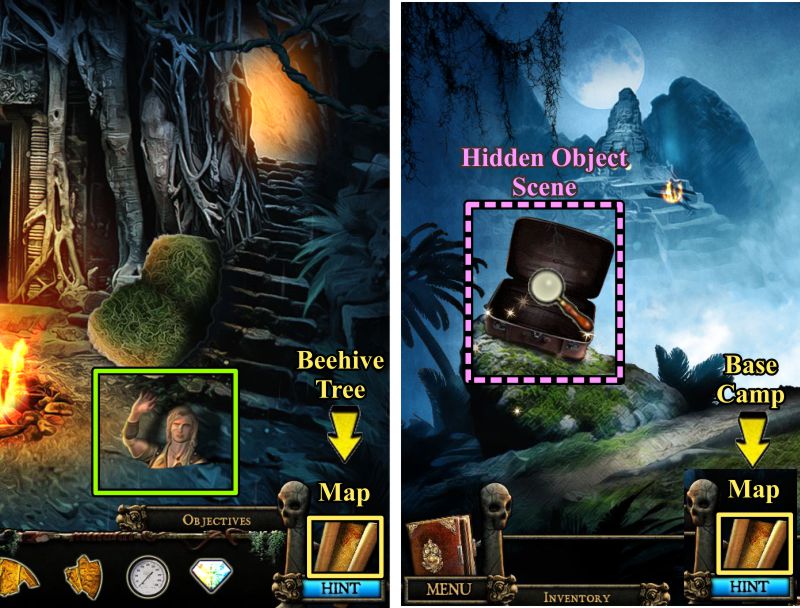
Go up the stairs to the Beehive Tree.
Screenshot
Beehive Tree
Captain Winters is caught by his parachute in a tree with a beehive.
He has been stung so badly that his eyes are swollen shut.
There is a very distressed Warrior, whose daughter is missing, guarding Captain Winters.
Your goal is to find the Warrior's Daughter, and get Captain Winters down from the tree.
Use the Map to travel to the Lake.
Screenshot
Lake
Play the Hidden Object Scene marked in the screenshot, and then go to the Bell.
Screenshot
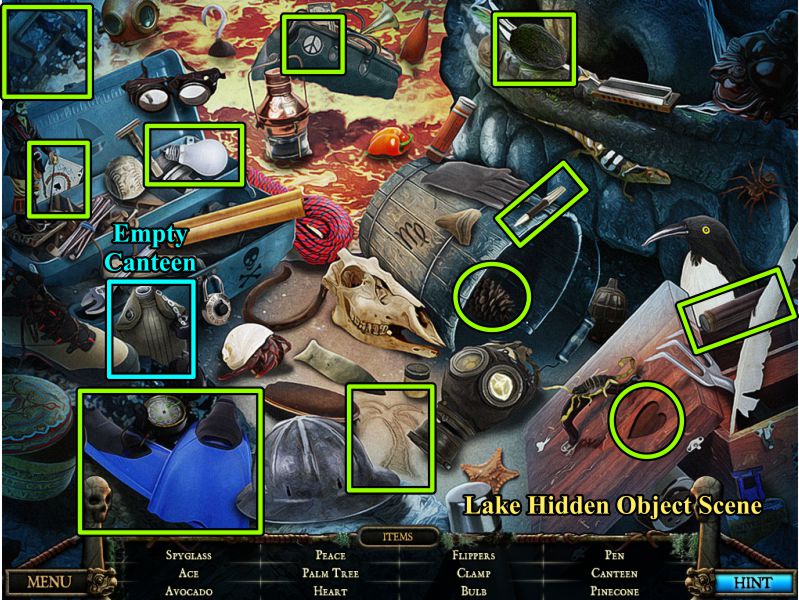
Lake Hidden Object Scene
When you collect everything, you will have an Empty Canteen.
Screenshot
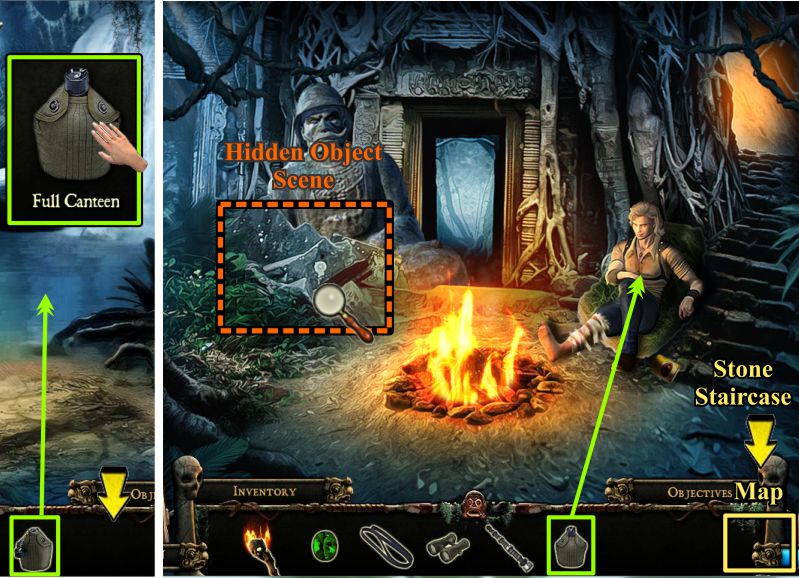
River and Base Camp
Fill the Canteen with water from the River, and clink down to Base Camp.
Give the Full Canteen to Lord Rockwood.
Play the Hidden Object Scene, and use the Map to go to the Stone Staircase.
Screenshot
Base Camp Hidden Object Scene
You will get Dynamite for your Inventory.
Screenshot
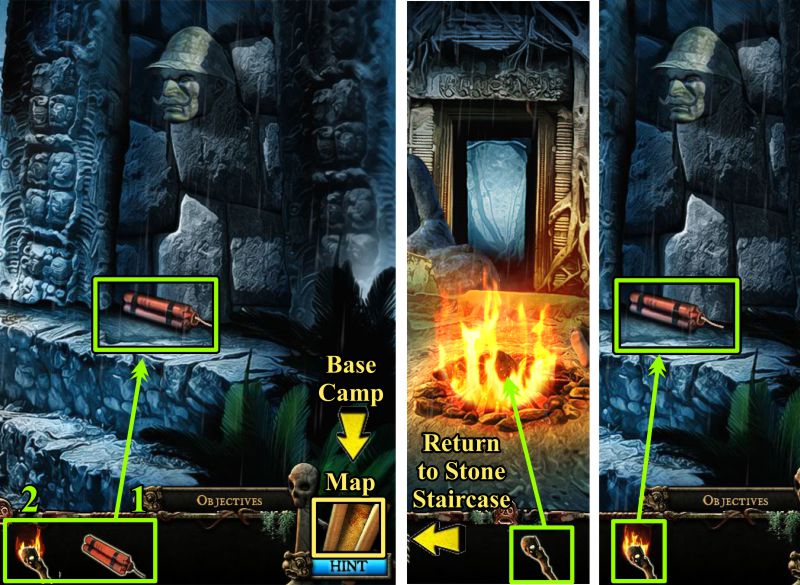
Stone Staircase and Base Camp
Place the Dynamite at the base of the rocks holding up the stone head.
Try to light it with your Torch, but a sudden rainstorm puts out the Torch.
Go back to Base Camp and relight the Torch.
Return to the Stone Staircase and light the Dynamite.
Screenshot
Stone Staircase and the Pit
Jacques' stone head falls on a step to touch it, and it breaks.
Pick up the Microchip and go through the door.
When you try to go to the distant door, you find out that the animal skin is covering an open Pit.
Screenshot
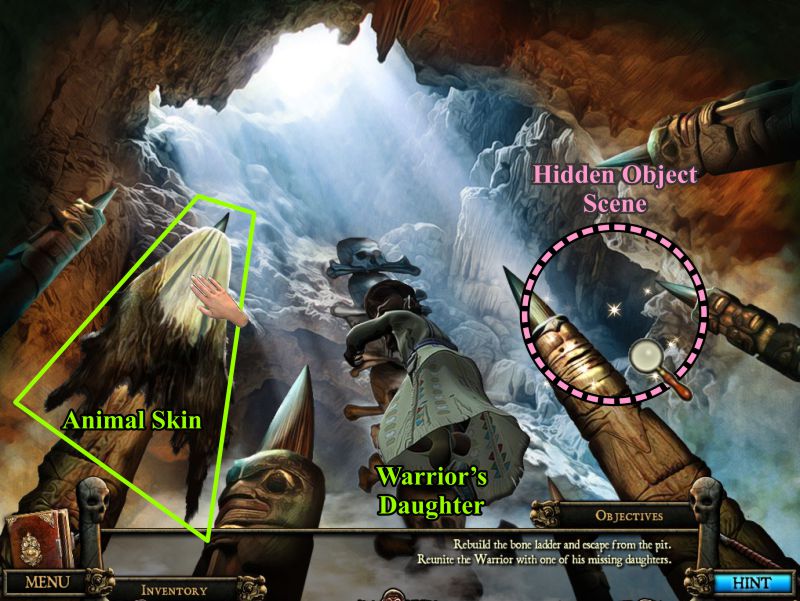
The Pit
Pick up the Animal Skin impaled on the column.
The Warrior's Daughter is clinging to the partial ladder.
Play the Hidden Object Scene to find more bones to rebuild the ladder.
Screenshot
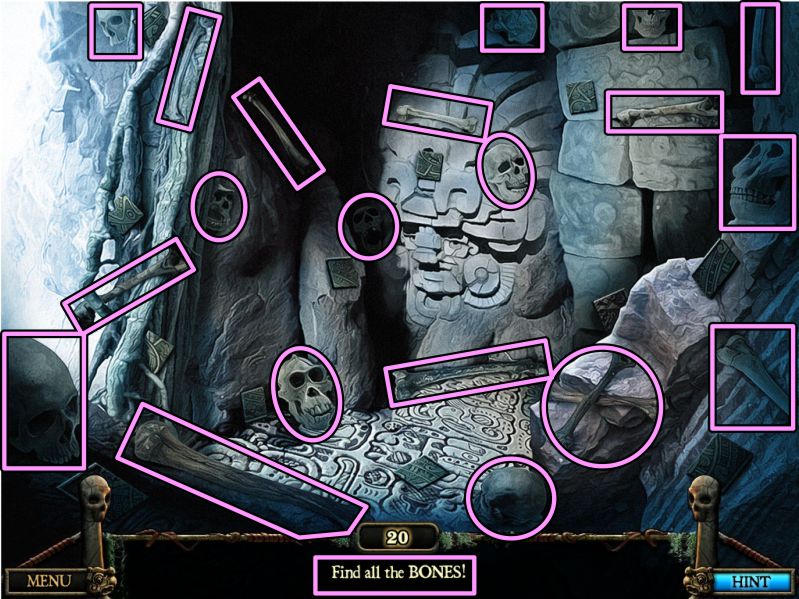
Bone Ladder Hidden Object Scene
Collect the 20 Bones marked in the screenshot.
Screenshot
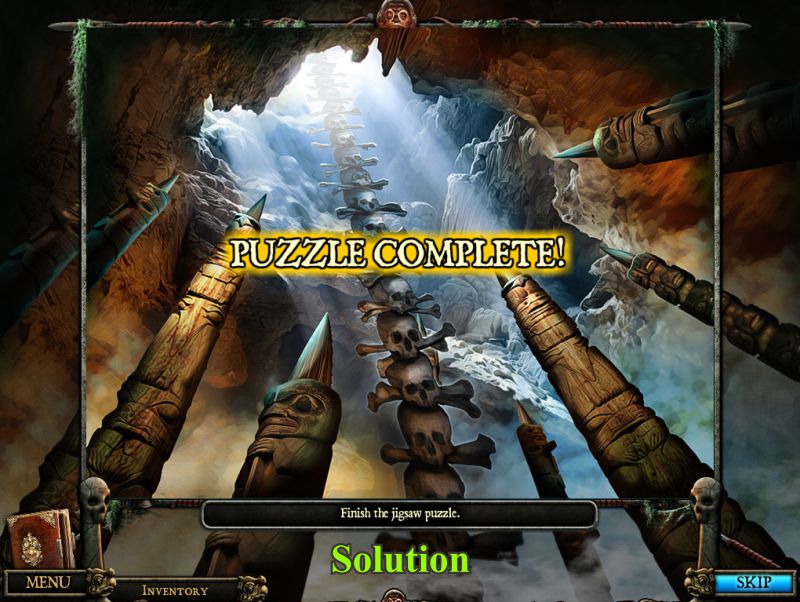
Bone Ladder Puzzle
Place the pile of bones on the existing ladder to trigger a Puzzle.
Put the jigsaw puzzle together to look like the solution in the screenshot.
Screenshot
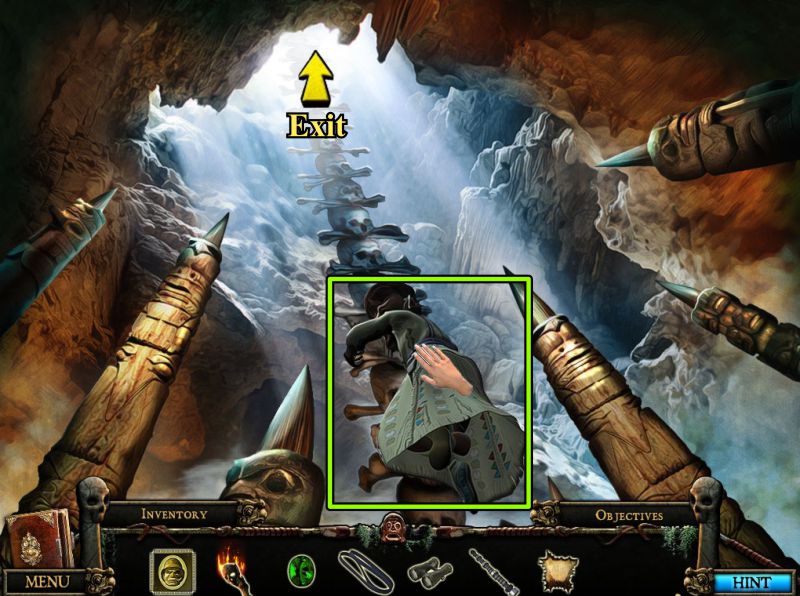
The Pit
Grab the Warrior's Daughter and exit the Pit.
Screenshot
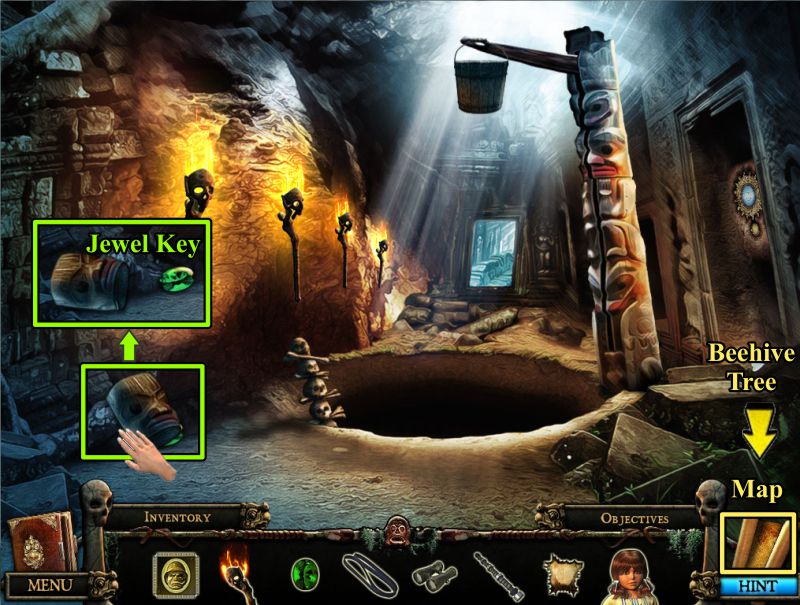
Move the stone head at the left and pick up the Jewel Key.
Use the Map to go to the Beehive Tree.
Screenshot
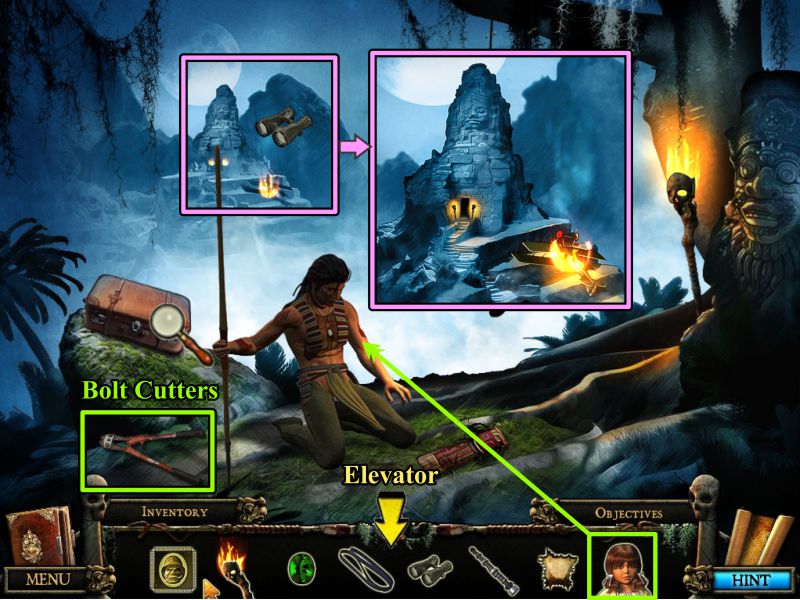
Beehive Tree
Give the Warrior his Daughter.
Pick up the Bolt Cutters, view the distant horizon, note the locked suitcase, and exit to the Elevator.
Screenshot
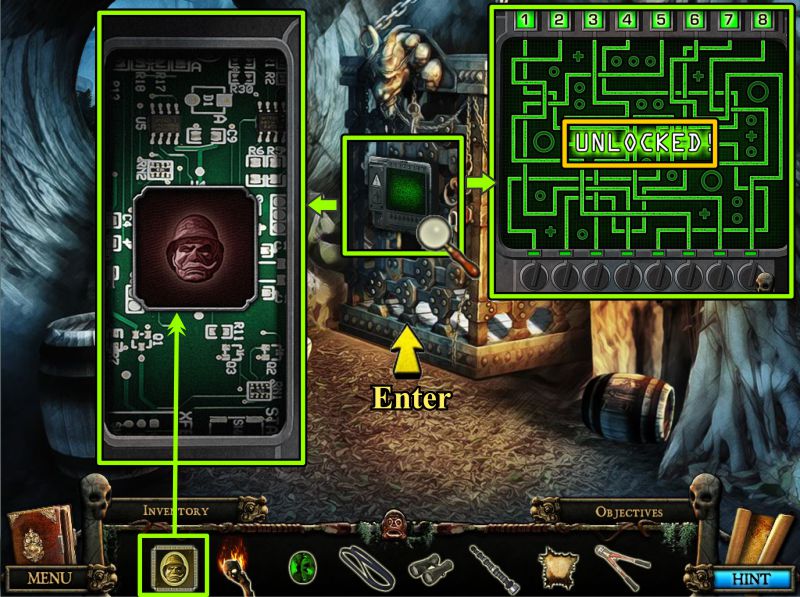
Tunnel Elevator
Zoom in on the Elevator and place your Microchip to trigger a Mini Game.
See the screenshot for the solution to unlock the Elevator.
A screenshot of the step-by-step solution follows.
Screenshot
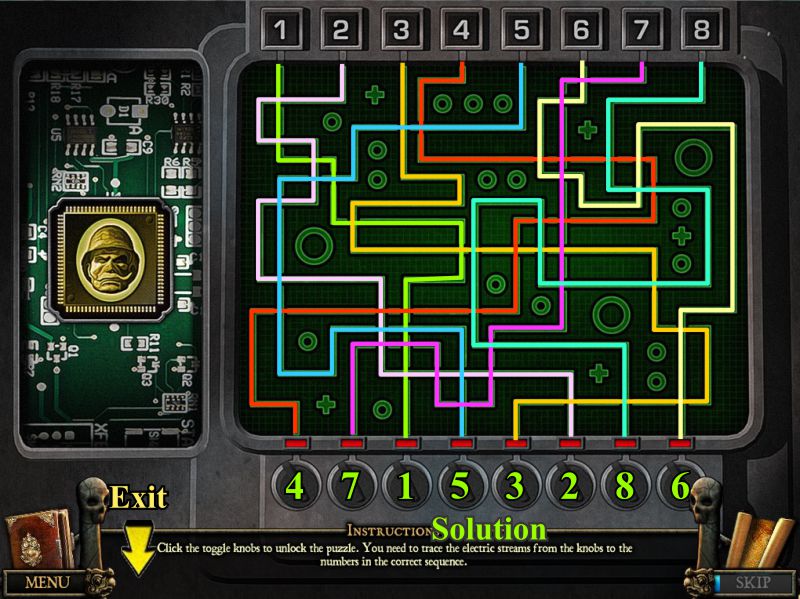
Tunnel Elevator Mini Game
See the numbered color-coded solution in the screenshot.
Once you have completed the game, exit out of it and enter the Elevator.
Screenshot
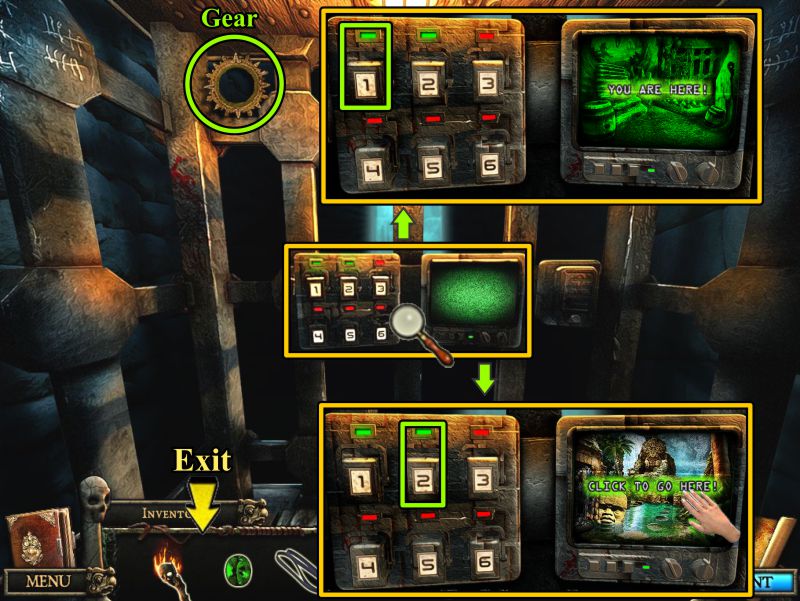
Ride the Tunnel Elevator
Take the Gear, and zoom in on the controls to see you are currently at Tunnel 1.
Press Tunnel 2 and click on the screen to go there.
Once there, click down to exit the Elevator.
Screenshot
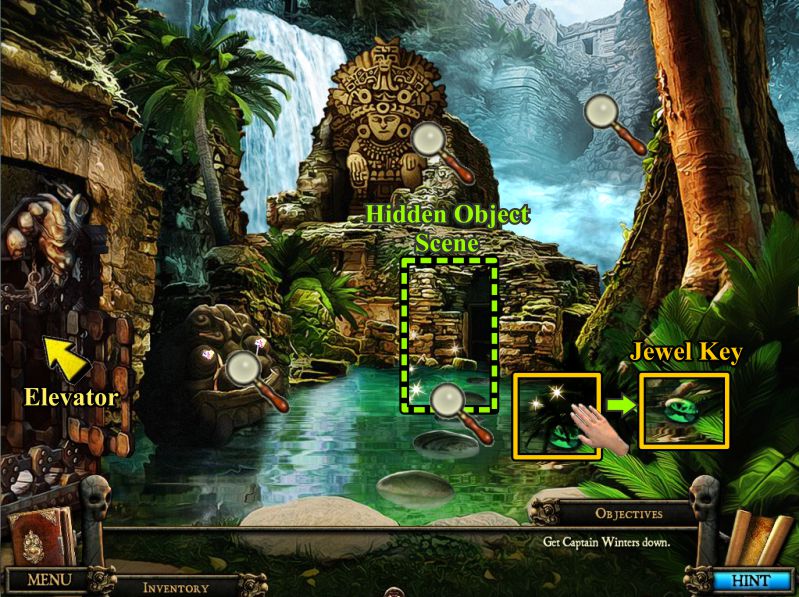
The Pond
Check out the magnifying glasses, move the foliage to uncover another Jewel Key, and play the Hidden Object Scene.
Screenshot
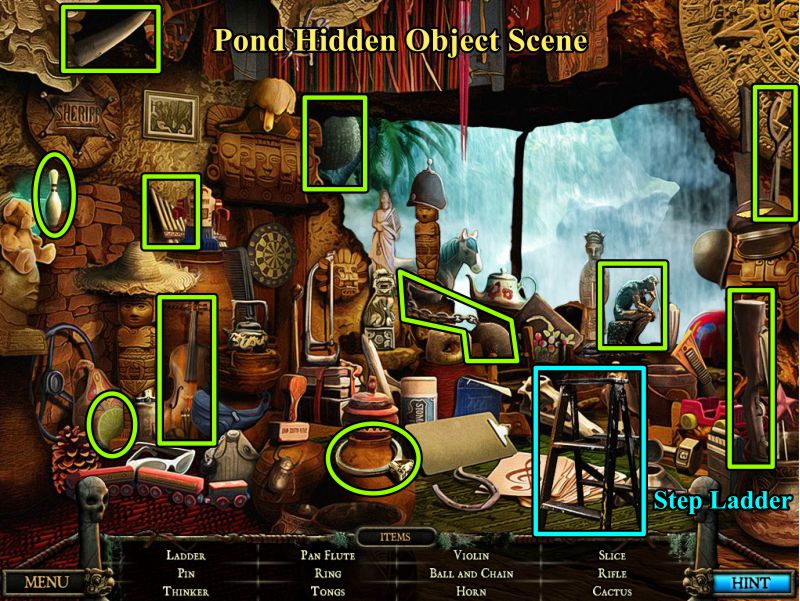
Pond Hidden Object Scene
You will receive a Step Ladder when you collect everything.
Enter the Elevator and return to Tunnel 1.
Screenshot
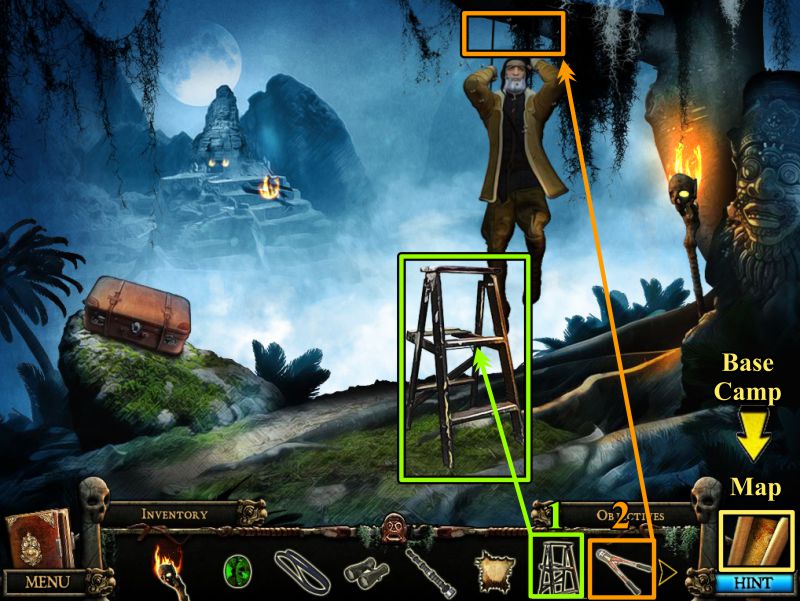
Beehive Tree
Go to the Beehive Tree, place the Step Ladder, and use the Bolt Cutters to get Captain Winters out of the tree.
Take him back to Base Camp.
Screenshot
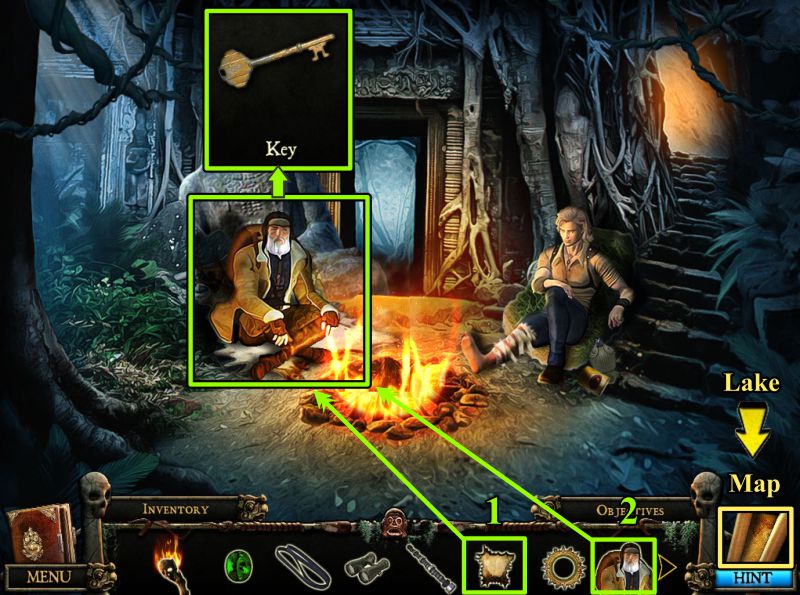
Base Camp
Place the Animal Skin on the ground and Captain Winters on it.
He will give you a Key for his trunk, so go to the Lake.
Screenshot
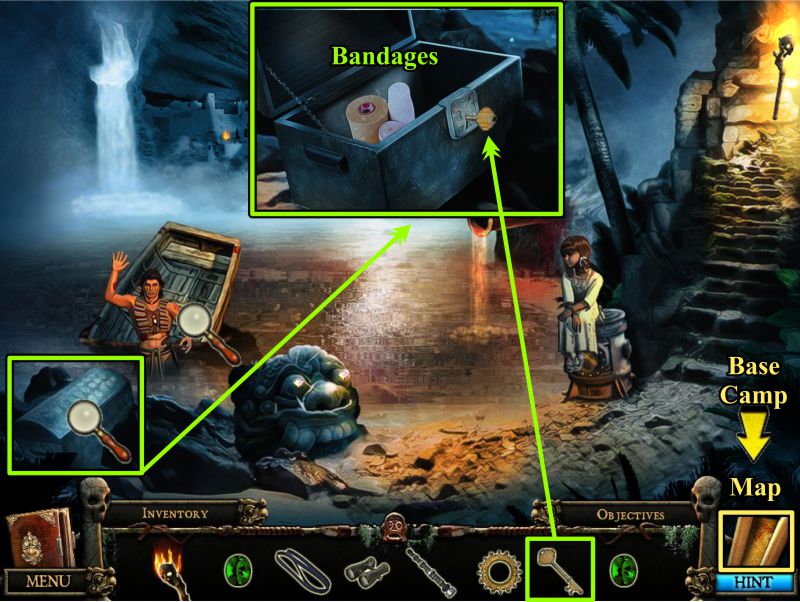
Chapter 4: The Chief's Family
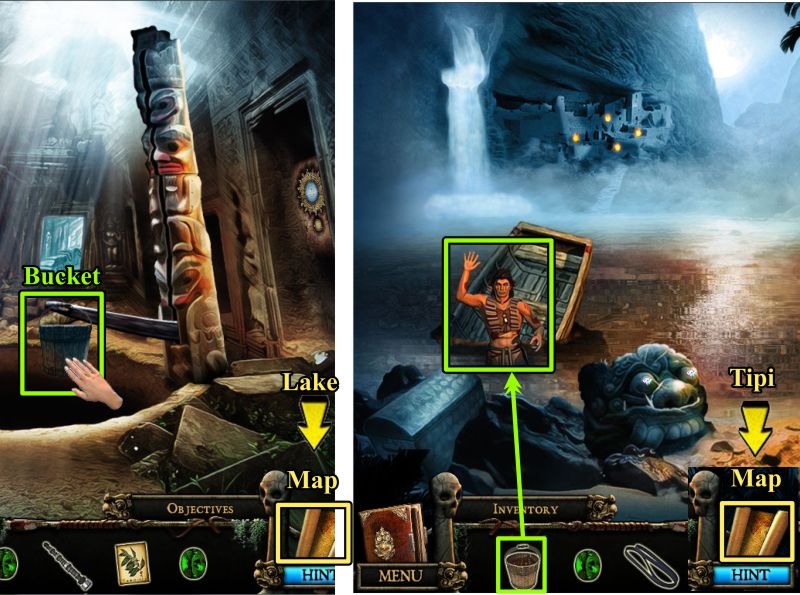
Lake
The Warrior and his Daughter are there, and he needs a bucket to bail out the boat.
Zoom in and open the trunk.
Take the Bandages back to Captain Winters at the Base Camp.
Screenshot
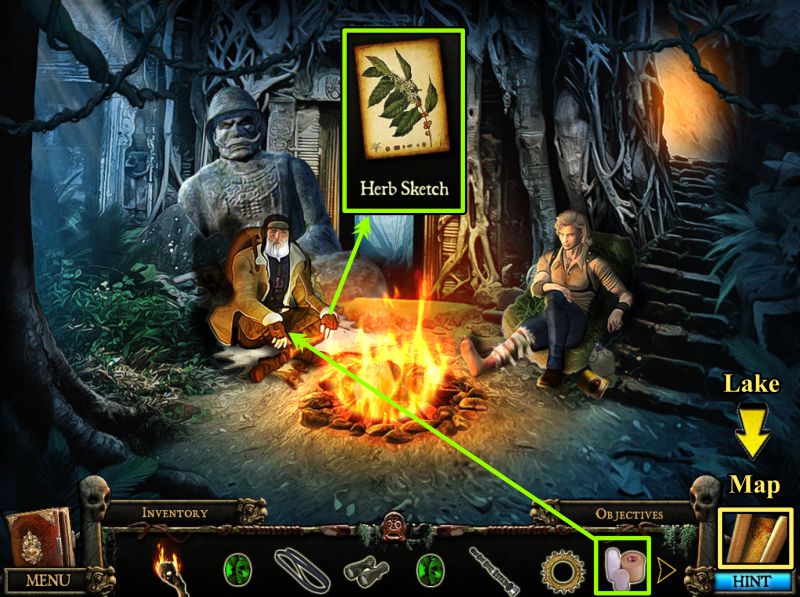
Base Camp
When you give the bandages to Captain Winters, he will give you a sketch of some herbs he can use to heal his eyes.
Screenshot
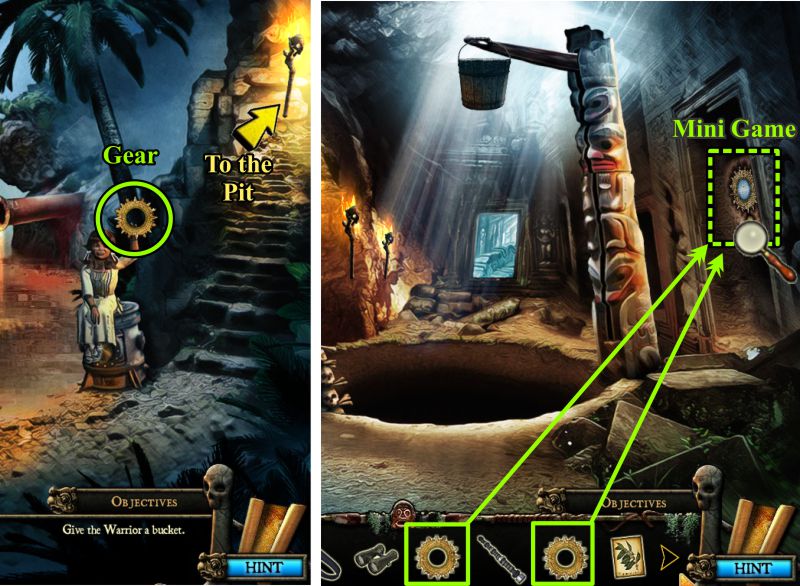
Lake and Pit
The Warrior's Daughter found a Gear in the surf.
Take the Gear and go up the stairs to the Pit.
Zoom in on the wall at the right for a Mini Game.
Screenshot
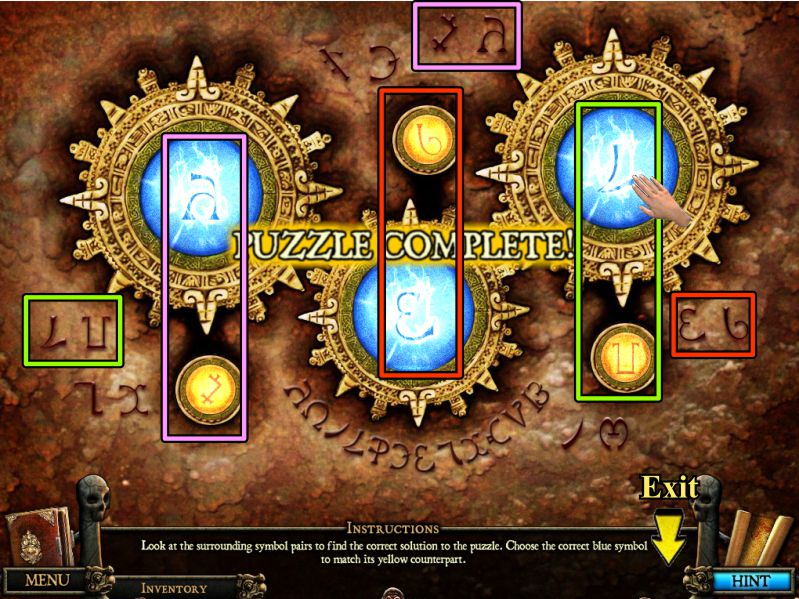
Gear Mini Game
Place you Gears to start the game.
There are symbols written the wall, so you need move the gears to the correct symbols.
See the screenshot for the color-coded solution.
Exit out of the game.
Screenshot
Pit and Lake
The mechanical arm on the totem has lowered so you can reach the bucket.
Take the bucket to the Warrior at the Lake.
While he is busy bailing, go to the Tipi.
Screenshot
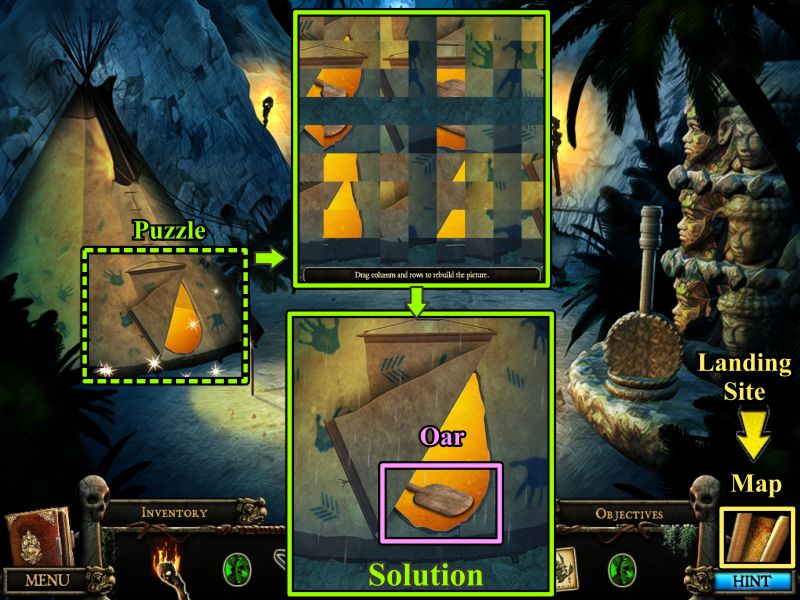
Tipi Puzzle
Click on the Tipi flap for a Puzzle.
Your goal is to swap the horizontal and vertical bars to produce the solution shown in the screenshot.
Take the Oar and go to the Landing Site.
Screenshot
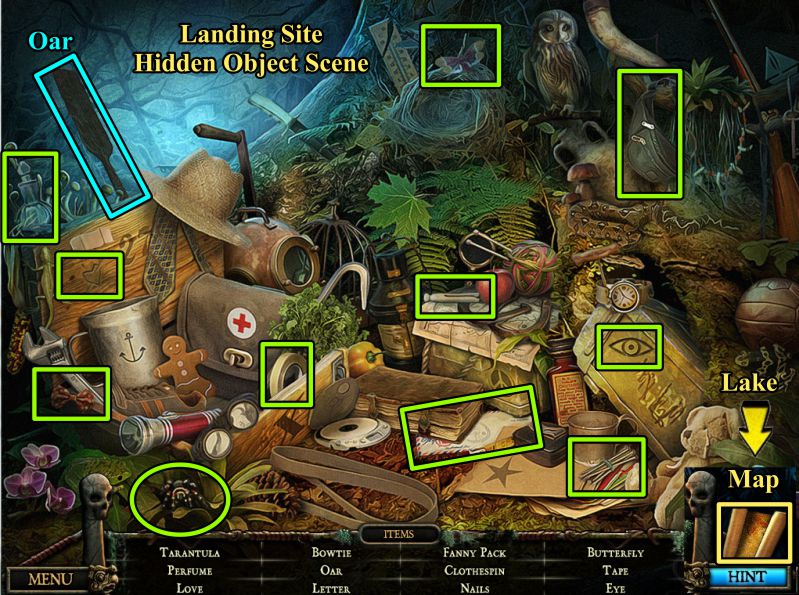
Landing Site Hidden Object Scene
Click on the sparkles by the tree for a Hidden Object Scene.
Collect everything to get another Oar.
Go to the Lake via the Map.
Screenshot
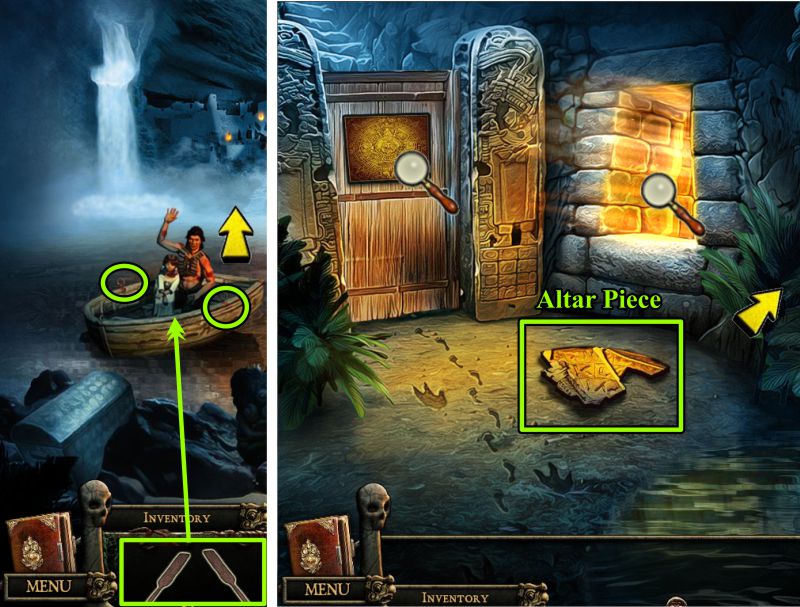
Lake and Village Entrance
Place the 2 Oars on the boat, and exit across the Lake.
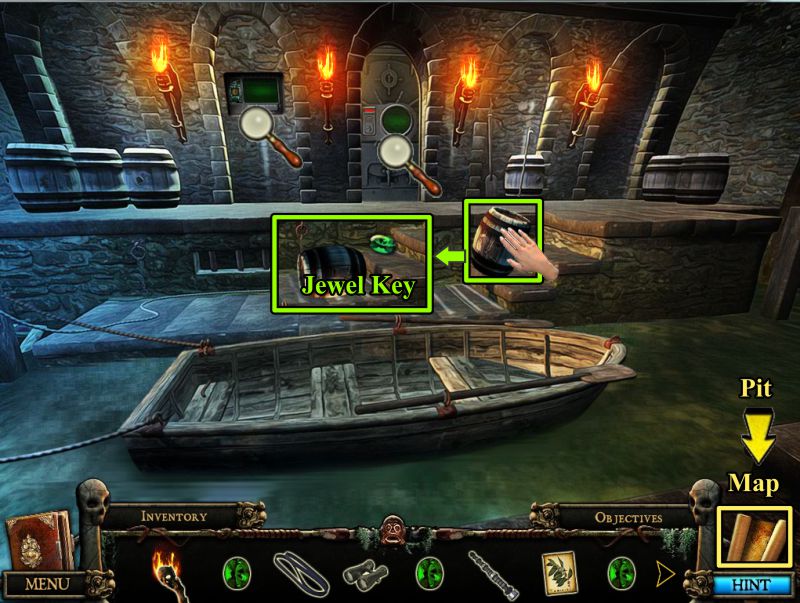
Pick up the Altar Piece, check out the magnifying glasses, and go right to the Boat Dock.
Screenshot
Boat Dock
Check out the two panels, move the barrel to get another Jewel Key, and go to the Pit.
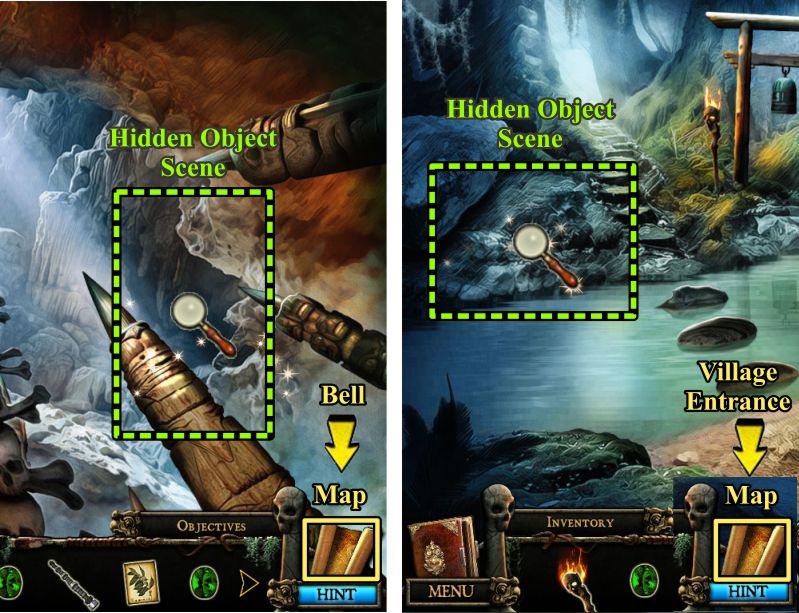
Screenshot
Pit and Bell
Go into the Pit to play a Hidden Object Scene, and then go to the Bell by the River.
Play the Hidden Object Scene on the far shore, and then go to the Village Entrance.
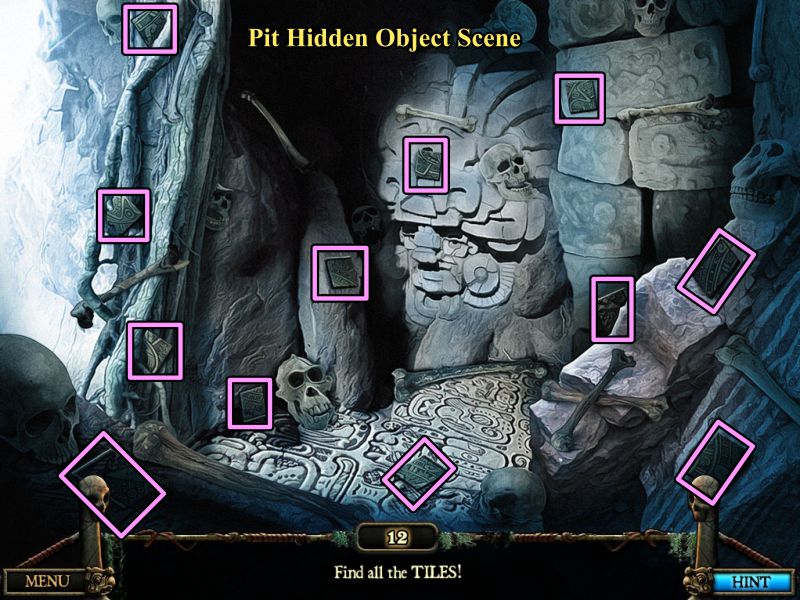
Screenshot
Tile Hidden Object Scene
Collect all 12 Tiles.
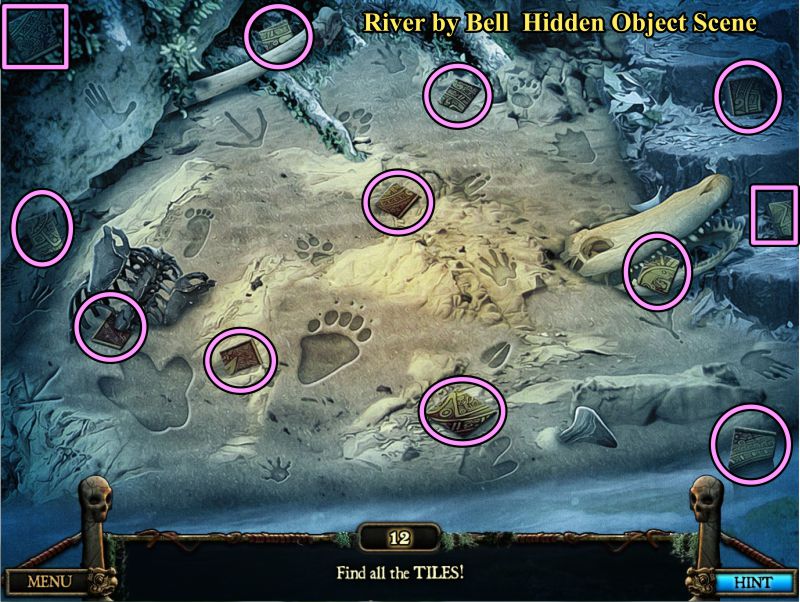
Screenshot
Beach Hidden Object Scene
Collect the 12 Tiles.
Screenshot
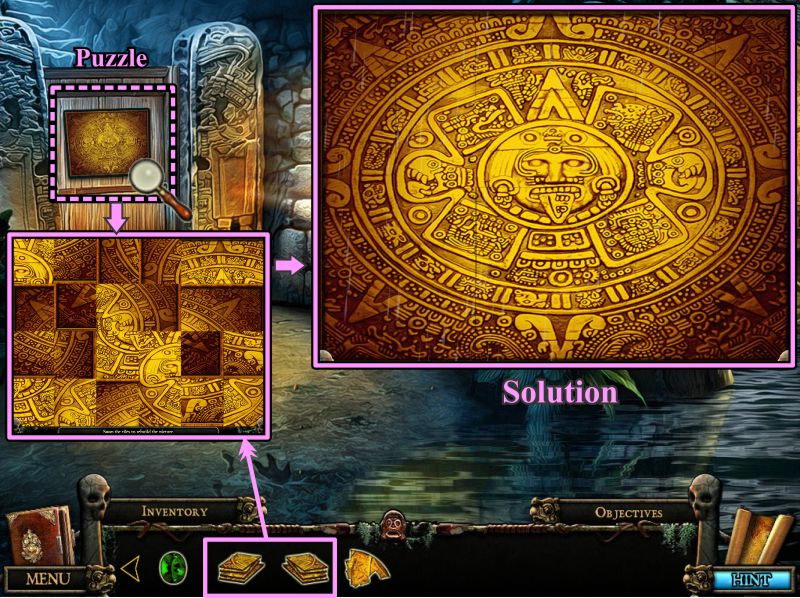
Village Entrance Puzzle
Zoom in on the Village Entrance and place your two sets of Tiles to trigger a Puzzle.
Swap the Tiles until the picture looks like the solution in the screenshot.
Screenshot
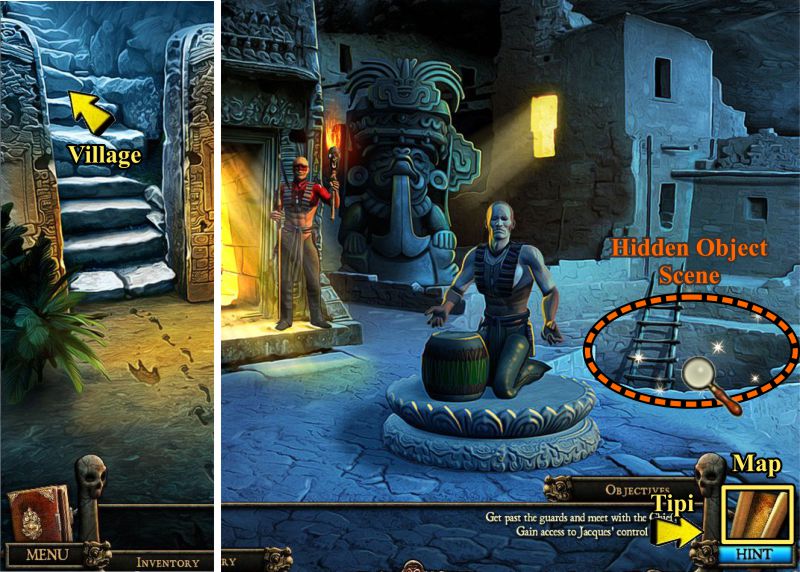
Village
Go up the stairs to the Village.
You can't get in to see the Chief because the guards won't let you.
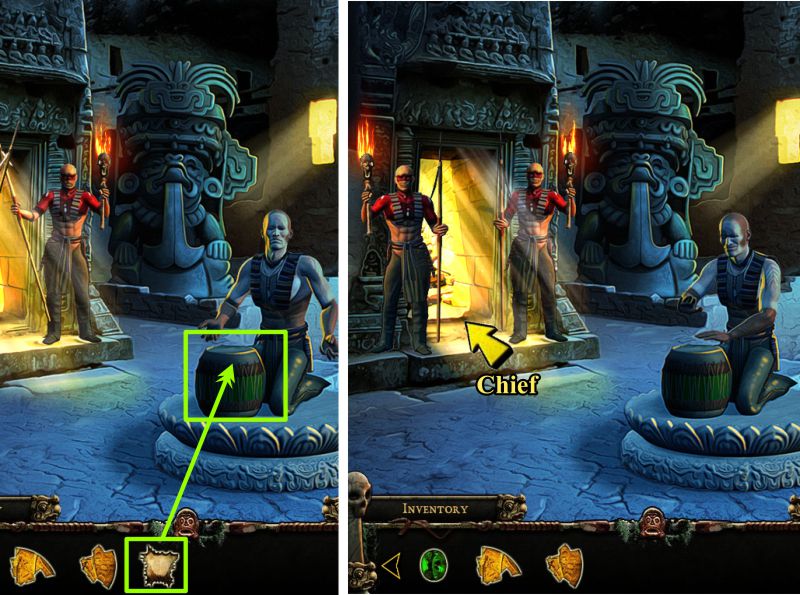
You need to be announced by the shaman and his drum is broken.
Play the Hidden Object Scene, and then go to the Tipi.
Screenshot
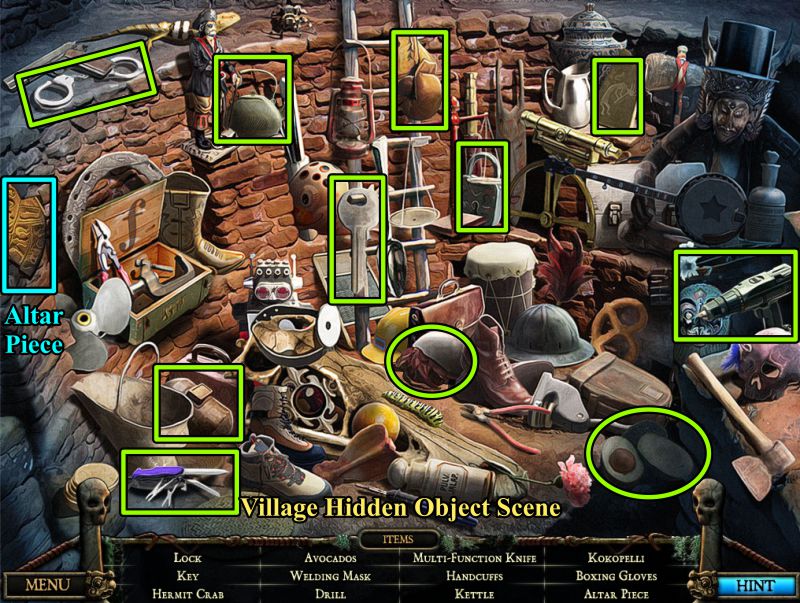
Village Hidden Object Scene
Collect all the items to get an Altar Piece.
Screenshot
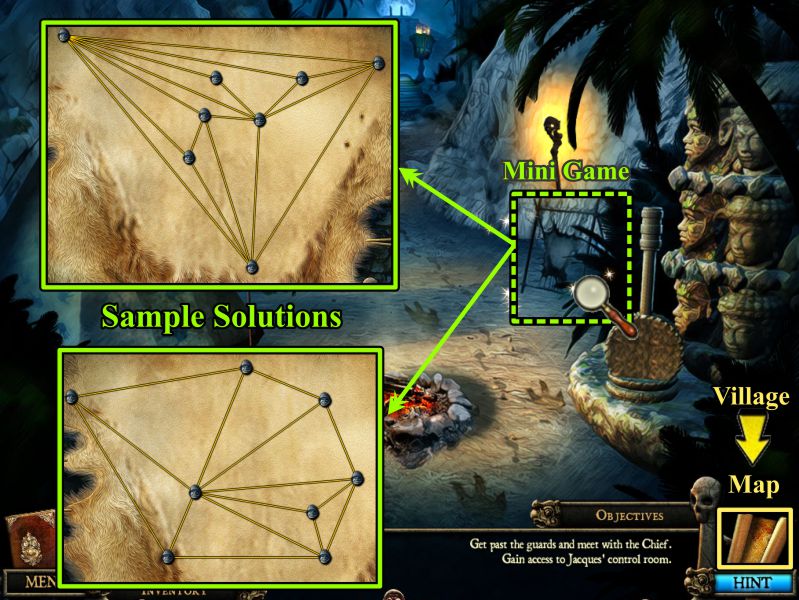
Animal Skin Mini Game
Zoom in on the animal skin drying on the rack for a Mini Game.
Your goal is to move the stone heads so that no lines cross each other.
See the screenshot for a couple of solutions.
Return to the Village.
Screenshot
Village
Give the Animal Skin to the shaman who will play the sacred music that announces you for a visit to the Chief.
Enter the Chief's quarters.
Screenshot
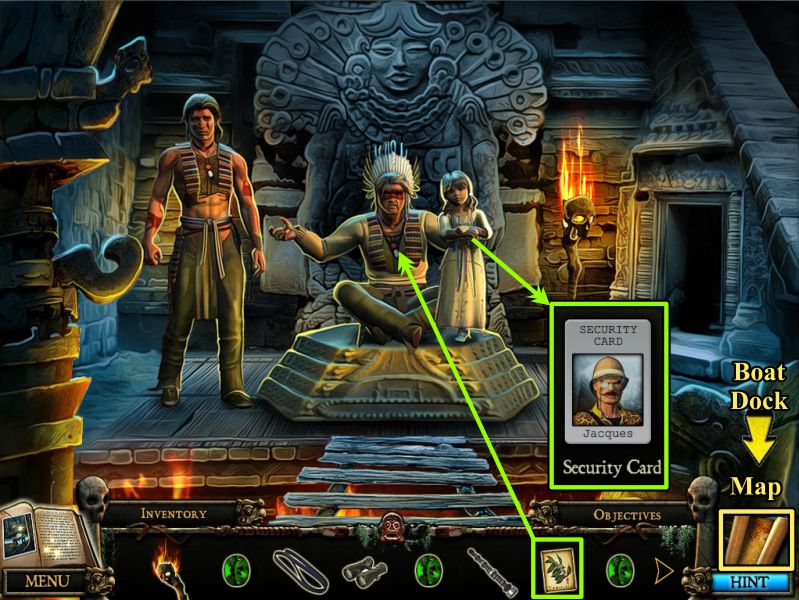
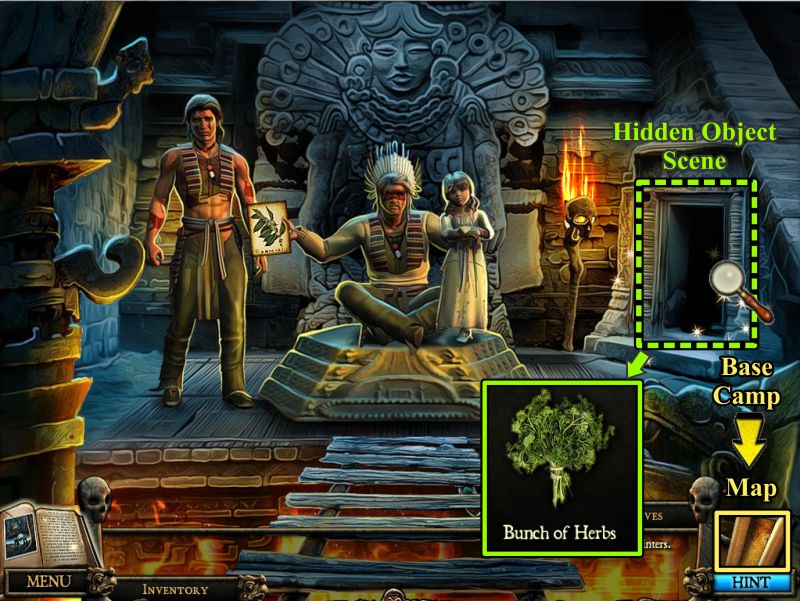
The Chief
The Chief is so happy to have one of his granddaughters back.
Give him the Herb Sketch and receive Jacques' Security Card.
The Chief will give you access to his medicinal herbs, if you turn off the toxic sludge in the Lake.
Go to the Boat Dock.
Screenshot
Chapter 5: Jacques' Computer Control Room
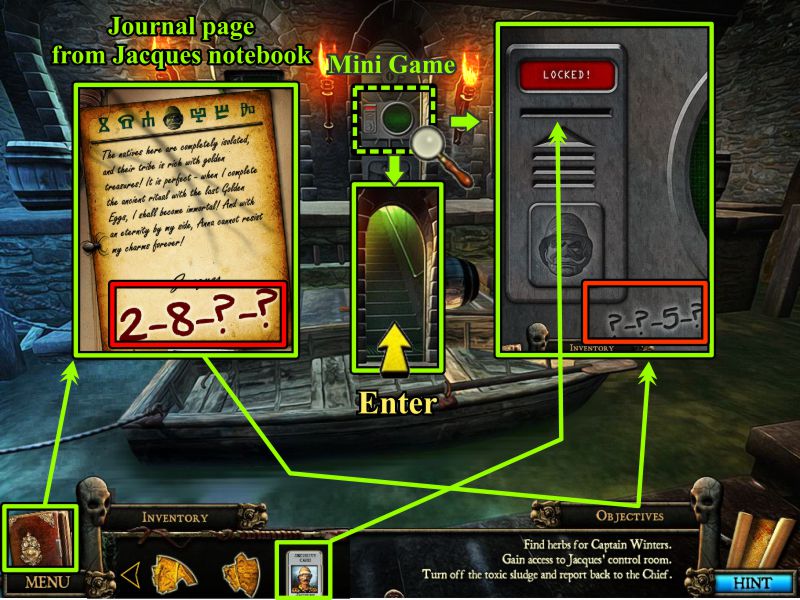
Boat Dock
Zoom in on the panel with the round screen.
Use Jacques' Security Card in the slot.
Your goal is to unlock the door by entering the correct numbers.
You have a page from Jacques' notebook in your Journal and the panel has an additional number to offer you.
Once the door is open, go up the stairs.
Screenshot
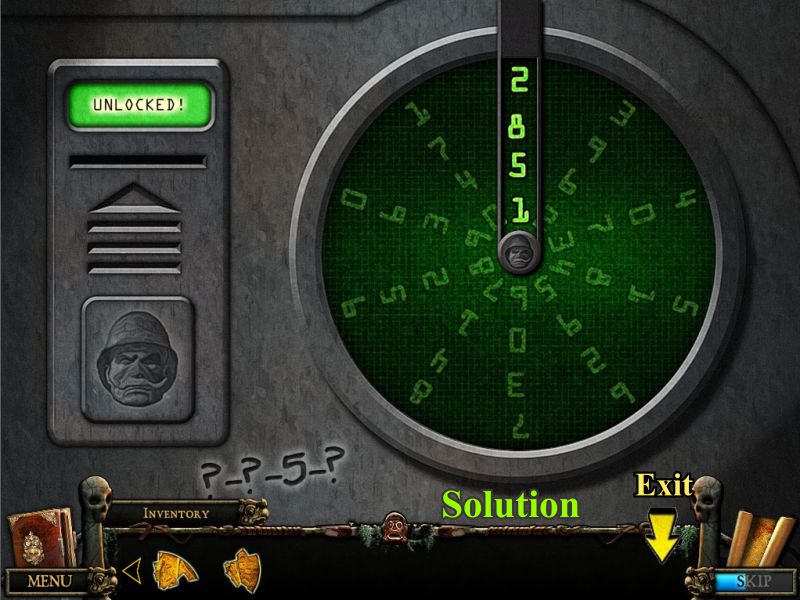
Jacques' Control Room Entrance Mini Game
Rotate the screen so the numbers appear in the slot.
We know the first two numbers are 2 and 8.
There is a 5 in the third space so the only unknown number is the last one.
To find the last number, we need to cycle through all the numbers to see what works.
Luckily, we can stop after the first one because the code is 2851.
Screenshot
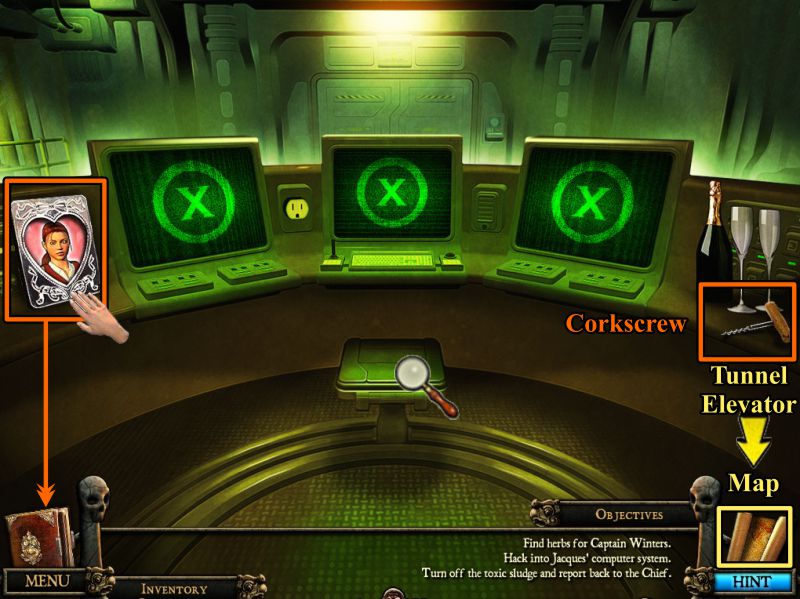
Jacques' Control Room
The only way to hack into Jacques' computers is going to be with Anna's laptop.
Take the picture of Anna for your Journal, and grab the Corkscrew.
Go to the Tunnel Elevator.
Screenshot
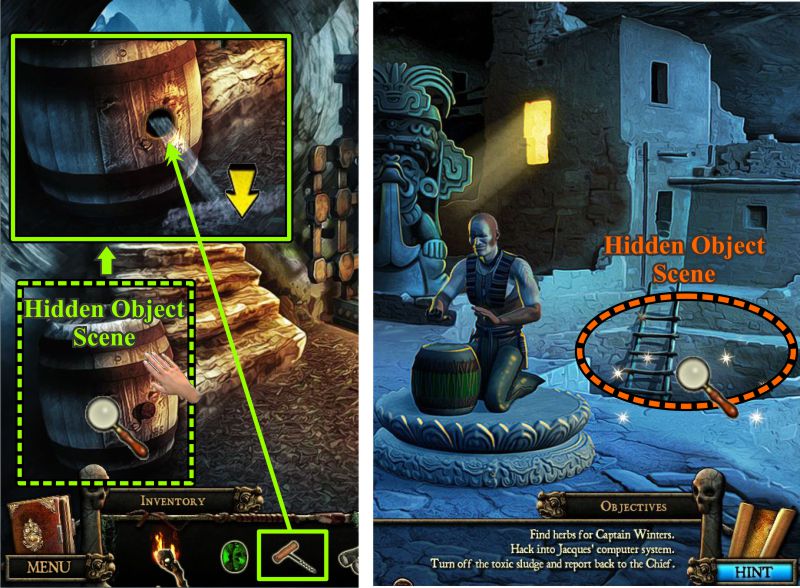
Tunnel Elevator and Village
Zoom in on the barrel at the left, and use the Corkscrew to empty it.
Exit out of the close up and tip the barrel over to trigger a Hidden Object Scene.
Play the Hidden Object Scene, and go to the Village.
Play the Hidden Object Scene there.
Screenshot
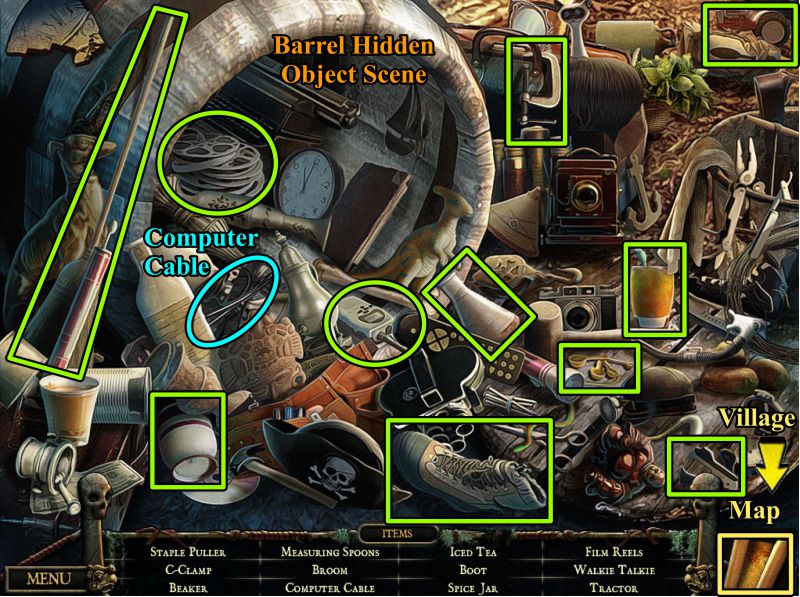
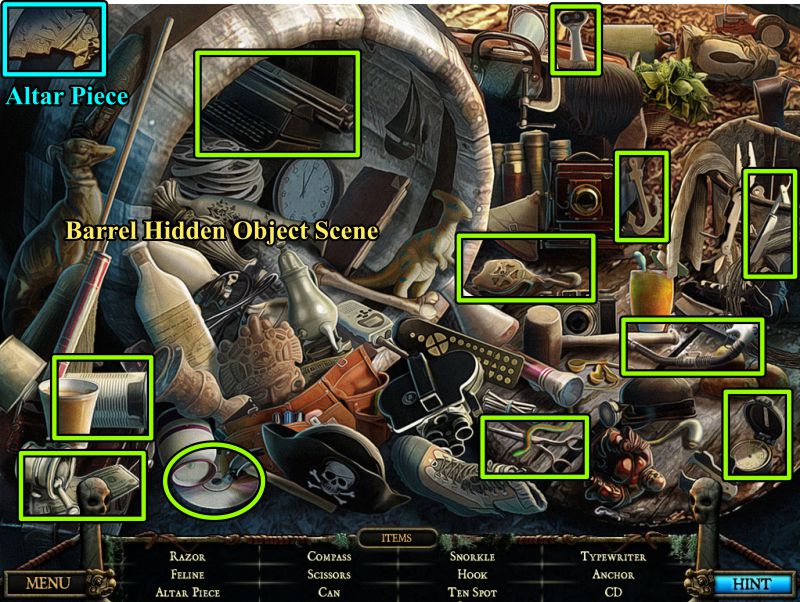
Barrel Hidden Object Scene
Collect everything to get a Computer Cable.
Go to the Village.
Screenshot
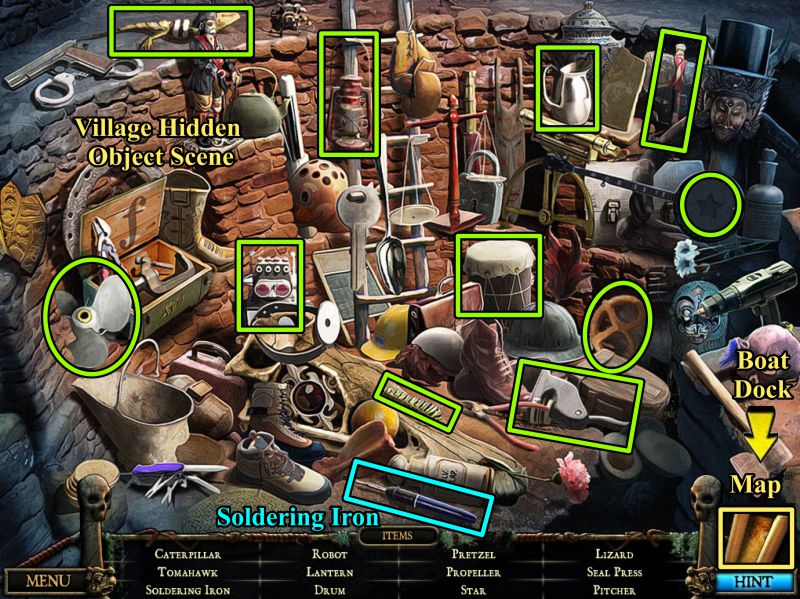
Village Hidden Object Scene
Play the Hidden Object Scene to get a Soldering Iron.
Go to the Boat Dock.
Screenshot
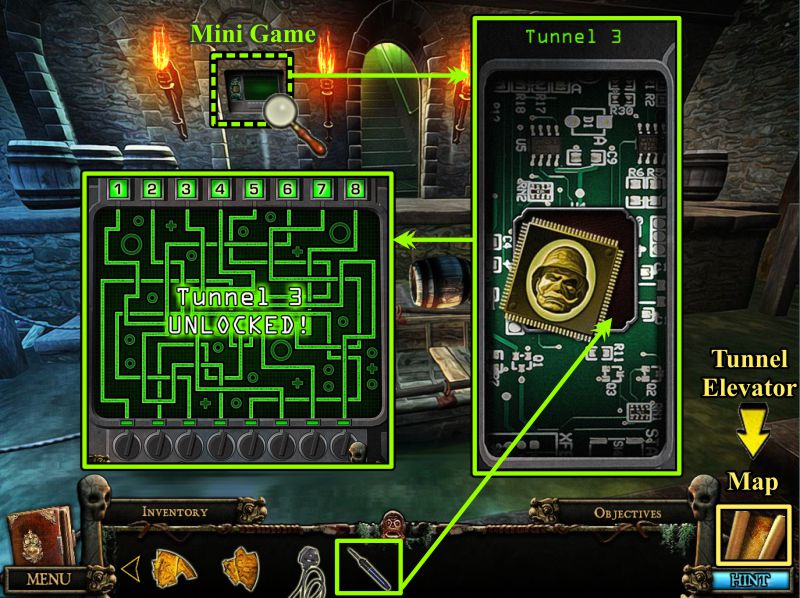
Boat Dock
Zoom in on the panel to the left of the doorway.
Use your Soldering Iron to fix the microchip and trigger a Mini Game.
The solution to the game is shown in the screenshot, but a step-by-step solution is available below.
Screenshot
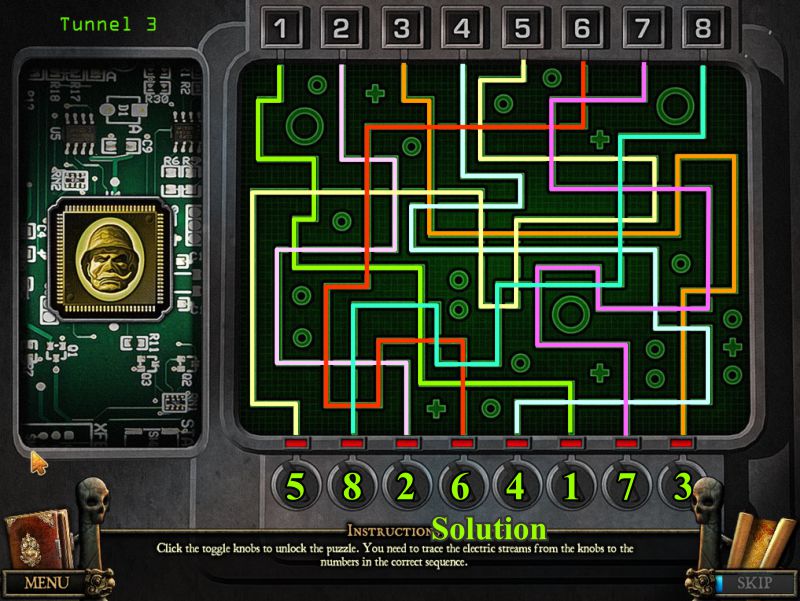
Tunnel 3 Mini Game
The screenshot shows a numbered and color-coded step-by-step solution.
Go to the Tunnel Elevator to see what you unlocked.
Screenshot
Tunnel Elevator
Zoom in and select Tunnel 3.
Press the screen to go there.
Exit the Elevator.
Screenshot
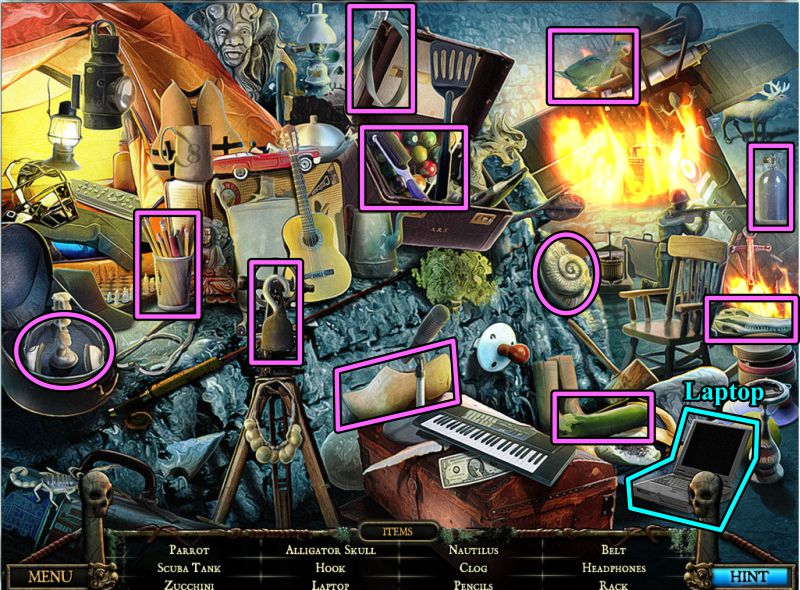
Crashed Plane
This is where one of your planes crashed.
Check out the Machine, and move the object on the step to get another Jewel Key.
Play the Hidden Object Scene, and then exit to the Control Room.
Screenshot
Crashed Plane Hidden Object Scene
Once you collect everything, you will have found Anna's Laptop.
Screenshot
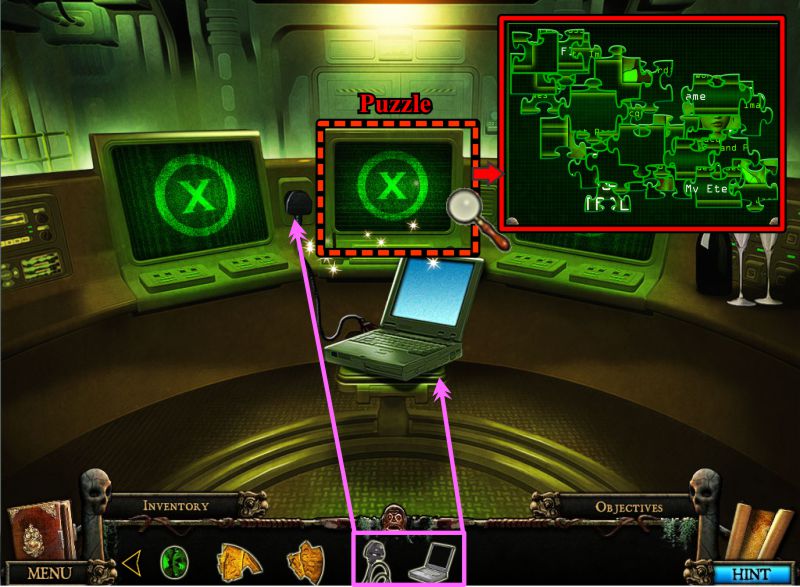
Jacques' Control Room
Place Anna's Laptop on the seat, and plug it in with the Computer Cord.
The center screen will present you with a puzzle.
Screenshot
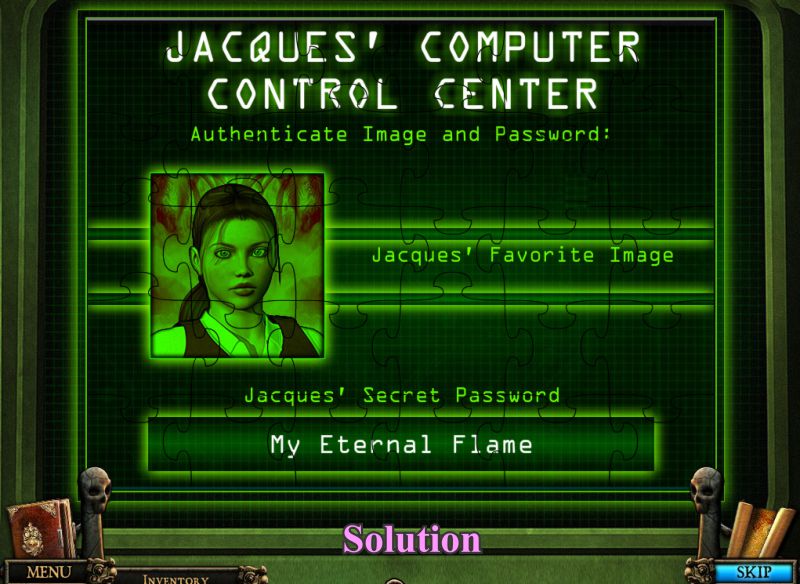
Jacques' Computer Control Center Puzzle
Put the jigsaw puzzle together so that it looks like the screenshot.
Screenshot
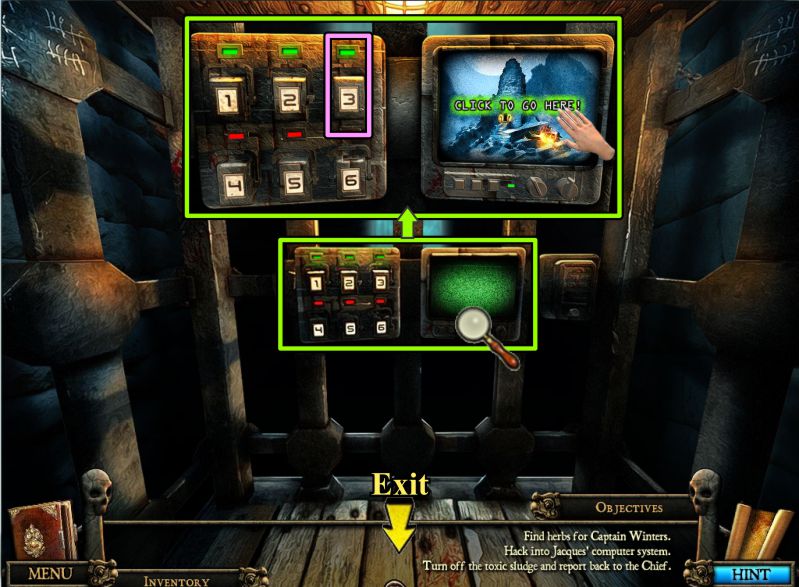
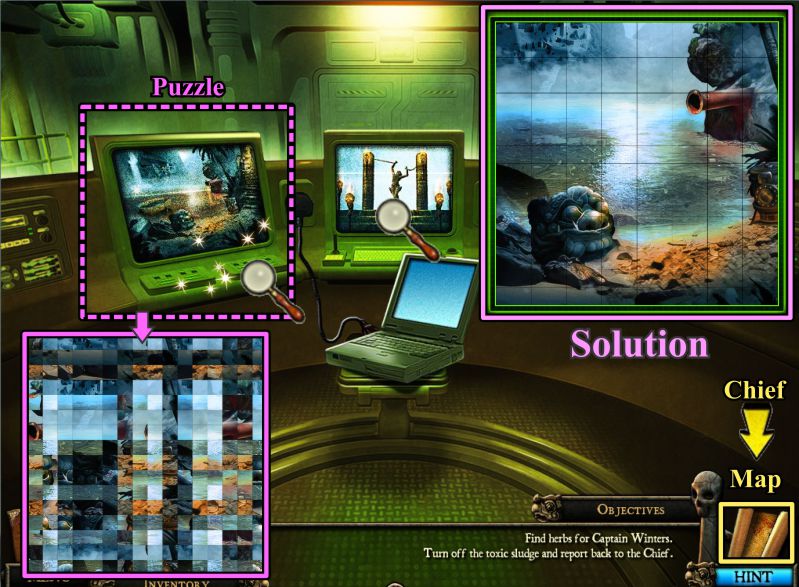
Lake Toxic Sludge Puzzle
Zoom in on the left computer for another puzzle to stop the toxic sludge in the lake.
For this puzzle, you will need to rearrange the horizontal and vertical strips so complete the solution shown in the screenshot.
Go see the Chief.
Screenshot
Chapter 6: Captain Winters' Eyes
The Chief
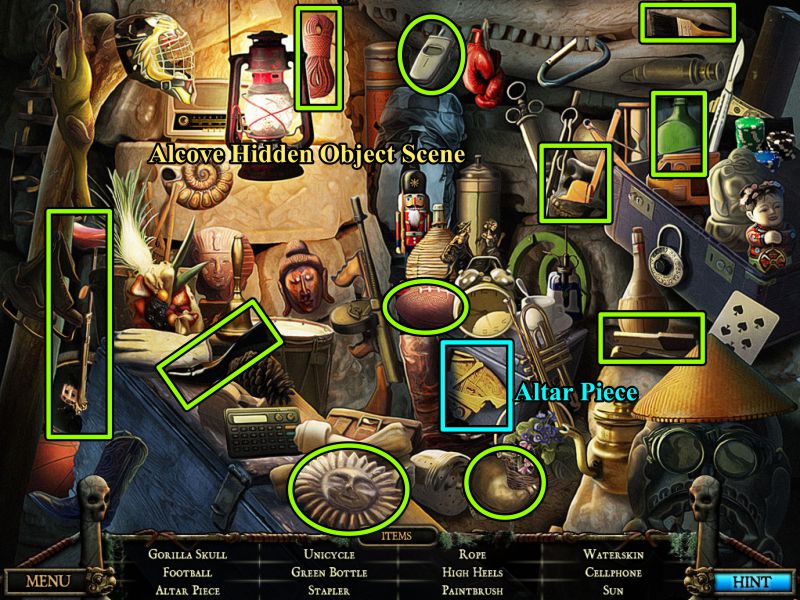
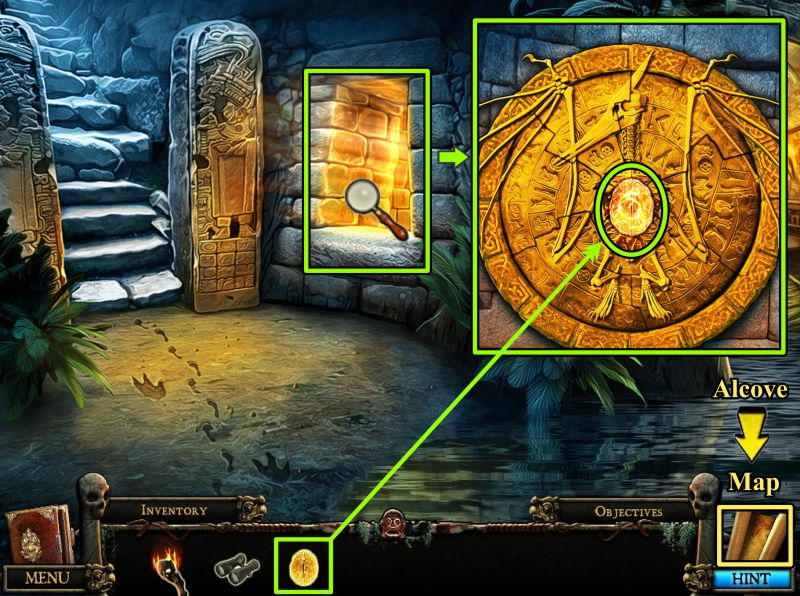
The Chief gives you access to his Medicinal Herbs, so click on the alcove at the right for a Hidden Object Scene.
Once you have the herbs, go to Base Camp.
Screenshot
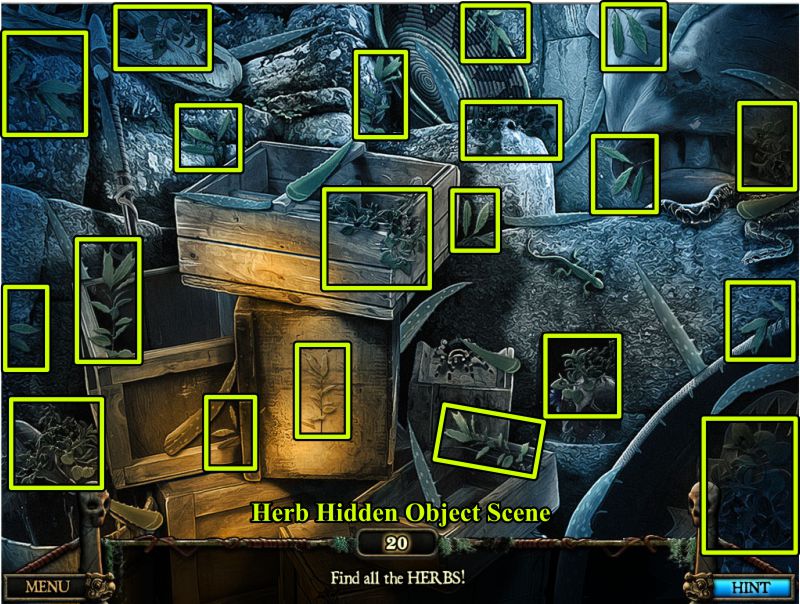
Herb Hidden Object Scene
Collect the 20 Herbs marked in the screenshot.
Screenshot
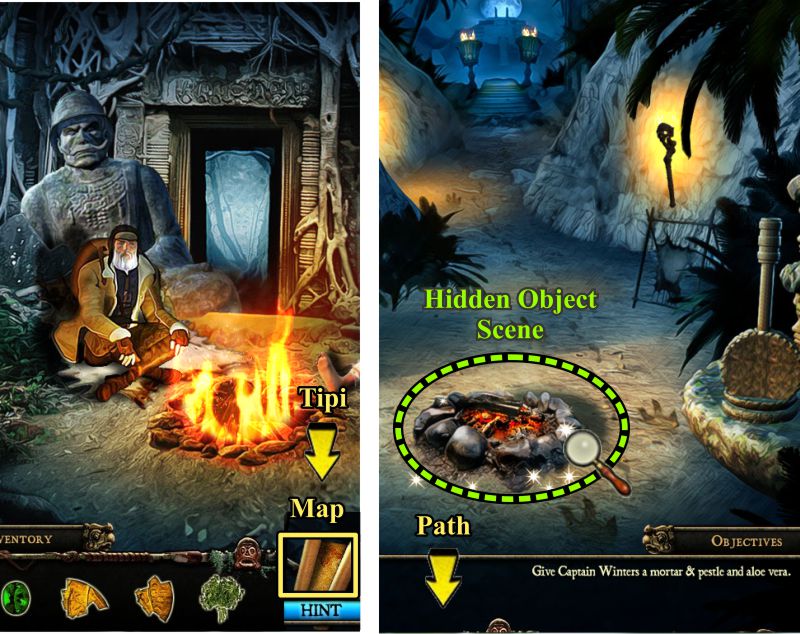
Base Camp and Tipi
Give the Herbs to Captain Winters who says he also needs some Aloe Vera and a mortar and pestle.
Go to the Tipi and click on the smoldering fire for a Hidden Object Scene.
Screenshot
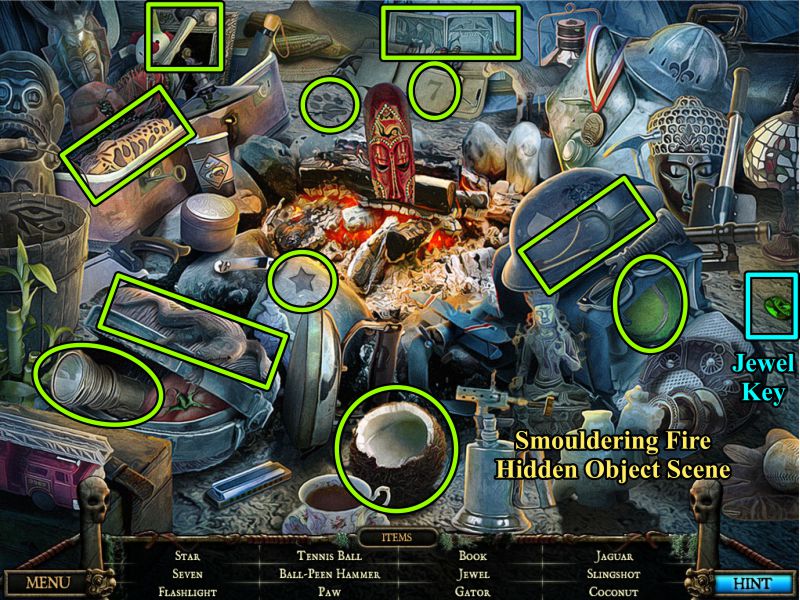
Smoldering Fire Hidden Object Scene
Collect everything to get a Jewel Key.
Head down to the Hillside Path.
Screenshot
Hillside Path Skull Door
You have all 6 Jewel Keys so zoom in on the entrance at the right.
Place your Keys and they will automatically go to the correct eye socket.
The door will open so enter.
Screenshot
Hillside Path Alcove
Examine the big stone head, and go forward to the Pteranodon Door to trigger a Hidden Object Scene in the broken wall.
Screenshot
Hillside Alcove Hidden Object Scene
Collect all 12 items to get a Gauge.
Go out to the Path.
Screenshot
Hillside Path Hidden Object Scene
Click on the shrine for a Hidden Object Scene to get the Mortar and Pestle.
Go see the Chief about some Aloe Vera.
Screenshot
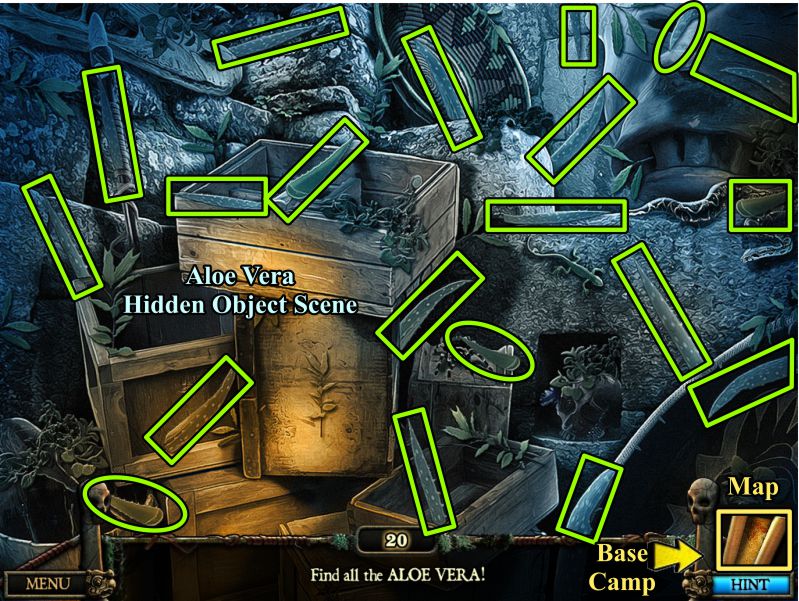
Aloe Vera Hidden Object Scene
Collect the 20 Aloe Vera marked in the screenshot.
Return to Base Camp.
Screenshot
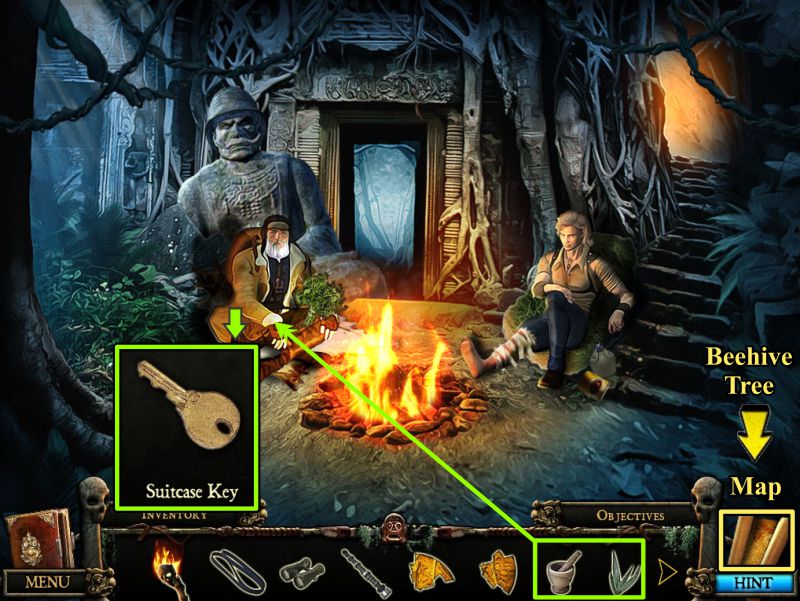
Base Camp
Give the Mortar and Pestle, plus the Aloe Vera to Captain Winters.
He will give you the key to his suitcase, and says his eyes have healed so goes with you.
Travel to the Beehive Tree.
Screenshot
Chapter 7: Exploration
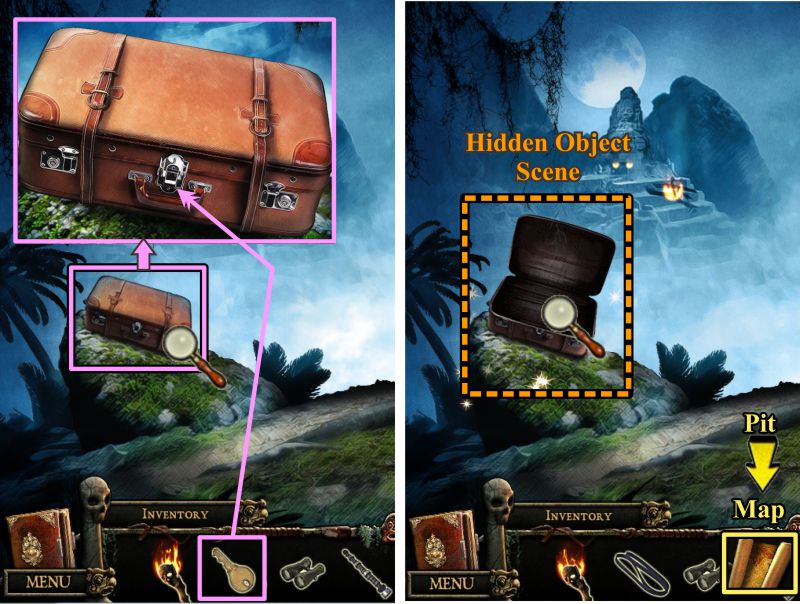
Beehive Tree Suitcase
Zoom in on the suitcase and open the lock to trigger a Hidden Object Scene.
Play the Hidden Object Scene, and then go to the Pit.
Screenshot
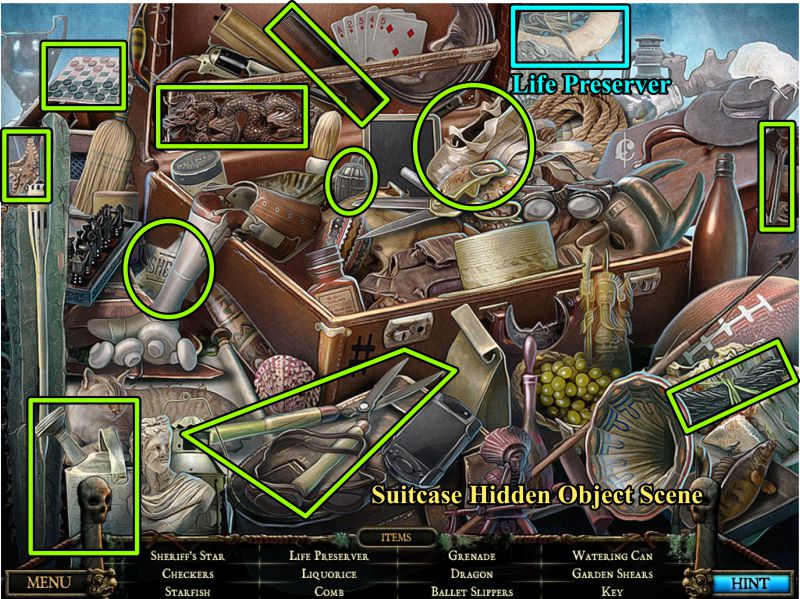
Suitcase Hidden Object Scene
You will get a Rope for your Inventory when you have collected all 12 objects.
Screenshot
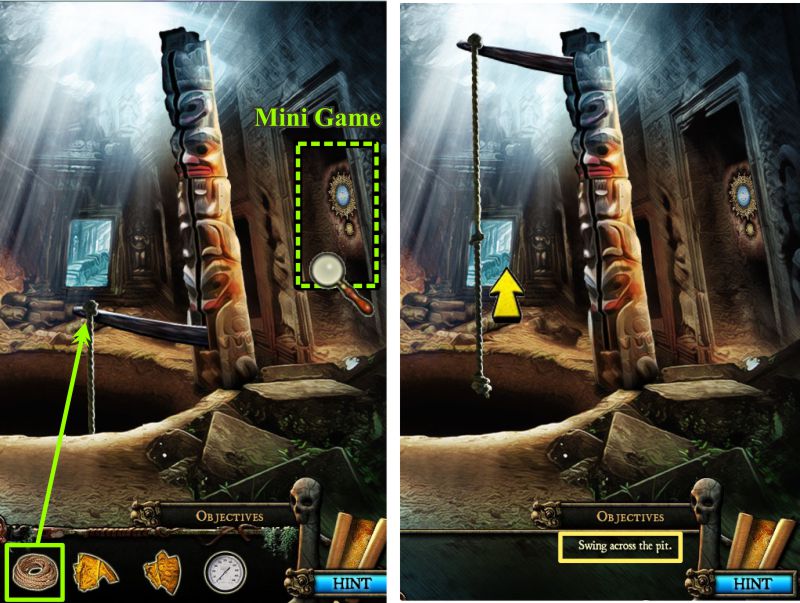
The Pit
Place the Rope on the totem arm, and go to the gears to play a Mini Game.
At the end of the game, the mechanism will move the arm to the top.
You can now use the rope to swing over the Pit and go through the far door.
Screenshot
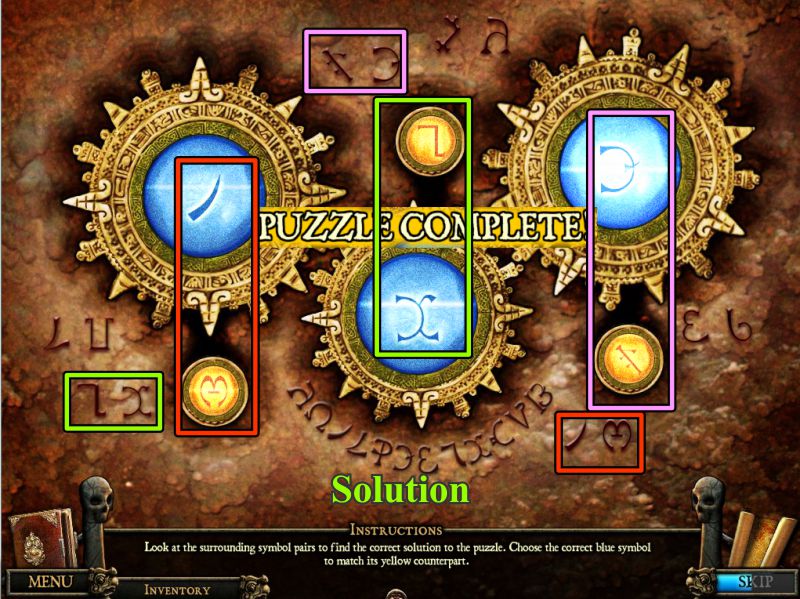
Gears Mini Game
Moves the symbols in the gears to match the appropriate symbols on the wall.
The color-coded solution is shown in the screenshot.
Screenshot
Chapter 8: The Stone Heads
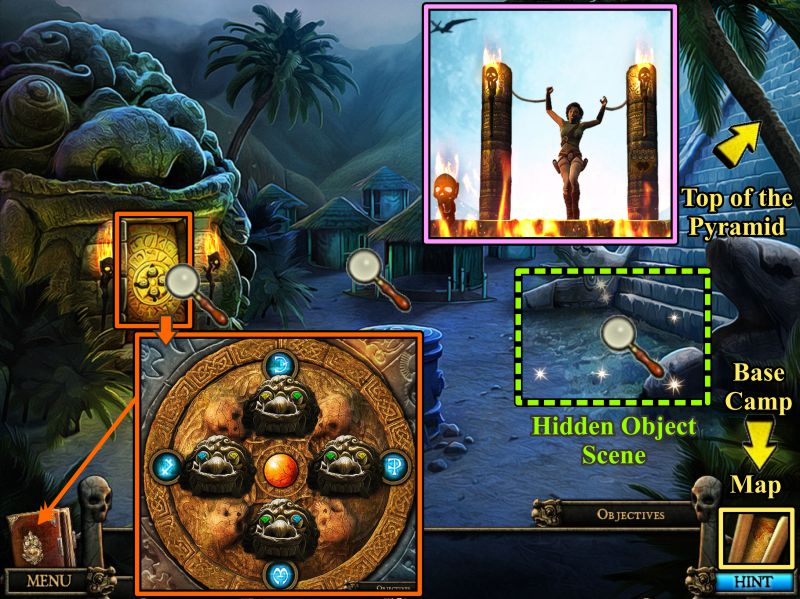
Base of the Pyramid
You have found the Big Stone Head, abandoned huts, are the base of the Pyramid where Professor is being held captive.
Click on the Big Stone Head to record the diamond eye configurations.
Play the Hidden Object Scene, and go to the Top of the Pyramid to see Professor Columbia.
Captain Winters stays with the Professor while you go back to Base Camp.
Screenshot
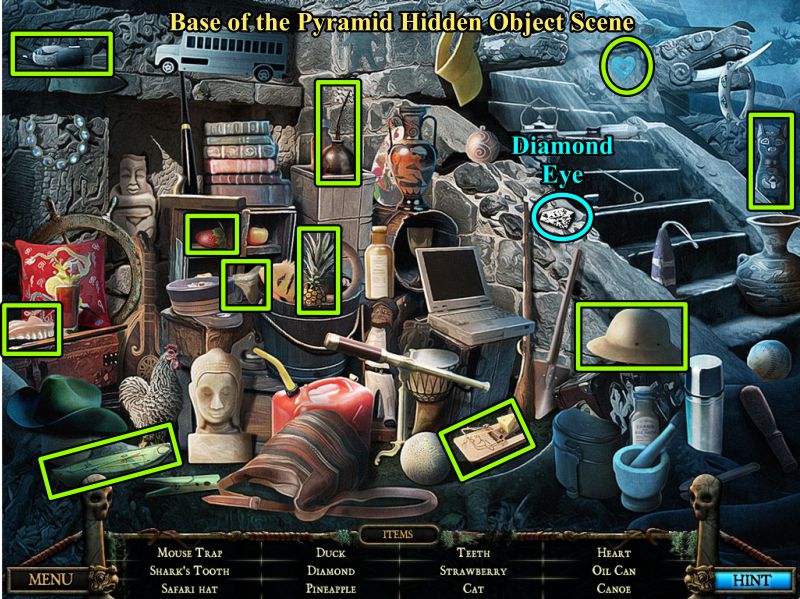
Base of the Pyramid Hidden Object Scene
Collect the objects to get a Diamond Eye.
Screenshot
Base Camp and Beehive Tree
Back at Base Camp, it seems that Lord Rockwood got himself sucked up in the quicksand.
Find something to free him at the Beehive Tree.
Click on the Suitcase for a Hidden Object Scene, and then return to Base Camp.
Screenshot
Suitcase Hidden Object Scene 2
Grab the Life Preserver and the other 11 objects.
Screenshot
Base Camp and Guardian Statue
Pull Lord Rockwood out of the mess and he will give you a Crowbar in found in the quicksand.
Go to the Guardian Statue and use the Crowbar to open the crate for a Hidden Object Scene.
Screenshot
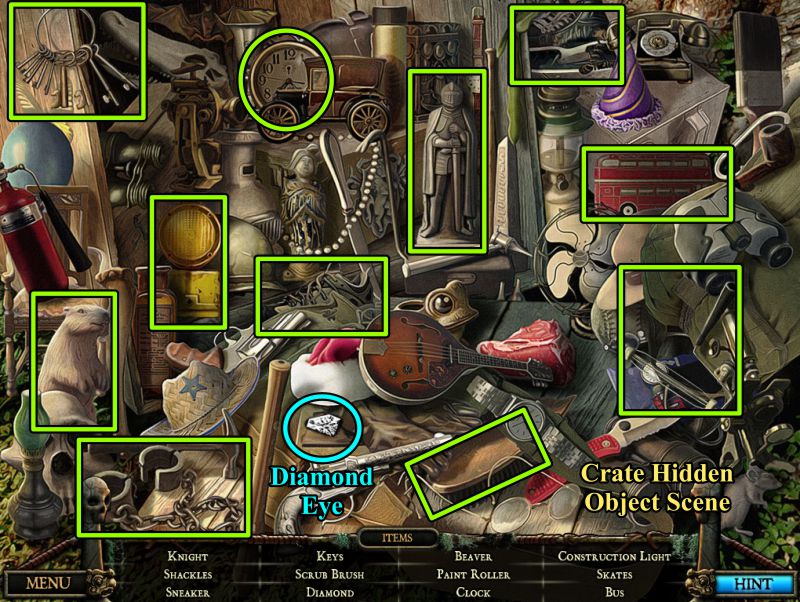
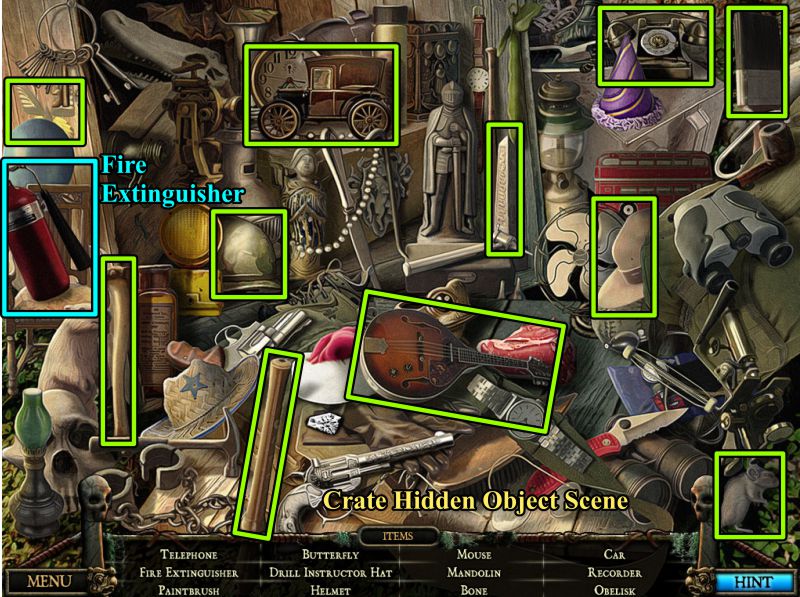
Crate Hidden Object Scene
When you are done, you will have a second Diamond Eye.
Go to the Landing Site.
Screenshot
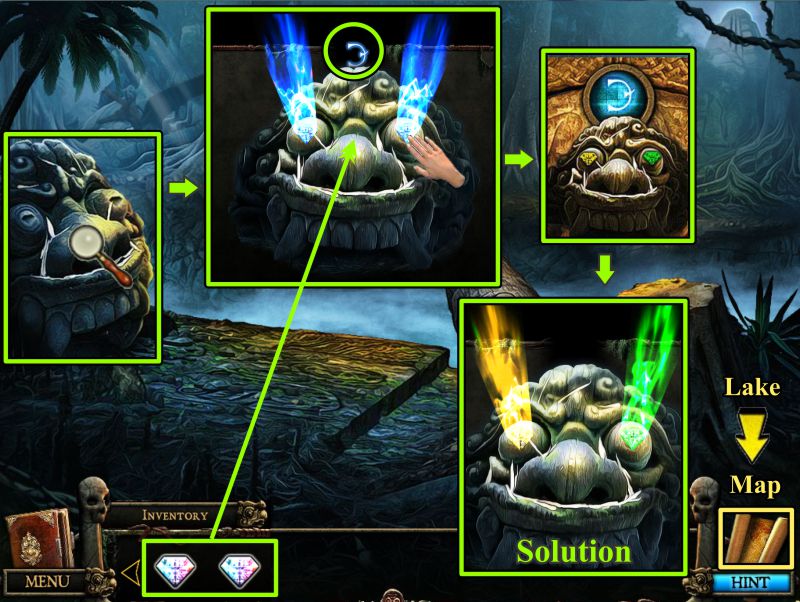
Landing Site Stone Head
Zoom in on the Stone Head and place the missing Diamond Eyes.
Change the eye color to yellow and green as shown in the screenshot.
Go to the Lake.
Screenshot
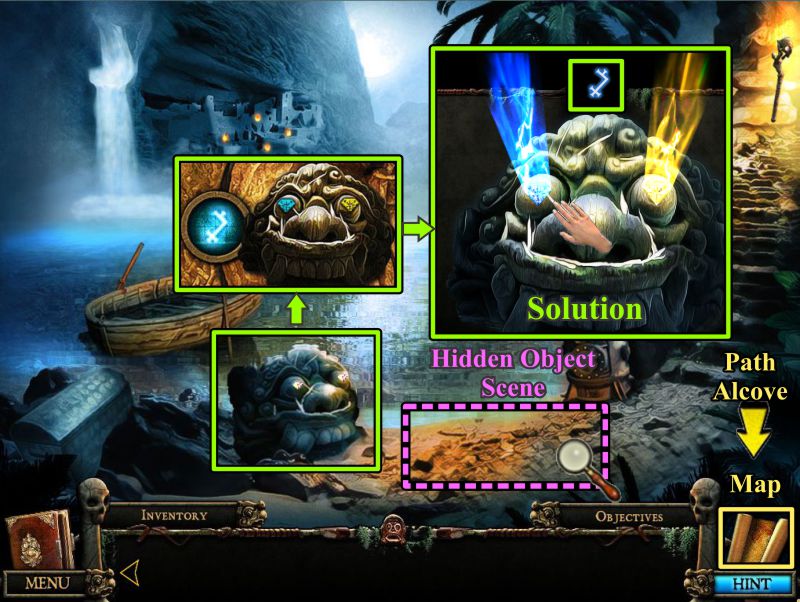
Lake Stone Head
Zoom in on that Stone Head and change the eye color to blue and yellow as shown in the screenshot.
Play the Hidden Object Scene, and then go to the Path Alcove.
Screenshot
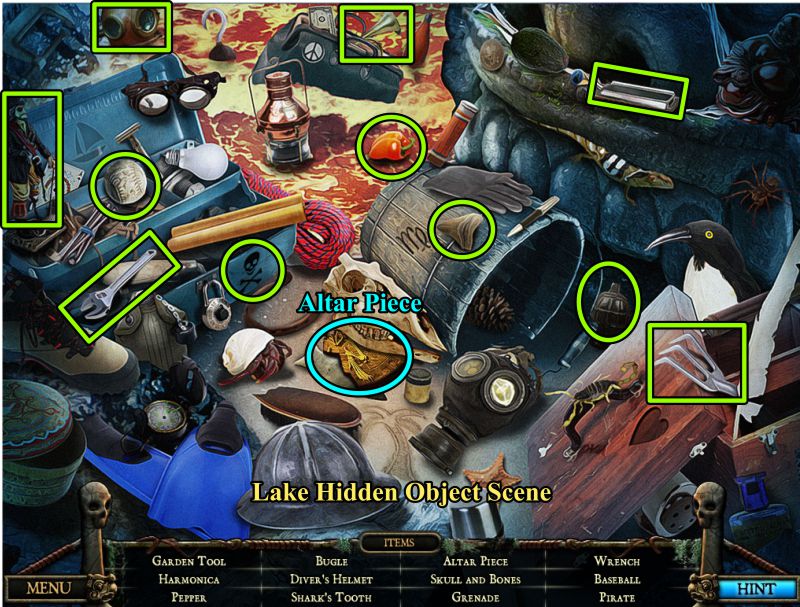
Lake Hidden Object Scene
Pick up the Altar Piece and the rest of the objects.
Screenshot
Alcove Stone Head
Zoom in on this Stone Head and make certain the eyes are green and blue as shown in the screenshot.
Go to the Pond.
Screenshot
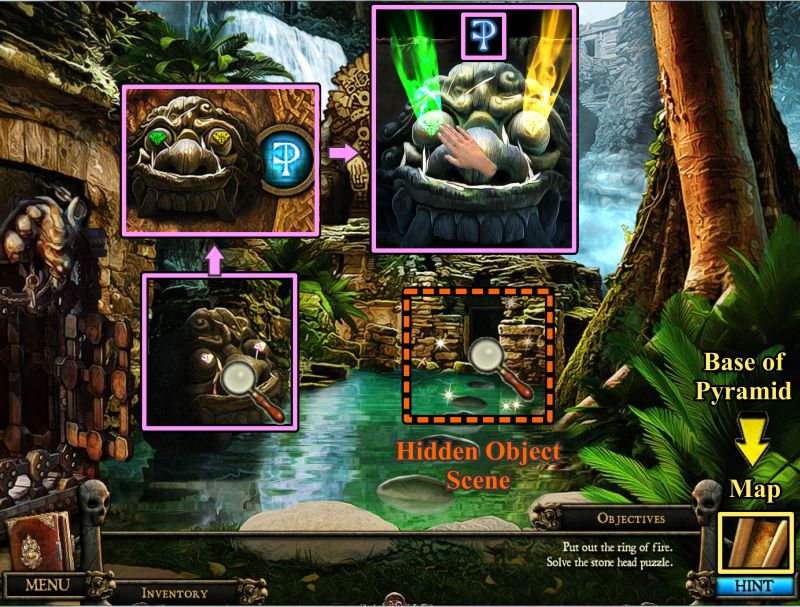
Pond Stone Head
Zoom in on the Stone Head and change the eyes to green and yellow as seen in the screenshot.
Play the Hidden Object Scene and go to the Base of the Pyramid.
Screenshot
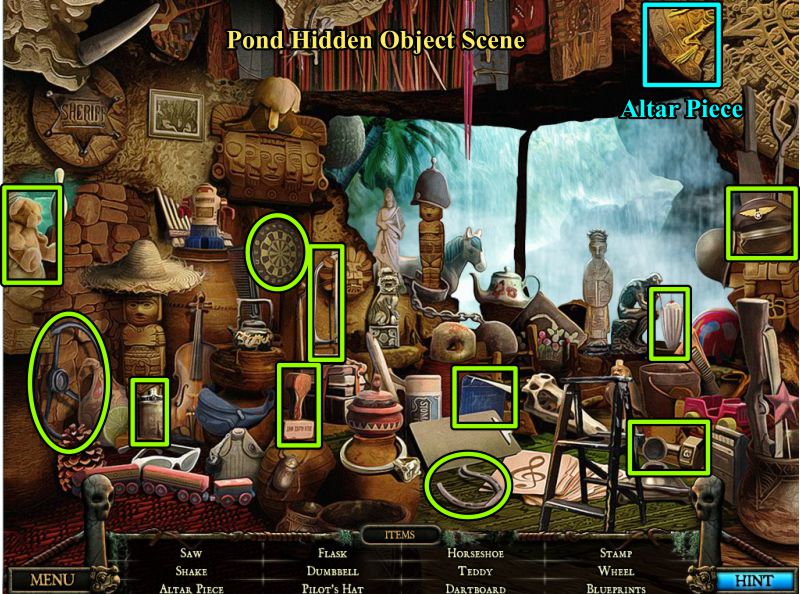
Pond Hidden Object Scene
You have collected another Altar Piece among these objects.
Screenshot
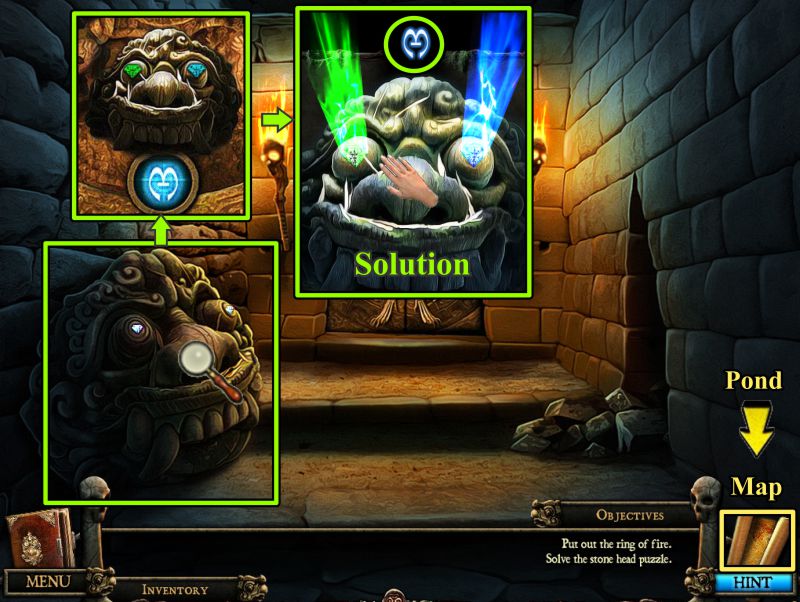
Base of Pyramid
Zoom in on the Big Stone Head and press the button in the center.
If you correctly set the heads, the door will open with a Mini Game to unlock Tunnel 4.
The solution is shown in the screenshot.
Screenshot
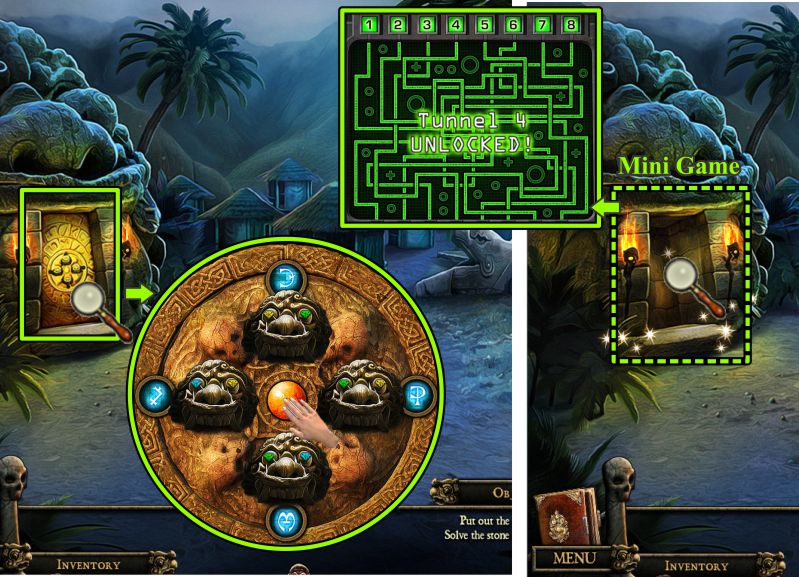
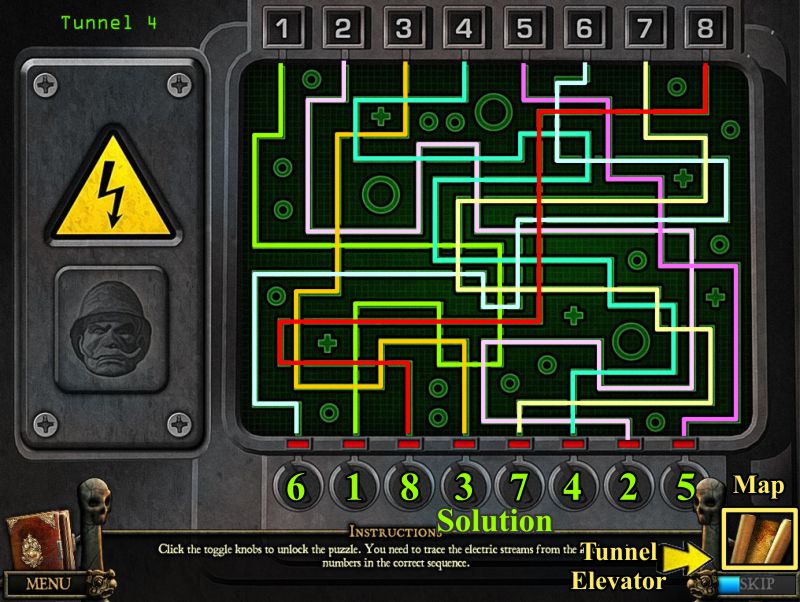
Tunnel 4 Mini Game
Check the screenshot for the numbered color-coded solution.
Go to the Tunnel Elevator.
Screenshot
Tunnel Elevator
Zoom in on the controls, select Tunnel 4 and press the screen to go there.
Exit the Elevator.
Screenshot
Chapter 9: Telescope and the Heavens
Telescope
You found a large telescope.
Look through it to discover the lens cap is on.
Check out the Machine, and zoom in on the hatch.
It appears we need to change symbols on 6 Machines to open the hatch.
Know the symbols for the first 3 Machines, but we need to find out how to set the 3 new Machines.
Go back in the Elevator and return to Tunnel 1.
Screenshot
Tunnel Elevator and Hillside Path
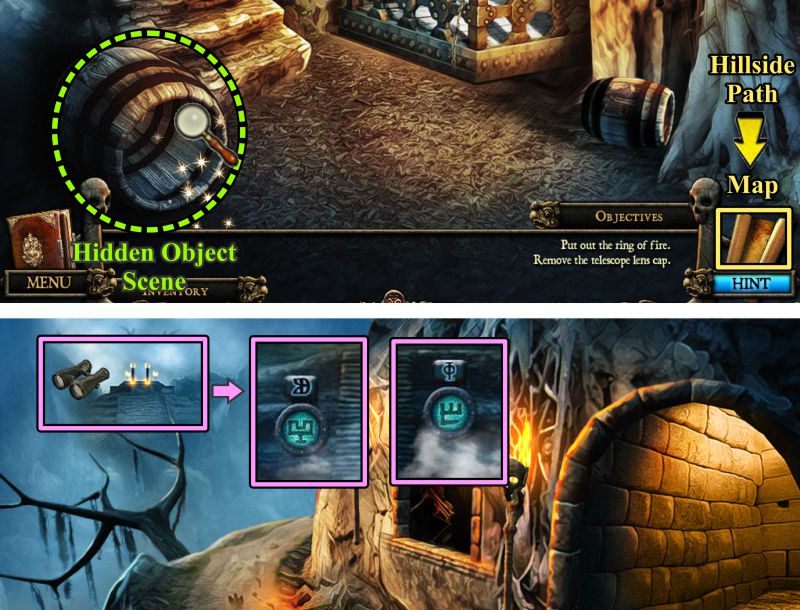
Play the Barrel Hidden Object Scene, and then go to the Hillside Path.
Zoom in on the distance and make note of the two symbols.
Return to the Tunnel Elevator.
Screenshot
Barrel Hidden Object Scene
Collect everything including the Altar Piece.
Screenshot
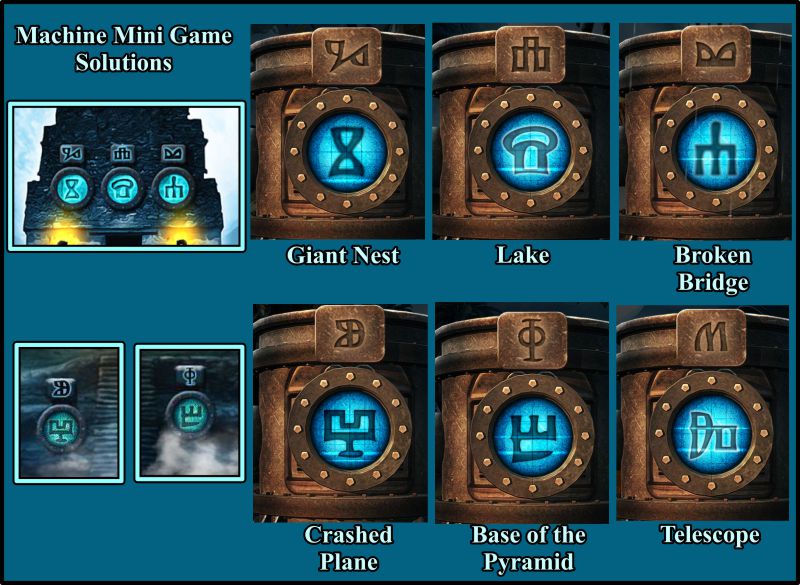
Machine Mini Game
The Location of the Machines, which are shown on the Map earlier in this walkthrough are as follows.
First 3 Machines: Giant Nest, Lake, and Broken Bridge.
The second 3 Machines are at: Crashed Plane, Base of the Pyramid, and Telescope.
The screenshot shows the solutions for each Machine.
We were not given a clue about the Machine at the Telescope, but there are a total of 6 symbols on the Machines.
All of the other symbols have been used, so the Machine at the Telescope needs to be the one remaining symbol.
You can visit each location in any order you wish, but I suggest ending up at the Telescope.
Screenshot
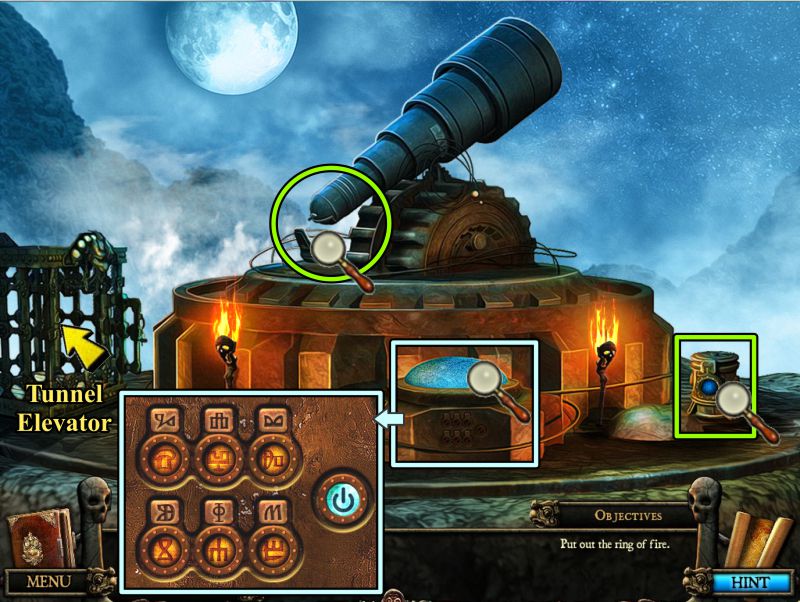
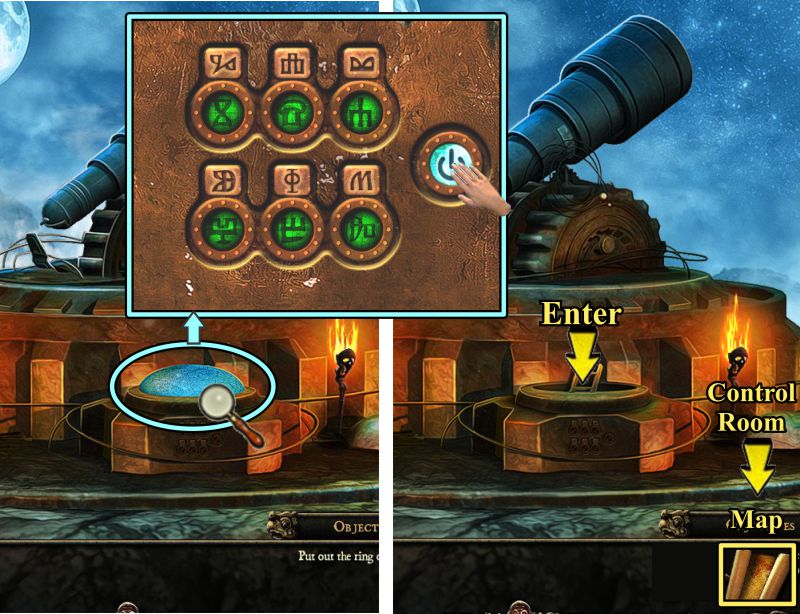
Telescope
Now that all the Machines have been set, zoom in on the hatch and press the blue button to test them.
Go down the hatch when it opens.
Screenshot
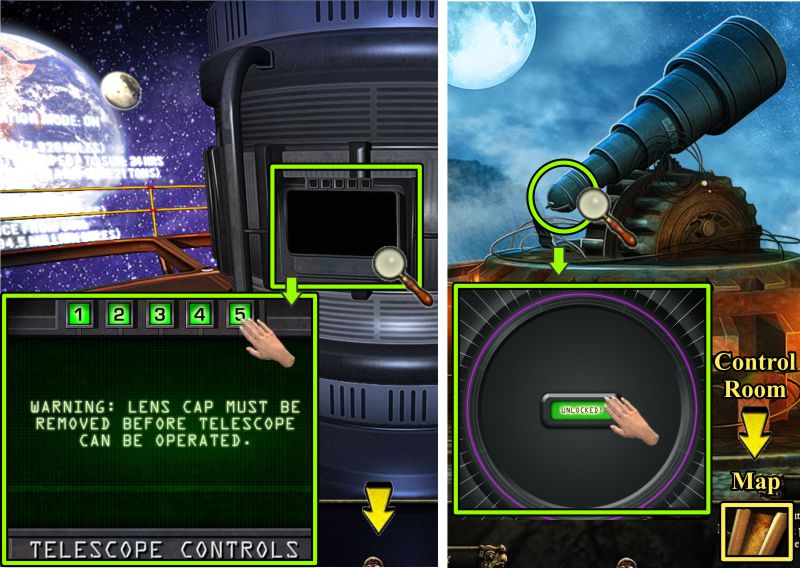
Zoom in on the Telescope Controls and press each of the 5 buttons.
Go back up to the Telescope and look through it.
Press on "unlocked" to find out it needs to be focused.
Go to Jacques' Control Room.
Screenshot
Jacques' Control Room
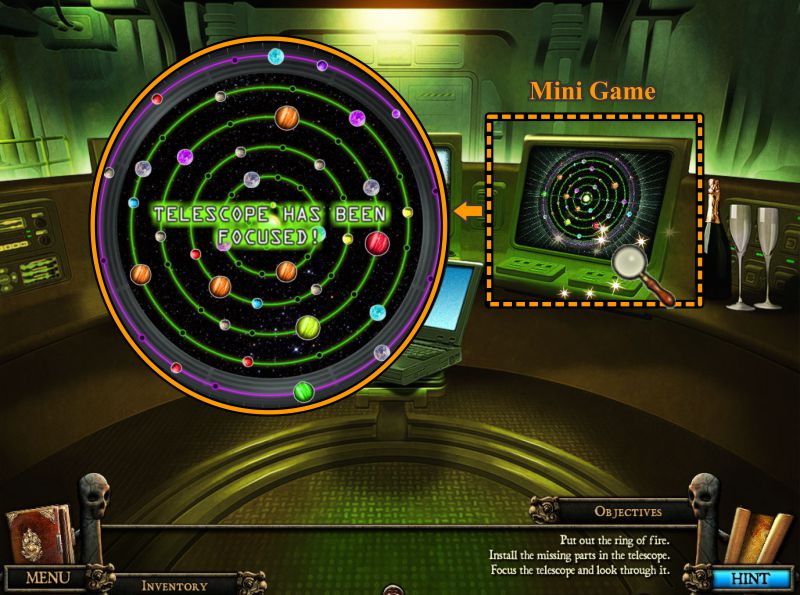
Zoom in on the right computer for a Mini Game to focus the telescope which is currently set to be viewed by Jacques' monocle.
The focused telescope is shown in the screenshot, but how to focus it will now be shown.
Screenshot
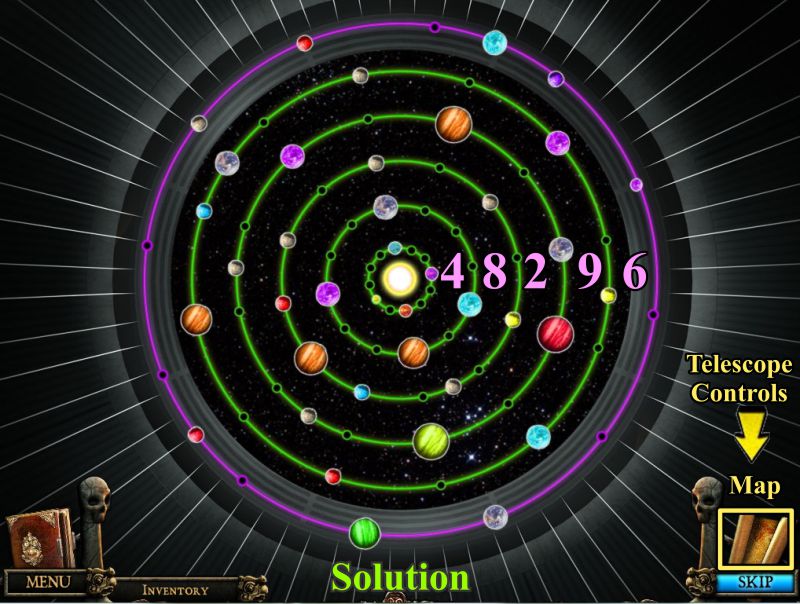
Focus the Telescope Mini Game
Each ring of planets needs to be brought into focus with the exception of the outer purple ring.
The screenshot shows the focused rings and how many turns it takes to get them that way.
Return to the Telescope Controls.
Screenshot
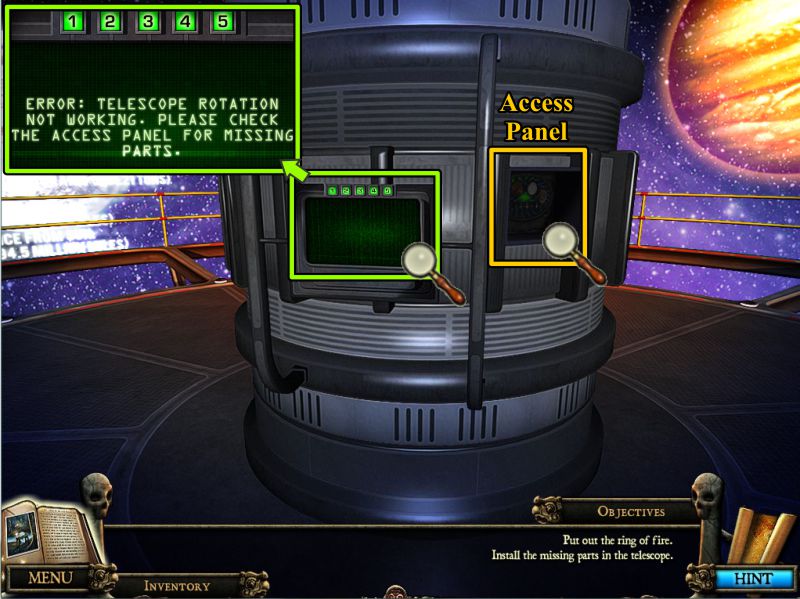
Telescope Control Room
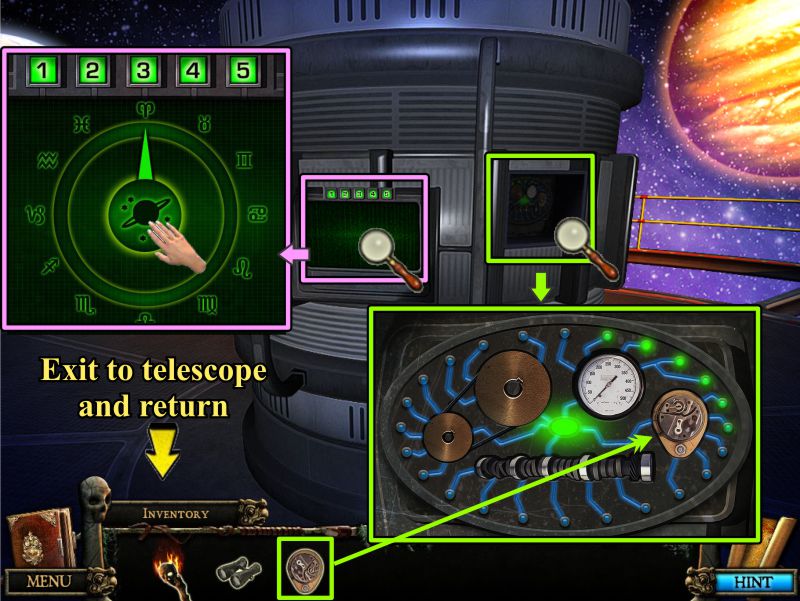
Zoom in on the controls only to find out the Access Panel is missing parts.
Zoom in on the Access Panel next to it.
Screenshot
Telescope Access Panel
We have 3 of the needed parts in our Inventory, so why not place them.
See the screenshot for how it should look.
Go to the Guardian Statue to begin our search.
Screenshot
Chapter 10: Professor Columbia
Guardian Statue and Top of Pyramid
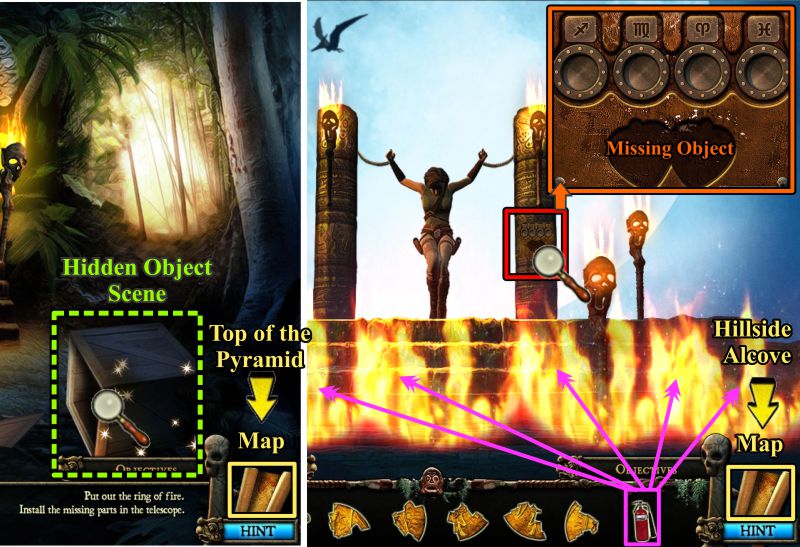
The crate has another Hidden Object Scene for us to search for a Fire Extinguisher.
When you have finished it, go to the Top of the Pyramid and put out the fire ring.
You still need to free Professor Columbia, so she says to check the mechanism on the post.
It looks like another set of symbols with an important missing part.
Go to the Hillside Alcove.
Screenshot
Crate Hidden Object Scene
Grab the Fire Extinguisher and the other items.
Screenshot
Alcove Hidden Object Scene
Zoom in on the broken wall for the Hidden Object Scene to find the last Altar Piece.
Go to the Village Entrance and zoom in on the Pteranodon Altar.
Screenshot
Pteranodon Altar
Place the 6 Altar Pieces and they will automatically go to their proper place.
There is a center egged shape piece missing.
Go to the Crashed Plane.
Screenshot
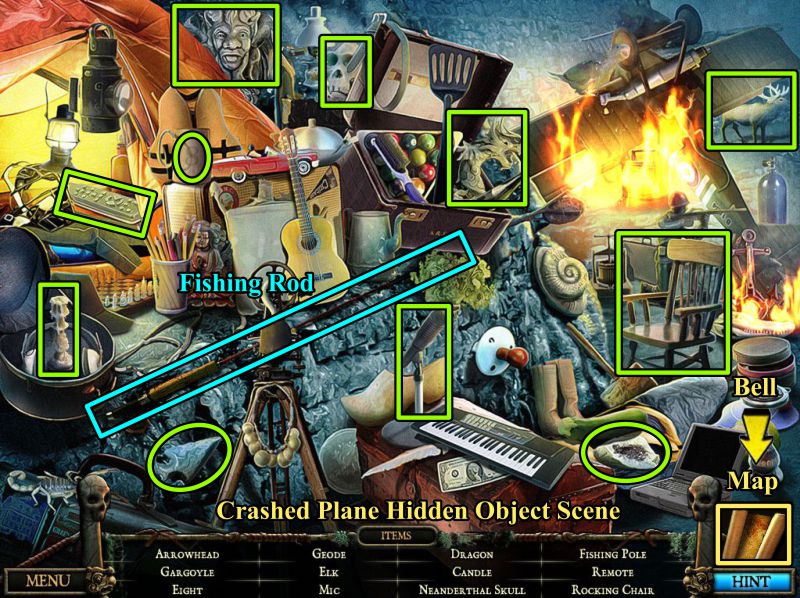
Crashed Plane Hidden Object Scene
Zoom in on the plane for a Hidden Object Scene to find a Fishing Rod about the 12 items.
Go to the River by the Bell.
Screenshot
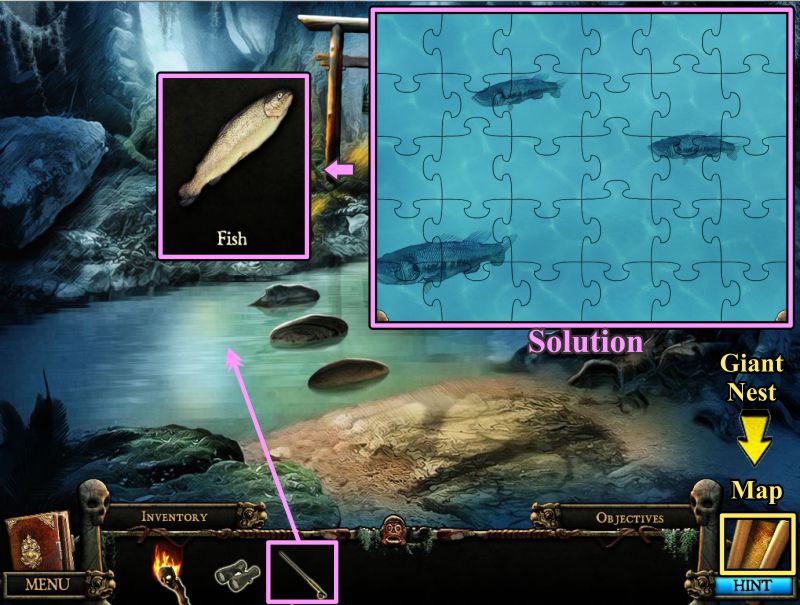
Fishing Puzzle
Place the Fishing Rod anywhere on the water to trigger a puzzle.
Put the jigsaw puzzle together according to the shapes in the screenshot solution.
Your fish may not be in the same exact places because the fish swim around while you are completing the puzzle.
In the end, you will get a Fish for your Inventory, so go to the Giant Nest.
Screenshot
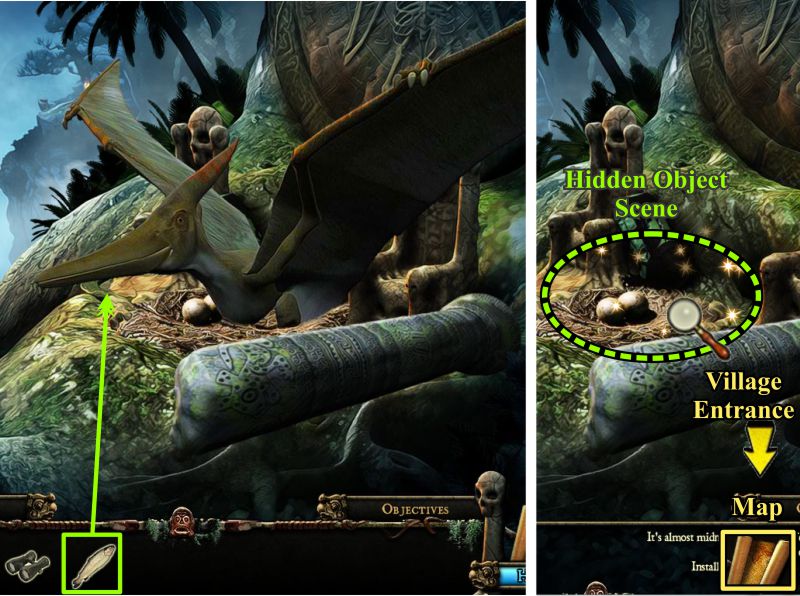
Giant Nest
Give the fish to the Pteranodon and she will abandon her nest to go eat it.
Play the Hidden Object Scene at the nest, and then go to the Village Entrance.
Screenshot
Giant Nest Hidden Object Scene
You have found a Golden Egg in the items, and it will go into you Inventory when everything is collected.
Screenshot
Pteranodon Altar
Zoom in on the Altar and place the Golden Egg.
A door elsewhere will open, so go to the Hillside Alcove.
Screenshot
Alcove Door
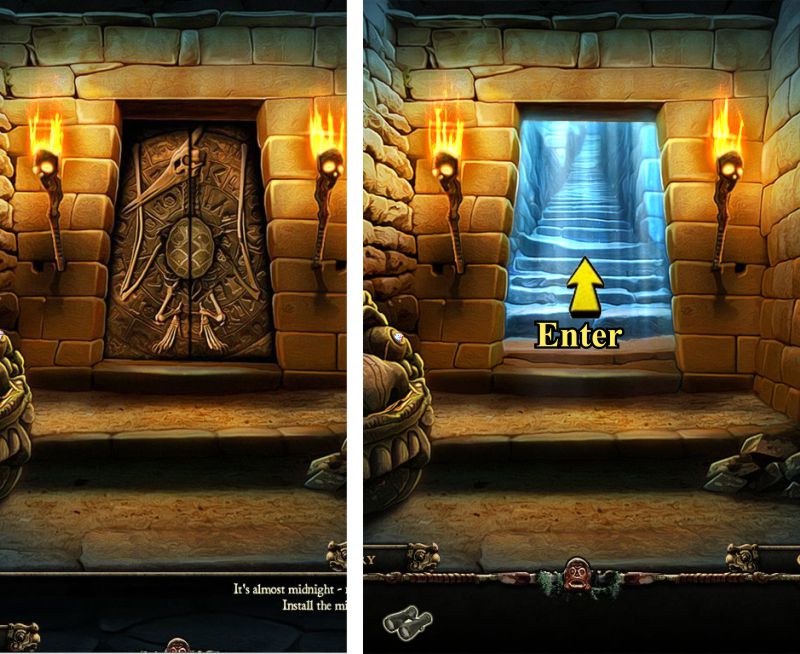
The Pteranodon door in the Alcove will open, so go up the stairs.
Screenshot
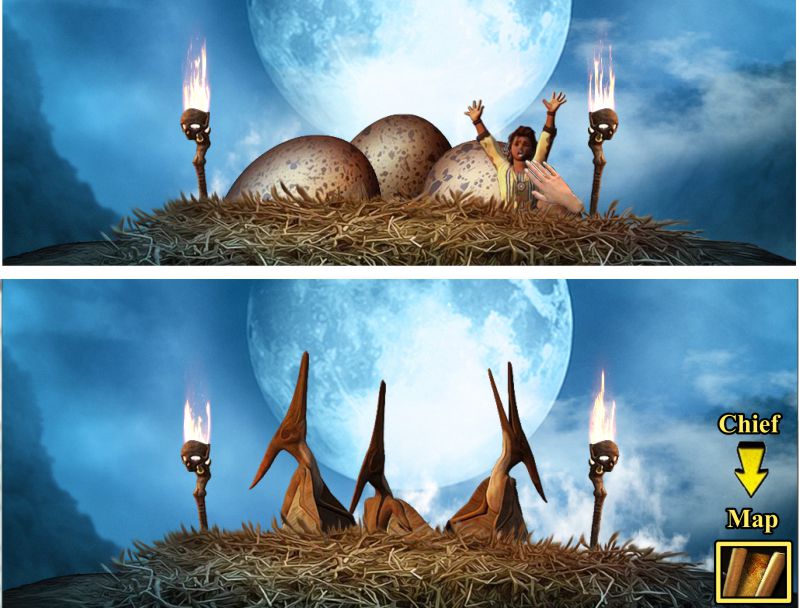
Hatchlings
The Chief's other granddaughter is trapped in a nest with 3 Pteranodon eggs.
Grab her quickly before the eggs turn into hungry, sharp-toothed hatchlings.
Take her to the Chief.
Screenshot
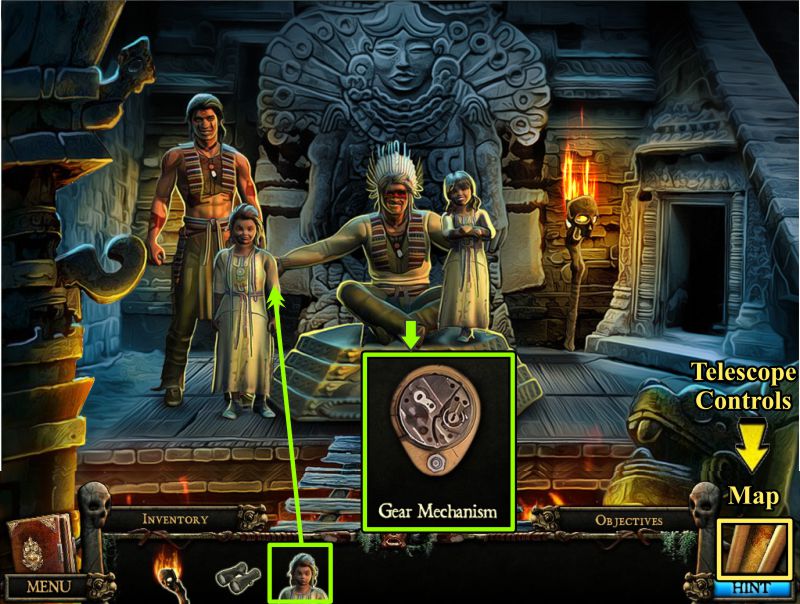
Chief
The Chief is thrilled to have his family back together so gives you a Gear Mechanism in hopes it will help to stop Jacques.
Go to the Telescope Control Room to place it in the Access Panel.
Screenshot
Chapter 11: Just Rewards
Telescope Control Room
Zoom in on the Access Panel and place the Gear Mechanism.
You can now begin the Constellation Mini Game that will run you back and forth between the Telescope Controls and the Telescope.
The Controls have a circle with 12 planetary constellations.
You will be turning the dial to each constellation, and then going to the Telescope to view it.
Once you view it, it will be recorded in your Journal.
Screenshot
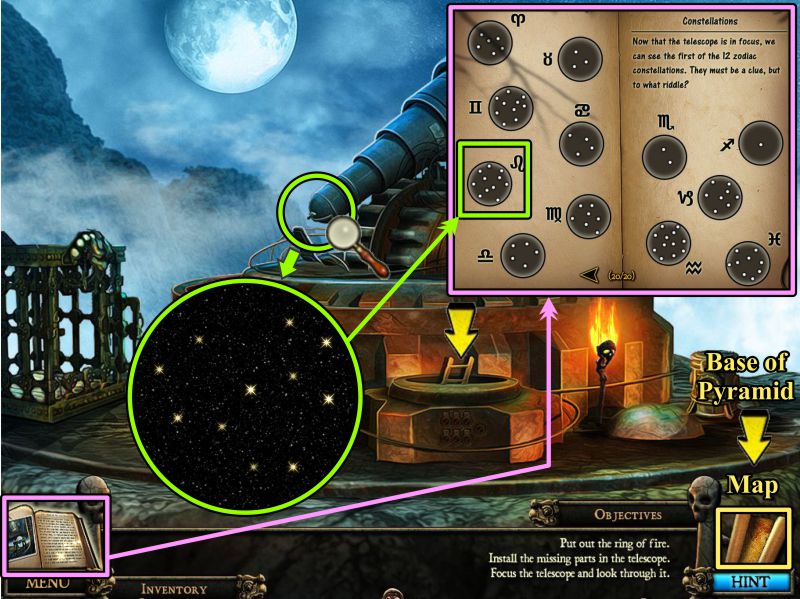
Constellations
The screenshot shows the Constellations page in your Journal and a sample of what you will see through the Telescope.
Once you have viewed the Constellation, return to the Controls and turn the dial to the next symbol until all the Constellations have been recorded in the Journal.
It's a lot of running around but there are no shortcuts.
If you accidentally miss a Constellation, go to the Controls, choose it again and go view it.
Once why have all the Constellations recorded, go to the Base of the Pyramid.
Screenshot
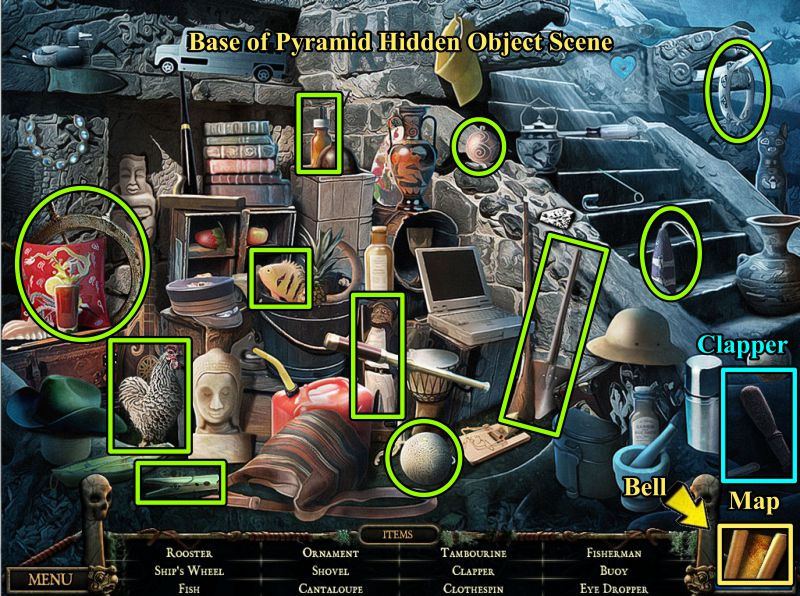
Base of Pyramid Hidden Object Scene
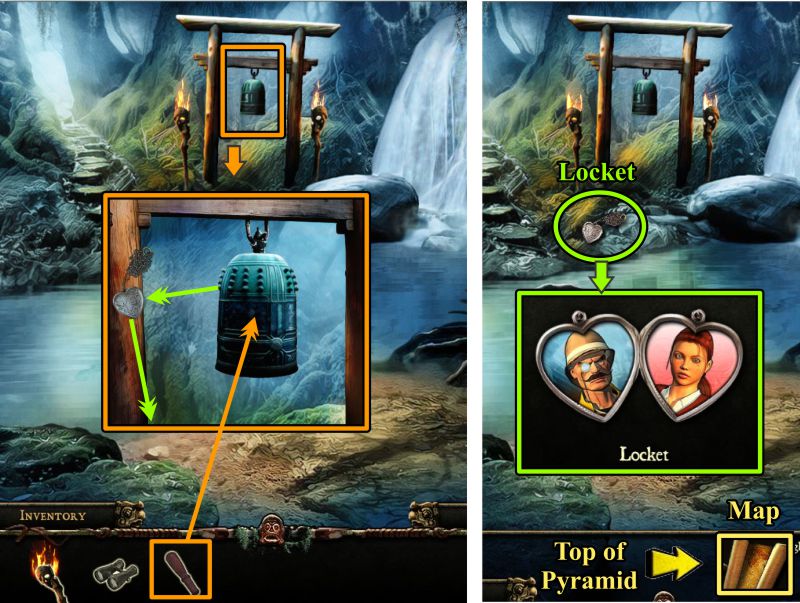
Play the Hidden Object Scene to get the Bell Clapper, and go to the Bell.
Screenshot
Bell
Zoom in on the Bell, place the Clapper on it and a Locket will fly out of it, hit the post and fall to the ground.
Exit the bell and pick up the Locket which apparently belongs to Jacques, and it is the correct shape for the Mini Game at the Top of the Pyramid, so go there.
Screenshot
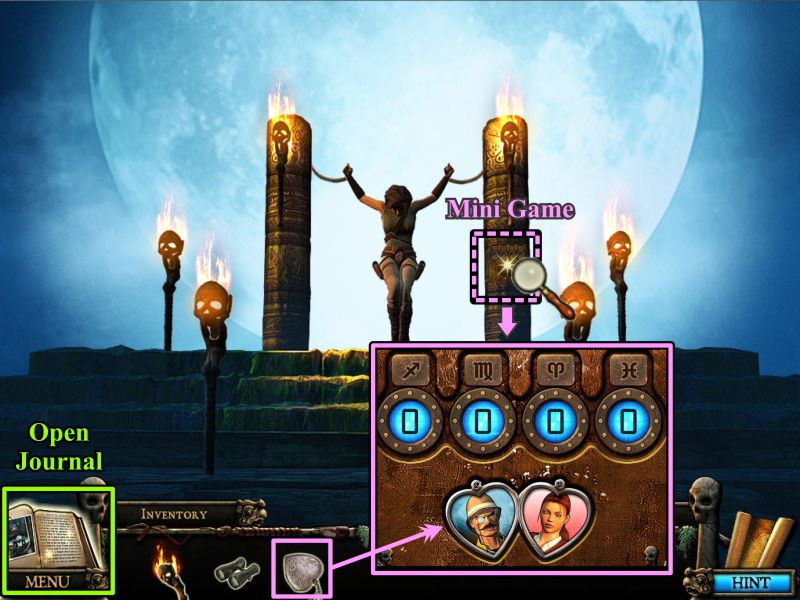
Top of the Pyramid
Zoom in on the column and place the Locket to trigger the Mini Game to free Professor Columbia.
The game requires a code so go to the Constellations page in your Journal.
Screenshot
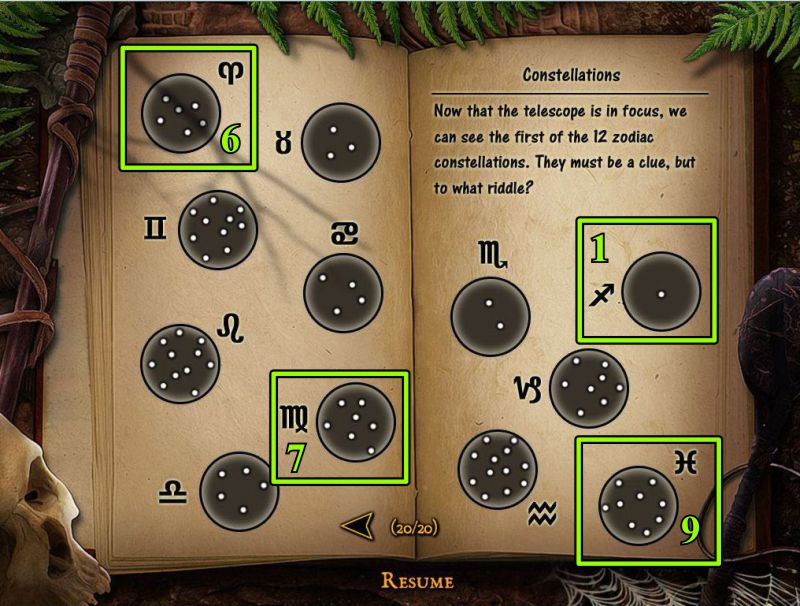
Constellation Page in Journal
Look at the symbols for the Mini Game, and then count the stars in the Constellations.
See the screenshot for the necessary Constellations and the number of stars.
Screenshot
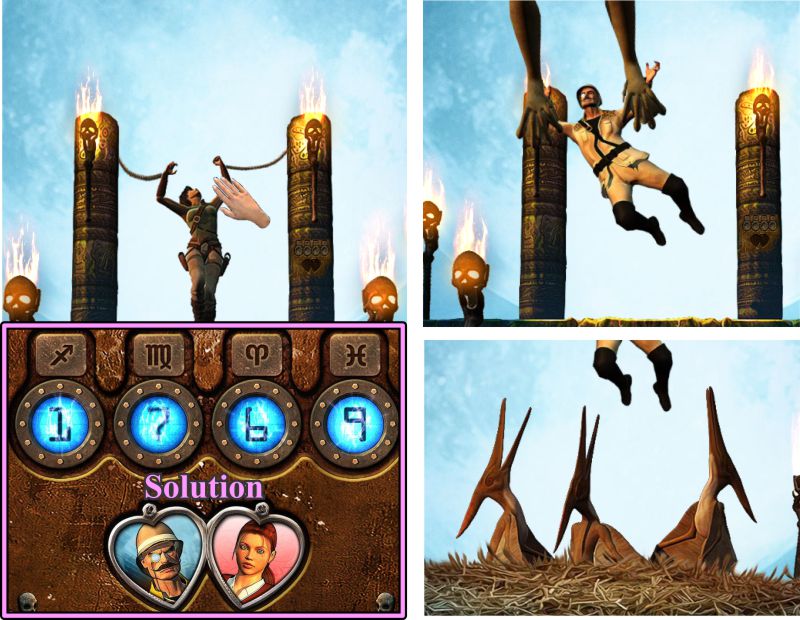
Locket Mini Game
Enter the numbers 1769 above the locket, and grab Professor Columbia.
As fate would have it, Jacques shows up and is grabbed by the Pteranodon.
He is now on his way to get a taste of his own medicine as dinner for the hatchlings.
Screenshot
Congratulations! You have completed your adventure in The Lost World.
Everybody is safe and ready for their next adventure.
Posted by: Jazz |
July 11, 2011 7:56 PM
|
July 11, 2011 7:56 PM