


The Serpent of Isis:
Your Journey Continues
Platform: Mac, Windows

![]() Oh, that Isis. She's quite a charmer, even with the whole "annually flooding the Nile river because my husband died boo hoo" thing. She's also apparently very fond of having her artifacts scattered throughout picturesque European cities. In 2009, the first Serpent of Isis game had hidden object fans jetsetting Prague and London in a quest to recover the titular thingummy and fulfill the dream of the hero Robert's dead grandfather. It was an excellent game that soon had people clamoring for a sequel, and now your journey can finally continue in, well, The Serpent of Isis: Your Journey Continues. Gamgo Games have made the new game in much the same mold as the first, with the hidden object scenes being the main attraction and the adventure and puzzle elements only there for a little variety. Enjoy beautiful scenes set in Paris, Venice and more as you search for the Tomb of Isis. Next game: the Vacation Home of Isis?
Oh, that Isis. She's quite a charmer, even with the whole "annually flooding the Nile river because my husband died boo hoo" thing. She's also apparently very fond of having her artifacts scattered throughout picturesque European cities. In 2009, the first Serpent of Isis game had hidden object fans jetsetting Prague and London in a quest to recover the titular thingummy and fulfill the dream of the hero Robert's dead grandfather. It was an excellent game that soon had people clamoring for a sequel, and now your journey can finally continue in, well, The Serpent of Isis: Your Journey Continues. Gamgo Games have made the new game in much the same mold as the first, with the hidden object scenes being the main attraction and the adventure and puzzle elements only there for a little variety. Enjoy beautiful scenes set in Paris, Venice and more as you search for the Tomb of Isis. Next game: the Vacation Home of Isis?
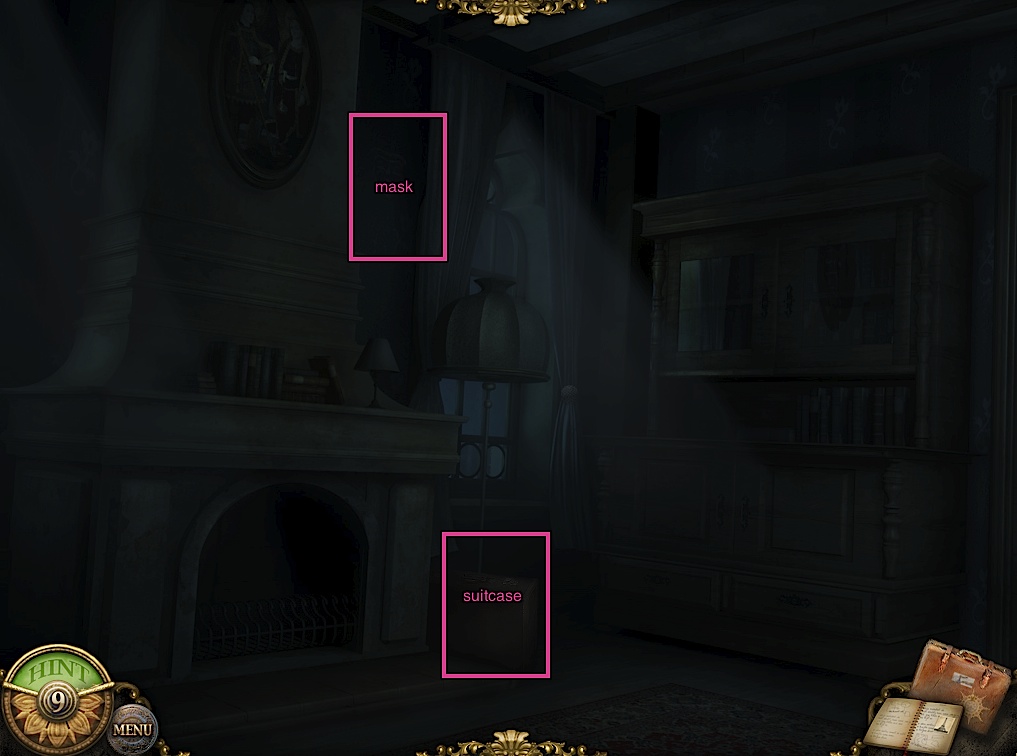
 The Serpent of Isis 2 is welcoming to both hidden object pros and newbies, featuring casual mode where sparkles guide the eye to clickable spots and no timer breathes down your neck. It also features an excellent tutorial, which is skippable for those of you who know the hidden object drill already. The game does have a somewhat uncommon set-up for its inventory, however. It can be accessed by clicking on the suitcase in the lower right, or by clicking on the bar at the top. Some objects, generally clues, can be zoomed in on by clicking on the magnifying class on them inside the inventory. Objects are never combined within the inventory, only in the game world.
The hidden object finding is pretty straightforward for the genre: you're given a scene and a list of objects, and you must find all of them. Sometimes some of the objects are listed in blue rather than black. If that's the case, you must manipulate something within the scene, perhaps using an inventory item to do so, in order to uncover the item. You're rewarded with at least one inventory item for every successfully completed hidden object scene, and most frequently these are used in what gamers usually call "inventory puzzles", figuring out what object is needed to coax a cat out of a tree or whatever. The game also contains more straight-up puzzles in order to open locks, piece together torn papers, and manipulate mysterious devices. The puzzles are a nice blend of old standbys like the photograph jigsaw and more challenging ones that require careful consideration of the clues.
Analysis: Hidden object games are a pretty hokey genre. The Serpent of Isis 2 lives and breathes all kinds of hokeyness: melodrama, multiple exclamation points, obsessive collection of useless objects after the useful object has been found. Love it or hate it, that's the game! Personally, I have to love it. It doesn't do anything by halves. Every character has that "my IQ has suddenly plummeted in reaction to this shocking news!" face as an option, and it's pulled out of the avatar repertoire whenever anything even a tiny bit exciting has happened. By the end of the game, I'm pretty sure Robert's face has frozen that way. It's too bad his grandfather didn't leave a note warning him about that. The game is so hilariously sincere that it makes me want to cuddle it and give it a mug of warm milk and a cookie.
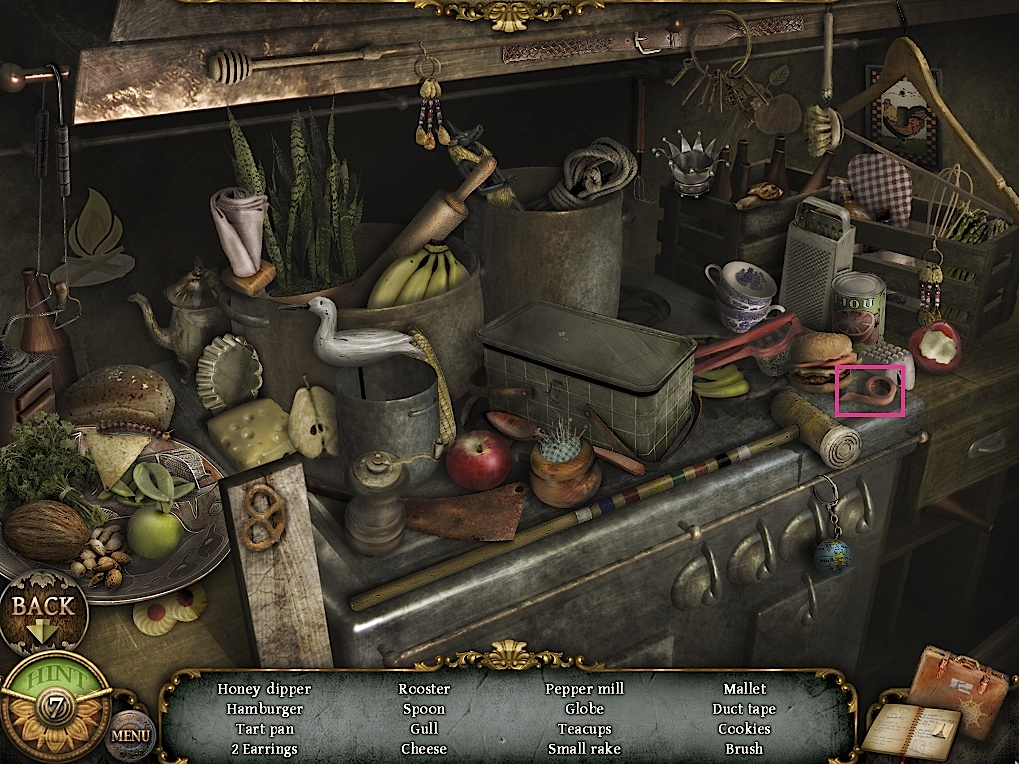
 Luckily, the game is as serious about doing the hidden object gameplay well as it is in living up to the somewhat dubious reputation of hidden object plots. Only two or three times in the entire game did I run into the issue of unclear or ambiguous object names (for example, one scene called for a "mallet" and contained both a croquet mallet and a meat tenderizer; the game only accepted the latter). Objects and scenes are clearly drawn and well lit enough to be fair and eliminate the eyestrain problem that plagues many contemporary hidden object games, but still provide a challenge to even the veteran player. The puzzle and adventure game parts are quite limited, so be aware of that going in; the game assumes you're here for the hidden object scenes and that's how you'll spend the majority of your time. However, they are also very well done. It should be noted that while the hints are given generously, they are almost useless outside of the hidden object scenes. Several times, when I was stuck about where to go next or stymied by a puzzle, I tried a hint, only to be told to do something I'd already done, or something keyboard-face-smashingly-obvious and vague, like "I should look for a clue!"
As the most recent Babylon Sticks comic adeptly demonstrated, there is a supervillain stalking our game shelves, and his name is The Incredible Shrinking Gametime. The problem isn't quite as frustrating when you're paying Big Fish Games' reasonable rates instead of $60 for a console game, but a lot of players are fed up with games where by the time you've finished the demo, the game is more than half-over. Serpent of Isis 2 took me four hours to beat, and I would say that if you're the "run to the walkthrough or ask for help at the first sign of trouble" style gamer, it would still take you at least 3 hours, because no walkthrough in the world can rush you through the game's hidden object scenes; you actually have to depend on your own item finding skills there. This truly makes the game a solid "buy" recommendation for hidden object fans.
![]() Windows:
Windows:
Download the demo
Get the full version
![]() Mac OS X:
Mac OS X:
Download the demo
Get the full version


Walkthrough Guide
(Please allow page to fully load for spoiler tags to be functional.)
Serpent of Isis: Your Journey Continues Walkthrough
Tips and Tricks:
Clicking too many times without picking up a hidden object in hidden object scenes causes a loss of control of the cursor; however, the game is comparatively lax about what it considers random clicking. Pausing for a while is enough to clear the random click "bank", so to speak. This makes random clicking something of a better strategy in this game than most, particularly because objects are often large and easy to hit.
Use the map in the lower right corner to quickly travel between rooms you've already visited, and to get clues for locations of unvisited rooms.
You can either click on the top of the screen or on the suitcase to open the inventory. However, it's not that easy to hit the top of the screen inventory button; especially if you're trying to use an object on a zoomed in area, it's easy for the game to think you're trying to click out, which can be frustarting. The suitcase is a much more straightforward way to open the inventory.
Skipping puzzles takes hardly any waiting time at all. It adds twenty minutes to your final game time, but if you don't care about your score, that doesn't matter.
By collecting all the special items in a chapter, you get a two hint bonus. If you use up all your hints, the hint meter will slowly recharge back up to 1 hint. If you have one or more hints, the hint meter will not give you any more.
Items listed in blue can only be found by moving something within the scene. This walkthrough will explain how to open or move whatever is necessary to reveal the blue items.
In this walkthrough, areas referred to in the text are marked with bright pink. Random objects that change every time you play are not marked to avoid distraction.
Prologue:
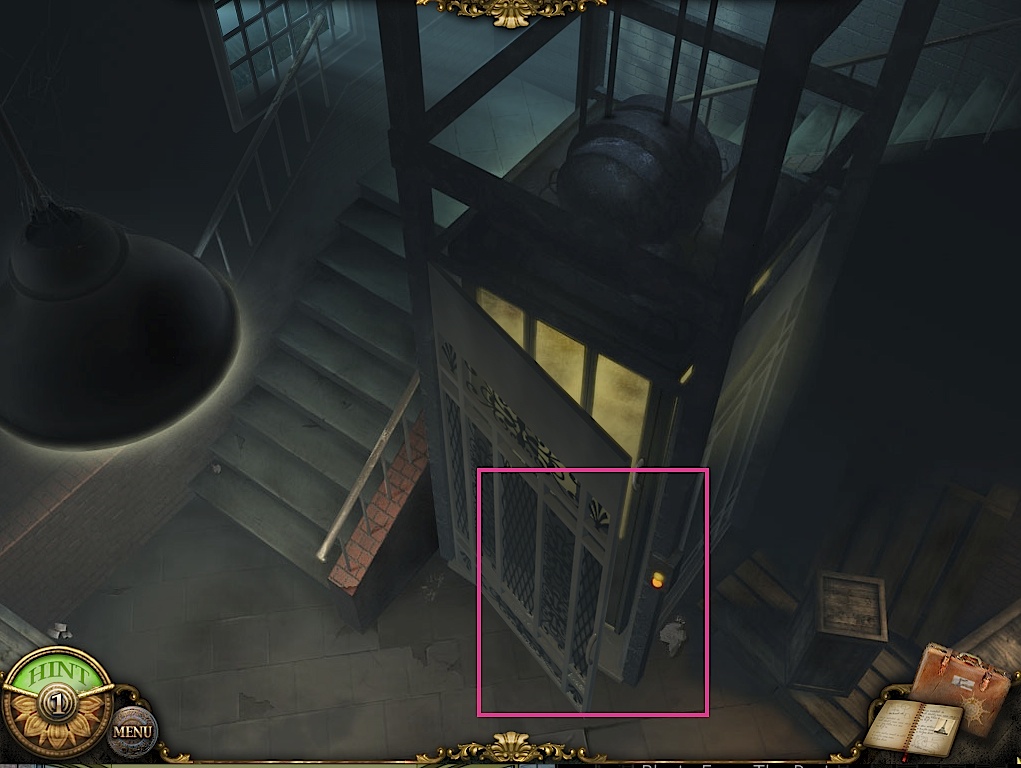
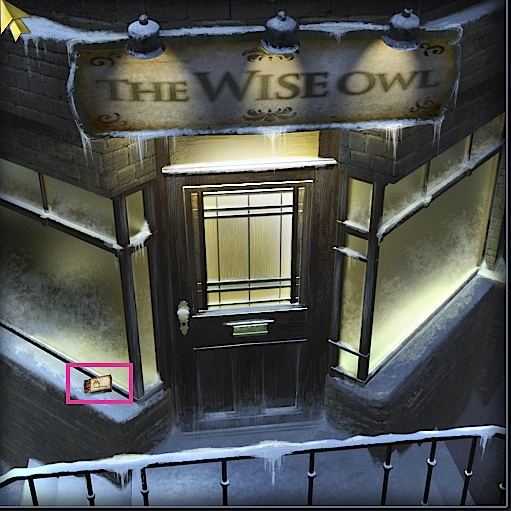
Click on the elevator door and take the glasses on the floor. Screenshot.
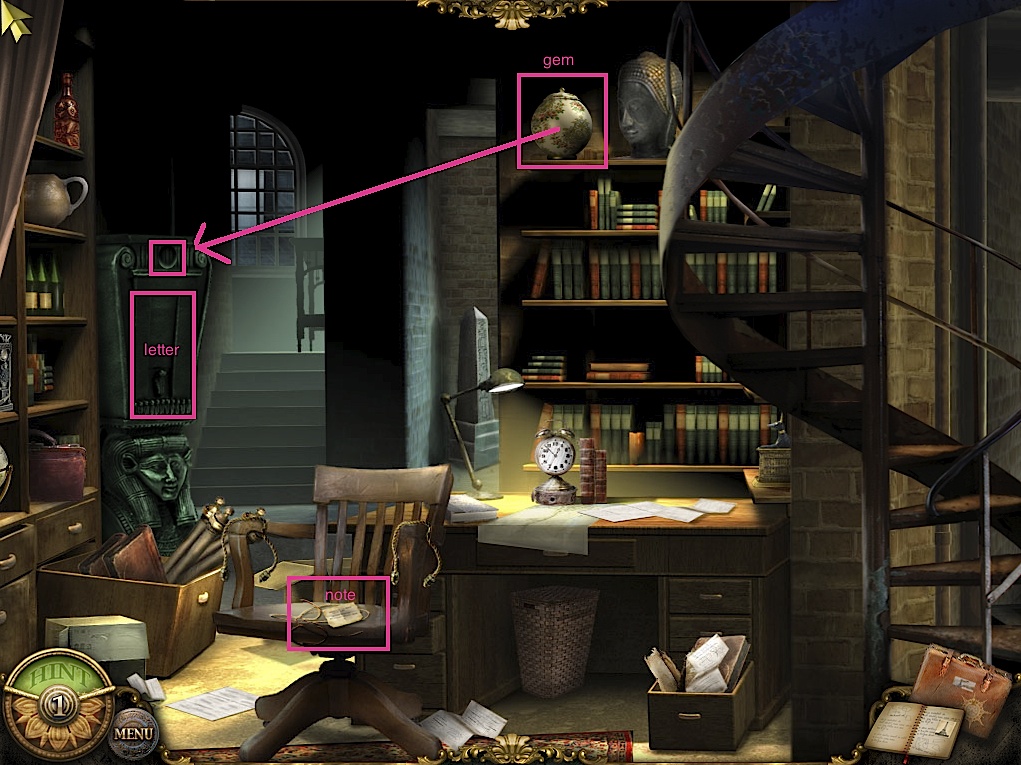
Read the note in the chair and pick up the special item in the zoomed in view. Click on the vase on the top shelf to get a gem, and use the gem on the sarcophagus on the left to open a secret chamber and get a letter. Screenshot.
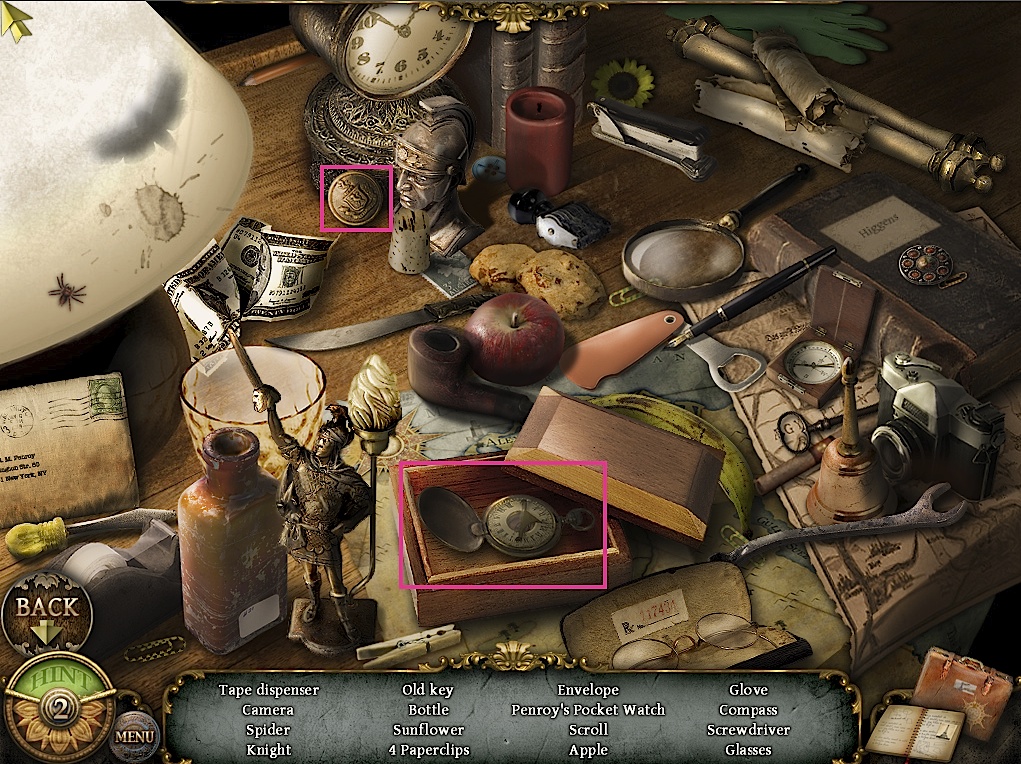
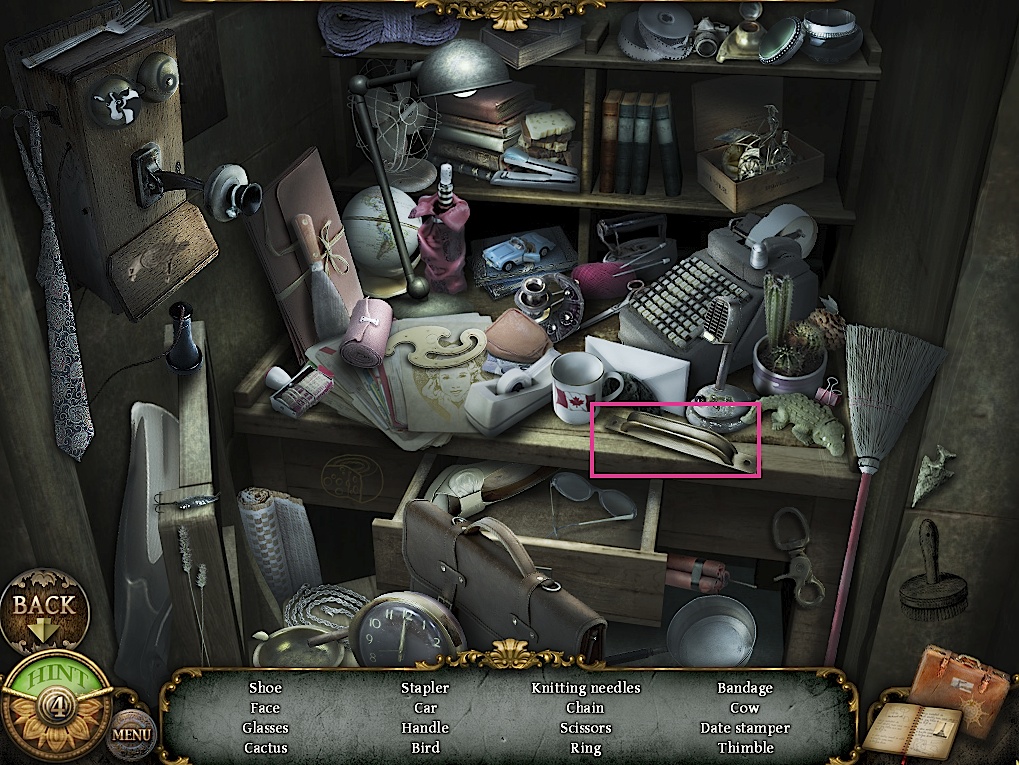
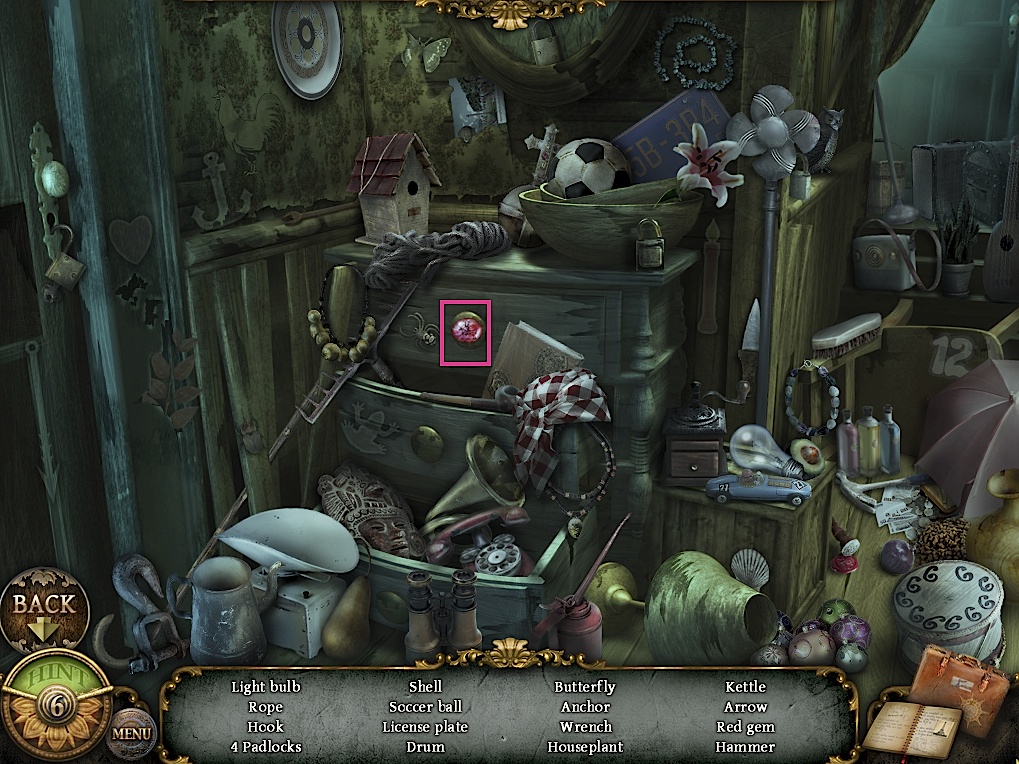
Click the desk to do a hidden object scene. There is a special item in the upper center left. Take the pocket watch from within the box. Screenshot.
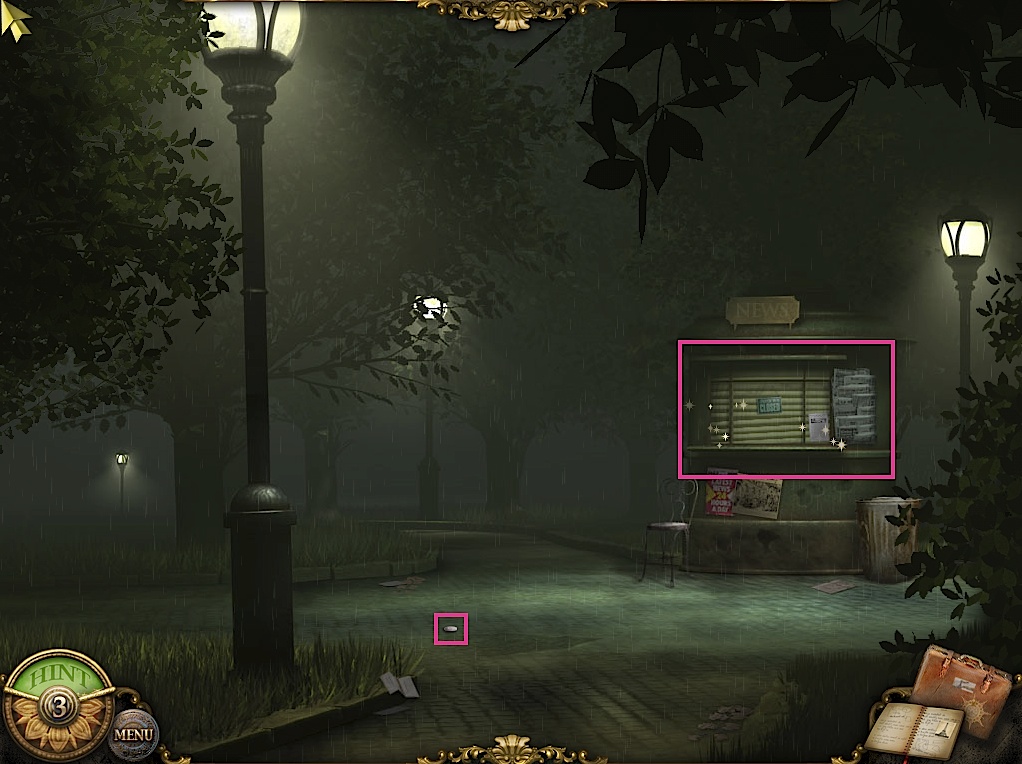
Go to Central Park. Take the coin from the ground. Screenshot.
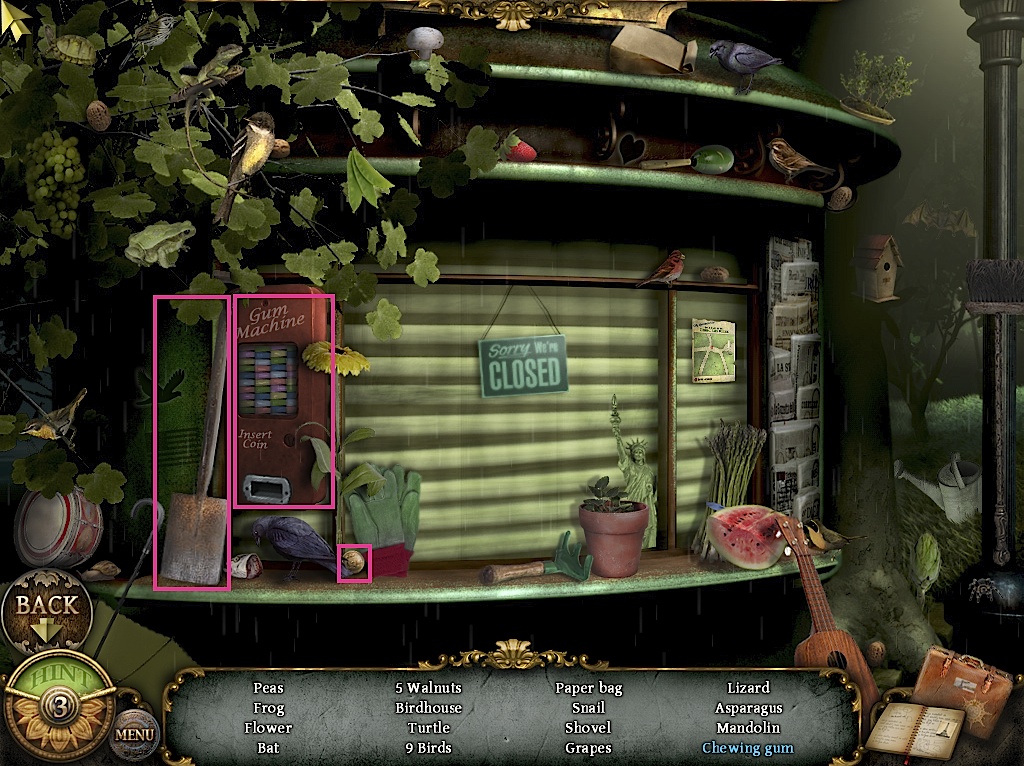
Click on the newstand to do a hidden object scene. Use the coin on the gum machine to find chewing gum. There is a special item under the gum machine, and the shovel is the left of the gum machine. Screenshot.
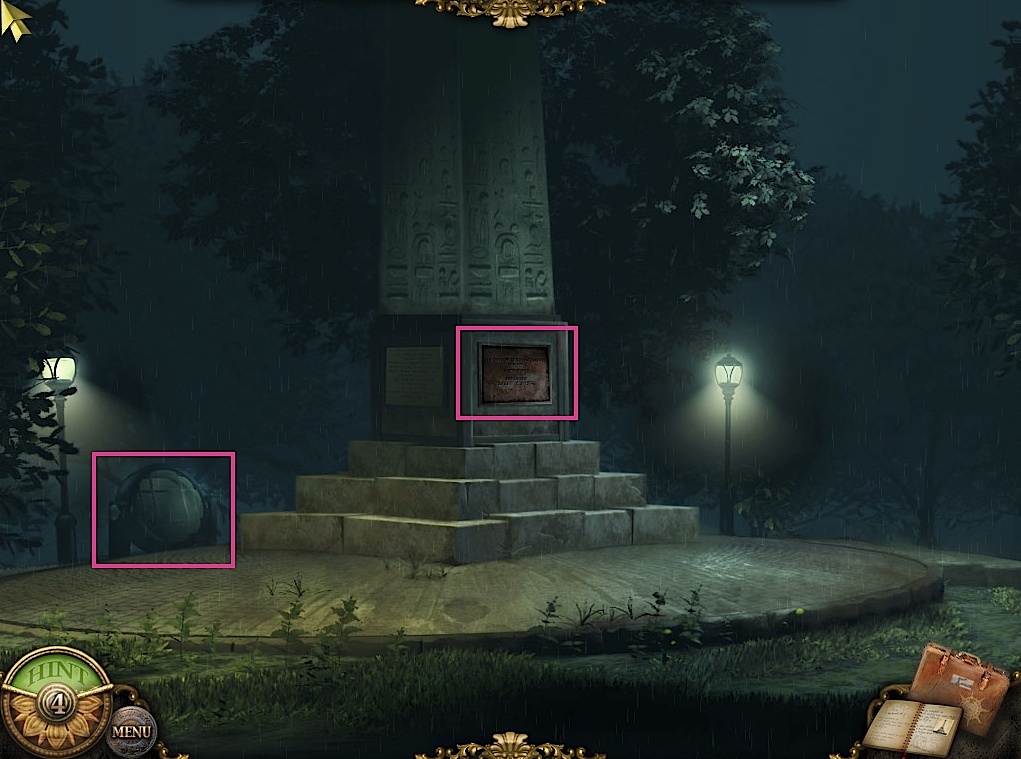
Travel to the obelisk. Note the inscription on the plate and the light to the left of the obelisk. Then go back down the stairs. Screenshot.
Click on the power unit to turn the light on, and go back to the obelisk. Screenshot.
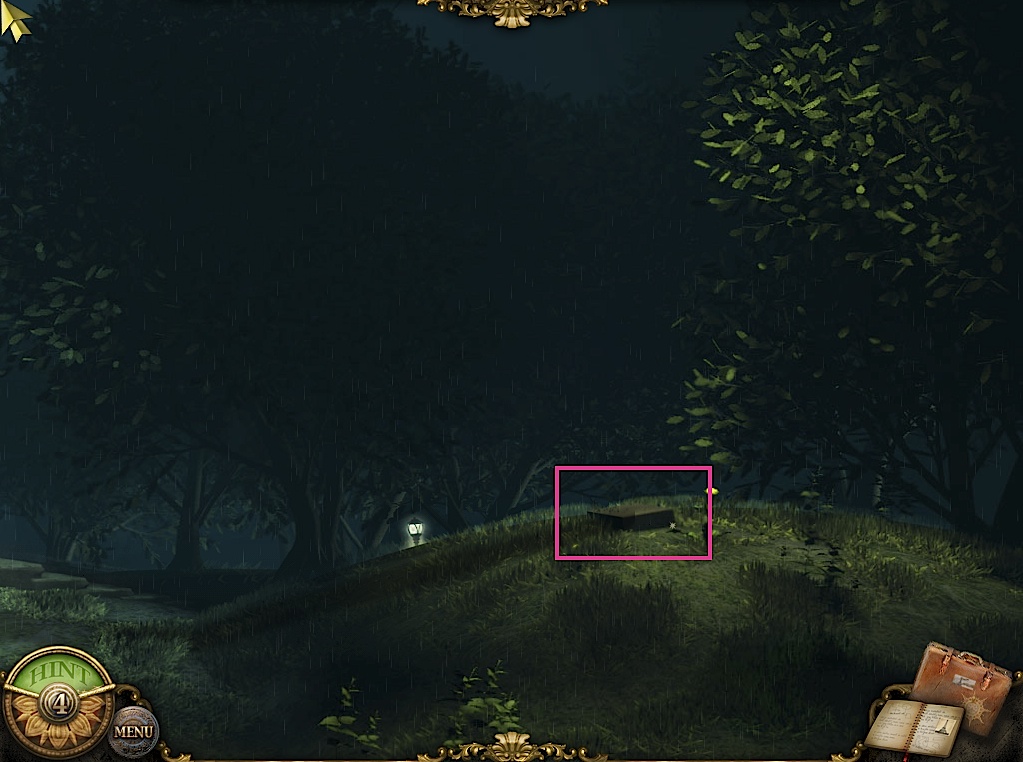
You will be taken to a hill. Use the shovel on the mound to get a wooden sword. Screenshot.
Chapter 1:
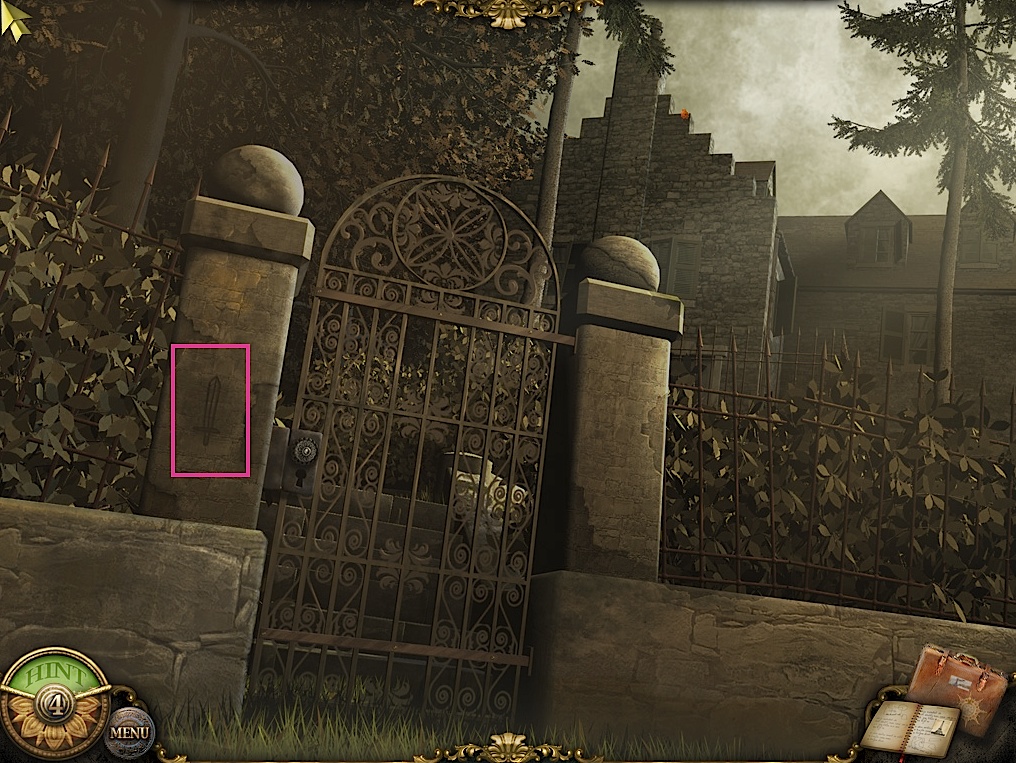
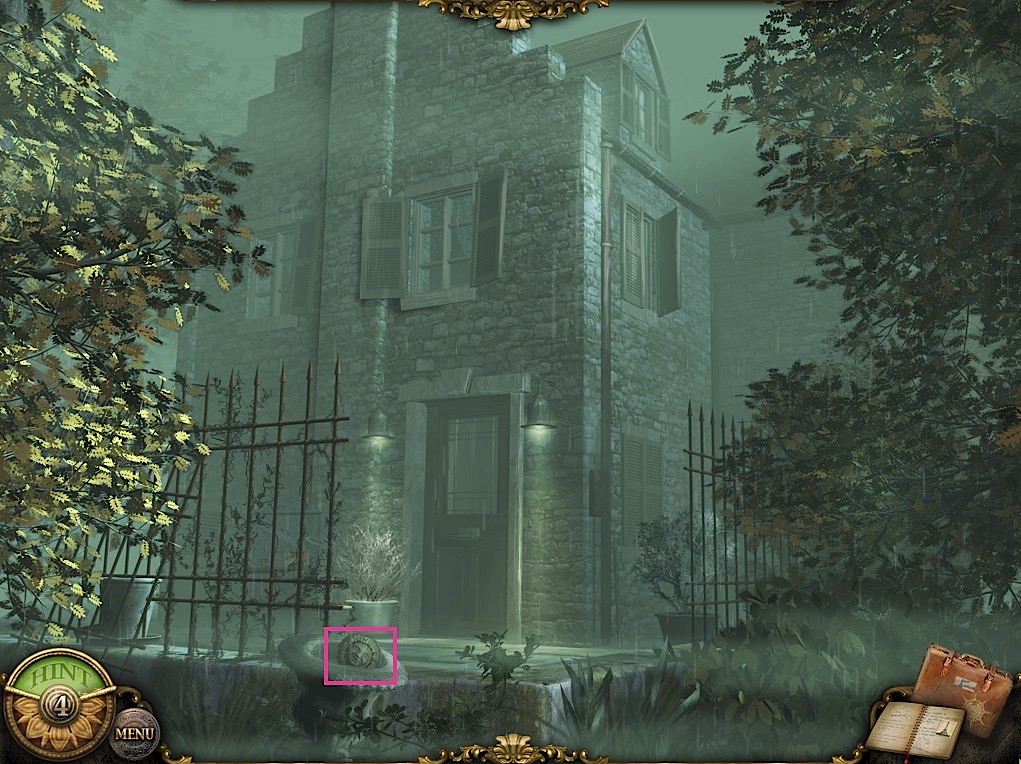
Use the wooden sword on the drawing of a sword on the left of the gate. Pull the handle and go through the gate. Screenshot.
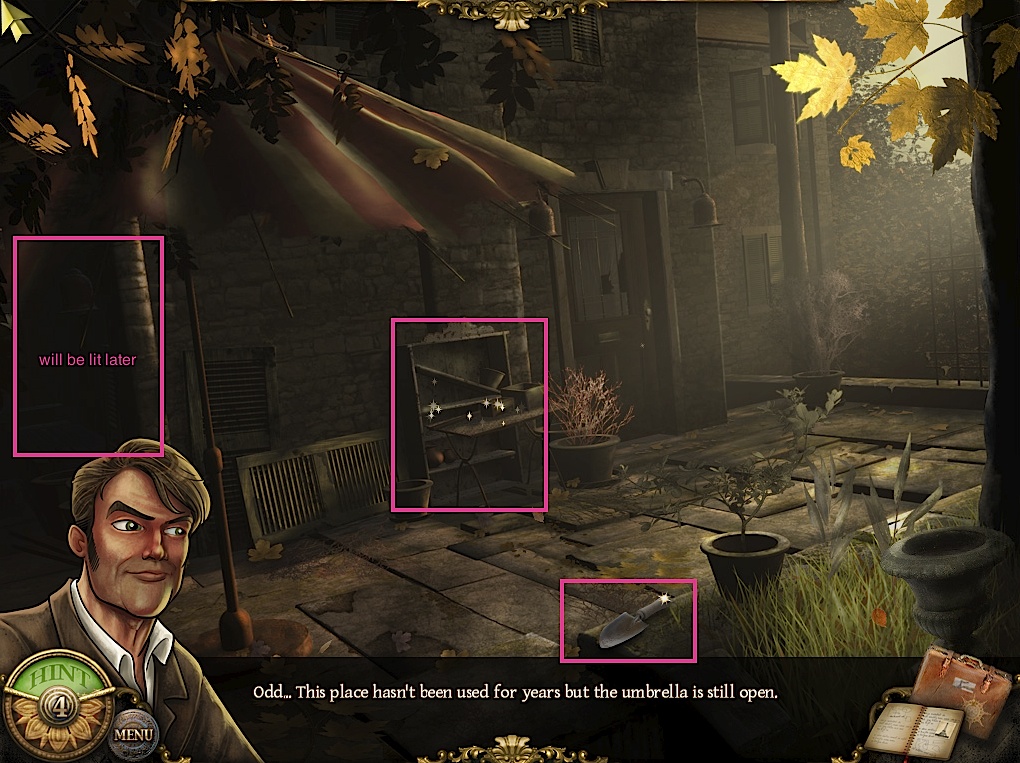
Pick up the trowel at the bottom of the screen. The dark area on the left will eventually be lit. Screenshot.
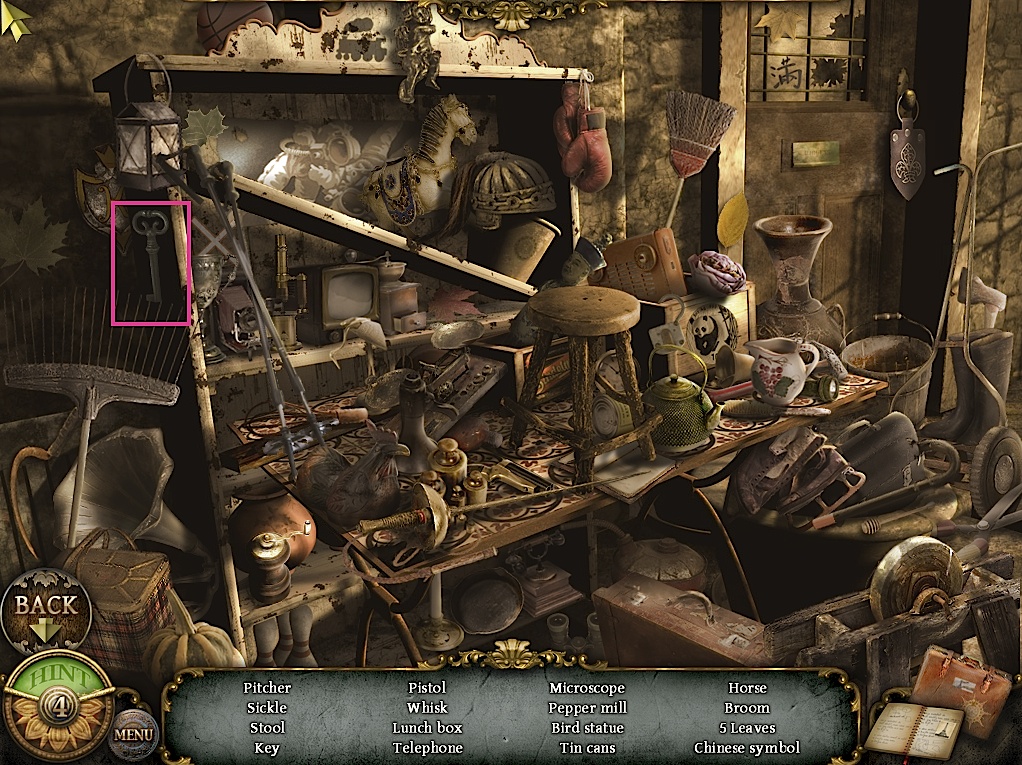
Click on the shelves for a hidden object scene. Take the key hanging on the left. Screenshot.
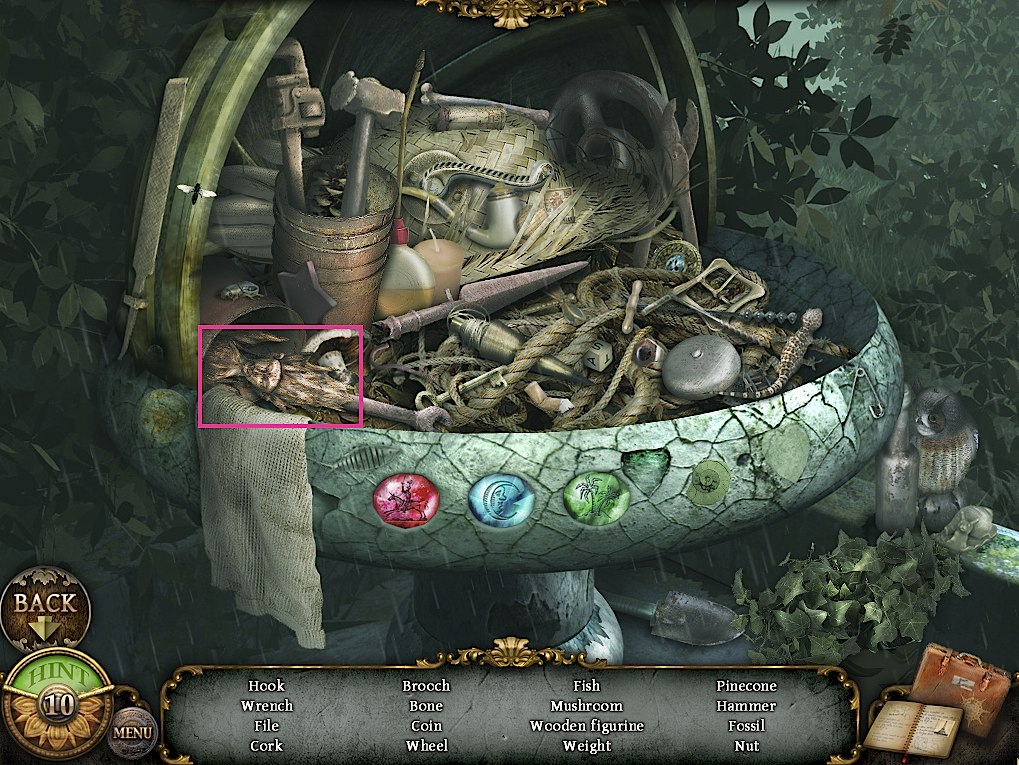
Go down to the garden and click on the dry fountain to get another hidden object scene. There is a special item wedged at the top of the fountain. Also, get a putty knife from the bottom of the fountain. Screenshot.
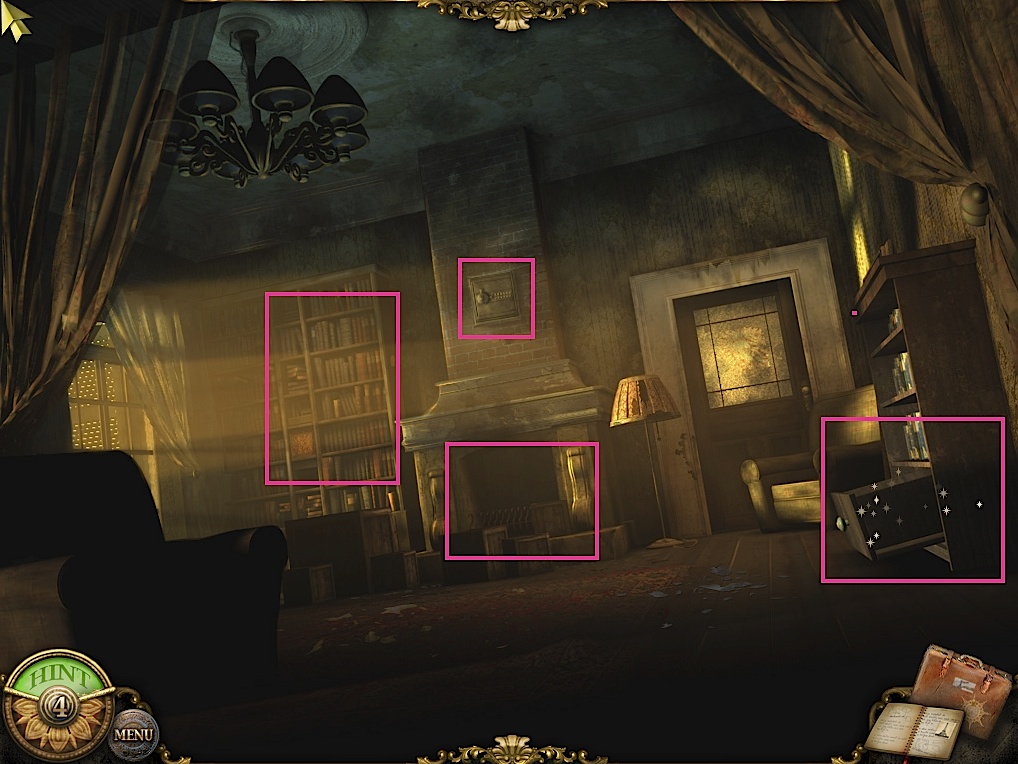
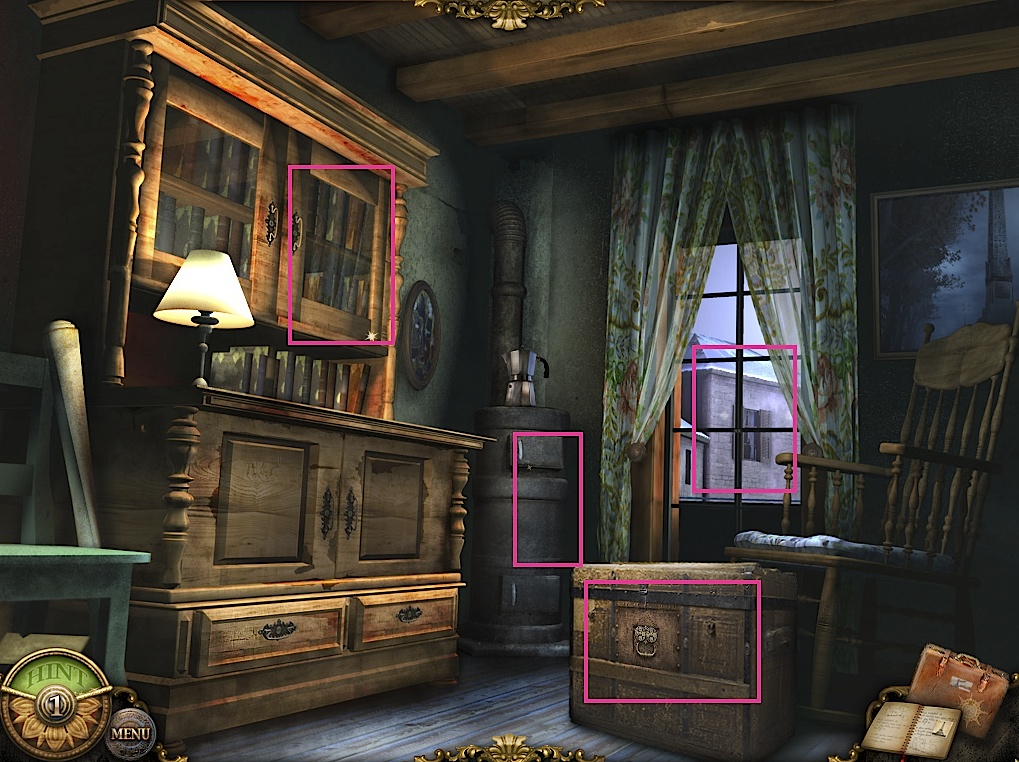
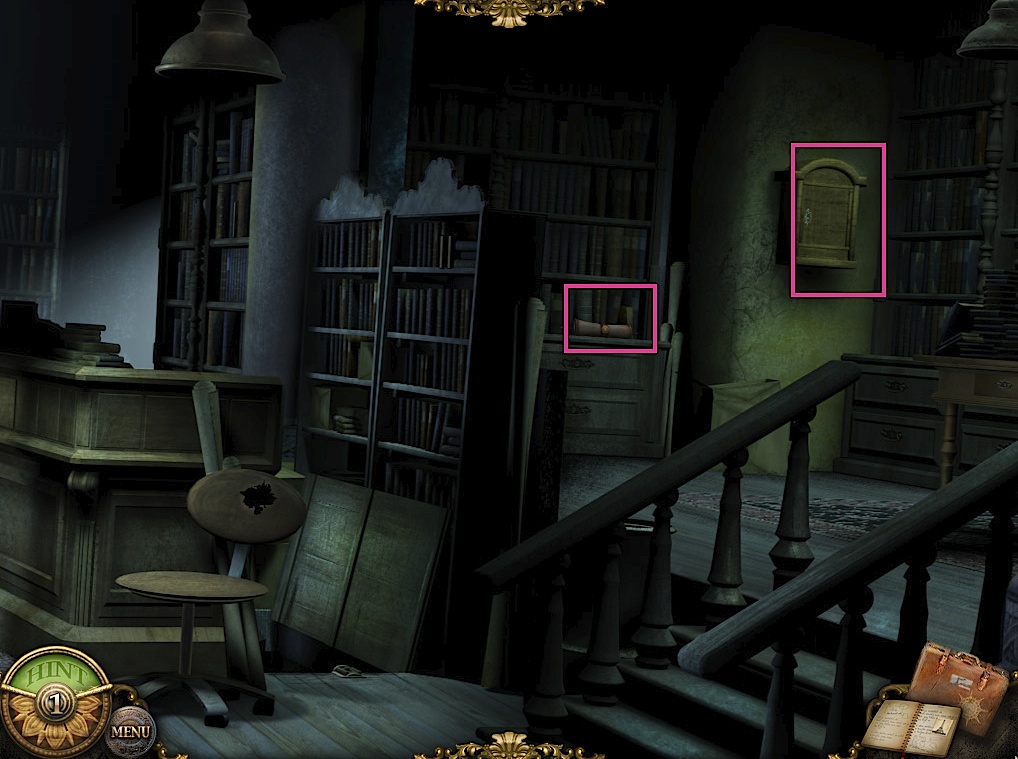
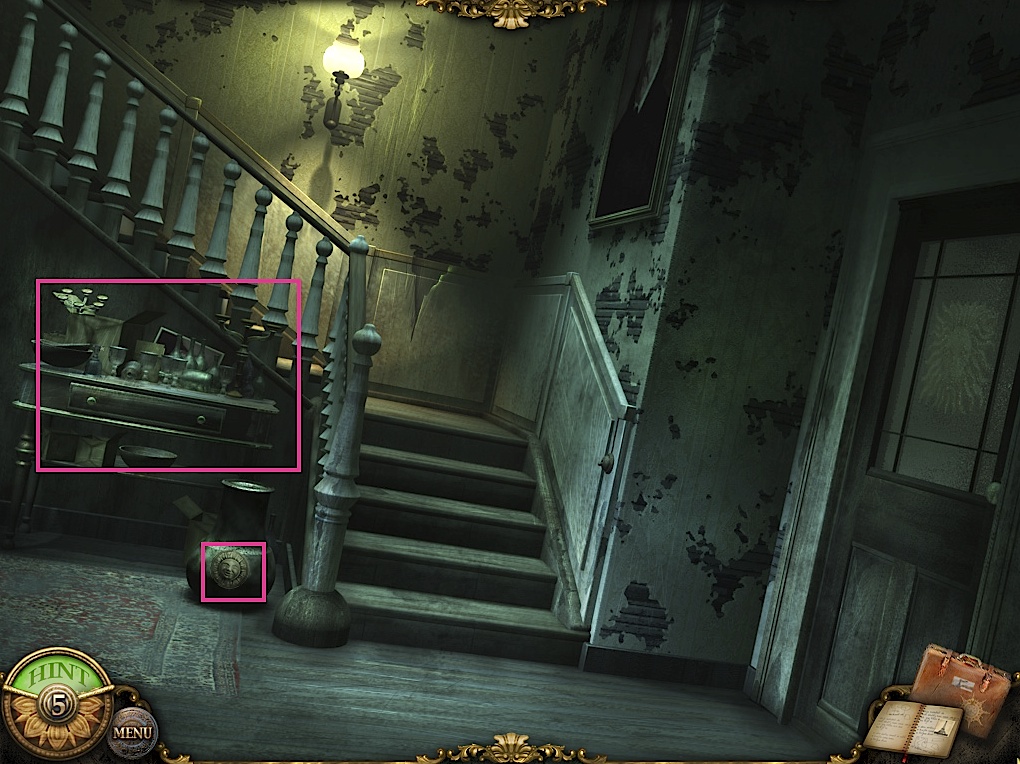
Go back to the front door and use the key on the door to enter the house. Click on the loose floorboard and use the putty knife to get a photo piece. There is a special item on the chandelier. Click the lightswitch to turn on the outside light. Screenshot.
Click the desk for a hidden object scene and take the empty frame from the center. Open the drawer to get to the blue items. Screenshot.
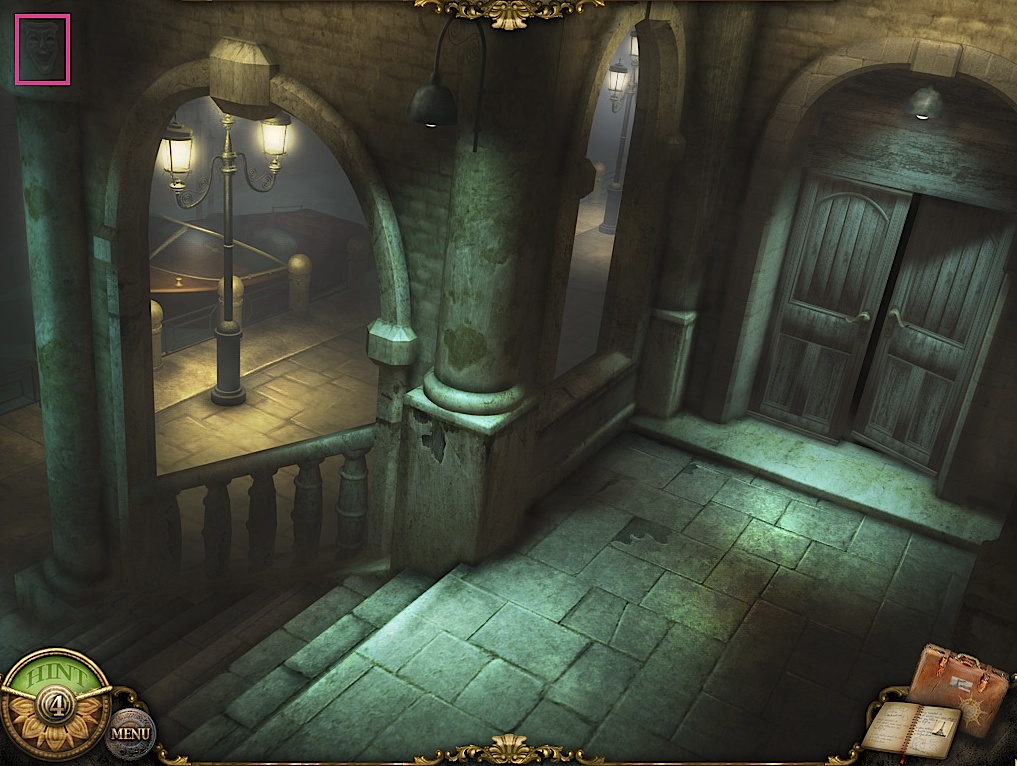
Go back to the front door and click on the previously dark area. Take the special item in the back. Take the key from the bottom. Use the trowel on the dirt to get a t-shaped key. Screenshot.
Go inside and go to the right hand room from the entrance. For the time being, you cannot yet do anything with the book case, safe, or fireplace. Screenshot.
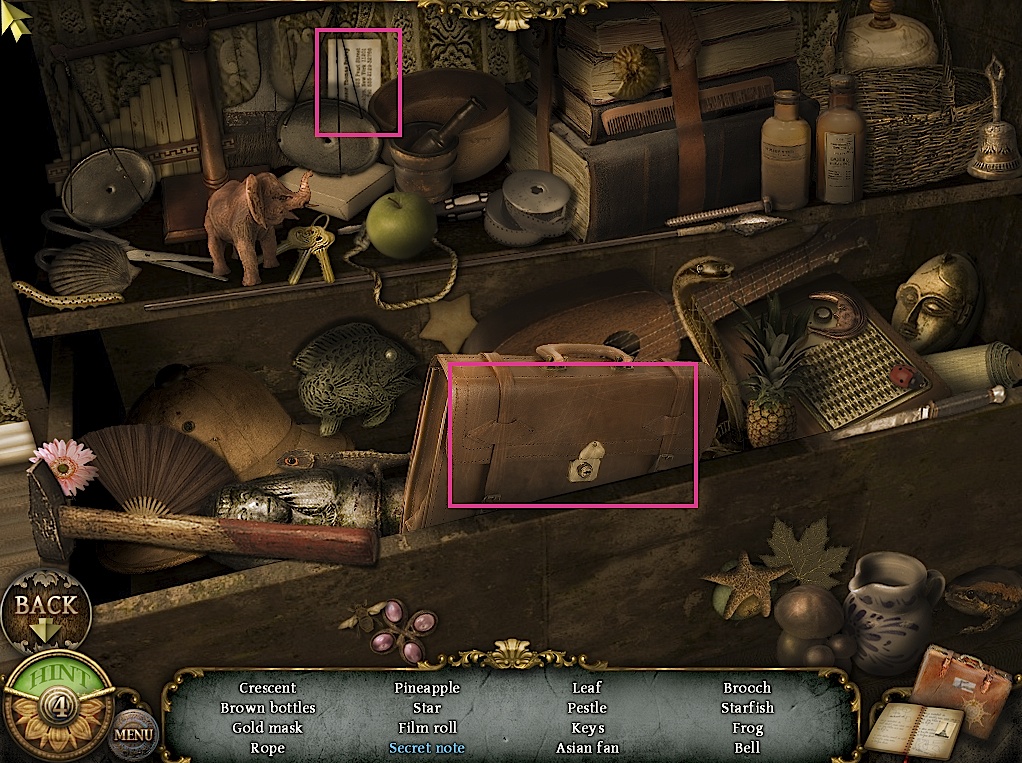
Click on the right hand shelf for a hidden object scene. Take the special item from the top. Use the small key on the locked bag to get a secret note. Screenshot.
Click the safe above the fireplace. Click on the note wedged to the left of the safe, and use the secret note on it. You will get a clue to decode the alphabet in the secret frame. The code is:
ROBERT
Enter the code in the safe and get a necklace. Screenshot.
Back out and the fireplace is now a hidden object scene. Get another photo piece on the left. Screenshot.
Go to the terrace and click on the shelves for another hidden object scene. Take the photo piece from the top of the shelf. Screenshot.
Click on the metal box at the bottom of the garden area and reassamble the photograph like a jigsaw. Screenshot. This is a clue for the last puzzle. Go back to the living room and click the bookshelves. Click the books in the same order as are marked A, B, C, D on the photograph.
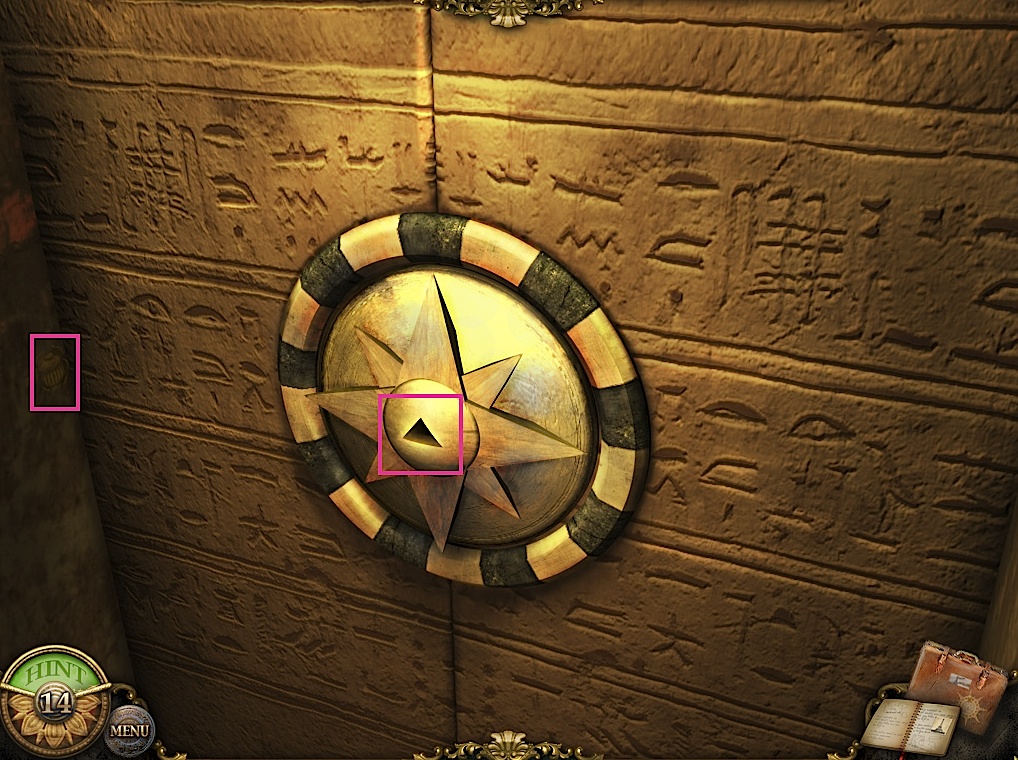
This will reveal another puzzle. Use the t-shaped key at the top of this puzzle. The clue is the necklace (go back and look at the necklace screenshot, or examine it, if you need to.) You must manipulate the colored dots to match the order in the necklace. Starting at the top (the key) and going counter-clockwise, it will be:
4 green, 3 blue, 2 aqua, 1 red, 1 yellow, 3 purple, and 3 gray.
Use the center arrow to change the individual dots, then bring the arrow back to the top and click the key.
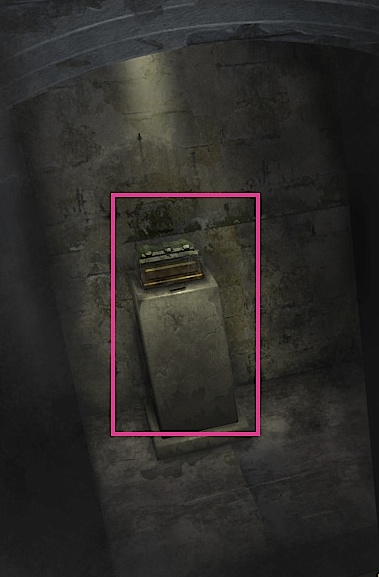
Go down the stairs and take the shield from on top of the stone platform. Zoom in on the platform and use the wooden sword on the slot to open the chest. Take the old book, and click on the envelope in it to read the letter. Keep clicking until the chapter ends. Screenshot.
Chapter 2:
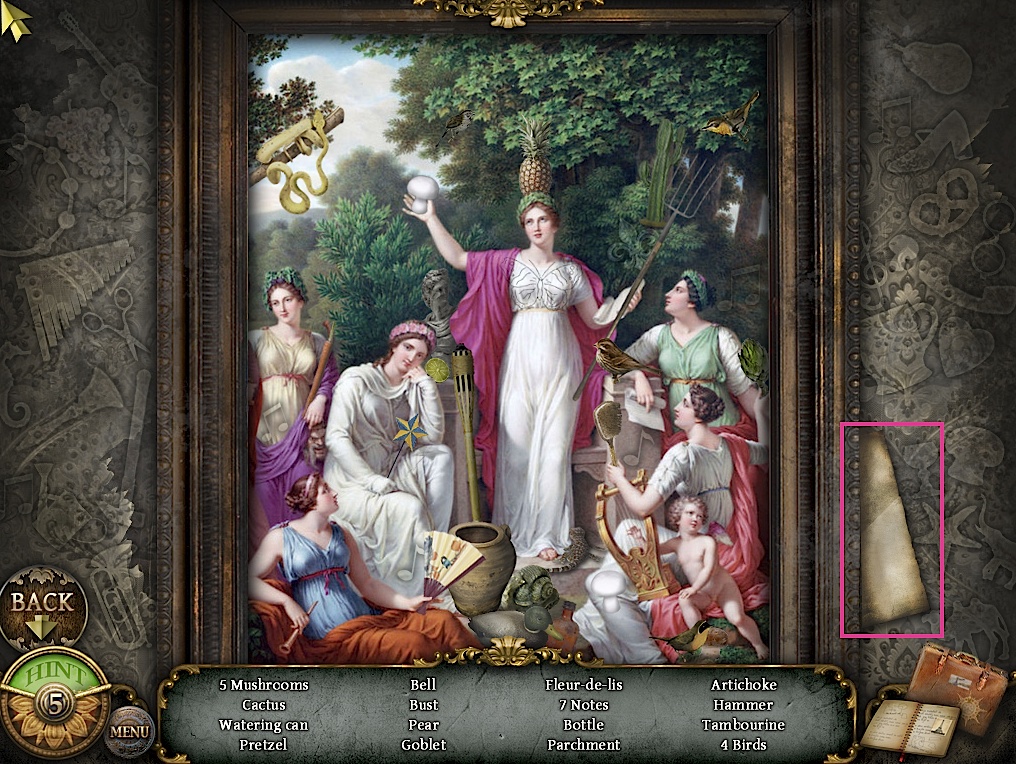
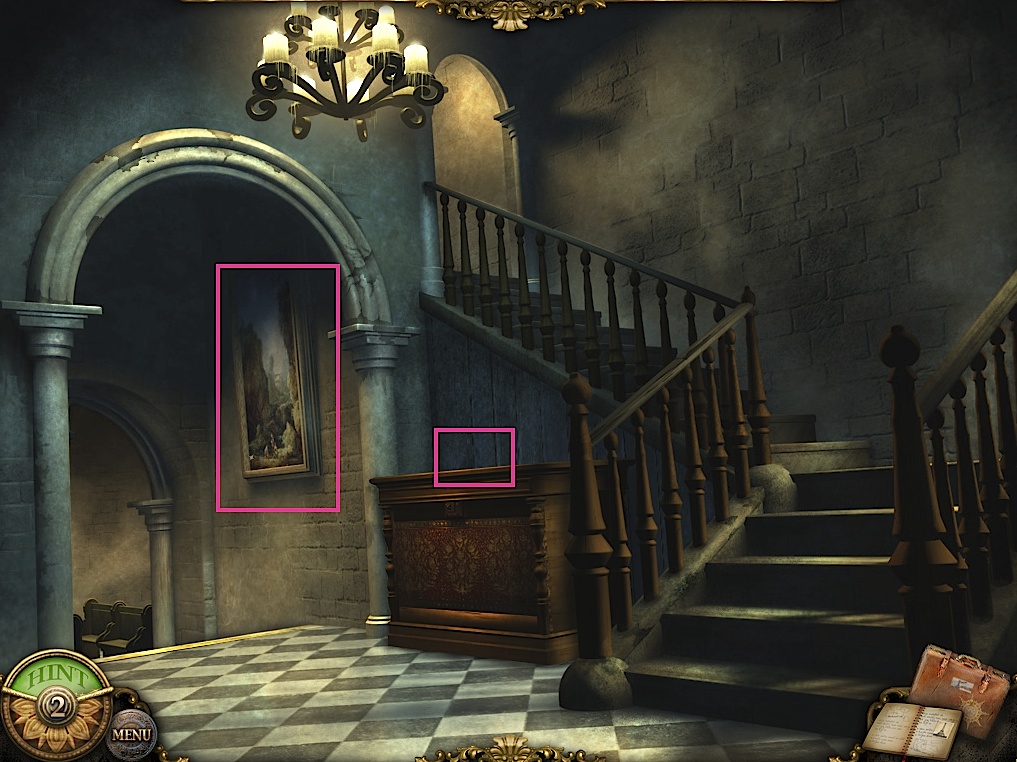
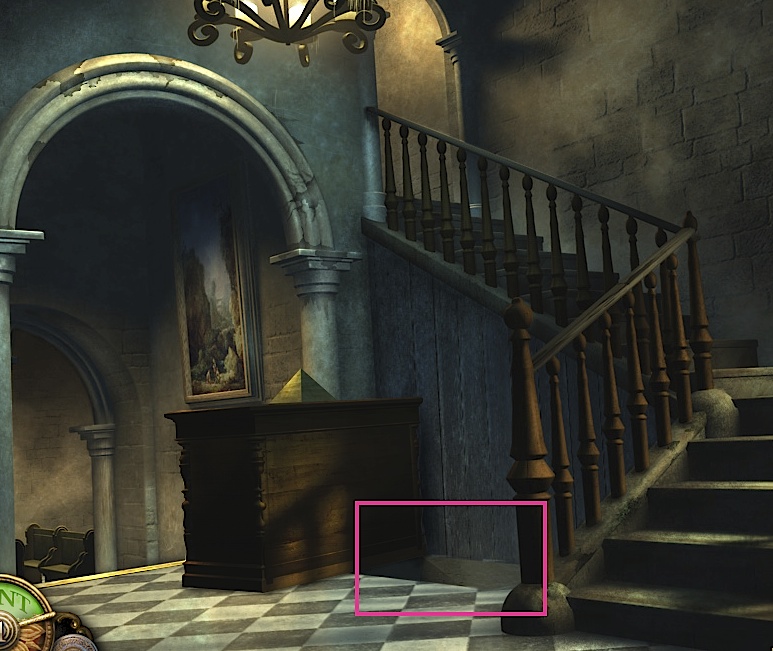
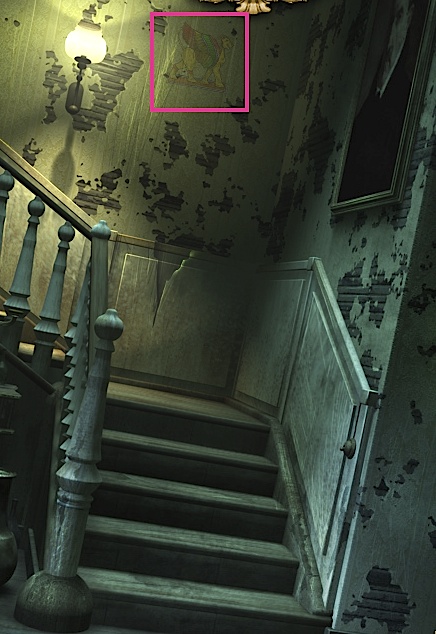
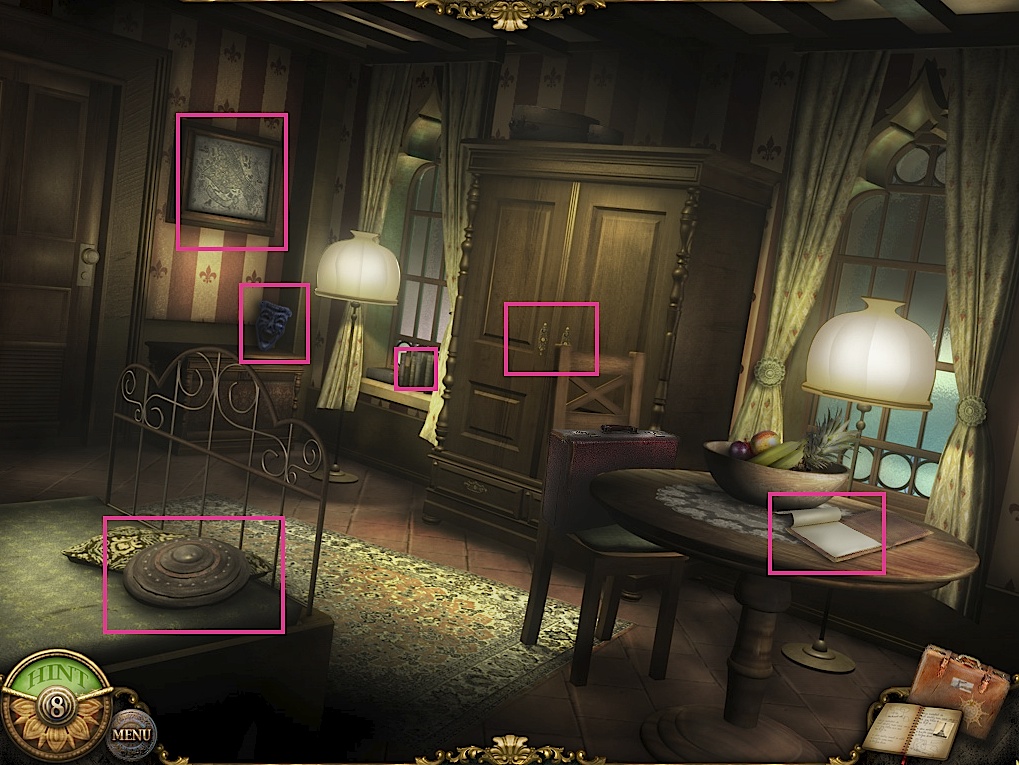
Pick up the piece of wood next to the armoire. Click the books on the dresser and get the newspaper. Click the mirror to activate a hidden object scene in the painting. Screenshot.
Take the paper wedged in the frame. Screenshot.
Exit the hotel and talk to the monk, then click on the bulletin board and complete the hidden object scene. The items are all random, but you will receive a wine coupon at the end. Screenshot.
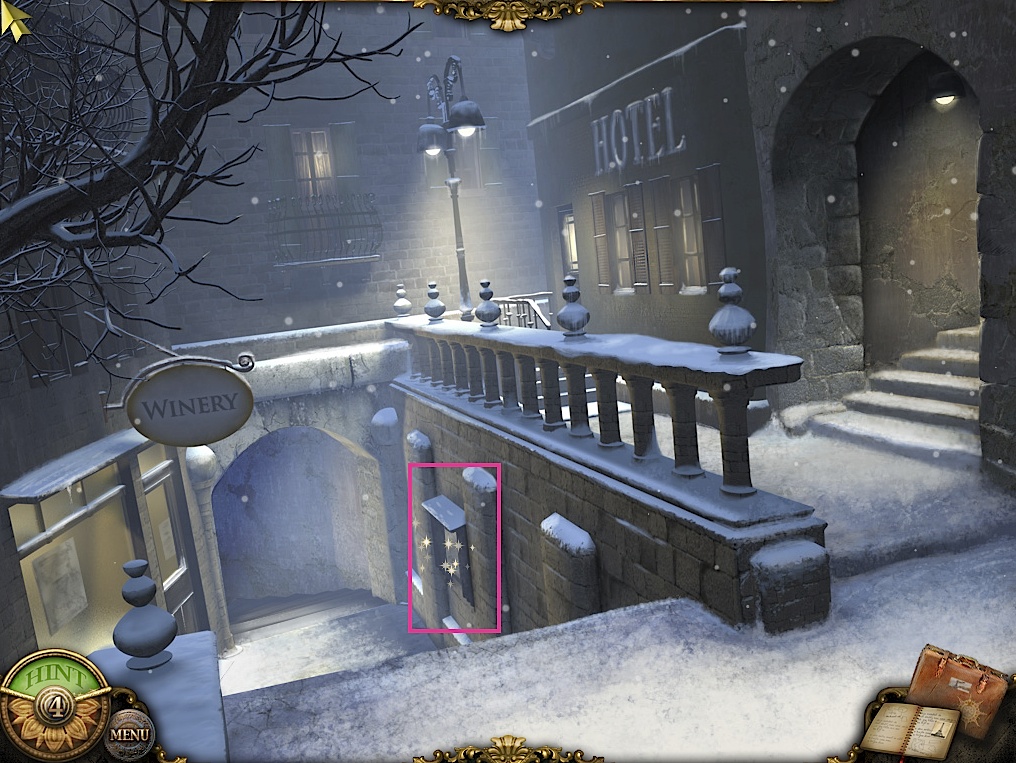
Go left to the winery. Take the special item next to the beam on the left. The dark area will be lit later. For now click on the hidden object scene in the barrels. The items are all random again, but you will be given a wine bottle after finishing. Screenshot.
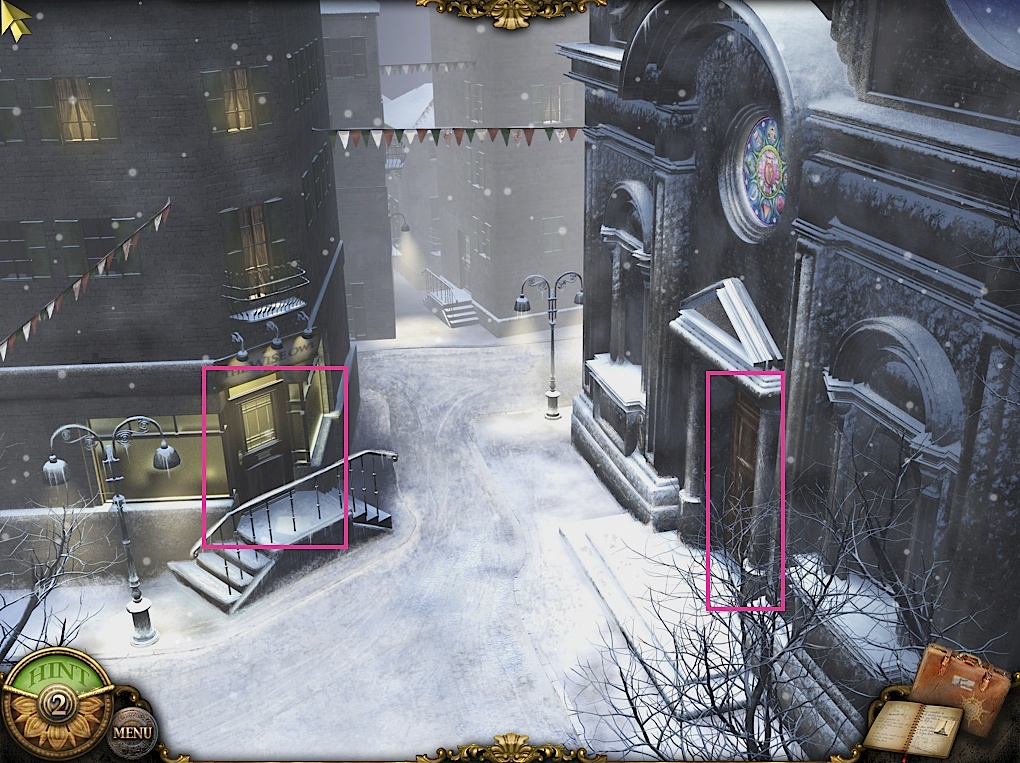
Exit the winery and head up the street. From here you can go far left to a fountain, or enter the doors to the bookshop and the church. Screenshot.
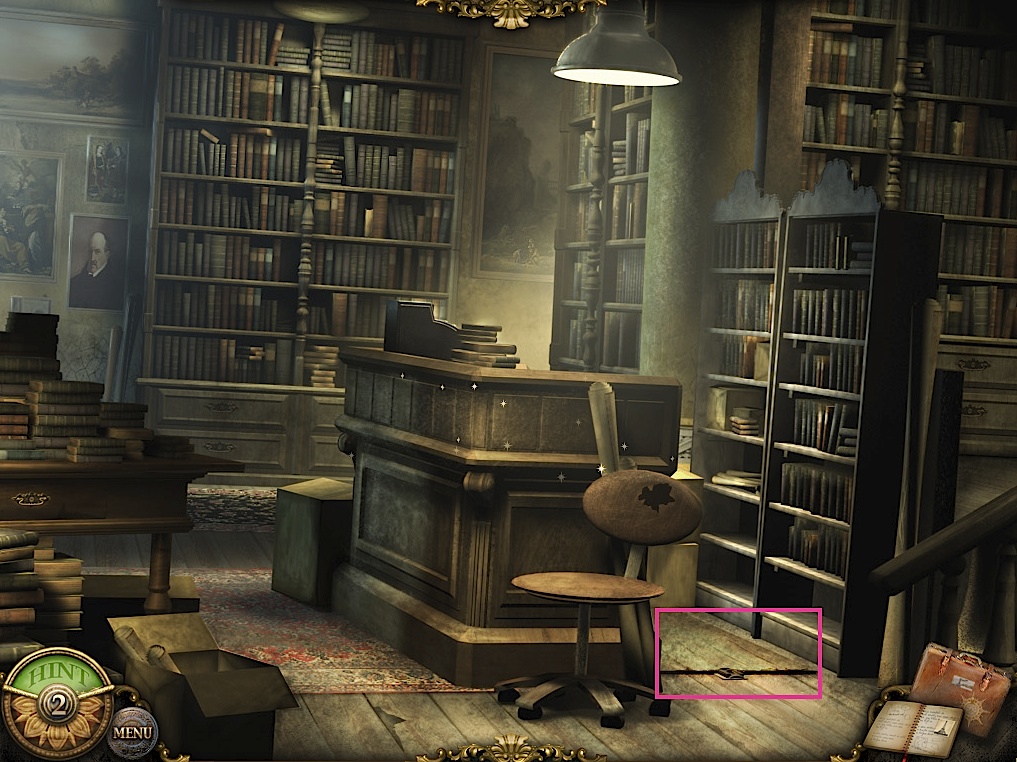
Go to the fountain and click on the back door. Pick up the stick to the left of the door, then go back to the bookshop entrance. You don't have the key to the door yet. Screenshot.
Click on the bookshop door and pick up the matches before going in. Screenshot.
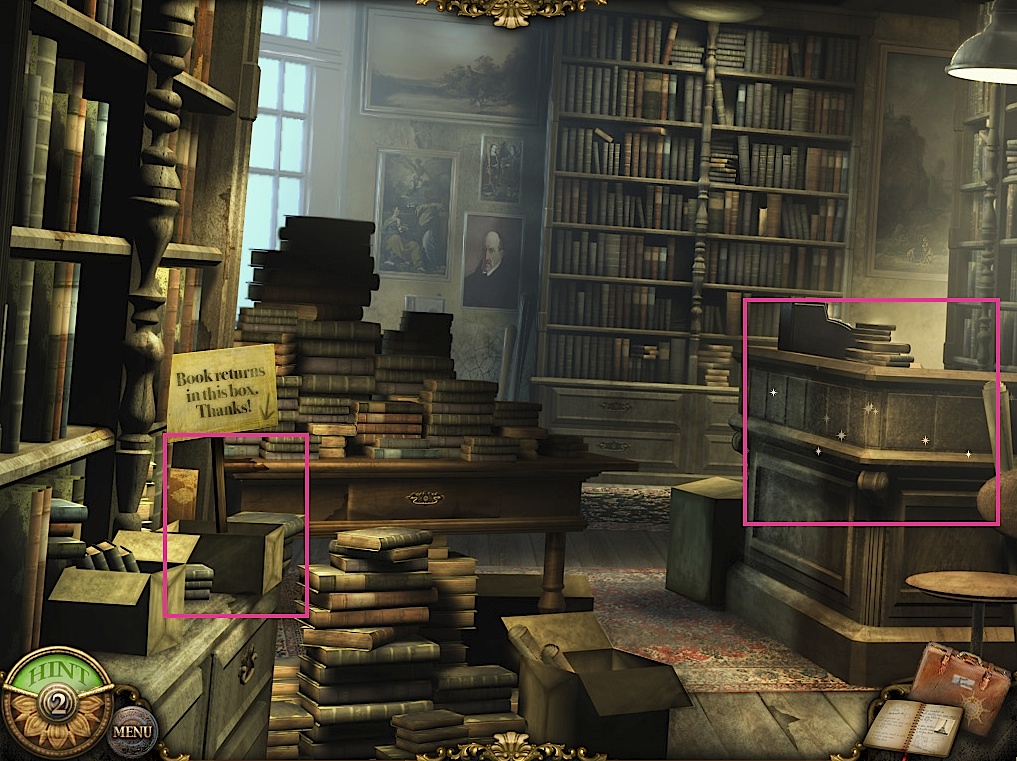
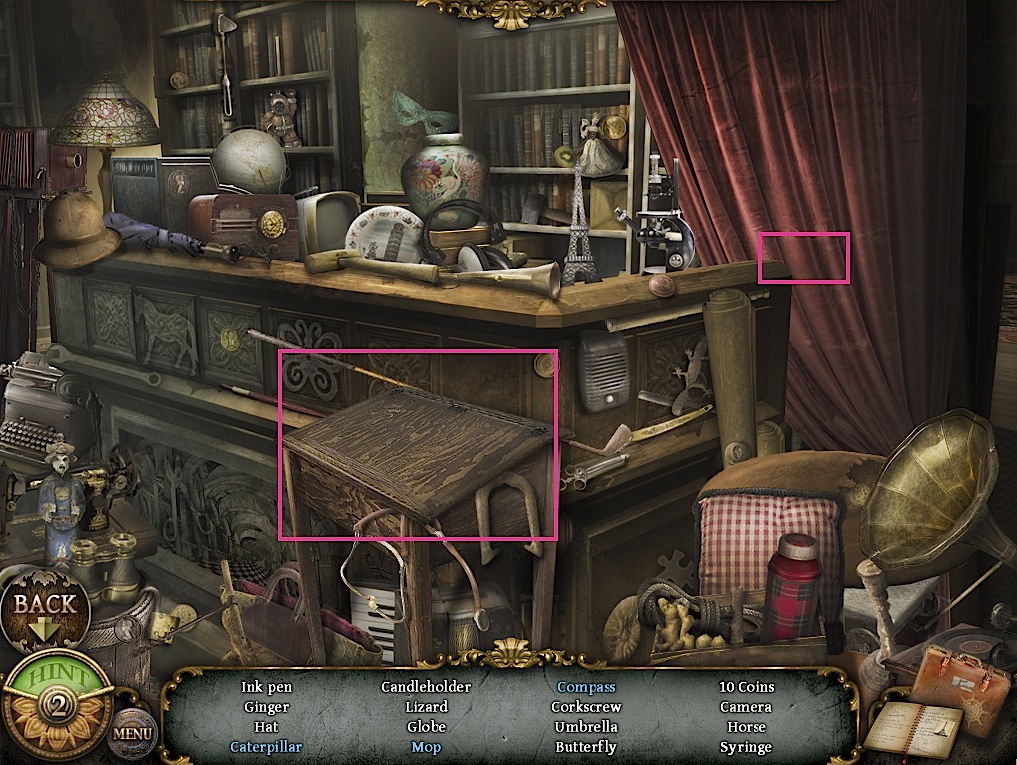
Place the old book in the book returns box, then click on the counter for a hidden object scene. Screenshot.
Use the stick to prop open the desk and take the blue items. Click the curtain to reveal more items, including the special item. You get a key. Screenshot.
Click on the trap door and unlock the latch. If you try to go to the room to the right, the bookkeeper will stop you. Screenshot.
Go back to the fountain area and use the key on the door to enter the bookshop owner's room. Click on the window to take a picture of a pyramid in the snow. Open the cabinet and take the secret note on the inside of the door. Click on the stove in the corner and open the stove's door, then use the piece of wood and box of matches to make a fire in it. Then use the blank paper from the hotel painting on the stove to reveal its contents. Screenshot.
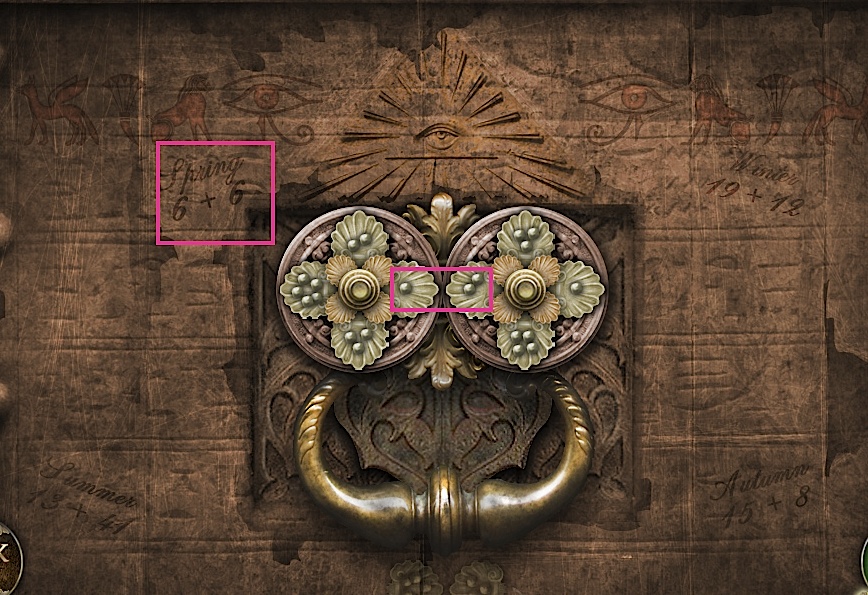
Click on the chest to solve a puzzle. The four combinations are solved by doing the additions marked in the four corners:
12, 54, 23, 31.
Rotate the flowers so that the dots facing in make the number. For example, in the screenshot, the left flower has 1 towards the center and the right flower has 2 towards the center, for 12, the spring combination. Sadly you can't actually open the trunk yet but solve the puzzle anyway.
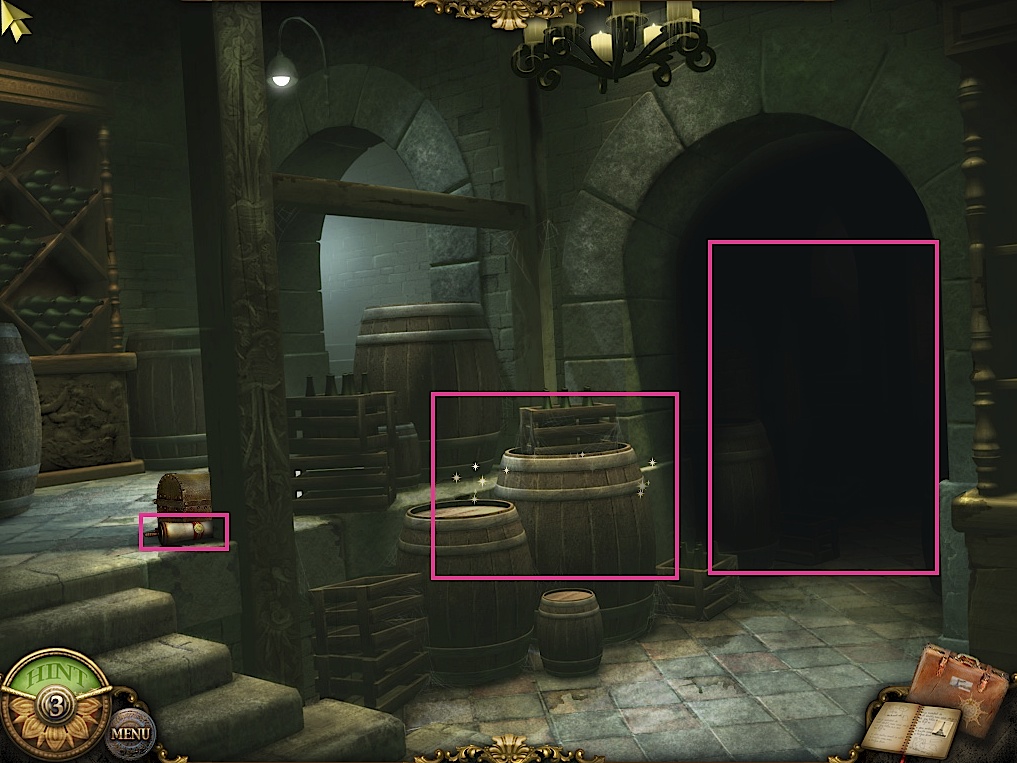
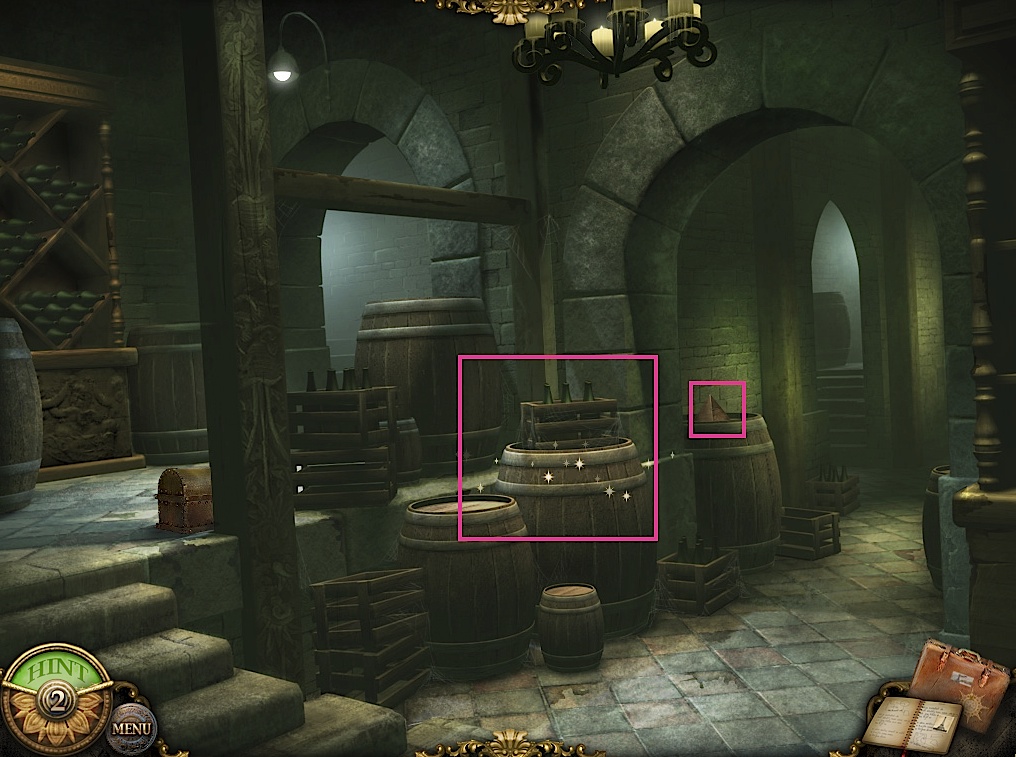
Go back to the winery. Pick up the pyramid in the now lit area, and click on the hidden object scene in the barrels. Screenshot.
Take the safety pin in the upper left. Screenshot.
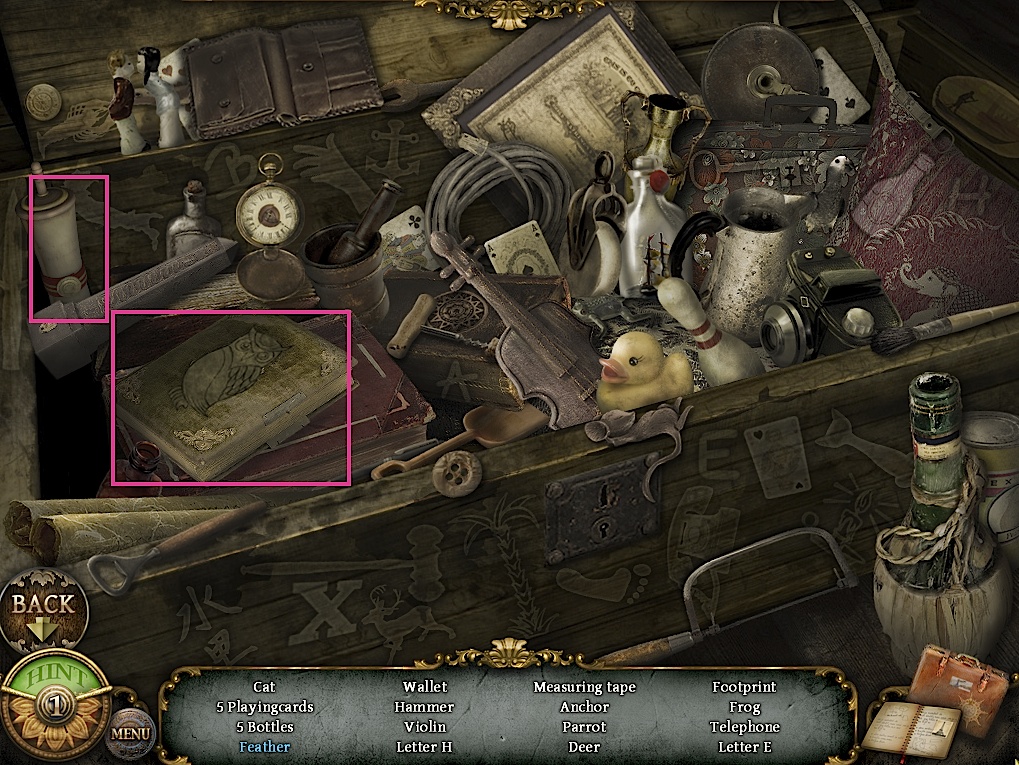
Go back to the bookshop owner's room and use the safety pin on the chest to open it and get a hidden object scene. Take the special item on the far left. Open the book with the owl on the cover to get the blue item. You'll get a book when you finish. Screenshot.
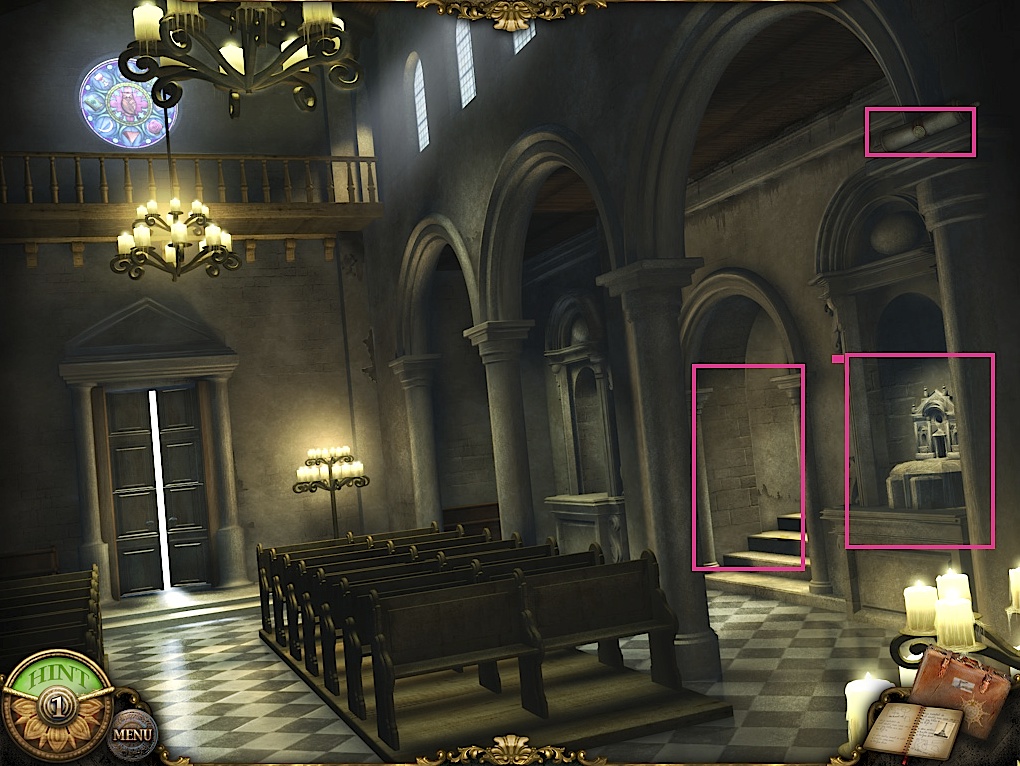
Go back to the bookstore and try talking to the bookseller again, then enter the church. There is a special item atop the rightmost pillar. Click on the little building in the niche to get a clue, then go deeper into the church. Screenshot.
Click the painting to get another clue. Zoom in on the chest and use the pyramid on the square depression to open a secret door. Screenshot.
Enter the secret passage. Screenshot.
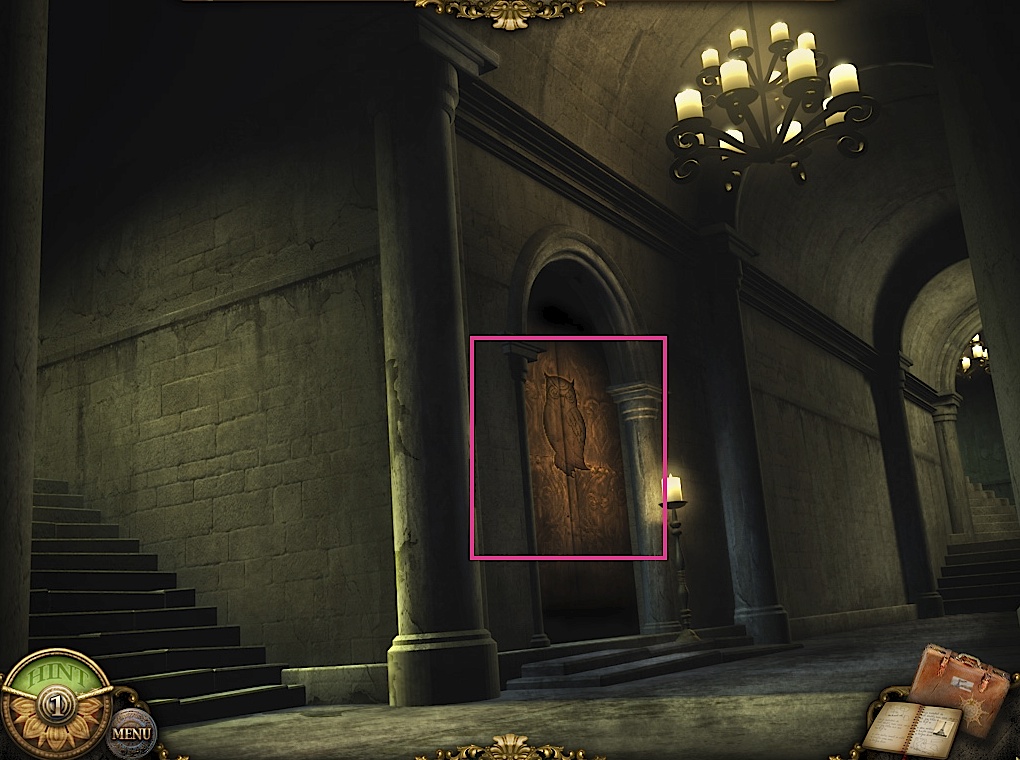
You can't open the owl door yet, but note it and go on to come up inside the bookshop. Screenshot.
There is a secret item on the bookshelf in the center. Click on the cabinet. Screenshot.
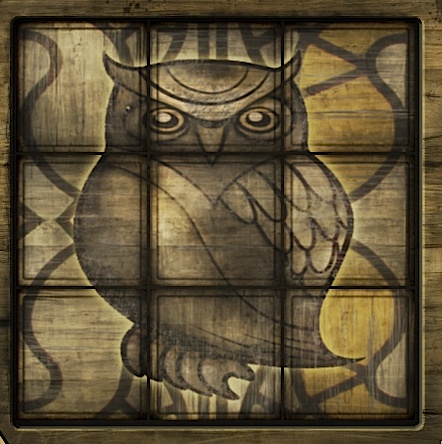
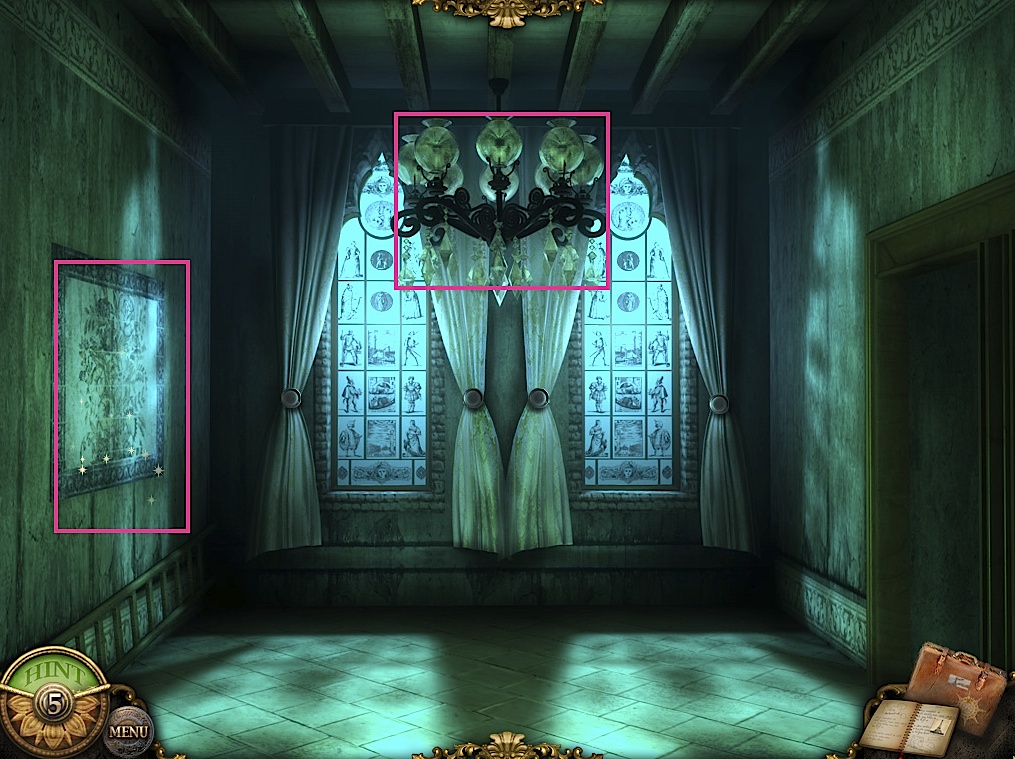
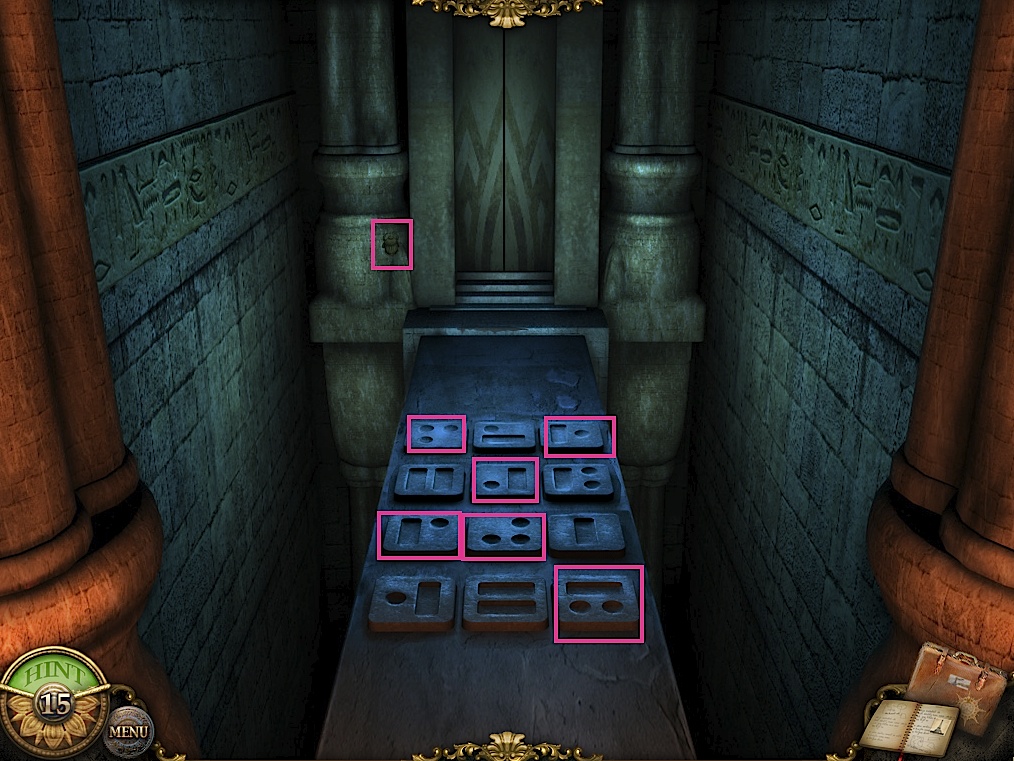
This puzzle is a tile swapping and rotating puzzle. Your final picture will depict an owl. After finishing, open the cabinet and take the postmarks from the book. You now have all the clues for the last puzzle. Go back to the church and in and upstairs to the stained glass window. Screenshot.
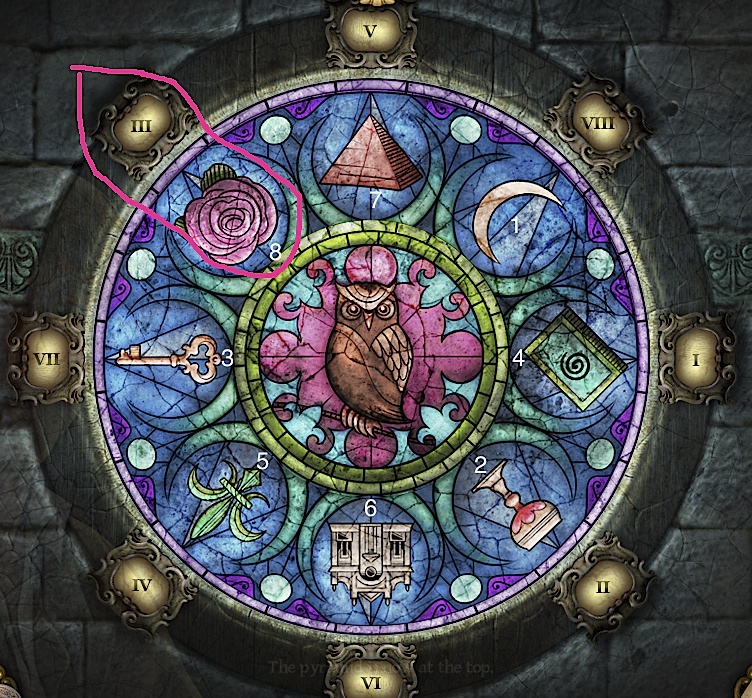
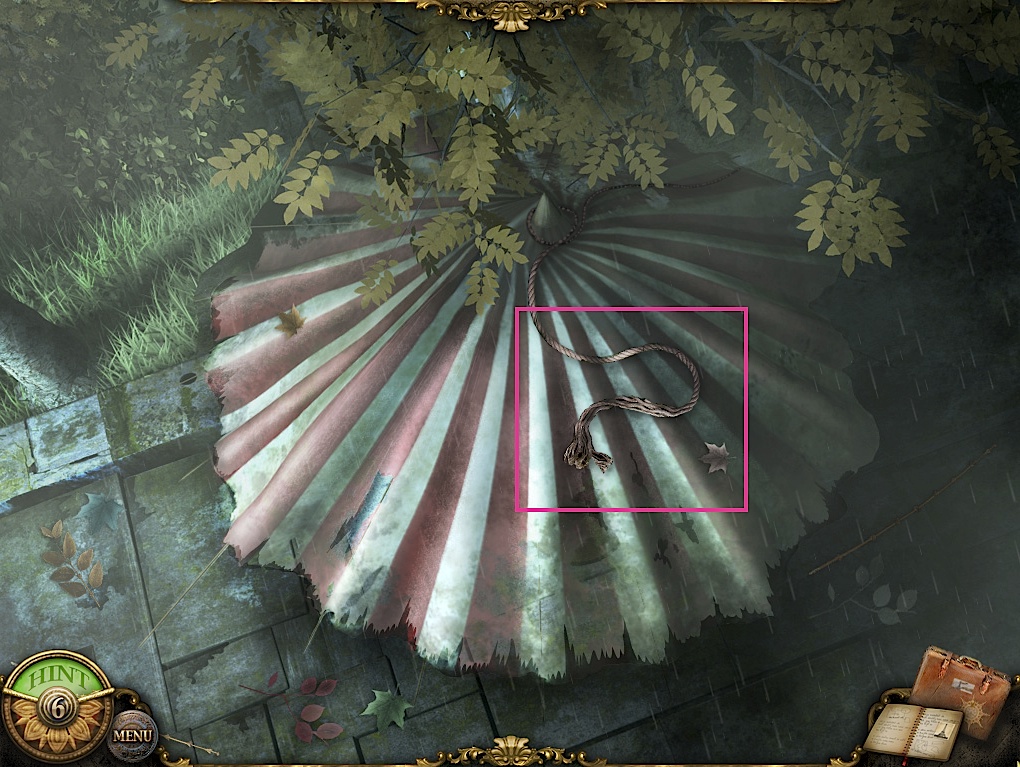
You must use all your clue images to match up the pictures with the numbers. The rope on the left rotates the pictures, and the rope on the right enters the solution. The "active" roman numeral will be in blue, and when solved correctly, it will change to gold. Starting at the top and going clockwise, you need to rotate and lock in this order:
Moon, chalice, key, book, fleur-de-lis, building, pyramid, rose.
The screenshot displays the rose in the final position, and marks all the other pictures with their correct order.
Go back to the secret passage and enter the door and take the blue capsule.
Chapter 3:
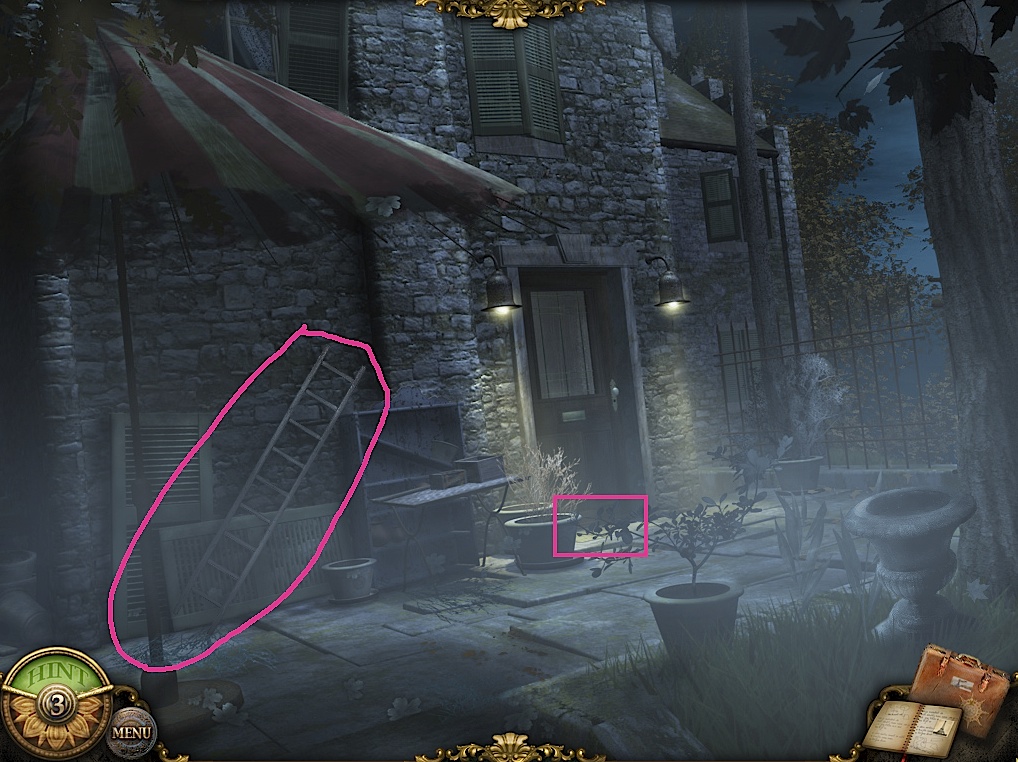
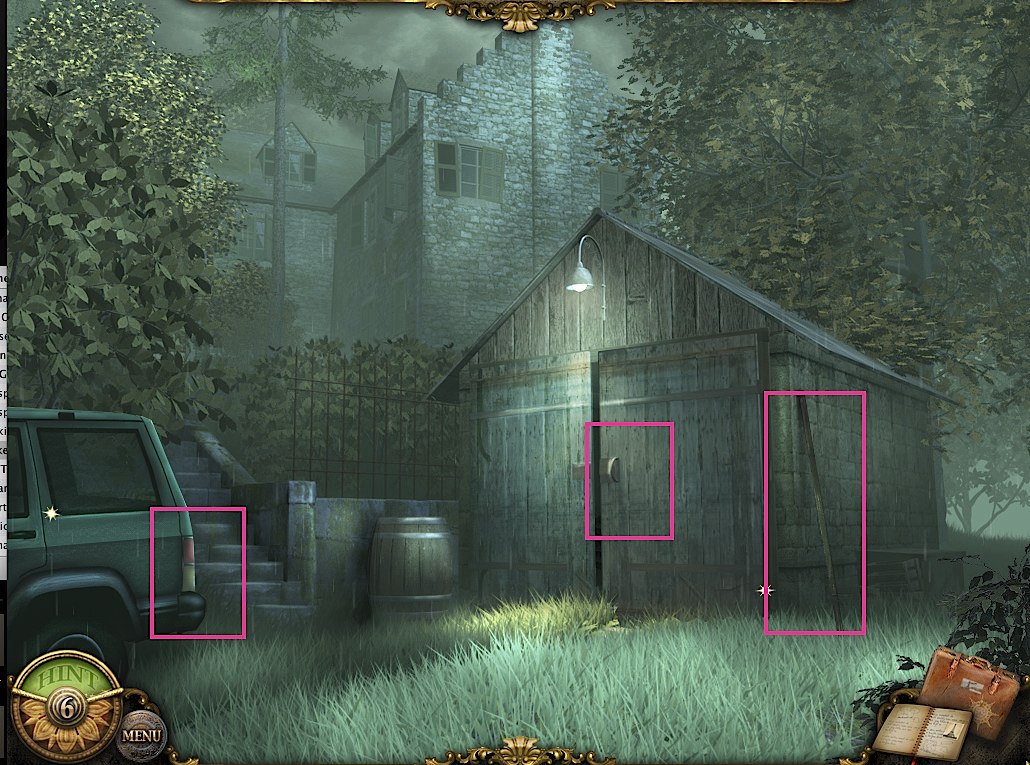
Take the ladder leaning against the house. Zoom in on the doormat and get the key from under it. Screenshot.
Go down the garden path to the right towards a shed area. You can't unlock the door yet or take the item out of the jars, but you can pick up the crowback leaning against the wall. Screenshot.
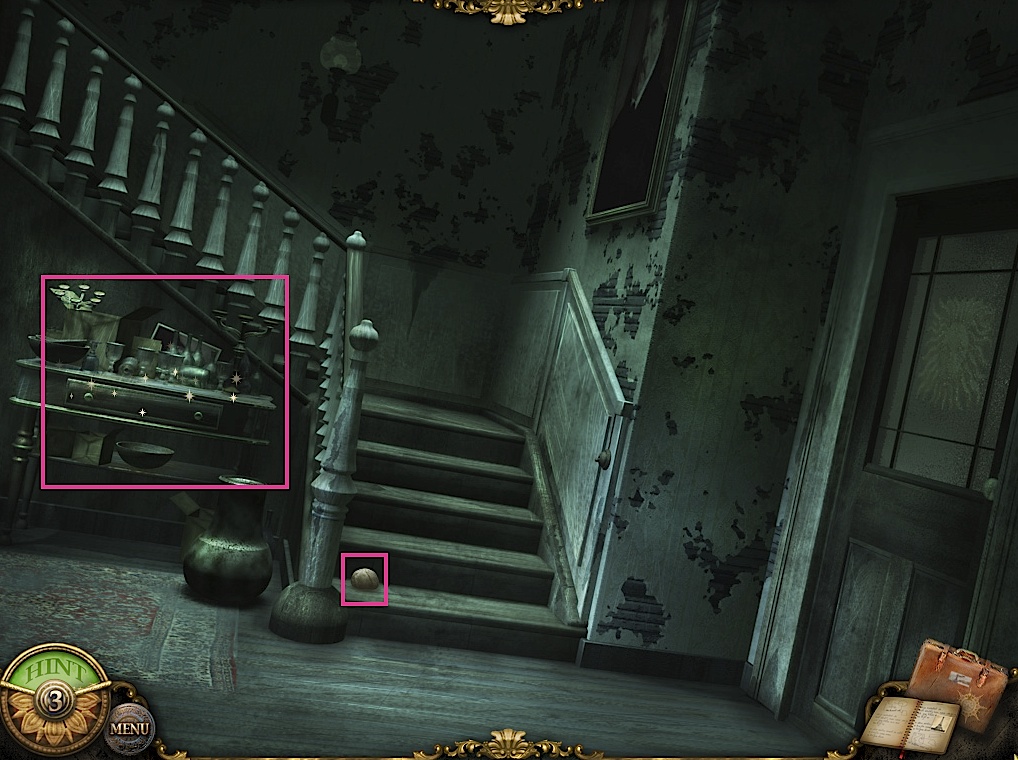
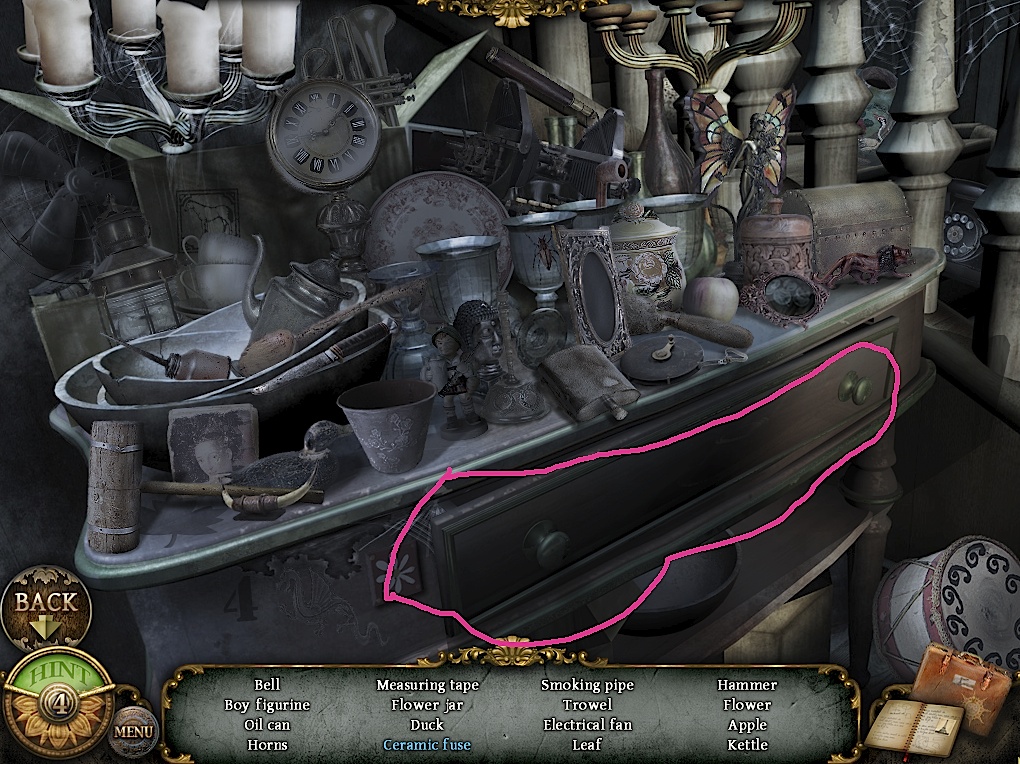
Go back and enter the house's foyer. Pick up the stone on the steps. Try to go upstairs but fail, and do the hidden object scene in the desk. Screenshot.
Open the drawer in the hidden object scene to get a fuse. Screenshot.
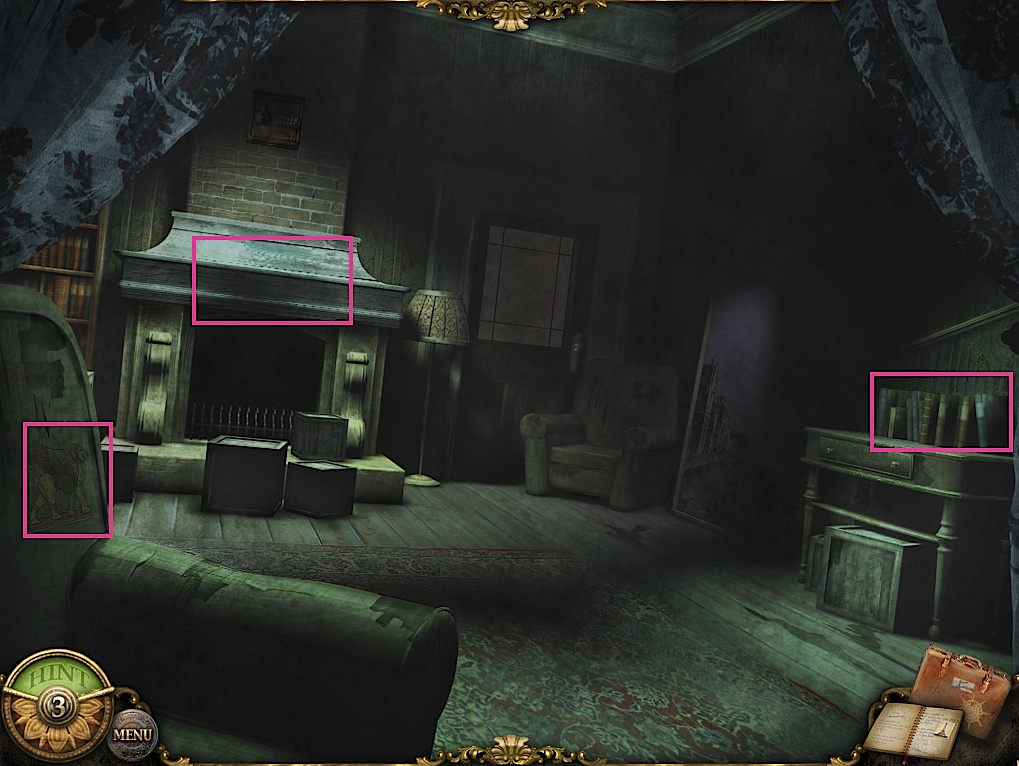
Go to the living room and click on the faded image on the armchair, which is a special item. Click on the mantlepiece and take the lighter. Click on the books and get a secret note. Screenshot.
Go back to the garden shed area and use the secret note you just picked up as the clue to unlock the lock. The solution is very easy: Simply point the top arrow at the left hand circle, the left circle at the bottom, the bottom at the right, and the right at the top.
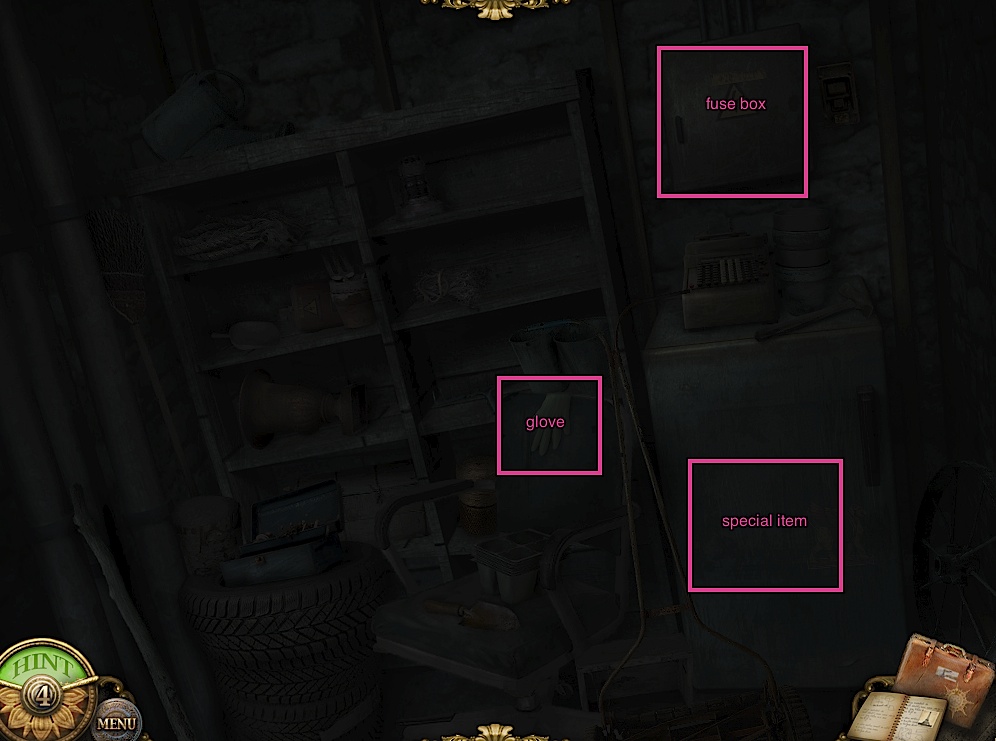
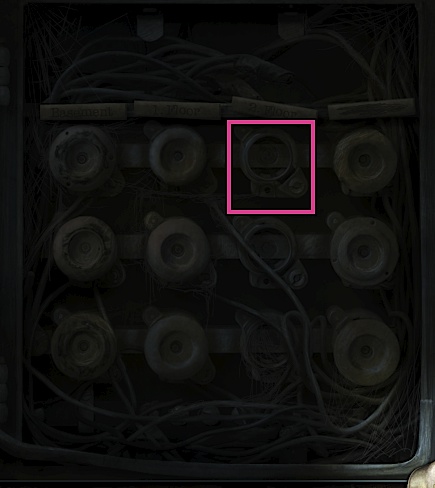
The shed is dark, but you can use your flashlight to see. Pick up a glove and special item, then open the fuse box. Screenshot.
Use the fuse on the top row, third from the left. Screenshot.
Go back to the foyer and the staircase will be lit now. Take the secret item above the lit stairs. Screenshot.
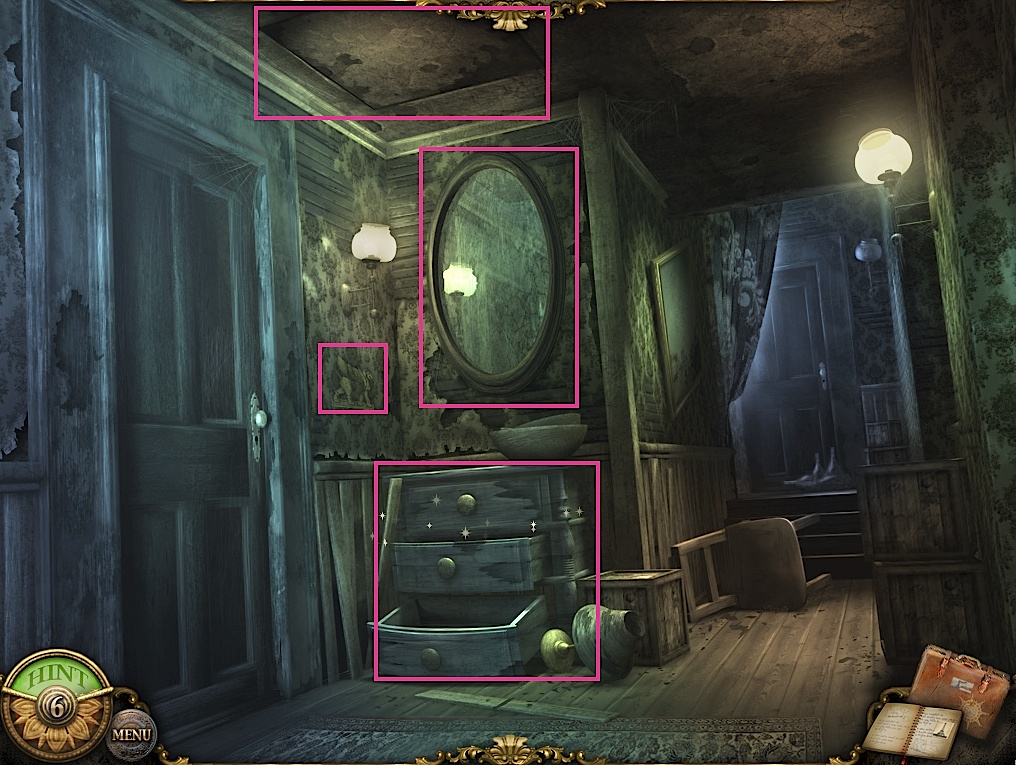
Go upstairs. Use the stone on the mirror to break it, though you can't solve the puzzle behind it yet. Take the secret item to the left of the mirror. The trapdoor can't be opened yet. Click on the drawers to do a hidden object scene. Screenshot.
Take the lightbulb to the right of the drawers in the hidden object scene. Screenshot.
Go back to the living room and use the lightbulb on the lamp to light up a hidden object scene. Get the oil lamp piece in the drawers. Screenshot.
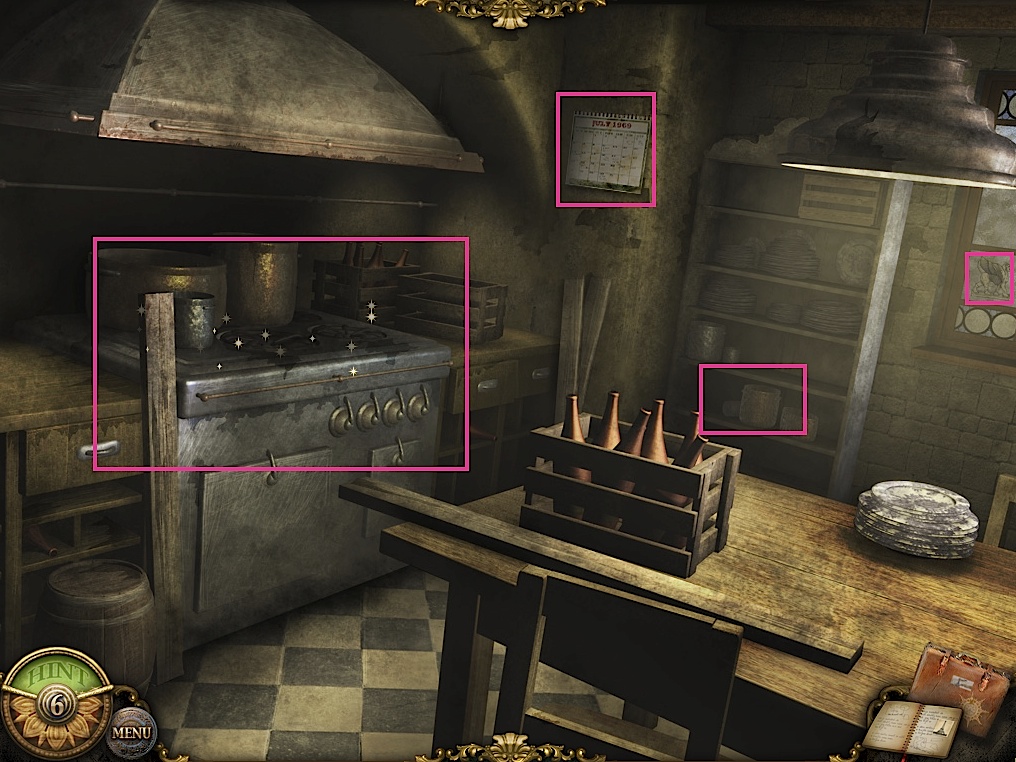
Go through the door in the living room to the kitchen. Click the calendar to get a clue. Click the secret item in the window. Click the lower shelf to zoom in, then pick up the scissors. Click on the oven until you get a hidden object scene. Screenshot.
Get the strangely pink duct tape at the right corner of the range in the hidden object scene. Screenshot.
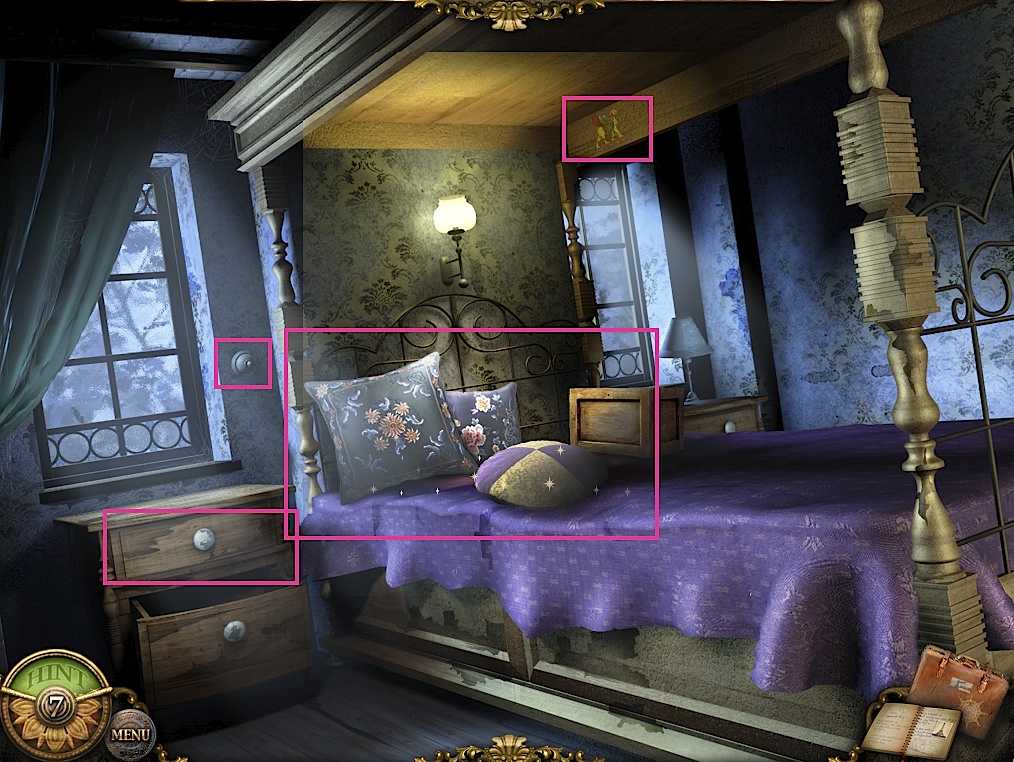
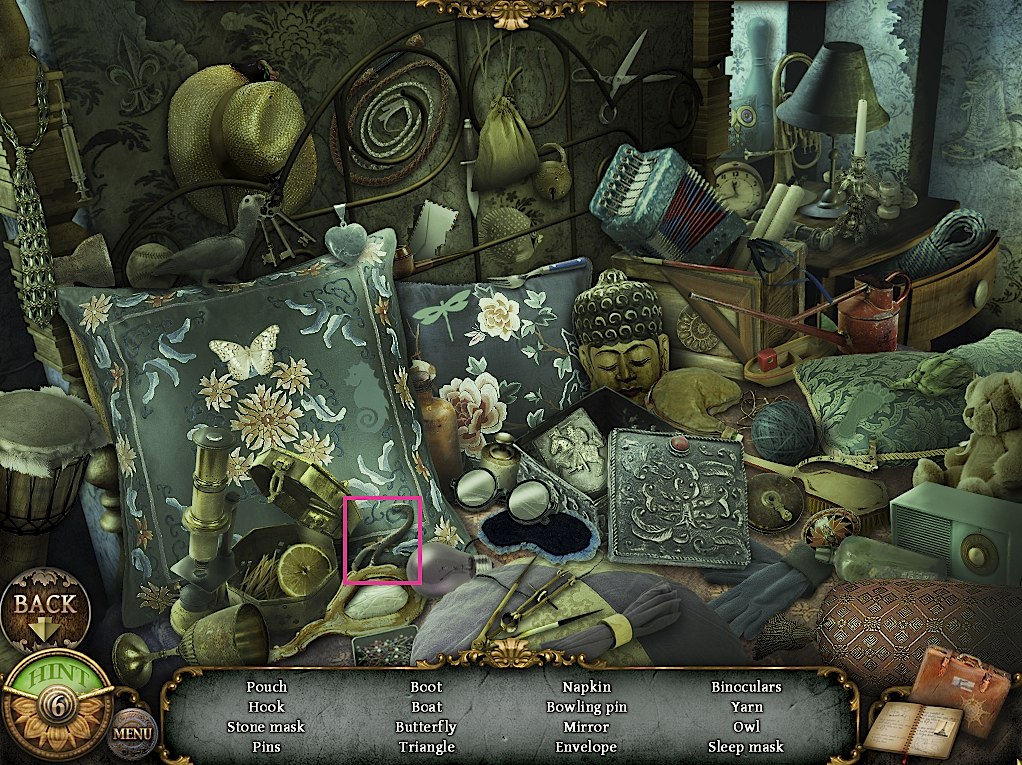
Go back upstairs and through the left-hand door to a bedroom, using the rusty key to open it. At first the bed will be dark. Zoom in on the switch and use the duct tape to keep the switch on and reveal a special item at the top and a hidden object scene. Also pick up another oil lamp piece in the top dresser drawer. Screenshot.
In the bed hidden object scene, open the drawer in the back and the box on the bed to find the blue items, including a screwdriver. Screenshot.
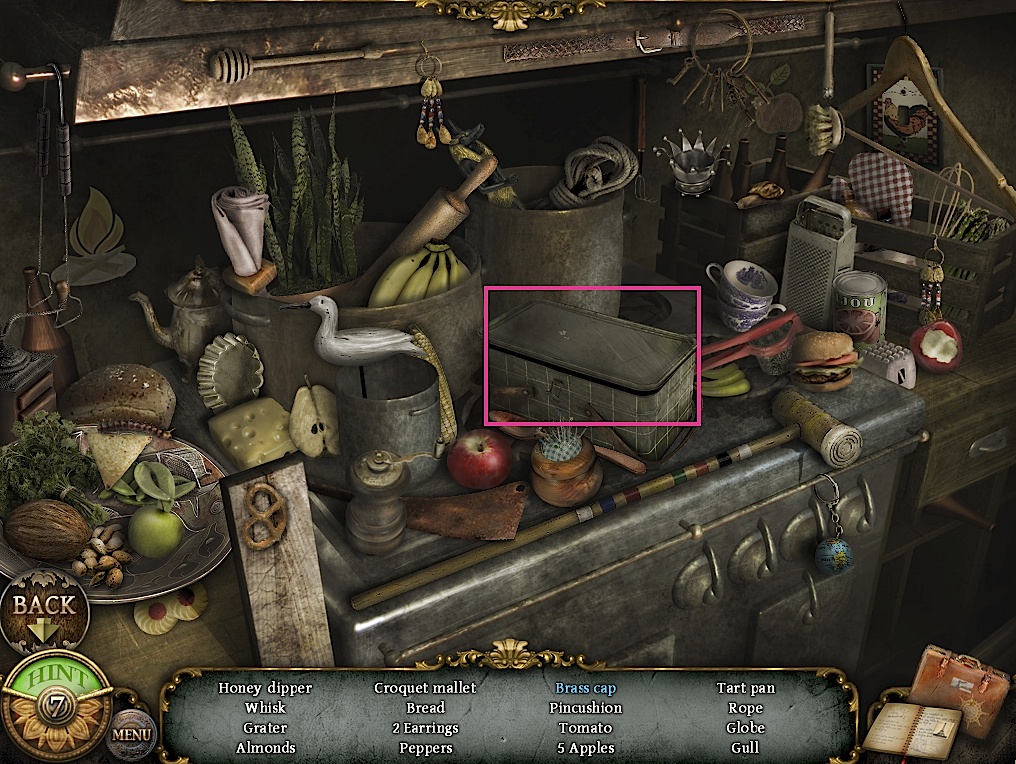
Go back to the kitchen and complete another hidden object scene on the stovetop. Use the scissors on the box to get a brass cap (another oil lamp piece). Screenshot.
Use the screwdriver on the oven door to open it. Place the oil lamp on the bottom in the area with the dripping oil. Go back upstairs and click on the drawer hidden object area.
Get another oil lamp piece (a glass tube) on the top of the dresser in the hidden object scene. Screenshot.
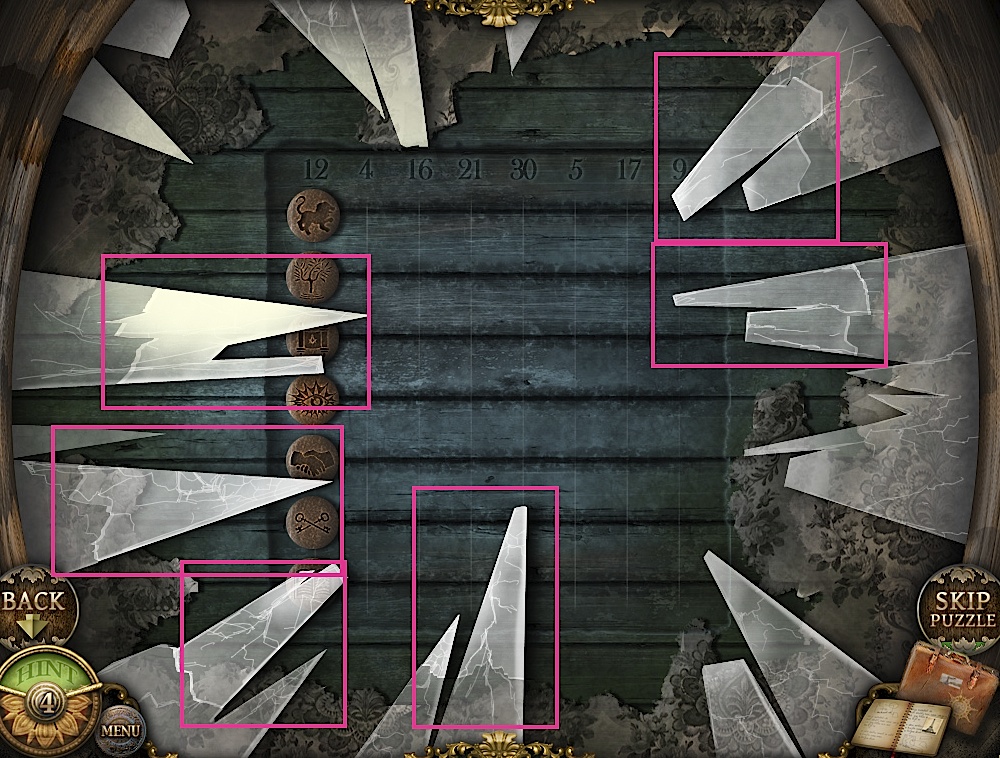
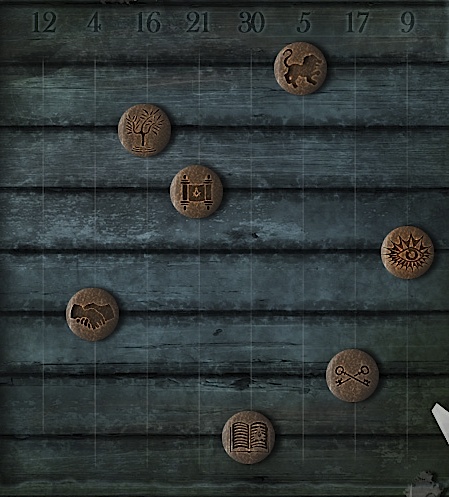
Before going back downstairs, zoom in on the mirror, smashing it with the stone if you haven't already, and using the stone to get rid of the six jagged areas. Screenshot.
Use the calendar clue from the kitchen to solve the puzzle. Move the symbols to the number day that the associated activity took place. Screenshot of solution. This opens the trapdoor, but first go back to the kitchen and pick up the oil lamp bottom, which now has oil in it.
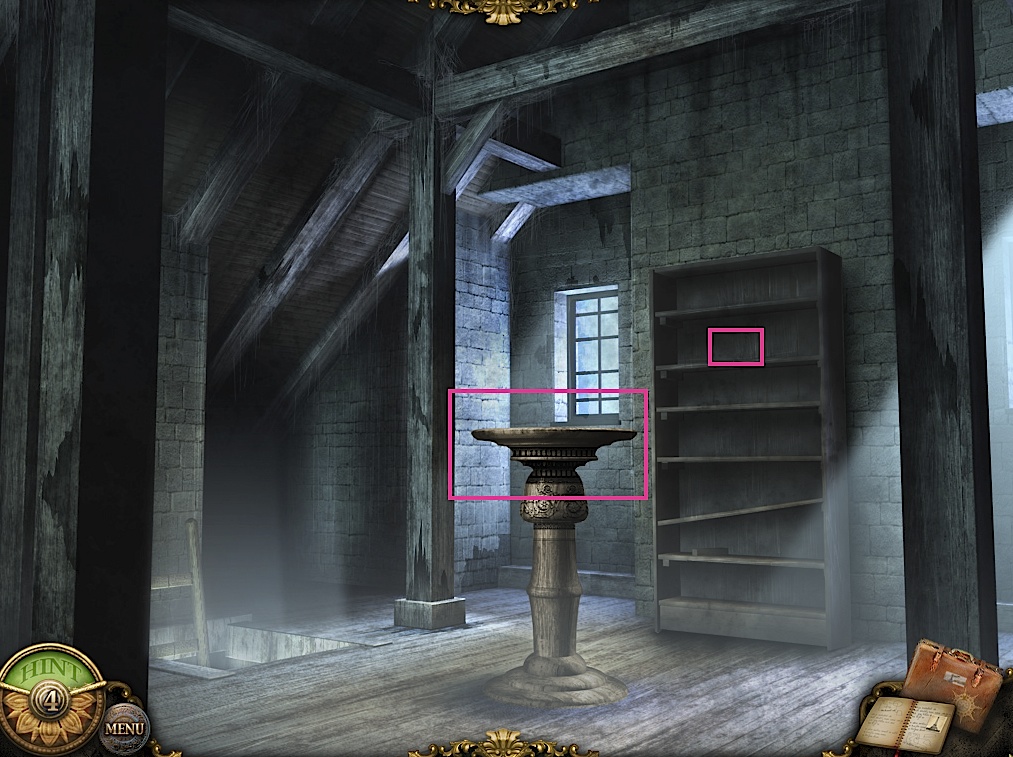
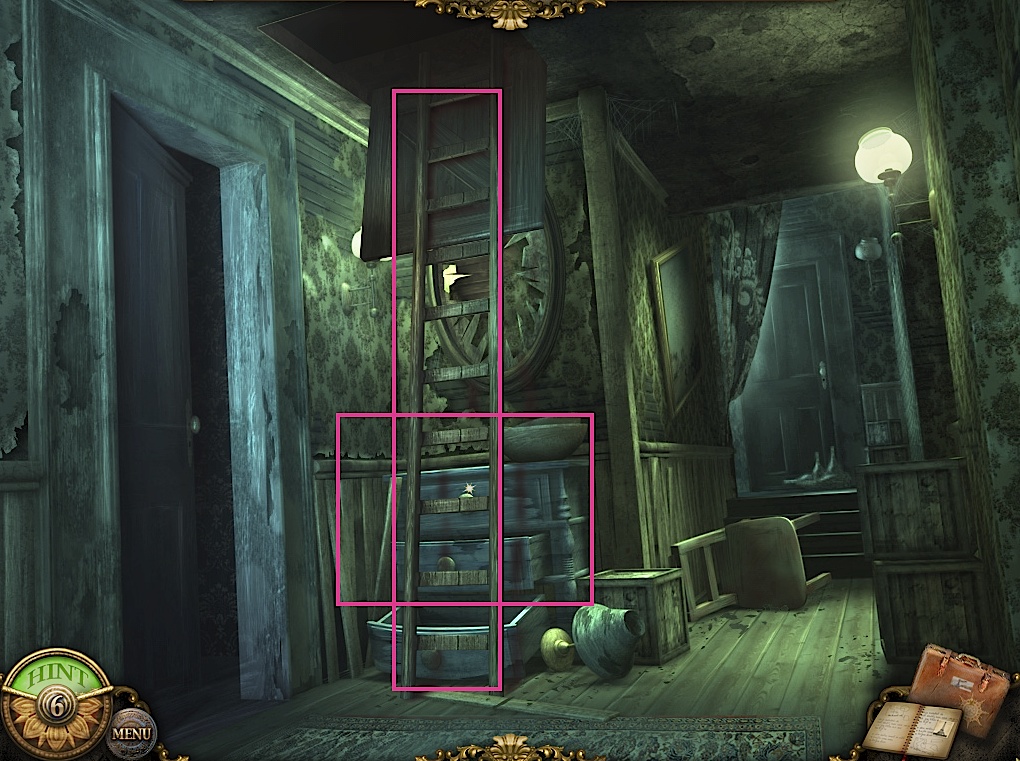
Once you have the filled oil lamp bottom, go back upstairs and use the ladder on the trapdoor and go up. There will be a pedestal and an empty bookshelf. Screenshot.
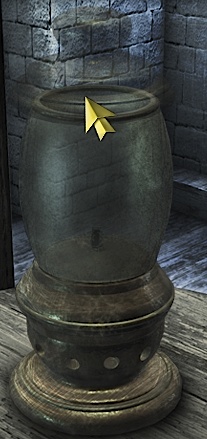
Assemble the oil lamp on the pedestal, starting with the oil lamp bottom, then the part, then the glass, then the top. Screenshot. Use the lighter on the assembled oil lamp and it will light up a spot (marked on the previous screenshot).
Use the crowbar on the bookshelf again and again until a painting is exposed. Click on the painting and use the scissors to cut it out of the frame. Take the key behind the painting.
Chapter 4:
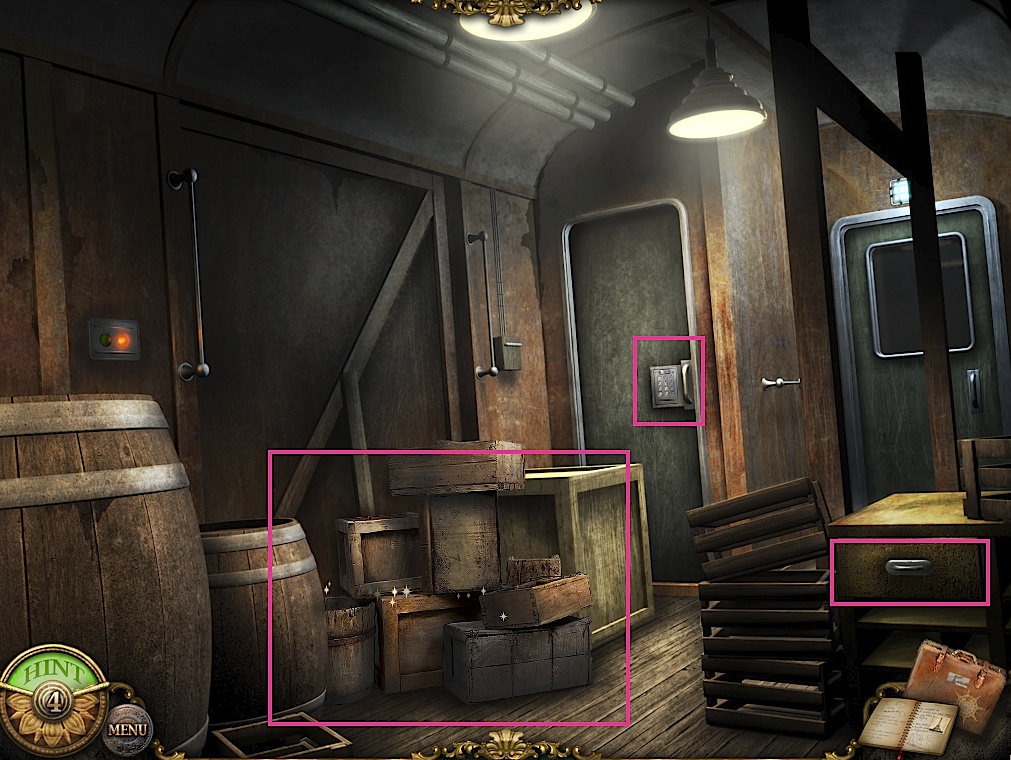
Click on the drawer on the right to get a loupe and also pick up the ring, which is a special item. The code pad on the door is a puzzle for later. The crates are a hidden object scene. Screenshot.
Among the hidden objects, pick up a pair of pliers at the top. Screenshot.
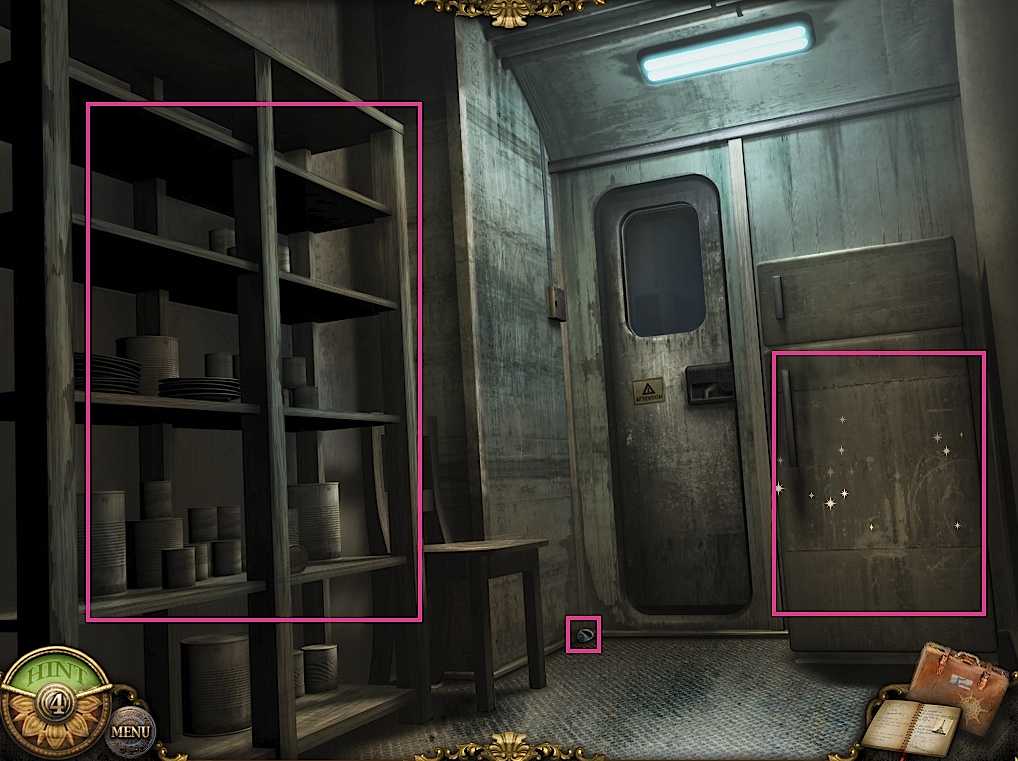
Go through the other door and then go through the right hand door to the kitchen. Pick up the special item at the bottom center. The shelves and fridge will both be hidden object scenes; right now the fridge is one. Screenshot.
In the fridge scene, get the corkscrew on the bottom shelf. Screenshot.
Go back to the hallway with the wine cart. Use the corkscrew on the wine bottle to get a cork. Screenshot.
Go further into the dining car and forward again into the first sleeping car. Room #1 is the villain's room and room #2 is your room. There is also a green sign here, but you don't have the tool to manipulate it yet. Screenshot.
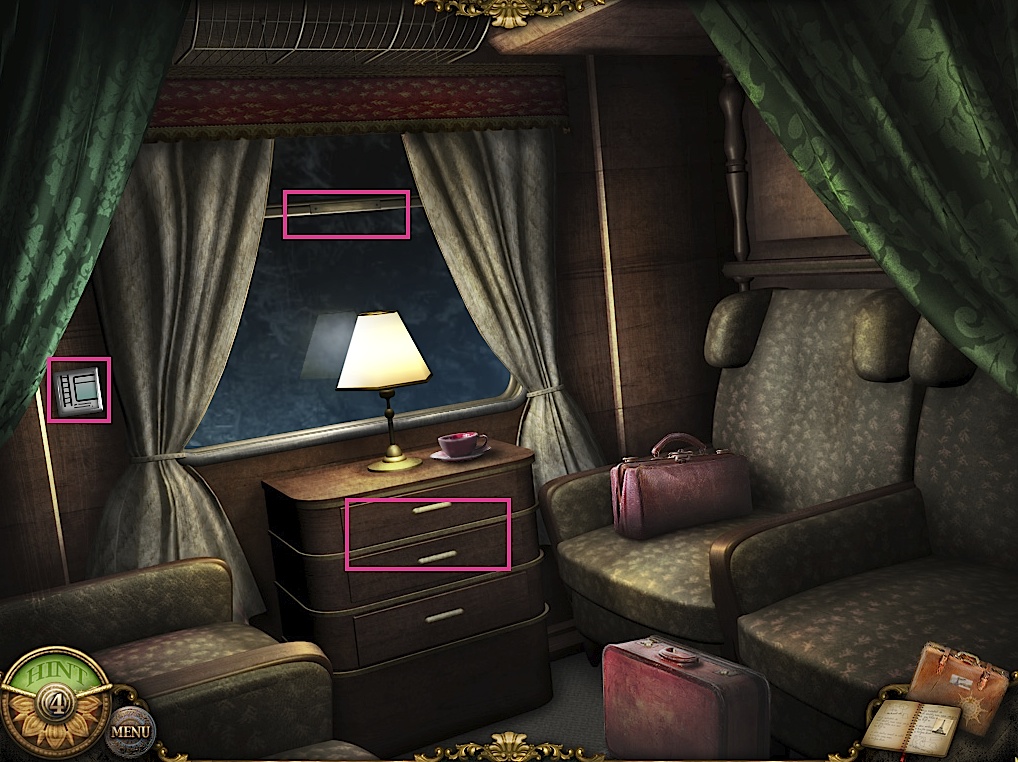
Enter your room. Note the window handle is missing and that according to the sign on the left, there is a ladder outside the window. Click on the drawer, click the book inside the drawer, and get a glove. Go back to the dining car. Screenshot.
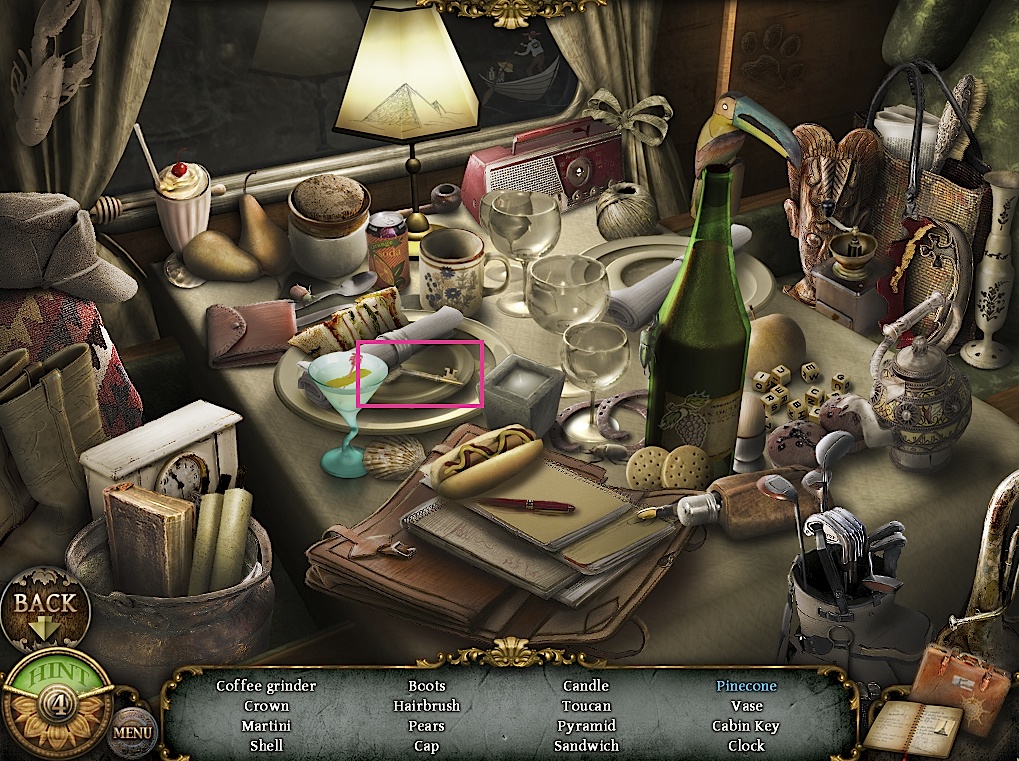
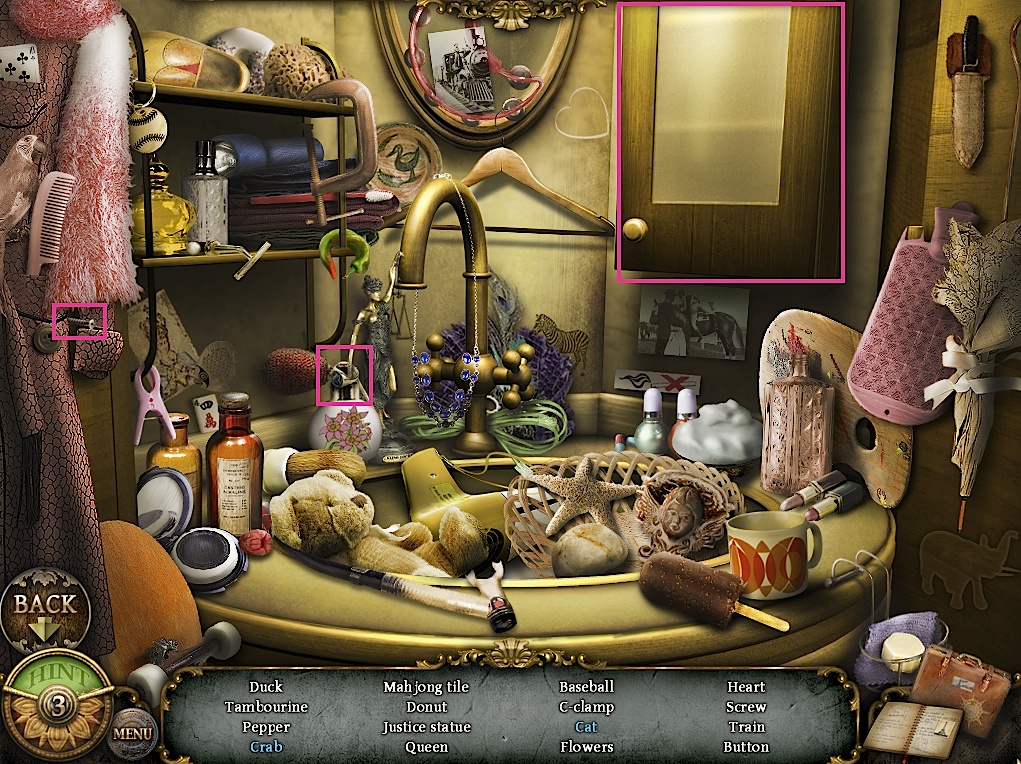
There is a hat box on the luggage rack on the top left, but you can't manipulate it yet. Click the table on the left for a hidden object scene. Screenshot.
Get the key on the plate in the center in the hidden object scene. If you have the pinecone on your list in blue, it is inside the corked jar, but this is random. Screenshot.
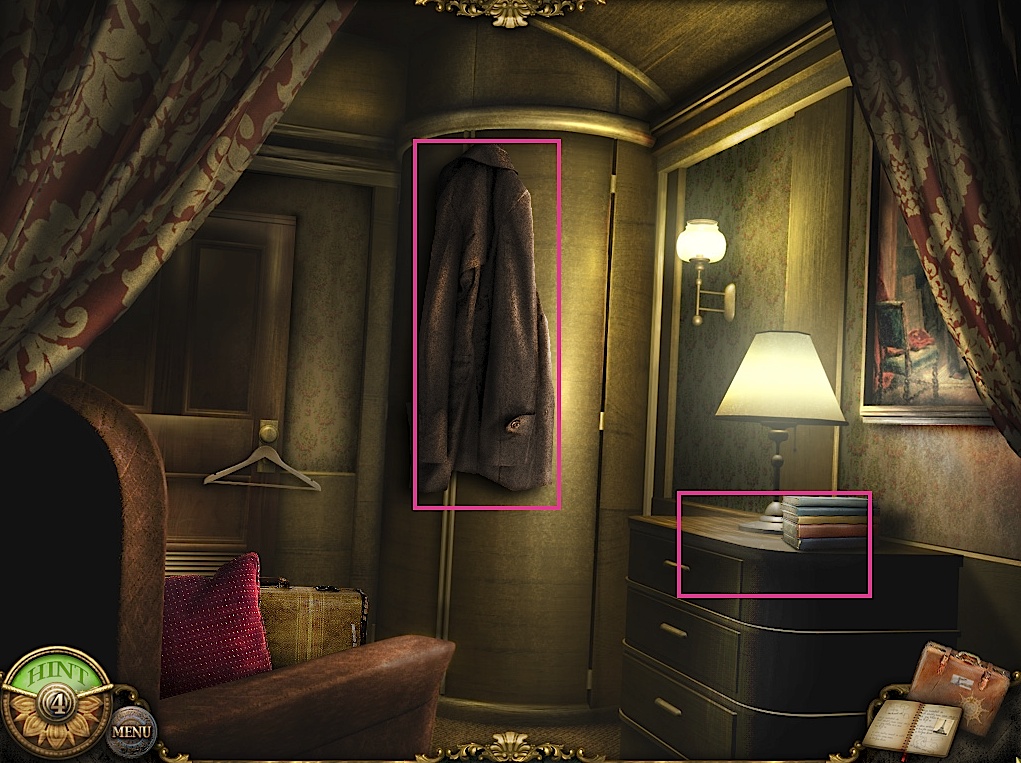
Go through the first sleeping car and into the second. Unlock door #5 and go in. Click on the desk and get a knife. Click on the coat to reveal the locked bathroom behind it, although you don't have the key yet. Screenshot.
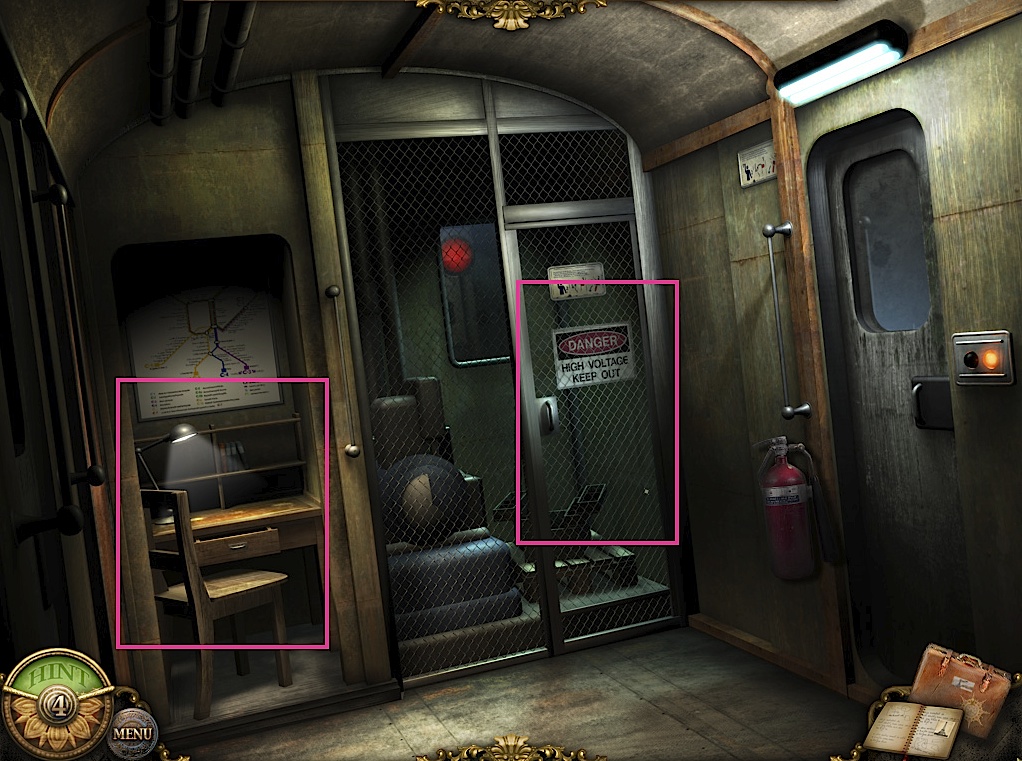
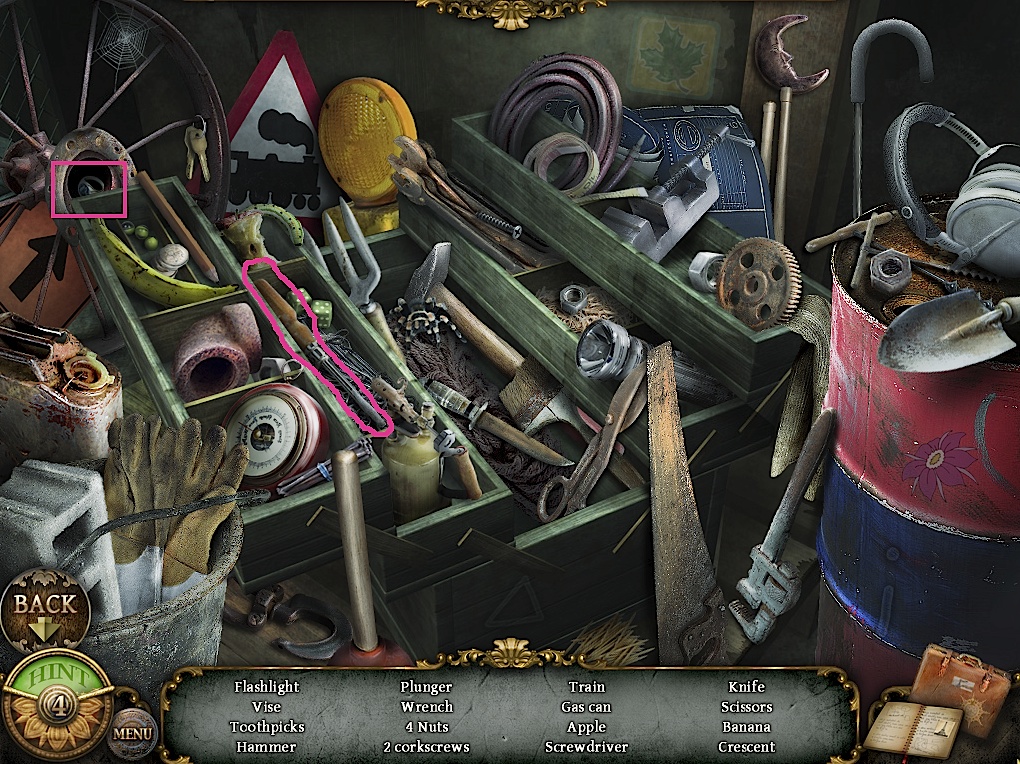
Go further down from the second sleeper car into the conductor's area. There is a hidden object area on the left and a gated area on the right. Zoom in on the gated area and use the pliers on the links repeatedly to break in. Once you finish, the toolbox behind the gate is a hidden object scene. Screenshot.
In the toolbox hidden object scene, get a special item inside the wheel on the left, and pick up a screwdriver in the toolbox. Screenshot.
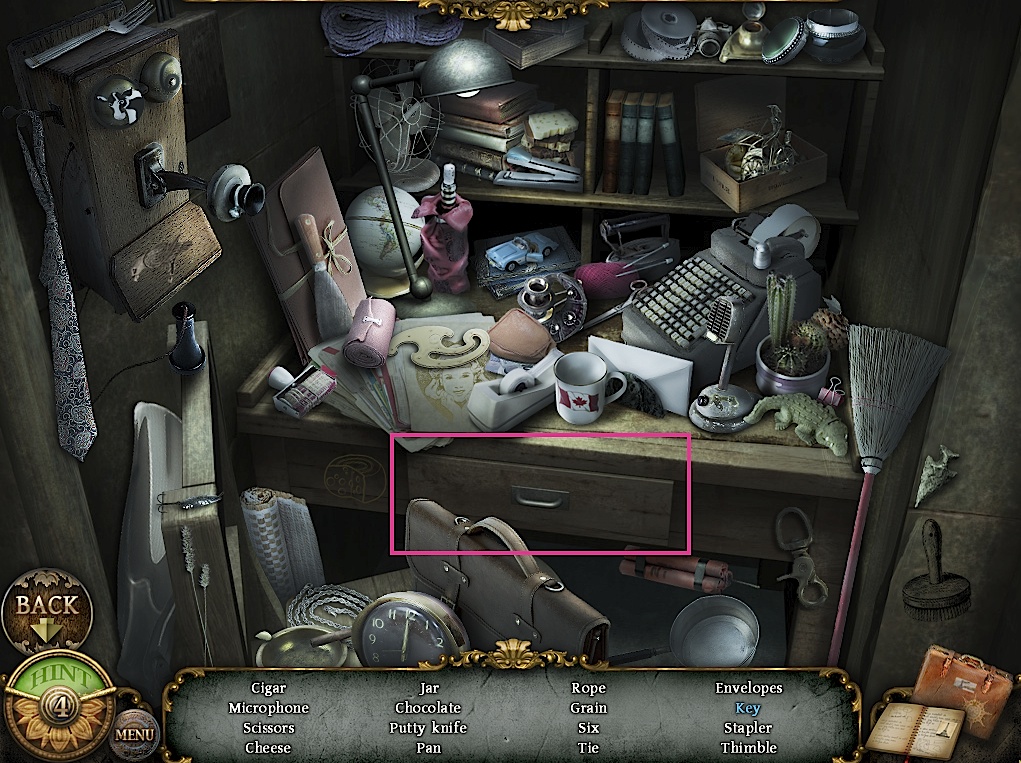
Click on the other hidden object scene, the desk. Open the drawer to get the key. Screenshot.
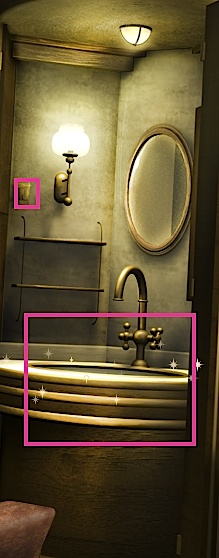
Go back to cabin 5, but before going in, use the cork on the door of cabin 6. In cabin 5, use the key to open the bathroom. Hit the switch to turn the light on and show the hidden object scene. Screenshot.
There is a special item above the sink on the left of the faucet. There is a screw next to the bathrobe on the left. Screenshot.
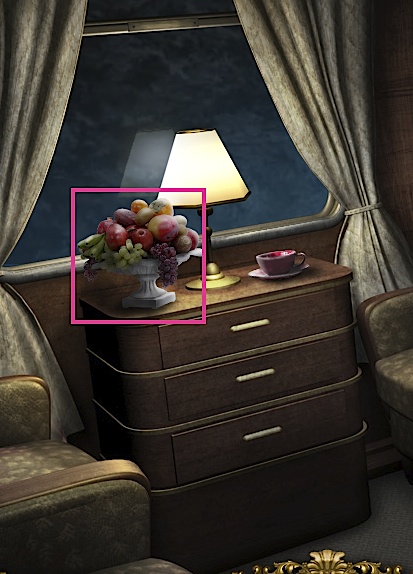
Go back to your room, but before going in, use the screwdriver on the green sign outside the door to get another screw. Inside the room, your requested fruit has been delivered. Click on the fruit and get the key to the roof as well. Screenshot.
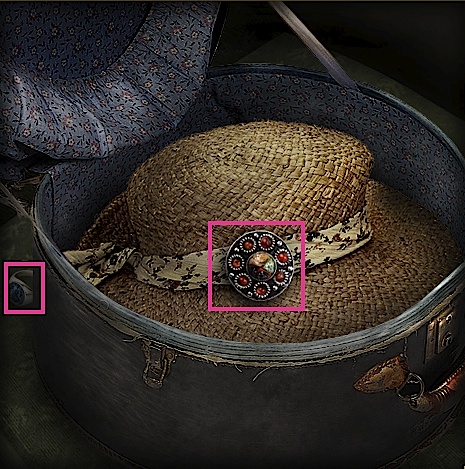
Go back to the dining car and click on the hat box. Use the knife on the brooch to cut it off. Also pick up the secret item to the left. Screenshot.
Go to the kitchen car, where the shelves are now a hidden object area. Get the rope on the bottom shelf. Screenshot.
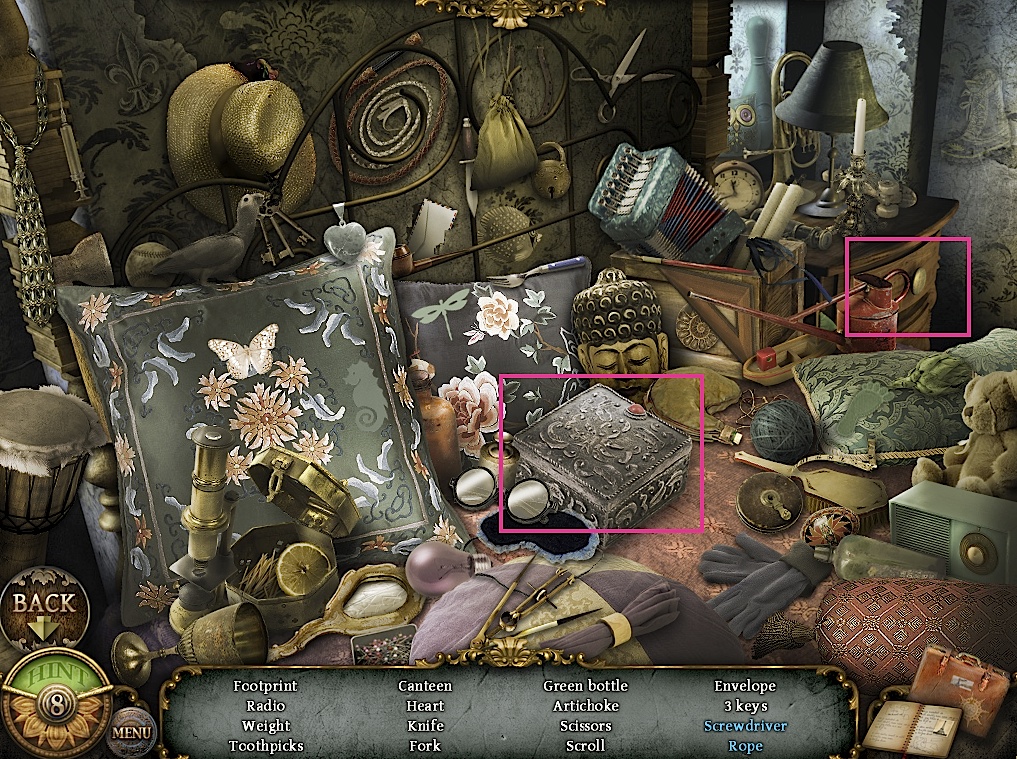
Go to cabin 6. Take the special item from the bed. Use the knife on the robe to get the belt. Click on the chair's pillow to reveal a pipe. Use the loupe on the pipe to get a clue. Look at the box on the table, though you can't yet open it. Screenshot.
Go to the conductor's car again and do the desk hidden object scene, picking up a handle for the window. Screenshot.
Go back to your cabin (#2) and click on the handle area. Use the two screws on the holes and use the screwdriver on the screws. Go through the window and up the ladder and forward. Use the roof key on the lock, and use the rope on the handle. Climb down into the cabin. Screenshot.
The cabin contains a hidden object scene in a painting. The items are all random, and you will get a note from Jassili when you finish it. There is a special item on the lamp on the right. Take the sun brooch out of the shoes at the bottom. Click on the mask on the wall and use the brooch from the hat box in the dining car to make it open its mouth and take a key. Use that key on the vase on the left to open it and get the capsule. Use the belt on the rope to lengthen it and climb back out. Then close the roof door and go to cabin 6. Screenshot.
Click the box on the table. Put the sun brooch in the hole. Using the scratchings from the pipe as a clue, enter the combination:
8 towards the star, 4 towards the moon, and 3 towards the stair.
Take the ID card from in the box.
Go to the luggage cart and click on the code pad lock on the door. Use the ID card to power it up. Use the note from the painting and the scratchings to the left of the pad as the clues to solve the combination. You must enter the numbers in ABCD order:
3962
Chapter 5:
Take the special item (a sun) out of the pot. Enter the house. Screenshot.
Take the special item from the front of the vase. Click on the desk to zoom in and get a gem from the jar. Screenshot.
Go upstairs. Take the ladder. Click the drawers for a hidden object scene. Screenshot.
Get a red gem in the hidden object scene. Screenshot.
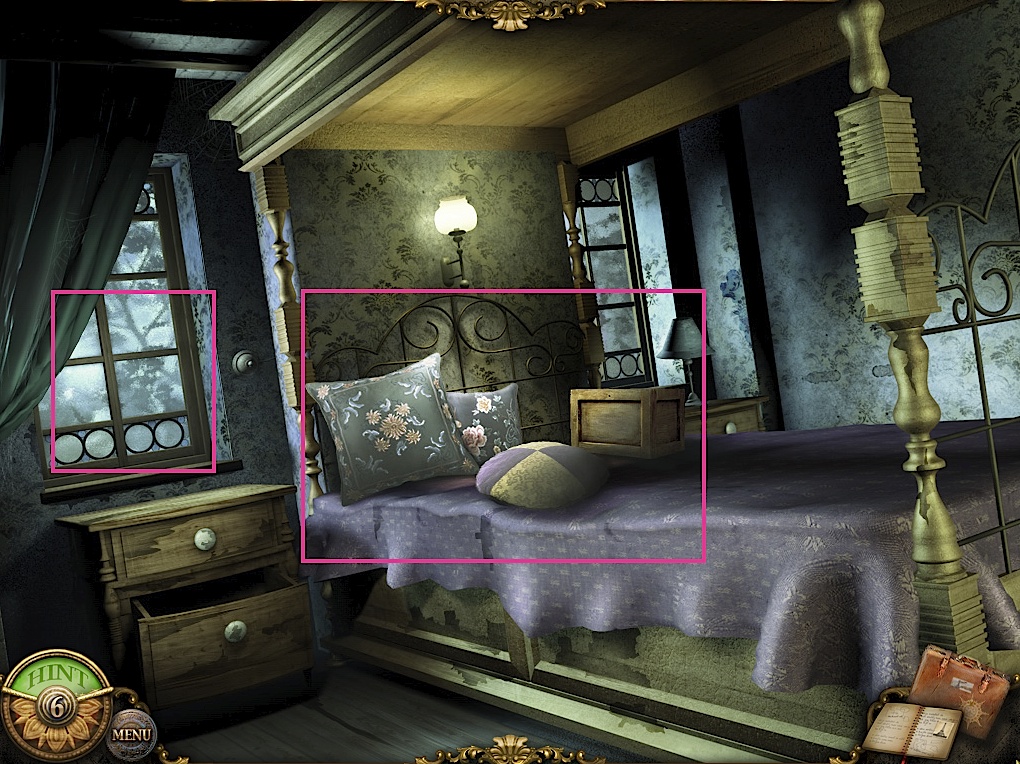
Go through the left door into the bedroom. You can look out the window and see a rope, but you can't reach it yet. Click on the bed for a hidden object scene. Screenshot.
Inside the hidden object scene, get the hook in front of the leftmost pillow. Screenshot.
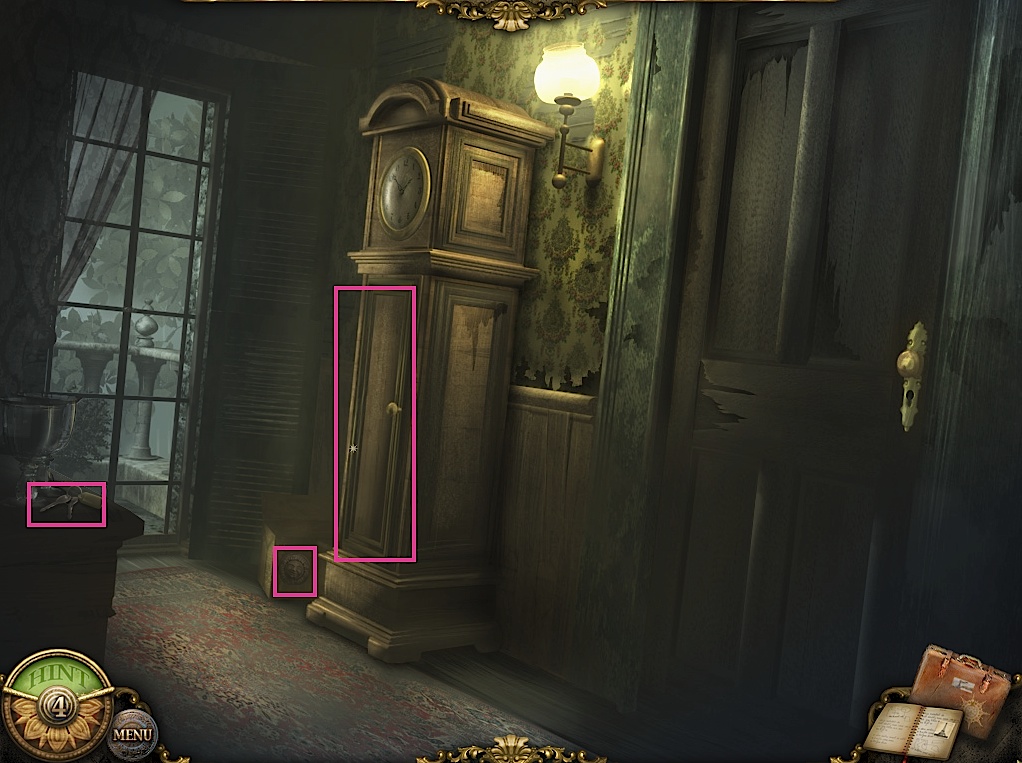
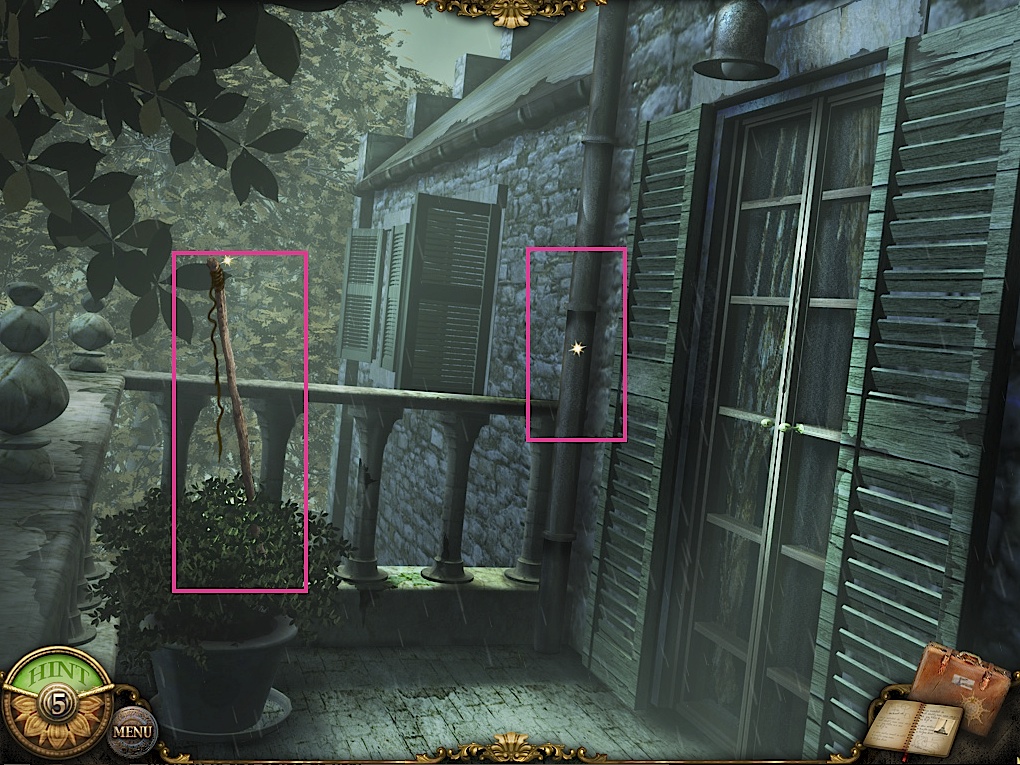
Go back to the upstairs landing and take the right door this time. Take the special item on the cardboard box and the car keys off the desk on the left. The grandfather clock contains a gear puzzle that can't be completed yet. The door to the right is currently locked. Go out the balcony. Screenshot.
Click on the fishing pole to zoom in, and use the hook on it to combine and pick up the finging angle. Use the ladder on the pipe to lean it against it. Go up the ladder. Screenshot.
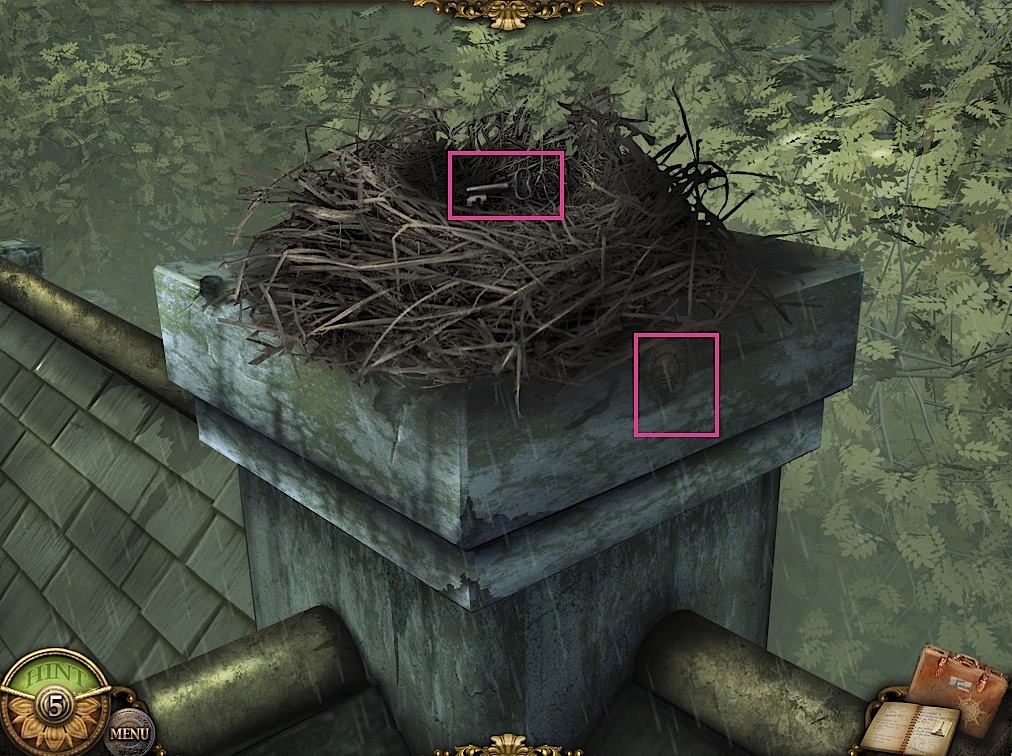
Pick up the key inside the nest and the special item on the side. Screenshot.
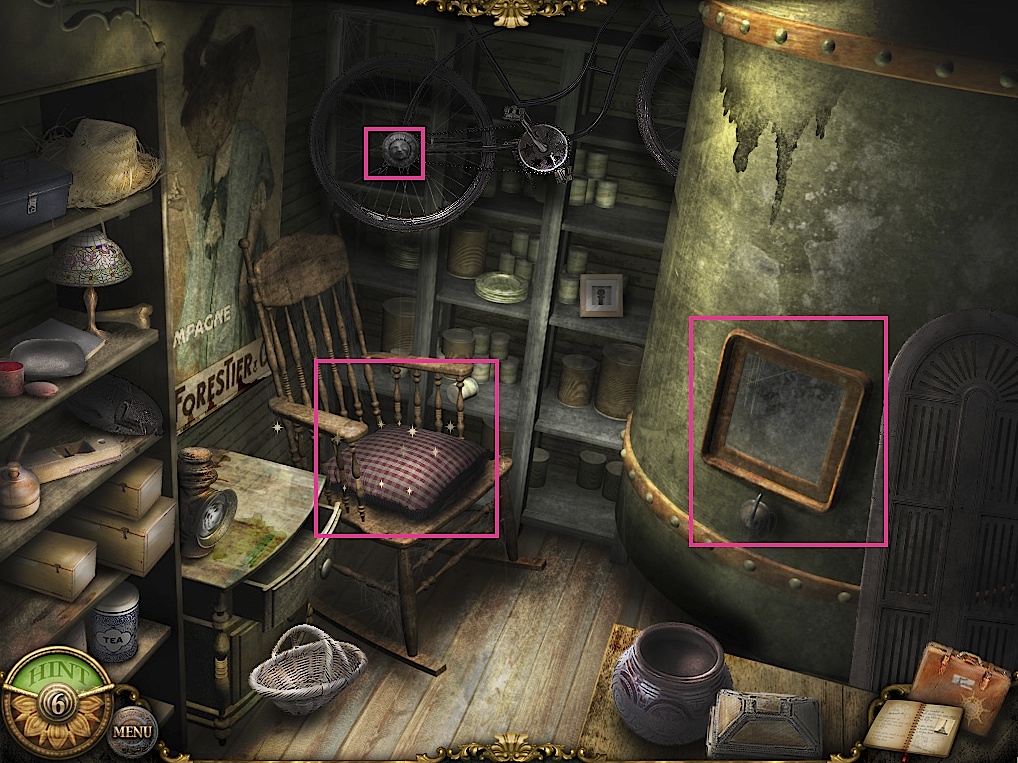
Go back down and use the key on the locked door to get to an boiler engine room. Get the special item on the bike wheel. The window has a key behind it but can't be broken yet. Click the rocking chair for a hidden object scene. Screenshot.
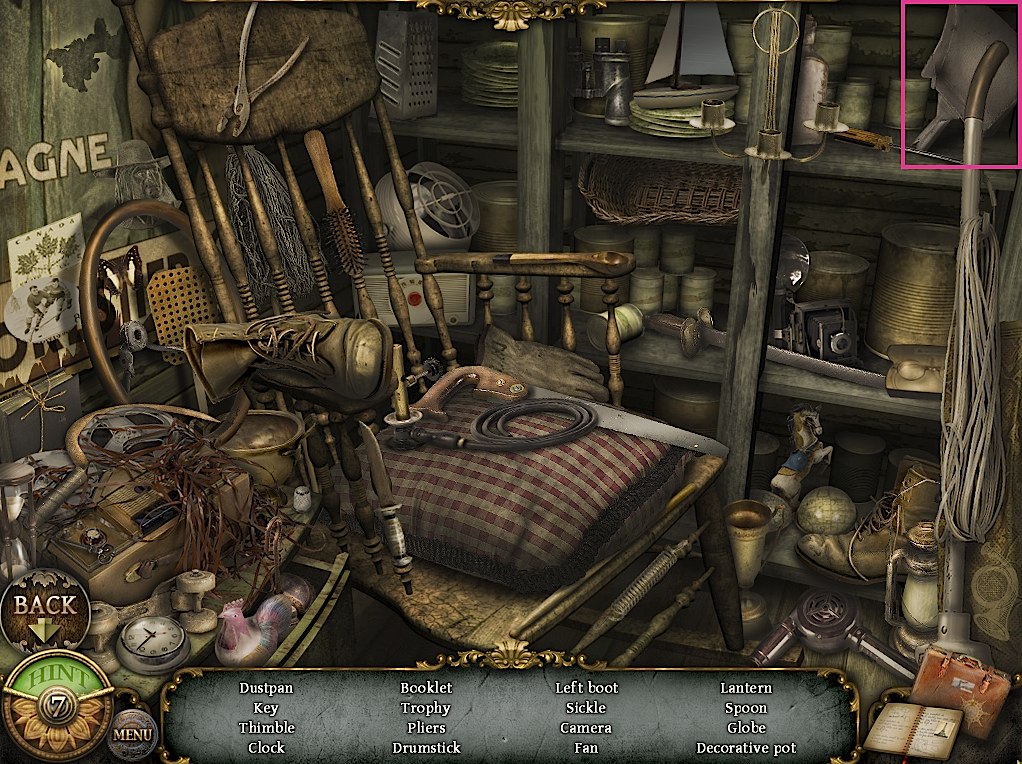
Find a dustpan in the upper right of the hidden object scene. Screenshot.
Go up to the chimney and use the dustpan on the bird's nest to clear it.
Go to the bedroom and look out the window and use the fishing angle to get the rope. Screenshot.
Go to the living room and click on the fireplace for a hidden object scene. Screenshot.
Get another gem in this scene, on the left. Screenshot.
Go outside the house and right. Pick up a piece of wood in the lower left. Note the dome, though you don't have the clue yet to solve that puzzle. Screenshot.
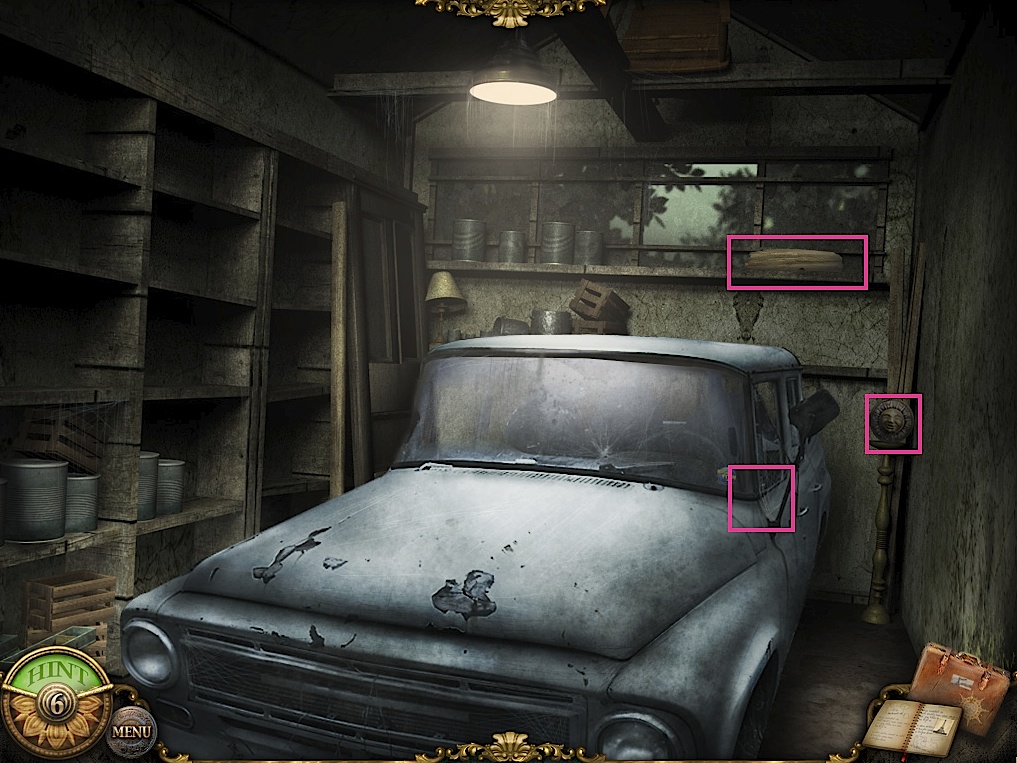
Go right again to the grage. Pick up the stick leaning against the garage. Use the rope on the garage door. Zoom in on the car and use the rope again on the trailer hookup. Enter the garage. Screenshot.
Get the special item on the right. Pick up the wood from the shelf. Open the car door with the car keys for a hidden object scene. Screenshot.
Get the gear from the car door in the scene. Screenshot.
Exit the garage and go right again further into the garden. There is a special item on the bridge. There is a gap in the bridge which we'll fix in a minute, but first, click around the statue on the right to go to a small graveyard. Screenshot.
Pick up the gear from the cross. Click on the grave that says "John Wood" to record a clue. Screenshot.
Exit the graveyard and examine the gap in the bridge. Use the plank to cover it. Screenshot.
Cross the bridge and keep going until you enter the gazebo. Pick up the special item on the pillar on the right. Click on the conrols to get a clue for the gem puzzle. You don't yet have the arrow for the archer. Screenshot.
Go back to the dome where you got the plank. Follow the clues from the control panel's poem to deduce the order of the colored gems:
Red, blue, green.
This unlocks a hidden object scene, where you will find a wooden figurine. Screenshot.
Go to the living room and click on the fireplace. Put the piece of wood in the fireplace. Use the lighter on the piece of wood. (If you haven't already cleaned the birds' nest with the dustpan, you must do that first to proceed.) Use the wooden figurine on the fire.
While the figurine is burning, complete the hidden object scene to the right of the fireplace, getting a third gear. Screenshot.
Go to the grandfather clock and place the three gears in the open slots. Use the clue from the John Wood grave to figure out the combination.
You must set the left hand side to 17, turn the crank, set the left side to 22, turn the crank, and set the left side to 18 and turn the crank one last time. (The right side moves automatically when you move the left.) This will give you the secret number of 726.
Go into the boiler room and use the rod from the garage on the boiler window. Take the small key.
Go back to the fireplace and the fire should be out. Take the arrow from the ashes.
Go to the gazebo. Use the arrow on the archer. Zoom in on the control panel and use the small key on it. Set the control panel to the secret number from the grandfather clock (726). You can do this by hitting the F button 16 times, the E button once, the D button three times, and the A button once, but there are many ways to reach the number. Once you have the correct number, turn the key.
Go back to the graveyard and click on the grave with the arrow.
Chapter 6:
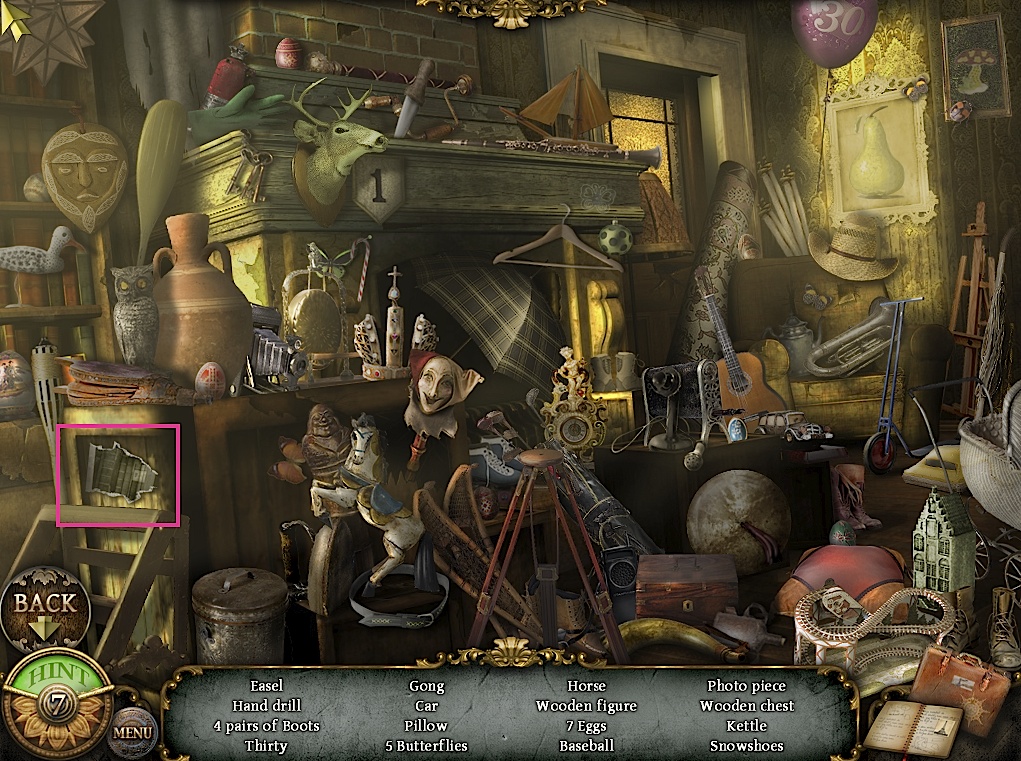
The special item for this chapter is a mask. Pick up the one sitting on the chest here. The map on the wall will later be a hidden object scene, the pad of paper and shield will also be used later. Click on the books in the windowsill to get a key, and use that key on the armoire. Take the pliers inside the armoire. Screenshot.
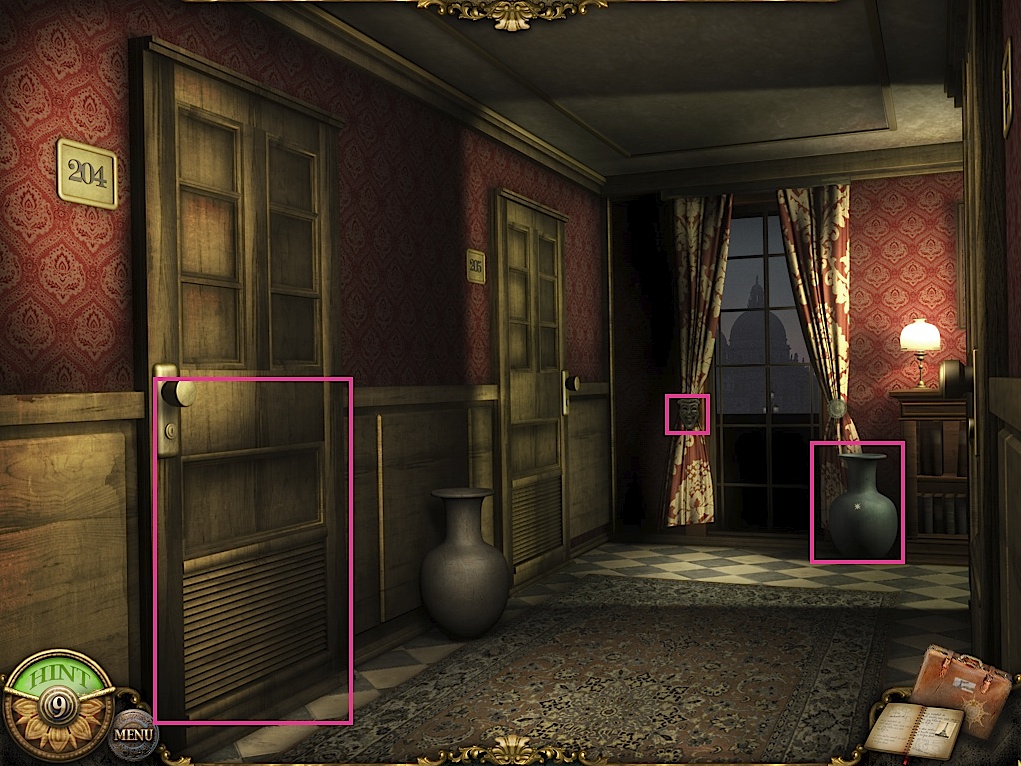
Exit the room. Room 204 will turn out to be the villain's room, but you can't go in yet. Get the special item from the curtains. Get another key out of the vase on the right. Screenshot.
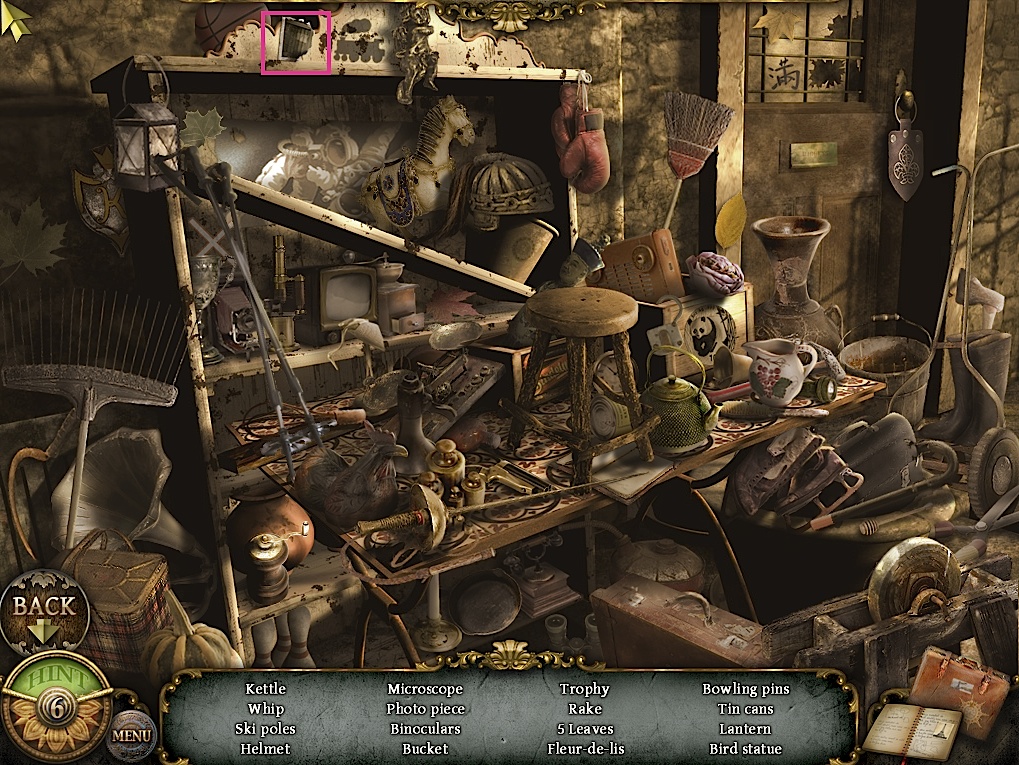
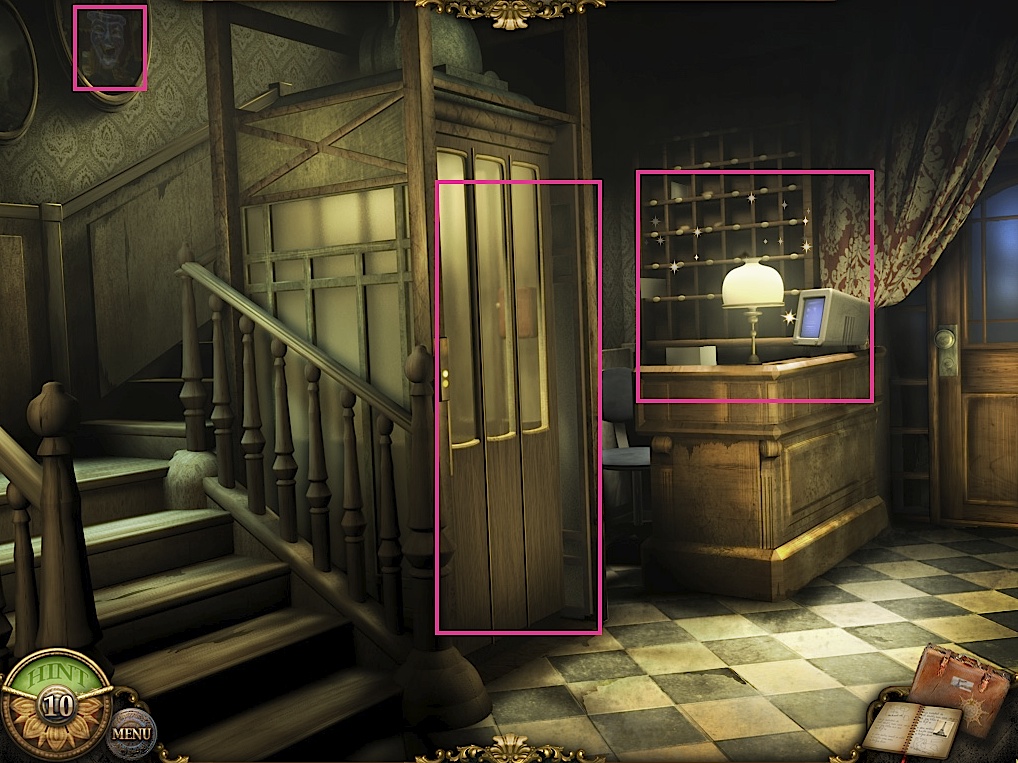
Go downstairs. Get another special item on the staircase wall. Open the elevator and zoom in on the control box. Use the key from the vase to open it and take a pencil from the top and a flashlight from inside. The desk is also a hidden object scene. Screenshot.
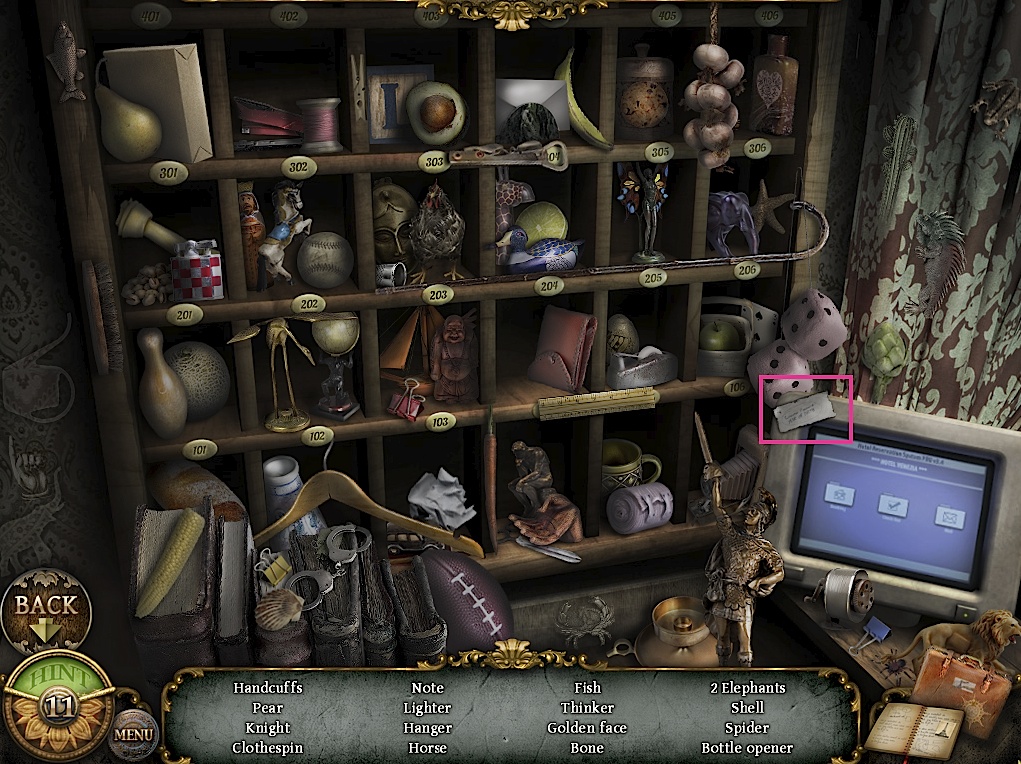
Complete the hidden object scene, taking the paper from the computer. Screenshot.
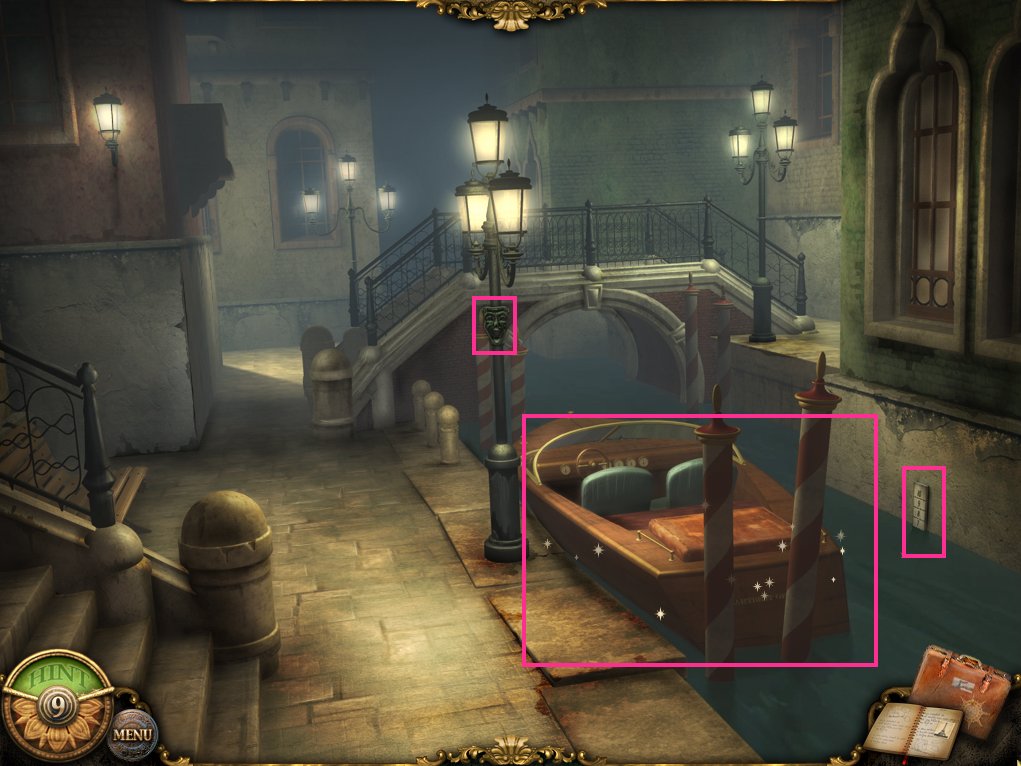
Exit the hotel and go over the bridge to an area where a boat is moored. Take the hidden object from the lamppost. Check the water level on the right hand side for a puzzle later. Click on the boat for a hidden object scene. Screenshot.
Take the newspaper in the hidden object scene. Screenshot.
Use the clue from the newspaper to deduce the password to the computer (the birth year, 1969). Click on room 204 to find out about Jassili. Go back to your own room and use the pencil on the pad to write a note. Go to the hall and slip the note under the door. Jassili will leave the hotel and then you can enter room 204.
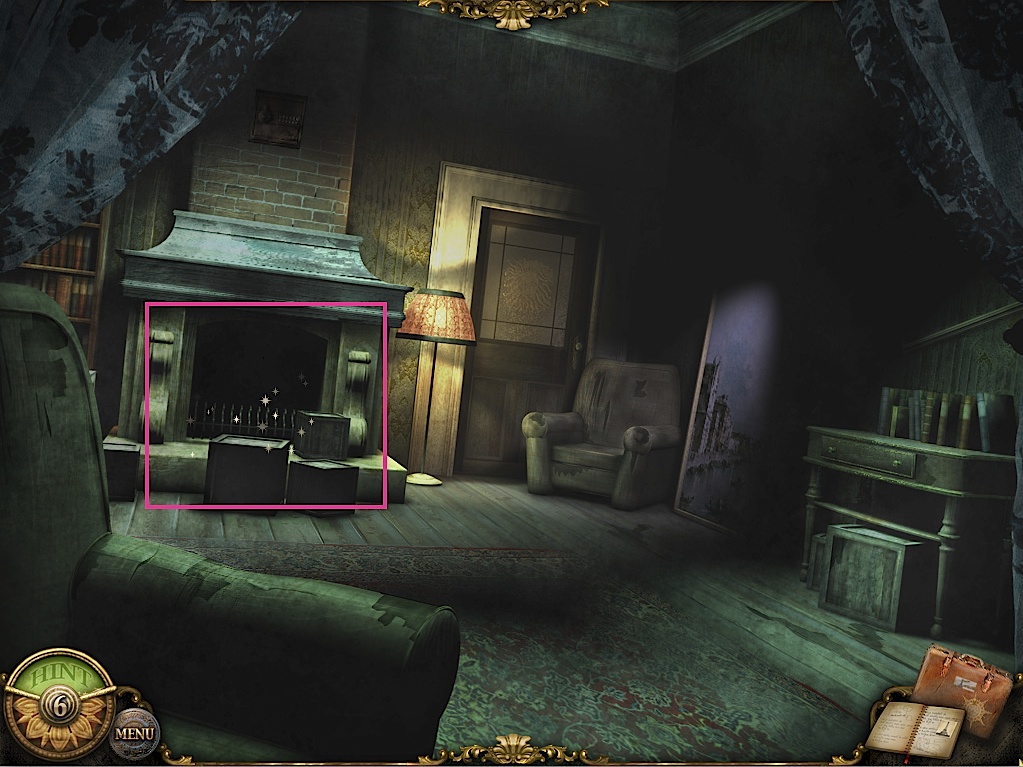
The room is dark, but you can use your flashlight to find things. There is a special item on the top right of the fireplace, and a suitcase to the bottom right of the fireplace. Screenshot.
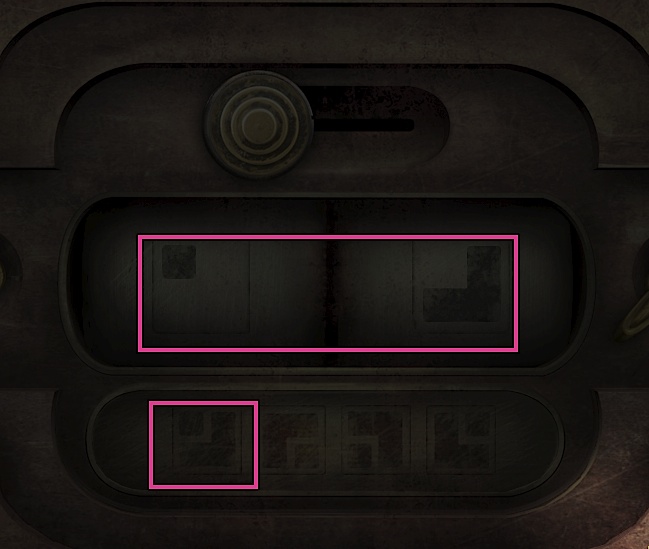
You have to unlock the suitcase in the dark too. Turn the knobs so that the two shapes mimic the shapes on the bottom row. In the screenshot, the two shapes are mimicking the first shape. Do the four shapes in order from left to right and then hit the slider at the top to open the suitcase and get a hidden object scene. Screenshot.
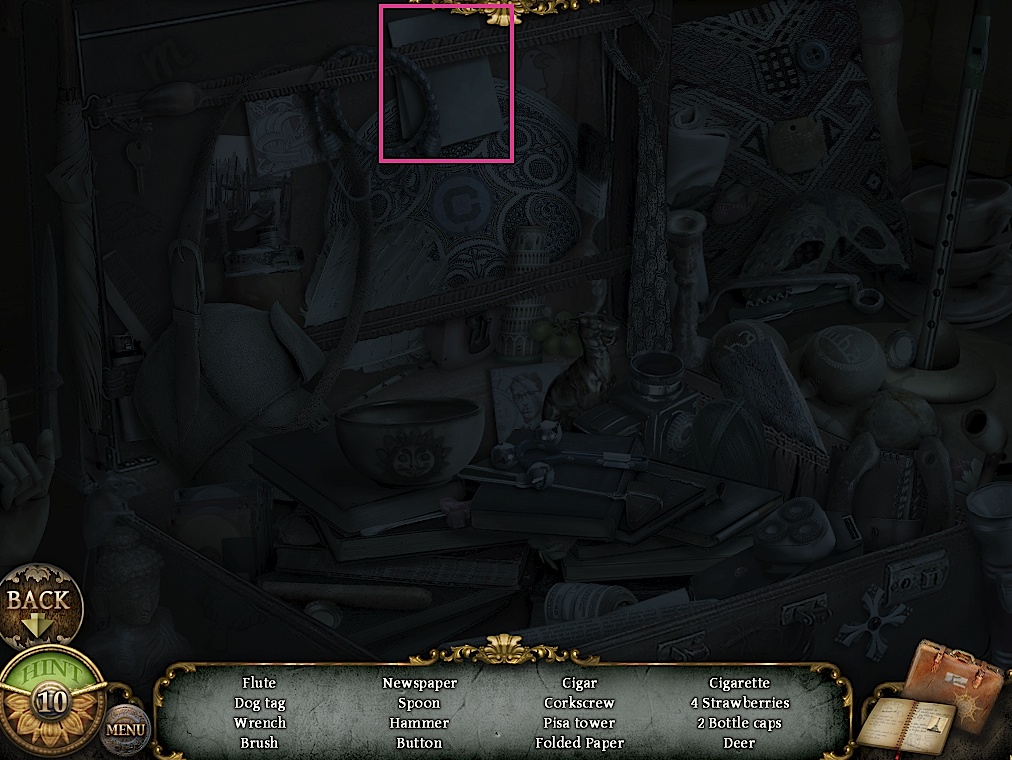
Still in the dark! You'll find a folded paper at the top middle that turns out to be a fax. Screenshot.
Go back to your own room and do the hidden object scene in the map. The objects are all random. You will get another map.
Go back outside and to the boat area. Talk to the boatman and he will say the gate needs to be opened to go anyhere. Go forward to the gate area. Note the number 12 over the red light. That's the gate ID number. Click on the control panel to the left and enter in the water level from the boat (7) and the gate ID (12). The dials are a little odd, the short end is the end you need to point at the number, not the long end. Screenshot.
Go back to the boatman and have him take you to the church. Enter it and note the openings in the wall and engravings on the floor. You can't do anything else here, so go back to the original boat area. Screenshot.
The boat will have another hidden object scene, where you will find a dagger. Screenshot.
Go back to the hotel room and use the dagger on the shield to pry off part of it and get a stone disk. Go back to the church and use the stone disk on the center slot, and you will unlock a new location, the library.
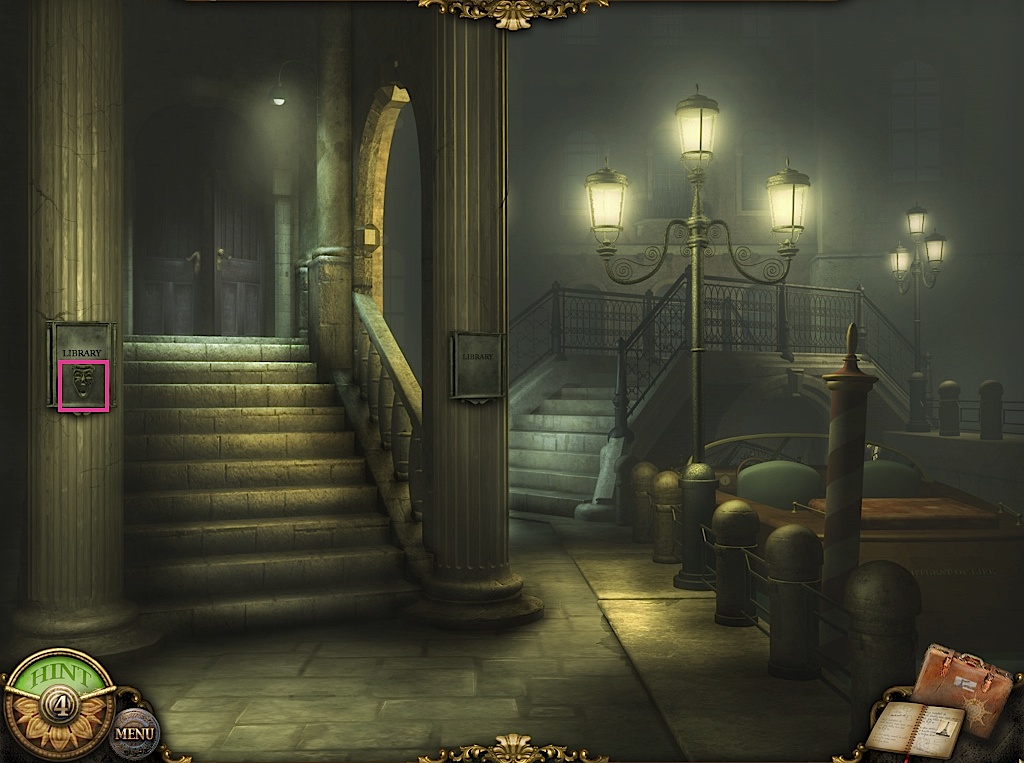
Go the library and get the special item on the lefthand side. Screenshot.
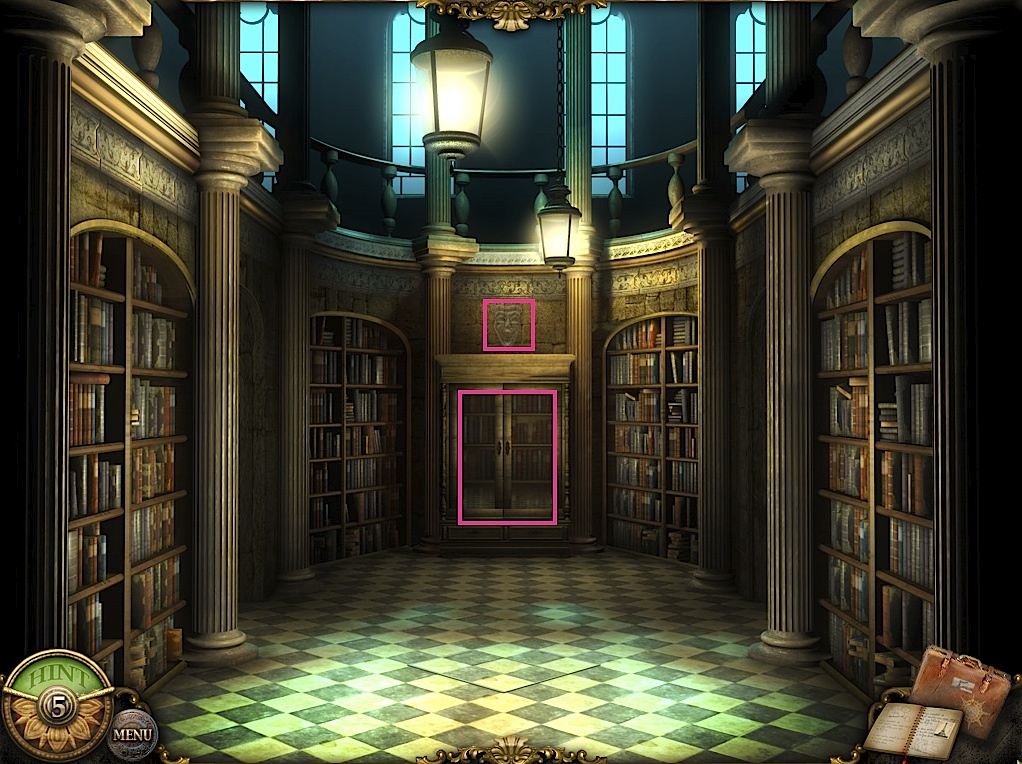
Go inside and there is another special item in the center. Try the center bookcase but it can't be opened yet. Screenshot.
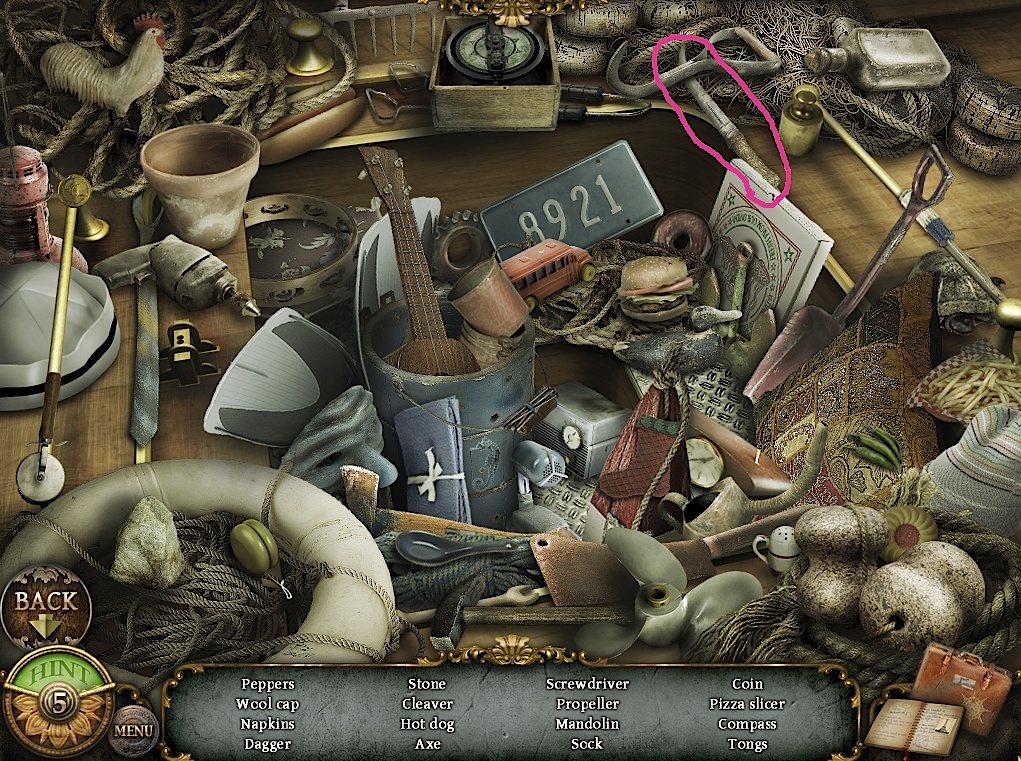
Go back to the hotel and do another hidden object scene at the desk to find a dart. Screenshot.
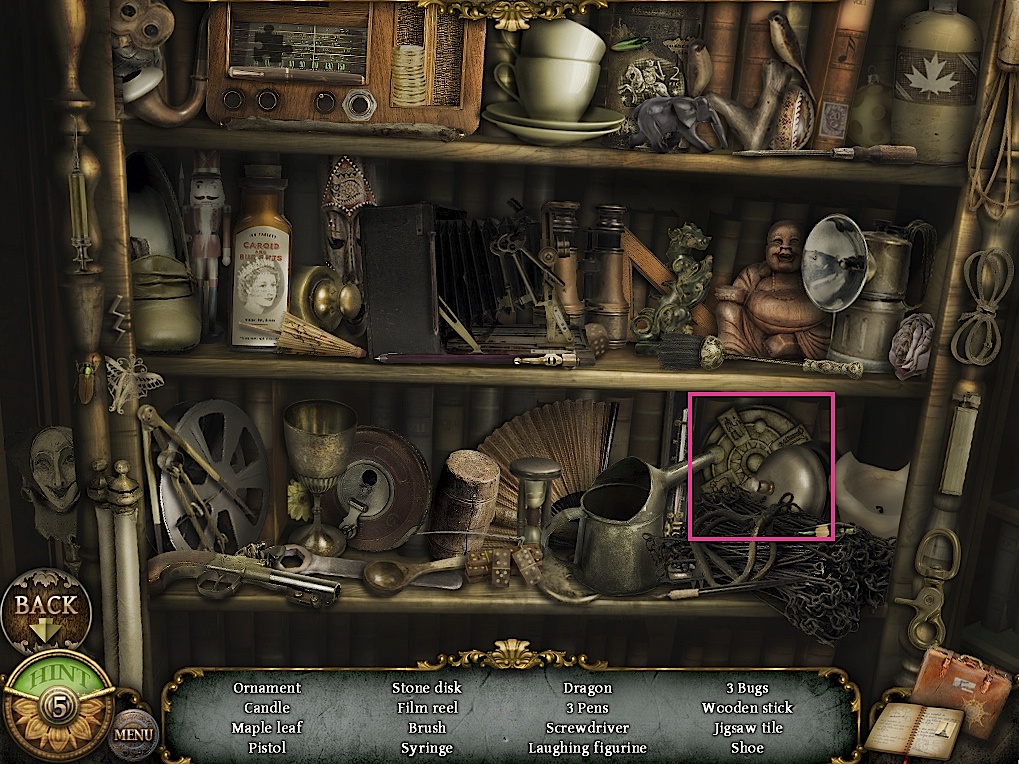
Go upstairs, and there will be a housekeeping cart in the hall. Zoom in and get the rust remover spray. Then return to the library and use the dart to pick the lock. Find another stone disk in the hidden object scene. Screenshot.
Go to the church and use this stone disk to unlock another location, the Palazzo. Go there. There is a special item in the upper left corner. Screenshot.
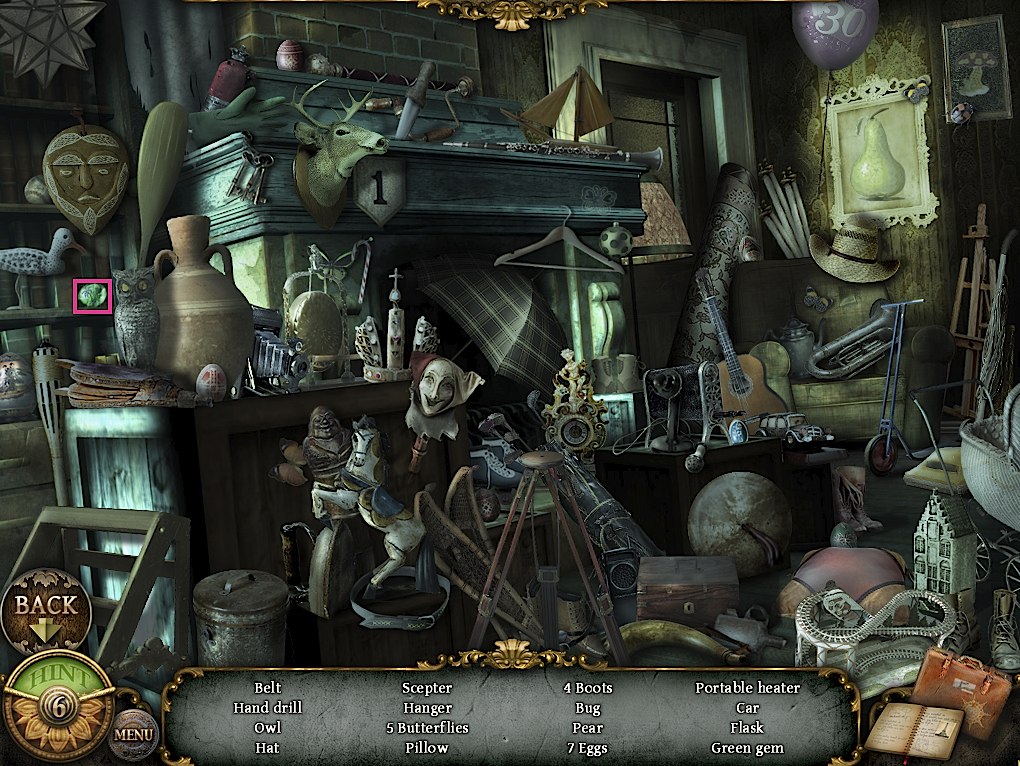
Go inside. Click the mosaic on the left to do a hidden object scene. It is all random items; you wll get a wall tile when you finish it. The chandelier will lower. Zoom in on it and use the rust remover spray on the rusty nuts, then take them off with the pliers. Take the stone disk out. Screenshot.
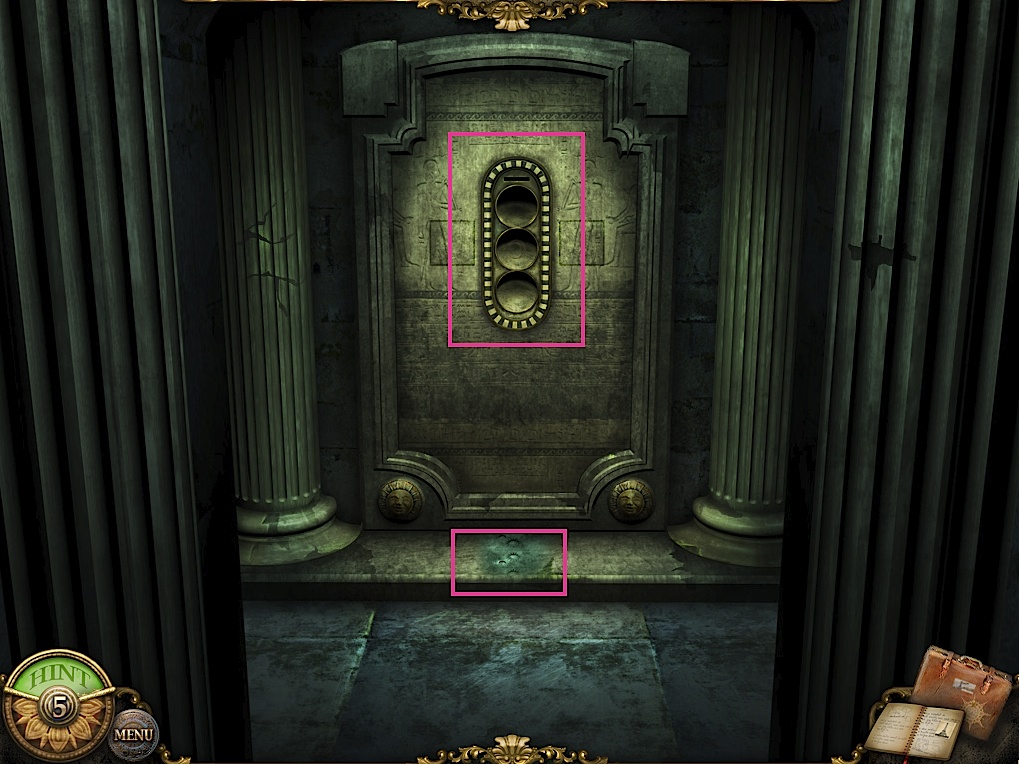
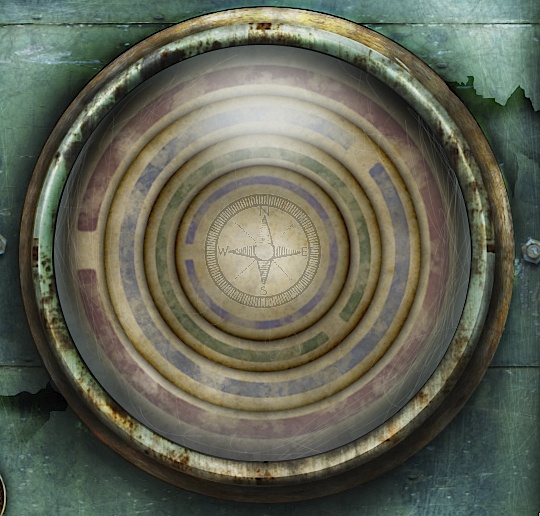
Go back to the church and put the last disk in. Rotate the disks so that all the pictures are rightside up. Screenshot. Click again to zoom in and use the wooden sword in the slot. Walk down the tunnel and get the red capsule and the key.
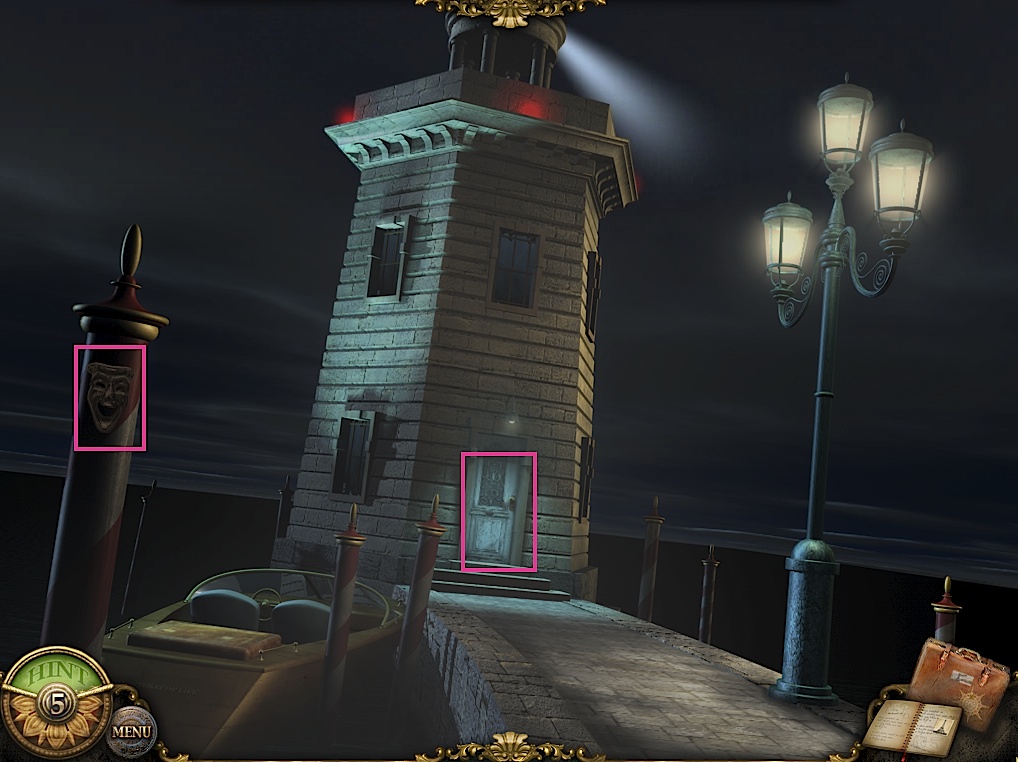
You will automatically be taken to the lighthouse. Get the special item on the left. Zoom in the door and open it with the key. Screenshot.
Click on the control panel. Screenshot.
Spin the rings in the picture to match the tile from the mosaic. Push the top button twice, the second button 5 times, the third button 7 times, and the bottom button twice. Screenshot.
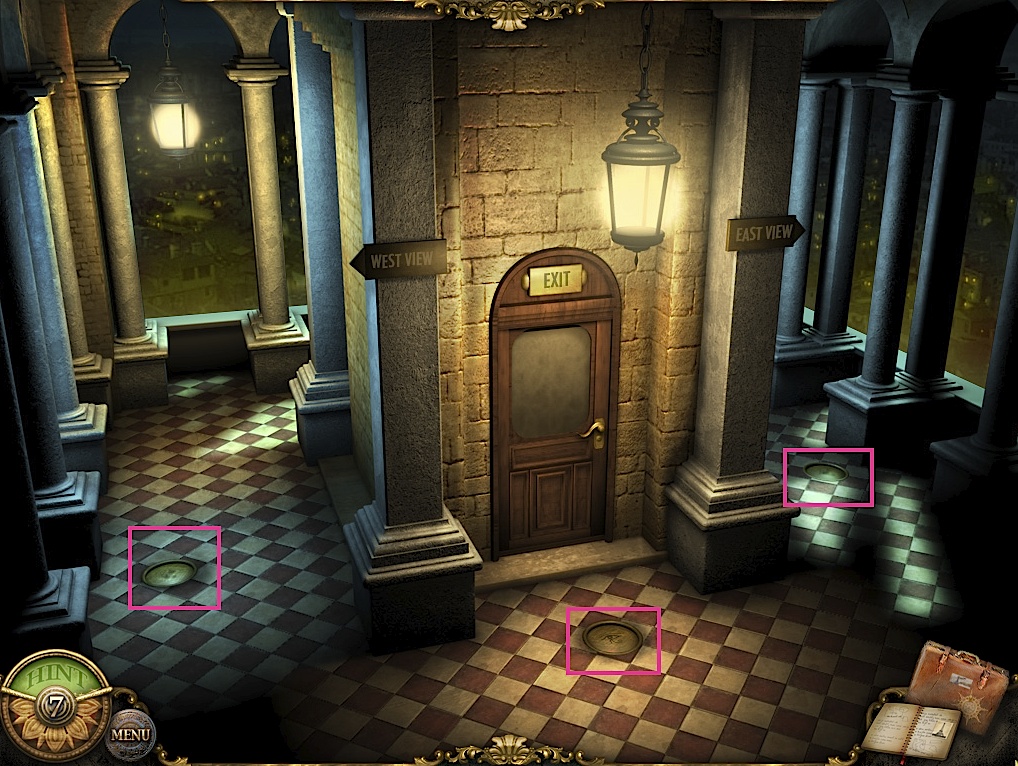
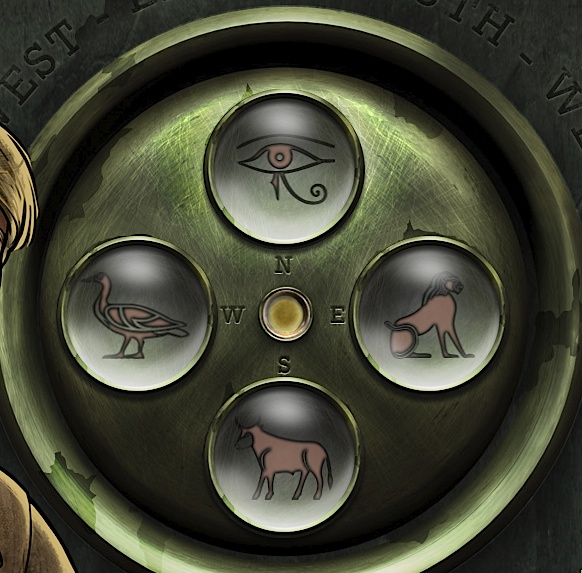
Go up to the top of the lighthouse and note the three round floor tiles and their positions with regard to north, south, east, and west. Screenshot.
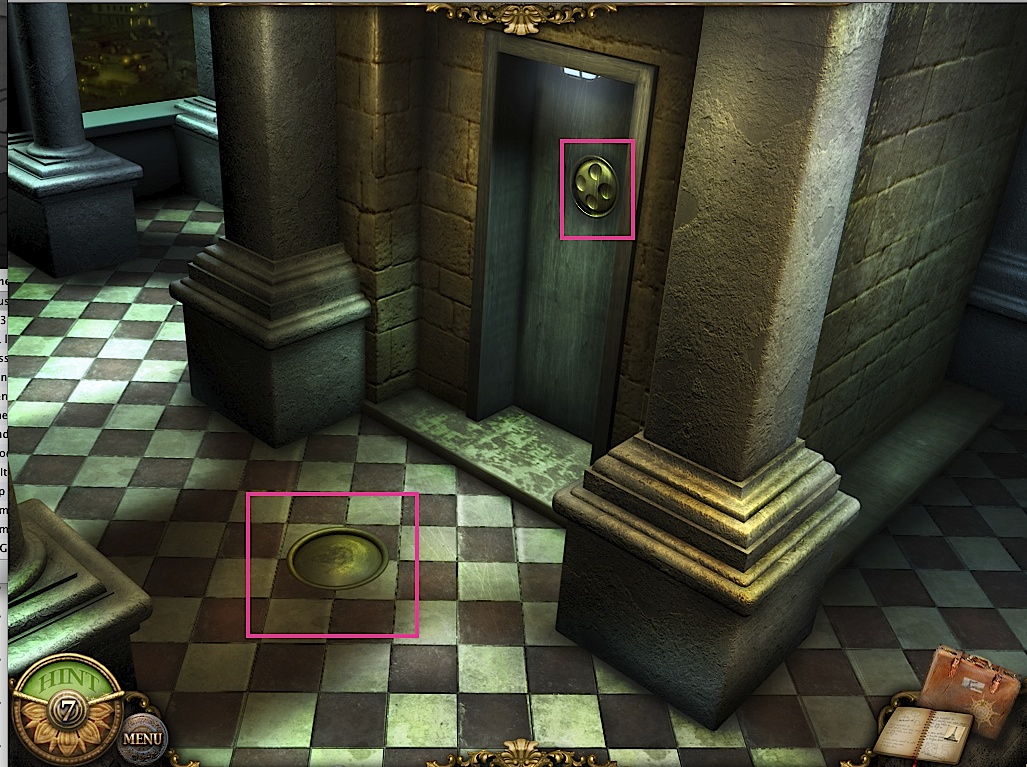
Go around to the other side of the lighthouse and note the last round tile, then zoom in on the door. Screenshot.
Match the directional images to the ones from the tiles. Screenshot.
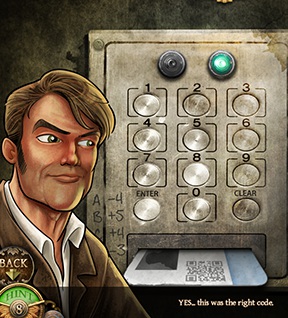
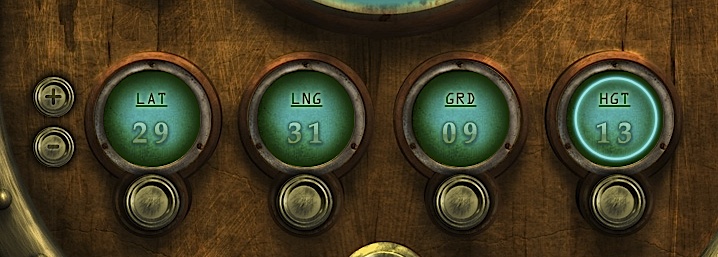
Head up the stairs and switch the lights on and enter the ship. Click on the number-symbol guide at left. Click on the slot at the bottom of the main control panel to get the key. Zoom in on the control panel. Screenshot.
Turn the power on with the key. Look at the pocket watch and match its inscriptions to the number-symbol guide. Screenshot.
The solution is:
29-31-9-13.
Enter this into the control panel and click the button at the bottom. Screenshot.
Chapter 7:
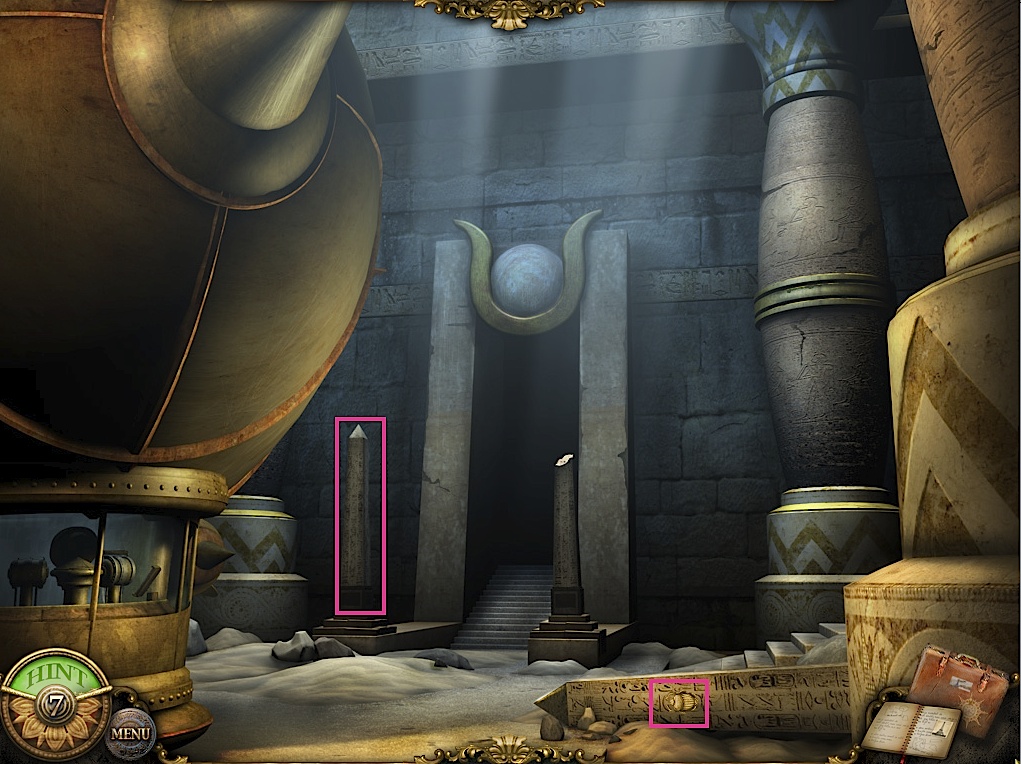
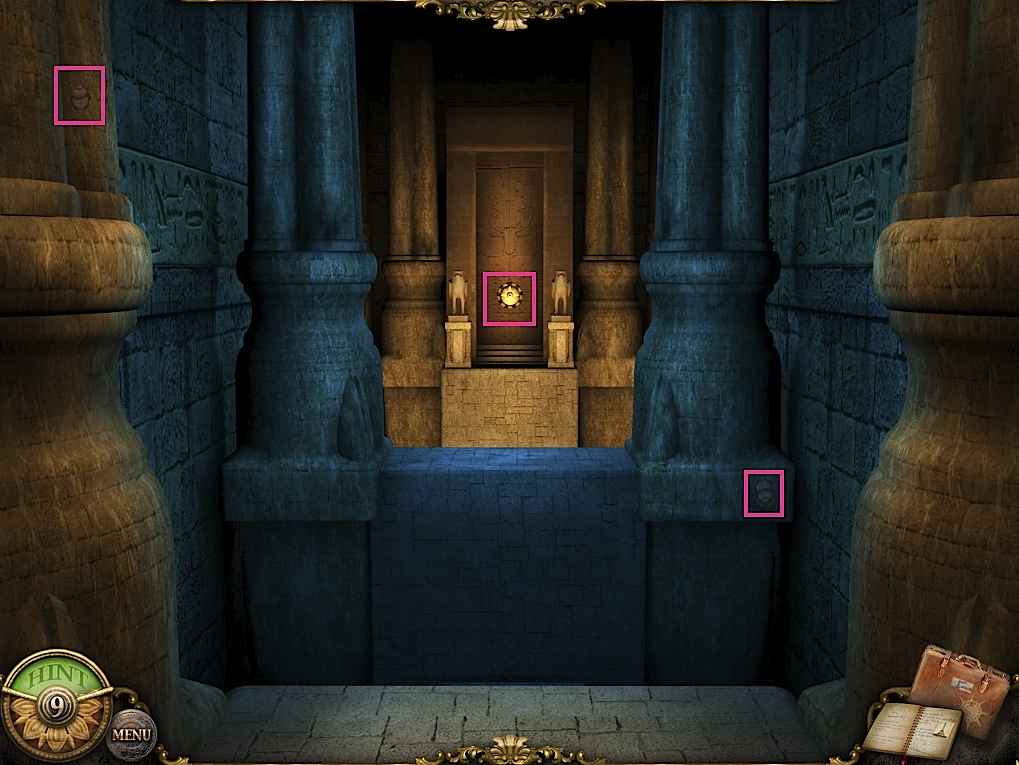
The special item in this chapter is a scarab. Take the one on the fallen obelisk in the front. Click on the left hand obelisk to get a clue, then go through the doorway. Screenshot.
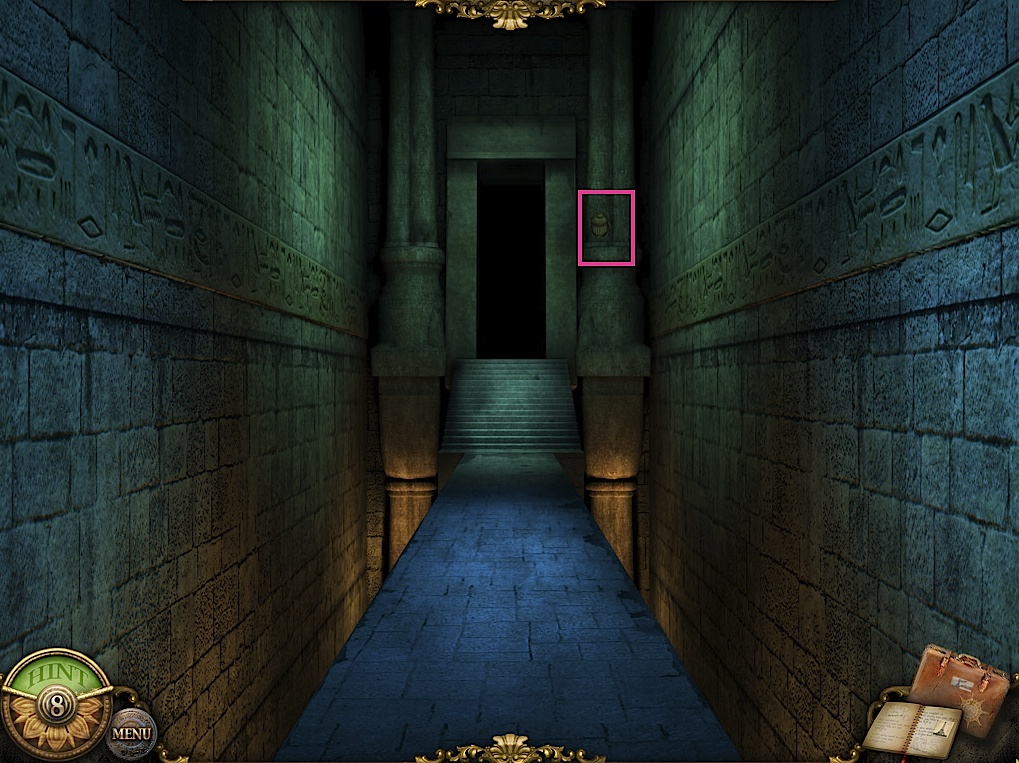
Take the special item on the right and go forward twice. Screenshot.
Take two special items, one on the upper left, and one on the lower right. You can't get across yet. Screenshot.
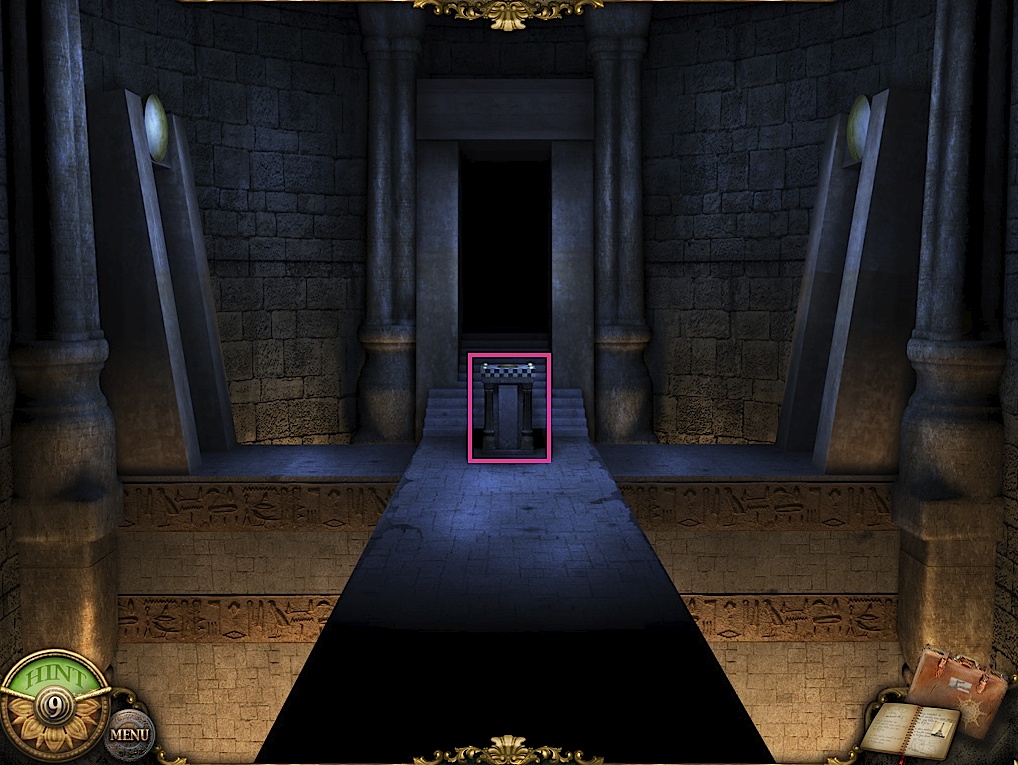
Go back and click on the pedestal in the center. Screenshot.
Take the special item in the lower left corner. Use the blue capsule on the hole. Screenshot.
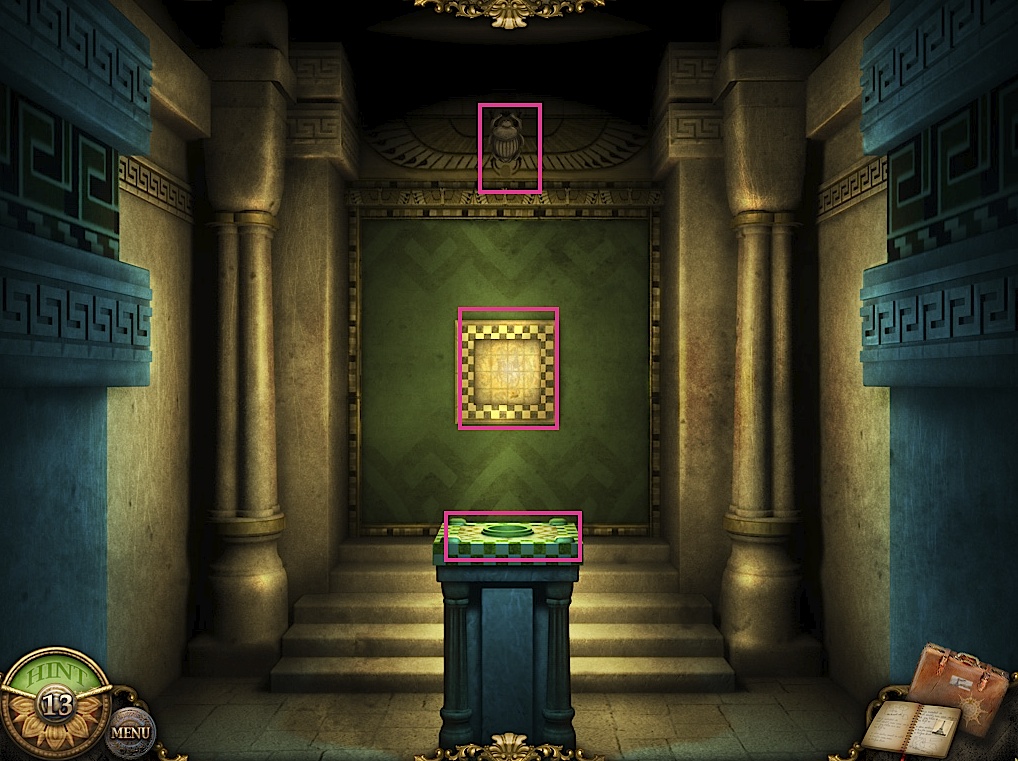
Go left and take the special item at the top center. Zoom in on the pedestal and use the red capsule on the hole. Click on the tile in the back. Screenshot.
Click on the tiles until they switch to the portion of the desired picture. This is the most tedious puzzle in the game, and if you skip it, I don't blame you! Screenshot.
Go back to the center and then right, and do basically the same thing: get the special item at top, put the green capsule in the hole, and click on the back tile. Screenshot.
Solve this puzzle in the same tedious way as the first one or skip it as you wish. It'll be our secret. Screenshot.
Go back to the center and forward and now you can walk to the door. There is one special item on the left. Then use the mysterious key on the keyhole. Screenshot.
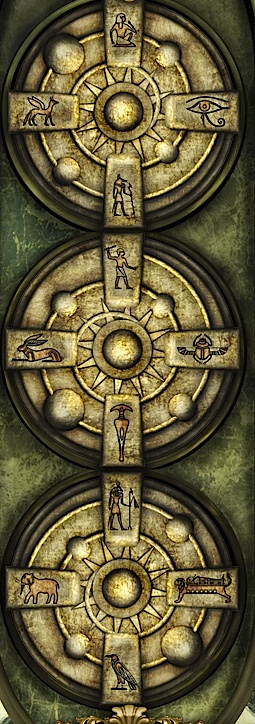
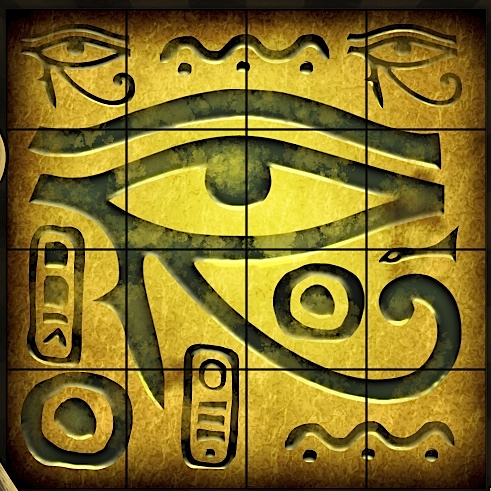
Go through, and there's another special item on the left hand pillar. Now you have to depress the tiles to match the clue you got from the obelisk out front. Screenshot.
Here is the original picture: it is taken as if from the other side, so it needs to be rotated twice mentally to match it to the puzzle. Screenshot.
Enter the final room and get the final special item to the upper left. Then click on the ankh on Isis's neck and once again to take it and win the game! Screenshot.
Posted by: joye |
March 26, 2011 3:25 AM
|
March 26, 2011 3:25 AM