

Stray Souls: Dollhouse Story
Platform: Mac, Windows
![]() How well do you know your significant other? I made my husband sign a statement swearing there were no unholy alliances or unspeakable secrets in his past before I agreed to marry him. (Hey, I still remember Lover's Vow from Tales from the Darkside: The Movie; momma didn't raise no fool.) Danielle Hunt didn't have my foresight, and now she's paying for it in Alawar Games' newest horror hidden-object adventure title, Stray Souls: Dollhouse Story. When her husband Sam vanishes one rainy night after a strange package shows up on their doorstep, Danielle sets out looking for him and winds up discovering she doesn't know her dearly beloved quite as well as she thought she did.
How well do you know your significant other? I made my husband sign a statement swearing there were no unholy alliances or unspeakable secrets in his past before I agreed to marry him. (Hey, I still remember Lover's Vow from Tales from the Darkside: The Movie; momma didn't raise no fool.) Danielle Hunt didn't have my foresight, and now she's paying for it in Alawar Games' newest horror hidden-object adventure title, Stray Souls: Dollhouse Story. When her husband Sam vanishes one rainy night after a strange package shows up on their doorstep, Danielle sets out looking for him and winds up discovering she doesn't know her dearly beloved quite as well as she thought she did.
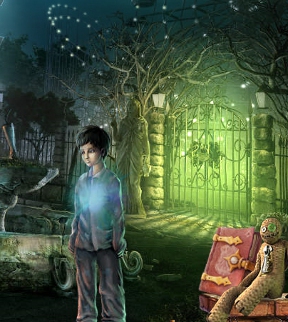 Alongside Danielle and one questionably helpful sidekick, you'll pay a visit to the town Sam grew up in and find out what the dilly is. The game has two modes, casual and expert, and the only real difference between the two is whether interactive areas are highlighted and how long your hint timer takes to recharge. The cursor will change as you move it around the screen to indicate something you can use or investigate, and hidden-object scenes announce themselves with what are by now a genre staple; pretty pretty sparklies. Gather items to get past obstacles, solve puzzles, and keep your eyes peeled for some Madame Fate-style morphing bonus items to collect throughout the course of the game.
Analysis: Oh, Alawar. I almost feel like a Disney princess. Here I was, going through my dull normal day, playing dull normal demos for dull normal hidden-object adventures, and then you swooped in the window and reminded me how fun things could be again. While I went into Stray Souls believing I knew what to expect, it didn't take long for it to show its true colours. There are a few surprising twists, and every a scary moment or two that make exploring quite rewarding. To be perfectly honest, the story does feel like it's a little bit all over the place, cobbling together all sorts of elements and themes, but the presentation is just so solid and entertaining that I hardly minded. The writing feels a bit clunky, unfortunately, and while it might seem unreasonable to be demanding an engrossing narrative from a casual title, here it really would have been the rich, cream cheese icing on your moist, fluffy carrot cake.
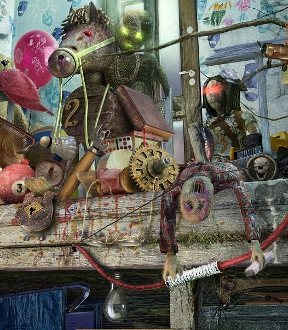 Visually, the game is solid, with nicely designed strange environments and some remarkably well done animated cutscenes. Hidden-object scenes are well designed, although in some cases it felt like the items were too small and faded/dim for me to possibly have found without the use of a hint. Somewhat less endearing is the music; while it starts off as serviceable enough, and even appropriately creepy, once you've heard the same handful of short looping tracks over and over and over you'll be reaching for the mute option too.
What's nice is that the game manages to strike an easy balance between hidden-object scenes and traditional point-and-click item hunter-gatherer gameplay. The puzzles you'll encounter are all unfortunately a little on the easy side, but a welcome chunk of them are at least interesting variations on existing puzzle styles. There's a Rube Goldberg-esque contraption, for example, and a puzzle that involves navigating around a series of clowns with cleavers. It feels like Stray Souls is trying really hard to present you with something different, and for the most part, it succeeds. While at times corny enough to make you raise an eyebrow, it's always entertaining, and never leaves you for very long without adding to the story. It reminds me a bit of an episode of the Twilight Zone, or maybe Tales from the Cryptkeeper, only without the painfully awkward morale being shoved down your throat. ("I think I will cheat on my spouse today. Gosh I hope I don't learn an ironic lesson over the course of a narrative.")
The bonus prequel chapter included with the Collector's Edition (the only one available as of this writing) is a bit of a disappointment if we're being completely honest with each other. It feels tacked on and unnecessary, disjointed and lacking any real puzzles beyond going back and forth and using one item on another. The main game itself will probably run most players around four hours, but you know what? I was fine with that. There's a good sense of pacing and story progression here, and any more and the game would have felt like it was dragging its feet to pad things out. The ending scene is probably one of the most impressive and satisfyingly climactic bits of work I've seen since Phantasmat. While not perfect, Stray Souls: Dollhouse Story is still very good, and definitely worth a peek at the demo if what you're a fan of the genre, and certainly if you're a fan of Alawar as a developer.
A Collector's Edition is also available. It contains a bonus prequel chapter to play, wallpapers, strategy guide, and more. Remember that Big Fish Game Club Members pay only $13.99 for Collector's Editions (or 2 club credits), and collector's editions count 3 card punches of 6 total needed for a free game.
![]() Windows:
Windows:
Download the demo
Get the full version
Also available: Collector's Edition
![]() Mac OS X:
Mac OS X:
Download the demo
Get the full version
Also available: Collector's Edition


Walkthrough Guide
(Please allow page to fully load for spoiler tags to be functional.)
Stray Souls: Dollhouse Story Walkthrough
General Information
On the Main Menu you can choose your profiles, play the game, select your options, view the credits or Strategy Guide if you have the Collector's Edition, and quit the game.
Options include Music and Sound volume, full screen or windowed, a custom cursor or not.
If you start a new profile, you will have to choose your options again for that profile.
If you purchased the Collector's Edition, the Bonus Chapter and "Extra Content" will be available once you have completed the Main Game.
When begin the game, you will be asked to choose a difficulty mode of play.
In Casual Mode it takes about 1 minute for the Hint Button to refill, and all interactive areas are highlighted, such as Hidden Object Scenes.
Expert Mode takes about 2 minutes for the Hint Button to refill and no interactive area are highlighted.
When you first begin the game, you will automatically have Interactive Help that you can turn off at any time you wish.
Scene Navigation
There is no timer or click penalty in the main scenes, but don't click too much in the Hidden Object Scenes or you will get red smoke.
If you purchased the Collector's Edition, you can access the Strategy Guide from the Menu in the lower left corner.
Other Menu options give you your choice of continuing the game, changing your Options or returning to the Main Menu.
Your Inventory items are in the lower middle of the scene.
Hints and your Journal are located in the lower right corner.
Once you meet up with the Doll, he will sit with the Journal and provide you with comments and hints.
The Journal contains comments about things you have discovered and a map of your journey.
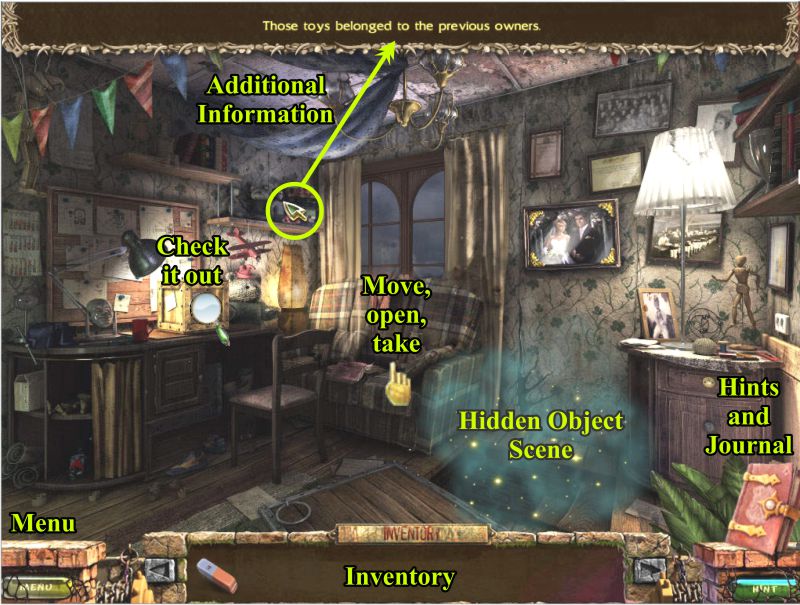
If you move around the scenes and see a cursor on an item, take note of any additional information that appears at the top of the screen.
Cursor changes will help you navigate the scenes: a magnifying glass wants you to check something out; a pointing finger says to move, open or take an object; a talk bubble I have provided in screenshots to remind you to talk to a person; and an arrow indicates a direction you can go.
Hidden Object lists are the same for everyone and are marked in the screenshots.
Once you have entered a Hidden Object Scene, you cannot leave until you've collected all 14 items.
There are 2 items from each Hidden Object Scene, marked and labeled in Turquoise Blue, that will go into your Inventory.
When you find a key to open a lock, you will need to click it 3 times to open the drawer, or door.
Some screenshots have been lightened so you can see the objects.
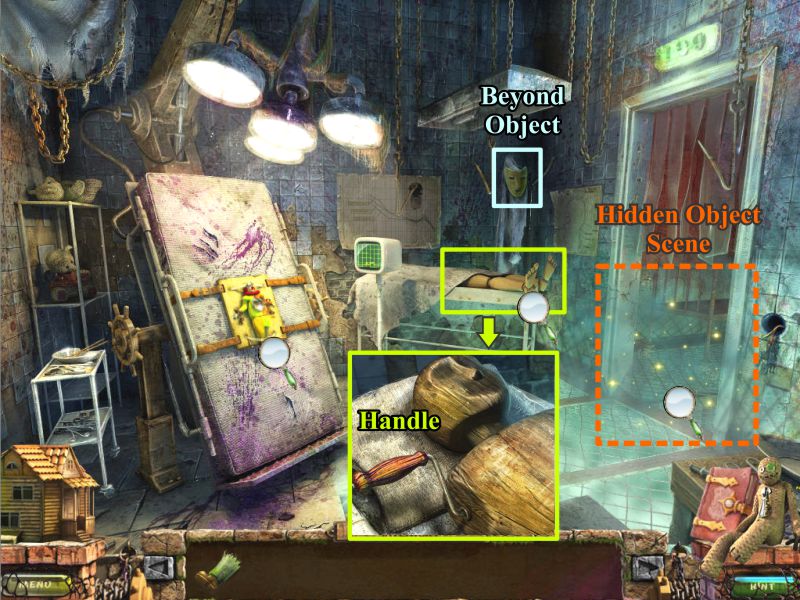
Screenshot
Beyond Objects
There are 36 Beyond Objects for you to locate throughout the game. You don't any extra awards or points for collecting them. They are just special Hidden Objects that morph back and forth from one image to another.
All of these objects are marked and labeled in the screenshots, and a list of the locations is provided in the screenshot below.
Screenshot
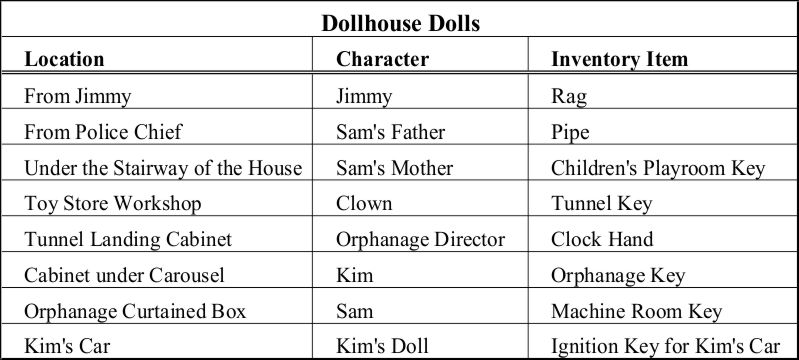
The Dollhouse
When you receive the Dollhouse from Jimmy, he will give you a Doll to place there.
There are a total of 8 Dolls you will receive throughout the game (see screenshot).
Each Doll has a short story that plays out when you place it in the Dollhouse.
Screenshot
After you have placed each Doll, you will receive an item for your Inventory.
The screenshot below has a list of the Dolls, their location, and what you receive for your Inventory.
Screenshot
Part 1: Sam's Disappearance
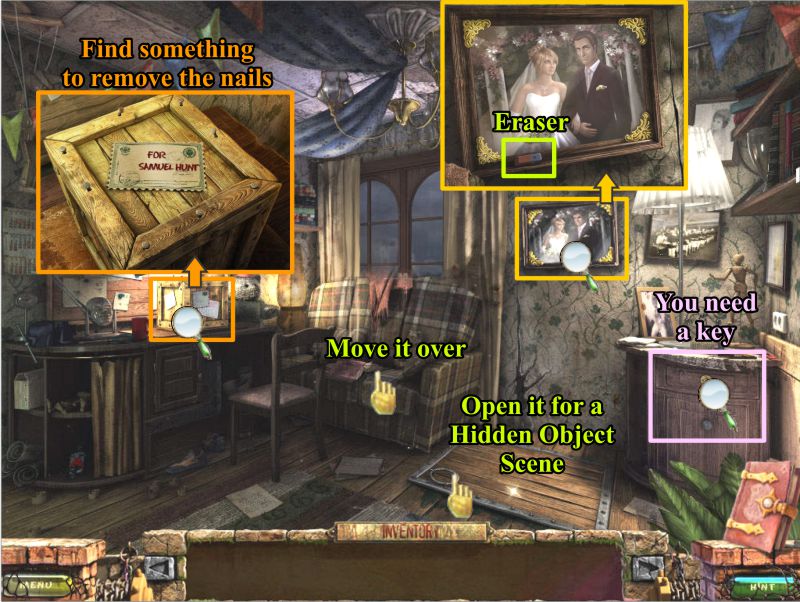
The Hunt's Living Room
Danielle goes to the open door, finds Sam gone and a box sitting there.
Examine the box, move the sofa, and open the hatch to the basement.
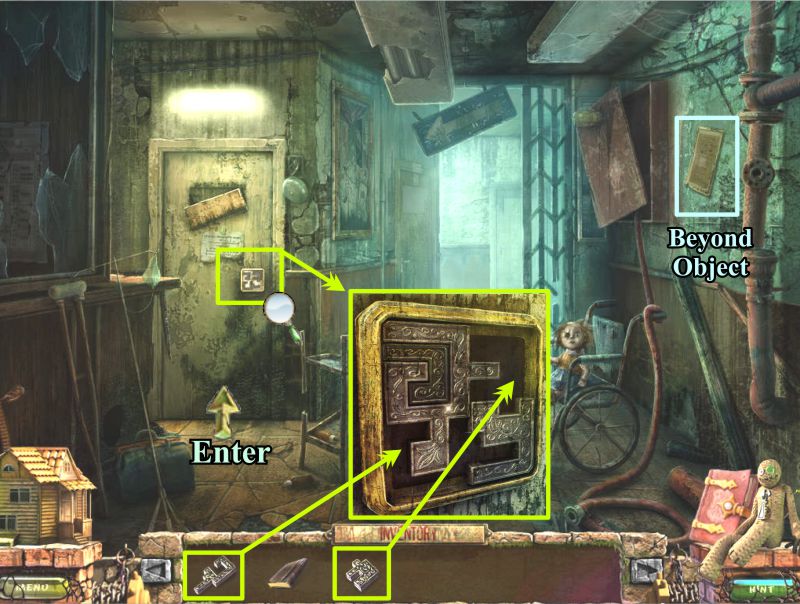
Play the Hidden Object Scene to find something to open the box.
Zoom in on the picture and take the Eraser.
You need a key to open the drawer to find Sam's papers.
Screenshot
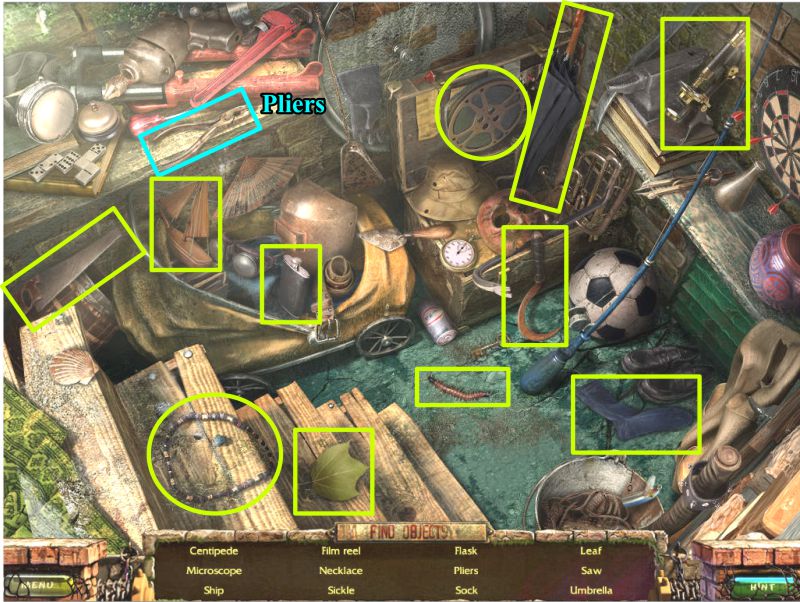
Basement Hidden Object Scene
Collect everything to get the Pliers.
Screenshot
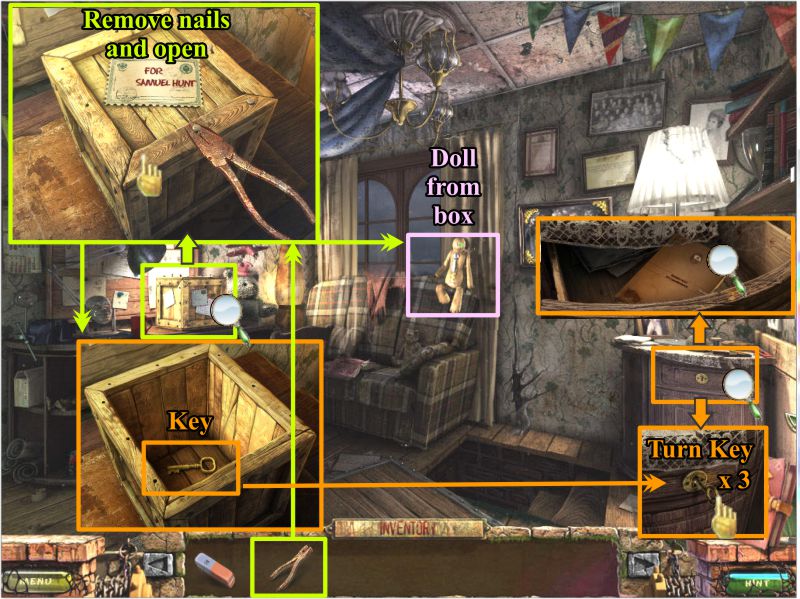
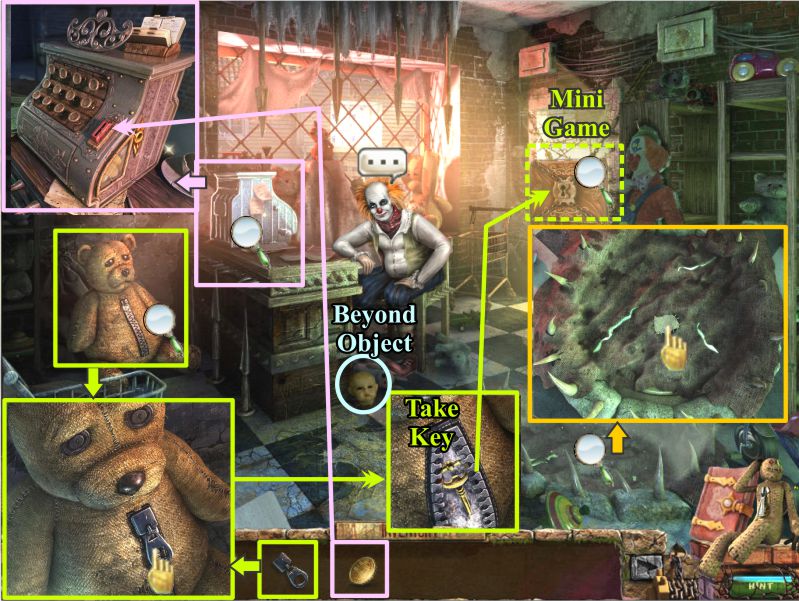
The Box
Zoom in on the box, place the pliers to remove the nails, and open the box.
After your conversation with the Doll, grab the key and click for a close up of Sam's drawer.
Place the key in the lock and turn it 3 times.
Pick up the book and click to open it for a closer look.
Screenshot
Sam's Records
Click on the picture. The Doll unzips himself to pull out the missing part of the photograph, so place it in the book.
Use the eraser to remove the scribbles and read the address beneath.
The Doll says you are going to need to go to the town where Sam was raised and he will come along to help you.
Screenshot
Part 2: Sam's Home Town
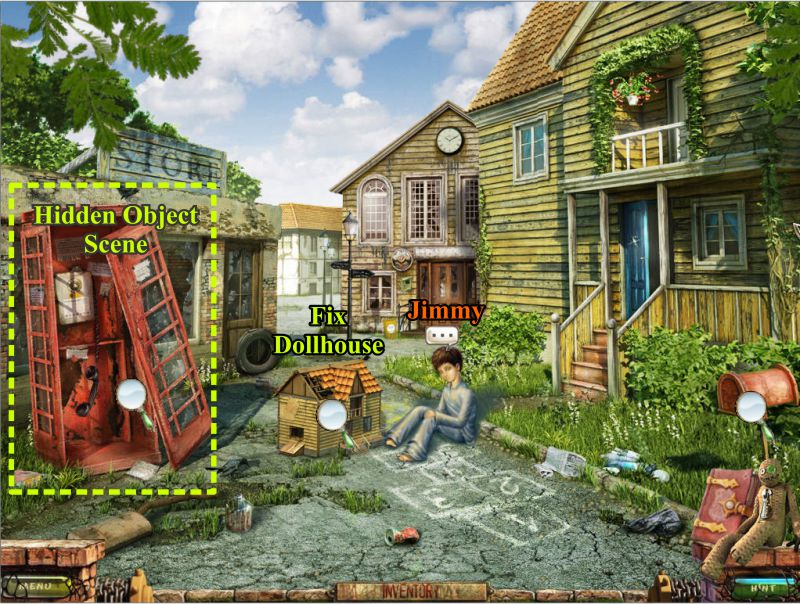
Jimmy
First person you run into is a kid named Jimmy.
Jimmy says he will help you if you fix the Dollhouse. Click on the phone booth for a Hidden Object Scene.
Screenshot
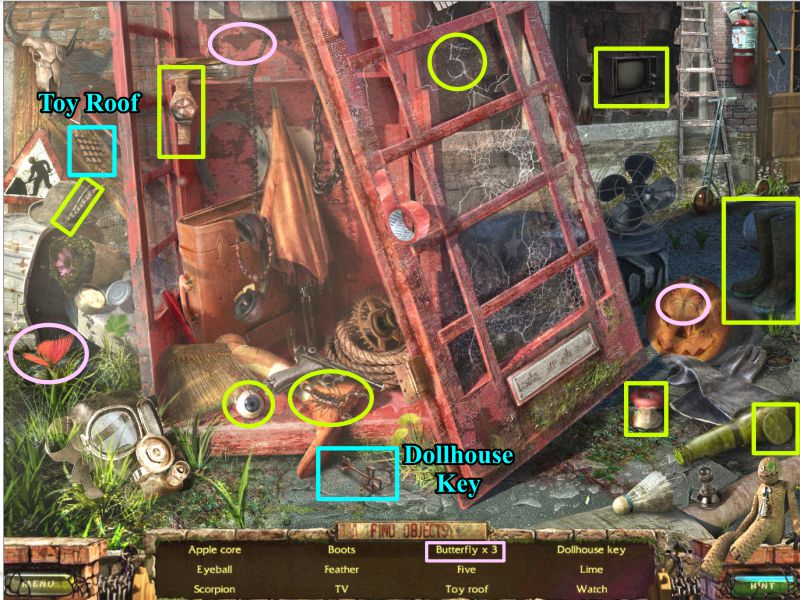
Phone Booth Hidden Object Scene
Once you have collected everything, you will have the Dollhouse Roof and Key.
Screenshot
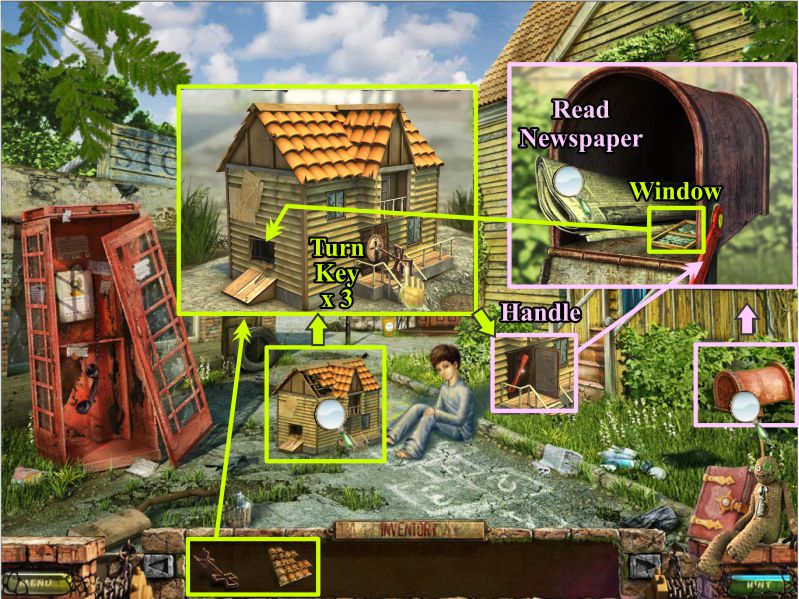
Repair the Dollhouse
Place the roof on the Dollhouse and the key in the door.
Click on the key 3 times to open the door and collect the Handle.
Zoom in on the mailbox and place the handle.
Collect the window for the Dollhouse and read the newspaper for information about Sam's parents.
Place the window in the Dollhouse, and Jimmy tells you to take it for more information about Sam.
Screenshot
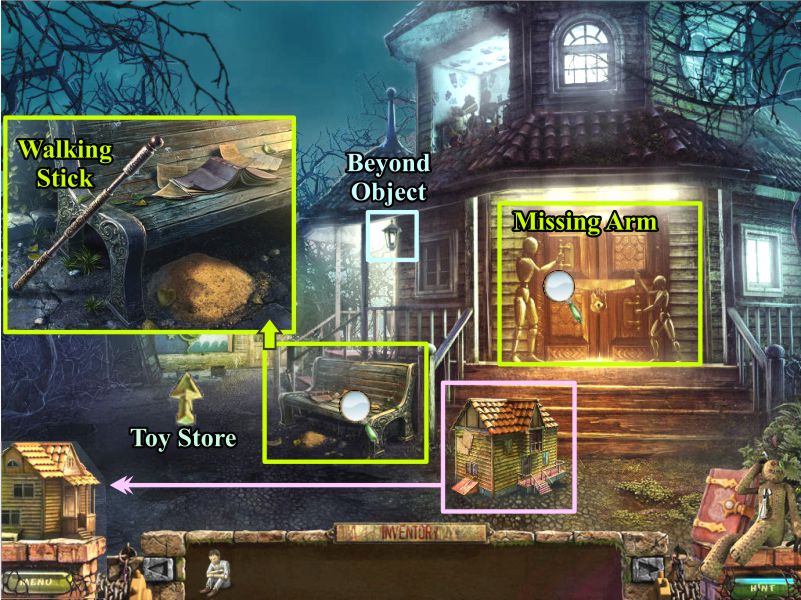
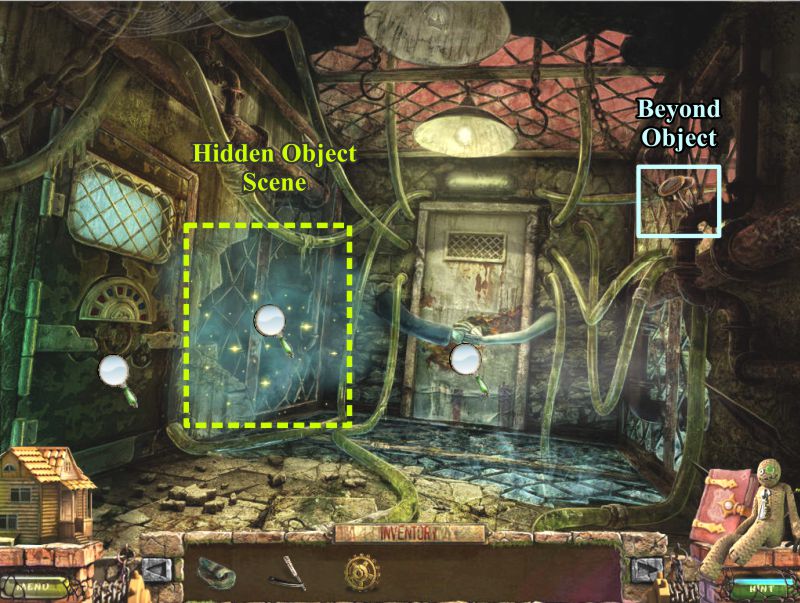
House Entrance
The town gets dark, and you end up in front of the house with the return address from the package.
Check the front door to the house you want to enter, only to find out you need to find a missing arm to be able to get the figures to saw through the lock so you can enter.
Click on the bench to find the Walking Stick.
Grab the Hanging Lamp/Beyond Object off the porch where marked in the screenshot.
The Doll says to take the house that Jimmy said was yours, so click on it and see what happens next.
Screenshot
The Dollhouse
Jimmy appears and gives you a Doll.
The Dollhouse appears for you to place the Doll, so place it where marked and watch the scene.
At the end of the scene, you will receive a Rag for your Inventory.
Screenshot
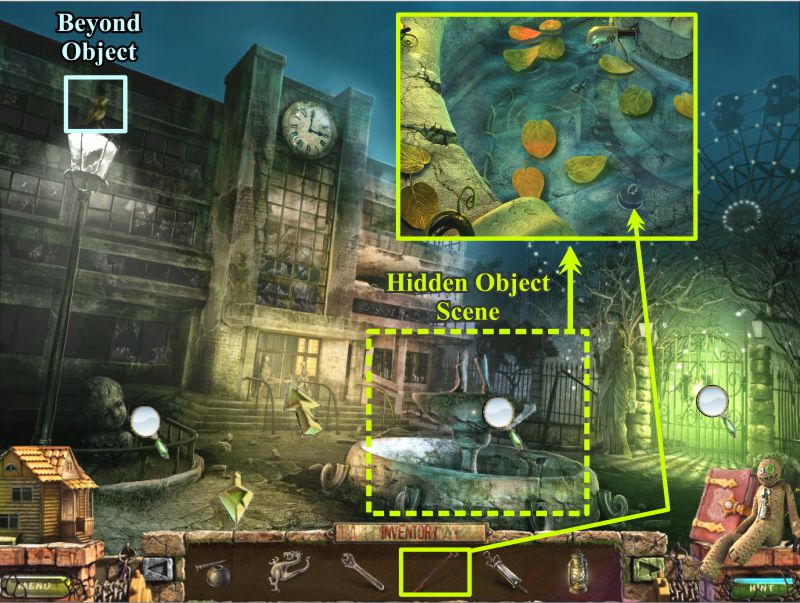
Outside Toy Store
Collect the Hat in the nest/Beyond Object marked in the screenshot.
Check out all the magnifying glasses and place the Walking Stick on the close up of the trash can.
Click it to open the grate and pick up the Shovel.
Screenshot
Bench
Go back to the house entrance and click on the Bench.
Use the shovel to dig up the dirt and grab the Steel Fangs.
Screenshot
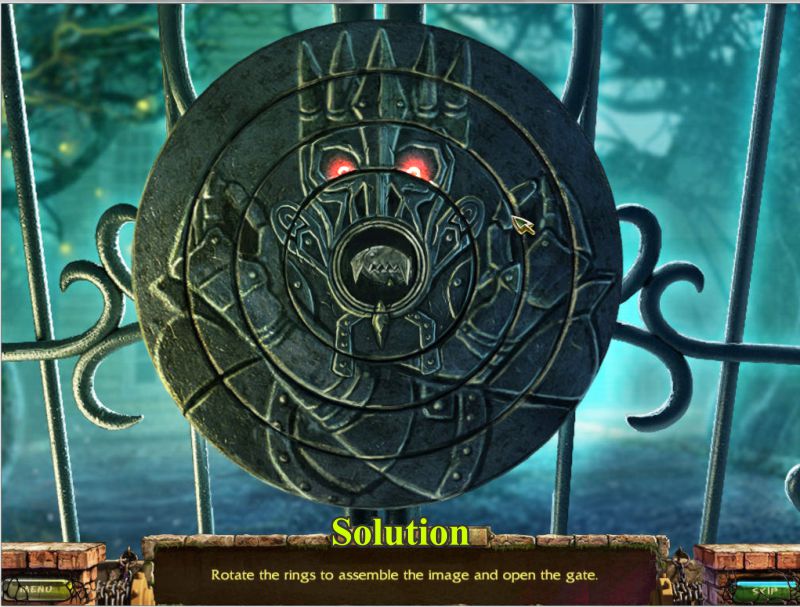
Gate Mini Game
Go back to the gate near the Toy Store and place the fangs in it to trigger a Mini Game.
Rotate the rings to look like the solution in the screenshot and the gate will open.
Start from the inside out, because you will find that a couple of rings turn other rings.
You will have to go back to another one again for the final solution.
Screenshot
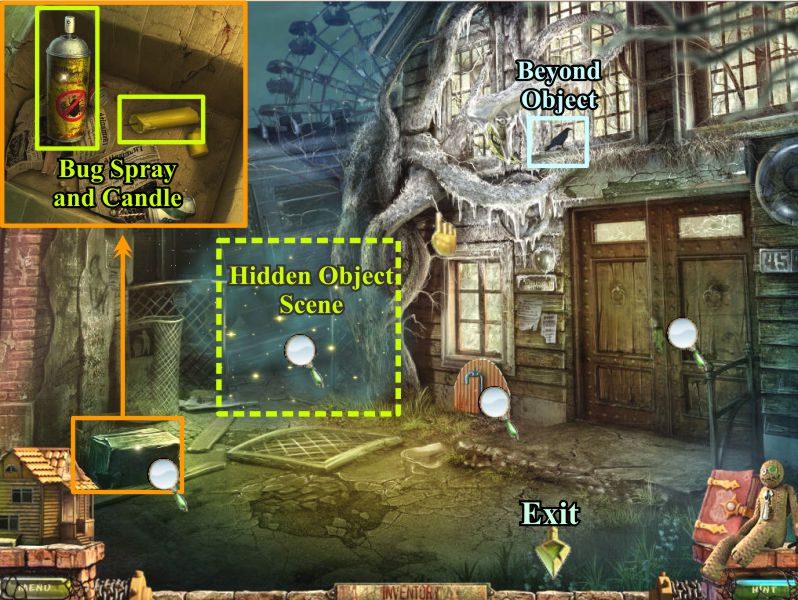
Outside the Police Station
Click on the box at the left, open it, and collect the Bug Spray and Candle.
Pick up the Beyond Object that morphs from a bird to a cat when the shadow goes by the window.
Check out the other items in the screenshot to see what you need to interact with them, and play the Hidden Object Scene.
Screenshot
Police Yard Hidden Object Scene
Collect everything to get a Wire Cutter and Skull Locket.
Screenshot
Outside Toy Store
Go back through the gate to the tree outside the Toy Store and zoom in on the mechanical arm.
Use the bug spray to get rid of the bugs and the wire cutters to snip the wire so you can take the arm.
House Entrance
Go to the House Entrance and zoom in on the figures at the door so you can place the mechanical arm.
They will saw the lock off so you can enter the house, but before you go in, play the Hidden Object Scene.
Loft Hidden Object Scene
Collect the list to get a Can Open and another Skull Locket.
Enter the House.
Screenshot
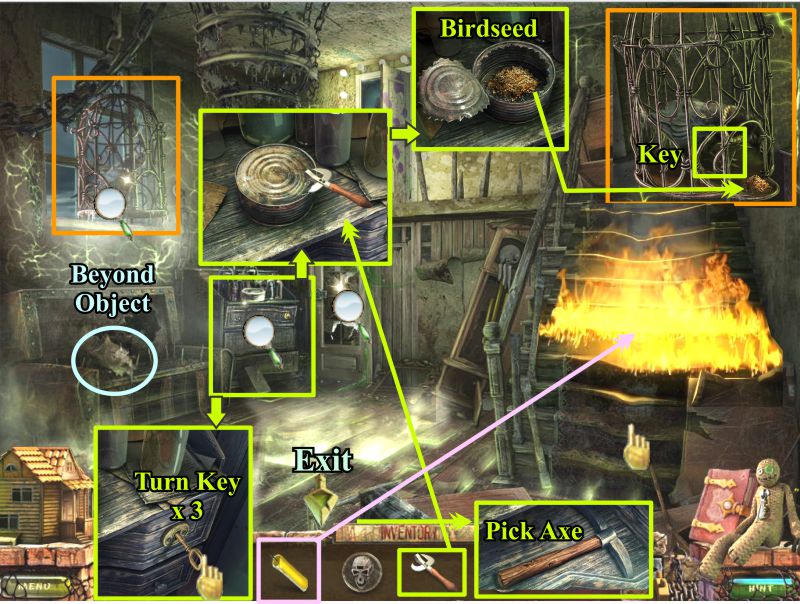
House Living Room
Touch the stairs and they catch on fire.
Use the fire to light the candle.
Click on the door to find out where the Skull Lockets will be used once you collect all of them.
Zoom in on the cabinet and use your can opener to get the birdseed inside the can.
Click on the birdcage, place the birdseed to distract the bird and take the key from the chain on his neck.
Return to the cabinet, place the key and turn it 3 times, then grab the Pick Axe.
Screenshot
Outside the Toy Store
Go outside and back to the Toy Store.
Click on the trash bin and use the Pick Axe 5 times on the key embedded in the wall.
Take the key for the Police Station and go there.
Outside the Police Station
Zoom in on the door, use your rag to clean off the gunk and place the key in the keyhole.
Turn the key 3 times and enter the Police Station.
Part 3: Police Station
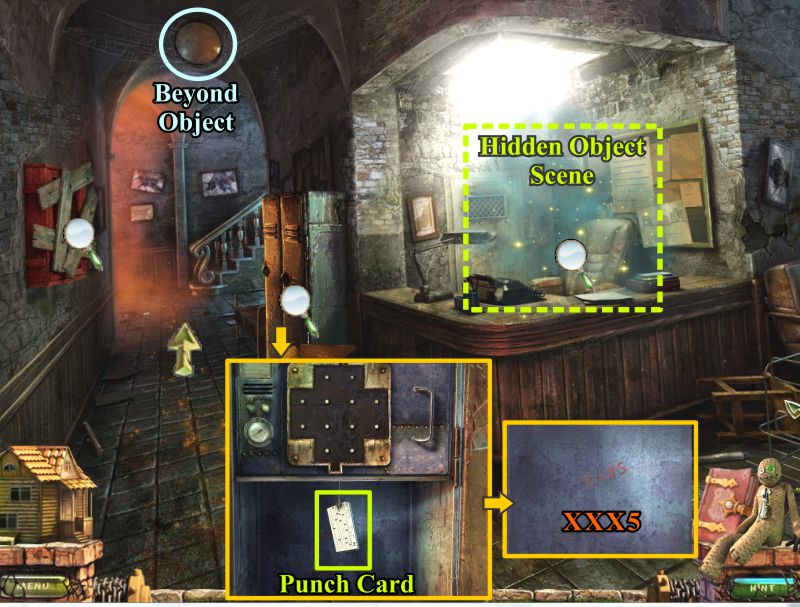
Police Station Front Desk
Collect the Beyond Object over the door as shown in the screenshot.
Check out the magnifying glass at the left to find out you need to remove the boards to get the bucket.
Click on the lockers, open the one, grab the Punch Card, and note the numbers behind it.
Play the Hidden Object Scene at the desk.
Screenshot
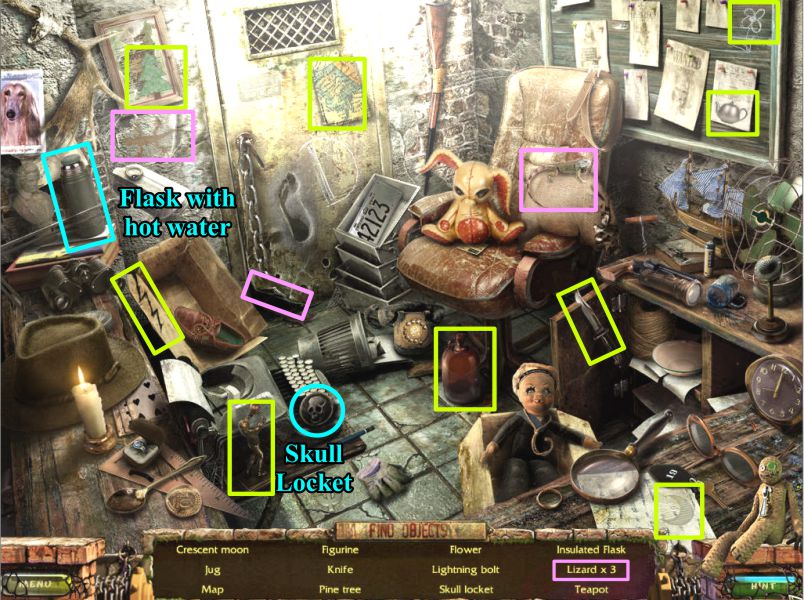
Police Station Front Desk Hidden Object Scene
When you've collected everything shown in the screenshot, you have a Flask with hot water and another Skull Locket for your Inventory.
Screenshot
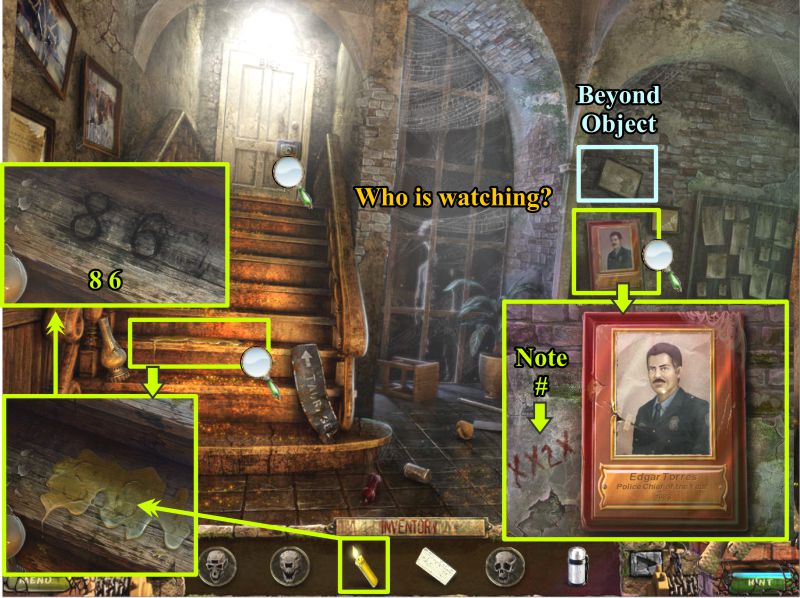
Stairway to Chief's Office
Check out the Chief's award picture at the right, and note the number.
Collect the Beyond Object above the Chief's picture.
Note the shadow outside the window.
Use your burning candle to melt the wax on the step and find another number.
Click on the door to the Chief's Office.
Screenshot
Chief's Office Door Mini Game
Enter the numbers you have found throughout the station using the dial.
The "X's" on the numbers indicate the position of that number, so you need to turn the dial to 8625 as shown in the screenshot so you can open the door.
It doesn't matter which way you turn the dial as long as you stop on the numbers in the proper order.
If you make a mistake, you will need to begin again.
Screenshot
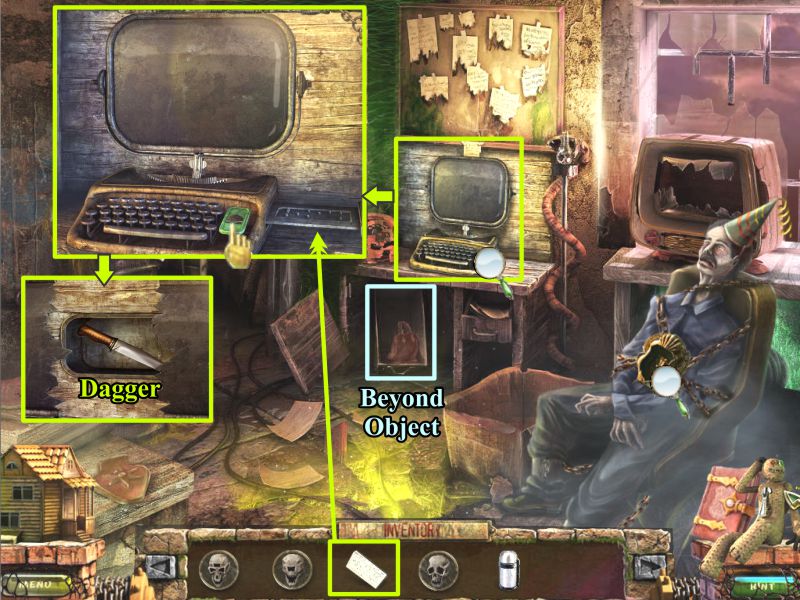
Police Chief's Office
Click on the Chief to find out you need a badge to undo his chains.
Check out the drawer under the desk to get the Beyond Object that morphs between a bag and a boot.
Click on the word processor. Push the button to see where to place the punch card.
When you place the punch card, the tray will close and the screen will open to reveal a Dagger for you to collect.
See the screenshot to view all the tasks.
Screenshot
Stairway to the Chief's Office
Go back downstairs and zoom in on the Chief's award picture.
Use the knife to remove the picture from the frame and take the puzzle piece.
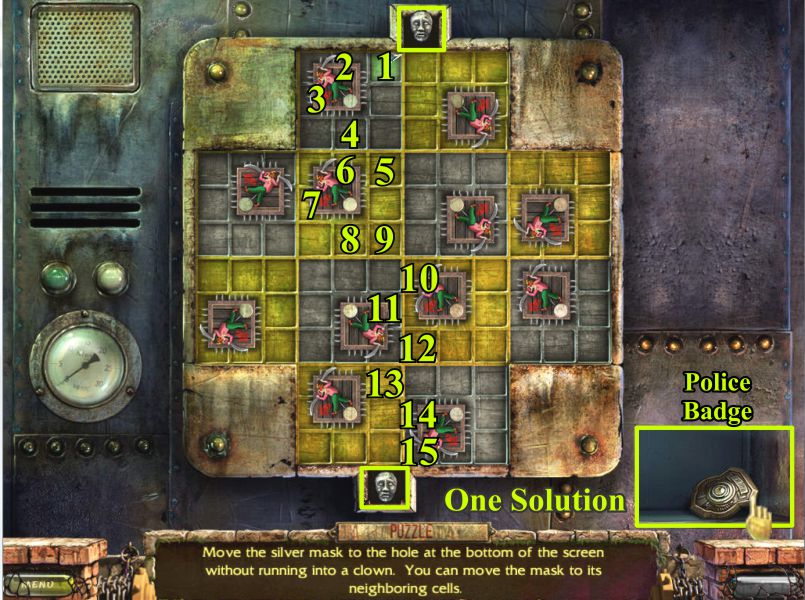
Police Locker Mini Game
Go back to the front desk area and click on the lockers.
Place the puzzle piece to trigger the Mini Game.
There is more than one way to navigate the route to get the skull from the top to the bottom of the grid without being wiped out by the clowns. One solution is shown in the screenshot.
When you have completed your task, the locker shelf will open for you to collect the Police Badge.
Screenshot
Police Chief's Office
Go back upstairs to the Chief's Office and zoom in to place the badge to undo his chains.
His ghost will appear and talk to you to explain what happened to him.
At the end of the conversation, a Doll will appear on the chair. Grab it, and the Dollhouse will appear for you to place the Doll.
Dollhouse
Place Sam's Father in the Dollhouse and watch the scene.
At the end of the scene, you will be given a Pipe for your Inventory.
When it is over, go back upstairs to the Chief's Office.
Police Chief's Office
Once you freed the Police Chief's spirit, you cleared all the evil from his office, so a whole new cleansed scene will appear.
Pick up the Beyond Object that morphs from a chain to a wire (see screenshot).
Place the pipe to hold open the cell door. You will trigger a Hidden Object Scene.
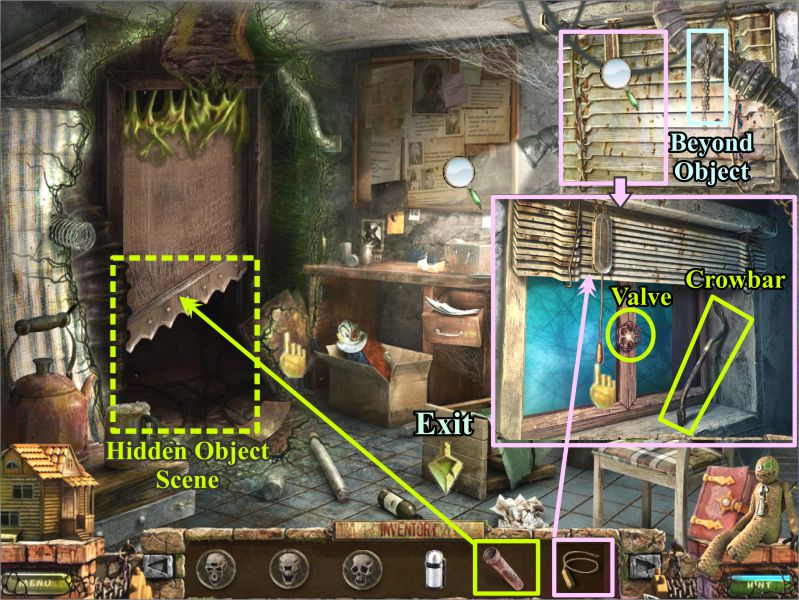
Play the Hidden Object Scene and put the Shutter Cord in place to open the shutters.
Take the Valve and Crowbar for your Inventory.
Screenshot
Police Chief's Office Hidden Object Scene
Collect everything, and you will get another Skull Locket and a Shutter Cord.
Screenshot
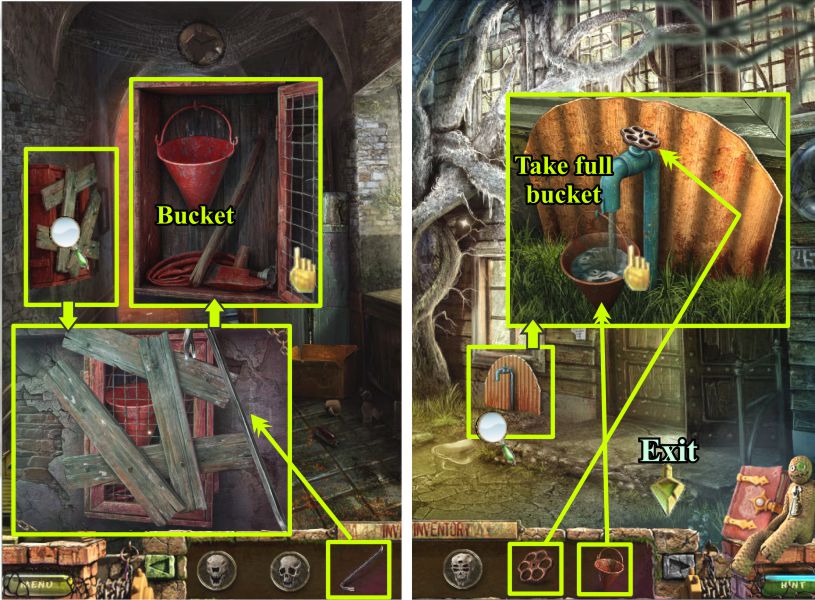
Police Station Front Desk and Outside the Police Station
Go downstairs to the Front Desk and zoom in on the boarded up cabinet across from the lockers.
Use the crowbar to remove the boards, open the cabinet and take the Bucket.
Go outside and zoom in on the water pipe.
Place the valve on the pipe, fill the bucket with water, and collect it.
Screenshot
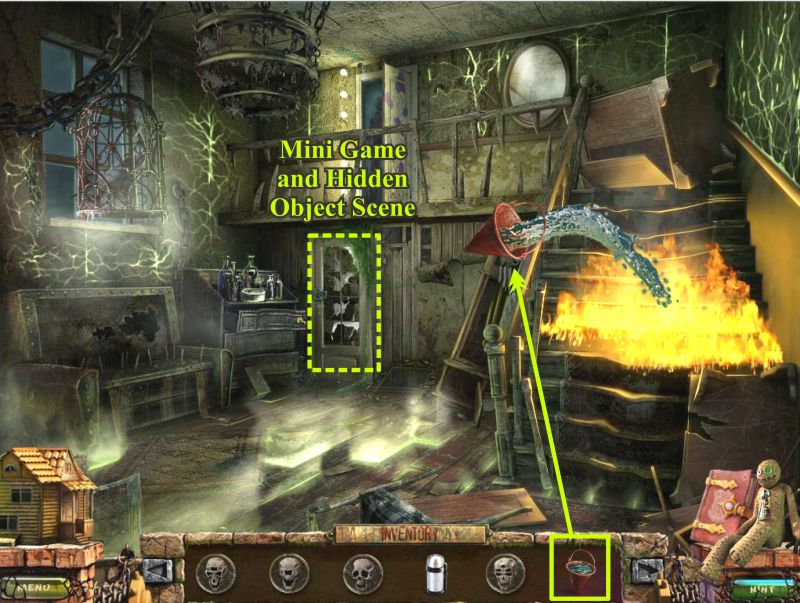
Part 4: The House
House Living Room
Go back to the House and use the bucket of water to put out the fire.
There is something stuck behind the steps, but you can't reach it. You need a tool.
You can't get to the second floor because the wardrobe is in your way.
Click on the door next to the cabinet for a Mini Game that will then trigger a Hidden Object Scene once you have completed the game.
Screenshot
Skull Locket Mini Game
Place the Skull Lockets on the lock to trigger the Mini Game.
Your goal is to move the skulls around until the number of eyes on each skull matches the numbers on the lock, as shown in the screenshot.
You can slide the skulls in any direction as long as there is an opening at the other end, such as the one at the bottom marked in the screenshot.
Screenshot
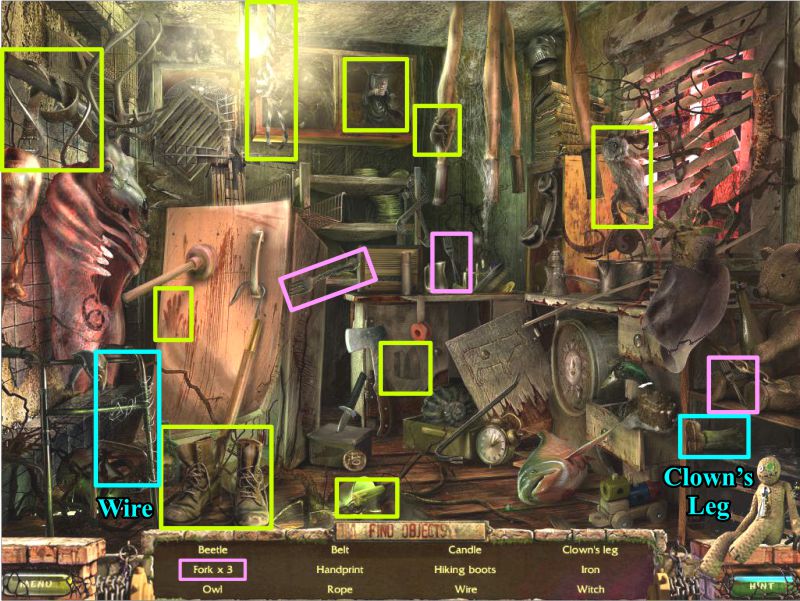
Closet Hidden Object Scene
The door will open after the game, so click on the Hidden Object Scene.
When you have collected everything, you will have a Clown's Leg and a Wire.
Screenshot
Stairway, Dollhouse, and Upstairs Landing
Zoom in on the part of the stairway marked in the screenshot and use the wire to fetch the Doll out of the hole.
The Dollhouse will appear, so place Sam's Mom in the sparkles and watch the scene.
At the end of the scene, you will receive a Key to the Children's Play Room.
All evil has now been removed from the Living Room, so a new scene appears.
Go upstairs to the landing and grab the Beyond Object shown on the top of the banister.
Put the key in the door of the Children's Play Room, turn it 3 times, and enter the room.
Screenshot
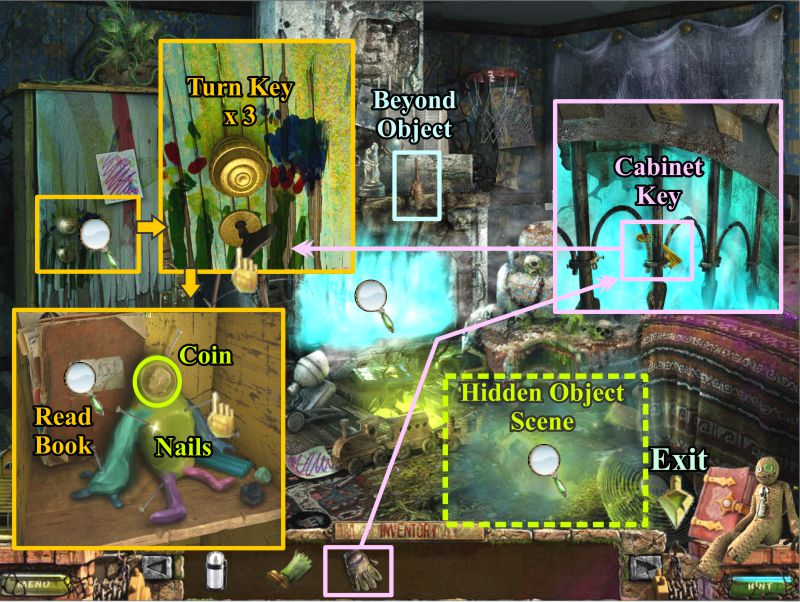
Children's Play Room
Pick up the Beyond Object shown on the mantle.
Zoom in on the fireplace and use the oven mitt to take the Cabinet Key.
Click on the cabinet, place the key and turn it 3 times.
Take the Coin and Nails off the doll, then read the book.
Play the Hidden Object Scene.
Screenshot
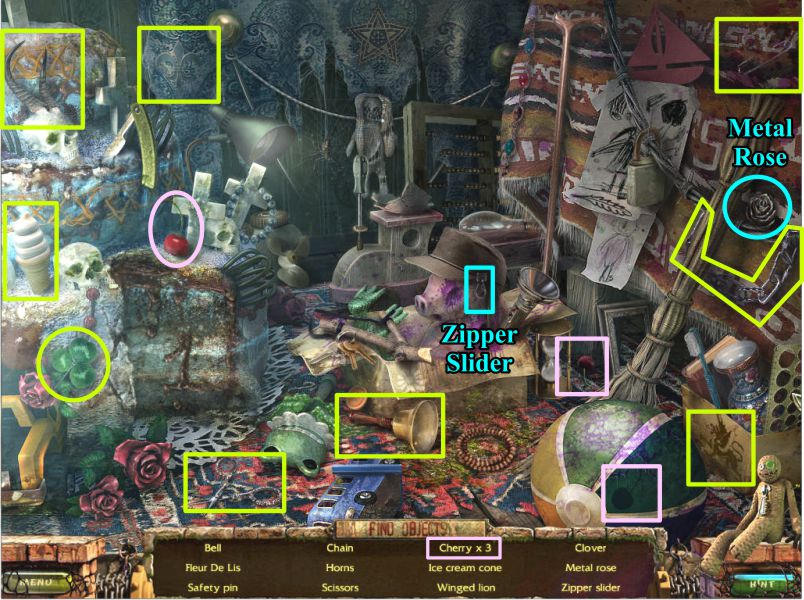
Children's Play Room Hidden Object Scene
Collect everything to get a Zipper Slider and a Metal Rose.
Screenshot
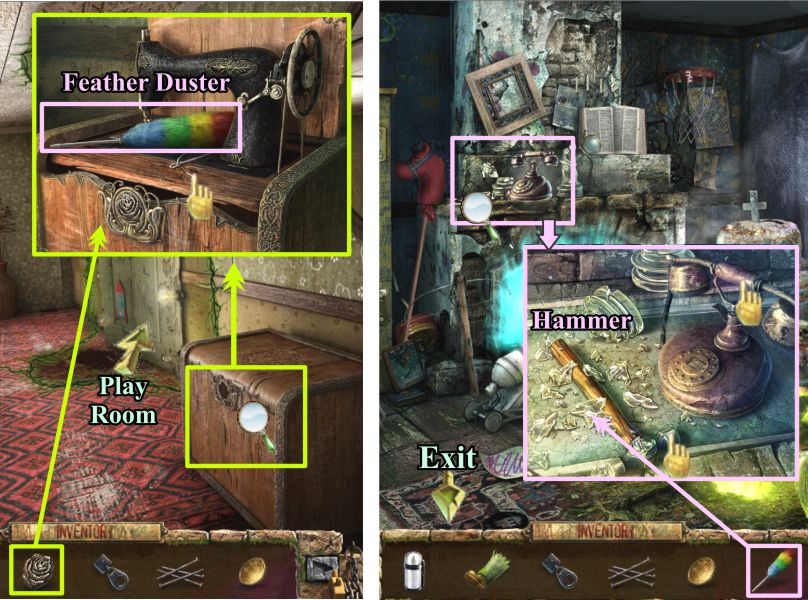
Upstairs Landing and Children's Play Room
Go out to the Landing and zoom in on the sewing machine chest.
Place the metal rose to open it and take the Feather Duster.
There is also a needle and thread there but you can't take it with your bare hands.
Return to the Play Room and click on the mantle.
Use the feather duster to sweep away the glass so you can grab the Hammer.
The phone rings, so answer it and watch the cutscene.
Screenshot
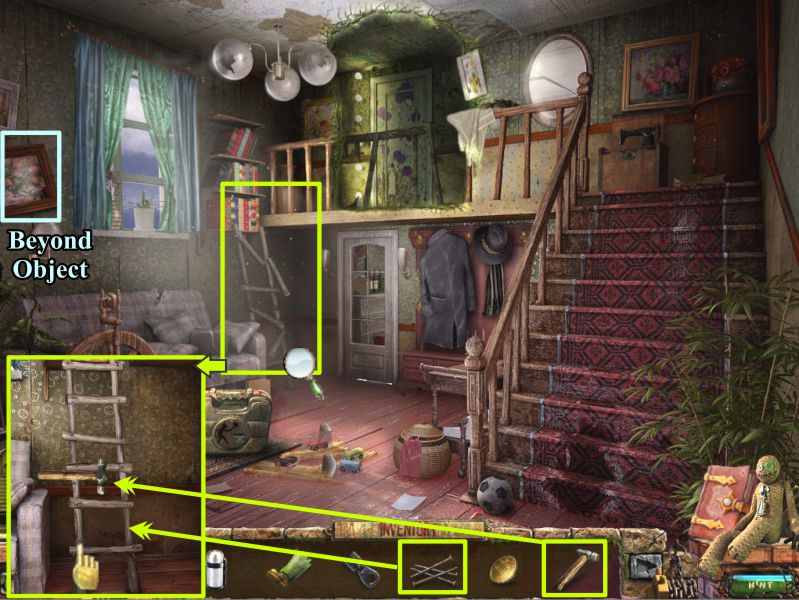
Living Room
Go downstairs and zoom in on the ladder.
Place the nails, use the hammer to secure them, and take the ladder.
Screenshot
Part 5: Toy Store
Outside Police Station
Go to the outside of the Police Station and place the ladder against the tree.
Click on the area marked in the screenshot and melt the ice with your thermos of hot water.
Collect the Steel Moon.
Screenshot
Outside Toy Store
Go to the Toy Store and place the Steel Moon on the window cover.
Since the door is locked, use your hammer to break the window when it is uncovered and enter the Toy Store.
Toy Store
Talk to the clown and he will leave.
Pick up the Beyond Object.
Zoom in on the floor where it is marked in the screenshot and view the cutscene.
Put your coin in the cash register, only to discover the handle is missing.
Place the zipper pull on the teddy bear and unzip him.
Take the key and use it on the Workshop Door to activate a Mini Game.
Screenshot
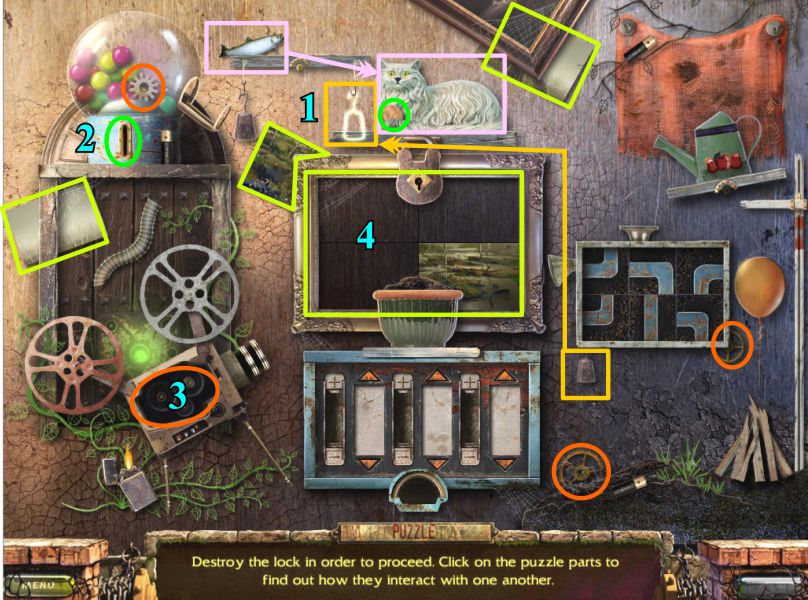
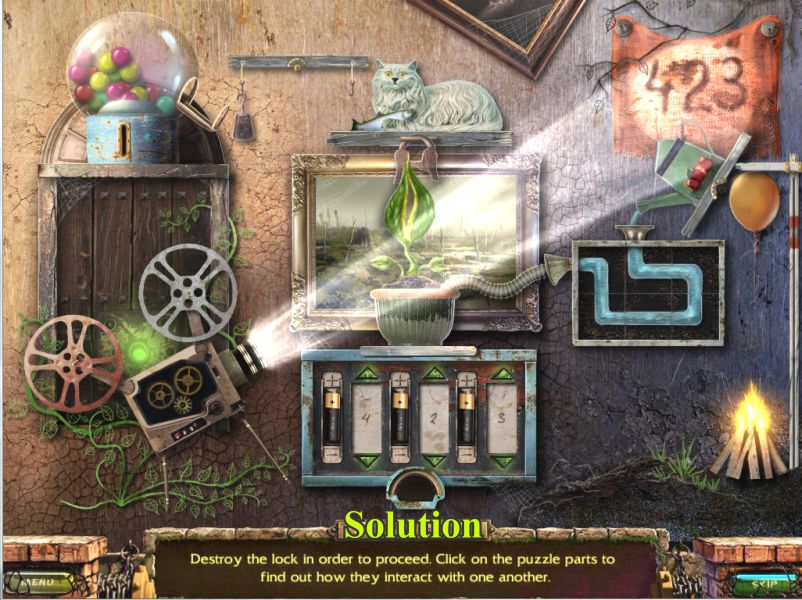
Workshop Door Mini Game
This Mini Game is a Rube Goldberg (named after a Pulitzer Prize winning cartoonist and author) because it is a complicated way to doing a simple task.
Your ultimate goal it to grow a plant that will pick the lock and open the door.
In order to achieve your goal, you will have to perform a number of tasks as shown in the screenshots.
Pick up the small weight and hook it in the outlined area next to the cat so the fish will slide off into the cat's paws and free the coin.
Pick up the coin and place it in the gumball machine to get the gear that is inside.
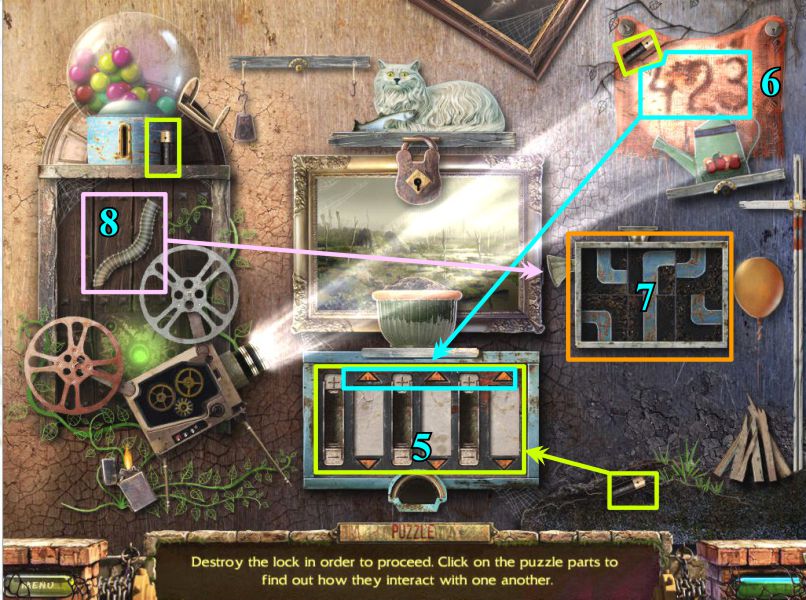
Collect all 3 gears and put them in the projector. It will project the number 423 on the hanging cloth.
Pick up the 3 picture pieces and place them in the frame.
Screenshot
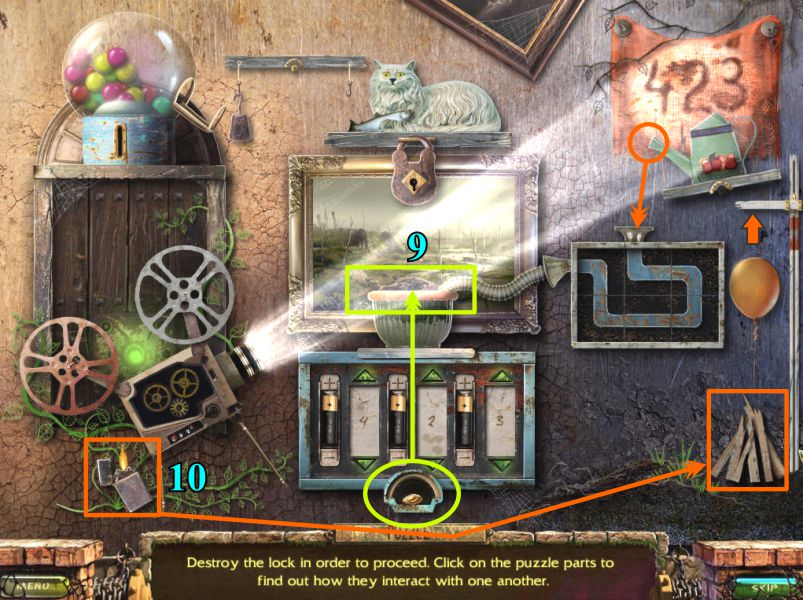
Place the 3 batteries as shown.
Use the arrows to enter 423 in the spaces next to the batteries, and a seed will drop into the hole.
Turn the pipes so the water can flow to the nozzle.
Attach the pipe to the nozzle so the water will flow to the bowl.
Screenshot
Place the seed in the bowl.
Pick up the lighter and light the wood so the balloon will rise and tip over the watering can.
Screenshot
Watch the plant grow and unlock the lock, then clear the door so you can enter the Workshop.
Screenshot
Workshop
Grab the Beyond Object.
Zoom in on the doll on the gurney and take the handle for the cash register.
Play the Hidden Object Scene.
Screenshot
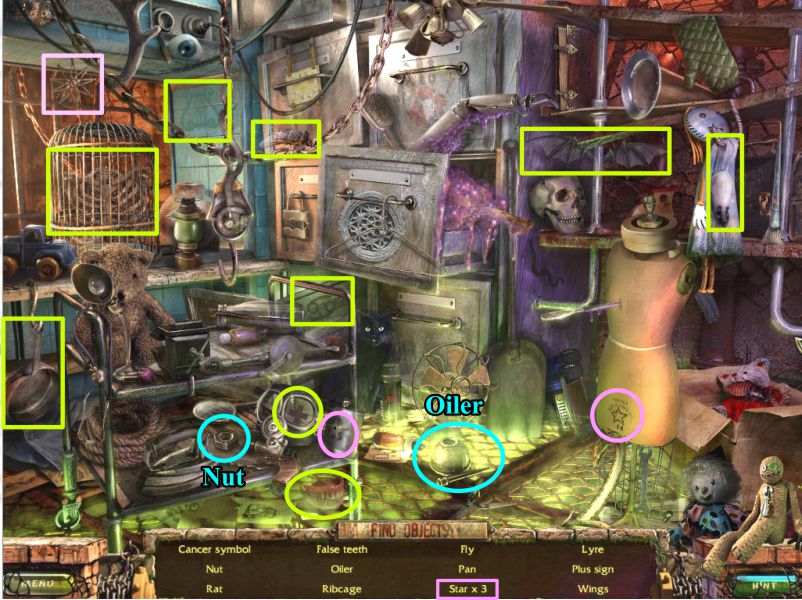
Workshop Hidden Object Scene
Collect everything, and you will get a Nut and an Oiler.
Screenshot
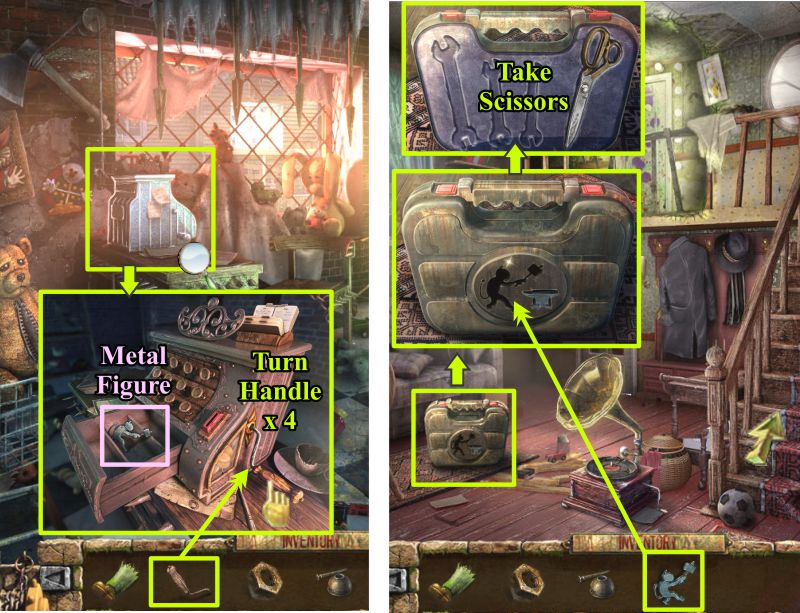
Toy Store and House Living Room
Go back into the Toy Store and zoom in on the cash register.
Place the handle and turn it 4 times.
When the drawer opens, take the Metal Figure and head off to the House.
Zoom in on the toolbox and place the Metal Figure.
Take the scissors and head upstairs to the landing.
Screenshot
Upstairs Landing
Zoom in on the sewing machine and use the scissors to cut the thread.
Toy Store
Return to the Toy Store and click on the sparkles at the right for a Hidden Object Scene.
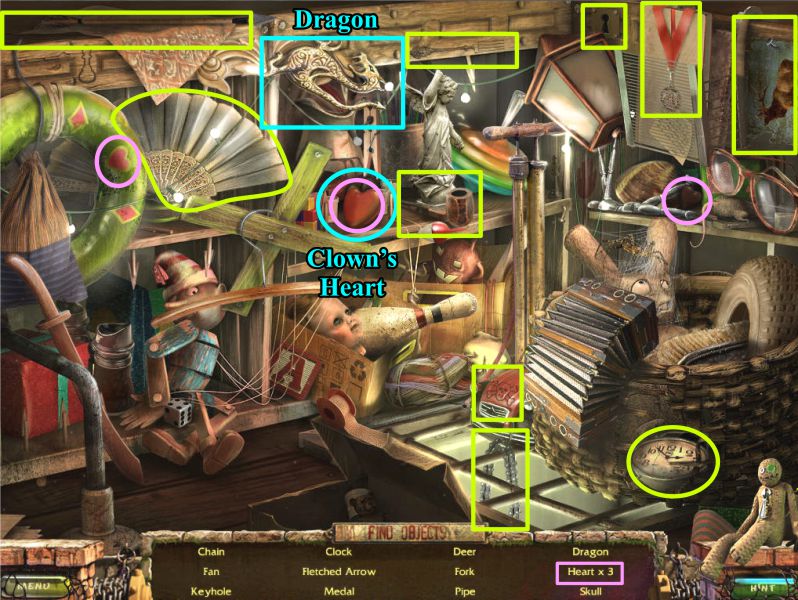
Toy Store Hidden Object Scene
Collect everything, and you will get the Clown's Heart and a Dragon.
The Clown's Heart is one of the 3 hearts, so is marked with 2 colors in the screenshot.
Screenshot
Toy Store Workshop
Go to the Workshop and zoom in on the clown strapped to the mattress.
Place the heart and leg as shown in the screenshot.
Once placed on the doll, the needle and thread will automatically sew it up, and you will get a Dollhouse Doll for your Inventory.
Screenshot
The Dollhouse
The Dollhouse will appear for you to place the clown in the sparkling area.
Watch the cutscene and at the end, you will receive the Tunnel Key.
Toy Store
Return to the Toy Store and zoom in on the tunnel opening.
Place the key to open the grate, turn it 3 times, and go down into the Tunnel.
Part 6: The Tunnel
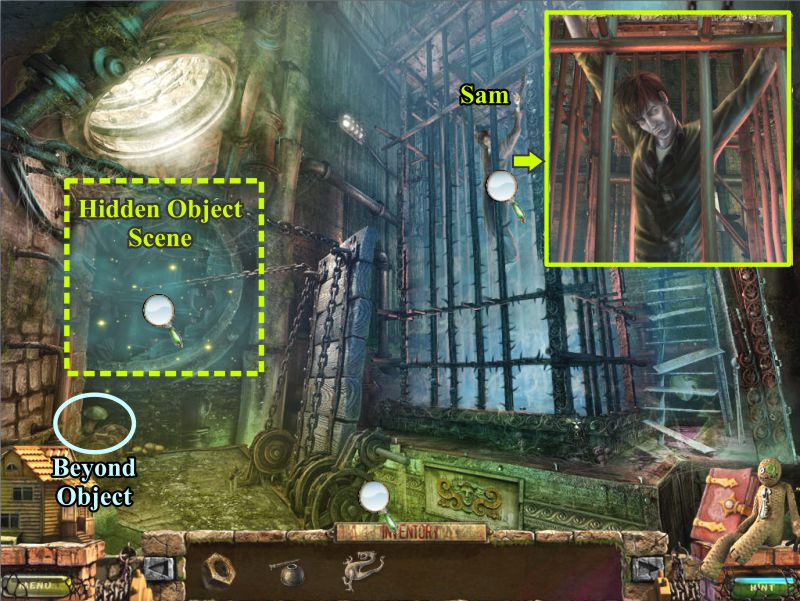
The Cage
Sam is hung up in a cage.
Grab the Beyond Object and play the Hidden Object Scene.
Screenshot
Tunnel Hidden Object Scene
When you have collected everything, you will come away with a Wrench and a Clock Hand.
Screenshot
Drawbridge
Zoom in on the drawbridge mechanism and place the nut.
Use the wrench to tighten the nut, cross the drawbridge, and go up the stairs.
Screenshot
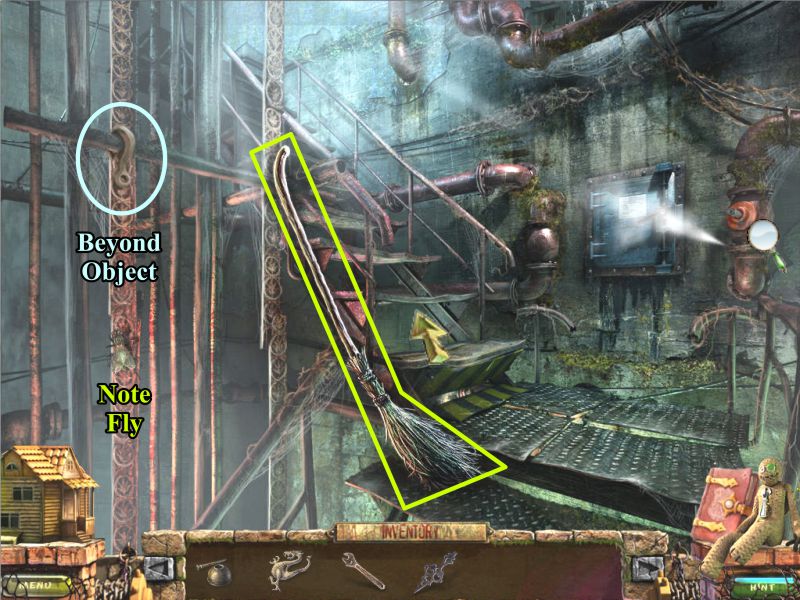
Tunnel Stairs
Pick up the broom and grab the Beyond Object.
Note the large fly on the cage and that you need a valve to shut off the steam.
Go up the next flight of stairs.
Screenshot
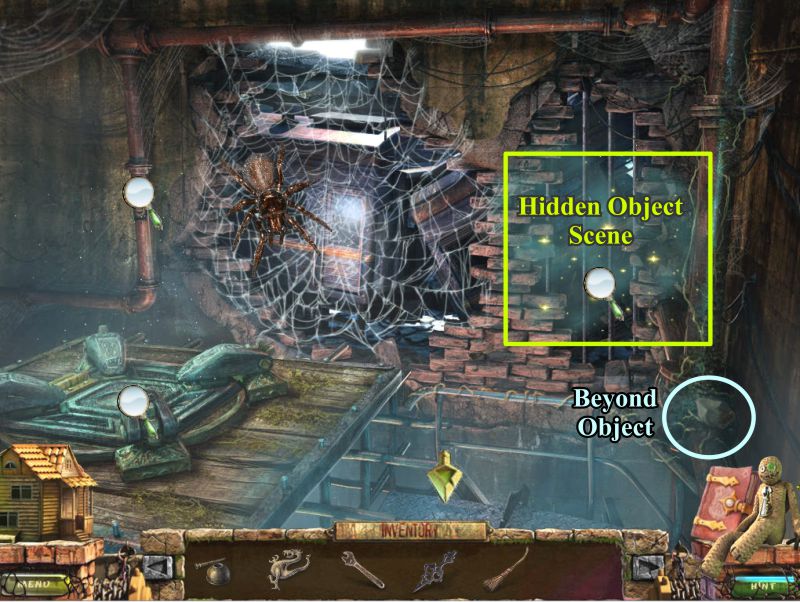
Top of the Stairs
The top of the stairs is also the top of the cage, but you need a key to open the hatch.
Pick up the Beyond Object and play the Hidden Object Scene.
Screenshot
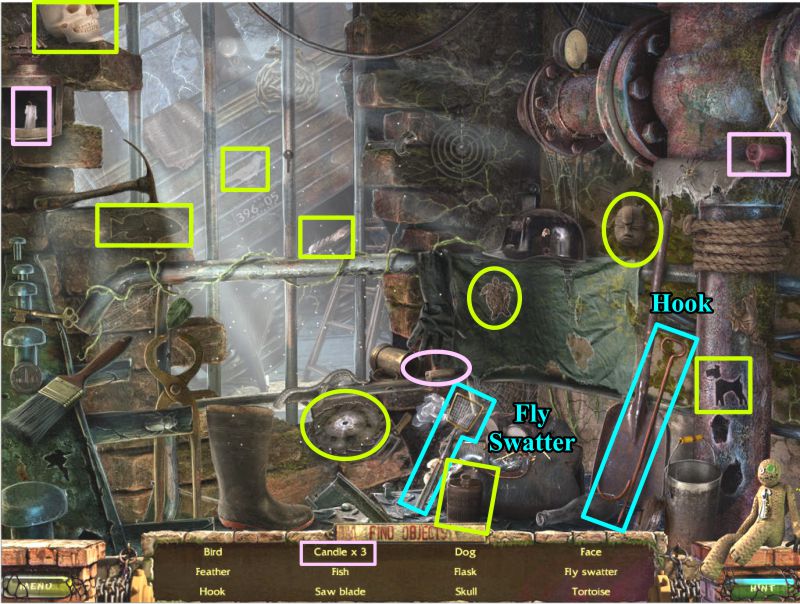
Top of the Stairs Hidden Object Scene
Once you have collected everything, you will have a Hook and a Fly Swatter.
Screenshot
Tunnel Stairs
Go back down the stairs to the landing and zap the fly with the fly swatter.
Top of the Stairs
Return to the top of the stairs and give the fly to the spider so he will disappear.
Use your broom to remove the web and go through the opening to the train.
Part 7: The Train
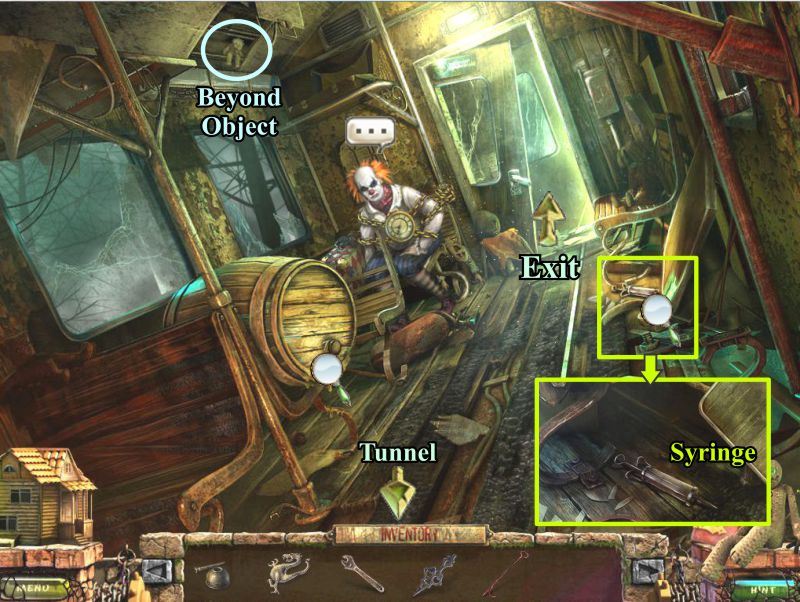
Train Car
Talk to the clown who is now all chained up.
Zoom in on the bench at the right and pick up the Syringe.
Grab the Beyond Object.
There is a drum of oil, but you need to find something to remove the cork so you can fill your oil can.
Exit through the back door of the train car.
Screenshot
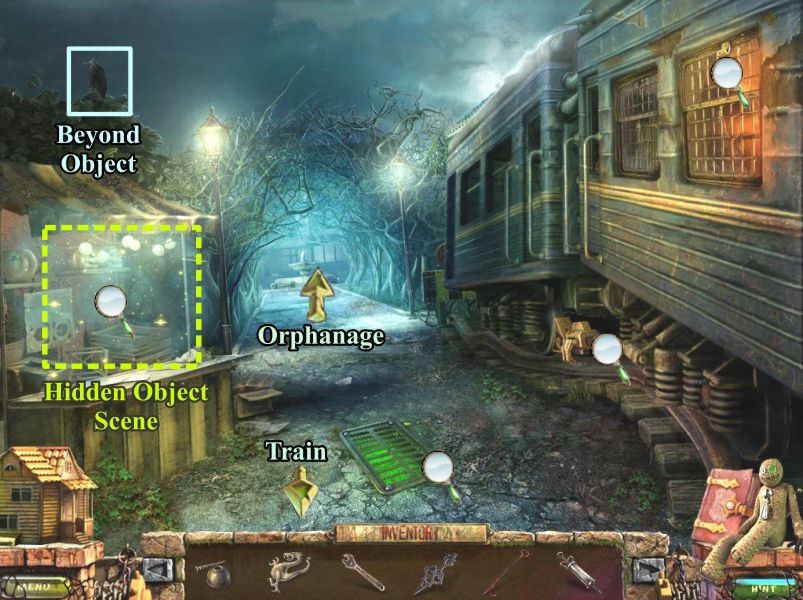
Concession Stand
Check out the magnifying glasses, take the Beyond Object, and play the Hidden Object Scene before heading toward the Orphanage.
Screenshot
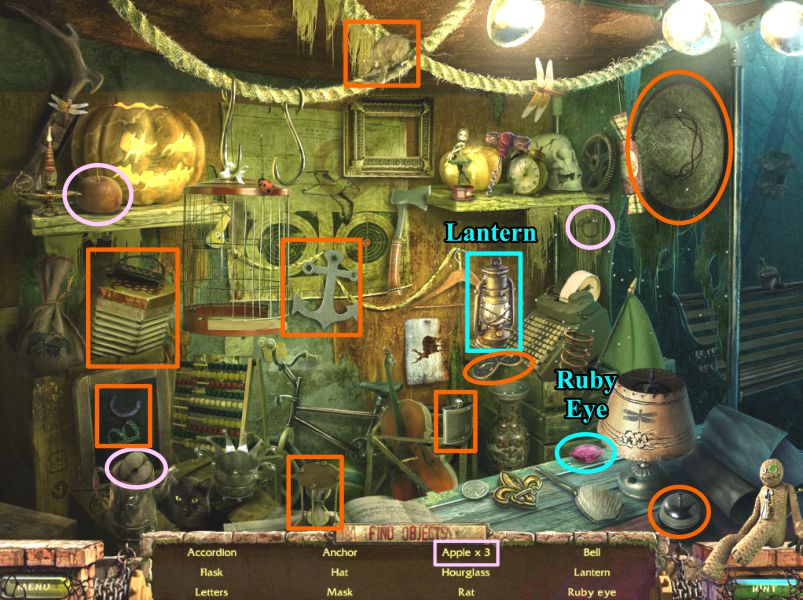
Concession Stand Hidden Object Scene
You will collect a Lantern and Ruby Eye when you have everything on the list.
Screenshot
Orphanage Square
Check out the magnifying glasses, take the Beyond Object and zoom in on the fountain.
Use your hook to pull the plug and rid the fountain of its smelly water.
When the fountain is drained, you will get a Hidden Object Scene to play.
Screenshot
Fountain Hidden Object Scene
Collect everything to get a Glass Shard and a Rope.
Screenshot
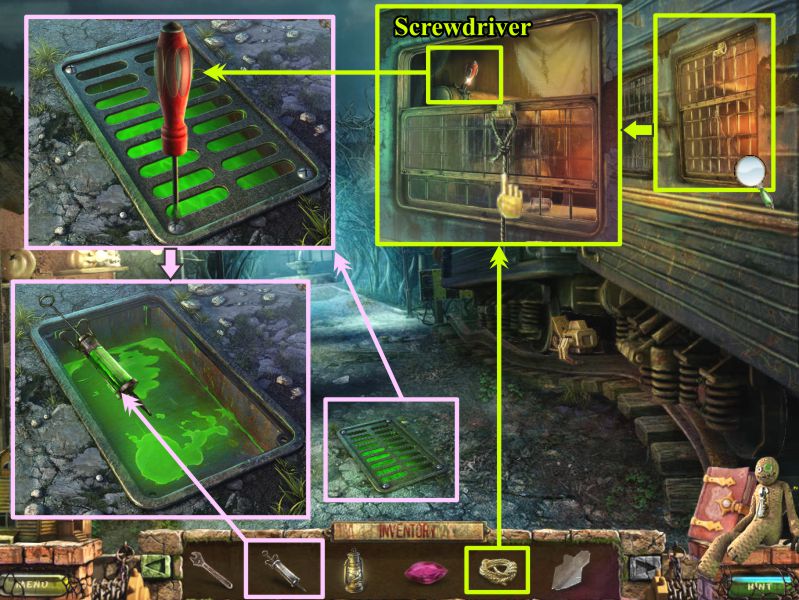
Concession Stand
Head back to the Concession Stand by the Train.
Zoom in on the train window the place the rope on the latch, as shown in the screenshot.
Pull on the rope to open the window and take the Screwdriver.
Click on the grate and use the screwdriver to remove the screws.
Use the syringe to get some of the acid.
Screenshot
Top of the Tunnel Stairs
Go through the train car to the Tunnel.
Zoom in on the rusted metal plate and use your syringe of acid to remove it.
Take the Valve and go downstairs to the landing.
Screenshot
Tunnel Stairs
Place the large valve to stop the steam.
Click on the cabinet next to the valve and take the Doll.
The Dollhouse
Place the Doll of the man who came to deliver the box. The scene will change, and the man will take Sam away.
You will get another Clock Hand for your Inventory.
Train
Go back upstairs and to the train.
Zoom in on the clock holding the chains on the clown.
Place the 2 clock hands and set the time to 3:00, the time on the clock tower over the Orphanage.
The clown is free and will talk with you.
He says the key to the cage hatch is in his briefcase.
Zoom in on the colorful case that appears and press the star to open it.
Take the fancy key and go back to the Tunnel.
Cage Hatch
Zoom in on the hatch and place the key.
Click on it and watch the cutscene.
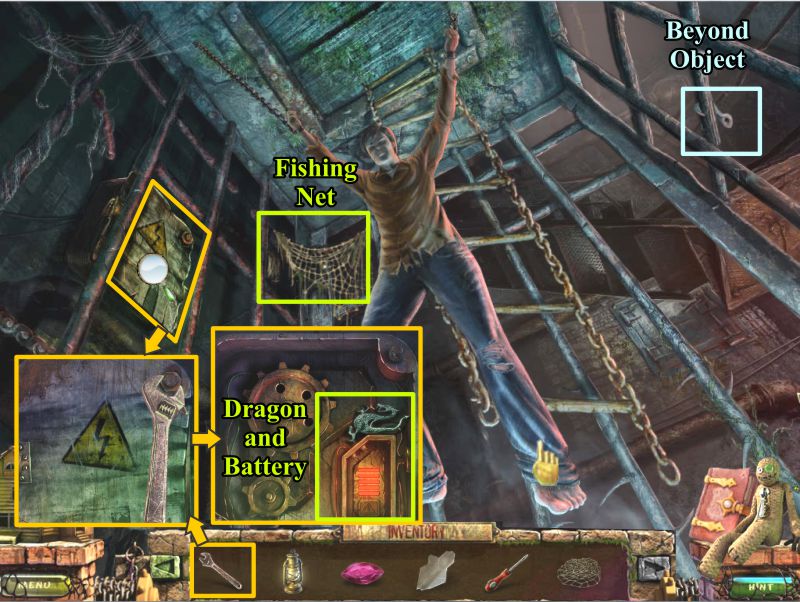
The Cage
Danielle finds herself thrown into the Cage by the clown.
Take the Beyond Object and Fishing Net.
Click on Sam and he will fall, but it's an electric mannequin and not the real Sam.
Zoom in on the electrical panel and use your wrench to undo the nut.
Take the Dragon and the Battery.
Screenshot
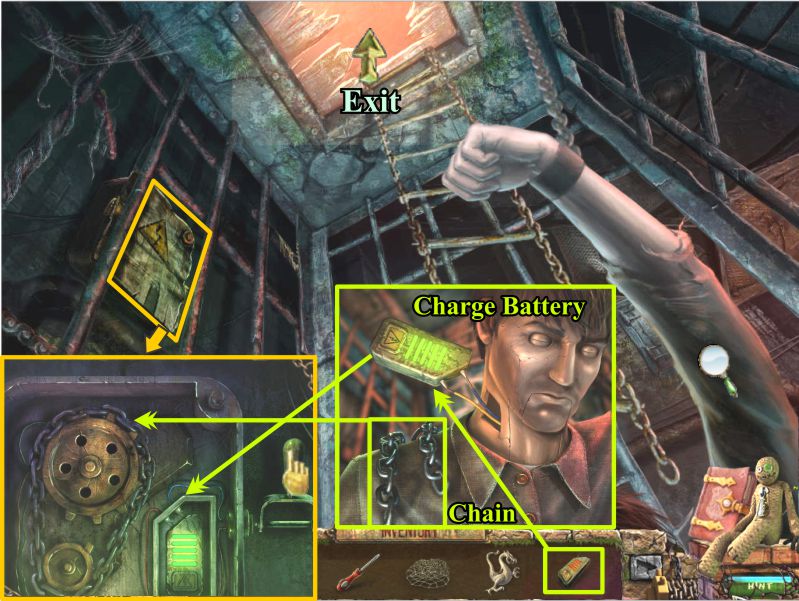
Zoom in on the mannequin and touch the hatch in it's neck.
Connect the battery to the wires to charge it.
Take the battery and chain.
Zoom in on the electrical panel and put the chain on the gears and the battery back in its place.
Pull the handle and the cage will rise, creating a hole in the top for you to escape.
Screenshot
Go through the Train and out the door to the Concession Stand.
Click on the stand for a Hidden Object Scene.
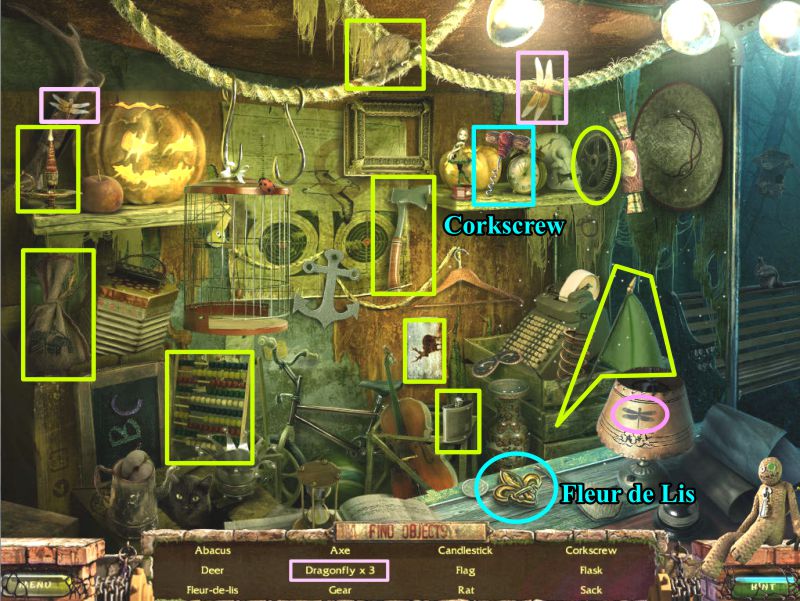
Concession Stand Hidden Object Scene
When you've collected everything, you will get a Corkscrew and Fleur de Lis.
Screenshot
Train
Go into the Train and use the Corkscrew to remove the cork from the oil barrel.
Fill your empty oiler with the oil and head off to the Orphanage.
Part 8: The Amusement Park
Orphanage Square
Jimmy is waiting for you by the fountain. Talk to him, and he will give you a videotape.
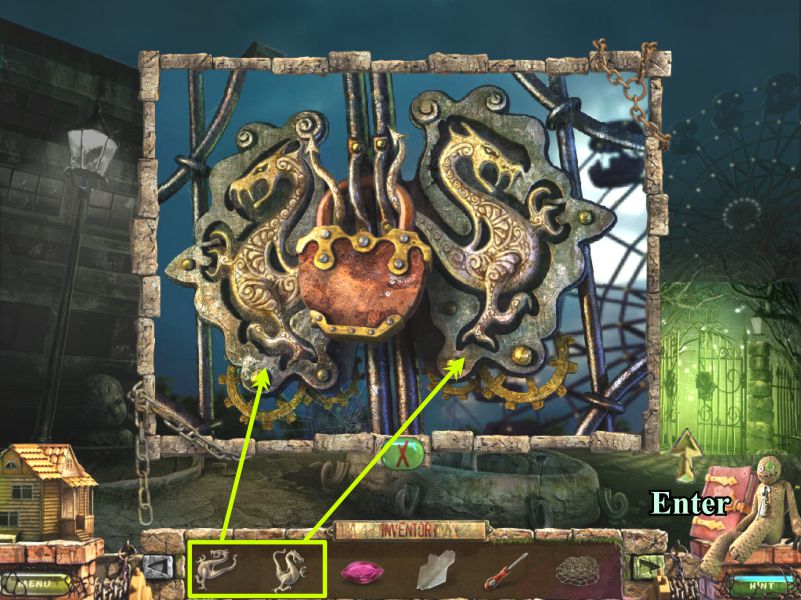
Amusement Park Gate
Place the 2 Dragon pieces as shown in the screenshot, and the lock will open for you to enter.
Screenshot
Amusement Park
Pick up the Beyond Object and click on the newspaper to read it.
Use the glass shard to cut the curtain and check out the carousel horse.
Zoom in on the clown gate and use your oiler to remove the rust on the hinge.
Play the Hidden Object Scene and then go through the gate.
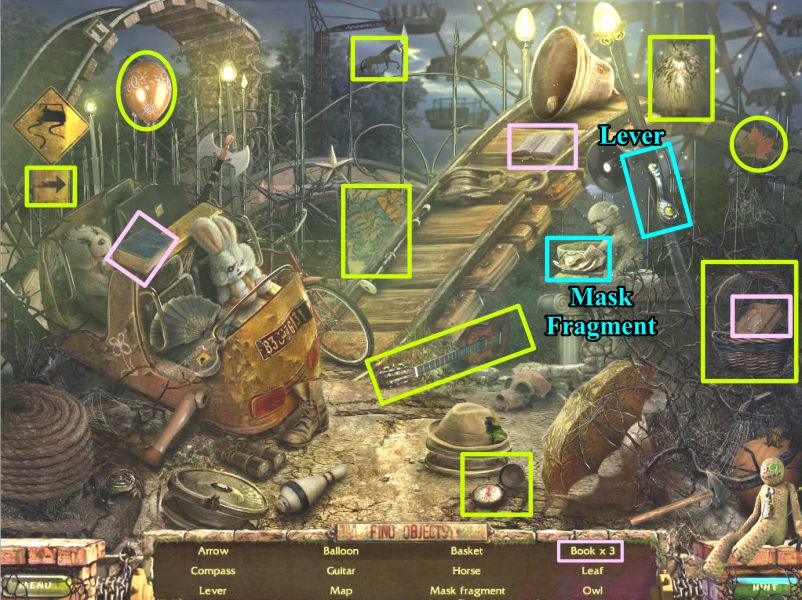
Screenshot
Amusement Park Hidden Object Scene
After you collect everything, you will have a Mask Fragment and Curtain Lever for your Inventory.
Screenshot
River Bank
Collect the Beyond Object, throw your fishing net over the green ball in the river, and talk to Kim.
Screenshot
Amusement Park Carousel
Go back to the Amusement Park and zoom in on the cabinet under the carousel.
Place the green ball and press it to open the door.
Take the Saw. Find out that the paint Kim wants is dried out and needs thinner.
Go back to the River.
Screenshot
River Bank
Use the saw you just found to cut down the tree so you can cross to the Cemetery.
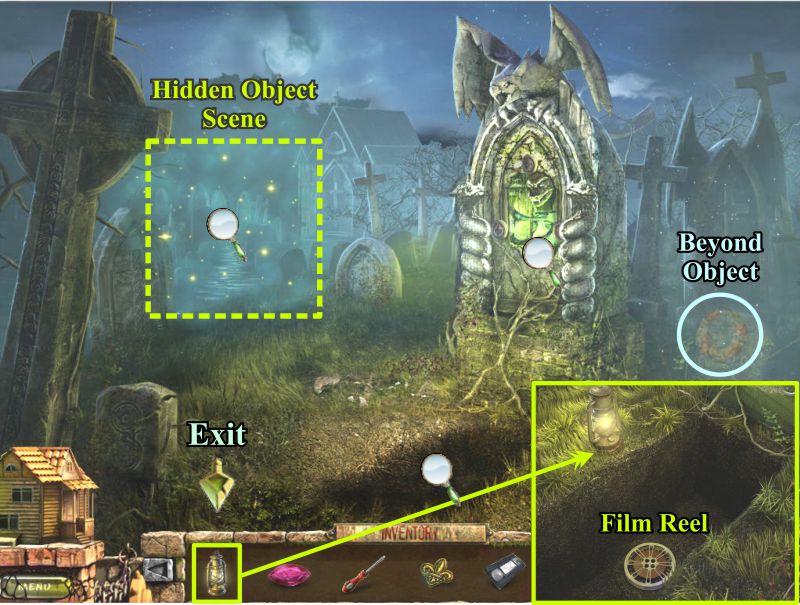
Cemetery
Collect the Beyond Object, zoom in on the grave and use your lantern to find the film reel.
Click on the sparkles for a Hidden Object Scene.
Screenshot
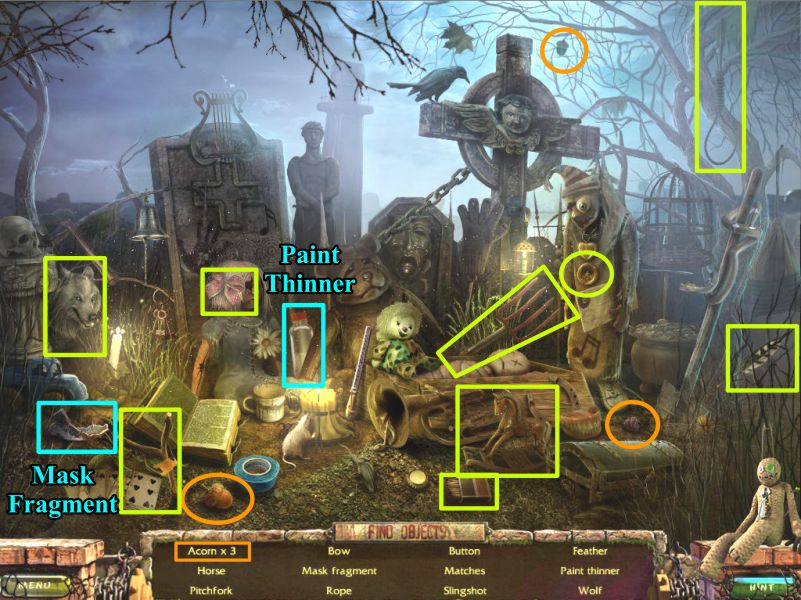
Cemetery Hidden Object Scene
When you have collected everything, you will get some Paint Thinner and a Mask Fragment.
Screenshot
Amusement Park Carousel
Go back to the Amusement Park, click on the cabinet under the carousel and fill the cans of paint with the paint thinner.
Collect the cans and go back to the River.
River Bank
Give the paints to Kim, and she will paint a picture of her family. She is Sam's sister.
Talk to Kim, zoom in on the painting, and take the Mask Fragment.
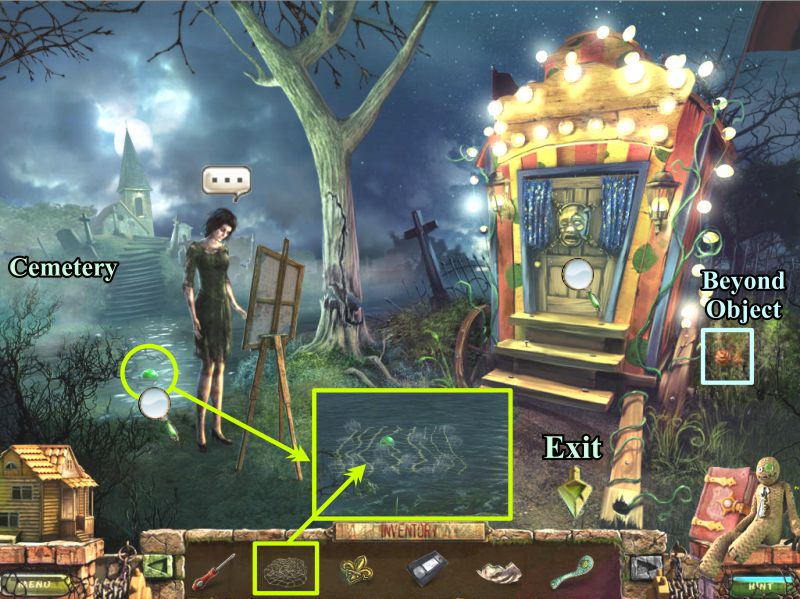
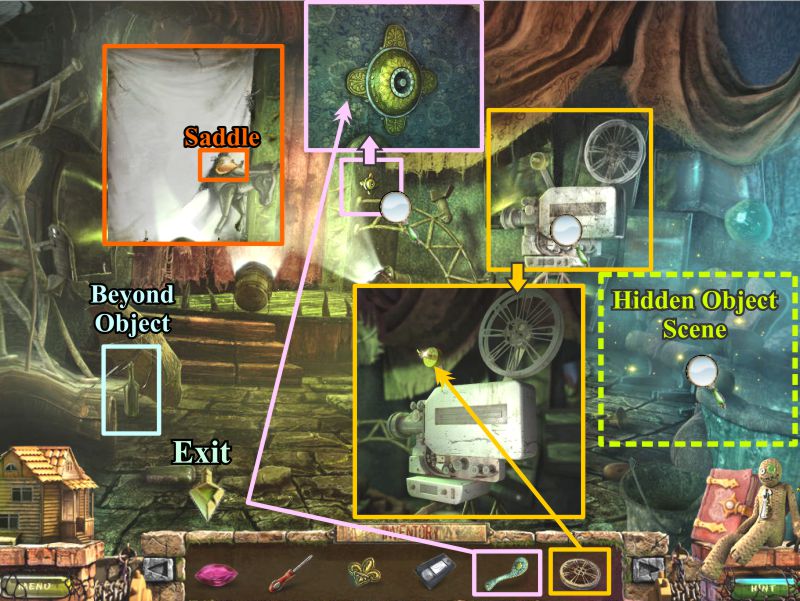
Wagon
Zoom in on the Wagon, place the mask fragment pieces, and enter the wagon.
Collect the Beyond Object, zoom in on the projector and place the film reel.
Click on the knob at the right of the curtain and place the curtain lever.
Watch the movie and take the saddle off the horse at the end of the movie.
Play the Hidden Object Scene.
Screenshot
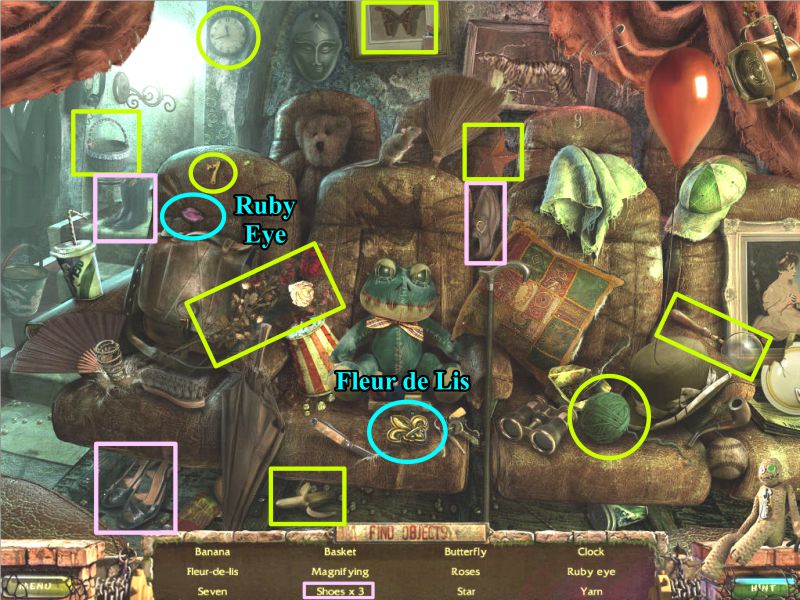
Wagon Hidden Object Scene
Collecting everything will get you another Ruby Eye and Fleur de Lis.
Screenshot
Amusement Park Carousel
Return to the Carousel, zoom in on the horse, and place the saddle. He will drop the Doll.
The Dollhouse
Place the Kim Doll and watch the cutscene.
A key to the Orphanage will be added to your Inventory.
Orphanage Square
Go to Orphanage Square and zoom in on the statue marked in the screenshot.
Place the 2 Ruby Eyes from your Inventory and you will get another Fleur de Lis.
Go back through the gate to the Amusement Park and continue on to the Cemetery.
Screenshot
Cemetery
Zoom in on the elaborate head stone and place the 3 Fleur de Lis as shown.
In return you will receive one of the Orphanage Keys.
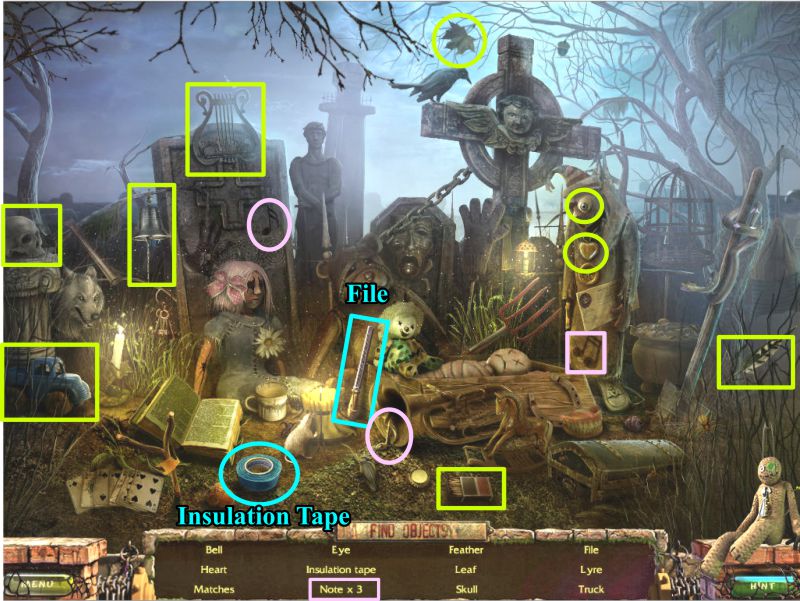
Play the Hidden Object Scene.
Screenshot
Cemetery Hidden Object Scene
After you collect everything, you will get a File and some Insulation Tape.
Screenshot
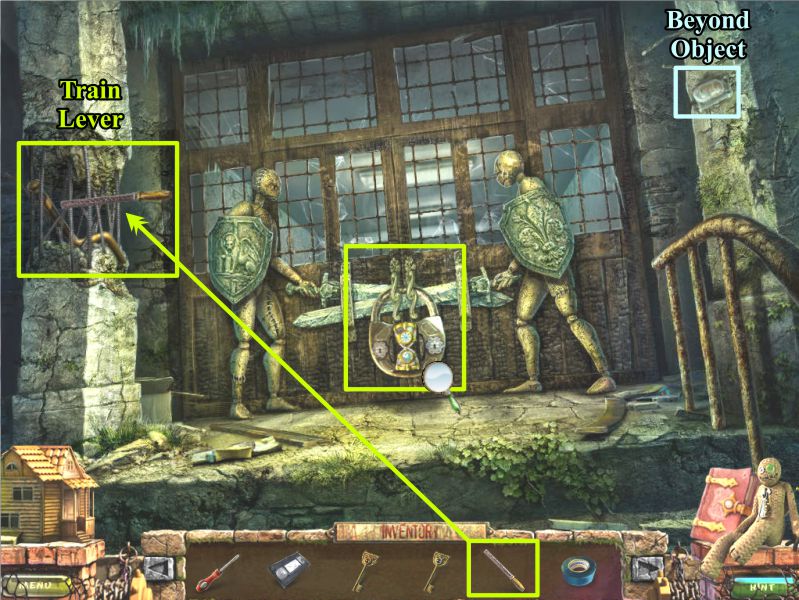
Orphanage Entrance
Go through the Amusement Park to the Orphanage Entrance.
Pick up the Beyond Object and use your file on the area marked at the left in order to get the Train Lever.
You have the 2 keys to the Orphanage Door, but you need to watch the video tape to see how to use them.
Screenshot
Concession Stand
Go to the Concession Stand area. Use the Train Lever on the boot to move the train forward so you can have access to the town.
Part 9: The Orphanage
Police Station
Go across the tracks to the Police Station and upstairs to the Chief's Office.
Zoom in on the TV and use the Insulation Tape to connect the wires.
Use your screwdriver to remove the grill and insert the tape.
Watch the cutscene and your Doll helper says he knows how to unlock the Orphanage Door, so go downstairs to the front desk and play the Hidden Object Scene at the front desk.
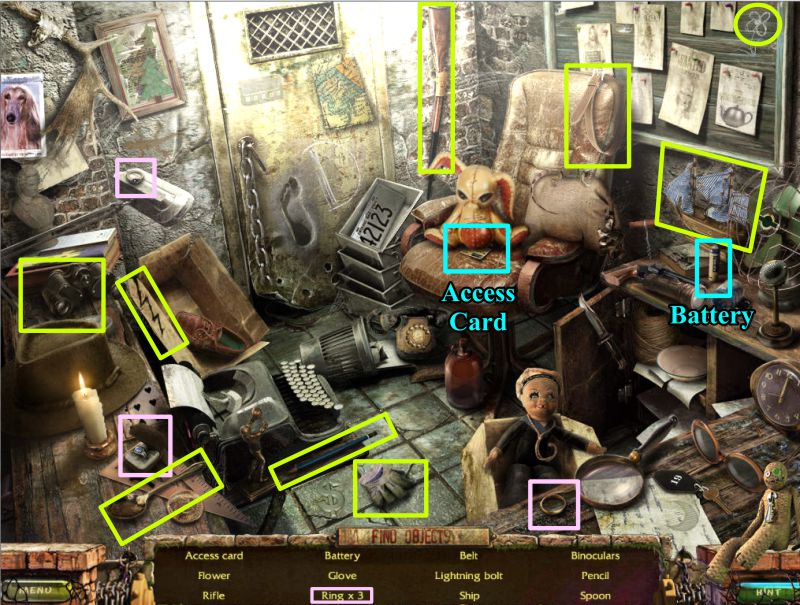
Police Station Hidden Object Scene
You will get an Access Card and a Battery when you have collected all the items.
Screenshot
Orphanage Entrance
Go to the entrance of the Orphanage and place the 2 keys in their proper places.
Turn each of them until the lock looks like the screenshot.
The blue key regulates the bottom picture and the red key turns the top picture.
The top should show the sun and the bottom should be a moon.
Once the lock is open, enter the Orphanage.
Screenshot
Orphanage Foyer
Pick up the Beyond Object and click for a close up of the button next to it.
Read the newspaper clipping and grab the painting piece.
Place the access card as shown in the screenshot to open the lid and press the red button to open the gate.
Screenshot
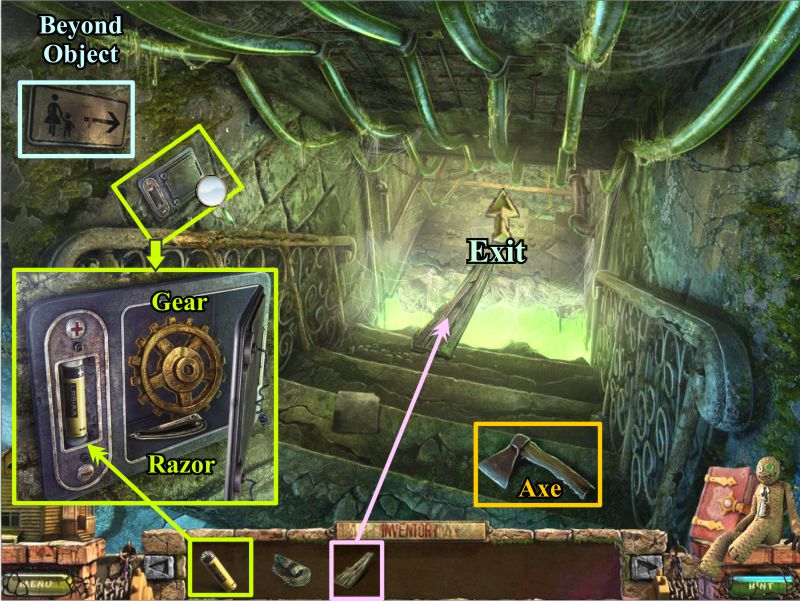
Orphanage Stairs
Pick up the Beyond Object and the Axe.
Zoom in on the electrical box and place the battery.
Take the Gear and the Razor and go back to the Foyer.
Use the axe to chop off the plank at the right and return to the Stairs.
Place the plank as shown in the screenshot and cross over.
Screenshot
Hall
Pick up the Beyond Object and play the Hidden Object Scene.
Screenshot
Hall Hidden Object Scene
Collect everything to get the Weed Killer and Putty Knife.
Screenshot
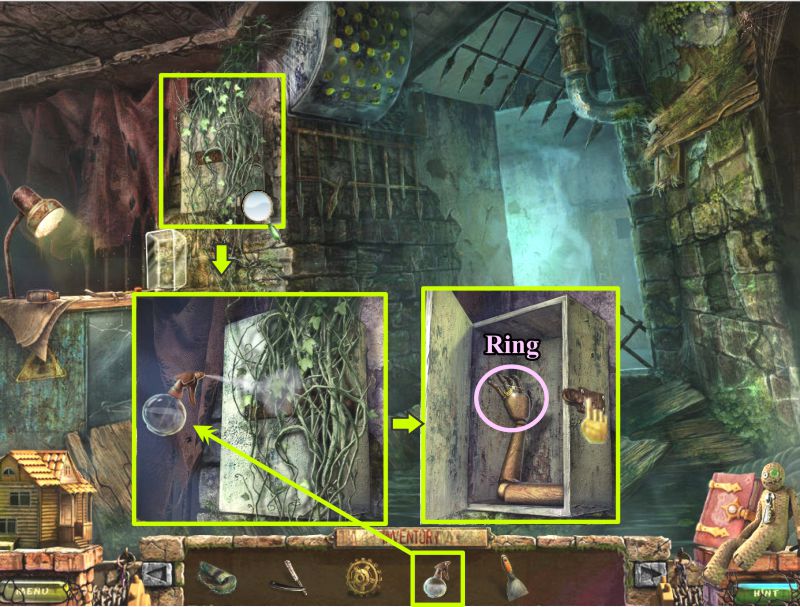
Orphanage Foyer
Return to the Foyer and zoom in on the vine-covered cabinet.
Use the weed killer to remove the vines, open the cabinet and take the Ring.
Screenshot
Hall
Return to the Hall and zoom in on the door with the clasped hands.
Place the ring on the woman's hand, and the hands will part so you can enter the room.
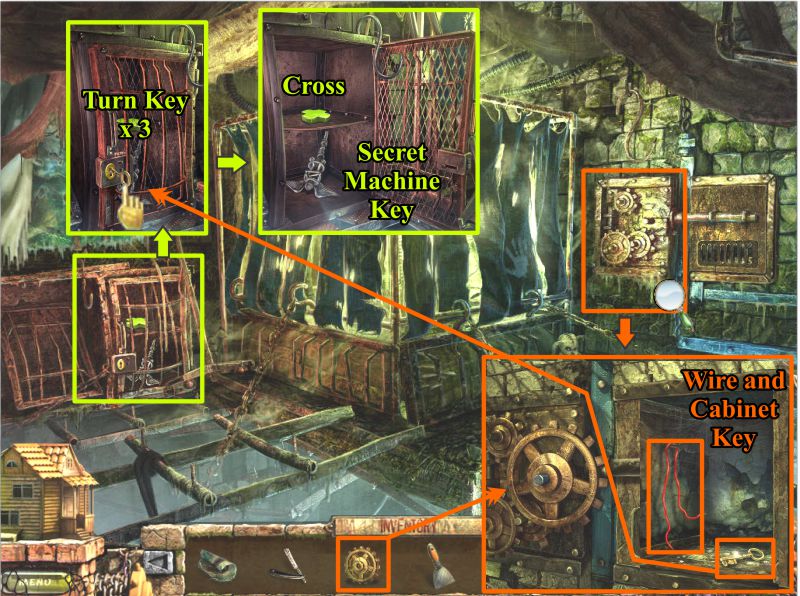
Curtained Box Room
Zoom in on the gears at the right and place your gear.
Take the Wire and Cabinet Key.
Zoom in on the cabinet, place the key and turn it 3 times.
Take the Cross and Secret Machine Key.
Screenshot
Zoom in on the painting at the left and place your painting piece.
Click on it and use your putty knife to remove the plaster. Take note of the shapes and their locations.
Click on the curtained box. Place your green cross over the red one to release the Doll so you can take it.
Screenshot
The Dollhouse
Place the Sam Doll where it belongs in the Dollhouse and watch the cutscene.
You will receive the Key for the Machine Room.
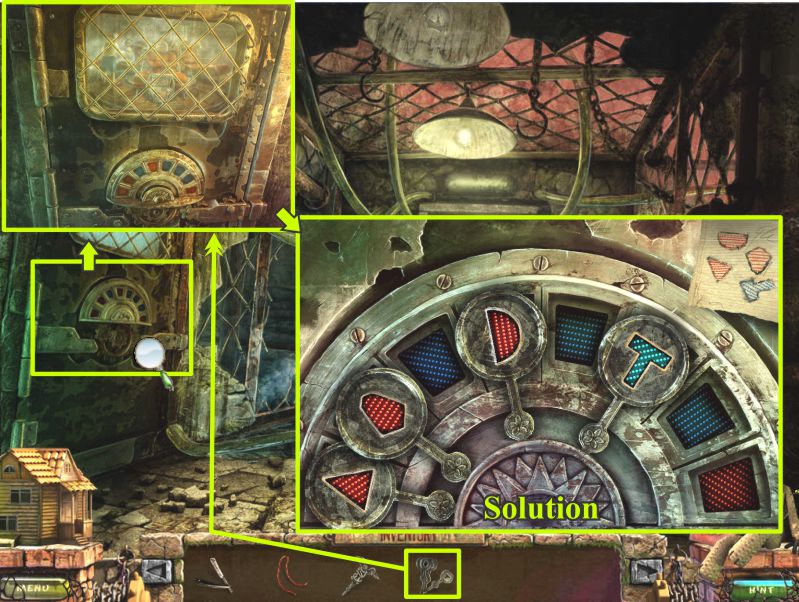
Hall
Zoom in on the door to the Machine Room and place the keys.
Your goal is to arrange the keys according to the diagram.
When you have a key in the correct place, as shown in the screenshot, the symbol will light up.
Screenshot
Part 10: Rescue Sam
The Machine
Go inside to find the Clown standing over Jimmy.
Watch the cutscene and then zoom in on the machine mechanism.
Remove the cover, place the red wire and key as shown, and press the red button.
Talk to Sam and grab the Beyond Object before leaving the room.
Screenshot
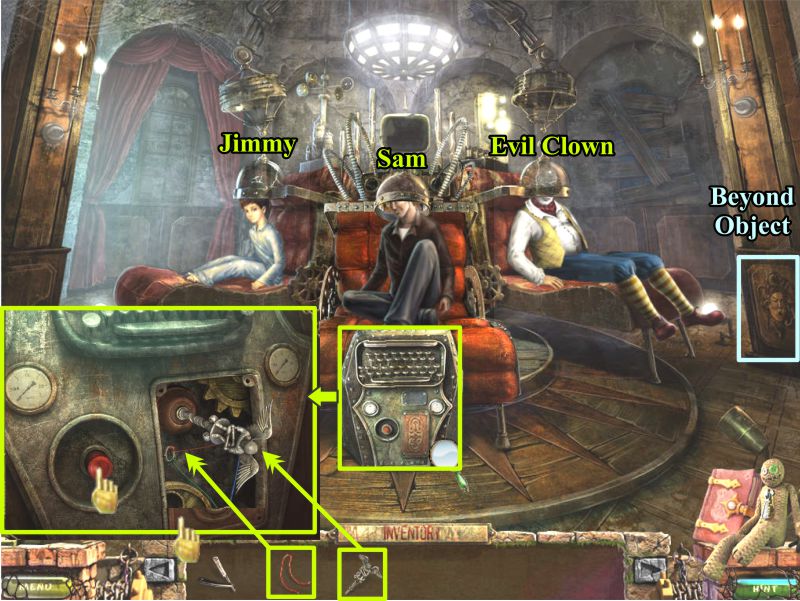
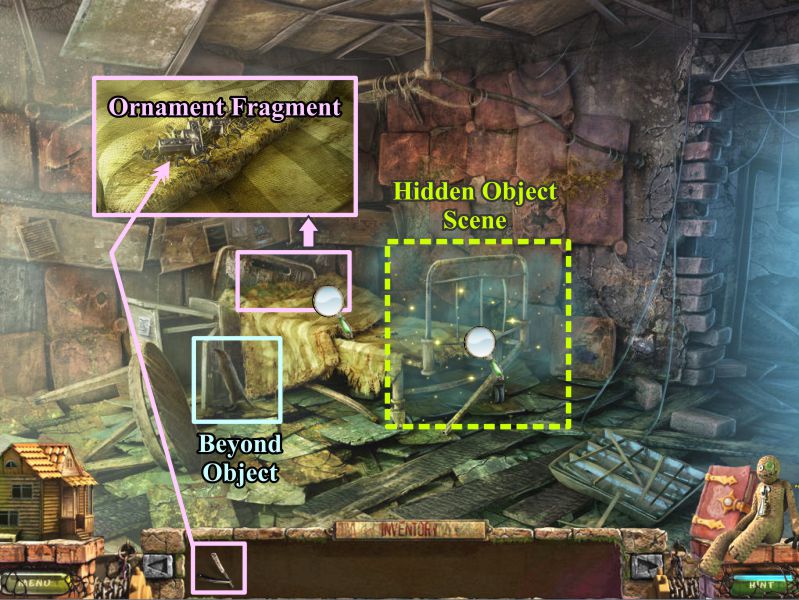
Child's Room
Exit down to what might have been Sam's Room.
Take the Beyond Object and zoom in on the bed.
Use the razor to slit the bedding and take the Ornament Fragment.
Play the Hidden Object Scene.
Screenshot
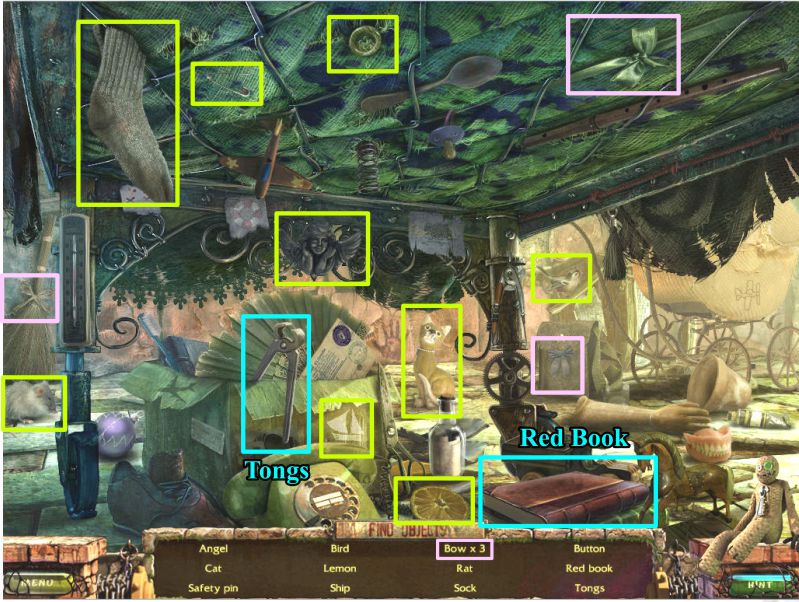
Child's Room Hidden Object Scene
Collect everything to get the Tongs and Red Book.
Screenshot
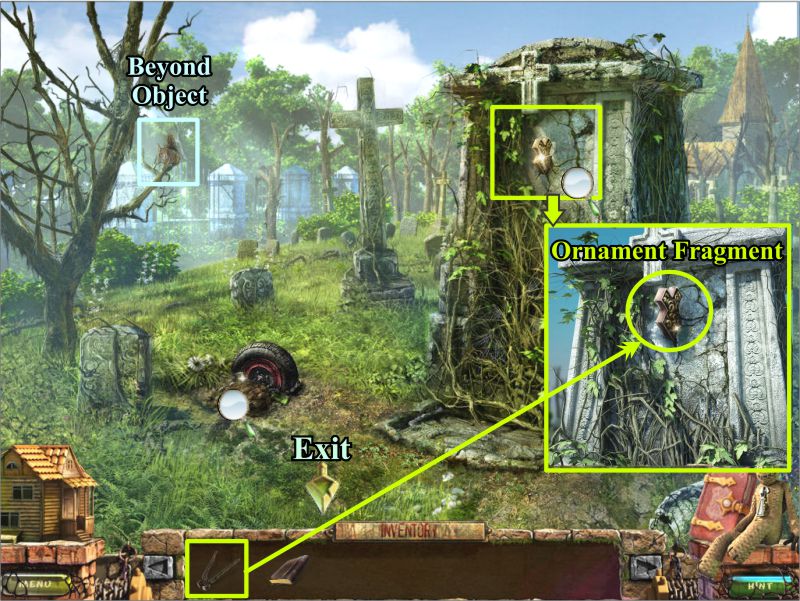
Cemetery
Exit down and take the gate at the left to the Cemetery.
Pick up the Beyond Object, note the grave with the tire, and zoom in on the large tombstone.
Use your tongs to remove the Ornament Fragment.
Screenshot
Orphanage Director's Office
Go back inside the Orphanage, grab the Beyond Object, and zoom in on the door.
Place the 2 ornament fragments as shown and enter the office.
Screenshot
Take the Beyond Object and zoom in on the open book on the stool.
Read what happened, zoom in on the books and place your red book to get a key.
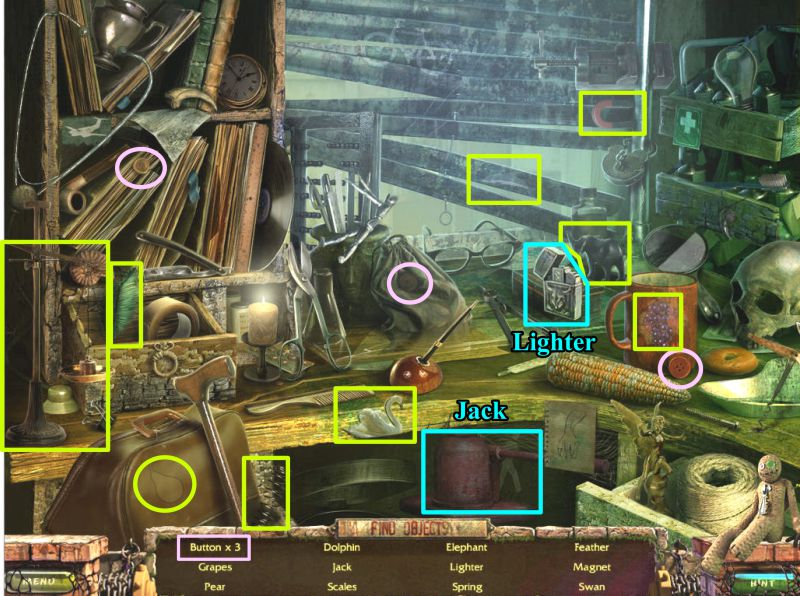
Play the Hidden Object Scene.
Screenshot
Director's Office Hidden Object Scene
Collect everything, including the Lighter and Jack.
Screenshot
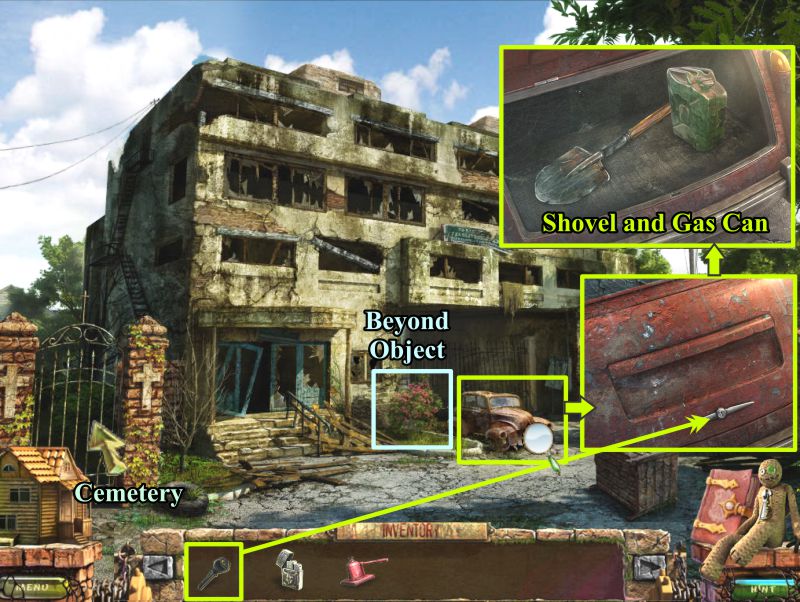
Outside Orphanage
Go outside, pick up the Beyond Object and click on the Director's car.
Open the trunk with your key, take the Shovel and Gas Can, and go to the Cemetery.
Screenshot
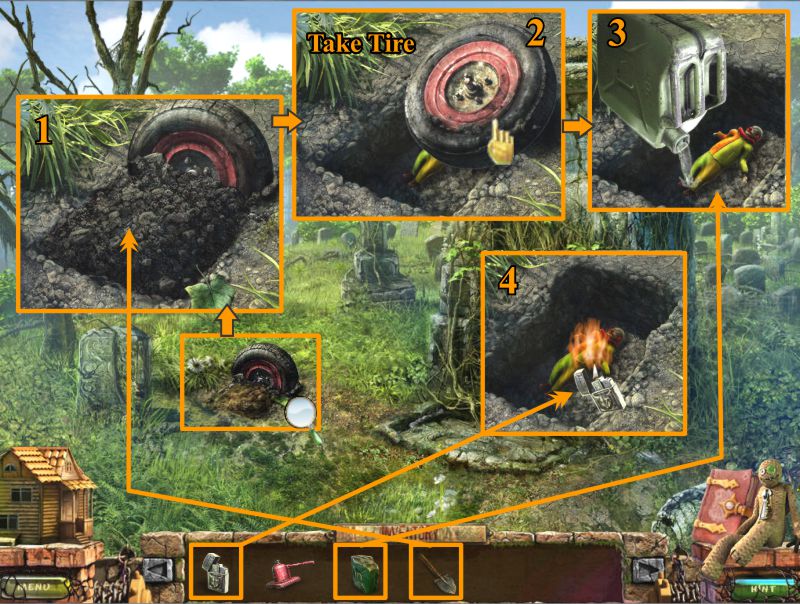
Cemetary
Use the shovel to dig the loose dirt.
Take the tire.
Pour gasoline on the doll.
Use the lighter to set it on fire.
Screenshot
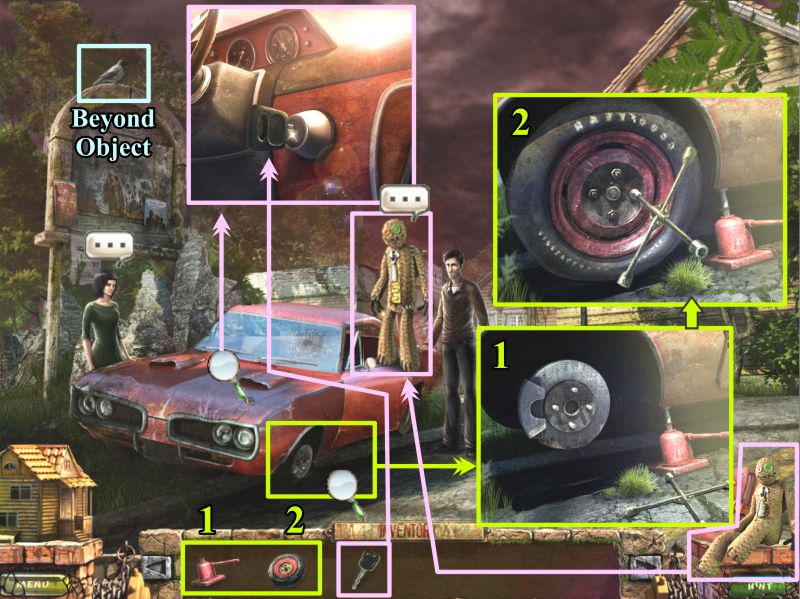
Kim's Car
Return to the outside of the Orphanage and exit down to Kim's Car.
Take the Beyond Object and talk to Kim.
Zoom in on the car and use the jack to jack it up.
Place the tire, and the tire wrench will tighten the nuts.
Your Doll helper jumps up with something to say.
The Dollhouse
Place the Doll where he belongs in the Dollhouse and watch the cutscene.
You receive the Ignition Key for Kim's car.
Kim's Car
Click on the car and place the key, but before you turn the key, you may want to check the list at the beginning of this walkthrough to see if you can go back and retrieve any of the Beyond Objects you've missed.
You should have now collected all 36 of the beyond objects, so you can turn the key and watch the final scenes.
Screenshot
Congratulations, you rescued Sam, so Danielle, Sam, and Kim will live happily ever after without the demons who haunted their lives.
Posted by: Jazz |
March 2, 2011 9:46 AM
|
March 2, 2011 9:46 AM
Stray Souls: Dollhouse Story Bonus Chapter Walkthrough
General Information
The Extra Content available at the beginning of the Bonus Chapter includes Deleted Scenes, Wallpapers, Media, and Concept Art.
The Storyline section isn't available until you finish playing the Bonus Chapter.
The Bonus Chapter begins 25 years earlier, and your character is Police Chief Edgar Torres.
Part 1: Police Station
Police Chief's Office
Zoom in on the desk, take the Scissors and Locker Keys, and read the folder.
You need to find something to open the cell door lock which was installed backwards, so go downstairs.
Screenshot
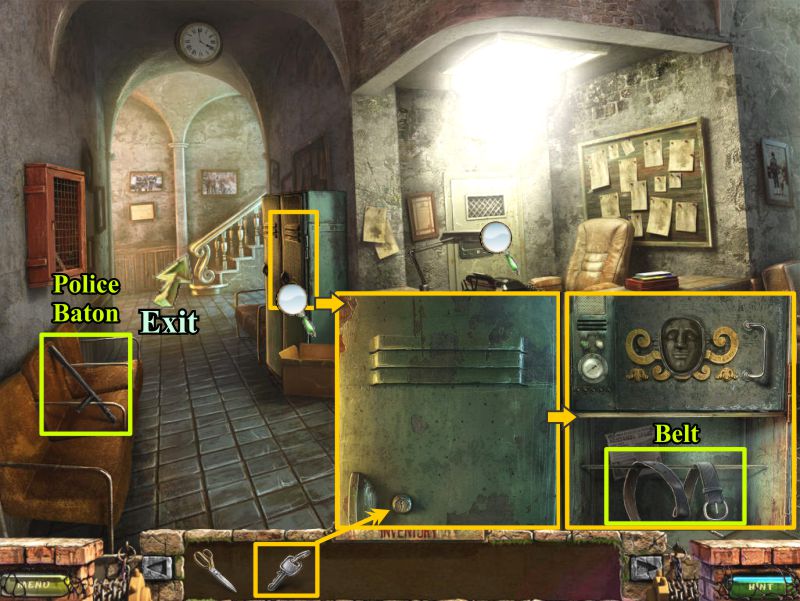
Front Desk
Pick up the Police Baton on the chair and zoom in on the lockers.
Open the locker with your key and take the belt.
Examine the weird lock on the compartment and go back upstairs.
Screenshot
Police Chief's Office
Use the belt to unlock the cell and you will trigger a Hidden Object Scene.
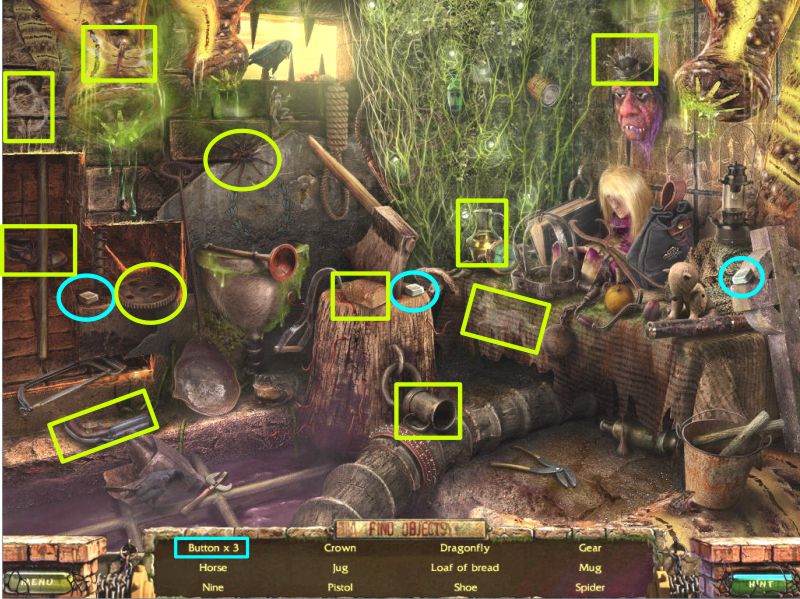
Cell Hidden Object Scene
Collect everything to get the 3 Buttons for the safe.
Screenshot
Front Desk
Go downstairs to the Front Desk and zoom in on the safe.
Place the 3 buttons and enter 341.
Take the House Key and Mask.
Zoom in on the lockers and place the mask.
Open the compartment and take the Handcuffs and Tweezers.
Exit down to the Hunt's House.
Screenshot
Part 2: The Hunt's House
Outside Hunt's House
Use your scissors to cut the tape and the key to open the front door to enter.
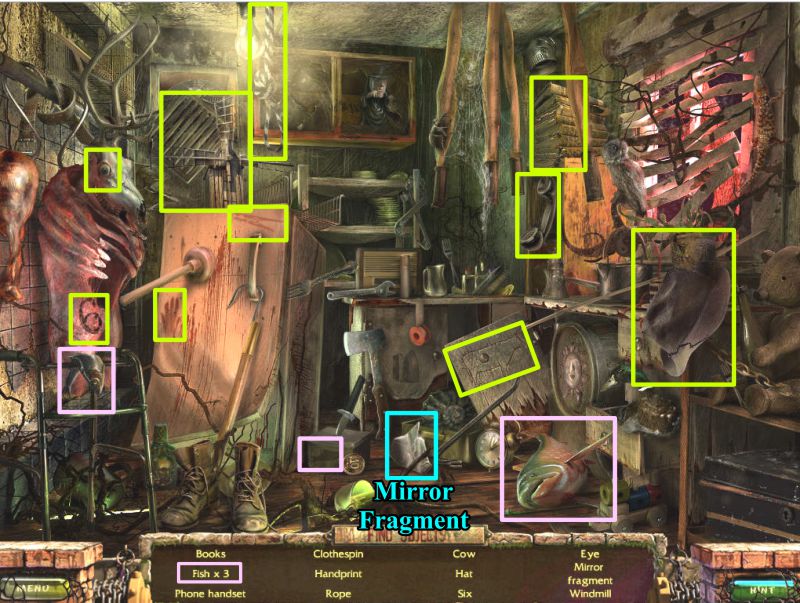
Hunt's Living Room
Zoom in on the spinning wheel, pick up the File, and use your tweezers to get the Mirror Fragment.
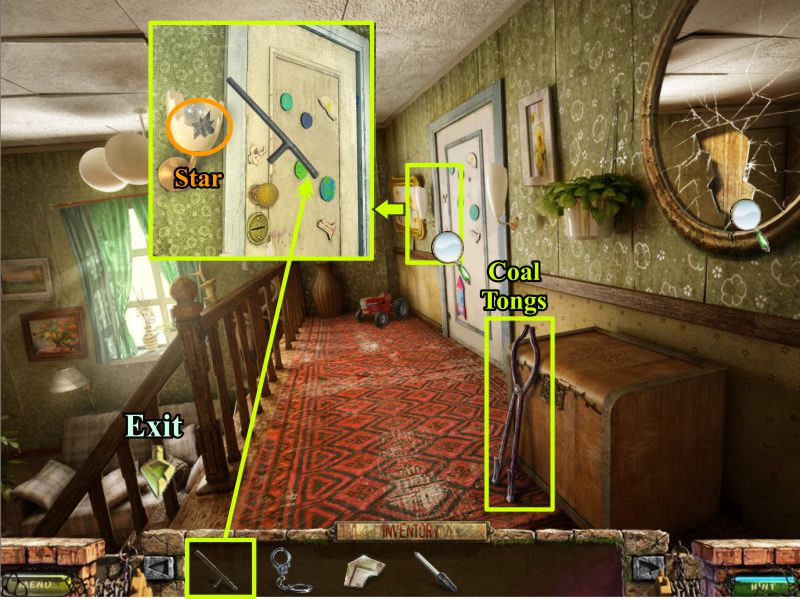
Go upstairs to the Landing. When you come back downstairs, zoom in on the glass door, place the Star on the lock, and play the Hidden Object Scene.
Screenshot
Upstairs Landing
Go upstairs, pick up the Coal Tongs, and zoom in on the door to the Children's Play Room.
Use the Police baton to smash the light fixture on the left and take the Star.
Go back downstairs.
Screenshot
Hunt's Living Room Hidden Object Scene
Collect everything to get another Mirror Fragment.
Screenshot
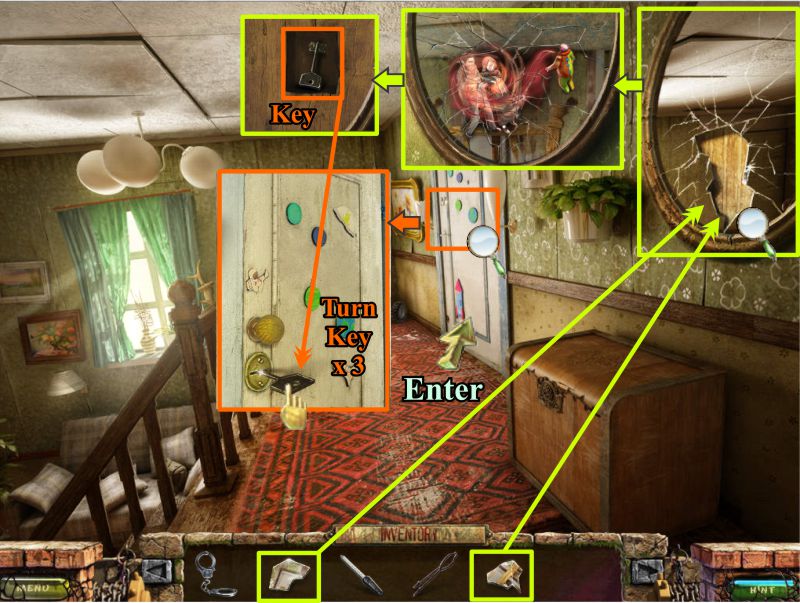
Upstairs Landing
Return to the Landing and zoom in on the mirror.
Place the fragments from your Inventory to see the image and find the key to the Play Room.
Zoom in and place the key in the lock, turn the key 3 times and enter the room.
Screenshot
Children's Play Room
Talk to Kim, use the Coal Tongs to retrieve the Metal Ring from the fireplace, and play the Hidden Object Scene.
Screenshot
Children's Play Room Hidden Object Scene
You will get a Utility Knife when you have collected everything.
Screenshot
Hunt's Living Room
Go downstairs and talk to Kim, who will give you a picture of the man who brought the clown.
It appears to be the Orphanage Director, so you need to stop at the Police Station before going to the Orphanage.
Kim gives you a key the man dropped.
Part 3: The Orphanage
Police Station Front Desk
Go to the Police Station down the street and play the Hidden Object Scene.
Police Station Front Desk Hidden Object Scene
You will get a Flashlight when you have collected everything.
Screenshot
Outside Orphanage
The Director's car isn't there, but a shadow shows someone is in the building.
Use your key to open the front door and enter.
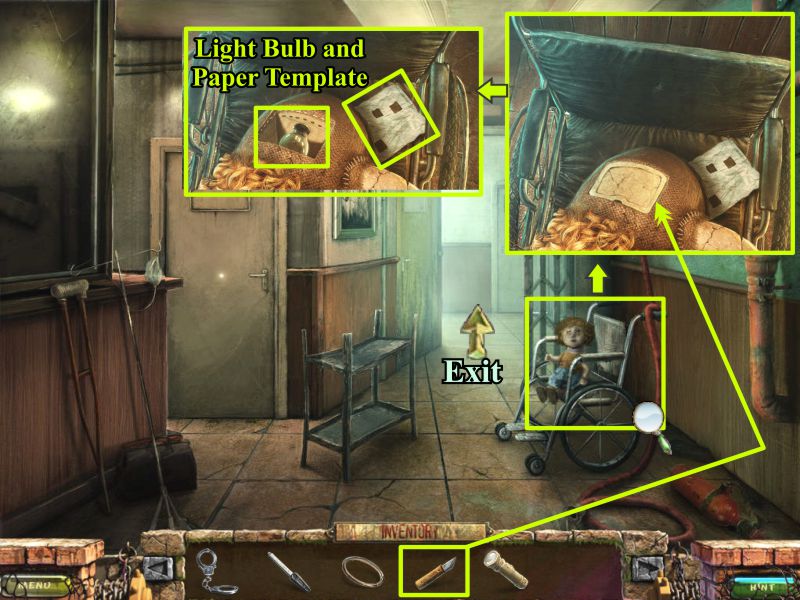
Outside the Director's Office
Zoom in on the doll in the wheelchair and use your utility knife to remove the plate.
Take the Light Bulb and Paper Template.
Screenshot
Child's Room
Exit through the door to one of the rooms and play the Hidden Object Scene.
Zoom in on the hatch and place your metal ring, lift the hatch and go enter it.
Screenshot
Child's Room Hidden Object Scene
Collecting everything will get you a Magnifying Glass.
Screenshot
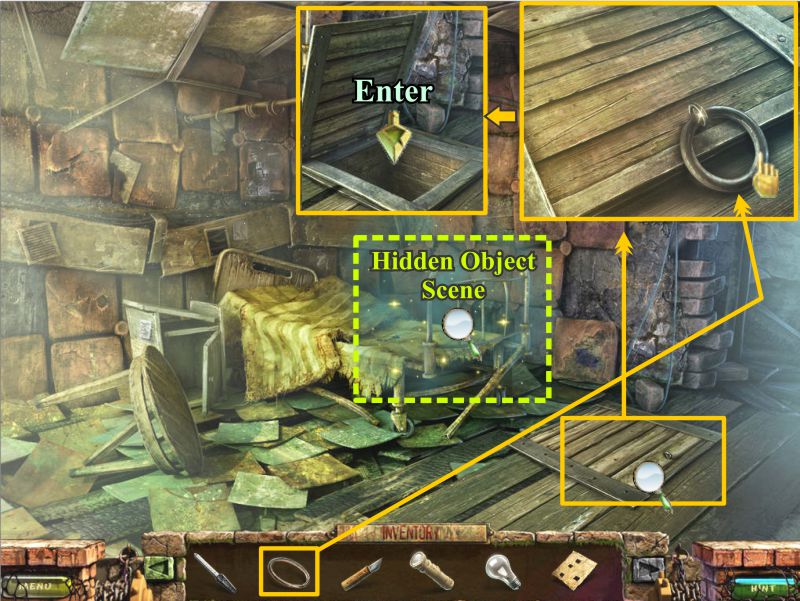
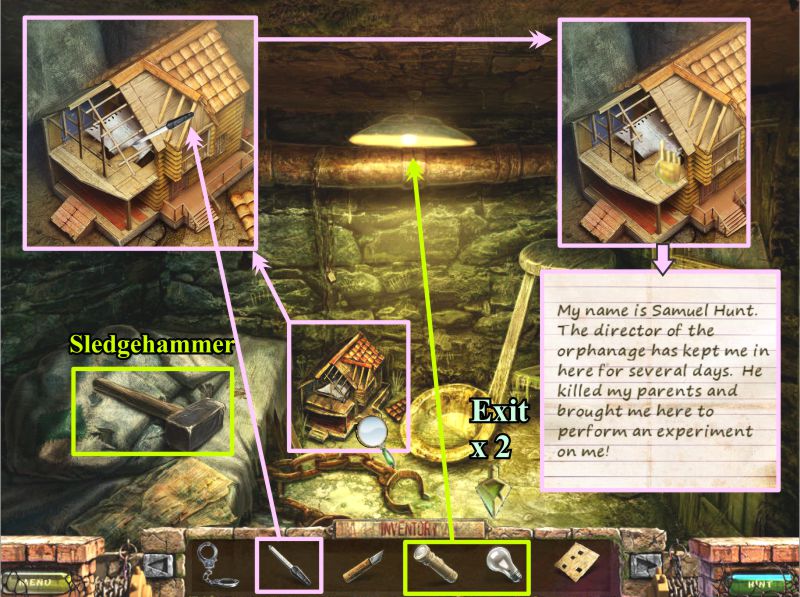
Solitary Confinement
The room is dark when you go down the hatch. Use your flashlight to find the light in the center top of the scene and put the light bulb in the light.
Pick up the Sledgehammer and zoom in on the Dollhouse.
There is a note inside the Dollhouse, so you need to use your file to remove some of the framing to get it.
Read the note and the Chief will decide he can break down the Director's door with this information.
Screenshot
Outside Director's Office
Use your sledgehammer to break down the door and enter.
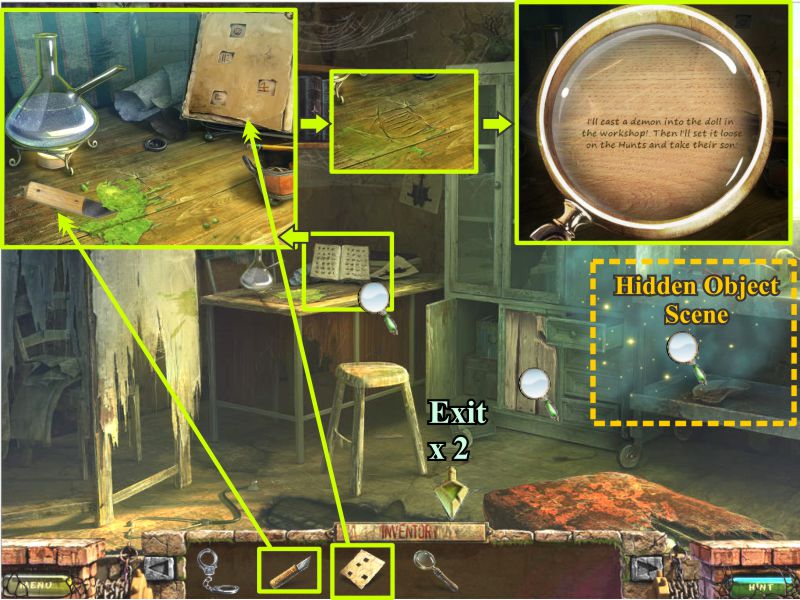
Director's Office
Zoom in on the table and use your utility knife to remove the green stuff so you can see what's under it.
The carving is too small to read, so use your magnifying glass.
Place the paper template over the code book, and a note with the code will go into your Inventory.
Play the Hidden Object Scene.
Screenshot
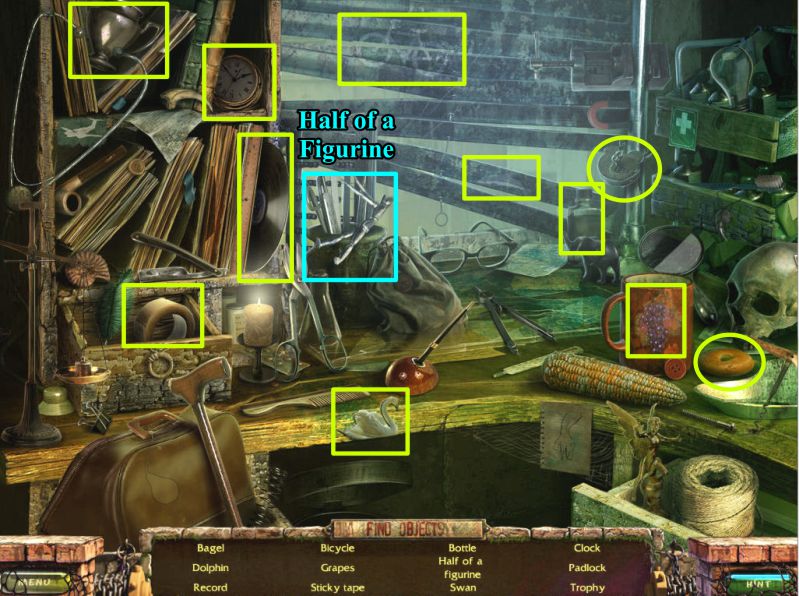
Director's Office Hidden Object Scene
When you collect everything, you will come away with Half of a Figurine.
Screenshot
Outside Orphanage
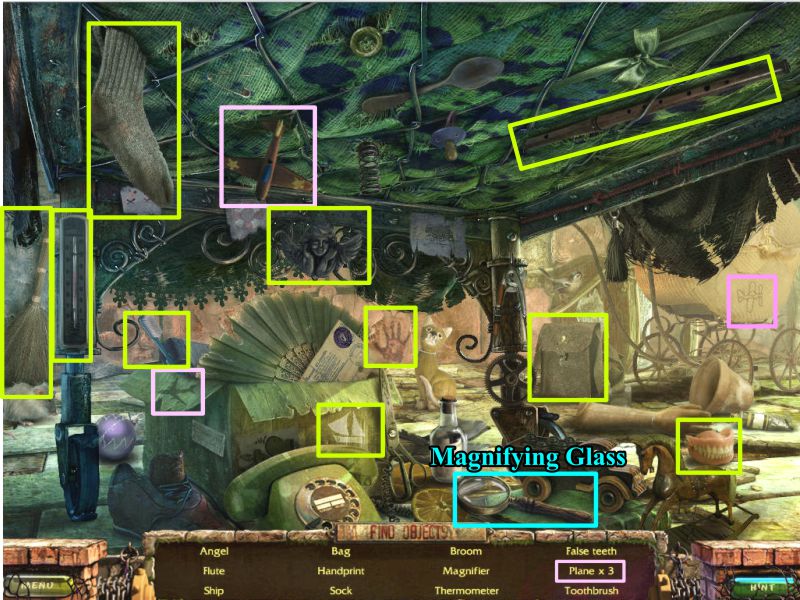
Exit down twice to the Outside of the Orphanage and play the Hidden Object Scene.
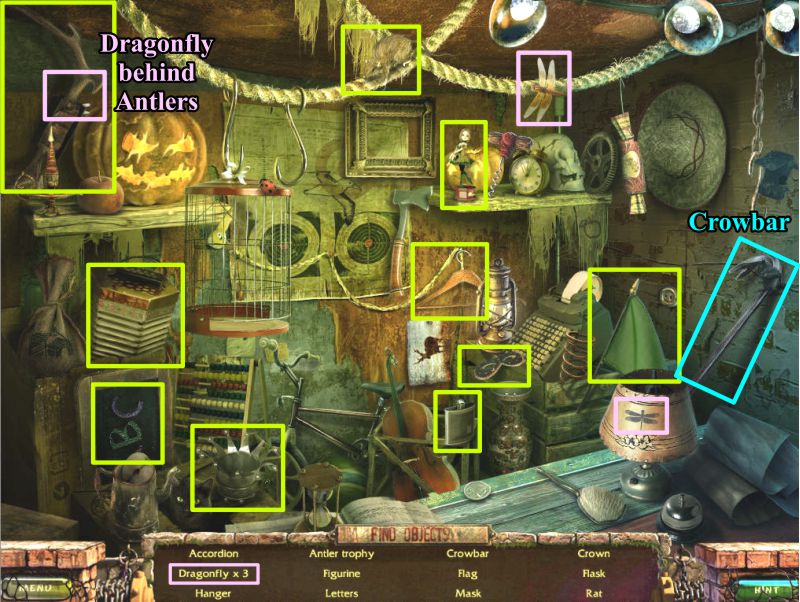
Outside Orphanage Hidden Object Scene
Collect everything and you will have a Crowbar.
Screenshot
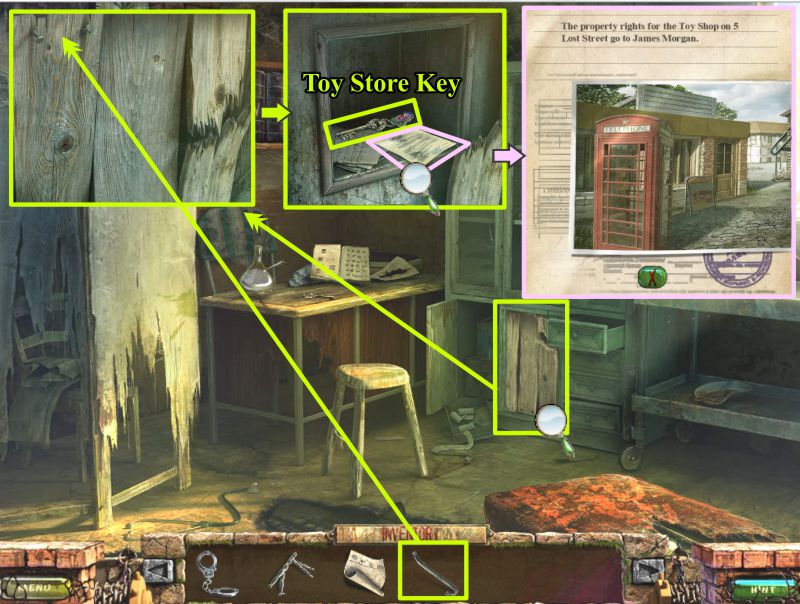
Director's Office
Go back to the Director's Office and remove the boards with the crowbar.
Take the Toy Store Key and read the deed.
Screenshot
Part 4: The Toy Store
Outside Toy Store
Exit the Orphanage and go to the Toy Store.
Use your key to open the door and enter.
Toy Store
Play the Hidden Object Scene.
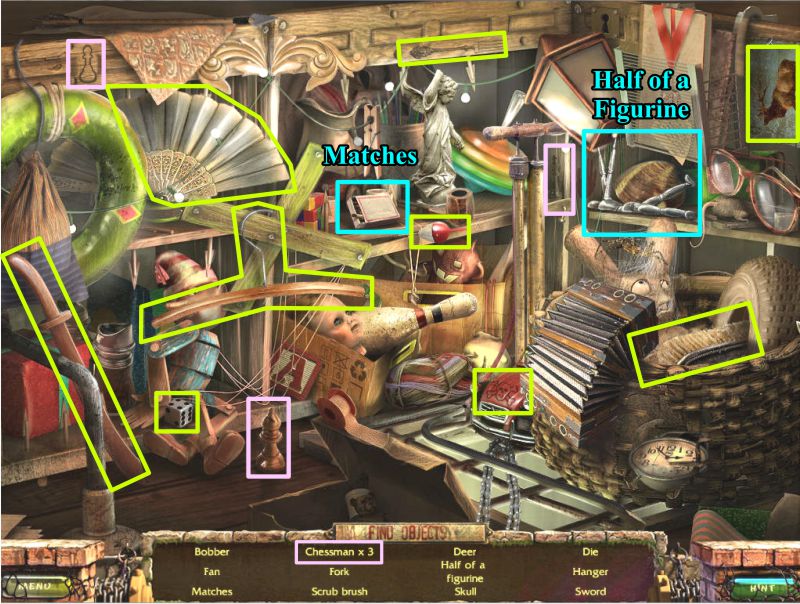
Toy Store Hidden Object Scene
After you collect everything, you will have some Matches and Half of a Figurine.
Screenshot
Toy Store
Zoom in on the box, marked in the screenshot, and place the 2 figurine halves, as well as the note with the code.
Enter the code using the buttons on the box and take the Workshop Key inside.
Zoom in on the Workshop door and use your matches to melt the wax covering the keyhole.
Insert to key and enter the Workshop.
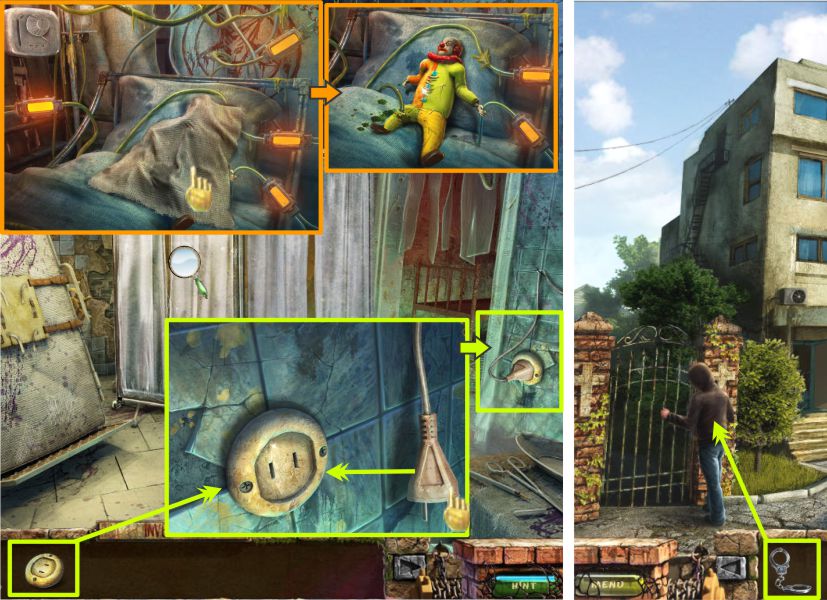
Screenshot
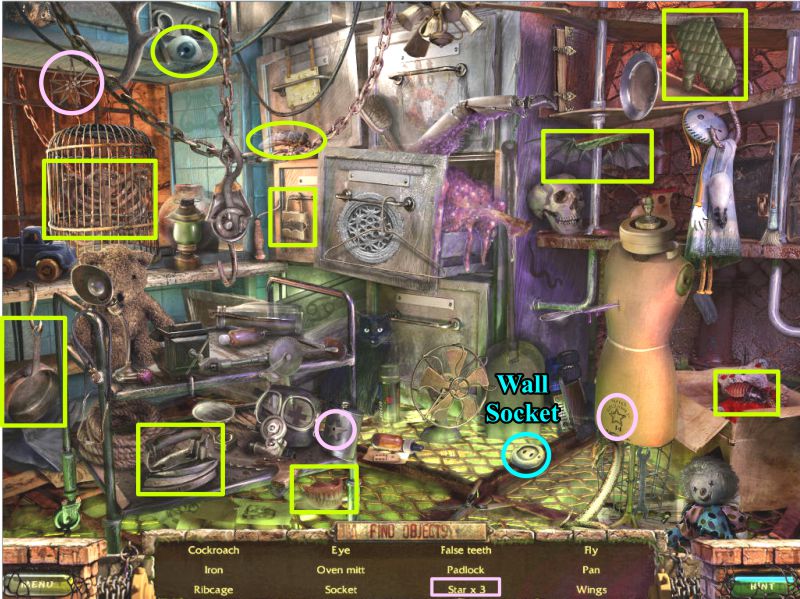
Workshop Hidden Object Scene
The light isn't on because there is no socket to plug it in. Play the Hidden Object scene to get the Wall Socket.
Screenshot
Workshop, Orphanage, and Cemetery Gate
Zoom in on the wall, place the socket and plug in the light.
Click on the curtain and remove the cloth to see the clown hooked up to the demon power.
Go to the Orphanage Director's Office and watch Morgan escape through the window.
Go outside and he will be trying to get into the cemetery, so cuff him and watch the ending scenes.
Screenshot
You have completed the Bonus Chapter of Stray Souls: Dollhouse Story and now know how it all began.
Posted by: Jazz |
March 2, 2011 9:48 AM
|
March 2, 2011 9:48 AM