

A Gypsy's Tale: The Tower of Secrets
Platform: Mac, Windows
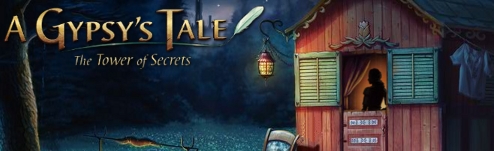
![]() A Gypsy's Tale: The Tower of Secrets is a fantasy-themed hidden object title from Amaranth Games, creator of Grimm's Hatchery and the Aveyond series of role playing games. You play the part of Reylin of Winderalth, a gypsy who has a strong sense of magic of both the good and wicked kinds. You are hired by a monk to locate a lost tower and rescue a girl within, but getting to that tower involves solving loads of puzzles and working your way through the maze-like landscape that surrounds the mysterious place.
A Gypsy's Tale: The Tower of Secrets is a fantasy-themed hidden object title from Amaranth Games, creator of Grimm's Hatchery and the Aveyond series of role playing games. You play the part of Reylin of Winderalth, a gypsy who has a strong sense of magic of both the good and wicked kinds. You are hired by a monk to locate a lost tower and rescue a girl within, but getting to that tower involves solving loads of puzzles and working your way through the maze-like landscape that surrounds the mysterious place.
 A Gypsy's Tale borrows a few gameplay ideas from The Mystery of the Crystal Portal and the Treasure Seekers series, namely the "objects as containers" element. Most puzzles require you to use an item or two on a specific object. Use the shears to chop down the vines, place the amulet on the pedestal, etc. Before you can grab these key items, however, the game opens up a circular menu around the object. Each menu pictures several other objects you must find and place in the appropriate slot before you can add the key item to your inventory.
You'll need to do a bit of wandering to complete your tasks in this game, and as you progress, your exploration area will gradually increase. Most of what you need is nearby, you just have to switch scenes by clicking on the glowing white parts of the screen. In addition to locating and picking up key inventory items, you'll also gather crystals, tiny pieces of shiny currency that help complete your map (which becomes important as you open up more areas to explore) and also function as currency in the store you eventually find.
 Analysis: Enchanting visuals are one of this game's strongest features, and you'll have to help yourself to a few staring sessions when you encounter animated characters in the game. The fantasy world feels surprisingly complete as you shuffle through its dark pieces of scenery, and Amaranth did a superb job weaving the story into the experience. This isn't a world created as an excuse to host a hidden object game, it's a hidden object game that takes place in this world.
A Gypsy's Tale: The Tower of Secrets features a lot of the famous "do this in this manner because I told you so" moments where you complete arbitrary objectives just because the game says you must. Strangely, though, you won't feel accosted, as somehow the storyline and setting make these seemingly pointless requirements feel right at home. Gather a bunch of birds so you can pick up a key? Why not?!
As with many hidden object games, you'll encounter your fair share of unfair items that are a little too well-disguised. Fortunately you aren't punished for misclicks, allowing you the freedom to run the cursor all over the screen, and the refilling hint timer is just as generous as it needs to be.
A Gypsy's Tale is a strong hidden object game filled with fantasy and wonder. It takes the genre one step closer to the role playing realm, putting an emphasis on exploration, story and content as opposed to adventure-style puzzles, and you'll appreciate the level of detail Amaranth Games went to to fill out this beautifully illustrated world.
![]() Windows:
Windows:
Download the demo
Get the full version
![]() Mac OS X:
Mac OS X:
Download the demo
Get the full version


Walkthrough Guide
(Please allow page to fully load for spoiler tags to be functional.)
A Gypsy's Tale: The Tower of Secrets
General Tips:
From the main menu you can play or exit the game, view the credits, and select your options.
Click on the Options Button to adjust the music and sound volume, decide if you want the custom cursor, and choose window versus full screen mode.
You can view the opening scene or skip it.
As you start the game you will be asked if you wish to see the tutorial.
Scene Navigation:
If you play in window mode, there is an auto pause feature otherwise you can pause the game by using the menu button at the top left of the scene.
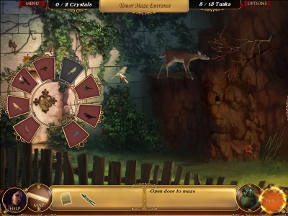
The number of Crystals to collect for a location is shown next to the menu button.
Your current location is next and the box will also show you where you can go when you exit the scene.
The number of tasks to complete is next to the location and another options button is available so you can make changes without going to the main menu.
The help button with the picture of Reylin is for general help or as a reminder of what you should do next.
If you have already been to an area, and obtained the Map Piece for that area you can use your Map to go directly there.
Your inventory is shown in the left center bar at the bottom of the screen.
If you have more than four items in your inventory, arrows will appear for you to scroll through the items.
Your current tasks are shown in the right portion of the center bar.
The crystal pouch shows the number of the Crystals you currently have.
The hints are unlimited but the hint button takes time to recharge in between each use.
Screenshot
Cursors:
Sparkles appear when there is something for you to do in an area of the scene.
Your cursor will turn into a magnifying glass to give you a close up of an area.
A hand will attach to your cursor when you can pick something up.
Gears attached to your cursor mean you will get a key object circle.
Your cursor shows a Game piece when there is a mini game for you to solve.
Your cursor shows a face attachment when one of the characters wants to talk.
To go to a new location move your mouse until it turns into an arrow.
Crystals:
Crystals allow you to purchase items at the Brenn General Store and obtain Map Pieces.
Different color Crystals have different values.
Collecting all the Crystals in a location adds a Map Piece to your Map for that location.
Crystals will be marked with red circles and a reminder to collect them will be in your task bar.
Tasks:
Your task bar lists your current tasks and are not just for your current location so you may be required to go elsewhere to complete them.
As you progress through the game entries will be added and removed from the list.
If you can't progress, make sure you have done everything you needed to do in previous locations.
Be sure to check for any cursor changes in a scene and to see if you can open doors and containers because there is no penalty for too many clicks.
When you use your Shears to clear away foliage it usually takes more than one click to get rid of all of it.
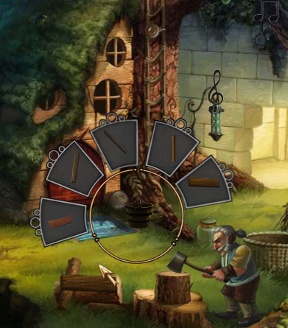
Key Objects:
A Key Object consists of one large circle surrounded by several small panels. Each small panel contains an object for you to find.
To open the Key Object click on the object you are trying to obtain and click on the circle if you wish to close it.
When you locate an item for a Key Object pick it up and place it in the large circle.
Mini Games:
Mini Games are used to open a locked area or container.
Most Mini Games have a "Skip Button".
Click the HELP button in the top left corner of the Mini Game to see the instructions.
Characters:
Sometimes the people you encounter along the way give you tasks to complete, items to use, hints, or maybe they just feel like talking.
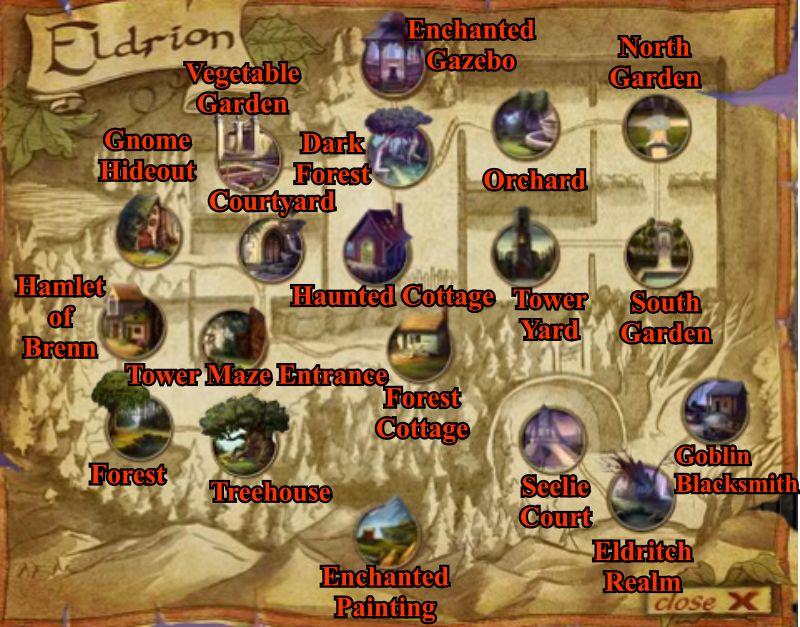
Map:
The map is your easy navigational device between locations so it is important to collect all the Crystals at that location to get your Map Piece.
Where to go next in a scene will be shown on the screen shot Map circle.
The various locations are marked to show you which picture represents which location in Eldrion as well as the 3 locations in the Eldritch Realm.
Screenshot
Chapter 1: The Maze
Collect the Map and Crystal Bag lying on the ground.
Read and collect the Monk's Note then click on the "Close" button in the bottom corner.
Screenshot
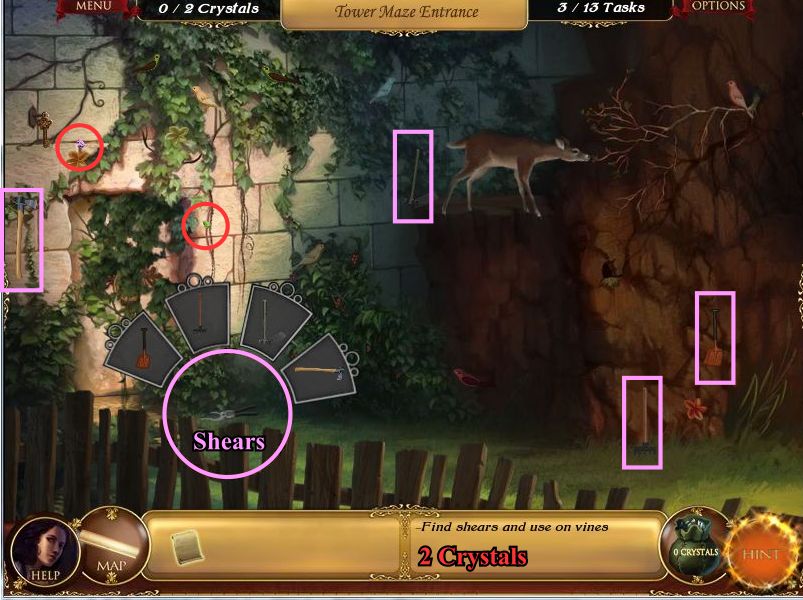
Pick up the 2 Crystals.
Click on the Shears for a Key Object circle to collect them.
Take the Shears from your inventory to get rid of the vines on the door.
Screenshot
Click on the Raven Medallion on the door and complete the Key Object.
Click on the Key hanging above the door to find out that you can't reach it.
Go to the right side of the scene and click to go to the Forest Cottage.
Screenshot
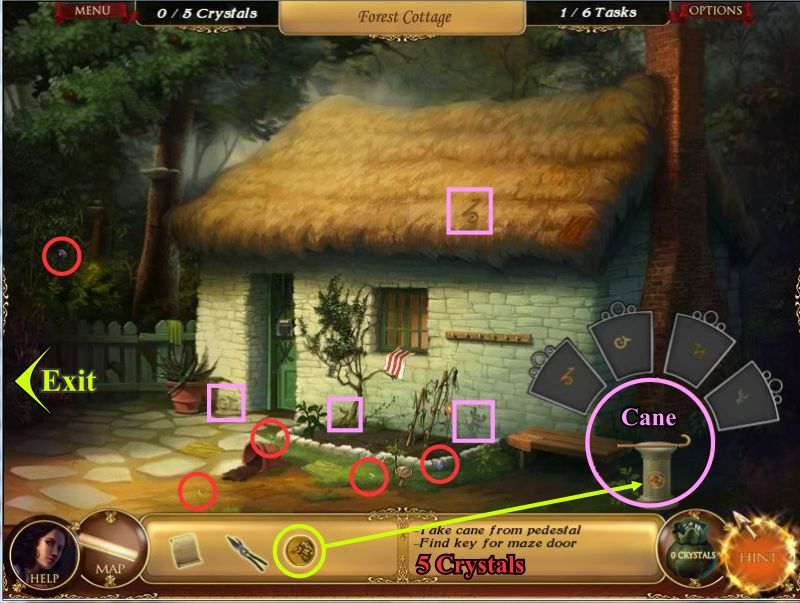
Collect the 5 Crystals.
Place the Raven Medallion from your inventory in the slot on the pedestal and the cane will land there.
Click on the Cane and complete the Key Object.
Click on the door to find out it is locked so return to the Tower Maze Entrance at the left of the scene.
Screenshot
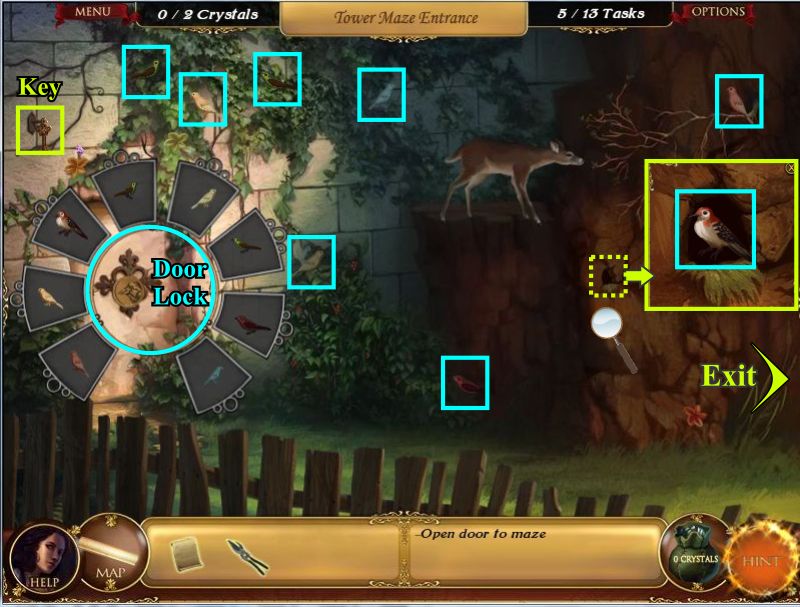
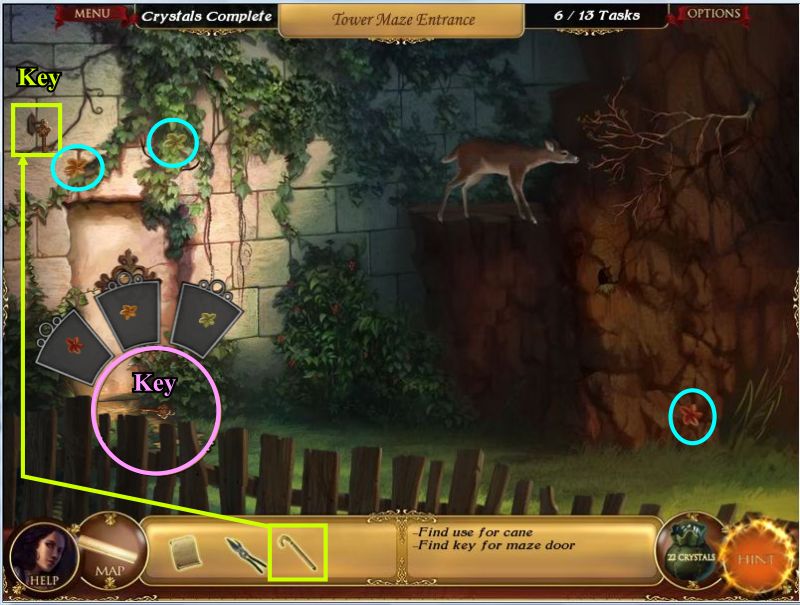
Use the Cane from your inventory on the Key and it will fall.
Click on the Key and complete the Key Object.
Once you get the Key use it to unlock the door and you will bring up a Mini Game.
Screenshot
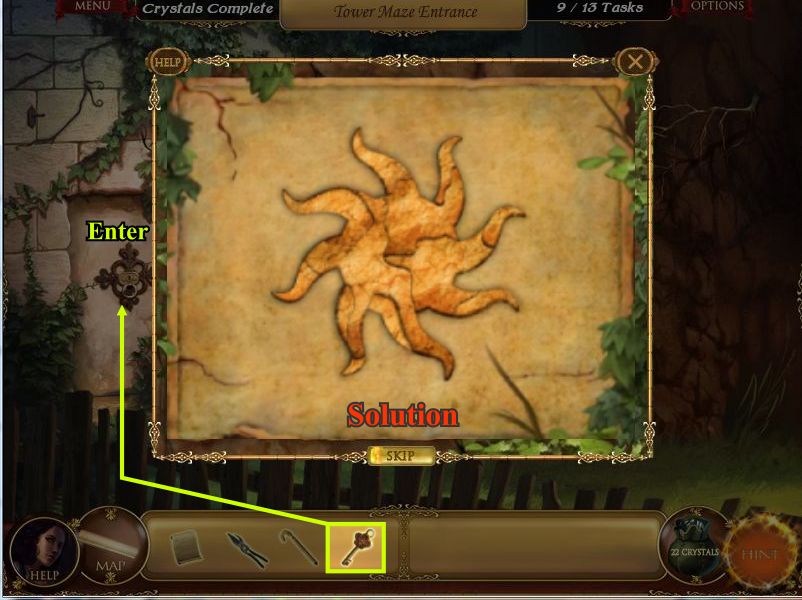
Sun Mini Game
Put the jigsaw Game pieces inside the outline and go through the open door.
Screenshot
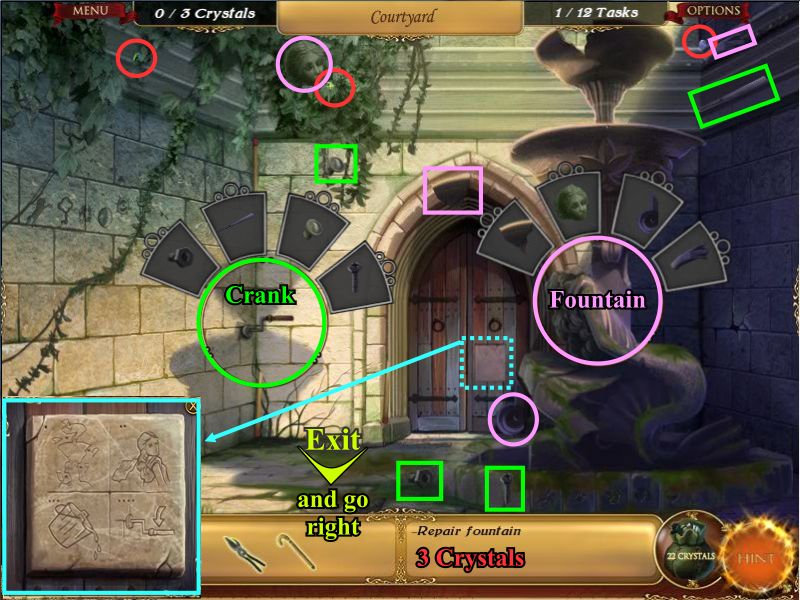
Chapter 2: The Fountain
Collect the 3 Crystals.
Take the Shears from your inventory and cut away the vines covering the wall and fountain.
Click on the plaque on the door to find out how to repair the fountain.
Click on the Fountain and Crank to complete the Key Objects.
Return to the Forest Cottage by clicking down once and then going to the right or you can now use your Map.
Screenshot
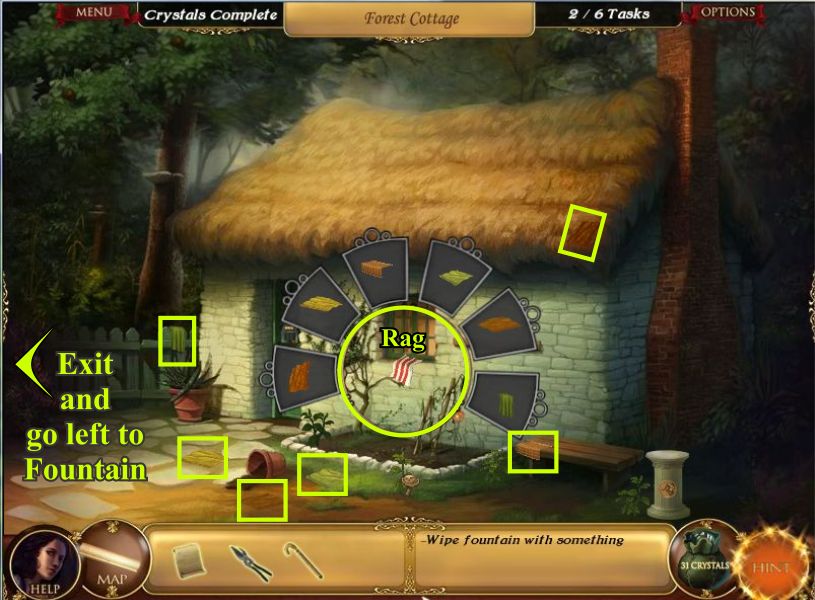
Click on the red and white Rag on the window ledge and complete the Key Object.
Screenshot
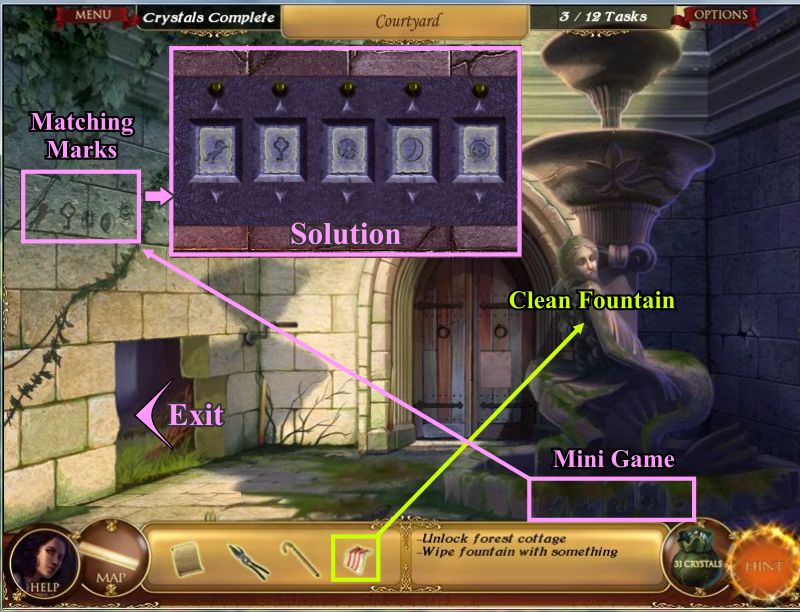
Return to the Courtyard and use the Rag from your inventory to clean the fountain.
Click on the symbols at the bottom of the fountain to get a Mini Game.
Use the arrows to make the symbols in the Mini Game match the symbols on the Courtyard wall.
Go through the hole in the Courtyard wall.
Screenshot
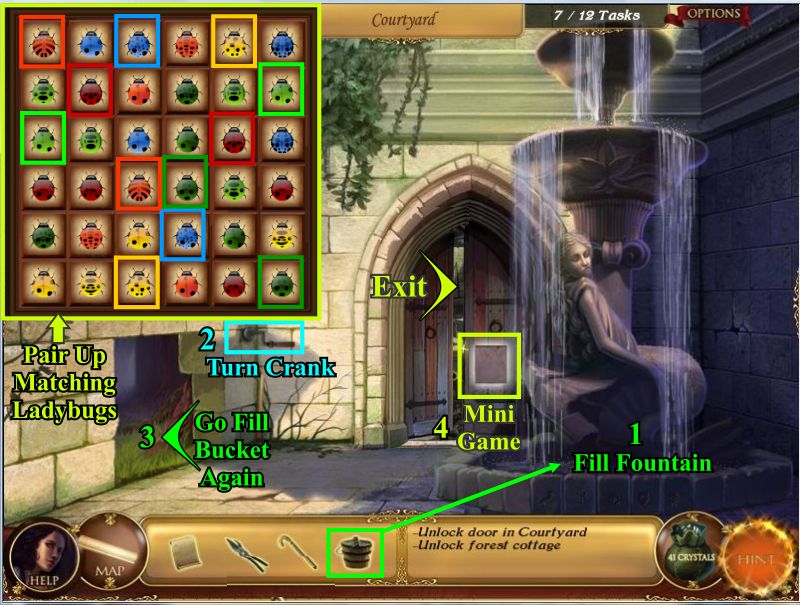
Collect the 3 Crystals.
Click on the Bucket and complete the Key Object.
Fill the Bucket in the pond and return to the Courtyard.
Screenshot
Place the bucket of water on the fountain to fill it.
Click on the Crank to make the water flow into the fountain.
Since you are close to the pond, go back and grab another bucket of water from the pond.
Return to the Courtyard and click on the glowing plaque on the door to bring up the Ladybug Mini Game.
Click on matching pairs of ladybugs until all of them are removed and exit through the now open door.
Screenshot
Chapter 3: The Garden
Collect the 5 Crystals.
Use the Shears from your inventory to remove all the vines on the wall.
Screenshot
Click on the plaque on the gate to see what is required to restore the garden.
Click on all the dead plants to get rid of them.
Screenshot
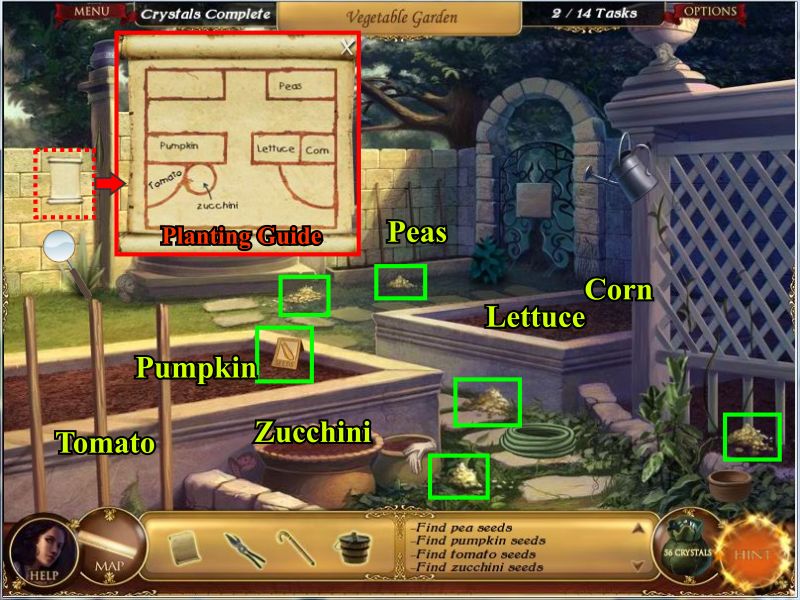
Collect all the seeds: Tomato, Zucchini, Pumpkin, Lettuce, Corn, and Peas.
Plant each of the seeds from your inventory in the garden beds.
The diagram on the left wall shows where the go.
Screenshot
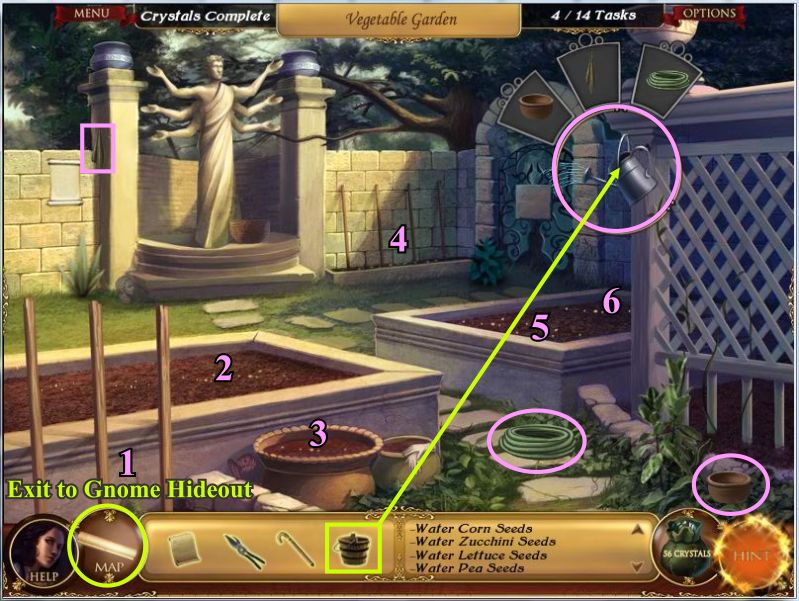
Since you already have a bucket of water in your inventory, place it on the Watering Can hanging on the wall and complete the Key Object.
Click on the Watering Can and then click on the numbered areas to water the seeds.
Screenshot
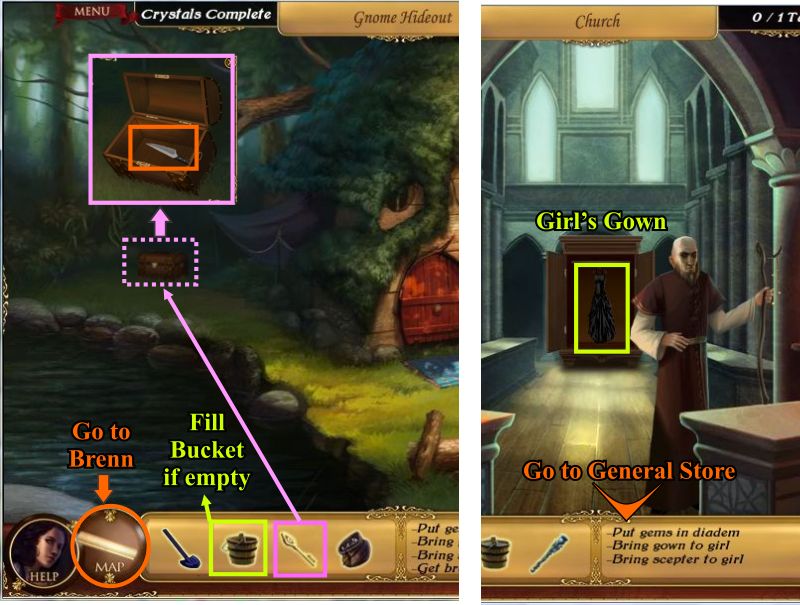
Click on the Gloves and complete the Key Object and go to the Gnome Hideout.
Screenshot
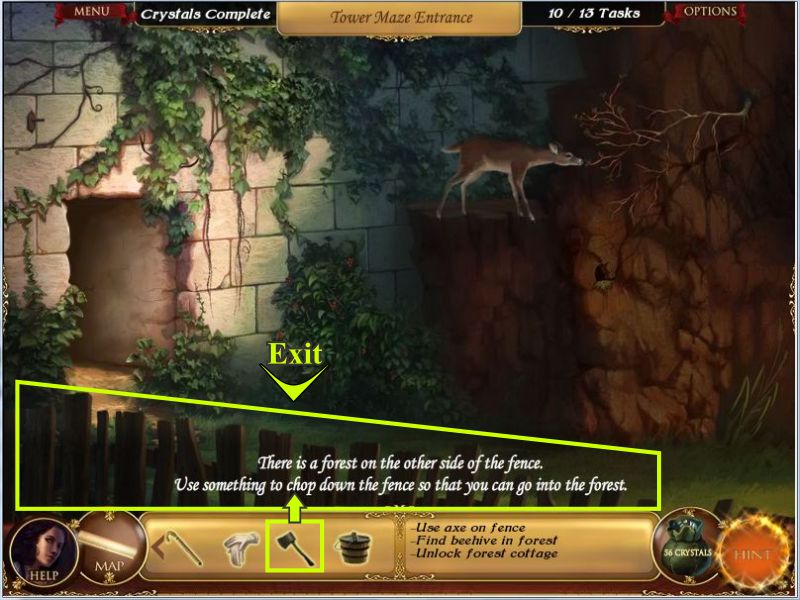
Click on the Axe and complete the Key Object.
Fill your bucket with water while you are there and go to the Tower Maze Entrance.
Screenshot
Use the Axe from your inventory to open up the wooden fence at the bottom of the scene and exit to the Treehouse.
Screenshot
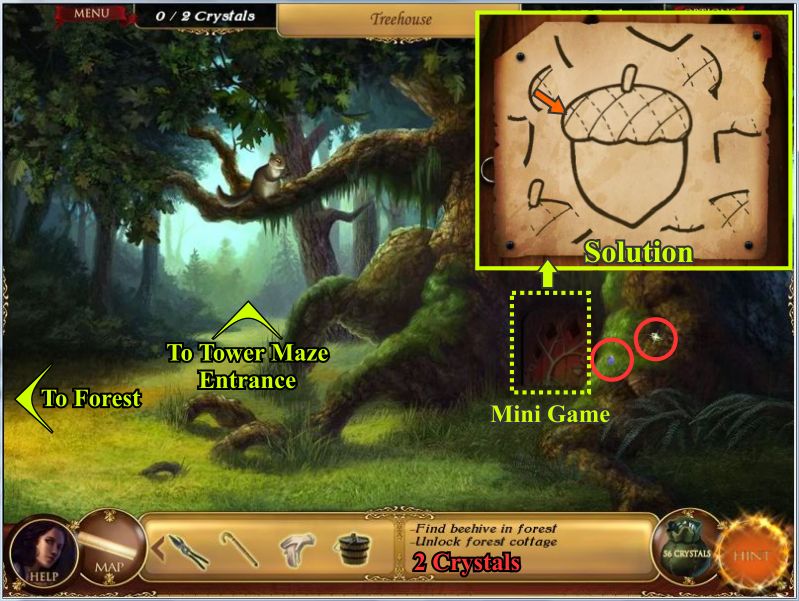
Pick up the 2 Crystals and click on the door for a Mini Game.
Use the surrounding pieces to complete the acorn.
Go left to the Forest.
Screenshot
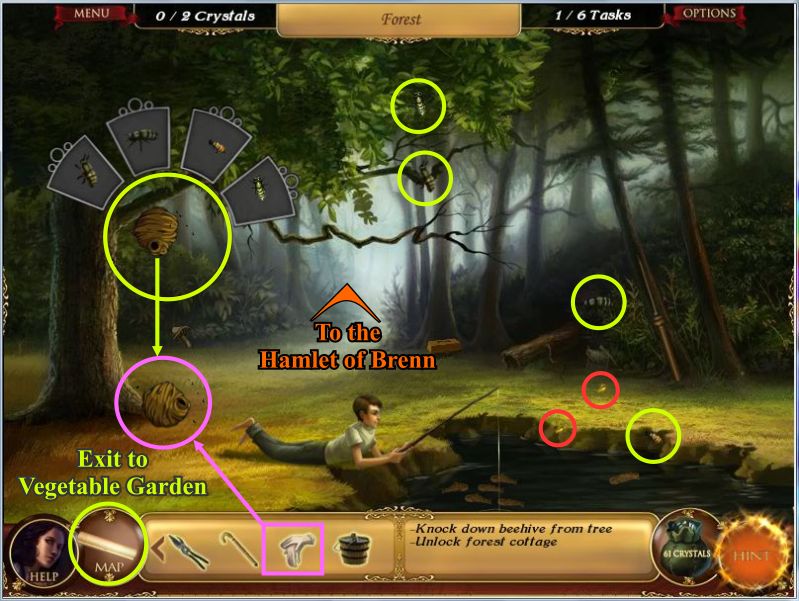
Collect the 2 Crystals
Use the Cane from your inventory and on the Beehive in the tree and complete the Key Object.
Use the Gloves from your inventory to pick up the Beehive and take it to the Vegetable Garden.
Screenshot
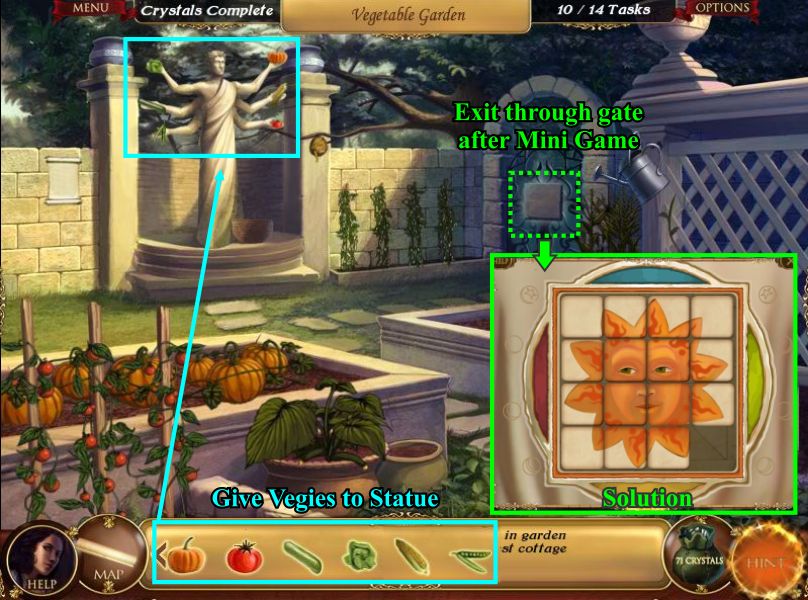
Place the Beehive on the branch on your right of the statue.
Collect one of each of the vegetables in the garden.
Click on the Harvest Statue and complete the Key Object.
Screenshot
Place each of the vegetables from your inventory on the Harvest Statue.
Click on the glowing plaque on the gate for a Mini Game.
Slide the first three pieces on the top row where they belong.
Continue moving pieces into the gap until the sun look like the screen shot solution and go through the open gate.
Screenshot
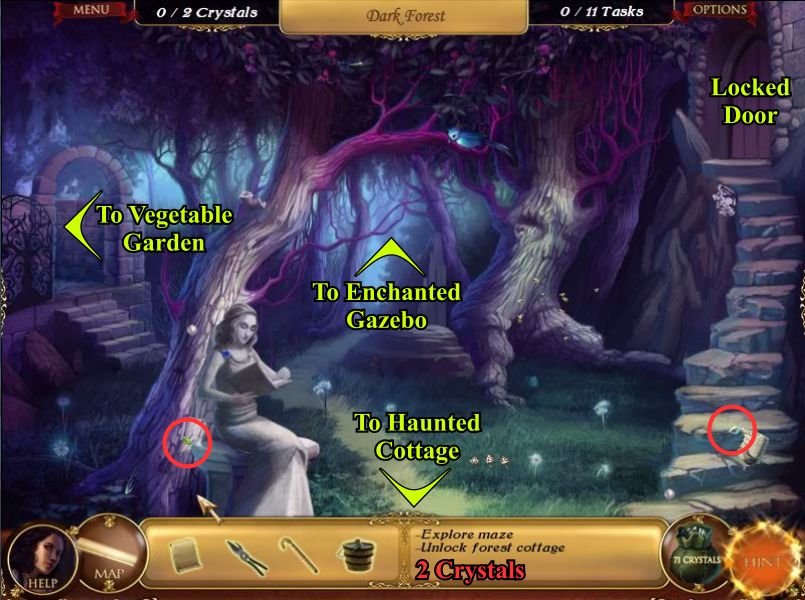
Chapter 4: The Dark Forest
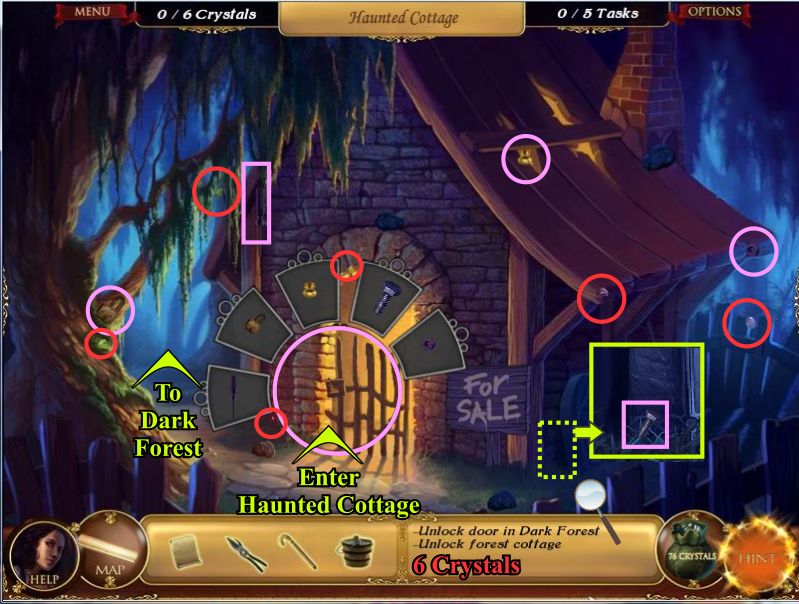
Collect the 2 Crystals.
Click on the door at the top of the stairs to find out it is locked.
Click at the bottom of the scene to go to the Haunted Cottage.
Screenshot
Collect the 6 Crystals.
Click on the door and complete the Key Object to enter the Haunted Cottage.
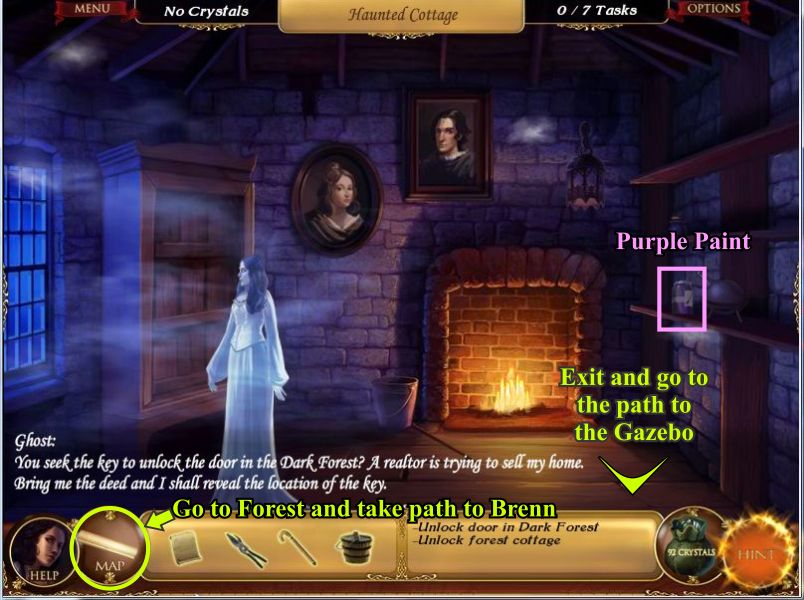
Screenshot
Click on the Ghost and she will request your help save her home.
Pick up the jar of Purple Paint.
Go to the Forest and click on the path to the village of Brenn.
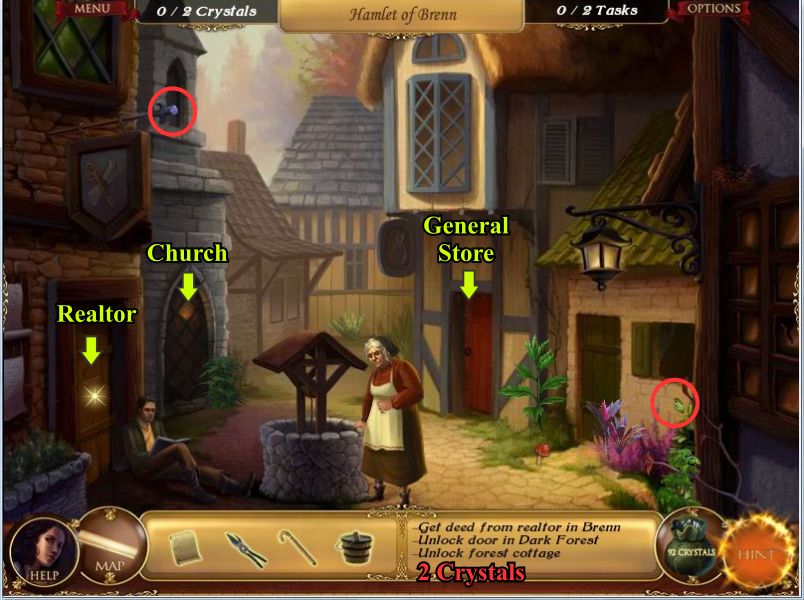
Screenshot
Collect the 2 Crystals and talk to the villagers before entering the Real Estate Office.
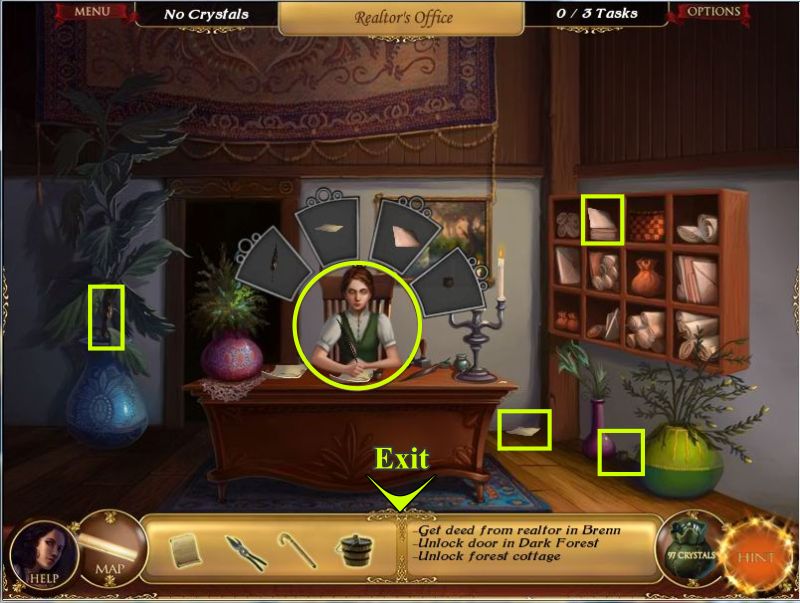
Screenshot
Click on the Realtor and complete the Key Object.
Click on her again and she will give you the combination to the lock.
Screenshot
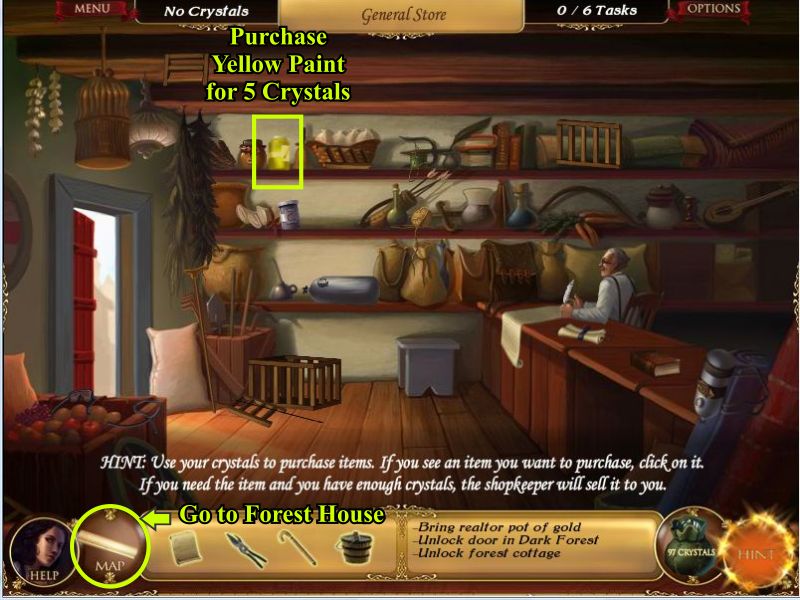
Stop at the General Store and purchase the Yellow Paint before going to the Forest Cottage.
Screenshot
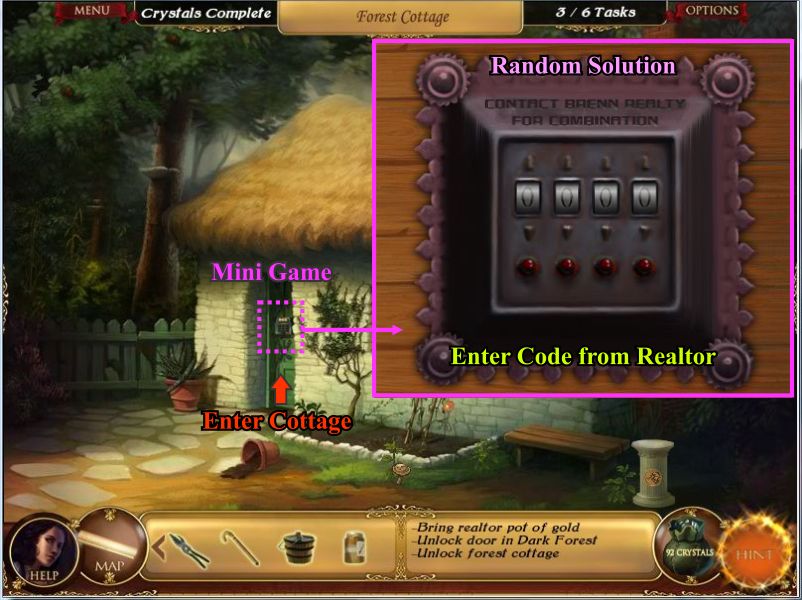
Click on the door and use the arrow buttons to enter the random code you received from the Realtor.
Screenshot
Once inside click on the "Rain Book" and take note of the Rain Potion.
Close the book, collect the two empty jars and go to the Dark Forest.
Screenshot
Take an Empty Jar from your inventory and put it on the Fireflies flying around by the tree.
Click on the Jar of Fireflies and complete the Key Object.
Click on the Exit in the middle of the scene to go to the Enchanted Gazebo.
Screenshot
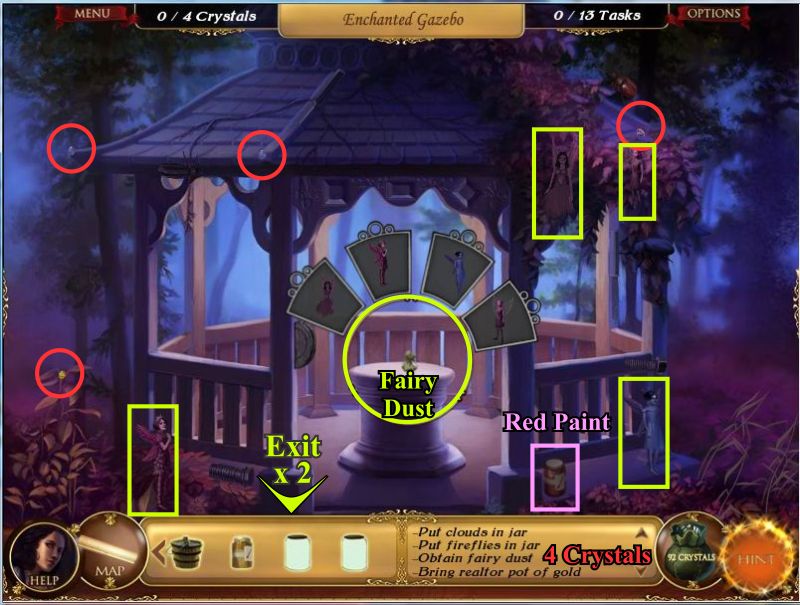
Collect the 4 Crystals and click on the bag of Fairy Dust on the pedestal to get a Key Object.
Exit down twice and enter the Haunted Cottage.
Screenshot
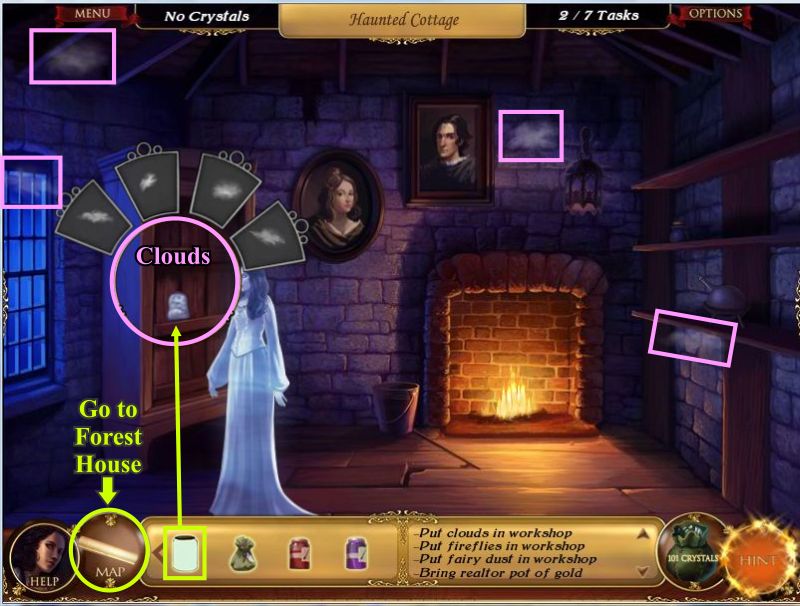
Put the other Empty Jar from your inventory onto the foggy looking stuff surrounding the Ghost.
Click on the Jar of Clouds and complete the Key Object.
Return to the Forest Cottage and go inside.
Screenshot
Click on the workbench to get a close up of the cauldron.
Click on the Flint and use it to light the firewood under the cauldron.
Pour the Bucket of Water from your inventory into the cauldron.
Put the Jar of Clouds, Jar of Fireflies, and Fairy Dust in your inventory on the table.
Click each one place the item in the cauldron.
You need to stir the mixture so click on the box with gems to the left of the cauldron for a Mini Game to unlock the Spoon.
The solution is random so turn the switches on and off until the three colors above the first lock are showing.
The lock will slight up and the switch colors will turn white.
Find the three switches with the colors for the next lock and keep repeating the process until the four locks are completed and the box opens.
Pick up the Spoon and stir the potion in the cauldron.
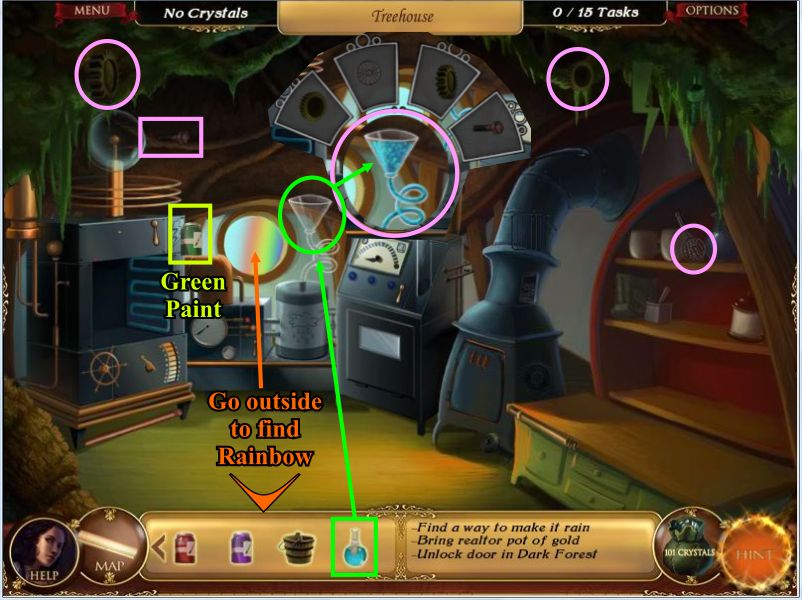
Add the Fairy Dust to the cauldron and place an Empty Flask on the cauldron to fill the flask with the Rain Potion.
Go to the Treehouse and click enter.
Screenshot
Place the Rain Potion from your inventory over the funnel of the rain machine and complete the Key Object.
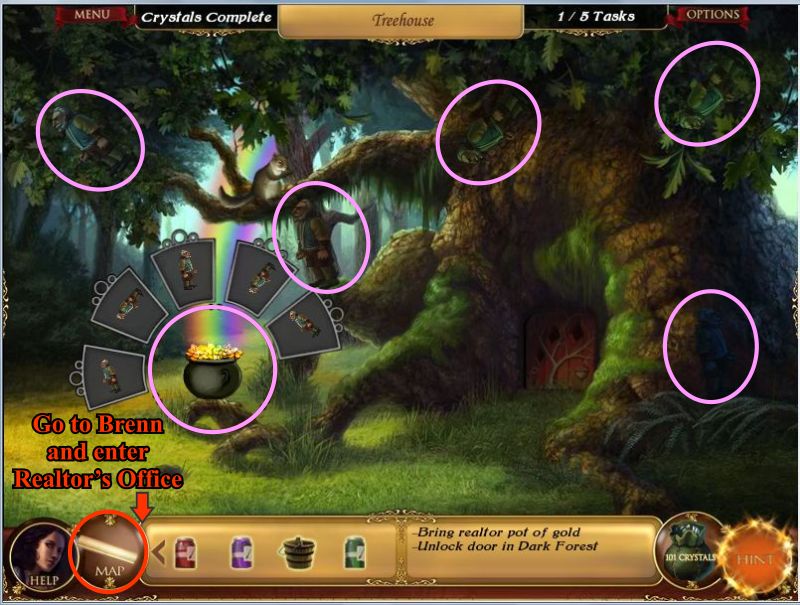
Pick up the can of Green Paint and go outside to find your Pot of Gold.
Screenshot
Click on the Pot of Gold and complete the Key Object to take it to the Realtor in Brenn.
Screenshot
Give the Pot of Gold from your inventory to the Realtor.
Take the Deed from her desk and go to the Haunted Cottage.
Give the Deed to the Ghost who tells you to look under the loose floorboard.
Click on the floor to the right of the Ghost who tells you her name is Isabelle and take the key.
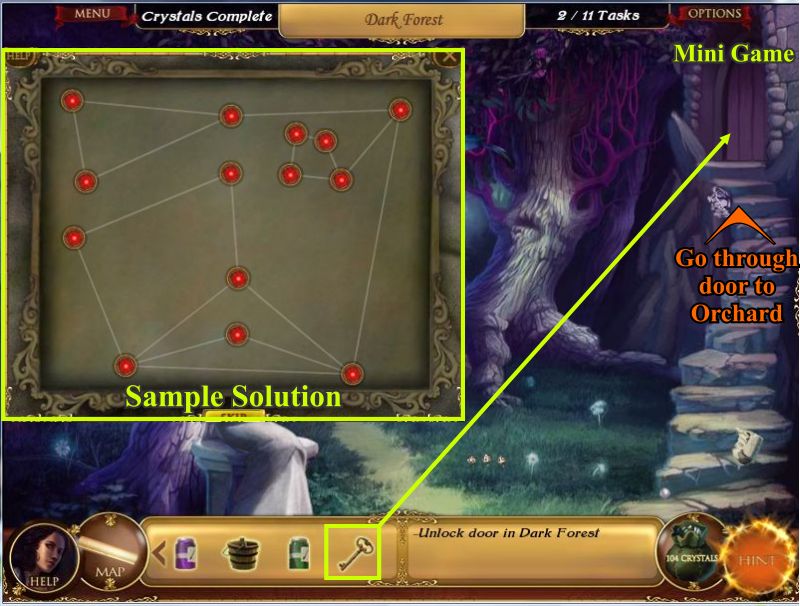
Go to the Dark Forest.
Screenshot
Use the Key from your inventory on the locked door at the top of the stairs for a Mini Game.
To complete the Mini Game move the discs around so none of the lines are overlapping and go through the open door.
Screenshot
Chapter 5: The Orchard
Collect the 7 Crystals.
Use your Shears to get rid of the vines on the door so you can read the plaque to see how to clean the Orchard.
Click one Apple and one Nut on the ground to pick them up.
Go back to the Tower Maze Entrance.
Screenshot
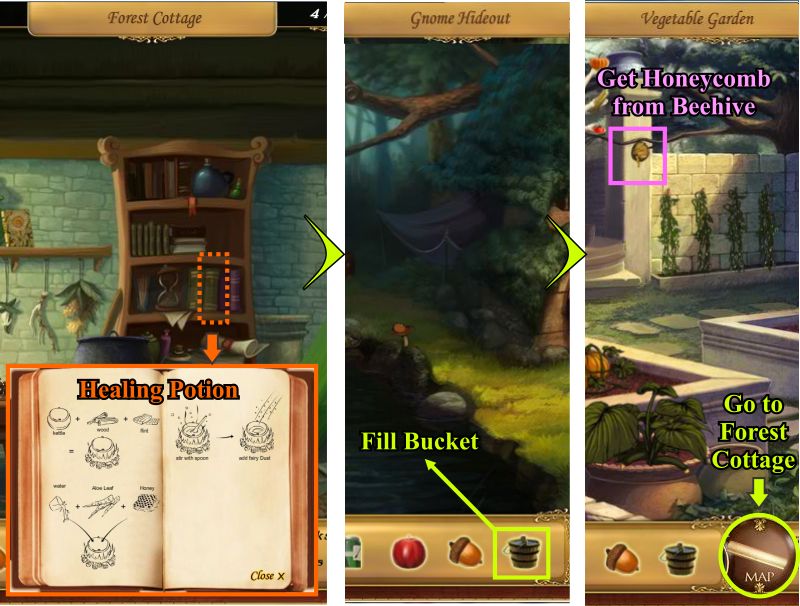
The deer that was on the cliff earlier is now on the ground and appears to have a broken leg so go to the Forest Cottage, enter and find the "Healing Book".
Click on the book to open it and out what you need for a Healing Potion and then exit to the Gnome's Hideout to fill up your Bucket of Water since you don't have a spare.
Go to the Vegetable Garden and click on the Beehive to collect some Honeycomb.
Screenshot
Go to the Forest Cottage and click on the Aloe Plant to get and complete the Key Object.
Screenshot
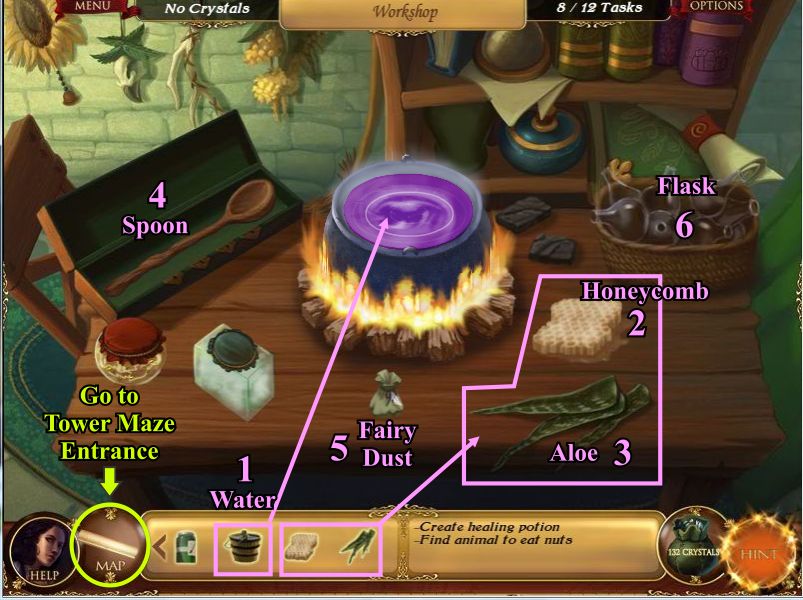
Take all of your ingredients into the Forest Cottage, enter and click on the Workshop which is the cauldron area.
Put the Bucket of Water in the cauldron and the Honeycomb and Aloe Leaf on the table.
Place the Honeycomb and Aloe in the cauldron and stir the potion.
Sprinkle it with Fairy Dust and fill up a flask with the Healing Potion.
Return to the Tower Maze Entrance.
Screenshot
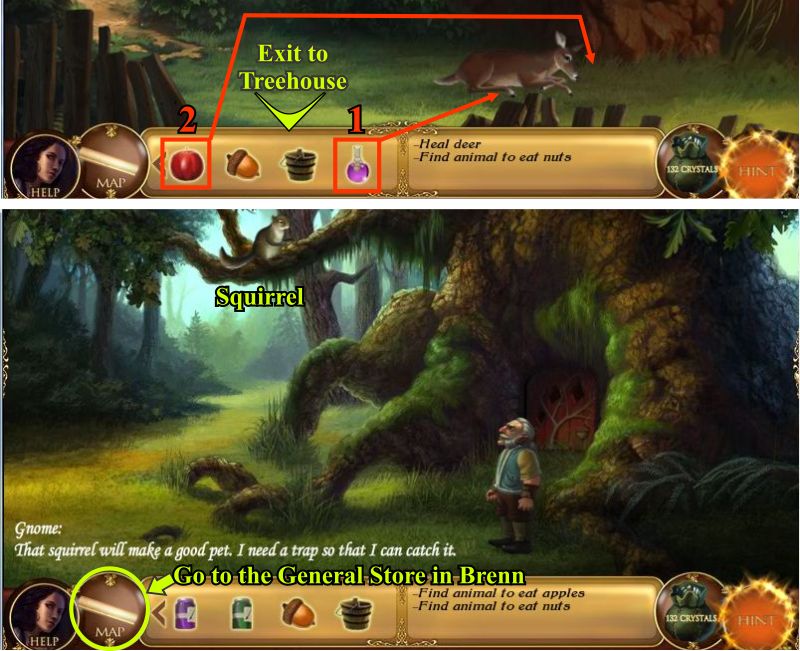
Give the Healing Potion to the Deer.
Take the Apple from your inventory and give it to the Deer so he will follow you.
Click on the exit at the bottom of the scene and go to the Treehouse.
Screenshot
Click on the Gnome outside the Treehouse and talk to him about the Squirrel.
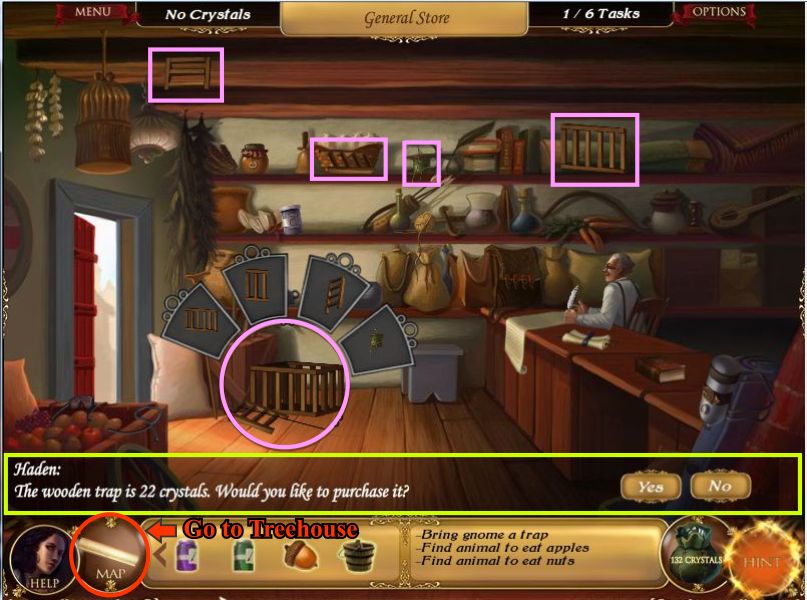
Go to Brenn, enter the General Store and click on the Trap to purchase it.
After purchasing the Trap you find out it is broken so click on it and complete the Key Object to repair it before returning to the Treehouse.
Screenshot
Give the Trap from your inventory to the Gnome.
He leaves so take the Nut from your inventory and place it into the Trap.
Wait for the Squirrel to come down from the tree and get the Nut so you can click on the Trap to collect it.
Return to the Orchard where the Squirrel and Deer will appear and eat the fruit and nuts.
Screenshot
After the Squirrel and Deer have cleared away the nuts and apples click on the Rake and complete the Key Object so you can take care of the leaves.
Screenshot
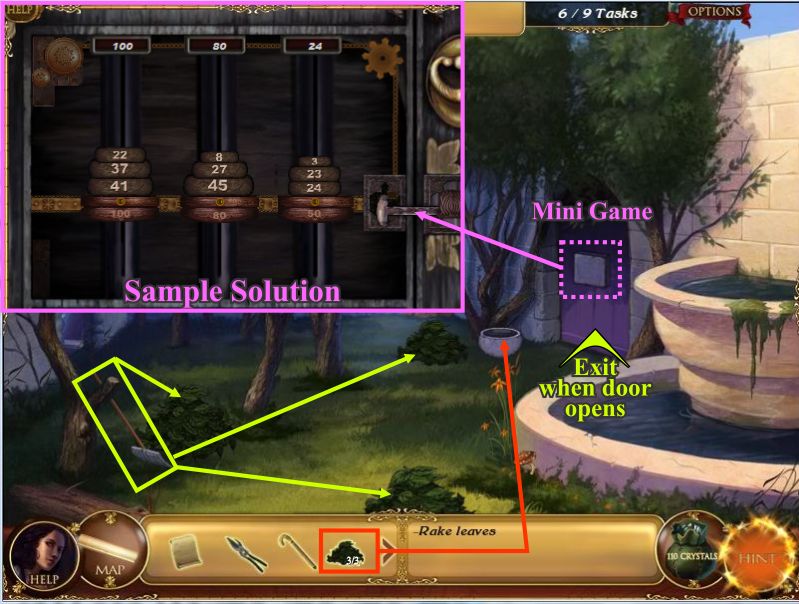
Use the Rake to gather up the three piles of Leaves and place them in the stone bin near the door on the right.
Click on the door for the Weights Mini Game.
To complete the Mini Game you will need to make the weights balance with the numbers 100, 80, and 50 so pick up the various weights and place them as shown for one solution that works.
When you have completed the game go through the open door.
Screenshot
Chapter 6: The Tower
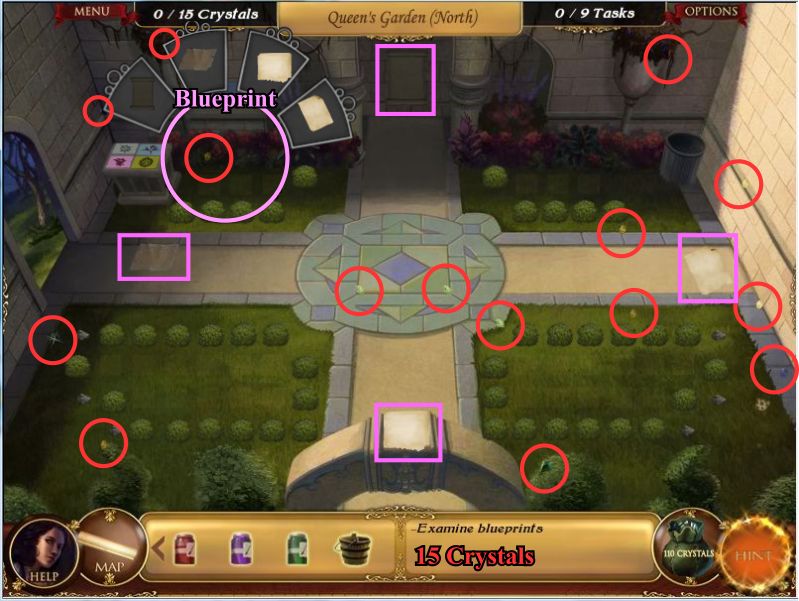
Collect the 15 Crystals.
Click on the blueprints on the back wall and complete the Key Object.
Screenshot
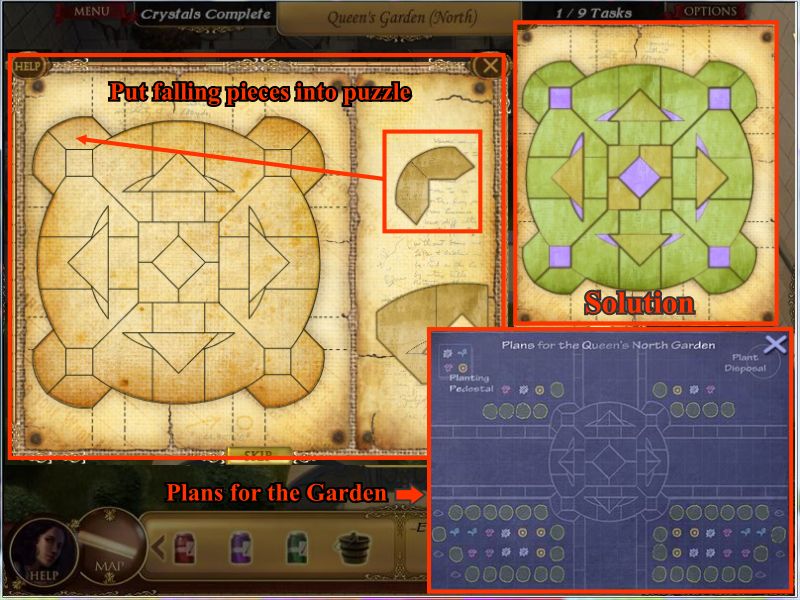
You also need to complete the Blueprint Mini Game. When you are finished the blueprints for the garden appear.
Note the placement of the flowers on the blueprint and click the "X" in the top right corner to close the blueprint.
Screenshot
Click on the Pedestal and complete the Key Object.
Notice that the Pedestal has four flower images.
When you click on one of them you get that flower as part of your cursor.
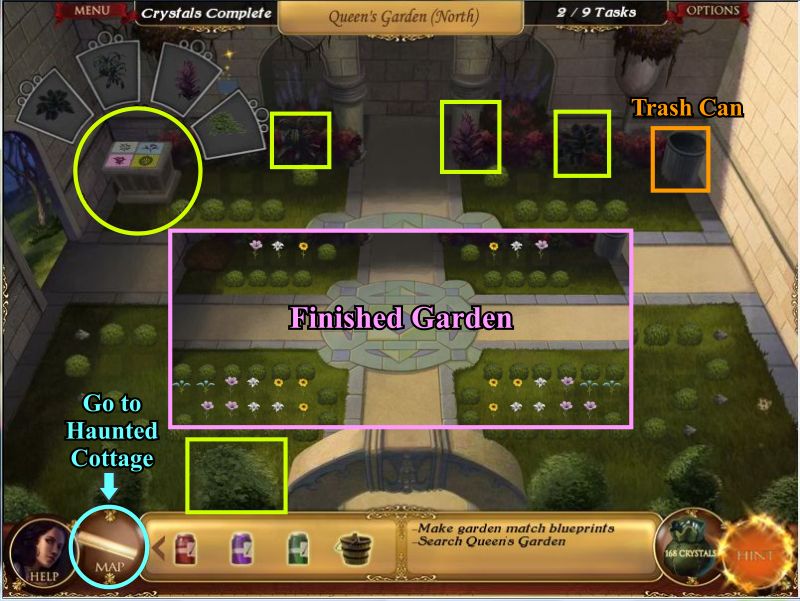
Follow the planting pattern in the blueprints and plant the appropriate flowers where they belong.
If you plant the wrong flower somewhere, you can click on it again to pick it up and put it in the trash bin in the top right corner of the garden.
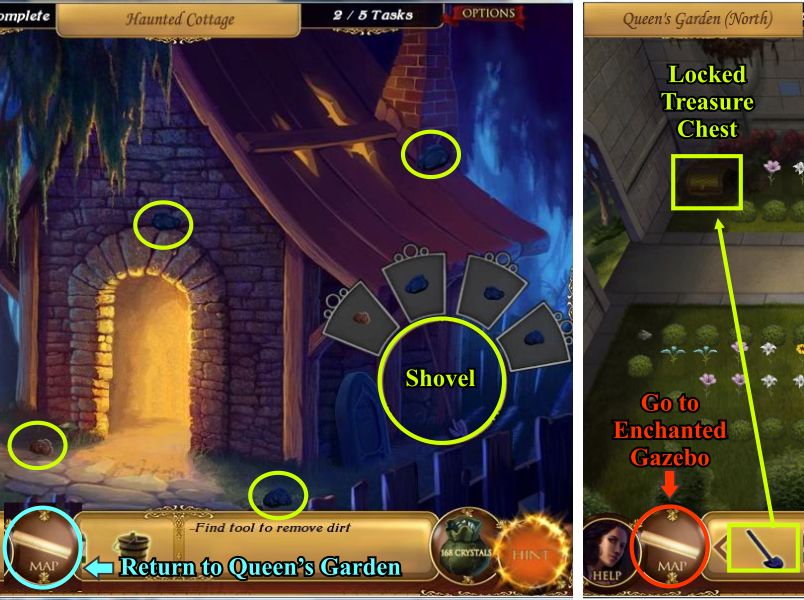
When you are finished the Pedestal disappears so click on the pile of dirt where the Pedestal used to be to see that you need to go to the Haunted Cottage and get the shovel.
Screenshot
Click on the Shovel, and complete the Key Object and return to the Queen's Garden.
Take the Shovel from your inventory and use it to dig up the pile of dirt where the Pedestal was.
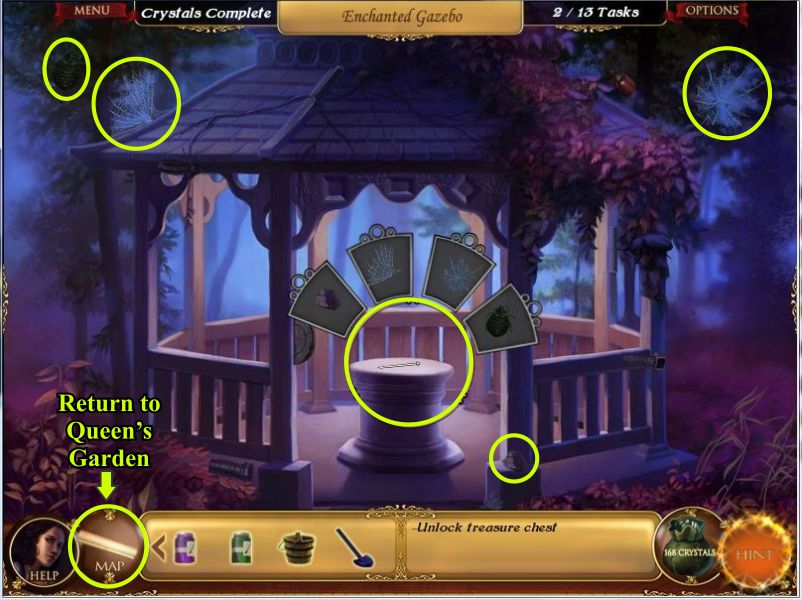
Click on the Treasure Chest to find out it's locked so go to the Gazebo in search of help to open it.
Screenshot
Click on the Needle and complete the Key Object and return to the Queen's Garden.
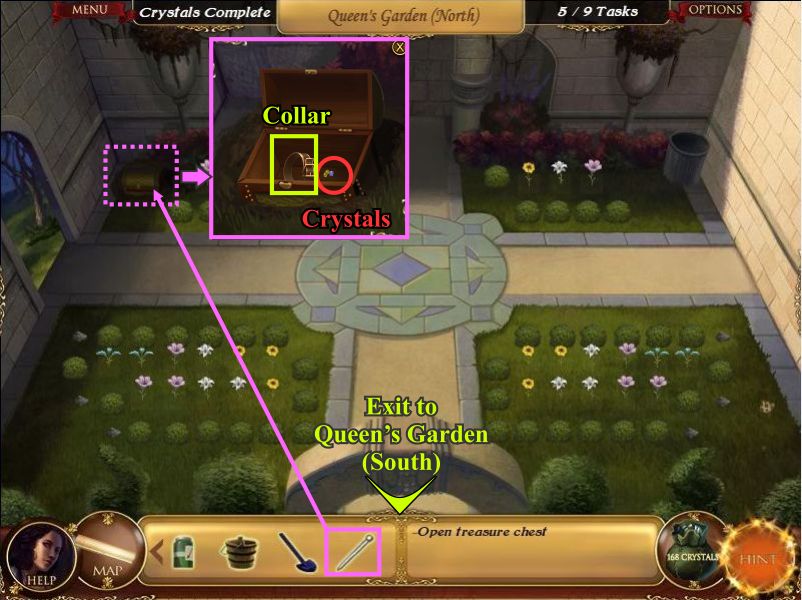
Screenshot
Use the Needle from your inventory to open the Treasure Chest and pick up the Collar and Crystals.
Click on the arch at the bottom of the scene to go to Queen's Garden (South).
Screenshot
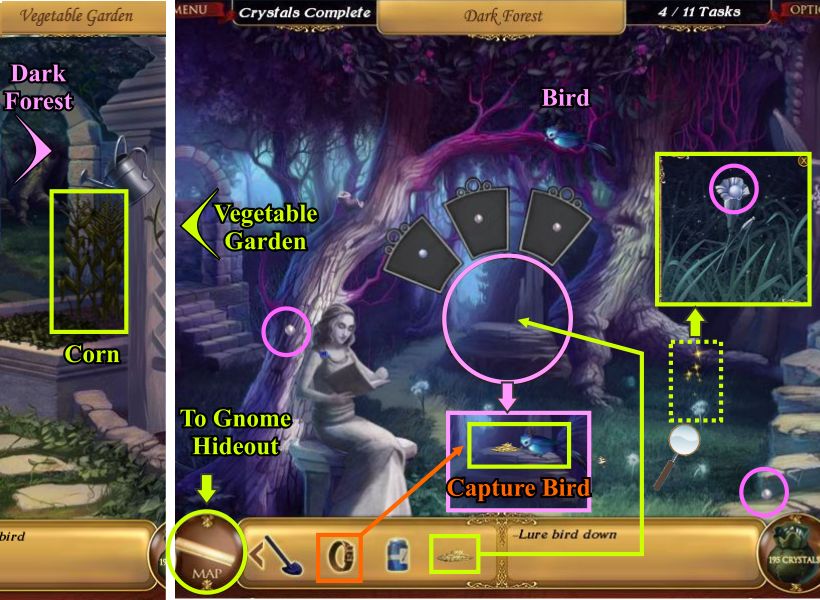
Click on the gate to the left to find out it's locked so go to the Dark Forest and talk to the Gnome.
Go to the Vegetable Garden and click on the corn stalks to obtain some Dried Corn.
Go back to the Dark Forest, click on the large, flat stone below the Bird, and complete the Key Object.
Put the Dried Corn from your inventory on top of the flat rock.
When the Bird flies down take the Collar from your inventory and place it on the Bird to capture it.
If you click on the bird and it doesn't have the collar on, it will fly back into the tree.
To get it to come down again you need to take a trip to another area and return.
Go to the Gnome Hideout and give the Bird to the Gnome in exchange for a Gem Flower.
Screenshot
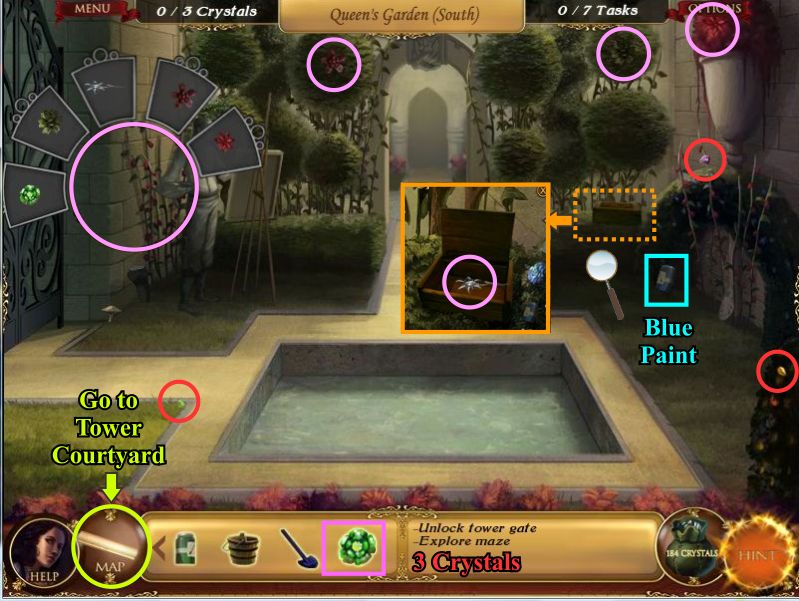
Go to the Queen's Garden (South), collect the 3 Crystals and pick up the can of Blue Paint.
Click on the gate and complete the Key Object using the Gem Flower from the Gnome as one of the items.
The gate opens so go through it.
Screenshot
Chapter 7: The Tower II
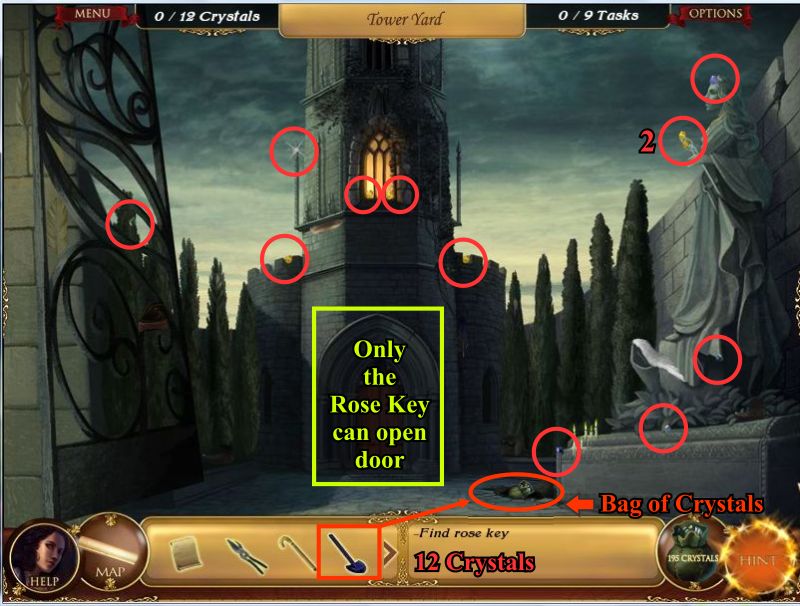
Click on the tower door to find out it is locked and only the Rose Key will open it.
Collect the 12 Crystals and use your shovel to dig next to the statue and take the Bag of Crystals buried there.
Screenshot
Go to the Gazebo to find the Rose Key but it isn't there.
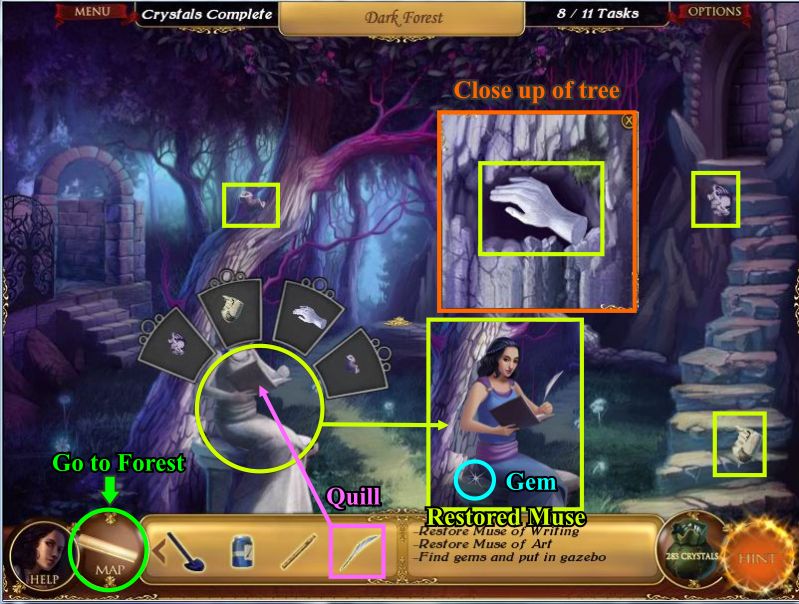
Go to the Dark Forest and click twice on the Muse of Writing statue to learn what item you must find.
Go to Brenn General Store and click on Haden to request his Quill.
Go to the Gnome Hideout and click on Iyia to talk to her.
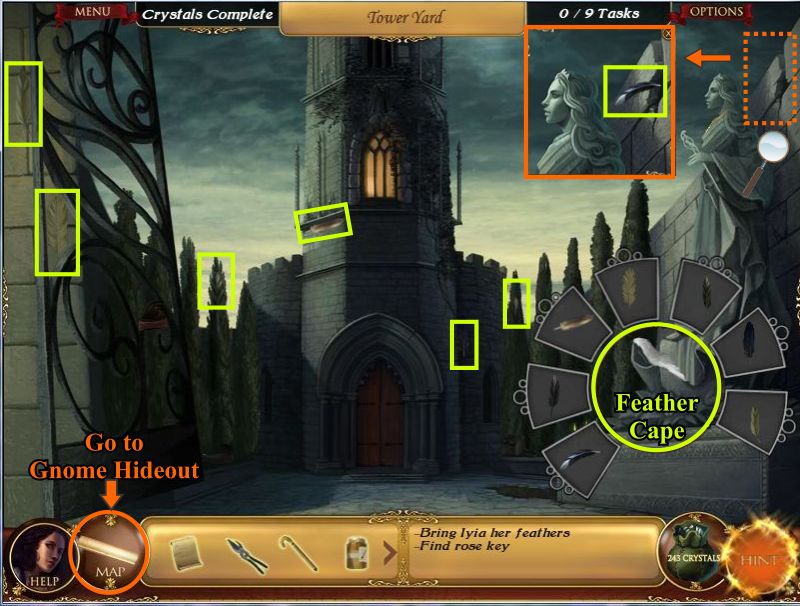
Return to the Tower Yard, click on the Feather Cape and complete the Key Object.
Screenshot
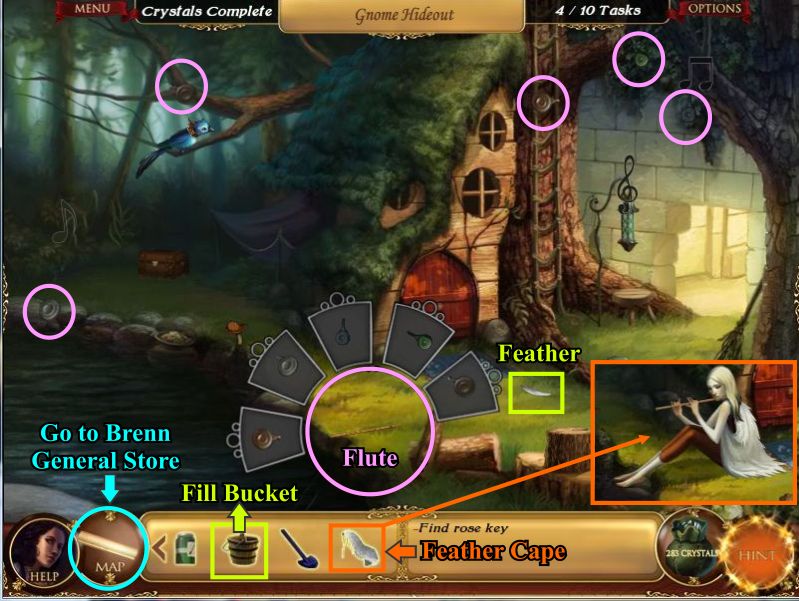
Go back to the Gnome Hideout and give the Feather Cape from your inventory to Iyia.
When she leaves click on the Flute and complete the Key Object.
Fill your Bucket while you are there and pick up the Swan Feather to take to the General Store in Brenn.
Screenshot
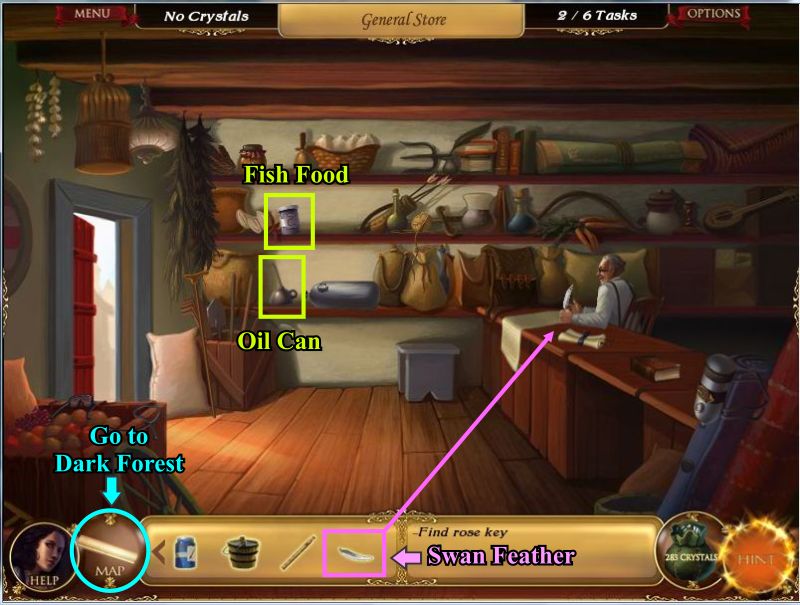
Give the Swan Feather to Haden who will give you his Quill to take to the Dark Forest.
Note a couple items on the shelves for future need.
Screenshot
Place the Quill from your inventory on the Muse of Writing statue and complete the Key Object on the statue.
Pick up the Sapphire next to the Muse and go to the Forest.
Screenshot
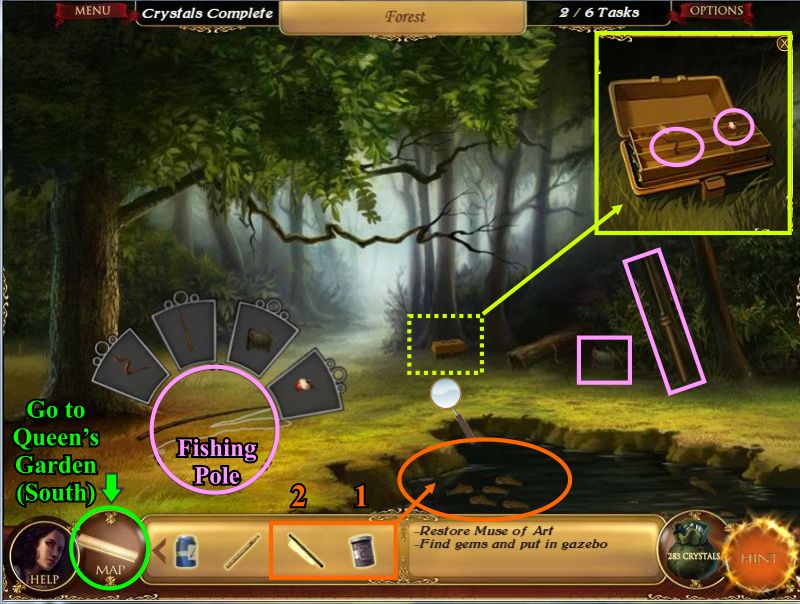
Click on the Fishing Pole and complete the Key Object.
Click on the pond with the Fishing Pole but the Fish are too far away to catch so go to Brenn and purchase the Fish Food from the General Store and return to the Forest.
Place the Fish Food from your inventory in the pond and the Fish will swim to the shallow side of the pond.
Use the Fishing Pole on the pond to catch the Fish and go to the Queen's Garden (South).
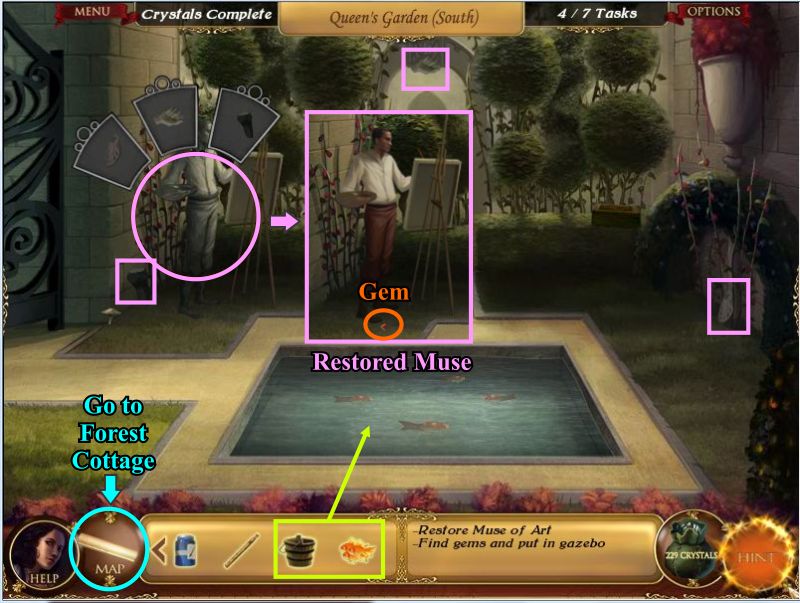
Screenshot
Fill the pool with the Bucket of Water and put the Fish in the pool.
Click on the Muse of Art and complete the Key Object.
Collect the Ruby the Muse drops and go to the Forest Cottage.
Screenshot
You should have all of jars of paint by now but if you are missing one, here are the locations:
Blue Paint: Queen's Garden (South)
Red Paint: Gazebo
Purple Paint: Inside the Haunted Cottage
Green Paint: Inside the Treehouse
Yellow Paint: A purchase at the General Store in Brenn
Click on the blank canvas on the easel at the right.
Pick up each bottle of Paint and click on the Canvas to complete the painting.
Click on the finished painting and enter the Enchanted Painting.
Collect the 6 Crystals and click on the Urisk.
Click on the Muse of Music statue, then place the Flute from your inventory on the statue and complete the Key Object.
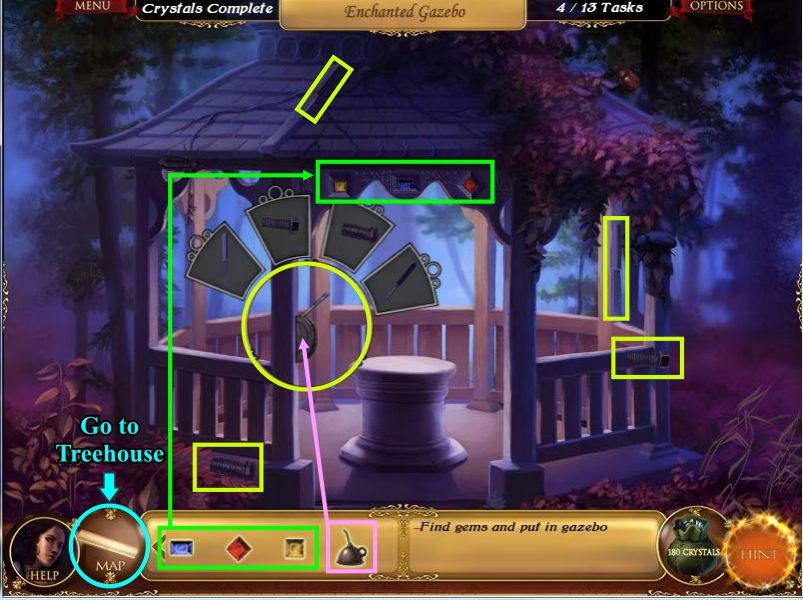
Pick up the Topaz next to the Muse and go to the Enchanted Gazebo.
65.jpg">Screenshot
Put the Topaz, Ruby and Sapphire into the slots above the door.
Click the lever on the Gazebo to find out it's too rusty to move so go to the General Store in Brenn and purchase Oil.
Return to the Gazebo, oil the lever and click it again for a Key Object to complete.
Click the lever again and it still doesn't work so click on each of the three gems to collect them and go to the Treehouse.
Screenshot
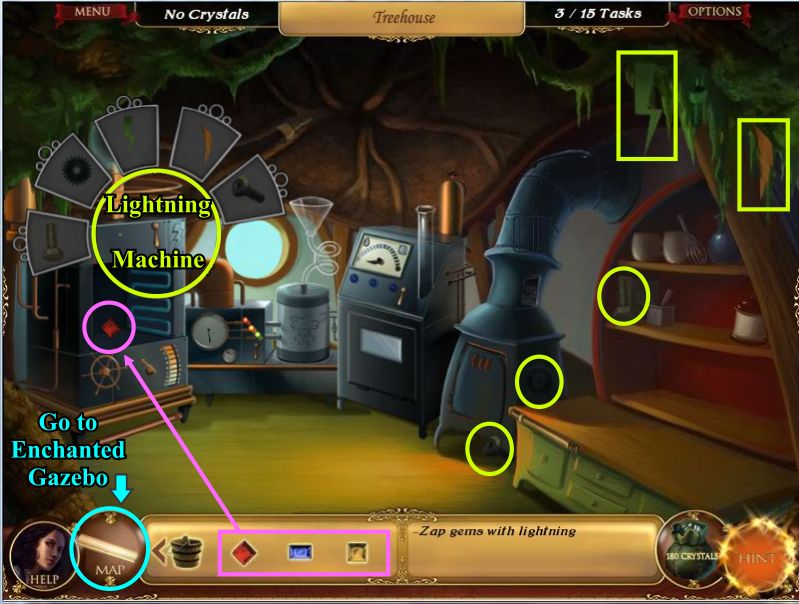
Place the Ruby into the Lightning Machine and complete the Key Object.
Collect the Glowing Ruby out and put in another gem.
Click the switch on the machine and when the gem glows remove it from the machine.
Repeat the process for the final gem and return the Gazebo.
Screenshot
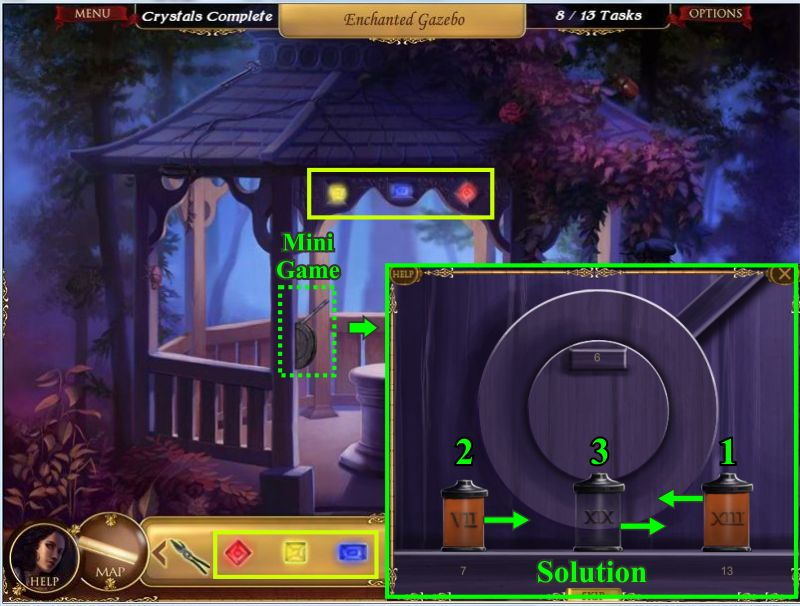
Put the 3 glowing gems back into the slots above the door and click the lever for a Mini Game.
Your goal is to fill the middle vial so that it only has 6 units of liquid.
Pour the liquid from one vial into another as numbered.
Screenshot
The Rose Key appears on the pedestal in the Gazebo so click on it and complete the Key Object.
Use the Rose Key from your inventory on the tower door and a beast appears that will not let you enter.
Go to the Tower Yard.
Screenshot
Go to the Gnome Hideout, click on the Bird and complete the Key Object
Fill the Bucket while you are there and return to the Tower Yard.
Screenshot
Place the Collar from your inventory on the Beast and enter the tower.
Click on the girl sleeping on the bed.
Click on the note sitting on the desk to read it.
Screenshot
Chapter 8: The Girl
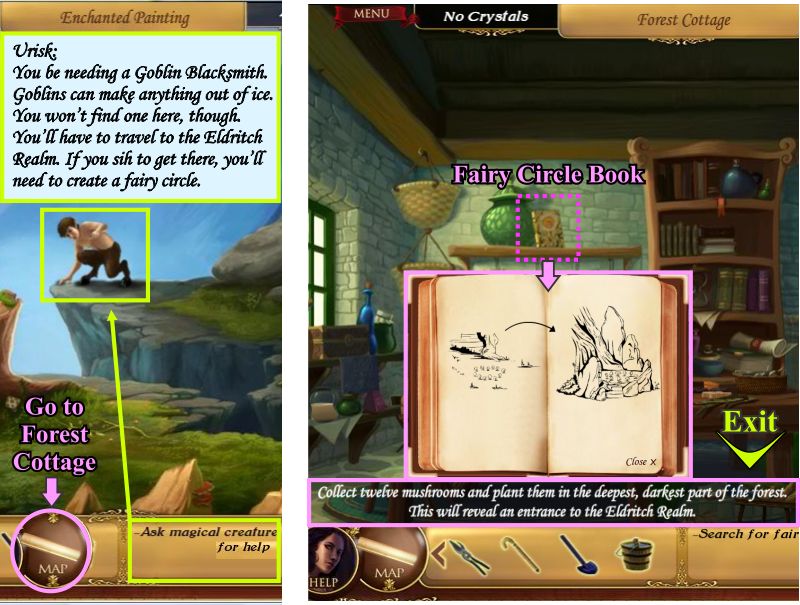
Go to the Enchanted Painting and talk to the Urisk.
Go to the Forest Cottage, find the "Fairy Circle" book and click on it to read it.
Click on the Enchanted Painting.
Screenshot
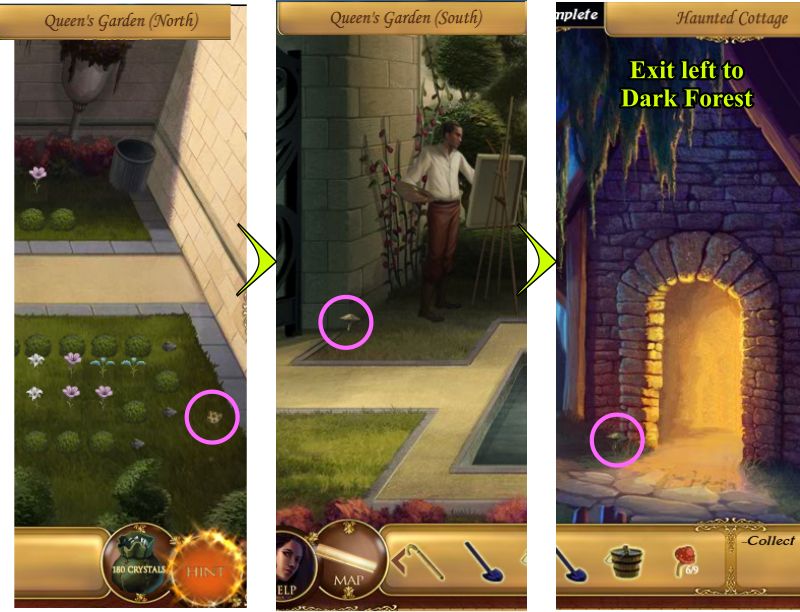
Fairy Circle Mushroom Locations:
Enchanted Painting
Forest Cottage
Gnome Hideout
Screenshot
Forest
Brenn
Orchard
Screenshot
Queen's Garden (North)
Queen's Garden (South)
Haunted Cottage
Screenshot
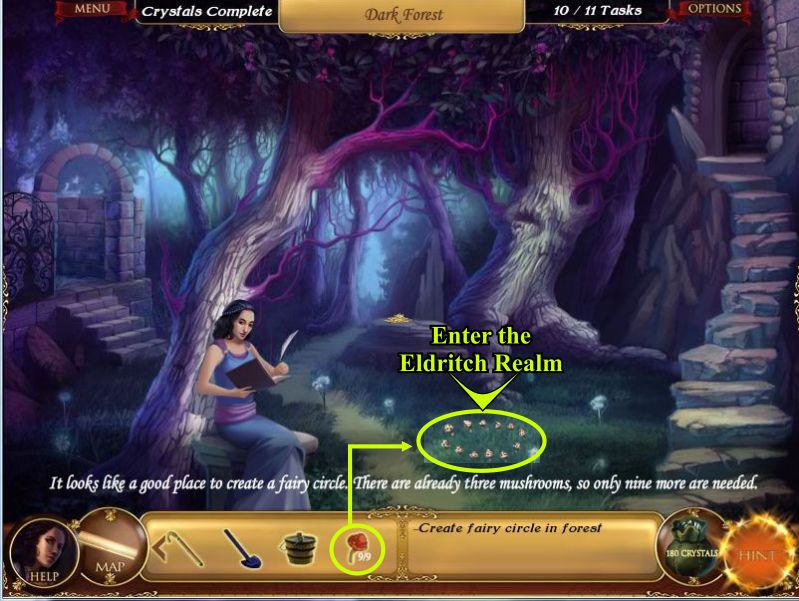
Go to the Dark Forest place the nine Mushrooms from your inventory on the 3 existing mushrooms to form a Fairy Circle.
Go through the Fairy Circle to the Eldritch Realm.
Screenshot
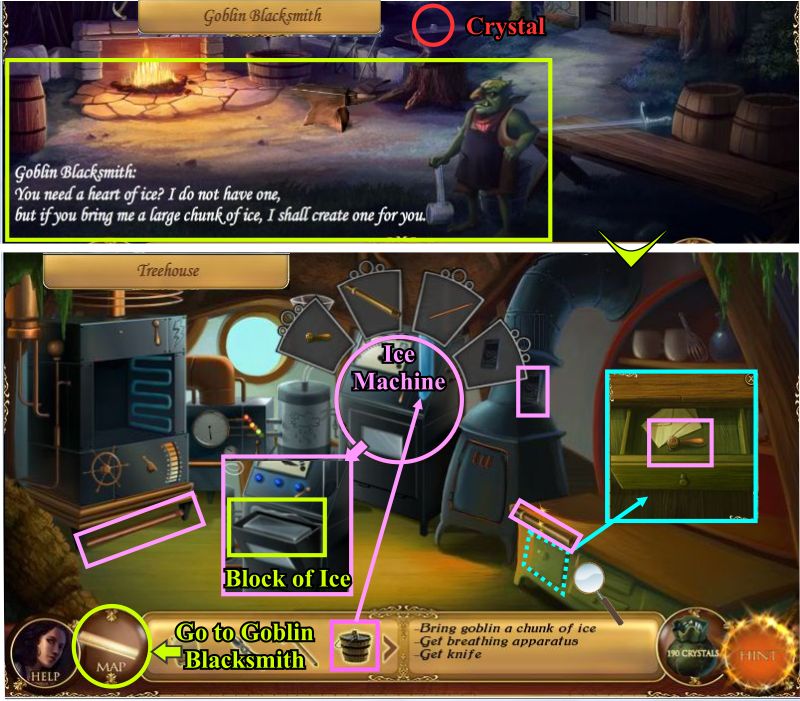
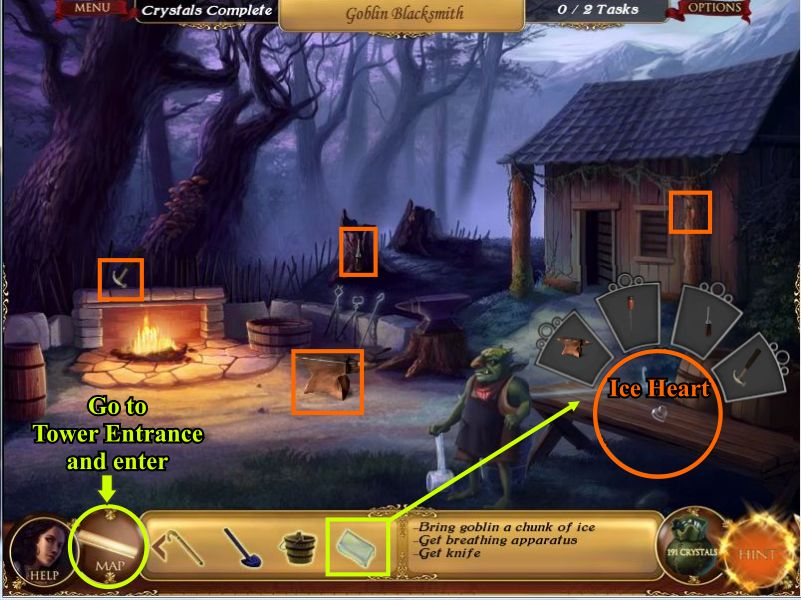
Collect the 6 Crystals and take to path to the right to go to the Goblin Blacksmith.
Click on the Horse to get some information about him.
Collect the Crystal, talk to the Goblin and go to the Treehouse.
Screenshot
Pour the Bucket of Water from your inventory in the Ice Machine and complete the Key Object.
Take the Ice from the Ice Machine and return to the Goblin Blacksmith.
Screenshot
Place the Ice Block on the workbench.
When he has finished carving the heart has been click on it and complete the Key Object.
Return to the Tower Courtyard.
Screenshot
Chapter 9: The Possessions
Place the Heart of Ice from your inventory on the sleeping girl.
Click on the Key on the bed behind the girl and complete the Key Object.
Use the Key to open the wardrobe and take the Diadem and the Dynamite from the wardrobe.
Screenshot
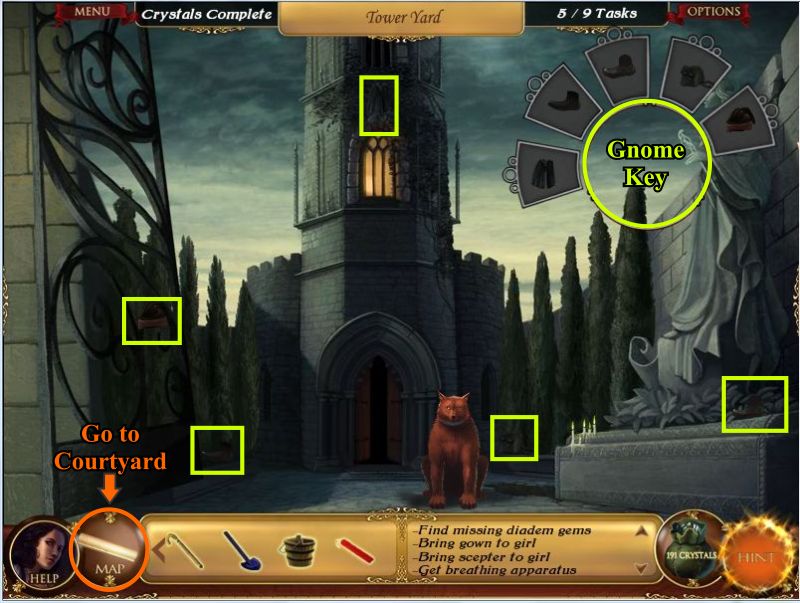
Give the Diadem to the girl and go to the Tower Yard.
Click on the Gnome Key and complete the Key Object.
Go to the Courtyard.
Screenshot
Place the Dynamite from your inventory in the crack on the wall next to the Fountain.
Click on the Dynamite and complete the Key Object to blow open the crack in the wall.
Click on the hole in the wall and collect the Gem Pouch and a small Bag of Crystals.
Go to the Gnome Hideout.
Screenshot
Use the Gnome Key from your inventory to open the Gnome Chest.
Pick up the Knife from the Gnome Chest and go to the Church in Brenn.
Screenshot
Click on the creepy Monk who tells you to go to the wardrobe and take the Black Gown.
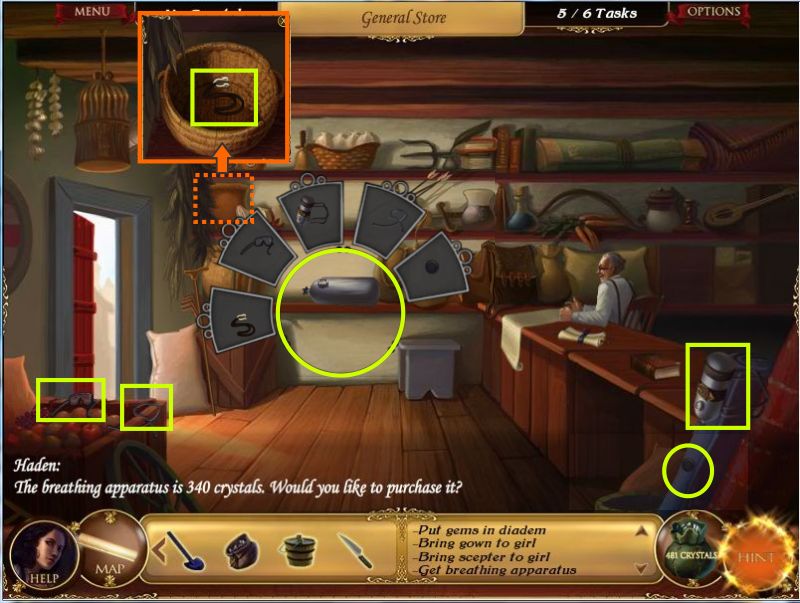
Go to the General Store and purchase the Breathing Apparatus which needs repair.
Click on it and complete the Key Object before going to the Eldritch Realm.
Screenshot
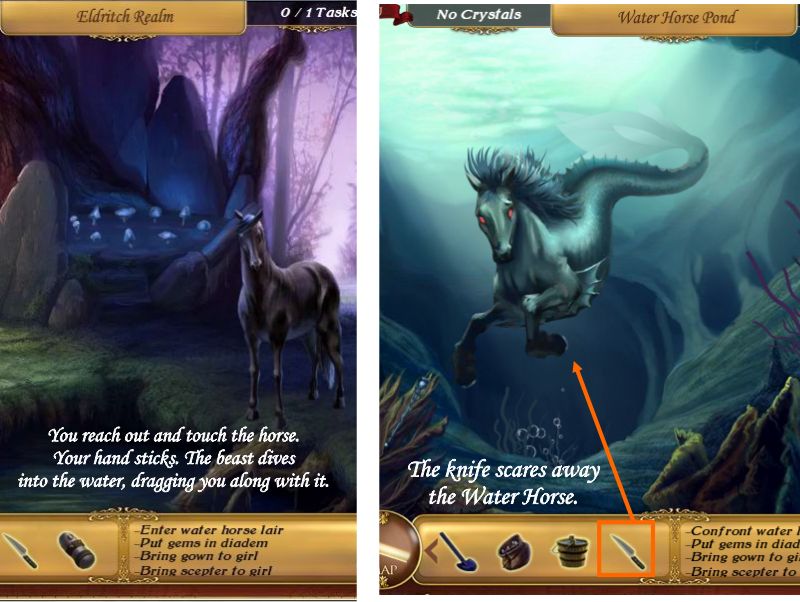
Click on the horse and it drags you into the Water Horse's Lair.
Take the Knife from your inventory and click on the horse to scare it away.
Screenshot
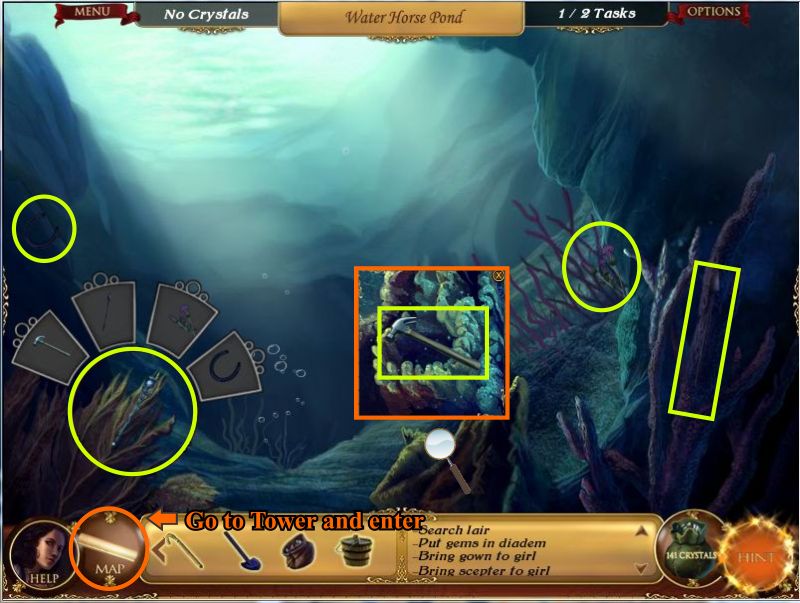
Click on the Thistle Scepter and complete the Key Object.
Go back to the Tower Yard and enter the Tower.
Screenshot
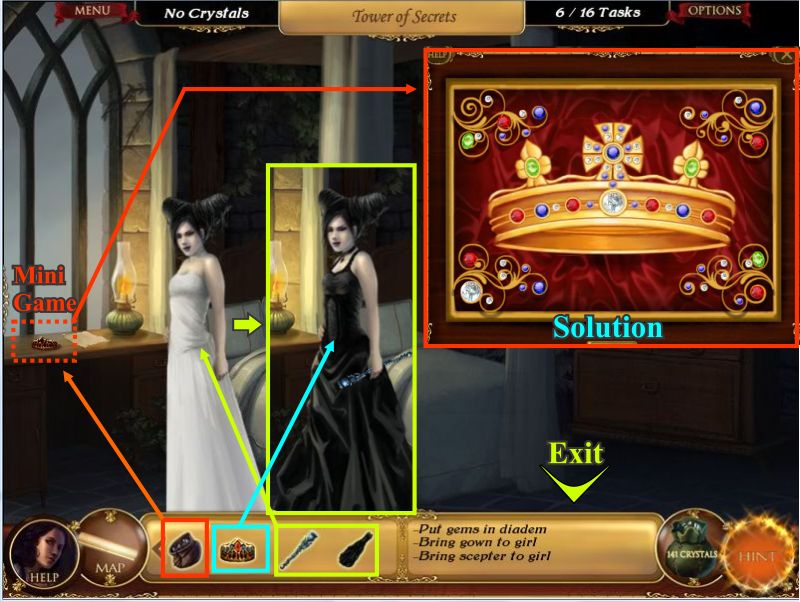
Place the Gem Pouch from your inventory on the Diadem which is now on the table to bring up the Diadem Mini Game.
Complete the Diadem Mini Game by placing the surrounding gems where they belong and then click on the finished Diadem.
Take the Diadem, Black Gown, and Thistle Scepter from your inventory and give each of them to the girl.
Screenshot
Chapter 10: The Witch
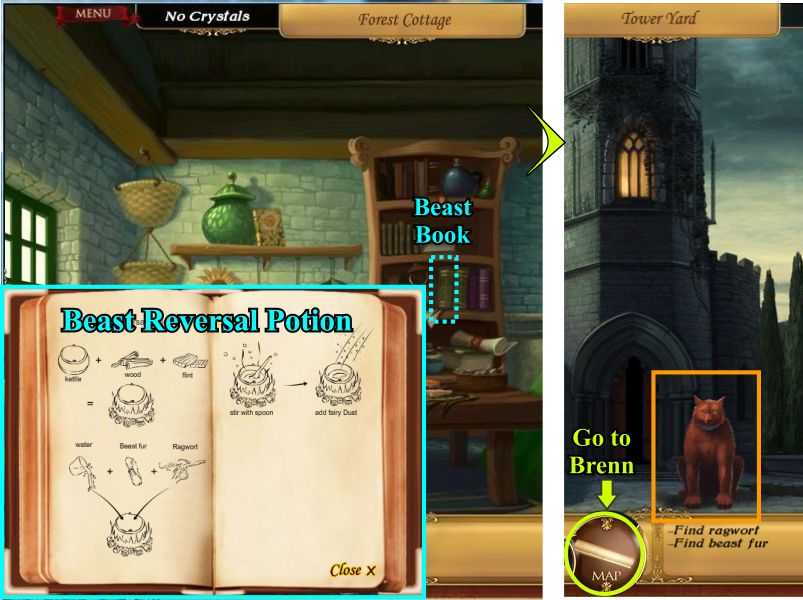
Go to the Forest Cottage and click on the "Beast Book" to find the potion you need to restore Prince William to a human.
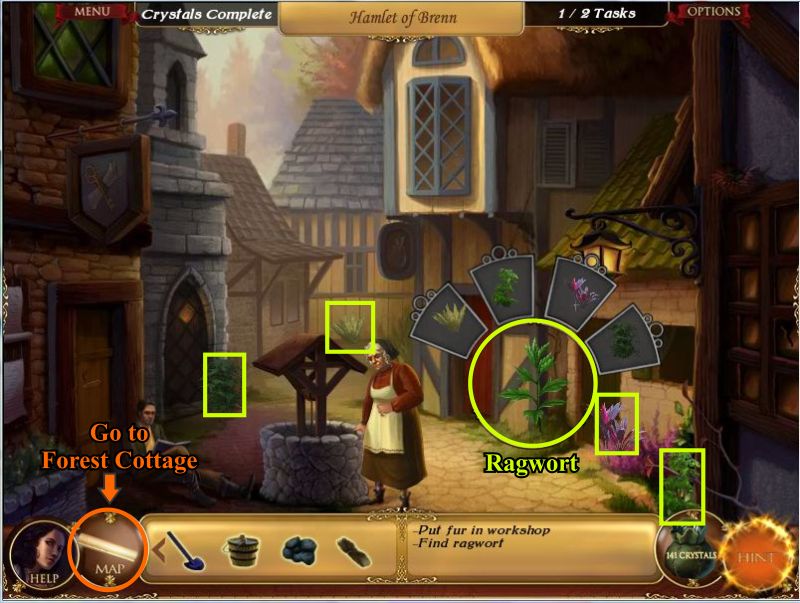
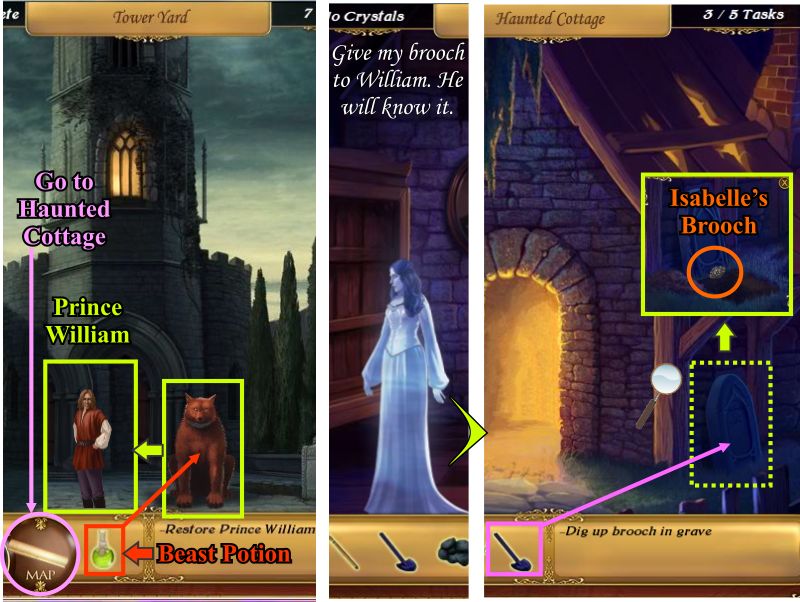
Return to the Tower Yard , click on the Beast to get some Beast Fur and go to Brenn.
Screenshot
Click on the Ragwort plant and complete the Key Object.
Go to the Forest Cottage.
Screenshot
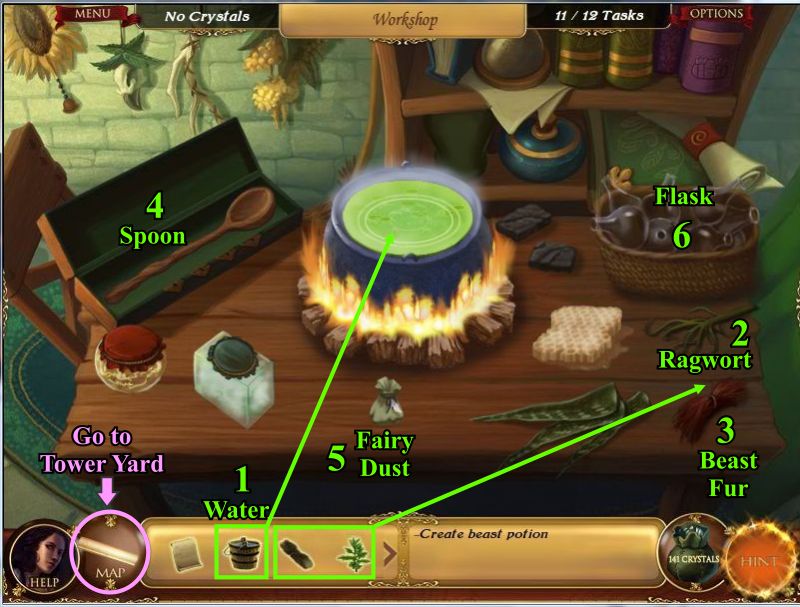
Place the Beast Fur and Ragwort from your inventory on the table.
Fill the cauldron with water, add Beast Fur and Ragwort, mix with the Spoon, and add some Fairy Dust.
Fill a flask with the Beast Reversal Potion and go to the Tower Yard.
Screenshot
Place the Beast Reversal Potion from your inventory on the Beast and he transforms into a man.
Go to the Haunted Cottage and talk to Isabelle.
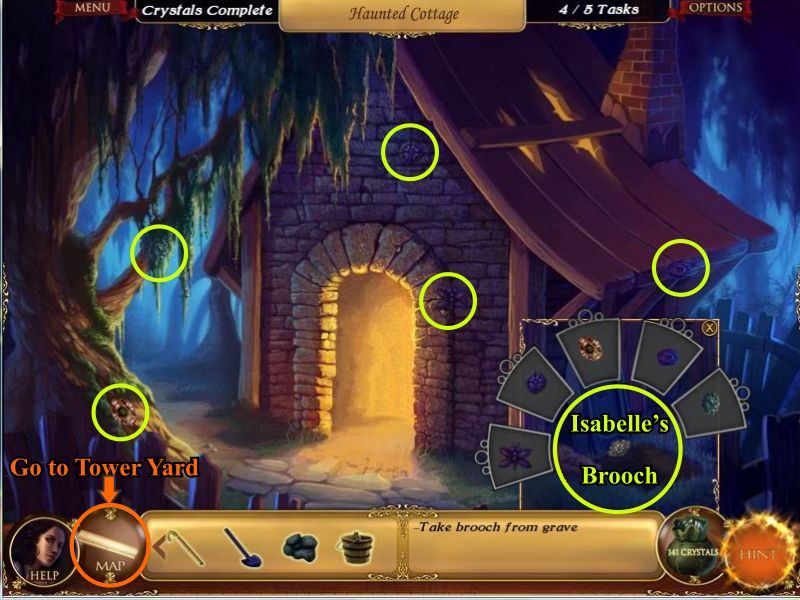
Go outside the Haunted Cottage, take the Shovel from your inventory and click on the bottom of the headstone to dig up the grave.
Click the hole at the base of the headstone to see the Brooch.
Screenshot
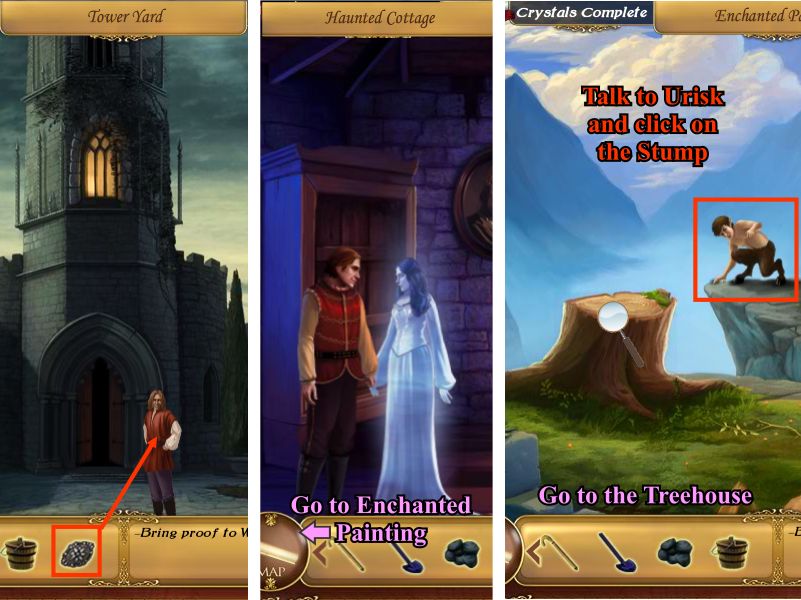
Click on the Brooch and complete the Key Object and return to the Tower Yard.
Screenshot
Give the Brooch from your inventory to Prince William and him to the Haunted Cottage to talk to Isabelle.
Go to the Enchanted Painting and talk to the Urisk.
Click on the tree stump and go to the Treehouse.
Screenshot
Click on the door of the Molten Oven and complete the Key Object.
Click on the oven door to open it, place the Coal from your inventory inside the oven and click the door again to close it.
Open the oven door and take the Diamond to the Gazebo.
Screenshot
Place the Diamond on the pedestal and it transforms into a Rope.
Click on the Rope and complete the Key Object and return to the Enchanted Painting.
Screenshot
Place the Rope from your inventory on the tree trunk.
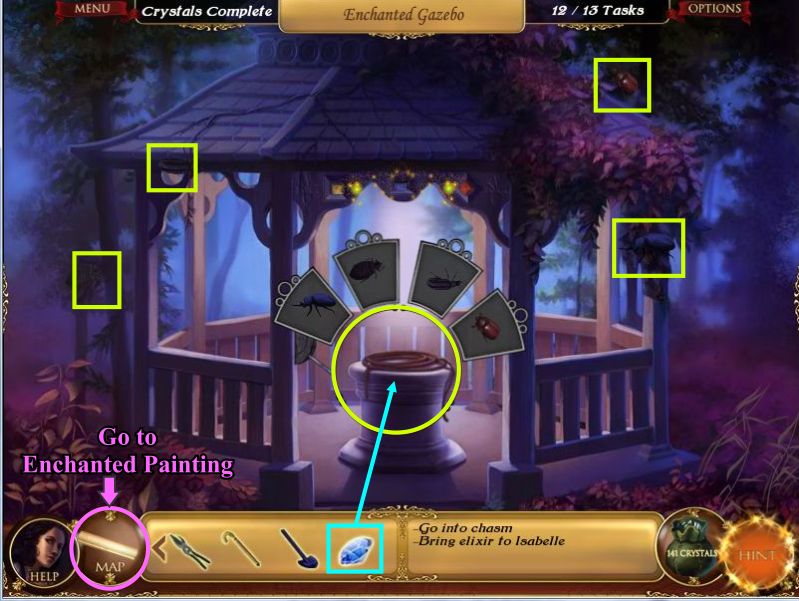
Click on the Rope and go into the Chasm.
Click on the Buttercup flower and complete the Key Object.
Dip the Buttercup into the Elixir of Life water in the Chasm and go to the Haunted Cottage.
Screenshot
Give the Elixir of Life to Isabelle whose life is restored.
Go back to the Eldritch Realm and click on the path to the left to Seelie Court.
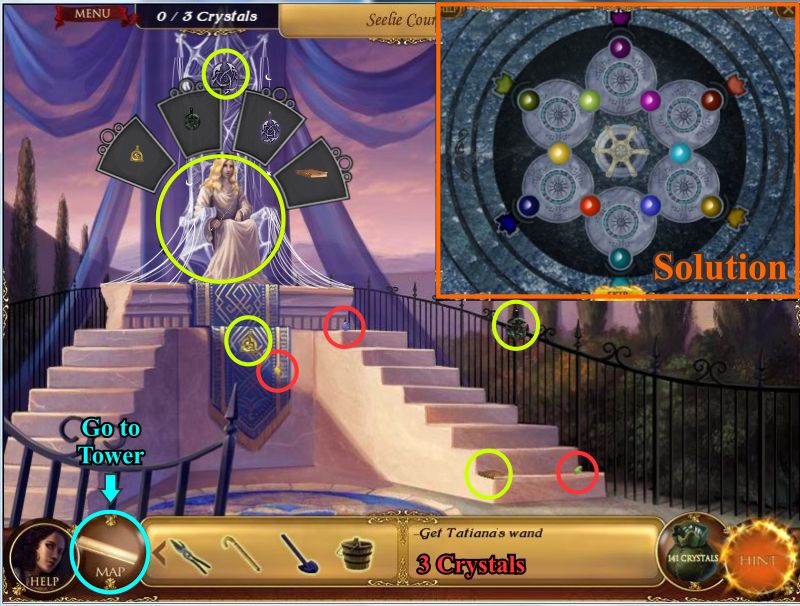
Click on Tatiana, the Eldritch Queen, and complete the Wand Mini Game.
Your goal is to rotate the disks so that they match the gems around the outside of the circle as shown in the Solution.
Click on the Wand in Tatiana's hand, and complete the Key Object.
Return to the Tower Yard and go inside to confront Hepmortula.
Screenshot
After Hepmortula casts a magic spell on Isabelle, the wand falls to the ground so click on the Wand to pick it up and click on Hepmortula who uses her magic to attack you.
Final Battle Mini Game:
Each time you successfully block her attack she receives damage but each time you are unsuccessful, you receive damage to your health.
Your goal is to win the battle by reducing Hepmortula's health to 0.
The card in the middle shows the magic Hepmortula has cast.
The circles at the bottom are the magic which is available for you to use to block her attack.
Tree defeats Water
Fire defeats Tree
Clouds defeat Sun
Sun defeats Snow
Arrow defeats Bird
Water defeats Fire
Wind defeats Clouds
Snow defeats Arrow
Bird defeats Wind
Congratulations, you have defeated Hepmortula for now so watch the ending scenes.
Special thanks to Jazz for this fabulous walkthrough!
Posted by: grinnyp |
July 10, 2010 8:53 AM
|
July 10, 2010 8:53 AM