

Awakening:
The Dreamless Castle
Platform: Mac, Windows

![]() You awaken alone. You have no memory of who you are, or how you got to this magical castle. There are fairies ready to guide you, and goblins waiting to test you. Are you ready to find out the secrets of your past, and your ultimate destiny in the adventure game Awakening: The Dreamless Castle?
You awaken alone. You have no memory of who you are, or how you got to this magical castle. There are fairies ready to guide you, and goblins waiting to test you. Are you ready to find out the secrets of your past, and your ultimate destiny in the adventure game Awakening: The Dreamless Castle?
 This game is the first in the adventure genre for Boomzap, makers of puzzle games like Hoyle Enchanted Puzzles. Using only the mouse, solve puzzles and mini-games while navigating through a magic castle, with the goal of collecting six magic runes and discovering who you are and why you've been asleep for a hundred years.
Although the game is being billed as an "adventure/hidden object" title, the hidden object part of the game is more like a recurring mini-game than the actual genre of the game. There are only five hidden object scenes in the entire game. That's a shame, because they're actually quite good. No pixel hunting, and the objects are rendered with the same fairy tale romanticism as the rest of the environments. Other mini-games include mahjong solitaire (called Goblinjong), Simon Says sequence, matching puzzles, and jigsaw puzzles. All puzzles and mini-games can be skipped, but you have to wait until the "skip" button charges before doing so.
Analysis: If you took in Sierra games while you were teething, you're going to find Awakening a bit on the easy side. The progression is mostly linear, it's rare that the use of an object is illogical, and you can't combine items in your inventory. If you pick up a shovel, you're going to dig with it, not tie a ribbon on it and use it in an interpretive dance to entertain a peeved minotaur. You're going to have a good idea of what kind of object will be used in each place, and if it isn't in your inventory, you just wait until you solve a puzzle and the game gives it to you.
Sometimes the linearity breaks logic a little. Is there any reason why the girl can't tie the rope to the pulley until you have the object that the rope will be attached to? And why do flowers and other pieces you need to collect often appear in the room only after you click on the puzzle that requires the pieces? If it were me, I'd be a bit frightened. Look around at ordinary garden scene; look down at box lid with missing tiles; think "Aha, I must find the tiles,"; look up and there are suddenly tiles everywhere, even though you've been in the room the whole time. I guess it's magic!
The art in the game is indeed beautiful, with a lush fantasy style. The fairies are especially lovely, and even the goblins are more endearing than ugly. The writing keeps to the same storybook mood, and in the cut-scenes, the voice actress sounds just like the fairy godmother you always wanted.
The game is on the short side. My completion time clocked in at almost two hours. However, beating the game unlocks Goblinjong to play anytime, and if you beat all of those levels you get some extra secrets. Mahjong solitaire fans will certainly consider that an added value.
![]() Windows:
Windows:
Download the demo
Get the full version
![]() Mac OS X:
Mac OS X:
Download the demo
Get the full version


Walkthrough Guide
(Please allow page to fully load for spoiler tags to be functional.)
GENERAL TIPS/MINI-PUZZLE GUIDES:
HINTS:
Your hint fairy can give you hints inside and outside of puzzles. She can also tell you if you have nothing left to do in a room; if she says you have nothing left to do, you don't lose the hint.
PUZZLES WITH CODES:
There is always a clue to any coded puzzle. When you find the clue, it will go into your journal. You can open your journal within the puzzle, thus making it very easy to copy the code.
RECURRING RANDOMIZED MINI-GAMES
Goblingjong (3 times):
If you are familiar with regular mah-jong solitaire, this is a little different in that your sole goal is to match the two key tiles.
Watch while the board is being laid out to determine where the key tiles are, since they might get covered with other tiles. Then focus on matching the tiles blocking your access to the key tiles.
Hidden Object Scenes (5 times):
There is always one object in the hidden object scene that will become an inventory item. The rest are random objects.
Find the items from the list in the scene. If you get stuck, simply click on Mira the Hint Fairy to locate an object.
"Simon Says" (5 times):
While these mini-games are all slightly different, they all use the same follow-the-leader style, where you watch a pattern and then repeat it.
Other than following the pattern with your mouse to help remember it, there aren't a lot of tricks to completing this game. If you aren't good at this kind of game, remember you can always skip the game.
Matching (4 times):
There are two varieties of this puzzle. In one variety, all the pieces are different except for two, and you must click on the two that are the same.
In the other variety, the pieces must all be matched except one piece that will be left unmatched (which you then obtain as a reward).
The solution is always random.
WALKTHROUGH:
Notes: The game is mostly linear, but it is possible to do things in a different order than I'm giving. I've tried to indicate the path that involves the least backtracking.
I also list all the inventory items in a location under your first trip to a location. You might go to a location more than once, so don't worry if you don't get all the items the first time.
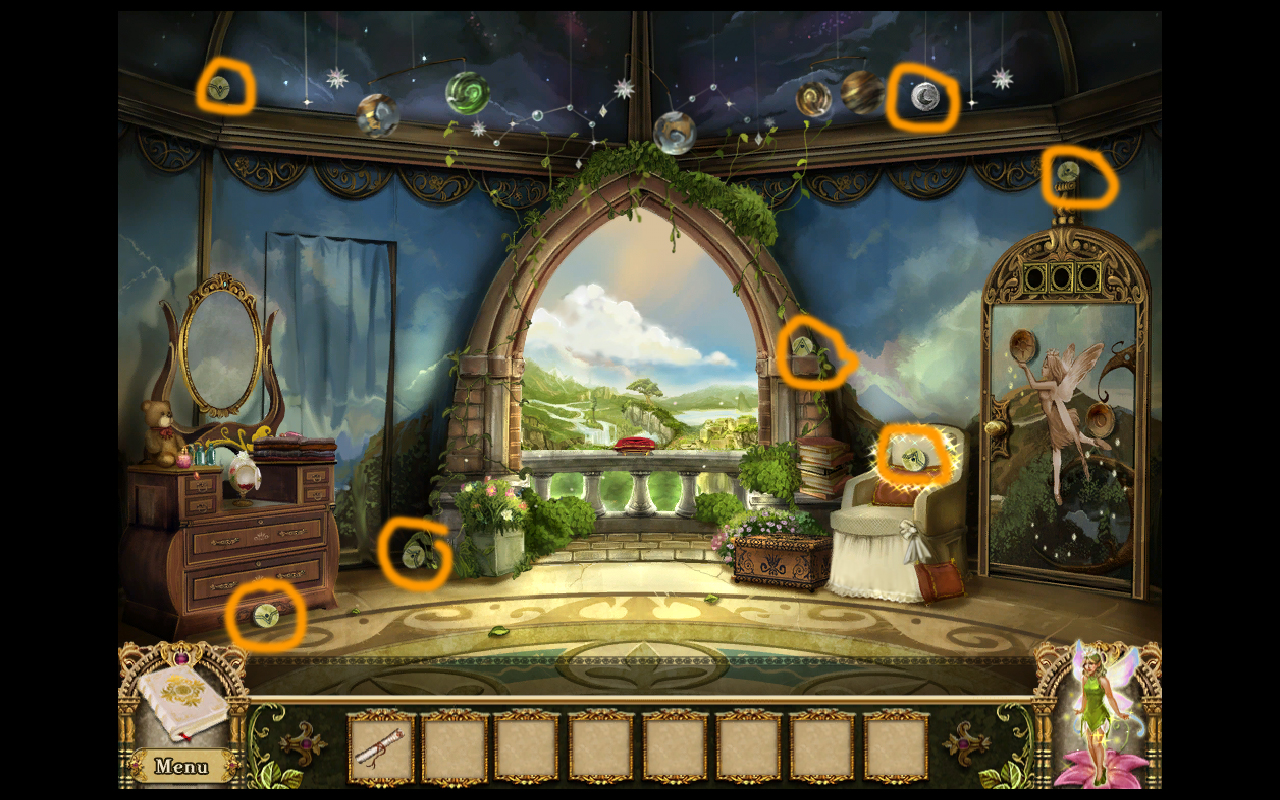
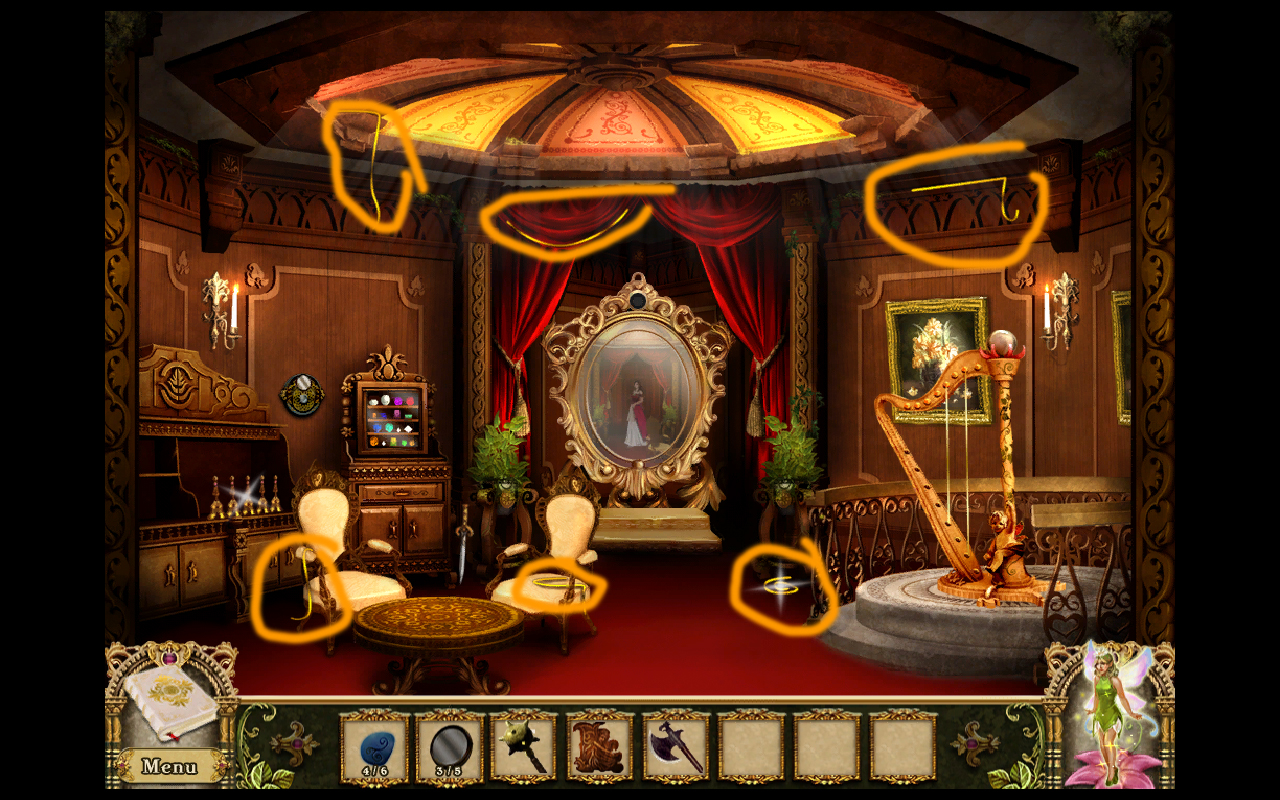
BEDROOM
Inventory Items To Get: Small Key, Note, Gold Disc x6, Sun Orb, Moon Orb, Handkerchief, Magic Rune
1. Click on the shining jewelry box. It's locked.
2. Click on the balcony to zoom in.
3. Pick up the key. Back out.
4. Use the key on the jewelry box's lock.
5. Talk to Mira and receive a note.
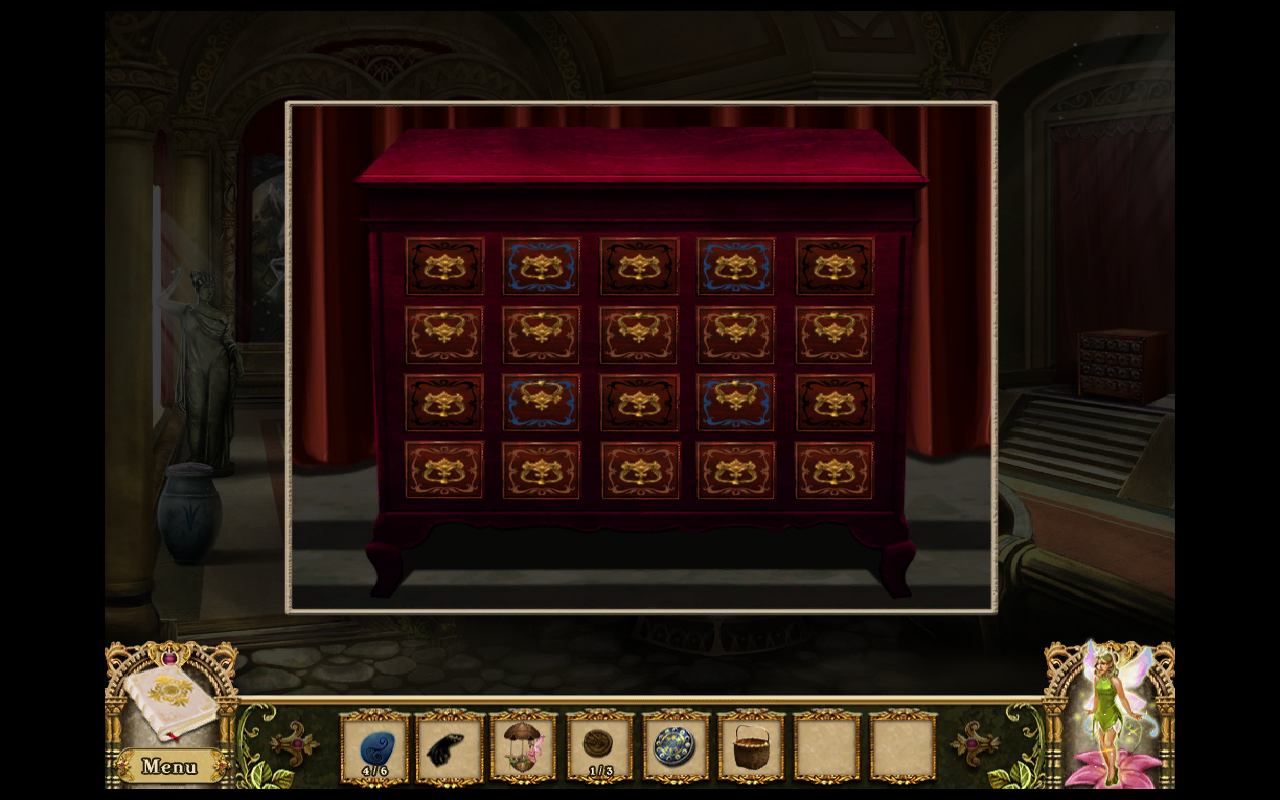
6. Click on the chest to get the puzzle.
7. Find six gold discs hidden in the room. Screen capture.
8. Click on the chest again. Rotate the discs until the double lines go continuously all around the decoration. I couldn't get the screen grab in time, but it's pretty simple. You're making a shape. Pick up the Sun Orb.
9. Hanging from the ceiling directly above the chair is a silver orb with a crescent moon on it. Pick up the Moon Orb.
10. Click on the mirror.
11. Now you can click on the closet, which is a hidden object mini-game; please see the hidden object section for hints. You will get a handkerchief for beating it.
12. Use the handkerchief on the mirror.
13. Pick up the Magic Rune.
14. Click on the symbols above the mirror.
15. Click on the door.
16. The symbols on top should be snowflake, heart, butterfly, from left to right.
17. Put the Sun Orb and Moon Orb into their slots.
18. Exit.
SOUTH TOWER LANDING:
Inventory Items: Glass Disc
1. Click on the vines, and then click on the inscription, for a clue on how to solve the puzzle: ballerina.
2. Click on the stone angel with gems over the vine to get a color clue.
3. Click on the panel to the right of the door. Take the Glass Disc. Click on the circle in the center to light it up and activate the switch.
4. Click on the door. Swap the lights in the order of the angel carving, from left to right: orange, green, blue, purple, red.
5. Enter.
GUEST ROOM:
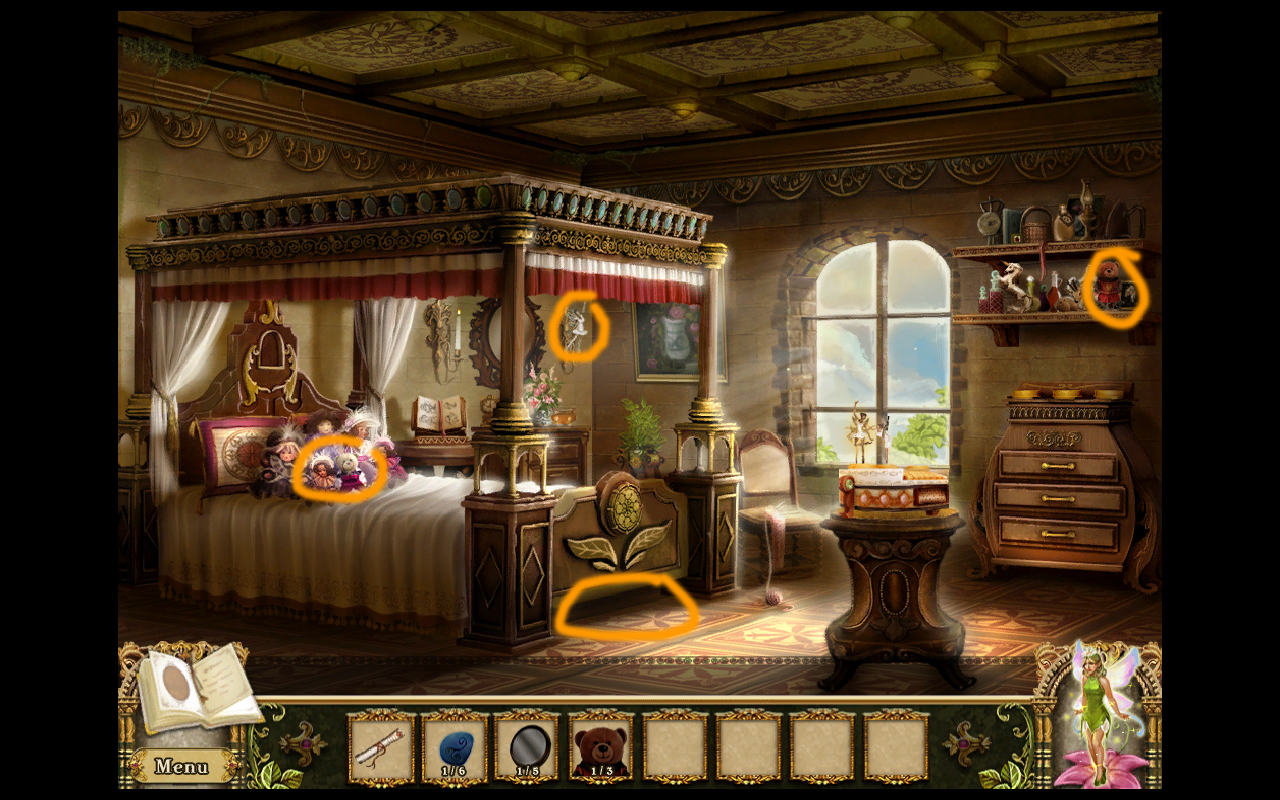
Inventory Items: Teddy Bear x3, Ballerina x2,
1. Pick up three teddy bears and one ballerina. Screen capture.
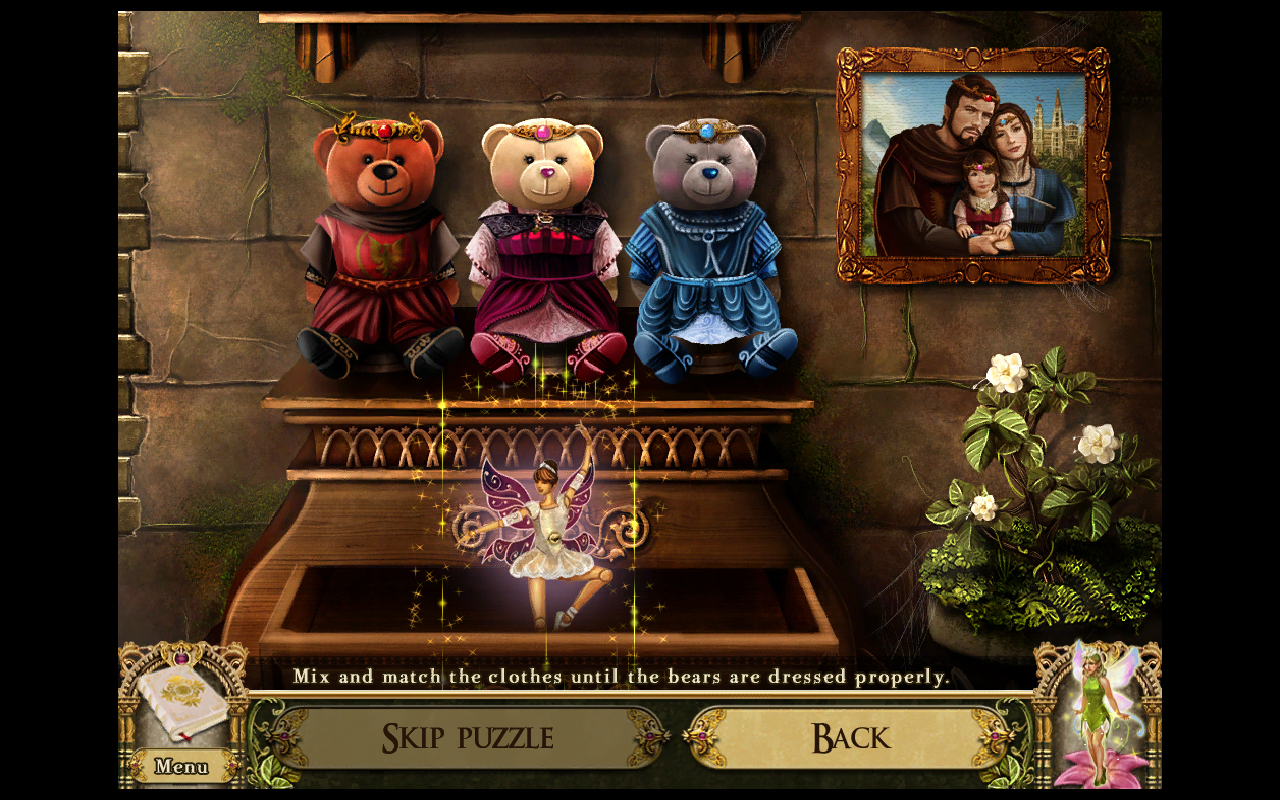
2. Click on the book on the nightstand to get a clue for your journal.
3. Click the dresser area and use the three teddy bears. Swap the bears' items of clothing in order to match the outfits on the family in the portrait. Screen capture. Pick up another ballerina as the reward.
4. Use the ballerinas on the music box. This is a Simon Says puzzle; please refer to the section on Simon Says mini-games.
5. When you win, click on the disc to copy the pattern to your journal.
6. Go back to the South Tower Landing.
SOUTH TOWER LANDING;
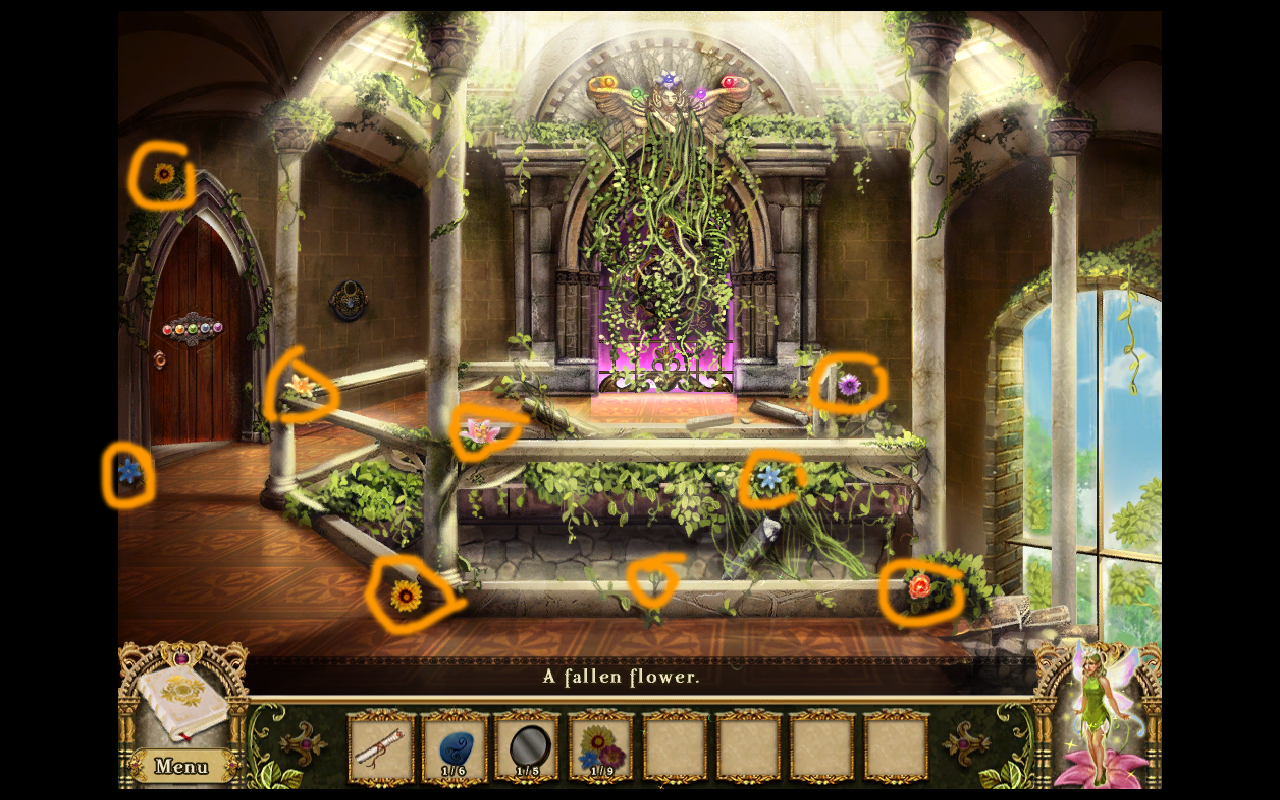
1. Collect 9 flowers. Screen capture.
2. Use the flowers on the vines and swap them like the picture in your journal. Screen capture.
3. Go through the portal.
SOUTH TOWER LOBBY:
Inventory Items: Silver Key, Stone Piece x4, Fairy Figurine, Sun Disc
1. Click on the goblin to talk with him. He will challenge you to Goblinjong; please see the Goblinjong section. You win a silver key.
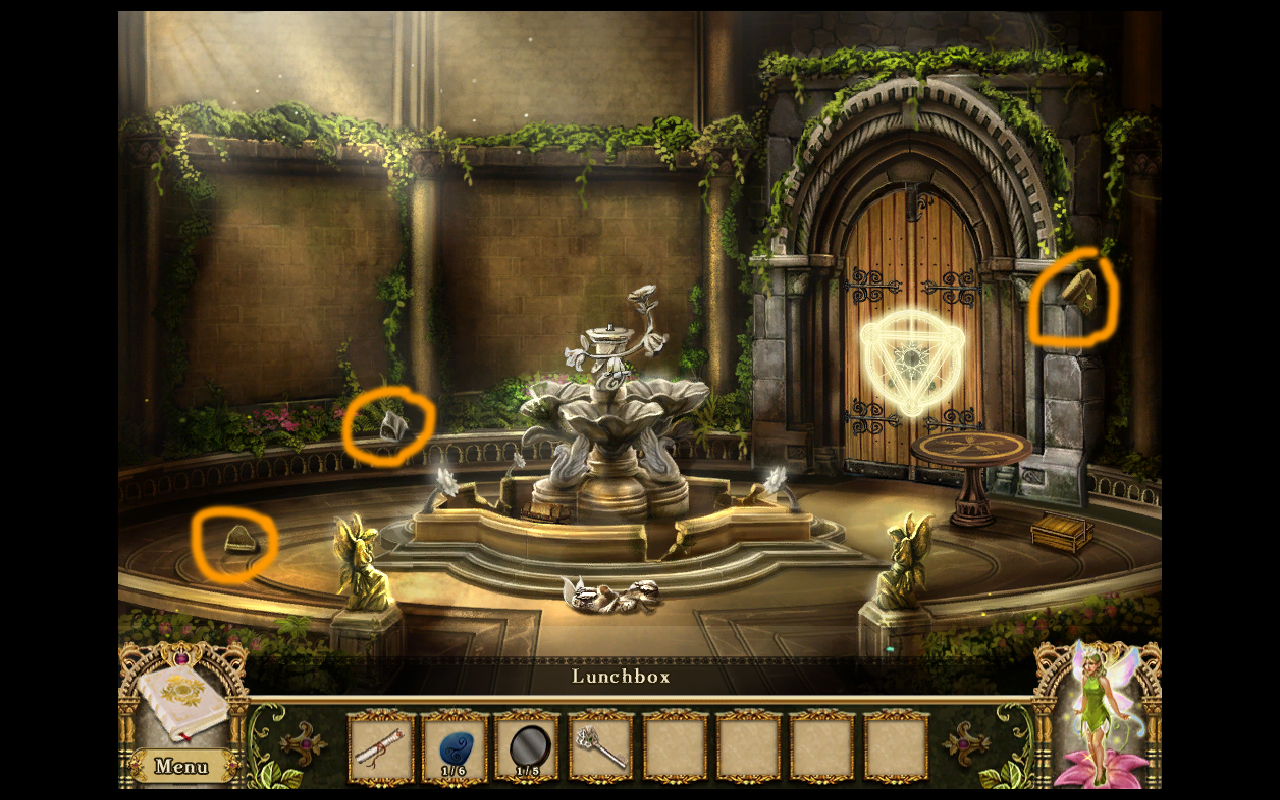
2. Click on the lunchbox to the right of where the goblin was and get a piece of stone.
3. Collect three more pieces of stone. Screen capture.
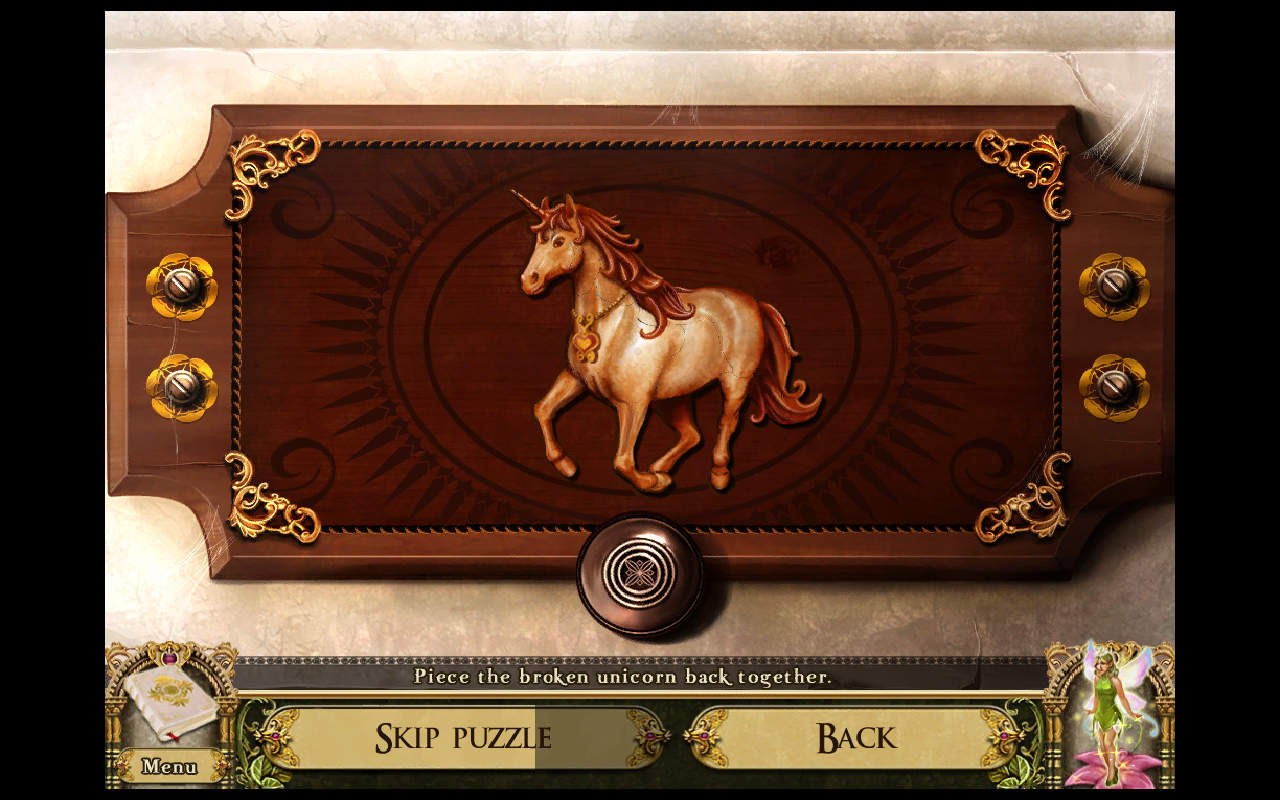
4. Click on the large broken piece in front of the fountain for a puzzle. Screen capture of completed statue. Receive Fairy Figurine.
5. Use Stone Pieces on fountain. Use Fairy Figurine on fountain. Click on the box that appears to get a Sun Disc.
6. Click on the door and use the sun in the middle. Get a magic rune.
7. Open door and exit.
GARDEN:
Inventory Items: Shovel, Rake, Star Symbol, Moon Symbol, Sun Symbol, Cloud Symbol, Shield, Teardrop Vial
1. Pick up the shovel.
2. Use the silver key on the shed door, which is a hidden object mini-game; please see the hidden object section for hints. You get a rake.
3. Go left to the Pond.
POND:
Inventory Items: Magic Stone
1. Examine the four goblin heads over the fountain.
2. Back out to the Garden and then go right to the Carriage House.
CARRIAGE HOUSE:
Inventory Items: Swing Seat Piece x 6, Bag of Puzzle Pieces, Crowbar
1. Pick up six sweet seat pieces. Screen capture.
2. Click on the swing and get a bag of puzzle pieces.
3. Click on the manger of hay several times to reveal a crowbar.
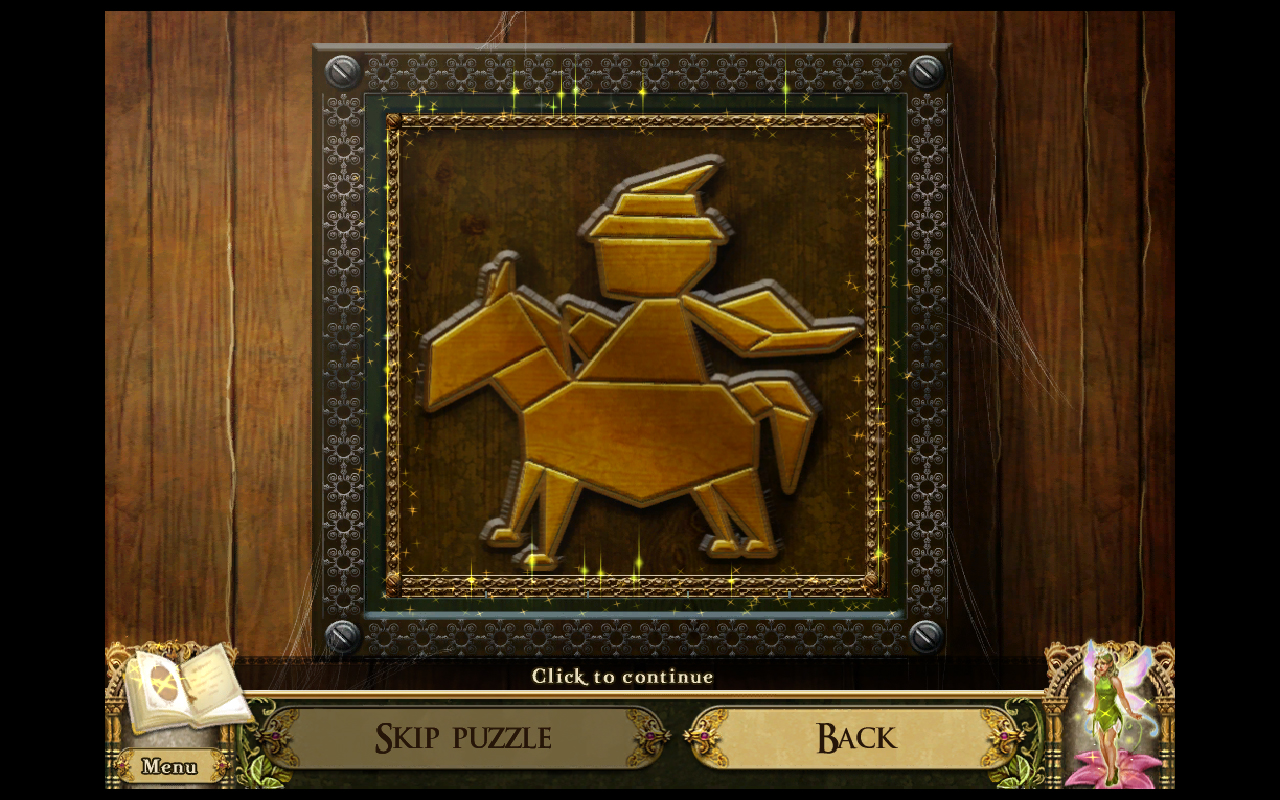
4. Click on the door and use the puzzle pieces for another assembly puzzle. Screen capture.
5. Enter the door.
CARRIAGE HOUSE INTERIOR:
Inventory Items: Feather Duster, Potion of Rapid Growth, Magic Beans, Heart Locket, Watering Can, Mushrooms
1. Click on the barrel on the right for a math puzzle. All the numbers in a line must add up to 15. Starting with the upper left wedge and moving clockwise: 9-7-3-1-5-9. You get a feather duster and a potion of rapid growth.
2. Use the feather duster on the shelf left of the column for a puzzle. The solution is in your journal from the Pond area. Click on the goblin heads so that the heads are arranged from light to dark, left to right. Or, from emotion, neutral face, sad face, happy face, angry face.
3. Another puzzle immediately follows. It is a matching puzzle; please see the section on matching puzzles. From this puzzle you obtain Magic Beans
4. Next, use your feather duster on the carriage front plate. This is an assembly puzzle. Screen capture. You get a heart locket.
5. Finally, use your feather duster on the trunk in the lower left corner to enter an hidden object scene; please see the hidden object section for hints. You get a watering can.
6. Go back to the Garden.
GARDEN:
1. Use the rake on the pile of leaves to reveal a trapdoor.
2. Use the crowbar on the trapdoor. Under the trapdoor is a shield missing its symbols.
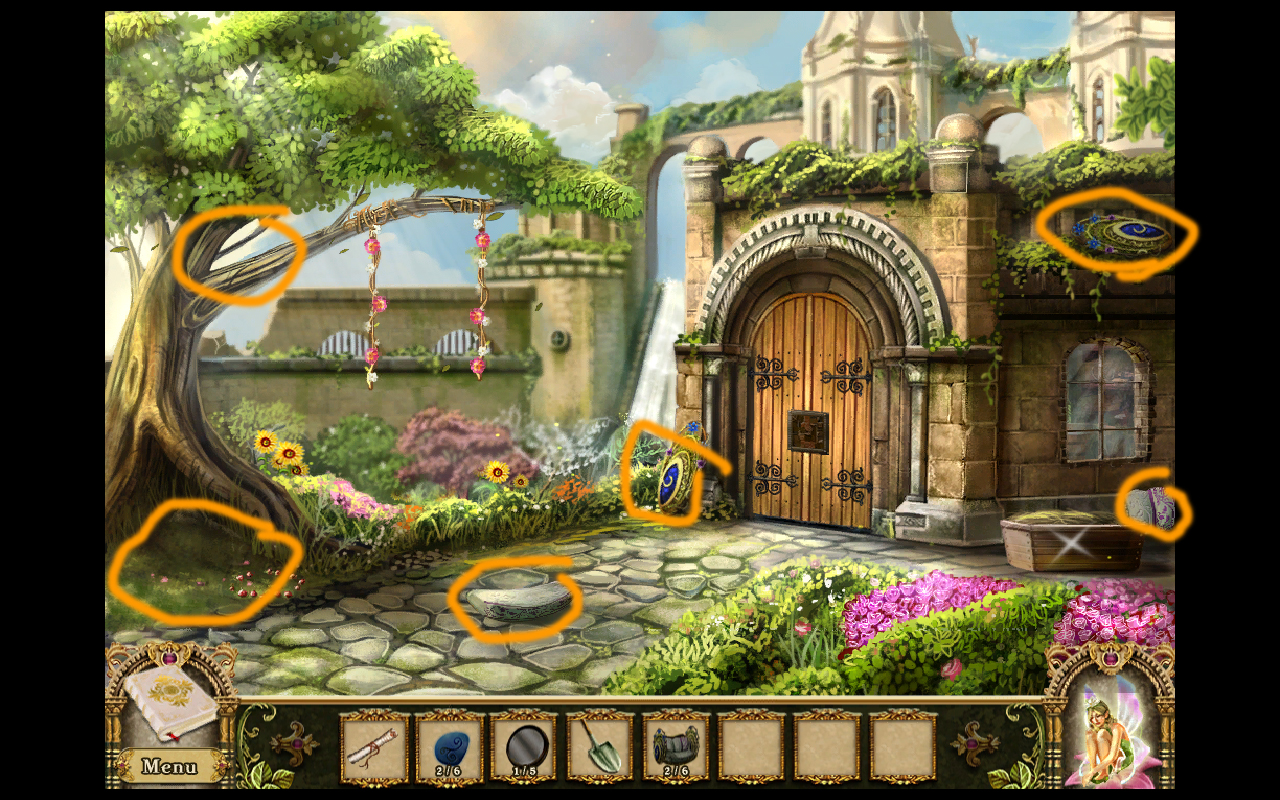
3. Pick up the four symbols around the garden. Screen capture.
4. Place the four symbols into their holes on the shield to open the box.
5. Press the buttons in the order from the Four Brave Animals in the Guest Room. Yellow, purple, blue, red. Get the shield.
6. Use the shield on the angel statue. Take the vial of tears from her other hand.
7. Go to the pond.
POND:
1. Give the note to the pigeon.
2. Use the shovel where the pigeon was standing.
3. Use the magic bean on the hole.
4. Fill the watering can with water from the fountain.
5. Use the watering can on the dirt.
6. Use the Potion of Rapid Growth on the plant.
7. Click on the window to enter the Alchemy Lab.
ALCHEMY LAB:
Inventory Items: Glass disc, Potion of Corrosion, Magic Rune, Salamander, Potion of Pure Heart
1. Talk to the goblin.
2. Pick up the butterfly net against the left wall.
3. Pick up the shears from the table.
4. Click on the panel to the right of the arch. Take the Glass Disc and turn on the switch.
5. Go back to the pond.
POND:
1. Use the shears on the vines at the top of the stairs until the vines are all gone.
2. This is an assembly puzzle. Screen capture.
3. Take the magic stone from the image.
4. Use the butterfly net on the pond to enter a butterfly matching game. See the section on matching games if necessary. You capture the last butterfly.
5. Go back to the lab.
ALCHEMY LAB:
1. Use the magic stone on the magnifier.
2. Click on the vials left of the torch.
3. Mix the colors to produce the color indicated. Put yellow in the first empty vial, blue in the second, and red in the third. Get Potion of Corrosion.
4. Use the potion of corrosion on the stone. Get another magic rune.
5. Click on the torch to get a salamander.
6. Click on the open book on the table to get a clue for your journal.
7. Click on the cauldron within the arch.
8. Place three objects according to the book's clue: heart locket on the left, vial in the middle, and butterfly on the right.
9. Get a potion of pure heart.
10. Go back to the Garden.
GARDEN:
1. Use the potion of pure heart on the door.
2. Enter the door to get to the Kitchen.
KITCHEN:
Inventory Items: Glass Disc, Vegetable x10, Key
1. Click on the panel to the right of the stove to get a glass disc. Don't forget to turn on the switch.
2. Go right to the Hall.
HALL:
Inventory Items: Empty Food Bowl, Magic Rune, Fairy Carving
1. Pick up the empty bowl on the table.
2. Go back to the Kitchen, and then left to the Pantry.
PANTRY:
Inventory Items: Cane, Cauldron, Wine Bottle, Firewood, Bucket
1. Talk to the goblin.
2. Pick up the cane leaning against the back wall and use it on the cauldron on top of the shelf on the left. The cauldron will fall to the ground. Pick it up.
3. Pick up the wine bottle on the floor at the bottom of the left hand shelf.
4. Pick up the firewood that fell out of the cauldron.
5. Pick up the bucket to the right of the goblin.
6. Go back to the kitchen, and then out to the pond.
POND:
1. Use the bucket on the fountain.
2. Go back to the Kitchen.
KITCHEN:
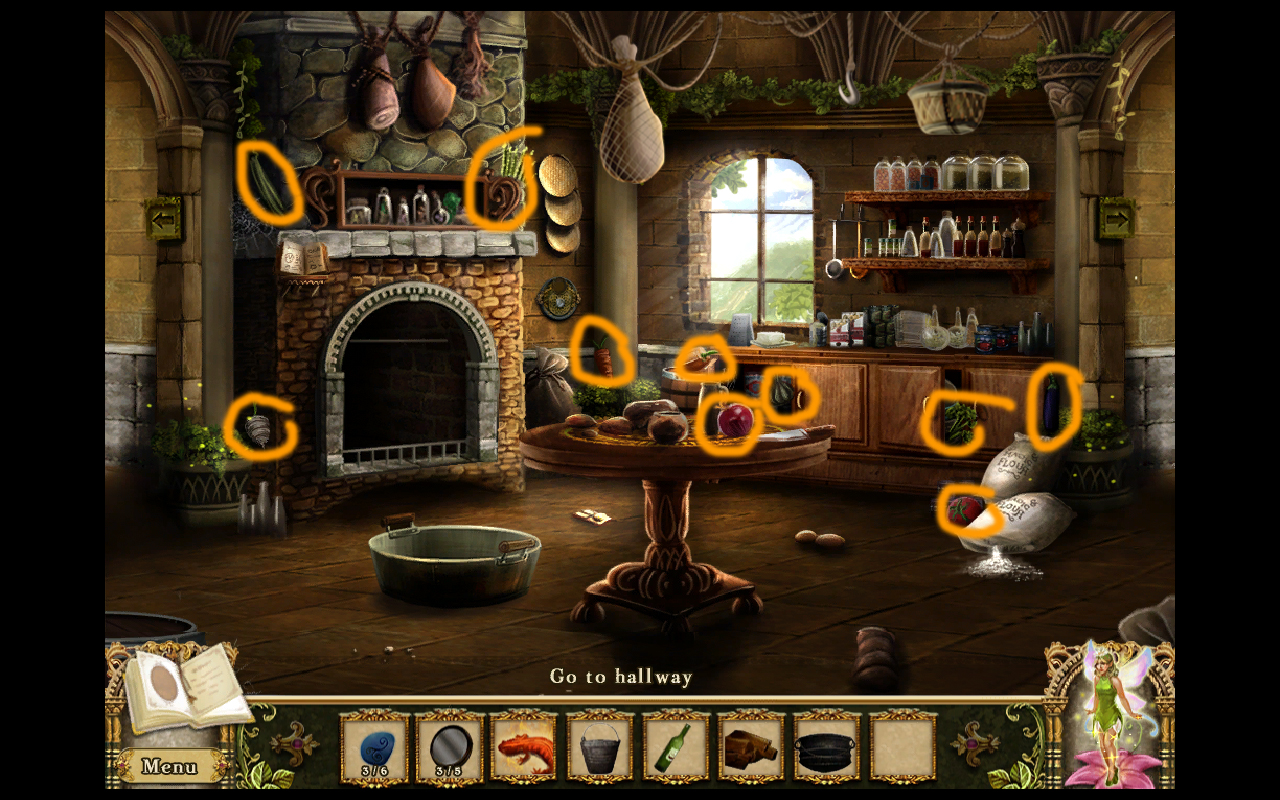
1. Pick up ten vegetables. Screen capture.
2. Use the firewood on the fireplace.
3. Use the salamander on the fireplace.
4. Pick up the key under the fireplace.
5. Go to the pantry.
PANTRY:
1. Use the key on the locked cabinet on the right.
2. Get a rag and a bar of soap.
3. Go back to the kitchen.
KITCHEN:
1. Use the bucket on the basin.
2. Use the cauldron on the basin.
3. Use the soap on the cauldron.
4. Use the rag on the cauldron.
5. Use the cauldron on the fireplace.
6. Use the vegetables on the cauldron for a cooking minigame, which is of the Simon Says type. Check out the Simon Says section if you need hints.
7. Use the empty food bowl on the cauldron once you cook the stew.
8. Go to the pantry.
PANTRY:
1. Give the goblin the stew.
2. Pick up the candle from the table.
3. Go back to the kitchen.
KITCHEN:
1. Use the candle on the fireplace to light it and then go back to the Pantry.
PANTRY:
1. Use the candle on the darkness to enter the wine cellar.
WINE CELLAR:
Inventory Items: Oil Can, Tap, Torn Scrap x 8, Rope, Sledgehammer
1. At first you just have a circle of light. Go to the lower left and get the oil can.
2. Move your circle up and slightly to the right to find the lantern. Use the oil can on the lantern to light the scene.
3. Click on the blanket in the center of the screen to uncover a drunk goblin.
4. Pick up the tap in the lower right corner.
5. Use the tap on the cask.
6. Use the wine bottle on the tap.
7. Give the bottle of wine to the drunk goblin, who vanishes in sheer drunk joy, I guess, revealing a trapdoor.
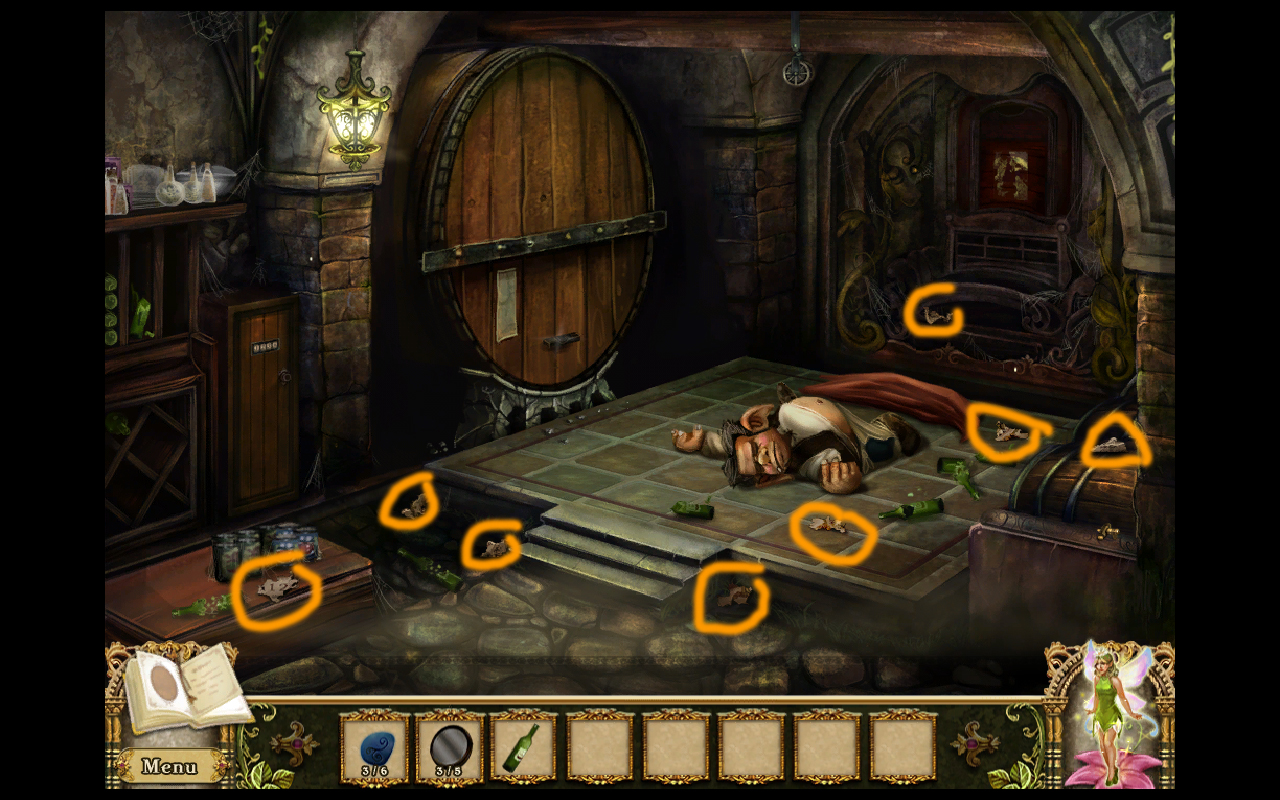
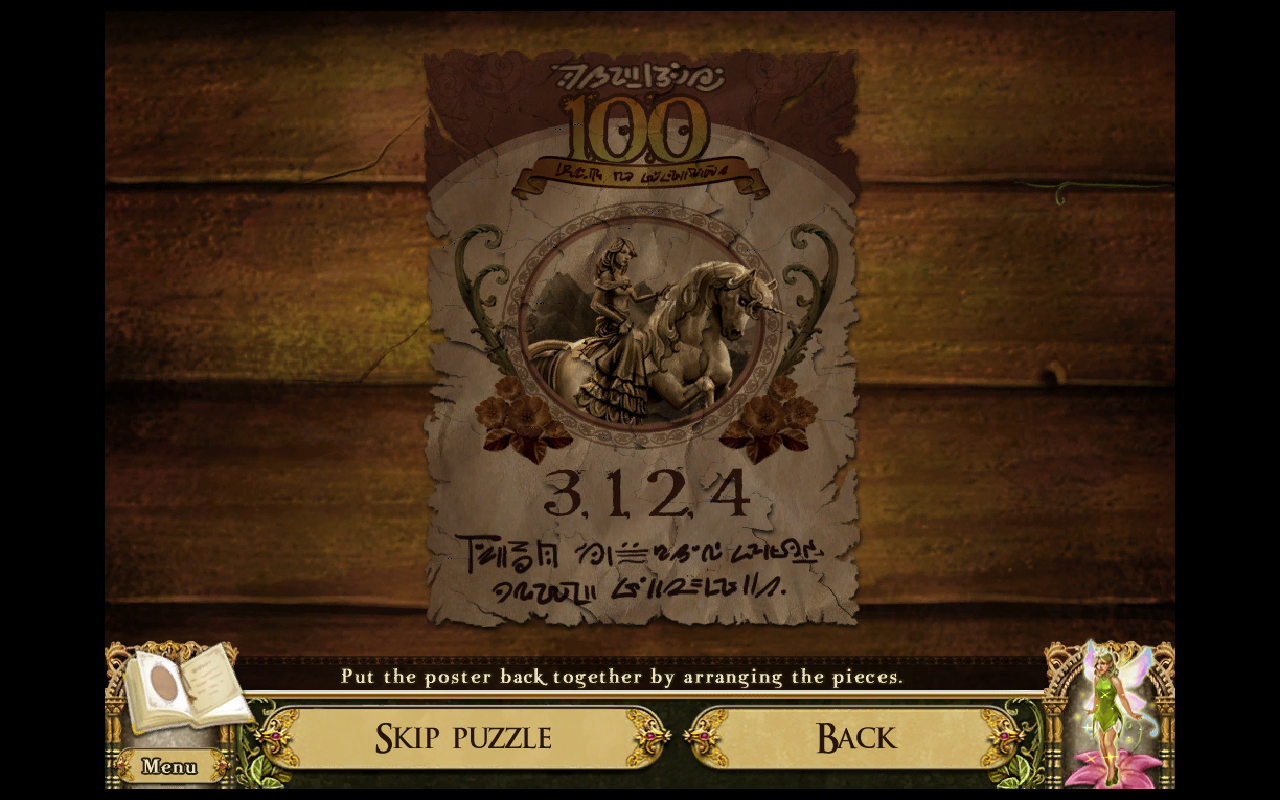
8. Pick up 8 scraps of paper. Screen capture.
9. Use the scraps of paper on the remnants of a poster on the back wall. This is an assembly puzzle. Screen capture.
10. The poster has a code on it: 3124.
11. Click on the locker on the left and enter the combination 3124.
12. Get a sledgehammer and a rope.
13. Use the rope on the pulley.
14. Use the sledgehammer on the cask.
15.The trapdoor opens to a secret passage.
SECRET PASSAGE:
Inventory Items: Bolgin coin x10,
1. Talk to the goblin.
2. Pick up ten Bolgin coins. Screen Capture
3. Use the coins on the goblin to start the most irritating Simon Says puzzle in the game, IMHO. No shame in skipping this one; I did!
4. The door opens to the Gambling Den.
GAMBLING DEN:
Inventory Items: Chest Key, Fake Bolgins, Glass Disc, Broom, Mace, Iron Key
1. Talk to the standing goblin.
2. Click on the tapestry to do an unscramble image puzzle. Screen capture. You get a chest key.
3. Use the chest key on the chest to open a matching game. You get Fake Bolgins.
4. Give the fake Bolgins to the standing goblin.
5. Talk to the sitting goblin and play Goblinjong. The scrap of paper he leaves is the clue to the rune location.
6. Click on the panel above the tapestry. Take the glass disc and turn on the switch.
7. Pick up the broom in the lower right.
8. Pick up the mace leaning against the back left wall.
9. Click on the right side of the carpet.
10. Use the broom on the dust.
11. Pick up the iron key.
12. Click on the statue on the right.
13. Color the face according to the gambler's clue: pink eyes, yellow nose, green lips, and orange cheeks.
14. This unlocks the entrance to the Library.
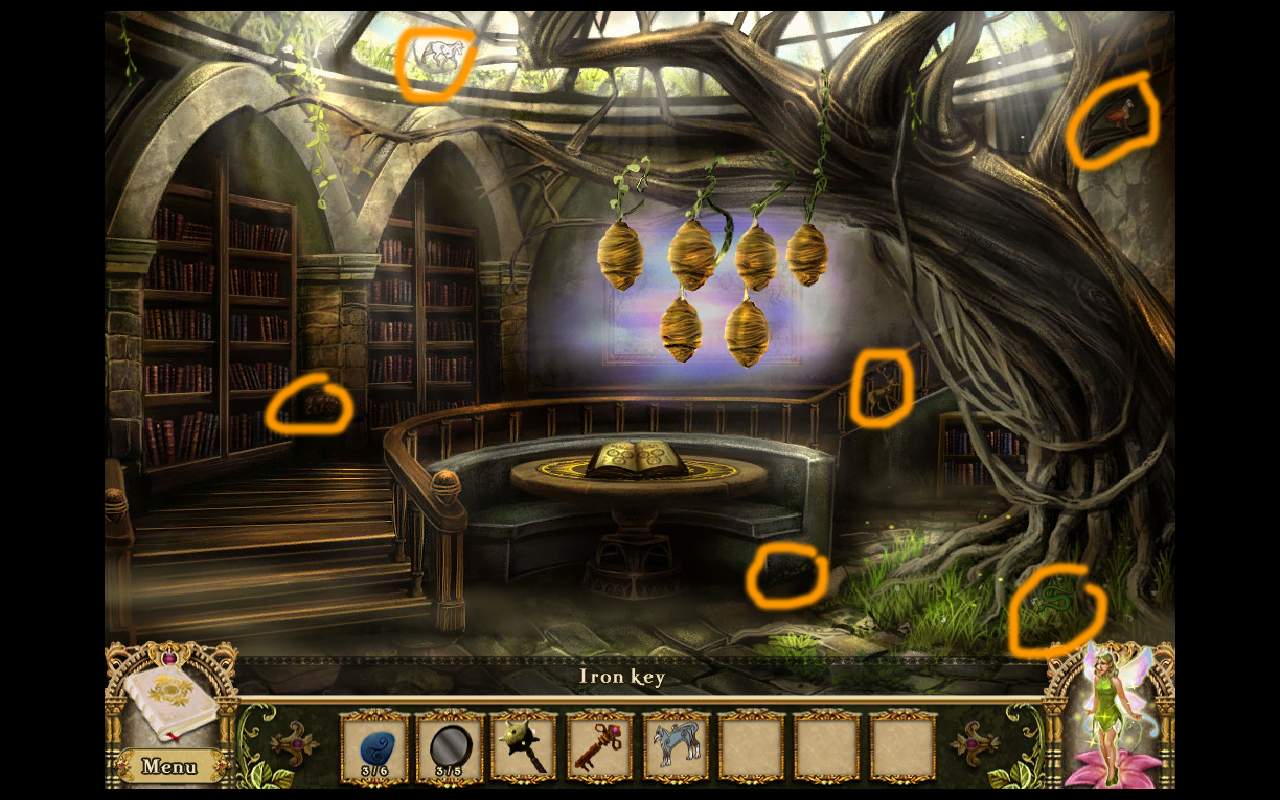
LIBRARY:
Inventory Items: Dusty Book, Animal Symbol x6, Metal Cross
1. Pick up the book that is sticking out of the bookshelf.
2. Use the book on the table to read it.
3. Pick up six animal symbols. Screen capture.
4. Use the animal symbols in the correct slots on the book.
5. Click on the book again, and some animals are lit while others are dark.
6. Click on the cocoons and touch the ones in the same position as the lit animal symbols: from left to right, lit, lit, unlit, lit, unlit, lit.
7. Click on the map for a hidden object mini-game. You get a cross.
8. Click the button to the right of the dumbwaiter to send the magic rune to the Hall.
9. Go back to the hall.
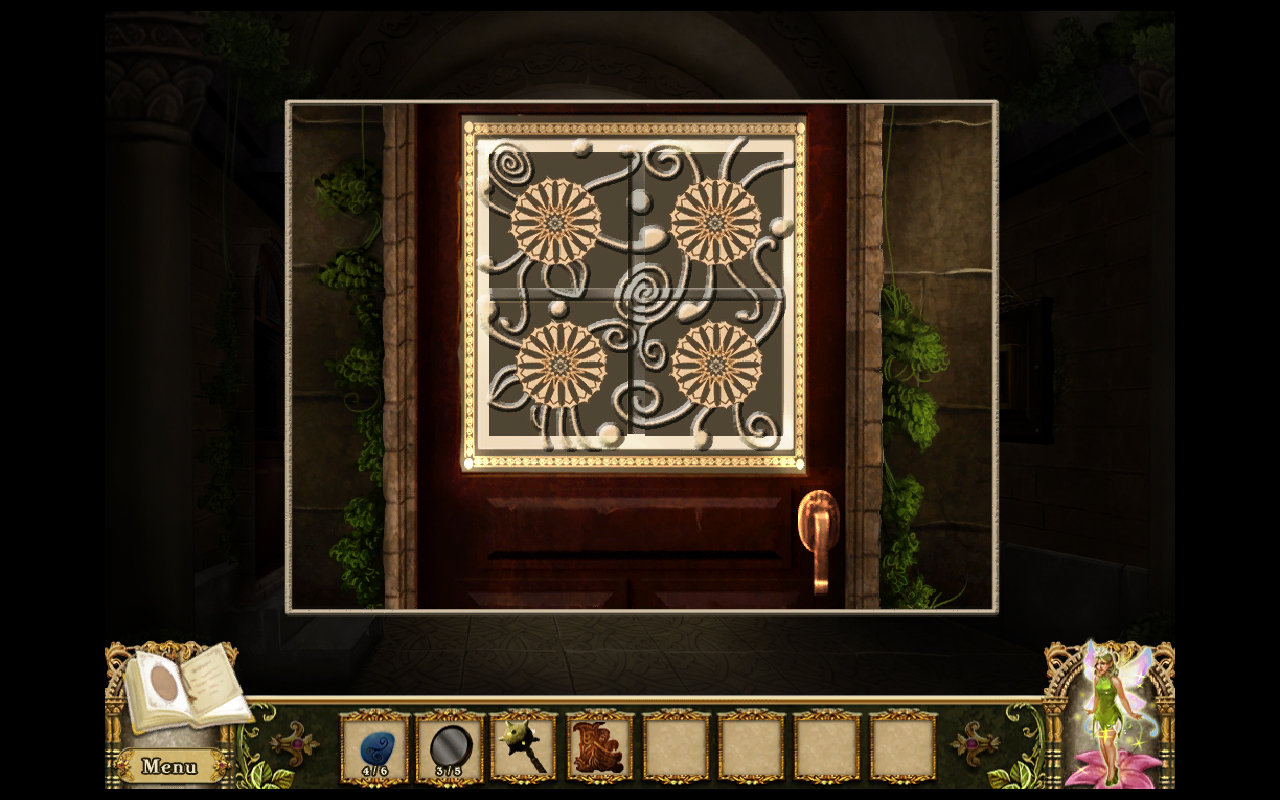
HALL:
1. Use the iron key to unlock the dumbwaiter on the right.
2. Take the magic rune and fairy carving.
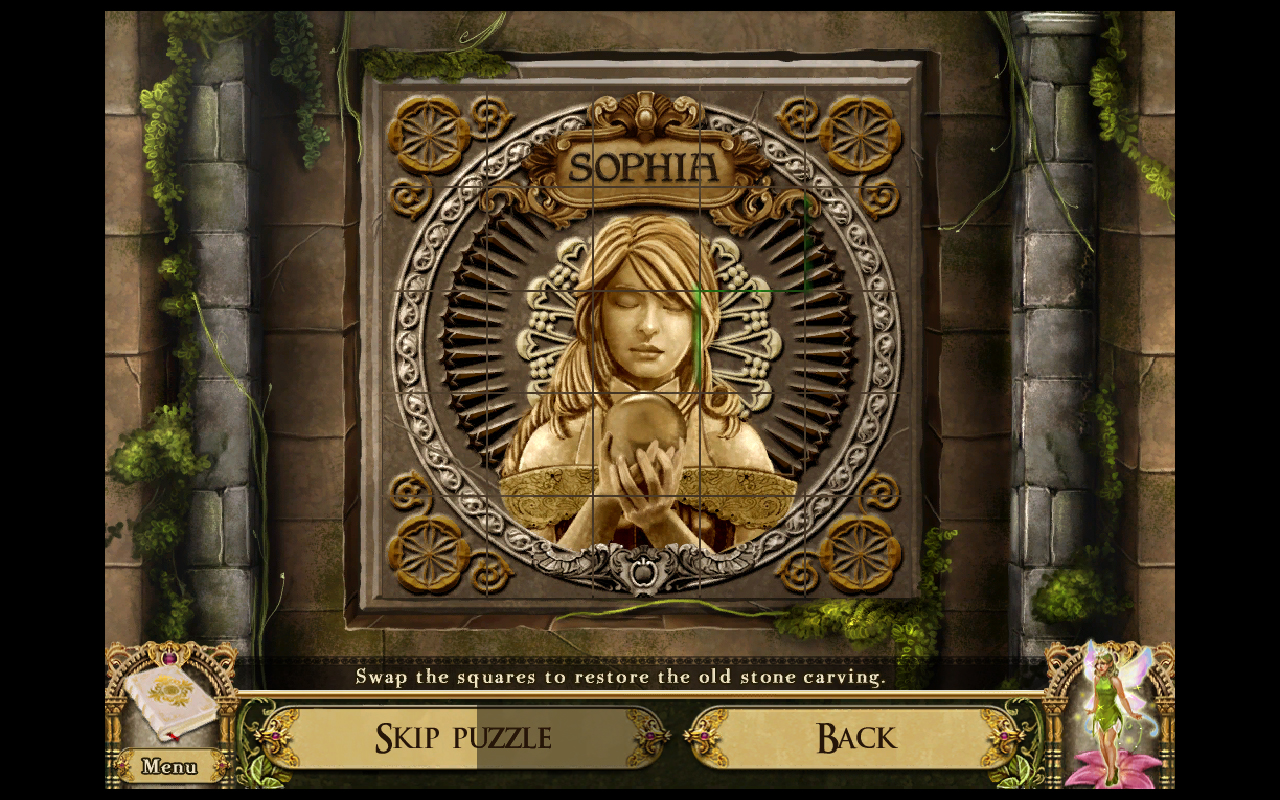
3. Use the cross on the door on the left. Rotate the squares to form a pattern. Screen capture.
4. Go through the door into the Parlor.
PARLOR:
Inventory Items: Axe, Prism
1. Click on the box of gems to enter an unusual kind of puzzle. You have to eliminate all the marbles, and you can only eliminate marbles in groups of two or more of the same color. There is usually more than one solution.
2. For the first puzzle, click on the colors in this order: red, gray, blue, brown, green
3. For the second puzzle, this is the order: the straight row of purple, all the other purples, the gray, the bottom blue, the remaining blue, and the black.
4. For the third puzzle, blue, gray, green, red, purple.
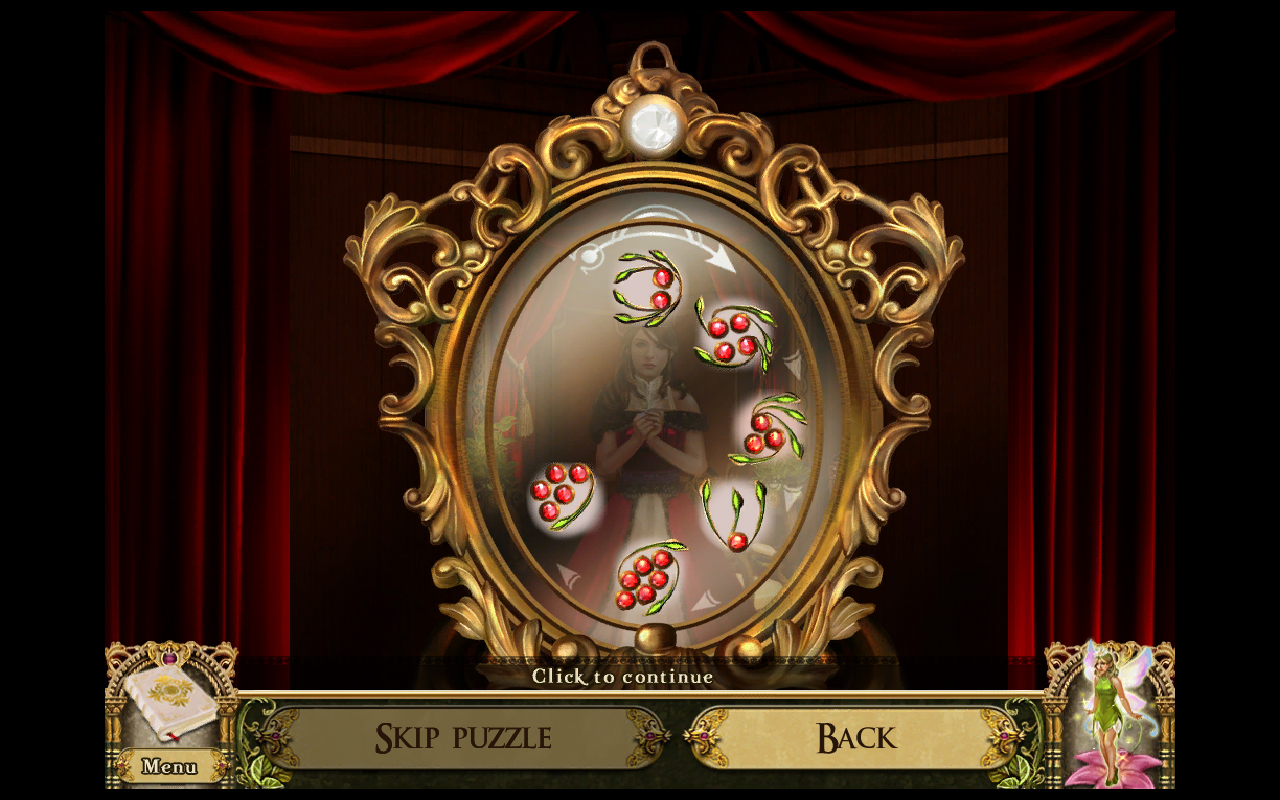
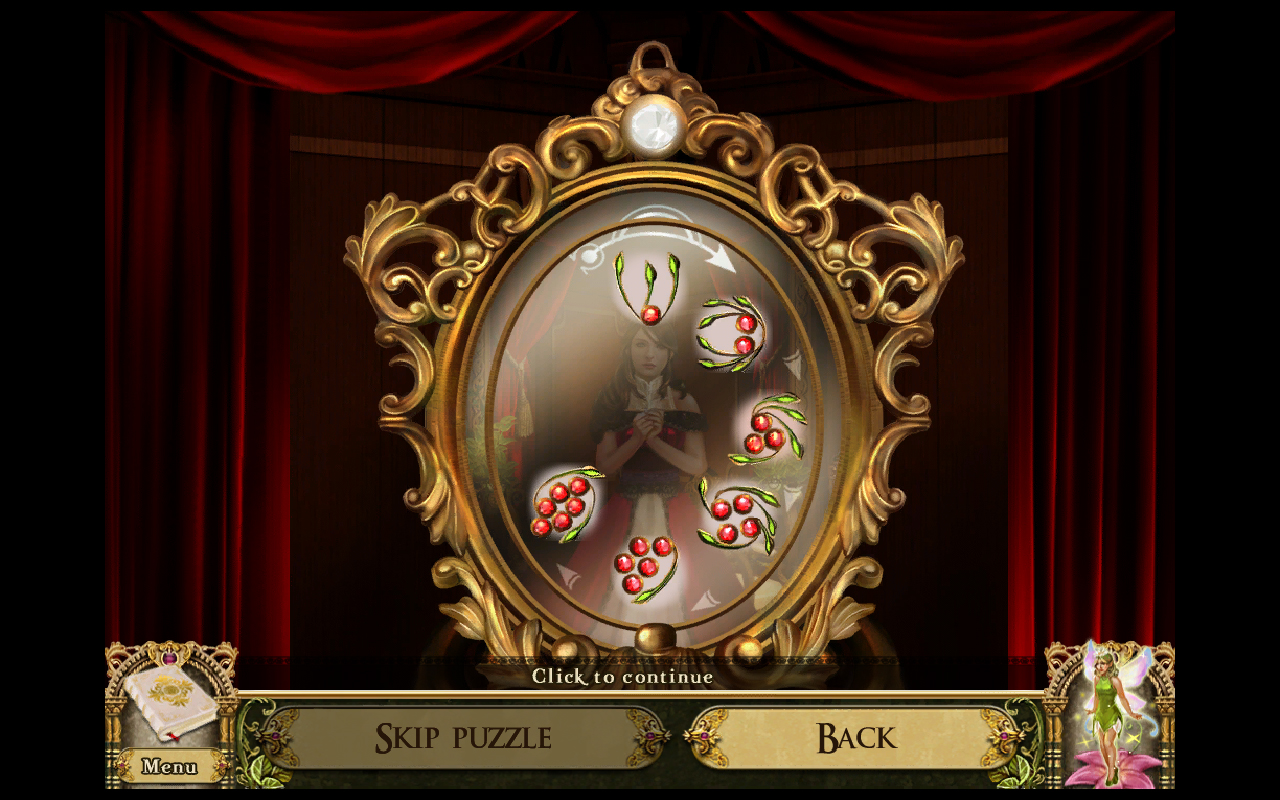
5. You win a clue for your journal.
6. Click on the harp for a Simon Says game. The curtain opens.
7. Use the clue from the marble puzzle to solve this one. Place the berries in order from most stems to least stems. Screen capture.
8. Get the axe from under the mirror.
9. Go through the mirror.
MIRRORED PARLOR:
Inventory Items: Sword, Harp String x 6, Crystal, Glass Disc,
1. Pick up the sword just to the left of center.
2. Pick up six harp strings. Screen capture.
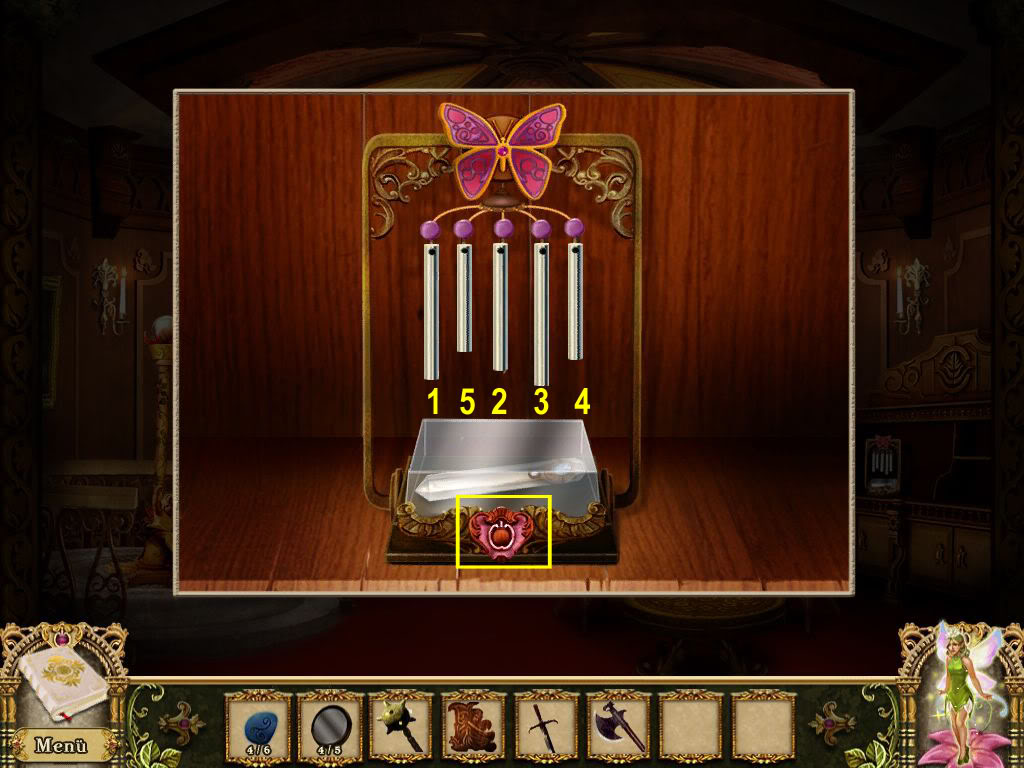
3. Use the strings on the harp for another Simon Says game. You win a Crystal.
4. Click on the bells on the left. Click on each bell until all the bells display a number, which is ringing instructions: 13452
5. Click on the panel to the right of the cabinet with the bells to get a glass disc and turn on the switch.
6. Click on the box of gems for another marble elimination game.
7. Click the center browns, the reds on top, all the purples, the bottom blues, the browns, the blues, and the reds.
8. Second puzzle: Go top to bottom, browns, grays, reds, greens, purples.
9. Third: Purples top to bottom, bottom blues, bottom grays, bottom blacks, grays top to bottom, upper right blacks, upper left blacks, all blues, blacks.
10. You get another clue.
11. Click on the mirror and use the crystal at the top.
12. Use the clue from the marble puzzle to solve it: arrange the berries from least berries to most berries. Screen Capture.
13. Go back to the Parlor through the mirror.
PARLOR:
1. Click on the chimes and ring them according to the bell clue: 13452. Press the red button at the bottom and receive a prism.
2. Go back to the hallway.
HALL:
1. Click on the portcullis.
2. Use the glass discs on the portcullis.
3. Use the fairy carving on the portcullis.
4. Go through the entrance.
ENTRANCE HALL:
Inventory Items: Gold chain, Bow, Beetle
1. Pick up the gold chain from the horse.
2. Pick up the bow from the woman.
3. Click on the inscription at the bottom of the horse for a clue.
4. Go left.
GREAT HALL (LEFT):
Inventory Items: Spear, Handle
1. Take the spear.
2. Go back to the Entrance Hall and then go right.
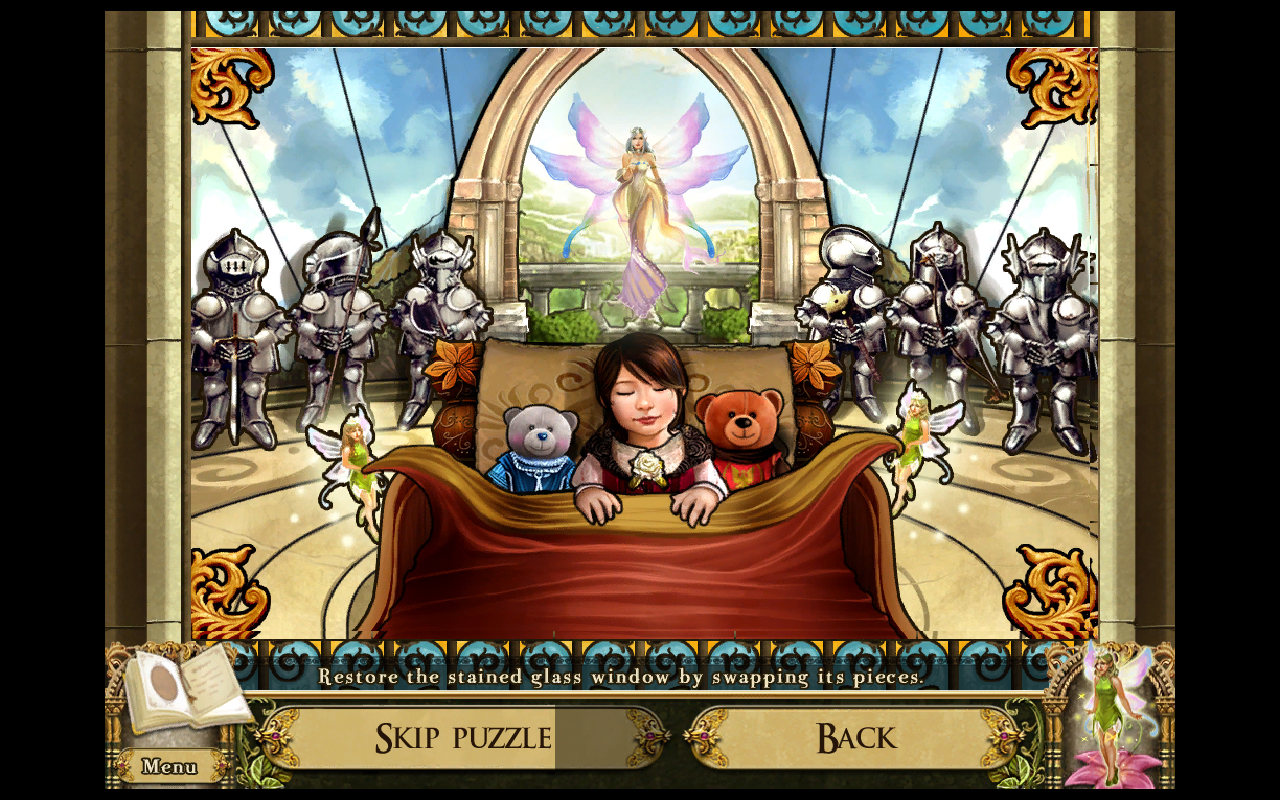
GREAT HALL (RIGHT):
Inventory Items: Dagger, Prism x2
1. Click on the stained glass window to do a swapping puzzle. Screen capture.
2. Look at the heads of the goblins. (It's going into your journal too.)
3. Pick up a dagger from the table.
4. Click on the suits of armor on the left.
5. Read the inscriptions to find who gets what weapon. Left to right, Sword, Spear, Axe.
6. Have their heads face front, left, front.
7. Look at the bricks that are pushed in.
8. Click on the suits of armor on the right.
9. Right-facing mace, forward-facing bow, forward-facing dagger.
10. Press in 3 bricks to match the other side. From top to bottom, the middle, the right most, and the middle. Then press the button at top. Take the prism.
11. Use the gold chain on the chest on the left wall to get another prism.
12. Go back to Great Hall (Left).
GREAT HALL (LEFT):
1. Use the prisms on the bottom on the mirror.
2. Arrange the prisms like the inscription: down, up, up.
3. Click the red button.
4. Go up the steps.
SECOND FLOOR:
Inventory Items: Birdfeeder, Gloves, Butterfly Net, Flying Key, Potion of True Sight, Scratched Coin
1. Take the birdfeeder from the upper left corner.
2. Take the gloves from the lower left.
3. Click on the painting on the floor. Complete the swap puzzle (Screen capture) and take the butterfly net.
4. Use the net on the flying things next to the top of the arch for another butterfly matching puzzle. You get a flying key.
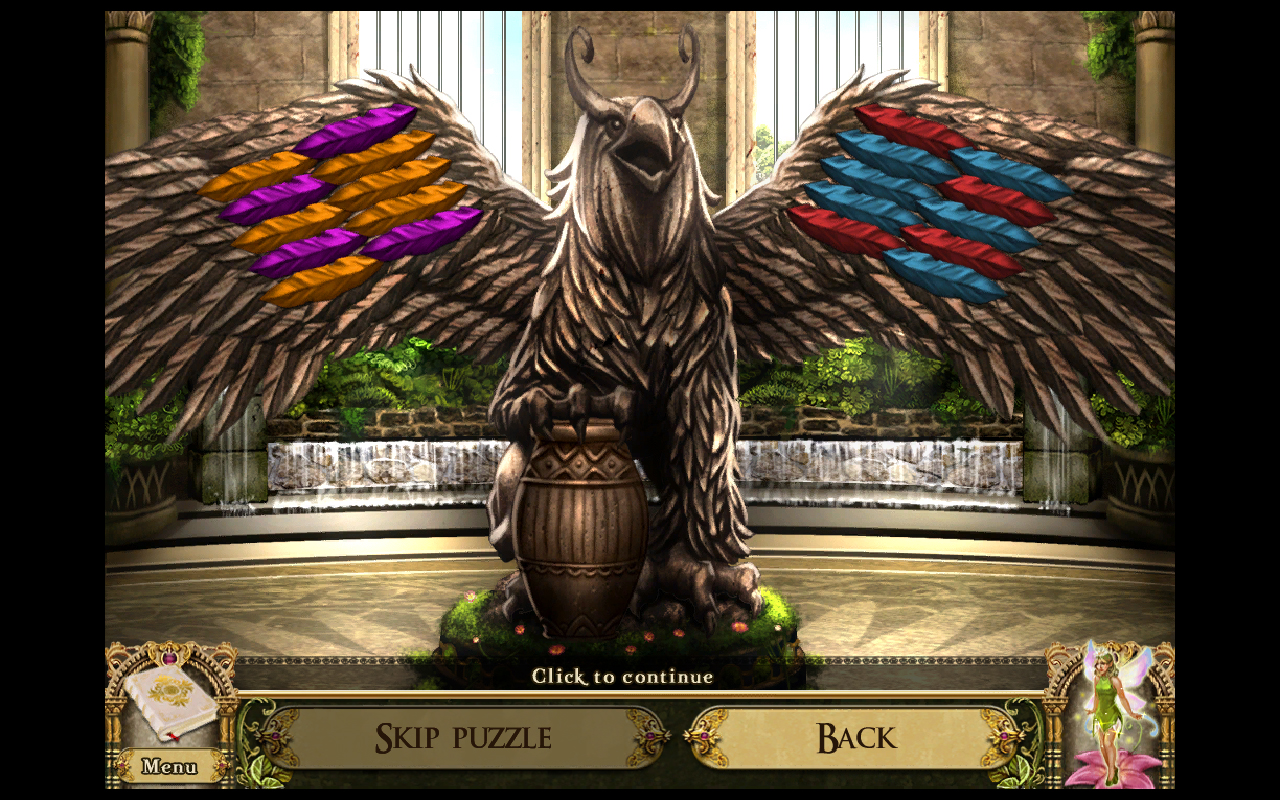
5. Click on the griffin statue. Swap the feathers on the right wing to match the left wing. Screen Capture. Get a Potion of True Sight and a scratched coin.
6. Use the flying key on the door to open the entrance to the Art Gallery. But first go back to the Great Hall (Left).
GREAT HALL (LEFT):
1. Use the gloves on the potted plant to get a handle. Now go up to the Art Gallery.
ART GALLERY:
Inventory Items: Handkerchief, Scratched Coin x2, Starry Disc,
1. Talk to the goblin for another elimination puzzle.
2. First puzzle: grays top to bottom, browns, reds, bottom black, greens, blues, blacks
3. Second puzzle: Greens from top to bottom, line of grays, blues, middle blacks, reds, grays, blacks.
4. Third puzzle: Grays, large group of browns, greens, blues, reds, rest of browns
5. You win a clue for the drawers. Click on the drawers.
6. The drawer handles can be up or down, and the color can be blue, black, or brown. Screen capture.
First Row: Black Down - Blue Down - Black Down - Blue Down - Black Down
Second Row: All Brown Up
Third Row: Black Down - Blue Up - Black Down - Blue Up - Black Down
Fourth Row: Brown Down - Brown Down - Brown Down - Brown Down - Brown Down
7. You get a handkerchief (what, she couldn't have hung on to the old one?).
8. Click on the tapesty in the back for a hidden object scene. You get another scratched coin.
9. Click on the paintings on the right wall. This is an unscramble puzzle with a twist: the pieces can be swapped between pictures. Screen capture. You get a Starry Disc.
10. Pick up the basket on the statue's head.
11. Use the handkerchief on the urn in front of the statue.
12. Use the handle on the urn.
13. Take another scratched coin.
14. Go back to Great Hall (Left).
GREAT HALL (LEFT):
1. Use the Starry Disc on the door and go through it.
NORTH TOWER LOBBY:
Inventory Items: Dragon Egg, Breadcrumbs, Beetle, Magic Rune
1. Talk to the goblin and play Goblinjong. He gives you a dragon egg.
2. Click on his lunchbox and take the breadcrumbs.
3. click on the bowl that the dragon statue is holding for another matching game. You get a beetle.
4. Put the dragon egg in the bowl.
5. Go back to the Carriage House.
CARRIAGE HOUSE:
1. Use the basket on the mushrroms in the lower left, and play a Simon Says game to win some mushrooms.
2. Go back to the Entrance Hall.
ENTRANCE HALL:
1. Click on the left window.
2. Use the birdfeeder on the hook.
3. Put the breadcrumbs in the birdfeeder.
4. Click again to see a pigeon. Take another beetle from its mouth.
5. Go back to the North Tower Lobby.
NORTH TOWER LOBBY:
1. Click on the egg.
2. Use the mushrooms on the dragon.
3. Get the magic rune.
4. Talk to the goblin again, and go through the portal.
OBSERVATORY:
Inventory Items: Book of Truth, Star x10, Magic Rune
1. It's dark, so first you have to use the beetles on the crystal ball. Why this causes light, I don't know.
2. Talk to the goblin.
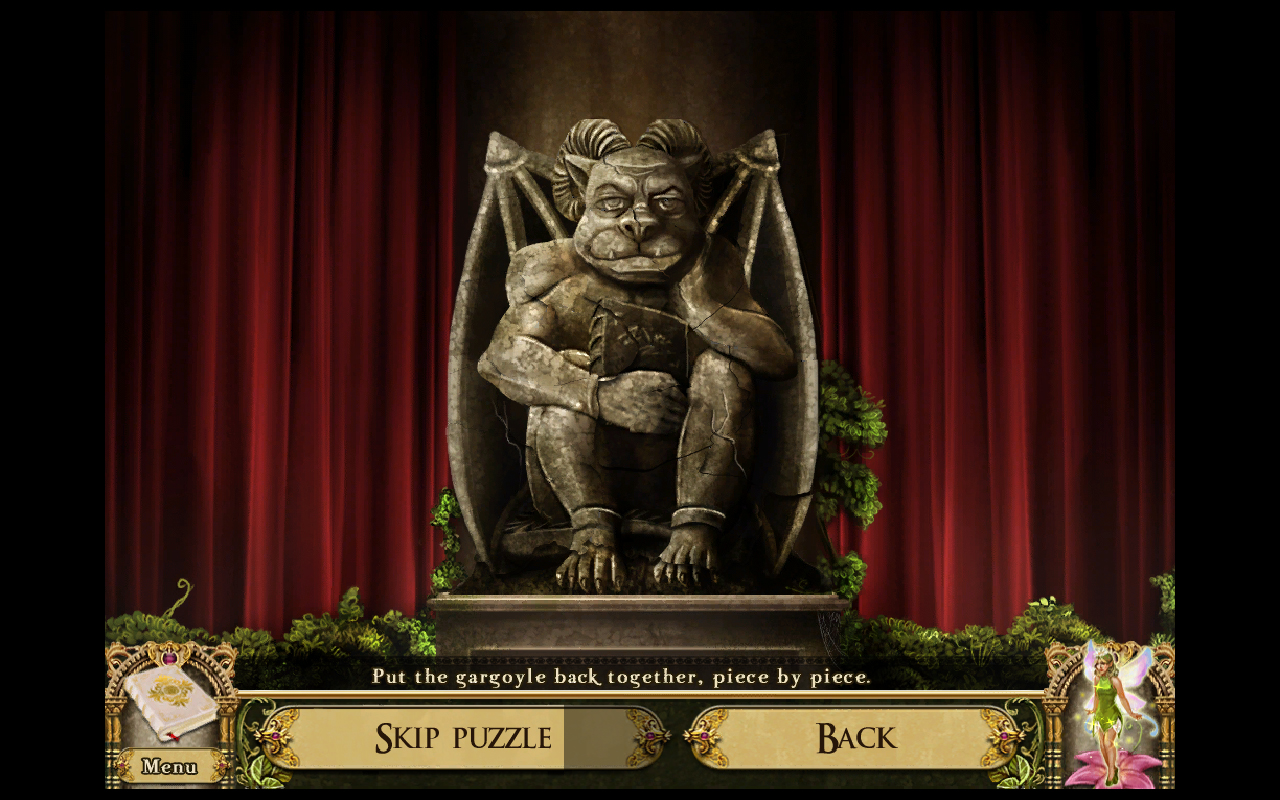
3. Click on the broken gargoyle for an assembly puzzle. Screen capture.
4. Use the scratched coins on the gargoyle's mouth.
5. Take the Book of Truth.
6. Use the Book of Truth on the stand.
7. Use the potion of true sight on the book.
8. Click on the crystal ball.
9. Pick up ten stars. Screen capture.
10. Use the stars on the ball.
11. Click on the panel under the telescope and place the sun, moon and star tiles according to the clue in your journal. If the thing were a clock, place the star at 10, the moon at 8, and the sun at 7.
12. You can click on the telescope now and see a constellation.
13. Click on the nebula cosmos cloud thing hovering about the ball, and light up the stars to match the constellation.
14. Get the last magic rune.
15. Go back to the Great Hall (Left).
GRAND HALL (LEFT):
1. Use the magic runes on the mirror.
2. Take the crown.
3. Go to the Entrance Hall.
ENTRANCE HALL:
1. Put the crown on the head of the statue.
2. A winner is you!
Posted by: joye |
February 20, 2010 1:29 AM
|
February 20, 2010 1:29 AM