


Alabama Smith in the
Quest of Fate
Platform: Windows

![]() It had to be tough growing up with a name like Alabama Smith. I'm sure the mullet jokes practically wrote themselves. But somehow the kid named after the 22nd U.S. state made it, growing up to become a successful archaeologist. Now, following Alabama Smith in Escape from Pompeii, the time-traveling ruins scavenger has returned in Alabama Smith in the Quest of Fate. And this time he has to stop a mysterious nemesis searching for magical relics in Peru!
It had to be tough growing up with a name like Alabama Smith. I'm sure the mullet jokes practically wrote themselves. But somehow the kid named after the 22nd U.S. state made it, growing up to become a successful archaeologist. Now, following Alabama Smith in Escape from Pompeii, the time-traveling ruins scavenger has returned in Alabama Smith in the Quest of Fate. And this time he has to stop a mysterious nemesis searching for magical relics in Peru!
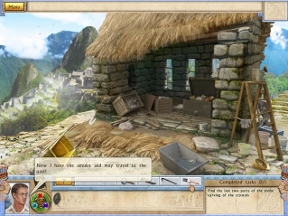 Alabama Smith is built on an adventure game skeleton, making its central focus exploration, inventory management, and puzzle solving. Most of the tasks you'll complete involve finding lists of hidden objects, making it a fine example of a hybrid casual game. Tasks appear at the bottom right corner of the screen, listing items you need to find, places you need to visit, and other jobs you need to get done. To the left of that you'll find your inventory, and the bar at the top of the screen shows you what items can be found in your current location.
The first few minutes of the game illustrate well what the rest of the game has to offer. Alabama receives an e-mail asking him to gather the relics he's been studying and travel to Macchu Picchu. Can you guess what your first job is? Find all 12 Incan statues! It isn't as easy as studying pixels and clicking in the right place, though. To grab all of the items, you'll need to unlock doors, pry open boxes, reach high ledges, solve mini-games, use items from your inventory, and dig around several rooms to find everything you need.
A forgiving hint system makes the sometimes obtuse puzzles more bearable. Clicking the "?" icon shows you where an item is located, and if it's in another room, it leads you out at no cost. Hints recharge after just a few seconds, so if you feel stuck, don't hesitate to give it a click.
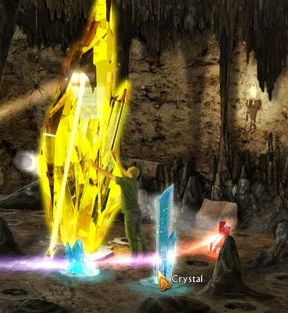 Analysis: Alabama Smith in the Quest of Fate takes a refreshing turn away from hidden object territory with its strong adventure slant. Inventory puzzles are where the challenge rests, and you aren't punished for mis-clicks or for using the hint button. This is not a game about getting a high score because you saw the camouflage snake hidden in the background faster than everybody else. This is a casual adventure game with real puzzles to solve.
Visually polished and a smooth experience to play, I couldn't help but notice the same faults present in the original game were repeated in the sequel. Puzzle construction often lands a bit on the "what?" side of things, making the hint system almost necessary to complete some tasks. It's nice to have your objectives spelled out at the bottom of the screen, but when the steps to completing those objectives don't make sense, you might as well abandon the list and let us try on our own.
Regardless of a few puzzle-related fumbles (and the fact that Peru isn't as epic a setting as Pompeii), Alabama Smith in the Quest of Fate manages to pick up the ball and score. Even though it's more adventure than it is hidden object, fans of both genres will find something to love in this well-made game.
![]() Windows:
Windows:
Download the demo
Get the full version
![]() Mac OS X:
Mac OS X:
Not available.
Try Boot Camp or Parallels or CrossOver Games.
Alabama Smith in the Quest of Fate is available to download from these affiliates:


Walkthrough Guide
(Please allow page to fully load for spoiler tags to be functional.)
Alabama Smith in the Quest of Fate-Walkthrough
After starting the game you will have the option to change difficulty.
You start with casual mode: Objects you need are listed on top of the screen, mini-games can be skipped, the hint renews very quickly, you will get less points.
Expert mode: You will have to combine objects found in the levels to solve puzzle, the hint needs longer to recharge, mini-games can't be skipped, you will get more points.
This walkthrough was made in EXPERT MODE.
General Tips
There is no time limit.
Choose replay in the main menu to replay each chapter.
Some mini-games can be restarted by choosing "close". Opening them again, will give you the start position again.
For some mini-games, this does not work. To restart with the original position, close the game to the main menu and start playing again.
The diary will give you clues, how to solve puzzles - at least, when you found this hints before.
During a mini-game, you can always open it and have a look.
Move by clicking with the mouse left or right side, top or bottom of the scene.
A little walking figure will show where you can change between the scenes.
To change between past and present, hover your mouse over the amulet and choose the place to go to.
Sparkling areas show your hog-scenes.
Hovering over an object's name with the mouse will show it's silhouette at the right side.
Behind the last object in each search scene you will find an inventory object.
Some of the normal objects to find are random.
A magnifier at your cursor asks you to take a closer look.
Click closets, trunks and things like this, some of them open and reveal needed objects.
A green mouse cursor indicates, that you will want to use an inventory object.
You have two different inventories: Objects at the bottom of the inventory you will have to use in the actual chapter. Object at the top of the inventory are for more often use and you will take them with you from one chapter to the next.
You will be able to win some trophies - which one and what you need to do to get them you can see by clicking "Trophies" in the main menu.
Use the journal often - it will give you useful hints
Chapter 1: The adventure begins
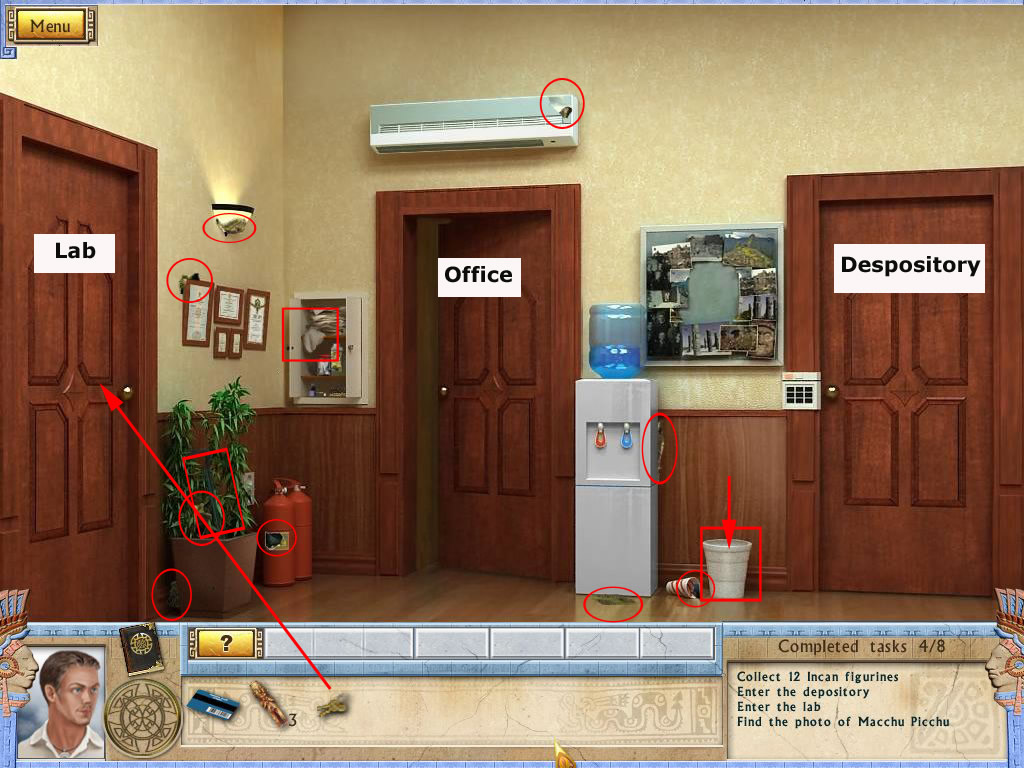
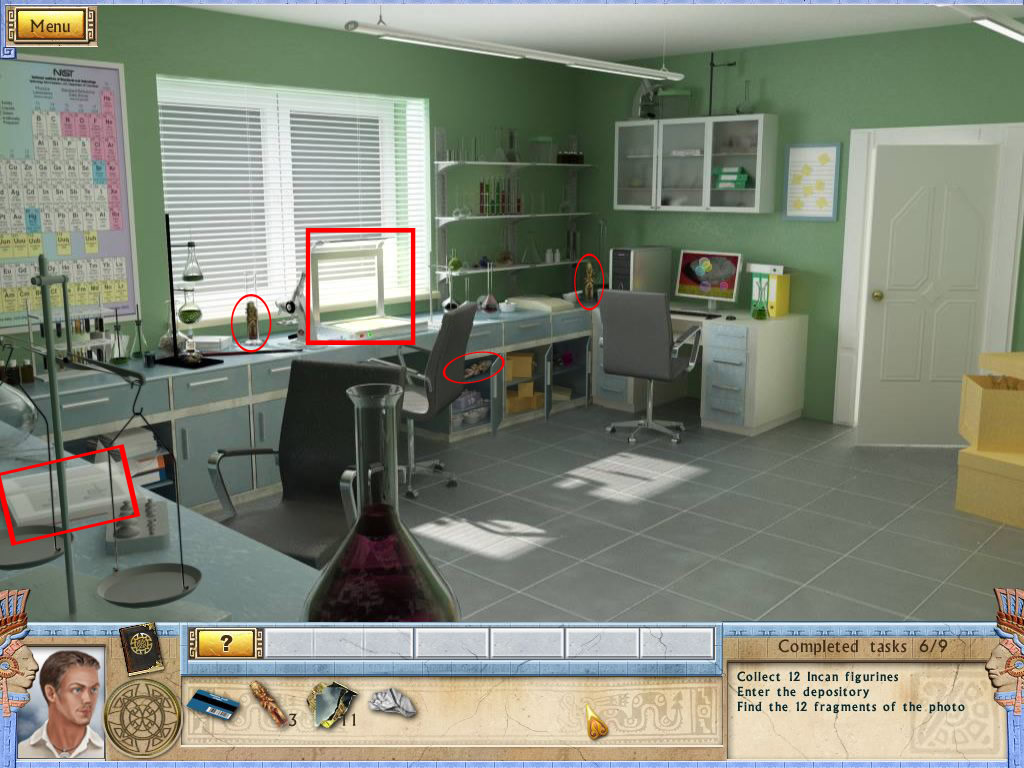
Office
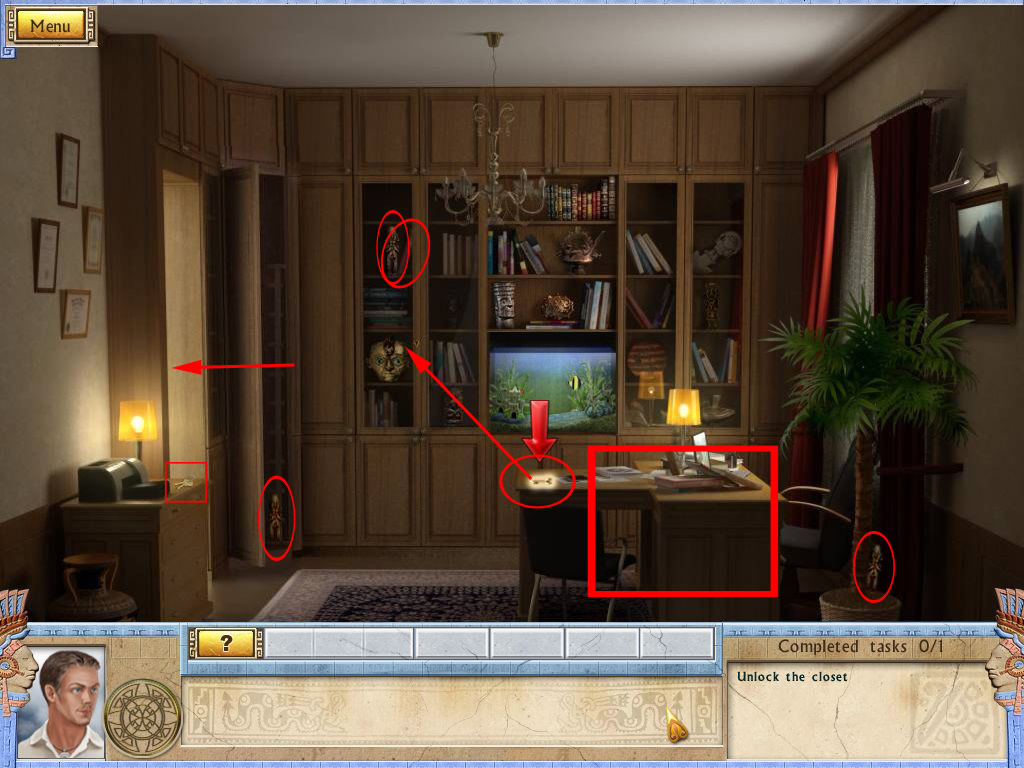
Follow the tutorial and get the key, shown by a red arrow.
Open the left glass door of the closet and get out the photo album.
Leave the album with a click right side of the screen.
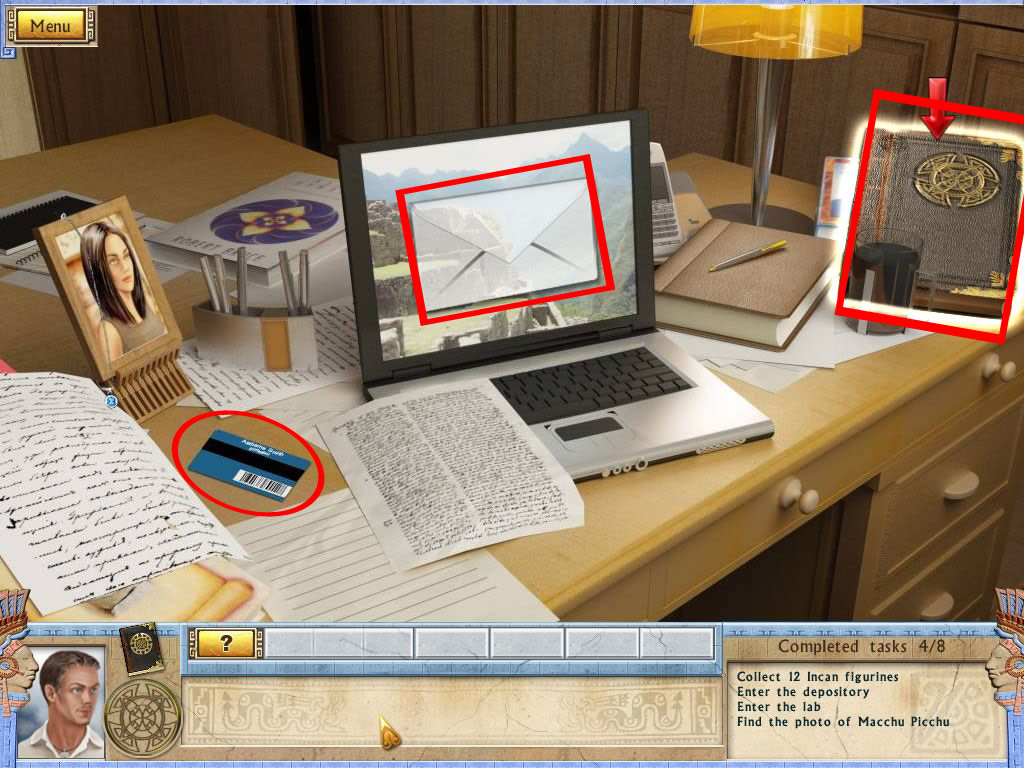
Click the desk and then the laptop - read the Email.
Leave the mail with the "close"-button.
Get the journal right side.
Click the papers on the desk and reveal the key card underneath.
Screenshot
Leave the nearby view by clicking at the right upper corner.
Get the keys from the closet left side.
Open the closet door two right next to the glass door, you opened before.
Recognize the ladder and get out the figurine.
Another figurine you will find, where the photo album has been.
The third one you can pick up from the planter, low right side.
Screenshot
Leave the office.
Hall
Open the hanging closet next to the office door.
Get out a rag and and a part of the photo.
Find the remaining pieces of the photo - two you will find inside the trash can, on the floor between water cooler and depository.
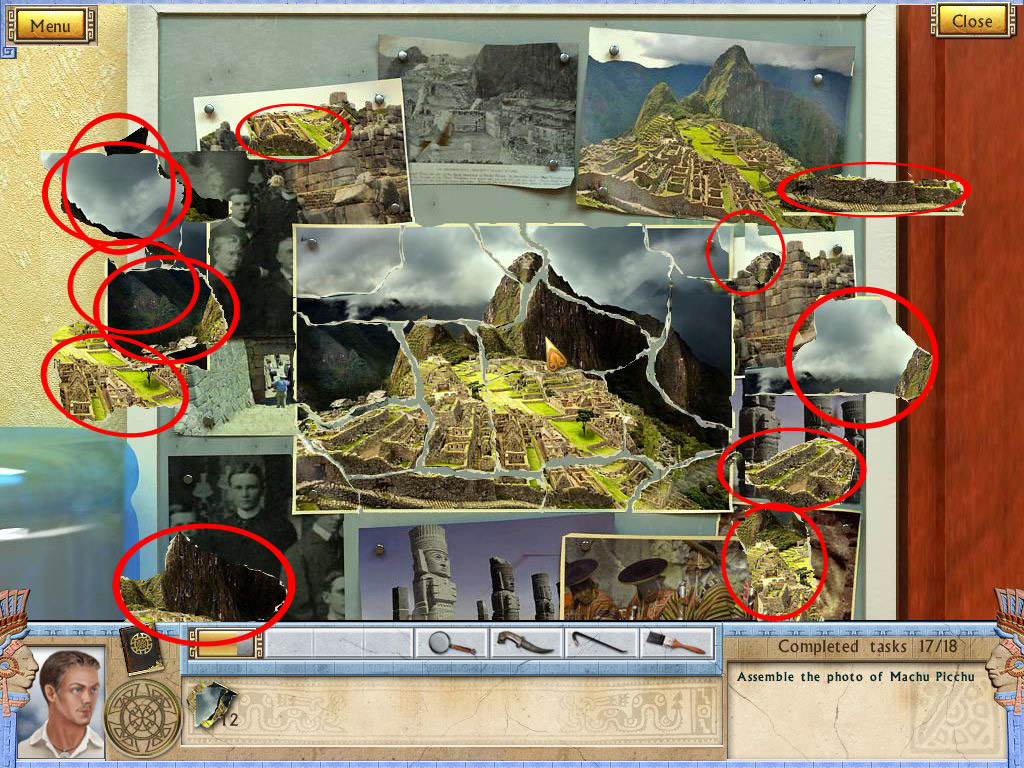
Screenshot
Click all parts of the photos at the pin board.
Reassemble the picture by clicking the parts at the correct places.
Right placed scraps will be locked.
Screenshot
Use the key card to enter the depository.
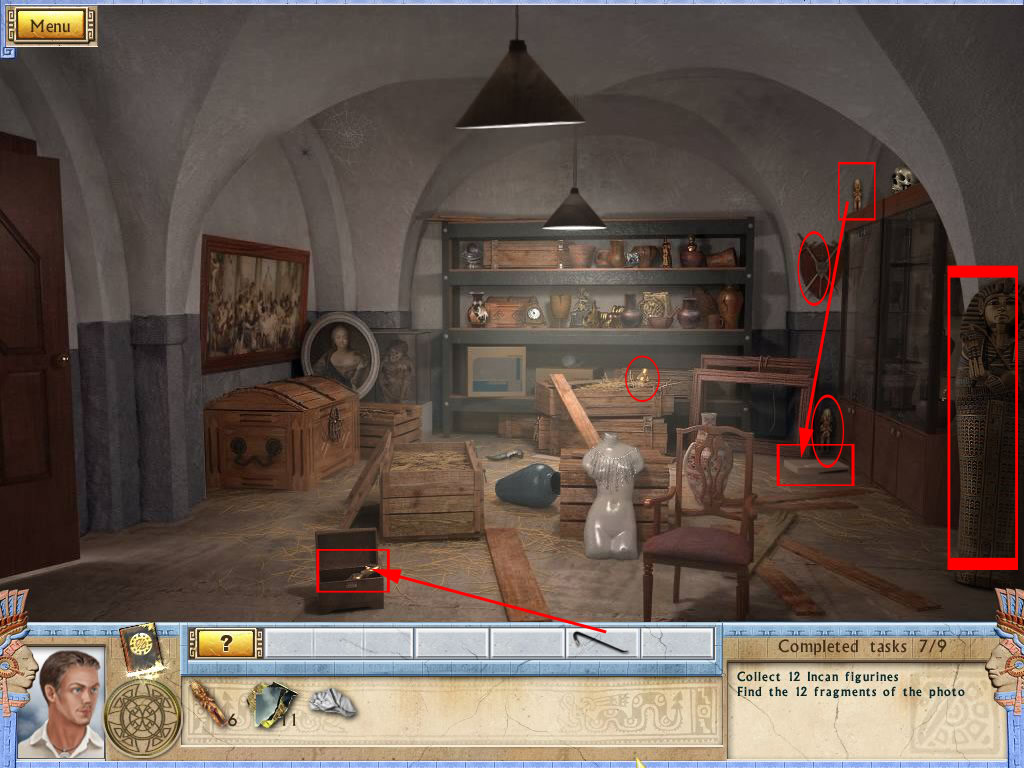
Depository
Find the 2 Incan figurines, one in the crate far middle and one on the floor far right.
Two others you can't reach: When you click the little casket on the floor it slams shut and the figurine on top of the closet far right is too high to reach.
Click the sarcophagus and recognize, that a gem is missing.
Screenshot
Hall/Office/Depository
Get the crowbar from the plant and enter the office.
Get the ladder out of the closet and click the desk.
Get the blue gem from the necklace at Anastasia's picture.
Return to the depository.
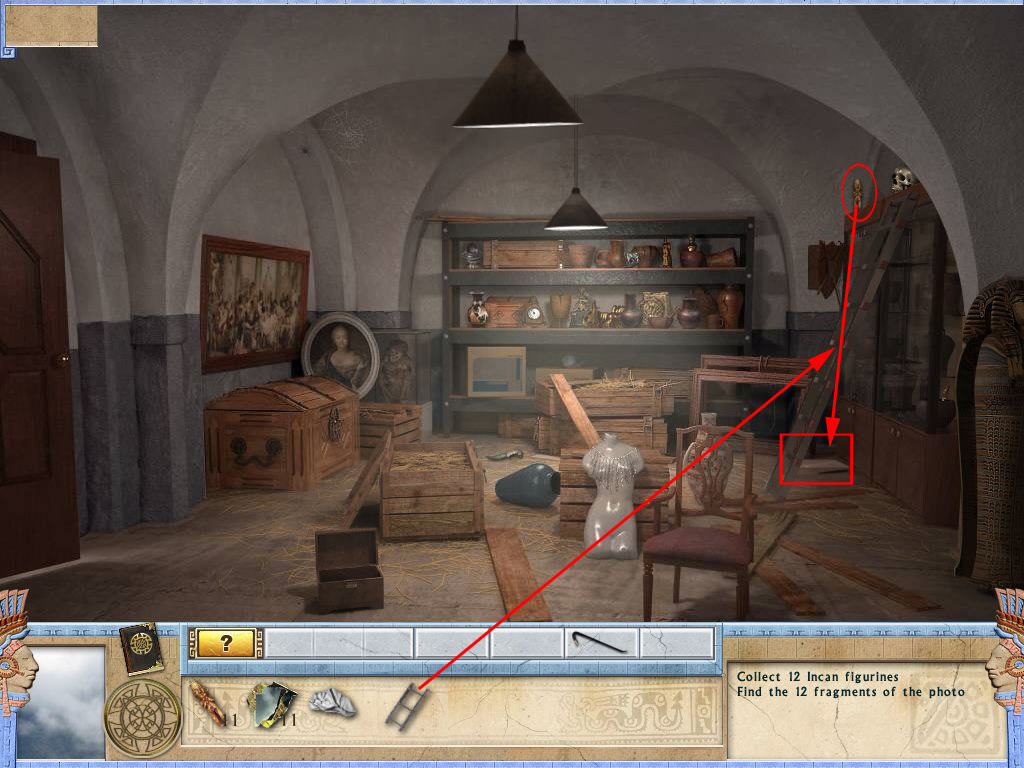
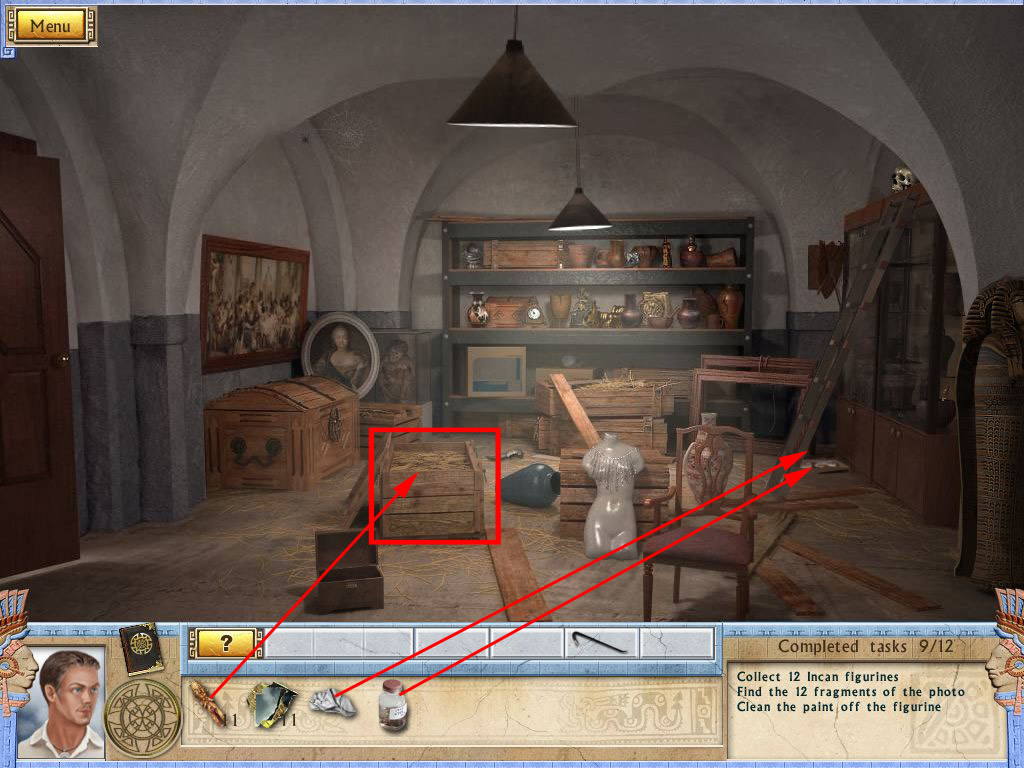
Depository
Use the crowbar with the little casket and get out the figurine.
Place the ladder at the shelf far right and grab the figurine.
It will fall down.
Click it on the floor and learn, that it fall into paint, you will have to clean it.
Screenshot
Exit and use the keys to enter the lab.
Lab
Click the devise on the counters left side.
Click the scarab to get the informations copied into the journal.
On the left side, you will find a book, click it also for a copy of the informations.
Get the 3 Incan figurines - one is behind the door of the closet right next to the chair.
Screenshot
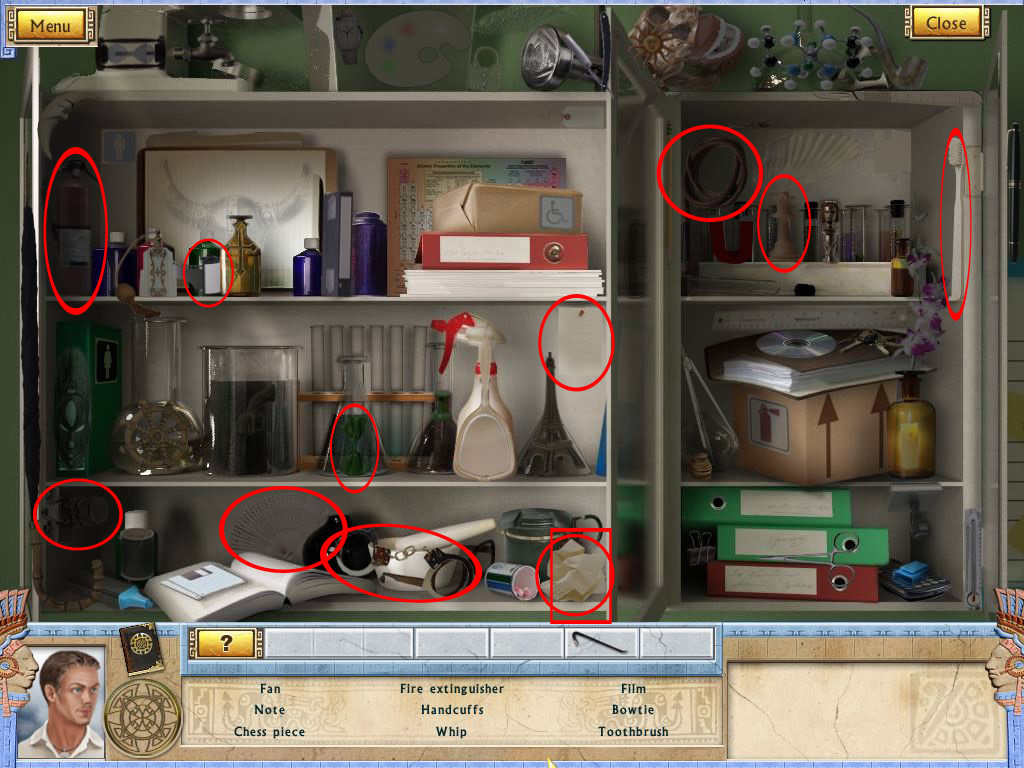
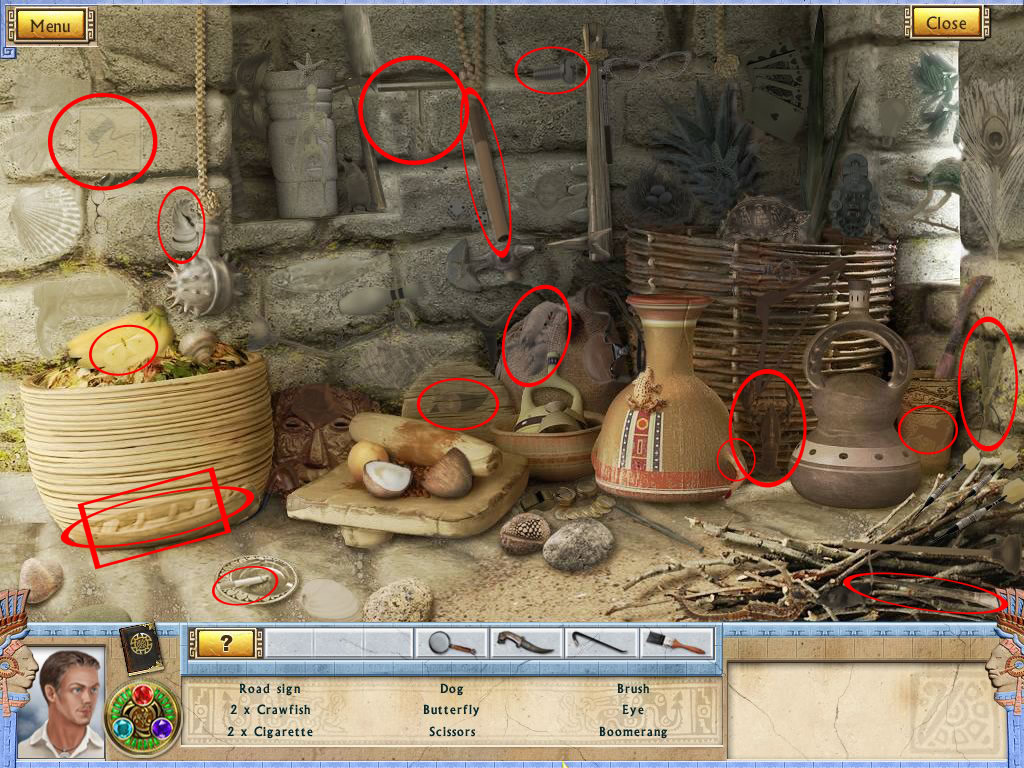
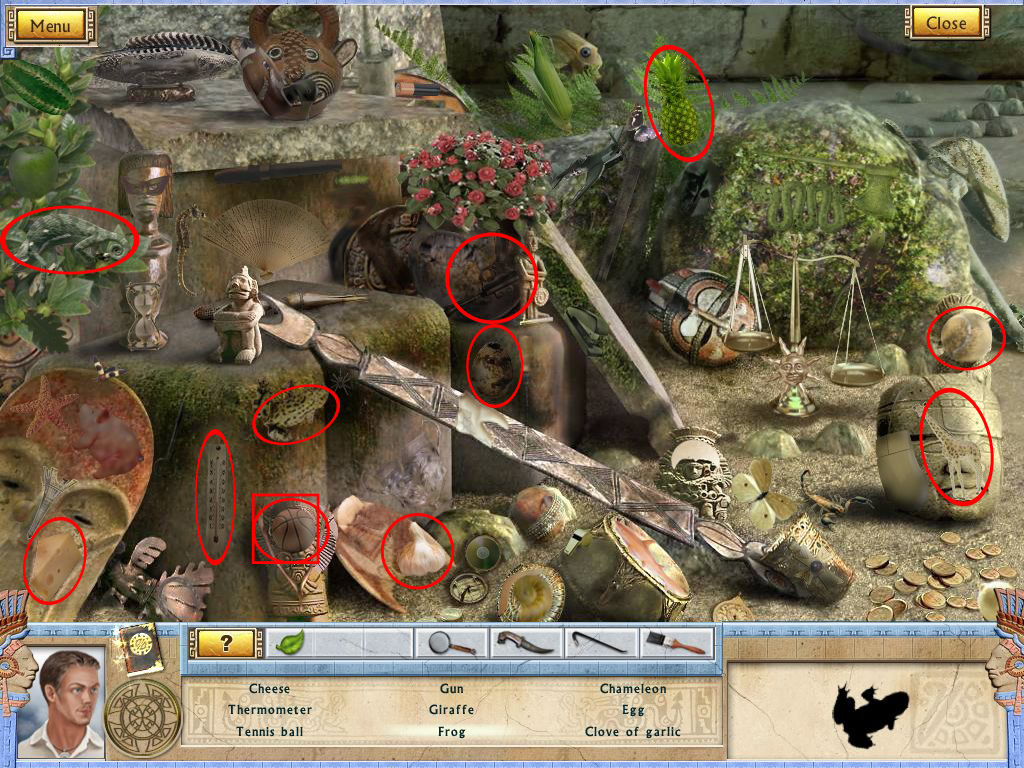
Click the hanging closet next to the door - a hidden object scene will open.
Find all the items from your list.
After finding the last, you will be asked to find crumpled paper.
Get it low right corner of the right closet part.
Behind this you will find the solvent.
Screenshot
Leave the lab and go back to the depository.
Depository
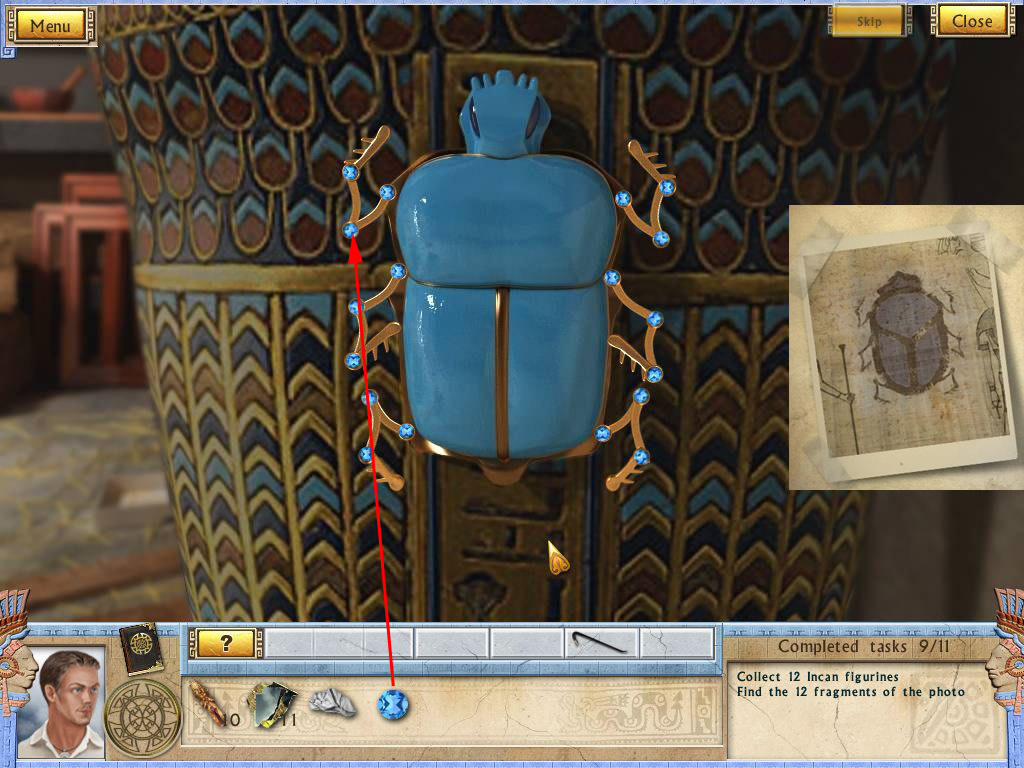
Click the sarcophagus and place the blue gem at its missing spot.
You want to open the sarcophagus by bringing the scarabs legs into the right position.
Refer to the journal, you found the needed informations in the lab.
The scarabs legs have to be placed as shown in the journal.
Move the joints of the scarab to match the papyrus by clicking the blue gems.
The sarcophagus opens and you can get out a figurine.
Screenshot
Pour the solvent onto the figurine on the floor and use the rag after.
Get the figurine.
Now as you have them all, get them out of the inventory and place them into the big crate in the middle of the room.
Click the crate again to close it.
Screenshot
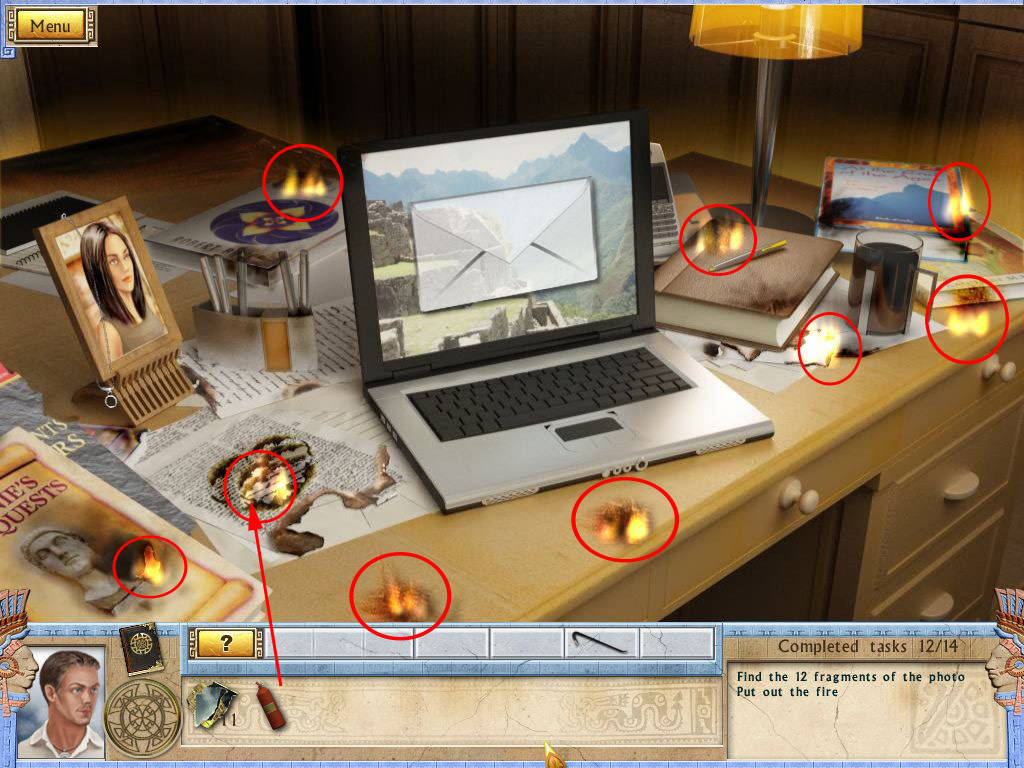
You smell fire - exit to the hall.
Hall/Office
Grab one of the fire extinguishers in the corner and enter the office.
Click the desk for a nearby view.
Extinguish the fire by clicking them with the fire extinguisher.
Screenshot
Get brush from the second shelf above the fish tank and enter the lab.
Lab/Depository
Click the hanging cabinet to activate a hidden object scene.
After finding the mirror, you can grab the magnifier.
Head over to the despository.
Screenshot
You will find the knife on the floor between the crates.
After the cut scene Macchu Picchu awaits you.
Chapter 2: Arrival at Macchu Picchu
Present: Entrance
Use the brush to remove the spider webs above the entrance.
Click right side of the scene to reach the House of the Guardians.
Screenshot
Open the wooden crate left side with the crowbar and have a look at the newspaper - recognize the year: 1911
You will find this also in your journal.
Click the trunk right next to it and change the combination lock to 1911.
The crate opens and you can grab a part of the entrance symbol.
After the cut scene, click the amulet.
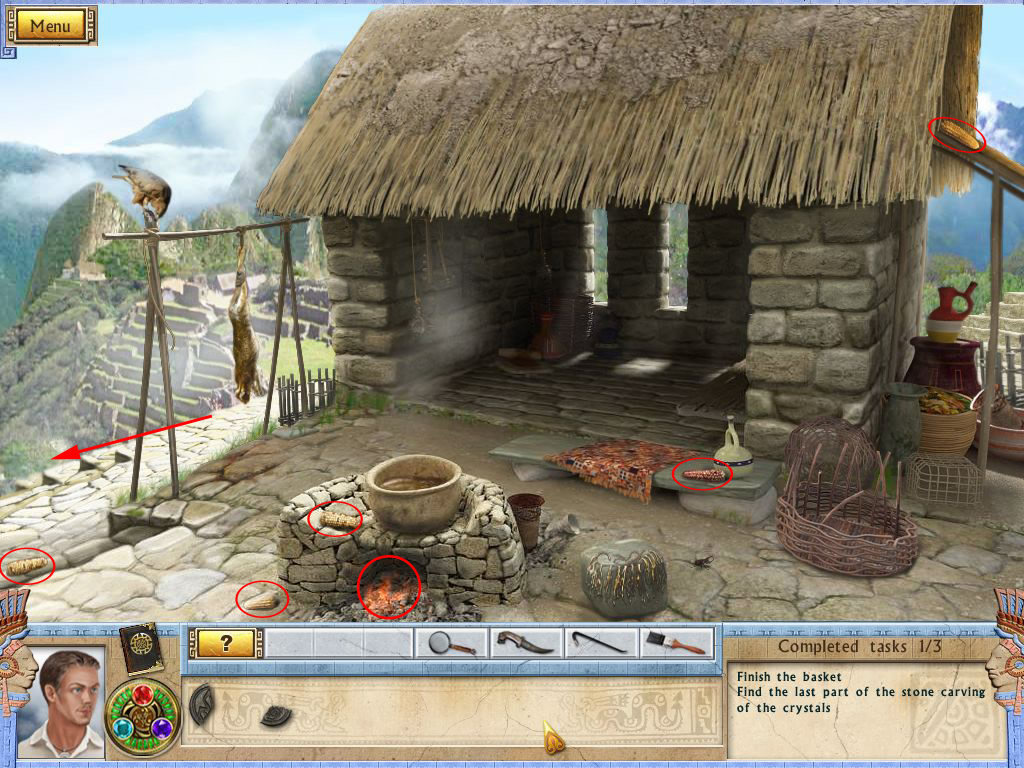
Past: House of the Guardians
Click the baskets in the back and look for the items from you list.
Behind the playing cards you will find the second part of the symbol
Screenshot
Get some of the coal from the fireplace into your inventory.
Collect the corn ears.
Use the steps left side to enter the tomb.
Screenshot
Past: Tomb
Use the knife to get some bamboo.
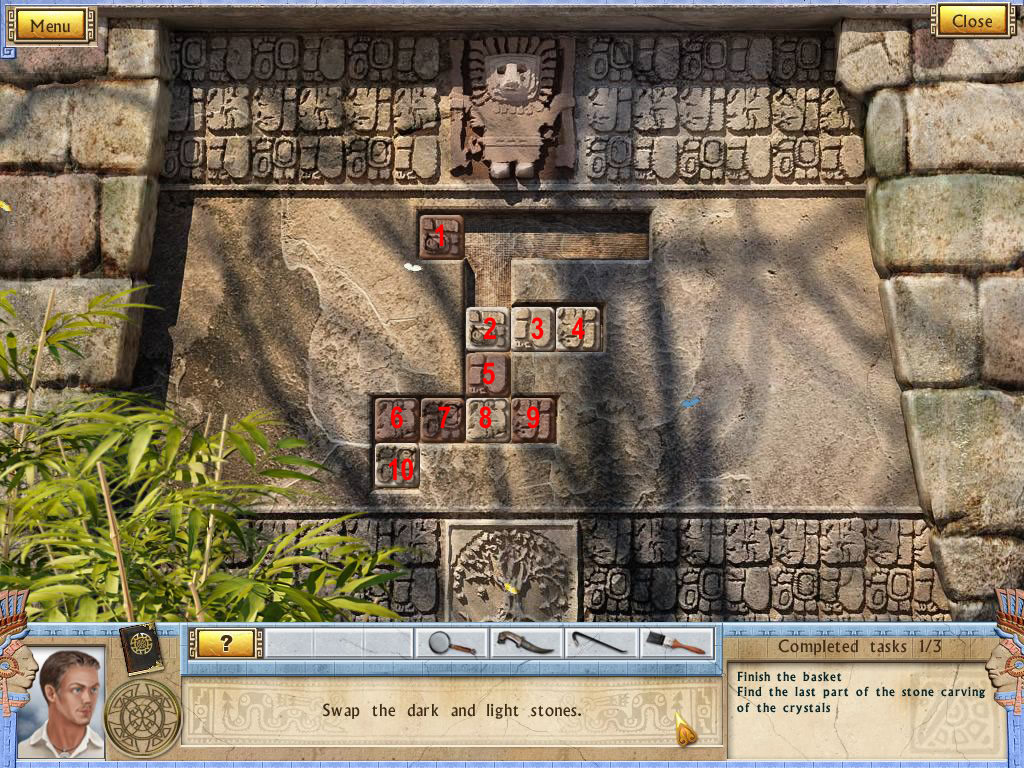
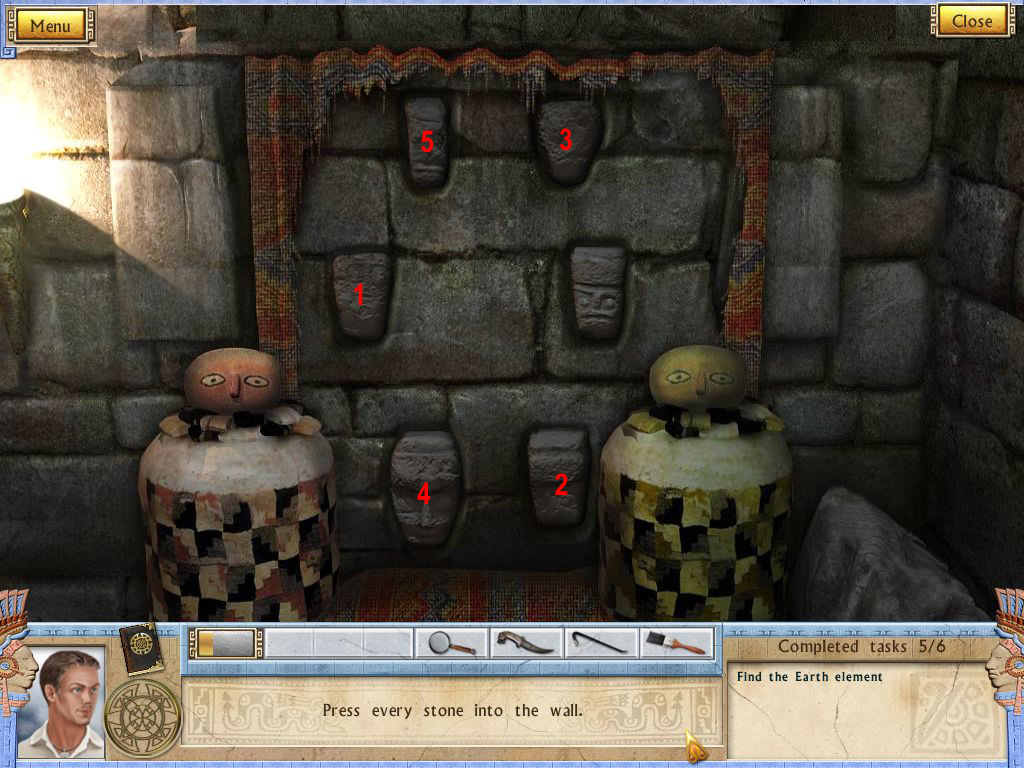
Click the gate to activate a mini game.
Screenshot
The dark and the light stones have to change places, the dark have to go upwards, the light ones down.
Half way you have a little niche to "park" two stones.
Click first one stone and then the place you want it to go.
To understand the solution please see the numbers on the screenshot
Screenshot
park 9 and 10
2 low right
6,7 and 6 to the top
2 low left corner
6 and 7 down left
8 down right.
1 down
10 upper left
9 down.
park 3 and 4
5 in the middle.
Please use the numbers from the next walkthrough to go on:
Screenshot
1 right
2 upper left
5 upper right
3 and 4 upper right.
8 up
park 6 and 7
8 and 4 down left
2 and 3 down
6 upper left
7 upper righ
park 2 and 3
9 down
2 and 3 down.
The door opens
Pick up the two ears of corn, you can see now on the ground, one outside of the tomb, one inside.
Use the knife to open the jar far left.
Get the third part of the symbol and a golden axe out.
Use the knife to cut open the left sack.li>
Take the 3rd Part of the symbol, and a golden axe out.
Screenshot
You need to go to the present, but to do so, you will first have to get up to the House of Guardians, as the place you are now, does not longer exists in the present.
Present: Entrance
Get the bamboo out of the inventory and place it in the tub with water.
Use the amulet and leave to the past.
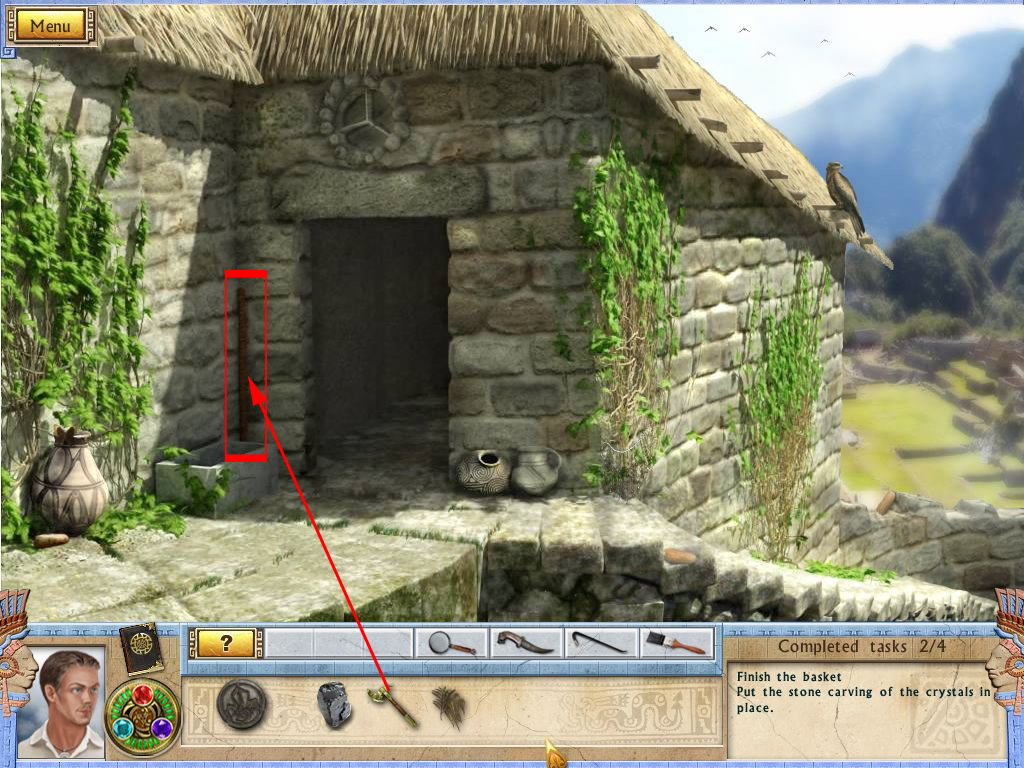
Past: Entrance
Go to the entrance and use the axe to cut the branch left next to the door into three pieces.
Pick up the branches and collect the corn ears.
Screenshot
Go back to the House of Guardians
Past: House of the Guardians
Place the first the branches, than the bamboo at the half done basket right side.
Click the basket to get it into your inventory.
Screenshot
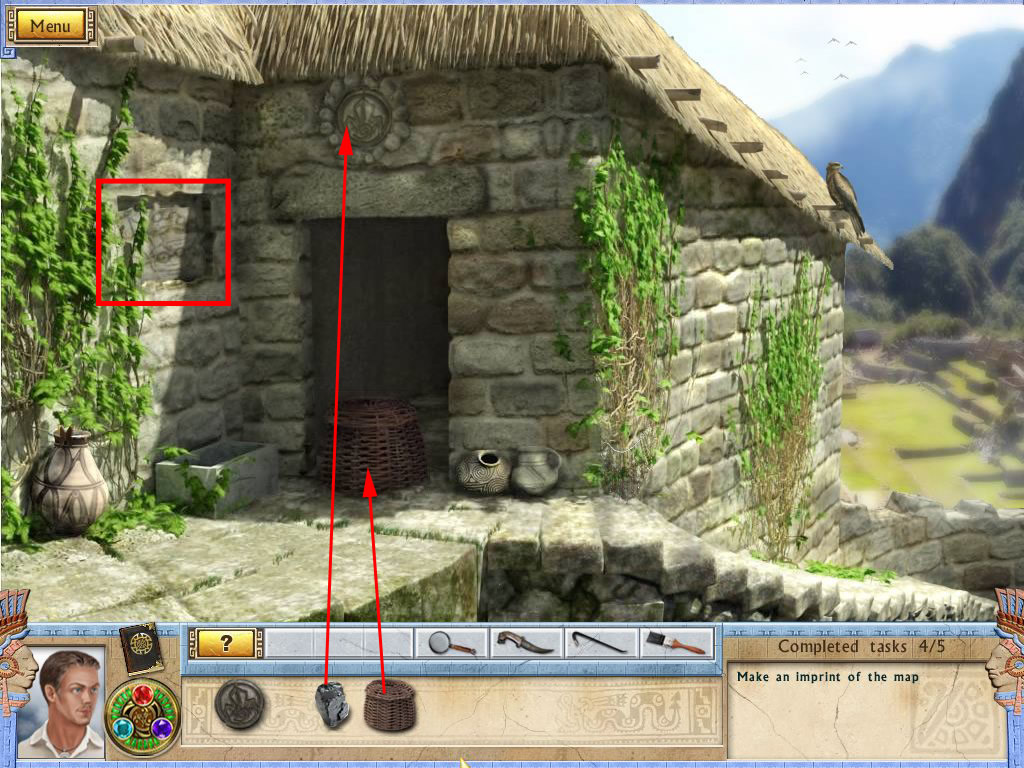
Go the entrance.
Past: Entrance
Place the basket on the ground below the the symbol slot and place then the symbol.
Left side a niche opens - get the map out.
Screenshot
To the left will open a niche with a map.
Go back to the House of the Guardians.
Past: House of the Guardians
Click the baskets to activate the hidden object scene.
You will have to find the row boat last, behind this one you will find the scroll.
Screenshot
Return to the entrance
Past: Entrance
Place the scroll on the niche.
Use the coal and click the scroll to activate a mini game.
Hover with pressed left mouse-button over the paper, till it closes automatically.
Go down to the tomb
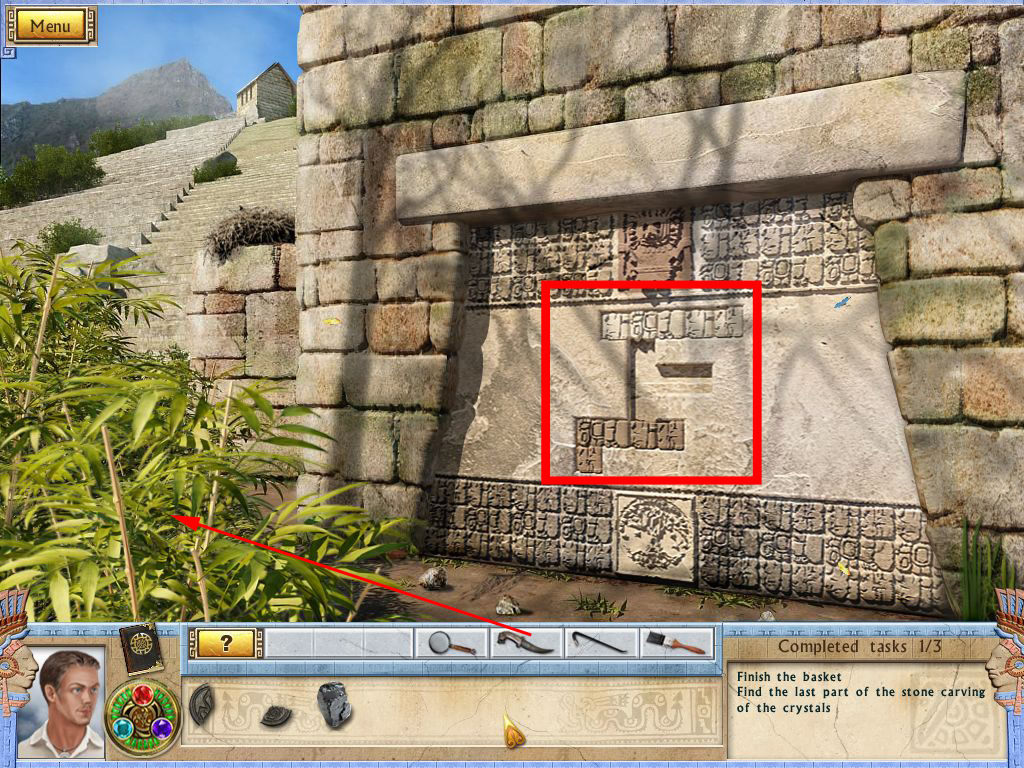
Past:Tomb
Use your knife to cut the curtain at the back wall.
Click the wall for a nearby view.
Click the stone in the right order, so that all of them stay in.
Each stone causes different reactions.
Please see screenshot for the solution.
Screenshot
Left side a compartment opens - get out the green gem.
Chapter 3: The temple of sun
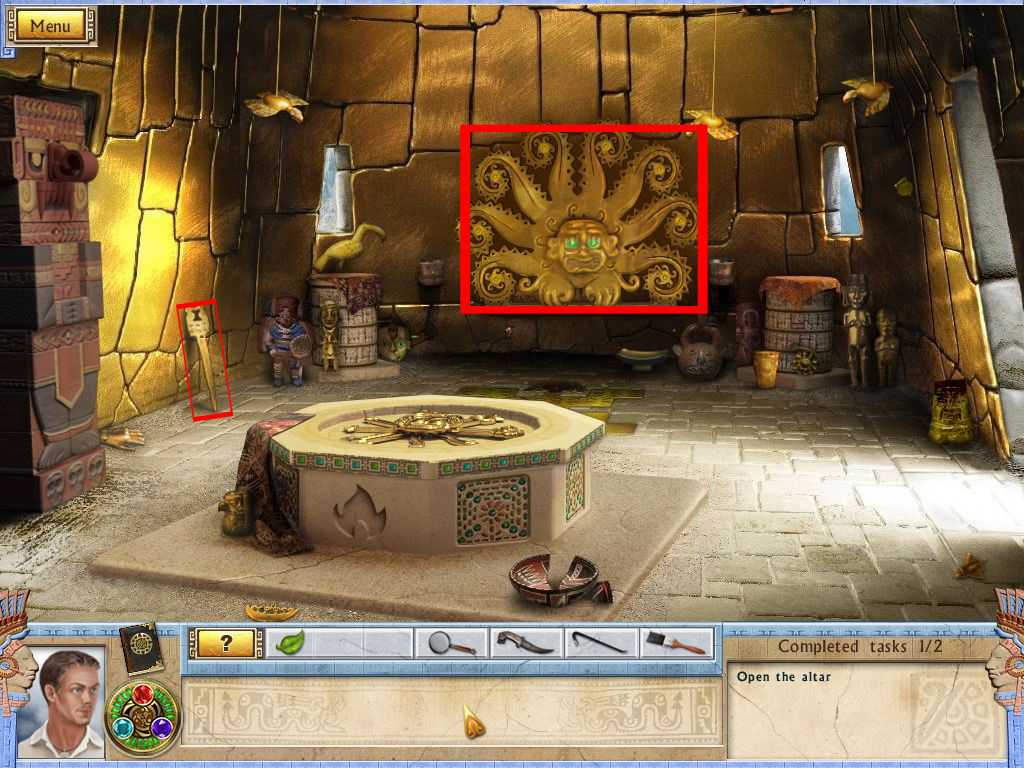
Past: Altar Room
Change to the past.
Click the golden sun, she will be protected by spiders from now on.
You can get the staff from the ground left side.
Screenshot
Use the amulet to go change to the present
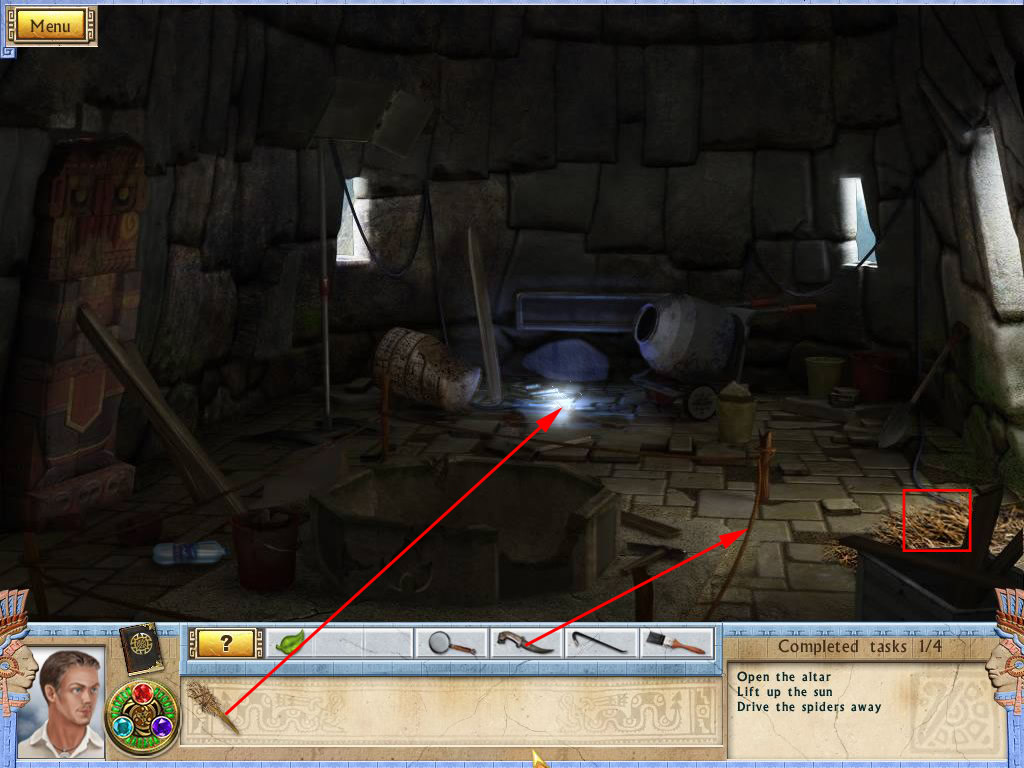
Present: Altar Room
Get some straw from the ground, right side.
Use the knife to cut off a part of the rope in front of the altar.
The rope will automatically be combined with the straw and the staff to a torch.
Light the torch at the sparkles.
Screenshot
Use the amulet to change to the past.
Past: Altar Room
Light the oil lamps right and left from the sun. This will scare away the spiders.
Collect all golden items around.
Also get the golden bowl below the sun.
Screenshot
Change to the present.
Present: Altar Room
Get the water bottle left from the altar.
Inside the inventory, the bowl will be filled with water.
Place it at the sparkling cable and you will see three suns back wall, left and right wall.
Go to the past
Past: Altar Room
Get the crowbar out of the inventory and hover over the places, where you have seen the suns in the present.
When your cursor changes to green and you see "golden tile" click it.
The golden till will fall down and reveal a sun.
After all three suns are revealed, the golden suns moves up.
Click the panel, you see underneath to play the mini-game.
The object of this mini-game is to move the water tiles to the left and the fire tiles to the right in six moves.
You must move two tiles at a time and you can move any two tiles as long as they do lay next to each other.
Click on the two tiles you wish to move, so that the sliding bar moves over them and they are highlighted.
Click on an empty spot to move the tiles.
You only have five trials to do finish your goal. After that, the game will start over.
I numbered the place on the bar from 1 - 9, seen from left to right.
Screenshot
Move 2 and 3 to the right.
Move 5 and 6 to the left.
Move 1 and 3 in the middle.
Move 8 and 9 to the left.
Move 5 and 5 to the right.
The idol left side moves and reveals a hidden entrance.
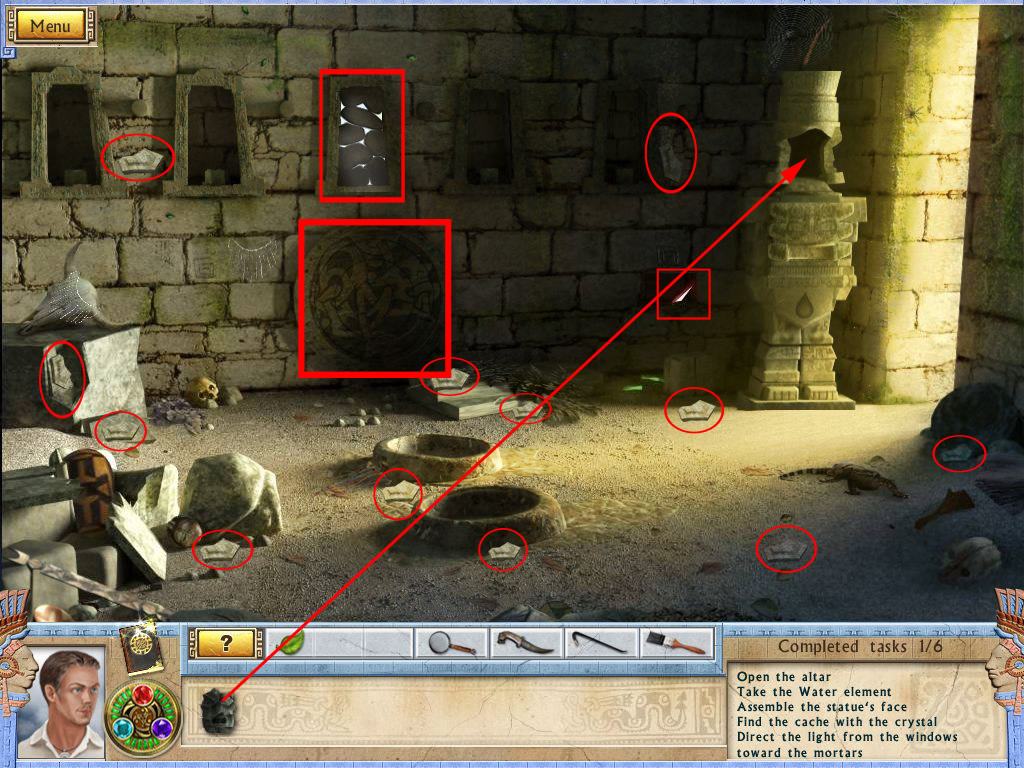
Past: Hidden Room
After Anastasie lost the amulet, click the sparkling rock low left on the ground and look for the objects hidden.
You will find the amulet behind the the basket ball low left.
Screenshot
Find all the stone fragments and collect also the talking knots.
Also pick up the red crystal, the green one is broken.
Click the middle window to remove all sherds.
When you found all stone fragments for the statue's face click it at the empty spot of the statue left next to the secret passage.
The statue starts to cry.
Screenshot
Click the circle at the low middle of the back wall.
You need to move the circles to recreate the image.
The solution is random, the game can be skipped, even when you are in expert mode.
Even though you might have a different solution, try this one:
Seen form the outside to the inside, I numbered the circles from 1 to 5
The inner circle can't be moved.
Click 1=2x, 2=2x, 3=9x, 4=0x, 5=9x
All windows will open.
Go to the altar room and grab the golden goblet on the ground, far right.
Change to the present
Present: Altar Room
Grab the pick axe, right side from the altar and go back into the past.
Go into the secret room.
Past: Secret Room
Fill the goblet with the statues tears - click it at the puddle on the ground.
Click the filled goblet on one of the mortars - both are filled.
Place your magnifier at the second window from the right.
Now use the pick axe at the brick a little below the second window from the left.
A secret compartment opens-get out the crystals.
They will combine with the red crystal.
Click all the crystals at one of the windows and they will take place on the crystals stand.
Because of the sun rays the water will disappear and you can grab two crystals.
Use them as statue eyes.
Screenshot
The statue opens, but a lever is missing.
Click the rock left side, it is again a hidden object scene.
Behind the ruler you will find the lever.
Screenshot
Place the lever at the spot, where the statue opened and click it again - the statue moves up and you can grab a blue gem.
Click the parchment you see as well, it will be copied into your journal.
Go into the altar room
Past: Altar Room
Click the altar to get nearby view.
Click on the ends of the suns rays to rotate them around according to the picture on the parchment, you just found.
You can have a look at the journal when you can't recall.
The altar opens.
Collect first all gold and the talking knots.
Then pick up the fire element.
Chapter 4: Mystery of the Incan Letters
Office
You know play the part from Wint Sanders.
Click the desk and in the nearby view the laptop.
Click "Printing" - the printer does not work.
Leave the scene, click the printer on the small cabinet left from the door and press the red button.
The printer does not have paper, so get it out of the closet right next to the door.
Click the paper on the printer and get the paper out.
Screenshot
Go to the lap
Lab
Place the paper under the hug magnifier on the table in front of the window.
You will have to look in the depository.
Depository
Grab the hook, low right corner.
Get the Talking Knot far back.
Click the big wooden crate in the front and get the part of the key.
Go back into the hall.
Hall
Open the hanging closet and get out the thread.
Click the trash bin, it will move and you can pick up some glue.
Enter the office.
Office
Click the desk and pick up the pen from the brown book.
Inside the inventory pen, thread and hook will combine to a homemade fish rod.
Get it out of your inventory and click the key part inside the fish tank.
Screenshot
Go back into the depository.
Depository
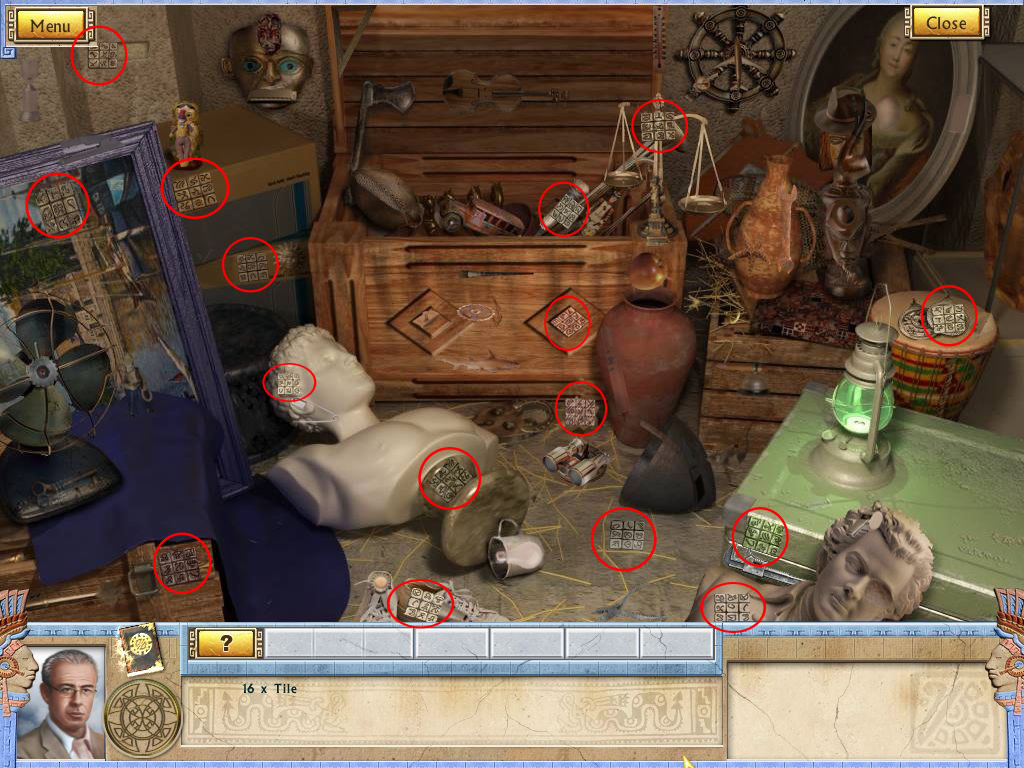
Use the key at the trunk below the painting.
You will get a nearby look.
Find the 16 tiles.
Screenshot
Screenshot
Go into the lab.
Lab
Place the tiles on the huge magnifier.
They are dirty, you will have to clean them.
Go into the office and wet the rag in the fish tank.
Return to the lab.
The door slams shut and a few papers fall on the ground.
One of them you can pick up - it goes into your inventory.
Click the magnifier and clean the tiles with the wet rag by clicking once each of them.
They are still not clean, you will need to need a special cleaning fluid.
Leave the nearby view and click the book left side of the screen on the table.
It is a formula for the cleaning fluid - it will be copied into your journal.
First you will need to flasks with green and two flasks with red liquid.
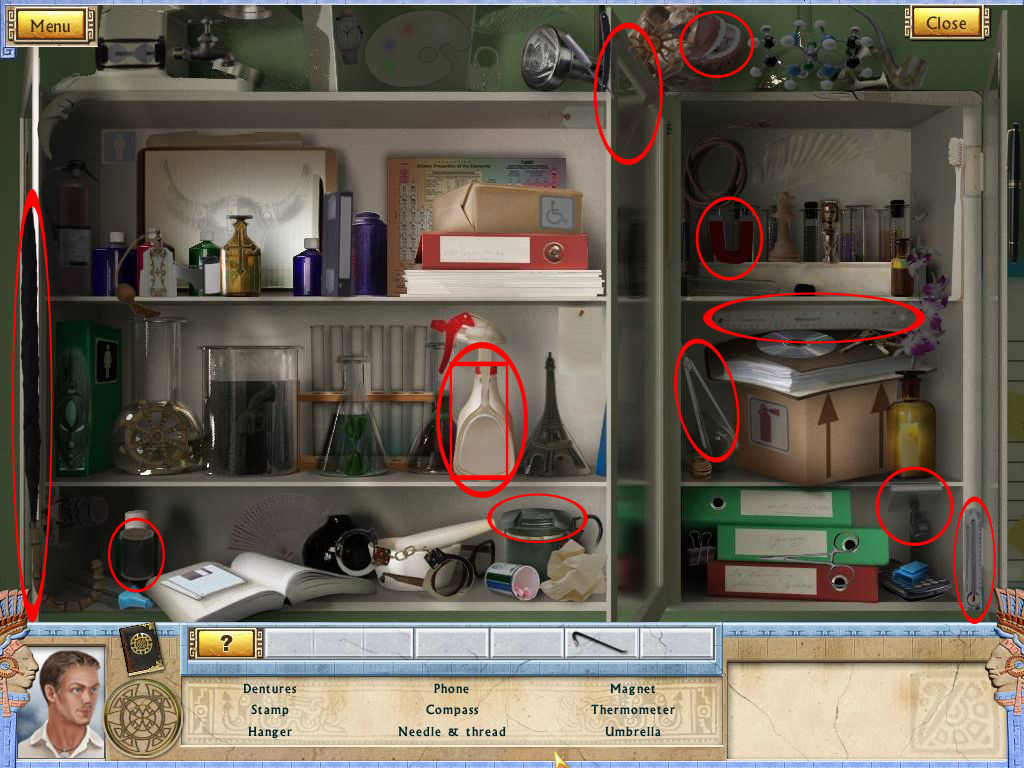
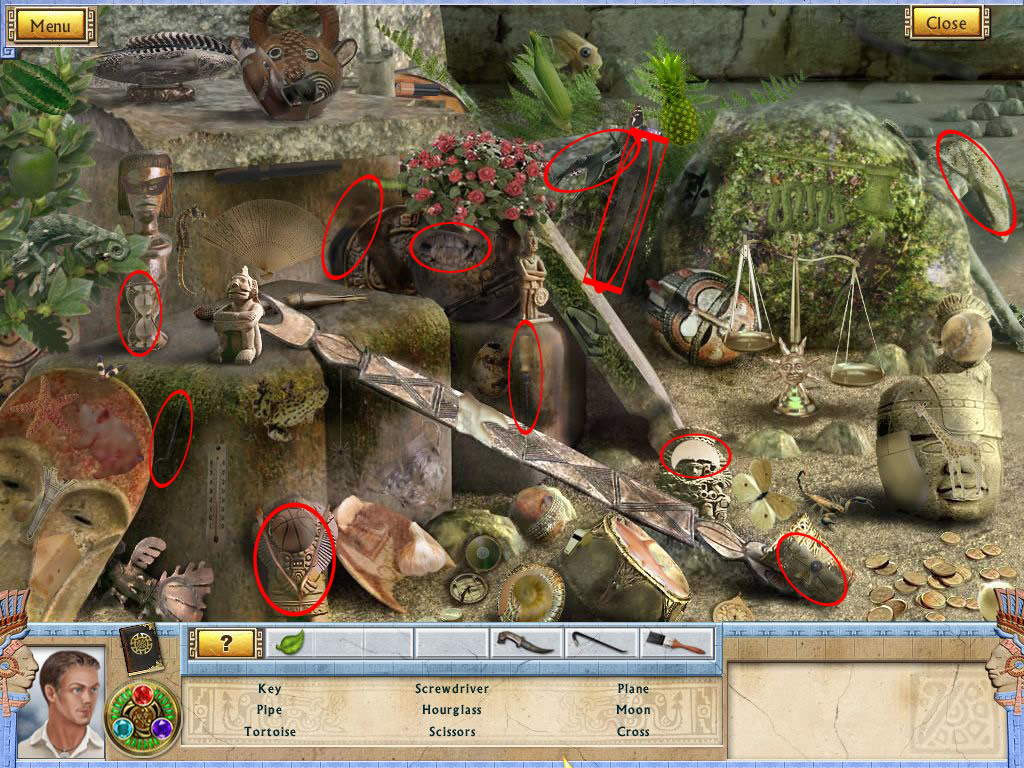
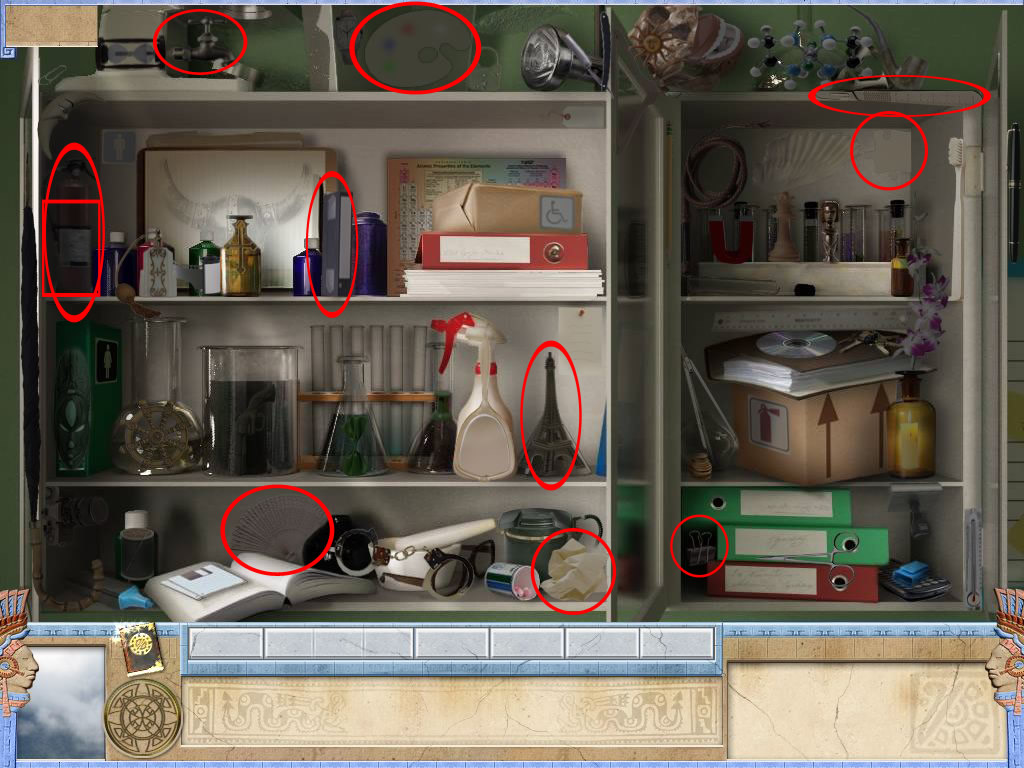
Leave the nearby view and click the hanging counter next to the door to enter a hog-scene.
Find all objects, there is one red flask behind the fire extinguisher in the upper shelf of the left part of the counter.
Screenshot
Find the three other flasks, for one green one, you will need to click the chair - it will turn around.
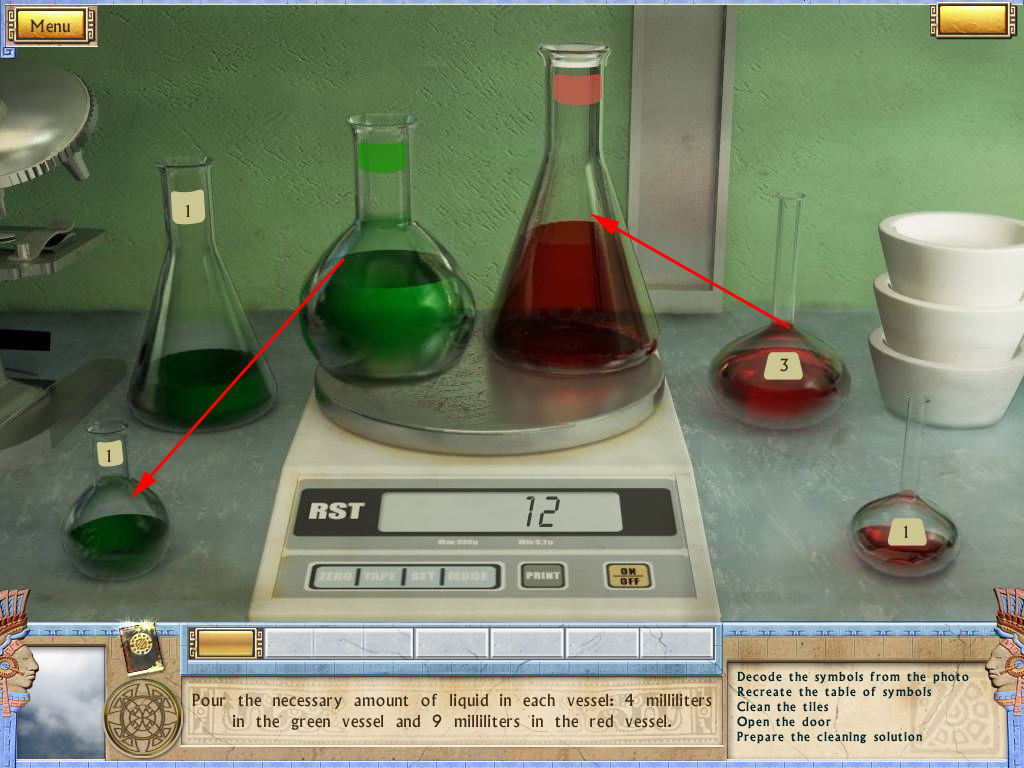
To find the right amount for each liquid, click the flask at the scale on the table far left.
Both flask on the scale are having 6 ml.
The other flask do show the right amount, they are filled with.
Red: Pour the liquid out of the 3 ml little flask into the one of the scale, that will make 9 ml.
Green: Pour the flask from the scale into the smaller bottle in the front with the one. 2 ml you will pour out, so that you will have 4 ml left in the flask.
Use the flasks now on the powder on the desk left side
Screenshot
Click the wet rag into the powder and click then the magnifier again.
Click each tile again with the wet rag.
Now they are clean and you have to find the right places for them.
Click one tile and place it at its correct position.
A right one place tile will highlight for a moment and be stuck then.
Screenshot
Click the door and learn, that it is closed, but the key stuck from the outside.
Pick up the wire next to the powder.
Click first the paper at the door, it will lay half outside.
Now push the key out of the lock with the wire.
Click the paper and pick up the key
Screenshot
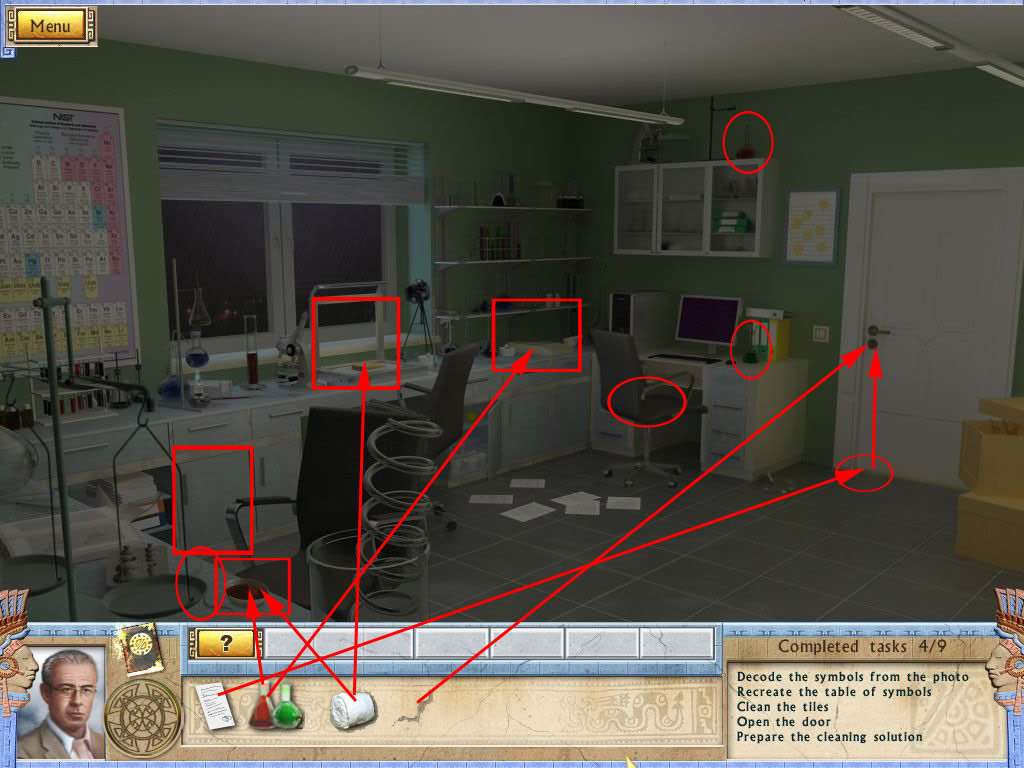
Leave the lab and enter the office.
Office/Lab
On the counter left next to the door you can get a memory card.
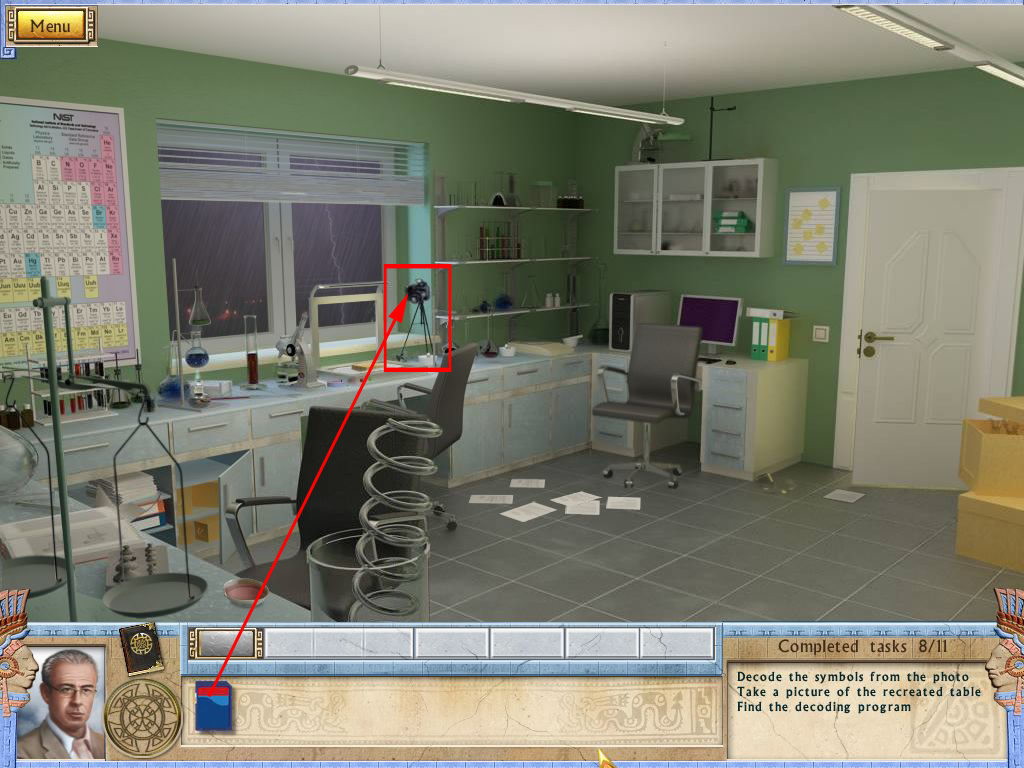
Go back into the lab and place the memory card at the camera next to the magnifier in front of the window.
Click the camera to make an picture.
Click again to get back the memory card.
Screenshot
Go back to the office and try to connect the memory card with the laptop.
The right program is missing.
Go to the depository to find the safe.
Depository
Click the painting, it will fall down.
Behind it you will find the safe, click it, but something is missing
Leave the nearby view and click the trunk under the painting for another hog scene.
Screenshot
Behind the last object, you will find a faceplate.
Click the faceplate at the numbers of the safe.
Now you see a plus and a minus sign between the number - the red number at the end is the result. You cant change that.
You will now have to determine an equation that will equal the given red number four times.
The solutions are:
23 + 24 - 3 = 44
8 + 13 - 6 = 15
28 + 24 - 6 = 46
8 + 1 - 3 = 6
Get the cd out of the safe.
Go back to the office
Screenshot
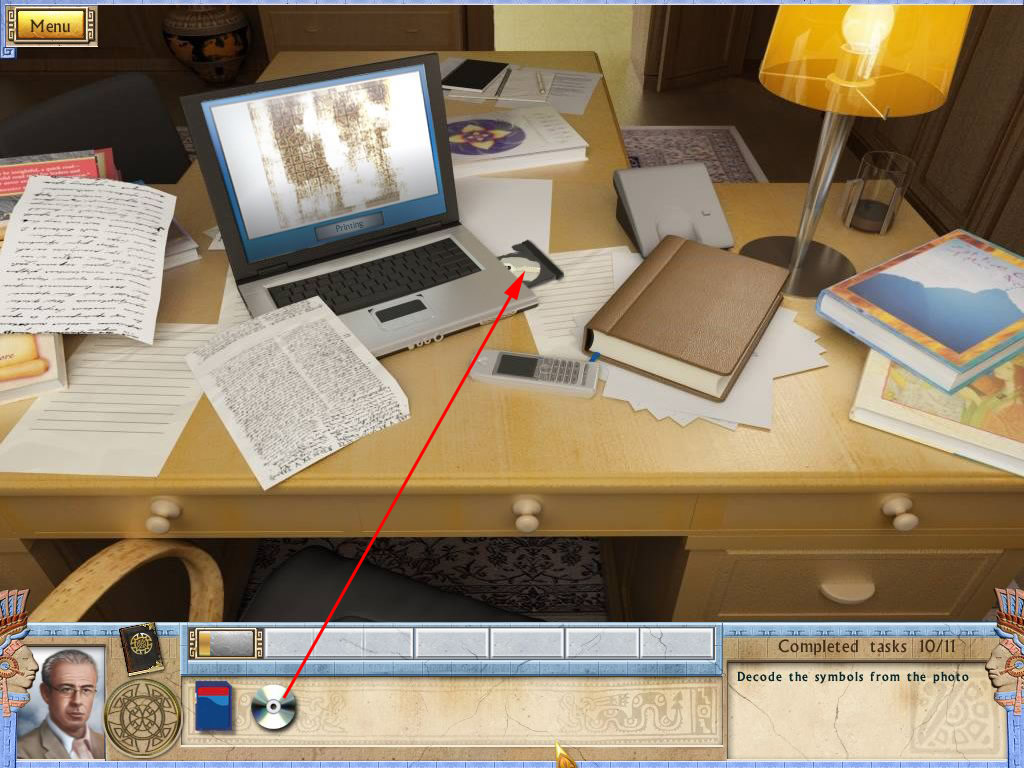
Office
Click the desk and open the cd-compartment, right side of the laptop.
Place the CD in the compartment and click to close it.
Screenshot
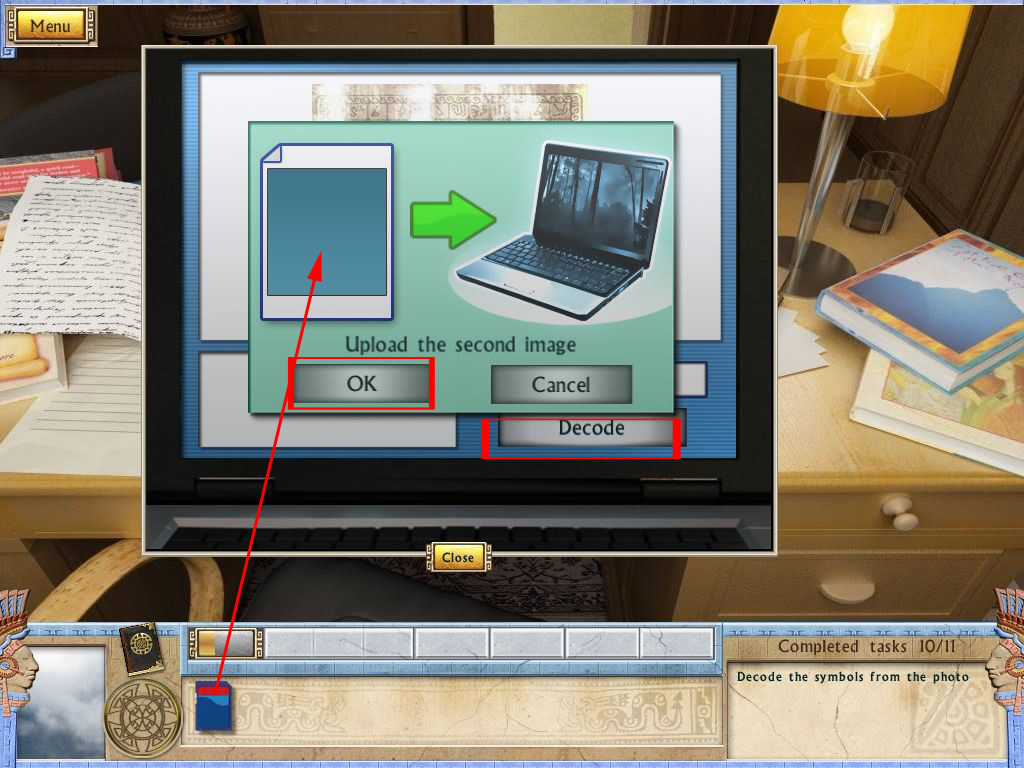
The program starts, click "Decode".
Place the memory card into the left place.
Click ok, the program runs.
When it is done, click ok again.
Screenshot
Chapter 5: The Emperor's Tomb
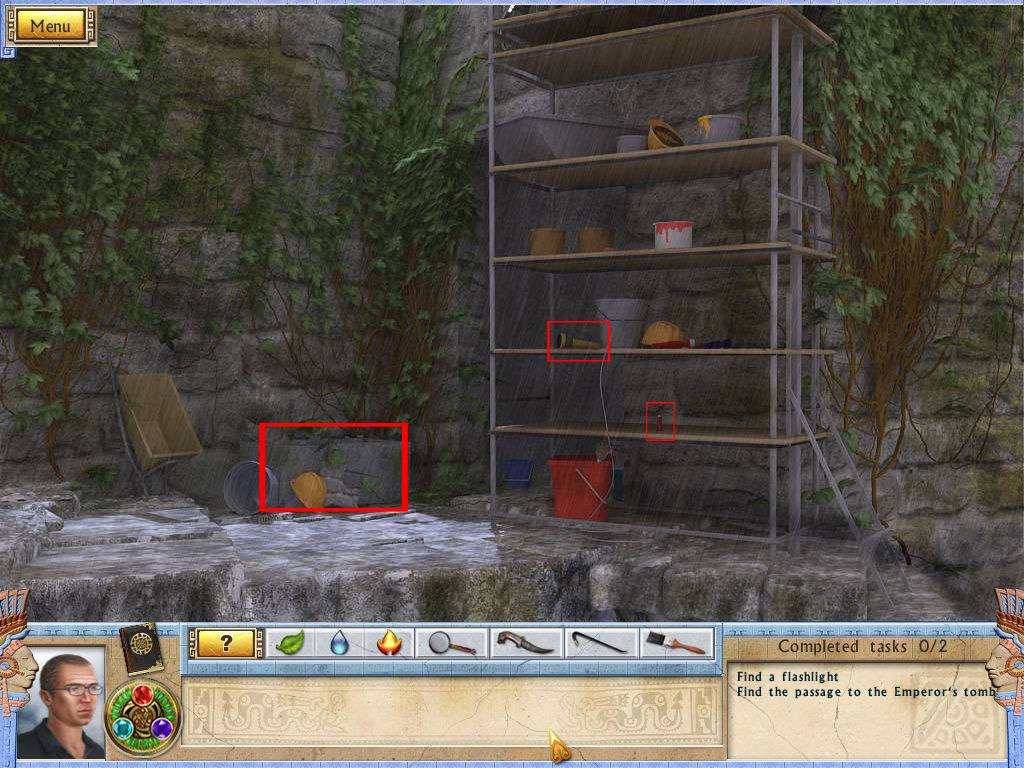
Present: Entrance
Find the flashlight an three batteries.
One you will find on the shelf, one by clicking the stone carving left side on the ground.
Screenshot
Move on to the House of the Guardians.
Present: House of the Guardians
The right trunk contains a hog-scene.
Behind the clown, left next to the trunk, you will find your last battery.
Screenshot
Use the amulet to go into the past.
Past: Tomb/House of the Guardians
Click the cloth on the ground and click it again, the pattern will go into your journal.
Click left side to reach the tomb.
Click the dirt left inside the tomb. Seems there is the entrance.
Go back to the House of the Guardians and use the amulet.
Get the shovel at the left wall and use the amulet again.
Go to the tomb and use the shovel with dirt.
Use the flashlight to see, what is behind.
Go back to the House of the Guardians and click the hog-scene.
Behind the bird's nest, you will find a green key.
Screenshot
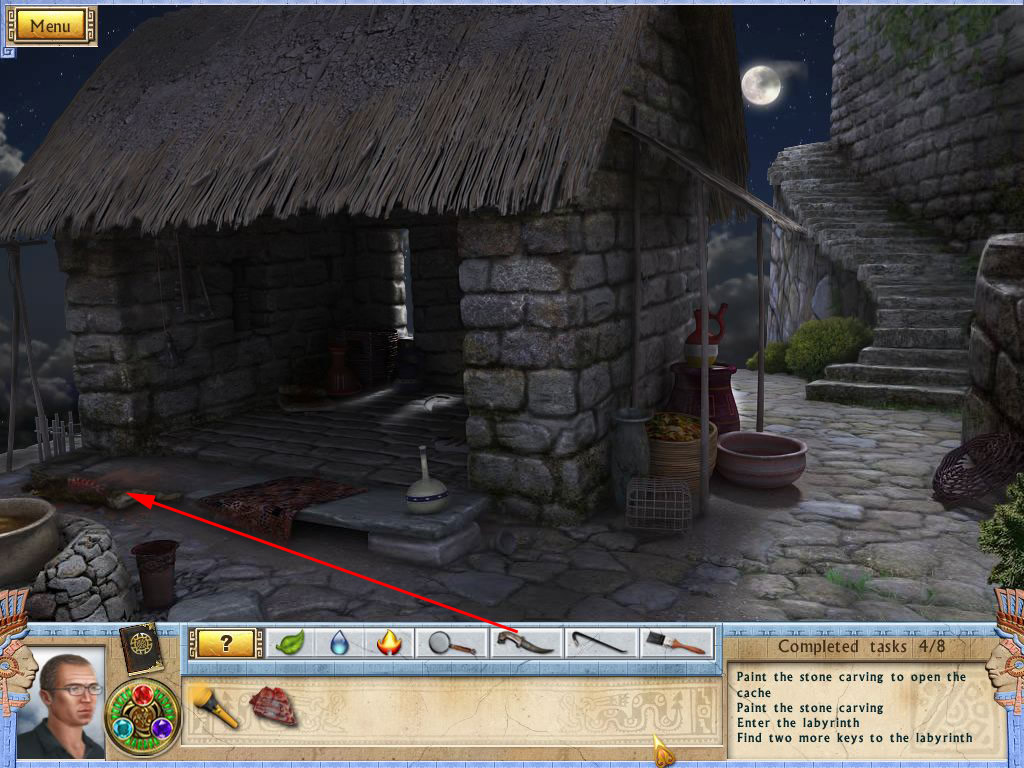
Use the knife to cut off a piece of the meat left on the ground in front of the house.
Screenshot
Go down to the tomb and feed the little condors in their nest left above the tomb with the meet.
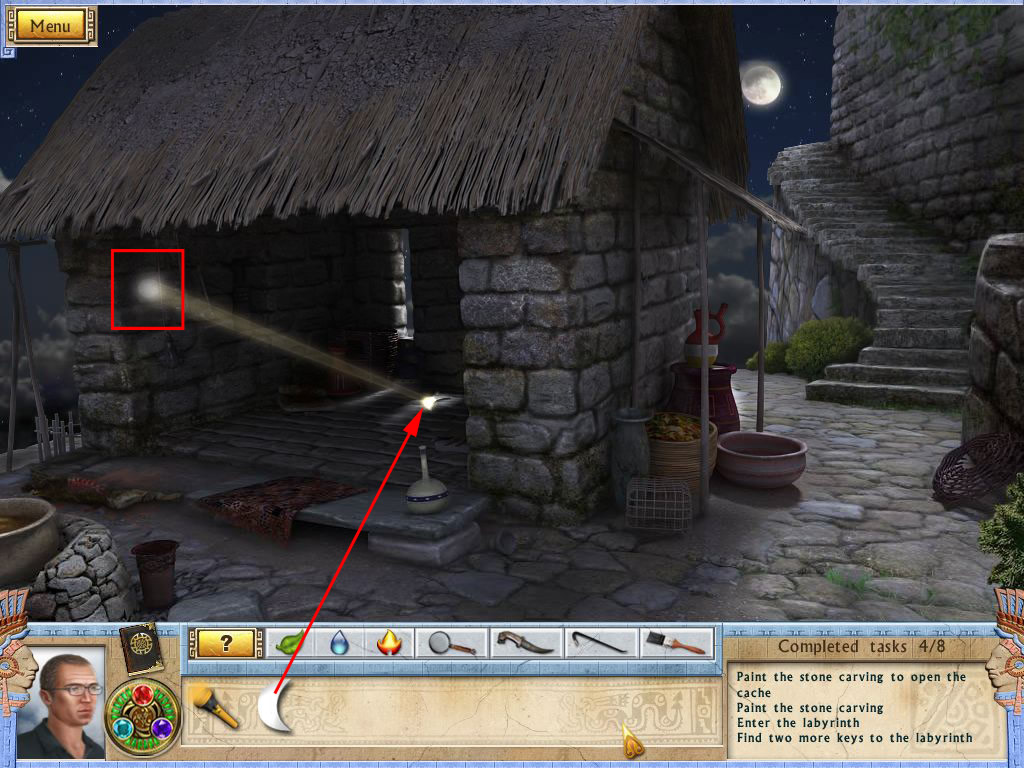
A moon symbol will fall out the nest - pick it up.
Go back to the House of the Guardians.
Place the moon symbol into the slot on the floor inside the house.
The moonlight will highlight a brick in the wall.
Screenshot
Move to the present.
Present: House of the Guardians
Use the crowbar to get out the stone, that was highlighted in the past.
Behind you will find a red key.
Grab the green paint, right next to the wall and the black paint under the ladder.
Go to the entrance.
Present: Entrance
Get the bucket with red paint from the middle shelf and the yellow one on the top.
Now click the stone carving left on the ground.
You need to paint the carvings now, according to the colors of the Incan carpet you saw before.
Have a look in your journal to find out, what has be colored in which color.
First fill the colors in the empty spots in the corners.
Black=top left, yellow=top right, red=low right, green=low left.
When this does not work out, use the amulet and click the stone carving once in the past and return into the present.
To paint the carvings use your paintbrush.
When you need correct some, just use another color.
Screenshot
The stone opens - click the symbols you will find to copy them into your journal.
Change to the past.
Past: Entrance
Use the crowbar to break the big jar left side and get out the key.
Go down to the tomb.
Past:Tomb
Use the flashlight and place the keys.
The gate opens - enter the labyrinth.
You will need a compass, so go back to the House of Guardians to change to the present.
Present: House of Guardian
Play the hidden object scene and find the compass underneath the pocket watch.
Screenshot
Click the wooden crate after, at the left and have a look at the paper.
You will find some inka symbols - they will be copied into your journal.
Also take the talking knots.
Use the amulet and go to the labyrinth.
Past: Labyrinth
Use the flashlight to enter the labyrinth.
Inside you will see the map at the left side of the scene.
Use the compass to follow the directions the map is giving you.
That means: When the map say n for north, you will have to look on the compass in which direction you have to go!
F= Forwards, L= Left, R= Right
Go: F F L F R L F R F R F L F L F L F R F R L R F F F F L F R F R L
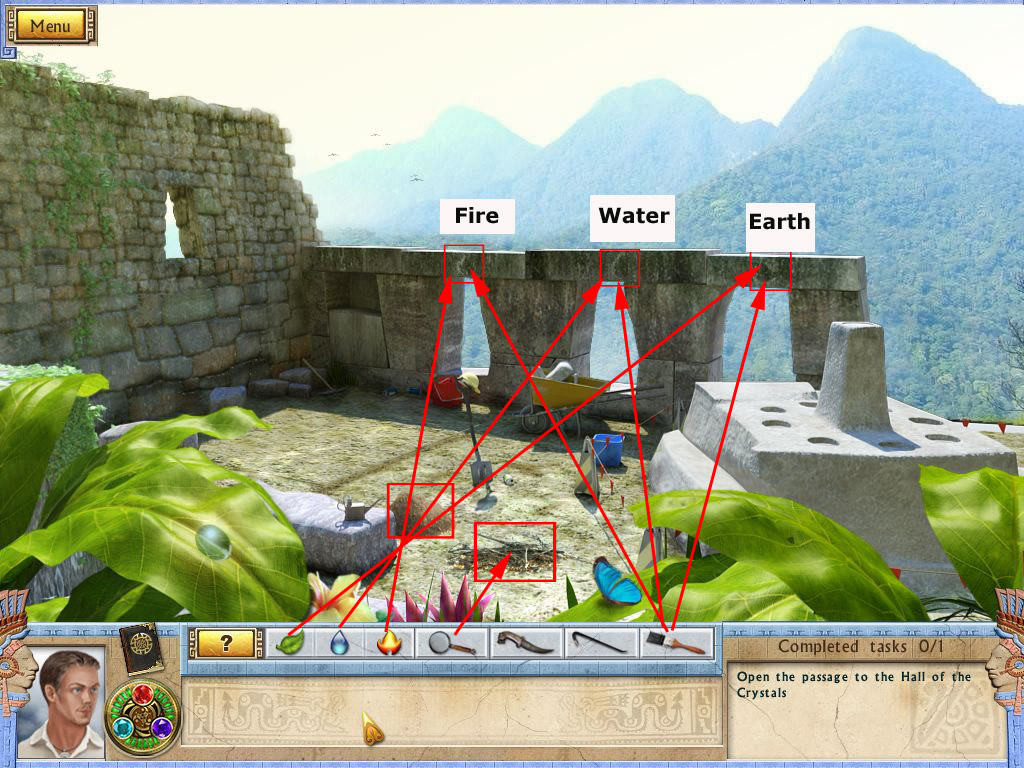
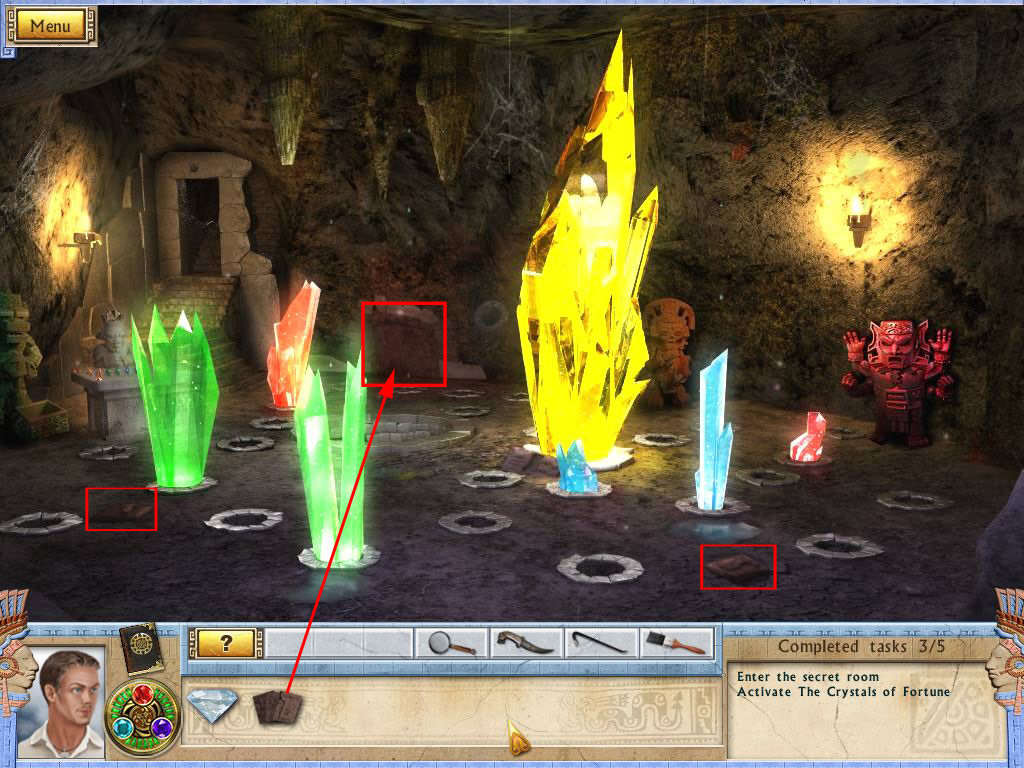
Chapter 6: The Crystal of Fortune
Temple of the three Windows
Get some dirt left to the fireplace into your inventory.
Use the magnifier to light a fire with the dry wood.
Click the fire a burning piece of wood will go into your inventory.
Get the brush and clean the symbol spots above the windows.
Get the three symbols out of your inventory and place them in the according spots.
You need to activate the symbols by placing their elements onto it.
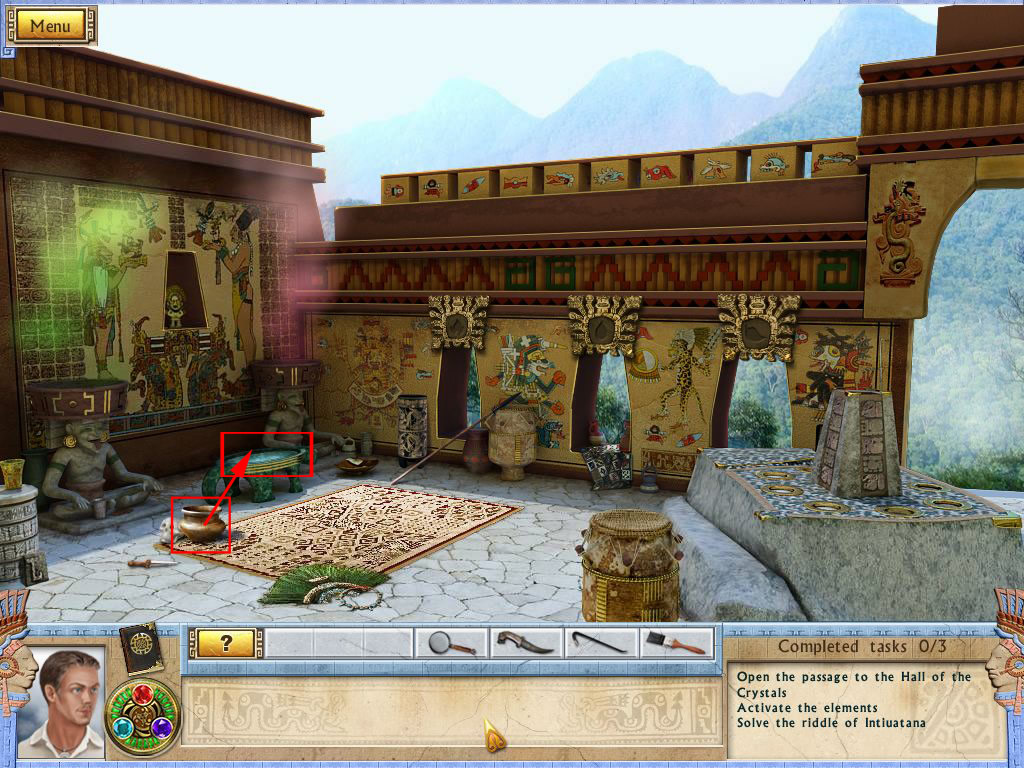
Change to the present and get the bowl left side on the carpet.
Fill it with water from the jade tub left.
Use the amulet.
The fire will be activated with the burning wood.
The leave for earth will be activated by the dirt from your inventory.
The water will be activated with the water bowl.
Screenshot
Screenshot
A huge stone on the ground move, revealing a secret passage.
Use the stairs to go down.
Hall of Crystals
The little round window lets you look into another room.
The hole in the middle of the room seems to get real deep down.
Screenshot
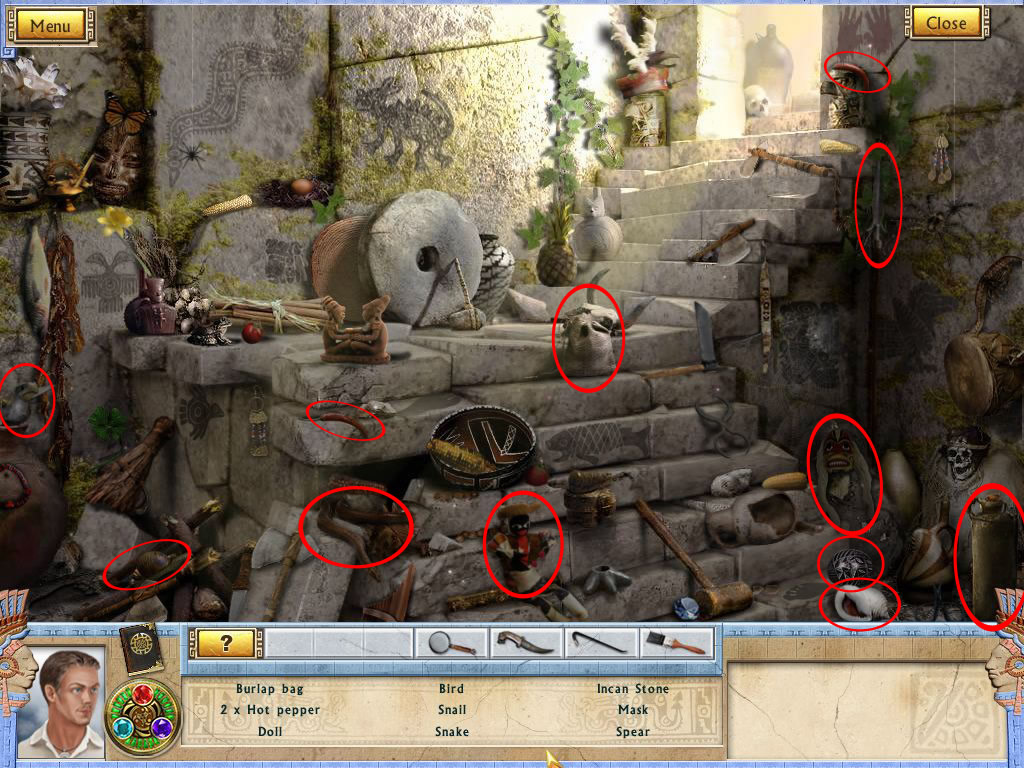
After recognizing these two things, play the hidden object scene at the stairs.
Screenshot
Behind the bottle right low corner you will find a tile.
The Journal will keep a note about the order of the Intiuatana symbols.
Use the stairs to go up again and use the amulet
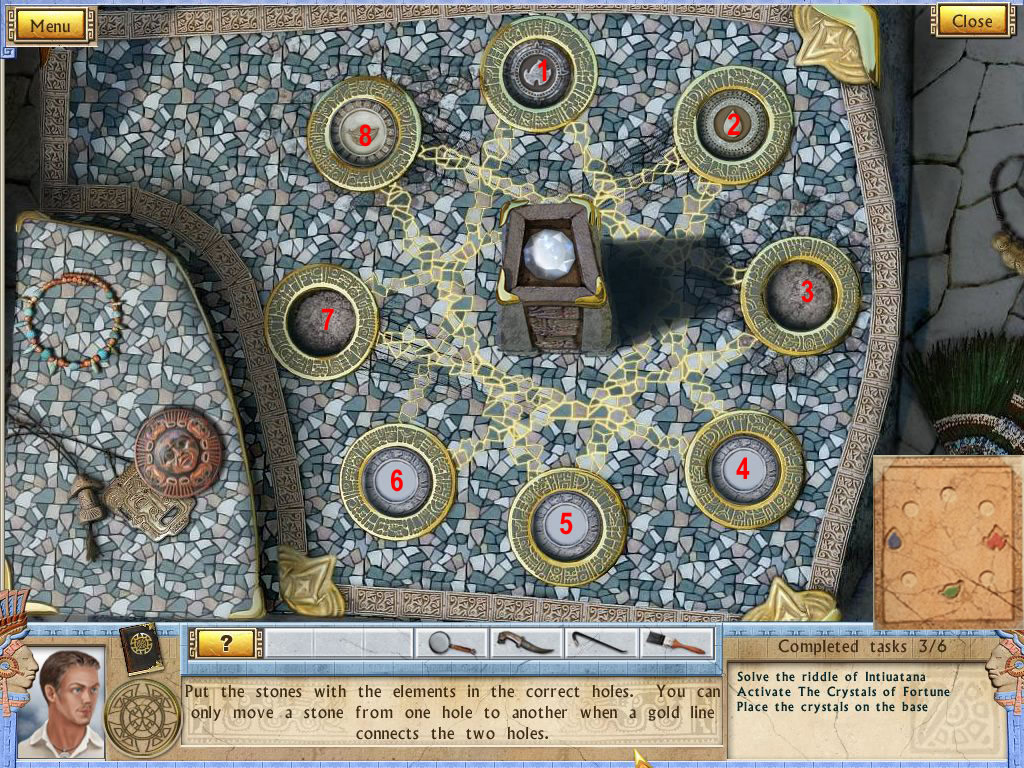
Past: Temple of the three Windows
Click the Intiuatana right side.
You will need to bring the symbols into the slots according to the note in your journal.
You will have to move the symbols and coins inside the slot by clicking first the symbol and then the empty slot, you want them to go.
You can only move them along a golden line.
I numbered the slots from 1-8 by starting with 1 at the top, going clockwise.
Move 2-7, 6-3, 1-6, 5-2, 8-5, 3-8, 6-3.
Screenshot
Get the crystal you see now above the Intiuatana.
Use the amulet and enter the Hall of the Crystals.
Past/Present: Hall of the Crystals/Temple of the three Windows
Change to the past.
Have a look through the window into the other room.
The hole in the wall is as deep as in the present.
The wall has a little door, you will need three key tiles for it.
Two of them you will find on the floor.
Change into the present and go up to the Temple of the three Windows.
Change to the past and get the third key low left corner.
Change to the present and enter the Hall of Crystals.
Change to the past and place the three key tiles at the slots of the little door.
A secret passage opens.
Screenshot
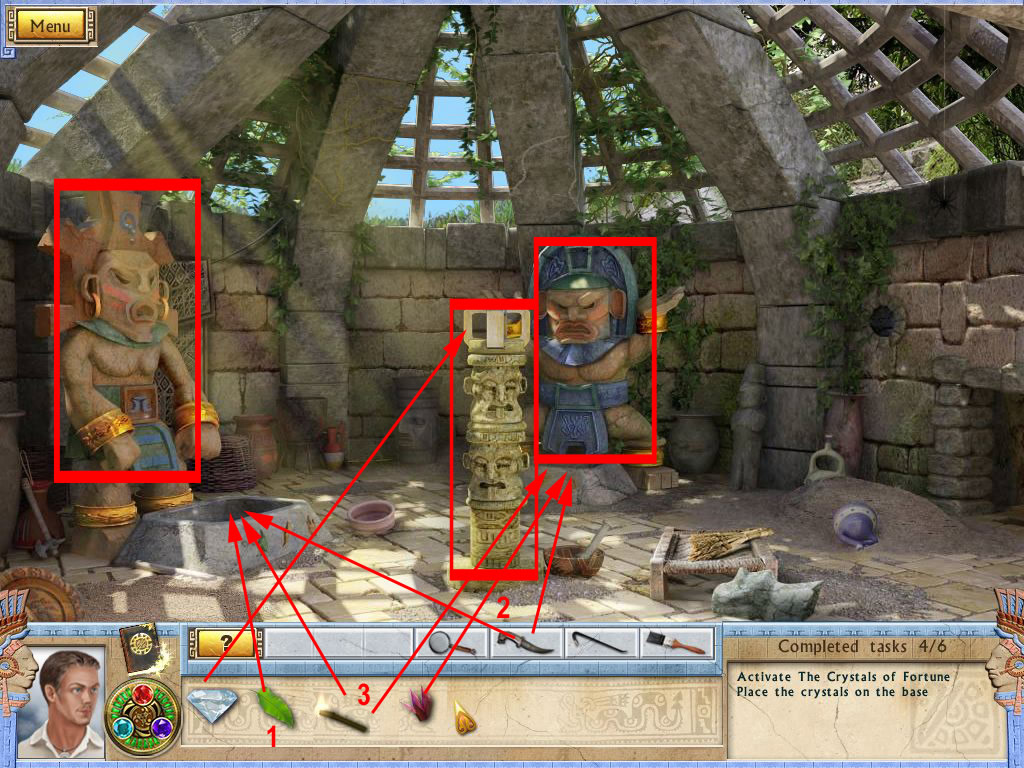
Past:Secret Room
Click the two altar-statues and the golden on in the middle.
The altar statues have engraved symbols of a leaf, a knife, a purple flower and fire into the bowl at their feet.
Go back to the Hall of Crystals and change to the present, go to the temple of the three windows.
Present: Temple of the Three Windows
Cut with your knife a leave from the plant low left side and a purple flower from the low middle.
Click the fire place to get a piece of burning wood.
Go down in the Hall of Crystals and change into the past, enter the secret room.
Past:Secret Room
Place the leaf into the bowl and cut it with the knife.
Place the burning branch on it.
Go the right statue and place the purple flower into it, cut it and use the burning branch.
Now you can place the crystal from your inventoy onto the golden statue.
Screenshot
Go back into the Hall of Crystals and change to the present.
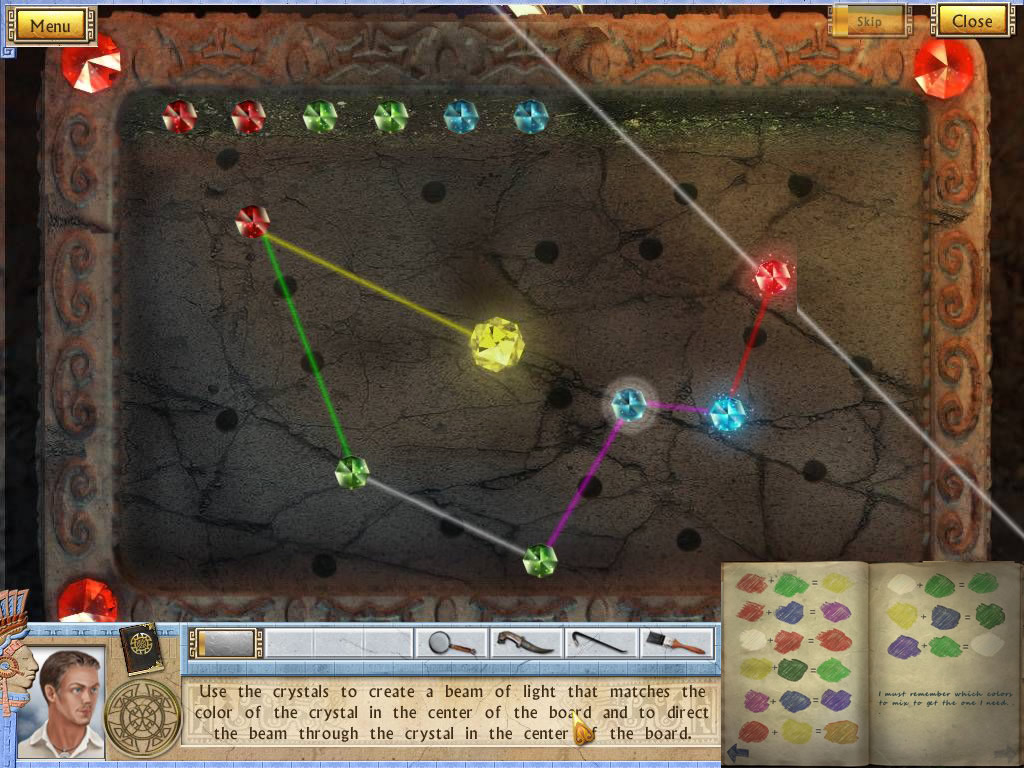
Present: Hall of Crystals
Click the table of crystals left next to the stairs.
Open the journal to see, which crystal colors you need to get the right color.
Lead the beam, so that at the end it will hit the yellow crystal in the middle with a yellow beam.
Screenshot
After the cut scene move to the past and enter the secret room
Past: Secret Room
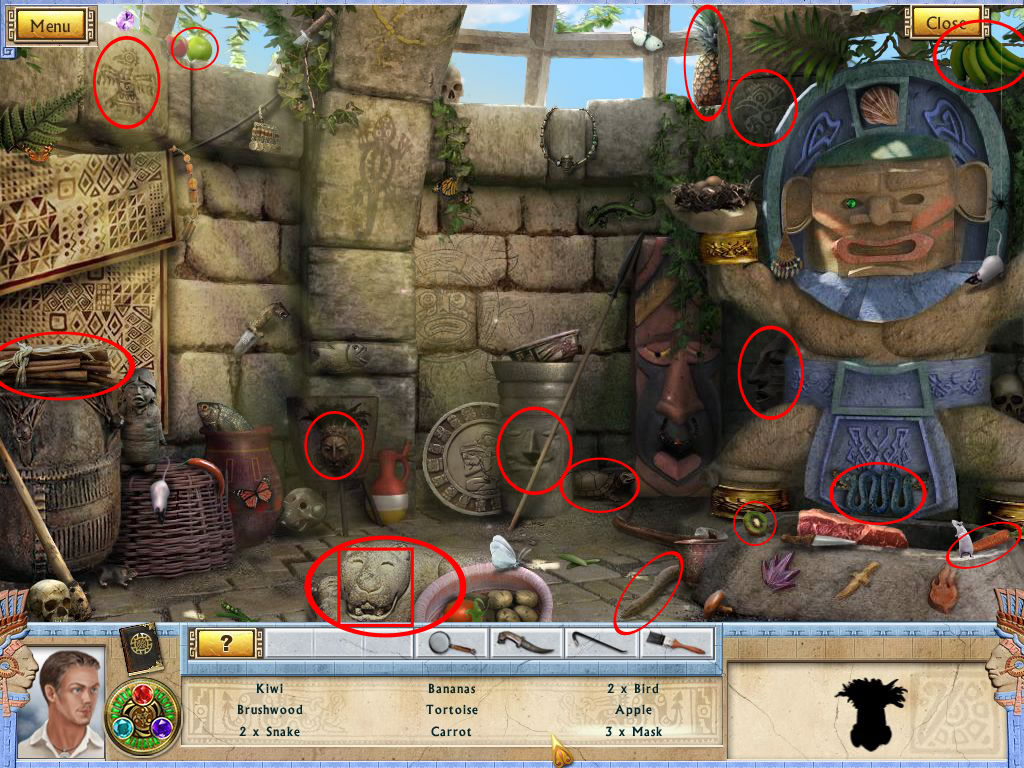
There is a hidden object scene between the two statues.
Behind the jaguar you will find Talking Knots.
Screenshot
Change to the Hall of Crystals.
Past: Hall of Crystals
Click the table of crystals and place the talking knots onto it.
Order the crystals into the hole as the knots show.
Screenshot
Change to the present, go up to the temple of the three windows and use the knife to cut a part of the rope in front of the Intiuatana.
Go down in the hall of crystals and change to the past.
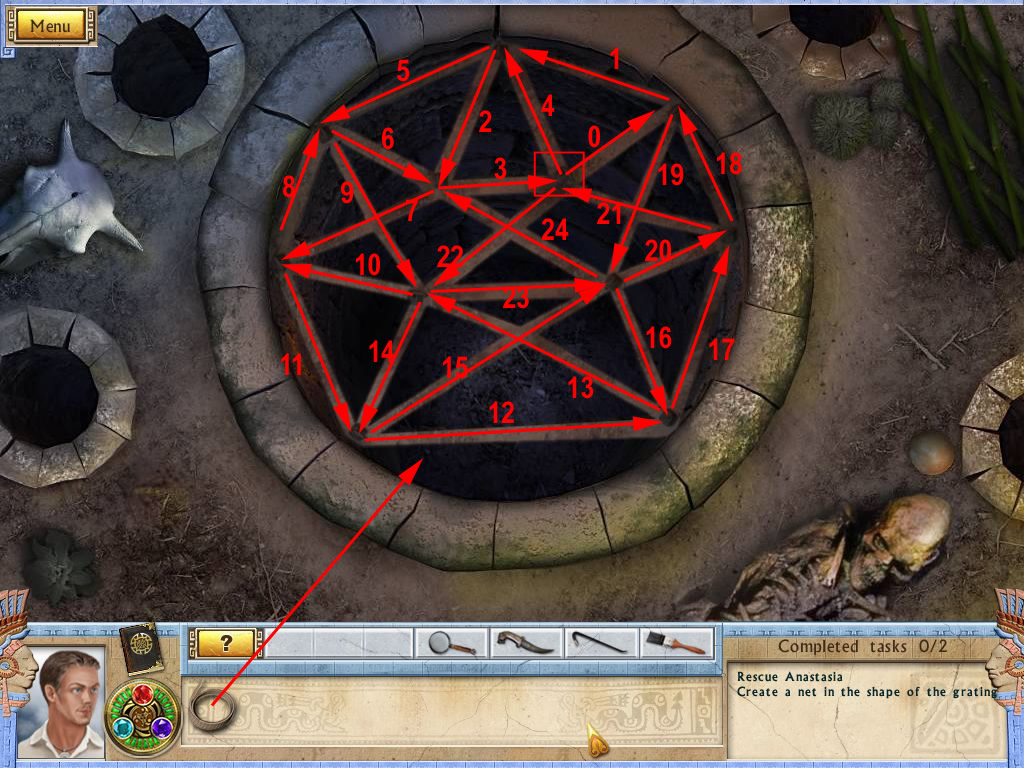
Your goal is it to create a net in the shape of the grate without passing over the same line twice.
Place the net onto the grate - click from knot to knot.
Please see screenshot for the solution.
Screenshot
Change to the Present and watch the End.
Congratulations you saved Anastasia.
To be rewarded with an alternate ending, play the game again with the same profile to find all clues about Mary, Wint's wife.
Special thanks to Kayleigh for writing this wicked awesome walkthrough \o/!!
Posted by: Kero |
November 19, 2009 12:58 AM
|
November 19, 2009 12:58 AM