


![]() There are artists and then...Well, there are those who critique. I'd like to think there can be an amalgamation of both in anyone who loves art, in all its forms, but that can be argued another day. As Anton Ego puts it: "The work of a critic is easy. We risk very little, yet enjoy a position over those who offer up their work and their selves to our judgment. We thrive on negative criticism, which is fun to write and to read. But...the average piece of junk is probably more meaningful than our criticism designating it so." Thusly I'm often hesitant to lay in too heavily in my own critiques as what makes games enjoyable is very subjective. Perhaps the loudest criticism I offer, though, is silent: Those games which don't often make it into the Weekday Escape lineup. Well, it's not that they're not enjoyable or rendered through talent and cleverness, it's just that there are quite a few new escape games born each week. Why did I pick this week's trio from FunkyLand, MayMay and Amakuchi Game? Well, good question. I'll answer that soon enough but for now, I've talked enough. Besides, I'd rather know what you think...
There are artists and then...Well, there are those who critique. I'd like to think there can be an amalgamation of both in anyone who loves art, in all its forms, but that can be argued another day. As Anton Ego puts it: "The work of a critic is easy. We risk very little, yet enjoy a position over those who offer up their work and their selves to our judgment. We thrive on negative criticism, which is fun to write and to read. But...the average piece of junk is probably more meaningful than our criticism designating it so." Thusly I'm often hesitant to lay in too heavily in my own critiques as what makes games enjoyable is very subjective. Perhaps the loudest criticism I offer, though, is silent: Those games which don't often make it into the Weekday Escape lineup. Well, it's not that they're not enjoyable or rendered through talent and cleverness, it's just that there are quite a few new escape games born each week. Why did I pick this week's trio from FunkyLand, MayMay and Amakuchi Game? Well, good question. I'll answer that soon enough but for now, I've talked enough. Besides, I'd rather know what you think...
 1st Room - by newcomer MayMay can be played on your PC or mobile device, just select appropriate button in upper right corner of the game page to switch between a Flash or HTML5 version of the game. While the cursor is unchanging and the puzzles tend toward simplicity, the game sports a nice user interface and artwork which may remind you of Petithima's style. Your successful exit from this room is likely to come quick, the only hangup being how to discern one cleaning apparatus' component from another. For a first entry, it's note-worthy enough to leave us looking forward to MayMay's next creative endeavor.
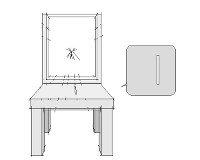 Table - Scroll down the page a bit to find the game window, then click anywhere in it, to begin this rather short escape from Amakuchi. The gameplay centers on a series of interconnected puzzles in a single line-drawn scene—some are simple and some are deceptive in their seemingly simple presentation. This is one that you'll enjoy if you like a little abstruse logic in your games; which means it'll probably appeal more to fans of Detarou than to those who favor more user-friendly stylings from Tomatea. Still, comparisons are easier made than justified and Amakuchi's own unique talent is evident enough in these small offerings that it's easy to long for something more epic by this designer.
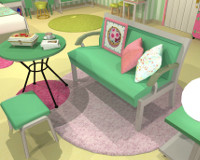 Girls Room No.2: Cheek Rouge - Although this series plays on the notion that girls must like all things pastel and frilly, and loses a bit of whimsical freshness in the process, there's enough of the FunkyLand charisma and style which we know and love to provide a pleasant midweek diversion. In case you've missed the first few dozen FunkyLand creations, here's the break-down: Search for and collect five items (rouge compacts this time around) in order to earn the door key. A few locks, made difficult to decode only by some hard-to-distinguish inventory and a hard-to-spot clue, are all that stand in your way of a smiling victory. Probably the only actual disappointment prompt is knowing FunkyLand has the artistic skill and cleverness to make something even more.
We love escape games, and our readers love talking about them and sharing hints! How about you? Let us know what you think, ask for clues, or help out other players in the comments below.


Walkthrough Guide
(Please allow page to fully load for spoiler tags to be functional.)
Girl's Room 2 Walkthrough
On the window-ledge behind the bed
note the number of flowers in the pictures
green 2
red 3
blue 4
yellow 1
use the flower picture numbers to get the key under the frog
use the key to open the jewelry box
wipes in the left dresser drawer
key under big white globe light (next to sofa)
use key on wardrobe
use wipes on pink smear on right mirror. note code
use code on make-up box on desk
In the shoebox under the side of the bed
get coathanger from wardrobe
attach coathanger to green lightfitting near blue flower painting
Posted by: Jonathan Kok |
February 4, 2015 1:41 AM
|
February 4, 2015 1:41 AM
Table Walkthrough
Exploration
This is one scene, but we have a number of views available to us.
First and most obvious is the table itself, with the numbers 2 3 4 carved into it. You can click on the numbers to see that this is no mere graffiti — they go straight through the table.
On the upper right corner of the table is a marker and a paper on which the marker has clearly been used to make some sort of design.
On the lower right corner of the table, next to some pencils, is a picture showing the underside of the table and a code entry for three digits.
Finally, on the front of the table are four buttons with odd shapes.
Looking around the room there are two other obvious panels on the back wall. On the left is one that has space for 3 digits and has "+ 7 7 5" written under it. On the right is an image of the top of the table and a three-digit entry.
What else? Well besides the lamps hanging over the table there's the chair.
Click on its left side to see a 7, click on its back to see a 1, and click on its right side to see a 6.
That's everything, so let's start entering codes.
Top
So far all we have are the digits 2, 3, and 4 on the top of the table. Let's find a place for them.
The panel on the right of the wall has an image of the top of the table, so they go here.
Entering them in the correct place earns you a little light show. You can repeat this as often as you want until you get the message.
2 3 2 1 3 4
Lights
Ok, so now we have a sequence of numbers but nothing that will accept six digits. What else do we know?
Well, there's the shapes from the marker.
There are four distinct shapes. Have we seen them anywhere else?
They look a lot like the buttons on the front, but how do we tie them together?
Notice that the shapes overlap on the page. They had to have been drawn in a specific order.
1 = U, 2 = I, 3 = —, and 4 = 7
Push the buttons in this order: I — I U — 7 enter
Solving this lowers the tray under the table.
Under
Well now we can see the light shining through the number-holes on to the tray, but they still say 234 so that isn't helpful. Maybe we need a different perspective?
Click under the table and you will see the carvings from underneath. Viewed this way, they say 5 3... uh, h? But backwards? Well, that's not helpful is it?
If you look closely, you'll notice an extra white mark that turns the 3 into a 9. Still not really helpful. What the heck does that backwards "h" mean?
Hey, doesn't the "h" character kind of look like a chair?
So... if we look at the chair in a way that it resembles a backwards h, we see the number 6.
Enter 5 9 6 on the lower-right part of the table.
Aw, nuts. Somehow that caused the pencils to spill all over the place.
Pencils
The pencils falling in the holes changed the way the light shines through them.
Now if you look at the lowered tray you see something like "= = |". How can we use this?
Well there's really only one place left.
How do we add 7 7 5 to this to get something useful?
Pay close attention. Those 7s don't look the way you probably think they do.
Adding the lit-up lines to the digits provided yields 9 9 9. Enter that.
And with that, you're done!
Posted by: Chris Ingersoll |
February 4, 2015 10:33 AM
|
February 4, 2015 10:33 AM
1st Room Walkthrough
Initial view (with the red couch)
Look at the plant - the pot contains the code 338 (sideways).
Look at the clock - its hands have different colors:
Green points at 12
Blue points at 3
Red points at 8
Pick up the yellow stick between the door and the couch.
Look under the couch.
Use the stick to get the nozzle from under the couch.
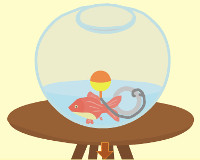
Other view (with the fish bowl)
Enter the code 338 on the code lock of the brown cupboard.
Take the vacuum cleaner from the cupboard.
Look at the code lock on the yellow doors on the right.
You see 8312 above the code buttons
Remember the clock?
8=red, 3=blue, 12=green
Open the doors and take the water.
Look at the fish bowl.
Use the water to top up the water.
Take the key that floats to the top.
Look at the box on the brown cupboard.
Use the key.
Open the box and take the broom.
Look at the broom, then use the yellow stick on it.
Use the broom to mop up some of the water on the floor.
Some water remains, showing 4 shapes:
Rectangle, square, triangle, quarter circle.
Zoom in on the code lock on the yellow door.
Try to recreate the shape of the remaining water.
Start with the rectangle in the lower left corner, then going clockwise, use the square, triangle and quarter circle.
(There are two triangles, it should be obvious which one to use to recreate the water shape.)
Open the yellow door and go through it.
Balcony room
Look at the book on the table and note the color pattern and the position of the green cup relative to it.
Look at the panel to the left of the window. Note the outline of a cup.
Recreate the pattern from the book.
Top row, left to right: blue, green
Middle row: blue, green
Bottom row: green, blue
Open the panel and take the scissors.
Use the scissors to cut some of the ivy from the balcony railing.
Take the vacuum cleaner hose from the railing.
Look at the vacuum cleaner and use the hose on it, then use the nozzle on it. You now have a complete vacuum cleaner.
Click on the table to move it to the left.
Use the vacuum cleaner on the carpet.
Look at the vacuum cleaner again. Click on its body to take the coin.
Look at the panel on the right.
Use the coin on it.
Open the panel and take the key.
Go back to the view with the fish bowl, then to the initial view.
Initial view
Use the key on the door, open the door and you're out.
Posted by: hans.vogelaar |
February 4, 2015 4:51 PM
|
February 4, 2015 4:51 PM