


![]() So you've arrived at your destination, your hut set out over the island shallows, set to indulge in a magical holiday. You're already here in a Pacific wonderland, there's no where else you need to go. Except swimming that is. And therein lies the problem—your sexy new bikini is locked in your suitcase, but where is the key? In Libertechno's Aries Escape: Episode No.12, it's not enough to just escape-the-room, you need the proper attire to do it, accessories included! So follow the navigational arrows to search your surroundings, high and low, inside and out, solving puzzles to unlock safes and cabinets, until you can don your swimwear and fully enjoy this awesome Bora Bora vacation.
So you've arrived at your destination, your hut set out over the island shallows, set to indulge in a magical holiday. You're already here in a Pacific wonderland, there's no where else you need to go. Except swimming that is. And therein lies the problem—your sexy new bikini is locked in your suitcase, but where is the key? In Libertechno's Aries Escape: Episode No.12, it's not enough to just escape-the-room, you need the proper attire to do it, accessories included! So follow the navigational arrows to search your surroundings, high and low, inside and out, solving puzzles to unlock safes and cabinets, until you can don your swimwear and fully enjoy this awesome Bora Bora vacation.
 If you don't read Japanese, you need to know that sometimes a puzzle won't operate in a "I have no clue how to solve this" fashion. Be sure to closely examine everything you see! The clean design and changing cursor make finding active areas a breeze. The setting is reminiscent of Cottage by 58Works yet Libertechno's style is not as well polished and the puzzles are more challenging. At times dependent on lateral thinking and inference, solutions often must be arrived at, not just reveled. By extension, it tends toward being overly obtuse—they have an interior logic, but straight-forward methods of presenting clues are eschewed for presentations that can be misleading. Also, a certain item use would make more sense if you had one nearby and read the ingredients. These kinds of puzzles are not for everyone, but if you think fun means twisting your brain in knots instead of dangling your feet in azure blue waters, then Aries Escape: Episode No.12 is your number to paradise.


Walkthrough Guide
(Please allow page to fully load for spoiler tags to be functional.)
Walkthrough
Note that the game will not let you solve a puzzle if you haven't seen the clue, so no cheating. :)
Single-click to use items, double-click to look at them. To combine items, double-click one, then single click the other and use it on the item you're viewing. If it won't work, try it the other way around.
Exploring
Sliding glass door view
The doors won't open, but there's no immediately-apparent way to unlock them.
There's a panel on the floor that's bolted shut. We'll need a wrench to get whatever that item is down there.
Bed view
There's something under the bed, but we can't reach it.
There's a notepad on the nightstand, but we have nothing to write with.
There's a blue box in the nightstand. It needs a three-letter code.
The sheet on the bed has E's all over it.
The picture above the bed looks oddly stretched. Maybe if we could look at it sideways?
Click the arrow on the left and note the code.
8368
Door view
Well, here's your fabled suitcase, thoroughly locked.
There's a row of coat hooks to the left of the door. Most of them are knobs, but one of them is a cup hook.
Note the colorful shapes on the door.
A blue circle, a yellow diamond, and a green triangle.
There's a small panel on the wall which is screwed shut.
Lift the corner of the rug and note the hint.
857 1
2 6
43
Also note that the rug is strewn with S's.
Dresser view
There's a scroll/poster on the wall with colorful A's on it.
On top of the dresser, there's an elf maiden figurine in a glass dome, and three playing cards in a frame.
The top drawer is locked.
The second and third drawers are empty.
The bottom drawer has a purple box that needs a four-digit code.
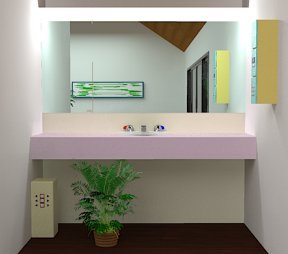
Sink view
(Click the bit of sink you can see when you're in the dresser view to get to the sink view)
The faucet handles are color-coded, but the water is apparently not on.
There's a cabinet hidden behind the left-hand side of the mirror (you can sorta see the gap in the mirror and the handle on the bottom edge), but it won't open.
There are three small lockers on the right. The top needs a key, the middle needs a three-digit code, and the bottom has 9 round buttons.
Under the sink, there's a panel hidden behind the plant. It needs a code involving shapes and colors.
Solving time, part 1
Shapes and colors
The panel under the sink is pretty straightforward: just put in the code from the front door.
Colorblind help:
If you press the right arrow, each shape cycles through blue, green, and yellow, in that order. (If you press the left arrow, the colors obviously go yellow, green, blue instead.)
When you've entered the code, press the Open button on top, then move the handle from "Close" to "Open".
Purple box
The box in the bottom drawer of the dresser needs a four-digit code, and you already found one of those on the picture above the bed. Get the black pen.
Blue box
The box in the nightstand needs a three-letter code. You've found three letters: the E's on the sheets, the A's on the scroll, and the S's on the rug. Dunno about you, but the only word I can form with those letters is "sea". Yup, that worked. Get the socket wrench.
Floor panel
Use the wrench to remove the bolt and open the panel. Unfortunately, you still can't reach the pink thing.
Exploring the back porch
(Turns out that the lever under the sink opened the sliding-glass doors.)
Right-hand view
Look at the plant and get the stick which will become your closest friend for the near future.
There's a torch on the outside corner.
Left-hand view
There's a torch on the corner here, too.
The left-hand deck chair has some sort of code on its headrest.
<└│┘ ┌│┘ ┌│┐ └│┐ └│┘ └│┐<
The right-hand deck chair has a blue and red code.
B R R B B B R
There's a table between the chairs with a box and bowl on top. The box has corners that can move outward (point just outside the corners to see arrows).
There's some sort of clue on the underside of the table.
7 → 3
8 → 7
9 → 6
More solving
The corners box
The clue is the diagram under the rug. For example, the 1 is the top number on the right, so the first step is to move the top right corner to the right. (As with all the puzzles, if you mess up, back out and come back.) Get the white pen.
Under the bed
Use your stick to get the pliers from under the bed.
Captain Hook
Use the pliers to get the cuphook from the coat rack. Put the cuphook on the end of your friend, the stick.
Floor panel, take two
Use the stick+hook to get the object, which turns out to be a key.
Top dresser drawer
Use the key you just found to open the top drawer. Get the bandage.
Sink
Use the blue & red code from the towel on the faucet handles.
Colorblind:
The left handle is red, the right handle is blue.
This opens the mirror cabinet. Get the magnifying glass. Note the white scribble on the back of the cabinet; use your white pen to add some more scribbles to it. Note the shape.
Middle locker
OK, this one is really abstruse. The clues are the cards in the frame plus the numbers on the underside of the table, though how you're supposed to intuit that, I couldn't tell you. (The least they could've done was put some card symbols with the number clue.) The 7 → 3 means that on an LCD display, a 7 is made up of three segments. Similarly, an 8 has 7 segments, and a 9 has 6 segments. These were just the preliminary clues, though: the actual code is the numbers on the cards, or rather the number of segments the numbers (or letters) on the cards have. An A has three lines (which doesn't even follow the rules set forth, but whatever), a 2 has 5 segments, and a 3 has 5 segments. So the code is 255. Get the screwdriver.
Panel next to door
Use the screwdriver to remove the cover of the panel to the right of the door.
There are four buttons underneath. Clicking them reveals curves or lines. To solve it, make the lines resemble the shape on the back of the mirror cabinet.
So the top left button should be a diagonal line from bottom to right; the top right button should be an arc of a circle; the bottom left button needs to be a diagonal line from top to right; and the bottom right button needs to be the bottom right part of a square.
Press OK when you're done and note the cut scene: the ceiling fan starts up, and something falls off of it.
Look down at the rug and collect the coin that fell.
Torches
Time to do some combining. First, add the bandage to your trusty stick. Next, use the black pen on the bandage (it's one of them highly-flammable solvent-based markers, apparently). Now go outside and use the magnifying glass on your contraption. Whoo-hoo, fire!
Use your flaming stick to light the two torches on the corners of the porch. Watch the cut scene.
Turn back to the house, but don't go in. Notice that there's now an upward arrow. Click it, then use your best friend, the stick, to get the key.
Top locker
Use the key you just got to open the locker and get the bucket.
Glass bowl
Put the bucket on the end of the love of your life, ahem, sorry, the stick. Go to the floor panel and fill the bucket with water. (Aw, you're now done with the stick. Sniff.) Go outside and pour the water into the glass bowl. Get the white disk.
Bottom locker
Look at the white disk: note that the Z pattern has an arrow at one end. Go to the bottom locker and press the buttons in a Z pattern, starting at the lower right and ending at the upper left. Get the pencil.
Elf maiden
Go use your pencil on the pad of paper on the nightstand. Note the symbol.
Put the coin into the slot on the base of the dome holding the elf maiden.
Rotate the bottom of the dome until the symbol from the nightstand is in front. Press the "open" button.
Remember the pattern on the headrest of the deck chair? Move the statue's arms in that pattern, going from right to left (not left to right!). When you're done, press the red button. Get the key.
The front door
Use the key from the elf maiden to open the front door. Don't worry, you're not done yet. Go out the door and turn around.
Planter
Get the paper peeking out from the plant.
Bench
There's a round box with four buttons, but you can't press them yet, so you can't tell what sort of code it needs.
And some more solving
The A's have it
Use the paper from the planter on the scroll with the A's. Note the colors and the arrow.
Green, blue, yellow, red.
Round box
Use the color code to open the box.
Colorblind:
Don't randomly click the buttons, because they don't reset. Click the first button twice, the second button once, the third button 4 times, and the last button 3 times.
Get the yellow key.
Suitcase
Use the yellow key (which incidentally looks like no suitcase key I've ever encountered) to open the suitcase. Get your swimsuit. Click the swimsuit, then click the torso to the right of your inventory to put on said swimsuit.
Normal end
Go out the door and jump into the water.
Happy end
Go outside, but don't jump into the water yet. Go back inside. Notice that the bedside lamp is now turned on. Look at the pad of paper and note the pattern of blue light. Go to the bottom locker and press the two white buttons (the ones that weren't involved in the original code) to reset the panel. Now press the buttons in an N shape, starting at the top right and ending at the bottom left. Get the necklace. Now go out the front door and jump in the water.
Posted by: Reka |
June 21, 2014 5:01 AM
|
June 21, 2014 5:01 AM