

Mystery Case Files: Fate's Carnival
Platform: Mac, Windows
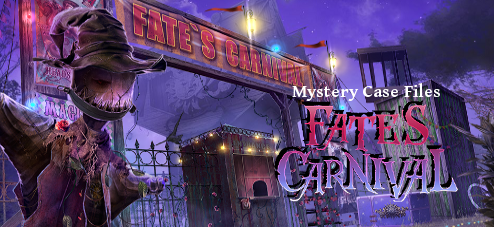
![]() There's some "strange phenomena" allegedly happening around a familiar abandoned carnival, but even though you're a member of the Mystery Case Files detectives, you're convinced it's just a bunch of kids stirring up trouble... right up until you find yourself trapped by a malevolent curse, that is. Now you and the rest of the carnival's performers are doomed unless you can find a way to save everyone and thwart the dark power du jour in the hidden-object adventure Mystery Case Files: Fate's Carnival by Elephant Games. With twelve cursed souls to save, including your own, and piles of confounding puzzles, some freaky and creepy jump scares, and a cat that actually does what it's told, it's a worthy successor to the series.
There's some "strange phenomena" allegedly happening around a familiar abandoned carnival, but even though you're a member of the Mystery Case Files detectives, you're convinced it's just a bunch of kids stirring up trouble... right up until you find yourself trapped by a malevolent curse, that is. Now you and the rest of the carnival's performers are doomed unless you can find a way to save everyone and thwart the dark power du jour in the hidden-object adventure Mystery Case Files: Fate's Carnival by Elephant Games. With twelve cursed souls to save, including your own, and piles of confounding puzzles, some freaky and creepy jump scares, and a cat that actually does what it's told, it's a worthy successor to the series.
 Though the game basically plays like your standard pointy-clicky, hidden-object-seeky title, it does a lot to both streamline the experience and engage you. You've got your magic map to traipse around the fairgrounds simply by clicking on any location you've visited, your magic sassy cat to retrieve items you can't reach, your five levels of difficulty you can switch between at any time... oh, and there's also some weird little extras, like collecting magically shifting playing cards to unlock a Solitaire game, and the ability to find cash to buy items for your cat, if that's what you're into. All of the carnival workers, who you should recognise, are snared in lethal yet oddly poetic traps, and the fairgrounds themselves are dangerously run down and laden with all sorts of puzzles left behind by the madman who seems to have caused all of this and has one serious grudge. Who could he be... and could he have more to do with your past than it seems?
 Analysis: Having veteran awesome-crafters Elephant Games take over the series is a bit of a surprise, but they've definitely done an outstanding job. Mystery Case Files is a series that has undergone some dramatic changes in basic design and style, some more successful than others, and Fate's Carnival feels like a return to classic form both in aesthetics and gameplay. No more real actors (you'll be in my heart, Cooter), this game features gorgeous artwork from top to bottom, and rich, stunning environmental design. Even more welcome are the sort of complex, Rube Goldberg-esque puzzles we haven't seen from the series in a long time, and a greater reliance on adventuring over hidden-object scenes. There's a bit less of a focus on storytelling this time around, and the game doesn't do much to fill you in on who all these returning characters are or what they're talking about if you haven't played Madame Fate... but you'll be going far beyond the carnival as it is, anyway, as the game changes things up just when you think you've explored everywhere you can.
Mystery Case Files: Fate's Carnival is one stunner of a game, with a satisfying length and engaging gameplay. It isn't, however, particularly difficult. The puzzles are all fairly logical and item uses are obvious, and the more tricky mechanical puzzles have their solutions spelled out in the notebook you require, which makes me wistful for Mystery Case Files: Dire Grove's fiendishly sneaky hidden clues and solutions. The biggest challenge can be that the game is occasionally finicky when it comes to accepting clicks to interact with or use/pick-up items, something that gets especially frustrating in the Rube Goldberg-sy challenges. Still, Fate's Carnival feels devoted to its gameplay rather than its cinema in a way that the series hasn't in a long time, and the result is worth the wait. It's filled with twist and turns that bring the entire series together in an unexpected way. If you've given up on the series because of the changes its undergone over the years, do yourself a favour and check out the demo for this one. And if you've never played but are looking for an adventure that's big, weird, and gorgeous in equal measure, check out the demo too. Highly recommended.
Note: Currently, only the Collector's Edition is available. It contains a bonus chapter, art gallery, strategy guide, and more. Remember that Big Fish Game Club Members pay only $13.99 for Collector's Editions (or 2 club credits), and collector's editions count 3 card punches of 6 total needed for a free game.
![]() Windows:
Windows:
Download the demo
Get the full version
![]() Mac OS X:
Mac OS X:
Download the demo
Get the full version


Walkthrough Guide
(Please allow page to fully load for spoiler tags to be functional.)
Mystery Case Files: Fates Carnival Walkthrough
General Information
Main Menu
From the Main Menu, you can Play or Quit the game, choose your Options and your Profile, access Bonus Content for the Collector's Edition, and preview the next game in the series.
Options include Music, Effects, Environment, and Voice volume; a Gamma adjustment; Full or Windowed screen; use of a Custom Cursor; a choice of Wide screen; and your choice of Special Effects or not.
Game Mode
There are 6 choices for the Game Mode you wish to play, and you can always switch modes once you start game play.
Easy Knievel is for new or casual players who want that more relaxed game play with all the bells and whistles.
Swallow Hard is for those players who like to do things the hard way without all the extra help of sparkles and quick hint recharges.
Difficult Directive is for those who say forget the help because there are no hints, skips, or sparkles.
Monstrously Tough is scary hard because it is like Difficult Directive without cursor changes over active areas.
Alister's Watch is only for daredevils who not only don't want help, but want time limits imposed for their game play. It is unlocked once you play the game in another mode.
Scene Navigation
In the lower left corner is your case file briefcase, under which you can connect with the Menu.
To the left of your Inventory that is in the middle, you can access your current Task by clicking on the tab.
To the right are your Hints if you are playing a mode that allows them.
For those modes with cursor changes, an index finger means that you can push, move, etc. and object.
A hand allows you to pick up an object from Inventory.
The magnifying glass wants you to take a closer look at an area.
A cursor with gears tells you that you can use an object from your Inventory and can select to see a text clue.
A cat cursor appears when you can use Isis for some help.
During the game there will be 16 Secret Cards for you to pick up that will be marked in yellow. These cards can be viewed from the Bonus Content Solitaire that can be accessed from the Main Menu.
Bobbleheads are marked in the screenshots, and a list with their locations will be provided at the end of this walkthrough.
Money to buy items for Isis is marked in the screenshots as well.
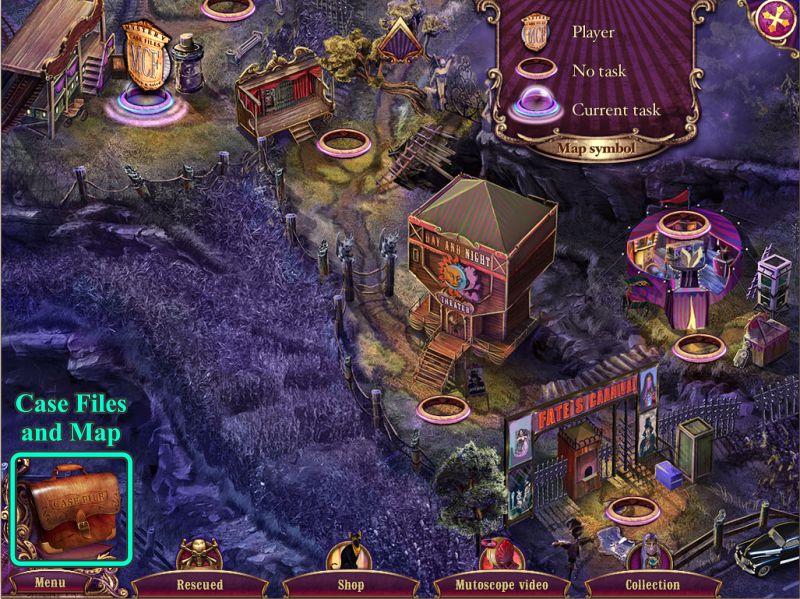
Case Files
When you access your Case Files, you will get an interactive Map that will allow you to travel between locations as well as show you your current location and locations with tasks.
In addition, you can also access the screen to show who you have rescued, shop for Isis, revisit the Mutoscope videos, and view your collection of bobbleheads that you pick up along the way.
Map
The Map, located in your Case Files, shows the locations with current tasks, and it is interactive so you can use it to transport to other locations.
See the screenshot for a sample Map.
Screenshot
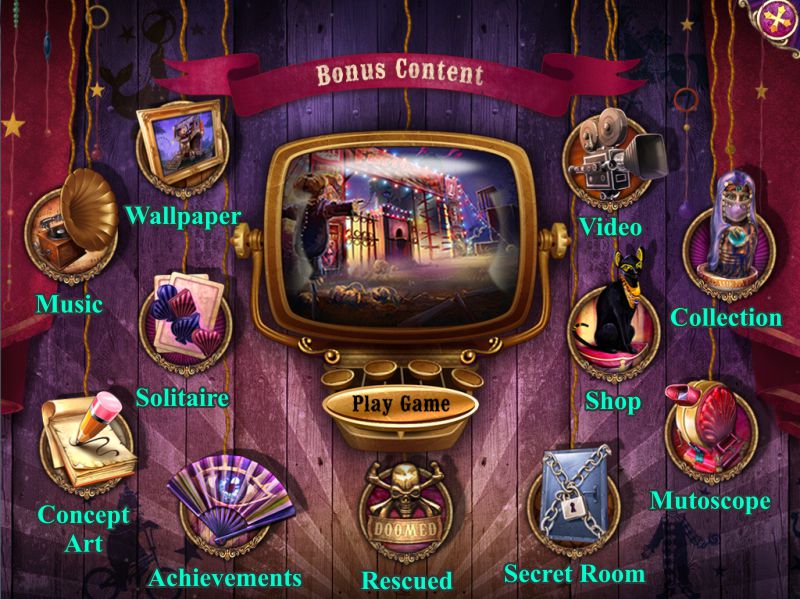
Bonus Content
If you purchased the Collector's Edition, you not only have a bonus game to play, but you will also have access to Wallpaper, Music, a game of Solitaire, Concept Art, your Achievements, Rescued people, and a Secret Room.
In addition, you can replay Videos and Mutoscope films, Shop for Isis, and view your Collection of Bobbleheads.
Screenshot
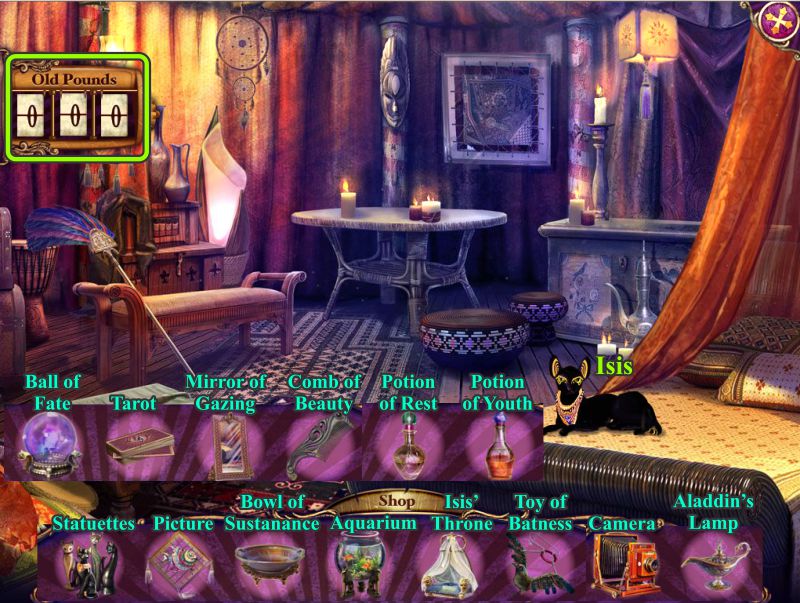
Shop
Madam Fate entrusted you with Isis to help on your journey, so you now have the option, when you collect Money in the form of Old Pounds, to go shop for her.
Since Isis likes nice thing, the collection of items you can buy for her is shown in the screenshot.
Screenshot
Achievements
As you progress through the game, you will collect Achievements that can be viewed from the Bonus Content link on the Main Menu.
Ten Pinned: Complete 10 hidden object scenes in a row in less than 3 minutes each.
Ten Second Rule: Pick up 10 hidden objects in 10 seconds.
Hint Denier: Complete 10 hidden object scenes without a hint.
Hint Hoarder: Complete 5 hidden object scenes without a hint.
How Time Fives: Complete 5 mini games without skipping.
Lookee Me: Pick up 3 hidden objects in 3 seconds.
Fiver Aliver: Complete 5 hidden object scenes in a row in less than 3 minutes each.
Spotter Plodder: Complete 1 hidden object scene in more than 10 minutes.
Hint of Hope: Complete all hidden object scenes without a hint.
Skip Skipper: Complete 8 mini games without skipping.
Three Hee Hee: Complete 3 mini games without skipping.
High-five Eye: Pick up 5 hidden objects in 5 seconds.
Not A Single Hint: Complete 3 hidden object scenes without a hint.
Fate's Finder: Complete 3 hidden object scenes in a row in less than 3 minutes each.
Lightning Looker: Complete the standard game in Alister's Watch mode.
Game Tamer: Complete all mini games without skipping.
Speedy Spotter: Complete 1 hidden object scene in less than 1 minute.
Chapter 1: The Amazing Larry
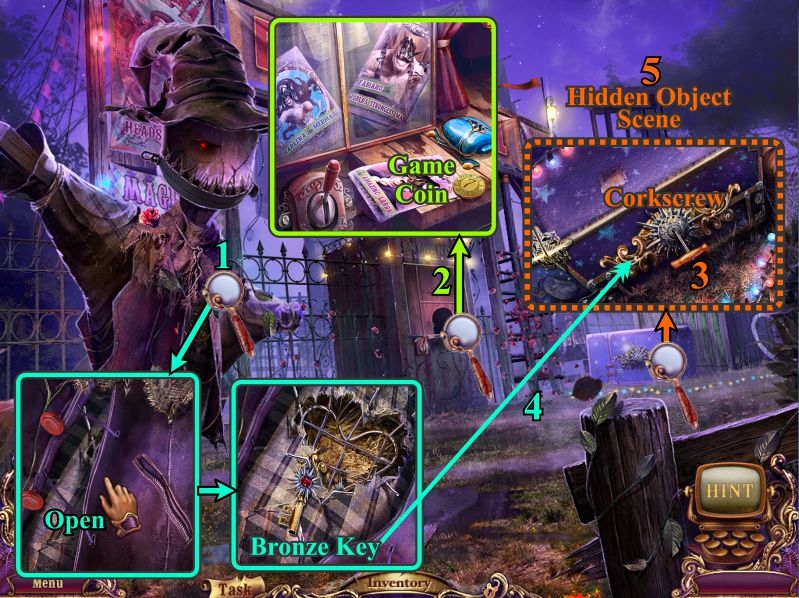
Outside Carnival
Touch the scene and the raven will fly off the post into the carnival.
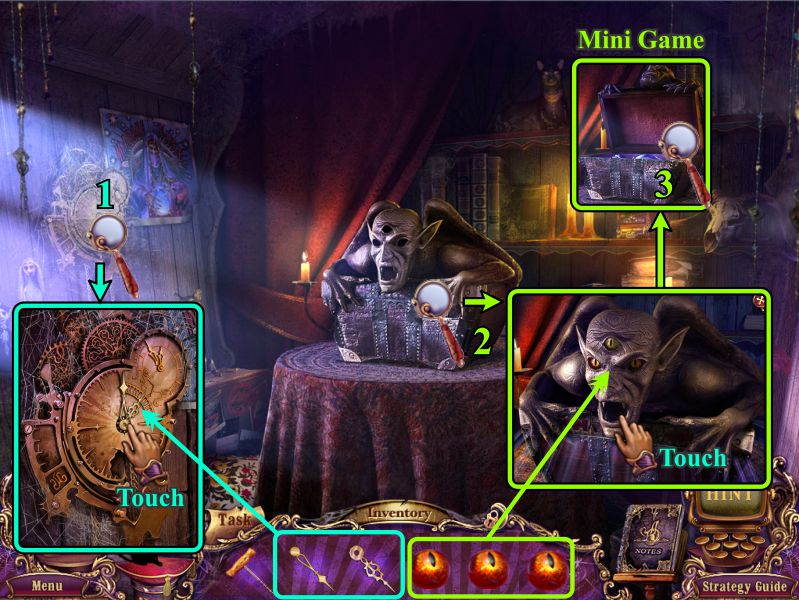
Examine the scarecrow and open his jacket to find a Bronze Key.
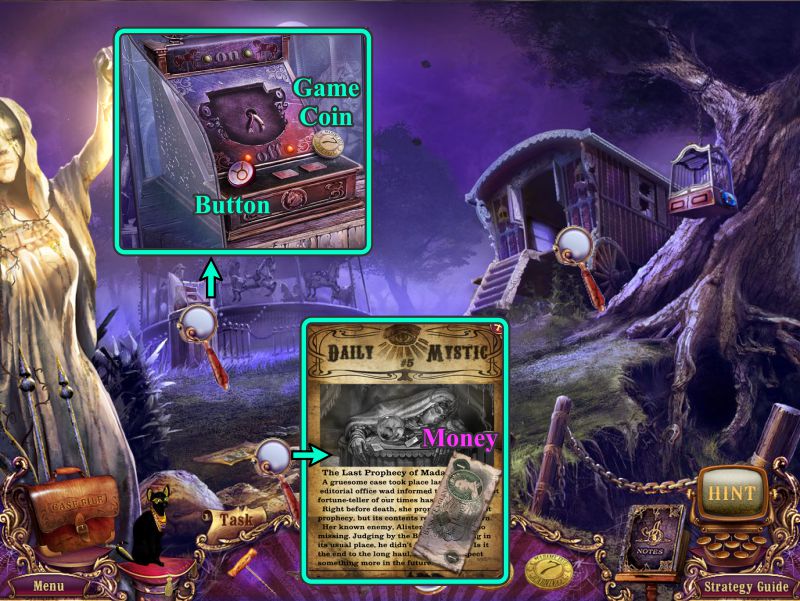
Zoom in on the ticket booth and pick up the Game Coin.
Check out the trunk and remove the Corkscrew.
Use the Bronze Key to open the trunk for a Hidden Object Scene.
Screenshot
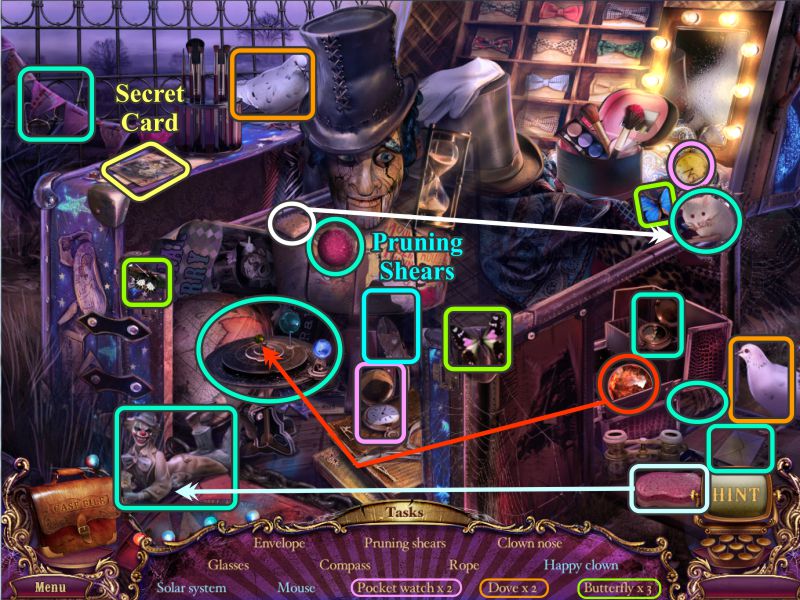
Trunk Hidden Object Scene
Collect the Secret Card and all other items on the list to get the Pruning Shears.
Give the chees to the Mouse to collect him.
Place the planet marked in red on the Solar System.
Clean up the clown with the sponge to get a Happy Clown.
Screenshot
Outside Carnival
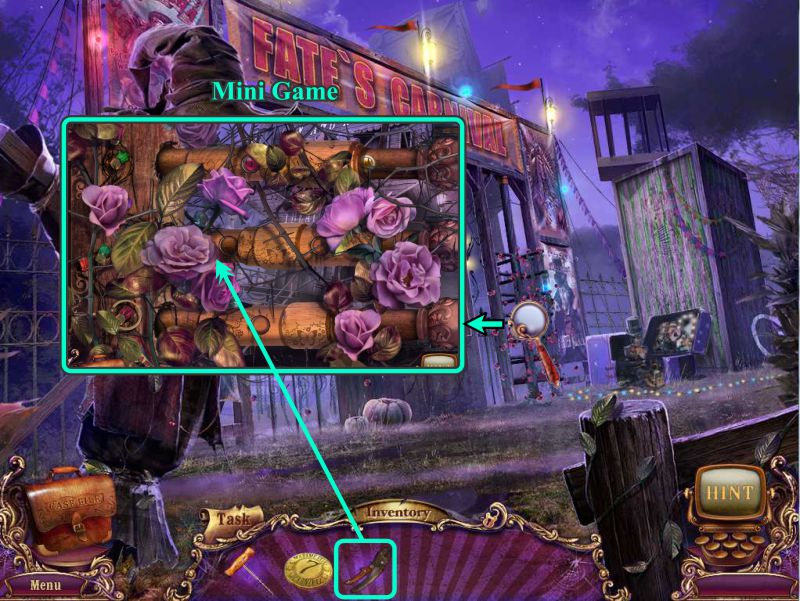
Zoom in on the gate and use the Pruning Shears to remove the roses in order to trigger a Mini Game.
Screenshot
Carnival Gate Mini Game
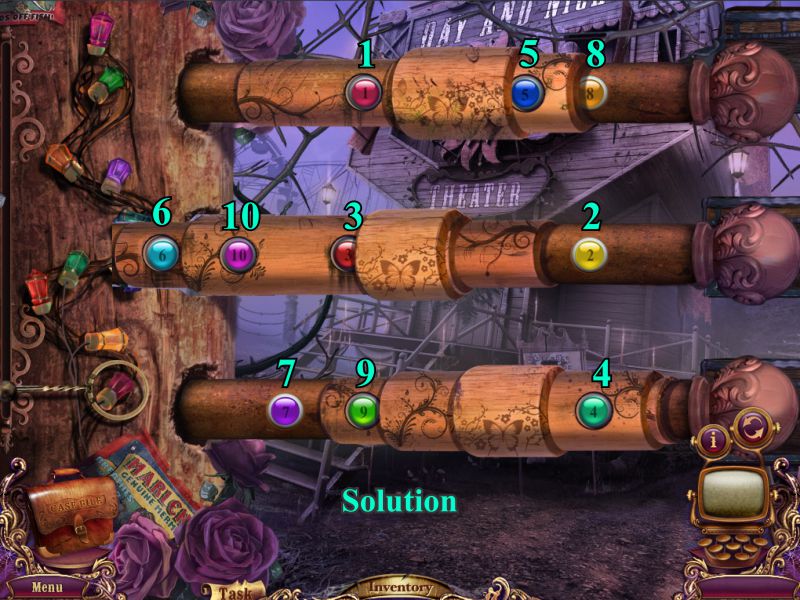
Your goal is to press all the buttons in order starting with 1 and ending with 10.
You will need to move the cylinders to uncover all the buttons and some cylinders will move other cylinders.
See the screenshot for the location of the buttons.
Number 6 is buried underneath the bottom rod and will appear next to 10 when all the cylinders are moved to the right.
Screenshot
Carnival Gate
When you've finished the game, use the gate to enter the Carnival.
We almost made it inside but the ghost of Madame Fate appears with a present of her cat Isis.
Collect Isis who will sit on her pedestal to accompany us on our investigation.
Let's try once more to enter through the Carnival gate.
Theater of Day and Night
Examine the door and collect the Mechanical Bird.
Zoom in on the gate at the left and send Isis in to retrieve the Comedy mask.
Go up the steps at the right to the area Outside the Tent.
Screenshot
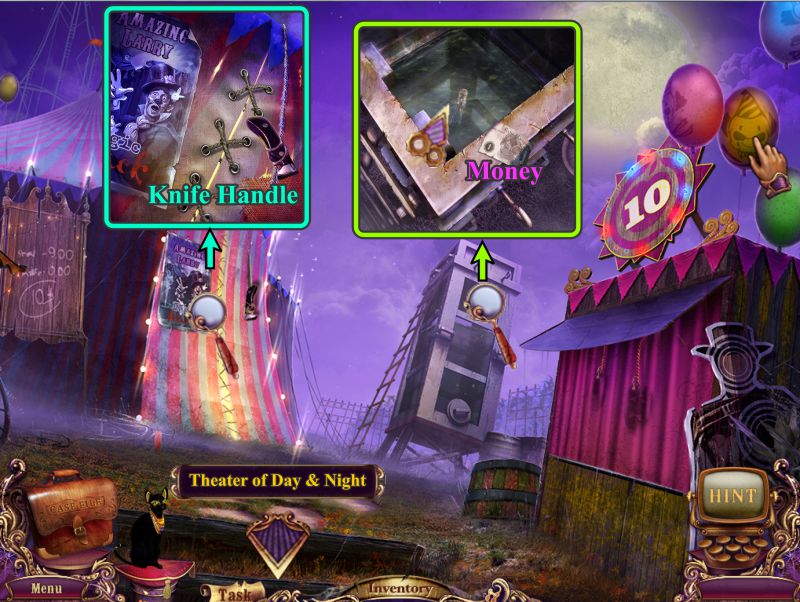
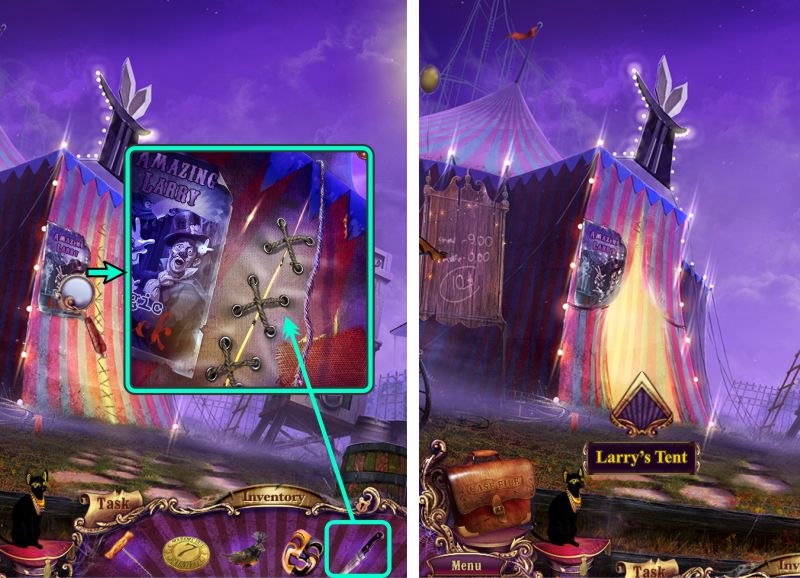
Outside Tent
Touch the yellow balloon and it will float away.
Examine the water tower and take the Money.
Zoom in on Amazing Larry's tent and take the Knife Handle.
Return to Theater of Day and Night.
Screenshot
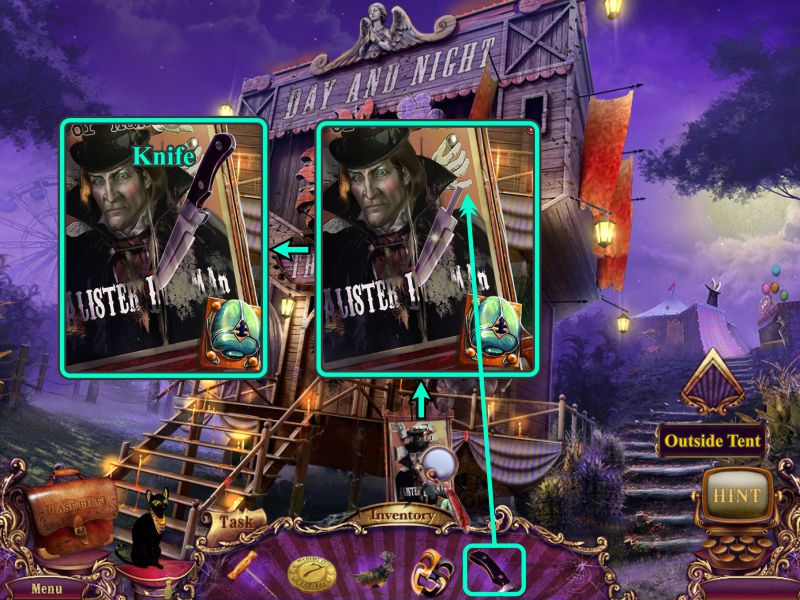
Theater of Day and Night
Zoom in on the sign, and place the Knife Handle on the blade to get a Knife.
Go back up the stairs to Outside the Tent.
Screenshot
Outside Tent
Zoom in on Larry's Tent and use the Knife to remove the stitches.
Enter Larry's Tent.
Screenshot
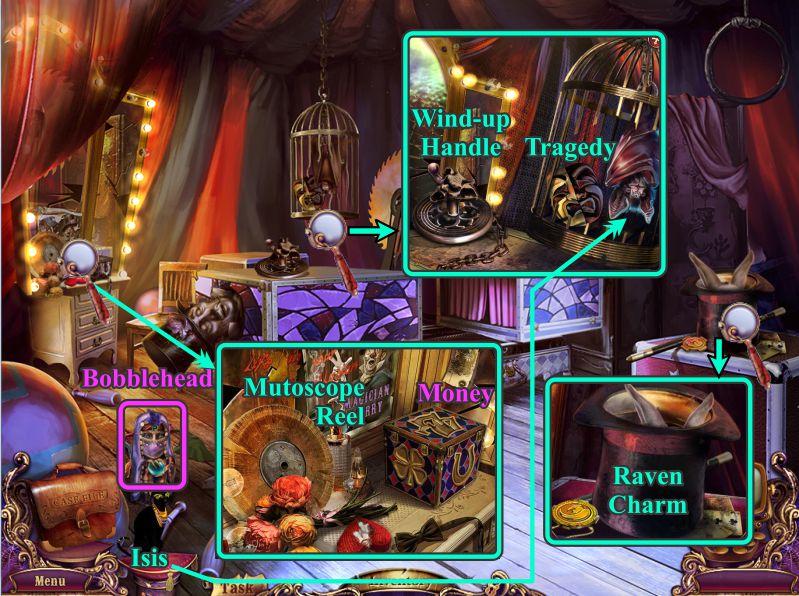
Larry's Tent
Check up on Larry for a cut scene to find out he's alive.
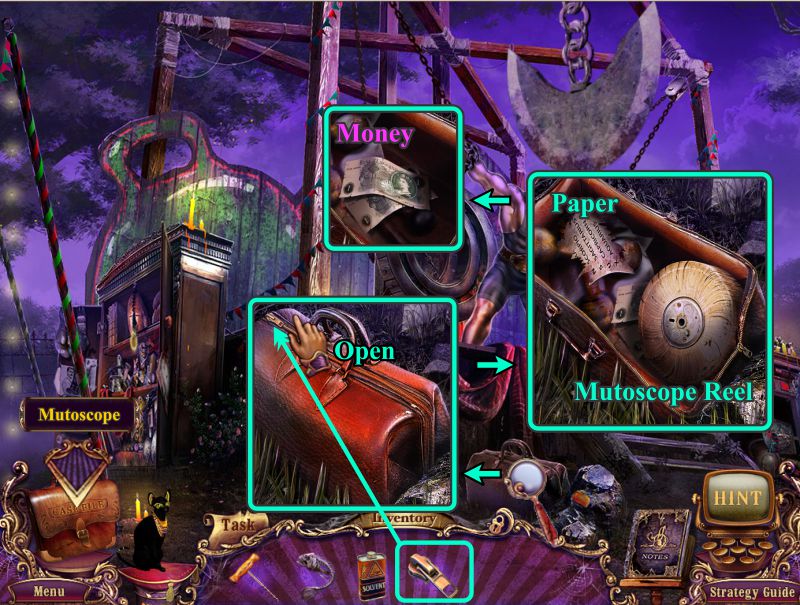
Examine the dressing table and take the Money and Mutoscope Reel.
The vase above Isis will morph into a Bobblehead of Madame Fate so grab it when you can.
Zoom in on the cage and send Isis to scare off the bat so you can take the Tragedy mask.
Pick up the Wind-up Handle, and examine the ears in the hat to find a hungry rabbit.
Take the Raven Charm and go outside.
Screenshot
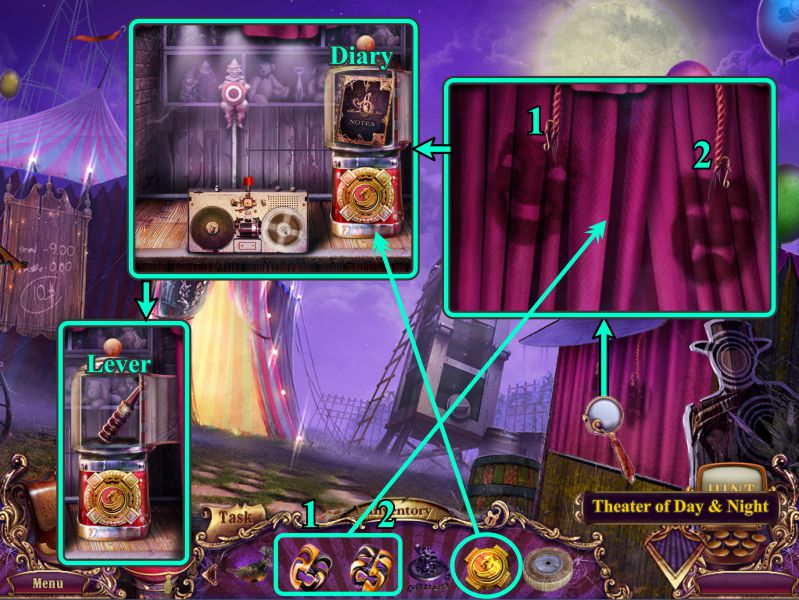
Outside Tent
Zoom in on the curtain to the right and place Comedy and Tragedy to open the curtain.
Examine the Dictaphone, and place the Raven Charm in the slot as shown.
Collect the Diary and it will situate itself between your Inventory and Hint button.
Take the Lever and go to the Theater of Day and Night.
Screenshot
Theater of Day and Night
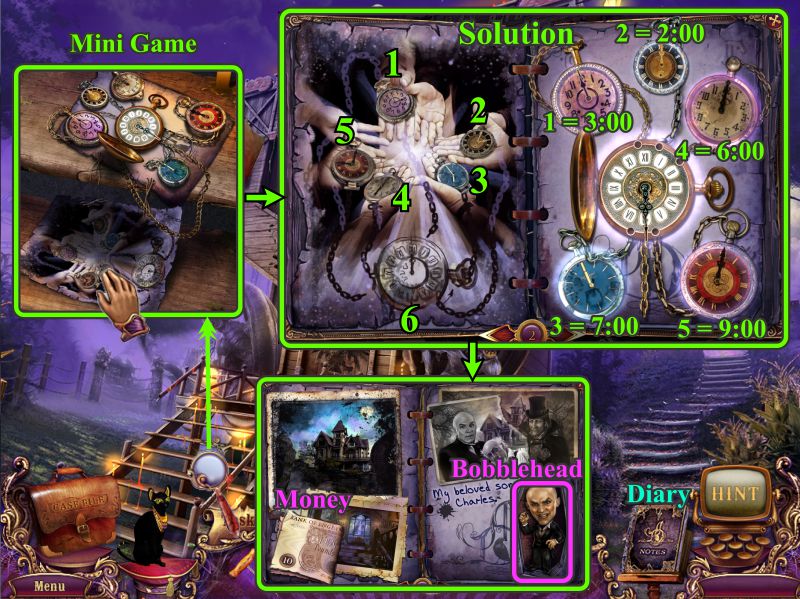
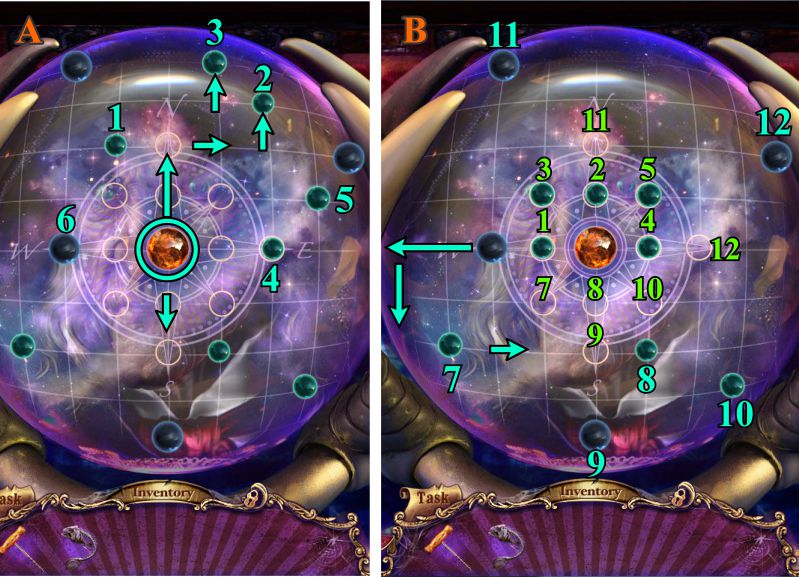
Look to see what the Raven dropped on the theater steps and collect it to trigger a Mini Game.
Clock Mini Game
Set the numbered clocks to the times shown in the screenshot and the large clock in the middle will automatically be set to 12:00.
Take Charles Bobblehead and the Money.
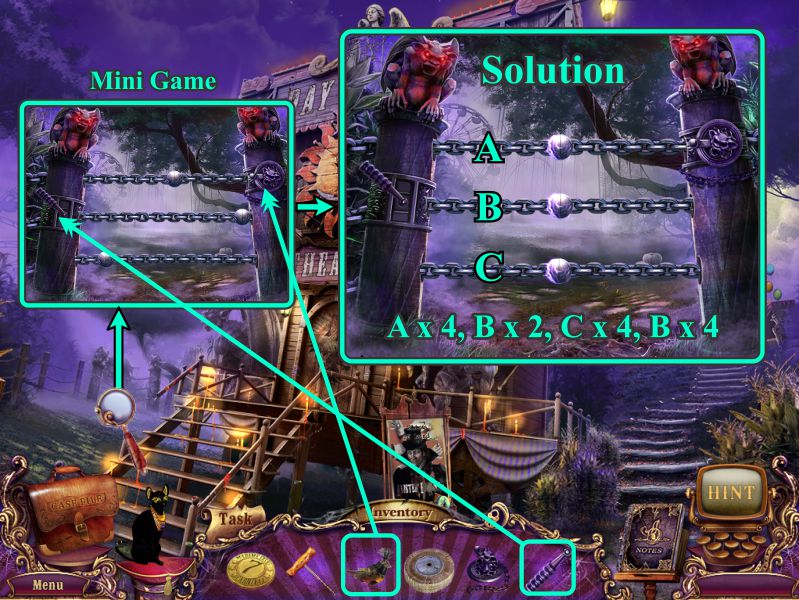
Zoom in on the far left gate to place your Lever and Wind-up Handle on the posts to trigger a Mini Game.
Screenshot
Chain Gate Mini Game
Your goal is to get all 3 balls lined up vertically.
Pull the lever on the left to change chains, while the pulley on the right moves the balls and chains.
Moving one chain will also make other chains move, but not necessarily at the same speed.
When you are on the top chain, it moves left and the other 2 chains move right.
On the middle chain, it moves left and the other 2 chains move to the right.
For the bottom chain, all 3 chains move left.
When the balls are near each other, they will create electricity.
If you want to reset the game, press the button at the right with the 2 circular arrows.
See the screenshot for the solution, and go to the Crossroads when the gate opens.
Screenshot
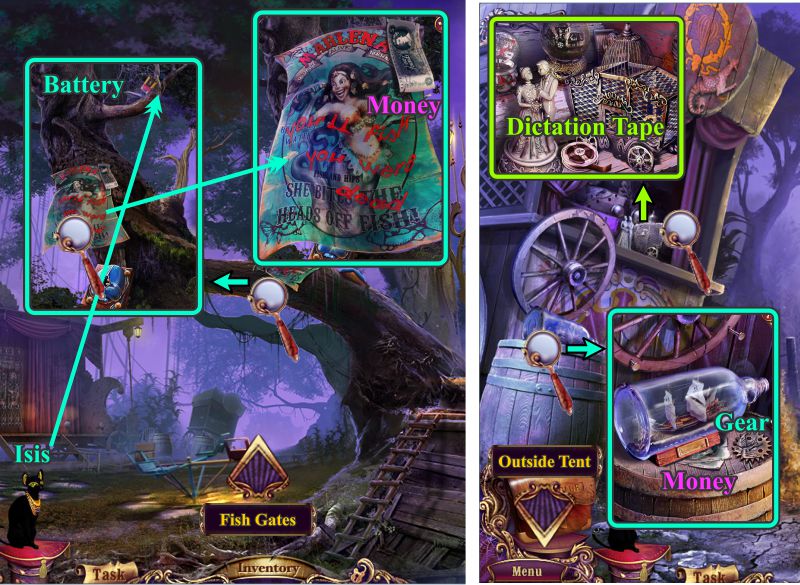
Crossroads and Fish Gates
Zoom in on the tree and take the Money.
Send Iris to get the Battery for your Inventory.
Head off to the Fish Gates.
Zoom in on the wagon and take the Dictation Tape.
Examine the top of the barrel to take the Money and Gear.
Use the Map to go to Outside the Tent.
Screenshot
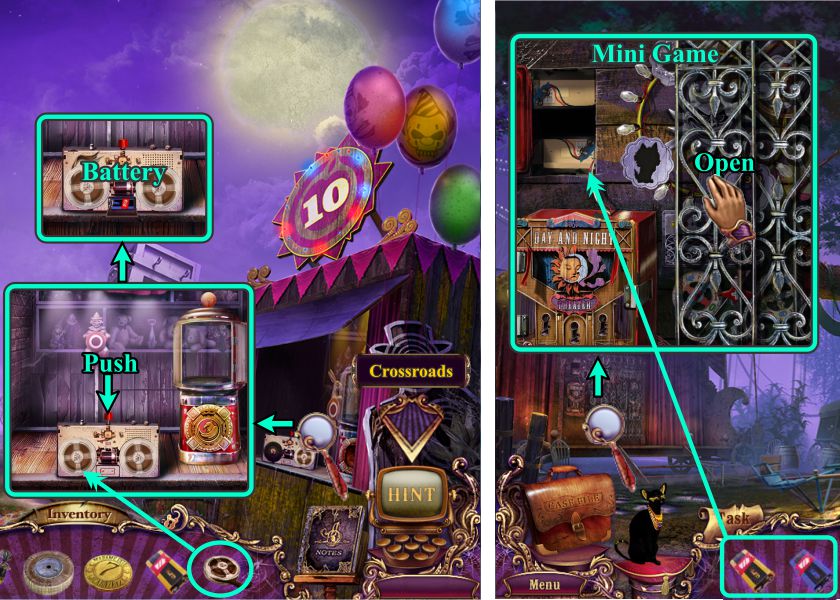
Outside Tent and Crossroads
Zoom in on the right tent and place the Dictation Tape on the machine.
Push the button to listen to the tape.
Take the Battery from the machine, and go to the Crossroads.
Zoom in on the tent and place your Batteries.
Open the gate to trigger a Mini Game.
Screenshot
Attractions Puzzle
Your goal is to move pieces of the puzzle in sequence to get things to interact.
Turn off all the ferris wheel lights except the yellow lights, then turn those off.
Turn on only the red lights, and then turn them off.
Turn on only the blue lights, take the saw, and give it to the rabbits.
Alternately touch the rabbits, starting on the left until they saw through the box.
The box will move over for the hammer man to test his powers and break the glass on the cabinet above, so set his power meter to 4 or 5 and then click on his arm, but first remove the round bell at the top.
Turn the wheels on the rocket scale to 6 and 7 so it eaquals 13, and place the wolf in the rocket on the ferris wheel.
Screenshot
Turn the ferris wheel so the wolf is inside the gold ring, and turn all the sheep in the cabinet upside down.
Place the owl in the gold ring and turn over all the mice.
Turn to place the lion in the ring and turn over all the zebras.
You now have 3 keys, so place them in the Day and Night box, and turn them to open it.
Change the detonator code to 315 and stand back.
Go through the hole it creates to the Attractions area.
.jpg">Screenshot
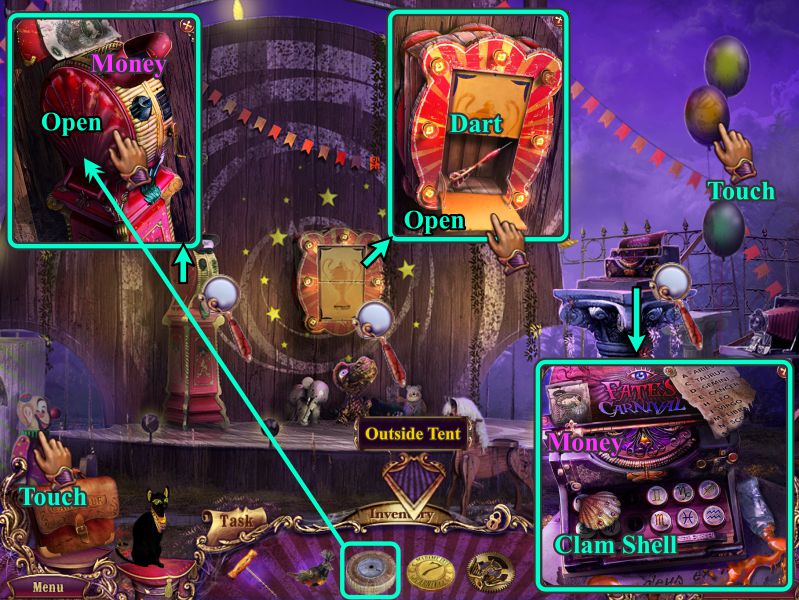
Attractions
Zoom in on the stairs and take the Corvus Flyer.
Examine the pedestal next to the stairs, push the torn ticket into the slot, take the Money and Gear.
Go forward to the Mutoscope.
Screenshot
Mutoscope
Zoom in on the machine on stage, take the money, open the side of the Mutoscope, and place the Mutoscope Reel to view it.
Examine the box with lights, open the lower half, and take the Dart.
Zoom in on the thing on the pedestal that looks like a typewriter to find Money and a Clam Shell.
Touch the middle balloon and it will fly away.
Also touch the clown in the lower left corner to see what happens.
Use the Map to go to the Outside Tent area.
Screenshot
Arcade Tent
Go to the tent on the right and aim your Dart at the bullseye.
Automatic bingo and you are presented with a can of Oil.
Take it and go to Larry's Tent.
Screenshot
Larry's Tent
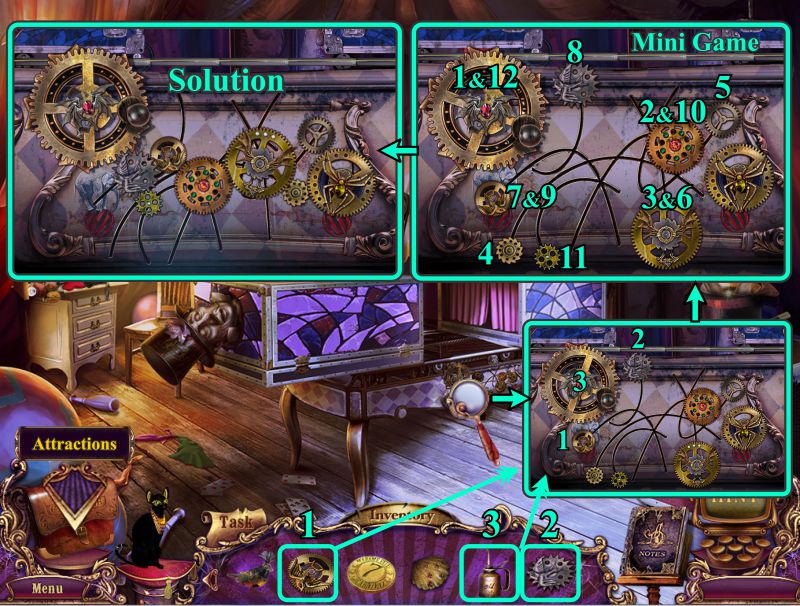
Time to put Larry back together, so zoom in on the table under the box.
Place the two Gears as shown, and oil the large gear to trigger a Mini Game.
Goal: Move the gears to their ending points in order to put the box back together.
See the screenshot for the step-by-step solution.
Once you have solved the game and saved Larry, he will give you a Ticket.
Go to Attractions via the Map.
Screenshot
Chapter 2: Marlena the Mermaid
Attractions
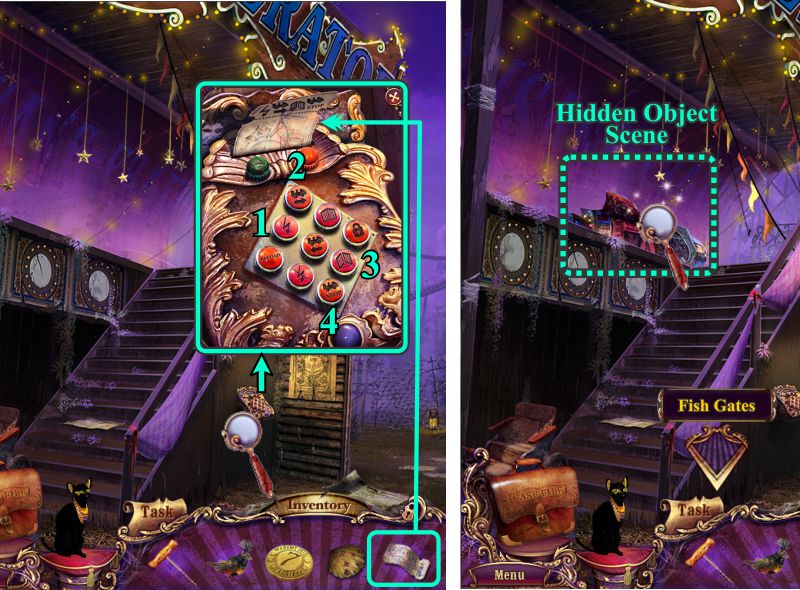
Zoom in on the control box.
Place your Ticket, and press the buttons as shown in order to summon the car.
Play the Hidden Object Scene on the car, and then go to the Fish Gates.
Screenshot
Attractions Ride Hidden Object Scene
Put catch the head as it rolls by and place it to collect the Doll.
Use the foil to pierce the balloon in order to collect the Candy.
Open the book marked in white and the hatch.
Turn the panel in the hatch to press the icons in the order indicated in the book.
The Driver's Seat will then pop up for you to collect it.
Multiple items to find are marked in the screenshot, and there is a Secret Card as well.
The Rubber Gloves will go into your Inventory.
Screenshot
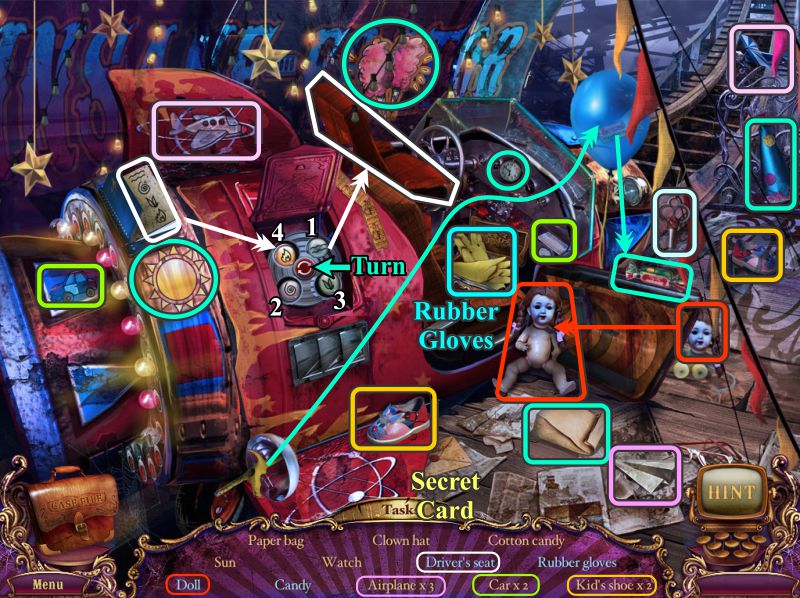
Fish Gate
Zoom in on the gate opener, and use your Rubber Gloves to disconnect the plug.
No more blades, so go through the gate to Marlena's Stage.
Screenshot
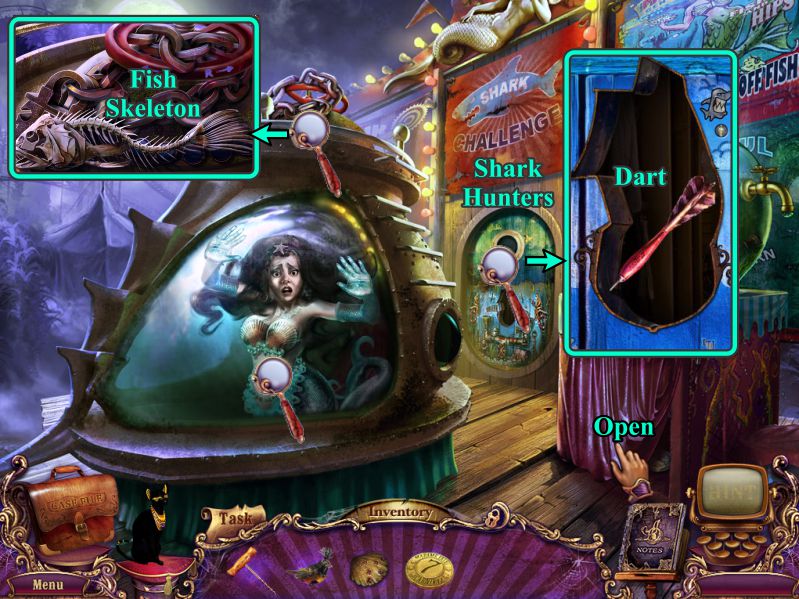
Marlena's Stage
Check out Marlena.
Examine the valve on top of her tank and take the Fish Skeleton.
Look at the Shark Hunter door and take the Dart.
Open the drape under the fish bubble.
Screenshot
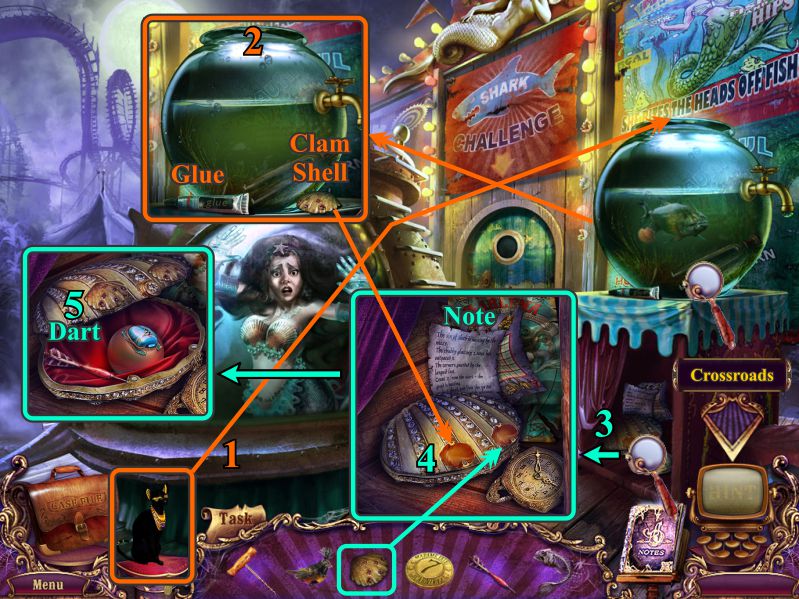
Zoom in on the fish bubble, take the Glue, and send Isis to get rid of the fish and retrieve the Scallop Shell.
Examine the box under the fish bubble, take the Note, and place both Shells on the purse shell to open it.
Take the Dart.
Open the Diary for a Mini Game, and then go to the Crossroads.
Screenshot
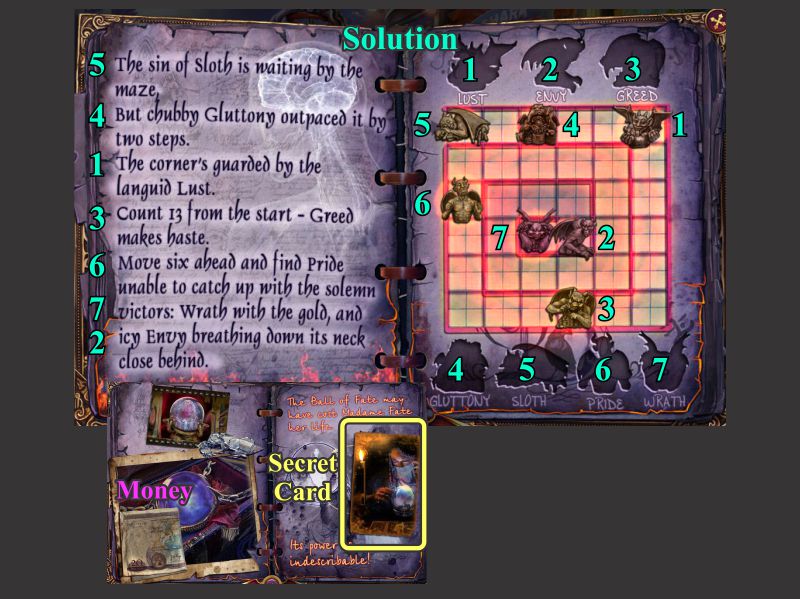
Diary Maze Mini Game
Follow the directions on the left page and place the 7 deadly sins in their places in the maze.
See the screenshot for the solution.
At the end of the game, take the Secret Card and Money.
Screenshot
Crossroads
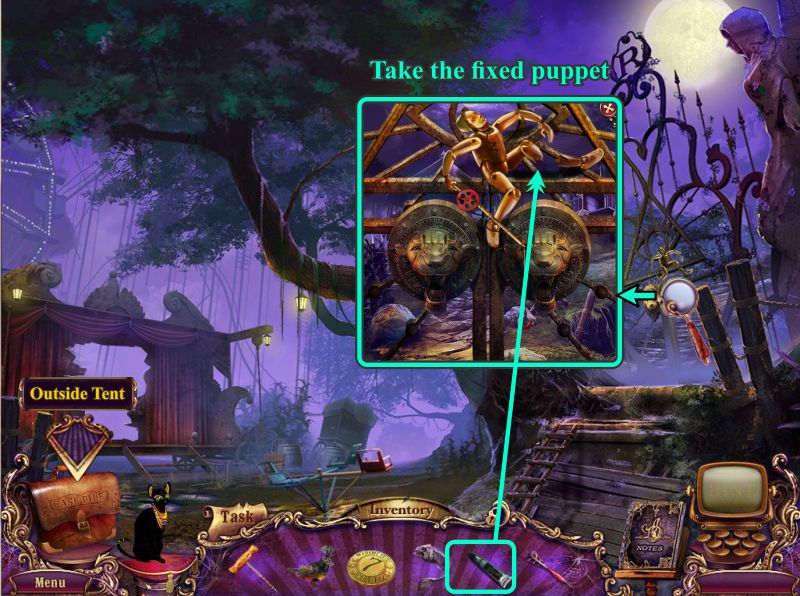
Zoom in on the gate and use the Glue to repair the puppet.
Collect the glued puppet.
Go to the Outside Tent area and zoom in on the right tent.
Screenshot
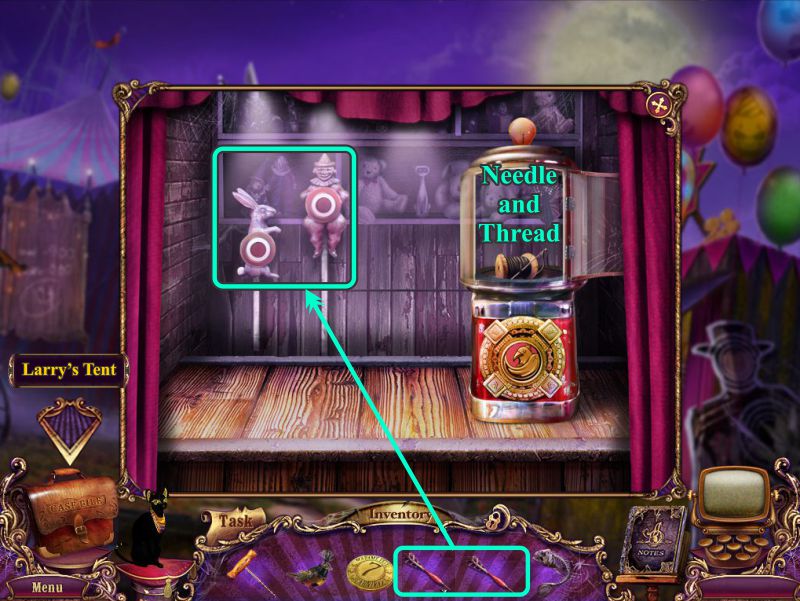
Outside Tent
Use your two darts on the targets to get a Needle and Thread.
Screenshot
Larry's Tent and Outside Carnival
Zoom in on the dressing table and use your Needle and Thread to sew the heart back together.
Take the Heart and go to Outside Carnival.
Zoom in on the scarecrow and place the Heart.
Remove the Mutoscope Reel from his mouth and go to the Mutoscope.
Screenshot
Mutoscope and Marlena's Stage
Zoom in and play the Mutoscope Reel.
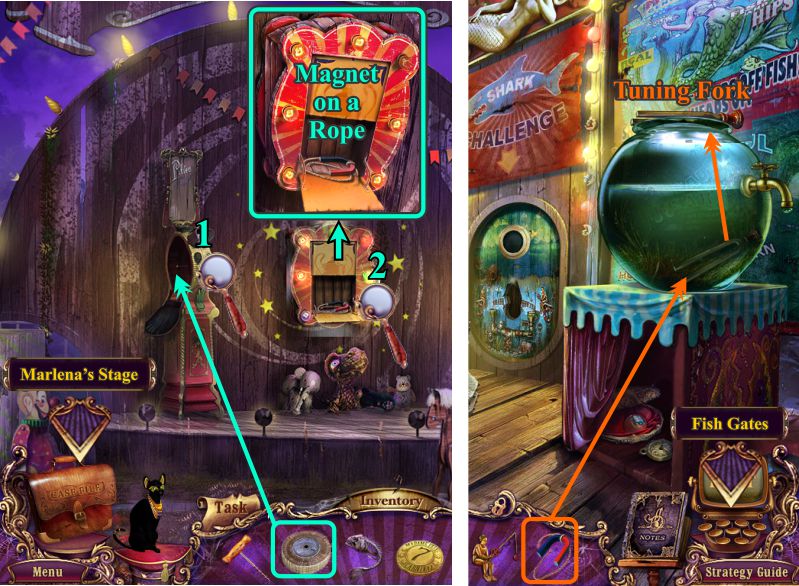
Examine the prize dispenser to get your Magnet on a Rope.
Go to Marlena's Stage and zoom in on the fish bubble.
Use the Magnet on a Rope to get the Tuning Fork.
Go to the Fish Gates.
Screenshot
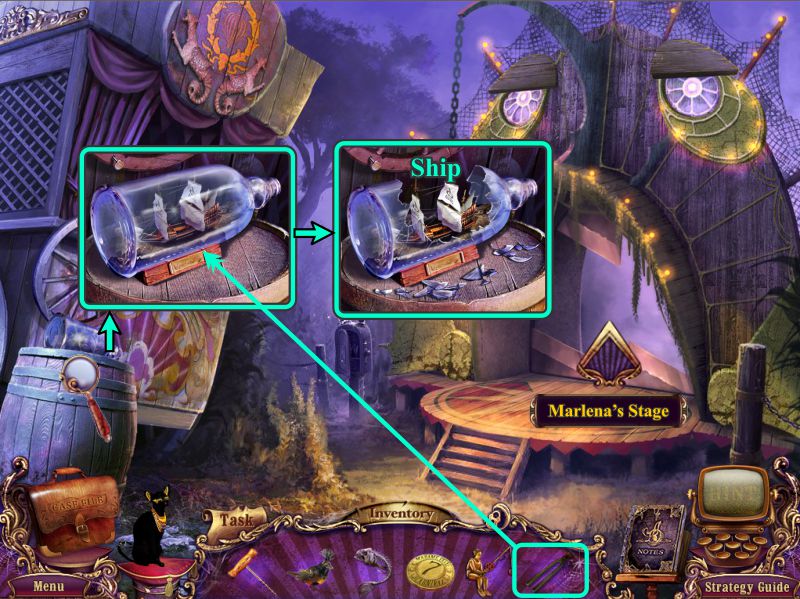
Fish Gates
Zoom in on the barrel and use the Tuning Fork to break the bottle.
Take the Ship and return to Marlena's Stage.
Screenshot
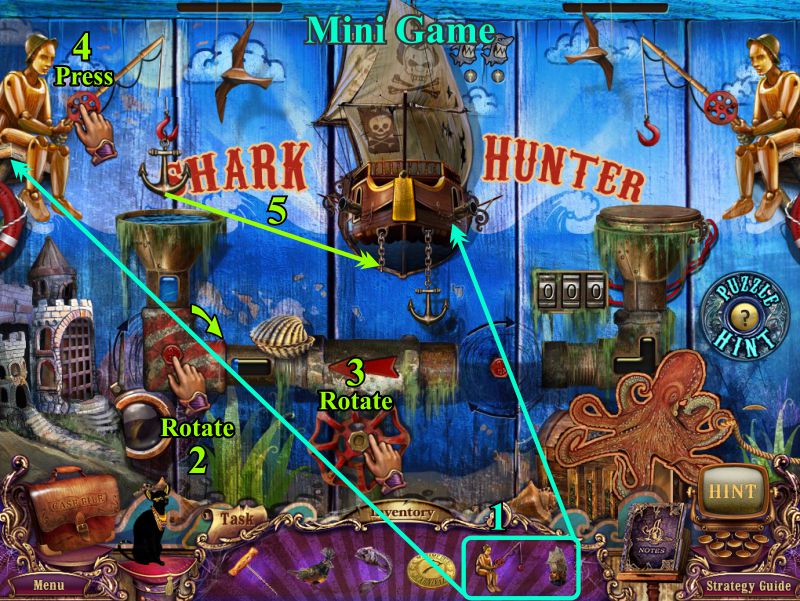
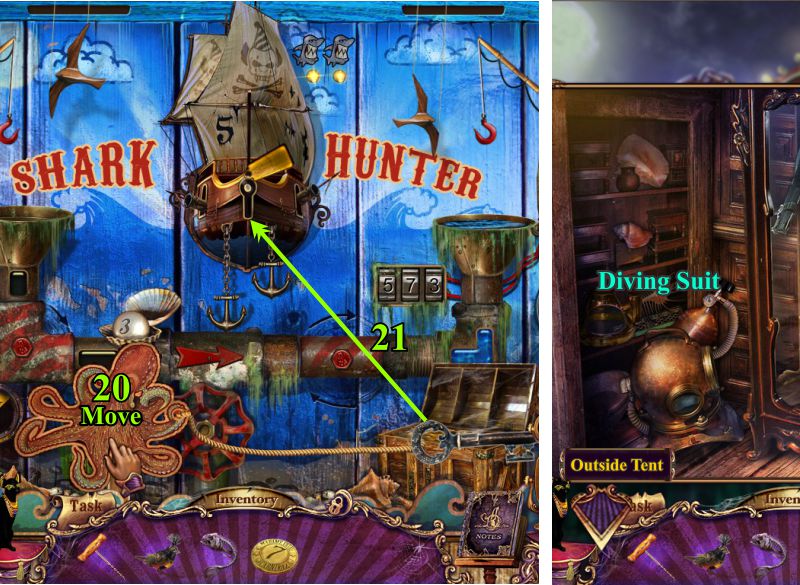
Shark Hunter Mini Game
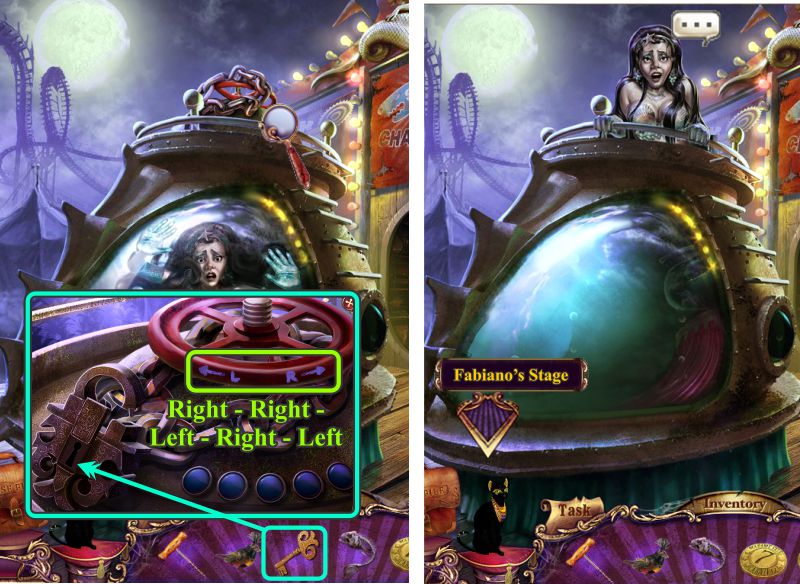
Place the Ship and Fisherman on the Shark Hunter door to begin a Mini Game.
Rotate the striped valve at the left to open the water line.
Rotate the round valve to supply the tank with water.
Press on the left fisherman's reel until he supplies you with an anchor.
Place the anchor on the ship's chain.
Screenshot
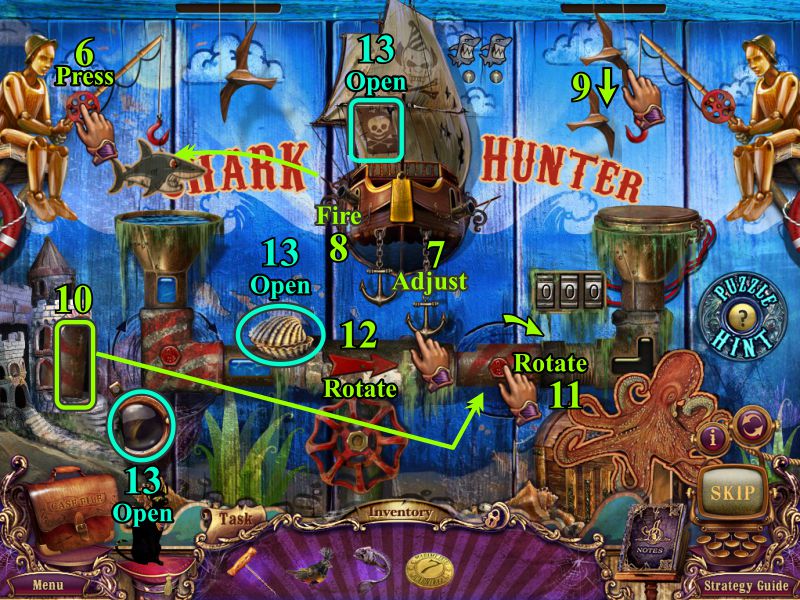
Press on the left fisherman's reel until he brings up a shark.
Adjust the anchors as shown to direct the cannon at the shark.
Shoot the cannon by touching it.
Touch the right seagull to open the gate to the castle.
Take the pipe and place it to repair the right water line.
Rotate the pipe to connect it to the existing pipes.
Rotate the red arrow to the right.
Open the 3 objects marked in bright blue.
Screenshot
Enter 573 on the dial next to the right tank in order to open the lid.
Rotate the round valve so the water flows to the right tank.
Press the reel on the right fisherman's pole until he brings up a mine.
Move the octopus to the left as shown, and open the trunk.
Adjust the anchors to aim the cannon at the mine.
Touch the right cannon and the mine will drop down to wipe out the shark in the trunk.
Screenshot
Move the octopus farther to the left until you see the key.
Place the key in the keyhole in the ship to unlock the door.
You will be returned to Marlena's Stage, so push the door to open it and zoom in.
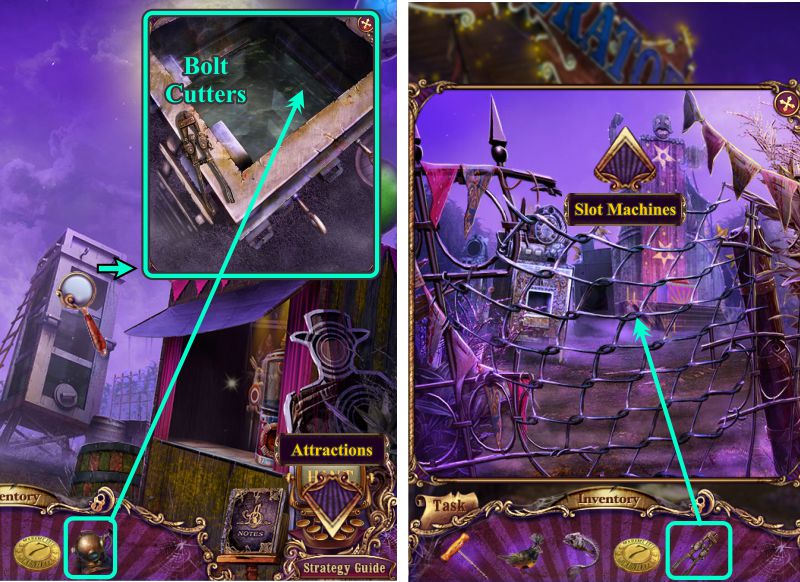
Take the Diving Suit and go to the Outside Tent area.
Screenshot
Outside Tent and Attractions
Zoom in on the tank and put the Diving Suit on it to retrieve the Bolt Cutters.
Go to the Attractions and zoom in on the gate.
Use the Bolt Cutters to cut the wire, and go forward to the Slot Machines.
Screenshot
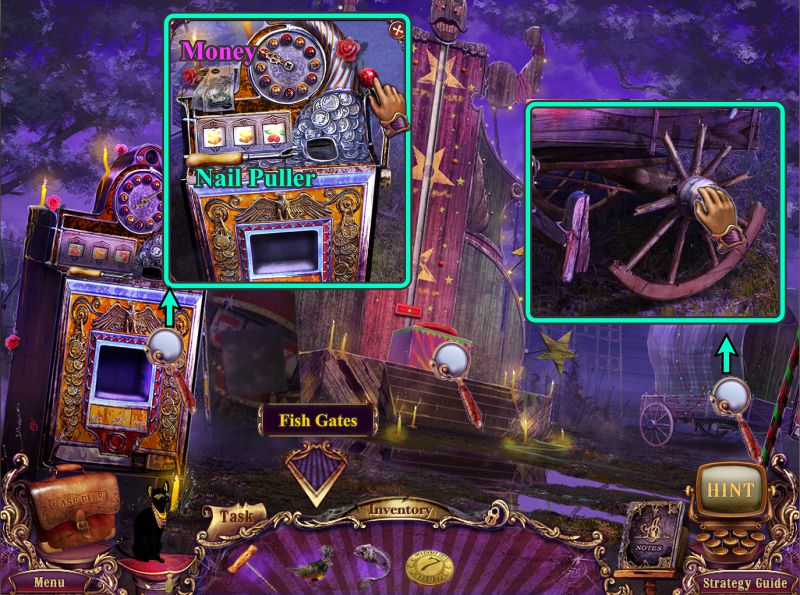
Slot Machines
Zoom in on the slot machine, and take the money and Nail Puller.
Try to pull the handle on the machine and it breaks off.
Check out the strength game to find out the hammer is missing.
Examine the wagon and remove the broken wheel.
Go to the Fish Gates.
Screenshot
Fish Gates and Slot Machines
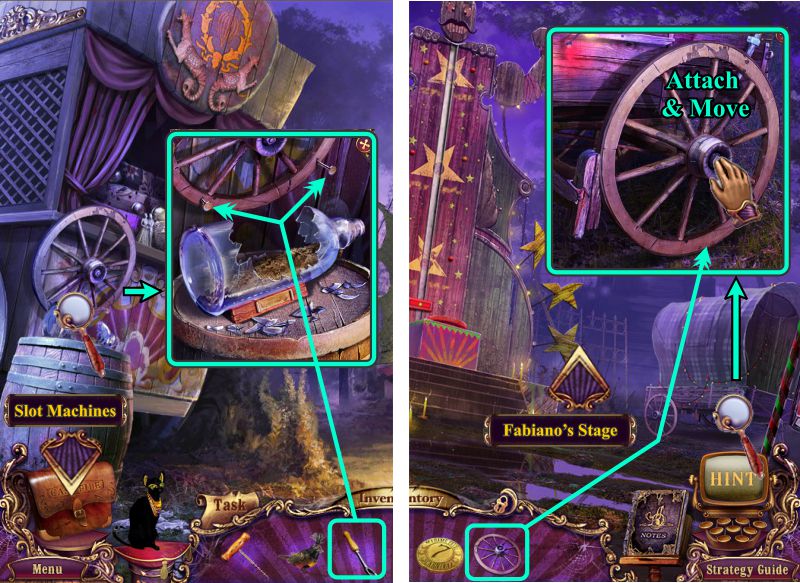
Zoom in on the wagon and use the Nail Puller to remove the Wheel.
Go to the Slot Machines and zoom in on that wagon.
Place the Wheel and push the wagon out of the way.
Go forward to Fabiano's Stage.
Screenshot
Fabiano's Stage
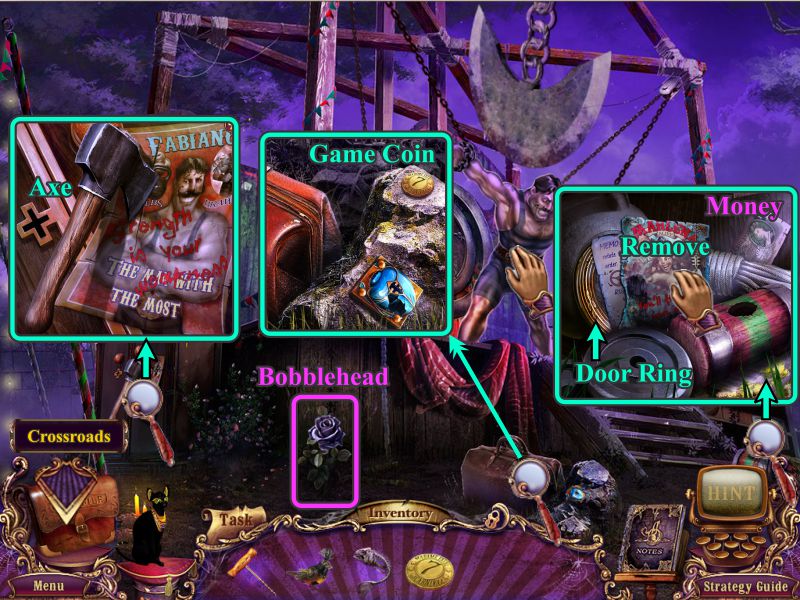
Zoom in on the poster and take the Axe.
Collect the Bobblehead of Alister.
Examine the briefcase and take the Game Coin.
Touch Fabiano for a cut scene.
Zoom in at the right of the steps, take the Money, pick up Marlena's poster and the note, and collect the Door Ring.
Go to the Crossroads.
Screenshot
Crossroads
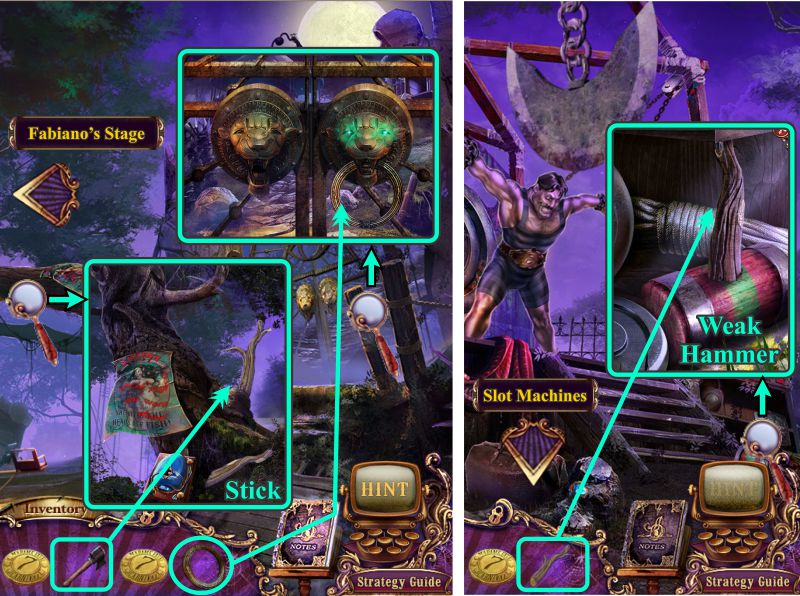
Zoom in on the gate and place the Door Ring.
Examine the tree and use the Axe to remove the Stick.
Return to Fabiano's Stage.
Zoom in on the right of the steps and place the Stick on the hammer to get a Weak Hammer.
Go to the Slot Machines.
Screenshot
Slot Machines and Fish Gates
Zoom in on the strength game and use your Weak Hammer on the pad.
Take the Acid from the compartment that opens.
Go to the Fish Gates.
Zoom in on the wagon and use the Acid on the coach.
Take the Sea Key and go to Marlena's Stage.
Screenshot
Marlena's Stage
Zoom in on the top of Marlena's tank and use the Sea Key to open the lock.
Consult your diary or the screenshot to see how to turn the valve.
Talk to Marlena and she will give you a Bone Head.
Go to Fabiano's Stage.
Screenshot
Chapter 3: Fabiano the Strong Man
Fabiano's Stage
Zoom in on the lock next to Fabiano, and place the Stone Head for a Mini Game.
This is only the first part of the lock in order to save Fabiano.
Check your Diary for the solution, or just have a look at the screenshot.
Collect the Closet Key and Button.
Use the Closet Key on Fabiano's Closet to open it for a Hidden Object Scene.
After that, go to the Slot Machines.
Screenshot
Fabiano's Closet Hidden Object Scene
Collect the Secret Card when it morphs.
Multiple items are marked in separate colors.
Place the light bulb (A) in the socket to collect the Lit Bulb.
Put the book (B) with the other books on the top shelf to collect Four Books.
When you collect the Envelope at the far right, the poster will curl to show the code for the phone.
Zoom in on the phone (C) and touch it to remove the receiver.
Enter the code as numbered in the screenshot in order to collect the Card.
The Hammer will go into your Inventory.
Screenshot
Slot Machines and Crossroads
Zoom in on the game and use your stronger Hammer to score big this time.
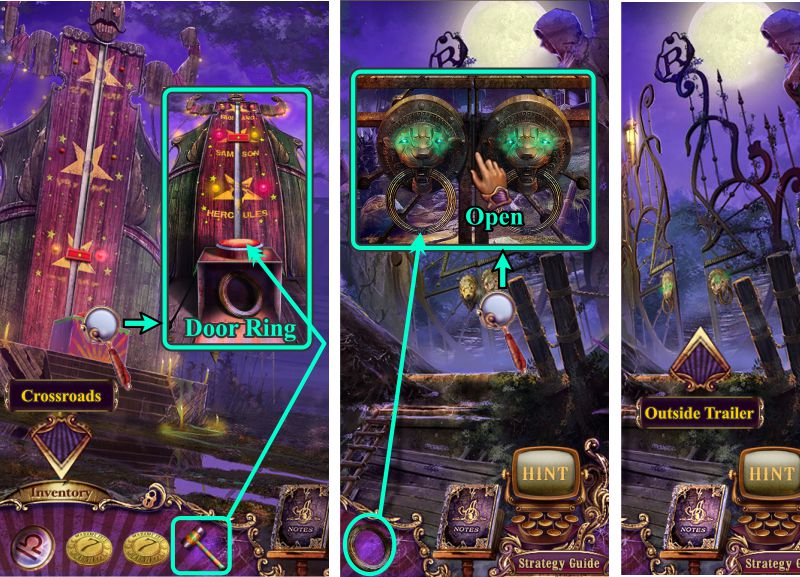
Collect the Door Ring and go to the Crossroads.
Examine the gate and place the second Door Ring.
Press to open the gate, and go to the Outside Trailer area.
Screenshot
Outside Trailer
Examine the paper on the ground and take the Money.
Zoom in on the carousel mechanism, and take the Game Coin and Button.
When you try to check out Madame Fate's trailer, you will encounter a cut scene and the door will become locked.
Screenshot
Examine the dark hole in the tree and send Isis to retrieve whatever is inside.
Pick up the Horseshoe Amulet nearby and collect the Mechanical Bird Isis found.
Zoom in on the cage attached to the tree, place both of your Mechanical Birds and touch them to see what happens.
A drawer opens, so collect the Carrot and Switch.
Go to Larry's Tent.
Screenshot
Larry's Tent and Slot Machines
Feed the Carrot to the hungry Rabbit and get a Four-leaf Amulet.
Go to the Slot Machines and zoom in on the slot machine at the left.
Replace the broken Switch with the one you just found.
Place your 3 Game Coins, on at a time, in the slot and pull the Switch to see your luck.
It will take you all 3 coins to get a jackpot, but then, you can collect the Jackpot Amulet and the Button.
Go to the Mutoscope.
Screenshot
Mutoscope and Larry's Tent
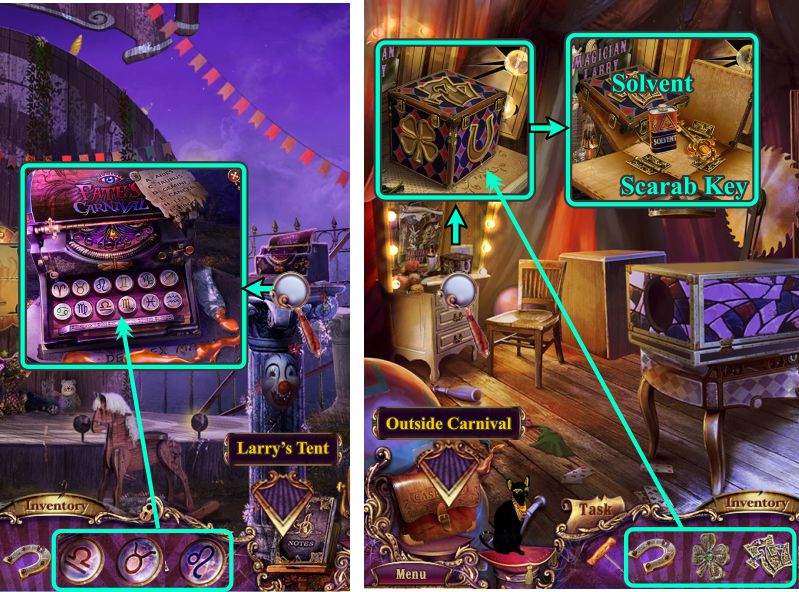
Zoom in on the typewriter and place your 3 buttons.
Ok, so that is all you can do at the moment until you find the bottom half of the note, but you have cleaned out a bunch of your Inventory so you can decide your next move because you are a detective after all.
That having been said, let's move on to Larry's Tent.
Zoom in on Larry's dressing table.
Place all your Inventory Amulets on the box: Horseshoe, Clover, and Jackpot.
Collect the Solvent and the Scarab Key.
Now is the time to collect all those Scarabs you've seen throughout the game, so let's start at Outside Carnival.
Screenshot
Outside Carnival, Theater of Day and Night, and Crossroads
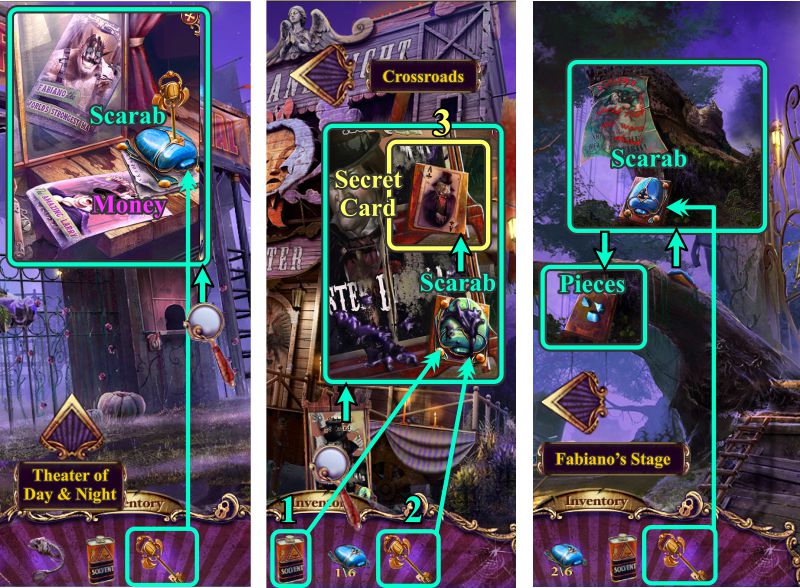
Zoom in on the ticket window, place your Scarab Key on the Scarab.
Collect the Scarab and the Money underneath it.
Go inside the carnival to the Theater of Day and Night and examine the sign.
Use your Solvent on the Scarab and then the Key.
Collect the Scarab and the Secret Card behind it.
Move on to the Crossroads.
Zoom in on the tree, place the Key and collect the Scarab.
Also collect the leftover pieces before going to Fabiano's Stage.
Screenshot
Fabiano's Stage, Marlena's Stage, and Outside Trailer
Zoom in to the left of the steps, place the Scarab Fragments and the Key to collect the Scarab.
Go to Marlena's Stage and zoom in under the fish bubble.
Place the Key and collect the Scarab.
Go to Outside Trailer.
Zoom in on the bird cage, place the Key, and the Scarab will fall.
Examine the Scarab and place the large fragment and it will automatically become a complete Scarab.
Zoom in on the trailer door, and place your 6 Scarabs to start the Mini Game.
Screenshot
Trailer Door Mini Game
Collect the Handle on top of the tin can, place it on the small box under the kettle and turn the Handle.
Look at the time on the melted ice block and change the clock to read 3:45.
Exchange the two right batteries for the flashlight so that the "
" sign on the bottom is the middle battery.
Flip the flashlight switch to turn it on.
On the round picture at the left, move the upper arrow 2 times.
Move the lower arrow twice to the left.
Take the chalk and use it to finish the bear picture on the chalk board at the right.
Turn the tin can until a constellation appears in the round below it.
Screenshot
Trace the constellation to match that in the bear picture and an eye will appear in a hand.
On the round picture at the left, move the lower arrow once to the right.
Move the down arrow once and you should have a mirror picture of the hand and eye.
Collect the eyes in both pictures.
Screenshot
The puppet's eyes will open and a coin will appear in her mouth, so take it and place it in the slot below.
When the crystal ball breaks, press the button to open the door.
Enter Madame Fate's Trailer.
Screenshot
Madame Fate's Trailer
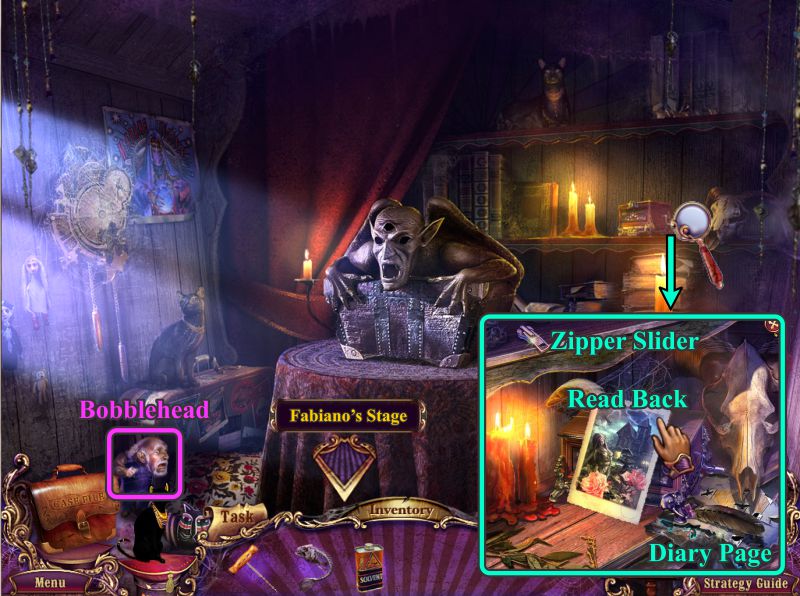
Collect the Bobblehead of Victor.
Zoom in at the back to collect the Zipper Slider and Diary Page.
Also, read the back of the postcard before going to Fabiano's Stage.
Screenshot
Diary Raven Mini Game
Before you head off, check your Diary for a Mini Game.
The page at the left shows you how the Ravens need to be placed on the right.
Turn the triangles around so they present the proper shape, and then turn the Ravens to match the shapes you need to complete the page.
Collect the Secret Card and Money before you move on.
Screenshot
Fabiano's Stage
Zoom in on the bag to the left of the stairs.
Place the Zipper Slider to open the bag.
Take Paper and the Mutoscope Reel.
Once you uncover the Money, collect it, and then go to the Mutoscope.
Screenshot
Mutoscope
Zoom in and play your Mutoscope Reel.
Check out the prize compartment and collect the Screwdriver.
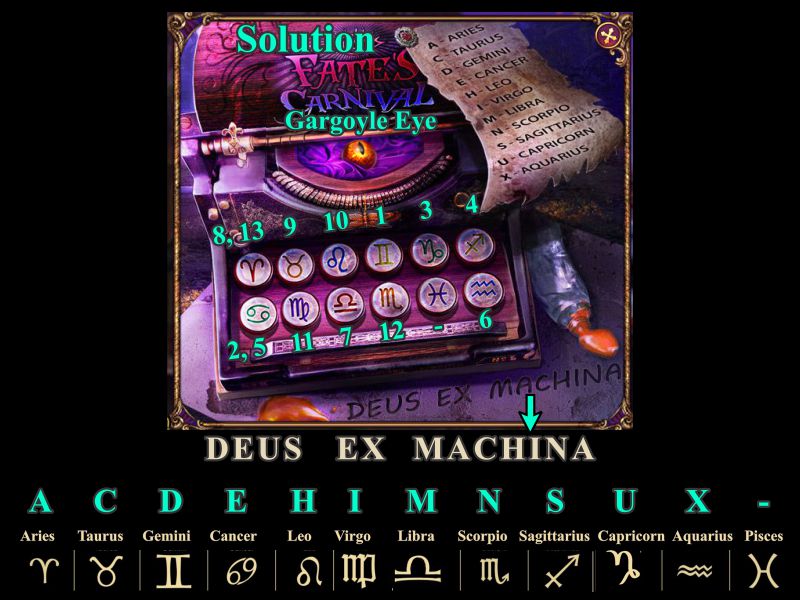
Zoom in on the typewriter and place the Paper to get the rest of the code, and use the Solvent to uncover the important phrase you will need to translate for the Mini Game.
When you have completed the Mini Game, go to the Slot Machines.
Screenshot
Typewriter Mini Game
See the screenshot for the translation of the Deus Ex Machina phrase that you need to enter on the typewriter in order to get the Gargoyle Eye.
Screenshot
Slot Machines and Marlene's Stage
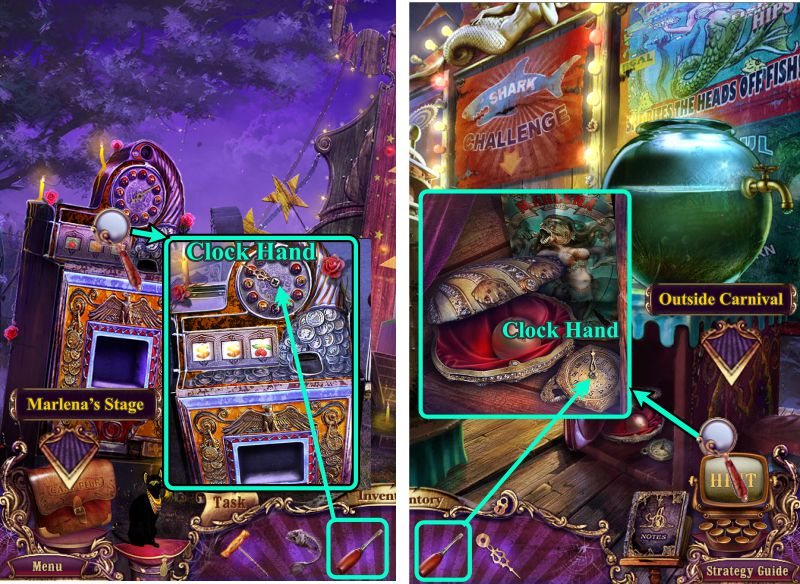
Zoom in on the machine and use the Screwdriver to get the Clock Hand.
Go to Marlena's Stage and use the Screwdriver to get the Clock Hand from under the bubble tank.
Got to Outside the Carnival.
Screenshot
Outside Carnival and Outside Trailer
Zoom in on the ticket booth and unscrew the Lever.
Go to Outside Madam Fate's Trailer and zoom in on the Carousel mechanism.
Place the Lever and flip it up.
Play the Hidden Object Scene.
Watch the cut scene as you start to enter Madame Fate's Trailer.
Screenshot
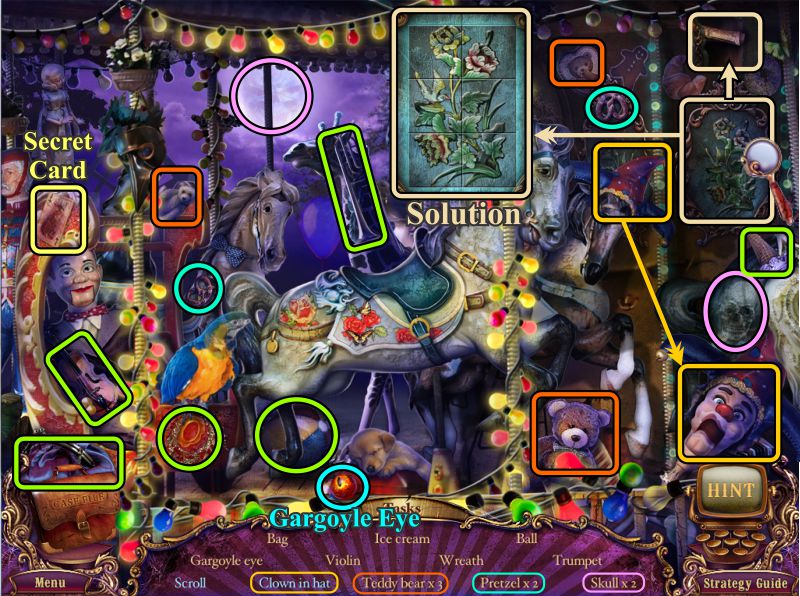
Carousel Hidden Object Scene
Collect the Secret Card.
Zoom in on the cabinet at the right side for a Mini Game for which the solution is shown in the screenshot.
Collect everything else as shown and you will get another Gargoyle Eye.
Screenshot
Madame Fate's Trailer
You are finally able to check out Madame Fate's Trailer, so examine and touch the clock which needs to be cleaned of cobwebs.
Put the Clock Hands on the clock.
Check out the Gargoyle and place all his eyes.
Examine him again for the Crystal Ball Mini Game.
Screenshot
Crystal Ball Mini Game
Your goal is to use the orange ball to pick up all of the other balls to correspond to the center pattern with the black balls taking the place of the directional letters.
See the screenshot for the blue numbered order in which to attach the balls.
The green numbers show where the balls should end up on the pattern.
At the end of the game, you will end up outside the carnival with the scarecrow.
Screenshot
Chapter 4: The Tomb
Outside Carnival
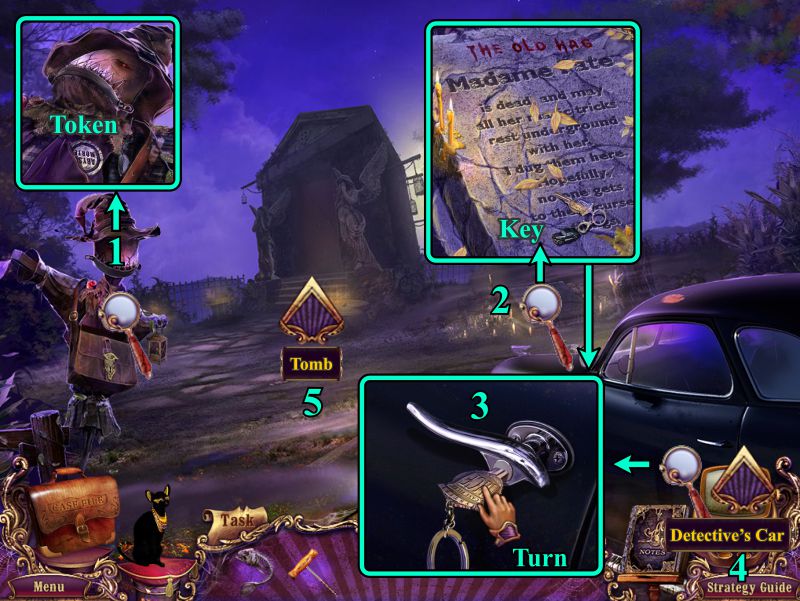
Zoom in on the scarecrow and take the Token.
Examine Madame Fate's tombstone and take the Key.
Use the Key to open the car door.
Enter the car.
When you are finished inside the car, go to the Tomb.
Screenshot
Detective's Car
Zoom in on the dashboard and take the Angel's Amulet.
Collect the Bobblehead of Rose, and take the Diary page.
Open the Diary for a Mini Game.
Screenshot
Diary Mini Game
Exchange the eyes on the right page to correspond with the animals on the left page.
See the screenshot for the numbered solution.
At the end of the game, collect the Money.
Screenshot
Tomb
Zoom in on the left statue and place the Angel's Amulet to trigger a Mini Game.
Swap the Amulets to match the images on the fingers.
See the screenshot for the solution, and take the Seal Half.
Zoom in on the right statue and place the Token.
Move the letters around until you spell out Abyss Morte.
Take the Seal Half, and zoom in on the tomb gate.
Send Isis to get the Crowbar, then go to the Detective's Car.
Screenshot
Detective's Car
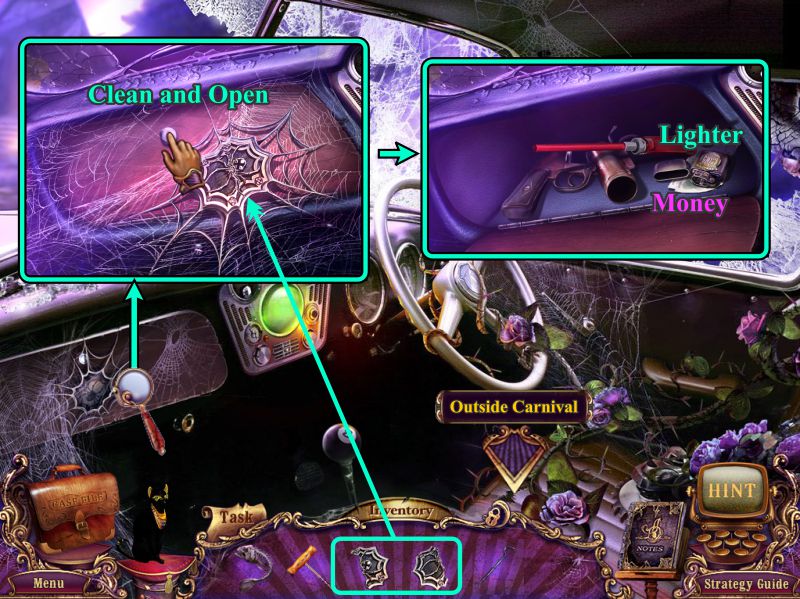
Examine the glove compartment, clean off the cobwebs, and place the Seal Half pieces to unlock it.
Open it and take the Lighter and Money.
Go to Outside Carnival.
Screenshot
Outside Carnival
Zoom in on the scarecrow, open the lantern, light it with the Lighter, and collect the Lit Lantern.
Examine the tombstone, remove the leaves, and use the Crowbar to move the stone.
Hang the Lit Lantern on the hook for a Hidden Object Scene.
Screenshot
Tombstone Hidden Object Scene
Use the flute to get the snake.
Collect the Secret Card.
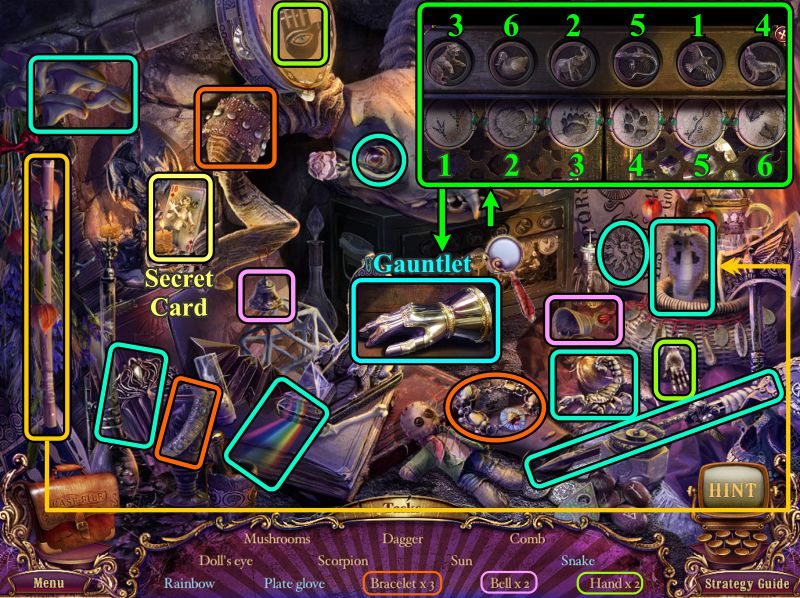
Examine the box with the dials for a Mini Game.
See the screenshot for the numbered solution as to which prints need to be placed with which animal.
Collect the Gauntlet and go to the Detective's Car.
Screenshot
Detective's Car and Tomb
Use the Gauntlet to remove the thorny flowers so you can get to the Disk Saw.
Go to the Tomb and use the Disk Saw to remove the chain.
Screenshot
Tomb and Outside Carnival
Pick up the Rusty Key and go to the scarecrow.
Open his bag and take the Moon Crystal.
Return to the Tomb.
Screenshot
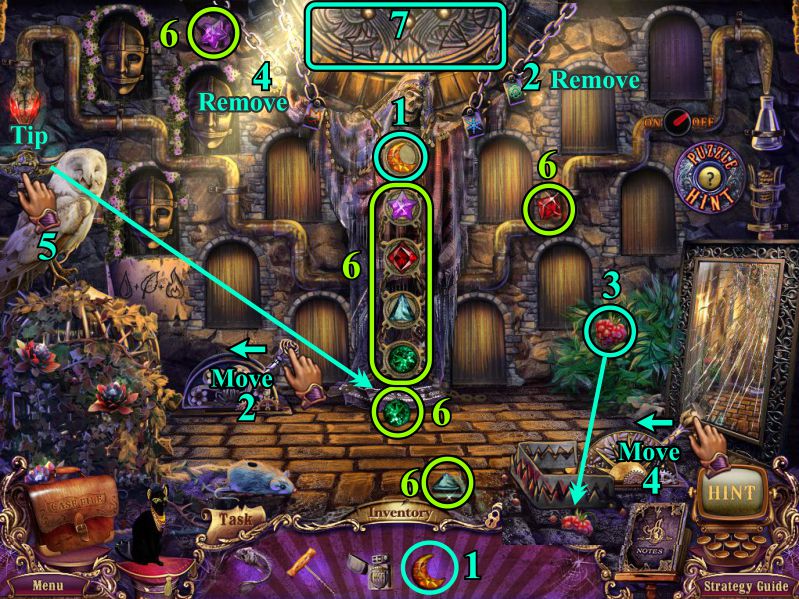
Tomb Puzzle
Place the Moon Crystal as shown.
Move the lever next to the cage to the left to remove the outer right shackle on the skeleton's arm.
Take the raspberries from the plant and place them to trigger the trap.
Move the lever to the left to remove the left outer shackle.
Tip over bowl next to the owl to get the Emerald.
Collect the Emerald and the other gems, marked in green, and place them in the slots on the skeleton.
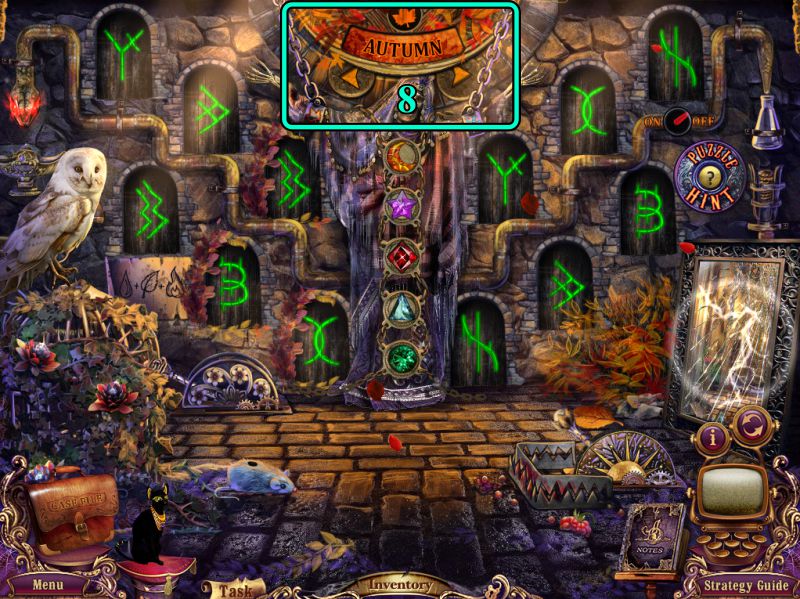
Watch the symbols above the skeleton and repeat the 3 sequences by pressing the gems on the skeleton.
Screenshot
A weather control machine will drop down at the end of the last sequence for you the use to in finding pairs of matching symbols behind the masked doors on the wall. The locations are random within the various seasons, so use the arrows on the machine to scroll through to find the masks with the symbols.
Screenshot
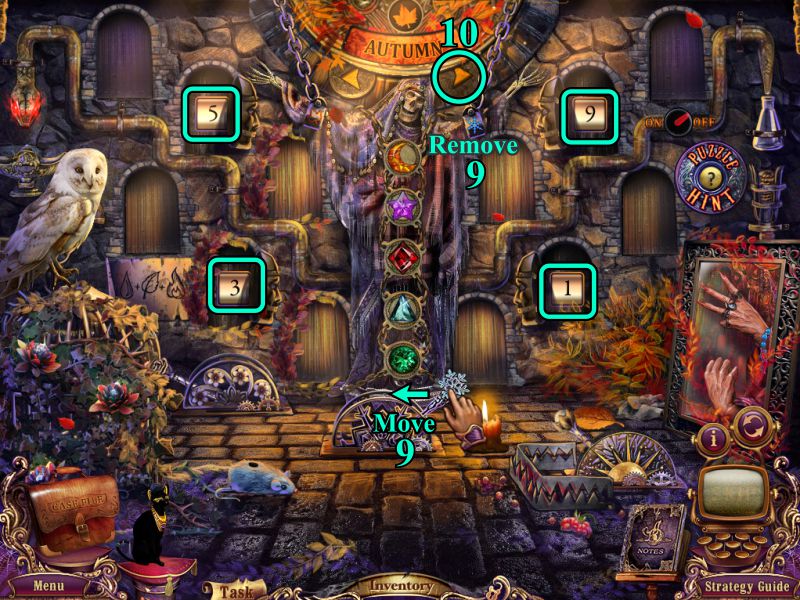
4 doors will open with zeros so you need to enter the correct number sequence as shown in the screenshot in order for another lever to appear for you to remove another shackle.
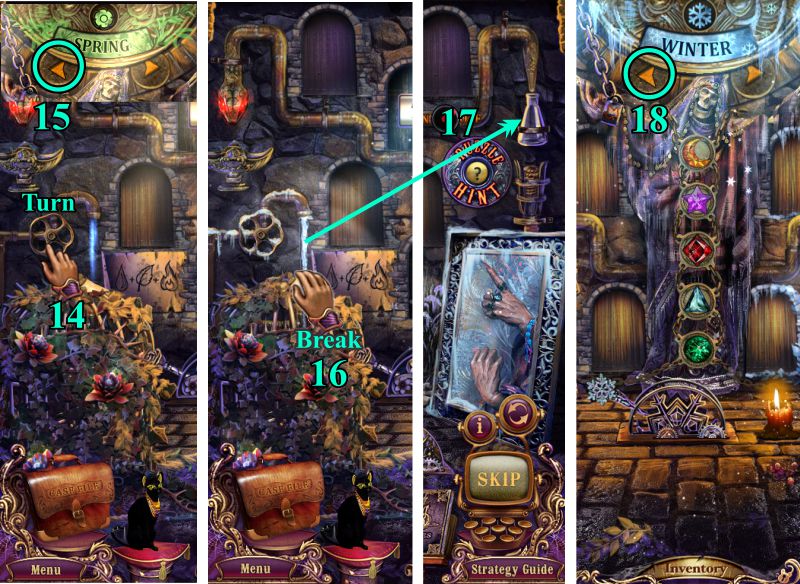
Select the right weather control arrow to move to Winter.
Screenshot
Take the Key from the plant and place it on the mouse.
Press the Key 3 times so the mouse will take off and the owl with go after him.
Change the weather control to Spring.
Screenshot
Turn the valve at the left to run the water.
Return to Winter.
The water will be frozen so break off the icicle.
Place the icicle in the beaker at the far right.
Choose the left arrow on the weather control in order to go to Autumn.
Screenshot
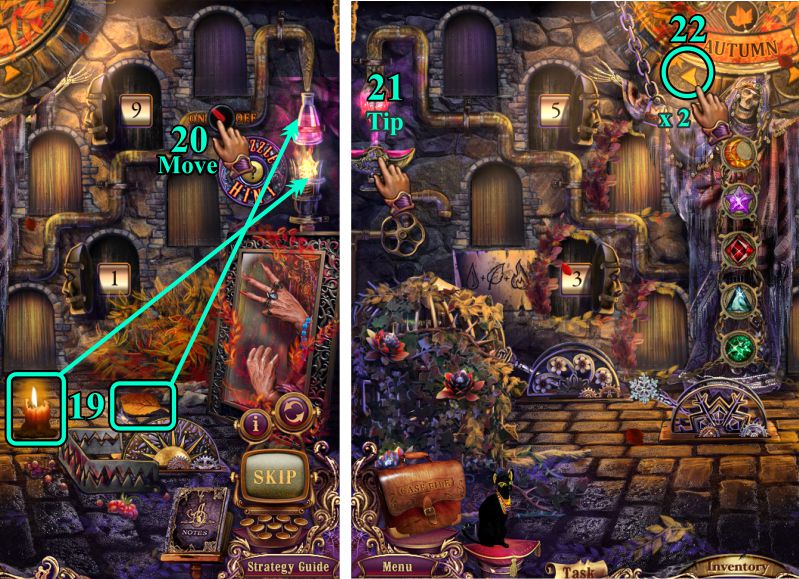
Collect the leaf by the plant, place it in the beaker, pick up the candle to the left of the leaf and place it under the beaker.
Flip the switch to the left of the beaker to move the liquid through the pipes to the bowl at the far left.
Tip the bowl to pour the poison on the cage in order to kill the plant.
Change the weather control to Spring.
Screenshot
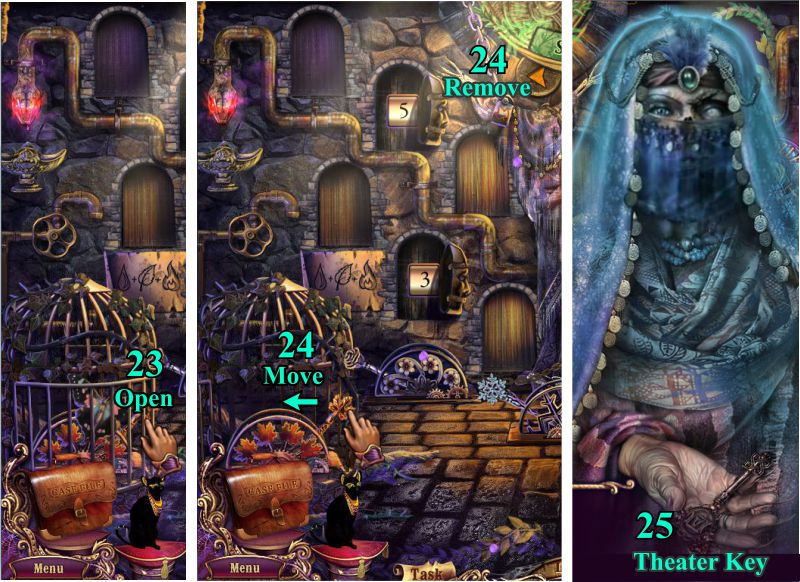
Open the cage to release the butterfly.
Move the lever to the left to remove the last shackle.
Madame Fate will appear and give you the Theater Key.
Screenshot
Posted by: Jazz |
November 30, 2013 4:26 PM
|
November 30, 2013 4:26 PM