

![]() If it's strange and mildly unsettling, then Detarou is probably the culprit, and we mean that in the fondest way possible. In the escape game Dokotonaku, you're trapped behind a giant wall, but at least you're outside! Surrounded by men doing questionable exercises with marshmallow peeps... a guy who won't stop picking his nose... a whole bunch of hip thrusting... and... hmmm. Well, uh. To each their own, I guess. Just click around to interact, finding items and clues to help you solve puzzles and escape. Don't forget to examine some items in your inventory. Since there are ways to fail, remember to save!
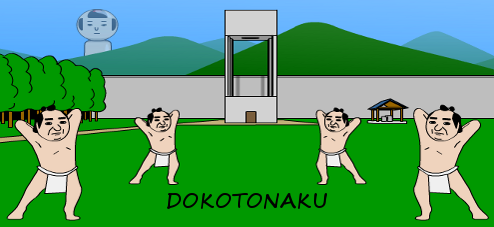
If it's strange and mildly unsettling, then Detarou is probably the culprit, and we mean that in the fondest way possible. In the escape game Dokotonaku, you're trapped behind a giant wall, but at least you're outside! Surrounded by men doing questionable exercises with marshmallow peeps... a guy who won't stop picking his nose... a whole bunch of hip thrusting... and... hmmm. Well, uh. To each their own, I guess. Just click around to interact, finding items and clues to help you solve puzzles and escape. Don't forget to examine some items in your inventory. Since there are ways to fail, remember to save!
 Though it features the typical Detarou blend of clever contextual clues and sneaky yet (... mostly... ) logical puzzles, Dokotonaku might be the most, ehhh, relentlessly suggestive Detarou title to date, almost startlingly so. Some of you will be fine with that, and that's cool. Others may not be, and that's cool too. It's just something you should know, since there's a lack of subtlety this time around that potentially ups the creep factor for some people. The puzzles and gameplay themselves will require a lot of exploration and experimentation usual, with clues that need interpretation and even to be reapplied to other puzzles. If strange doesn't scare you, you'll find Dokotonaku a surreal cerebral workout to get your freak on with.
Game not loading? Try this alternate link.


Walkthrough Guide
(Please allow page to fully load for spoiler tags to be functional.)
WALKTHROUGH
I wrote one that literally walks you through the game and spoils all the puzzles.
Notes:
- To examine an object, click on it twice.
- When using code locks, the rectangle at the bottom is the enter button you need to use after tapping in your code.
Starting out:
Click on the bottom of the screen to exit the view of the poster. You're now at the central crossing of the game. All walking from one screen to another is routed through this crossing. If you rotate you'll see screens with...
- a FOUNTAIN, a laughing PUNK and the EXIT
- someone dressed in a chicken suit, a LATCH and a SAND PIT
- a reading woman, a WELL with a face, a large STONE and some FOREST
- dancing sumo wrestlers with a BUILDING and a PUMP
- a RIDING MAN on a duck toy with a SHED and a TREE
Looking for clues:
Click on the STONE. Zoom in. Make note of the markings.
Click on the RIDING MAN. Click again to activate him.
Zoom in on the note underneath his head. It reads Po.
Zoom in on the TREE behind the man. Make note of the markings on the trunk.
Zoom on the SHED behind the man. It reads Ne.
How to use the first clues:
Go back to the center. Zoom in on the BUILDING. The door has a code lock with numbers.
Combine the clues from the TREE and the STONE. The stone has numbers of different colours. There's a polygon at the centre. Its corners point up and down (at nothing) and at numbers 6, 7, 8, 4.
The order of the colours from the tree is red, white, blue, yellow.
But there's a dot at the top in the stone. And in the tree there's a dot at the bottom.
So reverse the order of the colours to get yellow, blue, white, red.
The door code becomes 6 8 7 4.
Open the door and go inside the building.
What to do here:
Zoom in on the bottom cabinet of the large cupboard. Click on the note. It reads pE.
Go to the fridge. It has a code lock with letters.
You have three notes (in your head, not in the inventory): Po , Ne and pE. If you rotate the syllables so that the letters that are the same are next to each other you'll get oP pE eN. Then just merge the letters that are the same and you get O P E N. Enter it on the fridge.
Take the FISH from the fridge.
How to use the fish:
Look at the PAINTING on the wall. It has a picture of a grinning fish with a moon in the background.
Go back the the centre and enter the FOREST.
There's a magazine on your right. Zoom in on it to read it.
Go deeper into the forest and turn right at the SIGNPOST.
There's a summoning circle here. And a platform with a picture of the moon. Use the FISH on the platform.
Stand back. A CHEWING DEMON will appear. Zoom in on the CHEWING DEMON and take the PITCHFORK.
Go back to the centre. Click on the upper edge of the TREE to look up. There's a man in a bird suit sitting on a branch. Use the PITCHFORK on him. Take the SCREWDRIVER from the ground.
How to use the screwdriver:
Go to the FOUNTAIN. Zoom in on the pot the man is holding until you see the screws at the bottom. Use the SCREWDRIVER on them. Take the container of chewing gum. Examine it. Click on it to open and take the CHEWING GUM inside it.
Go to the building and zoom in on the fish PAINTING. Use the SCREWDRIVER on them.
Click on the painting on the floor. Make note of the markings behind it. There are red and blue figures and a shape that could very distantly be a face with a round mouth.
Make note of the code lock with SWITCHES behind the painting. Take the GLASS. Examine it. There's a hole in its bottom.
Next to the large cabinet there's a box on a table. Zoom in on it to see a circular indentation at the top. Use the GLASS on the indentation. Step back. Make note of the triangles. They are simple arrows, pointing up or down, in the same configuration as the SWITCHES on the other side of the room. Zoom back in and take your GLASS back.
Zoom in on the SWITCHES. Zoom again until you can use them. Set them in the configuration you got from the triangles: the top row goes down, up, down, up. The bottom row goes down, down, down.
Outside the PUMP turns on. But the water isn't going anywhere.
How to fix the pump:
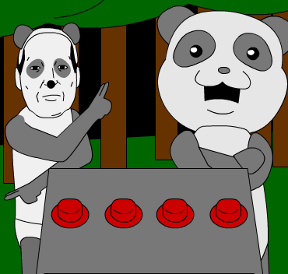
Go to the WELL with a face. It ears are buttons you can click.
Combine the clues from the STONE and the PAINTING.
The painting has pictures of blue and red switches. They are (top to bottom, left to right) B R R B R R B. The stone has a blue and a red number at the bottom: a blue eight on the left and a red four on the right. So blue=left, red=right.
Combining these you get L R R L R R L. Click on the ears in that order. You'll find out the last move doesn't actually count.
Take the PIPE. Go to the PUMP and use the PIPE on the water.
So the pump is fixed. Now what?
Let's see what's changed.
Go to the SAND PIT. Zoom in on the woman. Take the BULB from her head.
Go to the FOUNTAIN.
Go to the CHEWING DEMON and use the GUM on mouth. You get CHEWED GUM. Examine the GLASS and use the CHEWED GUM on the hole at the bottom. You now have a FIXED GLASS that can actually hold liquid.
Use the FIXED GLASS on the FOUNTAIN to obtain a GLASS OF WATER.
Go to the BUILDING. Use the BULB on the pile of sand at the centre of the room.
Use your GLASS OF WATER on the BULB in the sand. A vine grows.
Click on the top of the plant, then at the ceiling to climb to the top.
Zoom in on the circle in front of you. Zoom in again until you have buttons you can click to change their colours.
Use the clue in the STONE. The markings on the stone have a triangle in the centre, just like the circle here. But this one is upside down when compared to the other. The colours go in the same order around the triangle, but one set of colours has been rotated 180 degrees. Take your cue from the triangle and change the colours to correspond with the colours on the stone. Green at the bottom to the right of the triangle's point and so on. The order from top left going clockwise is red, blue, yellow, green, yellow, white. Then click on the triangle. Take the HEX WRENCH.
The keys and the stamp:
Go to the screen with the SAND PIT in the background, and there's a LATCH behind the chicken couple. Zoom in on the LATCH. Use the HEX WRENCH on the bolts. Take the SILVER KEY.
Go to the SHED and zoom in on the padlock on the door. Use the SILVER KEY on it. Go inside and open the box on the table. Take the GOLD KEY.
Go to the EXIT. Zoom in on the lock and use the GOLD KEY on it. Do not go through the door.
Go to the FOREST. Zoom in on the SIGNPOST. Click on it to turn it around. It has a sequence of numbers on it. 1 2 3 4 6 5.
Go to the WELL with a face.
Use your old order of clicking the left and right ears but reverse the fifth and sixth move.
So L R R L R R becomes L L R L R L.
Click the ears in this order. Take the stamp.
Go to the EXIT. Click on it to finish the game.
Posted by: jigcmmtacct |
December 10, 2013 6:36 AM
|
December 10, 2013 6:36 AM