

![]() Waking up inside a castle on a remote island, unsure of how she arrived or why that unusually unpleasant doll seems to be...watching her, Anna is filled with doubts. All she is certain of is that man in the bowler hat seems to have the answers, so she pursues him. You have been invited along, too, dear player, welcomed inside as Simogo's valued guests to playtest and experience Device 6. Turning conventions sideways and upside down, the written word is your map as well as your host in this remarkably unique, originally designed and bizarrely surreal narrative puzzle adventure. Everything here—design, interactions, graphics and sounds—is part of the game.
Waking up inside a castle on a remote island, unsure of how she arrived or why that unusually unpleasant doll seems to be...watching her, Anna is filled with doubts. All she is certain of is that man in the bowler hat seems to have the answers, so she pursues him. You have been invited along, too, dear player, welcomed inside as Simogo's valued guests to playtest and experience Device 6. Turning conventions sideways and upside down, the written word is your map as well as your host in this remarkably unique, originally designed and bizarrely surreal narrative puzzle adventure. Everything here—design, interactions, graphics and sounds—is part of the game.
 After an opening sequence that's deliciously similar to that of a James Bond film, the first thing you notice about Device 6 is its profusion of text. Tapping, dragging and turning your mobile device, follow the narration as if down a path, though, and it feels truly like you're playing a point-and-click game. Is it a game? Or did you somehow wind up inside Simogo's psychological testing facilities, caught unawares? You're expected to play with format and structure, manipulating what you read, see and hear, as you seek out solutions and gather information requisite to carrying on. Three-dimensional photographs not only illustrate and punctuate the narrative, they also serve as puzzle input terminals. Clues are found by reading the text and studying the images or sometimes presented to you in audio clips. To make any sense of it, you'll have to stop to think and consider fully what you've just experienced. A bit of backtracking is required as well while you make computations and deductions. Keep nearby a pen and paper—or a friend to act as your secretary—among the feats you'll need to accomplish: sifting through the beautifully useless to find the disturbingly useful.
 Analysis: I suspect that, by describing Device 6, I might be taking something away from your experience of it. Walking blind into this creatively interactive slice of art and amusement, no pre-conceived notions or opinions, is probably to your advantage. In which case, perhaps you should stop reading this review and return later to compare how your own assessment matches up with mine. I'll wait here until your return; it should take only a couple hours to complete the experimen...um, experience.
If you are not fond of reading mystery novellas, that shouldn't put you off from this game but it could be a hindrance. Likewise, as some clues are presented in the audio clips, you might not hear a needed bit of information and find yourself frustrated. Not all, but most solutions can only be found through combining various elements. It makes you think but it does make you feel quite good about doing it. Because there's minimal guidance regarding what to do or how to go on, many puzzles feel obscure and abstruse. That is until, you suddenly notice, the answer's staring directly at you and wearing a patiently polite smile. It's very gratifying to unravel these brain prickling riddles plus, after each of the six chapters the game engages you in a direct conversation, wanting to know how you feel and think, genuinely interested in you. We all love that feeling of being center stage, no? Yet there is a level of discomfort to go along with it, plus plenty of ironic pokes at the fourth wall that are surprisingly effective. This is probably because Device 6 is immensely artistic, yet humbly so, in that it welcomes you inside its fancy parlor and carries you around on its shoulders like an overly chummy old relative, coming too closely into your personal space while continually flattering you with compliments and courtesy.
Device 6 serenades you with song, woos you with images and poetry, bribes you with points and the desire to know just...why. In the end, will you leave as either a doubter or a believer? Whatever it is, this highly engaging game is expert at doing it.
NOTE: This game was played and reviewed on the iPad 2. Game was available in the North American market at the time of publication, but may not be available in other territories. Please see individual app market pages for purchasing info.


Walkthrough Guide
(Please allow page to fully load for spoiler tags to be functional.)
Device 6 User Manual and Puzzle Troubleshooting Guide
Chapter 1: "Awakening"
You begin inside the NORTHWEST GUEST ROOM. Read and swipe down through the narrative, noting anything that seems suspicious or note-worthy...
...specifically:
There's an orange painting on the wall with the number "2001" right in the centre of the orange."
Keep reading until you reach the WEST CORRIDOR. Continue along until you come to a series of four "windows" which provide a view of pictures hanging along a wall.
Carefully scroll and adjust the scene until you've determined what each picture says.
Now continue reading, scrolling to the right and coming to the 3RD FLOOR NURSERY. Continue on. When you reach the KIRKE ROOM, you'll find a cabinet locked with a curious device...
Two buttons, "L" and "R", will appear on the device when it's centered on the screen.
You need to look around a bit more, though, to find the exact sequence that will open the device.
Pass down the WEST CORRIDOR and into the 3RD FLOOR STUDY. Here, you some kind of computer on the desk.
To operate the computer, a 4-digit number code is needed.
Continuing to browse the room, you see the date on the calendar: 1946. Unfortunately, though, it is not the password.
Move right down the WEST CORRIDOR. Now the text goes two different directions. Keep going as far right as possible, then turn 90* where it angles upwards.
Scroll a bit further right to MASTER'S VOICE ROOM. Stop here.
Listen to the recording that begins "Good morning! In the room of the renaissance man..." and take note of all the clues:
A simple math problem:
A framed number, in the room where "red meets yellow"
+
Another number, between "hope" and "lies"
+
The channel am I on
You still need more information, so carry on while searching each of numbers by their descriptions.
Scroll further right to the paragraph beginning "Anna was facing a huge steel door."
There is another interactive photograph here: a TV monitor.
Pressing the "+" button on the left will scroll through a series of images.
As you "change the channels", make note of the images you see and the numbers that go with them. One of them is of significance to your math problem.
Now, turn your device clockwise again, and follow the text as it winds around the page and scrolls to the right until you reach another part of the WEST CORRIDOR narrative: "Anna made here way back around...the corner, back to the stairway."
Scroll down as Anna "walked downstairs" and keep going until you reach the end of the DINING HALL and the GROUND FLOOR LOBBY.
This is as far as you can go for now. Some sort of electronic device/monitor indicates you still have unfinished information to enter.
Well anyhow, by now you should know all the numbers needed to solve the math problem. Head all the way back to the 3RD FLOOR, STUDY and center the computer on your screen.
Two buttons above the computer control how you input information into it: left changes the digit placement while the right changes the number.
Enter the correct 4-digit code to activate the computer.
SOLUTION:
The "red meets yellow" clue refers to orange, specifically the 2001 in the Northwest Guest Room. FIVE is spelled in between framed letters spelling "hope" and "lies" along the West Corridor. Finally, at the huge steel door, turn to channel 56 to see a reel-to-reel audio tape player...that must be where the recorded voice is coming from.
2001+5+56= 2 0 6 2
When you've entered the correct number, the buttons fall away and an orange arrow leads you back downstairs to the end of LOBBY. Something is new and noteworthy here.
The device's monitor has changed. Press the button on its left and note the new information provided each time you press it.
Done with that, return to the 3rd Floor, KIRKE ROOM and focus on the lock-like device on the gargantuan cabinet:
Tap the Left and Right buttons in the correct sequence to unlock the cabinet.
SOLUTION:
After you entered the correct 4-digit code on the computer, the device at the end of the lobby will spell out "elle" and "are" each time you press the button. So, the correct sequence for pressing the buttons on the lock-like device...
L, R, R, L, L, L, R, L, R, L
Afterwards, you're transported from the scene.
Complete the series of user experience questions however you please and that will end chapter 1.
Chapter 2: "The Story of the Three Bears"
"The lock device made a loud click, followed by a few beeps..." Scroll down from there, turn around, and now you're on BEAR BRIDGE. Eventually, you'll see a bear. Push its button. Then read on until you reach a second bear. Push his button, too.
Keep going. At the third bear, push his button...
Listen. Make note of the information you're given. He tells you Mama Bear's password is 069. Can he be trusted?
Move on into darkness, turn on the light, and then read through LAUNCH FACILITY.
To the east, the PRODUCT EVALUATION AREA.
There's a magnifying glass here, but you have nothing to magnify so far, so move on.
If you keep going to the right, you'll pass through the RESEARCH AND DEVELOPMENT AREA.
Ignore the "it was best to not press any buttons" and enter the password you were given...It doesn't work for Mama Bear but it does work for Papa Bear.
Go back to the three bears. Surely there is more they can tell you...
Keep pressing buttons, in various sequences. You'll get several snippets of conversation to piece together:
"Mama Bear's password is 069"
"I see that baby bear tried to log in to my account. But the idiot must have read my password upside down."
"You got Mama Bear's password wrong. The password you told me was your own."
"My password was just yours and Papa Bear's added together."
Now you can return to the LAUNCHSOFT device just west of RESEARCH & DEVELOPMENT:
Use the buttons to scroll between Mama, Papa and Baby Bear's login screens and enter the correct numbers.
Remember to select "LOGIN" to input the passwords.
SOLUTION:
PAPA=069 "The password you told me was your own."
MAMA=690 "Must have read my password upside down."
BABY=759 "My password was just yours (Mama's) and Papa Bear's added together"
When all three are entered, a skull will show on the screen.
Move west into STRATEGY & MARKETING AREA until you trip over a lever on the floor and activate the shooting range targets.
Go back to the magnifying glass in the PRODUCT EVALUATION AREA. Now you can see targets in the background...
Adjust the screen over each target: 2, 3 and 1.
Use the button to focus until you can make note of the symbol corresponding to each number.
Now you can return to the RESEARCH &DEVELOPMENT AREA and focus on the lock for the "large steel door with no handles..."
Enter the correct symbols in each of the three squares.
SOLUTION:
Use the symbols found on the targets...
1=square; 2=smiley face; 3=heart
When done properly, the screen will fade to black...
Answer the questions, rating your experience up until now to end chapter 2.
Chapter 3: "Tiptoe Through the Tulips"
You're in a GARDEN, EAST CASTLE. Read along until you reach an area just past the LIFE & DEATH WALL..."as she lifted the lid she found a ----."
Press the "M?" button here to find out what it is: a VENETIAN MASK!
Use the button in the corner of your screen to switch between "MASK OFF" and "MASK ON".
With the mask on, you can see things you couldn't see before. You'll want to read each part of the narrative and view the various pictures with and without the mask.
At the end of this chapter is a TIME COMPASS GAZEBO.
It seems your goal is to find the code needed to unlock it.
While here, read the "note written in pretty cursive letters:"
Across the bridge only to be seen by a faithful customer, a piglet only tells half the truth. The rest of the truth is obscured by invisible flowers.
Return to the LIFE & DEATH WALL and put your mask on:
Notice how some of the letters are obscured?
Take off the mask and mark down the previously blocked-out letters to spell a word: "FORTY MINUTES."
Keeping your mask on, traveling back down to view the other images, taking care to remember all the clues that are given to you.
As you continue to re-trace your earlier steps, you'll come to a place where an arrow points at a dot. Now you can see an AUGMENTED BRIDGE.
Go across the bridge to the greenhouse, labeled BOTANICAL RESEARCH FACILITY...
Take off your mask at the sign to read another clue:
"Before the hours, south. After the minutes, east."
Then read through the rest of the narrative to get the piglet's paper:
"First come the hour, then come the minutes."
Still needing more clues, backtrack further to the GARDEN at the start of the chapter, where you see the GREEK STATUES.
Put your mask on to read the word written on the statues: "MIDNIGHT".
Armed with both hours and minutes and all the other necessary information, go to the TIME COMPASS GAZEBO at the end of the chapter...
Using the top button to turn the dial and the bottom button to input your selection, Enter the correct numbers into the time compass.
SOLUTION:
Hour is midnight and minutes are 40...but remember that before entering the hour, you need to enter "south" and after you enter the minutes, you need to enter "east". So, input the following settings, as if on a clock. Push the "Y" button after turning the dial each time to "enter" the number...
6, 12, 8, 3
Done correctly, you'll be transported to the next user survey.
Answer the questions about how you feel re: your experience to end the chapter.
Chapter 4: "An Inverted Funeral"
You begin chapter 4 in WHITE CHAPEL. Anna's in a coffin: her own funeral?
Listen carefully to the strange eulogy spoken by the gramophone priest...
"Say together the welcoming words:
The moon,
Let her in...
The head of a black dog,
Let her in...
A smile from a stranger,
Let her in.
Continue reading and discover, as Anna peeked inside the priest's robe, a rack of audio equipment...
There is an "a" button next to it; clicking this button changes the channel.
Notice that channel 2 appears to be playing in reverse.
The other channels have either static, snippets from other parts of the adventure, submarine noises or music.
Turn the dial to channel 2.
Moving on from the gramophone priest's audio equipment, you have a choice of directions to go: the blue path which winds upwards and to the west, or the red path that heads east...
Let's go west along the blue string of text first.
You'll end up to the far left of where the chapter began and inside the LAPAHC KCALB...aka BLACK CHAPEL, the mirror image of the white chapel!
If you left the radio on ch 2, the backwards channel, then you'll find it now sounds normal in this mirrored room. Here you will find some important clues:
Copy the graph in the picture here (note that it is also in a mirror).
Listen to the descriptions of the houses for Alpha, Beta, etc. and take note.
When you're done writing down the clues here, you can go back to the gramophone radio and change the channel to whatever you'd like to listen to.
This time, follow the red arrow through the "regular wooden door" to DOUBTER'S REST CEMETERY. Keep going down GLORY ROAD.
When Anna reaches for cigarettes, she finds a note instead:
Note that the LINK TEST paper presents another graph. Copy this down and include the letter coordinates along its edges.
Make note also that "the solution IS MY EX" is written on the back of the paper.
Then, go with Anna as she pursues the man in the bowler hat into BELIEVER WOODS.
Here, you find a projector screen with a series of slides.
You're shown a number of images, but three should seem significant to you:
Remember the eulogy given by the gramophone priest? He mentioned something about the moon, the black dog and the stranger...
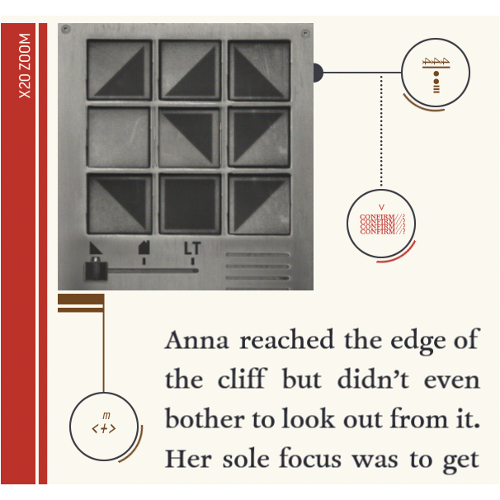
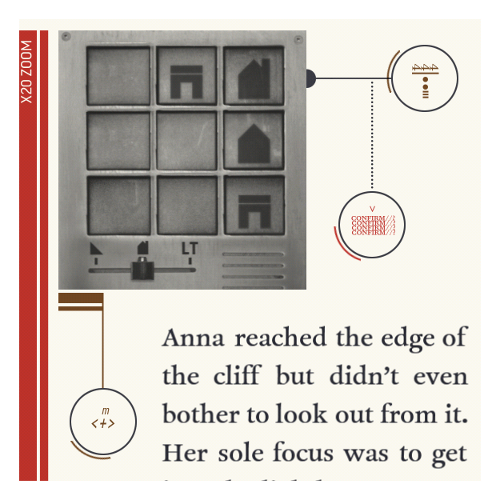
Continue down through the narrative, past the sheep, until you find yourself at FOOL HILL, LIGHTHOUSE SHELL.
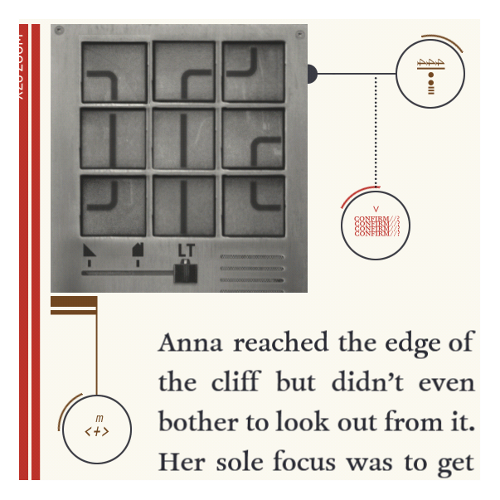
The lighthouse door is locked by another puzzle: a 3x3 square grid
The buttons on the right change what's inside a square on the grid (tap the top right button) or to move on to the next square on the grid (tap the bottom right button).
Use the bottom button to select between three different grid puzzles.
Recreate the correct patterns on the grid...
HINTS:
The clues for the first grid come from the eulogy given by the gramophone priest (if you didn't catch it the first time, turn it back to channel 1 then move into the white chapel to listen). Pay attention to the three images described by the priest, punctuated by "let her in." Then, look at the pictures the slid show in the believer woods: combine the appropriate three images to make a new one.
The "Our Town" clues are in the audio on channel 2 (that must be heard while in the black chapel) and the picture in the mirror of the black chapel. Remember the picture shown is also backwards because its in a mirror.
For the "Link Test", refer to the note Anna found in her pocket outside the cemetery glade. You need to draw lines to link certain letters. Which?
SOLUTIONS:
Screenshot: Lighthouse Door, 1st Grid
Screenshot: Lighthouse Door, 2nd Grid
Screenshot: Lighthouse Door, 3rd Grid
When you re-create a pattern correctly, the screen will flash and "OK" will fill each square.
After all three patterns are inputted properly, the screen will zoom in on the lighthouse door then fade to black...
Answer the questions about your playing environment to end chapter 4.
Chapter 5: "The Show"
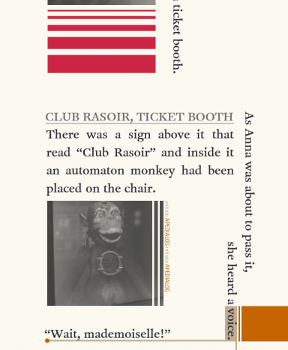
Read the narrative until you pass the automoton monkey in the TICKET BOOTH. Before heading to the show, turn your tablet around and go toward the restrooms.
After using the LADIE'S ROOM, Anna suspects the man in the bowler hat is hiding in the MEN'S ROOM.
In order to access it, though, a number code is needed.
Leave the restrooms area and go back to the ticket booth, turn your mobile device again, and continue reading at CLUB RASOIR, LOUNGE. To gain entrance to the show, you need to do a few things first...
Keep scrolling down until you reach the end and hear the "show starting" chime.
At this point, a new path is revealed: now you can turn your device again and head right past another automoton monkey, this one "human sized...emerged from a hatch in the floor."
Head west until you're asked "Tickets, please!" then turn your device around again.
Read down through the narrative as Anna hands her ticket to the monkey and the doors open.
At this point, you will be inside CLUB RASOIR, THEATRE.
Enjoy Jonathan Eng's musical performance.
When it's over, continue to the right and scroll down, heading backstage.
Once you arrive BACKSTAGE, you'll hear a voice: "You've impressed us, two hundred and forty-eight." Before this man can explain, Anna punches him and acquires his tablet device.
To get more of the story, press the top button on the device.
Then,"Please enter your HAT ID."
There are some important clues to pick up from Anna's brief conversation with the device's owner that could help you with determining this number:
HINT:
He told you he is also a player, and that he "came here before you."
SOLUTION:
Anna is player #248. Since he came before her, he must be player #...
247
2 dots-enter-
Use the bottom button to highlight the amount of dots representing the number of the first digit, then click the bottom button to move to the next digit.
After gaining access to the device, read through all the information you find on it...
Use the bottom button to change between icons; use the top button to open the app, then the top button to scroll through its contents. Close an open app by tapping the bottom button.
Pay special attention to what you find in the MESSAGES and MAPS:
On page 2 of the messages, you see player#247 forgot the men's room password and he's told to "take a look at the routes".
Then, look at both images for the ISLAND MAP: one gives coordinates, the other lists a series of letters.
With this important data, you can head back to the RESTROOMS.
Input a 4-digit number to unlock the MEN'S ROOM.
HINT:
This puzzle is similar to the link test puzzle of the previous chapter.
SOLUTION:
Using the four series of letters given in MAP app of 247's device, draw lines between the coordinates on the island map. Each will look like a number to create a 4-digit code...
7 1 4 1
Use the top button to change the number, use the bottom button to enter it.
When you've entered the proper men's room password, the screen will fade to black again.
Complete the personal preferences survey to end chapter 5.
Chapter 6: "Technical Perfection" and "Epilogue"
This chapter begins with you heading north, out of the men's room and into a STORAGE CAVE. Continue reading, following the narrative as it leads you to the end
Although there are some interactive bits, which you can play with as you please, you'll encounter no puzzles, just the slow unraveling of the final act of the story.
When you've read as far as you can (and have given up trying to operate the DEVICE6), you'll reach a POWER BUTTON.
Click "X" to turn it (whatever this is), off.
After which, you're given a disclaimer to read. Read through it and then make a choice:
"I Disagree"
OR
"I agree"
Make your choice as you choose and chapter 6 ends.
At this point, you can open and read the epilogue.* Then, claim your, um, complimentary gift.
*A note about the end(?):
As near as I could tell, there is no way to change the final outcome of the story. But...who knows?
Posted by: elle |
October 18, 2013 7:50 PM
|
October 18, 2013 7:50 PM