

Blue Toad Murder Files: A Touch of Mystery
Platform: iOS
![]() One part puzzle solving, one part snarky story, and one part riddles, Relentless Software's Blue Toad Murder Files: A Touch of Mystery is what you would get if you combined the Professor Layton series with You Don't Know Jack. Sounds like strange bedfellows for sure, but Blue Toad's wild narration and sense of humor keep the whodunit theme light and enjoyable while popping you from one mystery to the next. All without a single reference to Murder, She Wrote!
One part puzzle solving, one part snarky story, and one part riddles, Relentless Software's Blue Toad Murder Files: A Touch of Mystery is what you would get if you combined the Professor Layton series with You Don't Know Jack. Sounds like strange bedfellows for sure, but Blue Toad's wild narration and sense of humor keep the whodunit theme light and enjoyable while popping you from one mystery to the next. All without a single reference to Murder, She Wrote!
 Your mother has sent you to the quaint town of Little Riddle for some respite after you solved a particularly brutal case, knowing your detective skills could use a bit of a recharge. What better place to relax than a town with cows and streams and teashops and a mayor who gets murdered right in front of your face? Oh, wait, that last bit's not exactly good is it? Looks like it's time to put on your sleuthing hat after all.
Blue Toad Murder Files: A Touch of Mystery plays out as a series of puzzles interspersed with cutscenes that drive the story forward. Once the investigation begins, you'll head out to question suspects, each with their own motive and personality quirk (or two). After listening to their story you'll decipher a riddle, usually something involving a quick bit of wordplay or a classic mini-game like Towers of Hanoi. Afterwards you'll receive a ribbon based on how quickly you solved the puzzle, then it's on to the next bit of detective work!
This is only the beginning, however. Blue Toad Murder Files is packed with six episodes to complete, which should be plenty to keep you chuckling and solving for several days. And with its lovely artwork, smart puzzles and fantastic voice acting, you won't want to stop until you reach the end.
NOTE: This game was played and reviewed on the iPad 3. Game was available in the North American market at the time of publication, but may not be available in other territories. Please see individual app market pages for purchasing info.


Walkthrough Guide
(Please allow page to fully load for spoiler tags to be functional.)
Blue Toad Murder Files:
A Touch of Mystery walkthrough
Episode 1 - Little Riddle's Deadly Dilemma
Part 1
Train Station: Blue Toad Agency
Correctly match each detective's name with their portrait.
Read the newspaper article for clues:
Maple says she's "so proud of the younger members of the team," meaning Maple is older. Place the name Maple under the portrait of the old woman.
She also names the two younger members, "Dickens" (a boy's name) and "Dakota" (a girl's name). Put the name Dickens under the young man's portrait and Dakota under the young girl's portrait.
By process of elimination, and the clue that the last member is "mustachioed", you know the name Vanderbosh goes under the older man's portrait.
Solution.
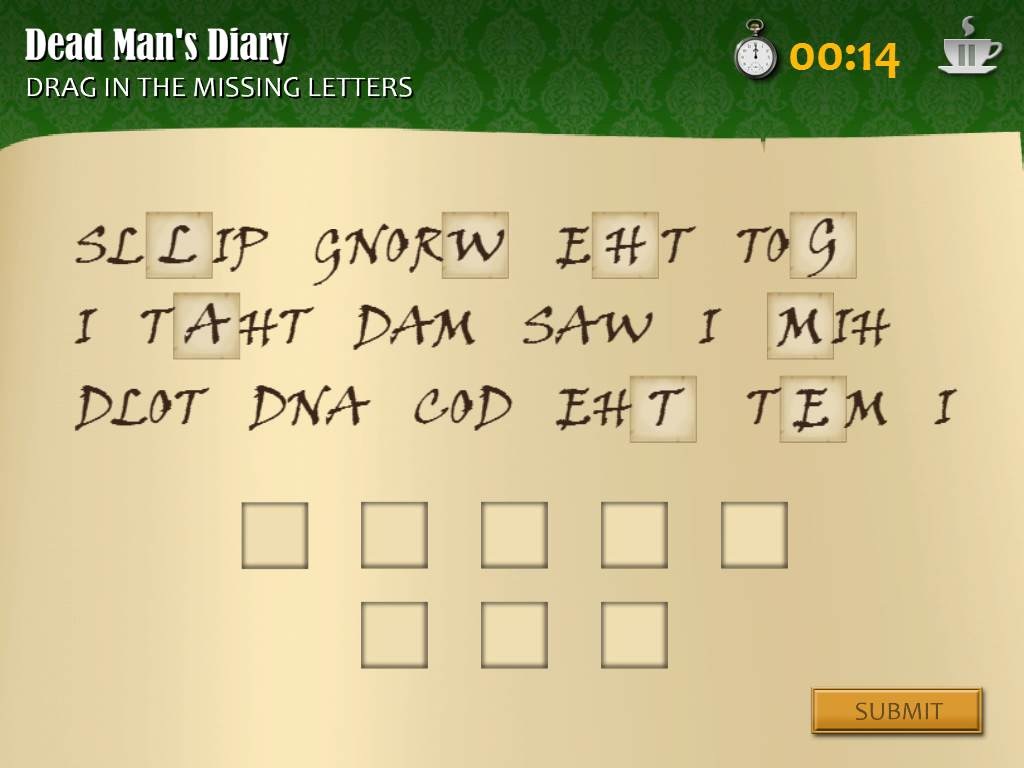
Town Hall: Dead Man's Diary
Decipher the mayor's diary, then insert the letters into the blank spaces to complete the message.
Read the words backwards, starting with the last word on the bottom line and you'll see:
"I m_t _he doc and told hi_ I was mad th_t I _ot t_e _rong pi_ls.
Now it should be easy to substitute the letters from the bank below to complete the message:
"I met the doc and told him I was mad that I got the wrong pills.
Solution.
Case Review 1
Q: What was the color of the train that brought you to Little Riddle?
A: Green
Q: The Station Master implied that he'd argued with the Mayor over what?
A: A tea room.
Q: By whom was this holiday to Little Riddle arranged?
A: Mother
Q: Who did the Constable say he was going to call?
A: The Inspector
Part 2
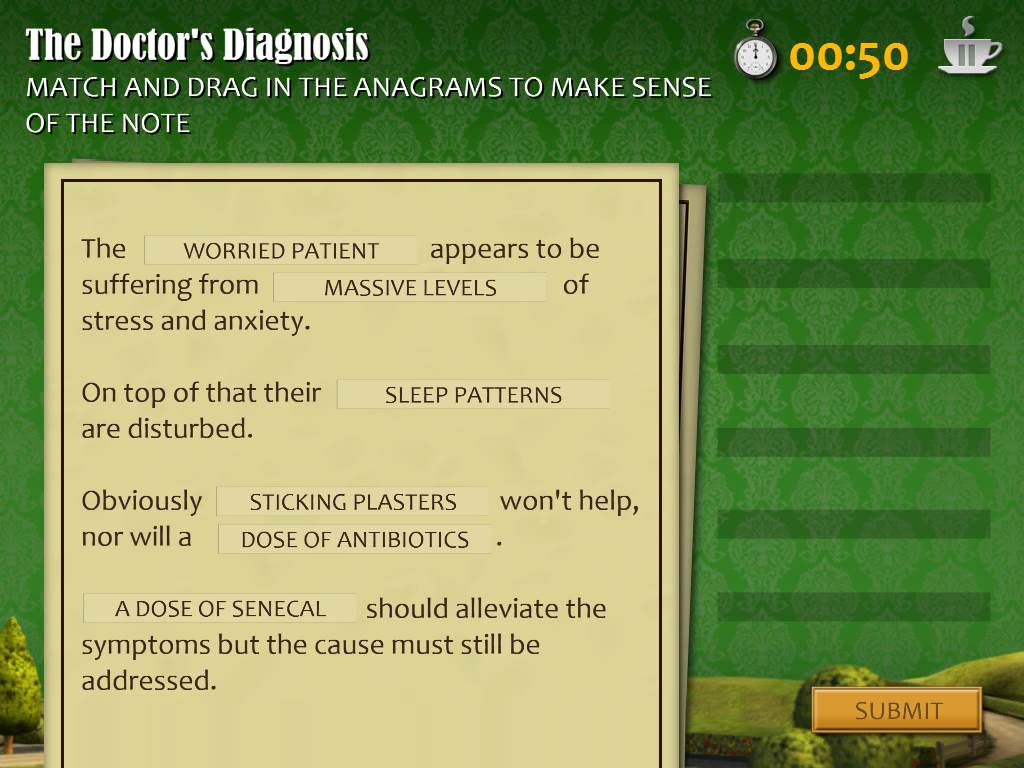
Doctor's Surgery: The Doctor's Diagnosis
Place each solution from the list over its matching anagram (a phrase made of rearranged letters) in the doctor's note.
WORN DIET PIRATE = worried patient.
EVASIVE SMELLS = massive levels.
TEN PEST PEARLS = sleep patterns.
STRANGE LIPSTICKS = sticking plasters.
FICTIONS TOO BIASED = dose of antibiotics.
CLEANSE SEAFOOD = a dose of senecal.
Solution.
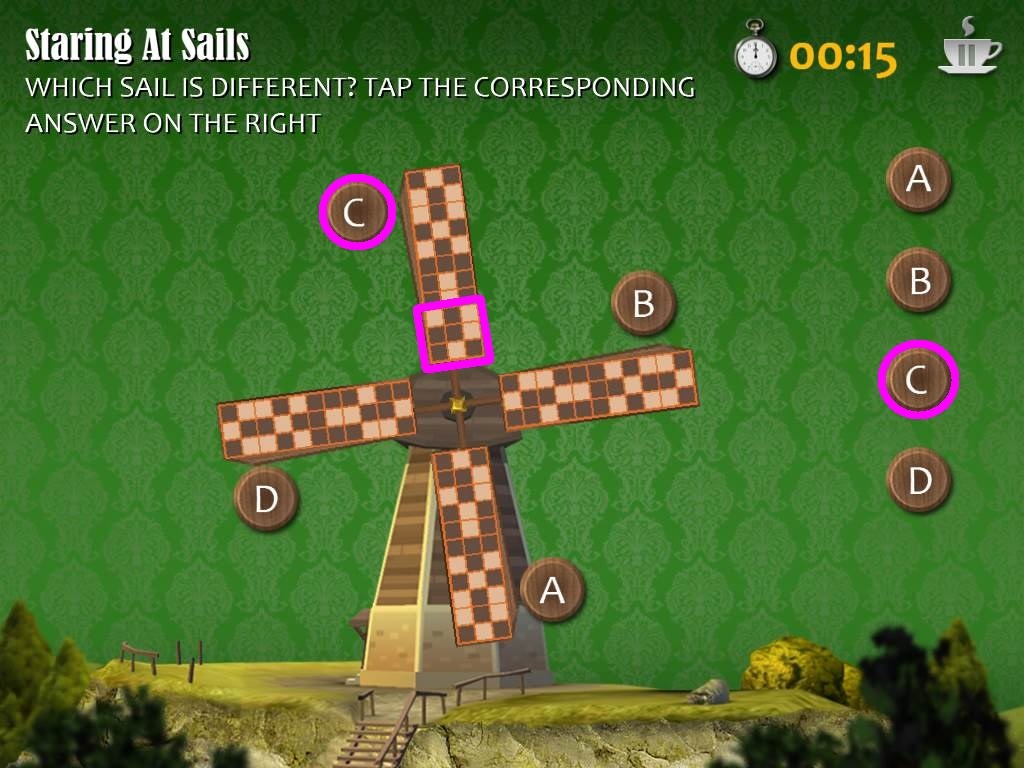
Windmill: Staring At Sails
Identify which windmill is different from the other three.
Study the patterns of squares on each sail and compare them to find the odd one out.
It's tricky to see, but the pattern on sail C within the 3x3 area at the bottom of the sail is reversed. Tap the C button and submit your solution.
Solution.
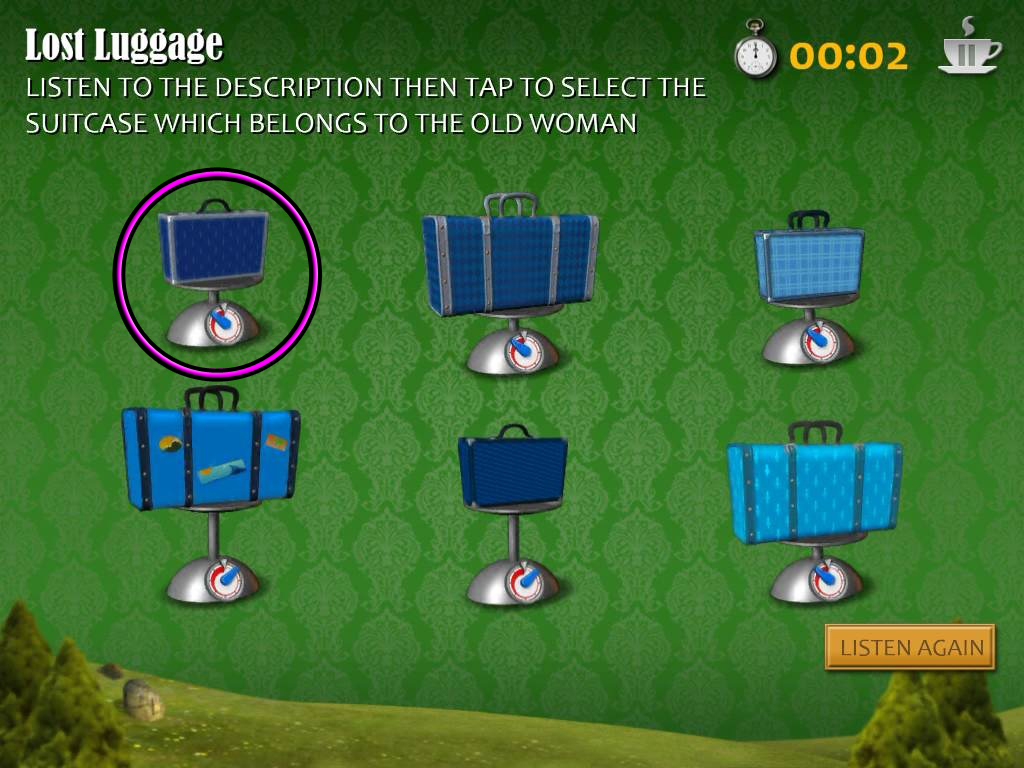
Train Station: Lost Luggage
Listen to the old woman's story to pick up clues describing her lost luggage, then select the correct suitcase from the visible options.
Amid the rambling, she'll list some important facts:
It's a little thing, very heavy, dark blue like the night sky, and has one handle.
Select the left bag in the top row.
Solution.
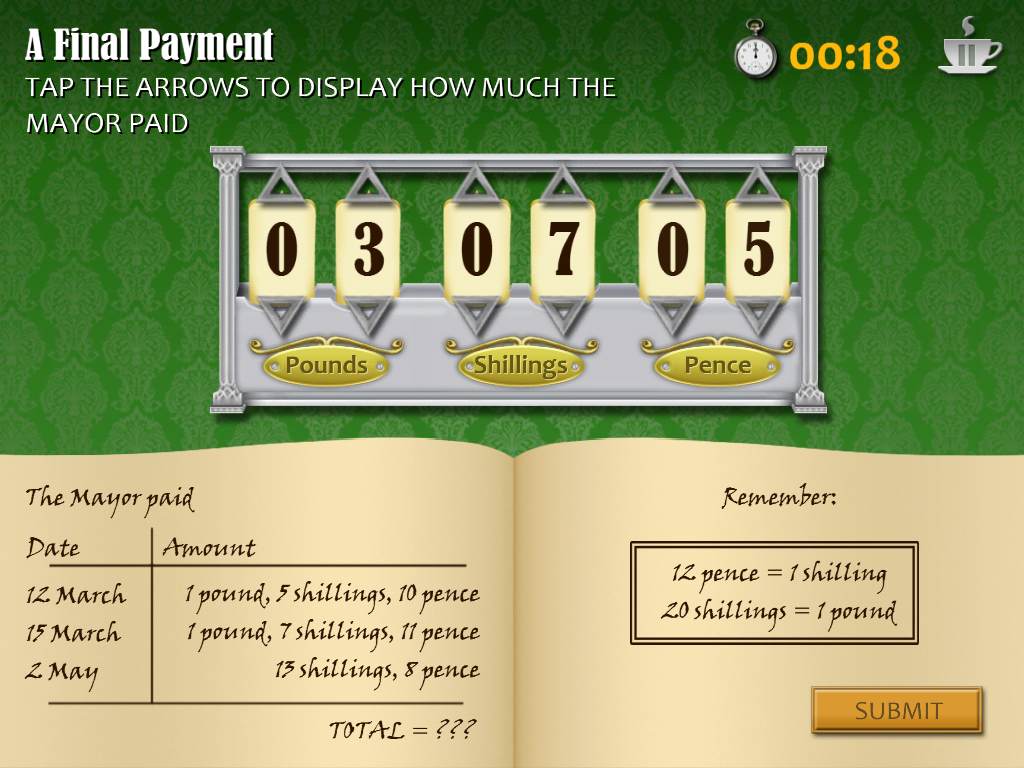
Jewelry Shop: A Final Payment
Simply find the sum of pence, shillings, and pounds by adding the Mayor's payments noted in the ledger.
Remember that 12 pence = 1 shilling and that 20 shillings = 1 pound.
Add the three payments together to get a subtotal of 2 pounds, 25 shillings, and 29 pence. But you're not done there!
Convert the currency so that each amount is the lowest common denominator.
The 29 pence becomes 2 shillings and 5 pence.
The now 27 shillings converts to 1 pound and 7 shillings.
The new sum is 3 pounds, 7 shillings, and 5 pence.
Solution.
Case Review 2
Q: What did the Station Master say the Mayor was going to do about his cafe?
A: Look into the matter again.
Q: Who is it that the Miller mentioned could confirm his meeting with the Mayor?
A: The Town Hall Clerk.
Q: Why did the Mayor receive the wrong medicine?
A: The chemist misread the prescription.
Q: The Jeweller appears to originally come from what country?
A: The USA.
Part 3
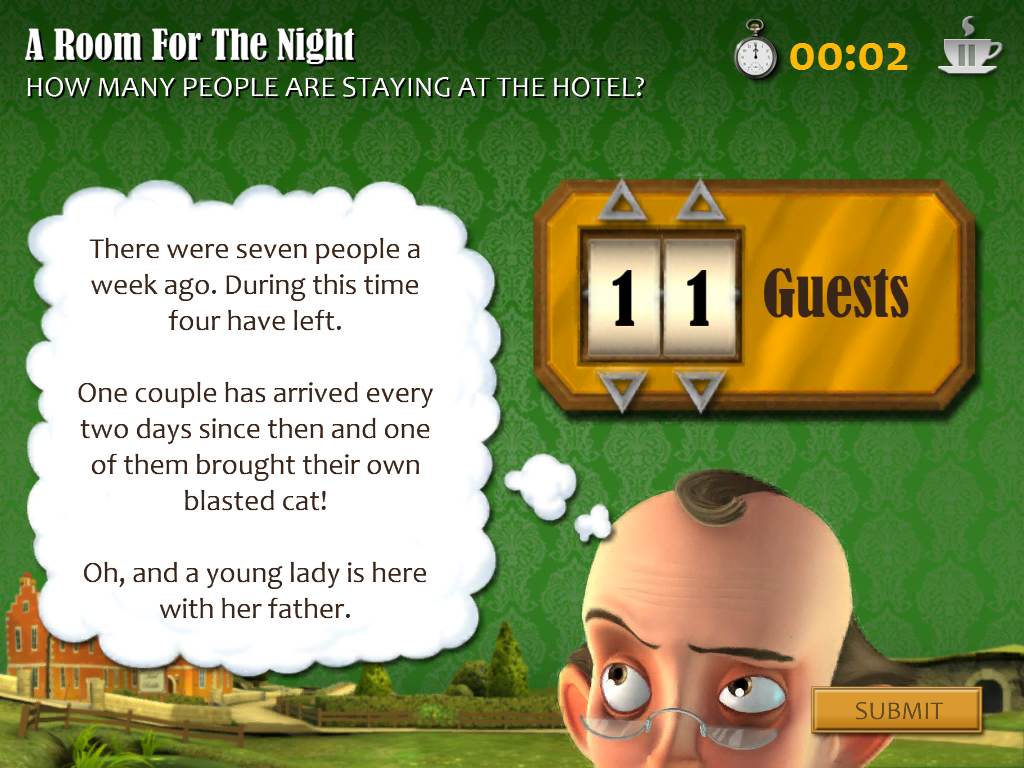
Town Hall: A Room For The Night
Use the clues given to you by the hotel manager to determine how many people are currently staying at the hotel.
The first part says, "There were seven people a week ago. During this time four have left."
From that, you can determine there are at least 3 people in the hotel.
Next, he says "One couple has arrived every two days since then and one of them brought their own blasted cat!"
If a couple arrives every two days in one week, then you know that by the sixth day 3 couples have arrived, totalling 6 people.
Add the 6 new guests to the 3 remaining guests from the previous clue for a subtotal of 9.
Lastly, he mentions "a young lady is here with her father."
Add those two people to the previous 9 people you've already accounted for to find the total of all guests: 11.
Solution.
Pub: The Pub's Pipe Problem
Arrange the pipes so that each barrel is connected to its matching colored tap.
Tap one of the tiles on the right side of the screen to select it, then tap a space to position the pipes in the space.
Solution.
Town Hall: A Shadowy Figure
Follow the instructions to discover the path the shadow figure took.
"When at a cross road, the figure went EAST if he found a multiple of 3."
Multiples of 3 are 3, 6, 9, and 12.
"If it was not a multiple of 3, he went NORTH if it was an even number (2, 4, 8) or went SOUTH if it was an odd number (1, 5, 7).
Start at the number 3 in the upper left corner of the grid.
3 = Move EAST to 7.
7 = Move SOUTH to 1.
1 = Move SOUTH to 11.
11 = Move SOUTH to 9.
9 = Move EAST to 6.
6 = Move EAST to 8.
8 = Move NORTH to 10.
10 = Move NORTH to 12.
12 = Move EAST to 5.
5 = Move SOUTH to 9.
9 = Move EAST to 2.
2 = Move NORTH to 3.
3 = Move EAST to B.
Solution.
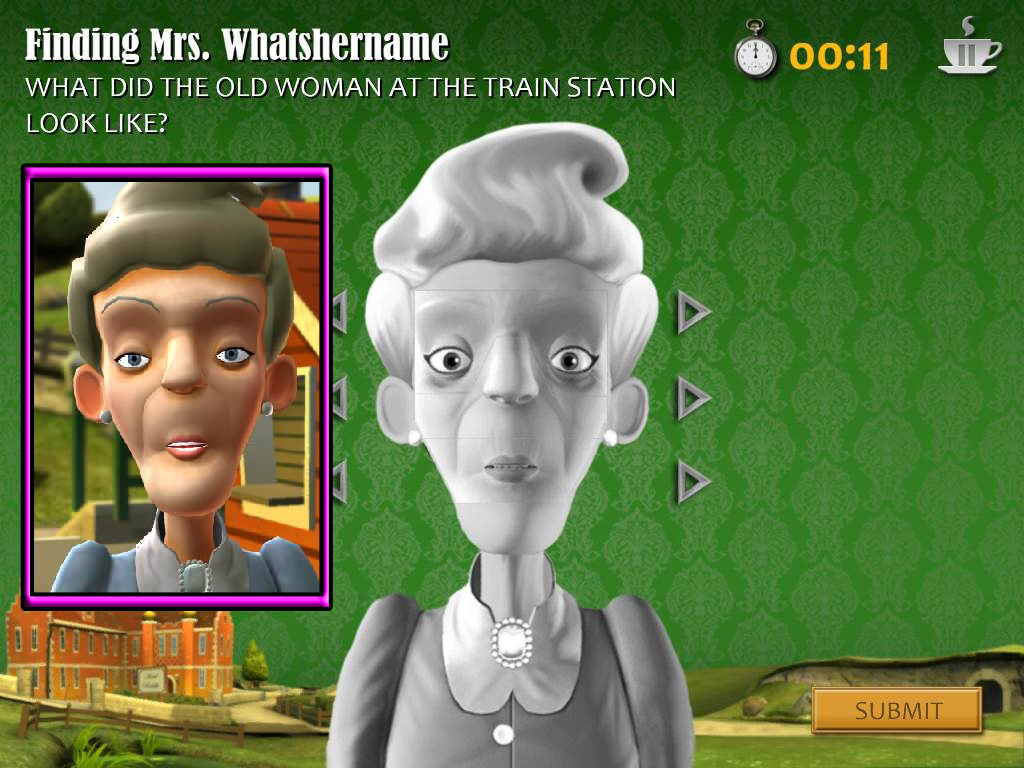
Hotel: Finding Mrs. Whatshername
Select the correct parts of the face to recreate the appearance of the old woman you met at the train station.
Choose the eyes, nose, and mouth that match the same features of the old woman's face.
Solution.
Case Review 3
Q: Who did the Hotel Owner complain had been booking people into the hotel?
A: His wife.
Q: Where does Mrs. Gossip live?
A: Near the stream.
Q: What is the Inspector's name?
A: Inspector Bragg.
Q: What is the name of the pub?
A: The Cloak and Dagger.
Part 4
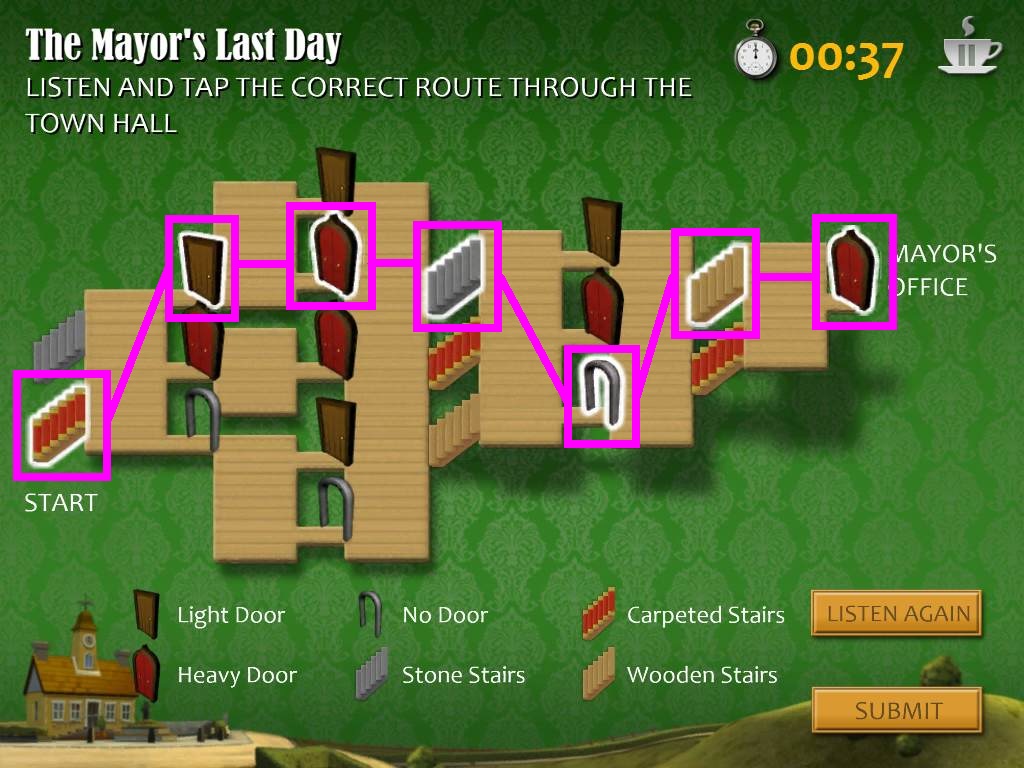
Town Hall: The Mayor's Last Day
Listen to the Town Hall Clerk's description of what she heard to identify the Mayor's path.
Select the object in the floorplan that matches the sounds you hear.
First, you'll hear soft footsteps, indicating that the Mayor walked on the carpeted stairs.
Next, is the sound of a door closing lightly. Select the single wooden door.
After that is a noise that sounds like a heavy door closing. Pick the large, red double doors that are parallel to the door you selected in the last step.
Then, you'll hear heavy footsteps with a slight grinding sound. Select the stone staircase at this point.
The clerk says she didn't hear any door after that, meaning the mayor walked through the archway.
After the short silence you'll hear the sound of footsteps on creaky stairs. Pick the wooden staircase.
Lastly, you'll hear a heavy door closing again, just like in the third step. Highlight the heavy door at the end of the flooplan to complete your map of the Mayor's route.
Solution.
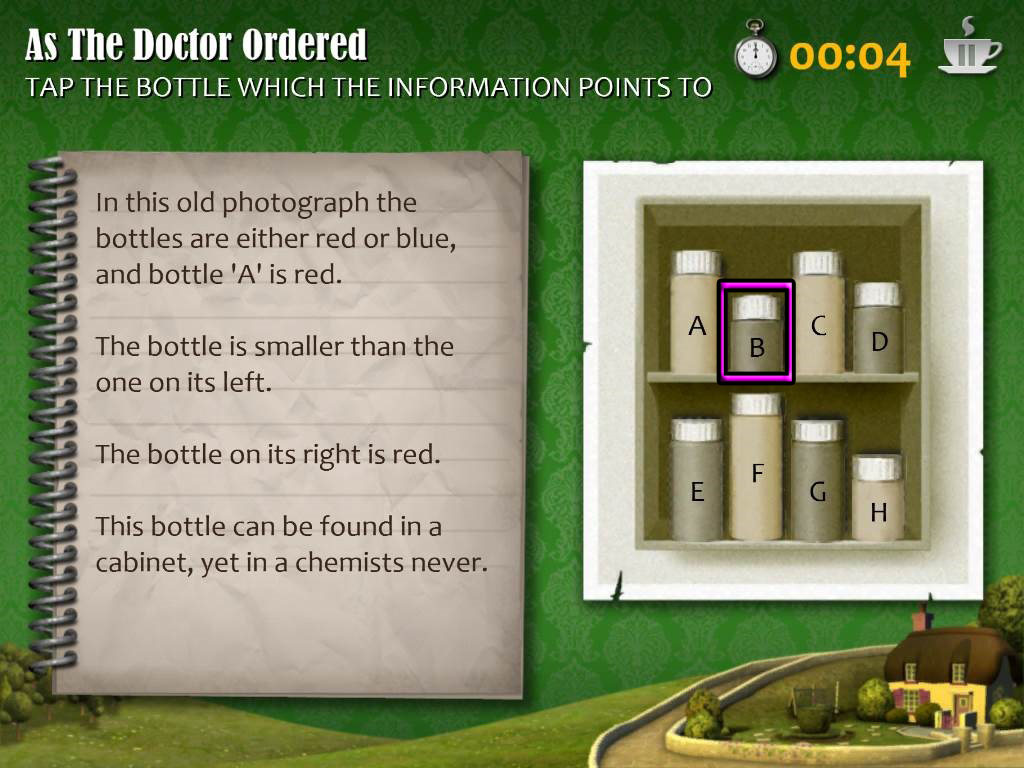
Mrs. Gossip: As The Doctor Ordered
Use the clues from the notes to determine which bottle Mrs. Gossip is looking for.
First you learn that bottle A is red.
You can therefore determine that all the light bottles like A are red and all the dark bottles like B are blue.
The next line says that the "bottle is smaller than the one on its left.
Only bottles B, D, G, and H are smaller than the bottle on their left, so now you've cut the number of possibilities in half.
The third line states that the "bottle on its right is red."
D and H have no bottles to their right at all, so now your options are limited to B and G.
The clue in the last line is a tricky one: "This bottle can be found in a cabinet, yet in a chemists never."
The riddle refers to the actual letters in the word "cabinet" and "chemist".
The letter G can't be found in either word, but you can find the letter B in cabinet, and not in chemist!
Select bottle B as your solution!
Solution.
Police Station: Whodunnit?
After a brief review of some of the evidence and motives, you'll have to select which of the four suspects in the lineup you believe is guilty of murdering the Mayor.
If you need to, you can go back to the menu and rewatch the cinematics to refresh your memory or pickup any vital information you may have overlooked.
Tap the guilty party to make your selection.
GUILTY: The Miller!
Aside from his very guilty and apologetic attitude, the Miller had a false alibi for his whereabouts around the time of the murder and the Town Hall Clerk confirmed that he had made no appointment for that morning.
Additionally, the Miller had claimed the purpose of the meeting was to discuss the windmill which supposedly needed repairs. However, when you arrived at the mill, it was operating perfectly fine.
Congratulations! Case solved.
Episode 2 - The Mystery of Riddle Manor
Part 1
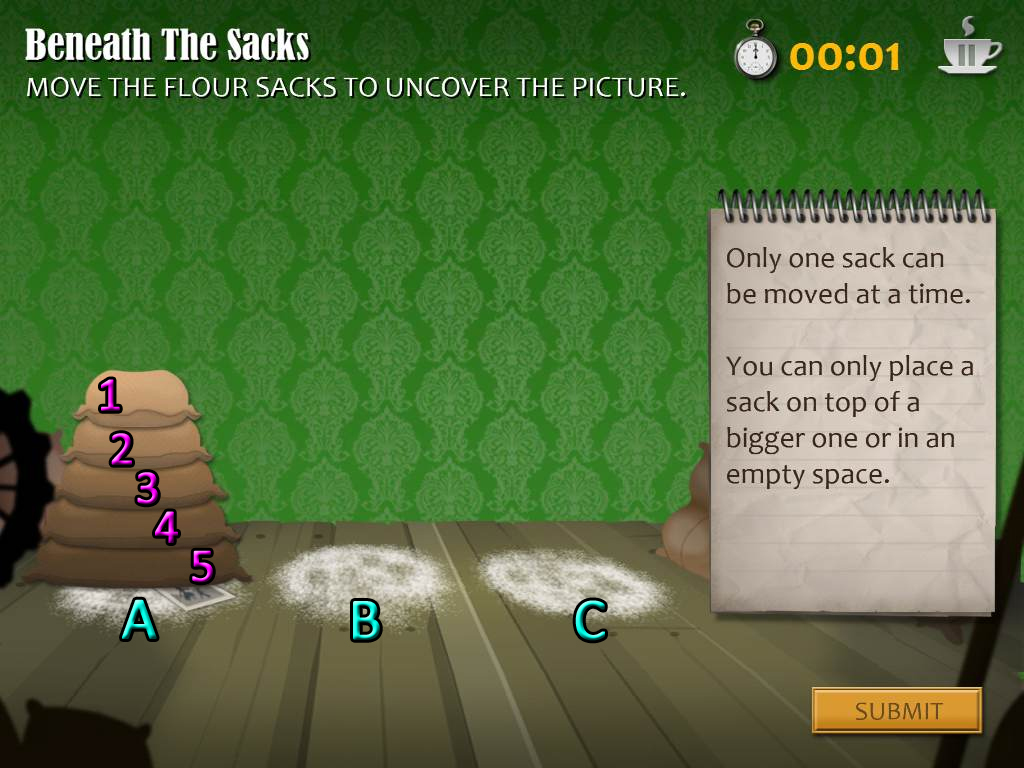
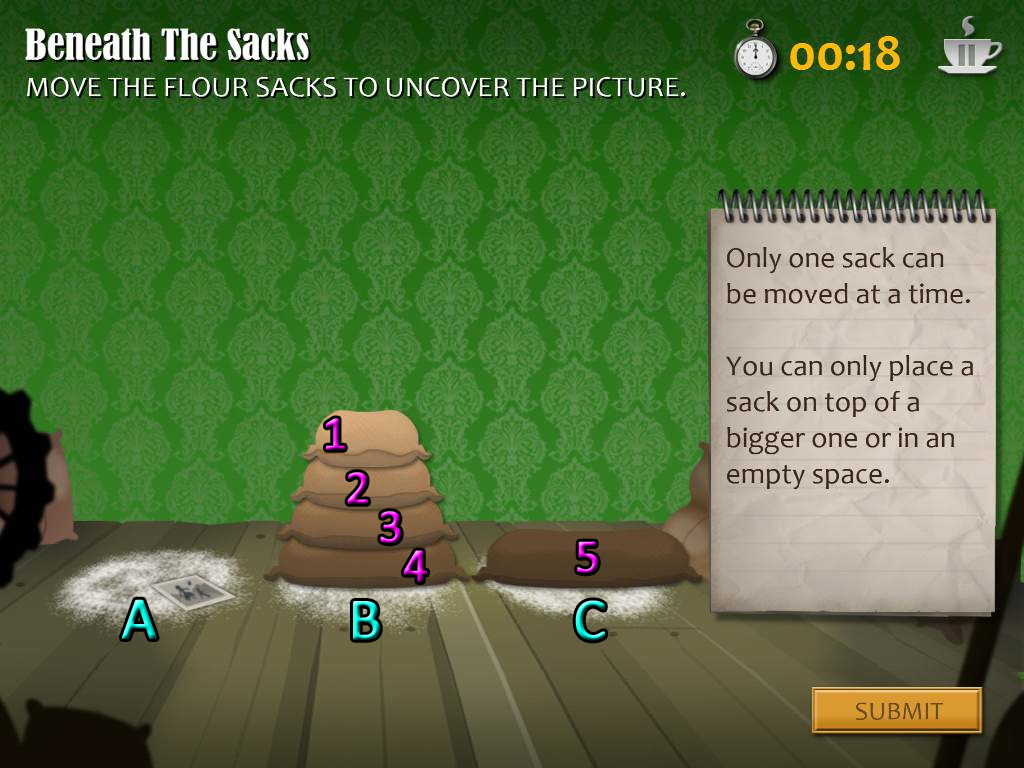
Windmill: Beneath The Sacks
Move the sacks of flour away from the left side of the floor to uncover the photograph.
You can move a sack either directly on the ground or on top of another sack.
Only smaller sacks can go on top of larger sacks; it does not work the other way around.
Refer to the screenshot and follow the instructions below to complete the puzzle.
Screenshot.
Move Sack 1 to Space C.
Move Sack 2 to Space B.
Move Sack 1 to Space B.
Move Sack 3 to Space C.
Move Sack 1 to Space A.
Move Sack 2 to Space C.
Move Sack 1 to Space C.
Move Sack 4 to Space B.
Move Sack 1 to Space B.
Move Sack 2 to Space A.
Move Sack 1 to Space A.
Move Sack 3 to Space B.
Move Sack 1 to Space C.
Move Sack 2 to Space B.
Move Sack 1 to Space B.
Move Sack 5 to Space C.
Solution.
Manor: The Manor's Maze
Swap the tiles to correctly arrange the hedge maze.
If there are open paths at the sides of a tile, they must connect to the paths of an adjacent tile.
Tap and drag a tile to move it, then release the tile to set it in place.
The easiest method is to start at the lower left and right corners. Next, position the correct tiles at the entrance and exit points of the mage. From there, you'll be able to organize the tiles at the middle of the maze.
Solution.
Case Review 1
Q: How many people have been murdered during your time in Little Riddle?
A: Two
Q: Who lives at the Manor?
A: Lady Snobbish.
Q: Why was the Colonel at the Manor?
A: To take the Lady for a walk.
Q: Who has not visted the manor today?
A: None of the above.
Part 2
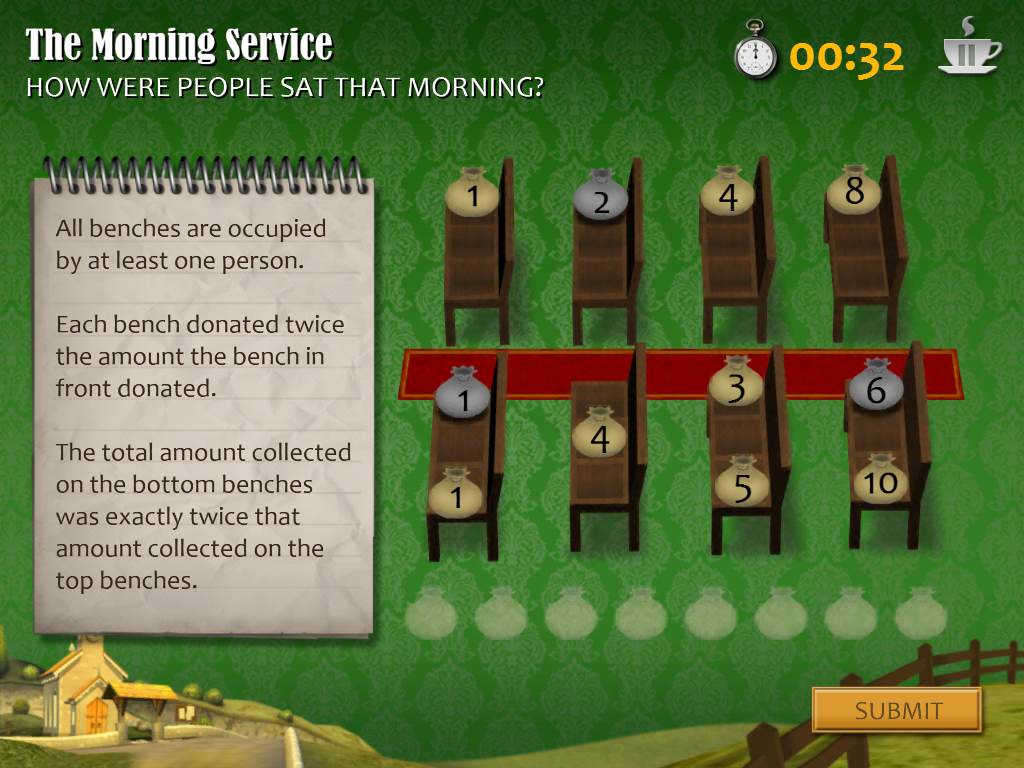
Church: The Morning Service
Use the clues to find out how much money each pew put in the collection plate, then place the money bags in the correct places according to the information.
The first clue states that each bench has at least one person.
According to the second clue, each bench donated twice as much money as the bench in front of it.
In the third clue it says the total amount collected on a bench at the bottom (below the red carpet) is double the amount collected as the opposite bench on the top (above the red carpet).
With these clues and the grey bags that are already placed on a few of the benches, you should be able to position the money bags so that they meet all of the previously stated conditions.
Start with the front benches, then work your way towards the back.
Solution.
Village Green: Duck and Colour
Count the number of ducks by color in both the inner and outer rings, then tap the duck of whichever color has the smallest amount.
The outer ring has 4 ducks of every color. Since the amount is equal, you can disregard the outer ring.
However, the inner ring has only 1 light blue, 3 dark blue, 2 light green, and 3 dark green.
From that you'll know that the light blue ducks are the fewest in number.
Solution.
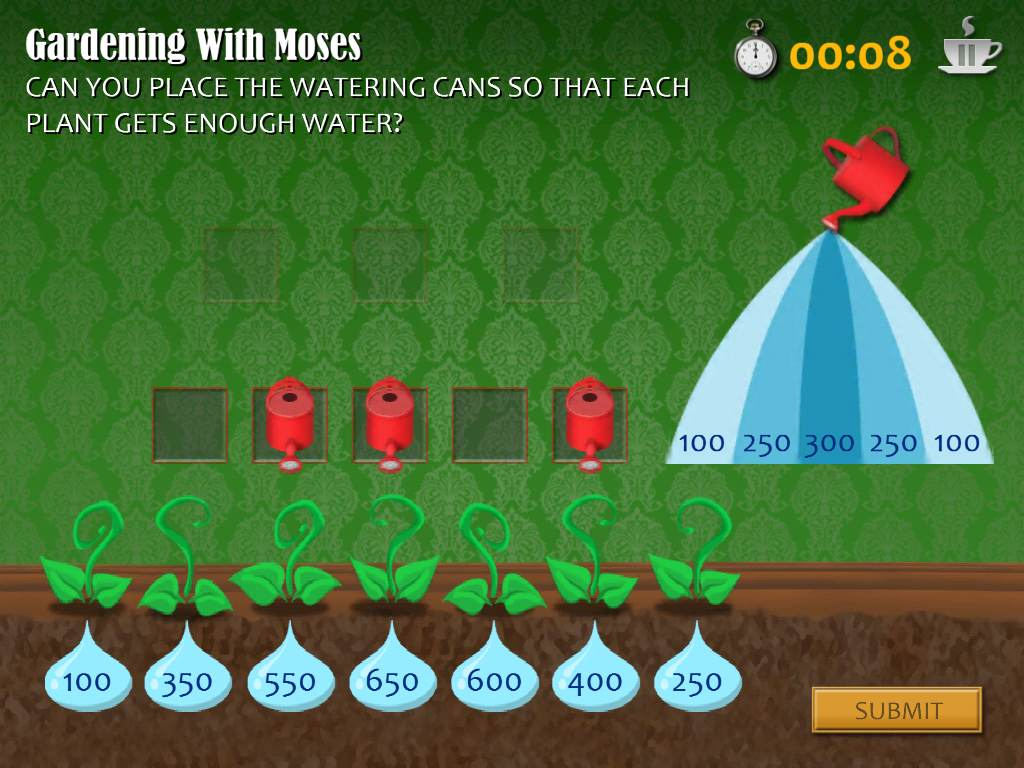
Moses' Shack: Gardening With Moses
Position the watering cans so that each plant gets the correct amount of water.
Refer to the diagram at the right side of the puzzle to see how the water is distributed from each can.
Plants directly under the can will receive the most amount of water, while plants two squares to the left or right sides of the can will receive lesser amounts of water.
The number inside the droplets under each plant indicates the exact amount of water that plant needs.
Solution.
Case Review 2
Q: What is the Vicar's name?
A: Vicar Goodman.
Q: What did Moses see at the Manor?
A: Weeds.
Q: What did you find at the windmill?
A: A photograph.
Q: Which of these things did the Vicar say he has not seen?
A: The mundane.
Part 3
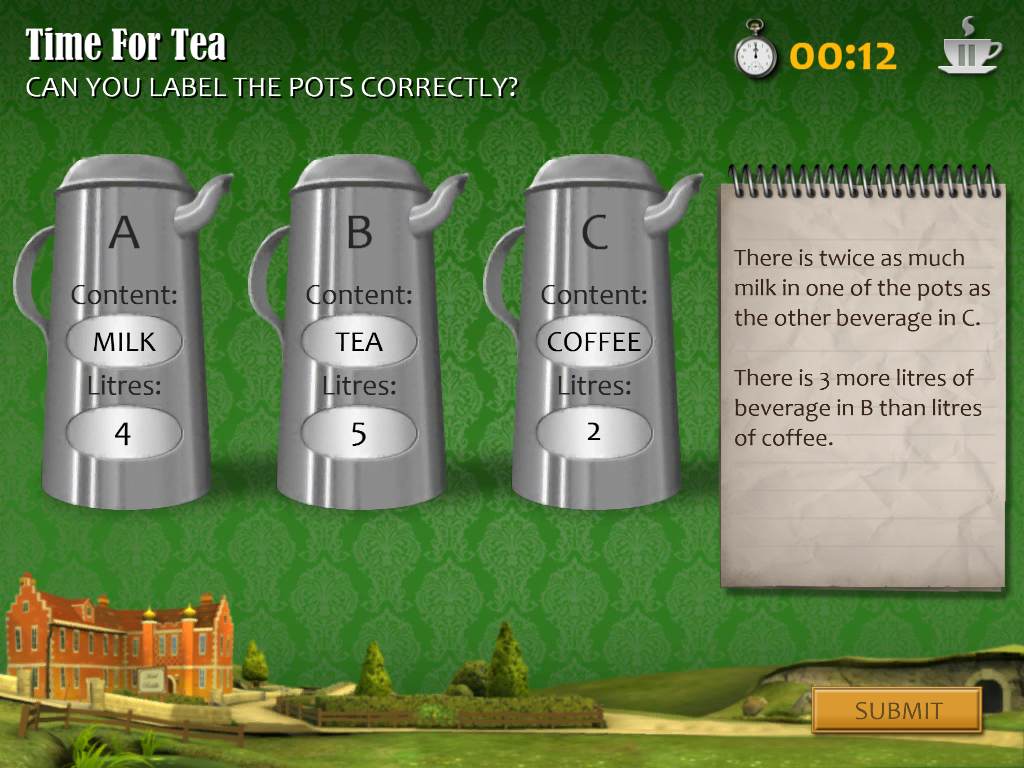
Hotel: Time For Tea
Correctly identify and label the pots and the amount of liquid they contain based on the information provided by the clues.
The first clue states that there is "twice as much milk in one of the pots as the other beverage in C."
From this, you know that milk is not in pot C.
Also, since pot C contains half as much liquid as whichever pot contains milk, you know the amount in C must be 2 and whatever pot contains milk must be 4.
The second clue states that there are "3 more litres of beverage in B than litres of coffee."
Now you know that pot B does not contain coffee.
You also learn from this clue that pot B must contain 5 litres of liquid, because only the 5 litre pot could contain 3 more litres of beverage than the 2 litre pot (which we already know is pot C).
Additionally, you can determine with that same evidence that the 2 litre pot must contain coffee. Thus, pot C contains 2 litres of coffee.
Since you know from before that there must be 4 litres of milk, and pot B contains 5 litres of a liquid, milk must be in pot A. That leaves tea for pot B.
Solution.
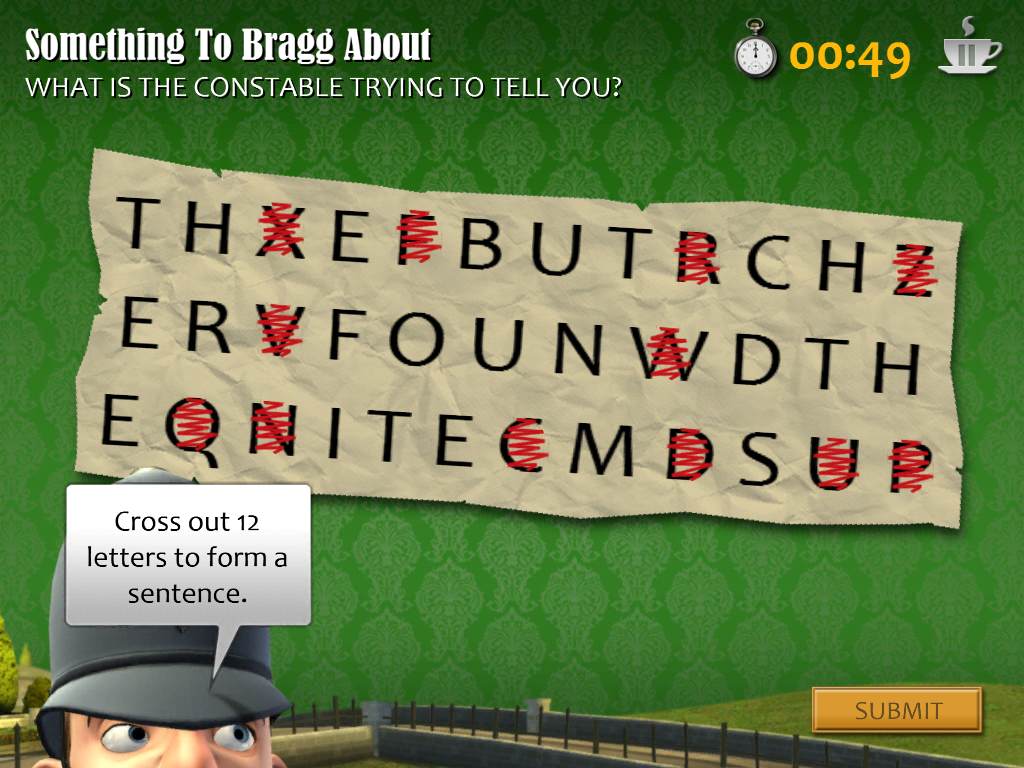
Police Station: Something To Bragg About
Select 12 letters to remove from the note to find the hidden message that remains.
Start by removing the obviously incorrect letters, like X, Z, V, and Q.
From that point, you should be able to understand the first few words of the note and find two more incorrect letters: F, R, and W.
The majority of the sentence should be legible now, so remove the remaining 5 inoccrect letters from the message.
Solution.
Post Office: Lost In The Post
Correctly arrange the tiles to organize the packages.
Use the ropes as a clue to where each package belongs. The ropes on one side of a package should connect to the ropes with an adjacent package.
One of the tiles is an extra and does not fit into the final pattern.
Solution.
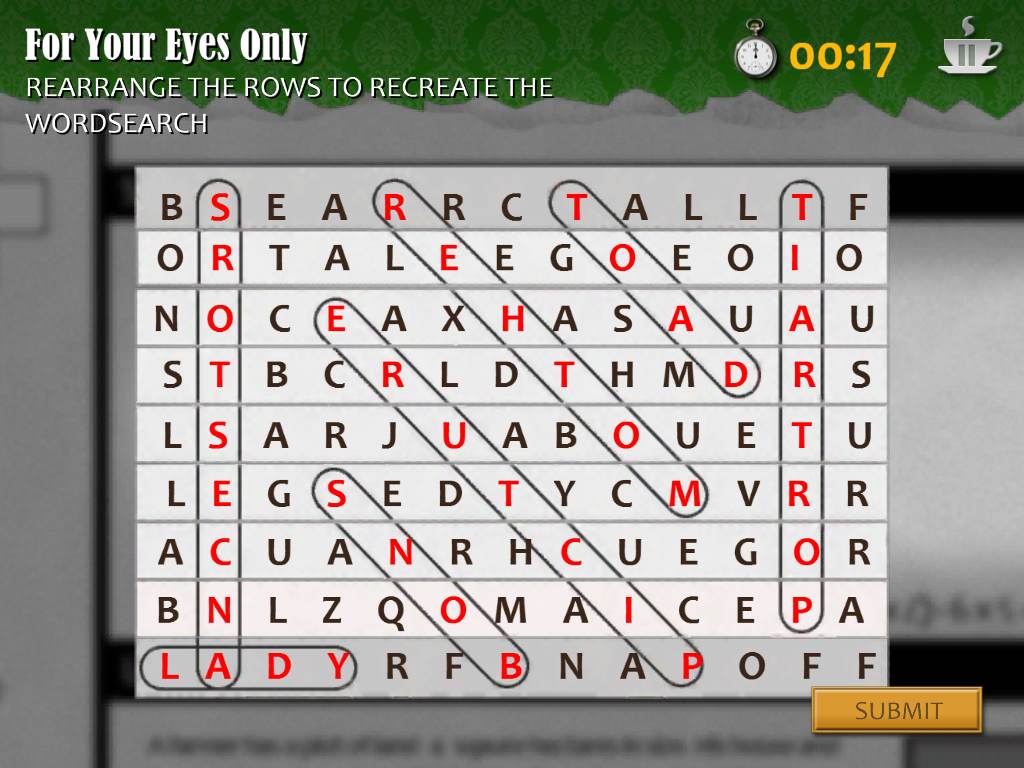
Village Green: For Your Eyes Only
Arrange the letters in the crossword puzzle so that the letters with the circled letters all contain a complete word.
Words may be written vertically, horizontally, and diagonally. The letters within the word may also be written backwards.
Use the stationary bars at the top and bottom of the puzzle as a starting point for figuring out the positions of the other bars.
It's a lot easier to solve the vertical words at the left and right sides of the puzzle than trying to solve the diagonal ones in the middle.
Solution.
Butcher's Shop: The Meat Of The Matter
Organize the meats into stacks that would sell for the highest total sum of money.
The price diagram on the black board indicates how much each meat group sells for.
If organized correctly, there should be meat on each plate labeled Bundles 1 to 4.
Solution.
Case Review 3
Q: What initials were on the letter from Mother?
A: FMFYEO
Q: What recovered item had a hidden space for a drink?
A: A walking stick.
Q: How many people were in the photo you found at the windmill?
A: Three.
Q: Which of your four suspects wear glasses?
A: The Vicar.
Part 4
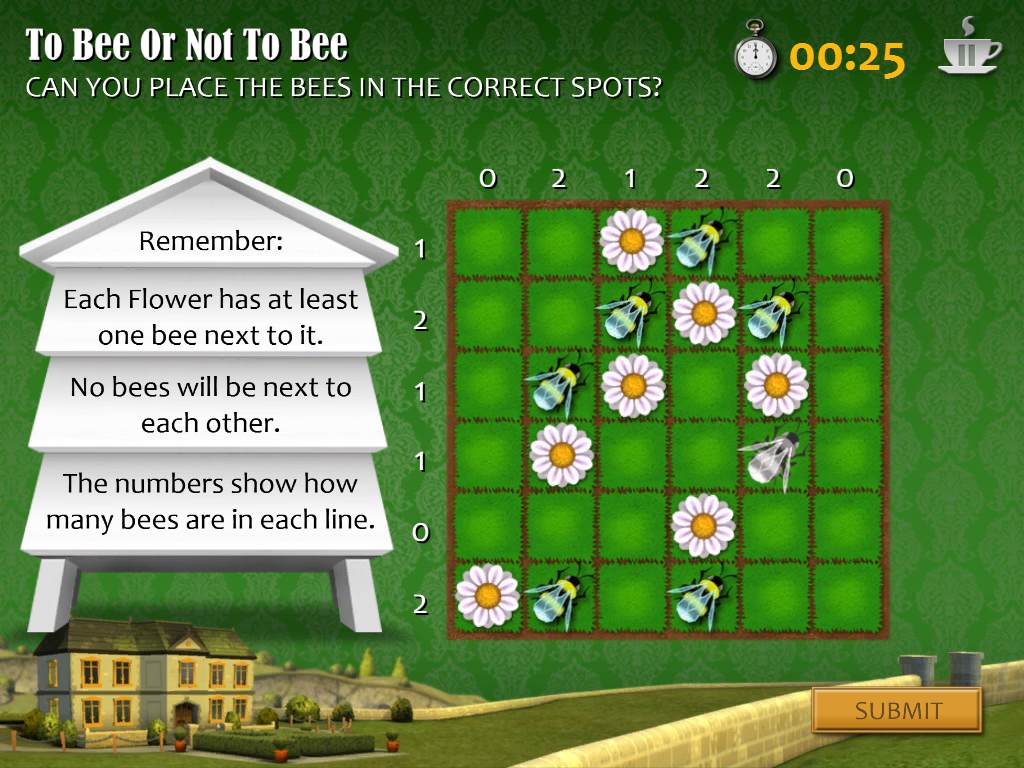
Manor: To Bee Or Not To Bee
Determine the location of all the bees using the conditions from the list of rules on the sign.
Rule 1 states that every flower must have at least one adjacent bee.
Rule 2 is that no two bees will be next to each other, meaning horizontally or vertically. However, bees can be one tile away diagonally.
Rule 3 states that the numbers at the top and left sides of the grid indicate how many bees are in each row and column.
Drag a bee to any square on the grid, then release to place the bee that you believe to be there. The first bee (greyed out) has already been placed for you.
Solution.
Mrs. Gossip: Mister Fluffykins
Use the clues given to you by Mrs. Gossip to determine which of the teddy bears is Mister Fluffykins.
The first line states that he is "next to a bear with a pink bow tie."
Only bears 1, 3, 4, 6, 8, and 9 meet that requirement (all the bears with blue bow ties).
In the second clue, you learn that Mr. Fluffykins either "has a hat or the one to the left of him does."
Discard bear 1 and 9, leaving 3, 4, 6, and 8 as options.
The third clue says that the "bear to the right of him has its eyes open."
The bear next to #3 has its eyes closed, so now only bears 4, 6, and 8 remain.
4, 6, and 8 are the three bears that meet the requirements of the third clue, which then instructs you to add the numbers on their bellies and divide by three.
(4+6+8)/3 = 6.
Select bear 6 as Mister Fluffykins.
Solution.
Police Station: Whodunnit?
After a brief review of some of the evidence and motives, you'll have to select which of the four suspects in the lineup you believe is guilty of stealing the items from Lady Snobbish's manor.
If you need to, you can go back to the menu and rewatch the cinematics to refresh your memory or pickup any vital information you may have overlooked.
Tap the guilty party to make your selection.
GUILTY: Moses!
When you questioned the Butcher about the missing items he found, he listed all of ones that Lady Snobbish had claimed were stolen except for one: the statue of Prometheus.
If you were paying attention during the visit to Moses, you could cearly see that statue was carelessly left on display at his bedside.
Congratulations! Case solved.
Episode 3 - The Mystery of the Concealing Flame
Part 1
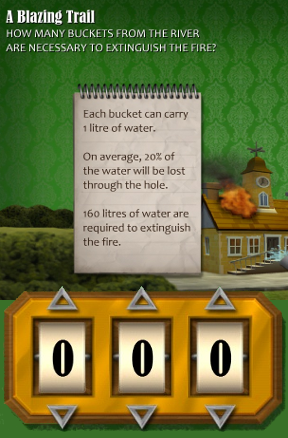
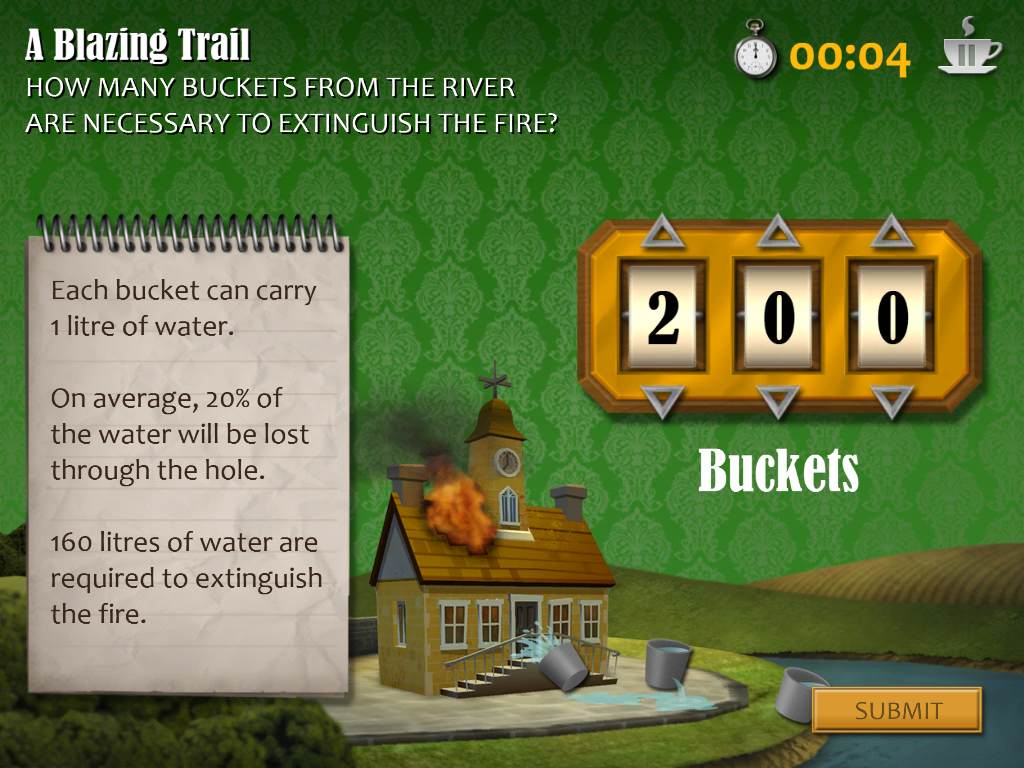
Town Hall: A Blazing Trail
Determine how many buckets of water are needed to put out the fire.
You know from the notes that each bucket can carry 1 litre of water and that 160 litres of water are required to extinguish the fire.
However, the hole in the bucket causes it to lose 20% of its water, thus containing only .8 litres of water by the time it reaches the Town Hall.
Simply divide the amount needed, 160 litres, by the amount contained in each bucket, .8 litres, to determine how many buckets are required.
160/.8 = 200.
Solution.
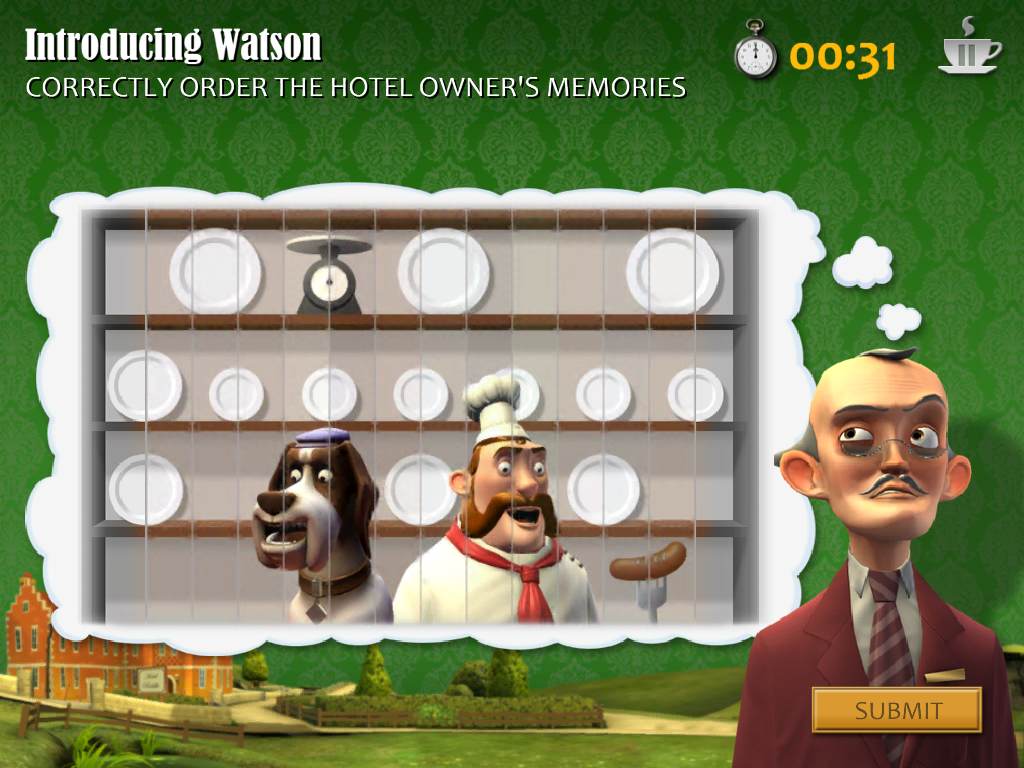
Hotel: Introducing Watson
Correctly organize the tiles to complete the picture.
Tap and drag a tile to move it, then release it to set it in place.
Use the stationary, greyed out sections at the left and right sides of the puzzle as a starting point.
Pay attention to the dishes on the racks behind Watson and the cook to make sure that they are oriented correctly.
Solution.
Case Review 1
Q: What item that Moses stole has not been recovered?
A: A statue
Q: Where did Inspector Bragg take Moses?
A: To the Police Station.
Q: Which of the following is not a suspect?
A: The Chef.
Q: Where did the fire start?
A: At the archives.
Part 2
Library: A Novel Way To Arrange
Arrange the books correctly to find the hidden message.
Note the highlighted letters in the titles at the bottom of each book's spine.
Position the books so that those letters spell out a hidden word.
The yellow letters when organized from left to right will spell out the word "DICTIONARY".
Solution.
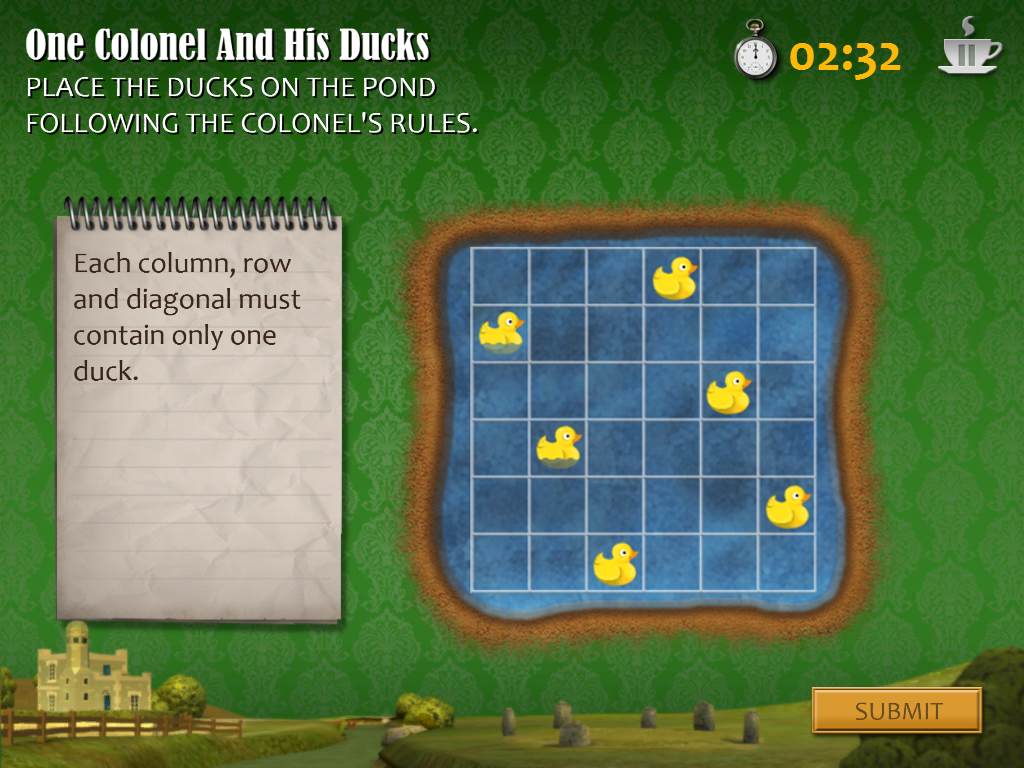
Colonel's House: One Colonel And His Ducks
Position the ducks on the grid so that every row, column, and diagonal line contains only one duck.
Tap and drag a duck to move it, then release it to position the duck on any unoccupied square in the grid.
Solution.
Jewellery Shop: Pearls Of Wisdom
Determine the four pearls missing from the necklace that would bring the final price to 4900.
First count the existing pearls on the necklace to find its current price, using the guide at the right side of the puzzle.
There are 2 small blue pearls, each worth 100 for a subtotal of 200.
There are 9 small white pearls, each worth 200 for a subtotal of 1800.
There are 3 large blue pearls, each worth 400 for a subtotal of 1200.
There is 1 large white pearl that is worth 600.
All together, the current price of the necklace is 3800.
Now you need to find four pearls with a sum of 1100 to bring the total to the needed 4900.
Tap and drag 1 large white pearl (600), 2 small white pearls (400), and 1 small blue pearl (100) on to the necklace.
600 + 400 + 100 = 1100
1100 + 3800 = 4900.
Solution.
Doctor's Surgery: Sparkles And The Slippers
Listen to the clues that Mrs. Bothersome gives you (you'll need the sound on to hear them) to find the location of the buried slippers in the garden:
Sparkles buried the slippers on a grass tile.
He chose a spot in between two plants.
His spot for the slippers was always next to the pond.
If you look at the 8 spots surrounding the burying place, you'd see it was the only one surrounded by 2 ponds and 4 plants.
Solution.
Case Review 2
Q: How did the Librarian feel about her being one of the suspects of the arson?
A: Thrilled.
Q: According to the Colonel...
A: Loose lips sink ships.
Q: What was the Jeweller doing in the archives?
A: Researching an old necklace she purchased.
Q: What was Mrs. Gossip's sister's name?
A: Mrs. Bothersome.
Part 3
Antique Shop: Seven Years Bad Luck
Rearrange the stained glass tile within the frame so that the colors on each side of a tile match the color on the sides of the adjacent tiles. The colors on the inside of the squares don't have to match.
Tap and drag a tile to move it, then release it within the frame to set it in place.
Solution.
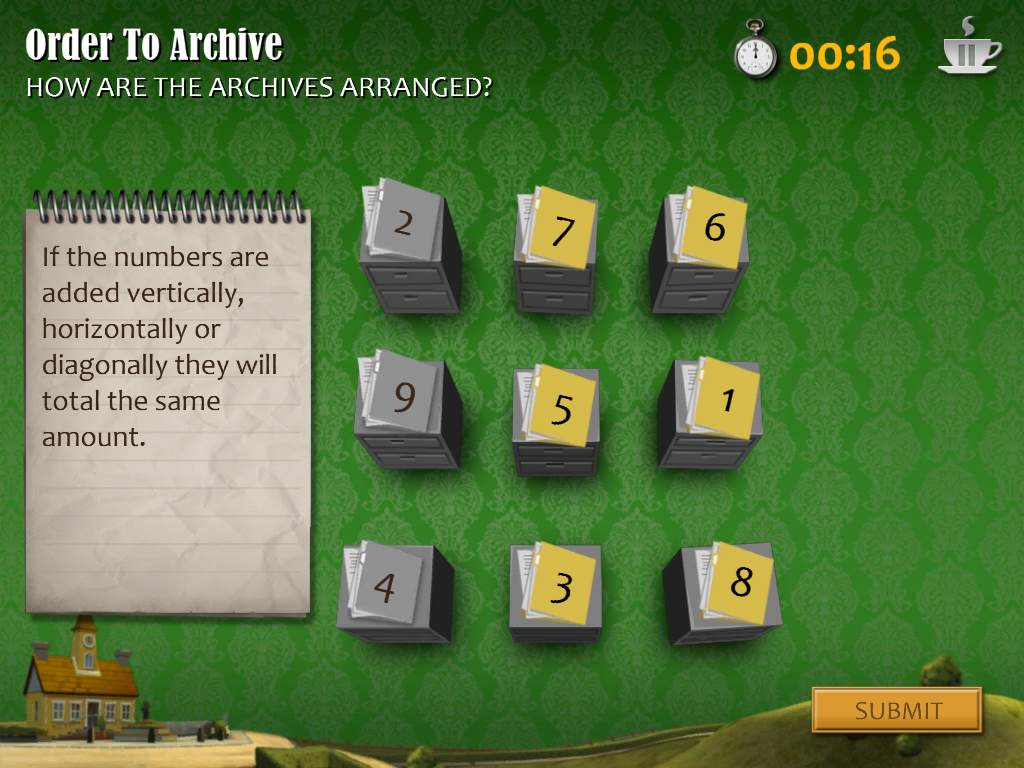
Town Hall: Order To Archive
Arrange the files in the archives so that each row, column, and diagonal all add to the same amount.
The numbers on the files indicate their value ranging from 1 to 9.
Use the immovable grey files at the left side of the puzzle as your starting point.
Note that the sum of that column is 15, so the sum of the other lines must equal 15 as well.
Solution.
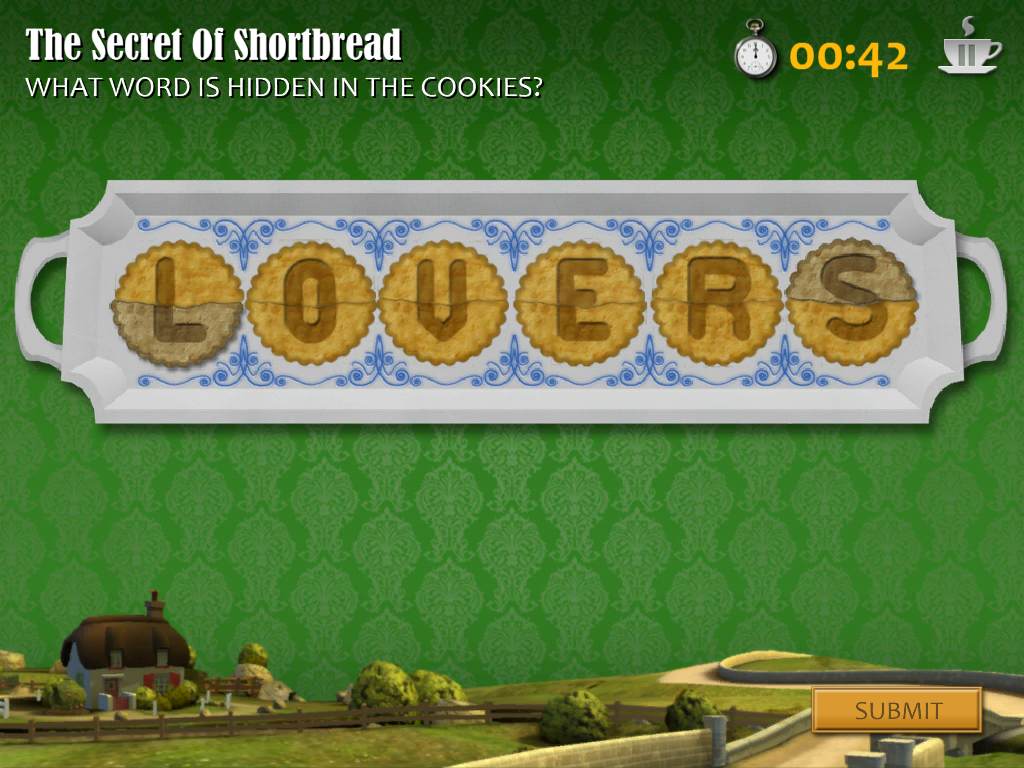
Mrs. Bothersome: The Secret Of Shortbread
Correctly arrange the pieces of shortbread to find the hidden message.
Each piece contains either the top or bottom half of a letter.
Tap and drag a shortbread slice to move it, then release it over the plate to set it in place.
The two darkened pieces on the plate are letter halves that have already been placed for you; use them as a starting point.
Solution.
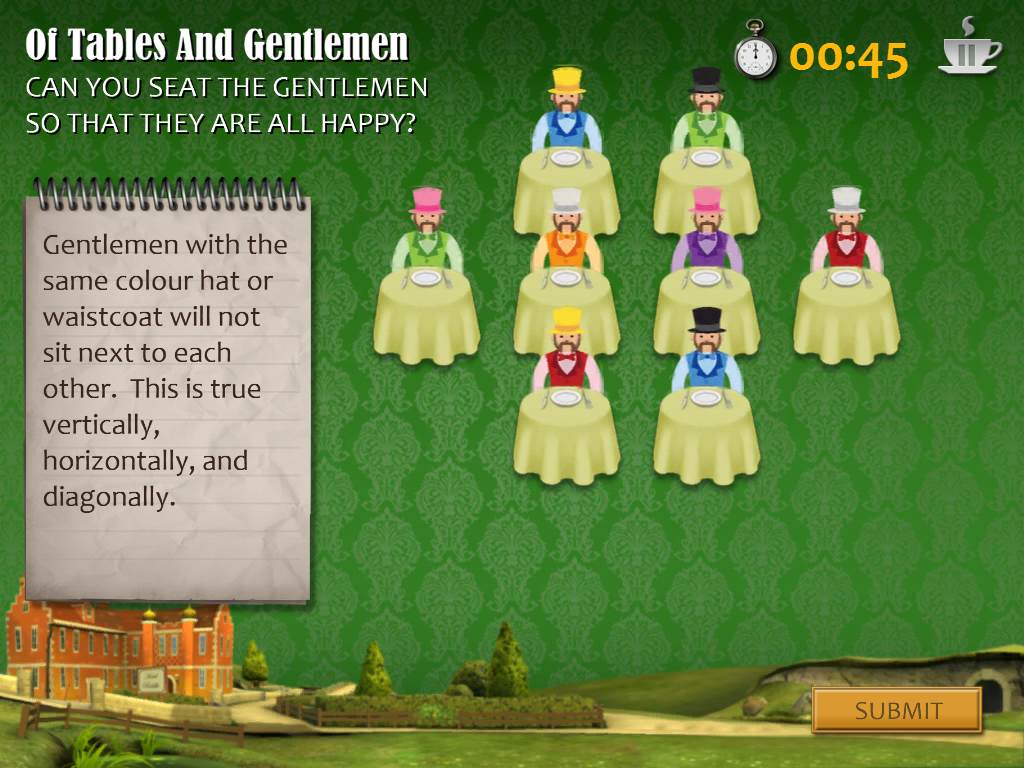
Hotel: Of Tables And Gentlemen
Arrange the gentlemen at each table so that no two men with either the same colored hat or the same colored clothing are next to each other.
Tap and drag a gentleman to seat him at a table, or place one gentleman at different one's table to swap their positions.
The gentleman with the white hat and orange waistcoat has already been placed for you as a starting clue.
Solution.
Case Review 3
Q: What was the man wearing who tried to steal the statue from the Antique Shop?
A: A hat, pulled down low.
Q: According to the Antique Shop Owner, how many statues were made?
A: Three.
Q: Which villagers seem to be having an affair?
A: The Doctor and the Librarian.
Q: What's the picture on the back of the newspaper that Watson brought you?
A: A portrait of Lady Snobbish's Great Grandparents.
Part 4
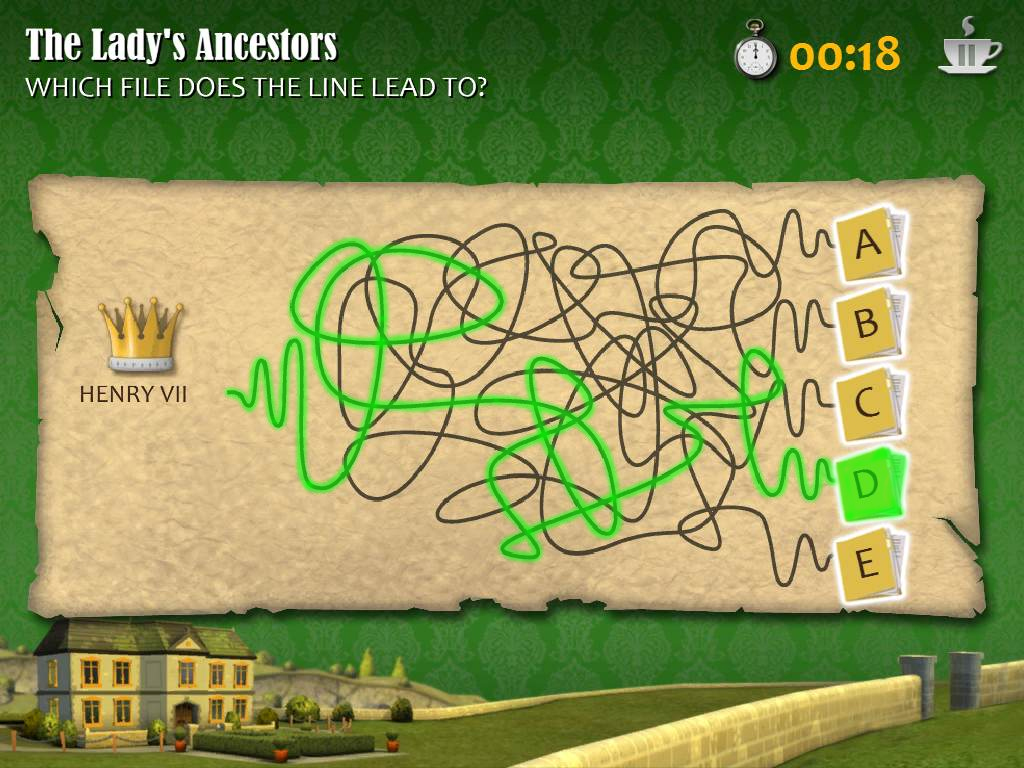
Manor: The Lady's Ancestors
Trace the line from the crown at the left side of the paper to one of the files at the right side of the paper.
Solution.
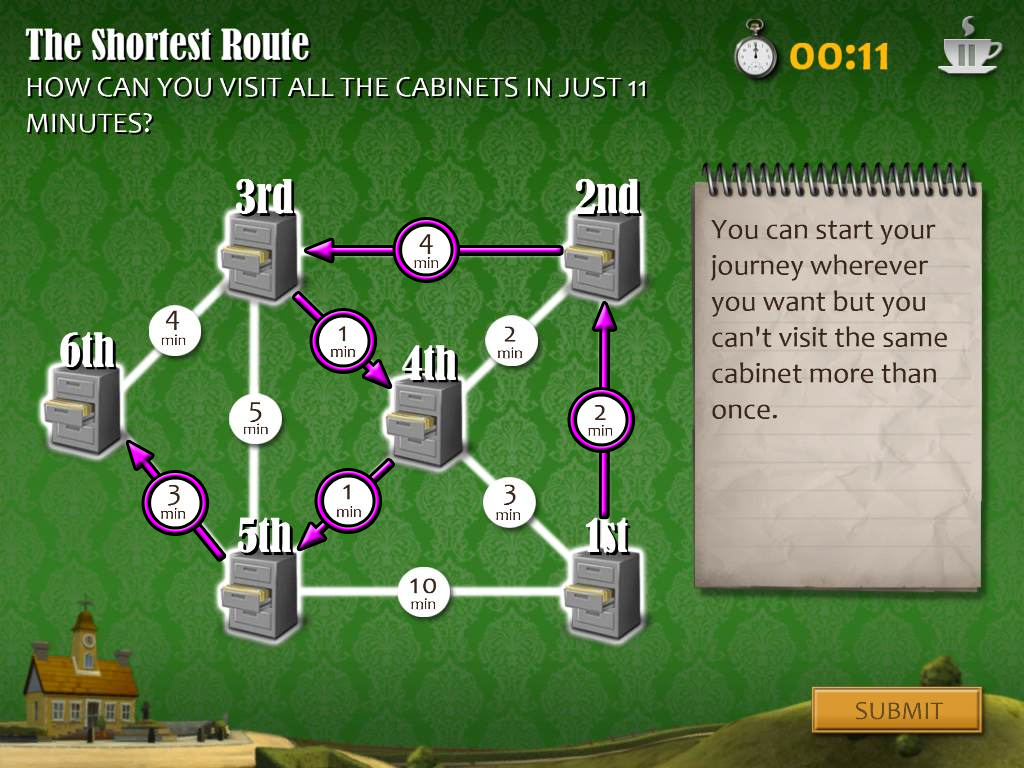
Town Hall: The Shortest Route
Find the path that takes you to all 6 file cabinets in the least amount of time.
Each point at the middle of a line indicates how many minutes it takes to walk between two file cabinets.
Tap the file cabinets to select the order of your path: the first cabinet you tap will be your starting point, the second will be the 2nd cabinet you visit, etc.
You can only go to each file cabinet one time.
Solution.
Police Station: Whodunnit?
After a brief review of some of the evidence and motives, you'll have to select which of the four suspects in the lineup you believe is guilty of starting the fire at the Town Hall.
If you need to, you can go back to the menu and rewatch the cinematics to refresh your memory or pickup any vital information you may have overlooked.
Tap the guilty party to make your selection.
GUILTY: The Librarian!
The Librarian had a weak alibi for her presence in the archives, and lied about it when you first interrogated her.
If you had been paying close attention to Watson throughout the story, you'd notice that when he sniffed the Librarian, and later sniffed the evidence you found in the archives, he let out the same three barks and a sneeze.
Congratulations! Case solved.
Episode 4 - Death From Above
Part 1
Graveyard: A Grave Concern
Determine where each of the mourners stood during the funeral.
Arrange the hats (that symbolize 1 person) so that there are an equal number of people standing beside each of the four ropes.
A hat placed at one of the four corners will count as a person standing next to both the horizontal and vertical ropes belonging to that corner.
Solution.
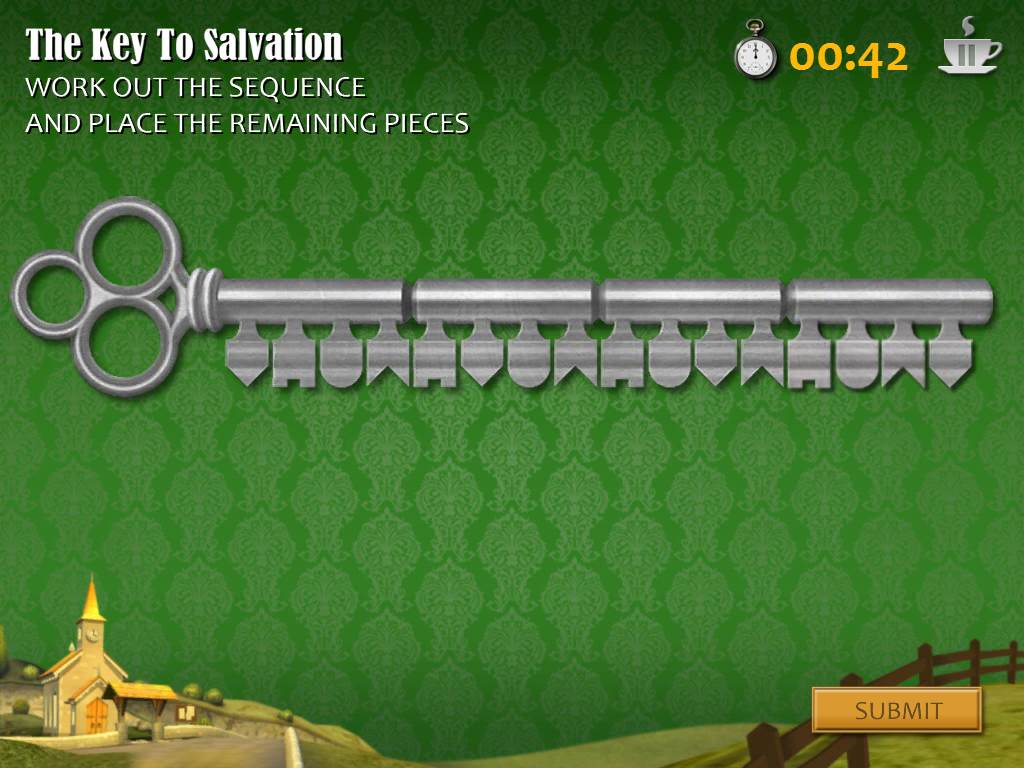
Church: The Key To Salvation
First the sequence of shapes on the teeth of the key, then add the four detached teeth in the correct order to the spaces at the end of the key.
In the first section of four shapes (on the left side of the key), you'll see the first shape is an outward triangle, the second is a small square cut-out, the third is a semi-circle, and the fourth is a cut-out V shape.
Then in the second section, the order changes slightly to: first the square cut-out, then the outward triangle, then the semi-circle, and lastly the cut-out V shape.
Finally in the third section, the order changes slightly again: first the square cut-out, then the semi-circle, then the outward triangle, and lastly the cut-out V shape.
By comparing these three sections, you can recognize one consistent difference between the three similar patterns.
In each section, the outward triangle shape moves one space further to the right.
Following that pattern, you can determine that the order of the teeth in the far right section of the key would be: first the square cut-out, then the semi-circle, then the cut-out V shape, and finally the outward triangle.
Solution.
Case Review 1
Q: Which of these villagers was not at the Librarian's funeral?
A: The Hotel Manager.
Q: According to the Vicar, what seems to be one of the reasons behind Moses' actions?
A: That his son ran away.
Q: What was the name of the Librarian?
A: Margaret Tess Madding.
Q: At the funeral, why did the Vicar ask you to come to the Church?
A: To pray.
Part 2
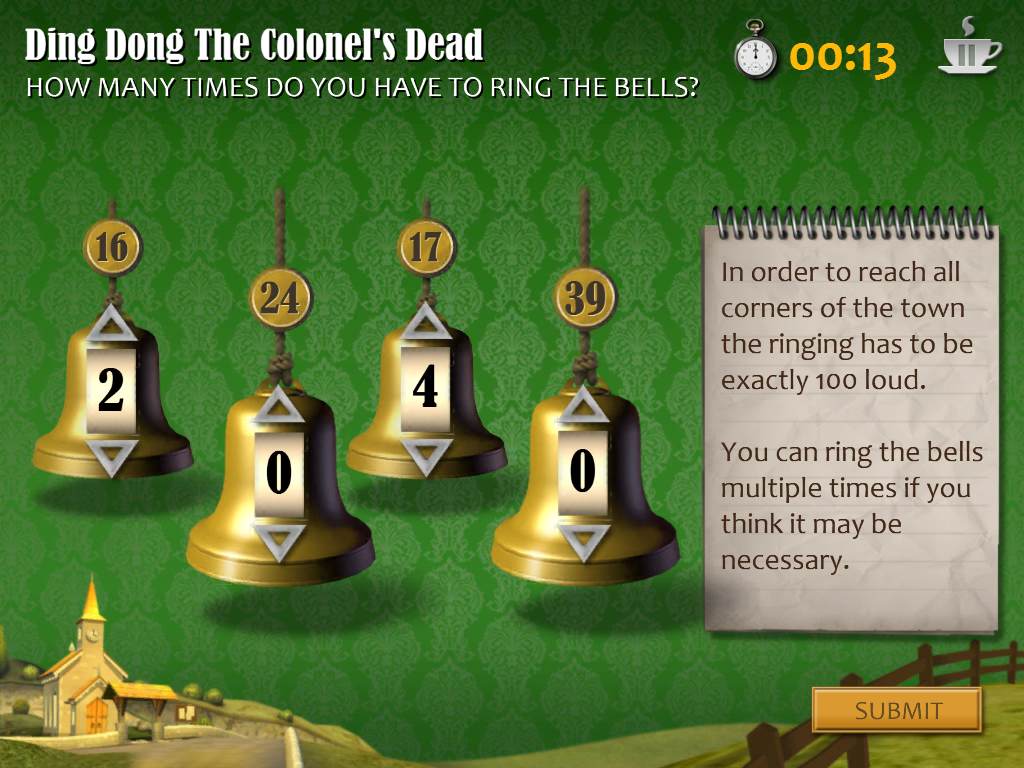
Belfry: Ding Dong The Colonel's Dead
Determine how many times the bells must be rung in order for the sound to reach the entire town.
Select how many times each bell must be rung by tapping the up or down arrows above the middle of the bells. Bells can be rung more than once or even not at all.
The numbers on the rope above the bells indicate how loud each bell is. Add their values together so that they total a sum of 100.
Ring the left bell (16) twice and the second bell from the right (17) four times.
16(2) + 17(4)
32 + 68 = 100.
Solution.
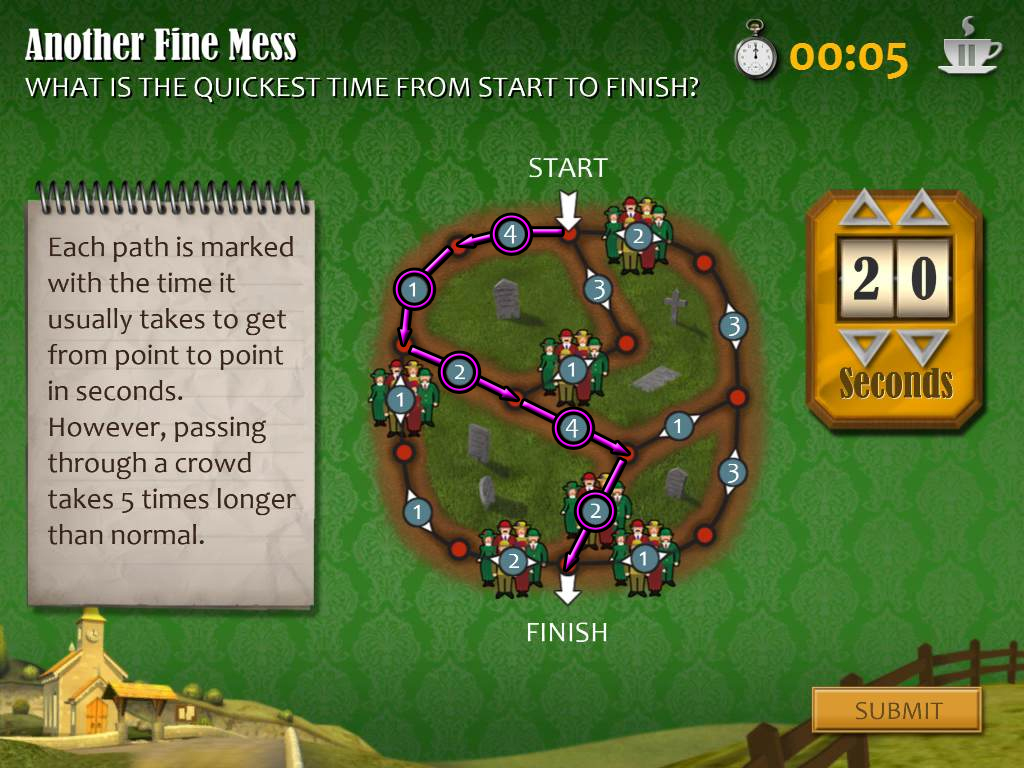
Church: Another Fine Mess
Find the fastest route from the starting point to the finish.
Follow the paths between the red dots: the numbers in the middle of the path indicate the amount of seconds it takes to travel between the two dots.
If you cross through a crowd of people, that time is multiplied by 5.
The best strategy is to take an indirect route to avoid as many crowds as possible.
Take the route that leads you on the path from 4, to 1, to 2, to 4, and finally through the crowd of 2.
4 + 1 + 2 + 4 + 2(5)
4 + 1 + 2 + 4 + 10 = 20.
Solution.
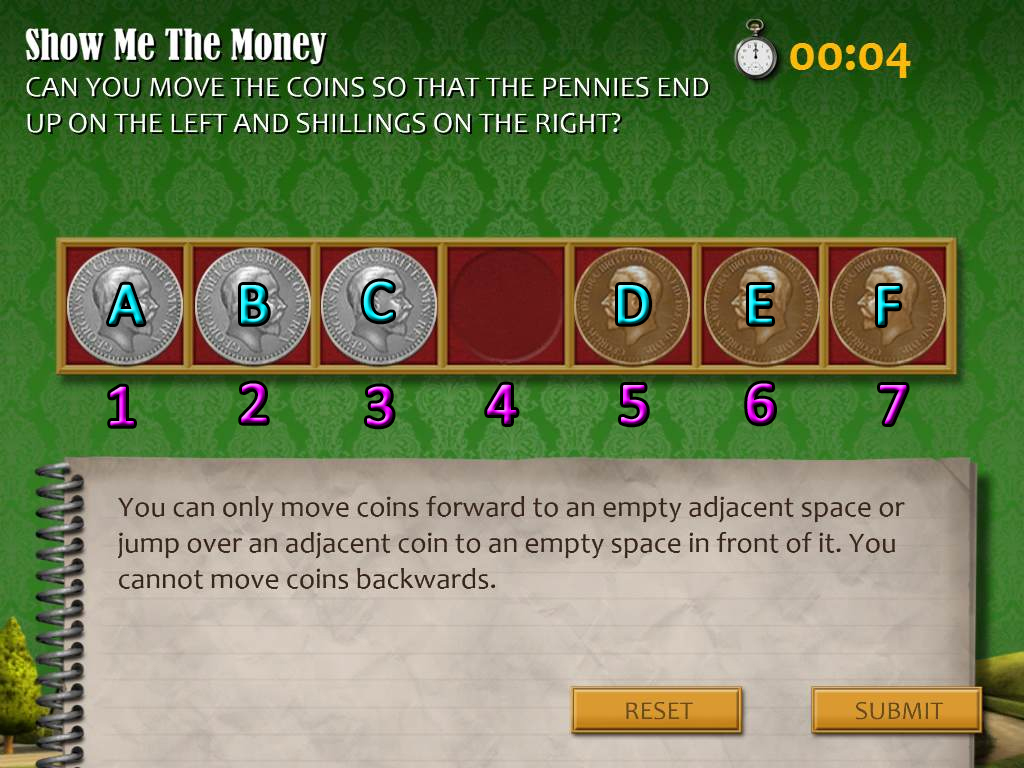
Doctor's Surgery: Show Me The Money
Move the coins so that the copper colored pennies are on the left and the silver colored shillings are on the right side.
A coin can either move into an adjacent empty space OR hop over an opposite-colored coin into an empty space.
Coins cannot move backwards or hop over other coins of the same color.
Refer to the screenshot below then follow the instructions to complete the puzzle.
Screenshot.
Move Shilling C to space 4.
Move Penny D to space 3.
Move Penny E to space 5.
Move Shilling C to space 6.
Move Shilling B to space 4.
Move Shilling A to space 2.
Move Penny D to space 1.
Move Penny E to space 3.
Move Penny F to space 5.
Move Shilling C to space 7.
Move Shilling B to space 6.
Move Shilling A to space 4.
Move Penny E to space 2.
Move Penny F to space 3.
Move Shilling A to space 5.
Solution.
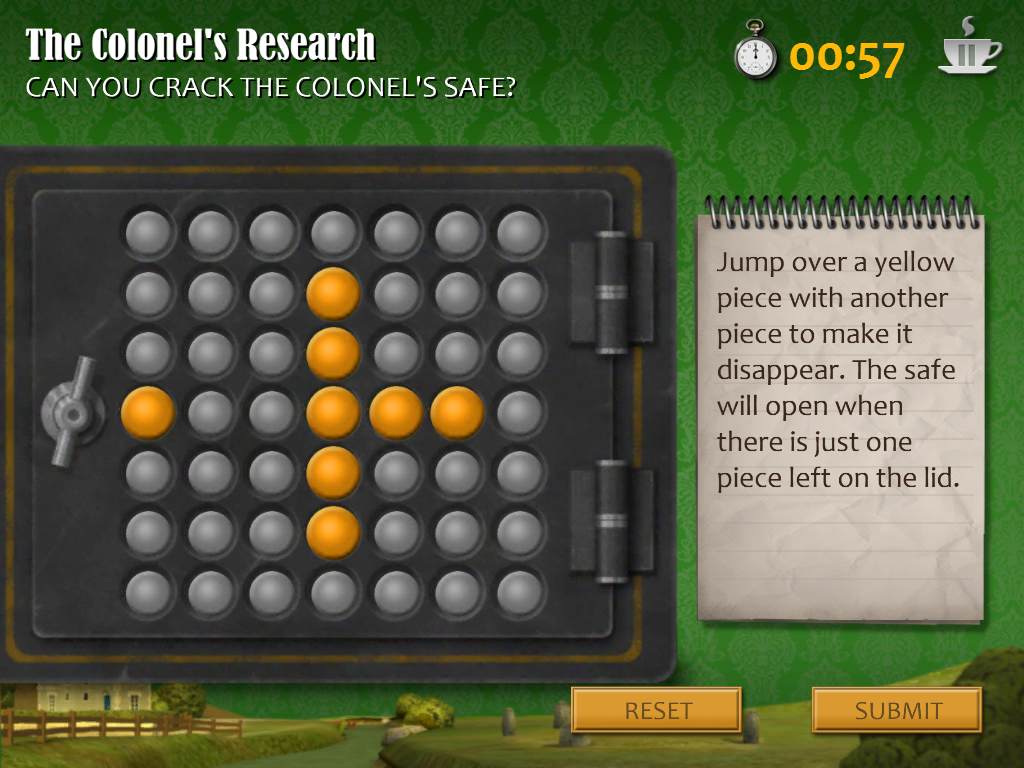
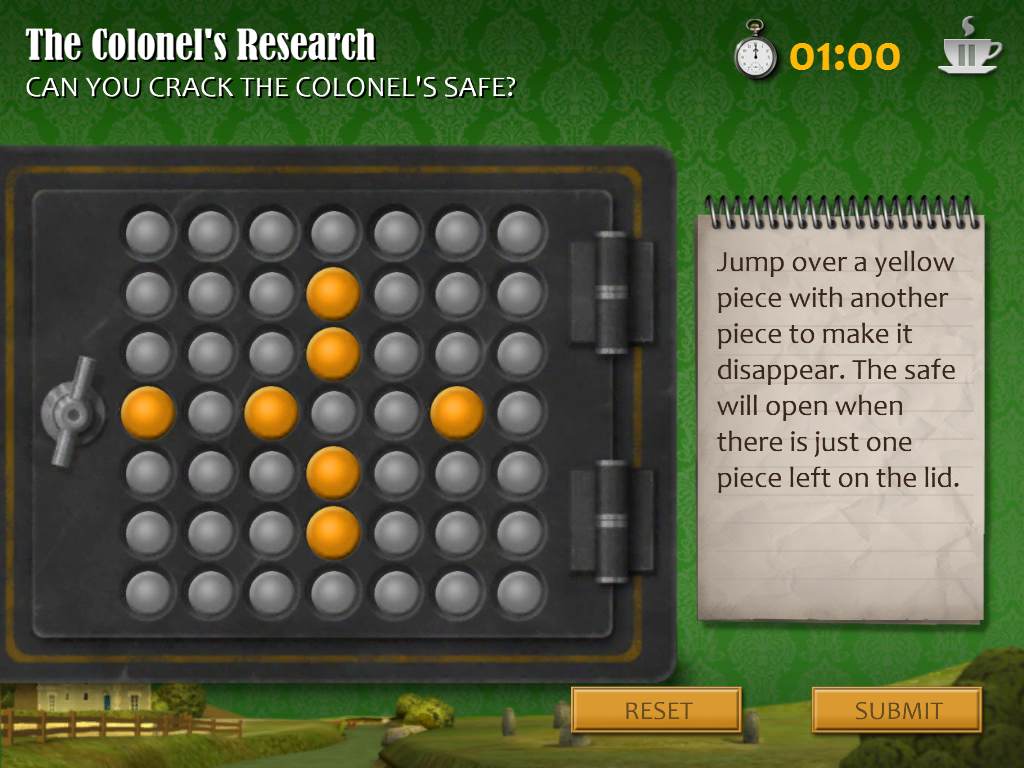
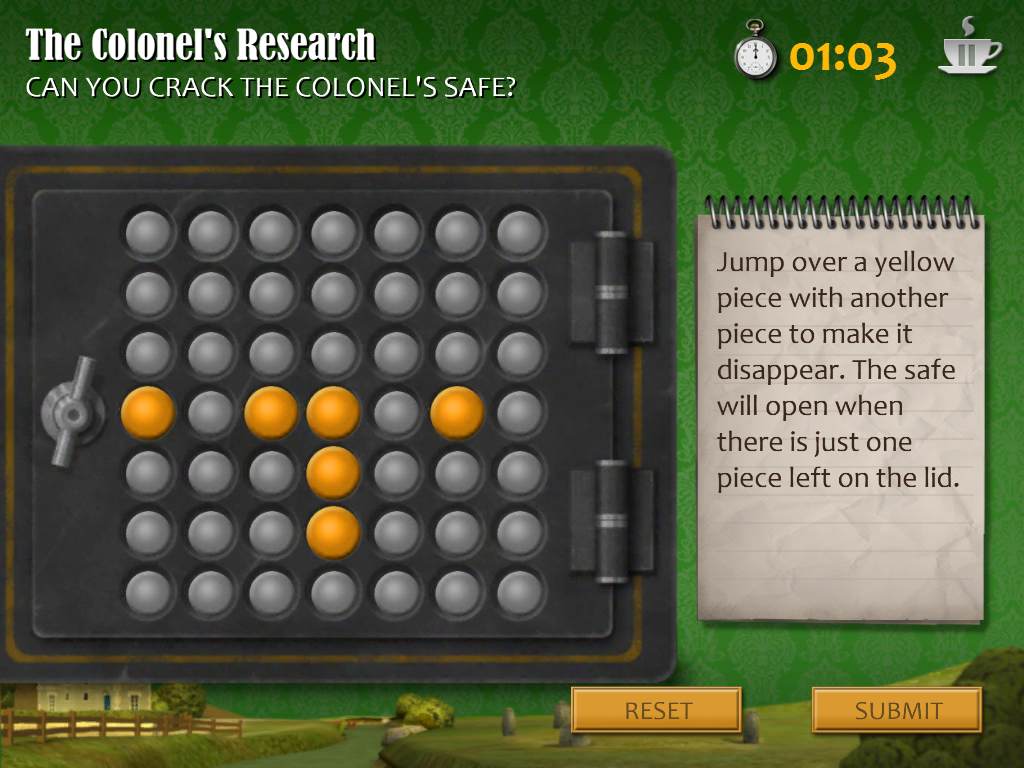
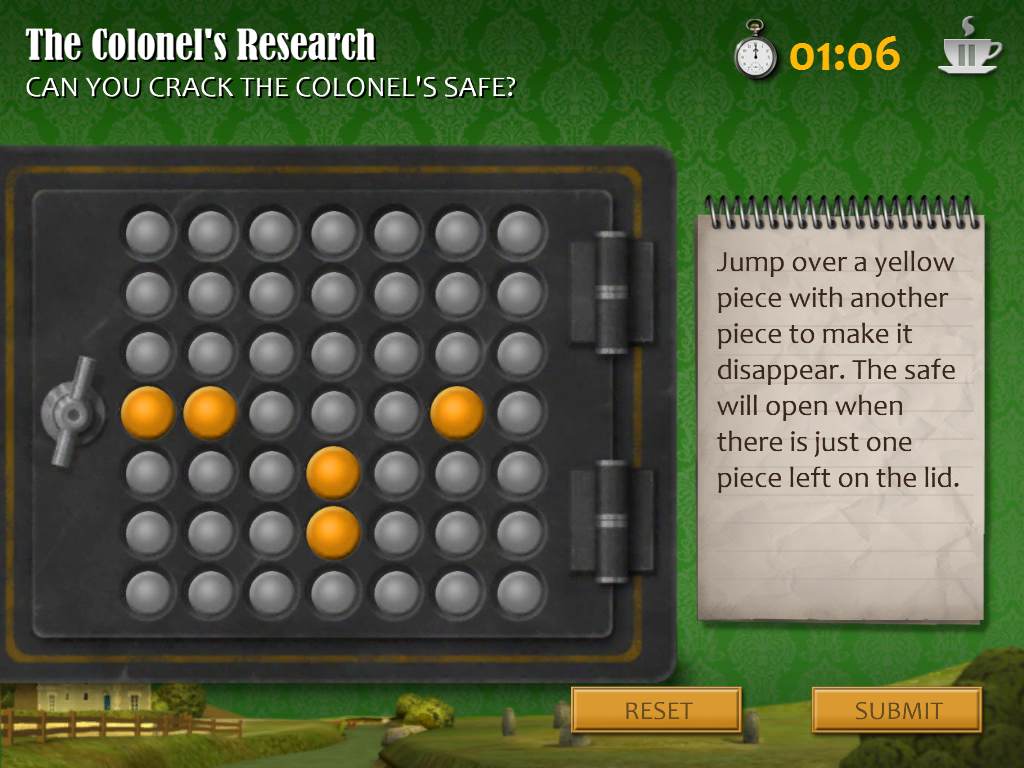
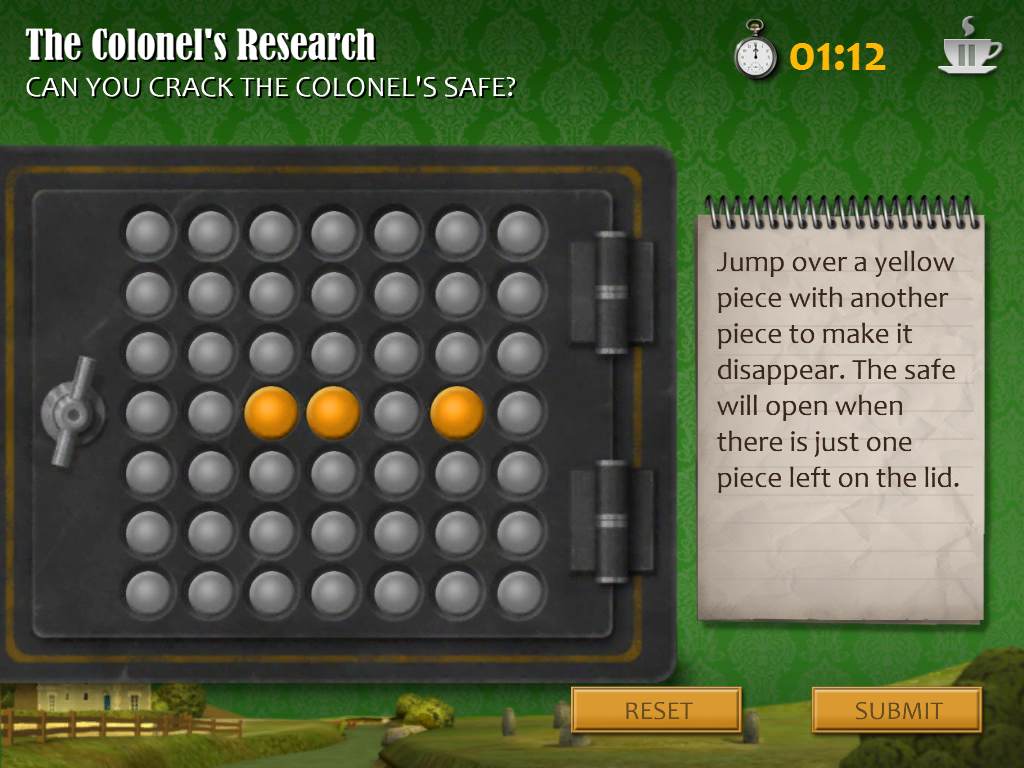
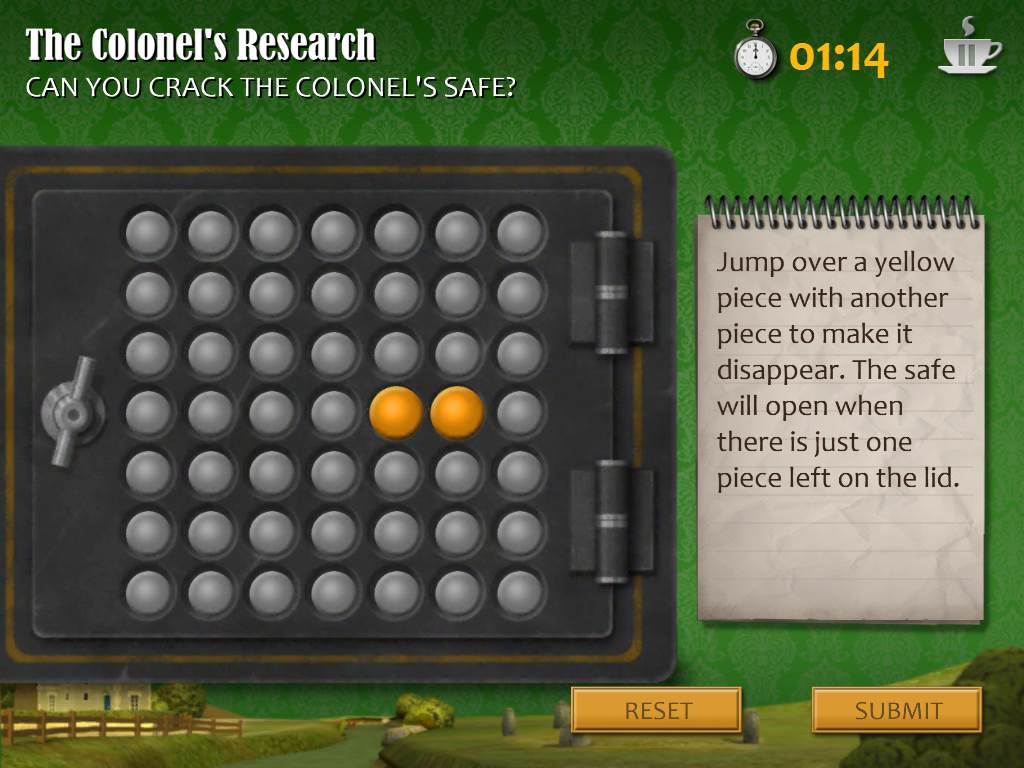
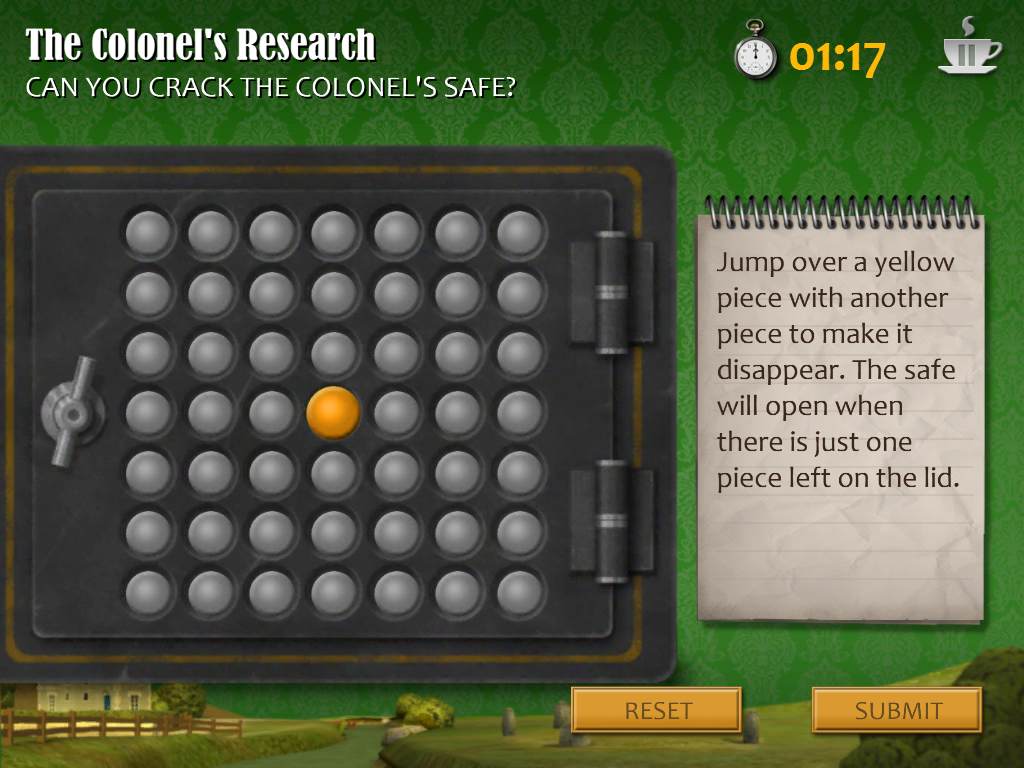
Colonel's House: The Colonel's Research
Jump the yellow pieces until there is only one left on the board.
Select a yellow piece and move it across a different yellow piece and into an empty space. The piece that is hopped over will be removed from the board.
Step 1
Step 2
Step 3
Step 4
Step 5
Step 6
Step 7
Step 8
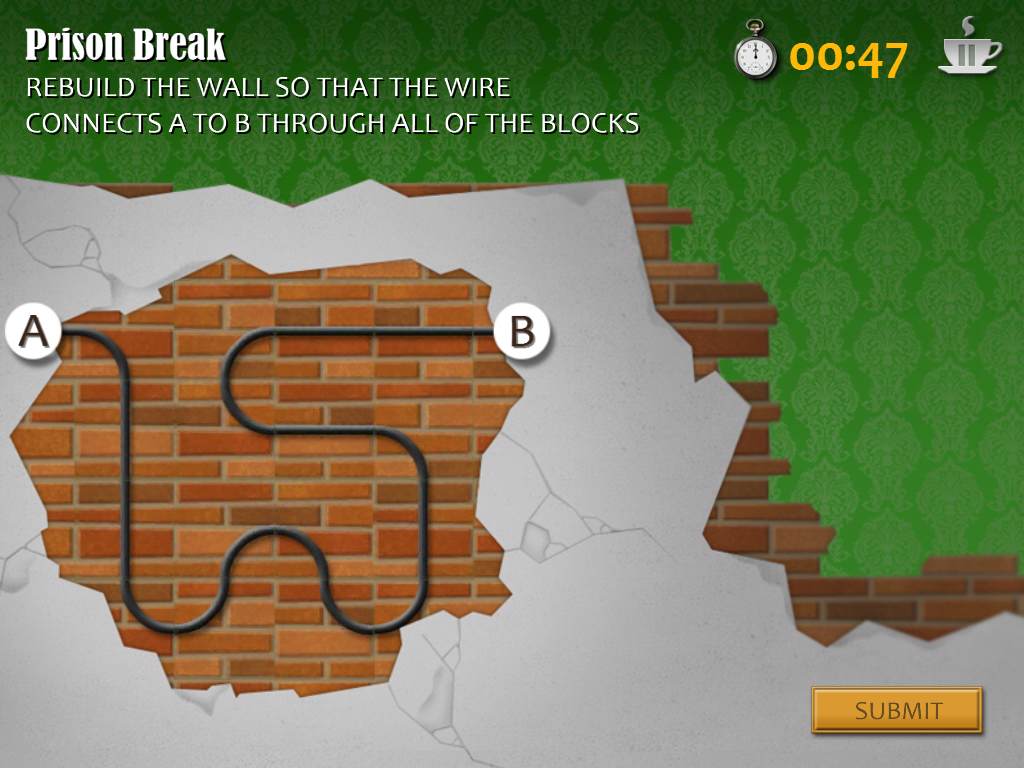
Police Station: Prison Break
Arrange the blocks on the wall so that the wire travels in an uninterrupted path from point A on the left to point B on the right.
Every tile must be used, and you cannot leave any spaces empty on the wall.
Solution.
Case Review 2
Q: What was the Colonel's real name?
A: Bert the Blag.
Q: At what time was the clock at the Police Station stopped?
A: Five past Ten.
Q: What was above the Colonel's safe?
A: Parts of a disguise.
Q: Which of these people was not staring at the Colonel's dead body?
A: The Town Hall Clerk.
Part 3
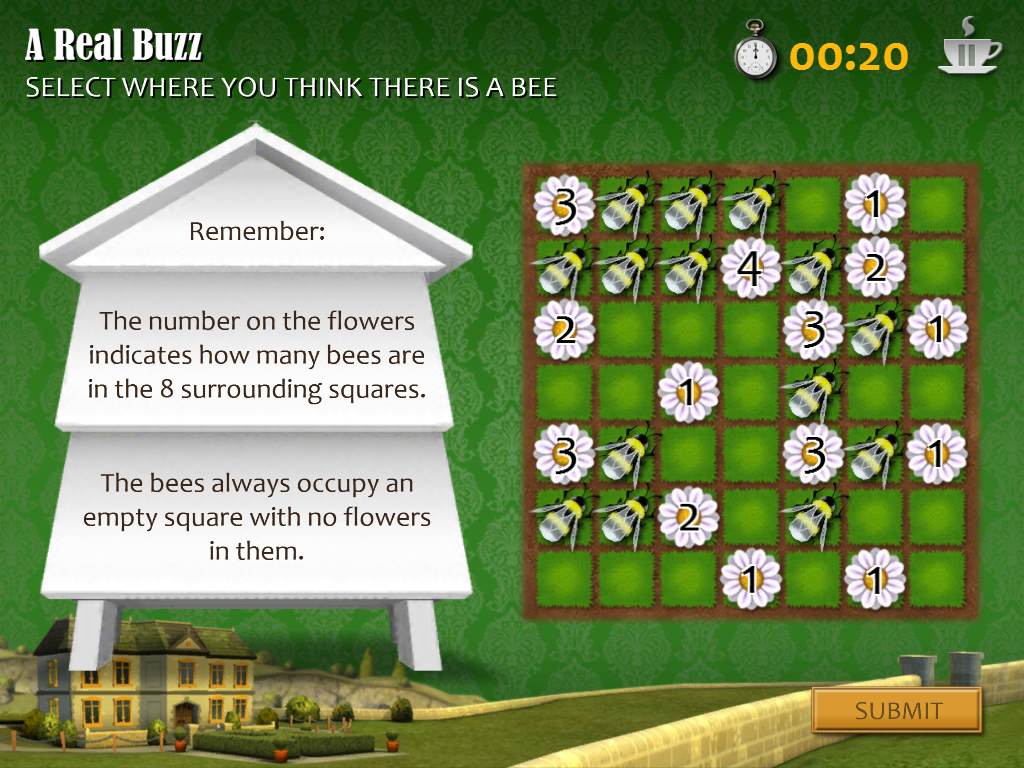
Manor: A Real Buzz
Determine the locations of all the bees on the grid.
Each flower has a number that indicates exactly how many bees are in the tiles in a circle around the flower. So a flower with the number 1 only has 1 bee in all 8 tiles around that flower.
Tap an empty square to place a bee on it, or tap a bee to remove it from its square.
Solution.
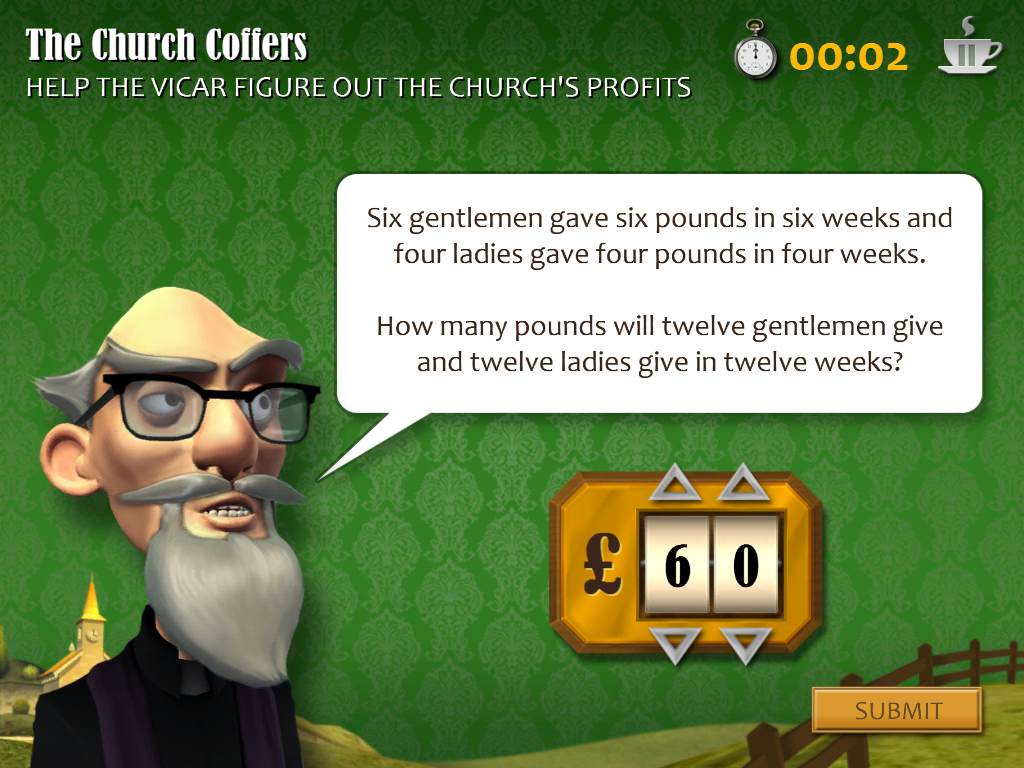
Church: The Church Coffers
Solve the math riddle to determine how much money the Vicar received. The problem's actually very simple, but it's easy to overthink it.
Start with the gentlemen: you know that 6 men gave 6 pounds in 6 weeks.
Following this pattern, at the end of 12 weeks these 6 men will have given 12 pounds.
If you double the number of men to equal 12, then the amount of money they would give in 12 weeks also doubles to equal 24 pounds.
Now solve for the ladies: 4 ladies gave 4 pounds in 4 weeks.
At the end of 12 weeks, 4 ladies would give 12 pounds.
Triple the amount of ladies to equal 12, which means you also must triple the amount of money they would give to equal 36.
Add the two amounts together to find the total that both 12 ladies and 12 men gave over 12 weeks: 60 pounds.
Solution.
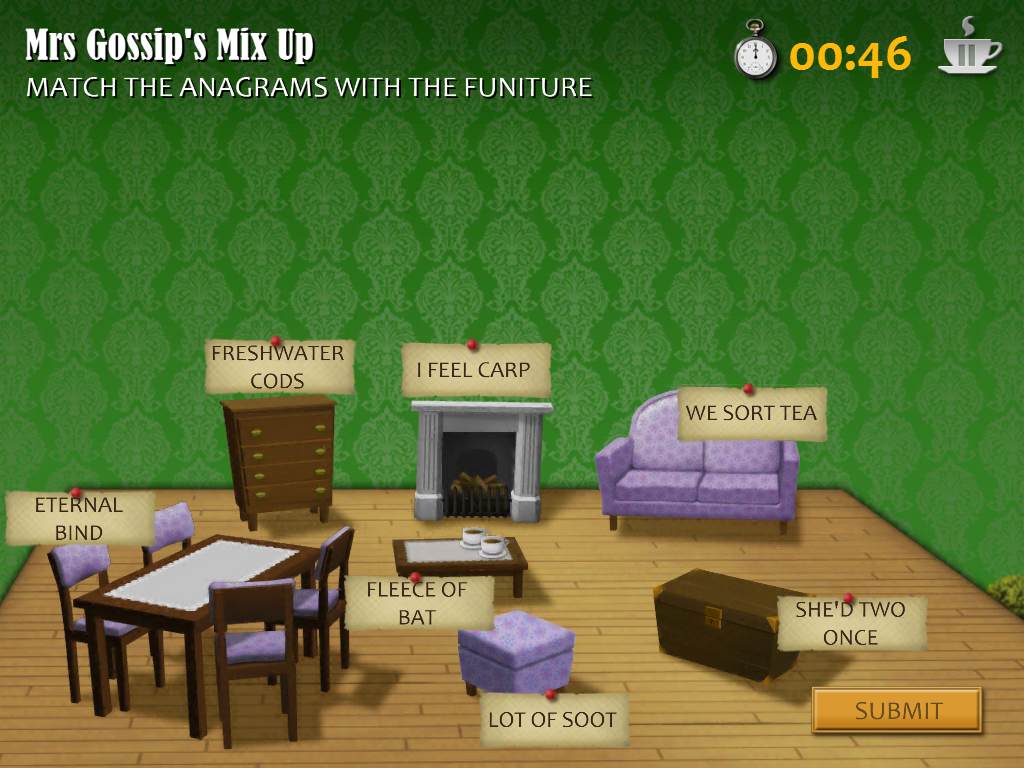
Mrs. Gossip: Mrs. Gossip's Mix Up
Solve the anagrams in the name tags by correctly rearranging the letters, then place the tags under the object they identify.
Eternal Bind = Dinner Table.
Freshwater Cods = Chest of Drawers.
I Feel Carp = Fireplace.
We Sort Tea = Two Seater.
Fleece Of Bat = Coffee Table.
She'd Two Once = Wooden Chest.
Lot Of Soot = Footstool.
Solution.
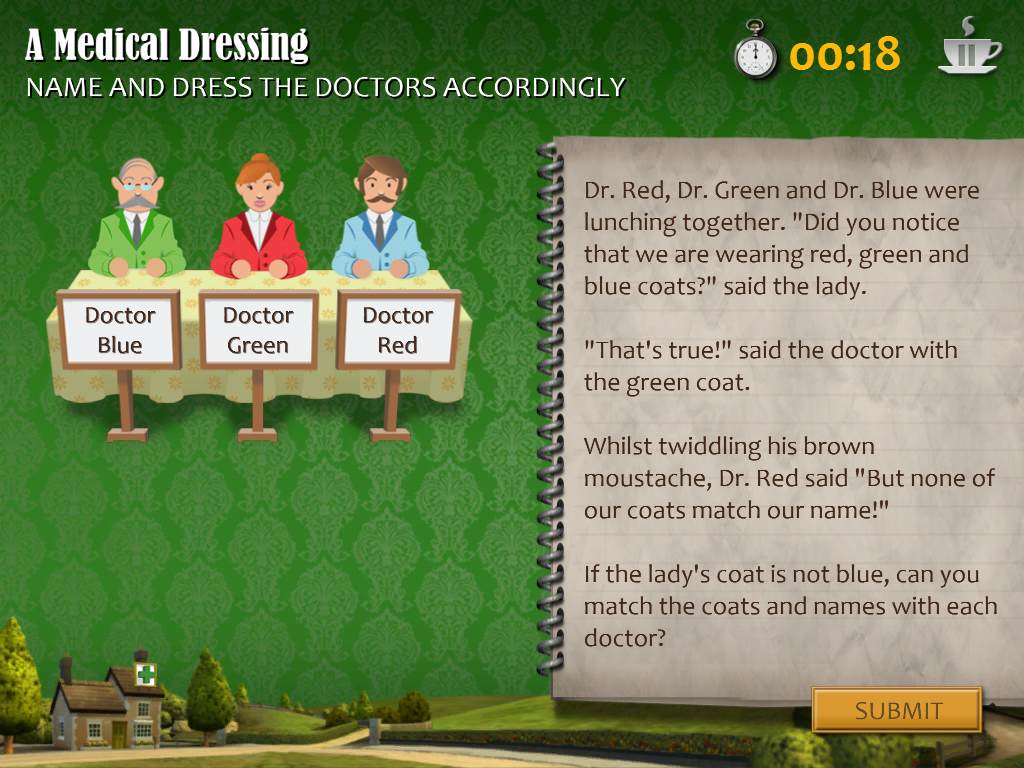
Doctor's Surgery: A Medical Dressing
Use the clues in the story to identify the name of each doctor and the color of their coat.
The first important clue to note is that none of the doctor's names are the same color as their coat (Dr. Red is NOT wearing red, etc.)
At the beginning of the story, the lady makes a statement and is then answered by a doctor with a green coat.
Therefore, you know the lady is not wearing a green coat.
Dr. Red is the third person to respond and was also "twiddling his brown moustache".
Only one of the men has a brown mustache, so you know he must be Doctor Red.
Additionally, since Dr. Red can't wear a red coat and he is answering the person with the green coat, the only coat remaining is blue.
Put the blue coat and the "Doctor Red" label on the man sitting at the right side of the table.
That leaves the green coat for the other gentleman.
If he's wearing the green coat, then he can't be Dr. Green, so he must be Doctor Blue.
By process of elimination, the only options left for the lady are the red coat and the Doctor Green nametag, which is also supported by the last clue that "the lady's coat is not blue".
Solution.
Case Review 3
Q: What was the name of the woman in the photo?
A: Mrs. Wentworth.
Q: Why does Lady Snobbish find herself indisposed?
A: She sprained her wrist.
Q: Where did Mrs. Gossip say the biscuits were?
A: On the freshwater cods.
Q: What was the name of the kid in the picture?
A: Charlie.
Part 4
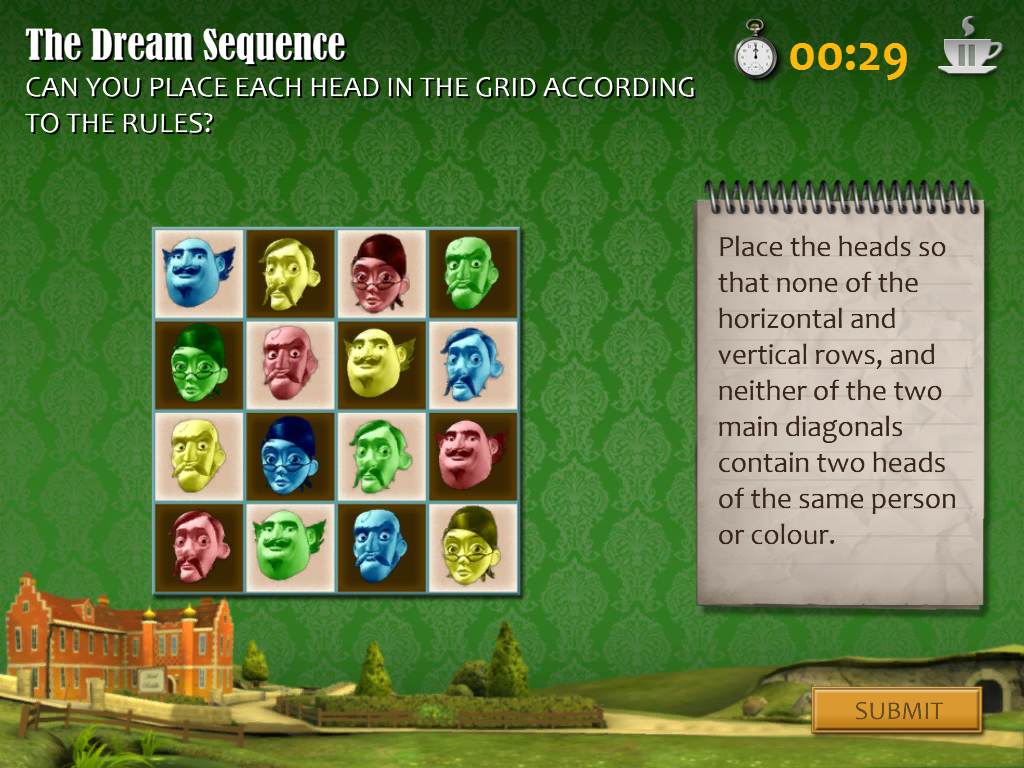
Hotel: The Dream Sequence
Arrange the heads on the grid so that no heads that either belong to the same person or are the same color are in the same vertical or horizontal rows or in the two longest diagonal lines.
Similar heads can be next to each other diagonally if it is on any of the smaller lines (these are the diagonals that consist of 3 squares or fewer).
Tap and drag a head to move it, then release it over a square to set it in place.
Solution.
Police Station: Whodunnit?
After a brief review of some of the evidence and motives, you'll have to select which of the four suspects in the lineup you believe is guilty of murdering the Colonel.
If you need to, you can go back to the menu and rewatch the cinematics to refresh your memory or pickup any vital information you may have overlooked.
Tap the guilty party to make your selection.
GUILTY: The Doctor!
Mrs. Gossip mentioned the Doctor when she was first discovered at the church immediately after the Colonel's murder.
She is much too weak to be able to push the block onto the Colonel, but the Doctor would have plenty strength to do it.
Moses would have had the means as well, but he didn't escape the prison until 10:05, which is 5 minutes after the murder was committed.
Congratulations! Case solved.
Episode 5 - The Riddles of the Past
Part 1
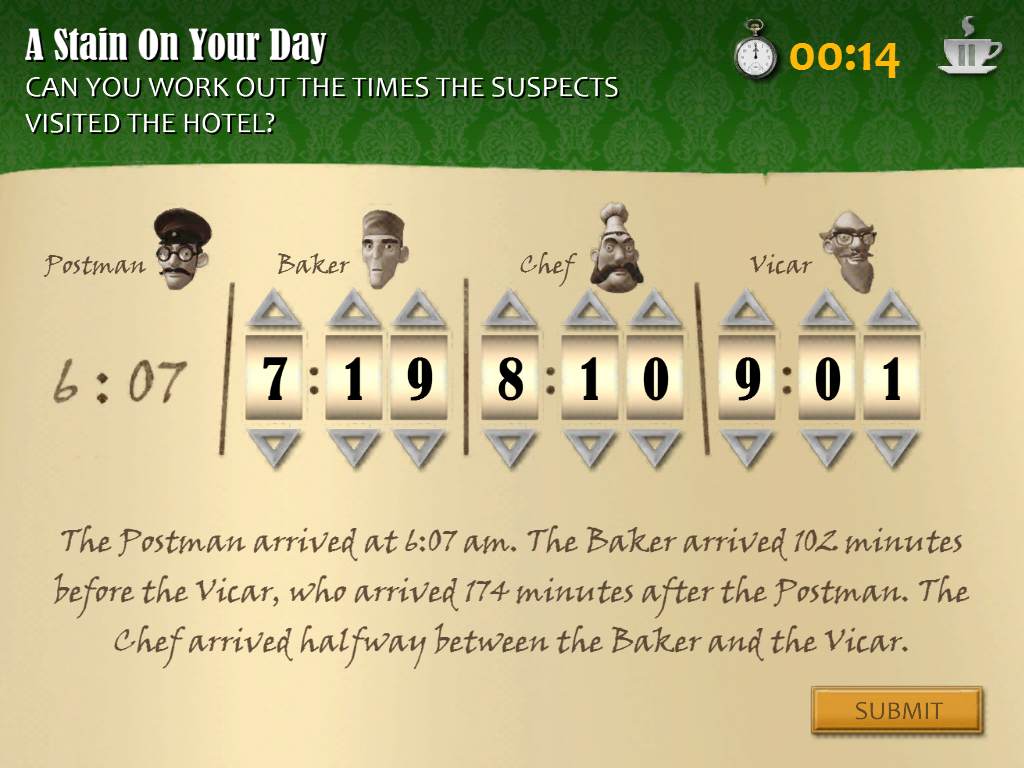
A Stain On Your Day
Determine the time that each visitor to the hotel arrived, then enter the time into the boxes under the person's name.
The first person, the Postman, has already been written at 6:07.
The note says that the Vicar arrived 174 minutes after the Postman.
Add 174 minutes (which is just 6 minutes short of 3 hours) to 6:07 and you'll find the Vicar's time is 9:01.
The first clue at the bottom states that the Baker arrived 102 minutes before the Vicar.
Subtract 102 minutes from 9:01 to find the time of the Baker's arrival, 7:19.
The final clue says that the Chef arrived halfway between the Baker and Vicar.
Since the Vicar came 102 minutes later than the Baker, to find the halfway point between them you only need to add 51 minutes to the Bakers time, which gives you 8:10.
Solution.
Case Review 1
Q: When does the Inspector want you out of Little Riddle?
A: By the time the last train leaves the town.
Q: What color is the hotel's carpet?
A: Cream.
Q: Which of your suspects visited the hotel first?
A: Postman.
Q: Why does the Vicar say he was at the Hotel?
A: He is planning to make a large booking.
Part 2
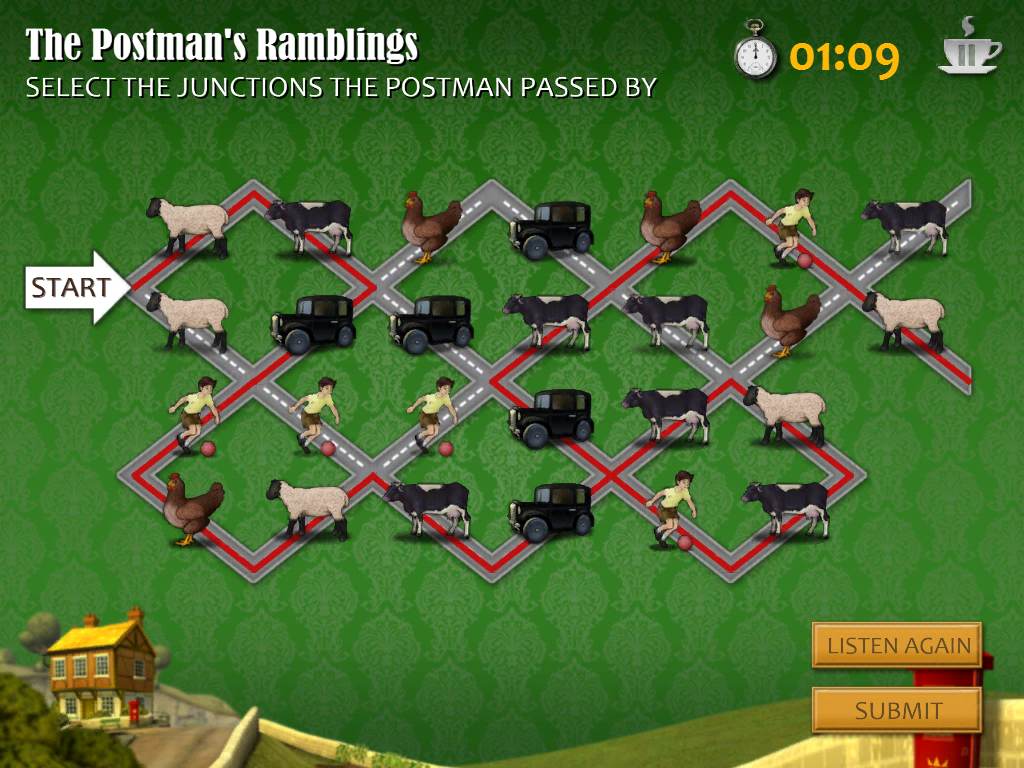
The Postman's Ramblings
Follow the postman's verbal instructions to find the route he took from the starting point to the end of the road at the right side of the puzzle.
He uses five sounds to represent obstacles he encountered on the road.
The first sound is bleating to represent a sheep.
The second sound is a moo to represent a cow.
The third sound is a horn honking to represent a car.
The fourth he calls "evil" every time, and is the sound of laughing to represent a child.
The fifth sound is the crow of a rooster.
Solution.
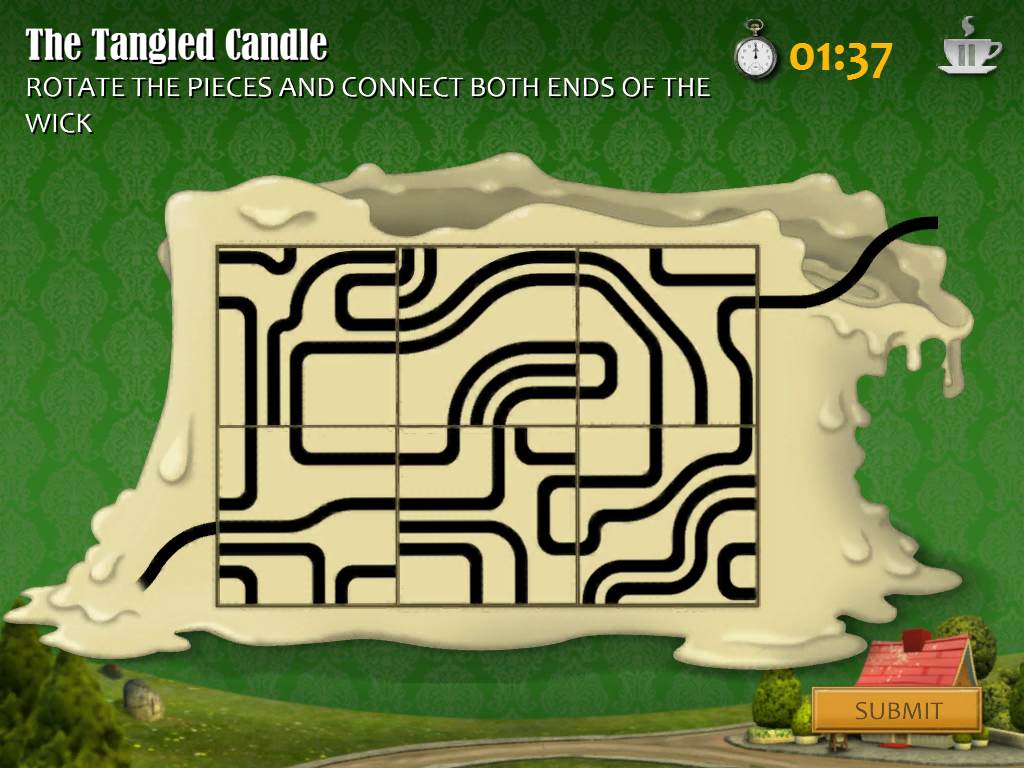
The Tangled Candle
Rotate the tiles in the candle to create an uninterrupted line of the wick from the starting point at the lower left corner to the end at the upper right corner.
The other lines do not need to connect, you only need a single path that goes between both sides.
Solution.
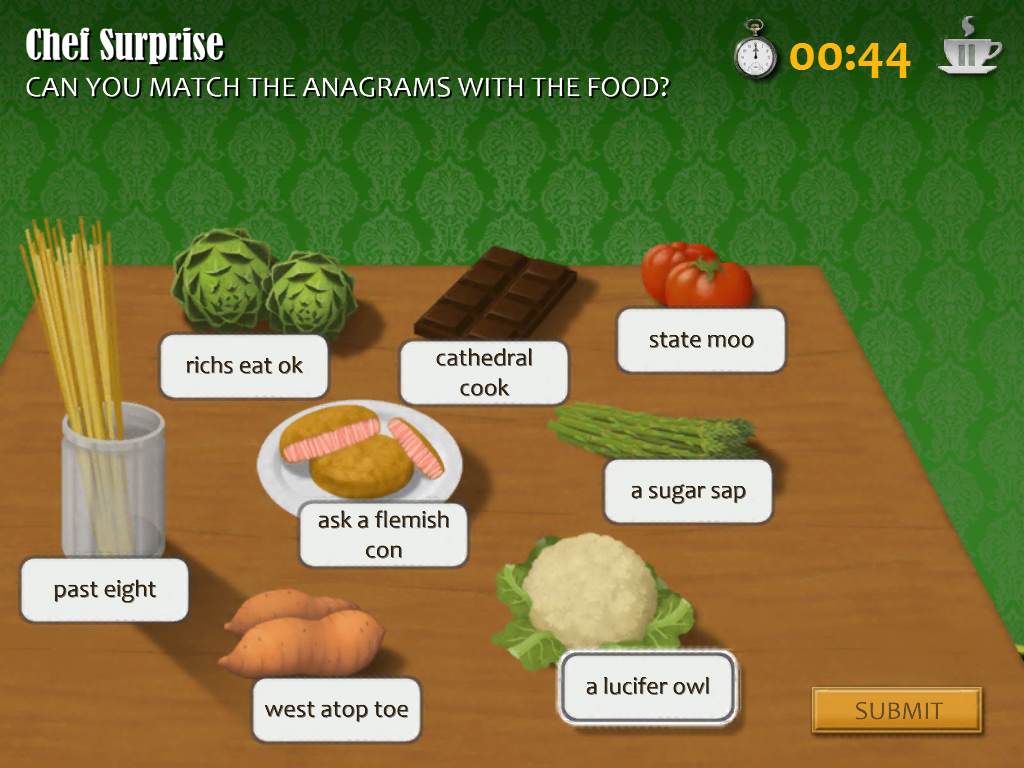
Chef Surprise
Solve the anagrams in the name tags by correctly rearranging the letters, then place the tags under the object they identify.
A Lucifer Owl = Cauliflower
West Atop Toe = Sweet Potato
Past Eight = Spaghetti
Richs Eat Ok = Artichokes
Cathedral Cook = Dark Chocolate
State Moo = Tomatoes
A Sugar Sap = Asparagus
Ask A Flemish Con = Salmon Fish Cake
Solution.
Gardening Without Moses
Position the rain clouds so that each plant gets the correct amount of water.
Refer to the diagram at the right side of the puzzle to see how the water is distributed from each cloud.
Plants directly under the cloud will receive the most amount of water, while plants two squares to the left or right sides of the cloud will receive lesser amounts of water.
The number inside the droplets under each plant indicates the exact amount of water that plant needs.
Solution.
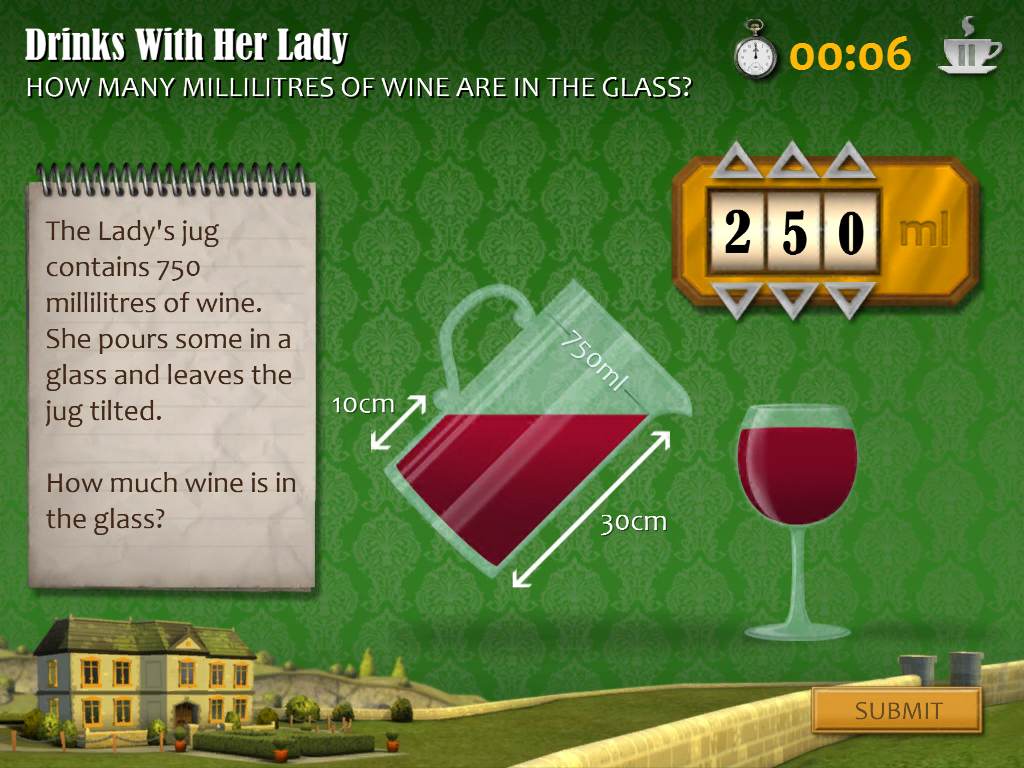
Drinks With Her Lady
Determine the amount of wine inside the wineglass by deducing how much liquid has been poured out of the jug.
First, consider the full jug (with a line at the 750 mL mark) in the shape of a rectangle, with an area of 750.
You know the height of the rectangle is 30cm, thanks to the marking on the right side of the jug.
Area of a rectangle = base x height, or in this case 750 = base x 30. Divide 750 by 30 to find that base = 25cm.
Now you know that the base of the jug is 25cm. The next step is to solve the area of the amount of fluid that is missing for the jug.
The empty space at the upper left side of the jug is in the shape of an equilateral triangle.
You know that the base of the triangle is 25cn. You can find the height of the triangle with simple deduction.
If the length of the whole side of the jug is 30 cm and the liquid at the left side of the jug goes up to exactly the 10cm mark, then the remaining empty space must be 20cm long.
Area of a triangle = 1/2(base) x height. Plug the numbers you've found into the equaiton to make Area of a Triangle = 1/2(25) x 20.
12.5 x 20 = 250.
The area of the triangular missing section of liquid from the jug is 250, which is exactly how much liquid is in the wineglass.
Solution.
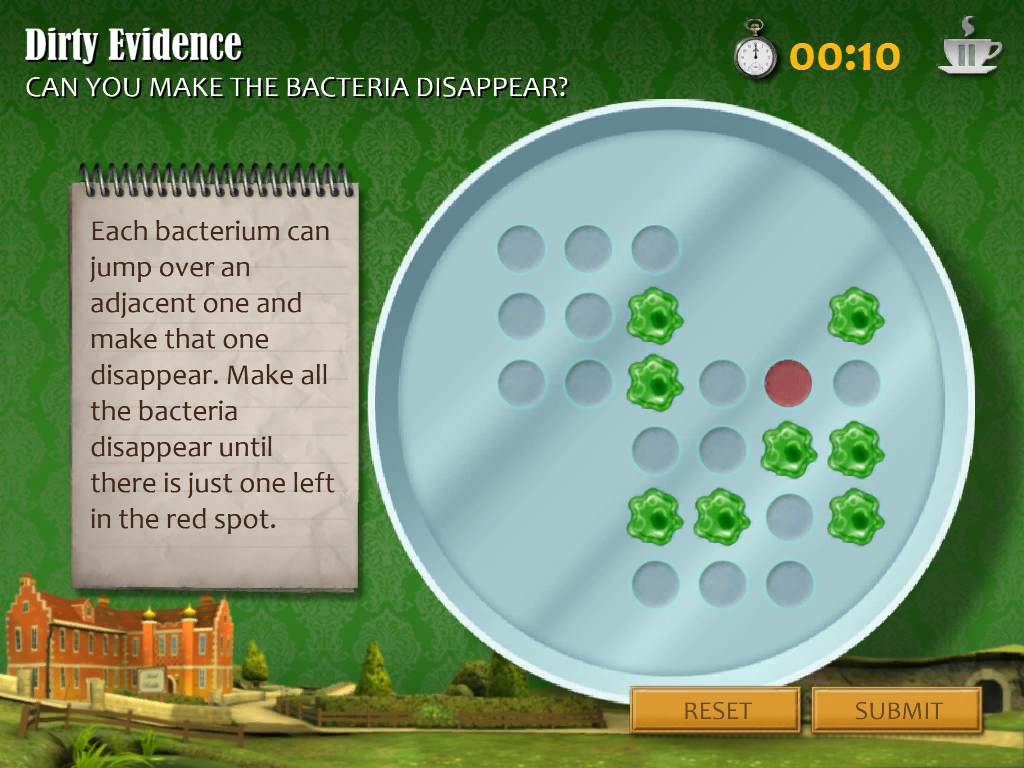
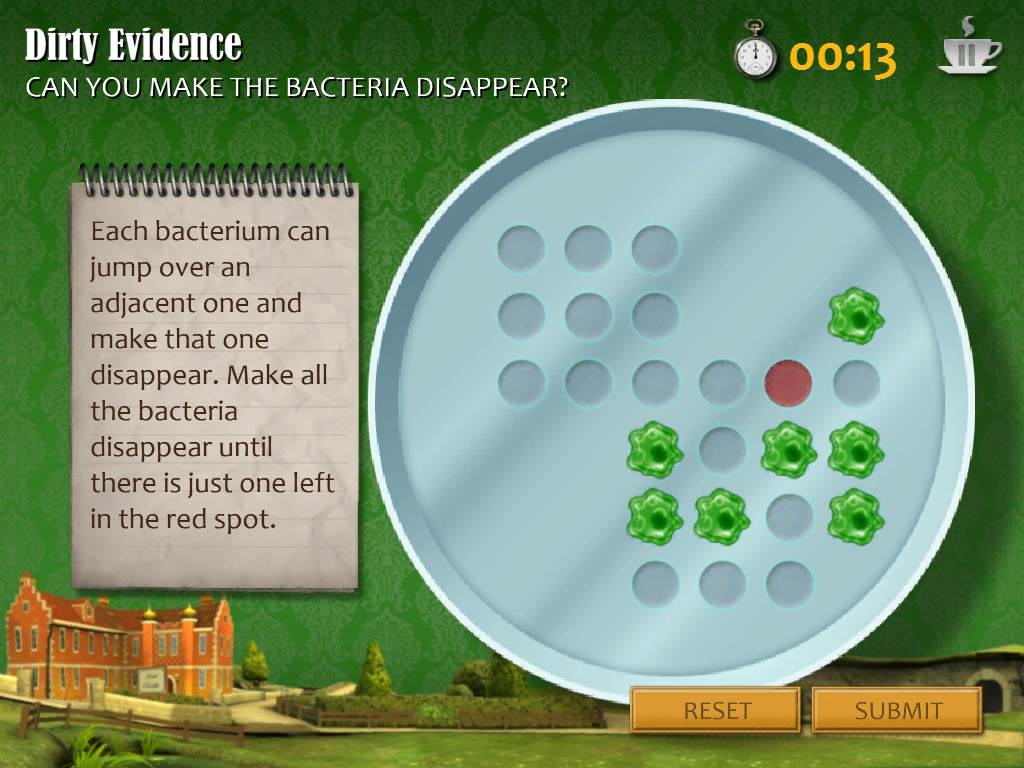
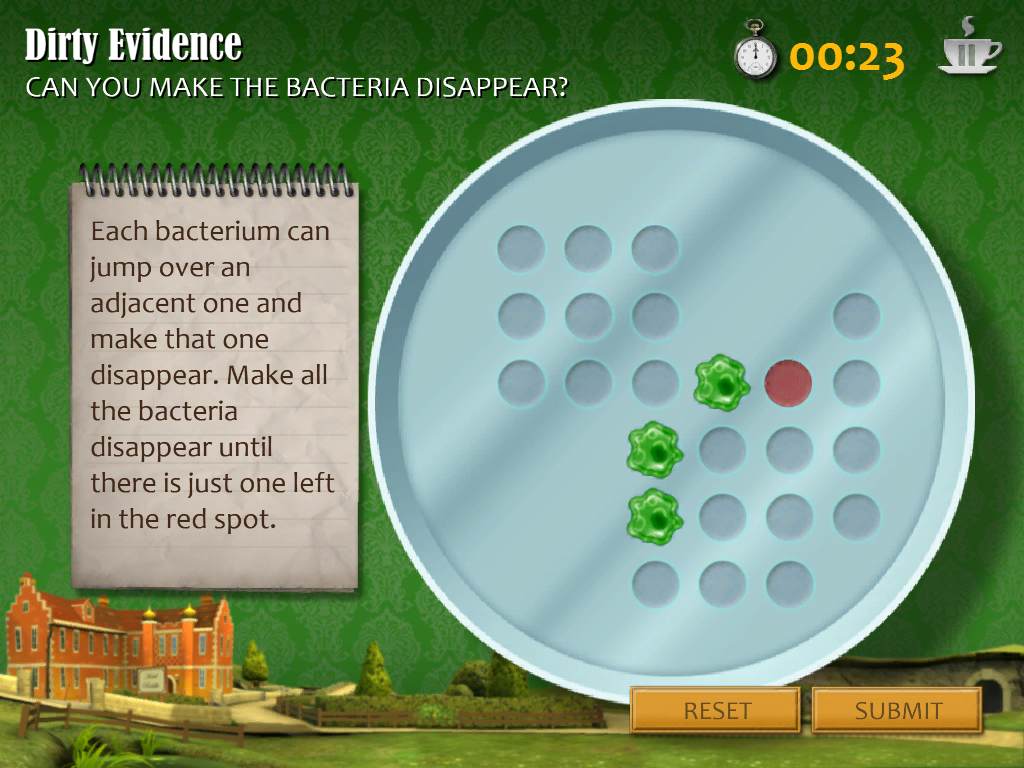
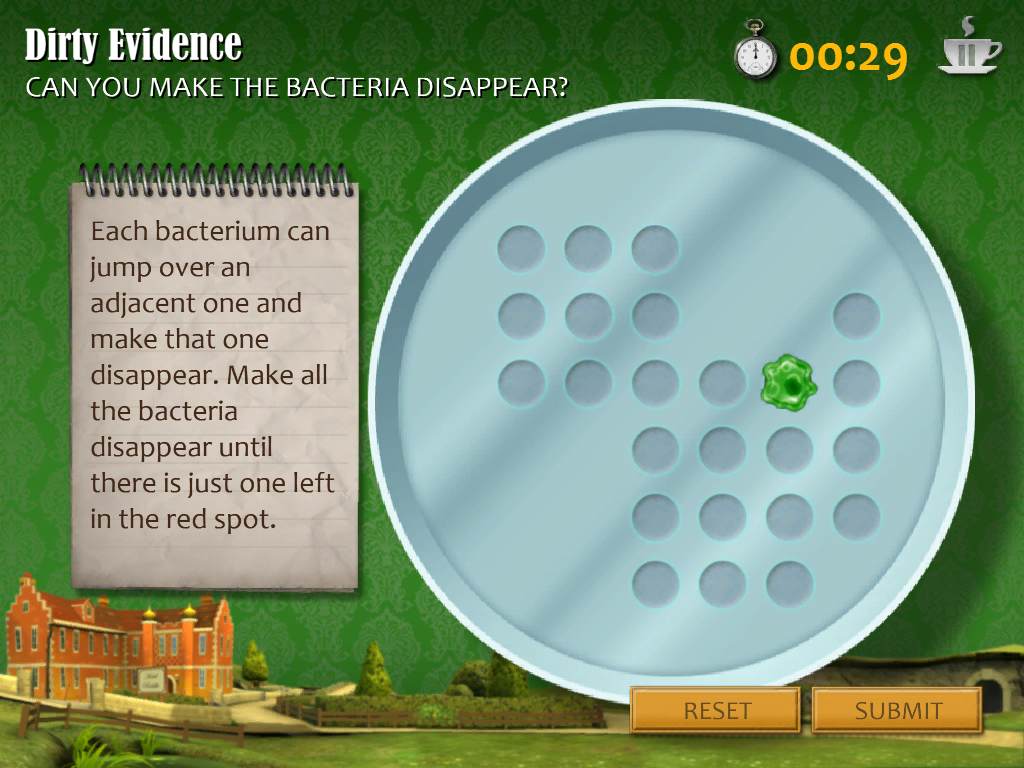
Dirty Evidence
Move the bacterium so that only 1 remains and so that it is positioned on top of the red pot in the petri dish.
Step 1.
Step 2.
Step 3.
Step 4.
Step 5.
Step 6.
Step 7.
Step 8.
Step 9.
Step 10.
Case Review 2
Q: What's the Butcher's first name?
A: Winston.
Q: What does the Baker say people think when they see a dirty bakery?
A: Dirty sausage rolls.
Q: Who is in possession of the statues?
A: The Antique Shop Owner, the Doctor, and one is missing.
Q: What did Lord Malachi say of the statues?
A: They are the key to the key.
Part 3
Breaking And Entering
Cross out the lines of the poem so that the remaining phrases are only 10 syllables long.
Line 1, "And The Trumpets Sound" is 5 syllables long.
Line 2, "At The End Of The Line" is 6 syllables long.
Line 3, "I Aim High" is 3 syllables long.
Line 4, "Now Alive" is 3 syllables long.
Line 5, "until Judgement Day" is 5 syllables long.
The only lines that add to a totall of 10 are the first and last lines of the poem. Cross out all the other lines in the middle.
Solution.
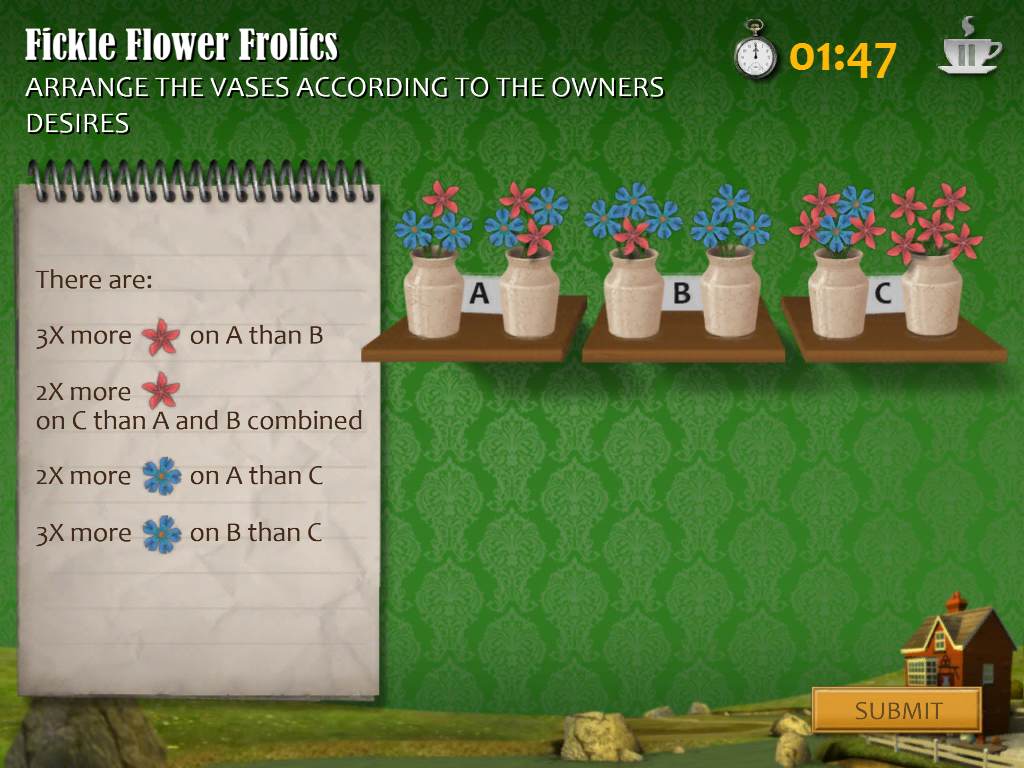
Fickle Flower Frolics
Arrange the vases so that the colored flowers match all of the rules indicated in the notes.
Count how many flowers of each color the vases contain, then place two vases on each of the shelves marked A, B, or C.
It doesn't matter if the flower pot is on the left or right side of its shelf.
Shelf A must have three times more red flowers than shelf B.
Shelf C must have twice as many red flowers as both A and B combined.
Shelf A must have twice as many blue flowers as shelf C.
Shelf B must have three times more blue flowers than shelf C.
From these clues before having to do any math, you can first deduce that shelf C has the most red flowers, shelf B has the fewest red flowers, and A is in the middle.
Additionally, you know that B has the most blue flowers, shelf C has the fewest, and A is again in the middle.
Solution.
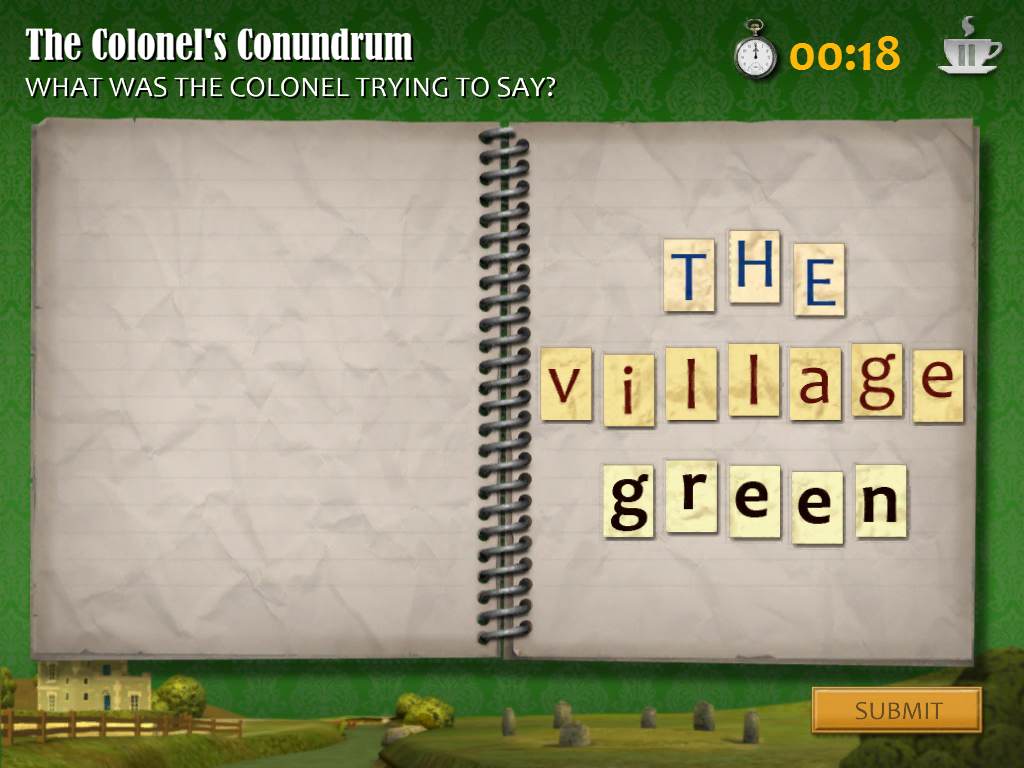
The Colonel's Conundrum
Place the letter scraps on the right page of the notebook to arrange them into a secret message.
Simply organize the letters by color to find which word they belong to.
The blue letters are E, H, and T, obviously forming the word "THE".
The red letters are A, E, G, I, L, L and V which can be arranged to spell "VILLAGE".
The black letters are E, E, G, N, and R which spell "GREEN".
The top line only has three spaces, the middle line has seven spaces, and the bottom line has five spaces.
Thus, the word "THE" goes at the top, "VILLAGE" in the middle, and "GREEN" at the bottom.
Solution.
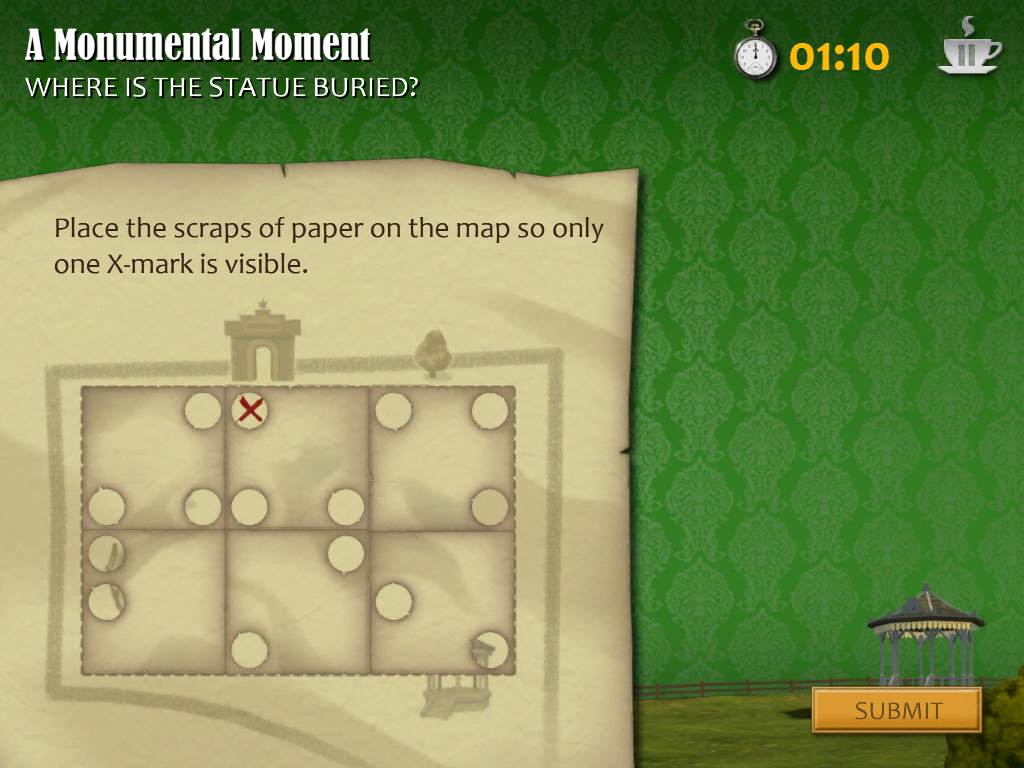
A Monumental Moment
Arrange the scraps of paper on the map so that all of the X-marks are covered up by the corners of the paper excpet for one.
The page will cover any markings except for the round cut-out areas at the corners.
Solution.
Case Review 3
Q: How did the constable find the tiles and the poem in the statue?
A: He turned one of the legs.
Q: Which of these verses is not part of the poem?
A: On that macabre call.
Q: How many tiles have you retrieved from the statues
A: Six.
Q: Why doesn't the Antique Shop Owner want to lend you the statue?
A: Because he likes it too much to lend it to anyone.
Part 4
Crypt-ic
Arrange the stones on the slab so that the symbols at the side of each tile matches the symbols on any tiles next to it.
For example, if one stone has an eye on its side, then the stone beside it must also have an eye on its side.
Symbols that go along the outwer border of a tile and are not next to any other stones do not need to be matched.
Solution.
Whodunnit?
After a brief review of some of the evidence and motives, you'll have to select which of the four suspects in the lineup you believe is guilty of dirtying the carpets at the hotel (how anti-climactic!).
If you need to, you can go back to the menu and rewatch the cinematics to refresh your memory or pickup any vital information you may have overlooked.
Tap the guilty party to make your selection.
GUILTY: The Vicar!
The Vicar had mentioned when giving you his alibi that he looked all around the church while searching for Moses.
When you visited the area around the church yourself, the narrator made a point of describing the area as very muddy more than once. This would account for how the Vicar managed to get his boots covered in mud.
If you had been looking around the church when you went inside to speak with the Vicar, you might have noticed a pair of very muddy boots carelessly on the ground under one of the Vicar's spare robes.
Congratulations! Case solved.
Thanks to Trinn for the walkthrough!
Posted by: Mike |
July 2, 2013 9:31 PM
|
July 2, 2013 9:31 PM