

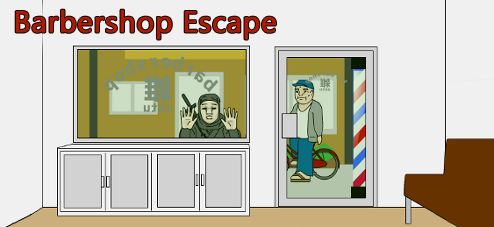
![]() During Detarou's stint in Jayisgame's escape game scene, we've witnessed many zany performances which raised more than a hair or two with their boundary-pushing antics. So it's absolutely fitting that Detarou would stage this latest brain teaser here, in Barbershop Escape. Strange is the style of the day and the only thing usual about it is the goal: find the way out by collecting clues, decoding codes, and solving the puzzles that bar the exit.
During Detarou's stint in Jayisgame's escape game scene, we've witnessed many zany performances which raised more than a hair or two with their boundary-pushing antics. So it's absolutely fitting that Detarou would stage this latest brain teaser here, in Barbershop Escape. Strange is the style of the day and the only thing usual about it is the goal: find the way out by collecting clues, decoding codes, and solving the puzzles that bar the exit.
 A changing cursor will alert you to interactive areas and places to zoom in while arrows on the edges of the screen indicate where and when you can turn. Point and click through each scene this way, paying close attention to every detail. Barbershop Escape is on the difficult side, with abstruse puzzles that might leave you tearing your hair in confusion. Avoid that frustration by thorough exploration before attempting an apparent solution that turns out to be no solution at all. Remember, even if a Detarou game seems to have no propriety, it's never without logic and sufficient, at times recycled, clues. Right-brained thinkers have the advantage here as well.
Navigation here could have you feeling like a robot, often turning at sharp angles rather than more direct routes to your destination. This could be a complaint for those who like simpler layouts but is a delight for those fans who enjoy moving around a diverse and large space. Once again there are three endings to discover: normal, perfect and bad. Get cozy with the SAVE button and stay on guard lest capricious pandas catch you with your guile down. Those furry black-and-white pranksters have some fresh tactics to try out on you. Outsmarting them and safely escaping is just one of many reasons why playing Barbershop Escape is so satisfying.
Game not loading? Try this alternative link.


Walkthrough Guide
(Please allow page to fully load for spoiler tags to be functional.)
Barbershop Escape Walkthrough
Begin: Room One Exploration
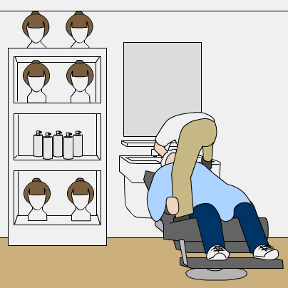
When you begin, you're looking at a calendar girl.
Click the grey arrow at the bottom of the screen to back up.Now you can see the whole calendar.
Zoom in and take note as you may need to refer back to it more than once later on.
Click on the bottom edge of the calendar to find another clue printed on the back.
Some black square shapes, a small circle, and a white rectangle underneath.
Back up from the calendar until you see the man in the green shirt practicing his karate.
Turn right to face the barbershop entrance. There is a cupboard under the front window.
Open the left side of the cupboard:
Here's some wigs and a brown box. The box needs a key to unlock.
Back up and open the right side of the cupboard:
Here are more wigs and an apparent clue. Make note of the cloud, moon and sun.
Back up twice.
Turning right from the window is a man reading a magazine.
You peek over his shoulder at the magazine...just some headshots.
Nothing of use at the moment so back up.
Turn right and you'll see a door with a green panel next to it.
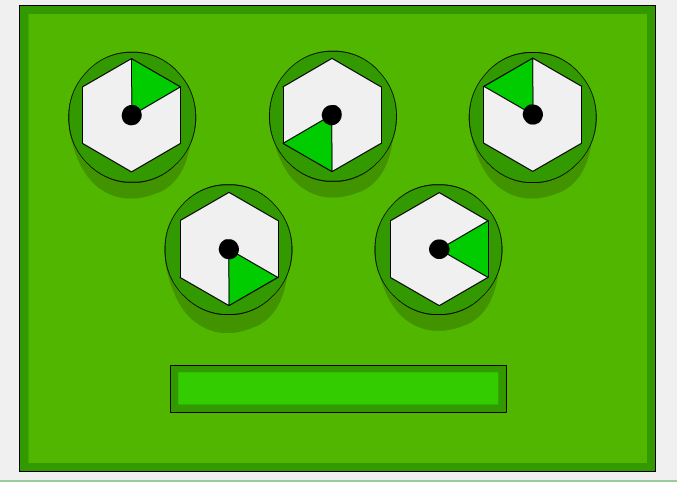
Zoom in to the green panel to see five dials. Note their design and layout.
Back up twice.
Turn right again to face the counter and a door to the bathroom.
Click the counter to move behind it.Then, look under the cash register:
Here's a box with a star on it. You need a 3-digit number to open the box.
Back up and turn left to look on the shelves:
Take the SPINNING WORM off the top shelf.
Examine the green triangles on the middle shelf:
These triangles should look familiar to you.
Notice how each of the five triangles point in a different direction as indicated by the black dot on the tip.
You can click on each of the green triangles to see its number underneath.
Back up three times.
After leaving the counter area, click twice on the bathroom door to enter the bathroom.
Turn left to face the bathroom sink. Then click twice on the cupboard under the bathroom sink:
Here you need a 4-digit code. Your clue is a plus sign printed above the lock panel.
Back up three times. Now, if you reeally want, you can open the other door to see what's behind it (quick! close it again!)
Back out of the bathroom area and turn right two times to face two shampoo sinks and more shelves.
Look in the left sink.
A weird fish guy is living in the sink.
Back out.
Look at the bottles on the middle shelf.
The arrangement of these bottles looks helpful. Make a note of the numbers on each.
Back out.
Now you've seen the whole room and are ready to move to the next!
Green Dials
Turn around until you're facing the door with the green panel next to it. Zoom in on the green panel:
You need to turn the dials to the correct position then press the rectangular button to unlock this door.
There are two clues that help with this:
Note the 5 green triangles on the shelf behind the cash register. You can also look underneath them.
Then, go to the shelf between the shampoo sinks. Look at the bottles.
Put the two clues together to number the dials and set them to the correct positions.
SOLUTION:
Screenshot: Green Dials Solution
When you get the door unlocked, click it to go inside the second room.
Room Two Exploration
When you first enter the second room, you'll be facing a grey door on the opposite wall. On the left side of the door is a stand with five columns of black-and-white beads. On its other side is a tv monitor.
Examine the columns of black-and-white beads:
You can move them up and down, each column is topped with a dot, and there is a rectangular button below. (You can solve this now if you want).
Back up then look at the monitor:
Here is another clue: there's the image of a bottle in the top corner, five circles, and some colored plus marks.
Back out.
Turn right to see another door. Next to it is a stand with blue squares on it.
Examine the stand with blue squares: one is missing its button.
Back up twice.
Turn left until you see another grey door with nothing else. Go inside. Here are two pandas trying to get your attention. Be careful!
Before checking out what the pandas are pointing to, SAVE YOUR GAME.
Then, if you want to see the "Bad Panda" ending, zoom in to the spot they're pointing at. Then click on the egg.
After, um, enjoying that ending. You can select "REPLAY" and then "LOAD" your saved game to start where you left off.
Back out of the Panda Room and turn right.
It's time to solve a couple more puzzles.
Cupboard Under Bathroom Sink
Back out until you're in the first room, facing the door with the green dials panel. Back up again and turn right, then click twice on the door with the blue and red symbols to go into the bathroom.
Turn left to face the sink area and examine the lock on the cupboard below the sink.
Enter the correct 4-digit number to unlock this door.
The clues are on the TV monitor on the wall and on the shelf by the shampoo station...
SOLUTION:
Look at the picture in the second room, the one by the grey door and stand with black and white beads. It shows the same configuration as the bottles on the shelf by the shampoo sinks. Do the math as shown with the color coded plus signs to get this code...
5 5 8 6
(Green = 55; Red = 8; Blue = 6)
With the correct code entered, press the rectangular button to unlock the doors. Then click on the doors to open them.
Get the BLUE BUCKET
and then make a note of the clue written inside:
Write down the numbers, 1-6, on either the left or right side of a jingle bell.
Back up four times. Turn left and click twice on the door to enter the next room.
Black and White Beads
Zoom in on the five columns of black-and-white beads on the brown stand next to the grey door.
You need to move each column down to form a certain pattern, then push the rectanglur button.
The hint for this is under the calendar in the other room...
SOLUTION:
Make the black beads match the positions of the black squares on the calendar's hint:
Screenshot: Black-and-White Beads Solution
When done correctly, this unlocks the door next to it. Back up and click the grey door to go into the next room.
Exploring the Water Tank Room
When you first enter this room, you'll see a rocker guy with long black hair standing by a large tank of water. Ignore him for a moment.
Turn right and you'll see a grey machine that appears to be missing one of its levers.
Zoom in on the cupboard above the machine and open it:
Take the bag of BREAD.
Back up and then look at the fish flag on the wall by the grey machine:
Lift up the lower left corner of the flag and you'll see another hint:
[green triangle]413224[blue square]
Back up twice and turn left to see a man in a suit next to a wall safe:
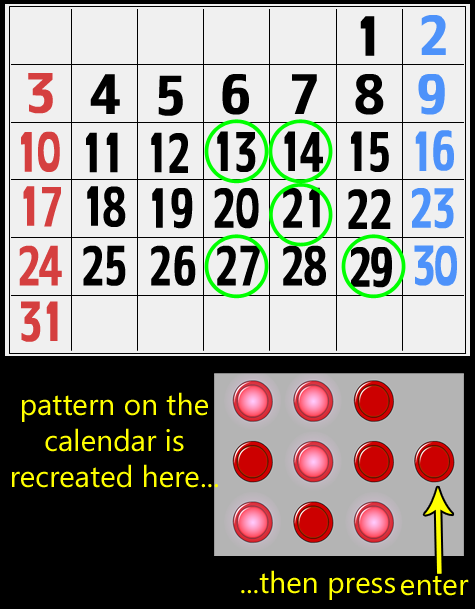
Examine the safe to see it has a 3x3 grid of red buttons plus a 7th button. The buttons light up when you press them so you'll probably need to find the correct pattern of buttons to light up.
Back up to face the water tank. Then, zoom in on the long-haired rocker dude...
Rocker Guy with Bell on His Neck
Click to pull the rocker dude's hair, either on the left or the right side.
Use the clue found under the bathroom sink to know which side to click on...
SOLUTION:
The numbers are either on the left or right side of the bell, so pull that side of his hair in the same order as the numbers under the sink...
RIGHT-LEFT-RIGHT-RIGHT-RIGHT-LEFT
When done correctly, the guy blushes and his wig is loosened up so you can click on the top of it (something else happens, but it's quite poor taste, even for Detarou!)
Click on his wig to pull it up and then get...
a PIECE OF PAPER with a clue on it.
Notice that the numbers and images in a particular pattern, the "2013" and the star.
Star Box
Back up from the wigged bell-on-neck guy and continue backing up into the first room.
Turn right to face the cash register counter and click the counter to go behind it.
Then click under the cash register to find the star box. Zoom in on its lid:
Enter the correct 3-digit number and press the rectangular button to open this box.
The clues to this are under the bell-on-neck guy's wig, the right cabinet under the front window, and the calendar. Put the three clues together to get the code...
SOLUTION:
Line-up the clue from the guy's wig with numbers on the calendar.
Notice that some numbers are replaced with a symbol (instead of 25, you get star-5).
Look inside the cupboard under window to see the three images in the order you need to put the numbers. Putting it all together, you get this code...
O 7 2
Open up the box and get:
a BLUE SQUARE
and another clue...
A pattern of yellow dots that are either on the left or the right. Note also the direction of the arrow.
Back out three times to leave the cash register counter.
Square Blue Buttons, Two Yellow Levers and the Key in the Fish Tank
Remember that ugly fish in the shampoo sink? Turn right to face the shampoo sinks then click twice on the left sink to see the fish is still there, swimming around in green water.
Give the fish some BREAD.
Then, use your BLUE BUCKET to scoop up the fish so you end up with a FISH(?!!) IN A BUCKET.
Back up from the sink, turn left twice, and go through the door to the second room. Turn right and zoom in on the stand with the four blue square buttons:
Replace the lower BLUE SQUARE's button with the one you found in the star box.
Now, press the buttons in the correct order to unlock this door.
Use the clues from under "the koi fish" Japanese flag in the water tank room and the green triangles behind the cash register counter....
SOLUTION:
The clue under the koi fish Japanese flag tells indicates the green triangles on the shelves behind the cash register counter.
Look underneath those green triangles and you'll see numbers. The direction the dot is located on the green triangles tells you which button the number goes with (i.e. 1 points to top right button).
BL - TR - BR - TL - TL - BL
BR=bottom right; TL=top left; etc.
When you've unlocked it, go through the door into the next room. Here you'll see a gold-knobbed door (the exit!) and a green turtle man sucking on something...
Give the green man the SPINNING WORM
and he'll give you the YELLOW LEVER.
Back up twice, turn left, and go through the door into the water tank room.
Turn right to face the grey machine and zoom in on it...
Replace the missing left lever with the YELLOW LEVER you got from the green man.
Now click each lever in the correct order...
using the clue you found in the star box.
SOLUTION:
The yellow dots are either on the left or the right and tell you order in which to pull the levers....
LEFT-RIGHT-LEFT-LEFT-RIGHT-LEFT
When done properly, a ladder is raised by the water tank.
Turn left and click on the ladder twice to climb up to the top of the water tank:
Pour your FISH IN A BUCKET into the tank.
The fish-thing will swim down to the bottom and bring back a SILVER KEY. Take it.
Back up six times into the first room. Then, turn left twice to face the front window of the barber shop.
Silver Key, Remote Control and Red Buttons Safe
Once you've retrieved the silver key from the water tank, you can open the brown box that's in the cupboard under the front window. Click on the left side of the cupboard and you'll see the box sitting on a shelf above some wigs.
Use the SILVER KEY to open the box.
Get the TV REMOTE.
Back up twice, turn right twice and go through the door to the next room. Examine the TV monitor by the door with the black-and-white beads:
Use the REMOTE CONTROL on this monitor and it'll blow up, giving you another clue.
Back up, go into the tank room, and turn left. Examine the red buttons safe:
You need to light up the correct pattern on the 3x3 grid of red buttons then press the last button to input the "code" and unlock the safe.
Use the clues from the blown-up wall monitor and the calendar...
SOLUTION:
The numbers on the blown-up monitor give you coordinates on the calendar. Ex: 26 to 6 = 27; 23 to 7 = 21.
When you mark it all on the calendar, it makes a recognizable pattern that you can then recreate onto the red buttons safe.
(The red herring here: the rightmost button is simply the ENTER button. Press it after you've selected the other five buttons.)
Red Button Solution
When you've unlocked the safe, you can open it to get...
the GOLD KEY to the exit door!
Normal Ending (with Panda Revenge)
Once you get the GOLD KEY, back up from the red buttons safe and back out of the tank room into the second room.
From here, you can turn right and head straight for the exit door, or you can turn left, to get some sweet revenge.
If you want revenge, turn left and go through the door to the pandas. Use the REMOTE CONTROL to blow up the monitor next to the two pandas.
Once done, back out and turn right.
Turn right to face the door by the blue square buttons and go through. Zoom in on the door with the gold knob:
Use the GOLD KEY to unlock the door but don't go through it yet.
--SAVE YOUR GAME--
Once you've saved the game, go through the door to the normal ending.
Red Stamp Ending
After unlocked the exit door with the gold key, instead of going through, back up several times into the first room.
Turn left to the guy on the couch and look over his shoulder at the magazine he's reading:
Note the clue on the left side of the magazine.
Back up, turn right, return to the room with the water tank, turn left and zoom in on the red buttons safe.
Input the new code into the red buttons safe...
SOLUTION:
Light up or "turn off" each red button by clicking on it until it matches the pattern seen in the magazine (marked below with Xs)...
- - x
- x x
x - x
After lighting up the correct buttons, push the rightmost button LAST to input this code.
You'll hear a thud when the code is correct. Open the safe again to get...
The RED STAMP.
Now, back out of the room, turn right, go through the door and then out the exit, the RED STAMP in your possession.
Posted by: elle |
March 13, 2013 12:55 AM
|
March 13, 2013 12:55 AM