

Azada: Elementa
Platform: Mac, Windows
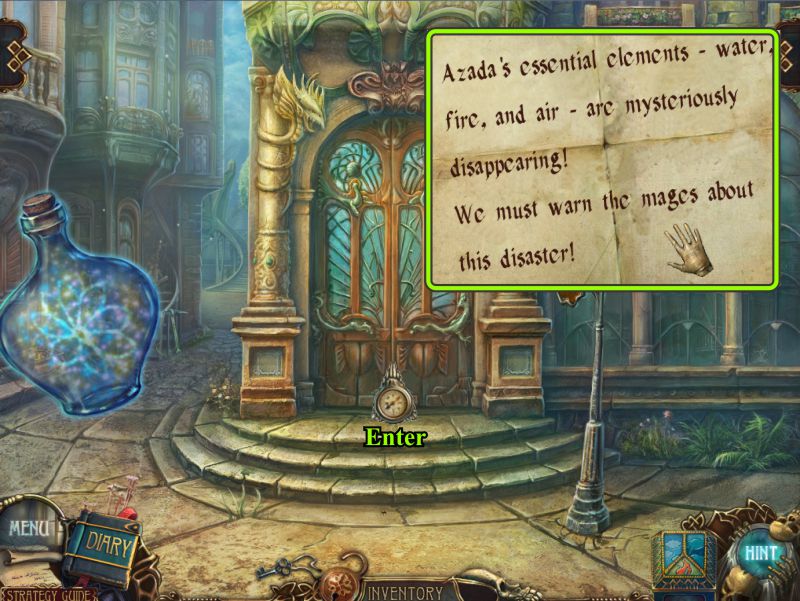
![]() Dreams can be pretty weird, especially if they are of a handsome guy telling you that a magic book told him you were the one chosen to save a magic land from his evil uncle... Wait just a minute! Handsome guy? Magic Book? Fabled Land? Evil Uncle? Yep, that can only mean one thing, that the latest Azada adventure has finally arrived! Created by ERS games, Azada: Elementa is the newest entry in the chronicles of Azada.
Dreams can be pretty weird, especially if they are of a handsome guy telling you that a magic book told him you were the one chosen to save a magic land from his evil uncle... Wait just a minute! Handsome guy? Magic Book? Fabled Land? Evil Uncle? Yep, that can only mean one thing, that the latest Azada adventure has finally arrived! Created by ERS games, Azada: Elementa is the newest entry in the chronicles of Azada.
 So the evil Uncle, Panoptes, has taken over the land of Azada, defeating the elemental mages who keep nature balanced. Wait, seriously, again? You know, maybe Azada should look into getting some better guardians than Titus or those mages who keep letting the evil Uncle take over, necessitating yet another rescue from yet another chosen one. Just saying. At any rate, Panoptes is exploiting the resources of Azada both there and in the real world and it is up to you to journey to the magical lands of Azada and rescue the elemental mages and set things right. Because, you know, nephew Titus has proven time and time again that he is useless when it comes to stuff like this.
Each game in the Azada series is different than the one before, and Azada: Elementa is no exception. While Azada was a series of puzzles strung together with a bare-bones story, Azada: Ancient Magic was a series of mini adventures, and Azada: En Libro was a fully realized point-and-click adventure, Azada: Elementa goes the hybrid route, combining the adventuring and puzzle solving with classic hidden object scenes. Navigate your way between the worlds with the help of your handy notebook, a hint feature, a lovely navigable map, and the changing cursor to guide you along the way. Items that are found laying around (or won from hidden object scenes) fall into a bottom-loading inventory that can drop down to stay out of the way when not needed.
 Hints as to what to do come in a variety of styles, from glints of light to a refilling hint timer to Titus sticking his nose in from time to time. Scattered throughout the scenery are also bits of paper which tell a story to explain why Panoptes, while doing everything he can to hinder your quest, occasionally pops up to lend a hand. Panoptes' dual personality is yet another riddle to solve while attempting to rescue the enchanted land of Azada (again).
Analysis: Azada: Elementa is probably going to be the most controversial of the series for two reasons: First, BigFishGames (the original creator) has farmed out the design to ERS, and they have taken a pure puzzle game and turned it into an adventure/hidden object hybrid. This is not necessarily a bad thing, but fans of the original games may be disappointed with the change.
 ERS makes pretty good games, and the quality is on display everywhere in Azada: Elementa. Luscious graphics, soothing music, nice incidental sounds. The hidden object scenes are interactive and pretty fun. Where the game really shines are the puzzles and mini-games, which once again straddle a vast array of gameplay up to and including a marble-popping match-3 and a fun rip-off of minesweeper. For those fans of the earlier games there is still a lot of puzzle fun to be had. There are three modes of play to match a wide variety of adventuring skills, and a host of amusing little extras like your companion animal whom you can name and customize with not only body parts but purchaseable clothing.
There are a few flaws, however, which can detract from your enjoyment of the game. There are some translation problems here and there with the dialogue and a couple of the list items in the hidden object scenes. The map will constantly ask you if you really want to move to a new location, which gets old pretty quick (yes, I really want to go there!). The clickable area at the bottom of the screen to move backward is perilously close to the inventory and you can often find yourself hitting one when you meant to hit the other. And the little companion animal, while cute, doesn't seem to do much other than look cute.
Despite the minor flaws Azada: Elementa is still an entertaining addition to both the Azada series and the adventure hybrid ouevre. Pretty to look at and with a great depth of gameplay (especially in the puzzles), you are looking at hours of entertainment for the whole family. Enjoy journeying to the land of Azada once again, but really, find that annoying evil Uncle and do something permanent with him. Please.
A Collector's Edition is also available. It includes wallpapers, concept art, music, screensavers, videos, extra gameplay, and a built-in strategy guide. Remember that Big Fish Game Club Members pay only $13.99 for Collector's Editions, and collector's editions count 3 card punches of 6 total needed for a free game.
![]() Windows:
Windows:
Download the demo
Order the full version
Also available: Collector's Edition
![]() Mac OS X:
Mac OS X:
Download the demo
Order the full version
Also available: Collector's Edition


Walkthrough Guide
(Please allow page to fully load for spoiler tags to be functional.)
Azada Elementa Walkthrough: chapters 1-3
General Information
Main Menu
On the Main Menu, you can choose or change your player name, check out more ERS games, choose "Help" to see what you will be doing during the game, and select your Options.
Options include changing the volume for Music, Sound, and Voice, Full or Windowed screen, Wide-Screen selection if you are playing in Full-Screen mode, or Custom or regular cursor.
Other choices include selecting Azada Dwellers, My Pet, and Extras, which will all be discussed later.
More Info gives you access to Forums, the built-in Strategy Guide, and the game Credits.
Extras include bonus items for the Collector's Edition, some of which are not available until you have finished the basic gamplay.
Items you can find in Extras include, Wallpapers, Concept Art, Screensavers, the ability to replay Mini-Games and Hidden Object Scenes, Videos, Music, and to also check out Azada in colors that shows scenes without color and what they finally look like colorfully in the game.
If you see an Azada in Color image you like, you can save it by selecting "Save" and it will save to your documents folder.
Azada Dwellers
You will encounter these dwellers throughout your journey, and when you do, they will be recorded in your Dweller Book, with the option to view dwellers from Azada Elementa and In Libro.
Switch Rat would rat out his own mother and can become as tiny as a drop of water. He has supernatural hearing so can feel conversations at a distance with his whiskers.
A Jumper Bunny can jump as high as the sky for its favorite food, sky flowers. They can also magically drive away storm clouds.
A Fire Dragon is the master of fire and takes his energy from the cries of his victims and turn them to ash in just one breath, unless they are the chosen one or wear a water cloak.
The Flower Fairy is the keeper of her people's magic amulets and can use the power of transformation to protect her people from the dark forces.
Corberus Mutt, with his three heads, is loyal to the forces of good. One head can see through the darkness, another can smell evil from a thousand miles away, and the third head can use its voice to sound a warning to Azada citizens at the slightest danger.
Sentinel Ravens are the dark shadows of Azada as they can see all. They can petrify their victims with their red eyes, and their smoke tails can turn you to ashes.
You cannot hide a thing from the Monkey Thief because they are agile, smart, and clever, and they will steal whatever you have available. They live at the top of volcanos, which is where they hide their stash.
The Sporty Spider is often seen as a loner because he is a cave dweller. They possess athleticism that is not usually found in the arachnid world. Their webs are so tough that Azada citizens use them as threads for their clothing.
Lucky Dragons are charming and kind and have be known to bring good luck to anyone who is honest with them, especially if they give them fire flowers.
Elusive Dragons feed on lava found in the volcano craters and is known for being able to accelerate to great speeds and then disappear suddenly.
The Phoenix is the main guardian of fire in Azada and is always ready to fight to protect Azada inhabitants.
The little metal Mining Robot spends all his time in the mine digging for diamonds. His scanning function lets him know everything about any person who encounters him.
You don't want to encounter the strong grip of the Biting Crab because he has steel claws that can cut through absolutely anything.
Sentinel Toad's intended mission is to maintaining order in Azada. He is very strict in abiding all the rules and never deserts his post.
The Wood Squirrel, with his unique gift or revival, is the main keeper of all of Azada's trees because he can make them grow faster.
The Mesmerizing Platypus is usually found on the floor and only feeds on tadpoles. Staring into their eyes is not advisable because they could hypnotize you.
The most beautiful of all is the Mermaid and she is so easygoing, playful and merry.
The Flying Lion is one of the noblest species. They can use their ability to fly and carry travelers to their intended destination.
Wingless Bird will need your help to provide him a way to make his dream of flying come true.
Carrier Pigeons provide a timely means of mail delivery and are the principal gossipmongers for Azada because they always have the latest news.
The Long-Lived Pterodactyl species is not only for having a lifespan of nearly 10,000 years, which also makes them the keepers of Azada's history.
My Pet
Once you meet you little helper Pet, you can name him, and you will collect coins that you can use to purchase accessories for him.
You can visit him any time from the left tab in the scene or from the Main Menu.
Play Mode
There are 3 play modes, and you can change whatever you choose during the game from the Options screen.
In Casual, the skip and hint buttons recharge more quickly, and you get the sparkles for active zones.
For Advanced, there are no sparkles, and the skip and hint buttons recharge slower.
If you decide to be a Fearless Hero, you get no black-bar tips or sparkles, and you wait almost forever for skip and hint to recharge.
Scene Navigation
During gameplay, when the game is paused, you get choices to Continue, go to Options, look at Help, read the Credits, or Quit to the Main Menu.
On the lower portion of the screens, you will have access to the Menu with the above choices, your Diary with notes about your journey will be recorded, Inventory for the items you collect and can use, the Elements box for holding pieces of the Fire, Water, and Air Amulets as you acquire them, and your Hint button.
The pullout tab at the left will show you the critter coins you have collected to shop for your Pet, and the tab on the right will let you view the Azada Dwellers from either In Libro or Elementa.
Your cursor will change to a magnifying glass when you need to view something up close, and you will see a hand when you can pick up an item.
Use the red "X" to exit a close-up scene and follow the arrow to another destination.
Once you receive your Magic Bottle, it will be on top of your Inventory and you will be able to use it to see things that are otherwise hidden.
When the Magic Bottle glows, pick it up and move it around the scene to see the hidden magic areas.
Search for the hidden magic areas until you find a symbol and then click on it to see what your next task which will require you to pour some magic on the item you have discovered.
Hidden Object Scenes are random, so only those objects requiring interaction on your part and the Inventory item will be marked.
In the second chapter of the game, you will receive a map from Titus that will not only show you locations in Azada, but also in the Kingdoms of Fire, Water, and Air.
It is an interactive Map, so you can use it to change locations.
Chapter 1: Journey to Azada
Apartment
Turn off the alarm clock, zoom in on the elevator, press the button and a messenger will come with a package for you.
Zoom in on him, hear what he has to say, and when he disappears, zoom into the window and take the scissors.
Check out the package on the table and use the scissors to open it.
Once you open the box, you will find your littler helper who will pop up from time to time with messages for you.
Now that you have met your Pet, you will have an opportunity to name him and can press on "My Pet" on the Main Menu or left screen tab if you wish to see him again in between visits.
Pick up the blue Magic Bottle that will attach itself to your Inventory for future use in being able to see things that are not normally visible to the naked eye.
Take the addressed envelope and read the letter about Titus's uncle Panoptes.
Titus will appear, give you your assignment, and explain that the Book of Azada has appointed you as the Chosen One to save Azada.
Enter the elevator, and when it stops, approach the taxi and give the driver the addressed envelope.
Open the rear door and get into the taxi to be transported to your destination.
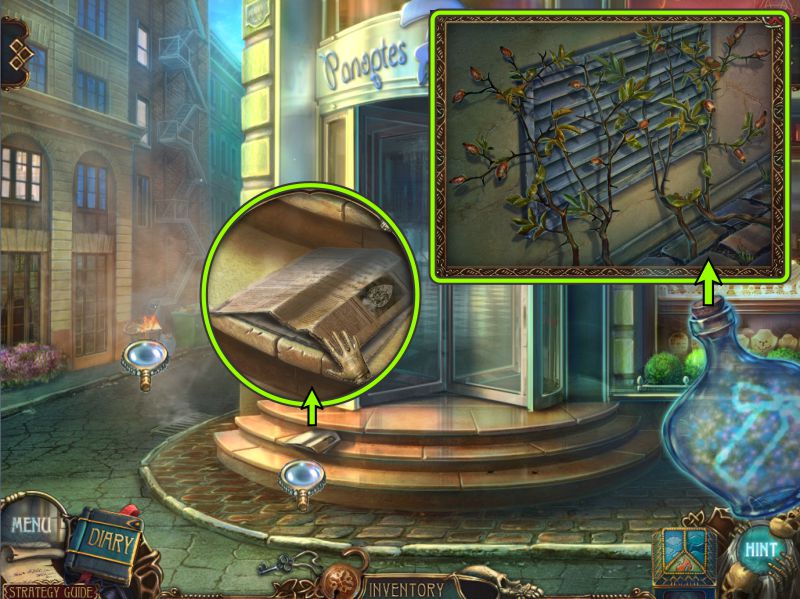
Outside Panoptes Diamonds
The Magic Bottle is glowing, so use it to find the symbol and click on it.
Pour some of the magic to get rid of the vines.
Open the grate and take the Fire Extinguisher.
Zoom in on the steps, take the newspaper page, and read the article.
Take the page and the information will go into your Diary.
Collect the blue button underneath the paper.
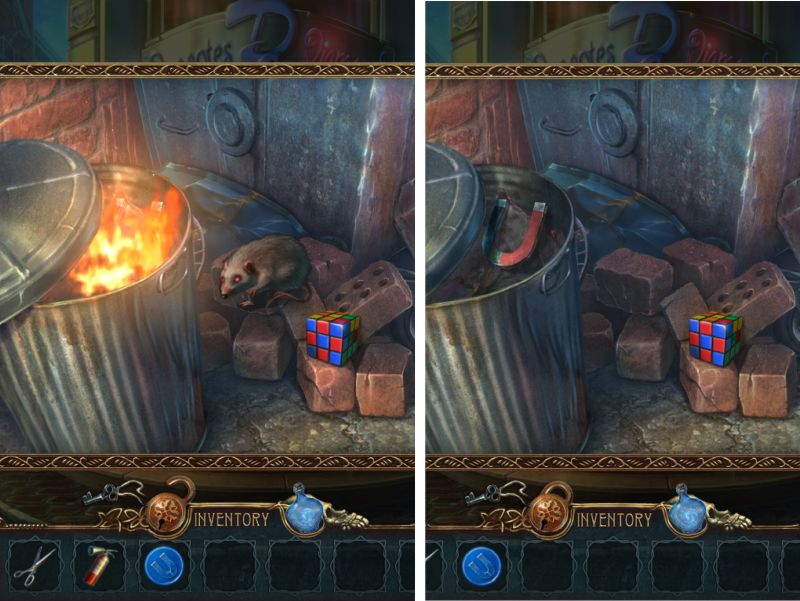
Zoom in on the fire in the can on the side street.
Screenshot
Use your Fire Extinguisher to put out the fire and the Switch Rat will run away.
Take the Magnet, note the design on the cube, and return to Panoptes' door.
Screenshot
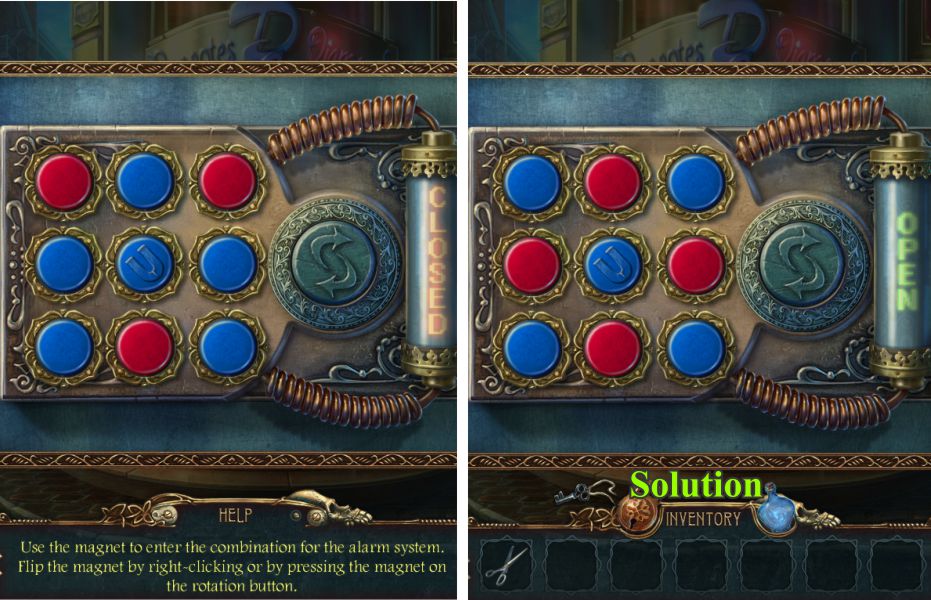
Electronic Lock Mini Game
Zoom in on the lock to the right of the door and place your Blue Button to trigger a Mini Game.
Using the Magnet, turn it so the blue portion will touch the buttons that should be blue and the red half will change the buttons as shown in the screenshot solution to red.
Screenshot
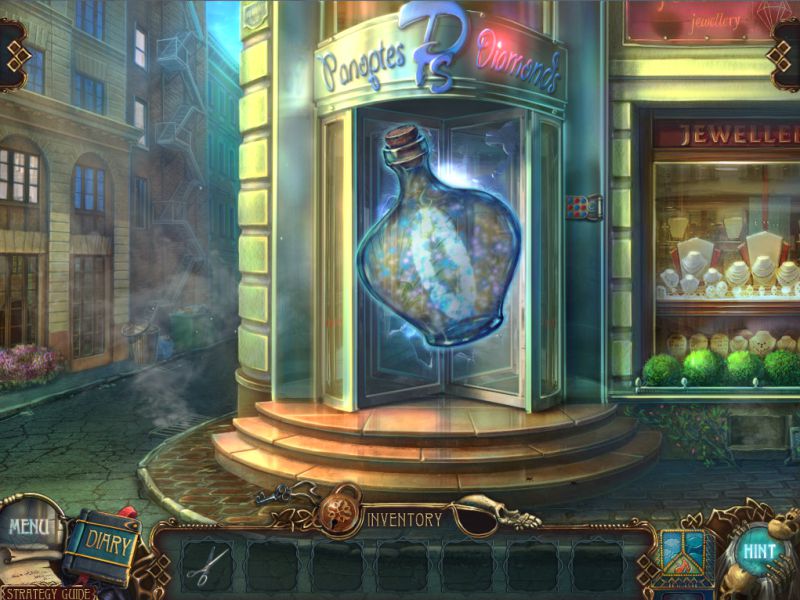
Panoptes appears, so place the magnifying glass on him to hear what he has to say.
He disappears, creating a portal, and your Pet shows up to warn you about Panoptes.
Use your Magic Bottle on the front door, and you will be transported to Azada.
Screenshot
Chapter 2: Azada
Outside Panoptes
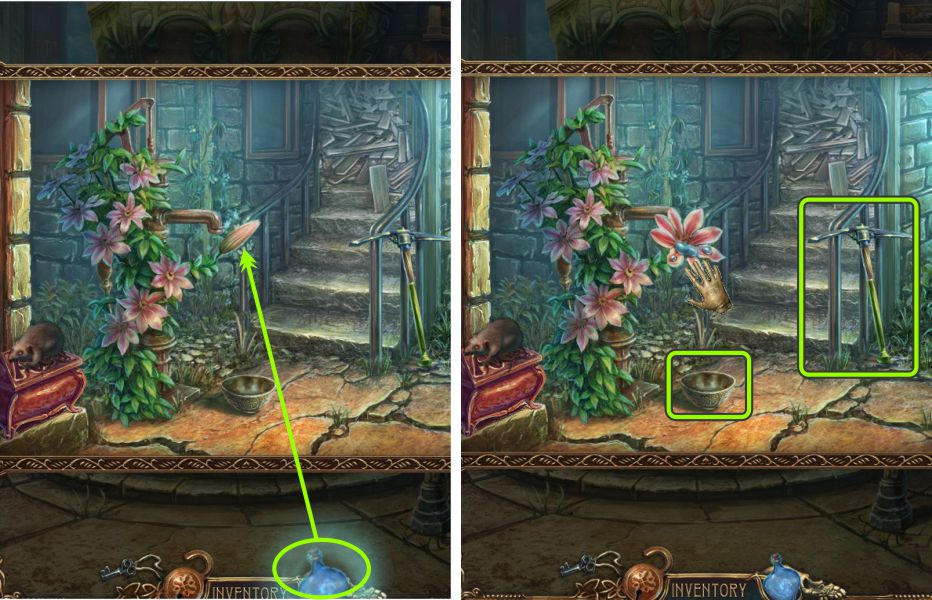
Take the message, and use the Magic Bottle to find the symbol on the side street.
Screenshot
Zoom in only to encounter Switch Rat again: try to catch him, and he will run away.
Use some magic on the flower and touch it so you can collect a Bowl with Water from the flower.
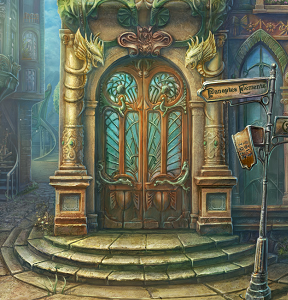
Take the Pick, return to Panoptes' door, and enter the shop.
Screenshot
Panoptes Hall
Speak to Titus and he will give you the Map of Azada, as previously mentioned, and it will station itself just above the Hint button.
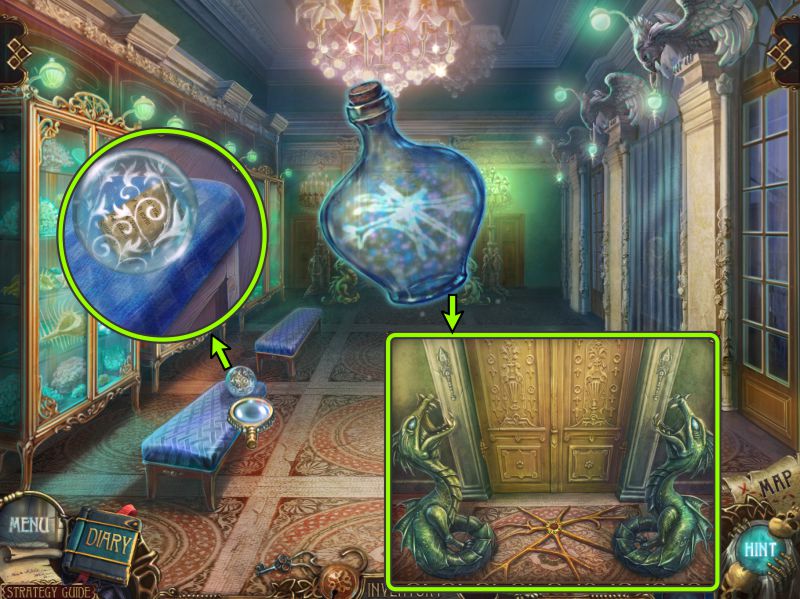
Use the Magic Bottle to find the symbol, and then pour some magic on the floor to create a holder for an item you will find.
Zoom in on the bench, remove the bubble, read and collect the note, then use your scissors to remove the stitches from the padding so you can collect the tile.
Screenshot
Examine the door on the right and remove the drapery.
Panoptes appears and leaves you a message, after which an intricate lock appears for you to find the objects in order to open the door.
Screenshot
Look at the orange display case as the left and insert you tile in the missing space.
You cannot solve the puzzle as yet until you find the code, so exit the shop and go right.
Circus
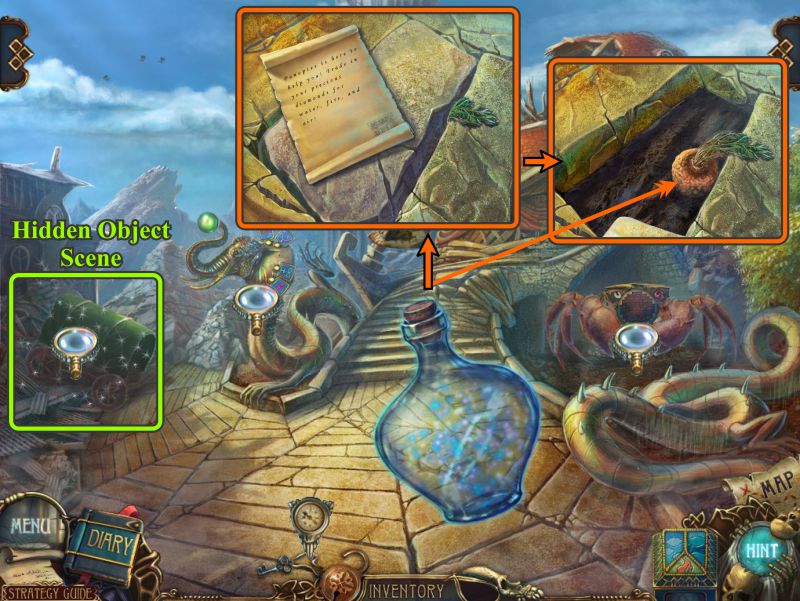
Use the Magic Bottle to find the symbol, pick up and read the note, and use the Pick from your Inventory to remove the stone.
Pour some magic on the carrot to revive it, but you need to find something to dig it out.
Examine the elephant and crab to see what parts they are missing, and play the Hidden Object Scene.
Return to the outside of Panoptes.
Screenshot
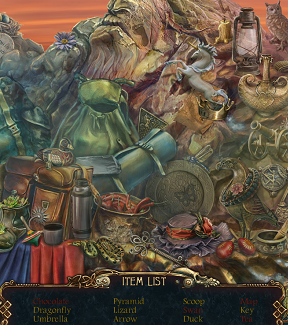
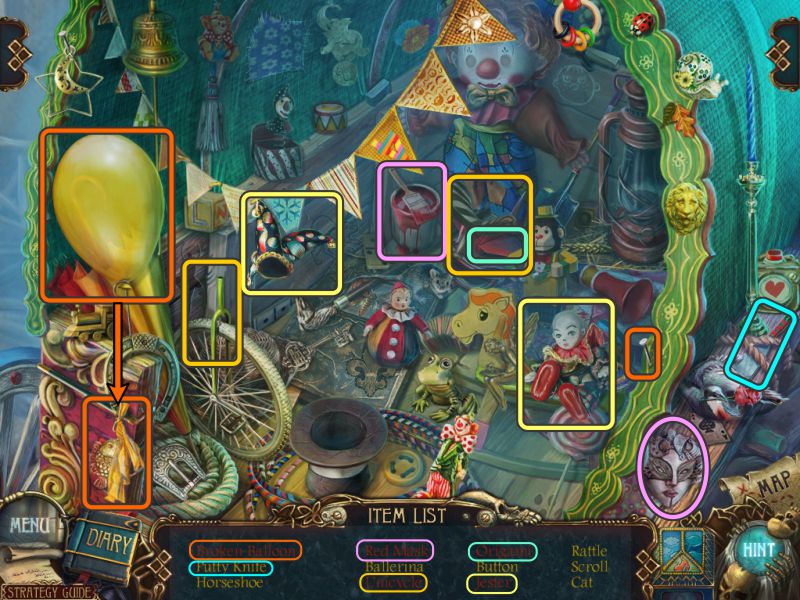
Circus Hidden Object Scene
Use the pin to pop the balloon to collect the Broken Balloon.
Put the hat on the doll and collect the Jester.
Place the seat to make a Unicycle.
Paint the mask red.
The Origami is partially hidden by the unicycle seat.
Your Inventory item is a Putty Knife at the right, marked in aqua.
Screenshot
Outside Panoptes
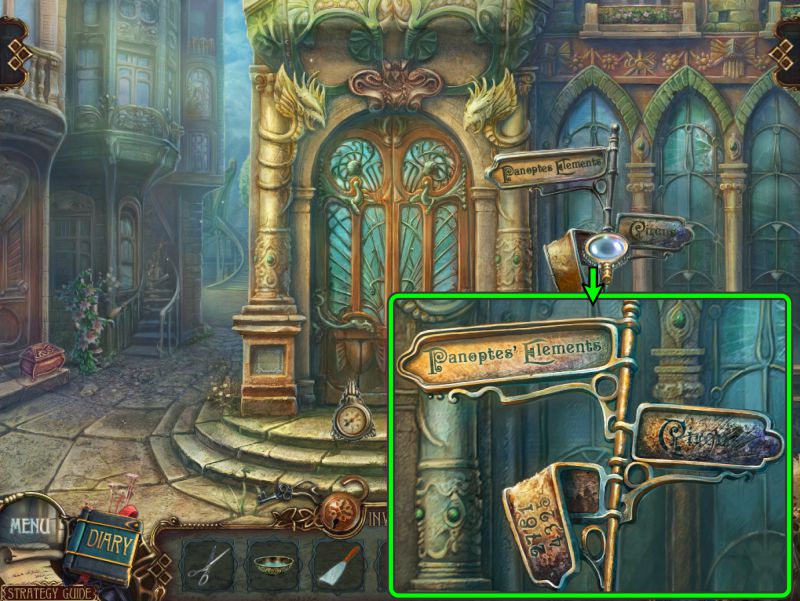
Zoom in on the street sign and scrape the rust off the bent sign with the Putty Knife to reveal numbers underneath.
Take note of the numbers and go inside Panoptes.
Screenshot
Display Case Mini Game
Now that you know the code, zoom into the orange display case for a Mini Game.
Arrange the tile according to the code on the street sign.
See the screenshot for the solution. Take the Earring as your reward.
Go outside and head to the circus.
Screenshot
Circus
Zoom in on the elephant and place your earring.
Play the Hidden Object Scene.
Screenshot
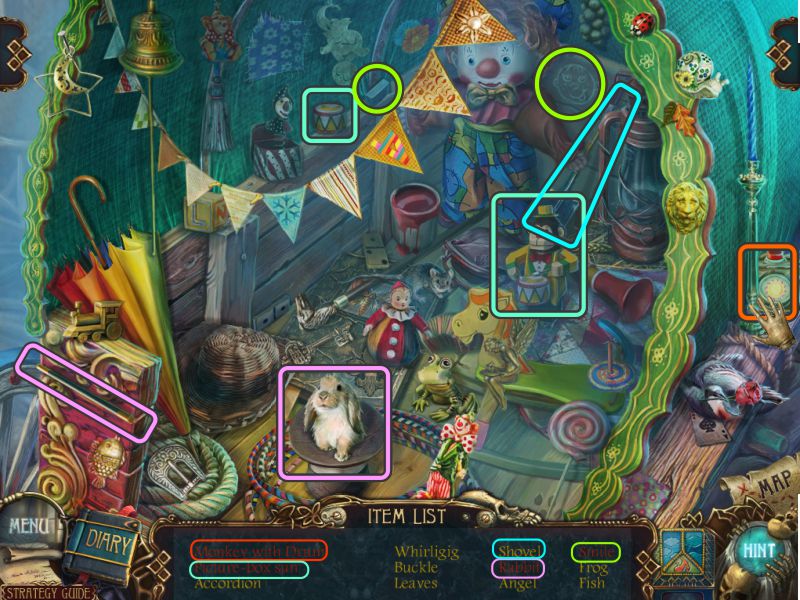
Circus Hidden Object Scene
Your Inventory item will be the Spade marked in aqua that is partially hidden behind the monkey.
Use the magic wand on the top hat to find the Rabbit.
Give the monkey the drum.
Use the chalk on the face to make it Smile.
Screenshot
Circus
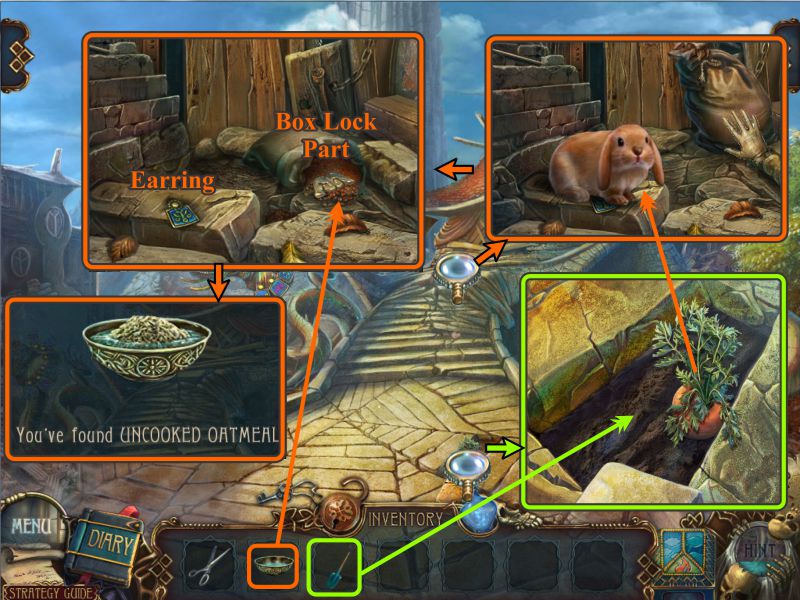
Zoom in and use your Spade to dig up the Carrot.
Examine the structure at the top of the stairs and give the Carrot to the Jumper Bunny, and tip over the bag to see what is inside.
When the bunny leaves, take the earring, and collect the Box Lock Part from the tipped over bag.
Use your bowl of water to collect some oatmeal from the bag so that you now have a Bowl of Uncooked Oatmeal.
Screenshot
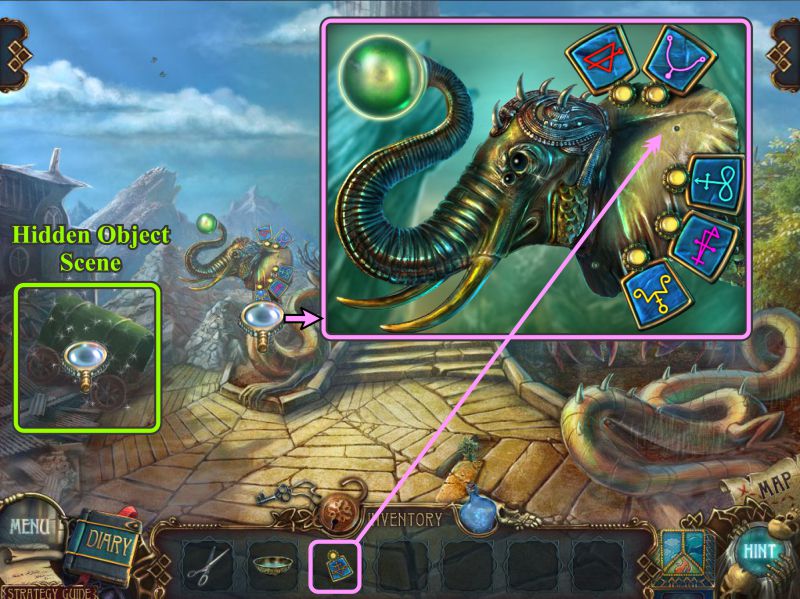
Circus Elephant Mini Game
Zoom in on the elephant and place the remaining Earring to trigger a Mini Game.
Your goal is to remember the sequence shown on the bubble on his trunk and match the symbols.
See the screen shot for the solution.
When you have completed the game, take the Tweezers from his mouth and return to Panoptes.
Screenshot
Outside Panoptes
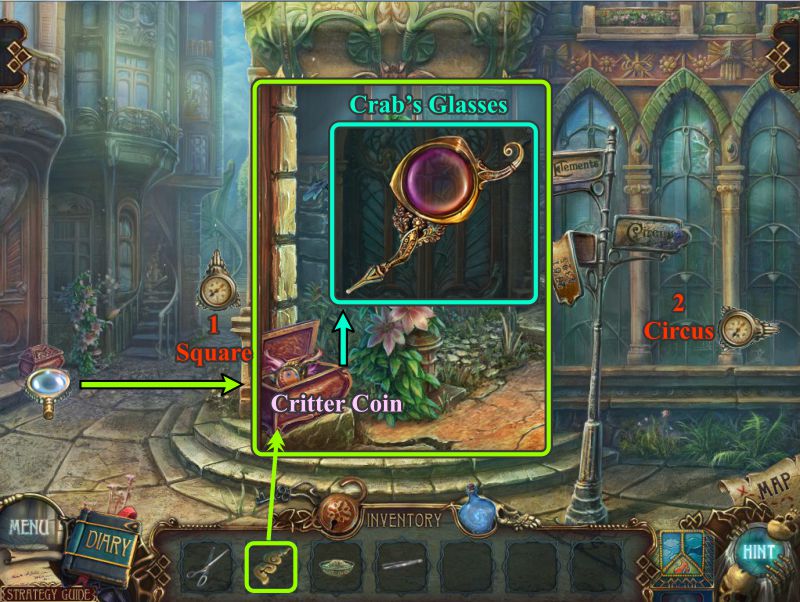
Zoom in on the area on the side street and place the Box Lock Part on the box.
Take the Crab's Glasses, and collect your first Critter Coin.
Go down the side street to the Square, and when you are done there, return and go to the Circus.
Screenshot
Square
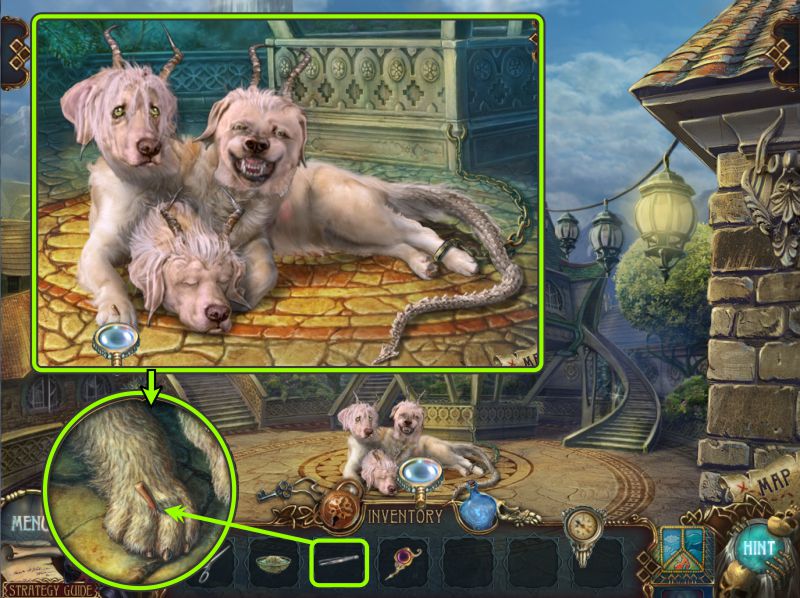
Meet the Corberus Mutt and zoom in to find out that he is not only shackled, but has a thorn in his paw.
Use your Tweezers to remove the thorn, but you cannot continue on your journey to meet Titus unless you free the Mutt, so return to Panoptes and continue to the Circus.
Screenshot
Circus Crab Mini Game
Zoom in on the crab and give him his glasses to trigger a Mini Game.
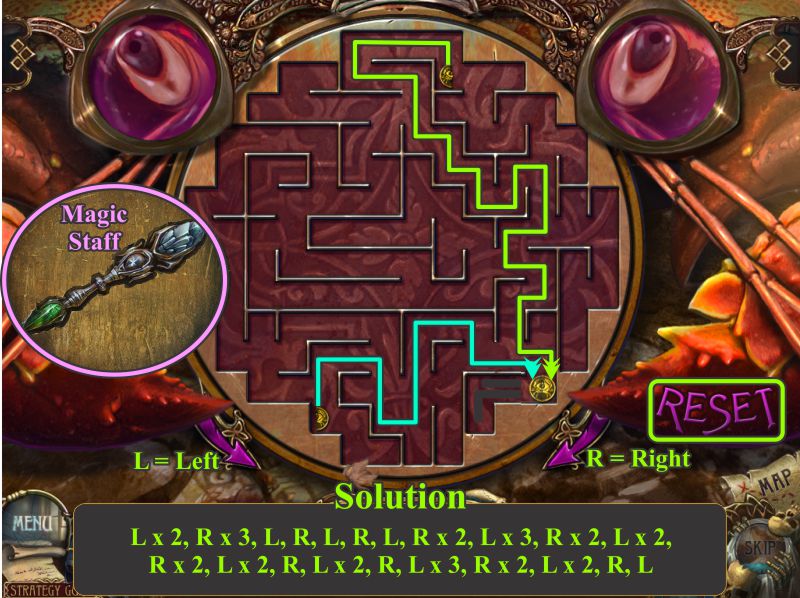
Your goal is to make the two halves of the coin meet so that they form a complete coin.
The arrows at the bottom rotate the circle left and right, so use them as indicated in the screenshot solution to achieve your goal.
Once you have the whole coin, you will be rewarded with a Magic Staff.
Return to Panoptes Hall.
Screenshot
Panoptes Hall
Zoom in on the far end of the room, first on the candelabra for a Mini Game, and then the door.
Your goal is to match all the fireflies and then collect the remaining one.
See the color-coded screenshot for the solution.
Place the Magic Staff in the hole in the configuration on the floor by the door, and the dragons will stop breathing fire so you can go through the door.
Screenshot
Second Floor
Look out for the Fire Dragon, who flies through the scene so you don't turn to ashes.
Once that is over with, use your glowing Magic Bottle to find the symbol.
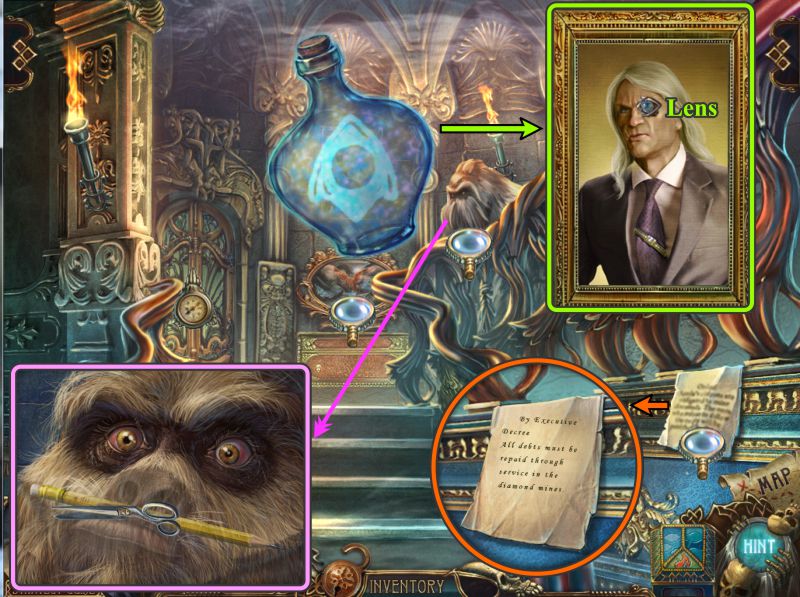
Click on Panoptes' portrait and pour some magic on it. He will wink and produce a Lens for you to collect.
Examine the note below the railing on the right, read it, and save it to your Diary.
Zoom in on the Yeti and use your scissors to trim his moustache so you collect the Pencil.
Enter the door on the landing.
Screenshot
Panoptes' Room
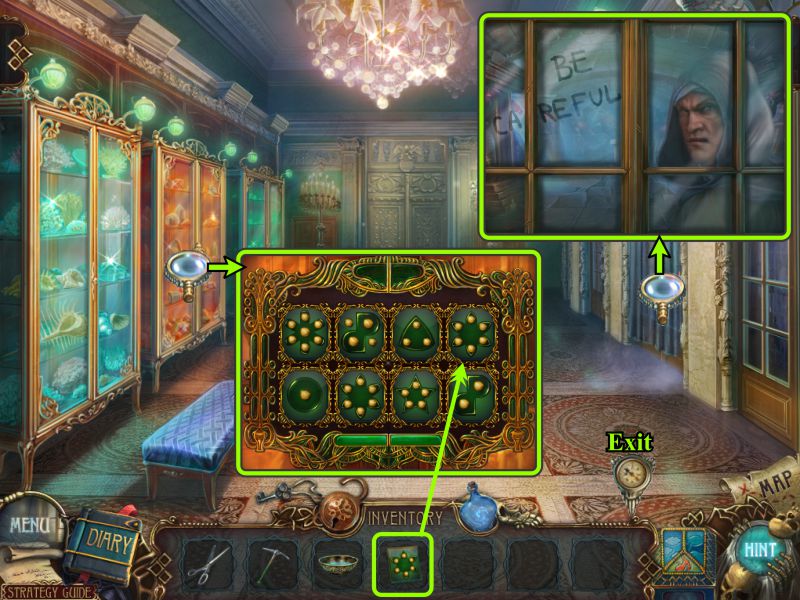
The only bright spot in the room is the window, so touch it to get rid of whoever is looking in and covering the light.
Use your Magic Bottle to find the symbol and discover about the Mages of Water, Air, and Fire.
Keep turning the pages until you come to two pages with a bookmark and some hidden symbols.
Use your magic to reveal the symbols, but you only have one Lens so must wait until you find the other one in order to solve the code.
Zoom in on the Flower Fairy to find out how you can free her from her captivity.
Check out the shelf with the skull to find the sealed diary: we need to find something to melt the seal.
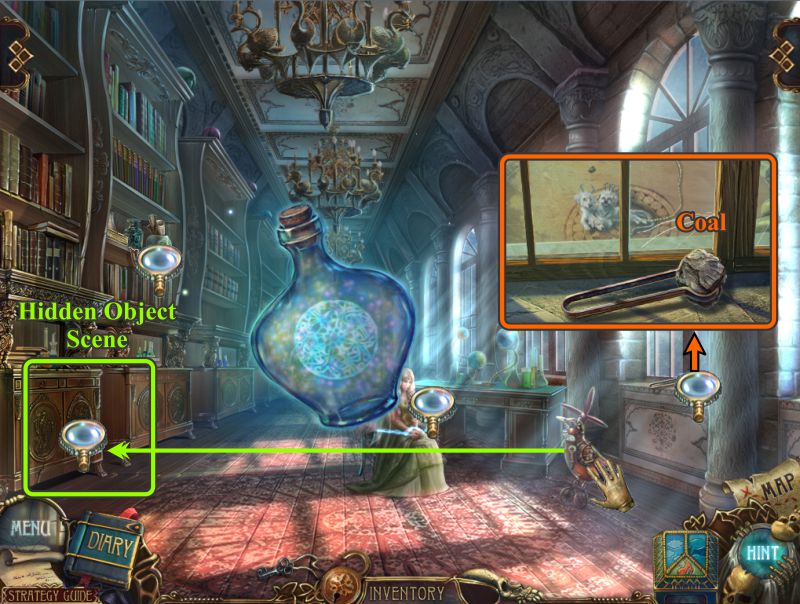
Zoom in on the window at the right to see what Panoptes is up to in the Square, and take the Coal.
Touch the bird to move him across the room and open the cabinet door for you.
You are going to need a little light, so place your Firefly in the cabinet to trigger a Hidden Object Scene.
Screenshot
Cabinet Hidden Object Scene
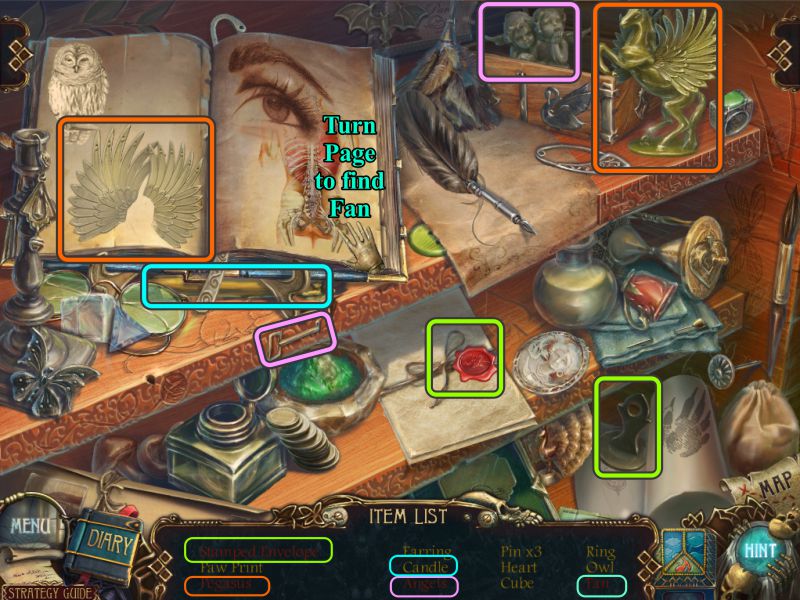
Stamp a seal on the envelope and collect the Stamped Envelope.
Put the wings and the horse to get Pegasus.
Turn the page in the book to find the Fan.
Use the key to open the chest and get the Angels.
The candle becomes your Inventory item.
Screenshot
Second Floor
Take your Candle back out to the landing and light it on one of the torches.
Return to Panoptes' Room.
Panoptes' Room
Zoom in on the shelf with the skull and use the Lit Candle to melt the wax seal.
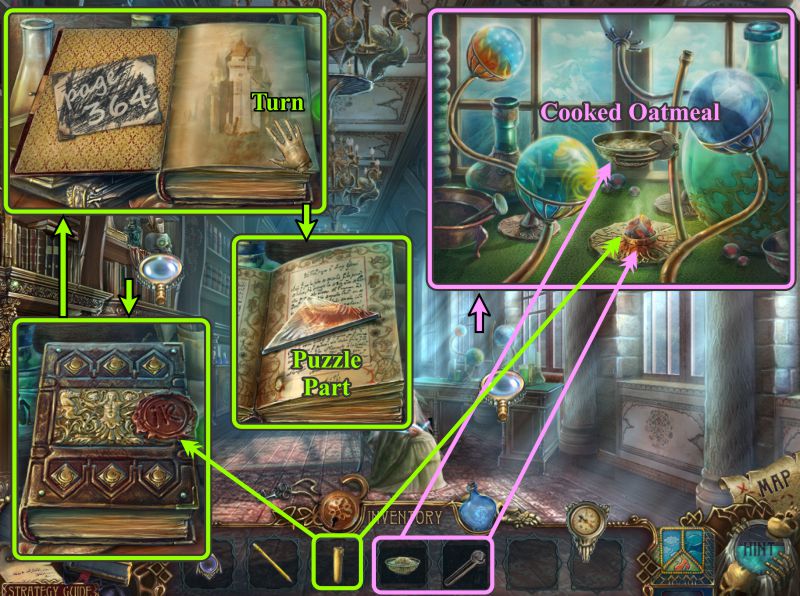
Use your Pencil on the note at the left to reveal Page 364.
Turn the pages and receive a message from Titus to meet him by the 3-headed dog.
Continue turning the pages until you come upon a Puzzle Part, and take it for your Inventory.
Examine the table by the Flower Fairy and place your Uncooked Oatmeal in the ring and the Coal in the holder at the bottom.
Light the Coal with the Candle and collect your Cooked Oatmeal.
Exit to the landing.
Screenshot
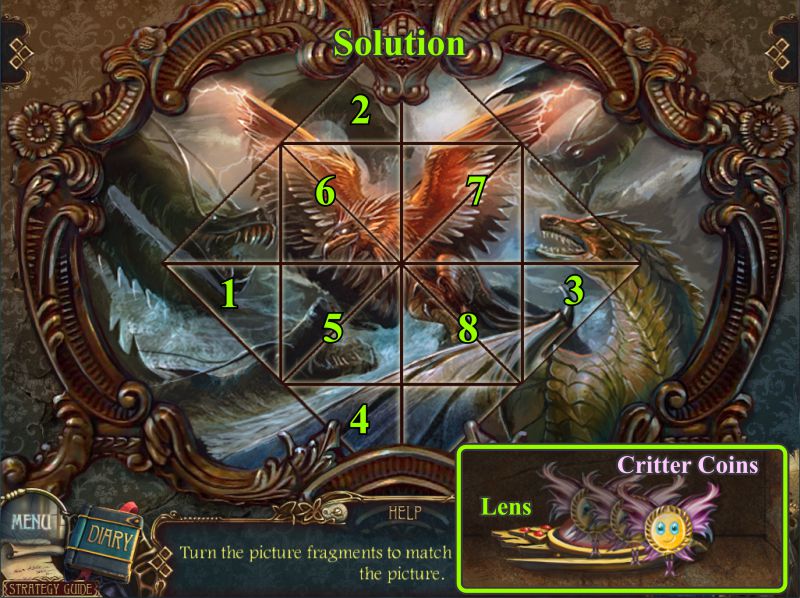
Second Floor Puzzle
Zoom in on the puzzle under Panoptes portrait and place your Puzzle Part to trigger a Mini Game.
Turn the 4 outside triangles and then the inside squares to complete the picture.
The screenshot shows a sample order and the solution.
Collect the Critter Coins and the Lens, and return to Panoptes' Room.
Screenshot
Panoptes' Room
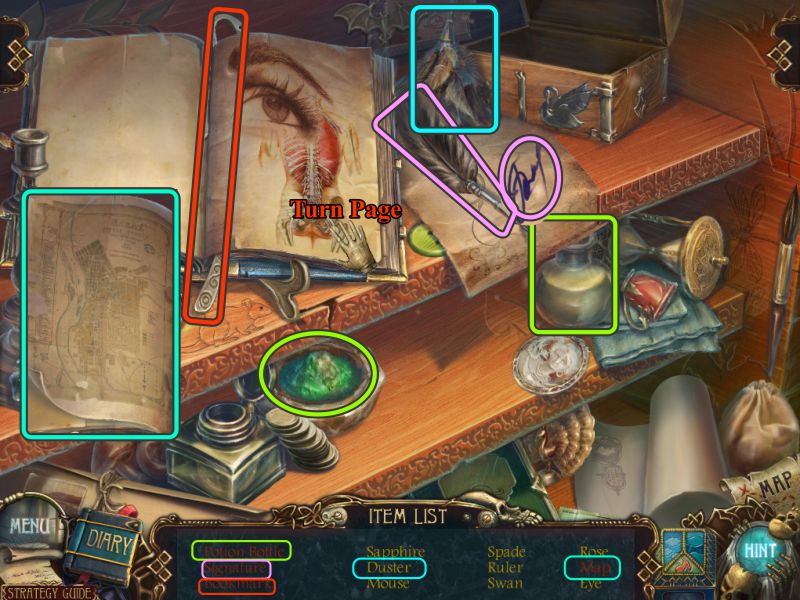
Play the Hidden Object Scene in the cabinet in front of the bird, and then zoom in on the back wall for a Mini Game.
Cabinet Hidden Object Scene
Turn the first page on the book to find the Map, and turn to the next page to be able to collect the Bookmark.
Place the green granules in the liquid to get a Potion Bottle.
Use the quill to write a Signature.
The Duster will go into your Inventory.
Screenshot
Code Book Mini Game
Place the Blue Lens on the left page and the Red Lens on the right page.
Your goal is to match both pages with the symbols on the bookmark.
Drag the Blue Lens to match the white part of the symbol and the Red Lens to match the black part of the symbol.
Press on the lenses to secure them and set the images.
See the screenshot for a color-matched solution.
Once you have completed solutions, the page will turn for another Mini Game.
Screenshot
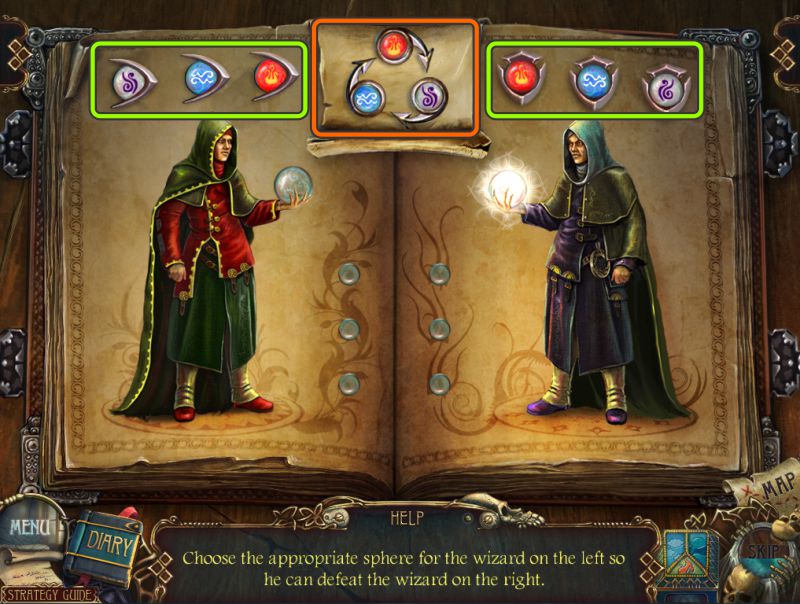
Wizard Mini Game
Your goal is for the Wizard on the left to defeat the Wizard on the right.
The solution is random. The elements above the left Wizard represent air, water and fire in that order, so translate the same elements to those shown above the Wizard at the right.
Keep in mind that Air defeats water, water defeats fire, and fire defeats air, so pay attention to the color of the globe in the right Wizard's hand.
Once you have completed the game, you will be rewarded with the Locket to return to the Flower Fairy.
Zoom in on her and give her the Locket in return for a Hammer.
Exit to the Square.
Screenshot
Square
Zoom in on the dog and place the Cooked Oatmeal.
Examine the chain restraining him and use the Hammer to release the dog, who will then disappear.
Screenshot
Zoom in on the area the dog just left and pick up the note.
Read the note, take it, and collect the Snake.
Examine the window at the left, open it, remove the handkerchief, and take the Gem.
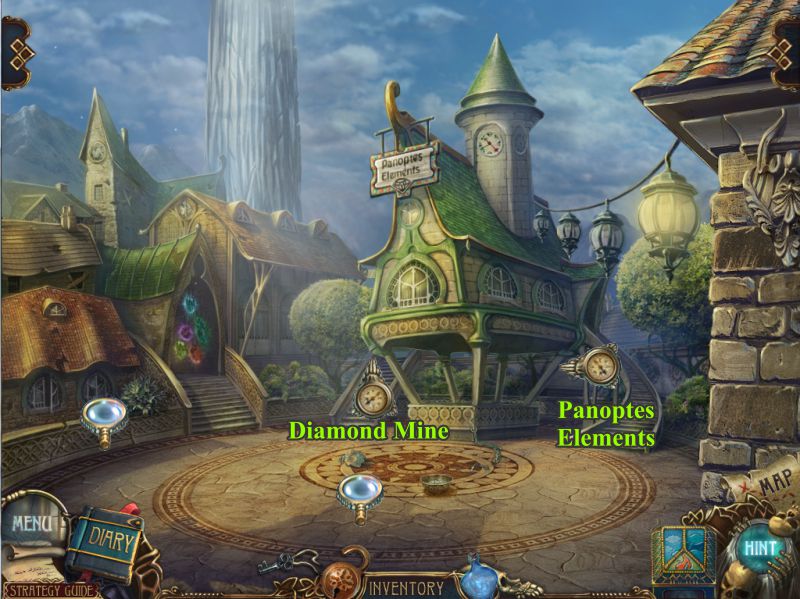
Go into Panoptes Elements to find the Monkey Thief surrounded by Sentinel Ravens you will need to get rid of.
Go up the center set of steps to the Diamond Mine.
Screenshot
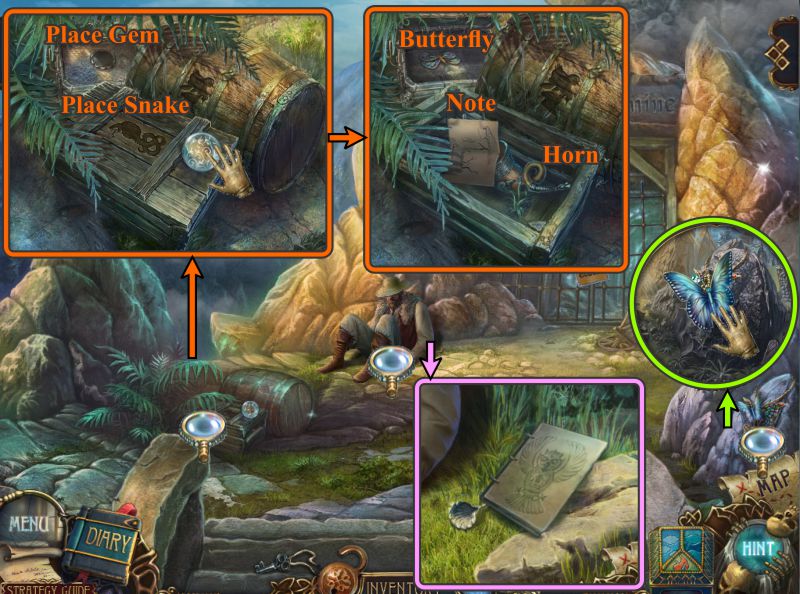
Diamond Mine Entrance
Zoom in on the rock at the right and chase away the butterfly so you can collect the Amulet.
Examine the boxes at the left, remove the bubble, and read the note that will go into your Diary.
Place the Gem in the slot on the far left box and the Snake in the slot on the box in front, then move the lid.
Take the Butterfly, Note, and Horn.
Zoom in on the miner who is sound asleep, and take the drawing of the owl and the Spoon.
Return to the Square.
Screenshot
Square
Zoom in on the closest hanging lantern and place the Butterfly to open it.
Take the Critter Coin and Puzzle Part behind it.
Go into Panoptes Elements.
Panoptes Elements
Blow the Horn by placing it in the scene, and the ravens will disappear.
Check out the monkey who is munching on a diamond.
Look at the cash register, try to take a diamond, and it will close up.
Zoom in on the cabinet below the cash register, open it, have a closer look and take the Goldfish.
Return to the Mine Entrance.
Screenshot
Mine Entrance
Zoom in on the barrel and place the Goldfish.
Take the Stones, and return to Panoptes Elements.
Panoptes Elements
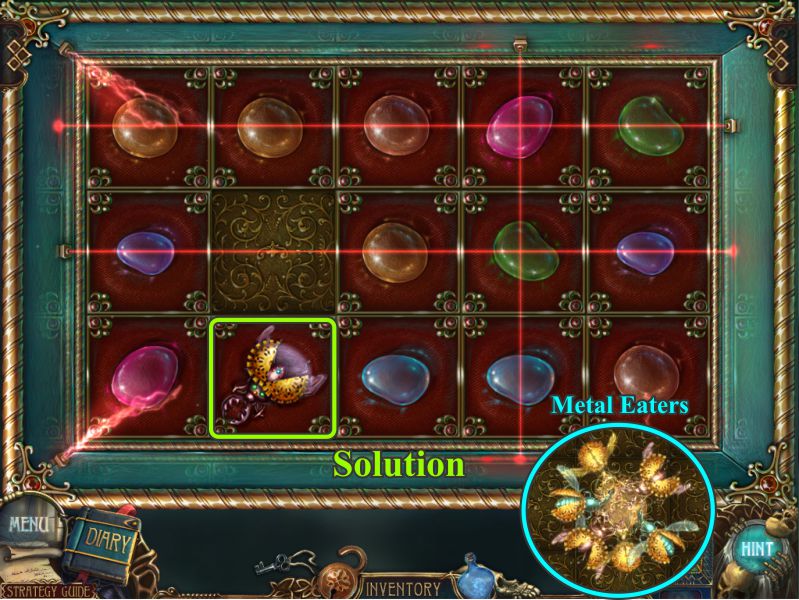
Zoom in on the open cabinet and place your Stones to trigger a Mini Game.
Laser Mini Game
Your goal is to move the stones to empty squares so the insect can be placed in the area with no laser lines.
See the screenshot for the solution, and collect your Metal Eaters.
Screenshot
Go outside to the Square just in time to see Panoptes removing the stones from the doorway at the left, then go through the door.
Courtyard
Titus is waiting for you, so listen to what he has to say about the mages of fire, water and air.
He creates a portal for you to enter the World of Fire, so go through it to see what lies beyond.
Chapter 3: World of Fire
Entrance
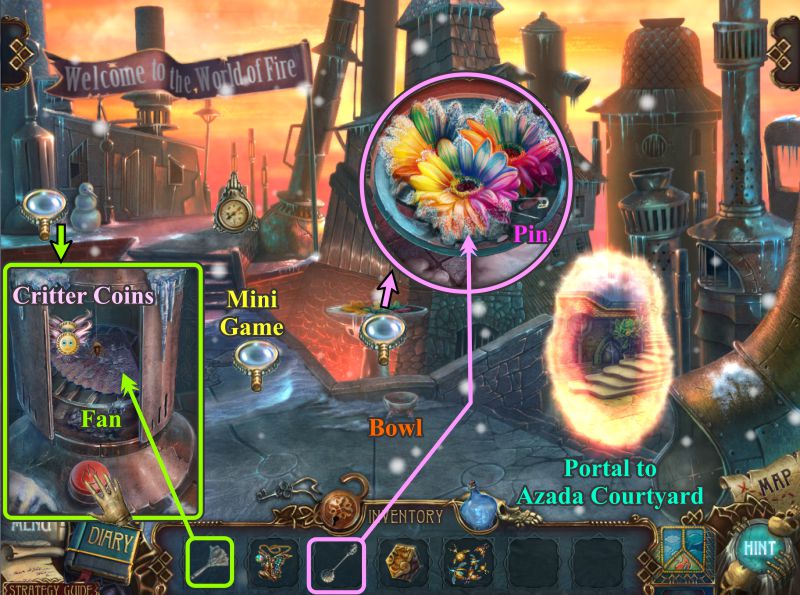
Apparently, Panoptes got here before we did because the sky looks like fire. It's snowing and your Pet wants you to buy him something to keep him warm, so check your Critter Coins.
Zoom in near the small snowman on the left and press the red button to open the stove.
Once you make a move toward the Critter Coins, the spider will disappear. Take the Critter Coins, use your Duster to clean the Fan, and collect it.
Examine the birdbath, use your Spoon to collect the flowers, and then pick up the Pin.
Collect the Bowl on the ground in front of the birdbath.
Zoom in on the ground as shown in the screenshot, and place your Puzzle Part to trigger a Mini Game.
At the completion of the Mini Game, go forward to find the Panoptes freezing everything in sight.
Screenshot
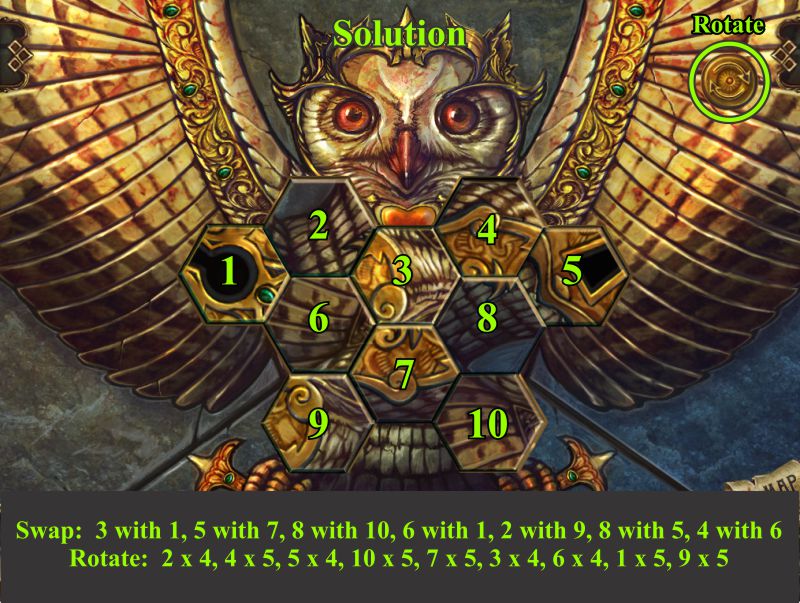
Owl Mini Game
Check out the numerical solution in the screenshot, and make sure when you need to rotate that you use the rotating arrows as marked in the upper right corner.
Once you've found the keyhole, all you need is to find the key.
Screenshot
Outside Town
Use your Magic Bottle to find the symbol on the oven and click on it.
Open the oven, note the half of a recipe, and use your Fan to flame the coals.
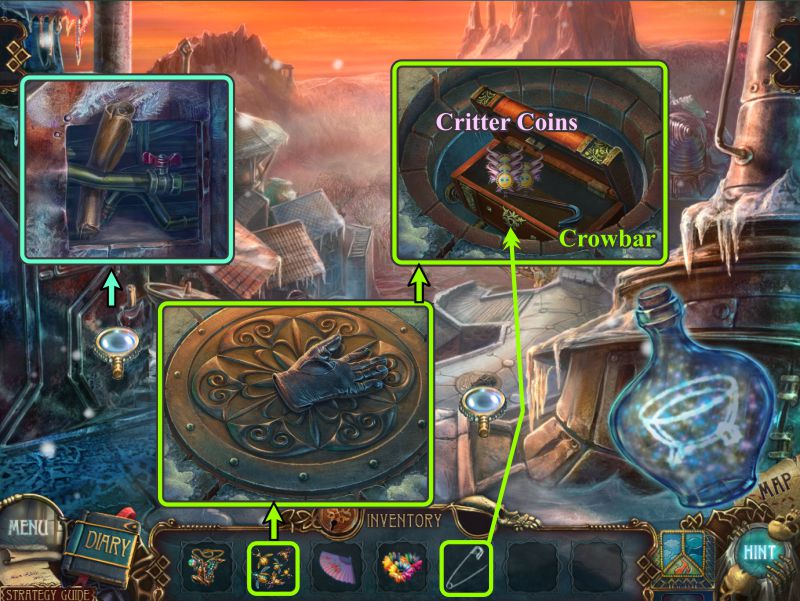
Zoom in on the hatch and pick up the glove.
Place the Metal Eaters on the hatch, and they will open it for you.
Use your Safety Pin to pick the lock on the box inside the compartment.
Take the Critter Coins and Crowbar.
Examine the wall at the left and use your Crowbar to remove the plate so you can collect the Drum Skin.
Screenshot
Zoom in on the turtle, take the Key, and place the Drum Skin on the drum.
Exit to the Entrance.
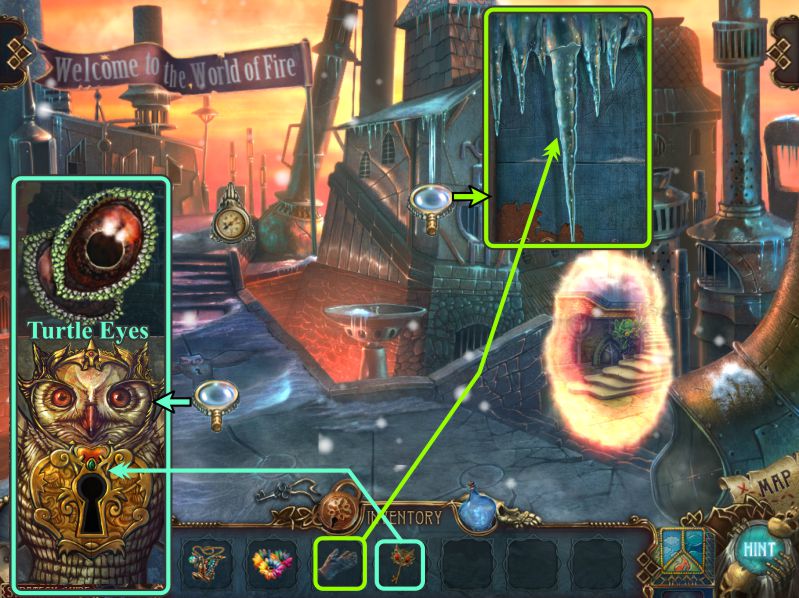
Entrance
Zoom in on the icicles above the birdbath and use your Glove to grab the large fractured Icicle.
Use your Owl Key to open the owl compartment to collect the Turtle Eyes.
Go forward to Outside Town and zoom in on the turtle.
Screenshot
Turtle Stomp Mini Game
Place the Turtle Eyes on the turtle to trigger a Mini Game.
Your goal is to watch how the turtle stomps and repeat the random sequences on the drums.
The back drums represent his back legs and the front drums his front legs.
The drum skins will turn green when you are correct.
At the end of the game, the turtle will repair the stair path so you can continue your journey.
Fire Garden
You meet up with the Flower Fairy who lost her amulet when she left Panoptes' Room. Give her the Amulet from your Inventory and she will give you some Healing Rib Grass.
Examine the cage at the left to meet the Sporty Spider and see that you need a plaque to open the door.
Check out the next magnifying glass and remove the branch to find out you need another green ball.
Zoom in on the roots of the fire-fruit tree and take the Recipe Half.
Wander on up the path to the right.
Screenshot
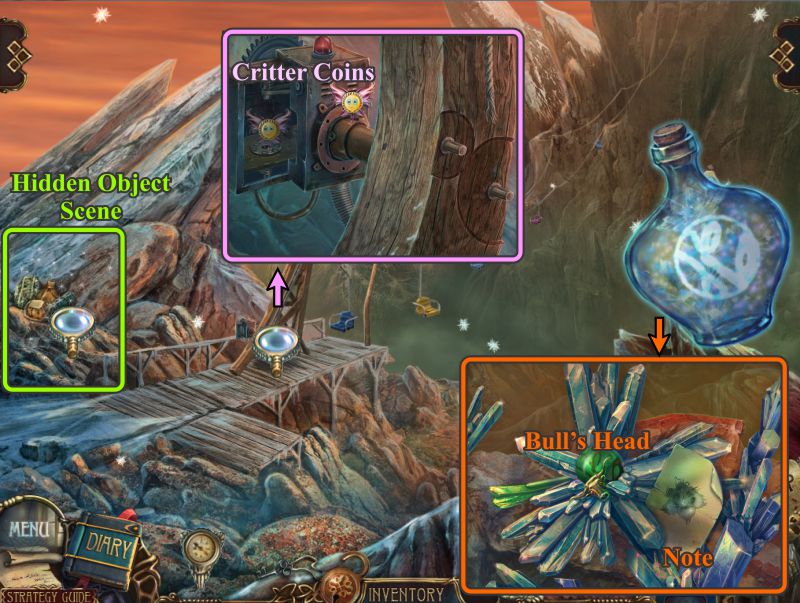
Chairlift
Use your Magic Bottle on the crystal flower and click.
Collect the Bull's Head and note that shows dragons like fire flowers.
Zoom in on the chairlift mechanism and take the Critter Coins.
Play the Hidden Object Scene, and return to the Fire Garden.
Screenshot
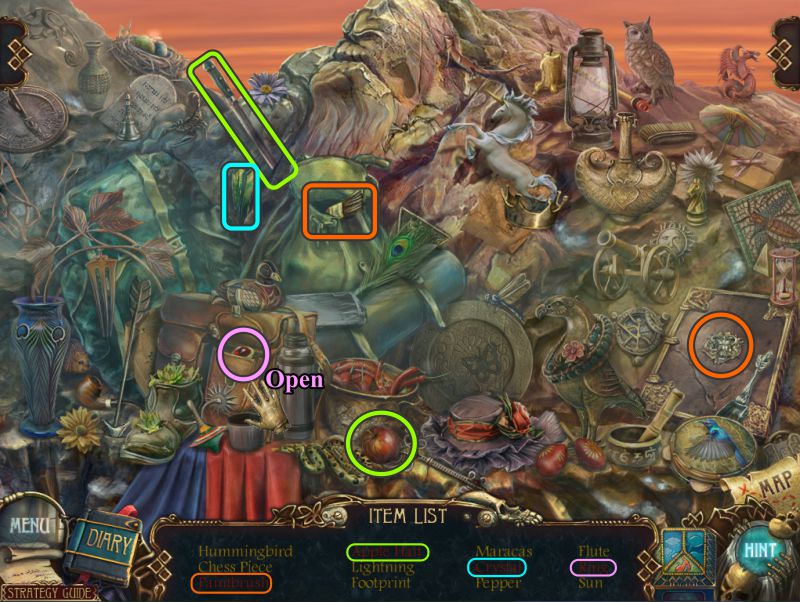
Chairlift Hidden Object Scene
Use the knife to cut the apple in half.
Move the left backpack to find the Crystal for your Inventory.
Use the medallion to open the right backpack to find the Paintbrush.
Open the pocket of the bag to get the Ring.
Screenshot
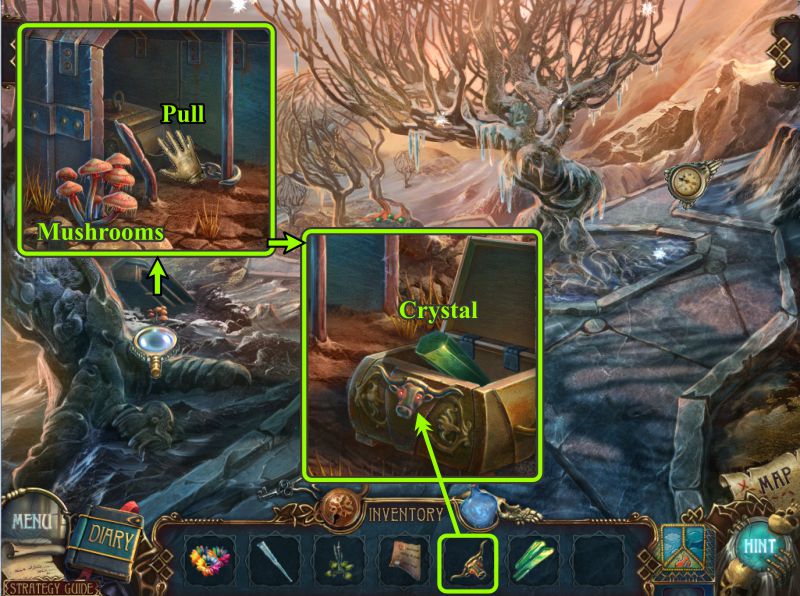
Fire Garden
Zoom in on the tree at the left and pick the Mushrooms.
Pull on the box so you can access it, place the Bull Head to open it, and take the Crystal.
Go up the path to the Chairlift.
Screenshot
Chairlift
Zoom in on the crystal flower and place the missing Crystals.
Pour some magic on the flower and take the Green Ball.
Return to the Fire Garden.
Screenshot
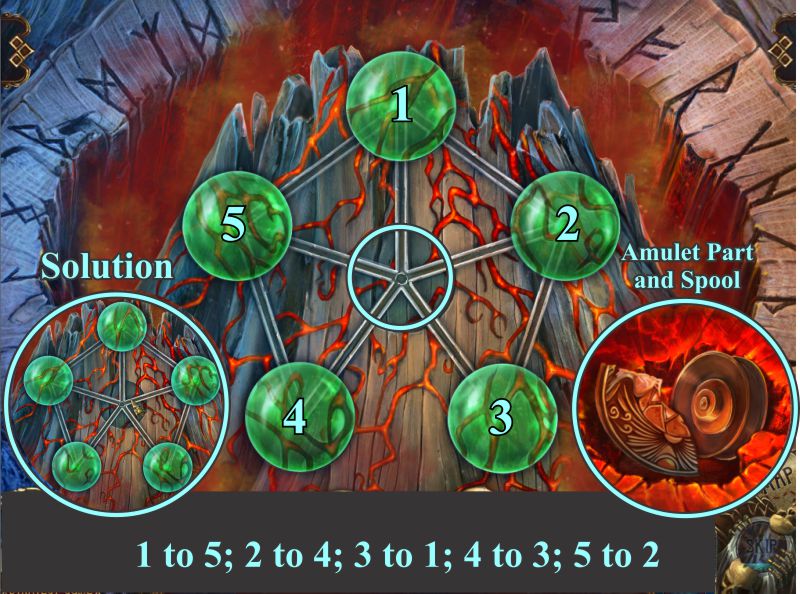
Volcano Mini Game
Zoom in on the middle tree and place the Green Ball to start a Mini Game.
Your goal is to move the green balls around the volcano, using existing ball spaces and the center space, so the lines in the balls match up with the lines in the volcano image.
When the balls are in the correct position, they will light up.
See the numbered solution in the screenshot.
Take your first Fire Amulet Part and the Spool.
Go forward on the path.
Screenshot
Path to the Mage's House
You will encounter an adorable little Lucky Dragon on the steps blocking your path.
Zoom in on him, click on the frozen Fire Flower and the Dragon, but his favorite Fire Flower is no longer available, so you must find him a real one.
After looking around, back out, go to the Chairlift, and play the Hidden Object Scene.
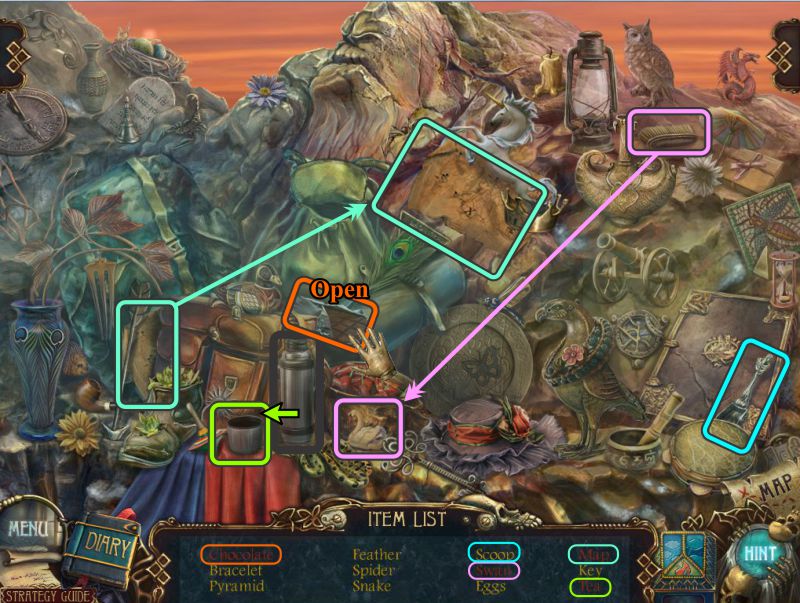
Chairlift Hidden Object Scene
Place the accessible map piece on the other piece to collect the Map.
Pour the Tea from the thermos into the cup.
Open the wrapper to get the Chocolate.
Use the Brush to clean off the pot to find the Swan.
The Scoop will go into your Inventory.
Go to Outside Town and zoom in on the oven.
Screenshot
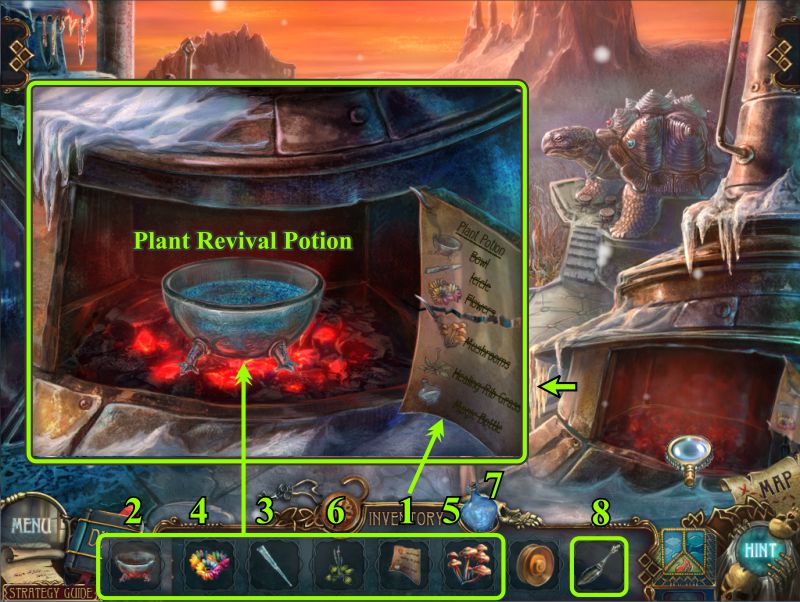
Oven
Place the bottom half of the recipe on the door.
Put the bowl in the oven.
Place the ingredients in the bowl in this order: Icicle, Flowers, Mushrooms, and Healing Rib Grass.
Pour in some magic from your bottle and take the Plant Revival Potion.
Use your Scoop to gather some Coals.
Head off to the Fire Garden.
Screenshot
Fire Garden
Zoom in on the Fire Tree's roots and place the Coals.
Once the roots have defrosted, pour the Plant Revival Potion on them.
Take a Fire Flower from the now blooming tree.
After Panoptes' appearance, walk down to the oven.
Oven
Zoom in and get another scoop of coals.
Return to the Fire Garden and take the path to the Mage's House.
Path to Mage's House
Zoom in on the little dragon and give him the Fire Flower.
He defrosts something on the railing, so examine it to see what's there.
Collect the diagram for the chairlift mechanism and the Shutters Moon underneath it.
Climb the stairs to find the Mage's House.
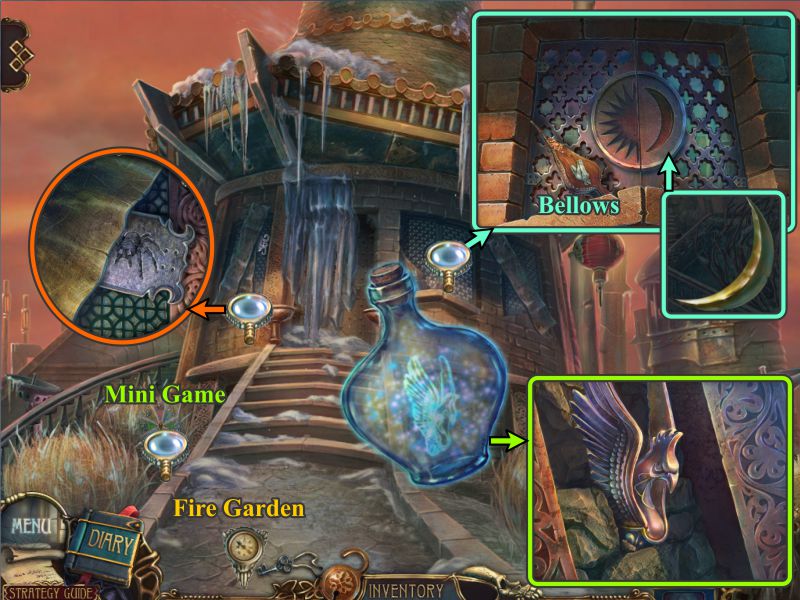
Outside Mage's House
Just as you get to the Mage's House it becomes frozen, so pick up your Magic Bottle and look for the symbol.
Pour some magic on the Peacock and collect him.
Examine the left window and take the Nameplate.
Zoom in on the right window, take the Bellows, and place your Shutters Moon.
Go to the Fire Garden.
Screenshot
Fire Garden
Zoom in on the cage and place the Nameplate to open the door.
Take the Spider and return to the outside of the Mage's House.
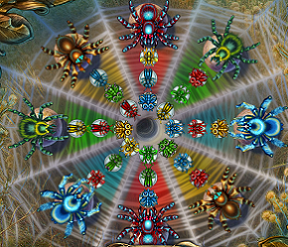
Spider Mini Game
Zoom in on the plant shown as a Mini Game in the last screenshot outside of the Mage's House.
Place your Spider to trigger the Mini Game.
Your goal is to move each fly to the cobweb that matches its color.
There is no specific fly that goes in any particular order as long as the color is correct, so the solution is random because it is however you make it.
Move your first fly into the center and then keep moving flies until they are all matched.
The flies and spiders will all move to the center hole, leaving you with a Spider Web to collect.
Walk down the path.
Path to Mage's House
Zoom in on the pole at the left and place the Spider Web in the mouth.
Use the Bellows to push the Shutters Sun down to the mouth so you can collect it.
Go back up the stairs to the Mage's House.
Screenshot
Outside Mage's House
Move the box close to the house so you can reach the lantern.
Touch the lantern to open it and take the Critter Coin.
Place the Scoop of Coals in the lantern and collect it.
Zoom in on the right window and place the Shutters Sun.
Enter the Mage's House.
Screenshot
Mage's Basement
Go through the door at the left.
Check out the magnifying glasses and open the drapery on the window.
Zoom in on the stand at the right and open the jar.
Take a Cookie and collect the Handle.
Go back upstairs.
Screenshot
Mage's House
Examine the stove, place the handle to open the door, and collect the Gear.
Zoom in on the table and feed the Cookie to the plant.
While it is otherwise busy, pour the tea in the cup and shake the Key out of the teapot.
Grab the Key and go back to the basement.
Screenshot
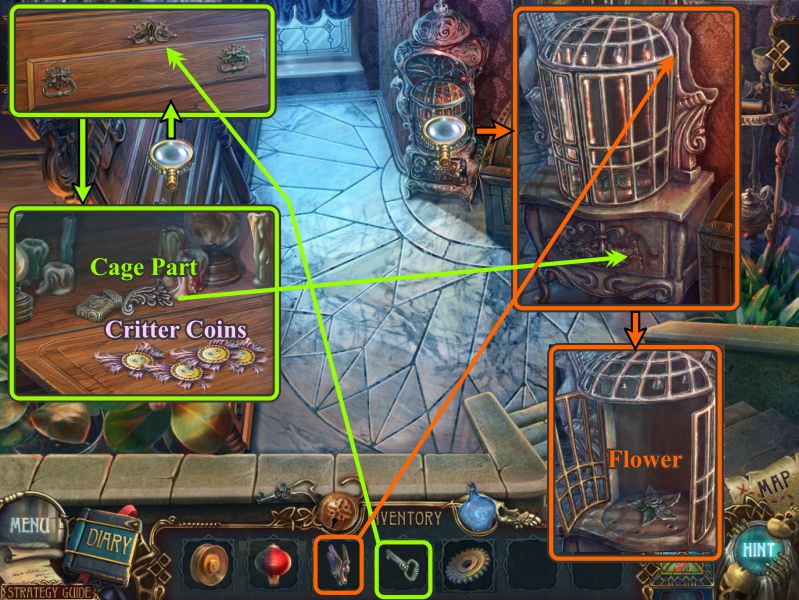
Mage's Basement
Zoom in on the chest at the left and open it with your Key.
Take the Critter Coins and Cage Part.
Examine the cage and place the Cage Part to get rid of the laser field.
Place the Phoenix from your Inventory to open the door.
Collect the Flower and return upstairs.
Screenshot
Mage's House
Zoom in on the upstairs door, place the Flower, and enter the room when the door opens.
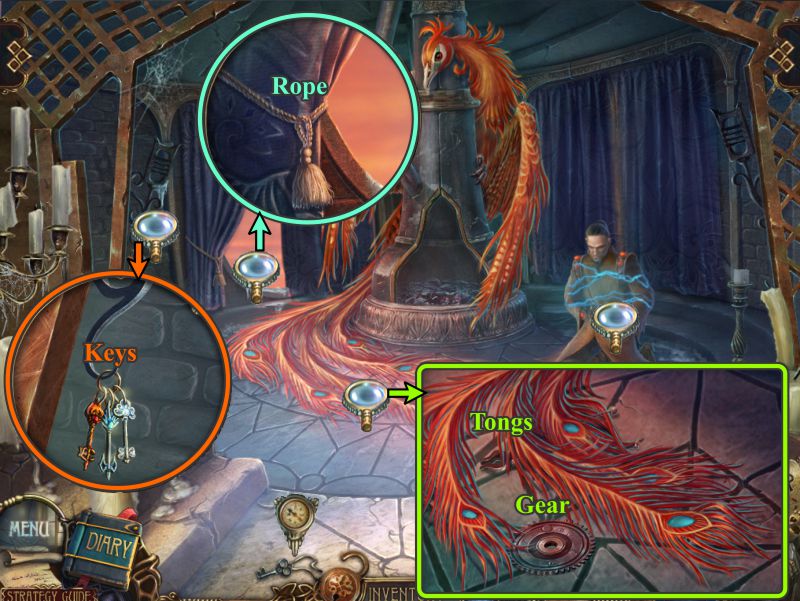
Mage's Room
The room is dark, so place your Lantern in the scene and talk to the Fire Mage.
Examine the Phoenix's tail feathers; move them to find the Tongs and Gear.
Zoom in on the post near the window and take the Keys.
Take a closer look at the window drapery and grab the tieback for a Rope.
Go downstairs.
Screenshot
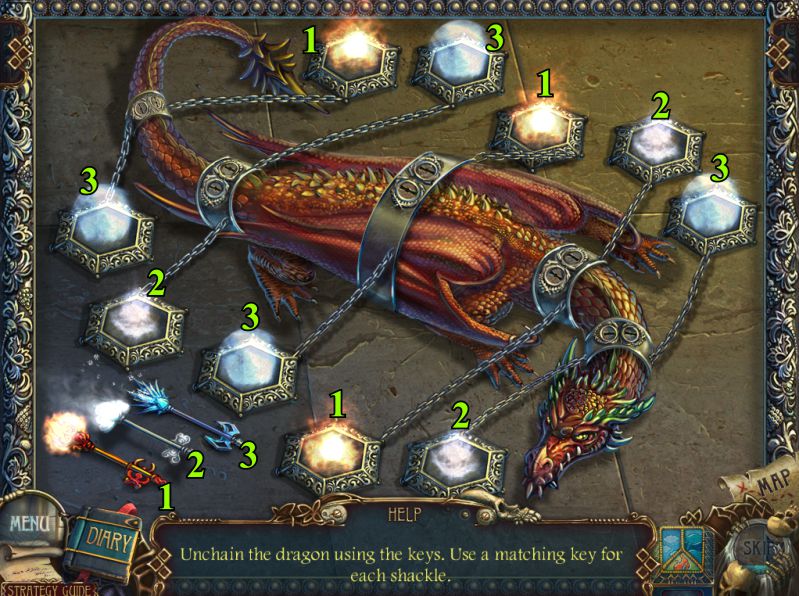
Elusive Dragon Mini Game
Zoom in on the Elusive Dragon above the basement door, and place the Keys to trigger a Mini Game.
Your goal is to match the keys to the shackles in order to unchain the dragon.
Place the two appropriate keys to remove a shackle and the keys will return to be used again.
See the screenshot for a numbered solution.
Once you have freed the dragon, a compartment will open for you to take an Engine.
Use the Map to go to the Chairlift.
Screenshot
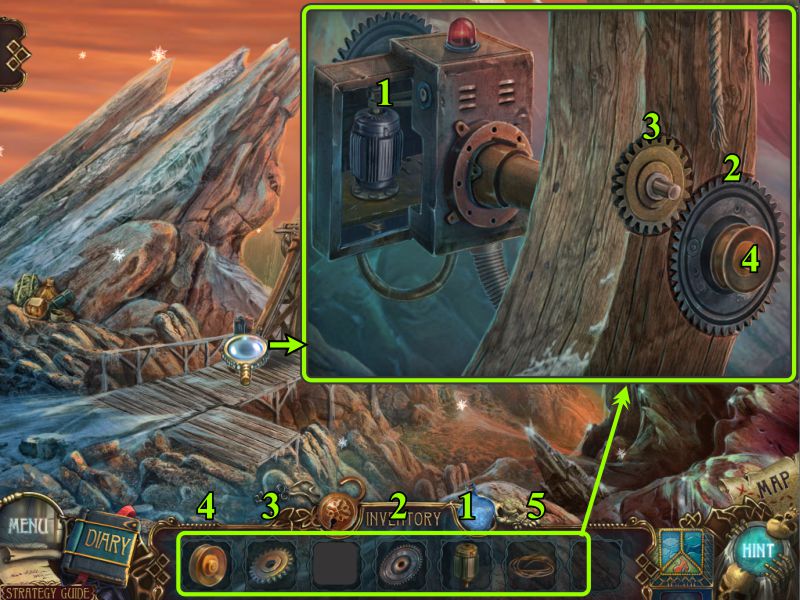
Chairlift
Zoom in on the mechanism and collect the Critter Coins.
Place the parts as shown in the numbered screenshot.
Attach the Rope, and you are ready to use the lift to cross the gorge.
Screenshot
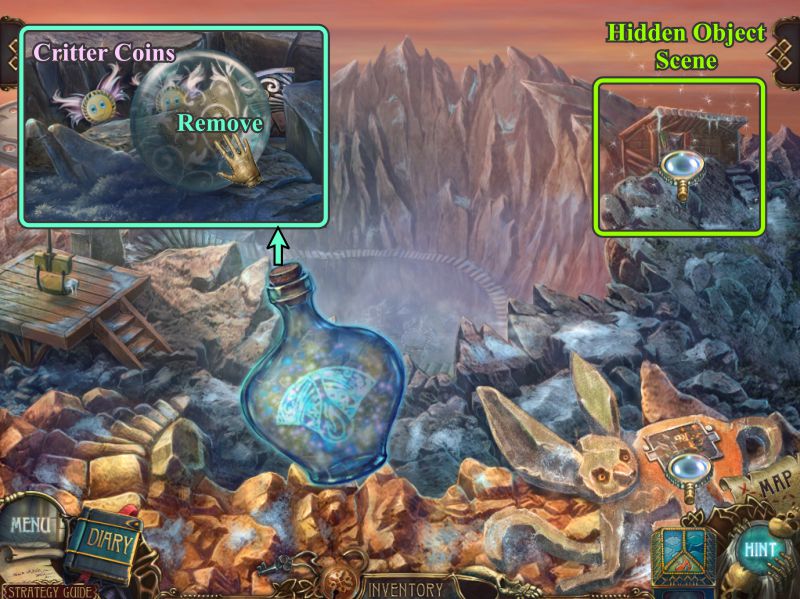
Crater
Use your Magic Bottle to find the symbol.
Remove the bubble and read the note.
Collect the Critter Coins and note that you need something to help you retrieve the stuck amulet.
Play the Hidden Object Scene.
Screenshot
Crater Hidden Object Scene
Pick up the wings to put on the Butterfly.
Move the rug to find the Fan.
Move the cloth to find the Net that will go into your Inventory.
Screenshot
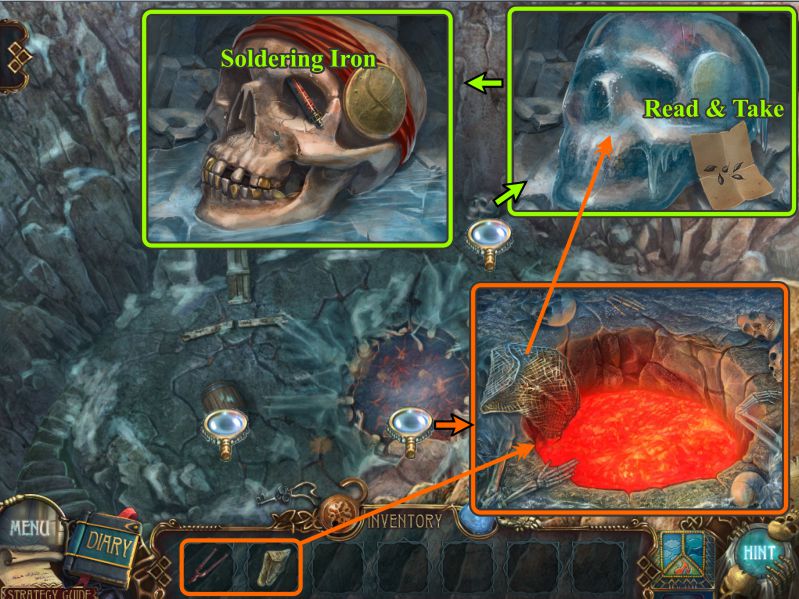
Lake Magma
Once you have finished the Hidden Object Scene, zoom into the Crater to find Panoptes doing something to the scene.
Zoom in on the fire lake and dip your Net in it.
Use the Tongs to retrieve the Hot Net.
Examine the skull, read and take the note.
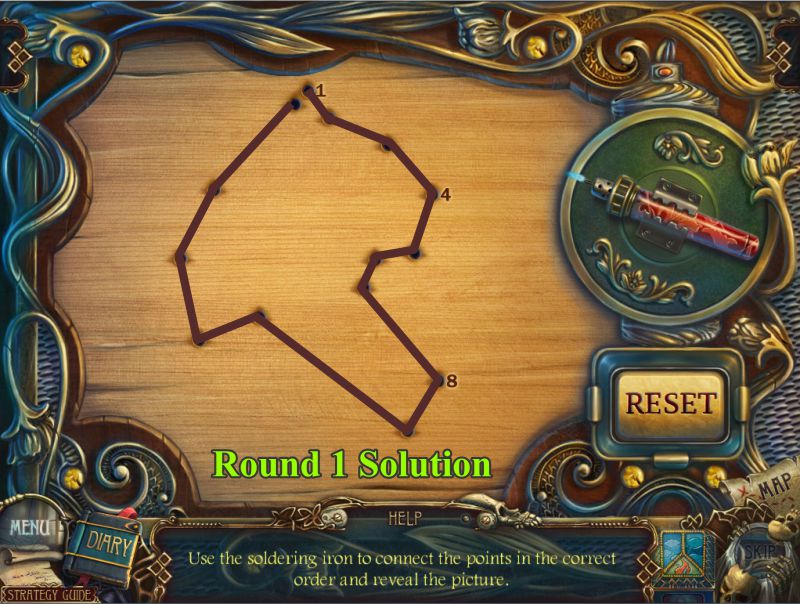
Melt the ice with the Hot Net, and take the Soldering Iron.
Go to the Basement of the Mage's House.
Screenshot
Chest Mini Game
Zoom in on the chest and place your Soldering Iron to start the Mini Game.
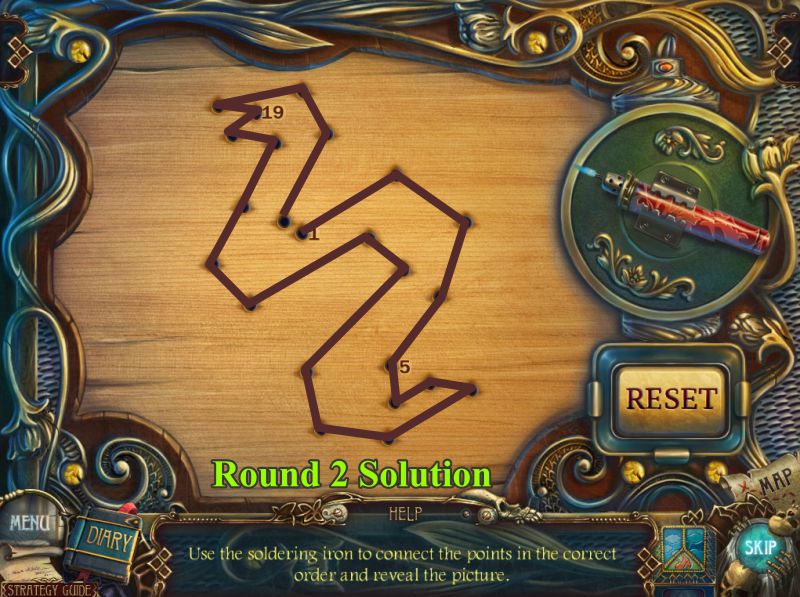
Your goal is connect the dots in the correct order using the Soldering Iron.
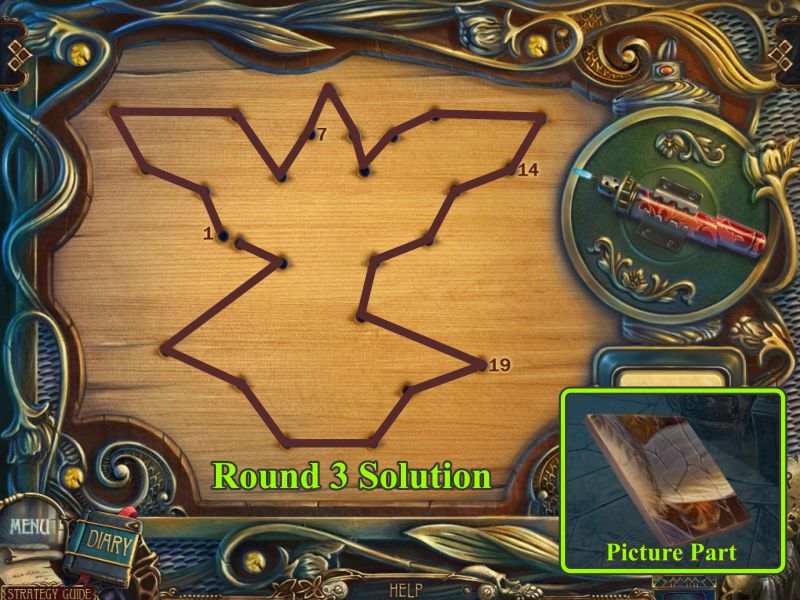
See the next 3 screenshots for the solutions to the 3 rounds.
Screenshot
Screenshot
Screenshot
Zoom in on the chest and take the Picture Part.
Return to the Crater.
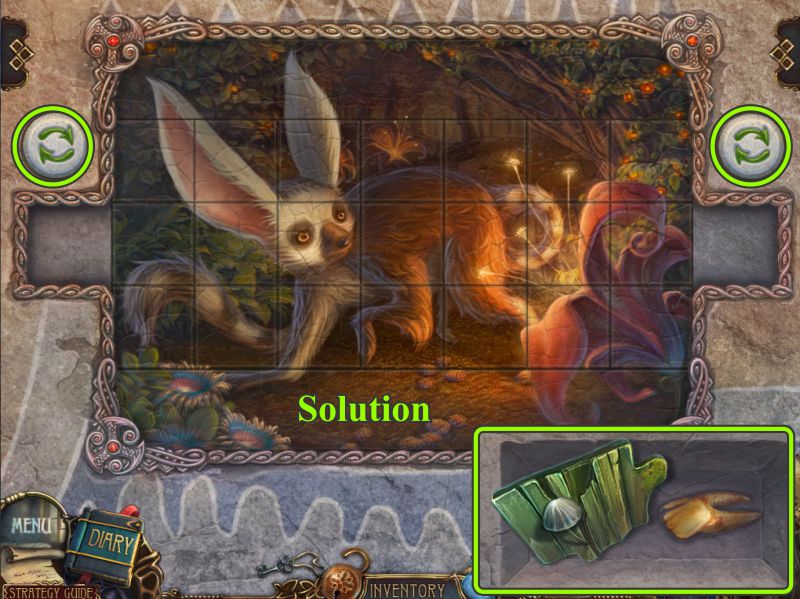
Bunny Chest Mini Game
Place you Picture Part to start the puzzle.
Your goal is to slide the parts of the picture to empty adjacent places until you complete the image shown in the screenshot.
If you need to rotate a piece, move it to either of the two empty slots on either side of the picture where you will be able to use the rotating arrows.
Collect the Picture Part and Gold Tooth from the compartment.
Screenshot
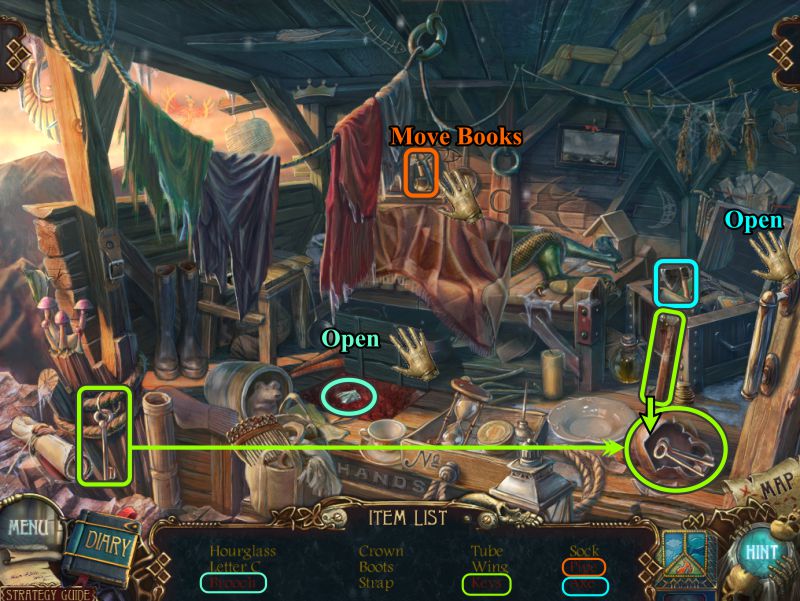
Crater Hidden Object Scene
Zoom in on the shack in the upper right of the scene for a Hidden Object Scene.
Move the books to find the Pipe.
Open the floorboards to collect the Broach.
Use the hammer to break the vase, and then add the stray key to the pile of Keys.
Open the trunk to find the Axe for your Inventory.
Go down the steps to Lake Magma.
Screenshot
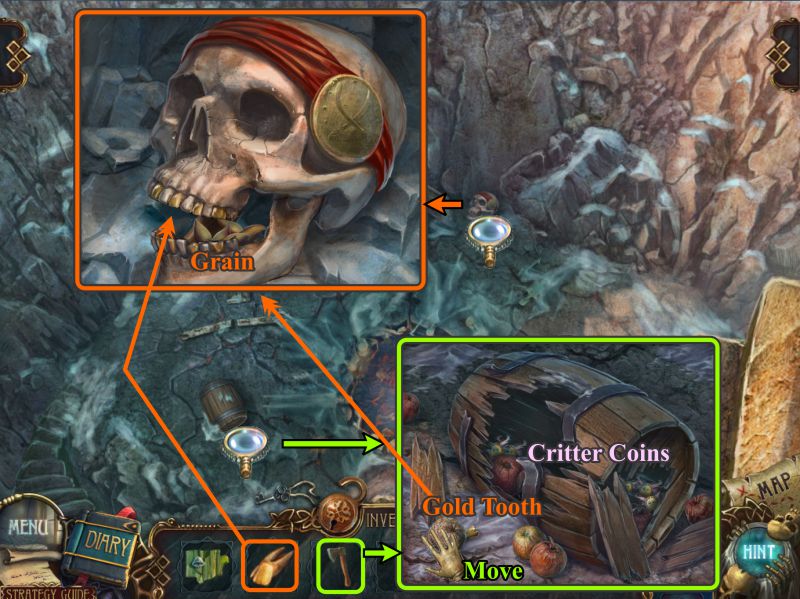
Lake Magma
Zoom in on the barrel and use the Axe to break it apart.
Collect the Critter Coins from inside the barrel.
Move the apple at the left so you can pick up the Gold Tooth.
Zoom in on the skull and place your 2 Gold Teeth.
Take the Grain and return to the Crater.
Screenshot
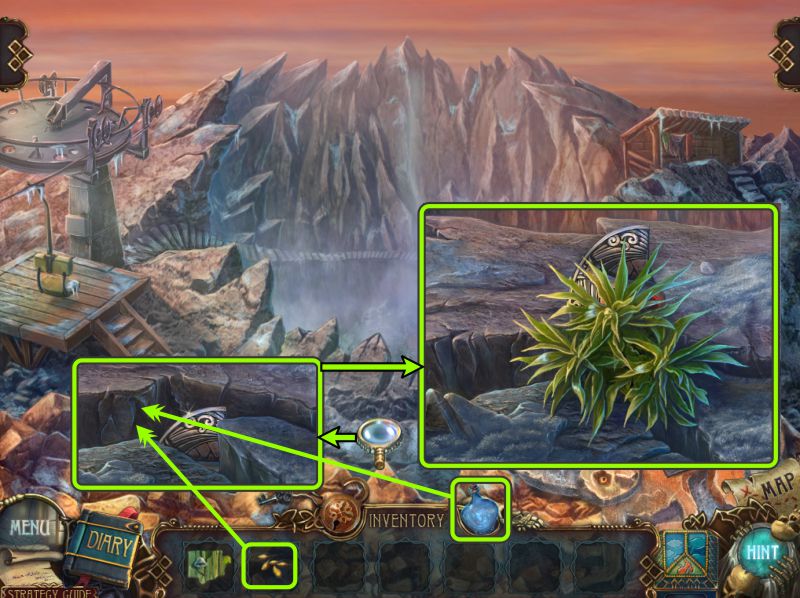
Crater
Zoom in on the crevice and drop your Grain into it.
Use some magic on it to make it grow faster.
Collect the piece of the Fire Amulet.
Use the Map to go to the Mage's Room.
Screenshot
Mage's Room
Take the completed Fire Amulet from your box, then zoom in on the Mage and remove his restraints.
Talk to him, and then go through the portal he creates.
Courtyard
Talk to Titus and go to the Diamond Mine.
Outside Diamond Mine
Talk to the Miner and collect the Diamond from the ground.
Go to Panoptes' shop.
Panoptes Elements
Zoom in on the monkey and give him the Diamond.
Take the Water Sphere and return to the Diamond Mine entrance.
Outside Diamond Mine
Give the water to the miner and he will give you the Key to the Mine.
Zoom in on the gate, remove the closed sign, and open the lock.
Enter the Mine.
Diamond Mine
Go to the Mining Robot to be scanned and cleared to mine.
Zoom in on the mining area for a Mini Game.
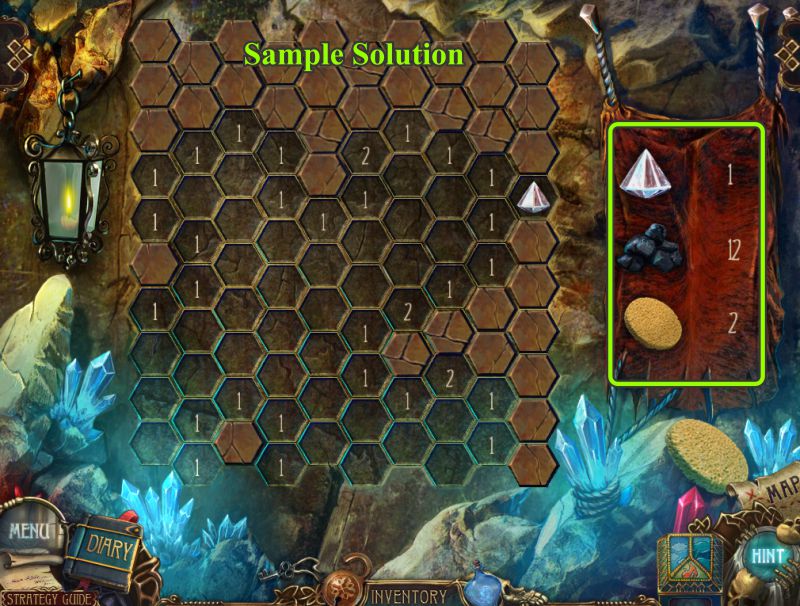
Diamond Mining Mini Game
Your goal is to find the one Diamond by breaking the hexagons, but the catch is that there are 12 hexagons containing coal.
The placement of the Diamond and coal is random.
If you choose a hexagon with a number, that number indicates how many adjacent hexagons have coal.
Choosing an empty hexagon will open a larger area of many hexagons.
If you end up with coal all over your screen, you have a sponge to remove it, but you can only do this twice before the game resets itself and you need to start over.
Once you find the Diamond, go to Panoptes' shop.
Screenshot
Panoptes Elements
Give the Diamond to the monkey and take the Sphere of Fire.
Courtyard
Return to the Courtyard and go through the portal.
Mage's Room
Give the Sphere of Fire to the Mage, and watch the cut scene.
Talk to the Mage and collect the Fire Rune from him.
Go through the portal.
Courtyard
Talk to Titus, who creates another portal for you to enter the World of Water.
Posted by: Jazz |
March 18, 2013 7:00 PM
|
March 18, 2013 7:00 PM