

![]()
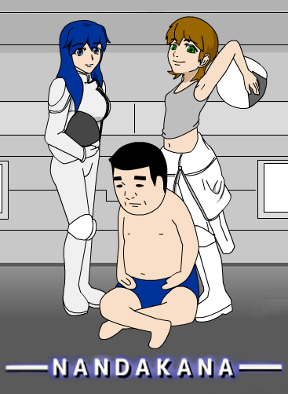 You know that warm hug of serendipity you get when a casual thought materializes into a welcome encounter? For some reason we were just having a conversation about escaping here at JayIsGames and, lo and behold, here walks Detarou into the room with eyebrows raised and a goofy lopsided grin, conveying a zany new escape game for our enjoyment: Nandakana.
Of course we right away got started playing, chattering on about the tricksy but smile-producing puzzles that Detarou has for us this time. Having played a few of these before, we easily took to the intuitively designed point-and-click navigation—as would anyone, even someone new to the genre. Arrows on the sides to turn, a changing cursor to indicate areas to explore or items to pick up, and an organized inventory (click to use, double-click to examine) all free up your thoughts to focus solely on puzzle solving. There are three endings to find again—the "Bad Panda" end, the normal exit, and the perfect red stamp ending. To get them all, use the save function and just be very observant.
We knew already what we were in for when we saw Detarou and Detarou does not disappoint. Especially not when you're expecting to be confounded by outlandish sights such as...well, I'll let you be surprised. It's more fun that way! While challenging, you'll be glad to discover the puzzles are wonderfully logical, enough to grind your grey matter without leaving it too slushy. Ah, Detarou, you with your shove match astronauts and animate pickles! For some reason, your games have really grown on us. I don't know why, it's kind of weird really.
Game not loading? Try this alternative link.


Walkthrough Guide
(Please allow page to fully load for spoiler tags to be functional.)
Nandakana Walkthrough and Zaniness Guide
General Info
There are three endings to this game:
Bad Panda.
Normal.
Red Stamp Perfect.
Select "SAVE" and then one of two save slots before trying new exits so you can easily return to where you left off.
Navigate by pointing and clicking on screen:
Hover your pointer near the edges (sides, bottom, and top) of the screen and, if an arrow in a grey bar appears, you can click it to turn, look up or move back.
The pointer will change to a hand when you can click on an object or area to pick it up or zoom in.
Also observe the area to look for places that are likely able to be explored, such as drawers and doors and puzzles.
Objects that can be picked up will be automatically added to your inventory:
When you click once on an inventory item, a blue glow forms around it. Then click in the game where you want to try using the object.
When you double-click on an item in inventory—or when you first pick it up—a detail window pops up for it.
Close the detail window by clicking on the button in the lower right corner.
Starting Out: Exploring the First Room
Back up twice from the pleasant astronaut trio and turn right.
Zoom in once on the light brown cupboard:
Look in the top left door of the cupboard to find:
a GREEN MARBLE.
Now look in the top right door of the cupboard for a clue:
Make a note of the symbol, its arrow marking and its color.
Back up and look in the bottom drawer to find another clue. Note this one, too.
If you back up and check the middle drawer, same thing. Another clue. Hmm. A pattern is building here.
Finally, the top drawer. Ah, another...what the??? Er, anyhow, back away from the cupboard.
Notice the box on the shaky pilates guy table? It needs a key. Remember to come back when you find one. Carrying on...
Turn right twice and you'll see a table with a heart vase and another, darker brown cupboard:
There is a nose in the heart vase and the table's drawer is locked. Will have to look for clues elsewhere.
Let's not say what that is in the top part of the cupboard. Instead, look in the bottom drawer:
First, get the YELLOW MARBLE.
Then, make a note of the symbols inside the drawer. They will be helpful later on.
Finally, check the top drawer:
Another colored symbol clue.
Welp, you're ready to solve the first room's exit door code! Back away from the cupboard/heart vase area and turn left:
Click on the code panel next to the door to find you need a 4-digit number.
Each digit is a different color. So you only need to think where you saw numbers in these four colors...
Inside the cupboards around this room.
Enter the numbers by clicking the buttons just below the digits, then click the larger button at the bottom of the panel to input the answer.
SOLUTION:
5473
Some numbers need to be turned or flipped over.
With the correct answer, the door will open and you can move on to the next room.
Rooms Two and Three: Color Knobs Machine, Part One
Make your way (careful now) past the blue shorts, skipping man to the color knobs machine in center of the far wall:
Make a note of the arrangement of the four numbers on the machine's monitor to use in a future puzzle.
Then, take a closer look at the five colored knobs: there's five colors but, so far, you have only four. Let's go look for blue clue.
Back up from the machine and go through the door on its left to the third room:
On the wall is an oddly-retouched portrait (hmm, it seems Detarou reads viral news stories or, at least, is hip to the latest memes. Poor well-meaning old lady!).
Zoom in on the serene-looking grey tube guy:
Under his hands is a club symbol and two buttons:
To solve this puzzle, use the clue found in a drawer back in room one.
Click the left and right buttons in the proper sequence.
SOLUTION:
Push each button in this order:
RIGHT-RIGHT-LEFT-RIGHT-LEFT-RIGHT
The symbols in the bottom drawer of the darker brown cupboard represent the left and right halves of a club.
When done correctly, the hands will open to reveal:
a SCREWDRIVER. Take it.
Back up once and notice the last blue clue needed.
Write it down, noting the color and arrow mark.
Back up and return to the color knobs machine in the second room:
Now you can use the five color clues to work the knobs on this machine's panel.
Click on the knobs until the arrows on each are pointing in the correct direction.
SOLUTION:
First, turn the numbers you found in the drawers and cupboards and grey tube guy so they're the correct orientation.
Then see which direction the arrow is on that number and use it to set the corresponding colored knob on the machine.
You'll end up with the knobs set this way:
Using compass directionals...
GREEN=Northeast
YELLOW=Southwest
RED=Northwest
WHITE=North
BLUE=Southeast
With the knobs on the proper settings, push the grey bar button.
This will open the door to the fifth room (the one beyond the room with dancing men and a window view of the vast galaxy).
Back up from the machine, go through the door to its right. If you wish to, stop to observe the scene out the window. Then, continue through that room to the room beyond.
In the Rooms Beyond: The Hologram Puzzle
When you enter the fifth room you'll know it by the man playing with an invisible hula hoop.
Stop in here to pick up a piece of paper from the floor: a clue that should be helpful later on.
Then, go through the door on the right to enter the halogram machine room:
Pick up a dry CLOTH from the floor on the left.
Examine the hologram machine to see its design. You'll want to find a clue that resembles it to figure out how it works.
Back out of that room and go through the first door on the left:
Ew, there is something wet on the floor. Better try to wipe it up:
Use the CLOTH on the puddle.
Go up to the door on the other end of the room:
The lock panel is broken. You'll need to find another way into this room.
Look at the markings on the door itself. They seem to be coming off...
Use the WET CLOTH on the door design to wipe part of it away. Make a note of the pattern that is leftover.
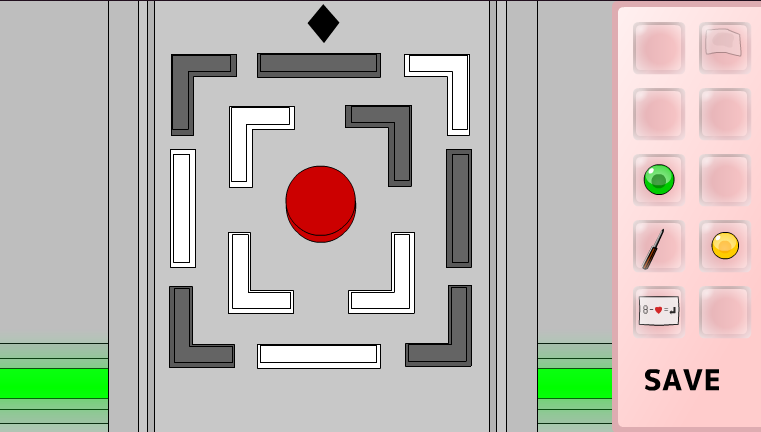
Back out of the drooling room and return to the hologram puzzle (through the door on the far right past the invisible hula hoop guy):
Press the grey bar buttons on this puzzle to match the design you saw in the drooling room.
SOLUTION:
Orientate the design according to the black diamond on top.
Turn white the buttons that shouldn't be there.
Screenshot: hologram puzzle solution
When the pattern is as it should be, press the red button and a hologram of that famously retouched portait picture appears.
Going by the direction the portrait should face, note the six colors from left to right.
Now you're ready to solve another puzzle. Back out of this room then back out two more times until you're in the color knobs machine room. From there, go through the door on the left.
The Wobbly Portrait Puzzle
Examine the wiggly portrait on the wall of the third room (the door to the left of the color knobs machine):
Use the clues gathered from around this...spaceship?...to tap the corners of the wobbly portrait in the correct sequence.
SOLUTION:
Use the colored numbers, the directions on the knobs, and the colors above the hologram to get your answer.
The colors refer to colors and the arrows on the knobs (if you haven't changed them yet) are pointing to different corners. (If you changed the knobs, then go by the arrows at the corner of each number).
You'll end up with this sequence:
BL-TL-BL-TR-BR-TR
TR=top right corner. TL=top left corner. BR=bottom right corner. BL=bottom left corner.
When you've clicked the corners correctly, the portrait will open and you can get:
a LADDER.
Back out of this room, go through the door on the right, then through the far door, into the room with the man and his invisible hula hoop.
In the Exit Room: Triangle Puzzle
From the hula guy room, go through the middle door. Here is a room with a brown door (needing a keycard). The exit door, in fact.
Turn to face the wall on the right and you'll see a triangle with a blue button in the middle.
Your GREEN MARBLE and YELLOW MARBLE found in the first room fit in the holes at each corner of the triangle.
The clue on the color knobs machine tells you where they go:
The numbers on the machine's moniter indicate colors:
Put the Green marble on top and the yellow marble on the bottom right corner.
Now you need a red marble.
Back away from the triangle puzzle and turn left twice to face a wall. Up in the corner is a vent.
Put the LADDER below the vent then use it to climb up to it.
Now, use the SCREWDRIVER to remove the screen.
Crawl through the ventilation shaft, past the drooling guy, to reach a new room; the pink bunny girl room:
Turn left to see a stack of crates. Click the floor in the middle of the crates to find a...
RED MARBLE. Pick it up.
Back up and turn around. Examine the safe on top of the crate:
You need a code for the eight colored buttons.
Back up, turn right, and go back through the ventilation shaft to the room with the triangle puzzle.
Add the last marble to the triangle puzzle and push the blue button:
Make a note of the pattern. A color on the triangle lights up for each of the eight buttons around the perimeter.
You have another clue. Time to crack another code.
Opening the Safe in Pink Bunny Girl's Room
Return to the pink bunny girl room through the ventillation shaft.
Use the clues from the colored marbles triangle to change the colors on the safe's door panel.
SOLUTION:
top row: GREEN-YELLOW-GREEN-BLUE
bottom row: RED-YELLOW-BLUE-RED
Colorblind Solution:
By number of clicks to reach each color...
TOP ROW: 0 - 2 - 0 - 1
BOTTOM ROW: 3 - 2 - 1 - 3
With the correct color code entered, click the white button below and the door will open:
Get the KEY.
Yay! Key! Now to go open something...
Key Card and Normal Exit
Go all the way back to the first room. Examine the locked box on the shaky yoga guy table:
Use the KEY you got out the safe in the pink bunny girl room.
Get the KEYCARD.
Notice that the keycard has heart halves on it.
In your inventory, you have a clue that also has a heart on it.
Turn around twice and look inside the heart vase:
Use the information on the keycard to figure this one out.
SOLUTION:
LEFT - RIGHT - LEFT - LEFT - RIGHT
Press the sides of the nose in the proper sequence and the drawer below the heart vase will unlock:
Open the drawer and get another clue.
Return to the exit door room:
Use the KEYCARD in the lock panel next to the door.
Now you need to enter five numbers:
Use the clue from the note you picked up earlier and combine it with the information you got out of the heart vase's table drawer.
SOLUTION:
Remove the lines from the number 8 to create new numbers...
3 7 2 4 5
With the correct code inputed, hit the enter key (curved arrow like on a computer keyboard) and the door will open.
Now you can go through the door and experience the normal end.
Save your game first if you want to come back easily and try the other two endings.
Red Stamp Ending
After opening the exit door but before going through, explore your surroundings to see if anything has changed.
Turn right to check out the color marble triangle again.
Notice that it's flashing in a new way?
Use that new information on the weebly wobbly picture in the other room...
As before, the colors correspond to arrows which point to corners of the picture frame.
SOLUTION
BR-TL-TR-TR-BR-BL
TR=top right corner. TL=top left corner. BR=bottom right corner. BL=bottom left corner.
When you click the corners in the new sequence, it opens up again.
Take the RED STAMP.
With the red stamp in your possession, exit through the brown door.
Congratulations!
Bad Panda End
In the room with the wobbly portrait and the grey tube guy, there is a panda stand. Push the red button. Weeeee!
Posted by: elle |
September 6, 2012 6:31 PM
|
September 6, 2012 6:31 PM